Embed Size (px)
Citation preview
1 © 2015 ANSYS, Inc. August 29, 2016 ANSYS Confidential
TryItNow! ANSYS AIMStep by Step Walkthrough:
Magnetic Relay
2 © 2015 ANSYS, Inc. August 29, 2016 ANSYS Confidential
ANSYS designed this TryItNow! experience to give you quick access to ANSYS AIM simulations on the cloud.
This AIM demonstration shows a magnetostatic simulation of an electrically operated switch relay. The simulation demonstrates the ease of setting up and solving a magnetostatic simulation using an adaptive solution and computing the magnetic force on the armature.
Default settings are used to highlight ease-of-use and to demonstrate how AIM automates many of the steps required for the magnetostatic simulation.
Step by Step Walkthrough:Magnetic Relay
3 © 2015 ANSYS, Inc. August 29, 2016 ANSYS Confidential
Background Information
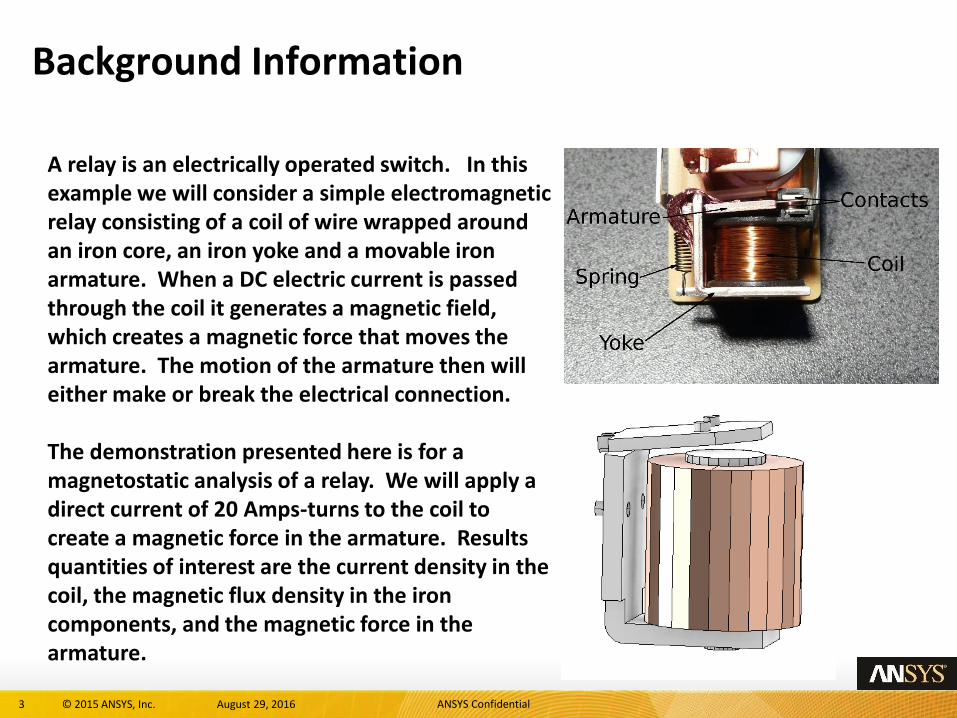
A relay is an electrically operated switch. In this example we will consider a simple electromagnetic relay consisting of a coil of wire wrapped around an iron core, an iron yoke and a movable iron armature. When a DC electric current is passed through the coil it generates a magnetic field, which creates a magnetic force that moves the armature. The motion of the armature then will either make or break the electrical connection.
The demonstration presented here is for a magnetostatic analysis of a relay. We will apply a direct current of 20 Amps-turns to the coil to create a magnetic force in the armature. Results quantities of interest are the current density in the coil, the magnetic flux density in the iron components, and the magnetic force in the armature.
4 © 2015 ANSYS, Inc. August 29, 2016 ANSYS Confidential
Select the Magnetics Template
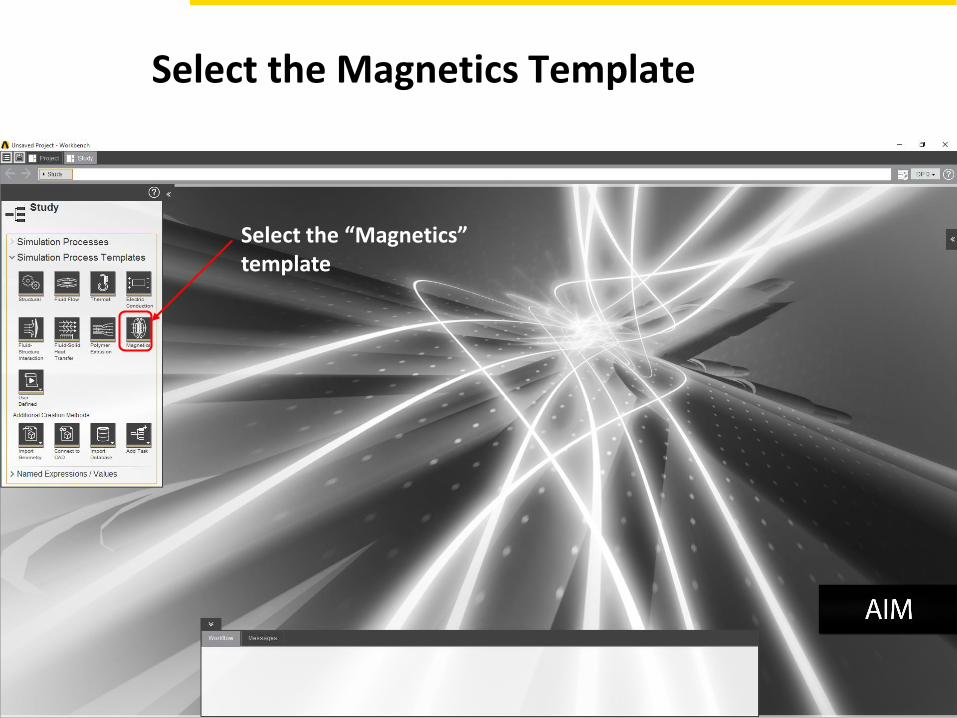
Select the “Fluid-Structure Interaction” template.Select the “Magnetics”
template
5 © 2015 ANSYS, Inc. August 29, 2016 ANSYS Confidential
Modify Template Settings
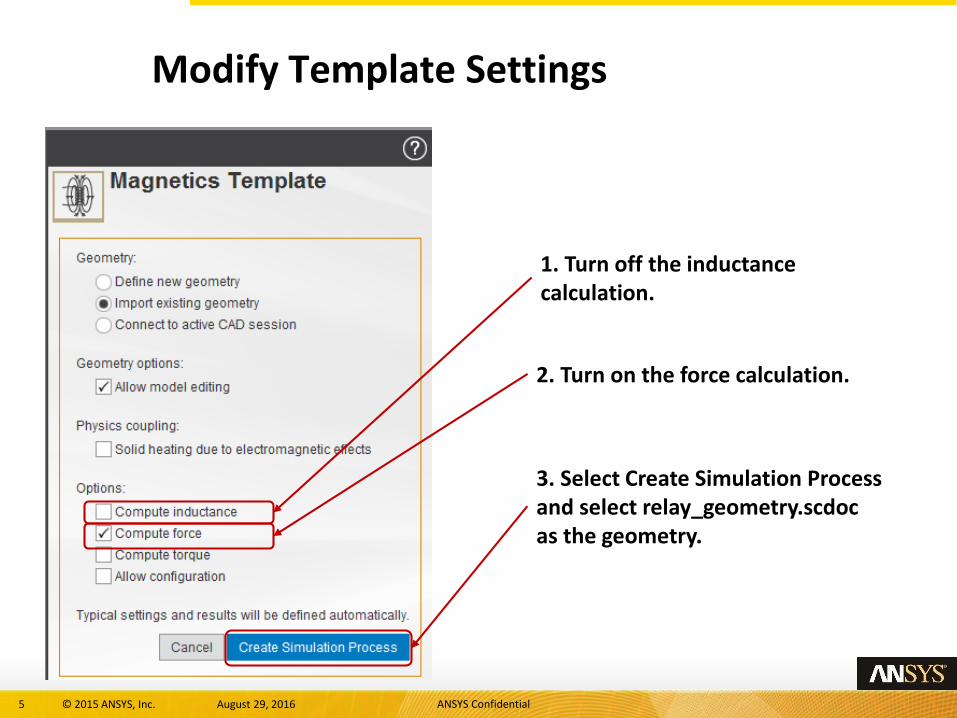
3. Select Create Simulation Process and select relay_geometry.scdocas the geometry.
1. Turn off the inductance calculation.
2. Turn on the force calculation.
6 © 2015 ANSYS, Inc. August 29, 2016 ANSYS Confidential
Specify Material
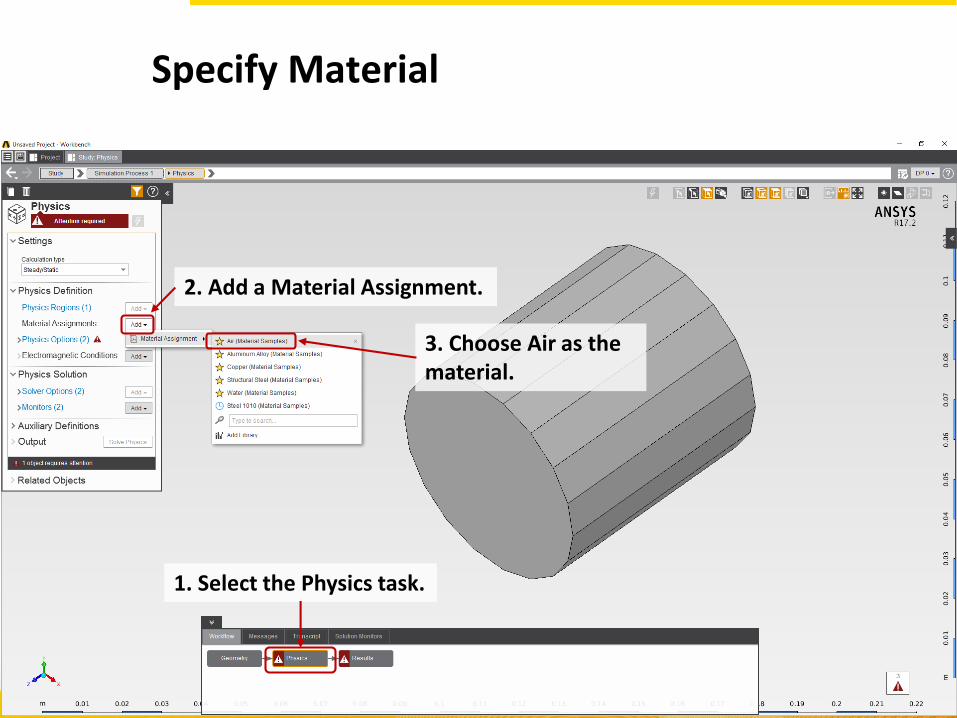
1. Select the Physics task.
2. Add a Material Assignment.
3. Choose Air as the material.
7 © 2015 ANSYS, Inc. August 29, 2016 ANSYS Confidential
Specify Material
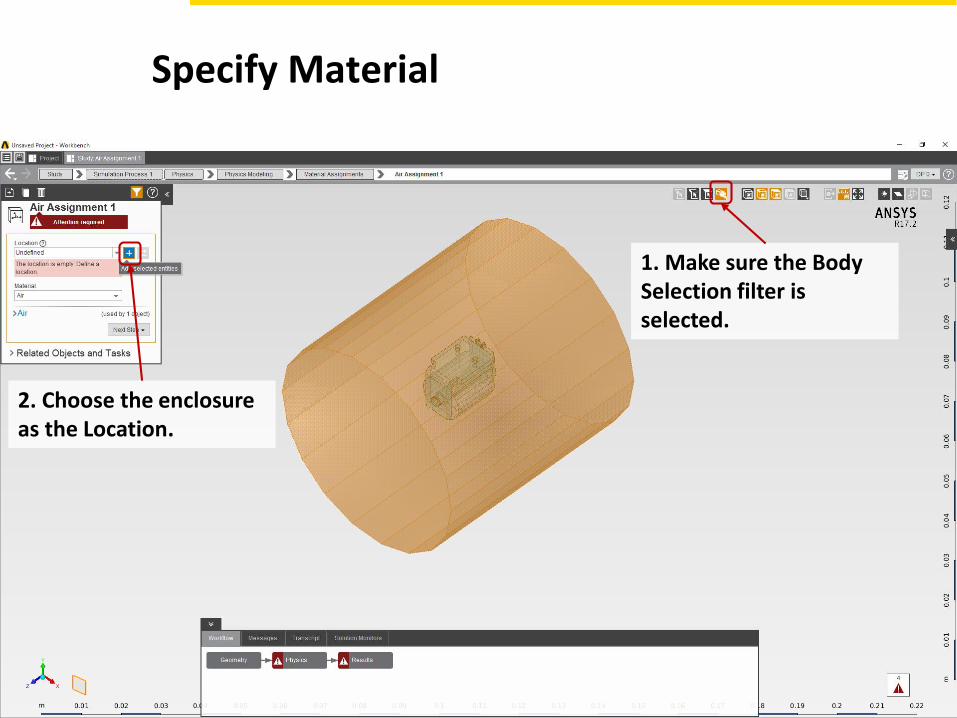
1. Make sure the Body Selection filter is selected.
2. Choose the enclosure as the Location.
8 © 2015 ANSYS, Inc. August 29, 2016 ANSYS Confidential
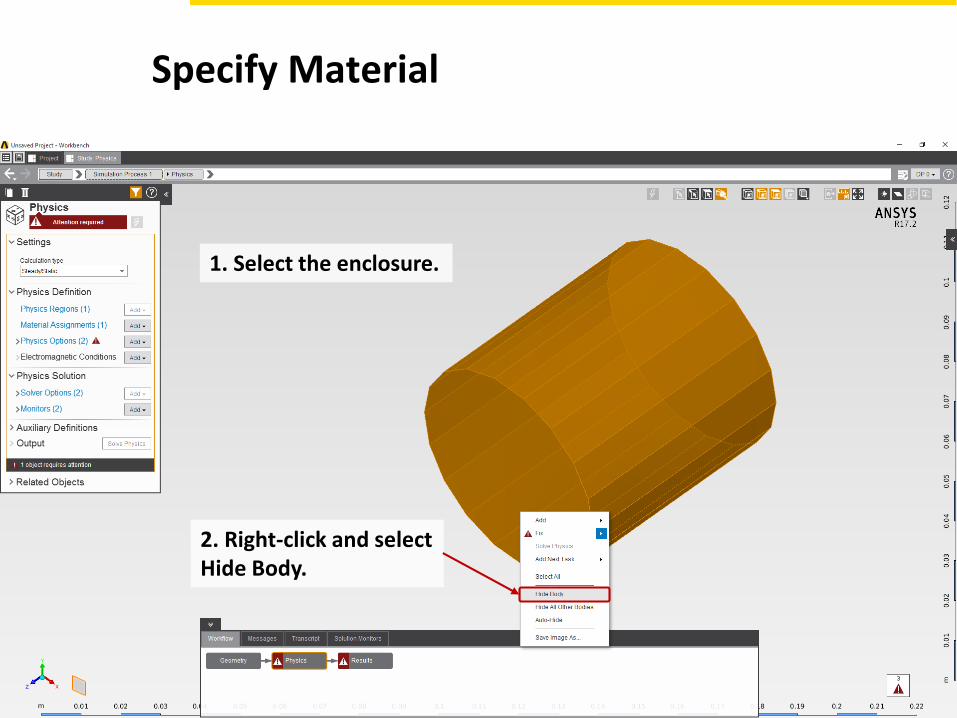
1. Select the enclosure.
2. Right-click and select Hide Body.
Specify Material
9 © 2015 ANSYS, Inc. August 29, 2016 ANSYS Confidential
Specify Material
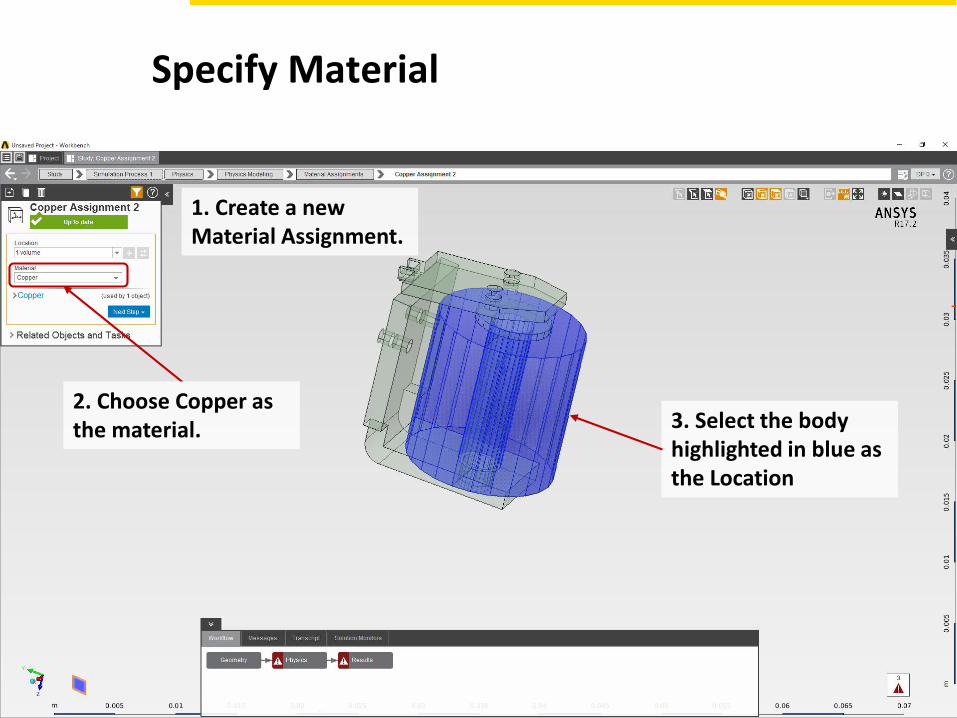
1. Create a new Material Assignment.
2. Choose Copper as the material. 3. Select the body
highlighted in blue as the Location
10 © 2015 ANSYS, Inc. August 29, 2016 ANSYS Confidential
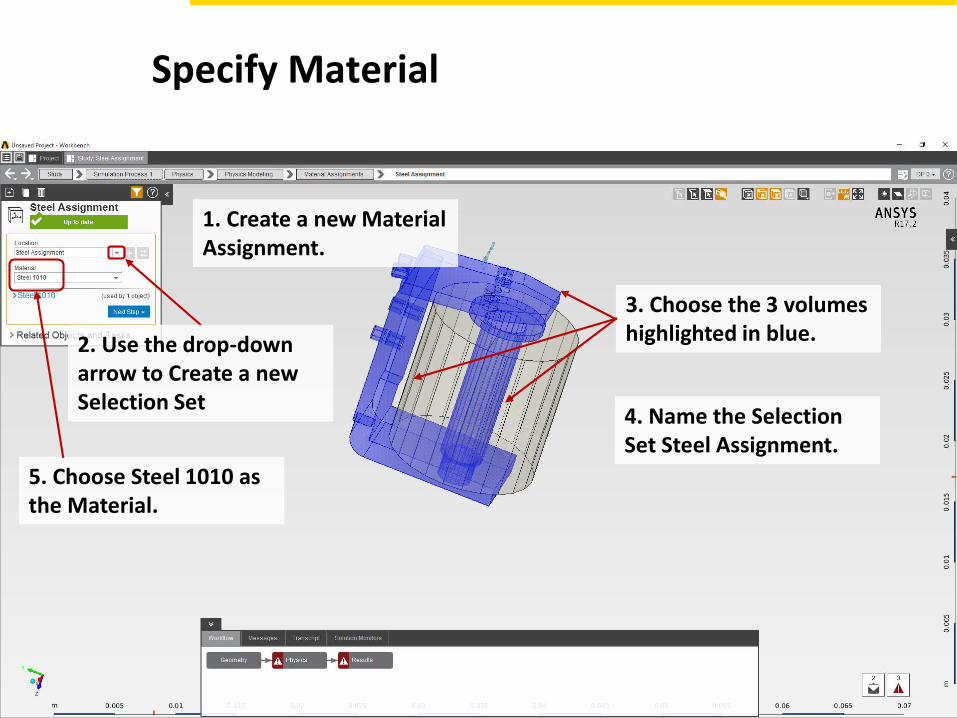
1. Create a new Material Assignment.
2. Use the drop-down arrow to Create a new Selection Set
3. Choose the 3 volumes highlighted in blue.
4. Name the Selection Set Steel Assignment.
5. Choose Steel 1010 as the Material.
Specify Material
11 © 2015 ANSYS, Inc. August 29, 2016 ANSYS Confidential
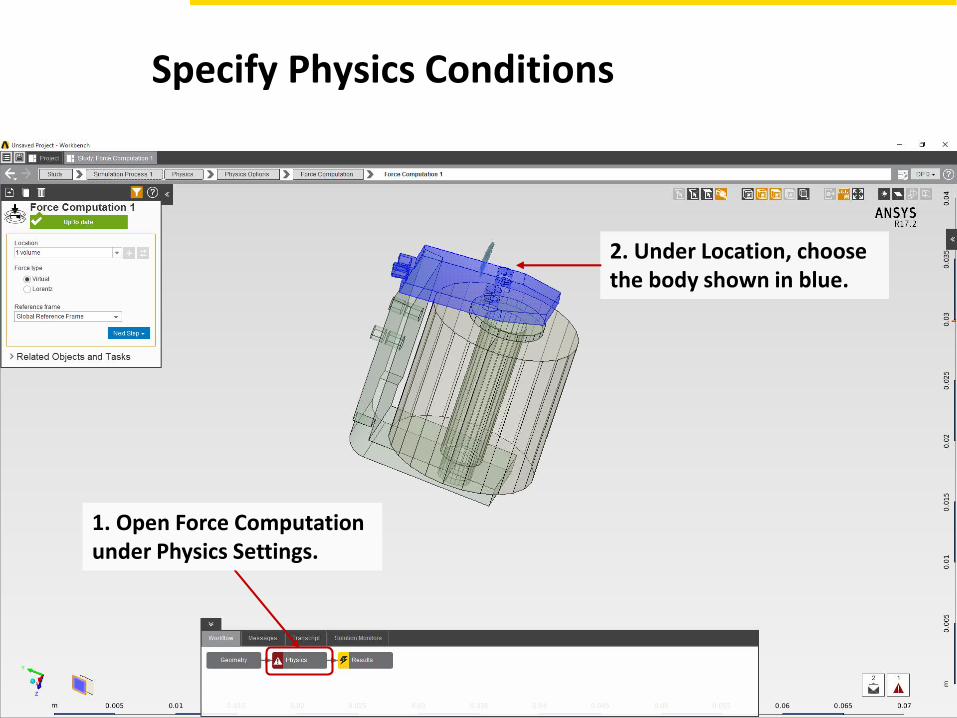
Specify Physics Conditions
2. Under Location, choose the body shown in blue.
1. Open Force Computation under Physics Settings.
12 © 2015 ANSYS, Inc. August 29, 2016 ANSYS Confidential
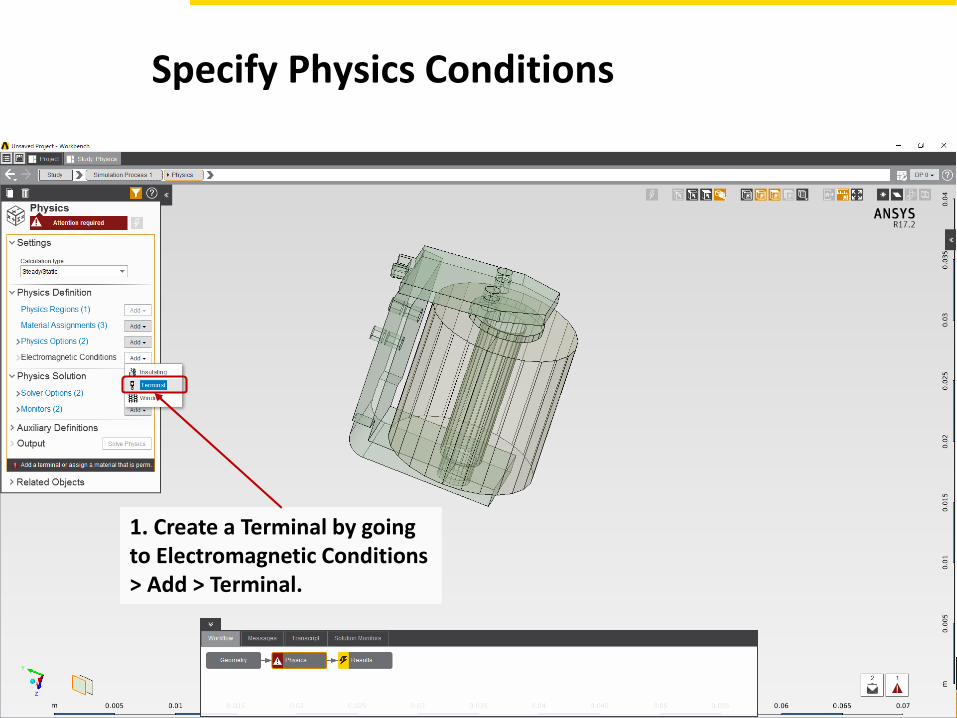
Specify Physics Conditions
1. Create a Terminal by going to Electromagnetic Conditions > Add > Terminal.
13 © 2015 ANSYS, Inc. August 29, 2016 ANSYS Confidential
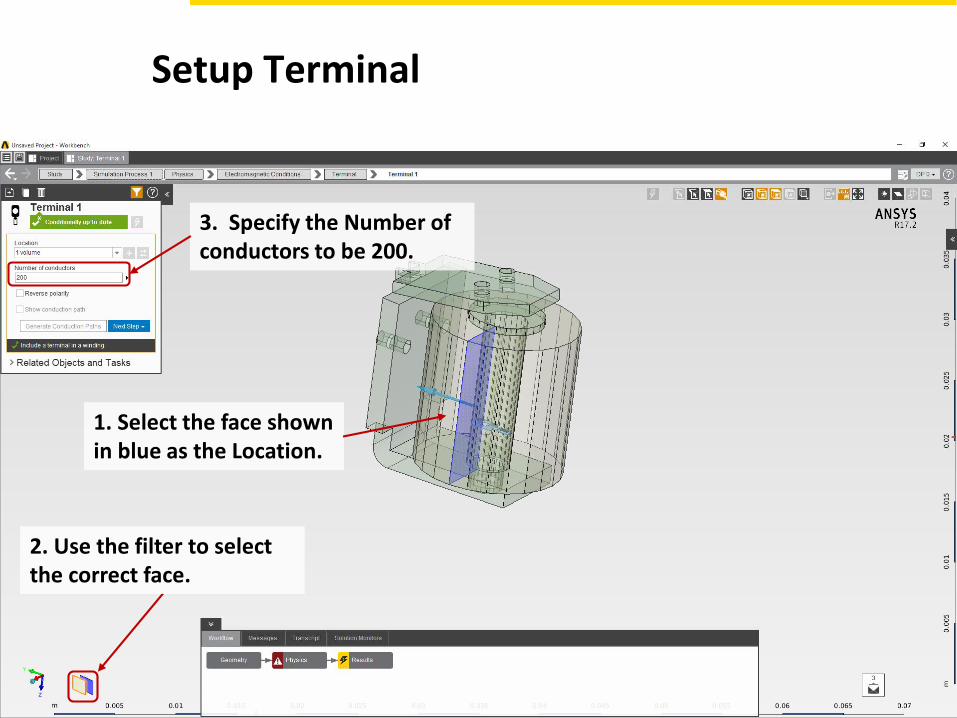
Setup Terminal
3. Specify the Number of conductors to be 200.
1. Select the face shown in blue as the Location.
2. Use the filter to select the correct face.
14 © 2015 ANSYS, Inc. August 29, 2016 ANSYS Confidential
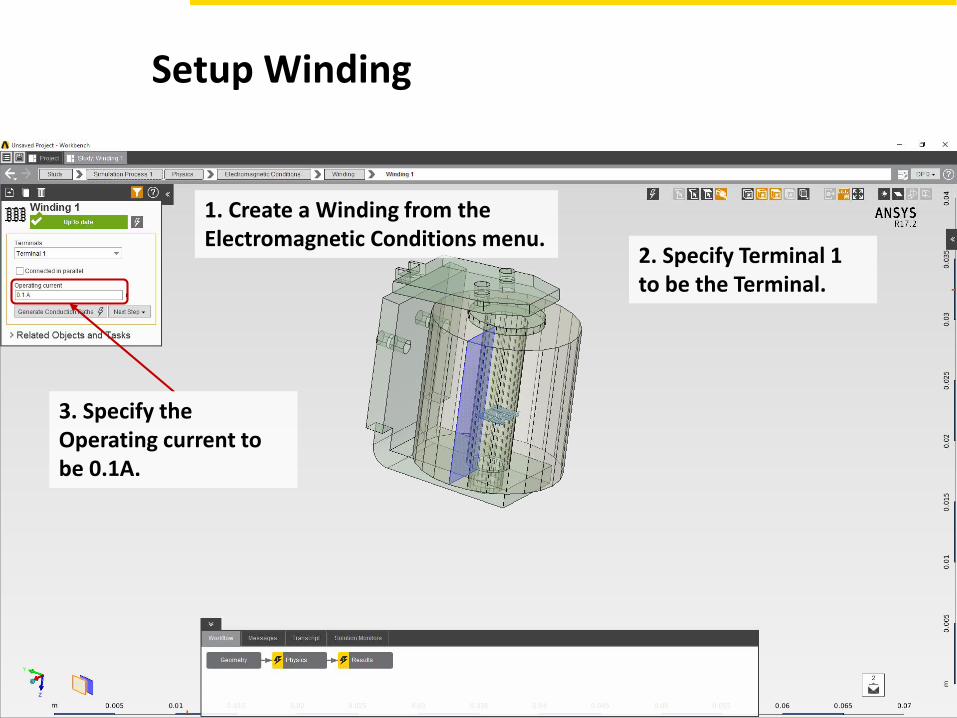
Setup Winding
1. Create a Winding from the Electromagnetic Conditions menu.
2. Specify Terminal 1 to be the Terminal.
3. Specify the Operating current to be 0.1A.
15 © 2015 ANSYS, Inc. August 29, 2016 ANSYS Confidential
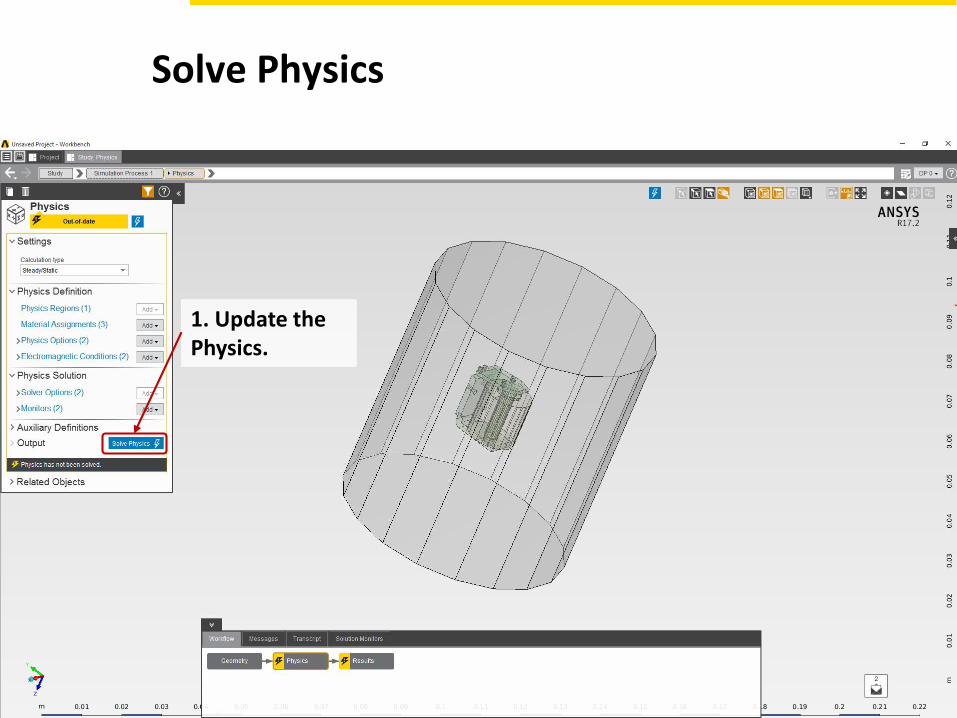
Solve Physics
1. Update the Physics.

16 © 2015 ANSYS, Inc. August 29, 2016 ANSYS Confidential
Review Convergence
1. Review the Solution Monitors to monitor convergence.
2. Right-click and Show All bodies.
17 © 2015 ANSYS, Inc. August 29, 2016 ANSYS Confidential
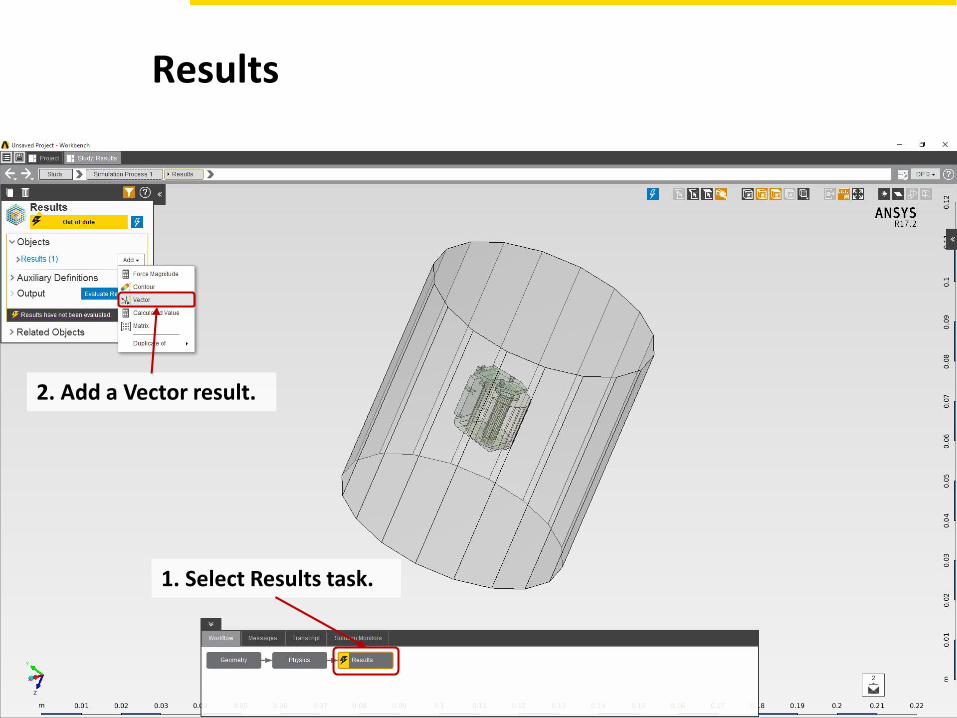
Results
1. Select Results task.
2. Add a Vector result.
18 © 2015 ANSYS, Inc. August 29, 2016 ANSYS Confidential
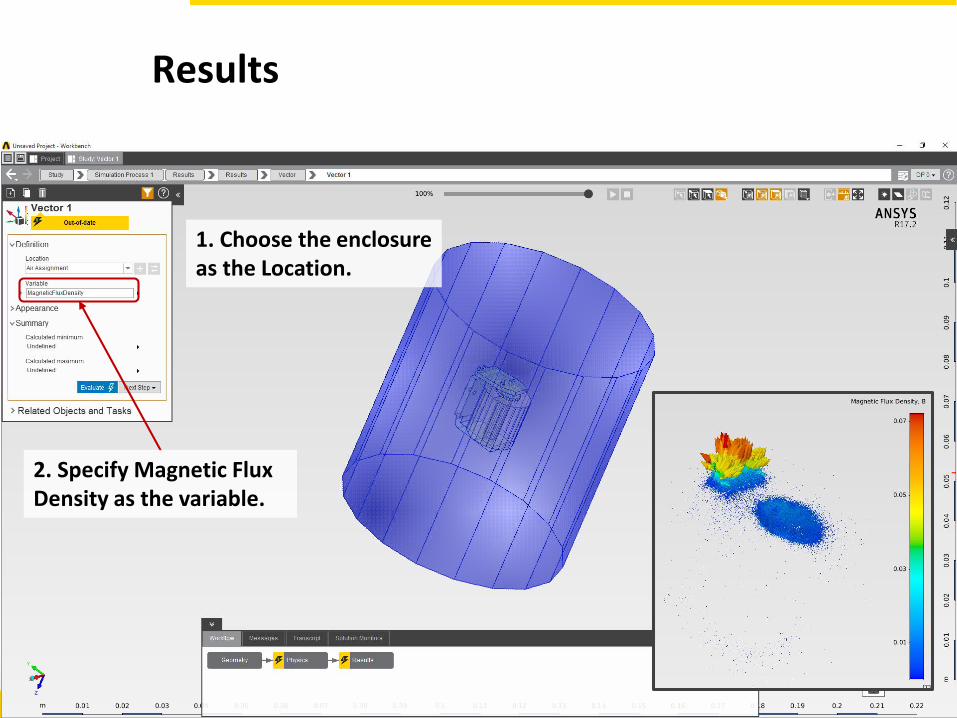
Results
1. Choose the enclosure as the Location.
2. Specify Magnetic Flux Density as the variable.
19 © 2015 ANSYS, Inc. August 29, 2016 ANSYS Confidential
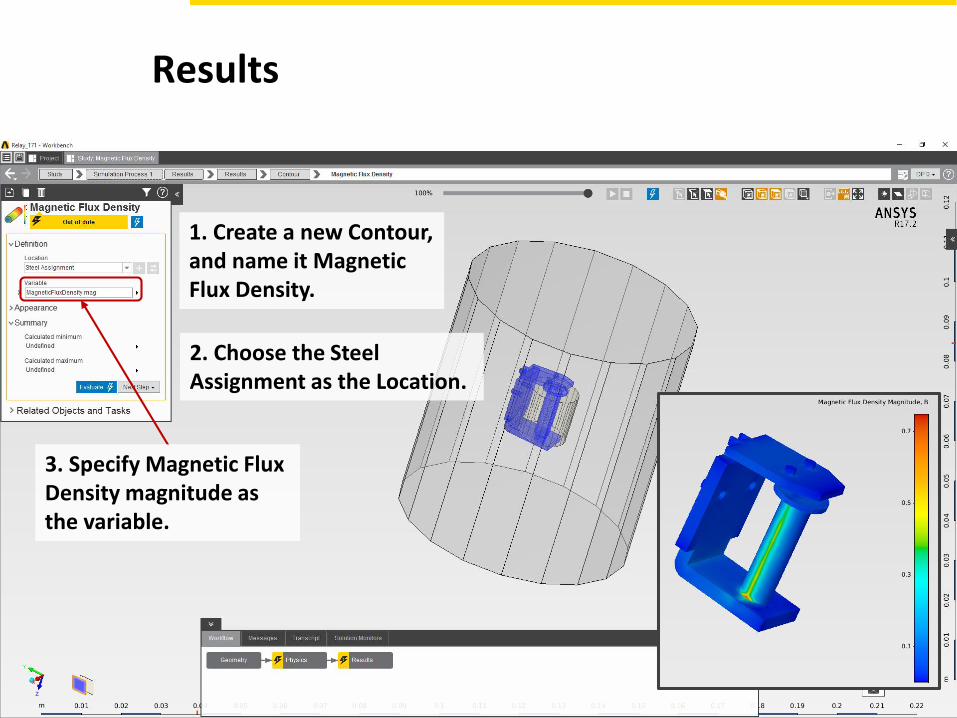
Results
1. Create a new Contour, and name it Magnetic Flux Density.
2. Choose the Steel Assignment as the Location.
3. Specify Magnetic Flux Density magnitude as the variable.
20 © 2015 ANSYS, Inc. August 29, 2016 ANSYS Confidential
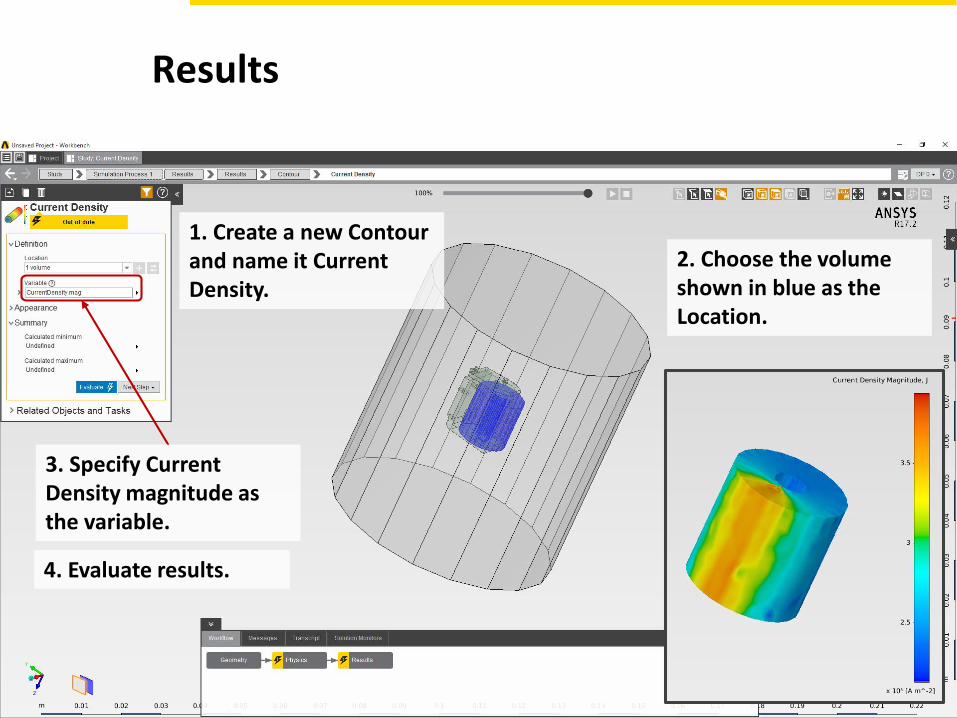
Results
1. Create a new Contour and name it Current Density.
2. Choose the volume shown in blue as the Location.
3. Specify Current Density magnitude as the variable.
4. Evaluate results.
21 © 2015 ANSYS, Inc. August 29, 2016 ANSYS Confidential
Ready to learn more about ANSYS AIM?
CONTACT US
ANSYS, Inc.
Southpointe
275 Technology Drive
Canonsburg, PA 15317
U.S.A.