Embed Size (px)
Citation preview
1 - EMC Isilon Customer Troubleshooting Guide: Troubleshoot a Full Pool or Cluster
For links to all Isilon customer troubleshooting guides, visit the Customer Troubleshooting - Isilon Info Hub.
We appreciate your help in improving this document. Submit your feedback at http://bit.ly/isi-docfeedback._________________
___________________________
Abstract
Use this guide when your cluster has become so full that you can no longer perform operations that would normally free up space. This guide helps you to free up enough space so that the cluster can return to normal operation. Use this guide if you receive any of the following errors: ENOSPC space error code embedded in messages in /var/log/messages Failed to satisfy layout preference errors in /var/log/messages No available space
No space left on device
Disk Quota Exceeded
December 14, 2017
EMC ISILON CUSTOMER TROUBLESHOOTING GUIDE
TROUBLESHOOT A FULL POOL OR CLUSTER
Note: This guide deals with capacity issues on /ifs only. For capacity alerts related to / (the root partition), /var, or /var/crash, see EMC Isilon Customer Troubleshooting Guide: Troubleshoot Capacity Alerts on Node Operating System Partitions.
OneFS 7.2.0 - 8.1.0
2 - EMC Isilon Customer Troubleshooting Guide: Troubleshoot a Full Pool or Cluster
For links to all Isilon customer troubleshooting guides, visit the Customer Troubleshooting - Isilon Info Hub.
We appreciate your help in improving this document. Submit your feedback at http://bit.ly/isi-docfeedback._________________
___________________________
Contents and overview
Page 3 Before you begin
Appendix A If you need further assistance
Page 4 Start troubleshooting
Page 17 Check options for adding capacity
Page 19 Enable Spillover
Page 24 Disable Virtual Hot Spare
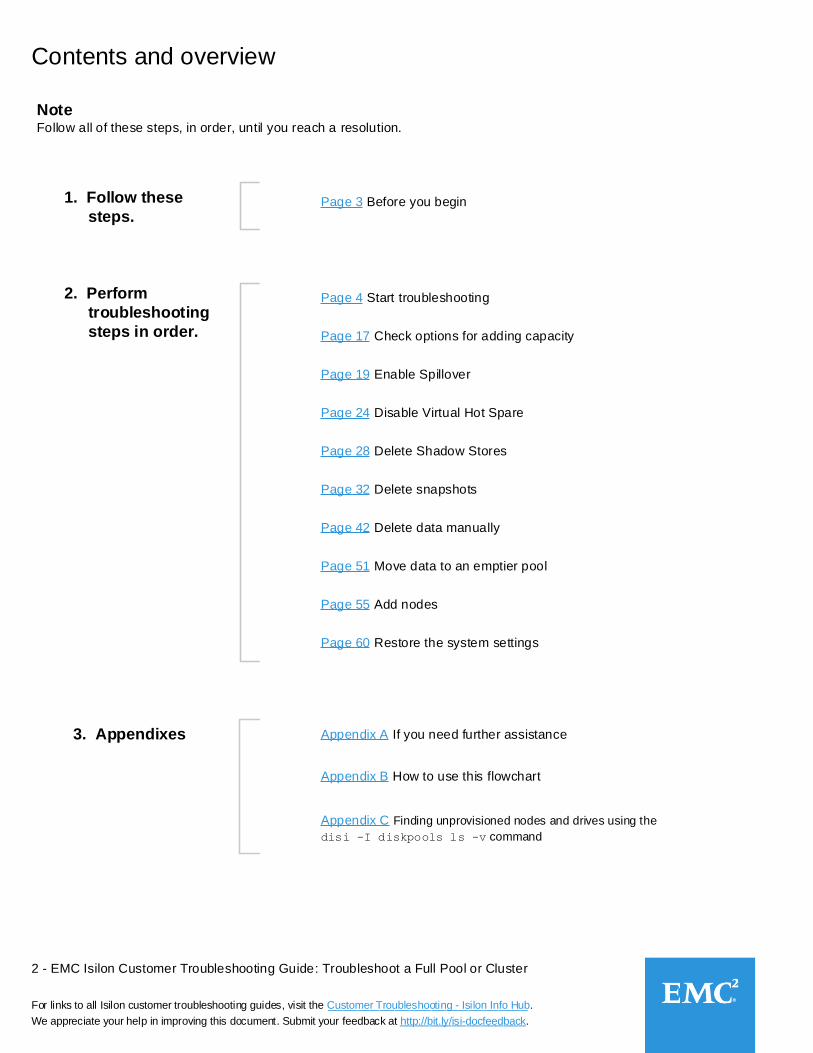
Note Follow all of these steps, in order, until you reach a resolution.
1. Follow these
steps.
2. Perform
troubleshooting
steps in order.
3. Appendixes
Appendix B How to use this flowchart
Page 28 Delete Shadow Stores
Page 32 Delete snapshots
Page 42 Delete data manually
Appendix C Finding unprovisioned nodes and drives using the
disi -I diskpools ls -v command
Page 51 Move data to an emptier pool
Page 55 Add nodes
Page 60 Restore the system settings

3 - EMC Isilon Customer Troubleshooting Guide: Troubleshoot a Full Pool or Cluster
For links to all Isilon customer troubleshooting guides, visit the Customer Troubleshooting - Isilon Info Hub.
We appreciate your help in improving this document. Submit your feedback at http://bit.ly/isi-docfeedback._________________
___________________________
Configure screen logging through SSH
We recommend that you configure screen logging to log all session input and output during your troubleshooting session.
This log file can be shared with EMC Isilon Technical Support, if you require assistance at any point during troubleshooting.
Note: The screen session capability does not work in OneFS 7.1.0.6 and 7.1.1.2. If you are running either of these versions,
you can configure logging by using your local SSH client's logging feature.
1. Open an SSH connection to the cluster and log in by using the root account.
Note: If the cluster is in compliance mode, use the compadmin account to log in. All compadmin commands must be
preceded by the sudo prefix.
2. Change the directory to /ifs/data/Isilon_Support by running the following command:
cd /ifs/data/Isilon_Support
3. Run the following command to capture all input and output from the session:
screen -L
This will create a file named screenlog.0 that will be appended to during your session.
4. Perform troubleshooting.
Before you begin
CAUTION!If the node, subnet, or pool that you are working on goes down during the course of
troubleshooting and you do not have any other way to connect to the cluster, you could
experience data unavailability.
Therefore, make sure that you have more than one way to connect to the cluster before
you start this troubleshooting process. The best method is to have a serial cable
available. This way, if you are unable to connect through the network, you will still be
able to connect to the cluster physically.
For specific requirements and instructions for making a physical connection to the
cluster, see article 304071 on the EMC Online Support site.
Before you begin troubleshooting, confirm that you can connect through either another
subnet or pool, or that you have physical access to the cluster.

4 - EMC Isilon Customer Troubleshooting Guide: Troubleshoot a Full Pool or Cluster
For links to all Isilon customer troubleshooting guides, visit the Customer Troubleshooting - Isilon Info Hub.
We appreciate your help in improving this document. Submit your feedback at http://bit.ly/isi-docfeedback._________________
___________________________
Start troubleshooting
Go to Page 5
Snapshot Reserve
Start
IntroductionStart troubleshooting here. If you need help
to understand the flowchart conventions that
are used in this guide, see Appendix B: How
to use this flowchart.
If you have not done so already, log in to the cluster
and configure screen logging through SSH, as
described on Page 3.
For your version of OneFS, run the following commands to get the
baseline percentage space used and available on /ifs and on the
cluster and node pools:
OneFS 8.0.0 - 8.1.0
df -k /ifs
isi status --all-nodepools -q
OneFS 7.2.x
df -k /ifs
isi status -d -q
Copy and save the output to use for comparison later.
Run the following command to get the current
Spillover settings on the cluster.
isi storagepool settings view
Copy the output to use for comparison later.
You could have arrived here from:
Page 61 - Restore the system settings (2)
Page 64 - Restore the system settings (5)
Page 66 - Restore the system settings (7)
Page 31 - Delete Shadow Stores (4)
Page 40 - Delete snapshots (9)
Page 50 - Delete data manually (7)
Page 54 - Move data to an emptier pool (4)
Page 59 - Add nodes (5)
Page 43 - Delete data manually (2)
5 - EMC Isilon Customer Troubleshooting Guide: Troubleshoot a Full Pool or Cluster
For links to all Isilon customer troubleshooting guides, visit the Customer Troubleshooting - Isilon Info Hub.
We appreciate your help in improving this document. Submit your feedback at http://bit.ly/isi-docfeedback._________________
___________________________
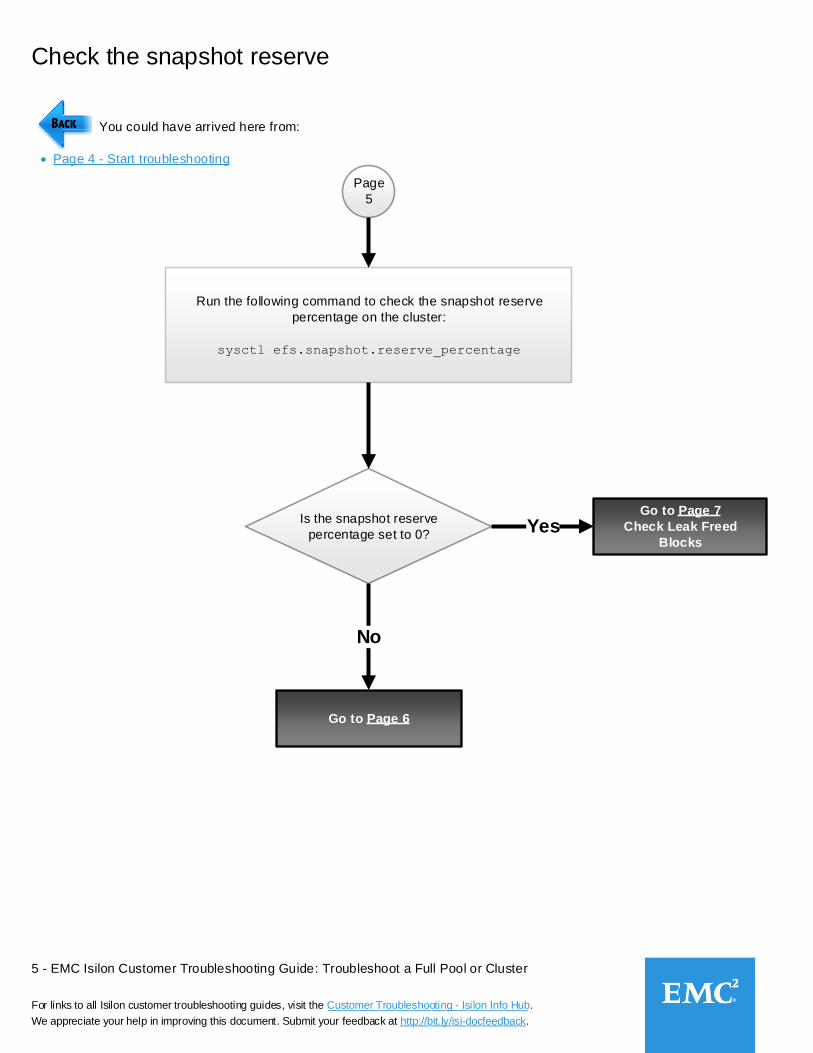
Check the snapshot reserve
Run the following command to check the snapshot reserve
percentage on the cluster:
sysctl efs.snapshot.reserve_percentage
Go to Page 6
Is the snapshot reserve
percentage set to 0?
No
YesGo to Page 7
Check Leak Freed
Blocks
Page
5
You could have arrived here from:
Page 4 - Start troubleshooting

6 - EMC Isilon Customer Troubleshooting Guide: Troubleshoot a Full Pool or Cluster
For links to all Isilon customer troubleshooting guides, visit the Customer Troubleshooting - Isilon Info Hub.
We appreciate your help in improving this document. Submit your feedback at http://bit.ly/isi-docfeedback._________________
___________________________
Check the snapshot reserve (2)
Page
6
You could have arrived here from:
Page 5 - Check the snapshot reserve
Set the snapshot reserve percentage to 0 by running the
following command:
isi snapshot settings modify --reserve 0
Did the command
succeed, or did you get
a license error?
Go to Page 7
Check Leak Freed
BlocksSucceed
Contact your Account Team to obtain a
temporary SnapshotIQ license. Install the
license on the cluster.
License error

7 - EMC Isilon Customer Troubleshooting Guide: Troubleshoot a Full Pool or Cluster
For links to all Isilon customer troubleshooting guides, visit the Customer Troubleshooting - Isilon Info Hub.
We appreciate your help in improving this document. Submit your feedback at http://bit.ly/isi-docfeedback._________________
___________________________
Check leak freed blocks
Check whether leak freed blocks is disabled (=0):
isi_for_array -X sysctl efs.lbm.leak_freed_blocks
Is leak freed blocks
disabled (=0) or
enabled (=1)?
Disabled
(=0)
Go to Page 8
Drives down but not
soft_failed
Enabled
(=1)
Page
7
You could have arrived here from:
Page 5 - Check the snapshot reserve
Note the page number that you
are currently on.
Upload log files and contact Isilon Technical
Support, as instructed in Appendix A.
Page 6 - Check the snapshot reserve (2)
8 - EMC Isilon Customer Troubleshooting Guide: Troubleshoot a Full Pool or Cluster
For links to all Isilon customer troubleshooting guides, visit the Customer Troubleshooting - Isilon Info Hub.
We appreciate your help in improving this document. Submit your feedback at http://bit.ly/isi-docfeedback._________________
___________________________
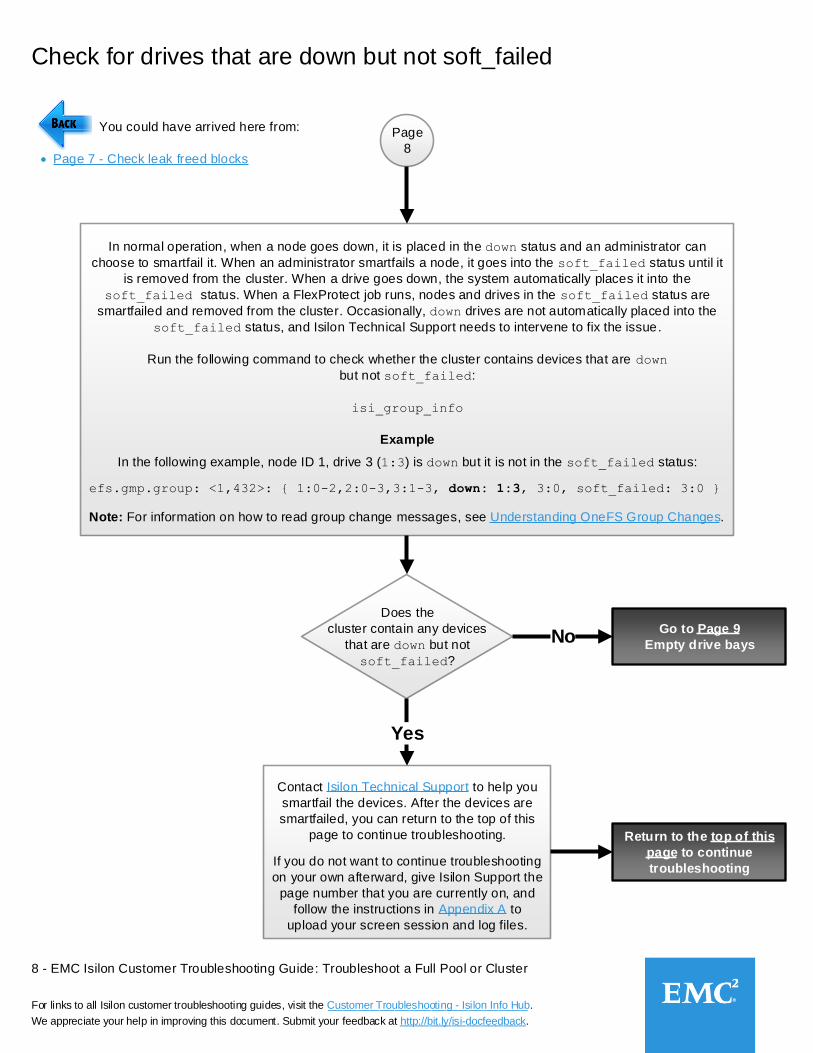
Check for drives that are down but not soft_failed
In normal operation, when a node goes down, it is placed in the down status and an administrator can
choose to smartfail it. When an administrator smartfails a node, it goes into the soft_failed status until it
is removed from the cluster. When a drive goes down, the system automatically places it into the
soft_failed status. When a FlexProtect job runs, nodes and drives in the soft_failed status are
smartfailed and removed from the cluster. Occasionally, down drives are not automatically placed into the
soft_failed status, and Isilon Technical Support needs to intervene to fix the issue.
Run the following command to check whether the cluster contains devices that are down
but not soft_failed:
isi_group_info
Example
In the following example, node ID 1, drive 3 (1:3) is down but it is not in the soft_failed status:
efs.gmp.group: <1,432>: { 1:0-2,2:0-3,3:1-3, down: 1:3, 3:0, soft_failed: 3:0 }
Does the
cluster contain any devices
that are down but not
soft_failed?
Go to Page 9
Empty drive baysNo
Yes
Page
8
You could have arrived here from:
Page 7 - Check leak freed blocks
Note: For information on how to read group change messages, see Understanding OneFS Group Changes.
Contact Isilon Technical Support to help you
smartfail the devices. After the devices are
smartfailed, you can return to the top of this
page to continue troubleshooting.
If you do not want to continue troubleshooting
on your own afterward, give Isilon Support the
page number that you are currently on, and
follow the instructions in Appendix A to
upload your screen session and log files.
Return to the top of this
page to continue
troubleshooting
9 - EMC Isilon Customer Troubleshooting Guide: Troubleshoot a Full Pool or Cluster
For links to all Isilon customer troubleshooting guides, visit the Customer Troubleshooting - Isilon Info Hub.
We appreciate your help in improving this document. Submit your feedback at http://bit.ly/isi-docfeedback._________________
___________________________
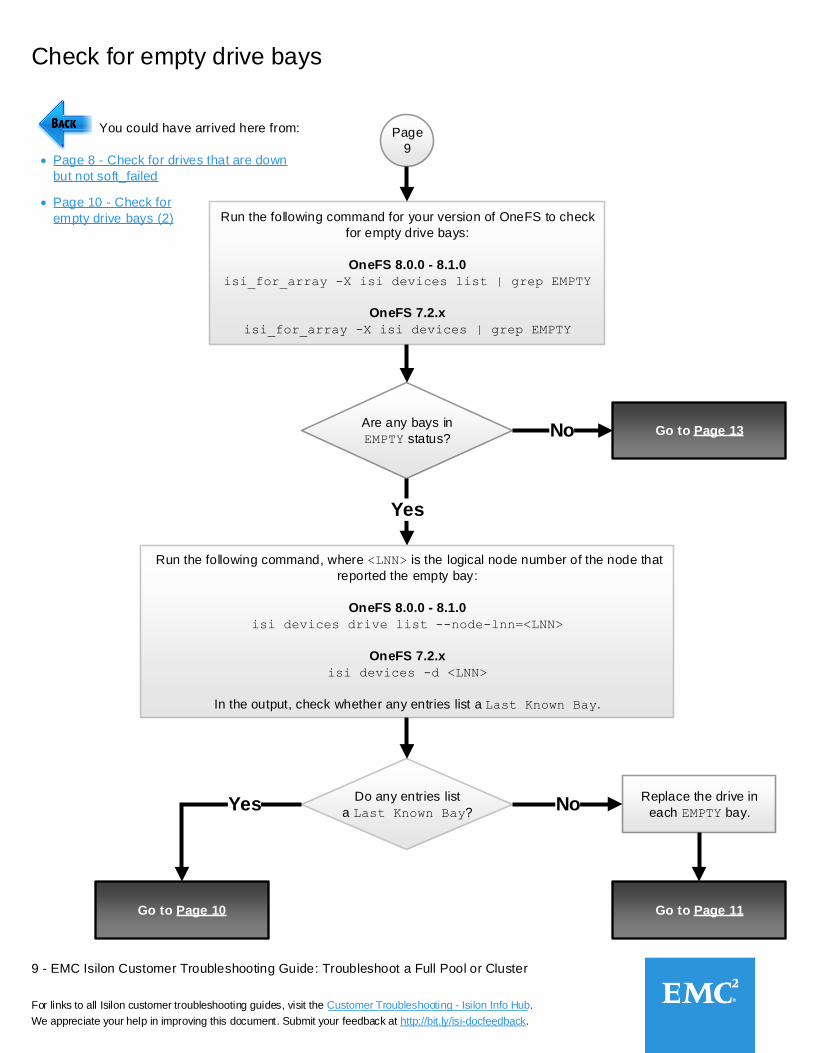
Check for empty drive bays
Run the following command for your version of OneFS to check
for empty drive bays:
OneFS 8.0.0 - 8.1.0
isi_for_array -X isi devices list | grep EMPTY
OneFS 7.2.x
isi_for_array -X isi devices | grep EMPTY
Are any bays in
EMPTY status?
Yes
Go to Page 13No
Page
9
You could have arrived here from:
Page 8 - Check for drives that are down
but not soft_failed
Run the following command, where <LNN> is the logical node number of the node that
reported the empty bay:
OneFS 8.0.0 - 8.1.0
isi devices drive list --node-lnn=<LNN>
OneFS 7.2.x
isi devices -d <LNN>
In the output, check whether any entries list a Last Known Bay.
Do any entries list
a Last Known Bay?Yes No
Go to Page 11
Replace the drive in
each EMPTY bay.
Go to Page 10
Page 10 - Check for
empty drive bays (2)
10 - EMC Isilon Customer Troubleshooting Guide: Troubleshoot a Full Pool or Cluster
For links to all Isilon customer troubleshooting guides, visit the Customer Troubleshooting - Isilon Info Hub.
We appreciate your help in improving this document. Submit your feedback at http://bit.ly/isi-docfeedback._________________
___________________________
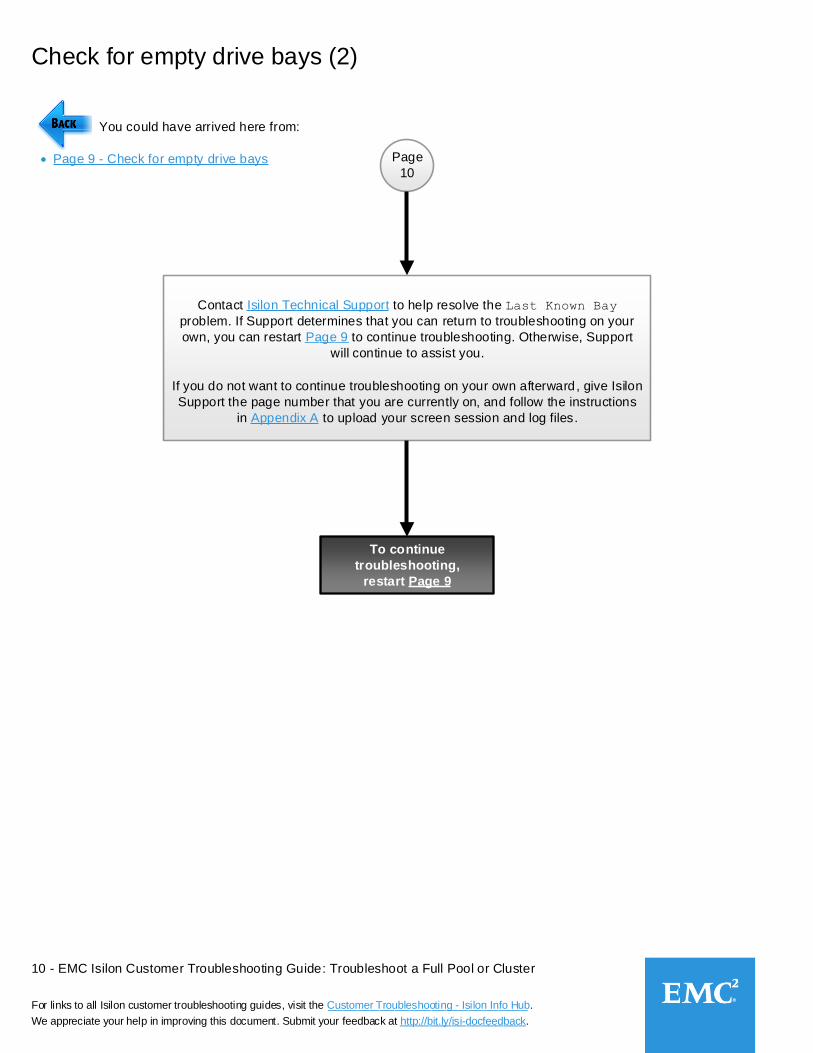
Check for empty drive bays (2)
Page
10
You could have arrived here from:
Page 9 - Check for empty drive bays
To continue
troubleshooting,
restart Page 9
Contact Isilon Technical Support to help resolve the Last Known Bay
problem. If Support determines that you can return to troubleshooting on your
own, you can restart Page 9 to continue troubleshooting. Otherwise, Support
will continue to assist you.
If you do not want to continue troubleshooting on your own afterward, give Isilon
Support the page number that you are currently on, and follow the instructions
in Appendix A to upload your screen session and log files.
______
11 - EMC Isilon Customer Troubleshooting Guide: Troubleshoot a Full Pool or Cluster
For links to all Isilon customer troubleshooting guides, visit the Customer Troubleshooting - Isilon Info Hub.
We appreciate your help in improving this document. Submit your feedback at http://bit.ly/isi-docfeedback._________________
___________________________
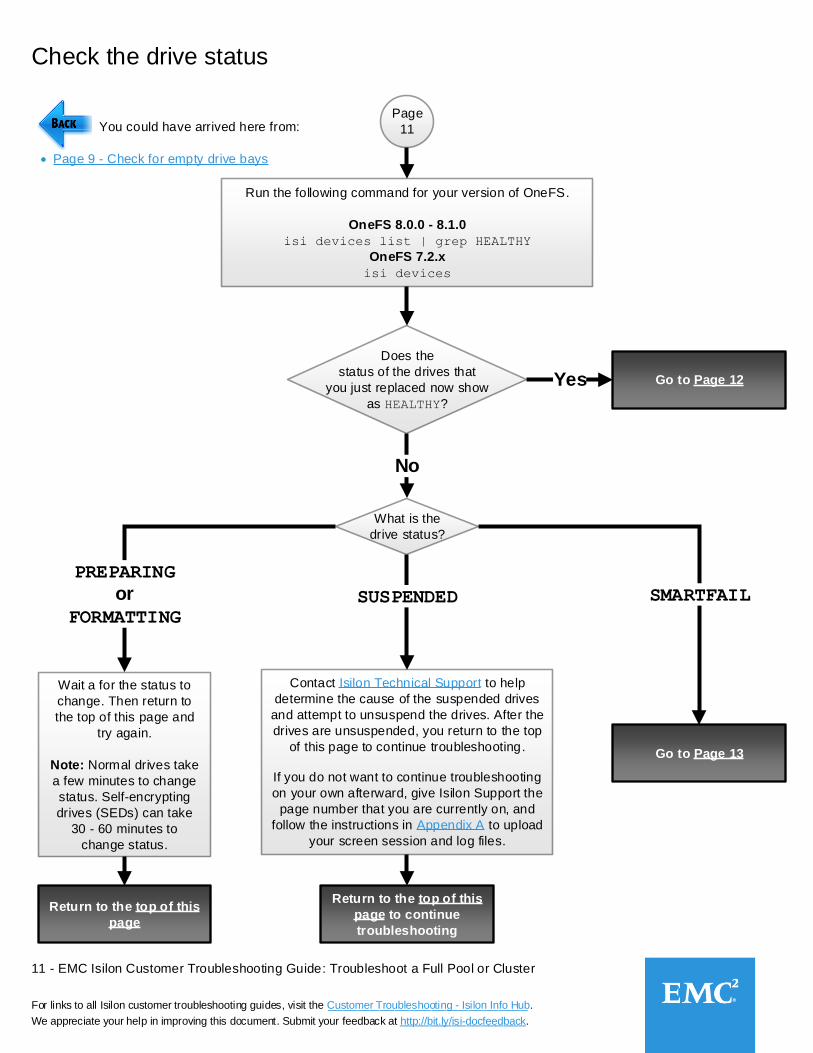
Check the drive status
Page
11 You could have arrived here from:
Page 9 - Check for empty drive bays
Run the following command for your version of OneFS.
OneFS 8.0.0 - 8.1.0
isi devices list | grep HEALTHY
OneFS 7.2.x
isi devices
Does the
status of the drives that
you just replaced now show
as HEALTHY?
No
Yes
What is the
drive status?
Wait a for the status to
change. Then return to
the top of this page and
try again.
Note: Normal drives take
a few minutes to change
status. Self-encrypting
drives (SEDs) can take
30 - 60 minutes to
change status.
Go to Page 12
Go to Page 13
Contact Isilon Technical Support to help
determine the cause of the suspended drives
and attempt to unsuspend the drives. After the
drives are unsuspended, you return to the top
of this page to continue troubleshooting.
If you do not want to continue troubleshooting
on your own afterward, give Isilon Support the
page number that you are currently on, and
follow the instructions in Appendix A to upload
your screen session and log files.
Return to the top of this
page to continue
troubleshooting
Return to the top of this
page
PREPARING
or
FORMATTING
SUSPENDED SMARTFAIL
12 - EMC Isilon Customer Troubleshooting Guide: Troubleshoot a Full Pool or Cluster
For links to all Isilon customer troubleshooting guides, visit the Customer Troubleshooting - Isilon Info Hub.
We appreciate your help in improving this document. Submit your feedback at http://bit.ly/isi-docfeedback._________________
___________________________
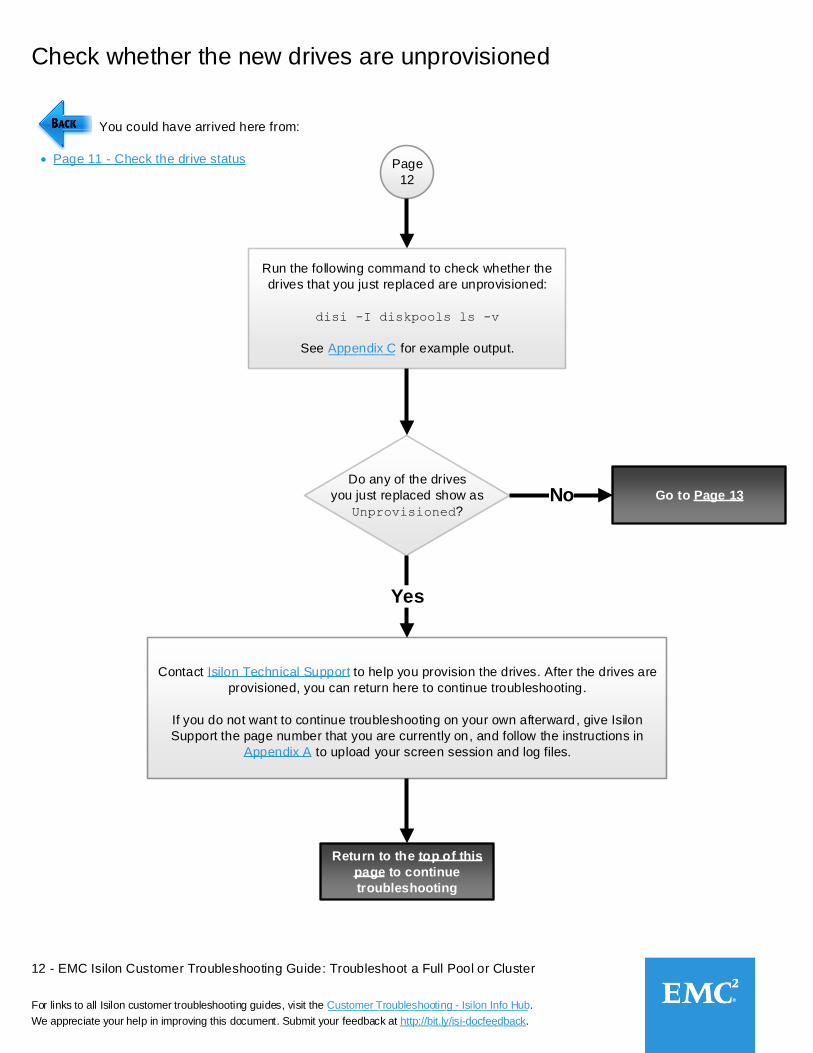
Check whether the new drives are unprovisioned
Page
12
You could have arrived here from:
Page 11 - Check the drive status
Run the following command to check whether the
drives that you just replaced are unprovisioned:
disi -I diskpools ls -v
See Appendix C for example output.
Do any of the drives
you just replaced show as
Unprovisioned?No
Yes
Go to Page 13
_________
Contact Isilon Technical Support to help you provision the drives. After the drives are
provisioned, you can return here to continue troubleshooting.
If you do not want to continue troubleshooting on your own afterward, give Isilon
Support the page number that you are currently on, and follow the instructions in
Appendix A to upload your screen session and log files.
Return to the top of this
page to continue
troubleshooting

13 - EMC Isilon Customer Troubleshooting Guide: Troubleshoot a Full Pool or Cluster
For links to all Isilon customer troubleshooting guides, visit the Customer Troubleshooting - Isilon Info Hub.
We appreciate your help in improving this document. Submit your feedback at http://bit.ly/isi-docfeedback._________________
___________________________
Check for drives that need to be replaced
Page
13
You could have arrived here from:
Page 9 - Check for empty drive bays
Page 11 - Check the drive status
Page 12 - Check whether the new drives
are unprovisioned
Are any drives in
REPLACE status?
Yes
Run the following command for your version of OneFS and look for
any drives that are in the REPLACE status.
OneFS 8.0.0 - 8.1.0
isi_for_array -X isi devices list | grep REPLACE
OneFS 7.2.x
isi_for_array -X isi devices | grep REPLACE
No
Replace the drives.
Go to Page 14
Go to Page 16
_____________________________
__________________________
_________________________________
_______________
14 - EMC Isilon Customer Troubleshooting Guide: Troubleshoot a Full Pool or Cluster
For links to all Isilon customer troubleshooting guides, visit the Customer Troubleshooting - Isilon Info Hub.
We appreciate your help in improving this document. Submit your feedback at http://bit.ly/isi-docfeedback._________________
___________________________
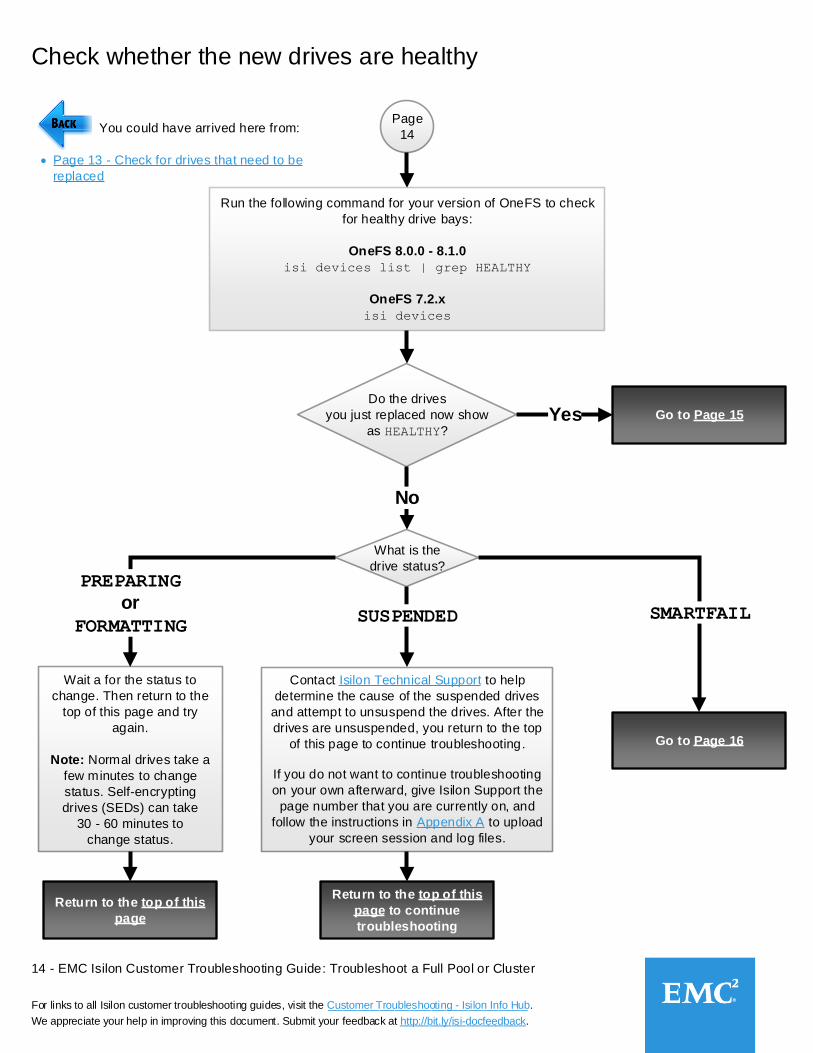
Check whether the new drives are healthy
Page
14 You could have arrived here from:
Page 13 - Check for drives that need to be
replaced
Do the drives
you just replaced now show
as HEALTHY?Yes Go to Page 15
No
Go to Page 16
Wait a for the status to
change. Then return to the
top of this page and try
again.
Note: Normal drives take a
few minutes to change
status. Self-encrypting
drives (SEDs) can take
30 - 60 minutes to
change status.
Contact Isilon Technical Support to help
determine the cause of the suspended drives
and attempt to unsuspend the drives. After the
drives are unsuspended, you return to the top
of this page to continue troubleshooting.
If you do not want to continue troubleshooting
on your own afterward, give Isilon Support the
page number that you are currently on, and
follow the instructions in Appendix A to upload
your screen session and log files.
Return to the top of this
page to continue
troubleshooting
Return to the top of this
page
Run the following command for your version of OneFS to check
for healthy drive bays:
OneFS 8.0.0 - 8.1.0
isi devices list | grep HEALTHY
OneFS 7.2.x
isi devices
What is the
drive status?
PREPARING
or
FORMATTINGSUSPENDED SMARTFAIL
15 - EMC Isilon Customer Troubleshooting Guide: Troubleshoot a Full Pool or Cluster
For links to all Isilon customer troubleshooting guides, visit the Customer Troubleshooting - Isilon Info Hub.
We appreciate your help in improving this document. Submit your feedback at http://bit.ly/isi-docfeedback._________________
___________________________
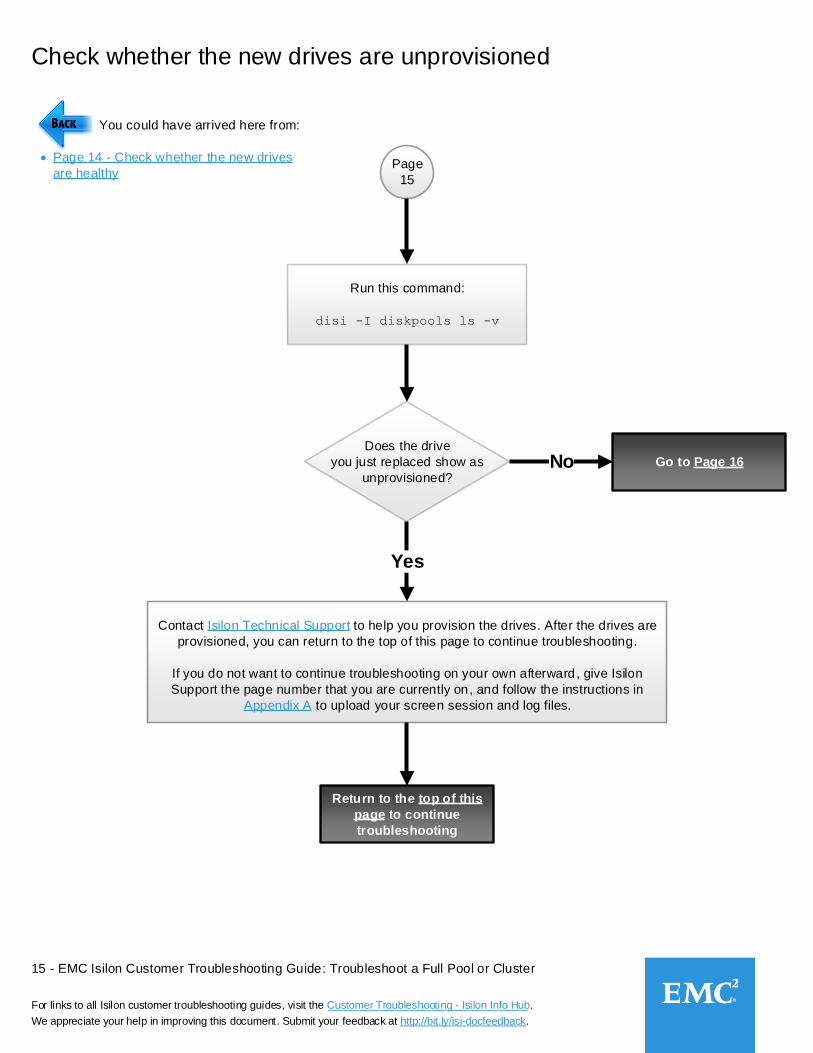
Page
15
You could have arrived here from:
Page 14 - Check whether the new drives
are healthy
Run this command:
disi -I diskpools ls -v
Does the drive
you just replaced show as
unprovisioned?No
Yes
Go to Page 16
Check whether the new drives are unprovisioned
Contact Isilon Technical Support to help you provision the drives. After the drives are
provisioned, you can return to the top of this page to continue troubleshooting.
If you do not want to continue troubleshooting on your own afterward, give Isilon
Support the page number that you are currently on, and follow the instructions in
Appendix A to upload your screen session and log files.
Return to the top of this
page to continue
troubleshooting
16 - EMC Isilon Customer Troubleshooting Guide: Troubleshoot a Full Pool or Cluster
For links to all Isilon customer troubleshooting guides, visit the Customer Troubleshooting - Isilon Info Hub.
We appreciate your help in improving this document. Submit your feedback at http://bit.ly/isi-docfeedback._________________
___________________________
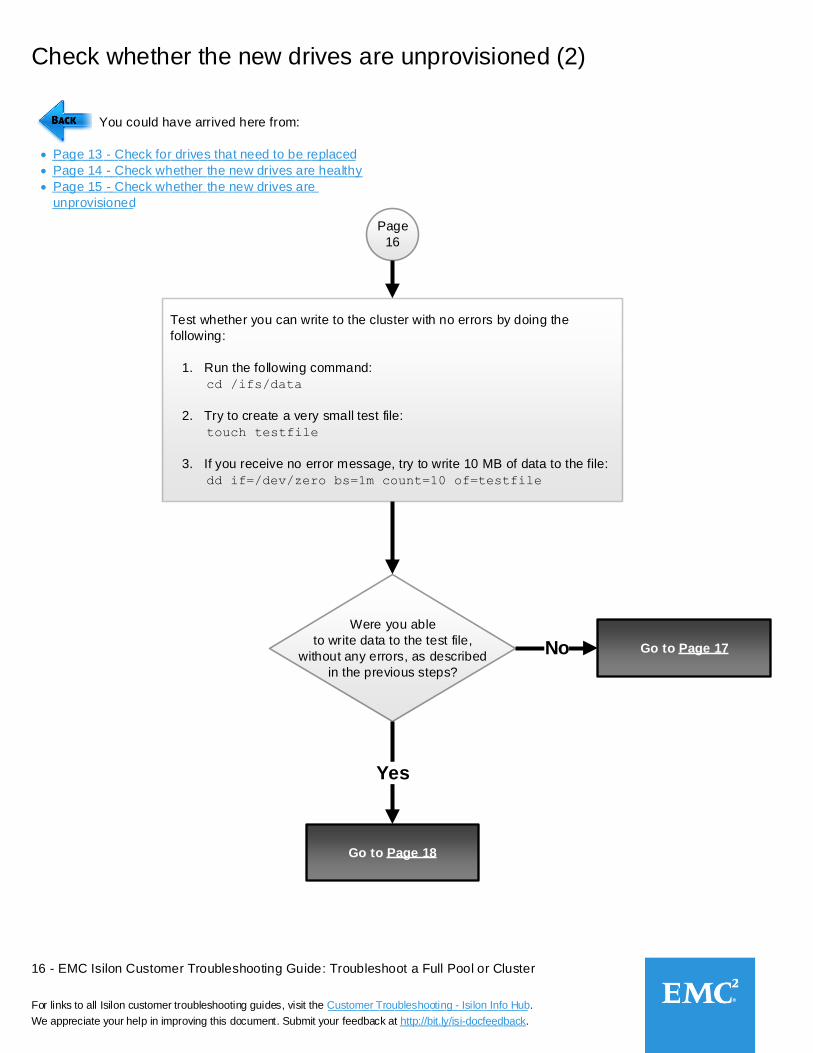
Page
16
Test whether you can write to the cluster with no errors by doing the
following:
1. Run the following command:
cd /ifs/data
2. Try to create a very small test file:
touch testfile
3. If you receive no error message, try to write 10 MB of data to the file:
dd if=/dev/zero bs=1m count=10 of=testfile
Were you able
to write data to the test file,
without any errors, as described
in the previous steps?
Go to Page 18
Yes
Go to Page 17No
Check whether the new drives are unprovisioned (2)
You could have arrived here from:
Page 13 - Check for drives that need to be replaced
Page 14 - Check whether the new drives are healthy
Page 15 - Check whether the new drives are
unprovisioned
_________________________________________
__________________________________________
____________________________________
___________

17 - EMC Isilon Customer Troubleshooting Guide: Troubleshoot a Full Pool or Cluster
For links to all Isilon customer troubleshooting guides, visit the Customer Troubleshooting - Isilon Info Hub.
We appreciate your help in improving this document. Submit your feedback at http://bit.ly/isi-docfeedback._________________
___________________________
Check options for adding capacity
Page
17
You could have arrived here from:
Page 16 - Check whether the new drives
are unprovisioned (2)
Is the cluster
99% or more full?Does the cluster contain
only one node pool?No
Would you
like to add capacity
by adding a node to the
cluster?
Yes
Yes
Does the cluster contain
only one node pool?No
No
Yes
No
Yes
Go to Page 18
Go to Page 19
Enable Spillover
Go to Page 55
Add nodes
Go to Page 24
Disable VHS

18 - EMC Isilon Customer Troubleshooting Guide: Troubleshoot a Full Pool or Cluster
For links to all Isilon customer troubleshooting guides, visit the Customer Troubleshooting - Isilon Info Hub.
We appreciate your help in improving this document. Submit your feedback at http://bit.ly/isi-docfeedback._________________
___________________________
Page
18
Are the nodes
in each node pool too full
to be able to write a full stripe?
(For example, five nodes in a six-node
pool are at > 99% used capacity,
and one node is
at 10%.) No, or
you don't knowYes
Run the following command:
isi status -q
Go to Page 19
Enable Spillover
Check options for adding capacity (2)
Contact Isilon Technical Support to help resolve
this issue. After this issue is resolved, you
return to the top of this page to continue
troubleshooting.
If you do not want to continue troubleshooting
on your own afterward, give Isilon Support the
page number that you are currently on, and
follow the instructions in Appendix A to upload
your screen session and log files.
Return to the top of this
page to continue
troubleshooting
You could have arrived here from:
Page 16 - Check whether the new drives
are unprovisioned (2)
Page 17 - Options for adding capacity
19 - EMC Isilon Customer Troubleshooting Guide: Troubleshoot a Full Pool or Cluster
For links to all Isilon customer troubleshooting guides, visit the Customer Troubleshooting - Isilon Info Hub.
We appreciate your help in improving this document. Submit your feedback at http://bit.ly/isi-docfeedback._________________
___________________________
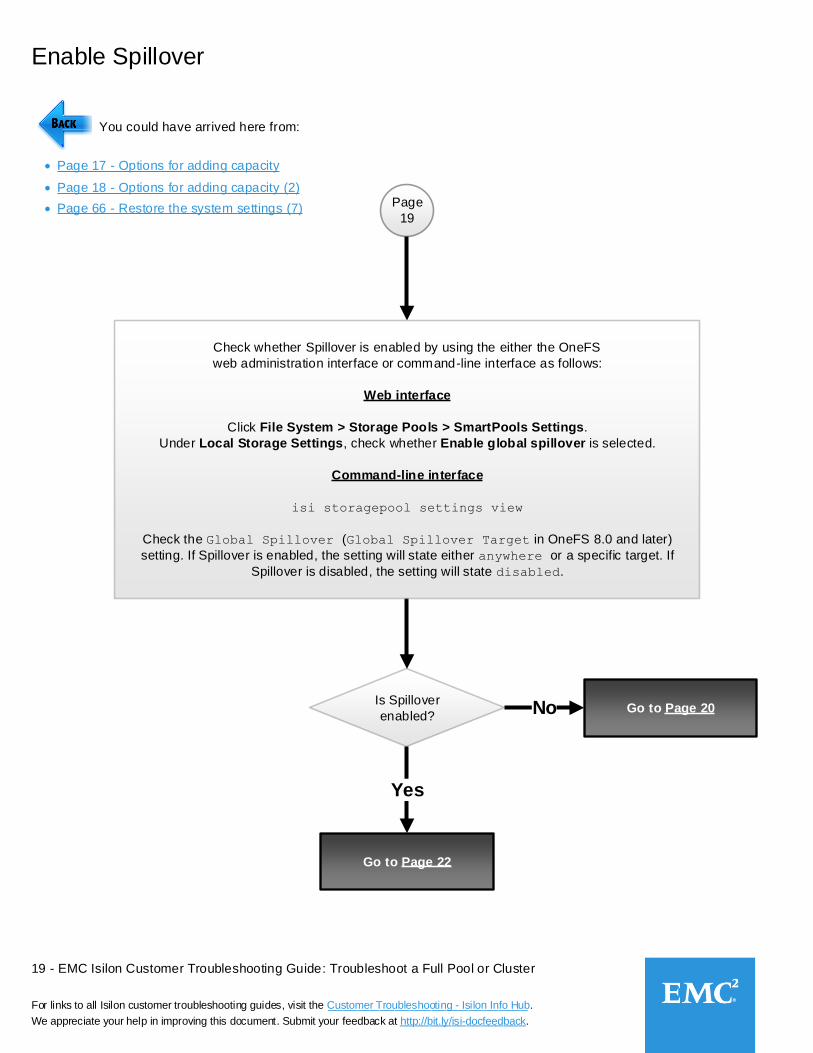
Enable Spillover
Page
19
You could have arrived here from:
Is Spillover
enabled?
Yes
No
Check whether Spillover is enabled by using the either the OneFS
web administration interface or command-line interface as follows:
Web interface
Click File System > Storage Pools > SmartPools Settings.
Under Local Storage Settings, check whether Enable global spillover is selected.
Command-line interface
isi storagepool settings view
Check the Global Spillover (Global Spillover Target in OneFS 8.0 and later)
setting. If Spillover is enabled, the setting will state either anywhere or a specific target. If
Spillover is disabled, the setting will state disabled.
Go to Page 20
Go to Page 22
Page 17 - Options for adding capacity
Page 18 - Options for adding capacity (2)
Page 66 - Restore the system settings (7)
20 - EMC Isilon Customer Troubleshooting Guide: Troubleshoot a Full Pool or Cluster
For links to all Isilon customer troubleshooting guides, visit the Customer Troubleshooting - Isilon Info Hub.
We appreciate your help in improving this document. Submit your feedback at http://bit.ly/isi-docfeedback._________________
___________________________
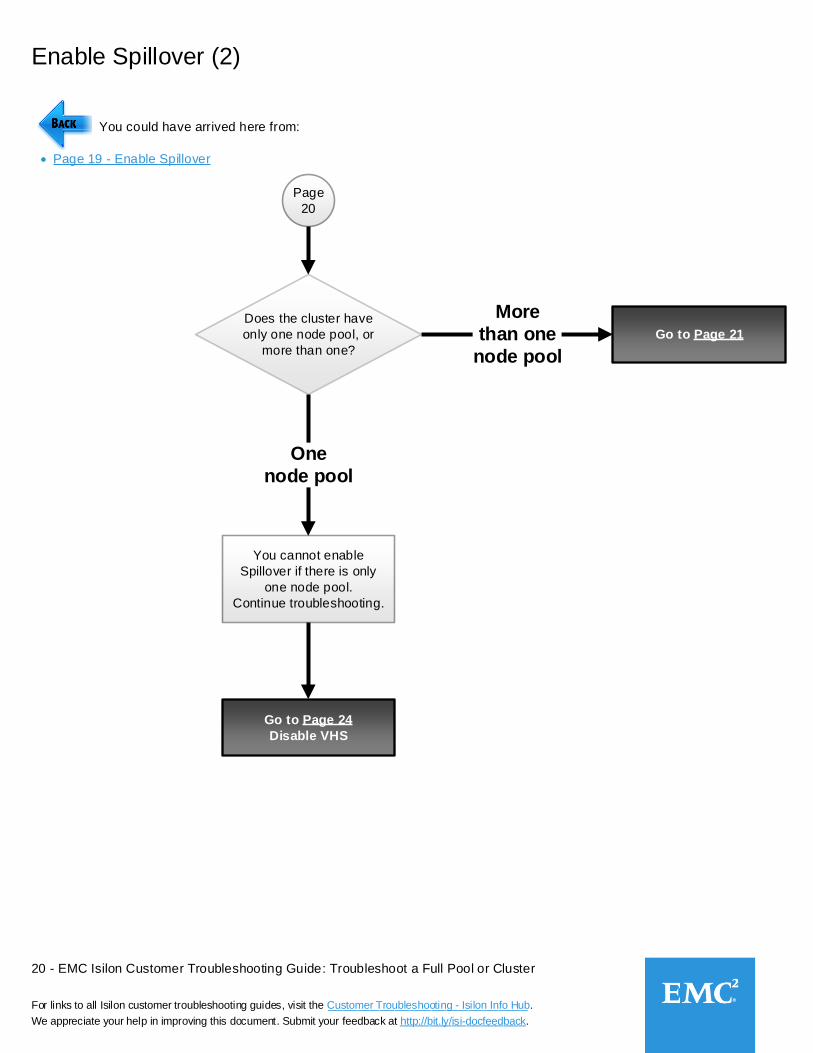
Page
20
You could have arrived here from:
Page 19 - Enable Spillover
Does the cluster have
only one node pool, or
more than one?
More
than one
node pool
One
node pool
Go to Page 24
Disable VHS
Enable Spillover (2)
You cannot enable
Spillover if there is only
one node pool.
Continue troubleshooting.
Go to Page 21
21 - EMC Isilon Customer Troubleshooting Guide: Troubleshoot a Full Pool or Cluster
For links to all Isilon customer troubleshooting guides, visit the Customer Troubleshooting - Isilon Info Hub.
We appreciate your help in improving this document. Submit your feedback at http://bit.ly/isi-docfeedback._________________
___________________________
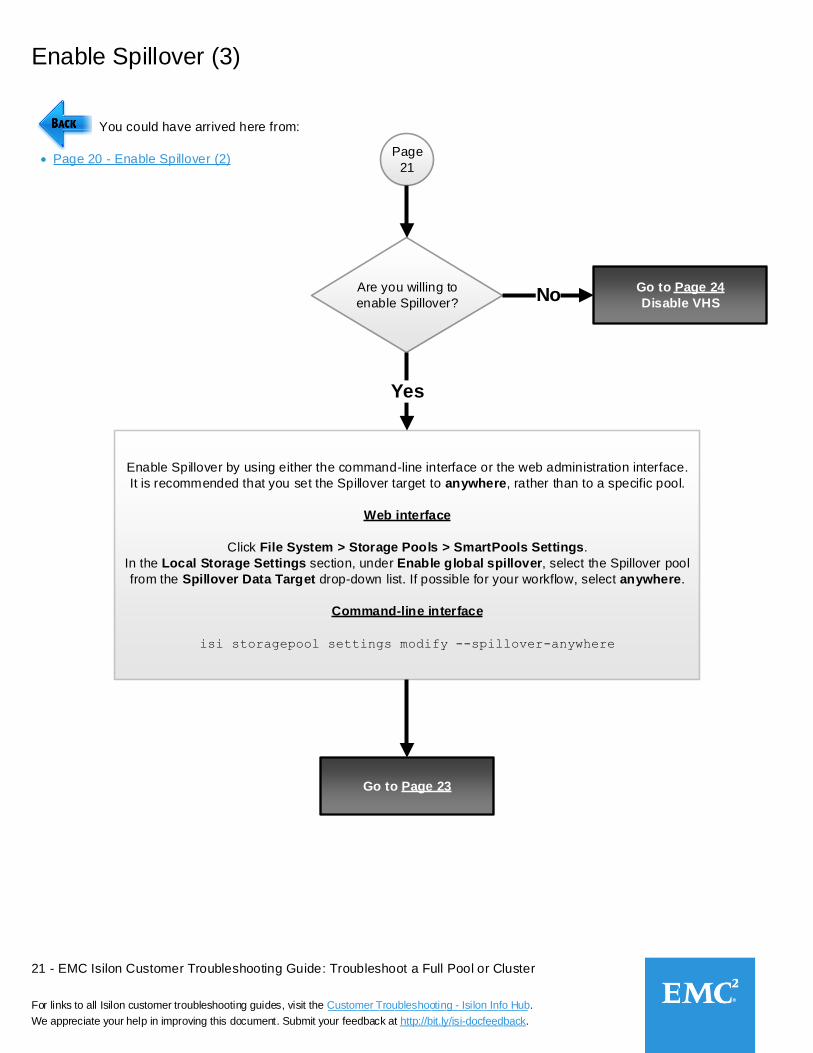
Page
21
You could have arrived here from:
Page 20 - Enable Spillover (2)
Enable Spillover (3)
Enable Spillover by using either the command-line interface or the web administration interface.
It is recommended that you set the Spillover target to anywhere, rather than to a specific pool.
Web interface
Click File System > Storage Pools > SmartPools Settings.
In the Local Storage Settings section, under Enable global spillover, select the Spillover pool
from the Spillover Data Target drop-down list. If possible for your workflow, select anywhere.
Command-line interface
isi storagepool settings modify --spillover-anywhere
Are you willing to
enable Spillover?
Go to Page 24
Disable VHS
Go to Page 23
No
Yes
22 - EMC Isilon Customer Troubleshooting Guide: Troubleshoot a Full Pool or Cluster
For links to all Isilon customer troubleshooting guides, visit the Customer Troubleshooting - Isilon Info Hub.
We appreciate your help in improving this document. Submit your feedback at http://bit.ly/isi-docfeedback._________________
___________________________
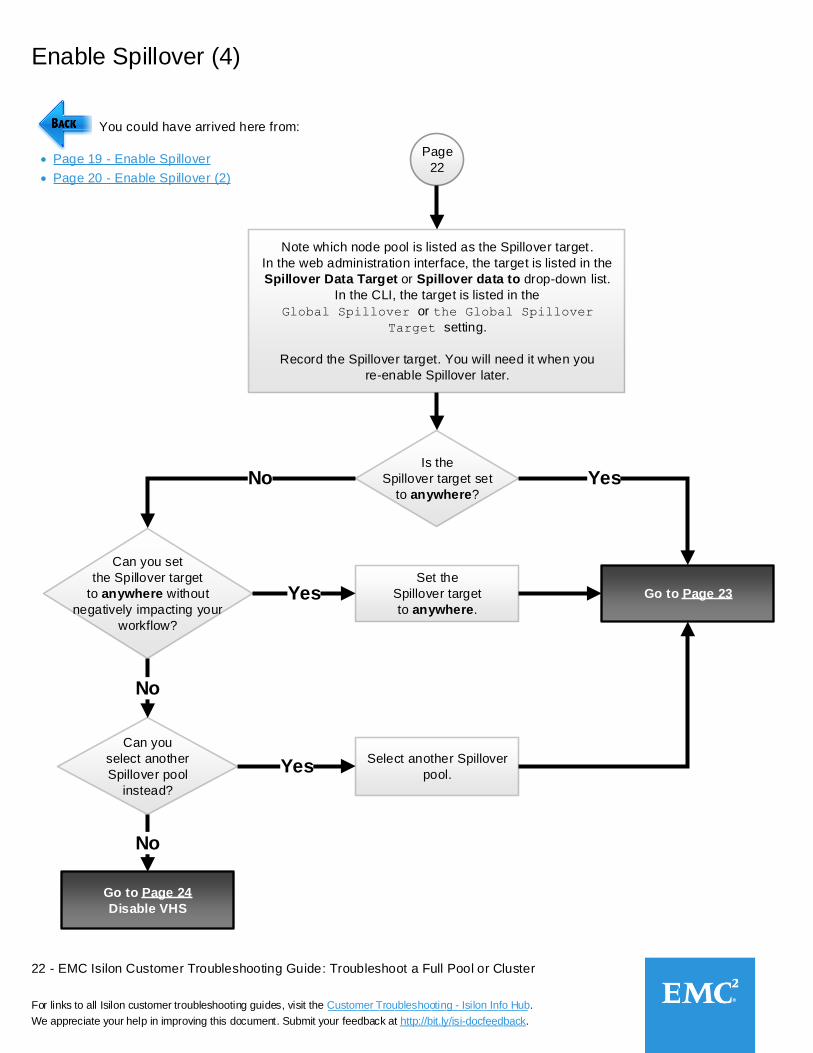
Enable Spillover (4)
Page
22
You could have arrived here from:
Page 19 - Enable Spillover
Is the
Spillover target set
to anywhere?No
Can you
select another
Spillover pool
instead?
Yes
Select another Spillover
pool.Yes
No
Note which node pool is listed as the Spillover target.
In the web administration interface, the target is listed in the
Spillover Data Target or Spillover data to drop-down list.
In the CLI, the target is listed in the
Global Spillover or the Global Spillover
Target setting.
Record the Spillover target. You will need it when you
re-enable Spillover later.
Can you set
the Spillover target
to anywhere without
negatively impacting your
workflow?
Set the
Spillover target
to anywhere.
No
Yes Go to Page 23
Page 20 - Enable Spillover (2)
Go to Page 24
Disable VHS
23 - EMC Isilon Customer Troubleshooting Guide: Troubleshoot a Full Pool or Cluster
For links to all Isilon customer troubleshooting guides, visit the Customer Troubleshooting - Isilon Info Hub.
We appreciate your help in improving this document. Submit your feedback at http://bit.ly/isi-docfeedback._________________
___________________________
Enable Spillover (5)
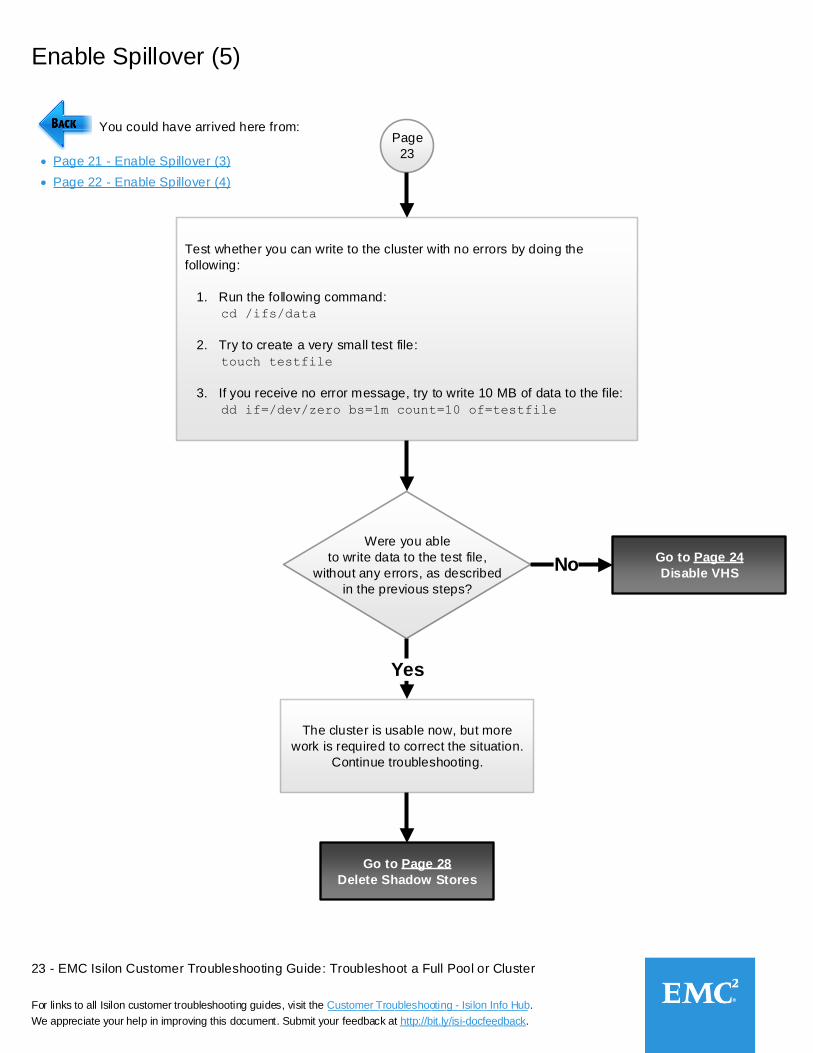
Page
23
You could have arrived here from:
The cluster is usable now, but more
work is required to correct the situation.
Continue troubleshooting.
Yes
No
Test whether you can write to the cluster with no errors by doing the
following:
1. Run the following command:
cd /ifs/data
2. Try to create a very small test file:
touch testfile
3. If you receive no error message, try to write 10 MB of data to the file:
dd if=/dev/zero bs=1m count=10 of=testfile
Were you able
to write data to the test file,
without any errors, as described
in the previous steps?
Go to Page 24
Disable VHS
Go to Page 28
Delete Shadow Stores
Page 21 - Enable Spillover (3)
Page 22 - Enable Spillover (4)
24 - EMC Isilon Customer Troubleshooting Guide: Troubleshoot a Full Pool or Cluster
For links to all Isilon customer troubleshooting guides, visit the Customer Troubleshooting - Isilon Info Hub.
We appreciate your help in improving this document. Submit your feedback at http://bit.ly/isi-docfeedback._________________
___________________________
Disable Virtual Hot Spare
Page
24
You could have arrived here from:
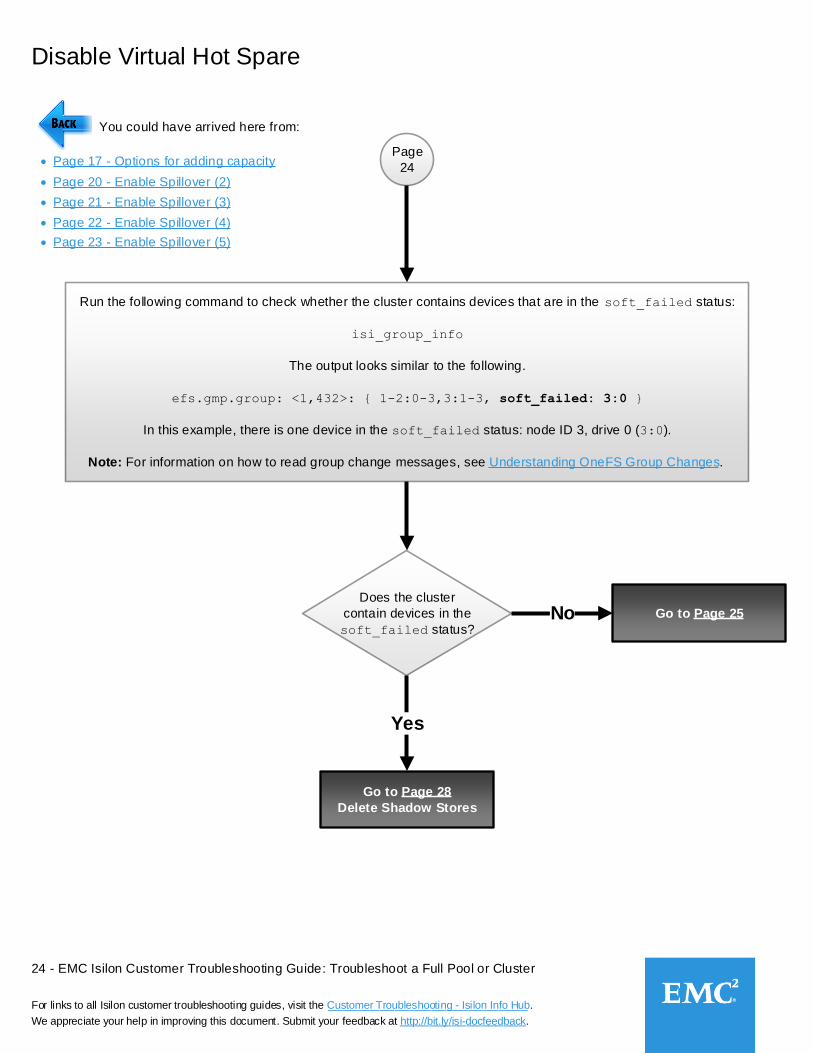
Run the following command to check whether the cluster contains devices that are in the soft_failed status:
isi_group_info
The output looks similar to the following.
efs.gmp.group: <1,432>: { 1-2:0-3,3:1-3, soft_failed: 3:0 }
In this example, there is one device in the soft_failed status: node ID 3, drive 0 (3:0).
Does the cluster
contain devices in the
soft_failed status?
Yes
Go to Page 28
Delete Shadow Stores
Go to Page 25No
Note: For information on how to read group change messages, see Understanding OneFS Group Changes.
Page 17 - Options for adding capacity
Page 20 - Enable Spillover (2)
Page 21 - Enable Spillover (3)
Page 22 - Enable Spillover (4)
Page 23 - Enable Spillover (5)

25 - EMC Isilon Customer Troubleshooting Guide: Troubleshoot a Full Pool or Cluster
For links to all Isilon customer troubleshooting guides, visit the Customer Troubleshooting - Isilon Info Hub.
We appreciate your help in improving this document. Submit your feedback at http://bit.ly/isi-docfeedback._________________
___________________________
Disable Virtual Hot Spare (2)
Is either the D flag or the
H flag (or both) present in the
Flags column?
Page
25 You could have arrived here from:
Page 24 - Disable Virtual Hot Spare
Go to Page 28
Delete Shadow Stores
No
Yes
Check whether Virtual Hot Spare (VHS) is enabled by running the following
command:
disi -I diskpools ls -v
The Flags column indicates the VHS settings. If the D flag or the H flag is
present, VHS is enabled. If neither flag is present, VHS is disabled.
See the box on this page for example output.
Go to Page 26
How to interpret VHS status from the disi -I diskpools ls -v command
Example with VHS enabledcluster-1# disi -I diskpools ls -v
Name Id Type Prot Flags Members VHS HDD Used / Size SSD Used / Size
---------------------------------------------------------------------------------------------------------------------
iq_vmware 2 G +2:1 SDH- 1 1 880M / 6.6G (13% ) 0 / 0 (n/a )
iq_vmware:1 1 D +2:1 S--- 1:bay1-4 - 880M / 6.6G (13% ) 0 / 0 (n/a )
Example with VHS disabledcluster-1# disi -I diskpools ls -v
Name Id Type Prot Flags Members VHS HDD Used / Size SSD Used / Size
---------------------------------------------------------------------------------------------------------------------
iq_vmware 2 G +2:1 S--- 1 1 879M / 13G (6% ) 0 / 0 (n/a )
iq_vmware:1 1 D +2:1 S--- 1:bay1-4 - 879M / 13G (6% ) 0 / 0 (n/a )
---------------------------------------------------------------------------------------------------------------------
Unprovisioned drives: none
Type: D = Disk pool, G = Group, P = Policy, T = Tier, E = Empty Group or Tier
Flags: S = System, H = VHS Hide Spare, D = VHS Deny Writes,
T = Spillover Target
26 - EMC Isilon Customer Troubleshooting Guide: Troubleshoot a Full Pool or Cluster
For links to all Isilon customer troubleshooting guides, visit the Customer Troubleshooting - Isilon Info Hub.
We appreciate your help in improving this document. Submit your feedback at http://bit.ly/isi-docfeedback._________________
___________________________
Disable Virtual Hot Spare (3)
Page
26
You could have arrived here from:
Page 25 - Disable Virtual Hot Spare (2)
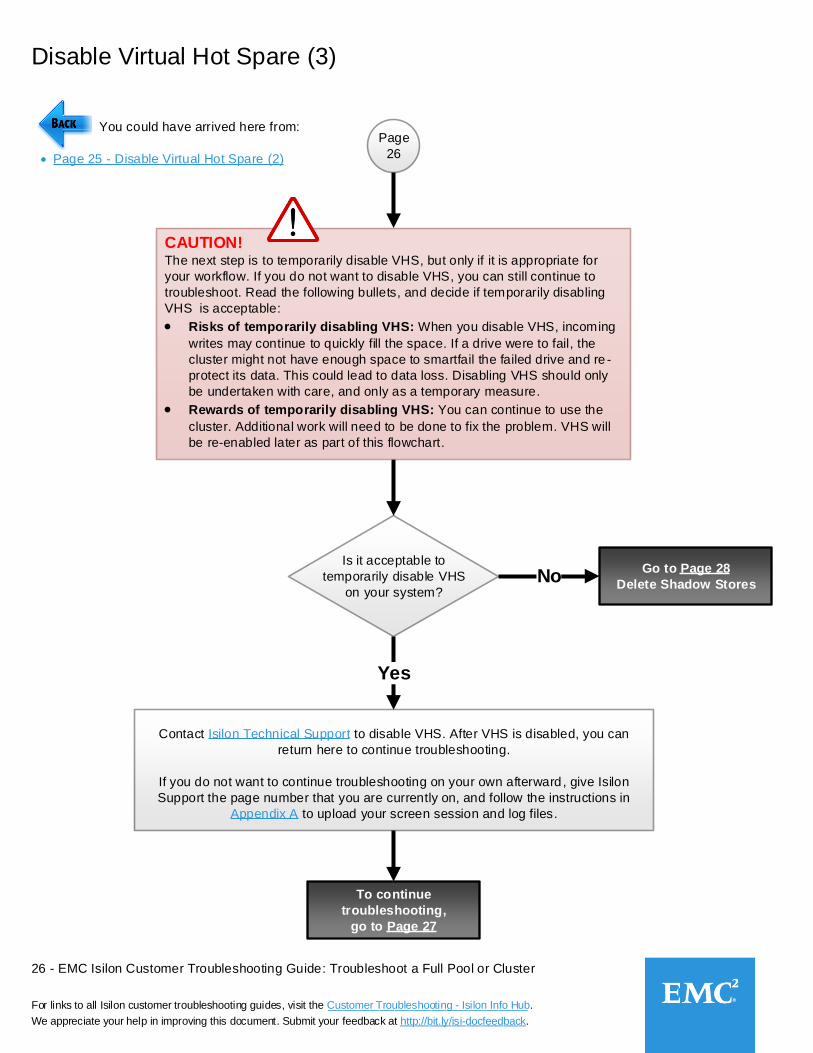
CAUTION!The next step is to temporarily disable VHS, but only if it is appropriate for
your workflow. If you do not want to disable VHS, you can still continue to
troubleshoot. Read the following bullets, and decide if temporarily disabling
VHS is acceptable:
Risks of temporarily disabling VHS: When you disable VHS, incoming
writes may continue to quickly fill the space. If a drive were to fail, the
cluster might not have enough space to smartfail the failed drive and re -
protect its data. This could lead to data loss. Disabling VHS should only
be undertaken with care, and only as a temporary measure.
Rewards of temporarily disabling VHS: You can continue to use the
cluster. Additional work will need to be done to fix the problem. VHS will
be re-enabled later as part of this flowchart.
Is it acceptable to
temporarily disable VHS
on your system?
Go to Page 28
Delete Shadow StoresNo
Yes
To continue
troubleshooting,
go to Page 27
Contact Isilon Technical Support to disable VHS. After VHS is disabled, you can
return here to continue troubleshooting.
If you do not want to continue troubleshooting on your own afterward , give Isilon
Support the page number that you are currently on, and follow the instructions in
Appendix A to upload your screen session and log files.

27 - EMC Isilon Customer Troubleshooting Guide: Troubleshoot a Full Pool or Cluster
For links to all Isilon customer troubleshooting guides, visit the Customer Troubleshooting - Isilon Info Hub.
We appreciate your help in improving this document. Submit your feedback at http://bit.ly/isi-docfeedback._________________
___________________________
Page
27
You could have arrived here from:
Page 26 - Disable Virtual Hot Spare (3)
Test whether you can write to the cluster with no errors by doing the
following:
1. Run the following command:
cd /ifs/data
2. Try to create a very small test file:
touch testfile
3. If you receive no error message, try to write 10 MB of data to the file:
dd if=/dev/zero bs=1m count=10 of=testfile
Were you able
to write data to the test file,
without any errors, as described
in the previous steps?
Yes
No
The cluster is usable, but more work is required
to correct the situation. Continue
troubleshooting.
VHS will need to be re-enabled later when the
problem is resolved.
Go to Page 28
Delete Shadow Stores
Go to Page 28
Delete Shadow Stores
Disable Virtual Hot Spare (4)
28 - EMC Isilon Customer Troubleshooting Guide: Troubleshoot a Full Pool or Cluster
For links to all Isilon customer troubleshooting guides, visit the Customer Troubleshooting - Isilon Info Hub.
We appreciate your help in improving this document. Submit your feedback at http://bit.ly/isi-docfeedback._________________
___________________________
Delete Shadow Stores
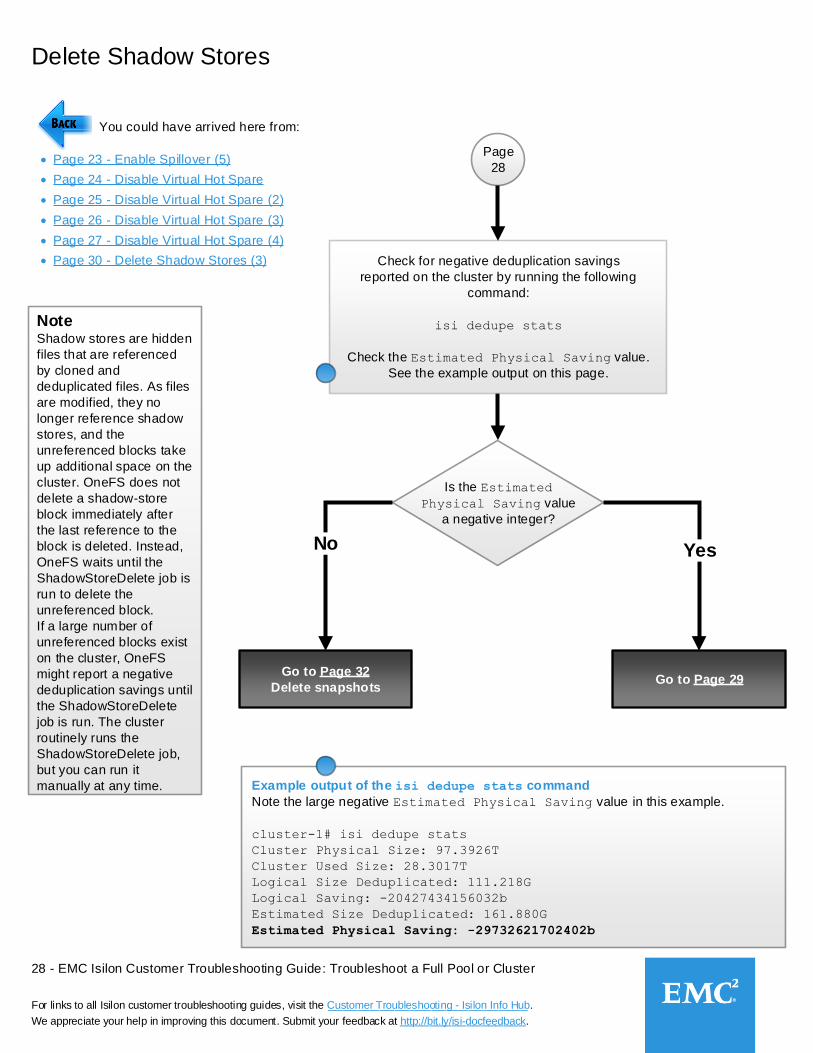
Is the Estimated
Physical Saving value
a negative integer?
Go to Page 32
Delete snapshotsGo to Page 29
Yes
Page
28
You could have arrived here from:
Example output of the isi dedupe stats command
Note the large negative Estimated Physical Saving value in this example.
cluster-1# isi dedupe stats
Cluster Physical Size: 97.3926T
Cluster Used Size: 28.3017T
Logical Size Deduplicated: 111.218G
Logical Saving: -20427434156032b
Estimated Size Deduplicated: 161.880G
Estimated Physical Saving: -29732621702402b
Check for negative deduplication savings
reported on the cluster by running the following
command:
isi dedupe stats
Check the Estimated Physical Saving value.
See the example output on this page.
No
Note Shadow stores are hidden
files that are referenced
by cloned and
deduplicated files. As files
are modified, they no
longer reference shadow
stores, and the
unreferenced blocks take
up additional space on the
cluster. OneFS does not
delete a shadow-store
block immediately after
the last reference to the
block is deleted. Instead,
OneFS waits until the
ShadowStoreDelete job is
run to delete the
unreferenced block.
If a large number of
unreferenced blocks exist
on the cluster, OneFS
might report a negative
deduplication savings until
the ShadowStoreDelete
job is run. The cluster
routinely runs the
ShadowStoreDelete job,
but you can run it
manually at any time.
Page 23 - Enable Spillover (5)
Page 24 - Disable Virtual Hot Spare
Page 25 - Disable Virtual Hot Spare (2)
Page 26 - Disable Virtual Hot Spare (3)
Page 27 - Disable Virtual Hot Spare (4)
Page 30 - Delete Shadow Stores (3)
29 - EMC Isilon Customer Troubleshooting Guide: Troubleshoot a Full Pool or Cluster
For links to all Isilon customer troubleshooting guides, visit the Customer Troubleshooting - Isilon Info Hub.
We appreciate your help in improving this document. Submit your feedback at http://bit.ly/isi-docfeedback._________________
___________________________
Delete Shadow Stores (2)
Page
29
You could have arrived here from:
Page 28 - Delete Shadow Stores
No
Yes
Go to Page 30
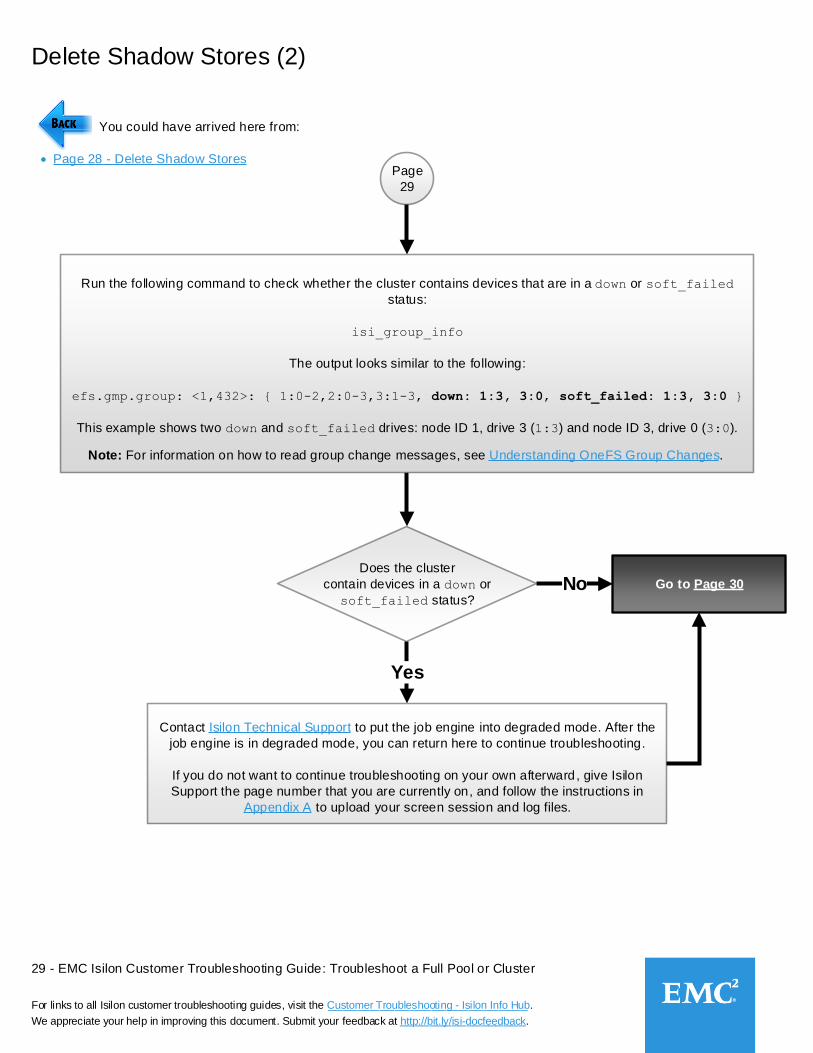
Run the following command to check whether the cluster contains devices that are in a down or soft_failed
status:
isi_group_info
The output looks similar to the following:
efs.gmp.group: <1,432>: { 1:0-2,2:0-3,3:1-3, down: 1:3, 3:0, soft_failed: 1:3, 3:0 }
This example shows two down and soft_failed drives: node ID 1, drive 3 (1:3) and node ID 3, drive 0 (3:0).
Does the cluster
contain devices in a down or
soft_failed status?
Contact Isilon Technical Support to put the job engine into degraded mode. After the
job engine is in degraded mode, you can return here to continue troubleshooting.
If you do not want to continue troubleshooting on your own afterward, give Isilon
Support the page number that you are currently on, and follow the instructions in
Appendix A to upload your screen session and log files.
Note: For information on how to read group change messages, see Understanding OneFS Group Changes.
30 - EMC Isilon Customer Troubleshooting Guide: Troubleshoot a Full Pool or Cluster
For links to all Isilon customer troubleshooting guides, visit the Customer Troubleshooting - Isilon Info Hub.
We appreciate your help in improving this document. Submit your feedback at http://bit.ly/isi-docfeedback._________________
___________________________
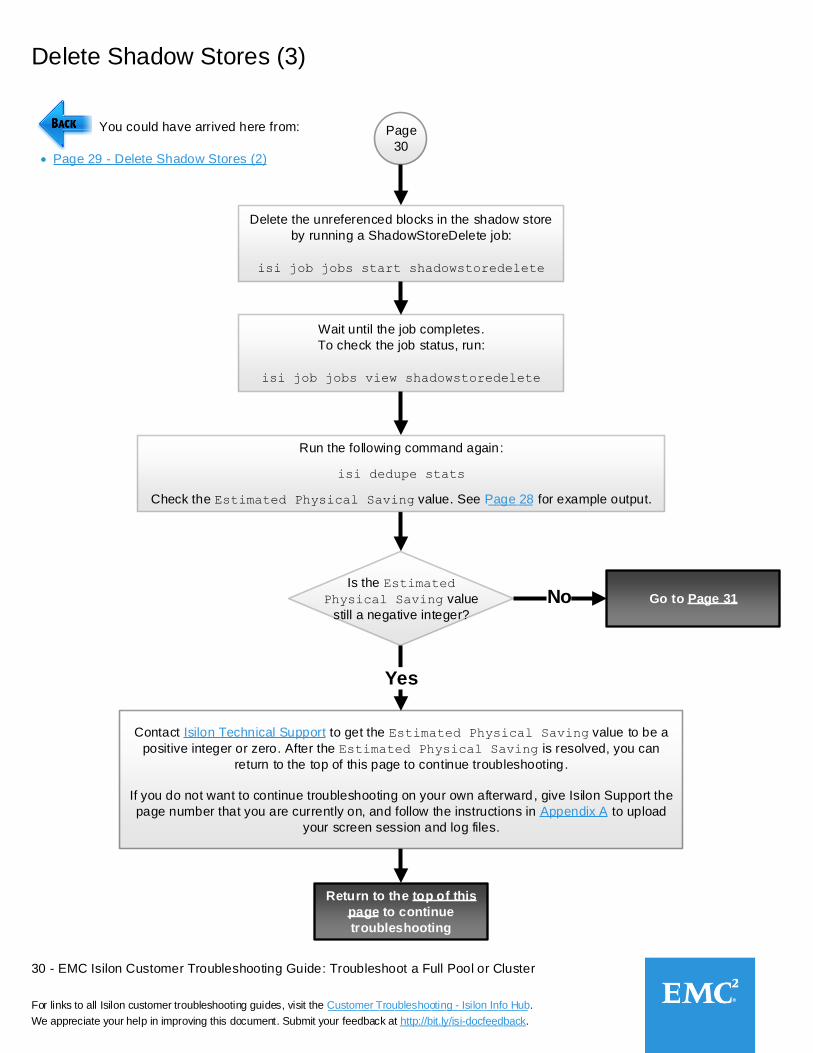
Delete Shadow Stores (3)
Go to Page 31
Page
30
You could have arrived here from:
Page 29 - Delete Shadow Stores (2)
Delete the unreferenced blocks in the shadow store
by running a ShadowStoreDelete job:
isi job jobs start shadowstoredelete
Wait until the job completes.
To check the job status, run:
isi job jobs view shadowstoredelete
Is the Estimated
Physical Saving value
still a negative integer?
Yes
No
Contact Isilon Technical Support to get the Estimated Physical Saving value to be a
positive integer or zero. After the Estimated Physical Saving is resolved, you can
return to the top of this page to continue troubleshooting.
If you do not want to continue troubleshooting on your own afterward, give Isilon Support the
page number that you are currently on, and follow the instructions in Appendix A to upload
your screen session and log files.
Return to the top of this
page to continue
troubleshooting
Run the following command again:
isi dedupe stats
Check the Estimated Physical Saving value. See Page 28 for example output.______

31 - EMC Isilon Customer Troubleshooting Guide: Troubleshoot a Full Pool or Cluster
For links to all Isilon customer troubleshooting guides, visit the Customer Troubleshooting - Isilon Info Hub.
We appreciate your help in improving this document. Submit your feedback at http://bit.ly/isi-docfeedback._________________
___________________________
Delete Shadow Stores (4)
Go to Page 60
Restore the system
settings
Go to Page 32
Delete snapshots
Page
31
You could have arrived here from:
Page 30 - Delete Shadow Stores (3)
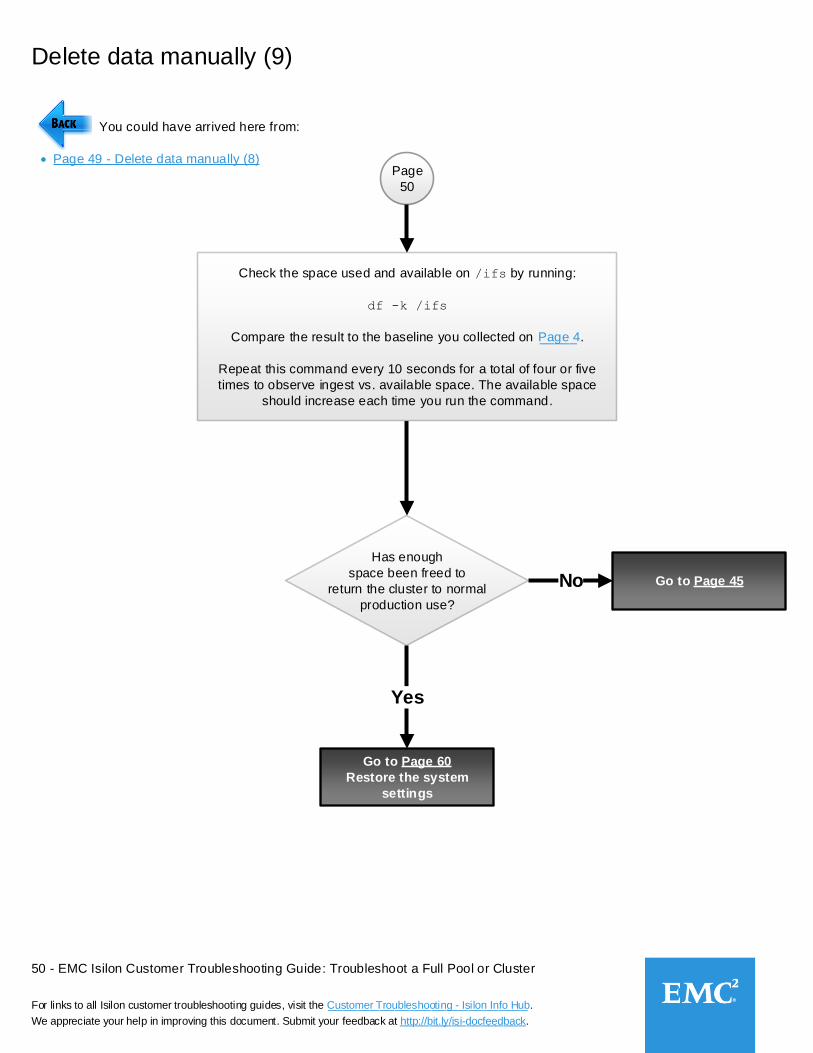
Has enough
space been freed to
return the cluster to normal
production use?
Yes
No
Check the space used and available on /ifs by running:
df -k /ifs
Compare the result to the baseline you collected on Page 4.
Repeat this command every 10 seconds for a total of four or five
times to observe ingest vs. available space. The available space
should increase each time you run the command.
_____
32 - EMC Isilon Customer Troubleshooting Guide: Troubleshoot a Full Pool or Cluster
For links to all Isilon customer troubleshooting guides, visit the Customer Troubleshooting - Isilon Info Hub.
We appreciate your help in improving this document. Submit your feedback at http://bit.ly/isi-docfeedback._________________
___________________________
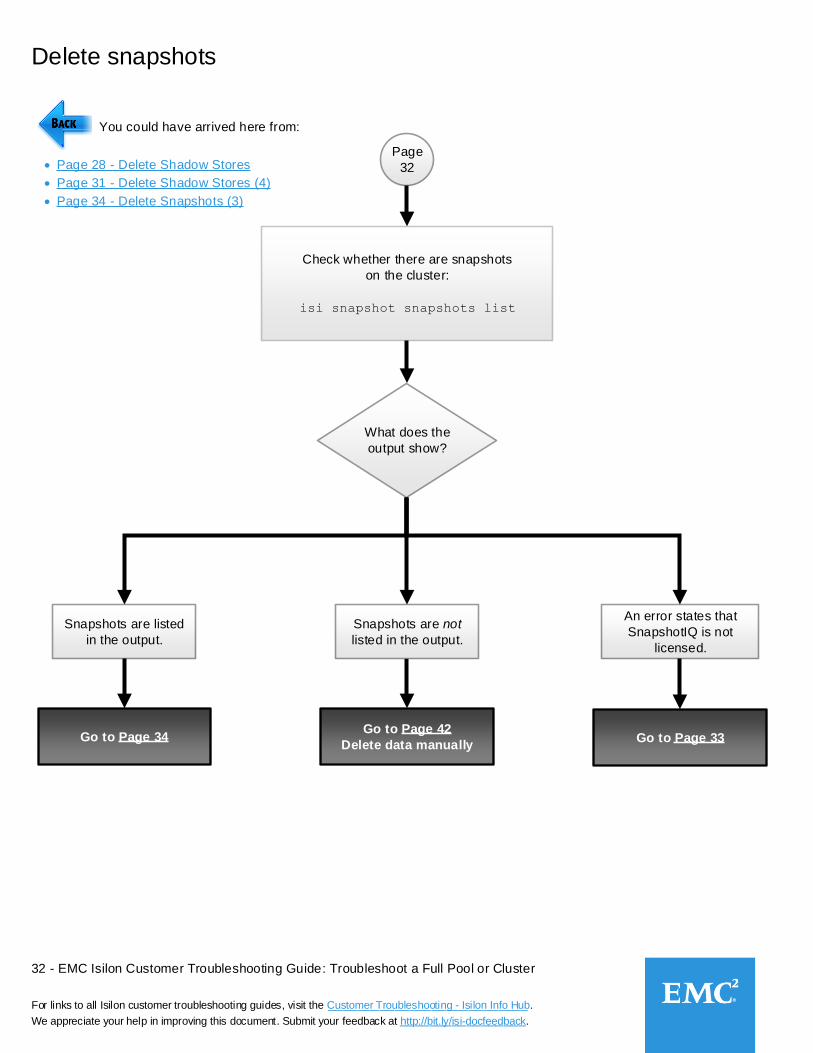
Delete snapshots
Check whether there are snapshots
on the cluster:
isi snapshot snapshots list
What does the
output show?
Go to Page 42
Delete data manually
Page
32
You could have arrived here from:
Snapshots are listed
in the output.
Snapshots are not
listed in the output.
An error states that
SnapshotIQ is not
licensed.
Go to Page 34 Go to Page 33
Page 28 - Delete Shadow Stores
Page 31 - Delete Shadow Stores (4)
Page 34 - Delete Snapshots (3)

33 - EMC Isilon Customer Troubleshooting Guide: Troubleshoot a Full Pool or Cluster
For links to all Isilon customer troubleshooting guides, visit the Customer Troubleshooting - Isilon Info Hub.
We appreciate your help in improving this document. Submit your feedback at http://bit.ly/isi-docfeedback._________________
___________________________
Delete snapshots (2)
Page
33
You could have arrived here from:
Page 32 - Delete snapshots
Contact Isilon Technical Support to confirm
whether there are snapshots on the cluster. If
there are snapshots, Support can determine
whether they can be deleted, and if so, get you a
temporary SnapshotIQ license so that you can
delete the snapshots.
Go to Page 35
Are there snapshots on the
cluster that can be deleted?
Go to Page 42
Delete data manuallyNo
Yes
Install the temporary
SnapshotIQ license on the
cluster.

34 - EMC Isilon Customer Troubleshooting Guide: Troubleshoot a Full Pool or Cluster
For links to all Isilon customer troubleshooting guides, visit the Customer Troubleshooting - Isilon Info Hub.
We appreciate your help in improving this document. Submit your feedback at http://bit.ly/isi-docfeedback._________________
___________________________
Delete snapshots (3)
Page
34
You could have arrived here from:
Page 32 - Delete snapshots
Look in the output of the
isi snapshot snapshots list
command that you ran on Page 32 and
check whether SyncIQ snapshots are the
only snapshots that are listed. SyncIQ
snapshot names begin with SIQ.
Are SIQ snapshots
the only snapshots that
are listed?
Go to Page 42
Delete data manually
Yes
Go to Page 35No
35 - EMC Isilon Customer Troubleshooting Guide: Troubleshoot a Full Pool or Cluster
For links to all Isilon customer troubleshooting guides, visit the Customer Troubleshooting - Isilon Info Hub.
We appreciate your help in improving this document. Submit your feedback at http://bit.ly/isi-docfeedback._________________
___________________________
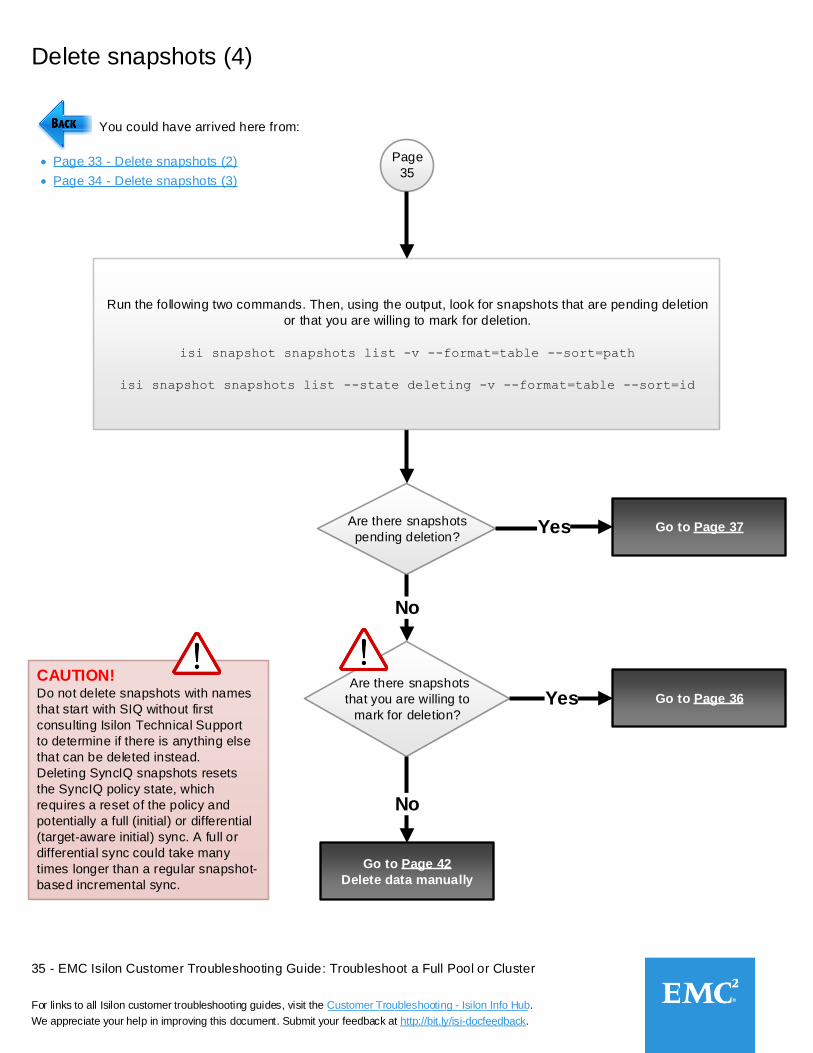
Delete snapshots (4)
Page
35
You could have arrived here from:
Are there snapshots
pending deletion?
No
Run the following two commands. Then, using the output, look for snapshots that are pending deletion
or that you are willing to mark for deletion.
isi snapshot snapshots list -v --format=table --sort=path
isi snapshot snapshots list --state deleting -v --format=table --sort=id
Are there snapshots
that you are willing to
mark for deletion?
No
Yes
Yes Go to Page 37
Go to Page 42
Delete data manually
Go to Page 36
CAUTION!Do not delete snapshots with names
that start with SIQ without first
consulting Isilon Technical Support
to determine if there is anything else
that can be deleted instead.
Deleting SyncIQ snapshots resets
the SyncIQ policy state, which
requires a reset of the policy and
potentially a full (initial) or differential
(target-aware initial) sync. A full or
differential sync could take many
times longer than a regular snapshot-
based incremental sync.
Page 33 - Delete snapshots (2)
Page 34 - Delete snapshots (3)
36 - EMC Isilon Customer Troubleshooting Guide: Troubleshoot a Full Pool or Cluster
For links to all Isilon customer troubleshooting guides, visit the Customer Troubleshooting - Isilon Info Hub.
We appreciate your help in improving this document. Submit your feedback at http://bit.ly/isi-docfeedback._________________
___________________________
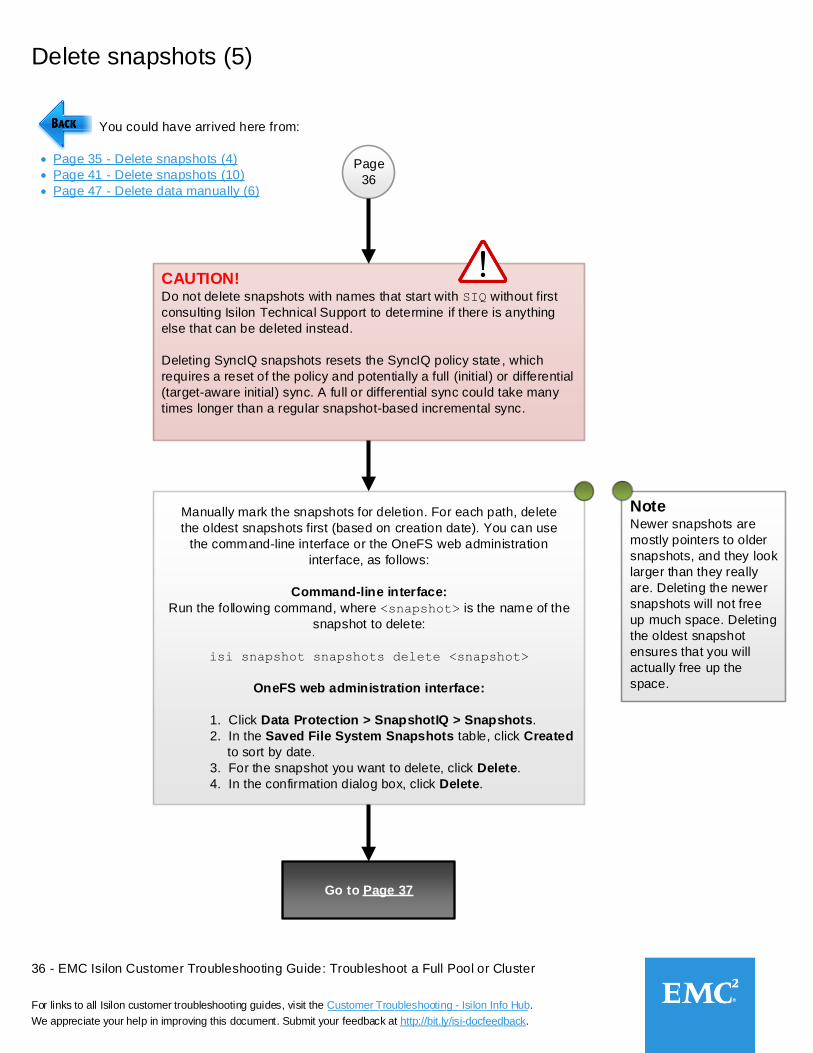
Delete snapshots (5)
Page
36
You could have arrived here from:
Page 35 - Delete snapshots (4)
CAUTION!Do not delete snapshots with names that start with SIQ without first
consulting Isilon Technical Support to determine if there is anything
else that can be deleted instead.
Deleting SyncIQ snapshots resets the SyncIQ policy state , which
requires a reset of the policy and potentially a full (initial) or differential
(target-aware initial) sync. A full or differential sync could take many
times longer than a regular snapshot-based incremental sync.
Manually mark the snapshots for deletion. For each path, delete
the oldest snapshots first (based on creation date). You can use
the command-line interface or the OneFS web administration
interface, as follows:
Command-line interface:
Run the following command, where <snapshot> is the name of the
snapshot to delete:
isi snapshot snapshots delete <snapshot>
OneFS web administration interface:
1. Click Data Protection > SnapshotIQ > Snapshots.
2. In the Saved File System Snapshots table, click Created
to sort by date.
3. For the snapshot you want to delete, click Delete.
4. In the confirmation dialog box, click Delete.
Note Newer snapshots are
mostly pointers to older
snapshots, and they look
larger than they really
are. Deleting the newer
snapshots will not free
up much space. Deleting
the oldest snapshot
ensures that you will
actually free up the
space.
Go to Page 37
Page 41 - Delete snapshots (10)
Page 47 - Delete data manually (6)
37 - EMC Isilon Customer Troubleshooting Guide: Troubleshoot a Full Pool or Cluster
For links to all Isilon customer troubleshooting guides, visit the Customer Troubleshooting - Isilon Info Hub.
We appreciate your help in improving this document. Submit your feedback at http://bit.ly/isi-docfeedback._________________
___________________________
Delete snapshots (6)
Page
37
You could have arrived here from:
No
Yes
Go to Page 38
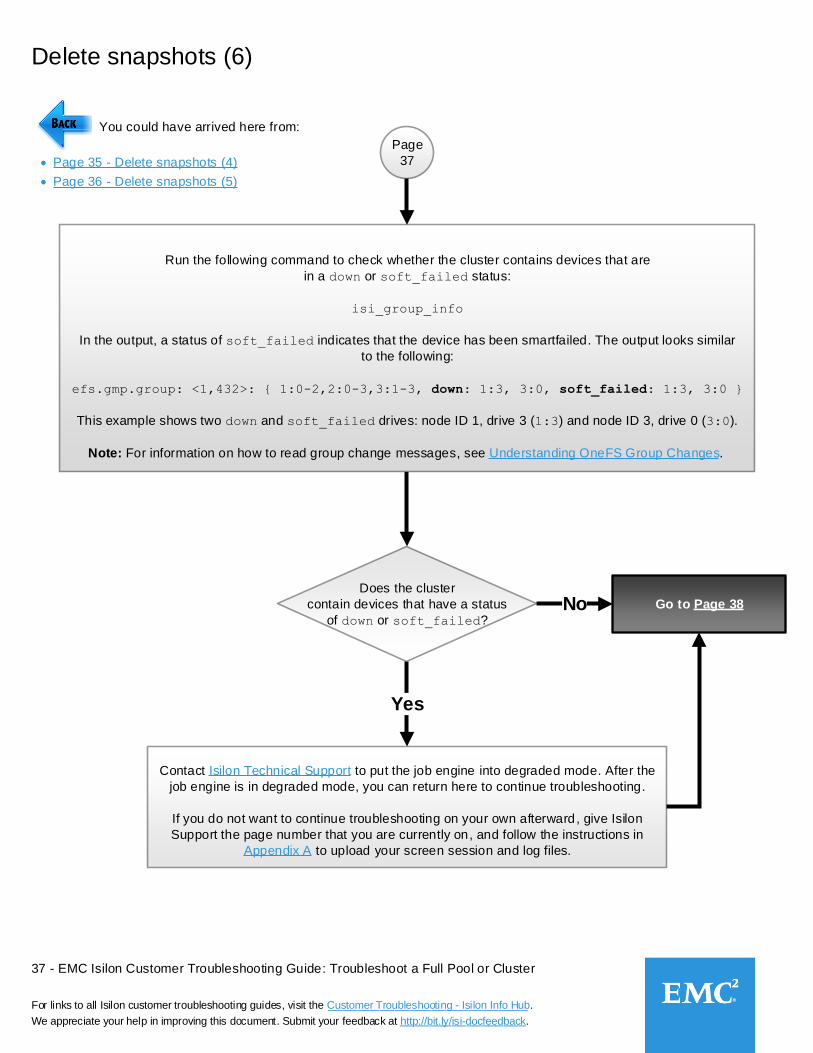
Run the following command to check whether the cluster contains devices that are
in a down or soft_failed status:
isi_group_info
In the output, a status of soft_failed indicates that the device has been smartfailed. The output looks similar
to the following:
efs.gmp.group: <1,432>: { 1:0-2,2:0-3,3:1-3, down: 1:3, 3:0, soft_failed: 1:3, 3:0 }
This example shows two down and soft_failed drives: node ID 1, drive 3 (1:3) and node ID 3, drive 0 (3:0).
Does the cluster
contain devices that have a status
of down or soft_failed?
Note: For information on how to read group change messages, see Understanding OneFS Group Changes.
Contact Isilon Technical Support to put the job engine into degraded mode. After the
job engine is in degraded mode, you can return here to continue troubleshooting.
If you do not want to continue troubleshooting on your own afterward, give Isilon
Support the page number that you are currently on, and follow the instructions in
Appendix A to upload your screen session and log files.
Page 35 - Delete snapshots (4)
Page 36 - Delete snapshots (5)
38 - EMC Isilon Customer Troubleshooting Guide: Troubleshoot a Full Pool or Cluster
For links to all Isilon customer troubleshooting guides, visit the Customer Troubleshooting - Isilon Info Hub.
We appreciate your help in improving this document. Submit your feedback at http://bit.ly/isi-docfeedback._________________
___________________________
Delete snapshots (7)
Page
38
You could have arrived here from:
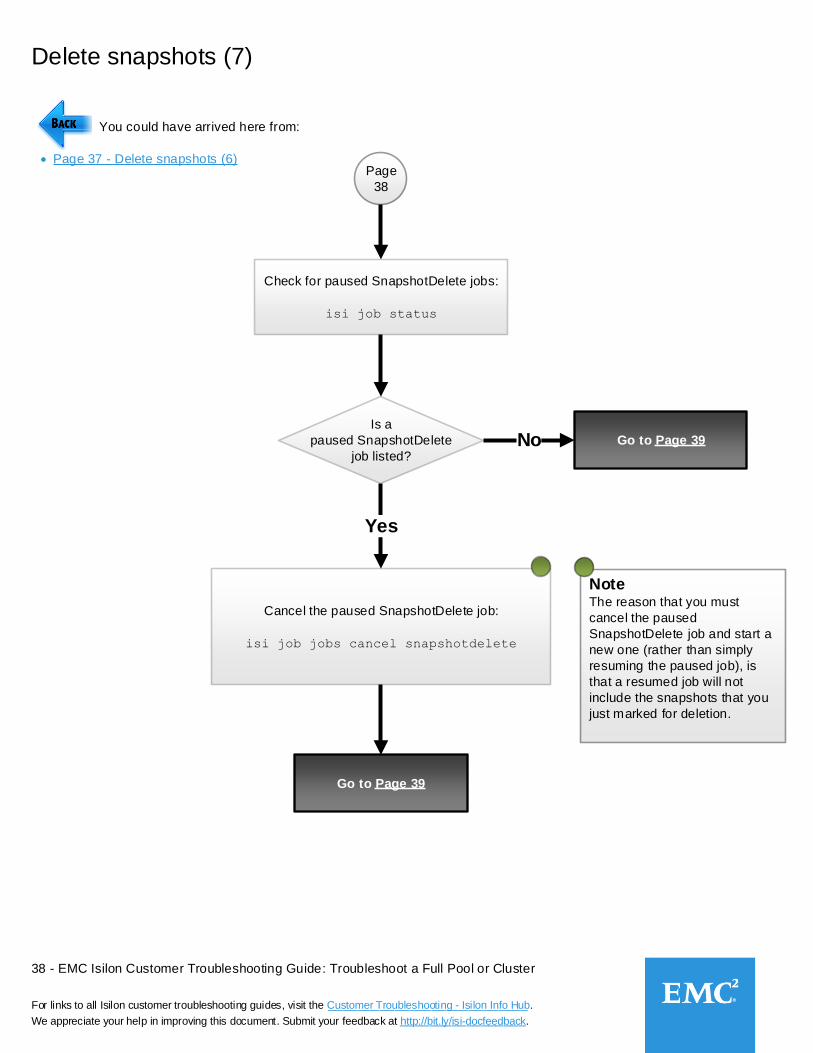
Page 37 - Delete snapshots (6)
Is a
paused SnapshotDelete
job listed?
Cancel the paused SnapshotDelete job:
isi job jobs cancel snapshotdelete
Yes
No
Check for paused SnapshotDelete jobs:
isi job status
Go to Page 39
Go to Page 39
Note The reason that you must
cancel the paused
SnapshotDelete job and start a
new one (rather than simply
resuming the paused job), is
that a resumed job will not
include the snapshots that you
just marked for deletion.

39 - EMC Isilon Customer Troubleshooting Guide: Troubleshoot a Full Pool or Cluster
For links to all Isilon customer troubleshooting guides, visit the Customer Troubleshooting - Isilon Info Hub.
We appreciate your help in improving this document. Submit your feedback at http://bit.ly/isi-docfeedback._________________
___________________________
Delete snapshots (8)
Page
39 You could have arrived here from:
Page 38 - Delete snapshots (7)
Run a SnapshotDelete job:
isi job jobs start snapshotdelete -p 1
Monitor the status of the SnapshotDelete job:
isi job jobs view snapshotdelete
If no results are returned, run the following command. Look at the last line of the output to
check whether it indicates whether the SnapshotDelete job is running :
grep job_d /var/log/messages | grep -i snapshotdelete | tail -10
Wait one minute.
Is the
SnapshotDelete job
running or has it already
completed without
errors?
No
Go to Page 40Yes
Contact Isilon Technical Support to help you delete snapshots. After the snapshots
are deleted, you can return here to continue troubleshooting.
If you do not want to continue troubleshooting on your own afterward, give Isilon
Support the page number that you are currently on, and follow the instructions in
Appendix A to upload your screen session and log files.

40 - EMC Isilon Customer Troubleshooting Guide: Troubleshoot a Full Pool or Cluster
For links to all Isilon customer troubleshooting guides, visit the Customer Troubleshooting - Isilon Info Hub.
We appreciate your help in improving this document. Submit your feedback at http://bit.ly/isi-docfeedback._________________
___________________________
Delete snapshots (9)
Go to Page 60
Restore the system
settings
Page
40
You could have arrived here from:
Page 39 - Delete snapshots (8)
Yes
No
Let the SnapshotDelete job continue to run. The final steps of the troubleshooting process are to
restore your cluster's system settings. However, you cannot do that until enough space is
available. Consult with Isilon Technical Support to determine how much space you need to
restore the system settings. When enough space is available, continue to the next step.
Note: It might take days or weeks for the Snapshot Delete job to make enough space available .
Remember to come back here to restore the settings.
Has enough
space been freed to
return the pool or cluster to
normal production use?
_____
Go to Page 41
Page 41 - Delete snapshots (10)
Check the space used and available on /ifs by running:
df -k /ifs
Compare the result to the baseline you collected on Page 4.
Repeat this command every 10 seconds for a total of four or five
times to observe ingest vs. available space. The available space
should increase each time you run the command.
_____
41 - EMC Isilon Customer Troubleshooting Guide: Troubleshoot a Full Pool or Cluster
For links to all Isilon customer troubleshooting guides, visit the Customer Troubleshooting - Isilon Info Hub.
We appreciate your help in improving this document. Submit your feedback at http://bit.ly/isi-docfeedback._________________
___________________________
Delete snapshots (10)
Page
41
You could have arrived here from:
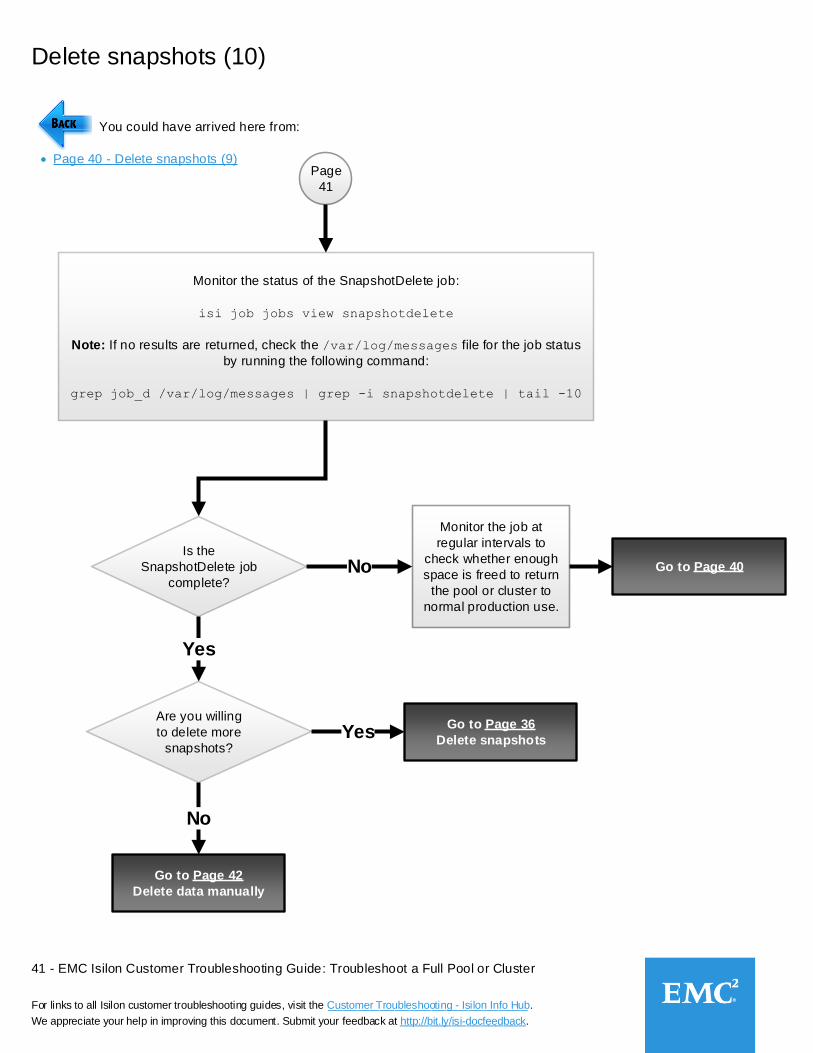
Page 40 - Delete snapshots (9)
Are you willing
to delete more
snapshots?Yes
No
Is the
SnapshotDelete job
complete?
Yes
No
Monitor the status of the SnapshotDelete job:
isi job jobs view snapshotdelete
Note: If no results are returned, check the /var/log/messages file for the job status
by running the following command:
grep job_d /var/log/messages | grep -i snapshotdelete | tail -10
Go to Page 36
Delete snapshots
Go to Page 42
Delete data manually
Monitor the job at
regular intervals to
check whether enough
space is freed to return
the pool or cluster to
normal production use.
Go to Page 40

42 - EMC Isilon Customer Troubleshooting Guide: Troubleshoot a Full Pool or Cluster
For links to all Isilon customer troubleshooting guides, visit the Customer Troubleshooting - Isilon Info Hub.
We appreciate your help in improving this document. Submit your feedback at http://bit.ly/isi-docfeedback._________________
___________________________
Delete data manually
Page
42
You could have arrived here from:
Go to Page 44
Page 32 - Delete snapshots
Page 33 - Delete snapshots (2)
Page 34 - Delete snapshots (3)
Page 35 - Delete snapshots (4)
Page 41 - Delete snapshots (10)
Check the /ifs/.ifsvar/audit directory and the
following subdirectories, where <nodeXXX> is the
node ID (for example node001):
/ifs/.ifsvar/audit/logs/
/ifs/.ifsvar/audit/logs/<nodeXXX>
/ifs/.ifsvar/audit/logs/<nodeXXX>/protocol
Did you find audit
files to delete?
Delete the files following the instructions in:
OneFS 7.1 and later: How to remove audit log
files, article 335488.
No
Yes
Go to Page 43

43 - EMC Isilon Customer Troubleshooting Guide: Troubleshoot a Full Pool or Cluster
For links to all Isilon customer troubleshooting guides, visit the Customer Troubleshooting - Isilon Info Hub.
We appreciate your help in improving this document. Submit your feedback at http://bit.ly/isi-docfeedback._________________
___________________________
Delete data manually (2)
Page
43
You could have arrived here from:
Go to Page 60
Restore the system
settings
Go to Page 45
Has enough
space been freed to
return the cluster to normal
production use?
Yes
No
Check the space used and available on /ifs by running:
df -k /ifs
Compare the result to the baseline you collected on Page 4.
Repeat this command every 10 seconds for a total of four or five
times to observe ingest vs. available space. The available space
should increase each time you run the command.
_____
Page 42 - Delete data manually
44 - EMC Isilon Customer Troubleshooting Guide: Troubleshoot a Full Pool or Cluster
For links to all Isilon customer troubleshooting guides, visit the Customer Troubleshooting - Isilon Info Hub.
We appreciate your help in improving this document. Submit your feedback at http://bit.ly/isi-docfeedback._________________
___________________________
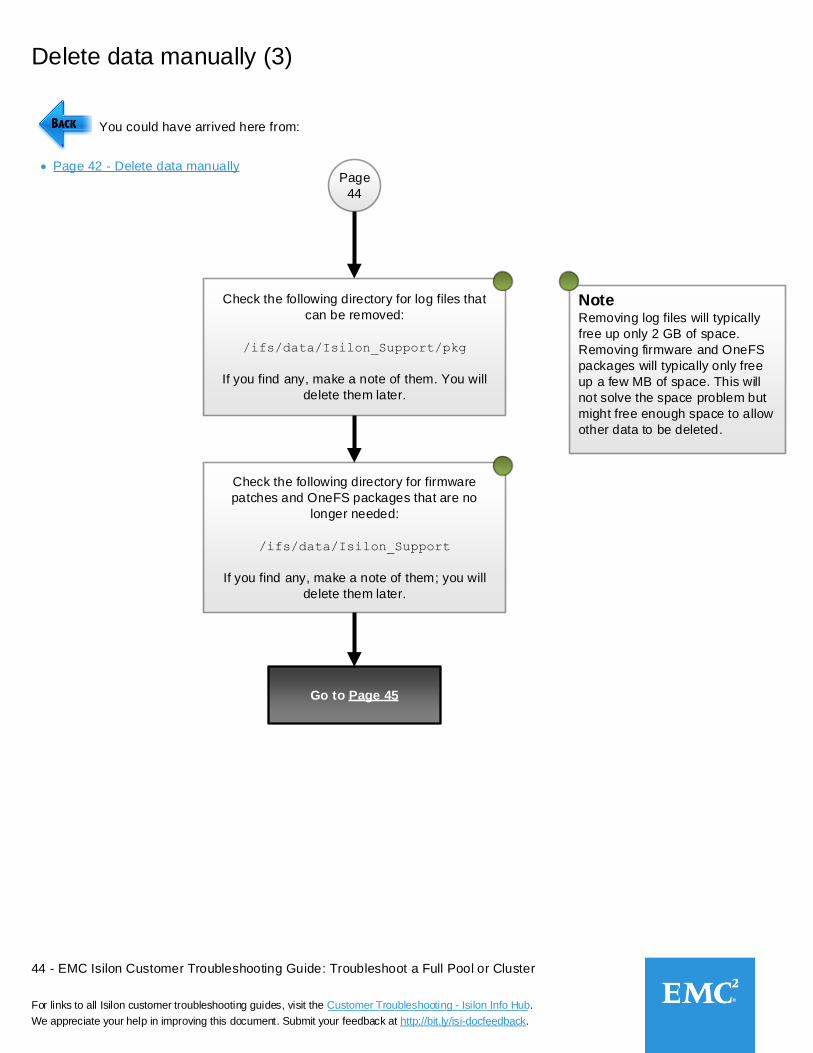
Note Removing log files will typically
free up only 2 GB of space.
Removing firmware and OneFS
packages will typically only free
up a few MB of space. This will
not solve the space problem but
might free enough space to allow
other data to be deleted.
Delete data manually (3)
Page
44
You could have arrived here from:
Check the following directory for log files that
can be removed:
/ifs/data/Isilon_Support/pkg
If you find any, make a note of them. You will
delete them later.
Check the following directory for firmware
patches and OneFS packages that are no
longer needed:
/ifs/data/Isilon_Support
If you find any, make a note of them; you will
delete them later.
Go to Page 45
Page 42 - Delete data manually
45 - EMC Isilon Customer Troubleshooting Guide: Troubleshoot a Full Pool or Cluster
For links to all Isilon customer troubleshooting guides, visit the Customer Troubleshooting - Isilon Info Hub.
We appreciate your help in improving this document. Submit your feedback at http://bit.ly/isi-docfeedback._________________
___________________________
Delete data manually (4)
Page
45
You could have arrived here from:
Page 43 - Delete data manually (2)
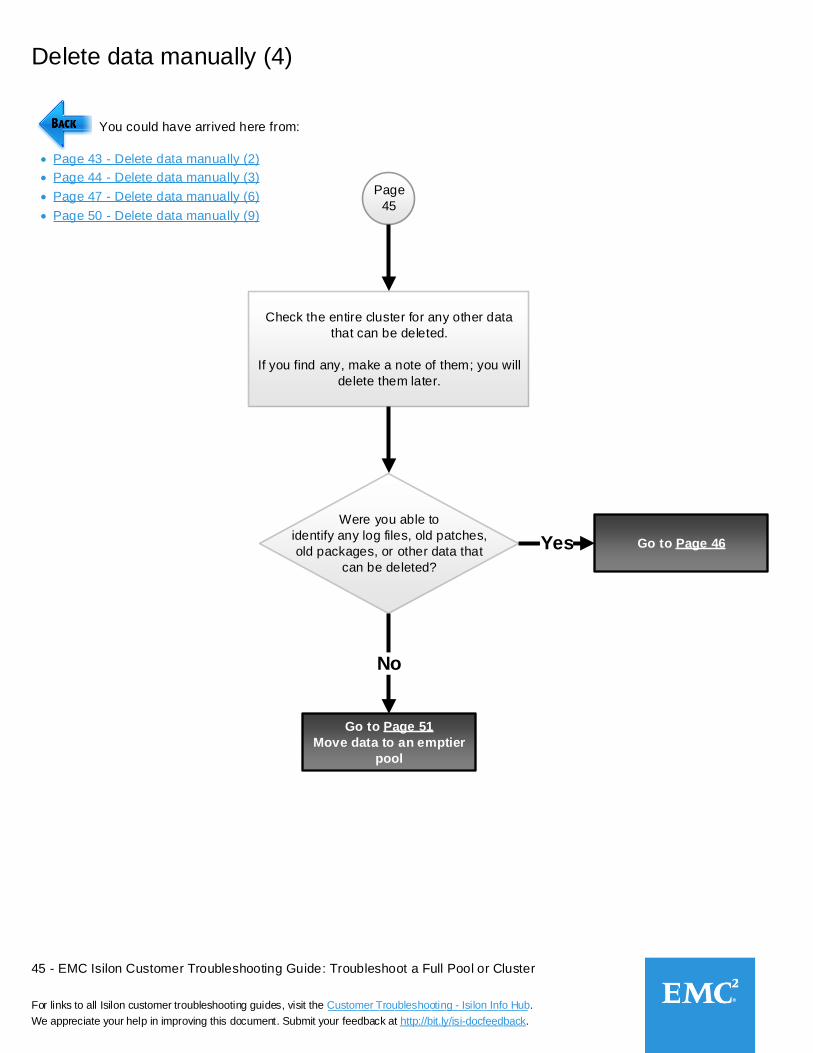
Were you able to
identify any log files, old patches,
old packages, or other data that
can be deleted?
Yes
No
Check the entire cluster for any other data
that can be deleted.
If you find any, make a note of them; you will
delete them later.
Go to Page 51
Move data to an emptier
pool
Go to Page 46
Page 47 - Delete data manually (6)
Page 50 - Delete data manually (9)
Page 44 - Delete data manually (3)
46 - EMC Isilon Customer Troubleshooting Guide: Troubleshoot a Full Pool or Cluster
For links to all Isilon customer troubleshooting guides, visit the Customer Troubleshooting - Isilon Info Hub.
We appreciate your help in improving this document. Submit your feedback at http://bit.ly/isi-docfeedback._________________
___________________________
Delete data manually (5)
Page
46
You could have arrived here from:
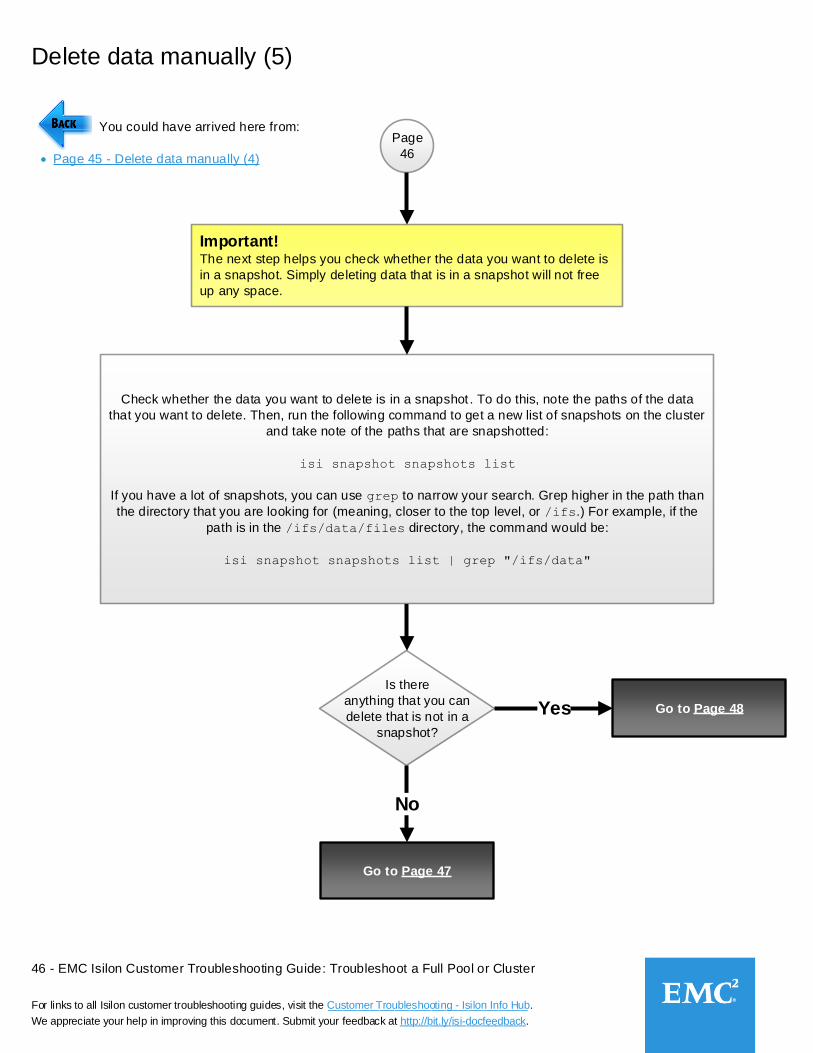
Page 45 - Delete data manually (4)
Check whether the data you want to delete is in a snapshot . To do this, note the paths of the data
that you want to delete. Then, run the following command to get a new list of snapshots on the cluster
and take note of the paths that are snapshotted:
isi snapshot snapshots list
If you have a lot of snapshots, you can use grep to narrow your search. Grep higher in the path than
the directory that you are looking for (meaning, closer to the top level, or /ifs.) For example, if the
path is in the /ifs/data/files directory, the command would be:
isi snapshot snapshots list | grep "/ifs/data"
Is there
anything that you can
delete that is not in a
snapshot?
Yes
No
Important!The next step helps you check whether the data you want to delete is
in a snapshot. Simply deleting data that is in a snapshot will not free
up any space.
Go to Page 48
Go to Page 47
47 - EMC Isilon Customer Troubleshooting Guide: Troubleshoot a Full Pool or Cluster
For links to all Isilon customer troubleshooting guides, visit the Customer Troubleshooting - Isilon Info Hub.
We appreciate your help in improving this document. Submit your feedback at http://bit.ly/isi-docfeedback._________________
___________________________
Delete data manually (6)
Page
47
You could have arrived here from:
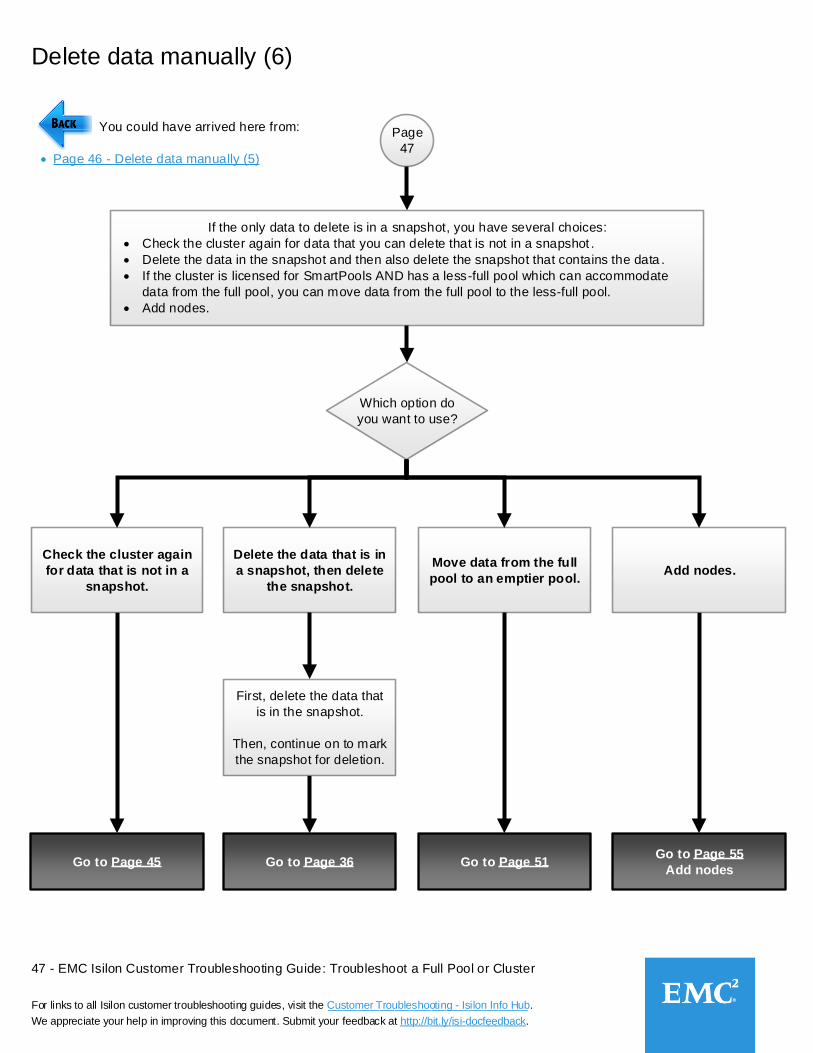
Page 46 - Delete data manually (5)
If the only data to delete is in a snapshot, you have several choices:
Check the cluster again for data that you can delete that is not in a snapshot .
Delete the data in the snapshot and then also delete the snapshot that contains the data .
If the cluster is licensed for SmartPools AND has a less-full pool which can accommodate
data from the full pool, you can move data from the full pool to the less-full pool.
Add nodes.
Go to Page 45 Go to Page 36Go to Page 55
Add nodesGo to Page 51
Which option do
you want to use?
Check the cluster again
for data that is not in a
snapshot.
Delete the data that is in
a snapshot, then delete
the snapshot.
First, delete the data that
is in the snapshot.
Then, continue on to mark
the snapshot for deletion.
Add nodes.Move data from the full
pool to an emptier pool.

48 - EMC Isilon Customer Troubleshooting Guide: Troubleshoot a Full Pool or Cluster
For links to all Isilon customer troubleshooting guides, visit the Customer Troubleshooting - Isilon Info Hub.
We appreciate your help in improving this document. Submit your feedback at http://bit.ly/isi-docfeedback._________________
___________________________
Delete data manually (7)
Page
48
You could have arrived here from:
Page 46 - Delete data manually (5)
Go to Page 49No
Yes
Run the following command to check whether the cluster contains devices that have
a status of down or soft_failed:
isi_group_info
The output looks similar to the following:
efs.gmp.group: <1,432>: { 1:0-2,2:0-3,3:1-3, down: 1:3, 3:0, soft_failed: 1:3, 3:0 }
This example shows two down and soft_failed drives: node ID 1, drive 3 (1:3) and node ID 3, drive 0 (3:0).
Does the cluster
contain devices that have a status
of down or soft_failed?
Contact Isilon Technical Support to put the job engine into degraded mode. After the
job engine is in degraded mode, you can return here to continue troubleshooting.
If you do not want to continue troubleshooting on your own afterward, give Isilon
Support the page number that you are currently on, and follow the instructions in
Appendix A to upload your screen session and log files.
Note: For information on how to read group change messages, see Understanding OneFS Group Changes.
49 - EMC Isilon Customer Troubleshooting Guide: Troubleshoot a Full Pool or Cluster
For links to all Isilon customer troubleshooting guides, visit the Customer Troubleshooting - Isilon Info Hub.
We appreciate your help in improving this document. Submit your feedback at http://bit.ly/isi-docfeedback._________________
___________________________
Delete data manually (8)
Page
49 You could have arrived here from:
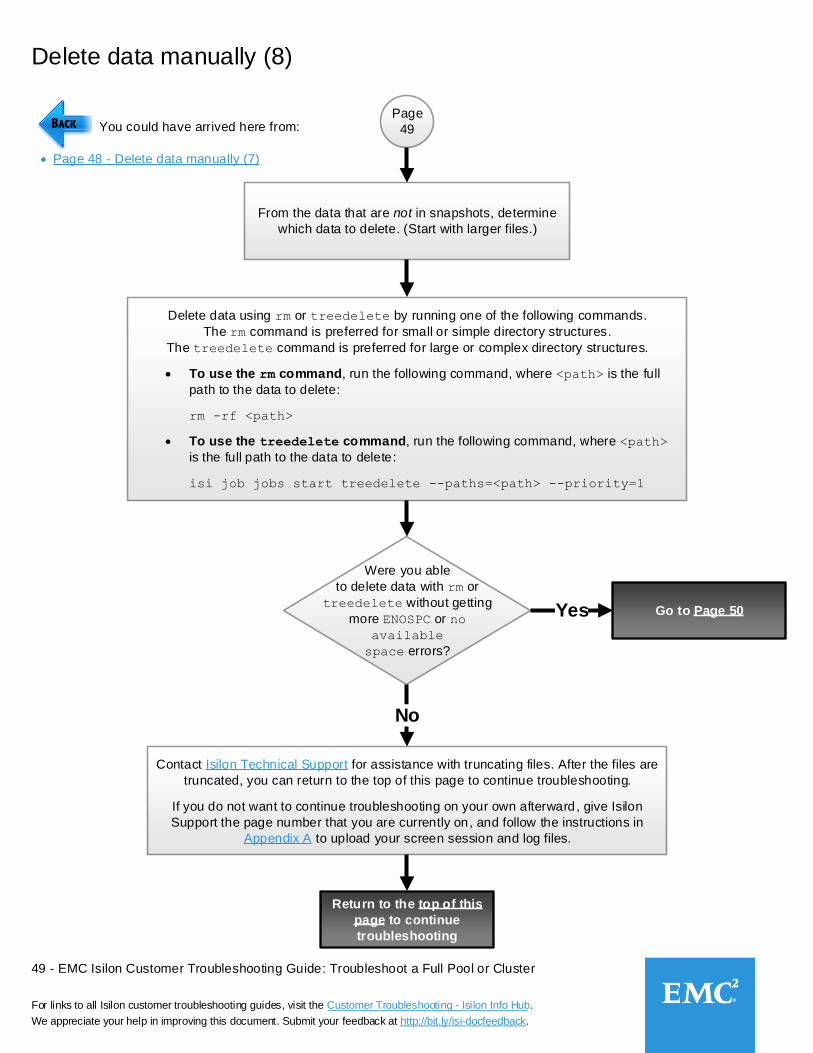
Page 48 - Delete data manually (7)
From the data that are not in snapshots, determine
which data to delete. (Start with larger files.)
Delete data using rm or treedelete by running one of the following commands.
The rm command is preferred for small or simple directory structures.
The treedelete command is preferred for large or complex directory structures.
To use the rm command, run the following command, where <path> is the full
path to the data to delete:
rm -rf <path>
To use the treedelete command, run the following command, where <path>
is the full path to the data to delete:
isi job jobs start treedelete --paths=<path> --priority=1
Were you able
to delete data with rm or
treedelete without getting
more ENOSPC or no
available
space errors?
No
Go to Page 50Yes
Contact Isilon Technical Support for assistance with truncating files. After the files are
truncated, you can return to the top of this page to continue troubleshooting.
If you do not want to continue troubleshooting on your own afterward, give Isilon
Support the page number that you are currently on, and follow the instructions in
Appendix A to upload your screen session and log files.
Return to the top of this
page to continue
troubleshooting
50 - EMC Isilon Customer Troubleshooting Guide: Troubleshoot a Full Pool or Cluster
For links to all Isilon customer troubleshooting guides, visit the Customer Troubleshooting - Isilon Info Hub.
We appreciate your help in improving this document. Submit your feedback at http://bit.ly/isi-docfeedback._________________
___________________________
Delete data manually (9)
Page
50
You could have arrived here from:
Page 49 - Delete data manually (8)
Go to Page 60
Restore the system
settings
Go to Page 45
Has enough
space been freed to
return the cluster to normal
production use?
Yes
No
Check the space used and available on /ifs by running:
df -k /ifs
Compare the result to the baseline you collected on Page 4.
Repeat this command every 10 seconds for a total of four or five
times to observe ingest vs. available space. The available space
should increase each time you run the command.
_____
51 - EMC Isilon Customer Troubleshooting Guide: Troubleshoot a Full Pool or Cluster
For links to all Isilon customer troubleshooting guides, visit the Customer Troubleshooting - Isilon Info Hub.
We appreciate your help in improving this document. Submit your feedback at http://bit.ly/isi-docfeedback._________________
___________________________
Page
51
You could have arrived here from:
Page 45 - Delete data manually (4)
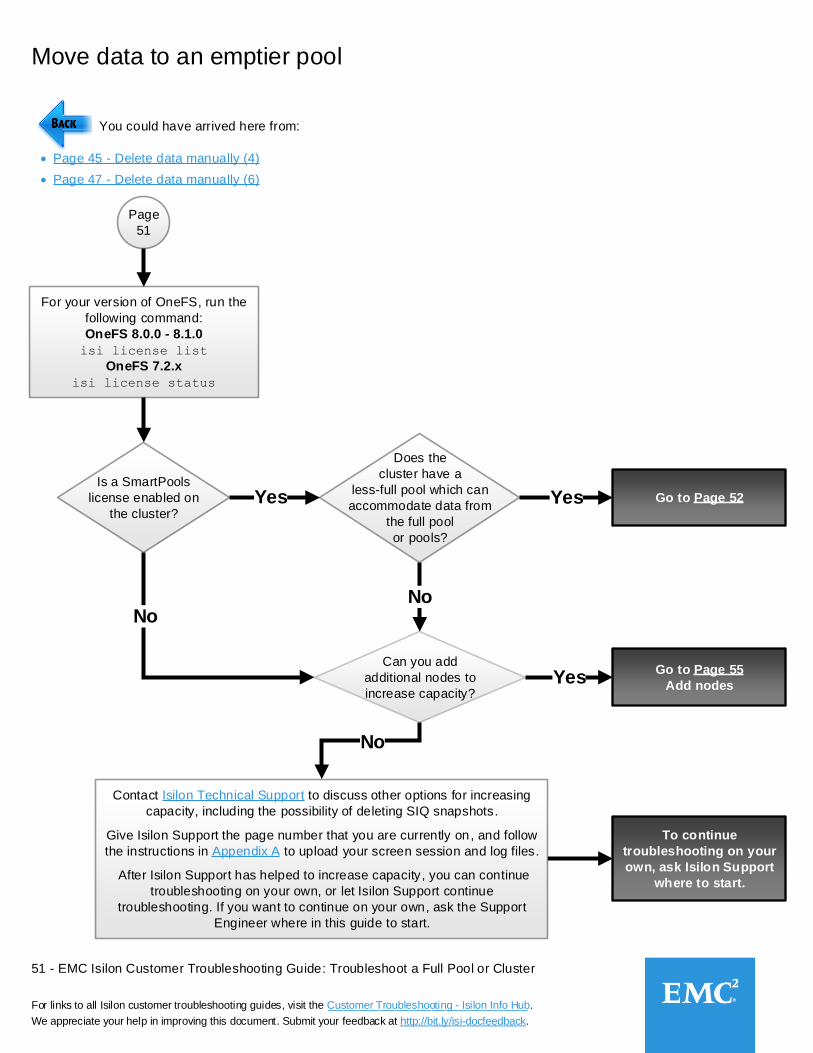
Can you add
additional nodes to
increase capacity?Yes
No
No
Yes
For your version of OneFS, run the
following command:
OneFS 8.0.0 - 8.1.0
isi license list
OneFS 7.2.x
isi license status
Is a SmartPools
license enabled on
the cluster?
Does the
cluster have a
less-full pool which can
accommodate data from
the full pool
or pools?
Yes
No
To continue
troubleshooting on your
own, ask Isilon Support
where to start.
Go to Page 52
Go to Page 55
Add nodes
Contact Isilon Technical Support to discuss other options for increasing
capacity, including the possibility of deleting SIQ snapshots.
After Isilon Support has helped to increase capacity, you can continue
troubleshooting on your own, or let Isilon Support continue
troubleshooting. If you want to continue on your own, ask the Support
Engineer where in this guide to start.
Give Isilon Support the page number that you are currently on, and follow
the instructions in Appendix A to upload your screen session and log files.
Move data to an emptier pool
Page 47 - Delete data manually (6)
52 - EMC Isilon Customer Troubleshooting Guide: Troubleshoot a Full Pool or Cluster
For links to all Isilon customer troubleshooting guides, visit the Customer Troubleshooting - Isilon Info Hub.
We appreciate your help in improving this document. Submit your feedback at http://bit.ly/isi-docfeedback._________________
___________________________
Move data to an emptier pool (2)
Page
52
You could have arrived here from:
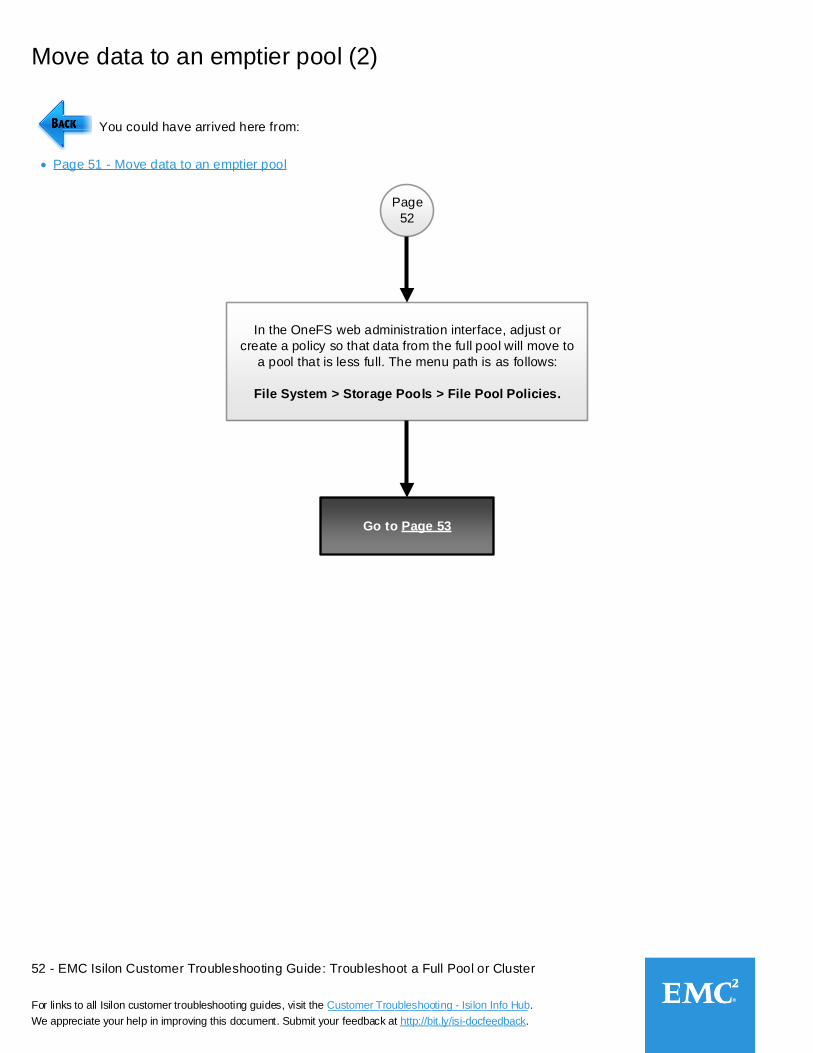
In the OneFS web administration interface, adjust or
create a policy so that data from the full pool will move to
a pool that is less full. The menu path is as follows:
File System > Storage Pools > File Pool Policies.
Go to Page 53
Page 51 - Move data to an emptier pool
53 - EMC Isilon Customer Troubleshooting Guide: Troubleshoot a Full Pool or Cluster
For links to all Isilon customer troubleshooting guides, visit the Customer Troubleshooting - Isilon Info Hub.
We appreciate your help in improving this document. Submit your feedback at http://bit.ly/isi-docfeedback._________________
___________________________
Move data to an emptier pool (3)
Page
53
You could have arrived here from:
Page 52 - Move data to an emptier pool (2)
Go to Page 54No
Yes
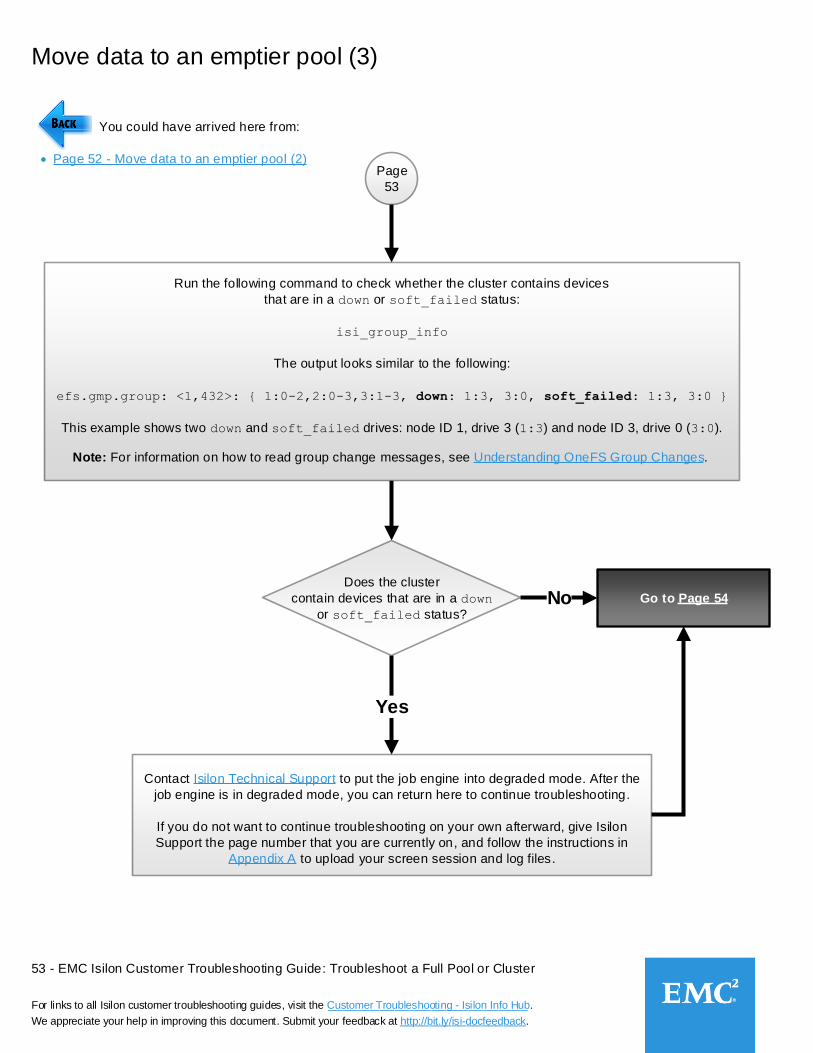
Does the cluster
contain devices that are in a down
or soft_failed status?
Run the following command to check whether the cluster contains devices
that are in a down or soft_failed status:
isi_group_info
The output looks similar to the following:
efs.gmp.group: <1,432>: { 1:0-2,2:0-3,3:1-3, down: 1:3, 3:0, soft_failed: 1:3, 3:0 }
This example shows two down and soft_failed drives: node ID 1, drive 3 (1:3) and node ID 3, drive 0 (3:0).
Contact Isilon Technical Support to put the job engine into degraded mode. After the
job engine is in degraded mode, you can return here to continue troubleshooting.
If you do not want to continue troubleshooting on your own afterward, give Isilon
Support the page number that you are currently on, and follow the instructions in
Appendix A to upload your screen session and log files.
Note: For information on how to read group change messages, see Understanding OneFS Group Changes.

54 - EMC Isilon Customer Troubleshooting Guide: Troubleshoot a Full Pool or Cluster
For links to all Isilon customer troubleshooting guides, visit the Customer Troubleshooting - Isilon Info Hub.
We appreciate your help in improving this document. Submit your feedback at http://bit.ly/isi-docfeedback._________________
___________________________
Page
54
You could have arrived here from:
Page 53 - Move data to an emptier pool (3)
Run a SmartPools job:
isi job start smartpools --priority 1
Go to Page 60
Restore the system
settings
Go to Page 55
Add nodes
Has enough
space been freed to
return the cluster to normal
production use?
Yes
No
Check the space used and available on /ifs by running:
df -k /ifs
Compare the result to the baseline you collected on Page 4.
Repeat this command every 10 seconds for a total of four or five
times to observe ingest vs. available space. The available space
should increase each time you run the command.
_____
Move data to an emptier pool (4)

55 - EMC Isilon Customer Troubleshooting Guide: Troubleshoot a Full Pool or Cluster
For links to all Isilon customer troubleshooting guides, visit the Customer Troubleshooting - Isilon Info Hub.
We appreciate your help in improving this document. Submit your feedback at http://bit.ly/isi-docfeedback._________________
___________________________
Add nodes
Page
55
You could have arrived here from:
Add one or more nodes to the cluster.
Contact your Account Representative or Isilon Technical Support
for assistance.
Is the new node
provisioned into the correct
node pool?
No
Yes Go to Page 56
Contact Isilon Technical Support to help you move the node into the correct node
pool. After the node is in the correct pool, you can return here to continue
troubleshooting.
If you do not want to continue troubleshooting on your own afterward , give Isilon
Support the page number that you are currently on, and follow the instructions in
Appendix A to upload your screen session and log files.
Verify that the new node was provisioned into the correct node pool. The OneFS
web administration path is as follows.
File System > Storage Pools > SmartPools
If the web interface is not available, run the following command and look for the
node in the Unprovisioned drives line. If the node does not appear in the
Unprovisioned drives line, then it was provisioned correctly.
disi -I diskpools list -v
For more explanation and example output, see Appendix C._________
Page 17 - Options for adding capacity
Page 47 - Delete data manually (6)
Page 51 - Move data to an emptier pool
Page 54 - Move data to an emptier pool (4)
56 - EMC Isilon Customer Troubleshooting Guide: Troubleshoot a Full Pool or Cluster
For links to all Isilon customer troubleshooting guides, visit the Customer Troubleshooting - Isilon Info Hub.
We appreciate your help in improving this document. Submit your feedback at http://bit.ly/isi-docfeedback._________________
___________________________
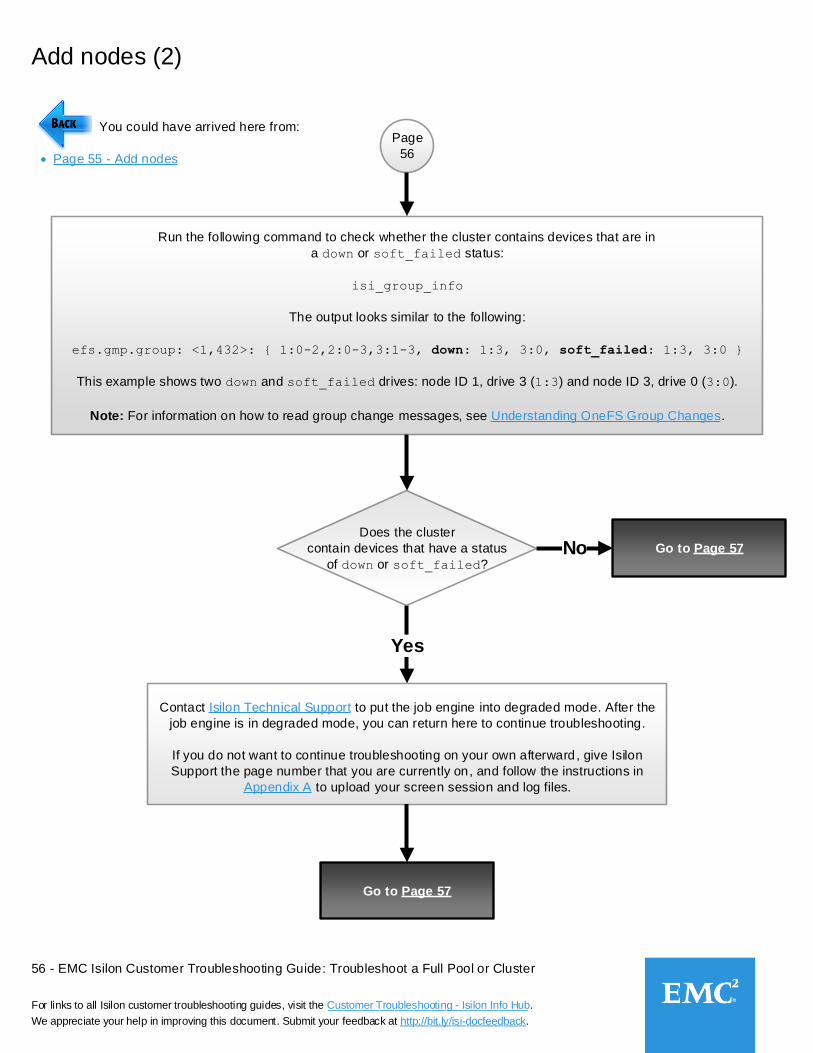
Add nodes (2)
Page
56
You could have arrived here from:
Page 55 - Add nodes
No
Yes
Does the cluster
contain devices that have a status
of down or soft_failed?
Go to Page 57
Go to Page 57
Contact Isilon Technical Support to put the job engine into degraded mode. After the
job engine is in degraded mode, you can return here to continue troubleshooting.
If you do not want to continue troubleshooting on your own afterward, give Isilon
Support the page number that you are currently on, and follow the instructions in
Appendix A to upload your screen session and log files.
Run the following command to check whether the cluster contains devices that are in
a down or soft_failed status:
isi_group_info
The output looks similar to the following:
efs.gmp.group: <1,432>: { 1:0-2,2:0-3,3:1-3, down: 1:3, 3:0, soft_failed: 1:3, 3:0 }
This example shows two down and soft_failed drives: node ID 1, drive 3 (1:3) and node ID 3, drive 0 (3:0).
Note: For information on how to read group change messages, see Understanding OneFS Group Changes.
57 - EMC Isilon Customer Troubleshooting Guide: Troubleshoot a Full Pool or Cluster
For links to all Isilon customer troubleshooting guides, visit the Customer Troubleshooting - Isilon Info Hub.
We appreciate your help in improving this document. Submit your feedback at http://bit.ly/isi-docfeedback._________________
___________________________
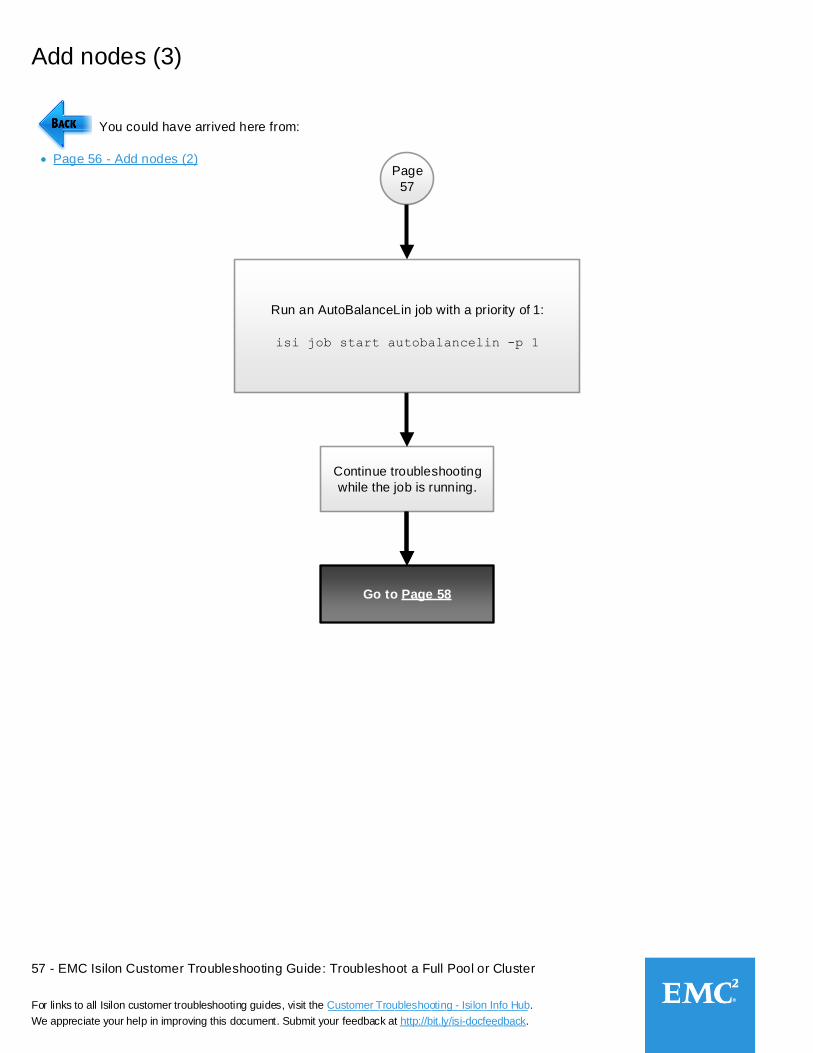
Add nodes (3)
Page
57
You could have arrived here from:
Page 56 - Add nodes (2)
Go to Page 58
Continue troubleshooting
while the job is running.
Run an AutoBalanceLin job with a priority of 1:
isi job start autobalancelin -p 1

58 - EMC Isilon Customer Troubleshooting Guide: Troubleshoot a Full Pool or Cluster
For links to all Isilon customer troubleshooting guides, visit the Customer Troubleshooting - Isilon Info Hub.
We appreciate your help in improving this document. Submit your feedback at http://bit.ly/isi-docfeedback._________________
___________________________
Add nodes (4)
Page
58
You could have arrived here from:
Page 57 - Add nodes (3)
While the AutoBalanceLin job is running, determine whether the newly added node is
receiving data. Run the following command twice, where
<new node LNN> is the logical node number of the new node. In the output, check
whether the block free (blkfree) value decreases for at least one of the drives.
isi_for_array -X -n <new node LNN> sysctl efs.lbm.drive_space
See the box on this page for example output.
Example output
cluster-1# isi_for_array -X -n 1 sysctl efs.lbm.drive_space
cluster-1: efs.lbm.drive_space: {
cluster-1: (ldnum=0, blkfree=1119986, totalblk=1172864, usedino=3739, inofree=13322901, totalino=13776000),
cluster-1: (ldnum=1, blkfree=1110444, totalblk=1172864, usedino=3686, inofree=13213402, totalino=13776000),
cluster-1: (ldnum=2, blkfree=1121449, totalblk=1172864, usedino=3727, inofree=13316081, totalino=13776000),
cluster-1: (ldnum=3, blkfree=1116479, totalblk=1172864, usedino=3640, inofree=13277720, totalino=13776000)
Is the newly added
node receiving data?
Note the page number that you
are currently on.
Upload log files and contact Isilon Technical
Support, as instructed in Appendix A.
No
Go to Page 59Yes

59 - EMC Isilon Customer Troubleshooting Guide: Troubleshoot a Full Pool or Cluster
For links to all Isilon customer troubleshooting guides, visit the Customer Troubleshooting - Isilon Info Hub.
We appreciate your help in improving this document. Submit your feedback at http://bit.ly/isi-docfeedback._________________
___________________________
Add nodes (5)
Page
59
You could have arrived here from:
Page 58 - Add nodes (4)
Have the ENOSPC
and no available
space errors ceased?
Yes
Go to Page 60
Restore the system
settings
Has enough
space been freed to
return the cluster to normal
production use?
Yes
No
Check the space used and available on /ifs by running:
df -k /ifs
Compare the result to the baseline you collected on Page 4.
Repeat this command every 10 seconds for a total of four or five
times to observe ingest vs. available space. The available space
should increase each time you run the command.
_____
Note the page
number that you
are currently on.
Upload log files and
contact Isilon Technical
Support, as instructed
in Appendix A.
No
Note the page
number that you
are currently on.
Upload log files and
contact Isilon Technical
Support, as instructed
in Appendix A.
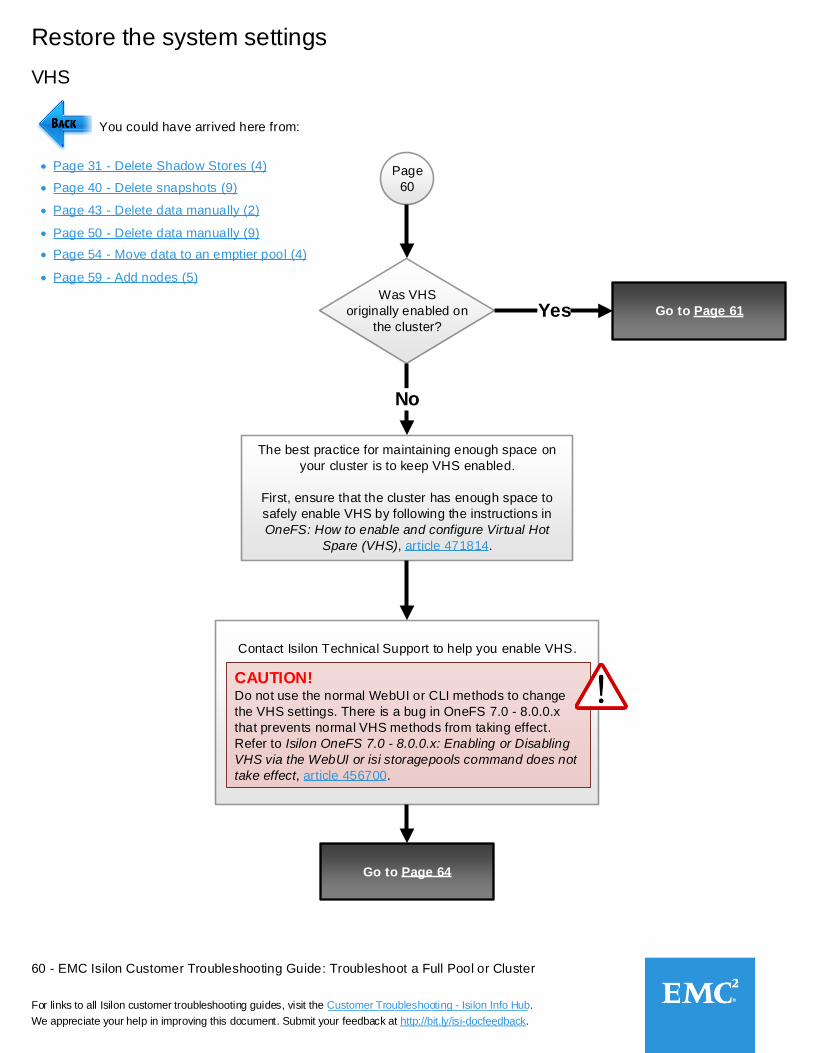
60 - EMC Isilon Customer Troubleshooting Guide: Troubleshoot a Full Pool or Cluster
For links to all Isilon customer troubleshooting guides, visit the Customer Troubleshooting - Isilon Info Hub.
We appreciate your help in improving this document. Submit your feedback at http://bit.ly/isi-docfeedback._________________
___________________________
Page
60
You could have arrived here from:
Was VHS
originally enabled on
the cluster?
The best practice for maintaining enough space on
your cluster is to keep VHS enabled.
First, ensure that the cluster has enough space to
safely enable VHS by following the instructions in
OneFS: How to enable and configure Virtual Hot
Spare (VHS), article 471814.
No
Go to Page 61Yes
Go to Page 64
Restore the system settings
VHS
Page 31 - Delete Shadow Stores (4)
Page 40 - Delete snapshots (9)
Page 50 - Delete data manually (9)
Page 54 - Move data to an emptier pool (4)
Page 59 - Add nodes (5)
Page 43 - Delete data manually (2)
Contact Isilon Technical Support to help you enable VHS.
CAUTION!Do not use the normal WebUI or CLI methods to change
the VHS settings. There is a bug in OneFS 7.0 - 8.0.0.x
that prevents normal VHS methods from taking effect.
Refer to Isilon OneFS 7.0 - 8.0.0.x: Enabling or Disabling
VHS via the WebUI or isi storagepools command does not
take effect, article 456700.
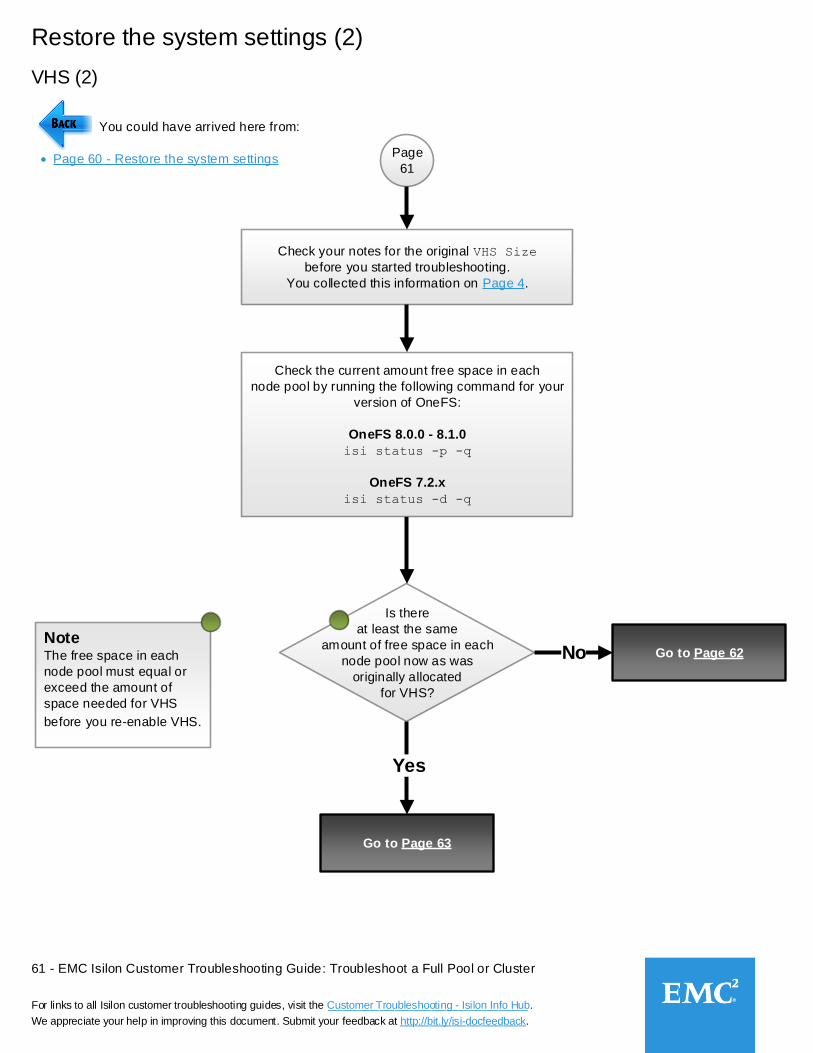
61 - EMC Isilon Customer Troubleshooting Guide: Troubleshoot a Full Pool or Cluster
For links to all Isilon customer troubleshooting guides, visit the Customer Troubleshooting - Isilon Info Hub.
We appreciate your help in improving this document. Submit your feedback at http://bit.ly/isi-docfeedback._________________
___________________________
Page
61
You could have arrived here from:
Page 60 - Restore the system settings
Is there
at least the same
amount of free space in each
node pool now as was
originally allocated
for VHS?
Yes
Check your notes for the original VHS Size
before you started troubleshooting.
You collected this information on Page 4.
NoteThe free space in each
node pool must equal or
exceed the amount of
space needed for VHS
before you re-enable VHS.
No Go to Page 62
Go to Page 63
Restore the system settings (2)
VHS (2)
Check the current amount free space in each
node pool by running the following command for your
version of OneFS:
OneFS 8.0.0 - 8.1.0
isi status -p -q
OneFS 7.2.x
isi status -d -q

62 - EMC Isilon Customer Troubleshooting Guide: Troubleshoot a Full Pool or Cluster
For links to all Isilon customer troubleshooting guides, visit the Customer Troubleshooting - Isilon Info Hub.
We appreciate your help in improving this document. Submit your feedback at http://bit.ly/isi-docfeedback._________________
___________________________
Page
62
You could have arrived here from:
Page 61 - Restore the system settings (2)
Is there
at least the same
amount of free space in
each node pool as was
originally allocated
for VHS?
No
Is an
AutoBalanceLin, SmartPools,
or SetProtectPlus job
running?
No
Wait until the cluster has balanced itself so that
there is enough free space.
Attempt to delete more data (so
that the pool has at least the
same amount of free space as
was originally allocated for
VHS). To do so, follow some of
the steps in this Troubleshooting
Guide, or add more nodes.
Yes
Go to Page 63
Yes
Restore the system settings (3)
VHS (3)
Check the current amount free space in each
node pool by running the following command for your version of OneFS:
OneFS 8.0.0 - 8.1.0
isi status -p -q
OneFS 7.2.x
isi status -d -q
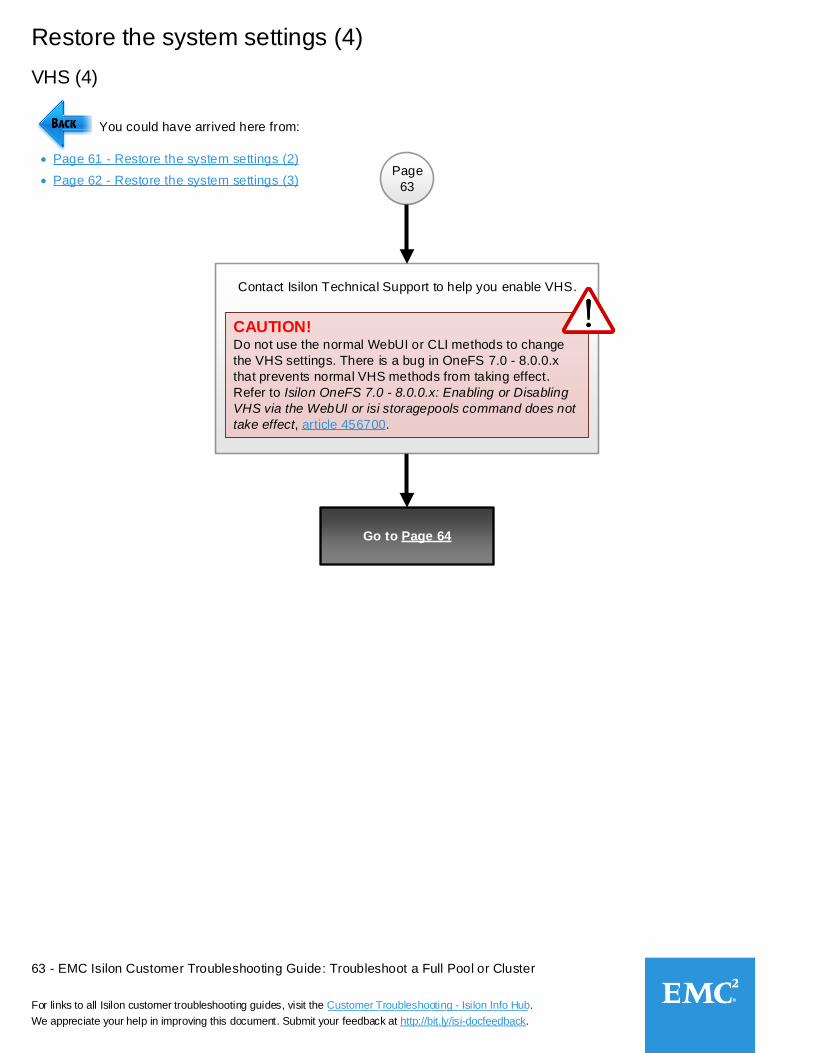
63 - EMC Isilon Customer Troubleshooting Guide: Troubleshoot a Full Pool or Cluster
For links to all Isilon customer troubleshooting guides, visit the Customer Troubleshooting - Isilon Info Hub.
We appreciate your help in improving this document. Submit your feedback at http://bit.ly/isi-docfeedback._________________
___________________________
Page
63
You could have arrived here from:
Page 61 - Restore the system settings (2)
Go to Page 64
Restore the system settings (4)
VHS (4)
Page 62 - Restore the system settings (3)
Contact Isilon Technical Support to help you enable VHS.
CAUTION!Do not use the normal WebUI or CLI methods to change
the VHS settings. There is a bug in OneFS 7.0 - 8.0.0.x
that prevents normal VHS methods from taking effect.
Refer to Isilon OneFS 7.0 - 8.0.0.x: Enabling or Disabling
VHS via the WebUI or isi storagepools command does not
take effect, article 456700.
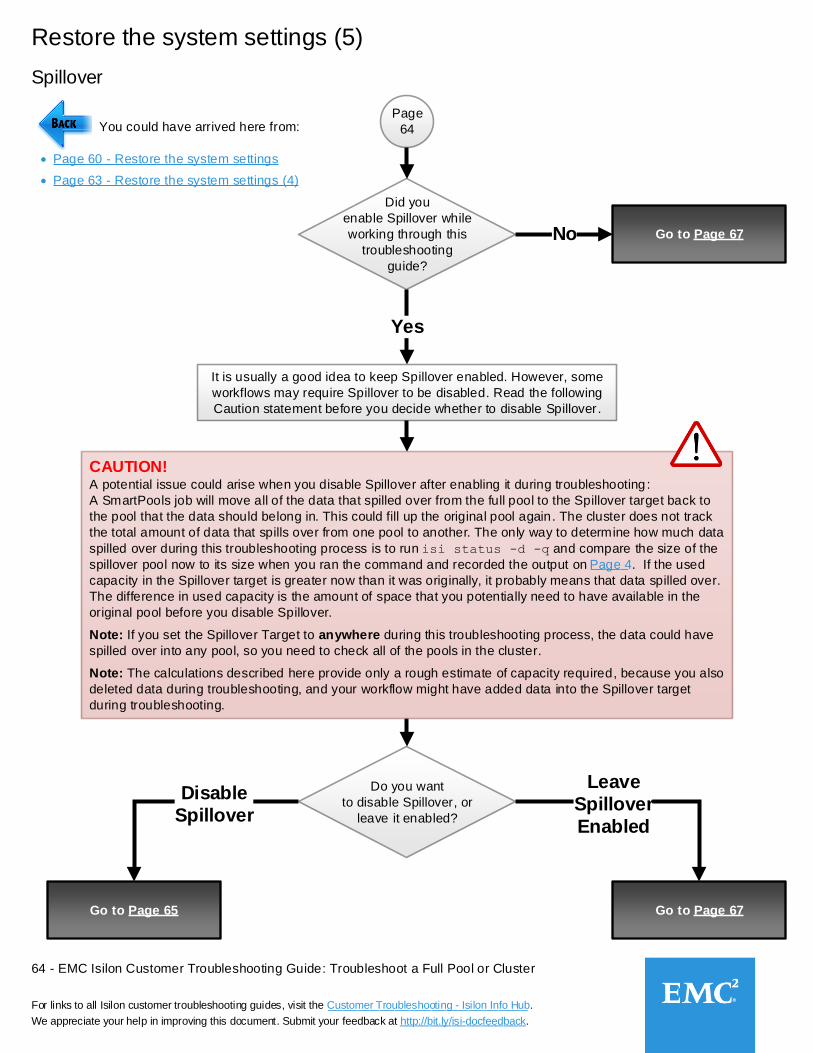
64 - EMC Isilon Customer Troubleshooting Guide: Troubleshoot a Full Pool or Cluster
For links to all Isilon customer troubleshooting guides, visit the Customer Troubleshooting - Isilon Info Hub.
We appreciate your help in improving this document. Submit your feedback at http://bit.ly/isi-docfeedback._________________
___________________________
Page
64 You could have arrived here from:
Page 60 - Restore the system settings
Did you
enable Spillover while
working through this
troubleshooting
guide?
Yes
No
Restore the system settings (5)
Spillover
It is usually a good idea to keep Spillover enabled. However, some
workflows may require Spillover to be disabled. Read the following
Caution statement before you decide whether to disable Spillover.
Do you want
to disable Spillover, or
leave it enabled?
Go to Page 67Go to Page 65
Disable
Spillover
Leave
Spillover
Enabled
Page 63 - Restore the system settings (4)
Go to Page 67
CAUTION!A potential issue could arise when you disable Spillover after enabling it during troubleshooting :
A SmartPools job will move all of the data that spilled over from the full pool to the Spillover target back to
the pool that the data should belong in. This could fill up the original pool again. The cluster does not track
the total amount of data that spills over from one pool to another. The only way to determine how much data
spilled over during this troubleshooting process is to run isi status -d -q and compare the size of the
spillover pool now to its size when you ran the command and recorded the output on Page 4. If the used
capacity in the Spillover target is greater now than it was originally, it probably means that data spilled over.
The difference in used capacity is the amount of space that you potentially need to have available in the
original pool before you disable Spillover.
Note: If you set the Spillover Target to anywhere during this troubleshooting process, the data could have
spilled over into any pool, so you need to check all of the pools in the cluster.
Note: The calculations described here provide only a rough estimate of capacity required, because you also
deleted data during troubleshooting, and your workflow might have added data into the Spillover target
during troubleshooting.
_____

65 - EMC Isilon Customer Troubleshooting Guide: Troubleshoot a Full Pool or Cluster
For links to all Isilon customer troubleshooting guides, visit the Customer Troubleshooting - Isilon Info Hub.
We appreciate your help in improving this document. Submit your feedback at http://bit.ly/isi-docfeedback._________________
___________________________
Page
65
You could have arrived here from:
Page 64 - Restore the system settings (5)
Restore the system settings (6)
Spillover (2)
Is each
node pool less than
99% full?No
Yes
Each node pool must be less than 99%
full to disable Spillover.
Try to obtain more space by following
some of the steps in this
Troubleshooting Guide, or add more
nodes. If you cannot make enough
space available, you will not be able to
disable Spillover.
Adjust the file pool or snapshot
policies to prevent the node pool
from filling up again.
Go to Page 66
Check the current amount free space in each
node pool by running the following command for your
version of OneFS:
OneFS 8.0.0 - 8.1.0
isi status -p -q
OneFS 7.2.x
isi status -d -q
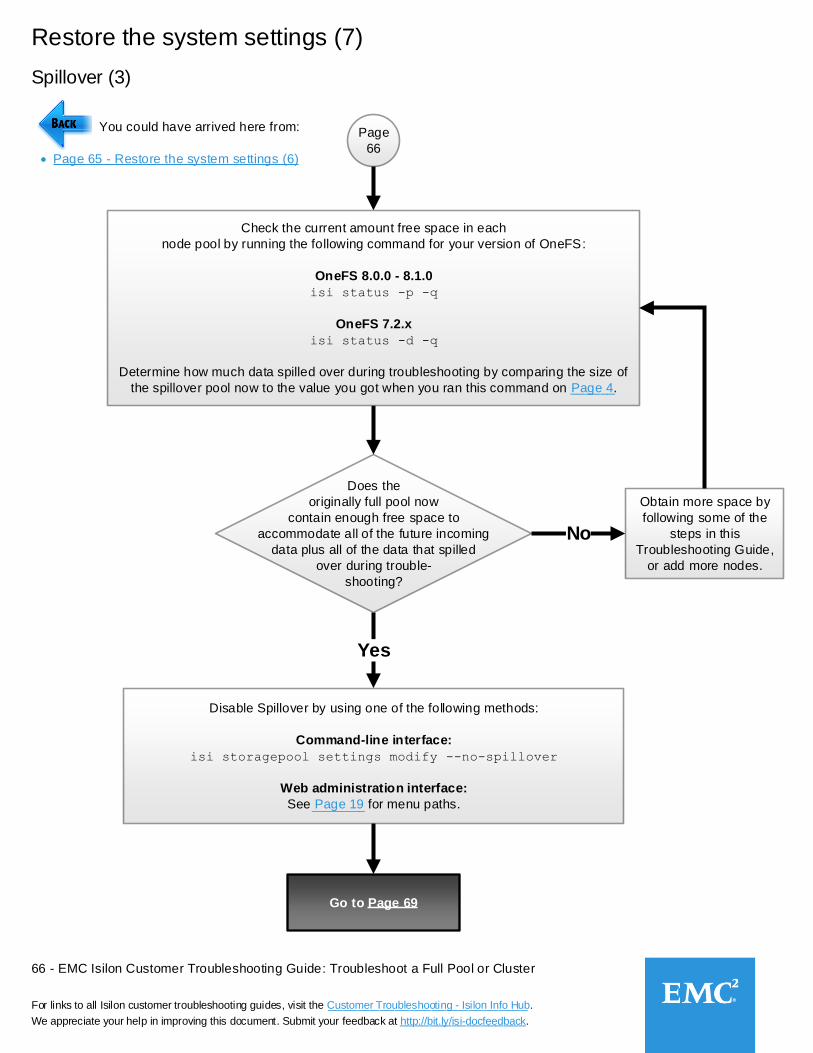
66 - EMC Isilon Customer Troubleshooting Guide: Troubleshoot a Full Pool or Cluster
For links to all Isilon customer troubleshooting guides, visit the Customer Troubleshooting - Isilon Info Hub.
We appreciate your help in improving this document. Submit your feedback at http://bit.ly/isi-docfeedback._________________
___________________________
Page
66
You could have arrived here from:
Page 65 - Restore the system settings (6)
Yes
Does the
originally full pool now
contain enough free space to
accommodate all of the future incoming
data plus all of the data that spilled
over during trouble-
shooting?
Obtain more space by
following some of the
steps in this
Troubleshooting Guide,
or add more nodes.
No
Disable Spillover by using one of the following methods:
Command-line interface:
isi storagepool settings modify --no-spillover
Web administration interface:
See Page 19 for menu paths._________
Go to Page 69
Restore the system settings (7)
Spillover (3)
Check the current amount free space in each
node pool by running the following command for your version of OneFS:
OneFS 8.0.0 - 8.1.0
isi status -p -q
OneFS 7.2.x
isi status -d -q
Determine how much data spilled over during troubleshooting by comparing the size of
the spillover pool now to the value you got when you ran this command on Page 4.______

67 - EMC Isilon Customer Troubleshooting Guide: Troubleshoot a Full Pool or Cluster
For links to all Isilon customer troubleshooting guides, visit the Customer Troubleshooting - Isilon Info Hub.
We appreciate your help in improving this document. Submit your feedback at http://bit.ly/isi-docfeedback._________________
___________________________
Page
67
You could have arrived here from:
Page 64 - Restore the system settings (5)
Did you change
the Spillover target pool
during troubleshooting?
Yes
No
Do you
want to return to using
the original Spillover
pool?
No
Does the
original Spillover pool have
enough space to accommodate
future spillovers?
Yes
Yes
Obtain more space by
following some of the
steps in this
Troubleshooting Guide,
or add more nodes.
No
Go to Page 68
Go to Page 69
Go to Page 69
Restore the system settings (8)
Spillover (4)
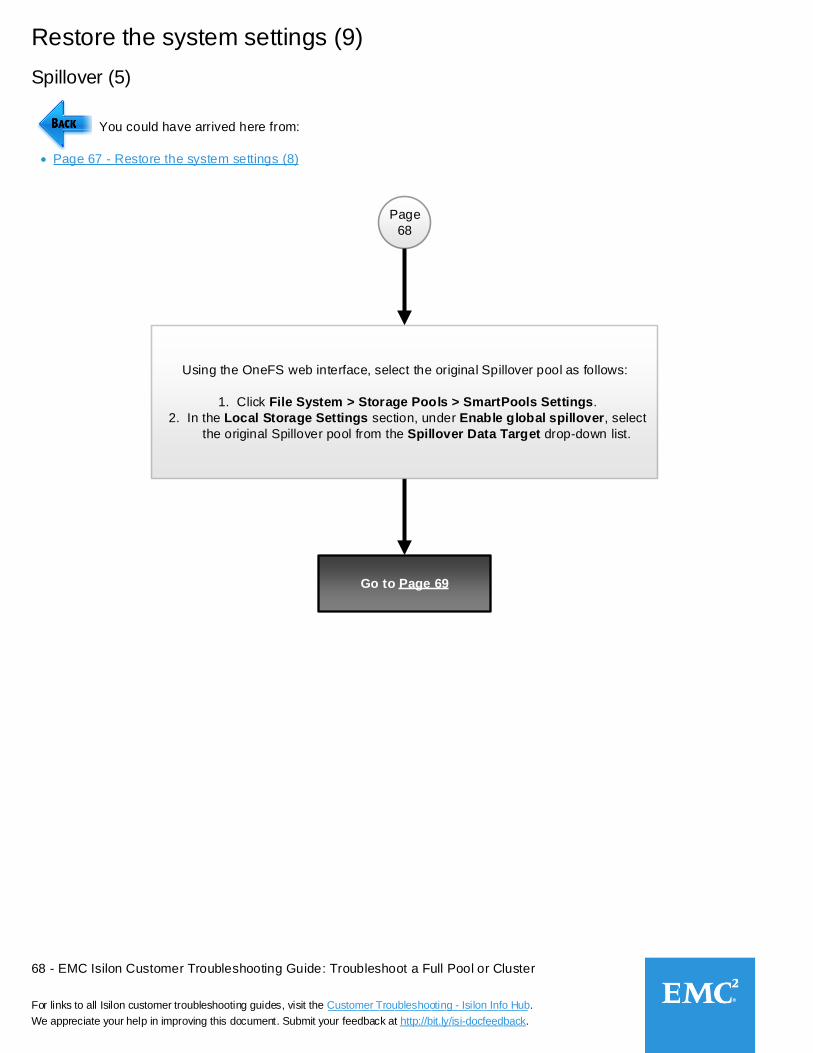
68 - EMC Isilon Customer Troubleshooting Guide: Troubleshoot a Full Pool or Cluster
For links to all Isilon customer troubleshooting guides, visit the Customer Troubleshooting - Isilon Info Hub.
We appreciate your help in improving this document. Submit your feedback at http://bit.ly/isi-docfeedback._________________
___________________________
Page
68
You could have arrived here from:
Page 67 - Restore the system settings (8)
Go to Page 69
Using the OneFS web interface, select the original Spillover pool as follows:
1. Click File System > Storage Pools > SmartPools Settings.
2. In the Local Storage Settings section, under Enable global spillover, select
the original Spillover pool from the Spillover Data Target drop-down list.
Restore the system settings (9)
Spillover (5)
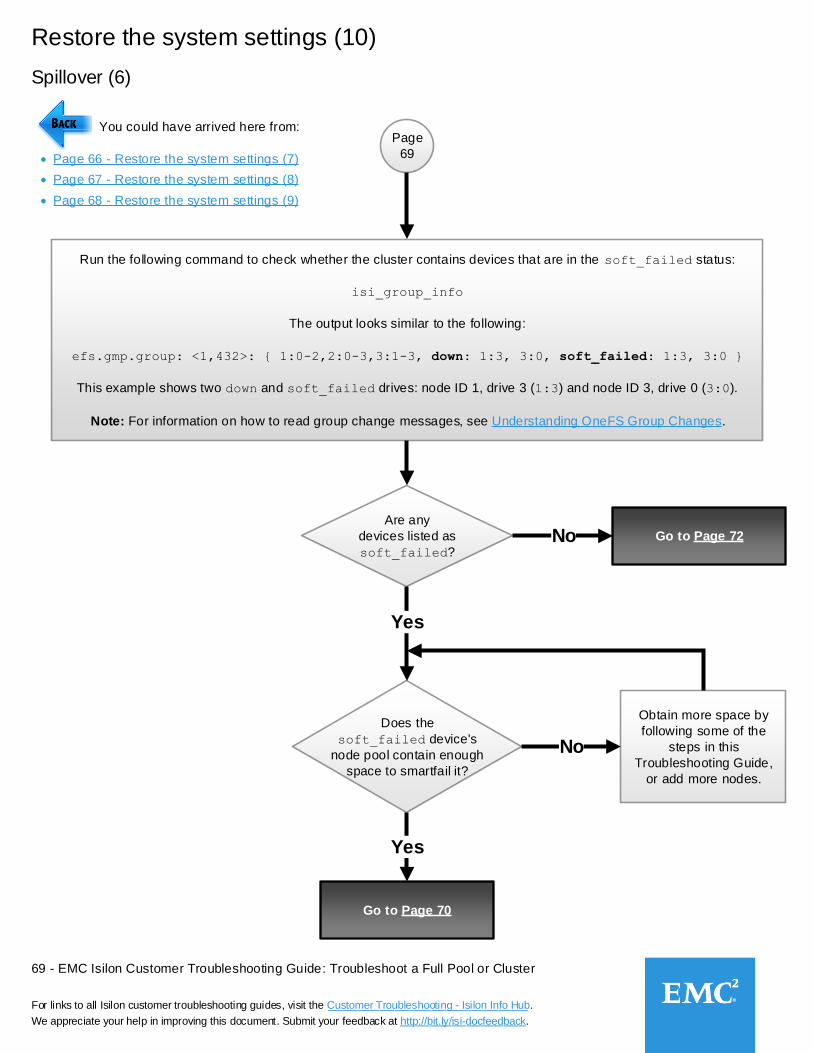
69 - EMC Isilon Customer Troubleshooting Guide: Troubleshoot a Full Pool or Cluster
For links to all Isilon customer troubleshooting guides, visit the Customer Troubleshooting - Isilon Info Hub.
We appreciate your help in improving this document. Submit your feedback at http://bit.ly/isi-docfeedback._________________
___________________________
Page
69
You could have arrived here from:
Page 66 - Restore the system settings (7)
Are any
devices listed as
soft_failed?
Does the
soft_failed device's
node pool contain enough
space to smartfail it?
Yes
No
Yes
No Go to Page 72
Obtain more space by
following some of the
steps in this
Troubleshooting Guide,
or add more nodes.
Go to Page 70
Run the following command to check whether the cluster contains devices that are in the soft_failed status:
isi_group_info
The output looks similar to the following:
efs.gmp.group: <1,432>: { 1:0-2,2:0-3,3:1-3, down: 1:3, 3:0, soft_failed: 1:3, 3:0 }
This example shows two down and soft_failed drives: node ID 1, drive 3 (1:3) and node ID 3, drive 0 (3:0).
Note: For information on how to read group change messages, see Understanding OneFS Group Changes.
Restore the system settings (10)
Spillover (6)
Page 67 - Restore the system settings (8)
Page 68 - Restore the system settings (9)

70 - EMC Isilon Customer Troubleshooting Guide: Troubleshoot a Full Pool or Cluster
For links to all Isilon customer troubleshooting guides, visit the Customer Troubleshooting - Isilon Info Hub.
We appreciate your help in improving this document. Submit your feedback at http://bit.ly/isi-docfeedback._________________
___________________________
Page
70
You could have arrived here from:
Page 69 - Restore the system settings (10)
Run the following command to cancel the job,
where <JobID> is the job ID listed in the output
of isi job status:
isi job cancel <JobID>
Yes
No
Is an
AutoBalanceLin, SmartPools,
or SetProtectPlus job
running?
Run the following command:
isi job status
Restore the system settings (11)
Run FlexProtect or FlexProtectLin
Go to Page 71
Go to Page 71
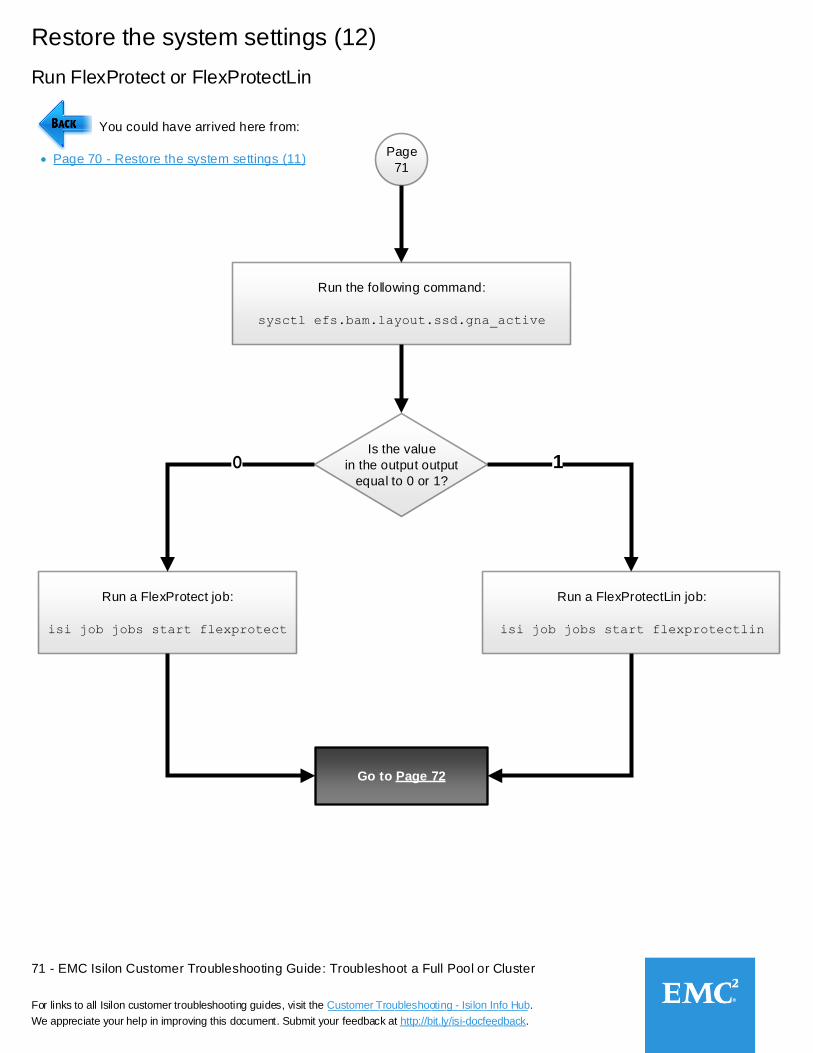
71 - EMC Isilon Customer Troubleshooting Guide: Troubleshoot a Full Pool or Cluster
For links to all Isilon customer troubleshooting guides, visit the Customer Troubleshooting - Isilon Info Hub.
We appreciate your help in improving this document. Submit your feedback at http://bit.ly/isi-docfeedback._________________
___________________________
Page
71
You could have arrived here from:
Page 70 - Restore the system settings (11)
Restore the system settings (12)
Run FlexProtect or FlexProtectLin
Go to Page 72
Run the following command:
sysctl efs.bam.layout.ssd.gna_active
Is the value
in the output output
equal to 0 or 1?
Run a FlexProtect job:
isi job jobs start flexprotect
0 1
Run a FlexProtectLin job:
isi job jobs start flexprotectlin
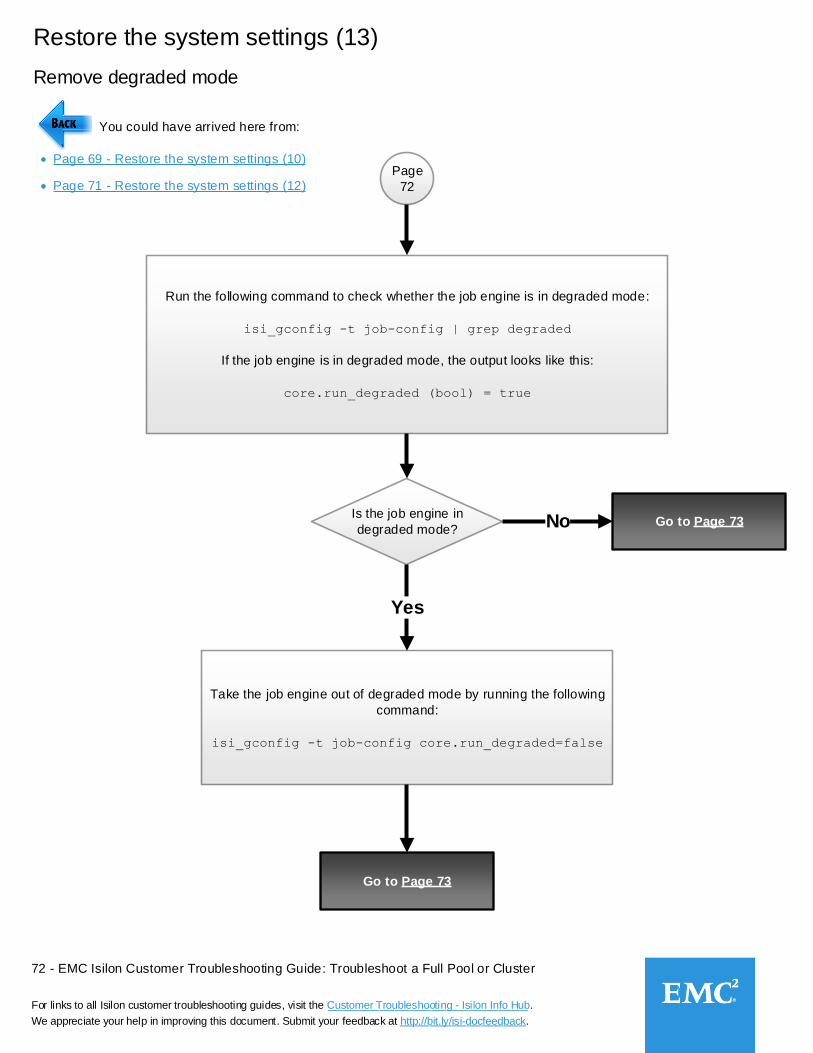
72 - EMC Isilon Customer Troubleshooting Guide: Troubleshoot a Full Pool or Cluster
For links to all Isilon customer troubleshooting guides, visit the Customer Troubleshooting - Isilon Info Hub.
We appreciate your help in improving this document. Submit your feedback at http://bit.ly/isi-docfeedback._________________
___________________________
Page
72
You could have arrived here from:
Page 69 - Restore the system settings (10)
Is the job engine in
degraded mode?
Take the job engine out of degraded mode by running the following
command:
isi_gconfig -t job-config core.run_degraded=false
No
Run the following command to check whether the job engine is in degraded mode:
isi_gconfig -t job-config | grep degraded
If the job engine is in degraded mode, the output looks like this:
core.run_degraded (bool) = true
Yes
Go to Page 73
Go to Page 73
Restore the system settings (13)
Remove degraded mode
Page 71 - Restore the system settings (12)

73 - EMC Isilon Customer Troubleshooting Guide: Troubleshoot a Full Pool or Cluster
For links to all Isilon customer troubleshooting guides, visit the Customer Troubleshooting - Isilon Info Hub.
We appreciate your help in improving this document. Submit your feedback at http://bit.ly/isi-docfeedback._________________
___________________________
Page
73
You could have arrived here from:
Page 72 - Restore the system settings (13)
Run a Collect job:
isi job jobs start collect
NotesThe Multiscan job does both a Collect job and an Autobalance job simultaneously .
The Collect and Multiscan jobs will free up any space that might be orphaned or unaccounted for on the cluster . This
is particularly important if you disabled leak freed blocks during troubleshooting.
The Collect and Multiscan jobs will not start until any running FlexProtect or FlexProtectLin job finishes.
The Collect or Multiscan job might take several
days to complete. While the job is running, you can
continue to the next page.
Monitor the status of the Collect or Multiscan job
and make sure that it completes successfully.
If the Collect or Multiscan job does not complete
successfully, contact Isilon Technical Support.
Did you add
one or more nodes to the
cluster as part of this
troubleshooting
process?
No
Run a Multiscan job:
isi job jobs start multiscan
Yes
Go to Page 74
Restore the system settings (14)
Run Collect or Multiscan
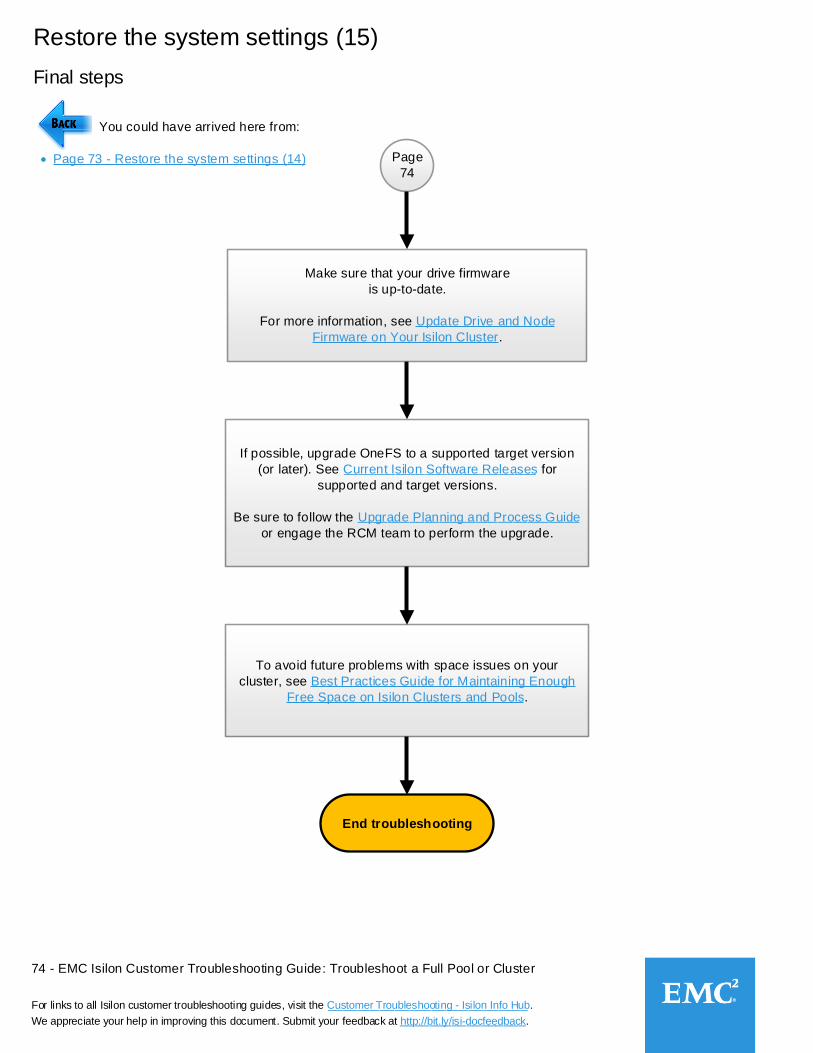
74 - EMC Isilon Customer Troubleshooting Guide: Troubleshoot a Full Pool or Cluster
For links to all Isilon customer troubleshooting guides, visit the Customer Troubleshooting - Isilon Info Hub.
We appreciate your help in improving this document. Submit your feedback at http://bit.ly/isi-docfeedback._________________
___________________________
Page
74
You could have arrived here from:
Page 73 - Restore the system settings (14)
To avoid future problems with space issues on your
cluster, see Best Practices Guide for Maintaining Enough
Free Space on Isilon Clusters and Pools.
If possible, upgrade OneFS to a supported target version
(or later). See Current Isilon Software Releases for
supported and target versions.
Be sure to follow the Upgrade Planning and Process Guide
or engage the RCM team to perform the upgrade.
Make sure that your drive firmware
is up-to-date.
For more information, see Update Drive and Node
Firmware on Your Isilon Cluster.
End troubleshooting
Restore the system settings (15)
Final steps
______________________________
__________________________
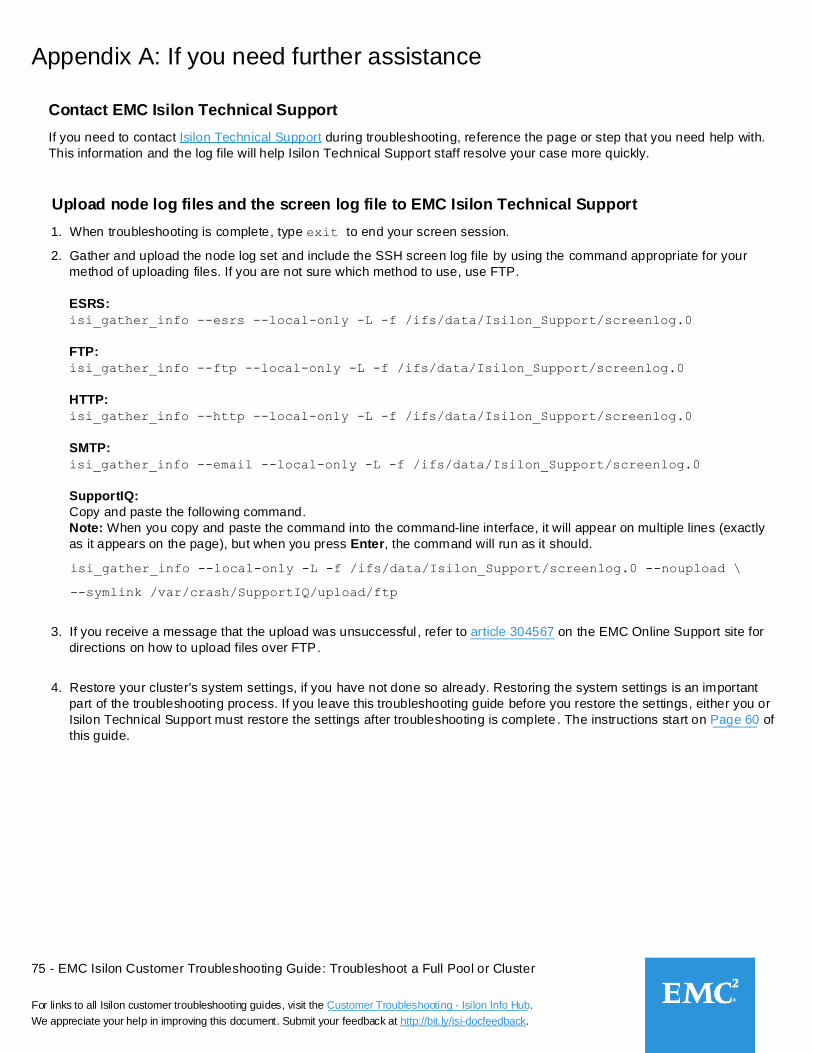
75 - EMC Isilon Customer Troubleshooting Guide: Troubleshoot a Full Pool or Cluster
For links to all Isilon customer troubleshooting guides, visit the Customer Troubleshooting - Isilon Info Hub.
We appreciate your help in improving this document. Submit your feedback at http://bit.ly/isi-docfeedback._________________
___________________________
Contact EMC Isilon Technical Support
If you need to contact Isilon Technical Support during troubleshooting, reference the page or step that you need help with.
This information and the log file will help Isilon Technical Support staff resolve your case more quickly.
Appendix A: If you need further assistance
Upload node log files and the screen log file to EMC Isilon Technical Support
1. When troubleshooting is complete, type exit to end your screen session.
2. Gather and upload the node log set and include the SSH screen log file by using the command appropriate for your
method of uploading files. If you are not sure which method to use, use FTP.
ESRS:
isi_gather_info --esrs --local-only -L -f /ifs/data/Isilon_Support/screenlog.0
FTP:
isi_gather_info --ftp --local-only -L -f /ifs/data/Isilon_Support/screenlog.0
HTTP:
isi_gather_info --http --local-only -L -f /ifs/data/Isilon_Support/screenlog.0
SMTP:
isi_gather_info --email --local-only -L -f /ifs/data/Isilon_Support/screenlog.0
SupportIQ:
Copy and paste the following command.
Note: When you copy and paste the command into the command-line interface, it will appear on multiple lines (exactly
as it appears on the page), but when you press Enter, the command will run as it should.
isi_gather_info --local-only -L -f /ifs/data/Isilon_Support/screenlog.0 --noupload \
--symlink /var/crash/SupportIQ/upload/ftp
3. If you receive a message that the upload was unsuccessful , refer to article 304567 on the EMC Online Support site for
directions on how to upload files over FTP.
4. Restore your cluster's system settings, if you have not done so already. Restoring the system settings is an important
part of the troubleshooting process. If you leave this troubleshooting guide before you restore the settings, either you or
Isilon Technical Support must restore the settings after troubleshooting is complete . The instructions start on Page 60 of
this guide.
____________
______

76 - EMC Isilon Customer Troubleshooting Guide: Troubleshoot a Full Pool or Cluster
For links to all Isilon customer troubleshooting guides, visit the Customer Troubleshooting - Isilon Info Hub.
We appreciate your help in improving this document. Submit your feedback at http://bit.ly/isi-docfeedback._________________
___________________________
Decision diamondYes No
Process stepProcess step with command:
command xyz
Go to Page #
Page
# Note Provides context and additional
information. Sometimes a note is linked
to a process step with a colored dot.
CAUTION!Caution boxes warn that
a particular step needs
to be performed with
great care, to prevent
serious consequences.
End point Document ShapeCalls out supporting documentation
for a process step. When possible,
these shapes contain links to the
reference document.
Sometimes linked to a process step
with a colored dot.
Optional process step
Directional arrows indicate
the path through the
process flow.
IntroductionDescribes what the section helps you to
accomplish.
You could have arrived here from:
Page # - Page title
Appendix B: How to use this flowchart

77 - EMC Isilon Customer Troubleshooting Guide: Troubleshoot a Full Pool or Cluster
For links to all Isilon customer troubleshooting guides, visit the Customer Troubleshooting - Isilon Info Hub.
We appreciate your help in improving this document. Submit your feedback at http://bit.ly/isi-docfeedback._________________
___________________________
You could have arrived here from:
Page 12 - Check whether the new drive is unprovisioned
Appendix C: Finding unprovisioned nodes and drives using the
disi -I diskpools ls -v command
Understanding the output of disi -I diskpools ls -v
Unprovisioned drives:
The output displays unprovisioned drives in the Unprovisioned drives section. The node logical
node number (LNN) is listed, followed by the bay numbers of the unprovisioned drives.
Unprovisioned nodes:
A node is unprovisioned if the node and all of its drive bays are listed in the Unprovisioned
drives section, and the node LNN not appear in the Members column.
In the example below, node 4 and all of its drives (1-4) are unprovisioned. In this example, node 4
contains only four drives.
Note: The node number used in the output of this command is the LNN (not the device ID).
Page 55 - Add nodes
Unprovisioned node and drives shown in the disi -I diskpools ls -v command
cluster-1# disi -I diskpools ls -v
Name Id Type Prot Flags Members VHS HDD Used / Size SSD Used / Size
-------------------------------------------------------------------------------------------------------------------
iq_vmware 2 G +2:1 SDH--- 1 1 18G / 17G (> 99%) 0 / 0 (n/a )
iq_vmware:1 1 D +2:1 S----- 1-3:bay1-4 - 18G / 17G (> 99%) 0 / 0 (n/a )
------------------------------------------------------------------------------------------------------------------
Unprovisioned drives: 4:bay1-4
Type: D = Disk pool, G = Group, P = Policy, T = Tier, E = Empty Group or Tier
Flags: S = System, H = VHS Hide Spare, D = VHS Deny Writes,
T = Spillover Target, M = Manual Group, E = Evacuate Pool
78 - EMC Isilon Customer Troubleshooting Guide: Troubleshoot a Full Pool or Cluster
For links to all Isilon customer troubleshooting guides, visit the Customer Troubleshooting - Isilon Info Hub.
We appreciate your help in improving this document. Submit your feedback at http://bit.ly/isi-docfeedback._________________
___________________________
Copyright © 2017 Dell Inc. or its subsidiaries. All rights reserved.
Dell believes the information in this publication is accurate as of its publication date. The information is subject to change without notice.
THE INFORMATION IN THIS PUBLICATION IS PROVIDED AS-IS. DELL MAKES NO REPRESENTATIONS OR WARRANTIES OF ANY KIND WITH RESPECT TO THE INFORMATION IN THIS PUBLICATION, AND SPECIFICALLY DISCLAIMS IMPLIED WARRANTIES OF MERCHANTABILITY OR FITNESS FOR A PARTICULAR PURPOSE. USE, COPYING, AND DISTRIBUTION OF ANY DELL SOFTWARE DESCRIBED IN THIS PUBLICATION REQUIRES AN APPLICABLE SOFTWARE LICENSE.
Dell, EMC, and other trademarks are trademarks of Dell Inc. or its subsidiaries. Other trademarks may be the property of their respective owners.
EMC CorporationHopkinton, Massachusetts 01748-91031-508-435-1000 in North America 1-866-464-7381www.EMC.com