Embed Size (px)
Citation preview

Version June 8, 2015 Page 1 of 20
Trophy Room Manual
Trophy Room is a Windows PC program that will manage and organize your trail camera images. This manual
does not explain every feature in Trophy Room, as some are fairly obvious and easy to use (such as delete,
copy & move). Instead, we will explain the advanced features and the recommended method for using
Trophy Room. Sorry, we do not plan to release a MAC version of Trophy Room.
While some of the concepts may seem difficult to follow in writing, in practice they are very easy to use.
Trophy Room does most of the work for you.
Trophy Room is designed to work with all brands of trail cameras. However, do to different ways the JPG files
are created, and what features the camera support, some Trophy Room features will not work with non-
Cuddeback images.
Note – Because Trophy Room is free to all users we do not offer phone support on Trophy Room use.
Version June 8, 2015 Page 2 of 20
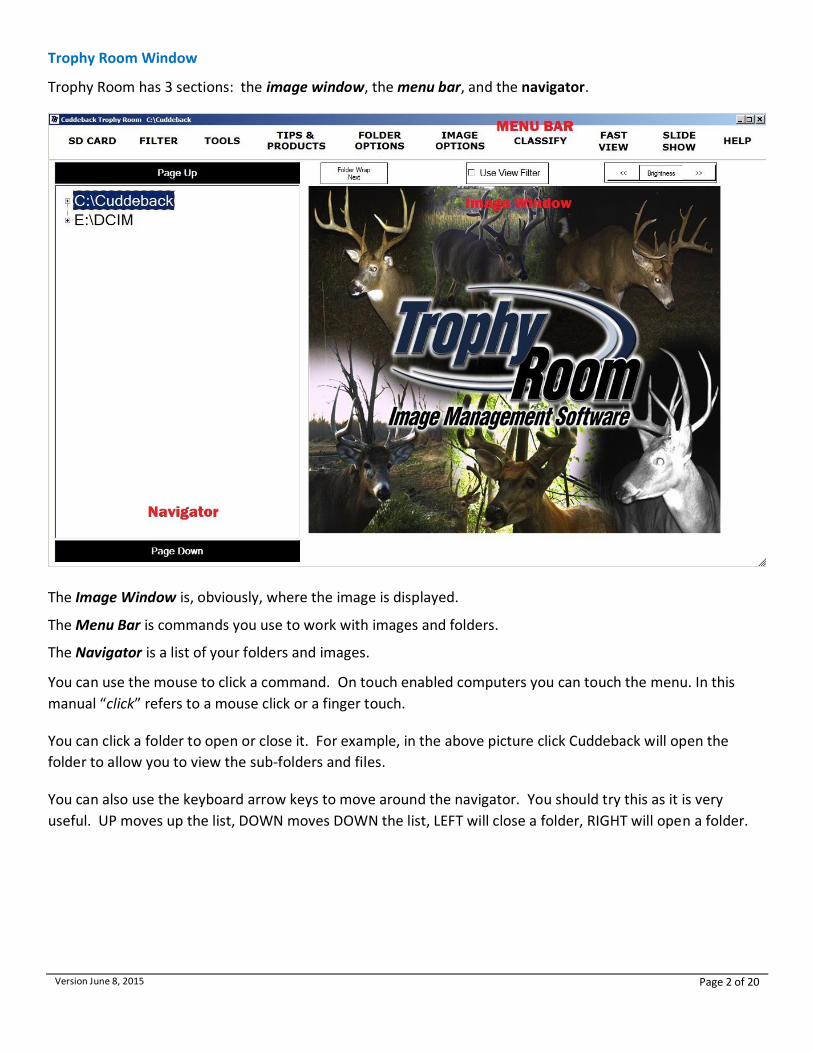
Trophy Room Window
Trophy Room has 3 sections: the image window, the menu bar, and the navigator.
The Image Window is, obviously, where the image is displayed.
The Menu Bar is commands you use to work with images and folders.
The Navigator is a list of your folders and images.
You can use the mouse to click a command. On touch enabled computers you can touch the menu. In this
manual “click” refers to a mouse click or a finger touch.
You can click a folder to open or close it. For example, in the above picture click Cuddeback will open the
folder to allow you to view the sub-folders and files.
You can also use the keyboard arrow keys to move around the navigator. You should try this as it is very
useful. UP moves up the list, DOWN moves DOWN the list, LEFT will close a folder, RIGHT will open a folder.
Version June 8, 2015 Page 3 of 20
Super Cool Stuff
Click TIPS & PRODUCTS for a list of trail camera documents and manuals. Here you can find all the latest
Cuddeback manuals, product information, hunting tips and other stuff we dream up.
Getting Help
Click HELP for an assortment of tools to help you use Trophy Room and manage your Cuddeback Trail
Cameras.
TROPHY ROOM HELP – displays this file
HOT KEY LIST – displays a list of keyboard shortcuts
CAMERA FIRMWARE UPDATES – the most recent firmware for all Cuddeback cameras can be copied to
an SD card from this menu. See Appendix A in this manual for additional details.
CUDDESHOP – link to the Cuddeback online store
CUDDEBACK SUPPORT – link to the Cuddeback online support site
REGISTER A PRODUCT – we recommend you register your new Cuddeback cameras within 14 days of
purchase. Click this link to register your new Cuddeback cameras.
CUDDETALK FORUM – link to the CuddeTalk user forum
ABOUT – version information
Organizing Images into Properties and Locations
Trophy Room organizes images in a manner similar to how you hunt. You hunt a property and set your
cameras in a specific location. Likewise, Trophy Room organizes your images into properties and locations.
Images are further saved into year folders, such as 2015. This is done automatically and requires no input
from you.
Property is the top level and is used to represent the general location of the camera. Some examples of
properties are: Wisconsin, Georgia, Trips, Buck County, etc. The idea is that if you hunt multiple properties, or
take hunting trips, you would store images recorded there in a separate property.
Property can also be used to separate types of trail camera use. For example, say you hunt deer and bear.
You can set up a property for Bear Hunting and a Property for Deer Hunting. If you also use trail cameras for
surveillance, creating a Surveillance property will allow you to separate those images from your hunting
images. In fact, you can use properties to group images any way you like.
Location is the precise place a camera is placed. In other words, each Location represents where a camera is
setup in the field. For example, Beaver Trail, West Food Plot, etc. Images from the camera are stored in
consecutively numbered folders inside the location folders.
Version June 8, 2015 Page 4 of 20
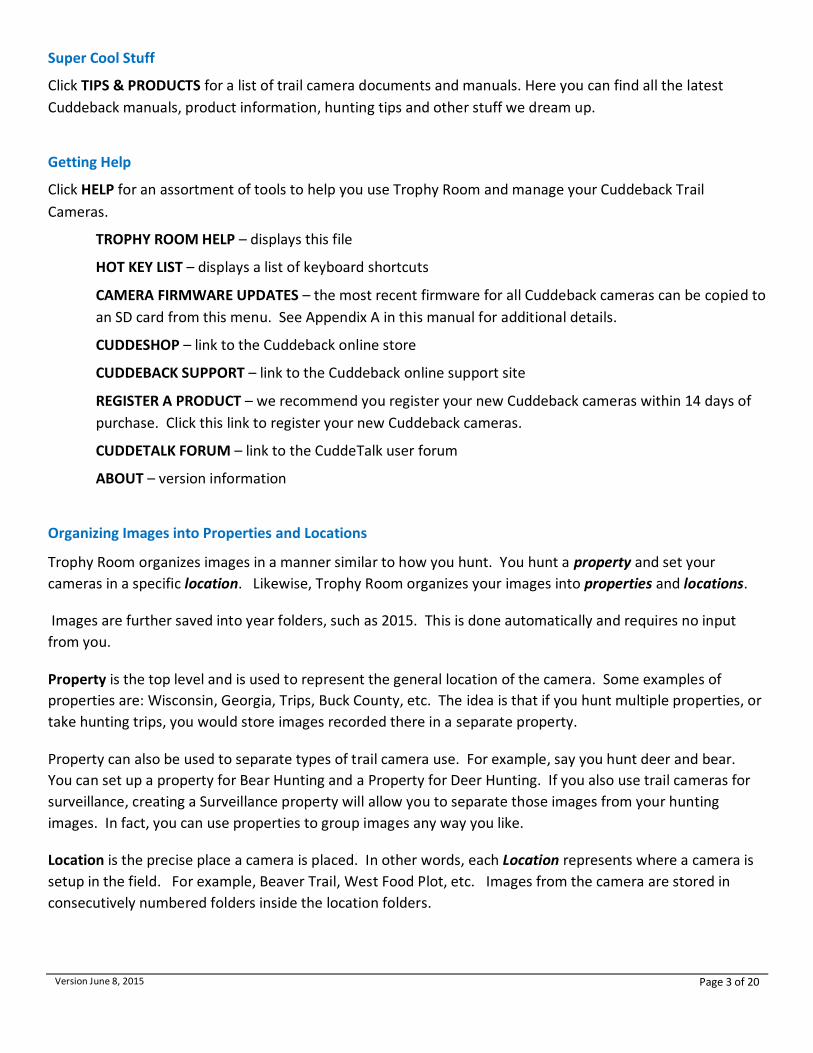
This example shows how Trophy Room organizes trail camera images into properties, locations, & years.
There is 3 properties - named Bass Lake, Bear Hunts, and Camera Testing.
In the Bass Lake property there is 2 year folders shown - 2014 and 2015. These are automatically
created and makes is easy to organize your images by year.
In the Bass Lake 2015 property there is 3 locations - Beaver Trail, Hard Woods Stand, and West Food
Plot. At some point a camera was setup at each one of these locations.
In the West Food Plot location there is 2 folders of images shown - named 0001 and 0002.
Clicking the 0001 or 0002 folder will display the images.
Version June 8, 2015 Page 5 of 20
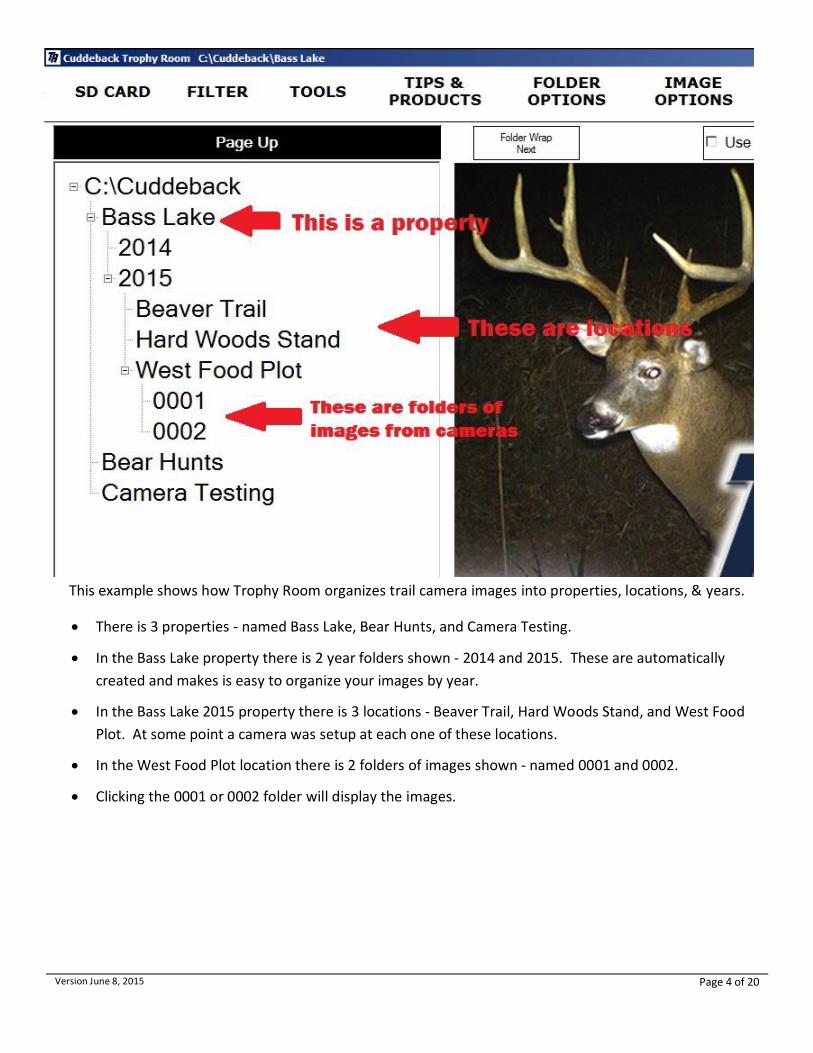
Coping Images from a SD card into Trophy Room’s Property and Location
Coping images into Trophy Room is a 2 step process. First, use the Get Images command to copy image from
the SD card into Trophy Room. Second, you use the Move to Location command to place the images into a
location.
Step 1: Copy Images from SD Card to Trophy Room
1. Insert SD card into the PC’s card reader
2. Click the SD CARD menu (or simply type G on the keyboard)
3. Click GET IMAGES
4. Select or enter the Property where these images were taken
5. Continue by following the instructions displayed to copy or move images and videos to the PC
You can type in a new property name, or select an existing property from the drop down list.
Step 2: Move Images into a Location
To move the folder to a location: Trophy Room copies the images into folders on your PC into the property
folder you selected. To move the
folder to a location:
1. Navigate to the folder copied
and display an image
2. With an image displayed click the FOLDER OPTIONS menu at the top of the screen
3. Then click MOVE TO LOCATION
4. Then enter a location name, or select one from the drop down list
5. Click OK
Version June 8, 2015 Page 6 of 20
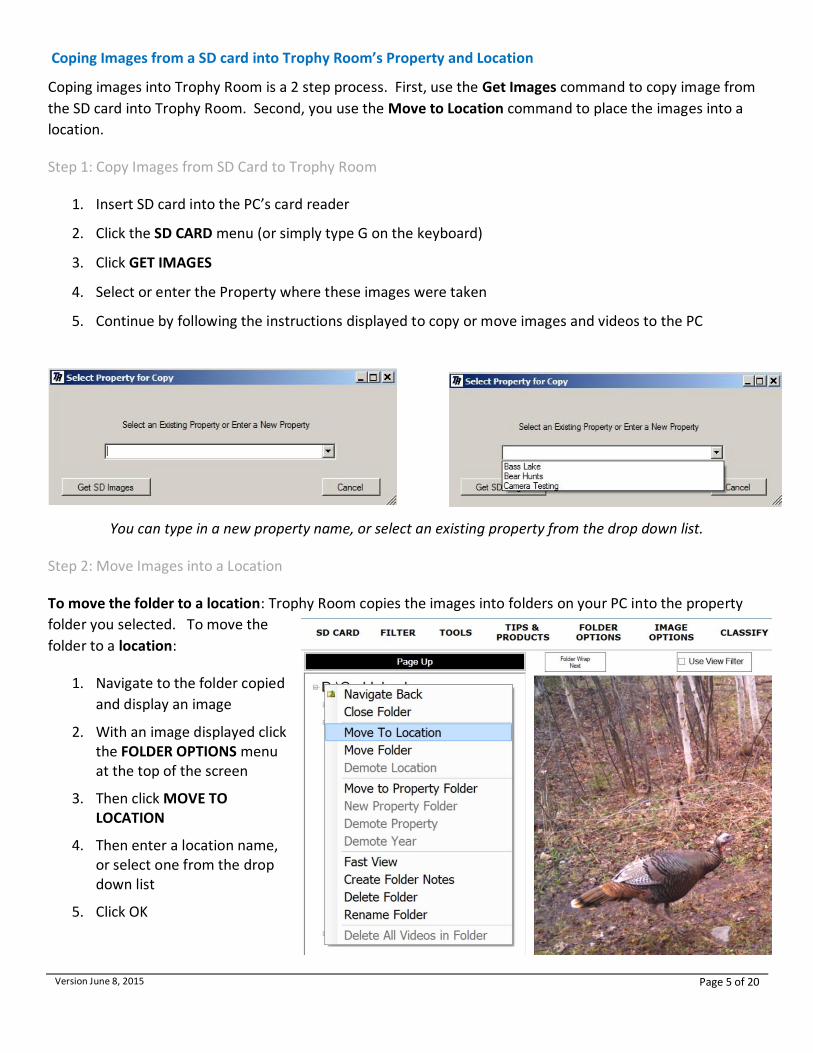
Special Folders
Trophy Room features a simple means to track
your best photos in 3 special folders named
Bucks, Best Bucks, and Neat Stuff. When viewing
an image click IMAGE OPTIONS and click the
appropriate command to copy the image to one
of these folders. This allows you to organize
your best photos in common folders.
Display Image Properties
Note - This only works with images taken with Cuddeback cameras. Right click an image and click Display Image Data. Or, click the menu IMAGE OPTIONS, then click Display Image Data. The following (or similar) table will be displayed with relevant information about the image and the camera that recorded the image.
Version June 8, 2015 Page 7 of 20
SD CARD - Working with SD Cards
Trophy has tools to view images on the SD card, copy the images to Trophy Room, or format the SD card.
Coping Images on your SD Card
The SD CARD – GET IMAGES command is used to copy images from a SD card to Trophy Room. Insert your
trail camera’s SD card into your PC’s SD card reader. Click SD CARD, then GET IMAGES. Follow onscreen
instructions.
Viewing Images on your SD Card
You can view the images directly from the SD card. This allows you to pre-view the images before copying
them into Trophy Room. Click SD CARD - VIEW SD IMAGES. The SD CARD will appear in the navigator. Click
the card and folders to begin viewing images. The SD card will appear as E:\\DCIM (where E is the PC drive
letter, and may be some letter other than E). Click DCIM to display the folders and images on the SD card.
Format SD Card
We recommend you occasionally format your SD card. Formatting is somewhat like a factory reset and can
correct any errors that are on the SD card. Click SD CARD and then FORMAT SD CARD. Follow the instructions
displayed. ** Warning – formatting erases all files on the SD card! **
TIP – It is generally faster to format a card than it is to delete the images. Instead of moving the files from the
SD card to Trophy Room, use the Copy option. When the copy is complete use the Format command to delete
all images on the SD card.
Viewing Images
To view images first select a folder in the navigator. You can click folders to open and close them. Click an
image to view.
When an image is displayed click the left side of the image to view the previous image, click the right side to
view the next image.
To zoom left click and drag the mouse to draw a box. To un-zoom click the image.
To display a list of commands for the image either right click the image, or click the IMAGE OPTIONS
command.
Classify Image Options
Click the IMAGE OPTIONS menu to display a list of image commands. Most are self-explanatory, but a few
need further explanation. (Note – you can also right click the image to display the IMAGE OPTIONS menu).
Version June 8, 2015 Page 8 of 20
Quick Classify – Displays a list of animals for a fast way to classify images. Click the appropriate animal
and that name will be written into the image file. You can edit this list to add and remove animal
names as you desire. See tools section latter in this manual.
Classify Whitetail – Displays a dialog box to allow detailed classification of Whitetailed deer images
Add Image Comments – Allows adding comments to images.
Each image can be classified as the image subject, such as Elk, Bear, Human, etc. Whitetailed Deer can be
further classified as sex, points, and number of deer in the image.
Whitetailed Deer classification allows you to run population reports on the images to help estimate your herd
size (explained latter in this manual).
View Filter - Use Classification to Control Images Viewing
Animal classification allows you a fast and easy way to only display specific animals. For example, say you only
want to display Whitetail Bucks; you would set the view filter to Whitetailed Bucks and when you click the
NEXT or PREVIOUS image command all non-buck images will be skipped and only the buck images will be
displayed. I find this very useful when I want to show how many wolf images I have recorded to demonstrate
that the Wisconsin wolf population, at least where I hunt, is very high.
View Filter
When images are classified you can use the filter to display selected types. Click the FILTER command. Click
one or more of the types you want to display. Select All and Clear All can be used as needed. To enable the
filter click the Use View Filter above the image.
Folder Wrap
The FOLDER WRAP command controls what happens when the NEXT or PREVIOUS image command gets to the
first or last image in the folder. LOOP will continue viewing to the first or last image in the same folder. NEXT
will advance viewing to the next (or previous) folder. STOP will not allow NEXT or PREVIOUS to continue. This
feature is best when using the SLIDE SHOW method to view images.
Slide Show
Click the SLIDE SHOW command to start & stop slide show viewing. Slide show displays images very quickly
so you can quickly search for interesting animals, such as bucks. Click the image to stop the slide show. The
Folder Wrap option will control what happens when slide show reaches the last image in the folder.
Version June 8, 2015 Page 9 of 20
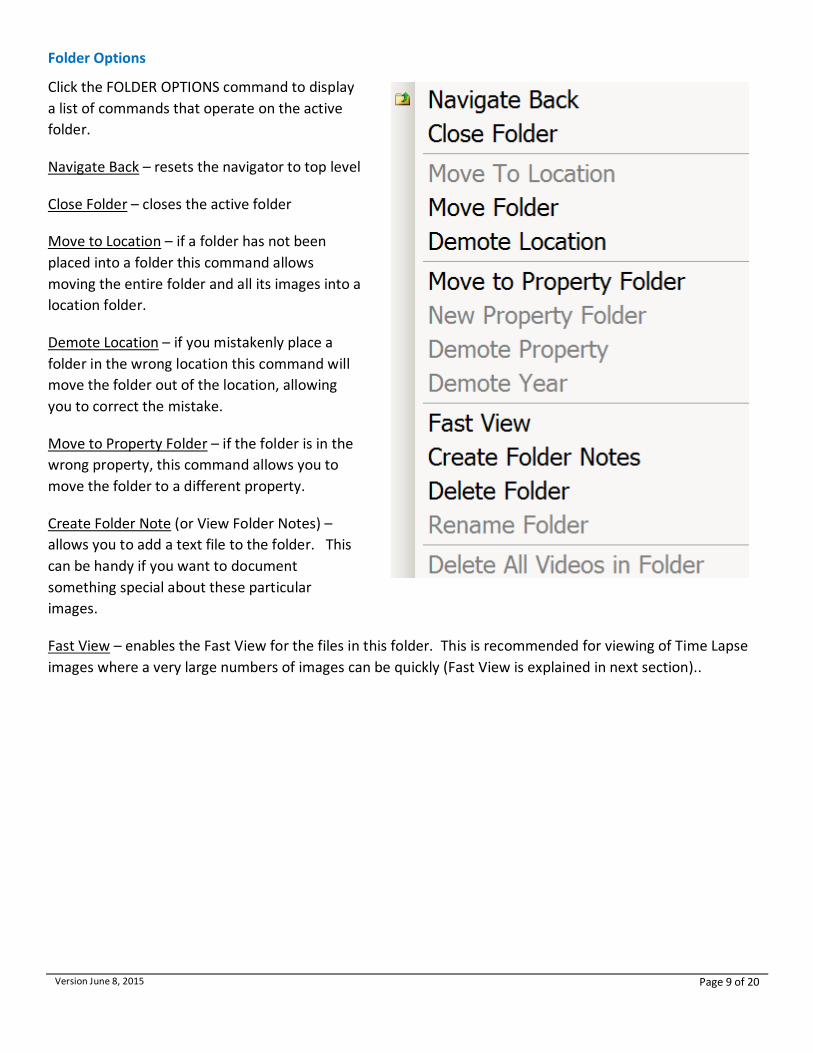
Folder Options
Click the FOLDER OPTIONS command to display
a list of commands that operate on the active
folder.
Navigate Back – resets the navigator to top level
Close Folder – closes the active folder
Move to Location – if a folder has not been
placed into a folder this command allows
moving the entire folder and all its images into a
location folder.
Demote Location – if you mistakenly place a
folder in the wrong location this command will
move the folder out of the location, allowing
you to correct the mistake.
Move to Property Folder – if the folder is in the
wrong property, this command allows you to
move the folder to a different property.
Create Folder Note (or View Folder Notes) –
allows you to add a text file to the folder. This
can be handy if you want to document
something special about these particular
images.
Fast View – enables the Fast View for the files in this folder. This is recommended for viewing of Time Lapse
images where a very large numbers of images can be quickly (Fast View is explained in next section)..
Version June 8, 2015 Page 10 of 20
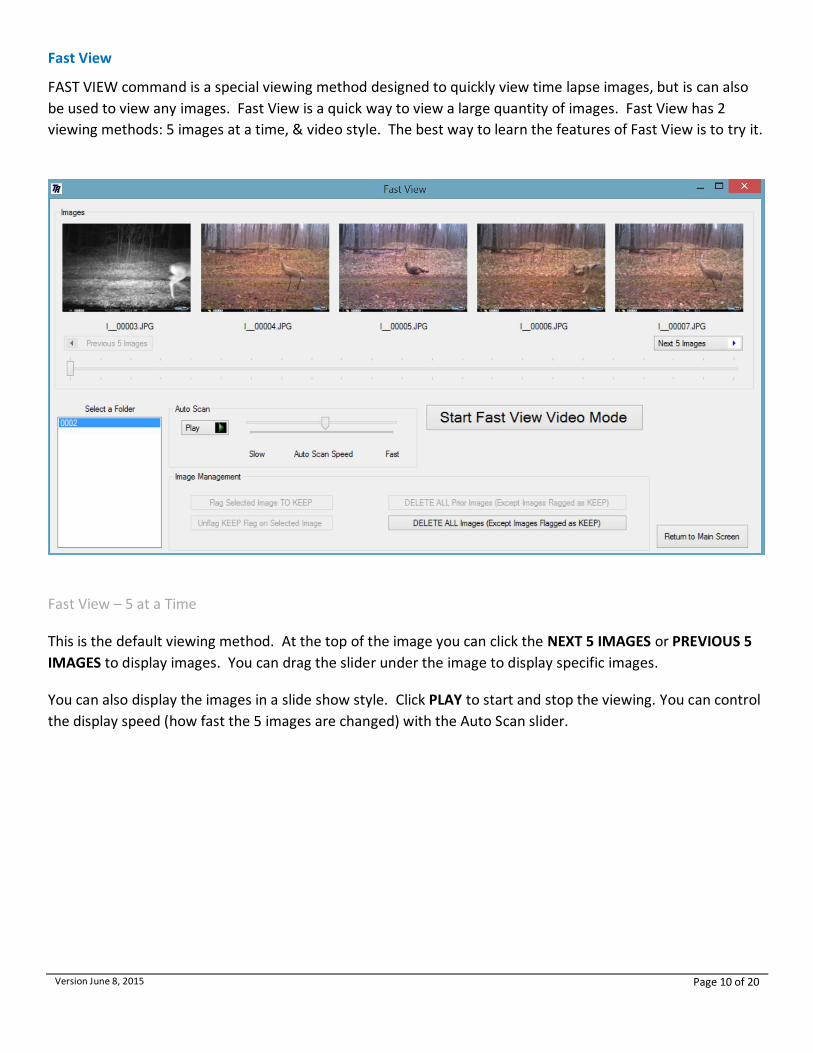
Fast View
FAST VIEW command is a special viewing method designed to quickly view time lapse images, but is can also
be used to view any images. Fast View is a quick way to view a large quantity of images. Fast View has 2
viewing methods: 5 images at a time, & video style. The best way to learn the features of Fast View is to try it.
Fast View – 5 at a Time
This is the default viewing method. At the top of the image you can click the NEXT 5 IMAGES or PREVIOUS 5
IMAGES to display images. You can drag the slider under the image to display specific images.
You can also display the images in a slide show style. Click PLAY to start and stop the viewing. You can control
the display speed (how fast the 5 images are changed) with the Auto Scan slider.
Version June 8, 2015 Page 11 of 20
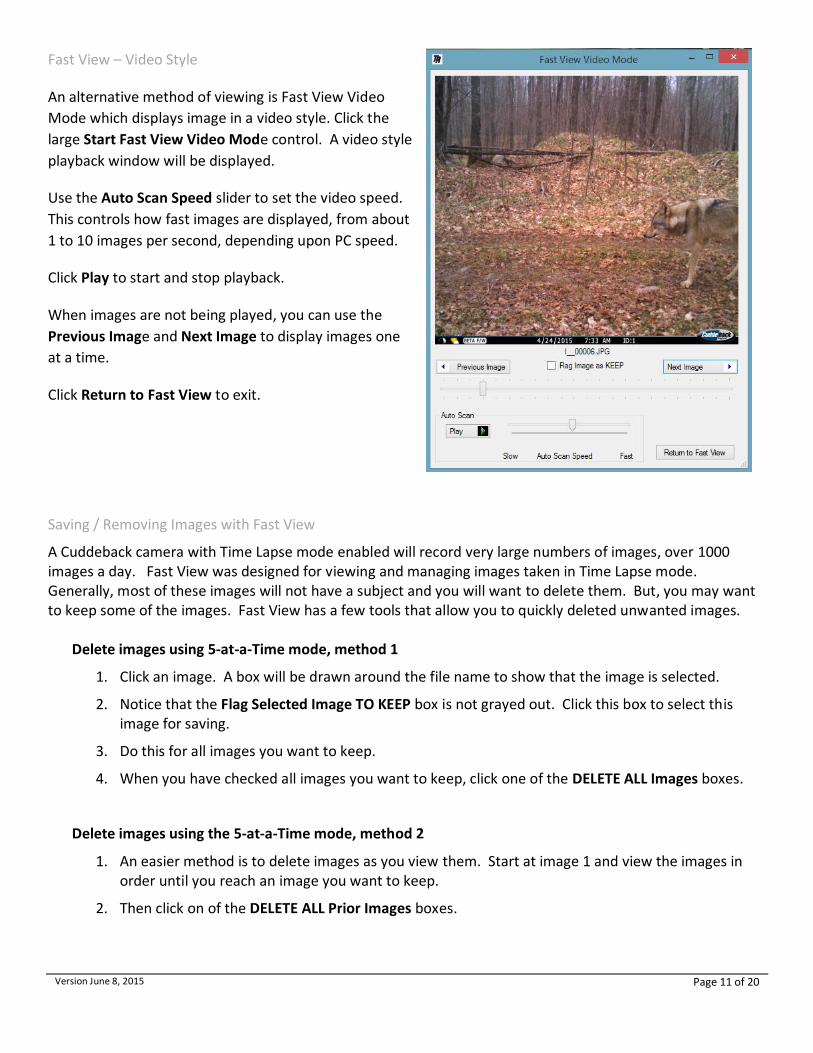
Fast View – Video Style
An alternative method of viewing is Fast View Video
Mode which displays image in a video style. Click the
large Start Fast View Video Mode control. A video style
playback window will be displayed.
Use the Auto Scan Speed slider to set the video speed.
This controls how fast images are displayed, from about
1 to 10 images per second, depending upon PC speed.
Click Play to start and stop playback.
When images are not being played, you can use the
Previous Image and Next Image to display images one
at a time.
Click Return to Fast View to exit.
Saving / Removing Images with Fast View
A Cuddeback camera with Time Lapse mode enabled will record very large numbers of images, over 1000 images a day. Fast View was designed for viewing and managing images taken in Time Lapse mode. Generally, most of these images will not have a subject and you will want to delete them. But, you may want to keep some of the images. Fast View has a few tools that allow you to quickly deleted unwanted images.
Delete images using 5-at-a-Time mode, method 1
1. Click an image. A box will be drawn around the file name to show that the image is selected.
2. Notice that the Flag Selected Image TO KEEP box is not grayed out. Click this box to select this image for saving.
3. Do this for all images you want to keep.
4. When you have checked all images you want to keep, click one of the DELETE ALL Images boxes.
Delete images using the 5-at-a-Time mode, method 2
1. An easier method is to delete images as you view them. Start at image 1 and view the images in order until you reach an image you want to keep.
2. Then click on of the DELETE ALL Prior Images boxes.
Version June 8, 2015 Page 12 of 20
Delete images in Video mode
1. Open Video Mode by clicking Start Fast View Video Mode.
2. View images and when you find an image you want to keep, click the Flag Image as KEEP box.
3. After you selected the images you want to keep, click Return to Fast View box.
4. Click one of the DELETE ALL Prior Images boxes.

Version June 8, 2015 Page 13 of 20
TOOLS
Trophy Room’s tools menu is where you can set preferences or generate advanced reports based upon your
images.
TOOLS - PREFERENCES
Display Rendering – choices are smooth and
sharp. Use the one that looks best on your
PC. Both may look the same.
Advance to Next Image after Classification –
to speed up classifying a lot of images you
can set this to Yes.
Default Display Brightness – This sets the
default brightness of images. Set this to
what you prefer.
Support Properties – if you do not want to place your images into Property folders, set this to No.
Restore Start Up Image – occasionally we will post announcements on the startup splash screen (the Trophy
Room logo page). You can use this command to restore the default image.
TOOLS – CUSTOMIZE CLASSIFICATONS
Trophy Room has default animal classifications that
you can edit. You can delete and add new animals,
and sort the order to your preference.
Add allows you to add a new animal. Edit allows
you to edit an animal, perhaps to correct a spelling
error. Delete will delete the animal from the list.
Use the Move Up, Move Down, and Sort to change
the display order.
Reset to Defaults will restore the original list.
Note – changing or editing the list or entry does not
change previously classified animals.
Version June 8, 2015 Page 14 of 20
TOOLS - MOON and SUN
Does the moon phase effect deer movement? For hundreds of years hunters have tried to determine what
makes deer move on some days, but not on others. Many believe the moon phase has some effect on deer
behavior. Trophy Room has 3 tools to allow you to study the impact the moon has on deer movement, and to
use your collection of images to predict future deer movement. Note – these tools may not work with images
from non-Cuddeback cameras.
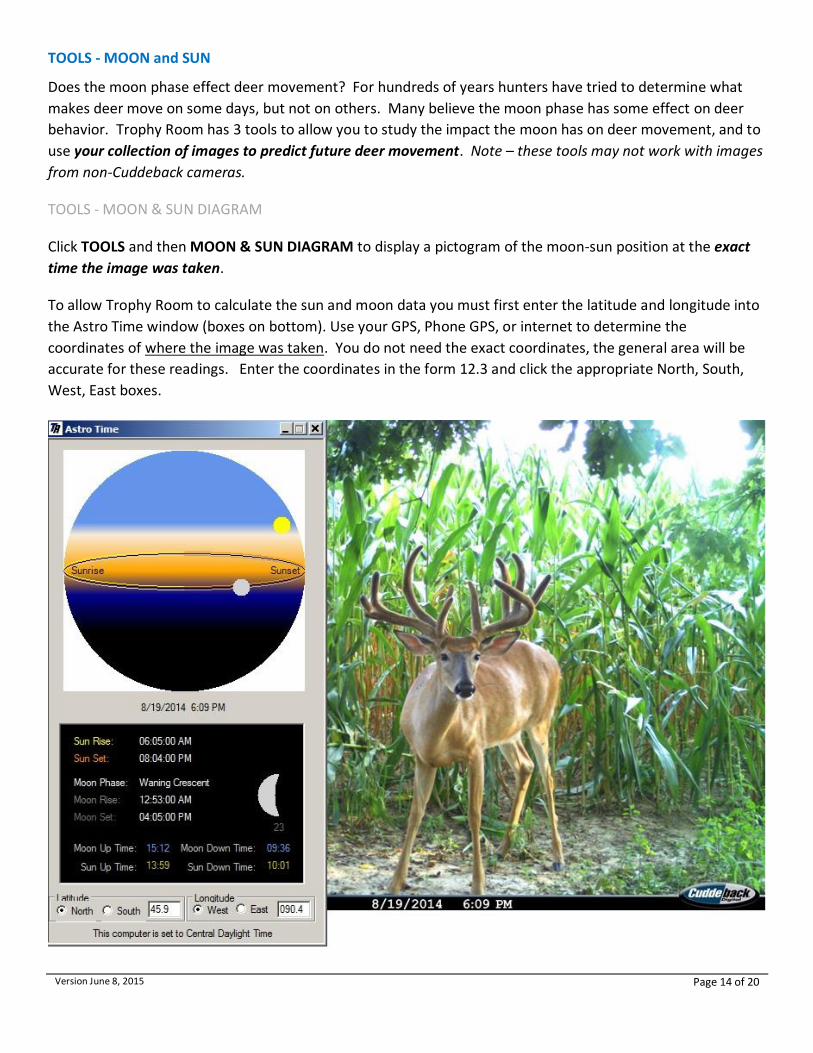
TOOLS - MOON & SUN DIAGRAM
Click TOOLS and then MOON & SUN DIAGRAM to display a pictogram of the moon-sun position at the exact
time the image was taken.
To allow Trophy Room to calculate the sun and moon data you must first enter the latitude and longitude into
the Astro Time window (boxes on bottom). Use your GPS, Phone GPS, or internet to determine the
coordinates of where the image was taken. You do not need the exact coordinates, the general area will be
accurate for these readings. Enter the coordinates in the form 12.3 and click the appropriate North, South,
West, East boxes.

Version June 8, 2015 Page 15 of 20
When the coordinates are entered correctly Trophy Room will display the moon phase, and the rise and set
times for the moon and sun, as well as how many hours moon light and sun light there are in the day. The
pictogram shows the position of the sun and moon at the precise time the image was taken. In the sample
image above the sun is a few hours from setting, and the moon is not visible in the sky.
The Astro Time display will remain on your desk top and update as you click through your images. Click the X
in the upper right to close the Astro Time window.
Version June 8, 2015 Page 16 of 20
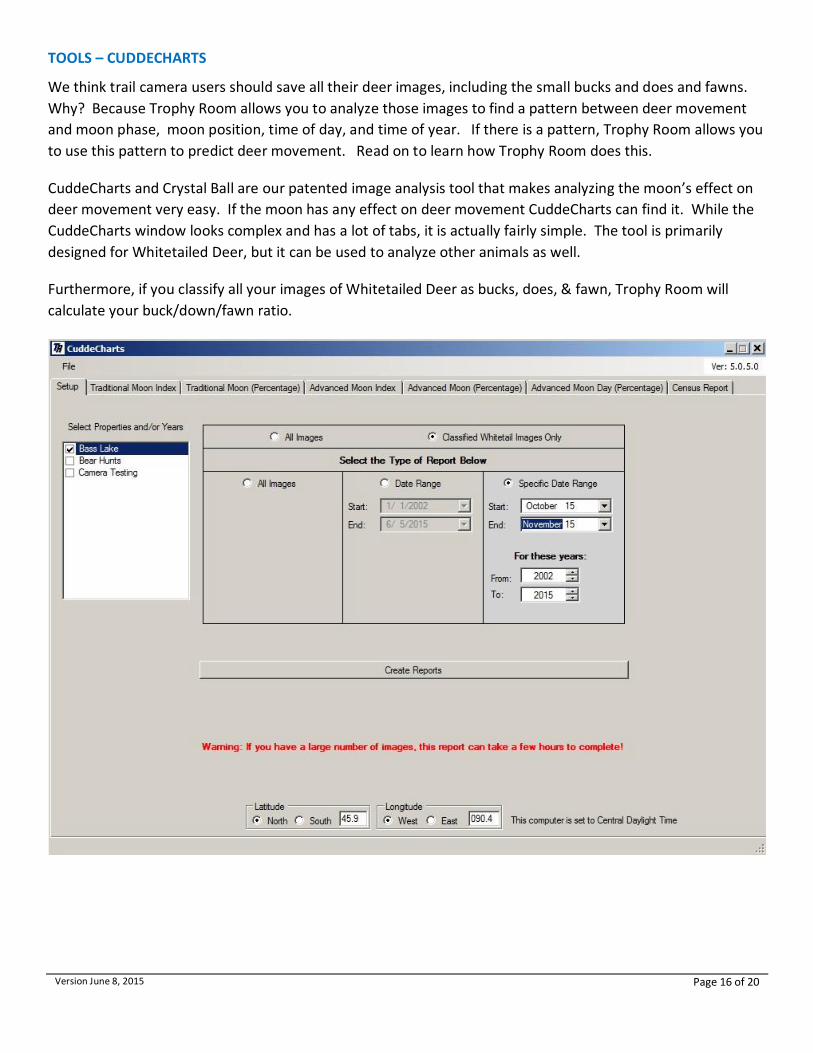
TOOLS – CUDDECHARTS
We think trail camera users should save all their deer images, including the small bucks and does and fawns.
Why? Because Trophy Room allows you to analyze those images to find a pattern between deer movement
and moon phase, moon position, time of day, and time of year. If there is a pattern, Trophy Room allows you
to use this pattern to predict deer movement. Read on to learn how Trophy Room does this.
CuddeCharts and Crystal Ball are our patented image analysis tool that makes analyzing the moon’s effect on
deer movement very easy. If the moon has any effect on deer movement CuddeCharts can find it. While the
CuddeCharts window looks complex and has a lot of tabs, it is actually fairly simple. The tool is primarily
designed for Whitetailed Deer, but it can be used to analyze other animals as well.
Furthermore, if you classify all your images of Whitetailed Deer as bucks, does, & fawn, Trophy Room will
calculate your buck/down/fawn ratio.
Version June 8, 2015 Page 17 of 20
CuddeCharts reports will be most accurate with more data. We recommend you keep every deer image you
take. This will provide CuddeCharts with enough data to accurately determine deer behavior on your
property, and estimate buck/doe/fawn ratios.
Note – CuddeCharts may not work with images taken from non-Cuddeback cameras
How CuddeCharts Works
CuddeCharts retrieves from every image the date & time the image was taken and calculates the sun position
and moon phase. It uses this data to create a detailed report of when activity occurred at each phase of the
moon. By analyzing the hundreds, thousands, or tens of thousands of images your trail cameras records it is
statistically probable that if there is a correlation, CuddeCharts will find it.
CuddeCharts Reports
Traditional Moon Index. This report is similar to the popular moon tables published in newspapers and
magazines. There are approximately 29 days in a moon cycle. For each day the report tallies the number of
images recorded when the moon is at 4 positions (straight up, straight down, straight east, straight west).
The report is generated in actual image numbers and in easy to read percentage.
Advanced Moon Index. After we analyzed over 30,000 images using the traditional method, we did not notice
much of a relationship between moon and images taken. This lead us to generate our own analyze based
upon what we know about deer behavior; mainly that deer are most active at dusk and dawn. Instead of
breaking the day into the 4 positions of the moon, which will occur anytime during the day, we broke the day
into 6 periods the coincide with deer movement: early morning, late morning, early afternoon, late afternoon,
and 2 nighttime periods. CuddeCharts will analyze the images for each day of the moon phase and tally the
number of images into these 6 periods. This report is displayed in 3 ways: actual numbers, percentages, and a
day only percentage.
The Advanced Moon Day report is very useful in that it only displays data during daylight, when it is legal to
hunt deer. Using this report you can attempt to predict when deer will move during hunting hours. See
section Crystal Ball later in this manual for how you can use these reports to predict future deer movement.
Census Report tallies all images that are classified as whitetail deer and determines the buck / doe/ fawn
ratio.
Date Ranges
Because deer behavior varies by time of year, CuddeCharts allows you to select how the reports are
generated. There is 2 options:
Date Range – select a start date and an end date and all images in this range are analyzed.
Specific Date Range – the method is much more useful in that you can select a period of time in a year,
then analyze that period over many years. For example, select a date range of October 15 to
Version June 8, 2015 Page 18 of 20
November 15 (the rut), and years 2003 to 2015. This will allow you to analyze deer movement only
during the rut.
Properties & Images
Use the properties check boxes to select which images you want to run the report on. This allows you to
exclude unwanted images. For example, I exclude by Bear Baits, and Camera Testing properties.
If you take the effort to classify all your images, you will want to check Classified Whitetail Image Only.
Otherwise you should check All Images. By classifying your images your reports will be much more accurate
as only whitetail deer images are analyzed.
Once you have selected the properties, the images, and the date range, click Create Reports. Note, depending
upon how many images you have and how fast your PC is, this report can take many hours to complete.
Saving Reports
After your reports has processed, you may want to save the report. Click File and Save Reports to File. We
recommend saving the report with a descriptive name, such as Oct15-to-Nov15.
You recommend you also save the report as a prediction file to be used in Crystal Ball to predict future deer
movement. Click File and Save Prediction File. See next section on Crystal Ball.
Getting Started
To help you learn how to use these reports Trophy Room includes default data which is taken from over
50,000 actual images recorded in Wisconsin from 2003 thru 2012. Click File and Load Default Report File.
Then check out the data in the 5 reports and census tabs. This will give you a good idea of how CuddeCharts
works and what is does.
Version June 8, 2015 Page 19 of 20
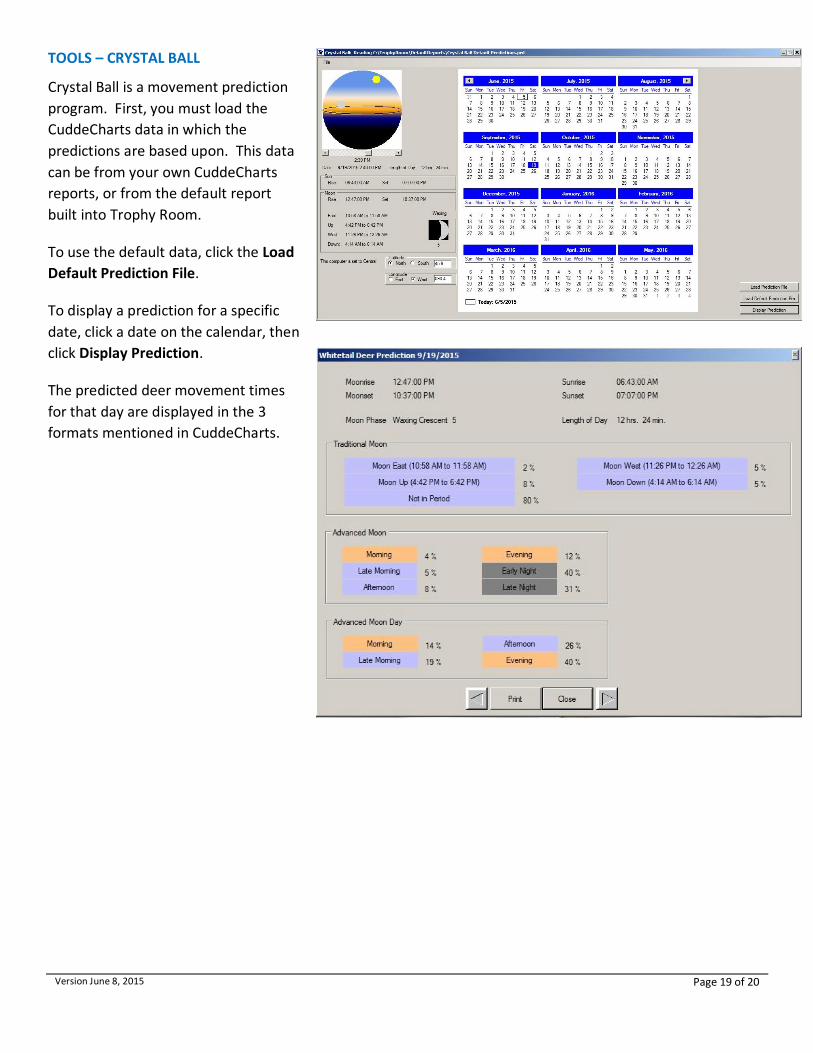
TOOLS – CRYSTAL BALL
Crystal Ball is a movement prediction
program. First, you must load the
CuddeCharts data in which the
predictions are based upon. This data
can be from your own CuddeCharts
reports, or from the default report
built into Trophy Room.
To use the default data, click the Load
Default Prediction File.
To display a prediction for a specific
date, click a date on the calendar, then
click Display Prediction.
The predicted deer movement times
for that day are displayed in the 3
formats mentioned in CuddeCharts.
Version June 8, 2015 Page 20 of 20
Appendix A – Firmware Updates
Cuddeback Trail Cameras use firmware that we periodically improve to make the cameras operate better. We
recommend you have the most recent firmware installed in your camera. Trophy Room makes keeping your
camera’s firmware up to date very easy.
1. Trophy Room will automatically download the most recent firmware for Cuddeback cameras.
2. Trophy Room will check your Cuddeback trail camera images and if newer firmware is available you will
be promoted to update your camera.
3. If you are prompted to update the camera, insert a SD card into your PC’s card reader and allow
Trophy Room to copy the firmware files to the SD card.
4. Update the camera by placing the SD card into the camera and executing the LOAD F/W command.
The LOAD command is in the MENU setting on Attack and Ambush cameras, and under the
COMMANDS menu on C & E model cameras.
5. Note – the same SD card can be used to update all your Cuddeback cameras.
6. Refer to your camera’s owner’s manual for additional instructions on how to update the firmware.
Click Trophy Room’s TIPS & PRODUCTS to find the manual for your camera.
Note – updating firmware requires the camera to have batteries with a 50% or higher level.