Embed Size (px)
Citation preview
TROLLING MOTORSELEKTRO-BOOTS-MOTORENMOTEURS ELECTRIQUESSILNIKI ELEKTRYCZNEMOTORE ELETTRICO
Owners Manual · Bedienungsanleitung Manuel d'utilisation · Instrukcja ObsługiManuale d’istruzioni
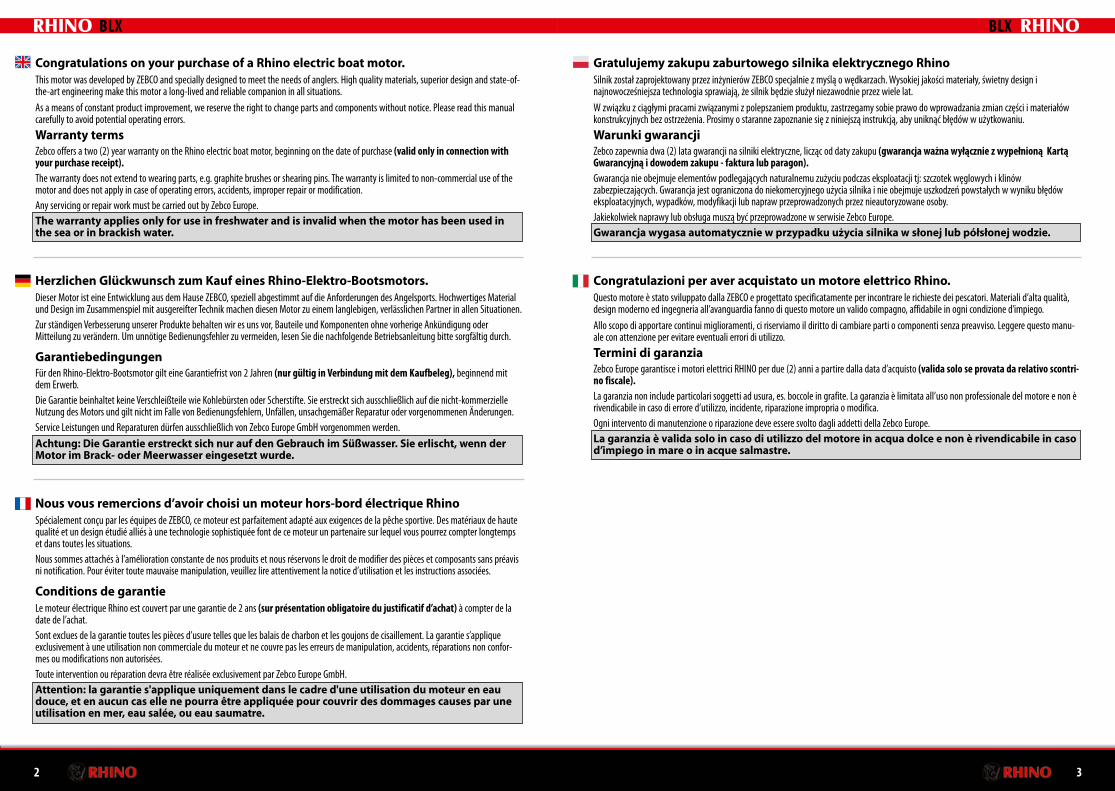
Congratulations on your purchase of a Rhino electric boat motor. This motor was developed by ZEBCO and specially designed to meet the needs of anglers. High quality materials, superior design and state-of-the-art engineering make this motor a long-lived and reliable companion in all situations.As a means of constant product improvement, we reserve the right to change parts and components without notice. Please read this manual carefully to avoid potential operating errors.Warranty termsZebco offers a two (2) year warranty on the Rhino electric boat motor, beginning on the date of purchase (valid only in connection with your purchase receipt).The warranty does not extend to wearing parts, e.g. graphite brushes or shearing pins. The warranty is limited to non-commercial use of the motor and does not apply in case of operating errors, accidents, improper repair or modification.Any servicing or repair work must be carried out by Zebco Europe.The warranty applies only for use in freshwater and is invalid when the motor has been used in the sea or in brackish water.
Herzlichen Glückwunsch zum Kauf eines Rhino-Elektro-Bootsmotors. Dieser Motor ist eine Entwicklung aus dem Hause ZEBCO, speziell abgestimmt auf die Anforderungen des Angelsports. Hochwertiges Material und Design im Zusammenspiel mit ausgereifter Technik machen diesen Motor zu einem langlebigen, verlässlichen Partner in allen Situationen.Zur ständigen Verbesserung unserer Produkte behalten wir es uns vor, Bauteile und Kompo nenten ohne vorherige Ankündigung oder Mitteilung zu verändern. Um unnötige Bedienungsfehler zu vermeiden, lesen Sie die nachfolgende Betriebsanleitung bitte sorgfältig durch.
GarantiebedingungenFür den Rhino-Elektro-Bootsmotor gilt eine Garantiefrist von 2 Jahren (nur gültig in Ver bind ung mit dem Kaufbeleg), beginnend mit dem Erwerb. Die Garantie beinhaltet keine Verschleißteile wie Kohlebürsten oder Scherstifte. Sie erstreckt sich ausschließlich auf die nicht-kommerzielle Nutzung des Motors und gilt nicht im Falle von Bedienungsfehlern, Unfällen, unsachgemäßer Reparatur oder vorgenommenen Änderungen.Service Leistungen und Reparaturen dürfen ausschließlich von Zebco Europe GmbH vorgenommen werden.Achtung: Die Garantie erstreckt sich nur auf den Gebrauch im Süßwasser. Sie erlischt, wenn der Motor im Brack- oder Meerwasser eingesetzt wurde.
Nous vous remercions d’avoir choisi un moteur hors-bord électrique RhinoSpécialement conçu par les équipes de ZEBCO, ce moteur est parfaitement adapté aux exigences de la pêche sportive. Des matériaux de haute qualité et un design étudié alliés à une technologie sophistiquée font de ce moteur un partenaire sur lequel vous pourrez compter longtemps et dans toutes les situations.Nous sommes attachés à l’amélioration constante de nos produits et nous réservons le droit de modifier des pièces et composants sans préavis ni notification. Pour éviter toute mauvaise manipulation, veuillez lire attentivement la notice d’utilisation et les instructions associées.
Conditions de garantieLe moteur électrique Rhino est couvert par une garantie de 2 ans (sur présentation obligatoire du justificatif d’achat) à compter de la date de l’achat.Sont exclues de la garantie toutes les pièces d’usure telles que les balais de charbon et les goujons de cisaillement. La garantie s’applique exclusivement à une utilisation non commerciale du moteur et ne couvre pas les erreurs de manipulation, accidents, réparations non confor-mes ou modifications non autorisées.Toute intervention ou réparation devra être réalisée exclusivement par Zebco Europe GmbH.Attention: la garantie s'applique uniquement dans le cadre d'une utilisation du moteur en eau douce, et en aucun cas elle ne pourra être appliquée pour couvrir des dommages causes par une utilisation en mer, eau salée, ou eau saumatre.
Gratulujemy zakupu zaburtowego silnika elektrycznego Rhino Silnik został zaprojektowany przez inżynierów ZEBCO specjalnie z myślą o wędkarzach. Wysokiej jakości materiały, świetny design i najnowocześniejsza technologia sprawiają, że silnik będzie służył niezawodnie przez wiele lat.W związku z ciągłymi pracami związanymi z polepszaniem produktu, zastrzegamy sobie prawo do wprowadzania zmian części i materiałów konstrukcyjnych bez ostrzeżenia. Prosimy o staranne zapoznanie się z niniejszą instrukcją, aby uniknąć błędów w użytkowaniu.Warunki gwarancjiZebco zapewnia dwa (2) lata gwarancji na silniki elektryczne, licząc od daty zakupu (gwarancja ważna wyłącznie z wypełnioną Kartą Gwarancyjną i dowodem zakupu - faktura lub paragon).Gwarancja nie obejmuje elementów podlegających naturalnemu zużyciu podczas eksploatacji tj: szczotek węglowych i klinów zabezpieczających. Gwarancja jest ograniczona do niekomercyjnego użycia silnika i nie obejmuje uszkodzeń powstałych w wyniku błędów eksploatacyjnych, wypadków, modyfikacji lub napraw przeprowadzonych przez nieautoryzowane osoby.Jakiekolwiek naprawy lub obsługa muszą być przeprowadzone w serwisie Zebco Europe.Gwarancja wygasa automatycznie w przypadku użycia silnika w słonej lub półsłonej wodzie.
Congratulazioni per aver acquistato un motore elettrico Rhino.Questo motore è stato sviluppato dalla ZEBCO e progettato specificatamente per incontrare le richieste dei pescatori. Materiali d’alta qualità, design moderno ed ingegneria all’avanguardia fanno di questo motore un valido compagno, affidabile in ogni condizione d’impiego.Allo scopo di apportare continui miglioramenti, ci riserviamo il diritto di cambiare parti o componenti senza preavviso. Leggere questo manu-ale con attenzione per evitare eventuali errori di utilizzo.Termini di garanziaZebco Europe garantisce i motori elettrici RHINO per due (2) anni a partire dalla data d’acquisto (valida solo se provata da relativo scontri-no fiscale).La garanzia non include particolari soggetti ad usura, es. boccole in grafite. La garanzia è limitata all’uso non professionale del motore e non è rivendicabile in caso di errore d’utilizzo, incidente, riparazione impropria o modifica.Ogni intervento di manutenzione o riparazione deve essere svolto dagli addetti della Zebco Europe.La garanzia è valida solo in caso di utilizzo del motore in acqua dolce e non è rivendicabile in caso d’impiego in mare o in acque salmastre.
2 3
BLX BLX
4 5
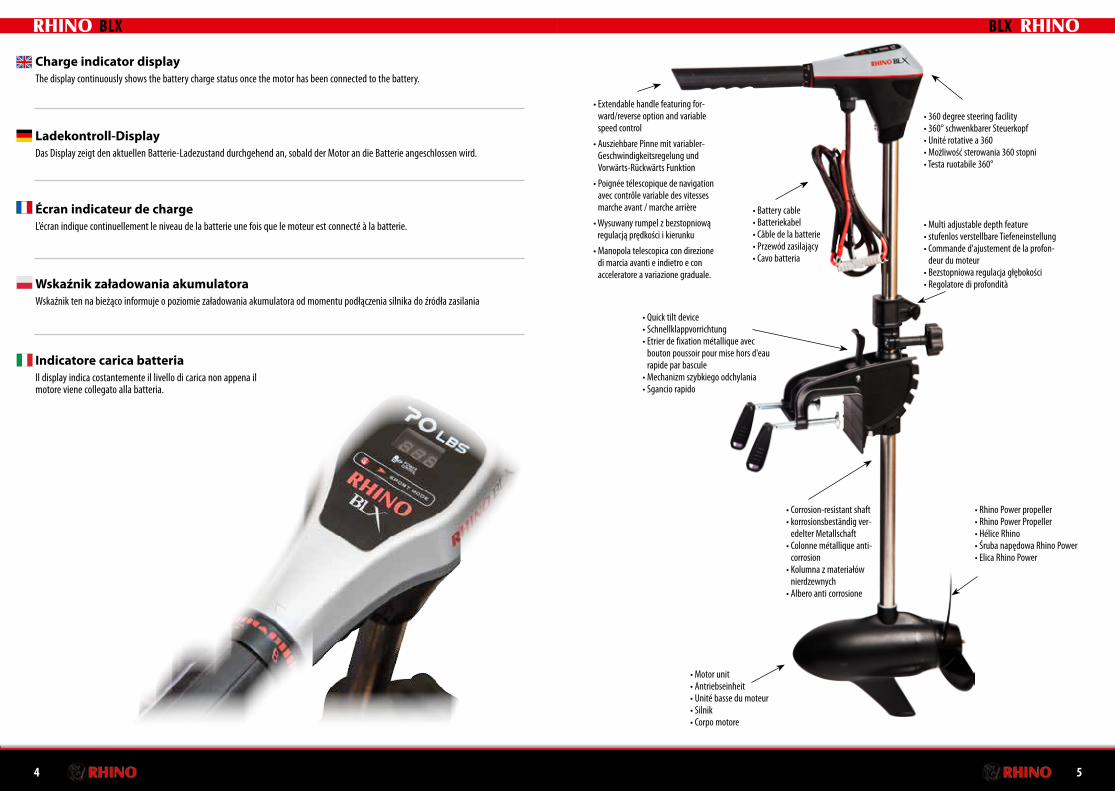
• Quick tilt device• Schnellklappvorrichtung • Etrier de fixation métallique avec
bouton poussoir pour mise hors d'eau rapide par bascule
• Mechanizm szybkiego odchylania• Sgancio rapido
• Rhino Power propeller• Rhino Power Propeller • Hélice Rhino• Śruba napędowa Rhino Power• Elica Rhino Power
• Multi adjustable depth feature• stufenlos verstellbare Tiefeneinstellung• Commande d'ajustement de la profon-
deur du moteur• Bezstopniowa regulacja głębokości• Regolatore di profondità
• 360 degree steering facility• 360° schwenkbarer Steuerkopf• Unité rotative a 360• Możliwość sterowania 360 stopni• Testa ruotabile 360°
• Motor unit• Antriebseinheit • Unité basse du moteur• Silnik• Corpo motore
• Extendable handle featuring for-ward/reverse option and variable speed control
• Ausziehbare Pinne mit variabler-Geschwindigkeitsregelung und Vorwärts-Rückwärts Funktion
• Poignée télescopique de navigation avec contrôle variable des vitesses marche avant / marche arrière
• Wysuwany rumpel z bezstopniową regulacją prędkości i kierunku
• Manopola telescopica con direzione di marcia avanti e indietro e con acceleratore a variazione graduale.
• Battery cable• Batteriekabel• Câble de la batterie• Przewód zasilający• Cavo batteria
Écran indicateur de charge L’écran indique continuellement le niveau de la batterie une fois que le moteur est connecté à la batterie.
Ladekontroll-Display Das Display zeigt den aktuellen Batterie-Ladezustand durchgehend an, sobald der Motor an die Batterie angeschlossen wird.
Charge indicator display The display continuously shows the battery charge status once the motor has been connected to the battery.
Wskaźnik załadowania akumulatoraWskaźnik ten na bieżąco informuje o poziomie załadowania akumulatora od momentu podłączenia silnika do źródła zasilania
Indicatore carica batteriaIl display indica costantemente il livello di carica non appena il motore viene collegato alla batteria.
• Corrosion-resistant shaft• korrosionsbeständig ver-
edelter Metallschaft• Colonne métallique anti-
corrosion• Kolumna z materiałów
nierdzewnych• Albero anti corrosione
BLX BLX
6 7
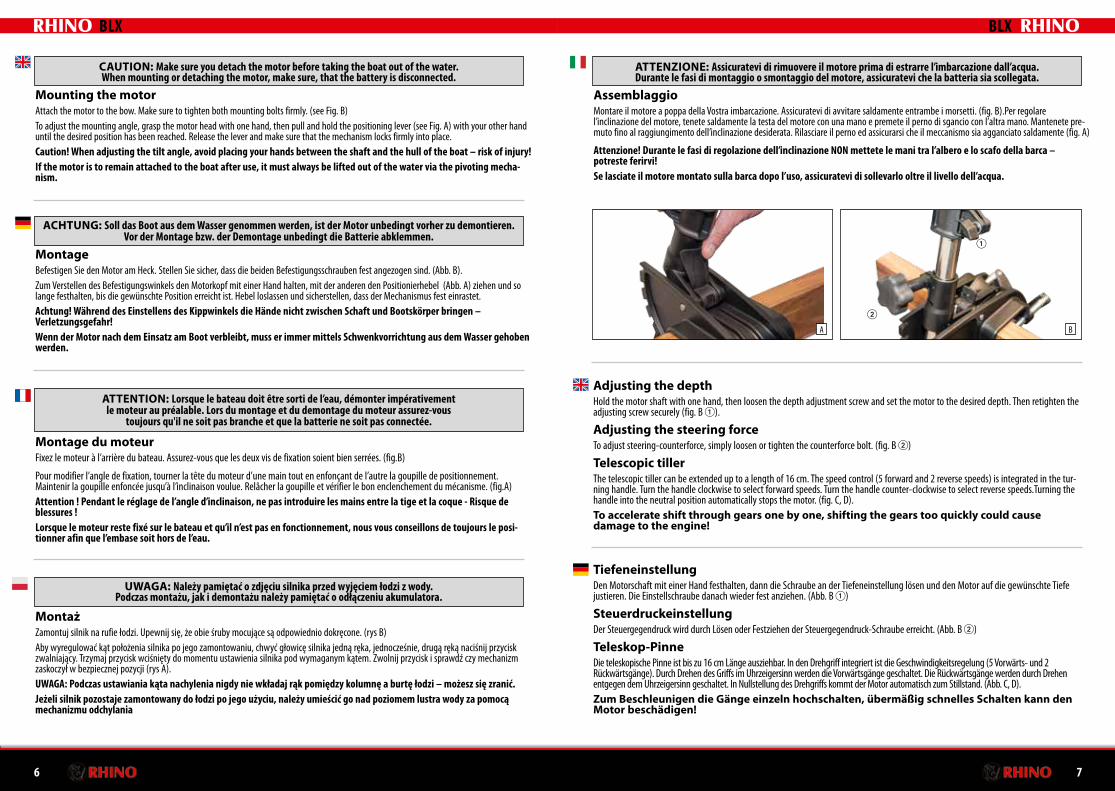
Adjusting the depthHold the motor shaft with one hand, then loosen the depth adjustment screw and set the motor to the desired depth. Then retighten the adjusting screw securely (fig. B ).
Adjusting the steering forceTo adjust steering-counterforce, simply loosen or tighten the counterforce bolt. (fig. B )
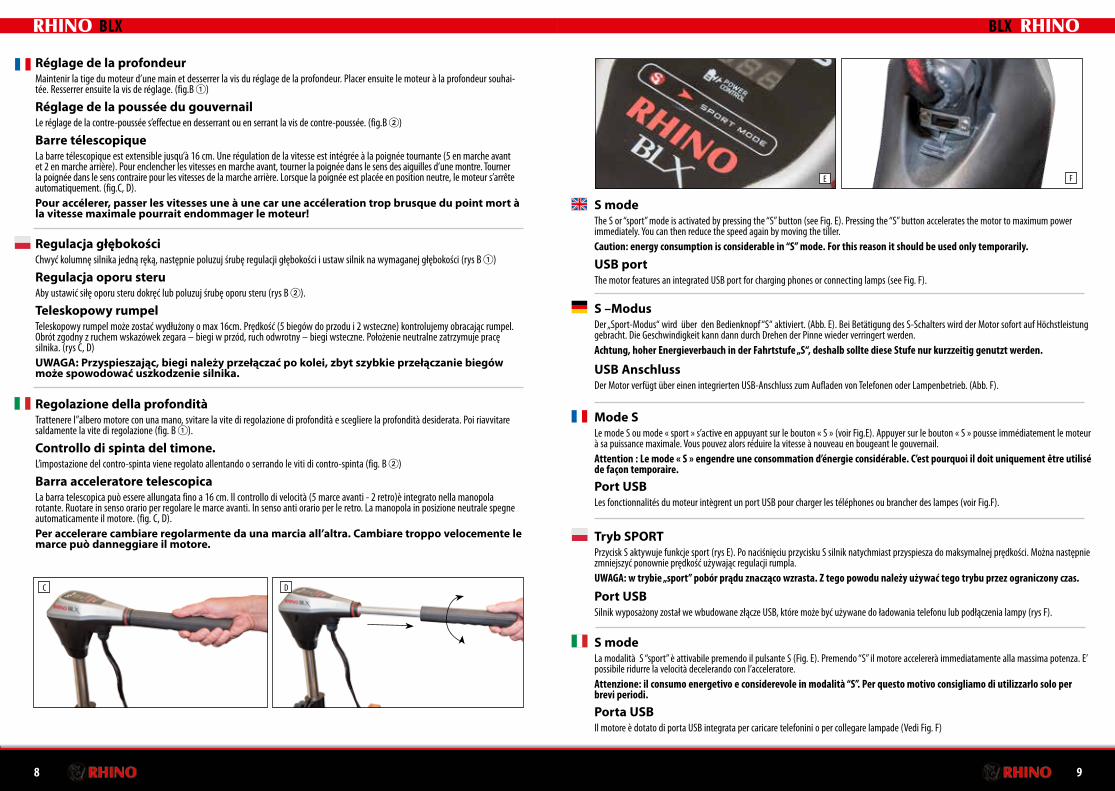
Telescopic tillerThe telescopic tiller can be extended up to a length of 16 cm. The speed control (5 forward and 2 reverse speeds) is integrated in the tur-ning handle. Turn the handle clockwise to select forward speeds. Turn the handle counter-clockwise to select reverse speeds.Turning the handle into the neutral position automatically stops the motor. (fig. C, D).To accelerate shift through gears one by one, shifting the gears too quickly could cause damage to the engine!
TiefeneinstellungDen Motorschaft mit einer Hand festhalten, dann die Schraube an der Tiefeneinstellung lösen und den Motor auf die gewünschte Tiefe justieren. Die Einstellschraube danach wieder fest anziehen. (Abb. B )
SteuerdruckeinstellungDer Steuergegendruck wird durch Lösen oder Festziehen der Steuergegendruck-Schraube erreicht. (Abb. B )
Teleskop-PinneDie teleskopische Pinne ist bis zu 16 cm Länge ausziehbar. In den Drehgriff integriert ist die Geschwin digkeitsregelung (5 Vorwärts- und 2 Rückwärtsgänge). Durch Drehen des Griffs im Uhrzeigersinn werden die Vorwärtsgänge geschaltet. Die Rückwärtsgänge werden durch Drehen entgegen dem Uhrzeigersinn geschaltet. In Nullstellung des Drehgriffs kommt der Motor automatisch zum Stillstand. (Abb. C, D).Zum Beschleunigen die Gänge einzeln hochschalten, übermäßig schnelles Schalten kann den Motor beschädigen!
Mounting the motorAttach the motor to the bow. Make sure to tighten both mounting bolts firmly. (see Fig. B)To adjust the mounting angle, grasp the motor head with one hand, then pull and hold the positioning lever (see Fig. A) with your other hand until the desired position has been reached. Release the lever and make sure that the mechanism locks firmly into place.Caution! When adjusting the tilt angle, avoid placing your hands between the shaft and the hull of the boat – risk of injury!If the motor is to remain attached to the boat after use, it must always be lifted out of the water via the pivoting mecha-nism.
MontażZamontuj silnik na rufie łodzi. Upewnij się, że obie śruby mocujące są odpowiednio dokręcone. (rys B)Aby wyregulować kąt położenia silnika po jego zamontowaniu, chwyć głowicę silnika jedną ręka, jednocześnie, drugą ręką naciśnij przycisk zwalniający. Trzymaj przycisk wciśnięty do momentu ustawienia silnika pod wymaganym kątem. Zwolnij przycisk i sprawdź czy mechanizm zaskoczył w bezpiecznej pozycji (rys A).UWAGA: Podczas ustawiania kąta nachylenia nigdy nie wkładaj rąk pomiędzy kolumnę a burtę łodzi – możesz się zranić.Jeżeli silnik pozostaje zamontowany do łodzi po jego użyciu, należy umieścić go nad poziomem lustra wody za pomocą mechanizmu odchylania
AssemblaggioMontare il motore a poppa della Vostra imbarcazione. Assicuratevi di avvitare saldamente entrambe i morsetti. (fig. B).Per regolare l’inclinazione del motore, tenete saldamente la testa del motore con una mano e premete il perno di sgancio con l’altra mano. Mantenete pre-muto fino al raggiungimento dell’inclinazione desiderata. Rilasciare il perno ed assicurarsi che il meccanismo sia agganciato saldamente (fig. A)
Attenzione! Durante le fasi di regolazione dell’inclinazione NON mettete le mani tra l’albero e lo scafo della barca – potreste ferirvi!Se lasciate il motore montato sulla barca dopo l’uso, assicuratevi di sollevarlo oltre il livello dell’acqua.
MontageBefestigen Sie den Motor am Heck. Stellen Sie sicher, dass die beiden Befestigungsschrauben fest angezogen sind. (Abb. B).Zum Verstellen des Befestigungswinkels den Motorkopf mit einer Hand halten, mit der anderen den Positionierhebel (Abb. A) ziehen und so lange festhalten, bis die gewünschte Position erreicht ist. Hebel loslassen und sicherstellen, dass der Mechanismus fest einrastet. Achtung! Während des Einstellens des Kippwinkels die Hände nicht zwischen Schaft und Bootskörper bringen – Verletzungsgefahr!Wenn der Motor nach dem Einsatz am Boot verbleibt, muss er immer mittels Schwenkvorrichtung aus dem Wasser gehoben werden.
CAUTION: Make sure you detach the motor before taking the boat out of the water. When mounting or detaching the motor, make sure, that the battery is disconnected.
UWAGA: Należy pamiętać o zdjęciu silnika przed wyjęciem łodzi z wody. Podczas montażu, jak i demontażu należy pamiętać o odłączeniu akumulatora.
ATTENZIONE: Assicuratevi di rimuovere il motore prima di estrarre l’imbarcazione dall’acqua. Durante le fasi di montaggio o smontaggio del motore, assicuratevi che la batteria sia scollegata.
ACHTUNG: Soll das Boot aus dem Wasser genommen werden, ist der Motor unbedingt vorher zu demontieren. Vor der Montage bzw. der Demontage unbedingt die Batterie abklemmen.
ATTENTION: Lorsque le bateau doit être sorti de l’eau, démonter impérativement le moteur au préalable. Lors du montage et du demontage du moteur assurez-vous
toujours qu'il ne soit pas branche et que la batterie ne soit pas connectée.
Montage du moteur Fixez le moteur à l’arrière du bateau. Assurez-vous que les deux vis de fixation soient bien serrées. (fig.B)
Pour modifier l’angle de fixation, tourner la tête du moteur d’une main tout en enfonçant de l’autre la goupille de positionnement. Maintenir la goupille enfoncée jusqu’à l’inclinaison voulue. Relâcher la goupille et vérifier le bon enclenchement du mécanisme. (fig.A)Attention ! Pendant le réglage de l’angle d’inclinaison, ne pas introduire les mains entre la tige et la coque - Risque de blessures !Lorsque le moteur reste fixé sur le bateau et qu’il n’est pas en fonctionnement, nous vous conseillons de toujours le posi-tionner afin que l’embase soit hors de l’eau.
A B
BLX BLX
8 9
C D
Réglage de la profondeurMaintenir la tige du moteur d’une main et desserrer la vis du réglage de la profondeur. Placer ensuite le moteur à la profondeur souhai-tée. Resserrer ensuite la vis de réglage. (fig.B )
Réglage de la poussée du gouvernailLe réglage de la contre-poussée s’effectue en desserrant ou en serrant la vis de contre-poussée. (fig.B )
Barre télescopiqueLa barre télescopique est extensible jusqu’à 16 cm. Une régulation de la vitesse est intégrée à la poignée tournante (5 en marche avant et 2 en marche arrière). Pour enclencher les vitesses en marche avant, tourner la poignée dans le sens des aiguilles d’une montre. Tourner la poignée dans le sens contraire pour les vitesses de la marche arrière. Lorsque la poignée est placée en position neutre, le moteur s’arrête automatiquement. (fig.C, D). Pour accélerer, passer les vitesses une à une car une accéleration trop brusque du point mort à la vitesse maximale pourrait endommager le moteur!
Regulacja głębokościChwyć kolumnę silnika jedną ręką, następnie poluzuj śrubę regulacji głębokości i ustaw silnik na wymaganej głębokości (rys B )
Regulacja oporu steruAby ustawić siłę oporu steru dokręć lub poluzuj śrubę oporu steru (rys B ).
Teleskopowy rumpelTeleskopowy rumpel może zostać wydłużony o max 16cm. Prędkość (5 biegów do przodu i 2 wsteczne) kontrolujemy obracając rumpel. Obrót zgodny z ruchem wskazówek zegara – biegi w przód, ruch odwrotny – biegi wsteczne. Położenie neutralne zatrzymuje pracę silnika. (rys C, D)UWAGA: Przyspieszając, biegi należy przełączać po kolei, zbyt szybkie przełączanie biegów może spowodować uszkodzenie silnika.
Regolazione della profonditàTrattenere l’’albero motore con una mano, svitare la vite di regolazione di profondità e scegliere la profondità desiderata. Poi riavvitare saldamente la vite di regolazione (fig. B ).
Controllo di spinta del timone.L’impostazione del contro-spinta viene regolato allentando o serrando le viti di contro-spinta (fig. B )
Barra acceleratore telescopicaLa barra telescopica può essere allungata fino a 16 cm. Il controllo di velocità (5 marce avanti - 2 retro)è integrato nella manopola rotante. Ruotare in senso orario per regolare le marce avanti. In senso anti orario per le retro. La manopola in posizione neutrale spegne automaticamente il motore. (fig. C, D).Per accelerare cambiare regolarmente da una marcia all’altra. Cambiare troppo velocemente le marce può danneggiare il motore.
BLX BLX
S –ModusDer „Sport-Modus“ wird über den Bedienknopf “S“ aktiviert. (Abb. E). Bei Betätigung des S-Schalters wird der Motor sofort auf Höchstleistung gebracht. Die Geschwindigkeit kann dann durch Drehen der Pinne wieder verringert werden. Achtung, hoher Energieverbauch in der Fahrtstufe „S“, deshalb sollte diese Stufe nur kurzzeitig genutzt werden.
Mode SLe mode S ou mode « sport » s’active en appuyant sur le bouton « S » (voir Fig.E). Appuyer sur le bouton « S » pousse immédiatement le moteur à sa puissance maximale. Vous pouvez alors réduire la vitesse à nouveau en bougeant le gouvernail. Attention : Le mode « S » engendre une consommation d’énergie considérable. C’est pourquoi il doit uniquement être utilisé de façon temporaire.
Tryb SPORTPrzycisk S aktywuje funkcje sport (rys E). Po naciśnięciu przycisku S silnik natychmiast przyspiesza do maksymalnej prędkości. Można następnie zmniejszyć ponownie prędkość używając regulacji rumpla. UWAGA: w trybie „sport” pobór prądu znacząco wzrasta. Z tego powodu należy używać tego trybu przez ograniczony czas.
S modeLa modalità S “sport” è attivabile premendo il pulsante S (Fig. E). Premendo “S” il motore accelererà immediatamente alla massima potenza. E’ possibile ridurre la velocità decelerando con l’acceleratore.Attenzione: il consumo energetivo e considerevole in modalità “S”. Per questo motivo consigliamo di utilizzarlo solo per brevi periodi.
S modeThe S or “sport” mode is activated by pressing the “S” button (see Fig. E). Pressing the “S” button accelerates the motor to maximum power immediately. You can then reduce the speed again by moving the tiller. Caution: energy consumption is considerable in “S” mode. For this reason it should be used only temporarily.
USB AnschlussDer Motor verfügt über einen integrierten USB-Anschluss zum Aufladen von Telefonen oder Lampenbetrieb. (Abb. F).
Port USBLes fonctionnalités du moteur intègrent un port USB pour charger les téléphones ou brancher des lampes (voir Fig.F).
Port USBSilnik wyposażony został we wbudowane złącze USB, które może być używane do ładowania telefonu lub podłączenia lampy (rys F).
Porta USB Il motore è dotato di porta USB integrata per caricare telefonini o per collegare lampade (Vedi Fig. F)
USB portThe motor features an integrated USB port for charging phones or connecting lamps (see Fig. F).
FE
10 11
G H
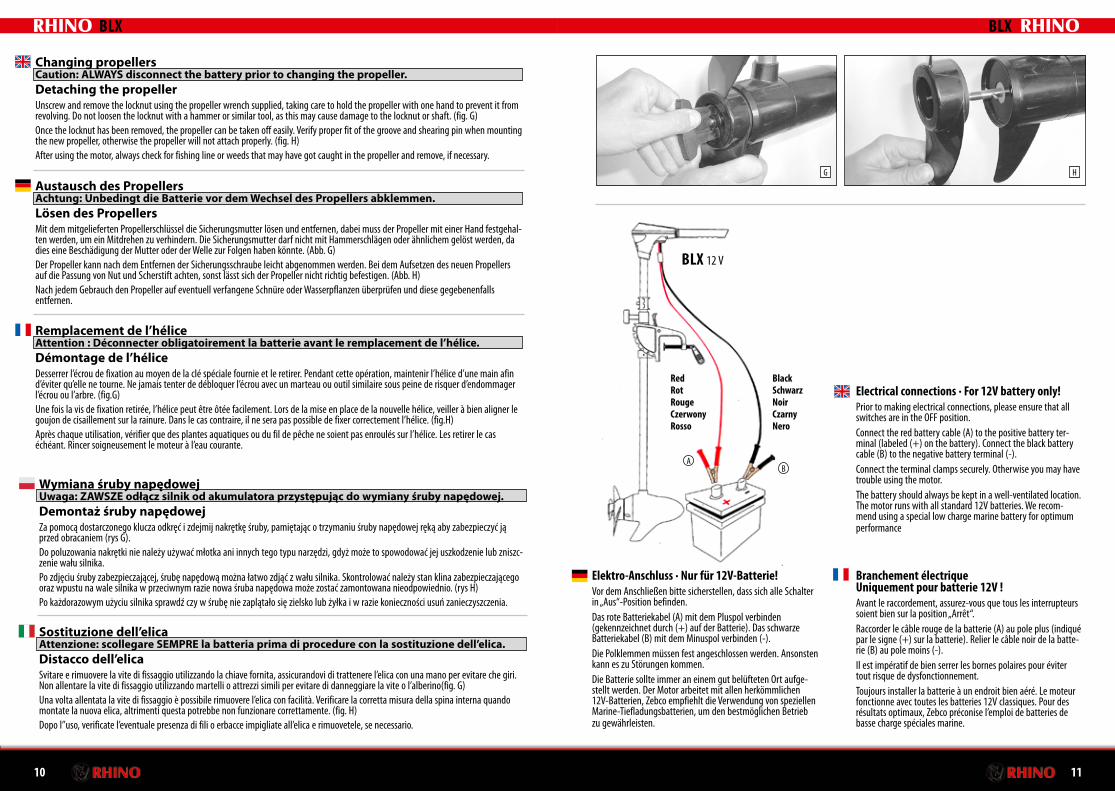
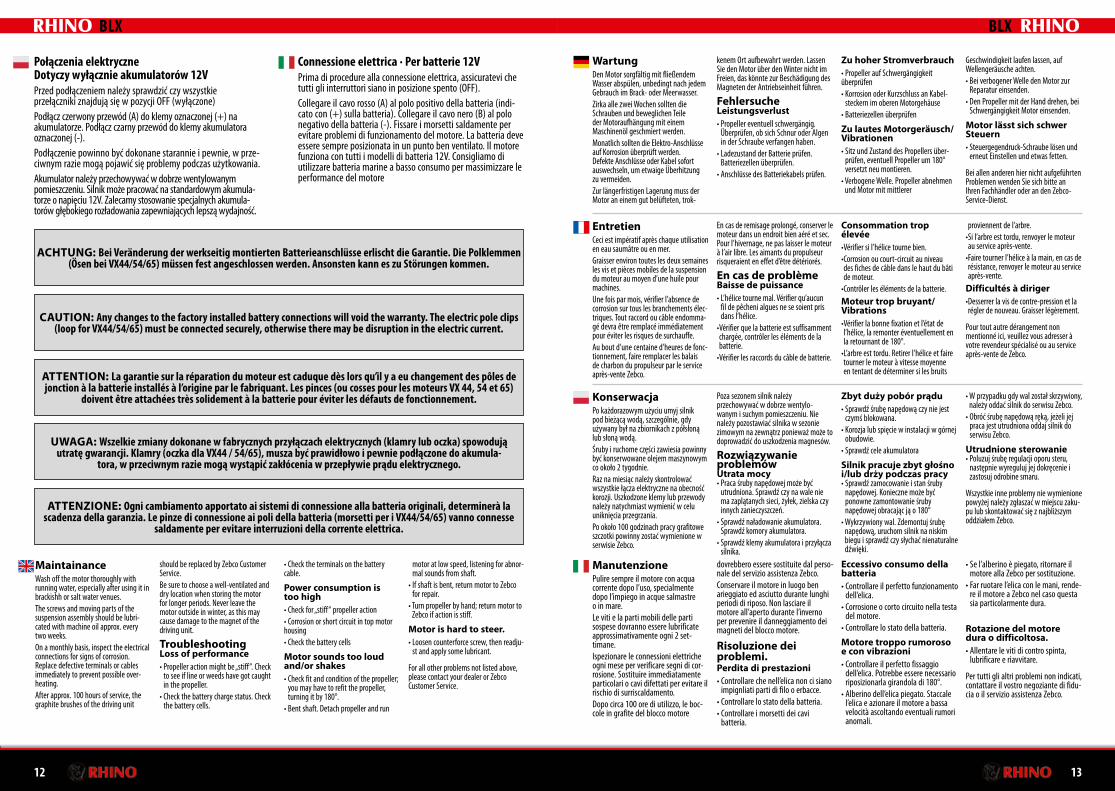
Electrical connections · For 12V battery only!Prior to making electrical connections, please ensure that all switches are in the OFF position.Connect the red battery cable (A) to the positive battery ter-minal (labeled (+) on the battery). Connect the black battery cable (B) to the negative battery terminal (-).Connect the terminal clamps securely. Otherwise you may have trouble using the motor.The battery should always be kept in a well-ventilated location. The motor runs with all standard 12V batteries. We recom-mend using a special low charge marine battery for optimum performance
Red Rot RougeCzerwonyRosso
Black Schwarz NoirCzarnyNero
AB
BLX 12 V
Elektro-Anschluss · Nur für 12V-Batterie!Vor dem Anschließen bitte sicherstellen, dass sich alle Schalter in „Aus“-Position befinden.Das rote Batteriekabel (A) mit dem Pluspol verbinden (gekennzeichnet durch (+) auf der Batterie). Das schwarze Batteriekabel (B) mit dem Minuspol verbinden (-).Die Polklemmen müssen fest angeschlossen werden. Ansonsten kann es zu Störungen kommen.Die Batterie sollte immer an einem gut belüfteten Ort aufge-stellt werden. Der Motor arbeitet mit allen herkömmlichen 12V-Batterien, Zebco empfiehlt die Verwendung von speziellen Marine-Tiefladungsbatterien, um den bestmöglichen Betrieb zu gewährleisten.
Branchement électrique Uniquement pour batterie 12V !Avant le raccordement, assurez-vous que tous les interrupteurs soient bien sur la position „Arrêt“.Raccorder le câble rouge de la batterie (A) au pole plus (indiqué par le signe (+) sur la batterie). Relier le câble noir de la batte-rie (B) au pole moins (-).Il est impératif de bien serrer les bornes polaires pour éviter tout risque de dysfonctionnement.Toujours installer la batterie à un endroit bien aéré. Le moteur fonctionne avec toutes les batteries 12V classiques. Pour des résultats optimaux, Zebco préconise l’emploi de batteries de basse charge spéciales marine.
BLX BLX
Wymiana śruby napędowejUwaga: ZAWSZE odłącz silnik od akumulatora przystępując do wymiany śruby napędowej.Demontaż śruby napędowejZa pomocą dostarczonego klucza odkręć i zdejmij nakrętkę śruby, pamiętając o trzymaniu śruby napędowej ręką aby zabezpieczyć ją przed obracaniem (rys G).Do poluzowania nakrętki nie należy używać młotka ani innych tego typu narzędzi, gdyż może to spowodować jej uszkodzenie lub zniszc-zenie wału silnika.Po zdjęciu śruby zabezpieczającej, śrubę napędową można łatwo zdjąć z wału silnika. Skontrolować należy stan klina zabezpieczającego oraz wpustu na wale silnika w przeciwnym razie nowa śruba napędowa może zostać zamontowana nieodpowiednio. (rys H)Po każdorazowym użyciu silnika sprawdź czy w śrubę nie zaplątało się zielsko lub żyłka i w razie konieczności usuń zanieczyszczenia.
Sostituzione dell’elicaAttenzione: scollegare SEMPRE la batteria prima di procedure con la sostituzione dell’elica. Distacco dell’elicaSvitare e rimuovere la vite di fissaggio utilizzando la chiave fornita, assicurandovi di trattenere l’elica con una mano per evitare che giri. Non allentare la vite di fissaggio utilizzando martelli o attrezzi simili per evitare di danneggiare la vite o l’alberino(fig. G)Una volta allentata la vite di fissaggio è possibile rimuovere l’elica con facilità. Verificare la corretta misura della spina interna quando montate la nuova elica, altrimenti questa potrebbe non funzionare correttamente. (fig. H)Dopo l’’uso, verificate l’eventuale presenza di fili o erbacce impigliate all’elica e rimuovetele, se necessario.
Changing propellersCaution: ALWAYS disconnect the battery prior to changing the propeller.Detaching the propellerUnscrew and remove the locknut using the propeller wrench supplied, taking care to hold the propeller with one hand to prevent it from revolving. Do not loosen the locknut with a hammer or similar tool, as this may cause damage to the locknut or shaft. (fig. G)Once the locknut has been removed, the propeller can be taken off easily. Verify proper fit of the groove and shearing pin when mounting the new propeller, otherwise the propeller will not attach properly. (fig. H)After using the motor, always check for fishing line or weeds that may have got caught in the propeller and remove, if necessary.
Remplacement de l’hélice Attention : Déconnecter obligatoirement la batterie avant le remplacement de l’hélice.Démontage de l’héliceDesserrer l’écrou de fixation au moyen de la clé spéciale fournie et le retirer. Pendant cette opération, maintenir l’hélice d’une main afin d’éviter qu’elle ne tourne. Ne jamais tenter de débloquer l’écrou avec un marteau ou outil similaire sous peine de risquer d’endommager l’écrou ou l’arbre. (fig.G)Une fois la vis de fixation retirée, l’hélice peut être ôtée facilement. Lors de la mise en place de la nouvelle hélice, veiller à bien aligner le goujon de cisaillement sur la rainure. Dans le cas contraire, il ne sera pas possible de fixer correctement l’hélice. (fig.H)Après chaque utilisation, vérifier que des plantes aquatiques ou du fil de pêche ne soient pas enroulés sur l’hélice. Les retirer le cas échéant. Rincer soigneusement le moteur à l’eau courante.
Austausch des PropellersAchtung: Unbedingt die Batterie vor dem Wechsel des Propellers abklemmen.Lösen des PropellersMit dem mitgelieferten Propellerschlüssel die Sicherungsmutter lösen und entfernen, dabei muss der Propeller mit einer Hand festgehal-ten werden, um ein Mitdrehen zu verhindern. Die Sicherungsmutter darf nicht mit Hammerschlägen oder ähnlichem gelöst werden, da dies eine Beschädigung der Mutter oder der Welle zur Folgen haben könnte. (Abb. G)Der Propeller kann nach dem Entfernen der Sicherungsschraube leicht abgenommen werden. Bei dem Aufsetzen des neuen Propellers auf die Passung von Nut und Scherstift achten, sonst lässt sich der Propeller nicht richtig befestigen. (Abb. H)Nach jedem Gebrauch den Propeller auf eventuell verfangene Schnüre oder Wasserpflanzen überprüfen und diese gegebenenfalls entfernen.
ManutenzionePulire sempre il motore con acqua corrente dopo l’uso, specialmente dopo l’impiego in acque salmastre o in mare.Le viti e la parti mobili delle parti sospese dovranno essere lubrificate approssimativamente ogni 2 set-timane.Ispezionare le connessioni elettriche ogni mese per verificare segni di cor-rosione. Sostituire immediatamente particolari o cavi difettati per evitare il rischio di surriscaldamento.Dopo circa 100 ore di utilizzo, le boc-cole in grafite del blocco motore
dovrebbero essere sostituite dal perso-nale del servizio assistenza Zebco.Conservare il motore in luogo ben arieggiato ed asciutto durante lunghi periodi di riposo. Non lasciare il motore all’aperto durante l’inverno per prevenire il danneggiamento dei magneti del blocco motore.
Risoluzione dei problemi.Perdita di prestazioni• Controllare che nell’elica non ci siano
impignliati parti di filo o erbacce.• Controllare lo stato della batteria.• Controllare i morsetti dei cavi
batteria.
Eccessivo consumo della batteria• Controllare il perfetto funzionamento
dell’elica.• Corrosione o corto circuito nella testa
del motore.• Controllare lo stato della batteria.
Motore troppo rumoroso e con vibrazioni• Controllare il perfetto fissaggio
dell’elica. Potrebbe essere necessario riposizionarla girandola di 180°.
• Alberino dell’elica piegato. Staccale l’elica e azionare il motore a bassa velocità ascoltando eventuali rumori anomali.
• Se l’alberino è piegato, ritornare il motore alla Zebco per sostituzione.
• Far ruotare l’elica con le mani, rende-re il motore a Zebco nel caso questa sia particolarmente dura.
Rotazione del motore dura o difficoltosa.• Allentare le viti di contro spinta,
lubrificare e riavvitare.
Per tutti gli altri problemi non indicati, contattare il vostro negoziante di fidu-cia o il servizio assistenza Zebco.
12 13
MaintainanceWash off the motor thoroughly with running water, especially after using it in brackishh or salt water venues.The screws and moving parts of the suspension assembly should be lubri-cated with machine oil approx. every two weeks.On a monthly basis, inspect the electrical connections for signs of corrosion. Replace defective terminals or cables immediately to prevent possible over-heating.After approx. 100 hours of service, the graphite brushes of the driving unit
should be replaced by Zebco Customer Service.Be sure to choose a well-ventilated and dry location when storing the motor for longer periods. Never leave the motor outside in winter, as this may cause damage to the magnet of the driving unit.
TroubleshootingLoss of performance• Propeller action might be „stiff“. Check
to see if line or weeds have got caught in the propeller.
• Check the battery charge status. Check the battery cells.
• Check the terminals on the battery cable.
Power consumption is too high• Check for „stiff“ propeller action• Corrosion or short circuit in top motor housing• Check the battery cells
Motor sounds too loud and/or shakes• Check fit and condition of the propeller;
you may have to refit the propeller, turning it by 180°.
• Bent shaft. Detach propeller and run
motor at low speed, listening for abnor-mal sounds from shaft.
• If shaft is bent, return motor to Zebco for repair.
• Turn propeller by hand; return motor to Zebco if action is stiff.
Motor is hard to steer.• Loosen counterforce screw, then readju-
st and apply some lubricant.
For all other problems not listed above, please contact your dealer or Zebco Customer Service.
WartungDen Motor sorgfältig mit fließendem Wasser abspülen, unbedingt nach jedem Gebrauch im Brack- oder Meerwasser.Zirka alle zwei Wochen sollten die Schrau ben und beweglichen Teile der Motor auf hängung mit einem Ma schinenöl ge schmiert werden.Monatlich sollten die Elektro-Anschlüsse auf Korrosion überprüft werden. Defekte Anschlüsse oder Kabel sofort auswechseln, um etwaige Überhitzung zu vermeiden.Zur längerfristigen Lagerung muss der Motor an einem gut belüfteten, trok-
kenem Ort aufbewahrt werden. Lassen Sie den Motor über den Winter nicht im Freien, das könnte zur Beschädigung des Magneten der Antriebseinheit führen.
FehlersucheLeistungsverlust• Propeller eventuell schwergängig.
Überprüfen, ob sich Schnur oder Algen in der Schraube verfangen haben.
• Ladezustand der Batterie prüfen. Batteriezellen überprüfen.
• Anschlüsse des Batteriekabels prüfen.
Zu hoher Stromverbrauch• Propeller auf Schwergängigkeit überprüfen• Korrosion oder Kurzschluss an Kabel-
steckern im oberen Motorgehäuse• Batteriezellen überprüfen
Zu lautes Motorgeräusch/Vibrationen• Sitz und Zustand des Propellers über-
prüfen, eventuell Propeller um 180° versetzt neu montieren.
• Verbogene Welle. Propeller abnehmen und Motor mit mittlerer
Geschwindigkeit laufen lassen, auf Wellengeräusche achten.• Bei verbogener Welle den Motor zur
Reparatur einsenden.• Den Propeller mit der Hand drehen, bei
Schwergängigkeit Motor einsenden.
Motor lässt sich schwer Steuern• Steuergegendruck-Schraube lösen und
erneut Einstellen und etwas fetten.
Bei allen anderen hier nicht aufgeführten Problemen wenden Sie sich bitte an Ihren Fachhändler oder an den Zebco-Service-Dienst.
EntretienCeci est impératif après chaque utilisation en eau saumâtre ou en mer. Graisser environ toutes les deux semaines les vis et pièces mobiles de la suspension du moteur au moyen d’une huile pour machines.Une fois par mois, vérifier l’absence de corrosion sur tous les branchements élec-triques. Tout raccord ou câble endomma-gé devra être remplacé immédiatement pour éviter les risques de surchauffe.Au bout d’une centaine d’heures de fonc-tionnement, faire remplacer les balais de charbon du propulseur par le service après-vente Zebco.
En cas de remisage prolongé, conserver le moteur dans un endroit bien aéré et sec. Pour l’hivernage, ne pas laisser le moteur à l’air libre. Les aimants du propulseur risqueraient en effet d’être détériorés.
En cas de problèmeBaisse de puissance• L’hélice tourne mal. Vérifier qu’aucun
fil de pêcheni algues ne se soient pris dans l’hélice.
• Vérifier que la batterie est suffisamment chargée, contrôler les éléments de la batterie.
• Vérifier les raccords du câble de batterie.
Consommation trop élevée• Vérifier si l’hélice tourne bien.• Corrosion ou court-circuit au niveau des fiches de câble dans le haut du bâti de moteur.
• Contrôler les éléments de la batterie.Moteur trop bruyant/Vibrations• Vérifier la bonne fixation et l’état de l’hélice, la remonter éventuellement en la retournant de 180°.
• L’arbre est tordu. Retirer l’hélice et faire tourner le moteur à vitesse moyenne en tentant de déterminer si les bruits
proviennent de l’arbre.• Si l’arbre est tordu, renvoyer le moteur au service après-vente.
• Faire tourner l’hélice à la main, en cas de résistance, renvoyer le moteur au service après-vente.
Difficultés à diriger• Desserrer la vis de contre-pression et la régler de nouveau. Graisser légèrement.
Pour tout autre dérangement non mentionné ici, veuillez vous adresser à votre revendeur spécialisé ou au service après-vente de Zebco.
KonserwacjaPo każdorazowym użyciu umyj silnik pod bieżącą wodą, szczególnie, gdy używany był na zbiornikach z półsłoną lub słoną wodą.Śruby i ruchome części zawiesia powinny być konserwowane olejem maszynowym co około 2 tygodnie.Raz na miesiąc należy skontrolować wszystkie łącza elektryczne na obecność korozji. Uszkodzone klemy lub przewody należy natychmiast wymienić w celu uniknięcia przegrzania.Po około 100 godzinach pracy grafitowe szczotki powinny zostać wymienione w serwisie Zebco.
Poza sezonem silnik należy przechowywać w dobrze wentylo-wanym i suchym pomieszczeniu. Nie należy pozostawiać silnika w sezonie zimowym na zewnątrz ponieważ może to doprowadzić do uszkodzenia magnesów.
Rozwiązywanie problemówUtrata mocy• Praca śruby napędowej może być
utrudniona. Sprawdź czy na wale nie ma zaplątanych sieci, żyłek, zielska czy innych zanieczyszczeń.
• Sprawdź naładowanie akumulatora. Sprawdź komory akumulatora.
• Sprawdź klemy akumulatora i przyłącza silnika.
Zbyt duży pobór prądu• Sprawdź śrubę napędową czy nie jest
czymś blokowana.• Korozja lub spięcie w instalacji w górnej
obudowie.• Sprawdź cele akumulatora
Silnik pracuje zbyt głośno i/lub drży podczas pracy• Sprawdź zamocowanie i stan śruby
napędowej. Konieczne może być ponowne zamontowanie śruby napędowej obracając ją o 180°
• Wykrzywiony wal. Zdemontuj śrubę napędową, uruchom silnik na niskim biegu i sprawdź czy słychać nienaturalne dźwięki.
• W przypadku gdy wal został skrzywiony, należy oddać silnik do serwisu Zebco.
• Obróć śrubę napędową ręką, jeżeli jej praca jest utrudniona oddaj silnik do serwisu Zebco.
Utrudnione sterowanie• Poluzuj śrubę regulacji oporu steru,
następnie wyreguluj jej dokręcenie i zastosuj odrobine smaru.
Wszystkie inne problemy nie wymienione powyżej należy zgłaszać w miejscu zaku-pu lub skontaktować się z najbliższym oddziałem Zebco.
BLX BLX
ACHTUNG: Bei Veränderung der werkseitig montierten Batterieanschlüsse erlischt die Garantie. Die Polklemmen (Ösen bei VX44/54/65) müssen fest angeschlossen werden. Ansonsten kann es zu Störungen kommen.
CAUTION: Any changes to the factory installed battery connections will void the warranty. The electric pole clips (loop for VX44/54/65) must be connected securely, otherwise there may be disruption in the electric current.
ATTENTION: La garantie sur la réparation du moteur est caduque dès lors qu’il y a eu changement des pôles de jonction à la batterie installés à l’origine par le fabriquant. Les pinces (ou cosses pour les moteurs VX 44, 54 et 65)
doivent être attachées très solidement à la batterie pour éviter les défauts de fonctionnement.
UWAGA: Wszelkie zmiany dokonane w fabrycznych przyłączach elektrycznych (klamry lub oczka) spowodują utratę gwarancji. Klamry (oczka dla VX44 / 54/65), musza być prawidłowo i pewnie podłączone do akumula-
tora, w przeciwnym razie mogą wystąpić zakłócenia w przepływie prądu elektrycznego.
ATTENZIONE: Ogni cambiamento apportato ai sistemi di connessione alla batteria originali, determinerà la scadenza della garanzia. Le pinze di connessione ai poli della batteria (morsetti per i VX44/54/65) vanno connesse
saldamente per evitare interruzioni della corrente elettrica.
Połączenia elektryczne Dotyczy wyłącznie akumulatorów 12VPrzed podłączeniem należy sprawdzić czy wszystkie przełączniki znajdują się w pozycji OFF (wyłączone)Podłącz czerwony przewód (A) do klemy oznaczonej (+) na akumulatorze. Podłącz czarny przewód do klemy akumulatora oznaczonej (-).Podłączenie powinno być dokonane starannie i pewnie, w prze-ciwnym razie mogą pojawić się problemy podczas użytkowania.Akumulator należy przechowywać w dobrze wentylowanym pomieszczeniu. Silnik może pracować na standardowym akumula-torze o napięciu 12V. Zalecamy stosowanie specjalnych akumula-torów głębokiego rozładowania zapewniających lepszą wydajność.
Connessione elettrica · Per batterie 12VPrima di procedure alla connessione elettrica, assicuratevi che tutti gli interruttori siano in posizione spento (OFF).Collegare il cavo rosso (A) al polo positivo della batteria (indi-cato con (+) sulla batteria). Collegare il cavo nero (B) al polo negativo della batteria (-). Fissare i morsetti saldamente per evitare problemi di funzionamento del motore. La batteria deve essere sempre posizionata in un punto ben ventilato. Il motore funziona con tutti i modelli di batteria 12V. Consigliamo di utilizzare batteria marine a basso consumo per massimizzare le performance del motore
14 15
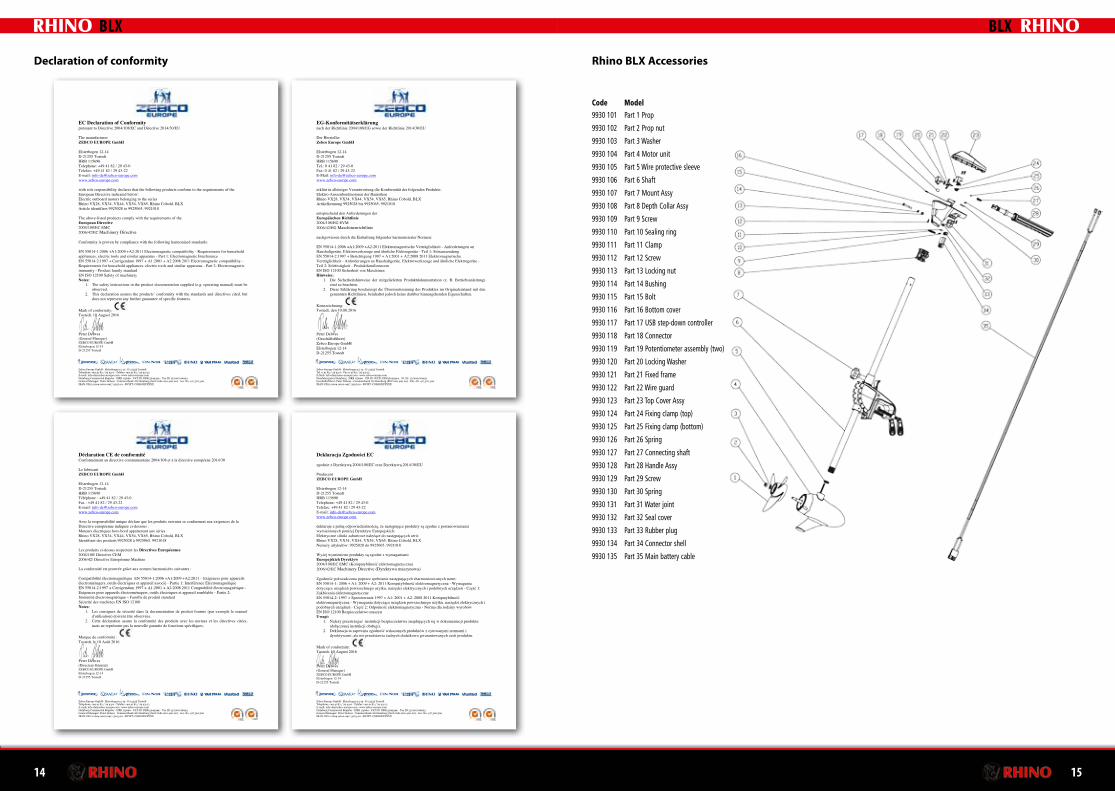
Declaration of conformity Rhino BLX Accessories
BLX BLX
Code Model9930 101 Part 1 Prop
9930 102 Part 2 Prop nut
9930 103 Part 3 Washer
9930 104 Part 4 Motor unit
9930 105 Part 5 Wire protective sleeve
9930 106 Part 6 Shaft
9930 107 Part 7 Mount Assy
9930 108 Part 8 Depth Collar Assy
9930 109 Part 9 Screw
9930 110 Part 10 Sealing ring
9930 111 Part 11 Clamp
9930 112 Part 12 Screw
9930 113 Part 13 Locking nut
9930 114 Part 14 Bushing
9930 115 Part 15 Bolt
9930 116 Part 16 Bottom cover
9930 117 Part 17 USB step-down controller
9930 118 Part 18 Connector
9930 119 Part 19 Potentiometer assembly (two)
9930 120 Part 20 Locking Washer
9930 121 Part 21 Fixed frame
9930 122 Part 22 Wire guard
9930 123 Part 23 Top Cover Assy
9930 124 Part 24 Fixing clamp (top)
9930 125 Part 25 Fixing clamp (bottom)
9930 126 Part 26 Spring
9930 127 Part 27 Connecting shaft
9930 128 Part 28 Handle Assy
9930 129 Part 29 Screw
9930 130 Part 30 Spring
9930 131 Part 31 Water joint
9930 132 Part 32 Seal cover
9930 133 Part 33 Rubber plug
9930 134 Part 34 Connector shell
9930 135 Part 35 Main battery cable
Zebco Europe GmbH · Elsterbogen 12-14 · D-21255 Tostedt Telephone +49 41 82 / 29 43-0 · Telefax +49 41 82 / 29 43-22 E-mail: [email protected] · www.zebco-europe.com Hamburg Commercial Register · HRB 115690 · VAT ID: DE815249344 · Tax ID 15/200/06923 General Manager: Peter Delwes Commerzbank AG Hamburg (Sort Code 200 400 00) · Acc. No. 417 322 500 IBAN: DE21 2004 0000 0417 3225 00 · SWIFT: COBADEFFXXX
EC Declaration of Conformity pursuant to Directive 2004/108/EC and Directive 2014/30/EU The manufacturer ZEBCO EUROPE GmbH Elsterbogen 12-14 D-21255 Tostedt HRB 115690 Telephone: +49 41 82 / 29 43-0 Telefax: +49 41 82 / 29 43-22 E-mail: [email protected] www.zebco-europe.com with sole responsibility declares that the following products conform to the requirements of the European Directive indicated below: Electric outboard motors belonging to the series Rhino VX28, VX34, VX44, VX54, VX65, Rhino Cobold, BLX Article identifiers 9925028 to 9925065, 9921018 The above-listed products comply with the requirements of the European Directive 2004/108/EC EMC 2006/42/EC Machinery Directive Conformity is proven by compliance with the following harmonized standards: EN 55014-1:2006 +A1:2009 +A2:2011 Electromagnetic compatibility - Requirements for household appliances, electric tools and similar apparatus - Part 1: Electromagnetic Interference EN 55014-2:1997 + Corrigendum 1997 + A1:2001 + A2:2008 2011 Electromagnetic compatibility - Requirements for household appliances, electric tools and similar apparatus - Part 2: Electromagnetic immunity - Product family standard EN ISO 12100 Safety of machinery Notes:
1. The safety instructions in the product documentation supplied (e.g. operating manual) must be observed.
2. This declaration assures the products’ conformity with the standards and directives cited, but does not represent any further guarantee of specific features.
Mark of conformity: Tostedt, 10 August 2016 Peter Delwes (General Manager) ZEBCO EUROPE GmbH Elsterbogen 12-14 D-21255 Tostedt
Zebco Europe GmbH · Elsterbogen 12-14 · D-21255 Tostedt Telephone +49 41 82 / 29 43-0 · Telefax +49 41 82 / 29 43-22 E-mail: [email protected] · www.zebco-europe.com Hamburg Commercial Register · HRB 115690 · VAT ID: DE815249344 · Tax ID 15/200/06923 General Manager: Peter Delwes Commerzbank AG Hamburg (Sort Code 200 400 00) · Acc. No. 417 322 500 IBAN: DE21 2004 0000 0417 3225 00 · SWIFT: COBADEFFXXX
Déclaration CE de conformité Conformément au directive communautaire 2004/108 et à la directive européene 2014/30 Le fabricant ZEBCO EUROPE GmbH Elsterbogen 12-14 D-21255 Tostedt HRB 115690 Téléphone : +49 41 82 / 29 43-0 Fax : +49 41 82 / 29 43-22 E-mail: [email protected] www.zebco-europe.com Avec la responsabilité unique déclare que les produits suivants se conforment aux exigences de la Directive européenne indiquée ci-dessous : Moteurs électriques hors-bord appartenant aux séries Rhino VX28, VX34, VX44, VX54, VX65, Rhino Cobold, BLX Identifiant des produits 9925028 à 9925065, 9921018 Les produits ci-dessus respectent les Directives Européennes 2004/108/ Directive CEM 2006/42/ Directive Européenne Machine La conformité est prouvée grâce aux normes harmonisées suivantes : Compatibilité électromagnétique EN 55014-1:2006 +A1:2009 +A2:2011 – Exigences pour appareils électroménagers, outils électriques et appareil associé - Partie 1: Interférence Electromagnétique EN 55014-2:1997 + Corrigendum 1997 + A1:2001 + A2:2008 2011 Comptabilité électromagnétique - Exigences pour appareils électroménagers, outils électriques et appareil semblable - Partie 2: Immunité électromagnétique – Famille de produit standard Sécurité des machines EN ISO 12100 Notes:
1. Les consignes de sécurité dans la documentation de produit fournie (par exemple le manuel d'utilisation) doivent être observées.
2. Cette déclaration assure la conformité des produits avec les normes et les directives citées, mais ne représente pas la nouvelle garantie de fonctions spécifiques.
Marque de conformité : Tostedt, le 10 Août 2016 Peter Delwes (Directeur Général) ZEBCO EUROPE GmbH Elsterbogen 12-14 D-21255 Tostedt
Zebco Europe GmbH · Elsterbogen 12-14 · D-21255 Tostedt Tel. 0 41 82 / 29 43-0 · Fax 0 41 82 / 29 43-22 E-Mail: [email protected] · www.zebco-europe.com Handelsregister Hamburg · HRB 115690 · USt-ID (VAT): DE815249344 · St.-Nr. 15/200/06923 Geschäftsführer: Peter Delwes · Commerzbank AG Hamburg (BLZ 200 400 00) · Kto.-Nr. 417 322 500 IBAN: DE21 2004 0000 0417 3225 00 · SWIFT: COBADEFFXXX
EG-Konformitätserklärung nach der Richtlinie 2004/108/EG sowie der Richtlinie 2014/30/EU Der Hersteller Zebco Europe GmbH Elsterbogen 12-14 D-21255 Tostedt HRB 115690 Tel.: 0 41 82 / 29 43-0 Fax: 0 41 82 / 29 43-22 E-Mail: [email protected] www.zebco-europe.com erklärt in alleiniger Verantwortung die Konformität der folgenden Produkte: Elektro-Aussenbordmotoren der Baureihen Rhino VX28, VX34, VX44, VX54, VX65, Rhino Cobold, BLX Artikelkennung 9925028 bis 9925065, 9921018 entsprechend den Anforderungen der Europäischen Richtlinie 2004/108/EG EVM 2006/42/EG Maschinenrichtlinie nachgewiesen durch die Einhaltung folgender harmonisierter Normen: EN 55014-1:2006 +A1:2009 +A2:2011 Elektromagnetische Verträglichkeit - Anforderungen an Haushaltgeräte, Elektrowerkzeuge und ähnliche Elektrogeräte - Teil 1: Störaussendung EN 55014-2:1997 + Berichtigung 1997 + A1:2001 + A2:2008 2011 Elektromagnetische Verträglichkeit - Anforderungen an Haushaltgeräte, Elektrowerkzeuge und ähnliche Elektrogeräte - Teil 2: Störfestigkeit - Produktfamiliennorm EN ISO 12100 Sicherheit von Maschinen Hinweise:
1. Die Sicherheitshinweise der mitgelieferten Produktdokumentation (z. B. Betriebsanleitung) sind zu beachten.
2. Diese Erklärung bescheinigt die Übereinstimmung des Produktes im Originalzustand mit den genannten Richtlinien, beinhaltet jedoch keine darüber hinausgehenden Eigenschaften.
Kennzeichnung: Tostedt, den 10.08.2016 Peter Delwes (Geschäftsführer) Zebco Europe GmbH Elsterbogen 12-14 D-21255 Tostedt
Zebco Europe GmbH · Elsterbogen 12-14 · D-21255 Tostedt Telephone +49 41 82 / 29 43-0 · Telefax +49 41 82 / 29 43-22 E-mail: [email protected] · www.zebco-europe.com Hamburg Commercial Register · HRB 115690 · VAT ID: DE815249344 · Tax ID 15/200/06923 General Manager: Peter Delwes Commerzbank AG Hamburg (Sort Code 200 400 00) · Acc. No. 417 322 500 IBAN: DE21 2004 0000 0417 3225 00 · SWIFT: COBADEFFXXX
Deklaracja Zgodności EC zgodnie z Dyrektywą 2004/108/EC oraz Dyrektywą 2014/30/EU Producent ZEBCO EUROPE GmbH Elsterbogen 12-14 D-21255 Tostedt HRB 115690 Telephone: +49 41 82 / 29 43-0 Telefax: +49 41 82 / 29 43-22 E-mail: [email protected] www.zebco-europe.com deklaruje z pełną odpowiedzialnością, że następujące produkty są zgodne z postanowieniami wymienionych poniżej Dyrektyw Europejskich: Elektryczne silniki zaburtowe należące do następujących serii: Rhino VX28, VX34, VX44, VX54, VX65, Rhino Cobold, BLX Numery artykułów: 9925028 do 9925065, 9921018 Wyżej wymienione produkty są zgodne z wymaganiami Europejskich Dyrektyw 2004/108/EC EMC (Kompatybilność elektromagnetyczna) 2006/42/EC Machinery Directive (Dyrektywa maszynowa) Zgodność poświadczona poprzez spełnianie następujących zharmonizowanych norm: EN 55014-1: 2006 + A1: 2009 + A2: 2011 Kompatybilność elektromagnetyczna - Wymagania dotyczące urządzeń powszechnego użytku, narzędzi elektrycznych i podobnych urządzeń - Część 1: Zakłócenia elektromagnetyczne EN 55014-2: 1997 + Sprostowanie 1997 + A1: 2001 + A2: 2008 2011 Kompatybilność elektromagnetyczna - Wymagania dotyczące urządzeń powszechnego użytku, narzędzi elektrycznych i podobnych urządzeń - Część 2: Odporność elektromagnetyczna - Norma dla rodziny wyrobów EN ISO 12100 Bezpieczeństwo maszyn Uwagi:
1. Należy przestrzegać instrukcji bezpieczeństwa znajdujących się w dokumentacji produktu (dołączonej instrukcji obsługi).
2. Deklaracja ta zapewnia zgodność wskazanych produktów z cytowanymi normami i dyrektywami, ale nie przedstawia żadnych dodatkowo gwarantowanych cech produktu.
Mark of conformity: Tostedt, 10 August 2016 Peter Delwes (General Manager) ZEBCO EUROPE GmbH Elsterbogen 12-14 D-21255 Tostedt
16
Zebco Europe GmbH · Elsterbogen 12-14 · D-21255 Tostedt · Germany Fax 0 41 82 / 29 43-22 · [email protected] · www.zebco-europe.com
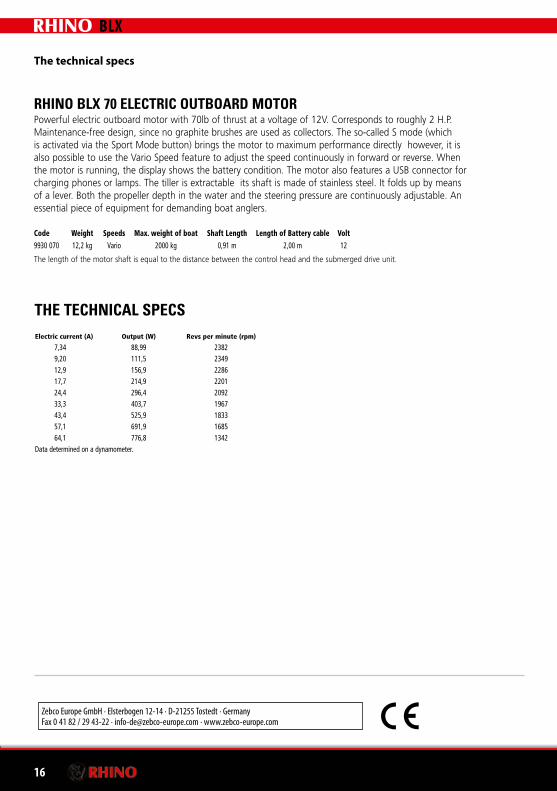
The technical specs
BLX
RHINO BLX 70 ELECTRIC OUTBOARD MOTORPowerful electric outboard motor with 70lb of thrust at a voltage of 12V. Corresponds to roughly 2 H.P. Maintenance-free design, since no graphite brushes are used as collectors. The so-called S mode (which is activated via the Sport Mode button) brings the motor to maximum performance directly however, it is also possible to use the Vario Speed feature to adjust the speed continuously in forward or reverse. When the motor is running, the display shows the battery condition. The motor also features a USB connector for charging phones or lamps. The tiller is extractable its shaft is made of stainless steel. It folds up by means of a lever. Both the propeller depth in the water and the steering pressure are continuously adjustable. An essential piece of equipment for demanding boat anglers.
Code Weight Speeds Max. weight of boat Shaft Length Length of Battery cable Volt9930 070 12,2 kg Vario 2000 kg 0,91 m 2,00 m 12
The length of the motor shaft is equal to the distance between the control head and the submerged drive unit.
THE TECHNICAL SPECSElectric current (A) Output (W) Revs per minute (rpm) 7,34 88,99 2382 9,20 111,5 2349 12,9 156,9 2286 17,7 214,9 2201 24,4 296,4 2092 33,3 403,7 1967 43,4 525,9 1833 57,1 691,9 1685 64,1 776,8 1342Data determined on a dynamometer.