Embed Size (px)
Citation preview
Version 1.00Revision CJune 2016
USER GUIDE
Trimble R1 GNSS Receiver
1
Corporate OfficeTrimble Navigation Limited10368WestmoorDriveWestminster, CO 80021USAwww.trimble.com
Legal Notices©2016, Trimble Navigation Limited. All rights reserved.Trimble, the Globe & Triangle logo, GPS Pathfinder, and Juno aretrademarks of Trimble Navigation Limited, registered in the UnitedStates and in other countries. Positions, TerraFlex, TerraSync, andViewPoint are trademarks of Trimble Navigation Limited.Microsoft, andWindows are either registered trademarks or trademarksof Microsoft Corporation in the United States and/or other countries.iPad, iPhone, and Retina are trademarks of Apple Inc., registered in theU.S. and other countries. iPad Air, iPad Air 2, and iPadmini aretrademarks of Apple Inc.The Bluetoothwordmark and logos are owned by the Bluetooth SIG,Inc. and any use of suchmarks by Trimble Navigation Limited is underlicense.All other trademarks are the property of their respective owners.Support forGalileo is developed under a license of the European Unionand the European Space Agency.Made for- iPhone 6 Plus, iPhone 6- iPhone 5s, iPhone 5c, iPhone 5- iPad Air, iPad Air 2- iPadmini with Retina display- iPad (4th generation)- iPadmini“Made for iPhone,” and “Made for iPad”mean that an electronicaccessory has been designed to connect specifically to iPhone or iPad,respectively, and has been certified by the developer tomeet Appleperformance standards. Apple is not responsible for the operation of thisdevice or its compliance with safety and regulatory standards. Pleasenote that the use of this accessory with iPhone or iPadmay affectwireless performance.
Limited Warranty Terms and Conditions
Product Limited WarrantySubject to the terms and conditions set forth herein, Trimble NavigationLimited (“Trimble”) warrants that for a period of 2 years from date ofpurchase this Trimble product (the “Product”) will substantially conformto Trimble's publicly available specifications for the Product and that thehardware and any storage media components of the Productwill besubstantially free from defects inmaterials andworkmanship.
Product SoftwareProduct software,whether built into hardware circuitry as firmware,provided as a standalone computer software product, embedded in flashmemory, or stored onmagnetic or othermedia, is licensed solely for usewith or as an integral part of the Product and is not sold. The terms of theend user license agreement, as included below, govern the use of theProduct Software, including any differing limitedwarranty terms,exclusions and limitations,which shall control over the terms andconditions set forth in the limited Productwarranty.
Warranty RemediesIf the Trimble Product fails during the warranty period for reasonscovered by this limitedwarranty and you notify Trimble of such failureduring the warranty period, Trimble will repair OR replace thenonconforming Productwith new, equivalent to new, or reconditionedparts or Product, OR refund the Product purchase price paid by you, atTrimble’s option, upon your return of the Product in accordance withTrimble's product return procedures then in effect.
How to Obtain Warranty ServiceTo obtain warranty service for the Product, please contact your Trimbledealer. Alternatively, youmay contact Trimble to request warrantyservice at +1-408-481-6940 (24 hours a day) or email your request [email protected]. Please be prepared to provide:–your name, address, and telephone numbers;–proof of purchase;
–a copy of this Trimble warranty–a description of the nonconforming Product including the modelnumber; and–an explanation of the problem.The customer service representative may need additional informationfrom you depending on the nature of the problem.
Warranty Exclusions and DisclaimerThis Product limitedwarranty shall only apply in the event and to theextent that (i) the Product is properly and correctly installed, configured,interfaced,maintained, stored, and operated in accordance withTrimble's applicable operator's manual and specifications, and; (ii) theProduct is notmodified ormisused. This Product limitedwarranty shallnot apply to, and Trimble shall not be responsible for, defects orperformance problems resulting from (i) the combination or utilization ofthe Productwith hardware or software products, information, data,systems, interfaces, or devices notmade, supplied, or specified byTrimble; (ii) the operation of the Product under any specification otherthan, or in addition to, Trimble's standard specifications for its products;(iii) the unauthorized installation,modification, or use of the Product;(iv) damage caused by: accident, lightning or other electrical discharge,fresh or salt water immersion or spray (outside of Productspecifications); or exposure to environmental conditions forwhich theProduct is not intended; (v) normal wear and tear on consumable parts(e.g., batteries); or (vi) cosmetic damage. Trimble does notwarrant orguarantee the results obtained through the use of the Product orSoftware, or that software components will operate error free.NOTICE REGARDING PRODUCTS EQUIPPEDWITH TECHNOLOGYCAPABLE OF TRACKING SATELLITE SIGNALS FROM SATELLITE BASEDAUGMENTATIONSYSTEMS (SBAS) (WAAS, EGNOS, ANDMSAS),OMNISTAR,GPS,MODERNIZED GPS ORGLONASS SATELLITES,ORFROM IALA BEACONSOURCES: TRIMBLE IS NOT RESPONSIBLE FORTHE OPERATIONOR FAILURE OF OPERATIONOF ANY SATELLITEBASED POSITIONING SYSTEM ORTHE AVAILABILITY OF ANYSATELLITE BASED POSITIONING SIGNALS.THE FOREGOING LIMITEDWARRANTY TERMS STATE TRIMBLE’SENTIRE LIABILITY, AND YOUREXCLUSIVE REMEDIES, RELATING TO THETRIMBLE PRODUCT. EXCEPT AS OTHERWISE EXPRESSLY PROVIDEDHEREIN, THE PRODUCT, AND ACCOMPANYINGDOCUMENTATIONANDMATERIALS ARE PROVIDED “AS-IS” ANDWITHOUT EXPRESS ORIMPLIEDWARRANTY OF ANY KIND, BY EITHER TRIMBLE ORANYONEWHO HAS BEEN INVOLVED IN ITS CREATION, PRODUCTION,INSTALLATION,ORDISTRIBUTION, INCLUDING, BUT NOT LIMITED TO,THE IMPLIEDWARRANTIES OF MERCHANTABILITY AND FITNESS FORA PARTICULAR PURPOSE, TITLE, AND NONINFRINGEMENT. THESTATED EXPRESS WARRANTIES ARE IN LIEUOF ALL OBLIGATIONS ORLIABILITIES ONTHE PART OF TRIMBLE ARISINGOUT OF,OR INCONNECTIONWITH, ANY PRODUCT. BECAUSE SOME STATES ANDJURISDICTIONS DO NOT ALLOW LIMITATIONS ONDURATIONORTHEEXCLUSIONOF AN IMPLIEDWARRANTY, THE ABOVE LIMITATIONMAY NOT APPLY TO YOU.
Limitation of LiabilityTRIMBLE'S ENTIRE LIABILITY UNDERANY PROVISIONHEREIN SHALL BELIMITED TO THE AMOUNT PAID BY YOUFORTHE PRODUCT. TO THEMAXIMUM EXTENT PERMITTED BY APPLICABLE LAW, INNO EVENTSHALL TRIMBLE OR ITS SUPPLIERS BE LIABLE FORANY INDIRECT,SPECIAL, INCIDENTAL,ORCONSEQUENTIAL DAMAGEWHATSOEVERUNDERANY CIRCUMSTANCE OR LEGAL THEORY RELATING INANYWAYTO THE PRODUCTS, SOFTWARE AND ACCOMPANYINGDOCUMENTATIONANDMATERIALS, (INCLUDING,WITHOUTLIMITATION,DAMAGES FOR LOSS OF BUSINESS PROFITS, BUSINESSINTERRUPTION, LOSS OF DATA,ORANY OTHERPECUNIARY LOSS),REGARDLESS OF WHETHER TRIMBLE HAS BEENADVISED OF THEPOSSIBILITY OF ANY SUCH LOSS AND REGARDLESS OF THE COURSE OFDEALINGWHICH DEVELOPS ORHAS DEVELOPED BETWEENYOUANDTRIMBLE. BECAUSE SOME STATES AND JURISDICTIONS DO NOTALLOW THE EXCLUSIONOR LIMITATIONOF LIABILITY FORCONSEQUENTIAL OR INCIDENTAL DAMAGES, THE ABOVE LIMITATIONMAY NOT APPLY TO YOU.PLEASE NOTE: THE ABOVE TRIMBLE LIMITEDWARRANTY PROVISIONSWILL NOT APPLY TO PRODUCTS PURCHASED IN THOSE JURISDICTIONS(E.G.,MEMBER STATES OF THE EUROPEANECONOMIC AREA) INWHICH PRODUCTWARRANTIES ARE THE RESPONSIBILITY OF THELOCAL DEALER FROM WHOM THE PRODUCTS ARE ACQUIRED. IN SUCH
2 Trimble R1 GNSS Receiver User Guide
A CASE, PLEASE CONTACT YOURTRIMBLE DEALER FORAPPLICABLEWARRANTY INFORMATION.
Notice to Australian Purchasers
The Australian Consumer LawOur goods come with guarantees that cannot be excluded under theAustralian Consumer Law. You are entitled to a replacement or refundfor a major failure and for compensation for any other reasonablyforeseeable loss or damage. You are also entitled to have the goodsrepaired or replaced if the goods fail to be of acceptable quality and thefailure does not amount to a major failure.Trimble's warranty, as set out in the usermanual accompanying thisstatement, or as described in the warranty card accompanying theProduct you purchased, is in addition to any mandatory rights andremedies that youmay have under the Australian Consumer Law.
Official LanguageTHE OFFICIAL LANGUAGE OF THESE TERMS AND CONDITIONS ISENGLISH. IN THE EVENT OF A CONFLICT BETWEENENGLISH ANDOTHER LANGUAGE VERSIONS, THE ENGLISH LANGUAGE SHALLCONTROL.
Notices
COCOM limitsThe U.S. Department of Commerce requires that all exportable GPSproducts contain performance limitations so that they cannot be used ina manner that could threaten the security of the United States. Thefollowing limitations are implemented on this product:– Immediate access to satellite measurements and navigation results isdisabledwhen the receiver velocity is computed to be greater than1,000 knots, or its altitude is computed to be above 18,000 meters. ThereceiverGPS subsystem resets until the COCOM situation clears. As aresult, all logging and stream configurations stop until the GPSsubsystem is cleared.
Class B statement- Notice to usersThis equipment has been tested and found to comply with the limits fora Class B digital device pursuant to Part 15 of the FCC Rules. Operation issubject to the following two conditions: (1) this device may not causeharmful interference, and (2) this device must accept any interferencereceived, including interference thatmay cause undesired operation.This equipment generates, uses, and can radiate radio frequency energyand, if not installed and used in accordance with the instructions maycause harmful interference to radio communication.However, there is no guarantee that interference will not occur in aparticular installation. If this equipment does cause harmful interferenceto radio or television reception,which can be determined by turning theequipment off and on, the user is encouraged to try to correct theinterference by one ormore of the following measures:–Reorient or relocate the receiving antenna.–Increase the separation between the equipment and the receiver.–Connect the equipment into an outlet on a circuit different from that towhich the receiver is connected.–Consult the dealer or an experienced radio/TV technician for help.Changes andmodifications not expressly approved by the manufactureror registrant of this equipment can void your authority to operate thisequipment under Federal Communications Commission rules.The radios in this device have been designed andmanufactured to notexceed stipulated emission limits for exposure to radio frequency (RF)energy as required by the Federal Communications Commission of theU.S. Government 47 C.F.R. § 2.1091 and 2.1093.The external antenna connector provided in this device is forGNSSantennas only.
CanadaThis digital apparatus does not exceed the Class B limits for radio noiseemissions from digital apparatus as set out in the radio interferenceregulations of the Canadian Department of Communications.Le présent appareil numérique n'émet pas de bruits radioélectriquesdépassant les limites applicables aux appareils numériques de Classe Bprescrites dans le règlement sur le brouillage radioélectrique édicté parle Ministère des Communications du Canada.
Antenna StatementUnder Industry Canada regulations, this radio transmittermay onlyoperate using an antenna of a type andmaximum (or lesser) gainapproved for the transmitter by Industry Canada. To reduce potentialradio interference to other users, the antenna type and its gain should beso chosen that the equivalent isotropically radiated power (e.i.r.p.) is notmore than that necessary for successful communication.Conformément à la réglementation d'Industrie Canada, le présentémetteur radio peut fonctionner avec une antenne d'un type et d'ungainmaximal (ou inférieur) approuvé pour l'émetteur par IndustrieCanada. Dans le but de réduire les risques de brouillage radioélectrique àl'intention des autres utilisateurs, il faut choisir le type d'antenne et songain de sorte que la puissance isotrope rayonnée équivalente (p.i.r.e.)ne dépasse pas l'intensité nécessaire à l'établissement d'unecommunication satisfaisante.Licence exemptThis device complies with Industry Canada licence-exempt RSS standard(s). Operation is subject to the following two conditions:(1) this device may not cause interference, and(2) this device must accept any interference, including interference thatmay cause undesired operation of the device.Le présent appareil est conforme aux CNRd'Industrie Canada applicablesaux appareils radio exempts de licence. L'exploitation est autorisée auxdeux conditions suivantes :(1) l'appareil ne doit pas produire de brouillage, et(2) l'utilisateur de l'appareil doit accepter tout brouillage radioélectriquesubi,même si le brouillage est susceptible d'en compromettre lefonctionnement.
EuropeThis product has been tested and found to complywith all requirements for CE Marking and sale withinthe European Economic Area (EEA). It is classifiedandmarked as being Class 2 Radio Equipment under2000/299/EC, as Bluetooth andwireless LANapprovals are country specific. Please consult your local distributor formore information.EU – Restrictions forUse in the 2.4GHz bandThis device may be operated indoors or outdoors in all countries of theEuropean Community using the 2.4GHz band, exceptwhere notedbelow.–In Norway, this unitmay not be operatedwithin 20 km of Ny AlesundThis GNSS receiver has Bluetooth approval inmost EU countries andsatisfies the requirements for Radio and Telecommunication TerminalEquipment specified by European Council Directive 1999/5/EC. Theserequirements provide reasonable protection against harmfulinterference when the equipment is operated appropriately in aresidential or commercial environment.A copy of the CE Declaration of Conformity can be accessed fromhttp://www.trimble.com/support.shtml.
Australia and New ZealandThis product conforms with the regulatory requirements ofthe Australian Communications andMedia Authority(ACMA) EMC framework, thus satisfying therequirements for C-Tick Marking and sale within Australiaand New Zealand.
JapanThis device has been granted two designation numbers by Ministry ofInternal Affairs and Communications: according:Ordinance concerning Technical Regulations Conformity Certification etc.of Specified Radio Equipment (特定無線設備の技術基準適合証明等に関する規則 )Article 2 clause 1 item 19Approval no: 007-AC0223This device should not be modified (otherwise the granted designationnumbers will be invalid).
Restriction of Use of Certain Hazardous Substances in Electrical
and Electronic Equipment (RoHS)Trimble products in this guide are in compliance in all material respectswith DIRECTIVE 2011/65/EUOF THE EUROPEANPARLIAMENT ANDOFTHE COUNCIL of 8 June 2011 on the restriction of the use of certainhazardous substances in electrical and electronic equipment (recast).
Trimble R1 GNSS Receiver User Guide 3

This certification is limited to Product placed on the market in theMember States of the European Union on or after 1-January-2013.
Waste Electrical and Electronic Equipment (WEEE)For product recycling instructions andmore information,please go towww.trimble.com/ev.shtml.Recycling in Europe: To recycle Trimble WEEE (WasteElectrical and Electronic Equipment, products that run onelectrical power.), Call +31 497 53 24 30, and ask for the“WEEE Associate”. Or,mail a request for recycling instructions to:Trimble Europe BVc/oMenloWorldwide LogisticsMeerheide 455521 DZ Eersel, NL
FCC Declaration of Conformity
We, TrimbleNavigation Limited.
935 Stewart DrivePO Box 3642Sunnyvale, CA 94088-3642United States+1-408-481-8000
Declare under sole responsibility that DoC products complywith Part 15of FCC Rules.
Operation is subject to the following two conditions:(1) This devicemay not cause harmful interference, and(2) This devicemust accept any interference received,including interference that may cause undesired operation.
Unlicensed radios in productsThis device complies with part 15 of the FCC Rules.Operation is subject to the following two conditions:(1) This device may not cause harmful interference, and(2) This device must accept any interference received, includinginterference thatmay cause undesired operation.
Licensed radios in productsThis device complies with part 15 of the FCC Rules.Operation is subject to the condition that this device may not causeharmful interference.
Release NoticeThis is the June 2016 release (Revision C) of the R1 GNSS receiverUserGuide.
4 Trimble R1 GNSS Receiver User Guide
Safety Information
Safety InformationBefore you use your Trimble product, make sure that you have read and understood all safetyrequirements.
WARNING – This alert warns of a potential hazard which, if not avoided, could result in severe injury oreven death.
CAUTION – This alert warns of a potential hazard or unsafe practice that could result in minor injury orproperty damage or irretrievable data loss.
Note – An absence of specific alerts does not mean that there are no safety risks involved.
Use and careThis product is is a high-precision electronic instrument and should be treated with reasonable care.
CAUTION – Operating or storing the receiver outside the specified temperature range can damage it.
Using an external antennaWARNING – Antennas are excellent conductors of electricity, so use extreme caution when operatingnear power lines and other sources of electric current or during stormy weather.
Exposure to radio frequency radiation from BluetoothtransmittersThis device is approved as a portable device with respect to Radio Frequency (RF) exposurecompliance. The radiated output power of the internal wireless radio transmitters is less than 100milliwatt, which results in exposure levels far below the FCC radio frequency exposure limits, evenwhen operated in close proximity to the body. The internal wireless radios operate within guidelinesfound in international radio frequency safety standards and recommendations, which reflect theconsensus of the international scientific community. Trimble therefore believes the internal wirelessradios are safe for use by users. The level of electromagnetic energy emitted is hundreds of timeslower than the electromagnetic energy emitted by wireless devices such as mobile phones.However, the use of wireless radios may be restricted in some situations or environments, such ason aircraft. If you are unsure of restrictions, you are encouraged to ask for authorization beforeturning on the wireless radios.
Trimble R1 GNSS Receiver User Guide 5
Contents
Safety Information 5
Use and care 5Using an external antenna 5Exposure to radio frequency radiation from Bluetooth transmitters 5
1 Introduction 7
What is the R1 GNSS receiver 8What's in the box 9Accessories 9Supported software 9Related information and technical support 9
2 Using the R1 GNSS receiver 11
Parts of the receiver 12Charging the battery 12Turning on and turning off the receiver 13LED status information 14Connecting the R1 GNSS receiver to a device 15Using the receiver with GIS software on Windows Embedded Handheld and Windowsdevices 16Using an external antenna 19
3 Using the GNSS status utility 20
Downloading the GNSS Status utility 21Using the GNSS Status utility 21
4 Troubleshooting 25
Receiver won't turn on 26Battery indicator for R1 GNSS receiver shows empty on an iOS device 26R1 GNSS receiver firmware upgrade 26Incorrect R1 GNSS receiver name showing in Bluetooth settings on iOS device 27
Glossary 28
Trimble R1 GNSS Receiver User Guide 6
Introduction
In this chapter:
n What is the R1 GNSS receiver
n What's in the box
n Accessories
n Supported software
n Related information and technical support
The Trimble R1 GNSS Receiver User Guidedescribes how to use a Trimble® R1 GNSS receiver.
Even if you have used other GNSS or GPS productsbefore, Trimble recommends that you spendsome time reading this manual to learn about thespecial features of this product. If you are notfamiliar with GNSS or GPS, visit the Trimble website(www.trimble.com).
Trimble R1 GNSS Receiver User Guide 7
1CHAPTER
1 Introduction
What is the R1 GNSS receiverThe R1 GNSS receiver is a high-performance GNSS receiver with an integrated antenna, andBluetooth®wireless technology for connectivity with field computers and smart phones. It is ratedIP65, and is small enough to be carried in a pocket or worn on a belt clip in its pouch.
The R1 GNSS receiver achieves best real time performance when used with a real-time correctionsource, such as SBAS, over L-Band (Trimble RTX™ technology), or IP via a phone device (TrimbleVRS™ or RTX technology).
Supported devicesThe R1 GNSS receiver is compatible with devices powered by the following operating systems:
l Android versions 4.1x and later l Windows® 7 and Windows 8.xl iOS l Windows Embedded Handheld 6.5
Supported constellationsThe R1 GNSS receiver supports the following L1 constellations:
l GPS L1 C/A l BeiDou B1l GLONASS L1 C/A (G1) l QZSS L1 C/Al Galileo E1
Supported correction sourcesThe R1 GNSS receiver supports the following correction signals:
l SBAS (WAAAS / EGNOS / MSAS / GAGAN, SDCM) l QZSS L1 SAIFl CMR, CMR+, CMRx l RTX ViewPoint™ (via Internet and
L-Band satellite)l RTCM 2.0 to 2.3 (DGPS and RTK), RTCM 3.0 and 3.1
CAUTION – SBAS and L-Band signals are highly compromised when the receiver is used close to thebody; geostationary satellites will have a lower signal margin at the receiver than the typical orbitingGNSS satellites. Performance will heavily depend on factors such as user orientation, position of thereceiver on body, how exposed the antenna is, and geographic location.
Trimble R1 GNSS Receiver User Guide 8
1 Introduction
What's in the boxl R1 GNSS receiver
l USB cable
l International adaptor kit
l Belt pouch / clip
l Quick Start Guide
AccessoriesThe following accessories are available for purchase to use with the R1 GNSS receiver:
l Belt pouch / clip
l Pole pouch
l External antenna
Supported softwareYou can use the following Trimble software with the R1 GNSS receiver:
l TerraFlex™mobile software
l TerraSync™ software
l Positions™ ArcPad extension
l GPS Pathfinder® Field toolkit
If you are not using Trimble field software, use the Trimble GNSS Status utility to manage theconnection to the R1 GNSS receiver. See Downloading the GNSS Status utility, page 21.
For full details of compatility with Trimble software, refer to the Product Compatibilty List. Forinformation on using the receiver with Trimble field software, refer to the documention for thesoftware you are using.
Related information and technical supportProduct updates, documentation, and any support issues are available for download on theSupport area of the Trimble website (www.trimble.com/Support/). Sources of related informationinclude the following:
l Release notes – The release notes describe new features of the product, information notincluded in themanuals, and any changes to themanuals.
Trimble R1 GNSS Receiver User Guide 9
1 Introduction
l Support notes – Support notes describe any known issues and offer solutions or workaroundsthat may be required throughout the life of the product.
These documents can be downloaded from the Trimble website atwww.trimble.com/Support/Support_AZ.aspx. Select the product you need information on.
If you have a problem and cannot find the information you need in the product documentation,contact your local dealer.
Trimble R1 GNSS Receiver User Guide 10
Using the R1 GNSS receiver
In this chapter:
n Parts of the receiver
n Charging the battery
n Turning on and turning off the receiver
n LED status information
n Connecting the R1 GNSS receiver to a device
n Using the receiver with GIS software onWindows Embedded Handheld andWindows devices
n Using an external antenna
Trimble R1 GNSS Receiver User Guide 11
2CHAPTER
2 Using the R1 GNSS receiver
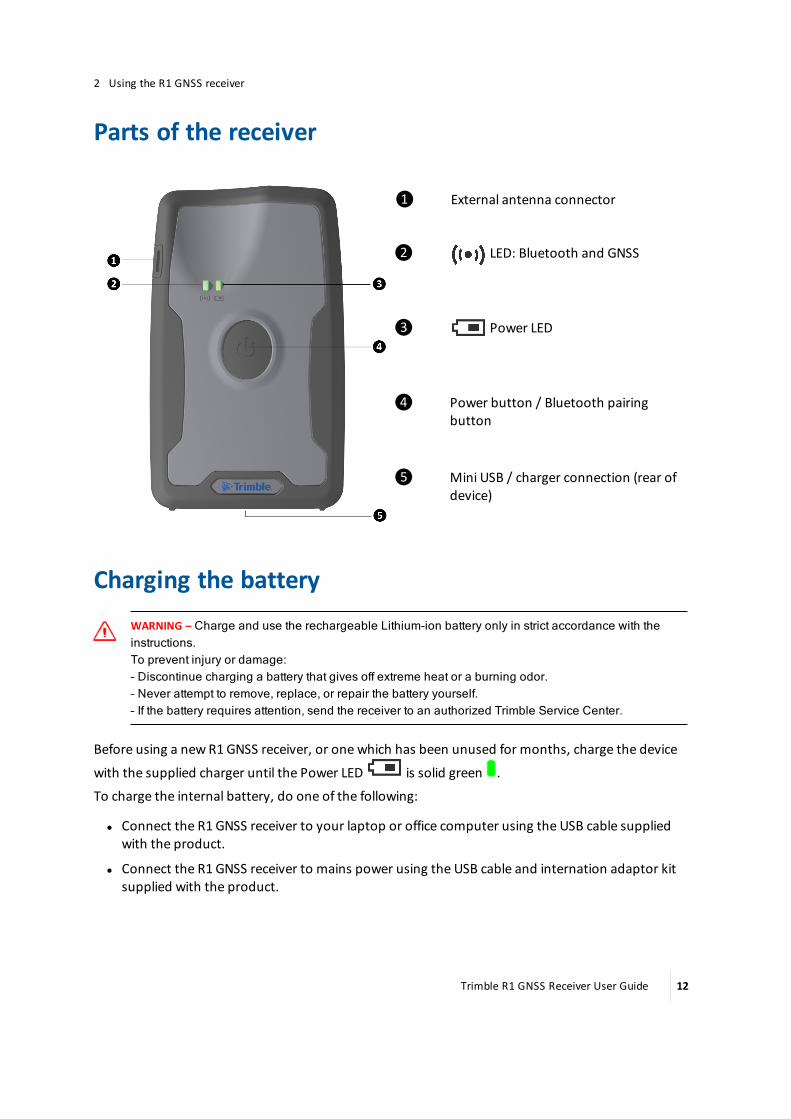
Parts of the receiver
❶ External antenna connector
❷ LED: Bluetooth and GNSS
❸ Power LED
❹ Power button / Bluetooth pairingbutton
❺ Mini USB / charger connection (rear ofdevice)
Charging the batteryWARNING – Charge and use the rechargeable Lithium-ion battery only in strict accordance with theinstructions.To prevent injury or damage:– Discontinue charging a battery that gives off extreme heat or a burning odor.– Never attempt to remove, replace, or repair the battery yourself.– If the battery requires attention, send the receiver to an authorized Trimble Service Center.
Before using a newR1 GNSS receiver, or one which has been unused for months, charge the device
with the supplied charger until the Power LED is solid green .
To charge the internal battery, do one of the following:
l Connect the R1 GNSS receiver to your laptop or office computer using the USB cable suppliedwith the product.
l Connect the R1 GNSS receiver to mains power using the USB cable and internation adaptor kitsupplied with the product.
Trimble R1 GNSS Receiver User Guide 12
2 Using the R1 GNSS receiver
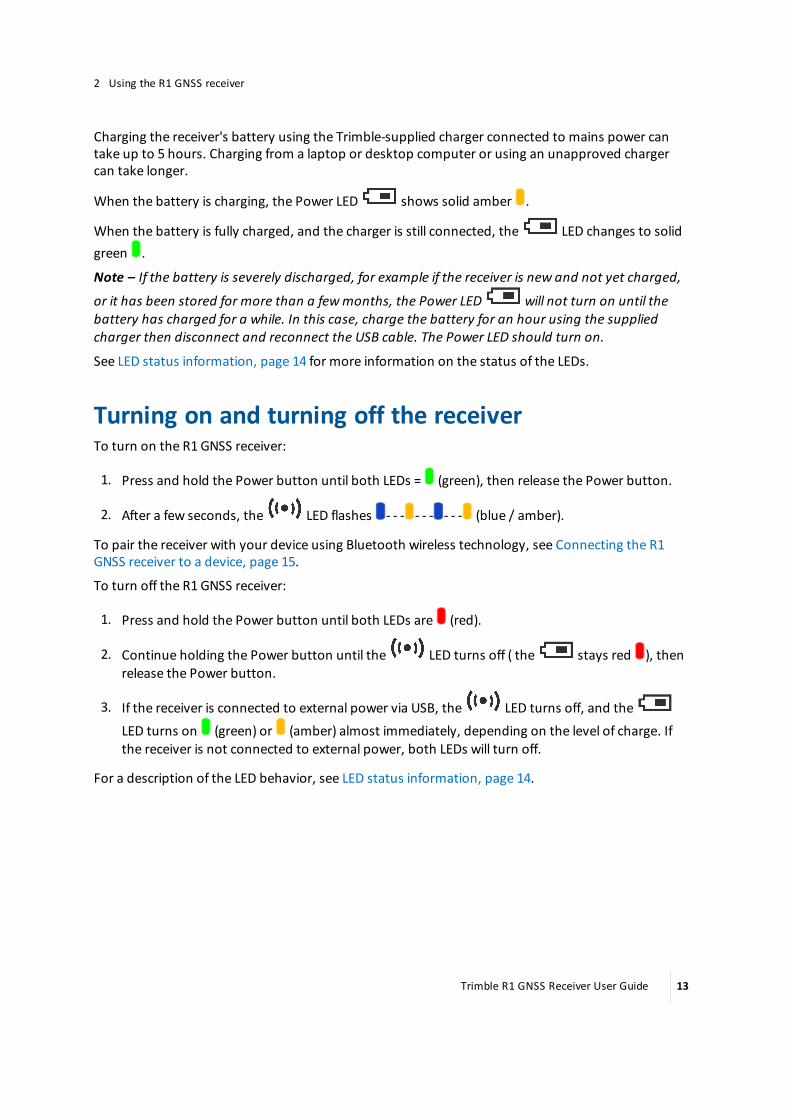
Charging the receiver's battery using the Trimble-supplied charger connected to mains power cantake up to 5 hours. Charging from a laptop or desktop computer or using an unapproved chargercan take longer.
When the battery is charging, the Power LED shows solid amber .
When the battery is fully charged, and the charger is still connected, the LED changes to solidgreen .
Note – If the battery is severely discharged, for example if the receiver is new and not yet charged,
or it has been stored for more than a fewmonths, the Power LED will not turn on until thebattery has charged for a while. In this case, charge the battery for an hour using the suppliedcharger then disconnect and reconnect the USB cable. The Power LED should turn on.
See LED status information, page 14 for more information on the status of the LEDs.
Turning on and turning off the receiverTo turn on the R1 GNSS receiver:
1. Press and hold the Power button until both LEDs = (green), then release the Power button.
2. After a few seconds, the LED flashes - - - - - - - - - (blue / amber).
To pair the receiver with your device using Bluetooth wireless technology, see Connecting the R1GNSS receiver to a device, page 15.
To turn off the R1 GNSS receiver:
1. Press and hold the Power button until both LEDs are (red).
2. Continue holding the Power button until the LED turns off ( the stays red ), thenrelease the Power button.
3. If the receiver is connected to external power via USB, the LED turns off, and theLED turns on (green) or (amber) almost immediately, depending on the level of charge. Ifthe receiver is not connected to external power, both LEDs will turn off.
For a description of the LED behavior, see LED status information, page 14.
Trimble R1 GNSS Receiver User Guide 13
2 Using the R1 GNSS receiver
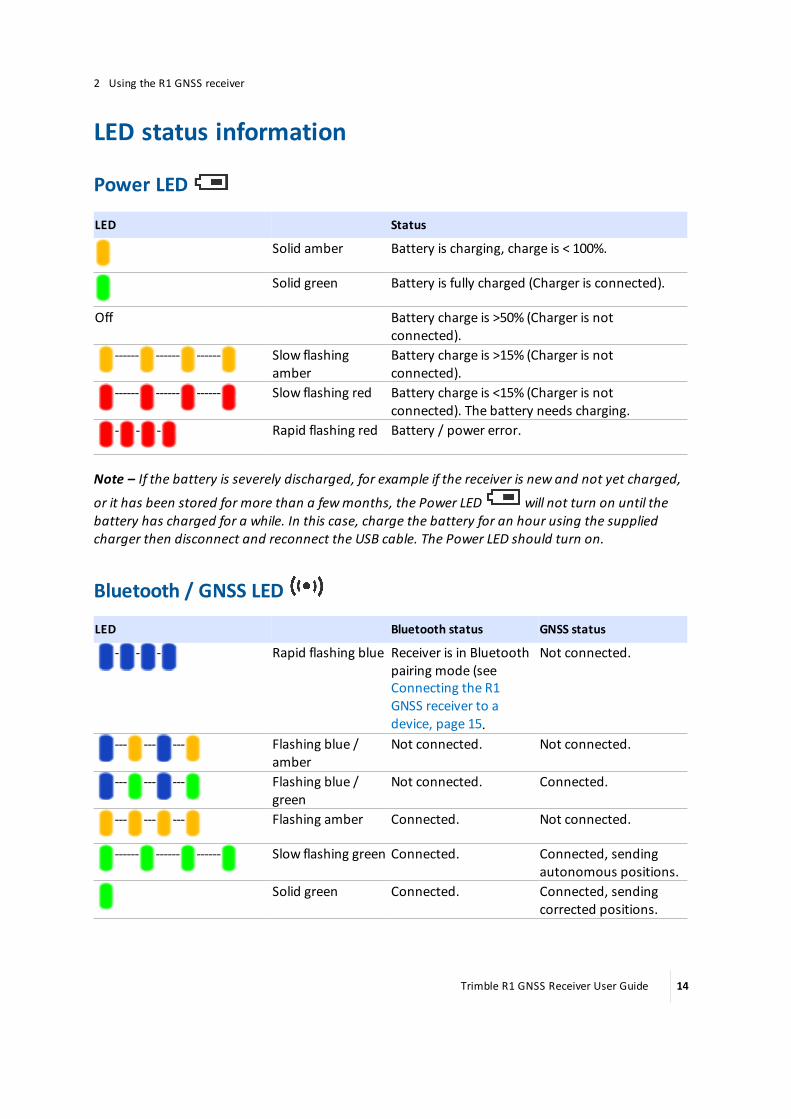
LED status information
Power LED
LED Status
Solid amber Battery is charging, charge is < 100%.
Solid green Battery is fully charged (Charger is connected).
Off Battery charge is >50% (Charger is notconnected).
------ ------ ------ Slow flashingamber
Battery charge is >15% (Charger is notconnected).
------ ------ ------ Slow flashing red Battery charge is <15% (Charger is notconnected). The battery needs charging.
- - - Rapid flashing red Battery / power error.
Note – If the battery is severely discharged, for example if the receiver is new and not yet charged,
or it has been stored for more than a fewmonths, the Power LED will not turn on until thebattery has charged for a while. In this case, charge the battery for an hour using the suppliedcharger then disconnect and reconnect the USB cable. The Power LED should turn on.
Bluetooth / GNSS LED
LED Bluetooth status GNSS status
- - - Rapid flashing blue Receiver is in Bluetoothpairing mode (seeConnecting the R1GNSS receiver to adevice, page 15.
Not connected.
--- --- --- Flashing blue /amber
Not connected. Not connected.
--- --- --- Flashing blue /green
Not connected. Connected.
--- --- --- Flashing amber Connected. Not connected.
------ ------ ------ Slow flashing green Connected. Connected, sendingautonomous positions.
Solid green Connected. Connected, sendingcorrected positions.
Trimble R1 GNSS Receiver User Guide 14
2 Using the R1 GNSS receiver
Connecting the R1 GNSS receiver to a deviceYou can connect a R1 GNSS receiver to a handheld device or tablet powered by the followingoperating systems:
l Android versions 4.1x and later
l iOS
l Windows® 7 and Windows 8.x
l Windows Embedded Handheld 6.5
Enabling Mock Locations on Android devicesOn Android devices, you must enableMock Locations to allow the Android device to useGNSS positions from the R1 GNSS receiver.
Themethod for enabling Mock Locations differs for different Android devices. Generally, this is doneunder Settings / Developer options, Allowmock locations. Refer to the documentation for yourdevice for specific instructions.
Pairing a R1 GNSS receiver and a deviceThe first time you use a R1 GNSS receiver, you must pair it with your device.
1. Make sure the device you want to use has Bluetooth wireless techology turned on.
2. To place the R1 GNSS receiver in Bluetooth pairing mode, press and hold the Power button
until the LED flashes blue .
3. Depending on the device you want to pair the receiver with, do one of the following:
ll On a device powered by theWindows 7 or 8.x operating system, Windows EmbeddedHandheld 6.5, or Android versions 4.1.x or later, use the GNSS Status utility to pair with thereceiver.
a. Tap GNSS Status to launch the GNSS Status utility.
b. Tap Select new receiver. The device you are using searches for receivers within range.
c. When the required receiver appears in the Select Receiver list, tap it, then tap theconnection icon to the right of the receiver ID to pair.
l On an iPhone or iPad, go to Settings / Bluetooth, and tap the R1 [ID] device you want topair with.
Trimble R1 GNSS Receiver User Guide 15
2 Using the R1 GNSS receiver
Connecting to a R1 GNSS receiverTo reconnect to a receiver at any time, make sure it is turned on, then:
l On a device powered by theWindows 7 or 8.x operating system, Windows EmbeddedHandheld 6.5, or Android versions 4.1.x or later, use the GNSS Status utility to connect with thereceiver:
a. Tap GNSS Status to launch the GNSS Status utility.
b. Tap the R1 [ID] at the bottom of the screen to bring up the Select Receiver list. Tap thedevice [R1 ID] you want to reconnect to. Tap the connection icon to the right of thereceiver ID to connect to it.
l On an iPhone or iPad, go to Settings / Bluetooth, and tap the R1 [ID] device you want toconnect to.
See Downloading the GNSS Status utility, page 21 for more information.
Using the receiver with GIS software on WindowsEmbedded Handheld and Windows devices
Using Trimble softwareIf you are using Trimble GIS software (for example, TerraSync software, Trimble Positions software,or the GPS Pathfinder Field toolkit) on devices powered by theWindows Embedded Handheld orWindows Desktop operating systems, you do not need to install the GNSS Status utility, unless youwant to install an option (subscription service) that you have purchased (see Downloading theGNSS Status utility, page 21). You can connect to the R1 GNSS receiver from within the softwarewhen the receiver is in Bluetooth pairing mode, as with other Trimble GIS external receivers.
Using other software with NMEAWhen using software that understands NMEA for position information, you must use the GNSSStatus utility to configure the receiver to output NMEA on the correct port. Because the receiveruses Serial Port Profile (SPP) ports, and software run on aWindows device uses Windows COMports, it is important to understand the relationship between Bluetooth Serial Port Profile ports andWindows COM ports, as described below.
Understanding the relationship between Bluetooth Serial Port Profile (SPP)ports and Windows COM portsNote – This process is specific to the Windows 7 operating system; instructions are similar forWindows 8 / 8.1 and Windows 10 operating systems.
Trimble R1 GNSS Receiver User Guide 16
2 Using the R1 GNSS receiver
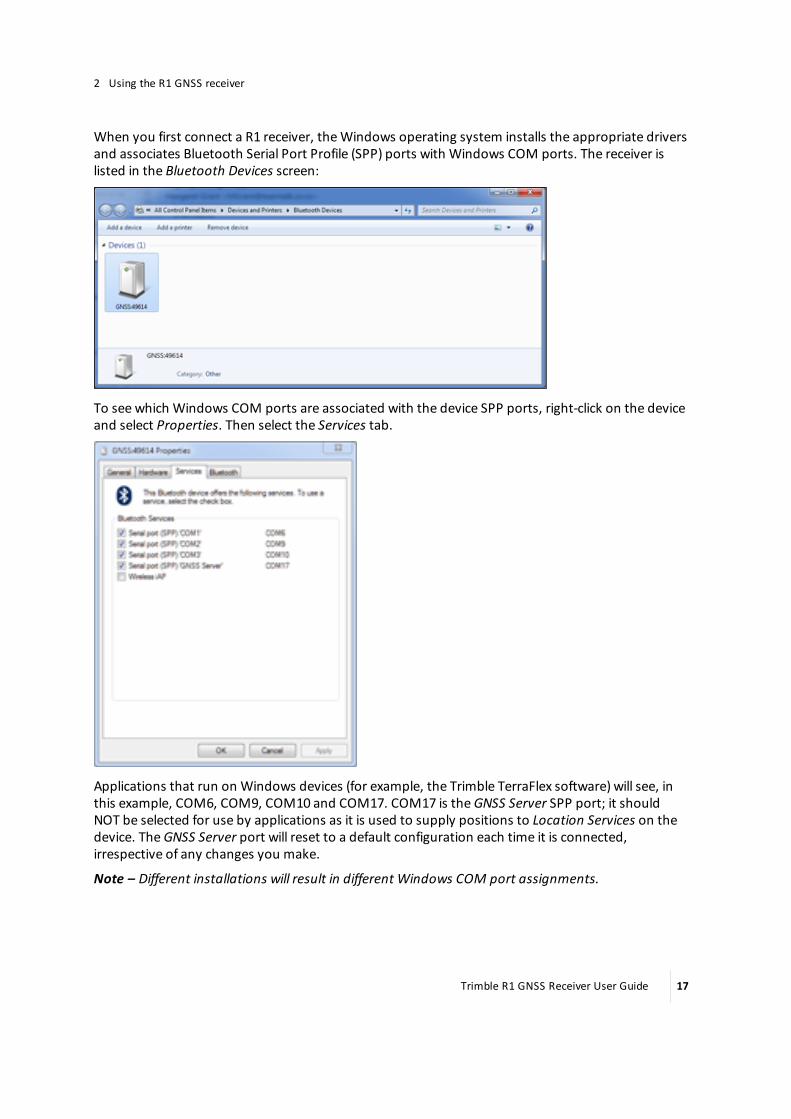
When you first connect a R1 receiver, theWindows operating system installs the appropriate driversand associates Bluetooth Serial Port Profile (SPP) ports with Windows COM ports. The receiver islisted in the Bluetooth Devices screen:
To see which Windows COM ports are associated with the device SPP ports, right-click on the deviceand select Properties. Then select the Services tab.
Applications that run on Windows devices (for example, the Trimble TerraFlex software) will see, inthis example, COM6, COM9, COM10 and COM17. COM17 is theGNSS Server SPP port; it shouldNOT be selected for use by applications as it is used to supply positions to Location Services on thedevice. TheGNSS Server port will reset to a default configuration each time it is connected,irrespective of any changes you make.
Note – Different installations will result in different Windows COM port assignments.
Trimble R1 GNSS Receiver User Guide 17
2 Using the R1 GNSS receiver
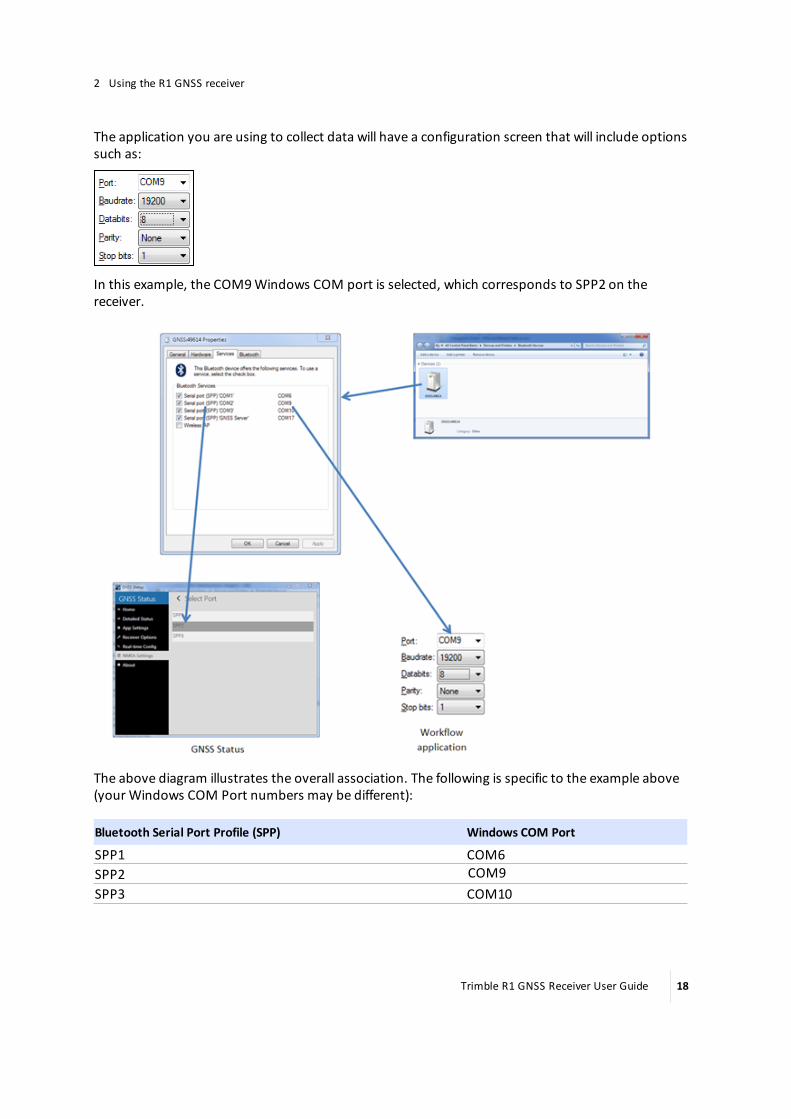
The application you are using to collect data will have a configuration screen that will include optionssuch as:
In this example, the COM9Windows COM port is selected, which corresponds to SPP2 on thereceiver.
The above diagram illustrates the overall association. The following is specific to the example above(yourWindows COM Port numbers may be different):
Bluetooth Serial Port Profile (SPP) Windows COM Port
SPP1 COM6SPP2 COM9SPP3 COM10
Trimble R1 GNSS Receiver User Guide 18

2 Using the R1 GNSS receiver
Using an external antennaWARNING – Antennas are excellent conductors of electricity, so use extreme caution when operatingnear power lines and other sources of electric current or during stormy weather.
Only use an external antenna that is designed to be used with the R1 GNSS receiver.
To connect an external antenna, open the external antenna cover on the left side of the receiver andconnect your antenna cable.
Trimble R1 GNSS Receiver User Guide 19

Using the GNSS status utility
In this chapter:
n Downloading the GNSS Status utility
n Using the GNSS Status utility
If you are not using Trimble field software on yourfield device, use the Trimble GNSS Status utility tomanage the connection to the R1 GNSS receiver.
Trimble R1 GNSS Receiver User Guide 20
3CHAPTER
3 Using the GNSS status utility
Downloading the GNSS Status utilityDownload the GNSS Status utility for your device:
l for Windows, Windows Embedded Handheld, go to the product downloads page onwww.trimble.com
l for Android, go to Google Play store and search for “GNSS Status Utility"
l for iOS, go to iTunes app store and search for "GNSS Status Utility"
Using the GNSS Status utility
On your device, tap GNSS Status to launch the GNSS Status utility.
If the device you are using is not connected to a R1 GNSS receiver, the GNSS Status utility shows:
l Select new receiver enabling you to select a R1 GNSS receiver to connect to
If the device you are using is connected to a R1 GNSS receiver, the GNSS Status utility Home screenshows:
l The estimated GNSS accuracy
l The R1 GNSS receiver's battery status
l The DGNSS status
l Themenu (on tablets), or Menu icon (on smartphones and handheld devices)
l The ID of the connected R1 GNSS receiver
Themenu options are described below.
Detailed statusTap the Estimated Accuracy shown on theHome screen. Or, flick the current screen to the right to
display themenu options, or tap , then tap Detailed Status.
TheDetailed Status screen shows:
l the receiver's GNSS status
l the satellites that are in use and being tracked (for all supported constellations; see Supportedconstellations, page 8)
l the real-time correction source in use
l the receiver's serial number, firmware version, and battery charge status
l packets received (if you are using Internet based sources) and error messages
Trimble R1 GNSS Receiver User Guide 21
3 Using the GNSS status utility
App settingsYou can configure the GNSS Status utility to usemetric or imperial (US) units.
1. Tap or flick the current screen to the right to display themenu options.
2. Tap App Settings. On an iOS or Android device, tap Unit System.
3. Select Metric or US.
Receiver optionsYou can configure the R1 GNSS receiver to use options (subscription services) if you have purchasedthem.
1. Tap or flick the current screen to the right to display themenu options.
2. Tap Receiver Options.
3. In the Install Option field, enter the key you received when you purchased the option.
4. Tap Submit.
The Subscription Status is shown on the lower part of the screen.
For more information on purchasing receiver options, contact your local Trimble reseller.
Real-time configTo configure real-time correction sources:
1. If a receiver is connected, tap theDGNSS Status shown on theHome screen. Or, flick the
current screen to the right to display themenu options, or tap , then tap Real-time Config.
2. Tap Edit. On an iOS or Android device, tap Primary Source Type.
3. Select Internet, SBAS, or Uncorrected as the primary real-time correction source.
4. If you selected Internet as the primary source, tap the fields on the Real-time Config screen toconfigure the primary source, and set a Secondary Source Type (SBAS or Uncorrected).
5. Tap Apply.
NMEA SettingsTo configure the connected receiver to output specific NMEA sentences:
1. Tap or flick the current screen to the right to display themenu options.
2. Tap NMEA Settings.
Trimble R1 GNSS Receiver User Guide 22
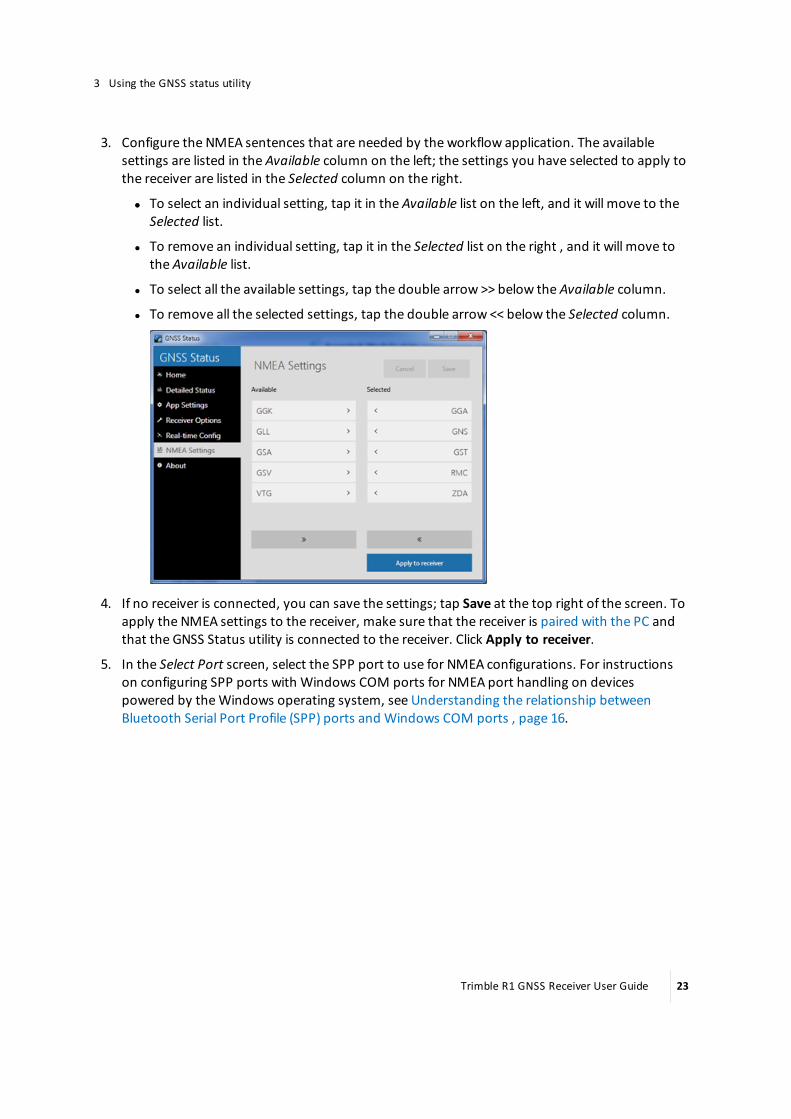
3 Using the GNSS status utility
3. Configure the NMEA sentences that are needed by the workflow application. The availablesettings are listed in the Available column on the left; the settings you have selected to apply tothe receiver are listed in the Selected column on the right.
ll To select an individual setting, tap it in the Available list on the left, and it will move to theSelected list.
l To remove an individual setting, tap it in the Selected list on the right , and it will move tothe Available list.
l To select all the available settings, tap the double arrow >> below the Available column.
l To remove all the selected settings, tap the double arrow << below the Selected column.
4. If no receiver is connected, you can save the settings; tap Save at the top right of the screen. Toapply the NMEA settings to the receiver, make sure that the receiver is paired with the PC andthat the GNSS Status utility is connected to the receiver. Click Apply to receiver.
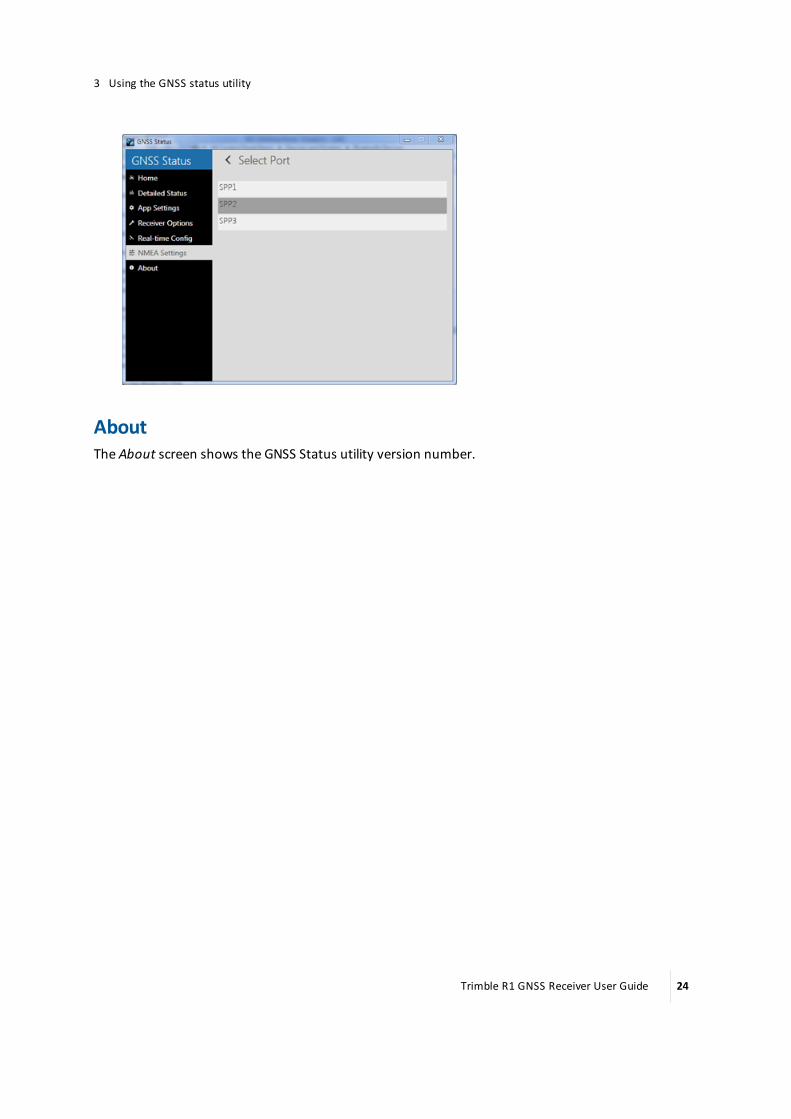
5. In the Select Port screen, select the SPP port to use for NMEA configurations. For instructionson configuring SPP ports with Windows COM ports for NMEA port handling on devicespowered by theWindows operating system, see Understanding the relationship betweenBluetooth Serial Port Profile (SPP) ports and Windows COM ports , page 16.
Trimble R1 GNSS Receiver User Guide 23
3 Using the GNSS status utility
AboutThe About screen shows the GNSS Status utility version number.
Trimble R1 GNSS Receiver User Guide 24
Troubleshooting
In this chapter:
n Receiver won't turn on
n Battery indicator for R1 GNSS receiver showsempty on an iOS device
n R1 GNSS receiver firmware upgrade
n Incorrect R1 GNSS receiver name showing inBluetooth settings on iOS device
This section describes some possible receiverissues, possible causes, and how to solve them.Please read this section before you contactTechnical Support.
Trimble R1 GNSS Receiver User Guide 25
4CHAPTER
4 Troubleshooting
Receiver won't turn on
The R1 GNSS receiver will not turn on. There is no LED indication when the Power button ispressed.
Cause: The battery is severely discharged. This may be because the device is new and hasnot yet been charged, or it has been in storage for more than a fewmonths.
Solution: Charge the battery for an hour using the supplied charger, then disconnect and
reconnect the USB cable. The Power LED should turn on. Leave the device oncharge until the Power LED = (Green).
See Charging the battery, page 12.
Battery indicator for R1 GNSS receiver shows emptyon an iOS device
On an iOS device, the small battery level indicator at the top of the status bar shows emptyin error.
Cause: This is an iOS issue which has been logged with Apple.
Solution: Use the GNSS Status utility to view the battery status. See Downloading theGNSS Status utility, page 21.
R1 GNSS receiver firmware upgrade
When you upgrade the firmware on a R1 GNSS receiver, and it was previously paired withan iOS device, you cannot reconnect.
Cause: The iOS device no longer recognises the R1 GNSS receiver when the firmware isupgraded on the receiver.
Solution: Before you can reconnect your iOS device with a previously connected R1GNSS receiver, you must 'forget' the connection on the iOS device:
1. Go to Settings / Bluetooth, and tap the Info button next to the R1 [serialnumber] device you want to forget.
2. Tap Forget this device.
Trimble R1 GNSS Receiver User Guide 26
4 Troubleshooting
You can then reconnect as usual (see Connecting the R1 GNSS receiver to a device,page 15) .
Incorrect R1 GNSS receiver name showing inBluetooth settings on iOS device
When you restart an iOS device that has been connected to a R1 GNSS receiver, thereceiver appears in the list under Bluetooth Settings as ‘iAP2’.This does not affect operation of the R1 GNSS receiver.
Solution: To make the name of the R1 GNSS receiver reappear:
1. On the iOS device, go to Settings / Bluetooth, and connect to the ‘iAP2’ device.
2. While the Bluetooth settings screen is open on the iOS device, place the R1 GNSSreceiver into Bluetooth pairing mode (press and hold the Power button until the
LED flashes blue ).
3. After a short time the R1 GNSS receiver's namewill reappear.
Trimble R1 GNSS Receiver User Guide 27
Glossary
GlossaryBeiDou The BeiDou Navigation System (Compass) Navigation Satellite System is a Chinese
satellite navigation system.The first BeiDou system (known as BeiDou-1), consists of three satellites and has limitedcoverage and applications. It has been offering navigation services mainly for customersin China and from neighboring regions since 2000.The second generation of the system (known as Compass or BeiDou-2) consists of 35satellites. It became operational with coverage of China in December 2011 with 10satellites in use. Services were planned to be offered to customers in Asia-Pacificregion by 2012 and the global system should be finished by 2020.
carrier A radio wave having at least one characteristic (such as frequency, amplitude, or phase)that can be varied from a known reference value by modulation.
carrier frequency The frequency of the unmodulated fundamental output of a radio transmitter. The GPSL1 carrier frequency is 1575.42 MHz.
carrier phase Is the cumulative phase count of the GPS or GLONASS carrier signal at a given time.CMR/CMR+ Compact Measurement Record. A real-time message format developed by Trimble for
broadcasting corrections to other Trimble receivers. CMR is a more efficient alternativeto RTCM.
CMRx A real-time message format developed by Trimble for transmitting more satellitecorrections resulting from more satellite signals, more constellations, and moresatellites. Its compactness means more repeaters can be used on a site.
DGNSS See real-time differential GNSS.differential GNSS See real-time differential GNSS.EGNOS European Geostationary Navigation Overlay Service. A Satellite-Based Augmentation
System (SBAS) that provides a free-to-air differential correction service for GNSS.EGNOS is the European equivalent of WAAS, which is available in the United States.
firmware The program inside the receiver that controls receiver operations and hardware.GAGAN GPS Aided Geo Augmented Navigation. A regional SBAS system currently in
development by the Indian government.Galileo Galileo is a GNSS system built by the European Union and the European Space Agency.
It is complimentary to GPS and GLONASS.GLONASS Global Orbiting Navigation Satellite System. Ccomparable to the American GPS system,
GLONASS is a space-based navigation system operated by the Russian AerospaceDefence Forces, consisting of 24 satellites in 3 orbit planes.
GNSS Global Navigation Satellite System.GPS Global Positioning System. GPS is a space-based satellite navigation system consisting of
multiple satellites in six orbit planes.L1 The primary L-band carrier used by GPS and GLONASS satellites to transmit satellite
data.MSAS Multi-functional Satellite Augmentation System. A Satellite-Based Augmentation System
(SBAS) that provides a free-to-air differential correction service for GNSS. MSAS is theJapanese equivalent of WAAS.
QZSS Quasi-Zenith Satellite System. A Japanese regional time transfer and Satellite Based
Trimble R1 GNSS Receiver User Guide 28
Glossary
Augmentation System (SBAS) for the GNSS, consisting of three geosynchronoussatellites over Japan.
real-time differentialGNSS
Also known as real-time differential correction or DGNSS. Real-time differential GNSS isthe process of correcting GNSS data as you collect it. Corrections are calculated at abase station and then sent to the receiver through a radio link. As the rover receivesthe position it applies the corrections to give you a very accurate position in the field.Most real-time differential correction methods apply corrections to code phasepositions.While DGNSS is a generic term, its common interpretation is that it entails the use ofsingle-frequency code phase data sent from a GNSS base station to a rover GNSSreceiver to provide sub-meter position accuracy. The rover receiver can be at a longrange (greater than 100 kms (62 miles)) from the base station.
RTX Real-time extended. A real-time differential GNSS method that uses carrier phasemeasurements for greater accuracy.
SBAS Satellite-Based Augmentation System. SBAS is based on differential GPS, but applies towide area (WAAS/EGNOS/MSAS) networks of reference stations. Corrections andadditional information are broadcast using geostationary satellites.
SDCM System for Differential Correction and Monitoring (Russian SBAS system, similar toWAAS and EGNOS)
VRS Virtual Reference Station. A VRS system consists of GNSS hardware, software, andcommunication links. It uses data from a network of base stations to providecorrections to each rover that are more accurate than corrections from a single basestation.To start using VRS corrections, the rover sends its position to the VRS server. The VRSserver uses the base station data to model systematic errors (such as ionospheric noise)at the rover position. It then sends RTCM correction messages back to the rover.
WAAS Wide Area Augmentation System. WAAS was established by the Federal AviationAdministration (FAA) for flight and approach navigation for civil aviation. WAASimproves the accuracy and availability of the basic GNSS signals over its coverage area,which includes the continental United States and outlying parts of Canada and Mexico.The WAAS system provides correction data for visible satellites. Corrections arecomputed from ground station observations and then uploaded to two geostationarysatellites. This data is then broadcast on the L1 frequency, and is tracked using achannel on the GNSS receiver, exactly like a GNSS satellite.Use WAAS when other correction sources are unavailable, to obtain greater accuracythan autonomous positions. For more information on WAAS, refer to the FAA websiteat http://gps.faa.gov.The EGNOS service is the European equivalent and MSAS is the Japanese equivalent ofWAAS.
Trimble R1 GNSS Receiver User Guide 29