Embed Size (px)
Citation preview
TEMS –
Travel Expense
Management System
User’s Guide
June 2014
TEMS User’s Guide
IT Training & Development 2 6/17/2014
Welcome to the Travel Expense Management System (TEMS) .........................................................................................3
TEMS Features and Benefits........................................................................................................................................3 TEMS User Roles ........................................................................................................................................................3 Who Do I Contact for Help? ..........................................................................................................................................3
Access Request ................................................................................................................................................................4 Travel Check List ..............................................................................................................................................................4 TEMS Travel Process .......................................................................................................................................................5
Travel Advance and Travel Reimbursement Check Distribution ....................................................................................6 Logging into TEMS............................................................................................................................................................7 Profile: Address, Approvers, Delegates, and Funding Default ............................................................................................8 Travel Authorization Report .............................................................................................................................................10
Itinerary ......................................................................................................................................................................12 Workflow Proxies ............................................................................................................................................................22 Travel Authorization Approval – Without Travel Advances ...............................................................................................24 Travel Authorization Approval – With Travel Advance Requests ......................................................................................28 Expense Reports ............................................................................................................................................................33 Expense Reimbursement Approval .................................................................................................................................37 Reviewing Travel ............................................................................................................................................................40 Cancelling Travel ............................................................................................................................................................41
TEMS User’s Guide
IT Training & Development 3 6/17/2014
Welcome to the Travel Expense Management System (TEMS) Welcome to the TEMS User’s Guide. This guide is designed to provide you with the information you need to successfully use the Banner Finance system and includes the following topics:
Overview of TEMS
Creating Authorization Request and Itinerary
Requesting Advances
Approving Travel
Expense Reports
TEMS Features and Benefits TEMS is an online travel authorization and reimbursement system. TEMS is an integrated Banner module that automates and streamlines the travel authorization, advance request, and expense reporting and reimbursement processes. The system replaces paper forms and the manual approval process used for travel-related requests. Benefits of TEMS include:
Improved self-service capability through a web-based, electronic process.
Real-time access to the status of travel request authorizations and travel expense reimbursements.
TEMS automatically provides per diem rates for lodging and meals.
TEMS automatically encumbers budget.
Reduced processing time for travel authorization and travel expense reimbursements.
Electronic approval queue that allows supervisors and budget authorities the ability to review and approve authorizations, advances and travel expense reports online.
Less paperwork supports improved sustainability practices and a "greener" footprint.
TEMS User Roles Traveler: The person who is traveling.
Delegate: The person processing travel for another individual (for example, the department Travel Coordinator).
Approver: The person with budget authority who is responsible for approving travel authorizations (additionally,
proxies may be assigned).
Who Do I Contact for Help? For TEMS technical and access issues, contact the Web Help Desk at whd.ewu.edu and submit a help desk ticket. For Washington State Travel policy visit: http://www.ofm.wa.gov/policy/10.htm and http://access.wa.gov/topics/government/stateemployees/travel

TEMS User’s Guide
IT Training & Development 4 6/17/2014
For travel policies, procedures, and resources, visit the EWU Travel Accounting site: http://access.ewu.edu/travel. Use the
links in the left-hand navigation column:
Access Request To request access to TEMS, submit a web help desk ticket (whd.ewu.edu). Be sure to include the following information:
EWU employee ID
EWU email address
Supervisor’s name
Requested TEMS role(s)
Traveler
Delegate
Approver Note: TEMS training is required for TEMS access. To enroll in TEMS training visit the Training Scheduler at:
https://web.ewu.edu/trainsched/
Travel Check List Prior to processing travel in TEMS, it is recommended to consider the following items. This is not a comprehensive list. For questions or instructions on traveling on university business, contact Travel Accounting or refer to the EWU Employee Travel Guide available on the Travel Accounting web page.
Is travel being processed for yourself or are you acting as a delegate.
Who will be approving the travel
Is travel being paid by grant money What are the dates
What is the airfare Will a rental car be used
What budget is the travel being charged to Will a travel advance be requested
Are there other travel related expenses Will a privately owned vehicle be used
TEMS User’s Guide
IT Training & Development 5 6/17/2014
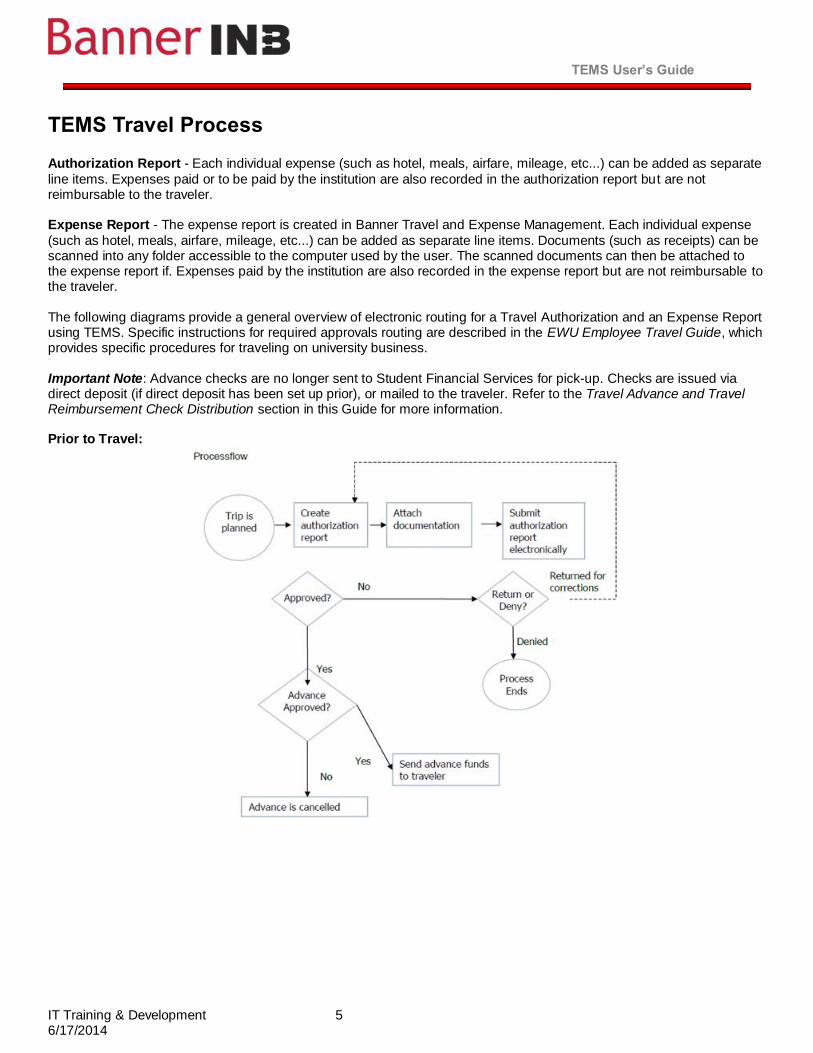
TEMS Travel Process Authorization Report - Each individual expense (such as hotel, meals, airfare, mileage, etc...) can be added as separate
line items. Expenses paid or to be paid by the institution are also recorded in the authorization report but are not reimbursable to the traveler. Expense Report - The expense report is created in Banner Travel and Expense Management. Each individual expense
(such as hotel, meals, airfare, mileage, etc...) can be added as separate line items. Documents (such as receipts) can be scanned into any folder accessible to the computer used by the user. The scanned documents can then be attached to the expense report if. Expenses paid by the institution are also recorded in the expense report but are not reimbursable to the traveler. The following diagrams provide a general overview of electronic routing for a Travel Authorization and an Expense Report using TEMS. Specific instructions for required approvals routing are described in the EWU Employee Travel Guide, which provides specific procedures for traveling on university business. Important Note: Advance checks are no longer sent to Student Financial Services for pick-up. Checks are issued via direct deposit (if direct deposit has been set up prior), or mailed to the traveler. Refer to the Travel Advance and Travel Reimbursement Check Distribution section in this Guide for more information. Prior to Travel:
TEMS User’s Guide
IT Training & Development 6 6/17/2014
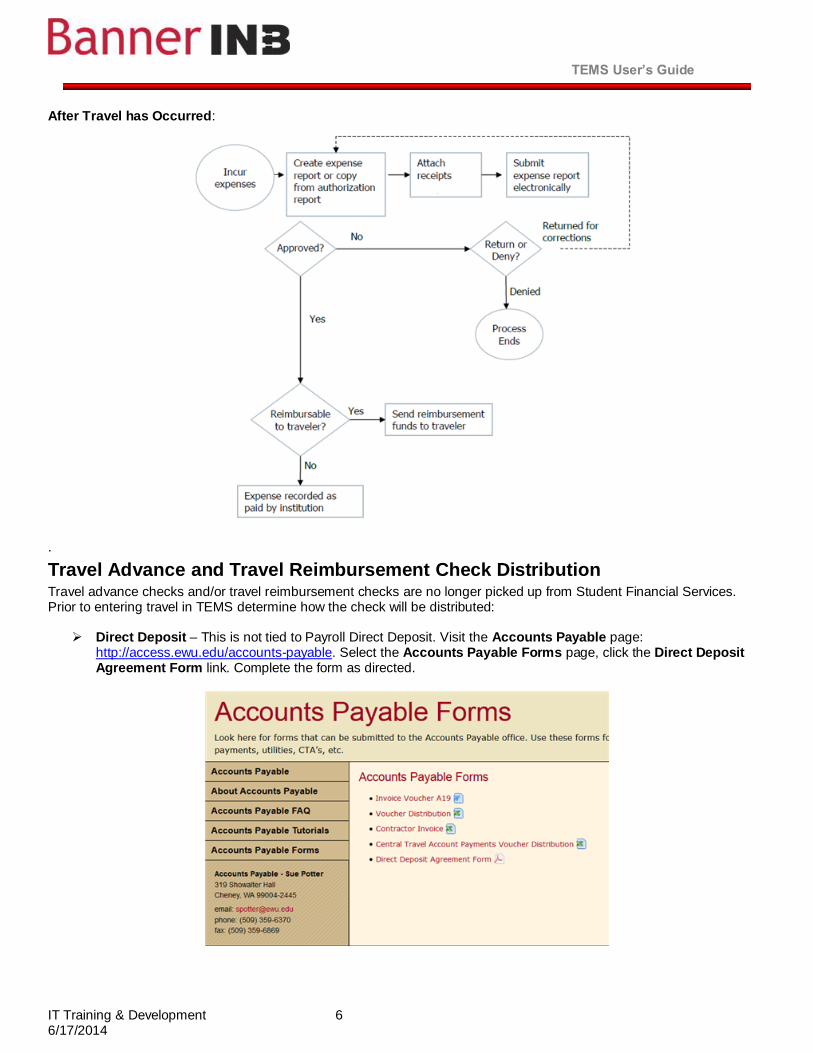
After Travel has Occurred:
.
Travel Advance and Travel Reimbursement Check Distribution Travel advance checks and/or travel reimbursement checks are no longer picked up from Student Financial Services. Prior to entering travel in TEMS determine how the check will be distributed:
Direct Deposit – This is not tied to Payroll Direct Deposit. Visit the Accounts Payable page: http://access.ewu.edu/accounts-payable. Select the Accounts Payable Forms page, click the Direct Deposit Agreement Form link. Complete the form as directed.
TEMS User’s Guide
IT Training & Development 7 6/17/2014
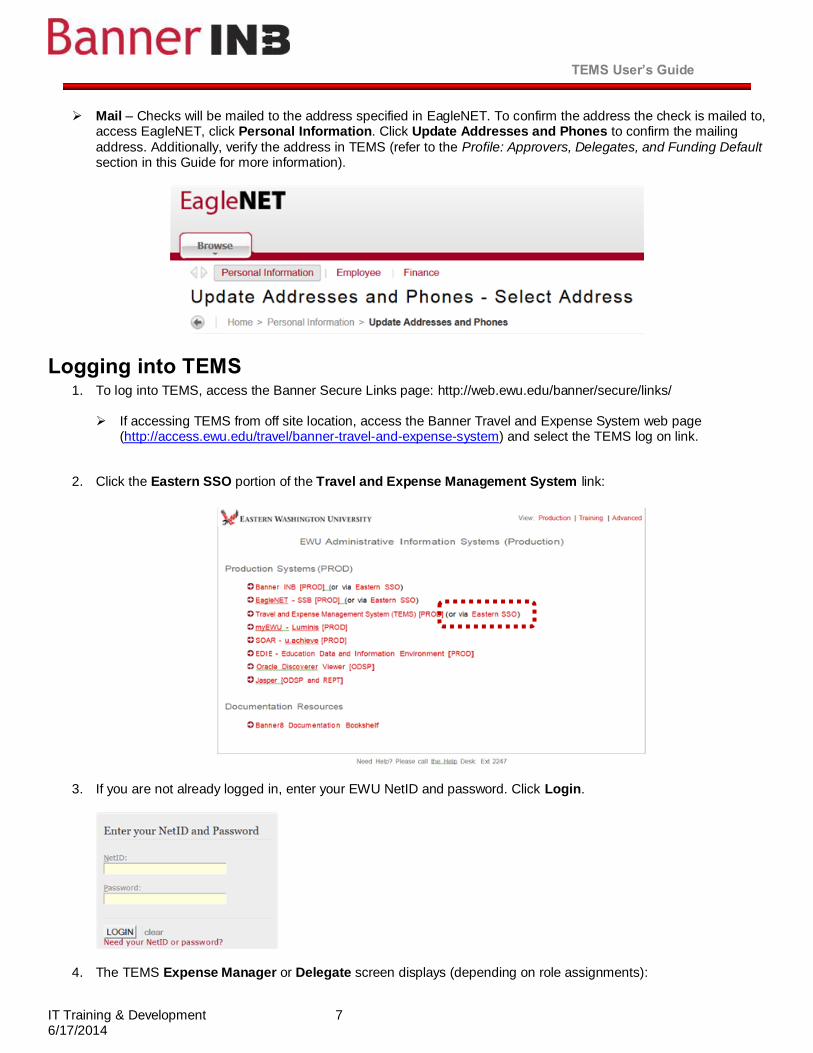
Mail – Checks will be mailed to the address specified in EagleNET. To confirm the address the check is mailed to, access EagleNET, click Personal Information. Click Update Addresses and Phones to confirm the mailing
address. Additionally, verify the address in TEMS (refer to the Profile: Approvers, Delegates, and Funding Default section in this Guide for more information).
Logging into TEMS 1. To log into TEMS, access the Banner Secure Links page: http://web.ewu.edu/banner/secure/links/
If accessing TEMS from off site location, access the Banner Travel and Expense System web page
(http://access.ewu.edu/travel/banner-travel-and-expense-system) and select the TEMS log on link.
2. Click the Eastern SSO portion of the Travel and Expense Management System link:
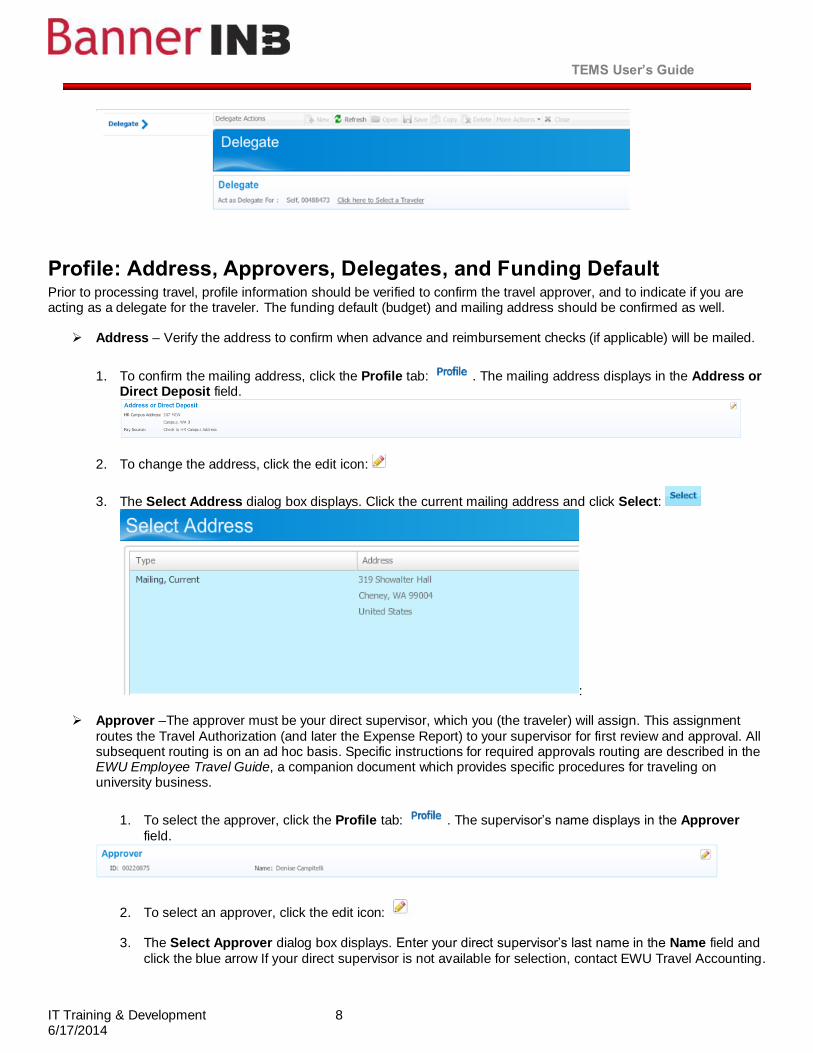
3. If you are not already logged in, enter your EWU NetID and password. Click Login.
4. The TEMS Expense Manager or Delegate screen displays (depending on role assignments):
TEMS User’s Guide
IT Training & Development 8 6/17/2014
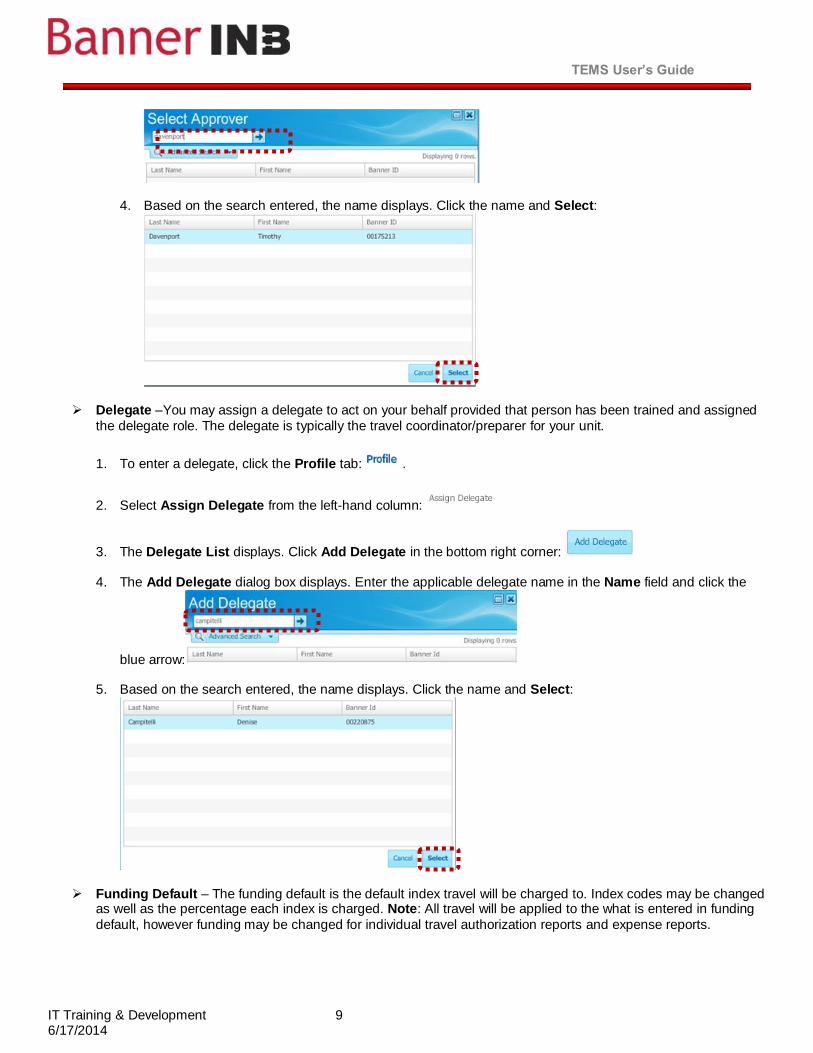
Profile: Address, Approvers, Delegates, and Funding Default Prior to processing travel, profile information should be verified to confirm the travel approver, and to indicate if you are acting as a delegate for the traveler. The funding default (budget) and mailing address should be confirmed as well.
Address – Verify the address to confirm when advance and reimbursement checks (if applicable) will be mailed.
1. To confirm the mailing address, click the Profile tab: . The mailing address displays in the Address or Direct Deposit field.
2. To change the address, click the edit icon:
3. The Select Address dialog box displays. Click the current mailing address and click Select:
:
Approver –The approver must be your direct supervisor, which you (the traveler) will assign. This assignment
routes the Travel Authorization (and later the Expense Report) to your supervisor for first review and approval. All subsequent routing is on an ad hoc basis. Specific instructions for required approvals routing are described in the EWU Employee Travel Guide, a companion document which provides specific procedures for traveling on university business.
1. To select the approver, click the Profile tab: . The supervisor’s name displays in the Approver
field.
2. To select an approver, click the edit icon:
3. The Select Approver dialog box displays. Enter your direct supervisor’s last name in the Name field and
click the blue arrow If your direct supervisor is not available for selection, contact EWU Travel Accounting.
TEMS User’s Guide
IT Training & Development 9 6/17/2014
4. Based on the search entered, the name displays. Click the name and Select:
Delegate –You may assign a delegate to act on your behalf provided that person has been trained and assigned
the delegate role. The delegate is typically the travel coordinator/preparer for your unit.
1. To enter a delegate, click the Profile tab: .
2. Select Assign Delegate from the left-hand column:
3. The Delegate List displays. Click Add Delegate in the bottom right corner:
4. The Add Delegate dialog box displays. Enter the applicable delegate name in the Name field and click the
blue arrow:
5. Based on the search entered, the name displays. Click the name and Select:
Funding Default – The funding default is the default index travel will be charged to. Index codes may be changed as well as the percentage each index is charged. Note: All travel will be applied to the what is entered in funding
default, however funding may be changed for individual travel authorization reports and expense reports.
TEMS User’s Guide
IT Training & Development 10 6/17/2014
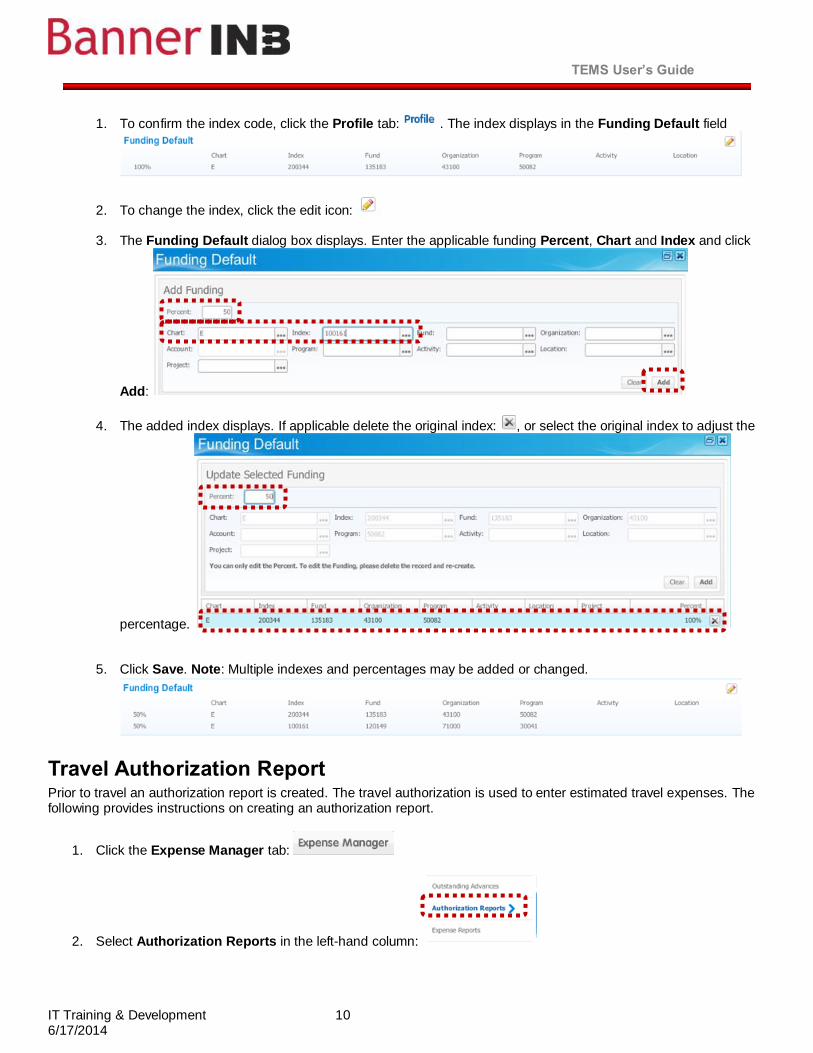
1. To confirm the index code, click the Profile tab: . The index displays in the Funding Default field
2. To change the index, click the edit icon:
3. The Funding Default dialog box displays. Enter the applicable funding Percent, Chart and Index and click
Add:
4. The added index displays. If applicable delete the original index: , or select the original index to adjust the
percentage.
5. Click Save. Note: Multiple indexes and percentages may be added or changed.
Travel Authorization Report Prior to travel an authorization report is created. The travel authorization is used to enter estimated travel expenses. The following provides instructions on creating an authorization report.
1. Click the Expense Manager tab:
2. Select Authorization Reports in the left-hand column:
TEMS User’s Guide
IT Training & Development 11 6/17/2014
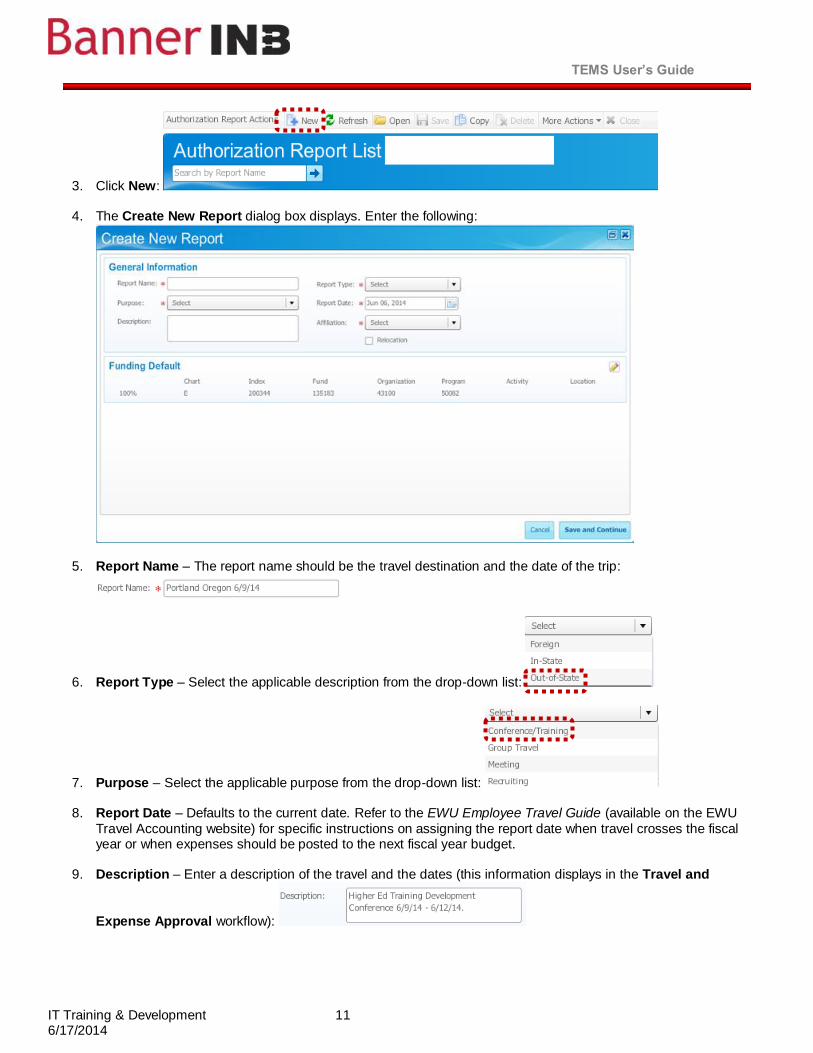
3. Click New:
4. The Create New Report dialog box displays. Enter the following:
5. Report Name – The report name should be the travel destination and the date of the trip:
6. Report Type – Select the applicable description from the drop-down list:
7. Purpose – Select the applicable purpose from the drop-down list:
8. Report Date – Defaults to the current date. Refer to the EWU Employee Travel Guide (available on the EWU
Travel Accounting website) for specific instructions on assigning the report date when travel crosses the fiscal year or when expenses should be posted to the next fiscal year budget.
9. Description – Enter a description of the travel and the dates (this information displays in the Travel and
Expense Approval workflow):
TEMS User’s Guide
IT Training & Development 12 6/17/2014
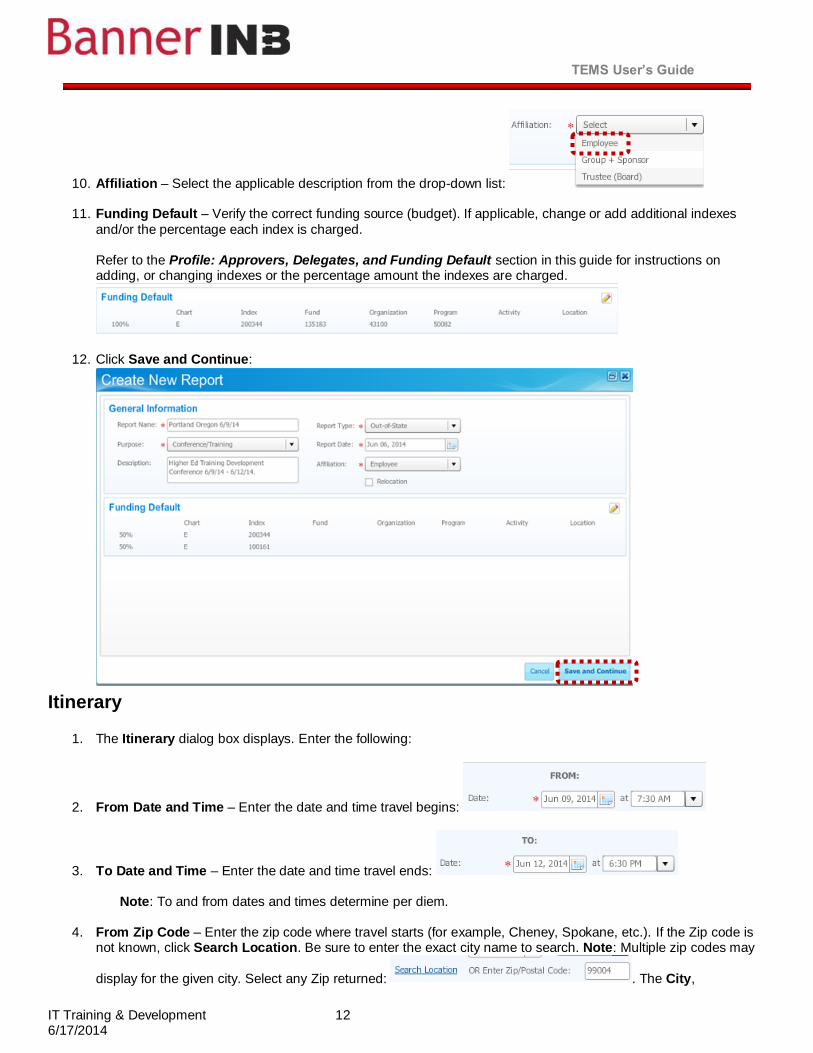
10. Affiliation – Select the applicable description from the drop-down list:
11. Funding Default – Verify the correct funding source (budget). If applicable, change or add additional indexes
and/or the percentage each index is charged. Refer to the Profile: Approvers, Delegates, and Funding Default section in this guide for instructions on adding, or changing indexes or the percentage amount the indexes are charged.
12. Click Save and Continue:
Itinerary
1. The Itinerary dialog box displays. Enter the following:
2. From Date and Time – Enter the date and time travel begins:
3. To Date and Time – Enter the date and time travel ends:
Note: To and from dates and times determine per diem.
4. From Zip Code – Enter the zip code where travel starts (for example, Cheney, Spokane, etc.). If the Zip code is
not known, click Search Location. Be sure to enter the exact city name to search. Note: Multiple zip codes may
display for the given city. Select any Zip returned: . The City,
TEMS User’s Guide
IT Training & Development 13 6/17/2014
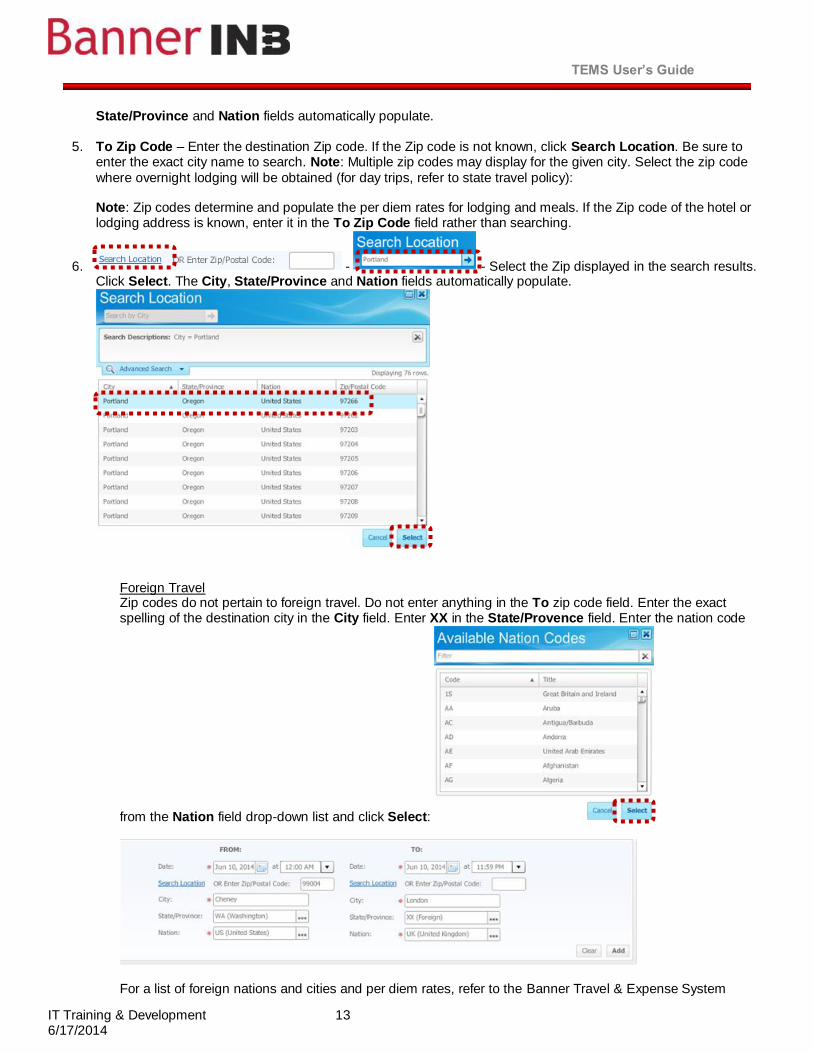
State/Province and Nation fields automatically populate.
5. To Zip Code – Enter the destination Zip code. If the Zip code is not known, click Search Location. Be sure to
enter the exact city name to search. Note: Multiple zip codes may display for the given city. Select the zip code
where overnight lodging will be obtained (for day trips, refer to state travel policy):
Note: Zip codes determine and populate the per diem rates for lodging and meals. If the Zip code of the hotel or lodging address is known, enter it in the To Zip Code field rather than searching.
6. - - Select the Zip displayed in the search results. Click Select. The City, State/Province and Nation fields automatically populate.
Foreign Travel Zip codes do not pertain to foreign travel. Do not enter anything in the To zip code field. Enter the exact spelling of the destination city in the City field. Enter XX in the State/Provence field. Enter the nation code
from the Nation field drop-down list and click Select:
For a list of foreign nations and cities and per diem rates, refer to the Banner Travel & Expense System
TEMS User’s Guide
IT Training & Development 14 6/17/2014
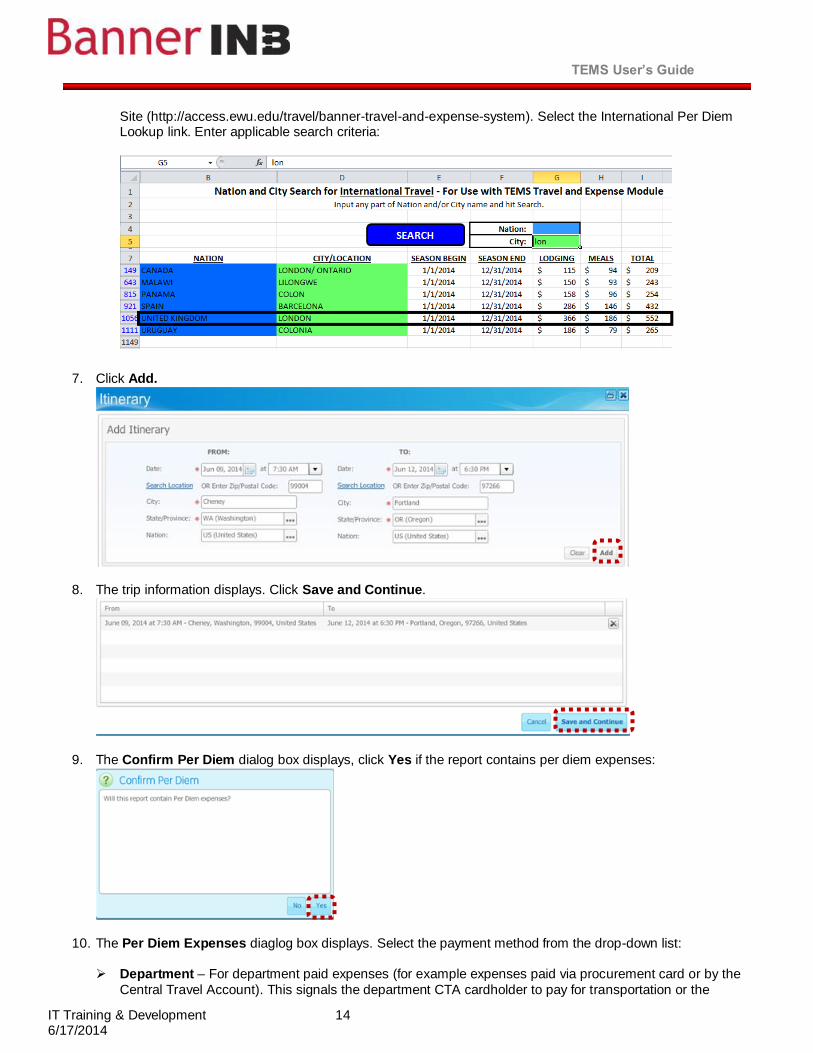
Site (http://access.ewu.edu/travel/banner-travel-and-expense-system). Select the International Per Diem Lookup link. Enter applicable search criteria:
7. Click Add.
8. The trip information displays. Click Save and Continue.
9. The Confirm Per Diem dialog box displays, click Yes if the report contains per diem expenses:
10. The Per Diem Expenses diaglog box displays. Select the payment method from the drop-down list:
Department – For department paid expenses (for example expenses paid via procurement card or by the
Central Travel Account). This signals the department CTA cardholder to pay for transportation or the
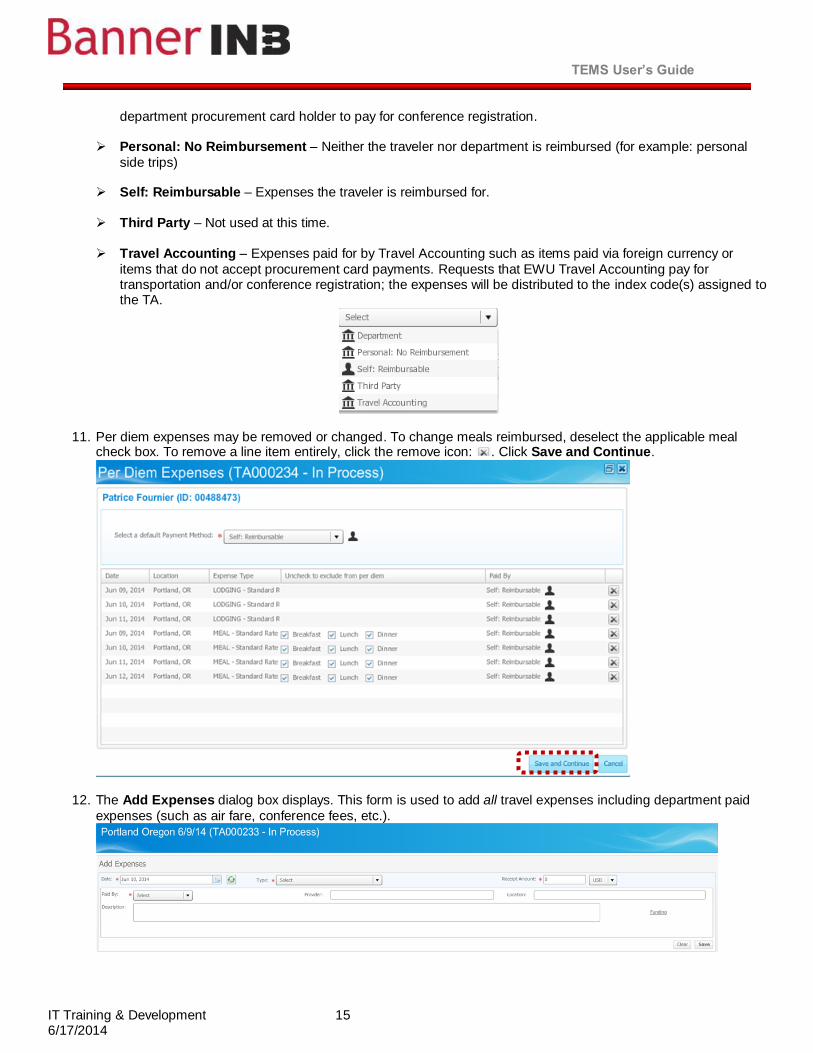
TEMS User’s Guide
IT Training & Development 15 6/17/2014
department procurement card holder to pay for conference registration.
Personal: No Reimbursement – Neither the traveler nor department is reimbursed (for example: personal
side trips)
Self: Reimbursable – Expenses the traveler is reimbursed for.
Third Party – Not used at this time.
Travel Accounting – Expenses paid for by Travel Accounting such as items paid via foreign currency or
items that do not accept procurement card payments. Requests that EWU Travel Accounting pay for transportation and/or conference registration; the expenses will be distributed to the index code(s) assigned to the TA.
11. Per diem expenses may be removed or changed. To change meals reimbursed, deselect the applicable meal check box. To remove a line item entirely, click the remove icon: . Click Save and Continue.
12. The Add Expenses dialog box displays. This form is used to add all travel expenses including department paid
expenses (such as air fare, conference fees, etc.).
TEMS User’s Guide
IT Training & Development 16 6/17/2014
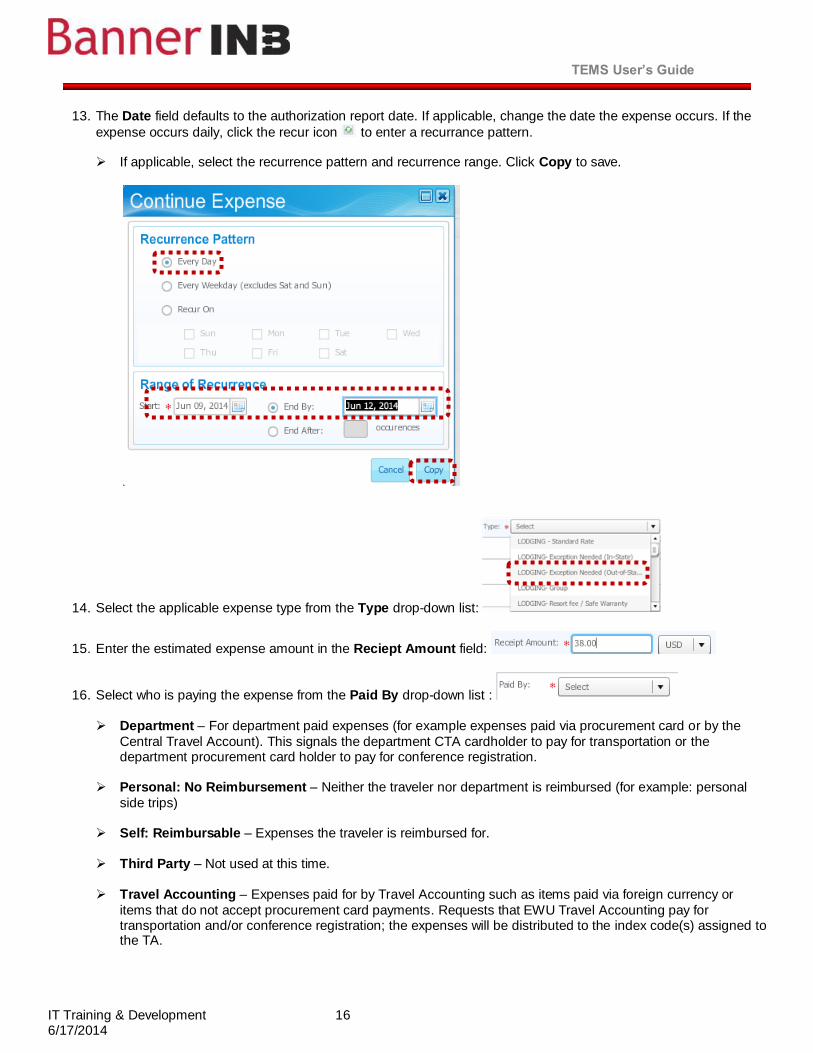
13. The Date field defaults to the authorization report date. If applicable, change the date the expense occurs. If the
expense occurs daily, click the recur icon to enter a recurrance pattern. If applicable, select the recurrence pattern and recurrence range. Click Copy to save.
14. Select the applicable expense type from the Type drop-down list:
15. Enter the estimated expense amount in the Reciept Amount field:
16. Select who is paying the expense from the Paid By drop-down list :
Department – For department paid expenses (for example expenses paid via procurement card or by the
Central Travel Account). This signals the department CTA cardholder to pay for transportation or the department procurement card holder to pay for conference registration.
Personal: No Reimbursement – Neither the traveler nor department is reimbursed (for example: personal
side trips)
Self: Reimbursable – Expenses the traveler is reimbursed for.
Third Party – Not used at this time.
Travel Accounting – Expenses paid for by Travel Accounting such as items paid via foreign currency or
items that do not accept procurement card payments. Requests that EWU Travel Accounting pay for transportation and/or conference registration; the expenses will be distributed to the index code(s) assigned to the TA.

TEMS User’s Guide
IT Training & Development 17 6/17/2014
17. Enter the provider name in the Provider field (for example, the hotel name, conference name, airline, rental car
agency, etc.). Be sure to include a telephone number if applicable.
18. Enter the provider location if applicable in the Location field.
19. Enter a description of the expense in the Description field.
20. If applicable, funding may be changed (for example; expenses charged to two or more indexes) for each expense
item. Select Funding: To add a new index, enter the Chart and Index. Click Add. A dollar amount or percentage may also be
entered.
To change the amount charged or, percentage charged to a specific index, select the applicable index and enter the desired amount or percentage of the expense in the Enter Amount field or Percentage field. Click Add.

TEMS User’s Guide
IT Training & Development 18 6/17/2014
21. Click Save for each added expense.
22. Continue to add all expenses (refer to steps 11 – 20). After all expenses have been added, click View or Submit Report.
Note: Recalculate Per Diem refreshes all default lodging and meals.
TEMS User’s Guide
IT Training & Development 19 6/17/2014
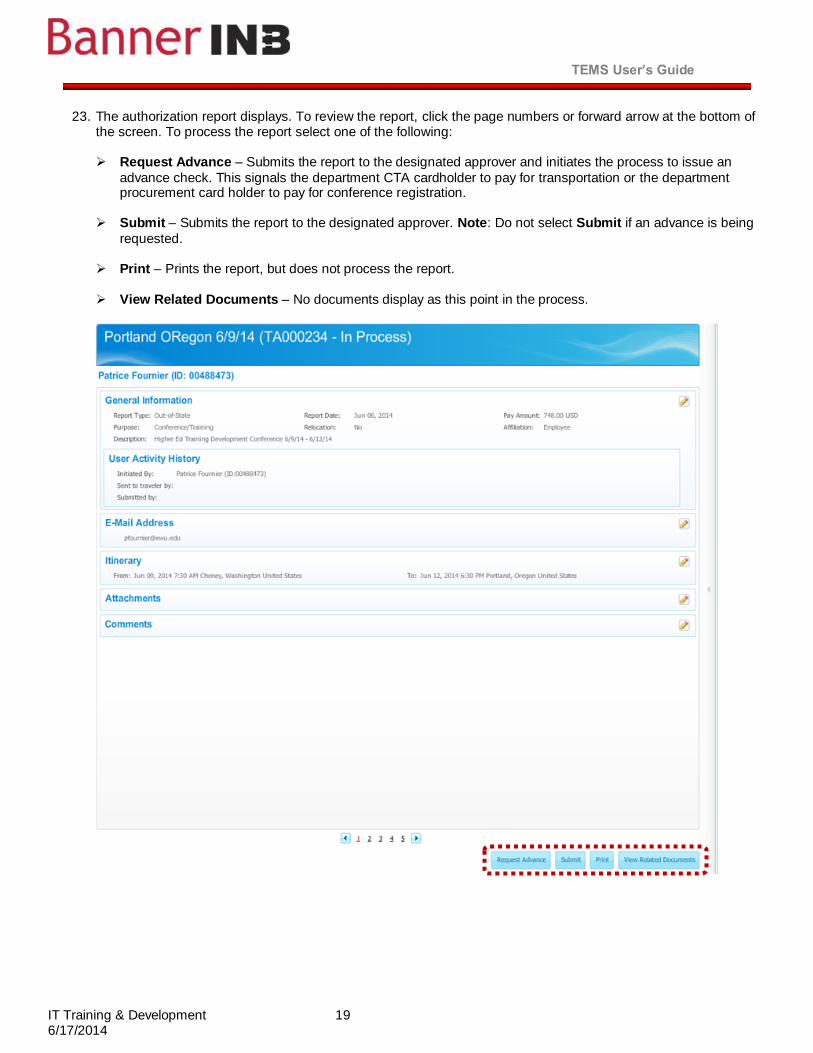
23. The authorization report displays. To review the report, click the page numbers or forward arrow at the bottom of the screen. To process the report select one of the following: Request Advance – Submits the report to the designated approver and initiates the process to issue an
advance check. This signals the department CTA cardholder to pay for transportation or the department procurement card holder to pay for conference registration.
Submit – Submits the report to the designated approver. Note: Do not select Submit if an advance is being
requested.
Print – Prints the report, but does not process the report.
View Related Documents – No documents display as this point in the process.
TEMS User’s Guide
IT Training & Development 20 6/17/2014
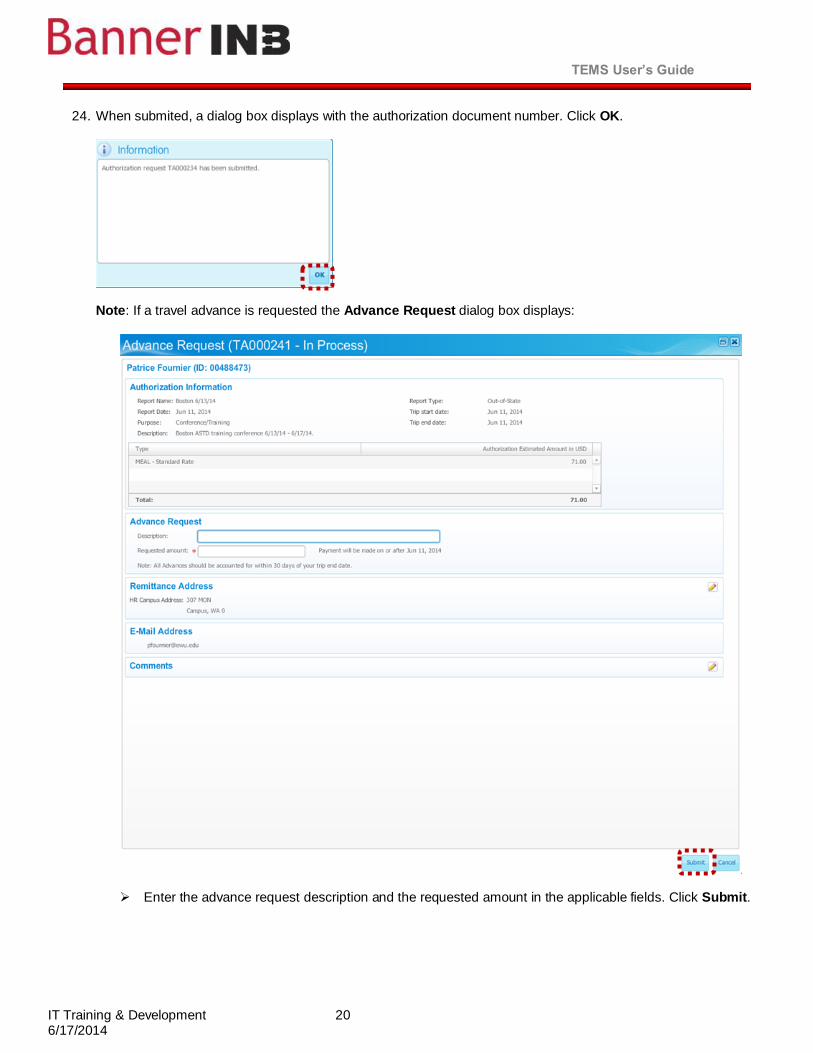
24. When submited, a dialog box displays with the authorization document number. Click OK.
Note: If a travel advance is requested the Advance Request dialog box displays:
Enter the advance request description and the requested amount in the applicable fields. Click Submit.
TEMS User’s Guide
IT Training & Development 21 6/17/2014
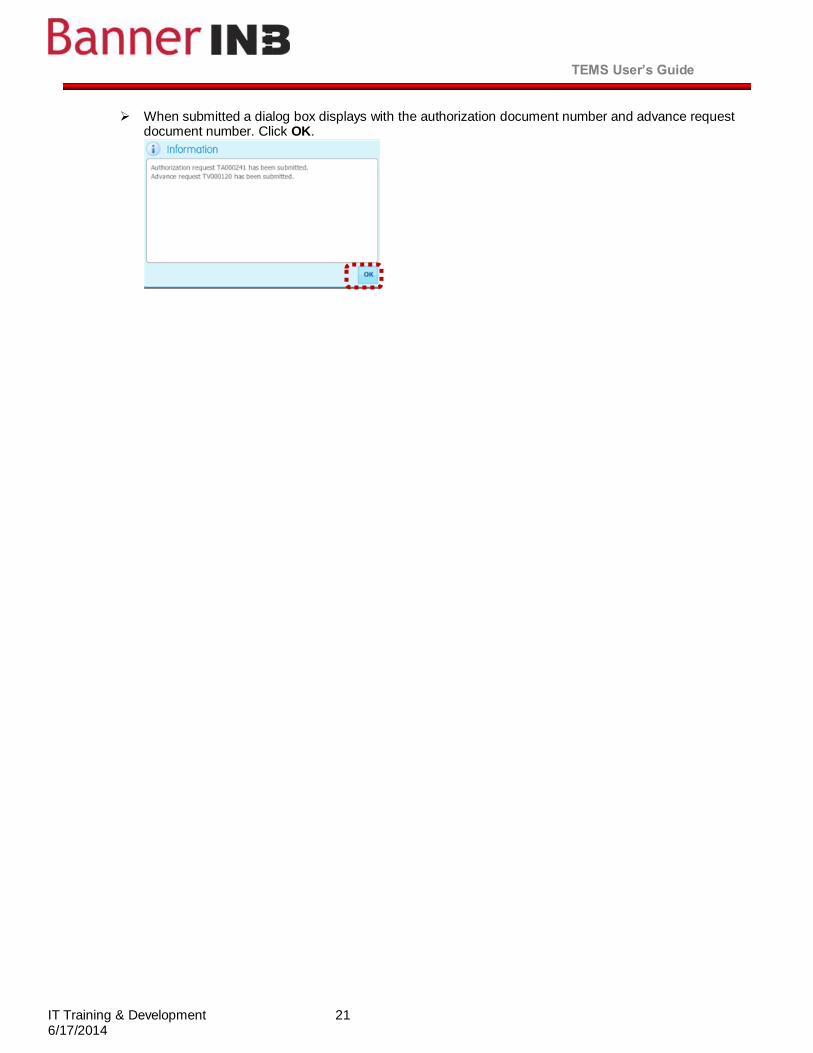
When submitted a dialog box displays with the authorization document number and advance request document number. Click OK.
TEMS User’s Guide
IT Training & Development 22 6/17/2014
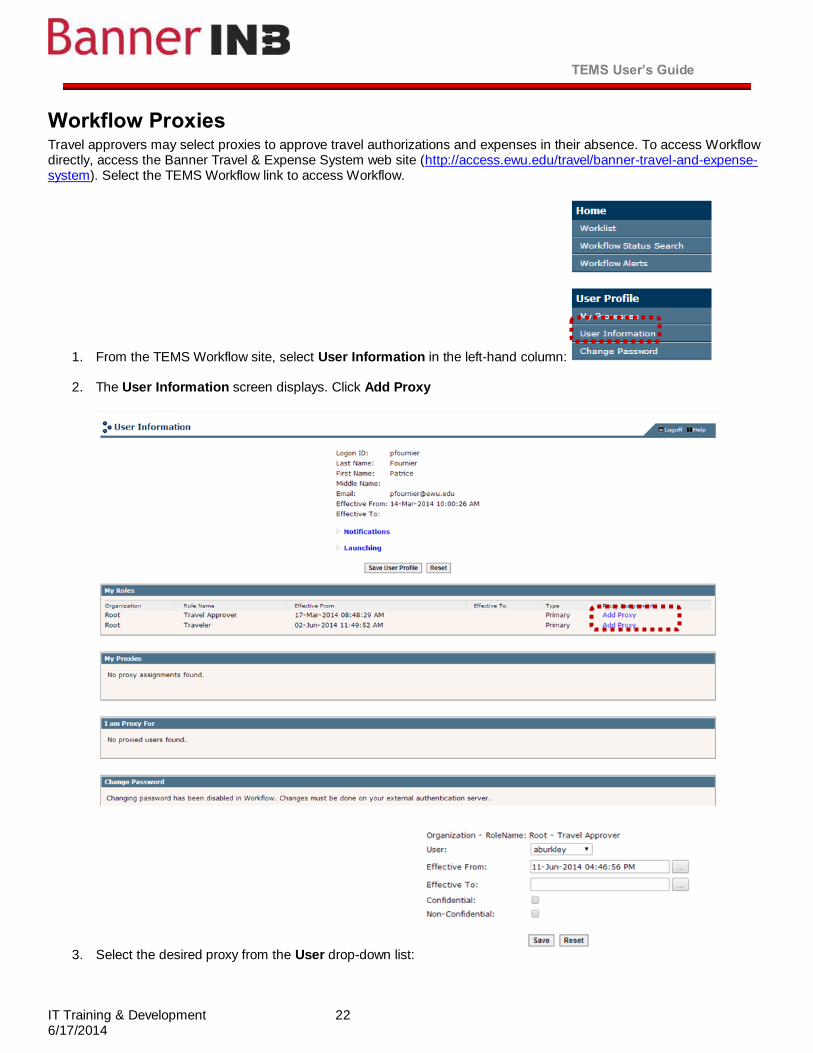
Workflow Proxies Travel approvers may select proxies to approve travel authorizations and expenses in their absence. To access Workflow directly, access the Banner Travel & Expense System web site (http://access.ewu.edu/travel/banner-travel-and-expense-system). Select the TEMS Workflow link to access Workflow.
1. From the TEMS Workflow site, select User Information in the left-hand column:
2. The User Information screen displays. Click Add Proxy
3. Select the desired proxy from the User drop-down list:
TEMS User’s Guide
IT Training & Development 23 6/17/2014
4. Enter effective from and to dates.
5. Select both the Confidential and Non-Confidential check boxes.
6. Click Save.
TEMS User’s Guide
IT Training & Development 24 6/17/2014
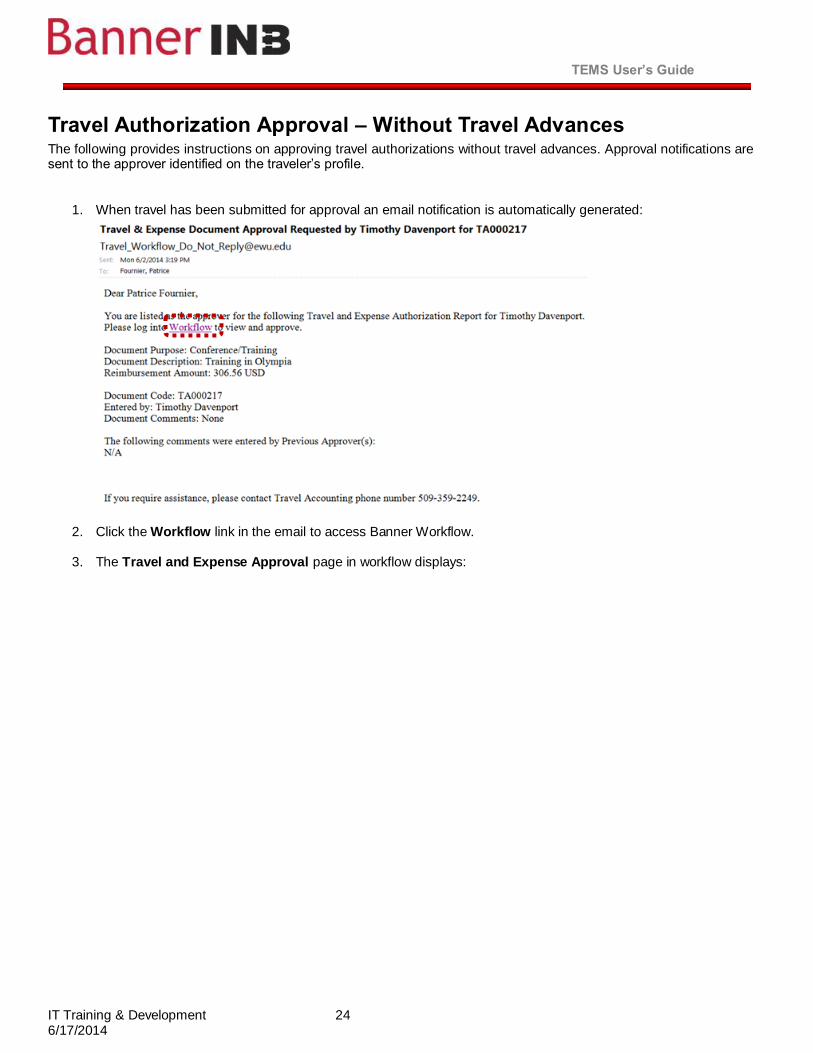
Travel Authorization Approval – Without Travel Advances The following provides instructions on approving travel authorizations without travel advances. Approval notifications are sent to the approver identified on the traveler’s profile.
1. When travel has been submitted for approval an email notification is automatically generated:
2. Click the Workflow link in the email to access Banner Workflow.
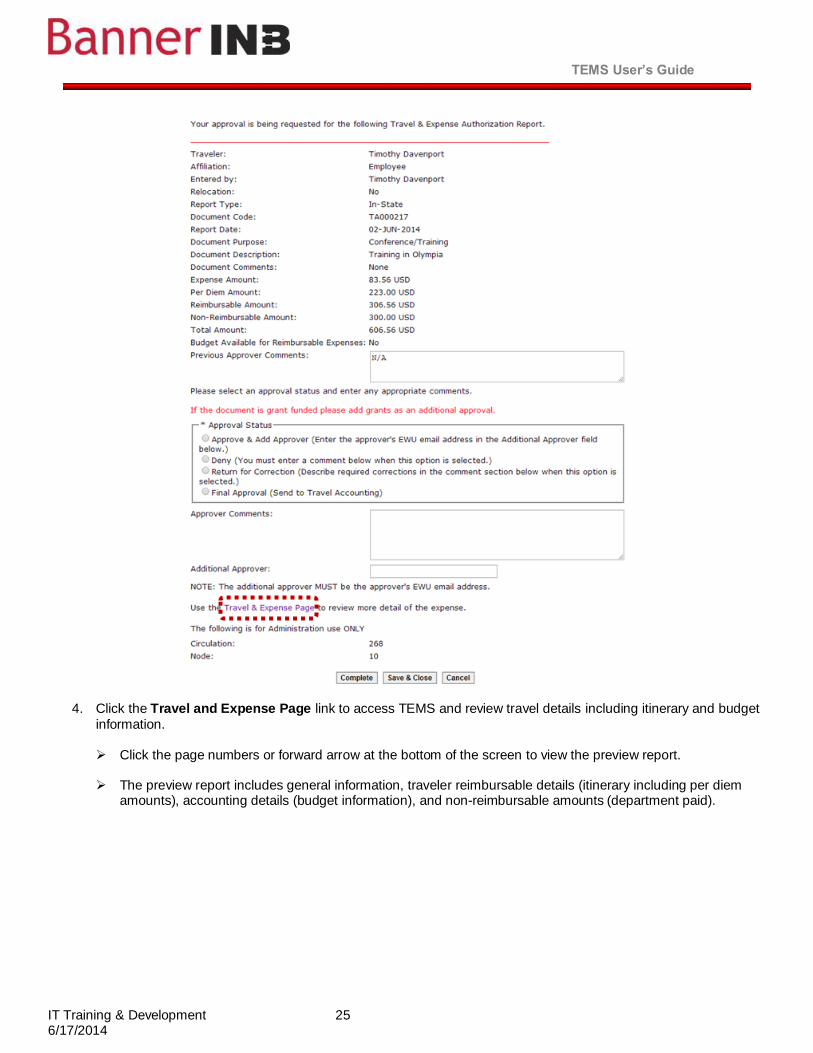
3. The Travel and Expense Approval page in workflow displays:
TEMS User’s Guide
IT Training & Development 25 6/17/2014
4. Click the Travel and Expense Page link to access TEMS and review travel details including itinerary and budget
information. Click the page numbers or forward arrow at the bottom of the screen to view the preview report.
The preview report includes general information, traveler reimbursable details (itinerary including per diem
amounts), accounting details (budget information), and non-reimbursable amounts (department paid).
TEMS User’s Guide
IT Training & Development 26 6/17/2014
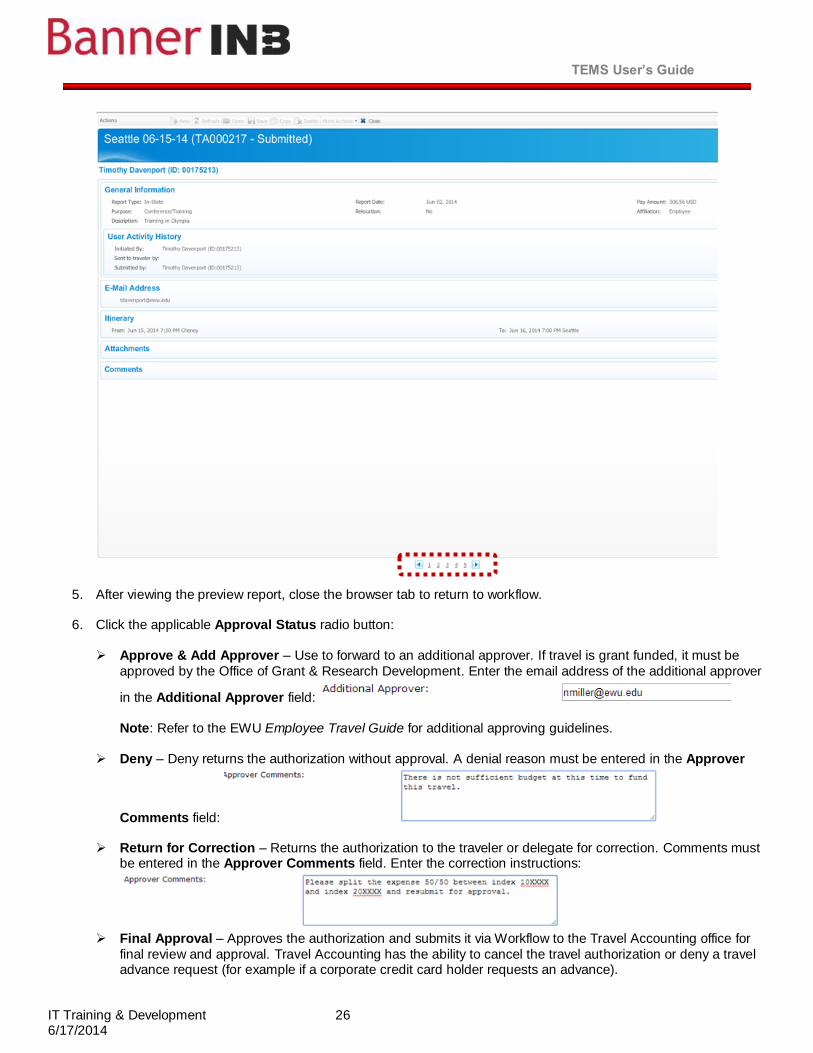
5. After viewing the preview report, close the browser tab to return to workflow.
6. Click the applicable Approval Status radio button:
Approve & Add Approver – Use to forward to an additional approver. If travel is grant funded, it must be
approved by the Office of Grant & Research Development. Enter the email address of the additional approver
in the Additional Approver field:
Note: Refer to the EWU Employee Travel Guide for additional approving guidelines.
Deny – Deny returns the authorization without approval. A denial reason must be entered in the Approver
Comments field:
Return for Correction – Returns the authorization to the traveler or delegate for correction. Comments must be entered in the Approver Comments field. Enter the correction instructions:
Final Approval – Approves the authorization and submits it via Workflow to the Travel Accounting office for
final review and approval. Travel Accounting has the ability to cancel the travel authorization or deny a travel advance request (for example if a corporate credit card holder requests an advance).
TEMS User’s Guide
IT Training & Development 27 6/17/2014
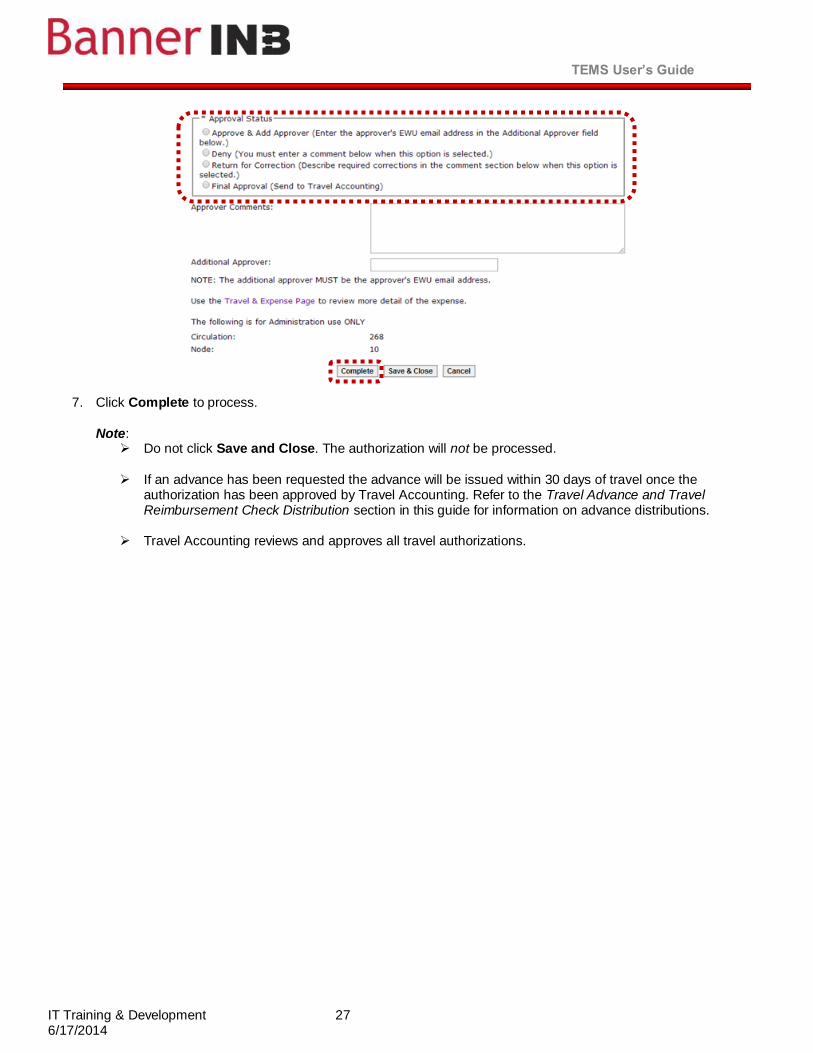
7. Click Complete to process.
Note:
Do not click Save and Close. The authorization will not be processed.
If an advance has been requested the advance will be issued within 30 days of travel once the
authorization has been approved by Travel Accounting. Refer to the Travel Advance and Travel Reimbursement Check Distribution section in this guide for information on advance distributions.
Travel Accounting reviews and approves all travel authorizations.
TEMS User’s Guide
IT Training & Development 28 6/17/2014
Travel Authorization Approval – With Travel Advance Requests The following provides instructions on approving travel authorizations with travel advance requests. Approval notifications are sent to the approver identified on the traveler’s profile.
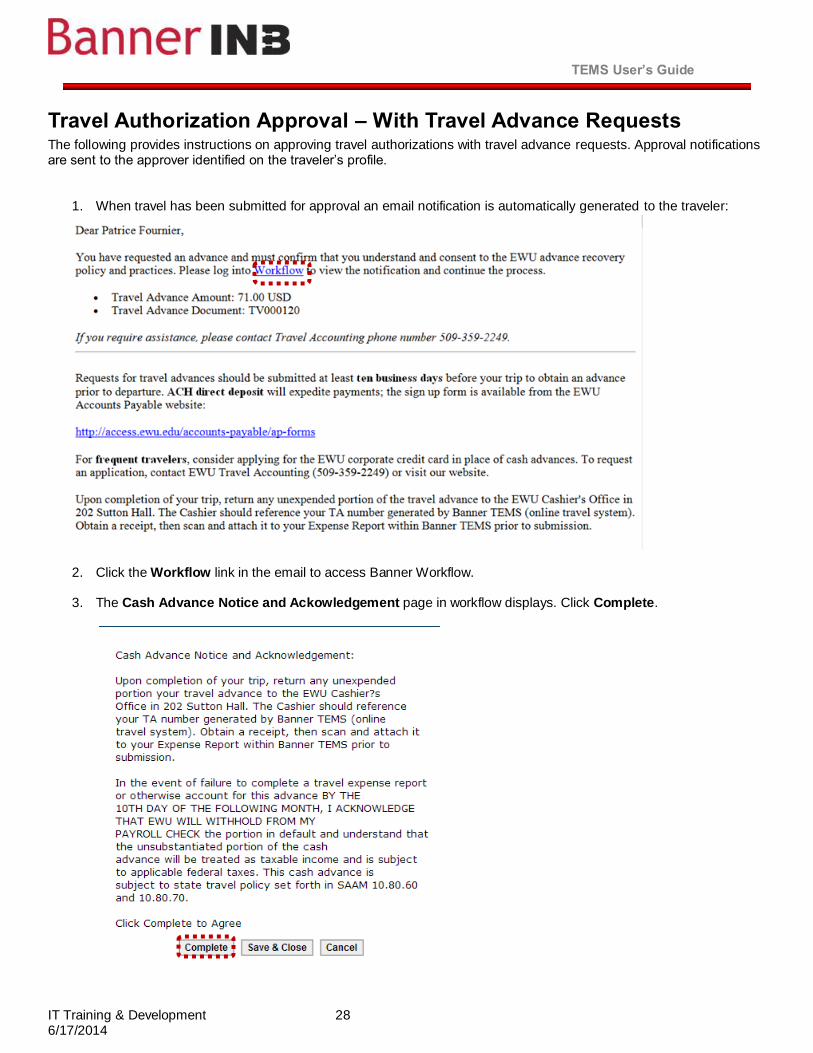
1. When travel has been submitted for approval an email notification is automatically generated to the traveler:
2. Click the Workflow link in the email to access Banner Workflow.
3. The Cash Advance Notice and Ackowledgement page in workflow displays. Click Complete.
TEMS User’s Guide
IT Training & Development 29 6/17/2014
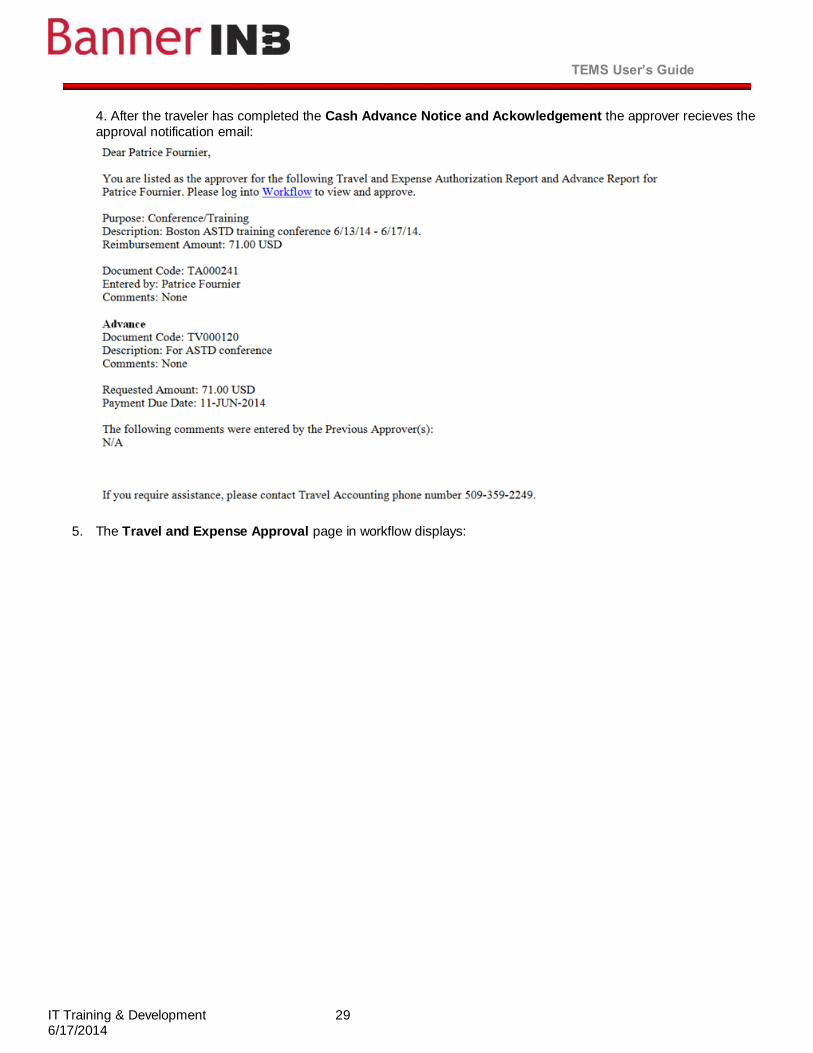
4. After the traveler has completed the Cash Advance Notice and Ackowledgement the approver recieves the
approval notification email:
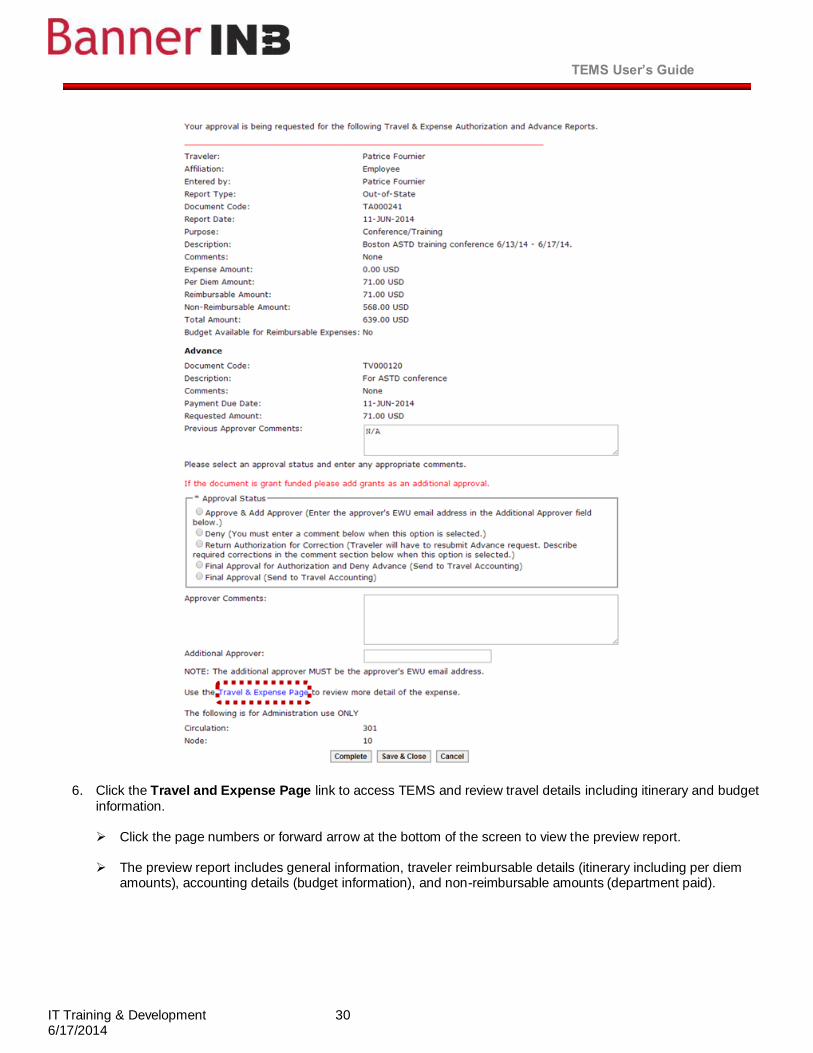
5. The Travel and Expense Approval page in workflow displays:
TEMS User’s Guide
IT Training & Development 30 6/17/2014
6. Click the Travel and Expense Page link to access TEMS and review travel details including itinerary and budget
information. Click the page numbers or forward arrow at the bottom of the screen to view the preview report.
The preview report includes general information, traveler reimbursable details (itinerary including per diem
amounts), accounting details (budget information), and non-reimbursable amounts (department paid).
TEMS User’s Guide
IT Training & Development 31 6/17/2014
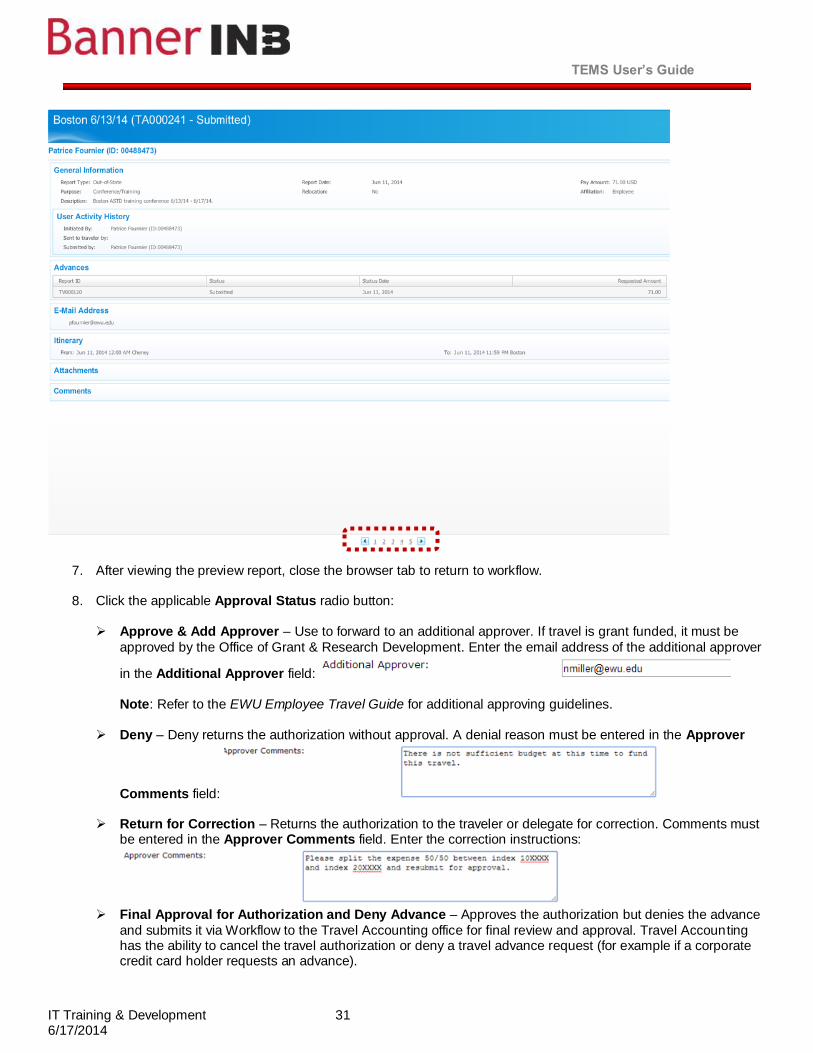
7. After viewing the preview report, close the browser tab to return to workflow.
8. Click the applicable Approval Status radio button:
Approve & Add Approver – Use to forward to an additional approver. If travel is grant funded, it must be
approved by the Office of Grant & Research Development. Enter the email address of the additional approver
in the Additional Approver field:
Note: Refer to the EWU Employee Travel Guide for additional approving guidelines.
Deny – Deny returns the authorization without approval. A denial reason must be entered in the Approver
Comments field:
Return for Correction – Returns the authorization to the traveler or delegate for correction. Comments must be entered in the Approver Comments field. Enter the correction instructions:
Final Approval for Authorization and Deny Advance – Approves the authorization but denies the advance
and submits it via Workflow to the Travel Accounting office for final review and approval. Travel Accounting has the ability to cancel the travel authorization or deny a travel advance request (for example if a corporate credit card holder requests an advance).
TEMS User’s Guide
IT Training & Development 32 6/17/2014
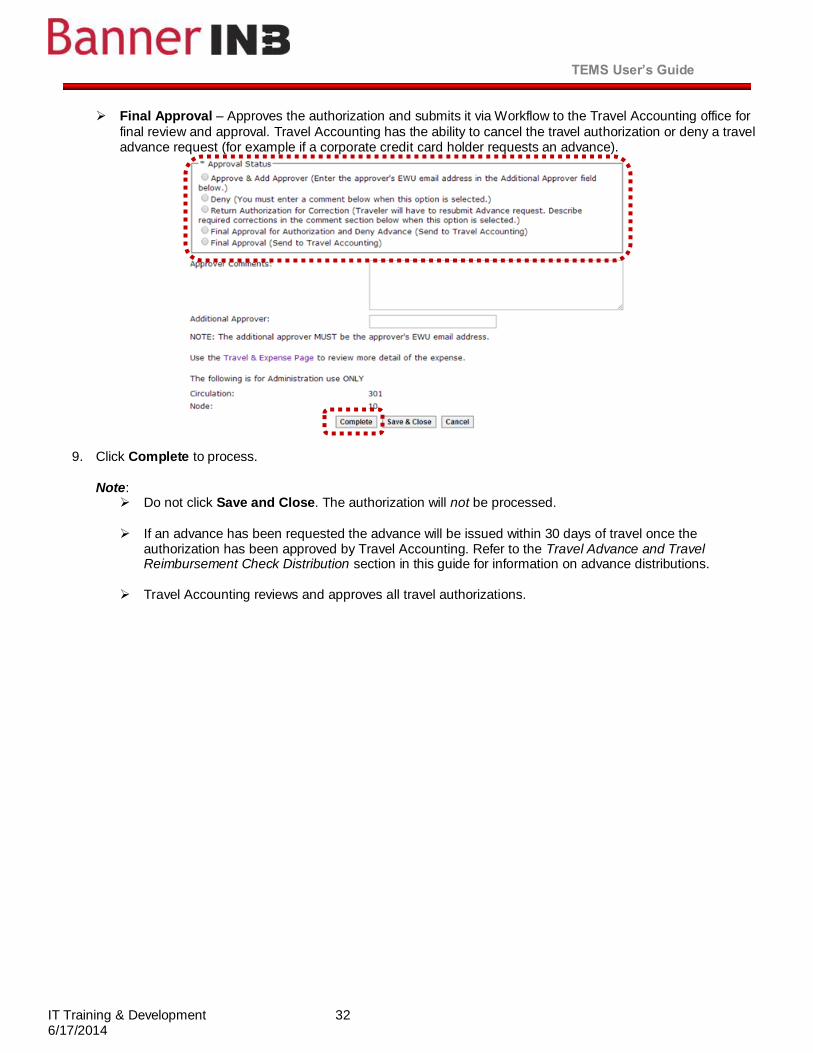
Final Approval – Approves the authorization and submits it via Workflow to the Travel Accounting office for
final review and approval. Travel Accounting has the ability to cancel the travel authorization or deny a travel advance request (for example if a corporate credit card holder requests an advance).
9. Click Complete to process.
Note:
Do not click Save and Close. The authorization will not be processed.
If an advance has been requested the advance will be issued within 30 days of travel once the
authorization has been approved by Travel Accounting. Refer to the Travel Advance and Travel Reimbursement Check Distribution section in this guide for information on advance distributions.
Travel Accounting reviews and approves all travel authorizations.
TEMS User’s Guide
IT Training & Development 33 6/17/2014
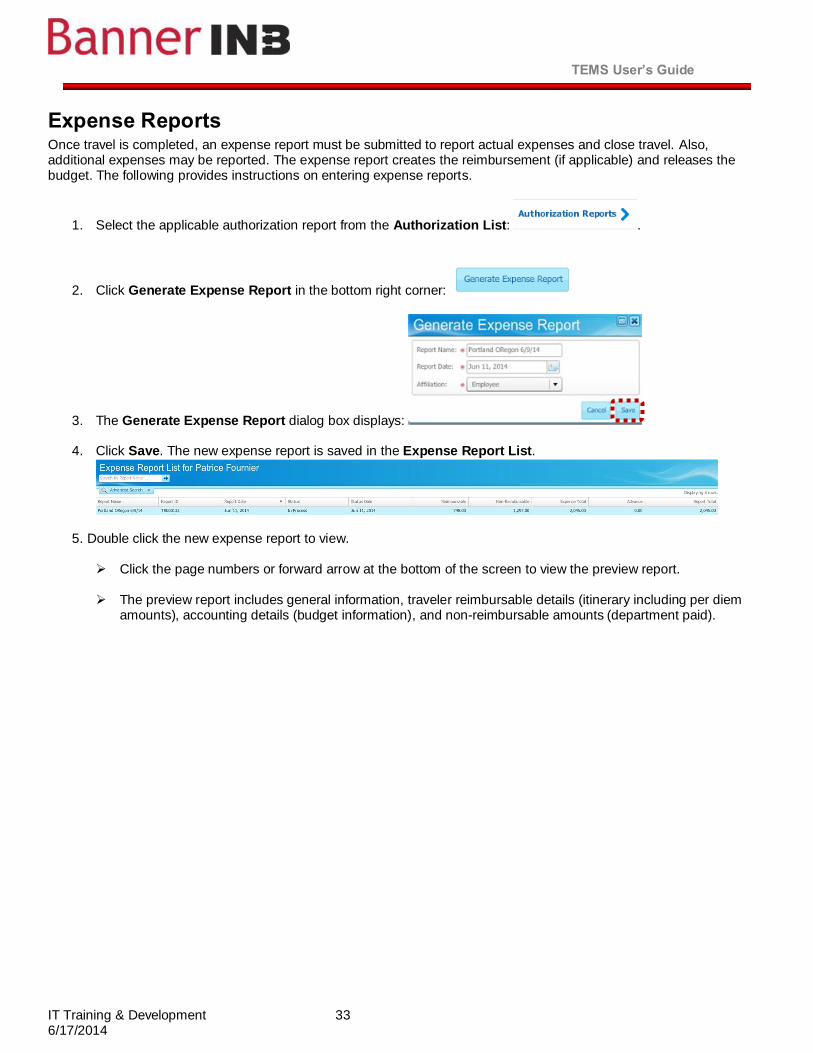
Expense Reports Once travel is completed, an expense report must be submitted to report actual expenses and close travel. Also, additional expenses may be reported. The expense report creates the reimbursement (if applicable) and releases the budget. The following provides instructions on entering expense reports.
1. Select the applicable authorization report from the Authorization List: .
2. Click Generate Expense Report in the bottom right corner:
3. The Generate Expense Report dialog box displays:
4. Click Save. The new expense report is saved in the Expense Report List.
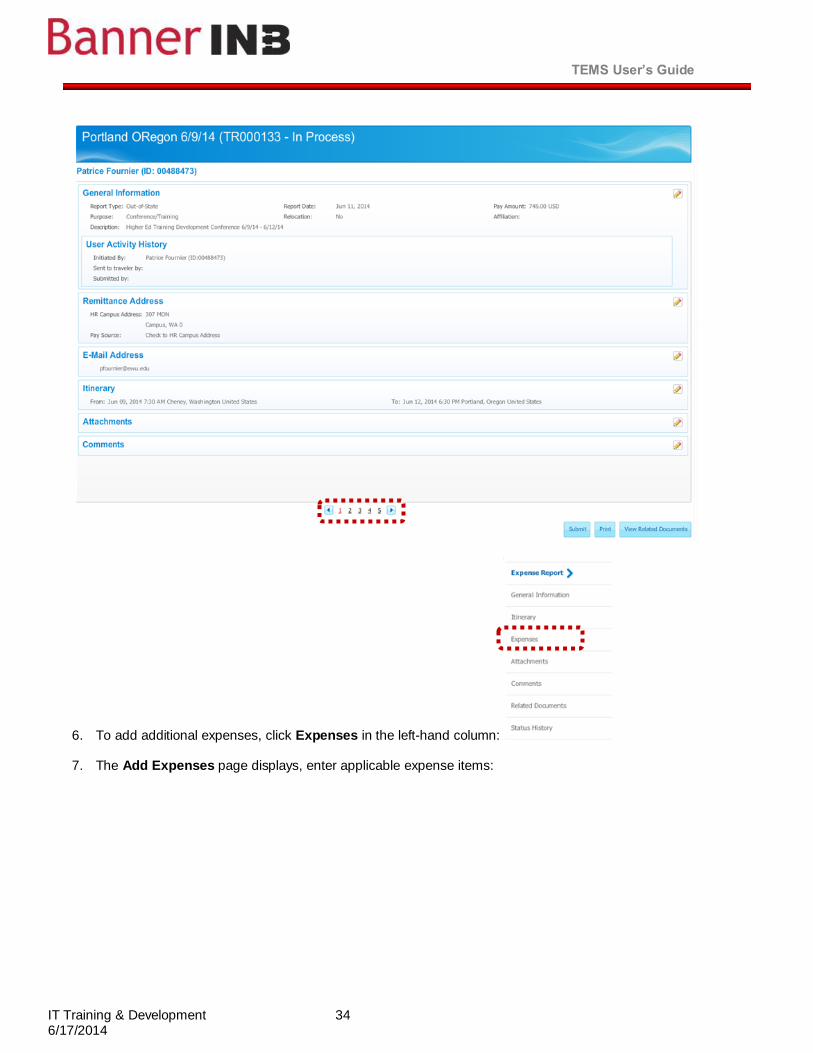
5. Double click the new expense report to view.
Click the page numbers or forward arrow at the bottom of the screen to view the preview report.
The preview report includes general information, traveler reimbursable details (itinerary including per diem amounts), accounting details (budget information), and non-reimbursable amounts (department paid).
TEMS User’s Guide
IT Training & Development 34 6/17/2014
6. To add additional expenses, click Expenses in the left-hand column:
7. The Add Expenses page displays, enter applicable expense items:

TEMS User’s Guide
IT Training & Development 35 6/17/2014
8. When completed click View or Submit: to save and return to the expense report.
9. To add attachments, click the edit icon in the Attachments section:
10. Click New in the documents screen:
11. The New Attachment dialog box displays. Click Choose File to browse your computer for the desired document.
TEMS User’s Guide
IT Training & Development 36 6/17/2014
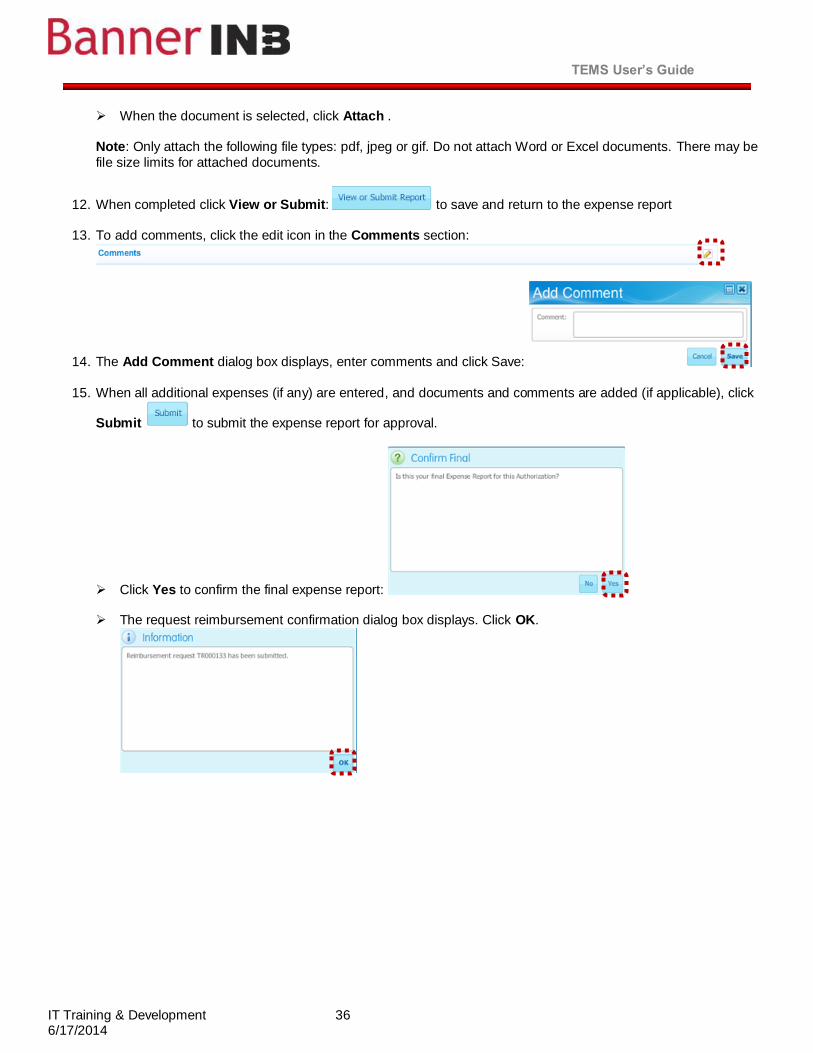
When the document is selected, click Attach .
Note: Only attach the following file types: pdf, jpeg or gif. Do not attach Word or Excel documents. There may be
file size limits for attached documents.
12. When completed click View or Submit: to save and return to the expense report
13. To add comments, click the edit icon in the Comments section:
14. The Add Comment dialog box displays, enter comments and click Save:
15. When all additional expenses (if any) are entered, and documents and comments are added (if applicable), click
Submit to submit the expense report for approval.
Click Yes to confirm the final expense report:
The request reimbursement confirmation dialog box displays. Click OK.
TEMS User’s Guide
IT Training & Development 37 6/17/2014
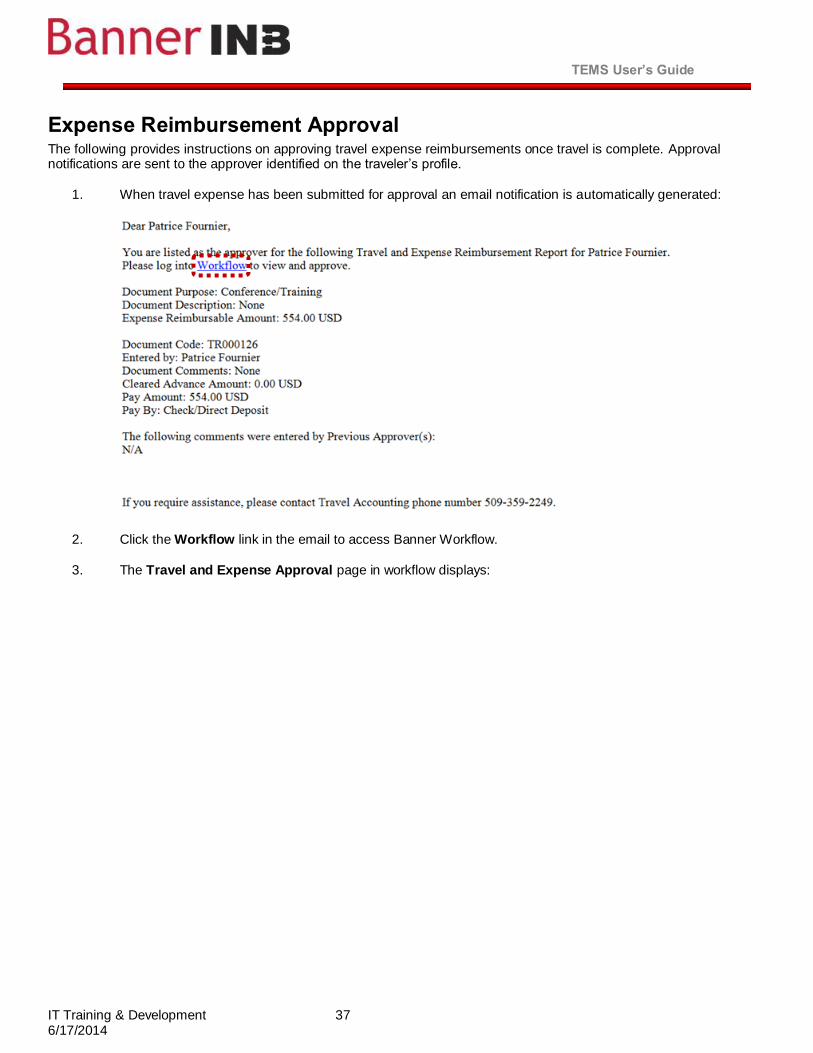
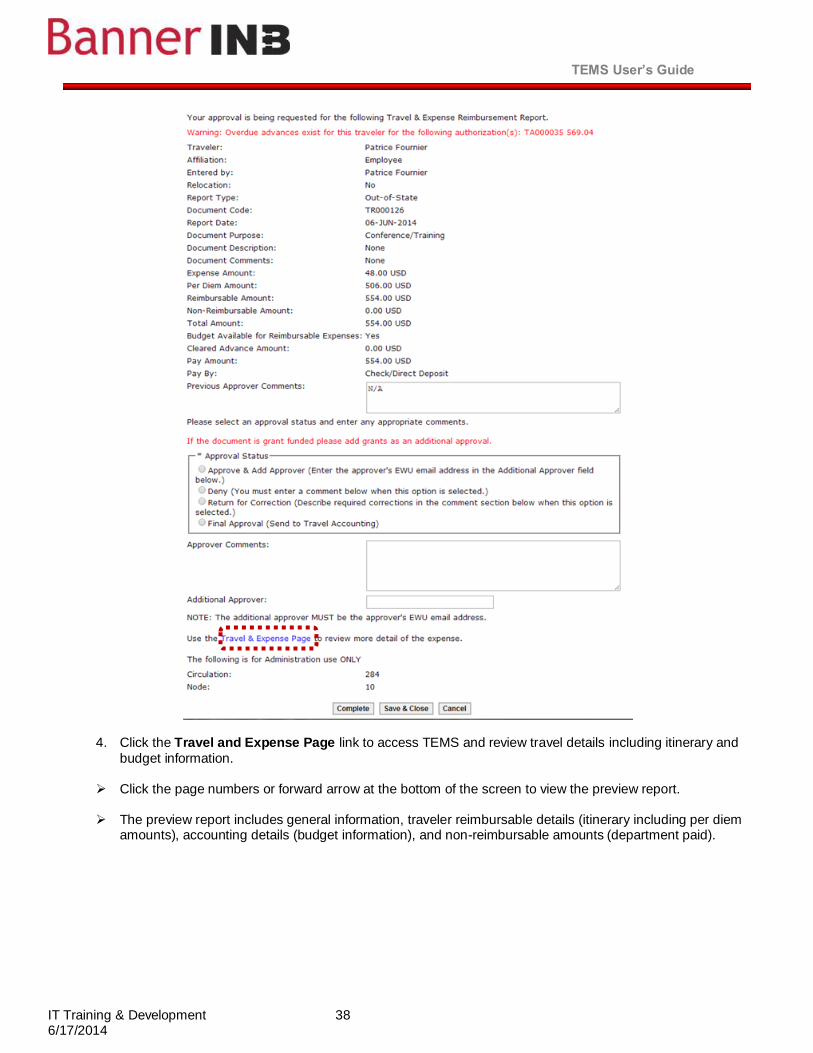
Expense Reimbursement Approval The following provides instructions on approving travel expense reimbursements once travel is complete. Approval notifications are sent to the approver identified on the traveler’s profile.
1. When travel expense has been submitted for approval an email notification is automatically generated:
2. Click the Workflow link in the email to access Banner Workflow.
3. The Travel and Expense Approval page in workflow displays:
TEMS User’s Guide
IT Training & Development 38 6/17/2014
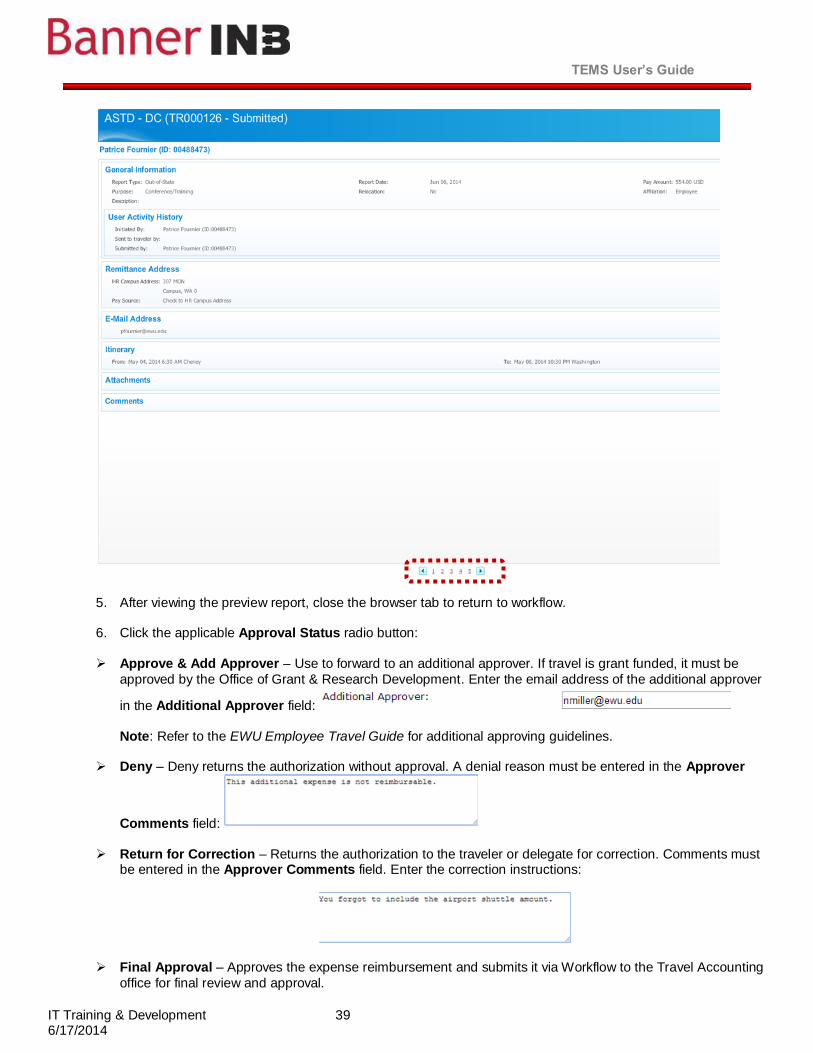
4. Click the Travel and Expense Page link to access TEMS and review travel details including itinerary and
budget information.
Click the page numbers or forward arrow at the bottom of the screen to view the preview report.
The preview report includes general information, traveler reimbursable details (itinerary including per diem amounts), accounting details (budget information), and non-reimbursable amounts (department paid).
TEMS User’s Guide
IT Training & Development 39 6/17/2014
5. After viewing the preview report, close the browser tab to return to workflow.
6. Click the applicable Approval Status radio button:
Approve & Add Approver – Use to forward to an additional approver. If travel is grant funded, it must be
approved by the Office of Grant & Research Development. Enter the email address of the additional approver
in the Additional Approver field:
Note: Refer to the EWU Employee Travel Guide for additional approving guidelines.
Deny – Deny returns the authorization without approval. A denial reason must be entered in the Approver
Comments field:
Return for Correction – Returns the authorization to the traveler or delegate for correction. Comments must
be entered in the Approver Comments field. Enter the correction instructions:
Final Approval – Approves the expense reimbursement and submits it via Workflow to the Travel Accounting
office for final review and approval.
TEMS User’s Guide
IT Training & Development 40 6/17/2014
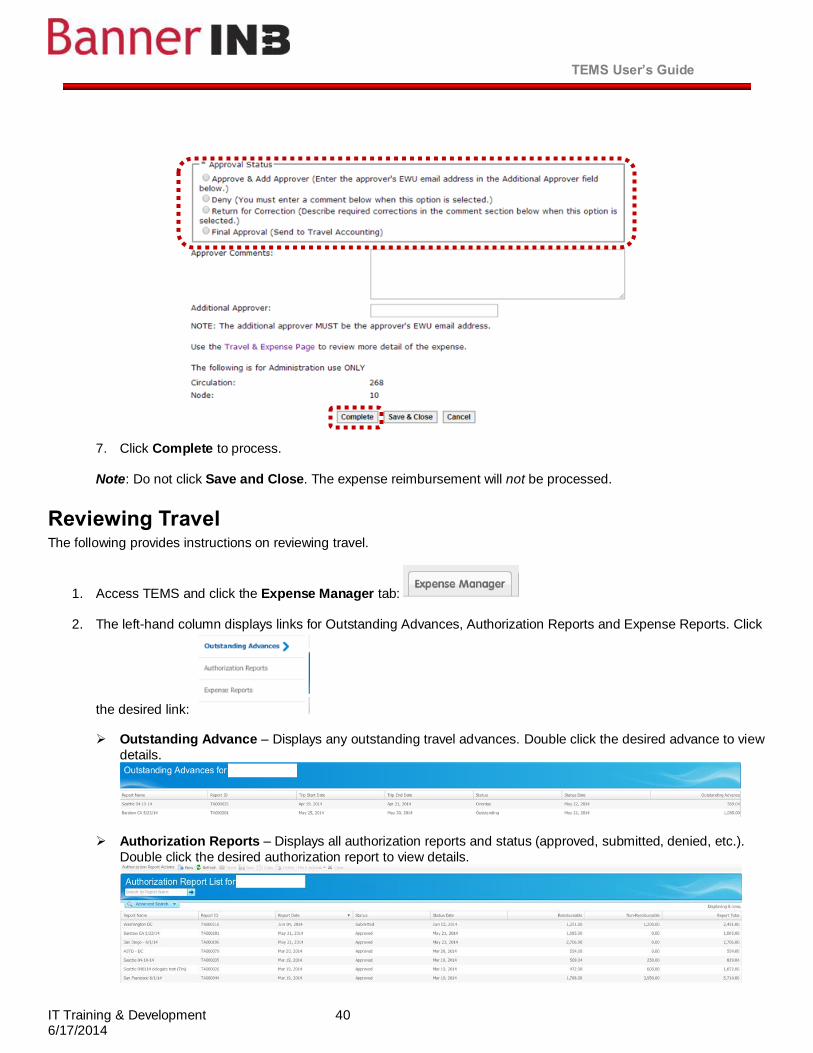
7. Click Complete to process.
Note: Do not click Save and Close. The expense reimbursement will not be processed.
Reviewing Travel The following provides instructions on reviewing travel.
1. Access TEMS and click the Expense Manager tab:
2. The left-hand column displays links for Outstanding Advances, Authorization Reports and Expense Reports. Click
the desired link:
Outstanding Advance – Displays any outstanding travel advances. Double click the desired advance to view
details.
Authorization Reports – Displays all authorization reports and status (approved, submitted, denied, etc.).
Double click the desired authorization report to view details.
TEMS User’s Guide
IT Training & Development 41 6/17/2014
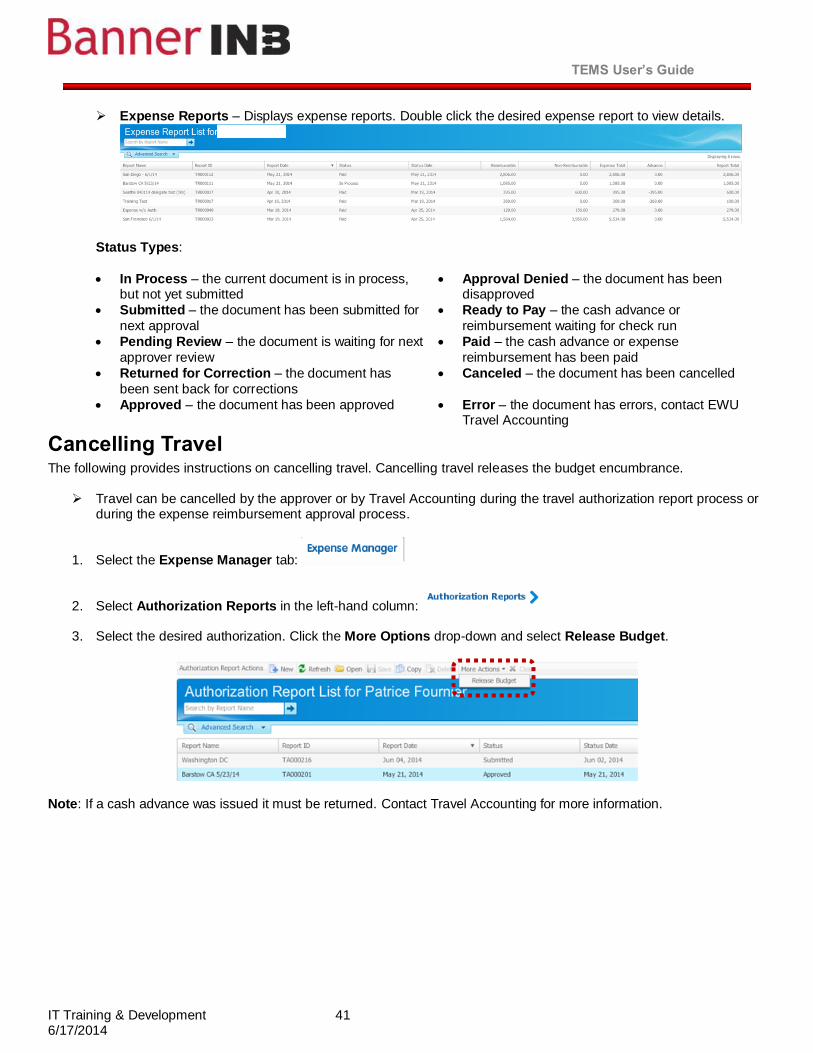
Expense Reports – Displays expense reports. Double click the desired expense report to view details.
Status Types:
In Process – the current document is in process, but not yet submitted
Approval Denied – the document has been disapproved
Submitted – the document has been submitted for
next approval
Ready to Pay – the cash advance or
reimbursement waiting for check run
Pending Review – the document is waiting for next
approver review
Paid – the cash advance or expense
reimbursement has been paid
Returned for Correction – the document has
been sent back for corrections
Canceled – the document has been cancelled
Approved – the document has been approved Error – the document has errors, contact EWU Travel Accounting
Cancelling Travel The following provides instructions on cancelling travel. Cancelling travel releases the budget encumbrance.
Travel can be cancelled by the approver or by Travel Accounting during the travel authorization report process or during the expense reimbursement approval process.
1. Select the Expense Manager tab:
2. Select Authorization Reports in the left-hand column:
3. Select the desired authorization. Click the More Options drop-down and select Release Budget.
Note: If a cash advance was issued it must be returned. Contact Travel Accounting for more information.