Embed Size (px)
Citation preview
Page 1 of 59
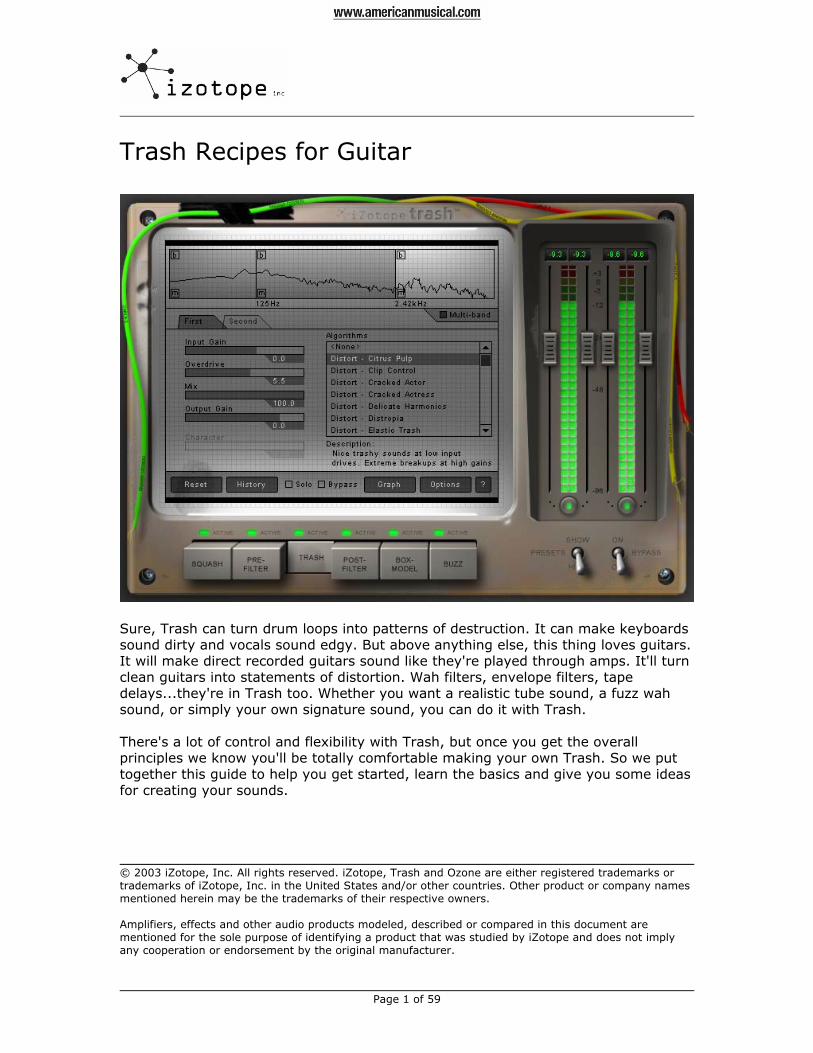
Trash Recipes for Guitar
Sure, Trash can turn drum loops into patterns of destruction. It can make keyboards sound dirty and vocals sound edgy. But above anything else, this thing loves guitars. It will make direct recorded guitars sound like they're played through amps. It'll turn clean guitars into statements of distortion. Wah filters, envelope filters, tape delays...they're in Trash too. Whether you want a realistic tube sound, a fuzz wah sound, or simply your own signature sound, you can do it with Trash. There's a lot of control and flexibility with Trash, but once you get the overall principles we know you'll be totally comfortable making your own Trash. So we put together this guide to help you get started, learn the basics and give you some ideas for creating your sounds. © 2003 iZotope, Inc. All rights reserved. iZotope, Trash and Ozone are either registered trademarks or trademarks of iZotope, Inc. in the United States and/or other countries. Other product or company names mentioned herein may be the trademarks of their respective owners. Amplifiers, effects and other audio products modeled, described or compared in this document are mentioned for the sole purpose of identifying a product that was studied by iZotope and does not imply any cooperation or endorsement by the original manufacturer.
Page 2 of 59
Table of Contents
Squash Module .............................................................................................. 6 Using the Squash Compressor ................................................................... 6 Using the Squash Gate............................................................................. 8 Squash Meters ........................................................................................ 8 Squash Meter Options .............................................................................10 Example Compressor Settings:.................................................................11
Prefilter .......................................................................................................12 Adjusting Filters .....................................................................................13 Selecting Filter Types..............................................................................14 Frequency References for Guitar ...............................................................16 Envelope Filters......................................................................................17 LFO Filters.............................................................................................18
Trash Module................................................................................................19 Distortion Overview ................................................................................19 Intermodulation Distortion .......................................................................22 Trash Module Controls.............................................................................24 Trash Algorithms ....................................................................................24 Dual Stage Distortion ..............................................................................25 Trash Algorithm Reference.......................................................................27 Amp Drainer: This is a model of a triode tube, commonly used in power amps. Good by itself or used after other distortions. .............................................28
Multiband Madness........................................................................................30 Working with Multibands..........................................................................30 Multiband Trash and Intermodulation Distortion ..........................................32 Box Model Controls:................................................................................34 What's an Oakdale Amp? .........................................................................35 Stepping Outside the Box ........................................................................36
Buzz Module.................................................................................................37 Delay Types...........................................................................................37 Controls ................................................................................................38
Trash Recipes...............................................................................................39 Filter Fun.................................................................................................39
Recipe 1: Traditional Wah........................................................................39 Recipe 2: Wah into Distortion or Distortion into Wah? ..................................40 Recipe 3: Parked Wah .............................................................................40 Recipe 4: Moog Resonator .......................................................................40 Recipe 5: Mellow Moog............................................................................40 Recipe 6: MicroSynths.............................................................................41 Recipe 7: Moog Water .............................................................................41 Recipe 8: Clean Mutron ...........................................................................41 Recipe 9: Dirty Mutron ............................................................................41 Recipe 10: Notch Mutron .........................................................................42 Recipe 11: Compress before Wah .............................................................42 Recipe 12: Phaser notches.......................................................................42 Recipe 13: Triggered notches ...................................................................43 Recipe 14: Tremolo ................................................................................43 Recipe 15: Talk Box................................................................................44
Page 3 of 59
Recipe 16: Reverse Wah..........................................................................44 Recipe 17: Wrong Way Wah.....................................................................44 Project 18: Peak Filter Wah......................................................................45
Distortion Pedals .......................................................................................45 Recipe 19: Boss DS-1 .............................................................................45 Recipe 20: Boss SD-1 .............................................................................46 Recipe 21: Distort and Drive ....................................................................46 Recipe 22: Tube Screamer.......................................................................47 Recipe 23: Fuzz Face ..............................................................................47 Recipe 24: Octavia .................................................................................48 Recipe 25: Univox Superfuzz....................................................................48 Recipe 26: Colorsound Tone Bender ..........................................................48 Recipe 27: Vox Tonebender .....................................................................49 Recipe 28: ProCo Rat ..............................................................................49 Recipe 29: MXR Distortion + ....................................................................49 Recipe 30: The Big Muff Pi .......................................................................49 Recipe 31: Chandler Tube Drive................................................................50 Recipe 32: Maestro Fuzz..........................................................................50 Recipe 33: The Boss Metal Zone ...............................................................50
People and Styles ......................................................................................50 Recipe 34: The Fender Sound...................................................................51 Recipe 35: The Marshall Sound.................................................................51 Recipe 36: Old Vox Sound .......................................................................52 Recipe 37: Old Fender Sound ...................................................................52 Recipe 38: Brian May (Queen)..................................................................52 Recipe 39: The Edge ...............................................................................53 Recipe 40: Kurt Cobain ...........................................................................54 Recipe 41: Stevie Ray Vaughan ................................................................54 Recipe 42: Jimi Hendrix...........................................................................54 Recipe 43: Tom Scholz (Boston) ...............................................................54 Recipe 44: Surf ......................................................................................55 Recipe 45: Dimebag Darrel ......................................................................55 Recipe 46: Strokes .................................................................................55 Recipe 47: Bruce Springsteen...................................................................56 Recipe 48: Joe Perry ...............................................................................56 Recipe 49: Moby Bodyrock.......................................................................56 Recipe 50: Clapton Cocaine......................................................................56 Recipe 51: Robby Krieger (Doors).............................................................56 Recipe 52: Brian Setzer...........................................................................57 Recipe 53: London Calling........................................................................57 Recipe 54: Steve Miller............................................................................57 Recipe 55: Beatles Cavern Club ................................................................57 Recipe 56: Pearl Jam ..............................................................................57 Recipe 57: Lithium .................................................................................57 Recipe 58: Eddie Van Halen .....................................................................58
Closing and Contact ......................................................................................59
Page 4 of 59
Trash Overview Distortion might just be a single effect or algorithm, but to really get a good distorted sound requires a combination of elements. We designed Trash with this in mind, to provide you with all the tools you need to shape, compress and distort your sound. It's important to understand distortion, of course, but the interaction with compressors and filters makes as much difference on the overall sound as which distortion effect you use. Trash has six modules that each perform different functions. By combining all of the modules into one system, as opposed to individual plugins, Trash is able to process the entire signal chain at 64 bit precision. More dynamics, more accuracy and better Trash. Squash: The Squash module provides compression/limiting and gating. Keeping in mind that most distortion is very level dependent (i.e. the louder the signal the more it is distorted), the Squash module can help control the peaks and even out your distortion. In addition, it's not unreasonable to be boosting your input >30 dB or more in Trash to get a strongly clipped signal. This also means that your noise floor is boosted 30 dB. And distorted noise does not sound very good. So the Squash module also serves as a noise gate to cut your noise floor down before gain and distortion is applied. Prefilter: Since louder signals are distorted more heavily, shaping the frequencies of your sound prior to distortion is an important factor in getting a good distorted tone. Boost the highs with a filter, and those highs will distort before the mids and lows. Looking for a heavily distorted Marshall sound? Cut the mids to avoid distortion and muddiness in that region1. And in addition to fixed frequency filtering, the Prefilter module also allows you to sweep filters for auto-wah and envelope filter effects. Trash: This is the heart of the distortion machine. A whole lot of waveform distorting algorithms to provide everything from tube saturation to rectified octave effects. But Trash goes beyond simple "single distortion". You can chain two distortions together to model the saturation of a 12AX7 preamp tube going into a 6L6 power amp tube2. Or, you can split the signal into bands of frequencies and apply different distortions to different ranges. Postfilter: Distortion generates additional frequencies of audio. Put in a sine wave and distort it, and out comes a whole bunch of additional frequencies and harmonics. Some of these you might want, others you might want to get rid of. Therefore, Trash provides a postfilter module to roll off harmonic distortion and shape the distorted sound to the get tone you want. Box Model: It turns out that one of the best "postfilters" for distorted signals is a speaker/cabinet model. With a limited frequency range (most guitar amps rolloff around 5 kHz or so) they provide natural control of harsh upper frequencies. They also provide a smearing effect to smooth out harsh clipping and resonances and 1 The cool kids call this "scooping the mids". We're just geeks with guitars, though. 2 Tubes used in Fender amps
Page 5 of 59
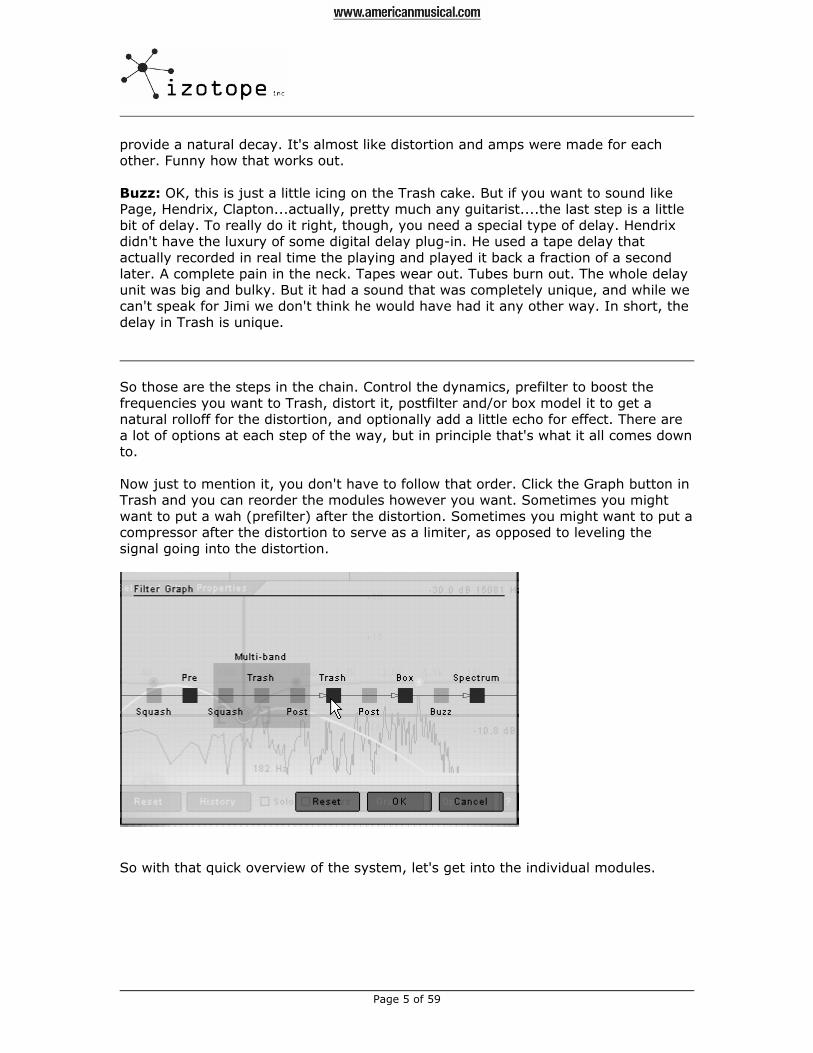
provide a natural decay. It's almost like distortion and amps were made for each other. Funny how that works out. Buzz: OK, this is just a little icing on the Trash cake. But if you want to sound like Page, Hendrix, Clapton...actually, pretty much any guitarist....the last step is a little bit of delay. To really do it right, though, you need a special type of delay. Hendrix didn't have the luxury of some digital delay plug-in. He used a tape delay that actually recorded in real time the playing and played it back a fraction of a second later. A complete pain in the neck. Tapes wear out. Tubes burn out. The whole delay unit was big and bulky. But it had a sound that was completely unique, and while we can't speak for Jimi we don't think he would have had it any other way. In short, the delay in Trash is unique. So those are the steps in the chain. Control the dynamics, prefilter to boost the frequencies you want to Trash, distort it, postfilter and/or box model it to get a natural rolloff for the distortion, and optionally add a little echo for effect. There are a lot of options at each step of the way, but in principle that's what it all comes down to. Now just to mention it, you don't have to follow that order. Click the Graph button in Trash and you can reorder the modules however you want. Sometimes you might want to put a wah (prefilter) after the distortion. Sometimes you might want to put a compressor after the distortion to serve as a limiter, as opposed to leveling the signal going into the distortion.
So with that quick overview of the system, let's get into the individual modules.
Page 6 of 59
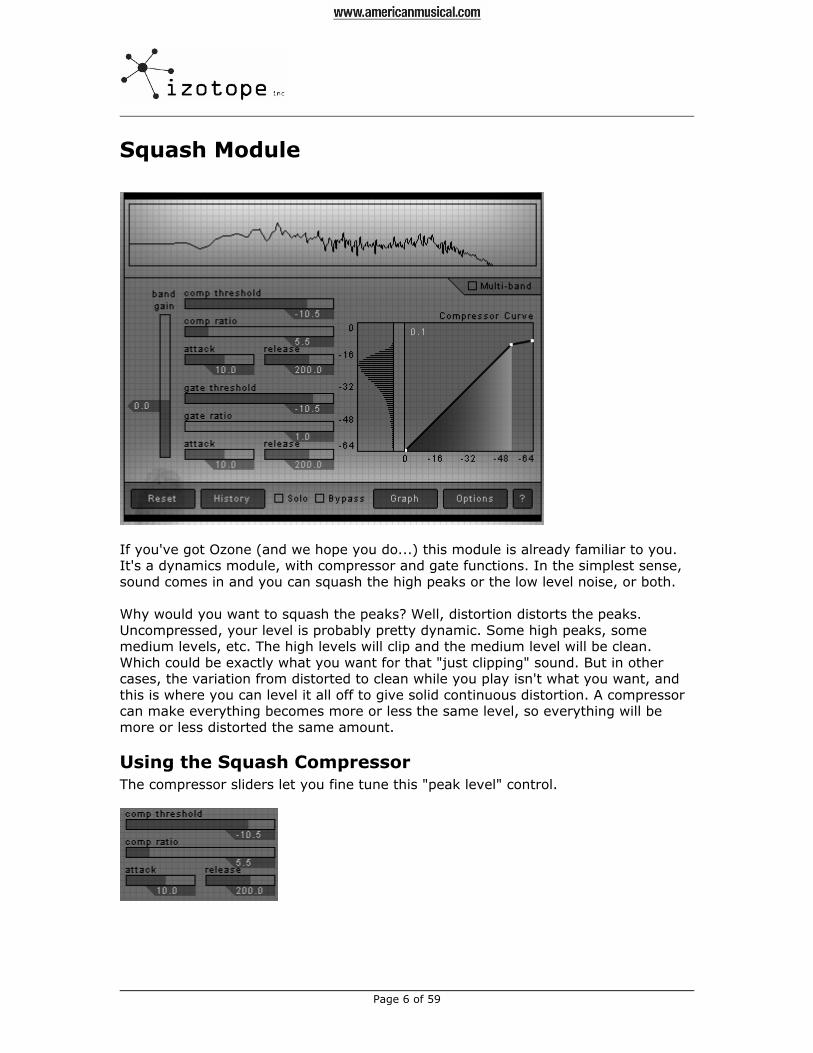
Squash Module
If you've got Ozone (and we hope you do...) this module is already familiar to you. It's a dynamics module, with compressor and gate functions. In the simplest sense, sound comes in and you can squash the high peaks or the low level noise, or both. Why would you want to squash the peaks? Well, distortion distorts the peaks. Uncompressed, your level is probably pretty dynamic. Some high peaks, some medium levels, etc. The high levels will clip and the medium level will be clean. Which could be exactly what you want for that "just clipping" sound. But in other cases, the variation from distorted to clean while you play isn't what you want, and this is where you can level it all off to give solid continuous distortion. A compressor can make everything becomes more or less the same level, so everything will be more or less distorted the same amount.
Using the Squash Compressor The compressor sliders let you fine tune this "peak level" control.
Page 7 of 59
Threshold: The compressor threshold is the level at which the compressor kicks in. So with a threshold of -10.5, this means that when the signal reaches or exceeds -10.5 dB the compressor will start working to compress it down. Ratio: The ratio is "how much" the compressor turns it down. A ratio of 2, or 2 to 1, means that for every 2 dB above the threshold, the compressor will turn it down so that the output is only 1 dB above the threshold. So if you hit a note at -12.5 dB, with a threshold of -10.5 and a ratio of 2 the output will be only -11.5 dB. So higher ratios mean more "squashing" of the sound. At very high ratios the compressor can provide a sort of "limiter" effect, e.g. a ratio of 30 means that even if the input exceeds the threshold by 30 dB, the output will only be 1 dB higher. To go one step further, we can also tell the compressor how quickly to turn the volume up and down with the attack and release controls. Attack: The attack is the time in milliseconds that the compressor should wait before kicking in. A slower (higher) attack time means "wait longer before turning down the volume". So with a slow attack time, short peaks will pass through without being compressed. With a fast time, everything - even the initial fast peaks - will be compressed. Release: The release time is the time in milliseconds that the compressor should keep turning down the sound before returning to normal. In other words, a peak comes through and the compressor kicks in and turns it down. When the peak is over, how long should the compressor wait before turning the signal back up? The answer is the release time. Slow (high) release times keep the level turned down longer even after the input signal has come down in level. So for a sustain effect, a long release time will keep the compressor working even after the natural sustain has dropped in level. Gain: The last slider related to compression is the band gain slider. Once you've compressed or turned down the peaks of the signal, you can then turn up the output signal. The band gain allows you to do this - control the peaks then "make up" the gain to bring the overall signal back up to a strong level. Random Bonus Tip: Trash has a preset manager that lets you selectively load and combine preset from different modules. For example, you can select to load just the Squash settings from a preset into your current settings. For more information on this check out the electronic help file that comes with Trash.

Page 8 of 59
Using the Squash Gate If you understand the compressor, the gate is very similar in concept. But reversed. Basically, where the compressor lets you turn down sound that goes above a threshold, the gate allows you to turn down sound that drops below a threshold. This is useful for turning down the noise. Basically, at some point the guitar level dies away, leaving you in some cases with electrical or other noise. What you want to do is have the gate turn down the noise at this point. By setting the gate threshold, you're specifying that point. The ratio then tells the gate how aggressively to turn down the noise, and the attack and release control the timing of "turning it down" as with the compressor. Setting a gate with a guitar (or any instrument for that matter) can be tricky if you don't have a good clean signal to begin with. It makes sense that if the guitar and the noise are at the same level, you can't turn down one with a gate without turning down the other. So the threshold starts to become a tradeoff of how much noise you can tolerate vs. how much you want to turn down the natural decay of the guitar. No easy rules here, just experiment.
Squash Meters
Trash provides three types of meters for viewing the dynamics in the Squash module.
You can set options for these meters by right clicking on any of these dynamics meters.
Level Histograms
Level histograms provide a view of the audio level as a function of time.
As Trash processes audio, it calculates the level and displays it on the level histogram. Unlike a standard level meter, the level histogram provides a view of the history of the level over time. The height of the histogram represents the high and low levels of the audio, while the width of the bar indicates the most frequent levels. In the example above, most
Page 9 of 59
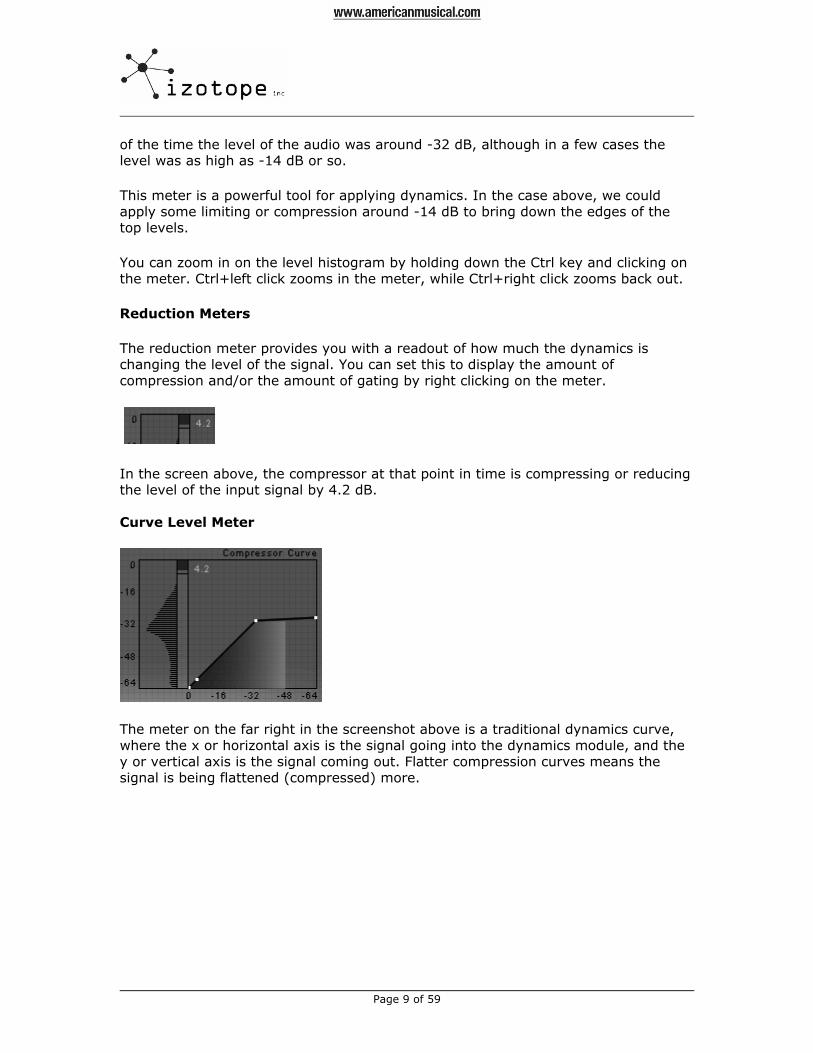
of the time the level of the audio was around -32 dB, although in a few cases the level was as high as -14 dB or so.
This meter is a powerful tool for applying dynamics. In the case above, we could apply some limiting or compression around -14 dB to bring down the edges of the top levels.
You can zoom in on the level histogram by holding down the Ctrl key and clicking on the meter. Ctrl+left click zooms in the meter, while Ctrl+right click zooms back out.
Reduction Meters
The reduction meter provides you with a readout of how much the dynamics is changing the level of the signal. You can set this to display the amount of compression and/or the amount of gating by right clicking on the meter.
In the screen above, the compressor at that point in time is compressing or reducing the level of the input signal by 4.2 dB. Curve Level Meter
The meter on the far right in the screenshot above is a traditional dynamics curve, where the x or horizontal axis is the signal going into the dynamics module, and the y or vertical axis is the signal coming out. Flatter compression curves means the signal is being flattened (compressed) more.
Page 10 of 59
Squash Meter Options
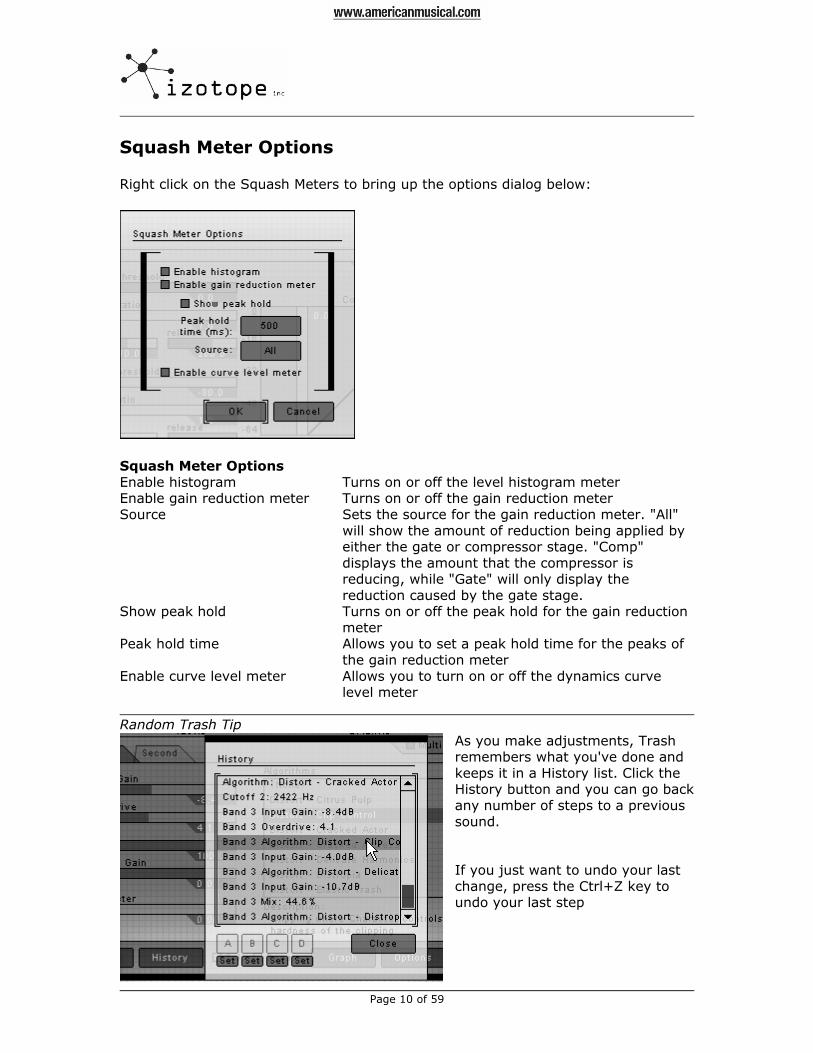
Right click on the Squash Meters to bring up the options dialog below:
Squash Meter Options Enable histogram Turns on or off the level histogram meter Enable gain reduction meter Turns on or off the gain reduction meter Source Sets the source for the gain reduction meter. "All"
will show the amount of reduction being applied by either the gate or compressor stage. "Comp" displays the amount that the compressor is reducing, while "Gate" will only display the reduction caused by the gate stage.
Show peak hold Turns on or off the peak hold for the gain reduction meter
Peak hold time Allows you to set a peak hold time for the peaks of the gain reduction meter
Enable curve level meter Allows you to turn on or off the dynamics curve level meter
Random Trash Tip
As you make adjustments, Trash remembers what you've done and keeps it in a History list. Click the History button and you can go back any number of steps to a previous sound. If you just want to undo your last change, press the Ctrl+Z key to undo your last step
Page 11 of 59
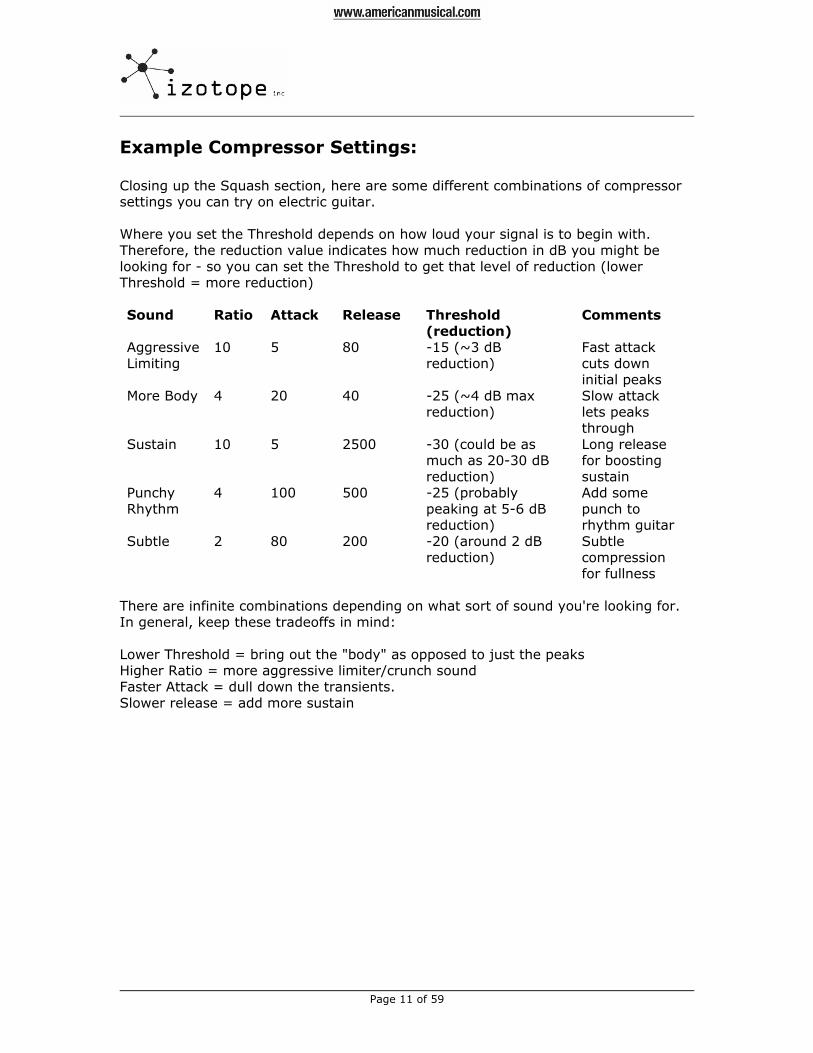
Example Compressor Settings: Closing up the Squash section, here are some different combinations of compressor settings you can try on electric guitar. Where you set the Threshold depends on how loud your signal is to begin with. Therefore, the reduction value indicates how much reduction in dB you might be looking for - so you can set the Threshold to get that level of reduction (lower Threshold = more reduction) Sound Ratio Attack Release Threshold
(reduction) Comments
Aggressive Limiting
10 5 80 -15 (~3 dB reduction)
Fast attack cuts down initial peaks
More Body 4 20 40 -25 (~4 dB max reduction)
Slow attack lets peaks through
Sustain 10 5 2500 -30 (could be as much as 20-30 dB reduction)
Long release for boosting sustain
Punchy Rhythm
4 100 500 -25 (probably peaking at 5-6 dB reduction)
Add some punch to rhythm guitar
Subtle 2 80 200 -20 (around 2 dB reduction)
Subtle compression for fullness
There are infinite combinations depending on what sort of sound you're looking for. In general, keep these tradeoffs in mind: Lower Threshold = bring out the "body" as opposed to just the peaks Higher Ratio = more aggressive limiter/crunch sound Faster Attack = dull down the transients. Slower release = add more sustain
Page 12 of 59
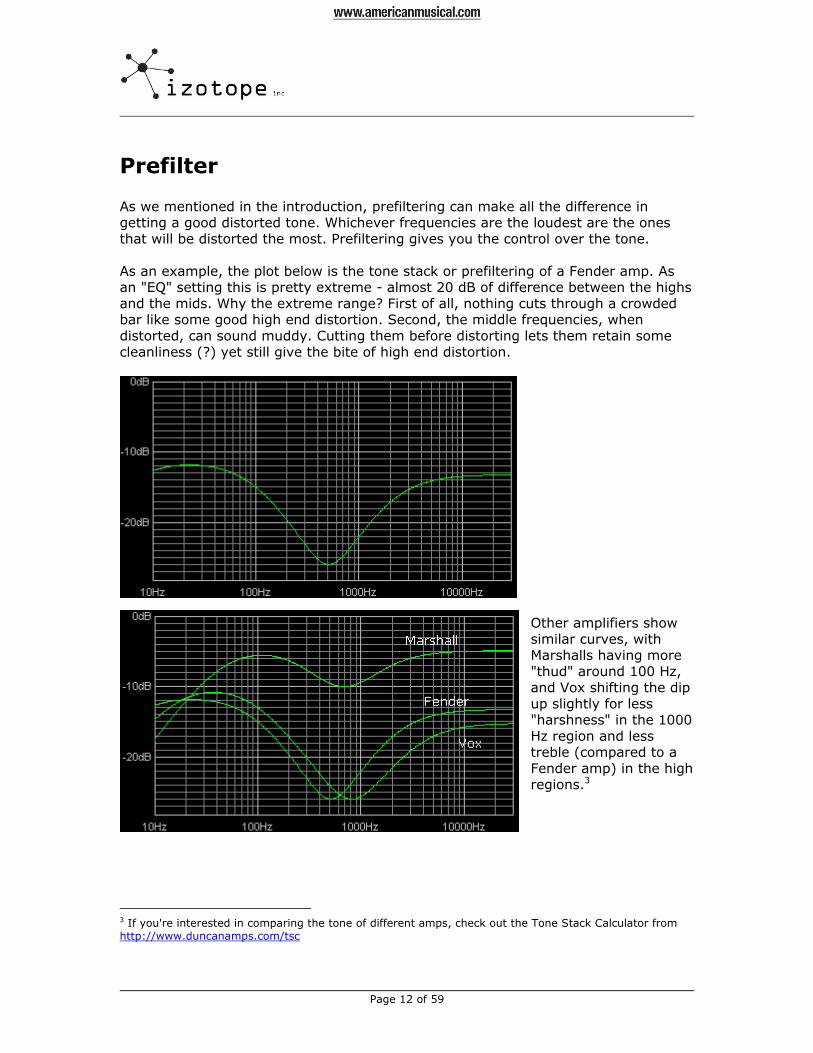
Prefilter As we mentioned in the introduction, prefiltering can make all the difference in getting a good distorted tone. Whichever frequencies are the loudest are the ones that will be distorted the most. Prefiltering gives you the control over the tone. As an example, the plot below is the tone stack or prefiltering of a Fender amp. As an "EQ" setting this is pretty extreme - almost 20 dB of difference between the highs and the mids. Why the extreme range? First of all, nothing cuts through a crowded bar like some good high end distortion. Second, the middle frequencies, when distorted, can sound muddy. Cutting them before distorting lets them retain some cleanliness (?) yet still give the bite of high end distortion.
Other amplifiers show similar curves, with Marshalls having more "thud" around 100 Hz, and Vox shifting the dip up slightly for less "harshness" in the 1000 Hz region and less treble (compared to a Fender amp) in the high regions.3
3 If you're interested in comparing the tone of different amps, check out the Tone Stack Calculator from http://www.duncanamps.com/tsc
Page 13 of 59
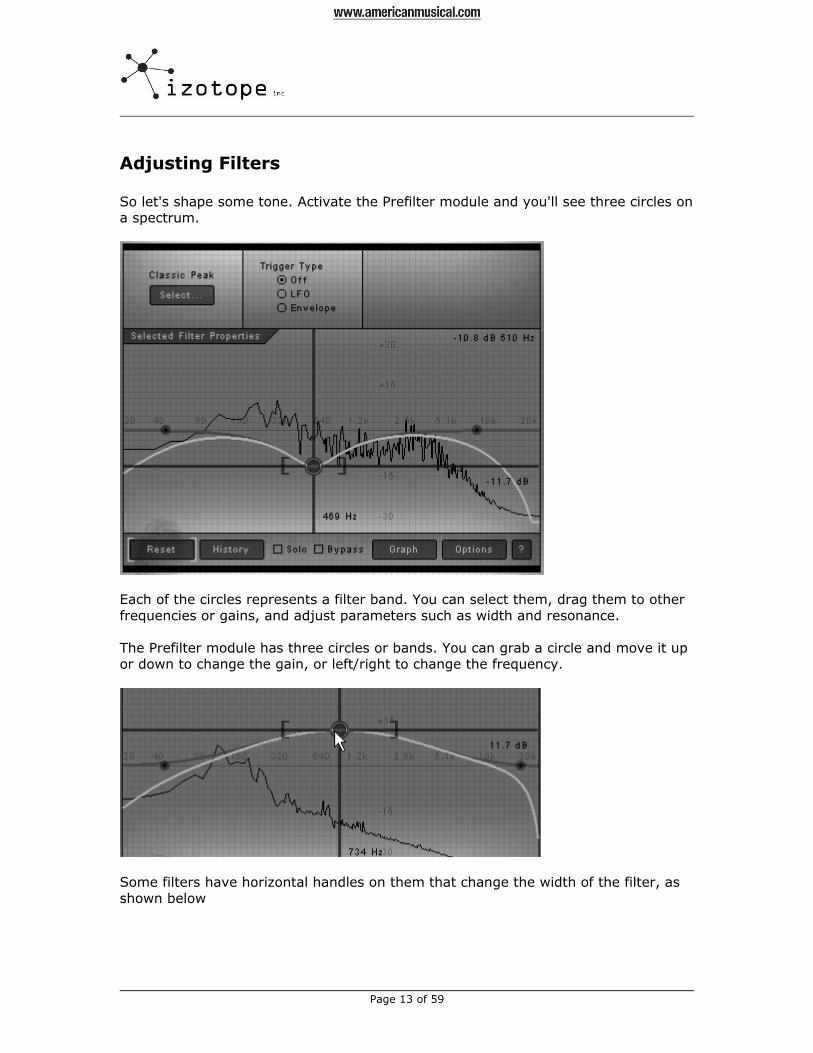
Adjusting Filters So let's shape some tone. Activate the Prefilter module and you'll see three circles on a spectrum.
Each of the circles represents a filter band. You can select them, drag them to other frequencies or gains, and adjust parameters such as width and resonance. The Prefilter module has three circles or bands. You can grab a circle and move it up or down to change the gain, or left/right to change the frequency.
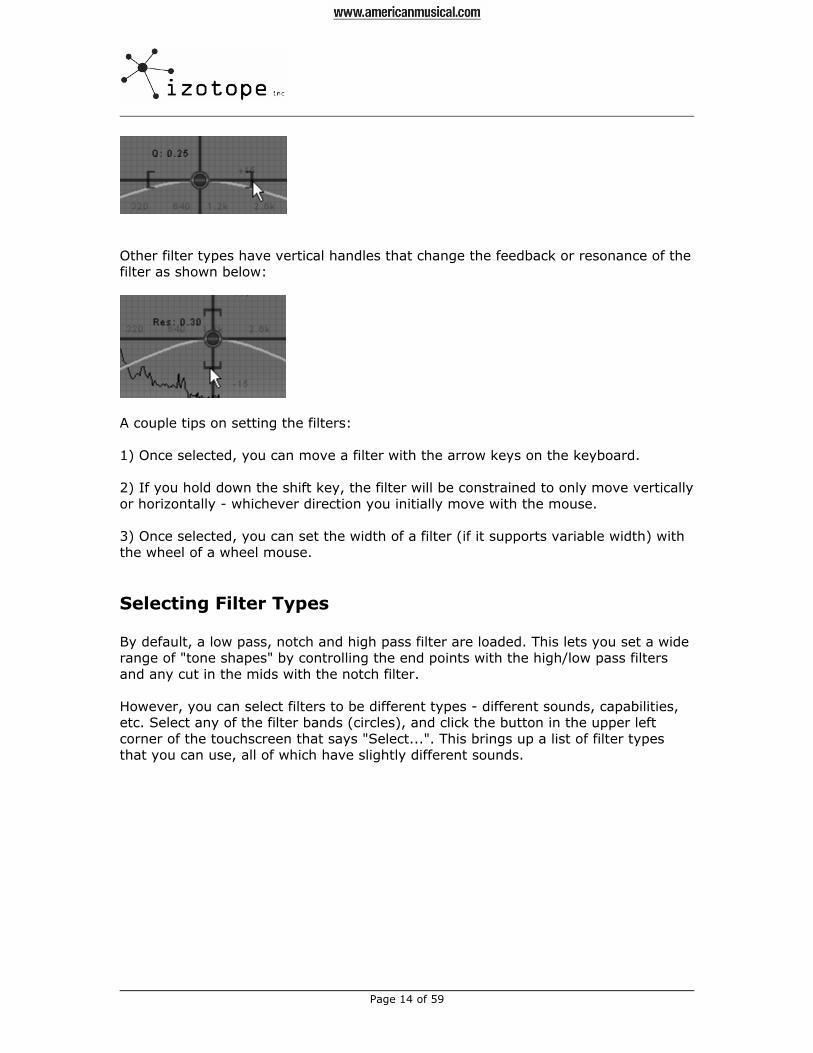
Some filters have horizontal handles on them that change the width of the filter, as shown below
Page 14 of 59
Other filter types have vertical handles that change the feedback or resonance of the filter as shown below:
A couple tips on setting the filters: 1) Once selected, you can move a filter with the arrow keys on the keyboard. 2) If you hold down the shift key, the filter will be constrained to only move vertically or horizontally - whichever direction you initially move with the mouse. 3) Once selected, you can set the width of a filter (if it supports variable width) with the wheel of a wheel mouse.
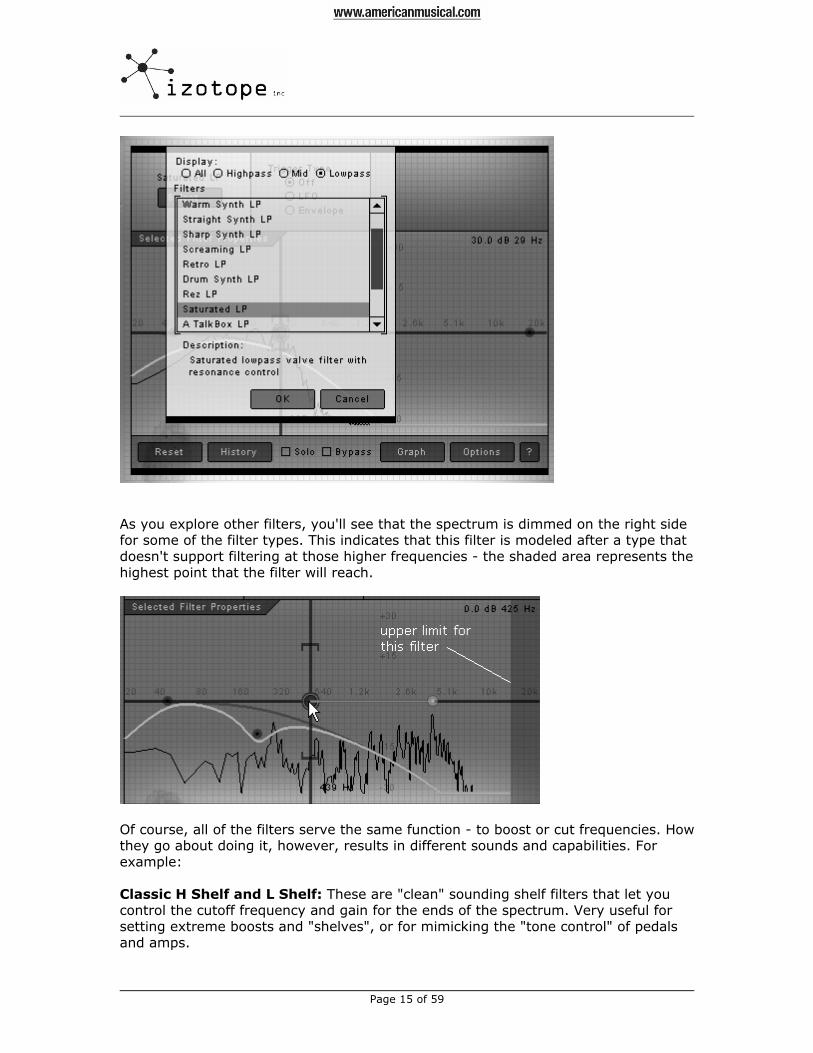
Selecting Filter Types By default, a low pass, notch and high pass filter are loaded. This lets you set a wide range of "tone shapes" by controlling the end points with the high/low pass filters and any cut in the mids with the notch filter. However, you can select filters to be different types - different sounds, capabilities, etc. Select any of the filter bands (circles), and click the button in the upper left corner of the touchscreen that says "Select...". This brings up a list of filter types that you can use, all of which have slightly different sounds.
Page 15 of 59
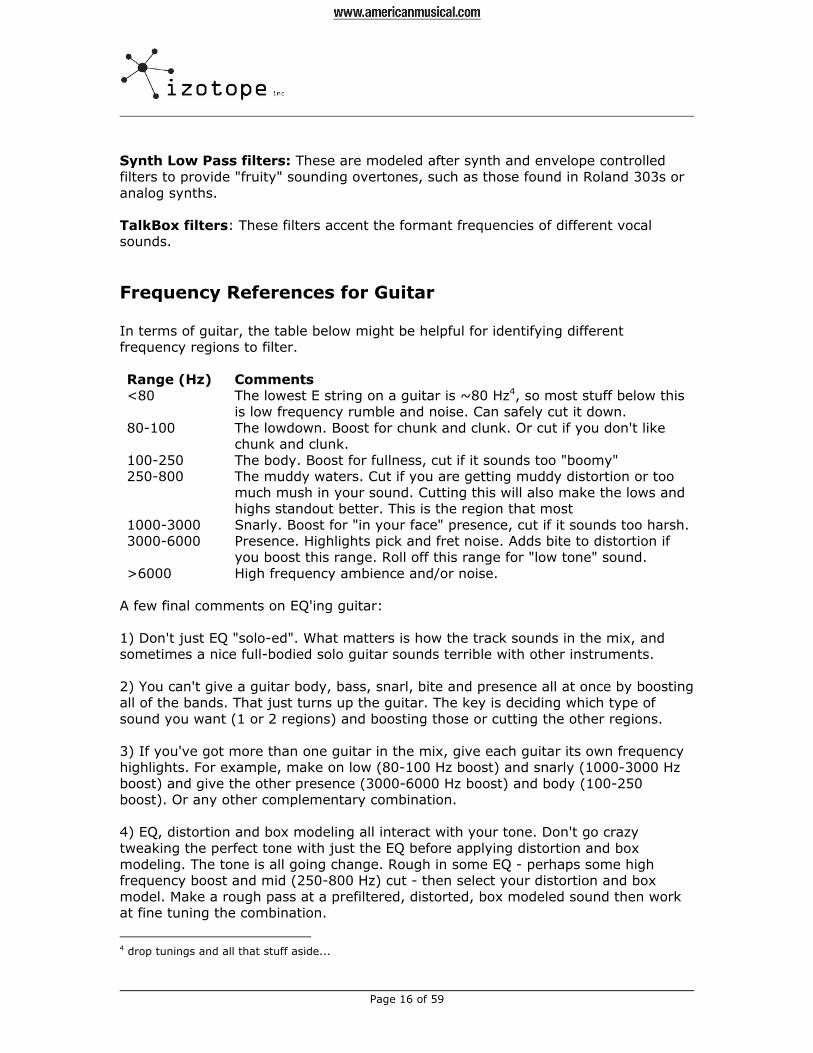
As you explore other filters, you'll see that the spectrum is dimmed on the right side for some of the filter types. This indicates that this filter is modeled after a type that doesn't support filtering at those higher frequencies - the shaded area represents the highest point that the filter will reach.
Of course, all of the filters serve the same function - to boost or cut frequencies. How they go about doing it, however, results in different sounds and capabilities. For example: Classic H Shelf and L Shelf: These are "clean" sounding shelf filters that let you control the cutoff frequency and gain for the ends of the spectrum. Very useful for setting extreme boosts and "shelves", or for mimicking the "tone control" of pedals and amps.
Page 16 of 59
Synth Low Pass filters: These are modeled after synth and envelope controlled filters to provide "fruity" sounding overtones, such as those found in Roland 303s or analog synths. TalkBox filters: These filters accent the formant frequencies of different vocal sounds.
Frequency References for Guitar In terms of guitar, the table below might be helpful for identifying different frequency regions to filter. Range (Hz) Comments <80 The lowest E string on a guitar is ~80 Hz4, so most stuff below this
is low frequency rumble and noise. Can safely cut it down. 80-100 The lowdown. Boost for chunk and clunk. Or cut if you don't like
chunk and clunk. 100-250 The body. Boost for fullness, cut if it sounds too "boomy" 250-800 The muddy waters. Cut if you are getting muddy distortion or too
much mush in your sound. Cutting this will also make the lows and highs standout better. This is the region that most
1000-3000 Snarly. Boost for "in your face" presence, cut if it sounds too harsh. 3000-6000 Presence. Highlights pick and fret noise. Adds bite to distortion if
you boost this range. Roll off this range for "low tone" sound. >6000 High frequency ambience and/or noise.
A few final comments on EQ'ing guitar: 1) Don't just EQ "solo-ed". What matters is how the track sounds in the mix, and sometimes a nice full-bodied solo guitar sounds terrible with other instruments. 2) You can't give a guitar body, bass, snarl, bite and presence all at once by boosting all of the bands. That just turns up the guitar. The key is deciding which type of sound you want (1 or 2 regions) and boosting those or cutting the other regions. 3) If you've got more than one guitar in the mix, give each guitar its own frequency highlights. For example, make on low (80-100 Hz boost) and snarly (1000-3000 Hz boost) and give the other presence (3000-6000 Hz boost) and body (100-250 boost). Or any other complementary combination. 4) EQ, distortion and box modeling all interact with your tone. Don't go crazy tweaking the perfect tone with just the EQ before applying distortion and box modeling. The tone is all going change. Rough in some EQ - perhaps some high frequency boost and mid (250-800 Hz) cut - then select your distortion and box model. Make a rough pass at a prefiltered, distorted, box modeled sound then work at fine tuning the combination.
4 drop tunings and all that stuff aside...
Page 17 of 59
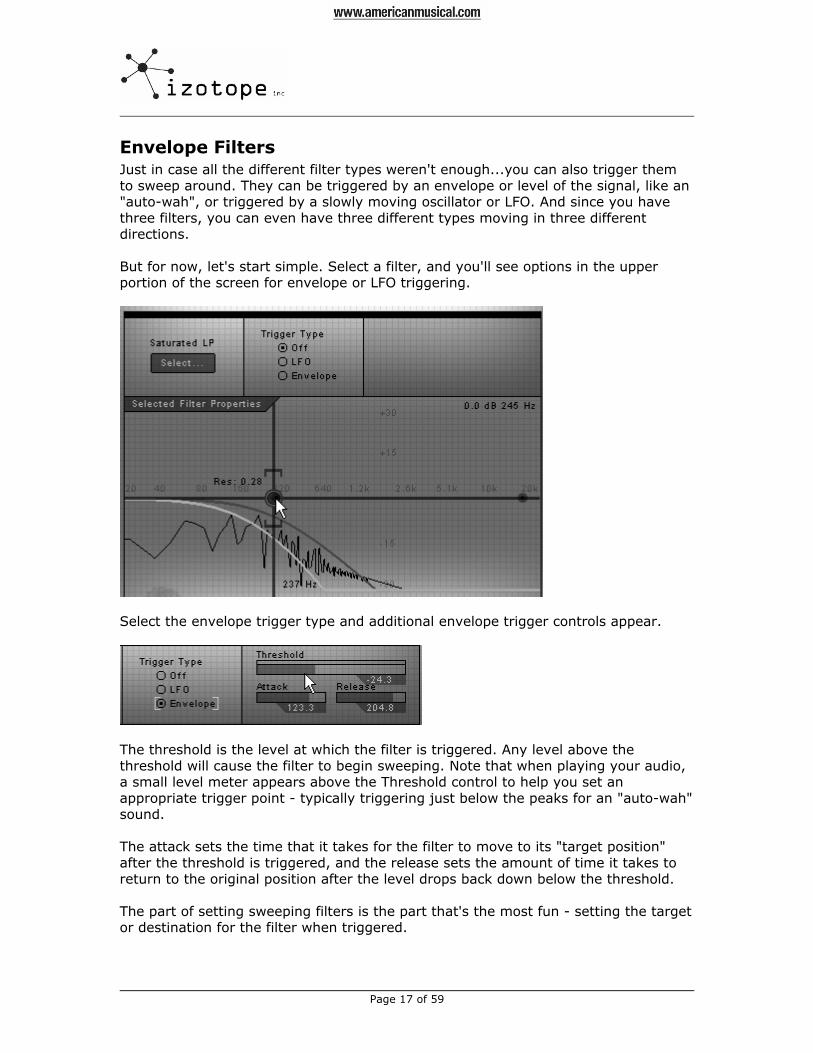
Envelope Filters Just in case all the different filter types weren't enough...you can also trigger them to sweep around. They can be triggered by an envelope or level of the signal, like an "auto-wah", or triggered by a slowly moving oscillator or LFO. And since you have three filters, you can even have three different types moving in three different directions. But for now, let's start simple. Select a filter, and you'll see options in the upper portion of the screen for envelope or LFO triggering.
Select the envelope trigger type and additional envelope trigger controls appear.
The threshold is the level at which the filter is triggered. Any level above the threshold will cause the filter to begin sweeping. Note that when playing your audio, a small level meter appears above the Threshold control to help you set an appropriate trigger point - typically triggering just below the peaks for an "auto-wah" sound. The attack sets the time that it takes for the filter to move to its "target position" after the threshold is triggered, and the release sets the amount of time it takes to return to the original position after the level drops back down below the threshold. The part of setting sweeping filters is the part that's the most fun - setting the target or destination for the filter when triggered.

Page 18 of 59
To do this, you'll note that when you select a filter and set it to be envelope triggered an additional white circle appears. Select that circle and you can set and adjust the target filter point.
Your target can be set to a higher frequency, higher level, higher resonance -- you can sweep or morph any filter parameter.
LFO Filters Instead of triggering off the envelope of level of the signal, you can alternatively have a sine wave or other signal automatically sweep the filters. To set an LFO filter, just select the filter band/circle you want to sweep, and select the LFO option for that filter
The Period is the time in milliseconds it will take for the filter to sweep from starting point to ending point and then back to starting point. You can enter this period directly with the slider, or click the Tap Tempo button at the speed you want the filter to oscillate. The shape button lets you select between different oscillator shapes. A sine wave (as shown above) will smoothly transition between end points, while a sawtooth (shown below) will rise smoothly from the start point to the end point, but then abruptly jump back to the starting point.
Page 19 of 59
Trash Module So at this point we can use the Squash module to level out the signal, and the Prefilter module to accentuate frequency ranges. Which takes us to the reason for all of this in the first place - to trash stuff.
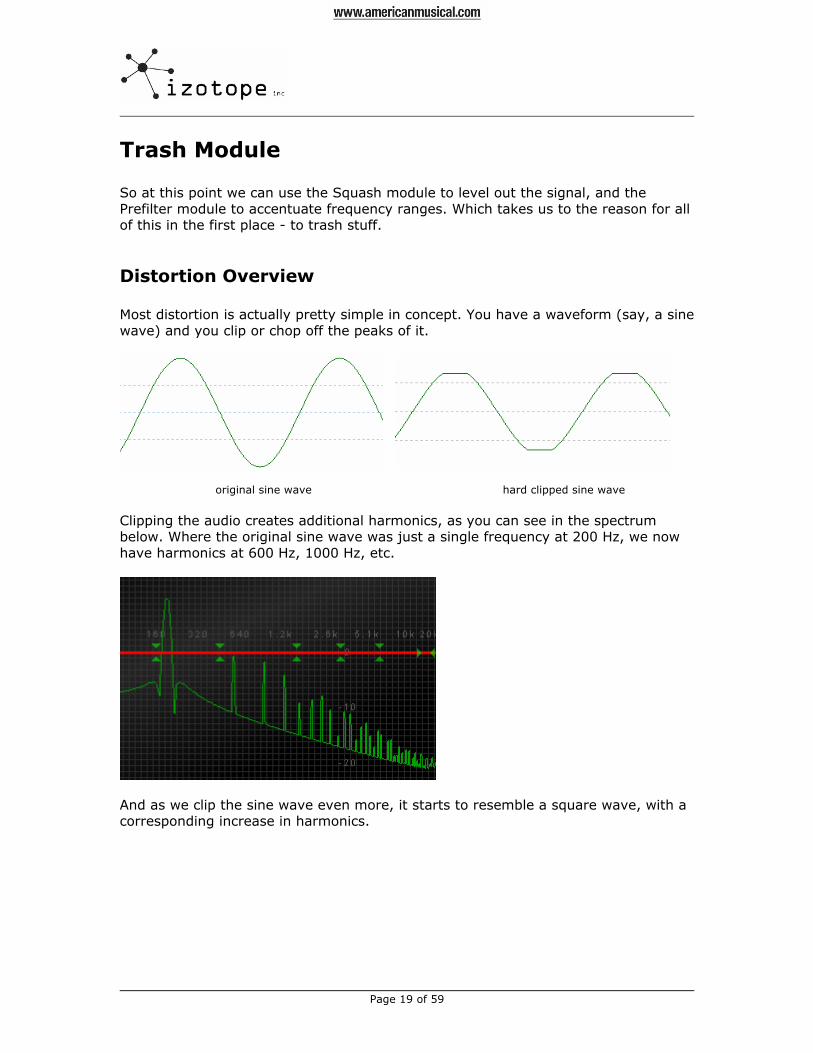
Distortion Overview Most distortion is actually pretty simple in concept. You have a waveform (say, a sine wave) and you clip or chop off the peaks of it.
original sine wave hard clipped sine wave Clipping the audio creates additional harmonics, as you can see in the spectrum below. Where the original sine wave was just a single frequency at 200 Hz, we now have harmonics at 600 Hz, 1000 Hz, etc.
And as we clip the sine wave even more, it starts to resemble a square wave, with a corresponding increase in harmonics.
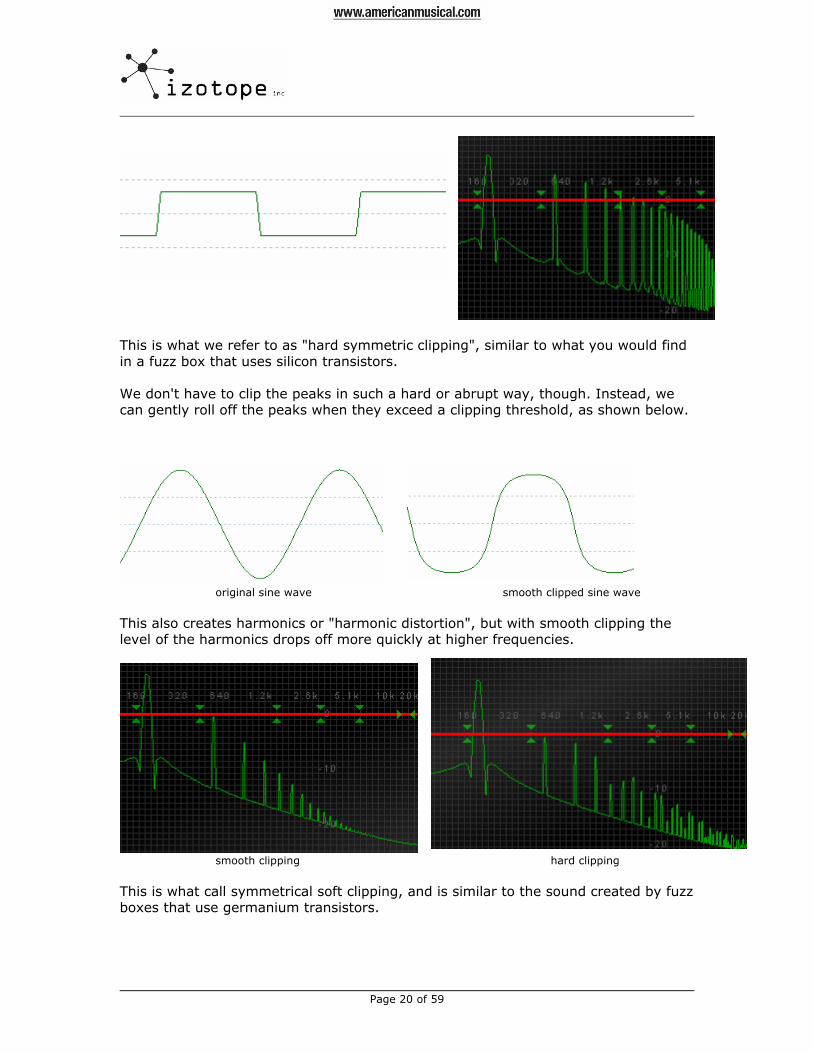
Page 20 of 59
This is what we refer to as "hard symmetric clipping", similar to what you would find in a fuzz box that uses silicon transistors. We don't have to clip the peaks in such a hard or abrupt way, though. Instead, we can gently roll off the peaks when they exceed a clipping threshold, as shown below.
original sine wave smooth clipped sine wave This also creates harmonics or "harmonic distortion", but with smooth clipping the level of the harmonics drops off more quickly at higher frequencies.
smooth clipping hard clipping This is what call symmetrical soft clipping, and is similar to the sound created by fuzz boxes that use germanium transistors.
Page 21 of 59
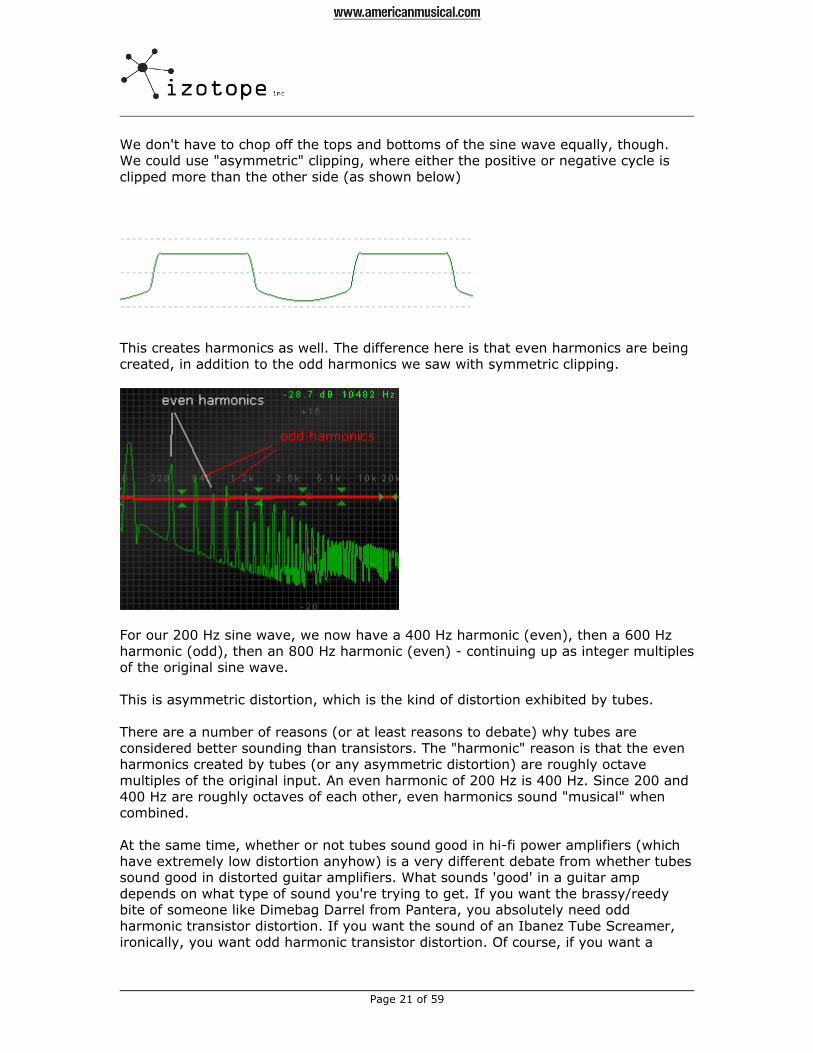
We don't have to chop off the tops and bottoms of the sine wave equally, though. We could use "asymmetric" clipping, where either the positive or negative cycle is clipped more than the other side (as shown below)
This creates harmonics as well. The difference here is that even harmonics are being created, in addition to the odd harmonics we saw with symmetric clipping.
For our 200 Hz sine wave, we now have a 400 Hz harmonic (even), then a 600 Hz harmonic (odd), then an 800 Hz harmonic (even) - continuing up as integer multiples of the original sine wave. This is asymmetric distortion, which is the kind of distortion exhibited by tubes. There are a number of reasons (or at least reasons to debate) why tubes are considered better sounding than transistors. The "harmonic" reason is that the even harmonics created by tubes (or any asymmetric distortion) are roughly octave multiples of the original input. An even harmonic of 200 Hz is 400 Hz. Since 200 and 400 Hz are roughly octaves of each other, even harmonics sound "musical" when combined. At the same time, whether or not tubes sound good in hi-fi power amplifiers (which have extremely low distortion anyhow) is a very different debate from whether tubes sound good in distorted guitar amplifiers. What sounds 'good' in a guitar amp depends on what type of sound you're trying to get. If you want the brassy/reedy bite of someone like Dimebag Darrel from Pantera, you absolutely need odd harmonic transistor distortion. If you want the sound of an Ibanez Tube Screamer, ironically, you want odd harmonic transistor distortion. Of course, if you want a
Page 22 of 59
melodic "singing" clean blues guitar tone, then you do want those octave (even) harmonics you get from the tube distortion algorithms. Another point to mention is that asymmetric clipping creates both even and odd order harmonics. Symmetric clipping only creates odd order harmonics. The overall number of additional harmonics created by asymmetric distortion is greater. The point is that when it comes to distortion, transistors and tubes all have their place. Even harmonics provide octave-like tones and odd harmonics provide edge. For soft/warm saturation a tube model sounds great. For heavy distortion you might want to put a symmetric transistor distortion in front of it, though. Important Note: When browsing through distortion algorithms, keep the level turned down. Different algorithms distort the sound in very different ways, which can sometimes cause the level to jump between different algorithms.
Intermodulation Distortion With a single sine wave, distortion is easy to see in terms of harmonics and easy to control. Unfortunately, another type of distortion called "intermodulation distortion" comes into play as soon as soon as a signal with anything but a single frequency component is distorted (that would be anything but a single simple sine wave...) Consider two tones - C (523 Hz) and E (659 Hz). Reasonable notes to play together. How would they sound distorted, though? Intermodulation distortion creates frequencies that are the sum and difference of the original tones - specifically 1182 Hz (somewhere between D and D#...) and 136 Hz (somewhere between C and C#). Not a well tempered combination of notes.5 So that's the problem - how to create nice harmonic distortion while minimizing intermodulation distortion. It's the reason that a guitarist might say of a pedal "yeah, it's OK for solo work but not for chords...". What they're really saying is that the harmonic distortion is good for simple frequencies, but intermodulation distortion is too high for anything more complex. Those are the basics of distortion, but there are other differences that make the difference between "simple distortion" and real modeled distortion. A couple examples: - Overload Characteristics - how the tube or transistor behaves after it's been overloaded. As one example, Fender amps are designed to be able to handle large
5 Consider though the mystical power of the power chord. Take your standard A-E bar chord. A is 440 Hz, E is 659 Hz. These frequencies work well together, because they are separated by a ratio of 3/2. Even and odd harmonic distortion from one note tends to fall on the harmonics of another note. Even better, power chords can tolerate intermodulation distortion pretty well. The sum of 440 and 659 is 1100 Hz (C# above - not a bad frequency for a major chord). And the difference is 219 Hz - an octave below 440. A rare case where harmonic as well as intermodulation distortion creates tones in reasonably nice places.
Page 23 of 59
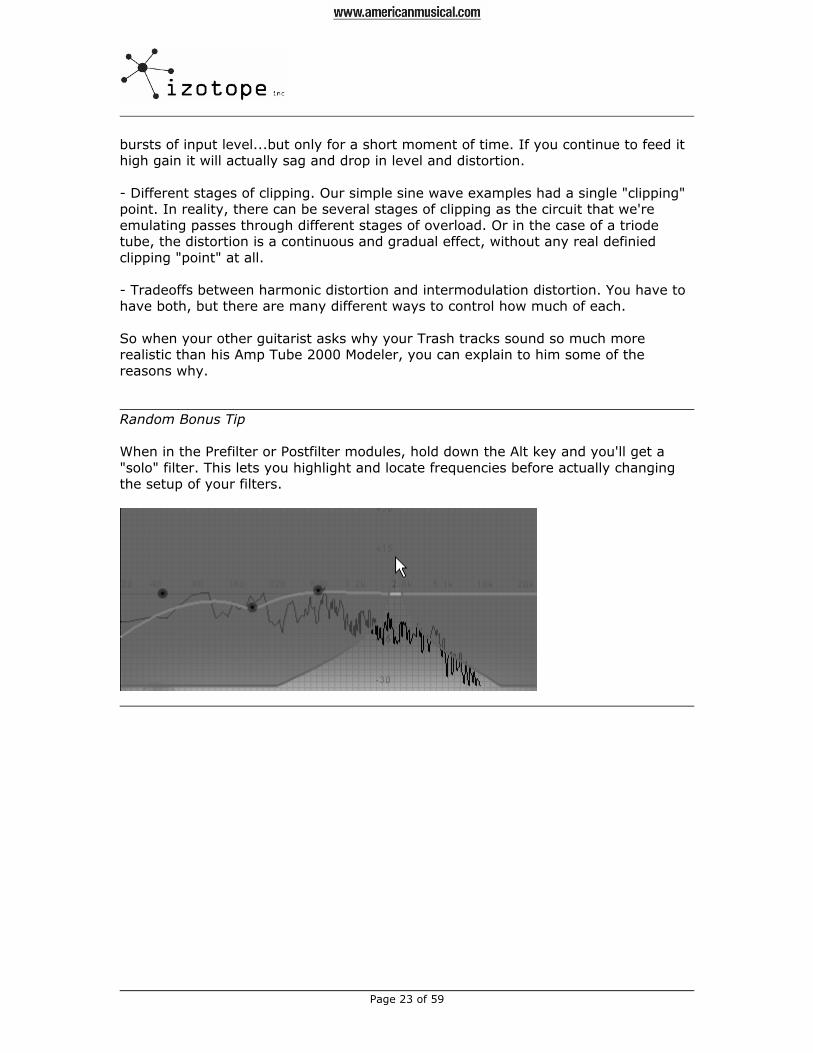
bursts of input level...but only for a short moment of time. If you continue to feed it high gain it will actually sag and drop in level and distortion. - Different stages of clipping. Our simple sine wave examples had a single "clipping" point. In reality, there can be several stages of clipping as the circuit that we're emulating passes through different stages of overload. Or in the case of a triode tube, the distortion is a continuous and gradual effect, without any real definied clipping "point" at all. - Tradeoffs between harmonic distortion and intermodulation distortion. You have to have both, but there are many different ways to control how much of each. So when your other guitarist asks why your Trash tracks sound so much more realistic than his Amp Tube 2000 Modeler, you can explain to him some of the reasons why. Random Bonus Tip When in the Prefilter or Postfilter modules, hold down the Alt key and you'll get a "solo" filter. This lets you highlight and locate frequencies before actually changing the setup of your filters.
Page 24 of 59
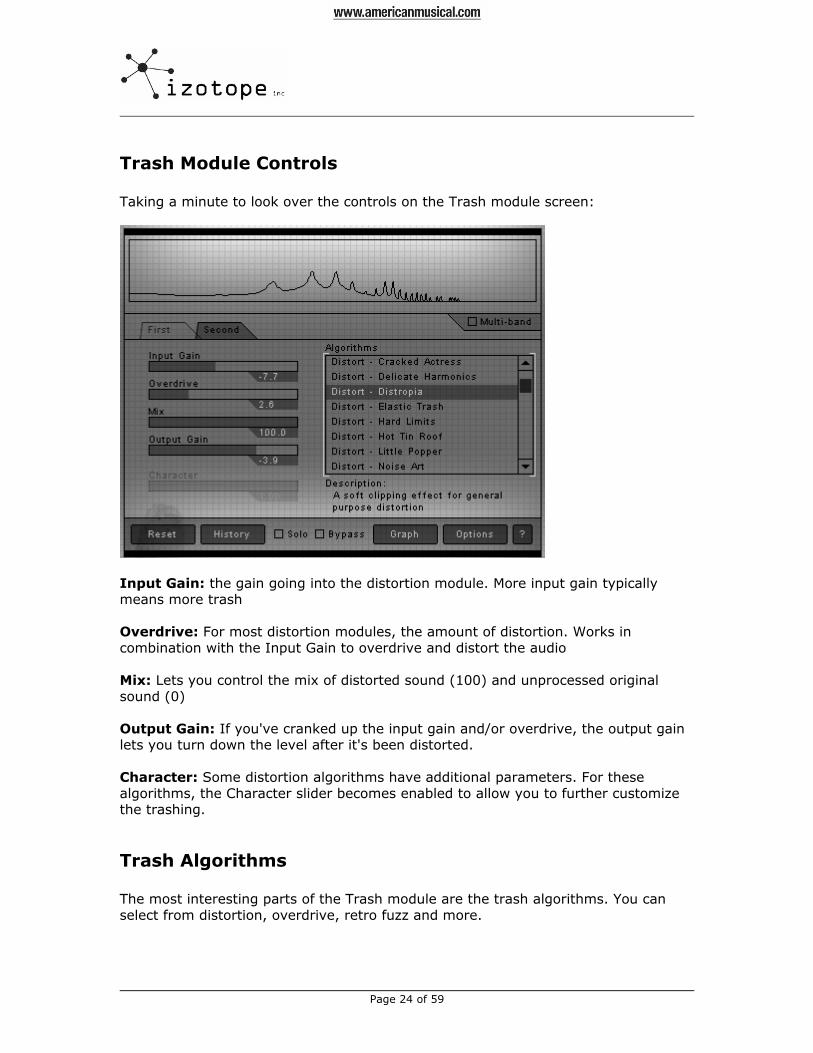
Trash Module Controls Taking a minute to look over the controls on the Trash module screen:
Input Gain: the gain going into the distortion module. More input gain typically means more trash Overdrive: For most distortion modules, the amount of distortion. Works in combination with the Input Gain to overdrive and distort the audio Mix: Lets you control the mix of distorted sound (100) and unprocessed original sound (0) Output Gain: If you've cranked up the input gain and/or overdrive, the output gain lets you turn down the level after it's been distorted. Character: Some distortion algorithms have additional parameters. For these algorithms, the Character slider becomes enabled to allow you to further customize the trashing.
Trash Algorithms The most interesting parts of the Trash module are the trash algorithms. You can select from distortion, overdrive, retro fuzz and more.
Page 25 of 59
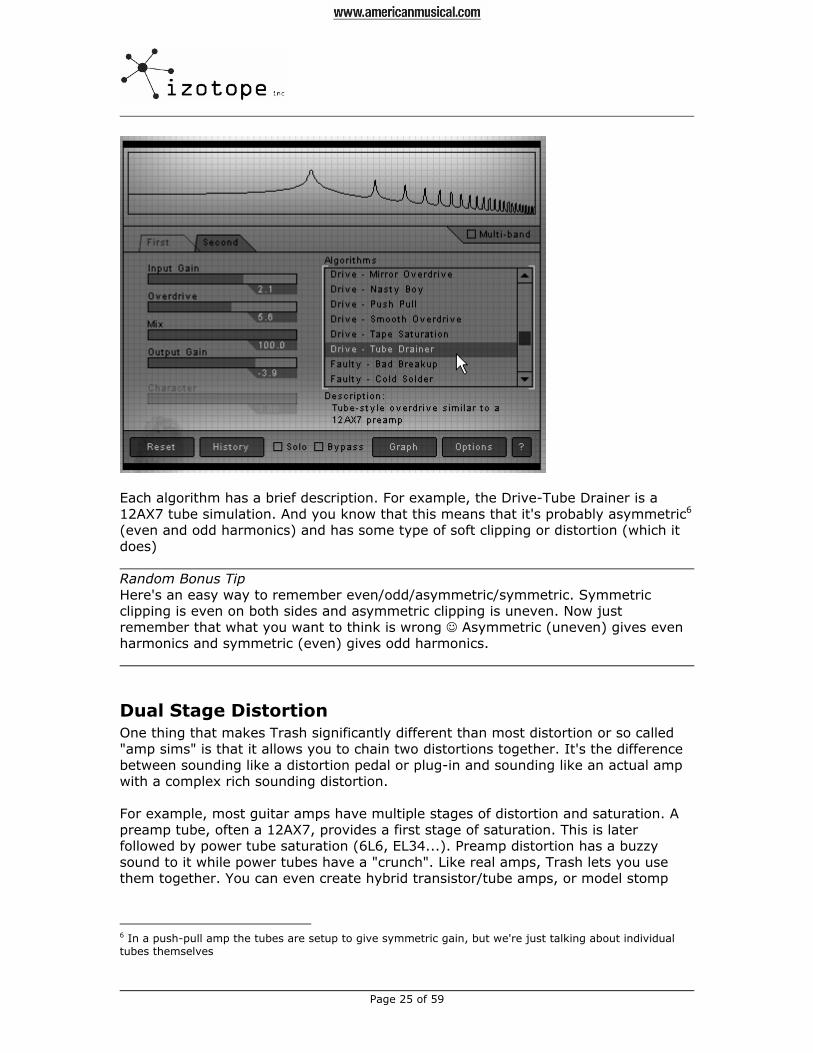
Each algorithm has a brief description. For example, the Drive-Tube Drainer is a 12AX7 tube simulation. And you know that this means that it's probably asymmetric6 (even and odd harmonics) and has some type of soft clipping or distortion (which it does) Random Bonus Tip Here's an easy way to remember even/odd/asymmetric/symmetric. Symmetric clipping is even on both sides and asymmetric clipping is uneven. Now just remember that what you want to think is wrong ☺ Asymmetric (uneven) gives even harmonics and symmetric (even) gives odd harmonics.
Dual Stage Distortion One thing that makes Trash significantly different than most distortion or so called "amp sims" is that it allows you to chain two distortions together. It's the difference between sounding like a distortion pedal or plug-in and sounding like an actual amp with a complex rich sounding distortion. For example, most guitar amps have multiple stages of distortion and saturation. A preamp tube, often a 12AX7, provides a first stage of saturation. This is later followed by power tube saturation (6L6, EL34...). Preamp distortion has a buzzy sound to it while power tubes have a "crunch". Like real amps, Trash lets you use them together. You can even create hybrid transistor/tube amps, or model stomp
6 In a push-pull amp the tubes are setup to give symmetric gain, but we're just talking about individual tubes themselves
Page 26 of 59
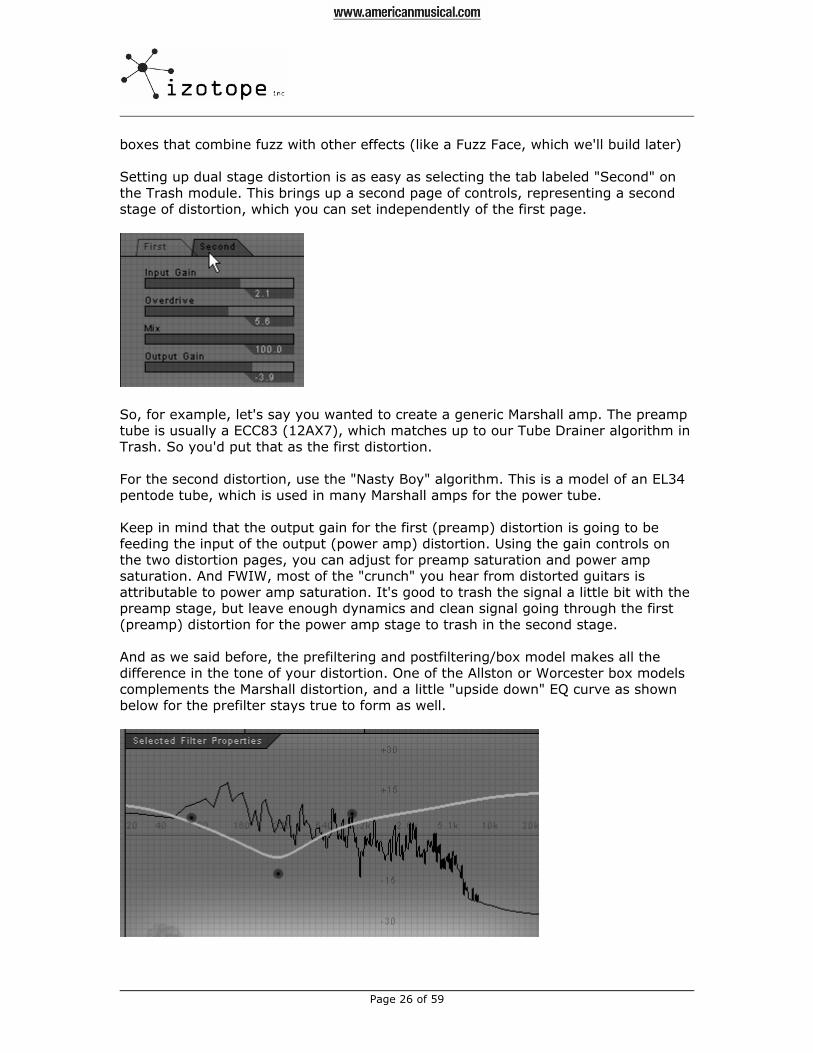
boxes that combine fuzz with other effects (like a Fuzz Face, which we'll build later) Setting up dual stage distortion is as easy as selecting the tab labeled "Second" on the Trash module. This brings up a second page of controls, representing a second stage of distortion, which you can set independently of the first page.
So, for example, let's say you wanted to create a generic Marshall amp. The preamp tube is usually a ECC83 (12AX7), which matches up to our Tube Drainer algorithm in Trash. So you'd put that as the first distortion. For the second distortion, use the "Nasty Boy" algorithm. This is a model of an EL34 pentode tube, which is used in many Marshall amps for the power tube. Keep in mind that the output gain for the first (preamp) distortion is going to be feeding the input of the output (power amp) distortion. Using the gain controls on the two distortion pages, you can adjust for preamp saturation and power amp saturation. And FWIW, most of the "crunch" you hear from distorted guitars is attributable to power amp saturation. It's good to trash the signal a little bit with the preamp stage, but leave enough dynamics and clean signal going through the first (preamp) distortion for the power amp stage to trash in the second stage. And as we said before, the prefiltering and postfiltering/box model makes all the difference in the tone of your distortion. One of the Allston or Worcester box models complements the Marshall distortion, and a little "upside down" EQ curve as shown below for the prefilter stays true to form as well.

Page 27 of 59
Trash Algorithm Reference Trash has a lot of algorithms, ranging from traditional distortions to iZotope creations to special effects (uncontrolled static, the intermittent crackle of a poor electrical connection, etc.). Descriptions of some of them are provided below to help you in choosing and combining them: Cracked Actor and Actress7: Distortion that compresses, then peaks, then falls off in a very nonlinear way (like an amp). Tube like-in principle (they started with a tube model) but we tweaked them until we had something even more special. Very sensitive to input gain, but if you use a compressor to level them off then set the drive just right they can be very useful. Distropia and Ten Inch Spike: Soft clip algorithms. Similar to the effect circuits found in many stomp boxes. As such, these two make great components for stomp boxes simulations, especially if you chain them with some tube models. Elastic Trash and Rubber Hammer: Really interesting overload properties with squishy "rubber" sounds. We're not aware of this type of algorithm used in any stomp boxes or amps so we don't have an example to give you for comparison. Like the Cracked Actor/Actress algorithms, these can sound great with the right levels. Harmonic Control, Slight Twist, Little Popper: These are exciter algorithms, which can either add harmonics or expand the signal. They can be good by themselves in small doses as exciters, or put before other distortion algorithms as "drivers".
Random Bonus Tip: When setting controls, a few shortcuts for you: 1) To enter numeric values directly, click the number label of the slider, enter the value you want and press the Enter key 2) Select the control with the mouse (or Tab key to it) and use the arrow keys to adjust it. Use Shift+arrow keys to adjust in larger increments. Use PgUP and PgDown to adjust in even larger increments. And use Shift+PgUp or Shift+PgDown to move in even even larger increments. 3) Our favorite one: just hold your wheel mouse over a slider and roll the wheel to adjust the slider. 4) Double click a slider to set it back to zero.
7 Yes, we're Bowie fans.

Page 28 of 59
Amp Drainer: This is a model of a triode tube, commonly used in power amps. Good by itself or used after other distortions.
Amperical: This is the 6L6 tube used in many Fender power amps. Sharp sound, but gets a little muddy in the low-mids under high distortion. Blues Driver: Similar to circuit found in many "overdrive" pedals. Odd harmonics, use lightly as a "booster" Crunchy Grunge and Grungey Crunch: Gradual saturation algorithm with odd harmonics. Double Stages: Similar to the Blues Driver in concept, but with two gain stages (Character slider controls the second gain stage) Harmonic Control: Strong even harmonics - good in small doses for clean tube sound. Mirror Overdrive: Transistor distortion model with strong odd harmonics Nasty Boy: EL34 tube model, used in Marshall amps. A hard "crunch" saturation character. Push Pull: Class A push-pull amp model. Symmetric saturation with crossover distortion as found in push pull amplifiers Tape Saturation: Tape saturation model. Use after other distortions for a "tape" finish Tube Drainer: 12AX7 preamp distortion - a triode tube used in many guitar preamps. Acid Fuzz: Very asymmetric and level sensitive fuzz clipping algorithm Bit Alias, Bit Wrench, Cheap Digital: Lo-fi digital trash algorithms where the Character slider controls the degree of digital lo-fi (e.g lower bit rates and sample rates) Garage Fuzz, Smooth Fuzz, Straight Fuzz: Traditional fuzz algorithms using either silicon or germanium transistors. Wrectifier: A rectifier where the Character slider controls the degree of "rectification". Basically flips the negative portion of the waveform back over to create Octavia effects. When Character = 0, there is no effect. When Character = 0.5, the signal is half wave. When Character=1.0, the signal is full wave rectified.

Page 29 of 59
Character= 0.5 (Half wave rectified)
Character = 0.75
Character = 1.0 (full wave rectified)
Random Bonus Tip: Right clicking on meters will bring up an options screen for the meters. If you right click on the main input/output level meters on the right side of Trash you get the options screen below
In addition to meter display settings, Trash offers a "Gain when Bypassed" option. This lets you set an offset gain that is only applied when the Trash bypass is switched on. When working with Trash, you'll find that many settings affect the gain. To compare Trash on with Trash off, this option lets you account for any level differences so you're just hearing the effect of a box model, trash algorithm, etc.
Page 30 of 59
Multiband Madness Here's where things get really wild. The Squash, Trash, and Postfilter modules in Trash are "multiband" and allow you to apply processing independently to up to four frequency ranges. This opens up a lot of possibilities. You could, for example, heavily compress the lows of a guitar and let the highs go through uncompressed. You could gate just the high frequency noise of a recording. You could apply fuzz distortion to the lows of a guitar and tube saturation to the highs.
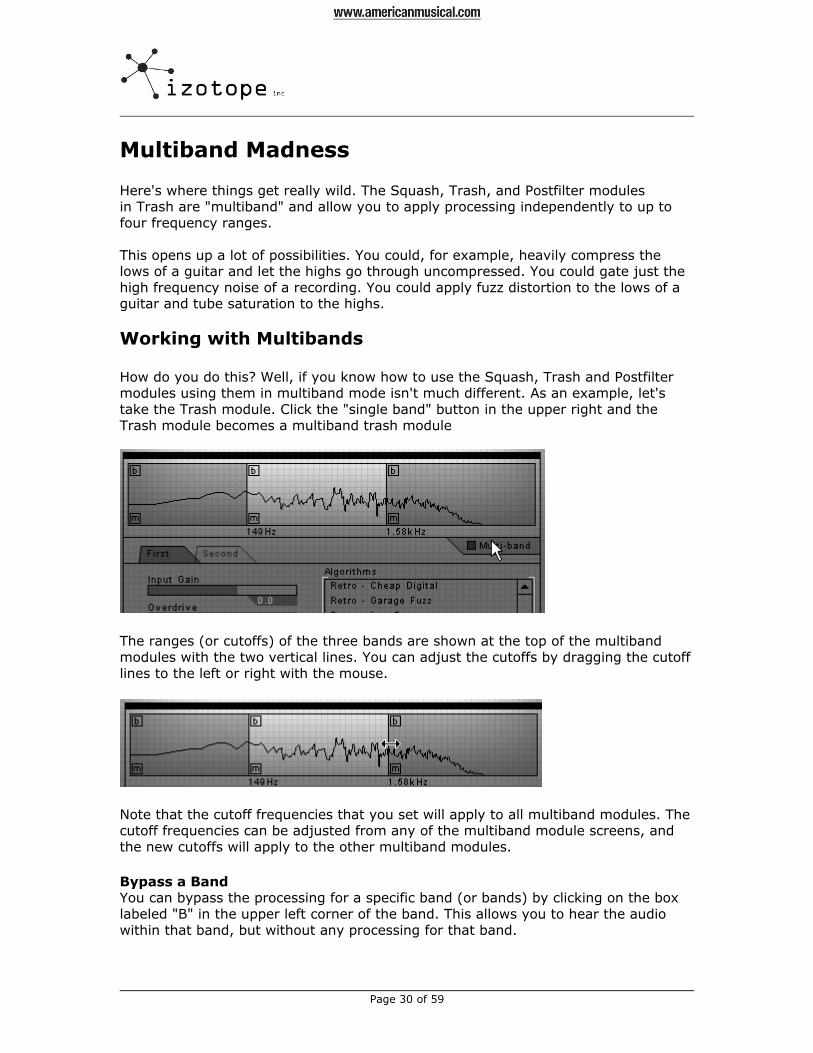
Working with Multibands How do you do this? Well, if you know how to use the Squash, Trash and Postfilter modules using them in multiband mode isn't much different. As an example, let's take the Trash module. Click the "single band" button in the upper right and the Trash module becomes a multiband trash module
The ranges (or cutoffs) of the three bands are shown at the top of the multiband modules with the two vertical lines. You can adjust the cutoffs by dragging the cutoff lines to the left or right with the mouse.
Note that the cutoff frequencies that you set will apply to all multiband modules. The cutoff frequencies can be adjusted from any of the multiband module screens, and the new cutoffs will apply to the other multiband modules.
Bypass a Band You can bypass the processing for a specific band (or bands) by clicking on the box labeled "B" in the upper left corner of the band. This allows you to hear the audio within that band, but without any processing for that band.
Page 31 of 59
Mute a Band You can mute a band by clicking on the box labeled "M" in the lower left corner of the band. This allows you to adjust multiband processing by hearing only the audio within the non-muted bands.
Solo a Band You can solo a band by holding down the Alt key and clicking the box labeled "M" in the lower left corner of the band.
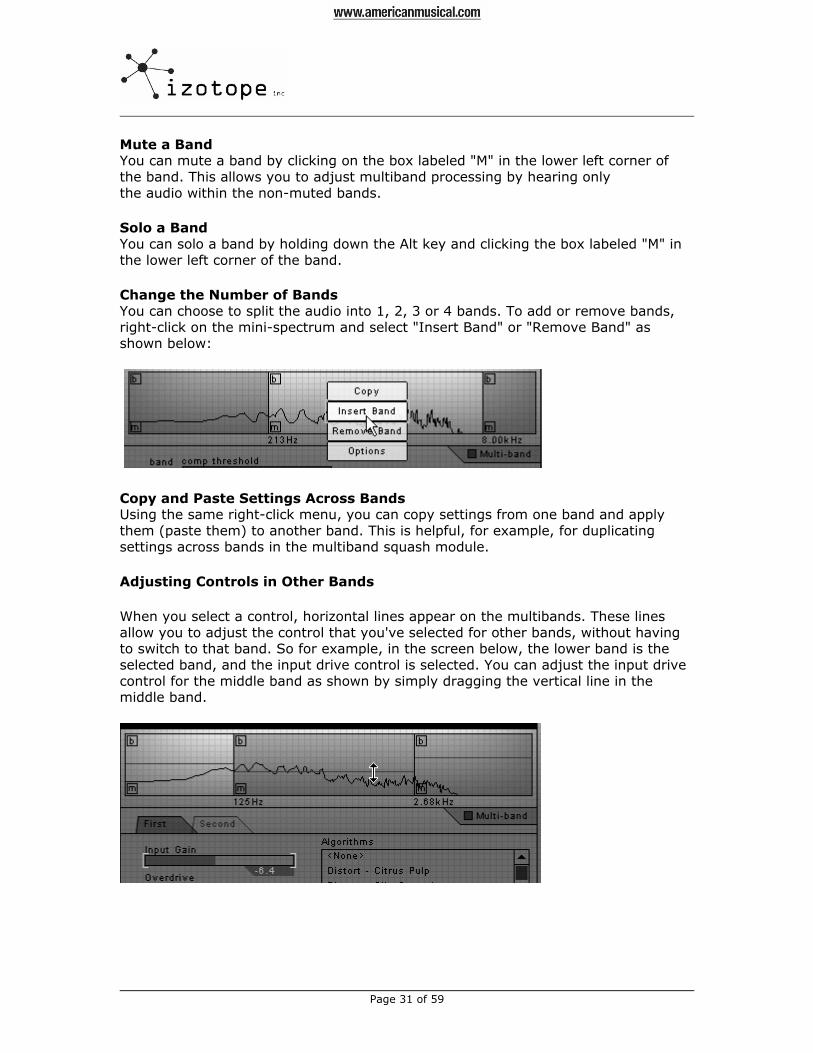
Change the Number of Bands You can choose to split the audio into 1, 2, 3 or 4 bands. To add or remove bands, right-click on the mini-spectrum and select "Insert Band" or "Remove Band" as shown below:
Copy and Paste Settings Across Bands Using the same right-click menu, you can copy settings from one band and apply them (paste them) to another band. This is helpful, for example, for duplicating settings across bands in the multiband squash module.
Adjusting Controls in Other Bands
When you select a control, horizontal lines appear on the multibands. These lines allow you to adjust the control that you've selected for other bands, without having to switch to that band. So for example, in the screen below, the lower band is the selected band, and the input drive control is selected. You can adjust the input drive control for the middle band as shown by simply dragging the vertical line in the middle band.
Page 32 of 59
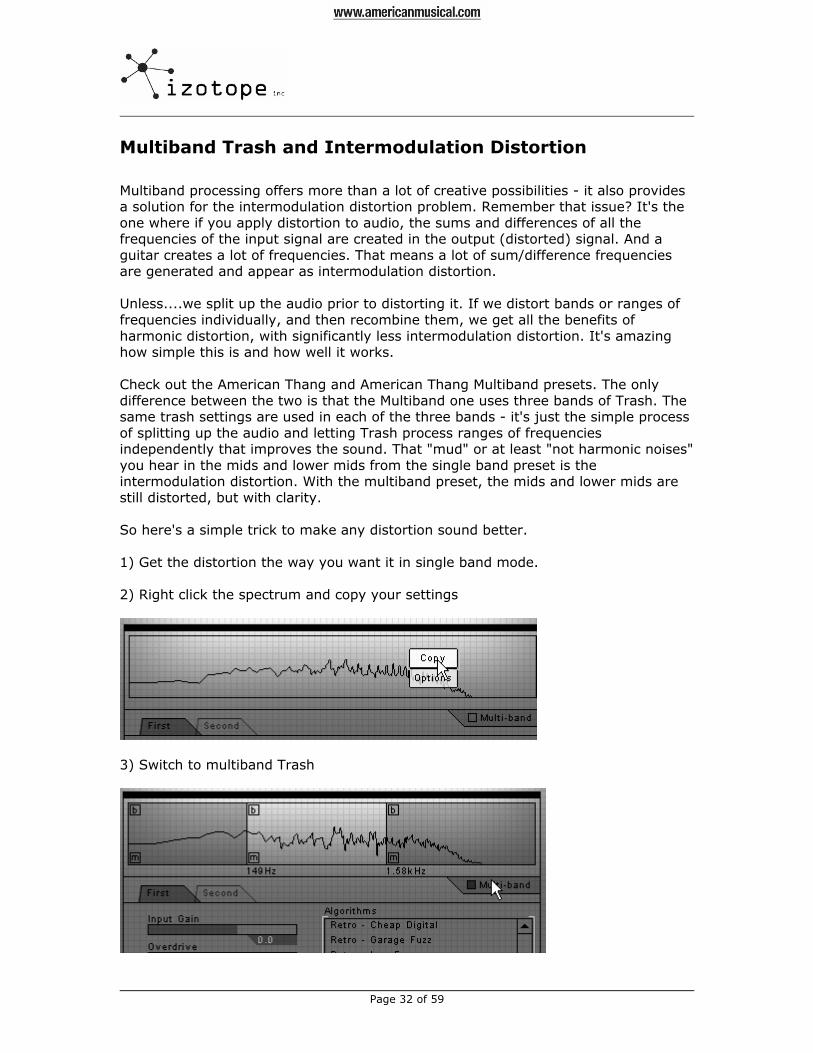
Multiband Trash and Intermodulation Distortion Multiband processing offers more than a lot of creative possibilities - it also provides a solution for the intermodulation distortion problem. Remember that issue? It's the one where if you apply distortion to audio, the sums and differences of all the frequencies of the input signal are created in the output (distorted) signal. And a guitar creates a lot of frequencies. That means a lot of sum/difference frequencies are generated and appear as intermodulation distortion. Unless....we split up the audio prior to distorting it. If we distort bands or ranges of frequencies individually, and then recombine them, we get all the benefits of harmonic distortion, with significantly less intermodulation distortion. It's amazing how simple this is and how well it works. Check out the American Thang and American Thang Multiband presets. The only difference between the two is that the Multiband one uses three bands of Trash. The same trash settings are used in each of the three bands - it's just the simple process of splitting up the audio and letting Trash process ranges of frequencies independently that improves the sound. That "mud" or at least "not harmonic noises" you hear in the mids and lower mids from the single band preset is the intermodulation distortion. With the multiband preset, the mids and lower mids are still distorted, but with clarity. So here's a simple trick to make any distortion sound better. 1) Get the distortion the way you want it in single band mode. 2) Right click the spectrum and copy your settings
3) Switch to multiband Trash
Page 33 of 59
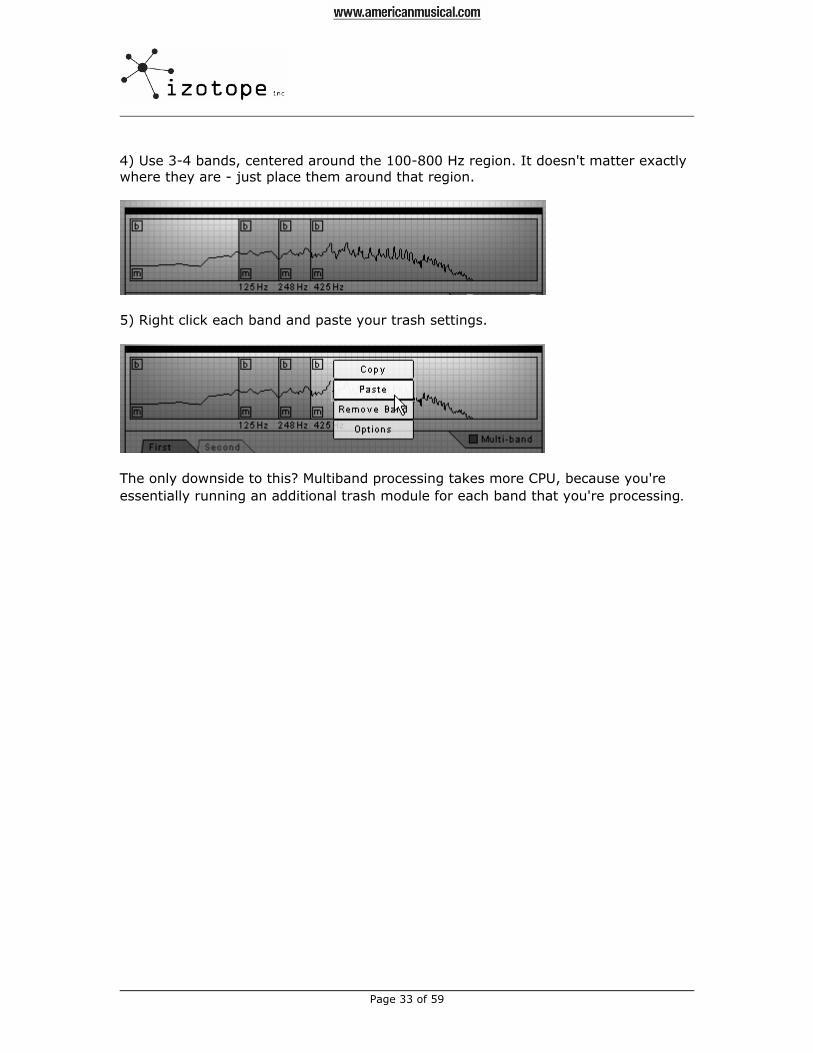
4) Use 3-4 bands, centered around the 100-800 Hz region. It doesn't matter exactly where they are - just place them around that region.
5) Right click each band and paste your trash settings.
The only downside to this? Multiband processing takes more CPU, because you're essentially running an additional trash module for each band that you're processing.
Page 34 of 59
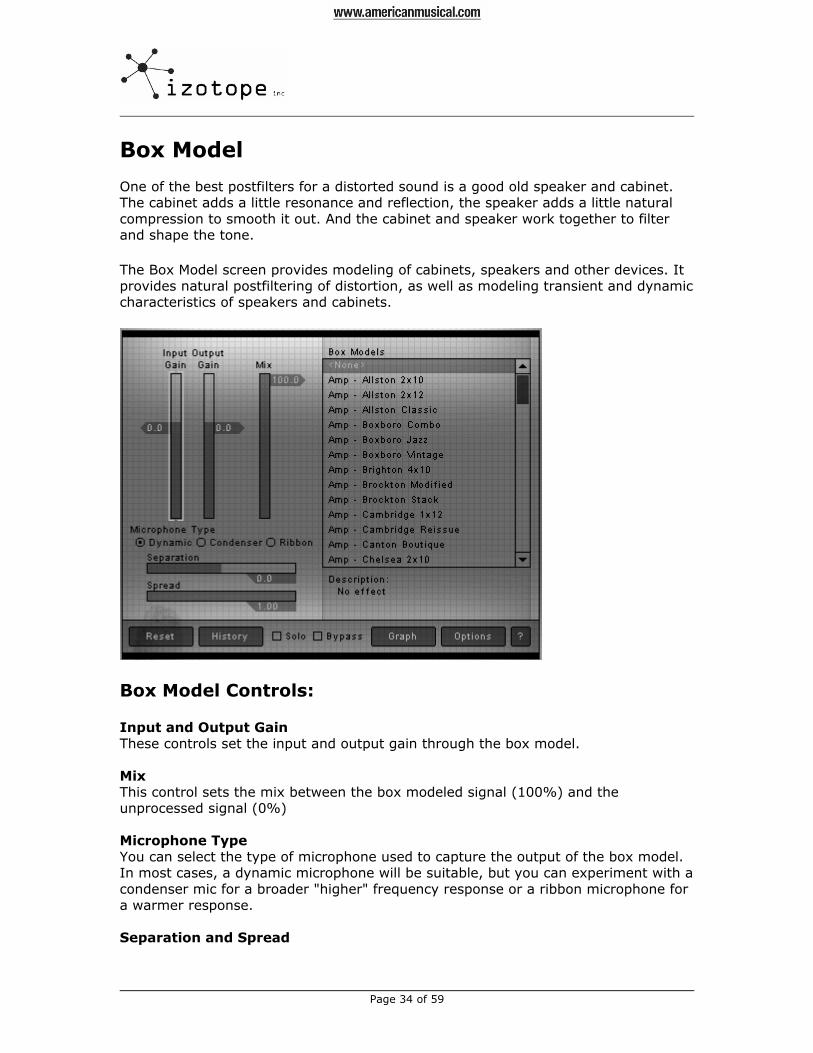
Box Model One of the best postfilters for a distorted sound is a good old speaker and cabinet. The cabinet adds a little resonance and reflection, the speaker adds a little natural compression to smooth it out. And the cabinet and speaker work together to filter and shape the tone.
The Box Model screen provides modeling of cabinets, speakers and other devices. It provides natural postfiltering of distortion, as well as modeling transient and dynamic characteristics of speakers and cabinets.
Box Model Controls:
Input and Output Gain These controls set the input and output gain through the box model. Mix This control sets the mix between the box modeled signal (100%) and the unprocessed signal (0%) Microphone Type You can select the type of microphone used to capture the output of the box model. In most cases, a dynamic microphone will be suitable, but you can experiment with a condenser mic for a broader "higher" frequency response or a ribbon microphone for a warmer response. Separation and Spread
Page 35 of 59
Stereo tracks are processed through the box modeler in stereo and mic'ed with a pair of microphones. By default, these microphones are aligned. You can place one microphone closer to the box by adjusting the separation control. This offset in distance creates a delay between the two channels causing a stereo effect. In addition, you can control the distance between the two microphones with the spread control. Larger spread values result from microphones that are further apart from each other.
The Spread control has no effect unless the microphones are separated from the box model by some amount. In other words, controlling how far apart the microphones are has no effect if they are both the same distance from the box model.
This effect only works on stereo tracks. To create a pseudo-stereo track from a mono track, create a stereo track and copy the mono track to the left and right channels in your host app. Adjusting the microphone placement will then mimic the sound of a stereo pair of mics rotated or offset on a single speaker.
What's an Oakdale Amp? You'll notice that there aren't any Marshalls, Fender, Vox, etc. listed as box models. We decided to create our own names8, for two main reasons: 1) The box model is a model of the cabinet and the speakers, and not the entire preamp, tone stack, power amp, etc. It would have been more accurate perhaps to call a Vox amp a "Celestion" box model, as we were modeling speakers and cabinets, and it was a company called Celestion that made the actual speakers for many of the Vox amps. But it's a Vox cabinet, and that's the name people associate with the sound. Tough call. 2) It's not going to sound like a Vox until you combine it with the right EQ, compression and tube saturation. Since Trash gives you the flexibility of combining different amps, tubes and filters with different cabinets, you could make a Vox cabinet sound more like a Marshall amp than a Vox amp if you used Marshall tube and EQ settings. We couldn't really say "this Box Model sounds like a Marshall" when it was just one component of the sound. So with that disclaimer as to why box models are just a portion of the total amp sound, here's a partial cross-reference for people like you that care enough to get into the product. Allston and Worcester models: Marshall sounds Oakdale models: Vox sounds Princeton model: Matchless sound Lincoln, Boxboro, Cambridge: Various Fender sounds
8 Actually, they're all names of towns in Massachusetts. It turns out that our state has a lot of towns that sound like amps (Boxboro, Rockport, etc.). OK, basically, we had to come up with a lot of names so this seemed to work.
Page 36 of 59
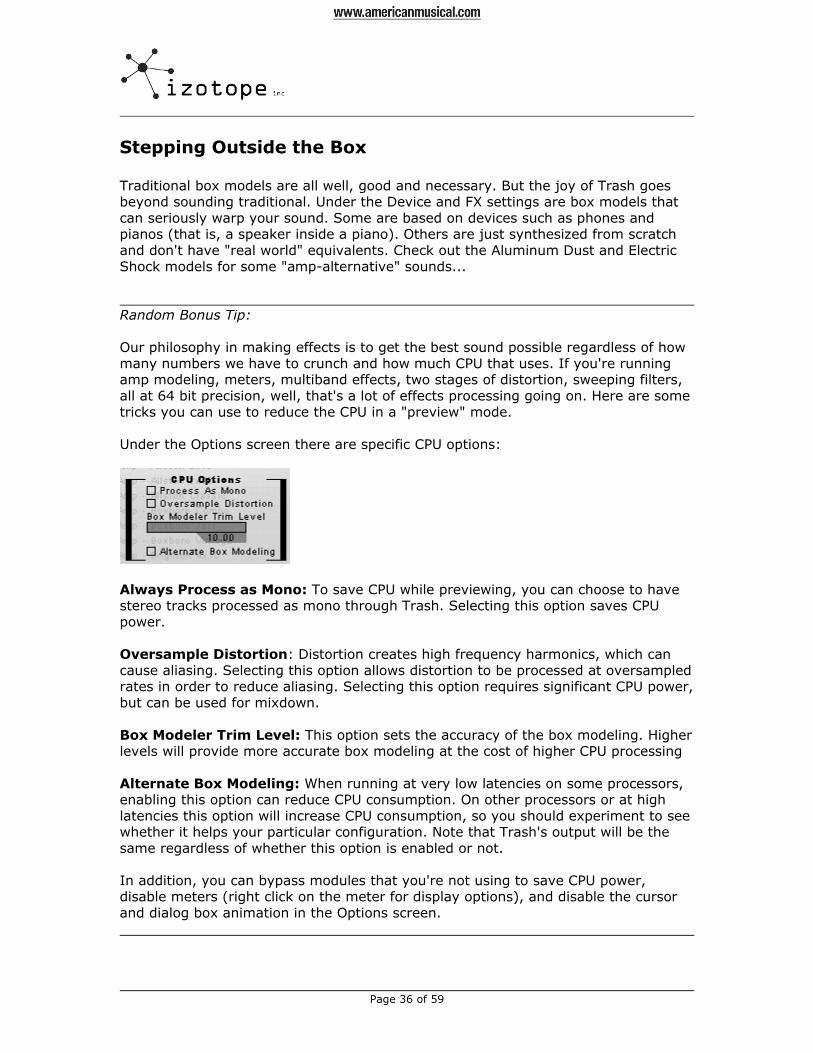
Stepping Outside the Box Traditional box models are all well, good and necessary. But the joy of Trash goes beyond sounding traditional. Under the Device and FX settings are box models that can seriously warp your sound. Some are based on devices such as phones and pianos (that is, a speaker inside a piano). Others are just synthesized from scratch and don't have "real world" equivalents. Check out the Aluminum Dust and Electric Shock models for some "amp-alternative" sounds... Random Bonus Tip: Our philosophy in making effects is to get the best sound possible regardless of how many numbers we have to crunch and how much CPU that uses. If you're running amp modeling, meters, multiband effects, two stages of distortion, sweeping filters, all at 64 bit precision, well, that's a lot of effects processing going on. Here are some tricks you can use to reduce the CPU in a "preview" mode. Under the Options screen there are specific CPU options:
Always Process as Mono: To save CPU while previewing, you can choose to have stereo tracks processed as mono through Trash. Selecting this option saves CPU power. Oversample Distortion: Distortion creates high frequency harmonics, which can cause aliasing. Selecting this option allows distortion to be processed at oversampled rates in order to reduce aliasing. Selecting this option requires significant CPU power, but can be used for mixdown. Box Modeler Trim Level: This option sets the accuracy of the box modeling. Higher levels will provide more accurate box modeling at the cost of higher CPU processing Alternate Box Modeling: When running at very low latencies on some processors, enabling this option can reduce CPU consumption. On other processors or at high latencies this option will increase CPU consumption, so you should experiment to see whether it helps your particular configuration. Note that Trash's output will be the same regardless of whether this option is enabled or not. In addition, you can bypass modules that you're not using to save CPU power, disable meters (right click on the meter for display options), and disable the cursor and dialog box animation in the Options screen.
Page 37 of 59
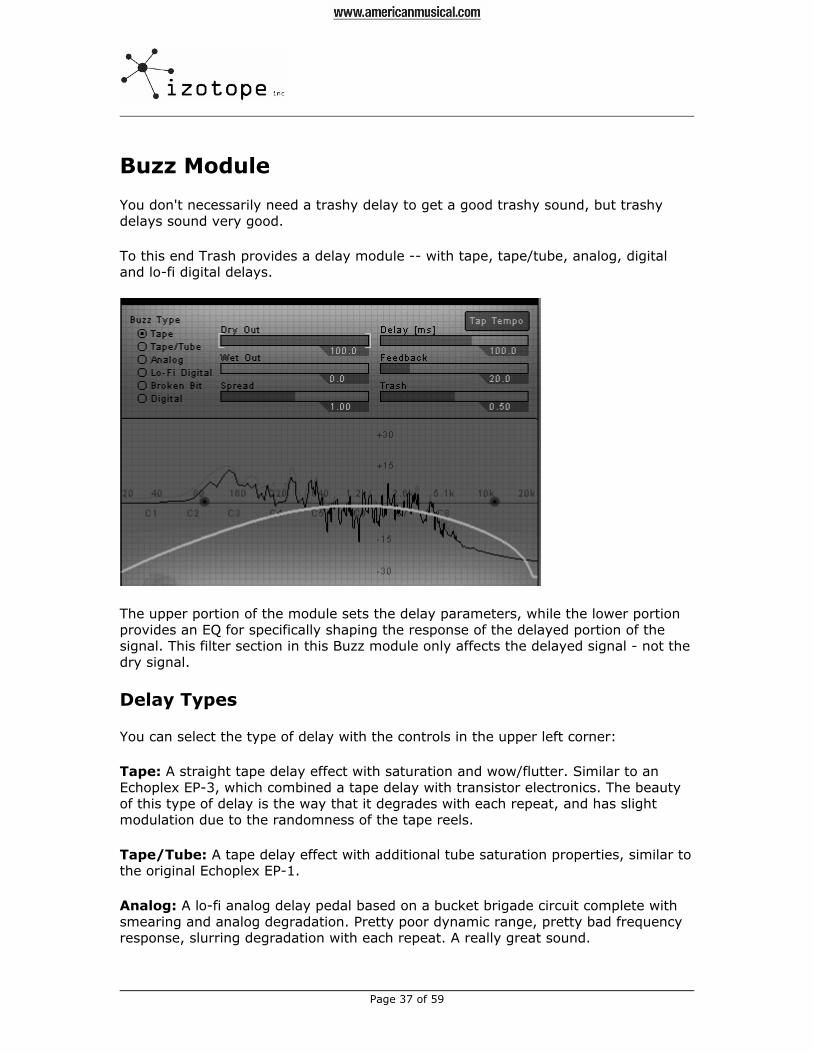
Buzz Module
You don't necessarily need a trashy delay to get a good trashy sound, but trashy delays sound very good.
To this end Trash provides a delay module -- with tape, tape/tube, analog, digital and lo-fi digital delays.
The upper portion of the module sets the delay parameters, while the lower portion provides an EQ for specifically shaping the response of the delayed portion of the signal. This filter section in this Buzz module only affects the delayed signal - not the dry signal.
Delay Types
You can select the type of delay with the controls in the upper left corner:
Tape: A straight tape delay effect with saturation and wow/flutter. Similar to an Echoplex EP-3, which combined a tape delay with transistor electronics. The beauty of this type of delay is the way that it degrades with each repeat, and has slight modulation due to the randomness of the tape reels.
Tape/Tube: A tape delay effect with additional tube saturation properties, similar to the original Echoplex EP-1.
Analog: A lo-fi analog delay pedal based on a bucket brigade circuit complete with smearing and analog degradation. Pretty poor dynamic range, pretty bad frequency response, slurring degradation with each repeat. A really great sound.
Page 38 of 59
Lo-Fi Digital: A lo-fi digital delay effect, similar to the first digital delay stomp boxes. Not the "best worst" delay effect (more like the "worst worst") but essential if you're doing lo-fi digital 80s stuff.
Broken Bit: A digital delay effect with infinite feedback on the lowest bit, similar to a faulty "stuck bit" delay
Digital: For completeness, a pure, clean digital delay. Of course, you can always filter the delay to round it off, but there isn't any saturation, wow, flutter, modulation or other randomness as with the organic analog models.
Controls Dry Out: Sets the output gain of the dry/undelayed signal
Wet Out: Sets the output gain of the wet/delayed signal
Spread: For stereo tracks. Sets the stereo spread of the signal, from mono (0) to extra wide (2)
Delay: Sets the delay time in milliseconds by default. In the Trash options screen, you can have the time displayed in tempo (beats per minute) instead. You can also set the delay time by tapping the "Tap Tempo" button.
Feedback: Sets the gain of the delay feedback. Higher values will result in longer audible feedback times, i.e. more repeats.
Trash: Sets the amount of degradation for the delay. For example, higher Trash values for tape delays results in more saturation. Higher Trash values for lo-fi digital delays results in more bit truncation and aliasing.
Page 39 of 59
Trash Recipes With a whole lot of theory behind us, it's time to have some fun. Let's put it all together and serve up some Trash. Just as an aside, we didn't set out to make an amp/stomp box simulator. Quite frankly, if you want to sound like Kurt Cobain, get a Boss DS-1, plug it into a Marshall and crank it up. It sounds great. What we did set out to do with Trash was to provide you with all the components - filters, distortion circuits, tubes, speakers, etc. - so that you could create your own unique sounds. There's just so much you can do with software like Trash beyond just copying sounds. OK, that said, a good way to get learn how to create your own sound is to look at ideas that have been used in existing effects and techniques used by other players. And sometimes, what starts off as a copy becomes unique in its own right9
Filter Fun
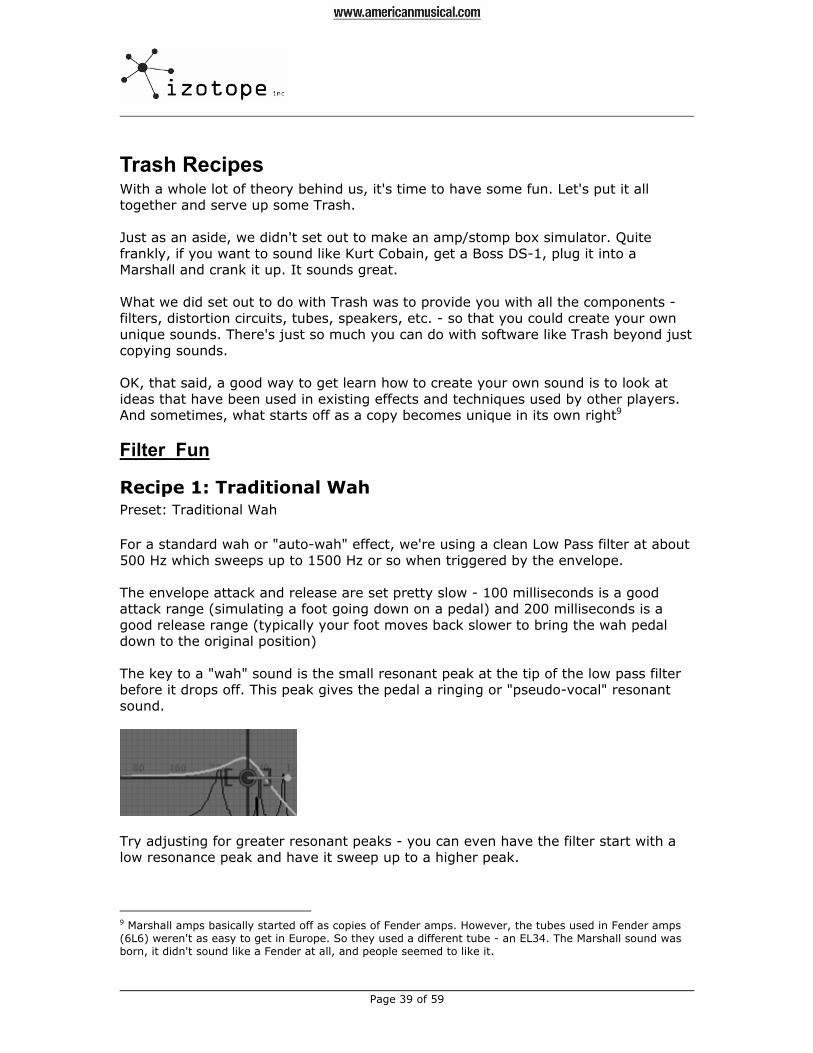
Recipe 1: Traditional Wah Preset: Traditional Wah For a standard wah or "auto-wah" effect, we're using a clean Low Pass filter at about 500 Hz which sweeps up to 1500 Hz or so when triggered by the envelope. The envelope attack and release are set pretty slow - 100 milliseconds is a good attack range (simulating a foot going down on a pedal) and 200 milliseconds is a good release range (typically your foot moves back slower to bring the wah pedal down to the original position) The key to a "wah" sound is the small resonant peak at the tip of the low pass filter before it drops off. This peak gives the pedal a ringing or "pseudo-vocal" resonant sound.
Try adjusting for greater resonant peaks - you can even have the filter start with a low resonance peak and have it sweep up to a higher peak.
9 Marshall amps basically started off as copies of Fender amps. However, the tubes used in Fender amps (6L6) weren't as easy to get in Europe. So they used a different tube - an EL34. The Marshall sound was born, it didn't sound like a Fender at all, and people seemed to like it.
Page 40 of 59
Recipe 2: Wah into Distortion or Distortion into Wah? Presets: Wah into Distortion and Distortion into Wah When working with envelope controlled filters10, the order of the effects can make a difference on the sound. If you put the envelope controlled filter before the distortion, the filter will open up when triggered and drive the distorted sound. If you put the distortion before the filter, the entire signal will be distorted before the filter, and you'll be revealing or "unfiltering" the distorted signal as the filter opens up. Check out the "Wah into Distortion" and "Distortion into Wah" presets. The only difference between the two is the order of the prefilter (wah) and distortion modules, yet the sound is noticeably different. So which is the correct order? Most would say wah before distortion for a "traditional" sound - Hendrix, Satriani, Clapton for example - but don't let that discourage you from trying it the other way as well.
Recipe 3: Parked Wah Preset: Parked Wah Guitarists like Joe Perry, Tom Scholz and Brian May recognized that the resonant peak of a wah pedal sounded cool, even if you weren't moving the pedal. Just setting it or "parking it" at a middle position gave their sound a resonant edge. The Parked Wah preset gives you that ringing tone. In this preset the wah is parked around 1000 Hz, which would be slightly above middle position for most wah pedals. Try it at other places - 500 Hz to 1500 Hz would be a realistic wah pedal range.
Recipe 4: Moog Resonator Preset: Fat Resonator Moog filters - such as the MoogerFooger - are known and loved for their extreme resonances and their signature "bwow" sweeping sound. While in concept similar to an autowah (play loud and it opens up the frequency range), Moog filters sweep quickly to give more of a synth sound and less of a "foot on the wah pedal" sound. Check out our Fat Resonator preset to hear what we mean.
Recipe 5: Mellow Moog Preset: Mellow Circuits Sure, the extreme resonances or whistling/swooping sounds you can make with Moog filters are fun. But the "bwow" sound of the filter itself is great, even without extreme resonances.
10 Filters that change frequency based on how loud you play
Page 41 of 59
The "Mellow Circuits" preset captures the warm "retro" sound of the filter without the resonant peaks. Of course, you can season to taste - more resonant, distortion after it, etc.
Recipe 6: MicroSynths Preset: Microtronics Back when analog keyboard synths came out, guitarists wanted something of their own to make strange electronic sounds. Companies like Electro-Harmonix responded with products like the Microsynth: an automatic LFO swept filter with all sorts of strange fuzz and octave sounds. Our "Microtronics" preset pays tribute to those days, with a swept LFO driving a wave rectifier, which in turns feeds a smooth fuzz. It's not the sort of thing you want to play chords with, but for those 80s New Wave leads it might be just the thing. And just to mention it, even though we only have one LFO filter sweeping in this preset there's no reason you can't take the idea even further with a couple other sweeping filters.. Recipe 7: Moog Water Preset: Squishy Circuits In this one we've used the "flavor" of an old analog Moog filter, and swept it to a triangle LFO. Why a triangle? Because in analog circuits, a triangle is much easier to generate (less components and cost) than a sine wave. That's also why many tremolos on vintage amps are driven by triangle waves, in case anyone ever asks you... If you match the LFO of this preset to the tempo of your song, and set the delay time as well you can get a really great sweepy echo vibe going. Recipe 8: Clean Mutron Preset: Cleanatronic In the 70s, Electro-Harmonix also brought us a funky envelope filter called the Mutron. From funk guitar to Stevie Wonder's clavichord, this pedal gave a great squelchy sweeping sound. Our "Cleanatronic" preset pays tribute to the funk of yesteryear, with a resonant and saturated low pass filter triggering as you play. It's a clean tone in general, with just a little tape saturation to round out the feel.
Recipe 9: Dirty Mutron Preset: Dirty Circuits
Page 42 of 59
The Mutron sounds great clean, but can sound even better when you feed it into a nice tube saturated amp. Our Dirty Circuits preset exemplifies this, letting the output of the Mutron drive a slightly dirty amp. Recipe 10: Notch Mutron Preset: Notch-a-tronic The Mutron was somewhat unique in the sense that you could set it to sweep a lowpass, bandpass, or high pass filter. A popular modification was to rewire the circuit so that you could also get a sweeping notch filter from it. Notch filters have a sort of "phaser" sound to them, and this mod gave you a sort of "envelope controlled phaser". We admire those people that voided their Mutron warranty by taking a soldering iron to it, and pay tribute to them with our Notch-a-tronic preset. Fun things to try: Add additional sweeping notch filters, and try it in combination with different distortion algorithms such as fuzz.
Recipe 11: Compress before Wah Preset: Compress before Wah Most people will tell you that you shouldn't compress audio before sending it to a wah or envelope controlled filter. This makes sense - an envelope controlled filter works off the dynamics of the audio, and if you level out the dynamics with a compressor the filter won't have anything to trigger off of. But rules are made to be broken. Like, you don't name a product "Trash". Anyhow, the "Compress before Wah" preset is in fact a compressor in front of a wah. It's an interesting sound. Not as obvious as the triggering without a compressor, as the compressor is turning on and off and in some ways working against the envelope trigger. So the combination creates an interesting and less "predictable" sweeping filter. Try turning on and off the Squash module and you'll hear the difference. We can have a very wide "sweep" range for the wah, with the compressor working to smooth out and keep the filter open.
Recipe 12: Phaser notches Preset: Sweeping Notches The great thing about analog filters is that they have magnitude and phase characteristics. We can use this quality to create some interesting sweep effects. Check out the Sweeping Notches preset. We have three narrow notches of filters which are all sweeping to their own LFOs. It's not the filtering that catches the ear as much as the
Page 43 of 59
phase effects of the filters sweeping and interacting with each other. You hear a sort of watery sound - not quite a phaser but something like it - in the upper midrange of the bass. To fool around with this, try slow sweeps in general (>1000 ms) and pass them through the 300-3000 Hz region for the most audible effect.
Recipe 13: Triggered notches Preset: Craig's Madness Craig Anderton has come up with a number of unique ideas and circuits for creating effects. Not the least of which, in the context of Trash, was his multiband Quadrafuzz circuit plug-in. You could say we liked that idea. There's another circuit that Craig came up with that we also remember - an envelope triggered phaser. The idea being that you could sweep the notches based on the level of your playing - sort of across between an auto-wah and a phaser. We don't have the circuit around anymore, so we can't say if this sounds anything like Craig's project. But it's there in spirit. There's a ton of possibilities with this one. Fool around with different sweep ranges and attack/release times. Or maybe make two notches sweep up in frequency when triggered and one sweep down.
Recipe 14: Tremolo Preset: Vibromatic Here's another use for LFOs - tremolo effects. Tremolo is a simple and classic sound, made famous by amps like the Fender Vibrolux. Basically, it modulates the volume of the signal to create the sort of "wobbling" you hear on the first chord of....well..."Hey Hey We're the Monkees". OK, not the best example, but just the first one we thought of. We can fake a tremolo with Trash by using a straight shelf filter and modulating not the frequency, but the gain. Check out the Vibromatic preset. A shelf filter is sweeping up and down in gain to create the modulation in level. Not exactly how a tremolo works in a strict technical sense, but does the job really well11. You can
11 Just as a footnote, vibrato and tremolo are sometimes confused. Vibrato is modulation of pitch or frequency modulation, while tremolo is modulation of level or amplitude modulation. Many amps and pedals that have "vibrato" in the name are really tremolo effects. One exception was the Magnatone guitar amp. Developed in the 50s, it was the first guitar amp with real Vibrato. U.S.Patent # 2,988,706 if you're curious how they did it. Another way to do it is found in Leslie rotating speakers. These have both amplitude modulation, when the speaker turns away from you, as well as frequency modulation due to the Doppler shift of the speaker moving towards you then away from you. Same reason that a police siren sounds higher pitched as it moves towards you and drops in frequency when it moves away from you.
Page 44 of 59
change the speed of the tremolo with the LFO period, and the amount of the effect by moving the start and end points of the shelf filter further apart. Fun thing to try: Combine sweeping of the gain with some changes in frequency or resonance to get strange hybrid phaser/tremolo/filter sounds.
Recipe 15: Talk Box Preset: TalkBox Let's admit it together. Frampton's "Do you feel like we do" is a good 13 minutes of guilty guitar fun. Not that this the sort of effect you want to use on every track, but it does seem to surface at least once every decade12. A real talkbox involves a small speaker inside a pedal. You place a tube from the pedal into your mouth, step up to a mic, and play as you mouth the sounds. The pedal drives the speaker which send the sound through the tube into your mouth. The natural resonances of your mouth and throat work to filter the sound into vocal sounding formant frequencies.13 Trash has a collection of formant filters that resonant the vowel harmonics. Check out the TalkBox preset as an example. It's a low pass envelope filter that sweeps to uncover the formants of an "A" vowel.
Recipe 16: Reverse Wah Preset: Reverse Wah The general rule for wah pedals is that as you "open it up" it reveals more of the higher end frequencies. Back off and the filter sweeps down to just let lower frequencies through. Does it have it be that way? We don't think so. What if opening up the wah meant filling in the low frequencies? Instead of a low pass filter sweeping up, it was a high pass filter sweeping down? Crazy?!?! Check out the Reverse Wah preset. Play harder and you get more low end. Lighten up and the tone is restricted to just the high end. Lots of fun.
Recipe 17: Wrong Way Wah Preset: Wrong Way Wah
12 70s, Rocky Mountain Way by Joe Walsh.......80s, The Zoo by The Scorpions...90s, Man in the Box by Alice in Chains...00, It's My Life by Bon Jovi.... 13 Author's note: I used to plug a small Walkman earphone into my synth's headphone jack and put the earphone in my mouth. With the earphone in my mouth, I could play the synth and mouth the sound into a mic. Worked really well. Just please don't choke on the earphone if you try this at home. And when playing live, remember to take the earphone out of your mouth before you take a sip of beer.
Page 45 of 59
The idea here was initially to create that sound that the Edge gets on Achtung Baby. That "raoooowww" sound that starts off Mysterious Ways. It sounded like us to a wah thing, but instead of opening up when he played louder, it dropped down and cut off the sound, after letting just a bit of the peak through. We're not exactly sure how that sound came about for the Edge, and this didn't really match it but still came out to be a cool preset.
Project 18: Peak Filter Wah Preset: Peak Wah Instead of a low pass filter, you can also try triggering a peak filter with a wah. This will let your high end remain even when the wah is off or not being triggered, but still add a little sweep when it is triggered. Check out the "Peak Wah" preset for an example of this. Two sweeping peak filters run to give a type of "wah" effect. Just to see what would happen, we spaced the two filters so they were an octave apart for some kind of coherence, and then set the thresholds and timing differently so they'd sweep differently. And finally, we thought is sounded cool through a bass amp, even on guitar tracks. We're not sure what we were actually going for this preset, but the result is kind of interesting.
Distortion Pedals Just to mention it again, the purpose of Trash wasn't to just mimic a few pedals. Not only is there so much more you can do with Trash, but seriously - a Boss DS-1 pedal is like 40 bucks or something. And it sounds just like a Boss DS-1 pedal. If you want that sound, get that pedal. But if you want to make your own Trash pedals, there's no better way to start than to look at some of the classics and see how they did it.
Recipe 19: Boss DS-1 Preset: Orange Box This orange box is a staple good of rock guitar. From high school garage bands to Kurt Cobain, everyone's used this one at one point or another. Like most stomp boxes, it's actually a really simple circuit. Back to back silicon diodes, or in other words "hard symmetric clipping". That is part of the beauty of this pedal, though. When you're playing lightly, you have practically no distortion at all. Whack the strings and it crunches. It's that simple.
Page 46 of 59
The "Orange Box" preset brings this box to your PC. Simple, straight and crunchy. That's not to say the original orange pedal is perfect. It has great high end crunch, but very little low end. So we took the liberty of modifying the tone in the "Orange Box Alternate" preset to drive more lows through it. Perhaps a chunkier sound, but it turns out that intermodulation distortion makes it a little muddy if you try to force mids and lows through it. Maybe that's why the tone circuit in the hardware box is set like it is... So....what do we do? Remember the intermodulation distortion trick? Split the spectrum into multiple bands, trash them separately, and let Trash recombine them. The "Orange Box Multiband" preset does this for you. It still has the character of the DS-1, but with strong and clear mids and lows. Great sound, but would have been pretty expensive to do with an analog hardware pedal. On the topic of Boss DS-1 modifications, a popular modification to the original DS-1 circuit is to replace the two diodes with three diodes, creating an asymmetric distortion. No problem with Trash - the "Orange Box Asymmetrical" preset puts an asymmetric tube distortion in front of the symmetric clipping. Sort of like putting a small preamp tube before the stomp box for some "even harmonic" distortion.
Recipe 20: Boss SD-1 Preset: Yellow Box As it turns out, the Boss SD-1 is a variation pedal that does use asymmetric clipping for odd and even harmonic distortion. You can hear it on Cure tracks and Radiohead tracks to name a few. To our ears, the SD-1 sounds rougher than the DS-1, even though it has "even harmonics". This could be because it also has odd harmonics, and the combination creates more distortion overall. In any event, the Yellow Box preset is our tribute to this pedal.
Recipe 21: Distort and Drive Preset: Distort and Drive A little tip when combining distortions - follow clipping algorithms (Distropia, Ten Inch Spike, Cracked Actor/Actress, etc.) by tube algorithms (Tube Drainer, Amperical, Amp Drainer, Nasty Boy, etc). First of all, this is what really usually happens - a distortion stomp pedal goes into the amp saturation. The reason this is what usually happens? Distortion or clipping algorithms sort of clip off the tops of the signal. This gives a dynamic feel as your level goes above and below the clipping point. In contrast, a tube has a gradual saturation. Combining the two gives your playing the accents of a distortion pedal, with the smoothing of tube saturation.
Page 47 of 59
The "Distort and Drive" preset demonstrates this. The overall sound is crunchy, due to the EL34 tube saturation (Nasty Boy) we're using for the second distortion. But there's an additional excitement when you hit the strings hard and clip the first distortion - Ten Inch Spike - a soft clipping algorithm.
Recipe 22: Tube Screamer Preset: Texas Shot This pedal is a bit of a paradox for a few reasons. - It's legendary, but, well, at least in our humble opinion, isn't that great.14 - It doesn't have any tubes in it. It doesn't even try to sound like tubes. - It doesn't scream. In fact, it sounds pretty muffled as pedals go. But even still, it does have a nice mellow sound and works great as an input/overdrive to tube amps. It's also an interesting design, so we decided to take a shot at it. The circuit itself isn't that different than other pedals, such as the OD-1. It's symmetric soft clipping, with diodes in the feedback loop. What makes the Tube Screamer is the prefiltering and postfiltering. The prefiltering is slanted towards the highs, so that the lows and mids don't get that distorted. Following this boost and corresponding distortion, the postfiltering is pretty aggressive, rolling of the distorted signal starting at a pretty low frequency. In general, this is a common and useful distortion technique - boost the highs with the prefilter, distort, and bring the highs back down with the postfilter. All in all, this gives the Tube Screamer a warm sound, or at least not a "trebly" sound, while providing decent saturation of the highs for those "Cold Shot" leads. Check out the Texas Shot presets for examples.
Recipe 23: Fuzz Face Preset: Fuzzy Wuzzy While on the topic of legendary pedals, let's take a stab at the Fuzz Face. It's often been said that Jimi Hendrix did for the Fuzz Face what Motley Crue did for hair extensions, and for good reason. The Fuzz Face was a unique sounding effect that became a part of Jimi's sound. What it actually sounds like by itself is a little difficult to figure out, because every pedal sounded different. It used germanium transistors for the fuzz, which have a nice smooth sound but unfortunately terrible manufacturing tolerances. Basically, like snowflakes, no two germanium transistors sound quite alike. On top of that, the design of the power supply was such that as the batteries wore down, or if you
14 Stevie Ray Vaughan, however, was really great.
Page 48 of 59
changed battery types, the sound actually changed. It wasn't enough to pick a good Fuzz Face - you had to go through and find the right batteries for it. Quirks aside, the Fuzzface had a good design and a great sound. It used asymmetrical clipping, with hard clipping on one side and soft clipping on the other. This made it sensitive to changes in level, with a soft clipping on the negative side happening at low levels, and soft clipping combined with hard clipping at higher levels. The result was a warm almost mushy sound that could turn into a hard crunch when you really hit the guitar. Check out the Fuzzy Wuzzy preset and you'll hear what we mean...
Recipe 24: Octavia Preset: Provocatavia OK, we can't mention Jimi without bringing up the Octavia as well. This device is responsible for that ghostlike higher octave sound you hear on some of Jimi's solos. It's a full wave rectifier, meaning that one side of the waveform is completely flipped over to become positive. This is the reason for the octave effect - the original fundamental frequency is completely gone, and the dominant harmonic is the second harmonic - which is an octave above the fundamental. Now by itself wave rectification sounds very strange, so a healthy amount of clipping and filtering follows it. OK, it still sounds strange, but that's the whole point... This is one of those effects that's best suited for solos. Or put another way, it gets really weird when you start feeding it chords. Check out the Provocatavia presets for examples of this. They use different filtering and clipping to get different tones, but the octave-up strangeness still sings through.
Recipe 25: Univox Superfuzz Preset: Super Fuzzy The "wave rectify followed by fuzz and filtering" technique was used in a number of classic pedals, including the Univox Superfuzz. Compared to the Octavia, the Superfuzz had a bit more treble and midrange, and a bit more of a "buzzy fuzzy" sound.
Recipe 26: Colorsound Tone Bender Preset: Tone Blender Another classic pedal, used by Page and Beck on early recordings. It used three germanium transistors for a warm/smooth asymmetric clipping sound. Go ahead.
Page 49 of 59
Load up the Tone Blender preset and play Communication Breakdown. You know you want to.
Recipe 27: Vox Tonebender Preset: Ziggy's Blender Yup, the Vox amp company made a pedal called the Tonebender also. Completely different product than the Colorsound one. The Vox pedal was similar in concept to the Fuzzface, but had a shriller mid and upper range. Even still, a classic sound that we're sure you heard on the Ziggy Stardust tour.15 Load up the Ziggy's Blender preset and let that G chord ring out for all the Spiders from Mars.
Recipe 28: ProCo Rat Preset: Ratsy We could probably all use a break from this fuzz stuff for a moment. Let's fast forward to the ProCo Rat pedal. Nothing says 80s metal like this pedal. It uses hard diode clipping to create rough symmetric clipping. Nothing soft or smooshy about this one. Going through a few of the symmetric hard clipping algorithms in Trash, we thought that the Crunchy Grunge algorithm captured the spirit of the ProCo Rat. Load it up and give us a little metal.
Recipe 29: MXR Distortion + Preset: Distro Plus This one is similar in design to the ProCo Rat, but uses germanium transistors for a slightly smoother distortion. Randy Rhoads liked this one, as did Bob Mould of Husker Du.
Recipe 30: The Big Muff Pi Preset: Slice of Pie Smashing Pumpkins, Pink Floyd, REM, The White Stripes, Sonic Youth: the list of Big Muff Pi fans is long and varied. This is not a subtle effect. It uses two clipping stages to produce a compressed buzzing squeal. Signal goes in, gets clipped once, gets boosted in level, and then gets clipped again before being spit out at the amp. Great stuff.
15 Don't tell us you missed that one. The only acceptable excuse is that you weren't born yet.
Page 50 of 59
We cascaded a couple fuzz clipping algorithms together, and cheated a little bit by squashing with the compressor the signal prior to clipping it. Not exactly how The Big Muff Pi gets the sound, but it got us the character that we were shooting for.
Recipe 31: Chandler Tube Drive Preset: Tube Pedal This is a fun old pedal that's too easy not to copy with Trash. The concept was simple: put an actual 12AX7 preamp tube in a pedal. Same sound, less batteries.
Recipe 32: Maestro Fuzz Preset: Lizard Fuzz OK, we couldn't stay away from the fuzz boxes for long. How else are we going to play those Doors albums? Robby Krieger was a Gibson fan, playing a Gibson Melody Maker or an SG through an effects pedal called the Gibson Maestro Fuzz. The Maestro was a simple fuzz using germanium soft clipping, with a tone that was well suited for the heavy hand of Gibson guitars. Check out the Maestro Fuzz presets for different tone and amp settings. The Lizard King wants you to. Robby wants you to. We want you to.
Recipe 33: The Boss Metal Zone Preset: Zoned It squeals. It screeches. It screams. It's hard symmetrical clipping in two stages. We used the Smooth Overdrive algorithm for this one. Which might seem strange, except the smooth overdrive actually gets pretty hard and nasty if you turn up the Character slider. Like any high gain algorithm, any pick sound, electrical noise, etc. gets brought into the mix with this one. But if you can keep the sound clean, this one will make it nice and nasty. For box models, the Allston and Worcester ones seemed to work well with this one.
People and Styles
Page 51 of 59
Now that we've got effects and techniques, let's put them together for some distinct sounds and styles. A couple caveats though before you get your hopes up that with the right preset you'll sound like Jimi Hendrix: 1) Playing technique has a lot to do with the sound. Mark Knopfler finger picks. Brian May uses a coin. Eddie Van Halen has a way of hitting and muting that influences the tone in a way no wah or EQ could. And we have no idea what Jimi was doing most of the time. 2) Guitar, pick, pickup, strings - it's a little difficult to make Springsteen's Telly sound like Slash's Les Paul. We'll get you in the ballpark with the presets below. Adjust to taste for your guitar and technique.
Recipe 34: The Fender Sound Preset: American Beauty Fender amps are either really complicated to explain, or really simple. In the interest of simplicity, we'll do this the simple way. Prefilter: Boost the highs. It's the only way to be heard over the bar fight that just broke out. Trash: Two stages of distortion here: 12AX7 preamp saturation followed by 6L6 power tube drive. Box Model: Lincolns will give you the old sound. Boxboros for more recent designs. Cambridges for a mellower Fender tone. Your choice... Note that as you choose different box models, you'll probably want to adjust the treble with the pre and postfilter modules.
Recipe 35: The Marshall Sound Preset: British Beauty We wouldn't deny you this one. Like Fender amps, a book could be written on the sound. Actually, books have been written on this. Anyhow, here's a quick Marshall trick. Prefilter: Boost the lows and highs, cut the mids. Unlike a Fender, there's a little more low-mid and a little less high-mid, but the concept is similar. Trash: Here we're using a 12AX7 preamp tube again, going into an EL34 power tube. We're doing most of the crunching with the power tube, but you can experiment with different levels of preamp distortion and power amp distortion.
Page 52 of 59
Box Model: Allston and Worcester models work well for this. Like the Fender, keep in mind that different box models have different tones, and therefore you might want to play with the pre and postfiltering as well. Side note: To get even more crunch from this we did our multiband spit trick to cut down on the intermodulation distortion. Try adjusting the cutoff of the multiband - what you're hearing is a change in the intermodulation distortion. Season to taste, or experiment with additional bands.
Recipe 36: Old Vox Sound Preset: FuzzyV, ClassicV More than a few good riffs have gone through Vox amps. Many from the Beatles.
Recipe 37: Old Fender Sound Preset: A Good Buddy Buddy Holly started with Ampeg amps, but later discovered the Fender amp sound. Like the Vox amps and the Beatles, what more can we say....
Recipe 38: Brian May (Queen) Preset: Brian Besides being a great guitarist, Brian May had an incredible sound. One of the things he used to do was use a wah pedal in a parked or fixed position - simply open it to some position and play through it. The resonance peak of the wah gave it a little edge without even having to rock the pedal. If we're going to do a Brian preset, we have to recognize his amp and treble booster. His amp was a Vox AC-30 - an oldie and a goodie. The only problem with the AC-30, though, is that it doesn't have the high end tone of other amps (see below). Simple enough, Brian had a treble booster pedal that he put through it. The combination delivers the full tone of an AC-30 with the high end creaminess that became part of Brian's signature sound.
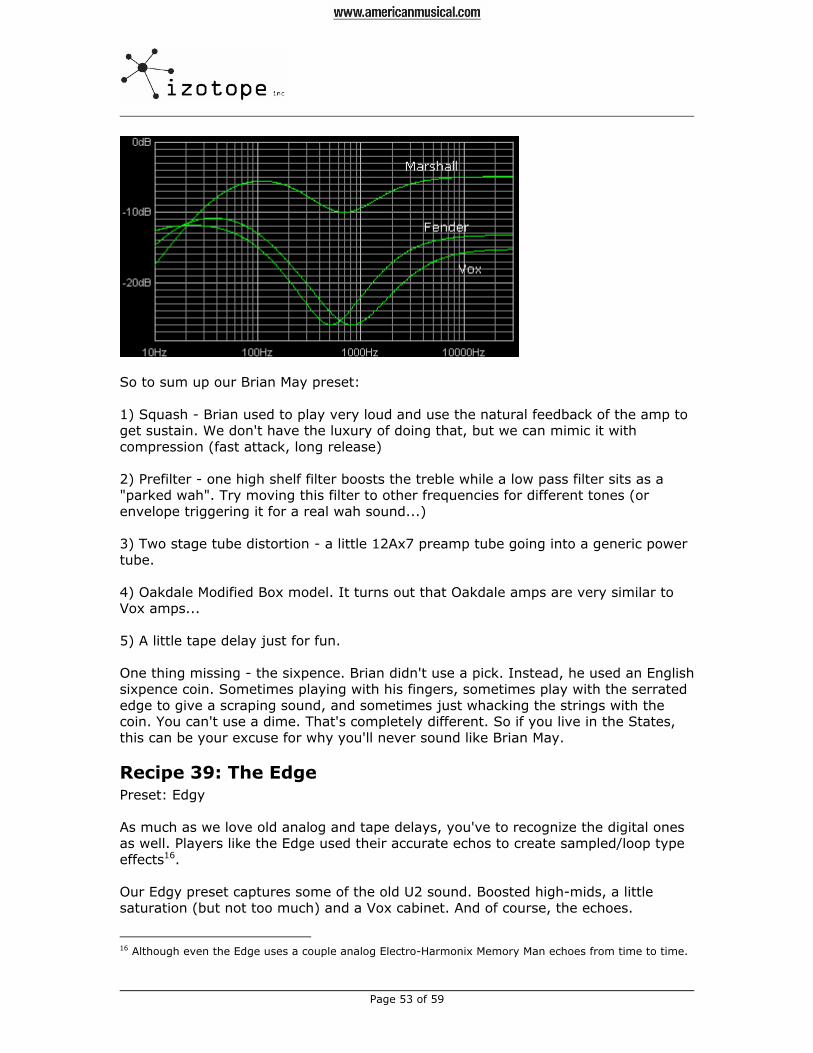
Page 53 of 59
So to sum up our Brian May preset: 1) Squash - Brian used to play very loud and use the natural feedback of the amp to get sustain. We don't have the luxury of doing that, but we can mimic it with compression (fast attack, long release) 2) Prefilter - one high shelf filter boosts the treble while a low pass filter sits as a "parked wah". Try moving this filter to other frequencies for different tones (or envelope triggering it for a real wah sound...) 3) Two stage tube distortion - a little 12Ax7 preamp tube going into a generic power tube. 4) Oakdale Modified Box model. It turns out that Oakdale amps are very similar to Vox amps... 5) A little tape delay just for fun. One thing missing - the sixpence. Brian didn't use a pick. Instead, he used an English sixpence coin. Sometimes playing with his fingers, sometimes play with the serrated edge to give a scraping sound, and sometimes just whacking the strings with the coin. You can't use a dime. That's completely different. So if you live in the States, this can be your excuse for why you'll never sound like Brian May.
Recipe 39: The Edge Preset: Edgy As much as we love old analog and tape delays, you've to recognize the digital ones as well. Players like the Edge used their accurate echos to create sampled/loop type effects16. Our Edgy preset captures some of the old U2 sound. Boosted high-mids, a little saturation (but not too much) and a Vox cabinet. And of course, the echoes.
16 Although even the Edge uses a couple analog Electro-Harmonix Memory Man echoes from time to time.
Page 54 of 59
Recipe 40: Kurt Cobain Preset: Seattle You've got to laugh at this business we're in. After Kurt and Nirvana hit the charts, companies started making "Grunge" pedals - sort of "Seattle in a Box". The irony is that the Seattle sound was really simple and had always been available. For Kurt, it was as simple as a Boss DS-1 (symmetric clipping pedal) going into a Marshall 4x12 cabinet. Actually, lots of Marshall cabinets. And all turned up very loud. Our Seattle 1 uses this type of setup. It's a great preset to play through, as the clipping lets you really control the distortion as you play. Be nice and gentle and you just get a little saturation. Give the strings a whack and it yells. Granted, Kurt used a lot of different effects. For example, a phaser before Trash will give that bubbly "Come As You Are" sound.17
Recipe 41: Stevie Ray Vaughan Preset: Stevie This is one case where technique means more than equipment. But even still, Stevie probably helped sell a lot of Tube Screamers. Stevie had a pretty clean sound with more of an "overdrive" than distortion. A tube screamer and wah pedal going into a Fender amp gets you most of the way there. A little compression won't hurt either.
Recipe 42: Jimi Hendrix Preset: Jimi Jimi was an inspiration for Trash. The sort of person that didn't simply accept what was out there or what guitars were supposed to sound like. He created effects. He played feedback. He used a kazoo on Crosstown Traffic. He made his own trash. His basic rig involved a Wah, Octavia (Recipe 24) mainly for leads, Fuzzface (Recipe 23) for fuzz, and a Univibe phaser18. And a really loud Marshall amp.
Recipe 43: Tom Scholz (Boston) Preset: Boston
17 Trash doesn't provide phaser/flanger/chorus effects. Feel free to augment Trash with your own. In general, filter based effects (i.e. phasers) work best at the beginning of the signal chain, and time based effects (i.e. flangers and choruses) work well at the end of the signal chain. 18 Remember what we just said about putting phasers at the beginning of the chain? Jimi actually used his after the wah and distortion. Which just proves you shouldn't believe anything we say.
Page 55 of 59
Not because we're from Boston19, but because this was a unique sound and signal chain that we wanted to share with you. This is a hard sound to nail. Tom used a lot of effects, many that he made himself. Here's the basic gist of our attempt though: - The EQ is important. Tom used a 10 band MXR EQ roughly set to the shape of the Prefilter in this preset - A wah pedal, often stuck in a fixed position for resonance. - Echoplex tape delay. This is the reason we wanted to include this preset - Tom used a delay before the distortion. The result is that the main sound is distorted, but the delays are clean(er) as they go through the distortion at a lower level. - Then just send the signal through a custom made distortion/sustain/EQ, another EQ, chorus/delay, another EQ for just the chorus delay, ummm..OK, we put away the circuit diagrams and just played, listened to some Boston, tweaked, played...until the other people at iZotope threatened us with bodily harm if we didn't move on to another song.
Recipe 44: Surf Preset: Surf Here's the gist of this one. 1) Tremolo. Absolutely key to this sound. 2) Slightly tinny filtering, mild distortion 3) Short delay with feedback and emphasis on high-mids to get a bit of spring reverb feel. Don't try to kick your computer to get that "sprassshhh" sound, though.
Recipe 45: Dimebag Darrel Preset: Dimebag Transistor distortion. Symmetric, buzzy and harsh. Compressed a bit with prefiltering to boost the mid-highs.
Recipe 46: Strokes Presets: Strokes Bright, Strokes Smooth Solo These guys trash everything. Vocals, guitars - nothing is safe. We love it. They use a nice garage fuzz sort of sound, with the guitars sharing the "frequency range". In other words, if one is bright and harsh, the other is smooth and mellow. So here's a couple variations for you.
19 Well, we are from Boston but that's not the reason we included this one.
Page 56 of 59
Recipe 47: Bruce Springsteen Preset: Bruce We listened to a bunch of Springsteen for this one, and never realized how trebly that Fender guitar could sound. With all the instruments in the E Street Band, we guess that this is the best way for it to cut through it all. ' Anyhow, prefiltering highs with basic preamp and power tube compression. We wanted to back down on the high end, but kept comparing it to the actual sound and decided to just leave it as is.
Recipe 48: Joe Perry Preset: Mama Kin Pretty simple straightahead rock and roll (at least on the old stuff). A guitar, sometimes a wah (sometimes parked in a fixed position) all going into a Marshall. Works for us...
Recipe 49: Moby Bodyrock Preset: Bodyrock Betcha didn't see that one coming ☺ But there's a cool sweeping resonant filter going on that guitar in Bodyrock and we just couldn't resist. Get down with it gonna make you freak. Yeah.
Recipe 50: Clapton Cocaine Preset: Cocaine There are so many great Clapton sounds - early Fuzz stuff, wah pedal work - but the best stuff is just simple tube sound and a great player. This preset adds the "pseudo-phaser" trick in the Prefilter. Other than that, just a little distortion, some tube saturation and a clean amp.
Recipe 51: Robby Krieger (Doors) Preset: Fuzzy Doors Robby Krieger had a great clean sound, but also knew how to fuzz it up for stuff like Break On Through. This preset goes after his fuzzy sound, with a rectifier+smooth fuzz (like our Maestro Fuzz recipe) and a Fender amp.
Page 57 of 59
Recipe 52: Brian Setzer Preset: Seltzer The guitar and playing are half the story, but for a general rockabilly sound (e.g. Stray Cats) we put this one together for you. The key is the "slapback" delay - a very short single echo. From a tube/tape delay, of course.
Recipe 53: London Calling Preset: Clash We love the Clash. Lots of different tones on different tracks, so we picked that harsh tone from London Calling and took a stab at that one in a preset for you. A little fuzz, a bit of power tube saturation and an old amp.
Recipe 54: Steve Miller Preset: Steve Miller The interesting thing about Steve Miller's sound is that it was basically clean, but could saturate when he wanted it to. Setting the overdrive on the second distortion (the Amperical power tube one) is important to get that "just clipping" sound. A little slapback echo rounds out the sound.
Recipe 55: Beatles Cavern Club Preset: Early Beatles There are tons of Beatles sounds. We could (should?) do an entire guide just on the effects these guys used. In lieu of that, here's one for where it all started. Not too hi-fi, not to pretty, but it's what you need to twist and shout.
Recipe 56: Pearl Jam Preset: Alive No real reason for this one, other than we were playing around with settings, played the beginning of "Alive" and thought we got lucky.
Recipe 57: Lithium Preset: Lithium
Page 58 of 59
OK, another Kurt Cobain presets. This one is based on the sound in the heavy part of "Lithium" which used a Big Muff Pi for a dark, crunchy sound.
Recipe 58: Eddie Van Halen Preset: Eddie The "brown" sound as they say. Not too high tech, but definitely well tuned from his years of experimentation. The gist of the setup, as best as we can tell: 1) Phaser and/or Flanger 2) EQ with a lot of midrange boost 3) Tape Echo Machines 4) Really loud Marshall with some special power draining stuff to make it even more dragged down and saturated.
Page 59 of 59
Closing and Contact There are so many players and sounds that we didn't have a chance to cover, and hopefully even more unique sounds that will come out of people using Trash. Whichever is your goal, we hope that this guide has been helpful and that you enjoy using Trash. We'd also like to thank Frank Basile and the others at Smart Loops for providing downloadable sample loops for you to try out with Trash. Check out their loop collections at www.smartloops.com - they've got some great stuff. If you have any questions, suggestions or simply want to share some Trash ideas or presets, please drop us a line at [email protected] Have fun, iZotope Audio Team www.izotope.com