Embed Size (px)
Citation preview
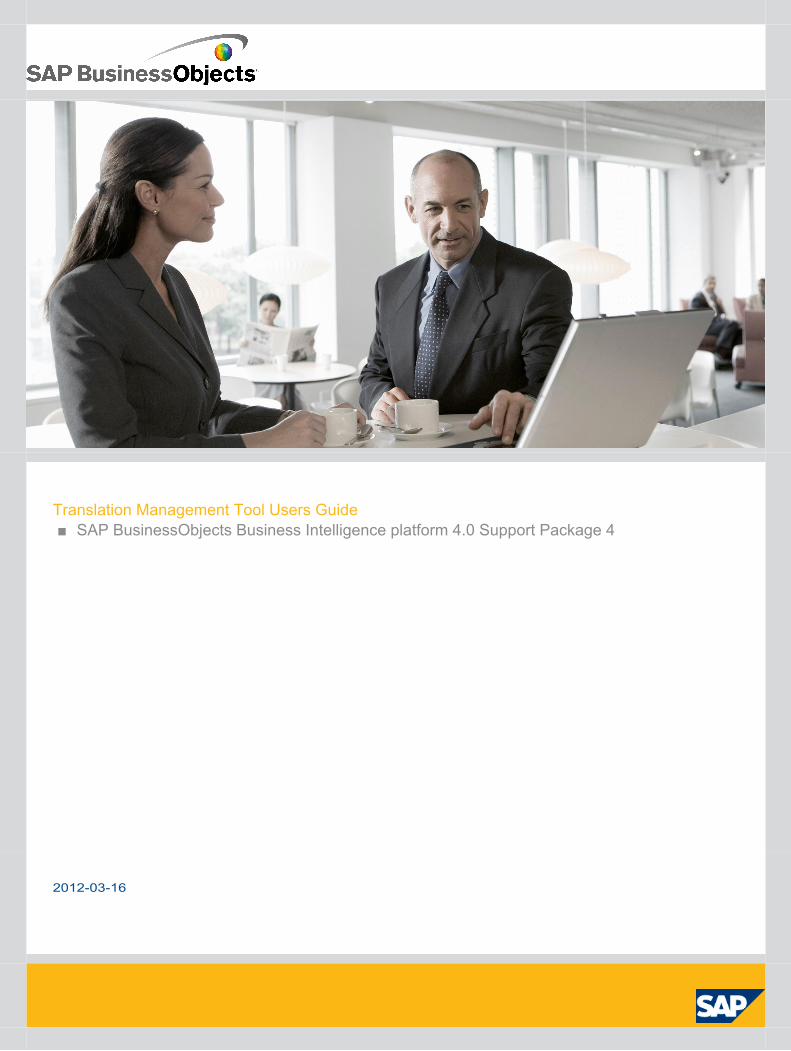
Translation Management Tool Users Guide■ SAP BusinessObjects Business Intelligence platform 4.0 Support Package 4
2012-03-16
© 2011 SAP AG. All rights reserved.SAP, R/3, SAP NetWeaver, Duet, PartnerEdge, ByDesign, SAPBusinessObjects Explorer, StreamWork, and other SAP products and services mentioned herein as
Copyright
well as their respective logos are trademarks or registered trademarks of SAP AG in Germany andother countries.Business Objects and the Business Objects logo, BusinessObjects, Crystal Reports,Crystal Decisions, Web Intelligence, Xcelsius, and other Business Objects products and servicesmentioned herein as well as their respective logos are trademarks or registered trademarks of BusinessObjects Software Ltd. Business Objects is an SAP company.Sybase and Adaptive Server, iAnywhere,Sybase 365, SQL Anywhere, and other Sybase products and services mentioned herein as well astheir respective logos are trademarks or registered trademarks of Sybase, Inc. Sybase is an SAPcompany. All other product and service names mentioned are the trademarks of their respectivecompanies. Data contained in this document serves informational purposes only. National productspecifications may vary.These materials are subject to change without notice. These materials areprovided by SAP AG and its affiliated companies ("SAP Group") for informational purposes only,without representation or warranty of any kind, and SAP Group shall not be liable for errors oromissions with respect to the materials. The only warranties for SAP Group products and servicesare those that are set forth in the express warranty statements accompanying such products andservices, if any. Nothing herein should be construed as constituting an additional warranty.
2012-03-16
Contents
Introduction to the translation management tool....................................................................7Chapter 1
Document History: translation management tool......................................................................71.1Introduction to the translation management tool.......................................................................71.2Which resources can you translate?.........................................................................................81.3About translating Interactive Analysis reports...........................................................................91.4About translating universes from the universe design tool......................................................101.5About translating universes from the information design tool..................................................101.6Terminology used in the translation management tool............................................................111.7About authentication and security..........................................................................................121.8
Getting started with the tool.................................................................................................15Chapter 2
To logon ................................................................................................................................152.1To change your login password..............................................................................................152.2About the translation management tool window.....................................................................162.3About the Translation Editor view...........................................................................................172.3.1About the Language Management view..................................................................................172.3.2About the Text Editor view.....................................................................................................182.3.3About the Filter view..............................................................................................................192.3.4About the Cell Properties view...............................................................................................192.3.5About the Help view...............................................................................................................202.3.6Customizing the translation management tool window...........................................................202.4Setting preferences................................................................................................................212.5To set the product language...................................................................................................212.5.1To set default folder locations................................................................................................222.5.2To set the locale to add automatically.....................................................................................222.5.3To set frequently used languages...........................................................................................222.5.4To set Auto-fill options...........................................................................................................232.5.5To set sample data for formats...............................................................................................232.5.6
Translation workflows...........................................................................................................25Chapter 3
About translation workflows...................................................................................................253.1How translated locales are managed......................................................................................253.2
2012-03-163
About security and translation rights......................................................................................263.3About concurrent translation .................................................................................................273.4About translating a resource from the CMS repository..........................................................283.5To import content to translate from a resource in the CMS repository...................................283.5.1About exporting the translations to the source resource in the CMS repository ....................293.5.2About translating a local resource..........................................................................................293.6To import content to translate from a local resource..............................................................303.6.1To export translations to the locally stored resource..............................................................303.6.2About the TMGR format.........................................................................................................303.7
Translating documents..........................................................................................................33Chapter 4
To add and remove languages in your document....................................................................334.1To set the fallback language...................................................................................................334.2To translate strings in the Translation Editor...........................................................................344.3To translate strings in the Text Editor.....................................................................................354.4To sort strings in the Translation Editor..................................................................................354.5To search and replace strings in the Translation Editor...........................................................354.6
Setting Formats.....................................................................................................................37Chapter 5
To set default formats in the Translation Editor.......................................................................375.1About the Format Editor.........................................................................................................375.2To start the Format Editor......................................................................................................385.3To start the Custom Format Editor.........................................................................................395.4To create a custom format.....................................................................................................395.5To delete a custom format.....................................................................................................405.6
Managing status....................................................................................................................43Chapter 6
Translation status...................................................................................................................436.1About metadata translation history ........................................................................................456.2To filter the List view by status...............................................................................................456.3To change cell properties.......................................................................................................466.4To change cell status.............................................................................................................466.5
Using XLIFF to exchange document translations..................................................................47Chapter 7
About XLIFF files....................................................................................................................477.1Exporting and Importing XLIFF files.........................................................................................487.2To export to XLIFF - select source..........................................................................................487.3To export to XLIFF - select target...........................................................................................497.4To import from XLIFF files......................................................................................................497.5
2012-03-164
Contents

Reference..............................................................................................................................51Chapter 8
List of locales and their dominant locales...............................................................................518.1Number format tokens...........................................................................................................568.2Date and time format tokens..................................................................................................588.3Types of InfoObject supported by the translation management tool........................................628.4
More Information...................................................................................................................65Appendix A
Index 67
2012-03-165
Contents

2012-03-166
Contents
Introduction to the translation management tool
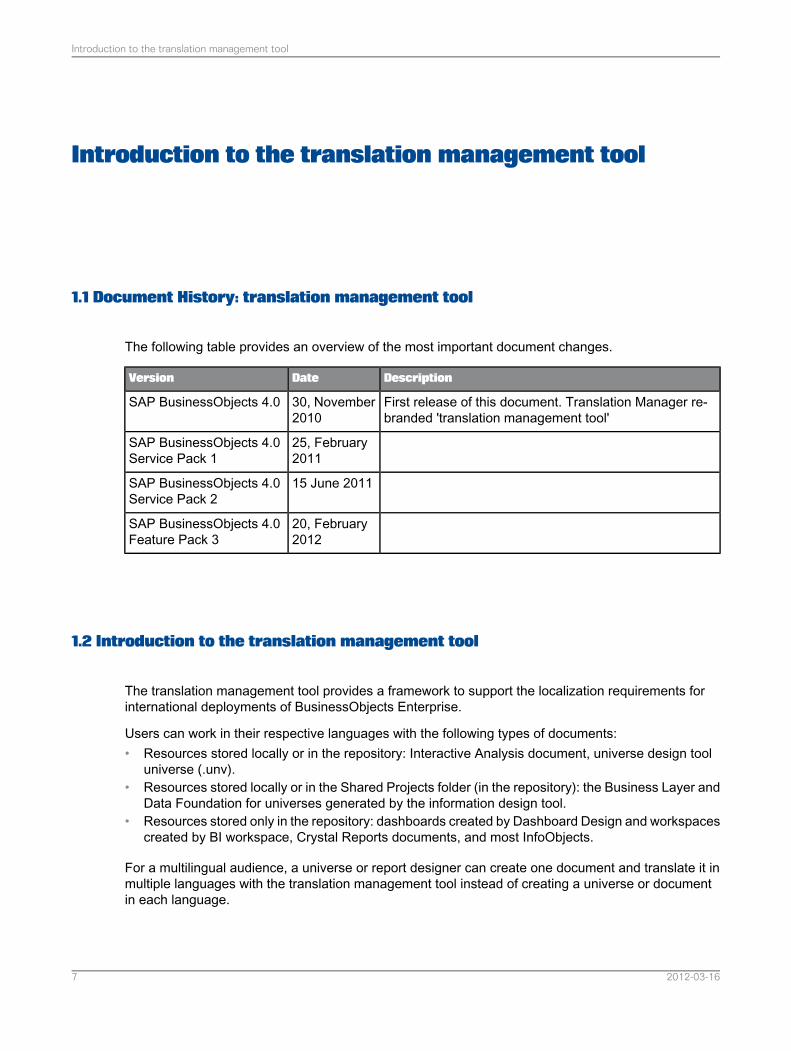
1.1 Document History: translation management tool
The following table provides an overview of the most important document changes.
DescriptionDateVersion
First release of this document. Translation Manager re-branded 'translation management tool'
30, November2010
SAP BusinessObjects 4.0
25, February2011
SAP BusinessObjects 4.0Service Pack 1
15 June 2011SAP BusinessObjects 4.0Service Pack 2
20, February2012
SAP BusinessObjects 4.0Feature Pack 3
1.2 Introduction to the translation management tool
The translation management tool provides a framework to support the localization requirements forinternational deployments of BusinessObjects Enterprise.
Users can work in their respective languages with the following types of documents:• Resources stored locally or in the repository: Interactive Analysis document, universe design tool
universe (.unv).• Resources stored locally or in the Shared Projects folder (in the repository): the Business Layer and
Data Foundation for universes generated by the information design tool.• Resources stored only in the repository: dashboards created by Dashboard Design and workspaces
created by BI workspace, Crystal Reports documents, and most InfoObjects.
For a multilingual audience, a universe or report designer can create one document and translate it inmultiple languages with the translation management tool instead of creating a universe or documentin each language.
2012-03-167
Introduction to the translation management tool
The translations are saved in the universe and report documents, and displayed in the reader's languageat reporting time.
For importing from the repository the content to translate, the tool uses the Translation Server tocommunicate with the other modules. Refer to the Administration Guide for more information about thetranslation server. Content that is imported is stored locally in the TMGR format. The TMGR format fileis also used to manage the exchanges between the translation management tool and the translationserver.
Features of the tool include:• Ability to translate metadata in most SAP BusinessObjects resources: universes, Interactive Analysis
reports and Crystal Reports documents...• An interface designed for in-house translations.• A format editor to easily define custom date, time, and number formats.• Ability to manage approximately 130 locales.• Enterprise deployment, with full integration with SAP BusinessObjects Enterprise including support
for all Central Management Server (CMS) authentication modes and a standalone mode.• Mid Market (Small-scale) or Local deployment with no repository.• Collaboration with external translators using XLIFF (XML Localization Interchange File Format) files.
This format is used by professional translators and is compatible with many translation tools.• Ability to perform concurrent and offline translation.• Support of the translation status throughout the translation process.
Note:
• The translation management tool runs on Windows platforms, though it can connect to CentralManagement Server running on other platforms.
• The XLIFF standard used in this tool is not compatible with previous versions of the translationmanagement tool. In particular, it is not possible to read XLIFF files generated by previous versionsof Translation Manager.
Related Topics• About translating Interactive Analysis reports
1.3 Which resources can you translate?
You can translate the following resources:
Table 1-1: Translatable resource types
ActionResource type
Stored locally or in the CMS repositoryWeb Intelligence reports
2012-03-168
Introduction to the translation management tool

ActionResource type
Stored locally or in the CMS repositoryUniverses created by the universe design tool
Stored locally or in the Shared Projects folder ofthe CMS repository
Data Foundations or Business Layers createdwith the information design tool
Stored in the CMS repository and created with BI4
Crystal Reports for Enterprise documents (butnot documents created with the C++ designer)
Stored in the CMS repository and created with BI4Dashboards created with Dashboard Design
Stored in the CMS repositoryWorkspaces created with BI workspace and mostInfoObjects
Note:
• The translation management tool can only translate the following previous version resources: WebIntelligence documents (wid), Universe Designer universes (unv) and general InfoObjects.
• The translation management tool does not translate query names.
1.4 About translating Interactive Analysis reports
You can use the translation management tool to translate report metadata (.wid files) created withInteractive Analysis or Web Intelligence XI 3.0 or later. This metadata includes:• Report names• Query names or data provider names• Prompt texts• Local variable names• Alerter names and descriptions• Content in an Interactive Analysis formula (for example in a table cell), an alerter message, or a
report variable (if requested using the GetLocalized function).
By default, the content of report formulas in Interactive Analysis reports is not translated. To makestrings in a report formula available for translation in the translation management tool, the report designermust use the GetLocalized function when designing the report. For more info about the GetLocalizedfunction, see the Using Functions, Formulas and Calculations in SAP BusinessObjects InteractiveAnalysis Guide.
Related Topics• About translating universes from the information design tool
2012-03-169
Introduction to the translation management tool
1.5 About translating universes from the universe design tool
You can translate• The universe name and description• Context names and descriptions• Class names and descriptions• Object names, descriptions and formats• Filter names and descriptions• Custom hierarchy names• Prompt texts• Input columns (identified as prompts in the translation management tool)
Derived universesWhen you use the translation management tool to open a derived universe based on one or more coreuniverses, only the content of the derived universe needs to be translated. When a user reports in aderived universe, the translations from the core universes and the derived universe are used. If thederived universe contains objects that are located in a class folder of a core universe, these objectsare displayed in an unnamed folder.
When the reporting application displays the content for a derived universe, the translations availableinclude the languages defined for the derived universe as well as the languages defined for its coreuniverses. The application determines the Fallback language for a derived universe using the followingset of rules.1. If a Fallback language is defined for the derived universe, then the application uses this Fallback
language.2. If no Fallback language is defined for the derived universe, then the application looks in the core
universes for a Fallback language.3. If no Fallback language is defined for any core universe, the universe has no Fallback language.
1.6 About translating universes from the information design tool
Universes generated by the information design tool are not directly translated. Translation managementtool can independently translate the data foundations or business layers created by the informationdesign tool. These resources can be located on local information design tool projects or on sharedinformation design tool projects stored in the CMS repository.
Once these resources are translated, use the information design tool to republish the universe that willcontain these translations.
2012-03-1610
Introduction to the translation management tool
Related Topics• Translation status• Terminology used in the translation management tool• About the Language Management view• To set the fallback language
1.7 Terminology used in the translation management tool
DescriptionTerm
A locale defines a language and a geographical area. A language can beassociated with several countries. For example, French (fr) is a languagespoken in France (FR), Belgium (BE), and Switzerland (CH). The localefor the French spoken in Switzerland is French (Switzerland) or fr-CH.
A locale also defines the way data is sorted and how dates and numbersare formatted.
Note:In the translation management tool, the terms language and locale areused interchangeably.
Locale
Locale abbreviations consist of the language abbreviation followed by thecountry abbreviation.
The locale abbreviation appears differently depending on your operatingsystem or the application you are using. For example:• Windows: French (France)• Java: fr_FR• Sun Solaris: fr_FR.ISO8859-1• InfoView 6.5.1: French (France) [fr-FR]
Locale abbreviations
The dominant locale is a pre-defined locale that is used as the substitutionlanguage when no substitution language is defined for the document. Onedominant locale is defined for every language.
Dominant locale
The product language is the language in which the application interfaceappears.
Product language
The Preferred Viewing Locale is the user's preferred language for viewingreport and query objects in an application.
Preferred Viewing Locale(PVL)
2012-03-1611
Introduction to the translation management tool
DescriptionTerm
Each time you export a document to XLIFF (XML Localization InterchangeFile Format), you define a source language that is identified as the sourcelanguage in the resulting XLIFF file.
Source language
A fallback locale can be defined to display when viewing a translated doc-ument and no translation in the user's Preferred Viewing Locale (PVL) isavailable.
Note:Because you can define only one fallback locale in a document, in mostcases it is more flexible to leave the fallback locale undefined and rely onthe default substitution of the dominant locale.
Fallback locale
All strings in every language are associated with a translation status. Thestatus indicates if the string has been translated, reviewed, or changed.The status also determines if the translation is ready to be displayed inreports.
Translation status
Related Topics• List of locales and their dominant locales• Translation status• About translating universes from the information design tool• To set the product language• To set the fallback language
1.8 About authentication and security
The tool controls access using login information and application rights configured in the CentralManagement Console (CMC).
You log into the translation management tool using one of the following login modes:
2012-03-1612
Introduction to the translation management tool

DescriptionMode
There are three authentication types: Enterprise, LDAP, and Windows AD.
These authentication types let you connect to the CMS repository, import fromand export documents to the CMS, and change your CMS login password.
You can also open and translate unsecured resources saved in a local directory.
Connected Mode
No authentication is required to use the tool in standalone mode.
You can only translate unsecured resources saved in a local directory.
You cannot open documents imported from the CMS repository unless they areunsecured and have been saved for all users.
Standalone Mode
To log into the translation management tool in connected or offline mode, you need the right "Log intothe Translation Manager and display it as an object in the CMC" granted for the translation managementtool.
Access to folders and objects in the Central Management Server (CMS) repository is controlled byrights granted by the SAP BusinessObjects Enterprise administrator. To open documents and edittranslations, you must have the following rights:• To open and edit translations in a universe, you must have the rights "View objects" and "Edit objects"
granted for a universe.• To open and edit translations in an Interactive Analysis document, you must have the rights "View
objects", "Edit objects", and "Download files associated with the object" granted for the document.• You also need the "View objects" right granted for the folders containing the universe and report
objects.
For more information on the description and definition of user rights, see the SAP BusinessObjectsEnterprise Administrator's Guide.
Related Topics• To logon
2012-03-1613
Introduction to the translation management tool

2012-03-1614
Introduction to the translation management tool
Getting started with the tool
2.1 To logon
To use the tool connected to the Central Management Server (CMS), you must have a user name,password, and the appropriate rights set up by your administrator. No authentication is necessary touse the translation management tool in standalone mode.
The translation management tool is automatically installed with SAP BusinessObjects Enterprise clienttools.1. Start the tool if it is not already started. From the Windows Start menu, select All programs > SAP
BusinessObjects XI 4.0 > SAP BusinessObjects Enterprise Client Tools > Translationmanagement tool.The "User Identification" dialog box appears.
2. In the Authentication box, select the authentication type. To use the tool in standalone mode, selectStandalone and click OK.
3. For all other authentication types, enter or select in the System box, the system name where theCMS is located.For more information about authentication type, see the related topic.
4. Enter your user name and password in the User Name and Password boxes.5. Click OK.
Note:Once you are logged in, your CMS session information displays in the status bar in the lower rightcorner of the translation management tool window. You can select the command Tools > Login Asto log in using a different user name or authentication type.
Related Topics• About authentication and security
2.2 To change your login password
2012-03-1615
Getting started with the tool
Once you are logged in and connected to the CMS, you can change your CMS login password withinthe translation management tool.1. Select Tools > Change password.
The "Change Password" dialog box appears.
2. Enter your old password in the Old Password box.3. Enter your new password in both the New password and Confirm new password boxes. The
entries must match exactly.4. Click OK.
Your new password is saved in the CMS.
2.3 About the translation management tool window
When the tool starts for the first time, the window displays the three most commonly used views: the"Translation Editor", "Text Editor", and "Language Management" views.
You can customize the window to display other views when you need them: the Cell Properties, Filter,and Help views.
The menu bar contains the command menus:• File with commands to open, save, import, and export files.• Edit with commonly used text editing commands.• Tools with commands to re-enter login information and change password.• Window with commands to open and close views and set application preferences.• Help with commands to display the translation management tool help in a separate window, and to
open the Help view.
A toolbar below the menu bar contains icons:• for command shortcuts that let you perform menu commands with a single click• for commonly used text editing commands• to display the different translation management tool views
The function of each icon displays as a tool tip when you hover the pointer over the icon.
A status indicator at the bottom of the translation management tool window shows the status of theconnection to the Central Management Server.
Related Topics• Customizing the translation management tool window
2012-03-1616
Getting started with the tool
2.3.1 About the Translation Editor view
The "Translation Editor" view lets you translate strings in a document. For information on the tasks youcan perform in the Translation Editor view, see the Related Topics below.
When you open a document, a new tab opens in the Translation Editor view. A table displays thedocument object names in the left column, the original content in the next column, and the languagesto translate in subsequent columns.
You can view the table in two ways:• The Category view displays by default and shows the document organized by the hierarchy structure.
• The List view displays the document as a flat list with no hierarchy information. The object namesand their icons appear in the left column. The List view lets you sort, find, replace, and filter strings.
For each object, the translation management tool displays the content that can be translated: either astring (for example, a name, description, or prompt) or a format (a date or number).
You can edit the content of the cells to enter translations.
Note:You cannot edit the cells in the Source language column.
The appearance of the cell content changes depending on the XLIFF translation status.
Properties are associated with the content in each cell. To see the properties of a cell, use the CellProperties view.
Related Topics• To translate strings in the Translation Editor• To sort strings in the Translation Editor• To search and replace strings in the Translation Editor• To set default formats in the Translation Editor• To filter the List view by status• Translation status
2.3.2 About the Language Management view
The Language Management view lets you add and manage the languages in your document. Forinformation on the tasks you can perform in the Language Management view, see the Related Topics.
2012-03-1617
Getting started with the tool

The list of Available Languages on the left of the Language Management view displays all languagessupported by the tool and lets you select languages to add to your document. In the applicationpreferences, you can define frequently used languages so that they appear at the top of the list.
TheSelected Languages table on the right lists the languages that you have selected for your document.By default, a column for each selected language displays in the Translation Editor view.
The following information applies to each language that you add to the document:
DescriptionColumn
The View check box lets you select whether or not to display the language in acolumn in the Translation Editor view.
View
The Translated column displays the percentage of the content that has beentranslated (cells that have a status of NEEDS_REVIEW_TRANSLATION,NEEDS_REVIEW_L10N, NEEDS_REVIEW_ADAPTATION, TRANSLATED,SIGNED_OFF, or FINAL).
Translated
The Visible check box lets you define that the language is ready to be viewed inreports. Before a language can be viewed, it must be exported back to the originaldocument.
Visible
The Fallback option lets you define the language to display when a translationis not available in the Preferred Viewing Language. You must set the languageto Visible before you can set it as the fallback language. You can define only onesubstitution language in a document.
Fallback
Related Topics• To add and remove languages in your document• To set the fallback language• To set frequently used languages• Terminology used in the translation management tool
2.3.3 About the Text Editor view
The "Text Editor" view lets you translate a string which is too long to be viewed in the "TranslationEditor" cell. The "Text Editor" view appears by default on the right in the translation management toolwindow.
When you select a cell in the "Translation Editor" view:• The content of the cell displays in the Translation box of the Text Editor view where you can edit
it.
Note:You cannot edit the original content.
2012-03-1618
Getting started with the tool
• The associated source language content displays in the Source box of the Text Editor view andcannot be edited.
• For Interactive Analysis documents, comments for the translator appear in the Notes box. Youcannot edit the comments.
Related Topics• To translate strings in the Text Editor
2.3.4 About the Filter view
The "Filter" view lets you filter the rows that display for a language in the "Translation Editor" list view.
For each language in the document (one language at a time), you can choose to display strings withone status, all, or a combination of statuses.
When the "Filter" view is activated, the "Translation Editor" displays in list view.
Related Topics• To filter the List view by status• Translation status
2.3.5 About the Cell Properties view
The "Cell Properties" view displays the properties of a cell in the "Translation Editor" view, and lets youchange the status of a cell.
The "Cell Properties" view displays the following properties of the current cell in the "Translation Editor"view:
DescriptionProperty
The contents of the cell: the text string or format definition.Name (Description, For-mat)
The XLIFF translation status of the selected cell. A drop-down list lets youchange the status.
Status
The date and time the contents or status of the cell was last changed.Last Updated
Related Topics• To change cell properties
2012-03-1619
Getting started with the tool
• Translation status
2.3.6 About the Help view
To open the Help view and display help for a particular topic, press F1, or selectHelp > Related Topics.
The Help view lists a link to a topic most related to the current view or dialog box. The "Dynamic Help"section lists links to other related topics, and the results of a search.
Using the icons at the bottom of the view, you can list all topics, search the help content, and bookmarka topic for future reference.
2.4 Customizing the translation management tool window
You can customize how views display in the translation management tool window. The customizationapplies every time you log into the translation management tool, regardless of your login information.
DescriptionAction
To open a view, select it from theWindowmenu, or click the icon on the translationmanagement tool toolbar.
Open view
To close a view, click the close button in the view title bar, or click the view iconon the translation management tool toolbar.
Close view
To move a view within the translation management tool window, click in the view'stitle bar, and drag the view to a new location.
Move view
To open a view in a new window, drag the view outside the translation manage-ment tool window, or right-click in the view's title bar and select Detached.
Detach view
To move a detached view back into the translation management tool window,right-click the view's title bar and deselect Detached.
Re-Attach view
To make a view larger or smaller, drag the edges of the view. To minimize andmaximize a view, use the icons in the upper right corner of the view.
Resize view
Related Topics• About the translation management tool window
2012-03-1620
Getting started with the tool
2.5 Setting preferences
You can set preferences for:• The product interface language when using the tool• The default folders for documents and XLIFF files.• The language to add automatically to a new resource to translate. This locale is added when the
strings to translate are retrieved from the resource in the translation management tool.• The languages you use frequently in your document. These languages appear at the top of the list
of available languages in the Language Management view.• The Auto-fill options define if a new locale must be added by copying the content of another locale.• The date-time and number values to use when displaying format examples in the tool.
The preferences settings apply every time you start the tool, regardless of your login information.
Related Topics• To set default folder locations• To set frequently used languages• To set the product language• Terminology used in the translation management tool
2.5.1 To set the product language
Use this procedure to change the translation management tool interface language.1. Select Window > Preferences > Set Product Language.2. Select a language in the list of available Product Languages.
Note:For a language to be in the list of available product languages, the language pack must be selectedwhen installing the translation management tool.
3. Click Apply to apply the changes, or click OK to apply the changes and close the "Preferences"dialog box.
Restart the translation management tool for the interface to display in the new language.
Related Topics• Terminology used in the translation management tool
2012-03-1621
Getting started with the tool
2.5.2 To set default folder locations
You can define the default file folders for two types of files:• resource files• XLIFF files
The translation management tool wizards use these default folders when saving files.1. Select Window > Preferences > Set Default Folders.2. To set a default folder for other documents, enter or browse to the folder in the Default User
Document Folder box.3. To set a default folder for XLIFF files, enter or browse to the folder in the Default XLIFF Folder box.4. Click Apply to apply the changes, or click OK to apply the changes and close the "Preferences"
dialog box.
2.5.3 To set the locale to add automatically
Use this procedure to automatically add a language in the list of locales to translate.1. Select Window > Preferences > Set Language Management Options2. Check the Automatically add a locale checkbox.3. In the list of available locales, select the locale to add.
The selected locale will be automatically added when the resources are opened.
4. Click Apply to apply the changes, or click OK to apply the changes and close the "Preferences"dialog.
2.5.4 To set frequently used languages
1. Select Window > Preferences > Set Language Management Options.2. Select a language in the Available list and click the right arrow.
The language moves to the Frequently Used list. The languages in the Frequently Used list appearat the top of the list of available languages in the Language Management view.
3. When you have finished adding frequently-used languages, click Apply to apply the changes, orclick OK to apply the changes and close the "Preferences" dialog box.
2012-03-1622
Getting started with the tool
Related Topics• About the Language Management view
2.5.5 To set Auto-fill options
1. Select Window > Preferences > Set Language Management Options2. Select Fill new column with text from Autofill source language if you want a new locale to be
automatically filled when it is added to the list of supported locales.3. Select the locale to add from the dropdown menu.4. Select Add blank column if you do not want the new locale to be initialized.5. When you have finished adding frequently-used languages, click Apply to apply the changes, or
click OK to apply the changes and close the "Preferences" dialog.
2.5.6 To set sample data for formats
1. Select Window > Preferences > Set Sample Data for Formats.2. To define a particular date to use when displaying date-time formats:
a. Select Custom Date-Time.b. In the Date box, select a date from the calendar.c. In the Time box, select the hours, minutes, or seconds and then change the number by selecting
or typing the new number.
3. To define a particular number to use when displaying numeric formats, enter the new number in thesample number box.
4. Click Apply to apply the changes, or click OK to apply the changes and close the "Preferences"dialog box.
2012-03-1623
Getting started with the tool

2012-03-1624
Getting started with the tool
Translation workflows
3.1 About translation workflows
You can translate documents in the following ways:• Translate internally (in-house) using the translation management tool to import content to translate
from a local resource or a resource saved in the repository.• Translators can add their translation language, translate their strings, and export them back to the
original resource file. The translation is merged with the original file.• Translators can save the translation metadata locally for offline work in a .tmgr file.• Once you have extracted the strings to translate, you may also export them in an XLIFF format file
distributing the file for translation with any XLIFF-compliant translation tool (see Chapter 8).
Note:You cannot translate documents within the repository. You must import the translatable content andwork on it.
Related Topics• About translating a resource from the CMS repository• About concurrent translation
3.2 How translated locales are managed
The translation management tool exports back only locales:• That have been added by the translators with the translation management tool (the locale is added
to the resource)• That have been modified by the translator with the translation management tool (the locale is updated
if there are no synchronization issues)
When the translation management tool retrieves translatable properties from a source, the source isnot locked. If the source changes during translation, when the tool exports the new translation to thesource, checks are performed to validate the synchronization/consistency between the source and thetranslated document.
2012-03-1625
Translation workflows
When inconsistencies are found, the tool proposes threee options:• Update the content stored in the translation management tool with the source (recommended).• Cancel the whole export. In this case, nothing is done. There is no change in the metadata opened
in the translation management tool, and no change in the source.• Force the export of the translated strings.
Table 3-1: The different publication options
Force locales publica-tionCancelUpdateStatus
Removed translationunits are removed fromthe translation metadatain the translation man-agement tool.
No change.Removed translation units are also re-moved from the translation metadata inthe translation management tool.
A translation unithas been re-moved from thesource.
The new translatableproperty is added, withthe NEW status, but notranslation is available.
No changeThe new units are added to the transla-tion metadata in the translation manage-ment tool. Their status is NEW.
A new translationunit has beenadded into thesource and mustbe translated.
Text source is updatedin the translation man-agement tool but thetranslation is publishedanyway with the XLIFFstatuses coming fromthe translation manage-ment tool.
No change
The modified translation unit is importedwith the NEEDS_REVIEW_TRANSLA-TION or NEEDS_REVIEW_LOCALISA-TION statuses.
A translation unithas been modi-fied in the source.(An ongoingtranslation mightbe out of date).
Modified translationsare published in the re-source with the XLIFFstatuses coming fromthe translation manage-ment tool.
No change
Modified translations are imported in thetranslation management tool with theNEEDS_REVIEW_TRANSLATION orNEEDS_REVIEW_LOCALISATION sta-tuses.
One or moretranslations of atranslation unithas beenchanged in thesource.
3.3 About security and translation rights
Translating objects published in the CMS repository implies that you have the granted authorizationsto do so. These authorizations are given through CMC rights that can be defined at the resource levelor translation management tool level.
2012-03-1626
Translation workflows
To use the translation management tool, you must have the Log into translation management toolright granted. To translate a specific resource, you need to have the following rights granted:• Translate objects• Edit objects
When the user has logged into the system, the translation management tool, the rights assigned to theuser define whether or not objects can be edited or translated.
Table 3-2: How edit rights are managed
DescriptionLevel
The CMS prevents the translation management tool userfrom updating any InfoObject multilingual information ifthe Edit rights are not granted.
At system level, in the CMS.
The translation management tool checks the effectivevalue of this right for the current user. If it is denied, thena warning message is displayed. The object is opened.The translator can open the source in the translationmanagement tool and edit it but it won't be able to saveit later.
At translation management tool level, be-fore opening an object
The translation management tool checks the edit rightsof the current user. If the rights are denied, then an errormessage is displayed and the translation is not saved.This is situation for XLIFF import, XLIFF Bulk import orwhen importing translation metadata into the source.
At translation management tool level, be-fore saving a new translation in a sourcelocated in the CMS
3.4 About concurrent translation
Translating documents concurrently allows you gain time in the translation process. Different translatorscan work in different locales at the same time. It is recommended that only one translator can work ona specific locale. If two translators try to submit the same locale, the last translator changes may removethe changes of the other translators. There are two ways you can translate documents:• Translate internally (in-house) using the translation management tool to import a locally stored file
and add the locale to translate. Translate the content and export the file back to the source file. Thetranslation is merged with the original file.
• Translate externally by exporting the .tmgr file as an XLIFF format file distributing the file for translationwith any XLIFF-compliant translation tool.
When translations are imported back into the original source, the translation management tool exportsback only locales:
2012-03-1627
Translation workflows
• That have been added by the translators with the translation management tool (the locale is addedto the resource).
• That have been modified with the translator with the translation management tool (the locale isupdated if there are no synchronization issues).
Thus, strings to translate can be sent to different translators who can translate them in parallel. Whentranslators export back their translations in the original resource, their export does not overwritetranslations from other translators since they are supposed to work on different locales.
3.5 About translating a resource from the CMS repository
You can translate metadata (document content) and document names in the CMS. To translate aresource that is stored in the repository:• You must have the rights to access the repository.• You must have the rights to translate the document, otherwise you cannot import the translation
back into the source document.• You must import the resource to the translation management tool and save the .tmgr file locally.• Export the translation back into the source document on the repository.
In addition to translating the content, you can translate filenames in the repository. Browse to the filein the repository, click the file and select Add.
3.5.1 To import content to translate from a resource in the CMS repository
You can import all translatable content from the resource and open it locally. You can import a resourceand translate it before exporting it, or you can import a resource and save it for working locally. Whenyou use the translation management tool to open a resource in the repository, the user rights are verifiedin order to check if the user has can edit or translate the document.
Translation metadata is retrieved from the selected object. The object is not actually saved in the filesystem, it is not actually extracted from the repository. This prevents the import of the whole document,when only a subset of the document content is needed for translation. Once this translation metadatais available from the translation management tool, the translator can work on them.
Only required information is retrieved. The user can work on them or temporarily save the translationmetadata locally for offline work. When the translation is done, use the translation management tool toexport the translated content into the resource in the repository, after checking the user has theappropriate application rights.1. Run the translation management tool using your SAP BusinessObjects credentials.2. In the File menu, select File > Import content to translate from > From the repository3. In the dialog box, navigate to and select the folder that contains the resources you want to translate.
2012-03-1628
Translation workflows
The available documents display in the pane on the right.
4. In the pane, select a resource and click Add.The resource file name appears in the import pane below the Add button. You can add moreresources in the same way.
5. To remove a resource from the list of resources to import, click the resource name and clickRemove.6. If you want the imported files to replace existing local resources of the same name, selectOverwrite
existing documents.7. Click Import.
If the import fails for a resource, a warning appears in the "Import status" column of the "Import"pane. Succesfully imported documents are saved in the local default folder as defined in the"Preferences" option. If all documents import successfully, the wizard closes.
8. The translation management tool checks user's rights and raises a warning if the Edit objects orTranslate objects rights is not granted, otherwise the translation management tool retrieves thetranslation metadata from the source (import translation metadata). Translation metadata is displayedin the translation management tool.
9. Add a locale to the document and save the translations locally.
The translated file is saved locally and can be reopened for editing. When you have finished translatingthe file, export it back to the original resource in the repository.
3.5.2 About exporting the translations to the source resource in the CMS repository
Once the resource content has been translated in the needed locales, these translations must beexported back to the resource in the repository so they can be available for users. The translationsmust have been set to the NEEDS_REVIEW_TRANSLATION, NEEDS_REVIEW_L10N,NEEDS_REVIEW_ADAPTATION, TRANSLATED, SIGNED_OFF, or FINAL status, and the localesmust be set to Visible.
To export translated content to the source resource:
• You must be connected to a CMS repository containing the resource.• You must have the necessary security rights granted by the administrator.
The translated metadata must be assigned the status visible and exported to the repository so thetranslations can be used in documents.
3.6 About translating a local resource
2012-03-1629
Translation workflows
For resources that are saved for all users and stored locally, you can extract the metadata from thelocal resources and translate the metadata. You can use the translation management tool to translateresources located on a file system, but the tool can only translate unsecured resources.
The resources that can be translated are:• Interactive Analysis reports• Universes created by the universe design tool• Data Foundations and Business Layers created by the information design tool
As for resources located in the CMS repository, to translate a local resource, you need to extract thecontent to translate with the translation management tool and save the files locally and translate themin the same way you translate local resources.
3.6.1 To import content to translate from a local resource
To import content to translate:1. Select File > Import content to translate from > From a local resource2. In the dialog box, navigate to, and select the folder that contains the document you want to import.3. Select the resource to translate and click OK.
When the strings have been imported you can add locales and translated the strings in these locales,or you can export these strings to XLIFF for exernal translation.
3.6.2 To export translations to the locally stored resource
Once the resource content has been translated in the needed locales, these translations must beexported back to the resource so they can be available for users. The translations must have been setto the NEEDS_REVIEW_TRANSLATION, NEEDS_REVIEW_L10N, NEEDS_REVIEW_ADAPTATION,TRANSLATED, SIGNED_OFF, or FINAL status. The locales must be set to Visible.• Select File > Export translated content
Translated content is exported back to the local resource.
3.7 About the TMGR format
When you translate strings coming from a local resouorce or a resource saved in a CMS repository,you may save your work locally in the translation management tool proprietary file format called TMGR
2012-03-1630
Translation workflows
(the file is saved as <filename>.tmgr). This file contains all strings to translate, their current translationsin the different locales, and their statuses. You can open this file later and continue to work on it beforefinally exporting the translations back to the resources.
Saving current translations can be useful for offline work where you can still work on translations of aCMS repository resource without being connected to it. Just select File > Save to save the translationslocally. Once you have the translations, you can close the translation management tool. You can startthe tool at a later date and open the .tmgr files and continue translating the content.
2012-03-1631
Translation workflows

2012-03-1632
Translation workflows

Translating documents
4.1 To add and remove languages in your document
Before you add a language, decide if you want to change the Autofill option or the autofill sourcelanguage.1. Import the content to translate from a resource.2. Open the Language Management view if it is not already open. Select Window > Language
Management View.3. To add a language, select the language in the Available Languages list and click the right arrow.
The language is added to the Selected Languages list. A new column for the language is addedto the Translation Editor view. If the Autofill option is turned on, the translation management tool fillsthe column with content in the Autofill source language.
4. To hide the column for the new language in the "Translation Editor" view, clear the View check box.
Note:The language remains in the document even though it is not displayed.
5. To remove a language from the document, select the language in the Selected Languages list andclick the left arrow.The translation management tool asks you to confirm the remove action.
Caution:When you remove a language, all translated content for the language is lost.
You can start translating the newly added language.
Related Topics• About the Language Management view
4.2 To set the fallback language
For a description of fallback language, see the terminology topic in the related topics.
2012-03-1633
Translating documents
1. Open the Language Management view if it is not already open. Select Window > LanguageManagement View.
2. In the Language Management view, select Visible for the language.3. Click the Fallback option for the language.4. Select File > Save.
Export the document to the repository for the language to be available to the query and reportingapplications as a fallback language.
Related Topics• Terminology used in the translation management tool
4.3 To translate strings in the Translation Editor
You can translate short strings in the Translation Editor view. To translate longer strings, use the "TextEditor" view.
Before you start translating, you must:• Import the content to translate from a resource.• Add at least one language to translate.
1. In the "Translation Editor", in the column with the language to translate, click the cell containing thecontent you want to translate.
If the language was added with the Autofill option on, the cell contains the Autofill source languagecontent. Otherwise the column is blank.
2. Enter the translation by typing over the previous string.When you click the cell, the content appears in the Text Editor view. Once you enter the translation,the status of the cell is automatically set to TRANSLATED.
Note:You cannot type into cells that contain date and numeric formats. To set a format, right click the celland select a default format, or use the Format Editor to create a custom format.
3. To move to the next cell to translate, click the cell.
Tip:While you are translating, in addition to the standard editing commands on the Edit menu, you canpress Escape to cancel the current translation and Ctrl + Z to undo the last translation.
4. Select File > Save.
Related Topics• To set default formats in the Translation Editor• About the Translation Editor view
2012-03-1634
Translating documents
• To translate strings in the Text Editor• Translation status
4.4 To translate strings in the Text Editor
Use the "Text Editor" view to translate strings that are too long to translate in the Translation Editor cell.1. Import the content to translate from a resource.2. Open the Text Editor view if it is not already open. Select Window > Text Editor View.3. In the Translation Editor view, click the cell of the content you want to translate.
The source appears in the Source box of the Text Editor. This content cannot be edited.
Existing translated content appears in the Translation box.
4. Edit the content in the Translation box.
Note:You cannot edit original content.
5. To apply what you have translated in the Translation Editor view, click Apply.6. To cancel the changes, click Reset.7. Select File > Save.
Related Topics• About the Text Editor view
4.5 To sort strings in the Translation Editor
1. Import the content to translate from a resource.2. Open the List view by clicking the tab on the left side of the Translation Editor view.3. Click the column header to sort the list by the strings in that column.
Change the sort from ascending to descending order by clicking the column header again.
4.6 To search and replace strings in the Translation Editor
1. Import the content to translate from a resource.
2012-03-1635
Translating documents
2. Open the "List" view by clicking the tab on the left side of the Translation Editor view.3. Select Edit > Find/Replace.4. In the "Find and Replace" dialog box, enter the string to search for in the Find box.
Note:The translation management tool searches starting from the selected cell in the List view.
5. To search a selected section of the List view:a. Click the row at the start of the section you want to search.b. Hold down Shift and click the row at the end of the section.
The section is highlighted.c. In the "Find and Replace" dialog box, select the Selected Lines option for the scope.
Note:You can select the section before selecting Edit > Find/Replace and the Selected Lines option isselected automatically.
6. To change the direction of the search, select the Forward or Backward option.7. Select other options by selecting the appropriate check boxes:
DescriptionOption
The search finds only strings that match the string in the Find box, respectingupper- and lower-case.
Case-sensitive
The search finds only strings that match the entire string in the Find box.Whole Word
The search continues searching from the beginning of the document when itreaches the end.
Wrap Search
The search starts finding strings as you enter characters into the Find box.Incremental
8. Click Find (except if you have selected the Incremental option).The translation management tool highlights the cell where it finds the search string. The Replaceand Replace/Find buttons are available. If no string is found, these buttons are unavailable.
9. When the translation management tool finds an instance of the string:• To find the next instance, click Find.• To replace the string, enter the replacement string in the Replace With box and click Replace,
or, to replace the string and find the next instance, click Replace/Find.
10. When you are finished searching, click Close.
2012-03-1636
Translating documents
Setting Formats
5.1 To set default formats in the Translation Editor
Use the Translation Editor view to set the format of number and date-time values to default formats.
Note:You can also use the Format Editor to select a default format. To define a custom format, you must usethe Format Editor.
1. In the "Translation Editor", right-click the cell of either a number or a date-time format object.A shortcut menu displays.
2. From the shortcut menu, select the default format you want to use.
The new format appears in the cell.
Note:The application uses the current system date and time and the numeric value 987,654,321 to displayformat examples. In the application preferences, you can define your own number and date-timevalues to use when displaying formats.
3. Select File > Save to save the formats.
Related Topics• To set sample data for formats• About the Format Editor
5.2 About the Format Editor
The Format Editor lets you define the format used to display date-time and numeric values. You canselect default formats or define custom formats. For metadata objects in your document, you can definea format for each locale. The formats are saved in the document as part of its localization.
The application uses the current system date and time and the numeric value 987,654,321 to displayformats. In the application preferences, you can define your own number and date-time values to usewhen displaying formats.
2012-03-1637
Setting Formats
Default FormatsDefault formats are available based on Common Locale Data Repository (CLDR) recommendations,managed by the UNICODE consortium. Microsoft standards, whenever they differ from the CLDRrecommendation, are followed. There are 15 default formats for date and time values, and four defaultformats for numbers.
The Format Editor lists the default formats available for each category of data.
Custom FormatsIf the default formats available do not meet your needs, you can create formats using the Custom FormatEditor.
You can delete a custom format even if it is used in the document. The next time you start the FormatEditor for an object using the deleted format, a custom format is automatically re-created.
A custom format consists of text and tokens. A token is a pre-formatted part of a number or date. Forexample, Day: 1-31 is a token that displays the day part of the date as a number between 1 and 31.For more information about tokens, see the related topics.
The Custom Format Editor lists the possible token categories. You define a format by typing text in theFormat Definition box, and dragging tokens from the Tokens box. Tokens appear in the format definitionwith a rectangle border and a gray background. As you define the format, a preview shows the resultingappearance.
You can define a display color for each custom format. When no color is defined, the client application(for example, Interactive Analysis) manages the color to display.
In the Format for undefined values box, you can define text and a color to display if no value is returnedat reporting time. By default, in the case of an undefined value, no text is displayed.
When defining a numeric format, you can enter a different format to be displayed when the value isnegative or equal to zero. If you do not enter a format, the format defined for positive values is used.
Related Topics• To start the Format Editor• To start the Custom Format Editor• To delete a custom format• Date and time format tokens• Number format tokens• To set sample data for formats
5.3 To start the Format Editor
1. In the "Translation Editor", right-click the cell of either a number or a date-time format object.A shortcut menu displays.
2012-03-1638
Setting Formats
2. From the shortcut menu, select Other formats (Format Editor)....
Related Topics• To create a custom format• About the Format Editor
5.4 To start the Custom Format Editor
You can create a custom format from scratch, or use an existing format (default or custom) as the basisfor the new format.1. Start the "Format Editor" if it is not already open.
The possible format categories are listed in Format Categories.
2. If more than one category of format is possible for the object, select a category in Format Categories.The default formats and any previously-defined custom formats are listed in Available Formats.
3. To create a format from scratch, open the "Custom Format Editor" by clicking Custom Format.4. To use a format as the basis for a new custom format, first select the format in theAvailable Formats
list, then open the "Custom Format Editor" by clicking Custom Format.
Related Topics• To create a custom format
5.5 To create a custom format
1. Start the "Custom Format Editor "if it is not already open.2. In the Tokens list, select a token category or an individual token, and add it to the Format Definition
box using one of these methods:• Double-click the token or token category.• Drag the token or token category to the Format Definition box.
Tip:A description of each token appears as a tool tip when you place the cursor over the token in theTokens list. For more information on tokens, see the related topics.
3. To select a different token in the category, click the arrow on the token just added to the FormatDefinition box.
4. Enter additional tokens in the same way. To add text to a definition, type directly in the FormatDefinition box.
2012-03-1639
Setting Formats
Tip:Edit the contents of the Format Definition box using the Copy (Ctrl + C), Paste (Ctrl + V), Cut (Ctrl+ X), and Delete keys.
5. To set the color of the format definition, select the color from the list next to the format definition box.An example of the appearance of the format displays in the Preview box.
6. For number formats, to define a format to display if the value is negative or zero, add tokens andtext in the Format for negative values and Format for values equal to zero definition boxes.
Note:If you do not define these formats, the format defined in the Positive box displays for negative andzero values.
7. For both date-time and number objects, to define text to display when the database returns no value,enter text in the Format for undefined values box.
8. To save the format definition, click OK.The "Custom Format Editor" dialog box closes.
The custom format you have just defined appears in the Available Formats list in the "Format Editor"dialog box. To use the format, select it and click OK.
Related Topics• To start the Custom Format Editor• Date and time format tokens• Number format tokens• About the Format Editor
5.6 To delete a custom format
1. Start the "Format Editor" if it is not already open.The possible format categories are listed in Format Categories.
2. If more than one category of format is possible for the object, select a category in Format Categories.The default formats and any previously-defined custom formats are listed in Available Formats.
3. Select the custom format in the Available Formats list.4. To delete the format, click Delete.
The format is removed from the list.
5. To confirm the deletion, click OK.
You can delete a custom format even if it is used elsewhere in the document. The next time you startthe Format Editor for an object using the deleted format, a custom format is automatically re-created.
2012-03-1640
Setting Formats

Related Topics• To start the Format Editor
2012-03-1641
Setting Formats

2012-03-1642
Setting Formats
Managing status
6.1 Translation status
A status is assigned to the content of each cell to be translated in every language. The translationmanagement tool uses the ten standard XML Localization Interchange File Format (XLIFF) statuses,grouped into two categories.
DescriptionXLIFF statusCategory
Indicates that the content is new. For example,content that was added to or edited in a previouslytranslated document.
NEW
Needs Trans-lation
(This contentis not dis-played to theend-user)
Indicates that the content needs to be translated.NEEDS_TRANSLATION
Indicates only non-textual information needsadaptation.NEEDS_ADAPTATION
Indicates text needs translation and non-textualinformation needs adaptation.NEEDS_L10N
2012-03-1643
Managing status
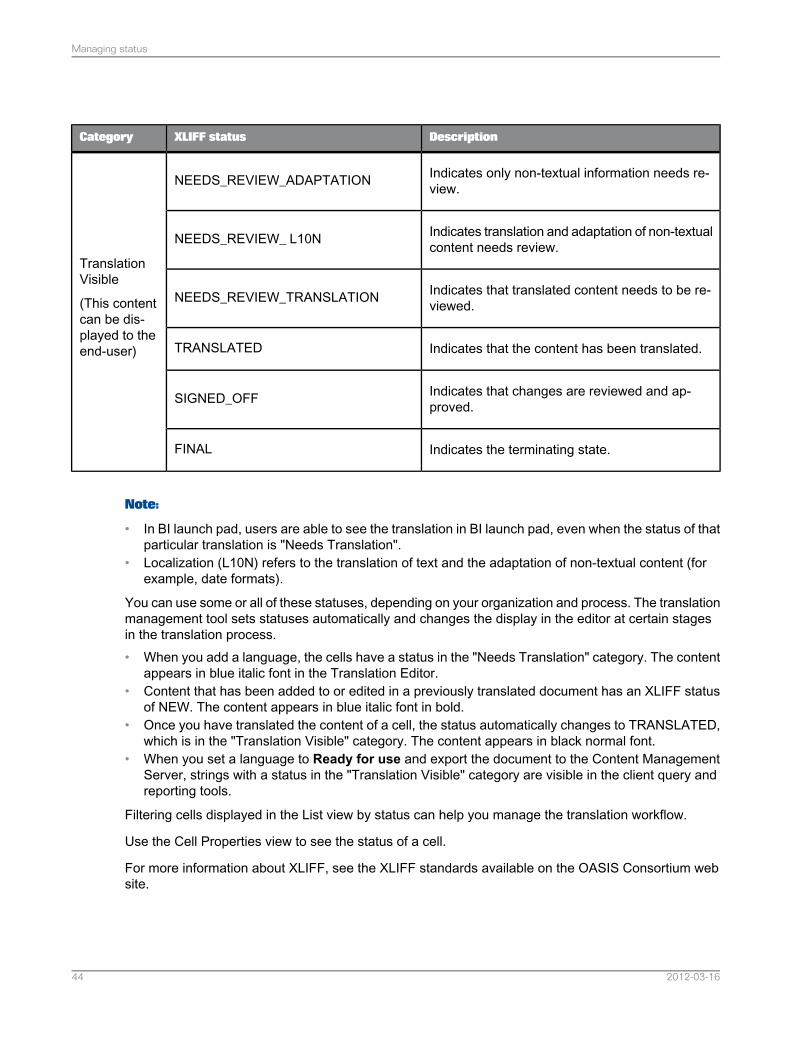
DescriptionXLIFF statusCategory
Indicates only non-textual information needs re-view.NEEDS_REVIEW_ADAPTATION
TranslationVisible
(This contentcan be dis-played to theend-user)
Indicates translation and adaptation of non-textualcontent needs review.NEEDS_REVIEW_ L10N
Indicates that translated content needs to be re-viewed.NEEDS_REVIEW_TRANSLATION
Indicates that the content has been translated.TRANSLATED
Indicates that changes are reviewed and ap-proved.SIGNED_OFF
Indicates the terminating state.FINAL
Note:
• In BI launch pad, users are able to see the translation in BI launch pad, even when the status of thatparticular translation is "Needs Translation".
• Localization (L10N) refers to the translation of text and the adaptation of non-textual content (forexample, date formats).
You can use some or all of these statuses, depending on your organization and process. The translationmanagement tool sets statuses automatically and changes the display in the editor at certain stagesin the translation process.• When you add a language, the cells have a status in the "Needs Translation" category. The content
appears in blue italic font in the Translation Editor.• Content that has been added to or edited in a previously translated document has an XLIFF status
of NEW. The content appears in blue italic font in bold.• Once you have translated the content of a cell, the status automatically changes to TRANSLATED,
which is in the "Translation Visible" category. The content appears in black normal font.• When you set a language to Ready for use and export the document to the Content Management
Server, strings with a status in the "Translation Visible" category are visible in the client query andreporting tools.
Filtering cells displayed in the List view by status can help you manage the translation workflow.
Use the Cell Properties view to see the status of a cell.
For more information about XLIFF, see the XLIFF standards available on the OASIS Consortium website.
2012-03-1644
Managing status

Related Topics• To filter the List view by status• To change cell status• To change cell properties• About the Cell Properties view• OASIS Consortium at http://www.oasis-open.org/
6.2 About metadata translation history
The tool may save with the metadata the date that the metadata was last edited. This feature is supportedby• Interactive Analysis documents (.wid)• universe design tool universes (.unv)• information design tool data foundation and business layers (.dfx and .blx)
Note:This is not supported by Crystal Reports documents.
6.3 To filter the List view by status
1. Import the content to translate from a resource.2. Open the List view by clicking the tab on the left side of the "Translation Editor" view.3. Open the Filter view if it is not already open. Select Window > Filter View.4. Select the language to filter in the list of languages.5. Select the category you want to filter on in the list of status categories.6. To filter on individual XLIFF statuses, select More... in the list of categories.
The list of all XLIFF statuses appears. Select the check boxes of the statuses you want to filter on.
The filter is applied to the display in the List view.
Related Topics• Translation status• About the Filter view
2012-03-1645
Managing status
6.4 To change cell properties
1. Import the content to translate from a resource.2. Select Windows > Cell Properties View to open the Cell Properties view.3. In the Translation Editor view, click the cell you want to change the status of.
The properties of the cell appear in the Cell Properties view.
4. To change the XLIFF status, in the Cell Properties view, select the status in the list in the Valuecolumn for the "Status" property.
Note:To change the XLIFF status for a group of cells, use the "Change Status" dialog box.
5. To change the approved status, select True or False in the list in the Value column for the "Approved"property.
Note:The translation management tool does not use the Approved property. Using the XLIFF translationstatus is recommended.
6. Select File > Save.
Related Topics• To change cell status• About the Cell Properties view
6.5 To change cell status
1. Import the content to translate from a resource.2. In the Translation Editor view, click the row of the cell you want to change the status of.3. To select all cells in a section, click the first row in the section. Hold down Shift and click the row at
the end of the section.4. Right-click the selected row or section, and select Change Status.5. In the "Change Status" dialog box, select the language in the Language list.6. Select the new status in the Status box and click OK.7. Select File > Save.
Note:You can also change the status of a cell in the Cell Properties view.
2012-03-1646
Managing status
Using XLIFF to exchange document translations
7.1 About XLIFF files
The translation management tool creates an XLIFF file for each target language you select when youexport. You can select one source language and any number of alternate translation languages forexport.
Each XLIFF file is created with the source and target languages in the file name, for example: Document_name.unv_en_US_DE.xlf is a universe file for a US English file that will be translated intoGerman. For an Interactive Analysis document, the file format is:
Document_name.wid_en_US_DE.xlf.
The XLIFF file contains:• Document information:
• Full document name, including the Central Management Server name• Source locale• Target locale• Document type
• For each string:• String identifier• String in the source language• String, translation status, and locale for each alternate translation language• Notes for the translator
Note:
The translation management tool follows XLIFF specification version 1.2.
For more information about XLIFF file formats, see the XLIFF standards available on the OASISConsortium web site.
Related Topics• OASIS Consortium at http://www.oasis-open.org/
2012-03-1647
Using XLIFF to exchange document translations

7.2 Exporting and Importing XLIFF files
If you send translations to third-party translators or vendors, you can use XLIFF (XML LocalizationInterchange File Format) files to exchange documents.
Use the following workflow with the translation management tool to outsource the translations of adocument using XLIFF files. See the related topics for more information on the steps in this workflow.• Open or import the document from the Central Management Server (CMS).• Export the document to XLIFF using the "Export to XLIFF" wizard.• When you receive completed XLIFF files from the third-party, import them to the translation
management tool document using the "Import from XLIFF" wizard.• You can use the translation management tool to display and edit the translations, manage status,
and import the document to the CMS.
Related Topics• To export to XLIFF - select source• To export to XLIFF - select target• To import from XLIFF files
7.3 To export to XLIFF - select source
The document you want to export must be open in the Translation Editor view. Open the Export toXLIFF wizard if it is not already open. Select File > Export to XLIFF file.1. Select the document you want to export in the document list.
Note:You can only export one document at a time.
2. Check the boxes next to the languages you want to export on the list of languages that are availablefor the document. You can export one or more languages.You can add other locales if they are not already in the .tmgr file.
Note:You must export at least one language.
3. Select the source option for one of the export languages.The language you select is the source language in the XLIFF file. Any other languages exportedare included in the XLIFF file as alternate translations.
4. If you export the original content, you must select the language of the original content in the list oflanguages.
2012-03-1648
Using XLIFF to exchange document translations

5. Click Next to select the target languages and continue the export.
Related Topics• To export to XLIFF - select target• About XLIFF files
7.4 To export to XLIFF - select target
You have started the Export to XLIFF wizard and have selected the source languages. To continuewith the export:1. Select a target language in the Available Languages list and click the right arrow.2. Add more target languages in the same way.
The translation management tool creates an XLIFF file for each target language.
3. To remove a target language, select it in the Selected Languages list and click the left arrow.4. The translation management tool creates the XLIFF files in the local default folder. To change the
folder, enter or browse to a new folder in the XLIFF file folder box.5. Click Finish.
Note:The Finish button is unavailable if you have not completed the required information. Make sure youselected at least one target language. Use the Back button, if necessary, and make sure you havecompleted the steps in the "Export to XLIFF - select source" dialog box.
Note:If you choose a target language that you have already translated or added to your document, thethird-party translator will see your translation and might modify it. This will result in a warning messagewhen you import the XLIFF file.
Related Topics• To export to XLIFF - select source• About XLIFF files
7.5 To import from XLIFF files
Open the "Import from XLIFF" wizard if it is not already open. Select File > Import from XLIFF file.1. Select the document to import the XLIFF files to.2. Enter or browse to the XLIFF folder where the translated XLIFF files are located.
2012-03-1649
Using XLIFF to exchange document translations
All the XLIFF files in the folder are listed. If you want to filter by the same name as the document,check Filter by document name.
3. Check the boxes next to the XLIFF files you want to import.
The "Matching Status" column provides information about the XLIFF file you are about to import:• A warning message appears if the language in the XLIFF file exists in the document. You can
proceed with the import, but any previous translations are overwritten.• A message appears if the XLIFF file was not exported from the same document. You can proceed
with the import, but some content may be corrupted.• The message "OK" appears if no problems are found when matching the document to the XLIFF
file.
4. Click Finish.
The translated languages are added to the Translation Editor and the Language Management views.
Related Topics• About XLIFF files
2012-03-1650
Using XLIFF to exchange document translations
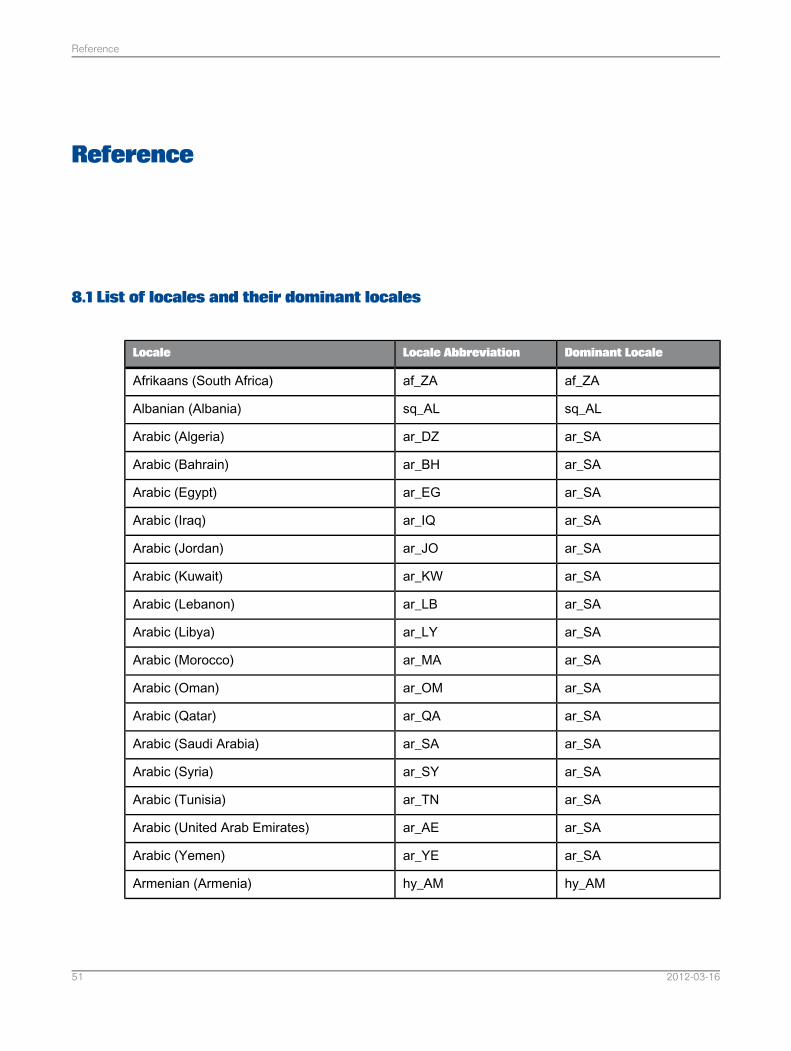
Reference
8.1 List of locales and their dominant locales
Dominant LocaleLocale AbbreviationLocale
af_ZAaf_ZAAfrikaans (South Africa)
sq_ALsq_ALAlbanian (Albania)
ar_SAar_DZArabic (Algeria)
ar_SAar_BHArabic (Bahrain)
ar_SAar_EGArabic (Egypt)
ar_SAar_IQArabic (Iraq)
ar_SAar_JOArabic (Jordan)
ar_SAar_KWArabic (Kuwait)
ar_SAar_LBArabic (Lebanon)
ar_SAar_LYArabic (Libya)
ar_SAar_MAArabic (Morocco)
ar_SAar_OMArabic (Oman)
ar_SAar_QAArabic (Qatar)
ar_SAar_SAArabic (Saudi Arabia)
ar_SAar_SYArabic (Syria)
ar_SAar_TNArabic (Tunisia)
ar_SAar_AEArabic (United Arab Emirates)
ar_SAar_YEArabic (Yemen)
hy_AMhy_AMArmenian (Armenia)
2012-03-1651
Reference
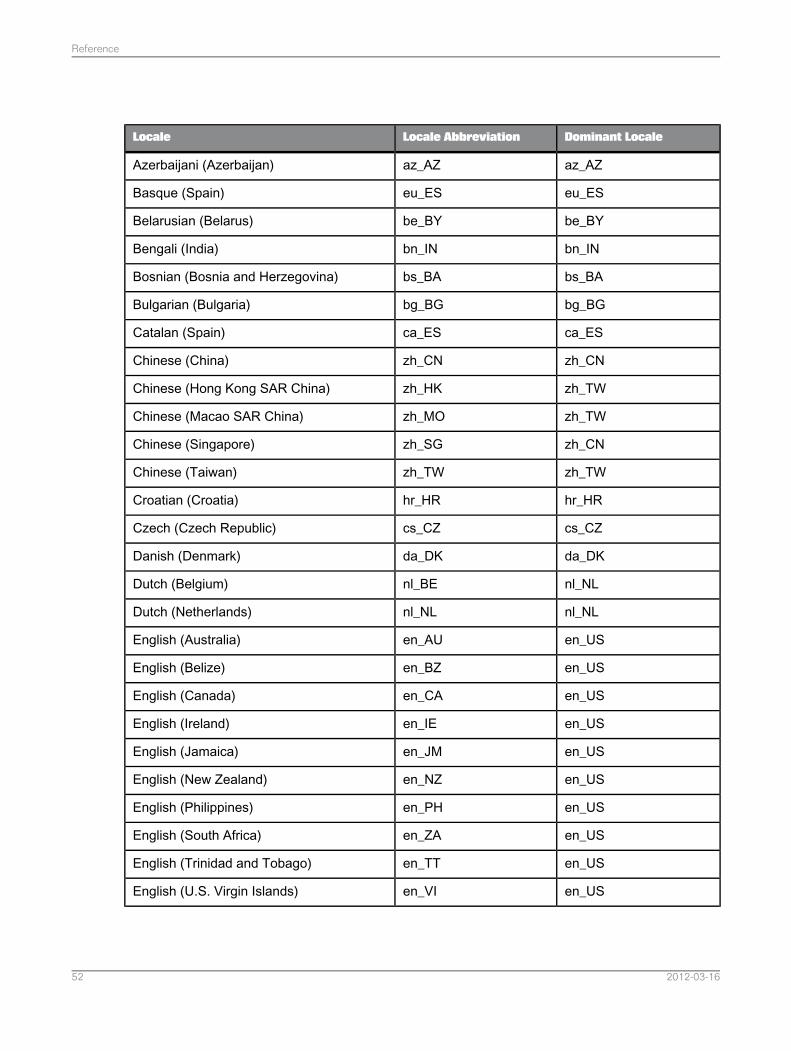
Dominant LocaleLocale AbbreviationLocale
az_AZaz_AZAzerbaijani (Azerbaijan)
eu_ESeu_ESBasque (Spain)
be_BYbe_BYBelarusian (Belarus)
bn_INbn_INBengali (India)
bs_BAbs_BABosnian (Bosnia and Herzegovina)
bg_BGbg_BGBulgarian (Bulgaria)
ca_ESca_ESCatalan (Spain)
zh_CNzh_CNChinese (China)
zh_TWzh_HKChinese (Hong Kong SAR China)
zh_TWzh_MOChinese (Macao SAR China)
zh_CNzh_SGChinese (Singapore)
zh_TWzh_TWChinese (Taiwan)
hr_HRhr_HRCroatian (Croatia)
cs_CZcs_CZCzech (Czech Republic)
da_DKda_DKDanish (Denmark)
nl_NLnl_BEDutch (Belgium)
nl_NLnl_NLDutch (Netherlands)
en_USen_AUEnglish (Australia)
en_USen_BZEnglish (Belize)
en_USen_CAEnglish (Canada)
en_USen_IEEnglish (Ireland)
en_USen_JMEnglish (Jamaica)
en_USen_NZEnglish (New Zealand)
en_USen_PHEnglish (Philippines)
en_USen_ZAEnglish (South Africa)
en_USen_TTEnglish (Trinidad and Tobago)
en_USen_VIEnglish (U.S. Virgin Islands)
2012-03-1652
Reference
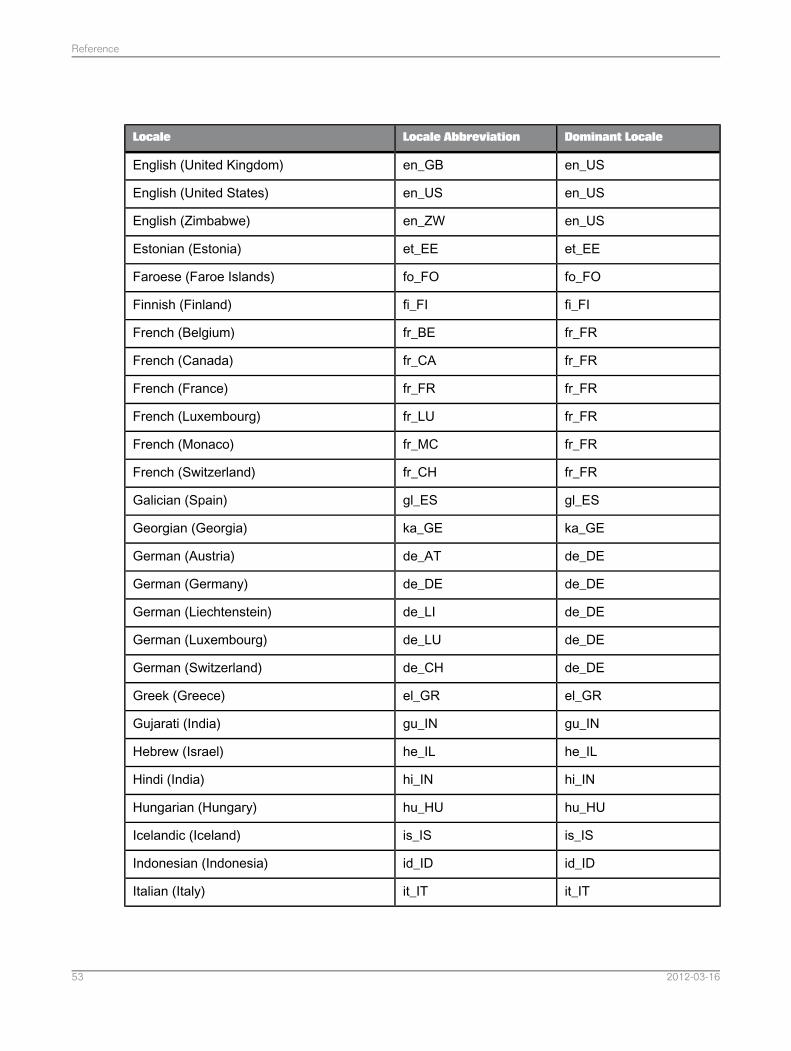
Dominant LocaleLocale AbbreviationLocale
en_USen_GBEnglish (United Kingdom)
en_USen_USEnglish (United States)
en_USen_ZWEnglish (Zimbabwe)
et_EEet_EEEstonian (Estonia)
fo_FOfo_FOFaroese (Faroe Islands)
fi_FIfi_FIFinnish (Finland)
fr_FRfr_BEFrench (Belgium)
fr_FRfr_CAFrench (Canada)
fr_FRfr_FRFrench (France)
fr_FRfr_LUFrench (Luxembourg)
fr_FRfr_MCFrench (Monaco)
fr_FRfr_CHFrench (Switzerland)
gl_ESgl_ESGalician (Spain)
ka_GEka_GEGeorgian (Georgia)
de_DEde_ATGerman (Austria)
de_DEde_DEGerman (Germany)
de_DEde_LIGerman (Liechtenstein)
de_DEde_LUGerman (Luxembourg)
de_DEde_CHGerman (Switzerland)
el_GRel_GRGreek (Greece)
gu_INgu_INGujarati (India)
he_ILhe_ILHebrew (Israel)
hi_INhi_INHindi (India)
hu_HUhu_HUHungarian (Hungary)
is_ISis_ISIcelandic (Iceland)
id_IDid_IDIndonesian (Indonesia)
it_ITit_ITItalian (Italy)
2012-03-1653
Reference
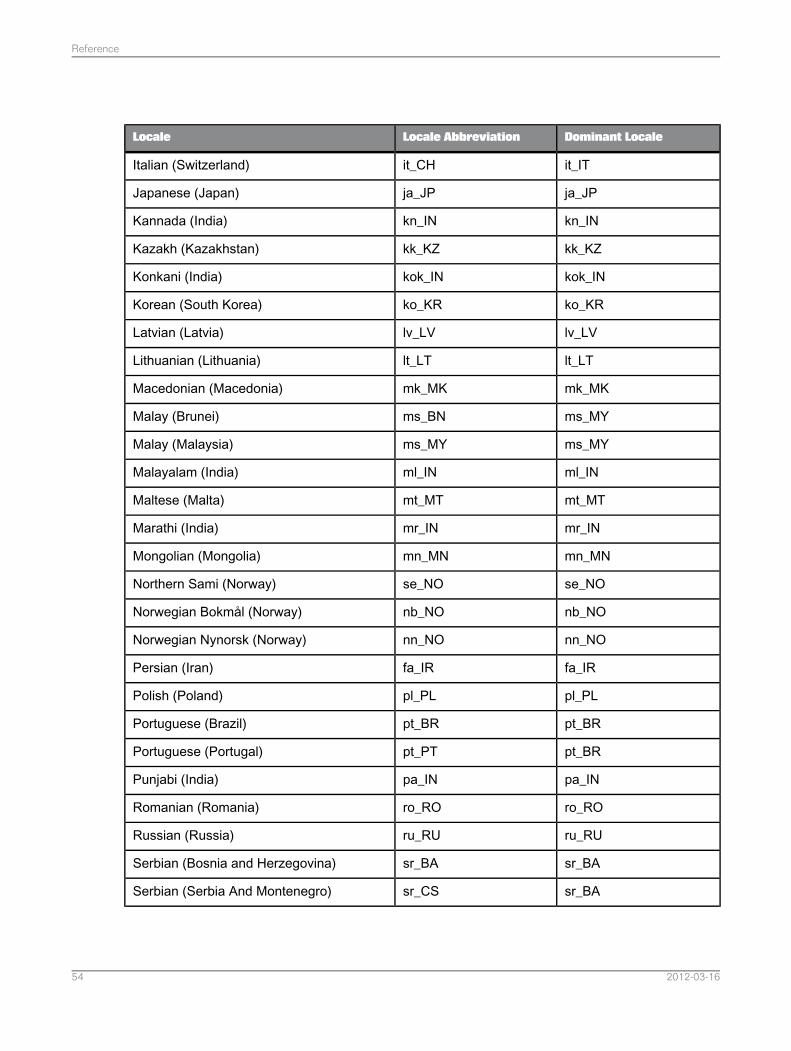
Dominant LocaleLocale AbbreviationLocale
it_ITit_CHItalian (Switzerland)
ja_JPja_JPJapanese (Japan)
kn_INkn_INKannada (India)
kk_KZkk_KZKazakh (Kazakhstan)
kok_INkok_INKonkani (India)
ko_KRko_KRKorean (South Korea)
lv_LVlv_LVLatvian (Latvia)
lt_LTlt_LTLithuanian (Lithuania)
mk_MKmk_MKMacedonian (Macedonia)
ms_MYms_BNMalay (Brunei)
ms_MYms_MYMalay (Malaysia)
ml_INml_INMalayalam (India)
mt_MTmt_MTMaltese (Malta)
mr_INmr_INMarathi (India)
mn_MNmn_MNMongolian (Mongolia)
se_NOse_NONorthern Sami (Norway)
nb_NOnb_NONorwegian Bokmål (Norway)
nn_NOnn_NONorwegian Nynorsk (Norway)
fa_IRfa_IRPersian (Iran)
pl_PLpl_PLPolish (Poland)
pt_BRpt_BRPortuguese (Brazil)
pt_BRpt_PTPortuguese (Portugal)
pa_INpa_INPunjabi (India)
ro_ROro_RORomanian (Romania)
ru_RUru_RURussian (Russia)
sr_BAsr_BASerbian (Bosnia and Herzegovina)
sr_BAsr_CSSerbian (Serbia And Montenegro)
2012-03-1654
Reference
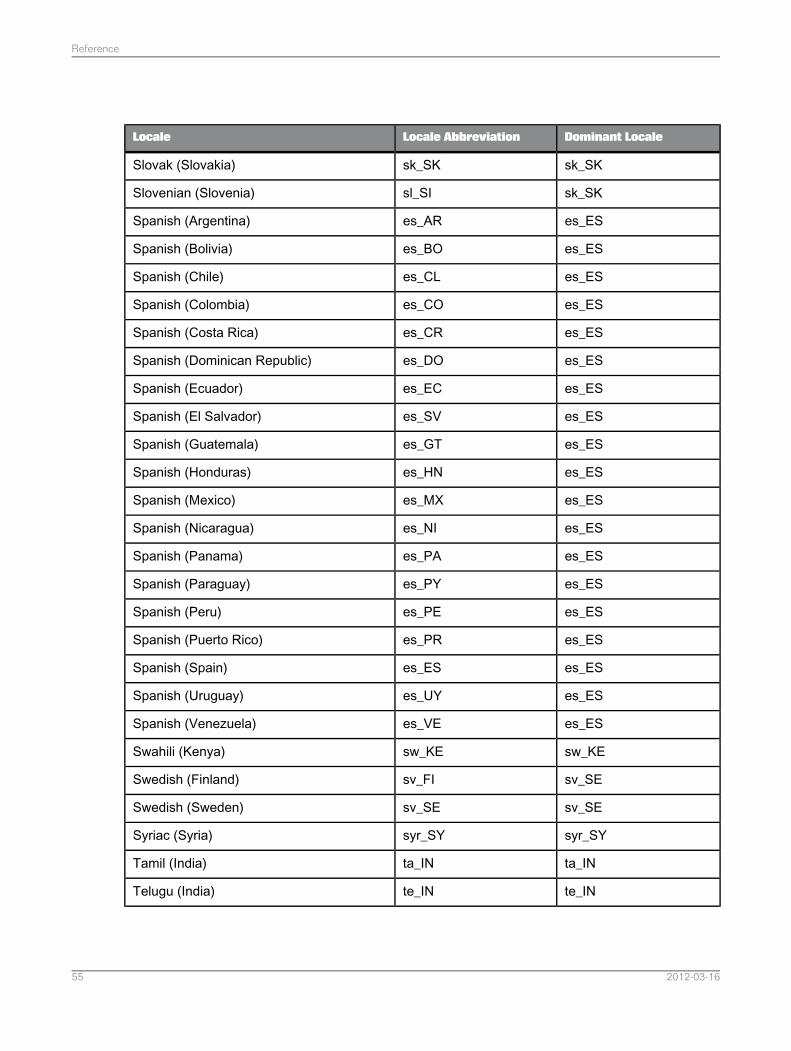
Dominant LocaleLocale AbbreviationLocale
sk_SKsk_SKSlovak (Slovakia)
sk_SKsl_SISlovenian (Slovenia)
es_ESes_ARSpanish (Argentina)
es_ESes_BOSpanish (Bolivia)
es_ESes_CLSpanish (Chile)
es_ESes_COSpanish (Colombia)
es_ESes_CRSpanish (Costa Rica)
es_ESes_DOSpanish (Dominican Republic)
es_ESes_ECSpanish (Ecuador)
es_ESes_SVSpanish (El Salvador)
es_ESes_GTSpanish (Guatemala)
es_ESes_HNSpanish (Honduras)
es_ESes_MXSpanish (Mexico)
es_ESes_NISpanish (Nicaragua)
es_ESes_PASpanish (Panama)
es_ESes_PYSpanish (Paraguay)
es_ESes_PESpanish (Peru)
es_ESes_PRSpanish (Puerto Rico)
es_ESes_ESSpanish (Spain)
es_ESes_UYSpanish (Uruguay)
es_ESes_VESpanish (Venezuela)
sw_KEsw_KESwahili (Kenya)
sv_SEsv_FISwedish (Finland)
sv_SEsv_SESwedish (Sweden)
syr_SYsyr_SYSyriac (Syria)
ta_INta_INTamil (India)
te_INte_INTelugu (India)
2012-03-1655
Reference
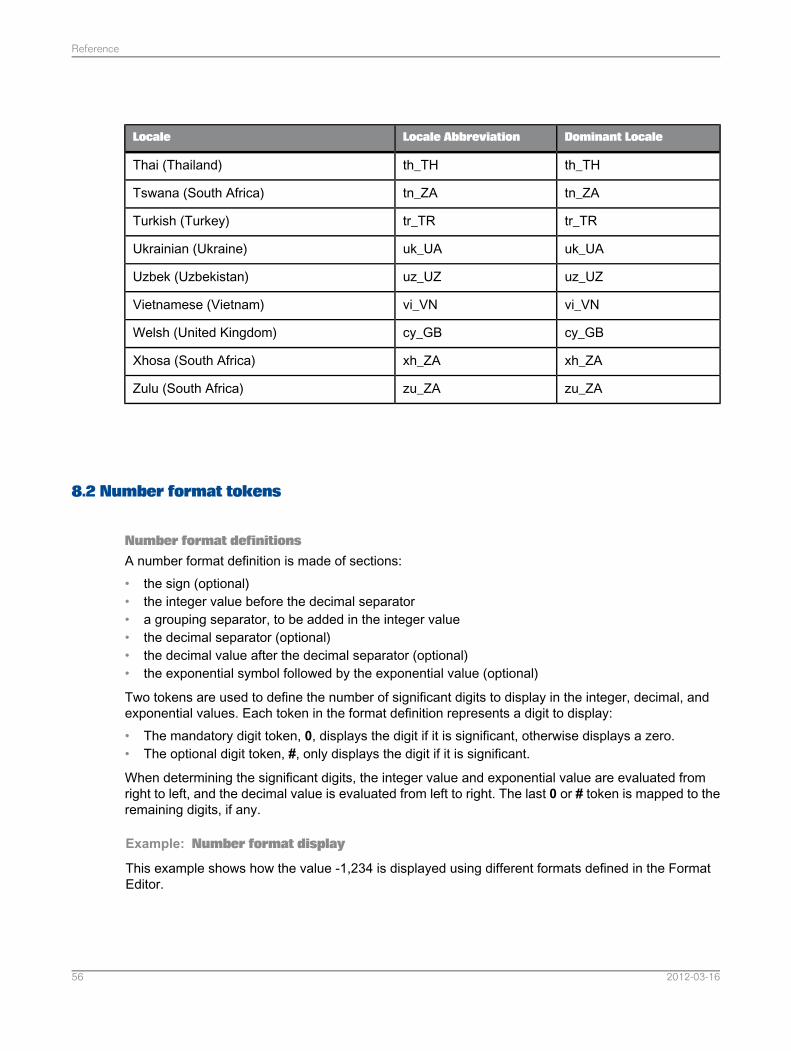
Dominant LocaleLocale AbbreviationLocale
th_THth_THThai (Thailand)
tn_ZAtn_ZATswana (South Africa)
tr_TRtr_TRTurkish (Turkey)
uk_UAuk_UAUkrainian (Ukraine)
uz_UZuz_UZUzbek (Uzbekistan)
vi_VNvi_VNVietnamese (Vietnam)
cy_GBcy_GBWelsh (United Kingdom)
xh_ZAxh_ZAXhosa (South Africa)
zu_ZAzu_ZAZulu (South Africa)
8.2 Number format tokens
Number format definitionsA number format definition is made of sections:• the sign (optional)• the integer value before the decimal separator• a grouping separator, to be added in the integer value• the decimal separator (optional)• the decimal value after the decimal separator (optional)• the exponential symbol followed by the exponential value (optional)
Two tokens are used to define the number of significant digits to display in the integer, decimal, andexponential values. Each token in the format definition represents a digit to display:• The mandatory digit token, 0, displays the digit if it is significant, otherwise displays a zero.• The optional digit token, #, only displays the digit if it is significant.
When determining the significant digits, the integer value and exponential value are evaluated fromright to left, and the decimal value is evaluated from left to right. The last 0 or # token is mapped to theremaining digits, if any.
Example: Number format display
This example shows how the value -1,234 is displayed using different formats defined in the FormatEditor.
2012-03-1656
Reference

Preview display:Format defined with tokens:
-1234[Sign] [#]
(001234)[Neg. start] [0] [0] [0] [0] [0] [0] [Neg. end]
-1234.00[Sign always] [#] [Dec.Sep.] [0] [0]
-1.23E+003[Sign] [#] [Decimal separator] [0] [0] [E+] [0] [0] [0]
Revenue: -1234.00 €Revenue: [Sign always] [#] [Decimal separator ] [0] [0]
true[Boolean]
List of number format tokens
DescriptionTokenCategory
Negative sign if the value is negative. Nothing if the value is positiveor zero.Sign
Signs
Negative sign if the value is negative. Positive sign if the value ispositive or zero.Sign always
Open parenthesis if the value is negative. Nothing if the value ispositive or zero.Negative start
Closing parenthesis if the value is negative. Nothing if the value ispositive or zero.Negative end
Optional digit. Displays digit only if significant.#Digits
Mandatory digit. Displays digit if significant, otherwise displays zero.0
The symbol used to separate the integer and decimal parts of thenumber. The symbol used is determined by the locale. The decimalseparator can be used only once in an expression.
Decimal separator
SeparatorsBy default, digits are grouped using the rule and the separator de-fined by the locale. The grouping symbol can be used only once inan expression. It must appear before the decimal separator.
Grouping
Exponent sign in upper case, always signed. Can be used onlyonce in an expression.E+
Exponents
Exponent sign in upper case, signed only if the value is negative.Can be used only once in an expression.E-
Exponent sign in lower case, always signed. Can be used only oncein an expression.e+
Exponent sign in lower case, signed only if the value is negative.Can be used only once in an expression.e-
2012-03-1657
Reference
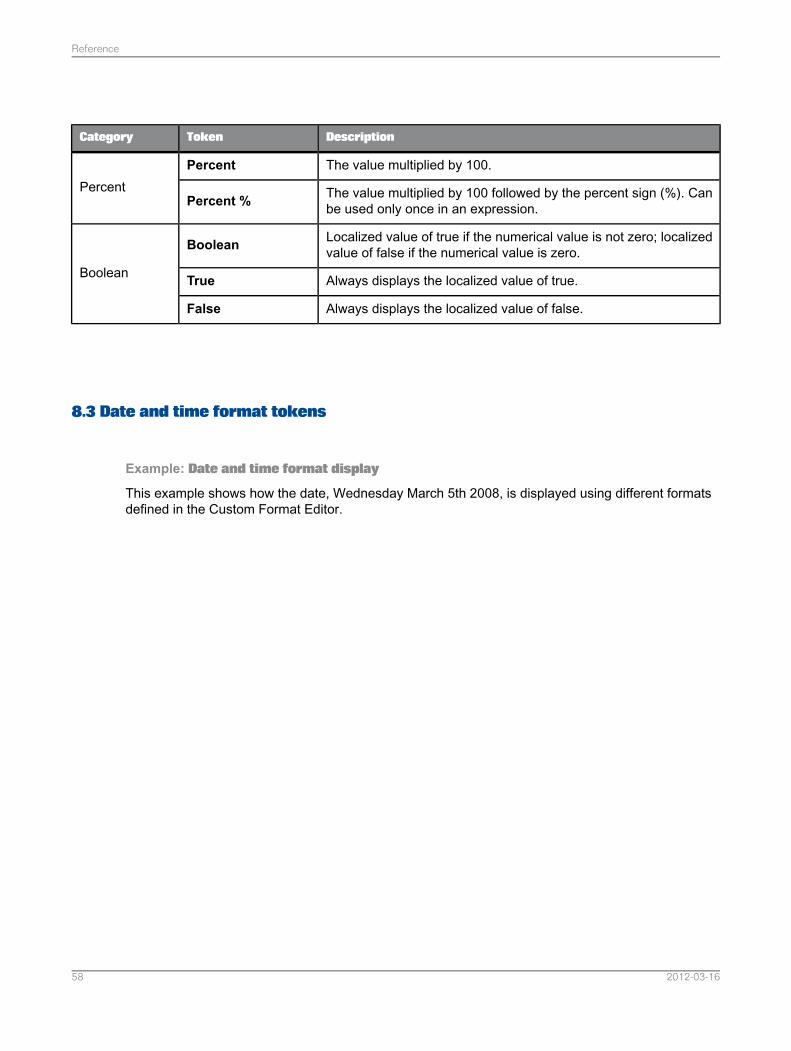
DescriptionTokenCategory
The value multiplied by 100.PercentPercent The value multiplied by 100 followed by the percent sign (%). Can
be used only once in an expression.Percent %
Localized value of true if the numerical value is not zero; localizedvalue of false if the numerical value is zero.Boolean
Boolean Always displays the localized value of true.True
Always displays the localized value of false.False
8.3 Date and time format tokens
Example: Date and time format display
This example shows how the date, Wednesday March 5th 2008, is displayed using different formatsdefined in the Custom Format Editor.
2012-03-1658
Reference
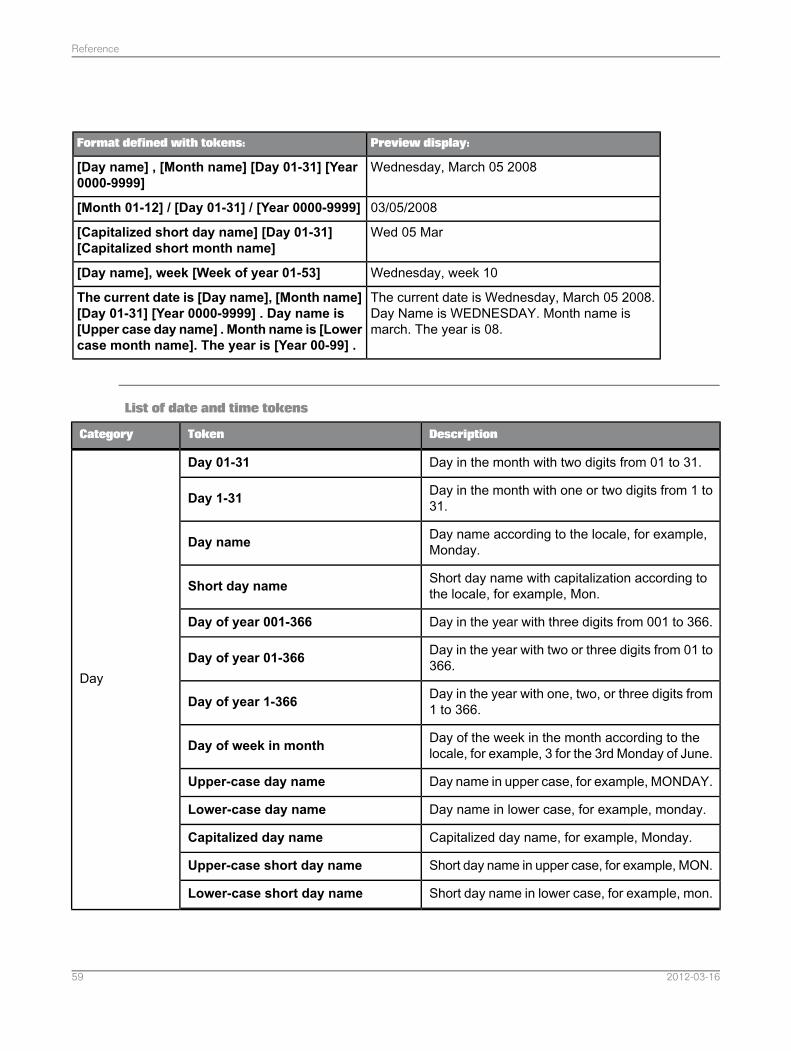
Preview display:Format defined with tokens:
Wednesday, March 05 2008[Day name] , [Month name] [Day 01-31] [Year0000-9999]
03/05/2008[Month 01-12] / [Day 01-31] / [Year 0000-9999]
Wed 05 Mar[Capitalized short day name] [Day 01-31][Capitalized short month name]
Wednesday, week 10[Day name], week [Week of year 01-53]
The current date is Wednesday, March 05 2008.Day Name is WEDNESDAY. Month name ismarch. The year is 08.
The current date is [Day name], [Month name][Day 01-31] [Year 0000-9999] . Day name is[Upper case day name] . Month name is [Lowercase month name]. The year is [Year 00-99] .
List of date and time tokens
DescriptionTokenCategory
Day in the month with two digits from 01 to 31.Day 01-31
Day
Day in the month with one or two digits from 1 to31.Day 1-31
Day name according to the locale, for example,Monday.Day name
Short day name with capitalization according tothe locale, for example, Mon.Short day name
Day in the year with three digits from 001 to 366.Day of year 001-366
Day in the year with two or three digits from 01 to366.Day of year 01-366
Day in the year with one, two, or three digits from1 to 366.Day of year 1-366
Day of the week in the month according to thelocale, for example, 3 for the 3rd Monday of June.Day of week in month
Day name in upper case, for example, MONDAY.Upper-case day name
Day name in lower case, for example, monday.Lower-case day name
Capitalized day name, for example, Monday.Capitalized day name
Short day name in upper case, for example, MON.Upper-case short day name
Short day name in lower case, for example, mon.Lower-case short day name
2012-03-1659
Reference
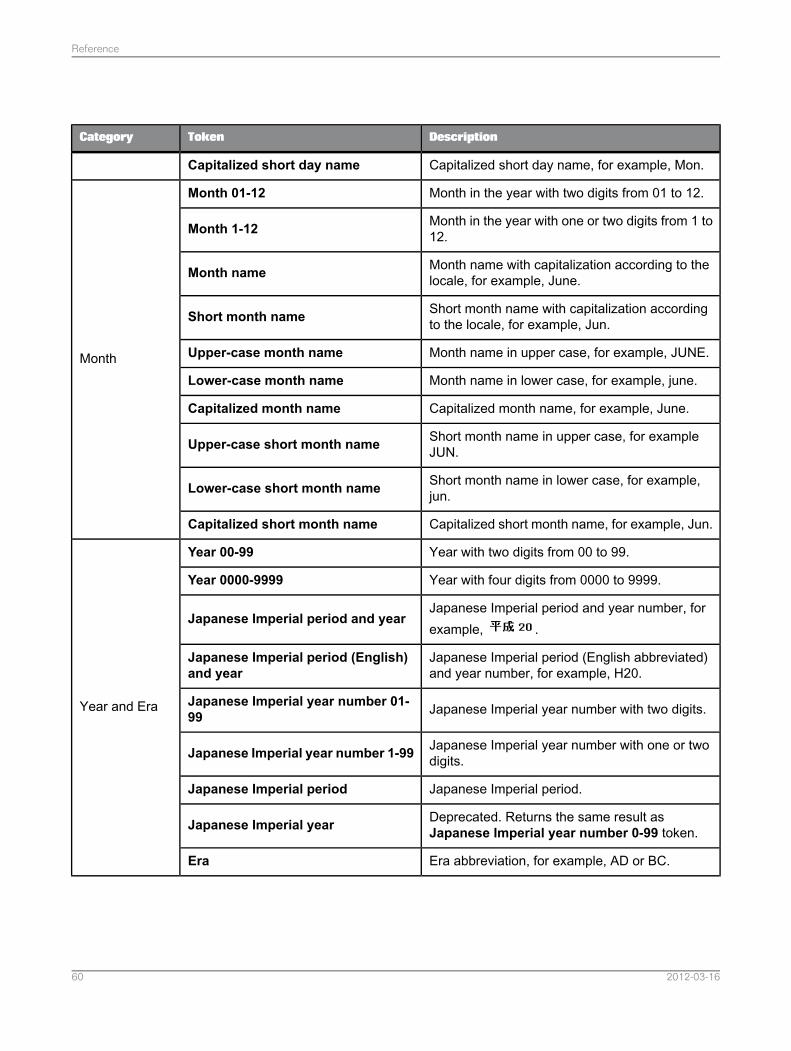
DescriptionTokenCategory
Capitalized short day name, for example, Mon.Capitalized short day name
Month in the year with two digits from 01 to 12.Month 01-12
Month
Month in the year with one or two digits from 1 to12.Month 1-12
Month name with capitalization according to thelocale, for example, June.Month name
Short month name with capitalization accordingto the locale, for example, Jun.Short month name
Month name in upper case, for example, JUNE.Upper-case month name
Month name in lower case, for example, june.Lower-case month name
Capitalized month name, for example, June.Capitalized month name
Short month name in upper case, for exampleJUN.Upper-case short month name
Short month name in lower case, for example,jun.Lower-case short month name
Capitalized short month name, for example, Jun.Capitalized short month name
Year with two digits from 00 to 99.Year 00-99
Year and Era
Year with four digits from 0000 to 9999.Year 0000-9999
Japanese Imperial period and year number, forexample, .
Japanese Imperial period and year
Japanese Imperial period (English abbreviated)and year number, for example, H20.
Japanese Imperial period (English)and year
Japanese Imperial year number with two digits.Japanese Imperial year number 01-99
Japanese Imperial year number with one or twodigits.Japanese Imperial year number 1-99
Japanese Imperial period.Japanese Imperial period
Deprecated. Returns the same result asJapanese Imperial year number 0-99 token.Japanese Imperial year
Era abbreviation, for example, AD or BC.Era
2012-03-1660
Reference
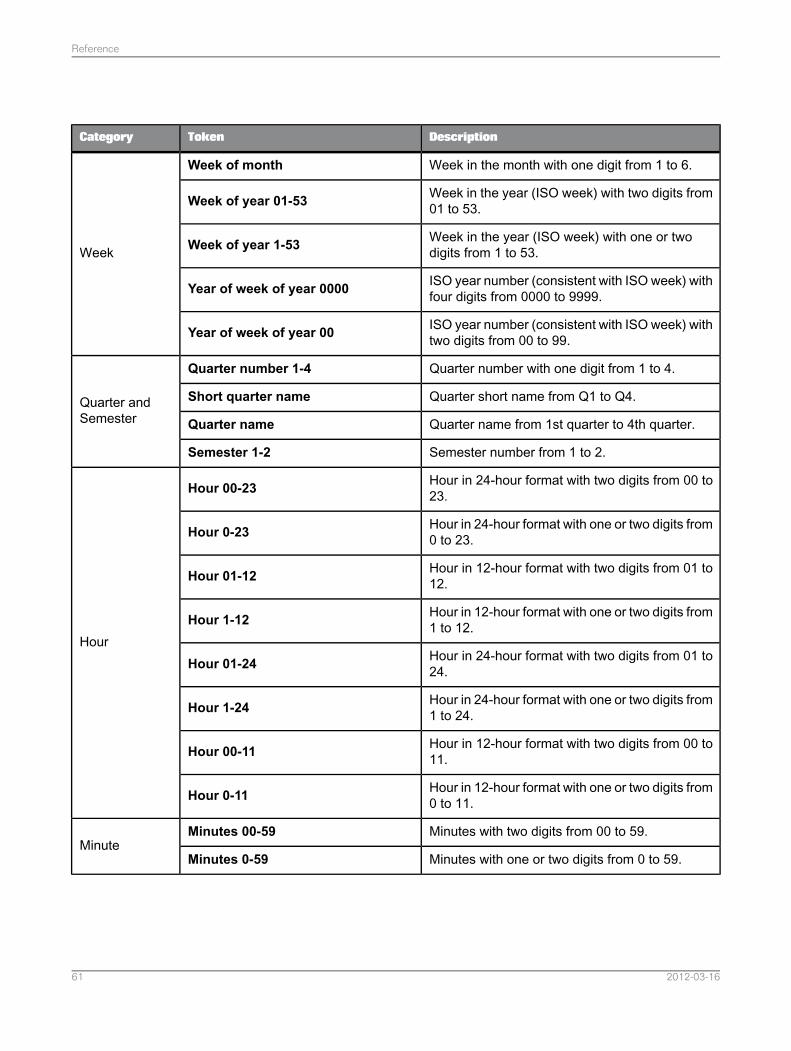
DescriptionTokenCategory
Week in the month with one digit from 1 to 6.Week of month
Week
Week in the year (ISO week) with two digits from01 to 53.Week of year 01-53
Week in the year (ISO week) with one or twodigits from 1 to 53.Week of year 1-53
ISO year number (consistent with ISO week) withfour digits from 0000 to 9999.Year of week of year 0000
ISO year number (consistent with ISO week) withtwo digits from 00 to 99.Year of week of year 00
Quarter number with one digit from 1 to 4.Quarter number 1-4
Quarter andSemester
Quarter short name from Q1 to Q4.Short quarter name
Quarter name from 1st quarter to 4th quarter.Quarter name
Semester number from 1 to 2.Semester 1-2
Hour in 24-hour format with two digits from 00 to23.Hour 00-23
Hour
Hour in 24-hour format with one or two digits from0 to 23.Hour 0-23
Hour in 12-hour format with two digits from 01 to12.Hour 01-12
Hour in 12-hour format with one or two digits from1 to 12.Hour 1-12
Hour in 24-hour format with two digits from 01 to24.Hour 01-24
Hour in 24-hour format with one or two digits from1 to 24.Hour 1-24
Hour in 12-hour format with two digits from 00 to11.Hour 00-11
Hour in 12-hour format with one or two digits from0 to 11.Hour 0-11
Minutes with two digits from 00 to 59.Minutes 00-59Minute
Minutes with one or two digits from 0 to 59.Minutes 0-59
2012-03-1661
Reference
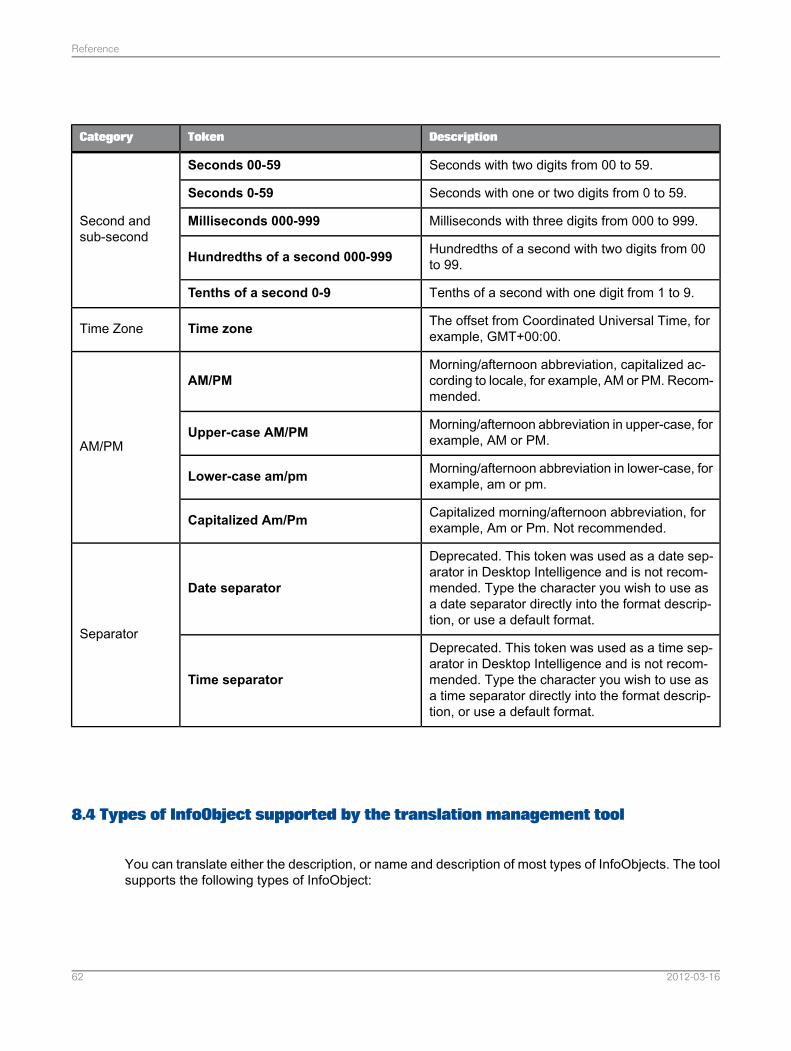
DescriptionTokenCategory
Seconds with two digits from 00 to 59.Seconds 00-59
Second andsub-second
Seconds with one or two digits from 0 to 59.Seconds 0-59
Milliseconds with three digits from 000 to 999.Milliseconds 000-999
Hundredths of a second with two digits from 00to 99.Hundredths of a second 000-999
Tenths of a second with one digit from 1 to 9.Tenths of a second 0-9
The offset from Coordinated Universal Time, forexample, GMT+00:00.Time zoneTime Zone
Morning/afternoon abbreviation, capitalized ac-cording to locale, for example, AM or PM. Recom-mended.
AM/PM
AM/PMMorning/afternoon abbreviation in upper-case, forexample, AM or PM.Upper-case AM/PM
Morning/afternoon abbreviation in lower-case, forexample, am or pm.Lower-case am/pm
Capitalized morning/afternoon abbreviation, forexample, Am or Pm. Not recommended.Capitalized Am/Pm
Deprecated. This token was used as a date sep-arator in Desktop Intelligence and is not recom-mended. Type the character you wish to use asa date separator directly into the format descrip-tion, or use a default format.
Date separator
SeparatorDeprecated. This token was used as a time sep-arator in Desktop Intelligence and is not recom-mended. Type the character you wish to use asa time separator directly into the format descrip-tion, or use a default format.
Time separator
8.4 Types of InfoObject supported by the translation management tool
You can translate either the description, or name and description of most types of InfoObjects. The toolsupports the following types of InfoObject:
2012-03-1662
Reference
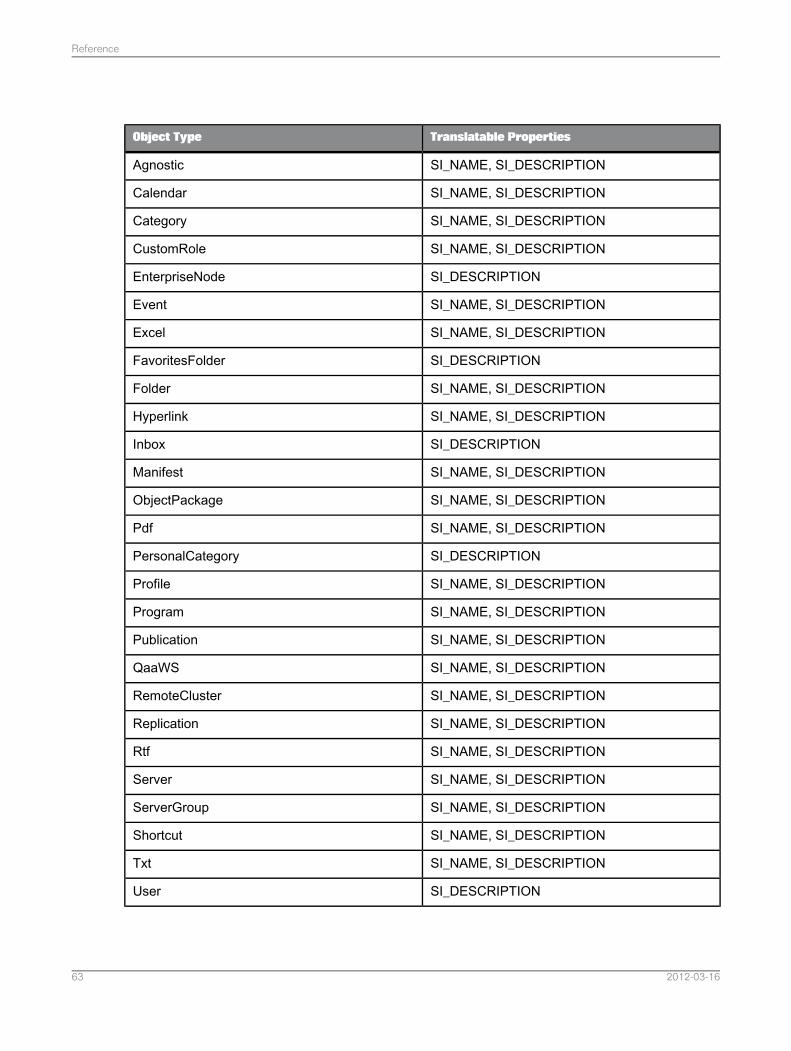
Translatable PropertiesObject Type
SI_NAME, SI_DESCRIPTIONAgnostic
SI_NAME, SI_DESCRIPTIONCalendar
SI_NAME, SI_DESCRIPTIONCategory
SI_NAME, SI_DESCRIPTIONCustomRole
SI_DESCRIPTIONEnterpriseNode
SI_NAME, SI_DESCRIPTIONEvent
SI_NAME, SI_DESCRIPTIONExcel
SI_DESCRIPTIONFavoritesFolder
SI_NAME, SI_DESCRIPTIONFolder
SI_NAME, SI_DESCRIPTIONHyperlink
SI_DESCRIPTIONInbox
SI_NAME, SI_DESCRIPTIONManifest
SI_NAME, SI_DESCRIPTIONObjectPackage
SI_NAME, SI_DESCRIPTIONPdf
SI_DESCRIPTIONPersonalCategory
SI_NAME, SI_DESCRIPTIONProfile
SI_NAME, SI_DESCRIPTIONProgram
SI_NAME, SI_DESCRIPTIONPublication
SI_NAME, SI_DESCRIPTIONQaaWS
SI_NAME, SI_DESCRIPTIONRemoteCluster
SI_NAME, SI_DESCRIPTIONReplication
SI_NAME, SI_DESCRIPTIONRtf
SI_NAME, SI_DESCRIPTIONServer
SI_NAME, SI_DESCRIPTIONServerGroup
SI_NAME, SI_DESCRIPTIONShortcut
SI_NAME, SI_DESCRIPTIONTxt
SI_DESCRIPTIONUser
2012-03-1663
Reference
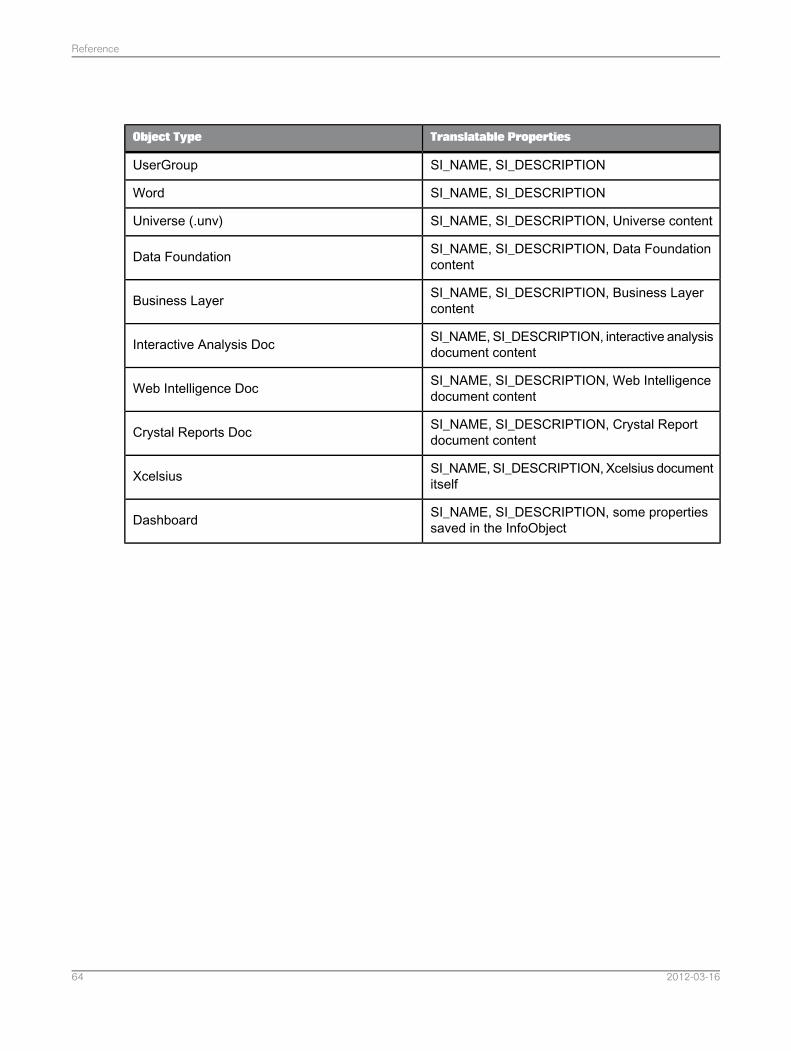
Translatable PropertiesObject Type
SI_NAME, SI_DESCRIPTIONUserGroup
SI_NAME, SI_DESCRIPTIONWord
SI_NAME, SI_DESCRIPTION, Universe contentUniverse (.unv)
SI_NAME, SI_DESCRIPTION, Data FoundationcontentData Foundation
SI_NAME, SI_DESCRIPTION, Business LayercontentBusiness Layer
SI_NAME, SI_DESCRIPTION, interactive analysisdocument contentInteractive Analysis Doc
SI_NAME, SI_DESCRIPTION, Web Intelligencedocument contentWeb Intelligence Doc
SI_NAME, SI_DESCRIPTION, Crystal Reportdocument contentCrystal Reports Doc
SI_NAME, SI_DESCRIPTION, Xcelsius documentitselfXcelsius
SI_NAME, SI_DESCRIPTION, some propertiessaved in the InfoObjectDashboard
2012-03-1664
Reference
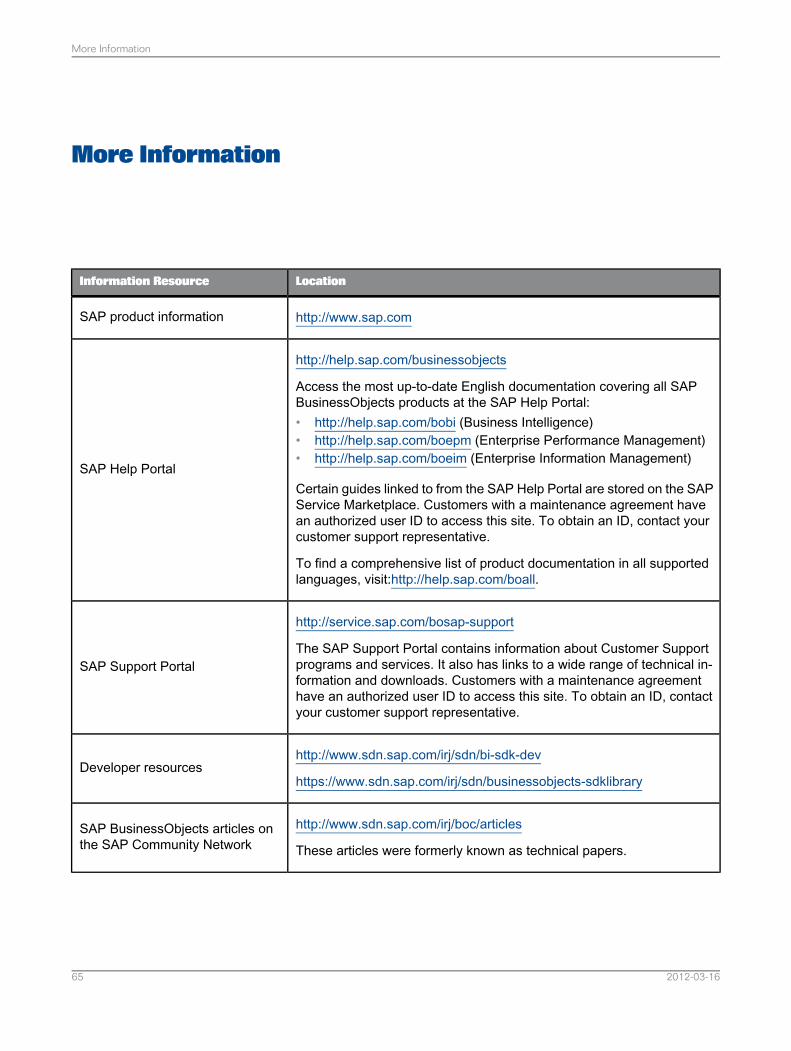
More Information
LocationInformation Resource
http://www.sap.comSAP product information
http://help.sap.com/businessobjects
Access the most up-to-date English documentation covering all SAPBusinessObjects products at the SAP Help Portal:• http://help.sap.com/bobi (Business Intelligence)• http://help.sap.com/boepm (Enterprise Performance Management)• http://help.sap.com/boeim (Enterprise Information Management)
Certain guides linked to from the SAP Help Portal are stored on the SAPService Marketplace. Customers with a maintenance agreement havean authorized user ID to access this site. To obtain an ID, contact yourcustomer support representative.
To find a comprehensive list of product documentation in all supportedlanguages, visit:http://help.sap.com/boall.
SAP Help Portal
http://service.sap.com/bosap-support
The SAP Support Portal contains information about Customer Supportprograms and services. It also has links to a wide range of technical in-formation and downloads. Customers with a maintenance agreementhave an authorized user ID to access this site. To obtain an ID, contactyour customer support representative.
SAP Support Portal
http://www.sdn.sap.com/irj/sdn/bi-sdk-dev
https://www.sdn.sap.com/irj/sdn/businessobjects-sdklibraryDeveloper resources
http://www.sdn.sap.com/irj/boc/articles
These articles were formerly known as technical papers.SAP BusinessObjects articles onthe SAP Community Network
2012-03-1665
More Information
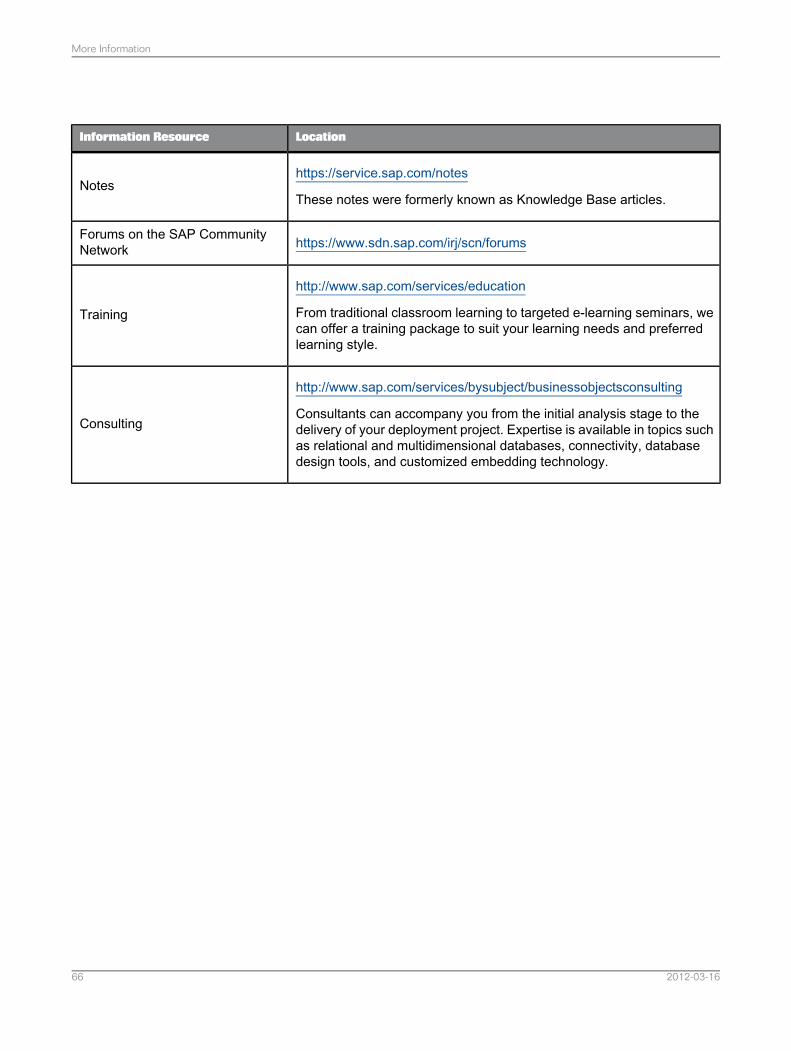
LocationInformation Resource
https://service.sap.com/notes
These notes were formerly known as Knowledge Base articles.Notes
https://www.sdn.sap.com/irj/scn/forumsForums on the SAP CommunityNetwork
http://www.sap.com/services/education
From traditional classroom learning to targeted e-learning seminars, wecan offer a training package to suit your learning needs and preferredlearning style.
Training
http://www.sap.com/services/bysubject/businessobjectsconsulting
Consultants can accompany you from the initial analysis stage to thedelivery of your deployment project. Expertise is available in topics suchas relational and multidimensional databases, connectivity, databasedesign tools, and customized embedding technology.
Consulting
2012-03-1666
More Information
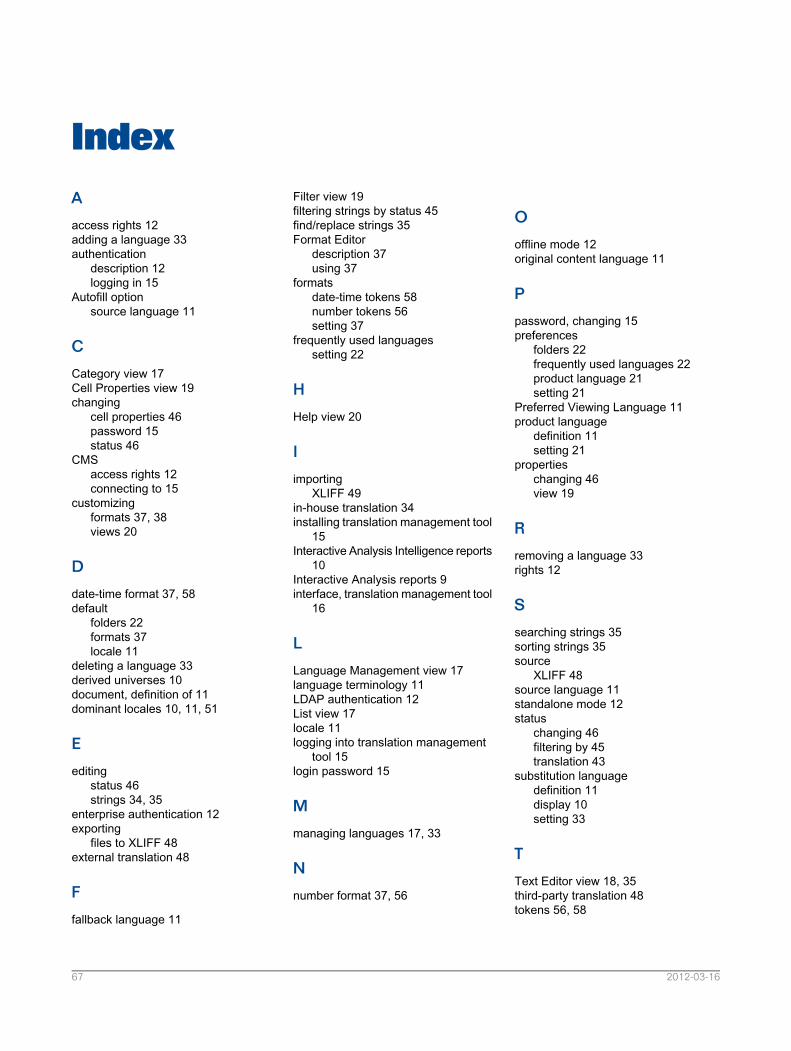
IndexA
access rights 12adding a language 33authentication
description 12logging in 15
Autofill optionsource language 11
C
Category view 17Cell Properties view 19changing
cell properties 46password 15status 46
CMSaccess rights 12connecting to 15
customizingformats 37, 38views 20
D
date-time format 37, 58default
folders 22formats 37locale 11
deleting a language 33derived universes 10document, definition of 11dominant locales 10, 11, 51
E
editingstatus 46strings 34, 35
enterprise authentication 12exporting
files to XLIFF 48external translation 48
F
fallback language 11
Filter view 19filtering strings by status 45find/replace strings 35Format Editor
description 37using 37
formatsdate-time tokens 58number tokens 56setting 37
frequently used languagessetting 22
H
Help view 20
I
importingXLIFF 49
in-house translation 34installing translation management tool
15Interactive Analysis Intelligence reports
10Interactive Analysis reports 9interface, translation management tool
16
L
Language Management view 17language terminology 11LDAP authentication 12List view 17locale 11logging into translation management
tool 15login password 15
M
managing languages 17, 33
N
number format 37, 56
O
offline mode 12original content language 11
P
password, changing 15preferences
folders 22frequently used languages 22product language 21setting 21
Preferred Viewing Language 11product language
definition 11setting 21
propertieschanging 46view 19
R
removing a language 33rights 12
S
searching strings 35sorting strings 35source
XLIFF 48source language 11standalone mode 12status
changing 46filtering by 45translation 43
substitution languagedefinition 11display 10setting 33
T
Text Editor view 18, 35third-party translation 48tokens 56, 58
2012-03-1667
translatingby a third party 48strings 34, 35translating
Interactive Analysis reports 9Web Intelligence reports 9
Translation Editor view 17translation status 43
U
universes 10updating
cell properties 46status 46
V
view customizing 20views
Cell Properties 19Filter 19Help 20Language Management 17Text Editor 18Translation Editor 17
W
Web Intelligence reports 9window 16
Windows authentication 12
X
XLIFFexporting files 48file exchange 48file structure 47importing 49status 43target languages 49
2012-03-1668
Index


![The SAP PartnerEdge Program Overview for OEM Partners[1]](https://img.pdfslide.us/doc/110x75/577cd4831a28ab9e7898aa2b/the-sap-partneredge-program-overview-for-oem-partners1.jpg)


![SAP PartnerEdge General Terms and Conditions [DUAL] idID.v.9](https://img.pdfslide.us/doc/110x75/5867c8571a28ab01578b910a/sap-partneredge-general-terms-and-conditions-dual-ididv9-.jpg)