Embed Size (px)
Citation preview
Transactions User Guide (Internet)
Version Oct 2011 Pg 1 of 256

Transactions User Guide (Internet)
Version Oct 2011 Pg 2 of 256
Table of Contents Purpose............................................................................................................................5 1. Transaction Flow Overview........................................................................................5 2. Bulk Import ..................................................................................................................6
2.1. Import......................................................................................................................6 2.2. Batch Instructions ...................................................................................................8
3. Create Transaction From Template.........................................................................10 4. Copy Instructions......................................................................................................14 5. Manual Transaction Creation, Template Creation & Quick Payments.................19
5.1.1. Transaction Creation .........................................................................................19 5.1.2. Amount Priority Capability For Cross Border Payments ....................................28 5.1.3. Save Transaction As Template..........................................................................29 5.1.4. Batch Instruction ................................................................................................32 5.1.5. Add to Existing Batch.........................................................................................33 5.1.6. Quick Payments.................................................................................................35 5.1.7. Template Status.................................................................................................44 5.2. Unique Fields In The Payment Templates............................................................48
5.2.1. Cheque Payment Template (Applicable to TH payment centre only).......................... 48 5.2.2. MT103 - Telegraphic Transfer...................................................................................... 49
6. Edit Instructions........................................................................................................51 6.1. Edit / Complete Instructions..................................................................................51 6.2. Edit Batched Instructions ......................................................................................54
7. Global Payment Solutions - GPS.............................................................................59 7.1. Cross Border Transactions Creation ....................................................................59
7.1.1. Cross Border Cheque................................................................................................... 60 7.1.2. Cross Border Payroll .................................................................................................... 62 7.1.3. Cross Border Direct Credit ........................................................................................... 64 7.1.4. Cross Border Book Transfer ........................................................................................ 66 7.1.5. Cross Border Real Time Settlement ............................................................................ 68
7.2. Unique Fields in Global Payment Solutions (GPS) – Templates..........................70 7.2.1. Destination Country...................................................................................................... 70 7.2.2. On Behalf of Information .............................................................................................. 70 7.2.3. Exchange Details ......................................................................................................... 71 7.2.4. Date Priority.................................................................................................................. 71 7.2.5. Amount Priority............................................................................................................. 72
8. Request For Quote (RFQ) During Send to Bank Stage .........................................73 8.1. RFQ For Telegraphic Transfer..............................................................................73 8.2. RFQ For Local Bank Transfer / Book Transfer / Book Transfer /Direct Credit / International Bank Cheque / Local Bank Cheque........................................................73 8.3. Send To Bank With The Option To Perform RFQ.................................................75 8.4. Check RFQ Status................................................................................................77
9. E&I ..............................................................................................................................79 9.1 Research Transaction............................................................................................81 9.2 Search Transaction................................................................................................89 9.3 New Investigation ..................................................................................................94 9.4 Stop Payment / Manual 199 ..................................................................................98 9.5 Amend Payment / Related 195............................................................................101
10. Trade Banking .......................................................................................................104 10.1. LC Issuance......................................................................................................104

Transactions User Guide (Internet)
Version Oct 2011 Pg 3 of 256
10.2. LC Amendment.................................................................................................112 10.3. Shipping Guarantees ........................................................................................117 10.4. Guarantee Issuance .........................................................................................123 10.5. Guarantee Amendment ....................................................................................130 10.6. Messages To Bank ...........................................................................................134
11. Document Manager Transactions .......................................................................139 11.1 Document Manager- Create a New Document..................................................141 11.2 Document Manager- Documents Maintenance - Edit Document.......................145 11.3 Document Manager- Track Documents .............................................................147 11.4 Document Manager- Create a Profile for L/C Issuance or Amendment ............148 11.5 Document Manager- Create a Profile for Payment Instruction ..........................154 11.7 Document Manager- View and Edit a Profile .....................................................159 11.8 Document Manager- Group Documents by Running a Profile...........................161 11.9 Document Manager Templates - Create a Template.........................................163 11.10 Document Manager Templates - Create New Document from Template........166 11.11 My Settings - View Documents........................................................................168 11.12 My Settings - View Documents List .................................................................171 11.13 My Settings - Create a View ............................................................................173 11.14 My Settings - Edit a View.................................................................................176 11.15 My Settings - Manage Personal Tags..............................................................178 11.16 My Settings - Create Customised Columns.....................................................179 11.17 My Settings - View Settings .............................................................................181 11.18 My Settings - Your Notification and Alert Settings ...........................................182 11.19 Document Manager Administrations - Maintain Auto-Grouping Profiles..........183 11.20 Document Manager Administrations - Manage Company Labels....................185 11.21 Document Manager Administrations - Manage Company Code Lists .............186 11.22 Document Manager Administrations - Company Logos & Signatures.............188 11.23 Document Manager Administrations - Import Address Book Contacts............189 11.24 Document Manager Administrations - Company Address Book......................190 11.25 Document Manager Administrations - L/C Template Settings .........................191 11.26 Utilities - Upload a File.....................................................................................192 11.27 Utilities - View an Uploaded File ......................................................................194 11.28 Utilities - View Received files...........................................................................195
12. Supply Chain Financing (SCF).............................................................................196 12.1 Supplier Finance / Buyer Finance.....................................................................197 12.1.1 Create Request For Finance (RFF) using existing documents.......................197 12.1.2 Create Request For Finance (RFF) Manually.................................................200 12.1.3 Search Request For Finance (RFF)................................................................202 12.1.3 PO Ledger ......................................................................................................203 12.1.4 Invoice Ledger ................................................................................................205 12.2 Receivable Services ..........................................................................................207 12.2.1 Add to Pool .....................................................................................................208 12.2.2 Create RFF – Pool Based...............................................................................210 12.2.3 Search Request For Finance (RFF)................................................................212 12.2.4 Invoice Ledger ................................................................................................213 12.2.5 Invoices submitted to pool ..............................................................................215 12.2.6 Pooled Batched Schedule Inquiry...................................................................216 12.3 View all RFF ......................................................................................................218

Transactions User Guide (Internet)
Version Oct 2011 Pg 4 of 256
Appendix 1 Standard Chartered Bank Singapore - Straight2Bank FX Payments Currency Reference Document.....................................................................................219 Appendix 2 Standard Chartered Bank Hong Kong Straight2Bank FX Payments Currency Reference Document.....................................................................................238 Disclaimer
This document is issued by Standard Chartered Bank (“SCB”). While all reasonable care has been taken in preparing this document, no responsibility or liability is accepted for any errors of fact, omission or for any opinion expressed herein. You are advised to exercise your own independent judgment (with the advice of your professional advisers as necessary) with respect to the risks and consequences of any matter contained herein. SCB expressly disclaims any liability and responsibility for any losses arising from any uses to which this document is put and for any errors or omissions in this document. This document contains information that is proprietary to SCB and should not be circulated to third parties without SCB’s prior written approval.
Transactions User Guide (Internet)
Version Oct 2011 Pg 5 of 256
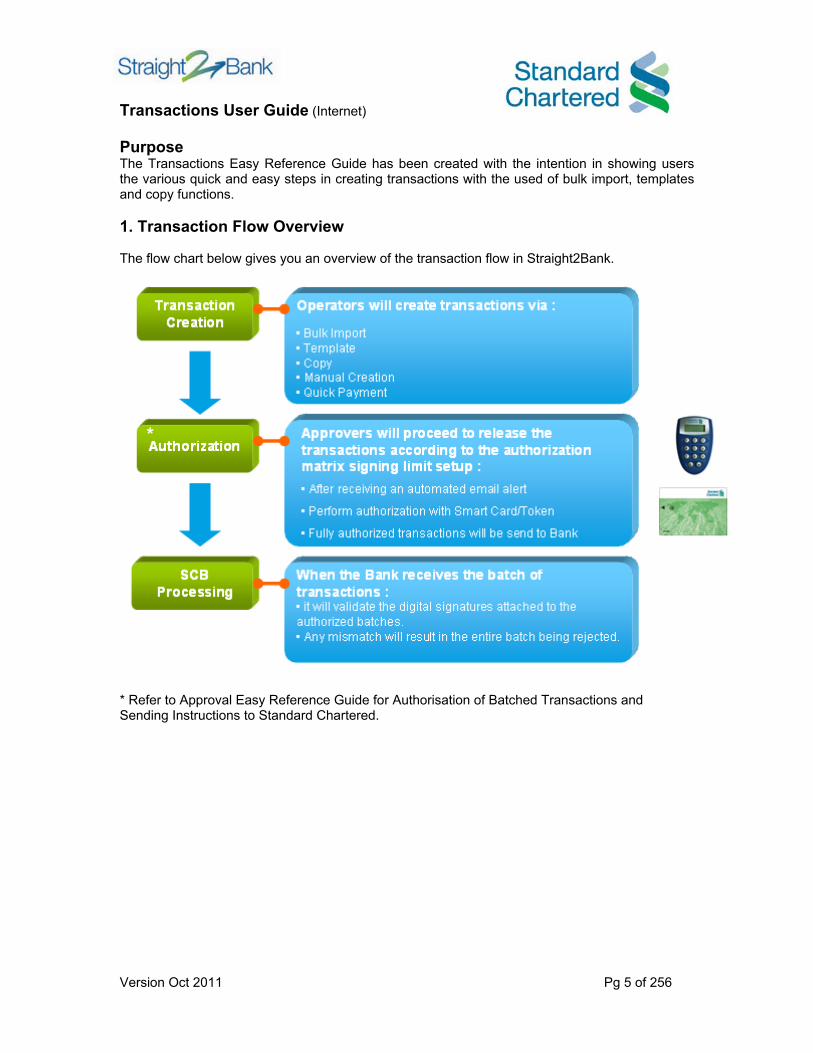
Purpose The Transactions Easy Reference Guide has been created with the intention in showing users the various quick and easy steps in creating transactions with the used of bulk import, templates and copy functions. 1. Transaction Flow Overview The flow chart below gives you an overview of the transaction flow in Straight2Bank.
* Refer to Approval Easy Reference Guide for Authorisation of Batched Transactions and Sending Instructions to Standard Chartered.
*

Transactions User Guide (Internet)
Version Oct 2011 Pg 6 of 256
2. Bulk Import
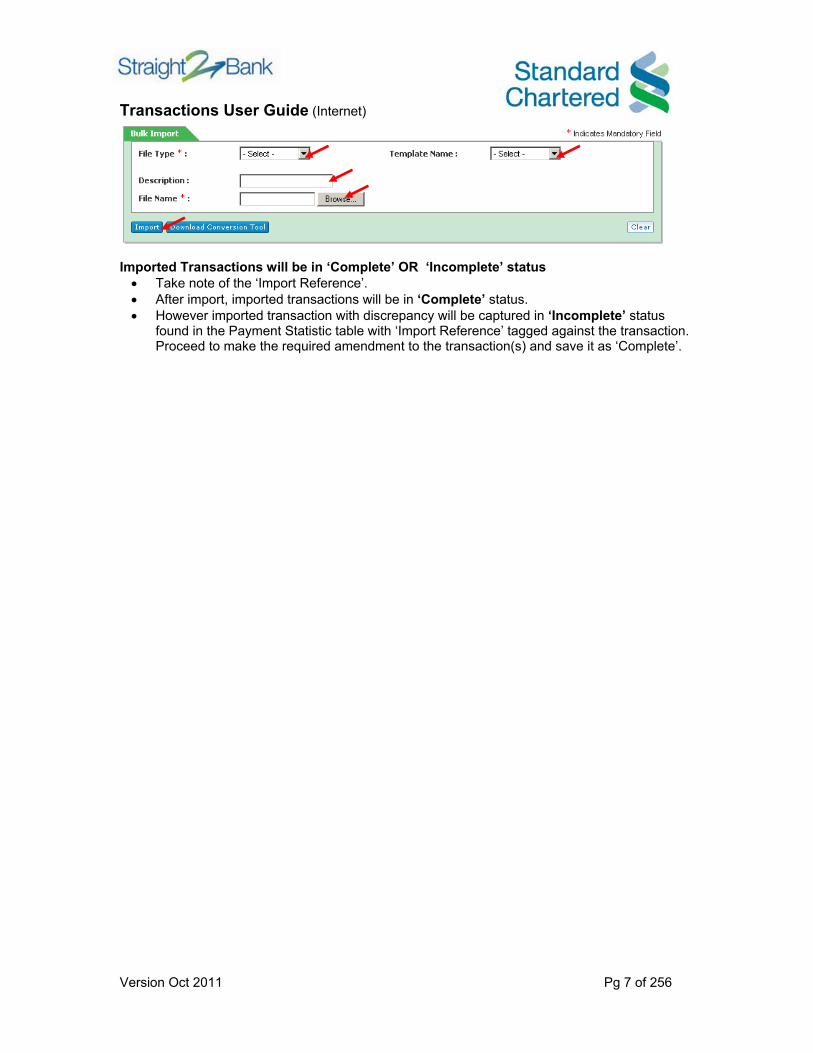
2.1. Import This capability allows you to import field of incomplete instructions into Straight2Bank. Step 1: Select – Transactions / Utilities / Bulk Import
Step 2:
• Select the correct file type. Eg. Payment. • Select the correct template. • Enter description. • Click ‘Browse’ to select the file for import. • Click ‘Import’
Transactions User Guide (Internet)
Version Oct 2011 Pg 7 of 256
Imported Transactions will be in ‘Complete’ OR ‘Incomplete’ status • Take note of the ‘Import Reference’. • After import, imported transactions will be in ‘Complete’ status. • However imported transaction with discrepancy will be captured in ‘Incomplete’ status
found in the Payment Statistic table with ‘Import Reference’ tagged against the transaction. Proceed to make the required amendment to the transaction(s) and save it as ‘Complete’.
Transactions User Guide (Internet)
Version Oct 2011 Pg 8 of 256
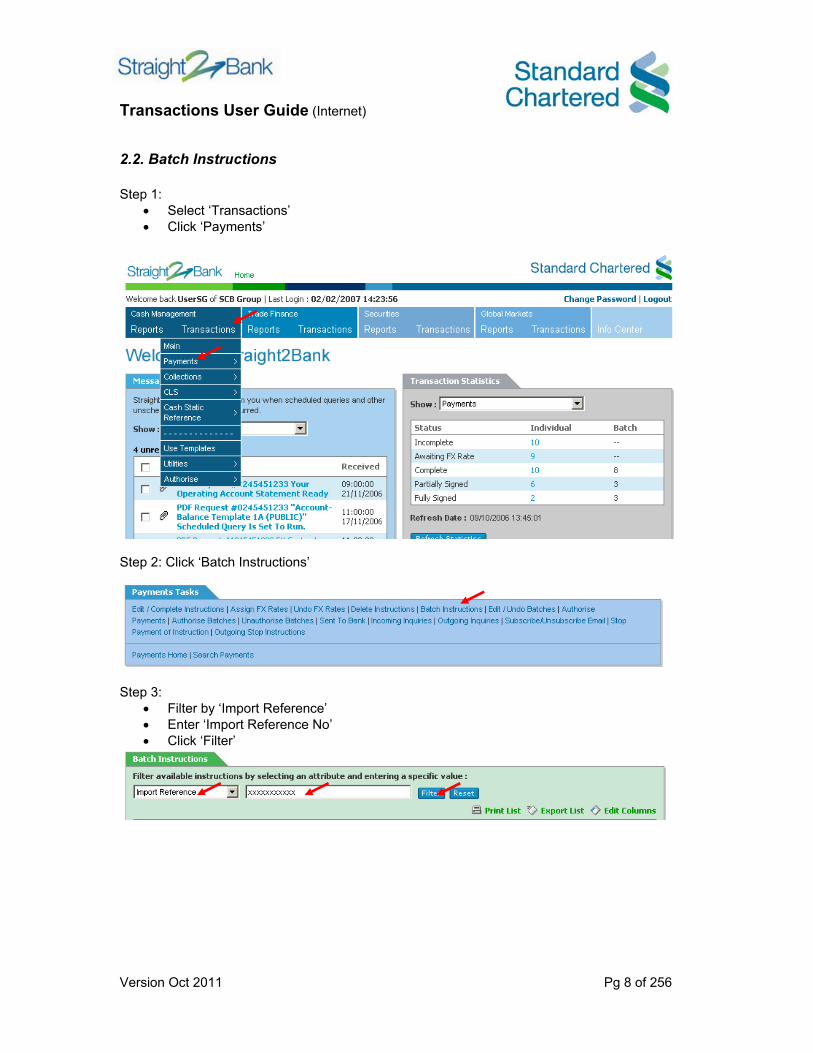
2.2. Batch Instructions Step 1:
• Select ‘Transactions’ • Click ‘Payments’
Step 2: Click ‘Batch Instructions’
Step 3:
• Filter by ‘Import Reference’ • Enter ‘Import Reference No’ • Click ‘Filter’

Transactions User Guide (Internet)
Version Oct 2011 Pg 9 of 256
Step 4:
• To select ‘All’ instructions for batching, click on the box as indicated. OR
• To select ‘Individual’ instructions for batching, click against the respective instructions.
• Click ‘Batch Selected Instructions’ OR ‘Auto Batch Instructions’ or ‘Add to Existing Batch’

Transactions User Guide (Internet)
Version Oct 2011 Pg 10 of 256
3. Create Transaction From Template For recurring instructions, it can be created from the transaction templates which you have saved earlier. Step 1:
• Click on ‘Use Template’ from the drop down
Step 2:
• Select the required approved template. • Click ‘Load Template’.
Transactions User Guide (Internet)
Version Oct 2011 Pg 11 of 256
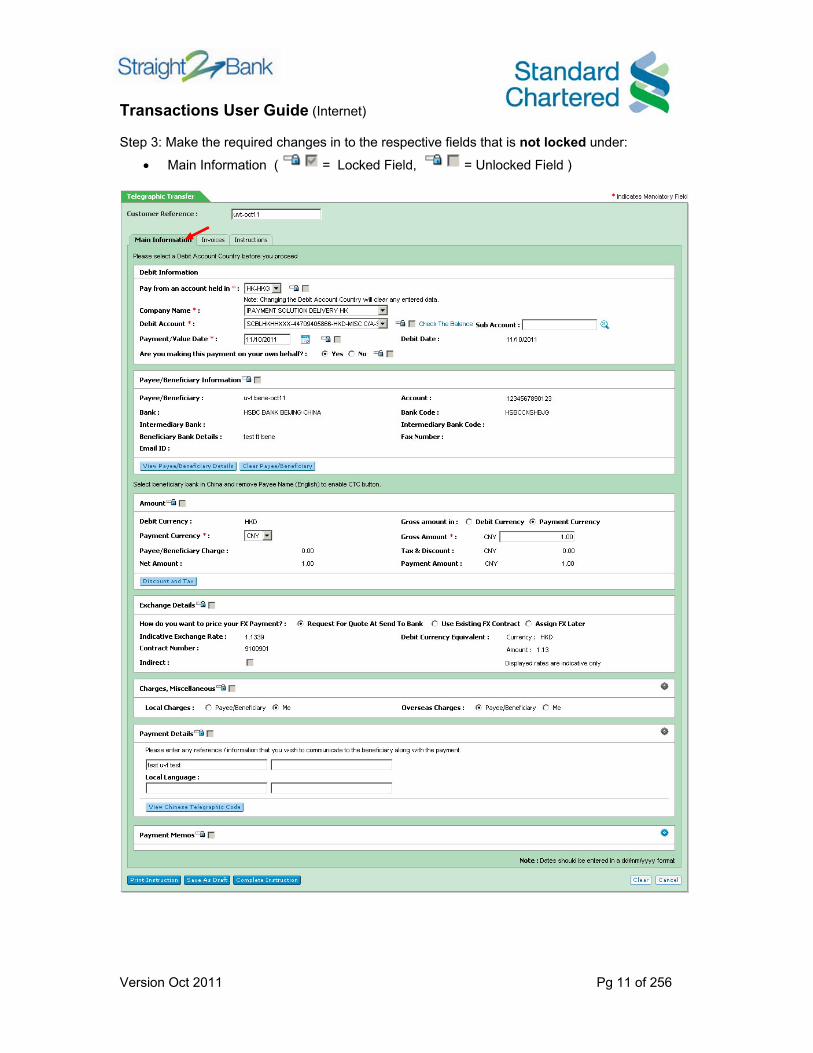
Step 3: Make the required changes in to the respective fields that is not locked under:
• Main Information ( = Locked Field, = Unlocked Field )

Transactions User Guide (Internet)
Version Oct 2011 Pg 12 of 256
• Invoices
• Instructions

Transactions User Guide (Internet)
Version Oct 2011 Pg 13 of 256
• Click ‘Complete Transaction’
• Proceed to perform one of functions the below: o Add to Existing Batch OR o Batch Instruction OR o Edit Instruction OR o Delete Instruction OR o Copy Instruction OR o Print Instruction OR
Transactions User Guide (Internet)
Version Oct 2011 Pg 14 of 256
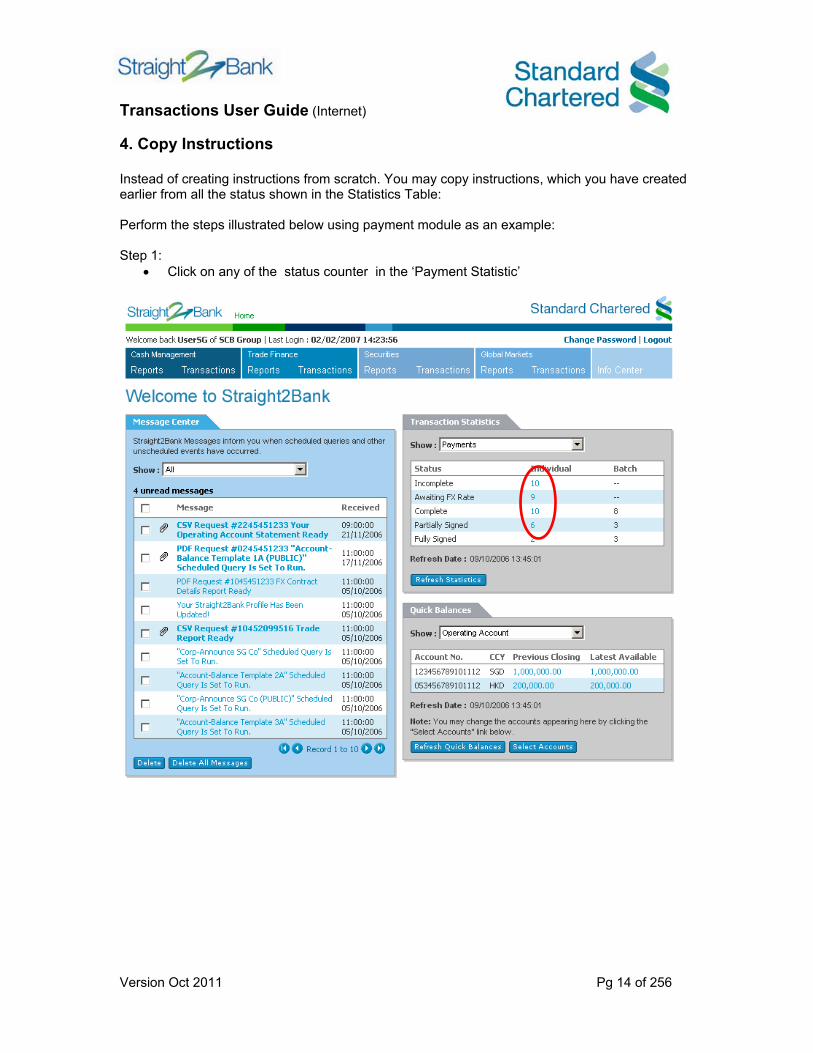
4. Copy Instructions Instead of creating instructions from scratch. You may copy instructions, which you have created earlier from all the status shown in the Statistics Table: Perform the steps illustrated below using payment module as an example: Step 1:
• Click on any of the status counter in the ‘Payment Statistic’

Transactions User Guide (Internet)
Version Oct 2011 Pg 15 of 256
• Click against the transaction you wish to copy. • Select ‘Copy Selected Items’ • Click ‘OK’
• Click ‘Back To Payments’
• Click on the counter for ‘Incomplete’ status

Transactions User Guide (Internet)
Version Oct 2011 Pg 16 of 256
• Click on the ‘Payment Reference’

Transactions User Guide (Internet)
Version Oct 2011 Pg 17 of 256
• Click on ‘Complete Transaction’ after verifying the payment information

Transactions User Guide (Internet)
Version Oct 2011 Pg 18 of 256
Once instruction is in ‘Complete’ status, proceed to: • ‘Batch Instruction’ to create a new batch OR • ‘Add To Existing Batch’
Transactions User Guide (Internet)
Version Oct 2011 Pg 19 of 256
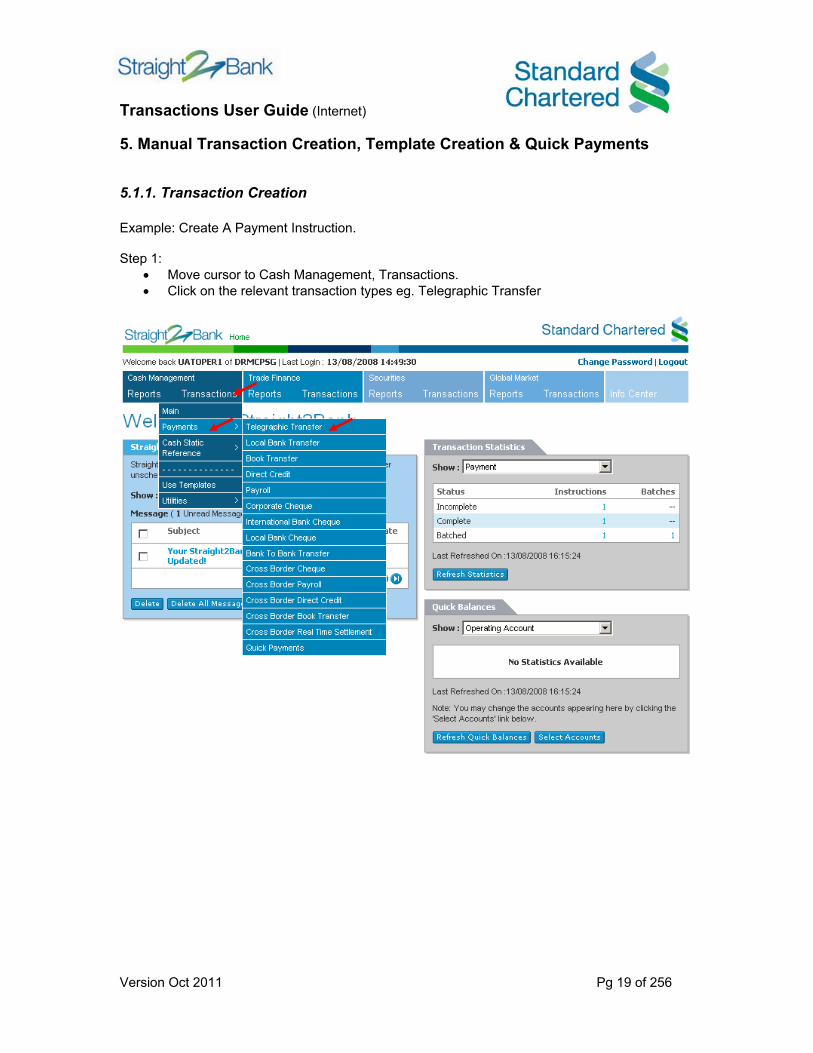
5. Manual Transaction Creation, Template Creation & Quick Payments
5.1.1. Transaction Creation Example: Create A Payment Instruction. Step 1:
• Move cursor to Cash Management, Transactions. • Click on the relevant transaction types eg. Telegraphic Transfer

Transactions User Guide (Internet)
Version Oct 2011 Pg 20 of 256
The Payment template for Telegraphic Transfer will be launched.
The initiation steps are illustrated below:
You will be given the options to:
• Select existing Payee/ Beneficiary form the list OR • Create New Payee/Beneficiary
Step 1) Enter Customer Reference if applicable.
Step 2) Select • Payment Center • Company Name • Debit Account • Payment / Value
Date
Step 3) Click “Search Payees/Beneficiaries.

Transactions User Guide (Internet)
Version Oct 2011 Pg 21 of 256
Step 3a) To Create New Payee/ Beneficiary
• Enter information for Mandatory Fields • Populate the Non Mandatory Fields if required • Click ‘Save’
OR Step 3b) Select existing Payee/ Beneficiary form the list
• Click to select Payee / Beneficiary from the list • Click ‘Use This Payee / Beneficiary’
Transactions User Guide (Internet)
Version Oct 2011 Pg 22 of 256
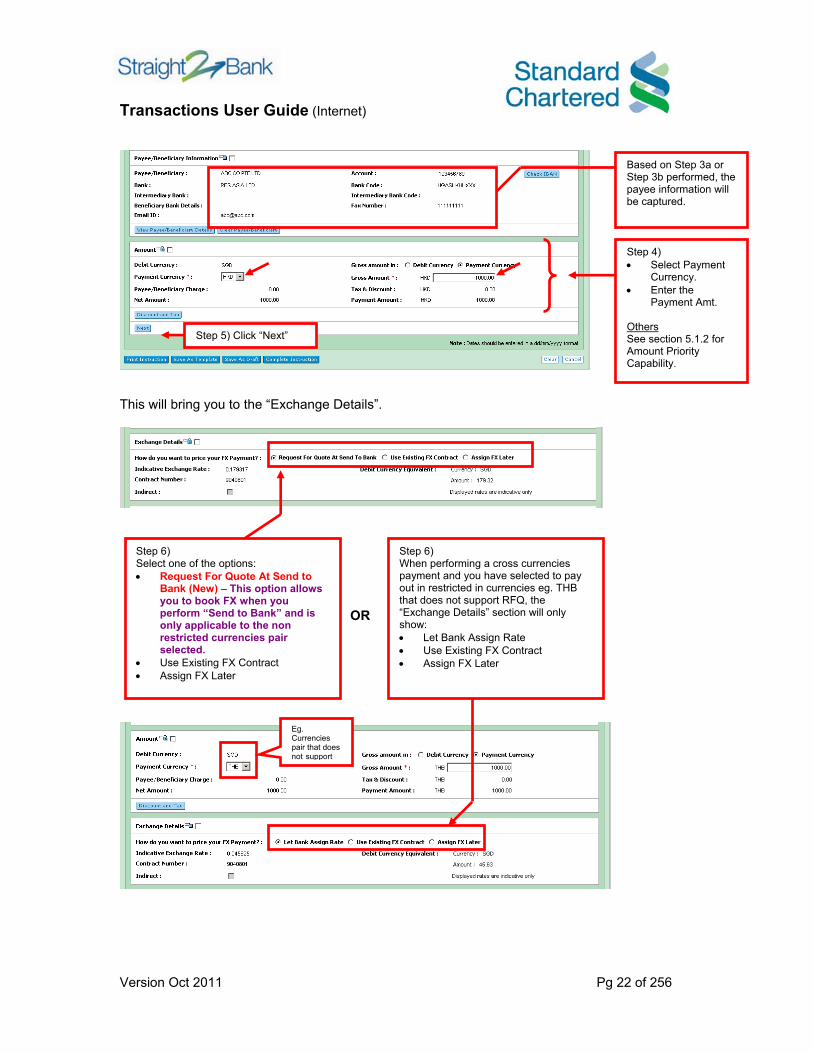
This will bring you to the “Exchange Details”.
Based on Step 3a or Step 3b performed, the payee information will be captured.
Step 4) • Select Payment
Currency. • Enter the
Payment Amt. Others See section 5.1.2 for Amount Priority Capability.
Step 6) Select one of the options: • Request For Quote At Send to
Bank (New) – This option allows you to book FX when you perform “Send to Bank” and is only applicable to the non restricted currencies pair selected.
• Use Existing FX Contract • Assign FX Later
Step 6) When performing a cross currencies payment and you have selected to pay out in restricted in currencies eg. THB that does not support RFQ, the “Exchange Details” section will only show: • Let Bank Assign Rate • Use Existing FX Contract • Assign FX Later
Eg. Currencies pair that does not support
Step 5) Click “Next”
OR

Transactions User Guide (Internet)
Version Oct 2011 Pg 23 of 256
Click on to expand the sections for “Payment Details” and “Payment Memos” to enter applicable information for the 2 sections.
Step 8: Enter the Payment Details and/or Payment Memos if applicable.
Step 7) Specify the bearer for Local & Overseas Charges.

Transactions User Guide (Internet)
Version Oct 2011 Pg 24 of 256
This is fully populated new TT Screen. From here, you can proceed to enter the “Invoice” + “Instructions” if applicable.
Transactions User Guide (Internet)
Version Oct 2011 Pg 25 of 256
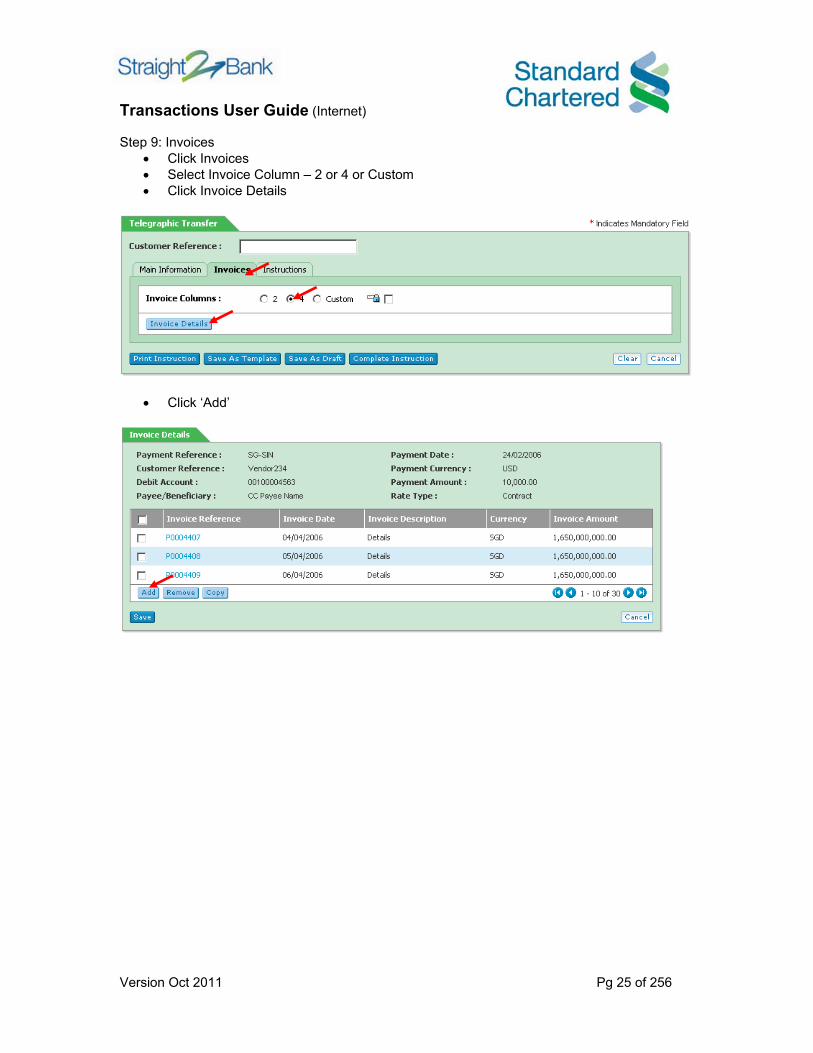
Step 9: Invoices
• Click Invoices • Select Invoice Column – 2 or 4 or Custom • Click Invoice Details
• Click ‘Add’

Transactions User Guide (Internet)
Version Oct 2011 Pg 26 of 256
• Enter ‘Invoice Reference’ • Enter ‘Invoice Description’ • Select ‘ Invoice Date’ • Enter ‘Invoice Amount’ • Click ‘Save & Add’
• Click ‘Save’

Transactions User Guide (Internet)
Version Oct 2011 Pg 27 of 256
Step 10 : Instructions (Only if applicable)
• Click on “Instructions” Tab • Specify the “Trans Type Code”, “Instruction Codes” and “Regulatory Reporting” if
required.
From here, you can perform the tasks as indicated below.
This button helps the user to print the transaction.
This button helps the user to save the information entered as a template which can be accessed and used later.
This button helps the user to save the entered information as a draft which can be accessed later and released once all the required fields are completely filled in.
Clicking this button finishes the data entry process for batching. The system will not allow you to complete if you have not entered all the mandatory fields.

Transactions User Guide (Internet)
Version Oct 2011 Pg 28 of 256
5.1.2. Amount Priority Capability For Cross Border Payments This feature allows you the option to make Straigh2Bank Web cross border payments in indicating the amount either in Payment Currency or Debit Currency. Payment Amount Priority Under Payment Amount Priority* - the cross border payment will be paid out in currency specified in the currency field. Example – Cross border payment will be in GBP1/-, debited from the HKD Account.
* Cross border payments in Straight2Bank Web will be automatically defaulted to Pay Amount Priority. Debit Amount Priority Under the Debit Amount Priority – the cross border payment will be paid in debit currency equivalent. Example – HKD100/- will be debited from HKD Account fro the cross border payment. Beneficiary will receive the payment in GBP amount equivalent to HKD/-.
Note: For Debit Amount Priority, the Payment Amount + Net Amount will be displayed as ZERO until a FX Contract is chosen. Straight2Bank Web does not support System Rate for debit amount priority payments.
Transactions User Guide (Internet)
Version Oct 2011 Pg 29 of 256
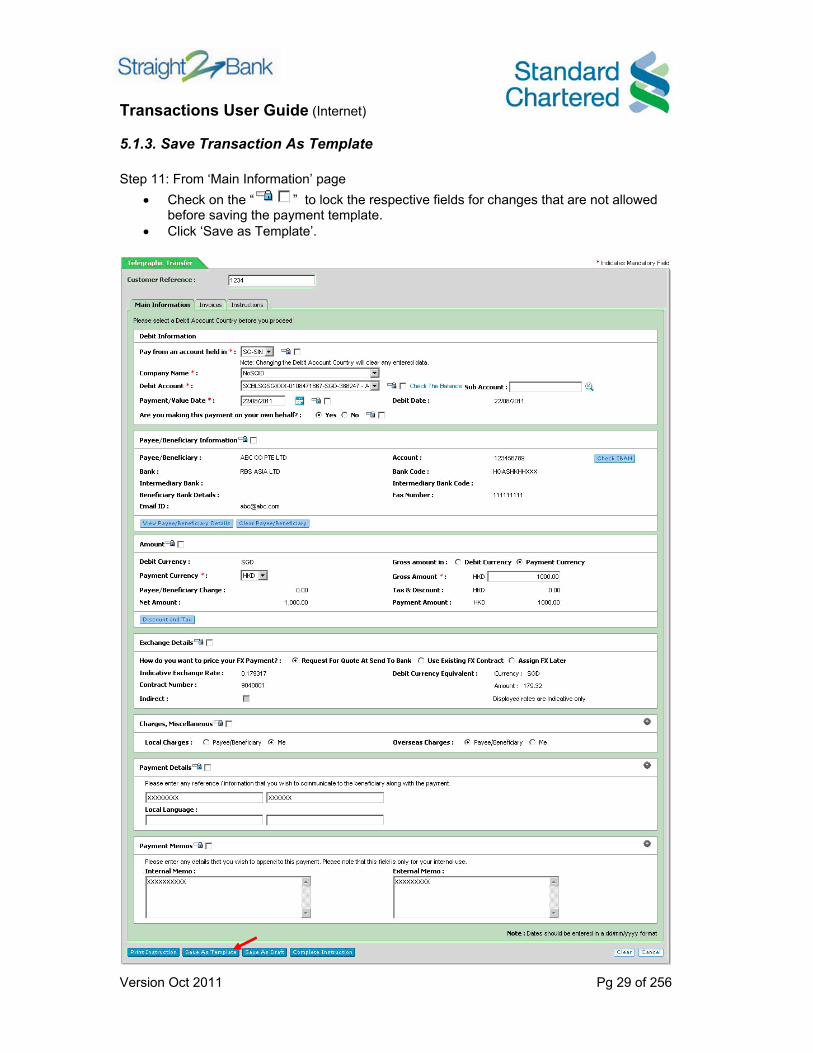
5.1.3. Save Transaction As Template Step 11: From ‘Main Information’ page
• Check on the “ ” to lock the respective fields for changes that are not allowed before saving the payment template.
• Click ‘Save as Template’.
Transactions User Guide (Internet)
Version Oct 2011 Pg 30 of 256
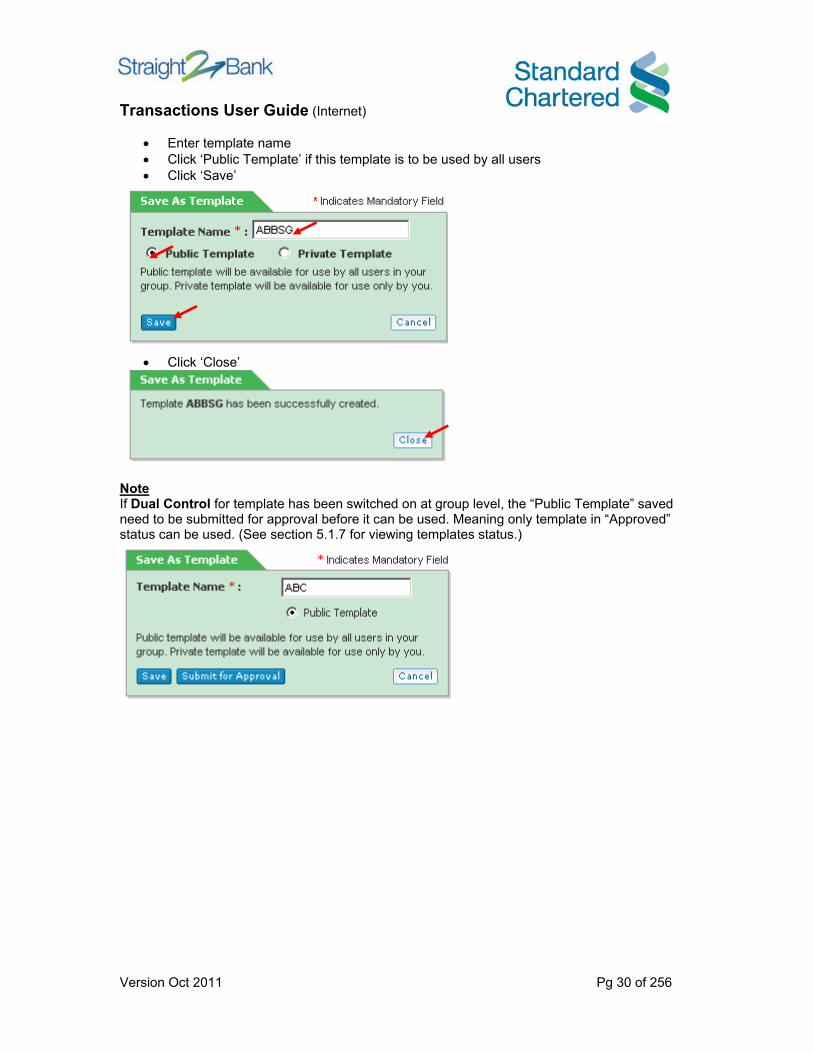
• Enter template name • Click ‘Public Template’ if this template is to be used by all users • Click ‘Save’
• Click ‘Close’
Note If Dual Control for template has been switched on at group level, the “Public Template” saved need to be submitted for approval before it can be used. Meaning only template in “Approved” status can be used. (See section 5.1.7 for viewing templates status.)

Transactions User Guide (Internet)
Version Oct 2011 Pg 31 of 256
Step 12: Click ‘Complete’
Other Functions: • ‘Print Instruction’ which prints a copy of the instruction; • ‘Save as Draft’ which saves this instruction with the status "incomplete"; • ‘Cancel’ which takes you back to the main page of the Payments module; • ‘Clear’ which clears all information you have already entered for this instruction.
Once payment is in ‘Complete’ status, proceed to: • ‘Batch Instruction’ – to create a new batch OR • ‘Add to Existing Batch’
Transactions User Guide (Internet)
Version Oct 2011 Pg 32 of 256
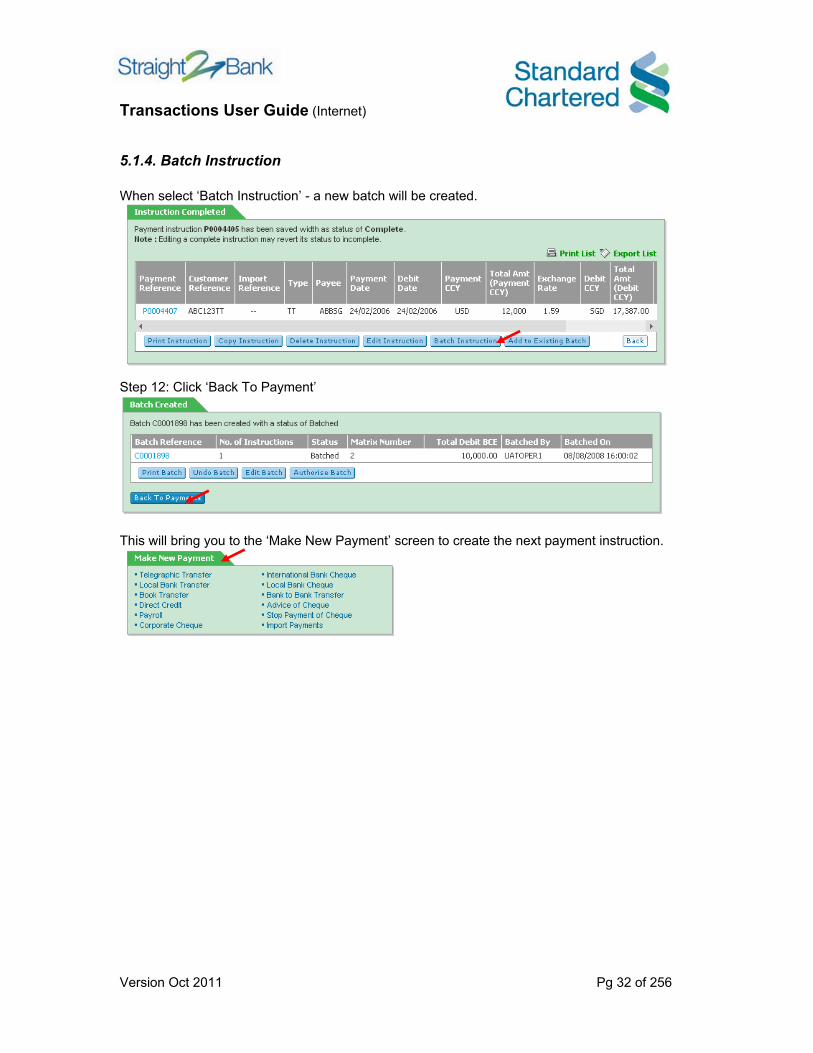
5.1.4. Batch Instruction When select ‘Batch Instruction’ - a new batch will be created.
Step 12: Click ‘Back To Payment’
This will bring you to the ‘Make New Payment’ screen to create the next payment instruction.

Transactions User Guide (Internet)
Version Oct 2011 Pg 33 of 256
5.1.5. Add to Existing Batch When click on ‘Add to Existing Batch’
Step 13:
• Select the batch no from the drop down list for adding the instruction to the existing batch.
• Click ‘Save’

Transactions User Guide (Internet)
Version Oct 2011 Pg 34 of 256
Step 14: Click ‘Back To Payment’
This will bring you to the ‘Make New Payment’ screen to create the next payment instruction.

Transactions User Guide (Internet)
Version Oct 2011 Pg 35 of 256
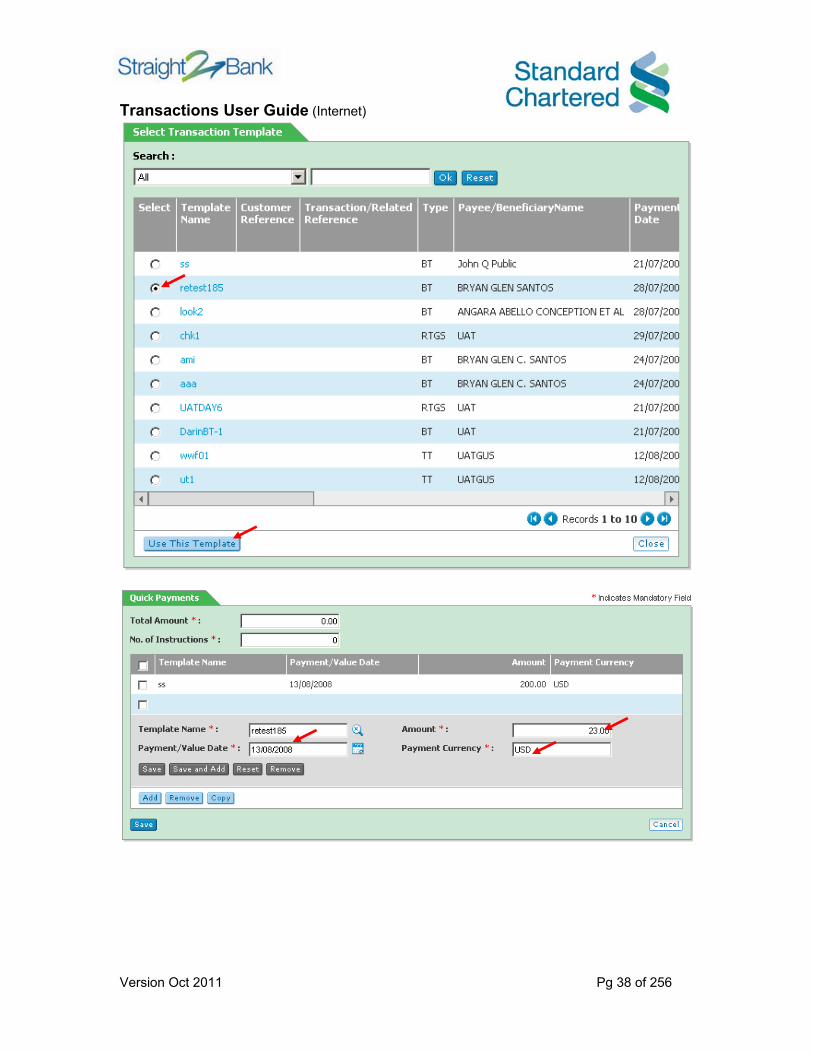
5.1.6. Quick Payments The “Quick Payments” feature will allow the user to create multiple instructions from the approved templates in one single screen and submit them in one click. Step 1:
• Move cursor to Cash Management, Transactions. • Click on “Quick Payments”
Step 2
• Click “Add”
Transactions User Guide (Internet)
Version Oct 2011 Pg 36 of 256
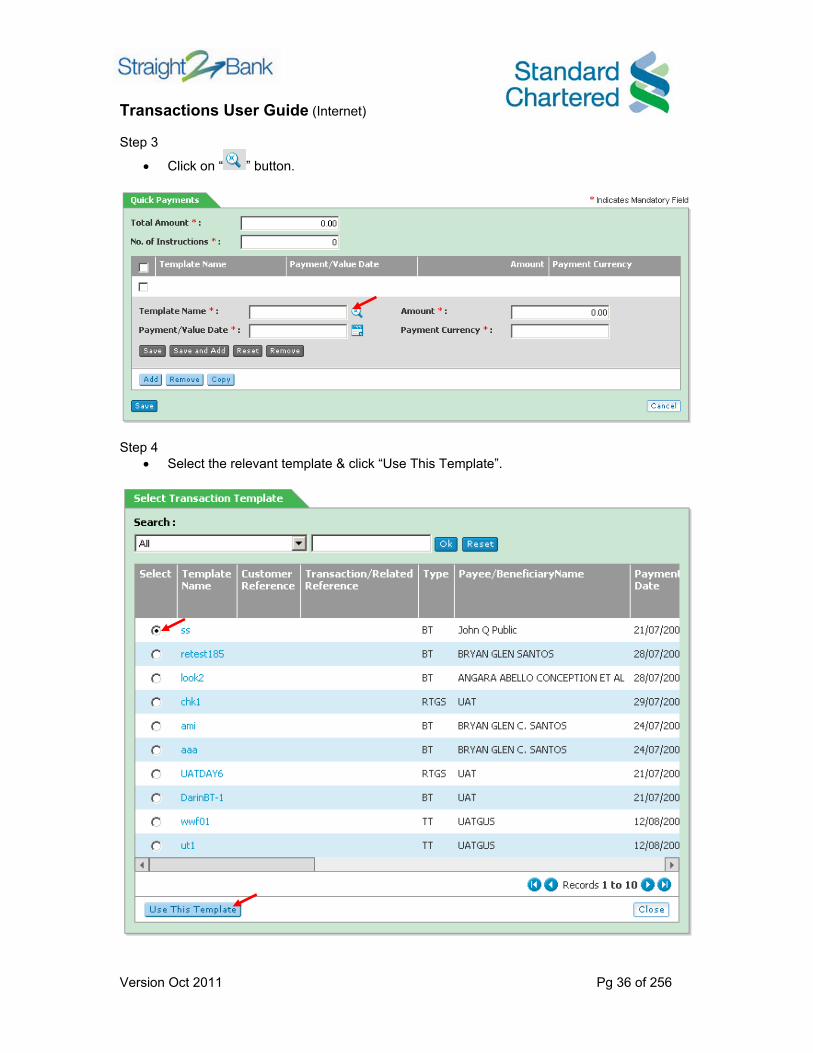
Step 3
• Click on “ ” button.
Step 4
• Select the relevant template & click “Use This Template”.

Transactions User Guide (Internet)
Version Oct 2011 Pg 37 of 256
Step 5
• You can make changes to the fields that are not grey out.
When click on “ ” button, this will allow you to add on another template by perform Step 3, Step 4 & Step 5 illustrated above
Transactions User Guide (Internet)
Version Oct 2011 Pg 38 of 256
Transactions User Guide (Internet)
Version Oct 2011 Pg 39 of 256
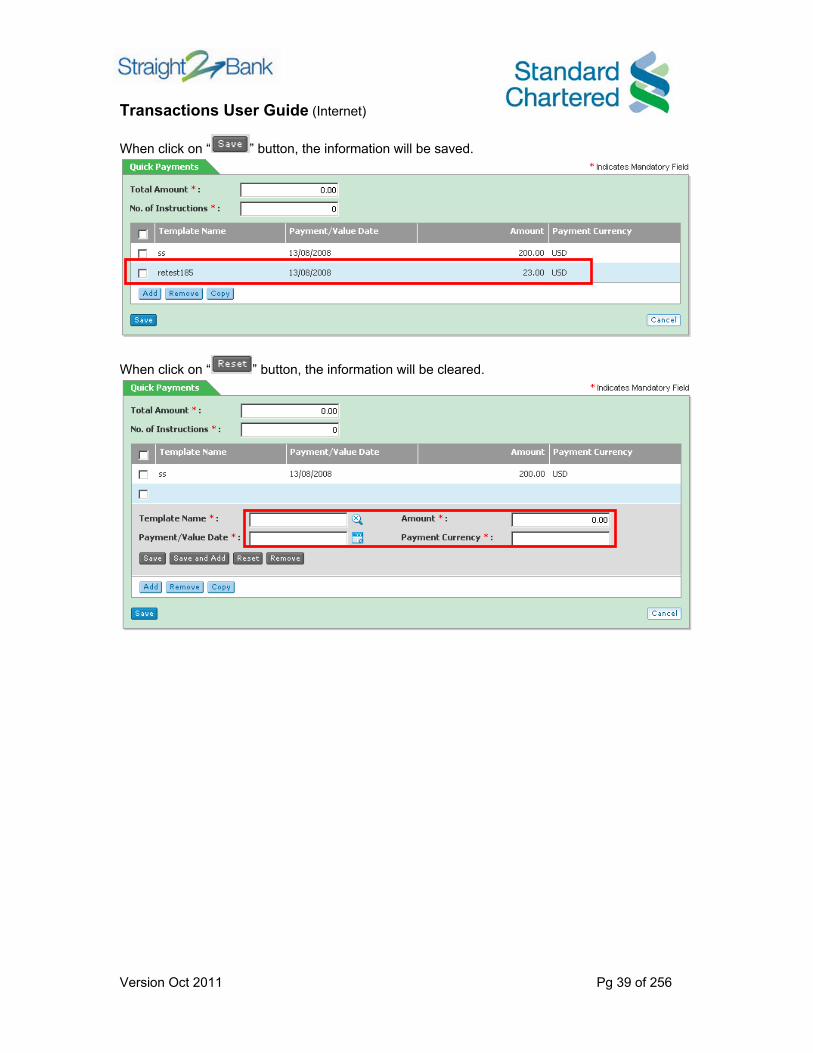
When click on “ ” button, the information will be saved.
When click on “ ” button, the information will be cleared.

Transactions User Guide (Internet)
Version Oct 2011 Pg 40 of 256
When click on “ ” button, the information will be removed.
Transactions User Guide (Internet)
Version Oct 2011 Pg 41 of 256
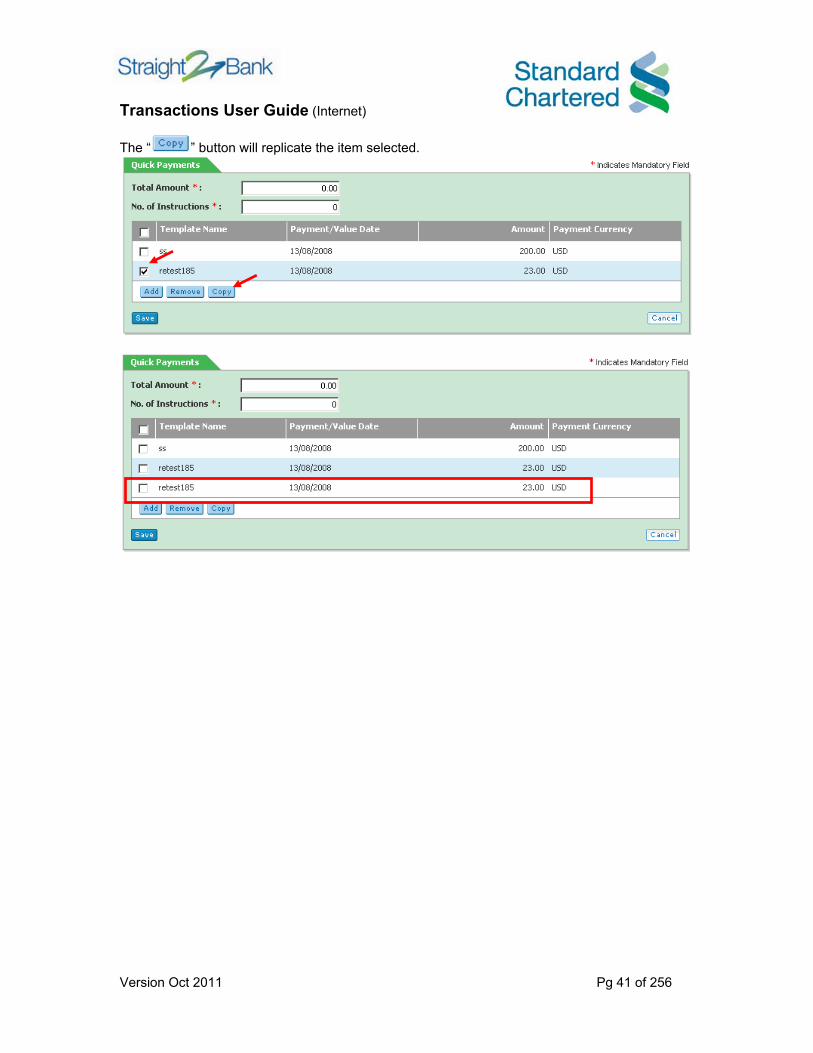
The “ ” button will replicate the item selected.

Transactions User Guide (Internet)
Version Oct 2011 Pg 42 of 256
The “ ” button will remove the item selected.

Transactions User Guide (Internet)
Version Oct 2011 Pg 43 of 256
Step 6
• Select the items • Click “Save”
• Click “Yes”
• Click “Back To Payments”

Transactions User Guide (Internet)
Version Oct 2011 Pg 44 of 256
5.1.7. Template Status If “Dual Control” is applicable after payment template creation (See section 5.1.3), below are various navigation steps under the payment homepage to view list of payment templates details. Payment Homepage - Under the payment homepage, user can view all templates status from:-
• Manage Templates • Search Payment Template • Template Statistic

Transactions User Guide (Internet)
Version Oct 2011 Pg 45 of 256
Manage Templates Click “Manage Templates” and the list of payment templates status will be launched.
Transactions User Guide (Internet)
Version Oct 2011 Pg 46 of 256
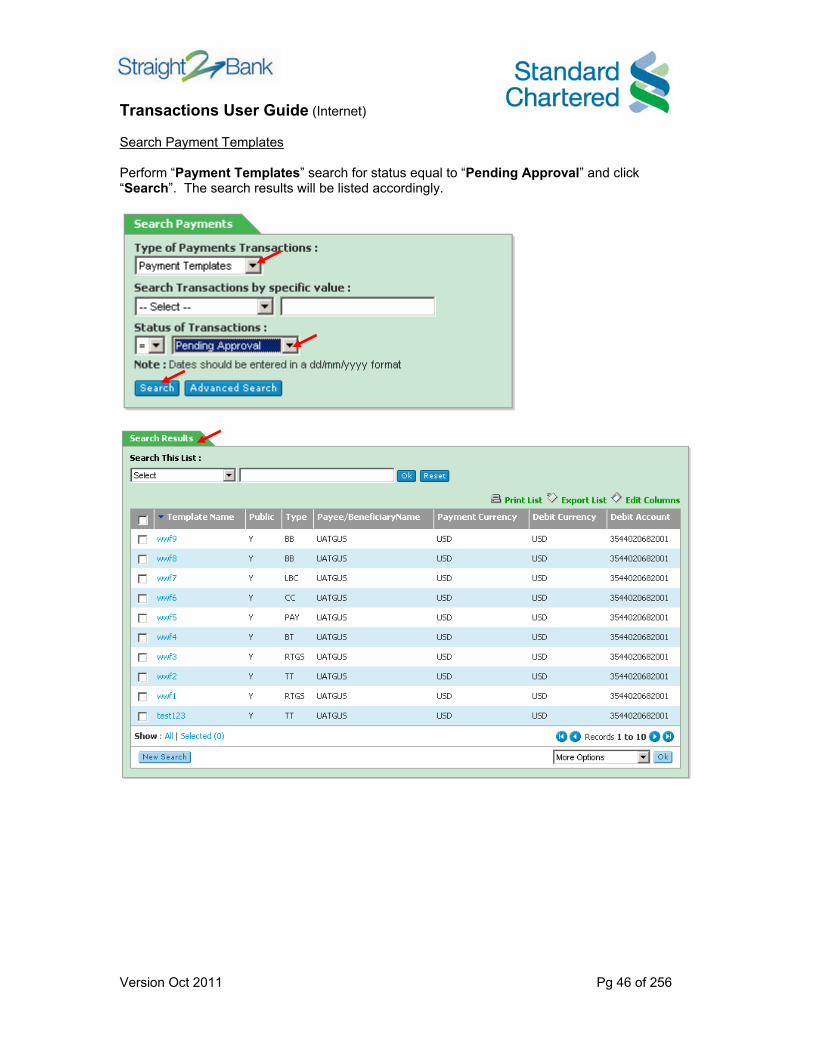
Search Payment Templates Perform “Payment Templates” search for status equal to “Pending Approval” and click “Search”. The search results will be listed accordingly.
Transactions User Guide (Internet)
Version Oct 2011 Pg 47 of 256
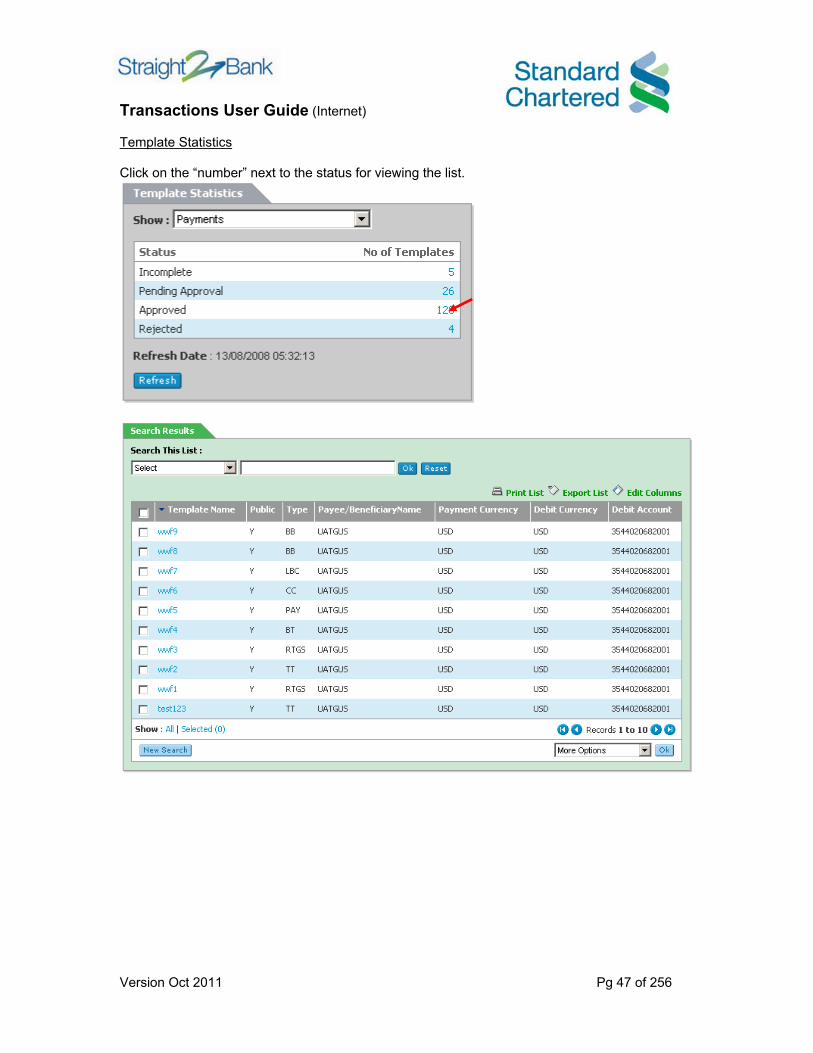
Template Statistics Click on the “number” next to the status for viewing the list.

Transactions User Guide (Internet)
Version Oct 2011 Pg 48 of 256
5.2. Unique Fields In The Payment Templates
5.2.1. Cheque Payment Template (Applicable to TH payment centre only) Corporate & Local Bank cheque payments, you can specify the documents that the payee must present at the pickup location in order to receive the cheque. To do this, simply click on the "Document Checklist" option.
On the resulting pop-up screen, you can specify which documents the payee need to present, as well as the number of copies required. You can use all available documents by selecting the "Use all Available Documents" checkbox. Once you have specified which documents are required, click on the "Save" button;

Transactions User Guide (Internet)
Version Oct 2011 Pg 49 of 256
5.2.2. MT103 - Telegraphic Transfer By clicking ‘Instructions’,
You can input specific set of instructions and information categorized below.

Transactions User Guide (Internet)
Version Oct 2011 Pg 50 of 256
Click on ‘Codeword Definitions’ for complete listing on –

Transactions User Guide (Internet)
Version Oct 2011 Pg 51 of 256
6. Edit Instructions
6.1. Edit / Complete Instructions This function allows you to edit instructions in status listed below: • Awaiting FX • Incomplete • Complete
Step 1: Click ‘Edit / Complete Instructions’
Step 2: Double Click on the ‘Payment Reference’ of the transaction for edit

Transactions User Guide (Internet)
Version Oct 2011 Pg 52 of 256
Step 3: Make changes to the fields applicable and click ‘Complete Transaction’

Transactions User Guide (Internet)
Version Oct 2011 Pg 53 of 256
Once payment is in ‘Complete’ status, proceed to: • ‘Batch Instruction’ to create a new batch OR • ‘Add to Existing Batch’

Transactions User Guide (Internet)
Version Oct 2011 Pg 54 of 256
6.2. Edit Batched Instructions The ‘Edit / Undo Batched’ function allows you to perform edit to an instruction in ‘Batched’ status. Step 1: Click ‘Edit / Undo Batches’
Step 2:
• Tick against the ‘Batch Reference’ to be edited • Click ‘Edit Batch’

Transactions User Guide (Internet)
Version Oct 2011 Pg 55 of 256
Step 3:
• Click to select the transaction for edit • Click ‘Remove Instruction(s) From Batch’
Step 4: Click ‘Back To Payments’
Step 5: Click ‘Edit / Complete Instructions’
Transactions User Guide (Internet)
Version Oct 2011 Pg 56 of 256
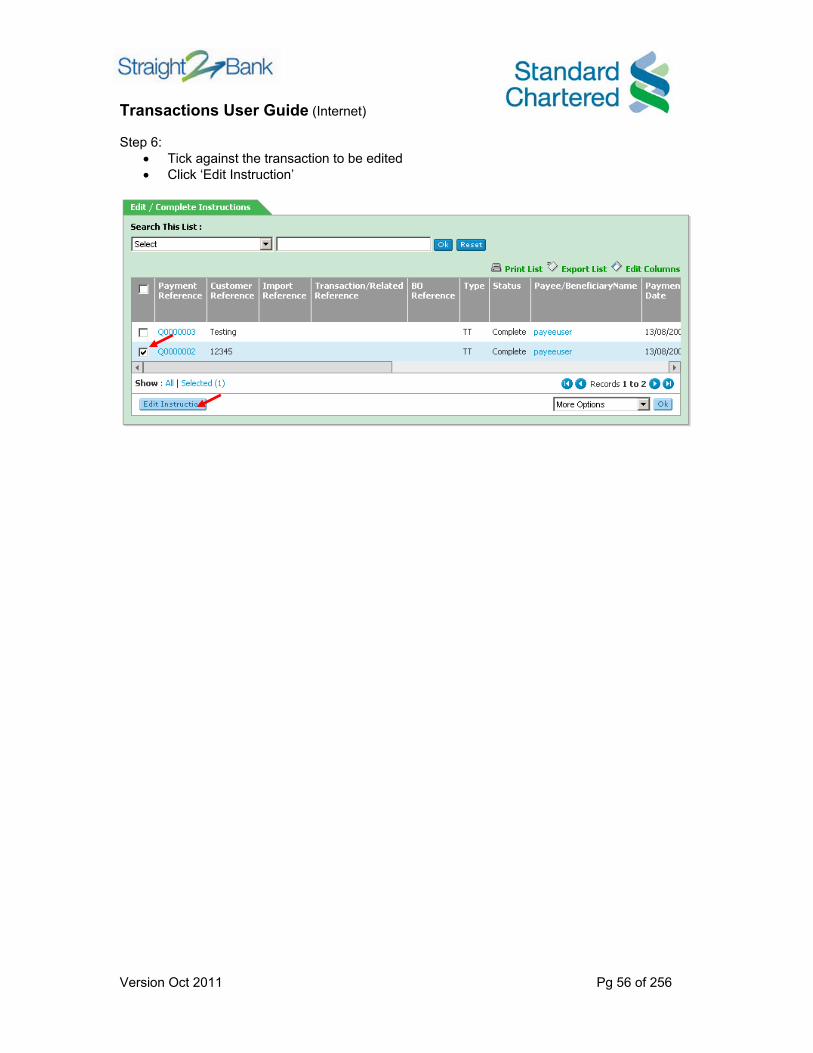
Step 6:
• Tick against the transaction to be edited • Click ‘Edit Instruction’

Transactions User Guide (Internet)
Version Oct 2011 Pg 57 of 256
Step 7:
• Edit the fields applicable • Click ‘Complete Transaction’
Transactions User Guide (Internet)
Version Oct 2011 Pg 58 of 256
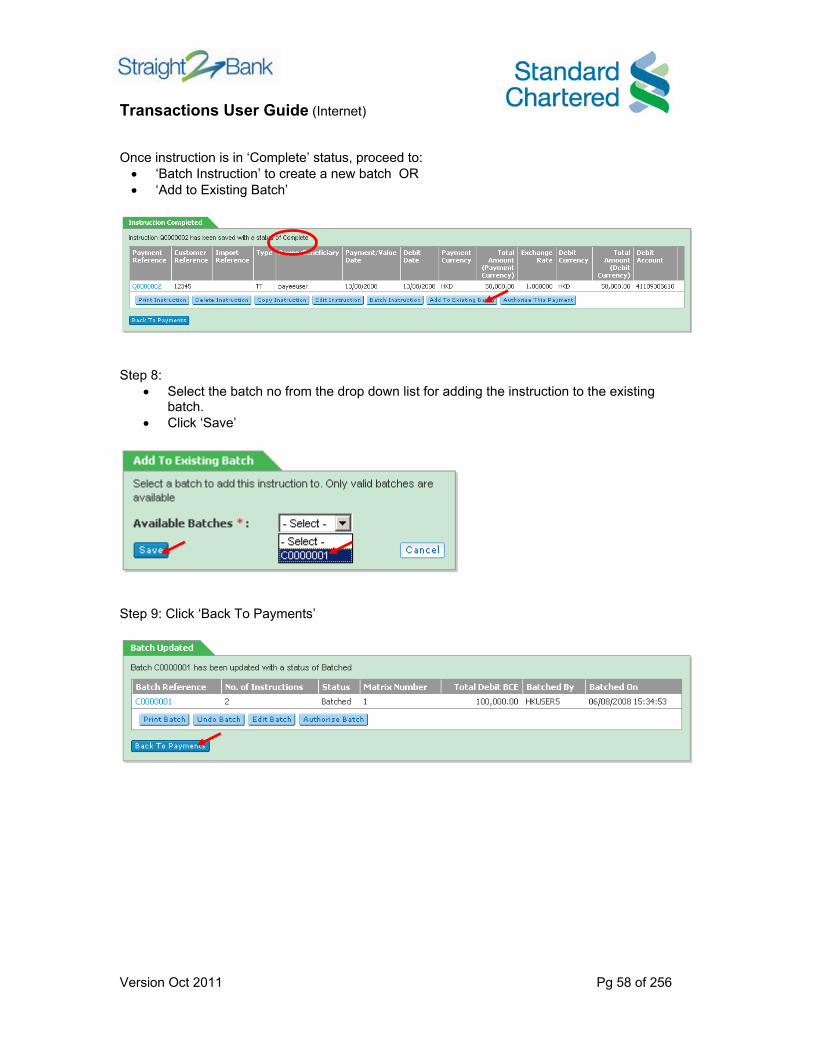
Once instruction is in ‘Complete’ status, proceed to: • ‘Batch Instruction’ to create a new batch OR • ‘Add to Existing Batch’
Step 8:
• Select the batch no from the drop down list for adding the instruction to the existing batch.
• Click ‘Save’
Step 9: Click ‘Back To Payments’
Transactions User Guide (Internet)
Version Oct 2011 Pg 59 of 256
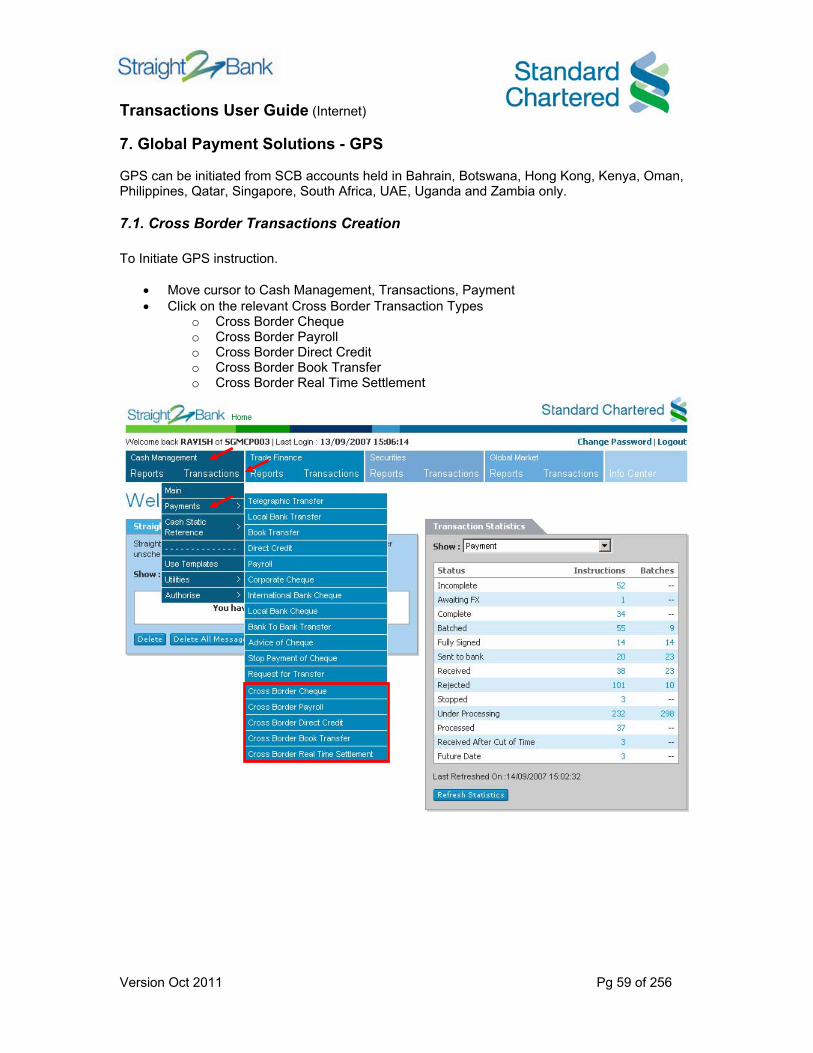
7. Global Payment Solutions - GPS GPS can be initiated from SCB accounts held in Bahrain, Botswana, Hong Kong, Kenya, Oman, Philippines, Qatar, Singapore, South Africa, UAE, Uganda and Zambia only.
7.1. Cross Border Transactions Creation To Initiate GPS instruction.
• Move cursor to Cash Management, Transactions, Payment • Click on the relevant Cross Border Transaction Types
o Cross Border Cheque o Cross Border Payroll o Cross Border Direct Credit o Cross Border Book Transfer o Cross Border Real Time Settlement
Transactions User Guide (Internet)
Version Oct 2011 Pg 60 of 256
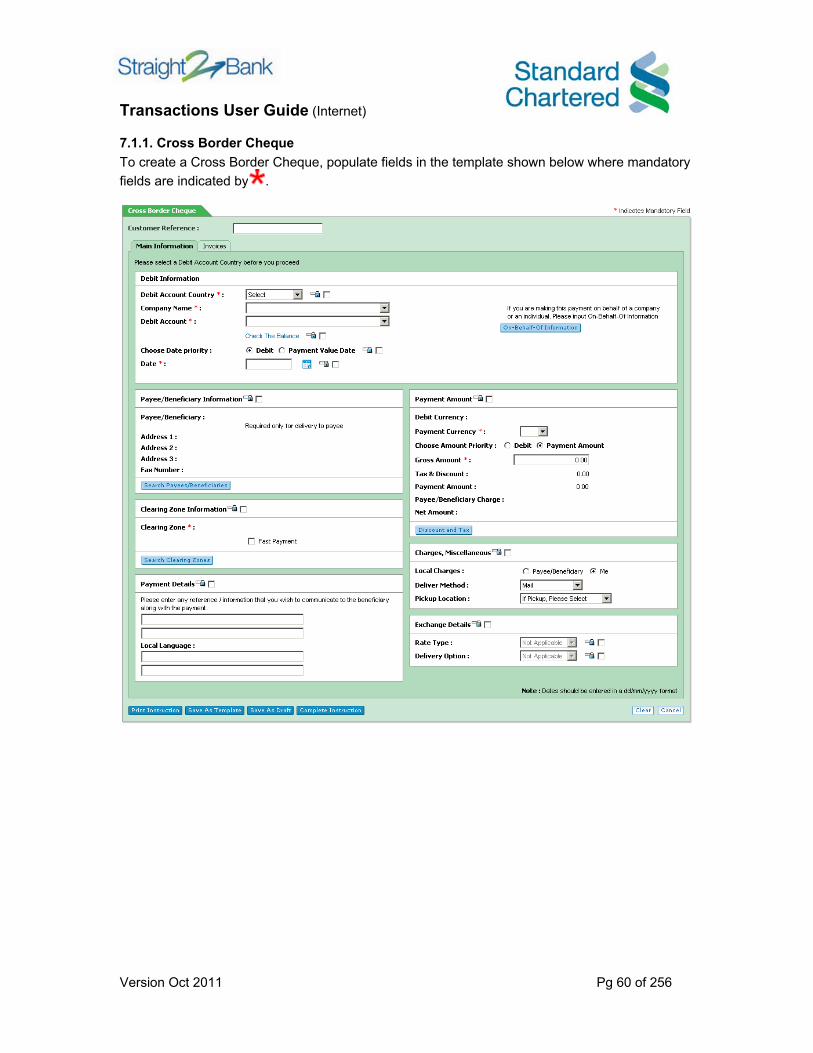
7.1.1. Cross Border Cheque To create a Cross Border Cheque, populate fields in the template shown below where mandatory fields are indicated by .

Transactions User Guide (Internet)
Version Oct 2011 Pg 61 of 256
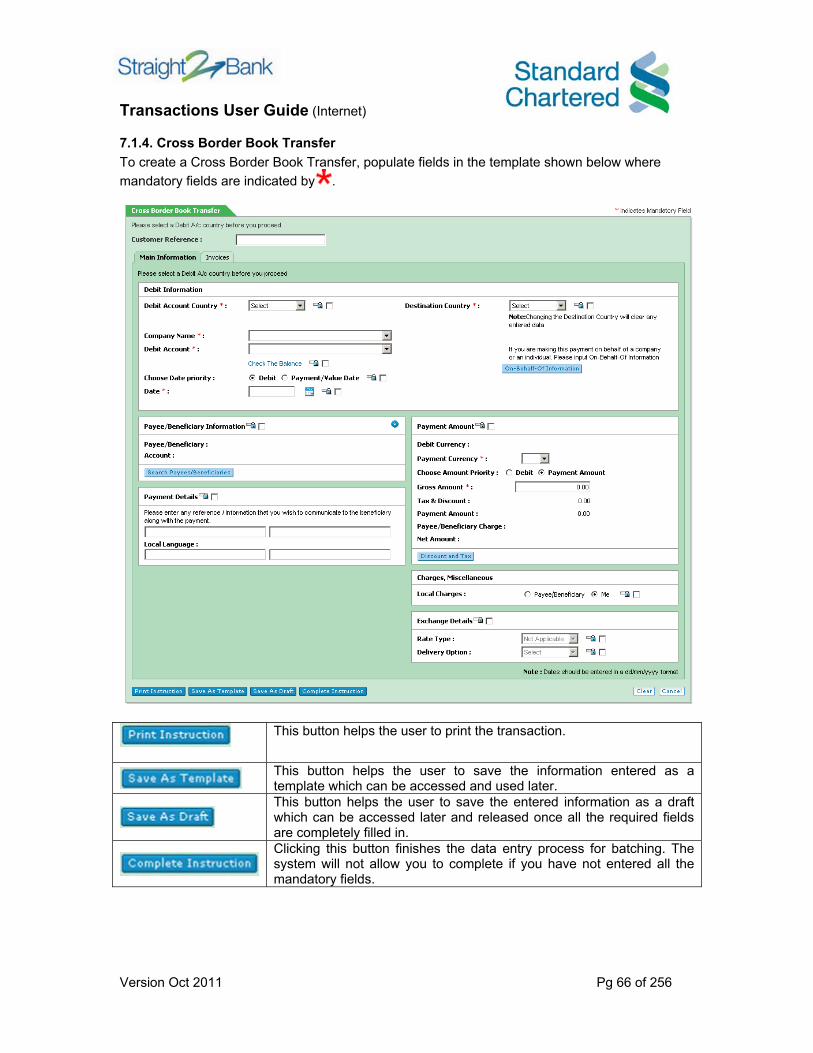
This button helps the user to print the transaction.
This button helps the user to save the information entered as a template which can be accessed and used later.
This button helps the user to save the entered information as a draft which can be accessed later and released once all the required fields are completely filled in.
Clicking this button finishes the data entry process for batching. The system will not allow you to complete if you have not entered all the mandatory fields.
Refer to the relevant pages for steps in:- 1) Creating Payee / Beneficiary 2) Selecting existing Payee / Beneficiary 3) Assigning Invoice 4) Saving transaction as template 5) Batching Instruction 6) Adding a transaction to an existing batch 7) Edit / Complete instruction 8) Edit “Batched” instruction 9) Create On Behalf of Information 10) Exchange Details

Transactions User Guide (Internet)
Version Oct 2011 Pg 62 of 256
7.1.2. Cross Border Payroll To create a Cross Border Payroll, populate fields in the template shown below where mandatory fields are indicated by .
This button helps the user to print the transaction.
This button helps the user to save the information entered as a template which can be accessed and used later.
This button helps the user to save the entered information as a draft which can be accessed later and released once all the required fields are completely filled in.
Clicking this button finishes the data entry process for batching. The system will not allow you to complete if you have not entered all the mandatory fields.

Transactions User Guide (Internet)
Version Oct 2011 Pg 63 of 256
Refer to the relevant pages for steps in:- 1) Creating Payee / Beneficiary 2) Selecting existing Payee / Beneficiary 3) Assigning Invoice 4) Saving transaction as template 5) Batching Instruction 6) Adding a transaction to an existing batch 7) Edit / Complete instruction 8) Edit “Batched” instruction 9) Create On Behalf of Information 10) Exchange Details

Transactions User Guide (Internet)
Version Oct 2011 Pg 64 of 256
7.1.3. Cross Border Direct Credit To create a Cross Border Direct Credit, populate fields in the template shown below where mandatory fields are indicated by .
This button helps the user to print the transaction.
This button helps the user to save the information entered as a template which can be accessed and used later.
This button helps the user to save the entered information as a draft which can be accessed later and released once all the required fields are completely filled in.
Clicking this button finishes the data entry process for batching. The system will not allow you to complete if you have not entered all the mandatory fields.

Transactions User Guide (Internet)
Version Oct 2011 Pg 65 of 256
Refer to the relevant pages for steps in:- 1) Creating Payee / Beneficiary 2) Selecting existing Payee / Beneficiary 3) Assigning Invoice 4) Saving transaction as template 5) Batching Instruction 6) Adding a transaction to an existing batch 7) Edit / Complete instruction 8) Edit “Batched” instruction 9) Create On Behalf of Information 10) Exchange Details
Transactions User Guide (Internet)
Version Oct 2011 Pg 66 of 256
7.1.4. Cross Border Book Transfer To create a Cross Border Book Transfer, populate fields in the template shown below where mandatory fields are indicated by .
This button helps the user to print the transaction.
This button helps the user to save the information entered as a template which can be accessed and used later.
This button helps the user to save the entered information as a draft which can be accessed later and released once all the required fields are completely filled in.
Clicking this button finishes the data entry process for batching. The system will not allow you to complete if you have not entered all the mandatory fields.

Transactions User Guide (Internet)
Version Oct 2011 Pg 67 of 256
Refer to the relevant pages for steps in:- 1) Creating Payee / Beneficiary 2) Selecting existing Payee / Beneficiary 3) Assigning Invoice 4) Saving transaction as template 5) Batching Instruction 6) Adding a transaction to an existing batch 7) Edit / Complete instruction 8) Edit “Batched” instruction 9) Create On Behalf of Information 10) Exchange Details

Transactions User Guide (Internet)
Version Oct 2011 Pg 68 of 256
7.1.5. Cross Border Real Time Settlement To create a Cross Border Real Time Settlement, populate fields in the template shown below where mandatory fields are indicated by .
This button helps the user to print the transaction.
This button helps the user to save the information entered as a template which can be accessed and used later.
This button helps the user to save the entered information as a draft which can be accessed later and released once all the required fields are completely filled in.
Clicking this button finishes the data entry process for batching. The system will not allow you to complete if you have not entered all the mandatory fields.
Transactions User Guide (Internet)
Version Oct 2011 Pg 69 of 256
Refer to the relevant pages for steps in:- 1) Creating Payee / Beneficiary 2) Selecting existing Payee / Beneficiary 3) Assigning Invoice 4) Saving transaction as template 5) Batching Instruction 6) Adding a transaction to an existing batch 7) Edit / Complete instruction 8) Edit “Batched” instruction 9) Create On Behalf of Information 10) Exchange Details

Transactions User Guide (Internet)
Version Oct 2011 Pg 70 of 256
7.2. Unique Fields in Global Payment Solutions (GPS) – Templates
7.2.1. Destination Country Destination Country field is required for Cross Border Direct Credit, Payroll, Book Transfer and Real time settlement. Destination country will determine the payment currency for the GPS payment types.
7.2.2. On Behalf of Information On Behalf of Information is only required if the original remitter is not the debit account holder. To ensure that originator payer information is captured in the payment, On Behalf of information of a total 9 fields is provided.
Transactions User Guide (Internet)
Version Oct 2011 Pg 71 of 256
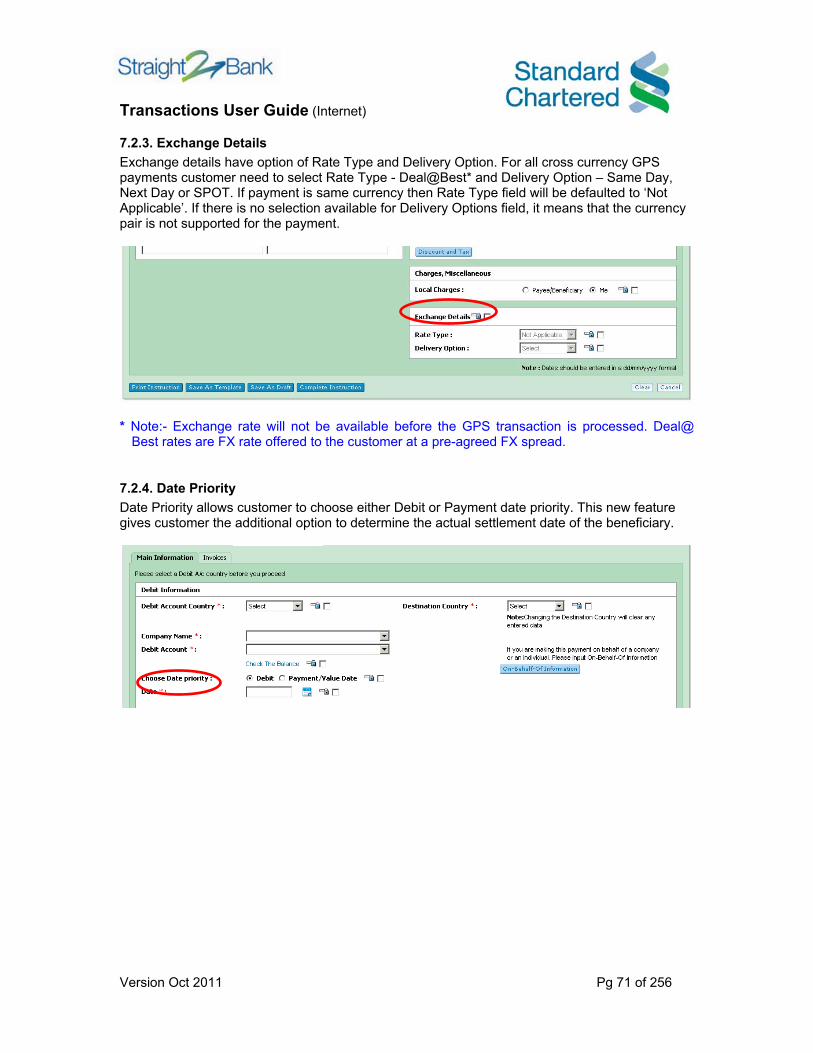
7.2.3. Exchange Details Exchange details have option of Rate Type and Delivery Option. For all cross currency GPS payments customer need to select Rate Type - Deal@Best* and Delivery Option – Same Day, Next Day or SPOT. If payment is same currency then Rate Type field will be defaulted to ‘Not Applicable’. If there is no selection available for Delivery Options field, it means that the currency pair is not supported for the payment.
* Note:- Exchange rate will not be available before the GPS transaction is processed. Deal@
Best rates are FX rate offered to the customer at a pre-agreed FX spread.
7.2.4. Date Priority Date Priority allows customer to choose either Debit or Payment date priority. This new feature gives customer the additional option to determine the actual settlement date of the beneficiary.
Transactions User Guide (Internet)
Version Oct 2011 Pg 72 of 256
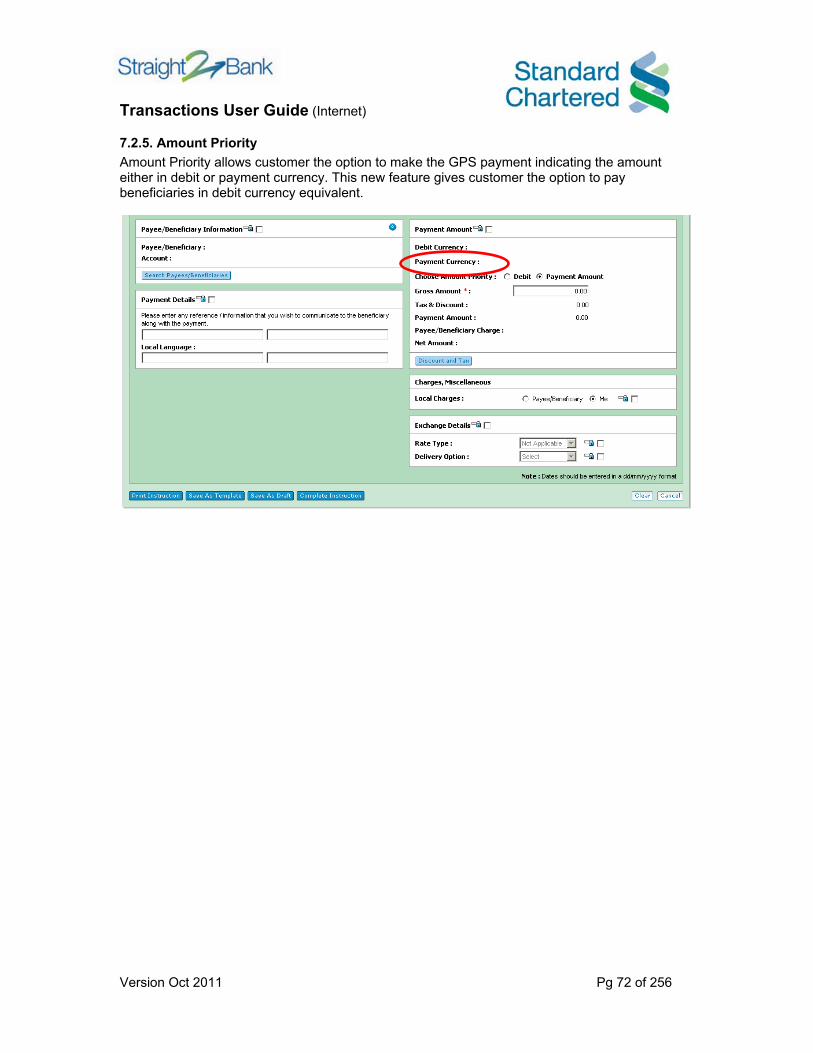
7.2.5. Amount Priority Amount Priority allows customer the option to make the GPS payment indicating the amount either in debit or payment currency. This new feature gives customer the option to pay beneficiaries in debit currency equivalent.

Transactions User Guide (Internet)
Version Oct 2011 Pg 73 of 256
8. Request For Quote (RFQ) During Send to Bank Stage You can now perform an optional feature - Request For Quote (RFQ) for the supported cross currencies* transactions initiated out of accounts maintained with Standard Chartered Bank Hong Kong and Singapore for the list of Straight2Bank Web Payment Types listed below:
*RFQ will be available during Send To Bank stage for supported cross currencies pair only. Paying out in restricted currencies eg. MYR, option for RFQ will not be available. *Appendix 1 – provides an overview of currencies offered by Standard Chartered Bank when making Cross Currency payments over Straight2Bank from Singapore based accounts denominated in USD, EUR, GBP, HKD, and SGD. *Appendix 2 – provides an overview of currencies offered by Standard Chartered Bank when making Cross Currency payments over Straight2Bank from Hong Kong based accounts denominated in USD, EUR, GBP, HKD, and SGD. Note : Straight2Bank Web user must be given the RFQ function access right to perform RFQ if not the RFQ option will not be available to the user during the Send To Bank stage.
8.1. RFQ For Telegraphic Transfer Refer to Section 5.1.1 Pg 21
8.2. RFQ For Local Bank Transfer / Book Transfer / Book Transfer /Direct Credit / International Bank Cheque / Local Bank Cheque When you are making cross currencies payments the Straight2Bank Web Payment Types listed below, the new “Exchange Details” section will be shown.
1. Local Bank Transfer 2. Book Transfer 3. Direct Credit
4. International Bank Cheque 5. Local Bank Cheque
Transactions User Guide (Internet)
Version Oct 2011 Pg 74 of 256
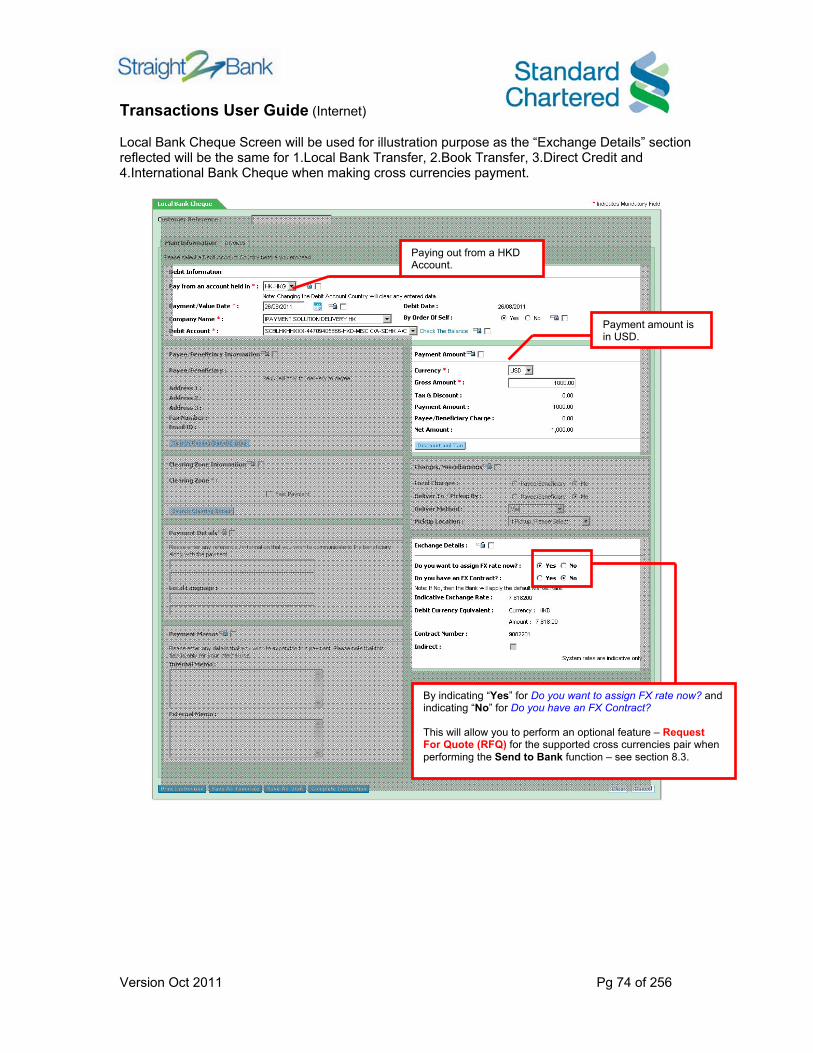
Local Bank Cheque Screen will be used for illustration purpose as the “Exchange Details” section reflected will be the same for 1.Local Bank Transfer, 2.Book Transfer, 3.Direct Credit and 4.International Bank Cheque when making cross currencies payment.
Paying out from a HKD Account.
Payment amount is in USD.
By indicating “Yes” for Do you want to assign FX rate now? and indicating “No” for Do you have an FX Contract? This will allow you to perform an optional feature – Request For Quote (RFQ) for the supported cross currencies pair when performing the Send to Bank function – see section 8.3.
Transactions User Guide (Internet)
Version Oct 2011 Pg 75 of 256
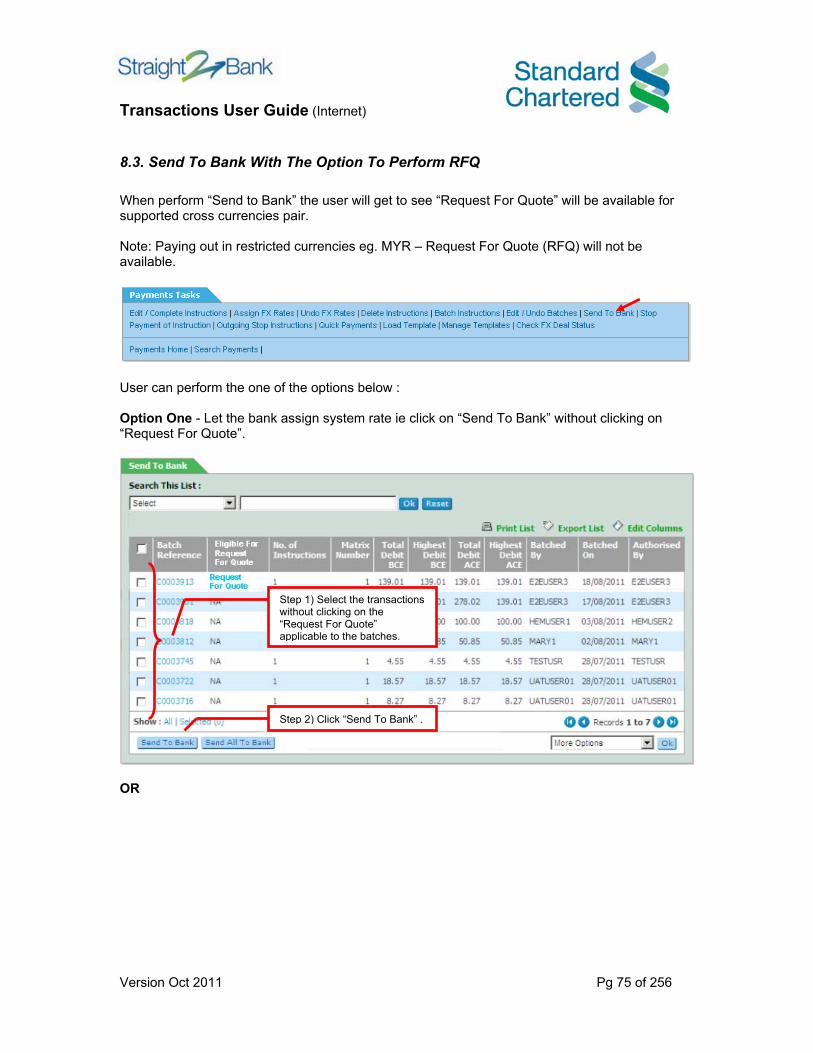
8.3. Send To Bank With The Option To Perform RFQ When perform “Send to Bank” the user will get to see “Request For Quote” will be available for supported cross currencies pair. Note: Paying out in restricted currencies eg. MYR – Request For Quote (RFQ) will not be available.
User can perform the one of the options below : Option One - Let the bank assign system rate ie click on “Send To Bank” without clicking on “Request For Quote”.
OR
Step 1) Select the transactions without clicking on the “Request For Quote” applicable to the batches.
Step 2) Click “Send To Bank” .
Transactions User Guide (Internet)
Version Oct 2011 Pg 76 of 256
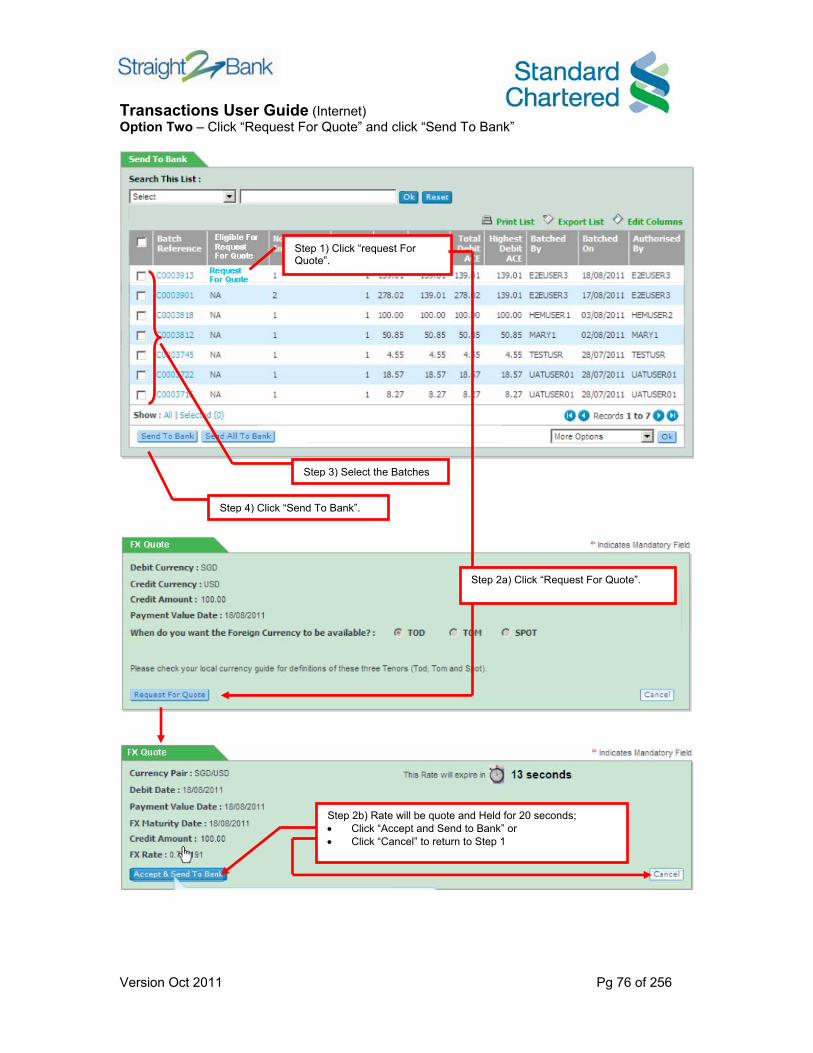
Option Two – Click “Request For Quote” and click “Send To Bank”
Step 1) Click “request For Quote”.
Step 2a) Click “Request For Quote”.
Step 3) Select the Batches
Step 4) Click “Send To Bank”.
Step 2b) Rate will be quote and Held for 20 seconds; • Click “Accept and Send to Bank” or • Click “Cancel” to return to Step 1
Transactions User Guide (Internet)
Version Oct 2011 Pg 77 of 256
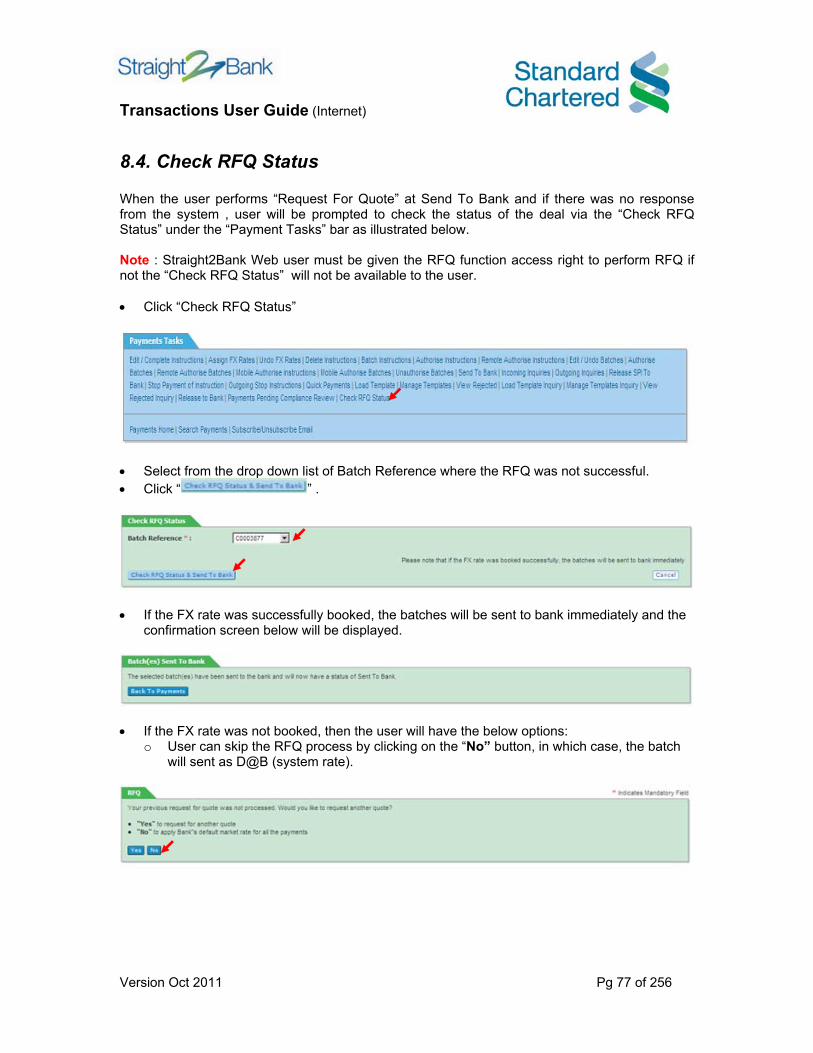
8.4. Check RFQ Status When the user performs “Request For Quote” at Send To Bank and if there was no response from the system , user will be prompted to check the status of the deal via the “Check RFQ Status” under the “Payment Tasks” bar as illustrated below. Note : Straight2Bank Web user must be given the RFQ function access right to perform RFQ if not the “Check RFQ Status” will not be available to the user. • Click “Check RFQ Status”
• Select from the drop down list of Batch Reference where the RFQ was not successful. • Click “ ” .
• If the FX rate was successfully booked, the batches will be sent to bank immediately and the
confirmation screen below will be displayed.
• If the FX rate was not booked, then the user will have the below options:
o User can skip the RFQ process by clicking on the “No” button, in which case, the batch will sent as D@B (system rate).
Transactions User Guide (Internet)
Version Oct 2011 Pg 78 of 256
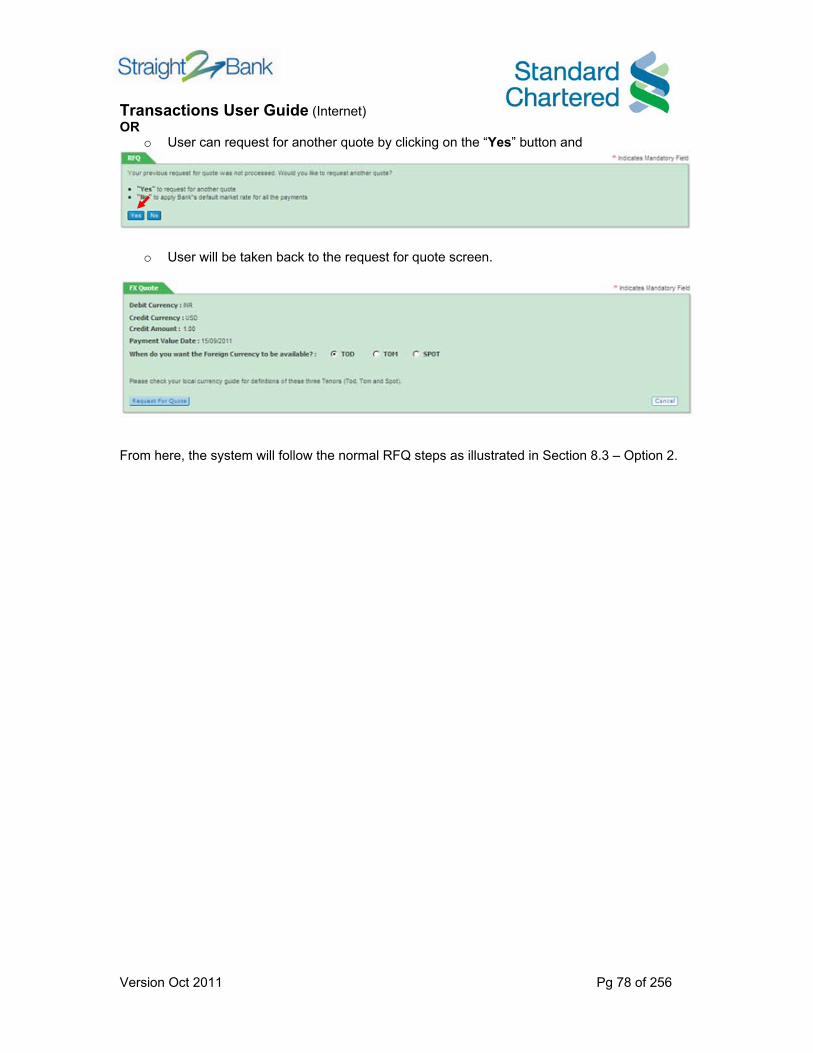
OR o User can request for another quote by clicking on the “Yes” button and
o User will be taken back to the request for quote screen.
From here, the system will follow the normal RFQ steps as illustrated in Section 8.3 – Option 2.
Transactions User Guide (Internet)
Version Oct 2011 Pg 79 of 256
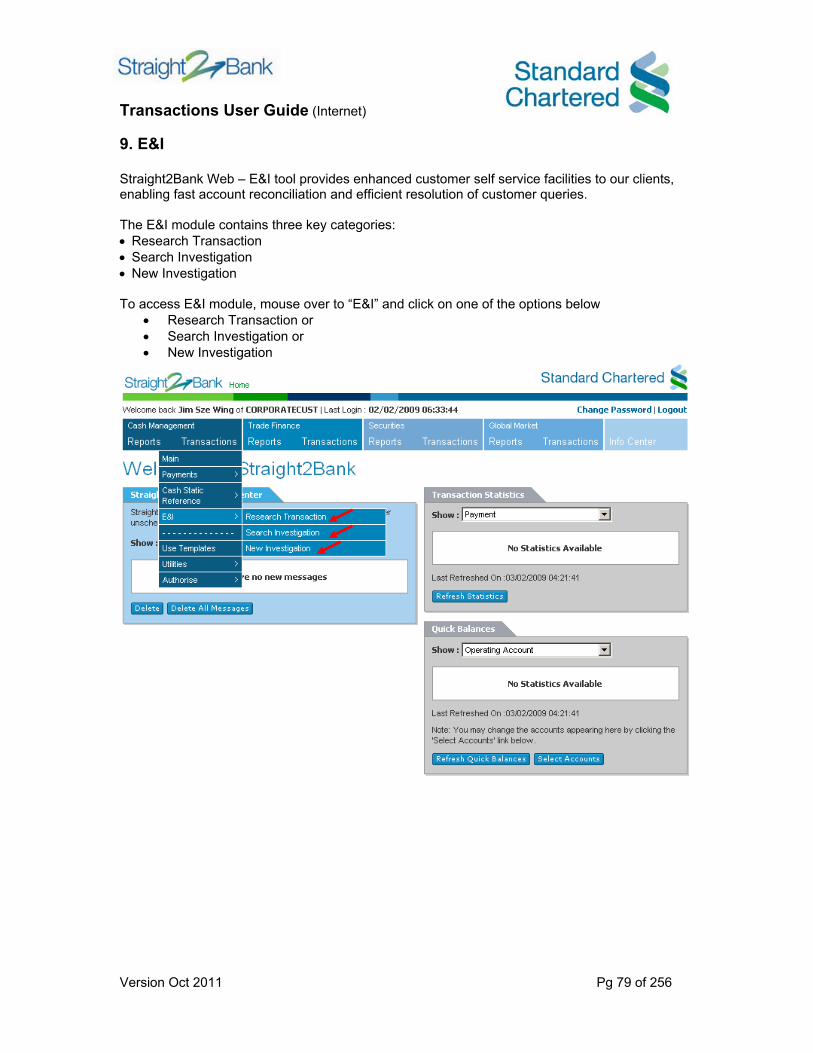
9. E&I Straight2Bank Web – E&I tool provides enhanced customer self service facilities to our clients, enabling fast account reconciliation and efficient resolution of customer queries. The E&I module contains three key categories: • Research Transaction • Search Investigation • New Investigation To access E&I module, mouse over to “E&I” and click on one of the options below
• Research Transaction or • Search Investigation or • New Investigation

Transactions User Guide (Internet)
Version Oct 2011 Pg 80 of 256
Alternatively, go to E&I landing page directly by:-
1. Click on “E&I”.
2. This will bring to “E&I” Tasks • Research Investigation • Search Investigation • New Investigation Others • Stop Payment • Amend Payment
Transactions User Guide (Internet)
Version Oct 2011 Pg 81 of 256
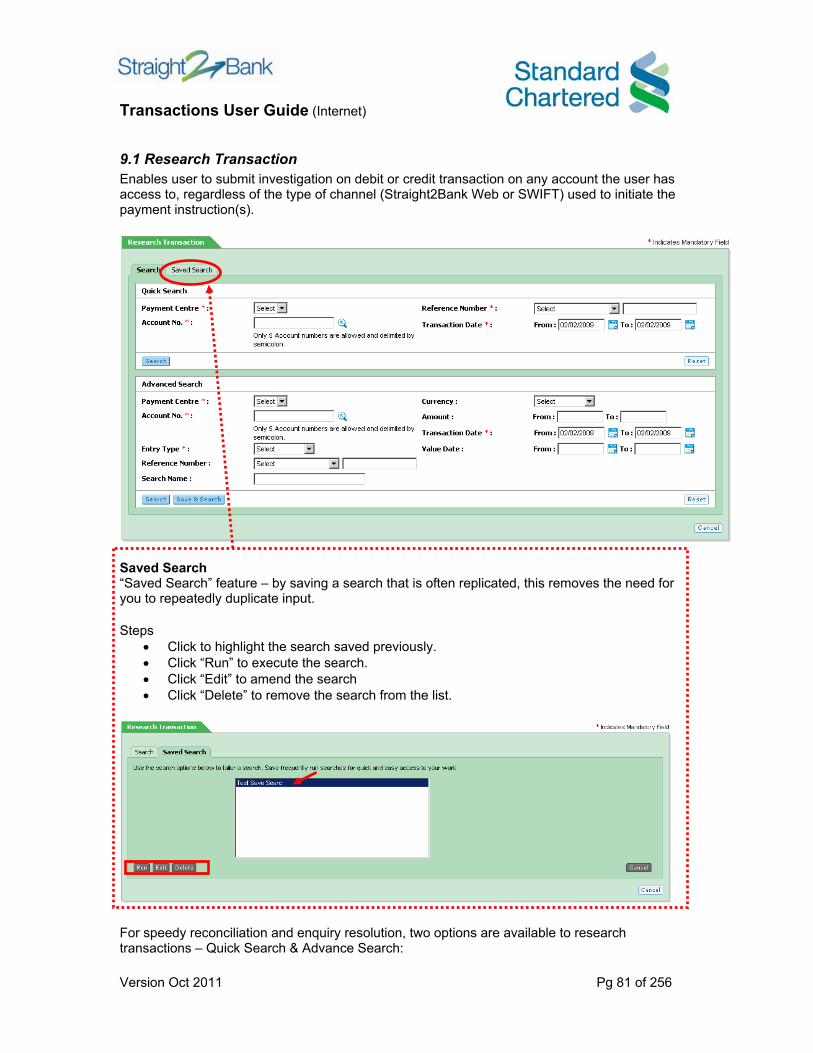
9.1 Research Transaction Enables user to submit investigation on debit or credit transaction on any account the user has access to, regardless of the type of channel (Straight2Bank Web or SWIFT) used to initiate the payment instruction(s).
Saved Search “Saved Search” feature – by saving a search that is often replicated, this removes the need for you to repeatedly duplicate input. Steps
• Click to highlight the search saved previously. • Click “Run” to execute the search. • Click “Edit” to amend the search • Click “Delete” to remove the search from the list.
For speedy reconciliation and enquiry resolution, two options are available to research transactions – Quick Search & Advance Search:

Transactions User Guide (Internet)
Version Oct 2011 Pg 82 of 256
Quick Search This is employed where a single transaction is to be viewed, and the reference number of the payment is known. Steps
• Select “Payment Centre” from the drop down list. • Specify the “Account No” • Specify “Reference No” • Specify the “Transaction Date” range • Click”Search”
Advanced Search 1. This option allows the user to search for one or more items using “multiples” if required, e.g.
accounts, days, amounts, etc. 2. The user may also view all transactions going across their accounts during the stated period,
and/or by type, e.g. credits or debits. 3. This search is flexible, and it is also used where limited information is at hand, e.g. the
transaction reference number is unknown. Steps
• Select “Payment Centre” from the drop down list. • Specify the “Account No” - (5 accounts over 5 days is permitted, with payment history
available up to 1 year if the data exists in CERS). • Specify “Entry Type” – Both or Credit or Debit. • Specify the “Reference Number” – Optional • Specify “Search Name” – Optional • Specify “Currency” – Optional • Specify “Amount” range – Optional • Specify “Transaction Date” range. • Specify “value Date” range – Optional • Click “Search” or “Save & Search”
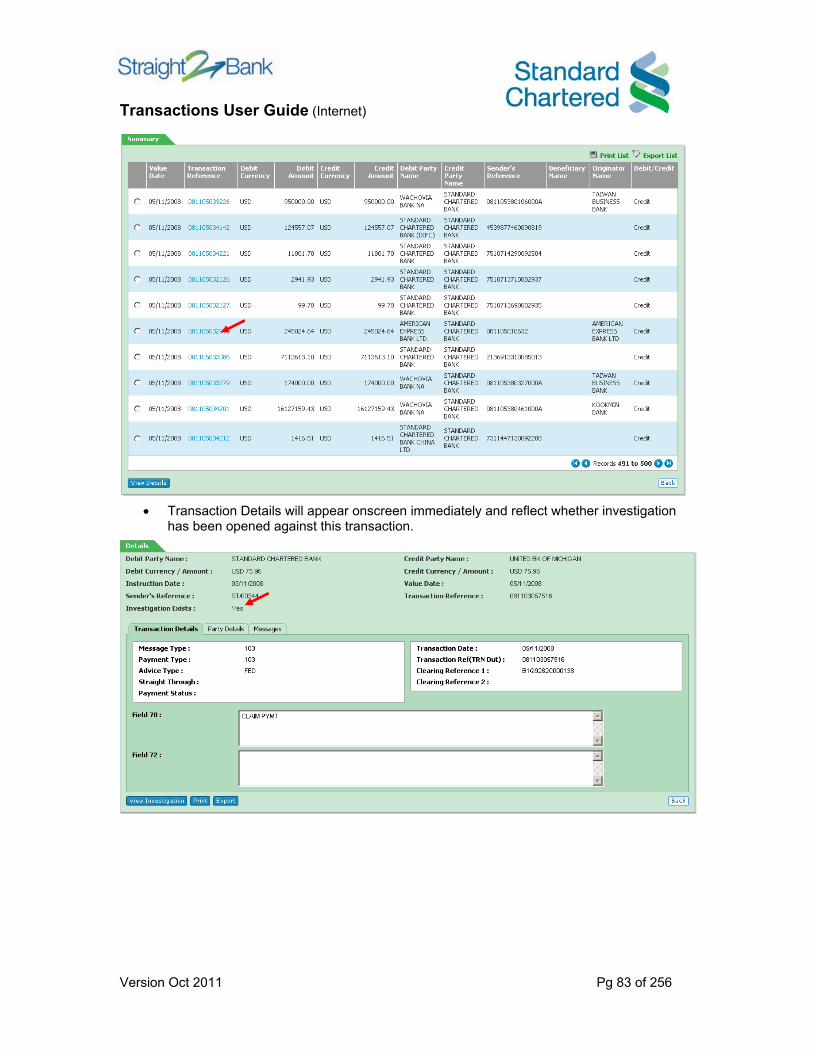
• After clicking on the “Search” button, the result (up to Max 500 records) will be displayed confirming to the “multiple” search parameter.
• Click on “Transaction Reference” hyperlink to view drill down.
Transactions User Guide (Internet)
Version Oct 2011 Pg 83 of 256
• Transaction Details will appear onscreen immediately and reflect whether investigation
has been opened against this transaction.

Transactions User Guide (Internet)
Version Oct 2011 Pg 84 of 256
• Click “Party Details” to display all parties to the transaction

Transactions User Guide (Internet)
Version Oct 2011 Pg 85 of 256
• Click “Messages” to view original incoming and outgoing messages related to the
transaction.
• Transaction details are immediately displayed onscreen
Investigation had been opened against this transaction. By clicking on the “View Investigation” button in the lower left hand corner of the page, the user will be linked directly to the Search Investigation module of E&I, and able to review all correspondence related to this enquiry case file.
Transactions User Guide (Internet)
Version Oct 2011 Pg 86 of 256
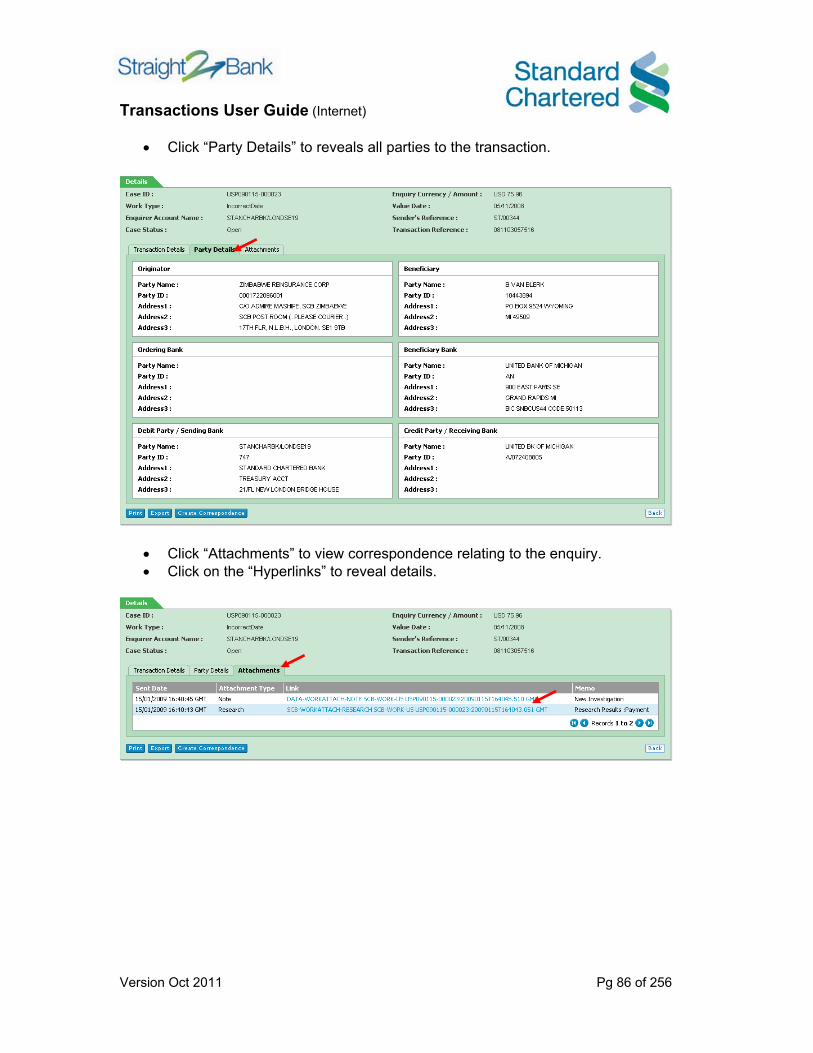
• Click “Party Details” to reveals all parties to the transaction.
• Click “Attachments” to view correspondence relating to the enquiry. • Click on the “Hyperlinks” to reveal details.

Transactions User Guide (Internet)
Version Oct 2011 Pg 87 of 256
• Attachments are displayed in pop up windows -- here a correspondence note
(with transaction details remaining onscreen for ready reference).
• Payment research details are included and available to view.
Transactions User Guide (Internet)
Version Oct 2011 Pg 88 of 256
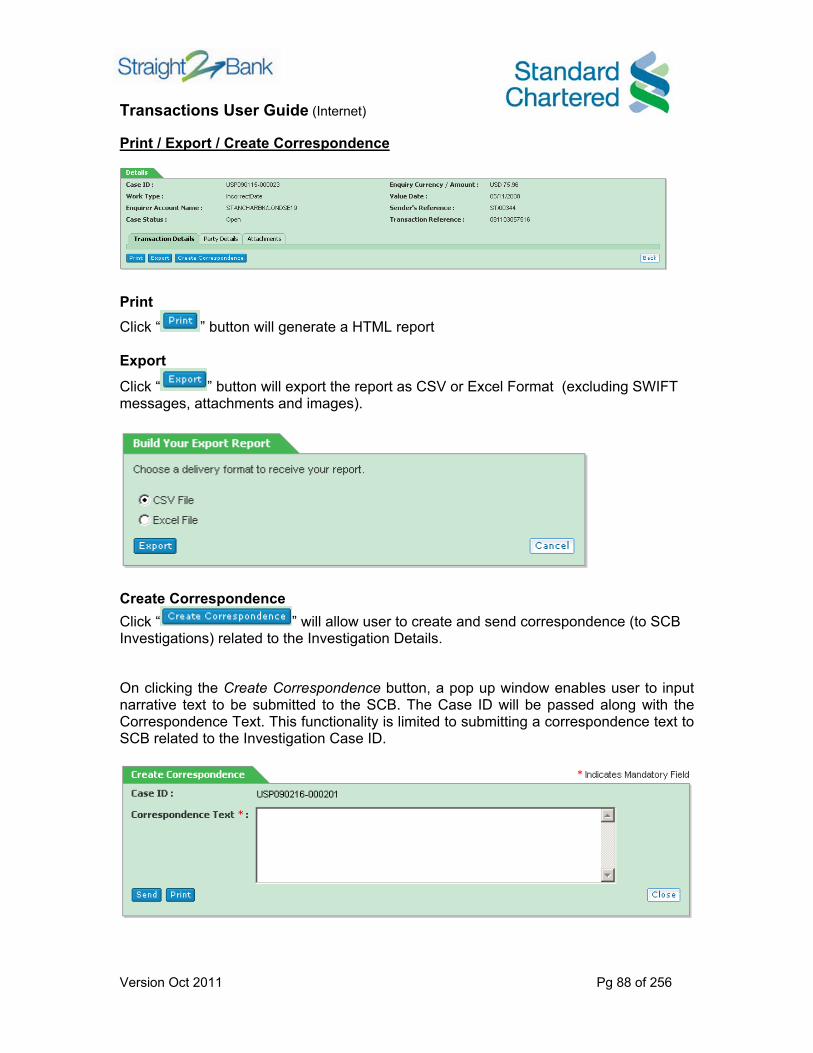
Print / Export / Create Correspondence
Print Click “ ” button will generate a HTML report Export
Click “ ” button will export the report as CSV or Excel Format (excluding SWIFT messages, attachments and images).
Create Correspondence Click “ ” will allow user to create and send correspondence (to SCB Investigations) related to the Investigation Details.
On clicking the Create Correspondence button, a pop up window enables user to input narrative text to be submitted to the SCB. The Case ID will be passed along with the Correspondence Text. This functionality is limited to submitting a correspondence text to SCB related to the Investigation Case ID.
Transactions User Guide (Internet)
Version Oct 2011 Pg 89 of 256
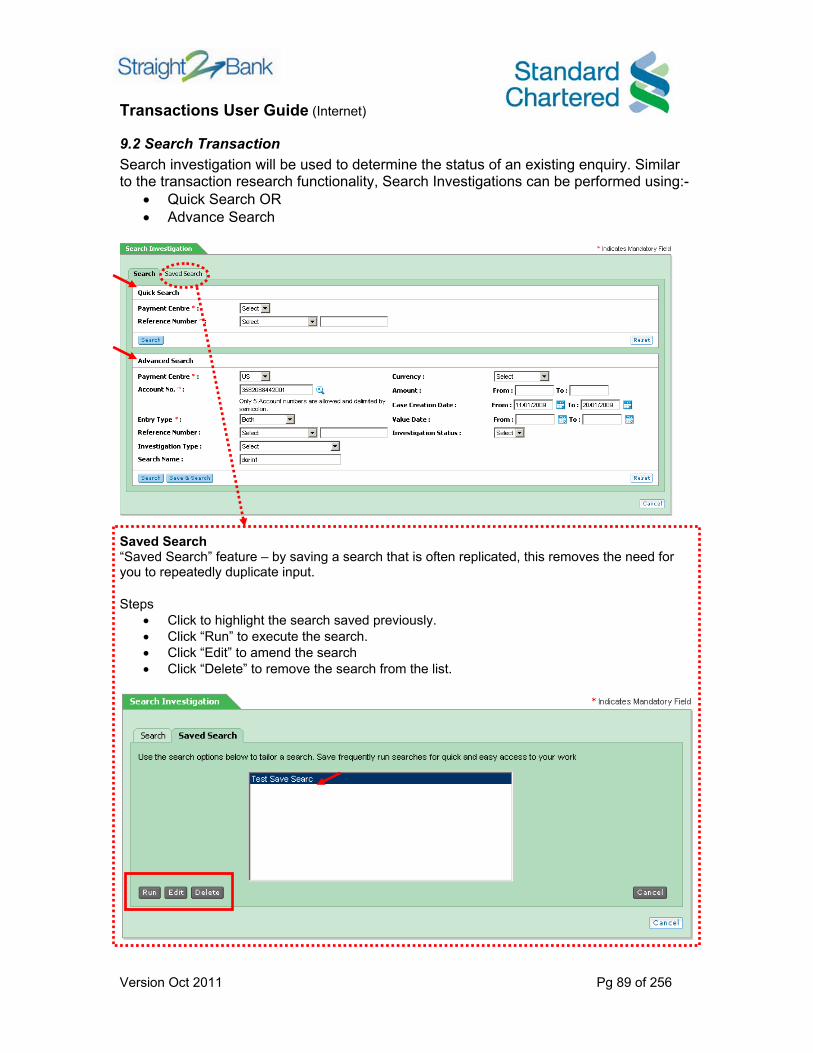
9.2 Search Transaction Search investigation will be used to determine the status of an existing enquiry. Similar to the transaction research functionality, Search Investigations can be performed using:-
• Quick Search OR • Advance Search
Saved Search “Saved Search” feature – by saving a search that is often replicated, this removes the need for you to repeatedly duplicate input. Steps
• Click to highlight the search saved previously. • Click “Run” to execute the search. • Click “Edit” to amend the search • Click “Delete” to remove the search from the list.
Transactions User Guide (Internet)
Version Oct 2011 Pg 90 of 256
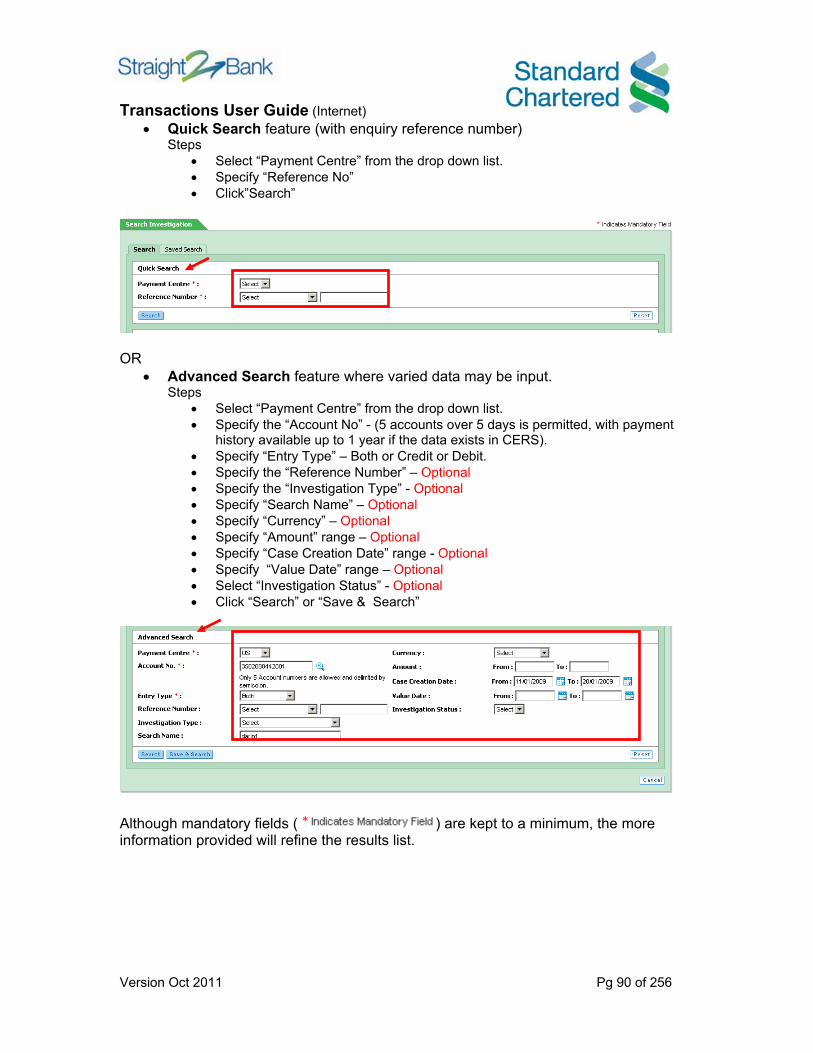
• Quick Search feature (with enquiry reference number) Steps
• Select “Payment Centre” from the drop down list. • Specify “Reference No” • Click”Search”
OR
• Advanced Search feature where varied data may be input. Steps
• Select “Payment Centre” from the drop down list. • Specify the “Account No” - (5 accounts over 5 days is permitted, with payment
history available up to 1 year if the data exists in CERS). • Specify “Entry Type” – Both or Credit or Debit. • Specify the “Reference Number” – Optional • Specify the “Investigation Type” - Optional • Specify “Search Name” – Optional • Specify “Currency” – Optional • Specify “Amount” range – Optional • Specify “Case Creation Date” range - Optional • Specify “Value Date” range – Optional • Select “Investigation Status” - Optional • Click “Search” or “Save & Search”
Although mandatory fields ( ) are kept to a minimum, the more information provided will refine the results list.
Transactions User Guide (Internet)
Version Oct 2011 Pg 91 of 256
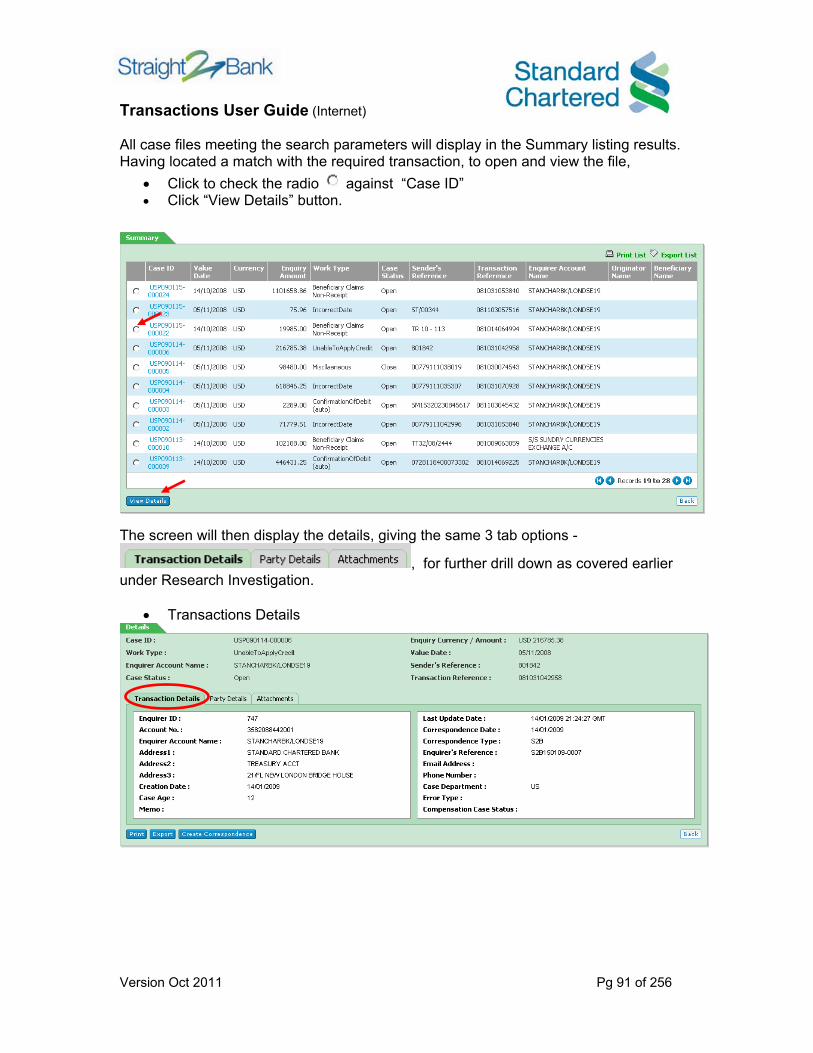
All case files meeting the search parameters will display in the Summary listing results. Having located a match with the required transaction, to open and view the file,
• Click to check the radio against “Case ID” • Click “View Details” button.
The screen will then display the details, giving the same 3 tab options -
, for further drill down as covered earlier under Research Investigation.
• Transactions Details
Transactions User Guide (Internet)
Version Oct 2011 Pg 92 of 256
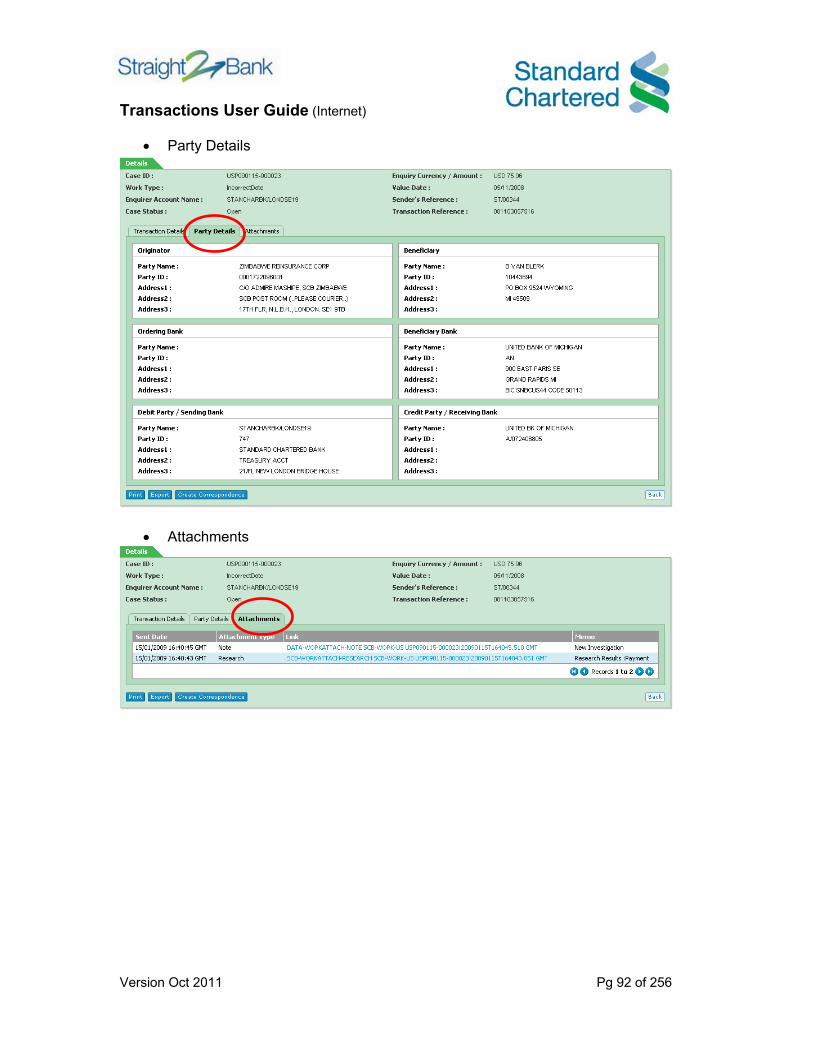
• Party Details
• Attachments

Transactions User Guide (Internet)
Version Oct 2011 Pg 93 of 256
Print / Export / Create Correspondence
Print Click “ ” button will generate a HTML report Export
Click “ ” button will export the report as CSV or Excel Format (excluding SWIFT messages, attachments and images).
Create Correspondence Click “ ” will allow user to create and send correspondence (to SCB Investigations) related to the Investigation Details.
On clicking the Create Correspondence button, a pop up window enables user to input narrative text to be submitted to the SCB. The Case ID will be passed along with the Correspondence Text. This functionality is limited to submitting a correspondence text to SCB related to the Investigation Case ID.

Transactions User Guide (Internet)
Version Oct 2011 Pg 94 of 256
9.3 New Investigation There are 2 ways of initiating New Investigations: 1. Directly from a transaction know as “IN-CONTEXT” 2. Creating a new investigation from scratch, by manually inputting data into a blank
screen “OUT OF CONTEXT” In-Context New Investigation To open an “IN-CONTEXT” enquiry, first research and display the details screen of the transaction in question Steps
• Click “Research Transaction”
• Perform “Quick Search “ or “Advanced Search”

Transactions User Guide (Internet)
Version Oct 2011 Pg 95 of 256
• After clicking on the “Search” button, the result (up to Max 500 records) will be displayed
confirming to the “multiple” search parameter. • Click on “Transaction Reference” hyperlink to view drill down.
• Transaction Details will appear onscreen immediately and reflect whether investigation
has been opened against this transaction. • Having checked that there is no existing enquiry against this transaction, click on the
“New Investigation” button located in the lower left corner of the screen.
Checked that there is no existing enquiry against this transaction.
Transactions User Guide (Internet)
Version Oct 2011 Pg 96 of 256
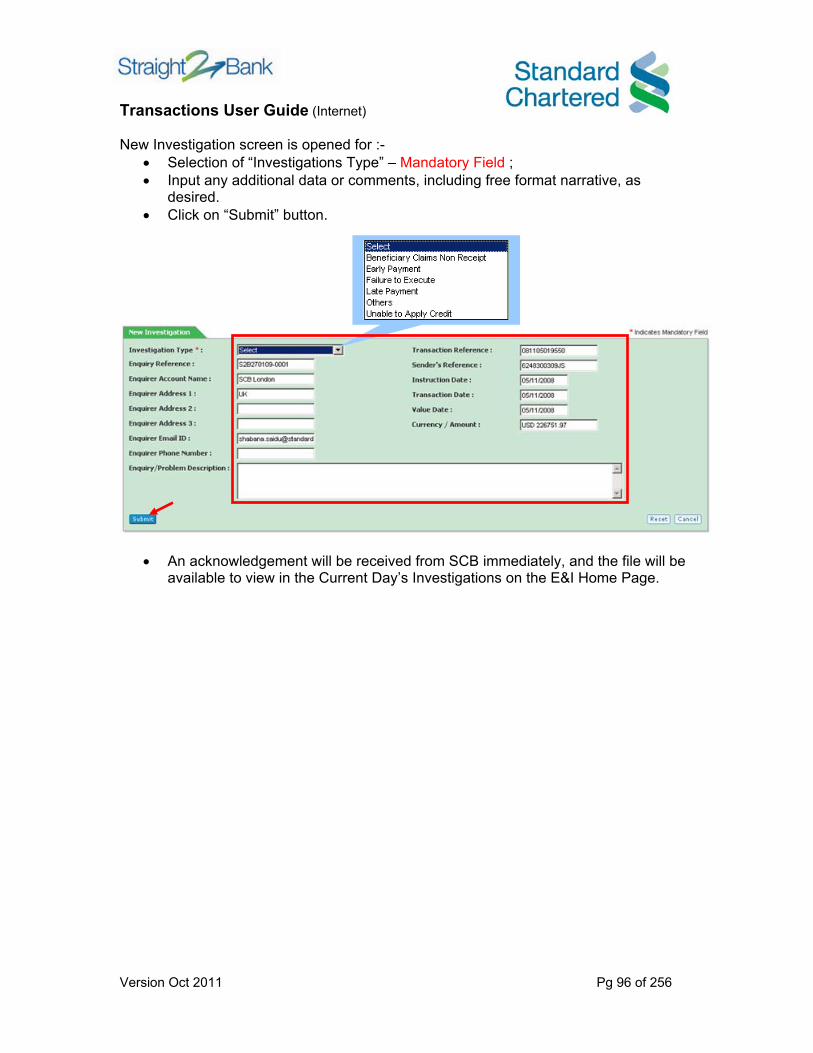
New Investigation screen is opened for :-
• Selection of “Investigations Type” – Mandatory Field ; • Input any additional data or comments, including free format narrative, as
desired. • Click on “Submit” button.
• An acknowledgement will be received from SCB immediately, and the file will be available to view in the Current Day’s Investigations on the E&I Home Page.
Transactions User Guide (Internet)
Version Oct 2011 Pg 97 of 256
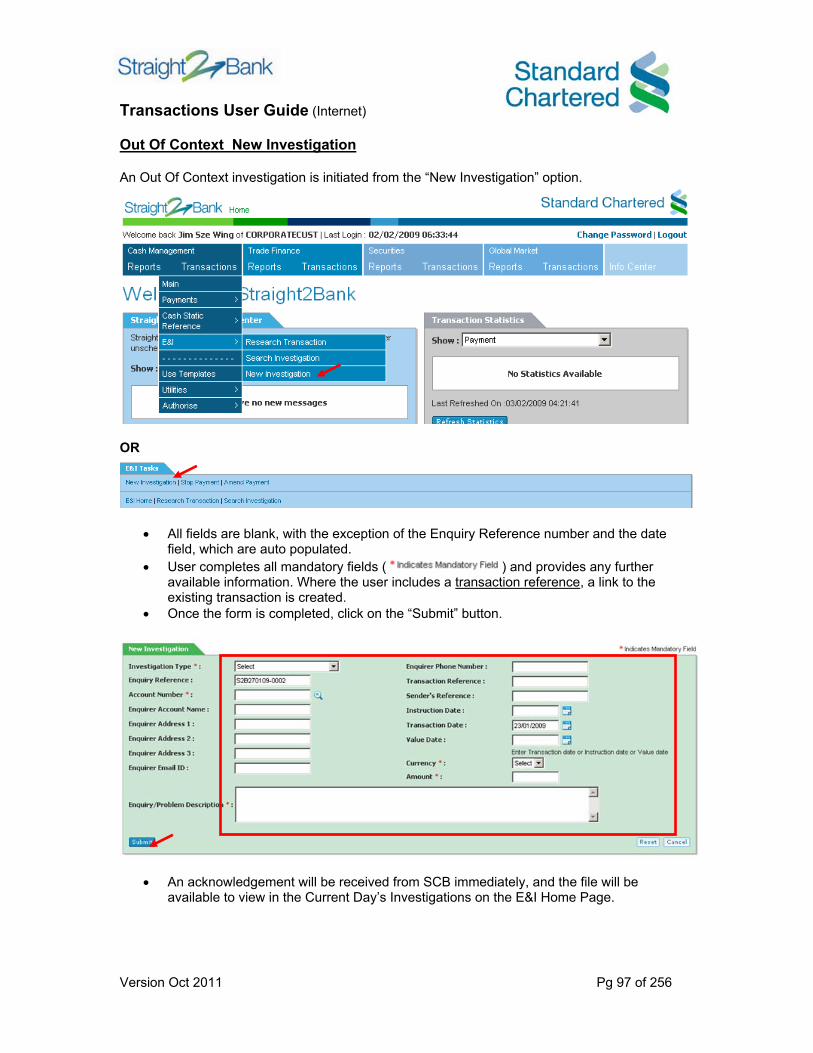
Out Of Context New Investigation An Out Of Context investigation is initiated from the “New Investigation” option.
OR
• All fields are blank, with the exception of the Enquiry Reference number and the date field, which are auto populated.
• User completes all mandatory fields ( ) and provides any further available information. Where the user includes a transaction reference, a link to the existing transaction is created.
• Once the form is completed, click on the “Submit” button.
• An acknowledgement will be received from SCB immediately, and the file will be available to view in the Current Day’s Investigations on the E&I Home Page.
Transactions User Guide (Internet)
Version Oct 2011 Pg 98 of 256
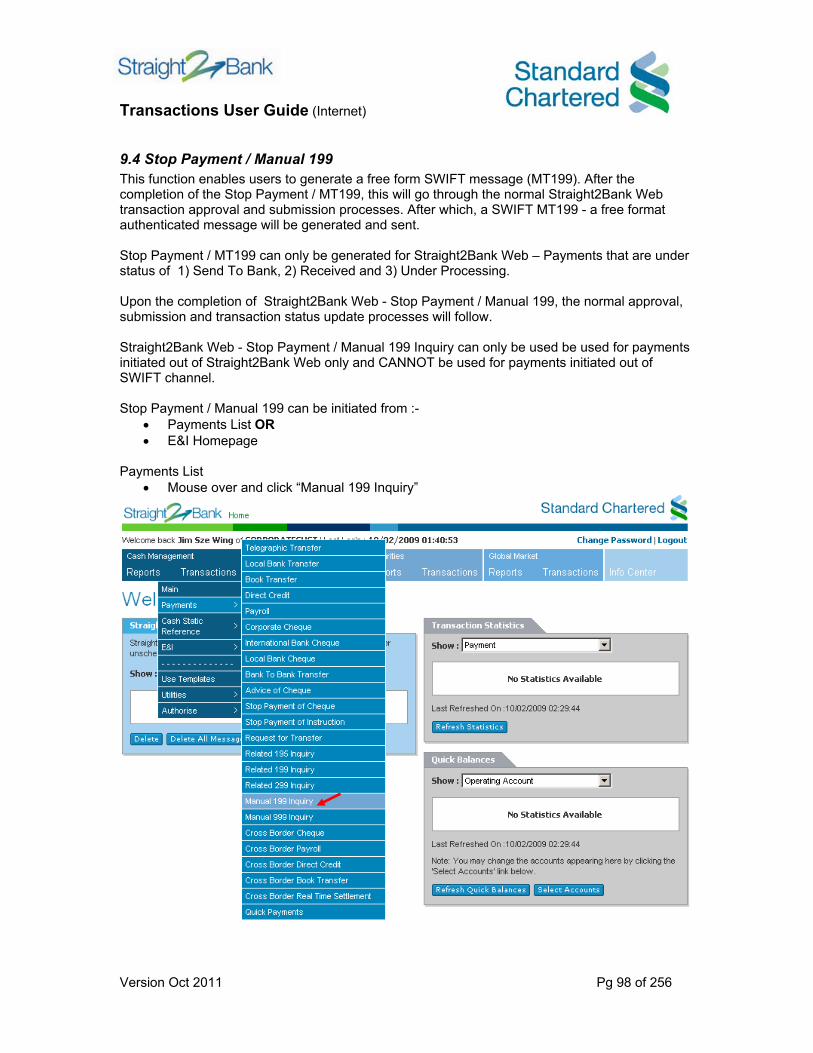
9.4 Stop Payment / Manual 199 This function enables users to generate a free form SWIFT message (MT199). After the completion of the Stop Payment / MT199, this will go through the normal Straight2Bank Web transaction approval and submission processes. After which, a SWIFT MT199 - a free format authenticated message will be generated and sent. Stop Payment / MT199 can only be generated for Straight2Bank Web – Payments that are under status of 1) Send To Bank, 2) Received and 3) Under Processing. Upon the completion of Straight2Bank Web - Stop Payment / Manual 199, the normal approval, submission and transaction status update processes will follow. Straight2Bank Web - Stop Payment / Manual 199 Inquiry can only be used be used for payments initiated out of Straight2Bank Web only and CANNOT be used for payments initiated out of SWIFT channel. Stop Payment / Manual 199 can be initiated from :-
• Payments List OR • E&I Homepage
Payments List
• Mouse over and click “Manual 199 Inquiry”

Transactions User Guide (Internet)
Version Oct 2011 Pg 99 of 256
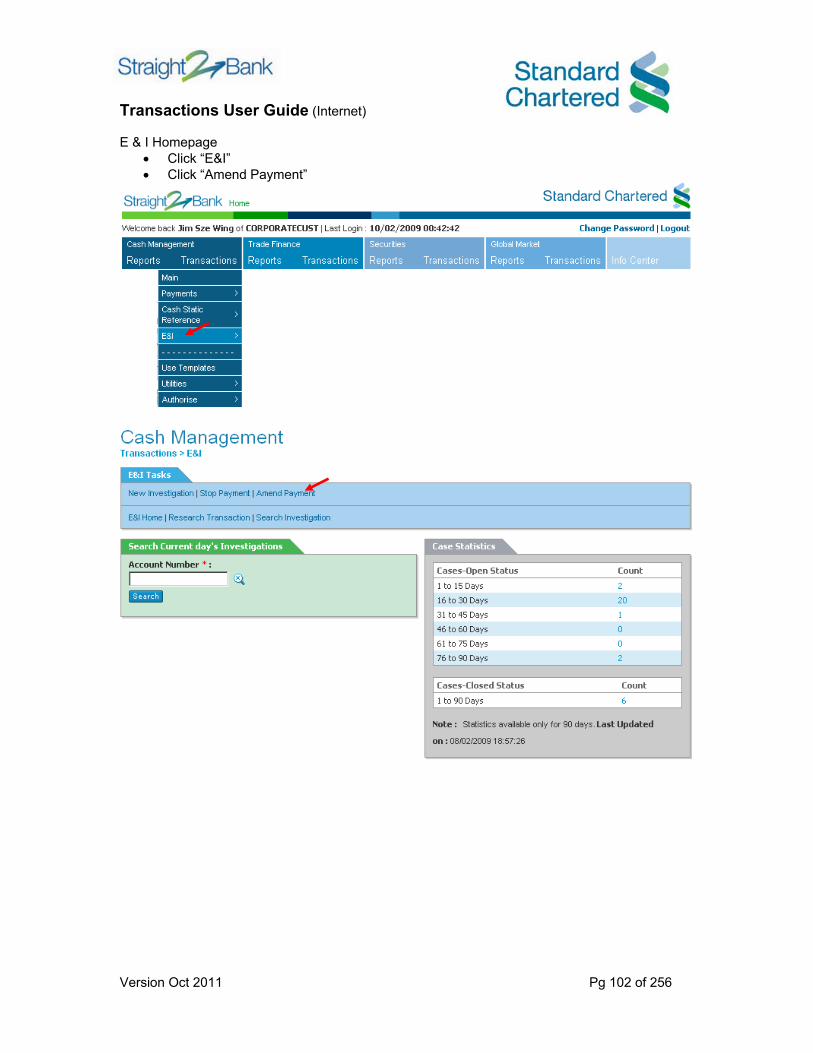
E & I Homepage
• Click “E&I” • Click “Stop Payment”
Transactions User Guide (Internet)
Version Oct 2011 Pg 100 of 256
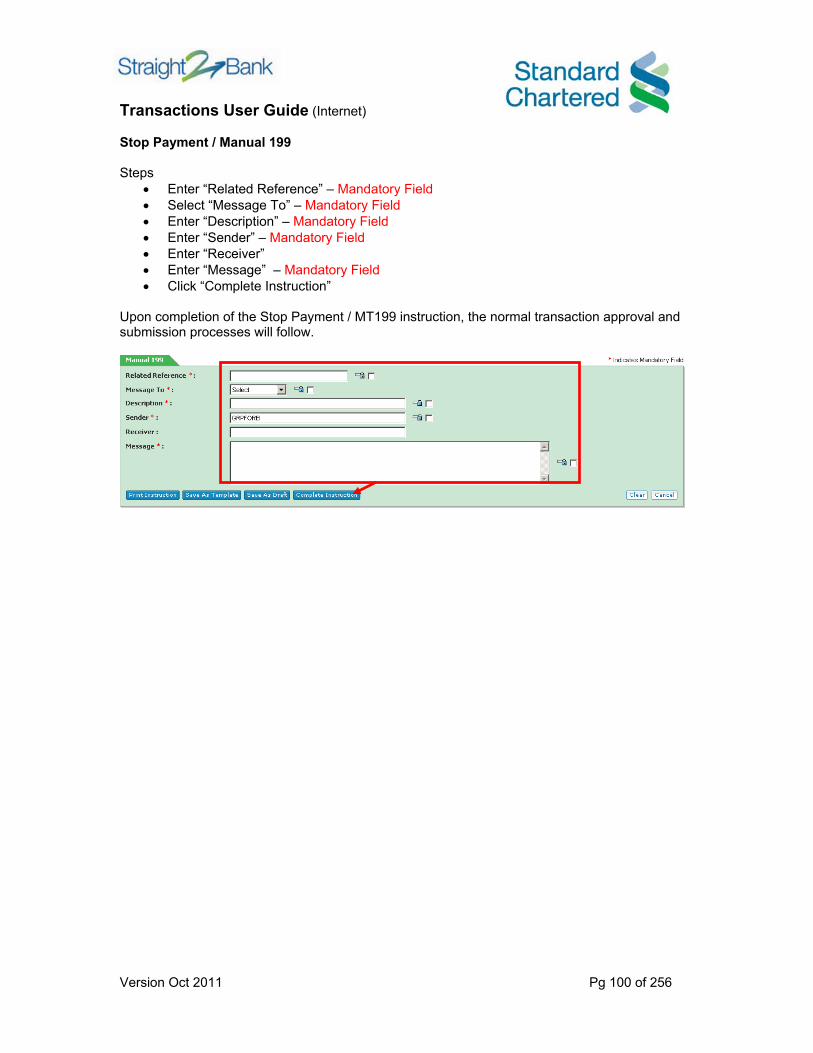
Stop Payment / Manual 199 Steps
• Enter “Related Reference” – Mandatory Field • Select “Message To” – Mandatory Field • Enter “Description” – Mandatory Field • Enter “Sender” – Mandatory Field • Enter “Receiver” • Enter “Message” – Mandatory Field • Click “Complete Instruction”
Upon completion of the Stop Payment / MT199 instruction, the normal transaction approval and submission processes will follow.

Transactions User Guide (Internet)
Version Oct 2011 Pg 101 of 256
9.5 Amend Payment / Related 195 This function enables users to generate a SWIFT message ( related MT195). After the completion of the Amend Payment / Related 195, this will go through the normal Straight2Bank Web transaction approval and submission processes. After which, a SWIFT MT195 a free authenticated message will be generated and sent. Amend Payment / Related 195 can only be generated for Straight2Bank Web – Payments that are under status of 1) Send To Bank, 2) Received and 3) Under Processing. Upon the completion of Straight2Bank Web - Amend Payment / Related 195, the normal approval, submission and transaction status update processes will follow. Straight2Bank Web - Amend Payment / Related 195 Inquiry can only be used be used for payments initiated out of Straight2Bank Web only and CANNOT be used for payments initiated out of SWIFT channel. Amend Payment / Related 195 can be initiated from :-
• Payments List OR • E&I Homepage
Payments List
• Mouse over and click “Related 195 Inquiry”
Transactions User Guide (Internet)
Version Oct 2011 Pg 102 of 256
E & I Homepage
• Click “E&I” • Click “Amend Payment”
Transactions User Guide (Internet)
Version Oct 2011 Pg 103 of 256
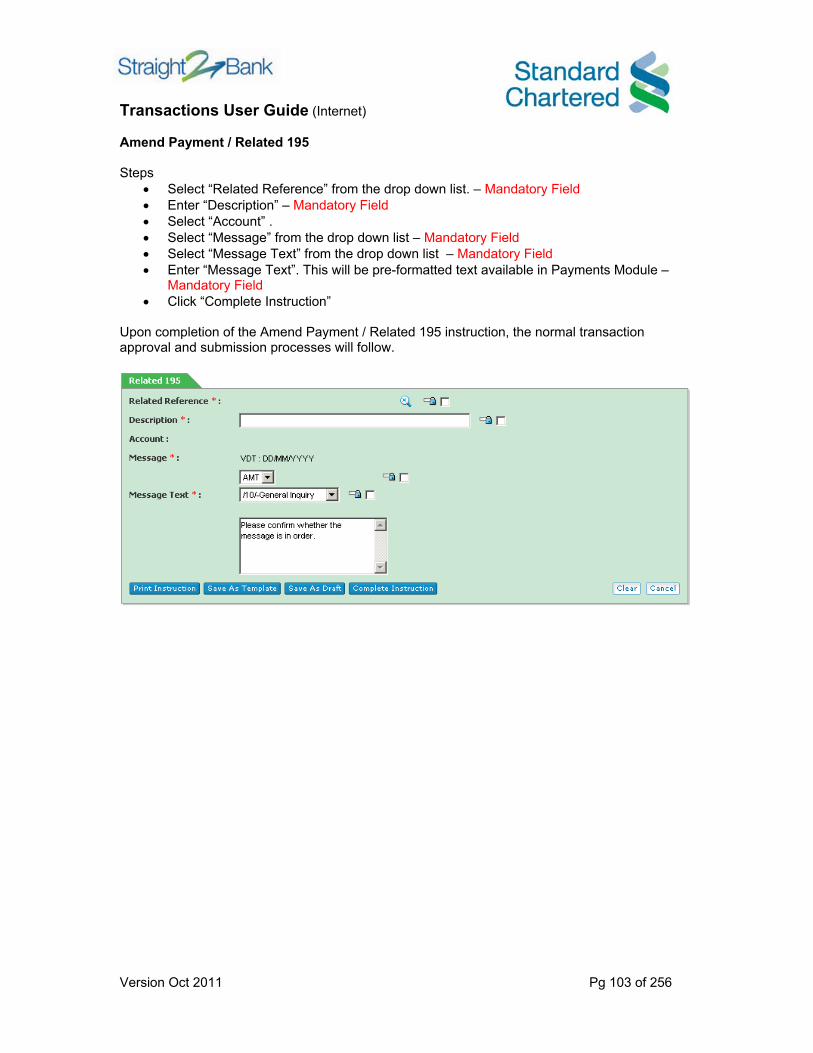
Amend Payment / Related 195 Steps
• Select “Related Reference” from the drop down list. – Mandatory Field • Enter “Description” – Mandatory Field • Select “Account” . • Select “Message” from the drop down list – Mandatory Field • Select “Message Text” from the drop down list – Mandatory Field • Enter “Message Text”. This will be pre-formatted text available in Payments Module –
Mandatory Field • Click “Complete Instruction”
Upon completion of the Amend Payment / Related 195 instruction, the normal transaction approval and submission processes will follow.

Transactions User Guide (Internet)
Version Oct 2011 Pg 104 of 256
10. Trade Banking
10.1. LC Issuance Step 1: Navigate and select
• Trade • Transaction • Trade Banking • LC Issuance
LC Issuance can be created through • Copy from transaction • Copy form template • New - manual input
Transactions User Guide (Internet)
Version Oct 2011 Pg 105 of 256
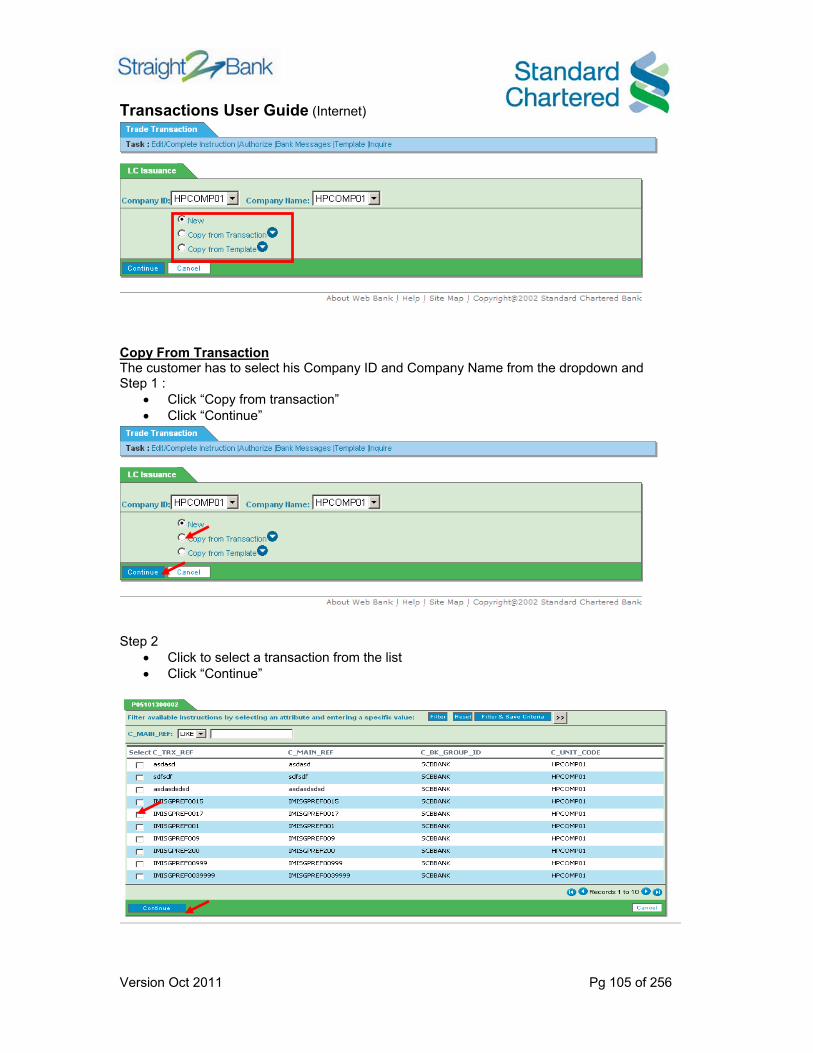
Copy From Transaction The customer has to select his Company ID and Company Name from the dropdown and Step 1 :
• Click “Copy from transaction” • Click “Continue”
Step 2
• Click to select a transaction from the list • Click “Continue”
Transactions User Guide (Internet)
Version Oct 2011 Pg 106 of 256
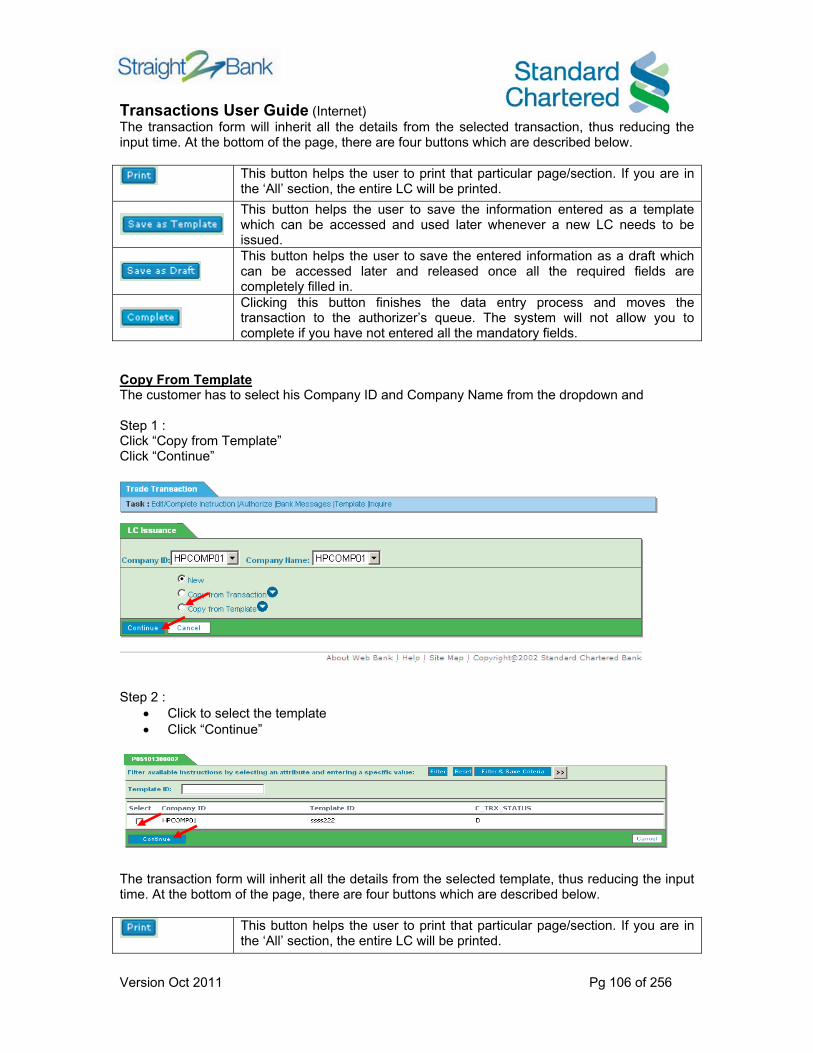
The transaction form will inherit all the details from the selected transaction, thus reducing the input time. At the bottom of the page, there are four buttons which are described below.
This button helps the user to print that particular page/section. If you are in the ‘All’ section, the entire LC will be printed.
This button helps the user to save the information entered as a template which can be accessed and used later whenever a new LC needs to be issued.
This button helps the user to save the entered information as a draft which can be accessed later and released once all the required fields are completely filled in.
Clicking this button finishes the data entry process and moves the transaction to the authorizer’s queue. The system will not allow you to complete if you have not entered all the mandatory fields.
Copy From Template The customer has to select his Company ID and Company Name from the dropdown and Step 1 : Click “Copy from Template” Click “Continue”
Step 2 :
• Click to select the template • Click “Continue”
The transaction form will inherit all the details from the selected template, thus reducing the input time. At the bottom of the page, there are four buttons which are described below.
This button helps the user to print that particular page/section. If you are in the ‘All’ section, the entire LC will be printed.

Transactions User Guide (Internet)
Version Oct 2011 Pg 107 of 256
This button helps the user to save the information entered as a template which can be accessed and used later whenever a new LC needs to be issued.
This button helps the user to save the entered information as a draft which can be accessed later and released once all the required fields are completely filled in.
Clicking this button finishes the data entry process and moves the transaction to the authorizer’s queue. The system will not allow you to complete if you have not entered all the mandatory fields.
Transactions User Guide (Internet)
Version Oct 2011 Pg 108 of 256
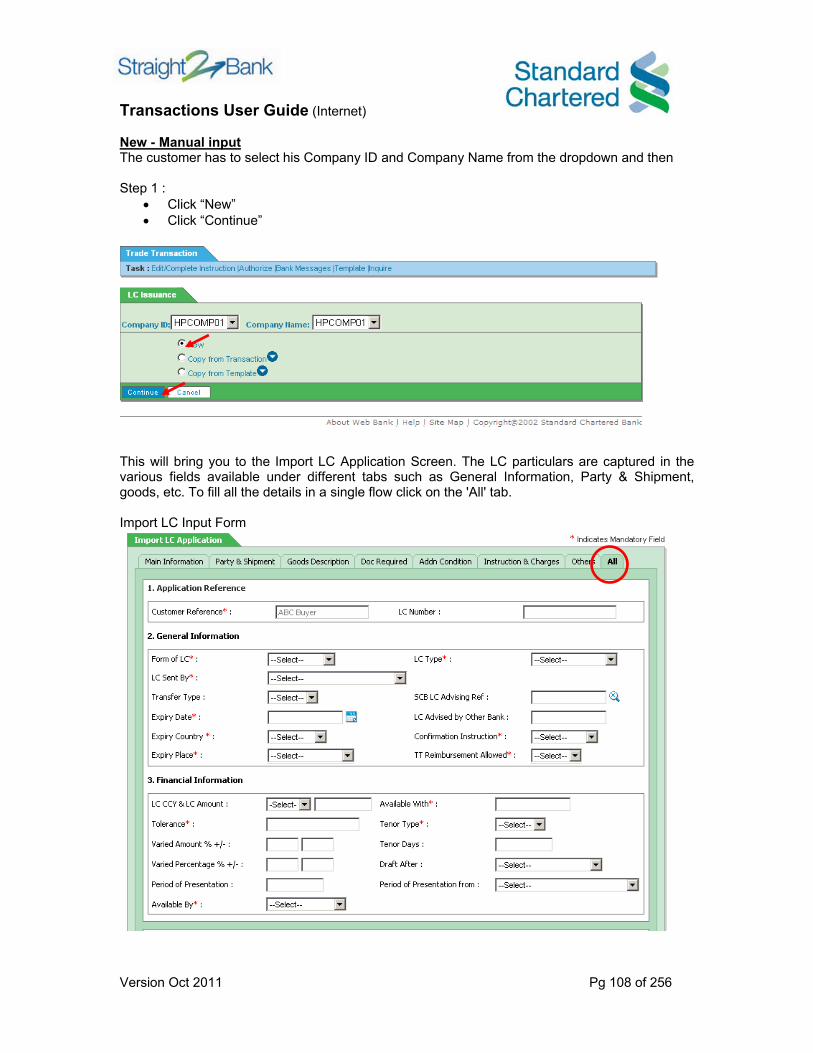
New - Manual input The customer has to select his Company ID and Company Name from the dropdown and then Step 1 :
• Click “New” • Click “Continue”
This will bring you to the Import LC Application Screen. The LC particulars are captured in the various fields available under different tabs such as General Information, Party & Shipment, goods, etc. To fill all the details in a single flow click on the 'All' tab. Import LC Input Form

Transactions User Guide (Internet)
Version Oct 2011 Pg 109 of 256
Import LC Input Form (Cont’d)

Transactions User Guide (Internet)
Version Oct 2011 Pg 110 of 256
Import LC Input Form (Cont’d)
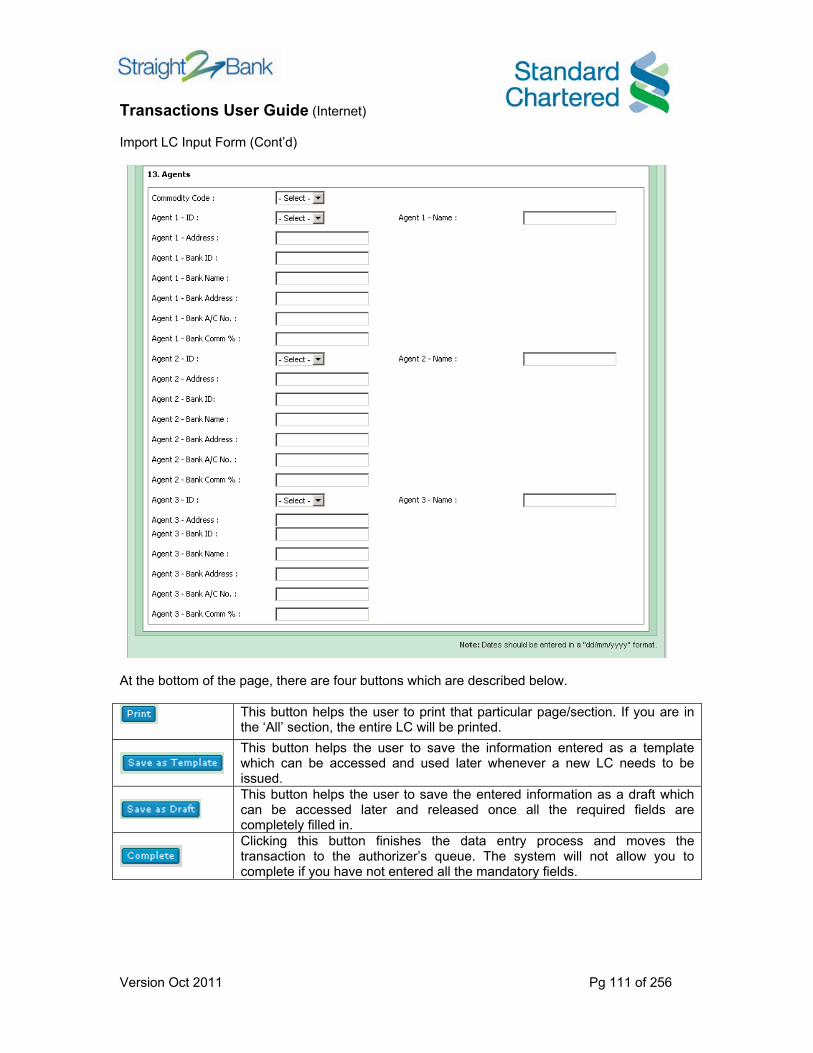
Transactions User Guide (Internet)
Version Oct 2011 Pg 111 of 256
Import LC Input Form (Cont’d)
At the bottom of the page, there are four buttons which are described below.
This button helps the user to print that particular page/section. If you are in the ‘All’ section, the entire LC will be printed.
This button helps the user to save the information entered as a template which can be accessed and used later whenever a new LC needs to be issued.
This button helps the user to save the entered information as a draft which can be accessed later and released once all the required fields are completely filled in.
Clicking this button finishes the data entry process and moves the transaction to the authorizer’s queue. The system will not allow you to complete if you have not entered all the mandatory fields.
Transactions User Guide (Internet)
Version Oct 2011 Pg 112 of 256
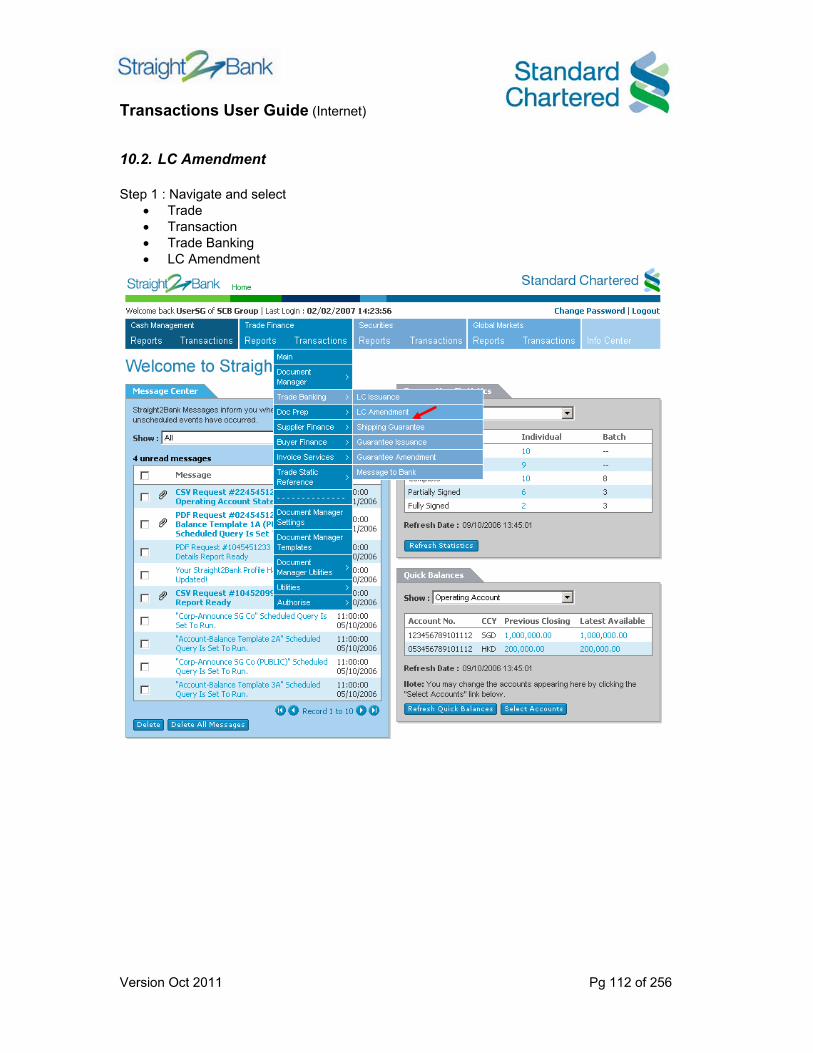
10.2. LC Amendment Step 1 : Navigate and select
• Trade • Transaction • Trade Banking • LC Amendment
Transactions User Guide (Internet)
Version Oct 2011 Pg 113 of 256
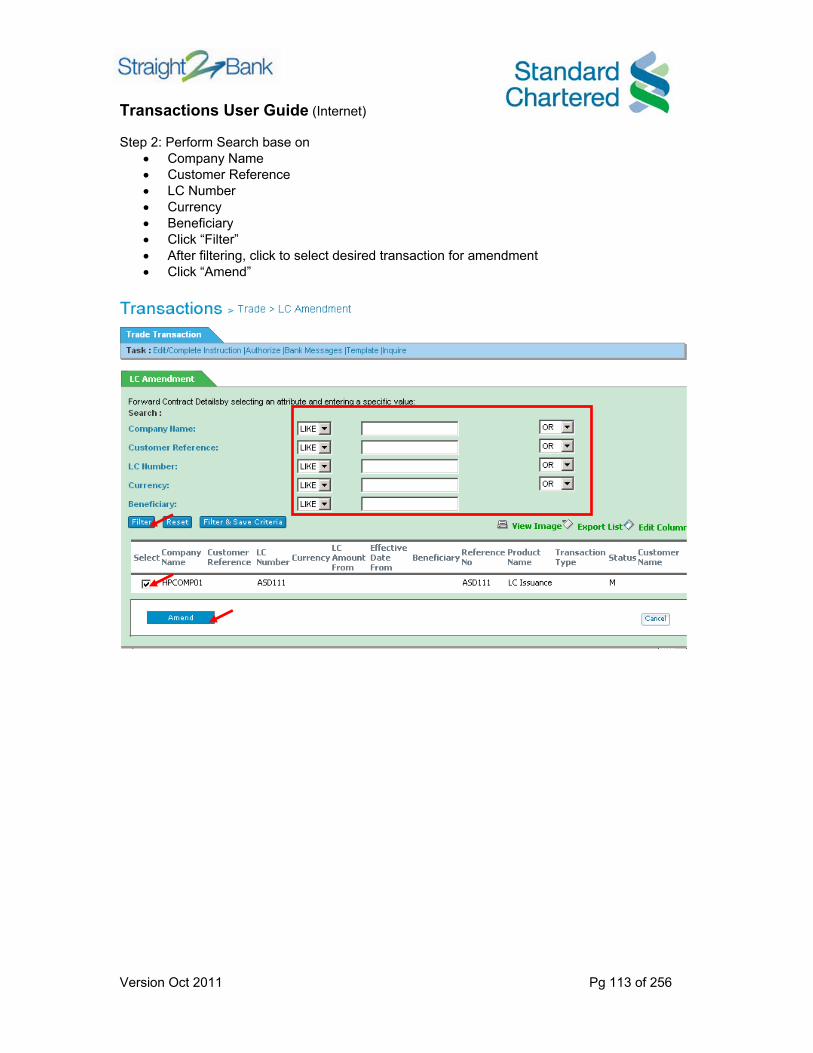
Step 2: Perform Search base on
• Company Name • Customer Reference • LC Number • Currency • Beneficiary • Click “Filter” • After filtering, click to select desired transaction for amendment • Click “Amend”

Transactions User Guide (Internet)
Version Oct 2011 Pg 114 of 256
The required particulars that need to be amended are to be entered and other fields can be skipped. To display all the details in a single flow click on the 'All' tab.
Import LC Amendment Form

Transactions User Guide (Internet)
Version Oct 2011 Pg 115 of 256
Import LC Amendment Form (Cont’d)

Transactions User Guide (Internet)
Version Oct 2011 Pg 116 of 256
Import LC Amendment Form (Cont’d)
At the bottom of the page, there are four buttons which are described below.
This button helps the user to print that particular page/section. If you are in the ‘All’ section, the entire LC amendment will be printed.
This button helps the user to save the information entered as a template which can be accessed and used later whenever a new amendment needs to be issued.
This button helps the user to save the entered information as a draft which can be accessed later and released once all the required fields are completely filled in.
Clicking this button finishes the data entry process and moves the transaction to the authorizer’s queue. The system will not allow you to complete if you have not entered all the mandatory fields.

Transactions User Guide (Internet)
Version Oct 2011 Pg 117 of 256
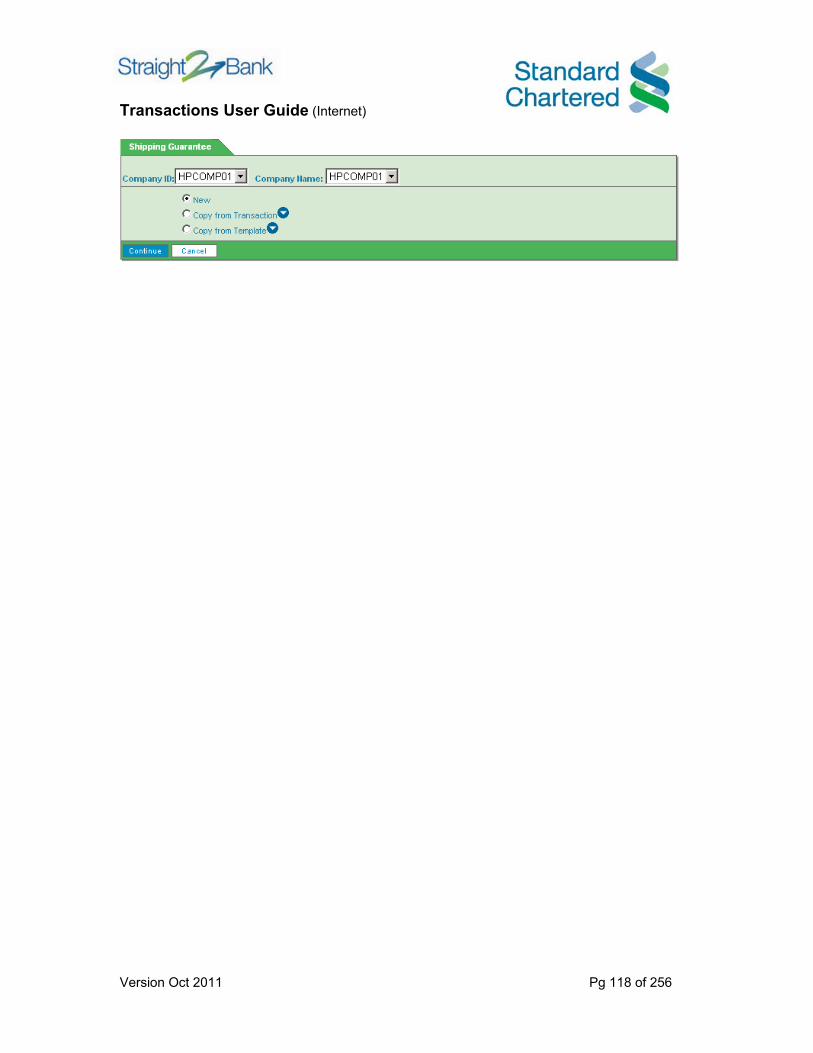
10.3. Shipping Guarantees Step 1 : Navigate and select
• Trade • Transaction • Trade Banking • Shipping Guarantee
Shipping Guarantee can be created through • Copy from transaction • Copy form template • New - manual input
Transactions User Guide (Internet)
Version Oct 2011 Pg 118 of 256

Transactions User Guide (Internet)
Version Oct 2011 Pg 119 of 256
Copy From Transaction The customer has to select his Company ID and Company Name from the dropdown and Step 1:
• Click “Copy from transaction” • Click “Continue”
Step 2:
• Click to select a transaction from the list • Click “Continue”
The transaction form will inherit all the details from the selected transaction, thus reducing the input time. At the bottom of the page, there are four buttons which are described below.
This button helps the user to print that particular page/section. If you are in the ‘All’ section, the entire shipping guarantee will be printed.
This button helps the user to save the information entered as a template which can be accessed and used later whenever a new shipping guarantee needs to be issued.
This button helps the user to save the entered information as a draft which can be accessed later and released once all the required fields are completely filled in.
Clicking this button finishes the data entry process and moves the transaction to the authorizer’s queue. The system will not allow you to complete if you have not entered all the mandatory fields.
Transactions User Guide (Internet)
Version Oct 2011 Pg 120 of 256
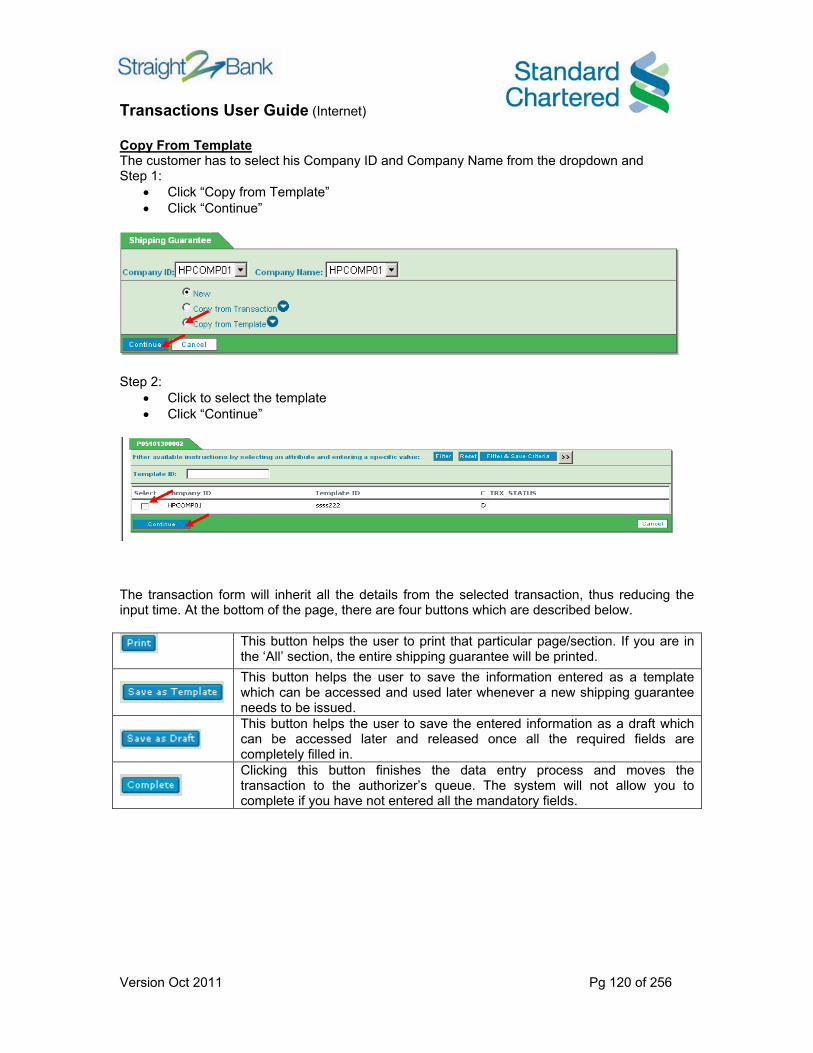
Copy From Template The customer has to select his Company ID and Company Name from the dropdown and Step 1:
• Click “Copy from Template” • Click “Continue”
Step 2:
• Click to select the template • Click “Continue”
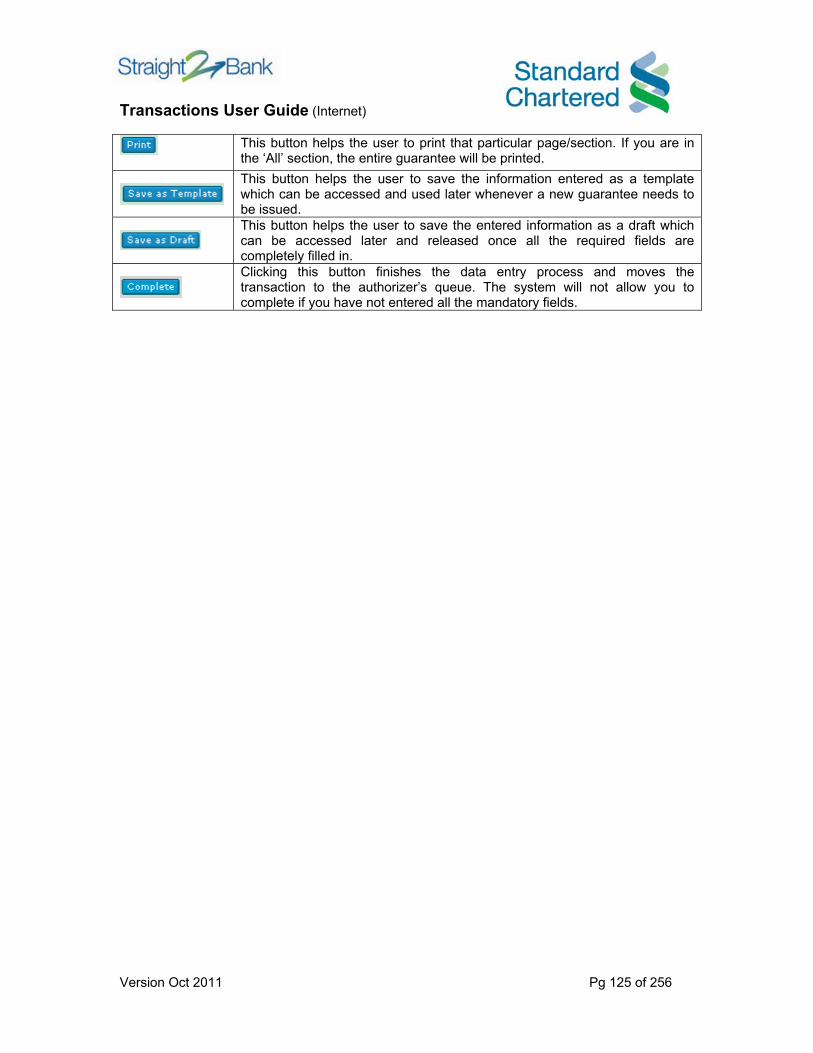
The transaction form will inherit all the details from the selected transaction, thus reducing the input time. At the bottom of the page, there are four buttons which are described below.
This button helps the user to print that particular page/section. If you are in the ‘All’ section, the entire shipping guarantee will be printed.
This button helps the user to save the information entered as a template which can be accessed and used later whenever a new shipping guarantee needs to be issued.
This button helps the user to save the entered information as a draft which can be accessed later and released once all the required fields are completely filled in.
Clicking this button finishes the data entry process and moves the transaction to the authorizer’s queue. The system will not allow you to complete if you have not entered all the mandatory fields.

Transactions User Guide (Internet)
Version Oct 2011 Pg 121 of 256
New - Manual input The customer has to select his Company ID and Company Name from the dropdown and then Step 1: Click “New” Click “Continue”
This will bring you to the Shipping Guarantee Issuance Form Screen. The Shipping Guarantee particulars are captured in the various fields available under different tabs such as Main, Party & Instructions and Charges. To fill all the details in a single flow click on the 'All' tab. Shipping Guarantee Issuance Form

Transactions User Guide (Internet)
Version Oct 2011 Pg 122 of 256
Shipping Guarantee Issuance Form (Cont’d)
At the bottom of the page, there are four buttons which are described below.
This button helps the user to print that particular page/section. If you are in the ‘All’ section, the entire shipping guarantee will be printed.
This button helps the user to save the information entered as a template which can be accessed and used later whenever a new shipping guarantee needs to be issued.
This button helps the user to save the entered information as a draft which can be accessed later and released once all the required fields are completely filled in.
Clicking this button finishes the data entry process and moves the transaction to the authorizer’s queue. The system will not allow you to complete if you have not entered all the mandatory fields.

Transactions User Guide (Internet)
Version Oct 2011 Pg 123 of 256
10.4. Guarantee Issuance Step 1 : Navigate and select
• Trade • Transaction • Trade Banking • Guarantee Issuance
Guarantee Issuance can be created through • Copy from transaction • Copy form template • New - manual input

Transactions User Guide (Internet)
Version Oct 2011 Pg 124 of 256
Copy From Transaction The customer has to select his Company ID and Company Name from the dropdown and Step 1:
• Click “Copy from transaction” • Click “Continue”
Step 3:
• Click to select a transaction from the list • Click “Continue”
The transaction form will inherit all the details from the selected transaction, thus reducing the input time. At the bottom of the page, there are four buttons which are described below.
Transactions User Guide (Internet)
Version Oct 2011 Pg 125 of 256
This button helps the user to print that particular page/section. If you are in the ‘All’ section, the entire guarantee will be printed.
This button helps the user to save the information entered as a template which can be accessed and used later whenever a new guarantee needs to be issued.
This button helps the user to save the entered information as a draft which can be accessed later and released once all the required fields are completely filled in.
Clicking this button finishes the data entry process and moves the transaction to the authorizer’s queue. The system will not allow you to complete if you have not entered all the mandatory fields.

Transactions User Guide (Internet)
Version Oct 2011 Pg 126 of 256
Copy From Template The customer has to select his Company ID and Company Name from the dropdown and Step 1: Click “Copy from Template” Click “Continue”
Step 3:
• Click to select the template • Click “Continue”
The transaction form will inherit all the details from the selected transaction, thus reducing the input time. At the bottom of the page, there are four buttons which are described below.
This button helps the user to print that particular page/section. If you are in the ‘All’ section, the entire guarantee will be printed.
This button helps the user to save the information entered as a template which can be accessed and used later whenever a new guarantee needs to be issued.
This button helps the user to save the entered information as a draft which can be accessed later and released once all the required fields are completely filled in.
Clicking this button finishes the data entry process and moves the transaction to the authorizer’s queue. The system will not allow you to complete if you have not entered all the mandatory fields.

Transactions User Guide (Internet)
Version Oct 2011 Pg 127 of 256
New - Manual input The customer has to select his Company ID and Company Name from the dropdown and then Step 1:
• Click “New” • Click “Continue”
This will bring you to the Guarantee Issuance Input Screen. The Guarantee particulars are captured in the various fields available under different tabs such as Main, Party & Instructions and Charges. To fill all the details in a single flow click on the 'All' tab. Guarantee Input Form

Transactions User Guide (Internet)
Version Oct 2011 Pg 128 of 256
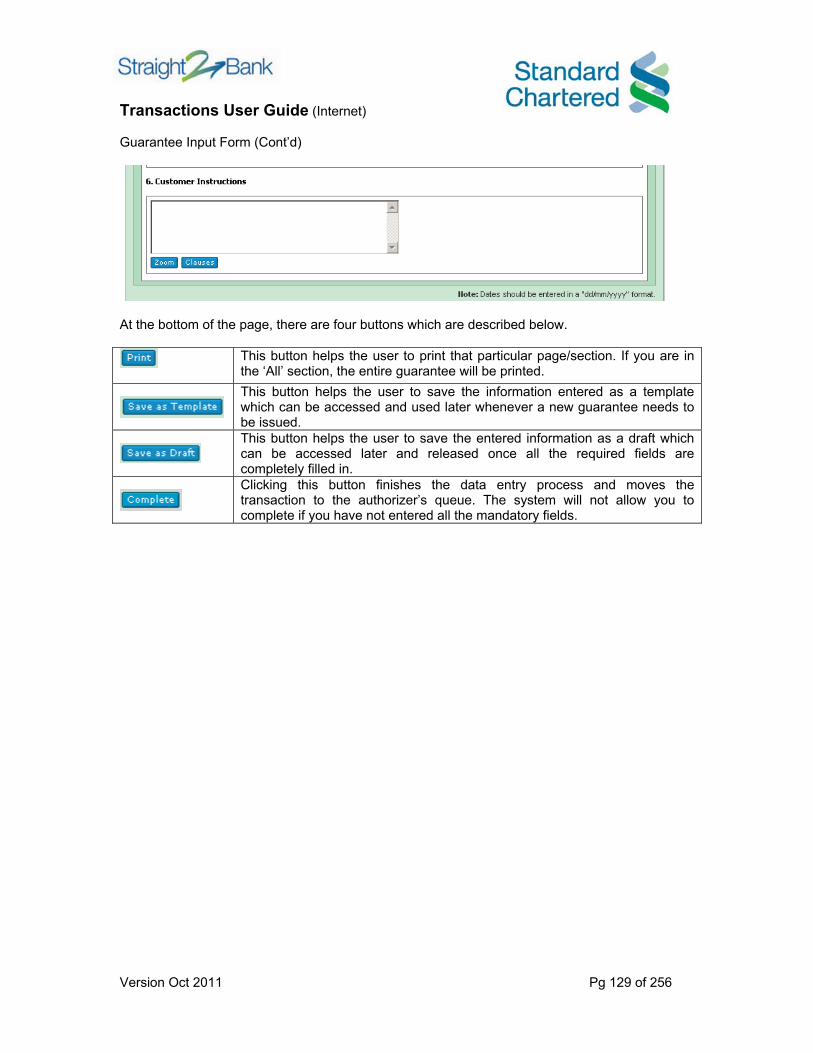
Guarantee Input Form (Cont’d)
Transactions User Guide (Internet)
Version Oct 2011 Pg 129 of 256
Guarantee Input Form (Cont’d)
At the bottom of the page, there are four buttons which are described below.
This button helps the user to print that particular page/section. If you are in the ‘All’ section, the entire guarantee will be printed.
This button helps the user to save the information entered as a template which can be accessed and used later whenever a new guarantee needs to be issued.
This button helps the user to save the entered information as a draft which can be accessed later and released once all the required fields are completely filled in.
Clicking this button finishes the data entry process and moves the transaction to the authorizer’s queue. The system will not allow you to complete if you have not entered all the mandatory fields.

Transactions User Guide (Internet)
Version Oct 2011 Pg 130 of 256
10.5. Guarantee Amendment Step 1 : Navigate and select
• Trade • Transaction • Trade Banking • Guarantee Amendment
Transactions User Guide (Internet)
Version Oct 2011 Pg 131 of 256
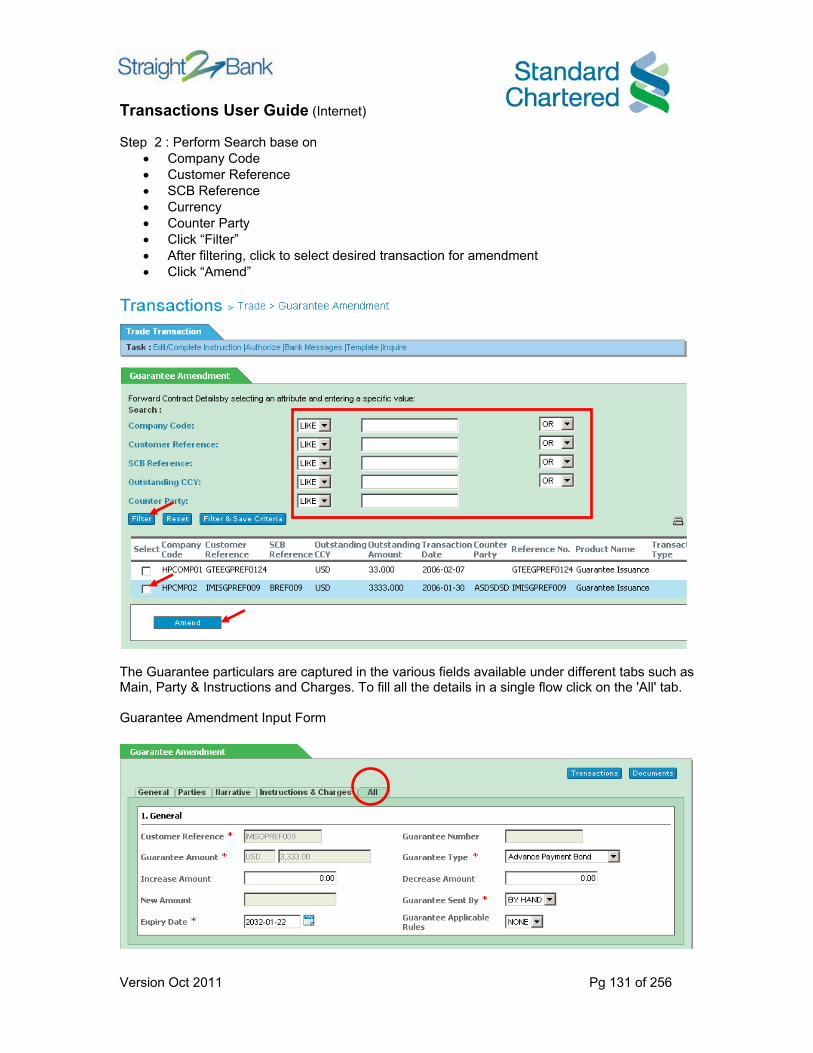
Step 2 : Perform Search base on
• Company Code • Customer Reference • SCB Reference • Currency • Counter Party • Click “Filter” • After filtering, click to select desired transaction for amendment • Click “Amend”
The Guarantee particulars are captured in the various fields available under different tabs such as Main, Party & Instructions and Charges. To fill all the details in a single flow click on the 'All' tab. Guarantee Amendment Input Form

Transactions User Guide (Internet)
Version Oct 2011 Pg 132 of 256
Guarantee Amendment Input Form (Cont’d)

Transactions User Guide (Internet)
Version Oct 2011 Pg 133 of 256
Guarantee Amendment Input Form (Cont’d)
At the bottom of the page, there are four buttons which are described below.
This button helps the user to print that particular page/section. If you are in the ‘All’ section, the entire guarantee will be printed.
This button helps the user to save the information entered as a template which can be accessed and used later whenever a new guarantee needs to be issued.
This button helps the user to save the entered information as a draft which can be accessed later and released once all the required fields are completely filled in.
Clicking this button finishes the data entry process and moves the transaction to the authorizer’s queue. The system will not allow you to complete if you have not entered all the mandatory fields.

Transactions User Guide (Internet)
Version Oct 2011 Pg 134 of 256
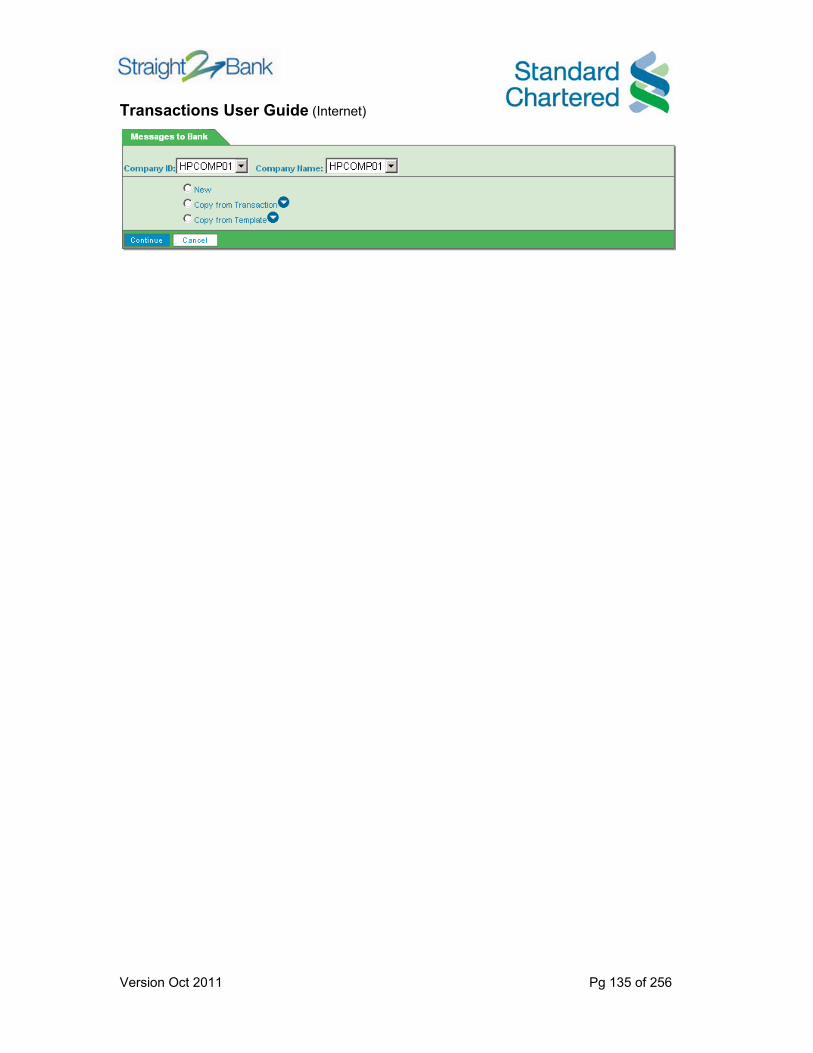
10.6. Messages To Bank Step 1 : Navigate and select
• Trade • Transaction • Trade Banking • Messages to Bank
Messages to Bank can be created through • Copy from transaction • Copy form template • New - manual input
Transactions User Guide (Internet)
Version Oct 2011 Pg 135 of 256

Transactions User Guide (Internet)
Version Oct 2011 Pg 136 of 256
Copy From Transaction The customer has to select his Company ID and Company Name from the dropdown and Step 1:
• Click “Copy from transaction” • Click “Continue”
Step 2:
• Click to select a transaction from the list • Click “Continue”
The transaction form will inherit all the details from the selected transaction, thus reducing the input time. At the bottom of the page, there are four buttons which are described below.
This button helps the user to print that particular page/section. If you are in the ‘All’ section, the entire Messages to Bank will be printed.
This button helps the user to save the information entered as a template which can be accessed and used later whenever a new Messages to Bank needs to be issued.
This button helps the user to save the entered information as a draft which can be accessed later and released once all the required fields are completely filled in.
Clicking this button finishes the data entry process and moves the transaction to the authorizer’s queue. The system will not allow you to complete if you have not entered all the mandatory fields.

Transactions User Guide (Internet)
Version Oct 2011 Pg 137 of 256
Copy From Template The customer has to select his Company ID and Company Name from the dropdown and Step 1:
• Click “Copy from Template” • Click “Continue”
Step 2:
• Click to select the template • Click “Continue”
The transaction form will inherit all the details from the selected transaction, thus reducing the input time. At the bottom of the page, there are four buttons which are described below.
This button helps the user to print that particular page/section. If you are in the ‘All’ section, the entire Messages to Bank will be printed.
This button helps the user to save the information entered as a template which can be accessed and used later whenever a new Messages to Bank needs to be issued.
This button helps the user to save the entered information as a draft which can be accessed later and released once all the required fields are completely filled in.
Clicking this button finishes the data entry process and moves the transaction to the authorizer’s queue. The system will not allow you to complete if you have not entered all the mandatory fields.

Transactions User Guide (Internet)
Version Oct 2011 Pg 138 of 256
New - Manual input The customer has to select his Company ID and Company Name from the dropdown and then Step 1
• Click “New” • Click “Continue”
On clicking ‘Continue’ the user will be taken to the message input form. The message particulars are captured in the various fields available.
At the bottom of the page, there are four buttons which are described below.
This button helps the user to print that particular page/section. If you are in the ‘All’ section, the entire Messages to Bank will be printed.
This button helps the user to save the information entered as a template which can be accessed and used later whenever a new Messages to Bank needs to be issued.
This button helps the user to save the entered information as a draft which can be accessed later and released once all the required fields are completely filled in.
Clicking this button finishes the data entry process and moves the transaction to the authorizer’s queue. The system will not allow you to complete if you have not entered all the mandatory fields.

Transactions User Guide (Internet)
Version Oct 2011 Pg 139 of 256
11. Document Manager Transactions The ‘Document Manager’ module allows you to create trade documents, view and edit trade documents, manage trade document profiles and track trade document
• Move cursor to Trade > Transactions > Document Manager
Under the Document Manager Module user can perform: Document Manager
Create Documents Documents Maintenance - Edit Document Track Documents Create a Profile for L/C Issuance or Amendment Create a Profile for Payment Instruction View and Edit a Profile Group Documents by Running a Profile
Document Manager Templates
Create Template Create New Document from Template
Transactions User Guide (Internet)
Version Oct 2011 Pg 140 of 256
My Settings
View Document View Document List Create a View Edit a View Manage Personal Tags Create Customised Columns View Settings Your Notification and Alert Settings
Document Manager Administrations
Maintain Auto-Grouping Profiles Manage Company Labels Manage Company Code Lists Company Logos & Signatures Import Address Book Contacts Company Address Book L/C Template Settings
Utilities
Upload a File View Upload Files View Received Files

Transactions User Guide (Internet)
Version Oct 2011 Pg 141 of 256
11.1 Document Manager- Create a New Document
Follow these steps to create a new trade document:
Step 1: Find the list of available documents.
• Select Purchase Order and click OK.

Transactions User Guide (Internet)
Version Oct 2011 Pg 142 of 256
Step 2:
A ‘Document Manager’ business trade document is generally comprised of three information panels, namely; Main Information, Goods Line Items, and Attachments. The Main Information panel will be displayed by default whenever you open a document. Please ensure that the Buyer or Buyer ID and the Supplier or Supplier ID are populated when creating a document.
Step 3 : Enter the required information into the document fields in the Main Information Panel. All fields with an asterisk (*) must be completed before a document can be sent.
Step 4 : Click on the Recipients search button to select your trading partners. Select the Recipient Names from the list and click OK when finished.
Step 5 : Click on View Document Logo to view or change the logo associated with this document.
Step 6 : Click on the Calendar icon to open the calendar and select dates.

Transactions User Guide (Internet)
Version Oct 2011 Pg 143 of 256
Step 7 : Similarly, click on Search icon on the Buyer field to select a buyer from your address
book. Click on the Expand button on the buyer field to show additional information for the
selected buyer. Step 8 : Enter the Transport details information.
Step 9 : Click on the Goods Line Items to display the Goods Line items in the document. You can
Add or Modify the items list of the document. Click on the Add button.
Step 10 : Enter the Line Item information for the product. Click Save to save the line item entered. Click Save and Add to save the line item and add another line item to the list. Click Copy to copy a Line Item. Repeat the same steps to add other line items.
If you want to remove a Line Item, place a check mark before each Line Item that you want to remove and click the Remove button in the bottom bar.

Transactions User Guide (Internet)
Version Oct 2011 Pg 144 of 256
Step 11 : Click on the Attachments button to display the attachment window. The attachment function lets you attach related file items to the document.
Note : You can attach a maximum of three files to your document.
Step 12 : Click on Browse in order to search for the file that you want to attach from your
workstation. Select the file you want to attach from the Dialogue box. Click on the Open button. The total size of all the files that make up your attachments cannot exceed 5MB in size.
File types can be binary, MS Word document, Excel, or plain text. Step 13 :
Click Save to keep the new document as Draft. Click Send to send the document to its recipients. Click Reset to discard the entered document information. Click Cancel to discard the document.
The document will be validated at the time of sending to make sure all the required fields are filled in properly.

Transactions User Guide (Internet)
Version Oct 2011 Pg 145 of 256
11.2 Document Manager- Documents Maintenance - Edit Document
Follow these steps to edit a document:
Step 1: Select Document Manager> Manage Documents. The 'Manage Documents' window will
appear on the screen. Click on the View drop down box and select Draft Documents.
Step 2 : The documents list will be displayed.
Click on the document that you want to Edit. The selected document will open up on the screen under Edit mode.

Transactions User Guide (Internet)
Version Oct 2011 Pg 146 of 256
Step 3 : Make the desired changes by clicking the various tabs for example, Main Information, Goods Line Items, and Attachments to get to the data fields within each information panel.
• Click the Save button, when finished editing.

Transactions User Guide (Internet)
Version Oct 2011 Pg 147 of 256
11.3 Document Manager- Track Documents
Follow these steps to track documents:
Step 1: Select Document Manager> Track Documents. In Track Documents page you can view the list of documents and all the related documents .
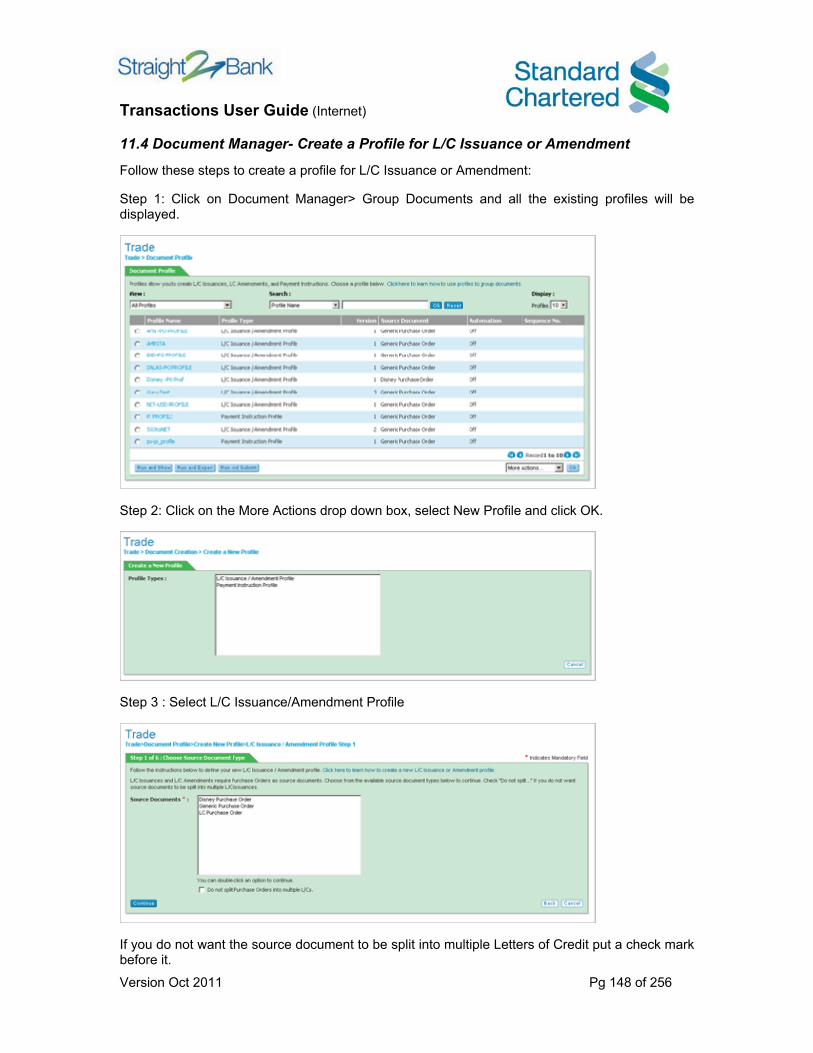
Transactions User Guide (Internet)
Version Oct 2011 Pg 148 of 256
11.4 Document Manager- Create a Profile for L/C Issuance or Amendment
Follow these steps to create a profile for L/C Issuance or Amendment:
Step 1: Click on Document Manager> Group Documents and all the existing profiles will be displayed.
Step 2: Click on the More Actions drop down box, select New Profile and click OK.
Step 3 : Select L/C Issuance/Amendment Profile
If you do not want the source document to be split into multiple Letters of Credit put a check mark before it.
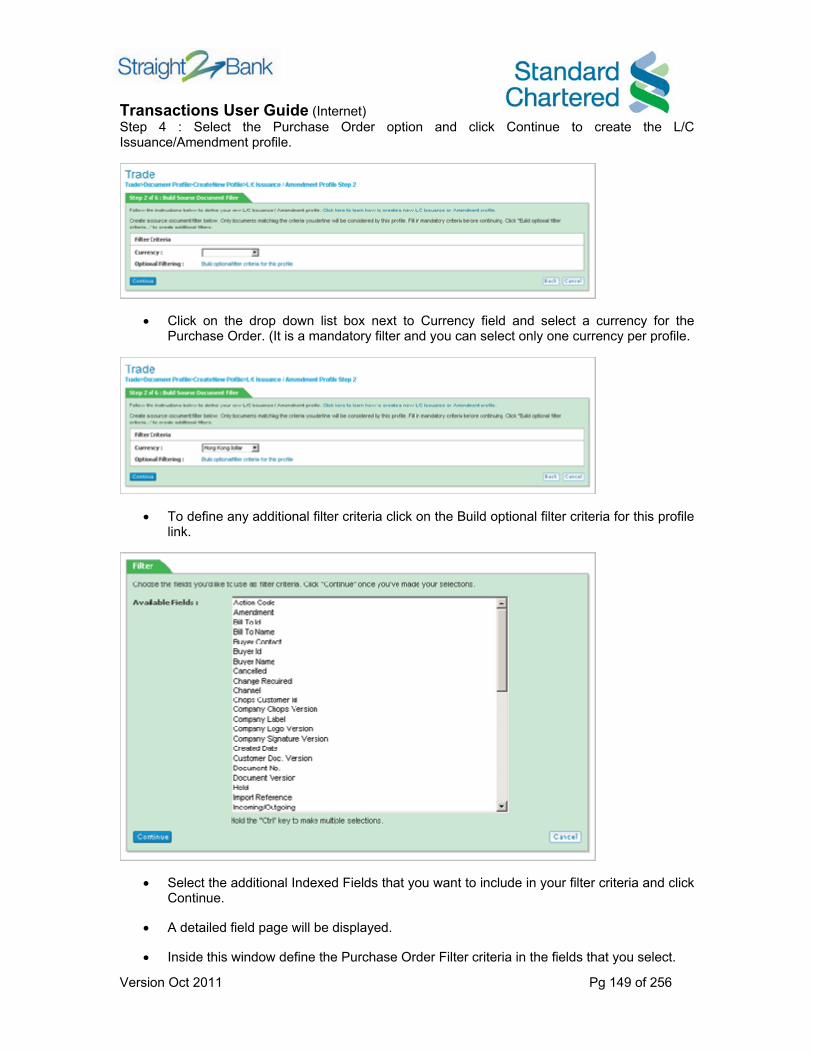
Transactions User Guide (Internet)
Version Oct 2011 Pg 149 of 256
Step 4 : Select the Purchase Order option and click Continue to create the L/C Issuance/Amendment profile.
• Click on the drop down list box next to Currency field and select a currency for the Purchase Order. (It is a mandatory filter and you can select only one currency per profile.
• To define any additional filter criteria click on the Build optional filter criteria for this profile link.
• Select the additional Indexed Fields that you want to include in your filter criteria and click Continue.
• A detailed field page will be displayed.
• Inside this window define the Purchase Order Filter criteria in the fields that you select.

Transactions User Guide (Internet)
Version Oct 2011 Pg 150 of 256
• You may choose from Payment Method Field or Terms of Delivery Fields options.
• Define the amount in the Amount Range and dates in the Date Range Fields.
• Click OK when finished, to return to the previous window.
• The New L/C Issuance/Amendment Profile page will be displayed.
• Click the Continue button.
Step 5 : Click on View Document Logo to view or change the logo associated with this document.
• The Choose Grouping Criteria page will be displayed.
• For Purchase Orders, mandatory Fields are Currency, Payment Method, Supplier Name/Supplier ID.
• You may define additional criteria by selecting fields inside the Optional Criteria box.
• Click the Continue button.
• Click OK when finished, to return to the previous window.
Step 6 : Click on the Calendar icon to open the calendar and select dates.
• The L/C Issuance Settings page will be displayed.

Transactions User Guide (Internet)
Version Oct 2011 Pg 151 of 256
• Define the L/C Issuance Settings on the screen.
• L/C Issuance Settings.
• L/C Latest Shipment Date = PO Latest Shipment Date + Days specified by you.
• L/C Expiry Date = L/C Latest Shipment Date + Days specified by you.
• Turn on/off Do not insert L/C Latest Shipment Date on L/C Issuance. If on, the L/C Latest Shipment Date will not be included in L/C Issuance and vice versa.
• Define maximum value of L/C Issuance.
• Define maximum number of Line Items in L/C Issuance.
• Define L/C Adjustment either as Fixed Amount or as Percentage.
• While submitting the PO information to Trade Banking you need to select the L/C Submission Template ID. The template ID will be passed to Trade Banking along with the application data. Trade Banking would use the appropriate template to display the L/C screen to the user.
• Provide a brief Description of goods.
• You may define a New Customer Reference Formula for search results.
• Click the Continue button.

Transactions User Guide (Internet)
Version Oct 2011 Pg 152 of 256
Step 7 : The L/C Amendment Settings page will be displayed.
• Define the L/C Amendment settings on this screen.
• Place a check mark before Generate L/C Amendment box.
• Define those Letter of Credit Issuances in the Amendment that were created within the specified number of days before the execution of the profile.
• Click on the check box to include the new or Ungrouped PO Line Items for Letter of Credit Amendments.
• Define the date range for PO Line Item's Latest Shipment as the number of days before and after execution of the profile.
• Define the value of PO Line Items in the Currency and Total Amount fields.
• Click on the check box to include the grouped PO Line Items for L/C Amendments.
• Define the date range for PO Line Items Latest Shipment as the number of days before and after execution of the profile.
• Define the maximum value for the Letter of Credit Amendment in the Currency and Total Amount fields.
• Define the Maximum Number of Line Items for the Letter of Credit Amendment.
• Turn on/off Do not insert Letter of Credit Latest Shipment Date on Letter of Credit Amendment. If on, the Letter of Credit Latest Shipment Date will not be included in Letter of Credit Amendment and vice versa.

Transactions User Guide (Internet)
Version Oct 2011 Pg 153 of 256
• Turn on/off Do not change Letter of Credit Latest Shipment Date and Letter of Credit Expiry Date on Letter of Credit Amendment when Calculated Letter of Credit Expiry Date <= Previous Letter of Credit Expiry Date. If on and meets the condition, the Letter of Credit Latest Shipment Date and Letter of Credit Expiry Date will not be changed.
• Once you have defined all the amendment settings, click the Continue button.
Step 8 : The Name and Description page will be displayed.
• Enter the Name and Description of the profile and click the Save Profile button.
Step 9 : A response page will be displayed. The profile will be saved and will appear in the Profiles list under Document Creation.
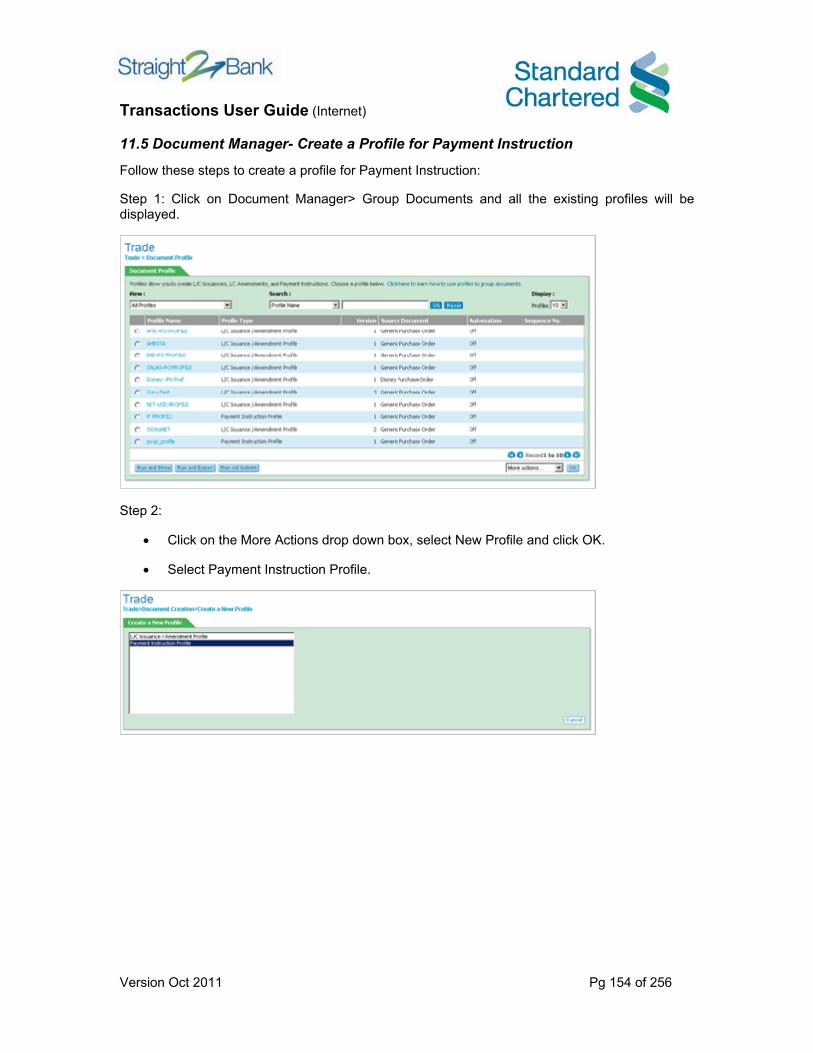
Transactions User Guide (Internet)
Version Oct 2011 Pg 154 of 256
11.5 Document Manager- Create a Profile for Payment Instruction
Follow these steps to create a profile for Payment Instruction:
Step 1: Click on Document Manager> Group Documents and all the existing profiles will be displayed.
Step 2:
• Click on the More Actions drop down box, select New Profile and click OK.
• Select Payment Instruction Profile.
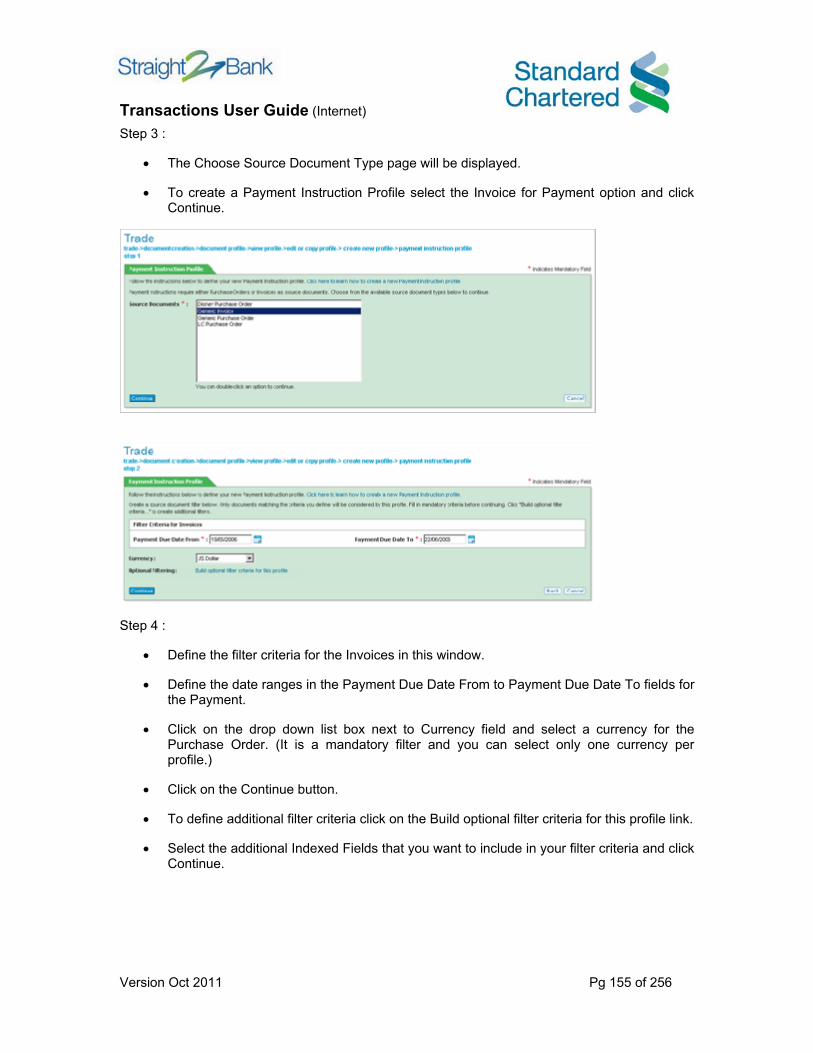
Transactions User Guide (Internet)
Version Oct 2011 Pg 155 of 256
Step 3 :
• The Choose Source Document Type page will be displayed.
• To create a Payment Instruction Profile select the Invoice for Payment option and click Continue.
Step 4 :
• Define the filter criteria for the Invoices in this window.
• Define the date ranges in the Payment Due Date From to Payment Due Date To fields for the Payment.
• Click on the drop down list box next to Currency field and select a currency for the Purchase Order. (It is a mandatory filter and you can select only one currency per profile.)
• Click on the Continue button.
• To define additional filter criteria click on the Build optional filter criteria for this profile link.
• Select the additional Indexed Fields that you want to include in your filter criteria and click Continue.

Transactions User Guide (Internet)
Version Oct 2011 Pg 156 of 256
• Define the Invoice Filter criteria in the fields you selected in this window.
• Click Save when finished, to return to the previous window.
• The New L/C Issuance/Amendment Profile page will be displayed.
• Click the Continue button.
• Click the Continue button.
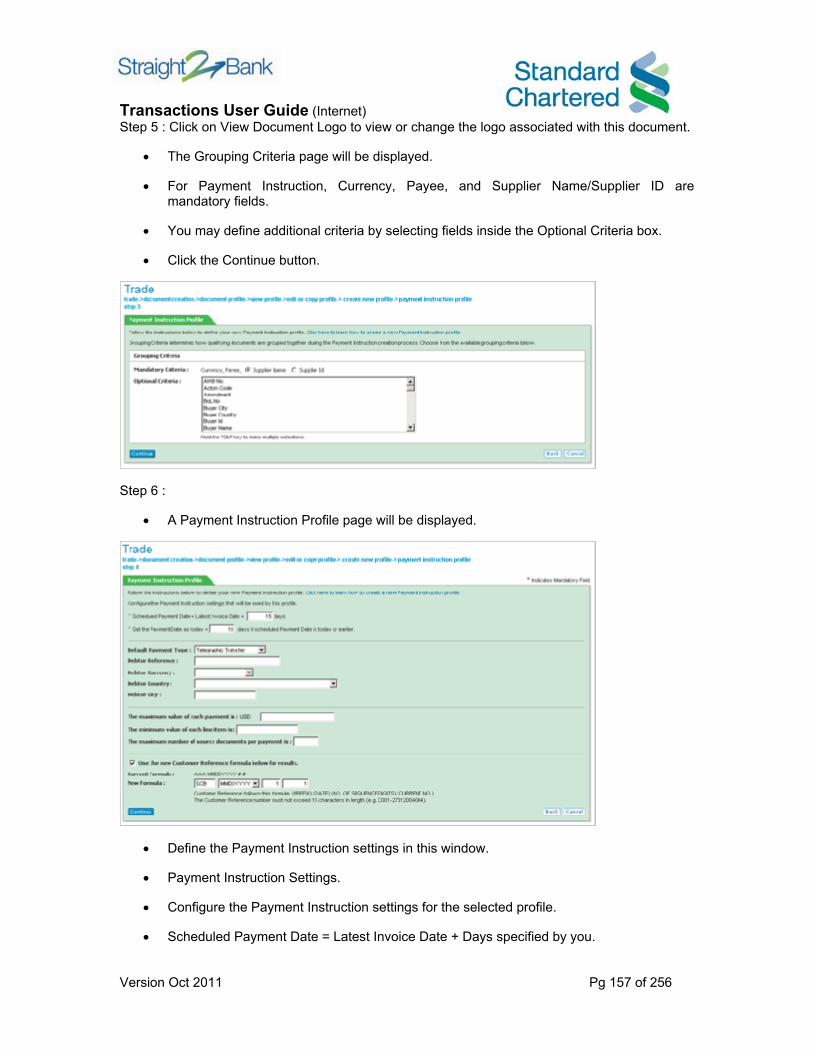
Transactions User Guide (Internet)
Version Oct 2011 Pg 157 of 256
Step 5 : Click on View Document Logo to view or change the logo associated with this document.
• The Grouping Criteria page will be displayed.
• For Payment Instruction, Currency, Payee, and Supplier Name/Supplier ID are mandatory fields.
• You may define additional criteria by selecting fields inside the Optional Criteria box.
• Click the Continue button.
Step 6 :
• A Payment Instruction Profile page will be displayed.
• Define the Payment Instruction settings in this window.
• Payment Instruction Settings.
• Configure the Payment Instruction settings for the selected profile.
• Scheduled Payment Date = Latest Invoice Date + Days specified by you.
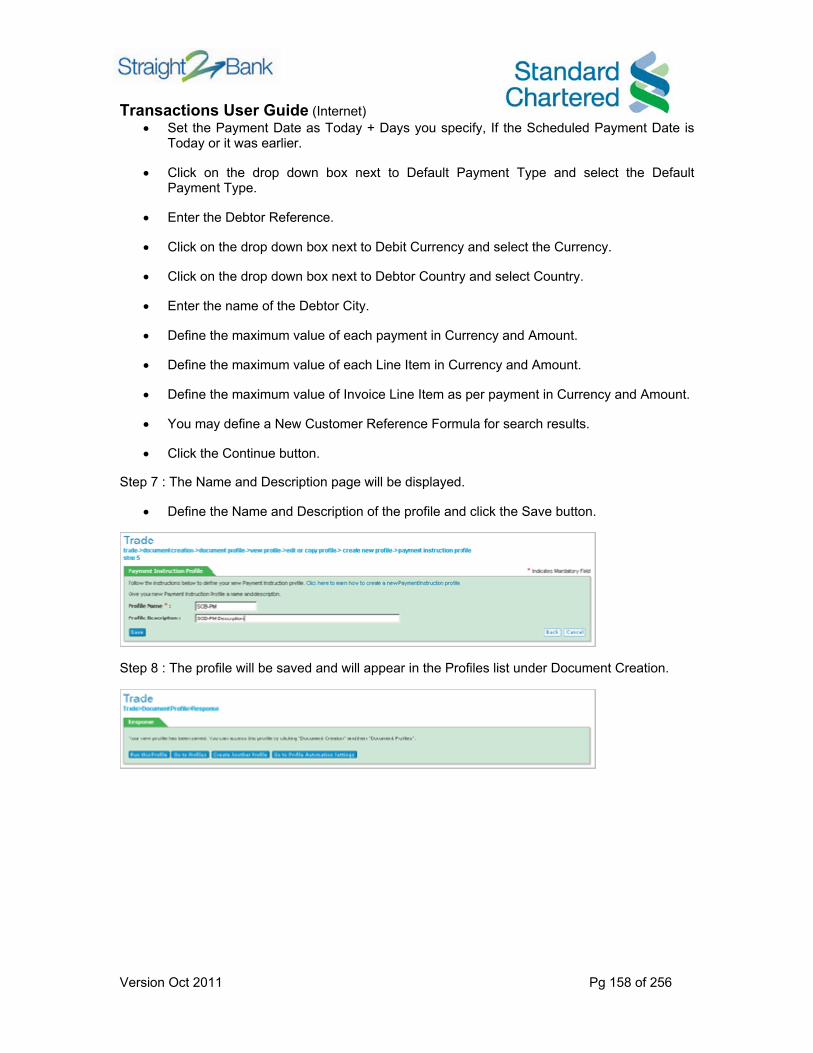
Transactions User Guide (Internet)
Version Oct 2011 Pg 158 of 256
• Set the Payment Date as Today + Days you specify, If the Scheduled Payment Date is Today or it was earlier.
• Click on the drop down box next to Default Payment Type and select the Default Payment Type.
• Enter the Debtor Reference.
• Click on the drop down box next to Debit Currency and select the Currency.
• Click on the drop down box next to Debtor Country and select Country.
• Enter the name of the Debtor City.
• Define the maximum value of each payment in Currency and Amount.
• Define the maximum value of each Line Item in Currency and Amount.
• Define the maximum value of Invoice Line Item as per payment in Currency and Amount.
• You may define a New Customer Reference Formula for search results.
• Click the Continue button.
Step 7 : The Name and Description page will be displayed.
• Define the Name and Description of the profile and click the Save button.
Step 8 : The profile will be saved and will appear in the Profiles list under Document Creation.
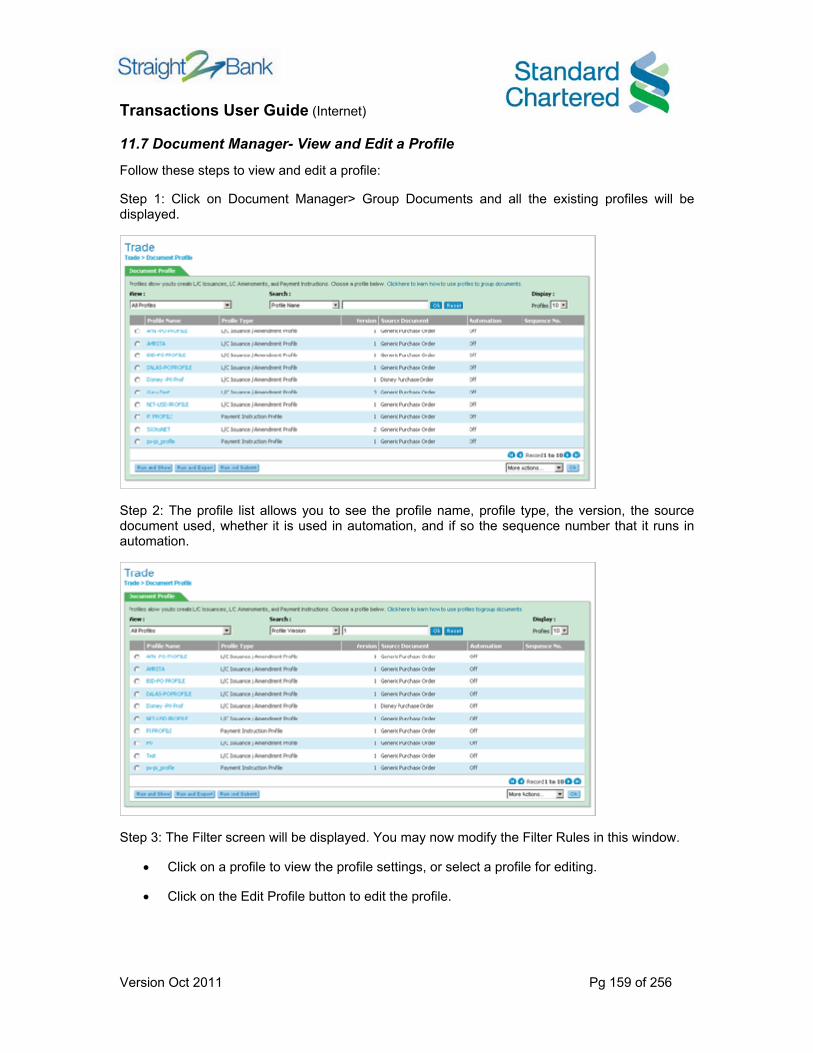
Transactions User Guide (Internet)
Version Oct 2011 Pg 159 of 256
11.7 Document Manager- View and Edit a Profile
Follow these steps to view and edit a profile:
Step 1: Click on Document Manager> Group Documents and all the existing profiles will be displayed.
Step 2: The profile list allows you to see the profile name, profile type, the version, the source document used, whether it is used in automation, and if so the sequence number that it runs in automation.
Step 3: The Filter screen will be displayed. You may now modify the Filter Rules in this window.
• Click on a profile to view the profile settings, or select a profile for editing.
• Click on the Edit Profile button to edit the profile.
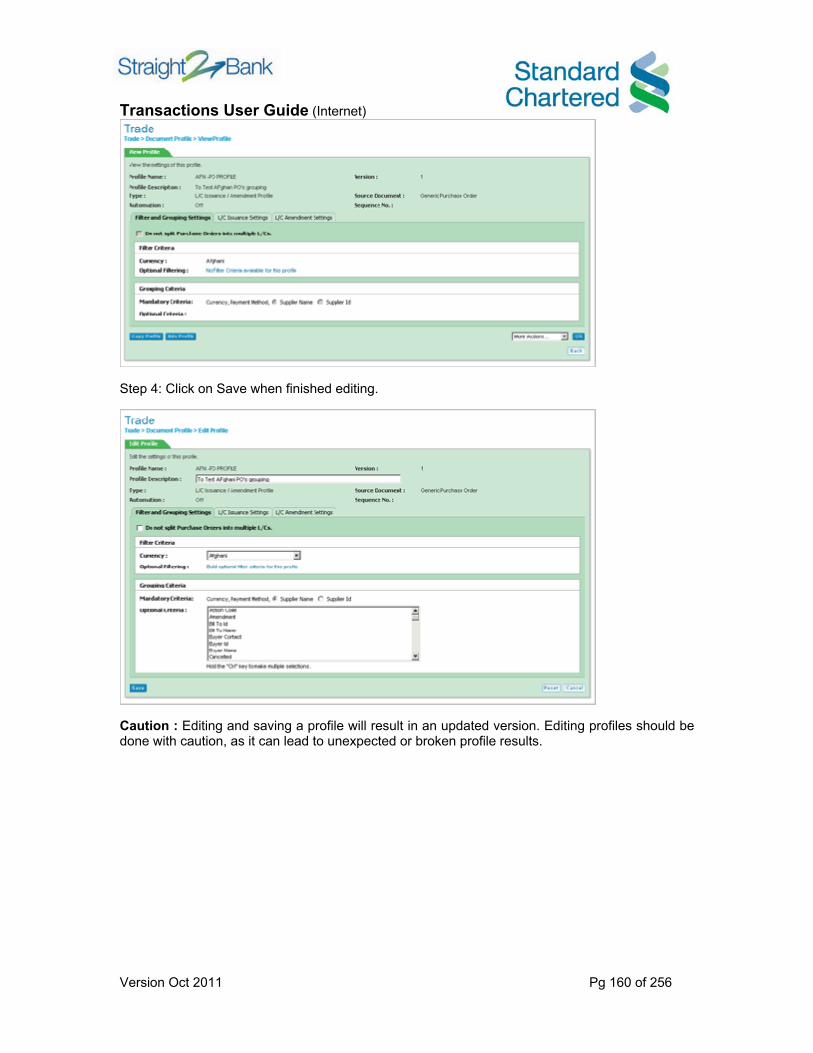
Transactions User Guide (Internet)
Version Oct 2011 Pg 160 of 256
Step 4: Click on Save when finished editing.
Caution : Editing and saving a profile will result in an updated version. Editing profiles should be done with caution, as it can lead to unexpected or broken profile results.
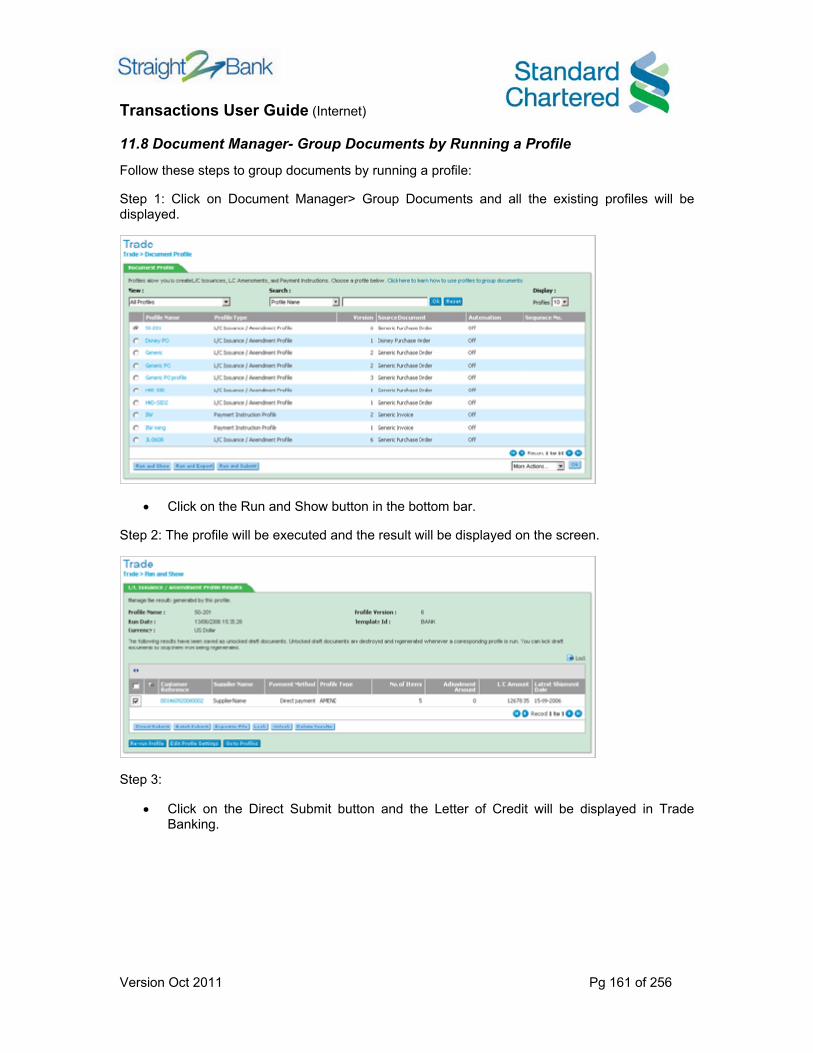
Transactions User Guide (Internet)
Version Oct 2011 Pg 161 of 256
11.8 Document Manager- Group Documents by Running a Profile
Follow these steps to group documents by running a profile:
Step 1: Click on Document Manager> Group Documents and all the existing profiles will be displayed.
• Click on the Run and Show button in the bottom bar.
Step 2: The profile will be executed and the result will be displayed on the screen.
Step 3:
• Click on the Direct Submit button and the Letter of Credit will be displayed in Trade Banking.

Transactions User Guide (Internet)
Version Oct 2011 Pg 162 of 256
• Lock a Letter of Credit
Follow these steps to lock a Letter of Credit:
• Hold/ Release a PO Line Item
Follow these steps to hold/ release a PO line item:

Transactions User Guide (Internet)
Version Oct 2011 Pg 163 of 256
11.9 Document Manager Templates - Create a Template
Follow these steps to create a new document template:
Step 1: Select Document Manager> Create Document. From the list provided select a document type and click OK.
Step 2 :
• Enter the complete relevant information inside the displayed document window.
• Click on Save as Template.

Transactions User Guide (Internet)
Version Oct 2011 Pg 164 of 256
Step 3 :
• The Save As Template window will be displayed on the screen.

Transactions User Guide (Internet)
Version Oct 2011 Pg 165 of 256
• Define the Template Name and click the Save button.
Step 4 :
• The Template Saved window will appear on the screen.
• Click Close to return to the previous window.
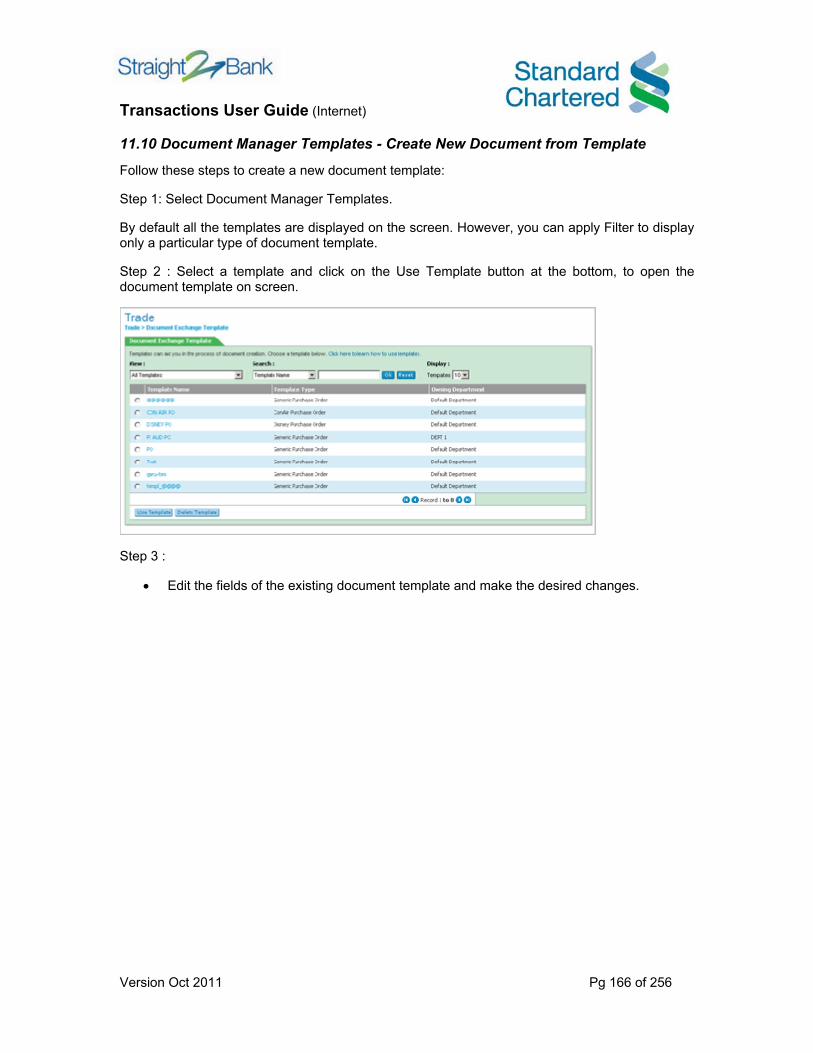
Transactions User Guide (Internet)
Version Oct 2011 Pg 166 of 256
11.10 Document Manager Templates - Create New Document from Template
Follow these steps to create a new document template:
Step 1: Select Document Manager Templates.
By default all the templates are displayed on the screen. However, you can apply Filter to display only a particular type of document template.
Step 2 : Select a template and click on the Use Template button at the bottom, to open the document template on screen.
Step 3 :
• Edit the fields of the existing document template and make the desired changes.
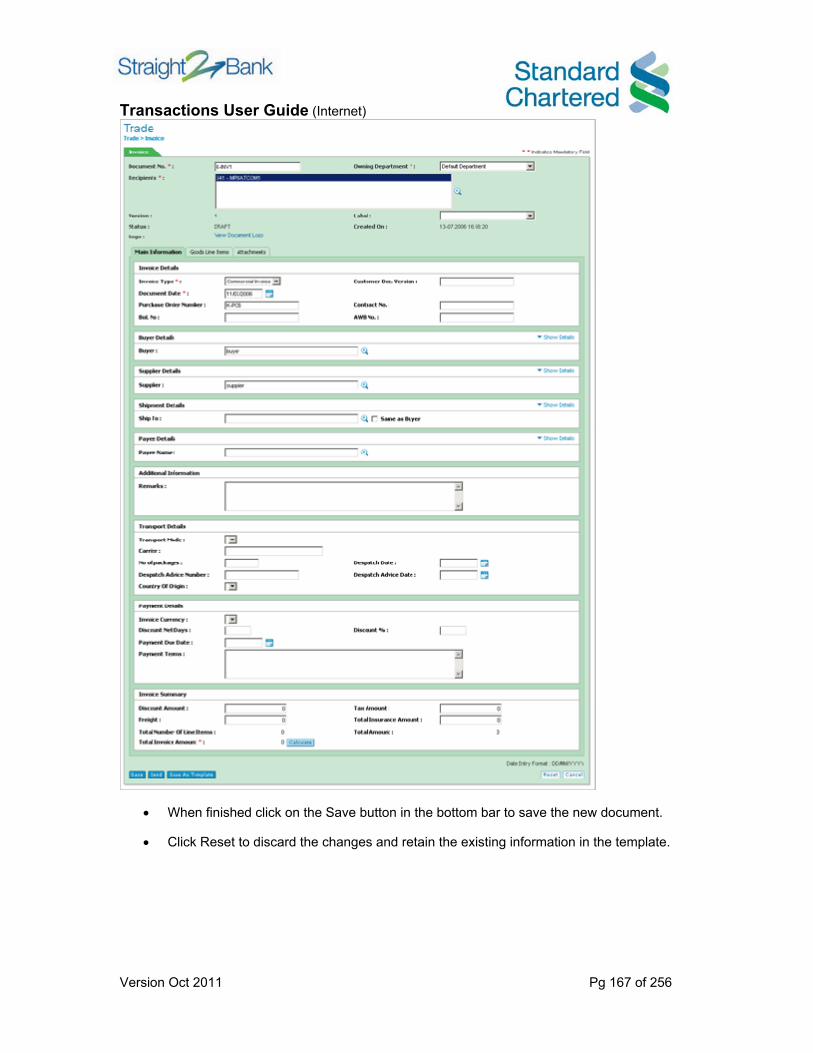
Transactions User Guide (Internet)
Version Oct 2011 Pg 167 of 256
• When finished click on the Save button in the bottom bar to save the new document.
• Click Reset to discard the changes and retain the existing information in the template.
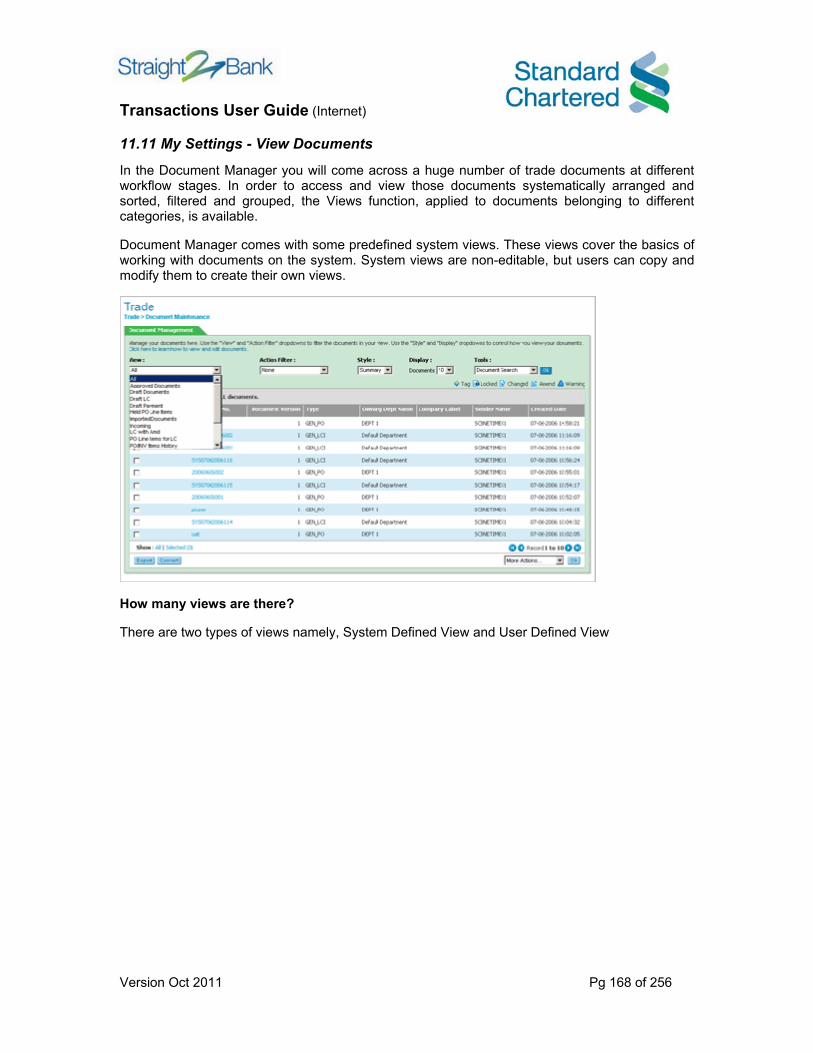
Transactions User Guide (Internet)
Version Oct 2011 Pg 168 of 256
11.11 My Settings - View Documents
In the Document Manager you will come across a huge number of trade documents at different workflow stages. In order to access and view those documents systematically arranged and sorted, filtered and grouped, the Views function, applied to documents belonging to different categories, is available.
Document Manager comes with some predefined system views. These views cover the basics of working with documents on the system. System views are non-editable, but users can copy and modify them to create their own views.
How many views are there?
There are two types of views namely, System Defined View and User Defined View

Transactions User Guide (Internet)
Version Oct 2011 Pg 169 of 256
System Defined View
In this view you will see common document information in the form of a list. By default there will be a set of views defined at system level. These views are available to all users. The system-defined views are as follows:
Transactions User Guide (Internet)
Version Oct 2011 Pg 170 of 256
User Defined View
It is possible to define your own views. In defining a new view, you can define a common filter criterion for all documents as well as a filter criterion applicable only to specific document types. The available common filters are:
• Incoming/ Outgoing
• Document Type
• Date Range
• Company Label Assigned to the Document
Note : You can modify and delete such defined views. However, you cannot make any changes to system-defined or default views.

Transactions User Guide (Internet)
Version Oct 2011 Pg 171 of 256
11.12 My Settings - View Documents List
Follow these steps to display or change documents view:
Step 1: Select Document Manager> Manage Documents.
Step 2:
• Click on the View drop down box to display all the available views.
• Select the View that you want to use; for example, Draft Documents.
Step 3: All the documents that belong to the Draft Documents category will be displayed.

Transactions User Guide (Internet)
Version Oct 2011 Pg 172 of 256
Repeat the same steps for switching over to another View.
Step 4: Repeat the same steps for switching over to another View.
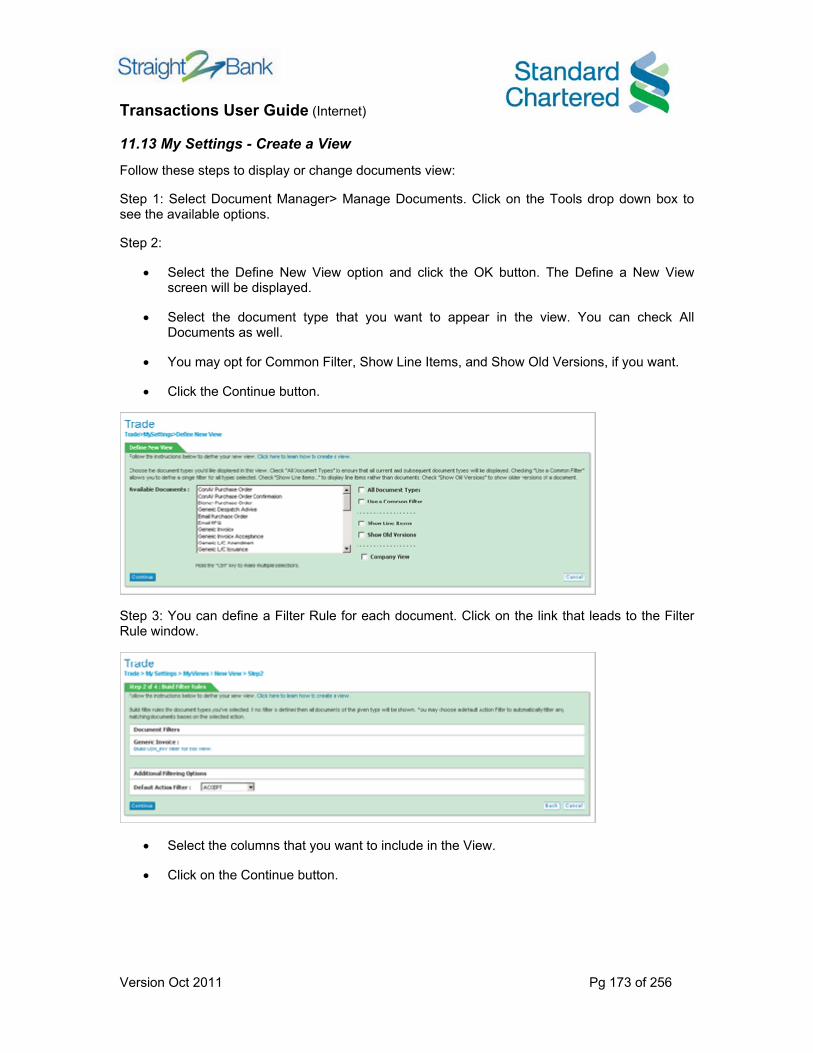
Transactions User Guide (Internet)
Version Oct 2011 Pg 173 of 256
11.13 My Settings - Create a View
Follow these steps to display or change documents view:
Step 1: Select Document Manager> Manage Documents. Click on the Tools drop down box to see the available options.
Step 2:
• Select the Define New View option and click the OK button. The Define a New View screen will be displayed.
• Select the document type that you want to appear in the view. You can check All Documents as well.
• You may opt for Common Filter, Show Line Items, and Show Old Versions, if you want.
• Click the Continue button.
Step 3: You can define a Filter Rule for each document. Click on the link that leads to the Filter Rule window.
• Select the columns that you want to include in the View.
• Click on the Continue button.

Transactions User Guide (Internet)
Version Oct 2011 Pg 174 of 256
• The Filter Rules window will be displayed. Please note that the fields will display as a single, multiple, or a range selection according to the field type.
• Click on OK to complete the task and return to Define a View page.
• Click on Continue to proceed.
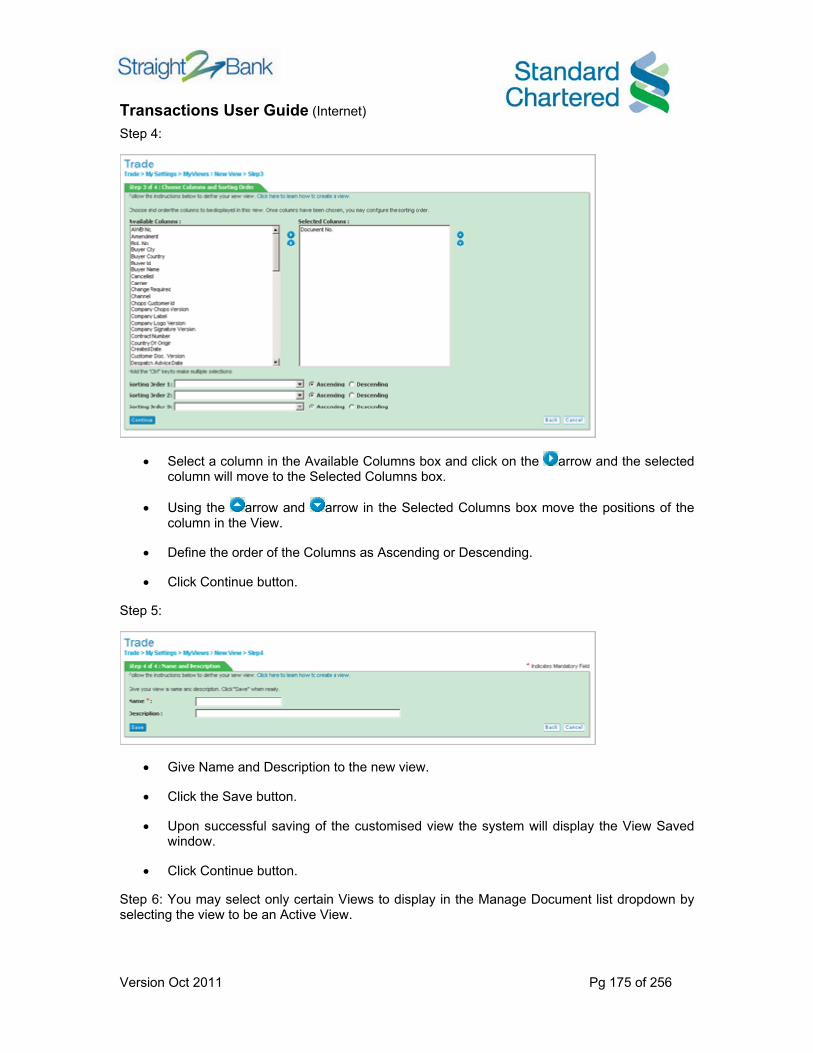
Transactions User Guide (Internet)
Version Oct 2011 Pg 175 of 256
Step 4:
• Select a column in the Available Columns box and click on the arrow and the selected column will move to the Selected Columns box.
• Using the arrow and arrow in the Selected Columns box move the positions of the column in the View.
• Define the order of the Columns as Ascending or Descending.
• Click Continue button.
Step 5:
• Give Name and Description to the new view.
• Click the Save button.
• Upon successful saving of the customised view the system will display the View Saved window.
• Click Continue button.
Step 6: You may select only certain Views to display in the Manage Document list dropdown by selecting the view to be an Active View.
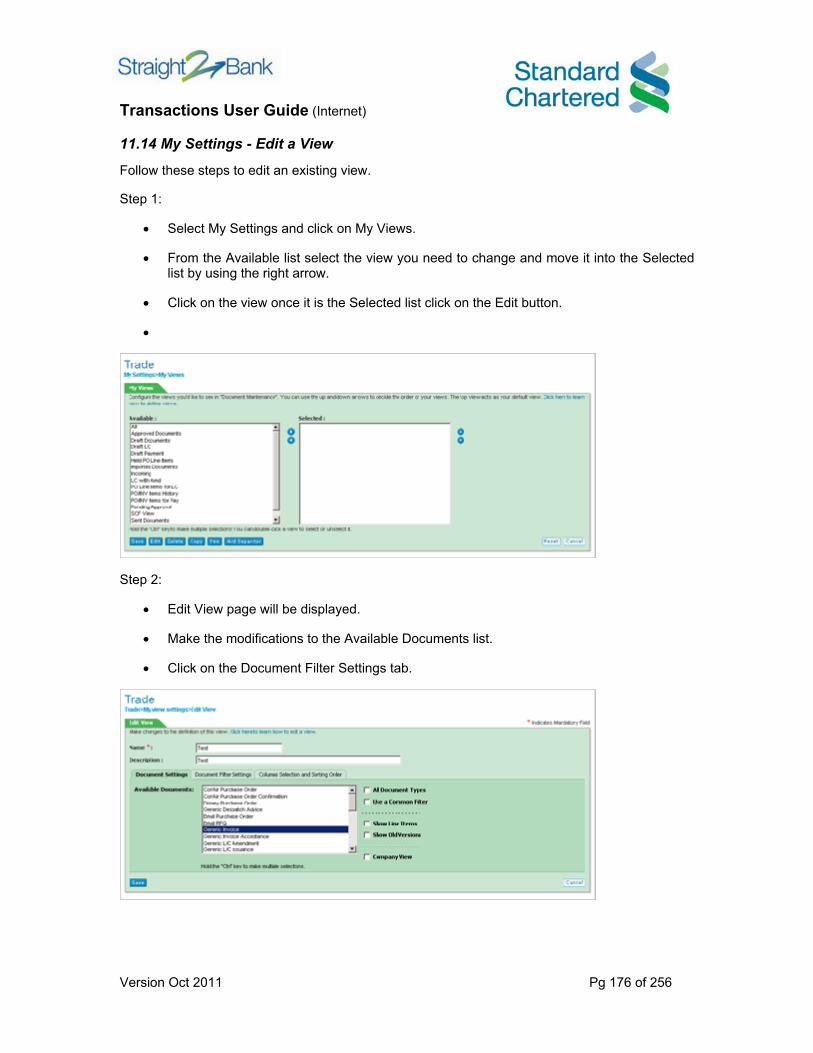
Transactions User Guide (Internet)
Version Oct 2011 Pg 176 of 256
11.14 My Settings - Edit a View
Follow these steps to edit an existing view.
Step 1:
• Select My Settings and click on My Views.
• From the Available list select the view you need to change and move it into the Selected list by using the right arrow.
• Click on the view once it is the Selected list click on the Edit button.
•
Step 2:
• Edit View page will be displayed.
• Make the modifications to the Available Documents list.
• Click on the Document Filter Settings tab.
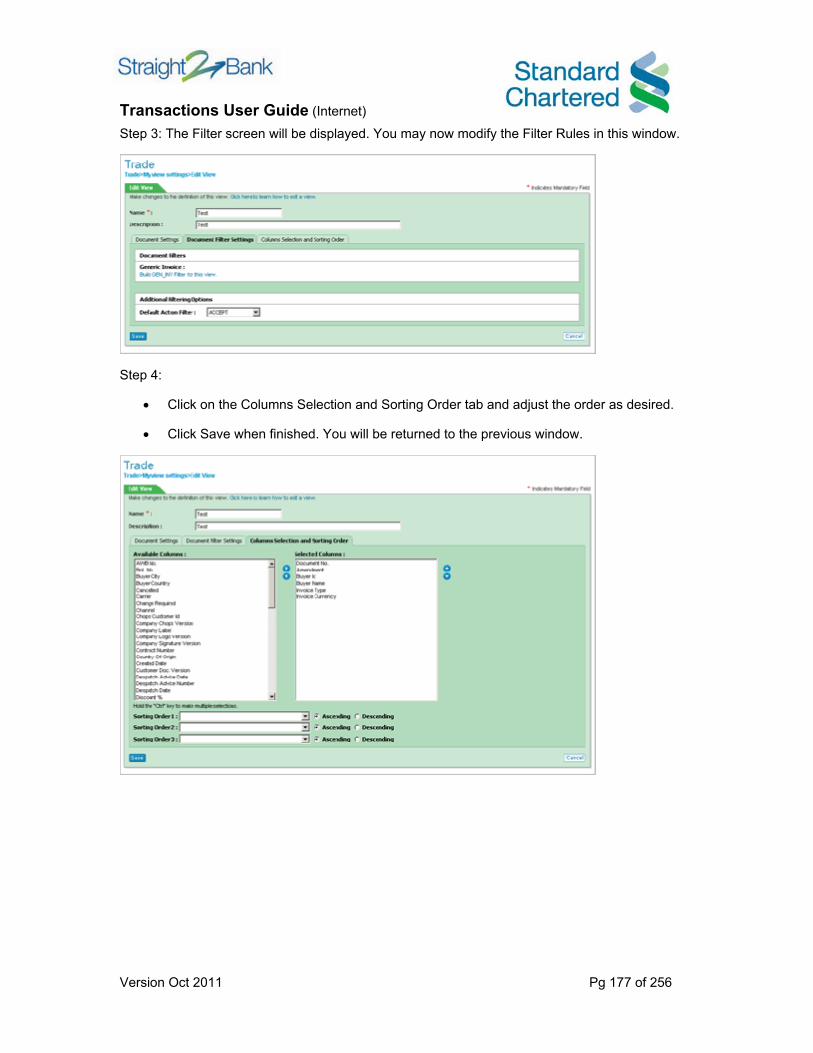
Transactions User Guide (Internet)
Version Oct 2011 Pg 177 of 256
Step 3: The Filter screen will be displayed. You may now modify the Filter Rules in this window.
Step 4:
• Click on the Columns Selection and Sorting Order tab and adjust the order as desired.
• Click Save when finished. You will be returned to the previous window.
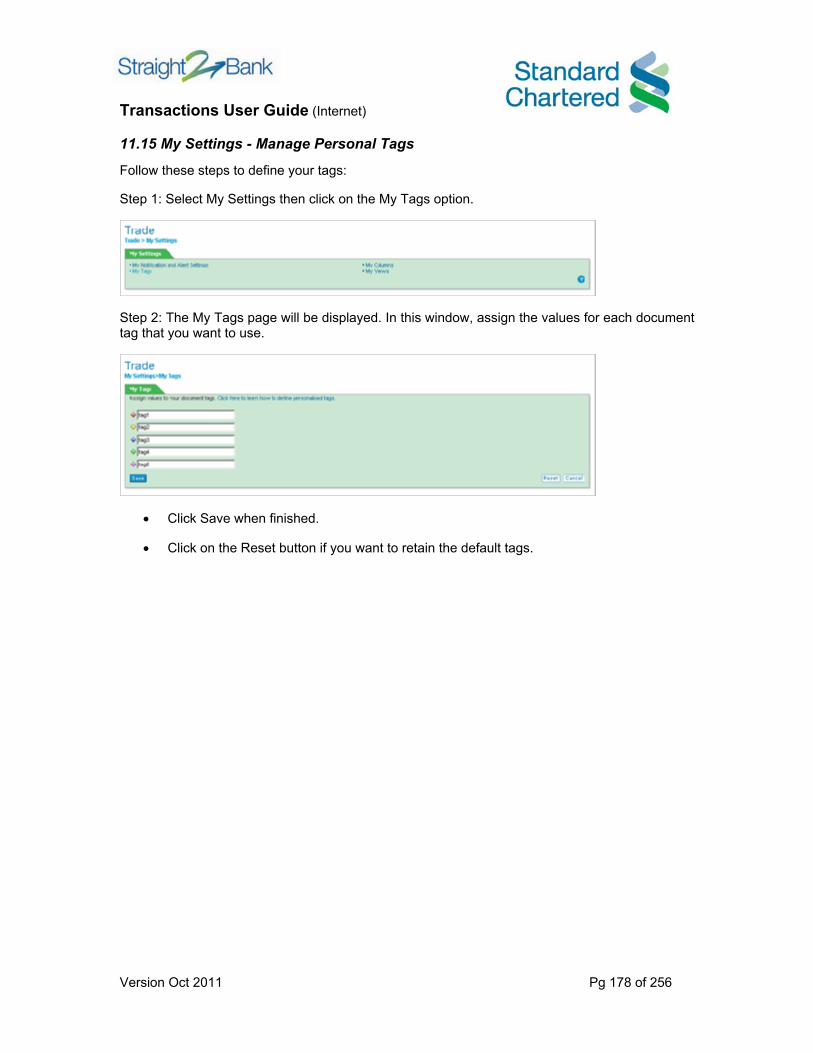
Transactions User Guide (Internet)
Version Oct 2011 Pg 178 of 256
11.15 My Settings - Manage Personal Tags
Follow these steps to define your tags:
Step 1: Select My Settings then click on the My Tags option.
Step 2: The My Tags page will be displayed. In this window, assign the values for each document tag that you want to use.
• Click Save when finished.
• Click on the Reset button if you want to retain the default tags.
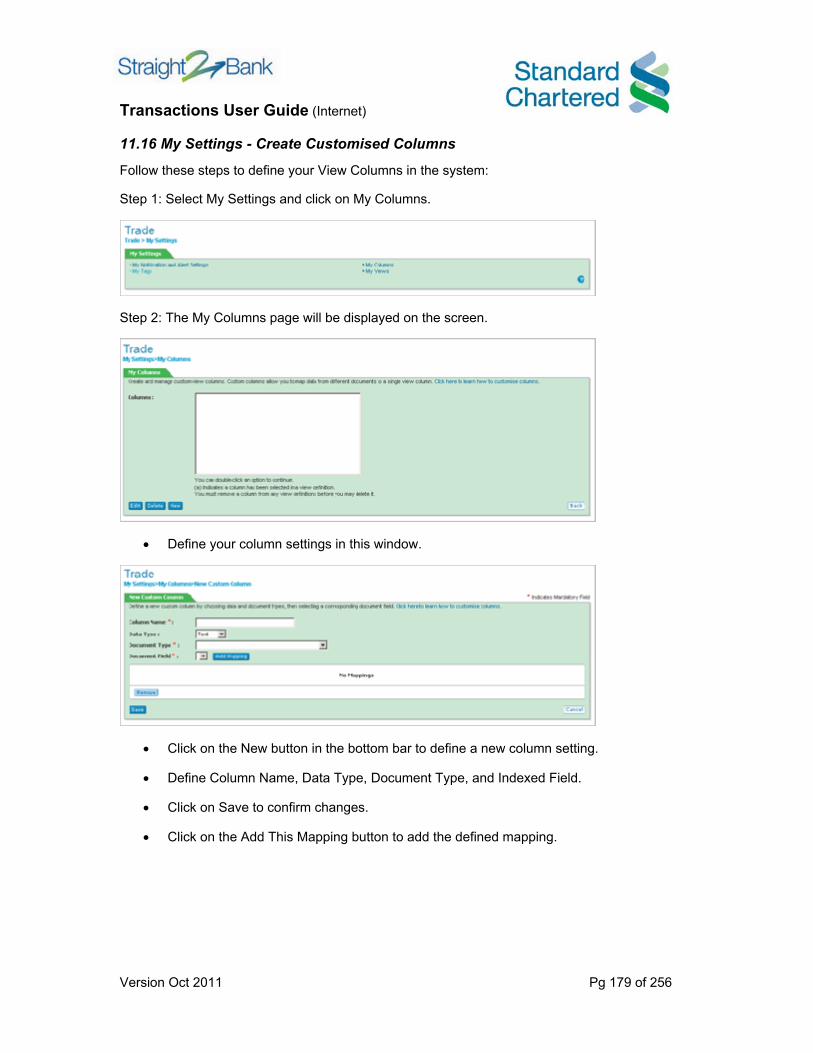
Transactions User Guide (Internet)
Version Oct 2011 Pg 179 of 256
11.16 My Settings - Create Customised Columns
Follow these steps to define your View Columns in the system:
Step 1: Select My Settings and click on My Columns.
Step 2: The My Columns page will be displayed on the screen.
• Define your column settings in this window.
• Click on the New button in the bottom bar to define a new column setting.
• Define Column Name, Data Type, Document Type, and Indexed Field.
• Click on Save to confirm changes.
• Click on the Add This Mapping button to add the defined mapping.

Transactions User Guide (Internet)
Version Oct 2011 Pg 180 of 256
• Follow the same procedure to add other mappings.
• Click Save when finished. The defined customised column settings will appear in the My Columns window.
• Once you define your columns settings the new settings will immediately take effect.
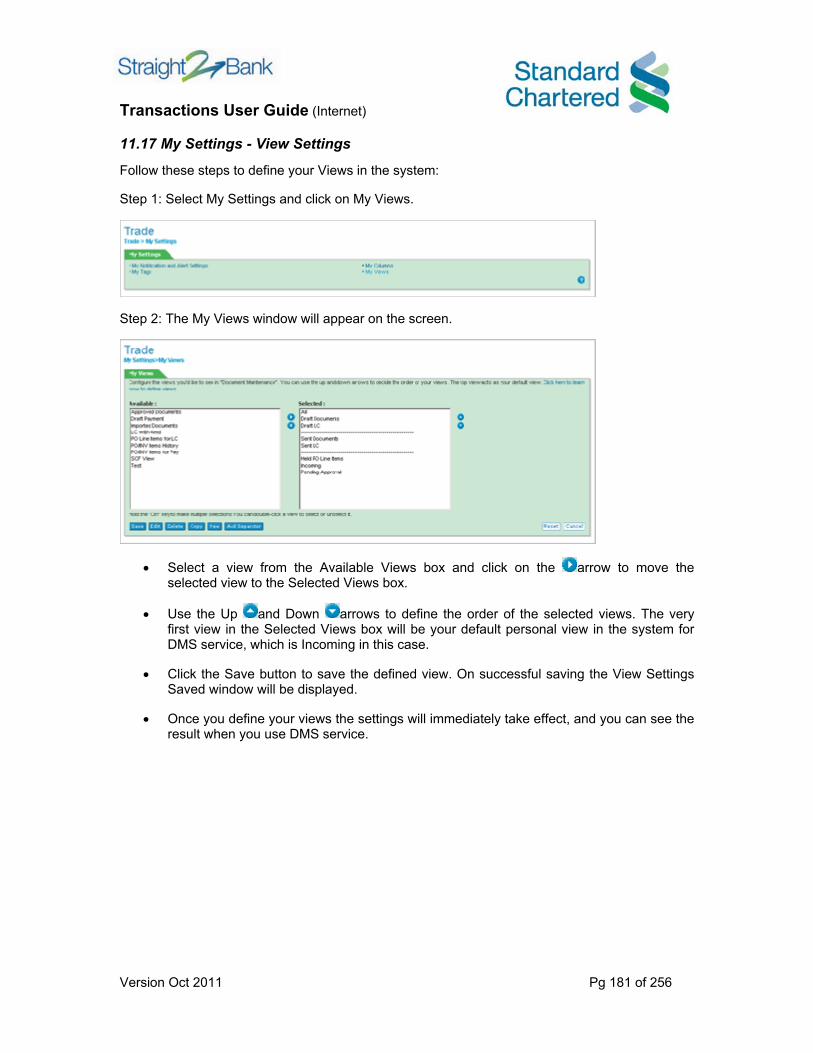
Transactions User Guide (Internet)
Version Oct 2011 Pg 181 of 256
11.17 My Settings - View Settings
Follow these steps to define your Views in the system:
Step 1: Select My Settings and click on My Views.
Step 2: The My Views window will appear on the screen.
• Select a view from the Available Views box and click on the arrow to move the selected view to the Selected Views box.
• Use the Up and Down arrows to define the order of the selected views. The very first view in the Selected Views box will be your default personal view in the system for DMS service, which is Incoming in this case.
• Click the Save button to save the defined view. On successful saving the View Settings Saved window will be displayed.
• Once you define your views the settings will immediately take effect, and you can see the result when you use DMS service.
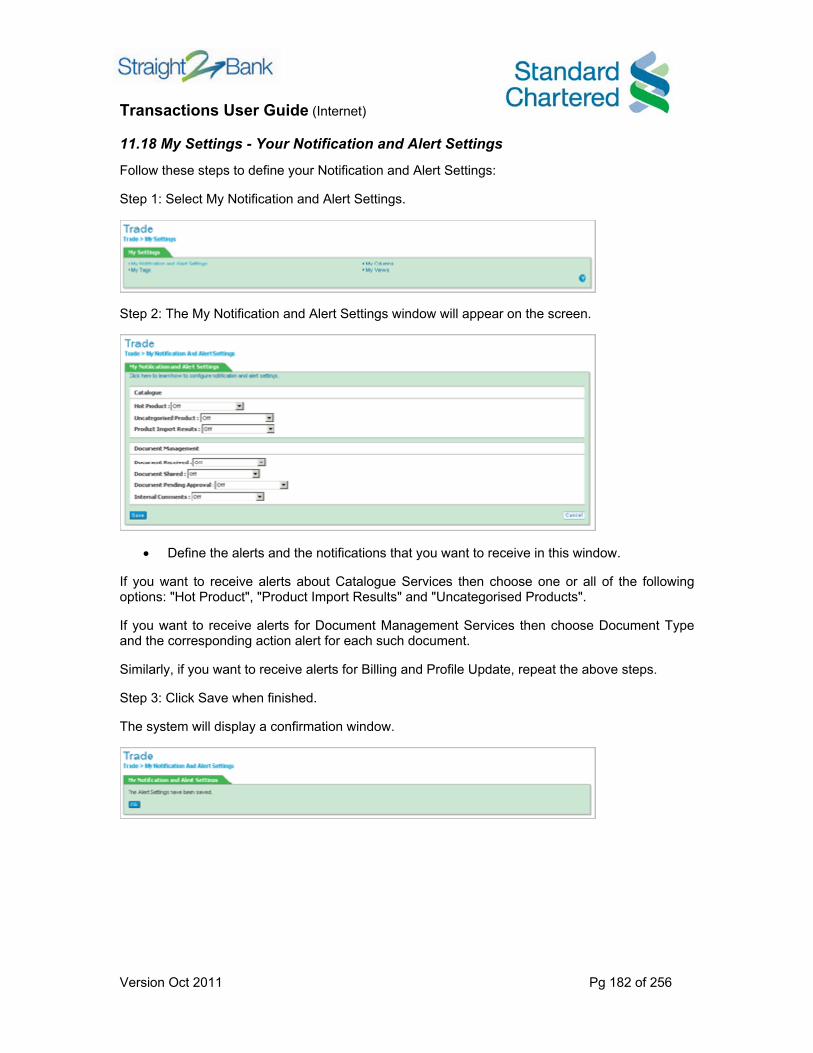
Transactions User Guide (Internet)
Version Oct 2011 Pg 182 of 256
11.18 My Settings - Your Notification and Alert Settings
Follow these steps to define your Notification and Alert Settings:
Step 1: Select My Notification and Alert Settings.
Step 2: The My Notification and Alert Settings window will appear on the screen.
• Define the alerts and the notifications that you want to receive in this window.
If you want to receive alerts about Catalogue Services then choose one or all of the following options: "Hot Product", "Product Import Results" and "Uncategorised Products".
If you want to receive alerts for Document Management Services then choose Document Type and the corresponding action alert for each such document.
Similarly, if you want to receive alerts for Billing and Profile Update, repeat the above steps.
Step 3: Click Save when finished.
The system will display a confirmation window.

Transactions User Guide (Internet)
Version Oct 2011 Pg 183 of 256
11.19 Document Manager Administrations - Maintain Auto-Grouping Profiles
Follow these steps to set up auto-grouping profiles:
Step 1: Select Document Manager Administration > Profile Automation.
Step 2: The Profile Automation page will be displayed.
• Select a profile type and click and click on OK to proceed.
Step 3: To set up a profile automation rule, select and order the profiles you would like to run automatically and choose a set of run times. Run time scheduling can be done at two-hour intervals on a daily or weekly basis.
• You have the option to input a start and end date as well. Take special care in ordering your profiles, as the order of profiles can have a significant impact on the type of results produced.
• Once you have selected, ordered, and timed your profiles, you can select how the results should be handled; whether they should be saved as drafts, exported to a file, or (in the case of L/C Issuance/Amendment profiles) autosubmitted.
• Additionally, you can input a set of email addresses to which automation run reports will be sent.
• Click on the Save button to complete the profile automation set-up.

Transactions User Guide (Internet)
Version Oct 2011 Pg 184 of 256

Transactions User Guide (Internet)
Version Oct 2011 Pg 185 of 256
11.20 Document Manager Administrations - Manage Company Labels
Follow these steps to manage Company Labels:
Step 1: Select the Company Labels option and click OK.
Step 2: The Company Labels window appears on the screen.
• Enter the name of the Label inside the box next to New Label.
• Click the Add button.
• The label will get added and will be displayed in the existing labels list.
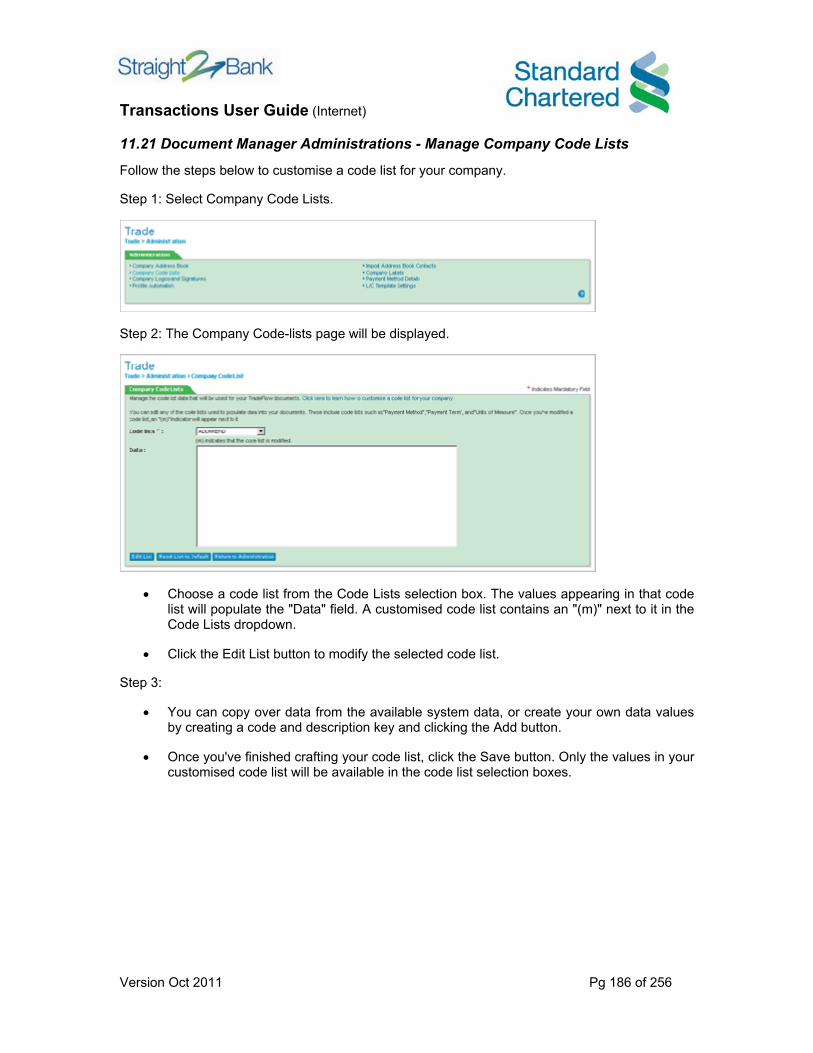
Transactions User Guide (Internet)
Version Oct 2011 Pg 186 of 256
11.21 Document Manager Administrations - Manage Company Code Lists
Follow the steps below to customise a code list for your company.
Step 1: Select Company Code Lists.
Step 2: The Company Code-lists page will be displayed.
• Choose a code list from the Code Lists selection box. The values appearing in that code list will populate the "Data" field. A customised code list contains an "(m)" next to it in the Code Lists dropdown.
• Click the Edit List button to modify the selected code list.
Step 3:
• You can copy over data from the available system data, or create your own data values by creating a code and description key and clicking the Add button.
• Once you've finished crafting your code list, click the Save button. Only the values in your customised code list will be available in the code list selection boxes.
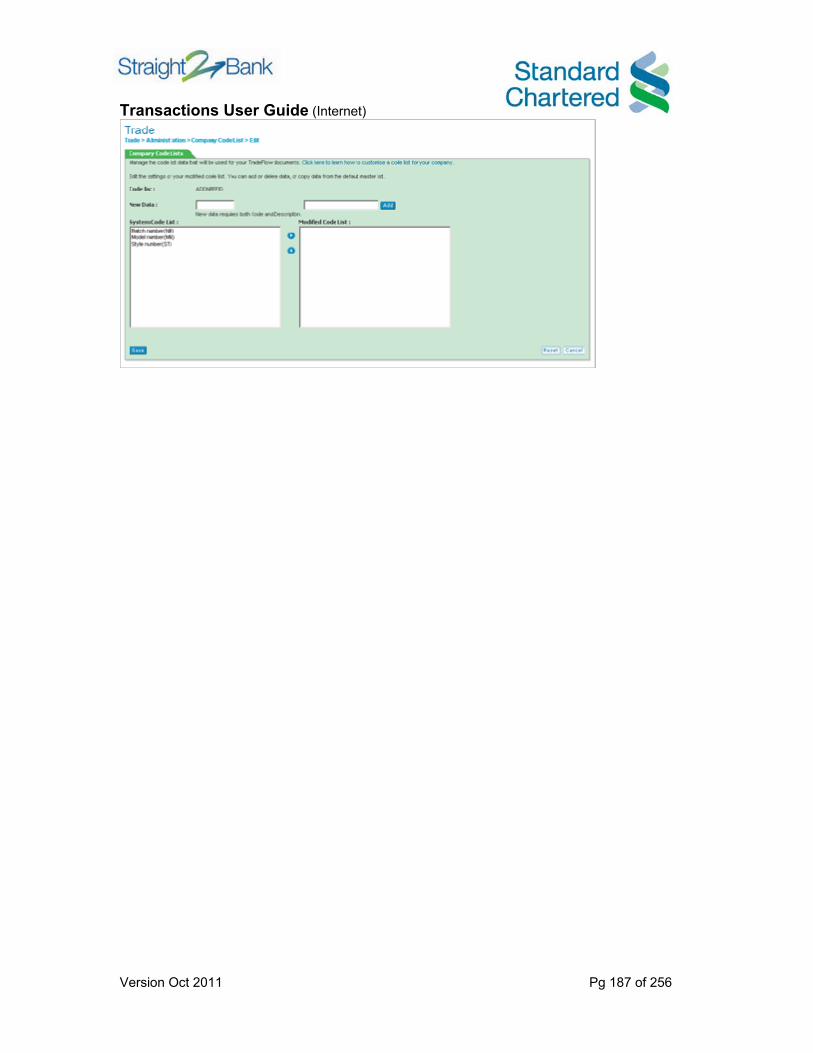
Transactions User Guide (Internet)
Version Oct 2011 Pg 187 of 256

Transactions User Guide (Internet)
Version Oct 2011 Pg 188 of 256
11.22 Document Manager Administrations - Company Logos & Signatures
Follow these steps to upload a company's logo, signature, and chop images:
Step 1: Select Company Logos & Signatures.
Step 2: The Company Logos & Signatures page will be displayed.
Step 3:
• Click on Change Image to upload a new image.
• Select Image Type and upload the Image File.
• Click on the Upload Image button when finished. The new image will get uploaded.
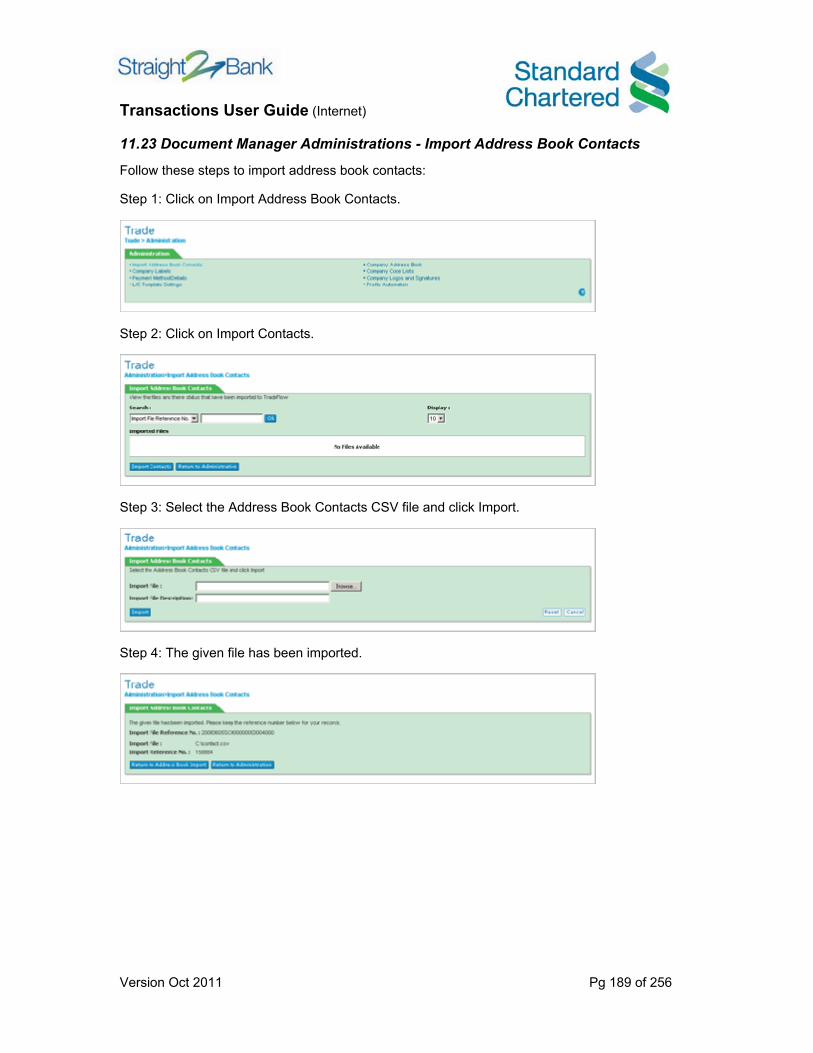
Transactions User Guide (Internet)
Version Oct 2011 Pg 189 of 256
11.23 Document Manager Administrations - Import Address Book Contacts
Follow these steps to import address book contacts:
Step 1: Click on Import Address Book Contacts.
Step 2: Click on Import Contacts.
Step 3: Select the Address Book Contacts CSV file and click Import.
Step 4: The given file has been imported.

Transactions User Guide (Internet)
Version Oct 2011 Pg 190 of 256
11.24 Document Manager Administrations - Company Address Book
Follow these steps to add an address book contact:
Step 1: Click on Company Address Book.
Step 2: Click on Add Contact.
Step 3: Input the new contact's information. Click Save.
Step 4: Address book contact saved successfully.
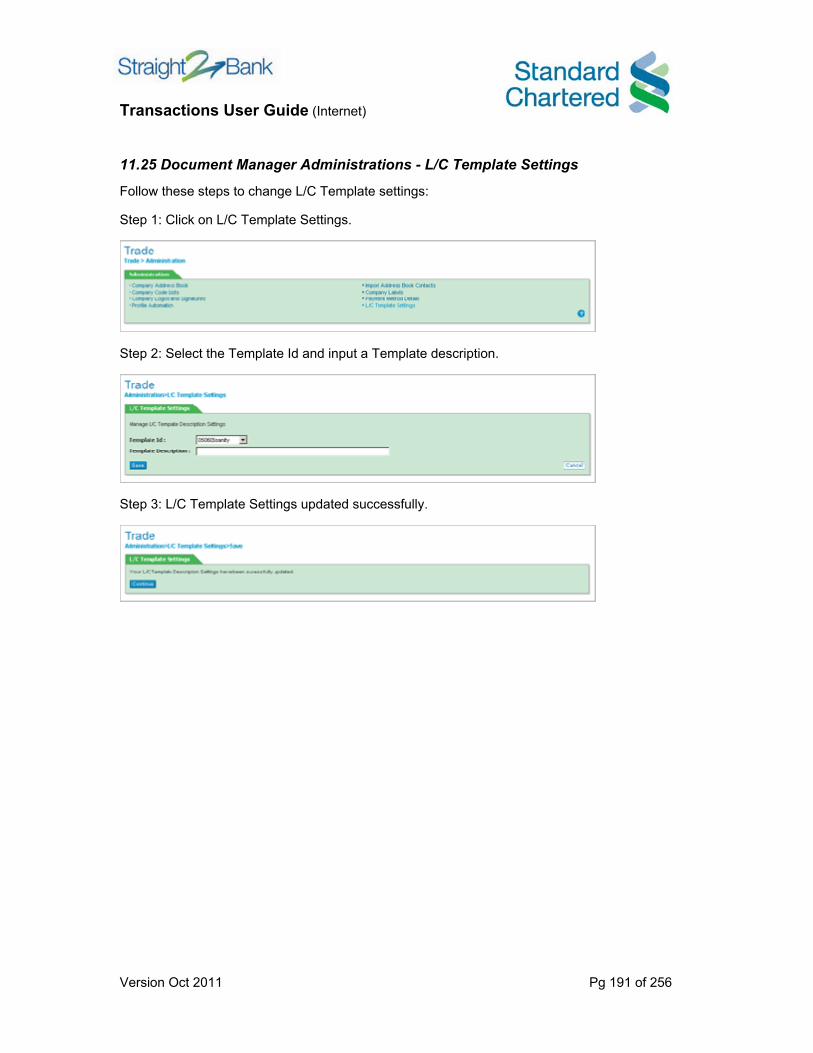
Transactions User Guide (Internet)
Version Oct 2011 Pg 191 of 256
11.25 Document Manager Administrations - L/C Template Settings
Follow these steps to change L/C Template settings:
Step 1: Click on L/C Template Settings.
Step 2: Select the Template Id and input a Template description.
Step 3: L/C Template Settings updated successfully.

Transactions User Guide (Internet)
Version Oct 2011 Pg 192 of 256
11.26 Utilities - Upload a File
Follow these steps to upload an EDI File
Step 1: Click on File Transfer to display the available options.
Step 2: Select Upload an EDI File and click OK.
Step 3: Enter the file name or click the Browse button to locate the file to be uploaded.
Step 4: Select the file to be uploaded and click Open.
Step 5: Click the Upload File button to upload the selected file.

Transactions User Guide (Internet)
Version Oct 2011 Pg 193 of 256
Step 6: Upon successful uploading the system will notify you by displaying the File Upload Succeeded window.
Step 7: Note down the Reference Number for record purpose.
• Follow this steps to upload a Non EDI File
Choose Upload a non EDI File and follow the same procedure for uploading a Non EDI file.

Transactions User Guide (Internet)
Version Oct 2011 Pg 194 of 256
11.27 Utilities - View an Uploaded File
Follow these steps to upload an EDI File
Step 1: Select View Uploaded File.
Step 2: Select Upload an EDI File and click OK. � Click on the View drop down box to select the view to which the uploaded files belong. � Click on the file that you want to view.
Step 3: Uploaded File Details page will be displayed.
Step 4: The selected file will be displayed on the screen along with its contents.
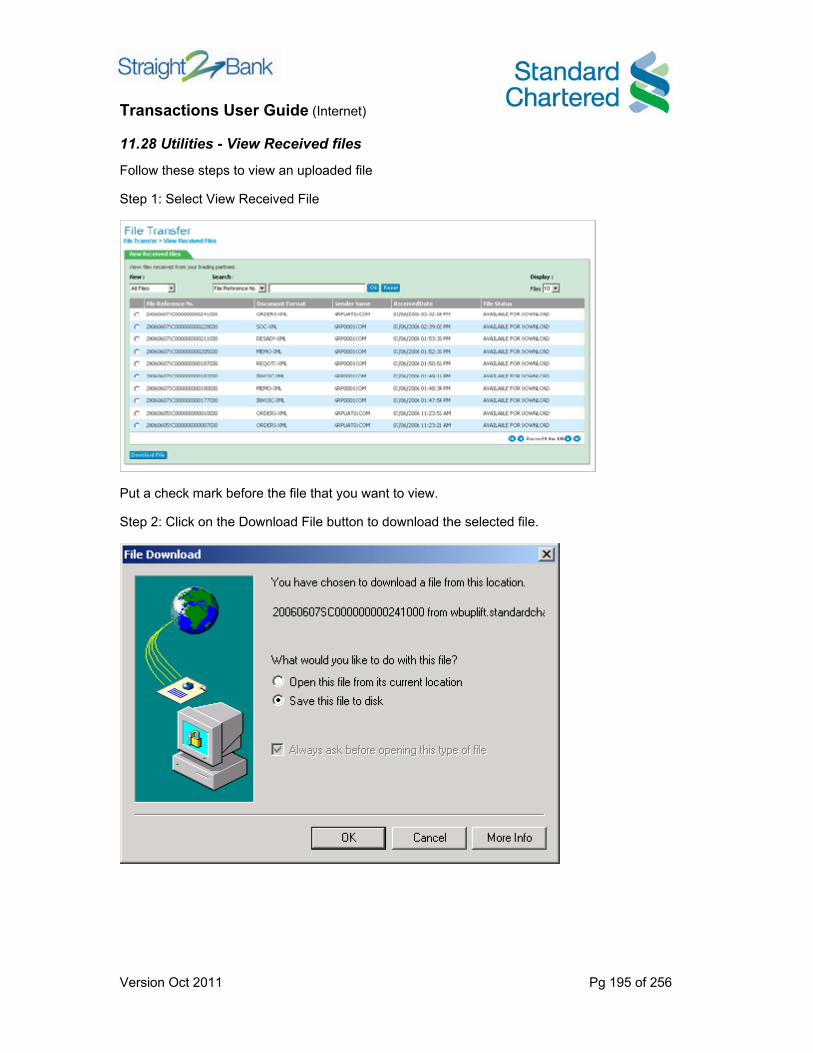
Transactions User Guide (Internet)
Version Oct 2011 Pg 195 of 256
11.28 Utilities - View Received files
Follow these steps to view an uploaded file
Step 1: Select View Received File
Put a check mark before the file that you want to view.
Step 2: Click on the Download File button to download the selected file.

Transactions User Guide (Internet)
Version Oct 2011 Pg 196 of 256
12. Supply Chain Financing (SCF) SCF in Straight2Bank is designed to simplify the process of filing finance requests which are
broadly defined in following three categories :
• Supplier Finance
• Buyer Finance
• Receivable Services Note : Users of SCF Tools in Straight2Bank should be a SCB Corporate Customer, with proper
access to our Internet banking system.

Transactions User Guide (Internet)
Version Oct 2011 Pg 197 of 256
12.1 Supplier Finance / Buyer Finance Options under Supplier Finance / Buyer Finance • Create RFF using existing documents • Create RFF Manually • Search RFF • PO Ledger • Invoice Ledger
12.1.1 Create Request For Finance (RFF) using existing documents Step 1 : Select
• Transactions • Supplier Finance / Buyer Finance • Create RFF using existing documents
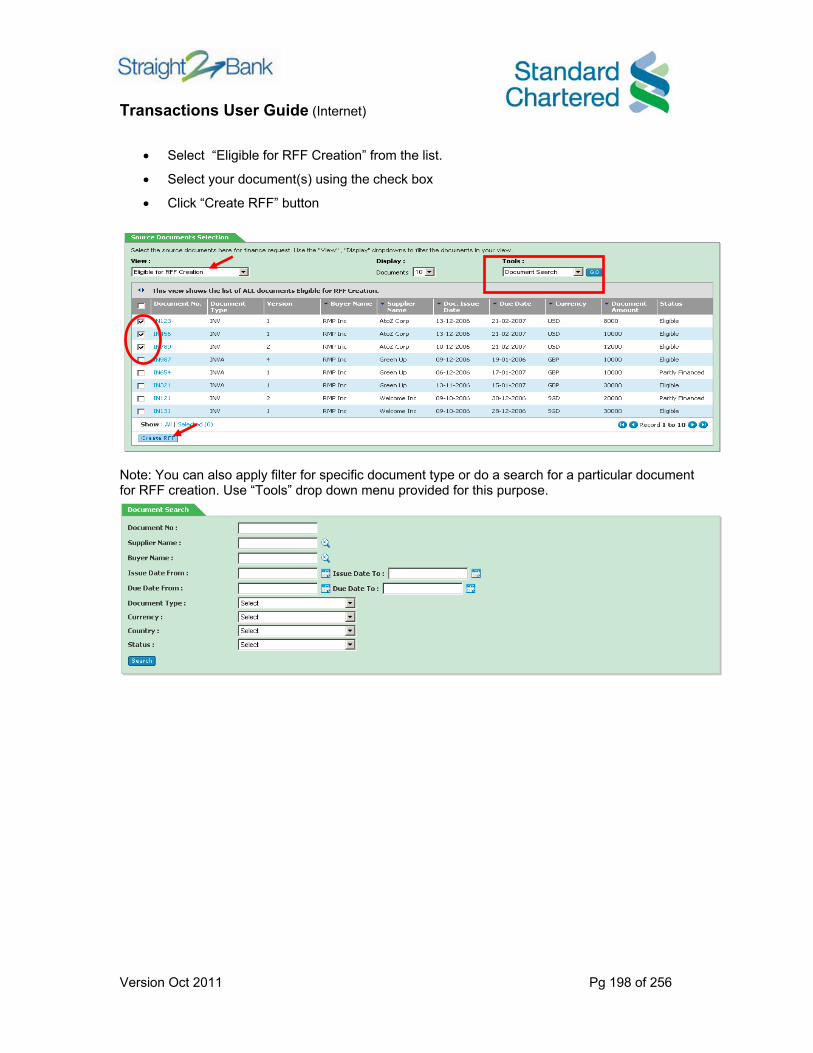
Transactions User Guide (Internet)
Version Oct 2011 Pg 198 of 256
• Select “Eligible for RFF Creation” from the list.
• Select your document(s) using the check box
• Click “Create RFF” button
Note: You can also apply filter for specific document type or do a search for a particular document for RFF creation. Use “Tools” drop down menu provided for this purpose.

Transactions User Guide (Internet)
Version Oct 2011 Pg 199 of 256
Once you click “Create RFF”, system will refresh your screen and created RFF in draft mode will show up in RFF Summery page, as shown below.
• Click on “RFF No” hyperlink to open doc for modification if required OR • Tick against the “RFF No” AND • Click “Submit For Approval”
Note : Users will proper level of authority can submit RFF directly to the bank. Others will need internal approval before a RFF can be submitted to the bank. Appropriate buttons are provided for these actions.
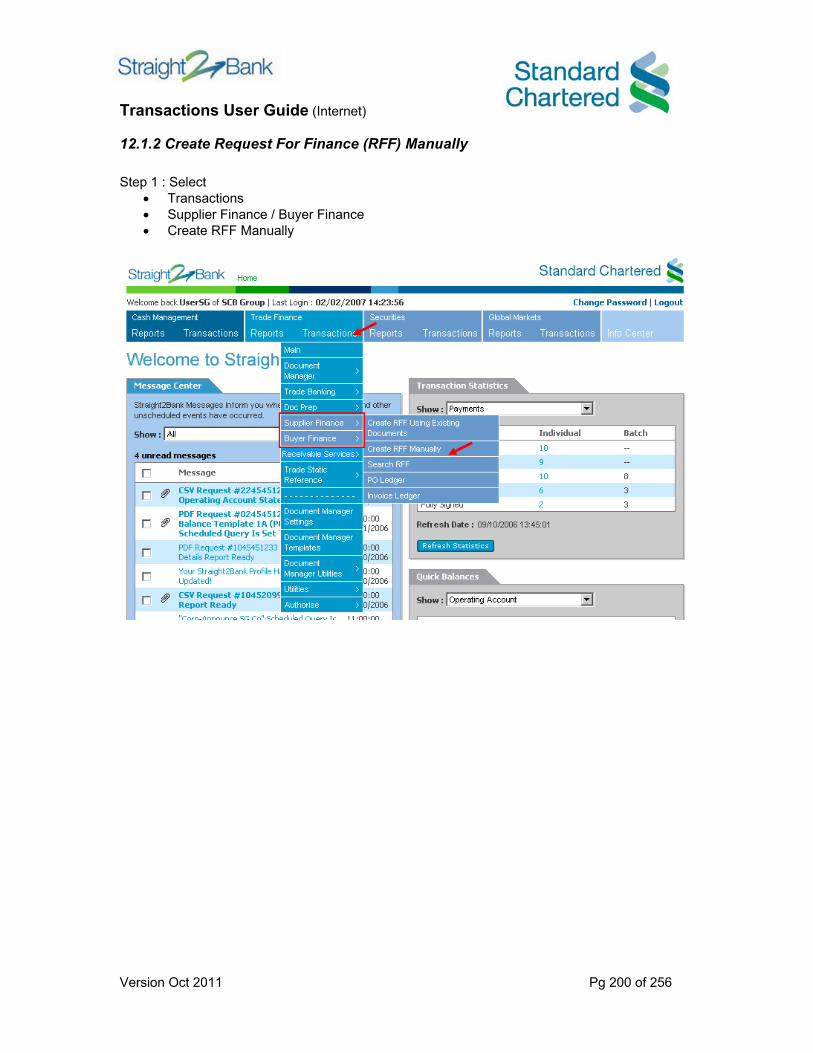
Transactions User Guide (Internet)
Version Oct 2011 Pg 200 of 256
12.1.2 Create Request For Finance (RFF) Manually Step 1 : Select
• Transactions • Supplier Finance / Buyer Finance • Create RFF Manually

Transactions User Guide (Internet)
Version Oct 2011 Pg 201 of 256
System will provide you with a blank form for insertion of RFF details.
• Fill in appropriate information including document type, i.e. INV or PO
IMPORTANT: In case of Manual RFF creation, you will need to submit a copy of your document to the Bank for approval & authentication of your finance request. On clicking submit for approval button, Straight2Bank will refresh your screen and return to available list of document.
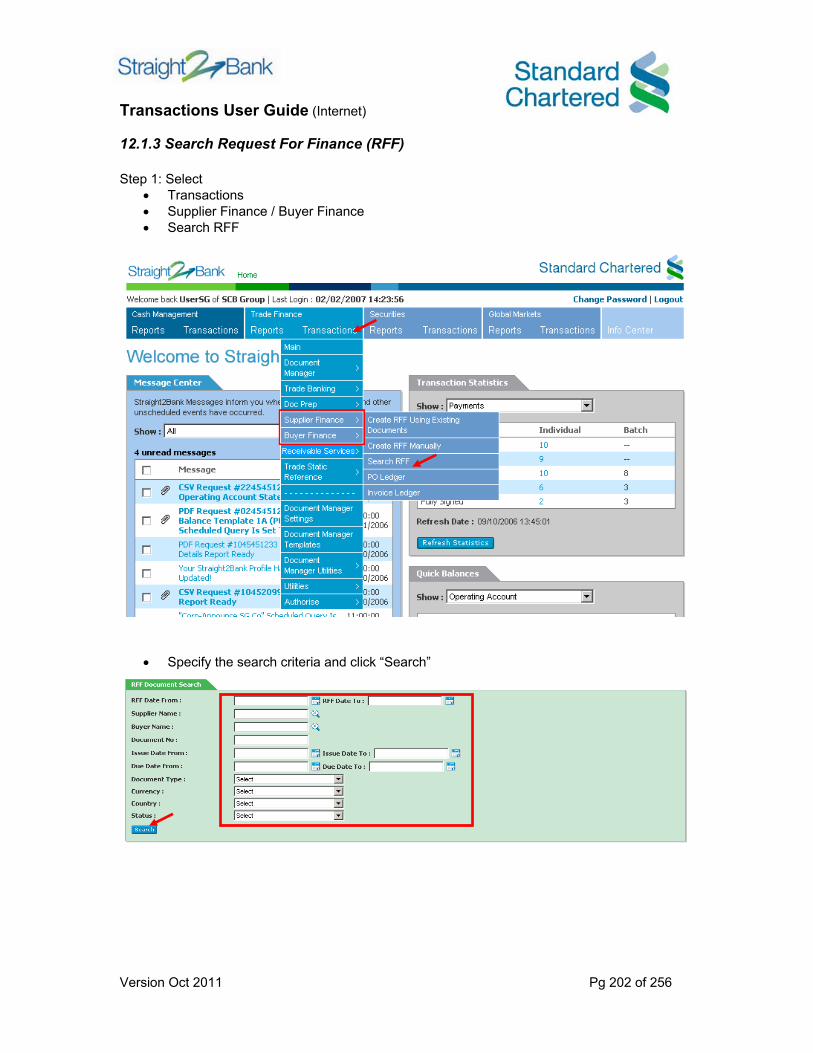
Transactions User Guide (Internet)
Version Oct 2011 Pg 202 of 256
12.1.3 Search Request For Finance (RFF) Step 1: Select
• Transactions • Supplier Finance / Buyer Finance • Search RFF
• Specify the search criteria and click “Search”

Transactions User Guide (Internet)
Version Oct 2011 Pg 203 of 256
12.1.3 PO Ledger
This offers you facility to seek details of all outstanding PO, sorted out according to your trading partners. Step 1: Select
• Transactions • Supplier Finance / Buyer Finance • PO Ledger

Transactions User Guide (Internet)
Version Oct 2011 Pg 204 of 256
• Click on the hyperlink for drill down to view individual POs.
• Click on “Export as Excel Spreadsheet” for export in MS Excel format to you local PC.
PO Ledger Drill Down
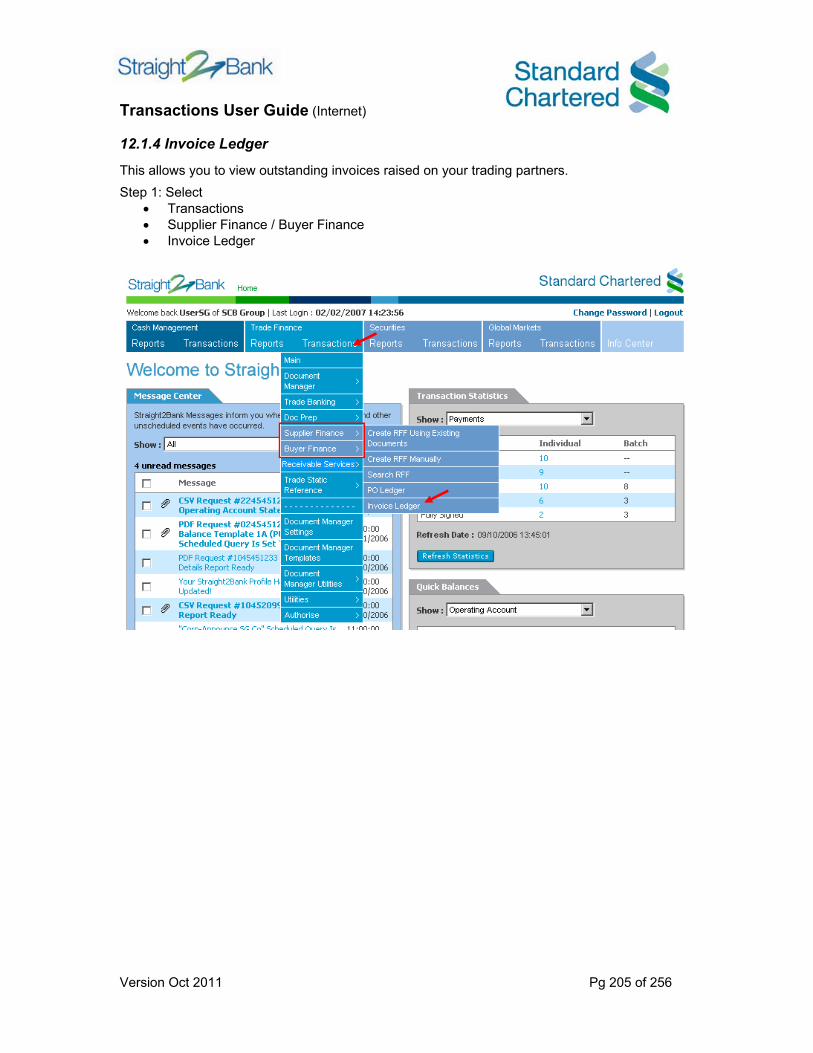
Transactions User Guide (Internet)
Version Oct 2011 Pg 205 of 256
12.1.4 Invoice Ledger
This allows you to view outstanding invoices raised on your trading partners. Step 1: Select
• Transactions • Supplier Finance / Buyer Finance • Invoice Ledger
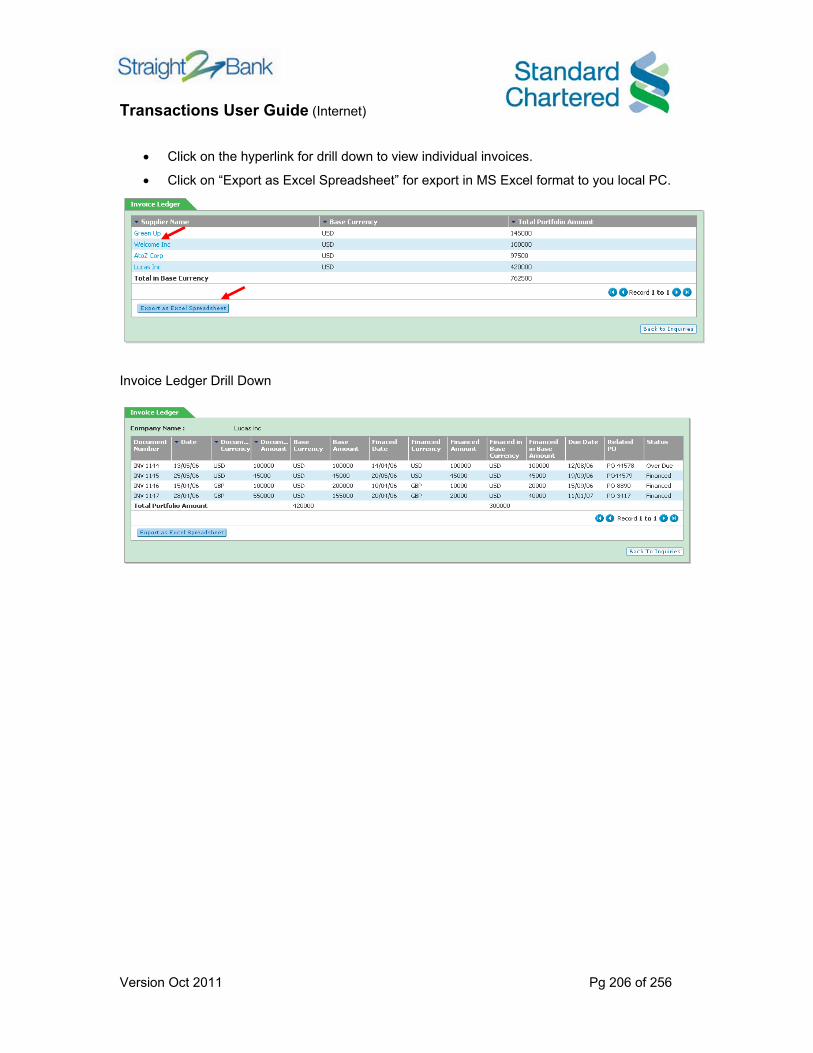
Transactions User Guide (Internet)
Version Oct 2011 Pg 206 of 256
• Click on the hyperlink for drill down to view individual invoices.
• Click on “Export as Excel Spreadsheet” for export in MS Excel format to you local PC.
Invoice Ledger Drill Down
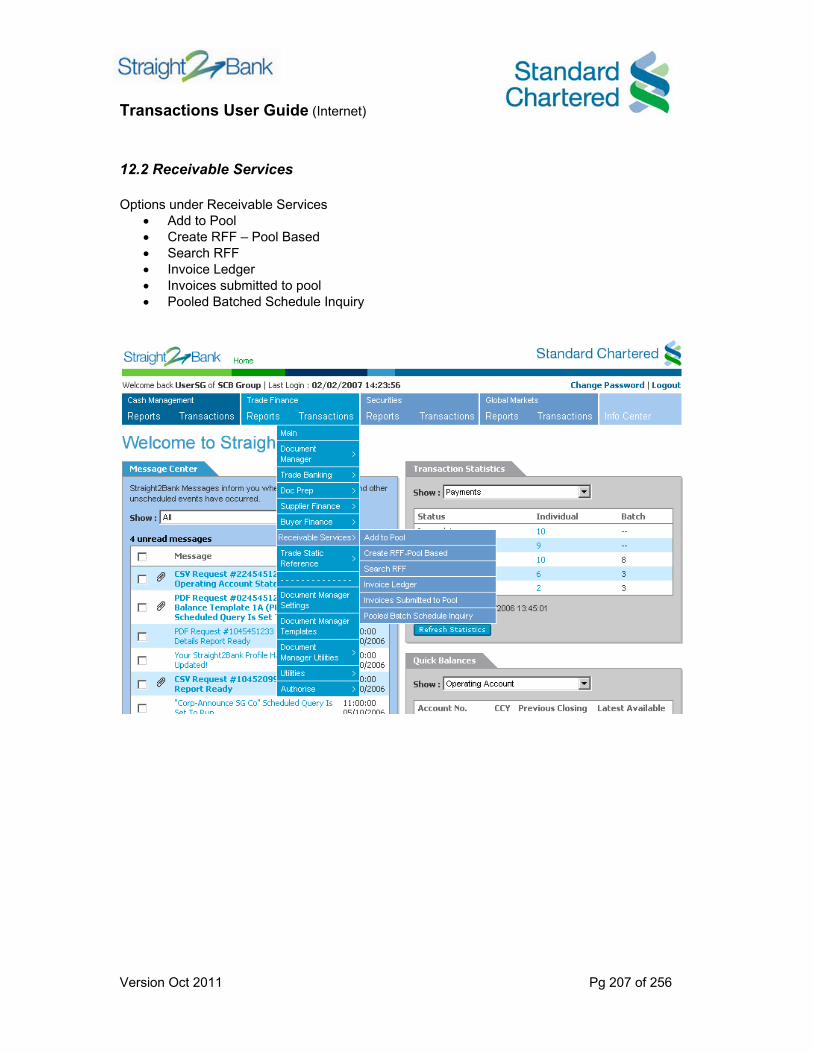
Transactions User Guide (Internet)
Version Oct 2011 Pg 207 of 256
12.2 Receivable Services Options under Receivable Services
• Add to Pool • Create RFF – Pool Based • Search RFF • Invoice Ledger • Invoices submitted to pool • Pooled Batched Schedule Inquiry

Transactions User Guide (Internet)
Version Oct 2011 Pg 208 of 256
12.2.1 Add to Pool Step 1: Select
• Transactions • Receivable Services • Add to Pool

Transactions User Guide (Internet)
Version Oct 2011 Pg 209 of 256
• Select document(s) using check box provided. • Click “Add to Pool”
The invoices are the source documents for raising RFFs and will display “Eligible” status. Except “Eligible” no other document will be displayed under Pooled view. On clicking “Add to Pool” documents (A selection or all) will disappear from this view.

Transactions User Guide (Internet)
Version Oct 2011 Pg 210 of 256
12.2.2 Create RFF – Pool Based Step 1: Select
• Transactions • Receivable Services • Create RFF – Pool Based

Transactions User Guide (Internet)
Version Oct 2011 Pg 211 of 256
• Insert finance request amount.
• You have an option to change currency type.
• You have an option to attach supporting documents, if any required by the bank.
• Click “Complete RFF”. This submits the RFF (subject to your level of authority) or save it for pending approval.
You can also save the RFF as draft for future processing. RFF created by you, can now be seen under “View RFF” menu (Section 9.3)

Transactions User Guide (Internet)
Version Oct 2011 Pg 212 of 256
12.2.3 Search Request For Finance (RFF) Step 1: Select
• Transactions • Receivable Services • Search RFF
• Specify the search criteria and click “Search”

Transactions User Guide (Internet)
Version Oct 2011 Pg 213 of 256
12.2.4 Invoice Ledger Invoice Ledger is a service available within Invoice services, to view all outstanding invoices. All relevant details can be seen which pertains to specific trading partner. Step 1: Select
• Transactions • Receivable Services • Invoice Ledger

Transactions User Guide (Internet)
Version Oct 2011 Pg 214 of 256
• To view details, click any one of the names
• Screen will refresh and invoices pertaining to a particular trading partner will show up.

Transactions User Guide (Internet)
Version Oct 2011 Pg 215 of 256
12.2.5 Invoices submitted to pool Step 1: Select
• Transactions • Receivable Services • Invoices Submitted to Pool
• Screen will display all the documents added to the pool with all relevant information.

Transactions User Guide (Internet)
Version Oct 2011 Pg 216 of 256
12.2.6 Pooled Batched Schedule Inquiry This facility provides a quick view of all the batched documents submitted to the bank as RFF. Step 1: Select
• Transactions • Receivable Services • Pooled Batched Schedule Inquiry
• For batch details, click any of the Batch Schedule numbers.
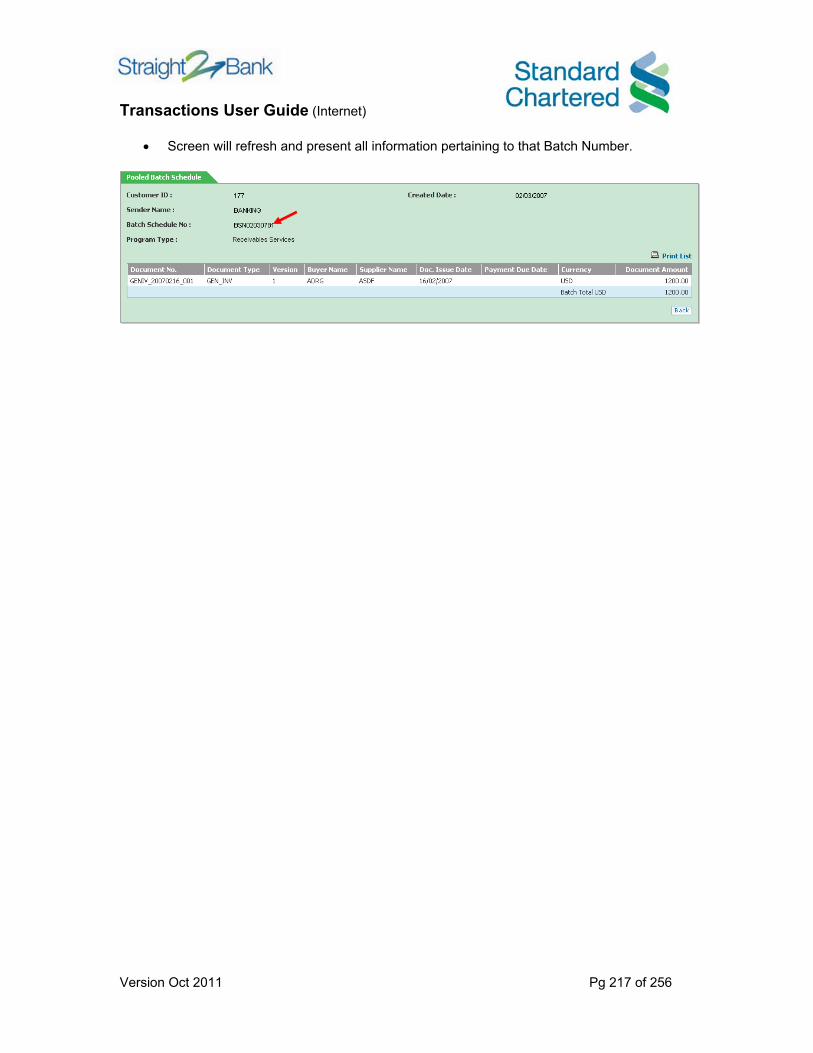
Transactions User Guide (Internet)
Version Oct 2011 Pg 217 of 256
• Screen will refresh and present all information pertaining to that Batch Number.

Transactions User Guide (Internet)
Version Oct 2011 Pg 218 of 256
12.3 View all RFF
View all RFF allows you to view the submitted RFFs. You can see status each RFF with other associated parameters, like buyer/supplier, finance amount, currency and so on.
• Tools allows you you to apply filtered view or do a search on available RFFs. • Click on “RFF No” to RFF details. • Tick against the “RFF No” to perform:
o Submit for Approval o Approve o Delete o Reject o Export as Excel Spreadsheet
This is available for all SCF products. (Buyer/Supplier finance and Receivable Services)

Transactions User Guide (Internet)
Version Oct 2011 Pg 219 of 256
Appendix 1 Standard Chartered Bank Singapore - Straight2Bank FX Payments Currency Reference Document This document gives an overview of currencies offered by Standard Chartered Bank when making Cross Currency payments over Straight2Bank from Singapore based accounts denominated in USD, EUR, GBP, HKD, and SGD. The document is sub-sectioned into two parts.
i) Summary Cut-off time tables: Is a summary of the cut off times available in the origination country (Singapore)
ii) Straight2Bank FX Payments Currency reference section : Provides information
regarding the various currencies and some key points to note while making payments in those currencies

Transactions User Guide (Internet)
Version Oct 2011 Pg 220 of 256
I. Straight2Bank FX Payment Cut Off Times summary Debit Account: USD, EUR, GBP, HKD, SGD1 in Standard Chartered Singapore. Currencies with Same Day value availability (TOD), Next Day (TOM) and SPOT values are also available with cutoff times at 18:00h Currencies with Next Day value availability (TOM), SPOT values are also available with cutoff times at 18:00h
Note: Cut off times are listed in Singapore Standard Time (+8 GMT) and are subject to change without notice
1Note: Debit Currencies will be progressively added in 2011/2012 2Note: Indian Rupee available after 11:30h for all tenors (TOD, TOM, SPOT) 3Note: Request for Quote not available when paying into these currencies 4Note: CNY Payments subject to documentation checks and FX value date will be dependent on submission of documents; no Request for Quote available 5Note: Cut off time for Bank assigned TOD rate will be at 18:00h
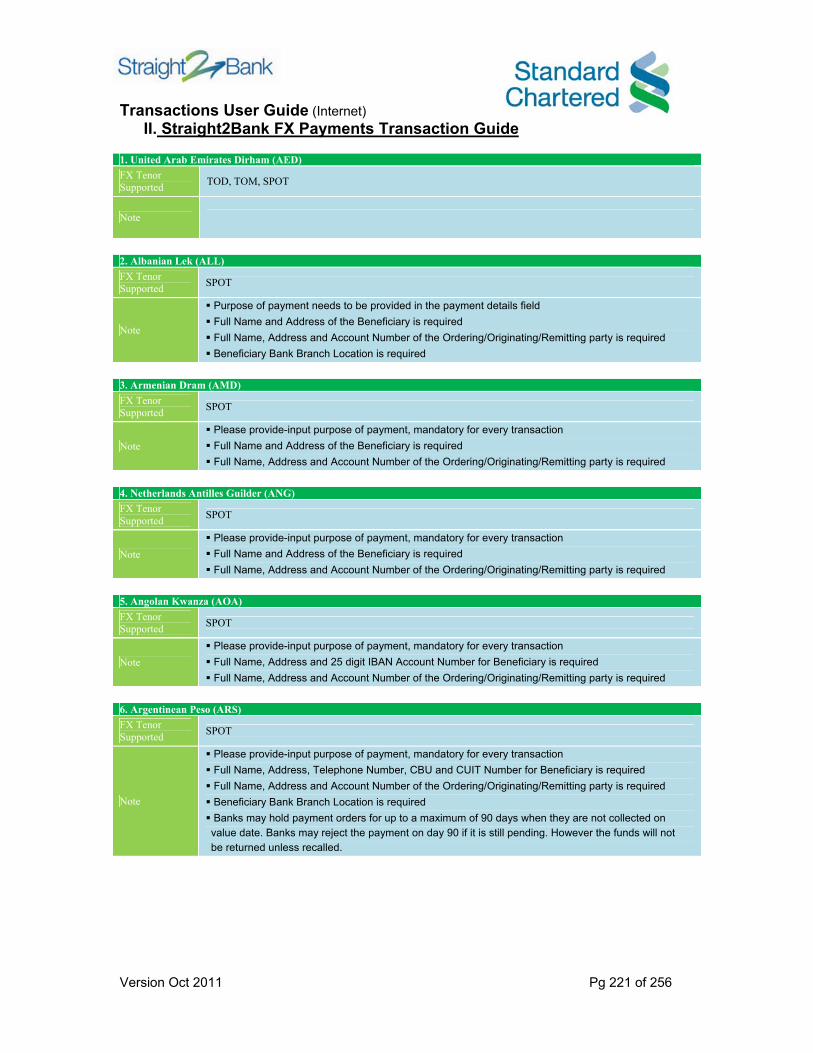
Transactions User Guide (Internet)
Version Oct 2011 Pg 221 of 256
II. Straight2Bank FX Payments Transaction Guide 1. United Arab Emirates Dirham (AED) FX Tenor Supported TOD, TOM, SPOT
Note
2. Albanian Lek (ALL) FX Tenor Supported SPOT
Note
Purpose of payment needs to be provided in the payment details field Full Name and Address of the Beneficiary is required Full Name, Address and Account Number of the Ordering/Originating/Remitting party is required Beneficiary Bank Branch Location is required
3. Armenian Dram (AMD) FX Tenor Supported SPOT
Note Please provide-input purpose of payment, mandatory for every transaction Full Name and Address of the Beneficiary is required Full Name, Address and Account Number of the Ordering/Originating/Remitting party is required
4. Netherlands Antilles Guilder (ANG) FX Tenor Supported SPOT
Note Please provide-input purpose of payment, mandatory for every transaction Full Name and Address of the Beneficiary is required Full Name, Address and Account Number of the Ordering/Originating/Remitting party is required
5. Angolan Kwanza (AOA) FX Tenor Supported SPOT
Note Please provide-input purpose of payment, mandatory for every transaction Full Name, Address and 25 digit IBAN Account Number for Beneficiary is required Full Name, Address and Account Number of the Ordering/Originating/Remitting party is required
6. Argentinean Peso (ARS) FX Tenor Supported SPOT
Note
Please provide-input purpose of payment, mandatory for every transaction Full Name, Address, Telephone Number, CBU and CUIT Number for Beneficiary is required Full Name, Address and Account Number of the Ordering/Originating/Remitting party is required Beneficiary Bank Branch Location is required Banks may hold payment orders for up to a maximum of 90 days when they are not collected on value date. Banks may reject the payment on day 90 if it is still pending. However the funds will not be returned unless recalled.

Transactions User Guide (Internet)
Version Oct 2011 Pg 222 of 256
7. Australian Dollar (AUD) FX Tenor Supported TOD, TOM, SPOT
Note
8. Bosnia & Herzegovina Convertible Mark (BAM) FX Tenor Supported SPOT
Note Please provide-input purpose of payment, mandatory for every transaction Full Name and Address of the Beneficiary is required Full Name, Address and Account Number of the Ordering/Originating/Remitting party is required
9. Barbadian Dollar (BBD)* FX Tenor Supported TOM, SPOT
Note
Remitter/Beneficiary may be required to provide the underlying documentation for the transaction to the bank/regulators as necessary to comply with the applicable regulations Payments can be made to onshore residents only Required to provide complete remitter details, beneficiary name, account number, beneficiary bank details and full address mandatory for every payment Return of funds can be complicated and time-consuming (typically weeks or more for the funds to be returned) and require to submit relevant documentation
* Sell back of the currency due to funds returned/unable to apply or any other reasons would not be supported
10. Bangladeshi Taka (BDT) FX Tenor Supported SPOT
Note
Strict exchange controls restrict the movement of funds in and out of the country Remitter/Beneficiary may be required to provide the underlying documentation for the transaction to the bank/regulators as necessary to comply with the applicable regulations
11. Bulgarian Lev (BGN) FX Tenor Supported SPOT
Note Please provide-input purpose of payment, mandatory for every transaction Full Name and Address of the Beneficiary is required Full Name, Address and Account Number of the Ordering/Originating/Remitting party is required
12. Bahraini Dinar (BHD) FX Tenor Supported TOD, TOM, SPOT
Note Please provide-input purpose of payment, mandatory for every transaction

Transactions User Guide (Internet)
Version Oct 2011 Pg 223 of 256
13. Burundian Franc (BIF) FX Tenor Supported SPOT
Note
Please provide-input purpose of payment, mandatory for every transaction Full Name, Address and Telephone Number for Beneficiary is required Full Name, Address and Account Number of the Ordering/Originating/Remitting party is required Beneficiary Bank Branch Location is required
14. Brunei Dollar (BND) FX Tenor Supported SPOT
Note
15. Bolivian Boliviano (BOB) FX Tenor Supported SPOT
Note Please provide-input purpose of payment, mandatory for every transaction Full Name and Address of the Beneficiary is required Full Name, Address and Account Number of the Ordering/Originating/Remitting party is required
16. Bhutanese Ngultrum (BTN) FX Tenor Supported SPOT
Note Please provide-input purpose of payment, mandatory for every transaction Full Name and Address of the Beneficiary is required Full Name, Address and Account Number of the Ordering/Originating/Remitting party is required
17. Botswana Pula (BWP) FX Tenor Supported TOM, SPOT
Note Purpose of payment is mandatory for all payments exceeding BWP10,000
18. Belize Dollar (BZD) FX Tenor Supported SPOT
Note Please provide-input purpose of payment, mandatory for every transaction Full Name and Address of the Beneficiary is required Full Name, Address and Account Number of the Ordering/Originating/Remitting party is required
19. Canadian Dollar (CAD) FX Tenor Supported TOD, TOM, SPOT
Note
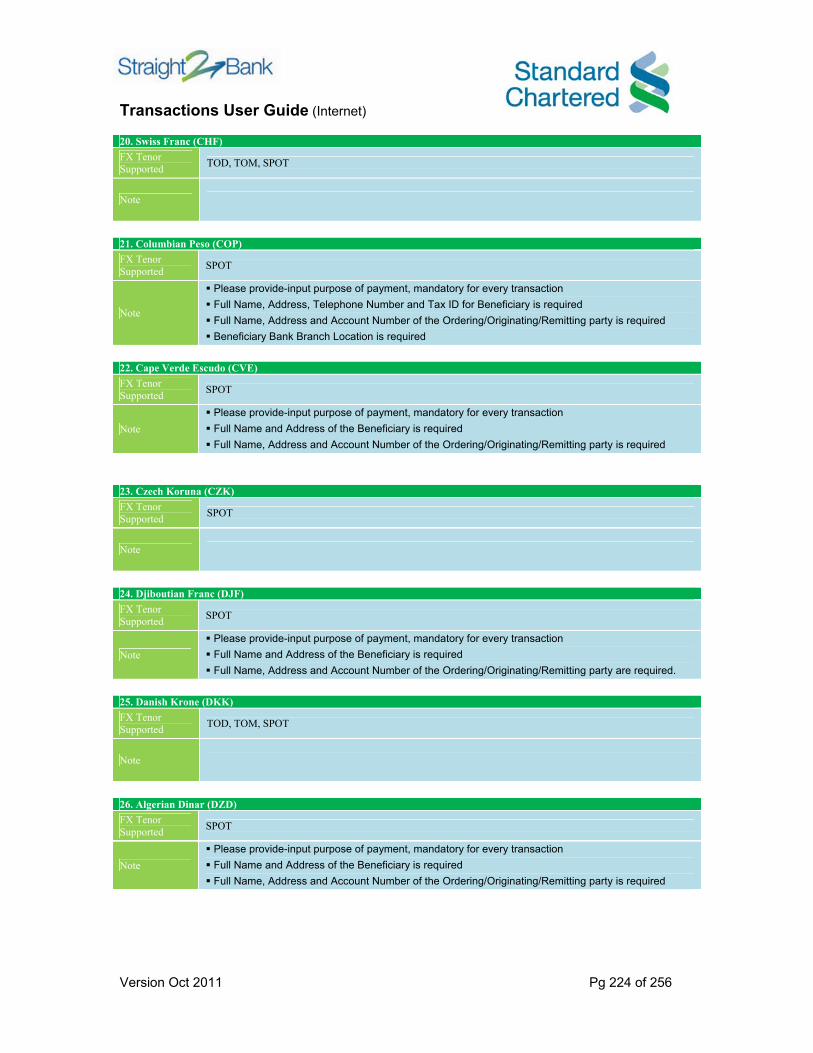
Transactions User Guide (Internet)
Version Oct 2011 Pg 224 of 256
20. Swiss Franc (CHF) FX Tenor Supported TOD, TOM, SPOT
Note
21. Columbian Peso (COP) FX Tenor Supported SPOT
Note
Please provide-input purpose of payment, mandatory for every transaction Full Name, Address, Telephone Number and Tax ID for Beneficiary is required Full Name, Address and Account Number of the Ordering/Originating/Remitting party is required Beneficiary Bank Branch Location is required
22. Cape Verde Escudo (CVE) FX Tenor Supported SPOT
Note Please provide-input purpose of payment, mandatory for every transaction Full Name and Address of the Beneficiary is required Full Name, Address and Account Number of the Ordering/Originating/Remitting party is required
23. Czech Koruna (CZK) FX Tenor Supported SPOT
Note
24. Djiboutian Franc (DJF) FX Tenor Supported SPOT
Note Please provide-input purpose of payment, mandatory for every transaction Full Name and Address of the Beneficiary is required Full Name, Address and Account Number of the Ordering/Originating/Remitting party are required.
25. Danish Krone (DKK) FX Tenor Supported TOD, TOM, SPOT
Note
26. Algerian Dinar (DZD) FX Tenor Supported SPOT
Note Please provide-input purpose of payment, mandatory for every transaction Full Name and Address of the Beneficiary is required Full Name, Address and Account Number of the Ordering/Originating/Remitting party is required

Transactions User Guide (Internet)
Version Oct 2011 Pg 225 of 256
27. Egyptian Pound (EGP) FX Tenor Supported SPOT
Note
28. Ethiopian Birr (ETB)* FX Tenor Supported SPOT
Note
Please provide full beneficiary bank address ,contact name and telephone number of the beneficiary for every payment In some cases the intermediary or the beneficiary bank may request for the signature of the beneficiary prior to funds being finally credited Payments can be made to onshore residents only
* Sell back of the currency due to funds returned/unable to apply or any other reasons would not be supported
29. Euro (EUR) FX Tenor Supported TOD, TOM, SPOT
Note Please provide full beneficiary bank address ,contact name and telephone number of the beneficiary for every payment IBAN would be required for payments into the EUROZONE
30. Fijian Dollar (FJD) FX Tenor Supported SPOT
Note Payments can be made to onshore residents only
31. Great Britain Pound (GBP) FX Tenor Supported TOD, TOM, SPOT
Note
32. Georgian Lari (GEL) FX Tenor Supported SPOT
Note
Please provide-input purpose of payment, mandatory for every transaction Full Name and Address of the Beneficiary is required Full Name, Address and Account Number of the Ordering/Originating/Remitting party is required Beneficiary Bank Branch Location is required
33. Ghanaian Cedi (GHS) FX Tenor Supported TOM, SPOT
Note
Purpose of payment is mandatory for every transaction Return of funds can be complicated and time-consuming (typically weeks or more for the funds to be returned) and require to submit relevant documentation Payments can be made to onshore residents only
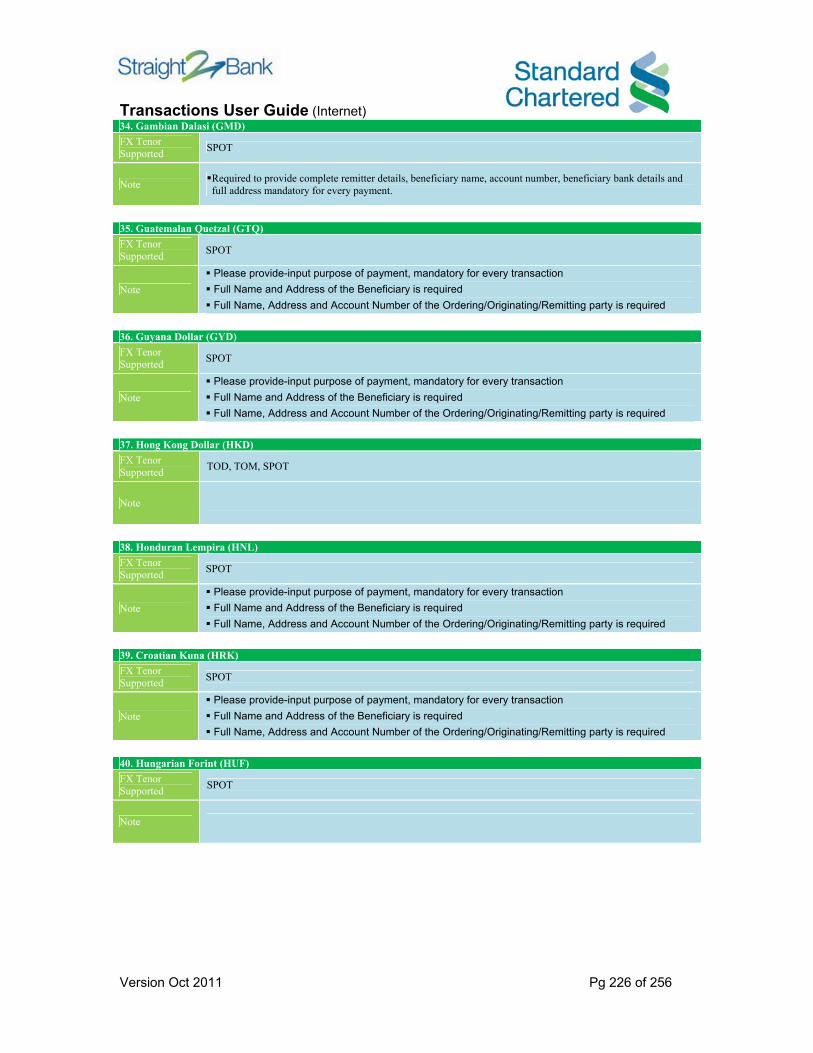
Transactions User Guide (Internet)
Version Oct 2011 Pg 226 of 256
34. Gambian Dalasi (GMD) FX Tenor Supported SPOT
Note Required to provide complete remitter details, beneficiary name, account number, beneficiary bank details and full address mandatory for every payment.
35. Guatemalan Quetzal (GTQ) FX Tenor Supported SPOT
Note Please provide-input purpose of payment, mandatory for every transaction Full Name and Address of the Beneficiary is required Full Name, Address and Account Number of the Ordering/Originating/Remitting party is required
36. Guyana Dollar (GYD) FX Tenor Supported SPOT
Note Please provide-input purpose of payment, mandatory for every transaction Full Name and Address of the Beneficiary is required Full Name, Address and Account Number of the Ordering/Originating/Remitting party is required
37. Hong Kong Dollar (HKD) FX Tenor Supported TOD, TOM, SPOT
Note
38. Honduran Lempira (HNL) FX Tenor Supported SPOT
Note Please provide-input purpose of payment, mandatory for every transaction Full Name and Address of the Beneficiary is required Full Name, Address and Account Number of the Ordering/Originating/Remitting party is required
39. Croatian Kuna (HRK) FX Tenor Supported SPOT
Note Please provide-input purpose of payment, mandatory for every transaction Full Name and Address of the Beneficiary is required Full Name, Address and Account Number of the Ordering/Originating/Remitting party is required
40. Hungarian Forint (HUF) FX Tenor Supported SPOT
Note

Transactions User Guide (Internet)
Version Oct 2011 Pg 227 of 256
41. Indonesian Rupiah (IDR)* FX Tenor Supported TOM, SPOT
Note
Purpose of payment is mandatory for every transaction Remitter/Beneficiary would be required to provide the underlying /supporting documentation for all payments exceeding IDR 500 million Remitter/Beneficiary may be required to provide the underlying documentation for the transaction to the bank/regulators as necessary to comply with the applicable regulations Payments can be made to onshore residents only
* Sell back of the currency due to funds returned/unable to apply or any other reasons would not be supported
42. Israeli Shekels (ILS) FX Tenor Supported TOD, TOM, SPOT
Note Beneficiary bank branch number is mandatory for all payments All instructions equal to or more than ILS 3 million must include the IBAN (19 digits) of the beneficiary and Bank Branch Code
43. Indian Rupee (INR) FX Tenor Supported TOD, TOM, SPOT
Note
Remitter/Beneficiary may be required to provide the underlying documentation for the transaction to the bank/regulators as necessary to comply with the applicable regulations Exchange control restrictions prevent the free flow of funds out of the country. Please provide-input purpose of payment, mandatory for every transaction
44. Jordanian Dinar (JOD) FX Tenor Supported SPOT
Note Please provide-input purpose of payment, mandatory for every transaction
45. Japanese Yen (JPY) FX Tenor Supported TOD, TOM, SPOT
Note Please provide-input purpose of payment, mandatory for every transaction
46. Kenyan Shilling (KES) FX Tenor Supported TOM, SPOT
Note Purpose of payment is mandatory for every transaction
47. Kyrgyzstani Som (KGS) FX Tenor Supported SPOT
Note Please provide-input purpose of payment, mandatory for every transaction Full Name and Address of the Beneficiary is required Full Name, Address and Account Number of the Ordering/Originating/Remitting party is required

Transactions User Guide (Internet)
Version Oct 2011 Pg 228 of 256
48. Cambodian Riel (KHR) FX Tenor Supported SPOT
Note Please provide-input purpose of payment, mandatory for every transaction Full Name and Address of the Beneficiary is required Full Name, Address and Account Number of the Ordering/Originating/Remitting party is required
49. Korean Won (KRW)* FX Tenor Supported TOM, SPOT
Note
Beneficiary’s phone number is required for every transaction-please provide it in the payment details field Remitter/Beneficiary may be required to provide the underlying documentation for the transaction to the bank/regulators as necessary to comply with the applicable regulations Purpose of payment is mandatory for every transaction Transactions below the value of equivalent of USD 500 would not be processed
* Sell back of the currency due to funds returned/unable to apply or any other reasons would not be supported
50. Kuwaiti Dinar (KWD) FX Tenor Supported TOM, SPOT
Note
51. Cayman Islands Dollar (KYD) FX Tenor Supported SPOT
Note Please provide-input purpose of payment, mandatory for every transaction Full Name and Address of the Beneficiary is required Full Name, Address and Account Number of the Ordering/Originating/Remitting party is required
52. Kazakhstani Tenge (KZT) FX Tenor Supported SPOT
Note Please provide-input purpose of payment, mandatory for every transaction Full Name and Address of the Beneficiary is required Full Name, Address and Account Number of the Ordering/Originating/Remitting party is required
53. Laos Kip (LAK) FX Tenor Supported SPOT
Note
Please provide-input purpose of payment, mandatory for every transaction Full Name and Address of the Beneficiary is required Full Name, Address and Account Number of the Ordering/Originating/Remitting party is required Beneficiary Bank Branch Location is required

Transactions User Guide (Internet)
Version Oct 2011 Pg 229 of 256
54. Sri Lankan Rupee (LKR) FX Tenor Supported SPOT
Note
Remitter/Beneficiary may be required to provide the underlying documentation for the transaction to the bank/regulators as necessary to comply with the applicable regulations Exchange control restrictions prevent free flow of funds out of the country. Consequently return of funds require additional approvals from Central Bank & reporting (handled by onshore Correspondent Bank) Please provide-input purpose of payment, mandatory for every transaction in free text regardless of the value of the payment Checking of documents may be required in country by the beneficiary bank
55. Lesotho Loti (LSL) FX Tenor Supported SPOT
Note Please provide-input purpose of payment, mandatory for every transaction Full Name and Address of the Beneficiary is required Full Name, Address and Account Number of the Ordering/Originating/Remitting party is required
56. Lithuanian litas (LTL) FX Tenor Supported SPOT
Note Please provide-input purpose of payment, mandatory for every transaction Full Name and Address of the Beneficiary is required Full Name, Address and Account Number of the Ordering/Originating/Remitting party is required
57. Latvian Lats (LVL) FX Tenor Supported SPOT
Note Please provide-input purpose of payment, mandatory for every transaction Full Name and Address of the Beneficiary is required Full Name, Address and Account Number of the Ordering/Originating/Remitting party is required
58. Moroccan Dirham (MAD) FX Tenor Supported TOM, SPOT
Note
59. Moldovan Leu (MDL) FX Tenor Supported SPOT
Note
Please provide-input purpose of payment, mandatory for every transaction Full Name and Address of the Beneficiary is required Full Name, Address and Account Number of the Ordering/Originating/Remitting party is required Beneficiary Bank Branch Location is required

Transactions User Guide (Internet)
Version Oct 2011 Pg 230 of 256
60. Macedonian Denar (MKD) FX Tenor Supported SPOT
Note
Please provide-input purpose of payment, mandatory for every transaction Full Name and Address of the Beneficiary is required Full Name, Address and Account Number of the Ordering/Originating/Remitting party is required Beneficiary Bank Branch Location is required
61. Mongolian Tugrik (MNT) FX Tenor Supported SPOT
Note
Please provide-input purpose of payment, mandatory for every transaction Full Name and Address of the Beneficiary is required Full Name, Address and Account Number of the Ordering/Originating/Remitting party is required Beneficiary Bank Branch Location is required
62. Macau Pataca (MOP) FX Tenor Supported SPOT
Note Please provide-input purpose of payment, mandatory for every transaction Full Name and Address for Beneficiary and Full Name, address and account number of Ordering/Originating/Remitting party is required
63. Mauritanian Ouguiya (MRO) FX Tenor Supported SPOT
Note
Please provide-input purpose of payment, mandatory for every transaction Full Name and Address of the Beneficiary is required Full Name, Address and Account Number of the Ordering/Originating/Remitting party is required Beneficiary Bank Branch Location is required
64. Mauritian Rupee (MUR) FX Tenor Supported SPOT
Note Please provide-input purpose of payment, mandatory for every transaction
65. Maldivian Rufiyaa (MVR) FX Tenor Supported SPOT
Note
Please provide-input purpose of payment, mandatory for every transaction Full Name and Address of the Beneficiary is required Full Name, Address and Account Number of the Ordering/Originating/Remitting party is required Beneficiary Bank Branch Location is required
66. Malawian Kwacha (MWK)* FX Tenor Supported SPOT
Note Payments can be made to onshore residents only
* Sell back of the currency due to funds returned/unable to apply or any other reasons would not be supported

Transactions User Guide (Internet)
Version Oct 2011 Pg 231 of 256
67. Mexican Peso (MXN) FX Tenor Supported TOM, SPOT
Note n/a
68. Malaysian Ringgit (MYR)* FX Tenor Supported TOM, SPOT
Note Purpose of payment is mandatory for every transaction Payments can be made to onshore residents only
*Sell back of the currency due to funds returned/unable to apply or any other reasons would not be supported 69. Namibian Dollar (NAD) FX Tenor Supported SPOT
Note Remitter/Beneficiary may be required to provide the underlying documentation for the transaction to the bank/regulators as necessary to comply with the applicable regulations Payments can be made to onshore residents only
70. Nigerian Naira (NGN) FX Tenor Supported SPOT
Note Remitter/Beneficiary may be required to provide underlying documentation for the transaction to the bank/regulators as necessary to comply with the applicable regulations Payments can be made to onshore residents only
71. Cordoba Oro (NIO) FX Tenor Supported SPOT
Note Please provide-input purpose of payment, mandatory for every transaction Full Name and Address of the Beneficiary is required Full Name, Address and Account Number of the Ordering/Originating/Remitting party is required
72. Norwegian Krone (NOK) FX Tenor Supported TOD, TOM, SPOT
Note n/a
73. Nepalese Rupee (NPR) FX Tenor Supported TOM, SPOT
Note Payments can be made to onshore residents only Purpose of payment is mandatory for every transaction
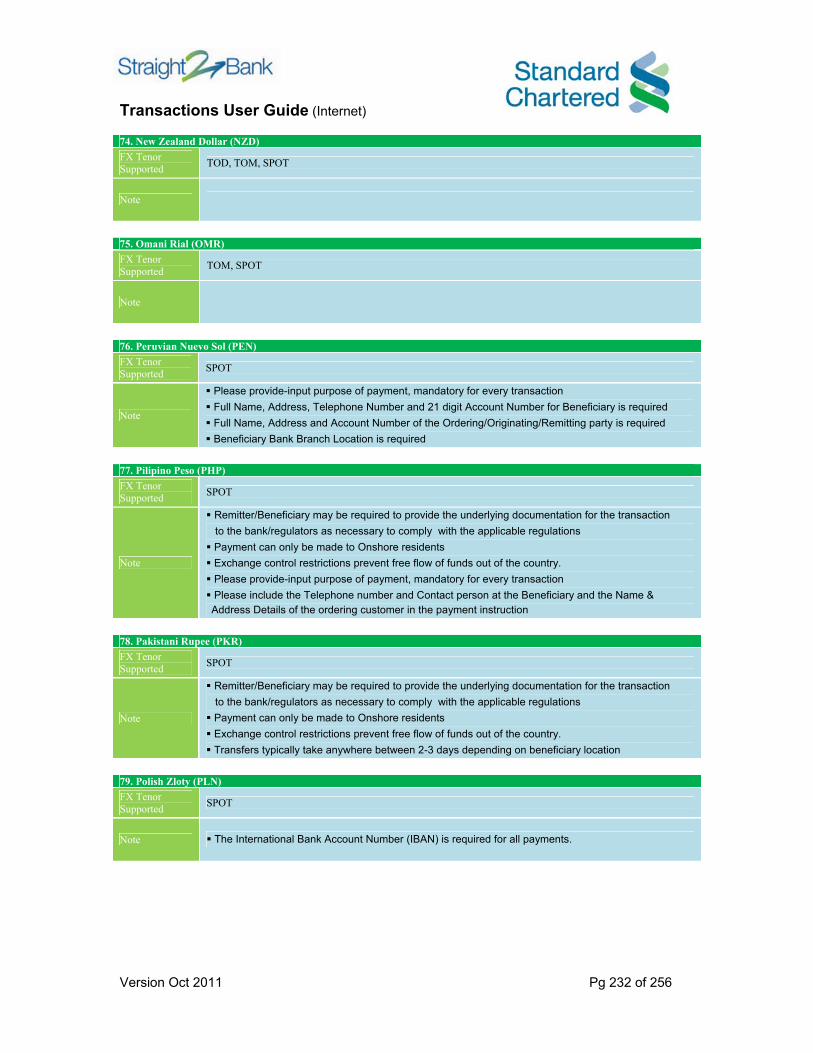
Transactions User Guide (Internet)
Version Oct 2011 Pg 232 of 256
74. New Zealand Dollar (NZD) FX Tenor Supported TOD, TOM, SPOT
Note
75. Omani Rial (OMR) FX Tenor Supported TOM, SPOT
Note
76. Peruvian Nuevo Sol (PEN) FX Tenor Supported SPOT
Note
Please provide-input purpose of payment, mandatory for every transaction Full Name, Address, Telephone Number and 21 digit Account Number for Beneficiary is required Full Name, Address and Account Number of the Ordering/Originating/Remitting party is required Beneficiary Bank Branch Location is required
77. Pilipino Peso (PHP) FX Tenor Supported SPOT
Note
Remitter/Beneficiary may be required to provide the underlying documentation for the transaction to the bank/regulators as necessary to comply with the applicable regulations Payment can only be made to Onshore residents Exchange control restrictions prevent free flow of funds out of the country. Please provide-input purpose of payment, mandatory for every transaction Please include the Telephone number and Contact person at the Beneficiary and the Name & Address Details of the ordering customer in the payment instruction
78. Pakistani Rupee (PKR) FX Tenor Supported SPOT
Note
Remitter/Beneficiary may be required to provide the underlying documentation for the transaction to the bank/regulators as necessary to comply with the applicable regulations Payment can only be made to Onshore residents Exchange control restrictions prevent free flow of funds out of the country. Transfers typically take anywhere between 2-3 days depending on beneficiary location
79. Polish Zloty (PLN) FX Tenor Supported SPOT
Note The International Bank Account Number (IBAN) is required for all payments.
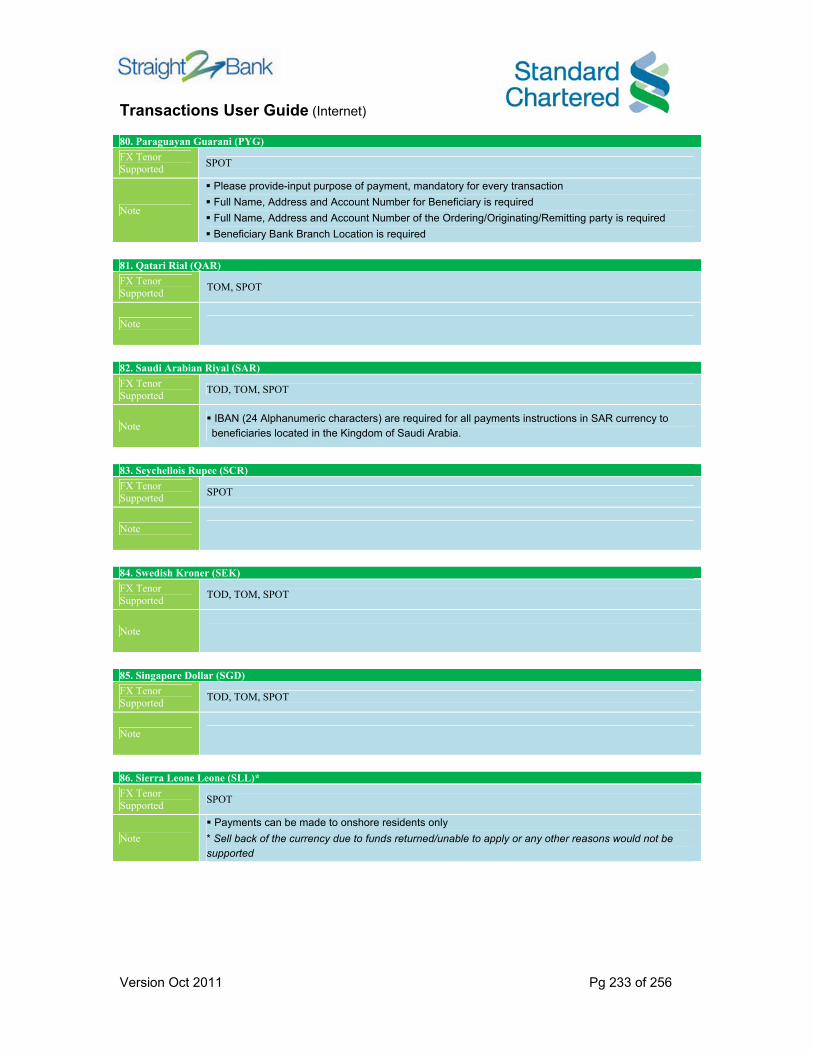
Transactions User Guide (Internet)
Version Oct 2011 Pg 233 of 256
80. Paraguayan Guarani (PYG) FX Tenor Supported SPOT
Note
Please provide-input purpose of payment, mandatory for every transaction Full Name, Address and Account Number for Beneficiary is required Full Name, Address and Account Number of the Ordering/Originating/Remitting party is required Beneficiary Bank Branch Location is required
81. Qatari Rial (QAR) FX Tenor Supported TOM, SPOT
Note
82. Saudi Arabian Riyal (SAR) FX Tenor Supported TOD, TOM, SPOT
Note IBAN (24 Alphanumeric characters) are required for all payments instructions in SAR currency to beneficiaries located in the Kingdom of Saudi Arabia.
83. Seychellois Rupee (SCR) FX Tenor Supported SPOT
Note
84. Swedish Kroner (SEK) FX Tenor Supported TOD, TOM, SPOT
Note
85. Singapore Dollar (SGD) FX Tenor Supported TOD, TOM, SPOT
Note
86. Sierra Leone Leone (SLL)* FX Tenor Supported SPOT
Note Payments can be made to onshore residents only
* Sell back of the currency due to funds returned/unable to apply or any other reasons would not be supported

Transactions User Guide (Internet)
Version Oct 2011 Pg 234 of 256
87. Surinamese Dollar (SRD) FX Tenor Supported SPOT
Note Please provide-input purpose of payment, mandatory for every transaction Full Name, Address and Account Number for Beneficiary is required Full Name, Address and Account Number of the Ordering/Originating/Remitting party is required
88. Swaziland Lilangeni (SZL) FX Tenor Supported SPOT
Note
Purpose of payment is mandatory for every transaction Remitter/Beneficiary may be required to provide the underlying documentation for the transaction
to the bank/regulators as necessary to comply with the applicable regulations Payments can be made to onshore residents only
89. Thai Baht (THB) FX Tenor Supported TOD, TOM, SPOT
Note
90. Tunisian Dinar (TND) FX Tenor Supported SPOT
Note
91. Tongan Pa’anga (TOP) FX Tenor Supported SPOT
Note
92. Turkish Lira (TRY) FX Tenor Supported SPOT
Note
93. Trinidad and Tobago Dollar (TTD) FX Tenor Supported SPOT
Note

Transactions User Guide (Internet)
Version Oct 2011 Pg 235 of 256
94. Taiwanese Dollar (TWD) FX Tenor Supported SPOT
Note
Purpose of payment is mandatory for every transaction The beneficiary is credited only once it has completed and submitted the complete inward remittance declaration and provided documentary evidence for the transaction. The documentation formalities generally take a few days or more depending on the transaction. Remitter/Beneficiary may be required to provide the underlying documentation for the transaction to the bank/regulators as necessary to comply with the applicable regulations Payments can be made to onshore residents only
95. Tanzanian Shilling (TZS) FX Tenor Supported TOM, SPOT
Note
Remitter/Beneficiary may be required to provide the underlying documentation for the transaction to the bank/regulators as necessary to comply with the applicable regulations Purpose of payment is mandatory for every transaction Payments can be made to onshore residents only
96. Ukrainian Hryvnia (UAH) FX Tenor Supported SPOT
Note
Please provide-input purpose of payment, mandatory for every transaction Full Name, Address and Account Number of the Ordering/Originating/Remitting party is required Full Name and Address of the Beneficiary is required In event that beneficiary holds an account with the bank:
Beneficiary Bank code Beneficiary Bank name Beneficiary Account Number Beneficiary Name Beneficiary Tax Code
In event that Beneficiary does not hold an account with the bank: Beneficiary Bank code Beneficiary Bank name Bank account number for processing payments for individuals without accounts Beneficiary name/passport details (possibly contact phone #) to be specified in the payment details field
Beneficiary Bank Branch Location is required.
97. Ugandan Shilling (UGX) FX Tenor Supported TOM, SPOT
Note
Remitter/Beneficiary may be required to provide the underlying documentation for the transaction to the bank/regulators as necessary to comply with the applicable regulations Purpose of payment is mandatory for every transaction Payments can be made to onshore residents only
98. United States Dollar (USD) FX Tenor Supported TOD, TOM, SPOT
Note
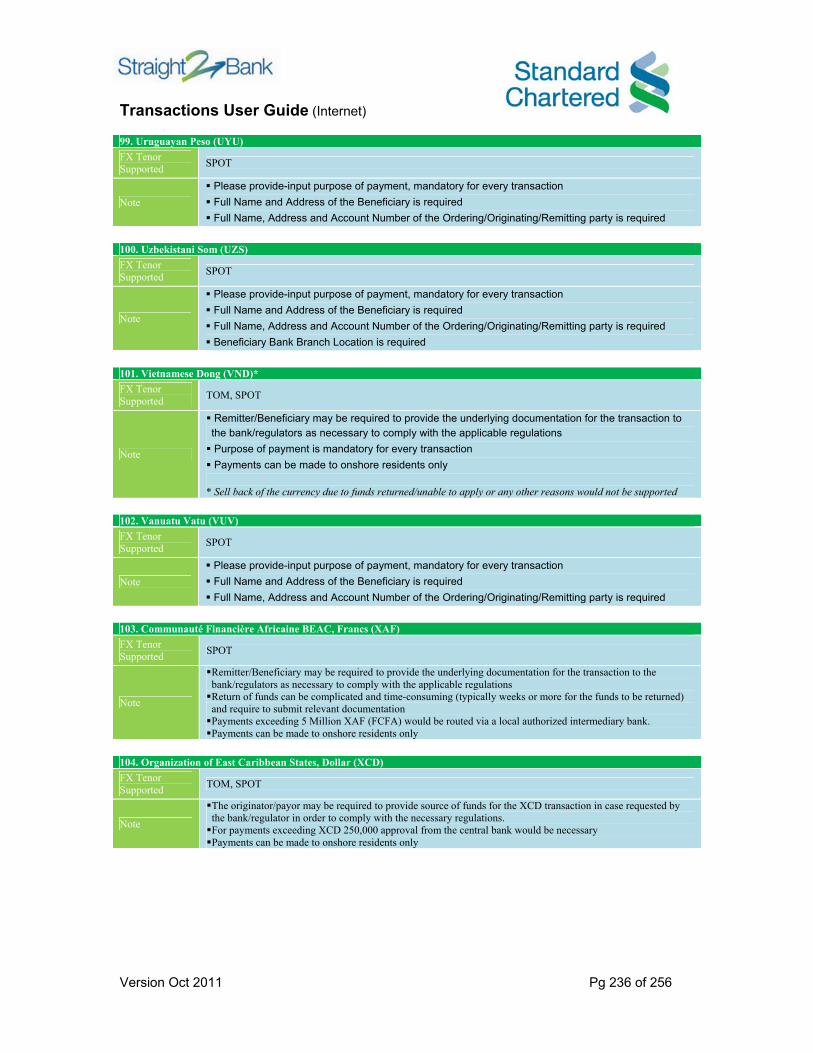
Transactions User Guide (Internet)
Version Oct 2011 Pg 236 of 256
99. Uruguayan Peso (UYU) FX Tenor Supported SPOT
Note Please provide-input purpose of payment, mandatory for every transaction Full Name and Address of the Beneficiary is required Full Name, Address and Account Number of the Ordering/Originating/Remitting party is required
100. Uzbekistani Som (UZS) FX Tenor Supported SPOT
Note
Please provide-input purpose of payment, mandatory for every transaction Full Name and Address of the Beneficiary is required Full Name, Address and Account Number of the Ordering/Originating/Remitting party is required Beneficiary Bank Branch Location is required
101. Vietnamese Dong (VND)* FX Tenor Supported TOM, SPOT
Note
Remitter/Beneficiary may be required to provide the underlying documentation for the transaction to the bank/regulators as necessary to comply with the applicable regulations Purpose of payment is mandatory for every transaction Payments can be made to onshore residents only
* Sell back of the currency due to funds returned/unable to apply or any other reasons would not be supported
102. Vanuatu Vatu (VUV) FX Tenor Supported SPOT
Note Please provide-input purpose of payment, mandatory for every transaction Full Name and Address of the Beneficiary is required Full Name, Address and Account Number of the Ordering/Originating/Remitting party is required
103. Communauté Financière Africaine BEAC, Francs (XAF) FX Tenor Supported SPOT
Note
Remitter/Beneficiary may be required to provide the underlying documentation for the transaction to the bank/regulators as necessary to comply with the applicable regulations Return of funds can be complicated and time-consuming (typically weeks or more for the funds to be returned) and require to submit relevant documentation Payments exceeding 5 Million XAF (FCFA) would be routed via a local authorized intermediary bank. Payments can be made to onshore residents only
104. Organization of East Caribbean States, Dollar (XCD) FX Tenor Supported TOM, SPOT
Note
The originator/payor may be required to provide source of funds for the XCD transaction in case requested by the bank/regulator in order to comply with the necessary regulations. For payments exceeding XCD 250,000 approval from the central bank would be necessary Payments can be made to onshore residents only
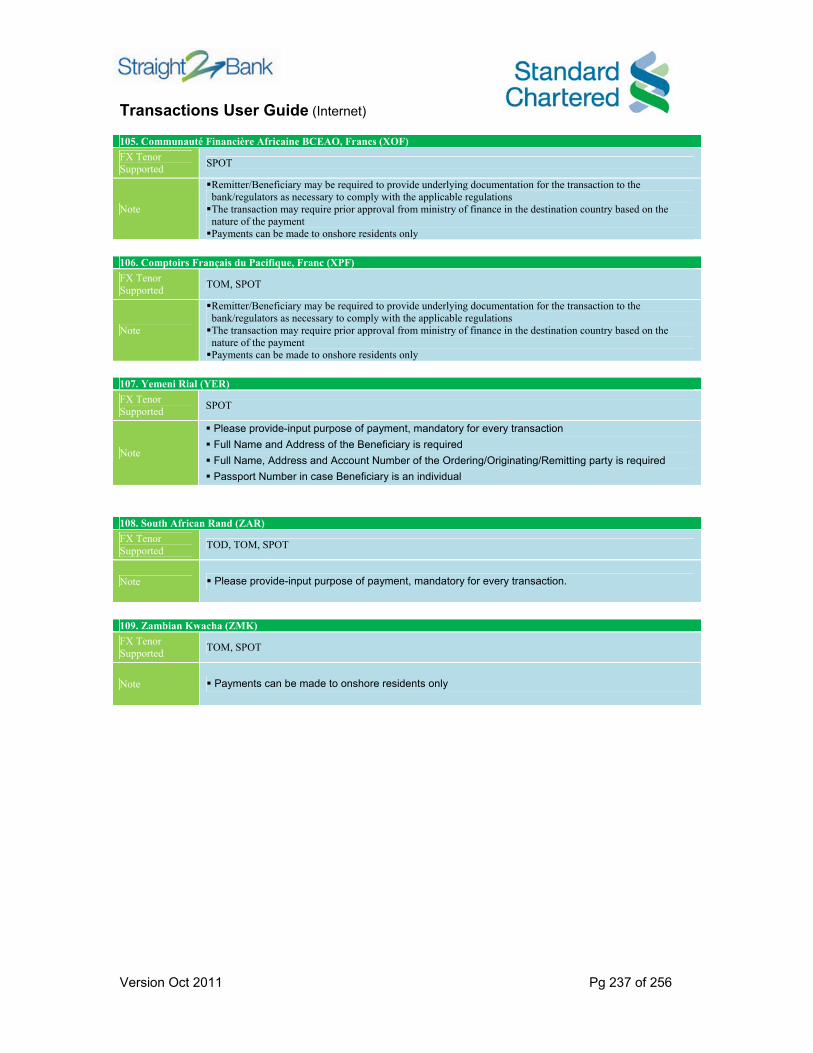
Transactions User Guide (Internet)
Version Oct 2011 Pg 237 of 256
105. Communauté Financière Africaine BCEAO, Francs (XOF) FX Tenor Supported SPOT
Note
Remitter/Beneficiary may be required to provide underlying documentation for the transaction to the bank/regulators as necessary to comply with the applicable regulations The transaction may require prior approval from ministry of finance in the destination country based on the nature of the payment Payments can be made to onshore residents only
106. Comptoirs Français du Pacifique, Franc (XPF) FX Tenor Supported TOM, SPOT
Note
Remitter/Beneficiary may be required to provide underlying documentation for the transaction to the bank/regulators as necessary to comply with the applicable regulations The transaction may require prior approval from ministry of finance in the destination country based on the nature of the payment Payments can be made to onshore residents only
107. Yemeni Rial (YER) FX Tenor Supported SPOT
Note
Please provide-input purpose of payment, mandatory for every transaction Full Name and Address of the Beneficiary is required Full Name, Address and Account Number of the Ordering/Originating/Remitting party is required Passport Number in case Beneficiary is an individual
108. South African Rand (ZAR) FX Tenor Supported TOD, TOM, SPOT
Note Please provide-input purpose of payment, mandatory for every transaction.
109. Zambian Kwacha (ZMK) FX Tenor Supported TOM, SPOT
Note Payments can be made to onshore residents only
Transactions User Guide (Internet)
Version Oct 2011 Pg 238 of 256
Appendix 2 Standard Chartered Bank Hong Kong Straight2Bank FX Payments Currency Reference Document This document gives an overview of currencies offered by Standard Chartered Bank when making Cross Currency payments over Straight2Bank from Hong Kong based accounts denominated in USD, EUR, GBP, HKD, and SGD. The document is sub-sectioned into two parts.
i) Summary Cut-off time tables: Is a summary of the cut off times available in the origination country (Hong Kong)
ii) Straight2Bank FX Payments Currency reference section : Provides information
regarding the various currencies and some key points to note while making payments in those currencies

Transactions User Guide (Internet)
Version Oct 2011 Pg 239 of 256
I. Straight2Bank FX Payment Cut Off Times summary Debit Account: USD, EUR, GBP, HKD, SGD1 in Standard Chartered Hong Kong. Currencies with Same Day value availability (TOD), Next Day (TOM) and SPOT values are also available with cutoff times at 18:00h Currencies with Next Day value availability (TOM), SPOT values are also available with cutoff times at 18:00h
Note: Cut off times are listed in Hong Kong Standard Time (+8 GMT) and are subject to change without notice
1Note: Debit Currencies will be progressively added in 2011/2012 2Note: Indian Rupee available after 11:30h for all tenors (TOD, TOM, SPOT) 3Note: Request for Quote not available when paying into these currencies 4Note: CNY Payments subject to documentation checks and FX value date will be dependent on submission of documents; no Request for Quote
available. 5Note: Cut off time for Bank assigned TOD rate remains at 17:30h

Transactions User Guide (Internet)
Version Oct 2011 Pg 240 of 256
II. Straight2Bank FX Payments Transaction Guide 1. United Arab Emirates Dirham (AED) FX Tenor Supported TOD, TOM, SPOT
Note
2. Albanian Lek (ALL) FX Tenor Supported SPOT
Note
Purpose of payment needs to be provided in the payment details field Full Name and Address of the Beneficiary is required Full Name, Address and Account Number of the Ordering/Originating/Remitting party is required Beneficiary Bank Branch Location is required
3. Armenian Dram (AMD) FX Tenor Supported SPOT
Note Please provide-input purpose of payment, mandatory for every transaction Full Name and Address of the Beneficiary is required Full Name, Address and Account Number of the Ordering/Originating/Remitting party is required
4. Netherlands Antilles Guilder (ANG) FX Tenor Supported SPOT
Note Please provide-input purpose of payment, mandatory for every transaction Full Name and Address of the Beneficiary is required Full Name, Address and Account Number of the Ordering/Originating/Remitting party is required
5. Angolan Kwanza (AOA) FX Tenor Supported SPOT
Note Please provide-input purpose of payment, mandatory for every transaction Full Name, Address and 25 digit IBAN Account Number for Beneficiary is required Full Name, Address and Account Number of the Ordering/Originating/Remitting party is required
6. Argentinean Peso (ARS) FX Tenor Supported SPOT
Note
Please provide-input purpose of payment, mandatory for every transaction Full Name, Address, Telephone Number, CBU and CUIT Number for Beneficiary is required Full Name, Address and Account Number of the Ordering/Originating/Remitting party is required Beneficiary Bank Branch Location is required Banks may hold payment orders for up to a maximum of 90 days when they are not collected on value date. Banks may reject the payment on day 90 if it is still pending. However the funds will not be returned unless recalled.

Transactions User Guide (Internet)
Version Oct 2011 Pg 241 of 256
7. Australian Dollar (AUD) FX Tenor Supported TOD, TOM, SPOT
Note
8. Bosnia & Herzegovina Convertible Mark (BAM) FX Tenor Supported SPOT
Note Please provide-input purpose of payment, mandatory for every transaction Full Name and Address of the Beneficiary is required Full Name, Address and Account Number of the Ordering/Originating/Remitting party is required
9. Barbadian Dollar (BBD)* FX Tenor Supported TOM, SPOT
Note
Remitter/Beneficiary may be required to provide the underlying documentation for the transaction to the bank/regulators as necessary to comply with the applicable regulations Payments can be made to onshore residents only Required to provide complete remitter details, beneficiary name, account number, beneficiary bank details and full address mandatory for every payment Return of funds can be complicated and time-consuming (typically weeks or more for the funds to be returned) and require to submit relevant documentation
* Sell back of the currency due to funds returned/unable to apply or any other reasons would not be supported
10. Bangladeshi Taka (BDT) FX Tenor Supported SPOT
Note
Strict exchange controls restrict the movement of funds in and out of the country Remitter/Beneficiary may be required to provide the underlying documentation for the transaction to the bank/regulators as necessary to comply with the applicable regulations
11. Bulgarian Lev (BGN) FX Tenor Supported SPOT
Note Please provide-input purpose of payment, mandatory for every transaction Full Name and Address of the Beneficiary is required Full Name, Address and Account Number of the Ordering/Originating/Remitting party is required
12. Bahraini Dinar (BHD) FX Tenor Supported TOD, TOM, SPOT
Note Please provide-input purpose of payment, mandatory for every transaction
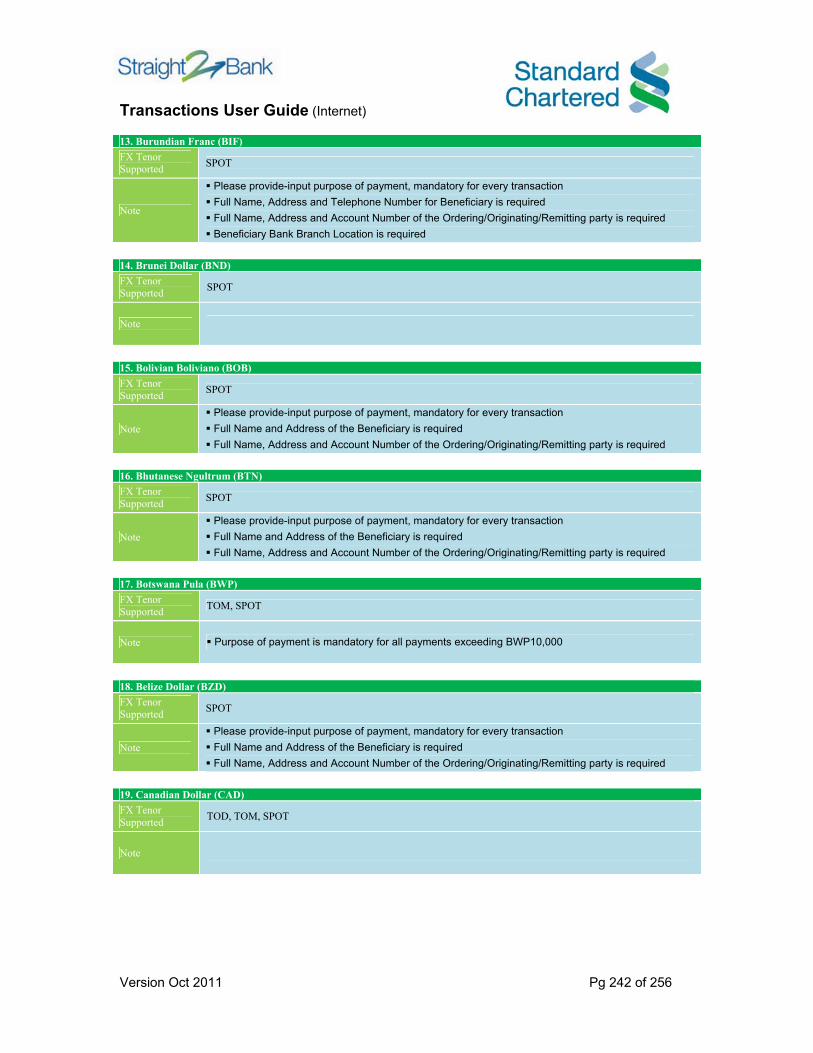
Transactions User Guide (Internet)
Version Oct 2011 Pg 242 of 256
13. Burundian Franc (BIF) FX Tenor Supported SPOT
Note
Please provide-input purpose of payment, mandatory for every transaction Full Name, Address and Telephone Number for Beneficiary is required Full Name, Address and Account Number of the Ordering/Originating/Remitting party is required Beneficiary Bank Branch Location is required
14. Brunei Dollar (BND) FX Tenor Supported SPOT
Note
15. Bolivian Boliviano (BOB) FX Tenor Supported SPOT
Note Please provide-input purpose of payment, mandatory for every transaction Full Name and Address of the Beneficiary is required Full Name, Address and Account Number of the Ordering/Originating/Remitting party is required
16. Bhutanese Ngultrum (BTN) FX Tenor Supported SPOT
Note Please provide-input purpose of payment, mandatory for every transaction Full Name and Address of the Beneficiary is required Full Name, Address and Account Number of the Ordering/Originating/Remitting party is required
17. Botswana Pula (BWP) FX Tenor Supported TOM, SPOT
Note Purpose of payment is mandatory for all payments exceeding BWP10,000
18. Belize Dollar (BZD) FX Tenor Supported SPOT
Note Please provide-input purpose of payment, mandatory for every transaction Full Name and Address of the Beneficiary is required Full Name, Address and Account Number of the Ordering/Originating/Remitting party is required
19. Canadian Dollar (CAD) FX Tenor Supported TOD, TOM, SPOT
Note

Transactions User Guide (Internet)
Version Oct 2011 Pg 243 of 256
20. Swiss Franc (CHF) FX Tenor Supported TOD, TOM, SPOT
Note
21. Columbian Peso (COP) FX Tenor Supported SPOT
Note
Please provide-input purpose of payment, mandatory for every transaction Full Name, Address, Telephone Number and Tax ID for Beneficiary is required Full Name, Address and Account Number of the Ordering/Originating/Remitting party is required Beneficiary Bank Branch Location is required
22. Cape Verde Escudo (CVE) FX Tenor Supported SPOT
Note Please provide-input purpose of payment, mandatory for every transaction Full Name and Address of the Beneficiary is required Full Name, Address and Account Number of the Ordering/Originating/Remitting party is required
23. Czech Koruna (CZK) FX Tenor Supported SPOT
Note
24. Djiboutian Franc (DJF) FX Tenor Supported SPOT
Note Please provide-input purpose of payment, mandatory for every transaction Full Name and Address of the Beneficiary is required Full Name, Address and Account Number of the Ordering/Originating/Remitting party are required.
25. Danish Krone (DKK) FX Tenor Supported TOD, TOM, SPOT
Note
26. Algerian Dinar (DZD) FX Tenor Supported SPOT
Note Please provide-input purpose of payment, mandatory for every transaction Full Name and Address of the Beneficiary is required Full Name, Address and Account Number of the Ordering/Originating/Remitting party is required

Transactions User Guide (Internet)
Version Oct 2011 Pg 244 of 256
27. Egyptian Pound (EGP) FX Tenor Supported SPOT
Note
28. Ethiopian Birr (ETB)* FX Tenor Supported SPOT
Note
Please provide full beneficiary bank address ,contact name and telephone number of the beneficiary for every payment In some cases the intermediary or the beneficiary bank may request for the signature of the beneficiary prior to funds being finally credited Payments can be made to onshore residents only
* Sell back of the currency due to funds returned/unable to apply or any other reasons would not be supported
29. Euro (EUR) FX Tenor Supported TOD, TOM, SPOT
Note Please provide full beneficiary bank address ,contact name and telephone number of the beneficiary for every payment IBAN would be required for payments into the EUROZONE
30. Fijian Dollar (FJD) FX Tenor Supported SPOT
Note Payments can be made to onshore residents only
31. Great Britain Pound (GBP) FX Tenor Supported TOD, TOM, SPOT
Note
32. Georgian Lari (GEL) FX Tenor Supported SPOT
Note
Please provide-input purpose of payment, mandatory for every transaction Full Name and Address of the Beneficiary is required Full Name, Address and Account Number of the Ordering/Originating/Remitting party is required Beneficiary Bank Branch Location is required
33. Ghanaian Cedi (GHS) FX Tenor Supported TOM, SPOT
Note
Purpose of payment is mandatory for every transaction Return of funds can be complicated and time-consuming (typically weeks or more for the funds to be returned) and require to submit relevant documentation Payments can be made to onshore residents only

Transactions User Guide (Internet)
Version Oct 2011 Pg 245 of 256
34. Gambian Dalasi (GMD) FX Tenor Supported SPOT
Note Required to provide complete remitter details, beneficiary name, account number, beneficiary bank details and full address mandatory for every payment.
35. Guatemalan Quetzal (GTQ) FX Tenor Supported SPOT
Note Please provide-input purpose of payment, mandatory for every transaction Full Name and Address of the Beneficiary is required Full Name, Address and Account Number of the Ordering/Originating/Remitting party is required
36. Guyana Dollar (GYD) FX Tenor Supported SPOT
Note Please provide-input purpose of payment, mandatory for every transaction Full Name and Address of the Beneficiary is required Full Name, Address and Account Number of the Ordering/Originating/Remitting party is required
37. Hong Kong Dollar (HKD) FX Tenor Supported TOD, TOM, SPOT
Note
38. Honduran Lempira (HNL) FX Tenor Supported SPOT
Note Please provide-input purpose of payment, mandatory for every transaction Full Name and Address of the Beneficiary is required Full Name, Address and Account Number of the Ordering/Originating/Remitting party is required
39. Croatian Kuna (HRK) FX Tenor Supported SPOT
Note Please provide-input purpose of payment, mandatory for every transaction Full Name and Address of the Beneficiary is required Full Name, Address and Account Number of the Ordering/Originating/Remitting party is required
40. Hungarian Forint (HUF) FX Tenor Supported SPOT
Note

Transactions User Guide (Internet)
Version Oct 2011 Pg 246 of 256
41. Indonesian Rupiah (IDR)* FX Tenor Supported TOM, SPOT
Note
Purpose of payment is mandatory for every transaction Remitter/Beneficiary would be required to provide the underlying /supporting documentation for all payments exceeding IDR 500 million Remitter/Beneficiary may be required to provide the underlying documentation for the transaction to the bank/regulators as necessary to comply with the applicable regulations Payments can be made to onshore residents only
* Sell back of the currency due to funds returned/unable to apply or any other reasons would not be supported
42. Israeli Shekels (ILS) FX Tenor Supported TOM, SPOT
Note Beneficiary bank branch number is mandatory for all payments All instructions equal to or more than ILS 3 million must include the IBAN (19 digits) of the beneficiary and Bank Branch Code
43. Indian Rupee (INR) FX Tenor Supported TOD, TOM, SPOT
Note
Remitter/Beneficiary may be required to provide the underlying documentation for the transaction to the bank/regulators as necessary to comply with the applicable regulations Exchange control restrictions prevent the free flow of funds out of the country. Please provide-input purpose of payment, mandatory for every transaction
44. Jordanian Dinar (JOD) FX Tenor Supported SPOT
Note Please provide-input purpose of payment, mandatory for every transaction
45. Japanese Yen (JPY) FX Tenor Supported TOD, TOM, SPOT
Note Please provide-input purpose of payment, mandatory for every transaction
46. Kenyan Shilling (KES) FX Tenor Supported TOM, SPOT
Note Purpose of payment is mandatory for every transaction
47. Kyrgyzstani Som (KGS) FX Tenor Supported SPOT
Note Please provide-input purpose of payment, mandatory for every transaction Full Name and Address of the Beneficiary is required Full Name, Address and Account Number of the Ordering/Originating/Remitting party is required
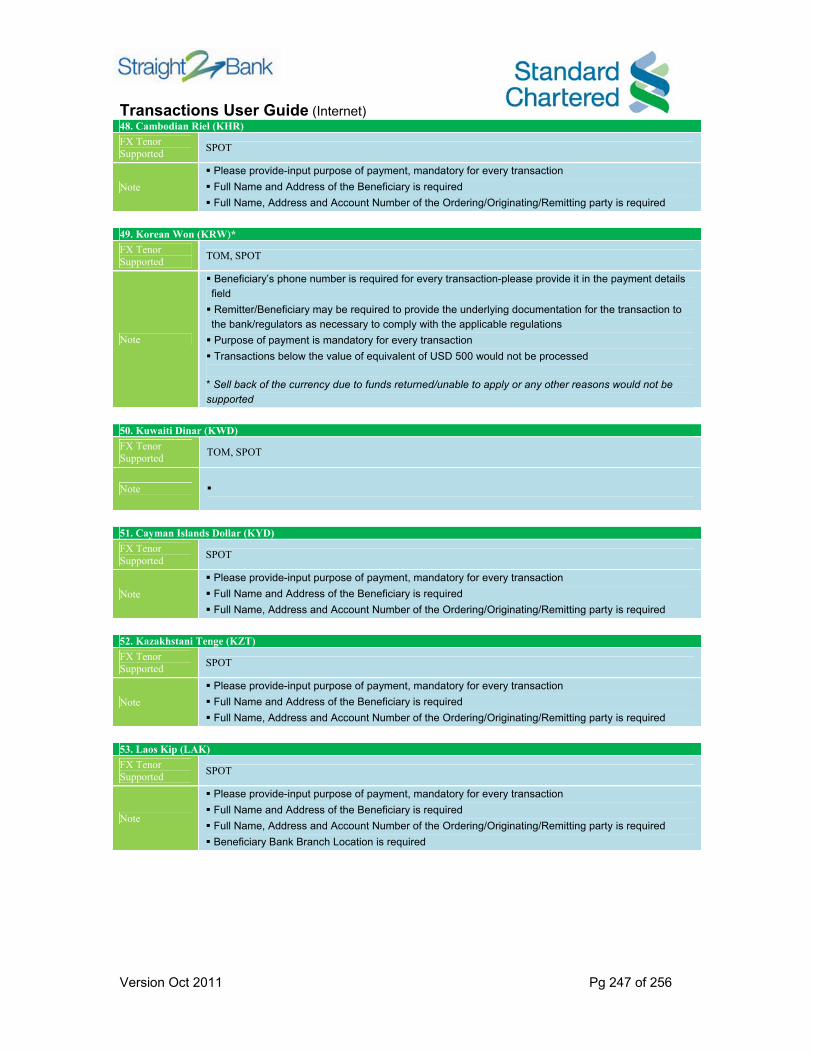
Transactions User Guide (Internet)
Version Oct 2011 Pg 247 of 256
48. Cambodian Riel (KHR) FX Tenor Supported SPOT
Note Please provide-input purpose of payment, mandatory for every transaction Full Name and Address of the Beneficiary is required Full Name, Address and Account Number of the Ordering/Originating/Remitting party is required
49. Korean Won (KRW)* FX Tenor Supported TOM, SPOT
Note
Beneficiary’s phone number is required for every transaction-please provide it in the payment details field Remitter/Beneficiary may be required to provide the underlying documentation for the transaction to the bank/regulators as necessary to comply with the applicable regulations Purpose of payment is mandatory for every transaction Transactions below the value of equivalent of USD 500 would not be processed
* Sell back of the currency due to funds returned/unable to apply or any other reasons would not be supported
50. Kuwaiti Dinar (KWD) FX Tenor Supported TOM, SPOT
Note
51. Cayman Islands Dollar (KYD) FX Tenor Supported SPOT
Note Please provide-input purpose of payment, mandatory for every transaction Full Name and Address of the Beneficiary is required Full Name, Address and Account Number of the Ordering/Originating/Remitting party is required
52. Kazakhstani Tenge (KZT) FX Tenor Supported SPOT
Note Please provide-input purpose of payment, mandatory for every transaction Full Name and Address of the Beneficiary is required Full Name, Address and Account Number of the Ordering/Originating/Remitting party is required
53. Laos Kip (LAK) FX Tenor Supported SPOT
Note
Please provide-input purpose of payment, mandatory for every transaction Full Name and Address of the Beneficiary is required Full Name, Address and Account Number of the Ordering/Originating/Remitting party is required Beneficiary Bank Branch Location is required

Transactions User Guide (Internet)
Version Oct 2011 Pg 248 of 256
54. Sri Lankan Rupee (LKR) FX Tenor Supported SPOT
Note
Remitter/Beneficiary may be required to provide the underlying documentation for the transaction to the bank/regulators as necessary to comply with the applicable regulations Exchange control restrictions prevent free flow of funds out of the country. Consequently return of funds require additional approvals from Central Bank & reporting (handled by onshore Correspondent Bank) Please provide-input purpose of payment, mandatory for every transaction in free text regardless of the value of the payment Checking of documents may be required in country by the beneficiary bank
55. Lesotho Loti (LSL) FX Tenor Supported SPOT
Note Please provide-input purpose of payment, mandatory for every transaction Full Name and Address of the Beneficiary is required Full Name, Address and Account Number of the Ordering/Originating/Remitting party is required
56. Lithuanian litas (LTL) FX Tenor Supported SPOT
Note Please provide-input purpose of payment, mandatory for every transaction Full Name and Address of the Beneficiary is required Full Name, Address and Account Number of the Ordering/Originating/Remitting party is required
57. Latvian Lats (LVL) FX Tenor Supported SPOT
Note Please provide-input purpose of payment, mandatory for every transaction Full Name and Address of the Beneficiary is required Full Name, Address and Account Number of the Ordering/Originating/Remitting party is required
58. Moroccan Dirham (MAD) FX Tenor Supported TOM, SPOT
Note
59. Moldovan Leu (MDL) FX Tenor Supported SPOT
Note
Please provide-input purpose of payment, mandatory for every transaction Full Name and Address of the Beneficiary is required Full Name, Address and Account Number of the Ordering/Originating/Remitting party is required Beneficiary Bank Branch Location is required
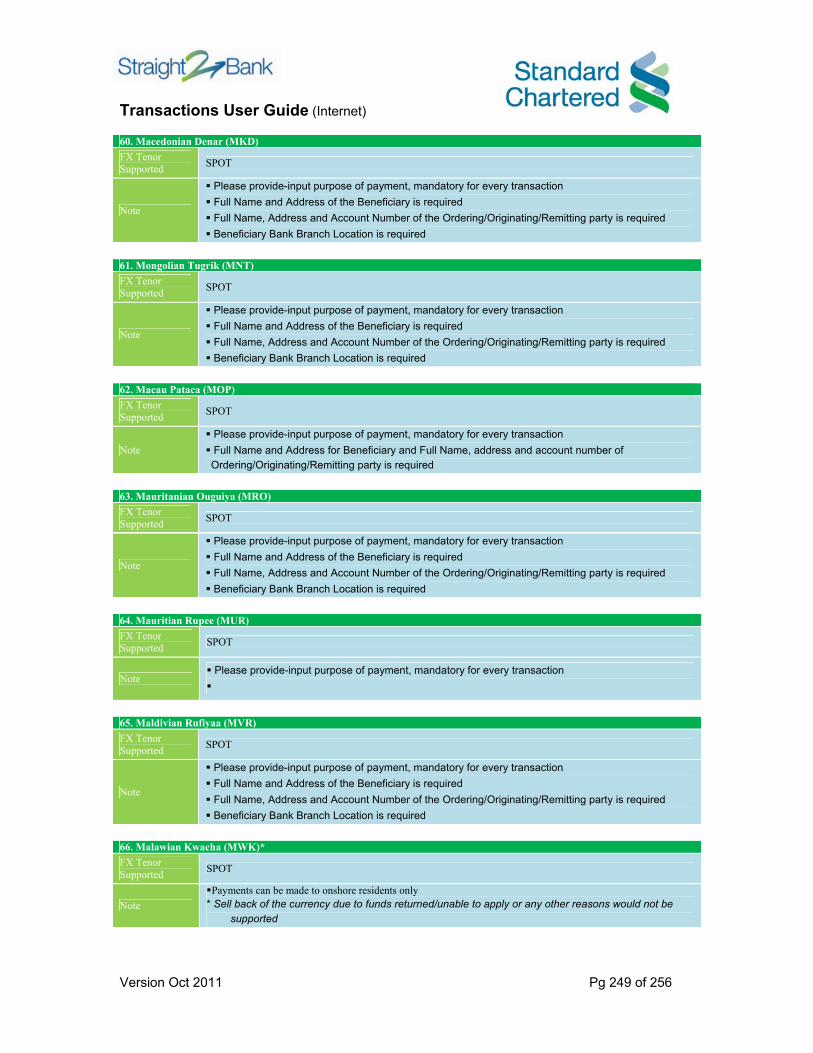
Transactions User Guide (Internet)
Version Oct 2011 Pg 249 of 256
60. Macedonian Denar (MKD) FX Tenor Supported SPOT
Note
Please provide-input purpose of payment, mandatory for every transaction Full Name and Address of the Beneficiary is required Full Name, Address and Account Number of the Ordering/Originating/Remitting party is required Beneficiary Bank Branch Location is required
61. Mongolian Tugrik (MNT) FX Tenor Supported SPOT
Note
Please provide-input purpose of payment, mandatory for every transaction Full Name and Address of the Beneficiary is required Full Name, Address and Account Number of the Ordering/Originating/Remitting party is required Beneficiary Bank Branch Location is required
62. Macau Pataca (MOP) FX Tenor Supported SPOT
Note Please provide-input purpose of payment, mandatory for every transaction Full Name and Address for Beneficiary and Full Name, address and account number of Ordering/Originating/Remitting party is required
63. Mauritanian Ouguiya (MRO) FX Tenor Supported SPOT
Note
Please provide-input purpose of payment, mandatory for every transaction Full Name and Address of the Beneficiary is required Full Name, Address and Account Number of the Ordering/Originating/Remitting party is required Beneficiary Bank Branch Location is required
64. Mauritian Rupee (MUR) FX Tenor Supported SPOT
Note Please provide-input purpose of payment, mandatory for every transaction
65. Maldivian Rufiyaa (MVR) FX Tenor Supported SPOT
Note
Please provide-input purpose of payment, mandatory for every transaction Full Name and Address of the Beneficiary is required Full Name, Address and Account Number of the Ordering/Originating/Remitting party is required Beneficiary Bank Branch Location is required
66. Malawian Kwacha (MWK)* FX Tenor Supported SPOT
Note Payments can be made to onshore residents only
* Sell back of the currency due to funds returned/unable to apply or any other reasons would not be supported
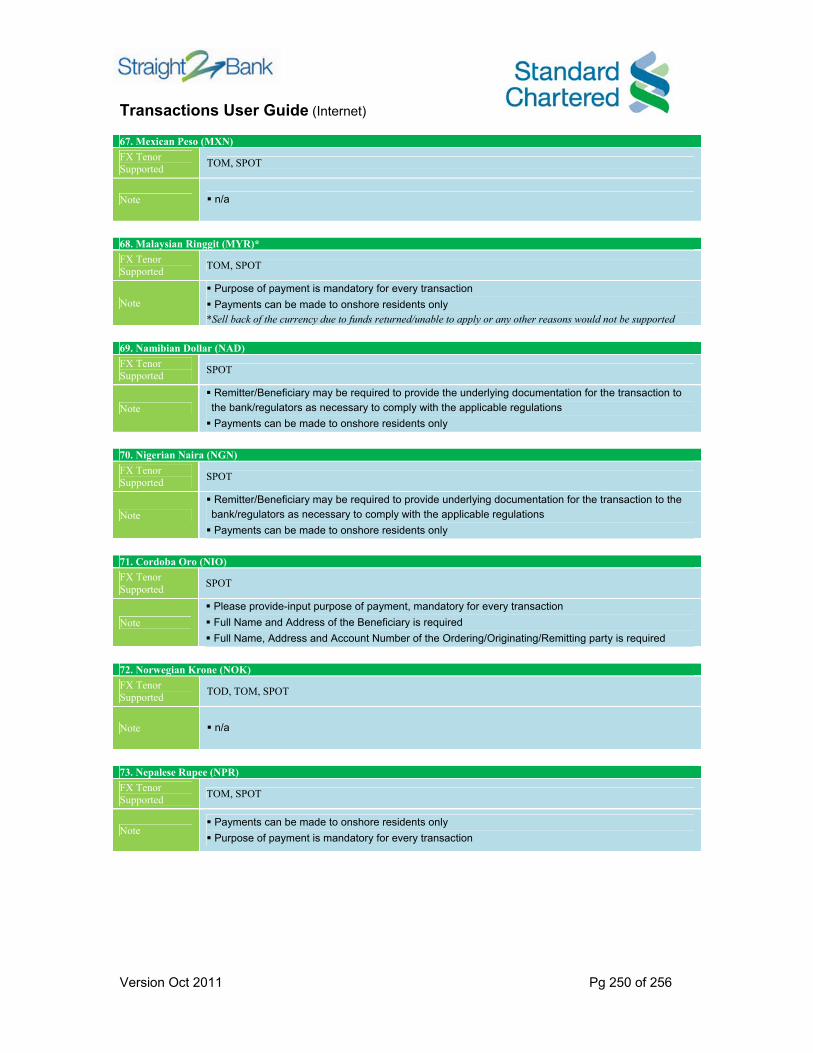
Transactions User Guide (Internet)
Version Oct 2011 Pg 250 of 256
67. Mexican Peso (MXN) FX Tenor Supported TOM, SPOT
Note n/a
68. Malaysian Ringgit (MYR)* FX Tenor Supported TOM, SPOT
Note Purpose of payment is mandatory for every transaction Payments can be made to onshore residents only
*Sell back of the currency due to funds returned/unable to apply or any other reasons would not be supported 69. Namibian Dollar (NAD) FX Tenor Supported SPOT
Note Remitter/Beneficiary may be required to provide the underlying documentation for the transaction to the bank/regulators as necessary to comply with the applicable regulations Payments can be made to onshore residents only
70. Nigerian Naira (NGN) FX Tenor Supported SPOT
Note Remitter/Beneficiary may be required to provide underlying documentation for the transaction to the bank/regulators as necessary to comply with the applicable regulations Payments can be made to onshore residents only
71. Cordoba Oro (NIO) FX Tenor Supported SPOT
Note Please provide-input purpose of payment, mandatory for every transaction Full Name and Address of the Beneficiary is required Full Name, Address and Account Number of the Ordering/Originating/Remitting party is required
72. Norwegian Krone (NOK) FX Tenor Supported TOD, TOM, SPOT
Note n/a
73. Nepalese Rupee (NPR) FX Tenor Supported TOM, SPOT
Note Payments can be made to onshore residents only Purpose of payment is mandatory for every transaction

Transactions User Guide (Internet)
Version Oct 2011 Pg 251 of 256
74. New Zealand Dollar (NZD) FX Tenor Supported TOD, TOM, SPOT
Note
75. Omani Rial (OMR) FX Tenor Supported TOM, SPOT
Note
76. Peruvian Nuevo Sol (PEN) FX Tenor Supported SPOT
Note
Please provide-input purpose of payment, mandatory for every transaction Full Name, Address, Telephone Number and 21 digit Account Number for Beneficiary is required Full Name, Address and Account Number of the Ordering/Originating/Remitting party is required Beneficiary Bank Branch Location is required
77. Pilipino Peso (PHP) FX Tenor Supported SPOT
Note
Remitter/Beneficiary may be required to provide the underlying documentation for the transaction to the bank/regulators as necessary to comply with the applicable regulations Payment can only be made to Onshore residents Exchange control restrictions prevent free flow of funds out of the country. Please provide-input purpose of payment, mandatory for every transaction Please include the Telephone number and Contact person at the Beneficiary and the Name & Address Details of the ordering customer in the payment instruction
78. Pakistani Rupee (PKR) FX Tenor Supported SPOT
Note
Remitter/Beneficiary may be required to provide the underlying documentation for the transaction to the bank/regulators as necessary to comply with the applicable regulations Payment can only be made to Onshore residents Exchange control restrictions prevent free flow of funds out of the country. Transfers typically take anywhere between 2-3 days depending on beneficiary location
79. Polish Zloty (PLN) FX Tenor Supported SPOT
Note The International Bank Account Number (IBAN) is required for all payments.

Transactions User Guide (Internet)
Version Oct 2011 Pg 252 of 256
80. Paraguayan Guarani (PYG) FX Tenor Supported SPOT
Note
Please provide-input purpose of payment, mandatory for every transaction Full Name, Address and Account Number for Beneficiary is required Full Name, Address and Account Number of the Ordering/Originating/Remitting party is required Beneficiary Bank Branch Location is required
81. Qatari Rial (QAR) FX Tenor Supported TOM, SPOT
Note
82. Saudi Arabian Riyal (SAR) FX Tenor Supported TOD, TOM, SPOT
Note IBAN (24 Alphanumeric characters) are required for all payments instructions in SAR currency to beneficiaries located in the Kingdom of Saudi Arabia.
83. Seychellois Rupee (SCR) FX Tenor Supported SPOT
Note
84. Swedish Kroner (SEK) FX Tenor Supported TOD, TOM, SPOT
Note
85. Singapore Dollar (SGD) FX Tenor Supported TOD, TOM, SPOT
Note
86. Sierra Leone Leone (SLL)* FX Tenor Supported SPOT
Note Payments can be made to onshore residents only
* Sell back of the currency due to funds returned/unable to apply or any other reasons would not be supported
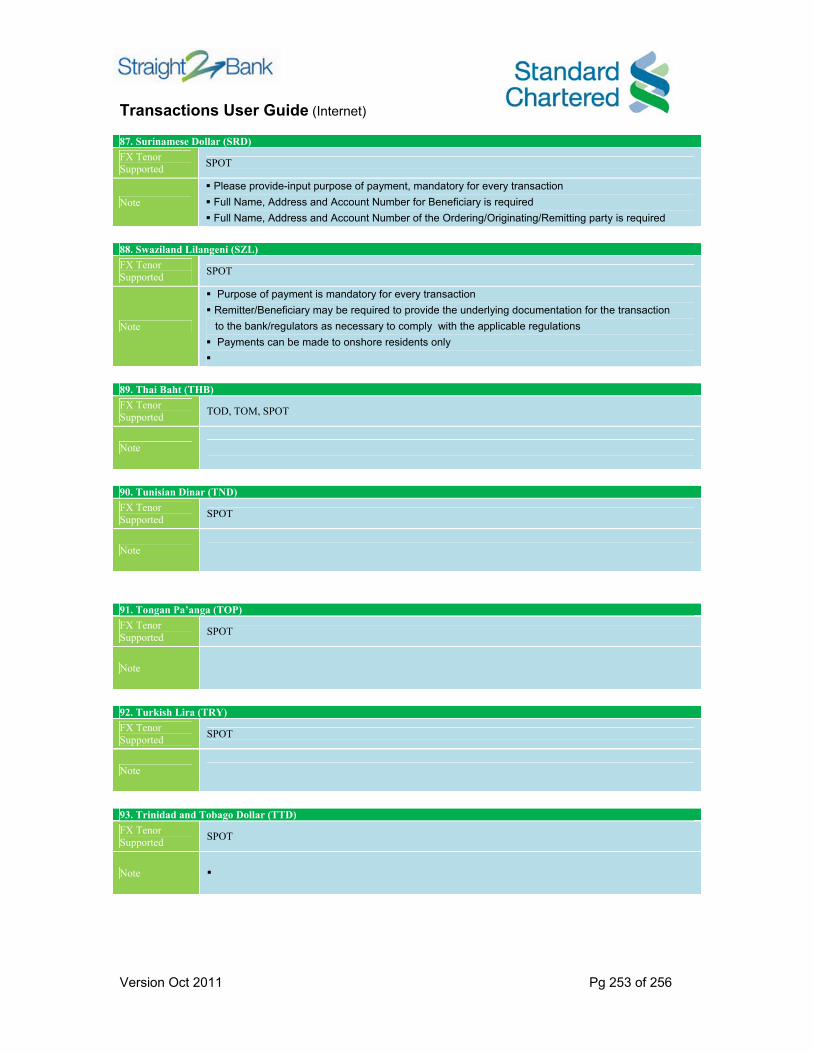
Transactions User Guide (Internet)
Version Oct 2011 Pg 253 of 256
87. Surinamese Dollar (SRD) FX Tenor Supported SPOT
Note Please provide-input purpose of payment, mandatory for every transaction Full Name, Address and Account Number for Beneficiary is required Full Name, Address and Account Number of the Ordering/Originating/Remitting party is required
88. Swaziland Lilangeni (SZL) FX Tenor Supported SPOT
Note
Purpose of payment is mandatory for every transaction Remitter/Beneficiary may be required to provide the underlying documentation for the transaction
to the bank/regulators as necessary to comply with the applicable regulations Payments can be made to onshore residents only
89. Thai Baht (THB) FX Tenor Supported TOD, TOM, SPOT
Note
90. Tunisian Dinar (TND) FX Tenor Supported SPOT
Note
91. Tongan Pa’anga (TOP) FX Tenor Supported SPOT
Note
92. Turkish Lira (TRY) FX Tenor Supported SPOT
Note
93. Trinidad and Tobago Dollar (TTD) FX Tenor Supported SPOT
Note
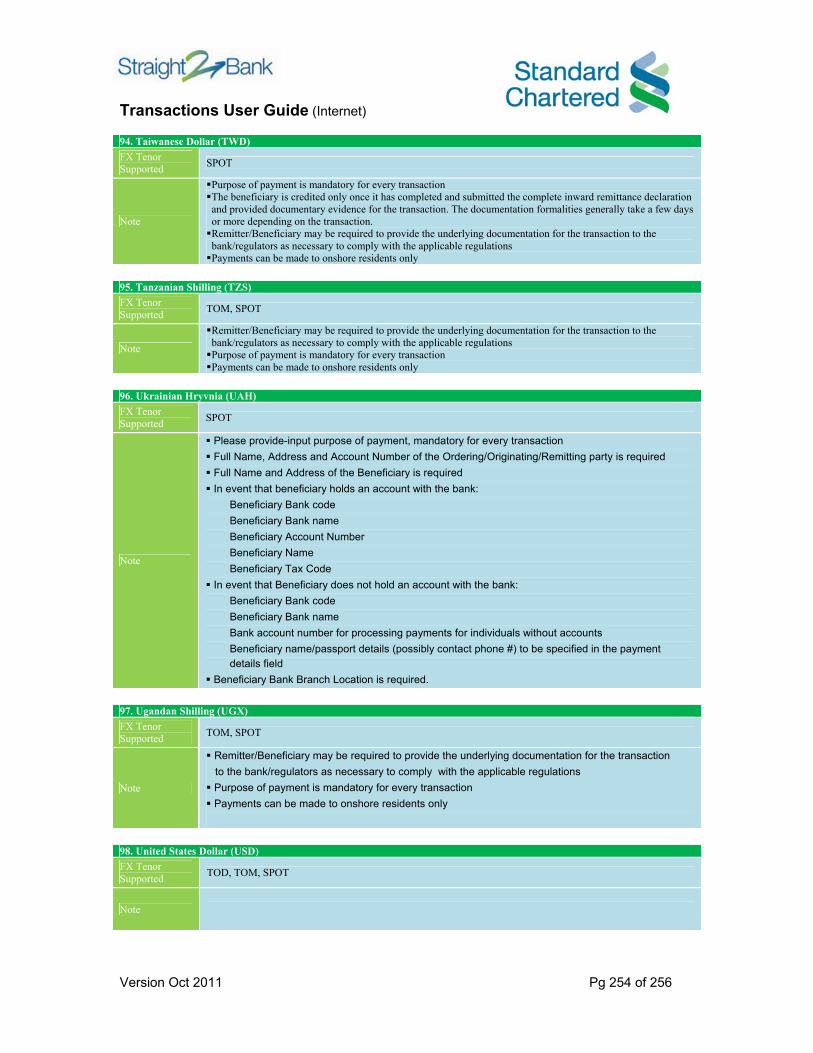
Transactions User Guide (Internet)
Version Oct 2011 Pg 254 of 256
94. Taiwanese Dollar (TWD) FX Tenor Supported SPOT
Note
Purpose of payment is mandatory for every transaction The beneficiary is credited only once it has completed and submitted the complete inward remittance declaration and provided documentary evidence for the transaction. The documentation formalities generally take a few days or more depending on the transaction. Remitter/Beneficiary may be required to provide the underlying documentation for the transaction to the bank/regulators as necessary to comply with the applicable regulations Payments can be made to onshore residents only
95. Tanzanian Shilling (TZS) FX Tenor Supported TOM, SPOT
Note
Remitter/Beneficiary may be required to provide the underlying documentation for the transaction to the bank/regulators as necessary to comply with the applicable regulations Purpose of payment is mandatory for every transaction Payments can be made to onshore residents only
96. Ukrainian Hryvnia (UAH) FX Tenor Supported SPOT
Note
Please provide-input purpose of payment, mandatory for every transaction Full Name, Address and Account Number of the Ordering/Originating/Remitting party is required Full Name and Address of the Beneficiary is required In event that beneficiary holds an account with the bank:
Beneficiary Bank code Beneficiary Bank name Beneficiary Account Number Beneficiary Name Beneficiary Tax Code
In event that Beneficiary does not hold an account with the bank: Beneficiary Bank code Beneficiary Bank name Bank account number for processing payments for individuals without accounts Beneficiary name/passport details (possibly contact phone #) to be specified in the payment details field
Beneficiary Bank Branch Location is required.
97. Ugandan Shilling (UGX) FX Tenor Supported TOM, SPOT
Note
Remitter/Beneficiary may be required to provide the underlying documentation for the transaction to the bank/regulators as necessary to comply with the applicable regulations Purpose of payment is mandatory for every transaction Payments can be made to onshore residents only
98. United States Dollar (USD) FX Tenor Supported TOD, TOM, SPOT
Note

Transactions User Guide (Internet)
Version Oct 2011 Pg 255 of 256
99. Uruguayan Peso (UYU) FX Tenor Supported SPOT
Note Please provide-input purpose of payment, mandatory for every transaction Full Name and Address of the Beneficiary is required Full Name, Address and Account Number of the Ordering/Originating/Remitting party is required
100. Uzbekistani Som (UZS) FX Tenor Supported SPOT
Note
Please provide-input purpose of payment, mandatory for every transaction Full Name and Address of the Beneficiary is required Full Name, Address and Account Number of the Ordering/Originating/Remitting party is required Beneficiary Bank Branch Location is required
101. Vietnamese Dong (VND)* FX Tenor Supported TOM, SPOT
Note
Remitter/Beneficiary may be required to provide the underlying documentation for the transaction to the bank/regulators as necessary to comply with the applicable regulations Purpose of payment is mandatory for every transaction Payments can be made to onshore residents only
* Sell back of the currency due to funds returned/unable to apply or any other reasons would not be supported
102. Vanuatu Vatu (VUV) FX Tenor Supported SPOT
Note Please provide-input purpose of payment, mandatory for every transaction Full Name and Address of the Beneficiary is required Full Name, Address and Account Number of the Ordering/Originating/Remitting party is required
103. Communauté Financière Africaine BEAC, Francs (XAF) FX Tenor Supported SPOT
Note
Remitter/Beneficiary may be required to provide the underlying documentation for the transaction to the bank/regulators as necessary to comply with the applicable regulations Return of funds can be complicated and time-consuming (typically weeks or more for the funds to be returned) and require to submit relevant documentation Payments exceeding 5 Million XAF (FCFA) would be routed via a local authorized intermediary bank. Payments can be made to onshore residents only
104. Organization of East Caribbean States, Dollar (XCD) FX Tenor Supported TOM, SPOT
Note
The originator/payor may be required to provide source of funds for the XCD transaction in case requested by the bank/regulator in order to comply with the necessary regulations. For payments exceeding XCD 250,000 approval from the central bank would be necessary Payments can be made to onshore residents only

Transactions User Guide (Internet)
Version Oct 2011 Pg 256 of 256
105. Communauté Financière Africaine BCEAO, Francs (XOF) FX Tenor Supported SPOT
Note
Remitter/Beneficiary may be required to provide underlying documentation for the transaction to the bank/regulators as necessary to comply with the applicable regulations The transaction may require prior approval from ministry of finance in the destination country based on the nature of the payment Payments can be made to onshore residents only
106. Comptoirs Français du Pacifique, Franc (XPF) FX Tenor Supported TOM, SPOT
Note
Remitter/Beneficiary may be required to provide underlying documentation for the transaction to the bank/regulators as necessary to comply with the applicable regulations The transaction may require prior approval from ministry of finance in the destination country based on the nature of the payment Payments can be made to onshore residents only
107. Yemeni Rial (YER) FX Tenor Supported SPOT
Note
Please provide-input purpose of payment, mandatory for every transaction Full Name and Address of the Beneficiary is required Full Name, Address and Account Number of the Ordering/Originating/Remitting party is required Passport Number in case Beneficiary is an individual
108. South African Rand (ZAR) FX Tenor Supported TOD, TOM, SPOT
Note Please provide-input purpose of payment, mandatory for every transaction.
109. Zambian Kwacha (ZMK) FX Tenor Supported TOM, SPOT
Note Payments can be made to onshore residents only