Embed Size (px)
Citation preview

Transaction Insight Portal
Uploading Claim Attachments
November 13, 2014
Transaction Insight Portal 275 Attachment 2
TABLE OF CONTENTS Section 1: Introduction …………………………………………….. …… Pages 3 – 4 Section 2: Log In and Book Marking ………………………………..… Pages 5 – 7 Section 3: Preparing your attachment for uploading…………………. Pages 8 – 9 Section 4: How to create a unique PWK number ……………………. Pages 10 – 12 Section 5: The two applications to be used to link your documents… Pages 13 – 15 Section 6: Where to Enter the PWK on the Online Claim Application. Pages 16 - 19 Section 7: How to sign on ………………………………………………. Pages 20 - 23 Section 8: Entering Provider, Patient and Attachment information … Pages 224 – 34 Section 9: Upload Attachment files ……………………………………. Pages 35 – 42 Section 10: How to Create a folder ……………………………………… Pagers 43 - 45 Section 11: Frequently Asked Questions ...…………………………….. Pages 46 - 447 Section 12: Contacts …………………………………..………………… Pages 48 – 49

Transaction Insight Portal 275 Attachment 3
Transaction Insight Portal
275 Attachments
Section 1:
Introduction
Transaction Insight Portal 275 Attachment 4
Overview This document is intended as a reference for those responsible for uploading attachment files to support Fee for Service claims to AHCCCS Division of Fee for Service Management (DFSM).
Transaction Insight Portal 275 Attachment 5
Transaction Insight Portal
275 Attachments
Section 2:
Log In and Bookmark

Transaction Insight Portal 275 Attachment 6
Book marking Transaction Insight
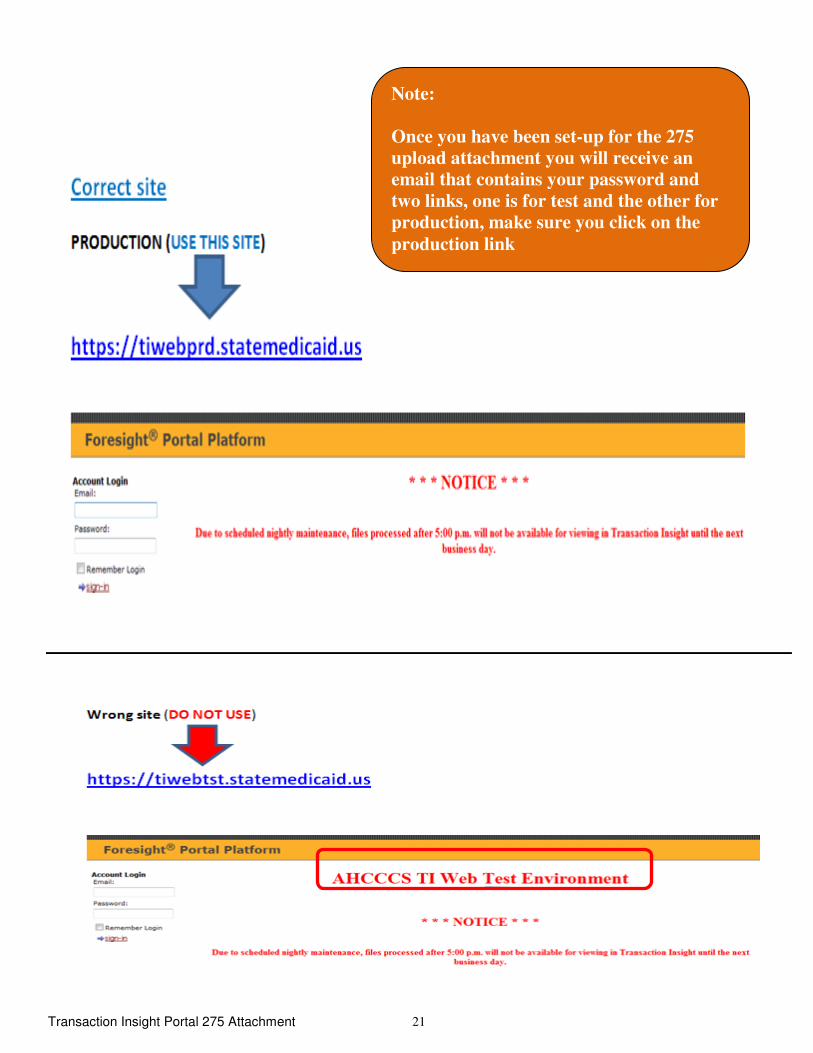
Go to the URL for the AHCCCS Transaction Insight Portal. Test and
Production have different links, so verify you are in the correct place.
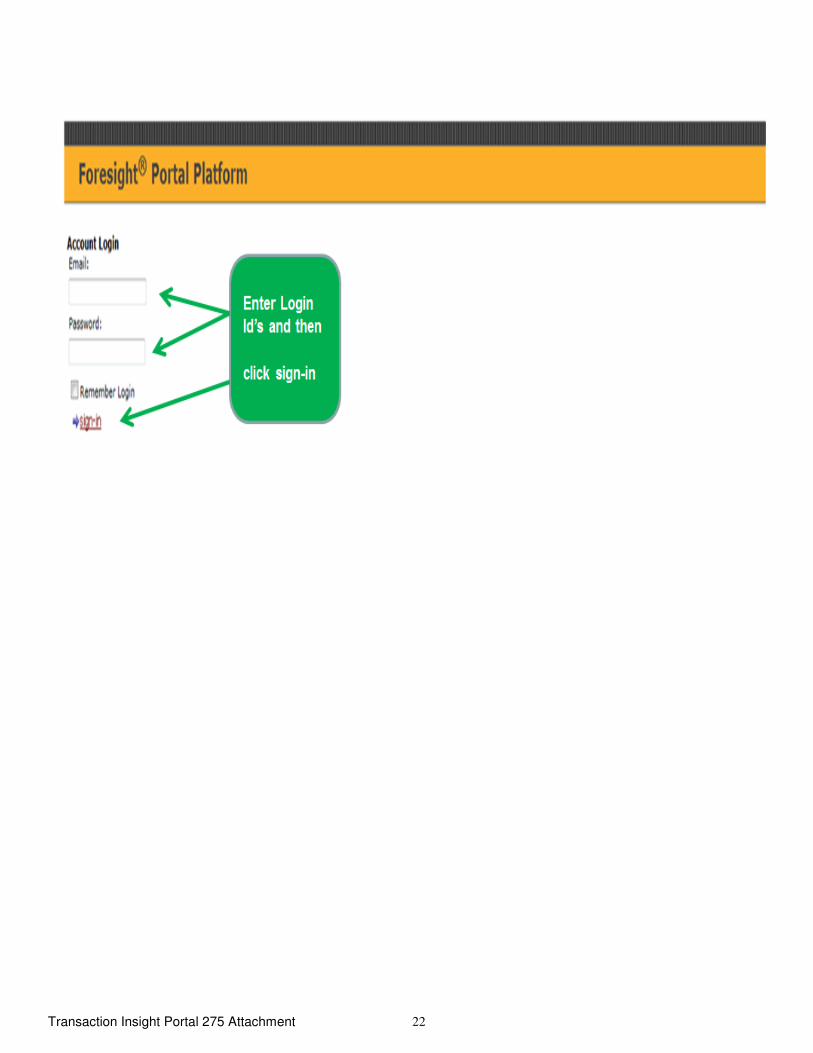
Click on Sign-In
Enter your email address as
your user name
Enter your password.
Click on Favorites Click on add to Favorites
Click the ADD
button
Transaction Insight Portal 275 Attachment 7
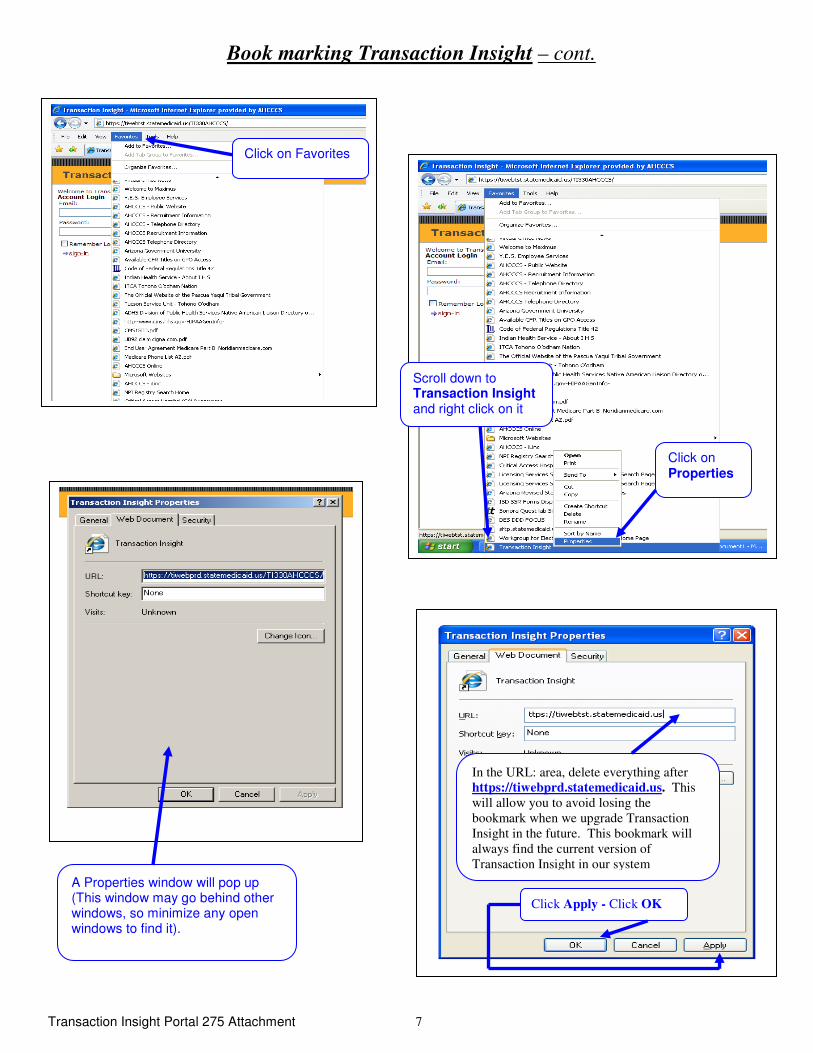
Book marking Transaction Insight – cont.
Click on Favorites
Scroll down to Transaction Insight and right click on it
Click on Properties
A Properties window will pop up (This window may go behind other windows, so minimize any open windows to find it).
In the URL: area, delete everything after
https://tiwebprd.statemedicaid.us. This
will allow you to avoid losing the
bookmark when we upgrade Transaction
Insight in the future. This bookmark will
always find the current version of
Transaction Insight in our system
Click Apply - Click OK
Transaction Insight Portal 275 Attachment 8
Transaction Insight Portal 275 Attachments
Section 3:
Preparing Your Attachment for Uploading
Transaction Insight Portal 275 Attachment 9
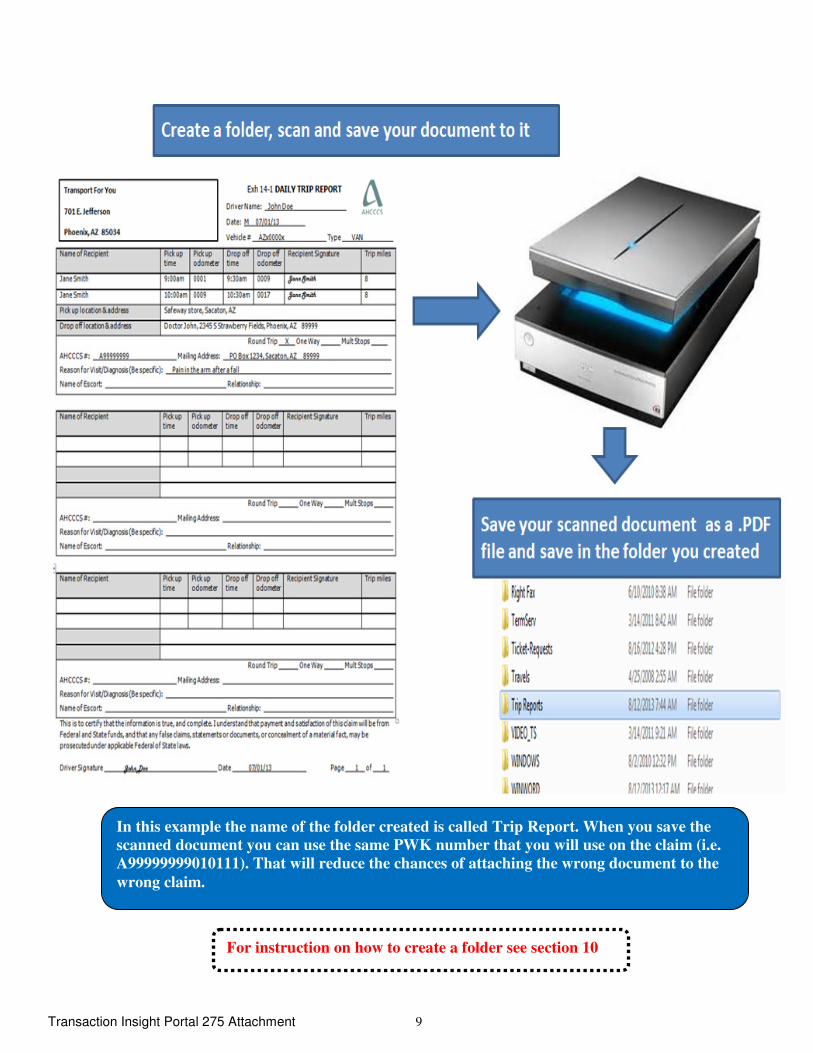
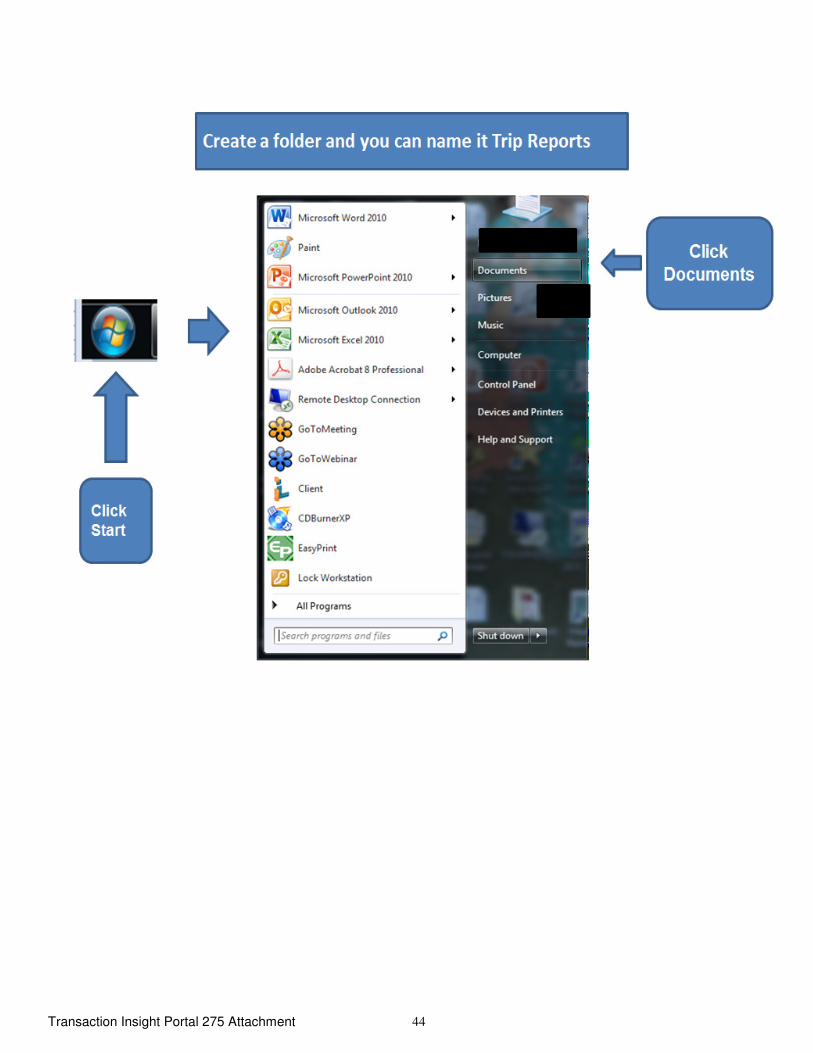
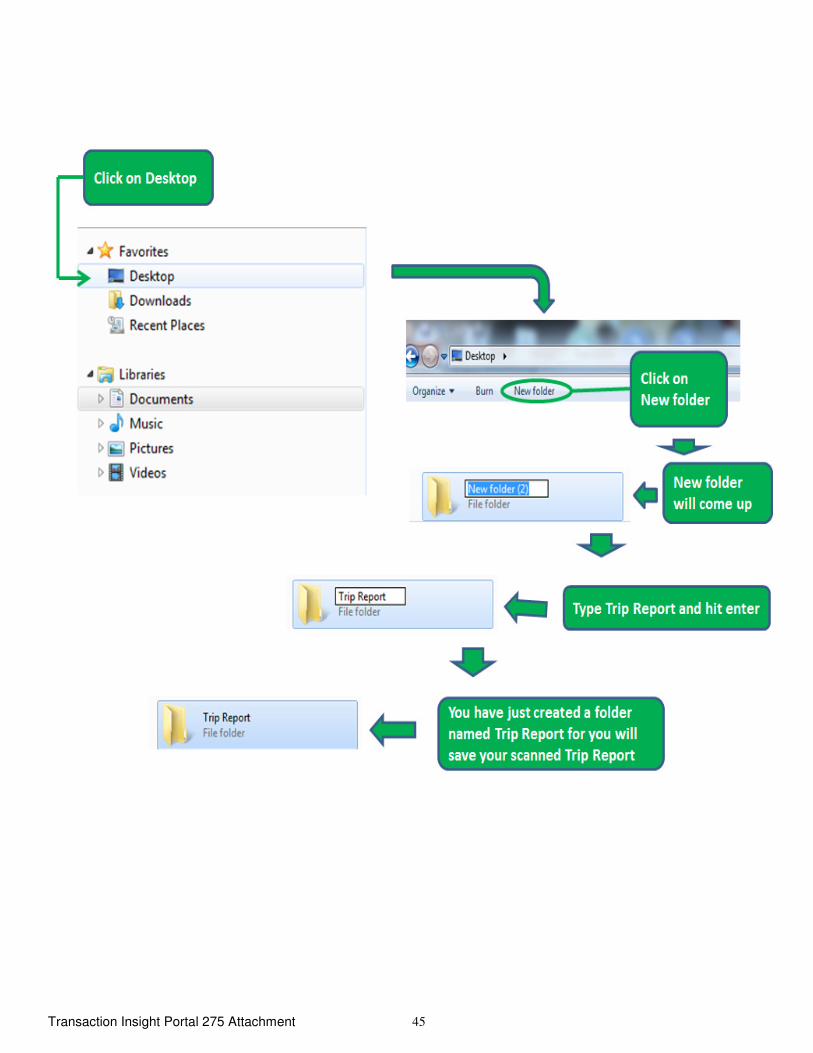
In this example the name of the folder created is called Trip Report. When you save the
scanned document you can use the same PWK number that you will use on the claim (i.e.
A99999999010111). That will reduce the chances of attaching the wrong document to the
wrong claim.
For instruction on how to create a folder see section 10
Transaction Insight Portal 275 Attachment 10
Transaction Insight Portal 275 Attachments
Section 4:
How to Create a Unique PWK Number (This will be used to attach the document to the Claim)
Transaction Insight Portal 275 Attachment 11
The PWK number is use when submitting an electronic claim and its’ attachment at
the same time. This is an automatic process when the PWK numbers finds its match it
will link automatically and the claim will drop for processing
The PWK number is a unique number that you will create for each claim and its’
attachment this is what the system will use to link the attachment to the correct claim.
The PWK number on the claim must match exactly with the one entered on the
attachment (275 attachment upload) failure to do so will result in document not linking
and the claim will denied.
If a claims requires documentation and a PWK number is entered on the electronic
claim (see section 12) the system will hold the claim for 15 days to allow you to submit
the attachment at a later day.
If after 15 days if the attachment hasn’t been submitted or the link failed the claim will
denied.
At this point you can still (re)submit the attachment but instead of using a PWK you
will use the Claims Reference Number (CRN) to upload the attachment. Do not need to
re-submit the claim.
Keep in mind that by using the CRN it makes the linking process a manual process
which can take 2 to 4 weeks for the claim to be re-processed.
Transaction Insight Portal 275 Attachment 12
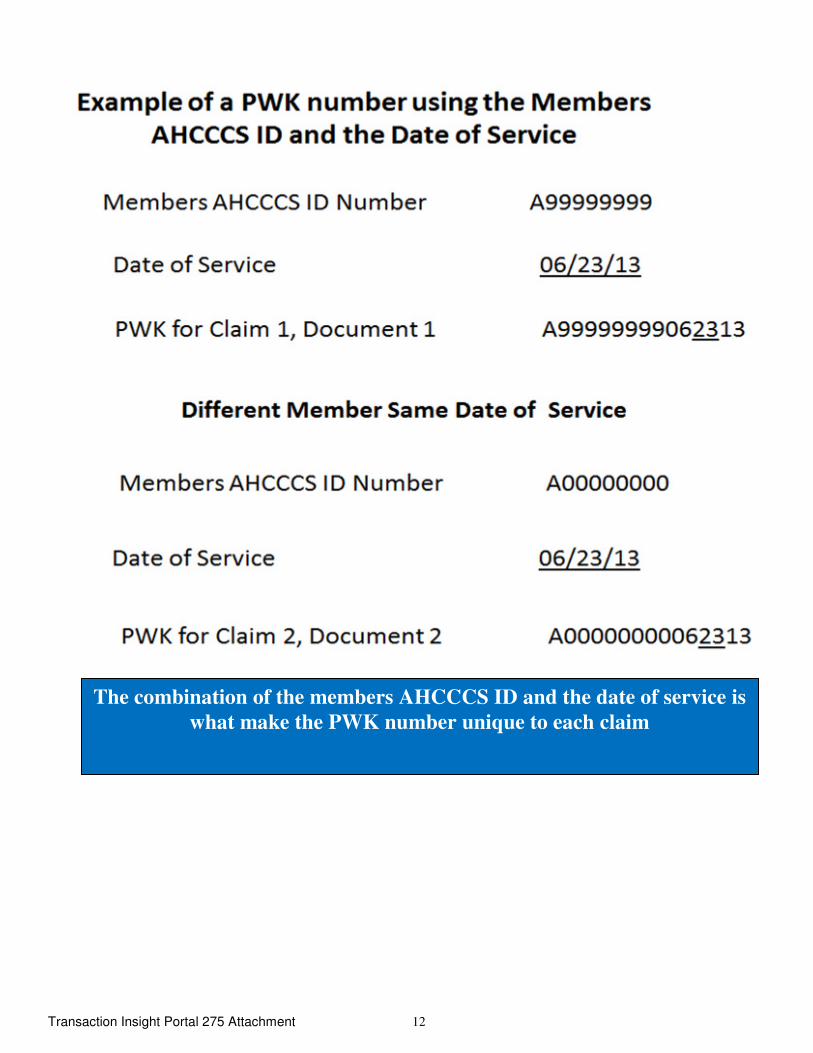
The combination of the members AHCCCS ID and the date of service is
what make the PWK number unique to each claim
Transaction Insight Portal 275 Attachment 13
Transaction Insight Portal 275 Attachments
Section 5:
Application’s for Uploading and Submitting Attachment and Claim
Transaction Insight Portal 275 Attachment 14
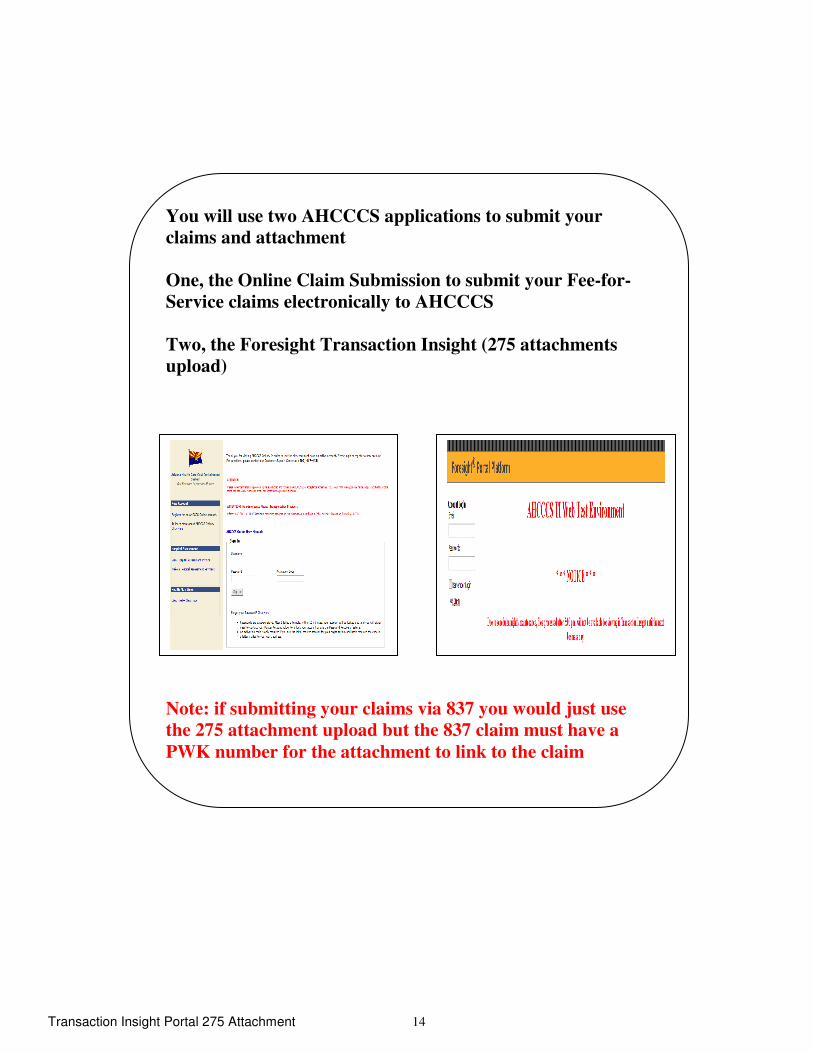
You will use two AHCCCS applications to submit your
claims and attachment
One, the Online Claim Submission to submit your Fee-for-
Service claims electronically to AHCCCS
Two, the Foresight Transaction Insight (275 attachments
upload)
Note: if submitting your claims via 837 you would just use
the 275 attachment upload but the 837 claim must have a
PWK number for the attachment to link to the claim
Transaction Insight Portal 275 Attachment 15
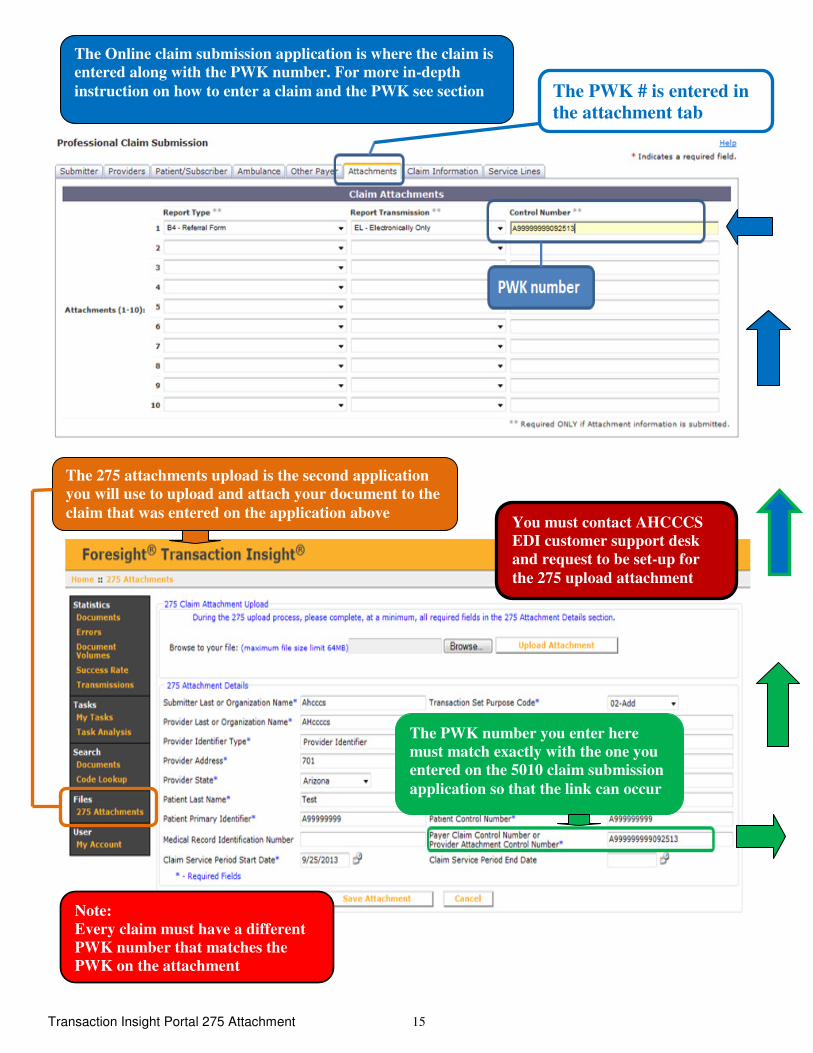
The Online claim submission application is where the claim is
entered along with the PWK number. For more in-depth
instruction on how to enter a claim and the PWK see section The PWK # is entered in
the attachment tab
The 275 attachments upload is the second application
you will use to upload and attach your document to the
claim that was entered on the application above You must contact AHCCCS
EDI customer support desk
and request to be set-up for
the 275 upload attachment
The PWK number you enter here
must match exactly with the one you
entered on the 5010 claim submission
application so that the link can occur
Note:
Every claim must have a different
PWK number that matches the
PWK on the attachment
Transaction Insight Portal 275 Attachment 16
Transaction Insight Portal 275 Attachments
Section 6:
Where to Enter the PWK on the Online Claim Submission
Application
Transaction Insight Portal 275 Attachment 17
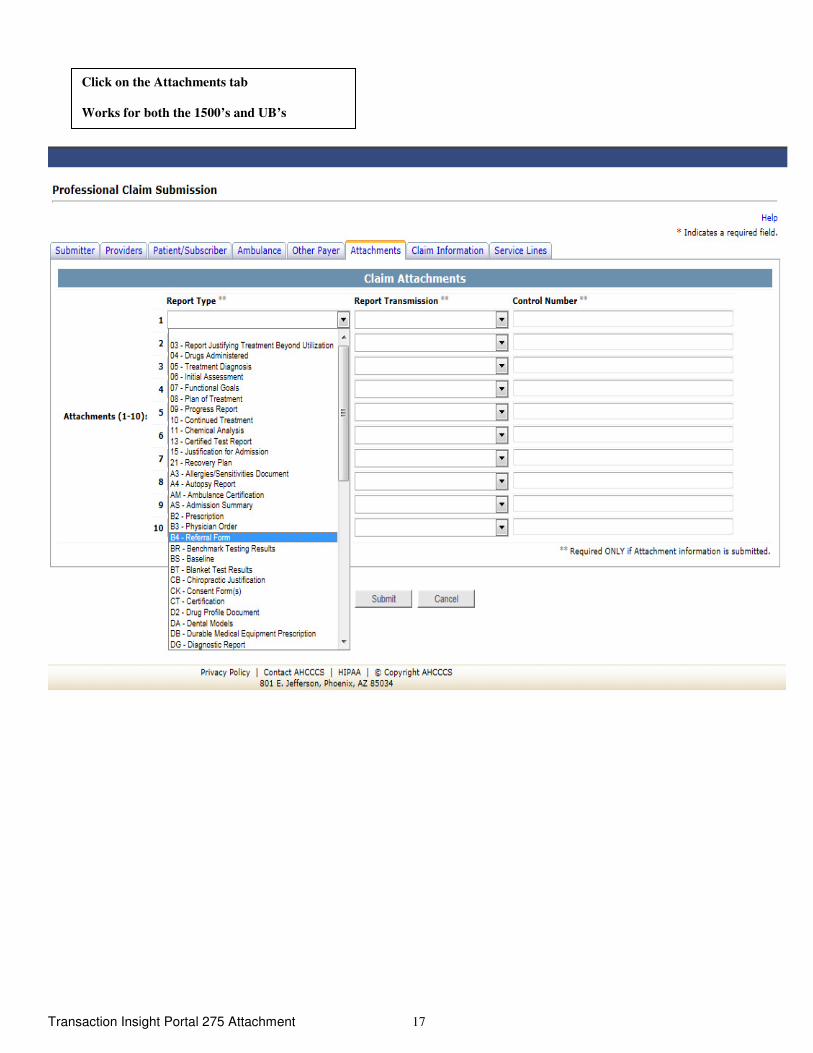
Click on the Attachments tab
Works for both the 1500’s and UB’s
Transaction Insight Portal 275 Attachment 18
Transaction Insight Portal 275 Attachment 19
Transaction Insight Portal 275 Attachment 20
Transaction Insight Portal 275 Attachments
Section 7:
How to Sign On
Transaction Insight Portal 275 Attachment 21
Note:
Once you have been set-up for the 275
upload attachment you will receive an
email that contains your password and
two links, one is for test and the other for
production, make sure you click on the
production link
Transaction Insight Portal 275 Attachment 22
Transaction Insight Portal 275 Attachment 23
Transaction Insight Portal 275 Attachment 24
Transaction Insight Portal 275 Attachments
Section 8:
Entering Provider, Patient and Attachment Information

Transaction Insight Portal 275 Attachment 25
Transaction Insight Portal 275 Attachment 26
Transaction Insight Portal 275 Attachment 27
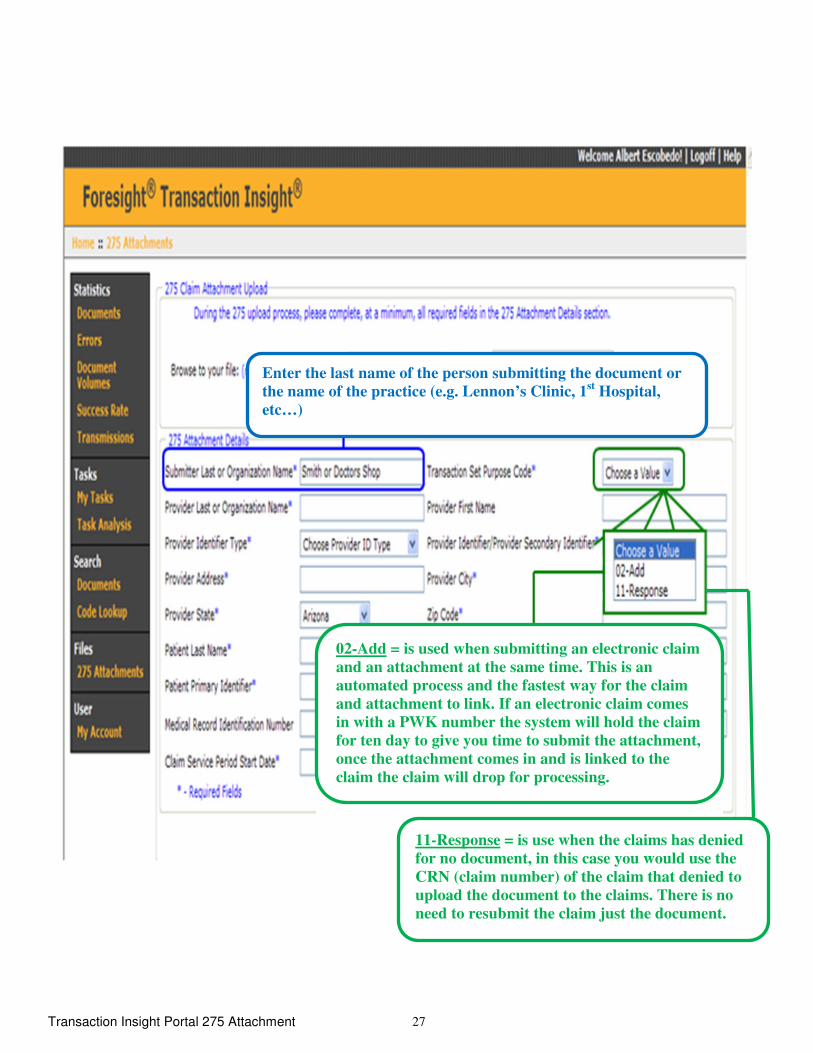
02-Add = is used when submitting an electronic claim
and an attachment at the same time. This is an
automated process and the fastest way for the claim
and attachment to link. If an electronic claim comes
in with a PWK number the system will hold the claim
for ten day to give you time to submit the attachment,
once the attachment comes in and is linked to the
claim the claim will drop for processing.
11-Response = is use when the claims has denied
for no document, in this case you would use the
CRN (claim number) of the claim that denied to
upload the document to the claims. There is no
need to resubmit the claim just the document.
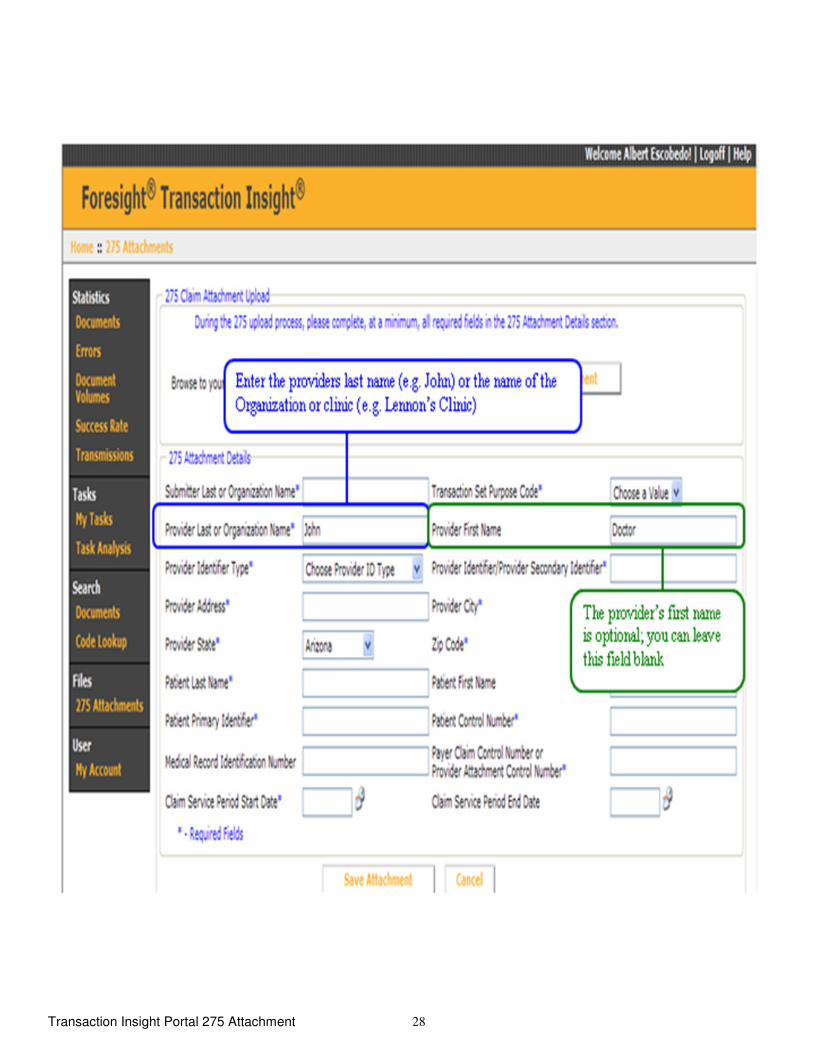
Enter the last name of the person submitting the document or
the name of the practice (e.g. Lennon’s Clinic, 1st Hospital,
etc…)
Transaction Insight Portal 275 Attachment 28
Transaction Insight Portal 275 Attachment 29
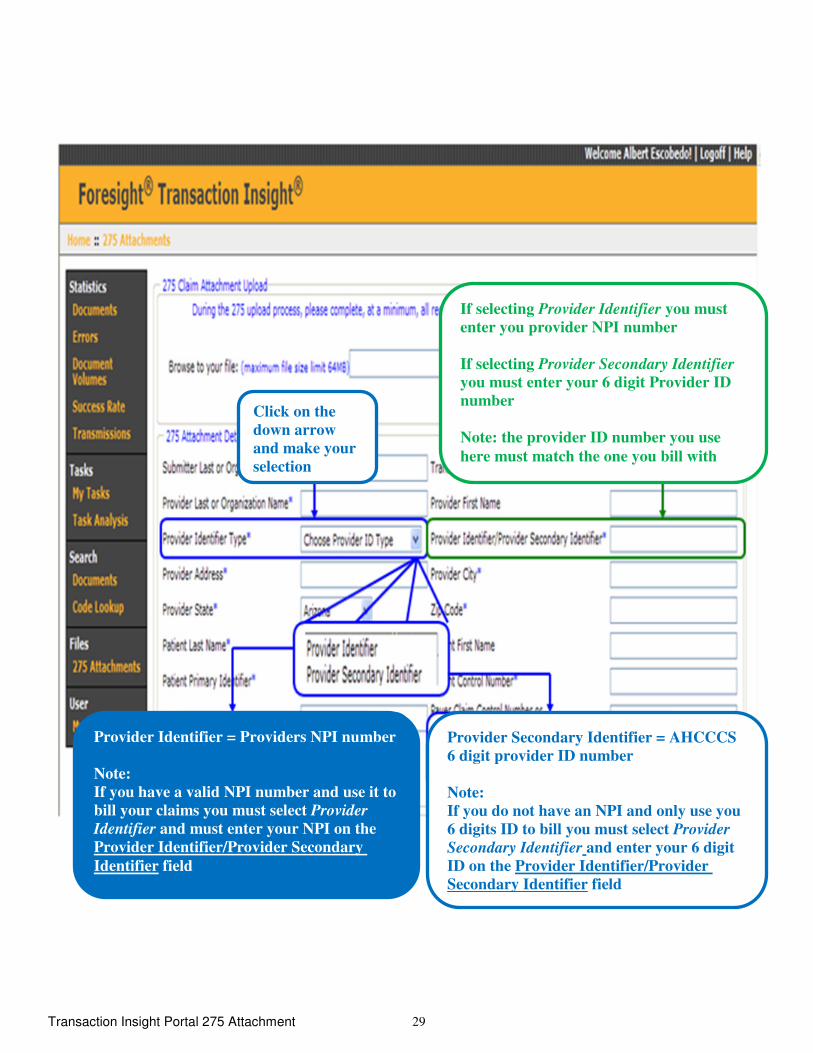
Provider Identifier = Providers NPI number
Note:
If you have a valid NPI number and use it to
bill your claims you must select Provider
Identifier and must enter your NPI on the
Provider Identifier/Provider Secondary
Identifier field
Provider Secondary Identifier = AHCCCS
6 digit provider ID number
Note:
If you do not have an NPI and only use you
6 digits ID to bill you must select Provider
Secondary Identifier and enter your 6 digit
ID on the Provider Identifier/Provider
Secondary Identifier field
Click on the
down arrow
and make your
selection
If selecting Provider Identifier you must
enter you provider NPI number
If selecting Provider Secondary Identifier
you must enter your 6 digit Provider ID
number
Note: the provider ID number you use
here must match the one you bill with
Transaction Insight Portal 275 Attachment 30
Transaction Insight Portal 275 Attachment 31
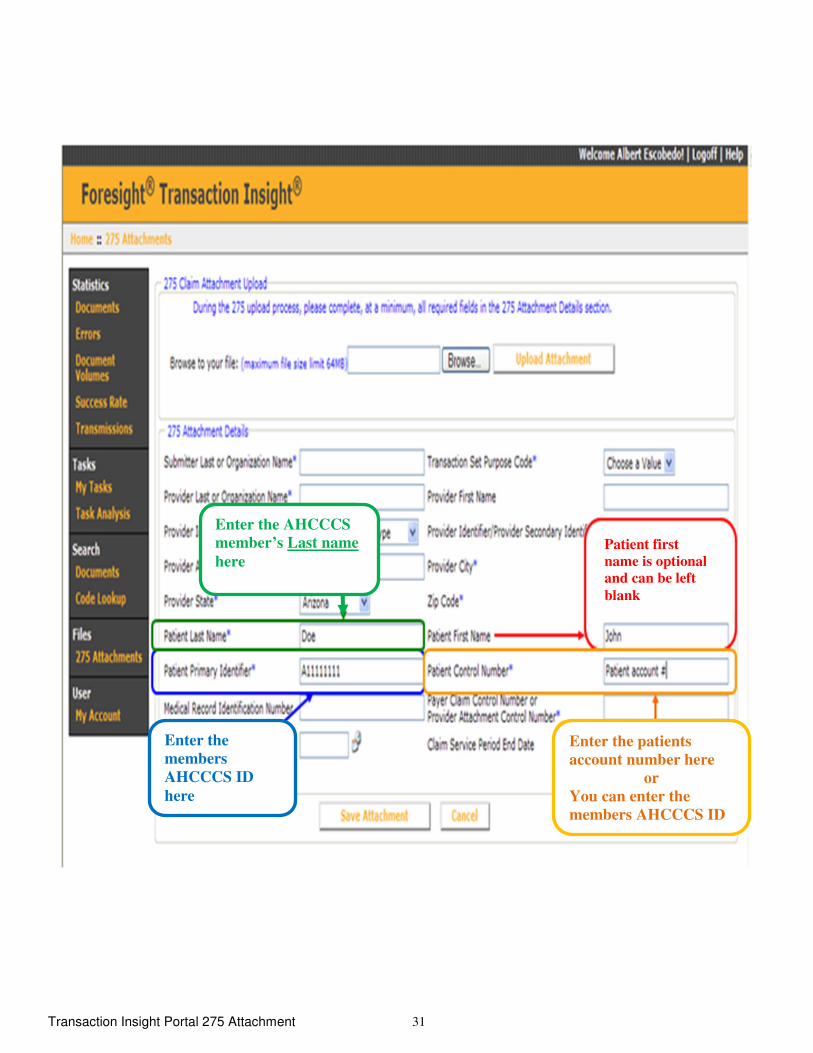
Enter the patients
account number here
or
You can enter the
members AHCCCS ID
Enter the
members
AHCCCS ID
here
Enter the AHCCCS
member’s Last name
here Patient first
name is optional
and can be left
blank
Transaction Insight Portal 275 Attachment 32
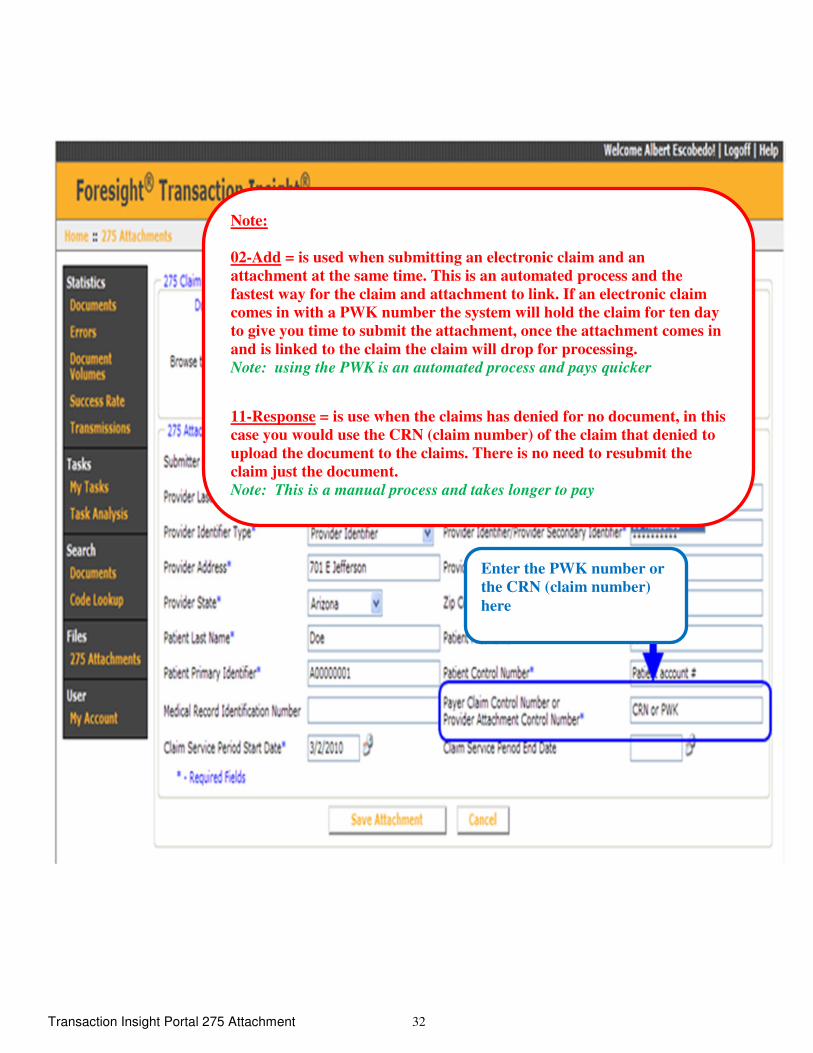
Note:
02-Add = is used when submitting an electronic claim and an
attachment at the same time. This is an automated process and the
fastest way for the claim and attachment to link. If an electronic claim
comes in with a PWK number the system will hold the claim for ten day
to give you time to submit the attachment, once the attachment comes in
and is linked to the claim the claim will drop for processing.
Note: using the PWK is an automated process and pays quicker
11-Response = is use when the claims has denied for no document, in this
case you would use the CRN (claim number) of the claim that denied to
upload the document to the claims. There is no need to resubmit the
claim just the document.
Note: This is a manual process and takes longer to pay
Enter the PWK number or
the CRN (claim number)
here
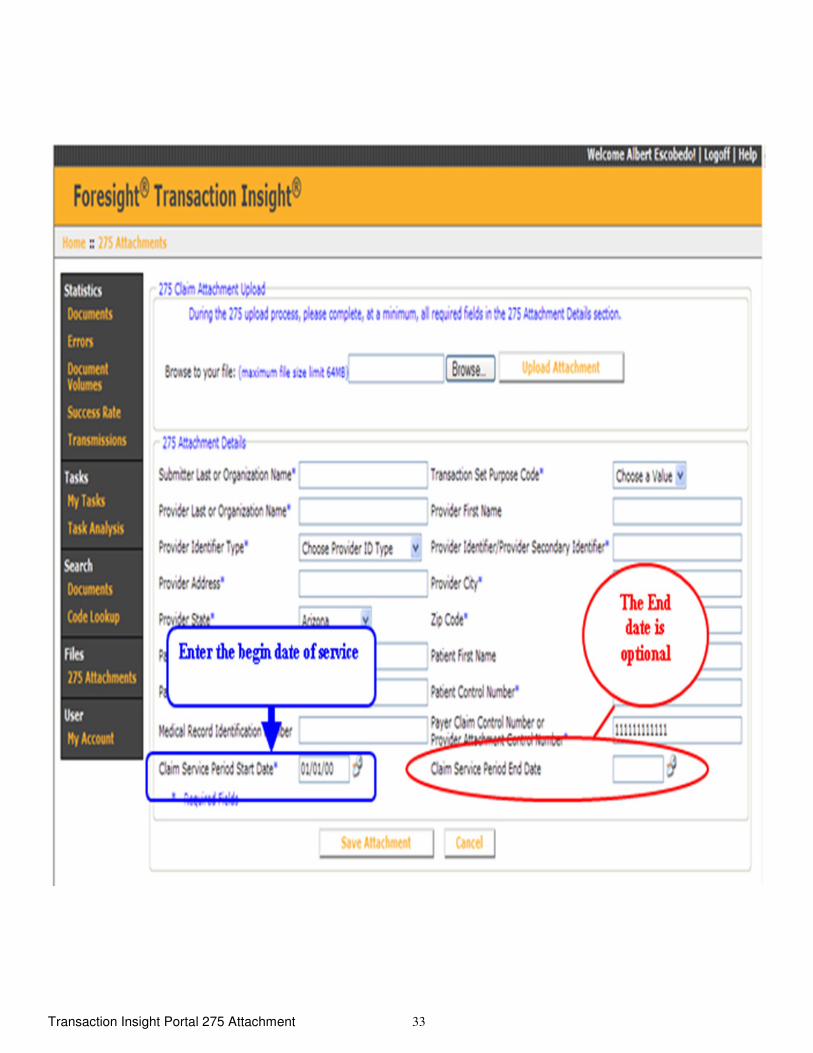
Transaction Insight Portal 275 Attachment 33
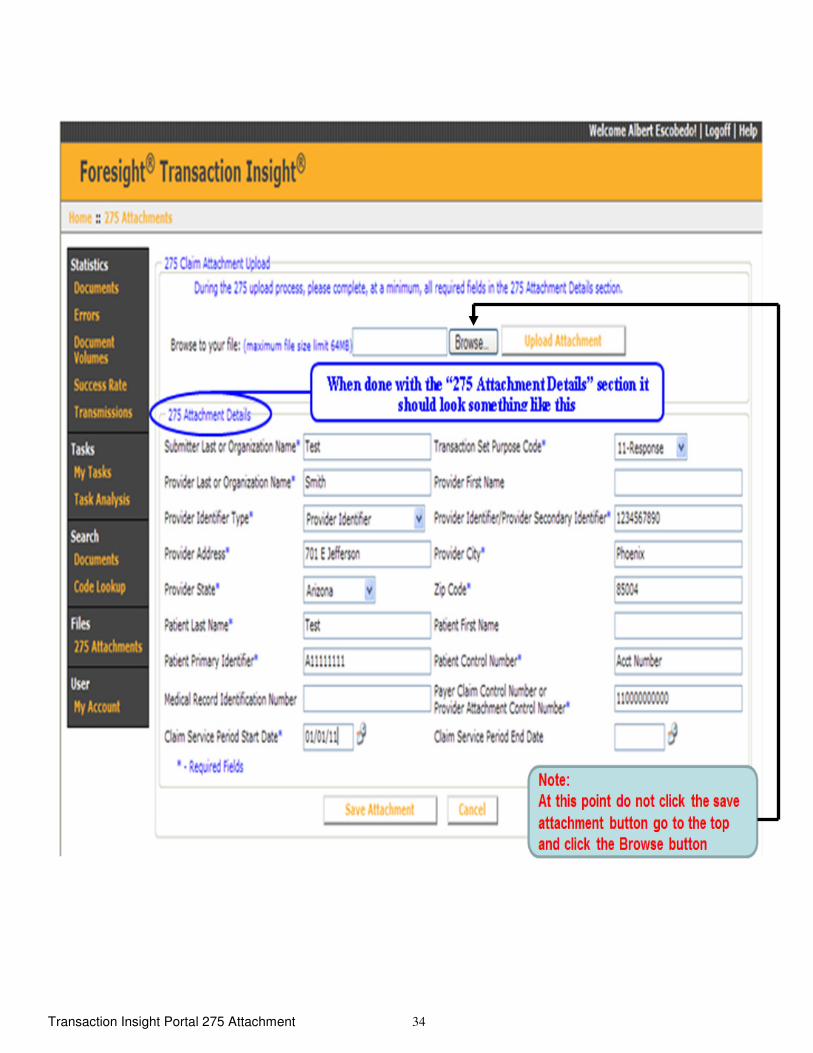
Transaction Insight Portal 275 Attachment 34
Transaction Insight Portal 275 Attachment 35
Transaction Insight Portal 275 Attachments
Section 9:
Upload Attachment Files
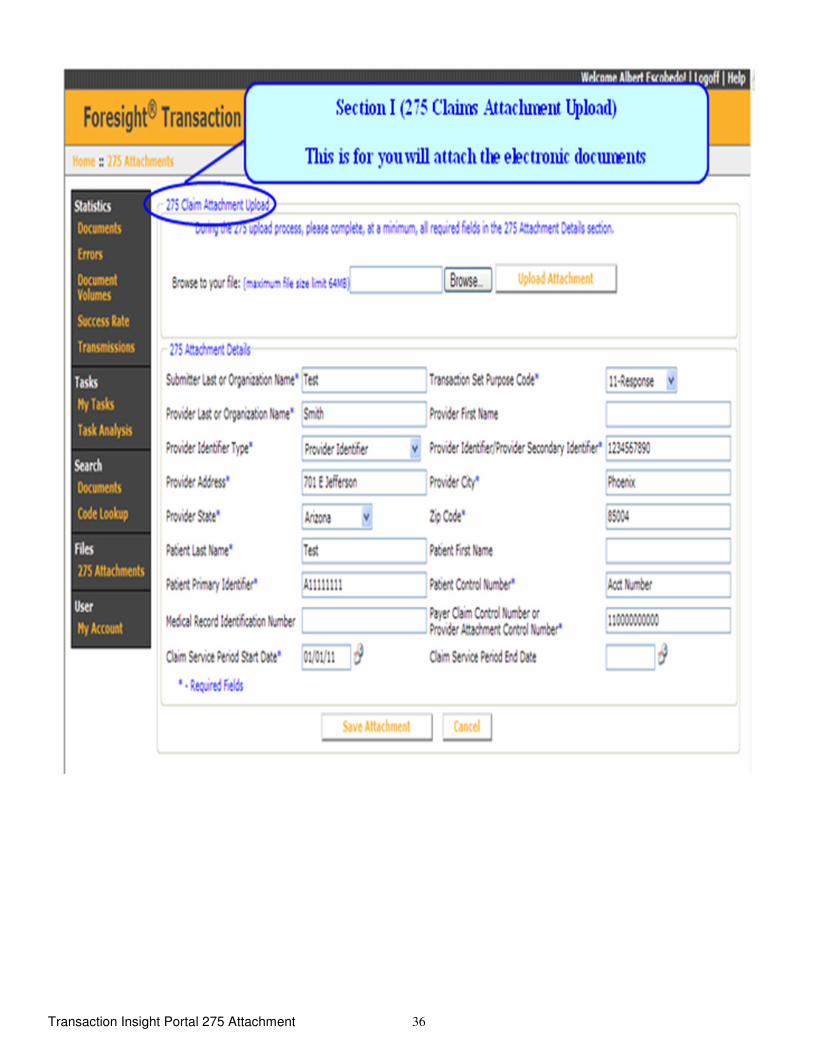
Transaction Insight Portal 275 Attachment 36
Transaction Insight Portal 275 Attachment 37
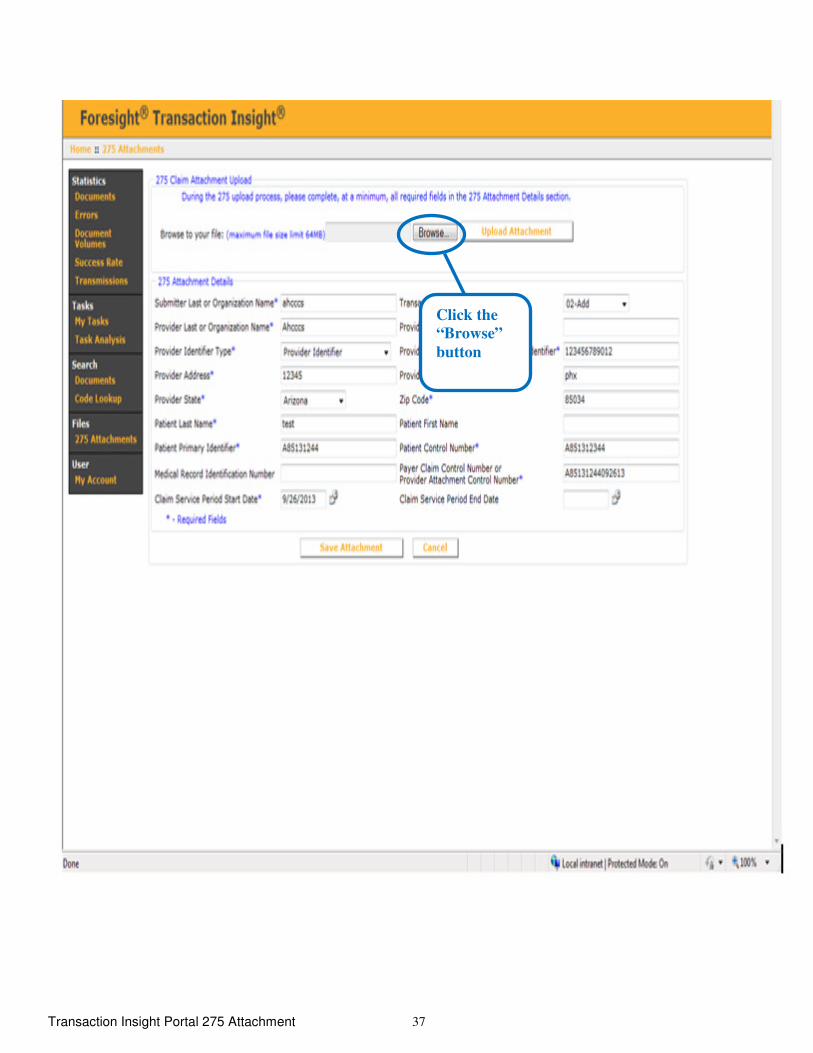
Click the
“Browse”
button
Transaction Insight Portal 275 Attachment 38
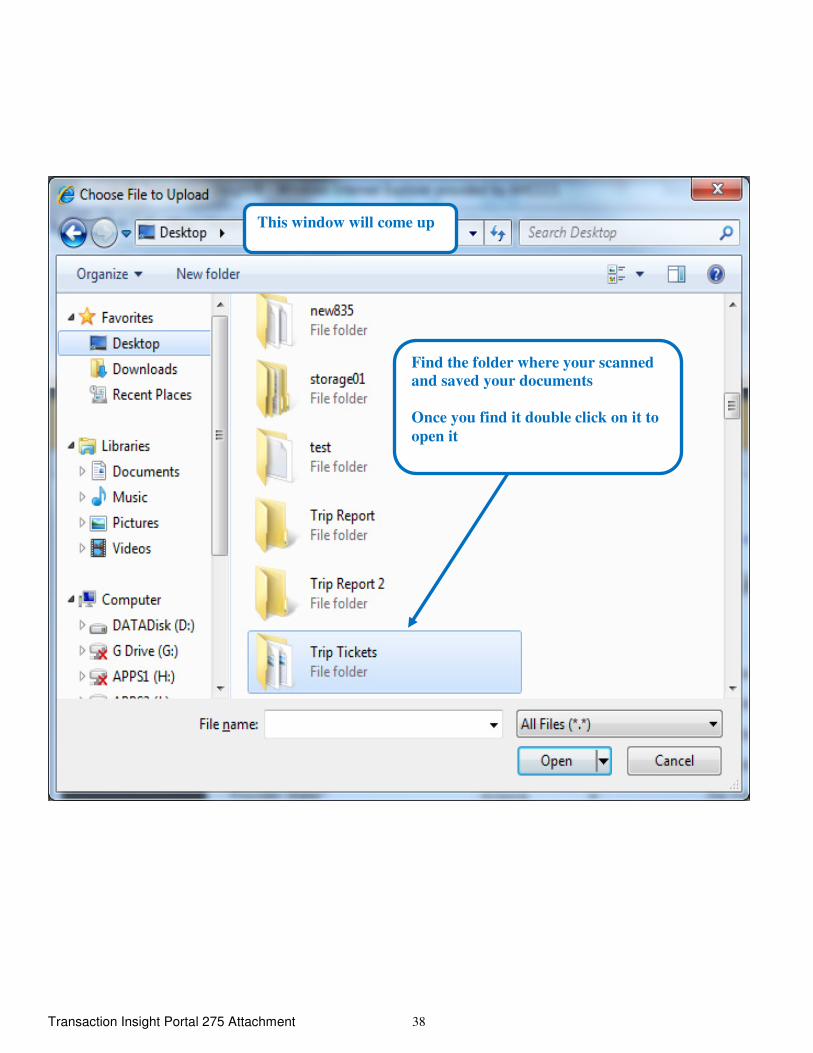
This window will come up
Find the folder where your scanned
and saved your documents
Once you find it double click on it to
open it
Transaction Insight Portal 275 Attachment 39
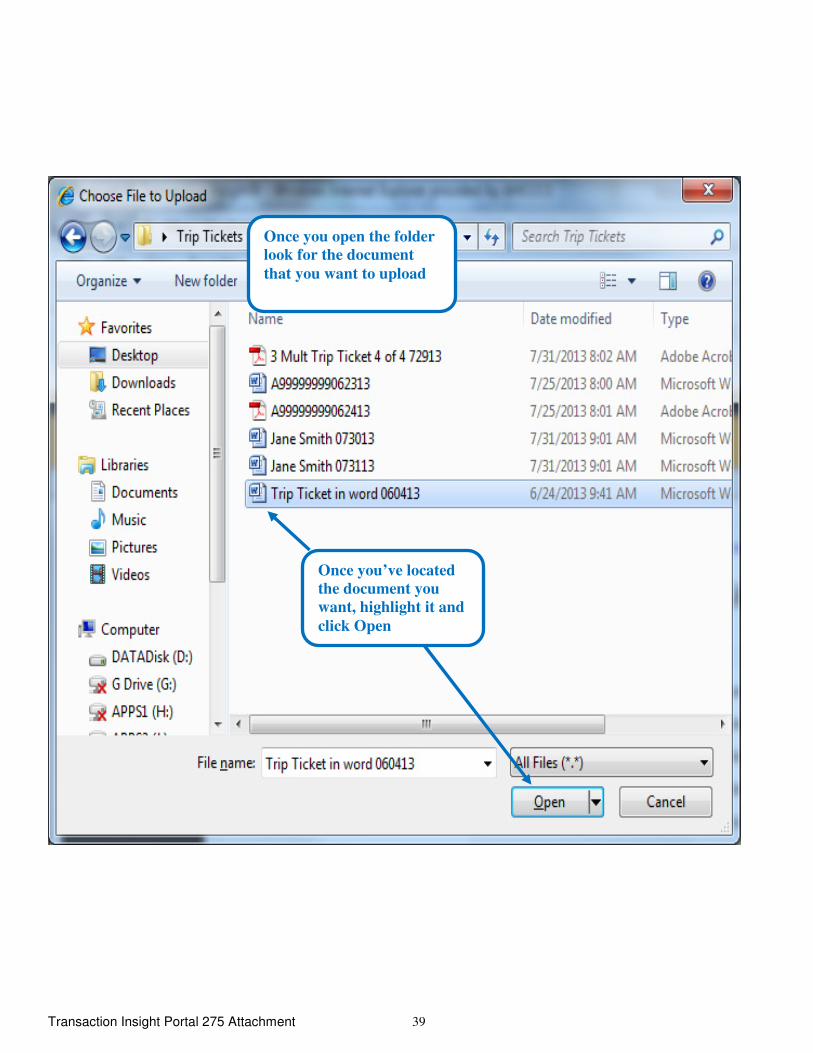
Once you open the folder
look for the document
that you want to upload
Once you’ve located
the document you
want, highlight it and
click Open
Transaction Insight Portal 275 Attachment 40
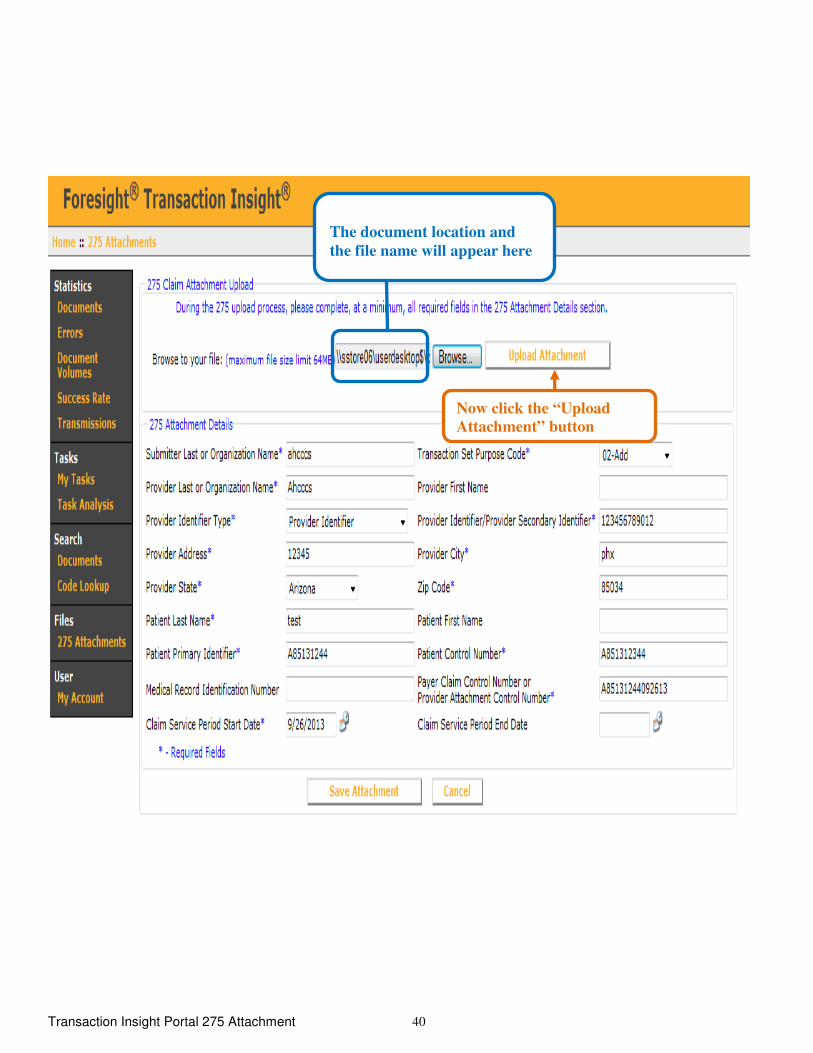
The document location and
the file name will appear here
Now click the “Upload
Attachment” button
Transaction Insight Portal 275 Attachment 41
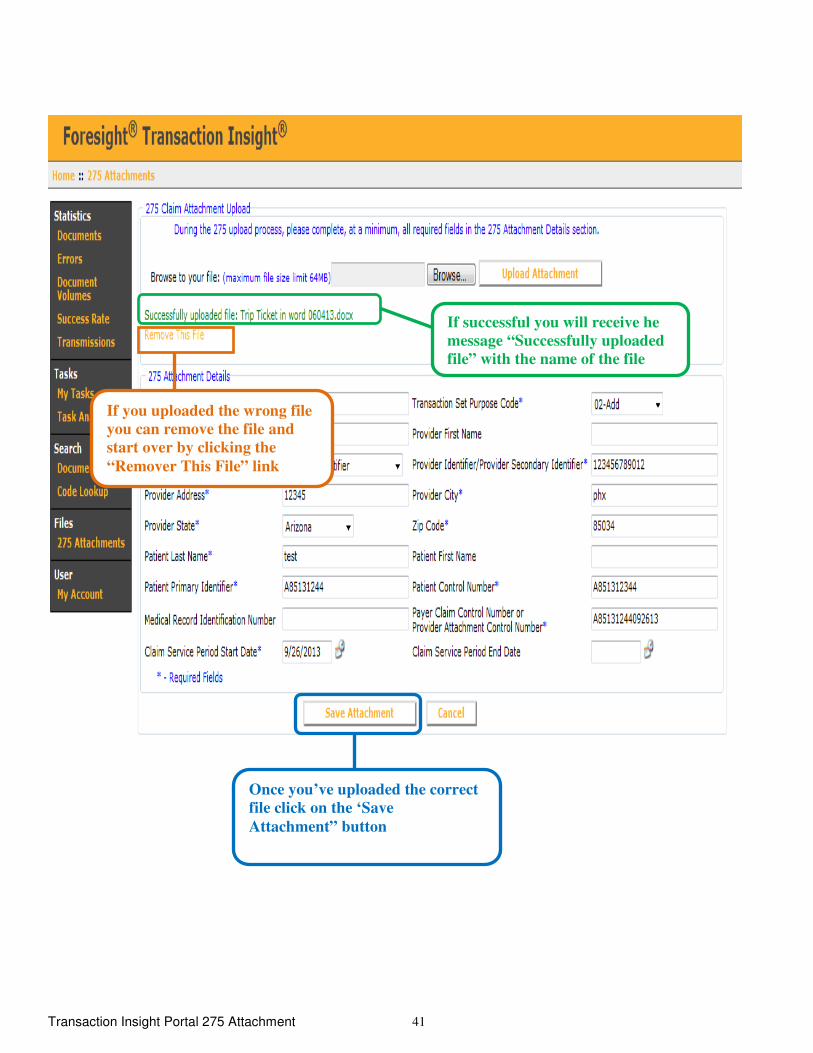
If successful you will receive he
message “Successfully uploaded
file” with the name of the file
If you uploaded the wrong file
you can remove the file and
start over by clicking the
“Remover This File” link
Once you’ve uploaded the correct
file click on the ‘Save
Attachment” button
Transaction Insight Portal 275 Attachment 42
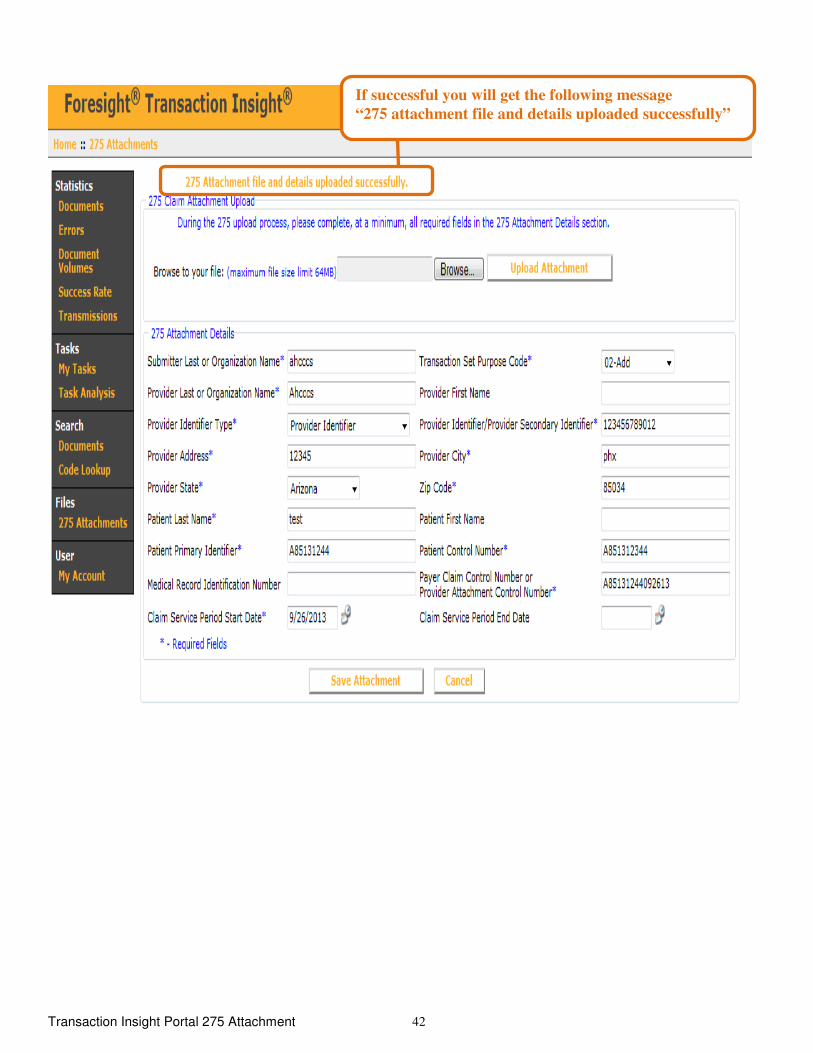
If successful you will get the following message
“275 attachment file and details uploaded successfully”

Transaction Insight Portal 275 Attachment 43
Transaction Insight Portal 275 Attachments
Section 10:
How to create a folder
Transaction Insight Portal 275 Attachment 44
Transaction Insight Portal 275 Attachment 45

Transaction Insight Portal 275 Attachment 46
Transaction Insight Portal 275 Attachments
Section 10:
Frequently Asked Questions
Transaction Insight Portal 275 Attachment 47
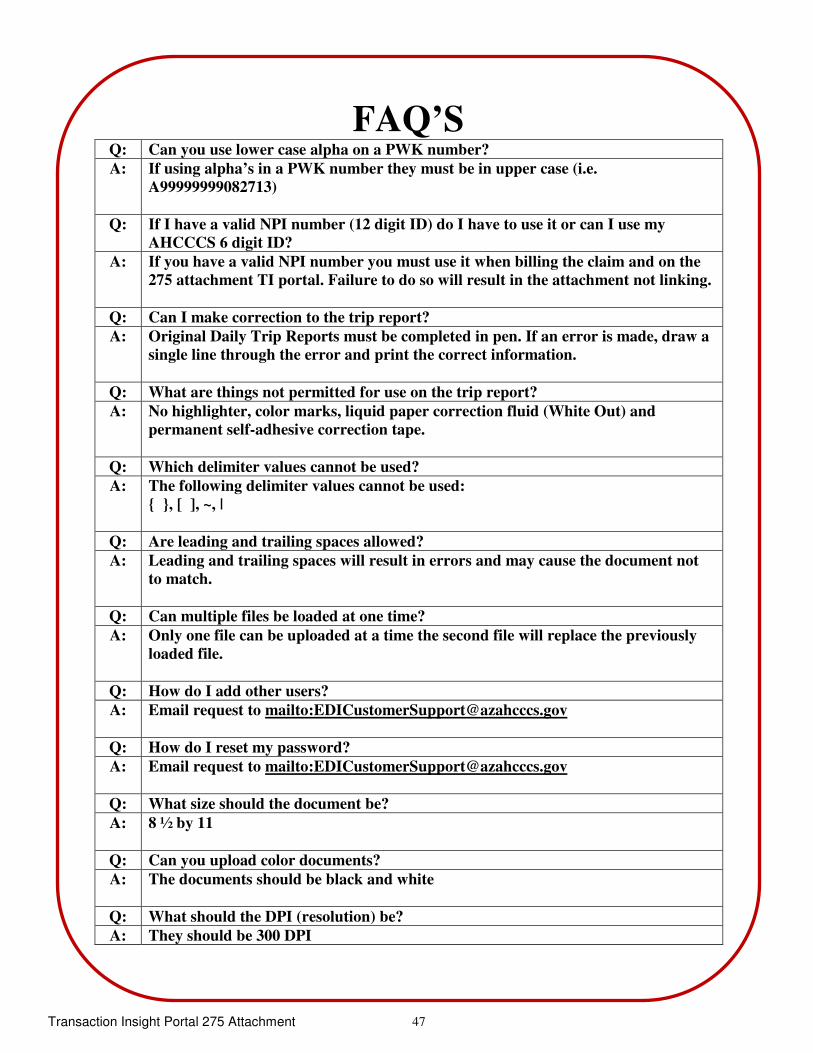
FAQ’S Q: Can you use lower case alpha on a PWK number?
A: If using alpha’s in a PWK number they must be in upper case (i.e.
A99999999082713)
Q: If I have a valid NPI number (12 digit ID) do I have to use it or can I use my
AHCCCS 6 digit ID?
A: If you have a valid NPI number you must use it when billing the claim and on the
275 attachment TI portal. Failure to do so will result in the attachment not linking.
Q: Can I make correction to the trip report?
A: Original Daily Trip Reports must be completed in pen. If an error is made, draw a
single line through the error and print the correct information.
Q: What are things not permitted for use on the trip report?
A: No highlighter, color marks, liquid paper correction fluid (White Out) and
permanent self-adhesive correction tape.
Q: Which delimiter values cannot be used?
A: The following delimiter values cannot be used:
{ }, [ ], ~, |
Q: Are leading and trailing spaces allowed?
A: Leading and trailing spaces will result in errors and may cause the document not
to match.
Q: Can multiple files be loaded at one time?
A: Only one file can be uploaded at a time the second file will replace the previously
loaded file.
Q: How do I add other users?
A: Email request to mailto:[email protected]
Q: How do I reset my password?
A: Email request to mailto:[email protected]
Q: What size should the document be?
A: 8 ½ by 11
Q: Can you upload color documents?
A: The documents should be black and white
Q: What should the DPI (resolution) be?
A: They should be 300 DPI

Transaction Insight Portal 275 Attachment 48
Transaction Insight Portal 275 Attachments
Section 11:
Contacts

Transaction Insight Portal 275 Attachment 49
Contacts for Transaction Insight Portal 275
Attachments To sign up for the Transaction Insight Portal 275 attachments please send an email request to mailto:[email protected]. To add additional users for the Transaction Insight Portal 275 attachments please send an email request to mailto:[email protected]. To request password reset for the Transaction Insight Portal 275 attachments please send an email request to mailto:[email protected]. The email must include the following statement in the subject line ‘TI
Password Reset.’ your password will be reset within an hour and you will receive an email with the new password The request will be assigned to the EDI Team for processing. Once the EDI Team has processed the request, further instructions including login and password, will be sent to the designated individual You may also contact the ISD Customer Support line ((602) 417-4451) and open a ticket. The ticket will be forwarded to the EDI Team for processing. Contacts EDI Customer Support Email mailto:[email protected] ISD Customer Support (602) 417-4451


![Custom App - Claim Registration WCL 1...Custom App - Claim Registration WCL 1 user 2 Step Action [1] Click on the Claim Registration to access the transaction. 1.1.2. EMPLOYER'S REPORT](https://img.pdfslide.us/doc/110x75/60472376d726296e9a4e9d2e/custom-app-claim-registration-wcl-1-custom-app-claim-registration-wcl-1.jpg)