Embed Size (px)
Citation preview

TRAINING MANUAL Revised 3/25/08
!!!!!!!!!!�!!!!!!!!!!!!!
ESP EMBROIDERY STARTUP MANUAL ESP SUPPORT LINE 1-877-246-7964
1-1
Section 1 - How to Operate Your Machine This section includes information on the following:
Automat Overview.....................................................................................................1-2 Powering On Machine ..............................................................................................1-4 Menu Overview .........................................................................................................1-5 Icon Overview ...........................................................................................................1-5 Threading ..................................................................................................................1-6 Hooping .....................................................................................................................1-8 Understanding CF Cards..........................................................................................1-9 Saving Designs to the CF Card..............................................................................1-9 Embroidery Exercise #1 .........................................................................................1-10 Loading Design from CF Card into Memory...................................................1-10 Assign Needles/Colors in F List ......................................................................1-11 Rotating the Design ..........................................................................................1-11 Getting Ready to Stitch in Drive Mode (Stitching) .........................................1-12 Using Perimeter Trace......................................................................................1-13 Powering Off Machine ............................................................................................1-14 Emergency Stop......................................................................................................1-14 Resume Stitching Using Standby Feature.............................................................1-15 Automend - Repairing Missed Stitches .................................................................1-15 Tensions ..................................................................................................................1-16 Running an I Test.............................................................................................1-16 Adjusting Tensions ............................................................................................1-16 Bobbin Tension..................................................................................................1-17 Replacing the Bobbin .............................................................................................1-18 Cap Embroidery ......................................................................................................1-20 Installing the Cap Driver for the Elite Pro/C Series.......................................1-20 Installing the Cap Driver for the Elite XL .......................................................1-23 Hooping a Cap .................................................................................................1-27 Hooping the Back of a Cap ............................................................................1-30

ESP EMBROIDERY STARTUP MANUAL ESP SUPPORT LINE 1-877-246-7964
1-2
Automat Overview ① LCD DISPLAY ⑦ MENU KEY ⑥ PAGE KEY ③ ⑪ ORIGIN LED FLOAT
⑫ TEACH LED
⑧ ④ ⑤ ⑨ ⑩ DRIVE ORIGIN JOG KEYS START STOP
⑬ COM SERIAL PORT ⑭ P/S 2 PORT (BARCODE READER) ⑮ CF (Compact Flash™) Reader
② ICON KEYS
ESP EMBROIDERY STARTUP MANUAL ESP SUPPORT LINE 1-877-246-7964
1-3
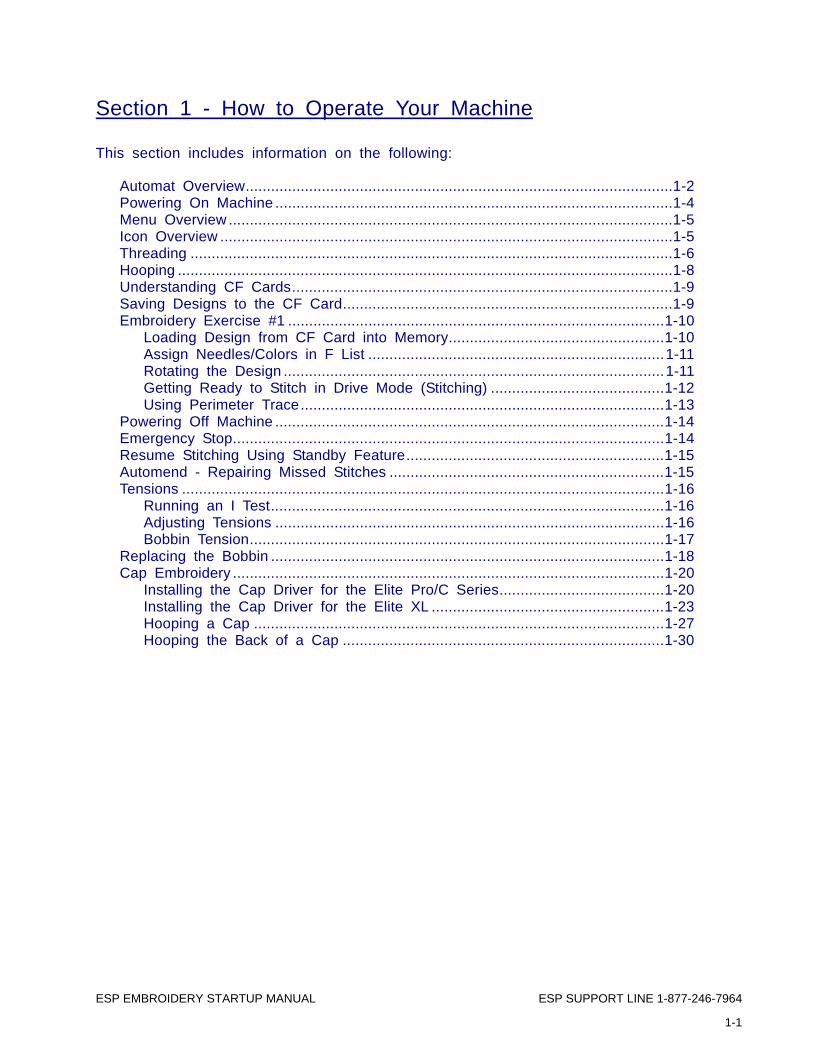
Automat Overview - cont'd. 1. LCD Display - Shows machine status, icons, design information
2. Icon keys – The A, B, C, D, E keys are operation buttons assigned to functions displayed by icons.
3. Origin LED - When lit the pantograph is located at the origin. Blinks when the Jog Keys are assigned to other functions.
4. Origin Key - Moves the pantograph to the origin. When the pantograph is located at the origin, it moves the pantograph to the previous position in stand-by state; the position of the last stitch while the machine was in Drive mode.
5. Jog Keys - Moves pantograph. Single stroke gives 0.1mm movement. Holding the button moves the pantograph in a continuous movement and the speed of the pantograph gradually increases. Also used to move the cursor for selecting items from a list.
6. Page Key - Switches to drive timeline screen, design sewing screen and basic screen.
7. Menu Key - Switches the Menu Icon Keys
8. Drive Key - Places the machine in Drive mode, ready to sew.
9. Start Key - The machine starts sewing.
10. Stop Key - The machine stops sewing.
11. Float LED - Lit when the pantograph is moving through a pattern without sewing.
12. Teach LED - Lit when locating/changing existing function codes in a pattern.
13. COM (Serial) Port - This is to connect to machine with RS-232 Null Modem Cable.
14. PS / 2 Port - The PS/2 port for optional barcode reader. Using barcode can automate some operations.
15. CF (Compact Flash™) Card Slot - The CF Card slot - Designs are loaded/saved onto the CF card. It also loads the system software for the automat.
ESP EMBROIDERY STARTUP MANUAL ESP SUPPORT LINE 1-877-246-7964
1-4
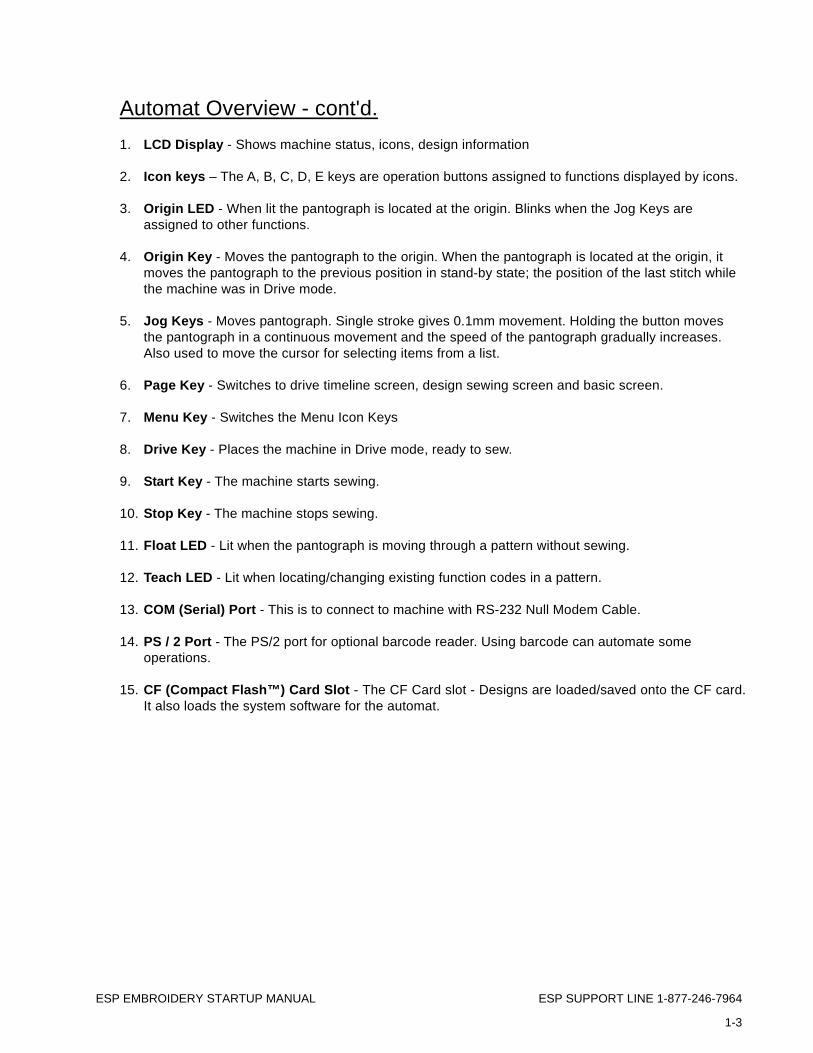
Powering On Machine
1. Press POWER ON Switch. The display shows the origin screen below.
2. Press the E-Key to move the pantograph to the origin. *No operation is allowed until the origin is set.
A B C D E
3. The first basic Menu Screen (Menu 1) displays. Press the MENU Key on the automat to advance to the second basic menu screen (Menu 2).
MENU 1 A B C D E ICON KEYS
ESP EMBROIDERY STARTUP MANUAL ESP SUPPORT LINE 1-877-246-7964
1-5
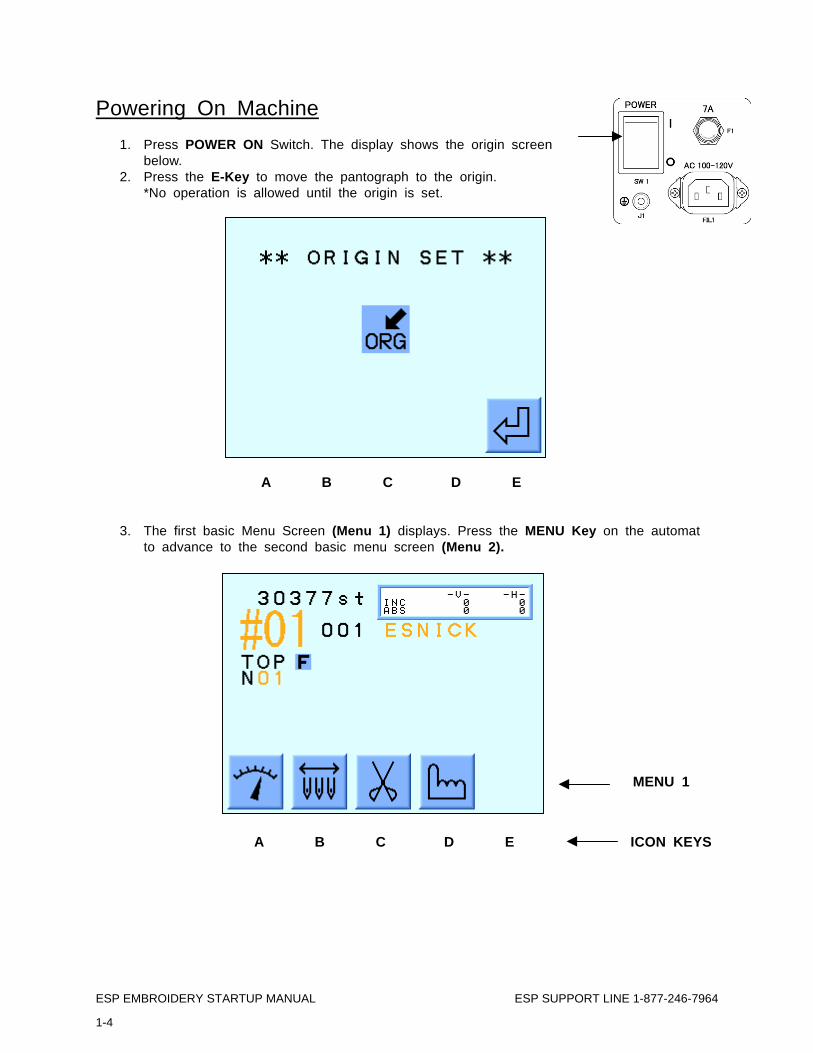
Menu Overview Icon Keys (A-E) Icon keys (A - E) correspond to the icon commands directly above them on the LCD. The commands above the A-E keys change depending on what menu you are in, i.e. the B key can be Needle in Menu 1 and Memory in Menu 2 - see below.
MENU 1
A B C D E Press Menu Key (toggles to Menu 2)
MENU 2
A B C D E Icon Overview
MENU 1 A B C D SPEED NEEDLE TRIM MANUAL Changes machine speed. Manually changes needles. Manually trims thread. Manual operations & Parameters settings
MENU 2
A B C D MEMORY IN MEMORY TEACH FLOAT Reads designs into Shows designs Lists & changes Moves the pantograph Machine memory in memory and color codes and thru design without using COM. on CF card. machine codes. stitching.
ESP EMBROIDERY STARTUP MANUAL ESP SUPPORT LINE 1-877-246-7964
1-6
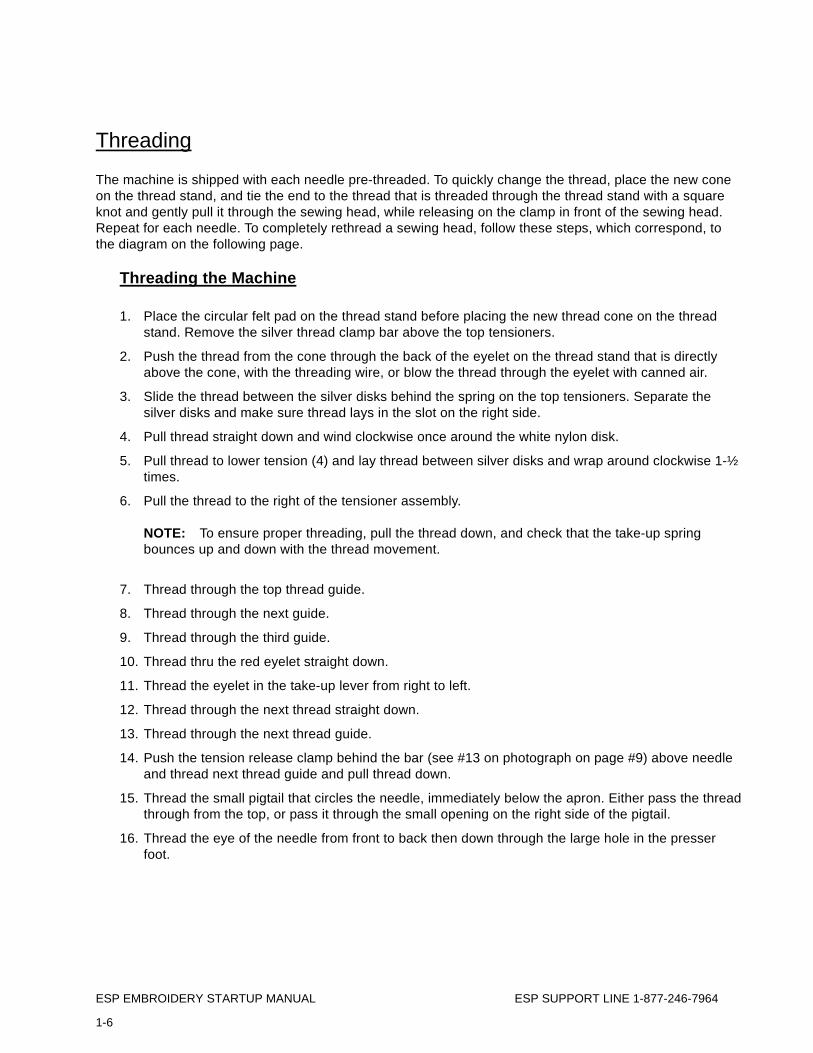
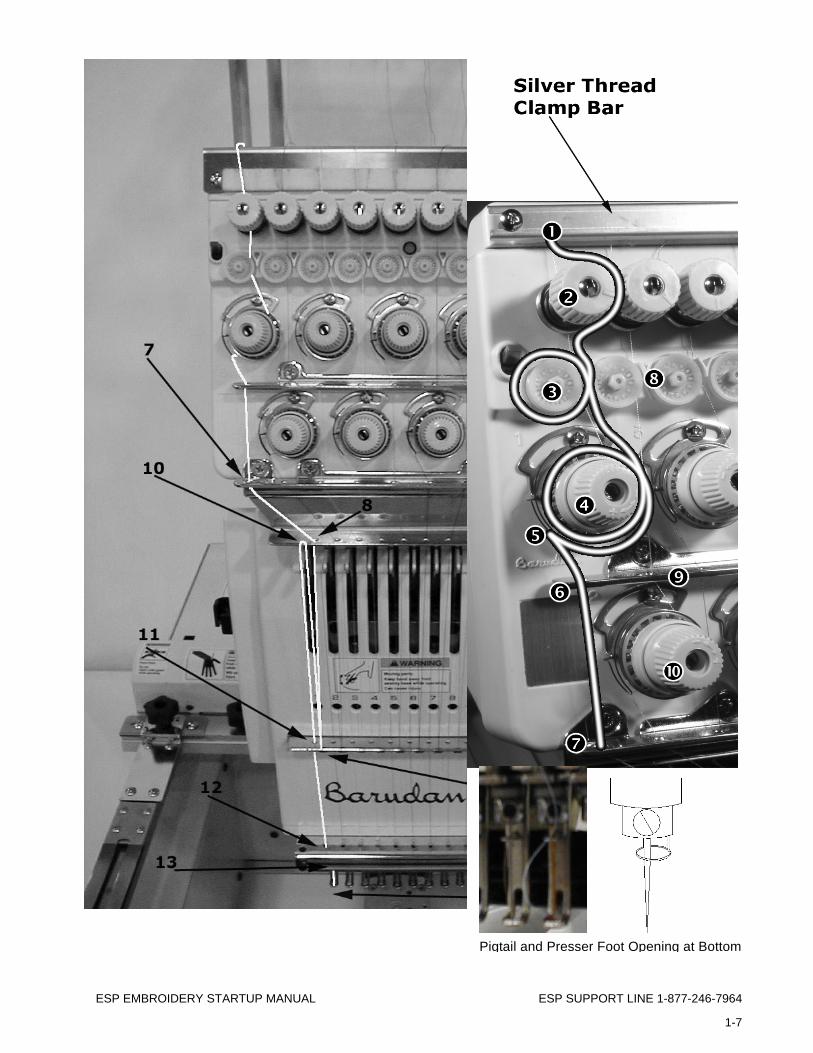
Threading The machine is shipped with each needle pre-threaded. To quickly change the thread, place the new cone on the thread stand, and tie the end to the thread that is threaded through the thread stand with a square knot and gently pull it through the sewing head, while releasing on the clamp in front of the sewing head. Repeat for each needle. To completely rethread a sewing head, follow these steps, which correspond, to the diagram on the following page.
Threading the Machine
1. Place the circular felt pad on the thread stand before placing the new thread cone on the thread stand. Remove the silver thread clamp bar above the top tensioners.
2. Push the thread from the cone through the back of the eyelet on the thread stand that is directly above the cone, with the threading wire, or blow the thread through the eyelet with canned air.
3. Slide the thread between the silver disks behind the spring on the top tensioners. Separate the silver disks and make sure thread lays in the slot on the right side.
4. Pull thread straight down and wind clockwise once around the white nylon disk.
5. Pull thread to lower tension (4) and lay thread between silver disks and wrap around clockwise 1-½ times.
6. Pull the thread to the right of the tensioner assembly. NOTE: To ensure proper threading, pull the thread down, and check that the take-up spring bounces up and down with the thread movement.
7. Thread through the top thread guide.
8. Thread through the next guide.
9. Thread through the third guide.
10. Thread thru the red eyelet straight down.
11. Thread the eyelet in the take-up lever from right to left.
12. Thread through the next thread straight down.
13. Thread through the next thread guide.
14. Push the tension release clamp behind the bar (see #13 on photograph on page #9) above needle and thread next thread guide and pull thread down.
15. Thread the small pigtail that circles the needle, immediately below the apron. Either pass the thread through from the top, or pass it through the small opening on the right side of the pigtail.
16. Thread the eye of the needle from front to back then down through the large hole in the presser foot.
ESP EMBROIDERY STARTUP MANUAL ESP SUPPORT LINE 1-877-246-7964
1-7
Pigtail and Presser Foot Opening at Bottom
ESP EMBROIDERY STARTUP MANUAL ESP SUPPORT LINE 1-877-246-7964
1-8
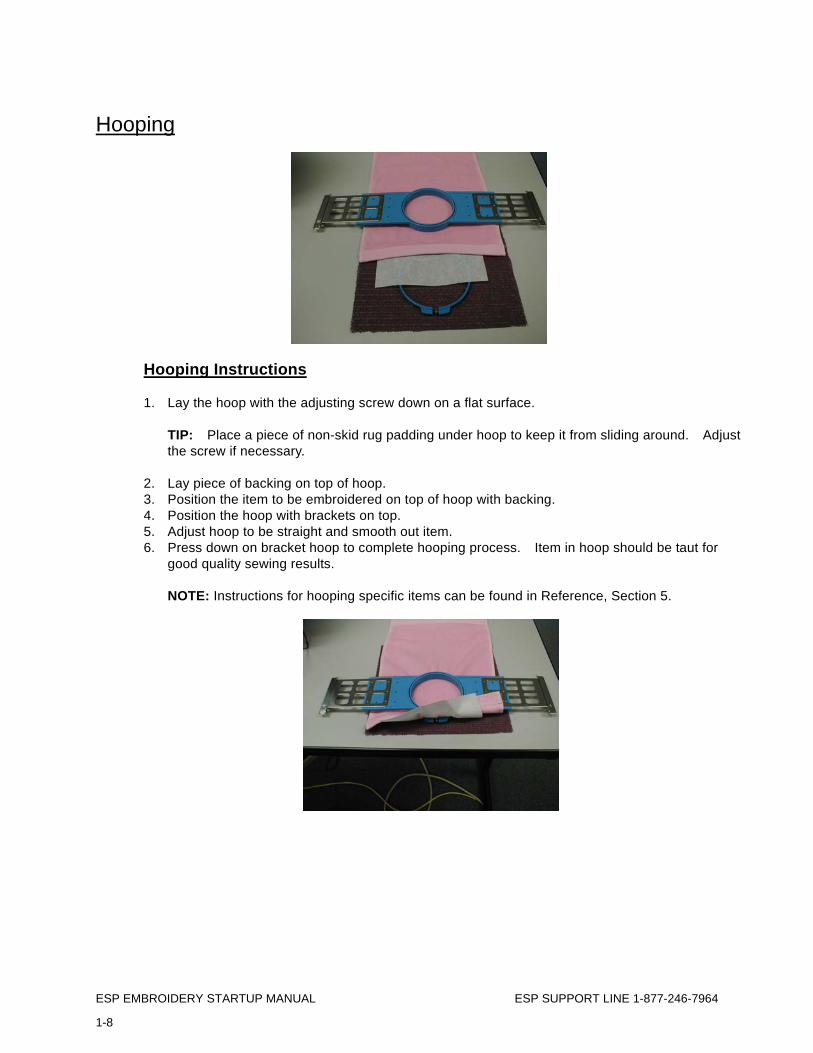
Hooping
Hooping Instructions 1. Lay the hoop with the adjusting screw down on a flat surface.
TIP: Place a piece of non-skid rug padding under hoop to keep it from sliding around. Adjust the screw if necessary.
2. Lay piece of backing on top of hoop. 3. Position the item to be embroidered on top of hoop with backing. 4. Position the hoop with brackets on top. 5. Adjust hoop to be straight and smooth out item. 6. Press down on bracket hoop to complete hooping process. Item in hoop should be taut for
good quality sewing results.
NOTE: Instructions for hooping specific items can be found in Reference, Section 5.
ESP EMBROIDERY STARTUP MANUAL ESP SUPPORT LINE 1-877-246-7964
1-9
Understanding Compact Flash™ Cards The Compact Flash™ Card supplements the machines memory with storage capacity of over 20 million stitches in up to 50 folders and a maximum of 5,000 designs. Patterns saved to the CF card to sew on your machine MUST be saved in a folder with an extension of FDR or TFD. Barudan designs are stored in FDR folders. Tajima DST patterns are stored in TFD folders. Folder names should be short and simple with NO special characters, i.e. DESIGNS.FDR (remember FDR must follow the period after the folder). ALL folders must follow this nomenclature for the machine to recognize it as a Design folder. The following rules must be followed for the Barudan embroidery machine to see these files:
The first letter in a file or folder must be a letter (A-Z) The rest of the filename can be letters or numbers Only the first 8 letters will be copied Only the first 50 folders (alphabetically) are recognized by the machine. No nested folders will be recognized Folders can only hold a maximum of 100 files each.
Saving Designs to the CF Card CF card folders can be made and patterns stored to the CF card through the SAVE AS command of various software’s, i.e. Wilcom, Melco. Remember the pattern will need to be saved as a Barudan FDR-HD or Tajima DST. Please follow the basic instructions below to make sure that folders and files are named correctly.
1. Insert the Compact Flash™ Card (CF Card) in the reader. 2. Select the File pull down menu. 3. Select Save As. The Save Design As dialog box displays. 4. Select the CF Card Reader from the drive pull down list, i.e. SanDisk ImageMate (E:). All contents
of the CF card will display. The drive letter for the CF Reader may be different on different computers. Selecting the CF Card Reader is NO different than selecting the Floppy Drive. You are simply selecting a different media type.
5. From the Save As dialog box select the Make Folder icon. A new folder will display and will be highlighted.
6. Rename the folder using the proper naming conventions for the CF Card, i.e. Designs.fdr. (For Barudan FDR files) or Designs.TFD (for Tajima DST files)
NOTE: Patterns that will be sewn on the machine must be stored in a FDR or TFD folder with the correct extension. If a folder is not named properly the machine will not recognize the folder.
7. Double click on either the FDR or TFD folder. The selected folder will display in the drive area at the top of the dialog box.
8. Select the file type, either Barudan FDR (FDR HD or FDR 1.44) or Tajima DST. 9. Type in the name of the pattern, i.e. Dog.
NOTE: Barudan FDR extensions are named in sequential order. A folder can only contain 100 patterns therefore the last file extension would be U99. Allowable extensions are U00- U99. DST will be added as the extension when saving Tajima format files.
10. Click OK. The pattern will be saved in the folder.
ESP EMBROIDERY STARTUP MANUAL ESP SUPPORT LINE 1-877-246-7964
1-10
Embroidery Exercise #1 – “Rainbow” The following is a quick and easy exercise to get you started on your machine. This exercise will walk you through the process of:
• Loading a Design from a CF Card • Assigning Needles/Colors in Using FList • Rotating the Pattern • Getting Ready to Stitch - Entering Drive Mode • Perimeter Trace - Make Sure a Design Fits within the Hoop
The Rainbow pattern stored on the CF card that came with the machine will be sewn in this exercise. What do you need before starting this exercise?
• CF Card that came with your machine • 15cm Hoop • Practice Cloth and Backing
Make sure to use some backing and to hoop the fabric tightly in the hoop. Refer to the section Basic Hooping on the previous pages.
Loading a Design from a CF Card in Memory
1. Make sure that the machine is out of Drive mode. If the Drive light is flashing, press and hold the
Drive key until the beeping stops and the Drive light is flashing. NOTE: When the Drive light is flashing the machine is out of Drive or sewing mode. You need to be out of Drive mode to load patterns to the machine’s memory.
2. Press the Menu key until the Memory icon displays.
3. Press B key below Memory icon.
Press E key below the Next icon.
4. Press D key below the CF icon. 5. Use the jog keys to select the folder FDR.fdr from the CF card. A
folder is selected when a box outline displays around it. 6. Press the Origin key to display the contents of the folder. 7. Use the jog keys to select the rainbow pattern. A pattern is selected when a box outline displays
around it. NOTE: The rainbow pattern does NOT start and end in the center. It starts at the bottom left and ends at the bottom right of the pattern. Make sure that you execute Perimeter Trace.
8. Press A key below the CF to Memory icon.
9. Press E key below the Execute icon to transfer the pattern to memory.
ESP EMBROIDERY STARTUP MANUAL ESP SUPPORT LINE 1-877-246-7964
1-11
Assigning Needles/Colors in Using FList
10. Press B key below Memory icon.
NOTE: If the Memory icon is not displayed press the Menu key until the Memory icon is displayed.
11. The pattern loaded in step 8, will be the selected from Memory. To select a different pattern, use the jog keys. A pattern is selected when a box outline is around it.
12. Press B key below the Pattern Char. Icon.
13. Press D key below the F List icon. 14. Use the jog keys to scroll up to Start. Press and hold the ORIGIN key to insert the first color on the
first stitch.
15. Press A or B key below the Minus or Plus icon respectively to select a lower or higher needle number. Use these keys until the needle number holding the thread needed is displayed. For example if the first color is red, needle 8, use either the Minus or Plus icon until C08 is displayed.
16. Use the up and down jog keys to select next color change. Follow this step until all colors needles are assigned.
17. Press the Menu key to exit. NOTE: Sometimes it is necessary to rotate the pattern. The rainbow could be sewn right side up. However, in order to practice rotating a pattern we will sew the rainbow upside down.
Rotating the Design
18. Press B key, below the Memory icon.
19. Press C key below the Program icon.
20. Use the jog keys to move through the list until Parameter 3, Rotate is selected. A box outline displays around the selected option.
21. Use the A and B keys, below the Minus and Plus icons to change the value. In order to sew the pattern upside down the Value should be set at 3.
22. Press the Menu key to exit. Notice that the pattern number is highlighted and the F is upside down at the upper left hand side of the screen.
ESP EMBROIDERY STARTUP MANUAL ESP SUPPORT LINE 1-877-246-7964
1-12
Getting Ready to Stitch - Drive Mode (Stitching) 23. Use the jog keys to move the pantograph to the desired starting point of the design, usually the
center of the hoop. However, the rainbow design being sewn in this exercise is not centered so you will need to find a good starting point for this particular design.
24. The machine is put in Drive Mode by pressing the Drive icon. The light will no longer blink when machine is in Drive mode.
The screen above displays when the machine is in Drive Mode and ready to begin stitching.
The machine is put in Drive Mode by pressing the Drive icon. The light will stay ON, and no longer blinks when machine is in Drive mode.
Drive Mode Screen – Page Screen 1 The PAGE KEY must be pressed while in Drive Mode for this screen to display.
Press the PAGE KEY again and the Page Screen 2 (another Drive screen) displays:
ESP EMBROIDERY STARTUP MANUAL ESP SUPPORT LINE 1-877-246-7964
1-13
Drive Mode Screen - Page Screen 2
Press the Page Key twice to show Screen 2. It shows the design and current needle location, as it is sewing, the machine speed, and the total stitch count.
Using Perimeter Trace - Make Sure a Design Fits in the Hoop
25. Press the Menu Key until the Perimeter Trace icon displays over the E key.
26. Press E, below the Outline Trace icon , to trace the pattern. The machine traces the pattern. NOTE: Never bypass Outline Trace. Always make sure the design you chose fits inside the hoop.
27. IMPORTANT NOTE: Watch the needle in the sewing position to prevent damage to your sewing head!
(THE NEEDLE TO WATCH DURING PERIMETER TRACE IS THE ONE WITH THE RED DOT ON THE FRONT OF THE SEWING HEAD) to see that it does not pass over any part of the hoop. If necessary, use a larger hoop. If you need to reposition the start point, use the jog keys to move the pantograph and position the needle in the hoop correctly. NOTE: Recently purchased machines may have a laser light making it easier to see your position.
When doing an outline trace watch the needle with the red dot. If your machine has a laser light, you can just watch the light.
ESP EMBROIDERY STARTUP MANUAL ESP SUPPORT LINE 1-877-246-7964
1-14
28. Repeat above steps if necessary. When pantograph is properly positioned, press the green START key to begin sewing.
Powering Off the Machine Press the POWER SOURCE switch to the off position, zero (0). CAUTION! It is best to unplug the machine when the machine is shut down at the end of the day due to the possibility of electrical surges.
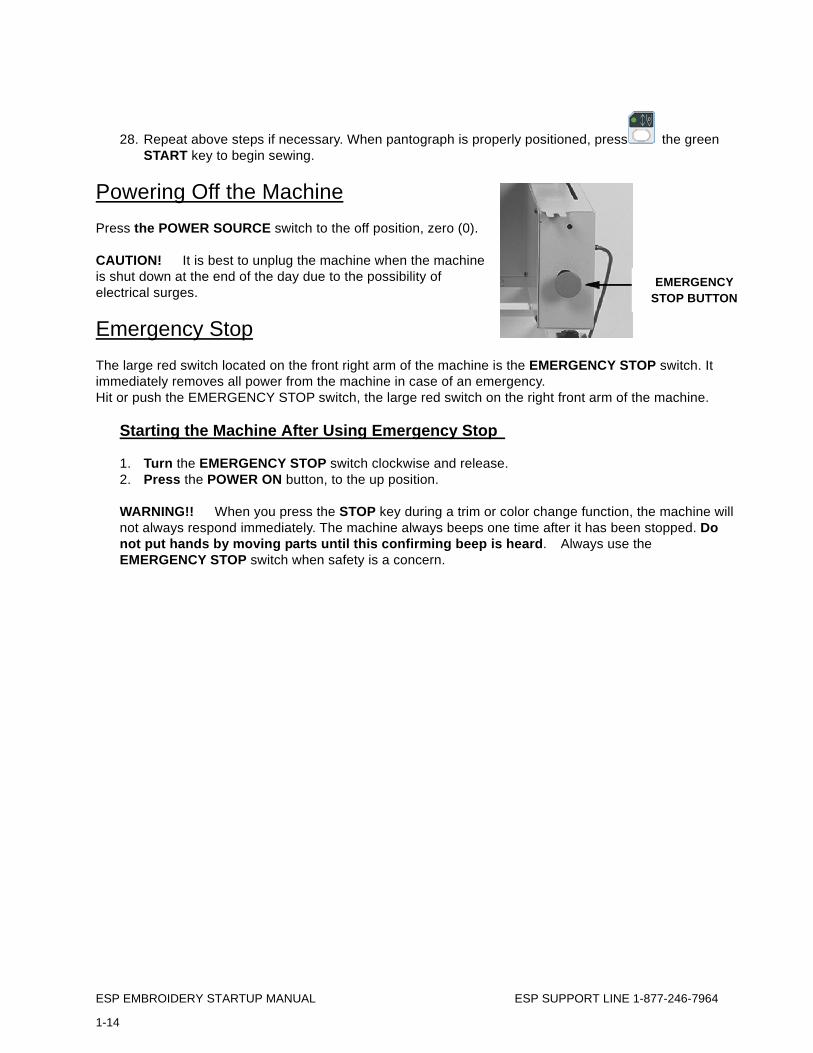
Emergency Stop The large red switch located on the front right arm of the machine is the EMERGENCY STOP switch. It immediately removes all power from the machine in case of an emergency. Hit or push the EMERGENCY STOP switch, the large red switch on the right front arm of the machine.
Starting the Machine After Using Emergency Stop
1. Turn the EMERGENCY STOP switch clockwise and release. 2. Press the POWER ON button, to the up position. WARNING!! When you press the STOP key during a trim or color change function, the machine will not always respond immediately. The machine always beeps one time after it has been stopped. Do not put hands by moving parts until this confirming beep is heard. Always use the EMERGENCY STOP switch when safety is a concern.
EMERGENCY STOP BUTTON
ESP EMBROIDERY STARTUP MANUAL ESP SUPPORT LINE 1-877-246-7964
1-15
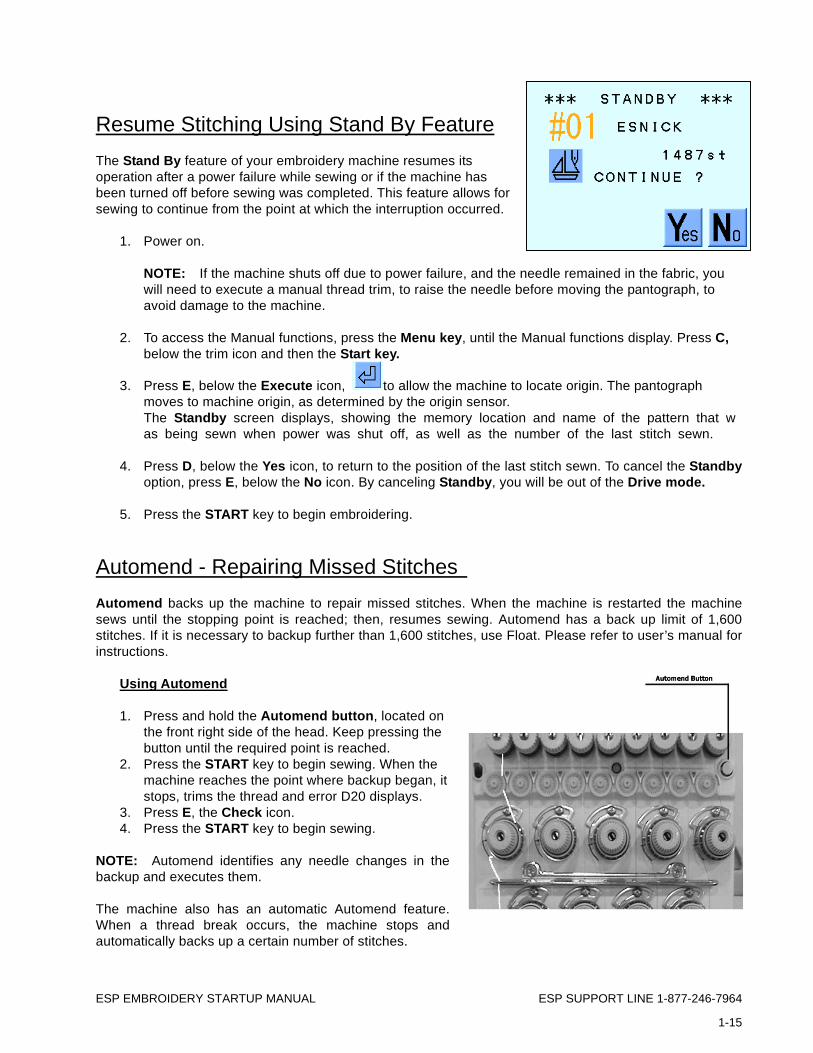
Resume Stitching Using Stand By Feature The Stand By feature of your embroidery machine resumes its operation after a power failure while sewing or if the machine has been turned off before sewing was completed. This feature allows for sewing to continue from the point at which the interruption occurred.
1. Power on.
NOTE: If the machine shuts off due to power failure, and the needle remained in the fabric, you will need to execute a manual thread trim, to raise the needle before moving the pantograph, to avoid damage to the machine.
2. To access the Manual functions, press the Menu key, until the Manual functions display. Press C,
below the trim icon and then the Start key.
3. Press E, below the Execute icon, to allow the machine to locate origin. The pantograph moves to machine origin, as determined by the origin sensor. The Standby screen displays, showing the memory location and name of the pattern that was being sewn when power was shut off, as well as the number of the last stitch sewn.
4. Press D, below the Yes icon, to return to the position of the last stitch sewn. To cancel the Standby option, press E, below the No icon. By canceling Standby, you will be out of the Drive mode.
5. Press the START key to begin embroidering.
Automend - Repairing Missed Stitches Automend backs up the machine to repair missed stitches. When the machine is restarted the machine sews until the stopping point is reached; then, resumes sewing. Automend has a back up limit of 1,600 stitches. If it is necessary to backup further than 1,600 stitches, use Float. Please refer to user’s manual for instructions.
Using Automend 1. Press and hold the Automend button, located on
the front right side of the head. Keep pressing the button until the required point is reached.
2. Press the START key to begin sewing. When the machine reaches the point where backup began, it stops, trims the thread and error D20 displays.
3. Press E, the Check icon. 4. Press the START key to begin sewing.
NOTE: Automend identifies any needle changes in the backup and executes them. The machine also has an automatic Automend feature. When a thread break occurs, the machine stops and automatically backs up a certain number of stitches.
ESP EMBROIDERY STARTUP MANUAL ESP SUPPORT LINE 1-877-246-7964
1-16
Tensions Tension is the tautness of the thread as stitches are formed. There are two tensions to consider when making adjustments. The top thread, located in the thread stand, is controlled by the top tension; and the bobbin thread, located in the bobbin case, is controlled by the bobbin tension. These tensions determine the quality of the embroidery. Different factors will play a part in setting the proper tensions, i.e. what product you are sewing on, tightness in hoop, backing, etc. An excellent way to test the tensions is by using the I Test.
Running an I Test
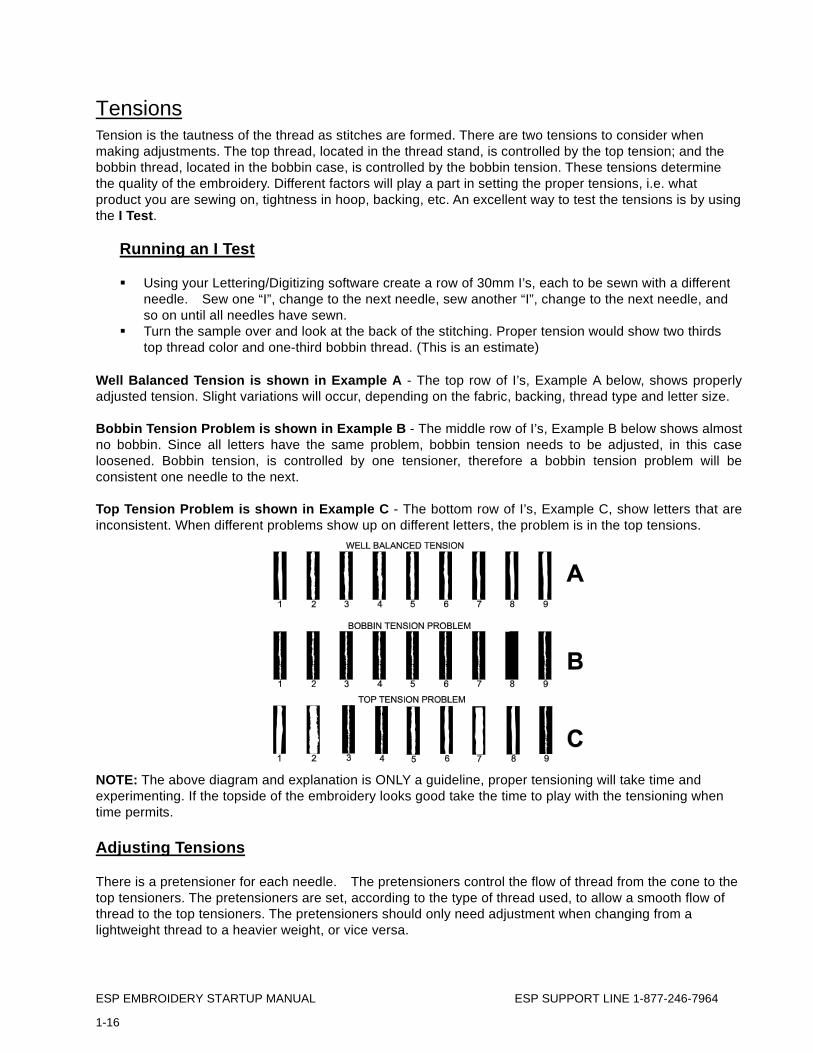
Using your Lettering/Digitizing software create a row of 30mm I’s, each to be sewn with a different needle. Sew one “I”, change to the next needle, sew another “I”, change to the next needle, and so on until all needles have sewn.
Turn the sample over and look at the back of the stitching. Proper tension would show two thirds top thread color and one-third bobbin thread. (This is an estimate)
Well Balanced Tension is shown in Example A - The top row of I’s, Example A below, shows properly adjusted tension. Slight variations will occur, depending on the fabric, backing, thread type and letter size. Bobbin Tension Problem is shown in Example B - The middle row of I’s, Example B below shows almost no bobbin. Since all letters have the same problem, bobbin tension needs to be adjusted, in this case loosened. Bobbin tension, is controlled by one tensioner, therefore a bobbin tension problem will be consistent one needle to the next. Top Tension Problem is shown in Example C - The bottom row of I’s, Example C, show letters that are inconsistent. When different problems show up on different letters, the problem is in the top tensions.
NOTE: The above diagram and explanation is ONLY a guideline, proper tensioning will take time and experimenting. If the topside of the embroidery looks good take the time to play with the tensioning when time permits. Adjusting Tensions There is a pretensioner for each needle. The pretensioners control the flow of thread from the cone to the top tensioners. The pretensioners are set, according to the type of thread used, to allow a smooth flow of thread to the top tensioners. The pretensioners should only need adjustment when changing from a lightweight thread to a heavier weight, or vice versa.
ESP EMBROIDERY STARTUP MANUAL ESP SUPPORT LINE 1-877-246-7964
1-17
Adjusting the Pretensioners
If the thread does not flow freely, loosen the pressure on the spring that holds the disk down by turning the thumbnut counterclockwise.
If the thread flows too freely, increase the pressure on the spring that holds the disk down by turning the thumbnut clockwise.
The top tensioners control the top thread tension. If the top tension is too tight, the bobbin will not be able to pull enough of the top thread to the back of the embroidery. Top tension that is too tight may cause thread breaks, needle breakage, or puckering of the fabric. If the tension is too loose, the bobbin will pull too much of the top thread to the back of the embroidery, causing the thread to loop on either the top side or the back side of the monogram, possibly both. The monogram will look rough, and will not lie smoothly on the fabric. The bobbin tension on the backside of the monogram will look very narrow.
It may be necessary to adjust the top tension to compensate for variances in material or thread. Generally when using a thicker material (e.g., heavy jackets) or thicker thread, the upper tension should be set more loosely. Checking the Top Tension
• Pull thread slowly, from front to back. Some resistance may be felt, but not so much that the thread feels as if it will break.
Adjusting the Top Tension
The plastic knob on the top tension assembly is marked with a + and -, with an arrow between them.
Turn the top tension disk clockwise, toward the + sign, to tighten the top thread tension. Turn the top tension disk counterclockwise, toward the - sign, to loosen the top thread tension.
NOTE: Getting the proper feel of resistance will take some time so take your time making your adjustments.
Bobbin Tension The bobbin tension is set by adjusting the larger screw on the bottom of the bobbin case. To test the tension, insert a bobbin in the case and slowly pull the end of the thread. The thread should unwind slowly and smoothly out of the bobbin case, yielding a slight resistance. Experience will help you determine the correct degree of tension. The tension is preset on all new bobbin cases, so readjusting bobbin tension is not often necessary. A poly-core, cotton-wrapped thread is recommended for the bobbin; however, other types will also work.
Adjusting the Bobbin Tension
Turn the screw on the bobbin case clockwise to tighten bobbin tension. Turn the screw on the bobbin case counterclockwise to loosen the bobbin tension.
NOTE: Once the tensions have been adjusted for the type of thread being used, only minor changes will be needed as the fabric, letter size, and alphabet style changes.
ESP EMBROIDERY STARTUP MANUAL ESP SUPPORT LINE 1-877-246-7964
1-18
Replacing the Bobbin
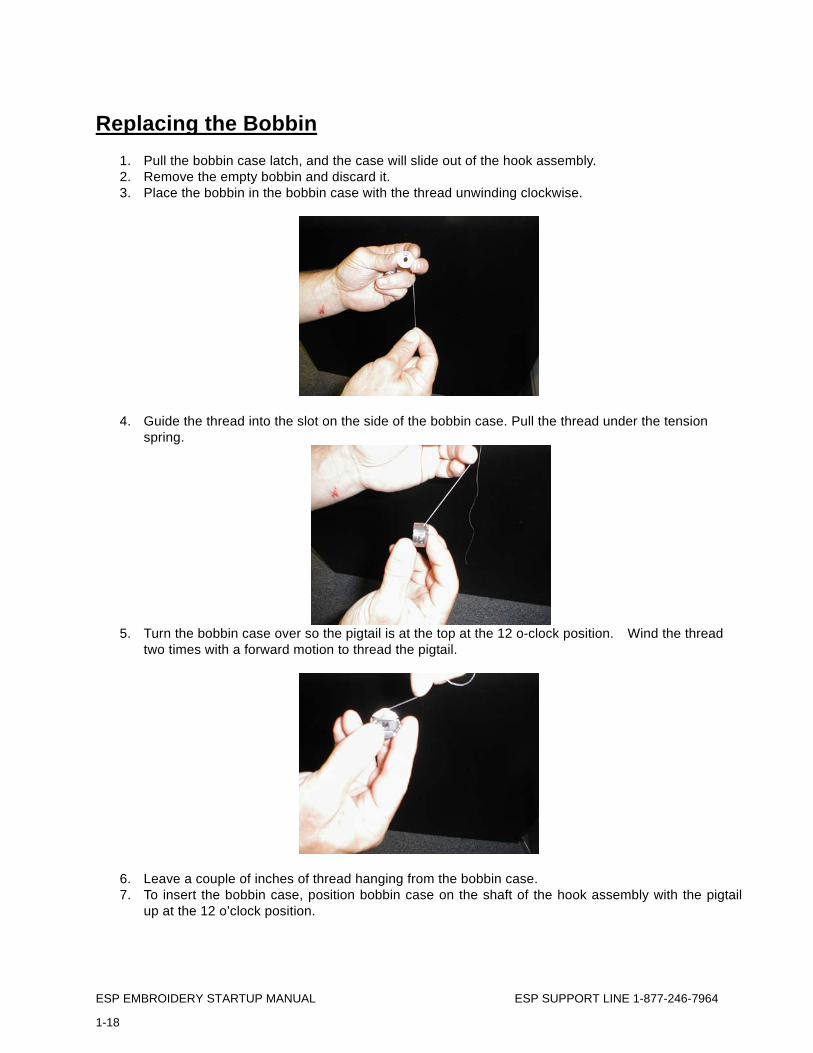
1. Pull the bobbin case latch, and the case will slide out of the hook assembly. 2. Remove the empty bobbin and discard it. 3. Place the bobbin in the bobbin case with the thread unwinding clockwise.
4. Guide the thread into the slot on the side of the bobbin case. Pull the thread under the tension spring.
5. Turn the bobbin case over so the pigtail is at the top at the 12 o-clock position. Wind the thread
two times with a forward motion to thread the pigtail.
6. Leave a couple of inches of thread hanging from the bobbin case. 7. To insert the bobbin case, position bobbin case on the shaft of the hook assembly with the pigtail
up at the 12 o’clock position.

ESP EMBROIDERY STARTUP MANUAL ESP SUPPORT LINE 1-877-246-7964
1-19
8. Push bobbin case into position until a distinct click is heard and let a couple of inches of thread
hang down.
9. Close the hook cover door and the machine is ready to sew.
ESP EMBROIDERY STARTUP MANUAL ESP SUPPORT LINE 1-877-246-7964
1-20
Cap Embroidery The EX Cap Frame and the Advantage EX cap frames allow for precision hooping and easy installation when embroidering finished caps. The sewing field size is: 3-1/8” high x 14” wide. However, the design size will depend on the type of cap used. Low profile caps will have a maximum height of about 2” to 2-1/4”. Cap backing should be a very heavy tearaway and is available in precut pieces as well as by the roll. Cap designs should be digitized sewing from the center out. When setting up text make sure to use the center out setting as well. If a sewing a 2-color font, set up your software center out and sew each letter completely; i.e. Sew letters inside outside before sewing the next letter. Sewing each letter completely will keep letters in registration.
Installing the EX Cap Driver on the Elite Pro/C-Series Machines
1. Take the arms off the machine. (For the Elite Pro machine, remove the complete hoop arm stay assembly from the top of the pantograph).
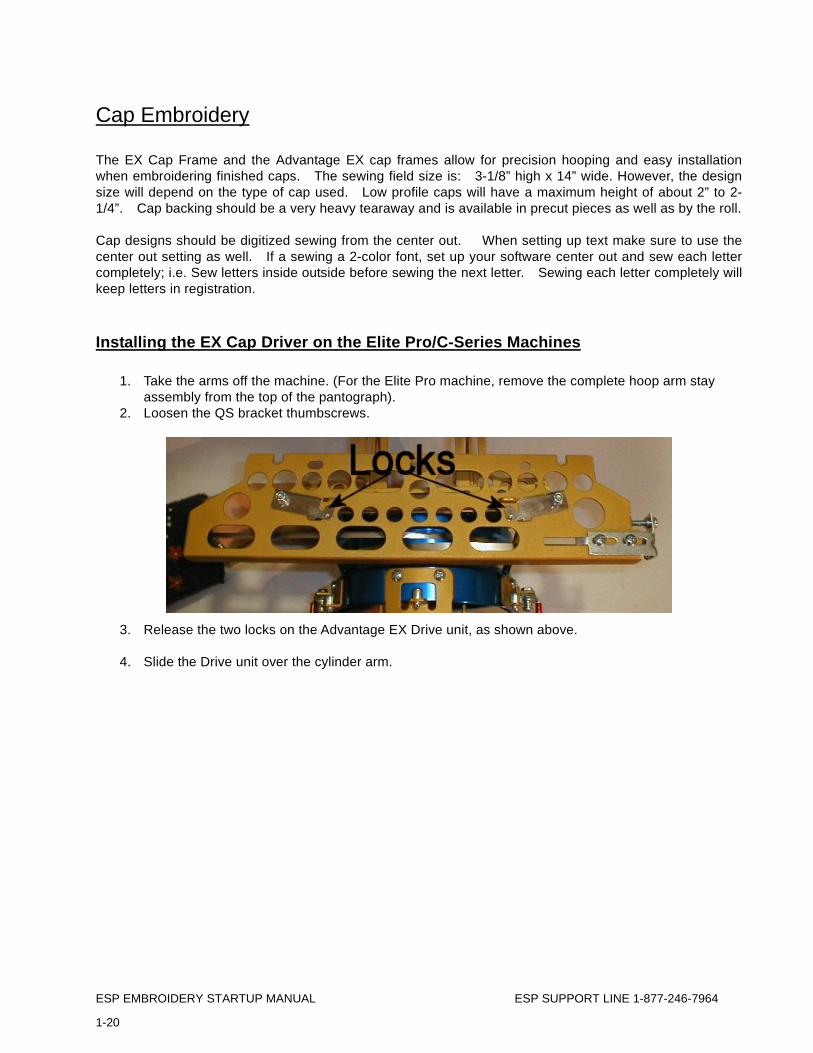
2. Loosen the QS bracket thumbscrews.
3. Release the two locks on the Advantage EX Drive unit, as shown above.
4. Slide the Drive unit over the cylinder arm.
ESP EMBROIDERY STARTUP MANUAL ESP SUPPORT LINE 1-877-246-7964
1-21
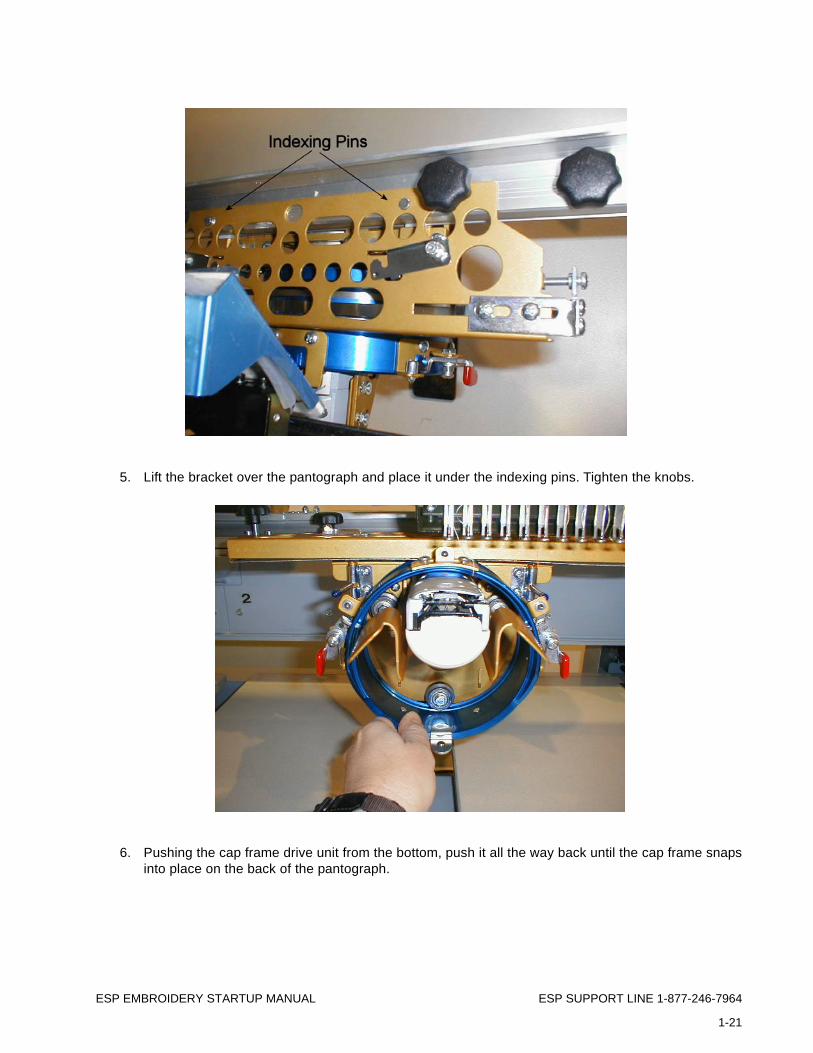
5. Lift the bracket over the pantograph and place it under the indexing pins. Tighten the knobs.
6. Pushing the cap frame drive unit from the bottom, push it all the way back until the cap frame snaps into place on the back of the pantograph.
ESP EMBROIDERY STARTUP MANUAL ESP SUPPORT LINE 1-877-246-7964
1-22
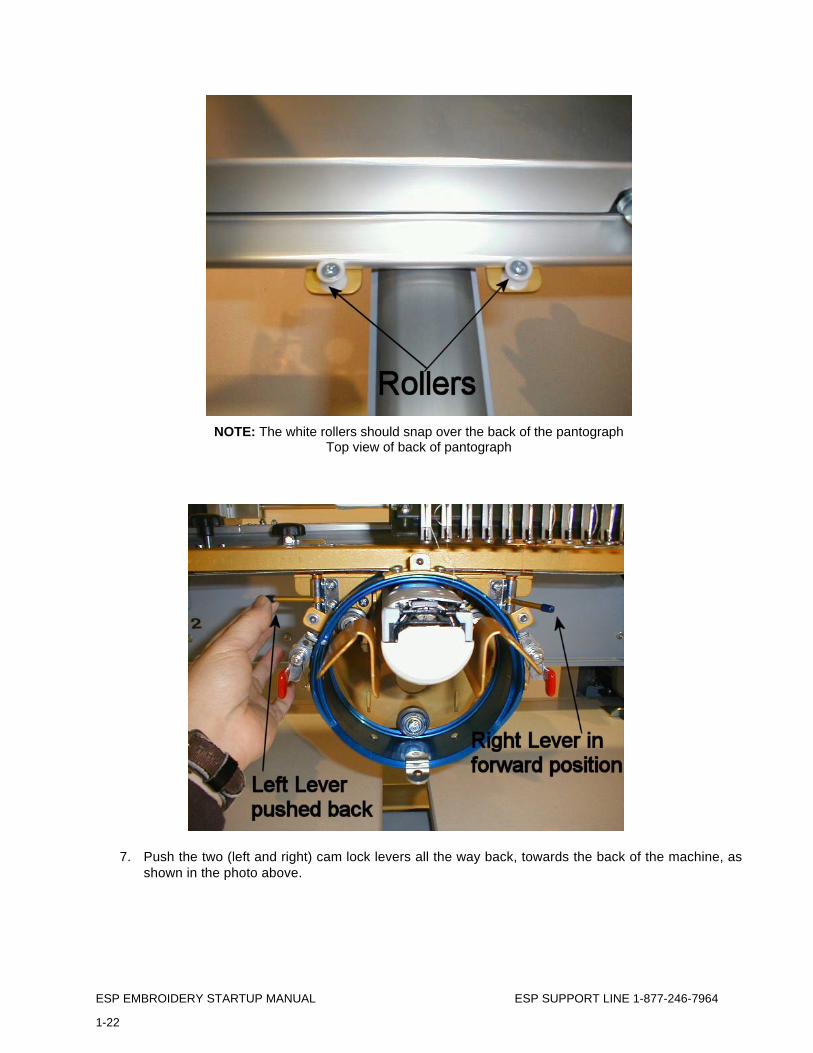
NOTE: The white rollers should snap over the back of the pantograph Top view of back of pantograph
7. Push the two (left and right) cam lock levers all the way back, towards the back of the machine, as
shown in the photo above.
ESP EMBROIDERY STARTUP MANUAL ESP SUPPORT LINE 1-877-246-7964
1-23
Installing the EX Cap Driver on the Elite XL
1. Remove the Panto Hoop Arm Stay from the top of the pantograph. Remove the Hardware Package from the Cap Frame box.
2. This package includes the following parts:
a. (2) Black Knobs b. (1) Left Mounting Bracket (Stamped “LEFT”) c. (1) Right Mounting Bracket (Stamped “RIGHT”) d. (4) M5 x 10 mm Flat head screws
ESP EMBROIDERY STARTUP MANUAL ESP SUPPORT LINE 1-877-246-7964
1-24
3. Attach the Left and Right Mounting Brackets using the (4) M5 x 10mm Flat head screws, as
pictured.
ESP EMBROIDERY STARTUP MANUAL ESP SUPPORT LINE 1-877-246-7964
1-25
4. Release the two locks on the Advantage EX Drive unit. 5. Slide the Drive unit over the cylinder arm.
6. Looking at the underside of the pantograph, align the slotted holes on the Drive unit with the Studs
on the Right and Left Mounting brackets. Push the Drive unit forward onto the Studs.
NOTE: You may need to lift up on the Gold top plate so it rides up and over the top of the pantograph.

ESP EMBROIDERY STARTUP MANUAL ESP SUPPORT LINE 1-877-246-7964
1-26
7. Make sure the Drive unit is pushed all the way forward and butts up against the front of the
pantograph. Then install the (2) Black Knobs and tighten them.
8. Lift the top drive unit bracket over the pantograph and place it over the indexing pins. Tighten the
(2) Black knobs on the top of the pantograph.
ESP EMBROIDERY STARTUP MANUAL ESP SUPPORT LINE 1-877-246-7964
1-27
Hooping a Cap Hooping caps is very easy when broken down into steps. Each area should be secured working left to right. Also remember you will have an opportunity to work out any wrinkles at the end.
1. Use a 3-3/4” x 15” piece of backing to hoop most caps. HINT: Cut several pieces, roll into small tube and put a rubber band around it to create curved backing pieces which will curve around cap framing device and stay in place.
2. Place backing piece up to ridge in cap frame.
3. Flip sweatband away from inside of cap.
4. Lay cap onto cap framing device.
5. Line cap center ¾” to 1” to the left of the cap frame center.
ESP EMBROIDERY STARTUP MANUAL ESP SUPPORT LINE 1-877-246-7964
1-28
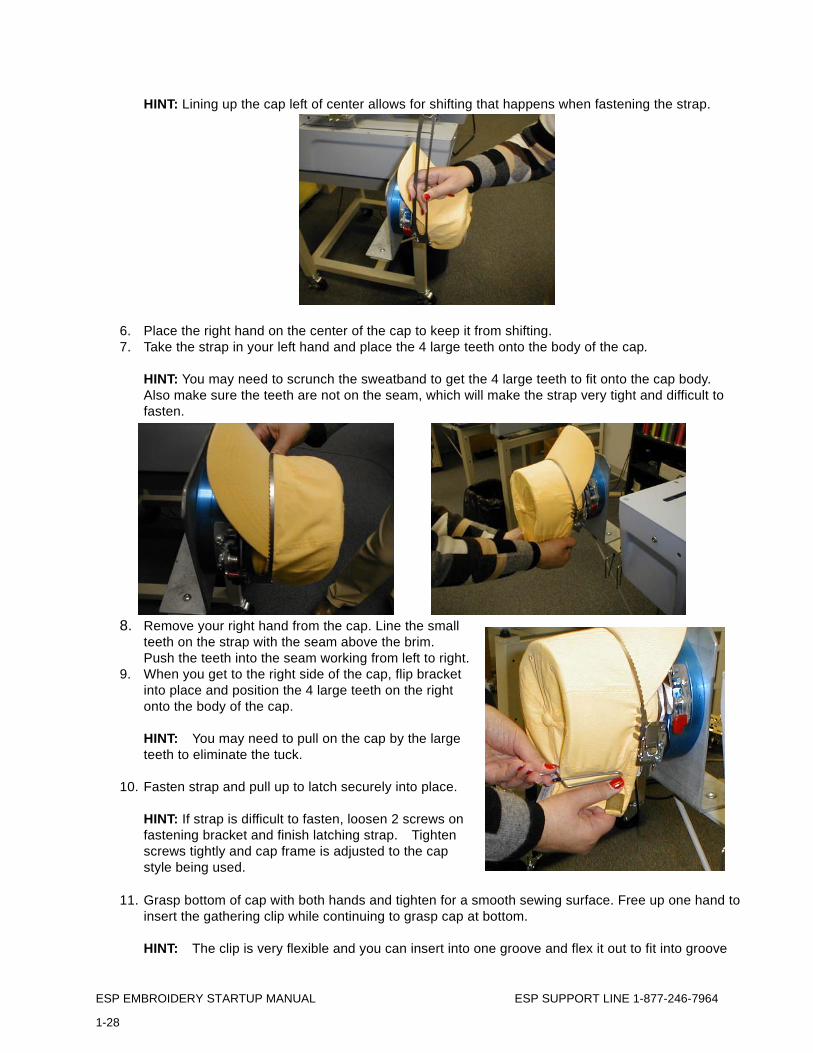
HINT: Lining up the cap left of center allows for shifting that happens when fastening the strap.
6. Place the right hand on the center of the cap to keep it from shifting. 7. Take the strap in your left hand and place the 4 large teeth onto the body of the cap.
HINT: You may need to scrunch the sweatband to get the 4 large teeth to fit onto the cap body. Also make sure the teeth are not on the seam, which will make the strap very tight and difficult to fasten.
8. Remove your right hand from the cap. Line the small teeth on the strap with the seam above the brim. Push the teeth into the seam working from left to right.
9. When you get to the right side of the cap, flip bracket into place and position the 4 large teeth on the right onto the body of the cap.
HINT: You may need to pull on the cap by the large teeth to eliminate the tuck.
10. Fasten strap and pull up to latch securely into place.
HINT: If strap is difficult to fasten, loosen 2 screws on fastening bracket and finish latching strap. Tighten screws tightly and cap frame is adjusted to the cap style being used.
11. Grasp bottom of cap with both hands and tighten for a smooth sewing surface. Free up one hand to
insert the gathering clip while continuing to grasp cap at bottom. HINT: The clip is very flexible and you can insert into one groove and flex it out to fit into groove
ESP EMBROIDERY STARTUP MANUAL ESP SUPPORT LINE 1-877-246-7964
1-29
on opposite side.
12. If there are diagonal wrinkles on the sides of cap, grasp the clip with one hand and pull down and towards you to work out the diagonal wrinkle. Repeat for the opposite side.
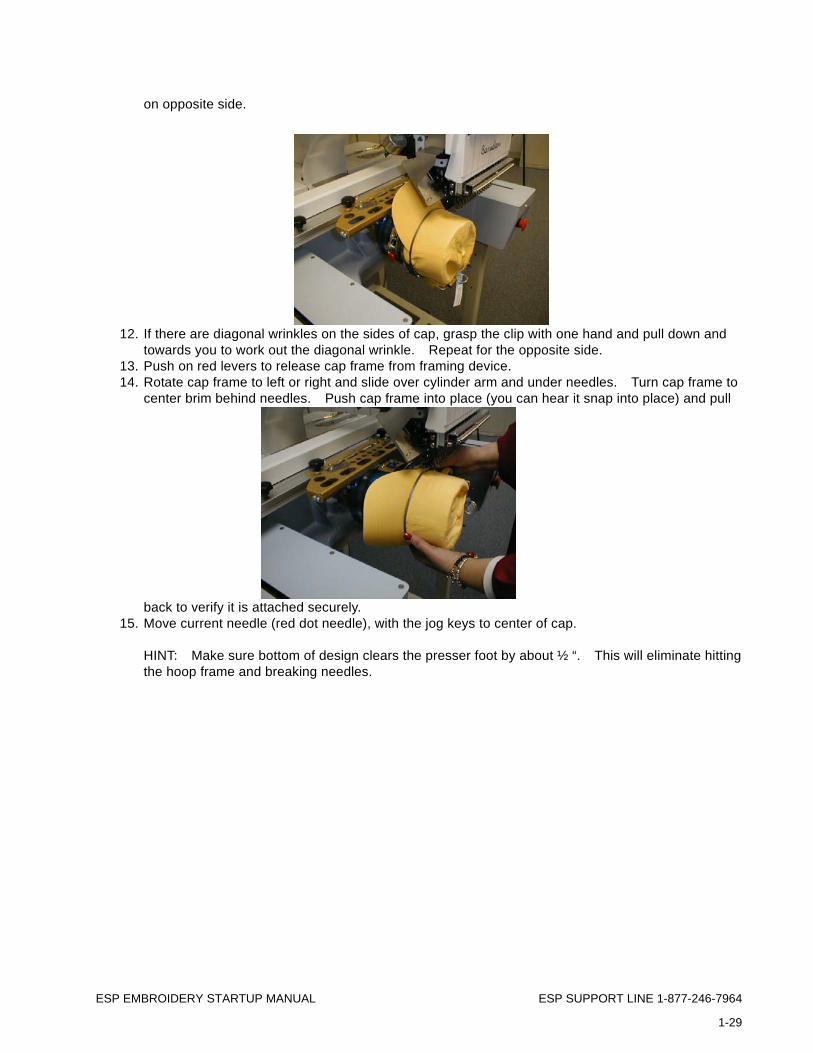
13. Push on red levers to release cap frame from framing device. 14. Rotate cap frame to left or right and slide over cylinder arm and under needles. Turn cap frame to
center brim behind needles. Push cap frame into place (you can hear it snap into place) and pull
back to verify it is attached securely. 15. Move current needle (red dot needle), with the jog keys to center of cap.
HINT: Make sure bottom of design clears the presser foot by about ½ “. This will eliminate hitting the hoop frame and breaking needles.
ESP EMBROIDERY STARTUP MANUAL ESP SUPPORT LINE 1-877-246-7964
1-30
Hooping the Back of a Cap Using a 12cm Round Hoop
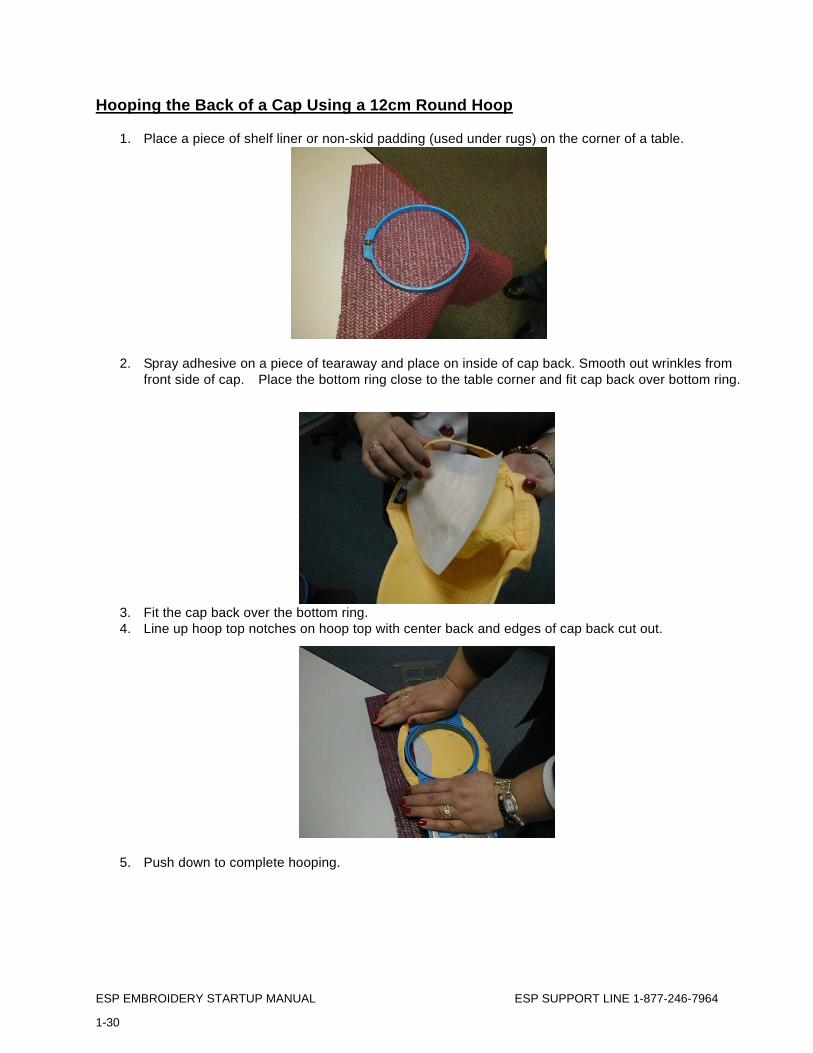
1. Place a piece of shelf liner or non-skid padding (used under rugs) on the corner of a table.
2. Spray adhesive on a piece of tearaway and place on inside of cap back. Smooth out wrinkles from
front side of cap. Place the bottom ring close to the table corner and fit cap back over bottom ring.
3. Fit the cap back over the bottom ring. 4. Line up hoop top notches on hoop top with center back and edges of cap back cut out.
5. Push down to complete hooping.
ESP EMBROIDERY STARTUP MANUAL ESP SUPPORT LINE 1-877-246-7964
2-1
Section 2 - Maintaining Your Machine This section includes information on the following:
Cleaning Your Machine..................................................................................................2-2 Needle Depth Adjustment ..............................................................................................2-2 Hook Timing...................................................................................................................2-4 Checking Hook Timing .............................................................................................2-5 Adjusting Hook Timing .............................................................................................2-7 Replacing Needles.........................................................................................................2-9 Troubleshooting ...........................................................................................................2-10 Lubrication....................................................................................................................2-12 Instructions for Lubricating the Elite Pro/Multi ........................................................2-11 Instructions for Lubricating the Elite XL..................................................................2-29
ESP EMBROIDERY STARTUP MANUAL ESP SUPPORT LINE 1-877-246-7964 2-2
Cleaning Your Machine
Cleaning your machine before oiling is very important. Keep all areas of the machine clean of built-up lint and dust.
A soft and stiff bristle brush as well as a shop vac should be available for routine cleaning. An air compressor is useful for cleaning hard to reach areas. A mild spray cleaner can be used on the tabletop to clean up excess oil that may splatter when the
machine is oiled.
A maintenance log, attached to the machine, is recommended. Keep a chart of the daily, weekly, etc. maintenance performed on the machine.
Cleaning the Bobbin Case
In a normal production setting, the bobbin case should be cleaned/checked every 4 to 6 hours. Brush lint and dust out of the bobbin case. Failure to keep the bobbin case clean can cause tension problems. If tension is adjusted without first removing dust and lint, the tension spring on the bobbin case can be bent too far and the bobbin case will need to be replaced.
1. When the bobbin case is removed for cleaning, check the lever for wear. 2. Brush lint and dust out of the bobbin case with a small, soft-bristle brush. 3. Replace the bobbin in the bobbin case and test the tension.
Cleaning the Hook Assembly
The hook assembly should be cleaned every 4 to 6 hours when the machine is used in a normal production setting. The hook assembly should be oiled every 4 to 6 hours.
1. Remove the bobbin case from the hook assembly. 2. Brush any lint or dust from the hook assembly with a small stiff-bristle brush. If you can’t remove
all the lint/dust with a brush, use compressed air to blow the hook assembly clean.
Needle Depth - ZN/ZQ Sewing Heads
Improper needle depth can cause a variety of sewing problems.
• Skipping Stitches • Looping • Fraying • Breaking Thread
During each stitch, the needle must rise 2-3 mm from bottom dead center to form a loop behind the needle. As the hook point passes behind the needle, it captures the formed loop. If the needle depth is too high or too low, the hook will be unable to capture the loop. The stitch will not form properly and sewing quality is affected. Some of the causes may be:
• Needle Breaking or Bending • Sewing into the hoop • Changing needle brands
ESP EMBROIDERY STARTUP MANUAL ESP SUPPORT LINE 1-877-246-7964
2-3
Tools needed for this procedure are:
• 3mm Hex Key (Allen Wrench) • No. 1 Philips Head Screwdriver • Flashlight
This procedure details how to check if the needle depth is set properly, and, if not, how to adjust it.
Adjusting the Needle Depth 1. Using the Automat/ Controller, position sewing head to needle 2. 2. Power down embroidery machine. 3. Remove bobbin case from Hook Assembly 4. Rotate hand wheel so needle is at its lowest point (Bottom Dead Center). (Zero degrees on the degree
wheel is Bottom Dead Center.)
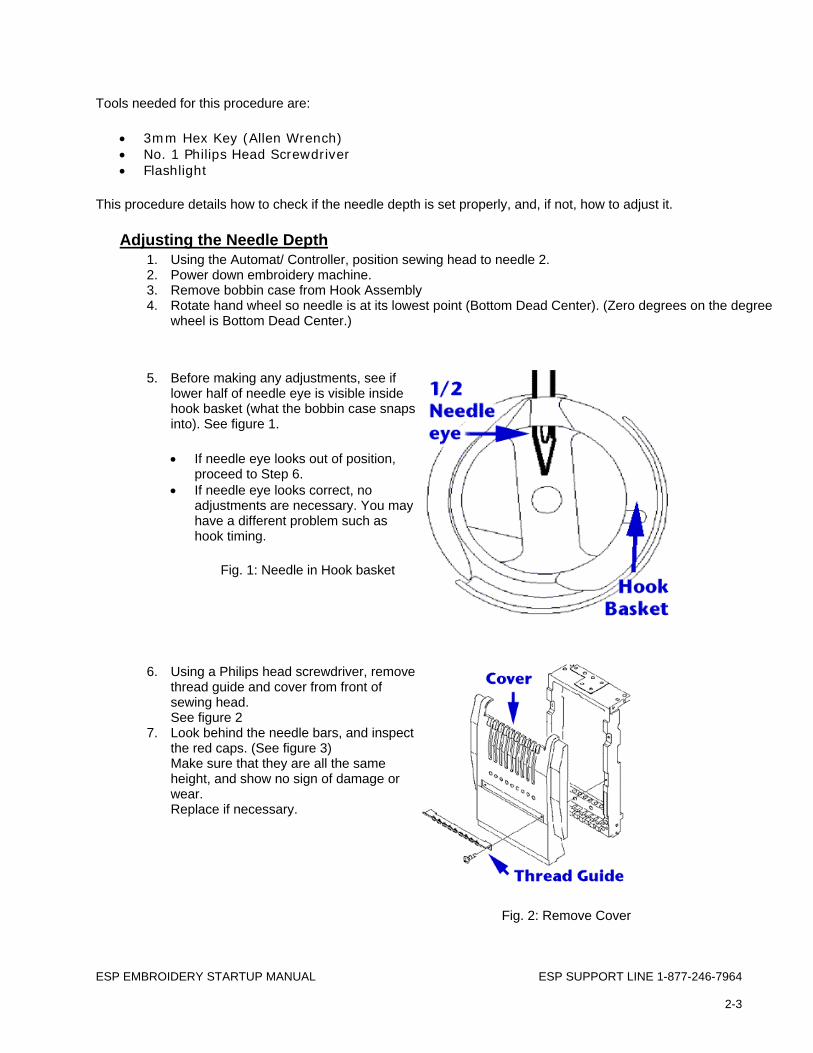
5. Before making any adjustments, see if
lower half of needle eye is visible inside hook basket (what the bobbin case snaps into). See figure 1.
• If needle eye looks out of position, proceed to Step 6.
• If needle eye looks correct, no adjustments are necessary. You may have a different problem such as hook timing.
Fig. 1: Needle in Hook basket
6. Using a Philips head screwdriver, remove
thread guide and cover from front of sewing head. See figure 2
7. Look behind the needle bars, and inspect the red caps. (See figure 3) Make sure that they are all the same height, and show no sign of damage or wear. Replace if necessary.
Fig. 2: Remove Cover
ESP EMBROIDERY STARTUP MANUAL ESP SUPPORT LINE 1-877-246-7964 2-4
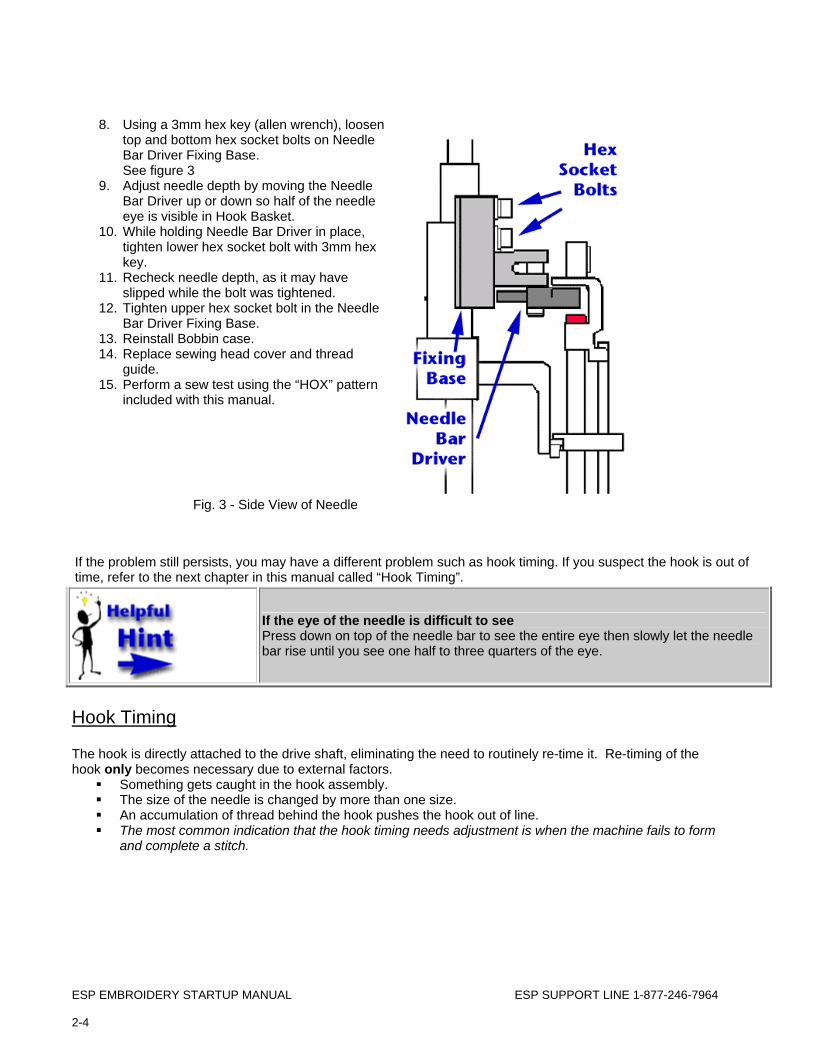
8. Using a 3mm hex key (allen wrench), loosen
top and bottom hex socket bolts on Needle Bar Driver Fixing Base. See figure 3
9. Adjust needle depth by moving the Needle Bar Driver up or down so half of the needle eye is visible in Hook Basket.
10. While holding Needle Bar Driver in place, tighten lower hex socket bolt with 3mm hex key.
11. Recheck needle depth, as it may have slipped while the bolt was tightened.
12. Tighten upper hex socket bolt in the Needle Bar Driver Fixing Base.
13. Reinstall Bobbin case. 14. Replace sewing head cover and thread
guide. 15. Perform a sew test using the “HOX” pattern
included with this manual.
Fig. 3 - Side View of Needle
If the problem still persists, you may have a different problem such as hook timing. If you suspect the hook is out of time, refer to the next chapter in this manual called “Hook Timing”.
If the eye of the needle is difficult to see Press down on top of the needle bar to see the entire eye then slowly let the needle bar rise until you see one half to three quarters of the eye.
Hook Timing
The hook is directly attached to the drive shaft, eliminating the need to routinely re-time it. Re-timing of the hook only becomes necessary due to external factors.
Something gets caught in the hook assembly. The size of the needle is changed by more than one size. An accumulation of thread behind the hook pushes the hook out of line. The most common indication that the hook timing needs adjustment is when the machine fails to form
and complete a stitch.
ESP EMBROIDERY STARTUP MANUAL ESP SUPPORT LINE 1-877-246-7964
2-5
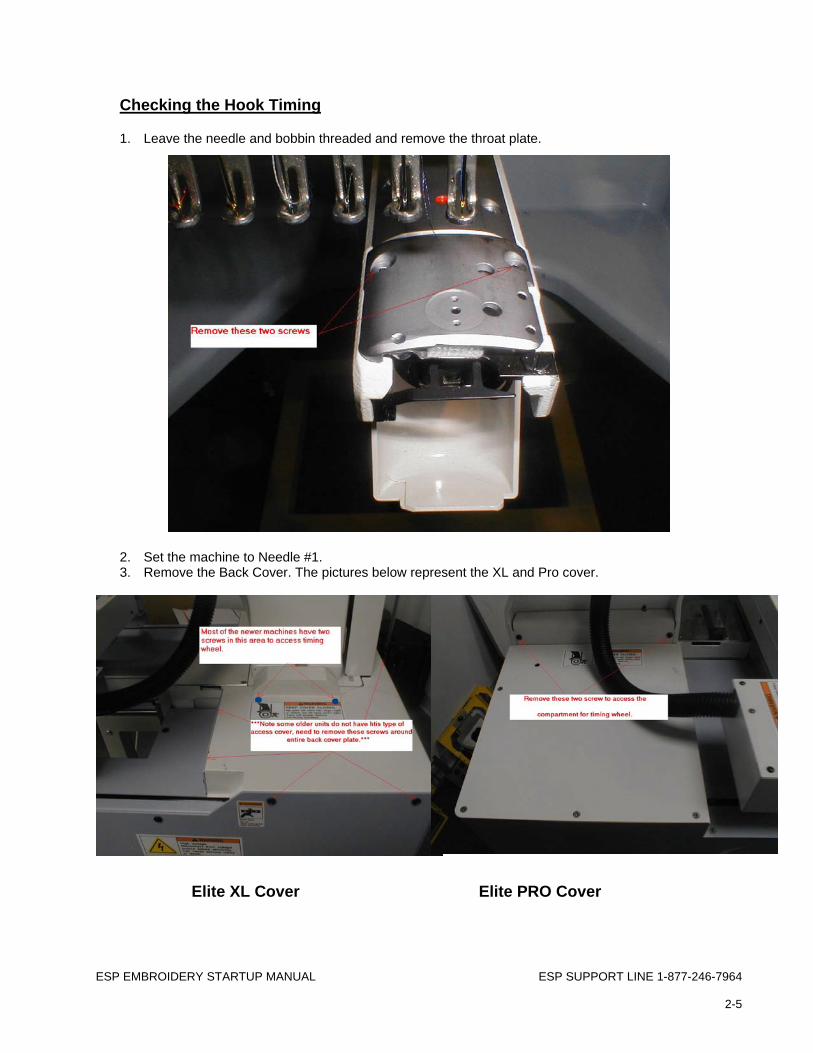
Checking the Hook Timing
1. Leave the needle and bobbin threaded and remove the throat plate.
2. Set the machine to Needle #1. 3. Remove the Back Cover. The pictures below represent the XL and Pro cover.
Elite XL Cover Elite PRO Cover
ESP EMBROIDERY STARTUP MANUAL ESP SUPPORT LINE 1-877-246-7964 2-6
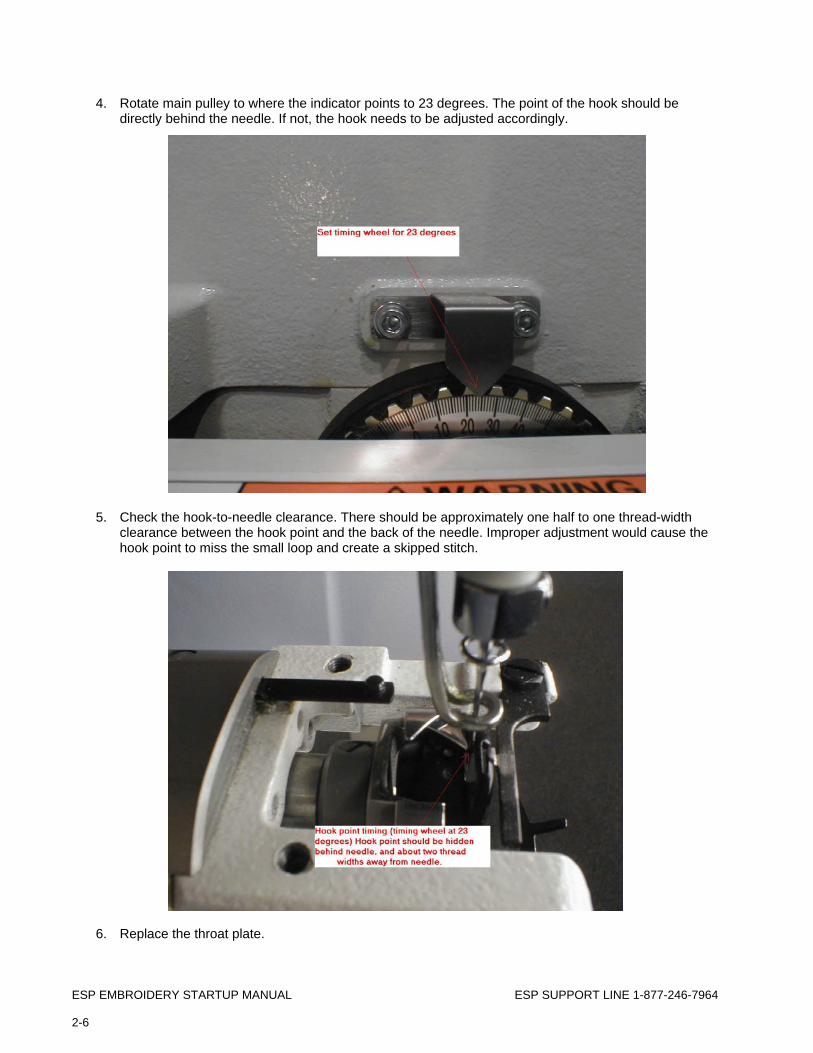
4. Rotate main pulley to where the indicator points to 23 degrees. The point of the hook should be directly behind the needle. If not, the hook needs to be adjusted accordingly.
5. Check the hook-to-needle clearance. There should be approximately one half to one thread-width
clearance between the hook point and the back of the needle. Improper adjustment would cause the hook point to miss the small loop and create a skipped stitch.
6. Replace the throat plate.
ESP EMBROIDERY STARTUP MANUAL ESP SUPPORT LINE 1-877-246-7964
2-7
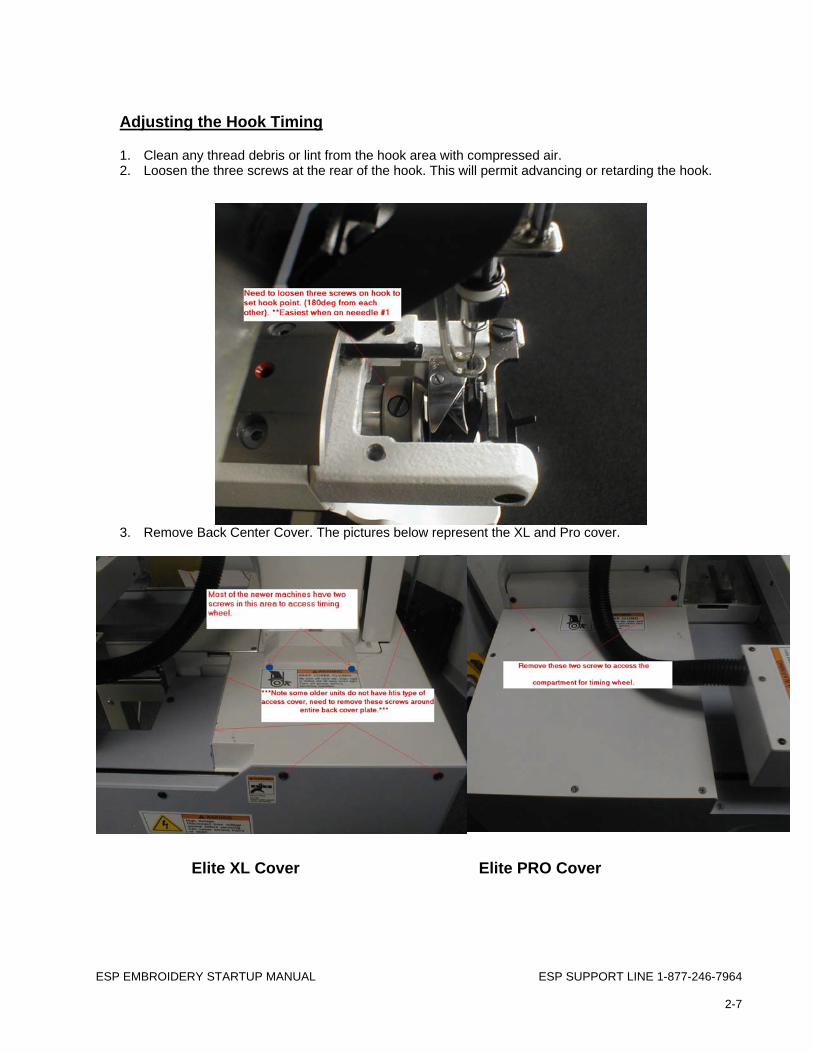
Adjusting the Hook Timing
1. Clean any thread debris or lint from the hook area with compressed air. 2. Loosen the three screws at the rear of the hook. This will permit advancing or retarding the hook.
3. Remove Back Center Cover. The pictures below represent the XL and Pro cover.
Elite XL Cover Elite PRO Cover
ESP EMBROIDERY STARTUP MANUAL ESP SUPPORT LINE 1-877-246-7964 2-8
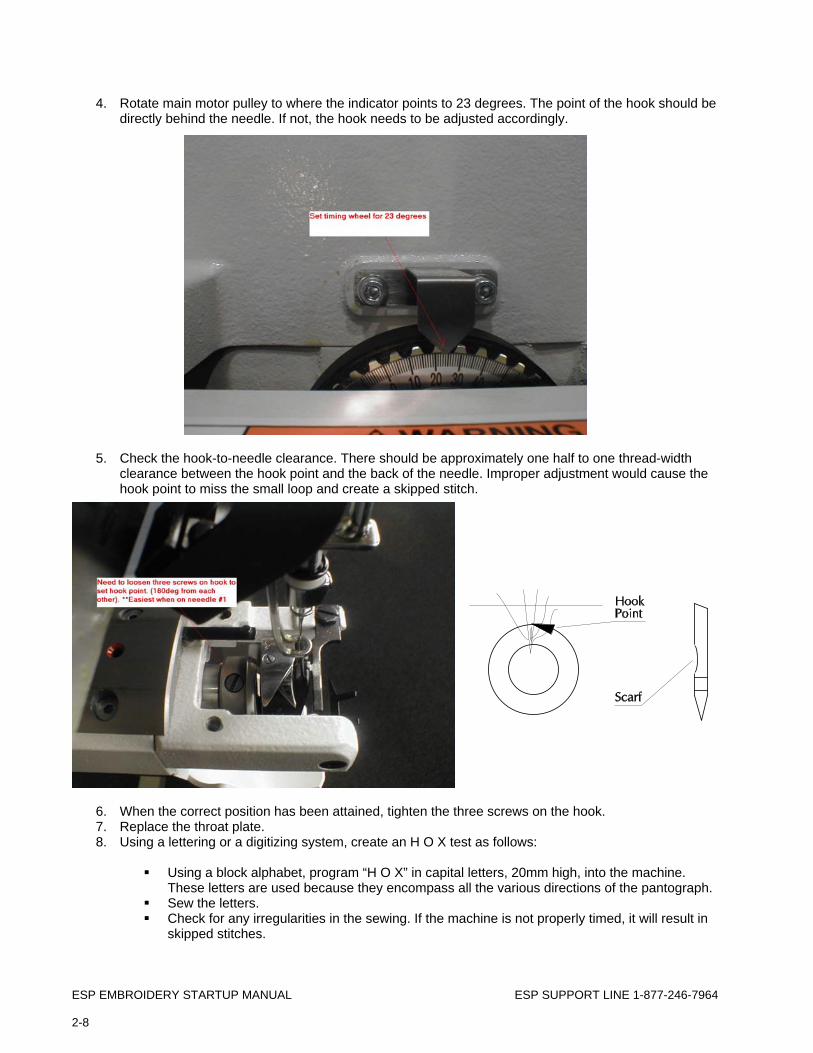
4. Rotate main motor pulley to where the indicator points to 23 degrees. The point of the hook should be directly behind the needle. If not, the hook needs to be adjusted accordingly.
5. Check the hook-to-needle clearance. There should be approximately one half to one thread-width
clearance between the hook point and the back of the needle. Improper adjustment would cause the hook point to miss the small loop and create a skipped stitch.
6. When the correct position has been attained, tighten the three screws on the hook. 7. Replace the throat plate. 8. Using a lettering or a digitizing system, create an H O X test as follows:
Using a block alphabet, program “H O X” in capital letters, 20mm high, into the machine.
These letters are used because they encompass all the various directions of the pantograph. Sew the letters. Check for any irregularities in the sewing. If the machine is not properly timed, it will result in
skipped stitches.

ESP EMBROIDERY STARTUP MANUAL ESP SUPPORT LINE 1-877-246-7964
2-9
Replacing Needles
1. Turn off the main power to the machine.
2. Loosen the needle clamp screw located at the bottom of the needle bar and remove the needle. NOTE: Be sure not to loosen screw too much or the needle clamp assembly will come off.
3. Insert the new needle as far up as possible. Make sure the groove on the needle is facing the front of
the sewing head. An improperly inserted needle will not sew, but can also damage the hook assembly.
4. Tighten the needle clamp screw to secure the needle.
Hint: Insert a straight pin into the eye to hold it in place and to avoid the needle from shifting when it is tightened.
ESP EMBROIDERY STARTUP MANUAL ESP SUPPORT LINE 1-877-246-7964 2-10
Troubleshooting FAQ’s are listed on our website at:
http://www.barudan.com/service/faq.htm 1. How do I tell if my tension is correct? 2. How do I adjust my tension? 3. How much bobbin should be showing on the back of the fabric? 4. How can I tell when my bobbin tension needs to be adjusted? 5. What do I do when the bobbin showing on the bottom is not centered? 6. How do I adjust the check spring? 7. My machine is not detecting thread breaks, what do I do? 8. What is the best thread to use on my machine? 9. What is the best needle to use? 10. How often should I change my needle? 11. What causes thread breaks/ frays? 12. What causes birdnesting? 13. My machine is skipping stitches or not picking up bobbin. Is the hook timing off? 14. How often should I oil my sewing hook? 15. How do I oil my machine? 16. How much oil do I put in the red holes? 17. How often should I oil my machine? 18. What regular maintenance should I do to my machine? 19. Should I shut the main breaker on the machine off at night? 20. My machine is giving an “Unexpected Fatal Error.” What is wrong? What should I do? (BEAT 900 series only) 21. Why is my machine telling me to call Barudan America? What should I do? 22. I hit my hoop with the needle. Now what? 23. How do I figure out what model my machine is? 24. How can I tell when my machine was built?
2-11
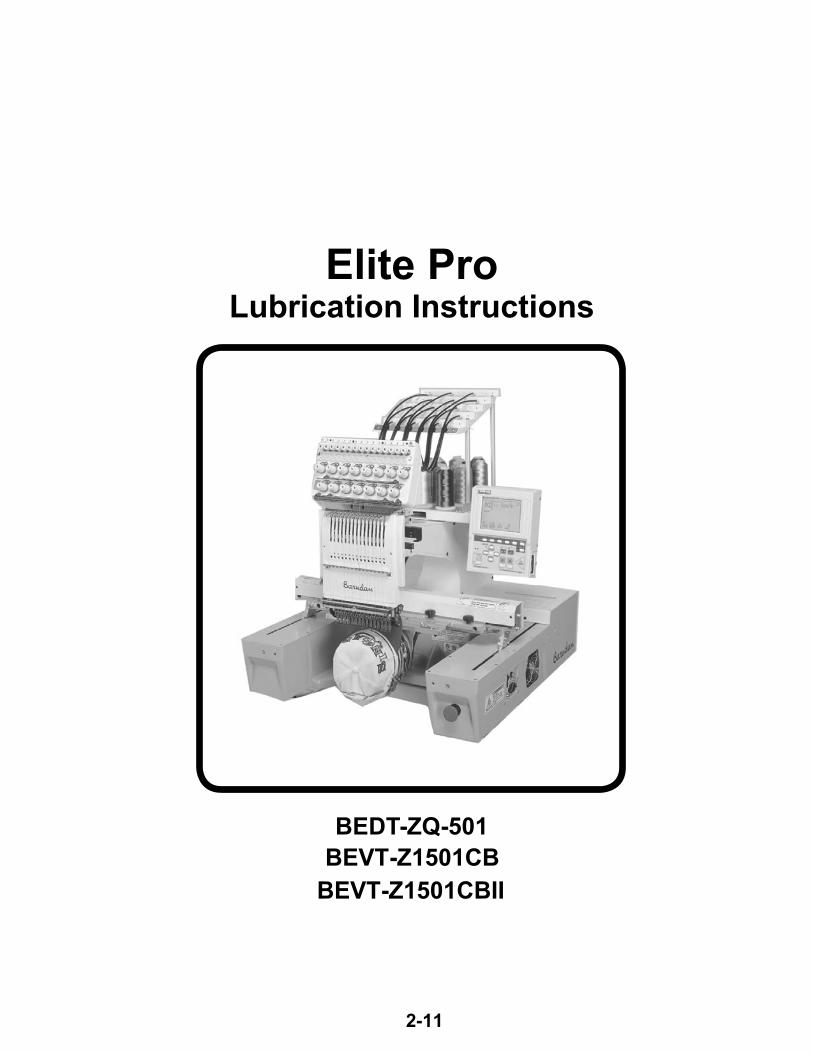
Elite Pro Lubrication Instructions
BEDT-ZQ-501BEVT-Z1501CBBEVT-Z1501CBII
2-12
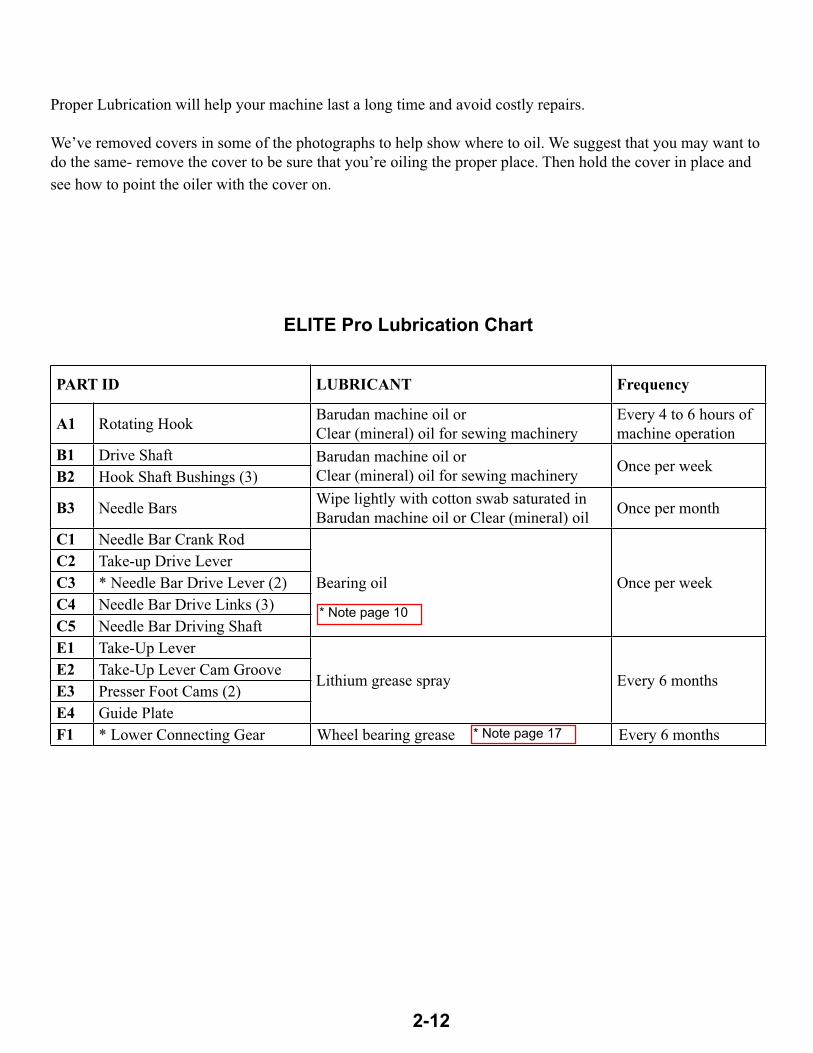
Proper Lubrication will help your machine last a long time and avoid costly repairs.
We’ve removed covers in some of the photographs to help show where to oil. We suggest that you may want to do the same- remove the cover to be sure that you’re oiling the proper place. Then hold the cover in place and see how to point the oiler with the cover on.
ELITE Pro Lubrication Chart
PART ID LUBRICANT Frequency
A1 Rotating Hook Barudan machine oil or Clear (mineral) oil for sewing machinery
Every 4 to 6 hours of machine operation
B1 Drive Shaft Barudan machine oil or Clear (mineral) oil for sewing machinery Once per week
B2 Hook Shaft Bushings (3)
B3 Needle Bars Wipe lightly with cotton swab saturated in Barudan machine oil or Clear (mineral) oil Once per month
C1 Needle Bar Crank Rod
Bearing oil Once per weekC2 Take-up Drive Lever C3 * Needle Bar Drive Lever (2)C4 Needle Bar Drive Links (3)C5 Needle Bar Driving ShaftE1 Take-Up Lever
Lithium grease spray Every 6 monthsE2 Take-Up Lever Cam GrooveE3 Presser Foot Cams (2)E4 Guide PlateF1 * Lower Connecting Gear Wheel bearing grease Every 6 months
* Note page 10
* Note page 17
2-13
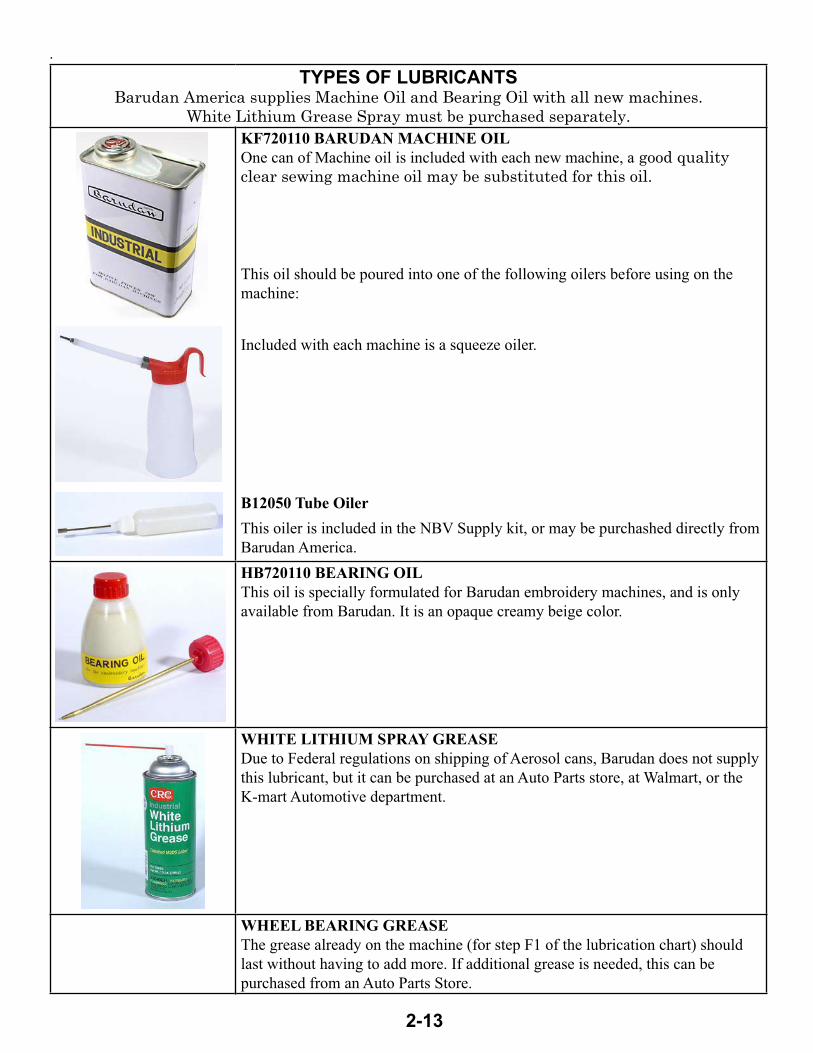
.TYPES OF LUBRICANTS
Barudan America supplies Machine Oil and Bearing Oil with all new machines. White Lithium Grease Spray must be purchased separately.
KF720110 BARUDAN MACHINE OILOne can of Machine oil is included with each new machine, a good quality clear sewing machine oil may be substituted for this oil.
This oil should be poured into one of the following oilers before using on the machine:
Included with each machine is a squeeze oiler.
B12050 Tube OilerThis oiler is included in the NBV Supply kit, or may be purchashed directly from Barudan America.HB720110 BEARING OILThis oil is specially formulated for Barudan embroidery machines, and is only available from Barudan. It is an opaque creamy beige color.
WHITE LITHIUM SPRAY GREASEDue to Federal regulations on shipping of Aerosol cans, Barudan does not supply this lubricant, but it can be purchased at an Auto Parts store, at Walmart, or the K-mart Automotive department.
WHEEL BEARING GREASEThe grease already on the machine (for step F1 of the lubrication chart) should last without having to add more. If additional grease is needed, this can be purchased from an Auto Parts Store.
2-14
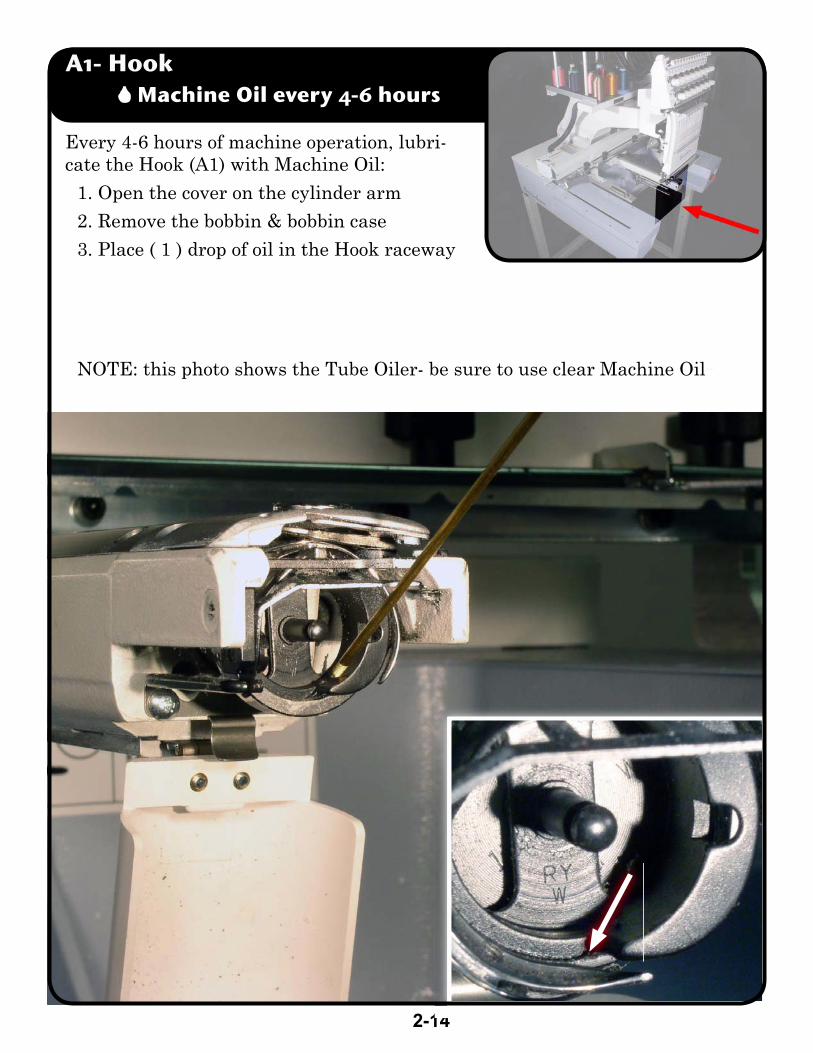
Every 4-6 hours of machine operation, lubri-cate the Hook (A1) with Machine Oil:
1. Open the cover on the cylinder arm2. Remove the bobbin & bobbin case3. Place ( 1 ) drop of oil in the Hook raceway
NOTE: this photo shows the Tube Oiler- be sure to use clear Machine Oil-
A1- Hook � Machine Oil every 4-6 hours
2-15
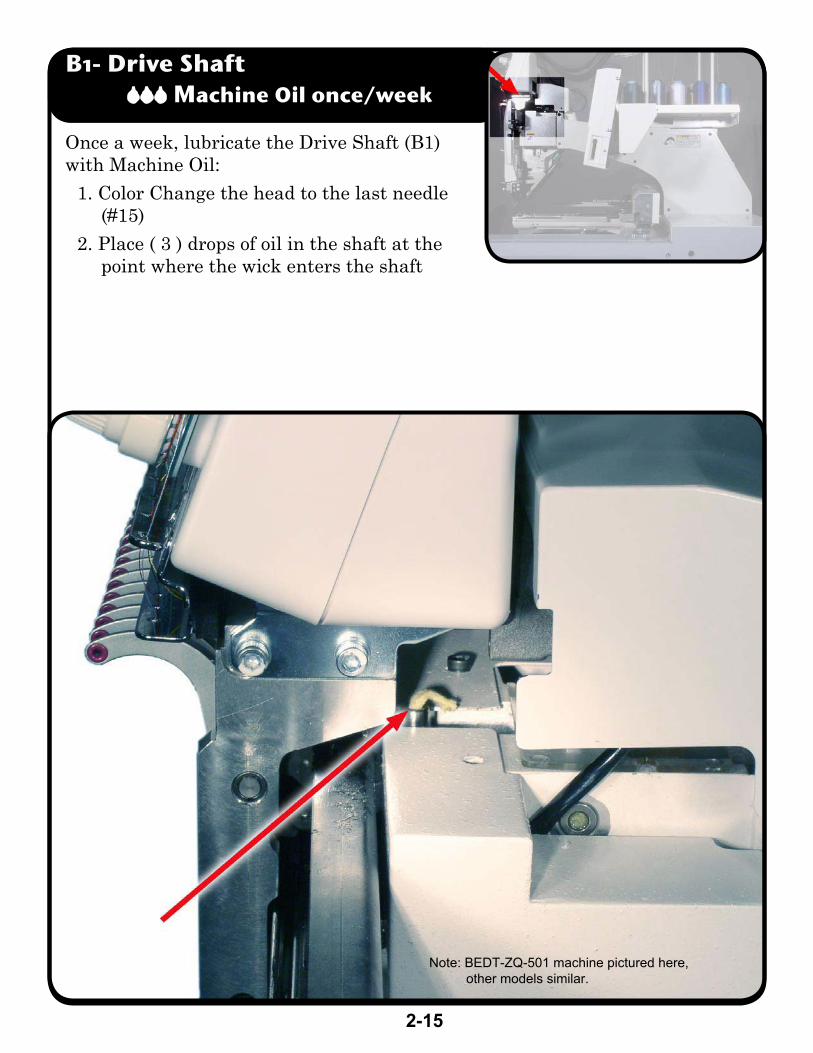
B1- Drive Shaft ��� Machine Oil once/week
Once a week, lubricate the Drive Shaft (B1) with Machine Oil:
1. Color Change the head to the last needle (#15)
2. Place ( 3 ) drops of oil in the shaft at the point where the wick enters the shaft
Note: BEDT-ZQ-501 machine pictured here, other models similar.
2-16
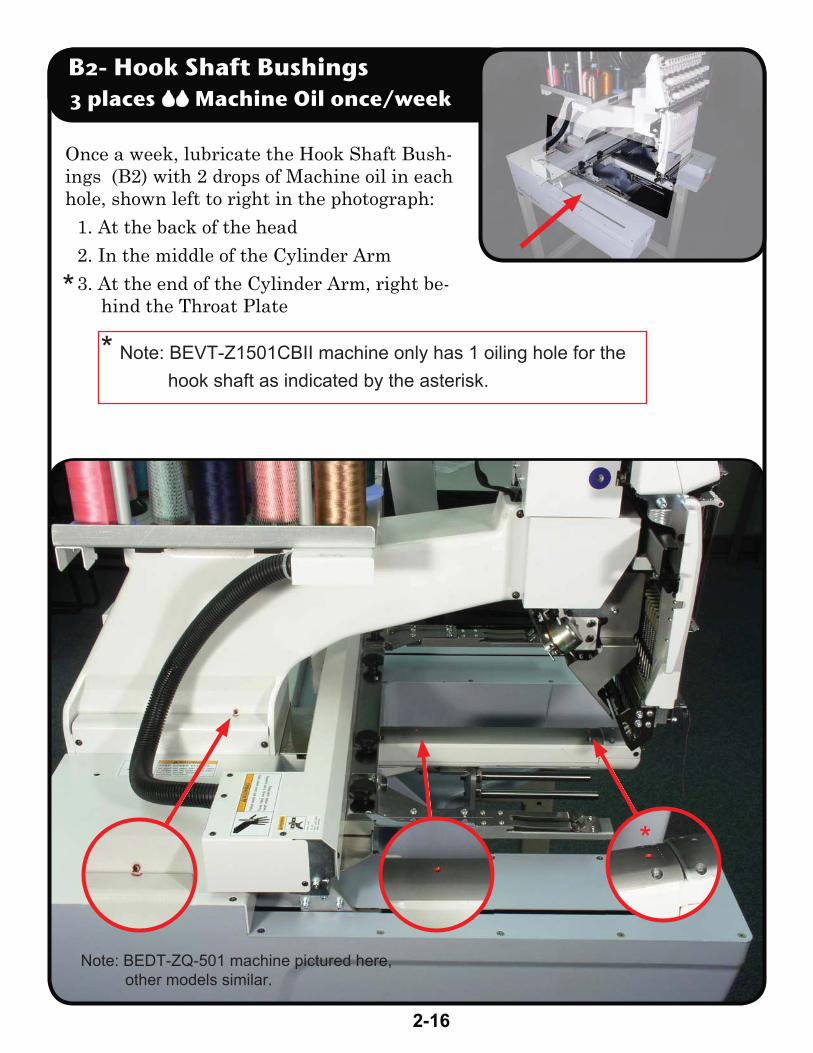
B2- Hook Shaft Bushings 3 places �� Machine Oil once/week
Once a week, lubricate the Hook Shaft Bush-ings (B2) with 2 drops of Machine oil in each hole, shown left to right in the photograph:
1. At the back of the head2. In the middle of the Cylinder Arm3. At the end of the Cylinder Arm, right be-
hind the Throat Plate
* Note: BEVT-Z1501CBII machine only has 1 oiling hole for the hook shaft as indicated by the asterisk.
*
*
Note: BEDT-ZQ-501 machine pictured here, other models similar.
2-17
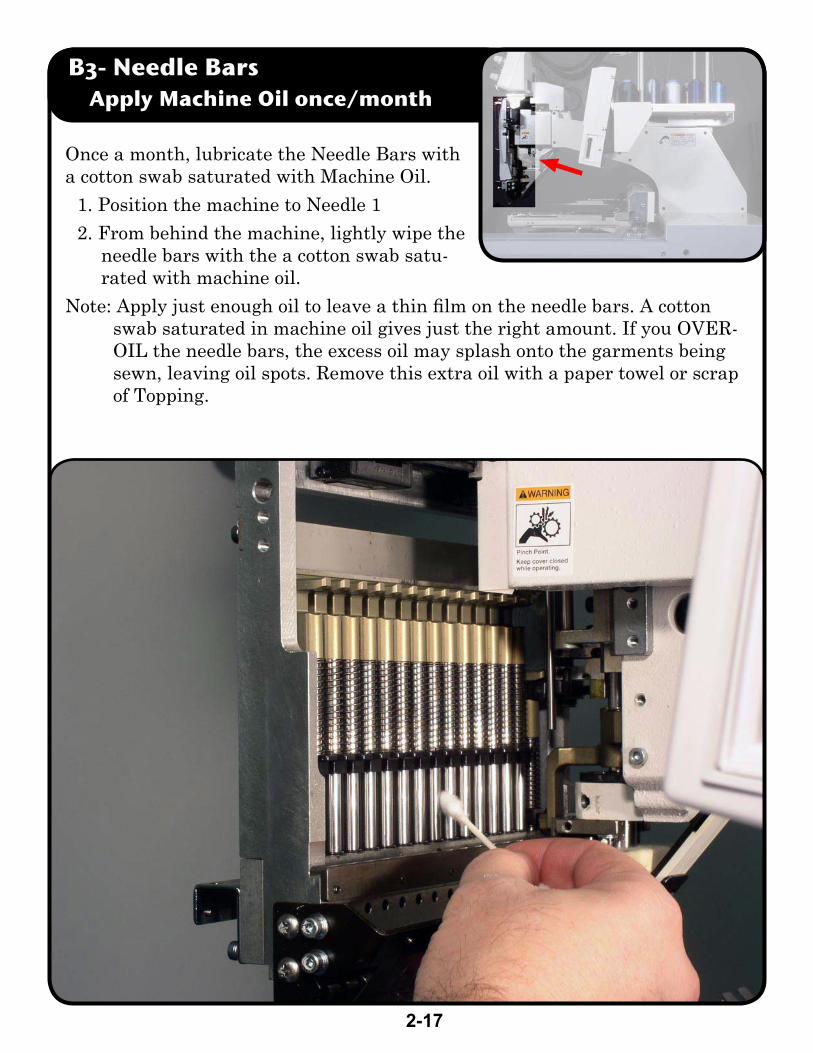
B3- Needle Bars Apply Machine Oil once/month
Once a month, lubricate the Needle Bars with a cotton swab saturated with Machine Oil.
1. Position the machine to Needle 12. From behind the machine, lightly wipe the
needle bars with the a cotton swab satu-rated with machine oil.
Note: Apply just enough oil to leave a thin film on the needle bars. A cotton swab saturated in machine oil gives just the right amount. If you OVER-OIL the needle bars, the excess oil may splash onto the garments being sewn, leaving oil spots. Remove this extra oil with a paper towel or scrap of Topping.
2-18
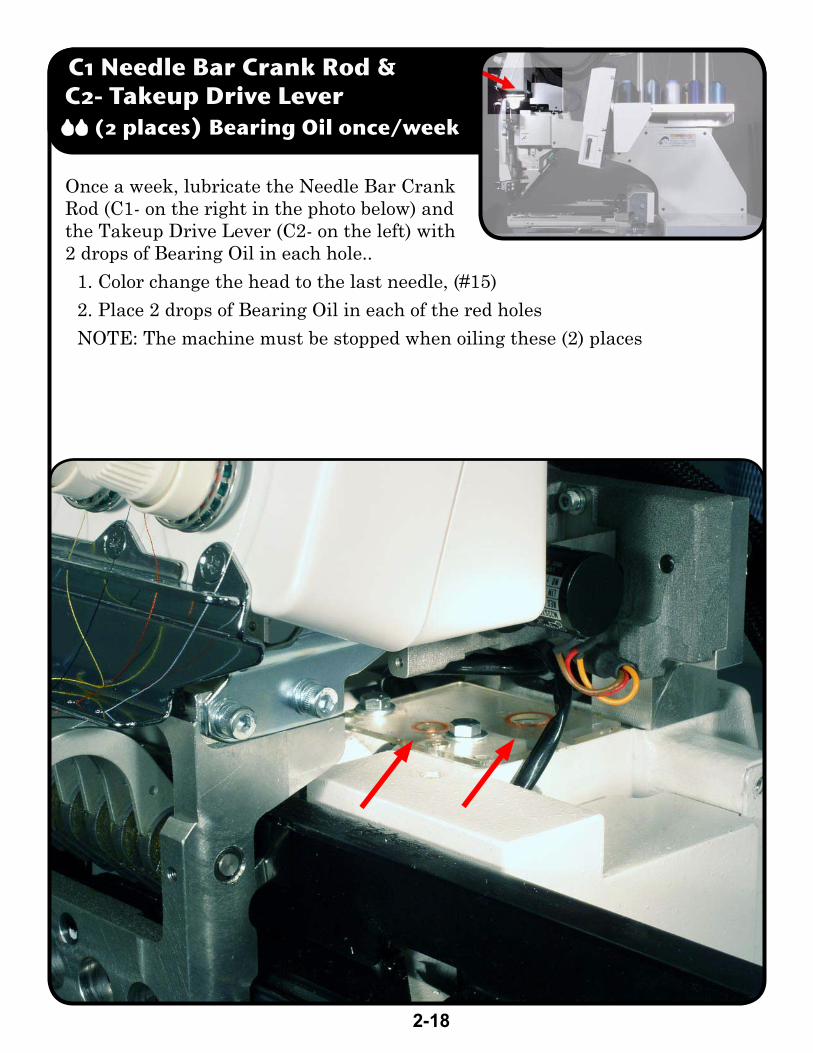
C1 Needle Bar Crank Rod & C2- Takeup Drive Lever �� (2 places) Bearing Oil once/week
Once a week, lubricate the Needle Bar Crank Rod (C1- on the right in the photo below) and the Takeup Drive Lever (C2- on the left) with 2 drops of Bearing Oil in each hole..
1. Color change the head to the last needle, (#15)2. Place 2 drops of Bearing Oil in each of the red holesNOTE: The machine must be stopped when oiling these (2) places
2-19
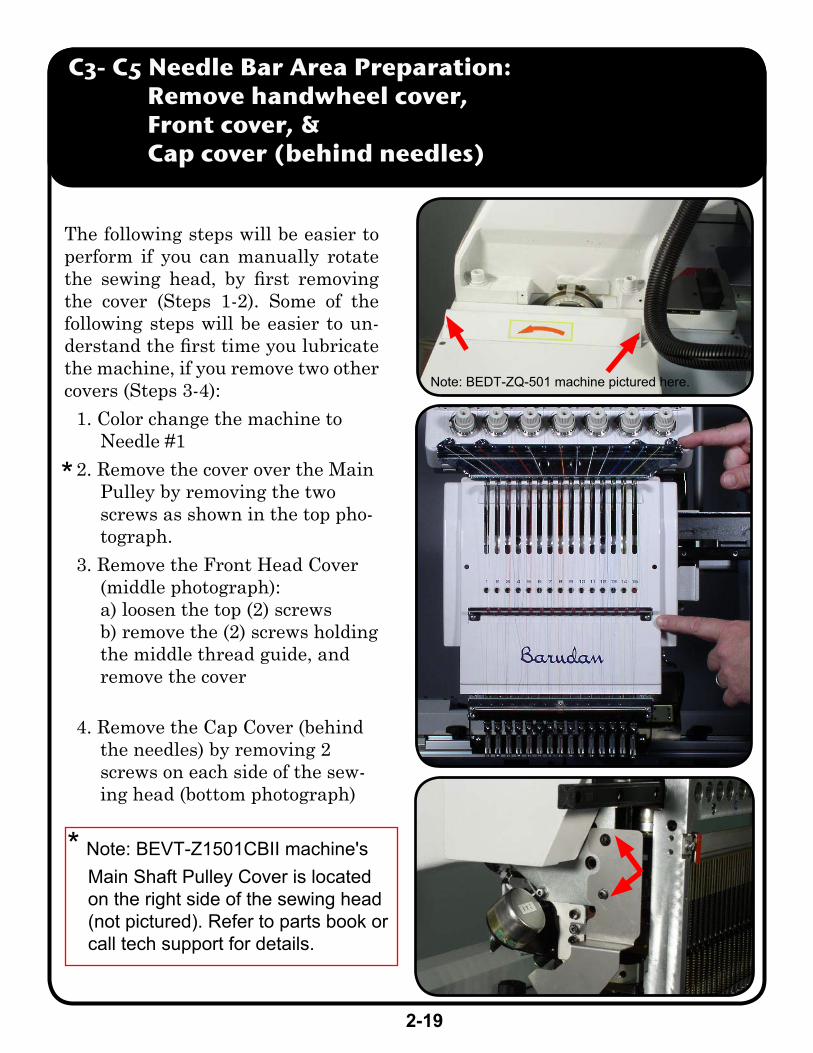
C3- C5 Needle Bar Area Preparation: Remove handwheel cover, Front cover, & Cap cover (behind needles)
The following steps will be easier to perform if you can manually rotate the sewing head, by first removing the cover (Steps 1-2). Some of the following steps will be easier to un-derstand the first time you lubricate the machine, if you remove two other covers (Steps 3-4):
1. Color change the machine to Needle #1
2. Remove the cover over the Main Pulley by removing the two screws as shown in the top pho-tograph.
3. Remove the Front Head Cover (middle photograph): a) loosen the top (2) screwsb) remove the (2) screws holding the middle thread guide, and remove the cover
4. Remove the Cap Cover (behind the needles) by removing 2 screws on each side of the sew-ing head (bottom photograph)
Note: BEDT-ZQ-501 machine pictured here.
*
* Note: BEVT-Z1501CBII machine's Main Shaft Pulley Cover is located on the right side of the sewing head (not pictured). Refer to parts book or call tech support for details.

2-20
Once a week, lubricate the Needle Bar Drive Lever and Needle Bar Drive Links with 1 drop of Bearing Oil in each hole.
1. Rotate the handwheel until you can see the 2 oil ports on the Needle Bar Drive Lever (C3) and place one drop of bearing oil in each hole
2. Rotate the handwheel until you can see the 3 oil ports on the Needle Bar Driver Links (C4) and place one drop of oil in each hole
See the photograph on the next page for a better view of the oil holes.
C3 Needle Bar Drive Lever & � (5 places) Bearing Oil C4 Needle Bar Driver Links once/week
* Note: Serial numbers ending in E07 or newer, Do Not have the (2) oiling holes pictured in the Needle Bar Drive Lever (C3). These bearings are permanently oiled from the factory.
*
2-21
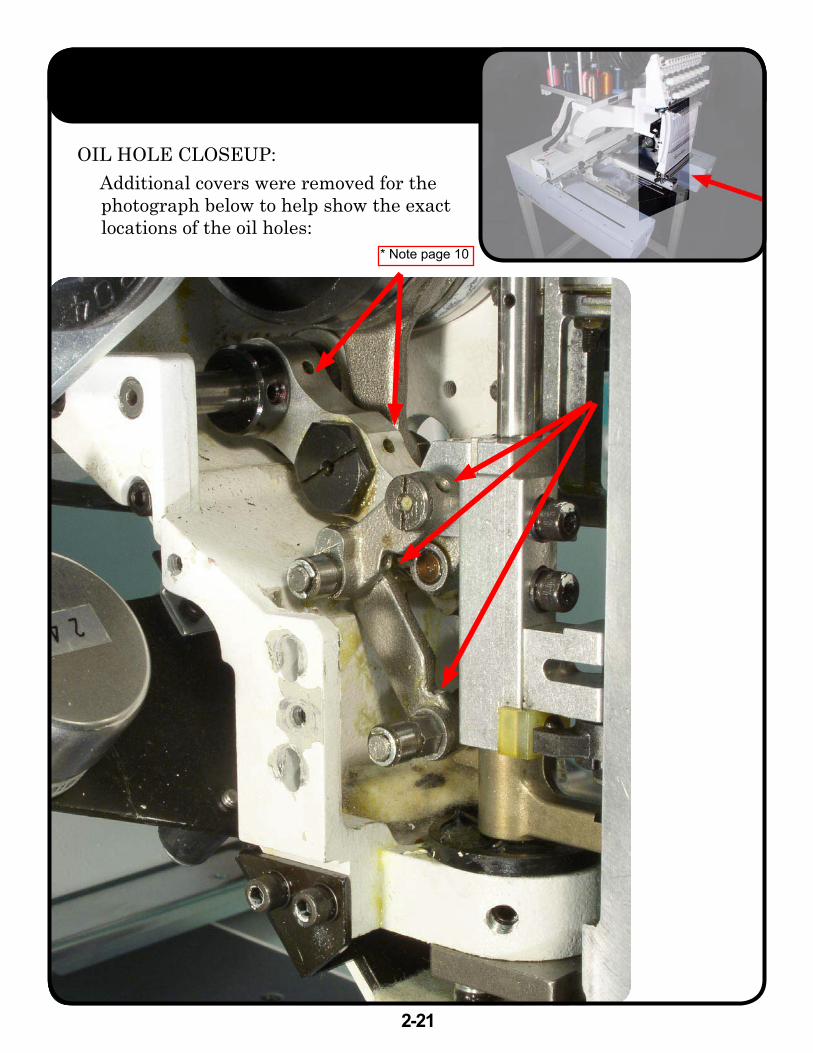
OIL HOLE CLOSEUP: Additional covers were removed for the
photograph below to help show the exact locations of the oil holes:
* Note page 10
2-22
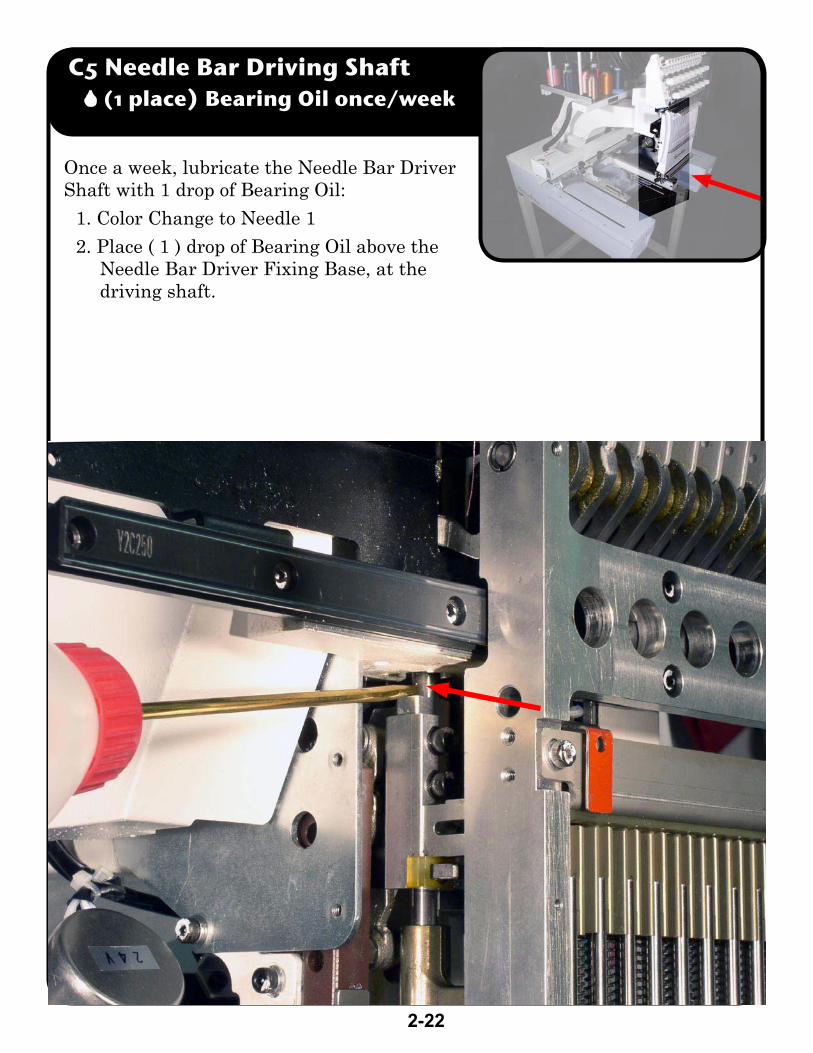
C5 Needle Bar Driving Shaft � (1 place) Bearing Oil once/week
Once a week, lubricate the Needle Bar Driver Shaft with 1 drop of Bearing Oil:
1. Color Change to Needle 12. Place ( 1 ) drop of Bearing Oil above the
Needle Bar Driver Fixing Base, at the driving shaft.
2-23
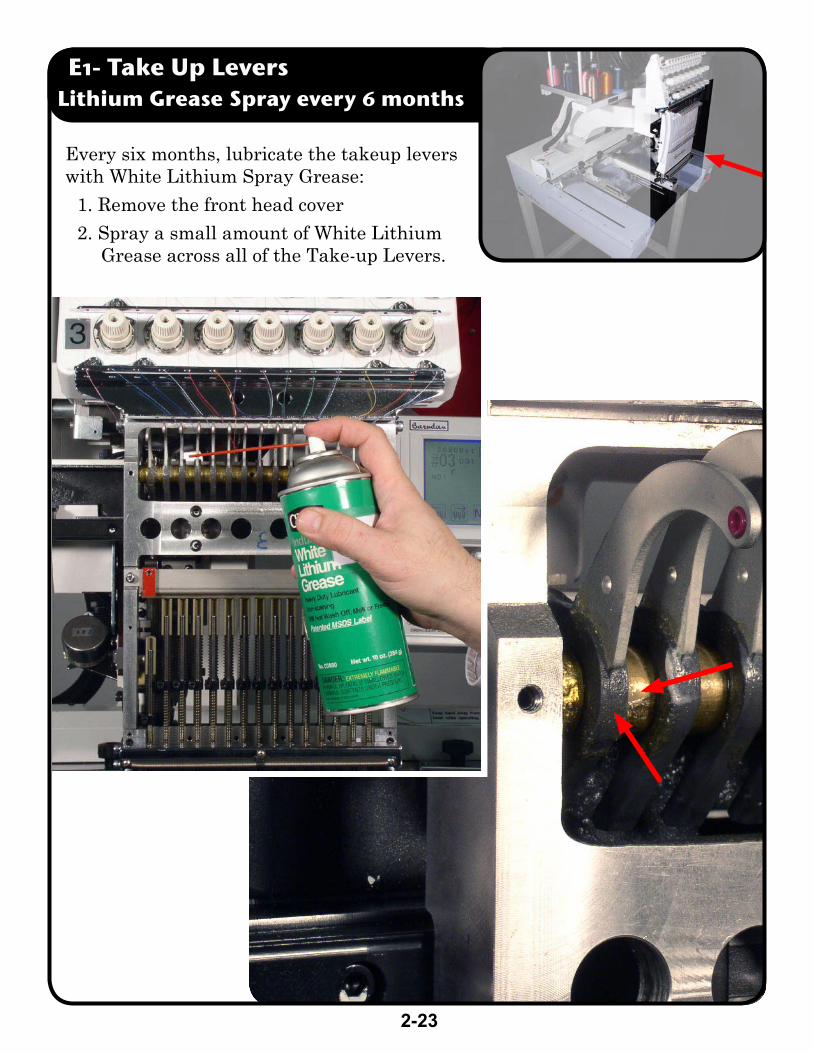
E1- Take Up Levers Lithium Grease Spray every 6 months
Every six months, lubricate the takeup levers with White Lithium Spray Grease:
1. Remove the front head cover2. Spray a small amount of White Lithium
Grease across all of the Take-up Levers.
2-24
E2- Take Up Lever Cam Lithium Grease Spray every 6 months
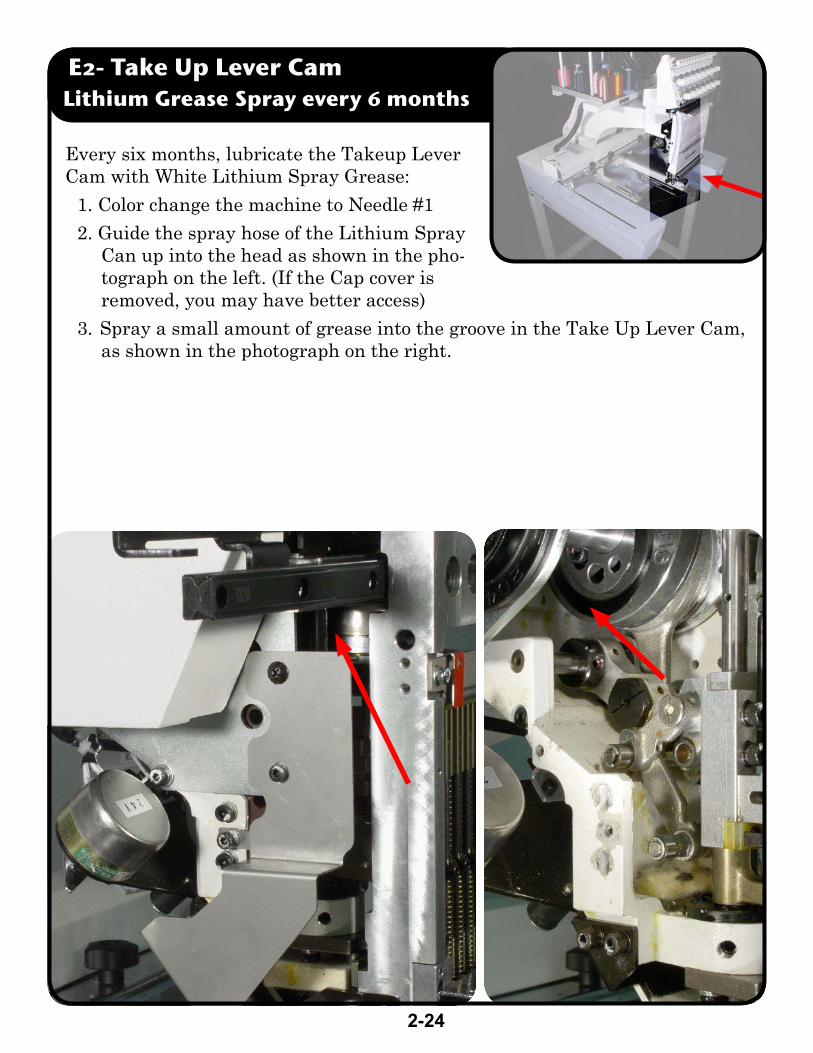
Every six months, lubricate the Takeup Lever Cam with White Lithium Spray Grease:
1. Color change the machine to Needle #12. Guide the spray hose of the Lithium Spray
Can up into the head as shown in the pho-tograph on the left. (If the Cap cover is removed, you may have better access)
3. Spray a small amount of grease into the groove in the Take Up Lever Cam, as shown in the photograph on the right.
2-25
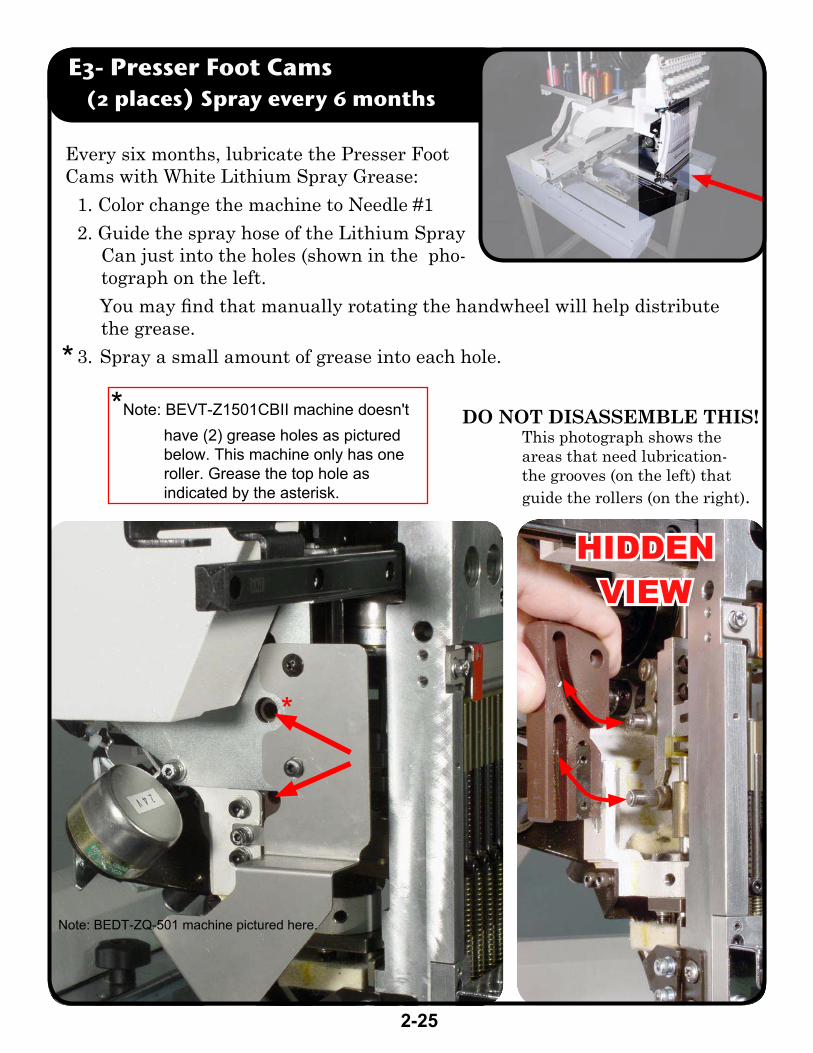
Every six months, lubricate the Presser Foot Cams with White Lithium Spray Grease:
1. Color change the machine to Needle #12. Guide the spray hose of the Lithium Spray
Can just into the holes (shown in the pho-tograph on the left.
You may find that manually rotating the handwheel will help distribute the grease.
3. Spray a small amount of grease into each hole.
E3- Presser Foot Cams (2 places) Spray every 6 months
DO NOT DISASSEMBLE THIS! This photograph shows the areas that need lubrication- the grooves (on the left) that guide the rollers (on the right).
HIDDEN VIEW
Note: BEDT-ZQ-501 machine pictured here.
*Note: BEVT-Z1501CBII machine doesn'thave (2) grease holes as picturedbelow. This machine only has oneroller. Grease the top hole asindicated by the asterisk.
*
*
2-26
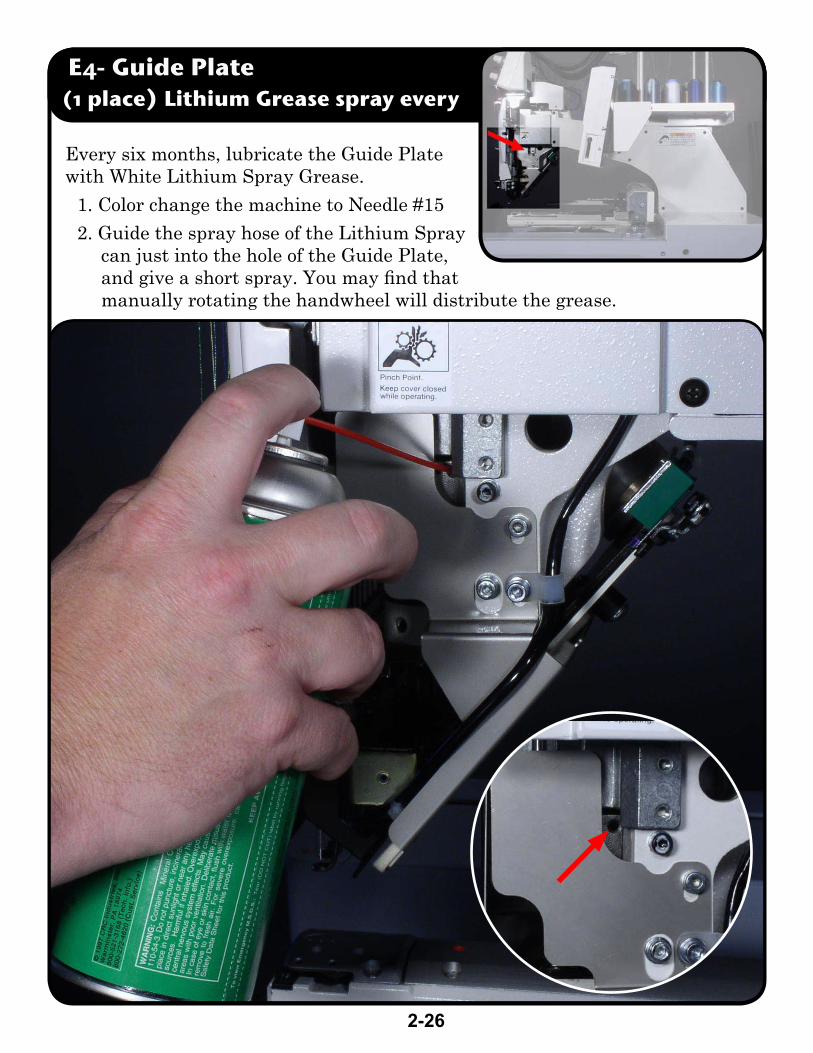
Every six months, lubricate the Guide Plate with White Lithium Spray Grease.
1. Color change the machine to Needle #152. Guide the spray hose of the Lithium Spray
can just into the hole of the Guide Plate, and give a short spray. You may find that manually rotating the handwheel will distribute the grease.
E4- Guide Plate(1 place) Lithium Grease spray every
2-27
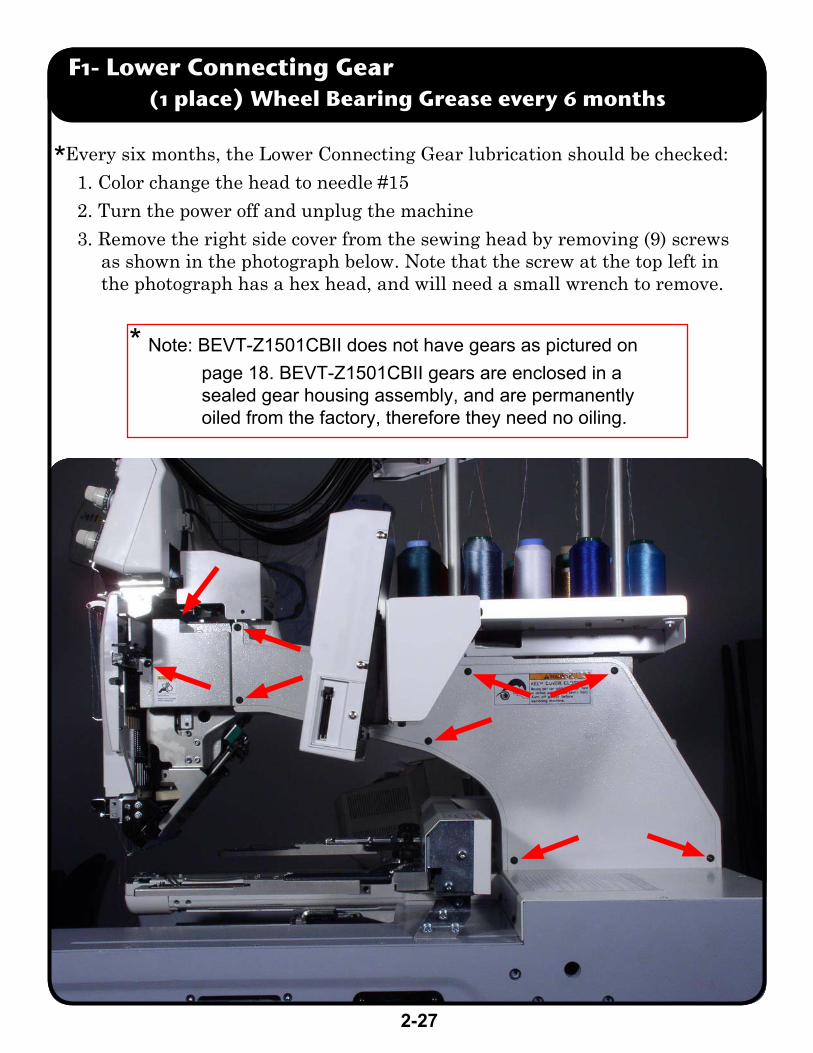
Every six months, the Lower Connecting Gear lubrication should be checked: 1. Color change the head to needle #152. Turn the power off and unplug the machine3. Remove the right side cover from the sewing head by removing (9) screws
as shown in the photograph below. Note that the screw at the top left in the photograph has a hex head, and will need a small wrench to remove.
F1- Lower Connecting Gear(1 place) Wheel Bearing Grease every 6 months
* Note: BEVT-Z1501CBII does not have gears as pictured on page 18. BEVT-Z1501CBII gears are enclosed in a sealed gear housing assembly, and are permanently oiled from the factory, therefore they need no oiling.
*

2-28
2. Check the lubrication where the two bevel gears meet.
3. Redistribute the grease so that the gear teeth are covered. If there is not enough grease, use more Wheel Bearing Grease.
* Note page 17
BEDT-ZQ-501 machine pictured.
ESP EMBROIDERY STARTUP MANUAL ESP SUPPORT LINE 1-877-246-7964
4-1
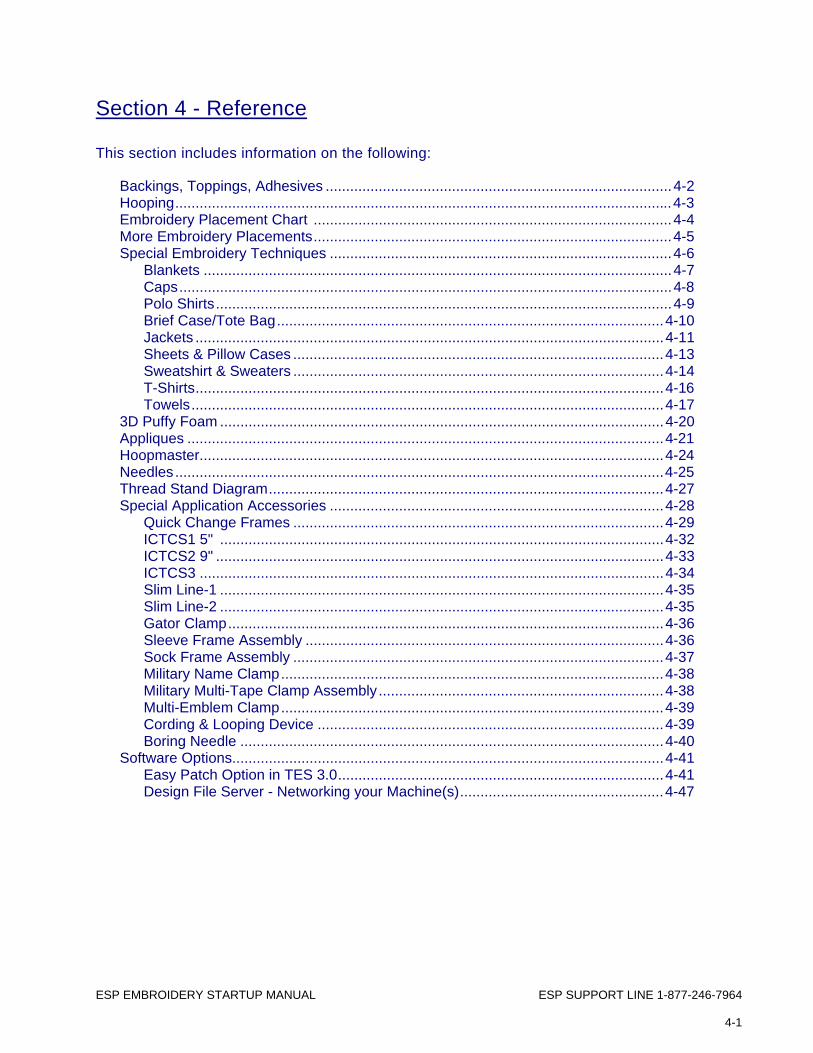
Section 4 - Reference This section includes information on the following:
Backings, Toppings, Adhesives .....................................................................................4-2 Hooping..........................................................................................................................4-3 Embroidery Placement Chart ........................................................................................4-4 More Embroidery Placements........................................................................................4-5 Special Embroidery Techniques ....................................................................................4-6 Blankets ...................................................................................................................4-7 Caps.........................................................................................................................4-8 Polo Shirts................................................................................................................4-9 Brief Case/Tote Bag...............................................................................................4-10 Jackets ...................................................................................................................4-11 Sheets & Pillow Cases ...........................................................................................4-13 Sweatshirt & Sweaters ...........................................................................................4-14 T-Shirts...................................................................................................................4-16 Towels....................................................................................................................4-17 3D Puffy Foam .............................................................................................................4-20 Appliques .....................................................................................................................4-21 Hoopmaster..................................................................................................................4-24 Needles........................................................................................................................4-25 Thread Stand Diagram.................................................................................................4-27 Special Application Accessories ..................................................................................4-28 Quick Change Frames ...........................................................................................4-29 ICTCS1 5" .............................................................................................................4-32 ICTCS2 9" ..............................................................................................................4-33 ICTCS3 ..................................................................................................................4-34 Slim Line-1 .............................................................................................................4-35 Slim Line-2 .............................................................................................................4-35 Gator Clamp...........................................................................................................4-36 Sleeve Frame Assembly ........................................................................................4-36 Sock Frame Assembly ...........................................................................................4-37 Military Name Clamp..............................................................................................4-38 Military Multi-Tape Clamp Assembly......................................................................4-38 Multi-Emblem Clamp..............................................................................................4-39 Cording & Looping Device .....................................................................................4-39 Boring Needle ........................................................................................................4-40 Software Options..........................................................................................................4-41 Easy Patch Option in TES 3.0................................................................................4-41 Design File Server - Networking your Machine(s)..................................................4-47

ESP EMBROIDERY STARTUP MANUAL ESP SUPPORT LINE 1-877-246-7964 4-2
Backings, Toppings and Spray Adhesives Backings will make designs sew with clarity, stabilize the area being sewn, and maintain the shape of the design after laundering. Cutaways should be used on unstable textiles such as knit t-shirts, sweatshirts, golf shirts, polar fleece shirts or anything that stretches. Backings should be hooped along with the project to be embroidered on the underside of the embroidered item. There are several types of backing. Cutaway backings are available in non-woven, and woven types. Weights will vary from very light and sheer to heavy. Non-woven backings do not stretch in any direction. Woven cutaways will have some stretch, especially diagonally. Using cutaway instead of tearaway will give better definition to the design sew out and maintain the shape of the garment. If the design is to be worn, the backing should be soft to alleviate irritation to the skin. Cutaway is a permanent backing that remains in the garment. The excess backing is “cutaway” close to the stitching on the underside of the embroidered item. Tearaways backings should be used on stable woven textiles and non-woven textiles such as broadcloth dress shirts, oxford cloth shirt, wool & poplin jackets, caps, light weight canvas bags, vinyl bags, towels or textiles that do not stretch. Tearaways are available from very light to very heavy weights and are torn away after design sew out is completed. Papery tearaways will “tearaway” very easily; however, they can be irritating to the skin. Soft tearaways should be used on wearable embroidered products. Soft tearaways will not tear as easily and care should be taken when removing it so stitches are not pulled out or damaged. An additional piece of tearaway can be used along with cutaway if a firmer sewing surface is needed. The tearaway is removed leaving the cutaway permanently attached to garment or project. Backings with adhesive are very useful for difficult to hoop items. Some backings have adhesives, which are activated by water. Use water sparingly to activate adhesive. Too much water can cause the tearaway to disintegrate. Also make sure the textile to be stitched is not adversely affected by water. Water Based Adhesive Backings are an excellent choice for making patches or emblems using the appliqué method and allow for clean tearaway. Sticky Paper Backings have an adhesive applied and covered with removable paper. When the paper is removed, the sticky paper can be applied to regular hoops or specialty hoops designed for “hoopless” embroidery. Cuffs, collars, ribbons, cap backs and other difficult to hoop items can be laid down on the tacky surface and will stay in place during stitching. Toppings can be placed on the top of a project and hooped before stitching. The topping or solvy, as it is sometimes referred to, can also be laid on top after hooping. Topping will keep the stitches on top, rather than sinking into a sweater knit or loosely woven knit or woven textile. Topping also provides better definition to designs sewn on textured knits, such as pique golf shirts, herringbone textured golf shirts, polar fleece, corduroy, velour, etc. Toppings are very important when stitching very small lettering. Topping is particularly important on towels; topping keeps the terry loops from poking through the stitches. Most toppings are water-soluble and will dissolve with water. Some toppings can be removed with heat and recommended temperatures will be included from the supplier. Topping should be torn away and any remaining topping will disappear during laundering. Solvy, aqua film, aqua solvy are a few of the types available. Embroidery Spray Adhesives are also very useful to adhere the textile to the backing to eliminate slipping and excess movement and puckering of knits or wovens. Spray adhesives should be used sparingly and well away from the embroidery machine, computer and in a well ventilated room.

ESP EMBROIDERY STARTUP MANUAL ESP SUPPORT LINE 1-877-246-7964
4-3
These adhesives are temporary in nature and are designed to dissipate in the air and loose their stickiness in a short amount of time. Be sure to use only Embroidery Spray Adhesives. Other types of adhesives are far too sticky and gum up needles; bobbin cases and a solvent must be used to remove the buildup. NOTE: Adhesives can cause some build up on needles, bobbin case, hook and shuttle area. Generally alcohol on a cotton swab will remove it. A silicone thread lubricant will help alleviate the needle eyes from gumming up as well.
Hooping
Hooping Instructions 1. Lay the hoop with the adjusting screw down on a flat surface.
TIP: Place a piece of non-skid rug padding under hoop to keep it from sliding around. Adjust the screw if necessary.
2. Lay piece of backing on top of hoop. 3. Position the item to be embroidered on top of hoop with backing. 4. Position the hoop with brackets on top. 5. Adjust hoop to be straight and smooth out item. 6. Press down on bracket hoop to complete hooping process. Item in hoop should be taut for good
quality sewing results.
NOTE: Instructions for hooping specific items can be found in Reference, Section 5.
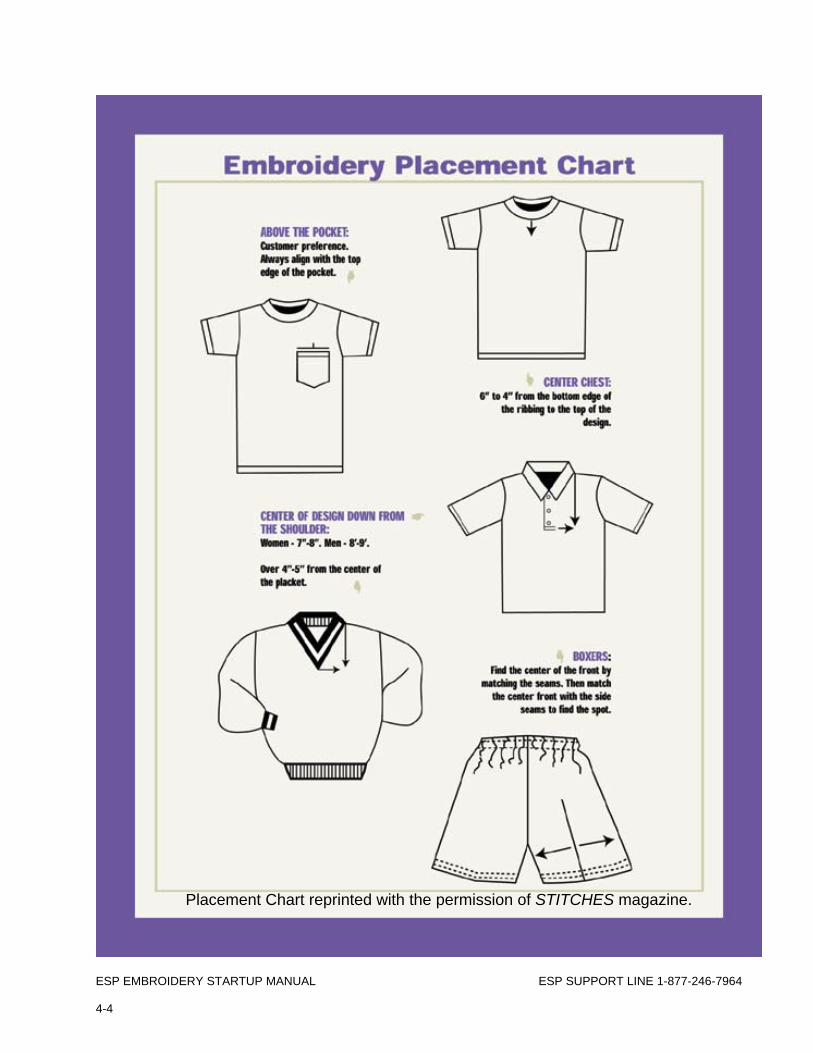
ESP EMBROIDERY STARTUP MANUAL ESP SUPPORT LINE 1-877-246-7964 4-4
Placement Chart reprinted with the permission of STITCHES magazine.
ESP EMBROIDERY STARTUP MANUAL ESP SUPPORT LINE 1-877-246-7964
4-5
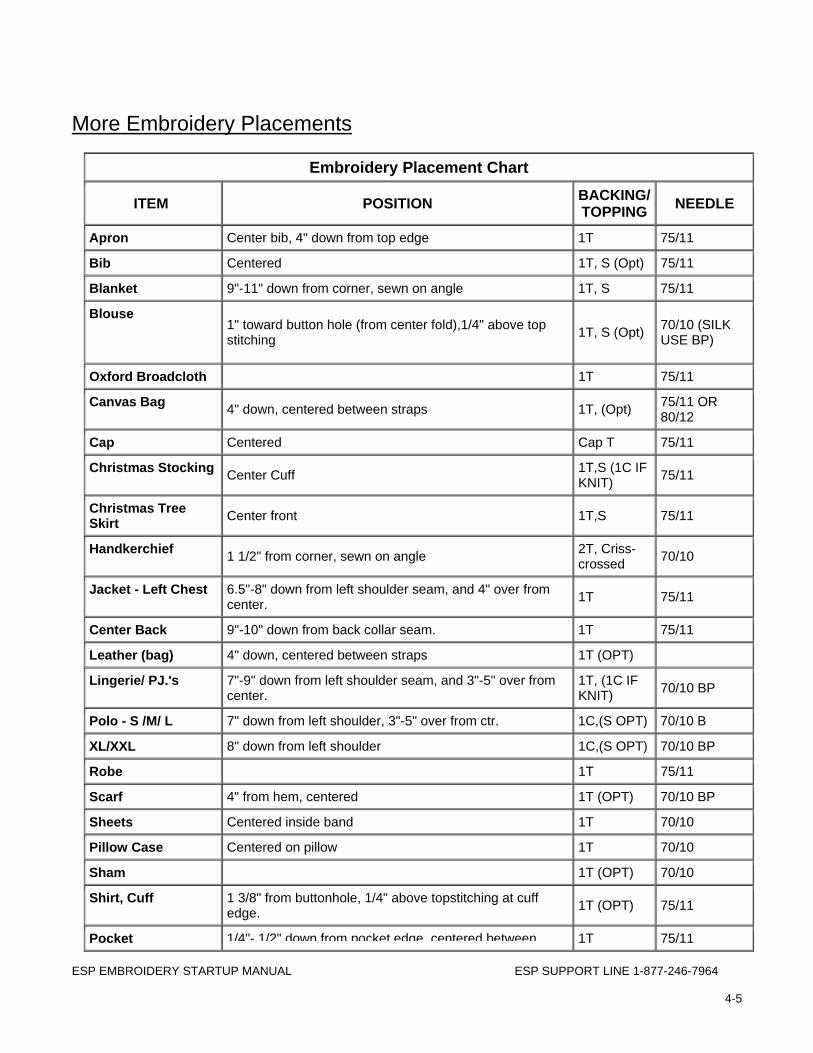
More Embroidery Placements
Embroidery Placement Chart
ITEM POSITION BACKING/ TOPPING NEEDLE
Apron Center bib, 4" down from top edge 1T 75/11
Bib Centered 1T, S (Opt) 75/11
Blanket 9"-11" down from corner, sewn on angle 1T, S 75/11
Blouse 1" toward button hole (from center fold),1/4" above top stitching 1T, S (Opt) 70/10 (SILK
USE BP)
Oxford Broadcloth 1T 75/11
Canvas Bag 4" down, centered between straps 1T, (Opt) 75/11 OR 80/12
Cap Centered Cap T 75/11
Christmas Stocking Center Cuff 1T,S (1C IF KNIT) 75/11
Christmas Tree Skirt Center front 1T,S 75/11
Handkerchief 1 1/2" from corner, sewn on angle 2T, Criss-crossed 70/10
Jacket - Left Chest 6.5"-8" down from left shoulder seam, and 4" over from center. 1T 75/11
Center Back 9"-10" down from back collar seam. 1T 75/11
Leather (bag) 4" down, centered between straps 1T (OPT)
Lingerie/ PJ.'s 7"-9" down from left shoulder seam, and 3"-5" over from center.
1T, (1C IF KNIT) 70/10 BP
Polo - S /M/ L 7" down from left shoulder, 3"-5" over from ctr. 1C,(S OPT) 70/10 B
XL/XXL 8" down from left shoulder 1C,(S OPT) 70/10 BP
Robe 1T 75/11
Scarf 4" from hem, centered 1T (OPT) 70/10 BP
Sheets Centered inside band 1T 70/10
Pillow Case Centered on pillow 1T 70/10
Sham 1T (OPT) 70/10
Shirt, Cuff 1 3/8" from buttonhole, 1/4" above topstitching at cuff edge. 1T (OPT) 75/11
Pocket 1/4"- 1/2" down from pocket edge centered between 1T 75/11
ESP EMBROIDERY STARTUP MANUAL ESP SUPPORT LINE 1-877-246-7964 4-6
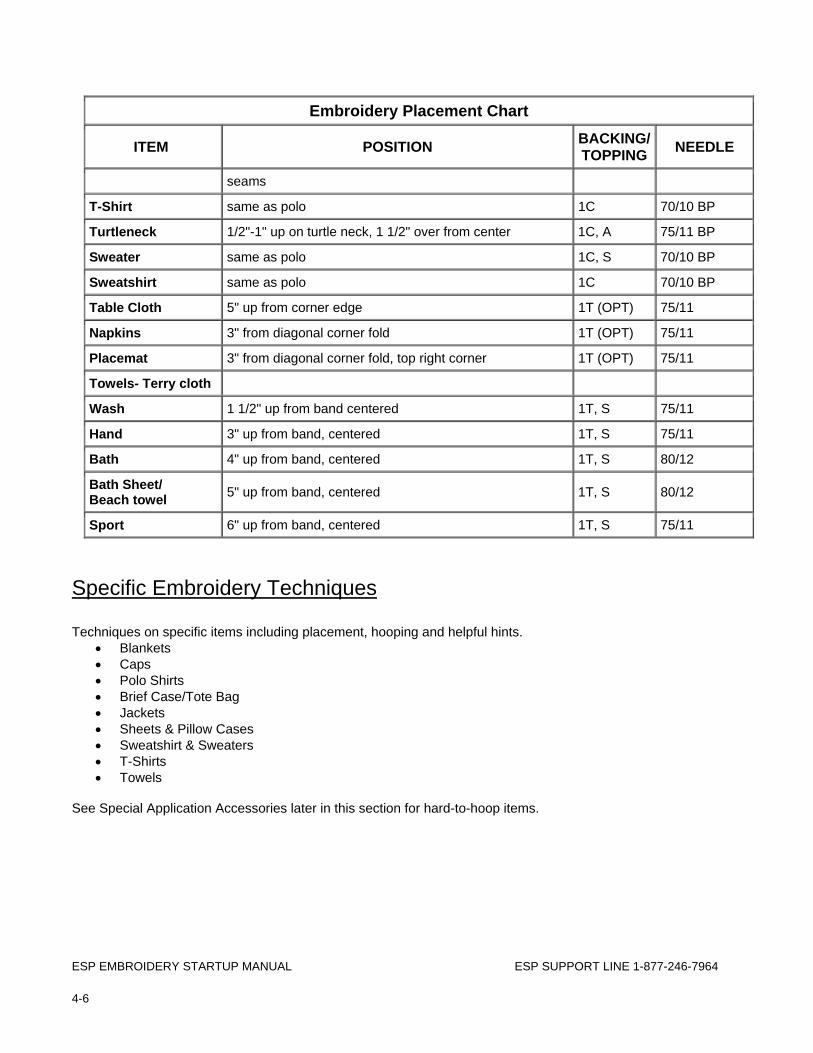
Embroidery Placement Chart
ITEM POSITION BACKING/ TOPPING NEEDLE
seams
T-Shirt same as polo 1C 70/10 BP
Turtleneck 1/2"-1" up on turtle neck, 1 1/2" over from center 1C, A 75/11 BP
Sweater same as polo 1C, S 70/10 BP
Sweatshirt same as polo 1C 70/10 BP
Table Cloth 5" up from corner edge 1T (OPT) 75/11
Napkins 3" from diagonal corner fold 1T (OPT) 75/11
Placemat 3" from diagonal corner fold, top right corner 1T (OPT) 75/11
Towels- Terry cloth
Wash 1 1/2" up from band centered 1T, S 75/11
Hand 3" up from band, centered 1T, S 75/11
Bath 4" up from band, centered 1T, S 80/12
Bath Sheet/ Beach towel 5" up from band, centered 1T, S 80/12
Sport 6" up from band, centered 1T, S 75/11
Specific Embroidery Techniques Techniques on specific items including placement, hooping and helpful hints.
• Blankets • Caps • Polo Shirts • Brief Case/Tote Bag • Jackets • Sheets & Pillow Cases • Sweatshirt & Sweaters • T-Shirts • Towels
See Special Application Accessories later in this section for hard-to-hoop items.
ESP EMBROIDERY STARTUP MANUAL ESP SUPPORT LINE 1-877-246-7964
4-7
Technique: Blankets - Baby, Polar Fleece, Throw, Stadium Blanket
Needle: #75/11 NP Backing: Tearaway, Water soluble topping
• Blankets normally have a good amount of stretch, but because they are a reversible item Tearaway backing and Solvy topping should be used instead of a cutaway backing.
• Framing the item upside down is highly recommended because of the size and bulk of most blankets.
• Solvy topping is needed for a cleaner finished product.
PLACEMENT CHART
POSITION Placement
Angled corner Place center point 9”-11” down from corner, angled. Corner point should be placed at the 12 O’clock position.
Bottom Edge Centered near bottom edge of binding.
How to Hoop a Blanket
1. Place 300 x 290 frame onto framing device. Loosen the frame thumbscrew slightly. TIP: Do a trial hooping with backing to adjust hoop screws.
2. The bottom right hand corner of blanket is the recommended placement for embroidery when angled. Lay garment flat and upside down, point of blanket should be at the 12 O’clock position. Measure down 9”-11 “mark center point of design with a pin.
3. Select a piece of Tearaway large enough to cover entire frame. Lightly spray one side with Adhesive spray. Press backing onto center of wrong side of garment until fabric is laying flat.
4. Lay blanket over framing device. Place your pin in the center of the frame. Lay Solvy topping over center. Make sure grain is straight and point of blanket is at the 12 O’clock position before pressing frame insert into place. You may pull the garment from top to bottom and side-to-side in order to straighten grain and pull out excess puckered fabric inside the frame. Tighten thumbscrew. The garment must be taut without being over stretched.
5. Lift the frame out of the framing device. Handle garment by the outer edges of the frame, so as not to loosen the fabric tension of the framed garment. You’re ready to attach frame to the machine. Remember the design must be rotated upside down prior to sewing.
6. When the garment has completed sewing. You may pull away the Tearaway and Solvy backing. Small amounts of residual solvy will simply wash out after its first laundering.
Use a full piece of Tearaway backing instead of strips. The added strength of the full piece of backing with Adhesive spray will result in an overall better design with less distortion of lettering and designs.
If additional stability is needed use two Tearaway backing crisscrossed. The second tearaway will give additional strength while sewing but can be pulled away when completed. Pull one layer away at a time.
Framing any large item upside down is recommended whenever possible. This way the bulk of the material lies in front of the machine.
ESP EMBROIDERY STARTUP MANUAL ESP SUPPORT LINE 1-877-246-7964 4-8
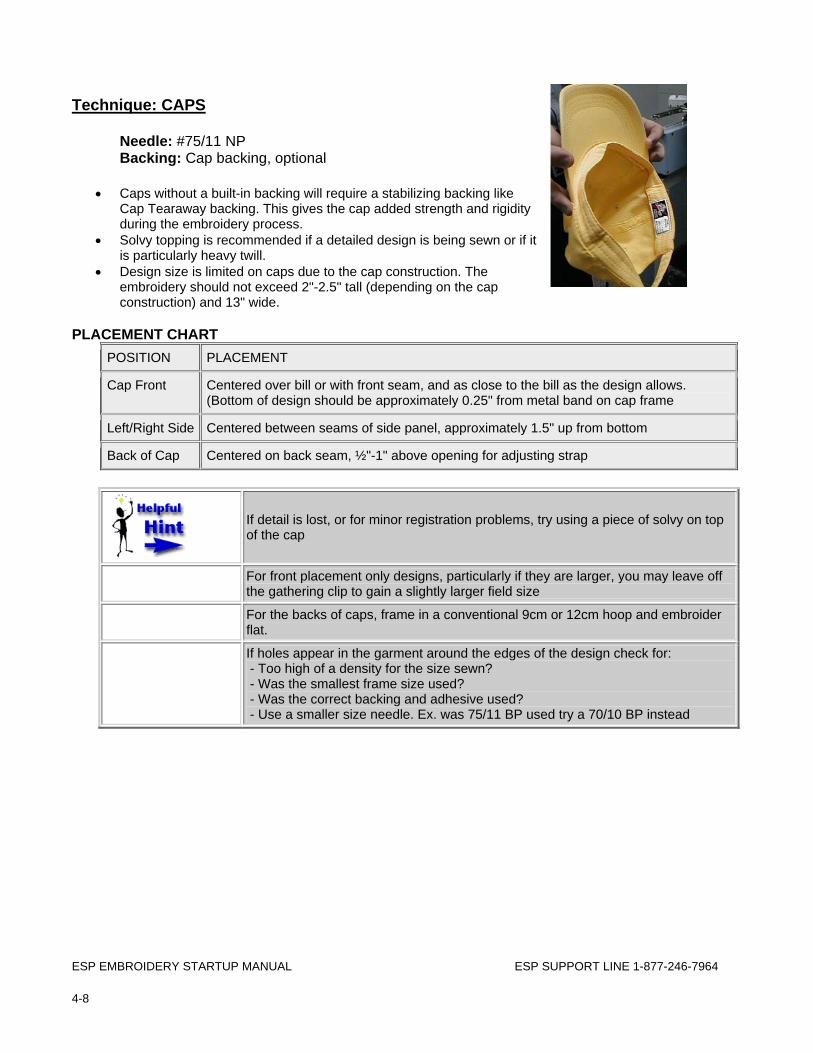
Technique: CAPS
Needle: #75/11 NP Backing: Cap backing, optional
• Caps without a built-in backing will require a stabilizing backing like Cap Tearaway backing. This gives the cap added strength and rigidity during the embroidery process.
• Solvy topping is recommended if a detailed design is being sewn or if it is particularly heavy twill.
• Design size is limited on caps due to the cap construction. The embroidery should not exceed 2"-2.5" tall (depending on the cap construction) and 13" wide.
PLACEMENT CHART POSITION PLACEMENT
Cap Front Centered over bill or with front seam, and as close to the bill as the design allows. (Bottom of design should be approximately 0.25" from metal band on cap frame
Left/Right Side Centered between seams of side panel, approximately 1.5" up from bottom
Back of Cap Centered on back seam, ½"-1" above opening for adjusting strap
If detail is lost, or for minor registration problems, try using a piece of solvy on top of the cap
For front placement only designs, particularly if they are larger, you may leave off the gathering clip to gain a slightly larger field size
For the backs of caps, frame in a conventional 9cm or 12cm hoop and embroider flat.
If holes appear in the garment around the edges of the design check for: - Too high of a density for the size sewn? - Was the smallest frame size used? - Was the correct backing and adhesive used? - Use a smaller size needle. Ex. was 75/11 BP used try a 70/10 BP instead
ESP EMBROIDERY STARTUP MANUAL ESP SUPPORT LINE 1-877-246-7964
4-9
Technique: Polo Shirts
Needle: #75/11 BP Backing: Cutaway, Water soluble topping optional.
• Polo shirts are knit fabric and require a stabilizing backing like cutaway. • If a white garment is being sewn a sheer cutaway is recommended, as it leaves no halo affect behind the light
colored garment after the backing is trimmed. • Solvy topping is recommended if a detailed design is being sewn or if slight distortion occurs on pique polo.
PLACEMENT CHART
Men's Women's
Left chest S,M,L Measure 8" down from left shoulder and 4" right of the placket center
Measure 6.5" down from left shoulder and 3.5" right of the placket center
XL & XXL Measure 9" down from left shoulder and 4.5" right of placket center
XL, & XXL, measure 7" down from left shoulder and 4" right of placket center
How to Hoop a Polo Shirt 1. Place 12cm, 15cm or 18cm frame onto hooping device. Loosen the frame thumbscrew.
TIP: Do a trial hooping with backing to adjust hoop screws.
2. Lay garment flat, measure down and over using placement chart above. Mark center point of design with a pin.
3. Select a piece of cutaway large enough to cover entire frame. 4. Slip garment over framing device. Place your pin in the center of the frame. Make sure grain is straight before
pressing frame insert into place. You may pull the garment from top to bottom to straighten grain and pull out excess puckered fabric inside the frame. Tighten thumbscrew. Knit garments must be taut without being over stretched. You would normally never pull a knit garment from side to side; this would create a puckered effect. The exception is to straighten the grain only.
5. Lift the frame out of the framing device. Handle garment by the outer edges of the frame, so as not to loosen the fabric tension of the framed garment. You're ready to attach frame to the machine.
6. When the garment has completed sewing. You may trim the excess Cutaway backing, approximately 1/4" around the stitching. Do not trim backing between letters or designs, or the garment may loose shape. If solvy topping was used simply pull away from stitching. Small amounts of residual solvy will simply wash out after its first laundering.
Use a full piece of cutaway or No-show backing instead of strips. The added strength of the full piece of backing with Adhesive spray will result in an overall better design with less distortion of lettering and designs.
If added stability is needed use one Cutaway and one Tearaway backing. The tearaway will give additional strength while sewing but can be pulled away when completed.
For added clarity on multicolor designs with extreme detail you may wish to add an additional piece of Solvy after a thread trim.
Cutaway backing is recommended on most knit fabrics, but when this is not possible,

ESP EMBROIDERY STARTUP MANUAL ESP SUPPORT LINE 1-877-246-7964 4-10
the use of two Tearaway crisscrossed will give added strength. Pull one layer away at a time.
If holes appear in the garment around the edges of the design check for: - Too high of a density for the size sewn? - Was the smallest frame size used? - Was the correct backing and adhesive used? - Use a smaller size needle. Ex. was 75/11 BP used try a 70/10 BP instead.
Technique: Brief Case/Tote Bag
Needle: #75/11-80/12 NP Backing: Tearaway optional
• Medium to heavy weight canvas and nylon does not require backing. • A lighter weight cotton or nylon tote bag may require a layer of Tearaway backing.
PLACEMENT CHART
BAG: POSITION
BRIEFCASE 3”-4” down from zipper closure and centered between handle straps.
TOTE BAG Centered on tote
How to Hoop a Briefcase/Totebag
1. Loosen the frame thumbscrew slightly. Place frame insert inside of briefcase or tote bag, make sure insert frame is straight, positioned with center of pin and tote is straight. TIP: Do a trial hooping with backing to adjust hoop screws.
2. If the tote bag is lightweight you may need to slip a piece of Tearaway under the fabric prior to inserting frame.
3. Make sure garment is straight before pressing frame into place. You may pull the garment from side to side in order to pull out excess puckered fabric inside the frame. Tighten thumbscrew. Woven fabric should be tight in the frame.
4. Handle garment by the outer edges of the frame, so as not to loosen the fabric tension of the framed garment. You’re ready to attach frame to the machine.
5. When the garment has completed sewing. You may pull away the excess Tearaway backing.
If additional stability is needed use two pieces of Tearaway backing crisscrossed. The tearaway will give additional strength while sewing but can be pulled away one piece at a time when completed.
The grain of heavy weight canvas material is thick and coarse. The needle may be deflected into the valley of the grain. Certain lettering styles may have a better-finished effect: i.e. Block lettering will have a better result than Script lettering. The curved areas of script letters on thick canvas may have a tendency to look slightly stair-stepped. The simplicity of block letters would be the better alternative in this instance.
ESP EMBROIDERY STARTUP MANUAL ESP SUPPORT LINE 1-877-246-7964
4-11
Technique: Jackets
Needle: #75/11 NP, (80/12NP for wool) Backing: Denim: Tearaway, Solvy optional
Satin/Nylon: Tearaway Windbreaker: 2 Tearaway, (crisscrossed) Wool Varsity: Tearaway optional, Solvy optional
PLACEMENT CHART
POSITION MEN WOMEN CHILDREN
Left chest S,M,L 8” down from left shoulder and 4” right of the placket center
6.5” down from left shoulder and 3.5” right of the placket center
4”-6” down from left shoulder seam and 2.5”-3” over from center
XL & XXL 9” down from left shoulder and 4” right of center
7” down from left shoulder and 3.5” right of center
Jacket Back 10” down from center back collar seam
9”-10” down from center back collar seam
5”-7” down from center back collar seam
Use 6” long piece of masking tape along center back of jacket. As a straight guide when framing. Check straightness of garment when loading garment onto machine and during Perimeter trace. Pull tape off before sewing
How to Hoop a Jacket
1. Place frame onto hooping device. Loosen the frame thumbscrew slightly.
TIP: Do a trial hooping with backing to adjust hoop screws.
2. Button or zipper close the jacket then lay garment flat, measure down and over using the placement chart. Mark center point of design with a pin. For jacket back use 6” piece of masking tape along center back of jacket. The tape acts as a straight guide while framing. Turn garment inside out.
3. If Tearaway is necessary select a piece of Tearaway large enough to cover entire frame. Lightly spray one side with Adhesive spray. Press backing onto center of wrong side of garment until fabric is laying flat.
4. Turn fabric right side out, unbutton or unzip and slip over framing device. Place your pin/tape in the center of the frame. Make sure garment/ tape is straight before pressing frame insert into place. You may pull the garment from top to bottom and side-to-side to straighten grain and pull out excess puckered fabric inside the frame. Once fabric is taught, tighten the thumbscrew. Note: If Jacket is a Knit, use Cutaway and Adhesive. The garment must be taut without being over stretched. You normally never pull a knit garment from side to side; this would create a puckered effect. The exception is to straighten the grain only.
5. Lift the frame out of the framing device. Handle garment by the outer edges of the frame, so as not to loosen the fabric tension of the framed garment. You’re ready to attach frame to the machine. If tape was used on jacket back check for straightness during Perimeter Trace. Remove tape prior to sewing.
ESP EMBROIDERY STARTUP MANUAL ESP SUPPORT LINE 1-877-246-7964 4-12
6. When the garment has completed sewing. Simply pull Tearaway backing away from stitching. If a knit was sewn you may trim the excess Cutaway or No-show backing, approximately 1/4” around the stitching. Do not trim backing between letters or designs, or the garment may loose shape. If solvy topping was used simply pull away from stitching. Small amounts of residual solvy will simply wash out after its first laundering.
Use a full piece of Tearaway or Cutaway backing instead of strips. The added strength of the full piece of backing with Adhesive spray will result in an overall better design with less distortion of lettering and designs.
If added stability is needed on a woven jacket use two layers of Tearaway, and crisscross them. On knits use one Cutaway and one Tearaway backing. The tearaway will give additional strength while sewing but can be pulled away when completed.
Wool varsity style jackets may require Solvy topping when larger satin stitch lettering is embroidered. The Solvy separates the wool from the stitching and gives a cleaner overall appearance.
For added clarity on multicolor designs with extreme detail you may wish to add an additional piece of Solvy after a thread trim.
Cutaway backing is recommended on most knit fabrics, but when this is not possible, the use of two Tearaway crisscrossed will give added strength. Pull one layer away at a time.
If holes appear in the garment around the edges of the design check for: - Too high of a density for the size sewn? - Was the smallest frame size used? - Was the correct backing and adhesive used? - Use a smaller size needle. Ex. If a 75/11NP was used try a70/10NP instead.
Be sure to keep jacket lining from shifting or bunching up during sewing. Lay jacket flat and adjust lining. Use some large straight pins to keep lining in place while hooping. Remove pins after hooping.
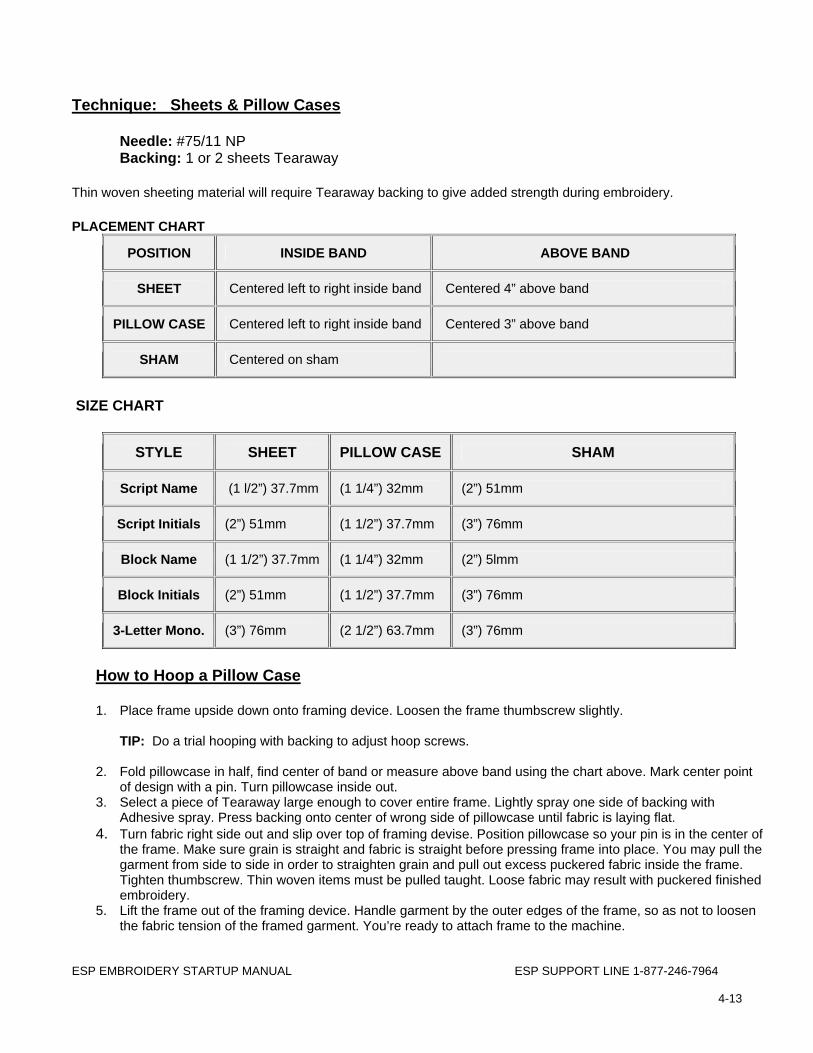
ESP EMBROIDERY STARTUP MANUAL ESP SUPPORT LINE 1-877-246-7964
4-13
Technique: Sheets & Pillow Cases
Needle: #75/11 NP Backing: 1 or 2 sheets Tearaway
Thin woven sheeting material will require Tearaway backing to give added strength during embroidery.
PLACEMENT CHART
POSITION INSIDE BAND ABOVE BAND
SHEET Centered left to right inside band Centered 4” above band
PILLOW CASE Centered left to right inside band Centered 3” above band
SHAM Centered on sham
SIZE CHART
STYLE SHEET PILLOW CASE SHAM
Script Name (1 l/2”) 37.7mm (1 1/4”) 32mm (2”) 51mm
Script Initials (2”) 51mm (1 1/2”) 37.7mm (3”) 76mm
Block Name (1 1/2”) 37.7mm (1 1/4”) 32mm (2”) 5lmm
Block Initials (2”) 51mm (1 1/2”) 37.7mm (3”) 76mm
3-Letter Mono. (3”) 76mm (2 1/2”) 63.7mm (3”) 76mm
How to Hoop a Pillow Case
1. Place frame upside down onto framing device. Loosen the frame thumbscrew slightly.
TIP: Do a trial hooping with backing to adjust hoop screws.
2. Fold pillowcase in half, find center of band or measure above band using the chart above. Mark center point of design with a pin. Turn pillowcase inside out.
3. Select a piece of Tearaway large enough to cover entire frame. Lightly spray one side of backing with Adhesive spray. Press backing onto center of wrong side of pillowcase until fabric is laying flat.
4. Turn fabric right side out and slip over top of framing devise. Position pillowcase so your pin is in the center of the frame. Make sure grain is straight and fabric is straight before pressing frame into place. You may pull the garment from side to side in order to straighten grain and pull out excess puckered fabric inside the frame. Tighten thumbscrew. Thin woven items must be pulled taught. Loose fabric may result with puckered finished embroidery.
5. Lift the frame out of the framing device. Handle garment by the outer edges of the frame, so as not to loosen the fabric tension of the framed garment. You’re ready to attach frame to the machine.

ESP EMBROIDERY STARTUP MANUAL ESP SUPPORT LINE 1-877-246-7964 4-14
6. When the garment has completed sewing. You may pull away the excess Tearaway backing. When using two layers of Tearaway backing, pull one layer away at a time to reduce puckering.
How to Hoop a Sheet/Sham
The same technique applies except a sheet and sham are framed right side up. Therefore, the frame is attached right side up in framing device.
Framing a pocket-style item upside down is recommended whenever possible.
If added stability is needed use 2 Tearaway backing criss crossed. It will give additional strength while sewing but can be pulled away 1 piece at a time when completed.
If satin or silk/like fabric is being embroidered a smaller needle may be used. 70/10NP or even a 70/10 BP (ball point needle)
If holes appear in the garment around the edges of the design check for: - Too high of a density for the size sewn? - Was the smallest frame size used? - Was the correct backing and adhesive used? - Use a smaller size needle. Ex. If a 75/1 1NP was used try a 70/10NP or BP (ball point needle) instead
Technique: Sweatshirt & Sweaters
Needle: #75/11 NP Backing: Cutaway, Water soluble topping optional.
• Sweatshirts are knit fabrics and require a stabilizing backing like cutaway. • If a white garment is being sewn a sheer cutaway is recommended, as it leaves no halo affect behind the light
colored garment after the backing is trimmed. • Solvy topping is recommended if a detailed design is being sewn or if slight distortion occurs.
PLACEMENT CHART
POSITION MEN WOMEN CHILDREN
Left chest S,M,L 8” down from left shoulder and 4” right of center
6.5” down from left shoulder and 3.5” right of center
4”-6” down from left shoulder seam and 2.5”-3” over from center
XL&XXL 9” down from left shoulder and 4.5” right of center
7” down from left shoulder and 4” right of center
Center chest S,M,L 6” down from center 6” down from center 3”-5” down from center
XL&XXL 7” down from center 7” down from center
ESP EMBROIDERY STARTUP MANUAL ESP SUPPORT LINE 1-877-246-7964
4-15
How to Hoop a Sweatshirt/Sweater
1. Place frame onto framing device. Loosen the frame thumbscrew slightly. TIP: Do a trial hooping with backing to adjust hoop screws.
2. Lay garment flat, measure down and over using the placement chart. Mark center point of design with a pin. Turn garment inside out.
3. Select a piece of cutaway large enough to cover entire frame. 4. Slip the garment over the framing device. Place your pin in the center of the frame. Make sure grain is straight
before pressing frame insert into place. You may pull the garment from top to bottom to straighten grain and pull out excess puckered fabric inside the frame. Tighten thumbscrew. Knit garments must be taut without being over stretched. You normally never pull a knit garment from side to side; this would create a puckered effect. The exception is to straighten the grain only.
5. Lift the frame out of the framing. Handle garment by the outer edges of the frame, so as not to loosen the fabric tension of the framed garment. You’re ready to attach frame to the machine.
6. When the garment has completed sewing. You may trim the excess Cutaway or No-show backing, approximately 1/4” around the stitching. Do not trim backing between letters or designs, or the garment may loose shape. If solvy topping was used simply pull away from stitching. Small amounts of residual solvy will simply wash out after its first laundering.
Use a full piece of cutaway backing instead of strips. The added strength of the full piece of backing with Adhesive spray will result in an overall better design with less distortion of lettering and designs.
If added stability is needed use one Cutaway and one Tearaway backing. The tearaway will give additional strength while sewing but can be pulled away when completed.
For added clarity on multicolored designs with extreme detail you may wish to add an additional piece of Solvy after a thread trim.
Cutaway backing is recommended on most knit fabrics, but when this is not possible, the use of two Tearaway crisscrossed will give added strength. Pull one layer away at a time.
If holes appear in the garment around the edges of the design check for: - Too high of a density for the size sewn? - Was the smallest frame size used? - Was the correct backing and adhesive used? - Use a smaller size needle. Ex. If a 75/11BP was used try a 70/10BP instead.
ESP EMBROIDERY STARTUP MANUAL ESP SUPPORT LINE 1-877-246-7964 4-16
Technique: T-Shirts
Needle: #70/10-75/11 BP Backing: Cutaway or sheer cutaway
• T- shirts are a knit fabric, which requires a stabilizing backing like cutaway. • If a white garment is being sewn the No-show type cutaway is recommended, as it leaves no halo affect
behind the light colored garment after the backing is trimmed. • Solvy topping is recommended if a detailed multicolored design is being sewn.
PLACEMENT CHART POSITION MEN WOMEN CHILD
Left chest S,M,L 8" down from left shoulder and 4" right of the center
6.5" down from left shoulder and 3.5" right of the center
4"-6" down from left shoulder seam and 2.5"-3" over from center
XL&XXL 9" down from left shoulder and 4.5" right of center
7" down from left shoulder and 4" right of center
Center chest S,M,L 6" down from center. 6" down from center 3"-5" down from center
XL&XXL 7"down from center 7" down from center.
How to Hoop a T-Shirt
1. Place frame onto framing device. Loosen the frame thumbscrew slightly.
TIP: Do a trial hooping with backing to adjust hoop screws.
2. Lay garment flat, measure down and over using placement chart above. Mark center point of design with a pin.
3. Select a piece of Cutaway large enough to cover entire frame. 4. Slip the garment over the framing device. Place your pin in the center of the frame. Make sure grain is straight
before pressing frame insert into place. You may pull the garment from top to bottom to straighten grain and pull out excess puckered fabric inside the frame. Tighten thumbscrew. Knit garments must be taut without being over stretched. You would normally never pull a knit garment from side to side, this would create a puckered effect. The exception is to straighten the grain only.
5. Lift the frame out of the framing device. Handle garment by the outer edges of the frame, so as not to loosen the fabric tension of the framed garment. You're ready to attach frame to the machine.
6. When the garment has completed sewing. You may trim the excess Cutaway or No-show backing, approximately 1/4" around the stitching. Do not trim backing between letters or designs, or the garment may loose shape. If solvy topping was used simply pull away from stitching. Small amounts of residual solvy will simply wash out after its first laundering.
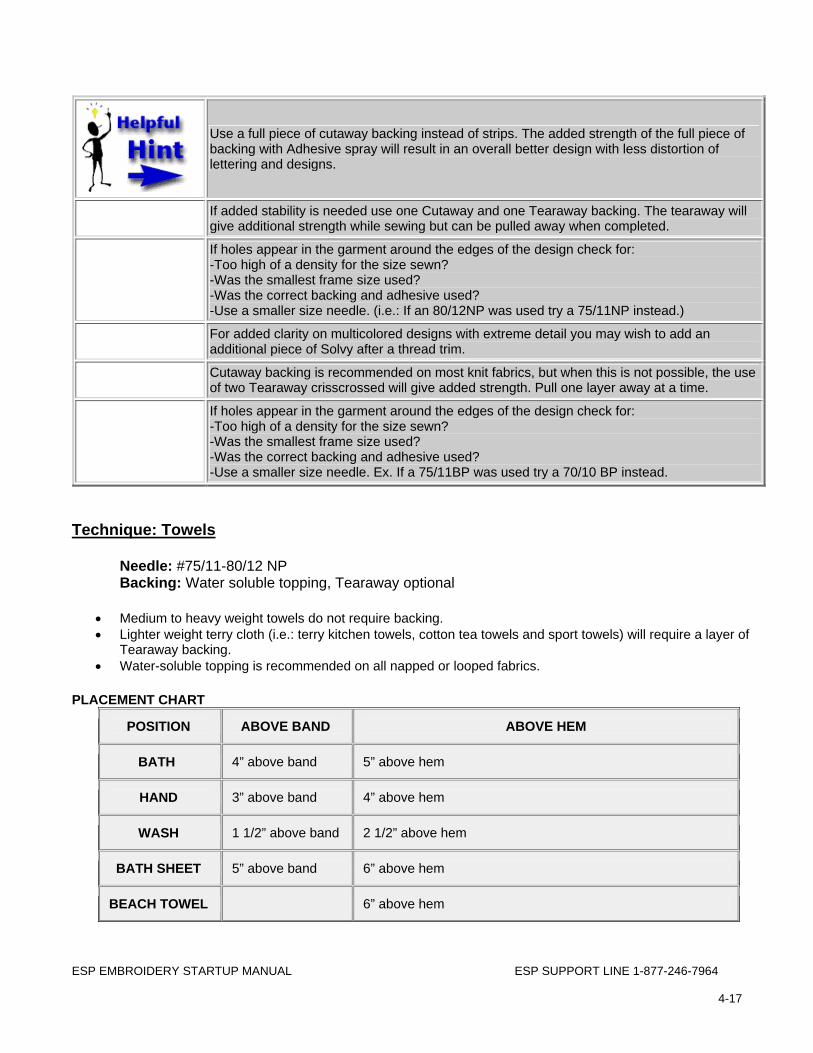
ESP EMBROIDERY STARTUP MANUAL ESP SUPPORT LINE 1-877-246-7964
4-17
Use a full piece of cutaway backing instead of strips. The added strength of the full piece of backing with Adhesive spray will result in an overall better design with less distortion of lettering and designs.
If added stability is needed use one Cutaway and one Tearaway backing. The tearaway will give additional strength while sewing but can be pulled away when completed.
If holes appear in the garment around the edges of the design check for: -Too high of a density for the size sewn? -Was the smallest frame size used? -Was the correct backing and adhesive used? -Use a smaller size needle. (i.e.: If an 80/12NP was used try a 75/11NP instead.)
For added clarity on multicolored designs with extreme detail you may wish to add an additional piece of Solvy after a thread trim.
Cutaway backing is recommended on most knit fabrics, but when this is not possible, the use of two Tearaway crisscrossed will give added strength. Pull one layer away at a time.
If holes appear in the garment around the edges of the design check for: -Too high of a density for the size sewn? -Was the smallest frame size used? -Was the correct backing and adhesive used? -Use a smaller size needle. Ex. If a 75/11BP was used try a 70/10 BP instead.
Technique: Towels
Needle: #75/11-80/12 NP Backing: Water soluble topping, Tearaway optional
• Medium to heavy weight towels do not require backing. • Lighter weight terry cloth (i.e.: terry kitchen towels, cotton tea towels and sport towels) will require a layer of
Tearaway backing. • Water-soluble topping is recommended on all napped or looped fabrics.
PLACEMENT CHART
POSITION ABOVE BAND ABOVE HEM
BATH 4” above band 5” above hem
HAND 3” above band 4” above hem
WASH 1 1/2” above band 2 1/2” above hem
BATH SHEET 5” above band 6” above hem
BEACH TOWEL 6” above hem
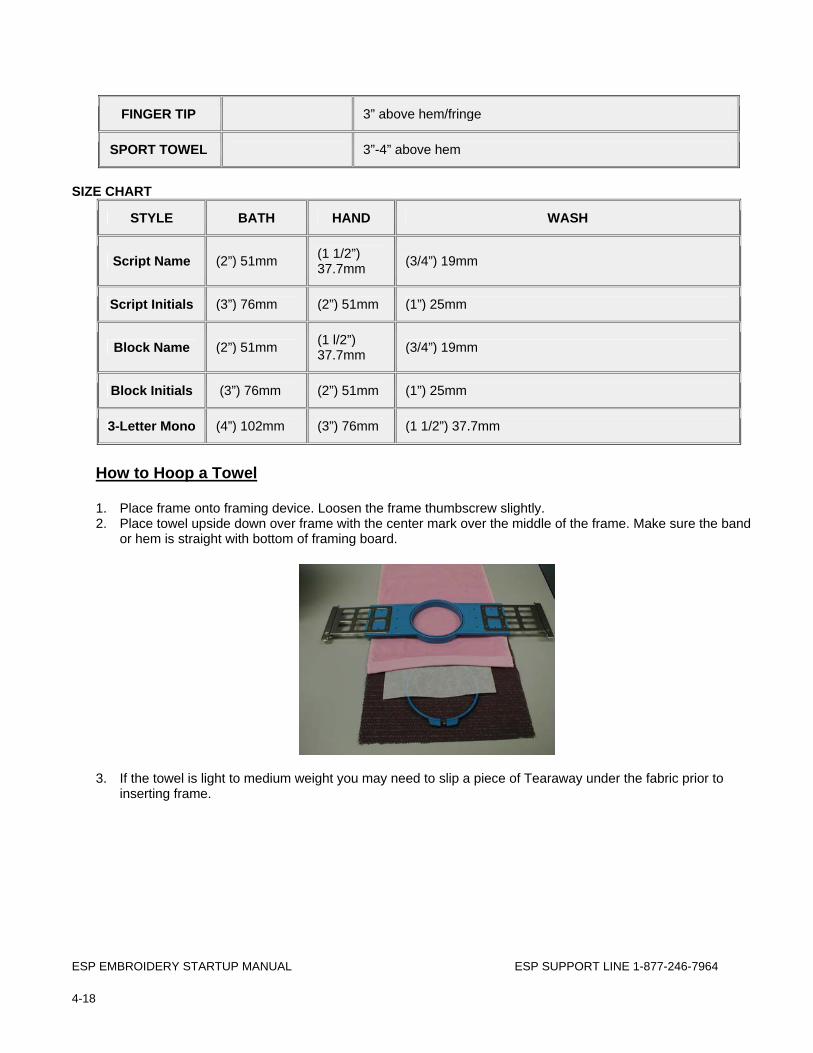
ESP EMBROIDERY STARTUP MANUAL ESP SUPPORT LINE 1-877-246-7964 4-18
FINGER TIP 3” above hem/fringe
SPORT TOWEL 3”-4” above hem
SIZE CHART
STYLE BATH HAND WASH
Script Name (2”) 51mm (1 1/2”) 37.7mm (3/4”) 19mm
Script Initials (3”) 76mm (2”) 51mm (1”) 25mm
Block Name (2”) 51mm (1 l/2”) 37.7mm (3/4”) 19mm
Block Initials (3”) 76mm (2”) 51mm (1”) 25mm
3-Letter Mono (4”) 102mm (3”) 76mm (1 1/2”) 37.7mm
How to Hoop a Towel
1. Place frame onto framing device. Loosen the frame thumbscrew slightly. 2. Place towel upside down over frame with the center mark over the middle of the frame. Make sure the band
or hem is straight with bottom of framing board.
3. If the towel is light to medium weight you may need to slip a piece of Tearaway under the fabric prior to
inserting frame.
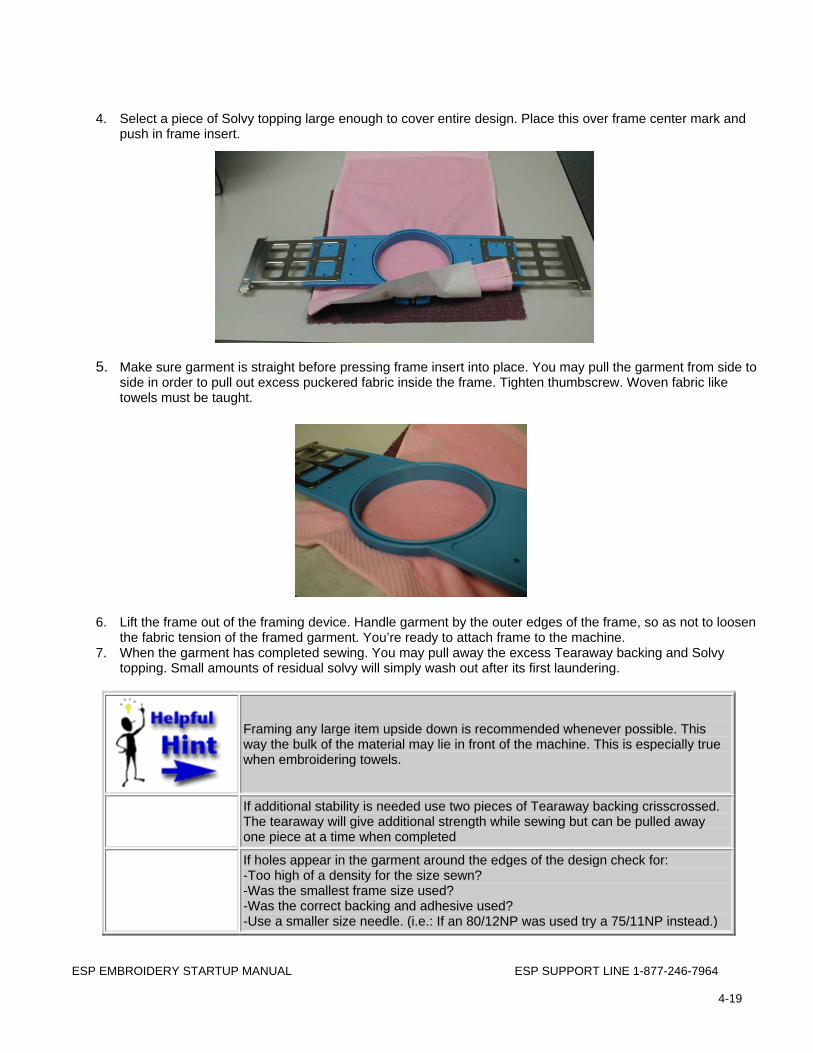
ESP EMBROIDERY STARTUP MANUAL ESP SUPPORT LINE 1-877-246-7964
4-19
4. Select a piece of Solvy topping large enough to cover entire design. Place this over frame center mark and
push in frame insert.
5. Make sure garment is straight before pressing frame insert into place. You may pull the garment from side to
side in order to pull out excess puckered fabric inside the frame. Tighten thumbscrew. Woven fabric like towels must be taught.
6. Lift the frame out of the framing device. Handle garment by the outer edges of the frame, so as not to loosen
the fabric tension of the framed garment. You’re ready to attach frame to the machine. 7. When the garment has completed sewing. You may pull away the excess Tearaway backing and Solvy
topping. Small amounts of residual solvy will simply wash out after its first laundering.
Framing any large item upside down is recommended whenever possible. This way the bulk of the material may lie in front of the machine. This is especially true when embroidering towels.
If additional stability is needed use two pieces of Tearaway backing crisscrossed. The tearaway will give additional strength while sewing but can be pulled away one piece at a time when completed
If holes appear in the garment around the edges of the design check for: -Too high of a density for the size sewn? -Was the smallest frame size used? -Was the correct backing and adhesive used? -Use a smaller size needle. (i.e.: If an 80/12NP was used try a 75/11NP instead.)
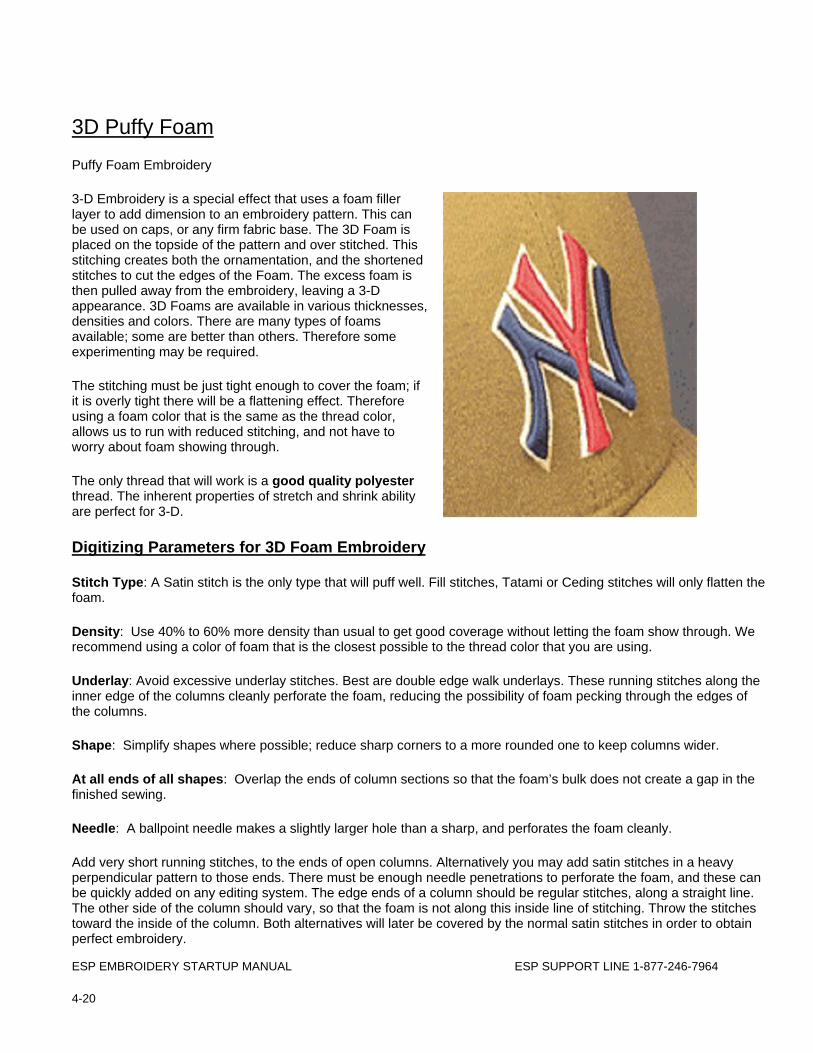
ESP EMBROIDERY STARTUP MANUAL ESP SUPPORT LINE 1-877-246-7964 4-20
3D Puffy Foam Puffy Foam Embroidery
3-D Embroidery is a special effect that uses a foam filler layer to add dimension to an embroidery pattern. This can be used on caps, or any firm fabric base. The 3D Foam is placed on the topside of the pattern and over stitched. This stitching creates both the ornamentation, and the shortened stitches to cut the edges of the Foam. The excess foam is then pulled away from the embroidery, leaving a 3-D appearance. 3D Foams are available in various thicknesses, densities and colors. There are many types of foams available; some are better than others. Therefore some experimenting may be required.
The stitching must be just tight enough to cover the foam; if it is overly tight there will be a flattening effect. Therefore using a foam color that is the same as the thread color, allows us to run with reduced stitching, and not have to worry about foam showing through.
The only thread that will work is a good quality polyester thread. The inherent properties of stretch and shrink ability are perfect for 3-D.
Digitizing Parameters for 3D Foam Embroidery
Stitch Type: A Satin stitch is the only type that will puff well. Fill stitches, Tatami or Ceding stitches will only flatten the foam.
Density: Use 40% to 60% more density than usual to get good coverage without letting the foam show through. We recommend using a color of foam that is the closest possible to the thread color that you are using.
Underlay: Avoid excessive underlay stitches. Best are double edge walk underlays. These running stitches along the inner edge of the columns cleanly perforate the foam, reducing the possibility of foam pecking through the edges of the columns.
Shape: Simplify shapes where possible; reduce sharp corners to a more rounded one to keep columns wider.
At all ends of all shapes: Overlap the ends of column sections so that the foam’s bulk does not create a gap in the finished sewing.
Needle: A ballpoint needle makes a slightly larger hole than a sharp, and perforates the foam cleanly.
Add very short running stitches, to the ends of open columns. Alternatively you may add satin stitches in a heavy perpendicular pattern to those ends. There must be enough needle penetrations to perforate the foam, and these can be quickly added on any editing system. The edge ends of a column should be regular stitches, along a straight line. The other side of the column should vary, so that the foam is not along this inside line of stitching. Throw the stitches toward the inside of the column. Both alternatives will later be covered by the normal satin stitches in order to obtain perfect embroidery.

ESP EMBROIDERY STARTUP MANUAL ESP SUPPORT LINE 1-877-246-7964
4-21
Want more height? Try two layers of 3-D embroidery for a more dramatic effect. The first few stitches will tack the foam together, but if there is a lot of pantograph movement at the beginning of the pattern, use a little spray adhesive (KK 100 or the very new KK 2200) to hold the two pieces together. The first layer should be quite wide, as this will form the base for the second layer. The second layer should then be only 30% of the column width used for the first. If you use two colors, then use the corresponding two colors of foam.
Final Clean Up
Tear off the foam. If digitized properly, and you are using the proper foam, you will find that the foam tears off easily and very cleanly. If the foam did not tear cleanly, you can use your hair dryer. The heat will both shrink back any protruding foam ends. You will be amazed at how clean the finished product looks.
Appliqués Appliqué is a piece of fabric that covers part of a design. The fabric is stitched on to the product being embroidered. The Appliqué process gives a different look and also reduces the number of stitches in a design. However, there is fabric involved as well as physically stopping the machine to place the appliqué down. All these things should be considered when pricing appliqué patterns. There are three basic steps to creating an appliqué:
1. A running stitch is placed in the middle of what will be the satin stitch. This running stitch is sometimes also called a guide line that assists in properly placing the appliqué.
2. A tack down stitch, which stitches after placing the appliqué, will secure the appliqué to the product. There are different ways of locking down the fabric. A running stitch can be used, an E- Stitch or a ZigZag stitch. You may find that a combination works best also.
3. The final stitching is placed around the appliqué i.e. Satin Stitch. This satin stitch must be wide enough to extend over the appliqué and onto the product.
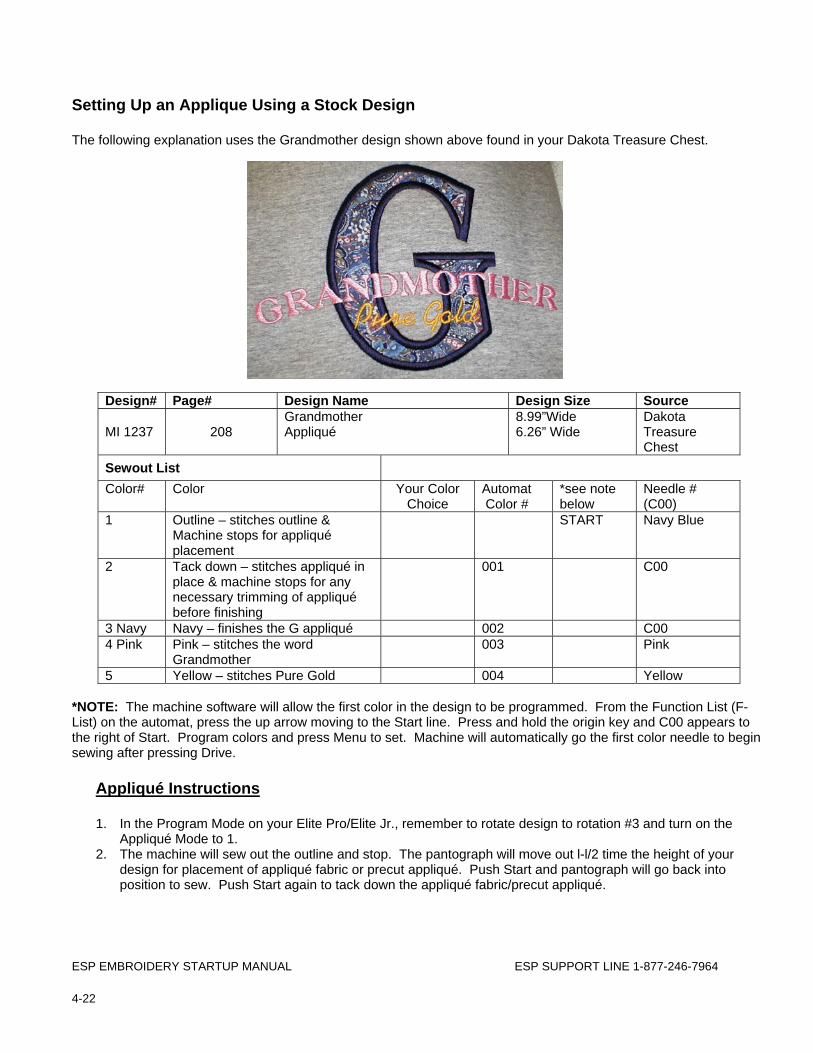
ESP EMBROIDERY STARTUP MANUAL ESP SUPPORT LINE 1-877-246-7964 4-22
Setting Up an Applique Using a Stock Design The following explanation uses the Grandmother design shown above found in your Dakota Treasure Chest.
Design# Page# Design Name Design Size Source MI 1237
208
Grandmother Appliqué
8.99”Wide 6.26” Wide
Dakota Treasure Chest
Sewout List Color# Color Your Color
Choice Automat Color #
*see note below
Needle # (C00)
1 Outline – stitches outline & Machine stops for appliqué placement
START Navy Blue
2 Tack down – stitches appliqué in place & machine stops for any necessary trimming of appliqué before finishing
001 C00
3 Navy Navy – finishes the G appliqué 002 C00 4 Pink Pink – stitches the word
Grandmother 003 Pink
5 Yellow – stitches Pure Gold 004 Yellow *NOTE: The machine software will allow the first color in the design to be programmed. From the Function List (F-List) on the automat, press the up arrow moving to the Start line. Press and hold the origin key and C00 appears to the right of Start. Program colors and press Menu to set. Machine will automatically go the first color needle to begin sewing after pressing Drive.
Appliqué Instructions
1. In the Program Mode on your Elite Pro/Elite Jr., remember to rotate design to rotation #3 and turn on the Appliqué Mode to 1.
2. The machine will sew out the outline and stop. The pantograph will move out l-l/2 time the height of your design for placement of appliqué fabric or precut appliqué. Push Start and pantograph will go back into position to sew. Push Start again to tack down the appliqué fabric/precut appliqué.
ESP EMBROIDERY STARTUP MANUAL ESP SUPPORT LINE 1-877-246-7964
4-23
3. After the tackdown is completed, the pantograph will move out again for trimming appliqué fabric or tidying up
precut appliqué pattern. Push Start and pantograph will go back into position. Push Start again to resume sewing. The Elite Pro/Elite Jr. will sew the remainder of the design.
Making the Appliqué Pattern
1. Hoop a piece of backing. Stitch outline and remove hoop from machine. 2. Make notations inside the outline i.e., pattern name, 100% etc. 3. If you have access to a copier, make a copy of the outline. Spray back of copy with spray adhesive and lay
on manila folder. Cut the pattern out. Flip it over and write “this side up”. 4. Spray a piece of cutaway backing with embroidery spray adhesive and place onto the wrong side of the
appliqué fabric. Place your embroidery pattern with “this side up” facing up and trace the pattern. Cut the pattern and spray backing side with embroidery spray adhesive.
5. If you are doing a number of the same appliqué, time will be saved cutting patterns in advance. It is also much easier than trimming each one at the machine. After the tack down, there is one more chance to tidy up appliqué for good stitch coverage.
6. Some stock design companies do not put a Stop code in after the tack down assuming precut appliqués will be used. A Stop code added after the tack down is useful to check the precut appliqué for any trimming adjustments. Appliqué patterns can shift around during the tack down, especially on a lofty fleece.
7. The appliqué outline can be copied to the clipboard, and saved as a plotter file (*.PLT) This can be used to cut appliqués on an Ioliner or other types of cutting equipment.
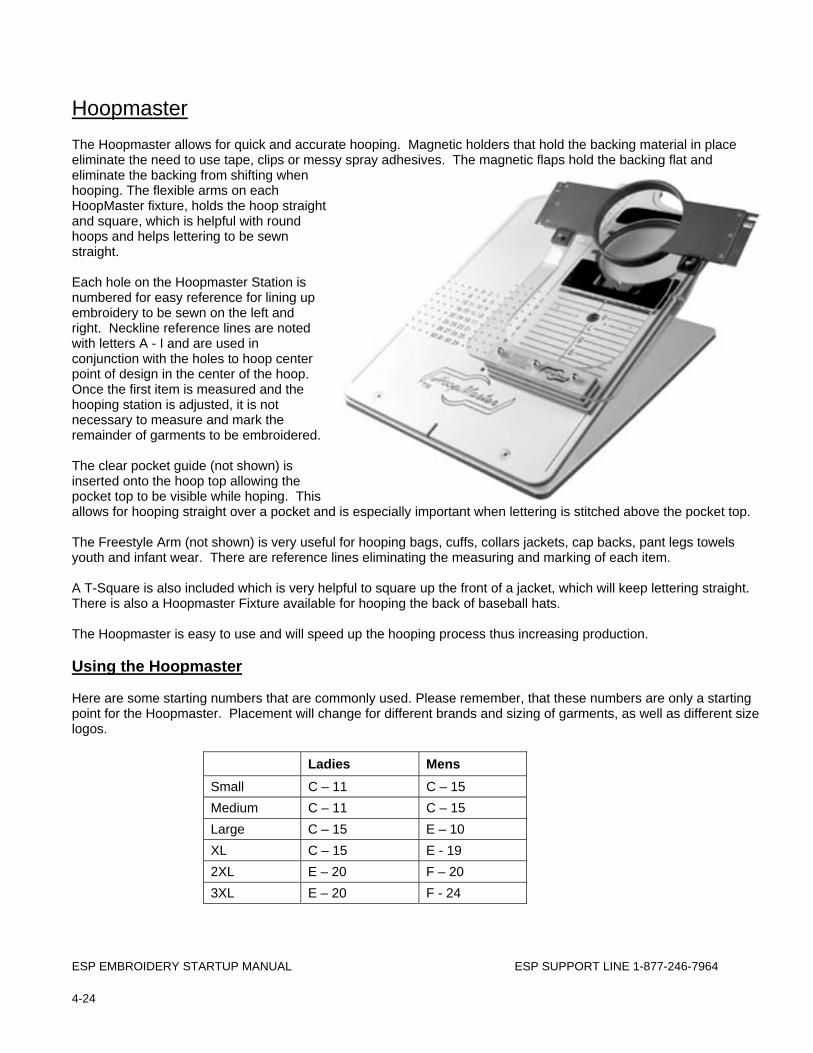
ESP EMBROIDERY STARTUP MANUAL ESP SUPPORT LINE 1-877-246-7964 4-24
Hoopmaster The Hoopmaster allows for quick and accurate hooping. Magnetic holders that hold the backing material in place eliminate the need to use tape, clips or messy spray adhesives. The magnetic flaps hold the backing flat and eliminate the backing from shifting when hooping. The flexible arms on each HoopMaster fixture, holds the hoop straight and square, which is helpful with round hoops and helps lettering to be sewn straight. Each hole on the Hoopmaster Station is numbered for easy reference for lining up embroidery to be sewn on the left and right. Neckline reference lines are noted with letters A - I and are used in conjunction with the holes to hoop center point of design in the center of the hoop. Once the first item is measured and the hooping station is adjusted, it is not necessary to measure and mark the remainder of garments to be embroidered. The clear pocket guide (not shown) is inserted onto the hoop top allowing the pocket top to be visible while hoping. This allows for hooping straight over a pocket and is especially important when lettering is stitched above the pocket top. The Freestyle Arm (not shown) is very useful for hooping bags, cuffs, collars jackets, cap backs, pant legs towels youth and infant wear. There are reference lines eliminating the measuring and marking of each item. A T-Square is also included which is very helpful to square up the front of a jacket, which will keep lettering straight. There is also a Hoopmaster Fixture available for hooping the back of baseball hats. The Hoopmaster is easy to use and will speed up the hooping process thus increasing production. Using the Hoopmaster Here are some starting numbers that are commonly used. Please remember, that these numbers are only a starting point for the Hoopmaster. Placement will change for different brands and sizing of garments, as well as different size logos.
Ladies Mens Small C – 11 C – 15 Medium C – 11 C – 15 Large C – 15 E – 10 XL C – 15 E - 19 2XL E – 20 F – 20 3XL E – 20 F - 24
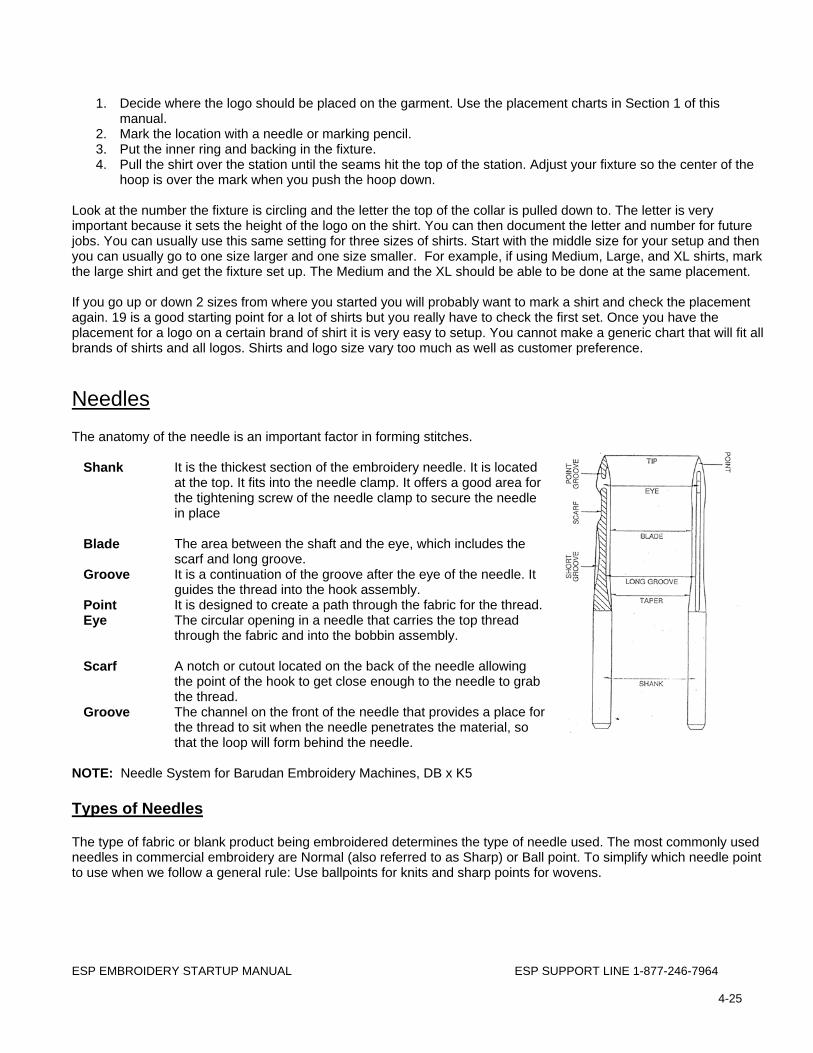
ESP EMBROIDERY STARTUP MANUAL ESP SUPPORT LINE 1-877-246-7964
4-25
1. Decide where the logo should be placed on the garment. Use the placement charts in Section 1 of this manual.
2. Mark the location with a needle or marking pencil. 3. Put the inner ring and backing in the fixture. 4. Pull the shirt over the station until the seams hit the top of the station. Adjust your fixture so the center of the
hoop is over the mark when you push the hoop down.
Look at the number the fixture is circling and the letter the top of the collar is pulled down to. The letter is very important because it sets the height of the logo on the shirt. You can then document the letter and number for future jobs. You can usually use this same setting for three sizes of shirts. Start with the middle size for your setup and then you can usually go to one size larger and one size smaller. For example, if using Medium, Large, and XL shirts, mark the large shirt and get the fixture set up. The Medium and the XL should be able to be done at the same placement. If you go up or down 2 sizes from where you started you will probably want to mark a shirt and check the placement again. 19 is a good starting point for a lot of shirts but you really have to check the first set. Once you have the placement for a logo on a certain brand of shirt it is very easy to setup. You cannot make a generic chart that will fit all brands of shirts and all logos. Shirts and logo size vary too much as well as customer preference.
Needles The anatomy of the needle is an important factor in forming stitches.
Shank
It is the thickest section of the embroidery needle. It is located at the top. It fits into the needle clamp. It offers a good area for the tightening screw of the needle clamp to secure the needle in place
Blade
The area between the shaft and the eye, which includes the scarf and long groove.
Groove It is a continuation of the groove after the eye of the needle. It guides the thread into the hook assembly.
Point It is designed to create a path through the fabric for the thread. Eye The circular opening in a needle that carries the top thread
through the fabric and into the bobbin assembly.
Scarf A notch or cutout located on the back of the needle allowing the point of the hook to get close enough to the needle to grab the thread.
Groove The channel on the front of the needle that provides a place for the thread to sit when the needle penetrates the material, so that the loop will form behind the needle.
NOTE: Needle System for Barudan Embroidery Machines, DB x K5 Types of Needles The type of fabric or blank product being embroidered determines the type of needle used. The most commonly used needles in commercial embroidery are Normal (also referred to as Sharp) or Ball point. To simplify which needle point to use when we follow a general rule: Use ballpoints for knits and sharp points for wovens.
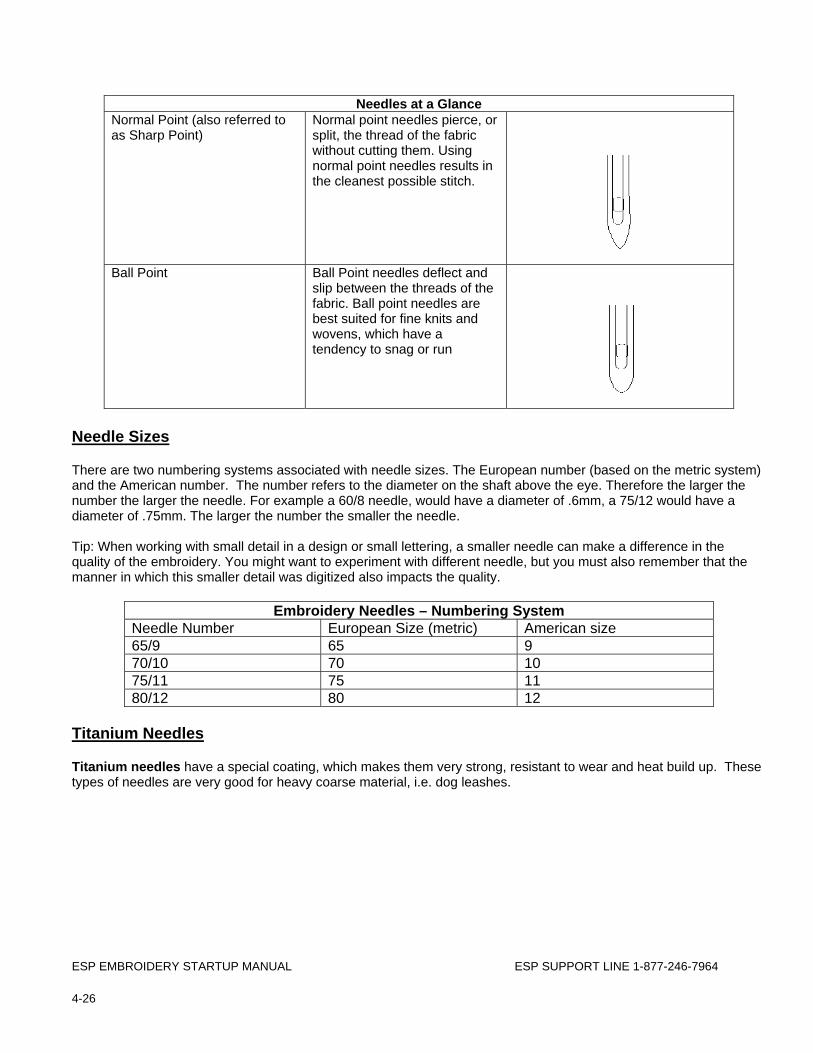
ESP EMBROIDERY STARTUP MANUAL ESP SUPPORT LINE 1-877-246-7964 4-26
Needles at a Glance Normal Point (also referred to as Sharp Point)
Normal point needles pierce, or split, the thread of the fabric without cutting them. Using normal point needles results in the cleanest possible stitch.
Ball Point Ball Point needles deflect and slip between the threads of the fabric. Ball point needles are best suited for fine knits and wovens, which have a tendency to snag or run
Needle Sizes There are two numbering systems associated with needle sizes. The European number (based on the metric system) and the American number. The number refers to the diameter on the shaft above the eye. Therefore the larger the number the larger the needle. For example a 60/8 needle, would have a diameter of .6mm, a 75/12 would have a diameter of .75mm. The larger the number the smaller the needle. Tip: When working with small detail in a design or small lettering, a smaller needle can make a difference in the quality of the embroidery. You might want to experiment with different needle, but you must also remember that the manner in which this smaller detail was digitized also impacts the quality.
Embroidery Needles – Numbering System Needle Number European Size (metric) American size 65/9 65 9 70/10 70 10 75/11 75 11 80/12 80 12
Titanium Needles Titanium needles have a special coating, which makes them very strong, resistant to wear and heat build up. These types of needles are very good for heavy coarse material, i.e. dog leashes.
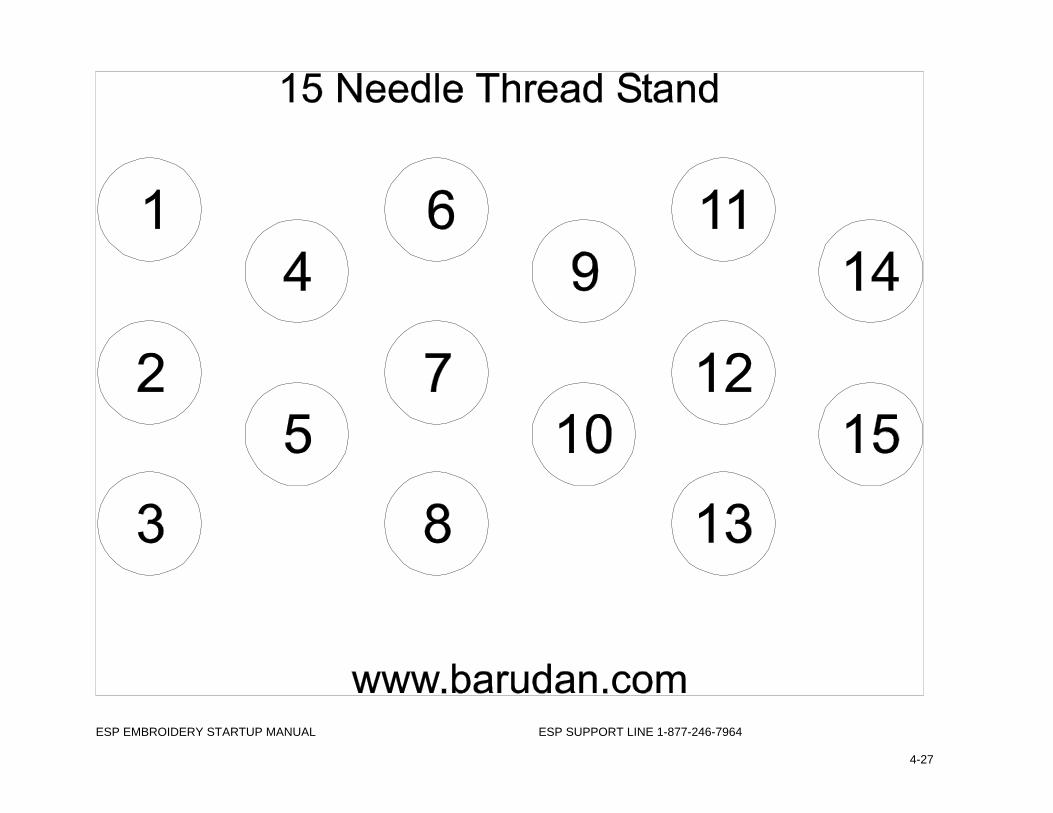
ESP EMBROIDERY STARTUP MANUAL ESP SUPPORT LINE 1-877-246-7964
4-27
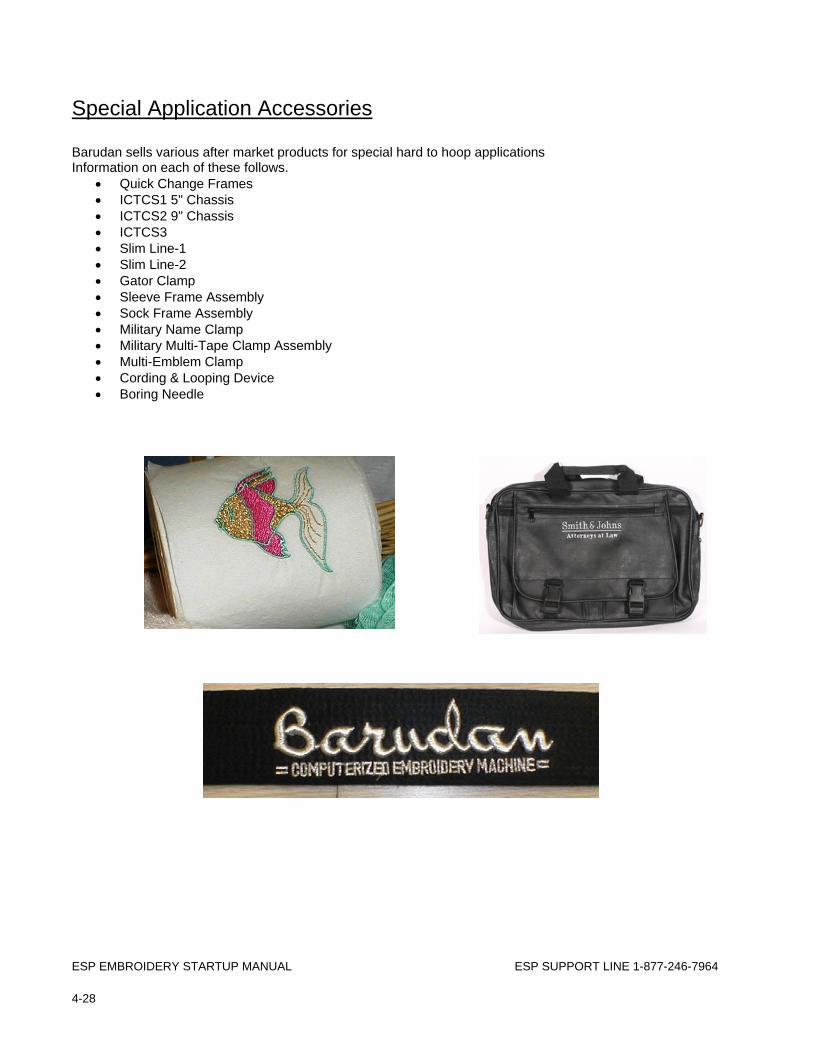
ESP EMBROIDERY STARTUP MANUAL ESP SUPPORT LINE 1-877-246-7964 4-28
Special Application Accessories Barudan sells various after market products for special hard to hoop applications Information on each of these follows.
• Quick Change Frames • ICTCS1 5" Chassis • ICTCS2 9" Chassis • ICTCS3 • Slim Line-1 • Slim Line-2 • Gator Clamp • Sleeve Frame Assembly • Sock Frame Assembly • Military Name Clamp • Military Multi-Tape Clamp Assembly • Multi-Emblem Clamp • Cording & Looping Device • Boring Needle
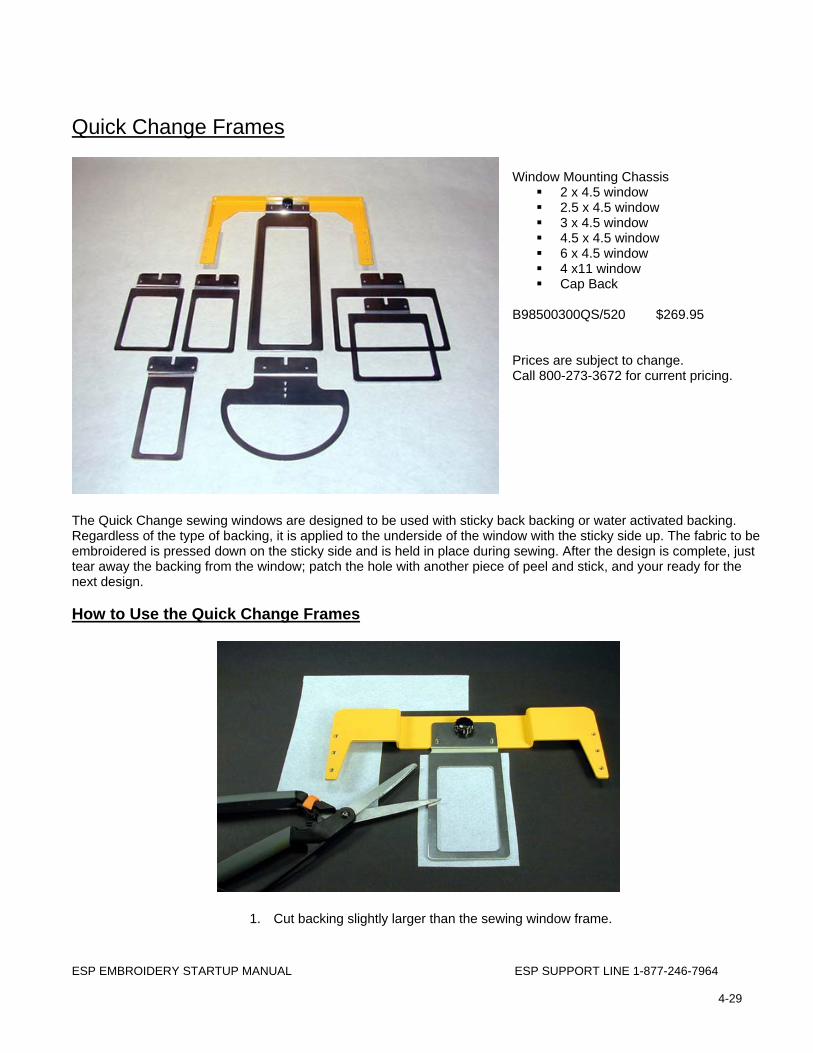
ESP EMBROIDERY STARTUP MANUAL ESP SUPPORT LINE 1-877-246-7964
4-29
Quick Change Frames
The Quick Change sewing windows are designed to be used with sticky back backing or water activated backing. Regardless of the type of backing, it is applied to the underside of the window with the sticky side up. The fabric to be embroidered is pressed down on the sticky side and is held in place during sewing. After the design is complete, just tear away the backing from the window; patch the hole with another piece of peel and stick, and your ready for the next design. How to Use the Quick Change Frames
1. Cut backing slightly larger than the sewing window frame.
Window Mounting Chassis 2 x 4.5 window 2.5 x 4.5 window 3 x 4.5 window 4.5 x 4.5 window 6 x 4.5 window 4 x11 window Cap Back
B98500300QS/520 $269.95 Prices are subject to change. Call 800-273-3672 for current pricing.

ESP EMBROIDERY STARTUP MANUAL ESP SUPPORT LINE 1-877-246-7964 4-30
2. Peel away the protective layer.
3. Stick the backing to the underside of the sewing window; wrap excess on top as shown.
4. Position garment on backing and sew design.
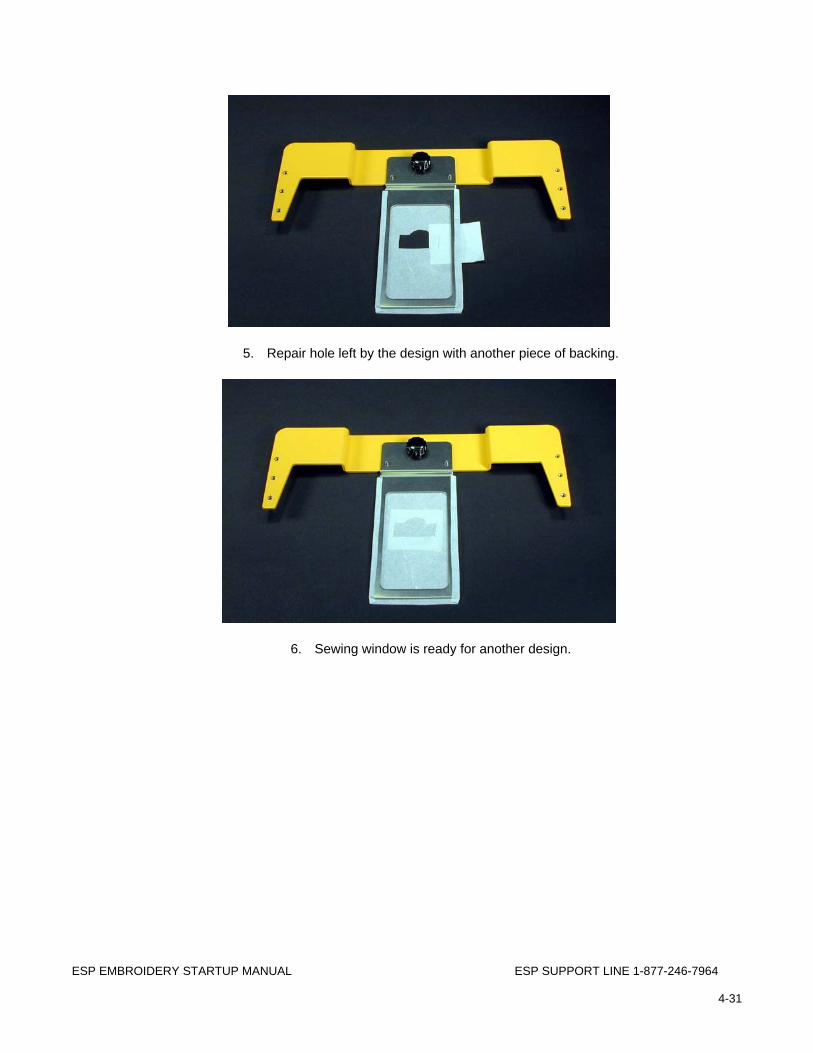
ESP EMBROIDERY STARTUP MANUAL ESP SUPPORT LINE 1-877-246-7964
4-31
5. Repair hole left by the design with another piece of backing.
6. Sewing window is ready for another design.
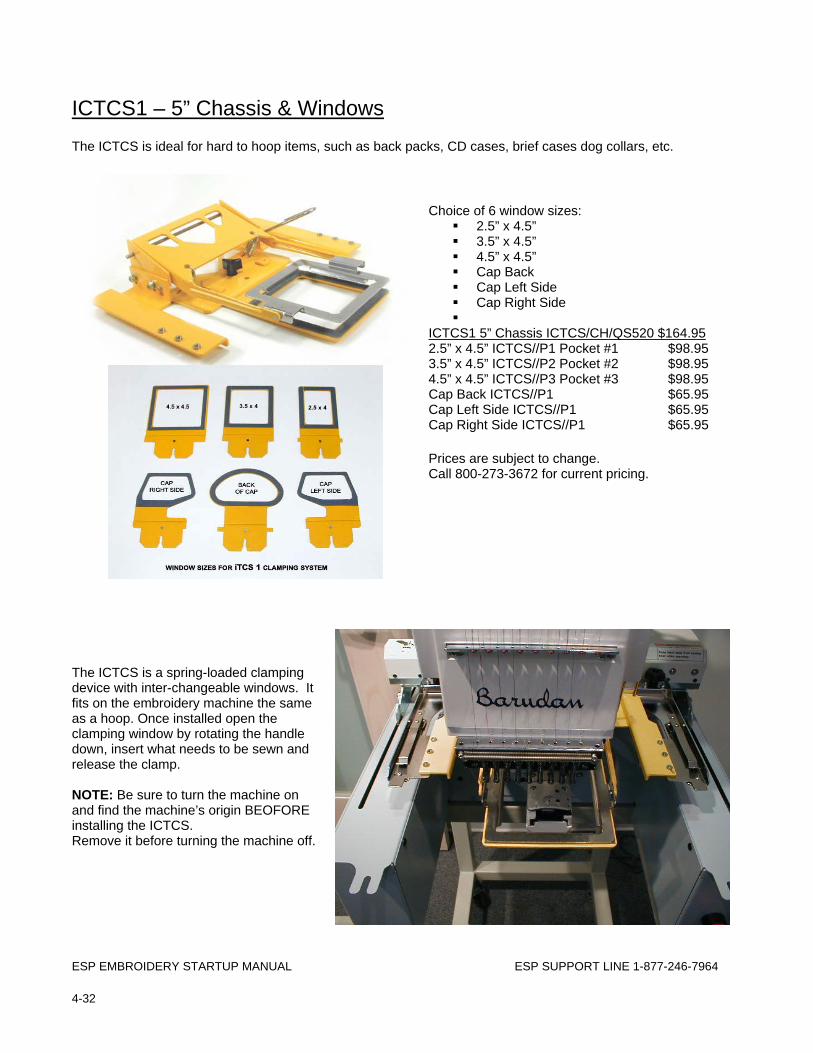
ESP EMBROIDERY STARTUP MANUAL ESP SUPPORT LINE 1-877-246-7964 4-32
ICTCS1 – 5” Chassis & Windows
The ICTCS is ideal for hard to hoop items, such as back packs, CD cases, brief cases dog collars, etc.
The ICTCS is a spring-loaded clamping device with inter-changeable windows. It fits on the embroidery machine the same as a hoop. Once installed open the clamping window by rotating the handle down, insert what needs to be sewn and release the clamp. NOTE: Be sure to turn the machine on and find the machine’s origin BEOFORE installing the ICTCS. Remove it before turning the machine off.
Choice of 6 window sizes: 2.5” x 4.5” 3.5” x 4.5” 4.5” x 4.5” Cap Back Cap Left Side Cap Right Side
ICTCS1 5” Chassis ICTCS/CH/QS520 $164.95 2.5” x 4.5” ICTCS//P1 Pocket #1 $98.95 3.5” x 4.5” ICTCS//P2 Pocket #2 $98.95 4.5” x 4.5” ICTCS//P3 Pocket #3 $98.95 Cap Back ICTCS//P1 $65.95 Cap Left Side ICTCS//P1 $65.95 Cap Right Side ICTCS//P1 $65.95 Prices are subject to change. Call 800-273-3672 for current pricing.
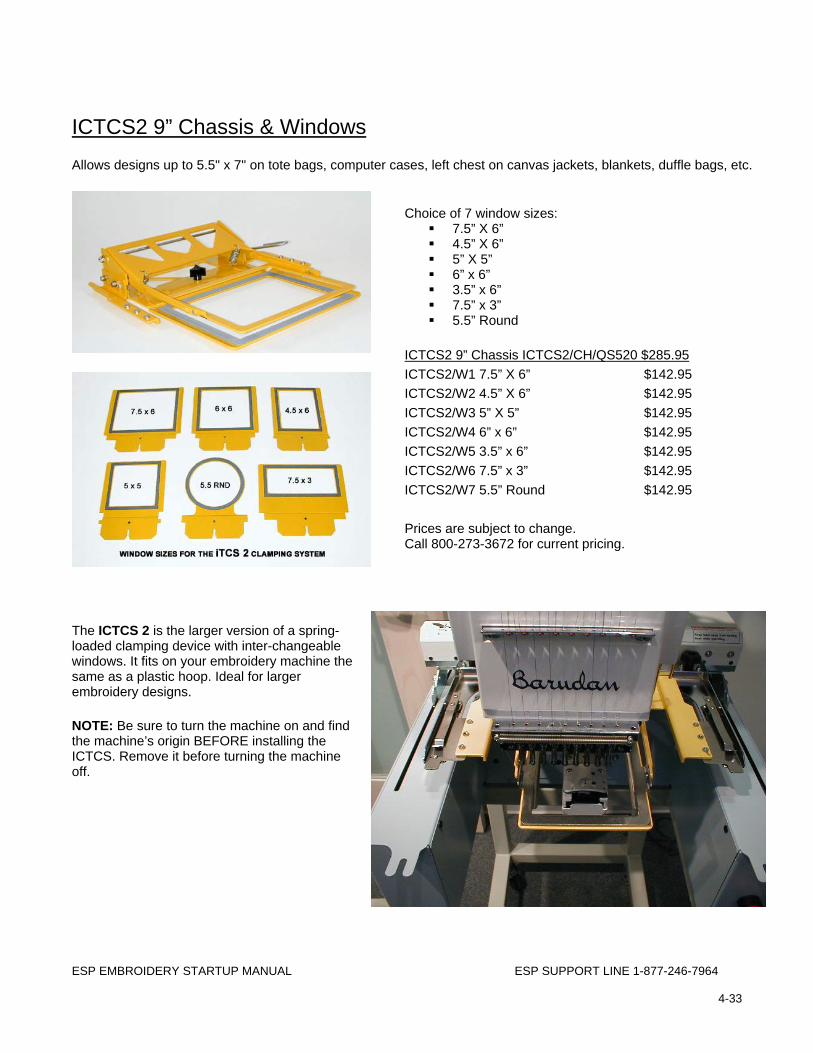
ESP EMBROIDERY STARTUP MANUAL ESP SUPPORT LINE 1-877-246-7964
4-33
ICTCS2 9” Chassis & Windows Allows designs up to 5.5" x 7" on tote bags, computer cases, left chest on canvas jackets, blankets, duffle bags, etc.
The ICTCS 2 is the larger version of a spring-loaded clamping device with inter-changeable windows. It fits on your embroidery machine the same as a plastic hoop. Ideal for larger embroidery designs.
NOTE: Be sure to turn the machine on and find the machine’s origin BEFORE installing the ICTCS. Remove it before turning the machine off.
Choice of 7 window sizes: 7.5” X 6” 4.5” X 6” 5” X 5” 6” x 6” 3.5” x 6” 7.5” x 3” 5.5” Round
ICTCS2 9” Chassis ICTCS2/CH/QS520 $285.95 ICTCS2/W1 7.5” X 6” $142.95 ICTCS2/W2 4.5” X 6” $142.95 ICTCS2/W3 5” X 5” $142.95 ICTCS2/W4 6” x 6” $142.95 ICTCS2/W5 3.5” x 6” $142.95 ICTCS2/W6 7.5” x 3” $142.95 ICTCS2/W7 5.5” Round $142.95 Prices are subject to change. Call 800-273-3672 for current pricing.
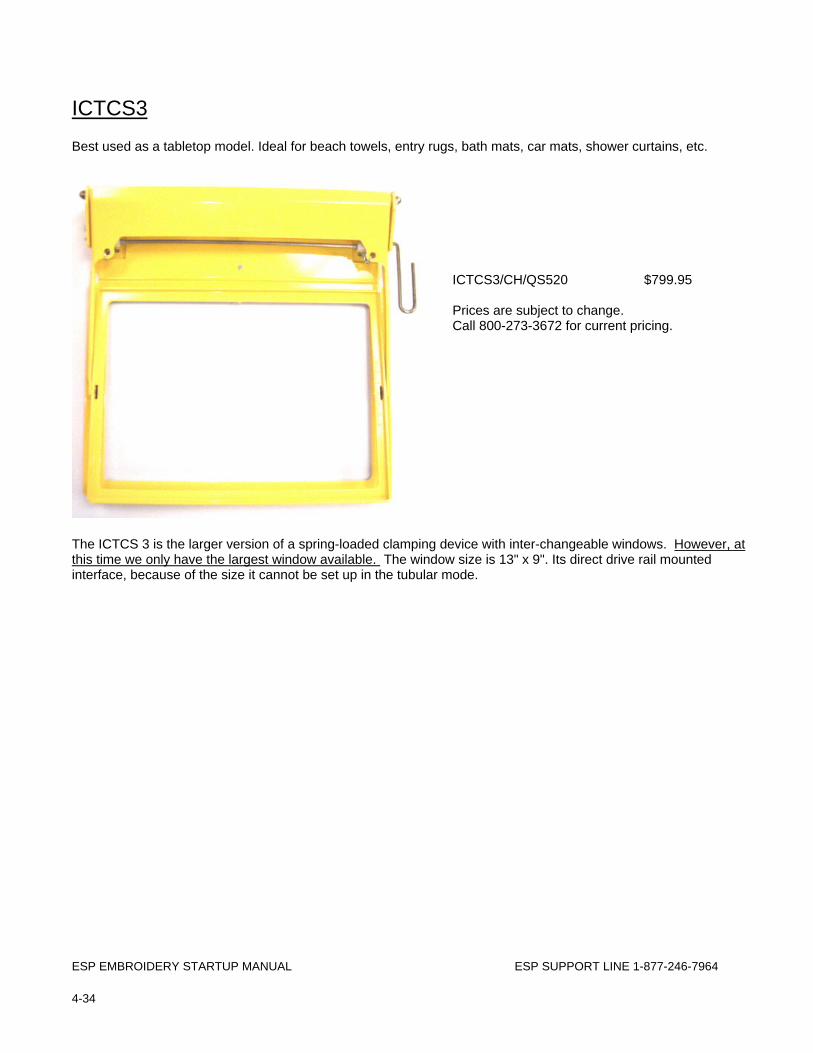
ESP EMBROIDERY STARTUP MANUAL ESP SUPPORT LINE 1-877-246-7964 4-34
ICTCS3
Best used as a tabletop model. Ideal for beach towels, entry rugs, bath mats, car mats, shower curtains, etc.
The ICTCS 3 is the larger version of a spring-loaded clamping device with inter-changeable windows. However, at this time we only have the largest window available. The window size is 13" x 9". Its direct drive rail mounted interface, because of the size it cannot be set up in the tubular mode.
ICTCS3/CH/QS520 $799.95 Prices are subject to change. Call 800-273-3672 for current pricing.
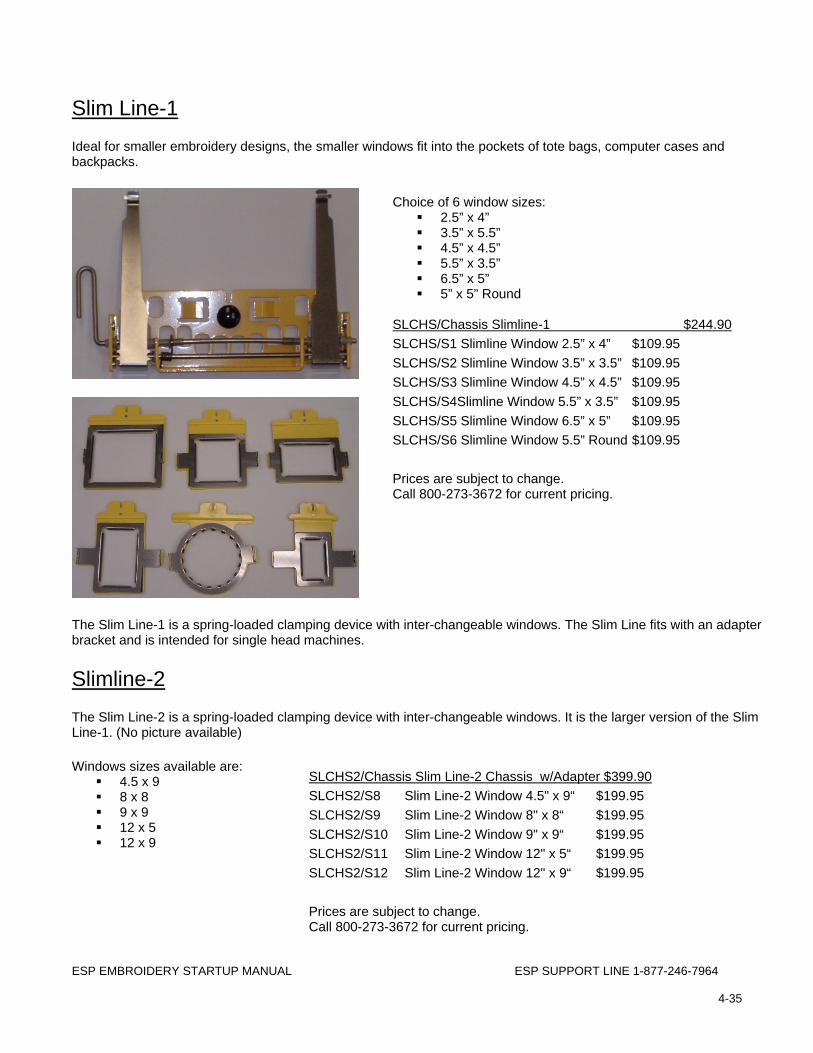
ESP EMBROIDERY STARTUP MANUAL ESP SUPPORT LINE 1-877-246-7964
4-35
Slim Line-1
Ideal for smaller embroidery designs, the smaller windows fit into the pockets of tote bags, computer cases and backpacks.
The Slim Line-1 is a spring-loaded clamping device with inter-changeable windows. The Slim Line fits with an adapter bracket and is intended for single head machines.
Slimline-2
The Slim Line-2 is a spring-loaded clamping device with inter-changeable windows. It is the larger version of the Slim Line-1. (No picture available)
Windows sizes available are: 4.5 x 9 8 x 8 9 x 9 12 x 5 12 x 9
Choice of 6 window sizes: 2.5” x 4” 3.5” x 5.5” 4.5” x 4.5” 5.5” x 3.5” 6.5” x 5” 5” x 5” Round
SLCHS/Chassis Slimline-1 $244.90 SLCHS/S1 Slimline Window 2.5” x 4” $109.95 SLCHS/S2 Slimline Window 3.5” x 3.5” $109.95 SLCHS/S3 Slimline Window 4.5” x 4.5” $109.95 SLCHS/S4Slimline Window 5.5” x 3.5” $109.95 SLCHS/S5 Slimline Window 6.5” x 5” $109.95 SLCHS/S6 Slimline Window 5.5” Round $109.95 Prices are subject to change. Call 800-273-3672 for current pricing.
SLCHS2/Chassis Slim Line-2 Chassis w/Adapter $399.90 SLCHS2/S8 Slim Line-2 Window 4.5" x 9“ $199.95 SLCHS2/S9 Slim Line-2 Window 8" x 8“ $199.95 SLCHS2/S10 Slim Line-2 Window 9" x 9“ $199.95 SLCHS2/S11 Slim Line-2 Window 12" x 5“ $199.95 SLCHS2/S12 Slim Line-2 Window 12" x 9“ $199.95 Prices are subject to change. Call 800-273-3672 for current pricing.
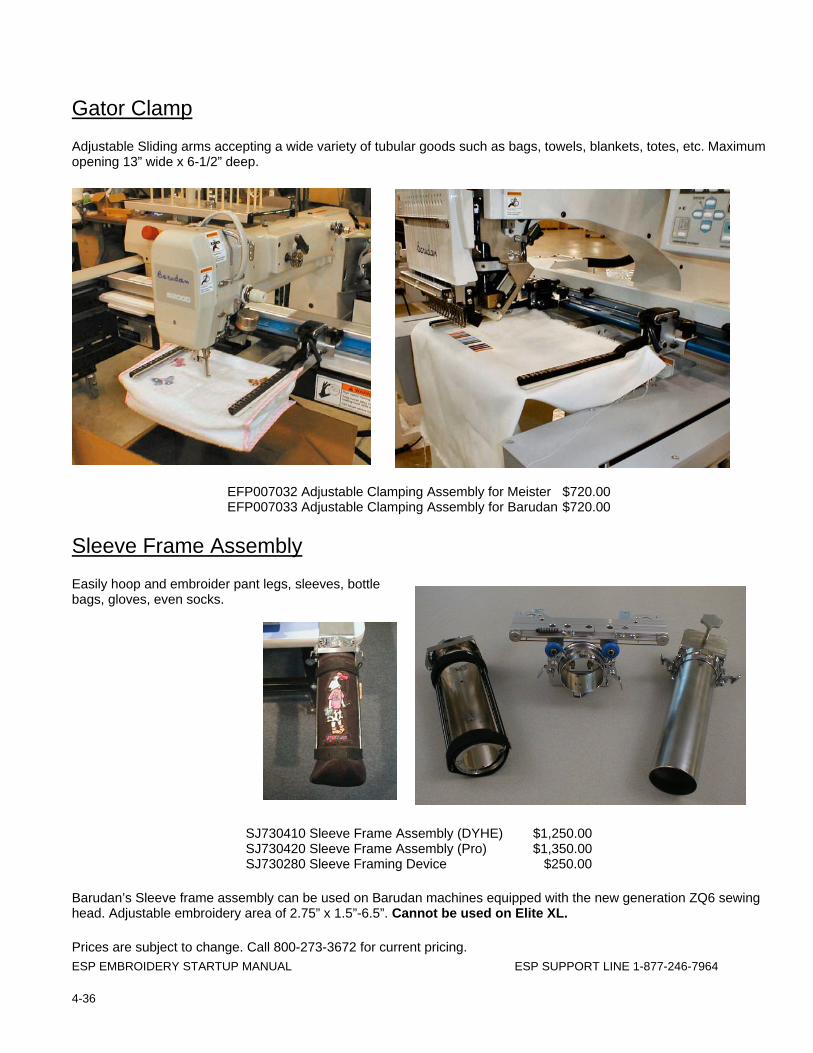
ESP EMBROIDERY STARTUP MANUAL ESP SUPPORT LINE 1-877-246-7964 4-36
Gator Clamp
Adjustable Sliding arms accepting a wide variety of tubular goods such as bags, towels, blankets, totes, etc. Maximum opening 13” wide x 6-1/2” deep.
EFP007032 Adjustable Clamping Assembly for Meister $720.00 EFP007033 Adjustable Clamping Assembly for Barudan $720.00
Sleeve Frame Assembly
Easily hoop and embroider pant legs, sleeves, bottle bags, gloves, even socks.
SJ730410 Sleeve Frame Assembly (DYHE) $1,250.00 SJ730420 Sleeve Frame Assembly (Pro) $1,350.00 SJ730280 Sleeve Framing Device $250.00
Barudan’s Sleeve frame assembly can be used on Barudan machines equipped with the new generation ZQ6 sewing head. Adjustable embroidery area of 2.75” x 1.5”-6.5”. Cannot be used on Elite XL.
Prices are subject to change. Call 800-273-3672 for current pricing.
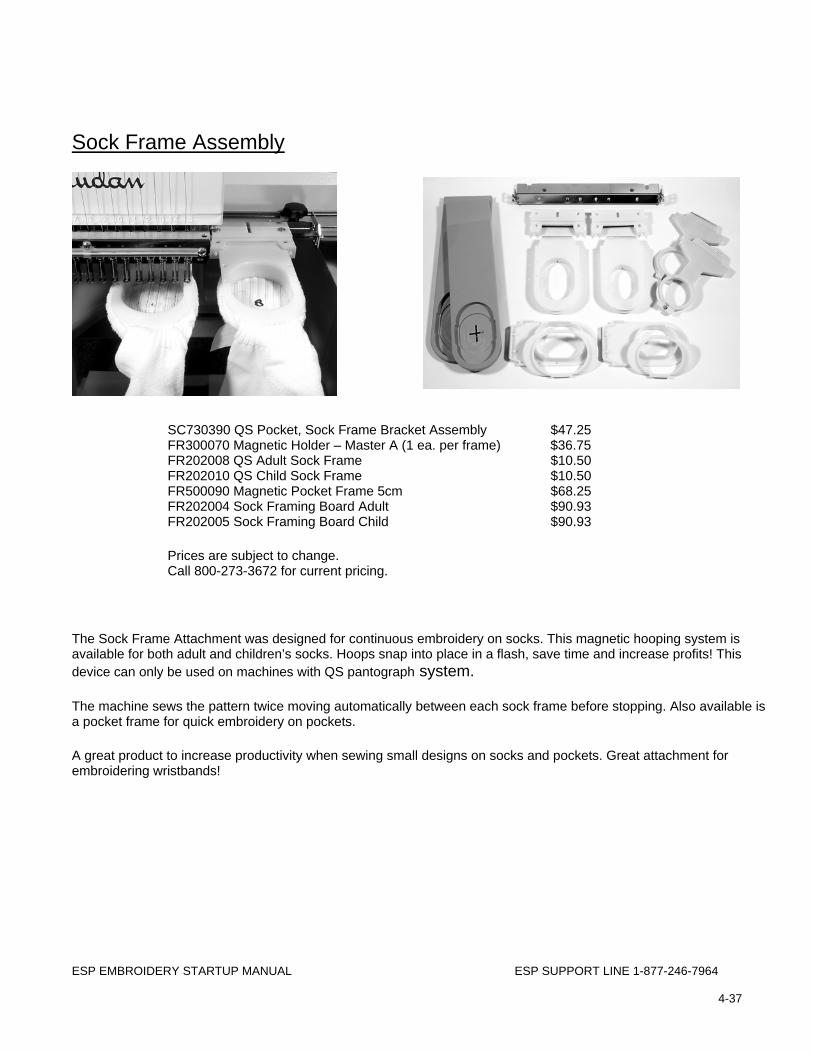
ESP EMBROIDERY STARTUP MANUAL ESP SUPPORT LINE 1-877-246-7964
4-37
Sock Frame Assembly
SC730390 QS Pocket, Sock Frame Bracket Assembly $47.25 FR300070 Magnetic Holder – Master A (1 ea. per frame) $36.75 FR202008 QS Adult Sock Frame $10.50 FR202010 QS Child Sock Frame $10.50 FR500090 Magnetic Pocket Frame 5cm $68.25 FR202004 Sock Framing Board Adult $90.93 FR202005 Sock Framing Board Child $90.93
Prices are subject to change. Call 800-273-3672 for current pricing.
The Sock Frame Attachment was designed for continuous embroidery on socks. This magnetic hooping system is available for both adult and children’s socks. Hoops snap into place in a flash, save time and increase profits! This device can only be used on machines with QS pantograph system.
The machine sews the pattern twice moving automatically between each sock frame before stopping. Also available is a pocket frame for quick embroidery on pockets.
A great product to increase productivity when sewing small designs on socks and pockets. Great attachment for embroidering wristbands!
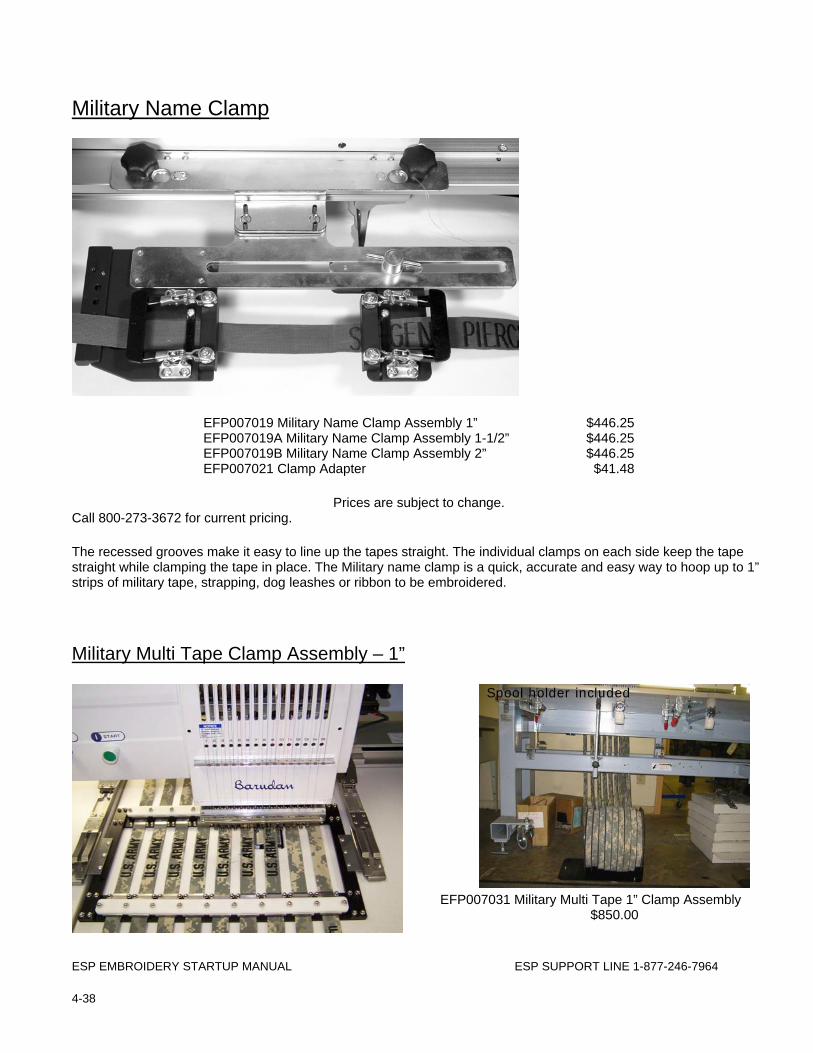
ESP EMBROIDERY STARTUP MANUAL ESP SUPPORT LINE 1-877-246-7964 4-38
Military Name Clamp
EFP007019 Military Name Clamp Assembly 1” $446.25 EFP007019A Military Name Clamp Assembly 1-1/2” $446.25 EFP007019B Military Name Clamp Assembly 2” $446.25 EFP007021 Clamp Adapter $41.48
Prices are subject to change. Call 800-273-3672 for current pricing.
The recessed grooves make it easy to line up the tapes straight. The individual clamps on each side keep the tape straight while clamping the tape in place. The Military name clamp is a quick, accurate and easy way to hoop up to 1” strips of military tape, strapping, dog leashes or ribbon to be embroidered.
Military Multi Tape Clamp Assembly – 1”
EFP007031 Military Multi Tape 1” Clamp Assembly $850.00
Spool holder included
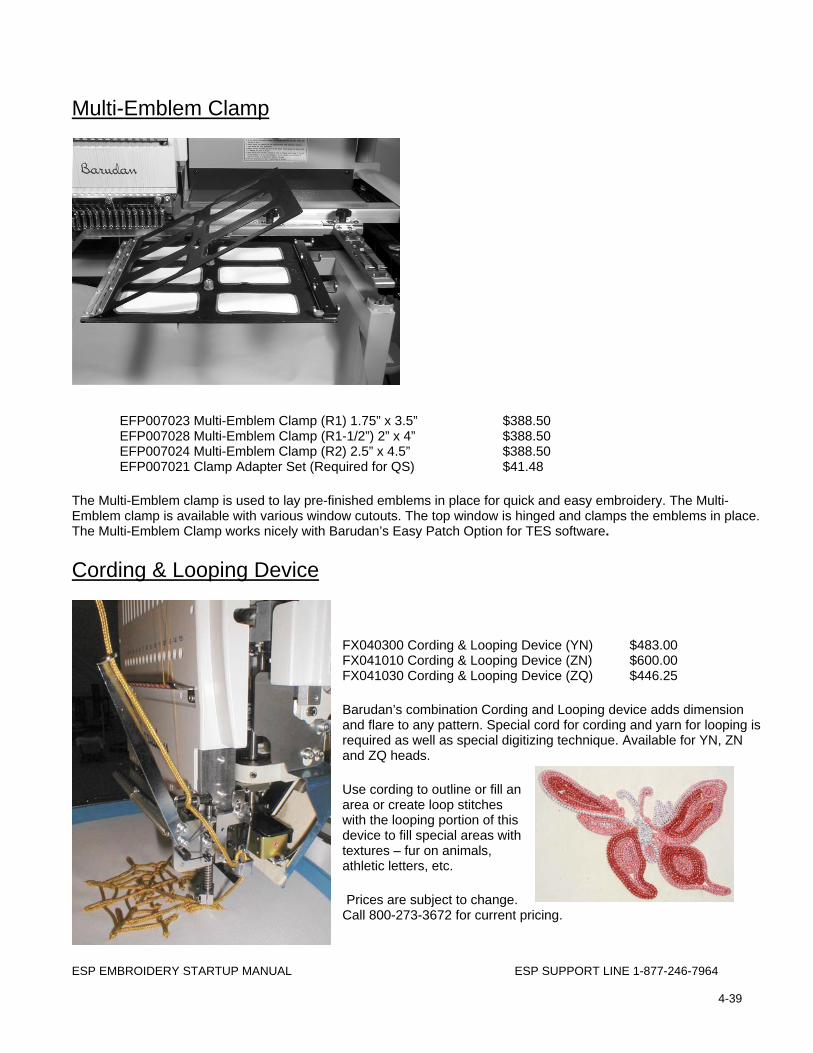
ESP EMBROIDERY STARTUP MANUAL ESP SUPPORT LINE 1-877-246-7964
4-39
Multi-Emblem Clamp
EFP007023 Multi-Emblem Clamp (R1) 1.75” x 3.5” $388.50 EFP007028 Multi-Emblem Clamp (R1-1/2”) 2” x 4” $388.50 EFP007024 Multi-Emblem Clamp (R2) 2.5” x 4.5” $388.50 EFP007021 Clamp Adapter Set (Required for QS) $41.48
The Multi-Emblem clamp is used to lay pre-finished emblems in place for quick and easy embroidery. The Multi-Emblem clamp is available with various window cutouts. The top window is hinged and clamps the emblems in place. The Multi-Emblem Clamp works nicely with Barudan’s Easy Patch Option for TES software.
Cording & Looping Device
FX040300 Cording & Looping Device (YN) $483.00 FX041010 Cording & Looping Device (ZN) $600.00 FX041030 Cording & Looping Device (ZQ) $446.25
Barudan’s combination Cording and Looping device adds dimension and flare to any pattern. Special cord for cording and yarn for looping is required as well as special digitizing technique. Available for YN, ZN and ZQ heads.
Use cording to outline or fill an area or create loop stitches with the looping portion of this device to fill special areas with textures – fur on animals, athletic letters, etc.
Prices are subject to change. Call 800-273-3672 for current pricing.
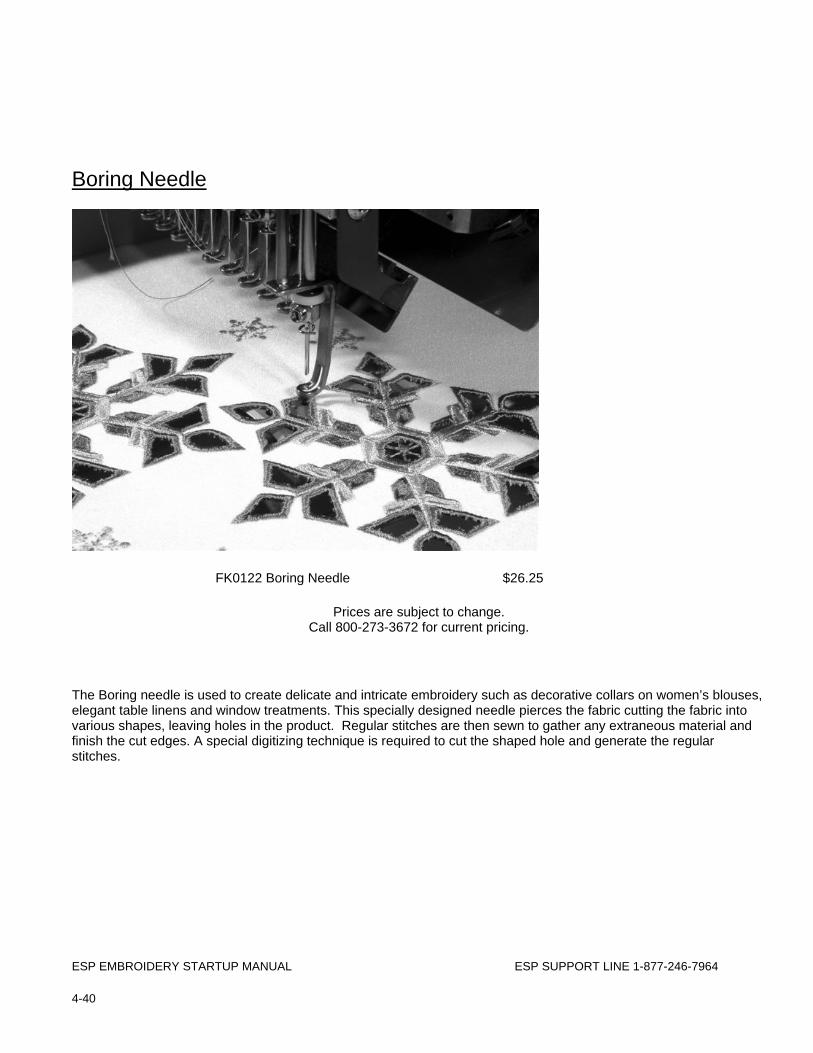
ESP EMBROIDERY STARTUP MANUAL ESP SUPPORT LINE 1-877-246-7964 4-40
Boring Needle
FK0122 Boring Needle $26.25
Prices are subject to change. Call 800-273-3672 for current pricing.
The Boring needle is used to create delicate and intricate embroidery such as decorative collars on women’s blouses, elegant table linens and window treatments. This specially designed needle pierces the fabric cutting the fabric into various shapes, leaving holes in the product. Regular stitches are then sewn to gather any extraneous material and finish the cut edges. A special digitizing technique is required to cut the shaped hole and generate the regular stitches.
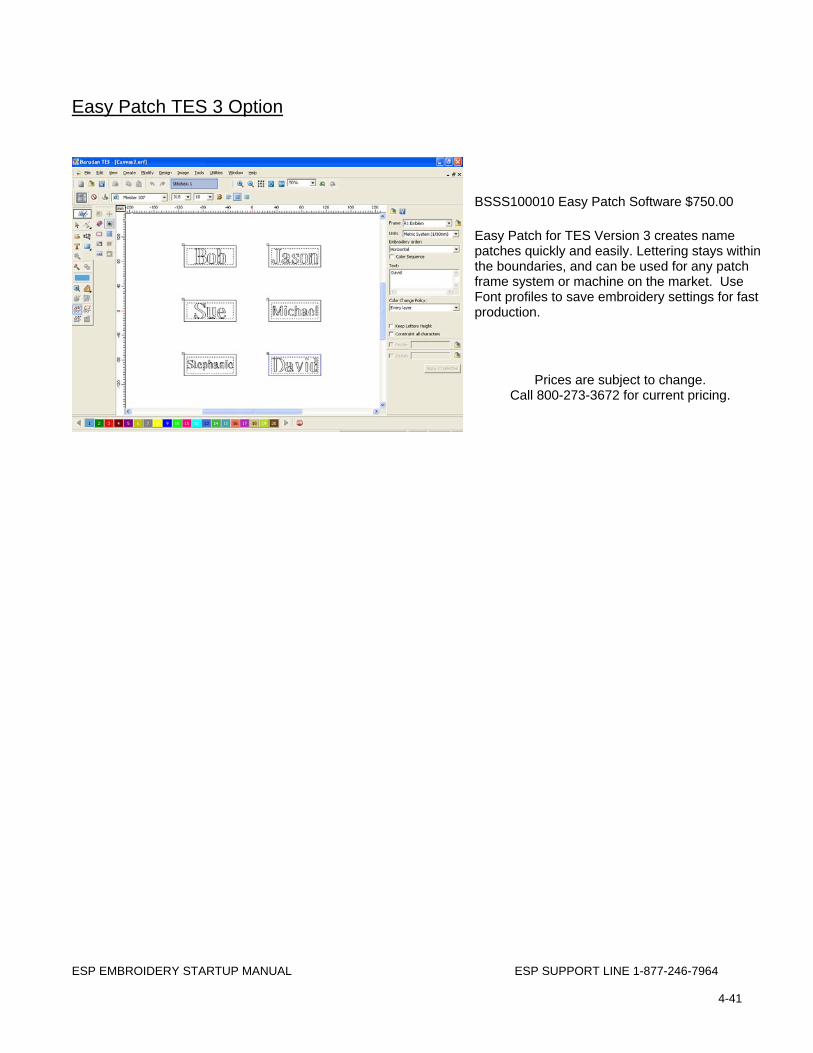
ESP EMBROIDERY STARTUP MANUAL ESP SUPPORT LINE 1-877-246-7964
4-41
Easy Patch TES 3 Option
BSSS100010 Easy Patch Software $750.00
Easy Patch for TES Version 3 creates name patches quickly and easily. Lettering stays within the boundaries, and can be used for any patch frame system or machine on the market. Use Font profiles to save embroidery settings for fast production.
Prices are subject to change. Call 800-273-3672 for current pricing.
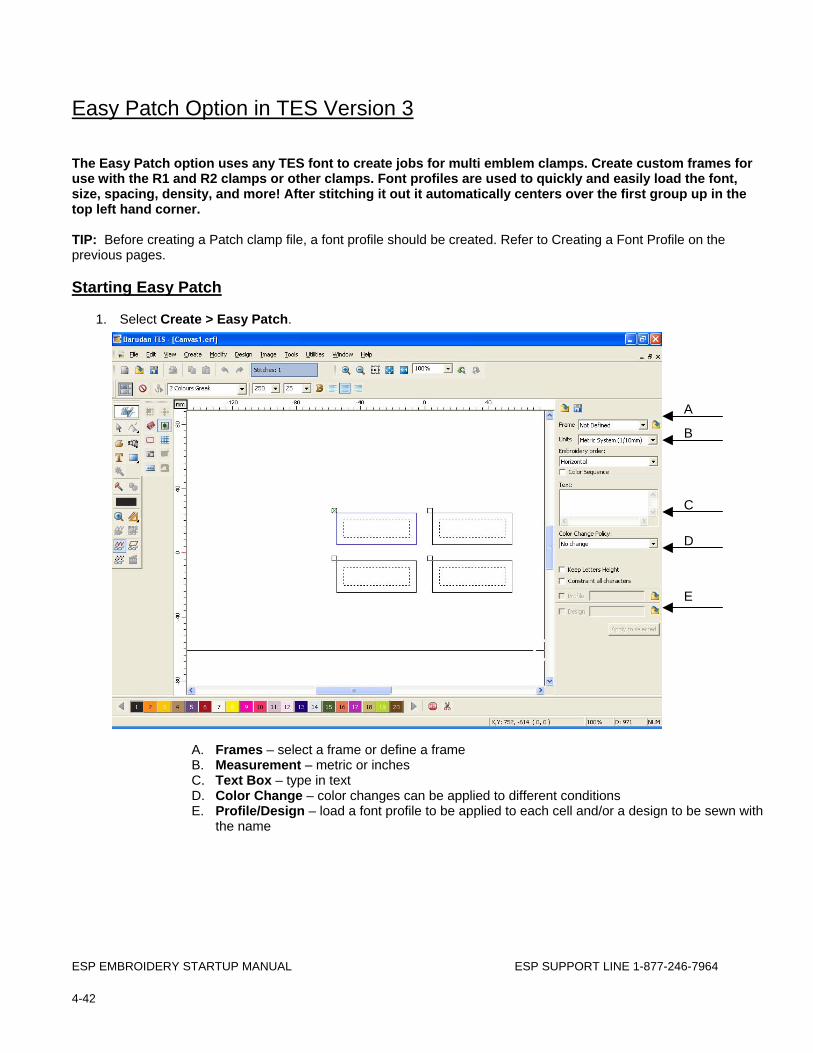
ESP EMBROIDERY STARTUP MANUAL ESP SUPPORT LINE 1-877-246-7964 4-42
Easy Patch Option in TES Version 3
The Easy Patch option uses any TES font to create jobs for multi emblem clamps. Create custom frames for use with the R1 and R2 clamps or other clamps. Font profiles are used to quickly and easily load the font, size, spacing, density, and more! After stitching it out it automatically centers over the first group up in the top left hand corner. TIP: Before creating a Patch clamp file, a font profile should be created. Refer to Creating a Font Profile on the previous pages. Starting Easy Patch
1. Select Create > Easy Patch.
A. Frames – select a frame or define a frame B. Measurement – metric or inches C. Text Box – type in text D. Color Change – color changes can be applied to different conditions E. Profile/Design – load a font profile to be applied to each cell and/or a design to be sewn with
the name
A
B
C
D
E
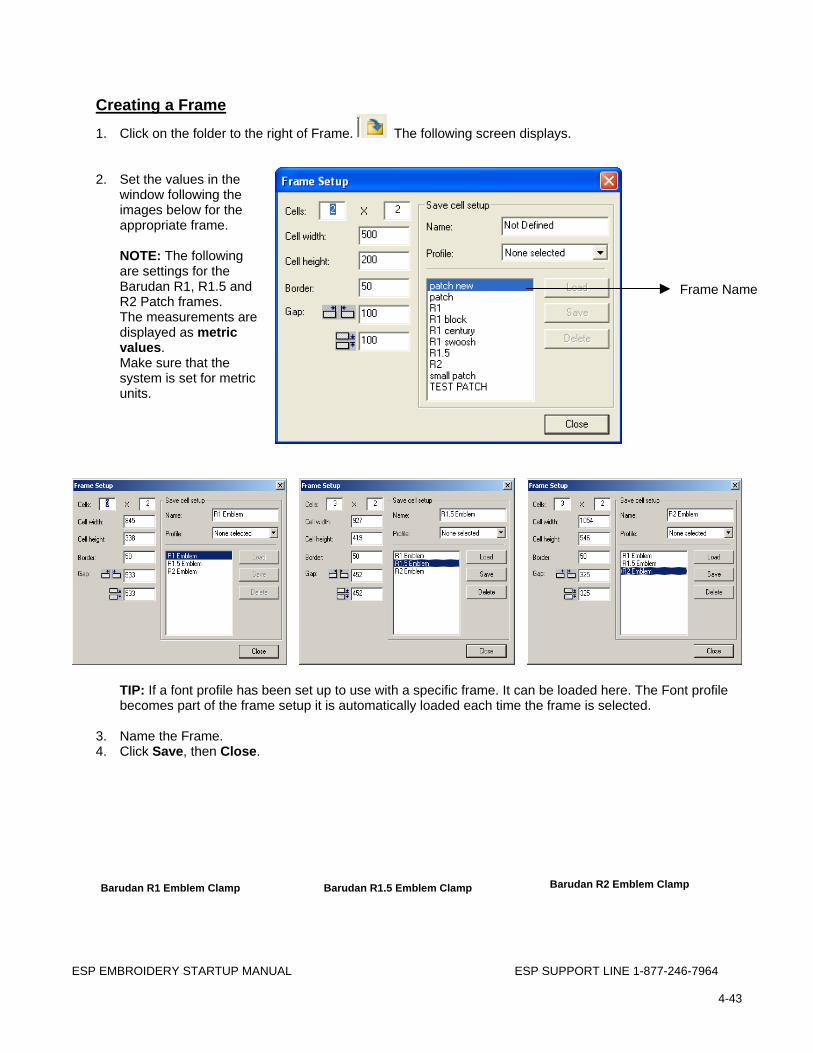
ESP EMBROIDERY STARTUP MANUAL ESP SUPPORT LINE 1-877-246-7964
4-43
Creating a Frame
1. Click on the folder to the right of Frame. The following screen displays.
2. Set the values in the window following the images below for the appropriate frame. NOTE: The following are settings for the Barudan R1, R1.5 and R2 Patch frames. The measurements are displayed as metric values. Make sure that the system is set for metric units.
TIP: If a font profile has been set up to use with a specific frame. It can be loaded here. The Font profile becomes part of the frame setup it is automatically loaded each time the frame is selected.
3. Name the Frame. 4. Click Save, then Close.
Barudan R1 Emblem Clamp Barudan R1.5 Emblem Clamp Barudan R2 Emblem Clamp
Frame Name
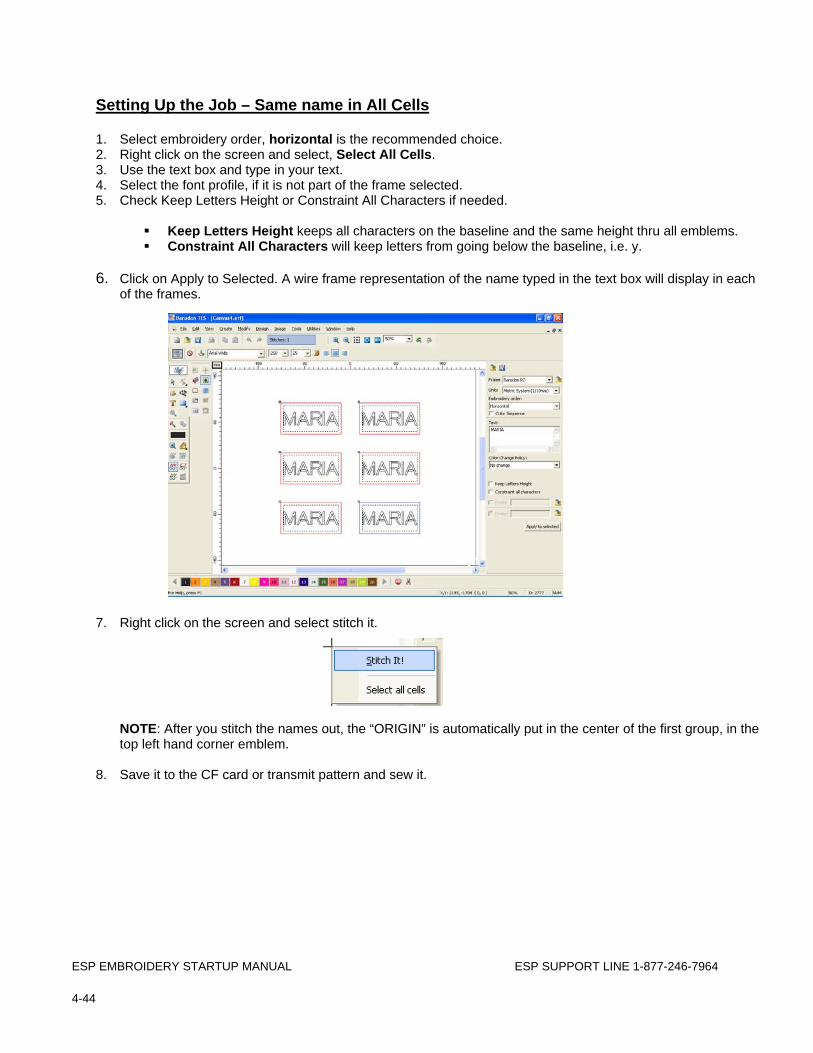
ESP EMBROIDERY STARTUP MANUAL ESP SUPPORT LINE 1-877-246-7964 4-44
Setting Up the Job – Same name in All Cells
1. Select embroidery order, horizontal is the recommended choice. 2. Right click on the screen and select, Select All Cells. 3. Use the text box and type in your text. 4. Select the font profile, if it is not part of the frame selected. 5. Check Keep Letters Height or Constraint All Characters if needed.
Keep Letters Height keeps all characters on the baseline and the same height thru all emblems. Constraint All Characters will keep letters from going below the baseline, i.e. y.
6. Click on Apply to Selected. A wire frame representation of the name typed in the text box will display in each
of the frames.
7. Right click on the screen and select stitch it.
NOTE: After you stitch the names out, the “ORIGIN” is automatically put in the center of the first group, in the top left hand corner emblem.
8. Save it to the CF card or transmit pattern and sew it.
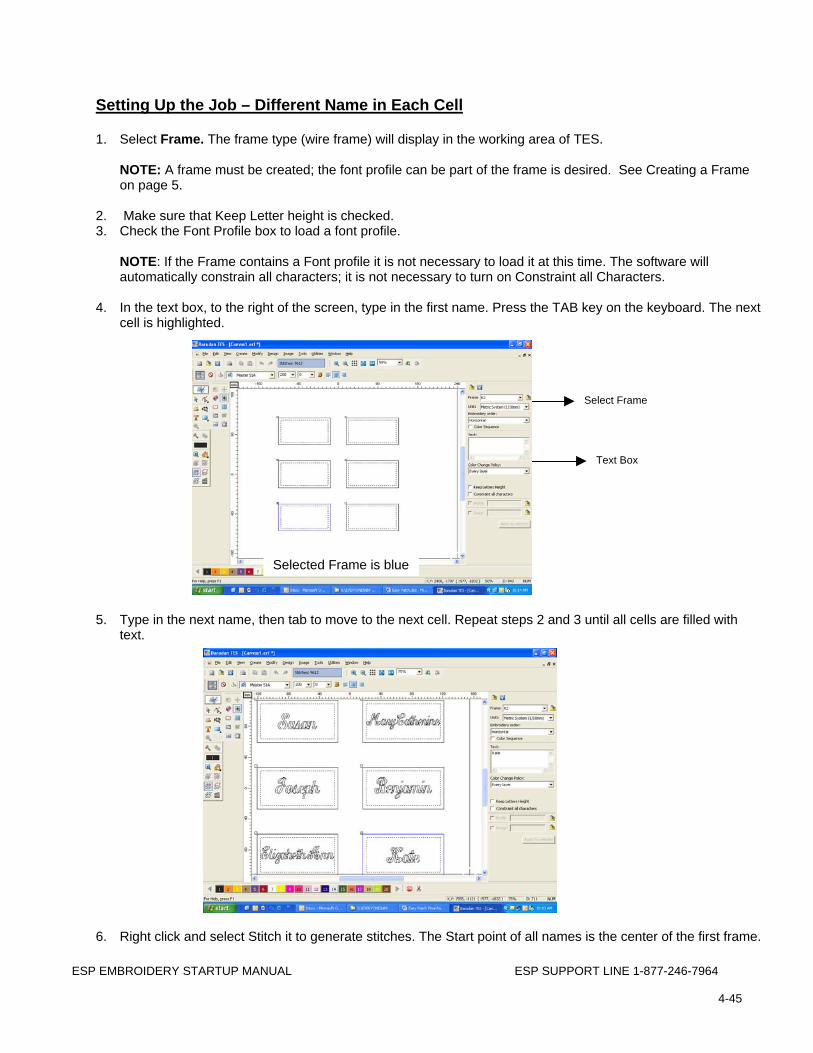
ESP EMBROIDERY STARTUP MANUAL ESP SUPPORT LINE 1-877-246-7964
4-45
Setting Up the Job – Different Name in Each Cell
1. Select Frame. The frame type (wire frame) will display in the working area of TES. NOTE: A frame must be created; the font profile can be part of the frame is desired. See Creating a Frame on page 5.
2. Make sure that Keep Letter height is checked. 3. Check the Font Profile box to load a font profile.
NOTE: If the Frame contains a Font profile it is not necessary to load it at this time. The software will automatically constrain all characters; it is not necessary to turn on Constraint all Characters.
4. In the text box, to the right of the screen, type in the first name. Press the TAB key on the keyboard. The next cell is highlighted.
5. Type in the next name, then tab to move to the next cell. Repeat steps 2 and 3 until all cells are filled with
text.
6. Right click and select Stitch it to generate stitches. The Start point of all names is the center of the first frame.
Select Frame
Text Box
Selected Frame is blue
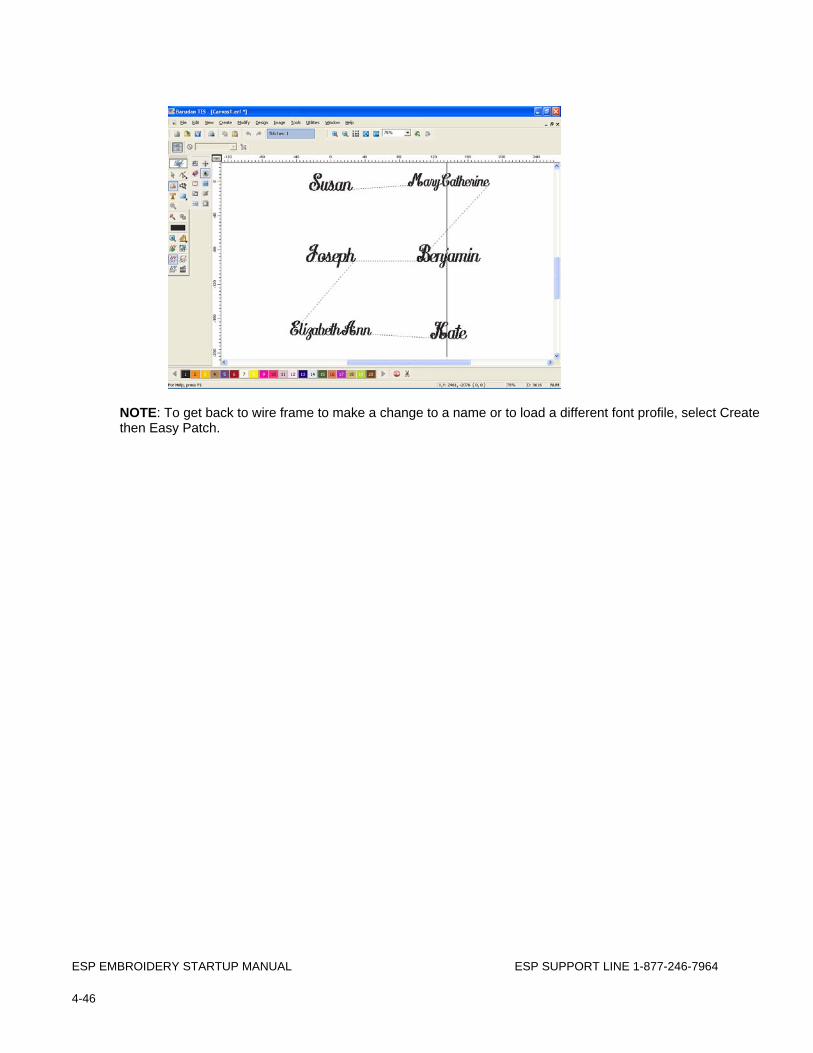
ESP EMBROIDERY STARTUP MANUAL ESP SUPPORT LINE 1-877-246-7964 4-46
NOTE: To get back to wire frame to make a change to a name or to load a different font profile, select Create then Easy Patch.
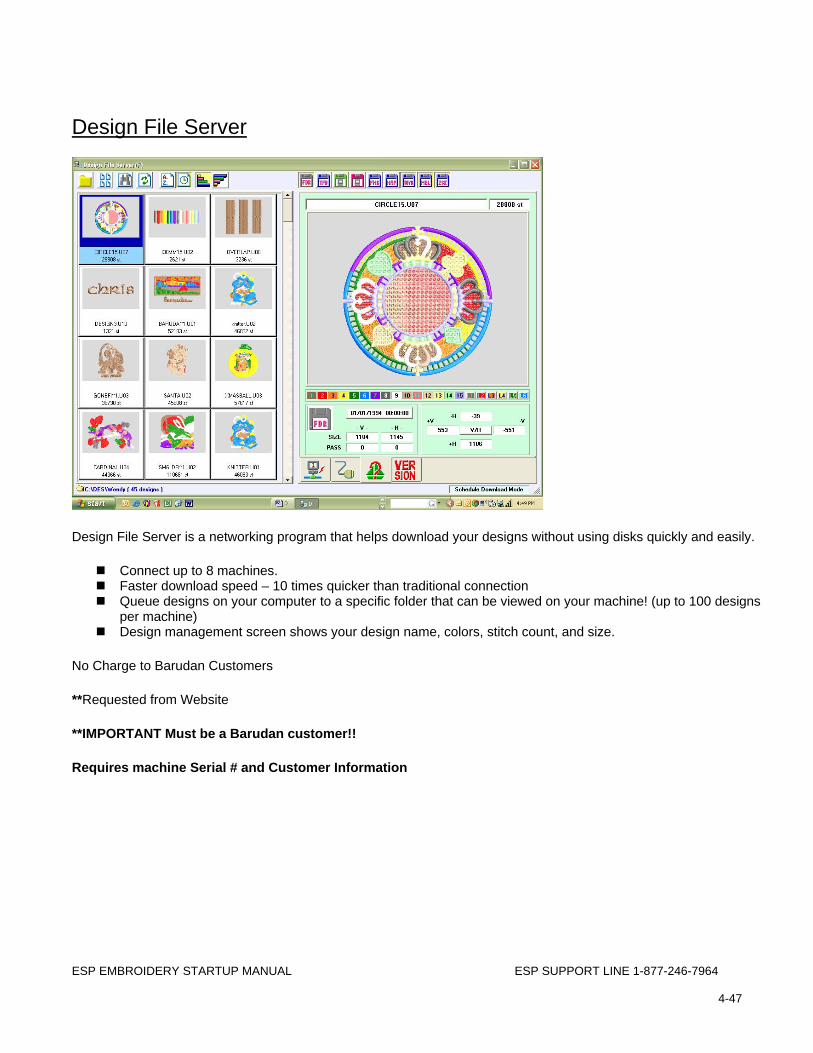
ESP EMBROIDERY STARTUP MANUAL ESP SUPPORT LINE 1-877-246-7964
4-47
Design File Server
Design File Server is a networking program that helps download your designs without using disks quickly and easily.
Connect up to 8 machines. Faster download speed – 10 times quicker than traditional connection Queue designs on your computer to a specific folder that can be viewed on your machine! (up to 100 designs
per machine) Design management screen shows your design name, colors, stitch count, and size.
No Charge to Barudan Customers
**Requested from Website
**IMPORTANT Must be a Barudan customer!!
Requires machine Serial # and Customer Information