Embed Size (px)
Citation preview

Training ManualElfa Professional Online

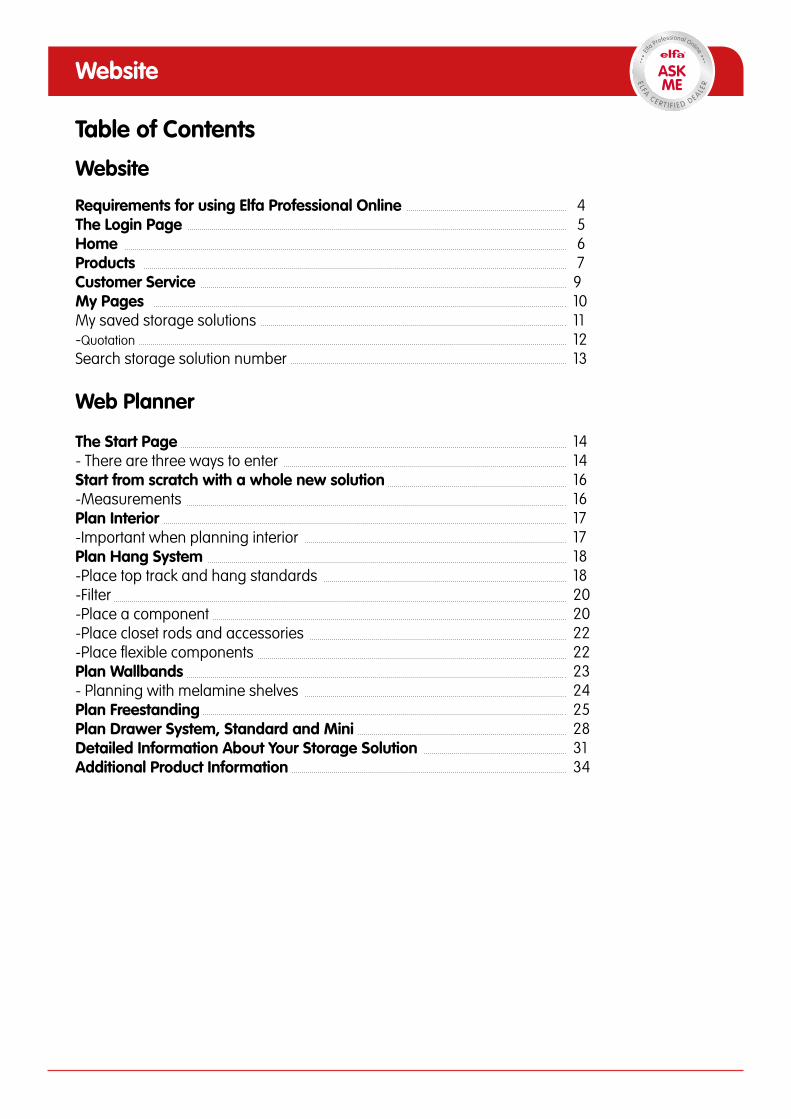
Table of Contents
Website
Requirements for using Elfa Professional Online The Login PageHomeProductsCustomer ServiceMy PagesMy saved storage solutions-QuotationSearch storage solution number
Web Planner
The Start Page- There are three ways to enterStart from scratch with a whole new solution -MeasurementsPlan Interior-Important when planning interiorPlan Hang System -Place top track and hang standards -Filter-Place a component-Place closet rods and accessories-Place flexible componentsPlan Wallbands- Planning with melamine shelves Plan FreestandingPlan Drawer System, Standard and MiniDetailed Information About Your Storage SolutionAdditional Product Information
Website
4 5 6 7910111213
141416161717181820202222232425283134

Requirements for using Elfa Professional Online
Elfa PlannerIn order to use the Web Planner, you will need to install Unity Web Player.It can be downloaded here: http://unity3d.com/webplayer
The technical requirements for using it are:
Windows XP/Vista/7/8orMac OS X 10.6 or later
4
Website

The Login Page
This is the first page you encounter. Here you will find the basic information about what the website can help you with as well as who to contact to obtain your login information.
You log in by filling in your user information on the right hand side.
5
Website

Home (Start Page)
The Home tab is largely similar to the consumer site. The slide show and the news spots (the red fields) show the latest news, ongoing campaigns etc and are regularly updated.
These are three new short cuts that will bring you to our high resolution images, the new Web Planner and our products.
6
Website
Products
A large part of the Products section works exactly like on the consumer site. However, the products here are categorised differently.
7
Website
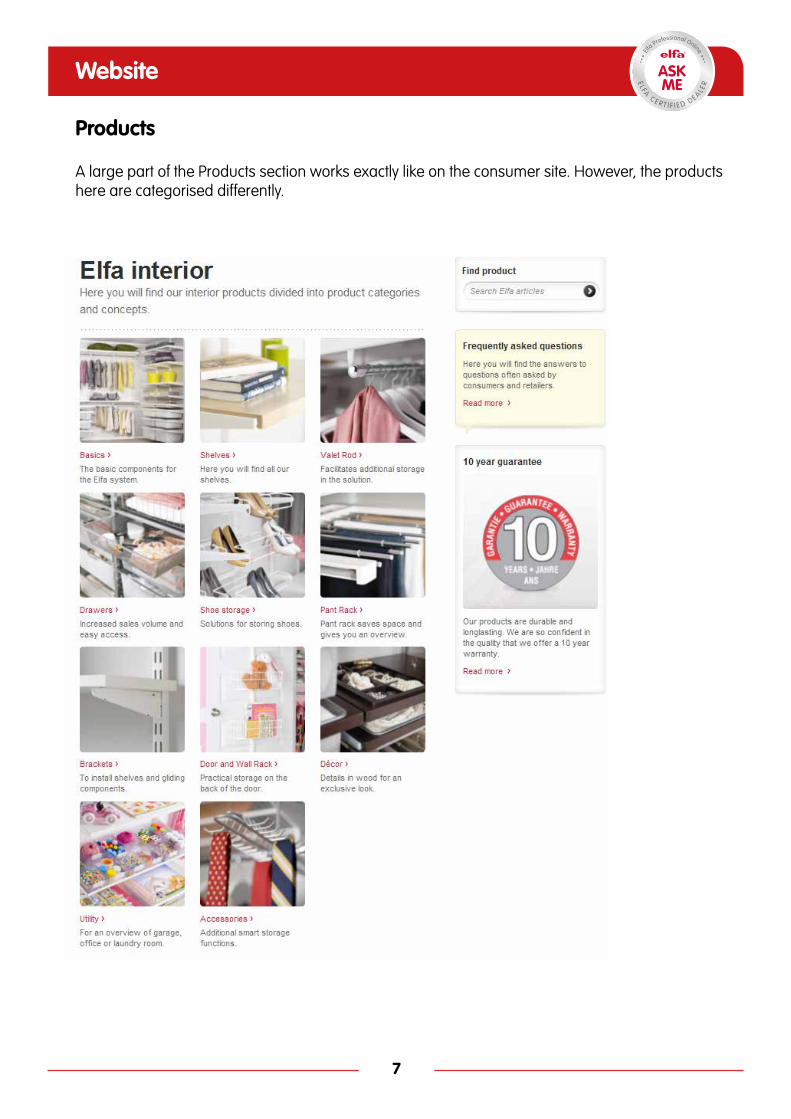
Down below in the product structure there is a new feature: packaging details. It will give you detailed information about the packaging, pallets, etc. The link to the packaging information is connected to each article number.
8
Website
Customer Service
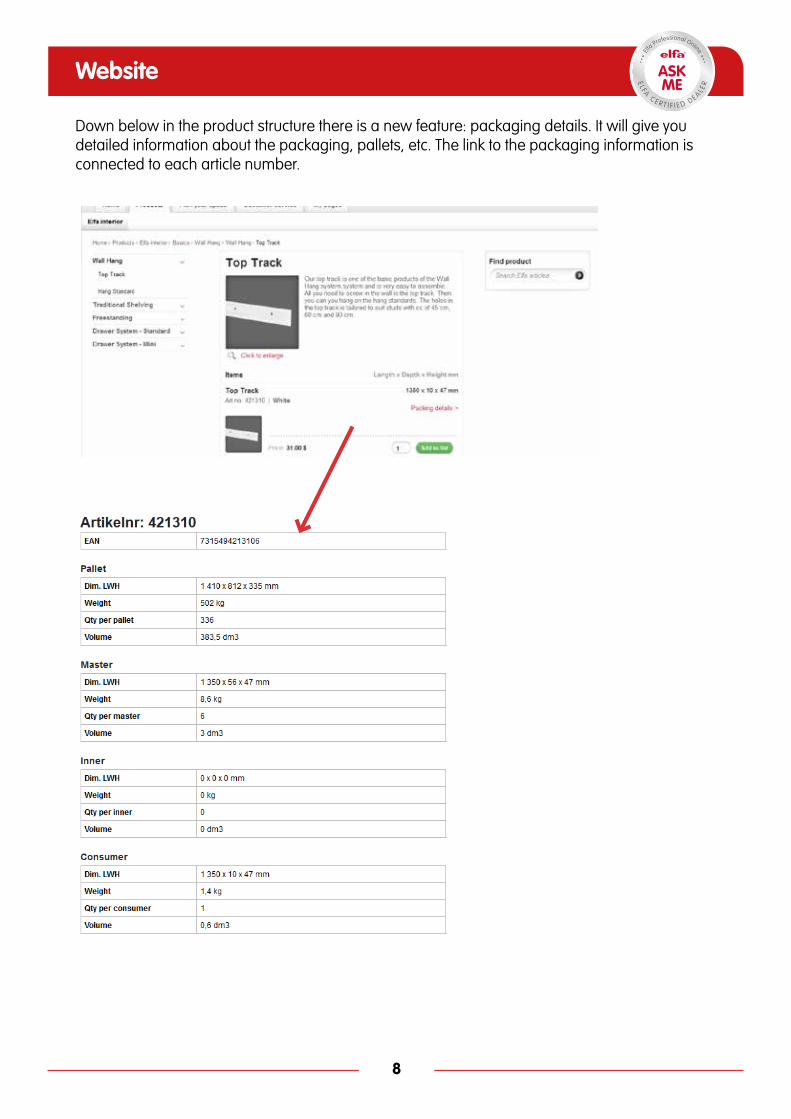
The customer service section is completely restructured compared to the consumer site, in order to be able to provide as much information as possible.
You now have the possibility to list all these in one place: contact information, frequently asked questions, assembly instructions, marketing material, claims, training material, InStore information, and warranty information.
For the rest, we have provided the pages with as much and as clear information as we possibly can - all to help you easily and quickly find what you are looking for, or to find answers to your questions. On the web, we’re never closed!
9
Website
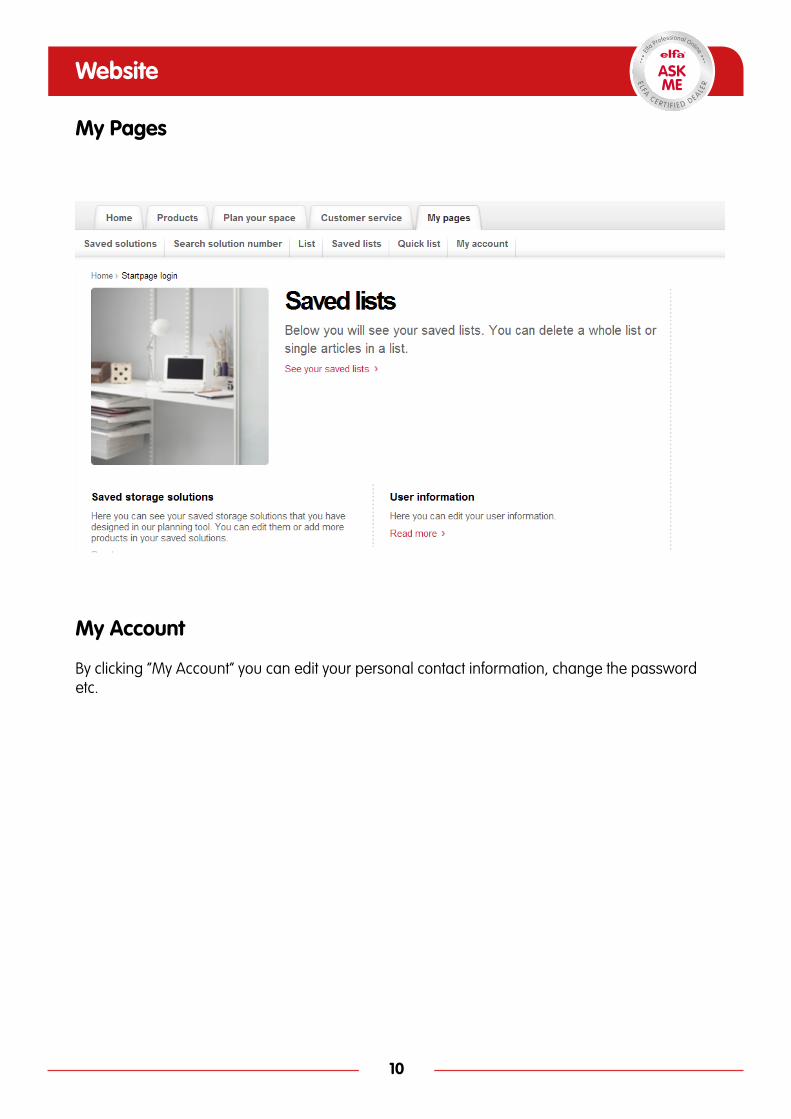
My Pages
10
Website
My Account By clicking ”My Account” you can edit your personal contact information, change the password etc.

My Saved Storage Solutions This page shows the storage solutions that you have saved in the Web Planner (both Elfa and Lumi, provided you sell both brands). The different solutions are marked with each logotype, for the sake of clarity.
11
When clicking the name of the storage solution (in the example here ”Test”), an overview of the storage solution will open.
You can also search for a saved solution by filling in the search field on the right hand side. The search phrase can contain the name of the storage solution and its content (products, e.g. ”Artic”). You can choose to search among your own solutions or the solutions of your company’s all user accounts (i.e. those using the same customer number).
When clicking ”Edit” your solution will open in the Web Planner.
You can copy (i.e. duplicate) a solution by clicking the copy icon or you can delete it by clicking the waste basket icon.
Website
When clicking ”Add to list” the selected solution (and all components) is added to your list. You can add several solutions as well as single components.
When clicking ”Quotation” you will be directed to a separate quotation page where you will find a form to fill in, with which you can generate a quotation in PDF format (see the following page).
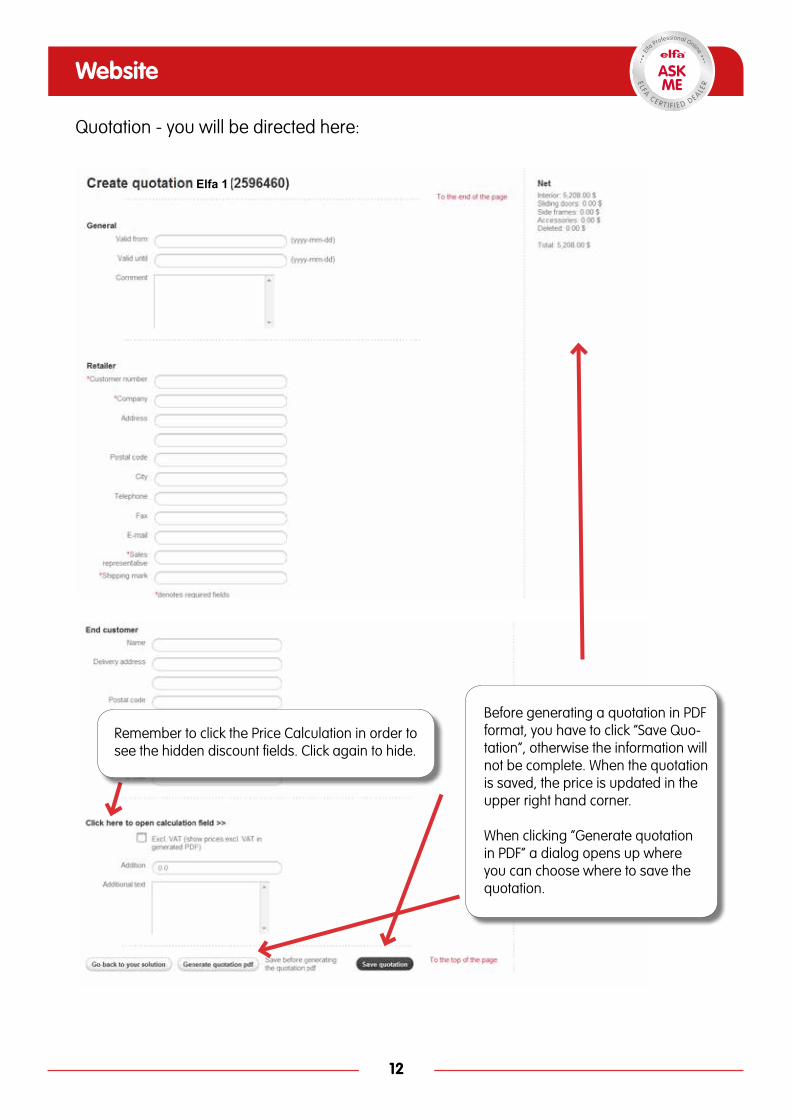
Before generating a quotation in PDF format, you have to click ”Save Quo-tation”, otherwise the information will not be complete. When the quotation is saved, the price is updated in the upper right hand corner.
When clicking ”Generate quotation in PDF” a dialog opens up where you can choose where to save the quotation.
12
Website
Quotation - you will be directed here:
Elfa 1
Remember to click the Price Calculation in order to see the hidden discount fields. Click again to hide.
13
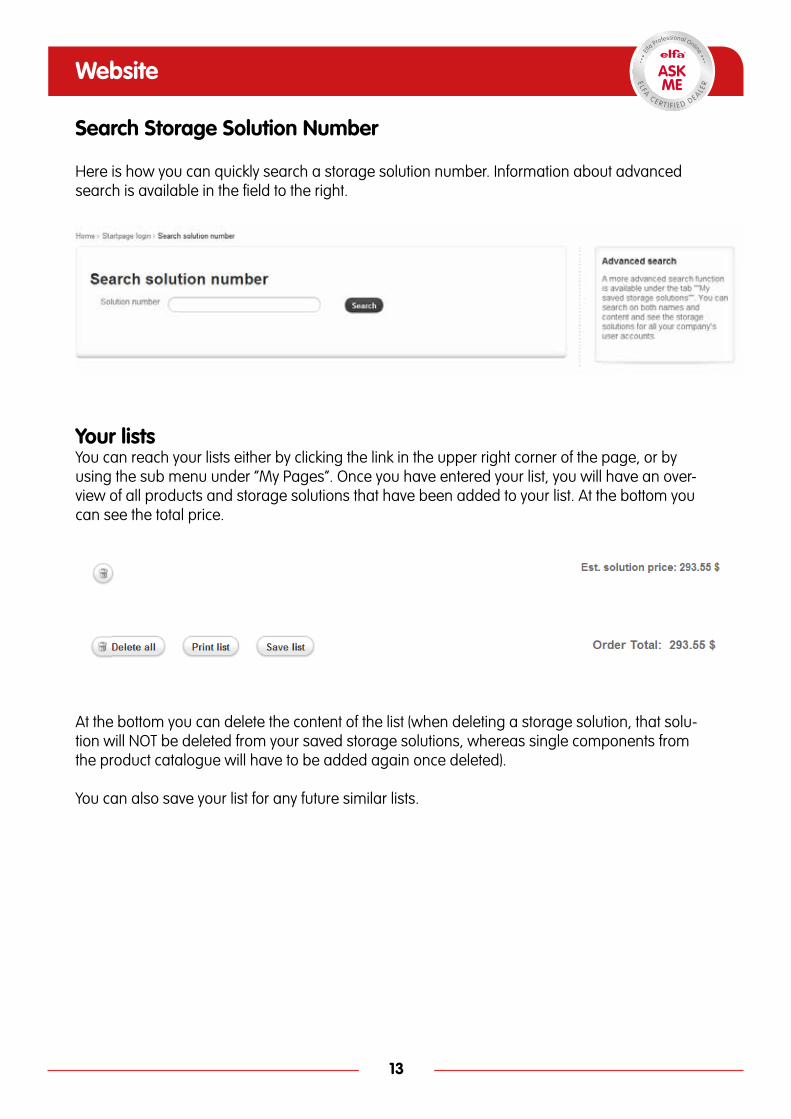
Your listsYou can reach your lists either by clicking the link in the upper right corner of the page, or by using the sub menu under ”My Pages”. Once you have entered your list, you will have an over-view of all products and storage solutions that have been added to your list. At the bottom you can see the total price.
At the bottom you can delete the content of the list (when deleting a storage solution, that solu-tion will NOT be deleted from your saved storage solutions, whereas single components from the product catalogue will have to be added again once deleted).
You can also save your list for any future similar lists.
Website
Search Storage Solution Number
Here is how you can quickly search a storage solution number. Information about advanced search is available in the field to the right.
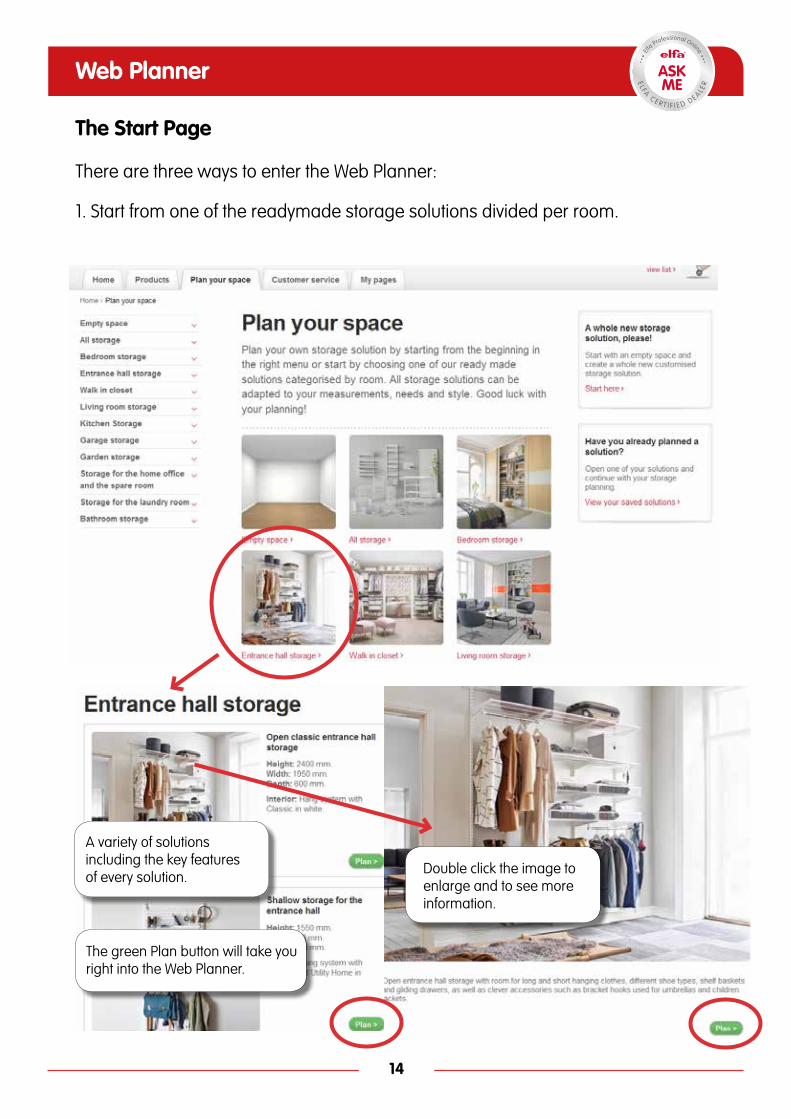
The Start Page
There are three ways to enter the Web Planner:
1. Start from one of the readymade storage solutions divided per room.
A variety of solutions including the key features of every solution. Double click the image to
enlarge and to see more information.
The green Plan button will take you right into the Web Planner.
14
Web Planner
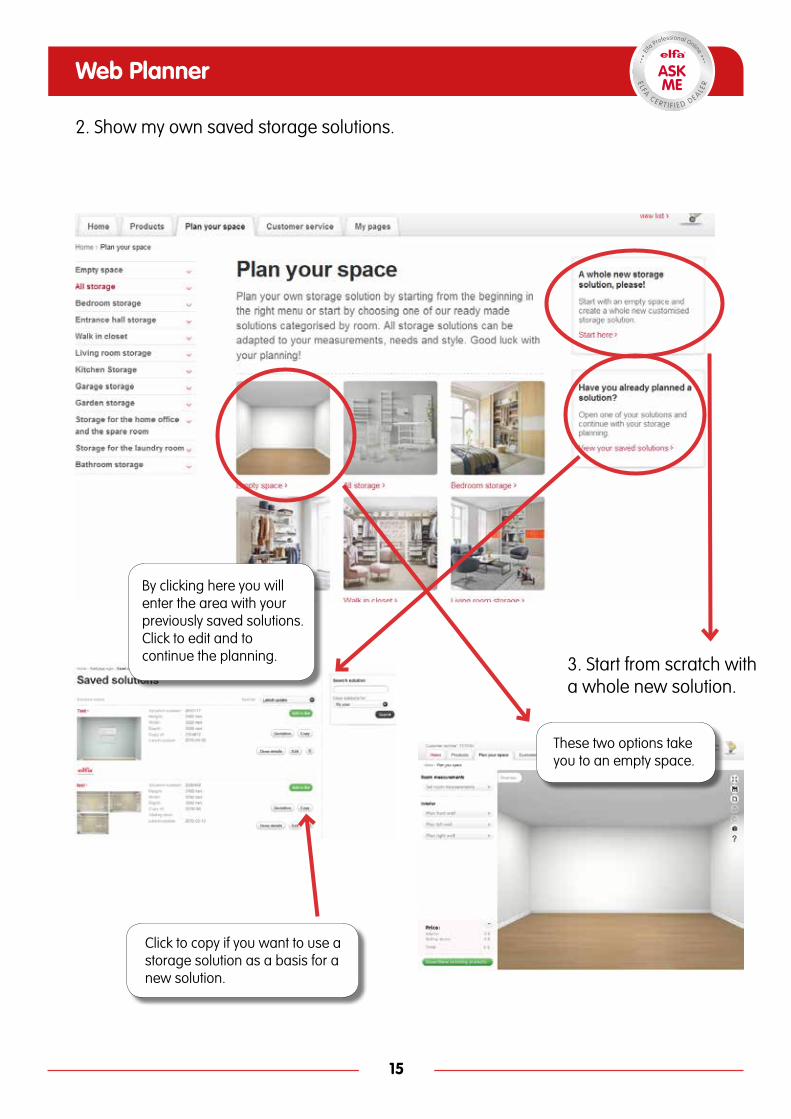
2. Show my own saved storage solutions.
These two options take you to an empty space.
By clicking here you will enter the area with your previously saved solutions. Click to edit and to continue the planning. 3. Start from scratch with
a whole new solution.
Click to copy if you want to use a storage solution as a basis for a new solution.
15
Web Planner
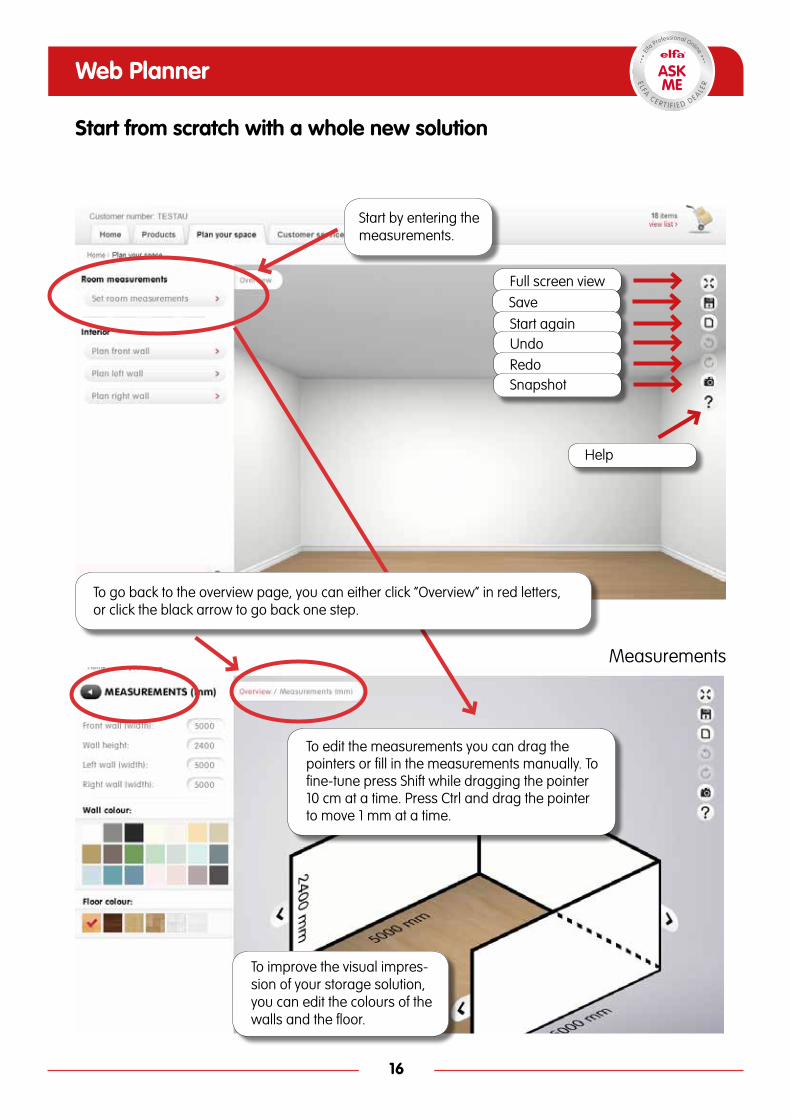
Start from scratch with a whole new solution
Full screen viewSave
Help
To improve the visual impres-sion of your storage solution, you can edit the colours of the walls and the floor.
To edit the measurements you can drag the pointers or fill in the measurements manually. To fine-tune press Shift while dragging the pointer 10 cm at a time. Press Ctrl and drag the pointer to move 1 mm at a time.
To go back to the overview page, you can either click ”Overview” in red letters, or click the black arrow to go back one step.
16
Start by entering the measurements.
Web Planner
Measurements
Start againUndoRedoSnapshot

You can plan for all three walls.
Start by picking wall material in order to have the correct screws and plugs for the wall based systems. If you indicate ”unspecified” there will be no screws or plugs delivered.
Pick a metal colour and Décor colour (if applicable). The choices are made per wall.
17
Plan Interior
Web Planner
Important when planning interior:
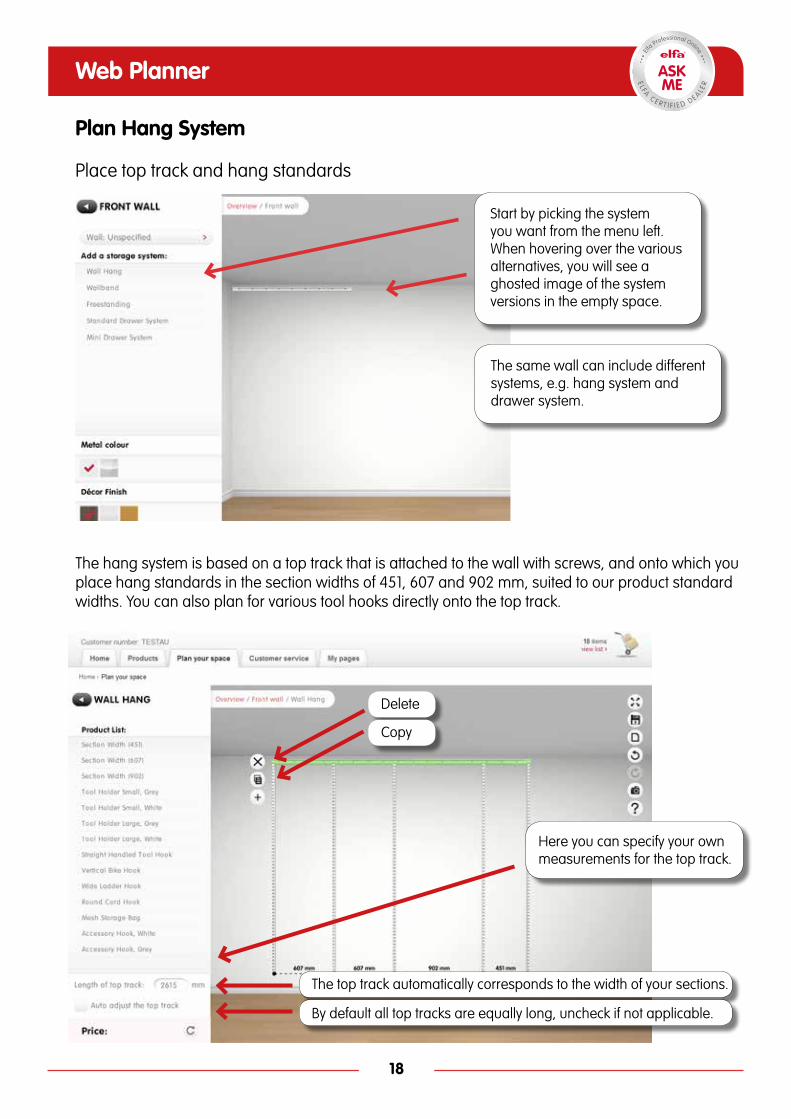
Start by picking the system you want from the menu left. When hovering over the various alternatives, you will see a ghosted image of the system versions in the empty space.
The same wall can include different systems, e.g. hang system and drawer system.
The top track automatically corresponds to the width of your sections.
By default all top tracks are equally long, uncheck if not applicable.
The hang system is based on a top track that is attached to the wall with screws, and onto which you place hang standards in the section widths of 451, 607 and 902 mm, suited to our product standard widths. You can also plan for various tool hooks directly onto the top track.
Delete
Copy
18
Plan Hang System
Web Planner
Here you can specify your own measurements for the top track.
Place top track and hang standards
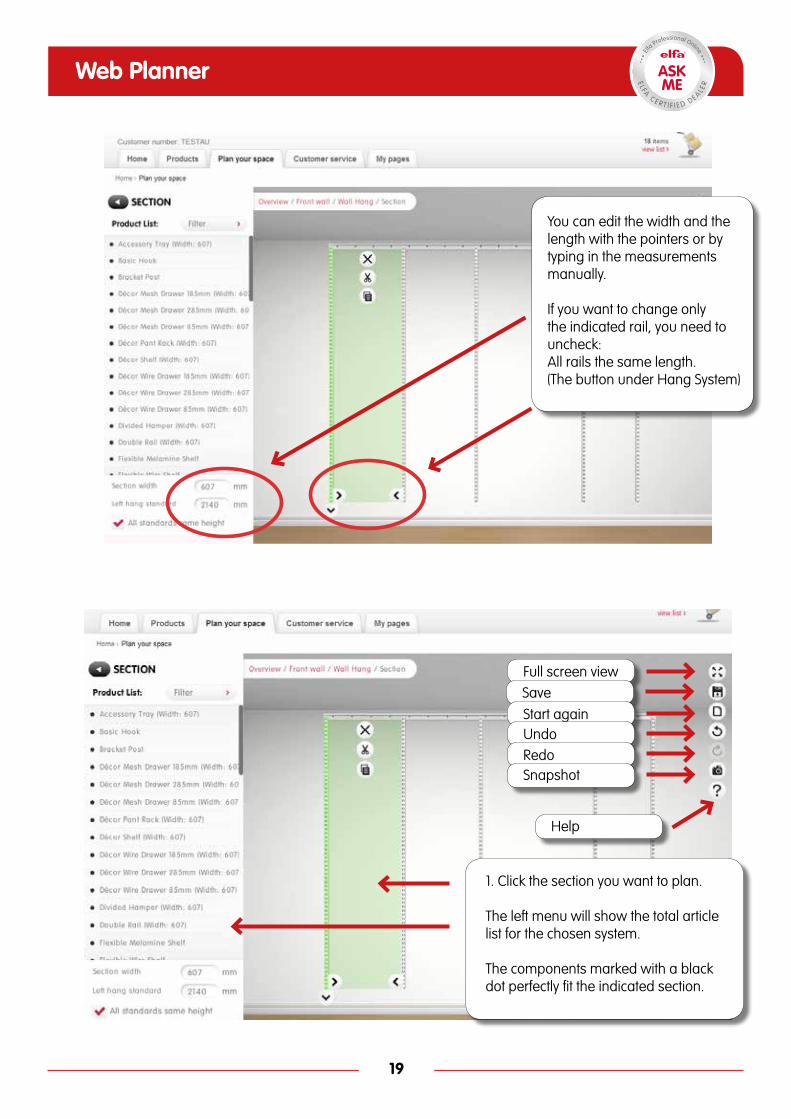
1. Click the section you want to plan.
The left menu will show the total article list for the chosen system.
The components marked with a black dot perfectly fit the indicated section.
19
Web Planner
You can edit the width and the length with the pointers or by typing in the measurements manually.
If you want to change only the indicated rail, you need to uncheck: All rails the same length. (The button under Hang System)
Full screen viewSave
Help
Start againUndoRedoSnapshot
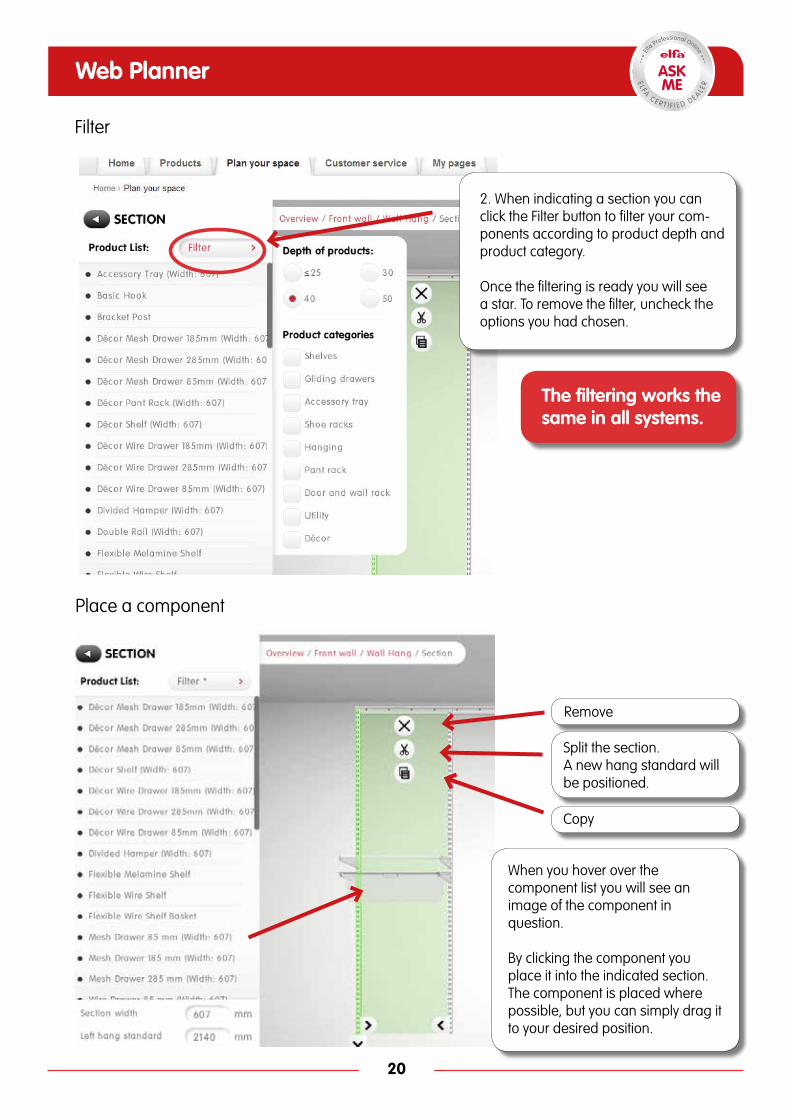
When you hover over the component list you will see an image of the component in question.
By clicking the component you place it into the indicated section. The component is placed where possible, but you can simply drag it to your desired position.
Place a component
Split the section.A new hang standard will be positioned.
Copy
Remove
20
Web Planner
2. When indicating a section you can click the Filter button to filter your com-ponents according to product depth and product category.
Once the filtering is ready you will see a star. To remove the filter, uncheck the options you had chosen.
The filtering works the same in all systems.
Filter

The components can be dragged up and down within a section but not between sections.
The black marks show the position of the component between the top track and the floor.
If moving the top track you can also see the distance between right and left wall and the top track.
When you have indicated a component you will see a plus sign that you can use to add exactly the same component in the following section sideways.
If the component does not fit it will turn red. A warning will specify the problem and you can find more information by clicking Help.
21
Web Planner

Web Planner
Place closet rods and accessories
To place a closet rod you will have to indicate the shelf under which the closet rod should go.
By indicating a component in a section, you can see in the left menu which accessories are available.
22
Place flexible components Wire shelves, shelf baskets, melamine shelves and closet rods are flexible components.
When indicating a component you will see an arrow. Drag the arrow to the desired length. The Web Planner will optimise the component in the detailed list of components.
Web Planner
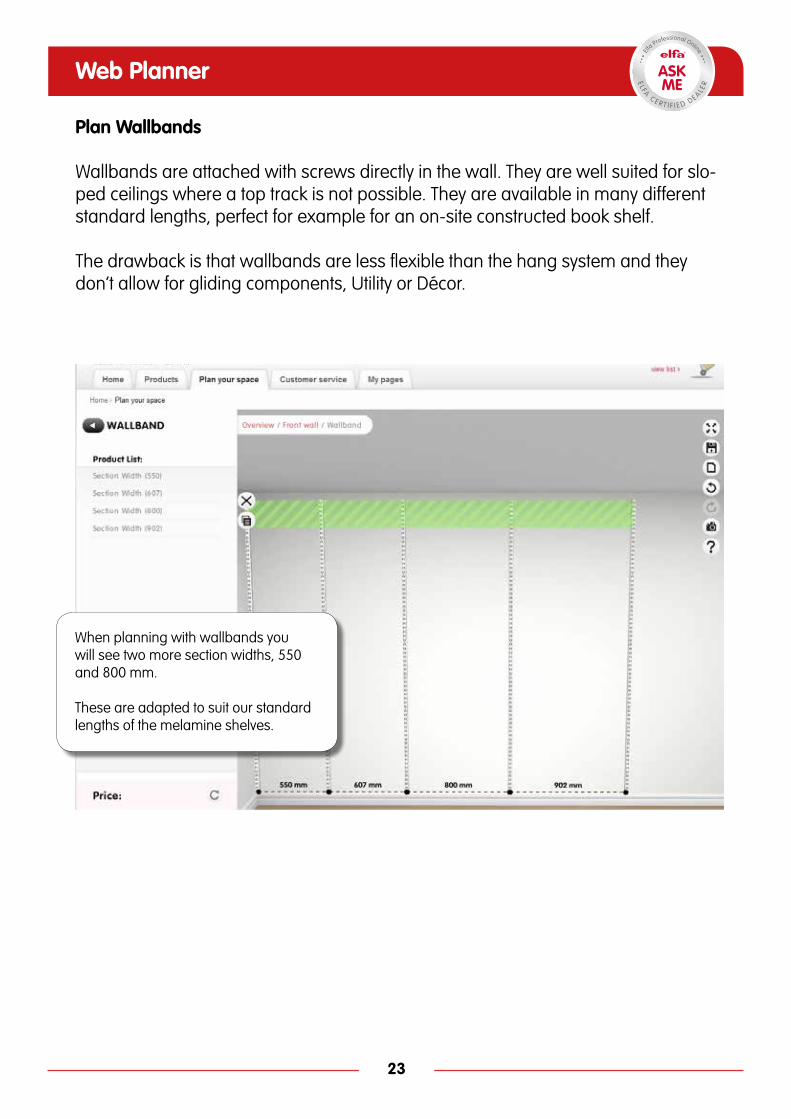
When planning with wallbands you will see two more section widths, 550 and 800 mm. These are adapted to suit our standard lengths of the melamine shelves.
23
Plan Wallbands Wallbands are attached with screws directly in the wall. They are well suited for slo-ped ceilings where a top track is not possible. They are available in many different standard lengths, perfect for example for an on-site constructed book shelf.
The drawback is that wallbands are less flexible than the hang system and they don’t allow for gliding components, Utility or Décor.
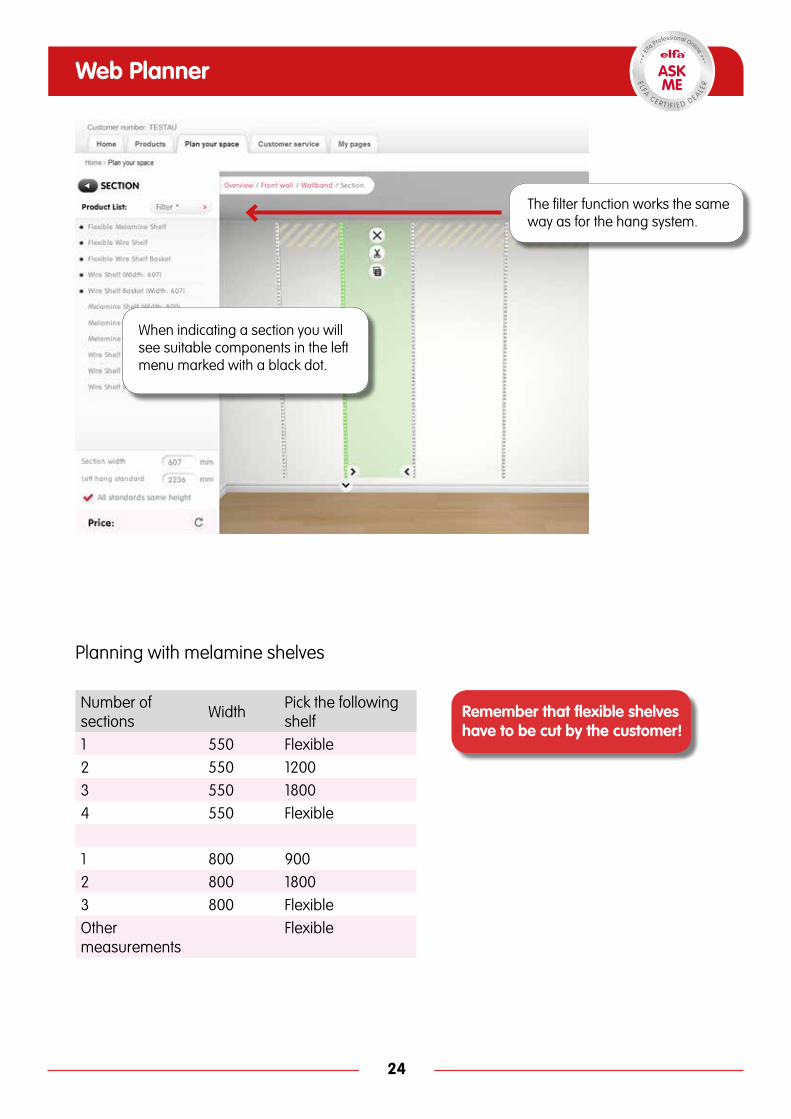
When indicating a section you will see suitable components in the left menu marked with a black dot.
The filter function works the same way as for the hang system.
Number of sections Width Pick the following
shelf1 550 Flexible2 550 1200 3 550 18004 550 Flexible
1 800 9002 800 18003 800 FlexibleOther measurements
Flexible
Planning with melamine shelves
Remember that flexible shelves have to be cut by the customer!
24
Web Planner

Plan Freestanding
Freestanding is a floor based system requiring no tools to be installed. The Web Plan-ner only allows for one-sided solutions.
First, click the Freestanding to place a section and then continue planning.
Go to the top of the page to indicate width and height of the section.
To add another section, simply click on the plus sign.
25
Web Planner
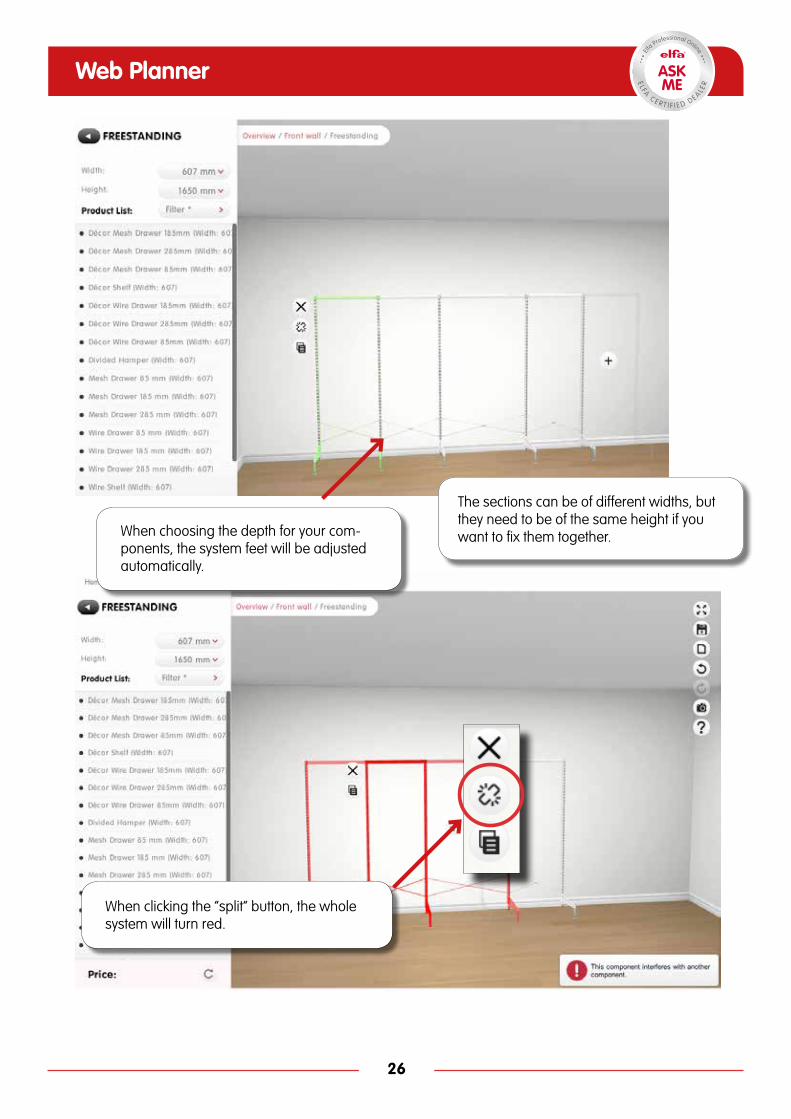
The sections can be of different widths, but they need to be of the same height if you want to fix them together. When choosing the depth for your com-
ponents, the system feet will be adjusted automatically.
When clicking the ”split” button, the whole system will turn red.
26
Web Planner
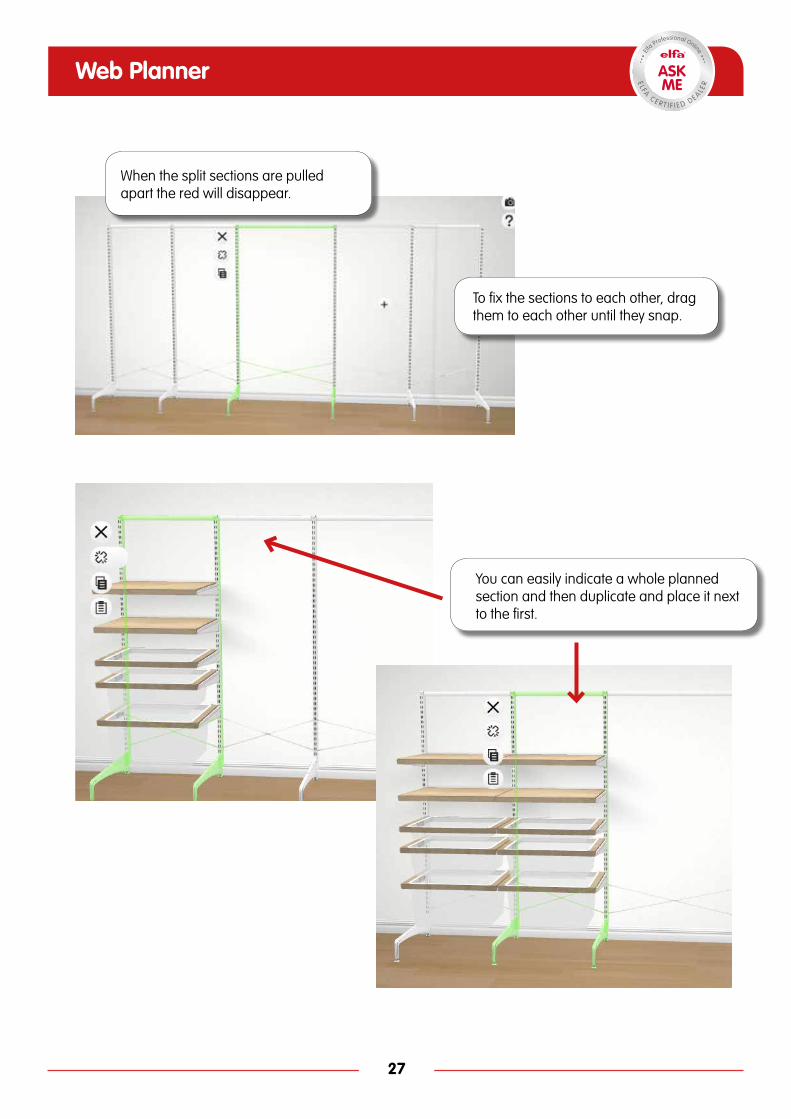
When the split sections are pulled apart the red will disappear.
To fix the sections to each other, drag them to each other until they snap.
27
Web Planner
You can easily indicate a whole planned section and then duplicate and place it next to the first.
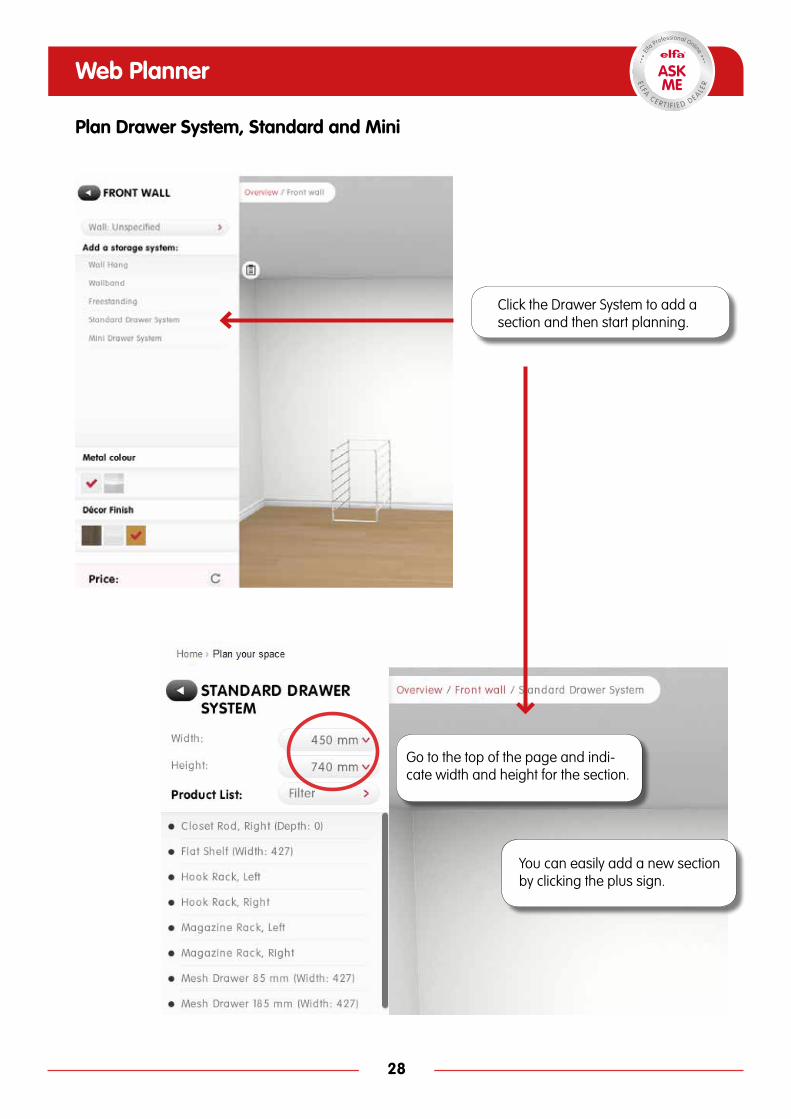
Plan Drawer System, Standard and Mini
Click the Drawer System to add a section and then start planning.
Go to the top of the page and indi-cate width and height for the section.
You can easily add a new section by clicking the plus sign.
28
Web Planner
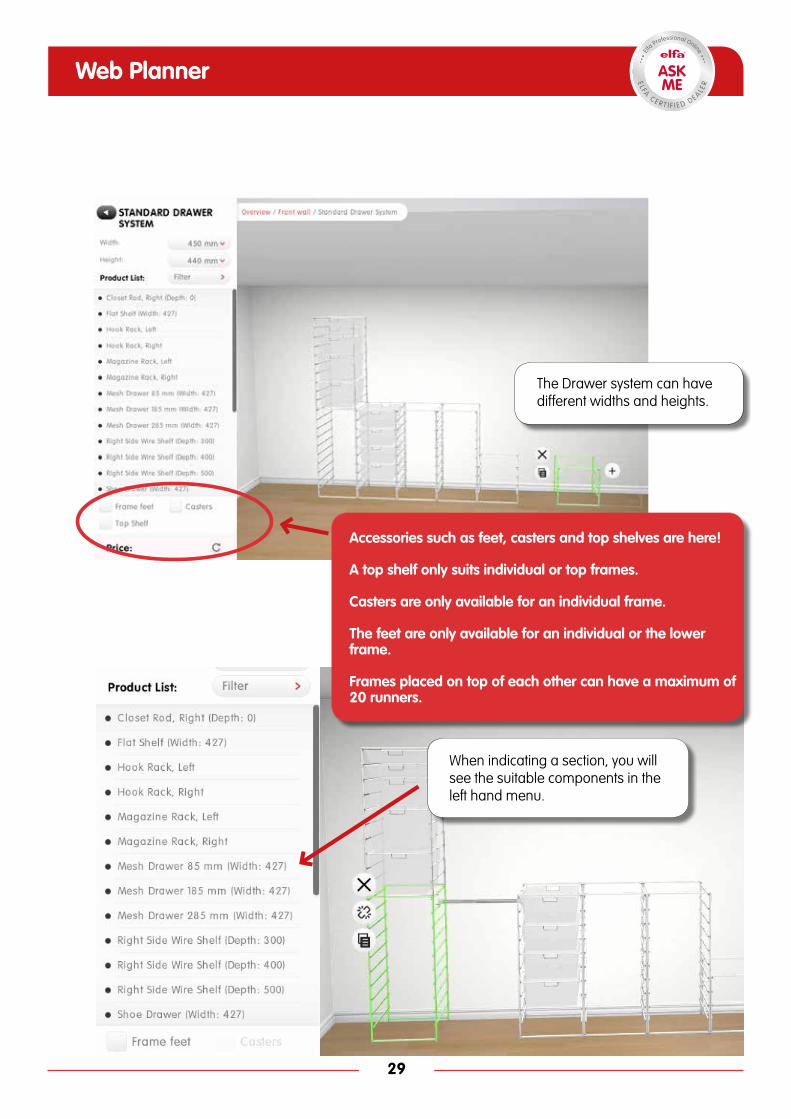
The Drawer system can have different widths and heights.
Accessories such as feet, casters and top shelves are here!
A top shelf only suits individual or top frames.
Casters are only available for an individual frame.
The feet are only available for an individual or the lower frame.
Frames placed on top of each other can have a maximum of 20 runners.
When indicating a section, you will see the suitable components in the left hand menu.
29
Web Planner
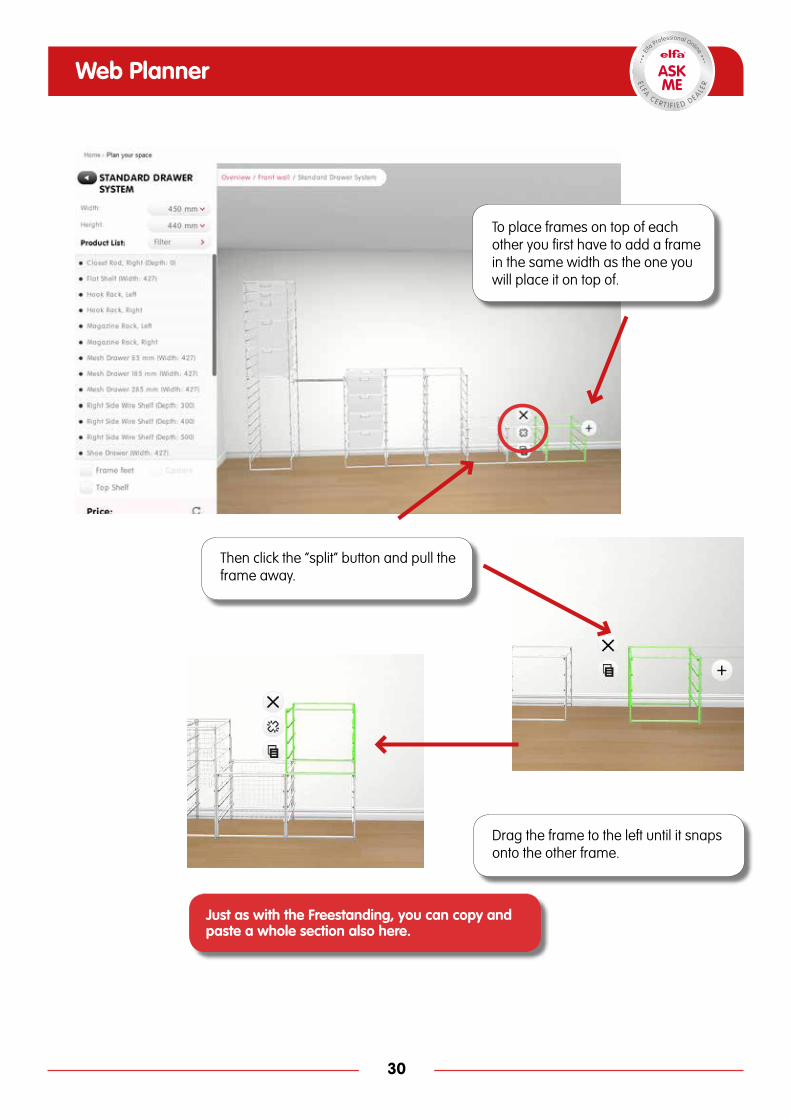
To place frames on top of each other you first have to add a frame in the same width as the one you will place it on top of.
Then click the ”split” button and pull the frame away.
Drag the frame to the left until it snaps onto the other frame.
30
Web Planner
Just as with the Freestanding, you can copy and paste a whole section also here.
31
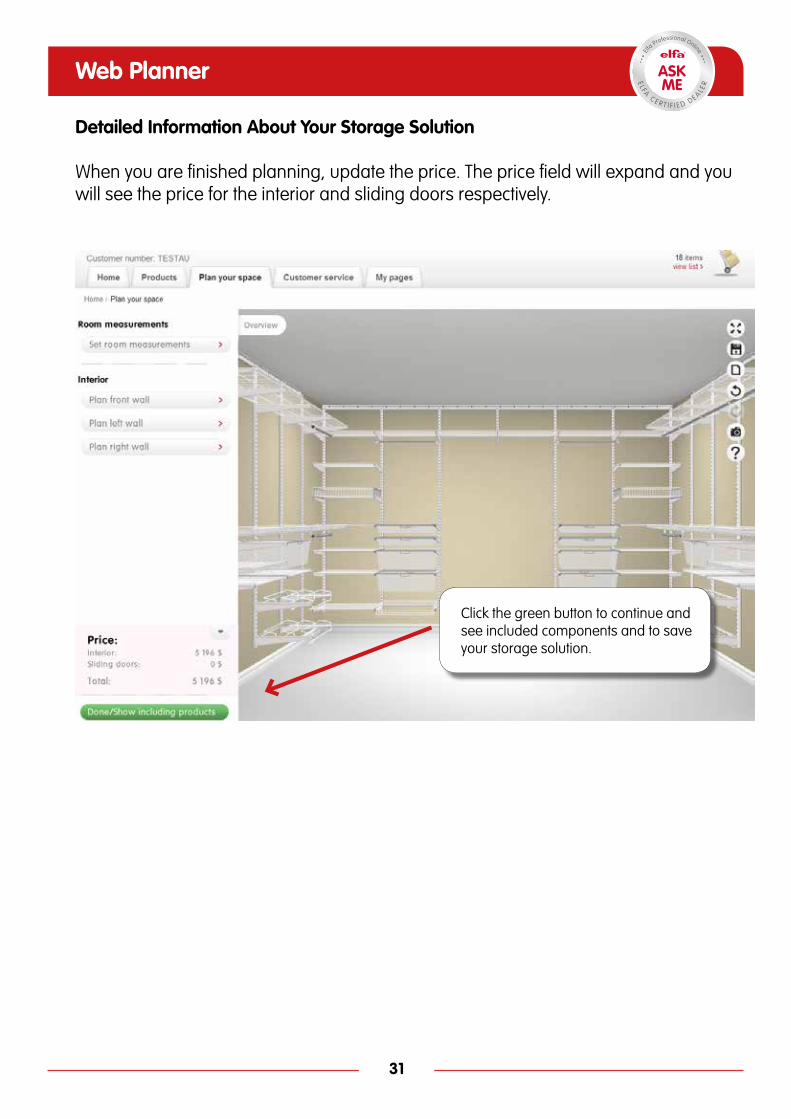
Detailed Information About Your Storage Solution When you are finished planning, update the price. The price field will expand and you will see the price for the interior and sliding doors respectively.
Click the green button to continue and see included components and to save your storage solution.
Web Planner
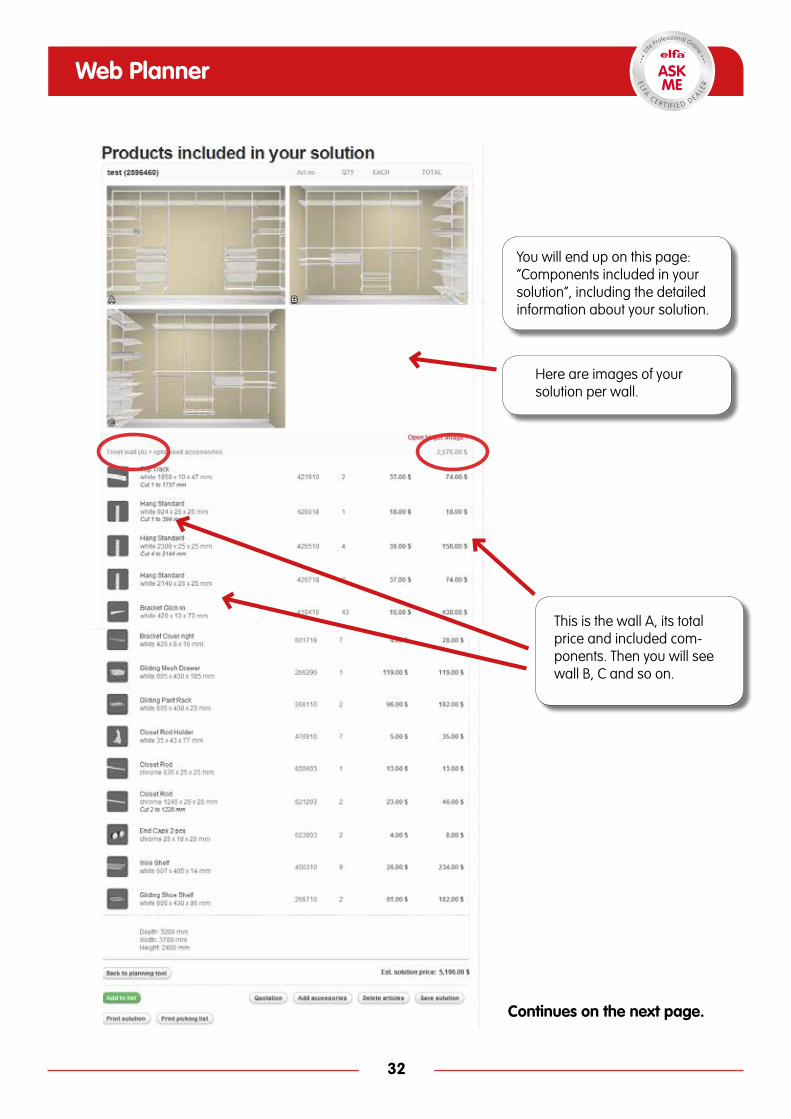
You will end up on this page: ”Components included in your solution”, including the detailed information about your solution.
Here are images of your solution per wall.
32
This is the wall A, its total price and included com-ponents. Then you will see wall B, C and so on.
Continues on the next page.
Web Planner

33
Continued...
The total price for the whole storage solution.
You have to click the green Add to list button to save your solution before you can generate a quota-tion, or add products.
Here you choose to either return to planning, print solution, or print a picking list.
Once you have clicked the Save button, you can name your solution and then save it.
Web Planner
To save your storage solution, see page 10.
Web Planner
34
Additional Product Information The following components are not available in the Web Planner, although you can of course add them as accessories from the product catalogue:
Drying ShelfPlastic Liner for Wire ShelvesBook SupportClips for Hang StandardsLabel Holder for UtilityFloor based Shoe RackBracket with closet rod (413010/413080)Slanting BracketAdjustable Foot for Drawer FramesFoot Height Extenders for FreestandingTop Shelf for Drawer Frames 1800 mm & 2480 mmUniversal RunnersCanvas Drawer LinerPeg Board Wall MountsOver Door Hook - to attach a wallband to a doorShelf Pins - to be used instead of screws for a melamin shelfCloset Rods for frame to wall, wall to wall, and for the central holder for drawer system
Components not visible in the Web Planner, but automatically included in the solu-tion: Top Track CoverBracket ScrewsShelf JoinerIn-and Out-stop for wire and mesh drawersWire Shelf Clips - to attach a wire shelf between two drawer framesFrame Clips - to attach two frames

Web Planner
Good luck with the planning!
35