Embed Size (px)
Citation preview
TRAIN THE TRAINER
Table of Contents
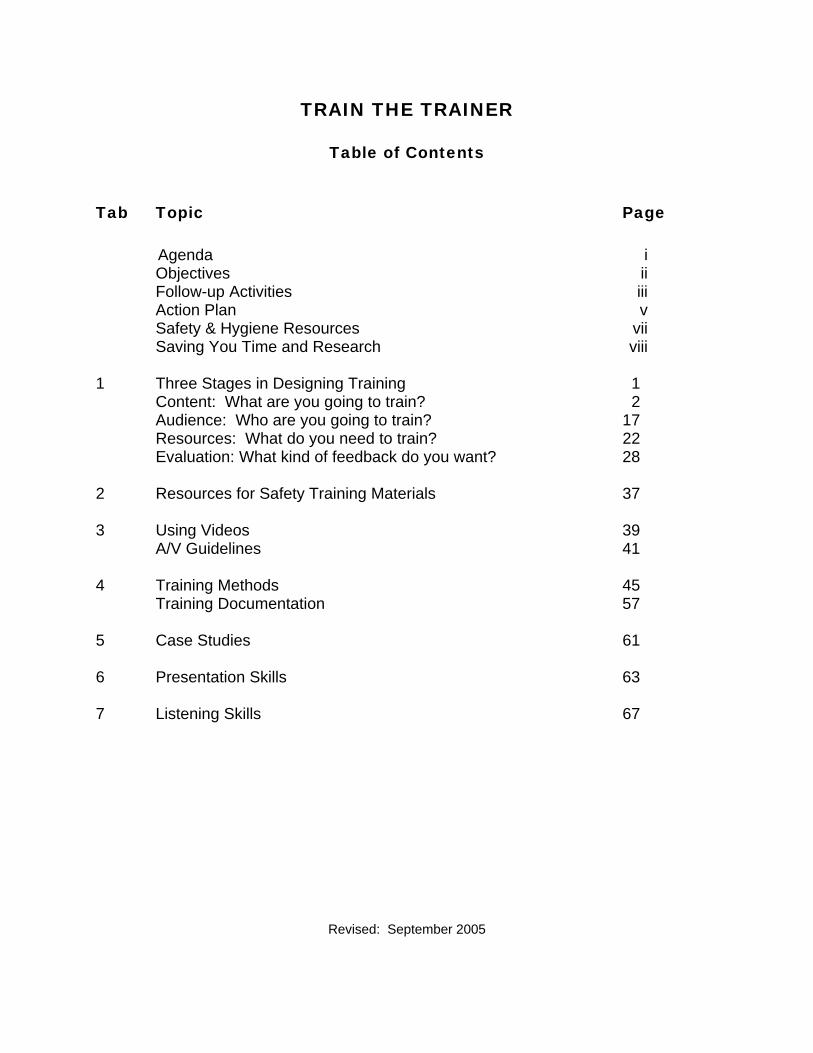
Tab Topic Page Agenda i Objectives ii Follow-up Activities iii Action Plan v Safety & Hygiene Resources vii Saving You Time and Research viii 1 Three Stages in Designing Training 1 Content: What are you going to train? 2 Audience: Who are you going to train? 17 Resources: What do you need to train? 22 Evaluation: What kind of feedback do you want? 28 2 Resources for Safety Training Materials 37 3 Using Videos 39 A/V Guidelines 41 4 Training Methods 45 Training Documentation 57 5 Case Studies 61 6 Presentation Skills 63 7 Listening Skills 67
Revised: September 2005
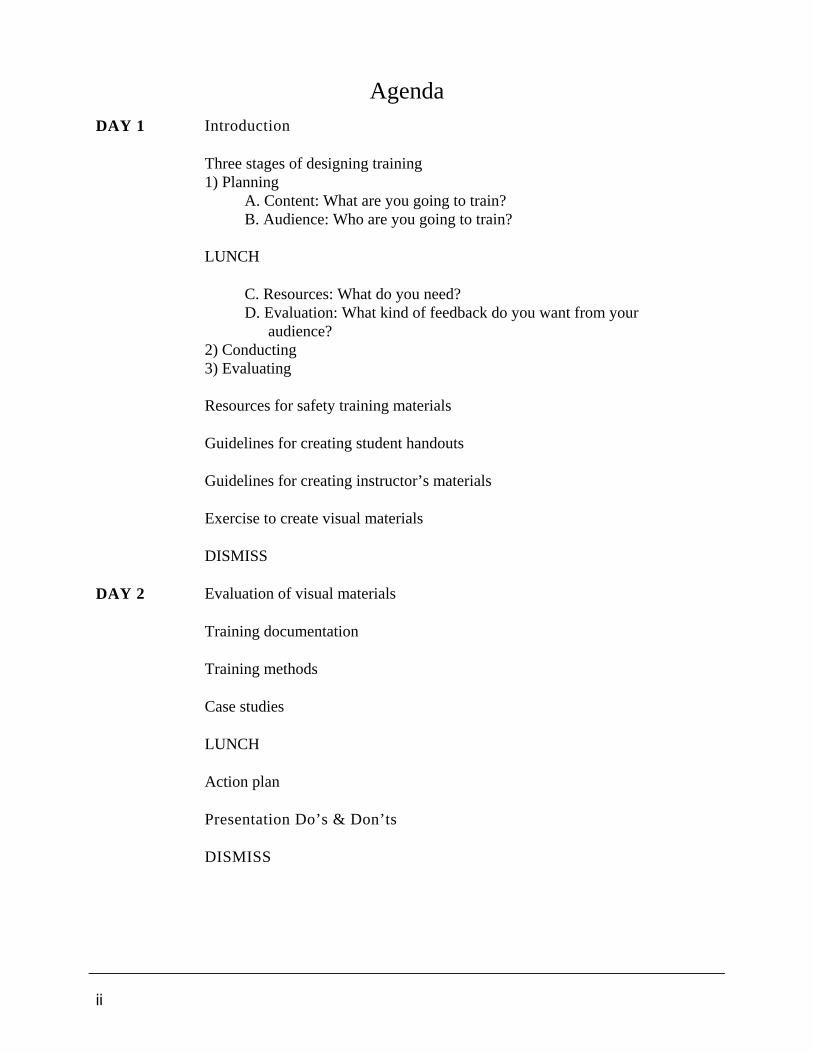
Agenda DAY 1 Introduction
Three stages of designing training 1) Planning A. Content: What are you going to train? B. Audience: Who are you going to train?
LUNCH
C. Resources: What do you need? D. Evaluation: What kind of feedback do you want from your
audience? 2) Conducting 3) Evaluating
Resources for safety training materials
Guidelines for creating student handouts
Guidelines for creating instructor’s materials
Exercise to create visual materials
DISMISS
DAY 2 Evaluation of visual materials
Training documentation
Training methods
Case studies
LUNCH
Action plan
Presentation Do’s & Don’ts
DISMISS
ii

Train the Trainer Follow-up Activities • Wrote or revised an in-house training program. • Developed appropriate visual materials for an in-house training program. • Presented training utilizing adult learning principles.
iii

iv

Rev
ised
: 03/
04/2
003
Activ
ity P
lan
Activ
ity
Oth
er p
eopl
e in
volv
ed
Targ
et D
eadl
ine
q
q
q
q
q
q
q
q

Rev
ised
: 03/
04/2
003
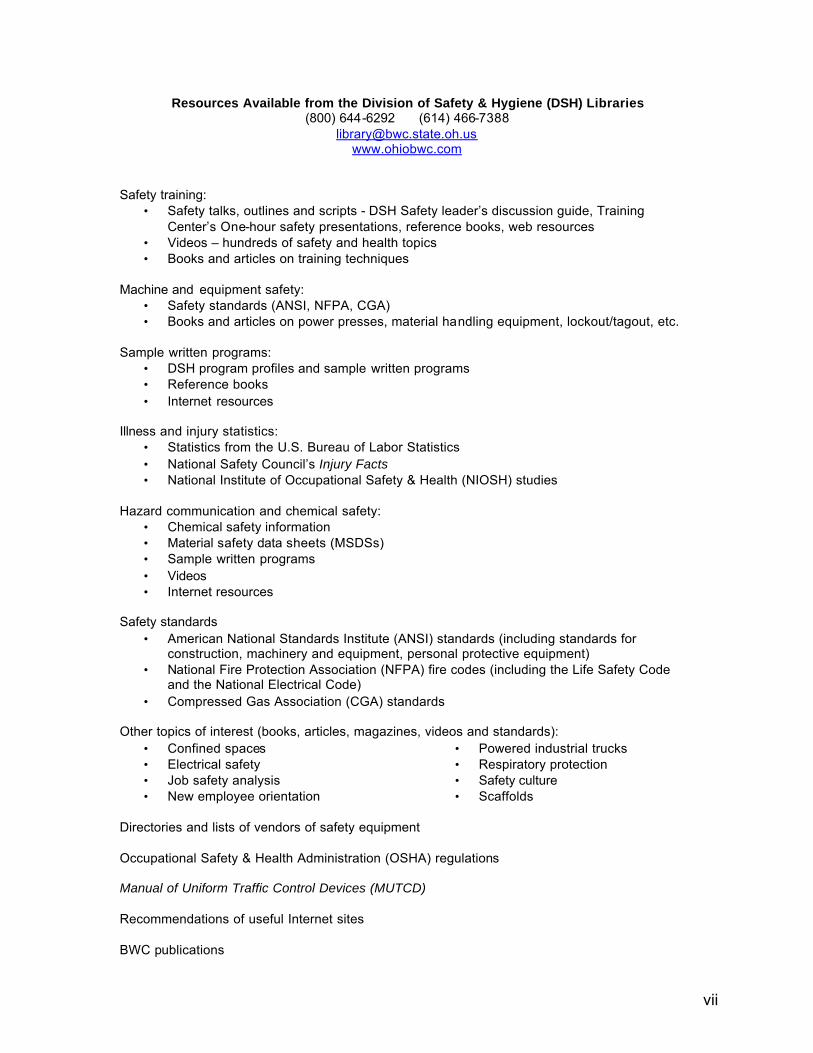
Resources Available from the Division of Safety & Hygiene (DSH) Libraries (800) 644-6292 (614) 466-7388
[email protected] www.ohiobwc.com
Safety training: • Safety talks, outlines and scripts - DSH Safety leader’s discussion guide, Training
Center’s One-hour safety presentations, reference books, web resources • Videos – hundreds of safety and health topics • Books and articles on training techniques
Machine and equipment safety:
• Safety standards (ANSI, NFPA, CGA) • Books and articles on power presses, material handling equipment, lockout/tagout, etc.
Sample written programs:
• DSH program profiles and sample written programs • Reference books • Internet resources
Illness and injury statistics:
• Statistics from the U.S. Bureau of Labor Statistics • National Safety Council’s Injury Facts • National Institute of Occupational Safety & Health (NIOSH) studies
Hazard communication and chemical safety:
• Chemical safety information • Material safety data sheets (MSDSs) • Sample written programs • Videos • Internet resources
Safety standards
• American National Standards Institute (ANSI) standards (including standards for construction, machinery and equipment, personal protective equipment)
• National Fire Protection Association (NFPA) fire codes (including the Life Safety Code and the National Electrical Code)
• Compressed Gas Association (CGA) standards Other topics of interest (books, articles, magazines, videos and standards):
• Confined spaces • Electrical safety • Job safety analysis • New employee orientation
• Powered industrial trucks • Respiratory protection • Safety culture • Scaffolds
Directories and lists of vendors of safety equipment Occupational Safety & Health Administration (OSHA) regulations Manual of Uniform Traffic Control Devices (MUTCD) Recommendations of useful Internet sites
BWC publications
vii

Saving You Time and Research Requests for copies of OSHA standards, information on starting a safety committee, a video on accident investigation techniques -- these are some of the thousands of inquiries BWC’s Division of Safety & Hygiene (DSH) libraries receive each year. DSH has two libraries to serve you:
• The central library in the William Green Building in downtown Columbus; • The resource center and video library located at the Ohio Center for Occupational Safety and
Health (OCOSH) in Pickerington. Both libraries are open 8 a.m. to 4:45 p.m., Monday through Friday. Your need for information does not require a visit to the library. You can phone, fax, or e-mail your requests and receive a quick response. The central library provides free information services on the topics of occupational safety and health, workers’ compensation and rehabilitation. The OCOSH resource center provides similar services for those who visit OCOSH for meetings and training center classes. The video library offers an extensive collection of videotapes to supplement your organization’s safety and health training program. It is a convenient and popular source for Ohio employers to borrow quality occupational safety- and health-related training aids. Visit our Web site at www.ohiobwc.com. Central library 30 W. Spring St., Third Floor Columbus OH 43215-2256 1-800-OHIOBWC (614) 466-7388 (614) 644-9634 (fax) [email protected] OCOSH resource center 13430 Yarmouth Drive Pickerington OH 43147 1-800-OHIOBWC Resource center (614) 728-6464 Video library (614) 644-0018
viii

1
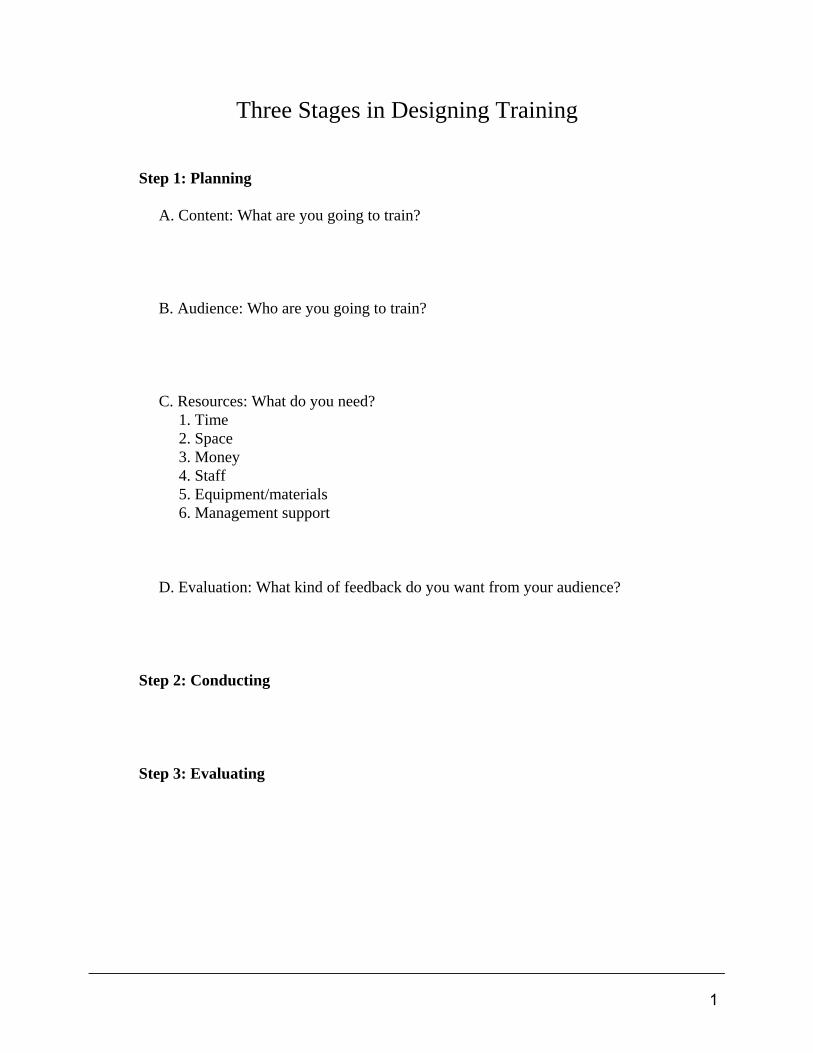
Three Stages in Designing Training
Step 1: Planning A. Content: What are you going to train? B. Audience: Who are you going to train? C. Resources: What do you need? 1. Time 2. Space 3. Money 4. Staff 5. Equipment/materials 6. Management support D. Evaluation: What kind of feedback do you want from your audience? Step 2: Conducting Step 3: Evaluating
1

Content: What are you going to train? To determine what to train, you can use a variety of needs assessment tools, including: • written instrument (survey, questionnaire) • structured interviews using a set of preplanned questions • informal discussions with employees • document review (researching and analyzing written documents) • observation • job safety analysis
2
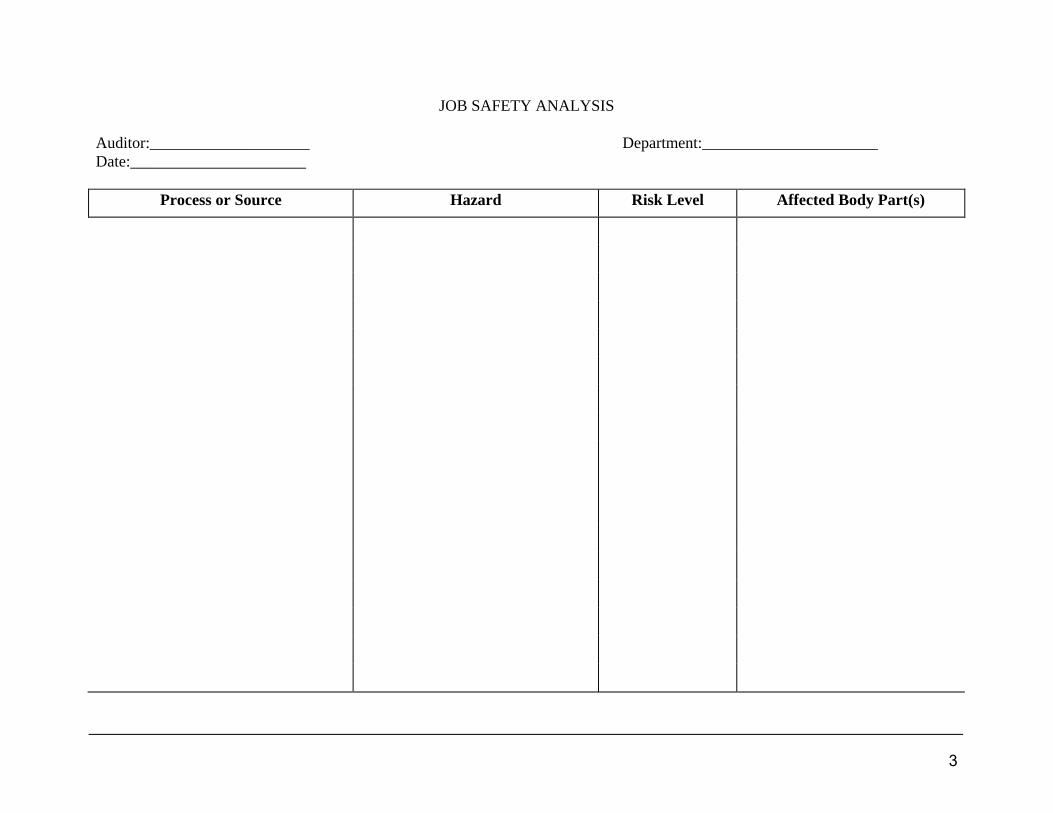
JOB SAFETY ANALYSIS Auditor:____________________ Department:______________________ Date:______________________
Process or Source Hazard Risk Level Affected Body Part(s)
3

4

Aim your Instruction at the Bull’s Eye!!
Helpful to know
Like to know
Should know
Must know
5

6

LESSON PLAN FOR THE CLAIMS ON LINE ADJUDICATION SYSTEM (COLA)
GLOBAL OBJECTIVE: The participant will demonstrate an understanding of the COLA system as it relates to claims processing.
SPECIFIC OBJECTIVES: At the end of the module, the participant will be able to: • Access the COLA system through the Multi-
Session-Manager (MSM) icon • Identify the various COLA formats and describe
the information contained in each • Describe the difference between CA, CC and CQ
COLA screens • Access specific claims information using the
appropriate COLA format
AUDIENCE: Claims Service Specialists
TEACHING STRATEGIES: • Lecture • Live COLA/COLA Training Data Base
MATERIALS NEEDED: • Flip Chart • Live COLA/COLA Training Data Base • handouts
REFERENCE MATERIALS: • MSM Tutorial • COLA Manual • applicable COLA Bulletins
TIME FRAME: Two Hours
7

8
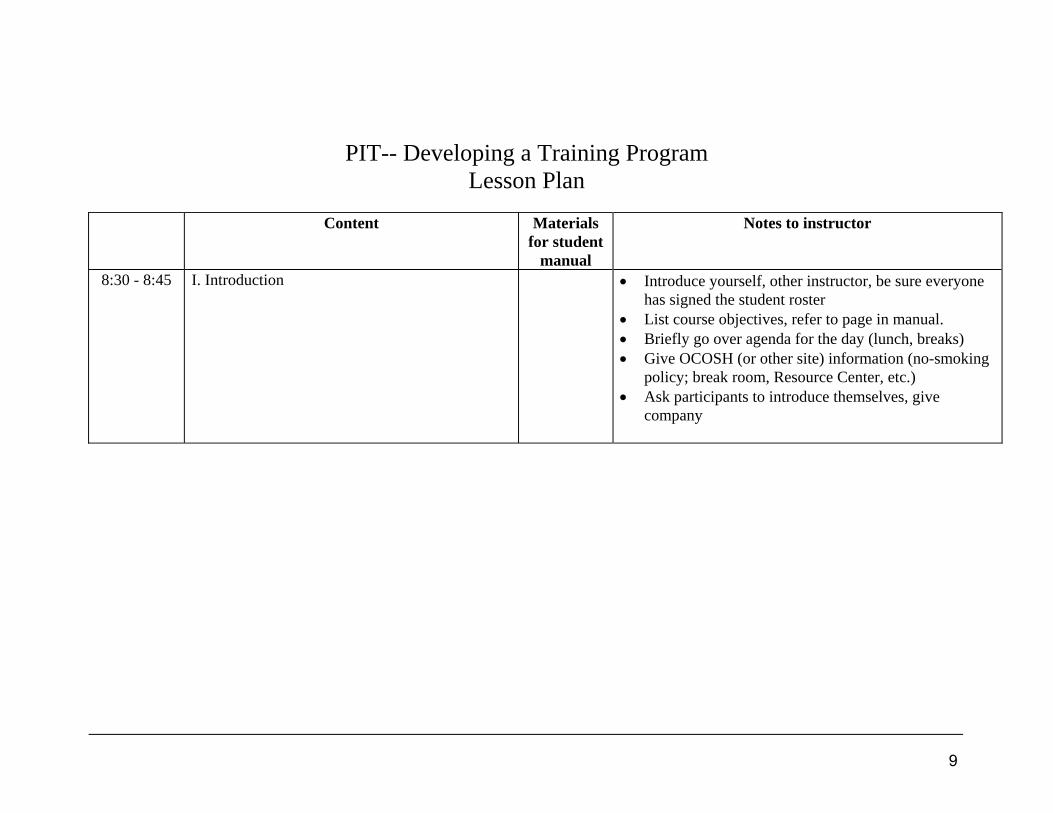
PIT-- Developing a Training Program
Lesson Plan
Content Materials for student
manual
Notes to instructor
8:30 - 8:45 I. Introduction • Introduce yourself, other instructor, be sure everyone has signed the student roster
• List course objectives, refer to page in manual. • Briefly go over agenda for the day (lunch, breaks) • Give OCOSH (or other site) information (no-smoking
policy; break room, Resource Center, etc.) • Ask participants to introduce themselves, give
company
9
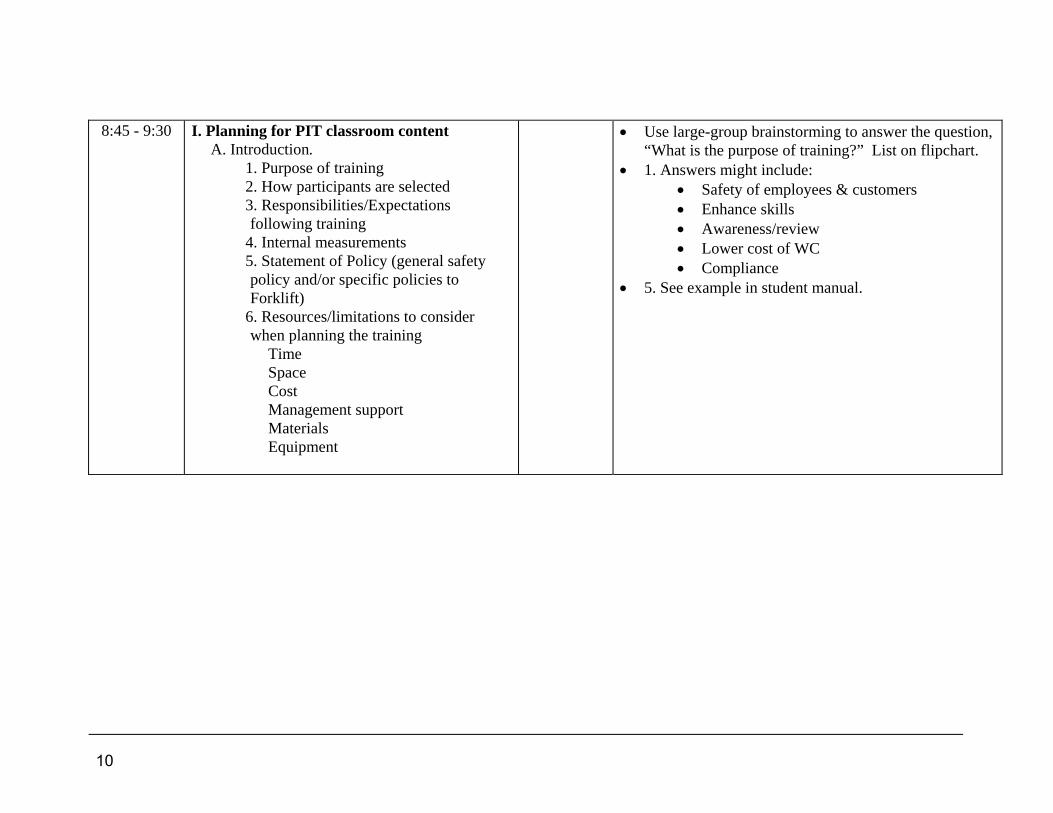
8:45 - 9:30 I. Planning for PIT classroom content A. Introduction.
1. Purpose of training 2. How participants are selected 3. Responsibilities/Expectations
following training 4. Internal measurements 5. Statement of Policy (general safety
policy and/or specific policies to Forklift)
6. Resources/limitations to consider when planning the training Time Space Cost Management support Materials Equipment
• Use large-group brainstorming to answer the question, “What is the purpose of training?” List on flipchart.
• 1. Answers might include: • Safety of employees & customers • Enhance skills • Awareness/review • Lower cost of WC • Compliance
• 5. See example in student manual.
10

9:30 - 10:00 B. Characteristics of PIT Differences between motor vehicles and
PIT Types of PIT
• 1. (10 min.) Large group discussion of the differences
between motor vehicles and PIT (related to new proposed standard); two flipcharts: one with “similarities,” one with “differences”
• 2. (20 min) Types of PIT (including EX, various grouping). Use pictorial model page from Ind. Truck Assoc.; pictures of forklifts in student manual. Ask “What do you need to train on?” Each student identifies and lists his/her PIT at workplace. If students have more than one type at their workplace, ask them to choose the one they are most familiar with for this exercise using operator’s manual and “blue” page.
10:00-10:15 BREAK 10:15 - 10:55
3. Controls & Configuration Wheels Load capacity Nameplates
• 3. Controls (use OSHA handout) (steering, brake, lift-tilt, gauges, etc.)
• (10 min) Use generic drawing as example • (30 min) Blue-page exercise using their own owners’
manual to list controls and configuration. 10:55 - 11:30
4. Pre-operation Inspection 5. Maintenance 6. Recharge & Refueling
• (20 min) Ask, “How many of you do pre-op inspection, maintenance?” (Only a few will probably raise their hands.) Ask those students, “Why do you do this?” Let their answer serve as a testimonial to their classmates.
• Show video 17 minutes 11:30-12:30 LUNCH
11

12:30 - C. Basic Principles of Safe Operation 1. Stability Triangle/ Center of Gravity
• Ask students, “What is your experience level?” • To demonstrate stability triangle, use diagrams,
definitions • Video on safe operation
until 1:45 2. Loads a) Picking up/setting down loads b) Types of loads c) Attachments 3. Traveling (with or without loads) 4. Parking
• For “Loads” use blue page exercise to describe loads, attachments (including personnel baskets, fall prevention)
1:45-2:00 BREAK 2:00 - 2:30 D. Operating Environment
1. Physical environment 2. Hazards (surfaces, grades, areas of
operation, clearances, noise, carbon monoxide, hazardous materials)
3. Specific operations (loading/unloading) 4. Pedestrians (sidewalk, plant, right of way)
• Blue page exercise to describe environment, list hazards, pedestrians
2:30 - 3:15 Case study • Example of loading dock emphasizes the identification and correction of hazards. Small group discussion followed by large group feedback.
3:15-3:30 BREAK
12
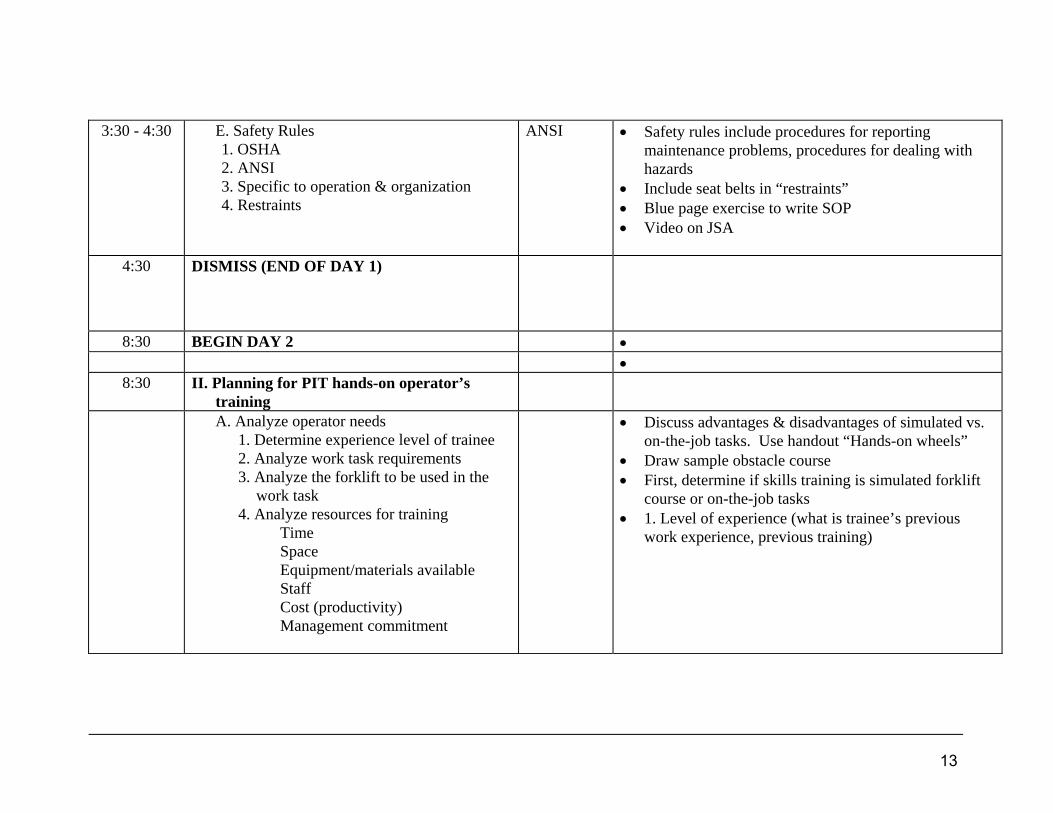
3:30 - 4:30 E. Safety Rules 1. OSHA 2. ANSI 3. Specific to operation & organization 4. Restraints
ANSI • Safety rules include procedures for reporting maintenance problems, procedures for dealing with hazards
• Include seat belts in “restraints” • Blue page exercise to write SOP • Video on JSA
4:30 DISMISS (END OF DAY 1)
8:30 BEGIN DAY 2 • •
8:30 II. Planning for PIT hands-on operator’s training
A. Analyze operator needs 1. Determine experience level of trainee 2. Analyze work task requirements 3. Analyze the forklift to be used in the
work task 4. Analyze resources for training
Time Space Equipment/materials available Staff Cost (productivity) Management commitment
• Discuss advantages & disadvantages of simulated vs. on-the-job tasks. Use handout “Hands-on wheels”
• Draw sample obstacle course • First, determine if skills training is simulated forklift
course or on-the-job tasks • 1. Level of experience (what is trainee’s previous
work experience, previous training)
13
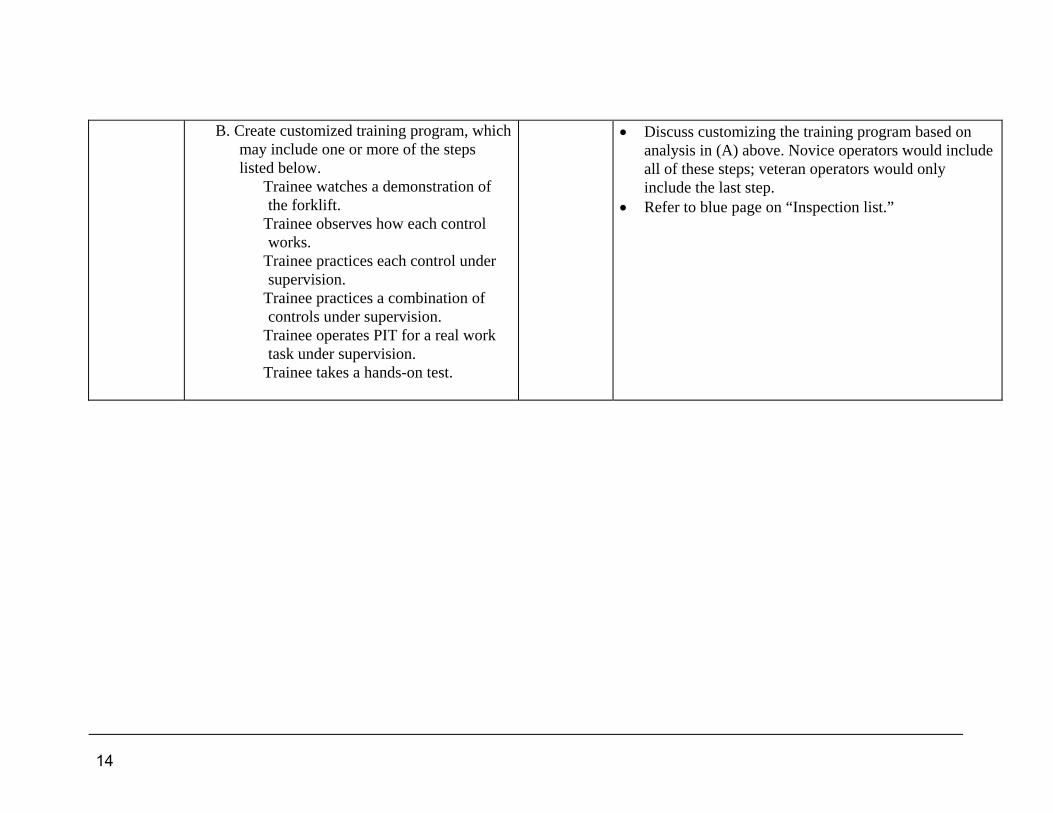
B. Create customized training program, which may include one or more of the steps listed below. Trainee watches a demonstration of
the forklift. Trainee observes how each control
works. Trainee practices each control under
supervision. Trainee practices a combination of
controls under supervision. Trainee operates PIT for a real work
task under supervision. Trainee takes a hands-on test.
• Discuss customizing the training program based on analysis in (A) above. Novice operators would include all of these steps; veteran operators would only include the last step.
• Refer to blue page on “Inspection list.”
14
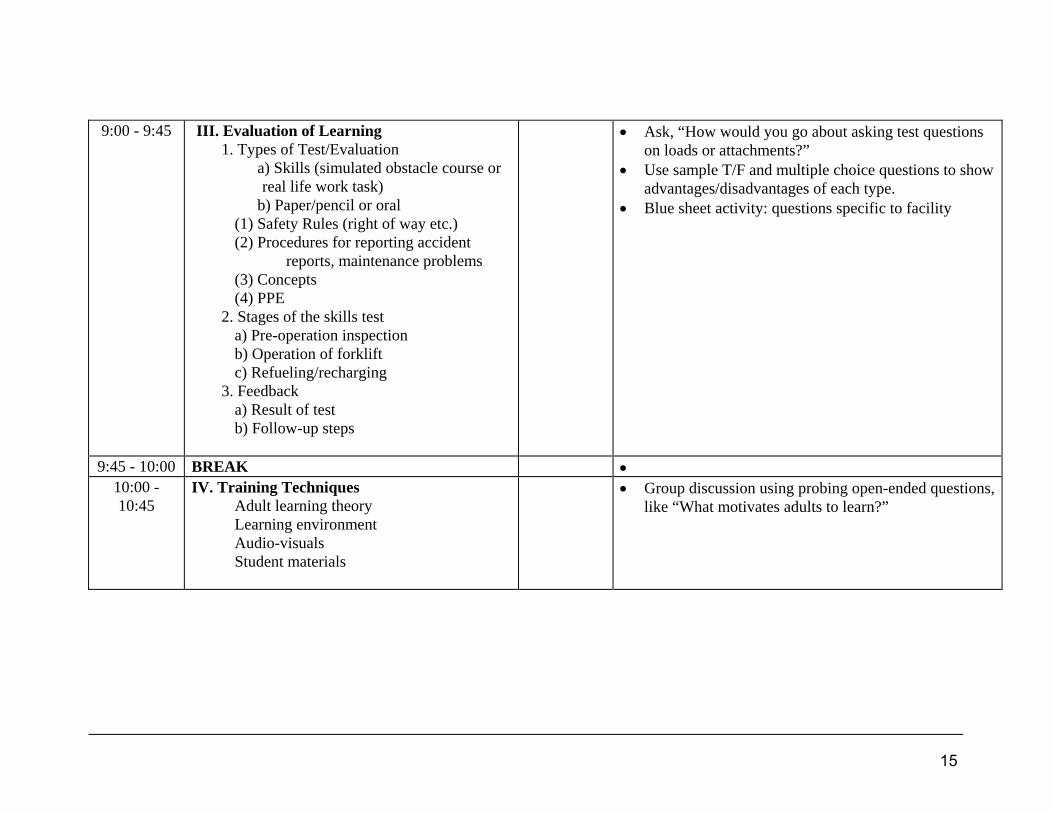
9:00 - 9:45 III. Evaluation of Learning 1. Types of Test/Evaluation
a) Skills (simulated obstacle course or real life work task)
b) Paper/pencil or oral (1) Safety Rules (right of way etc.) (2) Procedures for reporting accident
reports, maintenance problems (3) Concepts (4) PPE
2. Stages of the skills test a) Pre-operation inspection b) Operation of forklift c) Refueling/recharging
3. Feedback a) Result of test b) Follow-up steps
• Ask, “How would you go about asking test questions on loads or attachments?”
• Use sample T/F and multiple choice questions to show advantages/disadvantages of each type.
• Blue sheet activity: questions specific to facility
9:45 - 10:00 BREAK • 10:00 - 10:45
IV. Training Techniques Adult learning theory Learning environment Audio-visuals Student materials
• Group discussion using probing open-ended questions, like “What motivates adults to learn?”
15
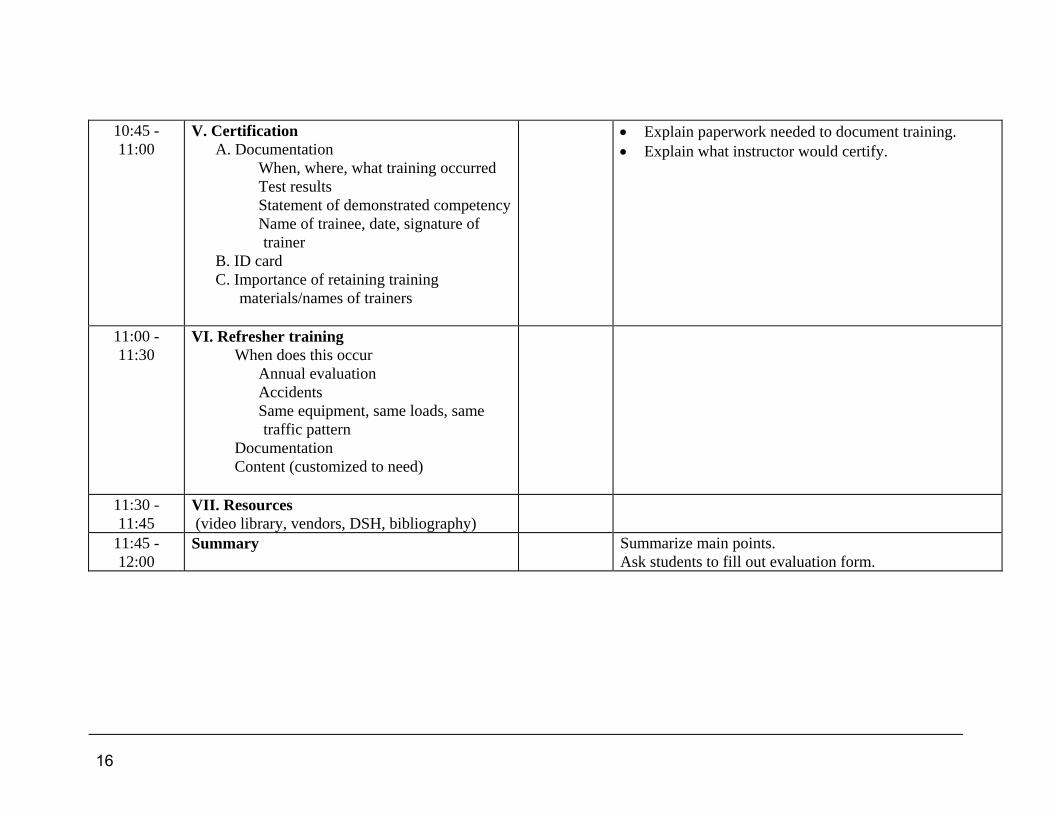
10:45 - 11:00
V. Certification A. Documentation
When, where, what training occurred Test results Statement of demonstrated competency Name of trainee, date, signature of
trainer B. ID card
C. Importance of retaining training materials/names of trainers
• Explain paperwork needed to document training. • Explain what instructor would certify.
11:00 - 11:30
VI. Refresher training When does this occur
Annual evaluation Accidents Same equipment, same loads, same
traffic pattern Documentation Content (customized to need)
11:30 - 11:45
VII. Resources (video library, vendors, DSH, bibliography)
11:45 - 12:00
Summary Summarize main points. Ask students to fill out evaluation form.
16
Audience: Who are you going to train?
How Adults Learn Best
Attitude • Adults like to know why something is important for them to learn; including the rationale for
their attending the class, facts/statistics to indicate the severity of a problem, and/or examples of what can go wrong if the class topic is ignored.
• Provide a relaxed, comfortable atmosphere where adults can safely explore new ideas; encourage and reward their comments and questions; give immediate recognition of achievement. These contribute to a positive learning environment, which is a prerequisite for participants to have an open, receptive attitude.
Active Participation • Adults bring a lot of work and life experience to the learning table, on which the trainer can
draw for content knowledge and real-life examples. • The more adults participate in the learning process, the more they will remember the content
and apply it. Participation in the learning process may involve asking questions, being part of a discussion group, applying a theory to a practical situation, practicing a skill, describing a process, writing procedures or programs, evaluating products and solving problems.
• Adults need to hear it, see it and practice it for maximum retention of the content. If adults only hear something (lecture mode), they remember 20% of the content; if adults hear it and see it (lecture plus visuals), they remember 50% of the content; if adults hear it, see it, and practice (apply) it, they remember 80% of the content.
• If the topic/content is new to an audience, the trainer needs to provide a context for the content that is meaningful to the audience; that is, it is somehow linked to previous knowledge. Also, new content takes longer to learn and requires more examples and/or more practice.
• The average adult attention span for a lecture in a classroom is 20 minutes.
Repetition for new or difficult concepts • If the content is new or complex, it needs to be repeated and/or practiced for learning to
occur. • Emphasize main points frequently, using a wide variety of examples. • Be sure that new or complex material is understood by asking questions of the students or
administering a test. • Ask students to explain a concept in their own words and/or give their own examples. Ask
them to explain why their responses are correct or incorrect. • Even if the concepts are not new or difficult, introductions and summaries should be used to
repeat important concepts.
17

Practical application • If an idea has immediate usefulness to an adult, it is more likely to be adopted. • Focus on “real-world” problems. • Focus on how the learning can be applied. • Relate the learning to the learners’ goals. • Can the concepts you teach be applied immediately? • Are there suggestions you can give to make them more easily applied?
Visuals • Similar to children, most adults learn best from visuals (charts, diagrams, photos, drawings,
flowcharts, props, pictures). Use them as often as possible. • People learn at different rates and in different ways. About 85% of adults are visual learners.
That is, they learn best when there is a visual image connected to the learning. There is a small percentage of auditory learners who learn best by hearing words or sounds. There is also a small percentage of kinesthetic learners who need to physically involve themselves in the learning task; that is, physical movement or patterning is essential to their understanding, involving their arms/hands, legs/feet, whole body or any single body part.
Variety • Variety in the presentation helps maintain adults’ interest and attention. Variety stimulates
the brain and keeps it engaged. • Variety can be added by changing teaching methods, changing visual aids, changing
instructors, changing lighting or location, or even the use of color. Instructors can vary their voice tone, body position (from standing still to walking around to sitting), gestures, facial expressions, and so forth.
• Having fun is a welcome addition, but not a necessity.
Examples. • Give sufficient and varied examples to explain the concept thoroughly. • Both theory (big picture) and application (specifics) are usually needed for learning to occur.
Adults need examples that drive the point home, along with the main point. • If the trainer does not have examples, s/he might ask the audience for examples. • Non-examples can also be given to show the limits/boundaries of the concept. • Examples should be:
⇒ realistic (not necessarily real) ⇒ relevant ⇒ current (if appropriate) ⇒ sufficiently complex to engage the learner, ⇒ thought-provoking
18

High-school Model
Adult learning Model
Motivation for attending class
External; law requires student to attend school
Internal; student chooses to grow/learn; professional advancement; curiosity
Role of teacher
Authoritarian; teacher knows content; gives it to students
All adults know a lot; teacher facilitates/guides learning process; coaches students
Role of student
Student is passive learner Student is active, participatory learner
Responsibility that learning occurs
Teacher Student
Teaching strategies
Lecture Discussion; hands-on activities;field trips; case studies
Structure of curriculum
Rigid, standardized; stand-along units Dynamic, versatile, adaptable; integrated with other learning
Interaction between student and instructor
Hierarchical Cooperative
Evaluation
Test Self-diagnosis (Student asks, “Did I learn the content?”)
End goal
Get an “A” Learn the content; grow; improve
19

20

Retention Rates
•HANDS-ON 90%
•LECTURE w/ 70%PARTICIPATION
•LECTURE ONLY 20%
21
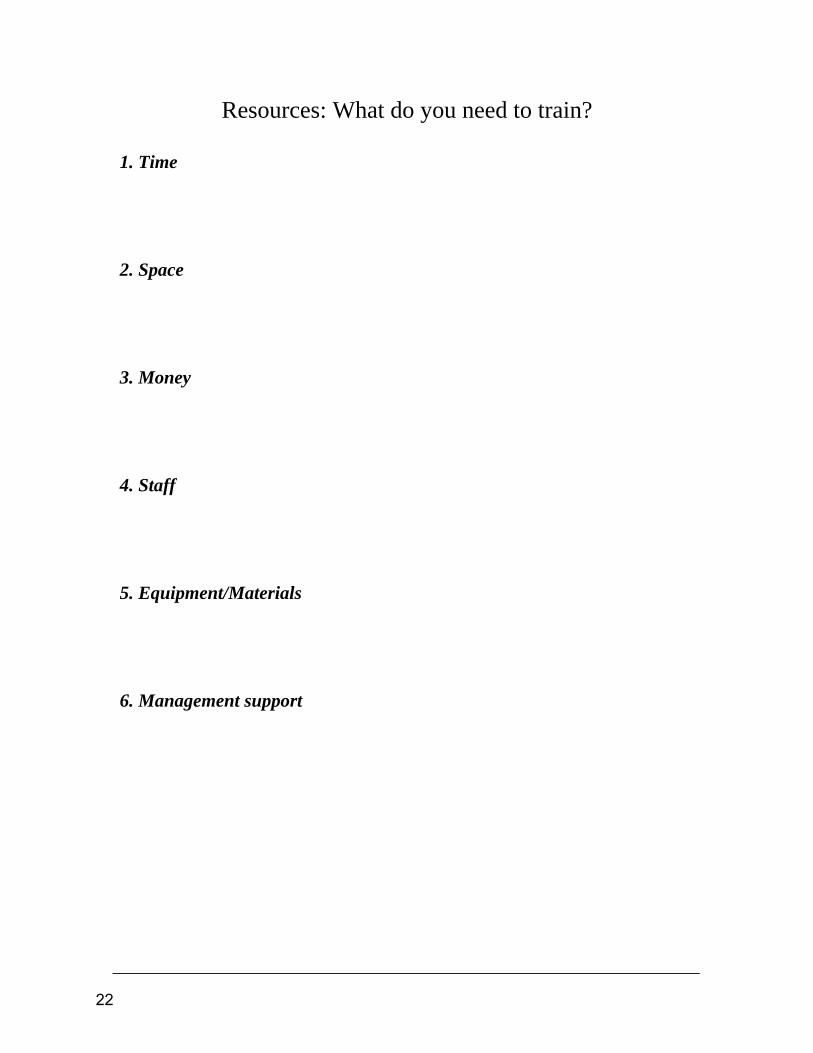
Resources: What do you need to train?
1. Time 2. Space 3. Money 4. Staff 5. Equipment/Materials 6. Management support
22

Room set-ups
Classroom Style
FrontTable
23
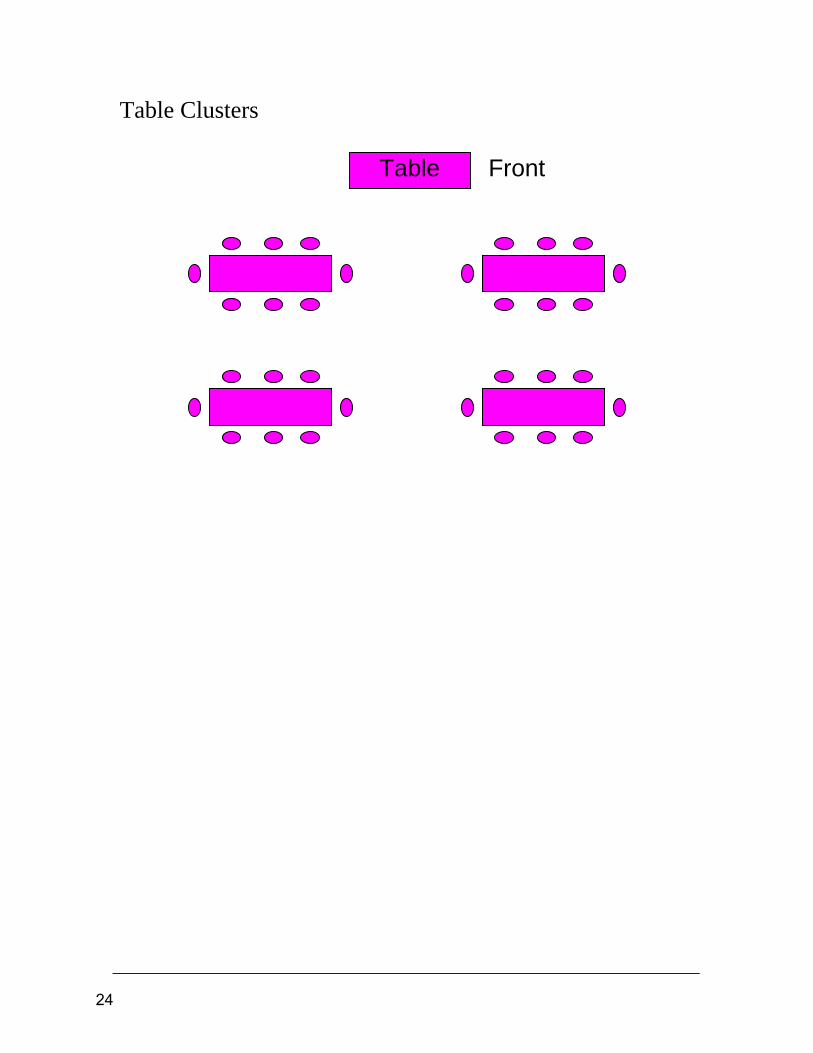
Table Clusters
FrontTable
24

U - Shape
FrontTable
25

Modified Classroom
FrontTable
26

Seven Tips to Ensure that Your Training Dollars Aren’t Wasted
1. Involve your participants’ managers. As early as possible try to get managers to
identify what they want accomplished with the training you’re designing. It might be that training is the wrong solution to the problem that they’re looking to solve.
2. Coach Managers to prepare their participants prior to the training. Have them review the objectives for the training with each participant. Also, suggest that managers and participants write an action plan that can be reviewed after the course is over. This promotes support from both parties for the training received.
3. Ask Managers to schedule post-session debriefings. This not only shows concern for and in interest in the training received but it also allows participants and managers to evaluate the training and make suggestions or improvements. The action plan mentioned above is also a good tool to use to guide any post-session debriefings.
4. Include an action plan or action plan page or pages in your training materials. This provides a way for students to record concrete applications of ideas that they can use on the job or in their future training.
5. Schedule periodic reflection time during your training. This allows participants to actually use the action idea or action plan pages and to consider how best to incorporate knowledge and skills from your training into their work setting.
6. Create follow-up support groups. Divide your class into groups of three or four participants each for up to a 60 day period after your training. These support groups would then be available to answer questions, discuss ideas, and encourage each other to implement techniques learned in the training. Generally, peer support is more readily accessible than you as the instructor will be.
7. Offer recognition, encouragement, and approval. For a period of 45-60 days after class, solicit results from your training participants that identify how they have applied what was learned and what the results were. Share these successes with management and with future training classes. This will help ensure that learning continues long after your training class has ended.
27
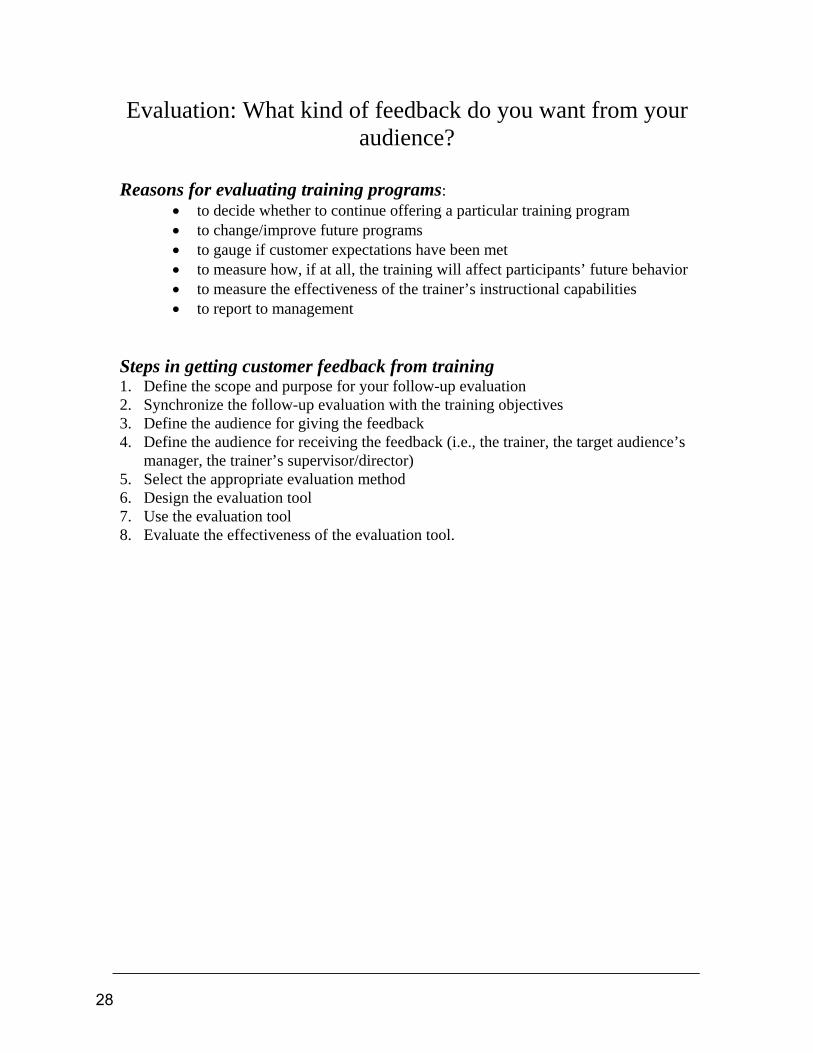
Evaluation: What kind of feedback do you want from your audience?
Reasons for evaluating training programs:
• to decide whether to continue offering a particular training program • to change/improve future programs • to gauge if customer expectations have been met • to measure how, if at all, the training will affect participants’ future behavior • to measure the effectiveness of the trainer’s instructional capabilities • to report to management
Steps in getting customer feedback from training 1. Define the scope and purpose for your follow-up evaluation 2. Synchronize the follow-up evaluation with the training objectives 3. Define the audience for giving the feedback 4. Define the audience for receiving the feedback (i.e., the trainer, the target audience’s
manager, the trainer’s supervisor/director) 5. Select the appropriate evaluation method 6. Design the evaluation tool 7. Use the evaluation tool 8. Evaluate the effectiveness of the evaluation tool.
28
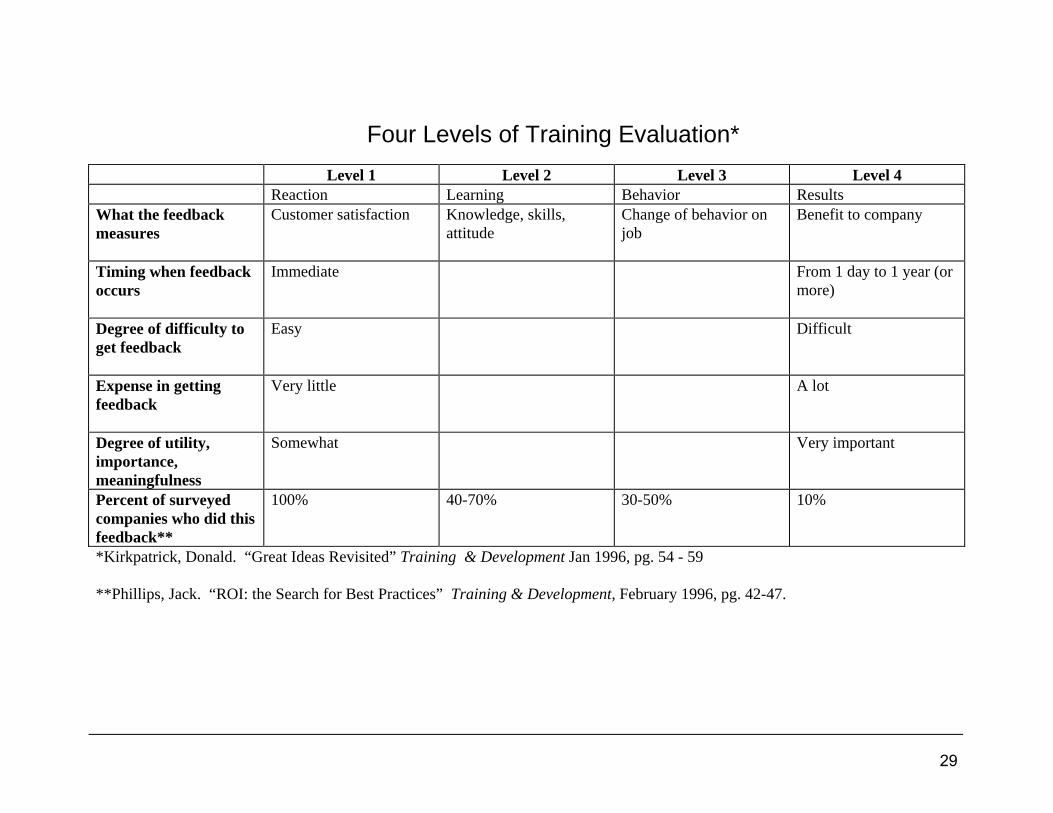
Four Levels of Training Evaluation*
Level 1 Level 2 Level 3 Level 4 Reaction Learning Behavior Results What the feedback measures
Customer satisfaction Knowledge, skills, attitude
Change of behavior on job
Benefit to company
Timing when feedback occurs
Immediate From 1 day to 1 year (or more)
Degree of difficulty to get feedback
Easy Difficult
Expense in getting feedback
Very little A lot
Degree of utility, importance, meaningfulness
Somewhat Very important
Percent of surveyed companies who did this feedback**
100% 40-70% 30-50% 10%
*Kirkpatrick, Donald. “Great Ideas Revisited” Training & Development Jan 1996, pg. 54 - 59 **Phillips, Jack. “ROI: the Search for Best Practices” Training & Development, February 1996, pg. 42-47.
29

30

Evaluation Methods
Level 1
Level 2 Level 3 Level 4
Reaction Learning Behavior Results End-of-training skills demonstration, test or assignment
Task or assignment Survey or questionnaire One-on-one interview Focus group Observation Action planning Performance contract 3-month Post-training follow-up (written or verbal)
Performance tracking (productivity, quality, quantity, cost, time)
Multi-rating (feedback from supervisor, team members, subordinates))
31

32

Sample evaluation forms
33

Sample 1 Audio-Visuals Which Support Your Presentation
Evaluation of Training Workshop Date ____________ Your name (optional) ___________________________________ Please answer these questions about the workshop. Your ideas will be used to create more worthwhile experiences for future students. Thanks for your help! 1) What was helpful/interesting in this workshop? 2) What suggestions do you have to change/improve the workshop? 3) What key ideas from the workshop are you intending to use in your future training efforts? 4) Please check the appropriate box for the amount of time spent on each topic. Please use the reverse side for additional comments.
Topic Too little
Just right
Too much
Comments
Advantages and limitations of various AV materials
Questions to ask before designing/using AV materials
Seven key design principles
Criticizing AV materials using the design principles
34

Sample 2 COURSE NAME: DATE:
OPERATIONS Strongly Agree
Agree Disagree Strongly Disagree
Not Applicable
1. I found it easy to register for this class.
2. My confirmation letter arrived in plenty of time.
3. The directions made the building easy to find.
4. The signs made the classroom easy to find.
COURSE CONTENT
5. The pace of the class was good (not too slow, not too fast).
6. I gained some safety & health ideas that will be useful in my job or in my workplace.
7. This course met my expectations.
8. The examples given were helpful.
9. Technical terms were explained/defined.
10. The course content was well-organized.
11. The course materials supported the classroom instruction.
INSTRUCTOR a) The instructor seemed very knowledgeable about
the content.
b) The instructor shared knowledge in a way that helped me learn the content.
c) The instructional presentation was interesting and kept my attention.
d) The instructor treated participants with respect.
e) The instructor encouraged questions and discussion.
f) I would attend another course taught by this instructor.
35
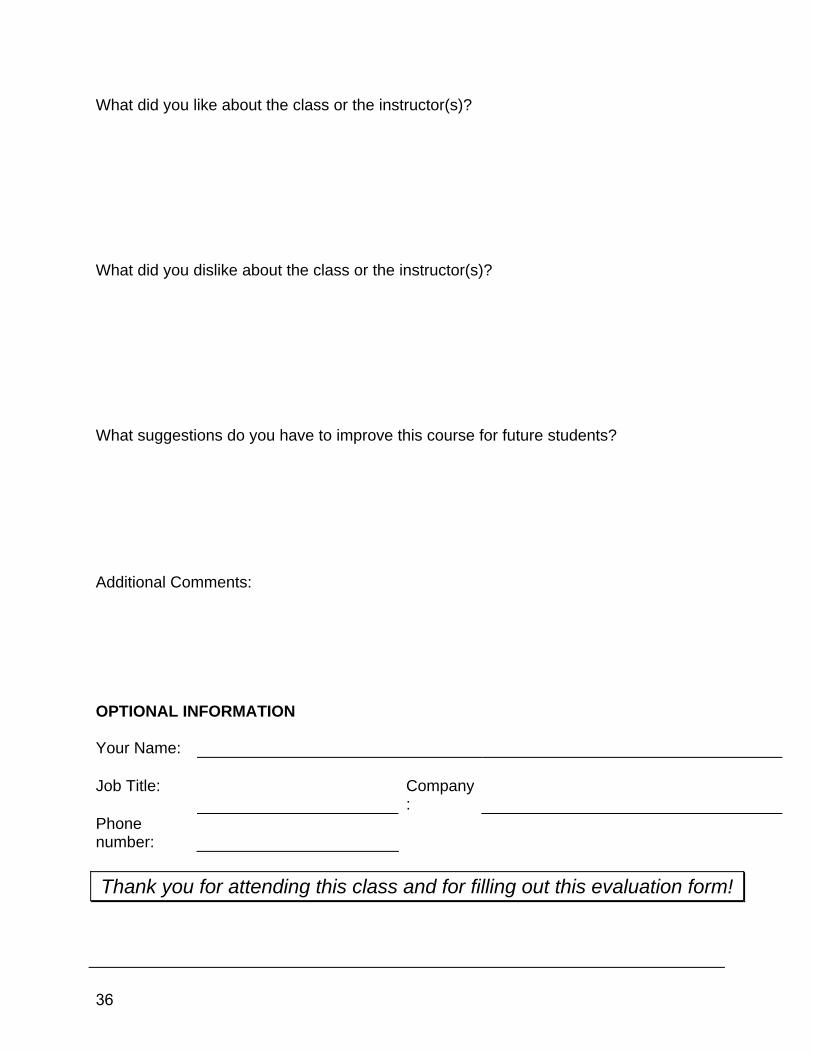
What did you like about the class or the instructor(s)? What did you dislike about the class or the instructor(s)? What suggestions do you have to improve this course for future students? Additional Comments: OPTIONAL INFORMATION Your Name: Job Title:
Company:
Phone number:
Thank you for attending this class and for filling out this evaluation form!
36

2

Resources for Safety Training Materials
Ohio Division of Safety & Hygiene OHIO BWC http://www.ohiobwc.com OSHA (Occupational Safety & Health Act) Training & Education OSHA’s area offices offer a variety of informational services, such as publications, audiovisual aids, technical advice, and speaker for special engagements. OSHA’s Training Institute in Des Plaines, Illinois, provides basic and advanced courses in safety and health for federal and state compliance officers, state consultants, federal agency personnel, and private sector employers, employees, and their representatives. For more information on training and education, contact: OSHA Training Institute Office of Training and Education 1555 Times Drive Des Plaines IL 60018 (847) 297-4810 Ohio Offices
CINCINNATI AREA OFFICE CLEVELAND AREA OFFICE 36 Triangle Park Drive Federal Office Building Cincinnati OH 45246 1240 East 9th Street, Room 899 Cleveland OH 44199 (513) 841-4132 (216) 522-3818 Fax: (513) 841-4114 Fax: (216) 771-6148 COLUMBUS AREA OFFICE TOLEDO AREA OFFICE Federal Office Building Room 600 200 North High Street, Room 620 420 Madison Avenue Columbus OH 43215 Toledo OH 43604 (614) 469-5582 (419) 259-7542 Fax: (614) 469-6791 Fax: (419) 259-6355
Web Address http://www.osha.gov Includes OSHA media releases, publications, statistics, and a download for the OSHA poster.
37

NIOSH (National Institute for Occupational Safety & Health) Publications Dissemination (or other information) 4676 Columbia Parkway Cincinnati OH 45226-1998 Phone: 800-35-NIOSH (800-356-4674) Fax: (513) 533-8573 Web address: http://www.cdc.gov/niosh
38

3

USING VIDEOS
Selecting a video In selecting a video consider these factors:
• Is it the right length? • Will there be enough time for discussion? • Where will the video fit into the program? • Who will introduce the film and lead the discussion?
Previewing a video Previewing a video prior to use is highly recommended. Take notes. Consider these questions:
• Does the video cover the area you want to discuss? • Is the information current, accurate, and relevant? • What information has to be updated or supplemented? • Does the video prepare the group for the follow-up discussion? • Is a discussion outline necessary?
Before: Introducing the video Prepare the group as you would for any learning experience.
• Briefly tell why you are showing the film; how it ties in with the subject under discussion.
• Describe the video revealing only enough information to build interest and focus attention on the subject.
• Prepare the group for discussion following the video by asking them to watch for certain points.
• Keep the introduction brief - - not more than five minutes.
Showing the video • Be sure you have a room that can be darkened. • Check out light switches, electrical outlets, extension cords, etc. • Arrange for projectionist, projector and screen. • Ask projectionist to get there early to have the film all set.
39
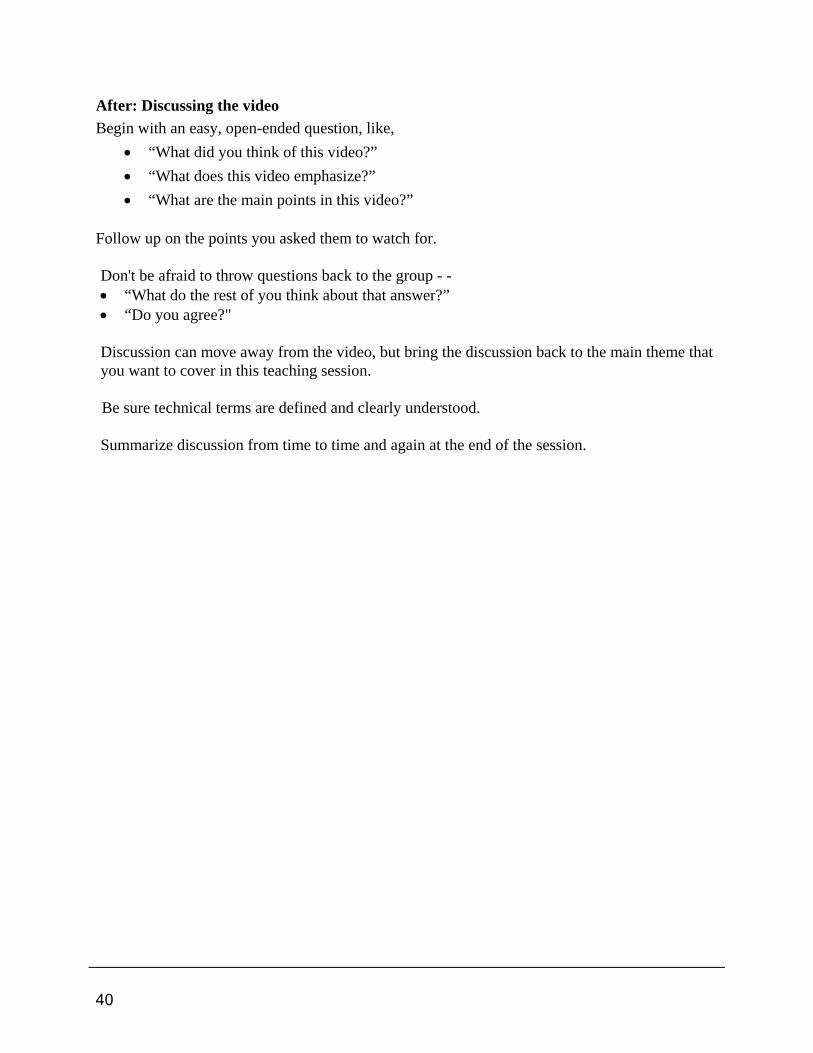
After: Discussing the video Begin with an easy, open-ended question, like,
• “What did you think of this video?” • “What does this video emphasize?” • “What are the main points in this video?”
Follow up on the points you asked them to watch for. Don't be afraid to throw questions back to the group - - • “What do the rest of you think about that answer?” • “Do you agree?"
Discussion can move away from the video, but bring the discussion back to the main theme that you want to cover in this teaching session. Be sure technical terms are defined and clearly understood.
Summarize discussion from time to time and again at the end of the session.
40
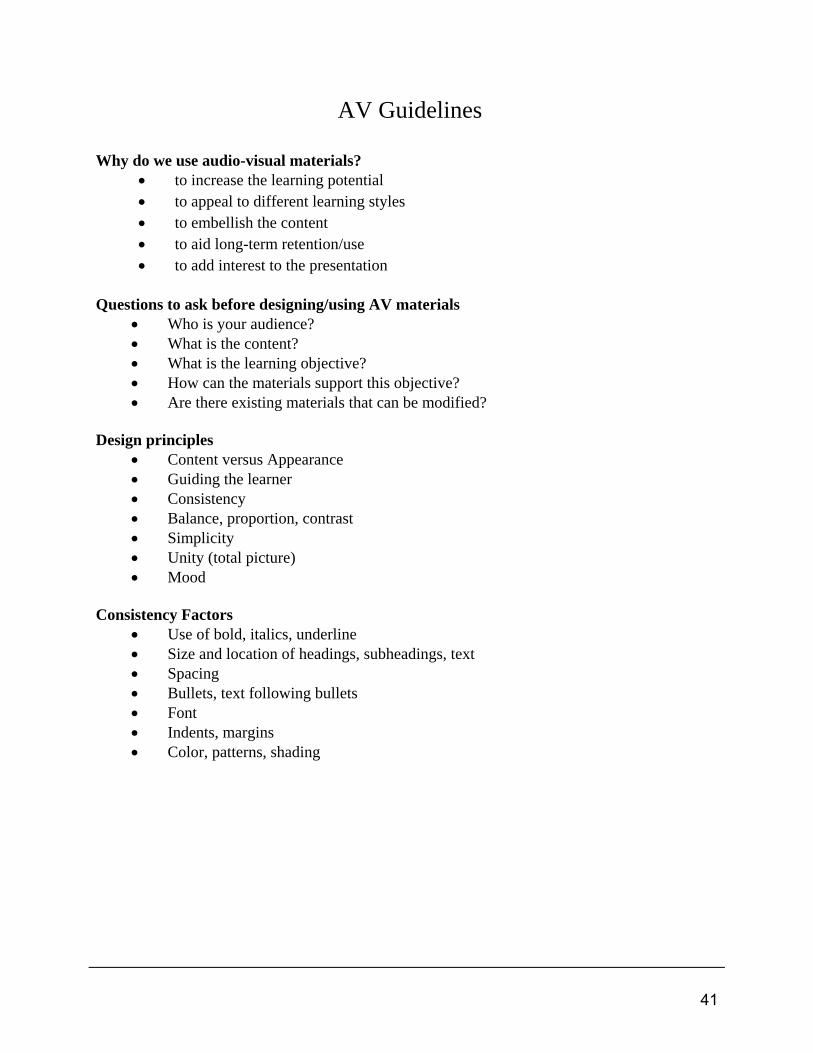
AV Guidelines
Why do we use audio-visual materials? • to increase the learning potential • to appeal to different learning styles • to embellish the content • to aid long-term retention/use • to add interest to the presentation
Questions to ask before designing/using AV materials
• Who is your audience? • What is the content? • What is the learning objective? • How can the materials support this objective? • Are there existing materials that can be modified?
Design principles
• Content versus Appearance • Guiding the learner • Consistency • Balance, proportion, contrast • Simplicity • Unity (total picture) • Mood
Consistency Factors
• Use of bold, italics, underline • Size and location of headings, subheadings, text • Spacing • Bullets, text following bullets • Font • Indents, margins • Color, patterns, shading
41
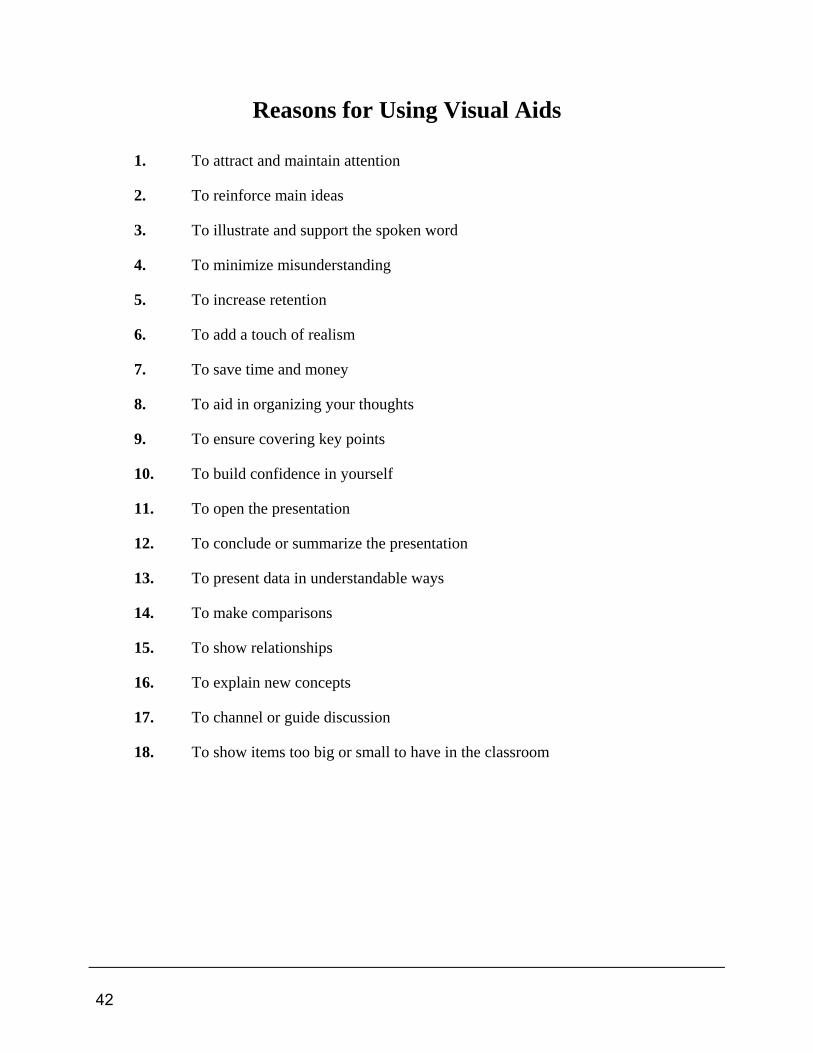
Reasons for Using Visual Aids
1. To attract and maintain attention
2. To reinforce main ideas
3. To illustrate and support the spoken word
4. To minimize misunderstanding
5. To increase retention
6. To add a touch of realism
7. To save time and money
8. To aid in organizing your thoughts
9. To ensure covering key points
10. To build confidence in yourself
11. To open the presentation
12. To conclude or summarize the presentation
13. To present data in understandable ways
14. To make comparisons
15. To show relationships
16. To explain new concepts
17. To channel or guide discussion
18. To show items too big or small to have in the classroom
42

Visual Aid Guidelines
A good visual clarifies and reinforces a presentation. A visual should highlight key information and focus on one clear idea. It should also be simple, accurate, bold, colorful, informative and easy to read.
• Use one idea per visual
• Use no more than seven words per line
• Use no more than seven lines per visual
• Use simple English and short words
• Avoid jargon and highly technical words and ideas
• Make the letters big and readable (18 + font)
• Use no more than three sizes of letters per visual
• Use color when possible, but no more than four colors per visual
Today’s Supervisor/October 1993
43

44

4

Training Methods
DISCUSSION Discussion is talking with a purpose. It is the discussion leader's role to determine the purpose and to guide the discussion. The success of any discussion group depends on how carefully the planning has been done. The discussion leader must be familiar with the subject, identify the goals of the session, draw up a discussion outline and guide, control and summarize the session. Here are some points to keep in mind:
1. Open the discussion with a brief introduction of the subject with carefully planned background data which will help move the group into the subject and outline the general goals of the discussion.
2. If the materials ask specific questions, read them to the group. And, as answers are developed and other questions asked do not forget the word "Why?"
3. Be ready to rephrase questions for better understanding.
4. Try to get as much participation as is possible although do not be discouraged if everyone does not talk. And, do not be afraid of occasional periods of silence after a question is asked. People need time to think.
5. Call on class members from time to time, but in a way that will not embarrass anyone.
6. Give credit where credit is due to group members for their contribution.
7. If there are arguments don't let them degenerate into conflict. Intervene and summarize the difference of opinion and move on.
8. Summarize as you go along - don't wait until the end of the discussion.
9. Stick to the subject. Side trips are all right if the material is relevant, but firmly and tactfully pull the group back to the main subject.
10. Do not force your opinion on the group.
11. Where possible, use illustrations from your own experience.
12. Maintain discipline - pleasantly.
13. End the discussion with a summary of what has been discussed and prepare the way for the next session.
45
QUESTIONS The question is not only a useful but a highly versatile tool. A good teacher tries to talk as little as possible and makes the students do the talking. This is achieved by asking the right kind of questions. Questions can help you:
1. Begin a discussion. The fastest way of getting a discussion under way is to ask a thought-provoking question.
2. Arouse interest in the subject under discussion. A question containing an element of
controversy is most likely to achieve this.
3. Direct the thinking of the group. Suppose your lesson deals with the problem of how to get workers to attend union meetings, and you wish to direct their attention to the fact that the apathy of the members might be the fault of the leaders. You do that by asking, "To what extent, would you say, that the apathy is the fault of the leaders?"
4. Determine the students' understanding or knowledge. You have taught the idea of
inflation and now you wish to know whether they know what inflation is. By simply asking them, "What do you mean by inflation?", you know whether they have the idea or not. If you wish to test their understanding, all you need do is ask this question, "How can one tell whether there is inflation?"
5. Get participation from a particular student. You call her name and ask her the
question directly.
6. Obtain information or opinion. What does the contract say about overtime?
7. End or limit the discussion. In that case, you would say, "It seems to me that we have sufficiently considered this point (or topic). What do you think?"
8. Reach a conclusion or agreement. "How can we, on the basis of the facts presented,
say what makes unions strong?". Or, "Can we agree that these are the reasons why unions are strong?"
Types of Questions Questions based on mental processes:
I. Information or facts for the purpose of knowledge. Example: What is the organizational structure of the union?
2. Interpretation from which inferences are drawn from known facts. Example: Why do
workers join unions?
46
3. Comparison in which relations are sought. Example: Which unions are more effective, industrial or craft?
4. Causal reasoning which seeks the reasons behind facts. Example: Why is collective
bargaining necessary?
5. Analysis which examines the elements of a statement or object. Example: What makes this contract a good one? Techniques in asking questions For maximum effect, the manner as well as the right question is important. Here are suggestions which you might consider: 1. Vary your questions. The majority of them should be questions which encourage students
to think. 2. Insist on getting a complete and fully developed answer. 3. Speak distinctly so that everyone can hear the question. 4. Pause after asking a question before naming an individual to answer. This is important to
give the members time to reflect and formulate their answer. 5. Do not repeat answers except when needed for emphasis. 6. Encourage students to ask and repeat the question to make sure that everyone heard it. 7. Avoid calling always on those who appear to know the answer. 8. Reword the question if it is not clear and give an example to clarify the meaning if
necessary. 9. Ask for more than one answer and avoid rapid fire questions. 10. Be sure that your manner is pleasant.
47
QUESTIONNAIRES A questionnaire is one of the best ways for a group to learn if the material to be discussed lends itself to this approach. The questionnaire can be handed out or questions can be written on the board. Advantages for the instructor
I. It is an automatic discussion starter.
2. It can help in organizing your material.
3. It avoids lecturing and helps determine students' understanding.
4. A question can be used to open a broader discussion.
5. It keeps you and the class on the track. Advantages for the group
I. It helps promote individual participation and arouse interest.
2. It focuses attention on one thing at a time. Disadvantages of using Questionnaires
1. People think they are being tested. This makes it extremely important to state at the beginning that it is not a test and that it does not have to be handed in.
2. People may become discouraged if they cannot answer at least some of the questions.
(This makes it important to include at least a few easy questions, possibly some questions asking for opinions. If the material is difficult and new, then the questionnaire can be used as a discussion guide without asking the people to try to individually answer the questions first.)
48

Example of Questionnaire
Violence in the Workplace Awareness Survey 1. Workplace violence by its definition has to involve some form of physical attack.
True or False 2. OSHA has cited organizations for allowing “violent” environments to exist. True or False 3. Workplace violence is primarily a “security” issue. True or False 4. As a cause of workplace fatalities in the U.S., violence ranks as: 1 2 3 4 5 5. Violence is actually a major “social” problem and therefore should not be considered a
serious “workplace” issue. True or False 6. Job layoffs and stress are typical causes of workplace homicides. True or False 7. There are ways you and your employer can effectively prevent violence. True or False 8. Your company probably needs a “policy” dealing with violence in the workplace.
True or False 9. Name some things any organization could do to reduce the threat of violence in the
workplace. 10. Some violent acts and threats just need to be ignored. True or False
49
LECTURE Introduction
1. State learning goals (what students will be able to do at the end of the class with the knowledge gained). Indicate how student achievement will be assessed.
2. Give an overview of the topic. Tell students what you will be talking about, why the
subject is important, and how it relates to previous topics in the course, and to their interests, experiences and future educational or vocational activities.
3. Provide an outline of the lecture. Write the main points on the board, use an overhead
transparency projector, or distribute a handout. Content 1. Limit the content to be taught. Some say include about 7 chunks of information in a 45
minute lecture. 2. Explain each major point fully, providing a variety of concrete examples, analogies or
illustration of the idea. 3. Present all the ideas essential to your major point (content that students "need to know")
before following up with content that is minor or simply "nice to know." 4. Relate ideas and examples to students' experience, future works or interests, or ask students to
provide examples from their own experiences. Presentation
1. Don't read your notes - try to use key words.
2. Vary your movement in the classroom, and voice (volume, speed).
3. Talk to your students, maintaining eye contact with your audience.
4. Use overhead transparencies, slides or handouts to provide variety in your lecture.
50

Student participation during the lecture The following procedures facilitate student participation:
1. Ask "open-ended" questions for which there is no single "right" or "wrong" answer, but several possible responses.
2. Ask for questions, but to save time ask for the type of question you want which deals with
the main idea. For example, instead of "Are there any questions?" use "Do you have a question about the sequence of steps in doing...?"
3. Redirect a student's question to other students. Invite them to clarify, expand, or comment.
Ask for examples from their experience. 4. Give recognition and praise to good questions or answers. For an incorrect statement, select
any part that is correct (if possible) and build on that. In any case, "reinforce the try" as well as correcting the error.
5. After making a series of points in your lecture, pose a problem that requires students to
apply them. Give students several minutes to jot down an answer and then survey the range of responses and discuss them (if time allows).
Summary of the lecture During the closing summary of the lecture:
1. Restate your main points.
2. State how the main points relate to previous or future lectures.
51
BUZZ GROUPS Buzz groups are small discussion groups composed of three to eight people. Increased participation can be obtained In a large class by breaking up into buzz groups where more individuals will have an opportunity to take part in the discussion. People are more apt to express themselves freely in small groups. Mechanics of the buzz group
1. The teacher should designate the number of buzz groups. The students could count off by the desired number of groups. This mixing procedure is important so that each buzz group has a cross section of the opinions represented in the group, rather than only one point of view.
2. A leader and recorder may be selected by each buzz group.
3. The teacher should designate the physical area where each group is to meet. If possible,
the groups should meet in separate rooms so not to interfere with one another. If space is limited the buzz groups should swing their chairs into a circle so all members of the group can see and hear each other.
4. The teacher should give each group a specific question or questions for discussion. They
may be the same question or different ones. It is preferable that the questions be in writing so each group knows exactly what is to be discussed.
5. The teacher should set the time limit for discussion before breaking into buzz groups.
6. The teacher should give each group a two minute warning so each group can summarize
before reconvening
7. If more than one question has been assigned, group one should be asked to state its findings on question one with supplementary comments from the other groups. Group two should then be asked to report on question two, and so forth.
8. The teacher should summarize the findings.
Advantages of buzz groups 1 Everyone in a large group can take part. 2. The whole group analyzes problems and suggests solutions. 3. This may be the only way to get a majority opinion in a large group.
52
4. Buzz groups stimulate the thinking of each individual and give more people the opportunity to lead and/or record the group’s ideas.
Disadvantages of buzz groups
1. It is sometimes hard to divide a large group. 2. Some groups may start “chatting,” not addressing the discussion question. 3. Some groups may not understand the assignment/question. 4. Allow sufficient time for large group feedback following the buzz group discussion.
ROLE-PLAYING Role-playing is "acting out" of a situation or incident. It's used to center group discussion around some concrete experience. Writing a role-playing case 1. Pick a problem that can have a number of equally good solutions. If there is a specific
answer, the case will not elicit much discussion. 2. Build into each case several -- but not too many -- points for discussion. Some can relate to
procedure and others to the content of what is said and agreed to. 3. Make the case both realistic and representative of what might occur in an actual bargaining
unit. Something that occurs only once in a blue moon is not worth spending time on. 4. When using a number of the cases, all of them taken together should give you a good
cross-section of problems faced. 5. Build into the case some human interest elements to make the case lively as well as
informative. 6. Depending on the complexity you want to have, and the time you want to spend, you may
wish to have several stages of role-playing. For example, 7. Incorporate enough detail so that the players do not have to make up too much, but not so
much detail that they will have trouble grasping all the details.
53
How to set up the role-play
1. The physical arrangements. The members of the group should be seated informally around a cleared part of the room. Everybody should be able to hear and see what is going on. Everybody should be able to participate.
2. Defining the problem situation. Ready made role-playing situations present
carefully planned case problems. Or you can make up your own or have the group suggest situations they have to face.
3. Setting the scene. Be sure everyone understands who the actors are supposed to be
and where the action is supposed to take place.
4. Defining the roles and choosing the actors. Ask for volunteers to play these roles. For the first time try to choose people who aren't shy and won't be embarrassed to act the part. Sometimes, it may be appropriate to instruct one or more characters out of hearing of the others.
5. What the observers do. Those not taking roles, act as observers. They watch closely
what the actors say and do. You may want to provide a form so they can write down what goes on during the scene, and their comments on how the actors handle the situation.
6. Role-playing begins. When you have outlined the situation, selected the actors and given them a chance to think over their parts for a minute or two, action begins. Avoid discussing the situation too much before role-playing begins. Discussion comes later.
Usually role-playing scenes run five or ten minutes -- never much more. Be sure to break in and stop the scene after the main points have been made or the actors begin repeating themselves.
Follow-up after the role-play Reactions of actors: Get the reactions of the actors - how they felt in their roles, what they thought of the arguments of the other actors. Reactions of observers: Then, throw discussion open to the group (observers). Some of the main points to cover are:
1. Good and bad arguments the actors used. 2. Good and bad approaches or strategies used. 3. Mistakes or omissions. 4. Suggestions for other lines of action or other arguments. 5. Ask the group "How else might this have been handled?"
54

NOTE: In discussing the good and bad points of the role-playing, use the role - names of the actors. Keep personalities out of the problems. Don't let the actors become personally involved.
Variations on role-playing
1. Have the group make up their own cases, scenes, actors. (New problems may grow out of discussion of cases already acted out. These can be handled through role-playing, too.)
2. Have actors reverse roles 3. Have two complete casts play the same situation (some of the observers probably think they could do better - this gives them a chance to try).
4. Have a recording device handy. Record the scene, refer to the recording to clear up any confusion that may come up during discussion. 5. Include everyone in the audience in the role-play by having many simultaneous
role-plays. Then follow-up with discussion about effective strategies, the outcomes, how the actors felt, and so forth.
Advantages of role-playing Role-playing is especially productive in a small group. It's one way for everybody to explore problems together. Through role-playing the group can:
- Test ideas and plans of action in practice situations; - See how it feels to do something face-to-face (in a discussion you just talk about it); - Discuss the problems revealed by the "act"; analyze how it might have been done better; - Have fun (people learn best when they can relax and enjoy themselves).
Disadvantages of role-playing 1. Some people are very self-conscious when “acting.” 2. If the role does not have enough flexibility, the outcome may be oversimplified. 3. The role-play may seem artificial or forced.
55

CASE STUDIES The advantage of the case method is that it requires a class to consider a problem, much as they would have to do in real life, and to use both facts and judgment in solving the problem. It also gives the class a common basis for discussion. Characteristics of a good case study
I. It is specific as to detail, yet can be handled in several different ways.
2. It is interesting and realistic; anyone could recognize this as a familiar situation. 3. It forces the class to take facts into account and exercise judgment in handling the problem.
4. It forces the class to talk about a common problem and guarantees that they will have the
same set of facts and conditions in mind. 5. It requires the class members to put themselves in the player’s shoes and consider the case
as if it were happening to them. BIBLIOGRAPHY Adapted from S. Fanny Simon, Teaching Methods and Techniques in Labor Education Adapted from "Teaching Practices and Techniques," International Association of Machinists (IAM), Education Department, Placid Harbor, Maryland
56

Training documentation (sample)
Sign-in Roster
Title of class Name of trainer(s) Date Location Start time End Time Company Name (please print) Department Signature Signature of trainer
57

58

Cer
tific
ate
of C
ompl
etio
nAw
arde
d to
(Em
ploy
ee n
ame)
, (N
ame
of )
CO
RPO
RA
TIO
N
(Nam
e), I
nst
ruct
or
(dat
e)
Pre
sent
ed b
y
Tit
le o
f Com
pany
, Dep
artm
ent,
Uni
t
(Titl
e of
) W
orks
hop

60

5

Case Studies Scenario One of your duties at your Tool and Die Manufacturing Shop is as the Safety Trainer. Business is good. There are a lot of jobs scheduled to be done so production is a top concern right now. The company employees 40 people. CASE 1 You have been given 20 minutes for the next staff meeting (it’s two weeks away) to do Hazard Communication Training for all 40 employees. There are no records that HAZCOM has ever been done for everyone. CASE 2 Your boss comes to you and asks you to develop a training plan which will identify ways that the company’s Worker’s Compensation costs can be reduced by 25%. The company is currently penalty rated by 20% and the boss wants to try to get into a group rating program. CASE 3 There was an accident in the warehouse involving the collapse of some storage shelves. Equipment and parts were damaged but there were no injuries. The accident investigation did not turn up any witnesses. Your boss asks you to develop a training plan to reduce the likelihood that it will happen again. CASE 4 A machine operator suggests that guarding is not adequate on all the equipment. You need to train the safety committee to recognize machine guarding issues so they can evaluate conditions in the plant and make appropriate recommendations to the engineering department.
61

62

6
Presentation Skills
Professional Do’s Professional Don’ts
63

Hints for Excellent Presentations 1. Prior to training, make an on-site visit to get acquainted with your audience. 2. On the day of training, get there early and set-up the room 20-30 minutes before class,
adjusting the setting as needed. 3. Meet/greet participants as they show up, chat with them, put them at ease. 4. Adjust to the facility. Don’t criticize the facility, equipment, or size of room in front of
the participants. 5. Mix and mingle during breaks, during small-group discussions and lunch (to establish
rapport, show you care about the participants and their problems, answer individual questions).
6. During your informal discussions with participants, listen for examples and problems you can mention in subsequent sessions.
7. Modify exercises to fit students (change case study example or add more hands-on activities etc.) Adapted from an article by Broardwell & Broardwell “Reaching for Rapport” in
Training, September 1987, pages1-4. Other hints:
• Don’t apologize to the audience for lack of equipment, poor visuals, or your lack of planning. Apologies give the impression that you have not prepared or communicated adequately. Be resourceful and adapt as necessary.
• Create a positive learning environment by listening carefully to participants’ questions and concerns, responding respectfully, and acknowledging their viewpoints, continually encouraging them to be agents of positive change in their workplace.
• Ask a colleague to observe your instruction and give constructive feedback in order to improve your presentation skills and audience interactions.
64
Etiquette Among Multiple Instructors The goal is to present complete and cohesive instruction to the audience when using several instructors, so that they complement each other, providing support for each other. Here are some suggestions for presenting with multiple instructors: 1. Plan the presentation together
∗ Agree on the start/end time of the entire presentation, as well as each individual presenter’s section. Plan who does what.
∗ Plan the segue (hand-off) between each presenter’s section to make sure the audience knows how your content “fits” together.
∗ Watch for holes and overlaps in the content, duplication of stories, examples and jokes, so the whole presentation runs smoothly.
2. Remain in the room while the other instructor presents, sit quietly in the back of the room, don’t side-talk with others in the room, don’t fidget or rustle papers, and don’t fall asleep!
3. When you are not presenting, listen for any errors that your co-instructor makes, then gently point them out during the next break so that the co-instructor can correct herself/himself at the beginning of the next section.
4. Don’t interrupt the instructor who is presenting unless the two of you have agreed ahead of time that this is OK.
5. Don’t argue with the other instructor in front of the audience. If there is a disagreement, present it to the audience as a difference in philosophy, but be careful not to convey hostility.
65

Dealing with a student’s negative feedback
• Clarify the negative feedback, if needed.
• Express your appreciation for the negative feedback, explaining your goal of continuous
improvement.
• Support individual differences -- different people believe different things and that’s OK.
• Assure the participant that his/her ideas will be considered, if they will be. Take a minute to
write down the idea. If appropriate, ask for the participant’s name/phone number to credit
him/her with the idea or contact later for elaboration on the idea.
• Explain why his/her ideas are not possible, if they are not. Possible reasons include:
• lack of resources, such as time, money, space, staff, materials, equipment,
• philosophical differences, and/or
• policy or procedural conflicts.
• Ask for comments/reactions from others in the audience to the participant’s ideas, if you
want to pursue the idea.
66

7

Listening Skills Objective Non-verbal communication Listening skills Materials Chairs Timing 15 minutes Procedure 1. Form participants into pairs (A and B) and ask them to get their chairs more or less facing
each other. Explain that the A’s are going to be speakers and the B’s listeners. 2. Explain that the A’s are to speak for two minutes about their favorite hobby, food, or travel
location. B’s are to do anything but listen. The only restriction on B’s is that they cannot leave the room.
3. Time the two minutes, giving a start signal and a stop signal. 4. Conduct a discussion on:
• what the listeners were doing to show they were not listening, • how the speakers knew they were not being listened to, • how they felt about the exercise, • tips on listening skills.
67
Team-building Objective Team-building exercise Materials Tables and chairs Puzzles (50-pieces or so, all of the same theme), except that one key piece (not an outside frame piece) is missing and each puzzle has one odd piece. Mix up the key pieces so each puzzle team has the key piece for another team. Timing 15 minutes Procedure 1. Place one puzzle at each table of 4-6 participants 2. Explain that they each table is to complete its puzzle as quickly as possible. Do not explain
that a key piece is missing. 3. Watch while they find that the key piece is missing and that another table has it. Discuss the concept of teams working together can accomplish more than teams working separately. Helping each other creates a positive work environment.
68

Introductions Objective Group introductions Materials Pen/pencil and paper Timing 20 minutes for 12 people Procedure 1. Ask participants to work in pairs, finding someone in the room whom they do not already
know. They are to get acquainted, then introduce the other person to the larger group. 2. Each one has 4 minutes to interview the other about his/her interests, job, etc. They may take
notes on each other, if they want to. 3. In the large group, ask each pair to introduce the new acquaintance to the group. Variations 1. Give participants some specific questions to answer, based on the topic of the training,
course expectations, knowledge of the topic, skills, experience and so on. 2. Ask the participants to discuss the results of an exercise or case study or video in pairs,
reporting back to the larger group.
69
Breaking into Groups Objective Various ways to break a large group into small discussion or buzz groups Materials Deck of cards Timing 1-2 minutes Procedure 1. Remove as many cards from the deck of playing cards to have as many cards as there are
participants. Plan how participants you want in the smaller groups. 2. Ask each person to draw a card from the remaining deck of cards. 3. Ask the subsets of cardholders to find each other to form a smaller group, such as:
• those holding the same number (5’s, Jacks, 10’s, Aces, etc.) • those holding the same number cluster (2-3-4’s together, face cards together, etc.) • those holding the same suit (Diamonds, Clubs, Spades, & Hearts) • those holding the same color cards (red, black)
4. To add a few extra or balance groups, declare certain numbers or categories as “wild” cards. 5. Shuffle the deck and re-draw for the next time you want to break up into groups.
70