Embed Size (px)
Citation preview

TR4500 series
Online Manual
English

ContentsUsing Online Manual. . . . . . . . . . . . . . . . . . . . . . . . . . . . . . . . . . . . . . . . . . . . . . 11
Symbols Used in This Document. . . . . . . . . . . . . . . . . . . . . . . . . . . . . . . . . . . . . . . . . . . . 12
Touch-enabled Device Users (Windows). . . . . . . . . . . . . . . . . . . . . . . . . . . . . . . . . . . . . . 13
Trademarks and Licenses. . . . . . . . . . . . . . . . . . . . . . . . . . . . . . . . . . . . . . . . . . . . . . . . . 14
Basic Operation. . . . . . . . . . . . . . . . . . . . . . . . . . . . . . . . . . . . . . . . . . . . . . . . . . 28
Printing Photos from a Computer. . . . . . . . . . . . . . . . . . . . . . . . . . . . . . . . . . . . . . . . . . . . 29
Printing Photos from a Smartphone/Tablet. . . . . . . . . . . . . . . . . . . . . . . . . . . . . . . . . . . . . 35
Copying. . . . . . . . . . . . . . . . . . . . . . . . . . . . . . . . . . . . . . . . . . . . . . . . . . . . . . . . . . . . . . . . 39
Faxing. . . . . . . . . . . . . . . . . . . . . . . . . . . . . . . . . . . . . . . . . . . . . . . . . . . . . . . . . . . . . . . . . 44
Network. . . . . . . . . . . . . . . . . . . . . . . . . . . . . . . . . . . . . . . . . . . . . . . . . . . . . . . . 46
Restrictions. . . . . . . . . . . . . . . . . . . . . . . . . . . . . . . . . . . . . . . . . . . . . . . . . . . . . . . . . . . . . 48
Network Connection Tips. . . . . . . . . . . . . . . . . . . . . . . . . . . . . . . . . . . . . . . . . . . . . . . . . . 50
Default Network Settings. . . . . . . . . . . . . . . . . . . . . . . . . . . . . . . . . . . . . . . . . . . . . . . . . . . . . . . . . . . . . 51
Detect Same Printer Name. . . . . . . . . . . . . . . . . . . . . . . . . . . . . . . . . . . . . . . . . . . . . . . . . . . . . . . . . . . 53
Connects to Another Computer via LAN/Changes from USB to LAN Connection. . . . . . . . . . . . . . . . . . 54
Printing Network Settings. . . . . . . . . . . . . . . . . . . . . . . . . . . . . . . . . . . . . . . . . . . . . . . . . . . . . . . . . . . . . 55
Reconfiguration Method of Wi-Fi Connection. . . . . . . . . . . . . . . . . . . . . . . . . . . . . . . . . . . . . . . . . . . . . 59
IJ Network Device Setup Utility (Windows). . . . . . . . . . . . . . . . . . . . . . . . . . . . . . . . . . . . . 60
IJ Network Device Setup Utility. . . . . . . . . . . . . . . . . . . . . . . . . . . . . . . . . . . . . . . . . . . . . . . . . . . . . . . . 61
Starting Up IJ Network Device Setup Utility. . . . . . . . . . . . . . . . . . . . . . . . . . . . . . . . . . . . . . . . . . . . . . . 62
Diagnosing and Repairing Network Settings. . . . . . . . . . . . . . . . . . . . . . . . . . . . . . . . . . . . . . . . . . . . . . 63
Performing/Changing Network Settings. . . . . . . . . . . . . . . . . . . . . . . . . . . . . . . . . . . . . . . . . . . . . . . . . . 64
Canon IJ Network Device Setup Utility Screen. . . . . . . . . . . . . . . . . . . . . . . . . . . . . . . . . . . . . . . . 65
Performing Network Settings. . . . . . . . . . . . . . . . . . . . . . . . . . . . . . . . . . . . . . . . . . . . . . . . . . . . . . 69
Performing/Changing Wired LAN Connection (Ethernet Cable) Settings. . . . . . . . . . . . . . . . 70
Performing/Changing Wi-Fi Settings. . . . . . . . . . . . . . . . . . . . . . . . . . . . . . . . . . . . . . . . . . . . 73
Assigning Printer Information. . . . . . . . . . . . . . . . . . . . . . . . . . . . . . . . . . . . . . . . . . . . . . . . . . 78
List of Models Which Does Not Support Diagnosis and Repair Function. . . . . . . . . . . . . . . . . . . . . . . . 79
Handling Paper, Originals, FINE Cartridges, etc.. . . . . . . . . . . . . . . . . . . . . . . . 80
Loading Paper. . . . . . . . . . . . . . . . . . . . . . . . . . . . . . . . . . . . . . . . . . . . . . . . . . . . . . . . . . 81

Loading Plain Paper. . . . . . . . . . . . . . . . . . . . . . . . . . . . . . . . . . . . . . . . . . . . . . . . . . . . . . . . . . . . . . . . . 82
Loading Photo Paper. . . . . . . . . . . . . . . . . . . . . . . . . . . . . . . . . . . . . . . . . . . . . . . . . . . . . . . . . . . . . . . . 87
Loading Envelopes. . . . . . . . . . . . . . . . . . . . . . . . . . . . . . . . . . . . . . . . . . . . . . . . . . . . . . . . . . . . . . . . . 93
Loading Originals. . . . . . . . . . . . . . . . . . . . . . . . . . . . . . . . . . . . . . . . . . . . . . . . . . . . . . . . 98
Where to Load Originals. . . . . . . . . . . . . . . . . . . . . . . . . . . . . . . . . . . . . . . . . . . . . . . . . . . . . . . . . . . . . 99
Loading Originals on Platen. . . . . . . . . . . . . . . . . . . . . . . . . . . . . . . . . . . . . . . . . . . . . . . . . . . . . . . . . . 100
Loading Documents in the ADF (Auto Document Feeder). . . . . . . . . . . . . . . . . . . . . . . . . . . . . . . . . . 102
Loading Based on Use. . . . . . . . . . . . . . . . . . . . . . . . . . . . . . . . . . . . . . . . . . . . . . . . . . . . . . . . . . . . . . 104
Supported Originals. . . . . . . . . . . . . . . . . . . . . . . . . . . . . . . . . . . . . . . . . . . . . . . . . . . . . . . . . . . . . . . . 107
Replacing a FINE Cartridge. . . . . . . . . . . . . . . . . . . . . . . . . . . . . . . . . . . . . . . . . . . . . . . 109
Replacing a FINE Cartridge. . . . . . . . . . . . . . . . . . . . . . . . . . . . . . . . . . . . . . . . . . . . . . . . . . . . . . . . . . 110
Checking Ink Status on the LCD. . . . . . . . . . . . . . . . . . . . . . . . . . . . . . . . . . . . . . . . . . . . . . . . . . . . . . 116
Ink Tips. . . . . . . . . . . . . . . . . . . . . . . . . . . . . . . . . . . . . . . . . . . . . . . . . . . . . . . . . . . . . . . . . . . . . . . . . 117
If Printing Is Faint or Uneven. . . . . . . . . . . . . . . . . . . . . . . . . . . . . . . . . . . . . . . . . . . . . . 118
Maintenance Procedure. . . . . . . . . . . . . . . . . . . . . . . . . . . . . . . . . . . . . . . . . . . . . . . . . . . . . . . . . . . . . 119
Printing the Nozzle Check Pattern. . . . . . . . . . . . . . . . . . . . . . . . . . . . . . . . . . . . . . . . . . . . . . . . . . . . . 122
Examining the Nozzle Check Pattern. . . . . . . . . . . . . . . . . . . . . . . . . . . . . . . . . . . . . . . . . . . . . . . . . . 123
Cleaning the Print Head. . . . . . . . . . . . . . . . . . . . . . . . . . . . . . . . . . . . . . . . . . . . . . . . . . . . . . . . . . . . . 124
Deep Print Head Cleaning. . . . . . . . . . . . . . . . . . . . . . . . . . . . . . . . . . . . . . . . . . . . . . . . . . . . . . . . . . . 125
Aligning the Print Head. . . . . . . . . . . . . . . . . . . . . . . . . . . . . . . . . . . . . . . . . . . . . . . . . . . . . . . . . . . . . 126
Cleaning. . . . . . . . . . . . . . . . . . . . . . . . . . . . . . . . . . . . . . . . . . . . . . . . . . . . . . . . . . . . . . 129
Cleaning Paper Feed Rollers. . . . . . . . . . . . . . . . . . . . . . . . . . . . . . . . . . . . . . . . . . . . . . . . . . . . . . . . . 130
Cleaning Inside the Printer (Bottom Plate Cleaning). . . . . . . . . . . . . . . . . . . . . . . . . . . . . . . . . . . . . . . 132
Overview. . . . . . . . . . . . . . . . . . . . . . . . . . . . . . . . . . . . . . . . . . . . . . . . . . . . . . 134
Safety. . . . . . . . . . . . . . . . . . . . . . . . . . . . . . . . . . . . . . . . . . . . . . . . . . . . . . . . . . . . . . . . 135
Safety Precautions. . . . . . . . . . . . . . . . . . . . . . . . . . . . . . . . . . . . . . . . . . . . . . . . . . . . . . . . . . . . . . . . . 136
Regulatory Information. . . . . . . . . . . . . . . . . . . . . . . . . . . . . . . . . . . . . . . . . . . . . . . . . . . . . . . . . . . . . . 139
WEEE (EU&EEA). . . . . . . . . . . . . . . . . . . . . . . . . . . . . . . . . . . . . . . . . . . . . . . . . . . . . . . . . . . . . . . . . 142
Handling Precautions. . . . . . . . . . . . . . . . . . . . . . . . . . . . . . . . . . . . . . . . . . . . . . . . . . . . 153
Legal Restrictions on Scanning/Copying. . . . . . . . . . . . . . . . . . . . . . . . . . . . . . . . . . . . . . . . . . . . . . . . 154
Transporting Your Printer. . . . . . . . . . . . . . . . . . . . . . . . . . . . . . . . . . . . . . . . . . . . . . . . . . . . . . . . . . . . 155
When Repairing, Lending, or Disposing of the Printer. . . . . . . . . . . . . . . . . . . . . . . . . . . . . . . . . . . . . . 157
Keeping Print Quality High. . . . . . . . . . . . . . . . . . . . . . . . . . . . . . . . . . . . . . . . . . . . . . . . . . . . . . . . . . . 158
Main Components and Their Use. . . . . . . . . . . . . . . . . . . . . . . . . . . . . . . . . . . . . . . . . . . 159

Main Components. . . . . . . . . . . . . . . . . . . . . . . . . . . . . . . . . . . . . . . . . . . . . . . . . . . . . . . . . . . . . . . . . 160
Front View. . . . . . . . . . . . . . . . . . . . . . . . . . . . . . . . . . . . . . . . . . . . . . . . . . . . . . . . . . . . . . . . . . . 161
Rear View. . . . . . . . . . . . . . . . . . . . . . . . . . . . . . . . . . . . . . . . . . . . . . . . . . . . . . . . . . . . . . . . . . . 163
Inside View. . . . . . . . . . . . . . . . . . . . . . . . . . . . . . . . . . . . . . . . . . . . . . . . . . . . . . . . . . . . . . . . . . 164
Operation Panel. . . . . . . . . . . . . . . . . . . . . . . . . . . . . . . . . . . . . . . . . . . . . . . . . . . . . . . . . . . . . . . 165
Power Supply. . . . . . . . . . . . . . . . . . . . . . . . . . . . . . . . . . . . . . . . . . . . . . . . . . . . . . . . . . . . . . . . . . . . . 167
Checking that Power Is On. . . . . . . . . . . . . . . . . . . . . . . . . . . . . . . . . . . . . . . . . . . . . . . . . . . . . . 168
Turning the Printer On and Off. . . . . . . . . . . . . . . . . . . . . . . . . . . . . . . . . . . . . . . . . . . . . . . . . . . 169
Checking the Power Plug/Power Cord. . . . . . . . . . . . . . . . . . . . . . . . . . . . . . . . . . . . . . . . . . . . . 171
Unplugging the Printer. . . . . . . . . . . . . . . . . . . . . . . . . . . . . . . . . . . . . . . . . . . . . . . . . . . . . . . . . . 172
LCD and Operation Panel. . . . . . . . . . . . . . . . . . . . . . . . . . . . . . . . . . . . . . . . . . . . . . . . . . . . . . . . . . . 173
Entering Numbers, Letters, and Symbols. . . . . . . . . . . . . . . . . . . . . . . . . . . . . . . . . . . . . . . . . . . . . . . 175
Changing Settings. . . . . . . . . . . . . . . . . . . . . . . . . . . . . . . . . . . . . . . . . . . . . . . . . . . . . . 178
Changing Printer Settings from Your Computer (Windows). . . . . . . . . . . . . . . . . . . . . . . . . . . . . . . . . 179
Changing the Print Options. . . . . . . . . . . . . . . . . . . . . . . . . . . . . . . . . . . . . . . . . . . . . . . . . . . . . . 180
Registering a Frequently Used Printing Profile. . . . . . . . . . . . . . . . . . . . . . . . . . . . . . . . . . . . . . . 181
Setting the FINE Cartridge to be Used. . . . . . . . . . . . . . . . . . . . . . . . . . . . . . . . . . . . . . . . . . . . . 183
Managing the Printer Power. . . . . . . . . . . . . . . . . . . . . . . . . . . . . . . . . . . . . . . . . . . . . . . . . . . . . 184
Changing the Printer Operation Mode. . . . . . . . . . . . . . . . . . . . . . . . . . . . . . . . . . . . . . . . . . . . . . 186
Changing Settings from Operation Panel. . . . . . . . . . . . . . . . . . . . . . . . . . . . . . . . . . . . . . . . . . . . . . . 188
Changing Settings from Operation Panel. . . . . . . . . . . . . . . . . . . . . . . . . . . . . . . . . . . . . . . . . . . 189
Setting Items on Operation Panel. . . . . . . . . . . . . . . . . . . . . . . . . . . . . . . . . . . . . . . . . . . . . . . . . 190
FAX settings. . . . . . . . . . . . . . . . . . . . . . . . . . . . . . . . . . . . . . . . . . . . . . . . . . . . . . . . . . . . . . . . . 191
Print settings. . . . . . . . . . . . . . . . . . . . . . . . . . . . . . . . . . . . . . . . . . . . . . . . . . . . . . . . . . . . . . . . . 196
LAN settings. . . . . . . . . . . . . . . . . . . . . . . . . . . . . . . . . . . . . . . . . . . . . . . . . . . . . . . . . . . . . . . . . 197
Other dev. settings. . . . . . . . . . . . . . . . . . . . . . . . . . . . . . . . . . . . . . . . . . . . . . . . . . . . . . . . . . . . . 200
Language selection. . . . . . . . . . . . . . . . . . . . . . . . . . . . . . . . . . . . . . . . . . . . . . . . . . . . . . . . . . . . 202
Firmware update. . . . . . . . . . . . . . . . . . . . . . . . . . . . . . . . . . . . . . . . . . . . . . . . . . . . . . . . . . . . . . 203
Reset setting. . . . . . . . . . . . . . . . . . . . . . . . . . . . . . . . . . . . . . . . . . . . . . . . . . . . . . . . . . . . . . . . . 204
Feed settings. . . . . . . . . . . . . . . . . . . . . . . . . . . . . . . . . . . . . . . . . . . . . . . . . . . . . . . . . . . . . . . . . 206
Web service setup. . . . . . . . . . . . . . . . . . . . . . . . . . . . . . . . . . . . . . . . . . . . . . . . . . . . . . . . . . . . . 207
ECO settings. . . . . . . . . . . . . . . . . . . . . . . . . . . . . . . . . . . . . . . . . . . . . . . . . . . . . . . . . . . . . . . . . 208
Quiet setting. . . . . . . . . . . . . . . . . . . . . . . . . . . . . . . . . . . . . . . . . . . . . . . . . . . . . . . . . . . . . . . . . . 210
System information. . . . . . . . . . . . . . . . . . . . . . . . . . . . . . . . . . . . . . . . . . . . . . . . . . . . . . . . . . . . 211
Specifications. . . . . . . . . . . . . . . . . . . . . . . . . . . . . . . . . . . . . . . . . . . . . . . . . . . . . . . . . . 212
Information about Paper. . . . . . . . . . . . . . . . . . . . . . . . . . . . . . . . . . . . . . . . . . 217
Supported Media Types. . . . . . . . . . . . . . . . . . . . . . . . . . . . . . . . . . . . . . . . . . . . . . . . . . 218
Paper Load Limit. . . . . . . . . . . . . . . . . . . . . . . . . . . . . . . . . . . . . . . . . . . . . . . . . . . . . . . . . . . . . . . . . . 220
Unsupported Media Types. . . . . . . . . . . . . . . . . . . . . . . . . . . . . . . . . . . . . . . . . . . . . . . . 222
Handling Paper. . . . . . . . . . . . . . . . . . . . . . . . . . . . . . . . . . . . . . . . . . . . . . . . . . . . . . . . . 223
Printing. . . . . . . . . . . . . . . . . . . . . . . . . . . . . . . . . . . . . . . . . . . . . . . . . . . . . . . 224
Printing from Computer. . . . . . . . . . . . . . . . . . . . . . . . . . . . . . . . . . . . . . . . . . . . . . . . . . . 225
Printing from Application Software (Windows Printer Driver). . . . . . . . . . . . . . . . . . . . . . . . . . . . . . . . . 226
Basic Printing Setup. . . . . . . . . . . . . . . . . . . . . . . . . . . . . . . . . . . . . . . . . . . . . . . . . . . . . . . . . . . 227
Paper Settings on the Printer Driver and the Printer (Media Type). . . . . . . . . . . . . . . . . . . . 230
Paper Settings on the Printer Driver and the Printer (Paper Size). . . . . . . . . . . . . . . . . . . . 232
Various Printing Methods. . . . . . . . . . . . . . . . . . . . . . . . . . . . . . . . . . . . . . . . . . . . . . . . . . . . . . . . 233
Setting a Page Size and Orientation. . . . . . . . . . . . . . . . . . . . . . . . . . . . . . . . . . . . . . . . . . . 234
Setting the Number of Copies and Printing Order. . . . . . . . . . . . . . . . . . . . . . . . . . . . . . . . . 235
Execute Borderless Printing. . . . . . . . . . . . . . . . . . . . . . . . . . . . . . . . . . . . . . . . . . . . . . . . . 237
Scaled Printing. . . . . . . . . . . . . . . . . . . . . . . . . . . . . . . . . . . . . . . . . . . . . . . . . . . . . . . . . . . . 240
Page Layout Printing. . . . . . . . . . . . . . . . . . . . . . . . . . . . . . . . . . . . . . . . . . . . . . . . . . . . . . . 243
Tiling/Poster Printing. . . . . . . . . . . . . . . . . . . . . . . . . . . . . . . . . . . . . . . . . . . . . . . . . . . . . . . 245
Duplex Printing. . . . . . . . . . . . . . . . . . . . . . . . . . . . . . . . . . . . . . . . . . . . . . . . . . . . . . . . . . . 248
Setting Up Envelope Printing. . . . . . . . . . . . . . . . . . . . . . . . . . . . . . . . . . . . . . . . . . . . . . . . . 252
Printing on Postcards. . . . . . . . . . . . . . . . . . . . . . . . . . . . . . . . . . . . . . . . . . . . . . . . . . . . . . . 254
Overview of the Printer Driver. . . . . . . . . . . . . . . . . . . . . . . . . . . . . . . . . . . . . . . . . . . . . . . . . . . . 256
Canon IJ Printer Driver. . . . . . . . . . . . . . . . . . . . . . . . . . . . . . . . . . . . . . . . . . . . . . . . . . . . . 257
Opening Printer Driver's Setup Screen. . . . . . . . . . . . . . . . . . . . . . . . . . . . . . . . . . . . . 258
Canon IJ Status Monitor. . . . . . . . . . . . . . . . . . . . . . . . . . . . . . . . . . . . . . . . . . . . . . . . . . . . 259
Checking Ink Status from Your Computer. . . . . . . . . . . . . . . . . . . . . . . . . . . . . . . . . . . 261
Instructions for Use (Printer Driver). . . . . . . . . . . . . . . . . . . . . . . . . . . . . . . . . . . . . . . . . . . . 262
Printer Driver Description. . . . . . . . . . . . . . . . . . . . . . . . . . . . . . . . . . . . . . . . . . . . . . . . . . . . . . . . 264
Quick Setup Tab Description. . . . . . . . . . . . . . . . . . . . . . . . . . . . . . . . . . . . . . . . . . . . . . . . . 265
Main Tab Description. . . . . . . . . . . . . . . . . . . . . . . . . . . . . . . . . . . . . . . . . . . . . . . . . . . . . . . 272
Page Setup Tab Description. . . . . . . . . . . . . . . . . . . . . . . . . . . . . . . . . . . . . . . . . . . . . . . . . 277
Maintenance Tab Description. . . . . . . . . . . . . . . . . . . . . . . . . . . . . . . . . . . . . . . . . . . . . . . . 289
Canon IJ Status Monitor Description. . . . . . . . . . . . . . . . . . . . . . . . . . . . . . . . . . . . . . . . . . . 291

Installing the MP Drivers. . . . . . . . . . . . . . . . . . . . . . . . . . . . . . . . . . . . . . . . . . . . . . . . . . . . 294
Printing Using Canon Application Software. . . . . . . . . . . . . . . . . . . . . . . . . . . . . . . . . . . . . . . . . . . . . . 295
Printing Using a Web Service. . . . . . . . . . . . . . . . . . . . . . . . . . . . . . . . . . . . . . . . . . . . . . . . . . . . . . . . 296
Printing from Smartphone/Tablet. . . . . . . . . . . . . . . . . . . . . . . . . . . . . . . . . . . . . . . . . . . 297
Printing/Scanning with Wireless Direct. . . . . . . . . . . . . . . . . . . . . . . . . . . . . . . . . . . . . . . . . . . . . . . . . 298
Paper Settings. . . . . . . . . . . . . . . . . . . . . . . . . . . . . . . . . . . . . . . . . . . . . . . . . . . . . . . . . 302
Copying. . . . . . . . . . . . . . . . . . . . . . . . . . . . . . . . . . . . . . . . . . . . . . . . . . . . . . . 305
Making Copies. . . . . . . . . . . . . . . . . . . . . . . . . . . . . . . . . . . . . . . . . . . . . . . . . . . . . . . . . 306
Setting Items for Copying. . . . . . . . . . . . . . . . . . . . . . . . . . . . . . . . . . . . . . . . . . . . . . . . . . . . . . . . . . . . 308
Scanning. . . . . . . . . . . . . . . . . . . . . . . . . . . . . . . . . . . . . . . . . . . . . . . . . . . . . . 311
Scanning from Computer (Windows). . . . . . . . . . . . . . . . . . . . . . . . . . . . . . . . . . . . . . . . 312
Scanning According to Item Type or Purpose (IJ Scan Utility). . . . . . . . . . . . . . . . . . . . . . . . . . . . . . . 313
IJ Scan Utility Features. . . . . . . . . . . . . . . . . . . . . . . . . . . . . . . . . . . . . . . . . . . . . . . . . . . . . . . . . 314
Scanning Easily (Auto Scan). . . . . . . . . . . . . . . . . . . . . . . . . . . . . . . . . . . . . . . . . . . . . . . . . . . . . 316
Scanning Documents and Photos. . . . . . . . . . . . . . . . . . . . . . . . . . . . . . . . . . . . . . . . . . . . . . . . . 317
Creating/Editing PDF Files. . . . . . . . . . . . . . . . . . . . . . . . . . . . . . . . . . . . . . . . . . . . . . . . . . . . . . 318
Scanning Using Application Software (ScanGear). . . . . . . . . . . . . . . . . . . . . . . . . . . . . . . . . . . . . . . . 321
What Is ScanGear (Scanner Driver)?. . . . . . . . . . . . . . . . . . . . . . . . . . . . . . . . . . . . . . . . . . . . . . 322
Starting ScanGear (Scanner Driver). . . . . . . . . . . . . . . . . . . . . . . . . . . . . . . . . . . . . . . . . . . . . . . 324
Scanning in Basic Mode. . . . . . . . . . . . . . . . . . . . . . . . . . . . . . . . . . . . . . . . . . . . . . . . . . . . . . . . 325
ScanGear (Scanner Driver) Screens. . . . . . . . . . . . . . . . . . . . . . . . . . . . . . . . . . . . . . . . . . . . . . . 328
Basic Mode Tab. . . . . . . . . . . . . . . . . . . . . . . . . . . . . . . . . . . . . . . . . . . . . . . . . . . . . . . . . . . 329
Advanced Mode Tab. . . . . . . . . . . . . . . . . . . . . . . . . . . . . . . . . . . . . . . . . . . . . . . . . . . . . . . 337
General Notes (Scanner Driver). . . . . . . . . . . . . . . . . . . . . . . . . . . . . . . . . . . . . . . . . . . . . . . . . . 343
Scanning Tips. . . . . . . . . . . . . . . . . . . . . . . . . . . . . . . . . . . . . . . . . . . . . . . . . . . . . . . . . . . . . . . . . . . . 345
Positioning Originals (Scanning from Computer). . . . . . . . . . . . . . . . . . . . . . . . . . . . . . . . . . . . . . 346
Network Scan Settings. . . . . . . . . . . . . . . . . . . . . . . . . . . . . . . . . . . . . . . . . . . . . . . . . . . . . . . . . 349
Scanning Using Smartphone/Tablet. . . . . . . . . . . . . . . . . . . . . . . . . . . . . . . . . . . . . . . . . 353
Faxing. . . . . . . . . . . . . . . . . . . . . . . . . . . . . . . . . . . . . . . . . . . . . . . . . . . . . . . . 354
Preparing for Faxing. . . . . . . . . . . . . . . . . . . . . . . . . . . . . . . . . . . . . . . . . . . . . . . . . . . . . 355
Connecting Telephone Line. . . . . . . . . . . . . . . . . . . . . . . . . . . . . . . . . . . . . . . . . . . . . . . . . . . . . . . . . . 356
Setting Telephone Line Type. . . . . . . . . . . . . . . . . . . . . . . . . . . . . . . . . . . . . . . . . . . . . . . . . . . . . . . . . 360

Setting Receive Mode. . . . . . . . . . . . . . . . . . . . . . . . . . . . . . . . . . . . . . . . . . . . . . . . . . . . . . . . . . . . . . 362
Setting Sender Information. . . . . . . . . . . . . . . . . . . . . . . . . . . . . . . . . . . . . . . . . . . . . . . . . . . . . . . . . . 367
Registering Recipients. . . . . . . . . . . . . . . . . . . . . . . . . . . . . . . . . . . . . . . . . . . . . . . . . . . 372
Registering Recipients Using Operation Panel of Printer. . . . . . . . . . . . . . . . . . . . . . . . . . . . . . . . . . . 373
Registering Fax/Telephone Number of Recipients. . . . . . . . . . . . . . . . . . . . . . . . . . . . . . . . . . . . 374
Registering Recipients in Group Dial. . . . . . . . . . . . . . . . . . . . . . . . . . . . . . . . . . . . . . . . . . . . . . . 377
Changing Registered Information. . . . . . . . . . . . . . . . . . . . . . . . . . . . . . . . . . . . . . . . . . . . . . . . . 380
Deleting Registered Information. . . . . . . . . . . . . . . . . . . . . . . . . . . . . . . . . . . . . . . . . . . . . . . . . . 382
Printing List of Registered Destinations. . . . . . . . . . . . . . . . . . . . . . . . . . . . . . . . . . . . . . . . . . . . . 383
Registering Recipients Using Speed Dial Utility2 (Windows). . . . . . . . . . . . . . . . . . . . . . . . . . . . . . . . 384
Starting Up Speed Dial Utility2. . . . . . . . . . . . . . . . . . . . . . . . . . . . . . . . . . . . . . . . . . . . . . . . . . . 385
Speed Dial Utility2 Dialog box. . . . . . . . . . . . . . . . . . . . . . . . . . . . . . . . . . . . . . . . . . . . . . . . . . . . 386
Saving Registered Telephone Directory on Printer to Your Computer. . . . . . . . . . . . . . . . . . . . . 388
Registering a Fax/telephone Number Using Speed Dial Utility2. . . . . . . . . . . . . . . . . . . . . . . . . . 389
Changing a Fax/telephone Number Using Speed Dial Utility2. . . . . . . . . . . . . . . . . . . . . . . . . . . 391
Deleting a Fax/telephone Number Using Speed Dial Utility2. . . . . . . . . . . . . . . . . . . . . . . . . . . . 393
Changing Sender Information Using Speed Dial Utility2. . . . . . . . . . . . . . . . . . . . . . . . . . . . . . . . 394
Registering/Changing Rejected Number Using Speed Dial Utility2. . . . . . . . . . . . . . . . . . . . . . . . 395
Registering Telephone Directory Has been Saved on Your Computer to Printer. . . . . . . . . . . . . 396
Sending Faxes Using Operation Panel of Printer. . . . . . . . . . . . . . . . . . . . . . . . . . . . . . . 397
Sending Faxes by Entering Fax/Telephone Number. . . . . . . . . . . . . . . . . . . . . . . . . . . . . . . . . . . . . . . 398
Resending Faxes (Redialing Busy Number). . . . . . . . . . . . . . . . . . . . . . . . . . . . . . . . . . . . . . . . . . . . . 401
Setting Items for Sending Faxes. . . . . . . . . . . . . . . . . . . . . . . . . . . . . . . . . . . . . . . . . . . . . . . . . . . . . . 403
Sending Faxes from Computer (Windows). . . . . . . . . . . . . . . . . . . . . . . . . . . . . . . . . . . . 405
Sending a FAX (Fax Driver). . . . . . . . . . . . . . . . . . . . . . . . . . . . . . . . . . . . . . . . . . . . . . . . . . . . . . . . . . 406
Creating an Address Book (Fax Driver). . . . . . . . . . . . . . . . . . . . . . . . . . . . . . . . . . . . . . . . . . . . . . . . . 409
Edit or Remove a Recipient from an Address Book (Fax Driver). . . . . . . . . . . . . . . . . . . . . . . . . . . . . . 413
Search for a Recipient in an Address Book (Fax Driver). . . . . . . . . . . . . . . . . . . . . . . . . . . . . . . . . . . . 416
Cannot Send Faxes from Computer. . . . . . . . . . . . . . . . . . . . . . . . . . . . . . . . . . . . . . . . . . . . . . . . . . . 418
How to Open the Setting Screen of the Fax Driver. . . . . . . . . . . . . . . . . . . . . . . . . . . . . . . . . . . . . . . . 420
General Notes (Fax Driver). . . . . . . . . . . . . . . . . . . . . . . . . . . . . . . . . . . . . . . . . . . . . . . . . . . . . . . . . . 422
Receiving Faxes. . . . . . . . . . . . . . . . . . . . . . . . . . . . . . . . . . . . . . . . . . . . . . . . . . . . . . . . 423
Receiving Faxes. . . . . . . . . . . . . . . . . . . . . . . . . . . . . . . . . . . . . . . . . . . . . . . . . . . . . . . . . . . . . . . . . . 424
Changing Paper Settings. . . . . . . . . . . . . . . . . . . . . . . . . . . . . . . . . . . . . . . . . . . . . . . . . . . . . . . . . . . . 429
Memory Reception. . . . . . . . . . . . . . . . . . . . . . . . . . . . . . . . . . . . . . . . . . . . . . . . . . . . . . . . . . . . . . . . . 431
Other Useful Fax Functions. . . . . . . . . . . . . . . . . . . . . . . . . . . . . . . . . . . . . . . . . . . . . . . 433
Document Stored in Printer's Memory. . . . . . . . . . . . . . . . . . . . . . . . . . . . . . . . . . . . . . . . . . . . . . . . . . 434
Printing Document in Printer's Memory. . . . . . . . . . . . . . . . . . . . . . . . . . . . . . . . . . . . . . . . . . . . . 435
Deleting Document in Printer's Memory. . . . . . . . . . . . . . . . . . . . . . . . . . . . . . . . . . . . . . . . . . . . 437
Frequently Asked Questions. . . . . . . . . . . . . . . . . . . . . . . . . . . . . . . . . . . . . . . 439
Network Settings and Common Problems. . . . . . . . . . . . . . . . . . . . . . . . . . . . . . . . . . . . 441
Network Communication Problems. . . . . . . . . . . . . . . . . . . . . . . . . . . . . . . . . . . . . . . . . 443
Cannot Find Printer on Network. . . . . . . . . . . . . . . . . . . . . . . . . . . . . . . . . . . . . . . . . . . . . . . . . . . . . . . 444
Cannot Find Printer on Check Printer Settings Screen During Setup (Windows). . . . . . . . . . . . . 445
Cannot Find Printer on Check Printer Settings Screen During Wi-Fi Setup (Windows)-CheckingPower Status. . . . . . . . . . . . . . . . . . . . . . . . . . . . . . . . . . . . . . . . . . . . . . . . . . . . . . . . . . . . . 446
Cannot Find Printer on Check Printer Settings Screen During Wi-Fi Setup (Windows)-CheckingPC Network Connection. . . . . . . . . . . . . . . . . . . . . . . . . . . . . . . . . . . . . . . . . . . . . . . . . . . . 447
Cannot Find Printer on Check Printer Settings Screen During Wi-Fi Setup (Windows)-CheckingPrinter's Wi-Fi Settings. . . . . . . . . . . . . . . . . . . . . . . . . . . . . . . . . . . . . . . . . . . . . . . . . . . . . 448
Cannot Find Printer on Check Printer Settings Screen During Wi-Fi Setup (Windows)-CheckingWi-Fi Environment. . . . . . . . . . . . . . . . . . . . . . . . . . . . . . . . . . . . . . . . . . . . . . . . . . . . . . . . . 449
Cannot Find Printer on Check Printer Settings Screen During Wi-Fi Setup (Windows)-CheckingPrinter's IP Address. . . . . . . . . . . . . . . . . . . . . . . . . . . . . . . . . . . . . . . . . . . . . . . . . . . . . . . . 451
Cannot Find Printer on Check Printer Settings Screen During Wi-Fi Setup (Windows)-CheckingSecurity Software Settings. . . . . . . . . . . . . . . . . . . . . . . . . . . . . . . . . . . . . . . . . . . . . . . . . . . 452
Cannot Find Printer on Check Printer Settings Screen During Wi-Fi Setup (Windows)-CheckingWireless Router Settings. . . . . . . . . . . . . . . . . . . . . . . . . . . . . . . . . . . . . . . . . . . . . . . . . . . . 453
Cannot Proceed beyond Printer Connection Screen. . . . . . . . . . . . . . . . . . . . . . . . . . . . . . . . . . . 454
Cannot Find Printer while Using Wi-Fi. . . . . . . . . . . . . . . . . . . . . . . . . . . . . . . . . . . . . . . . . . . . . . 456
Network Connection Problems. . . . . . . . . . . . . . . . . . . . . . . . . . . . . . . . . . . . . . . . . . . . . . . . . . . . . . . 459
Printer Suddenly Stopped Working for Some Reason. . . . . . . . . . . . . . . . . . . . . . . . . . . . . . . . . . 460
Network Key (Password) Unknown. . . . . . . . . . . . . . . . . . . . . . . . . . . . . . . . . . . . . . . . . . . . . . . . 465
Printer Cannot Be Used After Replacing Wireless Router or Changed Router Settings. . . . . . . . 467
Other Network Problems. . . . . . . . . . . . . . . . . . . . . . . . . . . . . . . . . . . . . . . . . . . . . . . . . . . . . . . . . . . . 469
Checking Network Information. . . . . . . . . . . . . . . . . . . . . . . . . . . . . . . . . . . . . . . . . . . . . . . . . . . . 470
Restoring to Factory Defaults. . . . . . . . . . . . . . . . . . . . . . . . . . . . . . . . . . . . . . . . . . . . . . . . . . . . 473
Problems while Printing/Scanning from Smartphone/Tablet. . . . . . . . . . . . . . . . . . . . . . 474
Cannot Print/Scan from Smartphone/Tablet. . . . . . . . . . . . . . . . . . . . . . . . . . . . . . . . . . . . . . . . . . . . . 475
Printing Problems. . . . . . . . . . . . . . . . . . . . . . . . . . . . . . . . . . . . . . . . . . . . . . . . . . . . . . . 479

Printer Does Not Print. . . . . . . . . . . . . . . . . . . . . . . . . . . . . . . . . . . . . . . . . . . . . . . . . . . . . . . . . . . . . . 480
Ink Does Not Come Out. . . . . . . . . . . . . . . . . . . . . . . . . . . . . . . . . . . . . . . . . . . . . . . . . . . . . . . . . . . . . 482
Paper Does Not Feed Properly/"No Paper" Error. . . . . . . . . . . . . . . . . . . . . . . . . . . . . . . . . . . . . . . . . 484
Printout Results Are Unsatisfactory. . . . . . . . . . . . . . . . . . . . . . . . . . . . . . . . . . . . . . . . . . . . . . . . . . . . 487
Printouts Are Blank/Blurry or Fuzzy/Inaccurate or Bleeding Colors/Streaks or Lines. . . . . . . . . . 489
Colors Are Unclear. . . . . . . . . . . . . . . . . . . . . . . . . . . . . . . . . . . . . . . . . . . . . . . . . . . . . . . . . . . . 493
Lines Are Misaligned/Distorted. . . . . . . . . . . . . . . . . . . . . . . . . . . . . . . . . . . . . . . . . . . . . . . . . . . 495
Paper Is Smudged / Printed Surface Is Scratched. . . . . . . . . . . . . . . . . . . . . . . . . . . . . . . . . . . . 496
Vertical Line Next to Image. . . . . . . . . . . . . . . . . . . . . . . . . . . . . . . . . . . . . . . . . . . . . . . . . . . . . . 500
Scanning Problems (Windows). . . . . . . . . . . . . . . . . . . . . . . . . . . . . . . . . . . . . . . . . . . . . 501
Scanning Problems. . . . . . . . . . . . . . . . . . . . . . . . . . . . . . . . . . . . . . . . . . . . . . . . . . . . . . . . . . . . . . . . 502
Scanner Does Not Work. . . . . . . . . . . . . . . . . . . . . . . . . . . . . . . . . . . . . . . . . . . . . . . . . . . . . . . . 503
ScanGear (Scanner Driver) Does Not Start. . . . . . . . . . . . . . . . . . . . . . . . . . . . . . . . . . . . . . . . . . 504
Faxing Problems. . . . . . . . . . . . . . . . . . . . . . . . . . . . . . . . . . . . . . . . . . . . . . . . . . . . . . . . 505
Problems Sending Faxes. . . . . . . . . . . . . . . . . . . . . . . . . . . . . . . . . . . . . . . . . . . . . . . . . . . . . . . . . . . . 506
Cannot Send a Fax. . . . . . . . . . . . . . . . . . . . . . . . . . . . . . . . . . . . . . . . . . . . . . . . . . . . . . . . . . . . 507
Errors Often Occur When Send a Fax. . . . . . . . . . . . . . . . . . . . . . . . . . . . . . . . . . . . . . . . . . . . . . 510
Problems Receiving Faxes. . . . . . . . . . . . . . . . . . . . . . . . . . . . . . . . . . . . . . . . . . . . . . . . . . . . . . . . . . 511
Cannot Receive a Fax, Cannot Print a Fax. . . . . . . . . . . . . . . . . . . . . . . . . . . . . . . . . . . . . . . . . . 512
Telephone Problems. . . . . . . . . . . . . . . . . . . . . . . . . . . . . . . . . . . . . . . . . . . . . . . . . . . . . . . . . . . . . . . 515
Cannot Dial. . . . . . . . . . . . . . . . . . . . . . . . . . . . . . . . . . . . . . . . . . . . . . . . . . . . . . . . . . . . . . . . . . 516
Telephone Disconnects During a Call. . . . . . . . . . . . . . . . . . . . . . . . . . . . . . . . . . . . . . . . . . . . . . 517
Poor Quality Fax Received. . . . . . . . . . . . . . . . . . . . . . . . . . . . . . . . . . . . . . . . . . . . . . . . . . . . . . . . . . 518
Mechanical Problems. . . . . . . . . . . . . . . . . . . . . . . . . . . . . . . . . . . . . . . . . . . . . . . . . . . . 519
Printer Does Not Turn On. . . . . . . . . . . . . . . . . . . . . . . . . . . . . . . . . . . . . . . . . . . . . . . . . . . . . . . . . . . 520
Printer Turns Off Unexpectedly or Repeatedly. . . . . . . . . . . . . . . . . . . . . . . . . . . . . . . . . . . . . . . . . . . 521
USB Connection Problems. . . . . . . . . . . . . . . . . . . . . . . . . . . . . . . . . . . . . . . . . . . . . . . . . . . . . . . . . . 523
Cannot Communicate with Printer via USB. . . . . . . . . . . . . . . . . . . . . . . . . . . . . . . . . . . . . . . . . . . . . . 524
Wrong Language Appears in LCD. . . . . . . . . . . . . . . . . . . . . . . . . . . . . . . . . . . . . . . . . . . . . . . . . . . . . 525
Installation and Download Problems. . . . . . . . . . . . . . . . . . . . . . . . . . . . . . . . . . . . . . . . 526
Failed to MP Drivers Installation (Windows). . . . . . . . . . . . . . . . . . . . . . . . . . . . . . . . . . . . . . . . . . . . . 527
Updating MP Drivers in Network Environment (Windows). . . . . . . . . . . . . . . . . . . . . . . . . . . . . . . . . . . 529
Errors and Messages. . . . . . . . . . . . . . . . . . . . . . . . . . . . . . . . . . . . . . . . . . . . . . . . . . . . 530

An Error Occurs. . . . . . . . . . . . . . . . . . . . . . . . . . . . . . . . . . . . . . . . . . . . . . . . . . . . . . . . . . . . . . . . . . . 531
Message (Support Code) Appears. . . . . . . . . . . . . . . . . . . . . . . . . . . . . . . . . . . . . . . . . . . . . . . . . . . . 532
List of Support Code for Error. . . . . . . . . . . . . . . . . . . . . . . . . . . . . . . . . . . . . . 535
List of Support Code for Error (Paper Jams). . . . . . . . . . . . . . . . . . . . . . . . . . . . . . . . . . 537
1300. . . . . . . . . . . . . . . . . . . . . . . . . . . . . . . . . . . . . . . . . . . . . . . . . . . . . . . . . . . . . . . . . . . . . . . . . . . . 538
1303. . . . . . . . . . . . . . . . . . . . . . . . . . . . . . . . . . . . . . . . . . . . . . . . . . . . . . . . . . . . . . . . . . . . . . . . . . . . 540
1304. . . . . . . . . . . . . . . . . . . . . . . . . . . . . . . . . . . . . . . . . . . . . . . . . . . . . . . . . . . . . . . . . . . . . . . . . . . . 541
Paper Is Jammed inside Printer. . . . . . . . . . . . . . . . . . . . . . . . . . . . . . . . . . . . . . . . . . . . . . . . . . . . . . . 542
Removing Jammed Paper from Rear Side. . . . . . . . . . . . . . . . . . . . . . . . . . . . . . . . . . . . . . . . . . 545
1003. . . . . . . . . . . . . . . . . . . . . . . . . . . . . . . . . . . . . . . . . . . . . . . . . . . . . . . . . . . . . . . . . 548
1200. . . . . . . . . . . . . . . . . . . . . . . . . . . . . . . . . . . . . . . . . . . . . . . . . . . . . . . . . . . . . . . . . 549
1203. . . . . . . . . . . . . . . . . . . . . . . . . . . . . . . . . . . . . . . . . . . . . . . . . . . . . . . . . . . . . . . . . 550
1250. . . . . . . . . . . . . . . . . . . . . . . . . . . . . . . . . . . . . . . . . . . . . . . . . . . . . . . . . . . . . . . . . 551
1401. . . . . . . . . . . . . . . . . . . . . . . . . . . . . . . . . . . . . . . . . . . . . . . . . . . . . . . . . . . . . . . . . 552
1430. . . . . . . . . . . . . . . . . . . . . . . . . . . . . . . . . . . . . . . . . . . . . . . . . . . . . . . . . . . . . . . . . 553
1485. . . . . . . . . . . . . . . . . . . . . . . . . . . . . . . . . . . . . . . . . . . . . . . . . . . . . . . . . . . . . . . . . 554
1682. . . . . . . . . . . . . . . . . . . . . . . . . . . . . . . . . . . . . . . . . . . . . . . . . . . . . . . . . . . . . . . . . 555
1686. . . . . . . . . . . . . . . . . . . . . . . . . . . . . . . . . . . . . . . . . . . . . . . . . . . . . . . . . . . . . . . . . 556
1688. . . . . . . . . . . . . . . . . . . . . . . . . . . . . . . . . . . . . . . . . . . . . . . . . . . . . . . . . . . . . . . . . 557
168A. . . . . . . . . . . . . . . . . . . . . . . . . . . . . . . . . . . . . . . . . . . . . . . . . . . . . . . . . . . . . . . . . 558
1890. . . . . . . . . . . . . . . . . . . . . . . . . . . . . . . . . . . . . . . . . . . . . . . . . . . . . . . . . . . . . . . . . 559
2110. . . . . . . . . . . . . . . . . . . . . . . . . . . . . . . . . . . . . . . . . . . . . . . . . . . . . . . . . . . . . . . . . 560
2900. . . . . . . . . . . . . . . . . . . . . . . . . . . . . . . . . . . . . . . . . . . . . . . . . . . . . . . . . . . . . . . . . 562
2901. . . . . . . . . . . . . . . . . . . . . . . . . . . . . . . . . . . . . . . . . . . . . . . . . . . . . . . . . . . . . . . . . 563
4103. . . . . . . . . . . . . . . . . . . . . . . . . . . . . . . . . . . . . . . . . . . . . . . . . . . . . . . . . . . . . . . . . 564
5011. . . . . . . . . . . . . . . . . . . . . . . . . . . . . . . . . . . . . . . . . . . . . . . . . . . . . . . . . . . . . . . . . 565
5012. . . . . . . . . . . . . . . . . . . . . . . . . . . . . . . . . . . . . . . . . . . . . . . . . . . . . . . . . . . . . . . . . 566
5100. . . . . . . . . . . . . . . . . . . . . . . . . . . . . . . . . . . . . . . . . . . . . . . . . . . . . . . . . . . . . . . . . 567
5200. . . . . . . . . . . . . . . . . . . . . . . . . . . . . . . . . . . . . . . . . . . . . . . . . . . . . . . . . . . . . . . . . 568
5B02. . . . . . . . . . . . . . . . . . . . . . . . . . . . . . . . . . . . . . . . . . . . . . . . . . . . . . . . . . . . . . . . . 569
6000. . . . . . . . . . . . . . . . . . . . . . . . . . . . . . . . . . . . . . . . . . . . . . . . . . . . . . . . . . . . . . . . . 570

Using Online Manual
Operating Environment
Symbols Used in This Document
Touch-enabled Device Users (Windows)
Printing Online Manual
Trademarks and Licenses
Screenshots in This Manual
11

Symbols Used in This Document
WarningInstructions that, if ignored, could result in death, serious personal injury, or property damage caused byincorrect operation of the equipment. These must be observed for safe operation.
CautionInstructions that, if ignored, could result in personal injury or property damage caused by incorrectoperation of the equipment. These must be observed for safe operation.
ImportantInstructions including important information that must be observed to avoid damage and injury orimproper use of the product. Be sure to read these instructions.
NoteInstructions including notes for operation and additional explanations.
Basics
Instructions explaining basic operations of your product.
Note• Icons may vary depending on your product.
12

Touch-enabled Device Users (Windows)
For touch actions, you need to replace "right-click" in this document with the action set on the operatingsystem. For example, if the action is set to "press and hold" on your operating system, replace "right-click"with "press and hold."
13

Trademarks and Licenses
• Microsoft is a registered trademark of Microsoft Corporation.• Windows is a trademark or registered trademark of Microsoft Corporation in the U.S. and/or other
countries.• Windows Vista is a trademark or registered trademark of Microsoft Corporation in the U.S. and/or other
countries.• Internet Explorer is a trademark or registered trademark of Microsoft Corporation in the U.S. and/or
other countries.• Mac, Mac OS, macOS, OS X, AirPort, App Store, AirPrint, the AirPrint logo, Safari, Bonjour, iPad,
iPhone and iPod touch are trademarks of Apple Inc., registered in the U.S. and other countries.• IOS is a trademark or registered trademark of Cisco in the U.S. and other countries and is used under
license.• Google Cloud Print, Google Chrome, Chrome OS, Chromebook, Android, Google Drive, Google Apps
and Google Analytics are either registered trademarks or trademarks of Google Inc. Google Play andGoogle Play Logo are trademarks of Google LLC.
• Adobe, Acrobat, Flash, Photoshop, Photoshop Elements, Lightroom, Adobe RGB and Adobe RGB(1998) are either registered trademarks or trademarks of Adobe Systems Incorporated in the UnitedStates and/or other countries.
• Bluetooth is a trademark of Bluetooth SIG, Inc., U.S.A. and licensed to Canon Inc.• Autodesk and AutoCAD are registered trademarks or trademarks of Autodesk, Inc., and/or its
subsidiaries and/or affiliates in the USA and/or other countries.
Note• The formal name of Windows Vista is Microsoft Windows Vista operating system.
Copyright (c) 2003-2015 Apple Inc. All rights reserved.
Redistribution and use in source and binary forms, with or without modification, are permitted providedthat the following conditions are met:
1. Redistributions of source code must retain the above copyright notice, this list of conditions and thefollowing disclaimer.
2. Redistributions in binary form must reproduce the above copyright notice, this list of conditions andthe following disclaimer in the documentation and/or other materials provided with the distribution.
3. Neither the name of Apple Inc. ("Apple") nor the names of its contributors may be used to endorse orpromote products derived from this software without specific prior written permission.
THIS SOFTWARE IS PROVIDED BY APPLE AND ITS CONTRIBUTORS "AS IS" AND ANY EXPRESSOR IMPLIED WARRANTIES, INCLUDING, BUT NOT LIMITED TO, THE IMPLIED WARRANTIES OFMERCHANTABILITY AND FITNESS FOR A PARTICULAR PURPOSE ARE DISCLAIMED. IN NOEVENT SHALL APPLE OR ITS CONTRIBUTORS BE LIABLE FOR ANY DIRECT, INDIRECT,INCIDENTAL, SPECIAL, EXEMPLARY, OR CONSEQUENTIAL DAMAGES (INCLUDING, BUT NOTLIMITED TO, PROCUREMENT OF SUBSTITUTE GOODS OR SERVICES; LOSS OF USE, DATA, ORPROFITS; OR BUSINESS INTERRUPTION) HOWEVER CAUSED AND ON ANY THEORY OFLIABILITY, WHETHER IN CONTRACT, STRICT LIABILITY, OR TORT (INCLUDING NEGLIGENCE OROTHERWISE) ARISING IN ANY WAY OUT OF THE USE OF THIS SOFTWARE, EVEN IF ADVISED OFTHE POSSIBILITY OF SUCH DAMAGE.
14

Apache License
Version 2.0, January 2004
http://www.apache.org/licenses/TERMS AND CONDITIONS FOR USE, REPRODUCTION, AND DISTRIBUTION
1. Definitions.
"License" shall mean the terms and conditions for use, reproduction, and distribution as defined bySections 1 through 9 of this document.
"Licensor" shall mean the copyright owner or entity authorized by the copyright owner that is grantingthe License.
"Legal Entity" shall mean the union of the acting entity and all other entities that control, are controlledby, or are under common control with that entity. For the purposes of this definition, "control" means(i) the power, direct or indirect, to cause the direction or management of such entity, whether bycontract or otherwise, or (ii) ownership of fifty percent (50%) or more of the outstanding shares, or (iii)beneficial ownership of such entity.
"You" (or "Your") shall mean an individual or Legal Entity exercising permissions granted by thisLicense.
"Source" form shall mean the preferred form for making modifications, including but not limited tosoftware source code, documentation source, and configuration files.
"Object" form shall mean any form resulting from mechanical transformation or translation of a Sourceform, including but not limited to compiled object code, generated documentation, and conversions toother media types.
"Work" shall mean the work of authorship, whether in Source or Object form, made available underthe License, as indicated by a copyright notice that is included in or attached to the work (an exampleis provided in the Appendix below).
"Derivative Works" shall mean any work, whether in Source or Object form, that is based on (orderived from) the Work and for which the editorial revisions, annotations, elaborations, or othermodifications represent, as a whole, an original work of authorship. For the purposes of this License,Derivative Works shall not include works that remain separable from, or merely link (or bind by name)to the interfaces of, the Work and Derivative Works thereof.
"Contribution" shall mean any work of authorship, including the original version of the Work and anymodifications or additions to that Work or Derivative Works thereof, that is intentionally submitted toLicensor for inclusion in the Work by the copyright owner or by an individual or Legal Entityauthorized to submit on behalf of the copyright owner. For the purposes of this definition, "submitted"means any form of electronic, verbal, or written communication sent to the Licensor or itsrepresentatives, including but not limited to communication on electronic mailing lists, source codecontrol systems, and issue tracking systems that are managed by, or on behalf of, the Licensor forthe purpose of discussing and improving the Work, but excluding communication that isconspicuously marked or otherwise designated in writing by the copyright owner as "Not aContribution."
"Contributor" shall mean Licensor and any individual or Legal Entity on behalf of whom a Contributionhas been received by Licensor and subsequently incorporated within the Work.
15

2. Grant of Copyright License. Subject to the terms and conditions of this License, each Contributorhereby grants to You a perpetual, worldwide, non-exclusive, no-charge, royalty-free, irrevocablecopyright license to reproduce, prepare Derivative Works of, publicly display, publicly perform,sublicense, and distribute the Work and such Derivative Works in Source or Object form.
3. Grant of Patent License. Subject to the terms and conditions of this License, each Contributor herebygrants to You a perpetual, worldwide, non-exclusive, no-charge, royalty-free, irrevocable (except asstated in this section) patent license to make, have made, use, offer to sell, sell, import, andotherwise transfer the Work, where such license applies only to those patent claims licensable bysuch Contributor that are necessarily infringed by their Contribution(s) alone or by combination oftheir Contribution(s) with the Work to which such Contribution(s) was submitted. If You institute patentlitigation against any entity (including a cross-claim or counterclaim in a lawsuit) alleging that theWork or a Contribution incorporated within the Work constitutes direct or contributory patentinfringement, then any patent licenses granted to You under this License for that Work shall terminateas of the date such litigation is filed.
4. Redistribution. You may reproduce and distribute copies of the Work or Derivative Works thereof inany medium, with or without modifications, and in Source or Object form, provided that You meet thefollowing conditions:
1. You must give any other recipients of the Work or Derivative Works a copy of this License; and2. You must cause any modified files to carry prominent notices stating that You changed the files;
and3. You must retain, in the Source form of any Derivative Works that You distribute, all copyright,
patent, trademark, and attribution notices from the Source form of the Work, excluding thosenotices that do not pertain to any part of the Derivative Works; and
4. If the Work includes a "NOTICE" text file as part of its distribution, then any Derivative Works thatYou distribute must include a readable copy of the attribution notices contained within suchNOTICE file, excluding those notices that do not pertain to any part of the Derivative Works, in atleast one of the following places: within a NOTICE text file distributed as part of the DerivativeWorks; within the Source form or documentation, if provided along with the Derivative Works; or,within a display generated by the Derivative Works, if and wherever such third-party noticesnormally appear. The contents of the NOTICE file are for informational purposes only and do notmodify the License. You may add Your own attribution notices within Derivative Works that Youdistribute, alongside or as an addendum to the NOTICE text from the Work, provided that suchadditional attribution notices cannot be construed as modifying the License.
You may add Your own copyright statement to Your modifications and may provide additional ordifferent license terms and conditions for use, reproduction, or distribution of Your modifications,or for any such Derivative Works as a whole, provided Your use, reproduction, and distribution ofthe Work otherwise complies with the conditions stated in this License.
5. Submission of Contributions. Unless You explicitly state otherwise, any Contribution intentionallysubmitted for inclusion in the Work by You to the Licensor shall be under the terms and conditions ofthis License, without any additional terms or conditions. Notwithstanding the above, nothing hereinshall supersede or modify the terms of any separate license agreement you may have executed withLicensor regarding such Contributions.
6. Trademarks. This License does not grant permission to use the trade names, trademarks, servicemarks, or product names of the Licensor, except as required for reasonable and customary use indescribing the origin of the Work and reproducing the content of the NOTICE file.
16

7. Disclaimer of Warranty. Unless required by applicable law or agreed to in writing, Licensor providesthe Work (and each Contributor provides its Contributions) on an "AS IS" BASIS, WITHOUTWARRANTIES OR CONDITIONS OF ANY KIND, either express or implied, including, withoutlimitation, any warranties or conditions of TITLE, NON-INFRINGEMENT, MERCHANTABILITY, orFITNESS FOR A PARTICULAR PURPOSE. You are solely responsible for determining theappropriateness of using or redistributing the Work and assume any risks associated with Yourexercise of permissions under this License.
8. Limitation of Liability. In no event and under no legal theory, whether in tort (including negligence),contract, or otherwise, unless required by applicable law (such as deliberate and grossly negligentacts) or agreed to in writing, shall any Contributor be liable to You for damages, including any direct,indirect, special, incidental, or consequential damages of any character arising as a result of thisLicense or out of the use or inability to use the Work (including but not limited to damages for loss ofgoodwill, work stoppage, computer failure or malfunction, or any and all other commercial damagesor losses), even if such Contributor has been advised of the possibility of such damages.
9. Accepting Warranty or Additional Liability. While redistributing the Work or Derivative Works thereof,You may choose to offer, and charge a fee for, acceptance of support, warranty, indemnity, or otherliability obligations and/or rights consistent with this License. However, in accepting such obligations,You may act only on Your own behalf and on Your sole responsibility, not on behalf of any otherContributor, and only if You agree to indemnify, defend, and hold each Contributor harmless for anyliability incurred by, or claims asserted against, such Contributor by reason of your accepting anysuch warranty or additional liability.END OF TERMS AND CONDITIONS
---- Part 1: CMU/UCD copyright notice: (BSD like) -----
Copyright 1989, 1991, 1992 by Carnegie Mellon University
Derivative Work - 1996, 1998-2000
Copyright 1996, 1998-2000 The Regents of the University of California
All Rights Reserved
Permission to use, copy, modify and distribute this software and its documentation for any purpose andwithout fee is hereby granted, provided that the above copyright notice appears in all copies and that boththat copyright notice and this permission notice appear in supporting documentation, and that the name ofCMU and The Regents of the University of California not be used in advertising or publicity pertaining todistribution of the software without specific written permission.
CMU AND THE REGENTS OF THE UNIVERSITY OF CALIFORNIA DISCLAIM ALL WARRANTIESWITH REGARD TO THIS SOFTWARE, INCLUDING ALL IMPLIED WARRANTIES OFMERCHANTABILITY AND FITNESS. IN NO EVENT SHALL CMU OR THE REGENTS OF THEUNIVERSITY OF CALIFORNIA BE LIABLE FOR ANY SPECIAL, INDIRECT OR CONSEQUENTIALDAMAGES OR ANY DAMAGES WHATSOEVER RESULTING FROM THE LOSS OF USE, DATA ORPROFITS, WHETHER IN AN ACTION OF CONTRACT, NEGLIGENCE OR OTHER TORTIOUS ACTION,ARISING OUT OF OR IN CONNECTION WITH THE USE OR PERFORMANCE OF THIS SOFTWARE.
---- Part 2: Networks Associates Technology, Inc copyright notice (BSD) -----
Copyright (c) 2001-2003, Networks Associates Technology, Inc
All rights reserved.
17

Redistribution and use in source and binary forms, with or without modification, are permitted providedthat the following conditions are met:
* Redistributions of source code must retain the above copyright notice, this list of conditions and thefollowing disclaimer.* Redistributions in binary form must reproduce the above copyright notice, this list of conditions and thefollowing disclaimer in the documentation and/or other materials provided with the distribution.* Neither the name of the Networks Associates Technology, Inc nor the names of its contributors may beused to endorse or promote products derived from this software without specific prior written permission.
THIS SOFTWARE IS PROVIDED BY THE COPYRIGHT HOLDERS AND CONTRIBUTORS ``AS IS''AND ANY EXPRESS OR IMPLIED WARRANTIES, INCLUDING, BUT NOT LIMITED TO, THE IMPLIEDWARRANTIES OF MERCHANTABILITY AND FITNESS FOR A PARTICULAR PURPOSE AREDISCLAIMED. IN NO EVENT SHALL THE COPYRIGHT HOLDERS OR CONTRIBUTORS BE LIABLEFOR ANY DIRECT, INDIRECT, INCIDENTAL, SPECIAL, EXEMPLARY, OR CONSEQUENTIALDAMAGES (INCLUDING, BUT NOT LIMITED TO, PROCUREMENT OF SUBSTITUTE GOODS ORSERVICES; LOSS OF USE, DATA, OR PROFITS; OR BUSINESS INTERRUPTION) HOWEVERCAUSED AND ON ANY THEORY OF LIABILITY, WHETHER IN CONTRACT, STRICT LIABILITY, ORTORT (INCLUDING NEGLIGENCE OR OTHERWISE) ARISING IN ANY WAY OUT OF THE USE OFTHIS SOFTWARE, EVEN IF ADVISED OF THE POSSIBILITY OF SUCH DAMAGE.
---- Part 3: Cambridge Broadband Ltd. copyright notice (BSD) -----
Portions of this code are copyright (c) 2001-2003, Cambridge Broadband Ltd.
All rights reserved.
Redistribution and use in source and binary forms, with or without modification, are permitted providedthat the following conditions are met:
* Redistributions of source code must retain the above copyright notice, this list of conditions and thefollowing disclaimer.* Redistributions in binary form must reproduce the above copyright notice, this list of conditions and thefollowing disclaimer in the documentation and/or other materials provided with the distribution.* The name of Cambridge Broadband Ltd. may not be used to endorse or promote products derived fromthis software without specific prior written permission.
THIS SOFTWARE IS PROVIDED BY THE COPYRIGHT HOLDER ``AS IS'' AND ANY EXPRESS ORIMPLIED WARRANTIES, INCLUDING, BUT NOT LIMITED TO, THE IMPLIED WARRANTIES OFMERCHANTABILITY AND FITNESS FOR A PARTICULAR PURPOSE ARE DISCLAIMED. IN NOEVENT SHALL THE COPYRIGHT HOLDER BE LIABLE FOR ANY DIRECT, INDIRECT, INCIDENTAL,SPECIAL, EXEMPLARY, OR CONSEQUENTIAL DAMAGES (INCLUDING, BUT NOT LIMITED TO,PROCUREMENT OF SUBSTITUTE GOODS OR SERVICES; LOSS OF USE, DATA, OR PROFITS; ORBUSINESS INTERRUPTION) HOWEVER CAUSED AND ON ANY THEORY OF LIABILITY, WHETHERIN CONTRACT, STRICT LIABILITY, OR TORT (INCLUDING NEGLIGENCE OR OTHERWISE) ARISINGIN ANY WAY OUT OF THE USE OF THIS SOFTWARE, EVEN IF ADVISED OF THE POSSIBILITY OFSUCH DAMAGE.
---- Part 4: Sun Microsystems, Inc. copyright notice (BSD) -----
Copyright c 2003 Sun Microsystems, Inc., 4150 Network Circle, Santa Clara, California 95054, U.S.A. Allrights reserved.
18

Use is subject to license terms below.
This distribution may include materials developed by third parties.
Sun, Sun Microsystems, the Sun logo and Solaris are trademarks or registered trademarks of SunMicrosystems, Inc. in the U.S. and other countries.
Redistribution and use in source and binary forms, with or without modification, are permitted providedthat the following conditions are met:
* Redistributions of source code must retain the above copyright notice, this list of conditions and thefollowing disclaimer.* Redistributions in binary form must reproduce the above copyright notice, this list of conditions and thefollowing disclaimer in the documentation and/or other materials provided with the distribution.* Neither the name of the Sun Microsystems, Inc. nor the names of its contributors may be used toendorse or promote products derived from this software without specific prior written permission.
THIS SOFTWARE IS PROVIDED BY THE COPYRIGHT HOLDERS AND CONTRIBUTORS ``AS IS''AND ANY EXPRESS OR IMPLIED WARRANTIES, INCLUDING, BUT NOT LIMITED TO, THE IMPLIEDWARRANTIES OF MERCHANTABILITY AND FITNESS FOR A PARTICULAR PURPOSE AREDISCLAIMED. IN NO EVENT SHALL THE COPYRIGHT HOLDERS OR CONTRIBUTORS BE LIABLEFOR ANY DIRECT, INDIRECT, INCIDENTAL, SPECIAL, EXEMPLARY, OR CONSEQUENTIALDAMAGES (INCLUDING, BUT NOT LIMITED TO, PROCUREMENT OF SUBSTITUTE GOODS ORSERVICES; LOSS OF USE, DATA, OR PROFITS; OR BUSINESS INTERRUPTION) HOWEVERCAUSED AND ON ANY THEORY OF LIABILITY, WHETHER IN CONTRACT, STRICT LIABILITY, ORTORT (INCLUDING NEGLIGENCE OR OTHERWISE) ARISING IN ANY WAY OUT OF THE USE OFTHIS SOFTWARE, EVEN IF ADVISED OF THE POSSIBILITY OF SUCH DAMAGE.
---- Part 5: Sparta, Inc copyright notice (BSD) -----
Copyright (c) 2003-2012, Sparta, Inc
All rights reserved.
Redistribution and use in source and binary forms, with or without modification, are permitted providedthat the following conditions are met:
* Redistributions of source code must retain the above copyright notice, this list of conditions and thefollowing disclaimer.* Redistributions in binary form must reproduce the above copyright notice, this list of conditions and thefollowing disclaimer in the documentation and/or other materials provided with the distribution.* Neither the name of Sparta, Inc nor the names of its contributors may be used to endorse or promoteproducts derived from this software without specific prior written permission.
THIS SOFTWARE IS PROVIDED BY THE COPYRIGHT HOLDERS AND CONTRIBUTORS ``AS IS''AND ANY EXPRESS OR IMPLIED WARRANTIES, INCLUDING, BUT NOT LIMITED TO, THE IMPLIEDWARRANTIES OF MERCHANTABILITY AND FITNESS FOR A PARTICULAR PURPOSE AREDISCLAIMED. IN NO EVENT SHALL THE COPYRIGHT HOLDERS OR CONTRIBUTORS BE LIABLEFOR ANY DIRECT, INDIRECT, INCIDENTAL, SPECIAL, EXEMPLARY, OR CONSEQUENTIALDAMAGES (INCLUDING, BUT NOT LIMITED TO, PROCUREMENT OF SUBSTITUTE GOODS ORSERVICES; LOSS OF USE, DATA, OR PROFITS; OR BUSINESS INTERRUPTION) HOWEVERCAUSED AND ON ANY THEORY OF LIABILITY, WHETHER IN CONTRACT, STRICT LIABILITY, OR
19

TORT (INCLUDING NEGLIGENCE OR OTHERWISE) ARISING IN ANY WAY OUT OF THE USE OFTHIS SOFTWARE, EVEN IF ADVISED OF THE POSSIBILITY OF SUCH DAMAGE.
---- Part 6: Cisco/BUPTNIC copyright notice (BSD) -----
Copyright (c) 2004, Cisco, Inc and Information Network Center of Beijing University of Posts andTelecommunications.
All rights reserved.
Redistribution and use in source and binary forms, with or without modification, are permitted providedthat the following conditions are met:
* Redistributions of source code must retain the above copyright notice, this list of conditions and thefollowing disclaimer.* Redistributions in binary form must reproduce the above copyright notice, this list of conditions and thefollowing disclaimer in the documentation and/or other materials provided with the distribution.* Neither the name of Cisco, Inc, Beijing University of Posts and Telecommunications, nor the names oftheir contributors may be used to endorse or promote products derived from this software without specificprior written permission.
THIS SOFTWARE IS PROVIDED BY THE COPYRIGHT HOLDERS AND CONTRIBUTORS ``AS IS''AND ANY EXPRESS OR IMPLIED WARRANTIES, INCLUDING, BUT NOT LIMITED TO, THE IMPLIEDWARRANTIES OF MERCHANTABILITY AND FITNESS FOR A PARTICULAR PURPOSE AREDISCLAIMED. IN NO EVENT SHALL THE COPYRIGHT HOLDERS OR CONTRIBUTORS BE LIABLEFOR ANY DIRECT, INDIRECT, INCIDENTAL, SPECIAL, EXEMPLARY, OR CONSEQUENTIALDAMAGES (INCLUDING, BUT NOT LIMITED TO, PROCUREMENT OF SUBSTITUTE GOODS ORSERVICES; LOSS OF USE, DATA, OR PROFITS; OR BUSINESS INTERRUPTION) HOWEVERCAUSED AND ON ANY THEORY OF LIABILITY, WHETHER IN CONTRACT, STRICT LIABILITY, ORTORT (INCLUDING NEGLIGENCE OR OTHERWISE) ARISING IN ANY WAY OUT OF THE USE OFTHIS SOFTWARE, EVEN IF ADVISED OF THE POSSIBILITY OF SUCH DAMAGE.
---- Part 7: Fabasoft R&D Software GmbH & Co KG copyright notice (BSD) -----
Copyright (c) Fabasoft R&D Software GmbH & Co KG, 2003 [email protected]
Author: Bernhard Penz <[email protected]>
Redistribution and use in source and binary forms, with or without modification, are permitted providedthat the following conditions are met:
* Redistributions of source code must retain the above copyright notice, this list of conditions and thefollowing disclaimer.* Redistributions in binary form must reproduce the above copyright notice, this list of conditions and thefollowing disclaimer in the documentation and/or other materials provided with the distribution.* The name of Fabasoft R&D Software GmbH & Co KG or any of its subsidiaries, brand or product namesmay not be used to endorse or promote products derived from this software without specific prior writtenpermission.
THIS SOFTWARE IS PROVIDED BY THE COPYRIGHT HOLDER ``AS IS'' AND ANY EXPRESS ORIMPLIED WARRANTIES, INCLUDING, BUT NOT LIMITED TO, THE IMPLIED WARRANTIES OFMERCHANTABILITY AND FITNESS FOR A PARTICULAR PURPOSE ARE DISCLAIMED. IN NOEVENT SHALL THE COPYRIGHT HOLDER BE LIABLE FOR ANY DIRECT, INDIRECT, INCIDENTAL,
20

SPECIAL, EXEMPLARY, OR CONSEQUENTIAL DAMAGES (INCLUDING, BUT NOT LIMITED TO,PROCUREMENT OF SUBSTITUTE GOODS OR SERVICES; LOSS OF USE, DATA, OR PROFITS; ORBUSINESS INTERRUPTION) HOWEVER CAUSED AND ON ANY THEORY OF LIABILITY, WHETHERIN CONTRACT, STRICT LIABILITY, OR TORT (INCLUDING NEGLIGENCE OR OTHERWISE) ARISINGIN ANY WAY OUT OF THE USE OF THIS SOFTWARE, EVEN IF ADVISED OF THE POSSIBILITY OFSUCH DAMAGE.
---- Part 8: Apple Inc. copyright notice (BSD) -----
Copyright (c) 2007 Apple Inc. All rights reserved.
Redistribution and use in source and binary forms, with or without modification, are permitted providedthat the following conditions are met:
1. Redistributions of source code must retain the above copyright notice, this list of conditions and thefollowing disclaimer.
2. Redistributions in binary form must reproduce the above copyright notice, this list of conditions andthe following disclaimer in the documentation and/or other materials provided with the distribution.
3. Neither the name of Apple Inc. ("Apple") nor the names of its contributors may be used to endorse orpromote products derived from this software without specific prior written permission.
THIS SOFTWARE IS PROVIDED BY APPLE AND ITS CONTRIBUTORS "AS IS" AND ANY EXPRESSOR IMPLIED WARRANTIES, INCLUDING, BUT NOT LIMITED TO, THE IMPLIED WARRANTIES OFMERCHANTABILITY AND FITNESS FOR A PARTICULAR PURPOSE ARE DISCLAIMED. IN NOEVENT SHALL APPLE OR ITS CONTRIBUTORS BE LIABLE FOR ANY DIRECT, INDIRECT,INCIDENTAL, SPECIAL, EXEMPLARY, OR CONSEQUENTIAL DAMAGES (INCLUDING, BUT NOTLIMITED TO, PROCUREMENT OF SUBSTITUTE GOODS OR SERVICES; LOSS OF USE, DATA, ORPROFITS; OR BUSINESS INTERRUPTION) HOWEVER CAUSED AND ON ANY THEORY OFLIABILITY, WHETHER IN CONTRACT, STRICT LIABILITY, OR TORT (INCLUDING NEGLIGENCE OROTHERWISE) ARISING IN ANY WAY OUT OF THE USE OF THIS SOFTWARE, EVEN IF ADVISED OFTHE POSSIBILITY OF SUCH DAMAGE.
---- Part 9: ScienceLogic, LLC copyright notice (BSD) -----
Copyright (c) 2009, ScienceLogic, LLC
All rights reserved.
Redistribution and use in source and binary forms, with or without modification, are permitted providedthat the following conditions are met:
* Redistributions of source code must retain the above copyright notice, this list of conditions and thefollowing disclaimer.* Redistributions in binary form must reproduce the above copyright notice, this list of conditions and thefollowing disclaimer in the documentation and/or other materials provided with the distribution.* Neither the name of ScienceLogic, LLC nor the names of its contributors may be used to endorse orpromote products derived from this software without specific prior written permission.
THIS SOFTWARE IS PROVIDED BY THE COPYRIGHT HOLDERS AND CONTRIBUTORS "AS IS" ANDANY EXPRESS OR IMPLIED WARRANTIES, INCLUDING, BUT NOT LIMITED TO, THE IMPLIEDWARRANTIES OF MERCHANTABILITY AND FITNESS FOR A PARTICULAR PURPOSE AREDISCLAIMED. IN NO EVENT SHALL THE COPYRIGHT HOLDERS OR CONTRIBUTORS BE LIABLE
21

FOR ANY DIRECT, INDIRECT, INCIDENTAL, SPECIAL, EXEMPLARY, OR CONSEQUENTIALDAMAGES (INCLUDING, BUT NOT LIMITED TO, PROCUREMENT OF SUBSTITUTE GOODS ORSERVICES; LOSS OF USE, DATA, OR PROFITS; OR BUSINESS INTERRUPTION) HOWEVERCAUSED AND ON ANY THEORY OF LIABILITY, WHETHER IN CONTRACT, STRICT LIABILITY, ORTORT (INCLUDING NEGLIGENCE OR OTHERWISE) ARISING IN ANY WAY OUT OF THE USE OFTHIS SOFTWARE, EVEN IF ADVISED OF THE POSSIBILITY OF SUCH DAMAGE.
LEADTOOLS
Copyright (C) 1991-2009 LEAD Technologies, Inc.
CMap Resources
-----------------------------------------------------------
Copyright 1990-2009 Adobe Systems Incorporated.All rights reserved.
Copyright 1990-2010 Adobe Systems Incorporated.All rights reserved.
Redistribution and use in source and binary forms, with orwithout modification, are permitted provided that thefollowing conditions are met:
Redistributions of source code must retain the abovecopyright notice, this list of conditions and the followingdisclaimer.
Redistributions in binary form must reproduce the abovecopyright notice, this list of conditions and the followingdisclaimer in the documentation and/or other materialsprovided with the distribution.
Neither the name of Adobe Systems Incorporated nor the namesof its contributors may be used to endorse or promoteproducts derived from this software without specific priorwritten permission.
THIS SOFTWARE IS PROVIDED BY THE COPYRIGHT HOLDERS ANDCONTRIBUTORS "AS IS" AND ANY EXPRESS OR IMPLIED WARRANTIES,INCLUDING, BUT NOT LIMITED TO, THE IMPLIED WARRANTIES OFMERCHANTABILITY AND FITNESS FOR A PARTICULAR PURPOSE AREDISCLAIMED. IN NO EVENT SHALL THE COPYRIGHT HOLDER ORCONTRIBUTORS BE LIABLE FOR ANY DIRECT, INDIRECT, INCIDENTAL,SPECIAL, EXEMPLARY, OR CONSEQUENTIAL DAMAGES (INCLUDING, BUTNOT LIMITED TO, PROCUREMENT OF SUBSTITUTE GOODS OR SERVICES;LOSS OF USE, DATA, OR PROFITS; OR BUSINESS INTERRUPTION)HOWEVER CAUSED AND ON ANY THEORY OF LIABILITY, WHETHER INCONTRACT, STRICT LIABILITY, OR TORT (INCLUDING NEGLIGENCE OROTHERWISE) ARISING IN ANY WAY OUT OF THE USE OF THISSOFTWARE, EVEN IF ADVISED OF THE POSSIBILITY OF SUCH DAMAGE.
-----------------------------------------------------------
22

MIT License
Copyright (c) 1998, 1999, 2000 Thai Open Source Software Center Ltd
Permission is hereby granted, free of charge, to any person obtaining a copy of this software andassociated documentation files (the "Software"), to deal in the Software without restriction, includingwithout limitation the rights to use, copy, modify, merge, publish, distribute, sublicense, and/or sell copiesof the Software, and to permit persons to whom the Software is furnished to do so, subject to the followingconditions:
The above copyright notice and this permission notice shall be included in all copies or substantialportions of the Software.
THE SOFTWARE IS PROVIDED "AS IS", WITHOUT WARRANTY OF ANY KIND, EXPRESS ORIMPLIED, INCLUDING BUT NOT LIMITED TO THE WARRANTIES OF MERCHANTABILITY, FITNESSFOR A PARTICULAR PURPOSE AND NONINFRINGEMENT. IN NO EVENT SHALL THE AUTHORS ORCOPYRIGHT HOLDERS BE LIABLE FOR ANY CLAIM, DAMAGES OR OTHER LIABILITY, WHETHERIN AN ACTION OF CONTRACT, TORT OR OTHERWISE, ARISING FROM, OUT OF OR INCONNECTION WITH THE SOFTWARE OR THE USE OR OTHER DEALINGS IN THE SOFTWARE.
Copyright 2000 Computing Research Labs, New Mexico State University
Copyright 2001-2015 Francesco Zappa Nardelli
Permission is hereby granted, free of charge, to any person obtaining a copy of this software andassociated documentation files (the "Software"), to deal in the Software without restriction, includingwithout limitation the rights to use, copy, modify, merge, publish, distribute, sublicense, and/or sell copiesof the Software, and to permit persons to whom the Software is furnished to do so, subject to the followingconditions:
The above copyright notice and this permission notice shall be included in all copies or substantialportions of the Software.
THE SOFTWARE IS PROVIDED "AS IS", WITHOUT WARRANTY OF ANY KIND, EXPRESS ORIMPLIED, INCLUDING BUT NOT LIMITED TO THE WARRANTIES OF MERCHANTABILITY, FITNESSFOR A PARTICULAR PURPOSE AND NONINFRINGEMENT. IN NO EVENT SHALL THE COMPUTINGRESEARCH LAB OR NEW MEXICO STATE UNIVERSITY BE LIABLE FOR ANY CLAIM, DAMAGES OROTHER LIABILITY, WHETHER IN AN ACTION OF CONTRACT, TORT OR OTHERWISE, ARISINGFROM, OUT OF OR IN CONNECTION WITH THE SOFTWARE OR THE USE OR OTHER DEALINGS INTHE SOFTWARE.
Written by Joel Sherrill <[email protected]>.
COPYRIGHT (c) 1989-2000.
On-Line Applications Research Corporation (OAR).
Permission to use, copy, modify, and distribute this software for any purpose without fee is herebygranted, provided that this entire notice is included in all copies of any software which is or includes acopy or modification of this software.
THIS SOFTWARE IS BEING PROVIDED "AS IS", WITHOUT ANY EXPRESS OR IMPLIED WARRANTY.IN PARTICULAR, THE AUTHOR MAKES NO REPRESENTATION OR WARRANTY OF ANY KIND
23

CONCERNING THE MERCHANTABILITY OF THIS SOFTWARE OR ITS FITNESS FOR ANYPARTICULAR PURPOSE.
(1) Red Hat Incorporated
Copyright (c) 1994-2009 Red Hat, Inc. All rights reserved.
This copyrighted material is made available to anyone wishing to use, modify, copy, or redistribute itsubject to the terms and conditions of the BSD License. This program is distributed in the hope that it willbe useful, but WITHOUT ANY WARRANTY expressed or implied, including the implied warranties ofMERCHANTABILITY or FITNESS FOR A PARTICULAR PURPOSE. A copy of this license is available athttp://www.opensource.org/licenses. Any Red Hat trademarks that are incorporated in the source code ordocumentation are not subject to the BSD License and may only be used or replicated with the expresspermission of Red Hat, Inc.
(2) University of California, Berkeley
Copyright (c) 1981-2000 The Regents of the University of California.
All rights reserved.
Redistribution and use in source and binary forms, with or without modification, are permitted providedthat the following conditions are met:
* Redistributions of source code must retain the above copyright notice, this list of conditions and thefollowing disclaimer.* Redistributions in binary form must reproduce the above copyright notice, this list of conditions and thefollowing disclaimer in the documentation and/or other materials provided with the distribution.* Neither the name of the University nor the names of its contributors may be used to endorse or promoteproducts derived from this software without specific prior written permission.
THIS SOFTWARE IS PROVIDED BY THE COPYRIGHT HOLDERS AND CONTRIBUTORS "AS IS" ANDANY EXPRESS OR IMPLIED WARRANTIES, INCLUDING, BUT NOT LIMITED TO, THE IMPLIEDWARRANTIES OF MERCHANTABILITY AND FITNESS FOR A PARTICULAR PURPOSE AREDISCLAIMED. IN NO EVENT SHALL THE COPYRIGHT OWNER OR CONTRIBUTORS BE LIABLE FORANY DIRECT, INDIRECT, INCIDENTAL, SPECIAL, EXEMPLARY, OR CONSEQUENTIAL DAMAGES(INCLUDING, BUT NOT LIMITED TO, PROCUREMENT OF SUBSTITUTE GOODS OR SERVICES;LOSS OF USE, DATA, OR PROFITS; OR BUSINESS INTERRUPTION) HOWEVER CAUSED AND ONANY THEORY OF LIABILITY, WHETHER IN CONTRACT, STRICT LIABILITY, OR TORT (INCLUDINGNEGLIGENCE OR OTHERWISE) ARISING IN ANY WAY OUT OF THE USE OF THIS SOFTWARE,EVEN IF ADVISED OF THE POSSIBILITY OF SUCH DAMAGE.
The FreeType Project LICENSE
----------------------------
2006-Jan-27
Copyright 1996-2002, 2006 by
David Turner, Robert Wilhelm, and Werner Lemberg
Introduction
============
24

The FreeType Project is distributed in several archive packages; some of them may contain, in addition tothe FreeType font engine, various tools and contributions which rely on, or relate to, the FreeType Project.
This license applies to all files found in such packages, and which do not fall under their own explicitlicense. The license affects thus the FreeType font engine, the test programs, documentation andmakefiles, at the very least.
This license was inspired by the BSD, Artistic, and IJG (Independent JPEG Group) licenses, which allencourage inclusion and use of free software in commercial and freeware products alike. As aconsequence, its main points are that:
o We don't promise that this software works. However, we will be interested in any kind of bug reports.(`as is' distribution)
o You can use this software for whatever you want, in parts or full form, without having to pay us.(`royalty-free' usage)
o You may not pretend that you wrote this software. If you use it, or only parts of it, in a program, youmust acknowledge somewhere in your documentation that you have used the FreeType code. (`credits')
We specifically permit and encourage the inclusion of this software, with or without modifications, incommercial products.
We disclaim all warranties covering The FreeType Project and assume no liability related to TheFreeType Project.
Finally, many people asked us for a preferred form for a credit/disclaimer to use in compliance with thislicense. We thus encourage you to use the following text:
"""
Portions of this software are copyright © <year> The FreeType
Project (www.freetype.org). All rights reserved.
"""
Please replace <year> with the value from the FreeType version you actually use.
Legal Terms
===========
0. Definitions
--------------
Throughout this license, the terms `package', `FreeType Project', and `FreeType archive' refer to the setof files originally distributed by the authors (David Turner, Robert Wilhelm, and Werner Lemberg) as the`FreeType Project', be they named as alpha, beta or final release.
`You' refers to the licensee, or person using the project, where `using' is a generic term includingcompiling the project's source code as well as linking it to form a `program' or `executable'.
This program is referred to as `a program using the FreeType engine'.
This license applies to all files distributed in the original FreeType Project, including all source code,binaries and documentation, unless otherwise stated in the file in its original, unmodified form asdistributed in the original archive.
If you are unsure whether or not a particular file is covered by this license, you must contact us to verifythis.
25

The FreeType Project is copyright (C) 1996-2000 by David Turner, Robert Wilhelm, and Werner Lemberg.All rights reserved except as specified below.
1. No Warranty
--------------
THE FREETYPE PROJECT IS PROVIDED `AS IS' WITHOUT WARRANTY OF ANY KIND, EITHEREXPRESS OR IMPLIED, INCLUDING, BUT NOT LIMITED TO, WARRANTIES OF MERCHANTABILITYAND FITNESS FOR A PARTICULAR PURPOSE. IN NO EVENT WILL ANY OF THE AUTHORS ORCOPYRIGHT HOLDERS BE LIABLE FOR ANY DAMAGES CAUSED BY THE USE OR THE INABILITYTO USE, OF THE FREETYPE PROJECT.
2. Redistribution
-----------------
This license grants a worldwide, royalty-free, perpetual and irrevocable right and license to use, execute,perform, compile, display, copy, create derivative works of, distribute and sublicense the FreeType Project(in both source and object code forms) and derivative works thereof for any purpose; and to authorizeothers to exercise some or all of the rights granted herein, subject to the following conditions:
o Redistribution of source code must retain this license file (`FTL.TXT') unaltered; any additions, deletionsor changes to the original files must be clearly indicated in accompanying documentation. The copyrightnotices of the unaltered, original files must be preserved in all copies of source files.
o Redistribution in binary form must provide a disclaimer that states that the software is based in part ofthe work of the FreeType Team, in the distribution documentation. We also encourage you to put an URLto the FreeType web page in your documentation, though this isn't mandatory.
These conditions apply to any software derived from or based on the FreeType Project, not just theunmodified files. If you use our work, you must acknowledge us. However, no fee need be paid to us.
3. Advertising
--------------
Neither the FreeType authors and contributors nor you shall use the name of the other for commercial,advertising, or promotional purposes without specific prior written permission.
We suggest, but do not require, that you use one or more of the following phrases to refer to this softwarein your documentation or advertising materials: `FreeType Project', `FreeType Engine', `FreeType library',or `FreeType Distribution'.
As you have not signed this license, you are not required to accept it. However, as the FreeType Projectis copyrighted material, only this license, or another one contracted with the authors, grants you the rightto use, distribute, and modify it.
Therefore, by using, distributing, or modifying the FreeType Project, you indicate that you understand andaccept all the terms of this license.
4. Contacts
-----------
There are two mailing lists related to FreeType:
26

Discusses general use and applications of FreeType, as well as future and wanted additions to the libraryand distribution.
If you are looking for support, start in this list if you haven't found anything to help you in thedocumentation.
Discusses bugs, as well as engine internals, design issues, specific licenses, porting, etc.
Our home page can be found at
http://www.freetype.org
--- end of FTL.TXT ---
The TWAIN Toolkit is distributed as is. The developer and distributors of the TWAIN Toolkit expresslydisclaim all implied, express or statutory warranties including, without limitation, the implied warranties ofmerchantability, noninfringement of third party rights and fitness for a particular purpose. Neither thedevelopers nor the distributors will be liable for damages, whether direct, indirect, special, incidental, orconsequential, as a result of the reproduction, modification, distribution or other use of the TWAIN Toolkit.
The following applies only to products supporting Wi-Fi.
(c) 2009-2013 by Jeff Mott. All rights reserved.
Redistribution and use in source and binary forms, with or without modification, are permitted providedthat the following conditions are met:
* Redistributions of source code must retain the above copyright notice, this list of conditions, and thefollowing disclaimer.* Redistributions in binary form must reproduce the above copyright notice, this list of conditions, and thefollowing disclaimer in the documentation or other materials provided with the distribution.* Neither the name CryptoJS nor the names of its contributors may be used to endorse or promoteproducts derived from this software without specific prior written permission.
THIS SOFTWARE IS PROVIDED BY THE COPYRIGHT HOLDERS AND CONTRIBUTORS "AS IS,"AND ANY EXPRESS OR IMPLIED WARRANTIES, INCLUDING, BUT NOT LIMITED TO, THE IMPLIEDWARRANTIES OF MERCHANTABILITY AND FITNESS FOR A PARTICULAR PURPOSE, AREDISCLAIMED. IN NO EVENT SHALL THE COPYRIGHT HOLDER OR CONTRIBUTORS BE LIABLEFOR ANY DIRECT, INDIRECT, INCIDENTAL, SPECIAL, EXEMPLARY, OR CONSEQUENTIALDAMAGES (INCLUDING, BUT NOT LIMITED TO, PROCUREMENT OF SUBSTITUTE GOODS ORSERVICES; LOSS OF USE, DATA, OR PROFITS; OR BUSINESS INTERRUPTION) HOWEVERCAUSED AND ON ANY THEORY OF LIABILITY, WHETHER IN CONTRACT, STRICT LIABILITY, ORTORT (INCLUDING NEGLIGENCE OR OTHERWISE) ARISING IN ANY WAY OUT OF THE USE OFTHIS SOFTWARE, EVEN IF ADVISED OF THE POSSIBILITY OF SUCH DAMAGE.
27

Basic Operation
Printing Photos from a Computer
Printing Photos from a Smartphone/Tablet
Copying
Faxing
28

Printing Photos from a Computer
This section describes how to print photos with Easy-PhotoPrint Editor.
1. Open the front cover (A) gently.
The paper output tray (B) opens.
2. Pull out the cassette until it stops.
3. Use the right paper guide (C) to slide both paper guides all the way out.
4. Load photo paper in portrait orientation WITH PRINT SIDE FACING DOWN.
29

* The above figure shows the printer with the paper output tray raised.
5. Slide the right paper guide (C) to align the paper guides with both sides of the paper stack.
* The above figure shows the printer with the paper output tray raised.
6. Push cassette back until arrow ( ) on front cover is aligned with edge of printer.
After pushing the cassette back, the paper information registration screen for the cassette is displayedon the LCD.
30

7. Press the OK button.
8. Use the button to select the size of the loaded paper in the cassette, then press theOK button.
Note• The (asterisk) on the LCD indicates the current setting.
9. Use the button to select the type of the loaded paper in the cassette, then press theOK button.
Follow the instructions of any messages displayed to register the paper information.
10. Pull the paper output support (D) out from the paper output tray.
11. Open the output tray extension (E).
31

12. Start Easy-PhotoPrint Editor.
For Windows:
The procedure below is for a computer running the Windows 10 operating system.
From the Start menu, select (All apps >) Canon Utilities > Easy-PhotoPrint Editor.
For macOS:
From the Go menu in Finder, select Application and double-click the Canon Utilities folder, the Easy-PhotoPrint Editor folder, and then the Easy-PhotoPrint Editor icon.
13. Click Photos icon (F).
14. Click Browse (G) in From computer: and select folder with photos you want to print.
15. Click photos (H) you want to print and select Open (I).
For Windows:
To select two or more photos at a time, click photos while pressing the Ctrl key.
For macOS:
To select two or more photos at a time, click photos while pressing the command key.
32
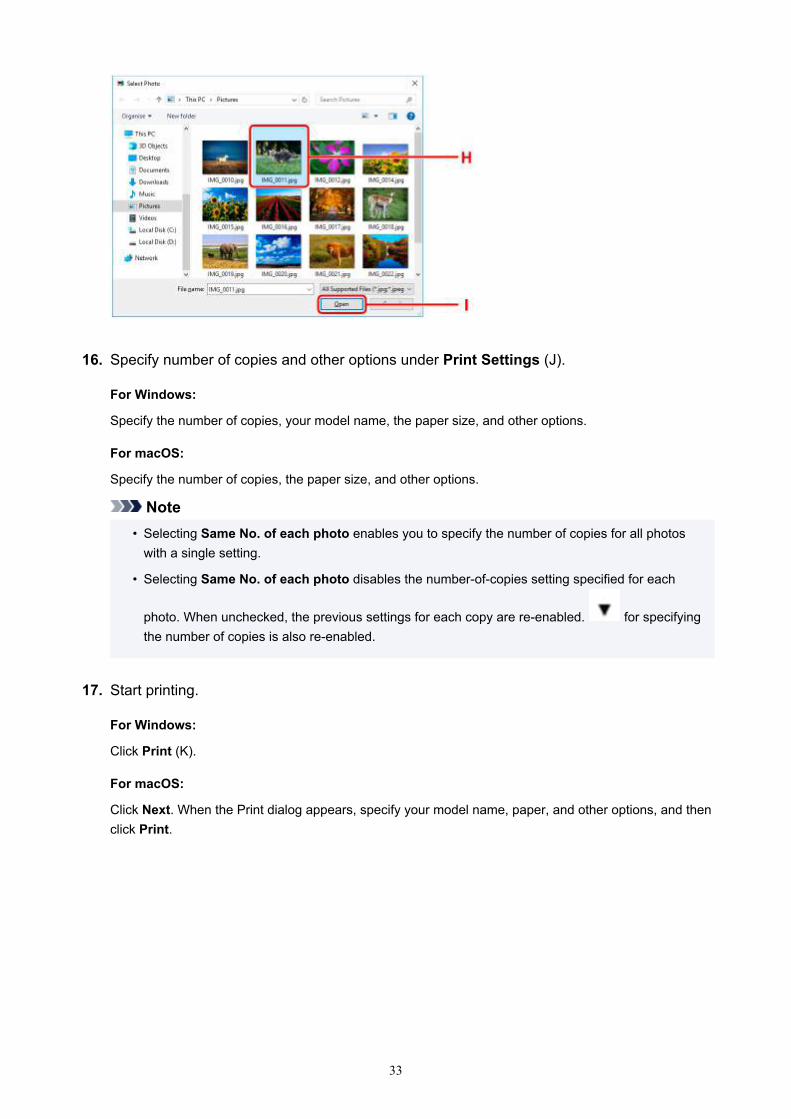
16. Specify number of copies and other options under Print Settings (J).
For Windows:
Specify the number of copies, your model name, the paper size, and other options.
For macOS:
Specify the number of copies, the paper size, and other options.
Note• Selecting Same No. of each photo enables you to specify the number of copies for all photos
with a single setting.
• Selecting Same No. of each photo disables the number-of-copies setting specified for each
photo. When unchecked, the previous settings for each copy are re-enabled. for specifyingthe number of copies is also re-enabled.
17. Start printing.
For Windows:
Click Print (K).
For macOS:
Click Next. When the Print dialog appears, specify your model name, paper, and other options, and thenclick Print.
33

Note• Easy-PhotoPrint Editor lets you easily create and print original collages, cards, or calendars using your
favorite photos.
Easy-PhotoPrint Editor Guide
34

Printing Photos from a Smartphone/Tablet
This section describes how to print photos with Canon PRINT Inkjet/SELPHY.
For details on how to download Canon PRINT Inkjet/SELPHY, see below.
Print Easily from a Smartphone or Tablet with Canon PRINT Inkjet/SELPHY
1. Open the front cover (A) gently.
The paper output tray (B) opens.
2. Pull out the cassette until it stops.
3. Use the right paper guide (C) to slide both paper guides all the way out.
4. Load photo paper in portrait orientation WITH PRINT SIDE FACING DOWN.
35

* The above figure shows the printer with the paper output tray raised.
5. Slide the right paper guide (C) to align the paper guides with both sides of the paper stack.
* The above figure shows the printer with the paper output tray raised.
6. Push cassette back until arrow ( ) on front cover is aligned with edge of printer.
After pushing the cassette back, the paper information registration screen for the cassette is displayedon the LCD.
36

7. Press the OK button.
8. Use the button to select the size of the loaded paper in the cassette, then press theOK button.
Note• The (asterisk) on the LCD indicates the current setting.
9. Use the button to select the type of the loaded paper in the cassette, then press theOK button.
Follow the instructions of any messages displayed to register the paper information.
10. Pull the paper output support (D) out from the paper output tray.
11. Open the output tray extension (E).
37

12. Start (Canon PRINT Inkjet/SELPHY) from your smartphone/tablet.
13. Select Photo Print on Canon PRINT Inkjet/SELPHY.
The list of photos saved on your smartphone/tablet is displayed.
14. Select a photo.
You can also select multiple photos at once.
15. Specify the number of copies, paper size, etc.
16. Select Print.
38

Copying
This section describes how to load originals and copy them to plain paper loaded.
1. Open the front cover (A) gently.
The paper output tray (B) opens.
2. Pull out the cassette until it stops.
3. Use the right paper guide (C) to slide both paper guides all the way out.
4. Load plain paper in portrait orientation WITH PRINT SIDE FACING DOWN.
39

* The above figure shows the printer with the paper output tray raised.
5. Slide the right paper guide (C) to align the paper guides with both sides of the paper stack.
* The above figure shows the printer with the paper output tray raised.
6. Push cassette back until arrow ( ) on front cover is aligned with edge of printer.
After pushing the cassette back, the paper information registration screen for the cassette is displayedon the LCD.
40

7. Press the OK button.
8. Use the button to select the size of the loaded paper in the cassette, then press theOK button.
Note• The (asterisk) on the LCD indicates the current setting.
9. Use the button to select the type of the loaded paper in the cassette, then press theOK button.
Follow the instructions of any messages displayed to register the paper information.
10. Pull the paper output support (D) out from the paper output tray.
11. Open the output tray extension (E).
41

12. Press the COPY button (F).
13. Open the document cover (G).
14. Load the original WITH THE SIDE TO COPY FACING DOWN and align it with thealignment mark (H).
Note• To copy two or more documents continuously, load them in the ADF (Auto Document Feeder).
42

Loading Documents in the ADF (Auto Document Feeder)
15. Close the document cover gently.
16. Confirm the paper settings, then press the Black button (I) or Color button (J).
Important• Do not open the document cover until copying is complete.
Note• Your printer is equipped with many other convenient copy features.
Copying
43

Faxing
Fax multiple documents in black and white as follows.
1. Open the document tray (A).
2. Slide the document guide (B) all the way out.
3. Insert the document WITH THE SIDE TO SCAN FACING UP.
4. Align document guide (B) with document width.
44

5. Press the FAX button (C).
6. Use the Numeric buttons (D) to enter the fax number.
7. Press the Black button (E).
Note• Many other convenient faxing features are available.
Faxing
45
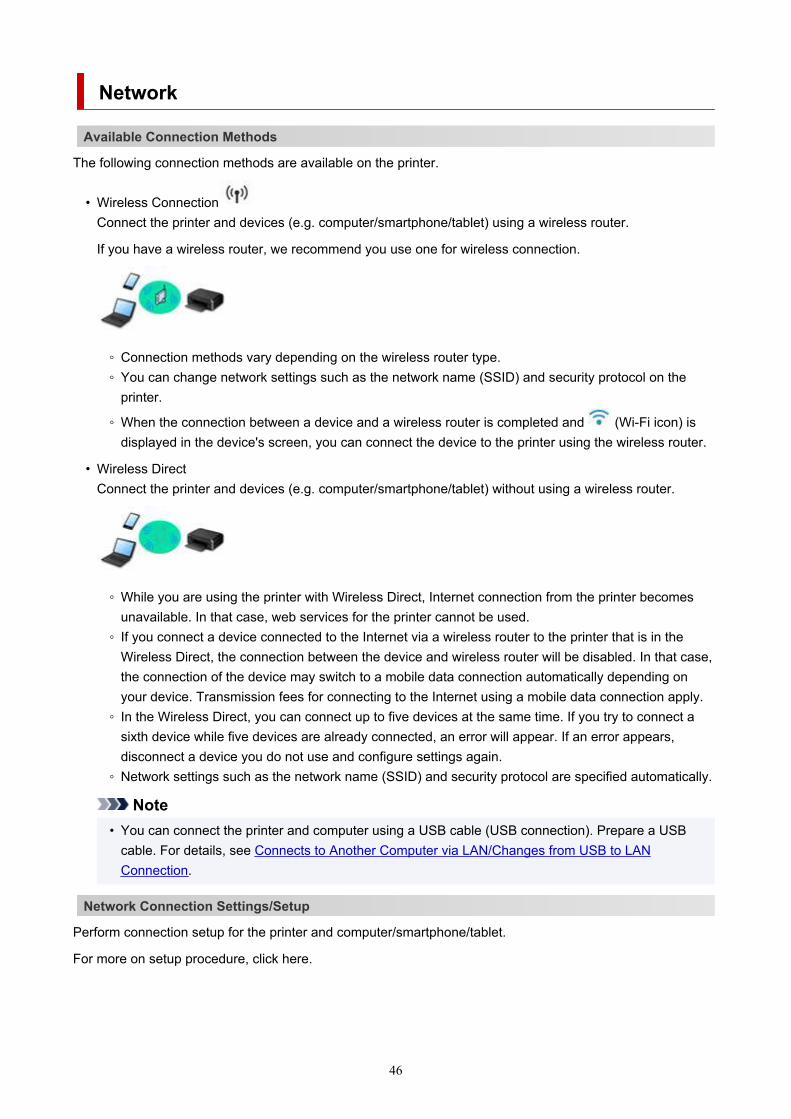
Network
Available Connection Methods
The following connection methods are available on the printer.
• Wireless ConnectionConnect the printer and devices (e.g. computer/smartphone/tablet) using a wireless router.
If you have a wireless router, we recommend you use one for wireless connection.
◦ Connection methods vary depending on the wireless router type.◦ You can change network settings such as the network name (SSID) and security protocol on the
printer.
◦ When the connection between a device and a wireless router is completed and (Wi-Fi icon) isdisplayed in the device's screen, you can connect the device to the printer using the wireless router.
• Wireless DirectConnect the printer and devices (e.g. computer/smartphone/tablet) without using a wireless router.
◦ While you are using the printer with Wireless Direct, Internet connection from the printer becomesunavailable. In that case, web services for the printer cannot be used.
◦ If you connect a device connected to the Internet via a wireless router to the printer that is in theWireless Direct, the connection between the device and wireless router will be disabled. In that case,the connection of the device may switch to a mobile data connection automatically depending onyour device. Transmission fees for connecting to the Internet using a mobile data connection apply.
◦ In the Wireless Direct, you can connect up to five devices at the same time. If you try to connect asixth device while five devices are already connected, an error will appear. If an error appears,disconnect a device you do not use and configure settings again.
◦ Network settings such as the network name (SSID) and security protocol are specified automatically.
Note• You can connect the printer and computer using a USB cable (USB connection). Prepare a USB
cable. For details, see Connects to Another Computer via LAN/Changes from USB to LANConnection.
Network Connection Settings/Setup
Perform connection setup for the printer and computer/smartphone/tablet.
For more on setup procedure, click here.
46

Changing Network Settings
See below for changing connection settings for the printer and computer/smartphone/tablet.
• To change network connection method:Reconfiguration Method of Wi-Fi Connection
Changing the Connection Mode
• To add computer/smartphone/tablet to the printer:Connects to Another Computer via LAN/Changes from USB to LAN Connection
• To use Wireless Direct temporarily:Printing/Scanning with Wireless Direct
IJ Network Device Setup Utility
IJ Network Device Setup Utility checks or diagnoses the settings of the printer and those of computer andrestores the status of them if anything is wrong with network connection. Select either link below to downloadIJ Network Device Setup Utility.
Checking Printer Connection Status Using IJ Network Device Setup Utility
• Performing/Changing Network Settings (Windows)
For Windows, you can perform network settings using IJ Network Device Setup Utility.
IJ Network Device Setup Utility (Windows)
• Diagnosing and Repairing Network Settings (Windows/macOS)
You can diagnose or repair network settings using IJ Network Device Setup Utility.
◦ For Windows:
IJ Network Device Setup Utility (Windows)
◦ For macOS:
IJ Network Device Setup Utility (macOS)
Network Connection Tips
See below for tips on using the printer via network connection.
Network Connection TipsHandling Printer Configuration using the Web Browser
Troubleshooting
See Network Settings and Common Problems for troubleshooting on network connection.
Notice/Restriction
See below for details.
• Restrictions on network settings:Restrictions
• Notices when printing using web service:Notice for Web Service Printing
47
Restrictions
When connecting another device while a device (such as a computer) is already connected to the printer,connect it using the same connection method as the connected device.If you connect using a different connection method, the connection to the device in use will be disabled.
Connect via wireless router
• Make sure your device and the wireless router are connected. For details on checking these settings,see the manual supplied with the wireless router or contact its manufacturer.As for a device already connected to the printer without using a wireless router, reconnect it via awireless router.
• Configuration, router functions, setup procedures and security settings of wireless routers varydepending on the system environment. For details, see the manual for your wireless router or contactits manufacturer.
• This printer does not support IEEE802.11ac. IEEE802.11a and IEEE802.11n (5 GHz) may not besupported depending on the country or region you live in. Check if your device supports IEEE802.11n,IEEE802.11g, IEEE802.11b or IEEE802.11a.
• If your device is set to the "IEEE802.11n only" mode, WEP or TKIP cannot be used as a securityprotocol. Change the security protocol for your device to something other than WEP and TKIP orchange the setting to something other than "IEEE802.11n only."The connection between your device and the wireless router will be temporarily disabled while thesetting is changed. Do not proceed to the next screen of this guide until setup is complete.
• For office use, consult your network administrator.• Note that if you connect to a network with no security protection, your personal information could be
disclosed to a third party.
Wireless Direct
Important• If a device is connected to the Internet via a wireless router, and you then connect it to a printer in
Wireless Direct mode, the existing connection between the device and wireless router will bedisabled. In that case, the connection of the device may switch to a mobile data connectionautomatically depending on your device. When you connect to the Internet using a mobile dataconnection, charges may apply depending on your contract.
• When you connect a device and the printer using Wireless Direct, the connection information willbe saved to Wi-Fi settings. The device may be connected to the printer automatically even afterdisconnecting it or connecting it to another wireless router.
• To prevent automatic connection to the printer in Wireless Direct mode, change the connectionmode after using the printer, or set not to connect automatically in the Wi-Fi settings of thedevice.For details on checking or changing the wireless router settings, see the wireless router manualor contact its manufacturer.
• If you connect a device and the printer using Wireless Direct, Internet connection may becomeunavailable depending on your environment. In that case, web services for the printer cannot be used.
48

• In Wireless Direct mode, you can connect up to five devices at the same time. If you try to connect asixth device while five devices are already connected, an error will appear.If an error appears, disconnect a device that does not use the printer, then configure settings again.
• Devices connected to the printer using Wireless Direct cannot communicate with each other.• Firmware updates for the printer are not available while using Wireless Direct.• When a device has been connected to the printer without using a wireless router and you want to set
it up again using the same connection method, disconnect it first. Disable the connection between thedevice and printer in the Wi-Fi setting screen.
49

Network Connection Tips
Default Network Settings
Detect Same Printer Name
Connects to Another Computer via LAN/Changes from USB to LAN Connection
Printing Network Settings
Reconfiguration Method of Wi-Fi Connection
50

Default Network Settings
LAN Connection Defaults
Item Default
Enable/Disable LAN Disable LAN
SSID BJNPSETUP
Wi-Fi security Disable
IP address (IPv4) Auto setup
IP address (IPv6) Auto setup
Set printer name* XXXXXXXXXXXX
Enable/disable IPv6 Enable
Enable/disable WSD Enable
Timeout setting 15 minutes
Enab./disab. Bonjour Enable
Service name Canon TR4500 series
LPR setting Active
RAW protocol Active
LLMNR Active
("XX" represents alphanumeric characters.)
* Default value depends on printer. To check value, use operation panel.
LAN settings
Wireless Direct Defaults
Item Default
Network name (SSID) for wireless direct DIRECT-abXX-TR4500series *1
WL Direct dev. name DIRECT-abXX-TR4500series *1
Password YYYYYYYYYY *2
Security method WPA2-PSK (AES)
Confirm request Displayed
51

*1 "ab" is specified at random and "XX" represents last two digits of printer's MAC address. (The value isspecified when the printer is turned on for the first time.)
*2 The password is specified automatically when the printer is turned on for the first time.
52

Detect Same Printer Name
When the printer is detected during setup, plural printers with the same name may appear on the resultsscreen.
Select a printer with checking the printer settings against those on detection result screen.
• For Windows:
Check the printer's MAC address or serial to select the correct printer from the results.
• For macOS:
The printer names appear with the MAC address added at the end or as the printer name specified byBonjour.
Check identifiers such as the MAC address, the printer name specified by Bonjour, and the printer'sserial number to select the printer from among those that appear.
Note• Serial number may not appear on result screen.
To check the printer's MAC address and the serial number, print out the network settings information.
Printing Network Settings
Note• You can check the serial number by displaying on the LCD.
System information
53

Connects to Another Computer via LAN/Changes from USB toLAN Connection
For Windows:For macOS:
For Windows:
To add a computer to connect to the printer on a LAN or to change from USB to LAN connection, performsetup using the Setup CD-ROM or from the web page.
For macOS:
To connect an additional computer to the printer via LAN, or to change from USB to LAN connection,perform setup from the web page.
54

Printing Network Settings
Use the operation panel to print the printer's current network settings.
Important• The network settings printout contains important information about your network. Handle it with care.
1. Check that printer is turned on.
2. Load two sheets of A4 or Letter-sized plain paper.
3. Press Setup button.
The Setup menu screen appears.
4. Select Device settings and press OK button.
5. Select LAN settings and press OK button.
6. Select Print LAN details and press OK button.
The printer starts printing the network setting information.
The following information on the printer's network setting is printed out. (Some setting values are notdisplayed depending on the printer settings.)
Item Num-ber
Item Description Setting
1 Product Information Product information –
1-1 Product Name Product name XXXXXXXX
1-2 ROM Version ROM version XXXXXXXX
1-3 Serial Number Serial number XXXXXXXX
2 Network Diagnostics Network diagnostics ―
2-1 Diagnostic Result Diagnostic result XXXXXXXX
2-2 Result Codes Result codes XXXXXXXX
2-3 Result Code Details Result code details http://canon.com/ijnwt
3 Wireless LAN Wireless LAN Enable/Disable
3-2 Infrastructure Infrastructure Enable/Disable
3-2-1 Signal Strength Signal strength 0 to 100 [%]
3-2-2 Link Quality Link quality 0 to 100 [%]
55

3-2-3 Frequency Frequency XX (GHz)
3-2-4 MAC Address MAC address XX:XX:XX:XX:XX:XX
3-2-5 Connection Connection status Active/Inactive
3-2-6 SSID SSID Wireless LAN network name (SSID)
3-2-7 Channel Channel XX (1 to 13)
3-2-8 Encryption Encryption method None/WEP/TKIP/AES
3-2-9 WEP Key Length WEP key length (bits) Inactive/128/64
3-2-10 Authentication Authentication method None/auto/open/shared/WPA-PSK/WPA2-PSK
3-2-11 TCP/IPv4 TCP/IPv4 Enable
3-2-12 IP Address IP address XXX.XXX.XXX.XXX
3-2-13 Subnet Mask Subnet mask XXX.XXX.XXX.XXX
3-2-14 Default Gateway Default gateway XXX.XXX.XXX.XXX
3-2-15 TCP/IPv6 TCP/IPv6 Enable/Disable
3-2-16 Link Local Address Link local address XXXX:XXXX:XXXX:XXXX
XXXX:XXXX:XXXX:XXXX
3-2-17 Link Local PrefixLength
Link local prefix length XXX
3-2-18 Stateless Address1 Stateless address 1 XXXX:XXXX:XXXX:XXXX
XXXX:XXXX:XXXX:XXXX
3-2-19 Stateless PrefixLength1
Stateless prefix length1
XXX
3-2-20 Stateless Address2 Stateless address 2 XXXX:XXXX:XXXX:XXXX
XXXX:XXXX:XXXX:XXXX
3-2-21 Stateless PrefixLength2
Stateless prefix length2
XXX
3-2-22 Stateless Address3 Stateless address 3 XXXX:XXXX:XXXX:XXXX
XXXX:XXXX:XXXX:XXXX
3-2-23 Stateless PrefixLength3
Stateless prefix length3
XXX
3-2-24 Stateless Address4 Stateless address 4 XXXX:XXXX:XXXX:XXXX
XXXX:XXXX:XXXX:XXXX
3-2-25 Stateless PrefixLength4
Stateless prefix length4
XXX
56

3-2-26 Default Gateway1 Default gateway 1 XXXX:XXXX:XXXX:XXXX
XXXX:XXXX:XXXX:XXXX
3-2-27 Default Gateway2 Default gateway 2 XXXX:XXXX:XXXX:XXXX
XXXX:XXXX:XXXX:XXXX
3-2-28 Default Gateway3 Default gateway 3 XXXX:XXXX:XXXX:XXXX
XXXX:XXXX:XXXX:XXXX
3-2-29 Default Gateway4 Default gateway 4 XXXX:XXXX:XXXX:XXXX
XXXX:XXXX:XXXX:XXXX
3-2-33 IPsec IPsec setting Active
3-2-34 Security Protocol Security method ESP/ESP & AH/AH
3-3 Wireless Direct Operation mode forWireless Direct
Enable/Disable
3-3-1 MAC Address MAC address XX:XX:XX:XX:XX:XX
3-3-2 Connection Connection status Active/Inactive
3-3-3 SSID SSID Wireless Direct network name (SSID)
3-3-4 Password Password Wireless Direct password (10 alphanumeric characters)
3-3-5 Channel Channel 3
3-3-6 Encryption Encryption method AES
3-3-7 Authentication Authentication method WPA2-PSK
3-3-8 TCP/IPv4 TCP/IPv4 Enable
3-3-9 IP Address IP address XXX.XXX.XXX.XXX
3-3-10 Subnet Mask Subnet mask XXX.XXX.XXX.XXX
3-3-11 Default Gateway Default gateway XXX.XXX.XXX.XXX
3-3-12 TCP/IPv6 TCP/IPv6 Enable/Disable
3-3-13 Link Local Address Link local address XXXX:XXXX:XXXX:XXXX
XXXX:XXXX:XXXX:XXXX
3-3-14 Link Local PrefixLength
Link local prefix length XXX
3-3-15 IPsec IPsec setting Active
3-3-16 Security Protocol Security method –
5 Other Settings Other settings –
57

5-1 Printer Name Printer name Printer name (Up to 15 alphanumeric characters)
5-2 Wireless Direct Dev-Name
Device name for wire-less direct
Device name for wireless direct (Up to 32 alphanumericcharacters)
5-4 WSD Printing WSD printing setting Enable/Disable
5-5 WSD Timeout Timeout 1/5/10/15/20 [min]
5-6 LPD Printing LPD printing setting Enable/Disable
5-7 RAW Printing RAW printing setting Enable/Disable
5-9 Bonjour Bonjour setting Enable/Disable
5-10 Bonjour Service Name Bonjour service name Bonjour service name (Up to 52 alphanumeric characters)
5-11 LLMNR LLMNR setting Enable/Disable
5-12 SNMP SNMP setting Enable/Disable
5-14 DNS Server Obtain DNS server ad-dress automatically
Auto/Manual
5-15 Primary Server Primary server address XXX.XXX.XXX.XXX
5-16 Secondary Server Secondary server ad-dress
XXX.XXX.XXX.XXX
5-17 Proxy Server Proxy server setting Enable/Disable
5-18 Proxy Address Proxy address XXXXXXXXXXXXXXXXXXXX
5-19 Proxy Port Proxy port specification 1 to 65535
5-20 Cert. Fingerprt(SHA-1) Certificate finger-print(SHA-1)
xxxxxxxx xxxxxxxx xxxxxxxx
xxxxxxxx xxxxxxxx
5-21 Cert. Fin-gerprt(SHA-256)
Certificate finger-print(SHA-256)
xxxxxxxx xxxxxxxx xxxxxxxx xxxxxxxx
xxxxxxxx xxxxxxxx xxxxxxxx xxxxxxxx
("XX" represents alphanumeric characters.)
58

Reconfiguration Method of Wi-Fi Connection
Follow either procedure below to change Wi-Fi connection method (infrastructure or Wireless Direct).
• For Windows:
◦ Redo setup using the Setup CD-ROM or from the web page.◦ Perform settings on the Network Settings screen on IJ Network Device Setup Utility.
Important• Before you perform settings using IJ Network Device Setup Utility, turn on Easy wireless
connect mode on the printer following the procedure below.
1. Check that printer is turned on.
2. Press Setup button.
The Setup menu screen appears.
3. Select Wi-Fi setup and press OK button.
4. Select Easy Wi-Fi connect and press OK button.
Follow instructions on your smartphone or tablet.
5. If message saying setup is completed appears, press OK button.
• For macOS:
Redo setup from the web page.
59

IJ Network Device Setup Utility (Windows)
IJ Network Device Setup Utility
Starting Up IJ Network Device Setup Utility
Diagnosing and Repairing Network Settings
Performing/Changing Network Settings
List of Models Which Does Not Support Diagnosis and Repair Function
60

IJ Network Device Setup Utility
IJ Network Device Setup Utility allows you to diagnose or repair the network status, and to perform printersettings on network.
Use IJ Network Device Setup Utility for:
• Searching printers on network and performing initial network setup for detected printers• Performing initial network setup by connecting the printer and computer using a USB cable (Not
available for some models)• Changing printer network settings• Diagnosing the settings of the printer and those of computer on which IJ Network Device Setup Utility is
installed if anything is wrong with connection. In addition, IJ Network Device Setup Utility repairs thestatus of the printer and computer (Not available for some models).
Important• Depending on the printer you are using, an administrator password is already specified for the printer at
the time of purchase. When you change the network settings, authentication by the administratorpassword is required.
For details:
Administrator Password
For improving security, we recommend to change the administrator password.
Change Administrator Password
• To use the printer over LAN, make sure you have the equipment necessary for the connection type,such as a wireless router or a LAN cable.
• When you install IJ Network Device Setup Utility, disable block function of firewall.• Do not change network settings using IJ Network Device Setup Utility while printing is in progress.
61
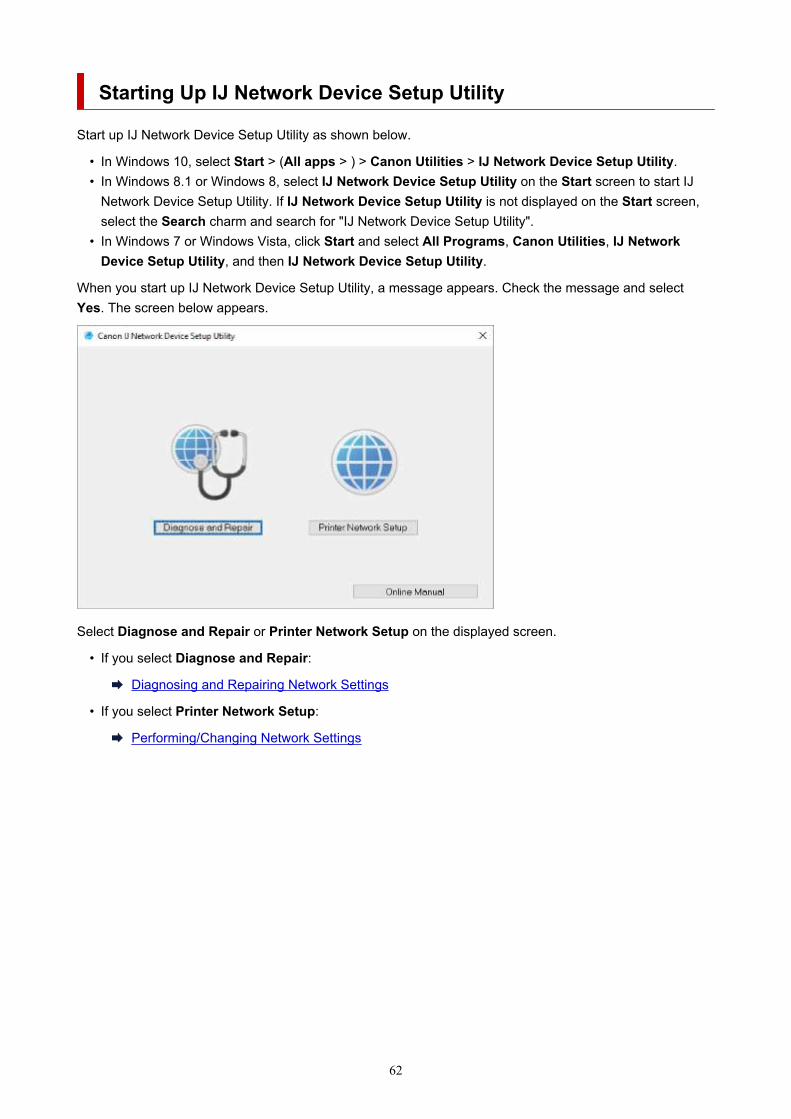
Starting Up IJ Network Device Setup Utility
Start up IJ Network Device Setup Utility as shown below.
• In Windows 10, select Start > (All apps > ) > Canon Utilities > IJ Network Device Setup Utility.• In Windows 8.1 or Windows 8, select IJ Network Device Setup Utility on the Start screen to start IJ
Network Device Setup Utility. If IJ Network Device Setup Utility is not displayed on the Start screen,select the Search charm and search for "IJ Network Device Setup Utility".
• In Windows 7 or Windows Vista, click Start and select All Programs, Canon Utilities, IJ NetworkDevice Setup Utility, and then IJ Network Device Setup Utility.
When you start up IJ Network Device Setup Utility, a message appears. Check the message and selectYes. The screen below appears.
Select Diagnose and Repair or Printer Network Setup on the displayed screen.
• If you select Diagnose and Repair:
Diagnosing and Repairing Network Settings
• If you select Printer Network Setup:
Performing/Changing Network Settings
62
Diagnosing and Repairing Network Settings
IJ Network Device Setup Utility diagnoses and repairs computer settings or connection between thecomputer and printer when a problem (e.g. cannot print from a printer on the network) occurs.
Important• Some models do not support diagnosis and repair function.
For details:
List of Models Which Does Not Support Diagnosis and Repair Function
Follow the procedure below.
1. Start up IJ Network Device Setup Utility.
2. Check the displayed message and select Yes.
3. Select Diagnose and Repair on the displayed screen.
Perform operations following the instructions on the screen.
Note• This function checks the following items:
• whether the computer is connected to the router• whether a web page on the Internet can be viewed• whether the printer can be detected on the network• whether the signal strength or communication level is sufficient (when using Wi-Fi)• whether the printer port setting matches with the network setting
63

Performing/Changing Network Settings
Canon IJ Network Device Setup Utility Screen
Performing Network Settings
64

Canon IJ Network Device Setup Utility Screen
Items on Canon IJ Network Device Setup Utility ScreenMenus on Canon IJ Network Device Setup Utility ScreenItems on Canon IJ Network Device Setup Utility Screen Toolbar
Items on Canon IJ Network Device Setup Utility Screen
The screen below appears when you start up IJ Network Device Setup Utility and select Printer NetworkSetup. Detected printers are listed on the screen and the items below are shown.
A: Product NameDisplays the product name of detected printer. The icon below appears on the left if the printer cannotbe used.
: Appears when the printer requires setup or has not been configured.
: Appears when the IP address is duplicated to another printer.
: Appears when you cannot communicate with the printer.
Note• If a printer you want to use is not detected, try to set the criteria for printer search.
Setting Criteria for Printer Search/Searching Specific Printer
• Right-clicking a printer displays setting items or items to confirm.
B: Serial Number (Last 5 Digits)Displays the last five digits of printer's serial number.
C: StatusDisplays the printer status as shown below.
• Available
Indicates the printer is available.
• Setup Completed
65

Appears after performing network setup and clicking Set to close the window.
• Requires Setup
Indicates the printer is required to perform Wi-Fi setup.
Performing/Changing Wi-Fi Settings
• Not Set
Indicates the printer cannot be used on network, or IPv6 is disabled. Specify an IP address or enableIPv6 on Network Settings....
Performing/Changing Wi-Fi Settings
• IP Address Overlap
Indicates the IP address is duplicated to another printer.
• Unknown
Indicates the printer recognized as Available in the past cannot be used currently.
Note• If USB is selected from the pulldown menu on the toolbar, nothing is displayed.
D: IP AddressDisplays the printer IP address. Nothing is displayed if the printer status is Requires Setup.
Note• If USB is selected from the pulldown menu on the toolbar, "-" is displayed.
E: LocationDisplays the printer location if it is registered. Nothing is displayed if the printer status is RequiresSetup.
Note• If USB is selected from the pulldown menu on the toolbar, nothing is displayed.
Assigning Printer Information
F: Connection MethodDisplays printer connection method (wired LAN, Wi-Fi, or USB).
Note• If USB is selected from the pulldown menu on the toolbar, USB is displayed.• If the printer supports both of the LAN connection methods, the printer is recognized as two
printers and they are displayed separately. (The same numbers are displayed on Serial Number(Last 5 Digits).)
• If the printer does not support wired LAN, wired LAN is not displayed.• If you are using IJ Network Device Setup Utility on the computer which does not support Wi-Fi,
Wi-Fi is not displayed.
G: Setting MethodDisplays printer setting method.
• Auto
66

Appears if the printer is used by IP address specified automatically.
• Manual
Appears if the printer is used by IP address specified manually.
Note• If USB is selected from the pulldown menu on the toolbar, "-" is displayed.
H: MAC AddressDisplays the MAC address of the detected printer.
Note• If USB is selected from the pulldown menu on the toolbar, "-" is displayed.
I: Device NameDisplays the printer device name if it is registered.
Note• If USB is selected from the pulldown menu on the toolbar, nothing is displayed.• The printer with Requires Setup displayed on Status is not displayed.
Assigning Printer Information
J: IPv6On appears when an IPv6 address is assigned for the printer.
Note• If USB is selected from the pulldown menu on the toolbar, "-" is displayed.
K: Displays the printer status and operation guides.Selecting a printer from the printer list displays its current status and what to do next.
Menus on Canon IJ Network Device Setup Utility Screen
This section describes menus on Canon IJ Network Device Setup Utility screen.
A: Printer Settings menuPrinter Settings Menu
B: View menuView Menu
C: Option menuOption Menu
67

D: Help menuHelp Menu
Items on Canon IJ Network Device Setup Utility Screen Toolbar
This section describes items on Canon IJ Network Device Setup Utility Screen toolbar.
A: Perform wired or Wi-Fi setup.Note
• This item has the same function as Network Settings... in the Printer Settings menu.
B: Redetects printers.Note
• This item has the same function as Update in the View menu.
C: Stops detecting printers.Note
• This item has the same function as Cancel in the View menu.
D: Switches the printer list. (IPv4, IPv6, or USB printers)Note
• This item has the same function as Switch View in the View menu.• You can also display the USB connected printer list. (Not available for some models.) In this
case, select USB.
E: Displays this guide.Note
• This item has the same function as Online Manual in the Help menu.
68

Performing Network Settings
Performing/Changing Wired LAN Connection (Ethernet Cable) Settings
Performing/Changing Wi-Fi Settings
Assigning Printer Information
69

Performing/Changing Wired LAN Connection (Ethernet Cable)Settings
Follow the procedure below to perform/change wired LAN settings.
Note• For some models, you can perform network setup for a USB connected printer using IJ Network Device
Setup Utility. Select USB on Switch View under the View menu to display printers for which you canperform setup.
1. Start up IJ Network Device Setup Utility.
2. Check the displayed message and select Yes.
3. Select Printer Network Setup on the displayed screen.
Detected printers are listed.
4. Select printer to perform/change settings from printer list.
Select the printer with Wired LAN displayed on Connection Method and Available displayed on Statusto perform settings.
You can perform settings for a printer with Available not displayed on Status via USB connection.
To perform setup for a USB connected printer, select USB from the pulldown menu on the toolbar andselect the printer to perform/change settings.
5. Select Network Settings... on Printer Settings menu.
The Confirm Printer Password screen appears.
For more on the password, refer to Administrator Password.
Note
• Clicking the icon allows you to perform/change settings.• If you select a USB connected printer on step 4, the screen below appears after the Confirm
Printer Password screen appears
Select Wired LAN and click OK.
6. Enter password and click OK.
The Network Settings screen appears.
70

7. Perform/change settings.
You can switch the screen between IPv4 and IPv6. Click the tab to switch the protocol.
• IPv4 settings
A: Use IPv4 addressAlways selected. (displayed in a gray out state)
B: Get IP address automaticallySelect this option to use an IP address automatically assigned by a DHCP server. DHCPserver functionality must be enabled on your router.
C: Use next IP addressSelect this option if no DHCP server functionality is available in your setup where you use theprinter, or you want to use a fixed IP address.
Enter the IP address, subnet mask, and default gateway.
• IPv6 settings
Note• If USB is selected from the pulldown menu on the toolbar, you cannot perform IPv6 settings.
71

A: Use IPv6 addressSelect when you use the printer with IPv6 environment.
B: Use Stateless Address:Select when you use an IP address assigned automatically. Use a router compatible withIPv6.
Note• This setting item is not available depending on the printer you are using.
C: Use Manual Address:Select this option if no DHCP server functionality is available in your setup where you use theprinter, or you want to use a fixed IP address.
Enter the IP address and IP address prefix length.
Note• This setting item is not available depending on the printer you are using.
D: Use DHCPv6:Select when you obtain an IP address using DHCPv6.
Note• This setting item is not available depending on the printer you are using.
8. Click Set.
72

Performing/Changing Wi-Fi Settings
Follow the procedure below to perform/change Wi-Fi settings.
Important• Enable Easy wireless connect (Cableless setup) before performing printer setup. (Not required if you
change the IP address.) For details, search for "NR049" on your printer's online manual and see thepage shown.
• If you use a printer over the Wi-Fi, we highly recommend you perform security settings for Wi-Finetwork using WPA/WPA2 from the viewpoint of security.
Note• For some models, you can perform network setup for a USB connected printer using IJ Network Device
Setup Utility. Select USB on Switch View under the View menu to display printers.
1. Start up IJ Network Device Setup Utility.
2. Check the displayed message and select Yes.
3. Select Printer Network Setup on the displayed screen.
Detected printers are listed.
4. Select printer to perform/change settings from printer list.
Select the printer with Wi-Fi displayed on Connection Method and Available or Requires Setupdisplayed on Status to perform settings.
You can perform settings for a printer with Available or Requires Setup not displayed on Status viaUSB connection.
To perform setup for a USB connected printer, select USB from the pulldown menu on the toolbar andselect the printer to perform/change settings.
5. Select Network Settings... on Printer Settings menu.
The Confirm Printer Password screen appears.
For more on the password, refer to Administrator Password.
Note
• Clicking the icon allows you to perform/change settings.• If you select a USB connected printer on step 4 and the selected printer is compatible with wired
LAN, the screen below appears after the Confirm Printer Password screen appears
73
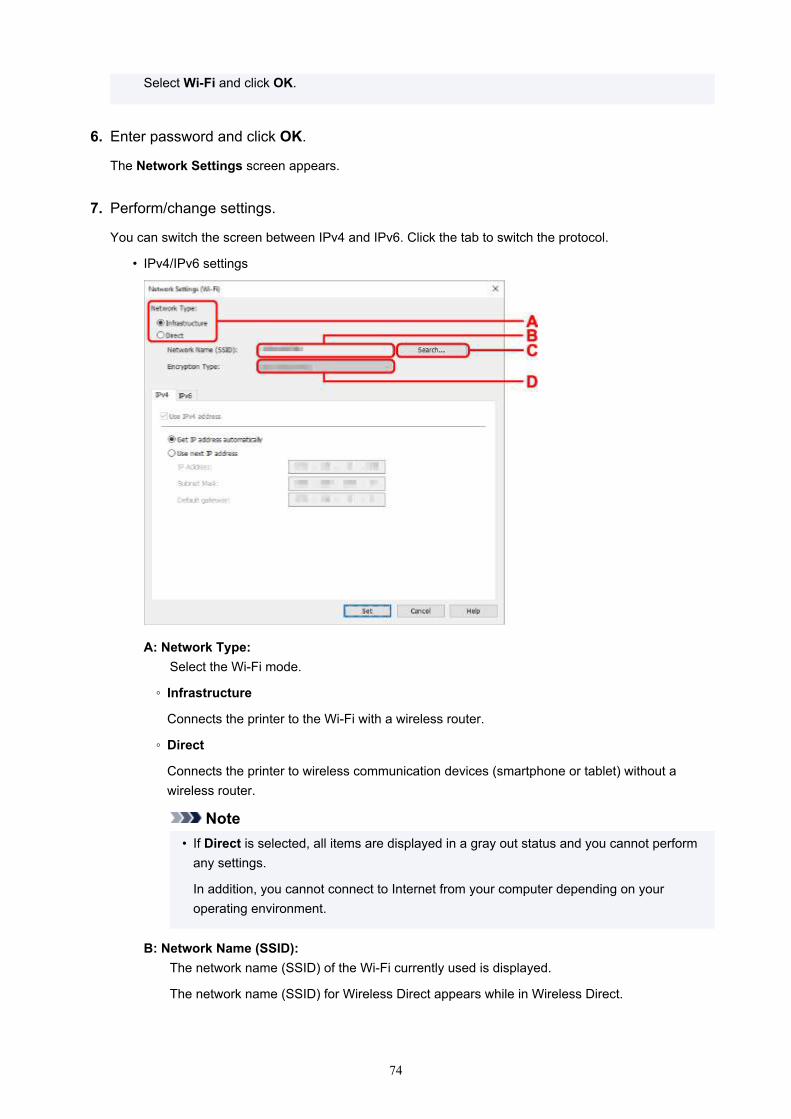
Select Wi-Fi and click OK.
6. Enter password and click OK.
The Network Settings screen appears.
7. Perform/change settings.
You can switch the screen between IPv4 and IPv6. Click the tab to switch the protocol.
• IPv4/IPv6 settings
A: Network Type:Select the Wi-Fi mode.
◦ Infrastructure
Connects the printer to the Wi-Fi with a wireless router.
◦ Direct
Connects the printer to wireless communication devices (smartphone or tablet) without awireless router.
Note• If Direct is selected, all items are displayed in a gray out status and you cannot perform
any settings.
In addition, you cannot connect to Internet from your computer depending on youroperating environment.
B: Network Name (SSID):The network name (SSID) of the Wi-Fi currently used is displayed.
The network name (SSID) for Wireless Direct appears while in Wireless Direct.
74

C: Search...The Detected Wireless Routers screen is displayed to select a wireless router to connect to.For a wireless router already connected to the computer, Available is displayed onCommunication Status.
If you select a wireless router with Not Connected on Communication Status from the list,clicking Set displays the WPA/WPA2 or WEP setting screen for a wireless router.
If WEP Details Screen AppearsIf WPA/WPA2 Details Screen Appears
D: Encryption Type:Displays the encryption method used over the Wi-Fi.
• IPv4 settings
Note• The setting items below are available only when Infrastructure is selected for Network
Type:.
If Direct is selected, all items are displayed in a gray out status and you cannot perform anysettings.
A: Use IPv4 addressAlways selected. (displayed in a gray out state)
B: Get IP address automaticallySelect this option to use an IP address automatically assigned by a DHCP server. DHCPserver functionality must be enabled on your router.
C: Use next IP addressSelect this option if no DHCP server functionality is available in your setup where you use theprinter, or you want to use a fixed IP address.
Enter the IP address, subnet mask, and default gateway.
75

• IPv6 settings
Note• If USB is selected from the pulldown menu on the toolbar, you cannot perform IPv6 settings.• The setting items below are available only when Infrastructure is selected for Network
Type:.
If Direct is selected, all items are displayed in a gray out status and you cannot perform anysettings.
A: Use IPv6 addressSelect when you use the printer with IPv6 environment.
B: Use Stateless Address:Select when you use an IP address assigned automatically. Use a router compatible withIPv6.
Note• This setting item is not available depending on the printer you are using.
C: Use Manual Address:Select this option if no DHCP server functionality is available in your setup where you use theprinter, or you want to use a fixed IP address.
Enter the IP address and IP address prefix length.
Note• This setting item is not available depending on the printer you are using.
D: Use DHCPv6:Select when you obtain an IP address using DHCPv6.
76

Note• This setting item is not available depending on the printer you are using.
8. Click Set.
77

Assigning Printer Information
Follow the procedure below to assign/change printer location name or device name.
The names appear on Device Name: and Location: on the Canon IJ Network Device Setup Utilityscreen.
Note• If USB is selected from the pulldown menu on the toolbar, this setting item is not available.
1. Start up IJ Network Device Setup Utility.
2. Check the displayed message and select Yes.
3. Select Printer Network Setup on the displayed screen.
Detected printers are listed.
4. Select printer to assign location name and device name.
Select the printer with Available displayed on Status.
5. Select Detailed Printer Settings... on Printer Settings menu.
The Confirm Printer Password screen appears.
For more on the password, refer to Administrator Password.
6. Enter password and click OK.
The Detailed Printer Settings screen appears.
7. Perform/change settings.
The setting items below are available.
A: Device Name:Assigns the device name.
B: Location:Assigns the location name.
8. Click Set.
78

List of Models Which Does Not Support Diagnosis and RepairFunction
The following models does not support "Diagnose and Repair" function of IJ Network Device Setup Utility.
• G4000 series• PRO-500 series• PRO-1000 series• MB2100 series• MB2700 series• MB5100 series• MB5400 series• iB4000 series• PRO-520• PRO-540• PRO-540S• PRO-560• PRO-560S• PRO-2000• PRO-4000• PRO-4000S• PRO-6000• PRO-6000S• TS9000 series• TS8000 series• TS6000 series• TS5000 series• MG3000 series• E470 series
79

Handling Paper, Originals, FINE Cartridges, etc.
Loading Paper
Loading Originals
Replacing a FINE Cartridge
80

Loading Paper
Loading Plain Paper
Loading Photo Paper
Loading Envelopes
81

Loading Plain Paper
You can load plain paper.
Important• If you cut plain paper to a size of 5" x 7" (13 x 18 cm) or smaller to perform a trial print, it may cause a
paper jam.
Note• You can use general copy paper or Canon Red Label Superior WOP111/Canon Océ Office Colour
Paper SAT213.
For the page size and paper weight you can use for this printer, see Supported Media Types.
1. Prepare paper.
Align the edges of paper. If paper is curled, flatten it.
Note• Align the edges of paper neatly before loading. Loading paper without aligning the edges may
cause paper jams.
• If paper is curled, hold the curled corners and gently bend them in the opposite direction until thepaper becomes completely flat.
For details on how to flatten curled paper, see Check3 in Paper Is Smudged / Printed Surface IsScratched.
2. Open the front cover (A) gently.
The paper output tray (B) opens.
82

3. Grab handle part of front cover and pull out cassette until it stops.
4. Use the right paper guide (C) to slide both paper guides all the way out.
5. Load paper stack in portrait orientation WITH PRINT SIDE FACING DOWN, and place it incenter of cassette.
Push the paper stack all the way to the back of the cassette.
* The above figure shows the printer with the paper output tray raised.
Important• Always load paper in portrait orientation (D). Loading paper in landscape orientation (E) can
cause paper jams.
83

6. Slide the right paper guide (C) to align the paper guides with both sides of the paper stack.
Do not slide the paper guides too hard against the paper. The paper may not be fed properly.
* The above figure shows the printer with the paper output tray raised.
Note• Do not load sheets of paper higher than the load limit mark (F).
• Keep the paper stack height below the tabs (G) of the paper guides.
* The above figure shows the printer with the paper output tray raised.
7. Grab right and left sides of front cover and push cassette back until arrow ( ) on frontcover is aligned with edge of printer.
After pushing the cassette back properly, the paper information registration screen appears on the LCD.
84

8. Press the OK button.
9. Use the button to select the size of the loaded paper in the cassette, then press theOK button.
Note• The (asterisk) on the LCD indicates the current setting.
10. Use the button to select Plain paper and press the OK button.
Follow the instructions of any messages displayed to register the paper information.
11. Pull the paper output support (H) out from the paper output tray.
12. Open the output tray extension (I).
85

Note• There are various types of paper, such as paper with a special surface coating for printing photos at
optimal quality and paper suitable for documents. Each media type has specific preset settings (how inkis used and sprayed, distance from nozzles, etc.), that allow you to print to that type with optimal imagequality. The wrong paper settings may cause poor printout color quality or scratches on the printedsurface. If you notice blurring or uneven colors, increase the print quality setting and try printing again.
• To prevent incorrect printing, this printer has a function that detects whether the information set for thepaper loaded matches the paper settings. Before printing, make paper settings in accordance with thepaper information. When this function is enabled, an error message is displayed if these settings do notmatch to prevent incorrect printing. When this error message is displayed, check and correct the papersettings.
86

Loading Photo Paper
You can load photo paper.
Important• If you cut plain paper to a size of 5" x 7" (13 x 18 cm) or smaller to perform a trial print, it may cause a
paper jam.
Note• We recommend Canon genuine photo paper for printing photos.
For details on the Canon genuine paper, see Supported Media Types.
1. Prepare paper.
Align the edges of paper. If paper is curled, flatten it.
Note• Align the edges of paper neatly before loading. Loading paper without aligning the edges may
cause paper jams.
• If paper is curled, hold the curled corners and gently bend them in the opposite direction until thepaper becomes completely flat.
For details on how to flatten curled paper, see Check3 in Paper Is Smudged / Printed Surface IsScratched.
• When using Photo Paper Plus Semi-gloss SG-201, even if the sheet is curled, load one sheet at atime as it is. If you roll up this paper to flatten, this may cause cracks on the surface of the paperand reduce the print quality.
2. Open the front cover (A) gently.
The paper output tray (B) opens.
87

3. Grab handle part of front cover and pull out cassette until it stops.
4. Use the right paper guide (C) to slide both paper guides all the way out.
5. Load paper stack in portrait orientation WITH PRINT SIDE FACING DOWN, and place it incenter of cassette.
Push the paper stack all the way to the back of the cassette.
88

* The above figure shows the printer with the paper output tray raised.
Important• Always load paper in portrait orientation (D). Loading paper in landscape orientation (E) can
cause paper jams.
6. Slide the right paper guide (C) to align the paper guides with both sides of the paper stack.
Do not slide the paper guides too hard against the paper. The paper may not be fed properly.
* The above figure shows the printer with the paper output tray raised.
Note• Do not load sheets of paper higher than the load limit mark (F).
• Keep the paper stack height below the tabs (G) of the paper guides.
89

* The above figure shows the printer with the paper output tray raised.
• Load small size paper, such as 4" x 6" (10 x 15 cm), by pushing it in all the way to the back of thecassette.
* The above figure shows the printer with the paper output tray raised.
7. Grab right and left sides of front cover and push cassette back until arrow ( ) on frontcover is aligned with edge of printer.
After pushing the cassette back properly, the printer makes an electronic sound and the paperinformation registration screen is displayed on the LCD.
90

8. Press the OK button.
9. Use the button to select the size of the loaded paper in the cassette, then press theOK button.
Note• The (asterisk) on the LCD indicates the current setting.
10. Use the button to select the type of the loaded paper in the cassette, then press theOK button.
Follow the instructions of any messages displayed to register the paper information.
11. Pull the paper output support (H) out from the paper output tray.
12. Open the output tray extension (I).
91

Note• There are various types of paper, such as paper with a special surface coating for printing photos at
optimal quality and paper suitable for documents. Each media type has specific preset settings (how inkis used and sprayed, distance from nozzles, etc.), that allow you to print to that type with optimal imagequality. The wrong paper settings may cause poor printout color quality or scratches on the printedsurface. If you notice blurring or uneven colors, increase the print quality setting and try printing again.
• To prevent incorrect printing, this printer has a function that detects whether the information set for thepaper loaded matches the paper settings. Before printing, make paper settings in accordance with thepaper information. When this function is enabled, an error message is displayed if these settings do notmatch to prevent incorrect printing. When this error message is displayed, check and correct the papersettings.
92

Loading Envelopes
The address is automatically rotated and printed according to the envelope's direction by specifying withyour computer properly.
Important• Printing of envelopes from the operation panel is not supported.
• Do not use the following envelopes. They could jam in the printer or cause the printer to malfunction.
• Envelopes with an embossed or treated surface
• Envelopes with a double flap
• Envelopes whose gummed flaps are already moistened and adhesive
1. Prepare envelopes.
• Press down on all four corners and edges of the envelopes to flatten them.
• If the envelopes are curled, hold the opposite corners and gently twist them in the oppositedirection.
• If the corner of the envelope flap is folded, flatten it.
• Use a pen to press the leading edge in the inserting direction flat and sharpen the crease.
The figures above show a side view of the leading edge of the envelope.
Important• The envelopes may jam in the printer if they are not flat or the edges are not aligned. Make sure
that no curl or puff exceeds 0.12 inch (3 mm).
2. Open the front cover (A) gently.
The paper output tray (B) opens.
93

3. Grab handle part of front cover and pull out cassette until it stops.
4. Use the right paper guide (C) to slide both paper guides all the way out.
5. Load the envelopes in the center of the cassette WITH THE PRINT SIDE FACING DOWN.
Fold flap of the envelope and load the envelope in portrait orientation with the address side facing down.
Push the envelopes all the way to the back of the cassette. Up to 5 envelopes can be loaded at once.
94
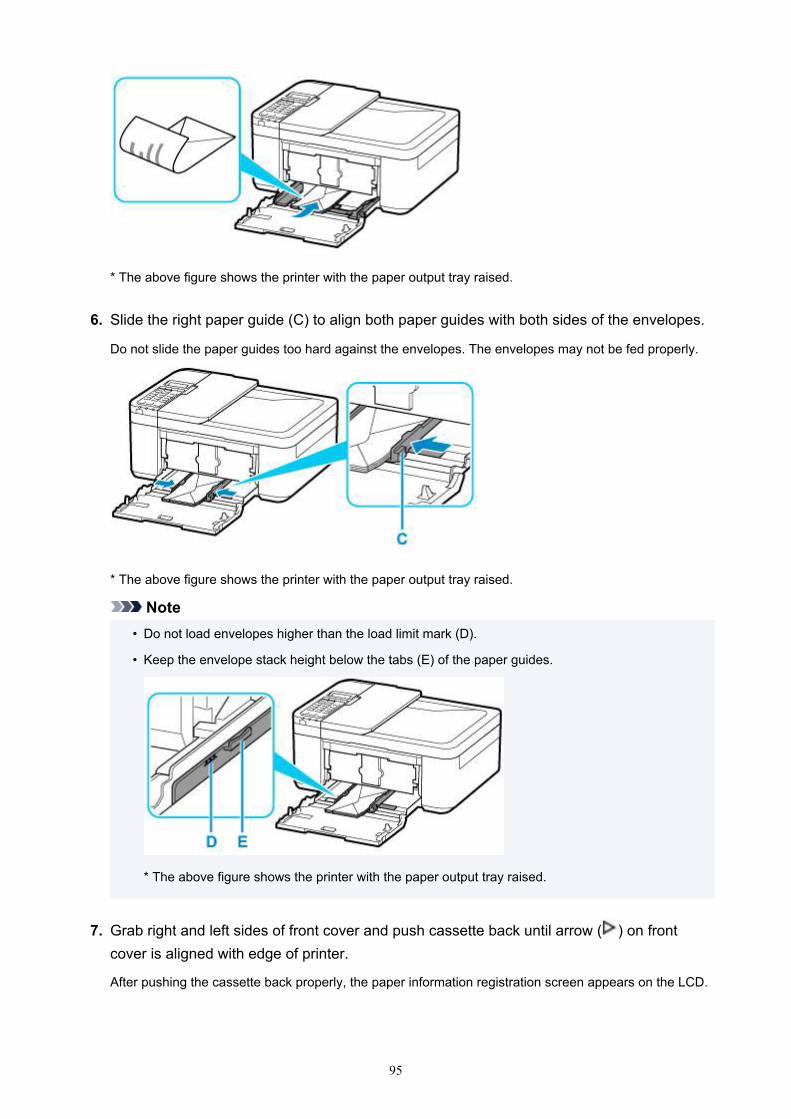
* The above figure shows the printer with the paper output tray raised.
6. Slide the right paper guide (C) to align both paper guides with both sides of the envelopes.
Do not slide the paper guides too hard against the envelopes. The envelopes may not be fed properly.
* The above figure shows the printer with the paper output tray raised.
Note• Do not load envelopes higher than the load limit mark (D).
• Keep the envelope stack height below the tabs (E) of the paper guides.
* The above figure shows the printer with the paper output tray raised.
7. Grab right and left sides of front cover and push cassette back until arrow ( ) on frontcover is aligned with edge of printer.
After pushing the cassette back properly, the paper information registration screen appears on the LCD.
95

8. Press the OK button.
9. Use button to select size of loaded envelopes in cassette and press OK button.
Note• The (asterisk) on the LCD indicates the current setting.
10. Use button to select Envelope and press OK button.
Follow the instructions of any messages displayed to register the paper information.
11. Pull the paper output support (F) out from the paper output tray.
12. Open the output tray extension (G).
96

Note• To prevent incorrect printing, this printer has a function that detects whether the information set for the
paper loaded matches the paper settings. Before printing, make paper settings in accordance with thepaper information. When this function is enabled, an error message is displayed if these settings do notmatch to prevent incorrect printing. When this error message is displayed, check and correct the papersettings.
97

Loading Originals
Where to Load Originals
Loading Originals on Platen
Loading Documents in the ADF (Auto Document Feeder)
Loading Based on Use
Supported Originals
98

Where to Load Originals
The printer has two positions to load originals: platen and ADF (Auto Document Feeder).
Select the position to load the original according to the size, type, or usage.
Note• For details on the supported originals, see below.
Supported Originals
Loading Documents, Photos, or Book on Platen
Loading Two or More Sheets of Document of the Same Size andThickness in the ADF
You can also load a sheet of document in the ADF.
Note• To scan the original at optimum quality, load it on the platen.
99

Loading Originals on Platen
1. Open the document cover.
2. Load original WITH SIDE TO SCAN FACING DOWN on platen.
Loading Based on UseSupported Originals
Important• Be sure to observe the following when loading the original on the platen.
Failure to observe the following may cause the scanner to malfunction or the platen glass tobreak.
• Do not place any objects weighing 4.4 lb (2.0 kg) or more on the platen glass.
• Do not put any pressure of 4.4 lb (2.0 kg) or more on the platen glass, such as pressing downthe original.
3. Close the document cover gently.
100

Important• After loading the original on the platen, be sure to close the document cover before starting to copy, fax,
or scan.
101

Loading Documents in the ADF (Auto Document Feeder)
Note• To scan a document at optimum quality, load it on the platen.
1. Make sure any original has been removed from platen.
2. Open document tray (A).
3. Slide the paper guides (B) all the way out.
4. Load document WITH SIDE TO SCAN FACING UP in document tray.
Insert the document until it stops.
Note• For details on the supported originals, see below.
Supported Originals
5. Adjust document guide (B) to match width of document.
Do not slide the document guide too hard against the document. The document may not be fed properly.
102

103

Loading Based on Use
Load the original in the correct position according to the function to use. If you do not load the originalcorrectly, it may not be scanned properly.
Originals Function How to Load
Magazines, Newspapers, andDocuments
Copying or Faxing Loading the Original to BeAligned with the alignment markScanning by detecting the type and
size of the original automatically
If you scan using the operation panel,press the SCAN button and select Autoscan for Document type.
Scanning by specifying a standardsize (A4, Letter, etc.)
If you scan using the operation panel,press the SCAN button, select Docu-ment or Photo for Document type, andthen specify a standard size (A4, Letter,etc.) for Scan size.
Photos, Postcards, BusinessCards, and Disc (BD/DVD/CD)
Scanning only one original
If you scan using the operation panel, fol-low the operation below.
• Press the SCAN button and selectAuto scan for Document type.
• Press the SCAN button, select Photofor Document type, and then specifyAuto scan(A) -Singl for Scan size.
Loading Only One Original inCenter of Platen
Scanning two or more originals
If you scan using the operation panel, fol-low the operation below.
• Press the SCAN button and selectAuto scan for Document type.
• Press the SCAN button, select Photofor Document type, and then specifyAuto scan(A) -Multi for Scan size.
Loading Two or More Originalson Platen
Note• For details on how to scan from the computer and how to load originals, see below.
• For Windows:
Scanning from Computer (Windows)
• For macOS:
Scanning from Computer (macOS)
104
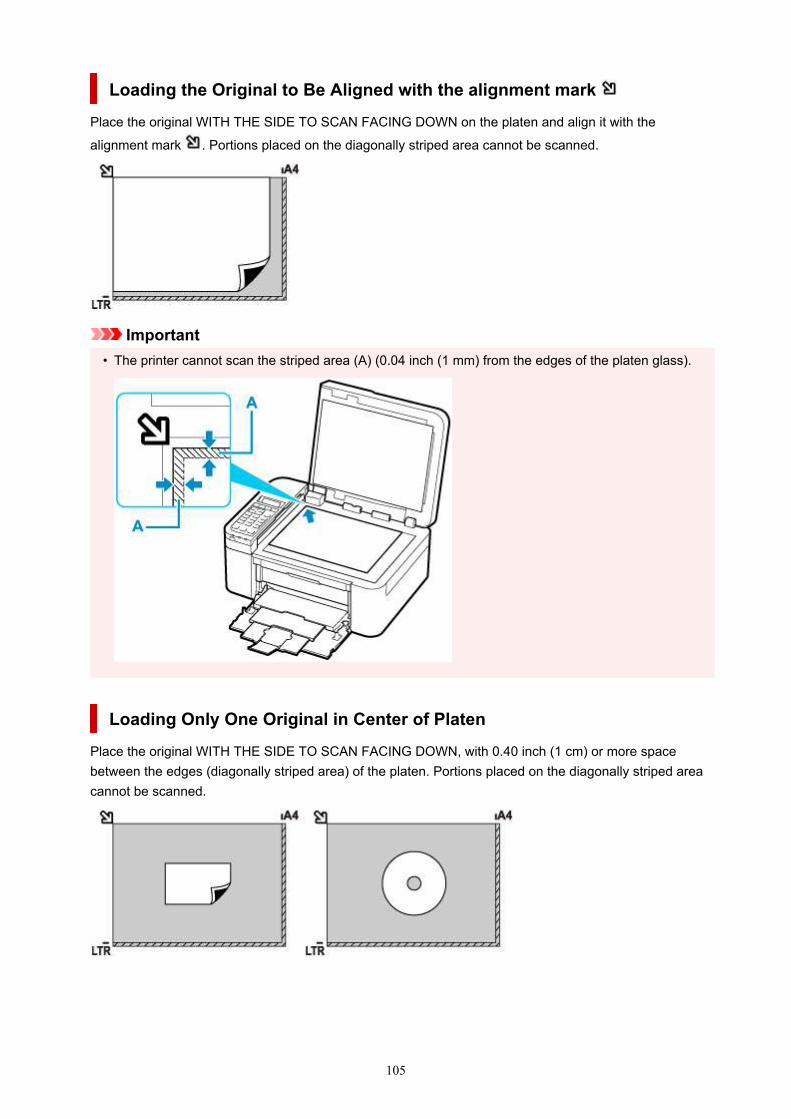
Loading the Original to Be Aligned with the alignment mark
Place the original WITH THE SIDE TO SCAN FACING DOWN on the platen and align it with the
alignment mark . Portions placed on the diagonally striped area cannot be scanned.
Important• The printer cannot scan the striped area (A) (0.04 inch (1 mm) from the edges of the platen glass).
Loading Only One Original in Center of Platen
Place the original WITH THE SIDE TO SCAN FACING DOWN, with 0.40 inch (1 cm) or more spacebetween the edges (diagonally striped area) of the platen. Portions placed on the diagonally striped areacannot be scanned.
105

Loading Two or More Originals on Platen
Place the originals WITH THE SIDE TO SCAN FACING DOWN. Allow 0.40 inch (1 cm) or more spacebetween the edges (diagonally striped area) of the platen and the originals, and between the originals.Portions placed on the diagonally striped area cannot be scanned.
You can place up to 12 items.
B: More than 0.40 inch (1 cm)
Note• The Skew Correction function automatically compensates for the originals placed at an angle of up to
approximately 10 degrees. Slanted photos with a long edge of 7.1 inches (180 mm) or more cannotbe corrected.
• Non-rectangular or irregular shaped photos (such as cut out photos) may not be scanned properly.
106

Supported Originals
Platen
Item Details
Types of originals • Text document, magazine, or newspaper
• Printed photo, postcard, business card, or disc (BD/DVD/CD, etc.)
• Documents that are not suitable for the ADF
Size (width x height) Max. 8.5 x 11.7 inches (216 x 297 mm)
Quantity One or more sheets*
Thickness Max. 0.2 inch (5 mm)
* Two or more originals can be loaded on the platen depending on the selected function.
Loading Based on Use
In the ADF (Auto Document Feeder)
Item Details
Kind of original Plain-paper documents with multiple pages of the same size, thickness, and weight
Size A4, Letter, Legal
Duplex copying or 2-on-1/4-on-1 copying: A4/Letter only
Quantity • A4/Letter: Max. 20 sheets (20 lb. (75 g /m2) paper), up to 0.08 inch (2 mm) high
• Legal: Max. 5 sheets (20 lb. (75 g /m2) paper), up to 0.02 inch (0.5 mm) high
Thickness 0.003 to 0.005 inch (0.07 to 0.13 mm)
Weight 16.0 to 25.3 lb. (60 to 95 g /m2)
Note• Make sure any liquids on documents, such as glue, ink, or correction fluid are dry before loading.
Do not load glued documents in the ADF, even if the glue is dry, because this may cause paper jams.
• Remove all staples, paper clips, or other fasteners before feeding documents.
• Load Legal-sized documents in the ADF.
• Do not load these kinds of documents in the ADF, which may cause paper jams.
• Wrinkled or creased documents
• Curled documents
• Torn documents
• Documents with holes
• Glued documents
• Documents with sticky notes
107

• Documents on carbon paper
• Documents on coated paper
• Documents on onion skin or other thin paper
• Photos or excessively thick documents
108

Replacing a FINE Cartridge
Replacing a FINE Cartridge
Checking Ink Status on the LCD
Ink Tips
109
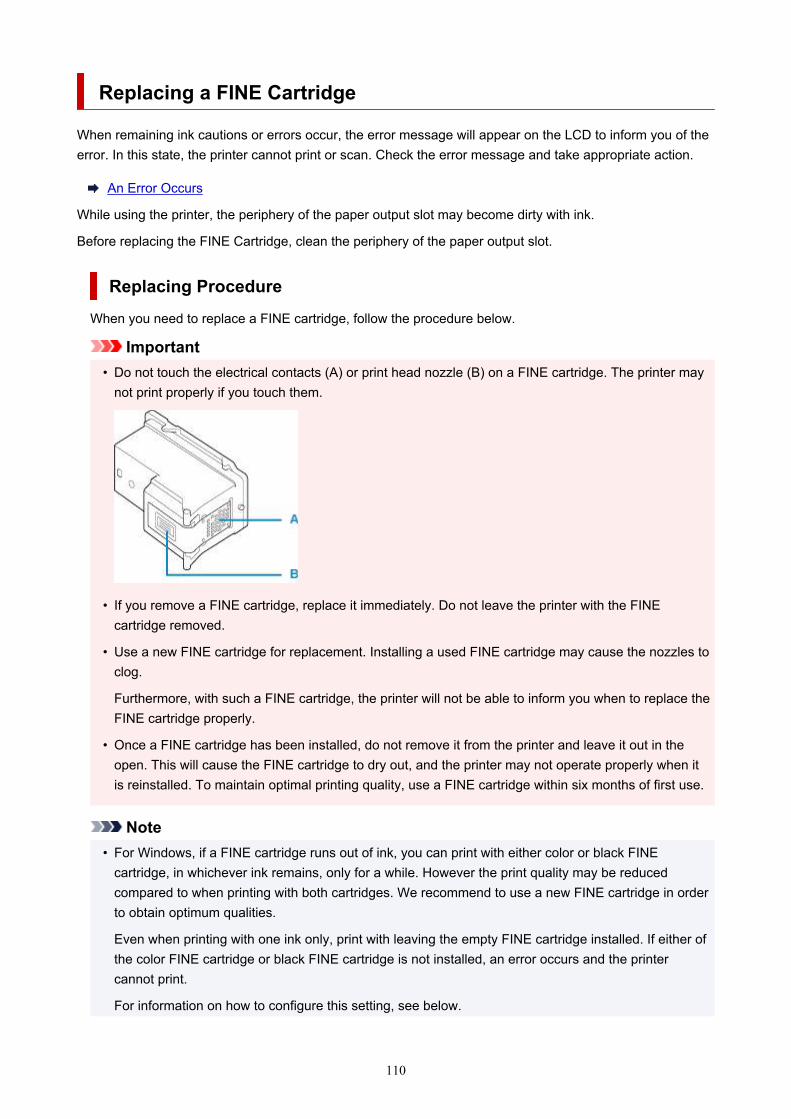
Replacing a FINE Cartridge
When remaining ink cautions or errors occur, the error message will appear on the LCD to inform you of theerror. In this state, the printer cannot print or scan. Check the error message and take appropriate action.
An Error Occurs
While using the printer, the periphery of the paper output slot may become dirty with ink.
Before replacing the FINE Cartridge, clean the periphery of the paper output slot.
Replacing Procedure
When you need to replace a FINE cartridge, follow the procedure below.
Important• Do not touch the electrical contacts (A) or print head nozzle (B) on a FINE cartridge. The printer may
not print properly if you touch them.
• If you remove a FINE cartridge, replace it immediately. Do not leave the printer with the FINEcartridge removed.
• Use a new FINE cartridge for replacement. Installing a used FINE cartridge may cause the nozzles toclog.
Furthermore, with such a FINE cartridge, the printer will not be able to inform you when to replace theFINE cartridge properly.
• Once a FINE cartridge has been installed, do not remove it from the printer and leave it out in theopen. This will cause the FINE cartridge to dry out, and the printer may not operate properly when itis reinstalled. To maintain optimal printing quality, use a FINE cartridge within six months of first use.
Note• For Windows, if a FINE cartridge runs out of ink, you can print with either color or black FINE
cartridge, in whichever ink remains, only for a while. However the print quality may be reducedcompared to when printing with both cartridges. We recommend to use a new FINE cartridge in orderto obtain optimum qualities.
Even when printing with one ink only, print with leaving the empty FINE cartridge installed. If either ofthe color FINE cartridge or black FINE cartridge is not installed, an error occurs and the printercannot print.
For information on how to configure this setting, see below.
110

Setting the FINE Cartridge to be Used
• Color ink may be consumed even when printing a black-and-white document or when black-and-white printing is specified.
Both color ink and black ink are also consumed in the standard cleaning and deep cleaning of theprint head, which may be necessary to maintain the performance of the printer. When ink runs out,replace the FINE cartridge immediately with a new one.
Ink Tips
1. Check that printer is turned on.
2. Open front cover (C).
The paper output tray (D) opens.
Note• Remove any paper in the cassette.
3. Open the paper output cover.
The FINE cartridge holder (E) moves to the replacement position.
Caution• Do not hold the FINE cartridge holder to stop or move it forcibly. Do not touch the FINE
cartridge holder until it stops completely.
111

Important• The inside of the printer may be stained with ink. Be careful not to stain your hands or clothing
when replacing the FINE cartridge. You can easily wipe off the ink from the inside of the printerwith tissue paper or the like.
• Do not touch the metallic parts or other parts inside the printer.
• If the paper output cover is left open for more than 10 minutes, the FINE cartridge holder maymove and the Alarm lamp may light. In this case, close the paper output cover, and then open itagain.
4. Remove the empty FINE cartridge.
1. Push down the FINE cartridge until it clicks.
2. Remove the FINE cartridge.
Important• Handle the FINE cartridge carefully to avoid staining of clothing or the surrounding area.
• Discard the empty FINE cartridge according to the local laws and regulations regarding disposalof consumables.
5. Prepare a new FINE cartridge.
1. Take new FINE cartridge out of its package and remove protective tape (F) gently.
112

Important• If you shake a FINE cartridge, ink may spill out and stain your hands and the surrounding area.
Handle a FINE cartridge carefully.
• Be careful not to stain your hands and the surrounding area with ink on the removed protectivetape.
• Do not reattach the protective tape once you have removed it. Discard it according to the locallaws and regulations regarding disposal of consumables.
• Do not touch the electrical contacts or print head nozzle on a FINE cartridge. The printer maynot print properly if you touch them.
6. Install the FINE cartridge.
1. Insert the new FINE cartridge at a slant into the FINE cartridge holder.
The color FINE cartridge should be installed into the left slot and the black FINE cartridge should beinstalled into the right slot.
Important• Insert the FINE cartridge gently so that it does not hit the electrical contacts on the FINE cartridge
holder.
113

2. Push the FINE cartridge in and up firmly until it snaps into place.
Important• Check if the FINE cartridge is installed correctly.
114

• The printer cannot print unless both the color FINE cartridge and black FINE cartridge areinstalled. Be sure to install both cartridges.
7. Close the paper output cover.
Note• If the error message appears on the LCD after the paper output cover is closed, take
appropriate action.
An Error Occurs
• When you start printing after replacing the FINE cartridge, the printer starts cleaning the printhead automatically. Do not perform any other operations until the printer completes the cleaningof the print head.
• If the print head is out of alignment, as indicated by misaligned printed ruled lines or similarsymptoms, adjust the print head position.
• The printer may make noise during operation.
115

Checking Ink Status on the LCD
1. Check that printer is turned on.
2. Press Setup button, use button to select Ink information, and then press OK button.
LCD and Operation Panel
3. Make sure Remaining ink appears and press OK button.
A in the figure below shows remaining ink level.
Example:
The ink is running low. Prepare a new ink cartridge.
The resulting print quality may not be satisfactory, if printing is continued under this condition.
Note• You can also check the ink status on the LCD when you press the COPY or FAX button. The
current remaining ink level will be displayed on the LCD for a few seconds.
• You can also check the ink status on the computer screen.
• For Windows:
Checking Ink Status from Your Computer
• For macOS:
Checking Ink Status from Your Computer
116

Ink Tips
How is ink used for various purposes other than printing?
Ink may be used for purposes other than printing. Ink is not only used for printing, but also for cleaning theprint head to maintain the optimal printing quality.
The printer has the function to automatically clean the ink jet nozzles to prevent clogging. In the cleaningprocedure, used ink for nozzle cleaning is limited to a small amount.
Does black-and-white printing use color ink?
Black-and-white printing may use ink other than black ink depending on the type of printing paper or thesettings of the printer driver. So, color ink is consumed even when printing in black-and-white.
117

If Printing Is Faint or Uneven
Maintenance Procedure
Printing the Nozzle Check Pattern
Examining the Nozzle Check Pattern
Cleaning the Print Head
Deep Print Head Cleaning
Aligning the Print Head
118

Maintenance Procedure
If print results are blurred, colors are not printed correctly, or print results are unsatisfactory (e.g. misalignedprinted ruled lines), perform the maintenance procedure below.
Important• Do not rinse or wipe the FINE cartridge. This can cause trouble with the FINE cartridge.
Note• Check if ink remains in the FINE cartridge.
Checking the Ink Status on the LCD
• Check if the FINE cartridge is installed correctly.
Replacing Procedure
Also check if the protective tape on the bottom of the FINE cartridge is removed.
• If an error message appears on the LCD, see An Error Occurs.
• For Windows, increasing the print quality in the printer driver settings may improve the print result.
Changing the Print Quality and Correcting Image Data
When the Print Results Are Blurred or Uneven:
Step1 Print the nozzle check pattern.
From the printer
Printing the Nozzle Check Pattern
From the computer
• For Windows:
Printing a Nozzle Check Pattern
• For macOS:
Printing a Nozzle Check Pattern
Step2 Examine the nozzle check pattern.
119

If there are missing lines or horizontal white streaks in the pattern:
Step3 Clean the print head.
From the printer
Cleaning the Print Head
From the computer
• For Windows:
Cleaning the Print Heads
• For macOS:
Cleaning the Print Heads
After cleaning the print head, print and examine the nozzle check pattern: Step1
If the problem is not resolved after performing from step 1 to step 3 twice:
Step4 Clean the print head deeply.
From the printer
Deep Print Head Cleaning
From the computer
• For Windows:
Cleaning the Print Heads
• For macOS:
Cleaning the Print Heads
If the problem is not resolved, turn off the power and clean the print head deeply again after 24 hours. Do notunplug the power cord when turning off the power.
If the problem is still not resolved:
Step5 Replace the FINE cartridge.
Replacing a FINE Cartridge
Note• If the problem is still not resolved after replacing the FINE cartridge, contact your nearest Canon
service center to request a repair.
120

When the Print Results Are Not Even such as the Ruled Lines AreMisaligned:
Step Align the print head.
From the printer
Aligning the Print Head
From the computer
• For Windows:
Adjusting Print Head Position Automatically
• For macOS:
Adjusting Print Head Position
121

Printing the Nozzle Check Pattern
Print the nozzle check pattern to determine whether the ink ejects properly from the print head nozzle.
Note• If the remaining ink level is low, the nozzle check pattern will not be printed correctly. Replace the FINE
Cartridge whose ink is low.
You need to prepare: a sheet of A4 or Letter-sized plain paper
1. Check that printer is turned on.
2. Load a sheet of A4 or Letter-sized plain paper in the cassette.
After pushing the cassette back, the paper information registration screen is displayed on the LCD.Select A4 or Letter for Size: and Plain paper for Type: and then press the OK button.
3. Pull the paper output support out from the paper output tray, then open the output trayextension.
4. Press the Setup button, use the button to select Maintenance, and press the OKbutton.
LCD and Operation Panel
5. Use the button to select Nozzle check and press the OK button.
The nozzle check pattern will be printed.
Do not perform any other operations until the printer completes the printing of the nozzle check pattern.
6. Examine the nozzle check pattern.
122

Examining the Nozzle Check Pattern
Examine the nozzle check pattern, and clean the print head if necessary.
1. Check if there are missing lines in the pattern A or horizontal white streaks in the pattern B.
If there are missing lines in the pattern A:
C: GoodD: Bad (lines are missing)
If there are horizontal white streaks in the pattern B:
E: GoodF: Bad (horizontal white streaks are present)
If any color in the pattern A or the pattern B is not printed:
(Example: Magenta pattern is not printed)
Cleaning the print head is required.
123

Cleaning the Print Head
Clean the print head if lines are missing or if horizontal white streaks are present in the printed nozzle checkpattern. Cleaning unclogs the nozzles and restores the print head condition. Cleaning the print headconsumes ink, so clean the print head only when necessary.
1. Check that printer is turned on.
2. Press the Setup button, use the button to select Maintenance, and press the OKbutton.
LCD and Operation Panel
3. Use the button to select Cleaning and then press the OK button.
The printer starts cleaning the print head.
Do not perform any other operations until the printer completes the cleaning of the print head. This takesabout 1 minute.
4. Examine the nozzle check pattern.
Note• If the problem is not resolved after cleaning the print head twice, clean the print head deeply.
124

Deep Print Head Cleaning
If print quality does not improve by the standard cleaning of the print head, clean the print head deeply.Cleaning the print head deeply consumes more ink than the standard cleaning of the print head, so cleanthe print head deeply only when necessary.
1. Check that printer is turned on.
2. Press the Setup button, use the button to select Maintenance, and press the OKbutton.
LCD and Operation Panel
3. Use the button to select Deep cleaning and then press the OK button.
The printer starts cleaning the print head deeply.
Do not perform any other operations until the printer completes the deep cleaning of the print head. Thistakes about 1 minute.
4. Examine the nozzle check pattern.
If the problem is not resolved, turn off the power and clean the print head deeply again after 24 hours. Donot unplug the power cord when turning off the power.
If the problem is still not resolved, replace the FINE cartridge with a new one. If the problem is still notresolved after replacing the FINE cartridge, contact your nearest Canon service center to request a repair.
125

Aligning the Print Head
If printed ruled lines are misaligned or print results are otherwise unsatisfactory, adjust the print headposition.
Note• If the remaining ink level is low, the print head alignment sheet will not be printed correctly.
Replace the FINE cartridge whose ink is low.
You need to prepare: a sheet of A4 or Letter-sized plain paper
1. Check that printer is turned on.
2. Load a sheet of A4 or Letter-sized plain paper in the cassette.
After pushing the cassette back, the paper information registration screen is displayed on the LCD.Select A4 or Letter for Size: and Plain paper for Type: and then press the OK button.
3. Pull the paper output support out from the paper output tray, then open the output trayextension.
4. Press the Setup button, use the button to select Maintenance, and press the OKbutton.
LCD and Operation Panel
5. Use the button to select Head alignment and then press the OK button.
The print head alignment sheet will be printed.
126

Important• Do not touch any printed part on the print head alignment sheet. If the sheet is stained or wrinkled,
it may not be scanned properly.
• If the print head alignment sheet was not printed correctly, press the Stop button, and redo thisprocedure from the beginning.
6. Check message and place print head alignment sheet on platen.
Place the print head alignment sheet WITH THE PRINTED SIDE FACING DOWN and align the mark
on the upper left corner of the sheet with the alignment mark .
127

Note• The print head alignment sheet cannot be scanned if it is loaded in the ADF (Auto Document
Feeder).
7. Close the document cover gently, then press the Black button or the Color button.
The printer starts scanning the print head alignment sheet, and the print head position will be adjustedautomatically.
After the print head position adjustment completion message is displayed, remove the print headalignment sheet on the platen.
Important• Do not open the document cover or move the print head alignment sheet on the platen until
adjusting the print head position is complete.
• If the error message appears on the LCD, press the OK button to release the error, then takeappropriate action.
An Error Occurs
Note• For Windows, when the print results are still not satisfactory after adjusting the print head position as
described above, adjust the print head position manually from the computer.
Adjusting Print Head Position Manually
• To print and check the current head position adjustment values, select Print align value from theMaintenance screen.
128

Cleaning
Cleaning Exterior Surfaces
Cleaning Platen and Document Cover
Cleaning the ADF (Auto Document Feeder)
Cleaning Paper Feed Rollers
Cleaning Inside the Printer (Bottom Plate Cleaning)
129
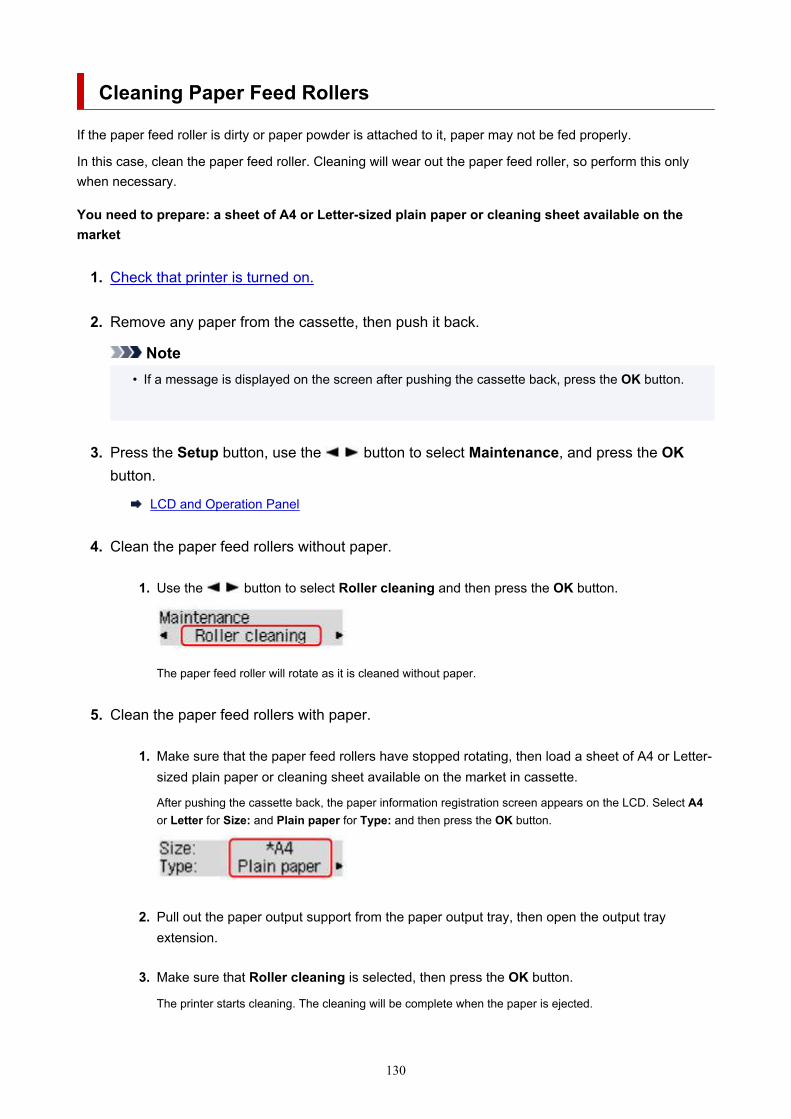
Cleaning Paper Feed Rollers
If the paper feed roller is dirty or paper powder is attached to it, paper may not be fed properly.
In this case, clean the paper feed roller. Cleaning will wear out the paper feed roller, so perform this onlywhen necessary.
You need to prepare: a sheet of A4 or Letter-sized plain paper or cleaning sheet available on themarket
1. Check that printer is turned on.
2. Remove any paper from the cassette, then push it back.
Note• If a message is displayed on the screen after pushing the cassette back, press the OK button.
3. Press the Setup button, use the button to select Maintenance, and press the OKbutton.
LCD and Operation Panel
4. Clean the paper feed rollers without paper.
1. Use the button to select Roller cleaning and then press the OK button.
The paper feed roller will rotate as it is cleaned without paper.
5. Clean the paper feed rollers with paper.
1. Make sure that the paper feed rollers have stopped rotating, then load a sheet of A4 or Letter-sized plain paper or cleaning sheet available on the market in cassette.
After pushing the cassette back, the paper information registration screen appears on the LCD. Select A4or Letter for Size: and Plain paper for Type: and then press the OK button.
2. Pull out the paper output support from the paper output tray, then open the output trayextension.
3. Make sure that Roller cleaning is selected, then press the OK button.
The printer starts cleaning. The cleaning will be complete when the paper is ejected.
130

If the problem is not resolved after cleaning the paper feed roller, contact your nearest Canon service centerto request a repair.
131

Cleaning Inside the Printer (Bottom Plate Cleaning)
Remove stains from the inside of the printer. If the inside of the printer becomes dirty, printed paper may getdirty, so we recommend performing cleaning regularly.
You need to prepare: a sheet of A4 or Letter-sized plain paper*
* Be sure to use a new piece of paper.
1. Make sure that the power is turned on, then remove any paper from the cassette.
2. Prepare paper.
1. Fold a single sheet of A4 or Letter-sized plain paper in half widthwise, then unfold the paper.
2. Fold one side of the opened paper in another half, aligning the edge with the center crease,and then unfold the paper.
3. Load only this sheet of paper in the cassette with the ridges of the creases facing up and theedge of the half with no crease facing to the far side.
* The above figure shows the printer with the paper output tray raised.
After pushing the cassette back, the paper information registration screen is displayed on the LCD. SelectA4 or Letter for Size: and Plain paper for Type: and then press the OK button.
4. Pull the paper output support out from the paper output tray, then open the output trayextension.
132

3. Press the Setup button, use the button to select Maintenance, and press the OKbutton.
LCD and Operation Panel
4. Use the button to select Bottom cleaning and then press the OK button.
The paper cleans the inside of the printer as it feeds through the printer.
Check the folded parts of the ejected paper. If they are smudged with ink, perform Bottom Plate Cleaningagain.
Note• When performing Bottom Plate Cleaning again, be sure to use a new piece of paper.
If the problem is not resolved after performing cleaning again, the protrusions inside the printer may bestained. Wipe off any ink from the protrusions using a cotton swab or the like.
Important• Before cleaning the printer, turn it off and unplug it.
• The power cannot be turned off while the printer is sending or receiving a fax, or when unsent faxesare stored in the printer's memory. Make sure the printer has finished sending or receiving faxesbefore turning it off.
• Remember that faxes cannot be sent or received while the printer is off.
• Unplugging the printer will reset the date/time setting and erase all documents in the printer'smemory. Send faxes or print documents as needed before unplugging the printer.
133

Overview
Safety
Safety Precautions
Regulatory Information
WEEE (EU & EEA)
Handling Precautions
Canceling Print Jobs
Storing Printed Images
Legal Restrictions on Scanning/Copying
Transporting Your Printer
When Repairing, Lending, or Disposing of the Printer
Keeping Print Quality High
Main Components and Their Use
Main Components
Power Supply
LCD and Operation Panel
Entering Numbers, Letters, and Symbols
Changing Settings
Changing Printer Settings from Your Computer (Windows)
Changing Printer Settings from Your Computer (macOS)
Changing Settings from Operation Panel
Specifications
134

Safety
Safety Precautions
Regulatory Information
WEEE (EU&EEA)
135
Safety Precautions
Safety Precautions
• This manual contains important notices and safety precautions about your printer.
Do not use the printer in ways other than described in the accompanying manuals, as this may resultin fire, electric shock or other unexpected accidents.
Safety standard marks and declarations are only valid for the supported voltages and frequencies inthe applicable countries or regions.
Warning• Users with cardiac pacemakers:
This product emits a low-level magnetic flux. If you feel abnormalities, please move away from theproduct and consult your doctor.
• Do not use the printer in the following cases:
Stop use immediately, unplug the printer and call your local service representative to request repair.
• Metal objects or liquids are spilt inside the printer.• The printer emits smoke, strange odors, or makes unusual noises.• The power cord or plug overheat or are broken, bent or damaged in any way.
• Failure to adhere to the following may result in fire, electric shock, or injury:• Do not place product close to the flammable solvents such as alcohol or thinner.• Do not open or modify the printer.• Use only the power cord/cables that came with your printer. Do not use these cables with other
devices.• Do not plug in to voltages or frequencies other than those specified.• Plug the power cord into the socket completely.• Do not plug in or unplug the power cord with wet hands.• Do not damage the power cord by twisting, bundling, tying, pulling or excessively bending it.• Do not place heavy objects on the power cord.• Do not connect multiple power cords to a single electrical outlet. Do not use multiple extension
cords.• Do not leave the printer plugged in during lightning storms.• Always unplug the power cord and cables when cleaning. Do not use flammable sprays or liquids
such as alcohol or thinners for cleaning.• Unplug the power cord once a month to check that it is not overheating, rusted, bent, scratched,
split, or otherwise damaged.
Caution• Do not put your hands inside the printer while printing.• Do not touch the print head or other metal parts immediately after printing.• Ink
• Keep ink out of reach of children.• If ink is accidentally licked or swallowed, rinse out your mouth and drink one or two glasses of
water. If irritation or discomfort occurs, obtain medical advice immediately.
136

• In case ink gets in contact with eyes, rinse with water immediately. In case ink gets in contactwith skin, wash with soap and water immediately. If irritation to eyes or skin persists, obtainmedical advice immediately.
• Moving the printer• Do not hold the printer by the cassette. Hold the printer by its sides and carry it with both hands.
General Notices
Choosing a LocationRefer to "Specifications" in the Online manual for details on operating environment.
• Do not install the printer in a location that is unstable or subject to excessive vibration.• Do not install the printer in locations that get very hot (direct sunlight, or close to a heating source),
very humid or dusty locations, or outdoors.• Do not place the printer on a thick rug or carpet.• Do not place the printer flush against a wall.
Power Supply• Keep the area around the power outlet clear at all times so you can easily unplug the power cord if
necessary.• Never remove the plug by pulling on the cord.
137

General Notices• Do not tilt the printer, stand it on end, or turn it upside down. This may cause ink to leak.• Do not place anything on top of the printer. Be especially careful to avoid metal objects such as
paper clips and staples, and containers holding flammable liquids such as alcohol or thinner.• Do not apply excessive pressure when placing large objects on the platen glass.• Do not attempt to open, disassemble or modify the FINE cartridges. Ink may leak and damage your
printer.• Do not throw FINE cartridges in the fire.
138

Regulatory Information
IMPORTANT SAFETY INSTRUCTIONS
SAVE THESE INSTRUCTIONS
When using your telephone equipment, basic safety precautions should always be followed to reduce therisk of fire, electric shock and injury to persons, including the following:
1. Do not use this product near water, for example, near a bath tub, wash bowl, kitchen sink or laundrytub, in a wet basement or near a swimming pool.
2. Avoid using this product during an electrical storm. There may be a remote risk of electric shock fromlightning.
3. Do not use this product to report a gas leak in the vicinity of the leak.
"CAUTION - To reduce the risk of fire, use only No. 26 AWG or larger telecommunication line cord."
IMPORTANTES MESURES DE SÉCURITÉ
CONSERVER CES INSTRUCTIONS
Certaines mesures de sécurité doivent être prises pendant l'utilisation de matérial téléphonique afin deréduire les risques d'incendie, de choc électrique et de blessures.
En voice quelquesunes :
1. Ne pas utiliser l'appareil près de l'eau, p.ex., près d'une baignoire, d'un lavabo, d'un évier de cuisine,d'un bac à laver, dans un sous-sol humide ou près d'une piscine.
2. Éviter d'utiliser l'appareil pendant un orage électrique. Ceci peut présenter un risque de chocélectrique causé par la foudre.
3. Ne pas utiliser l'appareil pour signaler une fuite de gaz s'il est situé près de la fuite.
"ATTENTION - Pour réduire les risques d'incendie, utiliser uniquement des conducteurs detélécommunications 26 AWG au de section supérleure."
Users in the U.S.A.
FCC Notice (U.S.A. Only)For 120V, 60Hz modelModel Number: K10483 (Contains FCC Approved WLAN Module K30365)
This device complies with Part 15 of the FCC Rules. Operation is subject to the following two conditions:(1) This device may not cause harmful interference, and (2) this device must accept any interferencereceived, including interference that may cause undesired operation.
Note: This equipment has been tested and found to comply with the limits for a Class B digital device,pursuant to Part 15 of the FCC Rules. These limits are designed to provide reasonable protection againstharmful interference in a residential installation. This equipment generates, uses and can radiate radiofrequency energy and, if not installed and used in accordance with the instructions, may cause harmfulinterference to radio communications.However, there is no guarantee that interference will not occur in a particular installation. If this equipmentdoes cause harmful interference to radio or television reception, which can be determined by turning the
139

equipment off and on, the user is encouraged to try to correct the interference by one or more of thefollowing measures:
• Reorient or relocate the receiving antenna.• Increase the separation between the equipment and receiver.• Connect the equipment into an outlet on a circuit different from that to which the receiver is
connected.• Consult the dealer or an experienced radio/TV technician for help.
Use of a shielded cable is required to comply with Class B limits in Subpart B of Part 15 of the FCC Rules.
Do not make any changes or modifications to the equipment unless otherwise specified in the manual. Ifsuch changes or modifications should be made, you could be required to stop operation of the equipment.
FCC ID:AZDK30365
Changes or modifications not expressly approved by the party responsible for compliance could void theuser's authority to operate equipment.
This transmitter must not be co-located or operating in conjunction with any other antenna or transmitter.
The equipment complies with FCC radiation exposure limits for at uncontrolled equipment. Thisequipment should be installed and operated with minimum distance at least 20cm between the radiatorand persons body (excluding extremities: hands, wrists, feet and ankles) and must not be colocated oroperated with any other antenna or transmitter.
Canon U.S.A., Inc.One Canon ParkMelville, New York 117471-800-652-2666
Interference
Do not use the printer around medical equipment or other electronic devices. Signals from the printer mayinterfere with the correct operation of these devices.
Pre-Installation Requirements
Order Information
When ordering service from the telephone company for this equipment, the following may be required.
Universal Service Order Code (USOC): RJ11C
The Facility Interface Code (FIC): 02LS2
Service Order Code (SOC): 9.0F
Connection of the Equipment
This equipment complies with Part 68 of the FCC rules and the requirements adopted by the ACTA.
A label on this equipment contains, among other information, a product identifier in the formatUS:AAAEQ##TXXXX. If requested, this number must be provided to the telephone company.
The REN is used to determine the number of devices that may be connected to a telephone line.
140

Excessive RENs on a telephone line may result in the devices not ringing in response to an incoming call.In most but not all areas, the sum of RENs should not exceed five (5.0). To be certain of the number ofdevices that may be connected to a line, as determined by the total RENs, contact the local telephonecompany. The REN for this product is part of the product identifier that has the formatUS:AAAEQ##TXXXX. The digits represented by ## are the REN without a decimal point (e.g., 03 is aREN of 0.3).
A plug and jack used to connect this equipment to the premises wiring and telephone network mustcomply with the applicable FCC Part 68 rules and requirements adopted by the ACTA. A complianttelephone cord and modular plug is provided with this product. It is designed to be connected to acompatible modular jack that is also compliant. See installation instructions for details.
Connection to party lines is subjected to state tariffs. Contact the state public utility commission, publicservice commission or corporation commission for information.
If your home has specially wired alarm equipment connected to the telephone line, ensure the installationof this equipment does not disable your alarm equipment. If you have questions about what will disablealarm equipment, consult your telephone company or a qualified installer.
In Case of Equipment Malfunction
Should any malfunction occur which cannot be corrected by the procedures described in the OnlineManual, disconnect the equipment from the telephone line cable, turn off the power and disconnect thepower cord. The telephone line cable should not be reconnected or the main power switch turned ON untilthe problem is completely resolved. Users should contact their local authorized Canon Facsimile ServiceDealer for the servicing of equipment.
Information regarding Authorized Service Facility locations can be obtained by calling the CanonCustomer Center.
Rights of the Telephone Company
If this equipment causes harm to the telephone network, the telephone company may temporarilydisconnect service. The telephone company also retains the right to make changes in facilities andservices that may affect the operation of this equipment. When such changes are necessary, thetelephone company is required to give adequate prior notice to the user. However, if advance notice is notpossible, the telephone company will notify the customer as soon as possible. Also, the customer will beadvised of his/her right to file a compliant with the FCC if he/she believes it is necessary.
Warning
The Telephone Consumer Protection Act of 1991 makes it unlawful for any person to use a computer orother electronic device to send any message via a telephone FAX machine unless such message clearlycontains in a margin at the top or bottom of each transmitted page, or on the first page of thetransmission, the date and time it is sent and an identification of the business or other entity, or otherindividual sending the message and the telephone number of the sending machine or such business,other entity, or individual.
In order to program this information into your FAX machine, you should complete the procedure to registeryour name, unit's telephone number, time, and date. Refer to the Online Manual.
141

WEEE (EU&EEA)
Only for European Union and EEA (Norway, Iceland and Liechtenstein)
This symbol indicates that this product is not to be disposed of with your household waste, according tothe WEEE Directive (2012/19/EU) and national legislation. This product should be handed over to adesignated collection point, e.g., on an authorized one-for-one basis when you buy a new similar productor to an authorized collection site for recycling waste electrical and electronic equipment (EEE). Improperhandling of this type of waste could have a possible negative impact on the environment and humanhealth due to potentially hazardous substances that are generally associated with EEE. At the same time,your cooperation in the correct disposal of this product will contribute to the effective usage of naturalresources. For more information about where you can drop off your waste equipment for recycling, pleasecontact your local city office, waste authority, approved WEEE scheme or your household waste disposalservice. For more information regarding return and recycling of WEEE products, please visit www.canon-europe.com/weee.
Nur für Europäische Union und EWR (Norwegen, Island undLiechtenstein)
Dieses Symbol weist darauf hin, dass dieses Produkt gemäß der EU-Richtlinie über Elektro- undElektronik-Altgeräte (2012/19/EU) und nationalen Gesetzen nicht über den Hausmüll entsorgt werdendarf. Dieses Produkt muss bei einer dafür vorgesehenen Sammelstelle abgegeben werden. Dies kann z.B. durch Rückgabe beim Kauf eines ähnlichen Produkts oder durch Abgabe bei einer autorisiertenSammelstelle für die Wiederaufbereitung von Elektro- und Elektronik-Altgeräten geschehen. Derunsachgemäße Umgang mit Altgeräten kann aufgrund potentiell gefährlicher Stoffe, die generell mitElektro- und Elektronik-Altgeräten in Verbindung stehen, negative Auswirkungen auf die Umwelt und diemenschliche Gesundheit haben. Durch die umweltgerechte Entsorgung dieses Produkts tragen Sieaußerdem zu einer effektiven Nutzung natürlicher Ressourcen bei. Informationen zu Sammelstellen fürAltgeräte erhalten Sie bei Ihrer Stadtverwaltung, dem öffentlich-rechtlichen Entsorgungsträger, einerautorisierten Stelle für die Entsorgung von Elektro- und Elektronik-Altgeräten oder Ihrem örtlichenEntsorgungsunternehmen. Weitere Informationen zur Rückgabe und Entsorgung von Elektro- undElektronik-Altgeräten finden Sie unter www.canon-europe.com/weee.
Union Européenne, Norvège, Islande et Liechtenstein uniquement.
142

Ce symbole indique que ce produit ne doit pas être jeté avec les ordures ménagères, conformément à ladirective DEEE (2012/19/UE) et à la réglementation de votre pays. Ce produit doit être confié audistributeur à chaque fois que vous achetez un produit neuf similaire, ou à un point de collecte mis enplace par les collectivités locales pour le recyclage des Déchets des Équipements Électriques etÉlectroniques (DEEE). Le traitement inapproprié de ce type de déchet risque d'avoir des répercussionssur l'environnement et la santé humaine, du fait de la présence de substances potentiellementdangereuses généralement associées aux équipements électriques et électroniques. Parallèlement, votreentière coopération dans le cadre de la mise au rebut correcte de ce produit favorisera une meilleureutilisation des ressources naturelles. Pour plus d'informations sur les points de collecte des équipementsà recycler, contactez vos services municipaux, les autorités locales compétentes, le plan DEEE approuvéou le service d'enlèvement des ordures ménagères. Pour plus d'informations sur le retour et le recyclagedes produits DEEE, consultez le site: www.canon-europe.com/weee.
Uitsluitend bestemd voor de Europese Unie en EER (Noorwegen,IJsland en Liechtenstein)
Dit symbool geeft aan dat dit product in overeenstemming met de AEEA-richtlijn (2012/19/EU) en denationale wetgeving niet mag worden afgevoerd met het huishoudelijk afval. Dit product moet wordeningeleverd bij een aangewezen, geautoriseerd inzamelpunt, bijvoorbeeld wanneer u een nieuwgelijksoortig product aanschaft, of bij een geautoriseerd inzamelpunt voor hergebruik van elektrische enelektronische apparatuur (EEA). Een onjuiste afvoer van dit type afval kan leiden tot negatieve effecten ophet milieu en de volksgezondheid als gevolg van potentieel gevaarlijke stoffen die veel voorkomen inelektrische en elektronische apparatuur (EEA). Bovendien werkt u door een juiste afvoer van dit productmee aan het effectieve gebruik van natuurlijke hulpbronnen. Voor meer informatie over waar u uwafgedankte apparatuur kunt inleveren voor recycling kunt u contact opnemen met het gemeentehuis in uwwoonplaats, de reinigingsdienst, of het afvalverwerkingsbedrijf. U kunt ook het schema voor de afvoer vanafgedankte elektrische en elektronische apparatuur (AEEA) raadplegen. Ga voor meer informatie over hetinzamelen en recyclen van afgedankte elektrische en elektronische apparatuur naar www.canon-europe.com/weee.
Sólo para la Unión Europea y el Área Económica Europea (Noruega,Islandia y Liechtenstein)
Este símbolo indica que este producto no debe desecharse con los desperdicios domésticos, de acuerdocon la directiva RAEE (2012/19/UE) y con la legislación nacional. Este producto debe entregarse en unode los puntos de recogida designados, como por ejemplo, entregándolo en el lugar de venta al comprarun producto similar o depositándolo en un lugar de recogida autorizado para el reciclado de residuos deaparatos eléctricos y electrónicos (RAEE). La manipulación inapropiada de este tipo de desechos podríatener un impacto negativo en el entorno y la salud humana, debido a las sustancias potencialmente
143

peligrosas que normalmente están asociadas con los RAEE. Al mismo tiempo, su cooperación a la horade desechar correctamente este producto contribuirá a la utilización eficazde los recursos naturales. Paramás información sobre cómo puede eliminar el equipo para su reciclado, póngase en contacto con lasautoridades locales, con las autoridades encargadas de los desechos, con un sistema de gestión RAEEautorizado o con el servicio de recogida de basuras doméstico. Si desea más información acerca de ladevolución y reciclado de RAEE, visite la web www.canon-europe.com/weee.
Només per a la Unió Europea i a l’Espai Econòmic Europeu (Noruega,Islàndia i Liechtenstein)
Aquest símbol indica que aquest producte no s’ha de llençar a les escombraries de la llar, d’acord amb laDirectiva RAEE (2012/19/UE) i la legislació nacional. Aquest producte s’hauria de lliurar en un dels puntsde recollida designats, com per exemple, intercanviant-lo un per un en comprar un producte similar olliurant-lo en un lloc de recollida autoritzat per al reciclatge de residus d’aparells elèctrics i electrònics(AEE). La manipulació inadequada d’aquest tipus de residus podria tenir un impacte negatiu en l’entorn ien la salut humana, a causa de les substàncies potencialment perilloses que normalment estanassociades als AEE. Així mateix, la vostra cooperació a l’hora de llençar correctament aquest productecontribuirà a la utilització efectiva dels recursos naturals. Per a més informació sobre els punts on podeulliurar aquest producte per procedir al seu reciclatge, adreceu-vos a la vostra oficina municipal, a lesautoritats encarregades dels residus, al pla de residus homologat per la RAEE o al servei de recollida dedeixalles domèstiques de la vostra localitat. Per a més informació sobre la devolució i el reciclatge deproductes RAEE, visiteu www.canon-europe.com/weee.
Solo per Unione Europea e SEE (Norvegia, Islanda e Liechtenstein)
Questo simbolo indica che il prodotto deve essere oggetto di raccolta separata in conformità alla DirettivaRAEE (2012/19/UE) e alla normativa locale vigente. Il prodotto deve essere smaltito presso un centro diraccolta differenziata, un distributore autorizzato che applichi il principio dell'"uno contro uno", ovvero delritiro della vecchia apparecchiatura elettrica al momento dell'acquisto di una nuova, o un impiantoautorizzato al riciclaggio dei rifiuti di apparecchiature elettriche ed elettroniche. La gestione impropria diquesto tipo di rifiuti può avere un impatto negativo sull'ambiente e sulla salute umana causato dallesostanze potenzialmente pericolose che potrebbero essere contenute nelle apparecchiature elettriche edelettroniche. Un corretto smaltimento di tali prodotti contribuirà inoltre a un uso efficace delle risorsenaturali ed eviterà di incorrere nelle sanzioni amministrative di cui all'art. 255 e successivi del DecretoLegislativo n. 152/06. Per ulteriori informazioni sullo smaltimento e il recupero dei Rifiuti diApparecchiature Elettriche ed Elettroniche, consultare la Direttiva RAEE, rivolgersi alle autoritàcompetenti, oppure visitare il sito www.canon-europe.com/weee.
144

Apenas para a União Europeia e AEE (Noruega, Islândia eLiechtenstein)
Este símbolo indica que o produto não deve ser colocado no lixo doméstico, de acordo com a DirectivaREEE (2012/19/UE) e a legislação nacional. Este produto deverá ser colocado num ponto de recolhadesignado, por exemplo, num local próprio autorizado quando adquirir um produto semelhante novo ounum local de recolha autorizado para reciclar resíduos de equipamentos eléctricos e electrónicos (EEE).O tratamento inadequado deste tipo de resíduo poderá causar um impacto negativo no ambiente e nasaúde humana devido às substâncias potencialmente perigosas normalmente associadas aosequipamentos eléctricos e electrónicos. Simultaneamente, a sua cooperação no tratamento correctodeste produto contribuirá para a utilização eficaz dos recursos naturais. Para mais informações sobre oslocais onde o equipamento poderá ser reciclado, contacte os serviços locais, a autoridade responsávelpelos resíduos, o esquema REEE aprovado ou o serviço de tratamento de lixo doméstico. Para maisinformações sobre a devolução e reciclagem de produtos REEE, vá a www.canon-europe.com/weee.
Gælder kun i Europæiske Union og EØS (Norge, Island ogLiechtenstein)
Dette symbol angiver, at det pågældende produkt ikke må bortskaffes sammen med dagrenovation jf.direktivet om affald af elektrisk og elektronisk udstyr (WEEE) (2012/19/EU) og gældende nationallovgivning. Det pågældende produkt skal afleveres på et nærmere specificeret indsamlingssted, f.eks. ioverensstemmelse med en godkendt én-til-én-procedure, når du indkøber et nyt tilsvarende produkt, ellerproduktet skal afleveres på et godkendt indsamlingssted for elektronikaffald. Forkert håndtering af dennetype affald kan medføre negative konsekvenser for miljøet og menneskers helbred på grund af depotentielt sundhedsskadelige stoffer, der generelt kan forefindes i elektrisk og elektronisk udstyr. Når duforetager korrekt bortskaffelse af det pågældende produkt, bidrager du til effektiv brug afnaturressourcerne. Yderligere oplysninger om, hvor du kan bortskaffe dit elektronikaffald med henblik pågenanvendelse, får du hos de kommunale renovationsmyndigheder. Yderligere oplysninger omreturnering og genanvendelse af affald af elektrisk og elektronisk udstyr får du ved at besøge www.canon-europe.com/weee.
Μόνο για την Ευρωπαϊκή Ένωση και τον ΕΟΧ (Νορβηγία, Ισλανδία καιΛιχτενστάιν)
145

Αυτό το σύμβολο υποδηλώνει ότι αυτό το προϊόν δεν πρέπει να απορρίπτεται μαζί με τα οικιακάαπορρίμματα, σύμφωνα με την Οδηγία σχετικά με τα Απόβλητα Ηλεκτρικού και Ηλεκτρονικού Εξοπλισμού(ΑΗΗΕ) (2012/19/ΕΕ) και την εθνική σας νομοθεσία. Αυτό το προϊόν πρέπει να παραδίδεται σεκαθορισμένο σημείο συλλογής, π.χ. σε μια εξουσιοδοτημένη βάση ανταλλαγής όταν αγοράζετε ένα νέοπαρόμοιο προϊόν ή σε μια εξουσιοδοτημένη θέση συλλογής για την ανακύκλωση των αποβλήτωνΗλεκτρικού και Ηλεκτρονικού Εξοπλισμού (ΗΗΕ). Ο ακατάλληλος χειρισμός αυτού του τύπου αποβλήτωνμπορεί να έχει αρνητικό αντίκτυπο στο περιβάλλον και την υγεία του ανθρώπου, λόγω δυνητικώςεπικίνδυνων ουσιών που γενικά συνδέονται με τον ΗΗΕ. Ταυτόχρονα, η συνεργασία σας όσον αφορά τησωστή απόρριψη αυτού του προϊόντος θα συμβάλει στην αποτελεσματική χρήση των φυσικών πόρων.Για περισσότερες πληροφορίες σχετικά με τα σημεία όπου μπορείτε να απορρίψετε τον εξοπλισμό σας γιαανακύκλωση, επικοινωνήστε με το τοπικό γραφείο της πόλης σας, την υπηρεσία απορριμμάτων, τοεγκεκριμένο σχήμα ΑΗΗΕ ή την υπηρεσία απόρριψης οικιακών αποβλήτων. Για περισσότερεςπληροφορίες σχετικά με την επιστροφή και την ανακύκλωση των προϊόντων ΑΗΗΕ, επισκεφθείτε τηντοποθεσία www.canon-europe.com/weee.
Gjelder kun den europeiske union og EØS (Norge, Island ogLiechtenstein)
Dette symbolet indikerer at dette produktet ikke skal kastes sammen med husholdningsavfall, i henhold tilWEEE-direktiv (2012/19/EU) og nasjonal lov. Produktet må leveres til et dertil egnet innsamlingspunkt, detvil si på en autorisert en-til-en-basis når du kjøper et nytt lignende produkt, eller til et autorisertinnsamlingssted for resirkulering av avfall fra elektrisk og elektronisk utstyr (EE-utstyr). Feil håndtering avdenne typen avfall kan være miljø- og helseskadelig på grunn av potensielt skadelige stoffer som oftebrukes i EE-utstyr. Samtidig bidrar din innsats for korrekt avhending av produktet til effektiv bruk avnaturressurser. Du kan få mer informasjon om hvor du kan avhende utrangert utstyr til resirkulering ved åkontakte lokale myndigheter, et godkjent WEEE-program eller husholdningens renovasjonsselskap. Dufinner mer informasjon om retur og resirkulering av WEEE-produkter på www.canon-europe.com/weee.
Vain Euroopan unionin sekä ETA:n (Norja, Islanti ja Liechtenstein)alueelle.
Tämä tunnus osoittaa, että sähkö- ja elektroniikkalaiteromua koskeva direktiivi (SER-direktiivi,2012/19/EU) sekä kansallinen lainsäädäntö kieltävät tuotteen hävittämisen talousjätteen mukana. Tuoteon vietävä asianmukaiseen keräyspisteeseen, esimerkiksi kodinkoneliikkeeseen uutta vastaavaa tuotettaostettaessa tai viralliseen sähkö- ja elektroniikkalaiteromun keräyspisteeseen. Sähkö- jaelektroniikkalaiteromun virheellinen käsittely voi vahingoittaa ympäristöä ja ihmisten terveyttä, koskalaitteet saattavat sisältää ympäristölle ja terveydelle haitallisia aineita. Lisäksi tuotteen asianmukainenhävittäminen säästää luonnonvaroja. Lisätietoja sähkö- ja elektroniikkalaiteromun keräyspisteistä saatkaupunkien ja kuntien tiedotuksesta, jätehuoltoviranomaisilta, sähkö- ja elektroniikkalaiteromun
146

kierrätysjärjestelmän ylläpitäjältä ja jätehuoltoyhtiöltä. Lisätietoja sähkö- ja elektroniikkalaiteromunkeräyksestä ja kierrätyksestä on osoitteessa www.canon-europe.com/weee.
Endast för Europeiska unionen och EES (Norge, Island ochLiechtenstein)
Den här symbolen visar att produkten enligt WEEE-direktivet (2012/19/EU) och nationell lagstiftning intefår sorteras och slängas som hushållsavfall. Den här produkten ska lämnas in på en därför avseddinsamlingsplats, t.ex. på en återvinningsstation auktoriserad att hantera elektrisk och elektroniskutrustning (EE-utrustning) eller hos handlare som är auktoriserade att byta in varor då nya, motsvarandeköps (en mot en). Olämplig hantering av avfall av den här typen kan ha en negativ inverkan på miljön ochmänniskors hälsa på grund av de potentiellt farliga ämnen som kan återfinnas i elektrisk och elektroniskutrustning. Din medverkan till en korrekt avfallshantering av den här produkten bidrar dessutom till eneffektiv användning av naturresurserna. Kontakta ditt lokala kommunkontor, berörd myndighet, företag föravfallshantering eller ta del av en godkänd WEEE-organisation om du vill ha mer information om var dukan lämna den kasserade produkten för återvinning. För mer information om inlämning och återvinning avWEEE-produkter, se www.canon-europe.com/weee.
Pouze Evropská unie a EHP (Norsko, Island a Lichtenštejnsko)
Tento symbol znamená, že podle směrnice o OEEZ (2012/19/EU) a podle vnitrostátních právníchpředpisů nemá být tento výrobek likvidován s odpadem z domácností. Tento výrobek má být vrácen dosběrného místa, např. v rámci autorizovaného systému odběru jednoho výrobku za jeden nově prodanýpodobný výrobek nebo v autorizovaném sběrném místě pro recyklaci odpadních elektrických aelektronických zařízení (OEEZ). Nevhodné nakládání s tímto druhem odpadu by mohlo mít negativnídopad na životní prostředí a lidské zdraví, protože elektrická a elektronická zařízení zpravidla obsahujípotenciálně nebezpečné látky. Vaše spolupráce na správné likvidaci tohoto výrobku současně napomůžeefektivnímu využívání přírodních zdrojů. Další informace o místech sběru vašeho odpadního zařízeník recyklaci vám sdělí místní úřad vaší obce, správní orgán vykonávající dozor nad likvidací odpadu,sběrny OEEZ nebo služba pro odvoz komunálního odpadu. Další informace týkající se vracení arecyklace OEEZ naleznete na adrese www.canon-europe.com/weee.
Csak az Európai Unió és az EGT (Norvégia, Izland és Liechtenstein)országaiban
147

Ez a szimbólum azt jelzi, hogy a helyi törvények és a WEEE-irányelv (2012/19/EU) szerint a termék nemkezelhető háztartási hulladékként. A terméket a kijelölt nyilvános gyűjtőpontokon kell leadni, példáulhasonló cserekészülék vásárlásakor, illetve bármelyik, elektromos és elektronikai berendezésekbőlszármazó hulladék (WEEE) átvételére feljogosított gyűjtőponton. Az ilyen jellegű hulladékok a nemmegfelelő kezelés esetén a bennük található veszélyes anyagok révén ártalmasak lehetnek a környezetreés az emberek egészségére. Továbbá, a termékből származó hulladék megfelelő kezelésévelhozzájárulhat a természetes nyersanyagok hatékonyabb hasznosításához. A berendezésekből származó,újrahasznosítható hulladékok elhelyezésére vonatkozó további tudnivalókért forduljon a helyiönkormányzathoz, a közterület-fenntartó vállalathoz, a háztartási hulladék begyűjtését végző vállalathoz,illetve a hivatalos WEEE-képviselethez. További tudnivalókat a WEEE-termékek visszajuttatásáról ésújrahasznosításáról a www.canon-europe.com/weee.
Tylko dla krajów Unii Europejskiej oraz EOG (Norwegia, Islandia iLiechtenstein)
Ten symbol oznacza, że zgodnie z dyrektywą WEEE dotyczącą zużytego sprzętu elektrycznego ielektronicznego (2012/19/UE) oraz przepisami lokalnymi nie należy wyrzucać tego produktu razem zodpadami gospodarstwa domowego. Produkt należy przekazać do wyznaczonego punktu gromadzeniaodpadów, np. firmie, od której kupowany jest nowy, podobny produkt lub do autoryzowanego punktugromadzenia zużytego sprzętu elektrycznego i elektronicznego w celu poddania go recyklingowi.Usuwanie tego typu odpadów w nieodpowiedni sposób może mieć negatywny wpływ na otoczenie izdrowie innych osób ze względu na niebezpieczne substancje stosowane w takim sprzęcie. Jednocześniepozbycie się zużytego sprzętu w zalecany sposób przyczynia się do właściwego wykorzystania zasobównaturalnych. Aby uzyskać więcej informacji na temat punktów, do których można dostarczyć sprzęt dorecyklingu, prosimy skontaktować się z lokalnym urzędem miasta, zakładem utylizacji odpadów,skorzystać z instrukcji zatwierdzonej dyrektywą WEEE lub skontaktować się z przedsiębiorstwemzajmującym się wywozem odpadów domowych. Więcej informacji o zwracaniu i recyklingu zużytegosprzętu elektrycznego i elektronicznego znajduje się w witrynie www.canon-europe.com/weee.
Platí len pre štáty Európskej únie a EHP (Nórsko, Island aLichtenštajnsko)
Tento symbol znamená, že podľa Smernice 2012/19/EÚ o odpade z elektrických a elektronickýchzariadení (OEEZ) a podľa platnej legislatívy Slovenskej republiky sa tento produkt nesmie likvidovať spolus komunálnym odpadom. Produkt je potrebné odovzdať do určenej zberne, napr. prostredníctvom výmenyza kúpu nového podobného produktu, alebo na autorizované zberné miesto, ktoré spracúva odpad zelektrických a elektronických zariadení (EEZ). Nesprávna manipulácia s takýmto typom odpadu môže maťnegatívny vplyv na životné prostredie a ľudské zdravie, pretože elektrické a elektronické zariadeniaobsahujú potenciálne nebezpečné látky. Spoluprácou na správnej likvidácii produktu prispejete
148

k účinnému využívaniu prírodných zdrojov. Ďalšie informácie o mieste recyklácie opotrebovanýchzariadení získate od miestneho úradu, úradu životného prostredia, zo schváleného plánu OEEZ alebo odspoločnosti, ktorá zaisťuje likvidáciu komunálneho odpadu. Viac informácií nájdete aj na webovej stránke:www.canon-europe.com/weee.
Üksnes Euroopa Liit ja EMP (Norra, Island ja Liechtenstein)
See sümbol näitab, et antud toodet ei tohi vastavalt elektri- ja elektroonikaseadmete jäätmeid käsitlevaledirektiivile (2012/19/EL) ning teie riigis kehtivatele õigusaktidele utiliseerida koos olmejäätmetega. Antudtoode tuleb anda selleks määratud kogumispunkti, nt müügipunkt, mis on volitatud üks ühe vastuvahetama, kui ostate uue sarnase toote, või elektri- ja elektroonikaseadmete jäätmete ümbertöötlemiseksmõeldud kogumispunkti. Täiendava teabe saamiseks elektri- ja elektroonikaseadmetest tekkinud jäätmetetagastamise ja ümbertöötlemise kohta võtke ühendust kohaliku omavalitsusega, asjakohasevalitsusasutusega, asjakohase tootjavastutusorganisatsiooniga või olmejäätmete käitlejaga. Lisateavetleitate ka Interneti-leheküljelt www.canon-europe.com/weee.
Tikai Eiropas Savienībai un EEZ (Norvēģijai, Islandei un Lihtenšteinai)
Šis simbols norāda, ka atbilstoši ES Direktīvai (2012/19/ES) par elektrisko un elektronisko iekārtuatkritumiem (EEIA) un vietējiem tiesību aktiem no šī izstrādājuma nedrīkst atbrīvoties, izmetot to kopā arsadzīves atkritumiem. Šis izstrādājums ir jānodod piemērotā savākšanas vietā, piemēram, apstiprinātāveikalā, kur iegādājaties līdzīgu jaunu produktu un atstājat veco, vai apstiprinātā vietā izlietotu elektriskoun elektronisko iekārtu pārstrādei. Nepareiza šāda veida atkritumu apsaimniekošana var apdraudēt vidiun cilvēka veselību tādu iespējami bīstamu vielu dēļ, kas parasti ir elektriskajās un elektroniskajāsiekārtās. Turklāt jūsu atbalsts pareizā šāda veida atkritumu apsaimniekošanā sekmēs efektīvu dabasresursu izmantošanu. Lai saņemtu pilnīgāku informāciju par vietām, kur izlietoto iekārtu var nodotpārstrādei, sazinieties ar vietējo pašvaldību, atkritumu savākšanas atbildīgo dienestu, pilnvarotu EEIAstruktūru vai sadzīves atkritumu apsaimniekošanas iestādi. Lai saņemtu plašāku informāciju par elektriskoun elektronisko iekārtu nodošanu pārstrādei, apmeklējiet tīmekļa vietni www.canon-europe.com/weee.
Tik Europos Sąjungai ir EEE (Norvegijai, Islandijai ir Lichtenšteinui)
Šis ženklas reiškia, kad gaminio negalima išmesti su buitinėmis atliekomis, kaip yra nustatyta Direktyvoje(2012/19/ES) ir nacionaliniuose teisė aktuose dėl EEĮ atliekų tvarkymo. Šį gaminį reikia atiduoti į tamskirtą surinkimo punktą, pvz., pagal patvirtintą keitimo sistemą, kai perkamas panašus gaminys, arba į
149

elektros ir elektroninės įrangos (EEĮ) atliekų perdirbimo punktą. Netinkamas tokios rūšies atliekųtvarkymas dėl elektros ir elektroninėje įrangoje esančių pavojingų medžiagų gali pakenkti aplinkai iržmonių sveikatai. Padėdami užtikrinti tinkamą šio gaminio šalinimo tvarką, kartu prisidėsite prieveiksmingo gamtos išteklių naudojimo. Jei reikia daugiau informacijos, kaip šalinti tokias atliekas, kad josbūtų toliau perdirbamos, kreipkitės į savo miesto valdžios institucijas, atliekų tvarkymo organizacijas,patvirtintų EEĮ atliekų sistemų arba jūsų buitinių atliekų tvarkymo įstaigų atstovus. Išsamesnėsinformacijos apie EEĮ atliekų grąžinimo ir perdirbimo tvarką galite rasti apsilankę tinklalapyje www.canon-europe.com/weee.
Samo za Evropsko unijo in EGP (Norveška, Islandija in Lihtenštajn)
Ta simbol pomeni, da tega izdelka v skladu z direktivo OEEO (2012/19/EU) in državno zakonodajo nesmete odvreči v gospodinjske odpadke. Ta izdelek morate odložiti na ustrezno zbiralno mesto, na primerpri pooblaščenem prodajalcu, ko kupite podoben nov izdelek ali na zbiralno mesto za recikliranjeelektrične in elektronske opreme. Neprimerno ravnanje s takšnimi odpadki lahko negativno vpliva naokolje in človekovo zdravje zaradi nevarnih snovi, ki so povezane z električno in elektronsko opremo. Spravilno odstranitvijo izdelka hkrati prispevate tudi k učinkoviti porabi naravnih virov. Če želite večinformacij o tem, kje lahko odložite odpadno opremo za recikliranje, pokličite občinski urad, komunalnopodjetje ali službo, ki skrbi za odstranjevanje odpadkov, ali si oglejte načrt OEEO. Če želite več informacijo vračanju in recikliranju izdelkov v skladu z direktivo OEEO, obiščite www.canon-europe.com/weee.
Само за Европейския съюз и ЕИП (Норвегия, Исландия иЛихтенщайн)
Този символ показва, че този продукт не трябва да се изхвърля заедно с битовите отпадъци,съгласно Директивата за ИУЕЕО (2012/19/ЕC) и Вашето национално законодателство. Тозипродукт трябва да бъде предаден в предназначен за целта пункт за събиране, например на базаразмяна, когато купувате нов подобен продукт, или в одобрен събирателен пункт за рециклиранена излязло от употреба електрическо и електронно оборудване (ИУЕЕО). Неправилното третиранена този тип отпадъци може да доведе до евентуални отрицателни последствия за околната средаи човешкото здраве поради потенциално опасните вещества, които обикновено са свързани с ЕЕО.В същото време Вашето съдействие за правилното изхвърляне на този продукт ще допринесе заефективното използване на природните ресурси. Повече информация относно местата, къдетоможе да предавате излязло от употреба оборудване за рециклиране, може да получите отместните власти, от органа, отговорен за отпадъците и от одобрена система за излязло отупотреба ЕЕО или от Вашата местна служба за битови отпадъци. За повече информация относновръщането и рециклирането на продукти от излязло от употреба ЕЕО посетете www.canon-europe.com/weee.
150

Doar pentru Uniunea Europeană şi EEA (Norvegia, Islanda şiLiechtenstein)
Acest simbol indică faptul că acest produs nu trebuie aruncat o dată cu reziduurile menajere, înconformitate cu Directiva DEEE (Directiva privind deşeurile de echipamente electrice şi electronice)(2012/19/UE) şi legile naţionale. Acest produs trebuie transportat la un punct de colectare special, deexemplu un centru care preia produsele vechi atunci când achiziţionaţi un produs nou similar, sau la unpunct de colectare autorizat pentru reciclarea deşeurilor provenite de la echipamentele electrice şielectronice (EEE). Mânuirea necorespunzătoare a acestor tipuri de deşeuri poate avea un impact negativasupra mediului înconjurător şi sănătăţii indivizilor, din cauza substanţelor potenţial nocive care sunt îngeneral asociate cu EEE. În acelaşi timp, cooperarea dvs. la reciclarea corectă a acestui produs vacontribui la utilizarea efectivă a resurselor naturale. Pentru mai multe informaţii privind locurile de reciclarea deşeurilor provenite de la echipamente, contactaţi biroul primăriei locale, autoritatea responsabilă cucolectarea deşeurilor, schema DEEE aprobată sau serviciul de colectare a deşeurilor menajere. Pentrumai multe informaţii privind returnarea şi reciclarea produselor DEEE, vizitaţi www.canon-europe.com/weee.
Samo za Europsku uniju i EEZ (Norveška, Island i Lihtenštajn)
Ovaj simbol pokazuje da se ovaj proizvod ne smije odlagati s kućnim otpadom sukladno WEEE Direktivi(2012/19/EC) i vašem nacionalnom zakonu. Ovaj proizvod je potrebno predati na posebno mjesto zasakupljanje otpada, npr. na ovlašteno mjesto gdje možete zamijeniti staro za novo ukoliko kupujete novisličan proizvod ili na ovlašteno mjesto za sakupljanje rabljene električne i elektroničke opreme (EEE) zarecikliranje. Nepropisno rukovanje ovom vrstom otpada može imati negativan učinak na okolinu i zdravljeljudi zbog supstanci koje su potencijalno opasne za zdravlje, a općenito se povezuju s EEE. Istovremeno,vaša će suradnja kroz propisno odlaganje ovog proizvoda doprinijeti efektivnoj uporabi prirodnih resursa.Za više informacija o tome gdje možete odložiti svoj otpad za recikliranje obratite se vašem lokalnomgradskom uredu, komunalnoj službi, odobrenom WEEE programu ili službi za odlaganje kućnog otpada.Ostale informacije o vraćanju i recikliranju WEEE proizvoda potražite na www.canon-europe.com/weee.
Korisnici u Srbiji
Ovaj simbol označava da ovaj proizvod ne sme da se odlaže sa ostalim kućnim otpadom, u skladu saWEEE Direktivom (2012/19/EU) i nacionalnim zakonima. Ovaj proizvod treba predati određenom centruza prikupljanje, npr. na osnovi "jedan-za-jedan" kada kupujete sličan novi proizvod, ili ovlašćenom centruza prikupljanje za reciklažu istrošene električne i elektronske opreme (EEE). Nepravilno rukovanje ovom
151

vrstom otpada može da ima moguće negativne posledice po životnu sredinu i ljudsko zdravlje usledpotencijalno opasnih materijala koji se uglavnom vezuju za EEE. U isto vreme, vaša saradnja naispravnom odlaganju ovog proizvoda će doprineti efikasnom korišćenju prirodnih resursa. Za višeinformacija o tome gde možete da predate vašu staru opremu radi recikliranje, vas molimo, dakontaktirate lokalne gradske vlasti, komunalne službe, odobreni plan reciklaže ili Gradsku čistoću. Za višeinformacija o vraćanju i recikliranju WEEE proizvoda, posetite stranicu www.canon-europe.com/weee.
152

Handling Precautions
Canceling Print Jobs
Storing Printed Images
Legal Restrictions on Scanning/Copying
Transporting Your Printer
When Repairing, Lending, or Disposing of the Printer
Keeping Print Quality High
153
Legal Restrictions on Scanning/Copying
Scanning, printing, copying, or modifying copies of the following may be punishable under law.
This list is non-exhaustive. When in doubt, check with a local legal representative.
• Paper money
• Money orders
• Certificates of deposit
• Postage stamps (canceled or uncanceled)
• Identification badges or insignia
• Selective service or draft papers
• Checks or drafts issued by governmental agencies
• Motor vehicle licenses and certificates of title
• Traveler's checks
• Food stamps
• Passports
• Immigration papers
• Internal revenue stamps (canceled or uncanceled)
• Bonds or other certificates of indebtedness
• Stock certificates
• Copyrighted works or works of art, without the owner's consent
154

Transporting Your Printer
When relocating the printer for changing your living place or repairing it, make sure of the following.
Important• Pack the printer in a sturdy box so that it is placed with its bottom facing down, using sufficient
protective material to ensure safe transport.
• With the FINE cartridge left installed in the printer, press the ON button to turn off the power. Thisallows the printer to automatically cap the print head, thus preventing it from drying.
• After packing, do not tilt the box containing the printer or turn it on its side or upside down. Doing somay cause the ink to leak during transport and cause damage to the printer.
• When a shipping agent is handling transport of the printer, have its box marked "THIS SIDE UP" tokeep the printer with its bottom facing down. Mark also with "FRAGILE" or "HANDLE WITH CARE".
1. Turn the printer off.
2. Check that ON lamp is off and unplug power cord.
Important• Do not unplug the printer while the ON lamp is lit or flashing, as it may cause malfunction or
damage to the printer, making the printer unable to print.
3. Retract the paper output support with the output tray extension closed.
4. Close the front cover.
5. Unplug the printer cable from the computer and from the printer, then unplug the powercord from the printer.
6. Use adhesive tape to secure all the covers on the printer to keep them from opening duringtransportation. Then pack the printer in the plastic bag.
7. Attach the protective material to the printer when packing the printer in the box.
155

Important• We recommend to hold and carry out this printer as shown in the figure below. If you hold the front
cover or the cassette, it may fall out of the printer.
156

When Repairing, Lending, or Disposing of the Printer
If you have entered personal data, passwords and/or other security settings on the printer, such informationmay be stored in the printer.
When sending the printer for repair, lending or transferring the printer to another person, or disposing of theprinter, please be sure to follow the steps below in order to delete such information and prevent third partiesfrom accessing it.
Press the Setup button and select Device settings > Reset setting > All data. Next, press the OK buttonand select Yes.
For printers with fax capabilities, user information and speed dial numbers can be backed up to a computerby utilizing the Speed Dial Utility2 software before resetting the printer or deleting data. Backed up data canbe restored to the repaired printer or another Canon printer.
Registering Recipients Using Speed Dial Utility2 (Windows)Registering Recipients Using Speed Dial Utility2 (macOS)
157
Keeping Print Quality High
The key to printing with the optimal printing quality is to prevent the print head from drying or clogging.Always observe the following rules for optimal printing quality.
Note• Depending on the type of paper, ink may blur if you trace the printed area with a highlight pen or paint-
stick, or bleed if water or sweat comes in contact with the printed area.
Never unplug the power cord until the power is turned off!
If you press the ON button to turn off the power, the printer caps the print head (nozzles) automatically toprevent from drying. If you unplug the power cord from the wall outlet before the ON lamp is turned off, theprint head will not be capped properly and this will cause drying or clogging.
When unplugging the power cord, check that the ON lamp is not lit.
Important• If the power cord is unplugged, the date/time settings will be reset and all documents stored in the
printer's memory will be lost. Send or print a necessary document before unplugging the power cord.
Print periodically!
Just as the tip of a felt pen becomes dry and unusable if it has not been used for a long time, even if it iscapped, the print head too, may become dried or clogged if the printer has not been used for a long time.We recommend you to use the printer at least once a month.
158

Main Components and Their Use
Main Components
Power Supply
LCD and Operation Panel
Entering Numbers, Letters, and Symbols
159

Main Components
Front View
Rear View
Inside View
Operation Panel
160

Front View
A: Operation PanelUse to change the settings of the printer or to operate it.
Operation Panel
B: PlatenLoad an original here.
C: Document CoverOpen to load an original on the platen.
D: Paper GuidesAlign with both sides of the paper stack.
E: CassetteLoad paper here. Two or more sheets of the same size and type of paper can be loaded at the sametime, and fed automatically one sheet at a time.
Loading Plain PaperLoading Photo PaperLoading Envelopes
F: Paper Output TrayPrinted paper is ejected.
G: Paper Output SupportExtend to support ejected paper.
H: Output Tray ExtensionOpen to support ejected paper.
161

I: Paper Output CoverOpen to replace the FINE cartridge or remove jammed paper inside the printer.
J: ON buttonTurns the power on or off. Before turning on the power, make sure that the document cover is closed.
Turning the Printer On and Off
K: ON lampLights after flashing when the power is turned on.
L: FAX Memory lampLights when there are received or unsent documents stored in the printer's memory.
M: Alarm lampLights or flashes when an error occurs.
N: ADF (Auto Document Feeder)Load a document here. The documents loaded in the document tray are scanned automatically onesheet at a time.
Loading Documents in the ADF (Auto Document Feeder)
O: Document Feeder CoverOpen when clearing jammed documents.
P: Document GuideAdjust this guide to match the width of document in the ADF.
Q: Document TrayOpen to load a document in the ADF. You can load two or more sheets of document of the same sizeand thickness. Load the document with the side you want to scan facing up.
R: Document Output SlotDocuments scanned from the ADF are delivered here.
S: Front CoverOpen to load paper in the cassette.
162

Rear View
A: Power Cord ConnectorPlug in the supplied power cord.
B: Rear CoverOpen when removing jammed paper.
C: Telephone Line JackConnect the telephone line.
D: External Device JackConnect an external device such as telephone or answering device.
E: USB PortPlug in the USB cable to connect the printer with a computer.
F: Transport Unit CoverDetach when removing jammed paper.
Important• Do not touch the metal casing.
• Do not plug in or unplug the USB cable while the printer is printing or scanning with the computer. Thiscan cause trouble.
163

Inside View
A: FINE Cartridge (ink cartridges)A replaceable cartridge that integrates print head and ink tank.
B: FINE Cartridge HolderInstall the FINE cartridge.
The color FINE cartridge should be installed into the left slot and the black FINE cartridge should beinstalled into the right slot.
Note• For details on replacing a FINE cartridge, see Replacing a FINE Cartridge.
Important• The area around the parts C may be splattered with ink. This does not affect the performance of the
printer.
• Do not touch the parts C. The printer may not print properly if you touch them.
164

Operation Panel
A: LCD (Liquid Crystal Display)Displays messages, menu items, and the operational status.
B: Back buttonReturns the LCD to the previous screen.
C: FAX buttonSwitches the printer to the fax mode.
D: COPY buttonSwitches the printer to the copy mode.
E: SCAN buttonSwitches the printer to the scan mode.
F: Setup buttonDisplays the Setup menu screen. With this menu, you can perform printer maintenance and changeprinter settings.
G: Black buttonStarts black & white copying, scanning, faxing, etc.
H: Color buttonStarts color copying, scanning, faxing, etc.
I: and buttonsUsed to select a menu or setting item. The button is also used when entering characters.
Selecting a Menu or Setting Item
165

J: OK buttonFinalizes the selection of a menu or setting item. This button is also used to resolve an error or ejectsdocuments in the ADF (Auto Document Feeder).
K: Menu/Wireless connect buttonDisplays the Copy menu, Scan menu, or FAX menu screen.
To set wireless router information in the printer directly from a smartphone or other such device (withouthaving to do any procedures at the router), hold down this button.
L: Numeric buttonsUsed to enter numerical values such as the number of copies, as well as fax/telephone numbers andcharacters.
M: Tone buttonSwitches to tone dialing temporarily if your printer is connected to a rotary pulse line.
N: Stop buttonCancels operation when print, copy, scan, or fax transmission/reception job is in progress.
Note• The printer makes the beep sound when pressing keypad buttons on the operation panel. The keypad
sound can be enabled or disabled in Sound control of Other dev. settings.
Other dev. settings
166

Power Supply
Checking that Power Is On
Turning the Printer On and Off
Checking the Power Plug/Power Cord
Unplugging the Printer
167

Checking that Power Is On
The ON lamp is lit when the printer is turned on.
Even if the LCD is off, if the ON lamp is lit, the printer is on.
Note• It may take a while for the printer to start printing immediately after you turn on the printer.
• The LCD will turn off if the printer is not operated for about 10 minutes. To restore the display, pressany button or perform the print operation. The display will be also restored when receiving faxes. Youcannot change the wait time before the LCD turns off.
168
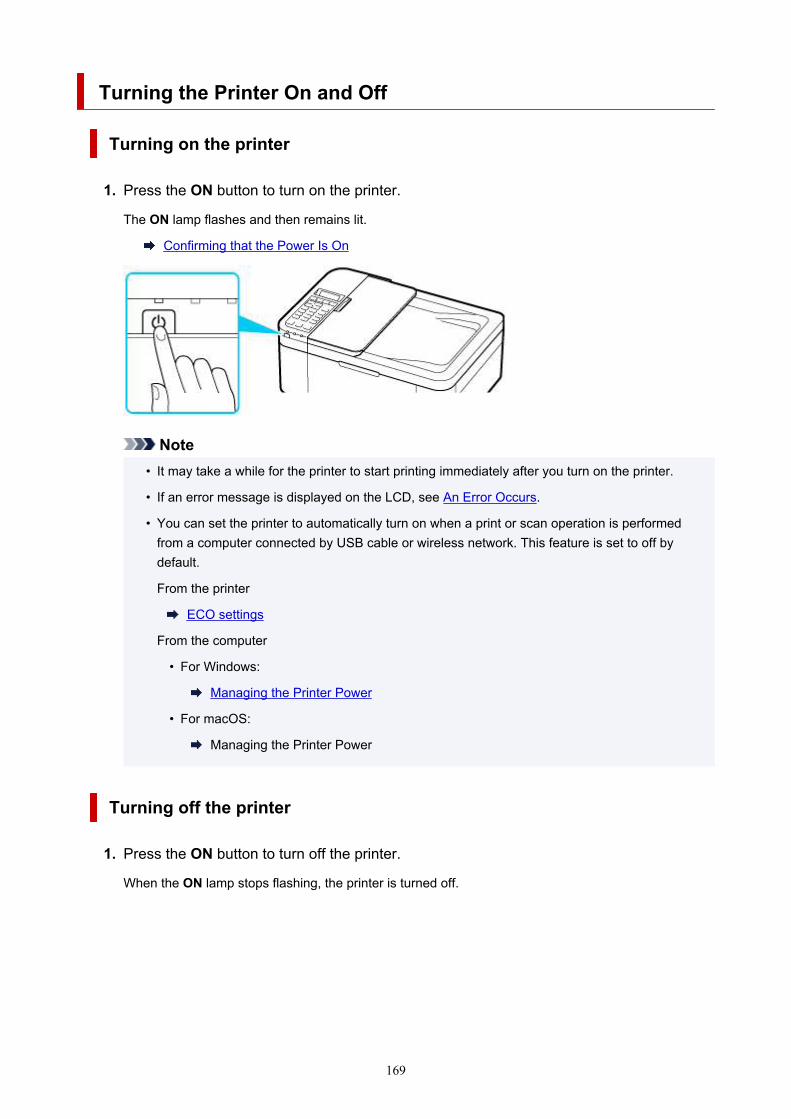
Turning the Printer On and Off
Turning on the printer
1. Press the ON button to turn on the printer.
The ON lamp flashes and then remains lit.
Confirming that the Power Is On
Note• It may take a while for the printer to start printing immediately after you turn on the printer.
• If an error message is displayed on the LCD, see An Error Occurs.
• You can set the printer to automatically turn on when a print or scan operation is performedfrom a computer connected by USB cable or wireless network. This feature is set to off bydefault.
From the printer
ECO settings
From the computer
• For Windows:
Managing the Printer Power
• For macOS:
Managing the Printer Power
Turning off the printer
1. Press the ON button to turn off the printer.
When the ON lamp stops flashing, the printer is turned off.
169

Important• When you unplug the power cord after turning off the printer, be sure to confirm that the ON
lamp is off.
Note• You can set the printer to automatically turn off when no operations are performed or no print
jobs are sent to the printer for a certain interval. This feature is set to on by default.
From the printer
ECO settings
From the computer
• For Windows:
Managing the Printer Power
• For macOS:
Managing the Printer Power
170

Checking the Power Plug/Power Cord
Check the power plug/power cord once a month to confirm that it does not have anything unusual describedbelow.
• The power plug/power cord is hot.
• The power plug/power cord is rusty.
• The power plug/power cord is bent.
• The power plug/power cord is worn.
• The power plug/power cord is split.
Caution• If you find anything unusual with the power plug/power cord described above, unplug the power cord
and call for service. Using the printer with one of the unusual conditions above may cause a fire or anelectric shock.
171

Unplugging the Printer
To unplug the power cord, follow the procedure below.
Important• When you unplug the power cord, press the ON button, then confirm that the ON lamp is off.
Unplugging the power cord while the ON lamp is lit or flashing may cause drying or clogging of the printhead and print quality may be reduced.
• If the power cord is unplugged, the date/time settings will be reset and all documents stored in theprinter's memory will be lost. Send or print a necessary document before unplugging the power cord.
1. Press the ON button to turn the printer off.
2. Confirm that the ON lamp is off.
3. Unplug the power cord.
The specification of the power cord differs depending on the country or region of use.
172

LCD and Operation Panel
The mode button (A) on the operation panel allows you to switch between the copy mode, scan mode, faxmode, and setup menu screen.
Pressing the Menu/Wireless connect button (B) in the respective modes shows the menu screen to selectvarious functions or settings.
Selecting a Menu or Setting Item
On the menu screen or settings screen, use the button (C) to select an item or option, then pressthe OK button (D) to proceed with the procedure.
To return to the previous screen, press the Back button (E).
Example: Changing the scan contrast for faxing.
1. Press Menu/Wireless connect button in Fax standby screen.
2. Press the button (C) to select FAX TX settings.
3. Press the OK button (D).
173

4. Select Scan contrast, press the OK button (D).
5. Use the button (C) to change the contrast, then press the OK button (D).
Network Status Indication
Wi-Fi setting and the network status indicate by the icon.
If the icon appears on the LCD when the SCAN button or Setup button is pressed, it indicatesthat Wi-Fi is enabled and the printer is connected to the wireless router.
Depending on the signal state, the icon will change.
Signal strength: 81 % or more
You can use the printer over Wi-Fi without any problems.
Signal strength: 51 % or more
The problem such as the printer cannot print may occur according to the network sta-tus. We recommend placing the printer near the wireless router.
Signal strength: 50 % or less
The problem such as the printer cannot print may occur. Place the printer near thewireless router.
Wi-Fi is enabled but the printer is not connected to the wireless router.
Note
• When Wi-Fi is disabled, icon is not displayed.
174

Entering Numbers, Letters, and Symbols
Use the Numeric buttons to enter or edit such information as unit name, a recipient's name for the directory,etc.
Switching the Input Mode
Each time the Tone button is pressed, the input mode is switched.
The current input mode appears at the upper right corner of the LCD.
Note• Only numbers and symbols that are available for the type of information you are entering are
displayed, such as numbers for telephone or fax number input.
Entering Numbers, Letters, and Symbols
Press the Tone button to switch the input mode.
Use the Numeric buttons to enter the desired characters.
• To insert a space
Press the button five times.
• To delete the last entered character
Press the Back button.
Editing Entered Numbers, Letters, and Symbols
Press the or button to move the cursor under the position you want to edit.
• To insert a space
Press the button five times.
• To insert a character
Move the cursor under the character to the right of the insertion position, then enter the character. Thecharacter on the cursor will move to the right and the new character will be inserted.
• To delete a character
Move the cursor under the character, then press the Back button.
175

List of Characters Assigned to Each Numeric Button
For Fax/Telephone Number, Name, Number of Copies
ButtonLowercase mode
(:a)Uppercase mode
(:A)Numeric mode
(:1)Fax/Tele-phone no.
1 1
abcåäáàãâæç ABCÅÄÁÀÃÂÆÇ 2 2
defëéèê DEFËÉÈÊ 3 3
gh i ï í ì î GH I Ï Í Ì Î 4 4
jkl JKL 5 5
mnoñøöóòõô MNOÑØÖÓÒÕÔ 6 6
pqrsþ PQRSÞ 7 7
tuvüúùû TUVÜÚÙÛ 8 8
wxyzý WXYZÝ 9 9
0 0
. @ - _ SP*1 # ! " , ; : ^ ` = / | ' ? $ % & + ( ) [ ] { } < > #
Switch the input mode.
*1 "SP" indicates a space.
For LAN Settings
ButtonLowercase mode
(:a)Uppercase mode
(:A)Numeric mode
(:1)
1
abc ABC 2
def DEF 3
gh i GH I 4
jkl JKL 5
mno MNO 6
176

pqrs PQRS 7
tuv TUV 8
wxyz WXYZ 9
0
. @ - _ SP*2 # ! " , ; : ^ ` = / | ' ? $ % & + ( ) [ ] { } < > \ ~
Switch the input mode.
*2 "SP" indicates a space.
177

Changing Settings
Changing Printer Settings from Your Computer (Windows)
Changing Printer Settings from Your Computer (macOS)
Changing Settings from Operation Panel
178

Changing Printer Settings from Your Computer (Windows)
Changing the Print Options
Registering a Frequently Used Printing Profile
Setting the FINE Cartridge to be Used
Managing the Printer Power
Changing the Printer Operation Mode
179

Changing the Print Options
You can change the detailed printer driver settings for print data that is sent from an application software.
Specify this option if you encounter print failures such as part of an image data being cut off.
1. Open the printer driver setup window
2. Click Print Options... on the Page Setup tab
The Print Options dialog box opens.
3. Change the individual settings
If necessary, change the setting of each item, and then click OK.
The Page Setup tab is displayed again.
180

Registering a Frequently Used Printing Profile
You can register the frequently used printing profile to Commonly Used Settings on the Quick Setup tab.Unnecessary printing profiles can be deleted at any time.
Registering a Printing Profile
1. Open the printer driver setup window
2. Set the necessary items
From Commonly Used Settings on the Quick Setup tab, select the printing profile to be used and ifnecessary, change the settings after Additional Features.You can also register necessary items on the Main and Page Setup tabs.
3. Click Save...
The Save Commonly Used Settings dialog box opens.
4. Save the settings
Enter a name in the Name field. If necessary, click Options..., set the items, and then click OK.In the Save Commonly Used Settings dialog box, click OK to save the print settings and return to the
181

Quick Setup tab.The name and icon are displayed in Commonly Used Settings.
Important• To save the page size, orientation, and number of copies that was set in each sheet, click Options...,
and check each item.
Note• When you re-install the printer driver or upgrade the printer driver version, the print settings that are
already registered will be deleted from Commonly Used Settings.Registered print settings cannot be saved and preserved. If a profile is deleted, register the printsettings again.
Deleting Unnecessary Printing Profile
1. Select the printing profile to be deleted
Select the printing profile you want to delete from the Commonly Used Settings list on the QuickSetup tab.
2. Delete the printing profile
Click Delete. When the confirmation message appears, click OK.The selected printing profile is deleted from the Commonly Used Settings list.
Note• Printing profiles that are registered in the initial settings cannot be deleted.
182

Setting the FINE Cartridge to be Used
This feature enables you to specify the most appropriate FINE cartridge among installed cartridgesaccording to an intended use.
1. Open the printer driver setup window
2. Click Print Options... on the Page Setup tab
The Print Options dialog box appears.
3. Select the FINE cartridge to be used from Print With
Select the FINE cartridge to be used for printing and click OK.
4. Click OK on the Page Setup tab
When you perform printing, the specified FINE cartridge will be used.
Important• When the following settings are specified, Black Only does not function because the printer uses the
color FINE cartridge to print documents.• Other than Plain Paper, Envelope, Ink Jet Hagaki (A), Hagaki K (A), Hagaki (A), or Hagaki is
selected for Media Type on the Main tab• Borderless is selected from the Page Layout list on the Page Setup tab
• Do not detach the FINE cartridge that is not in use. Printing cannot be performed while either FINEcartridge is detached.
183

Managing the Printer Power
This function allows you to manage the printer power from the Canon IJ Printer Assistant Tool.
Power Off
The Power Off function turns off the printer. When you use this function, you will not be able to turn theprinter on from the Canon IJ Printer Assistant Tool.
1. Open Canon IJ Printer Assistant Tool
2. Execute power off
Click Power Off. When the confirmation message appears, click OK.
The printer power switches off.
Important• You cannot receive faxes when the printer is switched off.
Auto Power
Auto Power allows you to set Auto Power On and Auto Power Off.The Auto Power On function automatically turns on the printer when data is received.The Auto Power Off function automatically turns off the printer when there are no operations from theprinter driver or the printer for a specified period of time.
1. Open the Canon IJ Printer Assistant Tool
2. Make sure that the printer is on and then click Auto Power
The Auto Power Settings dialog box opens.
Note• If the printer is off or if communication between the printer and the computer is disabled, an
error message may appear because the computer cannot collect the printer status.If this happens, click OK to display the most recent settings specified on your computer.
3. If necessary, complete the following settings:
Auto Power OnSpecifying Enable from the list will turn the printer on upon receipt of print data.
184
Auto Power OffSpecify the time from the list. When this time lapses without any operations from the printer driveror the printer, the printer is turned off automatically.
4. Apply the settings
Click OK. When the confirmation message appears, click OK.
The setting is enabled after this. When you want to disable this function, select Disable from the listaccording to the same procedure.
Note• When the printer is turned off, the Canon IJ Status Monitor message varies depending on the Auto
Power On setting.When the setting is Enable, "Printer is standing by" is displayed. When the setting is Disable,"Printer is offline" is displayed.
Important• When you use the printer by connecting it to a telephone line via a modular cable, you can set Auto
Power Off but the power will not be turned off automatically.
185

Changing the Printer Operation Mode
If necessary, switch between various modes of printer operation.
Custom Settings
1. Open the Canon IJ Printer Assistant Tool
2. Make sure that the printer is on, and then click Custom Settings
The Custom Settings dialog box opens.
Note• If the printer is off or if communication between the printer and the computer is disabled, an
error message may appear because the computer cannot collect the printer status.If this happens, click OK to display the most recent settings specified on your computer.
3. If necessary, complete the following settings:
Prevent paper abrasionThe printer can increase the gap between the print head and the paper during high-densityprinting to prevent paper abrasion.Check this check box to prevent paper abrasion.
Align heads manuallyUsually, the Print Head Alignment function in the Canon IJ Printer Assistant Tool is set toautomatic head alignment, but you can change it to manual head alignment.If the printing results of automatic print head alignment are not satisfactory, perform manual headalignment.Check this check box to perform the manual head alignment. Uncheck this check box to performthe automatic head alignment.
Rotate 90 degrees left when orientation is [Landscape]On the Page Setup tab, you can change the rotation direction of the Landscape in theOrientation.To rotate the print data 90 degrees to the left during printing, select this item. To rotate the printdata 90 degrees to the right during printing, clear this item.
Important• Do not change this setting while the print job is displayed in the print wait list. Otherwise,
characters may be omitted or the layout may become corrupt.
Don't detect mismatch of paper settings when printing from computerWhen you print documents from your computer, the paper settings in the printer driver and thepaper information registered on the printer do not match, this setting disables the messagedisplay and allows you to continue printing.To disable detection of paper setting mismatches, select this check box.
186

Prevent paper double-feedSelect this check box only if the printer is feeding multiple sheets of plain paper at the same time.
Important• Using this function slows down the print speed.
Ink Drying Wait TimeYou can set the length of the printer rest time until printing of the next page begins. Moving theslider to the right increases the pause time, and moving the slider to the left decreases the time.If the paper gets stained because the next page is ejected before the ink on the printed pagedries, increase the ink drying wait time.Reducing the ink drying wait time speeds up printing.
4. Apply the settings
Click OK and when the confirmation message appears, click OK.
The printer operates with the modified settings hereafter.
187

Changing Settings from Operation Panel
Changing Settings from Operation Panel
Setting Items on Operation Panel
FAX settings
Print settings
LAN settings
Other dev. settings
Language selection
Firmware update
Reset setting
Feed settings
Web service setup
ECO settings
Quiet setting
System information
188

Changing Settings from Operation Panel
This section describes the procedure to change the settings in the Device settings screen, taking the stepsto specify Extended copy amt. as an example.
Note• The (asterisk) on the LCD indicates the current setting.
1. Check that printer is turned on.
2. Press the Setup button.
The Setup menu screen is displayed.
3. Select Device settings and then press the OK button.
The Device settings screen is displayed.
4. Select a setting item to adjust and then press the OK button.
The setting screen for the selected item is displayed.
5. Select a setting item and then press the OK button.
6. Select a setting to specify and then press the OK button.
For more on setting items on the operation panel:
Setting Items on Operation Panel
189

Setting Items on Operation Panel
Items for Printer
FAX settingsOther dev. settingsLanguage selectionWeb service setupECO settingsQuiet setting
Items for Paper/Printing
Print settingsFeed settings
Items for Maintenance/Management
LAN settingsFirmware updateReset settingSystem information
190

FAX settings
Select this menu from Setup menu.
Easy setupTEL no. registrationFAX user settingsAdv. FAX settingsAuto print settingsSecurity control
Note• Before changing the settings, you can confirm the current settings by printing USER'S DATA LIST.
Summary of Reports and Lists
Easy setup
The printer must be set up depending on your telephone line and use of the faxing function. Follow theprocedure according to the instructions on the LCD.
Note• You can specify the setup setting individually or the advanced setting.
For details on how to specify the setting:
Preparing for Faxing
TEL no. registration
You can register the recipient's fax/telephone number to the printer.
Registering Recipients Using Operation Panel of Printer
FAX user settings
• Unit TEL no. registr.
Registers your fax/telephone number printed on sent faxes.
Registering User Information
• Unit name registr.
Registers your name printed on sent faxes.
Registering User Information
• Telephone line type (Country or region of purchase other than China)
Selects the telephone line type setting for the printer.
Setting Telephone Line Type
191

Note• This setting may not be available depending on the country or region of purchase.
• TEL line auto select (China only)
If you select ON, the telephone line type is selected automatically.
If you select OFF, you can select the telephone line type manually.
Setting Telephone Line Type
Adv. FAX settings
• Err reduction (VoIP)
If you select Reduce, it may be possible to reduce the incidence of communication errors whenconnecting to internet line such as IP phone.
Note• When Reduce is selected, V.34 (Super G3) cannot be used. Communication time generally
becomes longer than when communicating with V.34 (super G3).
• This setting has priority even if you select 33600 bps for TX start speed or RX start speed.
• Auto redial
Enables/disables automatic redialing.
If you select ON, you can specify the maximum number of redial attempts and the length of time theprinter waits between redial attempts.
• Dial tone detect
Avoids mistransmission when reception and transmission occur at the same time.
If you select ON, the printer transmits the fax after confirming the dial tone.
Note• This setting may not be available depending on the country or region of purchase.
• Pause time settings
Sets the length of pause time for each when you enter "P" (pause).
• TTI position
Selects the position of the sender information (outside or inside the image area).
• Remote RX
Enables/disables remote reception.
If you select ON, you can specify the remote reception ID.
Remote Reception
192
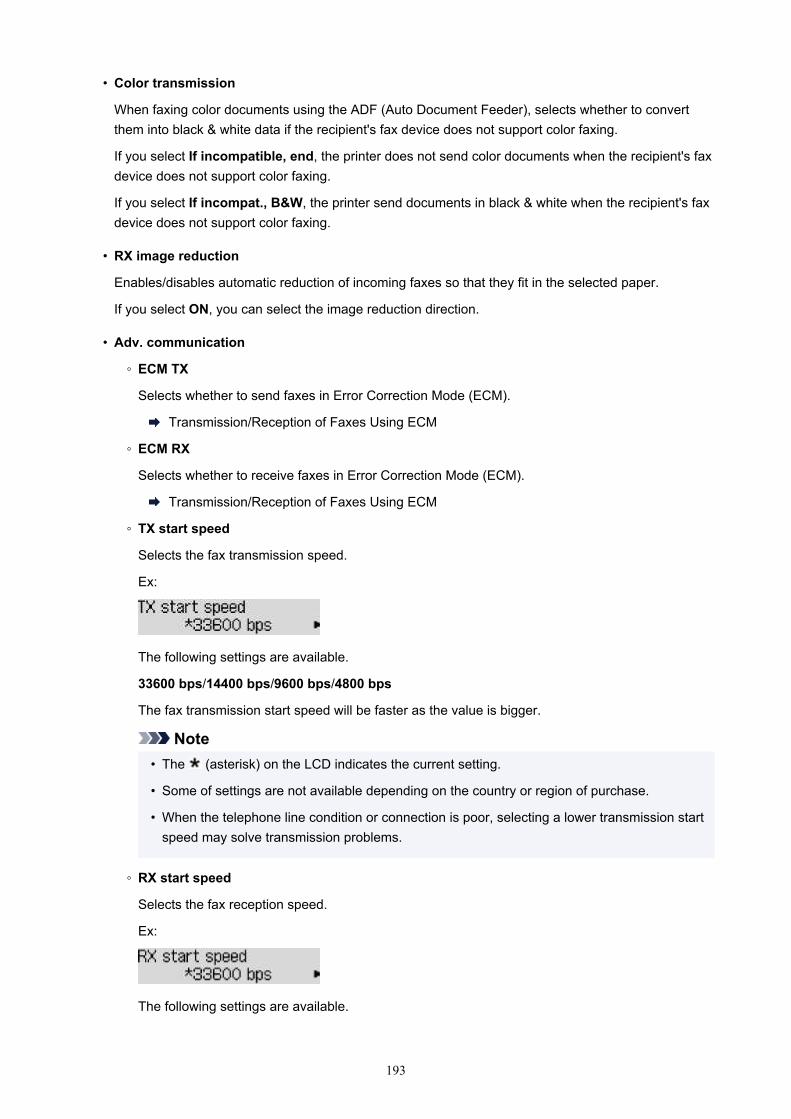
• Color transmission
When faxing color documents using the ADF (Auto Document Feeder), selects whether to convertthem into black & white data if the recipient's fax device does not support color faxing.
If you select If incompatible, end, the printer does not send color documents when the recipient's faxdevice does not support color faxing.
If you select If incompat., B&W, the printer send documents in black & white when the recipient's faxdevice does not support color faxing.
• RX image reduction
Enables/disables automatic reduction of incoming faxes so that they fit in the selected paper.
If you select ON, you can select the image reduction direction.
• Adv. communication
◦ ECM TX
Selects whether to send faxes in Error Correction Mode (ECM).
Transmission/Reception of Faxes Using ECM
◦ ECM RX
Selects whether to receive faxes in Error Correction Mode (ECM).
Transmission/Reception of Faxes Using ECM
◦ TX start speed
Selects the fax transmission speed.
Ex:
The following settings are available.
33600 bps/14400 bps/9600 bps/4800 bps
The fax transmission start speed will be faster as the value is bigger.
Note• The (asterisk) on the LCD indicates the current setting.
• Some of settings are not available depending on the country or region of purchase.
• When the telephone line condition or connection is poor, selecting a lower transmission startspeed may solve transmission problems.
◦ RX start speed
Selects the fax reception speed.
Ex:
The following settings are available.
193

33600 bps/14400 bps/9600 bps/4800 bps
The fax reception start speed will be faster as the value is bigger.
Note• The (asterisk) on the LCD indicates the current setting.
• Some of settings are not available depending on the country or region of purchase.
• When the telephone line condition or connection is poor, selecting a lower reception startspeed may solve reception problems.
Auto print settings
• Received documents
Selects whether to print the received fax automatically when receiving a fax.
If you select Do not print, the received fax is stored in the printer's memory.
For details on the received fax stored in the printer's memory:
Document Stored in Printer's Memory
• Activity report
Selects whether to print ACTIVITY REPORT automatically.
If you select Print, the printer prints ACTIVITY REPORT for the 20 histories of sent and receivedfaxes automatically.
For details on the procedure to print ACTIVITY REPORT manually:
Summary of Reports and Lists
• TX report
Selects whether to print TX REPORT/ERROR TX REPORT automatically after sending a fax.
If you print the report, select Print error only or Print for each TX.
If you select Print error only or Print for each TX, you can specify the print setting that the first pageof the fax is printed along with the report.
• RX report
Selects whether to print RX REPORT automatically after receiving a fax.
If you print RX REPORT, select Print error only or Print for each RX.
• Print when no ink
Sets whether to continue printing the received fax without storing it in the printer's memory when theink has run out.
However, part or all of the fax may not be printed since the ink has run out.
194

Security control
• FAX no. re-entry
If you select ON, you can set the printer to send faxes after using the Numeric buttons to enter thenumber twice. By using this setting, you can avoid the mistransmission of faxes.
Preventing Mistransmission of Faxes
• Check RX FAX info
If you select ON, the printer checks whether the recipient's fax device information matches the dialednumber. If it matches the number, the printer starts to send faxes.
Preventing Mistransmission of Faxes
• Hook setting
If you select Enable, you can use the on hook dial function.
• FAX RX reject
If you select ON, the printer rejects the reception of faxes with no sender information or faxes fromspecific senders.
Rejecting Fax Reception
• Caller rejection
If you subscribe to the Caller ID service, the printer detects the sender's Caller ID. If the sender's IDmatches the condition specified in this setting, the printer rejects the phone call or fax reception fromthe sender.
If you select Subscribed, you can specify the settings of rejection.
Using Caller ID Service to Reject Calls
Note• This setting may not be supported depending on the country or region of purchase. Contact your
telephone company to confirm whether it provides this service.
195

Print settings
Select this menu from Device settings in Setup menu.
• Prevent abrasion
Use this setting only if the print surface becomes smudged.
Important• Be sure to set this back to OFF after printing since it may result in lower printing speed or lower
print quality.
• Extended copy amt.
Selects the amount of image that extends off the paper when copying in Borderless (full).
Slight cropping may occur at the edges since the copied image is enlarged to fill the whole page. Youcan change the width to be cropped from the borders of the original image as needed.
Cropped area will be larger if Amount: Large is selected.
Note• If printouts contain margins even though you are copying in Borderless, specifying Amount: Large
for this setting may help solve the problem.
• Prevent double-feed
Select ON to prevent double-feed of plain paper.
Important• Be sure to set this back to OFF after printing since it may result in lower printing speed.
196

LAN settings
Select this menu from Device settings in Setup menu.
Wi-FiWireless DirectPrint LAN details
Wi-Fi
• Enable/disab. Wi-Fi
Enables or disables Wi-Fi.
• Wi-Fi setup
Selects the setup method for Wi-Fi connection.
Note• You can also enter this setting menu by selecting Wi-Fi setup from the Setup menu screen.
◦ Easy Wi-Fi connect
Select if you specify the settings of the access point information to the printer directly from adevice (such as a smartphone) without operating the wireless router. Follow the on-screeninstructions of the connecting device for the setup procedure.
◦ Manual connect
Select when you perform settings for Wi-Fi manually using the operation panel of the printer.
◦ WPS (Push button)
Select when you perform settings for Wi-Fi using a wireless router supporting a Wi-Fi ProtectedSetup (WPS) push button method. Follow the on-screen instructions during setup.
◦ Other setup
■ Manual setup
Select when you perform settings for Wi-Fi manually. You can specify multiple WEP keys.
■ WPS (PIN code)
Select when you perform settings for Wi-Fi using a wireless router supporting a Wi-FiProtected Setup (WPS) PIN code method. Follow the on-screen instructions during setup.
• Manual setup
For details on each setting item:
Manual setup
Wireless Direct
• Switch WL Direct
Enables/disables Wireless Direct.
197

• Change name (SSID)
Changes the identifier (SSID/the printer's name displayed on a Wi-Fi Direct compatible device) forWireless Direct.
• Change password
Changes the password for Wireless Direct.
• Confirm request
Set whether the printer displays the confirmation screen when a Wi-Fi Direct compatible device isconnecting the printer.
• Manual setup
For details on each setting item:
Manual setup
Print LAN details
You can print out the network settings of the printer such as its IP address and SSID.
For more information on the printer's network setting is printed out:
Printing Network Settings
Important• The network settings printout contains important information about your network. Handle it with care.
Manual setup
• Set printer name
Specifies the printer name. You can use up to 15 characters for the name.
Note• You cannot use the same printer name as that already used for other LAN connected devices.
• You cannot use a hyphen for the initial or last character of the printer name.
• TCP/IP settings
Performs IPv4 or IPv6 setting.
• WSD setting
Setting items when you use WSD (one of the network protocols supported in Windows).
Enable/disable WSDSelects whether WSD is enabled or disabled.
Note• When this setting is enabled, the printer icon is displayed on the Network Explorer in Windows.
198

Optimize WSD-InSelecting Active allows you to receive the WSD printing data faster.
WSD scan from dev.Selecting Active allows you to transfer the scanned data to the computer using WSD.
Timeout settingSpecifies the timeout length.
• Bonjour settings
Setting items for LAN using Bonjour for macOS.
Enab./disab. BonjourSelecting Active allows you to use Bonjour to perform the network settings.
Enter service nameSpecifies the Bonjour service name. You can use up to 48 characters for the name.
Note• You cannot use the same service name as that already used for other LAN connected devices.
• LPR setting
Enables/disables the LPR setting.
• RAW protocol
Enables/disables RAW printing.
• LLMNR
Enables/disables LLMNR (Link-Local Multicast Name Resolution). Selecting Active allows the printerto detect printer's IP address from the printer name without a DNS server.
• IPP settings
Selecting Active allows you to print via the network with the IPP protocol.
• IPsec settings
Selecting Active allows you to specify the IPsec settings.
199

Other dev. settings
Select this menu from Device settings in Setup menu.
• Date/time setting
Sets the current date and time.
Setting Sender Information
Important• If a power failure occurs or you unplug the power cord, the date/time settings will be reset.
• Date display format
Sets the format of dates displayed on the LCD and printed on sent faxes.
• DST setting
Some countries adopt the daylight saving time (summer time) system that shifts the clock time forwardat certain periods of the year.
You can set your printer to automatically change the time by registering the date and time that daylightsaving time (summer time) begins and ends.
Setting Sender Information
Note• This setting may not be available depending on the country or region of purchase.
• Sound control
Selects whether the beep sound in operations is enabled or not.
◦ Keypad sound
Selects whether the beep sound is enabled or not when pressing the buttons on the operationpanel.
◦ Alarm sound
Selects whether the alarm is enabled or not.
◦ Line monitor sound
Selects whether the line monitor sound is enabled or not.
◦ Offhook alarm
Selects whether the alarm is enabled or not when the phone receiver is not put on the hookproperly.
• Country or region
Selects the country or region where you are using the printer.
Note• This setting may not be available depending on the country or region of purchase.
200

• Key repeat
Enables/Disables continuous input by pressing and holding down the button when setting thenumber of copies, the zoom ratio, etc.
• Doc. remov. reminder
Selects whether the printer will display the reminder screen in case you forget to remove the originalfrom the platen after scanning.
Important• Depending on the type of original or the state of the document cover, forgetting to remove the
original may not be detected.
201

Language selection
Changes the language for LCD messages and menus.
Japanese / English / German / French / Italian / Spanish / Dutch / Portuguese / Norwegian / Swedish /Danish / Finnish / Russian / Ukrainian / Polish / Czech / Slovak / Hungarian / Slovene / Croatian /Romanian / Bulgarian / Turkish / Greek / Estonian / Latvian / Lithuanian / Simplified Chinese / TraditionalChinese / Korean / Indonesian / Vietnamese
202

Firmware update
Select this menu from Device settings in Setup menu.
You can update the firmware of the printer, check the firmware version, or perform settings of a notificationscreen.
Important• When you use this function, make sure the printer is connected to the internet.
Note• Only Current version is available when Inactive is selected for Enable/disab. Wi-Fi in Wi-Fi under
LAN settings.
• Install update
Performs the firmware update of the printer. Follow the on-screen instructions to perform update.
Note• If the firmware update is not complete, check the following and take an appropriate action.
• Check the network settings such as a wireless router.
• If Cannot connect to the server; try again is displayed on the LCD, press the OK button andtry again after a while.
• Current version
You can check the current firmware version.
• Update notification
When ON is selected and the firmware update is available, the screen to inform you of the firmwareupdate is displayed on the LCD.
• DNS server setup
Performs settings for a DNS server. Select Auto setup or Manual setup. If you select Manual setup,follow the display on the LCD to perform settings.
• Proxy server setup
Performs settings for a proxy server. Select Use or Do not use. If you select Use, follow the display onthe LCD to perform settings.
203

Reset setting
Select this menu from Device settings in Setup menu.
Returns all settings you made to the printer back to the default. However, some data may not be changed,depending on the current usage state of your printer.
Important• Depending on the setting item, it is necessary to perform connection or setup again after you have
returned the setting back to the default.
• Web service setup
Returns the Web service settings back to the default.
• LAN settings
Returns the LAN settings back to the default.
• Telephone no. data
Returns the telephone/fax number settings to default.
• Setting data
Returns the settings such as the paper size, media type, or other setting items other than the LANsettings or the fax settings back to the default.
• FAX settings
Returns the fax settings back to the default. Disconnect the telephone line from the printer before youreturn this setting item back to the default.
After resetting, perform setup again as necessary.
• All data
Sets all settings you made to the printer back to the default. The administrator password specified byRemote UI or IJ Network Device Setup Utility reverts to the default setting.
After resetting, perform setup again as necessary.
Note• You cannot set the following setting items back to the default:
• The language displayed on the LCD
• The current position of the print head
• CSR (Certificate Signing Request) for encryption method (SSL/TLS) setting
• The country or region selected for Country or region
You can delete the registered user's name or telephone number following the procedure below.
1. Displays Unit TEL no. registr. or Displays Unit name registr..
Setting Sender Information
2. Delete all the numbers and the letters by pressing the Back button.
204

3. Press the OK button after deleting all the numbers and the letters.
205

Feed settings
Select this menu from Setup menu.
By registering the paper size and the media type loaded in the cassette, you can prevent the printer frommisprinting by displaying the message before printing starts when the paper size or the media type of theloaded paper differs from the print settings.
For details:
Paper Settings
• Save paper info
Saves the paper size and the media type you load in the cassette.
Note• For more on the proper combination of paper settings you can specify by the printer driver
(Windows) or on the LCD:
Paper Settings on the Printer Driver and the Printer (Media Type)Paper Settings on the Printer Driver and the Printer (Paper Size)
• Det. paper mismatch
If you select ON, the printer detects whether the paper size and the media type are identical with thoseregistered in Save paper info. If printing starts with the settings that do not match, an error message isdisplayed on the LCD.
Note• When OFF is selected, Detect reinsertion is disabled.
• Detect reinsertion
If you select ON, the printer detects the cassette is reinserted. When the Save paper info screen isdisplayed, register the paper size and the media type.
206

Web service setup
Select this menu from Setup menu.
• Connection setup
The following setting items are available.
◦ GoogleCloudPrint
Registers/Deletes the printer to/from Google Cloud Print.
• DNS server setup
Performs settings for a DNS server. Select Auto setup or Manual setup. If you select Manual setup,follow the display on the LCD to perform settings.
• Proxy server setup
Performs settings for a proxy server. Select Use or Do not use. If you select Use, follow the display onthe LCD to perform settings.
207

ECO settings
This setting allows you to turn on/off the printer automatically to save electricity.
Turning off Printer AutomaticallyTurning on Printer AutomaticallyUsing Two-sided Printing
Turning off Printer Automatically
You can enable the printer to turn off automatically when no operation is made or no printing data is sentto the printer for a specified period of time.
1. Check that printer is turned on.
2. Press the Setup button.
The Setup menu screen is displayed.
3. Select ECO settings and then press the OK button.
4. Select EnergySaveSettings and then press the OK button.
5. Select Auto power off and then press the OK button.
6. Select a time to turn off the printer and then press the OK button.
Turning on Printer Automatically
You can enable the printer to turn on automatically when printing data is sent to the printer or the printer isoperated for scanning from the computer.
1. Check that printer is turned on.
2. Press the Setup button.
The Setup menu screen is displayed.
3. Select ECO settings and then press the OK button.
4. Select EnergySaveSettings and then press the OK button.
5. Select Auto power on and then press the OK button.
6. Select ON and then press the OK button.
208

Using Two-sided Printing
Follow the procedure below to use duplex printing.
1. Check that printer is turned on.
2. Press the Setup button.
The Setup menu screen is displayed.
3. Select ECO settings and then press the OK button.
4. Select 2-sidedPrintSetting and then press the OK button.
5. Specify settings as necessary.
• Copy
Select two-sided copying as a default.
• Template print
Select two-sided printing of template forms on the printer as a default.
• FAX print
Select two-sided printing of sent/received faxes, reports, or lists as a default.
209

Quiet setting
Enables this function on the printer if you want to reduce the operating noise, such as when printing at night.In addition, you can specify the time range to reduce the operating noise.
Important• Set the current date and time in advance.
Setting Sender Information
Follow the procedure below to perform setting.
1. Check that printer is turned on.
2. Press the Setup button.
The Setup menu screen is displayed.
3. Select Quiet mode and then press the OK button.
4. Select Use or Specify hrs of use and then press the OK button.
• When Use is selected:
You can reduce the operating noise while printing is in progress.
• When Specify hrs of use is selected:
The screen to specify starting/ending time is displayed. Use the button to move the cursorunder the desired position, use the Numeric buttons to enter the time, then press the OK button.
You can reduce the operating noise during the specified time.
Important• Operating speed may be reduced compared to when Do not use is selected.
• This function may not be so effective depending on the printer's setting. Furthermore, certainnoise, such as when the printer is preparing for printing, is not reduced.
Note• You can set the quiet mode from the operation panel of the printer, the printer driver, or ScanGear
(scanner driver). No matter how you set the quiet mode, the mode is applied when you performoperations from the operation panel of the printer or printing and scanning from the computer.
210

System information
Select this menu from Setup menu.
• Current version
Displays the current firmware version.
• Printer name
Displays the printer name currently specified.
• Serial number
Displays the printer serial number.
211

Specifications
General Specifications
Printing resolution (dpi) 4800* (horizontal) x 1200 (vertical)
* Ink droplets can be placed with a pitch of 1/4800 inch at minimum.
Interface USB Port:
Hi-Speed USB *
LAN Port:
Wi-Fi: IEEE802.11n / IEEE802.11g / IEEE802.11b
* A computer that complies with Hi-Speed USB standard is required. Since theHi-Speed USB interface is fully upwardly compatible with USB 1.1, it can beused at USB 1.1.
USB and LAN can be used at the same time.
Print width 8 inches/203.2 mm
(for Borderless Printing: 8.5 inches/216 mm)
Printable area Borderless printing: Top/Bottom/Left/Right margin: 0.0 inch (0.0 mm)
Standard printing:
• Top margin:
◦ 0.12 inch (3.0 mm)
• Bottom margin:
◦ 0.20 inch (5.0 mm)
• Left margin:
◦ Letter/Legal: 0.26 inch (6.4 mm)
◦ Other sizes: 0.14 inch (3.4 mm)
• Right margin:
◦ Letter/Legal: 0.25 inch (6.3 mm)
◦ Other sizes: 0.14 inch (3.4 mm)
* For printable area of envelope, see below.
Envelopes
Auto duplex printing:
• Top margin: 0.20 inch (5.0 mm)
• Bottom margin: 0.20 inch (5.0 mm)
• Left margin:
◦ Letter: 0.26 inch (6.4 mm)
◦ Other sizes: 0.14 inch (3.4 mm)
• Right margin:
◦ Letter: 0.25 inch (6.3 mm)
212
◦ Other sizes: 0.14 inch (3.4 mm)
Operating environment Temperature: 41 to 95 °F (5 to 35 °C)
Humidity: 10 to 90 % RH (no condensation)
* The performance of the printer may be reduced under certain temperatureand humidity conditions.
Recommended conditions:
Temperature: 59 to 86 °F (15 to 30 °C)
Humidity: 10 to 80 % RH (no condensation)
* For the temperature and humidity conditions of papers such as photo paper,refer to the paper's packaging or the supplied instructions.
Storage environment Temperature: 32 to 104 °F (0 to 40 °C)
Humidity: 5 to 95 % RH (no condensation)
Power supply AC 100-240 V, 50/60 Hz
(The supplied power cord is only for the country or region you purchased.)
Power consumption Printing (Copy): 8 W or less *1
Standby (minimum): 0.9 W or less *1*2
OFF: 0.2 W or less
*1 USB connection to PC
*2 The wait time for standby cannot be changed.
External dimensions Approx. 17.2 (W) x 11.7 (D) x 7.5 (H) inches
Approx. 435 (W) x 295 (D) x 189 (H) mm
* With the Cassette and trays retracted.
Weight Approx. 13.0 lb (Approx. 5.9 kg)
* With the FINE Cartridges installed.
Canon FINE Cartridge Total 1280 nozzles (BK 320 nozzles, C/M/Y each 320 nozzles)
ADF capacity A4 or Letter size: max. 20 sheets (20 lb/75 g /m2 paper), up to 0.08 inch/2 mmin height
Legal size: max. 5 sheets (20 lb/75 g /m2 paper), up to 0.02 inch/0.5 mm inheight
Copy Specifications
Multiple copy max. 99 pages
Intensity adjustment 9 positions, Auto intensity (AE copy)
Reduction / Enlargement 25 % - 400 % (1 % unit)
213

Scan Specifications
Scanner driver Windows: TWAIN 1.9 Specification, WIA
Maximum scanning size Platen: A4/Letter, 8.5" x 11.7"/216 x 297 mm
ADF: A4/Letter/Legal, 8.5" x 14.0"/216 x 356 mm
Optical resolution (horizontal xvertical)
600 x 1200 dpi *
* Optical Resolution represents the maximum sampling rate based on ISO14473.
Gradation (Input / Output) Gray: 16 bit/8 bit
Color: RGB each 16 bit/8 bit
Fax Specifications
Applicable line Public Switched Telephone Network (PSTN)
IP phone line (IP phone line with quality of no problem at all by using in conver-sation)
Communication mode Super G3, G3
Data compressing system Black: MH, MR, MMR
Color: JPEG
Modem speed max. 33.6 kbps
(Automatic fallback)
Transmission speed Black: Approx. 3 seconds/page at 33.6 kbps
(Based on ITU-T No.1 chart for US specifications and Canon FAX Standardchart No.1 for others, both in standard mode.)
Color: Approx. 1 minute/page at 33.6 kbps
(Based on Canon COLOR FAX TEST SHEET.)
Gradation Black: 256 levels
Color: 24 bit Full Color (RGB each 8 bit)
Density adjustment 3 levels
Memory Transmission/reception: approx. 50 pages
(Based on ITU-T No.1 chart for US specifications and Canon FAX Standardchart No.1 for others, both in standard mode.)
Fax resolution Black Standard: 203 pels/inch x 98 lines/inch (8 pels/mm x 3.85 lines/mm)
Black Fine, Photo: 203 pels/inch x 196 lines/inch (8 pels/mm x 7.70 lines/mm)
Black Extra fine: 300 x 300 dpi
Color: 200 x 200 dpi
Dialing Automatic dialing
214

• Recipient (max. 20 destinations)
• Group dial (max. 19 destinations)
Regular dialing (with Numeric buttons)
Automatic redialing
Manual redialing (max. 10 destinations)
Others Activity report (after every 20 transactions)
Sequential broadcasting (max. 21 destinations)
Rejected numbers (max. 10 destinations)
Err reduction (VoIP) *
* For details, see "Err reduction (VoIP)" in "Adv. FAX settings".
Network Specifications
Communication protocol TCP/IP
Wi-Fi Supported Standards: IEEE802.11n / IEEE802.11g / IEEE802.11b
Frequency bandwidth: 2.4 GHz
Channel: 1-11 or 1-13
* Frequency bandwidth and available channels differ depending on country orregion.
Communication distance: Indoors 164 feet/50 m
* Effective range varies depending on the installation environment and location.
Security:
WEP (64/128 bits)
WPA-PSK (TKIP/AES)
WPA2-PSK (TKIP/AES)
Setup:
WPS (Push button configuration/PIN code method)
WCN (WCN-NET)
Easy wireless connect
Other Features: Administration password
Minimum System Requirements
Conform to the operating system's requirements when higher than those given here.
Windows
Operating System Windows 10, Windows 8.1, Windows 7 SP1
Note: Operation can only be guaranteed on a PC with pre-installed Windows7 or later.
215

Hard Disk Space 3.0 GB or more
Note: For bundled software installation.
The necessary amount of hard disk space may be changed without notice.
Display XGA 1024 x 768
macOS
Operating System OS X 10.10.5 - OS X 10.11, macOS 10.12 - macOS 10.13
Hard Disk Space 1.5 GB or more
Note: For bundled software installation.
The necessary amount of hard disk space may be changed without notice.
Display XGA 1024 x 768
Other Supported OS
iOS, Android, Windows 10 Mobile
Some functions may not be available with the supported OS.
Refer to the Canon web site for details.
Mobile Printing Capability
Apple AirPrint
Google Cloud Print
PIXMA Cloud Link
Windows 10 Mobile Print
Mopria Print Service
• Internet connection or CD-ROM drive is required to install the software for Windows.
• Internet connection is required to use Easy-WebPrint EX and/or Easy-PhotoPrint Editor and all theuser's guide.
• Easy-WebPrint EX: Internet Explorer 8, 9, 10 and 11 (for Windows) is required.
• Windows: Some functions may not be available with Windows Media Center.
• Windows: The TWAIN driver (ScanGear) is based on the TWAIN 1.9 Specification and requires theData Source Manager bundled with the operating system.
• macOS: For macOS, an internet connection is required during software installation.
• In an in-house network environment, the 5222 port must be open. Contact the networkadministrator for details.
Information in this manual is subject to change without notice.
216

Information about Paper
Supported Media Types
Paper Load Limit
Unsupported Media Types
Handling Paper
Print Area
217

Supported Media Types
For best results, choose paper designed for how you are printing. A variety of paper for documents as wellas photos or illustrations is available from Canon. Use genuine Canon paper to print important photos, whenpossible.
Media Types
Genuine Canon paper
Note• For warnings on use of the non-printable side, see each product's usage information.
• For details on page sizes and media types, access the Canon website.
• Genuine Canon paper is not available in some countries or regions. Note that in the United States,Canon paper is not sold by model number. Instead, purchase paper by name.
Paper for printing documents:
• Canon Red Label Superior <WOP111>
• Canon Océ Office Colour Paper <SAT213>
• High Resolution Paper <HR-101N>*1
Paper for printing photos:
• Photo Paper Pro Platinum <PT-101>
• Glossy Photo Paper "Everyday Use" <GP-501>
• Photo Paper Glossy <GP-701>
• Photo Paper Plus Glossy II <PP-201/PP-301>
• Photo Paper Pro Luster <LU-101>
• Photo Paper Plus Semi-gloss <SG-201>
• Matte Photo Paper <MP-101>
Paper other than genuine Canon paper• Plain Paper (including recycled paper)
• Envelopes*1
• Greeting Card*1
*1 Printing to this paper from the operation panel is not supported.
Paper Load LimitPaper Settings on the Printer Driver and the Printer (Media Type) (Windows)
218

Page Sizes
You can use the following page sizes.
Note• Page sizes and media types the printer supports differ depending on the OS you are using.
Standard sizes:
• Letter
• Legal
• A5
• A4
• B5
• KG/4"x6"(10x15)
• 5"x7"(13x18cm)
• 8"x10"(20x25cm)
• L(89x127mm)
• 2L(127x178mm)
• Hagaki
• Hagaki 2
• Envelope Com 10
• Envelope DL
• Nagagata 3
• Nagagata 4
• Yougata 4
• Yougata 6
Special sizes
Special page sizes must be within the following limits:
• Minimum size: 3.50 x 5.00 inches (89.0 x 127.0 mm)
• Maximum size: 8.50 x 26.61 inches (215.9 x 676.0 mm)
Paper Weight
You can use paper in the following weight range.
• 17 to 28 lb (64 to 105 g /m2) (plain paper other than genuine Canon paper)
219

Paper Load Limit
Genuine Canon Paper
Paper for printing documents:
Media Name <Model No.> Cassette Paper Output Tray
Canon Red Label Superior <WOP111> Approx. 100 sheets Approx. 50 sheets
Canon Océ Office Colour Paper <SAT213> Approx. 80 sheets Approx. 40 sheets
High Resolution Paper <HR-101N>*1 Approx. 80 sheets Approx. 40 sheets
Paper for printing photos:
Media Name <Model No.> Cassette Paper Output Tray
Photo Paper Pro Platinum <PT-101>*2 A4, Letter, 8" x 10" (20 x 25cm): 10 sheets
4" x 6" (10 x 15 cm): 20 sheets
*3
Glossy Photo Paper "Everyday Use" <GP-501>*2 A4, Letter: 10 sheets
4" x 6" (10 x 15 cm): 20 sheets
*3
Photo Paper Glossy <GP-701>*2 A4, Letter: 10 sheets
4" x 6" (10 x 15 cm): 20 sheets
*3
Photo Paper Plus Glossy II <PP-201/PP-301>*2 A4, Letter, 5" x 7" (13 x 18cm), 8" x 10" (20 x 25 cm): 10sheets
4" x 6" (10 x 15 cm): 20 sheets
*3
Photo Paper Pro Luster <LU-101>*2 A4, Letter: 10 sheets *3
Photo Paper Plus Semi-gloss <SG-201>*2 A4, Letter, 5" x 7" (13 x 18cm), 8" x 10" (20 x 25 cm): 10sheets
4" x 6" (10 x 15 cm): 20 sheets
*3
Matte Photo Paper <MP-101> A4, Letter: 10 sheets
4" x 6" (10 x 15 cm): 20 sheets
*3
Paper other than Genuine Canon Paper
Common Name Cassette Paper Output Tray
Plain Paper (including recycled paper)*1 Approx. 100 sheets(Legal: 10 sheets)
Approx. 50 sheets(Legal: 10 sheets)
Envelopes 5 envelopes *3
Greeting Card Letter: 1 sheet *3
220

*1 Normal feeding at maximum capacity may not be possible with some types of paper, or under very highor low temperature or humidity. In this case, load half the amount of paper or less.*2 Feeding from a loaded stack of paper may leave marks on the printed side or prevent efficient feeding.In this case, load one sheet at a time.*3 For best results in continuous printing, remove printed paper or envelopes from the paper output tray toavoid smearing or discoloration.
221

Unsupported Media Types
Do not use the following types of paper. Using such paper will cause not only unsatisfactory results, but alsothe printer to jam or malfunction.
• Folded, curled, or wrinkled paper
• Damp paper
• Paper that is too thin (weighing less than 17 lb (64 g /m2))
• Paper that is too thick (plain paper weighing more than 28 lb (105 g /m2), except for Canon genuinepaper)
• Paper thinner than a postcard, including plain paper or notepad paper cut to a small size (when printingon paper smaller than A5)
• Picture postcards
• Postcards
• Envelopes with a double flap
• Envelopes with an embossed or treated surface
• Envelopes whose gummed flaps are already moistened and adhesive
• Any type of paper with holes
• Paper that is not rectangular
• Paper bound with staples or glue
• Paper with an adhesive surface on the back such as label seal
• Paper decorated with glitter, etc.
222

Handling Paper
• Be careful not to rub or scratch the surfaces of any types of paper when handling.
• Hold the paper as closely as possible to its edges and try not to touch the printing surface. The printquality may be degraded if the printing surface is smudged with sweat or oil that comes from yourhands.
• Do not touch the printed surface until the ink is dried. Even when the ink is dried, be careful not to touchthe printed surface as much as possible when handling. Due to the nature of the pigment ink, the ink onthe printed surface may be removed when being rubbed or scratched.
• Take out only the necessary number of paper from the package, just before printing.
• To avoid curling, when you do not print, put unused paper back into the package and keep it on a levelsurface. And also, store it avoiding heat, humidity, and direct sunlight.
223

Printing
Printing from Computer
Printing from Smartphone/Tablet
Printing Using Operation Panel
Paper Settings
224

Printing from Computer
Printing from Application Software (Windows Printer Driver)
Printing from Application Software (macOS AirPrint)
Printing Using Canon Application Software
Printing Using a Web Service
225

Printing from Application Software (Windows Printer Driver)
Basic Printing Setup Basic
Various Printing Methods
Changing the Print Quality and Correcting Image Data
Overview of the Printer Driver
Printer Driver Description
Updating the MP Drivers
226

Basic Printing Setup
This section describes settings on the Quick Setup tab used for basic printing.
Basic Printing Setup
1. Check that printer is turned on
2. Load paper in printer
3. Open printer driver's setup screen
4. Select frequently used settings
On the Quick Setup tab, use Commonly Used Settings to select from predefined print settings.When you select a print setting, the settings for Additional Features, Media Type, and Printer PaperSize automatically switch to the predefined values.
5. Select print quality
For Print Quality, select from High, Standard, or Draft.
227

Important• The print quality selections will differ depending on which print setting you select.
6. Click OK
The printer will now print using these settings.
Important• When you select Always Print with Current Settings, the settings on the Quick Setup, Main, and
Page Setup tabs are saved, and those settings are used in subsequent printings.• To register the current settings as a new preset, click Save... under Commonly Used Settings.
228

Note• If the paper settings in the printer driver differ from the paper information registered on the printer, an
error may occur. For instructions on what to do if an error occurs, see "Paper Settings."To check the current printer settings or to apply the printer settings to the printer driver, display theQuick Setup tab, click Printer Media Information..., and specify the settings in the dialog box thatappears.For details about the paper information to be registered on the printer, see the following:
• Paper Settings on the Printer Driver and the Printer (Media Type)• Paper Settings on the Printer Driver and the Printer (Paper Size)
Checking Printer Settings and Applying Settings to Printer Driver
1. Open printer driver setup window
2. On Quick Setup tab, click Printer Media Information...The Printer Media Information dialog box appears.
3. Select Paper Source
From Paper Source, check the setting or select a new paper source.The current printer settings appear in Media Type and Page Size.
4. Apply settings
To apply the printer settings to the printer driver, click Set.
Note• If the Type on the printer is set to Ink Jet Hagaki, Hagaki K, or Hagaki, or if the Page size on the
printer is set to 2L/5"x7"(13x18), click Set to display the dialog box.Select the media type and paper size that match your purpose, and then click OK.
• If the Type and the Page size on the printer are not set or are set to Others, Set will be grayedout and cannot be clicked.
• If communication with the printer is disabled, the Printer Media Information... dialog box willnot appear or the printer driver will not be able to obtain printer media information.
229

Paper Settings on the Printer Driver and the Printer (MediaType)
When you use this printer, selecting a media type and paper size that matches the print purpose will helpyou achieve the best print results.You can use the following media types on this printer.
Canon genuine papers (Document Printing)
Media name <Model No.>Media Type in the printer
driverPaper information registered on
the printer
Canon Red Label Superior <WOP111> Plain Paper Plain paper
Canon Océ Office Colour Paper <SAT213> Plain Paper Plain paper
Canon genuine papers (Photo Printing)
Media name <Model No.> Media Type in the printer driverPaper information registered
on the printer
Photo Paper Plus Glossy II <PP-201/PP-301> Photo Paper Plus Glossy II PlusGlossyII
Photo Paper Pro Platinum <PT-101> Photo Paper Pro Platinum ProPlatinum
Photo Paper Pro Luster <LU-101> Photo Paper Pro Luster Pro Luster
Photo Paper Plus Semi-gloss <SG-201> Photo Paper Plus Semi-gloss Semi-gloss
Glossy Photo Paper "Everyday Use" <GP-501> Glossy Photo Paper Glossy
Photo Paper Glossy <GP-701> Glossy Photo Paper Glossy
Matte Photo Paper <MP-101> Matte Photo Paper Matte
Canon genuine papers (Business Letter Printing)
Media name <Model No.> Media Type in the printer driverPaper information registered on the
printer
High Resolution Paper <HR-101N> High Resolution Paper High Res
Commercially available papers
Media name Media Type in the printer driverPaper information registered on the
printer
Plain Paper (including recycled paper) Plain Paper Plain paper
230

Envelopes Envelope Envelope
Greeting Cards Inkjet Greeting Card Others
231

Paper Settings on the Printer Driver and the Printer (PaperSize)
When you use this printer, selecting a paper size that matches the print purpose will help you achieve thebest print results.You can use the following paper sizes on this printer.
Printer Paper Size in the printer driver Cassette paper information registered on the printer
Letter 8.5"x11" 22x28cm Letter
Legal 8.5"x14" 22x36cm Legal
A5 A5
A4 A4
B5 B5
4"x6" 10x15cm KG/4"x6"
5"x7" 13x18cm 2L/5"x7"
8"x10" 20x25cm 8"x10"
L 89x127mm L
2L 127x178mm 2L/5"x7"
Hagaki 100x148mm Hagaki
Hagaki 2 200x148mm Hagaki 2
Envelope Com 10 Env. Com 10
Envelope DL Envelope DL
Nagagata 3 4.72"x9.25" Nagagata 3
Nagagata 4 3.54"x8.07" Nagagata 4
Yougata 4 4.13"x9.25" Yougata 4
Yougata 6 3.86"x7.48" Yougata 6
Custom Size Others
232

Various Printing Methods
Setting a Page Size and Orientation
Setting the Number of Copies and Printing Order
Execute Borderless Printing
Scaled Printing
Page Layout Printing
Tiling/Poster Printing
Duplex Printing
Setting Up Envelope Printing
Printing on Postcards
233
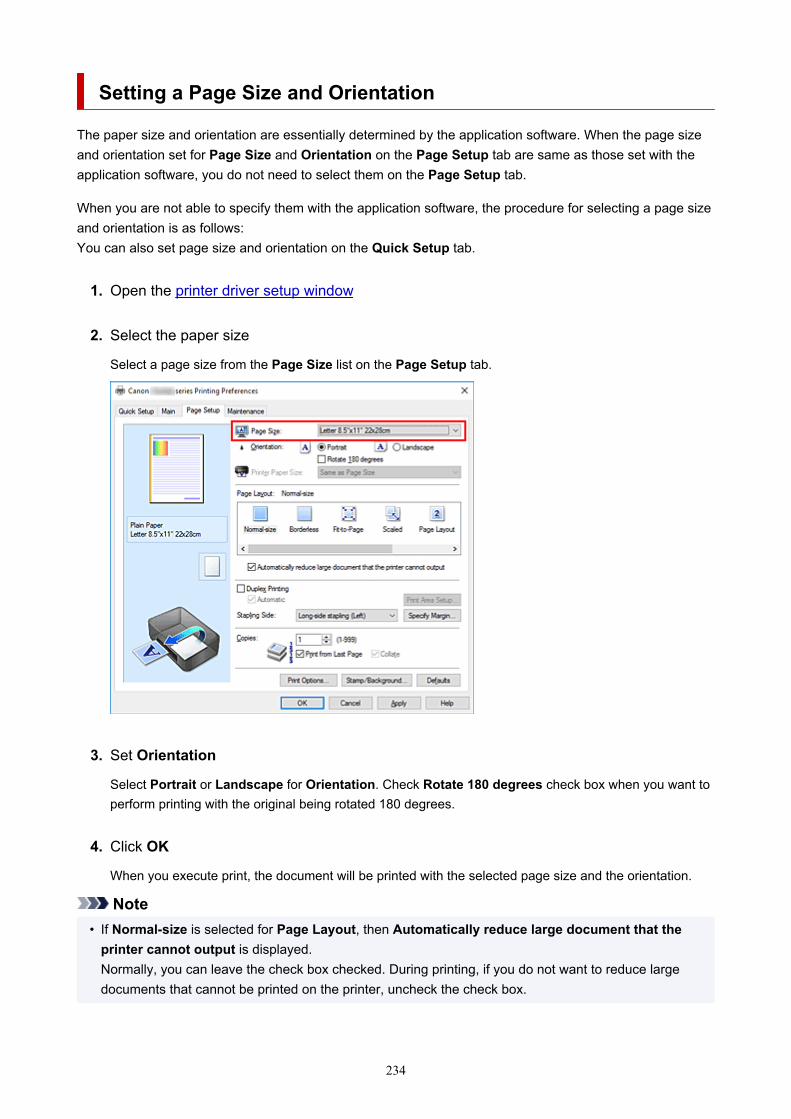
Setting a Page Size and Orientation
The paper size and orientation are essentially determined by the application software. When the page sizeand orientation set for Page Size and Orientation on the Page Setup tab are same as those set with theapplication software, you do not need to select them on the Page Setup tab.
When you are not able to specify them with the application software, the procedure for selecting a page sizeand orientation is as follows:You can also set page size and orientation on the Quick Setup tab.
1. Open the printer driver setup window
2. Select the paper size
Select a page size from the Page Size list on the Page Setup tab.
3. Set Orientation
Select Portrait or Landscape for Orientation. Check Rotate 180 degrees check box when you want toperform printing with the original being rotated 180 degrees.
4. Click OK
When you execute print, the document will be printed with the selected page size and the orientation.
Note• If Normal-size is selected for Page Layout, then Automatically reduce large document that the
printer cannot output is displayed.Normally, you can leave the check box checked. During printing, if you do not want to reduce largedocuments that cannot be printed on the printer, uncheck the check box.
234

Setting the Number of Copies and Printing Order
You can also set the number of copies on the Quick Setup tab.
1. Open the printer driver setup window
2. Specify the number of copies to be printed
For Copies on the Page Setup tab, specify the number of copies to be printed.
3. Specify the print order
Check the Print from Last Page check box when you want to print from the last page in order, anduncheck the check box when you want to print from the first page.Check the Collate check box when you are printing multiple copies of a document and want to print outall pages in each copy together. Uncheck this check box when you want to print all pages with the samepage number together.
• Print from Last Page: /Collate:
• Print from Last Page: /Collate:
235

• Print from Last Page: /Collate:
• Print from Last Page: /Collate:
4. Click OK
When you execute print, the specified number of copies will be printed with the specified printing order.
Important• When the application software that you used to create the document has the same function, specify the
settings on the printer driver. However, if the print results are not acceptable, specify the functionsettings on the application software. When you specify the number of copies and the printing order withboth the application software and this printer driver, the number of copies may be multiplied numbers ofthe two settings or the specified printing order may not be enabled.
• Print from Last Page appears grayed out and is unavailable when Tiling/Poster is selected for PageLayout.
• When Booklet is selected for Page Layout, Print from Last Page and Collate appear grayed out andcannot be set.
• When Duplex Printing is selected, Print from Last Page appears grayed out and cannot be set.
Note• By setting both Print from Last Page and Collate, you can perform printing so that papers are collated
one by one starting from the last page.These settings can be used in combination with Normal-size, Borderless, Fit-to-Page, Scaled, andPage Layout.
236

Execute Borderless Printing
The borderless printing function allows you to print data without any margin by enlarging the data so that itextends slightly off the paper. In standard printing, margins are created around the document area.However, in borderless printing function, these margins are not created. When you want to print data suchas a photo without providing any margin around it, set borderless printing.
You can also set borderless printing in Additional Features on the Quick Setup tab.
Setting Borderless Printing
1. Open the printer driver setup window
2. Set borderless printing
Select Borderless from the Page Layout list on the Page Setup tab.
Click OK when the confirmation message appears.When a message prompting you to change the media type appears, select a media type from the listand click OK.
237
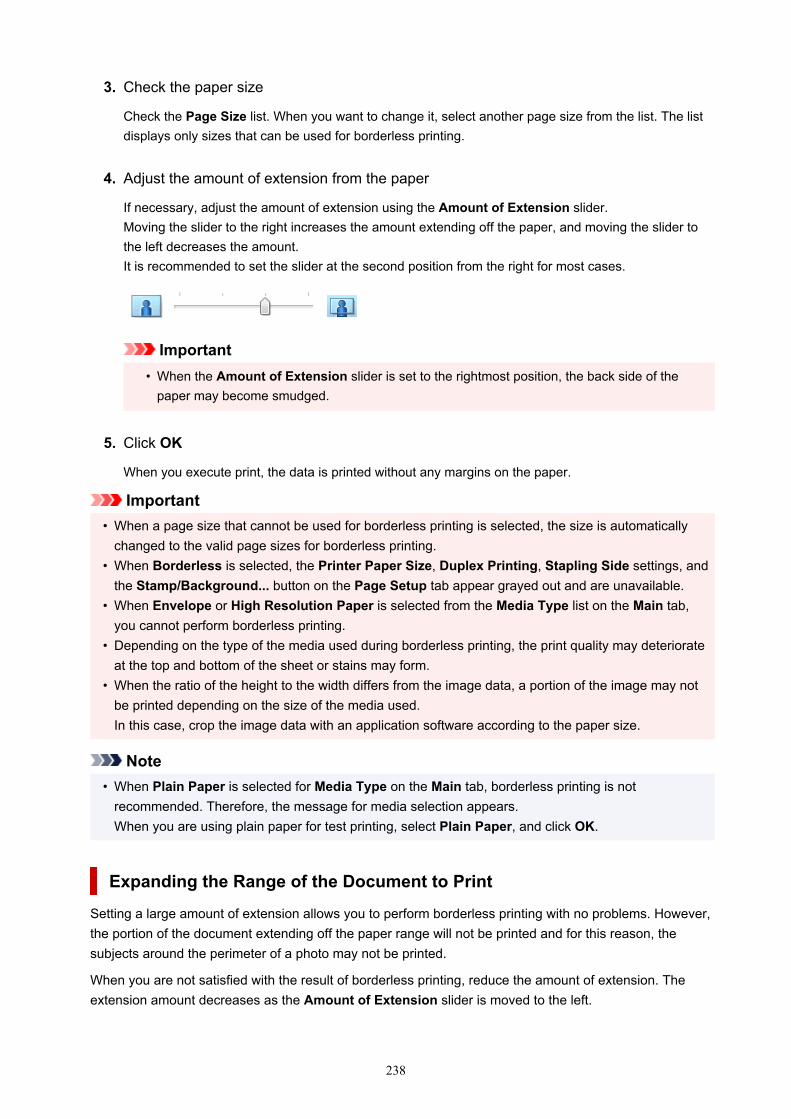
3. Check the paper size
Check the Page Size list. When you want to change it, select another page size from the list. The listdisplays only sizes that can be used for borderless printing.
4. Adjust the amount of extension from the paper
If necessary, adjust the amount of extension using the Amount of Extension slider.Moving the slider to the right increases the amount extending off the paper, and moving the slider tothe left decreases the amount.It is recommended to set the slider at the second position from the right for most cases.
Important• When the Amount of Extension slider is set to the rightmost position, the back side of the
paper may become smudged.
5. Click OK
When you execute print, the data is printed without any margins on the paper.
Important• When a page size that cannot be used for borderless printing is selected, the size is automatically
changed to the valid page sizes for borderless printing.• When Borderless is selected, the Printer Paper Size, Duplex Printing, Stapling Side settings, and
the Stamp/Background... button on the Page Setup tab appear grayed out and are unavailable.• When Envelope or High Resolution Paper is selected from the Media Type list on the Main tab,
you cannot perform borderless printing.• Depending on the type of the media used during borderless printing, the print quality may deteriorate
at the top and bottom of the sheet or stains may form.• When the ratio of the height to the width differs from the image data, a portion of the image may not
be printed depending on the size of the media used.In this case, crop the image data with an application software according to the paper size.
Note• When Plain Paper is selected for Media Type on the Main tab, borderless printing is not
recommended. Therefore, the message for media selection appears.When you are using plain paper for test printing, select Plain Paper, and click OK.
Expanding the Range of the Document to Print
Setting a large amount of extension allows you to perform borderless printing with no problems. However,the portion of the document extending off the paper range will not be printed and for this reason, thesubjects around the perimeter of a photo may not be printed.
When you are not satisfied with the result of borderless printing, reduce the amount of extension. Theextension amount decreases as the Amount of Extension slider is moved to the left.
238

Important• When the amount of extension is decreased, an unexpected margin may be produced on the print,
depending on the size of the paper.
Note• When the Amount of Extension slider is set to the leftmost position, image data will be printed in the
full size. If you set this when printing the address side of a postcard, the postal code of the sender isprinted in the correct position.
• When Preview before printing is checked on the Main tab, you can confirm whether there will be nomargin before printing.
239

Scaled Printing
1. Open the printer driver setup window
2. Set scaled printing
Select Scaled from the Page Layout list on the Page Setup tab.
3. Select the paper size of the document
Using Page Size, select the page size that is set with your application software.
4. Set the scaling rate by using one of the following methods:
• Select a Printer Paper Size
When the printer paper size is smaller than the Page Size, the page image will be reduced. Whenthe printer paper size is larger than the Page Size, the page image will be enlarged.
240

• Specify a scaling factor
Directly type in a value into the Scaling box.
The current settings are displayed in the settings preview on the left side of the printer driver.
5. Click OK
When you execute print, the document will be printed with the specified scale.
Important• When the application software which you used to create the original has the scaled printing function,
configure the settings on your application software. You do not need to configure the same setting inthe printer driver.
241

Note• Selecting Scaled changes the printable area of the document.
242

Page Layout Printing
The page layout printing function allows you to print more than one page image on a single sheet of paper.
1. Open the printer driver setup window
2. Set page layout printing
Select Page Layout from the Page Layout list on the Page Setup tab.The current settings are displayed in the settings preview on the left side of the printer driver.
3. Select the print paper size
Select the size of the paper loaded in the printer from the Printer Paper Size list.
4. Set the number of pages to be printed on one sheet and the page order
If necessary, click Specify..., specify the following settings in the Page Layout Printing dialog box, andclick OK.
243

Page LayoutTo change the number of pages to be printed on a single sheet of paper, select the number ofpages from the list.
Page OrderTo change the page arrangement order, select a placement method from the list.
Page BorderTo print a page border around each document page, check this check box.
5. Complete the setup
Click OK on the Page Setup tab.When you execute print, the specified number of pages will be arranged on each sheet of paper in thespecified order.
244

Tiling/Poster Printing
The tiling/poster printing function allows you to enlarge image data, divide it into several pages, and printthese pages on separate sheets of paper. You can also paste the pages together to create a large print likea poster.
Setting Tiling/Poster Printing
1. Open the printer driver setup window
2. Set tiling/poster printing
Select Tiling/Poster from the Page Layout list on the Page Setup tab.The current settings are displayed in the settings preview on the left side of the printer driver.
3. Select the print paper size
Select the size of the paper loaded in the printer from the Printer Paper Size list.
245

4. Set the number of image divisions and the pages to be printed
If necessary, click Specify..., specify the following settings in the Tiling/Poster Printing dialog box,and then click OK.
Image DivisionsSelect the number of divisions (vertical x horizontal).As the number of divisions increases, the number of sheets used for printing increases. If you arepasting pages together to create a poster, increasing the number of divisions allows you to createa larger poster.
Print "Cut/Paste" in marginsTo leave out words "Cut" and "Paste", uncheck this check box.
Note• This feature may be unavailable when certain printer drivers or operating environments are
used.
Print "Cut/Paste" lines in marginsTo leave out cut lines, uncheck this check box.
Print page rangeSpecifies the printing range. Select All under normal circumstances.To reprint only a specific page, select Pages and enter the page number you want to print. Tospecify multiple pages, enter the page numbers by separating them with commas or by entering ahyphen between the page numbers.
Note• You can also specify the print range by clicking the pages in the settings preview.
5. Complete the setup
Click OK on the Page Setup tab.When you execute print, the document will be divided into several pages during printing.
Printing Only Specific Pages
If ink becomes faint or runs out during printing, you can reprint only the specific pages by following theprocedure below:
1. Set the print range
246

In the settings preview on the left of the Page Setup tab, click the pages that do not need to beprinted.The pages that were clicked are deleted, and only the pages to be printed are displayed.
Note• Click the deleted pages to display them again.• Right-click the settings preview to select Print all pages or Delete all pages.
2. Complete the setup
After completing the page selection, click OK.When you execute print, only specified pages will be printed.
Important• Since tiling/poster printing enlarges the document when printing it, the print results may become coarse.
247

Duplex Printing
You can also set duplex printing in Additional Features on the Quick Setup tab.
Performing Automatic Duplex Printing
You can perform the duplex printing without having to turn over the paper.
1. Open the printer driver setup window
2. Set automatic duplex printing
Check the Duplex Printing check box on the Page Setup tab and confirm that Automatic is checked.
3. Select the layout
Select Normal-size, Fit-to-Page, Scaled, or Page Layout from the Page Layout list.
4. Set the print area
When you perform duplex printing, the print area of the document becomes slightly narrower thanusual and the document may not fit on one page.Click Print Area Setup..., select one of the following process methods, and then click OK.
248

Use normal-size printingPrint without reducing the page.
Use reduced printingReduce the page slightly during printing.
5. Specify the side to be stapled
The best Stapling Side is selected automatically from the Orientation and Page Layout settings. Tochange the setting, select another stapling side from the list.
6. Set the margin width
If necessary, click Specify Margin... and set the margin width, and then click OK.
7. Complete the setup
Click OK on the Page Setup tab.When you execute print, duplex printing will be started.
Performing Duplex Printing Manually
You can perform the duplex printing manually.
1. Open the printer driver setup window
2. Set duplex printing
Check the Duplex Printing check box and uncheck the Automatic check box on the Page Setup tab.
249

3. Select the layout
Select Normal-size, Fit-to-Page, Scaled, or Page Layout from the Page Layout list.
4. Specify the side to be stapled
The best Stapling Side is selected automatically from the Orientation and Page Layout settings. Tochange the setting, select another stapling side from the list.
5. Set the margin width
If necessary, click Specify Margin... and set the margin width, and then click OK.
6. Complete the setup
Click OK on the Page Setup tab.When you execute print, the document is first printed on one side of a sheet of paper. After one side isprinted, reload the paper correctly according to the message.Then click Start Printing to print the opposite side.
Important• When a media type other than Plain Paper is selected from the Media Type list on the Main tab,
Duplex Printing appears grayed out and is unavailable.• When Borderless, Tiling/Poster, or Booklet is selected from the Page Layout list, Duplex Printing
and Stapling Side appear grayed out and are unavailable.• Duplex Printing can be performed only when one of the following paper sizes is selected from Page
Size on the Page Setup tab.• Letter 8.5"x11" 22x28cm, A4
250

• After printing the front page, there is an ink drying wait time before starting to print the back page(Operation stops temporarily). Do not touch the paper during this time. You can change the ink dryingwait time at Custom Settings in the Canon IJ Printer Assistant Tool.
Related Topic
Changing the Printer Operation Mode
251

Setting Up Envelope Printing
1. Load envelope on the printer
2. Open the printer driver setup window
3. Select the media type
Select Envelope from Commonly Used Settings on the Quick Setup tab.
4. Select the paper size
When the Envelope Size Setting dialog box is displayed, select Envelope Com 10, Envelope DL,Yougata 4 4.13"x9.25", or Yougata 6 3.86"x7.48", and then click OK.
5. Set the orientation
To print the addressee horizontally, select Landscape for Orientation.
Note• If Envelope Com 10, Envelope DL, Yougata 4 4.13"x9.25", or Yougata 6 3.86"x7.48" is
selected for Printer Paper Size, the printer rotates the paper 90 degrees to the left to print,regardless of the Rotate 90 degrees left when orientation is [Landscape] setting for CustomSettings in the Canon IJ Printer Assistant Tool.
252

6. Select the print quality
Select High or Standard that matches your purpose for Print Quality.
7. Click OK
When you execute print, the information is printed on the envelope.
Important• When you execute envelope printing, guide messages are displayed.
To hide the guide messages, check the Do not show this message again check box.To show the guide again, click the View Printer Status button on the Maintenance tab, and start theCanon IJ Status Monitor.Then click Envelope Printing from Display Guide Message of the Option menu to enable the setting.
Note• If the paper settings in the printer driver differ from the paper information registered on the printer, an
error may occur. For instructions on what to do if an error occurs, see "Paper Settings."To check the current printer settings or to apply the printer settings to the printer driver, click PrinterMedia Information... from the Quick Setup tab, and specify the settings in the dialog box that appears.For details about the paper information to be registered on the printer, see the following:
• Paper Settings on the Printer Driver and the Printer (Media Type)• Paper Settings on the Printer Driver and the Printer (Paper Size)
253

Printing on Postcards
1. Load postcard on the printer
2. Open the printer driver setup window
3. Select commonly used settings
Display the Quick Setup tab, and for Commonly Used Settings, select Standard.
4. Select the media type
For Media Type, select Ink Jet Hagaki (A), Ink Jet Hagaki, Hagaki K (A), Hagaki K, Hagaki (A), orHagaki.
Important• This printer cannot print on postcards that have photos or stickers attached.• When printing on each side of a postcard separately, you will get cleaner printing if you print the
message side first and then print the address side.• The paper settings on the printer driver are different, depending on whether you are printing on
the address side or the message side.To check the current printer settings or to apply the printer settings to the printer driver, clickPrinter Media Information... from the Quick Setup tab, and specify the settings in the dialog boxthat appears.For details about the paper information to be registered to the printer driver and on the printer, seethe following:
• Paper Settings on the Printer Driver and the Printer (Media Type)• Paper Settings on the Printer Driver and the Printer (Paper Size)
5. Select the paper size
For Printer Paper Size, select Hagaki 100x148mm or Hagaki 2 200x148mm.
Important• Return postcards can be used only when you print them from the computer.• When printing a return postcard, always set the paper size to Hagaki 2 200x148mm from your
application software or the printer driver.• Do not fold the return postcard. If a crease is formed, the printer will not be able to feed the
postcard properly, and this condition will cause line shifts or a paper jam.• With return postcards, borderless printing cannot be used.
6. Set the print orientation
To print the address horizontally, set Orientation to Landscape.
7. Select the print quality
For Print Quality, select High or Standard, according to your purpose.
254

8. Click OK
When you execute printing, the data will be printed onto the postcard.
Important• If you want to display a guide message when performing postcard printing, open the Maintenance tab
and click View Printer Status to start the Canon IJ Status Monitor.On the Option menu, choose Display Guide Message and click Hagaki Printing to enable the setting.To hide these guide messages, select the Do not show this message again check box.
• When printing on media other than postcards, load the media according to usage method of that media,and click Start Printing.
255

Overview of the Printer Driver
Canon IJ Printer Driver
Opening Printer Driver's Setup Screen
Canon IJ Status Monitor
Checking Ink Status from Your Computer
Instructions for Use (Printer Driver)
256

Canon IJ Printer Driver
The Canon IJ printer driver (simply called printer driver below) is software that you install onto yourcomputer so that it can communicate with the printer.
The printer driver converts the print data created by your application software into data that your printer canunderstand, and sends the converted data to the printer.
Because different printers support different data formats, you need a printer driver that supports your printer.
Installing the Printer Driver
To install the printer driver, install the driver from Start Setup on the setup CD-ROM that came with yourprinter.
Specifying the Printer Driver
To specify the printer driver, open the Print dialog box of the application software you are using, andselect "Canon XXX" (where "XXX" is your model name).
Displaying the Manual from the Printer Driver
To display the description of a setup tab from the printer driver's setup screen, click Help on that tab.
Related Topic
Opening Printer Driver's Setup Screen
257

Opening Printer Driver's Setup Screen
You can display the printer driver's setup screen from your application software or by clicking the printericon.
Displaying the Printer Driver's Setup Screen from Your ApplicationSoftware
Perform this procedure to set up the print settings during printing.
1. Select print command from application software
The Print command can generally be found in the File menu.
2. Select your printer model, and click Preferences (or Properties)
The printer driver's setup screen appears.
Note• Depending on the application software you are using, the command and menu names, and the
number of steps may vary. For details, refer to the operating instructions of your applicationsoftware.
Displaying the Printer Driver's Setup Screen by Clicking the Printer Icon
From the setup screen you can perform printer maintenance operations such as print head cleaning, orset print settings to be shared by all application software.
1. Select Control Panel -> Hardware and Sound -> Devices and Printers
2. Right-click the icon of your model. When the menu appears, select Printing preferences
The printer driver's setup screen appears.
Important• Opening the printer driver setup window through Printer properties displays such tabs
regarding the Windows functions as the Ports (or Advanced) tab. Those tabs do not appearwhen opening through Printing preferences or application software. For tabs regardingWindows functions, refer to the user's manual for the Windows.
258

Canon IJ Status Monitor
The Canon IJ Status Monitor is an application software that shows the status of the printer and the progressof printing. You will know the status of the printer with graphics, icons, and messages.
Launching the Canon IJ Status Monitor
The Canon IJ Status Monitor launches automatically when print data is sent to the printer. Whenlaunched, the Canon IJ Status Monitor appears as a button on the task bar.
Click the button of the status monitor displayed on the task bar. The Canon IJ Status Monitor appears.
Note• To open the Canon IJ Status Monitor when the printer is not printing, open the printer driver setup
window and click View Printer Status on the Maintenance tab.• The information displayed on the Canon IJ Status Monitor may differ depending on the country or
region where you are using your printer.
When Errors Occur
The Canon IJ Status Monitor is automatically displayed if an error occurs (e.g., if the printer runs out ofpaper or if the ink is low).
259

In such cases, take the appropriate action as described.
260
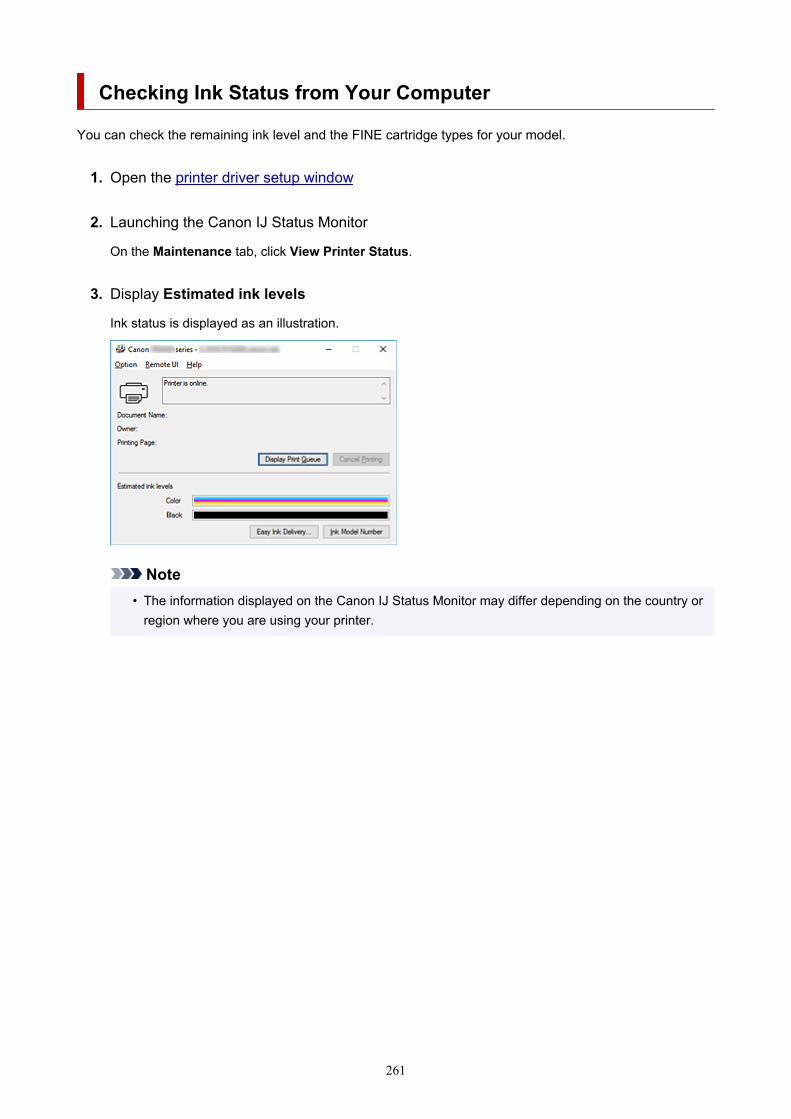
Checking Ink Status from Your Computer
You can check the remaining ink level and the FINE cartridge types for your model.
1. Open the printer driver setup window
2. Launching the Canon IJ Status Monitor
On the Maintenance tab, click View Printer Status.
3. Display Estimated ink levels
Ink status is displayed as an illustration.
Note• The information displayed on the Canon IJ Status Monitor may differ depending on the country or
region where you are using your printer.
261

Instructions for Use (Printer Driver)
This printer driver is subject to the following restrictions. Keep the following points in mind when using theprinter driver.
Restrictions on the Printer Driver
• With some applications, the Copies setting in the Page Setup tab of the printer driver may not beenabled.In this case, use the copies setting in the Print dialog box of the application software.
• If the selected Language in the About dialog box of the Maintenance tab does not match theoperating system interface language, the printer driver setup window may not be displayed properly.
• Do not change the Advanced tab items of the printer properties. If you change any of the items, youwill not be able to use the following functions correctly.Also, if Print to file is selected in the Print dialog box of the application software and with applicationsthat prohibit EMF spooling, such as Adobe Photoshop LE and MS Photo Editor, the followingfunctions will not operate.
◦ Preview before printing on the Main tab◦ Prevention of Print Data Loss in the Print Options dialog box on the Page Setup tab◦ Page Layout, Tiling/Poster, Booklet, Duplex Printing, Specify Margin..., Print from Last
Page, Collate, and Stamp/Background... on the Page Setup tab◦ Print a pattern for color adjustment on the Color Adjustment tab in the Manual Color
Adjustment dialog box
• Since the resolution in the preview display differs from the printing resolution, text and lines in thepreview display may appear different from the actual print result.
• With some applications, the printing is divided into multiple print jobs.To cancel printing, delete all divided print jobs.
• If image data is not printed correctly, display the Print Options dialog box from the Page Setup taband change the setting of Disable ICM required from the application software. This may solve theproblem.
Points to Note About Applications with Restrictions
• There are following restrictions in Microsoft Word (Microsoft Corporation).◦ When Microsoft Word has the same printing functions as the printer driver, use Word to specify
them.◦ When Fit-to-Page, Scaled, or Page Layout is used for Page Layout on the Page Setup tab of
the printer driver, the document may not print normally in certain versions of Word.◦ When Page Size in Word is set to "XXX Enlarge/Reduce", the document may not print normally in
certain versions of Word.If this happens, follow the procedure below.
1. Open Word's Print dialog box.2. Open the printer driver setup window, and on the Page Setup tab, set Page Size to the same
paper size that you specified in Word.3. Set the Page Layout that you want, and then click OK to close the window.4. Without starting printing, close the Print dialog box.
262

5. Open Word's Print dialog box again.6. Open the printer driver setup window and click OK.7. Start printing.
• If bitmap printing is enabled in Adobe Illustrator (Adobe Systems Incorporated), printing may take timeor some data may not be printed. Print after unchecking the Bitmap Printing check box in the Printdialog box.
263

Printer Driver Description
Quick Setup Tab Description
Main Tab Description
Page Setup Tab Description
Maintenance Tab Description
Canon IJ Status Monitor Description
264

Quick Setup Tab Description
The Quick Setup tab is for registering commonly used print settings. When you select a registered setting,the printer automatically switches to the preset items.
Commonly Used SettingsThe names and icons of frequently used printing profiles are registered. When you select a printingprofile according to the purpose of the document, settings that match the purpose are applied.In addition, functions that are thought to be useful for the selected printing profile are displayed inAdditional Features.You can also change a printing profile and register it under a new name. You can delete the registeredprinting profile.You can rearrange the profiles either by dragging the individual profiles or by holding down the Ctrl keyand pressing the up or down arrow keys.Standard
These are the factory settings.If Page Size, Orientation, and Copies were set from the application software, those settings havepriority.
Business DocumentSelect this setting when printing a general document.If Page Size, Orientation, and Copies were set from the application software, those settings havepriority.
Paper SavingSelect this setting to save paper when printing a general document. The 2-on-1 Printing andDuplex Printing check boxes are checked automatically.If Page Size, Orientation, and Copies were set from the application software, those settings havepriority.
265

Photo PrintingIf you select this setting when printing a photo, the photo paper and photo size generally used areset. The Borderless Printing check box is checked automatically.If Orientation and Copies were set from the application software, those settings have priority.
EnvelopeIf you select this setting for printing an envelope, Media Type is set automatically to Envelope. Inthe Envelope Size Setting dialog box, select the size of the envelope to be used.
Greeting CardWhen selected for printing a greeting card, the Media Type is automatically set to Inkjet GreetingCard. The Print Quality is also set to High, and a check-mark is added to Borderless Printing.
Note• The combination of the Additional Features that was displayed for the printing profile that had
been selected when the added printing profile was saved is also displayed when that addedprinting profile is selected.
Save...Displays the Save Commonly Used Settings dialog box.Click this button when you want to save the information that you set on the Quick Setup, Main, andPage Setup tabs to Commonly Used Settings.
DeleteDeletes a registered printing profile.Select the name of the setting to be deleted from Commonly Used Settings, and click Delete. When aconfirmation message is displayed, click OK to delete the specified printing profile.
Note• Printing profiles that are registered in the initial settings cannot be deleted.
Settings PreviewThe paper illustration shows how the original will be laid out on a sheet of paper.You can check an overall image of the layout.
Preview before printingShows what the print result will look like before you actually print the data.Check this check box to display a preview before printing.Uncheck this check box if you do not want to display a preview.
Additional FeaturesDisplays the frequently used, convenient functions for the printing profile that you selected forCommonly Used Settings on the Quick Setup tab.When you move the mouse pointer near a function that can be changed, a description of that function isdisplayed.To enable a function, check the corresponding check box.For some functions, you can set detailed settings from the Main and Page Setup tabs.
Important• Depending on the printing profiles, certain function may be grayed out and you will not be able to
change them.
266

2-on-1 PrintingPrints two pages of the document, side by side, on one sheet of paper.To change the page sequence, click the Page Setup tab, select Page Layout for Page Layout,and click Specify.... Then in the Page Layout Printing dialog box that appears, specify the PageOrder.
4-on-1 PrintingPrints four pages of the document, side by side, on one sheet of paper.To change the page sequence, click the Page Setup tab, select Page Layout for Page Layout,and click Specify.... Then in the Page Layout Printing dialog box that appears, specify the PageOrder.
Duplex PrintingSelects whether to print the document on both sides or one side of a sheet of paper.To change the staple side or the margins, set the new values from the Page Setup tab.
Borderless PrintingPerforms borderless printing without any margins on the paper.With the borderless printing function, the document to be printed is enlarged, so that it extendsslightly off the paper. In other words, the document is printed without any margin.To adjust the amount that the document extends beyond the paper, click the Page Setup tab,choose Borderless, and enter the value in Amount of Extension.
Grayscale PrintingThis function converts the data to monochrome data when printing your document.
DraftThis setting is appropriate for test printing.
Rotate 180 degreesPrints the document by rotating it 180 degrees against the paper feed direction.The width of print area and the amount of extension that are configured in other applicationsoftware will be reversed vertically and horizontally.
Color/Intensity Manual AdjustmentSelect when you set the Color Correction method and individual settings such as Cyan, Magenta,Yellow, Brightness, Intensity, Contrast, etc.
Media TypeSelects a type of printing paper.Select a media type that matches the paper that is loaded in the printer. This ensures that printing iscarried out properly for the specified paper.
Printer Paper SizeSelects the size of paper actually loaded into the printer.Normally, the paper size is set automatically according to the output paper size setting, and thedocument is printed with no scaling.When you set 2-on-1 Printing or 4-on-1 Printing in Additional Features, you can manually set thepaper size with Page Size on the Page Setup tab.If you select a paper size that is smaller than the Page Size, the document size will be reduced. If youselect a paper size that is larger, the document size will be enlarged.Also if you select Custom..., the Custom Paper Size dialog box opens and allows you to specify anyvertical and horizontal dimensions for the paper size.
267

OrientationSelects the printing orientation.If the application used to create your document has a similar function, select the same orientation thatyou selected in that application.Portrait
Prints the document so that its top and bottom positions are unchanged relative to the paper feeddirection. This is the default setting.
LandscapePrints the document by rotating it 90 degrees relative to the paper feed direction.You can change the rotation direction by going to the Canon IJ Printer Assistant Tool, opening theCustom Settings dialog box, and then using Rotate 90 degrees left when orientation is[Landscape] check box.To rotate the document 90 degrees to the left when printing, select the Rotate 90 degrees leftwhen orientation is [Landscape] check box.
Print QualitySelects your desired printing quality.Select one of the following to set the print quality level that is appropriate for the purpose.To set the print quality level individually, click the Main tab, and for Print Quality, select Custom. TheSet... becomes enabled. Click Set... to open the Custom dialog box, and then specify the desiredsettings.High
Gives priority to print quality over printing speed.
StandardPrints with average speed and quality.
DraftThis setting is appropriate for test printing.
Paper SourceShows the source from which paper is supplied.Cassette
Paper is always supplied from the cassette.
CopiesSpecifies the number of copies you want to print. You can specify a value from 1 to 999.
Important• When the application software that you used to create the document has the same function,
specify the settings on the printer driver. However, if the print results are not acceptable, specifythe function settings on the application software.
Always Print with Current SettingsPrints documents with the current settings starting from the next print execution.When you select this function and then close the printer driver setup window, the information that youset on the Quick Setup, Main, and Page Setup tabs are saved and printing with the same settings ispossible starting from the next print execution.
Important• If you log on with a different user name, the settings that were set when this function was enabled
are not reflected in the print settings.
268

• If a setting was specified on the application software, it has priority.
Printer Media Information...Displays Printer Media Information dialog box.You can check the printer settings and apply the checked settings to the printer driver.
DefaultsRestores all the settings you have changed to their default values.Click this button to return all settings on the Quick Setup, Main, and Page Setup tabs to their defaultvalues (factory settings).
Save Commonly Used Settings dialog box
This dialog box allows you to save the information that you set on the Quick Setup, Main, and PageSetup tabs and add the information to the Commonly Used Settings list on the Quick Setup tab.
NameEnter the name for the printing profile you wish to save.Up to 255 characters can be entered.The name appears, with its associated icon, in the Commonly Used Settings list on the QuickSetup tab.
Options...Opens the Save Commonly Used Settings dialog box.Changes the details of printing profile to be saved.
Save Commonly Used Settings dialog boxSelect the icons of the printing profiles to be registered to Commonly Used Settings, and change theitems to be saved in the printing profiles.
IconSelect the icon for the printing profile you wish to save.The selected icon appears, with its name, in the Commonly Used Settings list on the QuickSetup tab.
Save the paper size settingSaves the paper size to the printing profile in Commonly Used Settings.To apply the saved paper size when the printing profile is selected, check this check box.If this check box is unchecked, the paper size is not saved, and consequently the paper size settingis not applied when the printing profile is selected. Instead the printer prints with the paper sizespecified with the application software.
Save the orientation settingSaves the Orientation to the printing profile in Commonly Used Settings.To apply the saved print orientation when the printing profile is selected, check this check box.If this check box is unchecked, the print orientation is not saved, and consequently the Orientationsetting is not applied when the printing profile is selected. Instead the printer prints with the printorientation specified with the application software.
269

Save the copies settingSaves the Copies setting to the printing profile in Commonly Used Settings.To apply the saved copies setting when the printing profile is selected, check this check box.If this check box is unchecked, the copies setting is not saved, and consequently the Copiessetting is not applied when the printing profile is selected. Instead the printer prints with the copiessetting specified with the application software.
Custom Paper Size dialog box
This dialog box allows you to specify the size (width and height) of the custom paper.
UnitsSelect the unit for entering a user-defined paper size.
Paper SizeSpecifies the Width and the Height of the custom paper. Measurement is shown according to theunits specified in Units.
Printer Media Information dialog box
This dialog box allows you to check the printer settings and apply the checked settings to the printerdriver.
Paper SourceCheck the setting or select a new paper source.
Media TypeDisplays the Media Type that is currently set on the printer.To apply the displayed setting to the printer driver, click Set.
Page SizeDisplays the Page Size that is currently set on the printer.To apply the displayed setting to the printer driver, click Set.
Related Topics
Basic Printing SetupSetting a Page Size and OrientationSetting the Number of Copies and Printing OrderExecute Borderless PrintingDuplex PrintingSetting Up Envelope PrintingPrinting on PostcardsDisplaying the Print Results Before PrintingSetting Paper Dimensions (Custom Size)Printing a Color Document in MonochromeSpecifying Color CorrectionAdjusting Color BalanceAdjusting Color Balance Using Sample Patterns (Printer Driver)
270

Adjusting BrightnessAdjusting IntensityAdjusting ContrastAdjusting Intensity/Contrast Using Sample Patterns (Printer Driver)Registering a Frequently Used Printing Profile
271

Main Tab Description
The Main tab allows you to create a basic print setup in accordance with the media type. Unless specialprinting is required, normal printing can be performed just by setting the items on this tab.
Settings PreviewThe paper illustration shows how the original will be laid out on a sheet of paper.You can check an overall image of the layout.
Media TypeSelects a type of printing paper.Select a media type that matches the paper that is loaded in the printer. This ensures that printing iscarried out properly for the specified paper.
Paper SourceShows the source from which paper is supplied.Cassette
Paper is always supplied from the cassette.
Print QualitySelects your desired printing quality.Select one of the following to set the print quality level that is appropriate for the purpose.
Important• Depending on the Media Type settings, the same print results may be produced even if the Print
Quality is changed.
HighGives priority to print quality over printing speed.
StandardPrints with average speed and quality.
272

DraftThis setting is appropriate for test printing.
CustomSelect this when you want to set the printing quality level individually.
Set...Select Custom for Print Quality to enable this button.Open the Custom dialog box. You can then individually set the print quality level.
Color/IntensitySelects color adjustment method.Auto
Cyan, Magenta, Yellow, Brightness, Intensity, Contrast, and so on are adjusted automatically.
ManualSelect when you set the individual settings such as Cyan, Magenta, Yellow, Brightness,Intensity, Contrast, etc. and Color Correction method.
Set...Select Manual for Color/Intensity to enable this button.In the Manual Color Adjustment dialog box, you can adjust individual color settings such asCyan, Magenta, Yellow, Brightness, Intensity, and Contrast on the Color Adjustment tab, andselect the Color Correction method on the Matching tab.
Note• If you want to use an ICC profile to adjust colors, use the Manual Color Adjustment dialog
box to set the profile.
Grayscale PrintingThis function converts the data to monochrome data when printing your document.Check this check box to print a color document in monochrome.
Preview before printingShows what the print result will look like before you actually print the data.Check this check box to display a preview before printing.
DefaultsRestores all the settings you have changed to their default values.Clicking this button restores all the settings on the current screen to their default values (factorysettings).
Custom dialog box
Set the quality level, and select the desired print quality.
QualityYou can use the slider bar to adjust the print quality level.
Important• Certain print quality levels cannot be selected depending on the settings of Media Type.
273
Note• The High, Standard, or Draft print quality modes are linked with the slider bar. Therefore when
the slider bar is moved, the corresponding quality and value are displayed on the left. This is thesame as when the corresponding radio button is selected for Print Quality on the Main tab.
Color Adjustment Tab
This tab allows you to adjust the color balance by changing the settings of the Cyan, Magenta, Yellow,Brightness, Intensity, and Contrast options.
PreviewShows the effect of color adjustment.The color and brightness change when each item is adjusted.
Note• The graphic is in monochrome when the Grayscale Printing check box is checked.
View Color PatternDisplays a pattern for checking color changes produced by color adjustment.If you want to display the preview image with a color pattern, check this check box.
Cyan / Magenta / YellowAdjusts the strengths of Cyan, Magenta, and Yellow.Moving the slider to the right makes a color stronger, and moving the slider to the left makes a colorweaker.You can also directly enter a value linked to the slider. Enter a value in the range from -50 to 50.This adjustment changes the relative amount of ink of each color used, which alters the total colorbalance of the document. Use your application if you want to change the total color balancesignificantly. Use the printer driver only if you want to adjust the color balance slightly.
Important• When Grayscale Printing is checked on the Main tab, Cyan, Magenta, and Yellow appear
grayed out and are unavailable.
BrightnessSelects the brightness of your print.You cannot change the levels of pure white and black. However, the brightness of the colors betweenwhite and black can be changed.
IntensityAdjusts the overall intensity of your print.Moving the slider to the right increases the intensity, and moving the slider to the left decreases theintensity.You can also directly enter a value linked to the slider. Enter a value in the range from -50 to 50.
ContrastAdjusts the contrast between light and dark in the image to be printed.Moving the slider to the right increases the contrast, moving the slider to the left decreases thecontrast.You can also directly enter a value linked to the slider. Enter a value in the range from -50 to 50.
274
Print a pattern for color adjustmentWhen the color balance or intensity/contrast is changed, the pattern printing function prints a list ofthe adjustment results along with the adjustment values.Select this function when printing a pattern for color adjustment.
Pattern Print preferences...Check Print a pattern for color adjustment to enable this button.The Pattern Print dialog box opens and allows you to set pattern printing settings.
Pattern Print dialog boxPerforms the setup for printing of patterns that allow you to check the color balance and intensity/contrast of documents.
Parameters to AdjustSelect the item to be checked by pattern printing.Cyan/Magenta/Yellow
Prints a pattern that allows you to check the cyan/magenta/yellow balance.
Important• When Grayscale Printing is checked on the Main tab, Cyan/Magenta/Yellow appear
grayed out and are unavailable.
Intensity/ContrastPrints a pattern that allows you to check the intensity/contrast balance.
Printer Paper SizeSelects the paper size to be used for pattern printing.This setting is linked to Printer Paper Size on the Page Setup tab.
Note• Depending on the paper size selected on the Page Setup tab, there may be sizes that cannot
be selected.
Amount of Pattern InstancesSets the number of patterns to be printed.You can select from Largest, Large, and Small. When you select a pattern size, the number ofpatterns that can be printed is as follows:
Note• Largest and Large cannot be selected when certain paper sizes or output paper sizes are
selected.• The setting preview on the Main tab displays an image that allows you to check the overall
layout.
LargestCyan/Magenta/Yellow 37Intensity/Contrast 49
LargeCyan/Magenta/Yellow 19Intensity/Contrast 25
275

SmallCyan/Magenta/Yellow 7Intensity/Contrast 9
Color Variation Between InstancesSets the amount of color change between neighboring patterns.Select from Large, Medium, and Small. Large produces a large amount of change, and Smallproduces a small amount of change.
Note• Large is about double the size of Medium, and Small is about half the size of Medium.
Matching Tab
Allows you to select the method for adjusting colors to match the type of document to be printed.
Color CorrectionAllows you to select Driver Matching, ICM, or None to match the purpose of the print operation.
Important• When Grayscale Printing is checked on the Main tab, Color Correction appears grayed out
and is unavailable.
Driver MatchingWith Canon Digital Photo Color, you can print sRGB data with color tints that most people prefer.
ICMAdjusts the colors by using an ICC profile when printing.
Important• If the application software is set so that ICM is disabled, ICM is unavailable for Color
Correction and the printer may not be able to print the image data properly.
NoneDisables color adjustment with the printer driver.
Related Topics
Setting the Print Quality Level (Custom)Adjusting Color BalanceAdjusting BrightnessAdjusting IntensityAdjusting ContrastAdjusting Color Balance Using Sample Patterns (Printer Driver)Adjusting Intensity/Contrast Using Sample Patterns (Printer Driver)Specifying Color CorrectionAdjusting Colors with the Printer DriverPrinting with ICC ProfilesPrinting a Color Document in MonochromeDisplaying the Print Results Before Printing
276

Page Setup Tab Description
The Page Setup tab allows you to determine how a document is to be arranged on the paper. Also, this taballows you to set the number of copies and the order of printing. If the application which created thedocument has a similar function, set them with the application.
Settings PreviewThe paper illustration shows how the original will be laid out on a sheet of paper.You can check an overall image of the layout.
Page SizeSelects a page size.Ensure that you select the same page size as you selected within the application.If you select Custom..., the Custom Paper Size dialog box opens and allows you to specify anyvertical and horizontal dimensions for the paper size.
OrientationSelects the printing orientation.If the application used to create your document has a similar function, select the same orientation thatyou selected in that application.Portrait
Prints the document so that its top and bottom positions are unchanged relative to the paper feeddirection. This is the default setting.
LandscapePrints the document by rotating it 90 degrees relative to the paper feed direction.You can change the rotation direction by going to the Canon IJ Printer Assistant Tool, opening theCustom Settings dialog box, and then using Rotate 90 degrees left when orientation is[Landscape] check box.To rotate the document 90 degrees to the left when printing, select the Rotate 90 degrees leftwhen orientation is [Landscape] check box.
277

Rotate 180 degreesPrints the document by rotating it 180 degrees against the paper feed direction.The width of print area and the amount of extension that are configured in other applicationsoftware will be reversed vertically and horizontally.
Printer Paper SizeSelects the size of paper actually loaded into the printer.The default setting is Same as Page Size to perform normal-sized printing.You can select a printer paper size when you select Fit-to-Page, Scaled, Page Layout, Tiling/Poster,or Booklet for Page Layout.If you select a paper size that is smaller than the Page Size, the document size will be reduced. If youselect a paper size that is larger, the document size will be enlarged.Also if you select Custom..., the Custom Paper Size dialog box opens and allows you to specify anyvertical and horizontal dimensions for the paper size.
Page LayoutSelects the size of the document you want to print and the type of printing.Normal-size
This is the normal printing method. Select this when you do not specify any page layout.Automatically reduce large document that the printer cannot output
If the printer cannot print the paper size of a document, the printer can automatically reducethe size when it prints the document.Check this check box to reduce the size when printing the document.
BorderlessChooses whether you are printing on a full page without any page margins or printing with pagemargins.In borderless printing, originals are enlarged to extend slightly off the paper. Thus, printing can beperformed without any margins (border).Use Amount of Extension to adjust how much of the document extends off the paper duringborderless printing.Amount of Extension
Adjusts how much of the document extends off the paper during borderless printing.Moving the slider to the right increases the amount of extension and allows you to performborderless printing with no problems.Moving the slider to the left reduces the amount of extension and expands the range of thedocument to print.
Fit-to-PageThis function enables you to automatically enlarge or reduce documents to fit to the paper sizeloaded in the printer without changing the paper size you specified in your application software.
ScaledDocuments can be enlarged or reduced to be printed.Specify the size in Printer Paper Size, or enter the scaling ratio in the Scaling box.Scaling
Specifies an enlargement or reduction ratio for the document you want to print.
Page LayoutMultiple pages of document can be printed on one sheet of paper.
278

Specify...Opens the Page Layout Printing dialog box.Click this button to set details on page layout printing.
Tiling/PosterThis function enables you to enlarge the image data and divide the enlarged data into severalpages to be printed. You can also glue together these sheets of paper to create large printedmatter, such as a poster.Specify...
Opens the Tiling/Poster Printing dialog box.Click this button to set details on tiling/poster printing.
BookletThe booklet printing function allows you to print data for a booklet. Data is printed on both sides ofthe paper. This type of printing ensures that pages can be collated properly, in page number order,when the printed sheets are folded and stapled at the center.Specify...
Opens the Booklet Printing dialog box.Click this button to set details on booklet printing.
Duplex PrintingSelects whether to print the document automatically on both sides or one side of a sheet of paper.Check this check box to print the document on both sides.This function can be used only when Plain Paper is selected for Media Type and one of Normal-size,Fit-to-Page, Scaled, or Page Layout is selected.Automatic
Selects whether duplex printing is to be performed automatically or manually.This check box will be enabled if Booklet is selected from the Page Layout list or the DuplexPrinting check box is checked.To perform duplex printing automatically, check this check box.To perform duplex printing manually, uncheck this check box.
Print Area Setup...Opens the Print Area Setup dialog box in which you can configure the print area for automaticduplex printing.This button will be enabled if automatic duplex printing is set when Borderless is not selected.
Stapling SideSelects the stapling margin position.The printer analyzes the Orientation and Page Layout settings, and automatically selects the beststapling margin position. Check Stapling Side, and select from the list to change it.
Specify Margin...Opens the Specify Margin dialog box.You can specify the width of the margin.
CopiesSpecifies the number of copies you want to print. You can specify a value from 1 to 999.
Important• If the application used to create your document has a similar function, specify the number of copies
with the application without specifying it here.
279

Print from Last PageCheck this check box when you want to print from the last page in order. If you do this, you do not needto sort the pages into their correct order after printing.Uncheck this check box to print your document in normal order, starting from the first page.
CollateCheck this check box to group together the pages of each copy when you want to print multiple copies.Uncheck this check box when you want to print with all pages of the same page number groupedtogether.
Important• When the application software that you used to create the document has the same function, give
priority to the printer driver settings. However, if the print results are not acceptable, specify thefunction settings on the application software. When you specify the number of copies and theprinting order with both the application and this printer driver, the number of copies may bemultiplied numbers of the two settings or the specified printing order may not be enabled.
Print Options...Opens the Print Options dialog box.Changes detailed printer driver settings for print data that is sent from applications.
Stamp/Background...Opens the Stamp/Background dialog box.The Stamp function allows you to print a stamp text or a bitmap over or behind document data. It alsoallows you to print date, time and user name. The Background function allows you to print a lightillustration behind the document data.Depending on the environment, Stamp and Background may not be available.
Custom Paper Size dialog box
This dialog box allows you to specify the size (width and height) of the custom paper.
UnitsSelect the unit for entering a user-defined paper size.
Paper SizeSpecifies the Width and the Height of the custom paper. Measurement is shown according to theunits specified in Units.
Page Layout Printing dialog box
This dialog box allows you to select the number of document pages to be placed on one sheet of paper,the page order, and whether a page border line is to be printed around each document page.The settings specified in this dialog box can be confirmed in the settings preview on the printer driver.
Preview IconShows the settings made on the Page Layout Printing dialog box.You can check what the print result will look like before you actually print the data.
Page LayoutSpecifies the number of document pages to fit on one sheet.
280

Page OrderSpecifies the document orientation to be printed on a sheet of paper.
Page BorderPrints a page border line around each document page.Check this check box to print the page border line.
Tiling/Poster Printing dialog box
This dialog box allows you to select the size of the image to be printed. You can also make settings for cutlines and paste markers which are convenient for pasting together the pages into a poster.The settings specified in this dialog box can be confirmed in the settings preview on the printer driver.
Preview IconShows the settings of the Tiling/Poster Printing dialog box.You can check what the print result will look like.
Image DivisionsSelect the number of divisions (vertical x horizontal).As the number of divisions increases, the number of sheets used for printing increases. If you arepasting pages together to create a poster, increasing the number of divisions allows you to create alarger poster.
Print "Cut/Paste" in marginsSpecifies whether to print the words "Cut" and "Paste" in the margins. These words serve asguidelines for pasting together the pages into a poster.Check this check box to print the words.
Note• Depending on the environment, this function may not be available.
Print "Cut/Paste" lines in marginsSpecifies whether to print cut lines that serve as guidelines for pasting together the pages into aposter.Check this check box to print the cut lines.
Print page rangeSpecifies the printing range. Select All under normal circumstances.Select Pages to specify a specific page or range.
Note• If some of the pages have not been printed well, specify the pages that do not need to be printed
by clicking them in the settings preview of the Page Setup tab. Only the pages shown on thescreen will be printed this time.
Booklet Printing dialog box
This dialog box allows you to set how to bind the document as a booklet. Printing only on one side andprinting a page border, can also be set in this dialog box.The settings specified in this dialog box can be confirmed in the settings preview on the printer driver.
281

Preview IconShows the settings made on the Booklet Printing dialog box.You can check what the document will look like when printed as a booklet.
Margin for staplingSpecifies which side of the booklet is to be stapled.
Insert blank pageSelects whether to print the document on one side or both sides of the booklet.Check this check box to print the document on one side of the booklet and select the side to be leftblank from the list.
MarginSpecifies the width of the stapling margin.The specified width becomes the stapling margin from the center of the sheet.
Page BorderPrints a page border line around each document page.Check this check box to print the page border line.
Print Area Setup dialog box
When you perform duplex printing, the print area of the document becomes slightly narrower than usual.Therefore when a document that has small margins is printed, the document may not fit on one page.This dialog box allows you to set whether the page is to be reduced when printed so that the documentfits in one page.
Use normal-size printingPrints the document pages without reducing them. This is the default setting.
Use reduced printingSlightly reduces each document page so that it fits on one sheet of paper during printing.Select this setting when using automatic duplex printing to print a document with small margins.
Specify Margin dialog box
This dialog box allows you to specify the margin width for the side to be stapled. If a document does not fiton one page, the document is reduced when printed.
MarginSpecifies the width of the stapling margin.The width of the side specified by Stapling Side becomes the stapling margin.
Print Options dialog box
Makes changes to print data that is sent to the printer.
Depending on the environment, this function may not be available.
Disable ICM required from the application softwareDisables the ICM function required from the application software.When an application software uses Windows ICM to print data, unexpected colors may be produced
282
or the printing speed may decrease. If these problems occur, checking this check box may resolvethe problems.
Important• Uncheck this check box under normal circumstances.• This function does not work when ICM is selected for Color Correction on the Matching tab of
the Manual Color Adjustment dialog box.
Disable the color profile setting of the application softwareChecking this check box disables information in the color profile that was set on the applicationsoftware.When the information in the color profile set on the application software is output to the printer driver,the print result may contain unexpected colors. If this happens, checking this check box may resolvethe problem.
Important• Even when this check box is checked, only some of the information in the color profile is
disabled, and the color profile can still be used for printing.• Uncheck this check box under normal circumstances.
Ungroup PapersSets the display method of Media Type, Page Size, and Printer Paper Size.To display the items separately, select the check box.To display the items as a group, clear the check box.
Do not allow application software to compress print dataCompression of the application software print data is prohibited.If the print result has missing image data or unintended colors, selecting this check box may improvethe condition.
Important• Uncheck this check box under normal circumstances.
Print after creating print data by pageThe print data is created in page units, and printing starts after the processing of one page of printdata is complete.If a printed document contains unintended results such as streaks, selecting this check box mayimprove the results.
Important• Uncheck this check box under normal circumstances.
Prevention of Print Data LossYou can reduce the size of the print data that was created with the application software and then printthe data.Depending on the application software being used, the image data may be cut off or may not beprinted properly. In such cases, select On. If you will not be using this function, select Off.
Important• When using this function, the print quality may drop depending on the print data.
283

Unit of Print Data ProcessingSelects the processing unit of the print data to be sent to the printer.Select Recommended under normal circumstances.
Important• A large amount of memory may be used for certain settings.
Do not change the setting if your computer has a small amount of memory.
Print WithSpecify the FINE cartridge to be used from the installed FINE cartridges.Select from All Colors (Default), Color Only, Black Only.
Important• When the following settings are specified, Black Only does not function because the printer
uses the color FINE cartridge to print documents.• Other than Plain Paper, Envelope, Ink Jet Hagaki (A), Hagaki K (A), Hagaki (A), or
Hagaki is selected for Media Type on the Main tab• Borderless is selected from the Page Layout list on the Page Setup tab
• Do not detach the FINE cartridge that is not in use. Printing cannot be performed while eitherFINE cartridge is detached.
Stamp/Background dialog box
The Stamp/Background dialog box allows you to print a stamp and/or background over or behind thedocument pages. In addition to the pre-registered ones, you can register and use your original stamp orbackground.
StampStamp printing is a function that prints a stamp over a document.Check this check box and select a title from the list to print a stamp.
Define Stamp...Opens the Stamp Settings dialog box.You can check the details of a selected stamp or save a new stamp.
Place stamp over textSets how the stamp is to be printed over the document.Check the Stamp check box to enable this.Check this check box to print a stamp over the printed document page. The printed data may behidden behind the stamp.Uncheck this check box to print the document data over the stamp. The printed data will not behidden behind the stamp. However, the sections of the stamp that are overlapped by the documentmay be hidden.
Stamp first page onlySelects whether the stamp is to be printed on the first page only or on all pages when the documenthas two or more pages.Check the Stamp check box to enable this.Check this check box to print a stamp on the first page only.
284

BackgroundBackground printing is a function that allows you to print an illustration or a similar object (bitmap)behind the document.Check this check box to print a background and select a title from the list.
Select Background...Opens the Background Settings dialog box.You can register a bitmap as a background, and change layout method and intensity of the selectedbackground.
Background first page onlySelects whether to print the background on the first page only or print on all pages when thedocument has two or more pages.Check the Background check box to enable this.Check this check box to print a background on the first page only.
Stamp TabThe Stamp tab allows you to set the text and bitmap file (.bmp) to be used for a stamp.
Preview WindowShows the status of the stamp configured in each tab.
Stamp TypeSpecifies the stamp type.Select Text to create a stamp with characters. Select Bitmap to create with a bitmap file. SelectDate/Time/User Name to display the creation date/time and user name of the printed document.The setting items in the Stamp tab change depending on the selected type.
When Stamp Type is Text or Date/Time/User Name
Stamp TextSpecifies the stamp text string.Up to 64 characters can be entered.For Date/Time/User Name, the creation date/time and user name of the printed object aredisplayed in Stamp Text.
Important• Stamp Text appears grayed out and is unavailable if Date/Time/User Name is selected.
TrueType FontSelects the font for the stamp text string.
StyleSelects the font style for the stamp text string.
SizeSelects the font size for the stamp text string.
OutlineSelects a frame that encloses the stamp text string.If a large font size is selected for Size, characters may extend outside of the stamp border.
285

Color/Select Color...Shows the current color for the stamp.To select a different color, click Select Color... to open the Color dialog box, and select or create acolor you wish to use as a stamp.
When Stamp Type is Bitmap
FileSpecifies the name of the bitmap file to be used as the stamp.
Select File...Opens the dialog box to open a file.Click this button to select a bitmap file to be used as a stamp.
SizeAdjusts the size of the bitmap file to be used as a stamp.Moving the slider to the right increases the size, moving the slider to the left decreases the size.
Transparent white areaSpecifies whether to make white-filled areas of the bitmap transparent.Check this check box to make white-filled areas of the bitmap transparent.
Note• Click Defaults to set Stamp Type to text, Stamp Text to blank, TrueType Font to Arial, Style to
Regular, Size to 36 points, Outline unchecked, and Color to gray with the RGB values (192, 192,192).
Placement TabThe Placement tab allows you to set the position where the stamp is to be printed.
Preview WindowShows the status of the stamp configured in each tab.
PositionSpecifies the stamp position on the page.Selecting Custom from the list allows you to enter values for the X-Position and Y-Positioncoordinates directly.
OrientationSpecifies the angle of rotation for the stamp. The angle can be set by entering the number ofdegrees.Negative values rotate the stamp clockwise.
Note• Orientation is enabled only when Text or Date/Time/User Name is selected for Stamp Type
on the Stamp tab.
Note• Click Defaults to set the stamp position to Center and the orientation to 0.
286

Save settings TabThe Save settings tab allows you to register a new stamp or delete an unnecessary stamp.
TitleEnter the title to save the stamp you created.Up to 64 characters can be entered.
Note• Spaces, tabs, and returns cannot be entered at the beginning or end of a title.
StampsShows a list of saved stamp titles.Specify a title to display the corresponding stamp in Title.
Save/Save overwriteSaves the stamp.Enter a title in Title, and then click this button.
DeleteDeletes an unnecessary stamp.Specify the title of an unnecessary stamp from the Stamps list, and click this button.
Background TabThe Background tab allows you to select a bitmap file (.bmp) to be used as a background or determinehow to print the selected background.
Preview WindowShows the status of the bitmap set on the Background tab.
FileSpecifies the name of the bitmap file to be used as the background.
Select File...Opens the dialog box to open a file.Click this button to select a bitmap file (.bmp) to be used as the background.
Layout MethodSpecifies how the background image is to be placed on the paper.When Custom is selected, you can set coordinates for X-Position and Y-Position.
IntensityAdjusts the intensity of the bitmap to be used as a background.Moving the slider to the right increases the intensity, and moving the slider to the left decreases theintensity. To print the background at the original bitmap intensity, move the slider to the rightmostposition.
Note• Depending on the environment, this function may not be available.• Click Defaults to set File to blank, Layout Method to Fill page, and the Intensity slider to the
middle.
287

Save settings TabThe Save settings tab allows you to register a new background or delete an unnecessary background.
TitleEnter the title to save the background image you specified.Up to 64 characters can be entered.
Note• Spaces, tabs, and returns cannot be entered at the beginning or end of a title.
BackgroundsShows a list of registered background titles.Specify a title to display the corresponding background in Title.
Save/Save overwriteSaves the image data as a background.After inserting the Title, click this button.
DeleteDeletes an unnecessary background.Specify the title of an unnecessary background from the Backgrounds list, and then click thisbutton.
288

Maintenance Tab Description
The Maintenance tab allows you to start the Canon IJ Printer Assistant Tool or check the status of theprinter.
Maintenance and PreferencesCanon IJ Printer Assistant Tool is started.You can perform printer maintenance or change the settings of the printer.
View Printer StatusStarts the Canon IJ Status Monitor.Perform this function when you want to check the printer status and how a print job is proceeding.
AboutOpens the About dialog box.The version of the printer driver, plus a copyright notice, can be checked.In addition, the language to be used can be switched.
About dialog box
When you click About, the About dialog box is displayed.This dialog box displays the version, copyright, and module list of the printer driver. You can select thelanguage to be used and switch the language displayed in the setup window.
ModulesLists the printer driver modules.
LanguageSpecifies the language you wish to use in the printer driver setup window.
289

Important• If the font for displaying the language of your choice is not installed in your system, the
characters will be garbled.
290

Canon IJ Status Monitor Description
The Canon IJ Status Monitor displays the printer status and the printing progress. The printer status isshown by the images, icons, and messages in the status monitor.
Features of the Canon IJ Status Monitor
The Canon IJ Status Monitor has the following functions:
Onscreen display of printer statusThe status monitor displays the printer status in real-time.You can check the progress of each document to be printed (print job).
Display of error content and correction procedureThe status monitor displays information on any errors that occur on the printer.You can then immediately check what sort of action to perform.
Ink status displayThe status monitor displays FINE cartridge types and estimated ink levels.When the remaining ink level becomes low, a warning icon and message (low ink level warning)are displayed.
Overview of the Canon IJ Status Monitor
The Canon IJ Status Monitor uses images and messages to display the printer status and the ink status.During printing, you can check information about the document being printed and the print progress.If an error occurs, the status monitor displays the error content and instructions on how to correct theerror. Follow the message instructions.
PrinterCanon IJ Status Monitor shows an icon when a warning or error occurs to the printer.
: There is a warning.
: There has been an operator error.
: There is a notice about something other than a warning or an error.
: There has been an error which requires a service.
291

FINE cartridgesIf a low ink warning or an empty ink cartridge error occurs, the status monitor displays an icon.The status monitor also uses images to display the estimated ink levels of the FINE cartridges.Move the cursor onto the image to check detailed information such as the remaining ink levelsand the names of FINE cartridges that the printer can use.The colors are calibrated to match the color with the least amount of ink remaining, and then allcolors are displayed at the same level.
Document NameName of the document being printed.
OwnerOwner's name of the document being printed.
Printing PagePage number of current page and the total page count.
Display Print QueueThe print queue, which controls the current document and documents waiting to be printed.
Cancel PrintingCancels printing.
Estimated ink levelsDisplays icons to report a remaining ink level warning and an ink depletion error.The estimated ink level of the FINE cartridge is also displayed as an illustration.Ink Model Number
You can look up the correct FINE cartridge for your printer.
Option MenuIf a printer message appears, select Enable Status Monitor to start the Canon IJ StatusMonitor.Select Enable Status Monitor to use the following commands:Always Display Current Job
Displays the Canon IJ Status Monitor whenever a document is being printed.
Always Display on TopDisplays the Canon IJ Status Monitor in front of other windows.
Display Guide MessageDisplays guide messages for complicated paper setting operations.Envelope Printing
Displays a guide message when envelope printing starts.To hide this guide message, select the Do not show this message again check box.To display the guide message again, open the Option menu, select Display GuideMessage, click Envelope Printing, and enable this setting.
Hagaki PrintingDisplays a guide message before the printer begins hagaki printing.To display this guide message, open the Option menu, select Display GuideMessage, click Hagaki Printing, and enable this setting.To hide the guide message, select the Do not show this message again check box.
292

How to load paperDisplays a guide message if the other guide is not displayed when the printer beginsprinting for media types other than plain paper.To hide this guide message, select the Do not show this message again check box.To display the guide message again, click How to load paper on the Display GuideMessage in the Option menu and enable this setting.
Display Warning AutomaticallyWhen a Low Ink Warning Occurs
Starts the Canon IJ Status Monitor window automatically and displays it in front of theother windows when a low ink warning occurs.
Start when Windows is StartedAutomatically starts the Canon IJ Status Monitor when Windows is started.
Remote UI menuYou are able to open the printer's Remote User Interface.You are able to check the printer status and run maintenance functions on the printer whenconnected to and using it through a network.
Note• When the printer is being used via USB connection Remote UI will not display.
Printer InformationAllows you check detailed information, such as the printer status, the print progress, andremaining ink levels.
MaintenanceAllows you to run printer maintenance and change printer settings.
Download Security CertificateDisplays the For secure communication window.This window allows you to download the route certificate, register it to the browser, anddisable warning displays.
Help MenuSelect this menu to display Help information for the Canon IJ Status Monitor including versionand copyright information.
293

Installing the MP Drivers
You can access our web site through the Internet and download the latest MP Drivers for your model.
1. Turn off the printer
2. Start the installer
Double-click the icon of the downloaded file.The installation program starts.
Important• A confirmation/warning dialog box may appear when starting, installing or uninstalling software.
This dialog box appears when administrative rights are required to perform a task.When you are logged on to an administrator account, click Yes (or Continue, Allow) to continue.Some applications require an administrator account to continue. In such cases, switch to anadministrator account, and restart the operation from the beginning.
3. Install the MP Drivers
Take the appropriate action as described on the screen.
4. Complete the installation
Click Complete.
Depending on the environment you are using, a message prompting you to restart the computer may bedisplayed. To complete the installation properly, restart the computer.
Important• You can download the MP Drivers for free, but any Internet access charges incurred are your
responsibility.• Before installing the latest MP Drivers, delete the previously installed version.
Related Topics
Obtaining the Latest MP DriversDeleting the Unnecessary MP DriversBefore Installing the MP Drivers
294

Printing Using Canon Application Software
Easy-PhotoPrint Editor Guide
295

Printing Using a Web Service
Using PIXMA/MAXIFY Cloud Link
Printing with Google Cloud Print
296

Printing from Smartphone/Tablet
Printing from iPhone/iPad/iPod touch (iOS)
Printing from Smartphone/Tablet (Android)
Printing from Windows 10 Mobile Device
Printing/Scanning with Wireless Direct
297

Printing/Scanning with Wireless Direct
You can connect devices (e.g. computer, smartphone, or tablet) to the printer by two methods below.
• Wireless connection (connecting devices via a wireless router)
• Direct wireless connection (connecting devices using Wireless Direct)
This section describes Wireless Direct, which allows you to print or scan by connecting the devices to theprinter directly.
Follow the procedure below to use Wireless Direct.
1. Preparing the printer.
Changing Printer Setting to Use Wireless Direct
2. Preparing a device to connect to the printer.
Changing Settings of a Device and Connecting It to the Printer
3. Printing/Scanning.
Printing/Scanning with Wireless Direct
Important• You can connect up to 5 devices to the printer at the same time.
• Check the usage restrictions and switch the printer to the Wireless Direct.
Restrictions
Changing Printer Setting to Use Wireless Direct
1. Check that printer is turned on.
2. Press the Setup button.
The Setup menu screen is displayed.
3. Select Device settings and then press the OK button.
4. Select LAN settings and then press the OK button.
5. Select Wireless Direct and then press the OK button.
6. Select Switch WL Direct and then press the OK button.
7. Select Yes and then press the OK button.
When the setting is completed, the Wireless router info screen is displayed.
8. Select Done and then press the OK button.
298

The Wireless Direct is enabled and a device can be connected to the printer wirelessly.
Note• You can check the following on the Wireless router info screen. Use the button to select
an item you want to check and then press the OK button.
• Network name(SSID): Identifier
• Security protocol: Security setting and password
• WL Direct dev. name: Printer name displayed on a Wi-Fi Direct compatible device
The password is required when connecting a device to the printer. Depending on the device youare using, no password is required.
When you connect a Wi-Fi Direct compatible device to the printer, select the printer name fromyour device.
• For details on how to update the identifier (SSID) and the security setting, refer to the following.
Changing Wireless Direct Setting
Changing Settings of a Device and Connecting It to the Printer
1. Turn on Wi-Fi function on your device.
Enable "Wi-Fi" on your device's "Setting" menu.
For more on turning on Wi-Fi function, see your device's instruction manual.
2. Select "DIRECT-XXXX-TR4500series" ("X" represents alphanumeric characters) from listdisplayed on your device.
Note• If "DIRECT-XXXX-TR4500series" does not appear on the list, Wireless Direct is not enabled.
See Changing Printer Setting to Use Wireless Direct to enable Wireless Direct.
3. Enter password.
Your device is connected to the printer.
Note• You can check the password by printing the network settings from the printer.
Printing Network Settings
• Depending on the device you are using, no password is required.
• If your Wi-Fi Direct compatible device is set to prioritize using Wi-Fi Direct and it is connectingto the printer, the printer displays a confirmation screen asking if you allow the device toconnect to the printer.
Make sure the name on the LCD is the same as that of your wireless communication deviceand select Yes and press the OK button.
299

Printing/Scanning with Wireless Direct
After connecting a device and the printer, start printing/scanning from the application of your device.
Note• For more on printing or scanning from a device via Wi-Fi, refer to the device's or application's
instruction manual.
• You can print/scan from your smartphone or tablet by installing Canon PRINT Inkjet/SELPHY.Download it from App Store and Google Play.
For iOSFor Android
Changing Wireless Direct Setting
Change the settings for the Wireless Direct following the procedure below.
1. Check that printer is turned on.
2. Press the Setup button.
The Setup menu screen is displayed.
3. Select Device settings and then press the OK button.
4. Select LAN settings and then press the OK button.
5. Select Wireless Direct and then press the OK button.
6. Select a setting item and then press the OK button.
Change name (SSID)Updates the identifier (SSID) for Wireless Direct or the printer name displayed on a Wi-Fi Directcompatible device.
• Manual setup
1. Select Manual setup and then press the OK button.
2. Enter new printer name and then press the OK button.
3. Confirm your entries and press the OK button.
• Auto update
1. Select Auto update and then press the OK button.
2. Select Yes and then press the OK button.
3. Select Done and then press the OK button.
If you select Network name(SSID) and press the OK button, you can check the updatedidentifier (SSID).
300

Change password• Manual setup
1. Select Manual setup and then press the OK button.
2. Enter new password and then press the OK button.
• Auto update
1. Select Auto update and then press the OK button.
2. Select Yes and then press the OK button.
3. Select Done and then press the OK button.
If you select Security protocol instead of Done, you can check the updated password.
Confirm requestTo display the confirmation screen when a Wi-Fi Direct compatible device is connecting to theprinter, select Yes and press the OK button.
Important• To prevent an unauthorized access, we recommend you should not change the setting from
the default.
Note• If you change the Wireless Direct setting of the printer, also change the wireless router setting of the
device.
301

Paper Settings
By registering the paper size and the media type loaded in the cassette, you can prevent the printer frommisprinting by displaying the message before printing starts when the paper size or the media type of theloaded paper differs from the paper settings for printing.
Note• The default setting is different between when you print/copy from the operation panel, when you print
from Smartphone/tablet, when you print from Windows, and when you print from macOS.
Default Setting for Displaying the Message which Prevents Misprinting
When you insert the cassette with paper loaded:
The screen to register the paper information is displayed.
Register the paper size and the media type according to the loaded paper.
Important• For more on the proper combination of paper settings you can specify by the printer driver for
Windows and on the LCD:
Paper Settings on the Printer Driver and the Printer (Media Type)Paper Settings on the Printer Driver and the Printer (Paper Size)
When the paper settings for printing/copying are different from thepaper information registered in the printer:
Ex:
• Paper settings for printing/copying: A5
• Paper information registered in the printer: A4
302

When you start printing/copying, The size/type of loaded paper is different from the print settingsappears on the LCD.
When you press the OK button, the screen for selecting the processing method is displayed. Pleasechoose one of the following.
Note• Depending on the setting, the choices below may not be displayed.
Use cass. settingsSelect if you want to print on the paper loaded without changing the paper settings.
For example, when the paper size setting for printing/copying is A5 and the paper informationregistered in the printer is A4, the printer starts printing/copying on the paper loaded in the cassettewithout changing the paper size setting for printing/copying.
Replace the paperSelect if you want to print after replacing the paper of the cassette.
For example, when the paper size setting for printing/copying is A5 and the paper informationregistered in the printer is A4, you load A5 sized paper before you start printing/copying.
After replacing the paper and pushing the cassette back, the paper information registration screenappears. Register the paper information in the printer in accordance with the paper loaded in thecassette.
Note• For more on the proper combination of paper settings you can specify by the printer driver for
Windows and on the LCD:
Paper Settings on the Printer Driver and the Printer (Media Type)Paper Settings on the Printer Driver and the Printer (Paper Size)
CancelCancels printing.
Select when you change the paper settings specified for printing/copying. Change the paper settingsand try printing/copying again.
303

Default Setting for Displaying the Message which Prevents Misprinting
• When you print/copy using the operation panel of the printer or when you print fromsmartphone/tablet:
The message which prevents misprinting is enabled by default.
To change the setting:
Feed settings
• When you print from Windows:
The message which prevents misprinting is disabled by default.
To change the setting:
Changing the Printer Operation Mode
• When you print from macOS:
The message which prevents misprinting is enabled by default.
To change the setting:
Changing the Printer Operation Mode
Important• When the message which prevents misprinting is disabled:
The printer starts printing/copying even though the paper settings for printing/copying and the paperinformation registered in the printer are different.
304

Copying
Making Copies Basics
Reducing/Enlarging Copies
Two-Sided Copying
Collated Copying
Special Copy Menu
Copying Using Smartphone or Tablet
305

Making Copies
This section describes the basic procedure to perform standard copying.
1. Check that printer is turned on.
2. Load paper.
3. Press the COPY button.
The Copy standby screen is displayed.
4. Load original document on platen or in ADF (Auto Document Feeder).
5. Confirm the page size (A) and magnification (B).
Note• To change or confirm the page size, magnification, or other settings, press the Menu/Wireless
connect button, then use the button to display the desired setting item.
Setting Items for Copying
• Press the COPY button to reset the magnification to 100%.
6. Use the button or the Numeric buttons to specify the number of copies.
7. Press the Color button for color copying, or the Black button for black & white copying.
The printer starts copying.
Remove the original on the platen or from the document output slot after copying is complete.
Important• If you load the original on the platen, do not open the document cover or remove the original while
Scanning... is displayed on the screen.
• If you load the original in the ADF, do not move the original until copying is complete.
Note• To cancel copying, press the Stop button.
• If you load the original on the platen, you can add the copying job while printing.
Adding the Copying Job (Reserve copy)
306

Adding the Copying Job (Reserve copy)
If you load the original on the platen, you can add the copying job while printing (Reserve copy).
The screen like shown below is displayed when you can reserve copy.
Load the original on the platen and press the same button (the Color button or the Black button) as theone which you previously pressed.
Important• When you load the original on the platen, open and close the document cover gently.
Note• When Print quality is set High, or you load the original in the ADF, you cannot add the copying job.
• When you add the copying job, the number of copies or the settings such as the page size or mediatype cannot be changed.
• If you press the Stop button while reserve copying is in progress, the screen to select the method tocancel copying is displayed. If you select Cancel all reserv. then press the OK button, you cancancel copying all scanned data. If you select Cancel last reserv. then press the OK button, you cancancel the last copying job.
• If you set a document of too many pages to reserve copy, Memory is full may appear on the LCD.Press the OK button and wait a while, then try copying again.
• If Try again appears on the LCD when scanning, press the OK button, then press the Stop button tocancel copying. After that, copy the documents that have not been finished copying.
307

Setting Items for Copying
You can change the copy settings such as the page size, media type, and intensity.
In the copy mode, press the Menu/Wireless connect button, use the button to select a setting item,then press the OK button.
Use the button to adjust each setting item, then press the OK button. The next setting item isdisplayed.
The LCD returns to the Copy standby screen when all the settings are complete.
Note• The (asterisk) on the LCD indicates the current setting.
• Some settings cannot be specified in combination with the setting of other setting items or the copymenu.
• The settings of the page size, media type, etc. are retained even if the printer is turned off.
• Enlarge/Reduce
Select the reduction/enlargement method.
Reducing/Enlarging Copies
Ex:
Note• This setting item is displayed under the following conditions.
• When standard copying is selected
• When Borderless copy is selected for Special copy
• Copy intensity
Change the intensity (brightness).
Ex:
Note• If you select Auto adjust, load the original on the platen.
• If you select Manual adjust, use the button to decrease the intensity or the button toincrease it.
• Page size
Select the page size of the loaded paper.
Ex:
308

Note• Some of setting items are not available depending on the country or region of purchase.
• Media type
Select the media type of the loaded paper.
Ex:
• Print quality
Select the print quality according to the original.
Ex:
Note• If you use Draft with the media type set to Plain paper and the quality is not as good as expected,
select Standard or High and try copying again.
• Select High to copy in grayscale. Grayscale renders tones in a range of grays instead of black orwhite.
• 4-on-1 layout
Select the layout when copying four original pages onto a single sheet of paper by reducing each image.Four different layouts are available.
Ex:
Note• This setting item is displayed only when 4-on-1 copy is selected for Special copy.
Copying Four Pages onto Single Page
• Collate
Select whether to obtain sorted printouts when making multiple copies of a multi-paged original.
Collated Copying
Ex:
309

Note• This setting item is displayed when standard copying is selected.
• 2-sided
Select whether to perform two-sided copying.
Ex:
Note• This setting item is displayed only when 2-sided copy is selected for Special copy.
Two-Sided Copying
• Stapling side
Select the orientation and the stapling side of the printed paper.
Ex:
Note• This setting item is displayed only when 2-sided copy is selected for Special copy.
Two-Sided Copying
310

Scanning
Scanning from Computer (Windows)
Scanning from Computer (macOS)
Scanning from Operation Panel
Scanning Using Smartphone/Tablet
311

Scanning from Computer (Windows)
Scanning According to Item Type or Purpose (IJ Scan Utility)
IJ Scan Utility Features
Scanning Easily (Auto Scan) Basics
Scanning Documents and Photos
Creating/Editing PDF Files
Setting Passwords for PDF Files
Editing Password-Protected PDF Files
Scanning Using Application Software (ScanGear)
Scanning Tips
Positioning Originals (Scanning from Computer)
Network Scan Settings
IJ Network Scanner Selector EX2 Menu and Setting Screen
312

Scanning According to Item Type or Purpose (IJ Scan Utility)
IJ Scan Utility Features
Scanning Easily (Auto Scan) Basics
Scanning Documents and Photos
Creating/Editing PDF Files
Setting Passwords for PDF Files
Editing Password-Protected PDF Files
313
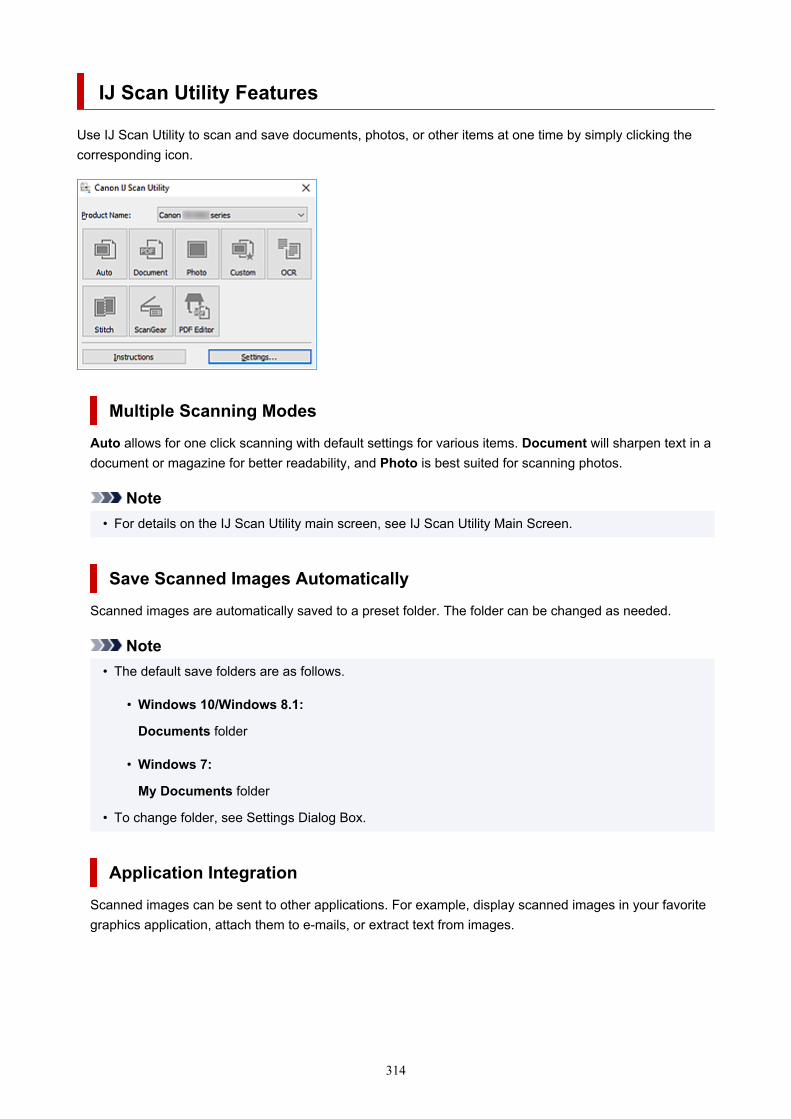
IJ Scan Utility Features
Use IJ Scan Utility to scan and save documents, photos, or other items at one time by simply clicking thecorresponding icon.
Multiple Scanning Modes
Auto allows for one click scanning with default settings for various items. Document will sharpen text in adocument or magazine for better readability, and Photo is best suited for scanning photos.
Note• For details on the IJ Scan Utility main screen, see IJ Scan Utility Main Screen.
Save Scanned Images Automatically
Scanned images are automatically saved to a preset folder. The folder can be changed as needed.
Note• The default save folders are as follows.
• Windows 10/Windows 8.1:
Documents folder
• Windows 7:
My Documents folder
• To change folder, see Settings Dialog Box.
Application Integration
Scanned images can be sent to other applications. For example, display scanned images in your favoritegraphics application, attach them to e-mails, or extract text from images.
314

Note• To set the applications to integrate with, see Settings Dialog Box.
315

Scanning Easily (Auto Scan)
Auto Scan allows for automatic detection of the type of the item placed on the platen or ADF (AutoDocument Feeder).
Important• The following types of items may not be scanned correctly. In that case, adjust the cropping frames
(scan areas) in whole image view of ScanGear (scanner driver), and then scan again.
• Photos with a whitish background• Items printed on white paper, hand-written text, business cards, and other unclear items• Thin items• Thick items
• When scanning two or more documents from the ADF, place documents of the same size.
1. Make sure scanner or printer is turned on.
2. Place items on platen or ADF.
Positioning Originals (Scanning from Computer)
3. Start IJ Scan Utility.
4. Click Auto.
Scanning starts.
Note• To cancel the scan, click Cancel.• Use the Settings (Auto Scan) dialog box to set where to save the scanned images and to make
advanced scan settings.• To scan a specific item type, see the following pages.
Scanning Documents and PhotosScanning with Favorite SettingsScanning Multiple Documents at One Time from the ADF (Auto Document Feeder)
316

Scanning Documents and Photos
Scan items placed on the platen with settings suitable for documents or photos.
Save documents in formats such as PDF and JPEG, and photos in formats such as JPEG and TIFF.
1. Place the Item on the Platen
Positioning Originals (Scanning from Computer)
2. Start IJ Scan Utility.
3. To specify the paper size, resolution, PDF settings, etc., click Settings..., and then set eachitem in the Settings dialog box.
Note• Once settings are made in the Settings dialog box, the same settings can be used for scanning
from the next time.• In the Settings dialog box, specify image processing settings such as slant correction and outline
emphasis, set the destination of the scanned images, and more, as needed.
When setting is completed, click OK.
4. Click Document or Photo.
Scanning starts.
Note• To cancel the scan, click Cancel.
317

Creating/Editing PDF Files
You can create PDF files by scanning items placed on the platen or ADF (Auto Document Feeder). Add,delete, rearrange pages or make other edits in the created PDF files.
Important• You can create or edit up to 100 pages of a PDF file at one time.• Only PDF files created or edited in IJ Scan Utility or IJ PDF Editor are supported. PDF files created or
edited in other applications are not supported.
Note• You can also create PDF files from images saved on a computer.• Selectable file formats are PDF, JPEG, TIFF, and PNG.• Images whose number of pixels in the vertical or horizontal direction is 10501 or more cannot be used.• When you select a password-protected PDF file, you must enter the password.
Editing Password-Protected PDF Files
1. Place items on platen or ADF.
2. Start IJ Scan Utility.
3. Click PDF Editor.
IJ PDF Editor starts.
4. To specify paper size, resolution, and other settings, click Settings... from the File menu,and then set each item in the Settings (Document Scan) dialog box.
Note• Once settings are made in the Settings dialog box, the same settings can be used for scanning
from the next time.• In the Settings dialog box, specify image processing settings such as slant correction and outline
emphasis.
When setting is completed, click OK.
318

5. Click (Scan) on Toolbar.
Scanning starts.
Note• To open a file saved on the computer, click Open... from the File menu, and then select the file
you want to edit.
• You can switch the view with the Toolbar buttons. For details, see PDF Edit Screen.
6. Add pages as needed.
When scanning and adding more items:
Place items, and then click (Scan) on the Toolbar.
When adding existing images or PDF files:
Click (Add Page) on the Toolbar. After the Open dialog box appears, select the image(s) or PDFfile(s) you want to add, and then click Open.
Note• You can also add images or PDF files from Add Page from Saved Data... in the File menu.
7. Edit pages as needed.
When changing page order:
Click the page you want to move, and then click (Page Up) or (Page Down) on the Toolbar tochange the page order. You can also change the page order by dragging and dropping a page to thetarget location.
319

When deleting pages:
Click the page you want to delete, and then click (Delete Page) on the Toolbar.
Note• These buttons appear when two or more pages have been created.
8. Select Save As... in File menu.
The Save dialog box appears.
9. Specify save settings.
Save Dialog Box (PDF Edit Screen)
10. Click Save.
The PDF file is saved.
Note• When a password-protected PDF file is edited, the passwords will be deleted. Reset the
passwords in the Save dialog box.
Setting Passwords for PDF Files
• To overwrite a saved file, click (Save) on the Toolbar.
320

Scanning Using Application Software (ScanGear)
What Is ScanGear (Scanner Driver)?
Starting ScanGear (Scanner Driver)
Scanning in Basic Mode
ScanGear (Scanner Driver) Screens
General Notes (Scanner Driver)
Important• Available functions and settings vary depending on your scanner or printer.
321

What Is ScanGear (Scanner Driver)?
ScanGear (scanner driver) is software required for scanning documents. Use the software to specify theoutput size, image corrections, and other settings.
ScanGear can be started from IJ Scan Utility or applications that are compatible with the standard TWAINinterface. (ScanGear is a TWAIN-compatible driver.)
Features
Specify the document type, output size, and other settings when scanning documents and preview scanresults. Make various correction settings or finely adjust the brightness, contrast, and other parameters toscan in a specific color tone.
Screens
There are two modes: Basic Mode and Advanced Mode.
Switch modes with the tabs on the upper right of the screen.
Note• ScanGear starts in the last used mode.• Settings are not retained when you switch modes.
Basic Mode
Use the Basic Mode tab to scan easily by following three simple on-screen steps ( , , and
).
322

Advanced ModeUse the Advanced Mode tab to scan by specifying the color mode, output resolution, image brightness,color tone, and other settings.
323

Starting ScanGear (Scanner Driver)
Use ScanGear (scanner driver) to make image corrections and color adjustments when scanning. StartScanGear from IJ Scan Utility or other applications.
Note• If you have more than one scanner or have a network compatible model and changed the connection
from USB connection to network connection, set up the network environment.
Starting from IJ Scan Utility
1. Start IJ Scan Utility.
For details, click Home to return to the top page of the Online Manual for your model and search for"Starting IJ Scan Utility."
2. In IJ Scan Utility main screen, click ScanGear.
The ScanGear screen appears.
Starting from Application
The procedure varies depending on the application. For details, see the application's manual.
1. Start application.
2. On application's menu, select machine.
Note• A machine connected over a network, will have "Network" displayed after the product name.
3. Scan document.
The ScanGear screen appears.
324

Scanning in Basic Mode
Use the Basic Mode tab to scan easily by following these simple on-screen steps.
To scan multiple documents at one time from the Platen, see Scanning Multiple Documents at One Timewith ScanGear (Scanner Driver).
When scanning from the ADF (Auto Document Feeder), preview is not available.
Important
• The following types of documents may not be scanned correctly. In that case, click (Thumbnail)on the Toolbar to switch to whole image view and scan.
• Photos with a whitish background• Documents printed on white paper, hand-written text, business cards, and other unclear documents• Thin documents• Thick documents
• The following types of documents cannot be scanned correctly.
• Documents smaller than 1.2 inches (3 cm) square• Photos that have been cut to irregular shapes
Note• Both sides of a two sided document can be scanned simultaneously on models with ADF duplex
scanning support.
1. Place document on machine's Platen or ADF, and then start ScanGear (scanner driver).
Positioning Originals (Scanning from Computer)Starting ScanGear (Scanner Driver)
2. Set Select Source to match your document.
325

Important• Some applications do not support continuous scanning from the ADF. For details, see the
application's manual.
Note• To scan magazines containing many color photos, select Magazine (Color).
3. Click Preview.
Preview image appears in the Preview area.
Important• Preview is not available when scanning from the ADF.
Note• Colors are adjusted based on the document type selected in Select Source.
4. Set Destination.
Note• Skip ahead to Step 7 if an ADF option is selected in Select Source.
5. Set Output Size.
Output size options vary with the selected Destination.
6. Adjust cropping frames (scan areas) as needed.
Adjust the size and position of the cropping frames on the preview image.
Adjusting Cropping Frames (ScanGear)
326

7. Set Image corrections as needed.
8. Click Scan.
Scanning starts.
Note
• Click (Information) to display a dialog box showing the document type and other details of thecurrent scan settings.
• How ScanGear behaves after scanning is complete can be set from Status of ScanGear dialog afterscanning on the Scan tab of the Preferences dialog box.
Related Topic
Basic Mode Tab
327

ScanGear (Scanner Driver) Screens
Basic Mode Tab
Advanced Mode Tab
328

Basic Mode Tab
Use the Basic Mode tab to scan easily by following these simple on-screen steps.
This section describes the settings and functions available on the Basic Mode tab.
(1) Settings and Operation Buttons(2) Toolbar(3) Preview Area
Note• The displayed items vary by document type and view.• Preview is not available when scanning from the ADF (Auto Document Feeder).
(1) Settings and Operation Buttons
Select SourcePhoto (Color)
Scan color photos.
Magazine (Color)Scan color magazines.
Document (Color)Scan documents in color.
Document (Grayscale)Scan documents in black and white.
Document (Color) ADF SimplexScan documents from the ADF in color.
Document (Grayscale) ADF SimplexScan documents from the ADF in black and white.
329
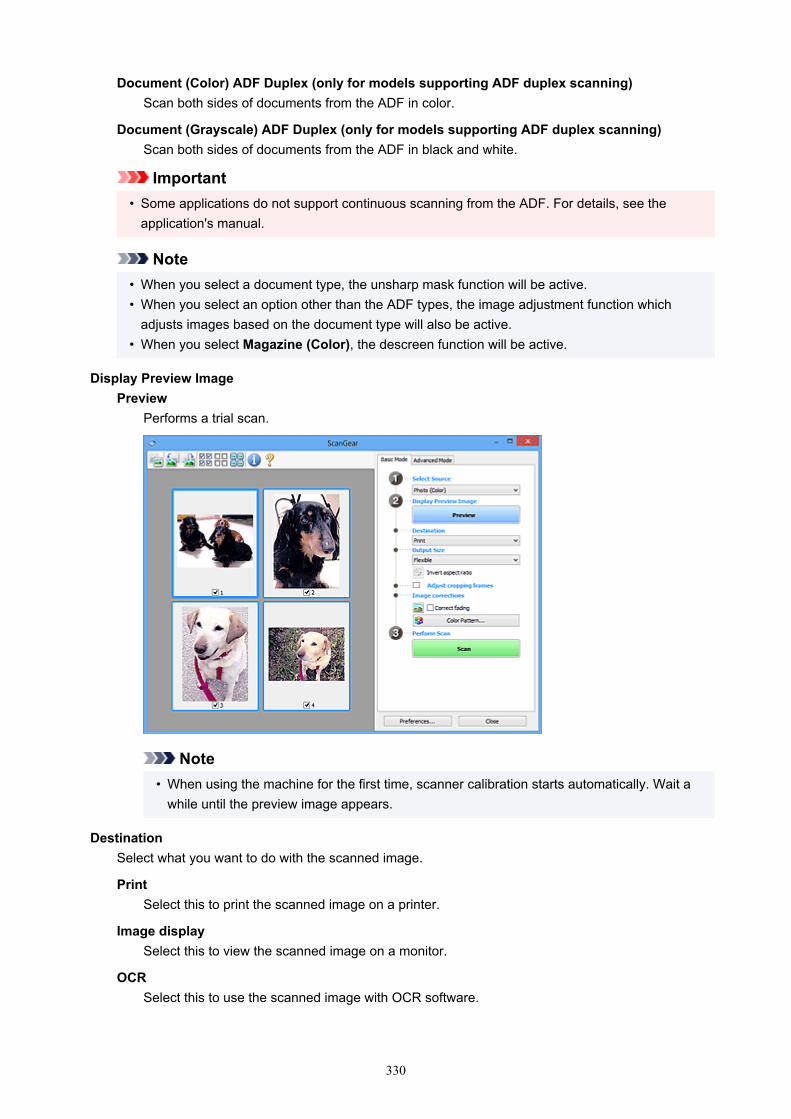
Document (Color) ADF Duplex (only for models supporting ADF duplex scanning)Scan both sides of documents from the ADF in color.
Document (Grayscale) ADF Duplex (only for models supporting ADF duplex scanning)Scan both sides of documents from the ADF in black and white.
Important• Some applications do not support continuous scanning from the ADF. For details, see the
application's manual.
Note• When you select a document type, the unsharp mask function will be active.• When you select an option other than the ADF types, the image adjustment function which
adjusts images based on the document type will also be active.• When you select Magazine (Color), the descreen function will be active.
Display Preview ImagePreview
Performs a trial scan.
Note• When using the machine for the first time, scanner calibration starts automatically. Wait a
while until the preview image appears.
DestinationSelect what you want to do with the scanned image.
PrintSelect this to print the scanned image on a printer.
Image displaySelect this to view the scanned image on a monitor.
OCRSelect this to use the scanned image with OCR software.
330

"OCR software" is software that converts text scanned as an image into text data that can beedited in word processors and other programs.
Output SizeSelect an output size.
Output size options vary by the item selected in Destination.
FlexibleAdjust the cropping frames (scan areas) freely.
In thumbnail view:
Drag the mouse over a thumbnail to display a cropping frame. When a cropping frame isdisplayed, the portion within the cropping frame will be scanned. When no cropping frame isdisplayed, each frame is scanned individually.
In whole image view:
When no cropping frame is displayed, the entire Preview area will be scanned. When a croppingframe is displayed, the portion within the cropping frame will be scanned.
Paper Size (such as L or A4)Select an output paper size. The portion within the cropping frame will be scanned at the size ofthe selected paper size. Drag the cropping frame to enlarge/reduce it while maintaining theaspect ratio.
Monitor Size (such as 1024 x 768 pixels)Select an output size in pixels. A cropping frame of the selected monitor size will appear and theportion within the cropping frame will be scanned. Drag the cropping frame to enlarge/reduce itwhile maintaining the aspect ratio.
Add/Delete...Displays the Add/Delete the Output Size dialog box for specifying custom output sizes. Thisoption can be selected when Destination is Print or Image display.
In the Add/Delete the Output Size dialog box, multiple output sizes can be specified and thensaved at one time. Saved items will be registered to the Output Size list and can be selected,along with the predefined items.
Adding:
Enter Output Size Name, Width, and Height, and then click Add. For Unit, select inches ormm if Destination is Print; if it is Image display, only pixels can be selected. The name of theadded size appears in Output Size List. Click Save to save the items listed in Output Size List.
331

Deleting:
Select the output size you want to delete in Output Size List, and then click Delete. Click Saveto save the items listed in Output Size List.
Important• Predefined output sizes such as A4 and 1024 x 768 pixels cannot be deleted.
Note• Save up to 10 items.• An error message appears when you enter a value outside the setting range. Enter a value
within the setting range.
Note• For details on whether or how the cropping frame initially appears on a preview image, see
Cropping Frame on Previewed Images in Preview Tab of the Preferences dialog box.
Invert aspect ratioAvailable when Output Size is set to anything but Flexible.
Click this button to rotate the cropping frame. Click again to return it to the original orientation.
Adjust cropping framesAdjust the scan area within the Preview area.
If an area is not specified, the document will be scanned at the document size (Auto Crop). If an areais specified, only the portion in the cropping frame will be scanned.
Adjusting Cropping Frames (ScanGear)
Image correctionsCorrect the image to be scanned.
Important• Apply Auto Document Fix and Correct fading are available when Recommended is selected
on the Color Settings tab of the Preferences dialog box.
Note• Available functions vary by the document type selected in Select Source.
Apply Auto Document FixSharpens text in a document or magazine for better readability.
Important• Scanning may take longer than usual when this checkbox is selected.• The color tone may change from the source image due to corrections. In that case, deselect
the checkbox and scan.• Correction may not be applied properly if the scan area is too small.
Correct fadingCorrects photos that have faded with time or have a colorcast.
332

Reduce gutter shadowCorrects shadows that appear between pages when scanning open booklets.
Important• Be sure to see Gutter Shadow Correction for precautions and other information on using
this function.
Color Pattern...Adjust the image's overall color. Correct colors that have faded due to colorcast or other reasonsand reproduce natural colors while previewing color changes.
Adjusting Colors Using a Color Pattern
Important• This setting is not available when Color Matching is selected on the Color Settings tab of
the Preferences dialog box.
Perform ScanScan
Starts scanning.
Note• When scanning starts, the progress appears. To cancel the scan, click Cancel.
Preferences...Displays the Preferences dialog box for making scan/preview settings.
CloseCloses ScanGear (scanner driver).
(2) Toolbar
Adjust or rotate preview images. The buttons displayed on the Toolbar vary by view.
In thumbnail view:
In whole image view:
(Thumbnail) / (Whole Image)Switches the view in the Preview area.
(3) Preview Area
(Rotate Left)Rotates the preview image 90 degrees counter-clockwise.
• The result will be reflected in the scanned image.
333

• The image returns to its original state when you preview again.
(Rotate Right)Rotates the preview image 90 degrees clockwise.
• The result will be reflected in the scanned image.• The image returns to its original state when you preview again.
(Auto Crop)Displays and adjusts the cropping frame automatically to the size of the document displayed in thePreview area. The scan area is reduced every time you click this button if there are croppable areaswithin the cropping frame.
(Check All Frames)Available when two or more frames are displayed.
Selects the checkboxes of the images in thumbnail view.
(Uncheck All Frames)Available when two or more frames are displayed.
Deselects the checkboxes of the images in thumbnail view.
(Select All Frames)Available when two or more frames are displayed.
Selects the images in thumbnail view and outlines them in blue.
(Select All Cropping Frames)Available when two or more cropping frames are specified.
Turns the cropping frames into thick broken lines and applies the settings to all of them.
(Remove Cropping Frame)Removes the selected cropping frame.
(Information)Displays the version of ScanGear, along with the document type and other details of the current scansettings.
(Open Guide)Opens this page.
(3) Preview Area
This is where a trial image appears after you click Preview. The results of image corrections, coloradjustments, and other settings made in (1) Settings and Operation Buttons are also reflected.
334

When (Thumbnail) is displayed on Toolbar:
Cropping frames are specified according to the document size, and thumbnails of scanned imagesappear. Only the images with the checkbox selected will be scanned.
Note• When multiple images are previewed, different outlines indicate different selection status.
• Focus Frame (thick blue outline): The displayed settings will be applied.• Selected Frame (thin blue outline): The settings will be applied to the Focus Frame and Selected
Frames simultaneously. To select multiple images, click them while pressing the Ctrl key.• Unselected (no outline): The settings will not be applied.
• Double-click a frame to enlarge the image. Click (Frame Advance) at the bottom of thescreen to display the previous or next frame. Double-click the enlarged frame again to return it to itsoriginal state.
When (Whole Image) is displayed on Toolbar:
Items on the Platen are scanned and appear as a single image. All portions in the cropping frames will bescanned.
335

Note• Create cropping frame(s) on the displayed image. In thumbnail view, one cropping frame can be
created per image. In whole image view, multiple cropping frames can be created.
Adjusting Cropping Frames (ScanGear)
Related Topic
Scanning in Basic Mode
336

Advanced Mode Tab
This mode allows you to make advanced scan settings such as the color mode, output resolution, imagebrightness, and color tone.
This section describes the settings and functions available on the Advanced Mode tab.
(1) Settings and Operation Buttons(2) Toolbar(3) Preview Area
Note• The displayed items vary by document type and view.• The preview function is not available when scanning from the ADF (Auto Document Feeder).
(1) Settings and Operation Buttons
Favorite SettingsYou can name and save a group of settings (Input Settings, Output Settings, Image Settings, andColor Adjustment Buttons) on the Advanced Mode tab, and load it as required. It is convenient tosave a group of settings if you will be using it repeatedly. You can also use this to reload the defaultsettings.
Select Add/Delete... from the pull-down menu to open the Add/Delete Favorite Settings dialog box.
337

Enter Setting Name and click Add; the name appears in Favorite Settings List.
When you click Save, the item appears in the Favorite Settings list and can be selected, along withthe predefined items.
To delete an item, select it in Favorite Settings List and click Delete. Click Save to save the settingsdisplayed in Favorite Settings List.
Note• You can set Add/Delete... in Favorite Settings after preview.• Save up to 10 items.
Input SettingsSpecify the input settings such as the document type and size.
Output SettingsSpecify the output settings such as the output resolution and size.
Image SettingsEnable/disable various image correction functions.
Color Adjustment ButtonsFine corrections to the image brightness and color tones can be made including adjustments to theimage's overall brightness or contrast and adjustments to its highlight and shadow values (histogram)or balance (tone curve).
ZoomZooms in on a frame, or zooms in on the image in the area specified with a cropping frame (scanarea). When zoomed in, Zoom changes to Undo. Click Undo to return the display to its non-magnified state.
In thumbnail view:
When multiple images are displayed in thumbnail view, clicking this button zooms in on the selected
frame. Click (Frame Advance) at the bottom of the screen to display the previous or nextframe.
Note• You can also zoom in on an image by double-clicking the frame. Double-click the enlarged frame
again to return it to its original state.
In whole image view:
Rescans the image in the area specified with a cropping frame at higher magnification.
338
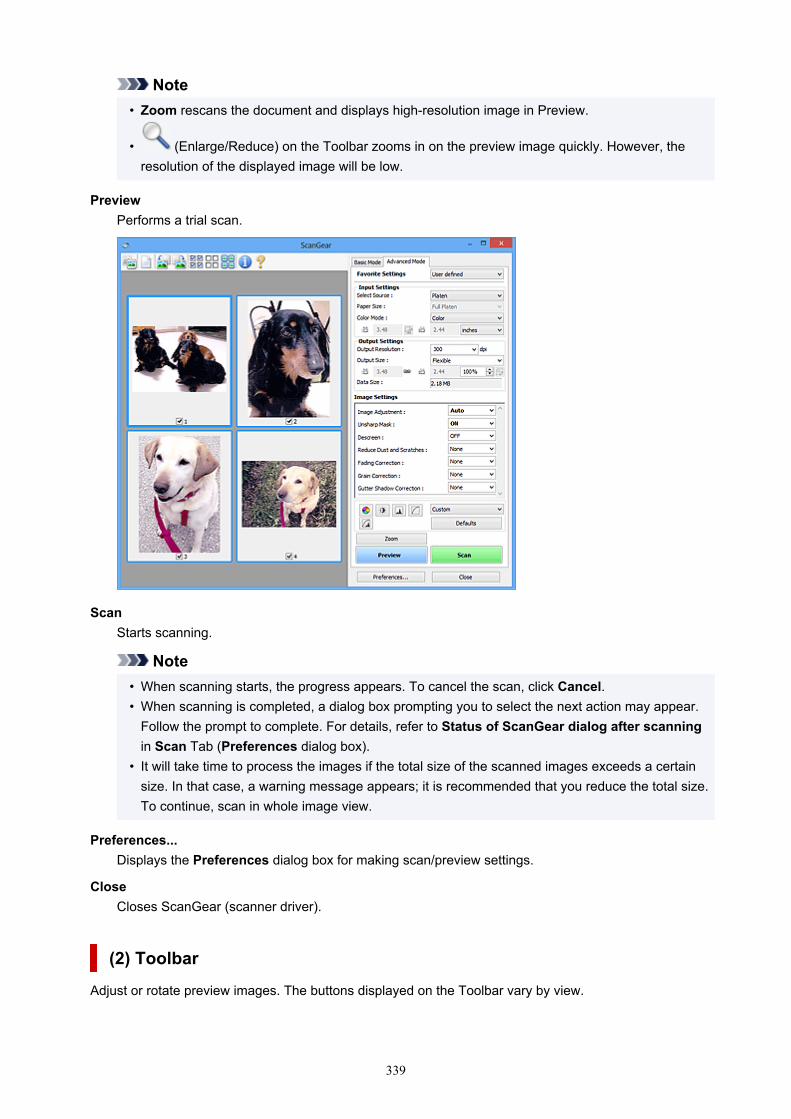
Note• Zoom rescans the document and displays high-resolution image in Preview.
• (Enlarge/Reduce) on the Toolbar zooms in on the preview image quickly. However, theresolution of the displayed image will be low.
PreviewPerforms a trial scan.
ScanStarts scanning.
Note• When scanning starts, the progress appears. To cancel the scan, click Cancel.• When scanning is completed, a dialog box prompting you to select the next action may appear.
Follow the prompt to complete. For details, refer to Status of ScanGear dialog after scanningin Scan Tab (Preferences dialog box).
• It will take time to process the images if the total size of the scanned images exceeds a certainsize. In that case, a warning message appears; it is recommended that you reduce the total size.To continue, scan in whole image view.
Preferences...Displays the Preferences dialog box for making scan/preview settings.
CloseCloses ScanGear (scanner driver).
(2) Toolbar
Adjust or rotate preview images. The buttons displayed on the Toolbar vary by view.
339
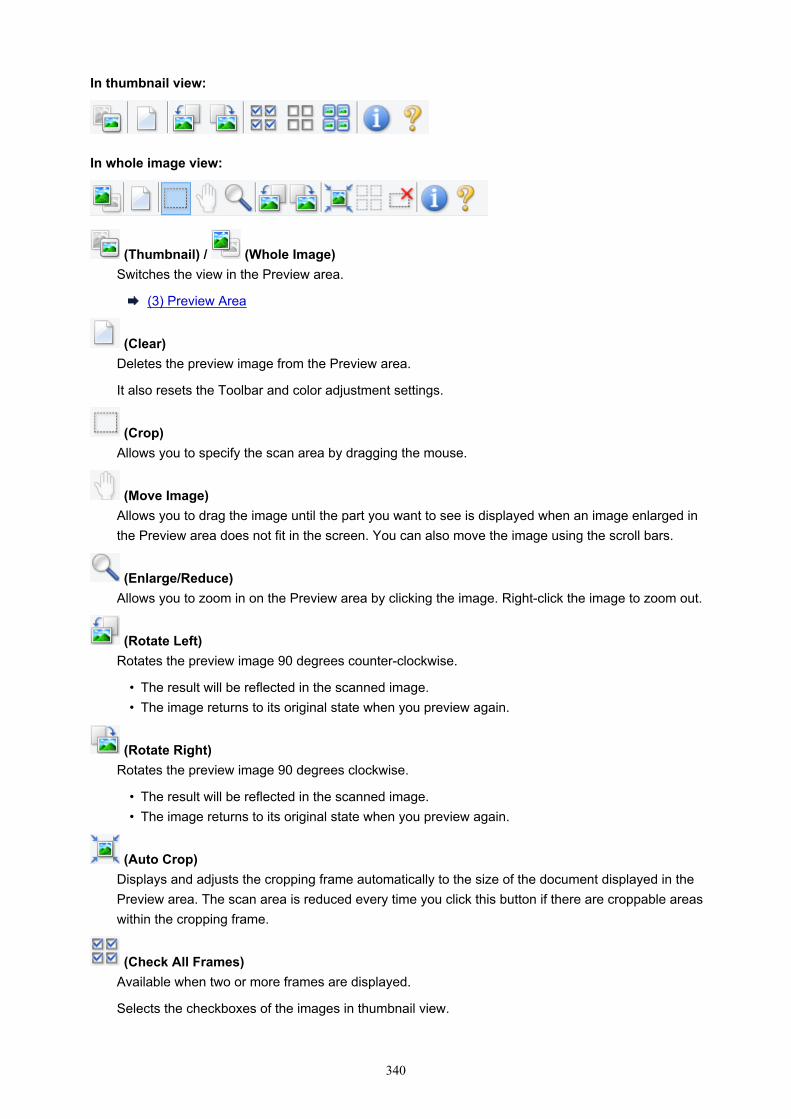
In thumbnail view:
In whole image view:
(Thumbnail) / (Whole Image)Switches the view in the Preview area.
(3) Preview Area
(Clear)Deletes the preview image from the Preview area.
It also resets the Toolbar and color adjustment settings.
(Crop)Allows you to specify the scan area by dragging the mouse.
(Move Image)Allows you to drag the image until the part you want to see is displayed when an image enlarged inthe Preview area does not fit in the screen. You can also move the image using the scroll bars.
(Enlarge/Reduce)Allows you to zoom in on the Preview area by clicking the image. Right-click the image to zoom out.
(Rotate Left)Rotates the preview image 90 degrees counter-clockwise.
• The result will be reflected in the scanned image.• The image returns to its original state when you preview again.
(Rotate Right)Rotates the preview image 90 degrees clockwise.
• The result will be reflected in the scanned image.• The image returns to its original state when you preview again.
(Auto Crop)Displays and adjusts the cropping frame automatically to the size of the document displayed in thePreview area. The scan area is reduced every time you click this button if there are croppable areaswithin the cropping frame.
(Check All Frames)Available when two or more frames are displayed.
Selects the checkboxes of the images in thumbnail view.
340

(Uncheck All Frames)Available when two or more frames are displayed.
Deselects the checkboxes of the images in thumbnail view.
(Select All Frames)Available when two or more frames are displayed.
Selects the images in thumbnail view and outlines them in blue.
(Select All Cropping Frames)Available when two or more cropping frames are specified.
Turns the cropping frames into thick broken lines and applies the settings to all of them.
(Remove Cropping Frame)Removes the selected cropping frame.
(Information)Displays the version of ScanGear, along with the document type and other details of the current scansettings.
(Open Guide)Opens this page.
(3) Preview Area
This is where a trial image appears after you click Preview. The results of image corrections, coloradjustments, and other settings made in (1) Settings and Operation Buttons are also reflected.
When (Thumbnail) is displayed on Toolbar:
Cropping frames are specified according to the document size, and thumbnails of scanned imagesappear. Only the images with the checkbox selected will be scanned.
341

Note• When multiple images are previewed, different outlines indicate different selection status.
• Focus Frame (thick blue outline): The displayed settings will be applied.• Selected Frame (thin blue outline): The settings will be applied to the Focus Frame and Selected
Frames simultaneously. To select multiple images, click them while pressing the Ctrl key.• Unselected (no outline): The settings will not be applied.
When (Whole Image) is displayed on Toolbar:
Items on the Platen are scanned and appear as a single image. All portions in the cropping frames will bescanned.
Note• Create cropping frame(s) on the displayed image. In thumbnail view, one cropping frame can be
created per image. In whole image view, multiple cropping frames can be created.
Adjusting Cropping Frames (ScanGear)
Related Topic
Scanning in Advanced ModeScanning Multiple Documents from the ADF (Auto Document Feeder) in Advanced Mode
342

General Notes (Scanner Driver)
ScanGear (scanner driver) is subject to the following restrictions. Keep these points in mind when using it.
Scanner Driver Restrictions
• When using the NTFS file system, the TWAIN data source may not be invoked. This is because theTWAIN module cannot be written to the winnt folder for security reasons. Contact the computer'sadministrator for help.
• Some computers (including laptops) connected to the machine may not resume correctly fromstandby mode. In that case, restart the computer.
• Do not connect two or more scanners or multifunction printers with scanner function to the samecomputer simultaneously. If multiple scanning devices are connected, you cannot scan from theoperation panel of the machine and also may experience errors while accessing the devices.
• Scanning may fail if the computer has resumed from sleep or standby mode. In that case, follow thesesteps and scan again.
1. Turn off the machine.2. Exit ScanGear, then disconnect the USB cable from the computer and reconnect it.3. Turn on the machine.
• ScanGear cannot be opened in multiple applications at the same time. Within an application,ScanGear cannot be opened for the second time when it is already open.
• Be sure to close the ScanGear window before closing the application.• When using a network compatible model by connecting to a network, the machine cannot be
accessed from multiple computers at the same time.• When using a network compatible model by connecting to a network, scanning takes longer than
usual.• Make sure that you have adequate disk space available when scanning large images at high
resolutions. For example, at least 300 MB of free space is required to scan an A4 document at 600dpi in full-color.
• ScanGear and WIA driver cannot be used at the same time.• Do not enter the computer into sleep or hibernate state during scanning.
Applications with Restrictions on Use
• Some applications may not display the TWAIN user interface. In that case, refer to the application'smanual and change the settings accordingly.
• Some applications do not support continuous scanning of multiple documents. In some cases, onlythe first scanned image is accepted, or multiple images are scanned as one image. For suchapplications, do not scan multiple documents from the ADF (Auto Document Feeder).
• To import scanned images into Microsoft Office 2000, first save them using IJ Scan Utility, then importthe saved files from the Insert menu.
• When scanning Platen size images into Microsoft Office 2003 (Word, Excel, PowerPoint, etc.), clickCustom Insert in the Insert Picture from Scanner or Camera screen. Otherwise, images may notbe scanned correctly.
• When scanning images into Microsoft Office 2007/Microsoft Office 2010 (Word, Excel, PowerPoint,etc.), use Microsoft Clip Organizer.
343

• Images may not be scanned correctly in some applications. In that case, increase the operatingsystem's virtual memory and retry.
• When image size is too large (such as when scanning large images at high resolution), your computermay not respond or the progress bar may remain at 0 % depending on the application. In that case,cancel the action (for example by clicking Cancel on the progress bar), then increase the operatingsystem's virtual memory or reduce the image size/resolution and retry. Alternatively, scan the imagevia IJ Scan Utility first, then save and import it into the application.
344

Scanning Tips
Positioning Originals (Scanning from Computer)
Network Scan Settings
IJ Network Scanner Selector EX2 Menu and Setting Screen
345
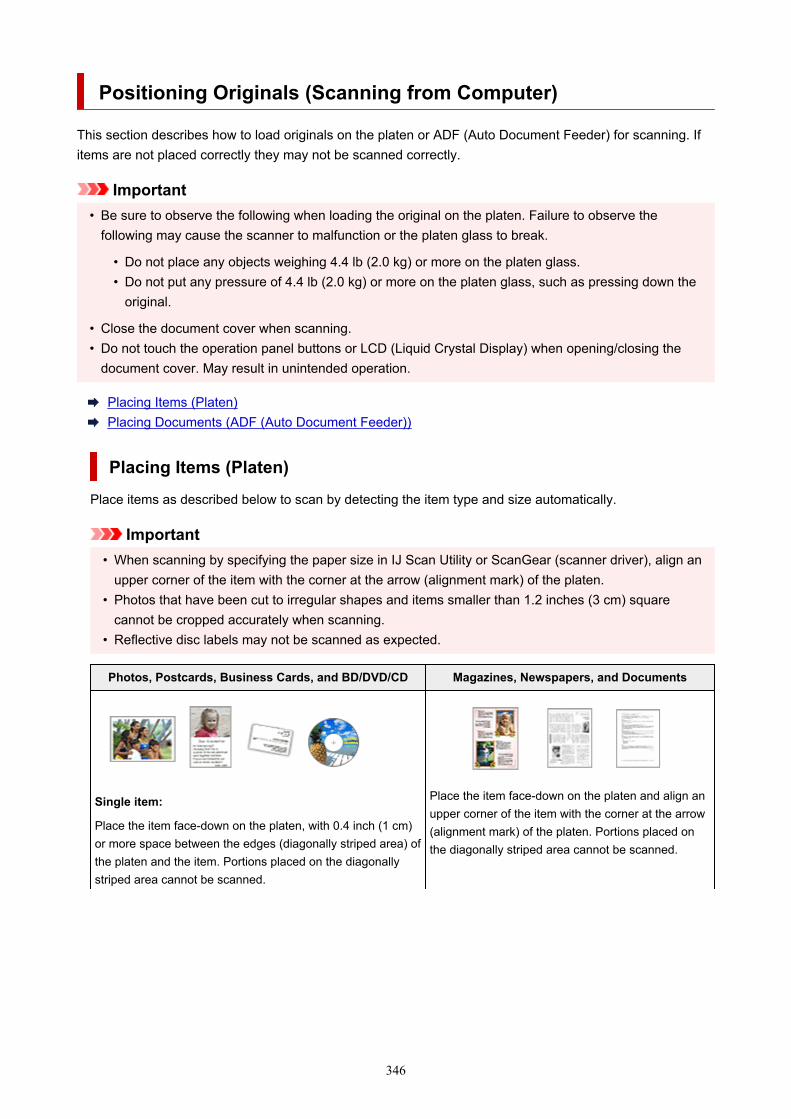
Positioning Originals (Scanning from Computer)
This section describes how to load originals on the platen or ADF (Auto Document Feeder) for scanning. Ifitems are not placed correctly they may not be scanned correctly.
Important• Be sure to observe the following when loading the original on the platen. Failure to observe the
following may cause the scanner to malfunction or the platen glass to break.
• Do not place any objects weighing 4.4 lb (2.0 kg) or more on the platen glass.• Do not put any pressure of 4.4 lb (2.0 kg) or more on the platen glass, such as pressing down the
original.
• Close the document cover when scanning.• Do not touch the operation panel buttons or LCD (Liquid Crystal Display) when opening/closing the
document cover. May result in unintended operation.
Placing Items (Platen)Placing Documents (ADF (Auto Document Feeder))
Placing Items (Platen)
Place items as described below to scan by detecting the item type and size automatically.
Important• When scanning by specifying the paper size in IJ Scan Utility or ScanGear (scanner driver), align an
upper corner of the item with the corner at the arrow (alignment mark) of the platen.• Photos that have been cut to irregular shapes and items smaller than 1.2 inches (3 cm) square
cannot be cropped accurately when scanning.• Reflective disc labels may not be scanned as expected.
Photos, Postcards, Business Cards, and BD/DVD/CD Magazines, Newspapers, and Documents
Single item:
Place the item face-down on the platen, with 0.4 inch (1 cm)or more space between the edges (diagonally striped area) ofthe platen and the item. Portions placed on the diagonallystriped area cannot be scanned.
Place the item face-down on the platen and align anupper corner of the item with the corner at the arrow(alignment mark) of the platen. Portions placed onthe diagonally striped area cannot be scanned.
346

Important• Large items (such as A4 size photos) that cannot be
placed away from the edges/arrow (alignment mark) ofthe platen may be saved as PDF files. To save in a for-mat other than PDF, scan by specifying the data format.
Multiple items:
Allow 0.4 inch (1 cm) or more space between the edges (di-agonally striped area) of the platen and items, and betweenitems. Portions placed on the diagonally striped area cannotbe scanned.
: 0.4 inch (1 cm) or more
Note• Place up to 12 items.• Positions of slanted items (10 degrees or less) are cor-
rected automatically.
Important• For the portions in which items cannot be scan-
ned, see Loading Originals.
Placing Documents (ADF (Auto Document Feeder))
Important• Do not leave thick items on the platen when scanning from the ADF. May result in paper jam.• Place and align documents of the same size when scanning two or more documents.• For supported document sizes when scanning from the ADF, see Supported Originals.
1. Make sure any original has been removed from platen.
347

2. Open document tray (A).
3. Slide the paper guides (B) all the way out.
4. Load document with side to scan facing up in document tray.
Insert the document until it stops.
5. Adjust document guide (B) to match width of document.
Do not slide the document guide too hard against the document. The document may not be fedproperly.
348

Network Scan Settings
You can connect your scanner or printer to a network to share it among multiple computers or scan imagesinto a specified computer.
Important• Multiple users cannot scan at the same time.
Note• Complete the network settings of your scanner or printer beforehand from the Setup CD-ROM or by
following the instructions our website.• With network connection, scanning takes longer than USB connection.
Complete the following settings to enable scanning over a network.
Specifying Your Scanner or Printer
Use IJ Network Scanner Selector EX to specify the scanner you want to use. By specifying the scanner,you can scan over a network from your computer or the operation panel.
Important• If the product you want to use is changed with IJ Network Scanner Selector EX, the product used for
scanning with IJ Scan Utility changes as well. The product for scanning from the operation panel alsochanges.
If your scanner or printer is not selected in IJ Scan Utility, check that it is selected with IJ NetworkScanner Selector EX.
Refer to "IJ Network Scanner Selector EX2 Menu and Setting Screen" for your model from Home ofthe Online Manual for details.
• To scan from the operation panel, specify your scanner or printer with IJ Network Scanner SelectorEX beforehand.
1. Check that IJ Network Scanner Selector EX is running.
If IJ Network Scanner Selector EX is running, (IJ Network Scanner Selector EX2) appears in thenotification area on the desktop. Click to check the hidden icons as well.
Note• If the icon is not displayed in the notification area on the desktop, follow the procedure below to
start.
• Windows 10:
From the Start menu, click (All apps >) Canon Utilities > IJ Network Scanner SelectorEX2.
• Windows 8.1:
Click IJ Network Scanner Selector EX2 on the Start screen.
349

If IJ Network Scanner Selector EX2 is not displayed on the Start screen, select theSearch charm, then search for "IJ Network Scanner Selector EX2".
• Windows 7:
From the Start menu, click All Programs > Canon Utilities > IJ Network ScannerSelector EX2 > IJ Network Scanner Selector EX2.
The icon appears in the notification area on the desktop, and the Scan-from-PC Settings screenappears. In that case, skip ahead to Step 3.
2. In the notification area on the desktop, right-click (IJ Network Scanner Selector EX2),then select Settings....
The Scan-from-PC Settings screen appears.
3. Select your scanner or printer from Scanners.
Normally, the MAC address of your scanner or printer is already selected after the network setup. Inthat case, you do not need to select it again.
Important• If multiple scanners exist on the network, multiple model names appear. In that case, you can
select one scanner per model.
4. Click OK.
Note• The scanner selected in the Scan-from-PC Settings screen will be automatically selected in the Scan-
from-Operation-Panel Settings screen as well.
Setting for Scanning with IJ Scan Utility
To scan from IJ Scan Utility using a scanner or printer connected to a network, specify your scanner orprinter with IJ Network Scanner Selector EX, then follow the steps below to change the connection statusbetween it and the computer.
1. Start IJ Scan Utility.
2. Select "Canon XXX series Network" (where "XXX" is the model name) for ProductName.
3. Click Settings... to use another scanner connected to a network.
4. Click (General Settings), then click Select in Product Name.
The Scan-from-PC Settings screen of IJ Network Scanner Selector EX appears.
350

Select the scanner you want to use and click OK.
5. In the Settings (General Settings) dialog box, click OK.
The IJ Scan Utility main screen reappears. You can scan via a network connection.
Setting for Scanning from the Operation Panel
You can make the setting for scanning from the operation panel.
Important• Set IJ Scan Utility to use your scanner or printer via a network connection beforehand.
Setting for Scanning with IJ Scan Utility
1. Check that IJ Network Scanner Selector EX is running.
If IJ Network Scanner Selector EX is running, (IJ Network Scanner Selector EX2) appears in thenotification area on the desktop. Click to check the hidden icons as well.
Note• If the icon is not displayed in the notification area on the desktop, follow the procedure below to
start.
• Windows 10:
From the Start menu, click (All apps >) Canon Utilities > IJ Network Scanner SelectorEX2.
• Windows 8.1:
Click IJ Network Scanner Selector EX2 on the Start screen.
If IJ Network Scanner Selector EX2 is not displayed on the Start screen, select theSearch charm, then search for "IJ Network Scanner Selector EX2".
• Windows 7:
From the Start menu, click All Programs > Canon Utilities > IJ Network ScannerSelector EX2 > IJ Network Scanner Selector EX2.
The icon appears in the notification area on the desktop, and the Scan-from-PC Settings screenappears. In that case, skip ahead to Step 3.
2. In the notification area on the desktop, right-click (IJ Network Scanner Selector EX2),then select Settings....
The Scan-from-PC Settings screen appears.
3. Click Scan-from-Operation-Panel Settings.
The Scan-from-Operation-Panel Settings screen appears.
351

4. Select your scanner or printer from Scanners and click OK.
Select the MAC address of your scanner or printer.
Note• When multiple scanners are connected via a network, you can select up to three scanners.
5. In the Scan-from-PC Settings screen, click OK.
Note• If your scanner or printer does not appear, check the following, click OK to close the screen, then
reopen it and try selecting again.
• MP Drivers is installed• Network settings of your scanner or printer is completed after installing the MP Drivers• Network communication between your scanner or printer and computer is enabled
If the problem is still not solved, see Network Communication Problems.
352

Scanning Using Smartphone/Tablet
Using PIXMA/MAXIFY Cloud Link
Printing/Scanning with Wireless Direct
353

Faxing
Preparing for Faxing
Registering Recipients
Sending Faxes Using Operation Panel ofPrinter
Sending Faxes from Computer (Windows)
Sending Faxes from Computer (Mac OS)
Receiving Faxes
Other Useful Fax Functions
354

Preparing for Faxing
Connect the printer to the telephone line and set up the printer before using the faxing functions. Thenspecify the basic setting such as sender information, date/time, and daylight saving time.
Important• If the Power Disconnects:
If there is a power failure or if you accidentally unplug the power cord, the date/time settings will bereset.
• The settings for user information and directory will be retained.
• All faxes stored in the printer's memory, such as unsent and received faxes, will be lost.
If the power disconnects, the following will apply:
• You will not be able to send or receive faxes, make copies, or scan originals.
• When you are connecting the telephone, whether or not you can use it depends upon yourtelephone line or telephone.
Setting Up Printer
The printer must be set up depending on your telephone line and use of the faxing function.
All SetupFAX Setup Guide
Individual Setup
Step1 Connecting Telephone Line
Step2 Setting Telephone Line Type
Step3 Setting Receive Mode
Step4 Setting Sender Information
Note• You can set the fax setting according to the instruction on the LCD.
Easy setup
If you set up according to the instruction on the LCD, the receive mode is set to TEL priority modeor Fax only mode. To receive faxes with DRPD or Network switch, change the receive mode.
Setting Receive Mode
355

Connecting Telephone Line
The connection method differs depending on your telephone line.
• If you connect the printer to wall telephone line directly/If you connect the printer with the xDSL splitter:
Basic Connection (Connecting with General Telephone line)
• If you connect the printer to another line such as an xDSL:
Connecting Various Lines
If the connection is incorrect, the printer cannot send/receive faxes. Connect the printer correctly.
Important• Do not connect fax devices and/or telephones in parallel (US and Canada only).
If two or more fax devices and/or telephones are connected in parallel, the following problems mayoccur and the printer may not operate properly.
• If you pick up the handset of the telephone that is connected in parallel during fax transmission orreception, the fax image may be corrupted or a communication error may occur.
• Such services as Caller ID, etc. may not operate properly on the telephone.
If you cannot avoid parallel connections, set the receive mode to TEL priority mode, understandingthat the above problems may occur. You will only be able to receive faxes manually.
Basic Connection (Connecting with General Telephone line)
Make sure that the printer is turned off, connect one end of supplied telephone line cable to the telephoneline jack near the "LINE" mark of the printer, then connect the other end to the telephone line jack on thewall or to the telephone line jack of the xDSL splitter.
When you connect the telephone to the printer, make sure that the printer is turned off, connect one endof the modular cable to the external device jack near the "EXT." mark of the printer, then connect the otherend to the telephone line jack of the telephone.
356

Important• Be sure to connect the telephone line before the printer is turned on.
If you connect the telephone line when the printer is turned on, turn the printer off and unplug thepower cord. Wait for 1 minute then connect the telephone line and power plug.
Note• Refer to Rear View for the position of the telephone line jack and the external device jack.
• Before connecting a telephone or answering machine, remove the Telephone connector cap.
• For users in the UK:
If the connector of the external device cannot be connected to the jack on the printer, you will need topurchase a B.T. adapter to connect as follows:
Attach the B.T. adapter to the modular cable connecting the external device, then connect the B.T.adapter to the external device jack.
Connecting Various Lines
This section introduces how to connect various lines.
These are examples and could not be guaranteed to suit every connecting condition. For details, refer tothe instruction manual supplied with the network device (control devices such as an xDSL (DigitalSubscriber Line) modem or terminal adapter) you are connecting to this printer.
Note• xDSL is the generic term for the high speed digital communication technology with telephone line
such as ADSL/HDSL/SDSL/VDSL.
357
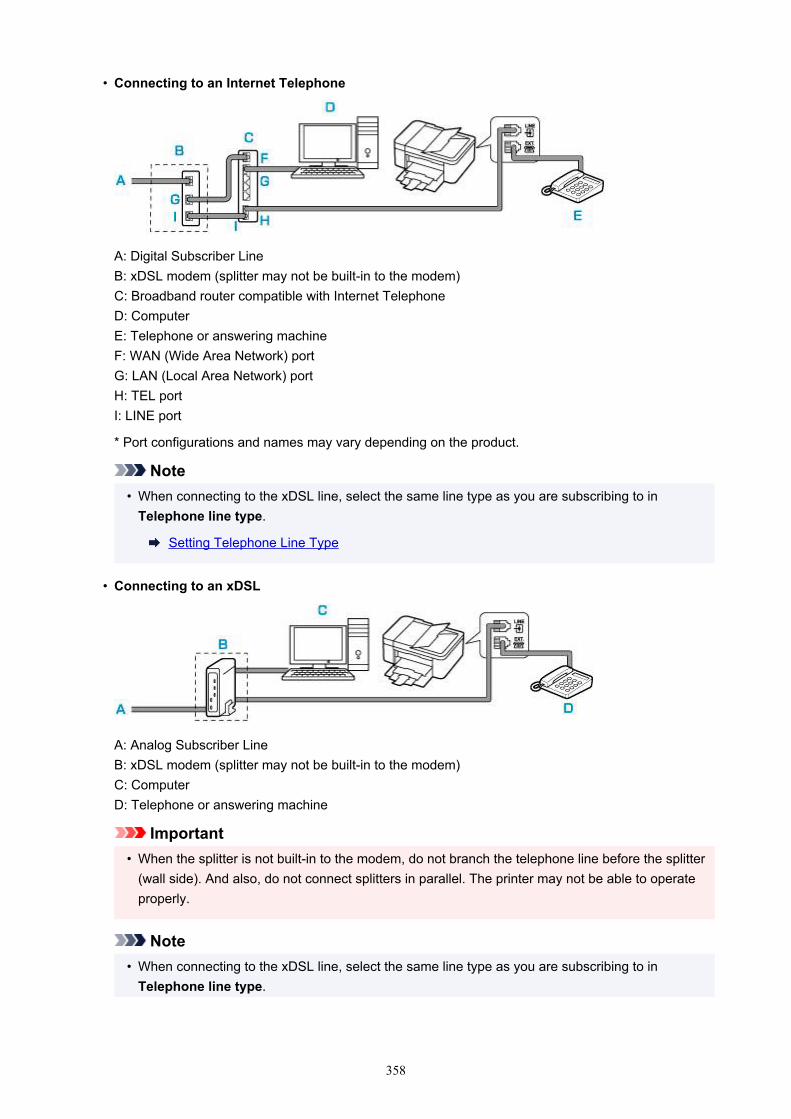
• Connecting to an Internet Telephone
A: Digital Subscriber LineB: xDSL modem (splitter may not be built-in to the modem)C: Broadband router compatible with Internet TelephoneD: ComputerE: Telephone or answering machineF: WAN (Wide Area Network) portG: LAN (Local Area Network) portH: TEL portI: LINE port
* Port configurations and names may vary depending on the product.
Note• When connecting to the xDSL line, select the same line type as you are subscribing to in
Telephone line type.
Setting Telephone Line Type
• Connecting to an xDSL
A: Analog Subscriber LineB: xDSL modem (splitter may not be built-in to the modem)C: ComputerD: Telephone or answering machine
Important• When the splitter is not built-in to the modem, do not branch the telephone line before the splitter
(wall side). And also, do not connect splitters in parallel. The printer may not be able to operateproperly.
Note• When connecting to the xDSL line, select the same line type as you are subscribing to in
Telephone line type.
358

Setting Telephone Line Type
• Connecting to an ISDN Line
For details on ISDN (Integrated Service Digital Network) connection and settings, refer to the manualssupplied with your terminal adapter or dial-up router.
359

Setting Telephone Line Type
Before using your printer, make sure you set the correct telephone line type for your telephone line. If youare unsure of your telephone line type, contact your telephone company. For xDSL or ISDN connections,contact the telephone company or service provider to confirm your line type.
Important
• For users in China
After plugging the power cord and turning on the printer, the telephone line type is selectedautomatically. However, if the printer is connected to the control device such as an xDSL modem orterminal adapter, the telephone line type may not be selected correctly.
In this case, set the line type manually.
For details on how to set the Telephone line type manually in China:
Setting the Telephone Line Type Manually in China
Note• Telephone line type will not appear in countries or regions where Rotary pulse is not supported.
• You can print USER'S DATA LIST to check the current setting.
Summary of Reports and Lists
1. Check that printer is turned on.
2. Press the Setup button.
The Setup menu screen is displayed.
3. Select Fax settings, then press the OK button.
4. Select FAX user settings, then press the OK button.
5. Select Telephone line type, then press the OK button.
6. Select a telephone line type, then press the OK button.
Rotary pulseSelect when your telephone line type is pulse dialing.
Touch toneSelect when your telephone line type is tone dialing.
Note• The (asterisk) on the LCD indicates the current setting.
360

7. Press the FAX button to return to the Fax standby screen.
Setting the Telephone Line Type Manually in China
This section describes the procedure to set the telephone line type manually in China.
1. Check that printer is turned on.
2. Press the Setup button.
The Setup menu screen is displayed.
3. Select Fax settings, then press the OK button.
4. Select FAX user settings, then press the OK button.
5. Select TEL line auto select, then press the OK button.
The current telephone line type is displayed.
Note• If you do not need to change the telephone line type, press the FAX button to return to the Fax
standby screen.
6. Select OFF, then press the OK button.
7. Select a telephone line type, then press the OK button.
Rotary pulseSelect when your telephone line type is pulse dialing.
Touch toneSelect when your telephone line type is tone dialing.
Note• The (asterisk) on the LCD indicates the current setting.
8. Press the FAX button to return to the Fax standby screen.
361

Setting Receive Mode
Set the receiving operation (receiving mode).
For details on how to set the receive mode:
Setting Receive Mode
You can select the appropriate mode.
For details on the selectable receive mode:
About Receive Mode
For details on the advanced settings of the receive mode:
Advanced Settings of Receive Mode
Note• The receiving operation procedure varies depending on the selected receive mode.
For details on receiving method depending on each receive mode:
Receiving Faxes
• If you want to use a single telephone line for faxes and voice calls, you need to connect a telephone oran answering machine to the external device jack of this printer.
For details on how to connect the telephone or the answering machine to the printer:
Basic Connection (Connecting with General Telephone line)
Setting Receive Mode
This section describes the procedure to select the receive mode.
1. Check that printer is turned on.
2. Press the FAX button.
The Fax standby screen is displayed.
3. Press the Menu/Wireless connect button.
The FAX menu screen is displayed.
4. Select Receive mode set., then press the OK button.
5. Select the receive mode, then press the OK button.
The confirmation message for the advanced settings appears.
Note• The (asterisk) on the LCD indicates the current setting.
• For details on the receive mode:
362

About Receive Mode
• DRPD is available only in the US and Canada.
• Network switch may not be available depending on the country or region of purchase.
• Refer to Receiving Faxes for information on receiving faxes or the procedure for each receivemode.
6. If you make the advanced settings, select Yes and press the OK button. If not, select Noand press the OK button.
Make the advanced settings as necessary.
Advanced Settings of Receive Mode
About Receive Mode
You can select the receive mode suitable for your fax use conditions: whether you use a dedicated line forfax, etc.
• TEL priority mode
Select when mainly receiving voice calls (with a telephone or answering machine connected to theprinter).
Receiving operation:
1. When a call incomes, the telephone will ring.
2. Pick up the handset.
If the call is a voice call, talk on the telephone.
If the call is a fax, hang up the handset after the printer starts receiving the fax.
Note• The telephone may not ring when a call incomes even if it is connected to the printer, depending
on the type or settings of the telephone.
• DRPD or Network switch
Select when receiving voice calls (with a telephone or answering machine connected to the printer)and subscribing to a ring pattern detection service provided by your telephone company.
Receiving operation:
1. When a call incomes, the telephone will ring.
2. The printer detects a fax call by the fax ring pattern.
If the call is a fax, the printer will receive the fax automatically.
If the printer does not detect the fax ring pattern, the telephone will continue ringing.
Note• The telephone may not ring when a call incomes even if it is connected to the printers, depending
on the type or settings of the telephone.
363

• Fax only mode
Select when not receiving voice calls.
Receiving operation:
1. When a fax incomes, the printer will receive the fax automatically.
Advanced Settings of Receive Mode
You can specify the advanced settings of each receive mode.
Note• The (asterisk) on the LCD indicates the current setting.
• Advanced setting in TEL priority mode
You can specify the following setting items.
◦ Manual/auto switch
If you select ON, the printer automatically receives faxes after the external device rang a specifiedlength of time.
Use the button or the Numeric buttons to specify the length of time until automatic receptionis started.
◦ User-friendly RX
If you select ON, the printer automatically switches from telephone calling to fax reception bydetecting the fax signal (CNG signal) when you lift the handset of the telephone or the answeringmachine answers. When you have an answering machine connected to the printer, select ON toswitch to fax reception automatically after the answering machine answers.
If you select OFF, the printer does not switch from telephone calling to fax reception automaticallyeven if the printer detects the fax signal (CNG signal). Select OFF if you want the printer not toswitch automatically during a call.
Note• If you subscribe to Duplex Ringing service in Hong Kong, the number of times the external device
rings specified with Incoming ring in Fax only mode is available in TEL priority mode.
If you want to specify the number of times the external device rings in TEL priority mode, selectFax only mode for Receive mode set. under FAX menu, specify the number of times theexternal device rings with Incoming ring, then switch to TEL priority mode for Receive modeset..
• If you subscribe to Duplex Ringing service in Hong Kong, we recommend that Manual/autoswitch be set to OFF.
• Advanced setting in Fax only mode
You can specify the following setting item.
◦ Incoming ring
364

Use the button or the Numeric buttons to specify the number of times the external devicerings when incoming.
• Advanced setting in DRPD
You can specify the following setting items.
◦ DRPD: FAX ring pat.
Sets the distinctive ring pattern of a call that the printer assumes is a fax call.
If you subscribe to a DRPD service, set the ring pattern to match the pattern assigned by yourtelephone company.
Setting the DRPD Ring Pattern (US and Canada only)
◦ Incoming ring
You can specify the number of times the external device rings when incoming.
• Advanced setting in Network switch
You can specify the following setting item.
◦ Incoming ring
You can specify the number of times the external device rings when incoming.
Setting the DRPD Ring Pattern (US and Canada only)
If you have subscribed to a Distinctive Ring Pattern Detection (DRPD) service provided by your telephonecompany, your telephone company will assign two or more telephone numbers with distinctive ringpatterns to your single telephone line, allowing you to have different numbers for fax calls and voice callsusing only one telephone line. Your printer will automatically monitor the ring pattern, and willautomatically receive the fax if the ring pattern is a fax call.
To use DRPD, follow the procedure below to set the fax ring pattern that matches the pattern assigned byyour telephone company.
Note• Contact your local telephone company for detailed information on this service.
1. Check that printer is turned on.
2. Press the FAX button.
The Fax standby screen is displayed.
3. Press the Menu/Wireless connect button.
The FAX menu screen is displayed.
4. Select Receive mode set., then press the OK button.
5. Select DRPD, then press the OK button.
365

The confirmation screen asking whether to make advanced settings is displayed.
6. Select Yes, then press the OK button.
7. Select DRPD: FAX ring pat., then press the OK button.
The DRPD: FAX ring pat. screen is displayed.
8. Select the ring pattern that your telephone company assigned to your fax number, thenpress the OK button.
Select from Normal ring, Double ring, Short-short-long, or Short-long-short.
Note• The (asterisk) on the LCD indicates the current setting.
9. Press the FAX button to return to the Fax standby screen.
366

Setting Sender Information
You can set the sender information such as user information and date/time.
About Sender InformationSetting Date and TimeSetting Daylight Saving Time (Summer Time)Registering User Information
About Sender Information
If the unit name and unit fax/telephone number are registered, they are printed with date and time assender information on the recipient's fax.
A: Date and time of transmissionB: Unit fax/telephone numberC: Unit nameD: The registered recipient's name is printed when sending faxes.E: Page number
Note• You can print USER'S DATA LIST to confirm the sender information you have registered.
Summary of Reports and Lists
• When sending faxes in black & white, you can select whether to print the sender information inside oroutside the image area.
Specify the setting on TTI position in Adv. FAX settings under Fax settings.
Adv. FAX settings
• You can select the date print format from three formats: YYYY/MM/DD, MM/DD/YYYY, and DD/MM/YYYY.
Select the date print format on Date display format under Other dev. settings.
Other dev. settings
367

Setting Date and Time
This section describes the procedure to set the date and time.
1. Check that printer is turned on.
2. Press the Setup button.
The Setup menu screen is displayed.
3. Select Device settings, then press the OK button.
4. Select Other dev. settings, then press the OK button.
5. Select Date/time setting, then press the OK button.
6. Set the date and time.
Use the button to move the cursor under the desired position, then use the Numeric buttons toenter the date and time.
Enter the time in 24-hour format.
Enter only the last two digits of the year.
7. Press the OK button.
8. Press the FAX button to return to the Fax standby screen.
Setting Daylight Saving Time (Summer Time)
Some countries adopt the daylight saving time (summer time) system that shifts the clock time forward atcertain periods of the year.
You can set your printer to automatically change the time by registering the date and time that daylightsaving time (summer time) begins and ends.
Important• Not all the latest information of all countries or regions is applied for DST setting by default. You
need to change the default setting according to the latest information of your country or region.
Note• This setting may not be available depending on the country or region of purchase.
1. Check that printer is turned on.
368

2. Press the Setup button.
The Setup menu screen is displayed.
3. Select Device settings, then press the OK button.
4. Select Other dev. settings, then press the OK button.
5. Select DST setting, then press the OK button.
6. Select ON, then press the OK button.
To disable summer time, select OFF.
7. Set the date and time when summer time starts.
1. Select Start date/time, then press the OK button.
2. Make sure that Set month is selected, then press the OK button.
3. Select the month when summer time starts, then press the OK button.
4. Make sure that Set week is selected, then press the OK button.
5. Select the week when summer time starts, then press the OK button.
6. Make sure that Set day of week is selected, then press the OK button.
7. Select the day of the week when summer time starts, then press the OK button.
8. Make sure that Set shift time is selected, then press the OK button.
9. Use the button to move the cursor under the desired position, use the Numeric buttons toenter the time (in 24-hour format) when summer time starts, then press the OK button.
Precede single digits with a zero.
8. Set the date and time when summer time ends.
1. Use the button to select End date/time, then press the OK button.
2. Make sure that Set month is selected, then press the OK button.
3. Use the button to select the month when summer time ends, then press the OK button.
4. Make sure that Set week is selected, then press the OK button.
5. Use the button to select the week when summer time ends, then press the OK button.
6. Make sure that Set day of week is selected, then press the OK button.
7. Use the button to select the day of the week when summer time ends, then press the OKbutton.
8. Make sure that Set shift time is selected, then press the OK button.
369

9. Use the button to move the cursor under the desired position, use the Numeric buttons toenter the time (in 24-hour format) when summer time ends, then press the OK button.
Precede single digits with a zero.
9. Press the FAX button to return to the Fax standby screen.
Registering User Information
This section describes the procedure to register the user information.
Note• Before sending a fax, be sure to enter your name and fax/telephone number in Unit TEL no. registr.
and Unit name registr. on the FAX user settings screen (for US only).
1. Check that printer is turned on.
2. Press the Setup button.
The Setup menu screen is displayed.
3. Select Fax settings, then press the OK button.
4. Select FAX user settings, then press the OK button.
5. Enter the unit fax/telephone number.
1. Make sure that Unit TEL no. registr. is selected, then press the OK button.
2. Use the Numeric buttons to enter the unit fax/telephone number.
3. Press the OK button.
Note• You can enter the fax/telephone number up to 20 digits, including spaces.
• For details on how to enter or delete characters:
Entering Numbers, Letters, and Symbols
6. Enter the unit name.
1. Make sure that Unit name registr. is selected, then press the OK button.
2. Use the Numeric buttons to enter the unit name.
370

3. Press the OK button.
Note• You can enter the name up to 24 characters, including spaces.
• For details on how to enter or delete characters:
Entering Numbers, Letters, and Symbols
7. Press the FAX button to return to the Fax standby screen.
371

Registering Recipients
Registering Recipients Using Operation Panel of Printer
Registering Recipients Using Speed Dial Utility2 (Windows)
Registering Recipients Using Speed Dial Utility2 (macOS)
372

Registering Recipients Using Operation Panel of Printer
Registering recipients in the printer's directory in advance allows you to dial fax/telephone numbers simply.
The following methods to register are available:
• Recipient registration
Registering the recipient's fax/telephone number and name allows you to send a fax by selecting aregistered recipient in the printer directory.
Registering Fax/Telephone Number of Recipients
• Group dial registration
You can combine two or more recipients registered in advance into a group. You can send the samedocument to all the registered recipients in the group.
Registering Recipients in Group Dial
You can register up to 20 recipients in total of individual recipients and group dials.
Note• To change the registered information of the recipient or the group dial, see Changing Registered
Information.
• To delete the registered information of the recipient or the group dial, see Deleting RegisteredInformation.
• To print a list of the recipient's fax/telephone numbers and names registered, see Printing List ofRegistered Destinations.
• You can register, change, or delete the registered information of the recipient or the group dial usingSpeed Dial Utility on the computer.
• For Windows:
Registering Recipients Using Speed Dial Utility2 (Windows)
• For macOS:
Registering Recipients Using Speed Dial Utility2 (macOS)
373
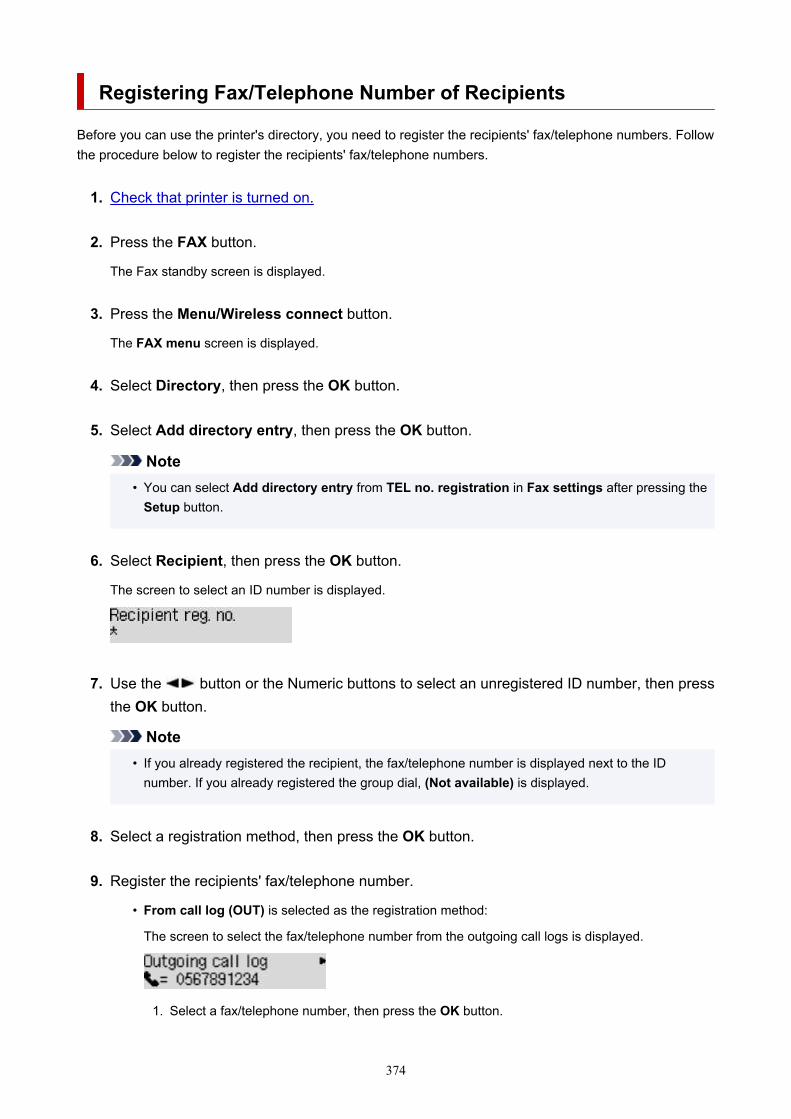
Registering Fax/Telephone Number of Recipients
Before you can use the printer's directory, you need to register the recipients' fax/telephone numbers. Followthe procedure below to register the recipients' fax/telephone numbers.
1. Check that printer is turned on.
2. Press the FAX button.
The Fax standby screen is displayed.
3. Press the Menu/Wireless connect button.
The FAX menu screen is displayed.
4. Select Directory, then press the OK button.
5. Select Add directory entry, then press the OK button.
Note• You can select Add directory entry from TEL no. registration in Fax settings after pressing the
Setup button.
6. Select Recipient, then press the OK button.
The screen to select an ID number is displayed.
7. Use the button or the Numeric buttons to select an unregistered ID number, then pressthe OK button.
Note• If you already registered the recipient, the fax/telephone number is displayed next to the ID
number. If you already registered the group dial, (Not available) is displayed.
8. Select a registration method, then press the OK button.
9. Register the recipients' fax/telephone number.
• From call log (OUT) is selected as the registration method:
The screen to select the fax/telephone number from the outgoing call logs is displayed.
1. Select a fax/telephone number, then press the OK button.
374

The fax/telephone number selected from the outgoing call logs is displayed.
2. Check the fax/telephone number, then press the OK button.
The fax/telephone number is registered to the printer and the screen to enter the recipient'sname is displayed.
• From call log (IN) is selected as the registration method:
The screen to select the fax/telephone number or the name from the incoming call logs isdisplayed.
1. Select a fax/telephone number or a name, then press the OK button.
The fax/telephone number selected from the incoming call logs is displayed.
2. Check the fax/telephone number, then press the OK button.
The fax/telephone number is registered to the printer and the screen to enter the recipient'sname is displayed.
Note• This registration method may not be available depending on the country or region of purchase.
• Direct entry is selected as the registration method:
The screen to enter the fax/telephone number is displayed.
1. Use the Numeric buttons to enter the fax/telephone number you want to register.
2. Press the OK button.
The fax/telephone number is registered to the printer and the screen to enter the recipient'sname is displayed.
Note• You can enter the fax/telephone number up to 60 digits (40 digits for the US, Canada,
Korea and some regions of Latin America), including spaces.
Entering Numbers, Letters, and Symbols
• Press the button twice to enter a pause.
• When Telephone line type in FAX user settings under Fax settings is set to Rotarypulse, you can enter a tone ("T") by pressing the Tone button.
10. Use the Numeric buttons to enter the recipient's name.
375

If you select a name on From call log (IN) in step 9, the name may be already entered. If you do notchange the name, go to step 11.
Note• You can enter the name up to 16 characters, including spaces.
Entering Numbers, Letters, and Symbols
11. Press the OK button to finalize registration.
Note• To register another recipient's number and name, select an unregistered ID number and operate
in the same procedure.
• To return to the Fax standby screen, press the FAX button.
• You can check the recipient's numbers and names you have registered by printing RECIPIENTTELEPHONE NUMBER LIST.
Printing List of Registered Destinations
376

Registering Recipients in Group Dial
If you register two or more registered recipients to a group dial, you can send the same documentsuccessively to all recipients registered to the group dial.
1. Check that printer is turned on.
2. Press the FAX button.
The Fax standby screen is displayed.
3. Press the Menu/Wireless connect button.
The FAX menu screen is displayed.
4. Select Directory, then press the OK button.
5. Select Add directory entry, then press the OK button.
Note• You can select Add directory entry from TEL no. registration in Fax settings after pressing the
Setup button.
6. Select Group dial, then press the OK button.
The screen to select an ID number is displayed.
7. Use the button or the Numeric buttons to select an unregistered ID number, then pressthe OK button.
Note• If you already registered the recipient, (Not available) is displayed next to the ID number. If you
already registered the group dial, the registered group name is displayed.
The Group member screen is displayed.
8. Register the registered recipient as a member of the group dial.
1. Press the Menu/Wireless connect button.
2. Choose a recipient to register as a member.
377

You can choose a recipient with the two methods. The method can be switched by pressing the
button.
• When Add to group is displayed on the LCD:
Use the button to select a recipient's ID number to register to the group dial.
• When Enter first letter is displayed on the LCD:
After you use the Numeric buttons to enter the first letter of the recipient's name you want tosearch, the registered recipients are displayed in alphabetical order.
Use the button to select a recipient's ID number to register to the group dial.
3. Press the OK button.
The selected recipient is registered as a member of the group dial.
4. Press the Menu/Wireless connect button to display the screen to select an ID number, then addanother member.
Repeat this step to register the other recipient to the same group dial.
Note• You can check the recipient's ID number and name registered to the group dial by using the
button.
9. Press the OK button after finishing registering the member you want to register to the groupdial.
The screen to enter the group name is displayed.
10. Use the Numeric buttons to enter the group name.
Note• You can enter the name up to 16 characters, including spaces.
Entering Numbers, Letters, and Symbols
378

11. Press the OK button to finalize registration.
Note• To register another group, select an unregistered ID number and operate in the same procedure.
• To return to the Fax standby screen, press the FAX button.
• You can check the recipients you have registered to the group dial by printing GROUP DIALTELEPHONE NO. LIST.
Printing List of Registered Destinations
379
Changing Registered Information
To change information registered for recipient and group dial, follow the procedure below.
1. Check that printer is turned on.
2. Press the FAX button.
The Fax standby screen is displayed.
3. Press the Menu/Wireless connect button.
The FAX menu screen is displayed.
4. Select Directory, then press the OK button.
5. Select Add directory entry, then press the OK button.
Note• You can select Add directory entry from TEL no. registration in Fax settings after pressing the
Setup button.
6. Change the registered information.
• To change the recipient's information:
1. Select Recipient, then press the OK button.
2. Use the button or the Numeric buttons to select a recipient's ID number, then press theOK button.
3. Select Edit, then press the OK button.
The screen to select a registration method is displayed as well as when you register therecipient.
4. Select a registration method, then press the OK button.
5. Change the recipient's fax/telephone number.
◦ From call log (OUT) is selected as the registration method:
The screen to select the fax/telephone number from the outgoing call logs is displayed.After you use the button to select a fax/telephone number and press the OK button,the editing screen is displayed. Change the recipient's fax/telephone number, then pressthe OK button.
◦ From call log (IN) is selected as the registration method:
The screen to select the fax/telephone number or the name from the incoming call logs isdisplayed. After you use the button to select a fax/telephone number or a name andpress the OK button, the editing screen is displayed. Change the recipient's fax/telephonenumber, then press the OK button.
380

Note• This registration method may not be available depending on the country or region of
purchase.
◦ Direct entry is selected as the registration method:
The editing screen is displayed. Change the recipient's fax/telephone number, then pressthe OK button.
Note• You can enter the fax/telephone number up to 60 digits (40 digits for the US, Canada,
Korea and some regions of Latin America), including spaces.
Entering Numbers, Letters, and Symbols
• Press the button twice to enter a pause.
• When Telephone line type in FAX user settings under Fax settings is set to Rotarypulse, you can enter a tone ("T") by pressing the Tone button.
6. Change the recipient's name, then press the OK button.
Note• You can enter the name up to 16 characters, including spaces.
Entering Numbers, Letters, and Symbols
• To change a group dial:
1. Select Group dial, then press the OK button.
2. Use the button or the Numeric buttons to select an ID number of group dial to change,then press the OK button.
3. Select Edit, then press the OK button.
4. Edit the member of the group dial.
To add a member, press the Menu/Wireless connect button to display the screen to selectan ID number and then add another member.
To delete a member, select a member to delete and then press the Tone button.
5. Change the group name, then press the OK button.
Note• You can enter the name up to 16 characters, including spaces.
Entering Numbers, Letters, and Symbols
Note• To return to the Fax standby screen, press the FAX button.
381

Deleting Registered Information
To delete information registered for recipient and group dial, follow the procedure below.
1. Check that printer is turned on.
2. Press the FAX button.
The Fax standby screen is displayed.
3. Press the Menu/Wireless connect button.
The FAX menu screen is displayed.
4. Select Directory, then press the OK button.
5. Select Add directory entry, then press the OK button.
Note• You can select Add directory entry from TEL no. registration in Fax settings after pressing the
Setup button.
6. Delete the registered information.
• To delete the recipient's information:
1. Select Recipient, then press the OK button.
2. Use the button or the Numeric buttons to select a recipient's ID number, then press theOK button.
3. Select Delete, then press the OK button.
4. Select Yes, then press the OK button.
• To delete a group dial:
1. Select Group dial, then press the OK button.
2. Use the button or the Numeric buttons to select an ID number of group dial to delete,then press the OK button.
3. Select Delete, then press the OK button.
4. Select Yes, then press the OK button.
Note• To return to the Fax standby screen, press the FAX button.
382

Printing List of Registered Destinations
You can print a list of the fax/telephone numbers and can keep it near the printer to refer to when dialing.
1. Check that printer is turned on.
2. Load paper.
3. Press the FAX button.
The Fax standby screen is displayed.
4. Press the Menu/Wireless connect button.
The FAX menu screen is displayed.
5. Select Print reports/lists, then press the OK button.
6. Select Directory list, then press the OK button.
7. Select an item to print, then press the OK button.
• If you selected Recipient:
The confirmation screen asking if you print the list alphabetically by name is displayed.
If you select Yes and press the OK button, RECIPIENT TELEPHONE NUMBER LIST is printed inalphabetical order.
If you select No and press the OK button, RECIPIENT TELEPHONE NUMBER LIST is printed inthe order of the ID number.
• If you selected Group dial:
GROUP DIAL TELEPHONE NO. LIST is printed.
383

Registering Recipients Using Speed Dial Utility2 (Windows)
About Speed Dial Utility2
Speed Dial Utility2 is a utility for forwarding the telephone directory registered on the printer to a computerand registering/changing it on the computer. In addition, you can register the telephone directory edited onthe computer to the printer. You can also save them on the computer as a backup.
For safety reasons, it is recommended that you backup the registered data on the computer using SpeedDial Utility2.
Starting Up Speed Dial Utility2Speed Dial Utility2 Dialog boxSaving Registered Telephone Directory on Printer to Your ComputerRegistering a Fax/telephone Number Using Speed Dial Utility2Changing a Fax/telephone Number Using Speed Dial Utility2Deleting a Fax/telephone Number Using Speed Dial Utility2Changing Sender Information Using Speed Dial Utility2Registering/Changing Rejected Number Using Speed Dial Utility2Registering Telephone Directory Has been Saved on Your Computer to Printer
384

Starting Up Speed Dial Utility2
Important• Before starting up Speed Dial Utility2, make sure that the printer is connected to the computer correctly.• Do not plug in or unplug any cables while the printer is in operation, or when the computer is in sleep or
standby mode.• If your printer is compatible with LAN connection, make sure that the printer is connected to the
computer with LAN connection to use Speed Dial Utility2 via LAN connection.• The password entry screen may appear during startup or operation. If it appears, enter the
administrator password, and then click OK. If you do not know the administrator password, contact theadministrator of the printer.
Follow the procedure below to start up Speed Dial Utility2.
1. Make sure printer is turned on.
2. Start up Speed Dial Utility2.
• For Windows 10, click Start button and select All apps, Canon Utilities, and then Speed DialUtility2.
• For Windows 8.1 or Windows 8, select Speed Dial Utility2 on the Start screen to start Speed DialUtility2. If Speed Dial Utility2 is not displayed on the Start screen, select the Search charm, andthen search for "Speed Dial Utility2".
• For Windows 7 or Windows Vista, click Start and select All programs, Canon Utilities, SpeedDial Utility2, and then Speed Dial Utility2.
Speed Dial Utility2 starts up.
Note• You can also start up Speed Dial Utility2 from Quick Utility Toolbox.
385

Speed Dial Utility2 Dialog box
The following items are on the Speed Dial Utility2 dialog box.
1. Printer Name:
Selects the printer for editing the telephone directory using Speed Dial Utility2.
Behind printer name, printer's MAC address is displayed.
Note• For checking printer's MAC address, refer to "Checking Network Information" for your model from
Home of the Online Manual.• For printer that supports both wireless LAN connection and wired LAN connection, MAC address
of wired LAN connection is displayed regardless of the connection method.
2. Display Printer Settings
Loads the telephone directory registered on the printer that selected for Printer Name: into Speed DialUtility2.
3. Setting Item List:
Selects a setting item for editing. Choose one item from TEL Number Registration, User InformationSetting, and Rejected Number Setting.
4. Registered information list
386

Displays the registered information selected for Setting Item List:.
Note• By clicking on the item name, you can sort the display order.
5. Edit.../Select All/Delete
Edits the item that selected for Setting Item List:, or deletes the item, or selects all the items.
When multiple items on the registered information list are selected, you cannot use the Edit... button.
6. Load from PC...
Displays the telephone directory saved on the computer.
7. Instructions
Displays this guide.
8. Exit
Quits Speed Dial Utility2. Information registered or edited using Speed Dial Utility2 is neither saved onthe computer nor registered on the printer.
9. Save to PC...
Saves the telephone directory edited using Speed Dial Utility2 on the computer.
10. Register to Printer
Registers the telephone directory edited using Speed Dial Utility2 to the printer.
387

Saving Registered Telephone Directory on Printer to YourComputer
Follow the procedure below to save the telephone directory (includes recipients' name, recipients' fax/telephone number, group dial, user's name, user's fax/telephone number, and rejected numbers) thatregistered on the printer to the computer.
1. Start up Speed Dial Utility2.
2. Select a printer from Printer Name: list box, and then click Display Printer Settings.
3. Click Save to PC....
4. Enter file name on displayed screen, and then click Save.
Note• The data of the telephone directory (RSD file, *.rsd) can be imported to other printer.
Registering Telephone Directory Has been Saved on Your Computer to Printer
388
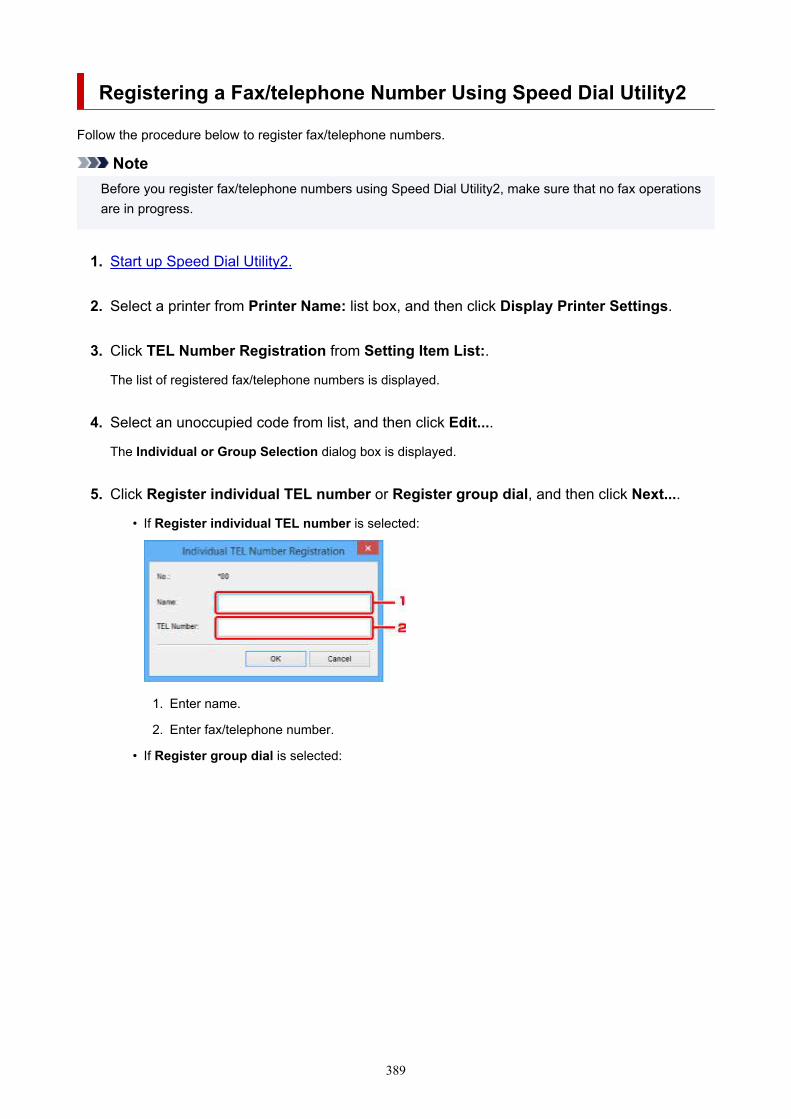
Registering a Fax/telephone Number Using Speed Dial Utility2
Follow the procedure below to register fax/telephone numbers.
NoteBefore you register fax/telephone numbers using Speed Dial Utility2, make sure that no fax operationsare in progress.
1. Start up Speed Dial Utility2.
2. Select a printer from Printer Name: list box, and then click Display Printer Settings.
3. Click TEL Number Registration from Setting Item List:.
The list of registered fax/telephone numbers is displayed.
4. Select an unoccupied code from list, and then click Edit....
The Individual or Group Selection dialog box is displayed.
5. Click Register individual TEL number or Register group dial, and then click Next....
• If Register individual TEL number is selected:
1. Enter name.
2. Enter fax/telephone number.
• If Register group dial is selected:
389

1. Enter group name.
2. Select a code you want to add to group dial, and then click Add >>.
Note• You can only add the numbers that have already been registered.
6. Click OK.
To continue registering fax/telephone numbers or a group dial, repeat steps 4 to 6.
• To save the registered information on the computer.
1. Click Save to PC....
2. Enter file name on displayed screen, and then click Save.
• To register the registered information to the printer:
1. Click Register to Printer.
2. When message appears, check it and click OK.
The information is registered to the printer.
390

Changing a Fax/telephone Number Using Speed Dial Utility2
Follow the procedure below to change fax/telephone numbers.
Note• Before you change fax/telephone numbers using Speed Dial Utility2, make sure that no fax operations
are in progress.
1. Start up Speed Dial Utility2.
2. Select a printer from Printer Name: list box, and then click Display Printer Settings.
3. Click TEL Number Registration from Setting Item List:.
The list of registered fax/telephone numbers is displayed.
4. Select a code to change from list, and then click Edit....
• If an individual fax/telephone number is selected:
1. Enter a new name.
2. Enter a new fax/telephone number.
• If a group dial is selected:
1. Enter a new group name.
391
2. Add or delete a member to/from group dial.
To add a member:Select a code to add to group dial, and then click Add >>.
To delete a member:Select a code to delete from group dial, and then click << Delete.
5. Click OK.
To continue changing fax/telephone numbers or group dials, repeat steps 4 and 5.
• To save the edited information on the computer.
1. Click Save to PC....
2. Enter file name on displayed screen, and then click Save.
• To register the edited information to the printer:
1. Click Register to Printer.
2. When message appears, check it and click OK.
The information is registered to the printer.
392

Deleting a Fax/telephone Number Using Speed Dial Utility2
Follow the procedure below to delete fax/telephone numbers.
Note• Before you delete fax/telephone numbers using Speed Dial Utility2, make sure that no fax operations
are in progress.
1. Start up Speed Dial Utility2.
2. Select a printer from Printer Name: list box, and then click Display Printer Settings.
3. Click TEL Number Registration from Setting Item List:.
The list of registered fax/telephone numbers is displayed.
4. Select a code to delete from list, and then click Delete.
Note• To delete all fax/telephone numbers on the list, click Select All, and then Delete.
5. When confirmation screen appears, click OK.
The selected fax/telephone number is deleted.
To continue deleting fax/telephone numbers, repeat steps 4 and 5.
• To save the edited information on the computer.
1. Click Save to PC....
2. Enter file name on the displayed screen, and then click Save.
• To register the edited information to the printer:
1. Click Register to Printer.
2. When message appears, check it and click OK.
The information is registered to the printer.
393

Changing Sender Information Using Speed Dial Utility2
Follow the procedure below to change the user's name or fax/telephone number.
1. Start up Speed Dial Utility2.
2. Select a printer from Printer Name: list box, and then click Display Printer Settings.
3. Click User Information Setting from Setting Item List:.
The user's information is displayed.
4. Select an item to change, and then click Edit....
The User Information dialog box is displayed.
5. Enter new user's name on User Name and new fax/telephone number in TEL Number,and then click OK.
• To save the edited information on the computer:
1. Click Save to PC....
2. Enter file name on displayed screen, and then click Save.
• To register the edited information to the printer:
1. Click Register to Printer.
2. When message appears, check it and click OK.
The information is registered to the printer.
394

Registering/Changing Rejected Number Using Speed DialUtility2
Follow the procedure below to register, change, or delete rejected numbers.
1. Start up Speed Dial Utility2.
2. Select a printer from Printer Name: list box, and then click Display Printer Settings.
3. Click Rejected Number Setting from Setting Item List:.
The list of rejected numbers is displayed.
• To register a rejected number:
1. Select an unoccupied code from list, and then click Edit....
2. Enter fax/telephone number in Rejected Number dialog box, and then click OK.
• To change a rejected number:
1. Select a code to change from list, and then click Edit....
2. Enter fax/telephone number in Rejected Number dialog box, and then click OK.
• To delete a rejected number:
1. Select a code to delete from list, and then click Delete.
The selected fax/telephone number is deleted.
Note• To delete all fax/telephone numbers on the list, click Select All, and then Delete.
395

Registering Telephone Directory Has been Saved on YourComputer to Printer
You can load the data of the telephone directory (RSD file, *.rsd) and register it to your printer.
The data of the telephone directory (RSD file, *.rsd) that is exported from other printer can be loaded andregistered to your printer.
Note• In Speed Dial Utility2, the data of the telephone directory (RSD file, *.rsd) that is exported using Speed
Dial Utility can be loaded.
1. Start up Speed Dial Utility2.
2. Select a printer from Printer Name: list box, and then click Display Printer Settings.
3. Click Load from PC....
4. Select a data of telephone directory (RSD file, *.rsd) to register to your printer.
5. Click Open on dialog box.
The selected telephone directory is displayed.
Note• If you select the data of the telephone directory (RSD file, *.rsd) that is exported from other printer,
the confirmation message appears. Click OK.
6. Click Register to Printer.
The telephone directory that has been saved on the computer is registered to your printer.
396

Sending Faxes Using Operation Panel of Printer
Sending Faxes by Entering Fax/Telephone Number Basic
Resending Faxes (Redialing Busy Number)
Setting Items for Sending Faxes
397

Sending Faxes by Entering Fax/Telephone Number
This section describes dialing and sending faxes directly by entering the fax/telephone numbers.
Important• It may be possible that faxes will reach unintended recipients due to the misdialing or incorrect
registration of fax/telephone numbers. When you send important documents, we recommend that yousend them after speaking on the telephone.
Sending Fax after Speaking on Telephone
1. Check that printer is turned on.
2. Press the FAX button.
The Fax standby screen is displayed.
3. Load documents on platen or in ADF (Auto Document Feeder).
Important• When sending a double-sided document, load the document on the platen. Double-sided
documents cannot be automatically scanned and sent from the ADF.
Note• For details on the types, conditions of document, and how to load the document:
Loading Originals
4. Adjust the scan contrast and resolution as necessary.
Setting Items for Sending Faxes
5. Use the Numeric buttons to dial the recipient's fax/telephone number.
Use the following buttons to dial the recipient's fax/telephone number.
Numeric buttons:Enters the number.
button:Enters a space.
button:Deletes the last character you entered.
398

button:By pressing this button once, "#" is entered. By pressing this button one more time, "P" is entered.
6. Press the Color button for color transmission, or the Black button for black & whitetransmission.
The printer starts scanning the document.
Important• Color transmission is available only when the recipient's fax device supports color faxing.
• Do not open the document cover until scanning is completed.
7. Start sending.
• If you load the document in the ADF:
The printer scans the document automatically and starts sending the fax.
Note• To cancel a fax transmission, press the Stop button. To cancel a fax transmission while it is in
progress, press the Stop button, then follow the instructions on the LCD.
• If documents remain in the ADF after the Stop button is pressed while scanning is in progress,Document in ADF [OK]Eject the document is displayed on the LCD. By pressing the OKbutton, the remaining documents are automatically ejected.
• If you load the document on the platen:
After scanning the document, the confirmation screen asking you if you load the next document isdisplayed.
To send the scanned document, press the OK button to start sending it.
To send two or more pages, follow the message to load the next page, and press the Color orBlack button. After scanning all pages, press the OK button to start sending.
Note• To cancel sending the fax, press the Stop button.
Note• When your printer is connected to a PBX (Private Branch Exchange) system, refer to the operating
instructions of the system for details on dialing the recipient's fax/telephone number.
• In case the printer was not able to send a fax, such as when the recipient's line was busy, it has thefunction to automatically redial the number after a specified interval. Automatic redialing is enabled bydefault.
Automatic Redialing
• Unsent documents, such as those pending redial, are stored in the printer's memory. They are notstored in the case of a sending error.
Document Stored in Printer's Memory
399

• Do not unplug the power cord until all documents are sent. If you unplug the power cord, all unsentdocuments stored in the printer's memory are lost.
400

Resending Faxes (Redialing Busy Number)
There are two methods of redialing: Automatic redialing and Manual redialing.
• Automatic Redialing
If you send a document and the recipient's line is busy, the printer will redial the number after a specifiedinterval.
Automatic Redialing
• Manual Redialing
You can redial to the recipients dialed using the Numeric buttons.
Manual Redialing
Important• It may be possible that faxes will reach unintended recipients due to the misdialing or incorrect
registration of fax/telephone numbers. When you send important documents, we recommend that yousend them after speaking on the telephone.
Sending Fax after Speaking on Telephone
Note• Automatic redialing is enabled by default.
• For details on the basic sending operations:
Sending Faxes by Entering Fax/Telephone Number
Automatic Redialing
You can enable or disable automatic redialing. If you enable automatic redialing, you can specify themaximum number of redial attempts and the length of time the printer waits between redial attempts.
Enable and specify the automatic redialing setting on Auto redial in Adv. FAX settings under Faxsettings.
Adv. FAX settings
Important• While automatic redialing, the unsent fax is stored in the printer's memory temporarily until the
sending fax is complete. If a power failure occurs or you unplug the power cord before automaticredialing is complete, all faxes stored in the printer's memory are deleted and not sent.
Note• To stop automatic redialing, wait until the printer starts redialing, then press the Stop button.
• To cancel automatic redialing, delete the unsent fax from the printer's memory while the printer is on-standby for a redial operation. For details, see Deleting Document in Printer's Memory.
401
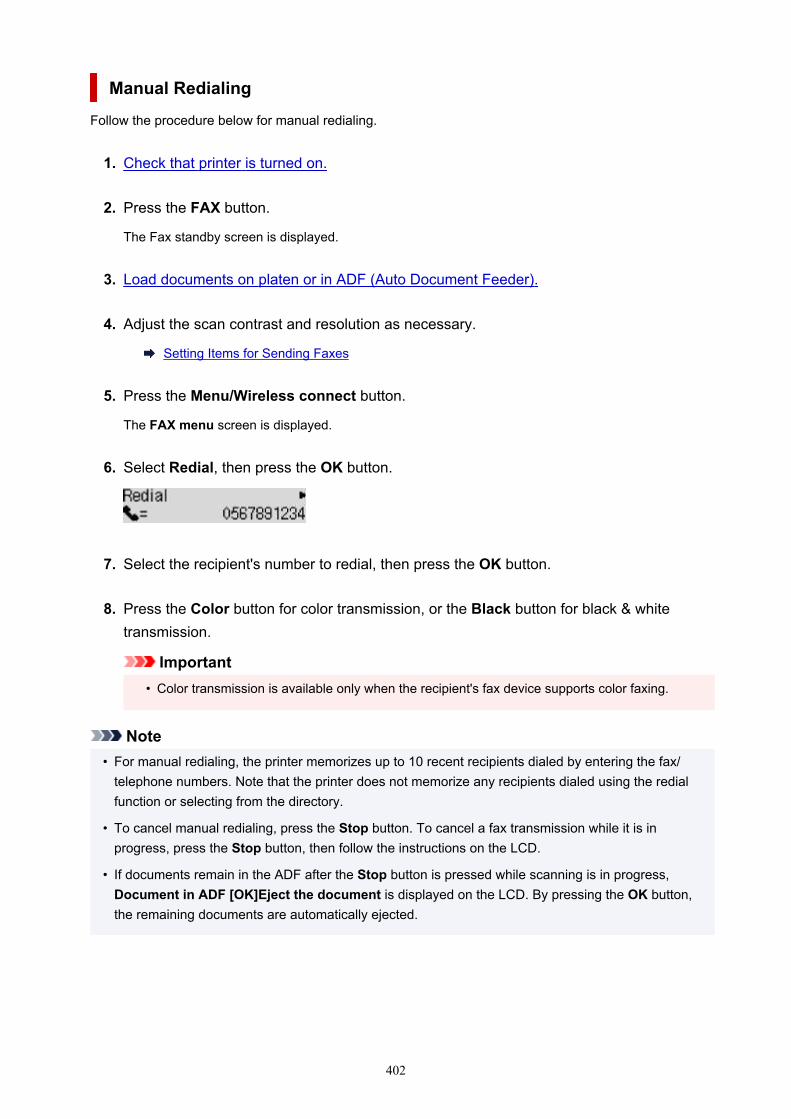
Manual Redialing
Follow the procedure below for manual redialing.
1. Check that printer is turned on.
2. Press the FAX button.
The Fax standby screen is displayed.
3. Load documents on platen or in ADF (Auto Document Feeder).
4. Adjust the scan contrast and resolution as necessary.
Setting Items for Sending Faxes
5. Press the Menu/Wireless connect button.
The FAX menu screen is displayed.
6. Select Redial, then press the OK button.
7. Select the recipient's number to redial, then press the OK button.
8. Press the Color button for color transmission, or the Black button for black & whitetransmission.
Important• Color transmission is available only when the recipient's fax device supports color faxing.
Note• For manual redialing, the printer memorizes up to 10 recent recipients dialed by entering the fax/
telephone numbers. Note that the printer does not memorize any recipients dialed using the redialfunction or selecting from the directory.
• To cancel manual redialing, press the Stop button. To cancel a fax transmission while it is inprogress, press the Stop button, then follow the instructions on the LCD.
• If documents remain in the ADF after the Stop button is pressed while scanning is in progress,Document in ADF [OK]Eject the document is displayed on the LCD. By pressing the OK button,the remaining documents are automatically ejected.
402

Setting Items for Sending Faxes
If you select FAX TX settings after pressing the Menu/Wireless connect button on the Fax standbyscreen, you can specify the settings of the scan contrast and the scan resolution.
Adjust the scan contrast and resolution following the procedure below.
1. Press the Menu/Wireless connect button on the Fax standby screen.
The FAX menu screen is displayed.
2. Select FAX TX settings, then press the OK button.
3. Select Scan contrast, then press the OK button.
4. Select the scan contrast, then press the OK button.
The button decreases the scan contrast, and the button increases the scan contrast.
5. Select Scan resolution, then press the OK button.
6. Select the scan resolution.
Note• The (asterisk) on the LCD indicates the current setting.
StandardSuitable for text-only documents.
FineSuitable for fine-print documents.
Extra fineSuitable for detailed illustration or fine-print quality documents.
If the recipient's fax device is not compatible with Extra fine (300 x 300 dpi), the fax will be sent inthe Standard or Fine resolution.
PhotoSuitable for photographs.
403

Note• When sending a color fax, documents are always scanned in the same resolution (200 x 200 dpi).
The image quality (compression rate) is determined by which scan resolution is selected, exceptthat Extra fine and Photo provide the same image quality.
7. Press the OK button.
The LCD returns to the Fax standby screen.
404

Sending Faxes from Computer (Windows)
Sending a FAX (Fax Driver) Basic
Creating an Address Book (Fax Driver)
Edit or Remove a Recipient from an Address Book (Fax Driver)
Search for a Recipient in an Address Book (Fax Driver)
Cannot Send Faxes from Computer
How to Open the Setting Screen of the Fax Driver
General Notes (Fax Driver)
405

Sending a FAX (Fax Driver)
You can send faxes using the fax driver from applications that support document printing.
Note• Only black and white transmission is supported.
1. Make sure that the machine is turned on.
2. Open the document you want to fax with an application (such as Notepad), and then clickthe Print command. (The command is Print... on the File menu.)
3. In Select Printer or Name in the Print dialog box, select Canon XXX series FAX (where"XXX" is the model name).
4. Click Print or OK.
* Print dialog box in Notepad
Note• Click Preferences or Properties in the Print dialog box to open the print settings dialog box of
the fax driver in which you can set the paper size and print orientation. For details on how to openthe print settings dialog box of the fax driver, see "How to Open the Setting Screen of the FaxDriver."
5. Click Display Address Book... in Set Recipient in the Send FAX dialog box.
406

6. Select a recipient from Recipient Name in the Select Recipient from Address Bookdialog box, then click Set as Recipient.
The selected recipient is reflected in Recipient in the Send FAX dialog box.
Important• You cannot specify a recipient if there is no recipient registered in the address book. Register the
recipient in the address book and reopen the address book.
For details on how to register recipients in the address book, see "Creating an Address Book (FaxDriver)."
• If the recipient's fax/telephone number is entered incorrectly or the registered fax/telephonenumber is incorrect, the fax may be sent to an unexpected recipient. When sending an importantfax, it is recommended that you send it after confirming the entered information and recipient'sstatus.
407
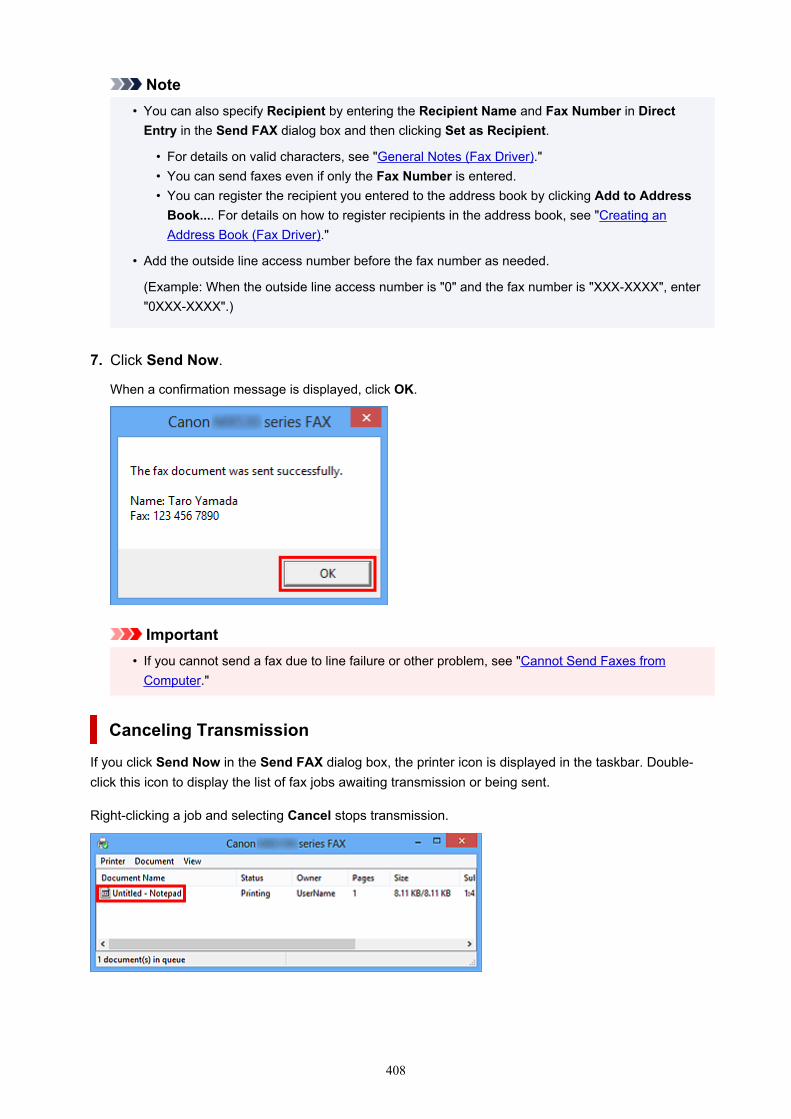
Note• You can also specify Recipient by entering the Recipient Name and Fax Number in Direct
Entry in the Send FAX dialog box and then clicking Set as Recipient.
• For details on valid characters, see "General Notes (Fax Driver)."• You can send faxes even if only the Fax Number is entered.• You can register the recipient you entered to the address book by clicking Add to Address
Book.... For details on how to register recipients in the address book, see "Creating anAddress Book (Fax Driver)."
• Add the outside line access number before the fax number as needed.
(Example: When the outside line access number is "0" and the fax number is "XXX-XXXX", enter"0XXX-XXXX".)
7. Click Send Now.
When a confirmation message is displayed, click OK.
Important• If you cannot send a fax due to line failure or other problem, see "Cannot Send Faxes from
Computer."
Canceling Transmission
If you click Send Now in the Send FAX dialog box, the printer icon is displayed in the taskbar. Double-click this icon to display the list of fax jobs awaiting transmission or being sent.
Right-clicking a job and selecting Cancel stops transmission.
408

Creating an Address Book (Fax Driver)
By using the address book, you can send a fax by simply specifying a recipient from it.
You can register the recipient's name, fax number and other information in the address book.
Registering a recipient (WAB contact) in the address book
You can register an individual recipient (Contact) in the address book.
1. Open the print settings dialog box of the fax driver.
2. Click Address Book... in the displayed dialog box.
Note• Once an individual recipient (Contact) is registered in the address book folder (Windows
Contacts) as an address book file (.contact file), it can be used in multiple applications.However, you cannot change the address book you use, as only one address book can becreated per user.
Follow the steps below to open Windows Contacts.
• Windows 8.1/Windows 8:
Select the Search charm, then search for "Contacts".
• Windows 7/Windows Vista:
Select XXXX (user name) from the Start menu, then double-click Contacts.
3. In the Address Book dialog box, click New....
409

4. Select Contact in the New Entry dialog box, then click OK.
Note• For faxing, you can only specify the Contact (one recipient). You cannot specify a Distribution
List.
5. On Name and E-mail tab of Properties dialog box, enter First and Last.
The recipient's name will be printed at the top of the fax received by the recipient.
410

6. Enter the fax number on the Home or Work tab, then click OK.
An individual recipient (Contact) is registered in the address book.
Note• You can also register a recipient by clicking the Add to Address Book... button on the Send
FAX dialog box after entering the recipient.
• Add the outside line access number before the fax number as needed.
(Example: When the outside line access number is "0" and the fax number is "XXX-XXXX",enter "0XXX-XXXX".)
• If you upgrade from Windows XP to Windows Vista, the address book you created in WindowsXP may not be reflected in Windows Vista. In this case, open the address book in the followingprocedure and reflect the information to a new address book.
411

1. From the Start menu, select Control Panel > Appearance and Personalization > FolderOptions.
2. Click the View tab of the Folder Options dialog box, select Show hidden files andfolders in Advanced settings, then click OK.
3. From the Start menu, select XXXX (user name), then double-click AppData > Roaming >Canon > MP5 to open the folder.
4. Double-click the ".wab" file.
The address book will be reflected in Windows Vista automatically.
Related Topic
Edit or Remove a Recipient from an Address Book (Fax Driver)Search for a Recipient in an Address Book (Fax Driver)
412
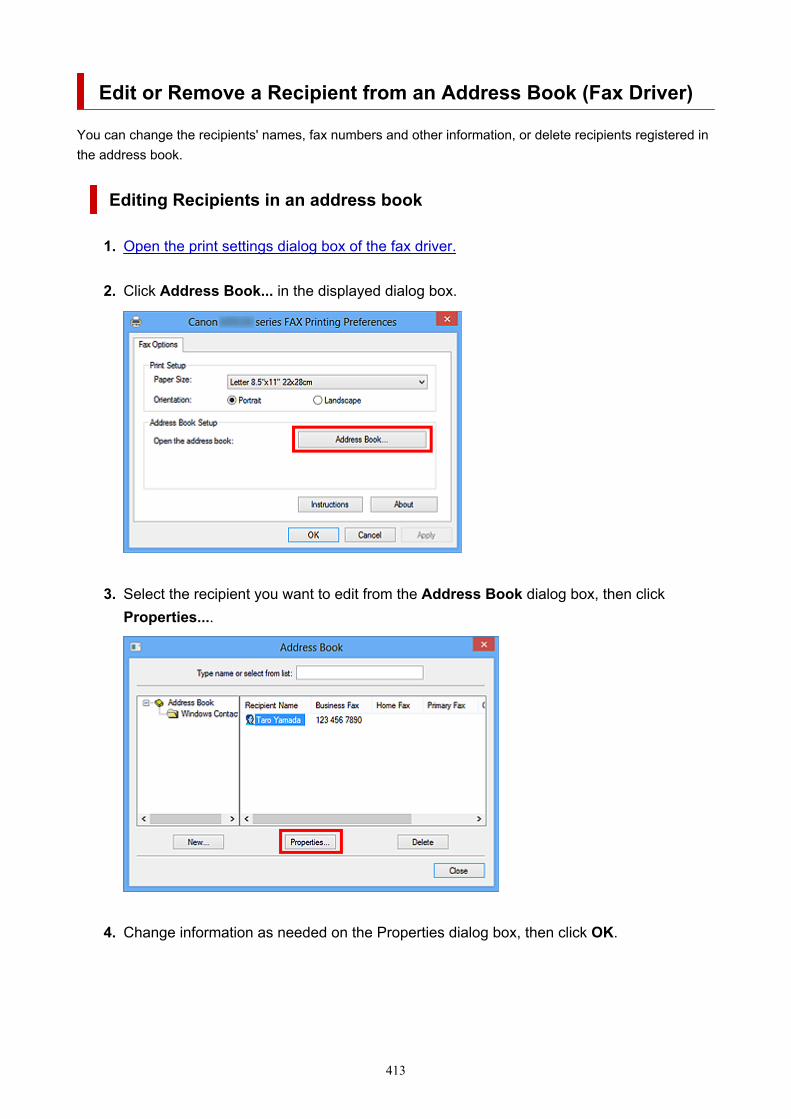
Edit or Remove a Recipient from an Address Book (Fax Driver)
You can change the recipients' names, fax numbers and other information, or delete recipients registered inthe address book.
Editing Recipients in an address book
1. Open the print settings dialog box of the fax driver.
2. Click Address Book... in the displayed dialog box.
3. Select the recipient you want to edit from the Address Book dialog box, then clickProperties....
4. Change information as needed on the Properties dialog box, then click OK.
413

Removing Recipients from an address book
1. Open the print settings dialog box of the fax driver.
2. Click Address Book... in the displayed dialog box.
3. Select the recipient you want to delete from the Address Book dialog box, then clickDelete.
414

4. When a confirmation message is displayed, click Yes.
415
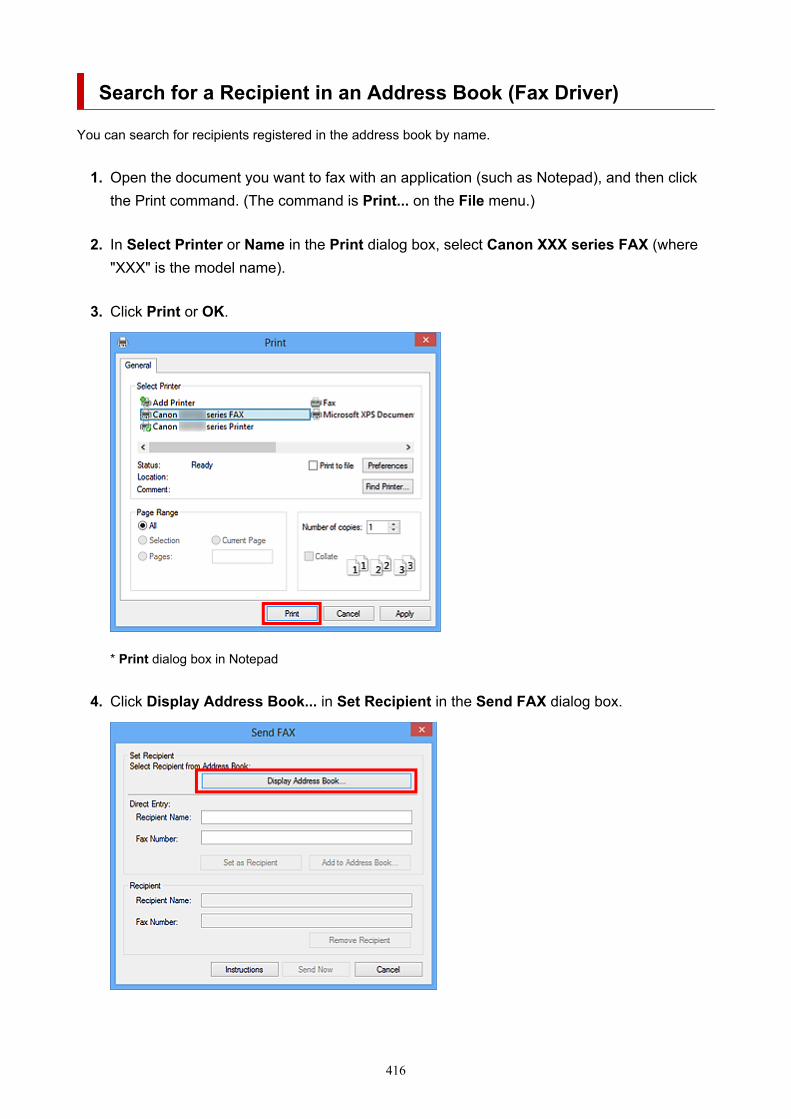
Search for a Recipient in an Address Book (Fax Driver)
You can search for recipients registered in the address book by name.
1. Open the document you want to fax with an application (such as Notepad), and then clickthe Print command. (The command is Print... on the File menu.)
2. In Select Printer or Name in the Print dialog box, select Canon XXX series FAX (where"XXX" is the model name).
3. Click Print or OK.
* Print dialog box in Notepad
4. Click Display Address Book... in Set Recipient in the Send FAX dialog box.
416

5. Enter the name of the recipient you want to search for in Search by Recipient in theSelect Recipient from Address Book dialog box.
If the entered name is found, the recipient will be displayed in the contact list with its name selected.
While the name is selected, click Set as Recipient to enter it as the recipient.
Important• You cannot search by criteria other than name.
417

Cannot Send Faxes from Computer
Check 1 Is the power turned on?
You cannot send faxes if the power is turned off. Press the ON button to turn the power on.
If you disconnected the power cord without turning off the power (one of the buttons on the operation panel is lit),reconnecting it turns on the power.
If you disconnected the power cord after pressing the ON button to turn off the power (no buttons on theoperation panel are lit), reconnect it, then press the ON button to turn on the power.
If the power was turned off due to power failure, etc., the power is automatically turned on when the power failureis resolved.
Important• Confirm that all lamps on the operation panel are off before unplugging the power cord, then unplug the
power cord.
If a power failure occurs or you unplug the power cord, all faxes stored in the machine's memory aredeleted.
Note• If the faxes stored in the machine's memory are deleted by a power failure or unplugging the power cord,
the list of the faxes deleted from the machine's memory will be printed after turning the machine on.
Check 2 Is a document being sent from memory or a fax being received into memory?
When the message for the transmission/reception is displayed on the machine's LCD (Liquid Crystal Display)monitor, a fax is being sent from/received into machine's memory. Wait until the transmission/reception iscomplete.
Check 3 Is the telephone line type set correctly?
Check the telephone line type setting and change it as necessary.
Check 4 Is Dial tone detect set to ON?
Resend the fax after a while.
If you still cannot send the fax, select OFF for Dial tone detect in Advanced FAX settings under FAX settings.
Check 5 Is the recipient's fax number correct?
Check the recipient's fax number, then send the document again.
Sending a FAX (Fax Driver)
418

Note• For details on how to change the recipients registered in the address book, see "Edit or Remove a
Recipient from an Address Book (Fax Driver)."
Check 6 Does an error occur during transmission?
Check if a message is displayed in the computer screen.
If displayed, check the message, then resolve the error.
Check 7 Does a printer error occur?
Check if a message is displayed on the LCD monitor.
If a support code is displayed, see "Support Code List" for your model from Home of the Online Manual.
If no support code is displayed, see "A Message Is Displayed" for your model from Home of the Online Manual.
If you are in a hurry, press the Stop button to close the message, then send the fax.
Check 8 Is the telephone line connected correctly?
Reconnect the telephone line cable to the telephone line jack.
If the telephone line is connected correctly, then there is a problem with your telephone line. Contact yourtelephone company and the manufacturer of your terminal adapter or telephone adapter.
419

How to Open the Setting Screen of the Fax Driver
The following explains how to display the print settings dialog box or the Properties dialog box of the faxdriver from your application or from the fax/printer icon.
Opening the Print Settings Dialog Box of the Fax Driver from anApplication
1. Click the Print command in the application.
In general, you can open the Print dialog box by selecting Print from the File menu.
2. Select "your model name," then click Preferences (or Properties).
The print settings dialog box of the fax driver appears.
Opening the Print Settings Dialog Box of the Fax Driver from the Fax/Printer Icon
• Windows 8.1/Windows 8:
1. Click the Settings charm > Control Panel > Hardware and Sound > Devices andPrinters.
2. Right-click the Canon XXX series Printer icon or Canon XXX series FAX icon andselect Printing Preferences, then Canon XXX series FAX. (Where "XXX" is themodel name.)
• Windows 7:
1. From the Start menu, select Control Panel > Hardware and Sound > Devices andPrinters.
2. Right-click the Canon XXX series Printer icon or Canon XXX series FAX icon andselect Printing Preferences, then Canon XXX series FAX. (Where "XXX" is themodel name.)
• Windows Vista:
1. From the Start menu, select Control Panel > Hardware and Sound > Printers.
2. Right-click the Canon XXX series FAX icon (where "XXX" is the model name) andselect Printing Preferences....
420

Opening the Properties Dialog Box of the Fax Driver from the Fax/Printer Icon
• Windows 8.1/Windows 8:
1. Click the Settings charm > Control Panel > Hardware and Sound > Devices andPrinters.
2. Right-click the Canon XXX series Printer icon or Canon XXX series FAX icon andselect Printer Properties, then Canon XXX series FAX. (Where "XXX" is the modelname.)
• Windows 7:
1. From the Start menu, select Control Panel > Hardware and Sound > Devices andPrinters.
2. Right-click the Canon XXX series Printer icon or Canon XXX series FAX icon andselect Printer Properties, then Canon XXX series FAX. (Where "XXX" is the modelname.)
• Windows Vista:
1. From the Start menu, select Control Panel > Hardware and Sound > Printers.
2. Right-click the Canon XXX series FAX icon (where "XXX" is the model name) andselect Properties.
421

General Notes (Fax Driver)
This fax driver is subject to the following restrictions.
Keep the following points in mind when using the fax driver.
• The fax driver may not work correctly when sending a Microsoft Excel 2002 document as a fax with theAllow A4/Letter Paper Resizing option checked in Microsoft Excel 2002. Follow the instructions belowto solve the problem:
1. Click Options... from the Tools menu.2. Uncheck the Allow A4/Letter Paper Resizing option on the International tab.
• When using a network compatible printer, you cannot send faxes from multiple computers at the sametime. If you try to send a fax from a computer while a fax is being sent from another computer, amessage appears and your fax cannot be sent.
Make sure that a fax is not being sent from another computer.
• If you assign the fax driver to the Bluetooth port, you cannot send a fax from the computer.• You can use the following characters for Fax Number:
Character Explanation
0 - 9 * # For use in telephone and fax numbers.
, p To place a pause between numbers.
P To place a pause at the end of a sequence of numbers.
T Numbers after the T will be sent as a tone signal.
+ - ( ), space To make the number easier to read. You cannot insert a space at the front of a number.
*You cannot use ".", "R", "M", or "E".
• You can enter the following number of characters in Recipient Name and Fax Number.
Recipient Name: Up to 16 characters
Fax Number: Up to 60 characters
* The number of characters you can enter differs in some regions.
• The fax driver does not work correctly if you uncheck the Enable printer pooling option on the Portstab of the Canon XXX series FAX Properties dialog box (where "XXX" is the model name). Check thatthe option is checked.
For details on how to open the Canon XXX series FAX Properties dialog box, see "Opening the PropertiesDialog Box of the Fax Driver from the Fax/Printer Icon."
422

Receiving Faxes
Receiving Faxes
Changing Paper Settings
Memory Reception
423

Receiving Faxes
This section describes the preparation necessary for receiving a fax and how to receive a fax.
Preparing for Receiving a Fax
Prepare for receiving a fax according to the following procedure.
1. Check that printer is turned on.
2. Press the FAX button.
The Fax standby screen is displayed.
3. Make sure of the receive mode setting.
Make sure of the receive mode setting displayed on the Fax standby screen.
Note• For details on how to change the receive mode:
Setting Receive Mode
4. Load paper.
Load the sheets of plain paper.
5. Specify the paper settings as necessary.
Changing Paper Settings
This completes the preparation for receiving fax.
When a fax is received, it is printed on the loaded paper automatically.
Receiving a Fax
Depending on the selected receive mode, the receive operation varies.
Note• For details on the receive mode:
Setting Receive Mode
• You can specify the advanced settings of each receive mode.
For details on the advanced settings of the receive mode:
Advanced Settings of Receive Mode
424
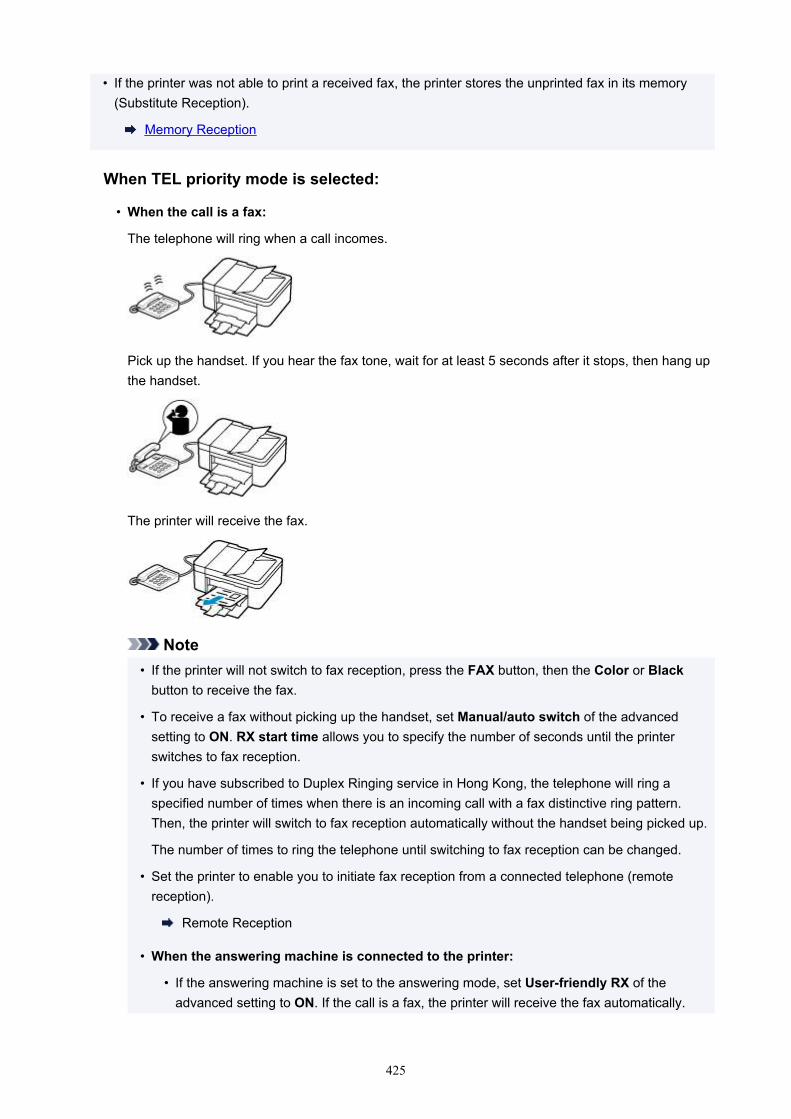
• If the printer was not able to print a received fax, the printer stores the unprinted fax in its memory(Substitute Reception).
Memory Reception
When TEL priority mode is selected:
• When the call is a fax:
The telephone will ring when a call incomes.
Pick up the handset. If you hear the fax tone, wait for at least 5 seconds after it stops, then hang upthe handset.
The printer will receive the fax.
Note• If the printer will not switch to fax reception, press the FAX button, then the Color or Black
button to receive the fax.
• To receive a fax without picking up the handset, set Manual/auto switch of the advancedsetting to ON. RX start time allows you to specify the number of seconds until the printerswitches to fax reception.
• If you have subscribed to Duplex Ringing service in Hong Kong, the telephone will ring aspecified number of times when there is an incoming call with a fax distinctive ring pattern.Then, the printer will switch to fax reception automatically without the handset being picked up.
The number of times to ring the telephone until switching to fax reception can be changed.
• Set the printer to enable you to initiate fax reception from a connected telephone (remotereception).
Remote Reception
• When the answering machine is connected to the printer:
• If the answering machine is set to the answering mode, set User-friendly RX of theadvanced setting to ON. If the call is a fax, the printer will receive the fax automatically.
425

• If the answering mode is turned off on the answering machine, pick up the handset. If youhear the fax tone, wait for at least 5 seconds after it stops, then hang up the handset.
• If Manual/auto switch of the advanced setting is set to ON, set RX start time to longerthan the time before the answering machine starts playing the answering message. Aftermaking this setting, we recommend that you call the answering machine using a mobilephone, etc. to confirm that messages are recorded successfully in the answering machine.
• Set your answering machine to answering mode and adjust it as follows:
• The entire message should be no longer than 15 seconds.
• In the message, tell your callers how to send a fax.
• When the call is a voice call:
The telephone will ring when a call incomes.
Pick up the handset, and talk on the telephone.
Note• If the printer unexpectedly switches to fax reception during telephone calls, set User-friendly
RX of the advanced setting to OFF.
• If Manual/auto switch of the advanced setting is set to ON, you must answer an incoming callby picking up the handset within the time specified in RX start time. Otherwise the printer willswitch to fax reception.
When Fax only mode is selected:
• When the call is a fax:
The printer will receive the fax automatically.
Note• If a telephone is connected to the printer, the telephone will ring when a call incomes.
426

• You can change the number of times to ring the telephone with Incoming ring of the advancedsetting.
When DRPD or Network switch is selected:
• When the call is a fax:
The telephone will ring when a call incomes.
The printer will receive the fax automatically when the fax ring pattern is detected.
Note• You can change the number of times to ring the telephone.
Advanced Settings of Receive Mode
• When the call is a voice call:
The telephone will ring when a call incomes.
When the printer does not detect the fax ring pattern, the telephone will continue ringing.
Pick up the handset, and talk on the telephone.
Note• To use this feature, you need to subscribe to a compatible service provided by your telephone
company.
• For DRPD
You need to select the appropriate ring pattern on the printer.
Setting the DRPD Ring Pattern (US and Canada only)
427

• For Network switch
The name of this service varies depending on the country or region of purchase. This settingmay not be also available depending on the country or region of purchase.
428

Changing Paper Settings
This printer prints received faxes to paper loaded in the printer beforehand. You can use the operation panelto change the paper settings for printing faxes. Make sure that the settings are appropriate for the loadedpaper.
Important• If the size of loaded paper is different from that specified in the paper size setting, Check page size
Press [OK] are displayed on the LCD. In this case, load the same size of paper as that specified in thepaper size setting, then press the OK button.
You can also press the Stop button to close the message and print the stored documents in theprinter's memory later.
Printing Document in Printer's Memory
• If no paper is loaded, or paper has run out while printing is in progress, the error message for no paperis displayed on the LCD. In this case, load paper and press the OK button.
You can also press the Stop button to close the message and print the stored documents in theprinter's memory later.
Printing Document in Printer's Memory
Note• If the sender sends a document that is larger than Letter-size or Legal-size, such as 11 x 17 inches, the
sender's printer may send the fax automatically reduced in size or divided, or send only a part of theoriginal.
1. Check that printer is turned on.
2. Press the FAX button.
The Fax standby screen is displayed.
3. Press the Menu/Wireless connect button.
The FAX menu screen is displayed.
4. Select FAX paper settings, then press the OK button.
5. Select a setting item, then press the OK button.
6. Specify the settings.
Use the button to adjust each setting item, then press the OK button. The next setting item isdisplayed.
The LCD returns to the Fax standby screen when all the settings are complete or when pressing theFAX button.
429

Note• The (asterisk) on the LCD indicates the current setting.
Page sizeSelect the page size from A4, Letter, or Legal.
Note• Some of page sizes are not available depending on the country or region of purchase.
Media typeThe paper type is set to Plain paper.
2-sidedSelect whether to perform two-sided printing when printing faxes, reports, or lists.
430

Memory Reception
If the printer was not able to print the received fax, the received fax is stored in the printer's memory. TheFAX Memory lamp is lit and Received in memory is displayed at the Fax standby screen.
Important• If you unplug the power cord, all faxes stored in the printer's memory are deleted. The next time you
turn the printer on, press the OK button after a confirmation screen is displayed. The list of the faxesdeleted from the printer's memory (MEMORY CLEAR REPORT) will be printed.
If the printer receives a fax under one of the following conditions, the received fax will be automaticallystored in the printer's memory.
• The printer is set to store received faxes in its memory:
When Do not print is selected for Received documents in Auto print settings under FAX settings,the received faxes are stored in the printer's memory.
You can print the faxes stored in the printer's memory from Memory reference in the FAX menuscreen.
Printing Document in Printer's Memory
Note• To print the received faxes automatically, select Print for Received documents in Auto print
settings under FAX settings.
Auto print settings
• An error has occurred on the printer:
If you select Print for Received documents in Auto print settings under FAX settings, a received faxwill be printed automatically. However, if any of the following errors occurs, the received fax will not beprinted. It will instead be stored in the printer's memory.
When the error is resolved, the fax stored in the printer's memory is printed automatically.
◦ The amount of remaining ink is insufficient to print a fax:
Replace the FINE cartridge.
Replacing a FINE Cartridge
Note• You can set the printer to forcibly print a received fax even if the ink has run out.
Set Print when no ink in Auto print settings under FAX settings to Print.
However, part or all of the fax may not be printed since the ink has run out.
Also, the contents of the fax will not be stored in the printer's memory.
If the ink has already run out, we recommend that Do not print be selected for Receiveddocuments in Auto print settings under FAX settings to store the received fax in the printer'smemory. After you replace the FINE cartridge and select Print for Received documents inAuto print settings, the fax stored in the printer's memory will be printed automatically.
431

Auto print settings
◦ Paper has run out:
Load the paper and press the OK button.
◦ A different size of paper from that specified by Page size in FAX paper settings is loaded:
Load the same size of paper as that specified by Page size in FAX paper settings, and then pressthe OK button.
• You pressed the Stop button to cancel printing of a fax:
To resume printing of the fax, display the Fax standby screen by pressing the FAX button again.
Note• The printer can store up to max. 50 pages* (max. 20 documents) of faxes in the printer's memory.
* When using ITU-T No.1 chart (Standard mode)
• If the printer's memory becomes full during memory reception, only pages which already have beenreceived are stored in the memory. Print the received faxes stored in the printer's memory, and thendelete them from the printer's memory and have the sender resend the faxes.
Document Stored in Printer's Memory
432

Other Useful Fax Functions
Document Stored in Printer's Memory
433

Document Stored in Printer's Memory
If the sending faxes is not complete or the printer was not able to print the received faxes, these faxes arestored in the printer's memory.
If an error occurred during a fax transmission, the document is not stored in the printer's memory.
In the following cases, the printer is not able to print the received fax and will automatically store the fax inits memory.
• The amount of remaining ink is insufficient to print a fax.
• Paper has run out.
• A different size of paper from that specified by Page size in FAX paper settings is loaded.
• Do not print is selected for Received documents in Auto print settings under FAX settings.
• You pressed the Stop button to cancel printing of a received fax.
Important• If you unplug the power cord of the printer, all faxes stored in the printer's memory are deleted.
For details on how to unplug the power cord, refer to Unplugging the Printer.
You can print or delete the faxes stored in the printer's memory.
• To print a document in the printer's memory:
Printing Document in Printer's Memory
• To delete a document in the printer's memory:
Deleting Document in Printer's Memory
Note• When confirming, printing, or deleting a document stored in the printer's memory, you specify it by its
transaction number. If you do not know the transaction number for your target document, print the list ofdocuments (MEMORY LIST) first.
For details on how to print MEMORY LIST, see Printing Document in Printer's Memory.
434

Printing Document in Printer's Memory
You can print a specified document in the printer's memory or print all the received documents in its memoryat a time.
When printing a specified document, you specify it by its transaction number. If you do not know thetransaction number for your target document, print the list of documents (MEMORY LIST) first.
1. Check that printer is turned on.
2. Load paper.
3. Press the FAX button.
The Fax standby screen is displayed.
4. Press the Menu/Wireless connect button.
The FAX menu screen is displayed.
5. Select Memory reference, then press the OK button.
Note• If no document is stored in the printer's memory, No documents in memory is displayed on the
LCD.
6. Select a print menu, then press the OK button.
Print memory listYou can print a list of the documents in the printer's memory (MEMORY LIST).
MEMORY LIST shows the transaction number of the unsent or unprinted fax (TX/RX NO.),transaction mode, recipient's number, and the date and time of the transaction.
A transaction number from "0001" to "4999" on MEMORY LIST indicates a document being sent. Atransaction number from "5001" to "9999" on MEMORY LIST indicates a document being received.
Print specified doc.You can specify the document and print it.
If you select this menu, the document selection screen is displayed.
Note• A transaction number from "0001" to "4999" indicates a document being sent. A transaction
number from "5001" to "9999" indicates a document being received.
• Each mark before the transaction number indicates the following:
No mark: Indicates a black and white document.
435

: Indicates a color document.
: Indicates the document during transmission.
: Indicates the document sent with sequential broadcasting.
• By pressing the button or the Tone button, the transaction number displayed on the LCDis switched to transaction time or fax/telephone number.
Specify the document and print it following the procedure below.
1. Select the transaction number (TX/RX no.) of the document you want to print, then press theOK button.
2. Select whether to print only the first page of the document, then press the OK button.
• If you select Yes:
Only the first page of the document will be printed.
The document is still stored in the printer's memory.
• If you select No:
All pages of the document will be printed.
The screen to confirm whether to delete the printed document in the printer's memory isdisplayed.
If you select Yes and press the OK button, the printed document in the printer's memory isdeleted.
Note• If there is not the specified document in the printer's memory, No document is displayed,
and the printer returns to the previous screen.
• To return to the Fax standby screen, press the Stop button.
Print all RX docsIf you select this menu, the confirmation screen is displayed.
You can print all the received documents in the printer's memory.
If you select Yes and press the OK button, all the documents in the printer's memory will be printed.
Each time a document is printed, the screen to confirm whether to delete the printed document inthe printer's memory is displayed.
If you select Yes and press the OK button, the printed document in the printer's memory is deleted.
436

Deleting Document in Printer's Memory
You can delete a specified document in the printer's memory or delete all the documents in its memory at atime.
Note• When deleting a specified document, you specify it by its transaction number (TX/RX no.). If you do not
know the transaction number for your target document, print the list of documents (MEMORY LIST)first.
Printing Document in Printer's Memory
1. Check that printer is turned on.
2. Press the FAX button.
The Fax standby screen is displayed.
3. Press the Menu/Wireless connect button.
The FAX menu screen is displayed.
4. Select Memory reference, then press the OK button.
Note• If no document is stored in the printer's memory, No documents in memory is displayed on the
LCD.
5. Select a delete menu, then press the OK button.
Del. specified doc.You can specify the document and delete it.
If you select this menu, the document selection screen is displayed.
Note• A transaction number from "0001" to "4999" indicates a document being sent. A transaction
number from "5001" to "9999" indicates a document being received.
• Each mark before the transaction number indicates the following:
No mark: Indicates a black and white document.
: Indicates a color document.
: Indicates the document during transmission.
: Indicates the document sent with sequential broadcasting.
437

• By pressing the button or the Tone button, the transaction number displayed on the LCDis switched to transaction time or fax/telephone number.
Specify the document and delete it following the procedure below.
1. Select the transaction number (TX/RX no.) of the document you want to delete, then press theOK button.
The confirmation screen is displayed.
2. Select Yes, then press the OK button.
The specified document will be deleted from printer's memory.
Note• If there is not the specified document in the printer's memory, No document is displayed,
and the printer returns to the previous screen.
• To return to the Fax standby screen, press the Stop button.
Delete all docsIf you select this menu, the confirmation screen is displayed.
You can delete all the documents in the printer's memory.
If you select Yes and press the OK button, all the documents in the printer's memory will be deleted.
438

Network
Cannot Find Printer on NetworkCannot Find Printer while Using Wi-FiNetwork Key (Password) UnknownCannot Print or Connect
For other questions about network, click here.
Printer Does Not PrintPrintouts Are Blank/Blurry or Fuzzy/Inaccurate or Bleeding Colors/Streaks or LinesPrintout Results Are UnsatisfactoryList of Support Code for Error (Paper Jams)Cannot Print or Connect
Error
Installation
Failed to MP Drivers Installation (Windows)
Fax
Cannot Send a FaxCannot Receive a Fax, Cannot Print a FaxFAX Setup Guide
An Error OccursMessage (Support Code) Appears
Frequently Asked Questions
Solve Problems
Printer Does Not Work
Printer Does Not Turn OnPrinter Turns Off Unexpectedly or RepeatedlyWrong Language Appears in LCDLCD Is OffUSB Connection ProblemsCannot Communicate with Printer via USBPrinter Does Not PrintCopying/Printing StopsCannot Print Using AirPrintPrinter Prints SlowlyInk Does Not Come Out
439

List of Support Code for Error (Paper Jams)Paper Does Not Feed Properly/"No Paper" ErrorAutomatic Duplex Printing ProblemsPrintout Results Are UnsatisfactoryScanning Problems (Windows)Scanning Problems (macOS)Scan Results Are Unsatisfactory (Windows)Scan Results Are Unsatisfactory (macOS)Cannot Print/Scan from Smartphone/Tablet
Cannot Set Correctly (Network)
Cannot Find Printer on Check Printer Settings Screen During Setup (Windows)Cannot Find Printer while Using Wi-FiPrinter Suddenly Stopped Working for Some ReasonNetwork Key (Password) UnknownForgot Administrator Password of PrinterPrinter Cannot Be Used After Replacing Wireless Router or Changed Router SettingsMessage Appears on Computer During SetupChecking Network InformationRestoring to Factory Defaults
Cannot Set Correctly (Installation)
Failed to MP Drivers Installation (Windows)Easy-WebPrint EX Does Not Start or Easy-WebPrint EX Menu Does Not Appear (Windows)Updating MP Drivers in Network Environment (Windows)
Error or Message Appears
An Error OccursMessage (Support Code) AppearsA Message for Faxing Is Displayed on the LCDList of Support Code for ErrorIJ Scan Utility Error Messages (Windows)IJ Scan Utility Lite Error Messages (macOS)ScanGear (Scanner Driver) Error Messages (Windows)
Operation Problems
Network Communication ProblemsPrinting ProblemsProblems while Printing/Scanning from Smartphone/TabletScanning Problems (Windows)Scanning Problems (macOS)Faxing ProblemsMechanical ProblemsInstallation and Download ProblemsErrors and MessagesIf You Cannot Solve a Problem
440

Network Settings and Common Problems
Here are frequently asked questions on network. Select a connection method you are using, or you want touse.
Wireless LAN
Wireless Direct
Wireless LAN
Cannot Find Printer
Cannot Find Printer while Using Wi-FiCannot Find Printer on Check Printer Settings Screen During Setup (Windows)Cannot Proceed beyond Printer Connection ScreenPrinter Is Not Found by Printer Find Screen of SetupSearching Printer by IP Address or Host Name During SetupError Occurs During Wi-Fi SetupDetect Same Printer NameReconfiguration Method of Wi-Fi Connection
Cannot Print or Connect
Printer Suddenly Stopped Working for Some ReasonPrinter Cannot Be Used After Replacing Wireless Router or Changed Router SettingsCannot Access to Internet on Wi-Fi from Communication DeviceConnecting Printer and Wireless Router Using Easy wireless connectCannot Connect Smartphone/Tablet to Wireless RouterError Occurs During Wi-Fi SetupConnects to Another Computer via LAN/Changes from USB to LAN ConnectionCannot Print or Connect
LAN Setting Tips/Changing LAN Settings
Network Key (Password) UnknownForgot Administrator Password of PrinterChecking Network InformationRestoring to Factory DefaultsChecking Wireless Router SSID/KeyChecking Wireless Router Network Name (SSID) for Smartphone/TabletPrivacy Separator/SSID Separator/Network Separation FunctionDefault Network SettingsConnects to Another Computer via LAN/Changes from USB to LAN ConnectionPrinting Network SettingsReconfiguration Method of Wi-Fi ConnectionChecking Status Code
441

Printing/Scanning from Smartphone/Tablet
Connecting Printer and Wireless Router Using Easy wireless connectCannot Connect Smartphone/Tablet to Wireless RouterChecking Wireless Router Network Name (SSID) for Smartphone/TabletSetting Up Using Smartphone/TabletCannot Print/Scan from Smartphone/TabletDownloading Canon PRINT Inkjet/SELPHY
Problems while Using Printer
Message Appears on Computer During SetupPrinter Prints SlowlyNo Ink Level Appears in Printer Status Monitor (Windows)Packets Are Sent Constantly (Windows)
Wireless Direct
Cannot Print or Connect
Printer Suddenly Stopped Working for Some ReasonCannot Access to Internet on Wi-Fi from Communication DeviceCannot Print or Connect
LAN Setting Tips/Changing LAN Settings
Network Key (Password) UnknownForgot Administrator Password of PrinterChecking Network InformationRestoring to Factory DefaultsDefault Network SettingsPrinting Network SettingsReconfiguration Method of Wi-Fi ConnectionChecking Status Code
Printing/Scanning from Smartphone/Tablet
Cannot Print/Scan from Smartphone/TabletDownloading Canon PRINT Inkjet/SELPHY
Problems while Using Printer
Message Appears on Computer During SetupPrinter Prints SlowlyNo Ink Level Appears in Printer Status Monitor (Windows)
442

Network Communication Problems
Cannot Find Printer on Network
Network Connection Problems
Other Network Problems
443

Cannot Find Printer on Network
While performing printer setup:
Cannot Find Printer on Check Printer Settings Screen During Setup(Windows)
Cannot Proceed beyond Printer Connection Screen
While using printer:
Cannot Find Printer while Using Wi-Fi
444

Cannot Find Printer on Check Printer Settings Screen DuringSetup (Windows)
If the printer cannot be found and the Check Printer Settings screen appears after searching the printer byAutomatic search on the Search for Printers screen, click Redetect and search for the printer again bythe IP address on the Search for Printers screen.
If the printer has not been found after searching it by the IP address, check network settings.
Cannot Find Printer on Check Printer Settings Screen During Wi-Fi Setup (Windows)-Checking PowerStatusCannot Find Printer on Check Printer Settings Screen During Wi-Fi Setup (Windows)-Checking PC
Network ConnectionCannot Find Printer on Check Printer Settings Screen During Wi-Fi Setup (Windows)-Checking
Printer's Wi-Fi SettingsCannot Find Printer on Check Printer Settings Screen During Wi-Fi Setup (Windows)-Checking Wi-Fi
EnvironmentCannot Find Printer on Check Printer Settings Screen During Wi-Fi Setup (Windows)-Checking
Printer's IP AddressCannot Find Printer on Check Printer Settings Screen During Wi-Fi Setup (Windows)-Checking
Security Software SettingsCannot Find Printer on Check Printer Settings Screen During Wi-Fi Setup (Windows)-Checking
Wireless Router Settings
445

Cannot Find Printer on Check Printer Settings Screen During Wi-FiSetup (Windows)-Checking Power Status
Are printer and network device (router, etc.) turned on?
Make sure the printer is turned on.
Checking that Power Is On
Make sure network device (router, etc.) is turned on.
If printer or network device is off:
Turn on printer or network device.
It may take a while for the printer and network device to become ready for use once they are turned on.Wait a while after turning on the printer or network device, and then click Redetect on the Check PrinterSettings screen to redetect the printer.
If the printer is found, follow the instructions on the screen to continue to set up network communication.
If printer and network device are on:
If the network devices are on, turn them off and on again.
If above does not solve the problem:
Cannot Find Printer on Check Printer Settings Screen During Wi-Fi Setup (Windows)-Checking PCNetwork Connection
446

Cannot Find Printer on Check Printer Settings Screen During Wi-FiSetup (Windows)-Checking PC Network Connection
Can you view any web pages on your computer?Make sure the computer and network device (router, etc.) are configured and the computer is connectedto the network.
If you cannot view any web pages:Click Cancel on the Check Printer Settings screen to cancel to set up the network communication.
After that, configure the computer and network device.
For the procedures, refer to the instruction manuals supplied with the computer and network device, orcontact their manufacturers.
If you can view web pages after configuring the computer and network device, try to set up the networkcommunication from the beginning.
If above does not solve the problem:
Cannot Find Printer on Check Printer Settings Screen During Wi-Fi Setup (Windows)-CheckingPrinter's Wi-Fi Settings
447

Cannot Find Printer on Check Printer Settings Screen During Wi-FiSetup (Windows)-Checking Printer's Wi-Fi Settings
Is printer set to allow wireless communication?
Make sure the or icon is displayed on the LCD.
If icon is not displayed:
The printer is not set to allow wireless communication. Turn on wireless communication on the printer.
If icon is displayed:
Cannot Find Printer on Check Printer Settings Screen During Wi-Fi Setup (Windows)-Checking Wi-FiEnvironment
448

Cannot Find Printer on Check Printer Settings Screen During Wi-FiSetup (Windows)-Checking Wi-Fi Environment
Is the printer connected to the wireless router?Use the icon on the LCD to make sure the printer is connected to the wireless router.
If is displayed:
• Check wireless router configuration.
After checking the wireless router setting, make sure the printer is not placed far away from thewireless router.
The printer can be up to 50 m (164 ft) from the wireless router indoors. Make sure the printer is closeenough to the wireless router to be used.
Place the printer and wireless router where there are no obstacles between them. Wirelesscommunication between different rooms or floors is generally poor. Wireless communication can beimpeded by building materials containing metal or concrete. If the printer cannot communicate withthe computer over a Wi-Fi due to a wall, place the printer and the computer in the same room.
In addition, if a device like a microwave oven that emits radio waves of the same frequency bandwidthas a wireless router is nearby, it may cause interference. Place the wireless router as far away frominterference sources as possible.
Note• Though an antenna is attached to most wireless routers, note that some of them have it inside.
• Check wireless router setting.
The printer and wireless router should be connected using 2.4 GHz bandwidth. Make sure thewireless router for the printer's destination is configured to use 2.4 GHz bandwidth.
Important• Note that some wireless routers distinguish network names (SSIDs) by the last alphanumeric
character according to their bandwidth (2.4 GHz or 5 GHz) or purpose (for computer or gamemachine).
To check the network name (SSID) of the wireless router the printer is connected to, print the networksettings.
Printing Network Settings
449

For details, see the instruction manual supplied with the wireless router or contact the manufacturer.
After taking measures above, click Redetect on the Check Printer Settings screen to redetect theprinter.
If the printer is found, follow the instructions on the screen to continue to set up network communication.
If the printer cannot be detected, the printer is not connected to the wireless router. Connect the printer tothe wireless router.
After connecting the printer to the wireless router, set up the network communication from the beginning.
If is displayed:
Cannot Find Printer on Check Printer Settings Screen During Wi-Fi Setup (Windows)-CheckingPrinter's IP Address
450
Cannot Find Printer on Check Printer Settings Screen During Wi-FiSetup (Windows)-Checking Printer's IP Address
Is printer's IP address specified correctly?If printer's IP address is not specified correctly, the printer may not be found. Make sure whether printer'sIP address is not used for another device.
To check the printer's IP address, print out the network settings information.
Printing Network Settings
If the IP address is not specified correctly:
See If an error screen appears: and specify the IP address.
If the IP address is specified correctly:
Cannot Find Printer on Check Printer Settings Screen During Wi-Fi Setup (Windows)-CheckingSecurity Software Settings
451

Cannot Find Printer on Check Printer Settings Screen During Wi-FiSetup (Windows)-Checking Security Software Settings
Disable block in firewall function temporarily.The firewall of your security software or operation system for computer may limit communication betweenthe printer and your computer. Check the firewall setting of your security software or operation system orthe message shown on your computer and disable block temporarily.
If firewall interferes with setup:
• If message appears:
If a message appears warning that Canon software is attempting to access the network, set thesecurity software to allow access.
After allowing the software to access, click Redetect on the Check Printer Settings screen toredetect the printer.
If the printer is found, follow the instructions on the screen to continue to set up networkcommunication.
• If no message appears:
Cancel the setup, and then set the security software to allow Canon software to access the network.
The file Setup.exe or Setup64.exe in the win > Driver > DrvSetup folder on the Setup CD-ROM
After setting the security software, redo the network communication setup from the beginning.
After setup is completed, enable firewall.
Note• For more on firewall settings of your operating system or security software, see instruction manual or
contact its manufacturer.
If above does not solve the problem:
Cannot Find Printer on Check Printer Settings Screen During Wi-Fi Setup (Windows)-CheckingWireless Router Settings
452

Cannot Find Printer on Check Printer Settings Screen During Wi-FiSetup (Windows)-Checking Wireless Router Settings
Check wireless router settings.Check wireless router network connection settings, such as IP address filtering, MAC address filtering,encryption key, and DHCP function.
Make sure the same radio channel is assigned to the printer and the wireless router.
To check the settings of the wireless router, see the instruction manual supplied with the wireless router orcontact the manufacturer.
In addition, make sure the wireless router you are using is configured to use 2.4 GHz bandwidth.
Important• Depending on the wireless router, note that different network name (SSID) is assigned for a
bandwidth (2.4 GHz or 5 GHz) or its usage (for PC or game machine) using alphanumeric charactersat the end of network name (SSID).
After checking the wireless router settings, click Redetect on the Check Printer Settings screen toredetect the printer.
If the printer is found, follow the instructions on the screen to continue to set up network communication.
453

Cannot Proceed beyond Printer Connection Screen
If you cannot proceed beyond the Printer Connection screen, check the following.
Check1 Make sure USB cable is securely plugged in to printer and computer.
Connect the printer and the computer using a USB cable as the illustration below. The USB port is located at theback of the printer.
Important• Connect the "Type-B" terminal to the printer with the notched side facing UP. For details, refer to the
instruction manual supplied with the USB cable.
Check2 Follow procedure below to connect printer and computer again.
Important• For macOS, make sure the lock icon is on the lower left of the Printers & Scanners screen.
If the icon (locked) is displayed, click the icon to unlock. (The administrator name and the passwordare necessary to unlock.)
1. Unplug USB cable from printer and computer and connect it again.
2. Make sure no printer operation is in progress and turn off.
3. Turn on printer.
Check3 If you cannot resolve problem, follow procedure below to reinstall MP Drivers.
• For Windows:
1. Click Cancel.
2. Click Back to Top on Setup Canceled screen.
3. Click Exit on Start Setup screen and finish setup.
454
4. Turn off printer.
5. Restart computer.
6. Make sure you have no application software running.
7. Perform setup on web page.
Note• You can use the Setup CD-ROM to redo setup.
• For macOS:
1. Click Next.
The screen telling you that installation has not been completed appears.
2. Click No.
The screen to select application software to install appears.
3. Click Back to Top.
4. Click Exit on Start Setup screen.
5. Turn off printer.
6. Restart computer.
7. Make sure you have no application software running.
8. Perform setup on web page.
455

Cannot Find Printer while Using Wi-Fi
Check1 Make sure printer is turned on.
If not, make sure the printer is securely plugged in and press ON button to turn on.
The ON lamp flashes while the printer is initializing. Wait until the ON lamp stops flashing and remains lit.
Check2 Check the icon on LCD .
The icon appears when you switch a mode by pressing the SCAN button or Setup button.
If the icon is not displayed, select Active for Enable/disab. Wi-Fi in Wi-Fi under LAN settings under Devicesettings from the setup menu.
If the icon is displayed, see Check 3 or later checking items to make sure whether printer setup iscomplete or the settings of wireless router to connect are correct.
Check3 Make sure printer setup is complete on the computer.
If it is not, perform setup.
• For Windows:
Perform setup using the Setup CD-ROM or from the web page.
• For macOS:
Perform setup from the web page.
Note• IJ Network Device Setup Utility allows you to diagnose and repair the network status. Download it from the
web page.
For WindowsFor macOS
Check4 Make sure printer and wireless router network settings match.
Make sure the network settings of the printer (e.g. network name (SSID) or network key (password), etc.) areidentical with those of the wireless router.
To check the settings of the wireless router, refer to the instruction manual provided with it or contact itsmanufacturer.
Note• Use 2.4 GHz frequency band to connect to a wireless router. Match the network name (SSID) set for the
printer with that for 2.4 GHz frequency band of the wireless router.
To check the network name (SSID) set for the printer, print out the network setting information.
456

Printing Network Settings
Note• IJ Network Device Setup Utility allows you to diagnose and repair the network status.
Select the link below to download IJ Network Device Setup Utility and install it.
Checking Printer Connection Status Using IJ Network Device Setup Utility
See below for starting up IJ Network Device Setup Utility.
• For Windows:
Starting Up IJ Network Device Setup Utility
• For macOS:
Starting Up IJ Network Device Setup Utility
Check5 Make sure the printer is not placed too far away from the wireless router.
If the distance between the printer and wireless router is too far, wireless communication becomes poor. Placethe printer and wireless router close to each other.
Note• Though an antenna is attached to most wireless routers, note that some of them have it inside.
Check6 Make sure wireless signal is strong. Monitor signal strength and move printerand wireless router as necessary.
Place the printer and wireless router where there are no obstacles between them. Wireless communicationbetween different rooms or floors is generally poor. Wireless communication can be impeded by buildingmaterials containing metal or concrete. If the printer cannot communicate with the computer over a Wi-Fi due toa wall, place the printer and the computer in the same room.
In addition, if a device like a microwave oven that emits radio waves of the same frequency bandwidth as awireless router is nearby, it may cause interference. Place the wireless router as far away from interferencesources as possible.
Check the signal strength on the LCD.
LCD and Operation Panel
Note• IJ Network Device Setup Utility allows you to diagnose and repair the network status.
Select the link below to download IJ Network Device Setup Utility and install it.
Checking Printer Connection Status Using IJ Network Device Setup Utility
See below for starting up IJ Network Device Setup Utility.
• For Windows:
Starting Up IJ Network Device Setup Utility
• For macOS:
Starting Up IJ Network Device Setup Utility
457

Check7 Make sure the computer is connected to the wireless router.
For more on how to check the computer settings or connection status, see your computer instruction manual orcontact its manufacturer.
Note• If you use a smartphone or tablet, make sure the Wi-Fi is enabled on the device.
Check8 Make sure Enable bidirectional support is selected in the Ports sheet of theproperties dialog box of the printer driver. (Windows)
If not, select it to enable bidirectional support.
Check9 Make sure security software's firewall is off.
If your security software's firewall is on, a message may appear warning you that Canon software is attemptingto access the network. If this warning message appears, set security software to always allow access.
If you are using any programs that switch between network environments, check their settings. Some programsuse a firewall by default.
Check10 If printer is connected to an AirPort Base Station via LAN, make sure you usealphanumeric characters for network name (SSID). (macOS)
If the problem is not resolved, redo setup.
• For Windows:
Perform setup using the Setup CD-ROM or from the web page.
• For macOS:
Perform setup from the web page.
458

Network Connection Problems
Printer Suddenly Stopped Working for Some Reason
Network Key (Password) Unknown
Printer Cannot Be Used After Replacing Wireless Router or Changed RouterSettings
459
Printer Suddenly Stopped Working for Some Reason
Cannot Connect to a Printer after Network Configuration ChangesCannot Connect to a Printer via Wireless LAN (Wi-Fi)Cannot Connect to a Printer through Wireless DirectCannot Print/Scan/Fax through Network
Cannot Connect to a Printer after Network Configuration Changes
It may take a while for the computer to obtain an IP address, or you may need to restart your computer.
Make sure the computer has obtained a valid IP address, and try again to find the printer.
Cannot Connect to a Printer via Wireless LAN (Wi-Fi)
Check1 Check the power status of printer, network devices (e.g. wireless router), andsmartphone/tablet.
• Turn on the printer or devices.• If the power is already turned on, cycle the power switch.• It may be necessary to resolve wireless router problems (e.g. update interval of a key, problems of DHCP
update interval, energy saving mode, etc.) or to update the wireless router firmware.
For details, contact the manufacturer of your wireless router.
Check2 Can you view any web pages on your computer?
Make sure your computer is connected to the wireless router properly.
For more on checking computer settings or connection status, see the instruction manual supplied with thecomputer or contact the manufacturer.
Check3 Is the printer connected to the wireless router?
Use the icon on the LCD to check the connection status between the printer and wireless router. If the icon is not displayed, Wi-Fi is disabled. Turn on wireless communication on the printer.
Check4 Make sure the printer and wireless router network settings match.
Make sure the network settings of the printer (e.g. network name (SSID) or network key (password), etc.) areidentical with those of the wireless router.
To check the settings of the wireless router, refer to the instruction manual provided with it or contact itsmanufacturer.
460

Note• Use 2.4 GHz frequency band to connect to a wireless router. Match the network name (SSID) set for the
printer with that for 2.4 GHz frequency band of the wireless router.
To check the current network settings of the printer, print out the network setting information.
Printing Network Settings
Note• IJ Network Device Setup Utility allows you to diagnose and repair the network status.
Select the link below to download IJ Network Device Setup Utility and install it.
Checking Printer Connection Status Using IJ Network Device Setup Utility
See below for starting up IJ Network Device Setup Utility.
• For Windows:
Starting Up IJ Network Device Setup Utility
• For macOS:
Starting Up IJ Network Device Setup Utility
Check5 Make sure the printer is not placed too far away from the wireless router.
If the distance between the printer and wireless router is too far, wireless communication becomes poor. Placethe printer and wireless router close to each other.
Note• Though an antenna is attached to most wireless routers, note that some of them have it inside.
Check6 Make sure wireless signal is strong. Monitor signal status and move printerand wireless router as necessary.
Place the printer and wireless router where there are no obstacles between them. Wireless communicationbetween different rooms or floors is generally poor. Wireless communication can be impeded by buildingmaterials containing metal or concrete. If the printer cannot communicate with the computer over a Wi-Fi dueto a wall, place the printer and the computer in the same room.
In addition, if a device like a microwave oven that emits radio waves of the same frequency bandwidth as awireless router is nearby, it may cause interference. Place the wireless router as far away from interferencesources as possible.
Check the signal strength on the LCD.
LCD and Operation Panel
Note• IJ Network Device Setup Utility allows you to diagnose and repair the network status.
Select the link below to download IJ Network Device Setup Utility and install it.
Checking Printer Connection Status Using IJ Network Device Setup Utility
See below for starting up IJ Network Device Setup Utility.
• For Windows:
461

Starting Up IJ Network Device Setup Utility
• For macOS:
Starting Up IJ Network Device Setup Utility
Check7 Make sure of the Wi-Fi channel numbers used for your computer.
You need to have the same Wi-Fi channel number that you are using for the wireless router as your computer.It is normally set in the way that you can use all the Wi-Fi channels. However, when the channels that you areusing are restricted, the Wi-Fi channels do not match.
See the instruction manual provided with your computer and check the Wi-Fi channel number available foryour computer.
Check8 Make sure channel set on wireless router is a usable channel as confirmed inCheck 7.
If it is not, change the channel set on the wireless router.
Check9 Make sure security software's firewall is off.
If your security software's firewall is on, a message may appear warning you that Canon software is attemptingto access the network. If this warning message appears, set security software to always allow access.
If you are using any programs that switch between network environments, check their settings. Someprograms use a firewall by default.
Check10 If printer is connected to an AirPort Base Station via LAN, make sure youuse alphanumeric characters for network name (SSID). (macOS)
If the problem is not resolved, redo setup.
• For Windows:
Perform setup using the Setup CD-ROM or from the web page.
• For macOS:
Perform setup from the web page.
• Positioning:
Make sure there are no obstacles between the printer and the wireless router.
Cannot Connect to a Printer through Wireless Direct
Check1 Check the power status of printer and other devices (smartphone or tablet).
Turn on the printer or devices.
If the power is already turned on, cycle the power switch.
462

Check2 Check printer settings.
Select LAN settings > Wireless Direct > Switch WL Direct in this order and select Yes.
Check3 Check the settings of your device (smartphone/tablet).
Make sure Wi-Fi is enabled on your device.
For details, refer to your device's instruction manual.
Check4 Make sure printer is selected as connection for device (e.g. smartphone ortablet).
Select the network name (SSID) for Wireless Direct specified for the printer as the connection destination fordevices.
Check the destination on your device.
For details, refer to your device's instruction manual or visit the manufacturer's website.
To check the network name (SSID) for Wireless Direct specified for the printer, print out the network settinginformation of the printer.
Printing Network Settings
Check5 Have you entered the proper password specified for the Wireless Direct?
To check the password specified for the printer, print out the network setting information of the printer.
Printing Network Settings
Check6 Make sure the printer is not placed too far away from the device.
If the distance between the printer and device is too far, wireless communication becomes poor. Place theprinter and device close to each other.
Check7 Make sure 5 devices are already connected.
Wireless Direct does not allow more than 5 devices to be connected.
Cannot Print/Scan/Fax through Network
Check1 Make sure the computer is connected to the wireless router.
For more on how to check the computer settings or connection status, see your computer instruction manualor contact its manufacturer.
Check2 If MP Drivers are not installed, install them. (Windows)
Install the MP Drivers using the Setup CD-ROM or install them from the Canon website.
Check3 Make sure wireless router does not restrict which computers can access it.
463

For more on connecting to and setting up your wireless router, see the wireless router instruction manual orcontact its manufacturer.
Note• To check the MAC address or IP address of your computer, see Checking Computer IP Address or MAC
Address.
464

Network Key (Password) Unknown
WPA/WPA2 or WEP Key Set for Wireless Router Unknown, Cannot ConnectSetting an Encryption Key
WPA/WPA2 or WEP Key Set for Wireless Router Unknown, CannotConnect
For more on setting up a wireless router, see the instruction manual provided with the wireless router orcontact its manufacturer. Make sure your computer can communicate with the wireless router.
Note• IJ Network Device Setup Utility allows you to diagnose and repair the network status.
Select the link below to download IJ Network Device Setup Utility and install it.
Checking Printer Connection Status Using IJ Network Device Setup Utility
See below for starting up IJ Network Device Setup Utility.
• For Windows:
Starting Up IJ Network Device Setup Utility
• For macOS:
Starting Up IJ Network Device Setup Utility
Setting an Encryption Key
For more on setting up a wireless router, see the instruction manual provided with the wireless router orcontact its manufacturer. Make sure your computer can communicate with the wireless router.
Note• IJ Network Device Setup Utility allows you to diagnose and repair the network status.
Select the link below to download IJ Network Device Setup Utility and install it.
Checking Printer Connection Status Using IJ Network Device Setup Utility
See below for starting up IJ Network Device Setup Utility.
• For Windows:
Starting Up IJ Network Device Setup Utility
• For macOS:
Starting Up IJ Network Device Setup Utility
465

Selecting WPA, WPA2, or WPA/WPA2 is recommended for security reason. If your wireless router iscompatible with WPA/WPA2, you can also use WPA2 or WPA.
• Using WPA/WPA2 (Windows)
The authentication method, Wi-Fi password, and dynamic encryption type must be identical amongthe wireless router, the printer, and your computer.
Enter the Wi-Fi password configured on the wireless router.
Either TKIP (basic encryption) or AES (secure encryption) is selected automatically as the dynamicencryption method.
For details, see If WPA/WPA2 Details Screen Appears.
Note• This printer supports WPA/WPA2-PSK (WPA/WPA2-Personal) and WPA2-PSK (WPA2-
Personal).
• Using WEP
The length or format of the Wi-Fi password and authentication method must be identical among thewireless router, the printer, and your computer.
To communicate with a wireless router that generates a password automatically, you must set theprinter to use the password generated by the wireless router.
◦ For Windows:
When the WEP Details screen appears after you click Search... on the Network Settings (Wi-Fi)screen in IJ Network Device Setup Utility, follow the on-screen instructions to set the passwordlength, format, and the password to use.
For details, see If WEP Details Screen Appears.
Note• If the printer is connected to an AirPort Base Station via LAN:
If the printer is connected to an AirPort Base Station via a LAN, check the settings in WirelessSecurity of AirPort Utility.
• Select 64 bit if WEP 40 bit is selected for password length in AirPort Base Station.• Select 1 for the password to use. Otherwise, computer will not be able to communicate with
printer via the wireless router.
466

Printer Cannot Be Used After Replacing Wireless Router orChanged Router Settings
When you replace a wireless router, redo the network setup for the printer according to the replaced one.
• For Windows:
Perform setup using the Setup CD-ROM or from the web page.
• For macOS:
Perform setup from the web page.
Note• IJ Network Device Setup Utility allows you to diagnose and repair the network status.
Select the link below to download IJ Network Device Setup Utility and install it.
Checking Printer Connection Status Using IJ Network Device Setup Utility
See below for starting up IJ Network Device Setup Utility.
• For Windows:
Starting Up IJ Network Device Setup Utility
• For macOS:
Starting Up IJ Network Device Setup Utility
If this does not solve the problem, see below.
Cannot Communicate with Printer After Enabling MAC/IP Address Filtering or Encryption Key onWireless RouterWith Encryption On, Cannot Communicate with Printer After Changing Encryption Type at Wireless
Router
Cannot Communicate with Printer After Enabling MAC/IP AddressFiltering or Encryption Key on Wireless Router
Check1 Check wireless router setting.
To check the wireless router setting, see the instruction manual provided with the wireless router or contact itsmanufacturer. Make sure the computer and the wireless router can communicate with each other under thissetting.
467

Check2 If filtering MAC addresses or IP addresses at wireless router, check that MACaddresses or IP addresses for computer, network device, and printer are registered.
Check3 If using WPA/WPA2 key or a password, make sure encryption key forcomputer, network device, and printer matches key set for wireless router.
The length or format of the Wi-Fi password and authentication method must be identical among the wirelessrouter, the printer, and your computer.
For details, see Setting an Encryption Key.
With Encryption On, Cannot Communicate with Printer AfterChanging Encryption Type at Wireless Router
If you change the encryption type for the printer and it subsequently cannot communicate with thecomputer, make sure the encryption type for the computer and the wireless router matches the type setfor the printer.
Cannot Communicate with Printer After Enabling MAC/IP Address Filtering or Encryption Key onWireless Router
468

Other Network Problems
Checking Network Information
Restoring to Factory Defaults
469

Checking Network Information
Checking Printer IP Address or MAC AddressChecking Computer IP Address or MAC AddressChecking Communication Between the Computer, the Printer, and the Wireless RouterChecking Network Setting Information
Checking Printer IP Address or MAC Address
To check the printer's IP Address or MAC address, print out the network settings information.
Printing Network Settings
For Windows, you can check the network setting information on the computer screen.
Canon IJ Network Device Setup Utility Screen
Checking Computer IP Address or MAC Address
To check the IP Address or MAC address of your computer, follow the instructions below.
• For Windows:
1. Select Command Prompt as shown below.
In Windows 10, right-click Start and select Command Prompt.
In Windows 8.1, select Command Prompt from the Start screen. If Command Prompt is notdisplayed on the Start screen, select the Search charm and search for "Command Prompt".
In Windows 7, click Start > All Programs > Accessories > Command Prompt.
2. Enter "ipconfig/all" and press Enter.
The IP address and MAC address of your computer appear. If your computer is not connected to anetwork, the IP address does not appear.
• For macOS:
1. Select System Preferences from Apple menu, and then click Network.
2. Make sure network interface used by computer is selected, and then click Advanced.
Make sure Wi-Fi is selected as network interface.
3. Click TCP/IP to check the IP address, or click Hardware to check the MAC address.
470

Checking Communication Between the Computer, the Printer, and theWireless Router
Perform a ping test to check if communication is taking place.
• For Windows:
1. Select Command Prompt as shown below.
In Windows 10, right-click Start and select Command Prompt.
In Windows 8.1, select Command Prompt from the Start screen. If Command Prompt is notdisplayed on the Start screen, select the Search charm and search for "Command Prompt".
In Windows 7, click Start > All Programs > Accessories > Command Prompt.
2. Type the ping command and press Enter.
The ping command is as follows: ping XXX.XXX.XXX.XXX
"XXX.XXX.XXX.XXX" is the IP address of the target device.
If communication is taking place, a message like the one shown below appears.
Reply from XXX.XXX.XXX.XXX: bytes=32 time=10ms TTL=255
If Request timed out appears, communication is not taking place.
• For macOS:
1. Start Network Utility as shown below.
Select Computer from Go menu of Finder, double-click Macintosh HD > System > Library >CoreServices > Applications > Network Utility.
2. Click Ping.
3. Make sure Send only XX pings (XX are numbers) is selected.
4. Enter IP address of target printer or target wireless router in Enter the networkaddress to ping.
5. Click Ping.
"XXX.XXX.XXX.XXX" is the IP address of the target device.
A message such as the following appears.
64 bytes from XXX.XXX.XXX.XXX: icmp_seq=0 ttl=64 time=3.394 ms
64 bytes from XXX.XXX.XXX.XXX: icmp_seq=1 ttl=64 time=1.786 ms
64 bytes from XXX.XXX.XXX.XXX: icmp_seq=2 ttl=64 time=1.739 ms
471

--- XXX.XXX.XXX.XXX ping statistics ---
3 packets transmitted, 3 packets received, 0% packet loss
If packet loss is 100%, communication is not taking place. Otherwise, computer is communicatingwith target device.
Checking Network Setting Information
To check the printer's network settings information, print out the network settings information.
Printing Network Settings
472

Restoring to Factory Defaults
Important• For Windows:
Initialization erases all network settings on the printer, making printing, scanning, or faxing operationfrom a computer over a network impossible. To use the printer over a network again after restoring it tothe factory defaults, redo setup using the Setup CD-ROM or from the web page.
• For macOS:
Initialization erases all network settings on the printer, making printing, scanning, or faxing operationfrom a computer over a network impossible. To use the printer over a network again after restoring it tothe factory defaults, redo setup from the web page.
Initialize the network setting using the printer's operation panel.
Reset setting
473

Problems while Printing/Scanning from Smartphone/Tablet
Cannot Print/Scan from Smartphone/Tablet
474

Cannot Print/Scan from Smartphone/Tablet
If you cannot print/scan from your smartphone/tablet, it is possible that your smartphone/tablet cannotcommunicate with the printer.
Check the cause of your problem according to the connection method.
Cannot Communicate with Printer over Wireless LANCannot Communicate with Printer while It Is in Wireless Direct
Note• For problems on printing with other connection methods or more on performing settings of each
connection method:
Using PIXMA/MAXIFY Cloud LinkPrinting with Google Cloud PrintPrinting from iOS Device (AirPrint)
Cannot Communicate with Printer over Wireless LAN
If your smartphone/tablet cannot communicate with the printer, check the following.
Check1 Check the power status of printer, network devices (e.g. wireless router), andsmartphone/tablet.
• Turn on the printer or devices.• If the power is already turned on, cycle the power switch.• It may be necessary to resolve wireless router problems (e.g. update interval of a key, problems of DHCP
update interval, energy saving mode, etc.) or to update the wireless router firmware.
For details, contact the manufacturer of your wireless router.
Check2 Check the settings of your device (smartphone/tablet).
Make sure Wi-Fi is enabled on your device.
For details, refer to your device's instruction manual.
Check3 Is the printer connected to the wireless router?
Use the icon on the LCD to check the connection status between the printer and wireless router. If the icon is not displayed, Wi-Fi is disabled. Turn on wireless communication on the printer.
Check4 Are network settings of printer identical with those of wireless router?
Make sure the network settings of the printer (e.g. network name (SSID) or network key (password), etc.) areidentical with those of the wireless router.
To check the settings of the wireless router, refer to the instruction manual provided with it or contact itsmanufacturer.
475

To check the current network settings of the printer, print out the network setting information.
Printing Network Settings
Note• IJ Network Device Setup Utility allows you to diagnose and repair the network status.
Select the link below to download IJ Network Device Setup Utility and install it.
Checking Printer Connection Status Using IJ Network Device Setup Utility
See below for starting up IJ Network Device Setup Utility.
• For Windows:
Starting Up IJ Network Device Setup Utility
• For macOS:
Starting Up IJ Network Device Setup Utility
Check5 Are network settings of your smartphone/tablet identical with those of wirelessrouter?
Make sure the network settings of the printer (e.g. network name (SSID) or network key (password), etc.) areidentical with those of the wireless router.
To check the settings of your smartphone/tablet, refer to the instruction manual provided with it.
If the network settings of your smartphone/tablet are not identical with those of the wireless router, change thenetwork settings of it to match with those of the wireless router.
Check6 Make sure the printer is not placed too far away from the wireless router.
If the distance between the printer and wireless router is too far, wireless communication becomes poor. Placethe printer and wireless router close to each other.
Note• Though an antenna is attached to most wireless routers, note that some of them have it inside.
Check7 Make sure wireless signal is strong. Monitor signal status and move printerand wireless router as necessary.
Place the printer and wireless router where there are no obstacles between them. Wireless communicationbetween different rooms or floors is generally poor. Wireless communication can be impeded by buildingmaterials containing metal or concrete. If the printer cannot communicate with the computer over a Wi-Fi dueto a wall, place the printer and the computer in the same room.
In addition, if a device like a microwave oven that emits radio waves of the same frequency bandwidth as awireless router is nearby, it may cause interference. Place the wireless router as far away from interferencesources as possible.
Check the signal strength on the LCD.
LCD and Operation Panel
Note• IJ Network Device Setup Utility allows you to diagnose and repair the network status.
476

Select the link below to download IJ Network Device Setup Utility and install it.
Checking Printer Connection Status Using IJ Network Device Setup Utility
See below for starting up IJ Network Device Setup Utility.
• For Windows:
Starting Up IJ Network Device Setup Utility
• For macOS:
Starting Up IJ Network Device Setup Utility
Cannot Communicate with Printer while It Is in Wireless Direct
If your smartphone/tablet cannot communicate with the printer in the Wireless Direct, check the following.
Check1 Check the power status of printer and other devices (smartphone or tablet).
Turn on the printer or devices.
If the power is already turned on, cycle the power switch.
Check2 Is Wireless Direct enabled?
From the Setup menu screen, select Device settings > LAN settings > Wireless Direct > Switch WLDirect in this order and select Yes.
Check3 Check the settings of your device (smartphone/tablet).
Make sure Wi-Fi is enabled on your device.
For details, refer to your device's instruction manual.
Check4 Make sure printer is selected as connection for device (e.g. smartphone ortablet).
Select the network name (SSID) for Wireless Direct specified for the printer as the connection destination fordevices.
Check the destination on your device.
For details, refer to your device's instruction manual or visit the manufacturer's website.
To check the network name (SSID) for Wireless Direct specified for the printer, print out the network settinginformation of the printer.
Printing Network Settings
Check5 Have you entered the proper password specified for the Wireless Direct?
To check the password specified for the printer, print out the network setting information of the printer.
Printing Network Settings
477

Check6 Make sure the printer is not placed too far away from the device.
If the distance between the printer and device is too far, wireless communication becomes poor. Place theprinter and device close to each other.
Check7 Make sure 5 devices are already connected.
Wireless Direct does not allow more than 5 devices to be connected.
478

Printing Problems
Printer Does Not Print
Ink Does Not Come Out
Paper Does Not Feed Properly/"No Paper" Error
Printout Results Are Unsatisfactory
479

Printer Does Not Print
Check1 Make sure printer is turned on.
If not, make sure the printer is securely plugged in and press ON button to turn on.
The ON lamp flashes while the printer is initializing. Wait until the ON lamp stops flashing and remains lit.
Note• If you are printing large data such as photos or other graphics, printing may take longer to start. The ON
lamp flashes while the computer is processing data and sending it to the printer. Wait until printing starts.
Check2 Make sure printer is properly connected to computer.
If you are using a USB cable, make sure it is securely connected to both the printer and the computer. When theUSB cable is securely plugged in, check the following:
• If you are using a relay device such as a USB hub, disconnect it, connect the printer directly to thecomputer, and retry the printing. If printing starts normally, there is a problem with the relay device. Contactthe vendor of the relay device.
• There could also be a problem with the USB cable. Replace the USB cable and retry the printing.
If you use the printer over a LAN, make sure the printer is correctly set up for network use.
Cannot Find Printer while Using Wi-Fi
Note• IJ Network Device Setup Utility allows you to diagnose and repair the network status. Download it from the
web page.
For WindowsFor macOS
Check3 Make sure paper settings match information set for cassette.
If the paper settings do not match the information set for the cassette, an error message appears on the LCD.Follow the instructions on the LCD to solve the problem.
Note• You can select whether the message which prevents misprinting is displayed.
• To change the message view setting when printing or copying using the printer's operation panel:
Feed settings
• To change the message view setting when printing using the printer driver:
Changing the Printer Operation Mode (Windows)
480
Changing the Printer Operation Mode (macOS)
Check4 If printing from a computer, delete jobs stuck in print queue.
• For Windows:
Deleting the Undesired Print Job
• For macOS:
Deleting the Undesired Print Job
Check5 Is your printer's printer driver selected when printing?
The printer will not print properly if you are using a printer driver for a different printer.
• For Windows:
Make sure "Canon XXX series" (where "XXX" is your printer's name) is selected in the Print dialog box.
Note• If multiple printers are registered to your computer, select Set as Default Printer for a printer to make
the one selected by default.
• For macOS:
Make sure your printer's name is selected in Printer in the Print dialog.
Note• If multiple printers are registered to your computer, select Set as Default Printer from System
Preferences > Printers & Scanners for a printer to make the one selected by default.
Check6 Are you trying to print a large data file? (Windows)
If you are trying to print a large file, it takes a long time to start printing.
If the printer does not start printing after a certain period of time, select On for Prevention of Print Data Loss.
For details, refer to Page Setup Tab Description.
Important• Selecting On for Prevention of Print Data Loss may reduce print quality.
• After printing is completed, select Off for Prevention of Print Data Loss.
Check7 If printing from a computer, restart the computer.
Restart the computer and try printing again.
481

Ink Does Not Come Out
Check1 Make sure of the estimated ink levels in the FINE cartridges.
Replace empty FINE cartridges with new ones.
Replacing a FINE Cartridge
Check2 Is the FINE cartridge installed properly?
If the FINE cartridge is not installed securely, ink may not be ejected correctly.
Open the paper output cover and remove the FINE cartridges.
Then install the FINE cartridges again. Push up the FINE cartridge until it clicks into place.
After confirming that the FINE cartridge is installed properly, close the paper output cover.
Check3 Are the print head nozzles clogged?
Print the nozzle check pattern to determine whether the ink ejects properly from the print head nozzles.
For details on printing the nozzle check pattern, print head cleaning, and print head deep cleaning, see If PrintingIs Faint or Uneven.
• If nozzle check pattern is not printed correctly:
After performing the print head cleaning, print the nozzle check pattern and examine the pattern.
• If problem is not resolved after performing print head cleaning twice:
Perform print head deep cleaning.
482

If the problem is not resolved after performing print head deep cleaning, turn off the printer and performprint head deep cleaning again 24 hours later. When you turn the printer off, do not unplug it from the powersupply.
• If problem is not resolved after performing print head deep cleaning twice:
Ink may have run out. Replace the FINE cartridge.
483

Paper Does Not Feed Properly/"No Paper" Error
Check1 Make sure paper is loaded.
Loading Paper
Check2 When loading paper, consider the following.
• When loading two or more sheets of paper, flip through the paper before loading it.
• When loading two or more sheets of paper, align the edges of the sheets before loading the paper.
• When loading two or more sheets of paper, make sure the paper stack does not exceed the paper loadlimit.
However, paper may not feed correctly at the maximum capacity, depending on the type of paper orenvironmental conditions (very high or low temperature and humidity). In such cases, reduce the amount ofpaper you load at a time to less than half of the paper load limit.
• Always load the paper in portrait orientation, regardless of the printing orientation.
• When you load the paper, load the paper with the print side facing DOWN and slide the paper guides toalign with the both sides of the paper.
Loading Paper
• When you load the paper, insert the paper stack until the leading edge touches the far end of the cassette.
Check3 Is paper too thick or curled?
Unsupported Media Types
Check4 When loading envelopes, consider the following.
When printing on envelopes, see Loading Envelopes, and prepare the envelopes before printing.
Once you have prepared the envelopes, load them in portrait orientation. If the envelopes are placed inlandscape orientation, they will not feed properly.
Check5 Is the cassette set properly?
Push the cassette so that the mark on the cassette aligns with the front panel as illustrated below.
484

Check6 Make sure media type and paper size settings match with loaded paper.
Check7 If multiple sheets of plain paper is fed from the printer, select the setting forpreventing double-feed of plain paper.
If multiple sheets of plain paper is fed from the printer, select the setting for preventing double-feed of plain paperusing the operation panel or your computer.
* After printing is finished, disable the setting for preventing double-feed of plain paper; otherwise, the setting isapplied from the next time.
• To set by using the operation panel
Press the Setup button, select Device settings and Print settings in this order, and then set Preventdouble-feed to ON.
Changing Settings from Operation Panel
• To set by using your computer (Windows)
1. Open Canon IJ Printer Assistant Tool.
Maintenance Tab Description
2. Select Select Printer... and select printer you are using from pulldown menu and selectOK.
3. Select Custom Settings.
4. Select the Prevent paper double-feed check box.
5. Select OK on the displayed screen.
6. Select OK.
7. Select OK on the displayed screen.
Check8 Clean paper feed roller.
Cleaning Paper Feed Rollers
485

If the measures above do not solve the problem, contact your nearest Canon service center to request arepair.
486

Printout Results Are Unsatisfactory
If the print results are unsatisfactory due to white streaks, misaligned/distorted lines, or uneven colors, checkthe paper and print quality settings first.
Check1 Do page size and media type settings match size and type of loaded paper?
If these settings do not match, it is not possible to obtain the proper result.
If you are printing a photograph or an illustration, an incorrect paper type setting may reduce the quality of theprintout color.
Also, if you print with an incorrect paper type setting, the printed surface may be scratched.
In borderless printing, uneven coloring may occur depending on the combination of the paper type setting andthe loaded paper.
The method for checking the paper and print quality settings differs depending on what you are using your printerfor.
• Copying
Check the settings using the operation panel.
Setting Items for Copying
• Printing from your computer
Check the settings using the printer driver.
Basic Printing Setup
• Printing from your smartphone/tablet using Canon PRINT Inkjet/SELPHY
Check the settings on Canon PRINT Inkjet/SELPHY.
Print Easily from a Smartphone or Tablet with Canon PRINT Inkjet/SELPHY
Check2 Make sure appropriate print quality is selected (see list above).
Select a print quality suited to the paper and to what you are printing. If you notice blurs or uneven colors,increase the print quality setting and retry the printing.
Check3 If problem is not resolved, check also the sections below.
See also the sections below:
Printouts Are Blank/Blurry or Fuzzy/Inaccurate or Bleeding Colors/Streaks or LinesColors Are UnclearLines Are Misaligned/DistortedPaper Is Smudged / Printed Surface Is ScratchedVertical Line Next to ImageCannot Complete PrintingPart of Page Is Not Printed (Windows)
487

Lines Incomplete or Missing (Windows)Images Incomplete or Missing (Windows)Ink Blots / Paper CurlBack of Paper Is SmudgedUneven or Streaked Colors
If Printed Paper Has Been Discolored
Colors may fade with time if the printed paper is left for a long period of time.
After printing, dry the paper sufficiently, avoid high temperatures, high humidity, and direct sunlight, andstore or display indoors at room temperature and normal humidity.
To avoid direct exposure to air, we recommend that you store the paper in an album, plastic folder, photoframe, etc.
488

Printouts Are Blank/Blurry or Fuzzy/Inaccurate or Bleeding Colors/Streaks or Lines
Printing Is Blurry
Colors Are Wrong
489

White Streaks Appear
Check1 Check paper and print quality settings.
Printout Results Are Unsatisfactory
Check2 Make sure of the estimated ink levels in the FINE cartridges.
Replace empty FINE cartridges with new ones.
Replacing a FINE Cartridge
Check3 Are the print head nozzles clogged?
Print the nozzle check pattern to determine whether the ink ejects properly from the print head nozzles.
For details on printing the nozzle check pattern, print head cleaning, and print head deep cleaning, see If PrintingIs Faint or Uneven.
• If nozzle check pattern is not printed correctly:
After performing the print head cleaning, print the nozzle check pattern and examine the pattern.
• If problem is not resolved after performing print head cleaning twice:
Perform print head deep cleaning.
If the problem is not resolved after performing print head deep cleaning, turn off the printer and performprint head deep cleaning again 24 hours later. When you turn the printer off, do not unplug it from the powersupply.
• If problem is not resolved after performing print head deep cleaning twice:
Ink may have run out. Replace the FINE cartridge.
Check4 When using paper with one printable surface, make sure paper is loaded withprintable side facing down.
Printing on the wrong side of such paper may cause unclear prints or prints with reduced quality.
Load paper with the printable side facing up.
Refer to the instruction manual supplied with the paper for detailed information on the printable side.
490

Check5 Is the FINE cartridge installed properly?
If the FINE cartridge is not installed securely, ink may not be ejected correctly.
Open the paper output cover and remove the FINE cartridges.
Then install the FINE cartridges again. Push up the FINE cartridge until it clicks into place.
After confirming that the FINE cartridge is installed properly, close the paper output cover.
• When copying, see also the sections below:
Check6 Is platen glass or glass of ADF dirty?
Clean the platen glass or the glass of ADF.
Cleaning Platen and Document Cover
Cleaning the ADF (Auto Document Feeder)
Note• If the glass of ADF is dirty, black streaks appear on the paper as shown below.
Check7 Make sure original is properly loaded on platen or ADF.
When you load the original on the platen, load it with the side to be copied facing down.
When you load the original on the ADF, load it with the side to be copied facing up.
Loading Originals
491

Check8 Is copy source a printed paper by printer?
If you use a printout done by this printer as the original, print quality may be reduced depending on the conditionof the original.
Print from the printer directly, or reprint from the computer if you can reprint from it.
492

Colors Are Unclear
Check1 Are the print head nozzles clogged?
Print the nozzle check pattern to determine whether the ink ejects properly from the print head nozzles.
For details on printing the nozzle check pattern, print head cleaning, and print head deep cleaning, see If PrintingIs Faint or Uneven.
• If nozzle check pattern is not printed correctly:
After performing the print head cleaning, print the nozzle check pattern and examine the pattern.
• If problem is not resolved after performing print head cleaning twice:
Perform print head deep cleaning.
If the problem is not resolved after performing print head deep cleaning, turn off the printer and performprint head deep cleaning again 24 hours later. When you turn the printer off, do not unplug it from the powersupply.
• If problem is not resolved after performing print head deep cleaning twice:
Ink may have run out. Replace the FINE cartridge.
Check2 When a FINE cartridge runs out of ink, replace it with a new one.
Replacing a FINE Cartridge
Check3 Is the FINE cartridge installed properly?
If the FINE cartridge is not installed securely, ink may not be ejected correctly.
Open the paper output cover and remove the FINE cartridges.
Then install the FINE cartridges again. Push up the FINE cartridge until it clicks into place.
493

After confirming that the FINE cartridge is installed properly, close the paper output cover.
Note• Printed colors may not match screen colors due to basic differences in the methods used to produce
colors. Color control settings and environmental differences can also affect how colors appear on thescreen. Therefore, colors of printing results may be different from those on the screen.
494

Lines Are Misaligned/Distorted
Check1 Perform print head alignment.
If printed lines are misaligned/distorted or print results are otherwise unsatisfactory, adjust the print headposition.
Aligning the Print Head
Note• If the problem is not resolved after performing the print head alignment, perform print head alignment
manually from your computer.
• For Windows:
Adjusting Print Head Position Manually
• For macOS:
Adjusting Print Head Position
Check2 Check paper and print quality settings.
Printout Results Are Unsatisfactory
Check3 Increase print quality and try printing again.
Increasing the print quality may improve the print result.
495

Paper Is Smudged / Printed Surface Is Scratched
Paper Is Smudged
Smudged Edges Smudged Surface
Printed Surface Is Scratched
Check1 Check paper and print quality settings.
Printout Results Are Unsatisfactory
Check2 Check paper type.
Make sure you are using the right paper for what you are printing.
Supported Media Types
Check3 Correct curl before loading paper.
When using Photo Paper Plus Semi-gloss, even if the sheet is curled, load one sheet at a time as it is. Rollingthis paper in the opposite direction to flatten it may crack the paper surface and reduce the print quality.
We recommend putting unused paper back into the package and storing it flat.
• Plain Paper
Turn the paper over and reload it to print on the other side.
• Other Paper such as envelope
If the paper corners curl more than 0.1 inch / 3 mm (A) in height, the paper may smudge or may not feedproperly. Follow the instructions below to correct the paper curl.
496

1. Roll up paper in opposite direction to paper curl as shown below.
2. Check that paper is now flat.
We recommend printing curl-corrected paper one sheet at a time.
Note• Depending on paper type, the paper may smudge or may not feed properly even if it is not curled inward.
Follow the instructions below to curl the paper outward up to 0.1 inch / 3 mm (B) in height before printing.This may improve the print result.
(C) Print side
We recommend feeding paper that has been curled outward one sheet at a time.
Check4 Set printer to prevent paper abrasion.
Adjusting the setting to prevent paper abrasion will widen the clearance between the print head and the paper. Ifyou notice abrasion even with the media type set correctly to match the paper, set the printer to prevent paperabrasion using the operation panel or the computer.
This may reduce the print speed.
* Once you have finished printing, undo this setting. Otherwise, it will apply to subsequent print jobs.
• From operation panel
Press the Setup button and select Device settings > Print settings in this order, and then set Preventabrasion to ON.
Changing Settings from Operation Panel
• From computer
◦ For Windows:
1. Make sure printer is turned on.
497

2. Open Canon IJ Printer Assistant Tool.
Maintenance Tab Description
3. Select Select Printer... and select printer you are using from pulldown menu and selectOK.
4. Select Custom Settings.
5. Select Prevent paper abrasion check box and click OK.
◦ For macOS:
Adjust the setting to prevent paper abrasion from Remote UI.
Opening Remote UI for Maintenance
Check5 If intensity is set high, reduce intensity setting and try printing again.
If you are printing with a high intensity setting on plain paper, the paper may absorb too much ink and becomewavy, causing paper abrasion.
• Printing from your computer (Windows)
Check the intensity setting in the printer driver.
Adjusting Intensity
• Copying
Setting Items for Copying
Check6 Is platen glass or glass of ADF dirty?
Clean the platen glass or the glass of ADF.
Cleaning Platen and Document Cover
Cleaning the ADF (Auto Document Feeder)
Note• If the glass of ADF is dirty, black streaks appear on the paper as shown below.
Check7 Is paper feed roller dirty?
Clean paper feed roller.
Cleaning Paper Feed Rollers
Check8 Is inside of printer dirty?
498

During duplex printing, ink may stain the inside of the printer, smudging the printout.
Perform bottom plate cleaning to clean inside of printer.
Cleaning Inside the Printer (Bottom Plate Cleaning)
Note• To prevent staining inside the printer, be sure to set the correct paper size.
Check9 Set longer ink drying time.
This allows the printed surface to dry, preventing smudges and scratches.
• For Windows:
1. Make sure printer is turned on.
2. Open Canon IJ Printer Assistant Tool.
Maintenance Tab Description
3. Select Select Printer... and select printer you are using from pulldown menu and selectOK.
4. Select Custom Settings.
5. Drag Ink Drying Wait Time slide bar to set the wait time and click OK.
6. Check message and click OK.
• For macOS:
Set the waiting time using Remote UI.
Changing the Printer Operation Mode
499

Vertical Line Next to Image
Check Is loaded paper size correct?
If the loaded paper is larger than the size you specified, a vertical line may appear in the margin.
Set the paper size to match the loaded paper.
Printout Results Are Unsatisfactory
Note• The direction of the vertical line pattern may vary depending on the image data or the print setting.
• This printer performs automatic cleaning when necessary to keep printouts clean. A small amount of ink isejected for cleaning.
Although the ink is normally ejected onto the ink absorber at the outer edge of the paper, it may get ontothe paper if the loaded paper is larger than the set size.
500

Scanning Problems (Windows)
Scanning Problems
501

Scanning Problems
Scanner Does Not Work
ScanGear (Scanner Driver) Does Not Start
502

Scanner Does Not Work
Check 1 Make sure that your scanner or printer is turned on.
Check 2 Connect the USB cable to a different USB port on the computer.
Check 3 If the USB cable is connected to a USB hub, remove it from the USB hub andconnect it to a USB port on the computer.
Check 4 With network connection, check the connection status and reconnect asneeded.
Check 5 Restart the computer.
503

ScanGear (Scanner Driver) Does Not Start
Check 1 Make sure MP Drivers is installed.
If not installed, install MP Drivers from the Setup CD-ROM or our website.
Check 2 Select your scanner or printer on the application's menu.
Important• If your scanner or printer name is displayed multiple times, select the one that does not include WIA.
Note• The operation may differ depending on the application.• Use the WIA driver when scanning from a WIA-compliant application.
Scanning with WIA Driver
Check 3 Make sure that the application supports TWAIN.
You cannot start ScanGear (scanner driver) from applications not supporting TWAIN.
Check 4 Scan and save images with IJ Scan Utility and open the files in yourapplication.
504

Faxing Problems
Problems Sending Faxes
Problems Receiving Faxes
Telephone Problems
Poor Quality Fax Received
505

Problems Sending Faxes
Cannot Send a Fax
Errors Often Occur When Send a Fax
506

Cannot Send a Fax
Check1 Is power turned on?
• You cannot send faxes if the power is turned off. Press the ON button to turn the power on.• If you unplugged the power cord without turning off the power (the ON lamp is lit), reconnecting it turns on
the power automatically.• If you unplugged the power cord after pressing the ON button to turn off the power (the ON lamp is off),
reconnect it, and then press the ON button to turn on the power.• If the power was turned off due to power failure, etc., the power is automatically turned on when the power
failure is resolved.
Important• Confirm that the ON lamp is off before unplugging the power cord, and then unplug the power cord.
If a power failure occurs or you unplug the power cord, all faxes stored in the printer's memory are deleted.
For details on how to unplug the power cord, see Unplugging the Printer.
Note• If the faxes stored in the printer's memory are deleted by a power failure or unplugging the power cord, the
list of the faxes deleted from the printer's memory (MEMORY CLEAR REPORT) will be printed after turningthe printer on.
Summary of Reports and Lists
Check2 Is document being sent from memory or the fax being received into memory?
When the message for the transmission/reception is displayed on the Fax standby screen, a fax is being sentfrom/received into printer's memory. Wait until the transmission/reception is complete.
Check3 Is printer's memory full?
Delete contents in memory, and then send a fax again.
Document Stored in Printer's Memory
Check4 Is telephone line type set correctly?
Check the telephone line type setting and change it as necessary.
Setting Telephone Line Type
Check5 Is Hook setting set to Disable?
When you send a fax manually, dial the number with Enable selected for Hook setting in Security controlunder Fax settings, or dial the number using the telephone connected to the printer.
507

Fax settings
Check6 Is Dial tone detect set to ON?
Resend the fax after a while.
If you still cannot send the fax, select OFF for Dial tone detect in Adv. FAX settings under Fax settings.
Fax settings
Check7 Is fax number registered correctly in printer's directory?
Check the recipient's fax/telephone number, correct the fax/telephone number registered in the printer'sdirectory, and then send the document again.
Changing Registered Information
Note• You can check the registered information in the printer's directory by printing RECIPIENT TELEPHONE
NUMBER LIST.
Summary of Reports and Lists
Check8 Does an error occur during transmission?
• Ensure that a message is displayed on the Fax standby screen. When a message is displayed on the Faxstandby screen, check the cause.
A Message for Faxing Is Displayed on the LCD
• Print ACTIVITY REPORT and check for an error.
Summary of Reports and Lists
If a transmission error has occurred, see below.
Errors Often Occur When Send a Fax
Check9 Is document loaded properly?
Remove the document, and then reload it on the platen or in the ADF.
Loading Originals
Check10 Does a printer error occur?
Ensure that an error message is displayed on the LCD. When an error message is displayed on the LCD, checkthe cause.
When the error message and support code are displayed, refer to List of Support Code for Error.
When only the error message is displayed, refer to Message (Support Code) Appears.
If you are in a hurry, press the Stop button to close the message, and then send the fax.
Check11 Is telephone line connected correctly?
Reconnect the telephone line cable to the telephone line jack.
Connecting Telephone Line
508

If the telephone line is connected correctly, there is a problem with your telephone line. Contact your telephonecompany and the manufacturer of your terminal adapter or telephone adapter.
509

Errors Often Occur When Send a Fax
Check Check telephone line condition or connection.
If errors occur frequently when using an Internet telephone, it is possible that they can be reduced by selectingReduce for Err reduction (VoIP) on Adv. FAX settings under Fax settings.
For details, see Err reduction (VoIP).
Fax settings
Note• If selecting Reduce does not reduce errors, select Do not reduce.
In addition, when using an Internet telephone, it is possible that errors occur more often if 4800 bps or 9600 bpsis selected for TX start speed. Select 14400 bps or 33600 bps.
If the telephone line or connection is poor when using a general telephone, reducing the transmission start speedmay correct the error.
Reduce the transmission start speed on TX start speed in Adv. communication in Adv. FAX settings underFax settings.
Fax settings
510

Problems Receiving Faxes
Cannot Receive a Fax, Cannot Print a Fax
511

Cannot Receive a Fax, Cannot Print a Fax
Check1 Is power turned on?
• You cannot receive faxes if the power is turned off. Press the ON button to turn the power on.• If you unplugged the power cord without turning off the power (the ON lamp is lit), reconnecting it turns on
the power automatically.• If you unplugged the power cord after pressing the ON button to turn off the power (the ON lamp is off),
reconnect it, and then press the ON button to turn on the power.• If the power was turned off due to power failure, etc., the power is automatically turned on when the power
failure is resolved.
Important• Confirm that the ON lamp is off before unplugging the power cord, and then unplug the power cord.
If a power failure occurs or you unplug the power cord, all faxes stored in the printer's memory are deleted.
For details on how to unplug the power cord, see Unplugging the Printer.
Note• If the faxes stored in the printer's memory are deleted by a power failure or unplugging the power cord, the
list of the faxes deleted from the printer's memory (MEMORY CLEAR REPORT) will be printed after turningthe printer on.
Summary of Reports and Lists
Check2 Is the printer's memory full?
Print the received faxes stored in the printer's memory or save them on the memory card, and then delete themfrom the printer's memory and have the sender resend the faxes.
Document Stored in Printer's Memory
Check3 Does an error occur during reception?
• Ensure that a message is displayed on the Fax standby screen. When a message is displayed on the Faxstandby screen, check the cause.
A Message for Faxing Is Displayed on the LCD
• Print ACTIVITY REPORT and check for an error.
Summary of Reports and Lists
If a reception error has occurred, see below.
Errors Often Occur When Received a Fax
Check4 Is telephone line cable connected to external device jack?
512

Reconnect it to the telephone line jack.
Connecting Telephone Line
Check5 Is paper loaded?
If paper is not loaded, received faxes will be stored in the printer's memory without being printed (MemoryReception). Load paper, and then press the OK button.
Check6 Is a different size of paper from that specified by Page size in FAX papersettings loaded?
If a different size of paper from that specified by Page size is loaded for printing faxes, the received faxes will notbe printed and will be stored in the printer's memory (Memory Reception). Load the same size of paper as thatspecified by Page size, then press the OK button.
Check7 Is amount of remaining ink sufficient to print a fax?
If the amount of remaining ink is insufficient to print, received faxes will be stored in the printer's memory withoutbeing printed (Memory Reception). Replace the FINE cartridge, and then print the faxes in the printer's memory.
Document Stored in Printer's Memory
Note• If the printer was receiving faxes in the fax mode, printing will start automatically after the FINE cartridge is
replaced.
Replacing a FINE Cartridge
• When the printer receives black & white faxes in the printer's memory, if ON is selected for 2-sided in FAXpaper settings, selecting OFF may print the faxes.
• You can set the printer to forcibly print a received fax even if the ink has run out.
Set Print when no ink in Auto print settings under Fax settings to Print.
However, part or all of the fax may not be printed since the ink has run out.
Also, the contents of the fax will not be stored in the printer's memory.
If the ink has already run out, we recommend that Do not print be selected for Received documents inAuto print settings under Fax settings to store the received fax in the printer's memory. After you replacethe FINE cartridge and select Print for Received documents in Auto print settings, the fax stored in theprinter's memory will be printed automatically.
Fax settings
Check8 Is printer set to appropriate receive mode?
Check the receive mode setting and change it to a mode suited to your connection if necessary.
Setting Receive Mode
Check9 Is FAX RX reject set to ON?
Select OFF for FAX RX reject in Security control under Fax settings.
For details, refer to Rejecting Fax Reception.
513

Check10 Are there setting items set Reject in Caller rejection?
If you select Reject for any setting items in Caller rejection in Security control under Fax settings, the printerrejects calls for setting item selected Reject.
For details, refer to Using Caller ID Service to Reject Calls.
514

Telephone Problems
Cannot Dial
Telephone Disconnects During a Call
515

Cannot Dial
Check1 Is telephone line cable connected correctly?
Check that the telephone line cable is connected correctly.
Connecting Telephone Line
Check2 Is telephone line type of printer or external device set correctly?
Check the telephone line type setting and change it as necessary.
Setting Telephone Line Type
516

Telephone Disconnects During a Call
Check Is telephone line cable or telephone (or a peripheral device such as an externaltelephone, an answering device, or a computer modem) connected correctly?
Check that the telephone line cable and the telephone (or a peripheral device such as an external telephone, ananswering device, or a computer modem) are connected correctly.
Connecting Telephone Line
517

Poor Quality Fax Received
Check1 Check scan settings of sender's fax device.
Ask the sender to adjust the scan settings of the fax device.
Check2 Is ECM RX set to OFF?
Select ON for ECM RX in Adv. communication in Adv. FAX settings under Fax settings.
If ECM RX is enabled, the sender's fax device resends the fax after correcting errors automatically.
Fax settings
Check3 Is sender's original document or scanning area of sender's fax device dirty?
The image quality of the fax is mainly determined by the sender's fax device. Contact the sender and ask thesender to check whether the scanning area of the fax device is dirty.
Check4 Is ECM transmission/reception enabled although the line/connection is poor, oris the sender's fax device compatible with ECM?
• Select ON for ECM RX in Adv. communication in Adv. FAX settings under Fax settings.
Fax settings
• Contact the sender and ask the sender to check whether the fax device is set to enable ECM transmission.
If the sender's or recipient's fax device is not compatible with ECM, the fax will be sent/received withoutautomatic error correction.
• Reduce the reception start speed on RX start speed in Adv. communication in Adv. FAX settings underFax settings.
Fax settings
Check5 Did you confirm paper and print quality settings?
Printout Results Are Unsatisfactory
518

Mechanical Problems
Printer Does Not Turn On
Printer Turns Off Unexpectedly or Repeatedly
USB Connection Problems
Cannot Communicate with Printer via USB
Wrong Language Appears in LCD
519

Printer Does Not Turn On
Check1 Press ON button.
Check2 Make sure power plug is securely connected to printer, and then turn on again.
Check3 Unplug printer, leave it for at least 2 minutes, and then plug it back in and turnon again.
If this does not solve the problem, contact your nearest Canon service center to request a repair.
520

Printer Turns Off Unexpectedly or Repeatedly
Check If printer is set to turn off automatically after a certain time, disable this setting.
If you have set the printer to turn off automatically after a specified time, the power will shut off by itself once thattime has elapsed.
• To disable the setting from the operation panel:
1. Check that printer is turned on.
2. Press the Setup button, use the button to select ECO settings, and press the OKbutton.
LCD and Operation Panel
3. Use the button to select EnergySaveSettings and then press the OK button.
4. Use the button to select Auto power off and then press the OK button.
5. Use the button to select OFF and then press the OK button.
The setting to shut off the power automatically is disabled.
• To disable the setting from the computer:
For Windows, use Canon IJ Printer Assistant Tool or ScanGear (scanner driver) to disable the setting.
Follow the procedure below to disable the setting using Canon IJ Printer Assistant Tool.
1. Open Canon IJ Printer Assistant Tool.
Maintenance Tab Description
2. Select Select Printer... and select printer you are using from pulldown menu and selectOK.
3. Select Auto Power.
4. Select Disable for Auto Power Off.
5. Select OK.
6. Select OK on the displayed screen.
521

The setting to shut off the power automatically is disabled.
Note• Refer to below to disable the setting from ScanGear (scanner driver).
Scanner Tab
522

USB Connection Problems
Printing or Scanning Is Slow/Hi-Speed USB Connection Does NotWork/"This device can perform faster" Message Appears (Windows)
If your system environment does not support Hi-Speed USB, the printer operates at the slower speed ofUSB 1.1. In this case, the printer works properly but printing or scanning speed may slow down due to thecommunication speed.
Check Check following to make sure your system environment supports Hi-SpeedUSB connection.
• Does the USB port on your computer support Hi-Speed USB connection?
• Does the USB cable or the USB hub support Hi-Speed USB connection?
Be sure to use a certified Hi-Speed USB cable. We recommend that the USB cable be no longer than 10feet / 3 meters or so.
• Is the Hi-Speed USB driver working properly on your computer?
Make sure the latest Hi-Speed USB driver is working properly and obtain and install the latest version ofthe Hi-Speed USB driver for your computer, if necessary.
Important• For more information, contact the manufacturer of your computer, USB cable, or USB hub.
523
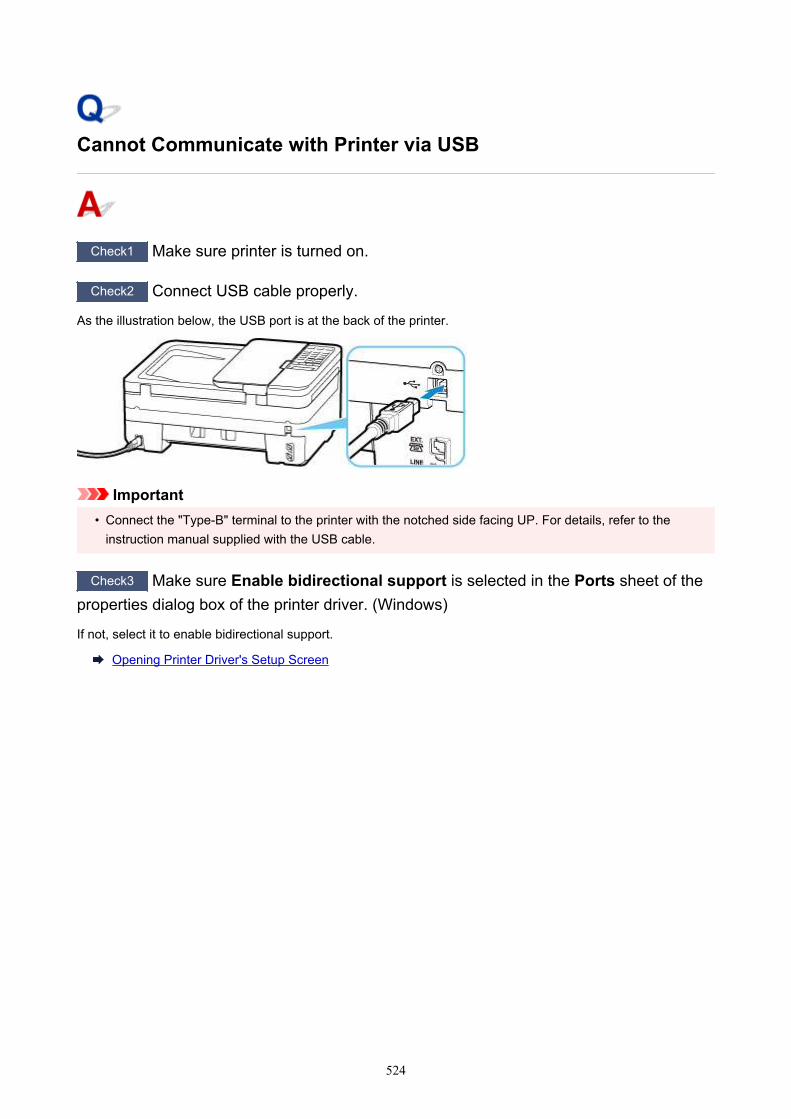
Cannot Communicate with Printer via USB
Check1 Make sure printer is turned on.
Check2 Connect USB cable properly.
As the illustration below, the USB port is at the back of the printer.
Important• Connect the "Type-B" terminal to the printer with the notched side facing UP. For details, refer to the
instruction manual supplied with the USB cable.
Check3 Make sure Enable bidirectional support is selected in the Ports sheet of theproperties dialog box of the printer driver. (Windows)
If not, select it to enable bidirectional support.
Opening Printer Driver's Setup Screen
524

Wrong Language Appears in LCD
Follow the instructions below to select your language.
1. Press Setup button and wait a little.
2. Press button twice and press OK button.
3. Press button 3 times and press OK button.
4. Use button to select language for LCD and press OK button.
The desired language appears on the LCD.
5. Press Stop button.
525

Installation and Download Problems
Failed to MP Drivers Installation (Windows)
Updating MP Drivers in Network Environment (Windows)
526

Failed to MP Drivers Installation (Windows)
• If installation does not start when you insert Setup CD-ROM:
Follow the instructions below to start the installation.
1. Make the following settings.
◦ In Windows 10, click Start > File Explorer, and then click This PC from list on left.
◦ In Windows 8.1, select Explorer icon in Taskbar on Desktop, and then select This PC fromlist on left.
◦ In Windows 7, click Start, and then click Computer.
2. Double-click the CD-ROM icon in the window that appears.
If the contents of the CD-ROM appear, double-click MSETUP4.EXE.
If you cannot install the MP Drivers with the Setup CD-ROM, install them from the Canon website.
Note• If the CD-ROM icon does not appear, try the following:
• Remove the CD-ROM from your computer and reinsert it.
• Restart your computer.
If the icon still does not appear, try a different disc and see if it appears. If it does, there is aproblem with the Setup CD-ROM. Contact your nearest Canon service center to request a repair.
527

• If you cannot get past the Printer Connection screen:
Cannot Proceed beyond Printer Connection Screen
• Other cases:
Reinstall the MP Drivers.
If the MP Drivers were not installed correctly, uninstall the MP Drivers, restart your computer, and thenreinstall the MP Drivers.
Deleting the Unnecessary MP Drivers
Reinstall the MP Drivers with the Setup CD-ROM or install them from the Canon website.
Note• If the installer was stopped due to a Windows error, Windows operation may be unstable, and you
may not be able to install the drivers. Restart your computer and then reinstall the drivers.
528

Updating MP Drivers in Network Environment (Windows)
Download the latest MP Drivers.
Download the latest MP Drivers for your model on the download page of the Canon website.
Uninstall the existing MP Drivers and follow the installation instructions to install the latest MP Drivers thatyou downloaded. In the connection method selection screen, select Use the printer with Wi-Ficonnection. The printer is detected automatically in the network.
Make sure the printer was found, and install the MP Drivers following the on-screen instructions.
Note• The network settings on the printer are not affected, so the printer can be used on the network without
redoing settings.
529

Errors and Messages
An Error Occurs
Message (Support Code) Appears
530

An Error Occurs
If an error occurs in printing, for example if the paper runs out or jams, a troubleshooting message appearsautomatically. Take the appropriate action described in the message.
When an error occurs, a message appears on the computer, or an error code appears on the printer. Forsome errors, a support code (error number) appears on the computer screen.
When a Support Code and a message are displayed on the computerscreen (Windows):
When a Support Code and a message are displayed on the printer(LCD):
For details on how to resolve errors, see List of Support Code for Error.
Note• For details on how to resolve errors without Support Codes, see Message (Support Code) Appears.
531

Message (Support Code) Appears
This section describes some of the errors and messages that may appear.
Note• A support code (error number) is displayed on the computer for some errors. For details on errors that
have support code, see List of Support Code for Error.
If a message appears on the LCD, see below.
Message Appears on LCD
If a message appears on the computer, see below.
Error Regarding Automatic Duplex Printing Is DisplayedError Regarding Power Cord Being Unplugged Is Displayed (Windows)Writing Error/Output Error/Communication Error (Windows)Other Error Messages (Windows)
Message Appears on LCD
Check the message and take an appropriate action.
• Check page size Press [OK]
The size of the loaded paper is different from that specified in the paper size setting.
Load the same size of paper as that specified in the paper size setting and press the OK button.
• Data error Press [OK]
A power failure has occurred or the power cord has been unplugged when the faxes are stored in theprinter's memory.
Important• If a power failure occurs or you unplug the power cord, all faxes stored in the printer's memory
are deleted.• For details on how to unplug the power cord, see Unplugging the Printer.
Press the OK button.
After pressing the OK button, the list of the faxes deleted from the printer's memory (MEMORYCLEAR REPORT) will be printed.
For details, refer to Summary of Reports and Lists.
• Cannot connect to the server; try again
You cannot connect to the server due to some communication error.
Press the OK button to dismiss the error and try again after a while.
532
Error Regarding Automatic Duplex Printing Is Displayed
Check See Automatic Duplex Printing Problems and take the appropriate action.
Error Regarding Power Cord Being Unplugged Is Displayed(Windows)
The printer may have been unplugged while it was on.
Check the error message that appears on the computer and click OK.
The printer starts printing.
See Unplugging the Printer for unplugging the power cord.
Important• If you unplug the power cord, all the faxes stored in the printer's memory are deleted.
Writing Error/Output Error/Communication Error (Windows)
Check1 If the ON lamp is off, make sure printer is plugged in and turn on.
The ON lamp flashes while the printer is initializing. Wait until the ON lamp stops flashing and remains lit.
Check2 Make sure printer is properly connected to computer.
If you are using a USB cable, make sure it is securely connected to both the printer and the computer. Whenthe USB cable is securely plugged in, check the following:
• If you are using a relay device such as a USB hub, disconnect it, connect the printer directly to thecomputer, and retry the printing. If printing starts normally, there is a problem with the relay device.Contact the vendor of the relay device.
• There could also be a problem with the USB cable. Replace the USB cable and retry the printing.
If you use the printer over a LAN, make sure the printer is correctly set up for network use.
Check3 Make sure MP Drivers are installed correctly.
Uninstall the MP Drivers following the procedure described in Deleting the Unnecessary MP Drivers andreinstall them from the Setup CD-ROM or the Canon website.
533

Check4 When printer is connected to your computer with a USB cable, check devicestatus from your computer.
Follow the procedure below to check the device status.
1. Select Control Panel > Programs > Programs and Features.
Note• If the User Account Control screen appears, select Continue.
2. Double-click Universal Serial Bus controllers and USB Printing Support.
If USB Printing Support Properties screen does not appear, make sure the printer is correctly connected to the computer.
Check2 Make sure printer is properly connected to computer.
3. Click General tab and check for a device problem.
If a device error is shown, see Windows Help to resolve it.
Other Error Messages (Windows)
Check If an error message appears outside printer status monitor, check thefollowing:
• "Could not spool successfully due to insufficient disk space"
Delete any unnecessary files to increase the amount of free space on the disk.
• "Could not spool successfully due to insufficient memory"
Close other applications to increase the available memory.
If you still cannot print, restart your computer and retry the printing.
• "Printer driver could not be found"
Uninstall the MP Drivers following the procedure described in Deleting the Unnecessary MP Drivers andreinstall them from the Setup CD-ROM or the Canon website.
• "Could not print Application name - File name"
Try printing again once the current job is complete.
534

List of Support Code for Error
Support code appears on the LCD and your computer screen when errors occur.
A "support code" is an error number, and appears along with an error message.
When an error occurs, check the support code displayed on the LCD and on the computer screen and takethe appropriate action in response.
Support Code Appears on LCD and Computer Screen
• 1000 to 1ZZZ
1003 1200 1203 1250 1300 1303
1304 1309 1310 1401 1403 1430
1485 15A1 15A2 1682 1684 1686
1688 168A 1702 1703 1704 1705
1712 1713 1714 1715 1871 1890
• 2000 to 2ZZZ
2110 2120 2700 2801 2802 2803
2900 2901
• 3000 to 3ZZZ
3402 3403 3404 3405 3406 3407
340D 340E 3410 3411 3412 3413
3434 3435 3436 3437 3438 3439
3440 3441 3446 3447
• 4000 to 4ZZZ
4100 4103 495A
• 5000 to 5ZZZ
5011 5012 5040 5050 5100 5200
5205 5206 5B02 5B03 5B04 5B05
5B12 5B13 5B14 5B15
535

• 6000 to 6ZZZ
6000 6500 6800 6801 6900 6901
6902 6910 6911 6930 6931 6932
6933 6936 6937 6938 6939 693A
6940 6941 6942 6943 6944 6945
6946 6D01
• 7000 to 7ZZZ
7500 7600 7700 7800
• 9000 to 9ZZZ
9500
For paper jam support codes, see also List of Support Code for Error (Paper Jams).
536

List of Support Code for Error (Paper Jams)
If paper jams, remove it following the appropriate procedure as shown below.
• If you can see the jammed paper at the paper output slot:
1300
• If you cannot see the jammed paper at the paper output slot:
◦ If the paper fed from the cassette is jammed:
1303
◦ If the paper is jammed when performing automatic duplex printing:
1304
• If the document is jammed in the ADF:
2801
• If the paper tears and you cannot remove it from the paper output slot or if the paper is jammed insidethe printer:
Paper Is Jammed inside Printer
• Cases other than above:
Other Cases
537

1300
Cause
Paper is jammed in the paper output slot.
What to Do
If you can see the jammed paper at the paper output slot, remove the paper following the procedurebelow.
Important• The printer cannot be turned off while it is sending or receiving a fax, or when the received fax or the
unsent fax is stored in the printer's memory.
Turn off the printer after making sure it has completed sending or receiving all the faxes. Do notunplug when turning off the printer.
If you unplug the power cord, all the faxes stored in the printer's memory are deleted.
1. Slowly pull out paper.
Hold the paper with both hands, and pull it out slowly so as not to tear it.
Note• If you cannot pull out the paper, turn the printer back on without pulling forcibly. The paper may
be ejected automatically.• If paper becomes jammed during printing and you need to turn off the printer to remove it, press
the Stop button to stop the printing before you turn off the printer.• If the paper tears and you cannot remove the jammed paper from the paper output slot, remove
the paper from inside the printer.
Paper Is Jammed inside Printer
• If you cannot pull the paper out from the paper output slot or from inside the printer, try to pullthe paper out from the rear side of the printer.
Removing Jammed Paper from Rear Side
2. Reload paper and press printer's OK button.
538

The printer resumes printing. Reprint the page you were printing if it was not printed properly due tothe paper jam.
If you turned off the printer in step 1, the print data that was sent to the printer is erased. Redo theprinting.
Note• When reloading the paper, make sure you are using suitable paper and loading it correctly.• We recommend using paper sizes other than A5 to print documents with photos or graphics. A5
paper may curl and jam as it leaves the printer.
If the measures above do not solve the problem, contact your nearest Canon service center to request arepair.
539

1303
Cause
Paper is jammed in the transport unit.
What to Do
1. Remove jammed paper.
• If the paper is jammed at the paper output slot:
1300
• If the paper is jammed inside the printer:
Paper Is Jammed inside Printer
• If none of the above is applied, see Removing Jammed Paper from Rear Side to open the rearcover and to remove the paper.
2. Load paper in cassette properly.
When you push the cassette back, grab the tabs at both sides of the front cover and push the cassette
back until the arrow ( ) on the front cover is aligned with edge of the printer.
Loading Paper
3. Perform printing or copying again.
540

1304
Cause
Paper is jammed when performing automatic duplex printing.
What to Do
1. Remove jammed paper.
• If the paper is jammed at the paper output slot:
1300
• If the paper is jammed inside the printer:
Paper Is Jammed inside Printer
• If none of the above is applied, see Removing Jammed Paper from Rear Side to open the rearcover and to remove the paper.
2. Load paper in cassette properly.
When you push the cassette back, grab the tabs at both sides of the front cover and push the cassette
back until the arrow ( ) on the front cover is aligned with edge of the printer.
Loading Paper
3. Perform printing or copying again.
541

Paper Is Jammed inside Printer
If the jammed paper tears and you cannot remove the paper either from the paper output slot or from thetransport unit, or if the jammed paper remains inside the printer, remove the paper following the procedurebelow.
Important• The printer cannot be turned off while it is sending or receiving a fax, or when the received fax or the
unsent fax is stored in the printer's memory.
Turn off the printer after making sure it has completed sending or receiving all the faxes. Do not unplugwhen turning off the printer.
If you unplug the power cord, all the faxes stored in the printer's memory are deleted.
Note• If paper becomes jammed during printing and you need to turn off the printer to remove it, press the
Stop button to stop the printing before you turn off the printer.
1. Turn off printer and unplug it.
2. Open paper output cover.
Remove the paper in the cassette if any.
Important• Do not touch clear film (A).
If you soil or scratch this part by touching it with paper or your hand, it could damage the printer.
3. Check if jammed paper is under FINE cartridge holder.
542

If the jammed paper is under the FINE cartridge holder, move the FINE cartridge holder to the far right orleft, whichever makes it easier to remove the paper.
When moving the FINE cartridge holder, hold the top of the FINE cartridge holder and slide it slowly tothe far right or left.
4. Hold jammed paper firmly in both hands.
If the paper is rolled up, pull out it.
5. Slowly pull out paper, so as not to tear it.
543

6. Make sure all jammed paper is removed.
If the paper tears when you pull out it, a bit of paper may remain in the printer. Check the following andremove any remaining paper.
• Any paper left under the FINE cartridge holder?• Any small bits of paper left in the printer?• Any paper left in the left and right empty spaces (B) in the printer?
7. Close paper output cover.
8. Plug printer back in and turn printer back on.
All jobs in the print queue are canceled. Redo the printing.
Note• When reloading the paper, make sure you are using suitable paper and loading it correctly. If a
paper jam message appears on the LCD of the printer or on your computer screen when youresume printing after removing all the jammed paper, there may be some paper still inside theprinter. Check the printer again for any remaining bits of paper.
If the measures above do not solve the problem, contact your nearest Canon service center to request arepair.
544

Removing Jammed Paper from Rear Side
Important• The printer cannot be turned off while it is sending or receiving a fax, or when the received fax or the
unsent fax is stored in the printer's memory.
Turn off the printer after making sure it has completed sending or receiving all the faxes. Do not unplugwhen turning off the printer.
If you unplug the power cord, all the faxes stored in the printer's memory are deleted.
Note• If paper becomes jammed during printing and you need to turn off the printer to remove it, press Stop
button to stop the printing before you turn off the printer.
1. Turn off printer and unplug it.
2. Retract output tray extension and paper output support, close front cover.
3. Open document cover.
Close the document tray if it is open.
4. Stand printer with right side of front facing down.
Important• Stand the printer on a wide and flat surface such as a desk.
• When you stand the printer, hold it securely and be careful not to hit it on a hard object.
5. Open transport unit cover.
When you open the transport unit cover, support the printer with your hand so that it does not fall down.
545

6. Slowly pull out paper.
When you pull the jammed paper, support the printer with your hand so that it does not fall down.
Note• If the paper is rolled up and it is difficult to remove, grasp the edges of the paper, then remove the
jammed paper.
7. Close transport unit cover.
546

Note• After you close the transport unit cover, take back the printer in original position at once.
8. Plug printer back in and turn printer back on.
If the measures above do not solve the problem, contact your nearest Canon service center to request arepair.
547
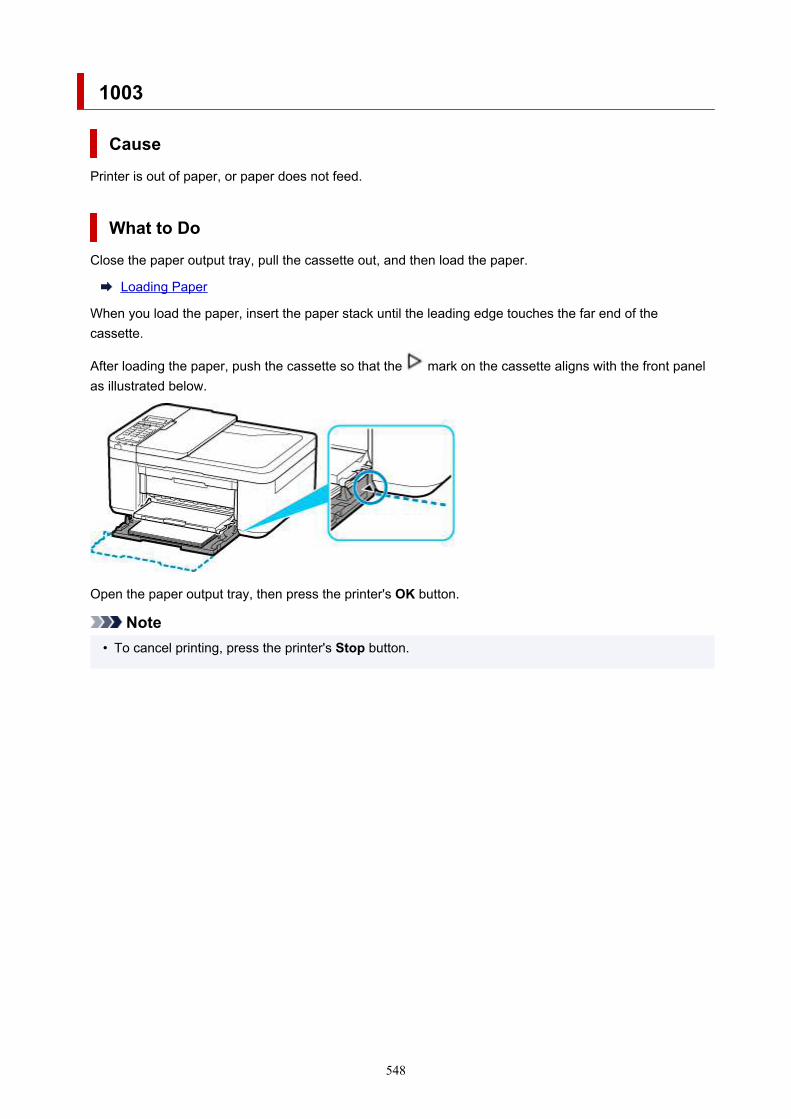
1003
Cause
Printer is out of paper, or paper does not feed.
What to Do
Close the paper output tray, pull the cassette out, and then load the paper.
Loading Paper
When you load the paper, insert the paper stack until the leading edge touches the far end of thecassette.
After loading the paper, push the cassette so that the mark on the cassette aligns with the front panelas illustrated below.
Open the paper output tray, then press the printer's OK button.
Note• To cancel printing, press the printer's Stop button.
548

1200
Cause
Paper output cover is open.
What to Do
Close the paper output cover and wait for a while.
Do not close it while you are replacing a FINE cartridge.
549

1203
Cause
Paper output cover is opened during printing.
What to Do
If paper remains inside the printer, slowly pull out the paper with both hands and close the paper outputcover.
Press the printer's OK button to resolve the error.
The printer ejects one blank sheet of paper and resumes printing from the next paper.
The printer will not reprint the page that was printed when the paper output cover is opened. Retryprinting.
Important• Do not open or close the cover during printing, as this can damage the printer.
550

1250
Cause
Paper output tray is closed.
What to Do
Open the paper output tray to resume printing.
551

1401
Cause
FINE cartridge is not installed.
What to Do
Install the FINE cartridge.
If the error is not resolved, the FINE cartridge may be damaged. Contact your nearest Canon servicecenter to request a repair.
Important• If you unplug the power cord, all the faxes stored in the printer's memory are deleted.
552

1430
Cause
FINE cartridge cannot be recognized.
What to Do
Remove the FINE cartridge and reinstall it.
If the error is not resolved, the FINE cartridge may be damaged. Replace the FINE cartridge with a newone.
If this still does not solve the problem, contact your nearest Canon service center to request a repair.
Important• If you unplug the power cord, all the faxes stored in the printer's memory are deleted.
553

1485
Cause
Appropriate ink cartridge is not installed.
What to Do
Printing cannot be executed because the ink cartridge is not compatible with this printer.
Install the appropriate ink cartridge.
If you want to cancel printing, press the printer's Stop button.
554

1682
Cause
FINE cartridge cannot be recognized.
What to Do
Replace the FINE cartridge.
If the error is not resolved, the FINE cartridge may be damaged. Contact your nearest Canon servicecenter to request a repair.
Important• If you unplug the power cord, all the faxes stored in the printer's memory are deleted.
555

1686
Cause
The ink may have run out.
What to Do
The function for detecting the remaining ink level will be disabled since the ink level cannot be correctlydetected.
If you want to continue printing without this function, press the printer's Stop button for at least 5 seconds.
Canon recommends to use new genuine Canon cartridges in order to obtain optimum qualities.
Please be advised that Canon shall not be liable for any malfunction or trouble caused by continuation ofprinting under the ink out condition.
556

1688
Cause
The ink has run out.
What to Do
Replace the ink cartridge and close the paper output cover.
If printing is in progress and you want to continue printing, press the printer's Stop button for at least 5seconds with the ink cartridge installed. Then printing can continue under the ink out condition.
The function for detecting the remaining ink level will be disabled.
Replace the empty ink cartridge immediately after the printing. The resulting print quality is notsatisfactory, if printing is continued under the ink out condition.
557

168A
Cause
FINE cartridge is not installed properly, or FINE cartridge not compatible with this printer is installed.
What to Do
Retract the output tray extension and the paper output support, open the paper output cover, and thenremove the FINE cartridges.
Make sure the FINE cartridge compatible with the printer is installed.
Then install the FINE cartridges again.
Replacing a FINE Cartridge
Push up the FINE cartridge until it clicks into place.
After installing, close the paper output cover.
558

1890
Cause
Protective material or tape may still be attached to FINE cartridge holder.
What to Do
Open the paper output cover, then confirm that the protective material or the tape does not remainattached to the FINE cartridge holder.
If you find the protective material or the tape remains attached, remove it, then close the paper outputcover.
If this does not solve the problem, contact your nearest Canon service center to request a repair.
559

2110
Cause
Paper settings for printing or copying do not match cassette paper information set on printer.
Note• See below for the correct correspondence between paper settings made on the printer driver or on
the LCD.
Paper Settings on the Printer Driver and the Printer (Media Type) (Windows)Paper Settings on the Printer Driver and the Printer (Paper Size) (Windows)
• For copying, make the copy paper settings to match cassette paper information set on the printer.• See below for details on cassette paper information set on the printer.
Paper Settings
If the print or copy paper settings do not match cassette paper information set on the printer, as shownbelow, a message appears on the LCD.
• Print settings specified on the printer driver:
Paper size: A5
Media type: Plain paper
• Cassette paper information set on the printer:
Paper size: A4
Media type: Plain paper
What to Do
Press the printer's OK button to display the screen below.
Select the appropriate action.
Note• Depending on settings, some of the options below may not appear.
Use cass. settingsSelect this option to print or copy onto the paper in the cassette without changing the paper settings.
For example, if the print or copy paper setting is A5, and cassette paper information is set to A4, theA5 size setting is used to print or copy onto the paper in the cassette.
Replace the paperSelect this option to print after changing the paper in the cassette.
560

For example, if the print or copy paper setting is A5, and cassette paper information is set to A4,change the paper in the cassette to A5 paper and proceed with printing or copying.
Once you have inserted the cassette after changing the paper, the screen for setting cassette paperinformation appears. Set paper information for the paper in the cassette.
Note• If you do not know what paper information to set, press the Back button. The previous screen
appears, showing the paper size and media type. Check the paper settings and set them as cassettepaper information.
• See below for the correct correspondence between paper settings made on the printer driver or onthe LCD.
Paper Settings on the Printer Driver and the Printer (Media Type) (Windows)Paper Settings on the Printer Driver and the Printer (Paper Size) (Windows)
CancelCancels printing.
Select this option when you want to change the print or copy paper settings. Change the papersettings and retry printing.
Note• To suppress the misprint prevention message, change the setting as described below. When you
suppress the message, the printer uses the paper settings for printing or copying onto the paper inthe cassette regardless of whether or not the paper matches these settings.
• To change the message view setting when printing or copying using the operation panel of theprinter:
Feed settings
• To change the message view setting when printing using the printer driver:
Changing the Printer Operation Mode (Windows)Changing the Printer Operation Mode (macOS)
561

2900
Cause
Scanning print head alignment sheet failed.
What to Do
Press the printer's OK button and check the following.
• Make sure the print head alignment sheet is set in the correct position and orientation on the platen.• Make sure the platen and the print head alignment sheet are not dirty.• Make sure the loaded paper is correct.
For print head alignment, load A4 or Letter-sized plain paper.
• Make sure the print head nozzle is not clogged.
Check the print head condition by printing the nozzle check pattern.
After checking the above, start over auto print head alignment from the beginning.
If the error is still not resolved, try manual print head alignment.
562

2901
Cause
Print head alignment pattern has been printed and printer is waiting to scan sheet.
What to Do
Scan the printed alignment pattern.
1. Load print head alignment sheet on platen.
Place the printed side down and align the mark in the upper left corner of the sheet with the
alignment mark .
2. Slowly close the document cover and press printer's Black or Color button.
The printer starts scanning the print head alignment sheet, and automatically adjusts the print headposition.
563

4103
Cause
Cannot perform printing with current print settings.
What to Do
Press the printer's Stop button to cancel printing.
Then change the print settings and retry printing.
564

5011
Cause
Printer error has occurred.
What to Do
Turn off printer and unplug it.
Plug in the printer again and turn it back on.
If this does not solve the problem, contact your nearest Canon service center to request a repair.
Important• If you unplug the power cord, all the faxes stored in the printer's memory are deleted.
565
5012
Cause
Printer error has occurred.
What to Do
Turn off printer and unplug it.
Plug in the printer again and turn it back on.
If this does not solve the problem, contact your nearest Canon service center to request a repair.
Important• If you unplug the power cord, all the faxes stored in the printer's memory are deleted.
566

5100
Cause
Printer error has occurred.
What to Do
Cancel printing and turn off the printer.
Check the following:
• Make sure FINE cartridge holder motion is not impeded by stabilizer, jammed paper, etc.
Remove any impediment.
• Make sure the FINE cartridges are properly installed.
Push up the FINE cartridge until it clicks into place.
Turn the printer back on.
If this does not solve the problem, contact your nearest Canon service center to request a repair.
Important• When clearing an impediment to FINE cartridge holder motion, be careful not to touch clear film (A).
If you soil or scratch this part by touching it with paper or your hand, it could damage the printer.
• If you unplug the power cord, all the faxes stored in the printer's memory are deleted.
567

5200
Cause
Printer error has occurred.
What to Do
Turn off printer and unplug it.
Plug in the printer again and turn it back on.
If this does not solve the problem, contact your nearest Canon service center to request a repair.
Important• If you unplug the power cord, all the faxes stored in the printer's memory are deleted.
568

5B02
Cause
Printer error has occurred.
What to Do
Contact your nearest Canon service center to request a repair.
Important• If you unplug the power cord, all the faxes stored in the printer's memory are deleted.
Note• In the case of warnings or errors caused by remaining ink levels, the printer cannot print or scan.
569

6000
Cause
Printer error has occurred.
What to Do
If the paper is jammed, remove it depending on the jammed location and cause.
List of Support Code for Error (Paper Jams)
Turn off printer and unplug it.
Plug in the printer again and turn it back on.
If this does not solve the problem, contact your nearest Canon service center to request a repair.
Important• If you unplug the power cord, all the faxes stored in the printer's memory are deleted.
570