Embed Size (px)
Citation preview

Th
Technical Report
NetApp and Microsoft Virtualization: Solution and Implementation Guide Microsoft Business Unit, NetApp March 2011 | TR-3701
ABSTRACT This document provides technical insight into the unique value propositions of virtual storage solutions from NetApp® for a Microsoft® Hyper-V™ environment that can help reduce costs, increase storage utilization, increase fault tolerance, and address the challenges associated with backup and restore in virtual infrastructures. It also provides step-by-step guidance on how to configure a Microsoft Windows® Server 2008 Hyper-V solution on NetApp storage.

2 NetApp and Microsoft Virtualization: Solution and Implementation Guide
TABLE OF CONTENTS
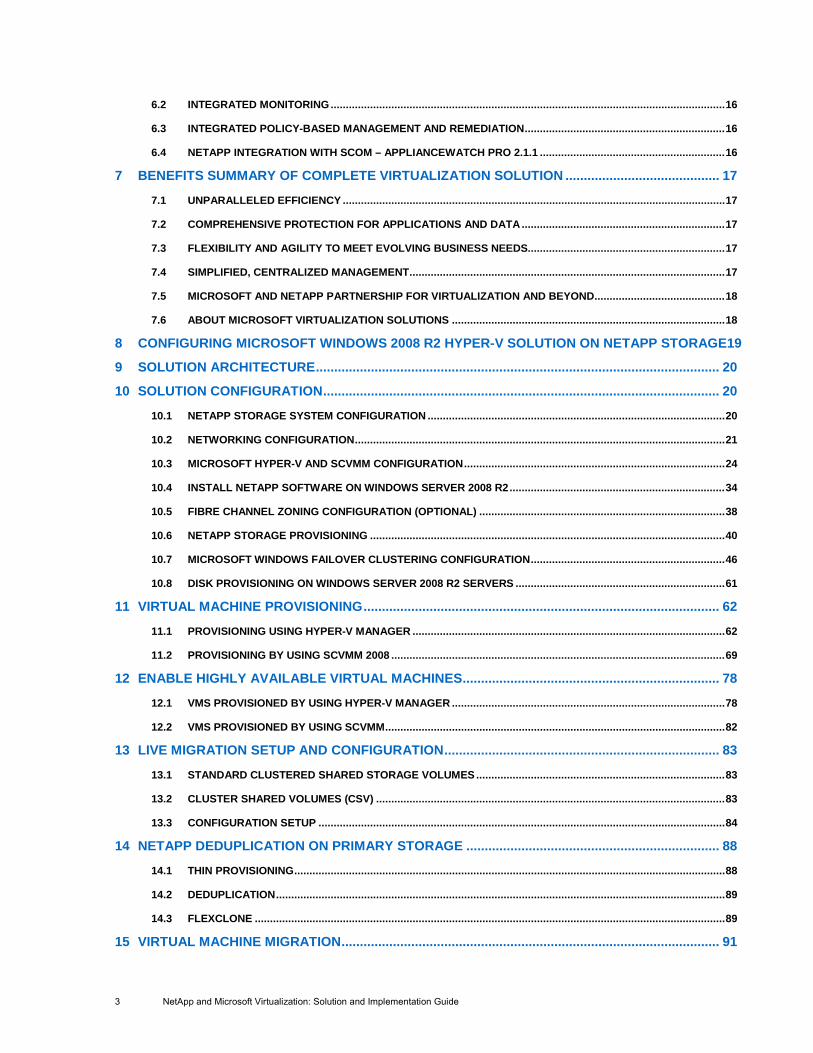
1 INTRODUCTION .................................................................................................................................... 5 2 MICROSOFT VIRTUALIZATION AND NETAPP STORAGE TECHNOLOGY ..................................... 5 3 UNPARALLELED EFFICIENCY ............................................................................................................ 6
3.1 MANAGE MORE WITH LESS ................................................................................................................................... 6 3.2 REDUCE COSTS ....................................................................................................................................................... 7 3.3 MICROSOFT’S ONE-STOP APPROACH TO SERVER VIRTUALIZATION .............................................................. 7 3.4 HARDWARE COSTS ................................................................................................................................................. 7 3.5 MANAGEMENT COSTS ............................................................................................................................................ 8 3.6 OVERHEAD COSTS .................................................................................................................................................. 8 3.7 ADDITIONAL STORAGE EFFICIENCIES.................................................................................................................. 8 3.8 DEDUPLICATION ...................................................................................................................................................... 8 3.9 OPEN ARCHITECTURE ............................................................................................................................................ 9
4 COMPREHENSIVE PROTECTION FOR APPLICATIONS AND DATA ............................................... 9 4.1 STORAGE RELIABILITY ........................................................................................................................................... 9 4.2 DUAL-PARITY RAID ................................................................................................................................................. 9 4.3 BACKUP AND RESTORE ....................................................................................................................................... 10 4.4 FAST, SPACE-EFFICIENT COPIES ........................................................................................................................ 10 4.5 POLICY-BASED APPLICATION BACKUP ............................................................................................................. 10 4.6 POLICY-BASED VIRTUAL MACHINE BACKUP ..................................................................................................... 10 4.7 BUSINESS CONTINUITY ........................................................................................................................................ 11 4.8 REDUNDANT I/O PATHS ........................................................................................................................................ 11 4.9 NETWORK LOAD BALANCING .............................................................................................................................. 11 4.10 HIGH AVAILABILITY WITH LOCAL CLUSTERING ................................................................................................ 11 4.11 HIGH AVAILABILITY WITH STRETCH CLUSTERING ........................................................................................... 11 4.12 LONG-DISTANCE DISASTER RECOVERY ............................................................................................................ 12 4.13 DISASTER RECOVERY TESTING .......................................................................................................................... 13
5 AGILITY AND FLEXIBILITY TO MEET EVOLVING BUSINESS NEEDS .......................................... 13 5.1 INSTANT SCALABILITY AND RAPID ROLLOUTS................................................................................................. 13 5.2 FLEXIBLE PROVISIONING ..................................................................................................................................... 13 5.3 FAST AND COST-EFFECTIVE DEPLOYMENT OF TEST ENVIRONMENTS ......................................................... 14 5.4 ACCELERATED VIRTUAL DESKTOP PROVISIONING AND PERFORMANCE .................................................... 14 5.5 “ALWAYS ON” APPLICATION AND DATA MOBILITY .......................................................................................... 14 5.6 ELIMINATE PLANNED DOWNTIME AND GAIN ONLINE WORKLOAD BALANCING ........................................... 15
6 SIMPLIFIED, CENTRALIZED MANAGEMENT ................................................................................... 15 6.1 MICROSOFT SYSTEM CENTER ............................................................................................................................. 15
3 NetApp and Microsoft Virtualization: Solution and Implementation Guide
6.2 INTEGRATED MONITORING .................................................................................................................................. 16 6.3 INTEGRATED POLICY-BASED MANAGEMENT AND REMEDIATION .................................................................. 16 6.4 NETAPP INTEGRATION WITH SCOM – APPLIANCEWATCH PRO 2.1.1 ............................................................. 16
7 BENEFITS SUMMARY OF COMPLETE VIRTUALIZATION SOLUTION .......................................... 17 7.1 UNPARALLELED EFFICIENCY .............................................................................................................................. 17 7.2 COMPREHENSIVE PROTECTION FOR APPLICATIONS AND DATA ................................................................... 17 7.3 FLEXIBILITY AND AGILITY TO MEET EVOLVING BUSINESS NEEDS................................................................. 17 7.4 SIMPLIFIED, CENTRALIZED MANAGEMENT ........................................................................................................ 17 7.5 MICROSOFT AND NETAPP PARTNERSHIP FOR VIRTUALIZATION AND BEYOND........................................... 18 7.6 ABOUT MICROSOFT VIRTUALIZATION SOLUTIONS .......................................................................................... 18
8 CONFIGURING MICROSOFT WINDOWS 2008 R2 HYPER-V SOLUTION ON NETAPP STORAGE19 9 SOLUTION ARCHITECTURE .............................................................................................................. 20 10 SOLUTION CONFIGURATION ............................................................................................................ 20
10.1 NETAPP STORAGE SYSTEM CONFIGURATION .................................................................................................. 20 10.2 NETWORKING CONFIGURATION .......................................................................................................................... 21 10.3 MICROSOFT HYPER-V AND SCVMM CONFIGURATION ...................................................................................... 24 10.4 INSTALL NETAPP SOFTWARE ON WINDOWS SERVER 2008 R2 ....................................................................... 34 10.5 FIBRE CHANNEL ZONING CONFIGURATION (OPTIONAL) ................................................................................. 38 10.6 NETAPP STORAGE PROVISIONING ..................................................................................................................... 40 10.7 MICROSOFT WINDOWS FAILOVER CLUSTERING CONFIGURATION ................................................................ 46 10.8 DISK PROVISIONING ON WINDOWS SERVER 2008 R2 SERVERS ..................................................................... 61
11 VIRTUAL MACHINE PROVISIONING ................................................................................................. 62 11.1 PROVISIONING USING HYPER-V MANAGER ....................................................................................................... 62 11.2 PROVISIONING BY USING SCVMM 2008 .............................................................................................................. 69
12 ENABLE HIGHLY AVAILABLE VIRTUAL MACHINES ...................................................................... 78 12.1 VMS PROVISIONED BY USING HYPER-V MANAGER .......................................................................................... 78 12.2 VMS PROVISIONED BY USING SCVMM ................................................................................................................ 82
13 LIVE MIGRATION SETUP AND CONFIGURATION ........................................................................... 83 13.1 STANDARD CLUSTERED SHARED STORAGE VOLUMES .................................................................................. 83 13.2 CLUSTER SHARED VOLUMES (CSV) ................................................................................................................... 83 13.3 CONFIGURATION SETUP ...................................................................................................................................... 84
14 NETAPP DEDUPLICATION ON PRIMARY STORAGE ..................................................................... 88 14.1 THIN PROVISIONING .............................................................................................................................................. 88 14.2 DEDUPLICATION .................................................................................................................................................... 89 14.3 FLEXCLONE ........................................................................................................................................................... 89
15 VIRTUAL MACHINE MIGRATION ....................................................................................................... 91
4 NetApp and Microsoft Virtualization: Solution and Implementation Guide
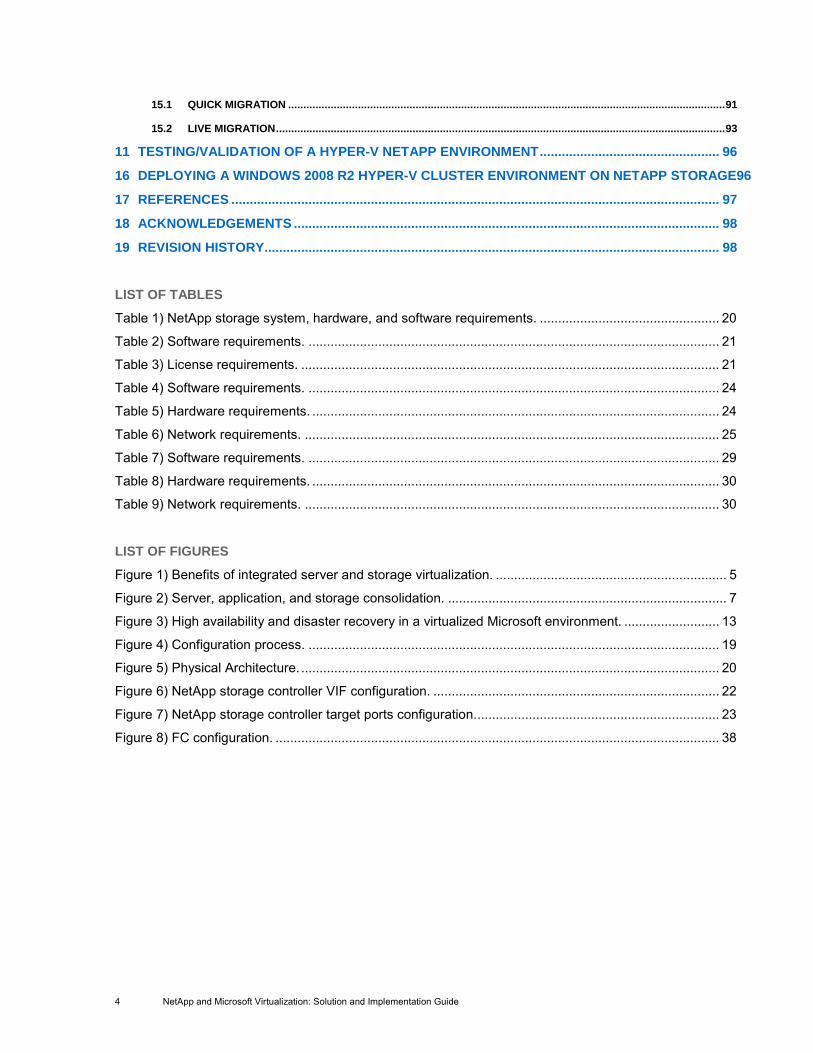
15.1 QUICK MIGRATION ................................................................................................................................................ 91 15.2 LIVE MIGRATION .................................................................................................................................................... 93
11 TESTING/VALIDATION OF A HYPER-V NETAPP ENVIRONMENT ................................................. 96 16 DEPLOYING A WINDOWS 2008 R2 HYPER-V CLUSTER ENVIRONMENT ON NETAPP STORAGE96 17 REFERENCES ..................................................................................................................................... 97 18 ACKNOWLEDGEMENTS .................................................................................................................... 98 19 REVISION HISTORY............................................................................................................................ 98
LIST OF TABLES
Table 1) NetApp storage system, hardware, and software requirements. ................................................. 20 Table 2) Software requirements. ................................................................................................................ 21 Table 3) License requirements. .................................................................................................................. 21 Table 4) Software requirements. ................................................................................................................ 24 Table 5) Hardware requirements. ............................................................................................................... 24 Table 6) Network requirements. ................................................................................................................. 25 Table 7) Software requirements. ................................................................................................................ 29 Table 8) Hardware requirements. ............................................................................................................... 30 Table 9) Network requirements. ................................................................................................................. 30
LIST OF FIGURES
Figure 1) Benefits of integrated server and storage virtualization. ............................................................... 5 Figure 2) Server, application, and storage consolidation. ............................................................................ 7 Figure 3) High availability and disaster recovery in a virtualized Microsoft environment. .......................... 13 Figure 4) Configuration process. ................................................................................................................ 19 Figure 5) Physical Architecture. .................................................................................................................. 20 Figure 6) NetApp storage controller VIF configuration. .............................................................................. 22 Figure 7) NetApp storage controller target ports configuration................................................................... 23 Figure 8) FC configuration. ......................................................................................................................... 38
5 NetApp and Microsoft Virtualization: Solution and Implementation Guide
1 INTRODUCTION This guide discusses the integration of Microsoft virtualization technology, specifically Windows 2008 Hyper-V, with various NetApp storage technologies. It also serves as an implementation guide for Microsoft virtualization on NetApp systems.
2 MICROSOFT VIRTUALIZATION AND NETAPP STORAGE TECHNOLOGY Microsoft Windows Server 2008 R2 Hyper-V and System Center provide a robust solution that integrates server virtualization with high-availability clustering, online VM mobility, and centralized management of the server infrastructure. NetApp provides advanced storage technologies to complement and enhance all the benefits offered by a Microsoft virtualization solution while addressing the aforementioned storage-related challenges that can result from server virtualization.
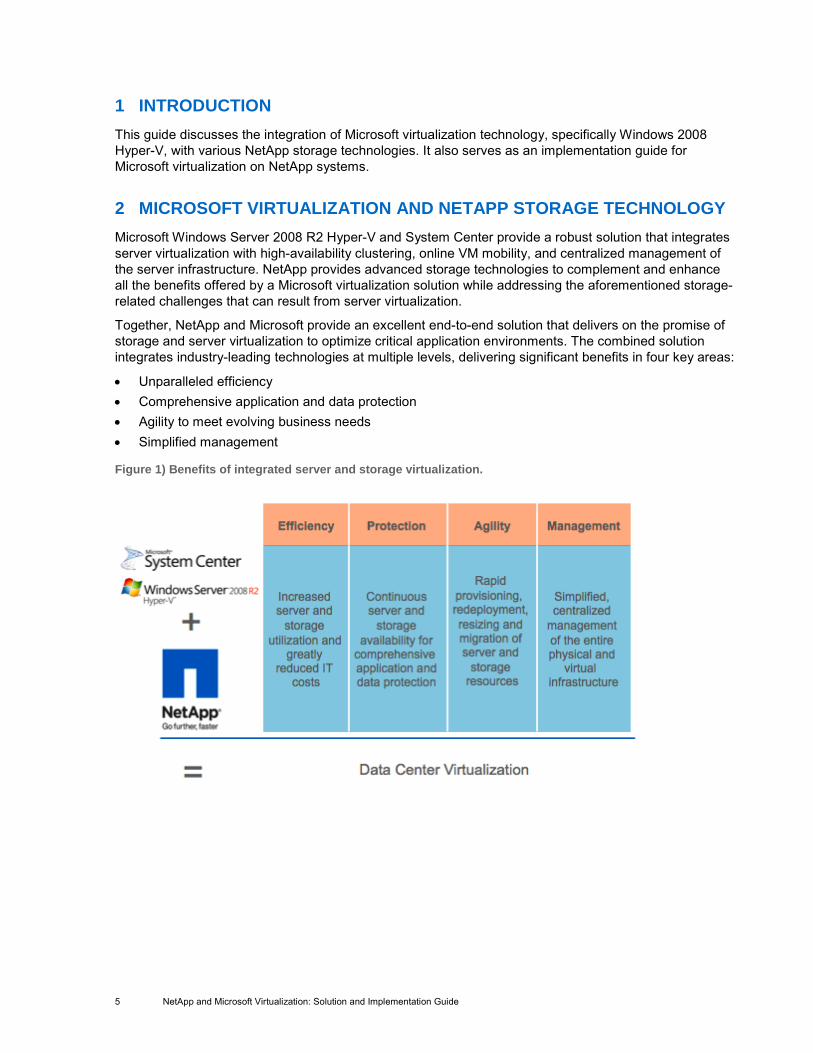
Together, NetApp and Microsoft provide an excellent end-to-end solution that delivers on the promise of storage and server virtualization to optimize critical application environments. The combined solution integrates industry-leading technologies at multiple levels, delivering significant benefits in four key areas:
• Unparalleled efficiency • Comprehensive application and data protection • Agility to meet evolving business needs • Simplified management
Figure 1) Benefits of integrated server and storage virtualization.

6 NetApp and Microsoft Virtualization: Solution and Implementation Guide
3 UNPARALLELED EFFICIENCY Microsoft server virtualization and NetApp storage virtualization together provide a pool of processor, memory, and disk resources that can be dynamically allocated across the entire virtual infrastructure. This pool of resources enables fast consolidation of multiple VMs, business applications, and associated data and significantly boosts server and storage utilization.
3.1 MANAGE MORE WITH LESS
Microsoft Hyper-V, included with Windows Server 2008 R2, enables multiple VMs and associated applications to be consolidated onto a single server. It’s not uncommon for physical Windows servers to be consolidated at a ratio of 10 to 1 or more, providing a tremendous increase in CPU utilization and other efficiencies. For more information, see Virtualization and Consolidation with Hyper-V.
NetApp complements Hyper-V virtualization with advanced storage virtualization capabilities that enable data for multiple applications to reside on a single storage system. Just as CPU and memory resources associated with Hyper-V VMs can be dedicated to specific applications, storage volumes on NetApp systems can be dedicated to specific VMs and applications. The unused capacity for each VM volume is, in essence, ―virtual and can be used by any other VM volume. This dramatically reduces the need for excess capacity across multiple VMs.
Server and storage policies can be established so that unused resources from the common pool can be automatically allocated to VMs within seconds, expanding them when applications need them most, usually without any administrative intervention. This just-in-time approach to server and storage (thin) provisioning delays hardware purchases and avoids the overprovisioning and wasted resources that are characteristic of environments with dedicated, nonvirtualized servers and direct-attached storage. Typical server and storage utilization levels of 5% to 25% can be boosted to 80% or more. For more information, see NetApp Thin Provisioning: Better for Business.
7 NetApp and Microsoft Virtualization: Solution and Implementation Guide
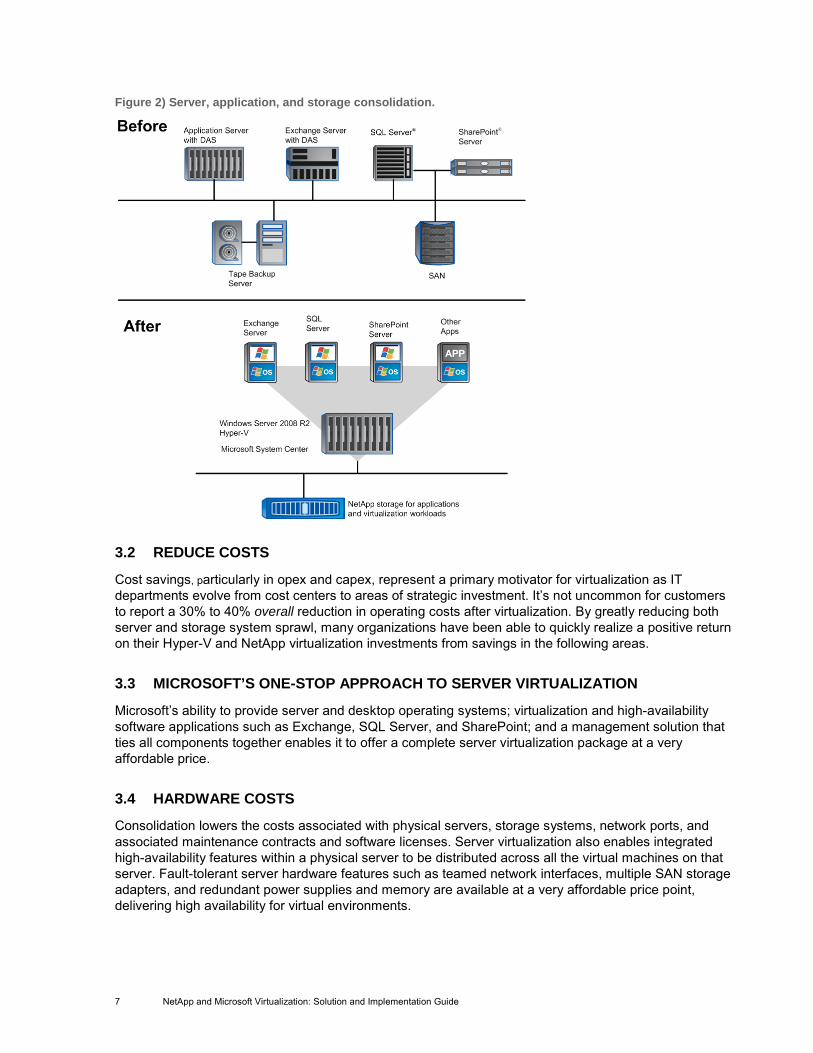
Figure 2) Server, application, and storage consolidation.
3.2 REDUCE COSTS
Cost savings, particularly in opex and capex, represent a primary motivator for virtualization as IT departments evolve from cost centers to areas of strategic investment. It’s not uncommon for customers to report a 30% to 40% overall reduction in operating costs after virtualization. By greatly reducing both server and storage system sprawl, many organizations have been able to quickly realize a positive return on their Hyper-V and NetApp virtualization investments from savings in the following areas.
3.3 MICROSOFT’S ONE-STOP APPROACH TO SERVER VIRTUALIZATION
Microsoft’s ability to provide server and desktop operating systems; virtualization and high-availability software applications such as Exchange, SQL Server, and SharePoint; and a management solution that ties all components together enables it to offer a complete server virtualization package at a very affordable price.
3.4 HARDWARE COSTS
Consolidation lowers the costs associated with physical servers, storage systems, network ports, and associated maintenance contracts and software licenses. Server virtualization also enables integrated high-availability features within a physical server to be distributed across all the virtual machines on that server. Fault-tolerant server hardware features such as teamed network interfaces, multiple SAN storage adapters, and redundant power supplies and memory are available at a very affordable price point, delivering high availability for virtual environments.

8 NetApp and Microsoft Virtualization: Solution and Implementation Guide
3.5 MANAGEMENT COSTS
An environment with fewer hardware resources translates into less manual, time-consuming administration, and lower overall IT staffing expenses. Operational, policy-based automation minimizes costly mistakes and downtime caused by human error, while the use of preestablished VM templates facilitates rapid deployment. In a virtual environment, administrators are not required to update configurations, download software patches, and upgrade firmware for a number of physical machines.
3.6 OVERHEAD COSTS
The elimination of server and storage systems frees up costly floor and rack space, drives down electricity costs for power and cooling, and helps organizations move toward their vision of a green data center. Windows Server 2008 R2 also provides power-optimizing capabilities for additional kilowatt-hour savings. The Core Parking feature, for example, reduces processor power consumption in servers with multicore processors by enabling CPU processes to be consolidated onto the fewest possible processor cores and suspending inactive cores.
3.7 ADDITIONAL STORAGE EFFICIENCIES
In addition to storage virtualization, NetApp offers a variety of storage-efficient technologies that complement Hyper-V environments by enhancing storage utilization and enabling unused storage space to be reclaimed. In fact, analysts such as Gartner have noted that NetApp is the only major storage provider to guarantee that Microsoft virtualization customers will use 50% less storage with its solutions. For more information, see the NetApp Virtualization Guarantee Program.
3.8 DEDUPLICATION
Storing multiple similar OS images in a volume results in redundant data. As data is created, distributed, backed up, and archived, duplicate data objects are stored unabated across all storage tiers. The end result is inefficient use of data storage resources. Data deduplication is an important technology used to control data proliferation, and is particularly useful for virtualized environments in which each VM contains the operating system, patches, software applications, and other data. All of those copies can now be reduced to a single instance, reducing storage-capacity needs by up to 90%. NetApp deduplication is a fundamental component of the Data ONTAP®
operating system and is the first that can be used broadly across many applications, including primary data, backup data, and archived data. In fact NetApp provides the industry’s only solution that can deduplicate primary data. For more information, see NetApp Deduplication.
The following NetApp technologies are also critical to improving storage efficiency and will be covered in subsequent sections:
Snapshot™, which provides instant VM backups of Hyper-V data volumes using almost no disk space
FlexClone®, which enables the use of space-efficient VM clones to set up test environments in minutes
RAID-DP®, which protects against dual disk failures using almost 50% less disk space than RAID 10
Thin provisioning, which provides instant, nondisruptive just-in-time storage provisioning and resizing

9 NetApp and Microsoft Virtualization: Solution and Implementation Guide
3.9 OPEN ARCHITECTURE
The combined Hyper-V and NetApp solution provides an open architectural design that further facilitates consolidation.
• Hyper-V can simultaneously support VMs running different operating systems on the same physical server, including Windows Server 2008 R2, Windows Server 2008, Windows Server 2003, Windows 7, Windows Vista®, Windows XP, and both Red Hat and SUSE Linux®.
• All NetApp systems, from entry level to high end, are based on a single unified storage architecture that simplifies management with common tools and processes for both physical and virtual environments. A single NetApp system supports major storage protocols, including Fibre Channel and iSCSI, and both Fibre Channel and SATA disk drives, and can be used to consolidate all data types. NetApp storage can also cost-effectively replicate data between primary and remote DR sites without requiring identical arrays at each site. NetApp V-Series controllers take openness a step further, enabling disk arrays from major vendors to be managed as if they were NetApp storage systems.
4 COMPREHENSIVE PROTECTION FOR APPLICATIONS AND DATA Virtualization not only improves infrastructure efficiencies, it actually plays a critical role in centralizing and simplifying high availability and disaster recovery. A virtualization solution from NetApp and Microsoft enables enterprises to maintain application and data access throughout practically any imaginable disruptive event. Strong system reliability and integrated business continuity technologies from both companies provide end-to-end protection of the entire physical and virtualized environment—not just a few applications. Hyper-V, in conjunction with other Windows Server 2008 R2 technologies, provides simplified, reliable high availability at the host and application layers, while NetApp adds fast, cost-effective backups and restores, continuous data availability, and rapid disaster recovery at the storage layer. Critical Exchange, SQL Server, and SharePoint applications and data can be available to keep businesses running, even under the most extreme conditions.
4.1 STORAGE RELIABILITY
Storage systems that support virtualization must be robust enough to prevent system downtime and data inaccessibility that can unravel the cost savings associated with server consolidation. In addition to hardware availability features such as hot-swappable disks and dual, hot-pluggable power supplies and cooling fans, NetApp systems offer a collection of system and data availability technologies that provide predictive failure analysis and self-healing elements to support the world’s most demanding data center environments. At the heart of this architecture is the Data ONTAP operating system, optimized specifically for storage and enabling unique technologies that are not available with general-purpose systems. One of these technologies is RAID-DP.
4.2 DUAL-PARITY RAID
RAID-DP (dual parity) is a NetApp disk configuration that can simultaneously support 2 concurrent drive failures, providing up to 10,000 times the availability of a RAID 5 configuration—without any performance overhead. A RAID-DP configuration provides two parity disks instead of the single parity disk offered with RAID 4 or 5. While the extra disk required for RAID-DP does impact overall disk capacity, the enhanced data availability represents an excellent trade-off. RAID-DP also overcomes the read performance penalties typically associated with RAID 5. Other disk configurations, such as RAID 6 or RAID 10 (RAID 1 + 0), can also protect data against two drive failures; however, RAID-DP provides the same level of protection using nearly 50% less disk.
For more information, see NetApp RAID-DP: Dual-Parity RAID 6 Protection Without Compromise.
10 NetApp and Microsoft Virtualization: Solution and Implementation Guide
4.3 BACKUP AND RESTORE
Tight integration of NetApp and Microsoft technologies enables instant, policy-based backups of Windows-based infrastructures with application-consistent restores.
4.4 FAST, SPACE-EFFICIENT COPIES
NetApp offers patented Snapshot technology that eliminates shrinking backup windows and avoids the performance limitations of traditional tape or disk-based backup and restore in consolidated virtualized environments. A Snapshot copy is a point-in-time image of a file system, representing a backup copy of data that can be taken as frequently as desired and recovered as needed—while systems and applications remain online. After the initial backup, subsequent Snapshot-based backups only need to capture pointers to changed data blocks in the file system, which require very little disk space. NetApp Snapshot copies thereby eliminate the need for secondary storage to accommodate even hundreds of copies of Hyper-V VM data. And since no data is actually moved, there is no performance penalty.
NetApp Snapshot, the industry’s first point-in-time copy technology, is still the fastest and most disk-efficient—and the only solution that doesn’t have a negative impact on system performance, so CPU cycles can be used for virtualization. Hyper-V VM data can be restored from a NetApp Snapshot copy at the file, folder, directory, or multi-terabyte file system level, in minutes, at the touch of a button. The ability to back up or recover an entire virtual infrastructure in seconds, without having to purchase additional storage, makes Snapshot a particularly important and complementary technology for virtual environments. For more information, see NetApp Snapshot Technology.
4.5 POLICY-BASED APPLICATION BACKUP
NetApp SnapManager® software leverages Snapshot technology to simplify backup and other data management functions for Exchange, SQL Server, and SharePoint applications running on either physical or virtual machines. All SnapManager solutions can be configured with automatic policies that back up data according to a defined schedule, dramatically simplifying and accelerating application recovery. SnapManager integrates with the Microsoft Volume Shadow Copy Service (VSS) framework via the Windows Scheduler to put the application in hot backup mode. A NetApp Snapshot copy then creates an application-consistent backup in just a few seconds, enabling backups to be performed more frequently, without disrupting operations. SnapManager products for Microsoft applications also provide additional functionality such as Exchange backup validation and granular recovery, including the ability to restore individual Exchange mailboxes and even individual e-mails and attachments.
4.6 POLICY-BASED VIRTUAL MACHINE BACKUP
NetApp also offers SnapManager for Hyper-V, an automation tool with a Microsoft Management Console– based interface that enables near-instantaneous policy-based backup, recovery, replication, and scripting activities for Hyper-V VMs. By grouping VMs into data sets and applying standard backup policies across entire groups, SnapManager for Hyper-V can easily schedule and automate backups for all the VMs in a Microsoft virtual environment. As new VMs are deployed, they are automatically identified within the SnapManager for Hyper-V dashboard and any VMs without a backup policy are flagged.
This tool is Live Migration aware, so backup policies follow VMs as they migrate between nodes in a clustered Hyper-V environment. SnapManager for Hyper-V is also one of the first backup products to support Cluster Shared Volumes (CSV) on Windows Failover Clusters. (CSV is discussed in more detail later in this section.)
The combination of SnapManager for Hyper-V with application-specific SnapManager products provides a tightly integrated management solution that leverages native Windows Server 2008 R2 tools and interfaces and NetApp Snapshot technology to simplify, automate, and accelerate backup and recovery for Microsoft virtual environments.

11 NetApp and Microsoft Virtualization: Solution and Implementation Guide
4.7 BUSINESS CONTINUITY
The Microsoft and NetApp virtualization solution maintains continuous uptime for the entire infrastructure. The combination of hardware redundancy, high availability clustering, and thin data replication technologies support continuous connectivity, synchronized failover, and rapid recovery of VMs, applications, and data in the event of component or system failures or a primary site outage.
4.8 REDUNDANT I/O PATHS
An architecture that provides multiple I/O paths between servers and storage is critical to maintaining data availability. Multipath I/O (MPIO), a Windows Server 2008 R2 feature, provides a network of redundant connections between Hyper-V hosts and shared NetApp storage arrays to maintain connectivity in the event of component failures along an I/O path, including network adapters, switches, or array ports. In addition to enhancing high availability, MPIO complements Hyper-V environments by dynamically balancing I/O traffic across multiple paths and VMs for optimal performance.
4.9 NETWORK LOAD BALANCING
To further optimize scalability, performance, and availability, Hyper-V VMs can also run the Windows Network Load Balancing Service to balance network (IP) traffic across VMs on different servers, detect host failures, and automatically redistribute traffic to operational hosts in the event of such failures.
4.10 HIGH AVAILABILITY WITH LOCAL CLUSTERING
In a local failover cluster configuration all clustered server nodes reside within the same data center. If a node fails, applications and services need to quickly resume on the other node(s) in the cluster. Windows Failover Clustering (WFC) is another key Windows Server 2008 high-availability component that supports failover in Hyper-V environments. WFC enables VMs and applications to automatically fail over to another node in the local cluster in the event of server hardware, operating system, or network failures, minimizing application downtime.
NetApp provides the shared storage required to enable local clustering. With NetApp, storage systems can be simultaneously mapped to multiple Hyper-V hosts, providing continuous data access to support local Hyper-V VM failover.
To further leverage NetApp shared storage for high availability, the Windows Server 2008 R2 clustering feature set also includes Cluster Shared Volumes capability. CSV enables multiple nodes in a WFC to simultaneously access the same LUN. This allows a single LUN to contain multiple VMs, which can be live migrated independently of one another. Concurrent access to truly shared volumes eliminates any delays in accessing data during disaster scenarios, which further helps reduce recovery time.
4.11 HIGH AVAILABILITY WITH STRETCH CLUSTERING
Local failover is an important step in maintaining application availability during failures within a data center, but it can’t protect applications from an outage that affects the entire primary site, such as an earthquake, flood, or fire. In addition to local failover, Windows Failover Clustering also provides automatic VM and application failover from the primary server node to a secondary node or nodes located at an unaffected geographical location beyond the primary site.
NetApp storage integrates with WFC and provides data failover that addresses storage system failures and supports applications that have failed over to a secondary system within the data center or at a remote site. NetApp enables a complete local and regional disaster recovery solution for Hyper-V environments with immediate data availability using a combination of storage clustering and data replication technologies. NetApp MetroCluster is the industry’s only solution that combines array-based

12 NetApp and Microsoft Virtualization: Solution and Implementation Guide
clustering with synchronous mirroring to eliminate downtime and data loss. MetroCluster complements WFC by protecting Hyper-V VM data against local downtime events within the data center, including human errors and power, cooling, and network failures that occur beyond the array. To help protect data from site-wide disasters, MetroCluster extends failover capability from within a data center to another site within 100 kilometers. MetroCluster maintains two consistent mirror images of data on local and remote arrays, automatically reflecting any updates on both sides to simplify change management. For more information, see NetApp MetroCluster Technology.
The combined WFC and MetroCluster solution delivers automated, transparent failover and data mirroring that enables organizations to recover Hyper-V VMs, applications, and data from a disaster in minutes.
4.12 LONG-DISTANCE DISASTER RECOVERY
Many organizations have data centers that span multiple geographical regions and may need to recover data from a regional outage or disaster that extends beyond a metropolitan area. NetApp SnapMirror®
is a data replication product that reliably replicates Hyper-V VM data across unlimited distances over IP, providing disaster protection for global operations.
SnapMirror provides synchronous data replication (mirroring) for zero data loss or asynchronous replication for optimal performance. SnapMirror also optimizes network bandwidth and minimizes storage requirements at DR site(s) by deduplicating redundant data, replicating only changes to data blocks, and using native network compression technology. In addition, all SnapManager products integrate with SnapMirror, enabling users to automate remote replication of application-consistent backups.
As with MetroCluster, SnapMirror works with Hyper-V environments exactly as it does with physical servers and optimizes resources by supporting different NetApp storage systems on primary and secondary sites. It complements Windows Failover Clustering, enabling data recovery for critical virtualized Microsoft applications at remote sites within minutes versus hours or days with tape-based disaster recovery solutions. For more information, see NetApp SnapMirror Technology.

13 NetApp and Microsoft Virtualization: Solution and Implementation Guide
4.13 DISASTER RECOVERY TESTING
To further maximize the use of disaster recovery assets, replicated data can be used for multiple purposes. NetApp FlexClone enables Hyper-V VMs to be instantly cloned at remote sites, converting replicated read-only data volumes into writable copies that can be used for disaster recovery testing and development and test environments.
Figure 3) High availability and disaster recovery in a virtualized Microsoft environment.
5 AGILITY AND FLEXIBILITY TO MEET EVOLVING BUSINESS NEEDS The benefits of consolidated server and storage resources and the use of just-in-time provisioning to enhance resource utilization were briefly discussed in section 3. In addition to higher efficiencies, the Microsoft and NetApp virtualization solution also enables this common pool of dynamic resources to be used to quickly meet rapidly changing application service-level requirements.
5.1 INSTANT SCALABILITY AND RAPID ROLLOUTS
Together Microsoft and NetApp technologies enable virtual machines and storage to be quickly provisioned and resized instantly, so applications can be deployed, grown, or migrated as dictated by fluid business needs. Organizations can leverage these advanced virtualization capabilities for fast scalability, load balancing, or fast rollouts of production or test environments.
5.2 FLEXIBLE PROVISIONING
Virtual Machine Manager (SCVMM) is a Microsoft Systems Center product that includes technology to consolidate underutilized physical servers and convert them into virtual machines. SCVMM provides criteria during virtual machine provisioning that help administrators determine the most suitable Hyper-V host for the virtual machine based on CPU utilization, memory utilization, physical disk space, disk utilization, and network utilization. In addition, preestablished templates are also available to speed the deployment process. Additional SCVMM capabilities are discussed in section 6. For more information, see Microsoft System Center Virtual Machine Manager 2008.

14 NetApp and Microsoft Virtualization: Solution and Implementation Guide
NetApp provides comparable fast provisioning and resizing of data volumes. Flexible volumes enable disk storage capacity to be centrally pooled, managed, and allocated to Hyper-V VMs to meet the needs of each application. VM volumes can be rapidly provisioned and automatically resized up or down while applications are online, eliminating potential downtime and simplifying management. In particular, the thin provisioning technique enables a VM volume to automatically acquire unused disk capacity as needed to support unexpected application growth.
Both the Microsoft SCVMM and NetApp thin provisioning technologies eliminate the time-consuming guesswork and resource constraints associated with server and storage provisioning in non-virtualized server and DAS environments. As a result, IT departments can be much more responsive to the needs of the business and deliver application-specific quality of service with much higher server and storage utilization levels.
5.3 FAST AND COST-EFFECTIVE DEPLOYMENT OF TEST ENVIRONMENTS
IT departments often struggle to deploy development and test environments in a timely, cost-effective manner, slowing down their time to production. This is largely because development environments usually require multiple full-volume copies of data, significant amounts of disk storage, and sufficient time to set up. NetApp FlexClone, briefly mentioned earlier in the context of disaster recovery, addresses these challenges in Hyper-V environments by leveraging Snapshot-based technology. FlexClone complements SCVMM with rapid, space-efficient storage provisioning to further accelerate VM deployment for test environments. FlexClone allows a Snapshot copy of a VM volume to be instantly converted into a virtual read/write volume—without consuming additional disk space or any system resources until new data has been written to the volume. Similar to Snapshot copies that are used for backups, FlexClone volumes are created from pointers to data blocks on the primary volume, not from copies of actual data. The only data that needs to be captured with a FlexClone virtual copy is metadata, which consumes only a negligible amount of disk space.
FlexClone volumes facilitate nearly instant VM provisioning for Hyper-V virtual server and desktop environments without disrupting production environments or ongoing replication processes. For more information, see TR 3357 -NetApp FlexClone Volumes: A Thorough Introduction and Avanade: Delivers Rapid Turnkey VM Provisioning.
5.4 ACCELERATED VIRTUAL DESKTOP PROVISIONING AND PERFORMANCE
The NetApp Performance Acceleration Module (PAM) can be used to optimize the performance of random read–intensive workloads in Hyper-V virtual infrastructures without requiring additional high-performance disk drives. PAM modules have been shown to reduce boot time by 45% or more for virtual desktops during ―boot storms,‖ in which hundreds of virtual machines or more attempt to boot at one time. Solid-state read caching technology accelerates data access, reducing latency by a factor of 10 or more compared to disk drives. PAM modules can also reduce costs for storage, power, and rack space, eliminating up to 50% to 75% of the disk drives in a storage system with no change to I/O throughput.
5.5 “ALWAYS ON” APPLICATION AND DATA MOBILITY
As application workloads change over time it’s likely that VMs will need to be moved to another physical server for a variety of reasons, including performance, scalability, and load balancing. Microsoft and NetApp offer technologies to enable VMs and associated applications and data to be quickly migrated to different physical servers and storage to optimize service levels without disrupting applications.

15 NetApp and Microsoft Virtualization: Solution and Implementation Guide
5.6 ELIMINATE PLANNED DOWNTIME AND GAIN ONLINE WORKLOAD BALANCING
Hyper-V Live Migration enables a running virtual machine to be moved from one Hyper-V physical host to another without taking it offline, maintaining application uptime and user productivity during routine functions like upgrades, maintenance, and backups. In addition to eliminating planned downtime, Live Migration can be used to avoid unplanned downtime by manually migrating VMs to another Hyper-V host in the event of a primary system failure. The feature is also ideal for real-time performance management, enabling VMs to be moved to physical servers with more processors or memory.
Live Migration is built on WFC, and therefore requires the source and target servers for the migrating VM to be connected to networked storage—again an area in which NetApp shared network storage is an ideal fit.
NetApp Data Motion provides the same type of online mobility for datastores that Live Migration does for VMs. NetApp Data Motion easily and quickly migrates data across multiple storage systems while maintaining continuous access to applications. Organizations can keep their shared storage infrastructure running as they add capacity, update infrastructure technology, and balance performance without disruption.
Together Live Migration and NetApp Data Motion can help maintain quality of service—both performance and availability—in Microsoft virtual environments. For more information, see TR 3814: NetApp Data Motion for vFiler.
6 SIMPLIFIED, CENTRALIZED MANAGEMENT Manageability represents perhaps the biggest advantage to implementing an integrated Microsoft and NetApp virtualization solution. This begins with the efficiency that’s built into Windows Server 2008 R2, which combines Hyper-V virtualization with high-availability technologies such as Windows Failover Cluster and Live Migration. Microsoft’s ownership of Exchange, SQL Server, and SharePoint is also an advantage when it comes to virtualizing Microsoft application environments. By offering both the operating system and applications, Microsoft is able to provide very specific guidance about the Exchange, SQL Server, and SharePoint roles that are best suited for virtualization. The integration of Windows Server 2008 R2 with Microsoft applications also enables many tasks and processes to be based on familiar Windows commands and interfaces. This common, well-understood approach reduces complexity and enables IT teams to use existing skills and lower administrative costs.
6.1 MICROSOFT SYSTEM CENTER
Microsoft System Center is the management suite that ties together all of the above Microsoft components—along with key NetApp technologies—to locate and optimize virtualization assets and deliver centralized, integrated server and storage management for the entire Hyper-V infrastructure.
Microsoft System Center is comprised of several products that together deliver policy-based administration for both physical and virtualized infrastructures and uses common deployment, provisioning, monitoring, and backup methodologies across both—from a single interface. Microsoft System Center also provides the flexibility to manage multiple hypervisor environments. In short, Microsoft provides the only virtualization solution that can manage multiple hypervisors, physical resources, and applications.
The products within the Microsoft System Center suite that are most relevant to the integrated management of Microsoft and NetApp virtualization technologies are Operations Manager (SCOM) and System Centre Virtual Machine Manager (SCVMM)

16 NetApp and Microsoft Virtualization: Solution and Implementation Guide
6.2 INTEGRATED MONITORING
SCOM enables administrators to monitor Microsoft servers, applications, and clients. It provides a complete view of the health of both physical and virtual environments to enable rapid response to disruptive events; for example, the ability to automatically detect and initiate failovers. For more information, see Microsoft System Center Operations Manager 2007.
6.3 INTEGRATED POLICY-BASED MANAGEMENT AND REMEDIATION
SCVMM—briefly mentioned in the previous section—provides complete management of Hyper-V VMs, enabling them to be consolidated, configured, provisioned, resized, or reassigned from a single console. High-availability administration can also be performed, including online migration of VMs (Live Migration) and the ability to add an entire Hyper-V host cluster in a single step and automatically detect node additions and removals. SCVMM Performance and Resource Optimization (PRO) provides an open and extensible framework for the creation of management packs for virtualized applications or associated hardware.
6.4 NETAPP INTEGRATION WITH SCOM – APPLIANCEWATCH PRO 2.1.1
ApplianceWatch® PRO 2.1.1 is an enterprise-class storage monitoring application from NetApp that simplifies storage management and increases tools available to SCOM administrators for NetApp storage controllers.
Following are the key features of ApplianceWatch PRO 2.1.1:
• Easy storage management for Windows and NetApp storage administrators • Monitor all elements of IT infrastructure (single pane of glass from MMC) • Simplify distributed NetApp storage system monitoring • Isolate problems quickly using alerts • Troubleshoot performance issues using performance views • Minimize downtime, shorten time to resolution, and provide auto-recovery tools in a virtualized
environment • Rapidly provision and clone VMs using the cmdlets
NetApp ApplianceWatch PRO 2.0 includes PRO tips that enable automatic remediation of common storage issues through SCVMM. For example, administrators can choose to automatically increase the size of a volume that contains VMs if the volume’s utilization rate exceeds the established threshold.
In addition to ApplianceWatch based integration with SCOM and SCVMM, NetApp provides technology to centralize storage management and enables key storage activities to be performed by storage, server, or application administrators. This set of activities includes configuring and executing storage deduplication, data failover, VM cloning, and thin provisioning. For example, administrators can expand and shrink LUNs on the fly to address changing application workloads without impacting production environments. The ability to shrink storage in an iSCSI or FC environment is unique to the combination of Microsoft and NetApp technologies.
Microsoft administrators can also set up storage policies or use existing policies that have been set up by NetApp storage administrators. Policy-based automation can apply to backups, failover, replication, and recovery to reduce errors and provide consistent execution across all major components of the solution

17 NetApp and Microsoft Virtualization: Solution and Implementation Guide
7 BENEFITS SUMMARY OF COMPLETE VIRTUALIZATION SOLUTION A server and storage virtualization solution from Microsoft and NetApp integrates advanced industry-leading technologies at numerous levels within the virtual infrastructure. The combined solution provides all the benefits of server virtualization, addresses storage-related challenges that can result from server virtualization, and provides complementary storage technologies that enhance server virtualization. By unleashing the full potential of end-to-end virtualization, Microsoft and NetApp address today’s most critical IT challenges and deliver outstanding results for critical business applications in the following areas.
7.1 UNPARALLELED EFFICIENCY
By using Microsoft and NetApp virtualization to consolidate physical servers and storage, organizations can dramatically boost resource utilization and reduce hardware sprawl. Virtual machines can be automatically resized by leveraging a pool of available server and storage resources to support unexpected demand without costly over-provisioning. A consolidated Hyper-V environment delivers cost savings by reducing hardware count; simplifying management; and cutting power, cooling, and space requirements. Additional storage efficiencies are provided by data deduplication and space-saving point-in-time copies for backup and cloning. The Microsoft and NetApp solution also provides an open architecture that supports multiple operating systems, hypervisors, data types, and storage protocols to further facilitate consolidation.
7.2 COMPREHENSIVE PROTECTION FOR APPLICATIONS AND DATA
While virtualization technologies can help improve overall availability and disaster recovery, the impact of component, system, or site failures can be magnified in a consolidated environment in which more applications reside on fewer hosts. A virtualization solution from NetApp and Microsoft enables enterprises to maximize application and data access throughout practically any imaginable disruptive event. In addition to strong system reliability, the tight integration of NetApp technologies with Windows, Hyper-V, and Microsoft applications enables:
• Instant, space-efficient backups with application-consistent restores for Exchange, SQL Server, or SharePoint
• Local and stretch failover clustering for VMs with zero data loss and zero downtime • Cost-effective disaster recovery with IP-based data replication that restores VMs and data at remote
sites within minutes, across any distance
7.3 FLEXIBILITY AND AGILITY TO MEET EVOLVING BUSINESS NEEDS
VMs and storage volumes can be provisioned and resized in minutes or even seconds to support rapidly changing business needs. New applications can be quickly deployed or scaled without downtime or disruption. Instant, space-efficient cloning of VMs enables development and test environments to be set up within minutes without requiring full copies of production data or significant disk space. Organizations can also eliminate planned downtime by moving VMs and associated data to other physical servers and storage without taking applications offline for load balancing, upgrades, maintenance, or improved quality of service.
7.4 SIMPLIFIED, CENTRALIZED MANAGEMENT
Microsoft simplifies the management of virtualized infrastructures by combining the Windows operating system with Hyper-V and related high-availability technologies. It also does so by integrating Windows tightly with applications such as Exchange, SQL Server, and SharePoint. Manageability is further enhanced with a centralized framework that facilitates integrated monitoring, provisioning, and

18 NetApp and Microsoft Virtualization: Solution and Implementation Guide
management of physical and virtual assets. NetApp provides integration with key modules within Microsoft’s management framework to enable policy-based virtual machine and storage management. It also enables critical storage administration tasks to be performed directly through Microsoft System Center.
7.5 MICROSOFT AND NETAPP PARTNERSHIP FOR VIRTUALIZATION AND BEYOND
The technical collaboration between Microsoft and NetApp dates back to 1998 and continues to be strong today, exemplified by Microsoft’s selection of NetApp as its 2009 Storage Partner of the Year.
Virtualization continues to be an area of collaboration and innovation. For example, NetApp actively participates in the development of Microsoft’s Dynamic Infrastructure Toolkit for System Center. This toolkit provides an extensible framework built on Windows Server 2008 R2, Hyper-V, and SCVMM and is designed to help enterprises move beyond virtualization toward the realization of cloud computing and delivery of IT as a service. As virtualization technologies and enterprise requirements continue to evolve, Microsoft and NetApp are committed to developing integrated; end-to-end solutions that help organizations meet their business goals and go further, faster.
7.6 ABOUT MICROSOFT VIRTUALIZATION SOLUTIONS
Microsoft provides a complete suite of technologies to enable an integrated, end-to-end, virtualized infrastructure. Using products that span the desktop to the data center, Microsoft technologies bring capacities online in real time, as needed; streamline and provision applications, services, and data on demand; accelerate backup and recovery; and enhance availability to protect against system failure and service interruptions. Microsoft's extensive partner ecosystem complements and extends the Microsoft virtualization toolset with products for desktops, servers, applications, storage, and networks. Together with our partners, we deliver robust, complete solutions for the virtualized infrastructure.

19 NetApp and Microsoft Virtualization: Solution and Implementation Guide
8 CONFIGURING MICROSOFT WINDOWS 2008 R2 HYPER-V SOLUTION ON NETAPP STORAGE
Sections 8 through 15 describe how to configure a Microsoft Windows Server 2008 Hyper-V solution on NetApp storage. It documents in detail the configuration steps for an environment with two Windows Server 2008 R2 Hyper-V systems with full installation, two Windows Server 2008 R2 Hyper-V systems with server core installation, one Windows Server 2008 R2 full installation system with System Center Virtual Machine Manager 2008 (SCVMM) installed, and one NetApp FAS3070C storage array configured with both FC and iSCSI protocols.
Note : The information listed in the sections that follow should not be considered as a design guide. For information about NetApp best practices for Hyper-V, see TR-3702: NetApp Storage Best Practices for Microsoft Virtualization
Proper licensing for the NetApp controllers, NetApp storage management software installed on the Windows Server 2008 R2 Hyper-V servers, Microsoft Windows Server 2008, and any OS installed on the virtual machines must be obtained to use the features described in this section. Where appropriate, trial licenses can be used for many of the components to test the configuration.
Figure 4) Configuration process.

20 NetApp and Microsoft Virtualization: Solution and Implementation Guide
9 SOLUTION ARCHITECTURE Figure 5 shows the high-level architecture of the environment setup to demonstrate the deployment of Microsoft Hyper-V on NetApp storage.
Figure 5) Physical Architecture.
10 SOLUTION CONFIGURATION
10.1 NETAPP STORAGE SYSTEM CONFIGURATION
It is important to follow the recommendations and requirements described in this document for a successful deployment of the environment shown in Figure 5.
NETAPP STORAGE SYSTEM HARDWARE AND SOFTWARE REQUIREMENTS
The components, quantity, and details shown in Table 1 describe the requirements for configuring NetApp storage systems. It is important to install the required hardware and software components to support the planned environment shown in Figure 5.
Table 1) NetApp storage system, hardware, and software requirements.
NetApp System Component Quantity Details
Number and type of controllers 1 FAS3070c
1GB Ethernet NICs 2-4 Min. two per controller (on board)
Fibre Channel ports 2-4 Min. two per controller (on board)
Data ONTAP® n/a Version 7.3 or later

21 NetApp and Microsoft Virtualization: Solution and Implementation Guide
FAS controller CF mode n/a Single image
NETAPP SOFTWARE REQUIREMENTS
The NetApp software components described in Table 2 are meant to be installed on the Windows Server 2008 R2 Hyper-V servers planned as part of the environment shown in Figure 5.
Table 2) Software requirements.
NetApp Software Component Quantity Details
NetApp Windows Host Utilities Kit 4 5.x (one per Microsoft Windows Server 2008 R2 server)
NetApp Data ONTAP DSM for Windows MPIO 4 3.3.1 (one per Microsoft Windows Server 2008 R2
server)
NetApp SnapDrive® for Windows 2 6.x (one per Microsoft Windows Server 2008 R2 server with full installation)
NETAPP LICENSE REQUIREMENTS
The NetApp license components described in the following table are meant to be installed on both the NetApp storage system and the Microsoft Windows Server 2008 R2 servers planned as part of the environment shown in Figure 5. It is important to pay attention to the details column to determine which license components should be installed on the NetApp storage system and which on the Microsoft Windows Server 2008 R2 servers.
Table 3) License requirements.
NetApp License Component Quantity Details
FCP 2 One per controller
iSCSI 2 One per controller
Cluster 1
NetApp SnapDrive for Windows 2 One per Microsoft Windows Server 2008 R2 server with full installation
NetApp SnapRestore® 2 One per controller
NetApp Windows Host Utilities Kit 4 One per Microsoft Windows Server 2008 R2 server
NetApp Data ONTAP DSM for Windows MPIO 4 One per Microsoft Windows Server 2008 R2 server
10.2 NETWORKING CONFIGURATION
IP NETWORK CONFIGURATION
For a redundant, highly available IP storage network, configure virtual interfaces (VIFs) on both of the NetApp storage controllers, using the procedure outlined in this section. If this is an existing storage array that already has the VIFs configured, this procedure might not be necessary.
For this exercise, we used one Ethernet switch. In your environment, you might have multiple switches. Figure 6 shows the connectivity.
22 NetApp and Microsoft Virtualization: Solution and Implementation Guide
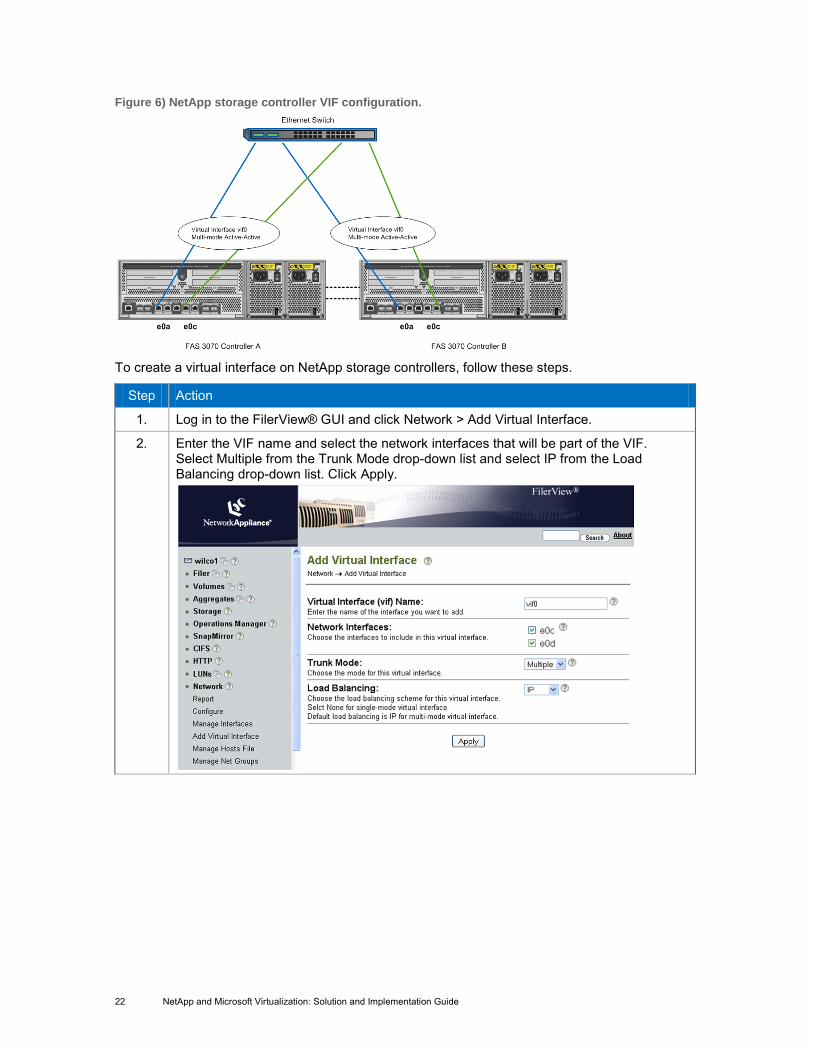
Figure 6) NetApp storage controller VIF configuration.
To create a virtual interface on NetApp storage controllers, follow these steps.
Step Action
1. Log in to the FilerView® GUI and click Network > Add Virtual Interface.
2. Enter the VIF name and select the network interfaces that will be part of the VIF. Select Multiple from the Trunk Mode drop-down list and select IP from the Load Balancing drop-down list. Click Apply.
23 NetApp and Microsoft Virtualization: Solution and Implementation Guide
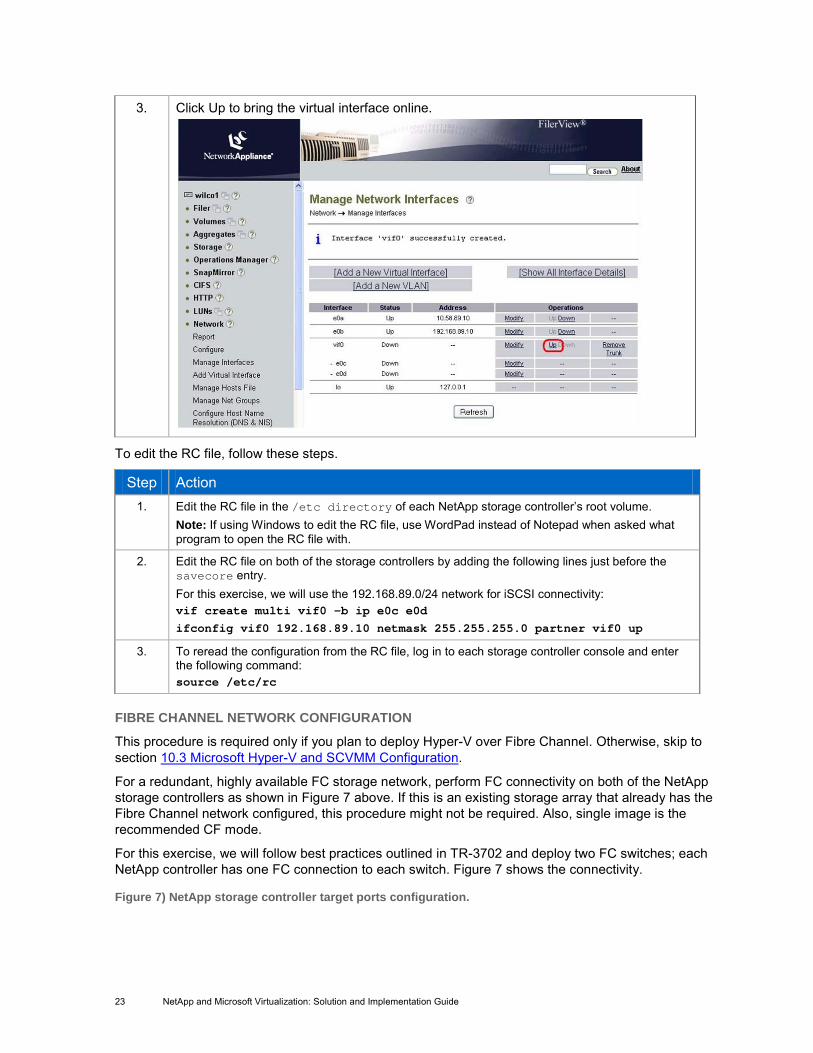
3. Click Up to bring the virtual interface online.
To edit the RC file, follow these steps.
Step Action 1. Edit the RC file in the /etc directory of each NetApp storage controller’s root volume.
Note: If using Windows to edit the RC file, use WordPad instead of Notepad when asked what program to open the RC file with.
2. Edit the RC file on both of the storage controllers by adding the following lines just before the savecore entry. For this exercise, we will use the 192.168.89.0/24 network for iSCSI connectivity: vif create multi vif0 -b ip e0c e0d ifconfig vif0 192.168.89.10 netmask 255.255.255.0 partner vif0 up
3. To reread the configuration from the RC file, log in to each storage controller console and enter the following command: source /etc/rc
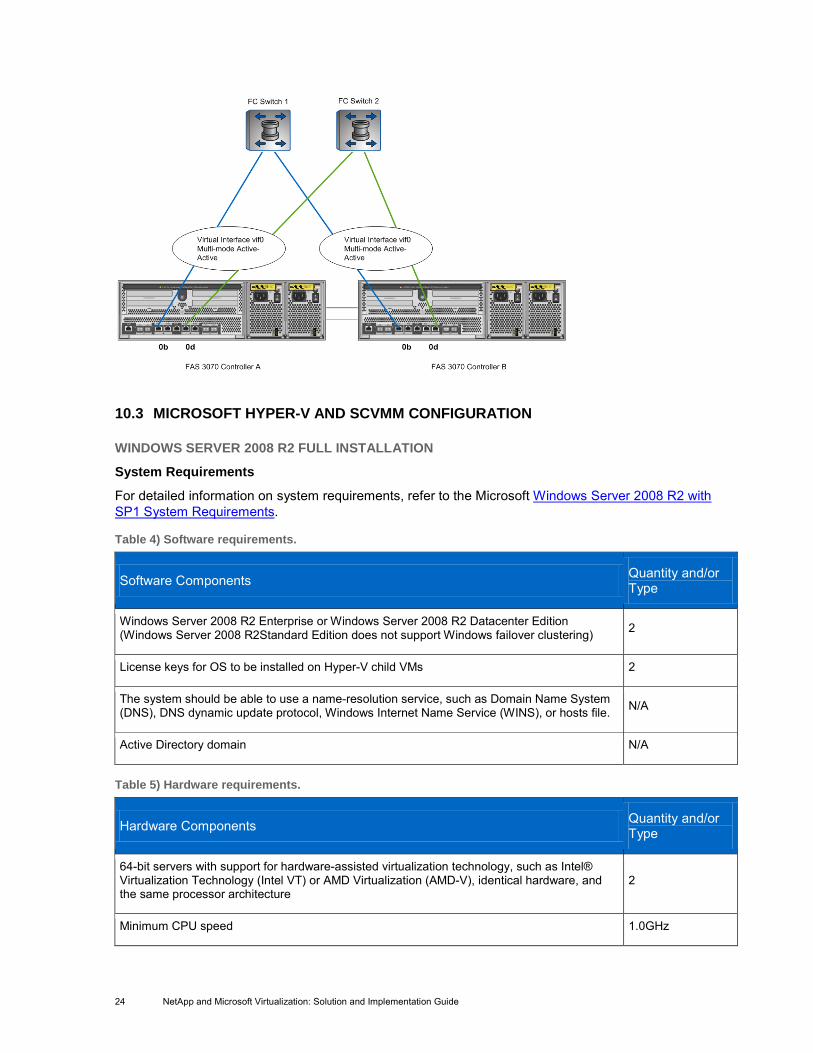
FIBRE CHANNEL NETWORK CONFIGURATION
This procedure is required only if you plan to deploy Hyper-V over Fibre Channel. Otherwise, skip to section 10.3 Microsoft Hyper-V and SCVMM Configuration.
For a redundant, highly available FC storage network, perform FC connectivity on both of the NetApp storage controllers as shown in Figure 7 above. If this is an existing storage array that already has the Fibre Channel network configured, this procedure might not be required. Also, single image is the recommended CF mode.
For this exercise, we will follow best practices outlined in TR-3702 and deploy two FC switches; each NetApp controller has one FC connection to each switch. Figure 7 shows the connectivity.
Figure 7) NetApp storage controller target ports configuration. r target
24 NetApp and Microsoft Virtualization: Solution and Implementation Guide
ports configuration.
10.3 MICROSOFT HYPER-V AND SCVMM CONFIGURATION
WINDOWS SERVER 2008 R2 FULL INSTALLATION
System Requirements
For detailed information on system requirements, refer to the Microsoft Windows Server 2008 R2 with SP1 System Requirements.
Table 4) Software requirements.
Software Components Quantity and/or Type
Windows Server 2008 R2 Enterprise or Windows Server 2008 R2 Datacenter Edition (Windows Server 2008 R2Standard Edition does not support Windows failover clustering) 2
License keys for OS to be installed on Hyper-V child VMs 2
The system should be able to use a name-resolution service, such as Domain Name System (DNS), DNS dynamic update protocol, Windows Internet Name Service (WINS), or hosts file. N/A
Active Directory domain N/A
Table 5) Hardware requirements.
Hardware Components Quantity and/or Type
64-bit servers with support for hardware-assisted virtualization technology, such as Intel® Virtualization Technology (Intel VT) or AMD Virtualization (AMD-V), identical hardware, and the same processor architecture
2
Minimum CPU speed 1.0GHz
25 NetApp and Microsoft Virtualization: Solution and Implementation Guide
Processor Intel VT or AMD-V
Minimum RAM (additional memory needed for each child OS) 512MB
Table 6) Network requirements.
Network Components Quantity and/or Type
Network adapters per server 4
INSTALL MICROSOFT WINDOWS SERVER 2008 R2
For detailed information on the installation and configuration of Windows Server 2008 R2, refer to the Microsoft Installing Windows Server 2008 documentation. Install all Microsoft packages required for Hyper-V according to the instructions in the Microsoft documentation.
Network Configuration
Configure Management Interface
Configure one network adapter on the Windows Server 2008 R2 server or servers to be used for the management network, give it an easily readable name (for example, LLAN01), and assign a static public IP address.
Configure IP Storage Interfaces
This procedure is required only if configuring NetApp shared storage over iSCSI. Configure two network adapters on the server or servers to be used for configuring and managing iSCSI storage traffic over Microsoft iSCSI software initiator and NetApp SnapDrive software. The two network connections are recommended for high availability. Assign them easily readable names (for example, SLAN01 and SLAN02) and static public or private IP addresses. Make sure that the NetApp storage network port or virtual interface (for iSCSI storage) can be reached from the servers.
Install Hyper-V Role
To install the Hyper-V role, follow these steps. For more information on installing Hyper-V role, refer to the Hyper-V Getting Started Guide.
Step Action
1. Open Server Manager: Start > Programs > Administrative Tools > Server Manager.
2. Right-click Roles in the left pane.

26 NetApp and Microsoft Virtualization: Solution and Implementation Guide
3. Select Add Roles from the Context menu.
4. Select Hyper-V from the list of server roles and click Next.
5. Review the information associated with the Introduction to Hyper-V and click Next.
27 NetApp and Microsoft Virtualization: Solution and Implementation Guide
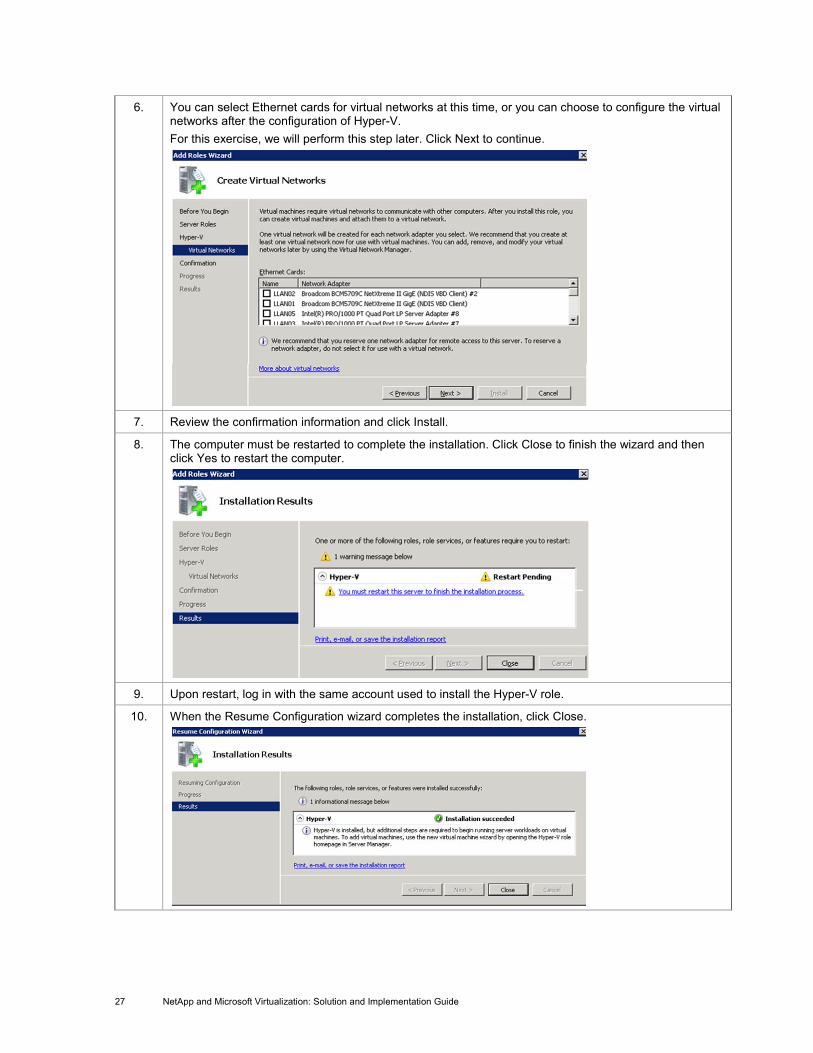
6. You can select Ethernet cards for virtual networks at this time, or you can choose to configure the virtual networks after the configuration of Hyper-V. For this exercise, we will perform this step later. Click Next to continue.
7. Review the confirmation information and click Install.
8. The computer must be restarted to complete the installation. Click Close to finish the wizard and then click Yes to restart the computer.
9. Upon restart, log in with the same account used to install the Hyper-V role.
10. When the Resume Configuration wizard completes the installation, click Close.

28 NetApp and Microsoft Virtualization: Solution and Implementation Guide
Virtual Network Configuration
Create Hyper-V virtual networks by using the procedure outlined in the following Microsoft documentation:
• http://technet.microsoft.com/en-us/library/cc816585.aspx • http://technet.microsoft.com/en-us/library/cc732470.aspx#BKMK_ConfigVN
For this exercise, we created public networks for VM LAN traffic and SAN traffic (for configuring the iSCSI software initiator on the child VM).
Step Action
1. Open Hyper-V Manager: Start > Programs > Administrative Tools > Hyper-V Manager.
2. From the Actions menu on the right, select Virtual Network Manager.
3. In the “Create virtual network,” select the type of network to create. The types of network are external, internal, and private. For this exercise we will create one external network for virtual machine LAN traffic. The same procedure applies to creating an external network for SAN traffic. In all, we will create two external networks for LAN and two external networks for SAN.
4. In the Virtual Network Manager window, click Add to open the New Virtual Network page.

29 NetApp and Microsoft Virtualization: Solution and Implementation Guide
5. Enter a name for the new network and specify the external physical adapter to bind to this virtual network. Review the other properties and modify them if necessary. Click OK to create the virtual network and close Virtual Network Manager; or click Apply to create the virtual network and continue using Virtual Network Manager. (This virtual network will later bind to the new virtual machine that will be created by using the Hyper-V Manager.)
WINDOWS SERVER 2008 R2 SERVER CORE INSTALLATION
This procedure is required only if you plan to install Windows Server 2008 R2 with the server core installation option. Otherwise, skip to section 10.3.1 Windows Server 2008 R2 Full Installation.
The server core installation option of the Windows Server 2008 R2 operating system installs a minimal server installation of Windows Server 2008 R2 to run supported server roles, including the Hyper-V role.
System Requirements
For detailed information on system requirements, refer to the Microsoft Windows Server 2008 R2 with SP1 System Requirements.
Table 7) Software requirements.
Software Components Quantity and/or Type
64-bit Windows Server 2008 R2 Enterprise or Windows Server 2008 Datacenter Edition 2
License keys for OS to be installed on Hyper-V child VMs 2
The system should be able to use a name-resolution service, such as Domain Name System (DNS), DNS dynamic update protocol, Windows Internet Name Service (WINS), or hosts file N/A
Active Directory domain N/A
30 NetApp and Microsoft Virtualization: Solution and Implementation Guide
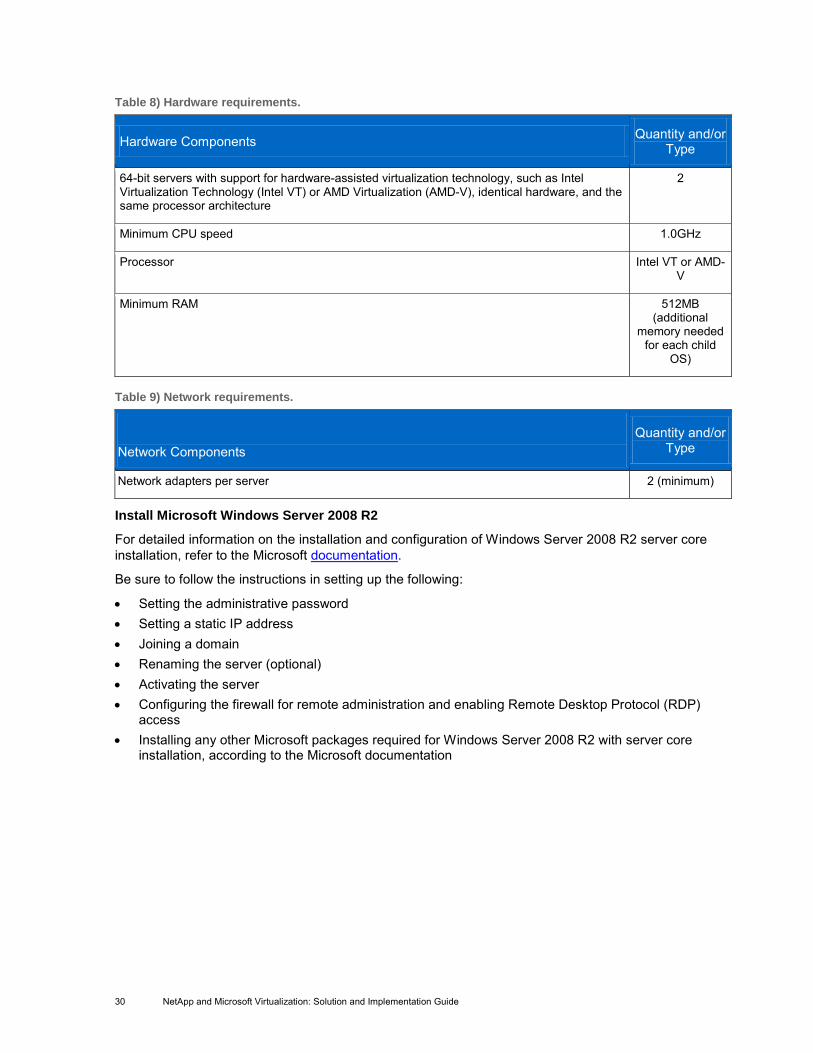
Table 8) Hardware requirements.
Hardware Components Quantity and/or Type
64-bit servers with support for hardware-assisted virtualization technology, such as Intel Virtualization Technology (Intel VT) or AMD Virtualization (AMD-V), identical hardware, and the same processor architecture
2
Minimum CPU speed 1.0GHz
Processor Intel VT or AMD-V
Minimum RAM 512MB (additional
memory needed for each child
OS)
Table 9) Network requirements.
Network Components Quantity and/or
Type
Network adapters per server 2 (minimum)
Install Microsoft Windows Server 2008 R2
For detailed information on the installation and configuration of Windows Server 2008 R2 server core installation, refer to the Microsoft documentation.
Be sure to follow the instructions in setting up the following:
• Setting the administrative password • Setting a static IP address • Joining a domain • Renaming the server (optional) • Activating the server • Configuring the firewall for remote administration and enabling Remote Desktop Protocol (RDP)
access • Installing any other Microsoft packages required for Windows Server 2008 R2 with server core
installation, according to the Microsoft documentation

31 NetApp and Microsoft Virtualization: Solution and Implementation Guide
Step Action
1.
Enable remote management of the servers by using the Computer Management Microsoft Management Console (MMC) snap-in. netsh advfirewall firewall set rule group="Remote Administration" new enable=yes
This opens up the rules to allow remote management and unlock the following MMC snap-ins: • Task Scheduler (taskschd.msc) • Event Viewer (eventvwr.msc) • Shared Folders (fsmgmt.msc) • Performance Monitor (perfmon.msc) • Device Manager (devmgmt.msc)
Configure the Virtual Disk Service (VDS)
By default, the virtual disk service is set to start manually on server core installations of Windows Server 2008. The service should be set to start automatically, and after that it should be started manually. This enables you to use the MMC Disk Management snap-in to remotely access a server core installation.
Step Action
1. Enter the following command on both of the servers: sc config vds start=auto
2. Start the VDS service: net start vds
Enable Exceptions in the Firewalls
Remote disk management exception also needs to be enabled on the server core installation server and the server that is used to manage the server core installation server.
Step Action
1. Enter the following command on both of the servers: netsh advfirewall firewall set rule group="Remote Volume Management" new enable=yes
Now the server core can be managed by using the Disk Management portion of the Computer Management MMC snap-in.
Install the Hyper-V Role
To enable the Hyper-V role, follow the instructions in the Microsoft Hyper-V Planning and Deployment Guide.
Step Action
1. Enter the following command on both of the servers: start /w ocsetup Microsoft-Hyper-V
32 NetApp and Microsoft Virtualization: Solution and Implementation Guide
Network Configuration
Configure Management Interface
If it was not done earlier when installing the Windows Server 2008 R2 server core option, configure one network adapter on the Windows Server 2008 R2 server or servers to be used for the management network and assign a static public IP address.
Step Action
1. Enter the following command on both of the servers: netsh interface ipv4 set address name="<ID>" source=static address=<StaticIP> mask=<SubnetMask> gateway=<DefaultGateway>
Configure IP Storage Interfaces
This procedure is required only if configuring NetApp shared storage over iSCSI. Configure two network adapters on the Windows Server 2008 R2 server or servers to be used for configuring and managing iSCSI storage traffic over Microsoft iSCSI software initiator and NetApp SnapDrive software. Assign static IP addresses to the two network adapters. The two network connections are recommended for high availability. Make sure that the NetApp IP storage network port or virtual interface can be pinged from the servers.
Step Action
1. Enter the following command on both of the servers: netsh interface ipv4 set address name="<ID>" source=static address=<StaticIP> mask=<SubnetMask> gateway=<DefaultGateway>
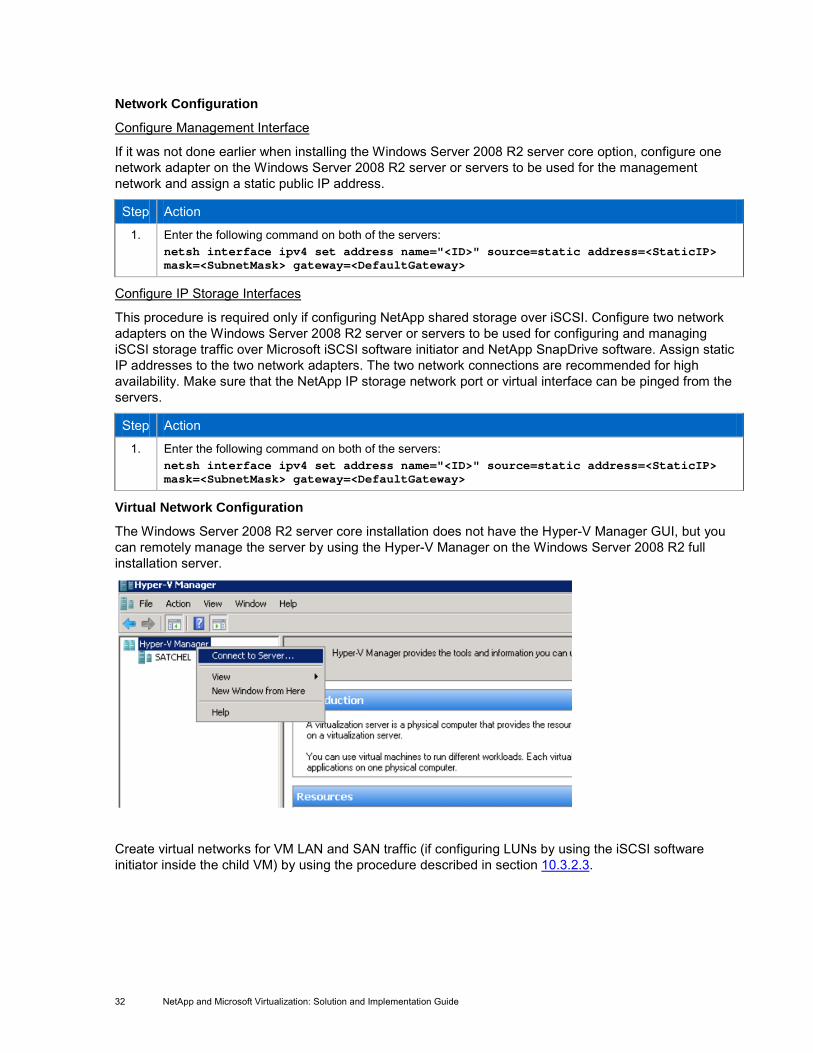
Virtual Network Configuration
The Windows Server 2008 R2 server core installation does not have the Hyper-V Manager GUI, but you can remotely manage the server by using the Hyper-V Manager on the Windows Server 2008 R2 full installation server.
Create virtual networks for VM LAN and SAN traffic (if configuring LUNs by using the iSCSI software initiator inside the child VM) by using the procedure described in section 10.3.2.3.

33 NetApp and Microsoft Virtualization: Solution and Implementation Guide
SCVMM 2008 INSTALLATION
For the detailed procedure for installing and configuring SCVMM, refer to the Microsoft System Center Virtual Machine Manager 2008 and Virtual Machine Manager 2008 R2. For this exercise, we will install SCVMM on a Windows Server 2008 R2 full installation system.
SCVMM Server Components
The first procedure in installing SCVMM is to install the server components. Follow these steps.
Step Action
1. Select Server from the installation splash screen.
2. Accept the license terms.
3. Select an option for updating SCVMM: Microsoft Update or manual methods.
4. Select whether to participate in the Microsoft Customer Improvement Program.
5. Enter your name and the name of your organization.
6. If you have completed the prerequisites check, click Next to continue the installation.
7. Select an installation path for the SCVMM server components.
8. Select the appropriate SQL Server® settings. If you choose to configure SCVMM with a previously installed SQL Server instance, follow the Microsoft recommendations: http://technet.microsoft.com/en-us/library/bb740749(TechNet.10).aspx.
9. a. Select a share name for the SCVMM library; if possible, choose a share name that is short and easy to recall.
b. Select a share location. Select the LUN that you configured for the SCVMM library, then select Create New Folder on the LUN and select the newly created folder. If possible, select a short folder name for the SCVMM library, usually matching the share name.
c. Enter a share description.
10. Unless you have good reason to change the default port settings for the SCVMM installation, do not change them. If you do make changes, be sure to record the newly configured port numbers and their respective settings.
11. Review the summary of settings, then select Install to begin installation of SCVMM and its required components.
12. Depending on the components required by SCVMM, which might or might not already be installed on the server, you might be asked to answer requests to run or install components using pop-ups outside the installation. These are generated by the SCVMM installation. Click Run to continue installing SCVMM.
13. When the installation is complete, review the summary information and click Close to finish installing the SCVMM.
SCVMM Administrator Console
The second procedure is to install the SCVMM Administrator Console components, either on the server on which you just installed the server components or on another supported server or workstation.
To install the Administrator Console, follow these steps.
Step Action
1. Select Administrator Console from the installation splash screen.
2. Accept the license terms.
3. Select an option for updating SCVMM: Microsoft Update or manual methods.
4. Acknowledge information associated with the Microsoft Customer Improvement Program.

34 NetApp and Microsoft Virtualization: Solution and Implementation Guide
5. If you have completed the prerequisites check, click Next to continue the installation.
6. Select an installation path for the SCVMM server components.
7. Enter the port number configured during the previous installation of the SCVMM server components.
8. Review the summary of settings before continuing, then click Install to begin installing SCVMM and its required components.
9. Depending on the components required by SCVMM, which might or might not already be installed on the server, you might be asked to answer requests to run or install components using pop-ups outside the installation. These are generated by the SCVMM installation. Click Run to continue installing SCVMM.
10. After the installation is complete, review the summary information and click Close to finish installing the SCVMM.
10.4 INSTALL NETAPP SOFTWARE ON WINDOWS SERVER 2008 R2
WINDOWS SERVER 2008 R2 FULL INSTALL
NetApp Windows Host Utilities Kit
To install Windows Host Utilities 5.3 on the servers, follow these steps.
Step Action
1. Log in to NOW™ (NetApp on the Web) (http://now.netapp.com). Under Software Download, click Download Software. Be sure to download the correct version of FCP Host Utilities. Refer to the latest supported software version and related requirements from the NetApp Interoperability Matrix.
2. On the download software page, select Windows in either the FCP Host Utilities entry or the iSCSI Host Utilities entry and then click Go. Windows Host Utilities 5.3 combines two previous products, iSCSI WHU 4.1 and FCP WHU 4.0.
3. Select Windows Host Utilities 5.3
4. On the Windows Host Utilities 5.3 Download Page, click netapp_windows_host_utilities_5.3_x64.msi to download the file.
5. Double-click the downloaded file and click Run. Make sure that you are logged in as local administrator or domain administrator to the Windows Server 2008 R2 server. Note: If there is a Microsoft hot fix prerequisite, a warning appears, and the installation is canceled. Download the required hot fix and retry the host utilities installation.
6. On the welcome page, click Next.
7. Accept the licensing agreement and click Next.
8. Select the protocol support required and click Next. • The base registry entries and HBA parameters are set depending on your choice. • Host utilities are installed. • Select the Both option to install all of the utilities.
For this exercise, we will select Both.
9. If you will have multiple paths configured to the storage array, select “Yes, install support for Multipath I/O” and click Next. For Windows Server 2008 R2, this automatically installs and enables the Microsoft MPIO components feature and installs support for the Microsoft Device Specific Module (MSDSM).
10. Specify the installation location and click Next.
11. Click Next to begin the installation.
12. Monitor the installation and click Finish when it is complete.

35 NetApp and Microsoft Virtualization: Solution and Implementation Guide
13. The computer must be restarted to complete the installation. Click Yes to restart the computer.
14. When the computer restarts, verify the installation: Start > Programs > NetApp > Windows Host Utilities. Also navigate to the installation directory to verify the installed files.
NetApp Data ONTAP DSM for Windows MPIO
To install Data ONTAP DSM for Windows MPIO on the servers, follow these steps.
Step Action
1. Log in to NOW (http://now.netapp.com). Under Software Download, click Download Software. Be sure to download the correct version of Multipath I/O. Refer to the latest supported software version and related requirements from the NetApp Interoperability Matrix.
2. Next to Multipath I/O, select Windows and click Go.
3. On the Multipath I/O for Windows page, click View and Download.
4. On the Data ONTAP DSM for Windows MPIO page, click Data ONTAP DSM 3.4 for Windows MPIO.
5. Read the Data ONTAP DSM 3.4 for Windows MPIO description page and click Continue.
6. Read the base customer software license agreement and click Accept.
7. On the Data ONTAP DSM 3.4 for Windows MPIO download page, click Install Package for Windows Server 2008 R2 systems to download the file to the server.
8. On the server, double-click the installation file and click Next on the welcome screen.
9. Accept the license agreement and click Next.
10. On the License Key page, enter the license key and click Next.
11. On the Data ONTAP DSM Management Service Credentials page, enter the account information for a user account that is a member of the local administrator group of the Windows Server 2008 R2 server and click Next. For this exercise, we will use a local user account, sd_admin, which is a member of the local administrator group for the server.
12. Select the protocol support required and click Next. For this project, we will select Both.
13. Verify the driver information and click Next.
14. Verify the installation folder and click Next.
15. Click Install to begin installation.
16. On completion, click Finish.
17. Click Yes to restart the computer.
18. After restarting, verify the installation: Server Manager > Storage > Data ONTAP DSM Manager.
NetApp SnapDrive for Windows
Download
To download NetApp SnapDrive 6.3 for Windows, follow these steps.
Step Action
1. Log in to NOW. Under Software Download, click Download Software. Be sure to download the correct version of SnapDrive. Refer to the latest supported software version and related requirements from the NetApp Interoperability Matrix.
2. On the download software page, next to SnapDrive, select Windows and click Go.
3. Click View and Download for SnapDrive 6.3.
4. Read the SnapDrive 6.3 for Windows description page and click Continue.
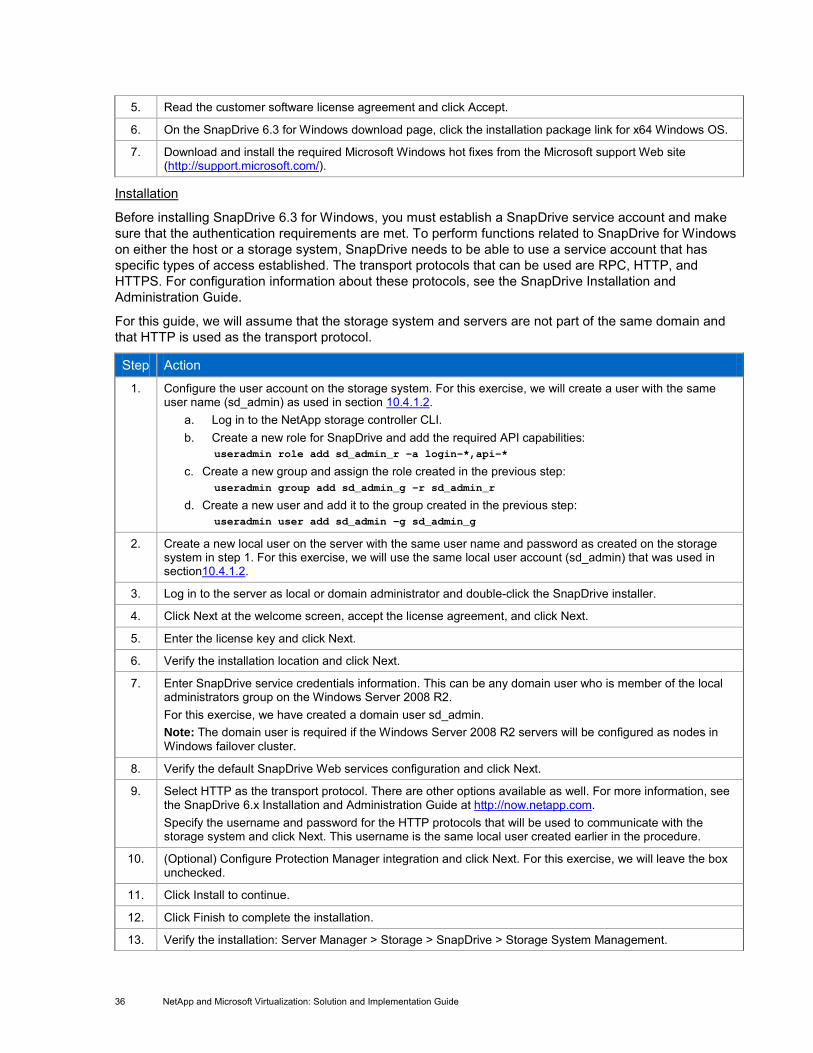
36 NetApp and Microsoft Virtualization: Solution and Implementation Guide
5. Read the customer software license agreement and click Accept.
6. On the SnapDrive 6.3 for Windows download page, click the installation package link for x64 Windows OS.
7. Download and install the required Microsoft Windows hot fixes from the Microsoft support Web site (http://support.microsoft.com/).
Installation
Before installing SnapDrive 6.3 for Windows, you must establish a SnapDrive service account and make sure that the authentication requirements are met. To perform functions related to SnapDrive for Windows on either the host or a storage system, SnapDrive needs to be able to use a service account that has specific types of access established. The transport protocols that can be used are RPC, HTTP, and HTTPS. For configuration information about these protocols, see the SnapDrive Installation and Administration Guide.
For this guide, we will assume that the storage system and servers are not part of the same domain and that HTTP is used as the transport protocol.
Step Action
1. Configure the user account on the storage system. For this exercise, we will create a user with the same user name (sd_admin) as used in section 10.4.1.2.
a. Log in to the NetApp storage controller CLI. b. Create a new role for SnapDrive and add the required API capabilities:
useradmin role add sd_admin_r -a login-*,api-* c. Create a new group and assign the role created in the previous step:
useradmin group add sd_admin_g –r sd_admin_r d. Create a new user and add it to the group created in the previous step:
useradmin user add sd_admin –g sd_admin_g
2. Create a new local user on the server with the same user name and password as created on the storage system in step 1. For this exercise, we will use the same local user account (sd_admin) that was used in section10.4.1.2.
3. Log in to the server as local or domain administrator and double-click the SnapDrive installer.
4. Click Next at the welcome screen, accept the license agreement, and click Next.
5. Enter the license key and click Next.
6. Verify the installation location and click Next.
7. Enter SnapDrive service credentials information. This can be any domain user who is member of the local administrators group on the Windows Server 2008 R2. For this exercise, we have created a domain user sd_admin. Note: The domain user is required if the Windows Server 2008 R2 servers will be configured as nodes in Windows failover cluster.
8. Verify the default SnapDrive Web services configuration and click Next.
9. Select HTTP as the transport protocol. There are other options available as well. For more information, see the SnapDrive 6.x Installation and Administration Guide at http://now.netapp.com. Specify the username and password for the HTTP protocols that will be used to communicate with the storage system and click Next. This username is the same local user created earlier in the procedure.
10. (Optional) Configure Protection Manager integration and click Next. For this exercise, we will leave the box unchecked.
11. Click Install to continue.
12. Click Finish to complete the installation.
13. Verify the installation: Server Manager > Storage > SnapDrive > Storage System Management.
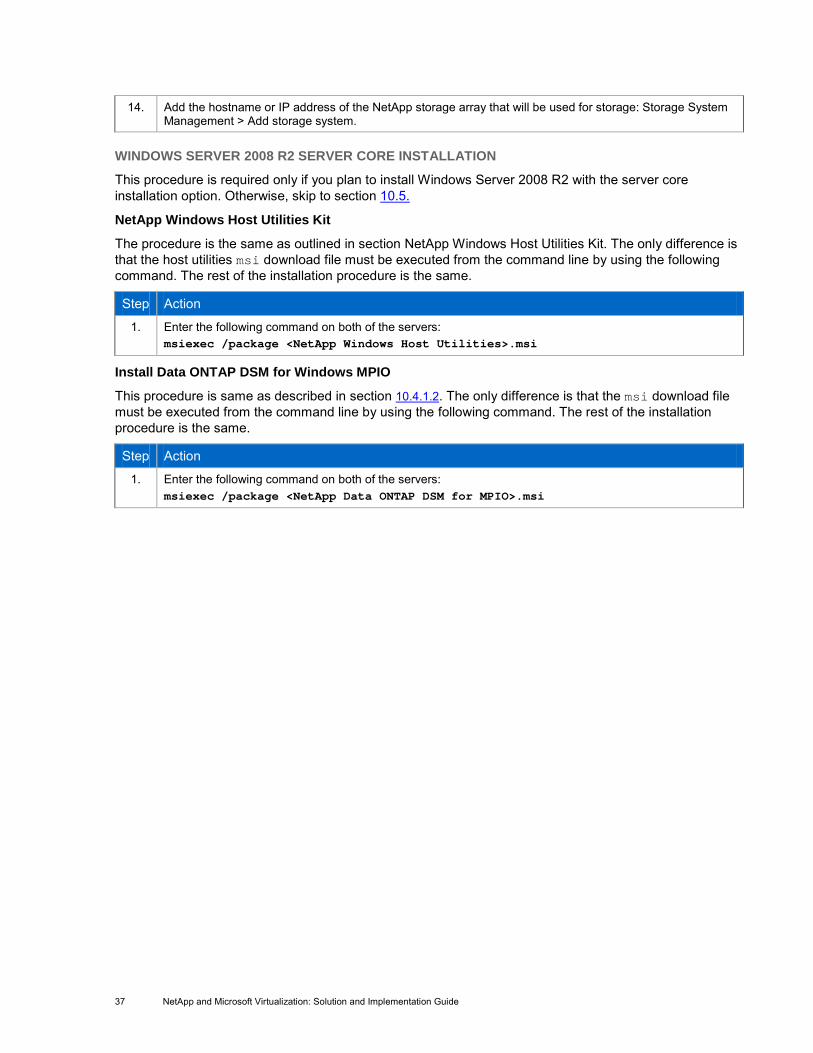
37 NetApp and Microsoft Virtualization: Solution and Implementation Guide
14. Add the hostname or IP address of the NetApp storage array that will be used for storage: Storage System Management > Add storage system.
WINDOWS SERVER 2008 R2 SERVER CORE INSTALLATION
This procedure is required only if you plan to install Windows Server 2008 R2 with the server core installation option. Otherwise, skip to section 10.5.
NetApp Windows Host Utilities Kit
The procedure is the same as outlined in section NetApp Windows Host Utilities Kit. The only difference is that the host utilities msi download file must be executed from the command line by using the following command. The rest of the installation procedure is the same.
Step Action
1. Enter the following command on both of the servers: msiexec /package <NetApp Windows Host Utilities>.msi
Install Data ONTAP DSM for Windows MPIO
This procedure is same as described in section 10.4.1.2. The only difference is that the msi download file must be executed from the command line by using the following command. The rest of the installation procedure is the same.
Step Action
1. Enter the following command on both of the servers: msiexec /package <NetApp Data ONTAP DSM for MPIO>.msi
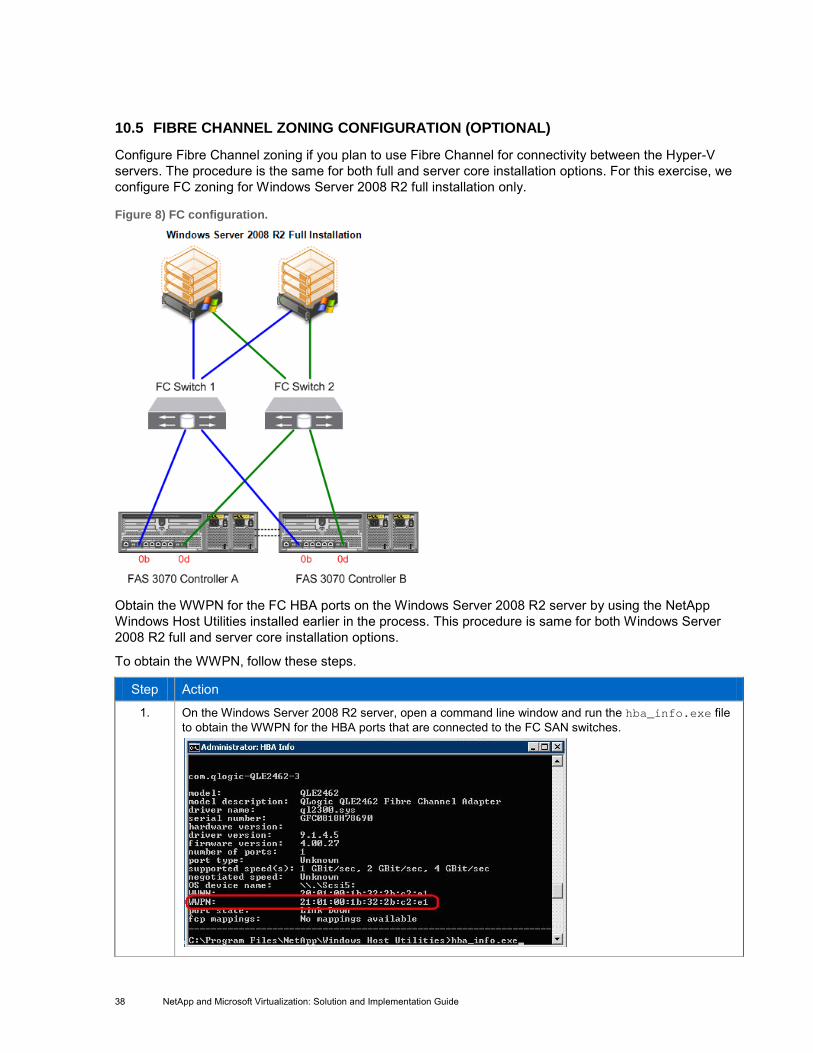
38 NetApp and Microsoft Virtualization: Solution and Implementation Guide
10.5 FIBRE CHANNEL ZONING CONFIGURATION (OPTIONAL)
Configure Fibre Channel zoning if you plan to use Fibre Channel for connectivity between the Hyper-V servers. The procedure is the same for both full and server core installation options. For this exercise, we configure FC zoning for Windows Server 2008 R2 full installation only.
Figure 8) FC configuration.
Obtain the WWPN for the FC HBA ports on the Windows Server 2008 R2 server by using the NetApp Windows Host Utilities installed earlier in the process. This procedure is same for both Windows Server 2008 R2 full and server core installation options.
To obtain the WWPN, follow these steps.
Step Action
1. On the Windows Server 2008 R2 server, open a command line window and run the hba_info.exe file to obtain the WWPN for the HBA ports that are connected to the FC SAN switches.
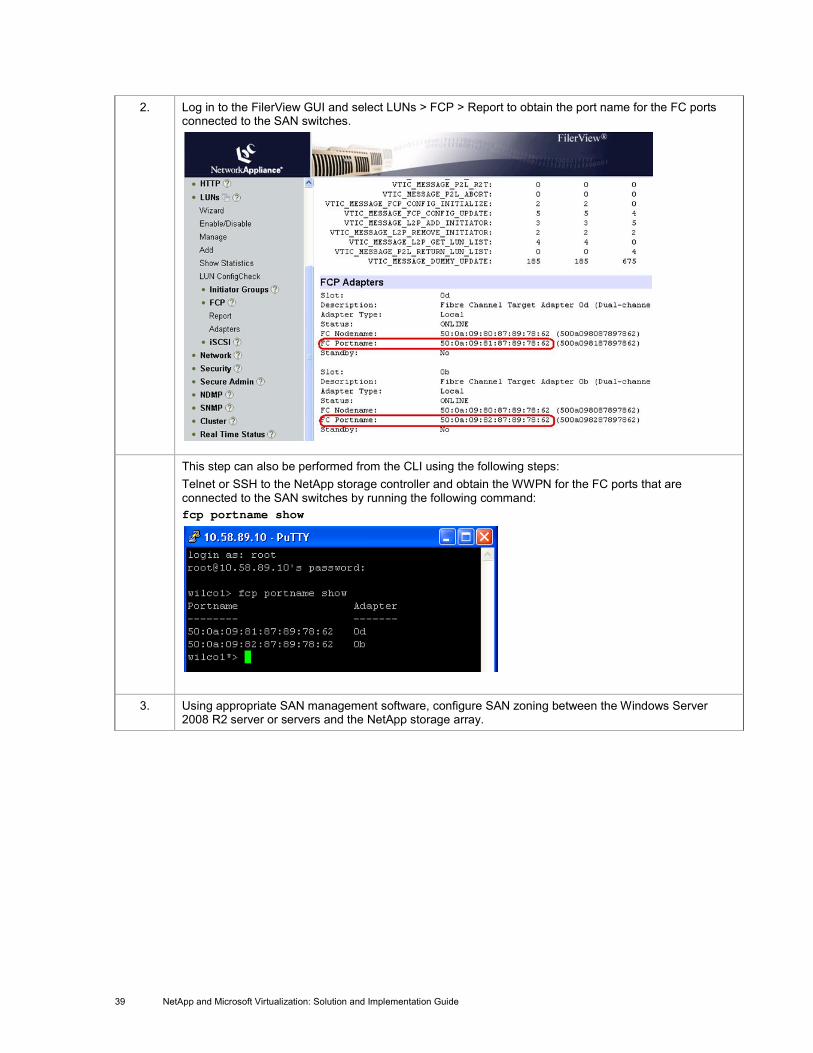
39 NetApp and Microsoft Virtualization: Solution and Implementation Guide
2. Log in to the FilerView GUI and select LUNs > FCP > Report to obtain the port name for the FC ports connected to the SAN switches.
This step can also be performed from the CLI using the following steps: Telnet or SSH to the NetApp storage controller and obtain the WWPN for the FC ports that are connected to the SAN switches by running the following command: fcp portname show
3. Using appropriate SAN management software, configure SAN zoning between the Windows Server 2008 R2 server or servers and the NetApp storage array.

40 NetApp and Microsoft Virtualization: Solution and Implementation Guide
10.6 NETAPP STORAGE PROVISIONING
CONFIGURE AN AGGREGATE
The first step to configuring storage on NetApp storage is to add a new aggregate. To configure an aggregate by using NetApp FilerView, follow these steps.
Steps Action
1. Open NetApp FilerView, click Aggregates, and click Add.
2. For aggregate name, enter a name that includes “Hyper-V” and that reflects the Hyper-V environment that will use it. Select the Double Parity check box to take advantage of RAID-DP® (the NetApp recommended RAID level for an aggregate). Click Next.
3. For RAID group size, select the number of disks to assign. NetApp recommends that you accept the default value of 16.
4. For disk selection, select the method for selecting disks to be used for the aggregate. Automatic is selected by default and is the NetApp recommended best practice.
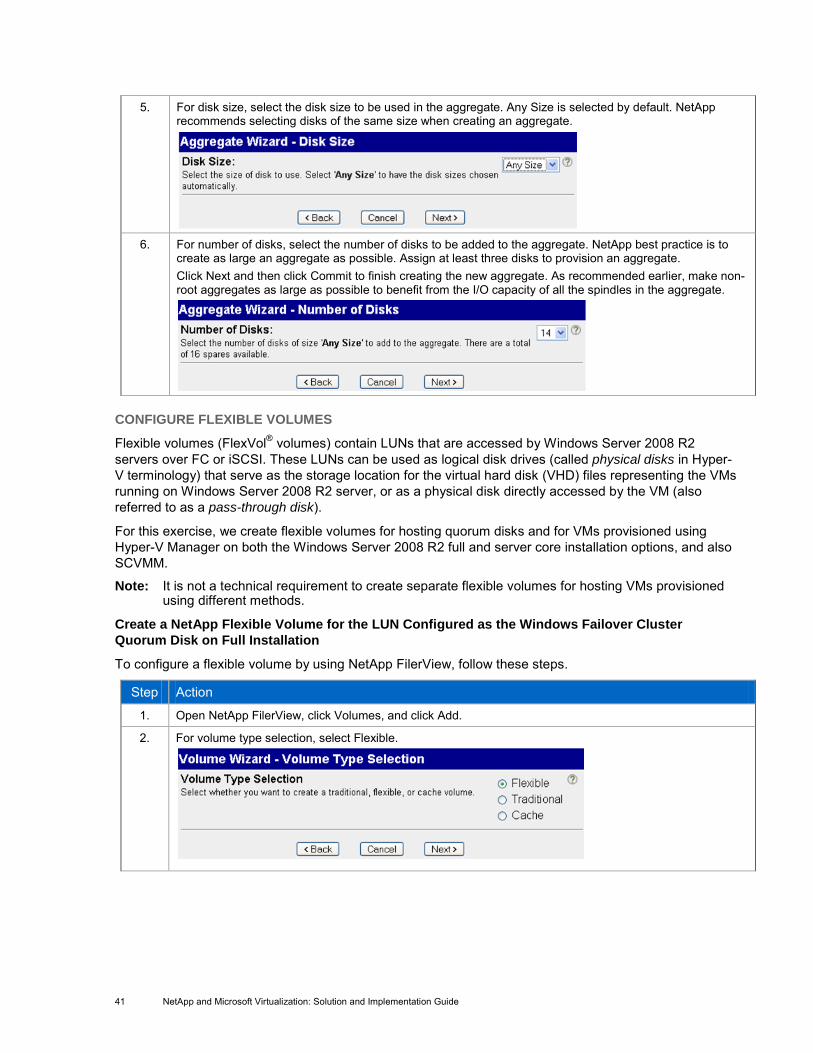
41 NetApp and Microsoft Virtualization: Solution and Implementation Guide
5. For disk size, select the disk size to be used in the aggregate. Any Size is selected by default. NetApp recommends selecting disks of the same size when creating an aggregate.
6. For number of disks, select the number of disks to be added to the aggregate. NetApp best practice is to create as large an aggregate as possible. Assign at least three disks to provision an aggregate. Click Next and then click Commit to finish creating the new aggregate. As recommended earlier, make non-root aggregates as large as possible to benefit from the I/O capacity of all the spindles in the aggregate.
CONFIGURE FLEXIBLE VOLUMES
Flexible volumes (FlexVol® volumes) contain LUNs that are accessed by Windows Server 2008 R2 servers over FC or iSCSI. These LUNs can be used as logical disk drives (called physical disks in Hyper-V terminology) that serve as the storage location for the virtual hard disk (VHD) files representing the VMs running on Windows Server 2008 R2 server, or as a physical disk directly accessed by the VM (also referred to as a pass-through disk).
For this exercise, we create flexible volumes for hosting quorum disks and for VMs provisioned using Hyper-V Manager on both the Windows Server 2008 R2 full and server core installation options, and also SCVMM.
Note: It is not a technical requirement to create separate flexible volumes for hosting VMs provisioned using different methods.
Create a NetApp Flexible Volume for the LUN Configured as the Windows Failover Cluster Quorum Disk on Full Installation
To configure a flexible volume by using NetApp FilerView, follow these steps.
Step Action
1. Open NetApp FilerView, click Volumes, and click Add.
2. For volume type selection, select Flexible.
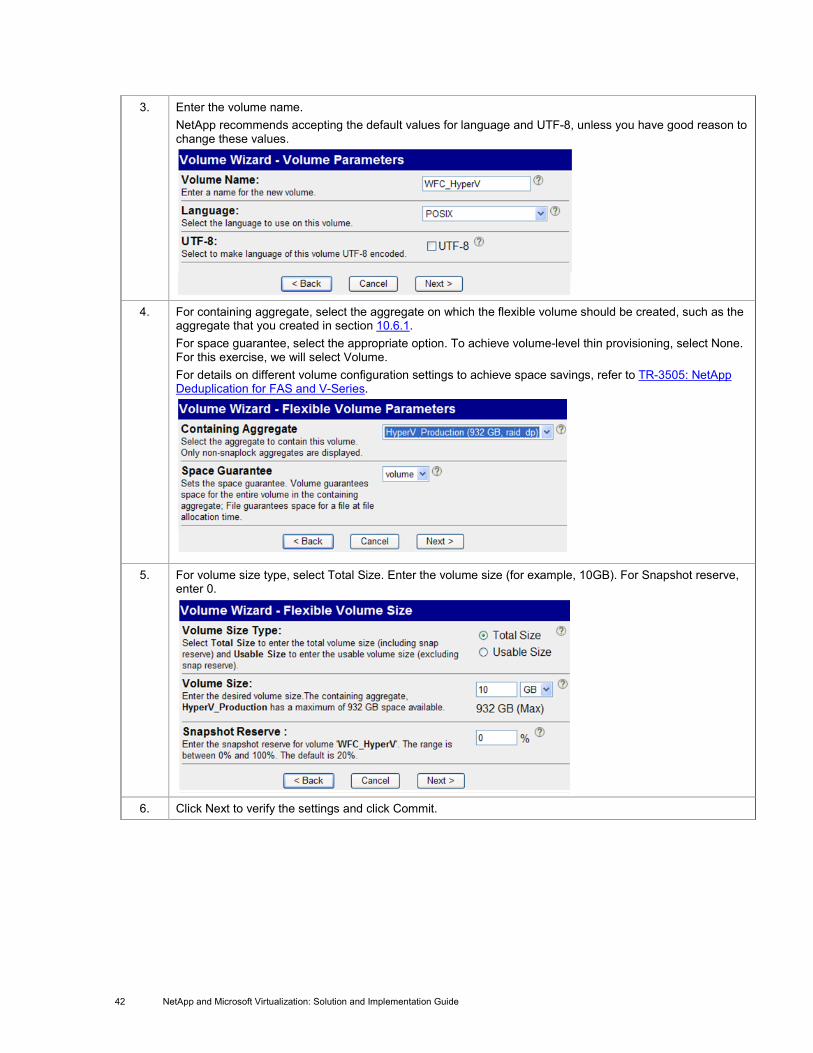
42 NetApp and Microsoft Virtualization: Solution and Implementation Guide
3. Enter the volume name. NetApp recommends accepting the default values for language and UTF-8, unless you have good reason to change these values.
4. For containing aggregate, select the aggregate on which the flexible volume should be created, such as the aggregate that you created in section 10.6.1. For space guarantee, select the appropriate option. To achieve volume-level thin provisioning, select None. For this exercise, we will select Volume. For details on different volume configuration settings to achieve space savings, refer to TR-3505: NetApp Deduplication for FAS and V-Series.
5. For volume size type, select Total Size. Enter the volume size (for example, 10GB). For Snapshot reserve, enter 0.
6. Click Next to verify the settings and click Commit.
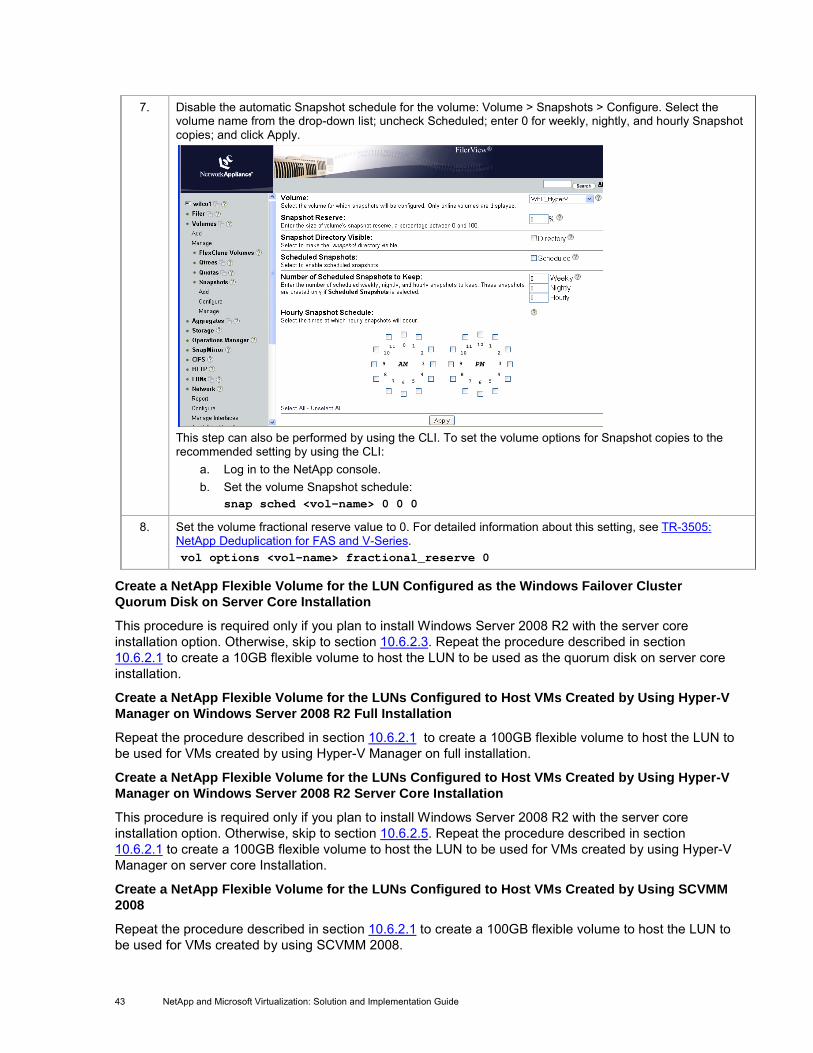
43 NetApp and Microsoft Virtualization: Solution and Implementation Guide
7. Disable the automatic Snapshot schedule for the volume: Volume > Snapshots > Configure. Select the volume name from the drop-down list; uncheck Scheduled; enter 0 for weekly, nightly, and hourly Snapshot copies; and click Apply.
This step can also be performed by using the CLI. To set the volume options for Snapshot copies to the recommended setting by using the CLI:
a. Log in to the NetApp console. b. Set the volume Snapshot schedule:
snap sched <vol-name> 0 0 0
8. Set the volume fractional reserve value to 0. For detailed information about this setting, see TR-3505: NetApp Deduplication for FAS and V-Series. vol options <vol-name> fractional_reserve 0
Create a NetApp Flexible Volume for the LUN Configured as the Windows Failover Cluster Quorum Disk on Server Core Installation
This procedure is required only if you plan to install Windows Server 2008 R2 with the server core installation option. Otherwise, skip to section 10.6.2.3. Repeat the procedure described in section 10.6.2.1 to create a 10GB flexible volume to host the LUN to be used as the quorum disk on server core installation.
Create a NetApp Flexible Volume for the LUNs Configured to Host VMs Created by Using Hyper-V Manager on Windows Server 2008 R2 Full Installation
Repeat the procedure described in section 10.6.2.1 to create a 100GB flexible volume to host the LUN to be used for VMs created by using Hyper-V Manager on full installation.
Create a NetApp Flexible Volume for the LUNs Configured to Host VMs Created by Using Hyper-V Manager on Windows Server 2008 R2 Server Core Installation
This procedure is required only if you plan to install Windows Server 2008 R2 with the server core installation option. Otherwise, skip to section 10.6.2.5. Repeat the procedure described in section 10.6.2.1 to create a 100GB flexible volume to host the LUN to be used for VMs created by using Hyper-V Manager on server core Installation.
Create a NetApp Flexible Volume for the LUNs Configured to Host VMs Created by Using SCVMM 2008
Repeat the procedure described in section 10.6.2.1 to create a 100GB flexible volume to host the LUN to be used for VMs created by using SCVMM 2008.

44 NetApp and Microsoft Virtualization: Solution and Implementation Guide
CONFIGURE ISCSI ON WINDOWS SERVER 2008 R2 SERVER
This procedure is required only if you plan to install Windows Server 2008 R2 with the server core installation option. Otherwise, skip to section 10.7 Microsoft Windows Failover Clustering Configuration.
Step Action
1. The Windows Server 2008 R2 server core installation needs to have the iSCSI services running to access the iSCSI target. Use the following command at the prompt to initiate the services during the boot and start the service: sc config msiscsi start= auto net start msiscsi
2. After the services are started, add the target’s (NetApp storage array) IP address. Use the following
command to add the target portal: iscsicli QAddTargetPortal <Portal IP Address>
where <Portal IP Address> is the IP of the NetApp storage controller.
3. After adding the portal IP, use the following zscommand to list the target IQNs: iscsicli ListTargets
4. The IQN obtained from the previous command can be used to establish an iSCSI session. Use the following command to perform a login and establish a connection: iscsicli QloginTarget <target_iqn>
Where <target_iqn> is the IQN obtained in step 3. The login operation returns a message indicating a successful session.

45 NetApp and Microsoft Virtualization: Solution and Implementation Guide
CONFIGURE WINDOWS SERVER 2008 R2 INITIATOR GROUPS ON NETAPP STORAGE
This procedure is required only for Windows Server 2008 R2 servers with server core installation. Otherwise, skip to section 10.7 Microsoft Windows Failover Clustering Configuration.
For Windows Server 2008 R2 servers with the full installation option, NetApp SnapDrive software is used to perform this procedure.
Step Action
1. Use the following command to obtain the initiator (Windows Server 2008 R2 server) IQN from the command line on the Windows Server 2008 R2 server: iscsicli
2. Create initiator groups for all the Windows Server 2008 R2 with server core installation on the NetApp storage by using FilerView: FilerView > LUN > Initiator Groups > Add.
3. Enter the initiator group name. Select iSCSI for the type, Windows for the operating system, and IQN for the initiator (Windows Server 2008 R2 server core installation) obtained from the previous step. Click Add.

46 NetApp and Microsoft Virtualization: Solution and Implementation Guide
10.7 MICROSOFT WINDOWS FAILOVER CLUSTERING CONFIGURATION
WINDOWS SERVER 2008 R2 FULL INSTALLATION
Installation Failover Clustering Feature
For the detailed procedure, follow the guidelines outlined in the Hyper-V: Using Hyper-V and Failover Clustering.
Step Action
1. Open Server Manager, click Features, and click Add Features.
2. Check Failover Clustering and click Next.
3. Click Install to continue.
4. When installation is complete, click Close.
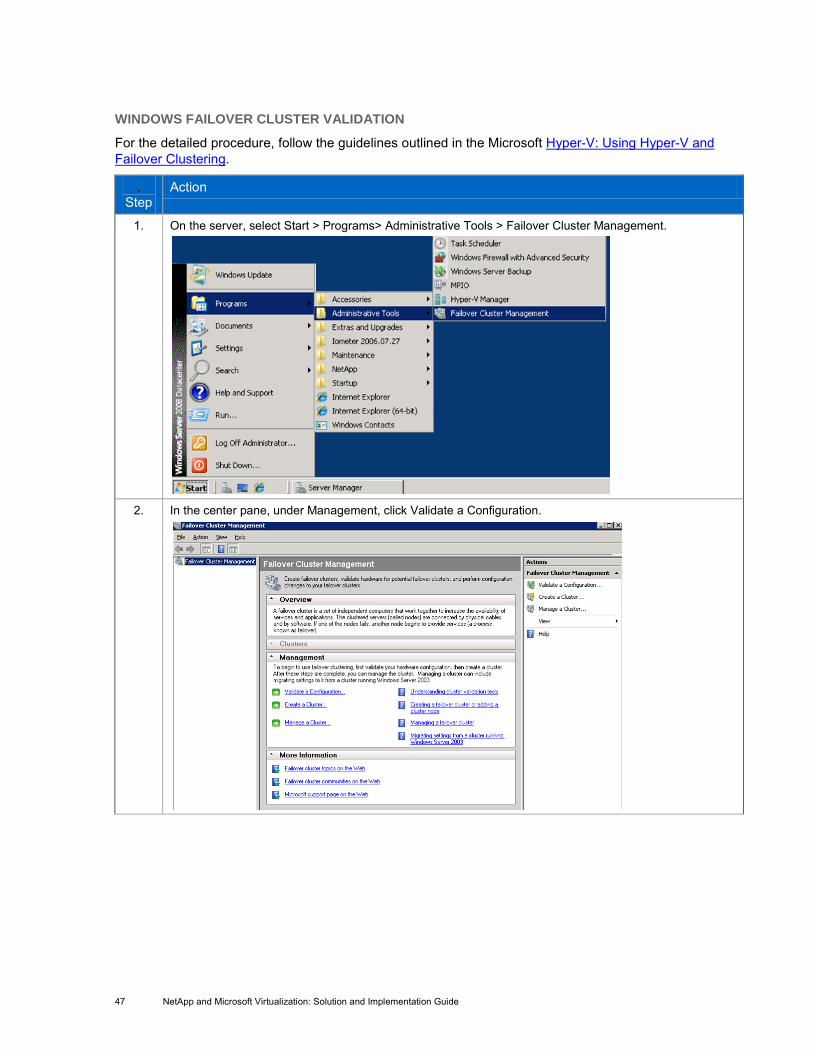
47 NetApp and Microsoft Virtualization: Solution and Implementation Guide
WINDOWS FAILOVER CLUSTER VALIDATION
For the detailed procedure, follow the guidelines outlined in the Microsoft Hyper-V: Using Hyper-V and Failover Clustering.
. Step
Action
1. On the server, select Start > Programs> Administrative Tools > Failover Cluster Management.
2. In the center pane, under Management, click Validate a Configuration.

48 NetApp and Microsoft Virtualization: Solution and Implementation Guide
3. Follow the wizard to validate the cluster before creating it.
4. A summary page appears at the end of the procedure. Click View Report and analyze the test results for success and warnings.
Create a Windows Failover Cluster
For the detailed procedure, follow the guidelines outlined in the Microsoft documentation.
Step Action
1. In the Failover Cluster Management window, click Create a Cluster. Enter the names of the servers that will be part of the cluster and click Next.

49 NetApp and Microsoft Virtualization: Solution and Implementation Guide
2. Enter a name and IP address for the cluster and click Next.
3. On the Summary page, click View Report to view a report of the task performed by the wizard.

50 NetApp and Microsoft Virtualization: Solution and Implementation Guide
Configure Windows Failover Cluster Quorum
The quorum disk is a disk on the shared storage that is designated to hold a copy of the failover cluster configuration database.
Create a Shared LUN by using NetApp
Step
SnapDrive
Action
1. Open Server Manager and select Storage > SnapDrive > Server Name > Disks.
2. Right-click and select Create a Disk.
3. In the Create Disk wizard, select a storage system name, LUN path, and LUN name. Use the NetApp volume created in section 10.6.2.1 to host the witness disk.
4. On the Select a LUN Type page, select Shared (Microsoft Cluster Services only) and click Next.

51 NetApp and Microsoft Virtualization: Solution and Implementation Guide
5. The next page displays all the active nodes in the cluster. Click Next to continue.
6. Assign a drive letter and a size. Click Next to continue.

52 NetApp and Microsoft Virtualization: Solution and Implementation Guide
7. Continue through the wizard. On the Select Initiators page, check the WWN or IQN (based on the requirements) for all the servers in the cluster. Click Next to continue. For this exercise, we will use Fibre Channel initiators.
8. On the Select Initiator Group Management page, select either Automatic or Manual. For this exercise, we will select Automatic. Click Next.

53 NetApp and Microsoft Virtualization: Solution and Implementation Guide
9. On the Specify Microsoft Cluster Services Group page, select Available Storage for the group name and click Next.
If Available Storage is not listed in the Group Name drop-down list, make sure that the Windows server that is creating the shared disk is the owner of the Available Storage cluster group. To find out the owner of the available storage, enter the following command at the command prompt: cluster group "Available Storage"
If the group is owned by a different server, you can either use that server to create the shared disk or use the failover cluster command line to move the Available Storage group between different nodes. The Failover Cluster MMC snap-in does not provide this feature. cluster group "Available Storage" /MOVE

54 NetApp and Microsoft Virtualization: Solution and Implementation Guide
10. Continue through the wizard and click Finish to start the LUN provisioning process.
11. The Details section of the Disks MMC snap-in for SnapDrive shows the steps as the disk is being configured.

55 NetApp and Microsoft Virtualization: Solution and Implementation Guide
Configure Windows Failover Cluster Quorum Disk
Step Action
1. To launch the Windows Server 2008 R2 Failover Cluster Management snap-in: Start > Programs > Administrative Tools > Failover Cluster Management.
2. Click the name of the failover cluster for which you want to configure the witness disk.
3. From the menu choices at the top of the snap-in, select Action > More Actions > Configure Cluster Quorum Settings to launch the Configure Cluster Quorum wizard.
4. In the Configure Cluster Quorum wizard, click Next to display the Select Quorum Configuration page.
5. On the Select Quorum Configuration page, select Node and Disk Majority and click Next to display the Configure Storage Witness page.

56 NetApp and Microsoft Virtualization: Solution and Implementation Guide
6. On the Configure Storage Witness page, select the shared LUN that you created in SnapDrive to be the witness disk and click Next. The Confirmation page is displayed.
7. In the Confirmation page, click Next to configure the cluster quorum settings.
When the quorum settings are configured, the Summary page is displayed.
8. On the Summary page, click Finish to close the wizard.
WINDOWS SERVER 2008 R2 SERVER CORE INSTALLATION
This step is required only if you plan to install Windows Server 2008 R2 with the server core installation option. Otherwise, skip to section 10.8.
Install the Failover Clustering Feature
RDP to the Windows Server 2008 R2 server core installation and run the following command to enable Windows failover clustering. Reboot the server when prompted.
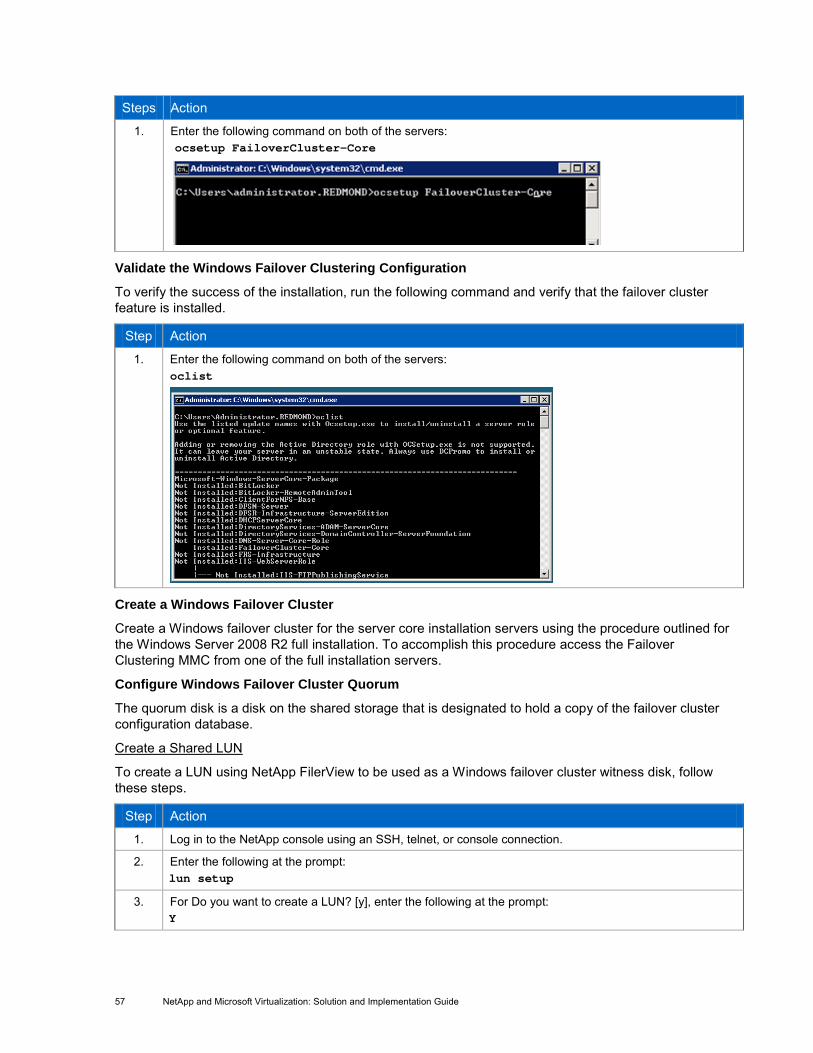
57 NetApp and Microsoft Virtualization: Solution and Implementation Guide
Steps Action
1. Enter the following command on both of the servers: ocsetup FailoverCluster-Core
Validate the Windows Failover Clustering Configuration
To verify the success of the installation, run the following command and verify that the failover cluster feature is installed.
Step Action
1. Enter the following command on both of the servers: oclist
Create a Windows Failover Cluster
Create a Windows failover cluster for the server core installation servers using the procedure outlined for the Windows Server 2008 R2 full installation. To accomplish this procedure access the Failover Clustering MMC from one of the full installation servers.
Configure Windows Failover Cluster Quorum
The quorum disk is a disk on the shared storage that is designated to hold a copy of the failover cluster configuration database.
Create a Shared LUN
To create a LUN using NetApp FilerView to be used as a Windows failover cluster witness disk, follow these steps.
Step Action
1. Log in to the NetApp console using an SSH, telnet, or console connection.
2. Enter the following at the prompt: lun setup
3. For Do you want to create a LUN? [y], enter the following at the prompt: Y

58 NetApp and Microsoft Virtualization: Solution and Implementation Guide
4. Enter the LUN type. For Windows Server 2008 R2 (including Hyper-V), enter the following at the prompt: windows_2008
5. Enter the LUN path. Example: /vol/<volume_name>/<lun_name>
6. Select whether the LUN is to be space reserved. For this exercise, we will leave this value at the default, Yes.
7. Enter the LUN size. For this exercise, we created a 2GB LUN for the quorum.
8. Enter the comment string.
9. Enter the name of the initiator group for the server, created in section 10.6.4.
10. Select the LUN ID at which the initiator group sees the LUN. Leaving this blank autoselects the LUN ID.
11. Accept the configuration by entering the following at the prompt: Y
12. Map the initiator groups for additional Windows Server 2008 R2 servers that will be part of the Windows failover cluster to this LUN: lun map [ -f ] <lun_path> <initiator_group> [<lun_id>]
Connect the Windows Server 2008 R2 server core installation system to LUNs Provisioned on a NetApp Storage System
To connect a previously created LUN, follow these steps.
Step Action
1. Open the Computer Management window from either the server with Windows Server 2008 R2 full installation or any other Windows server and connect to one of the Windows Server 2008 R2 servers with server core installation.
2. Open Disk Management: Storage >Disk Management.

59 NetApp and Microsoft Virtualization: Solution and Implementation Guide
3. Rescan disks: Right-click Disk Management and select Rescan Disks.
A rescan forces the rescanning of all HBAs (FC and iSCSI) to discover changes in the storage that is available to the Windows Server 2008 R2 server.
4. When the LUN has been identified, bring it online and format with the NTFS file system. When initializing disks, use the default partition style, master boot record (MBR).
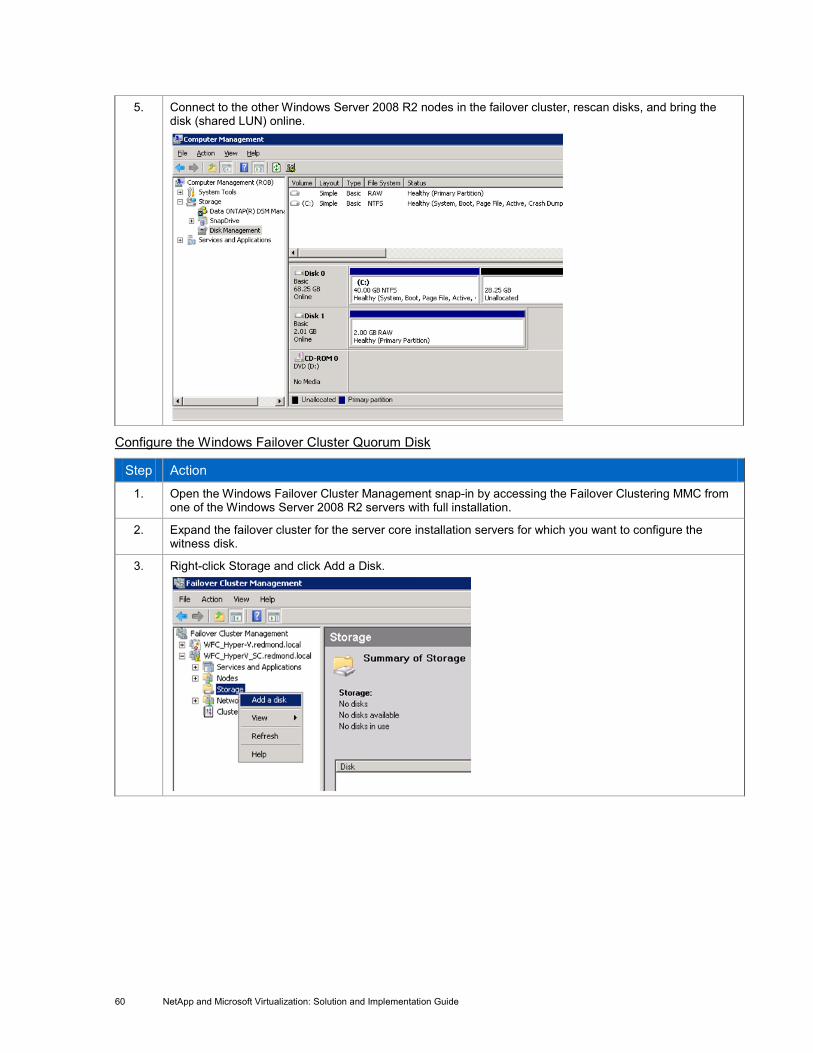
60 NetApp and Microsoft Virtualization: Solution and Implementation Guide
5. Connect to the other Windows Server 2008 R2 nodes in the failover cluster, rescan disks, and bring the disk (shared LUN) online.
Configure the Windows Failover Cluster Quorum Disk
Step Action
1. Open the Windows Failover Cluster Management snap-in by accessing the Failover Clustering MMC from one of the Windows Server 2008 R2 servers with full installation.
2. Expand the failover cluster for the server core installation servers for which you want to configure the witness disk.
3. Right-click Storage and click Add a Disk.

61 NetApp and Microsoft Virtualization: Solution and Implementation Guide
4. Select the disk created earlier and click OK.
5. The remaining steps are the same as described in section Configure Windows Failover Cluster Quorum Disk.
10.8 DISK PROVISIONING ON WINDOWS SERVER 2008 R2 SERVERS
WINDOWS SERVER 2008 R2 FULL INSTALLATION
Create a Shared LUN by Using NetApp SnapDrive to Host Production VMs Configured by Using Hyper-V Manager
Follow the procedure described in section 10.6.2 to create a LUN to host the production VMs configured by using the Hyper-V Manager. Also make sure that the disk is removed from the cluster resource group.
Create a Shared LUN by Using NetApp SnapDrive to Host VMs Configured Through SCVMM
Repeat the process described in section 10.6.2 to create a LUN to host the production VMs configured through SCVMM. Also make sure that the disk is removed from the cluster resource group.
WINDOWS SERVER 2008 R2 SERVER CORE INSTALLATION
This procedure is required only if you plan to install with the Windows Server 2008 R2 server core installation. Otherwise, skip to section 11.
Create a Shared LUN
Follow the procedure in section 10.7.3.4 to create a shared LUN to host the VMs configured through Hyper-V Manager.
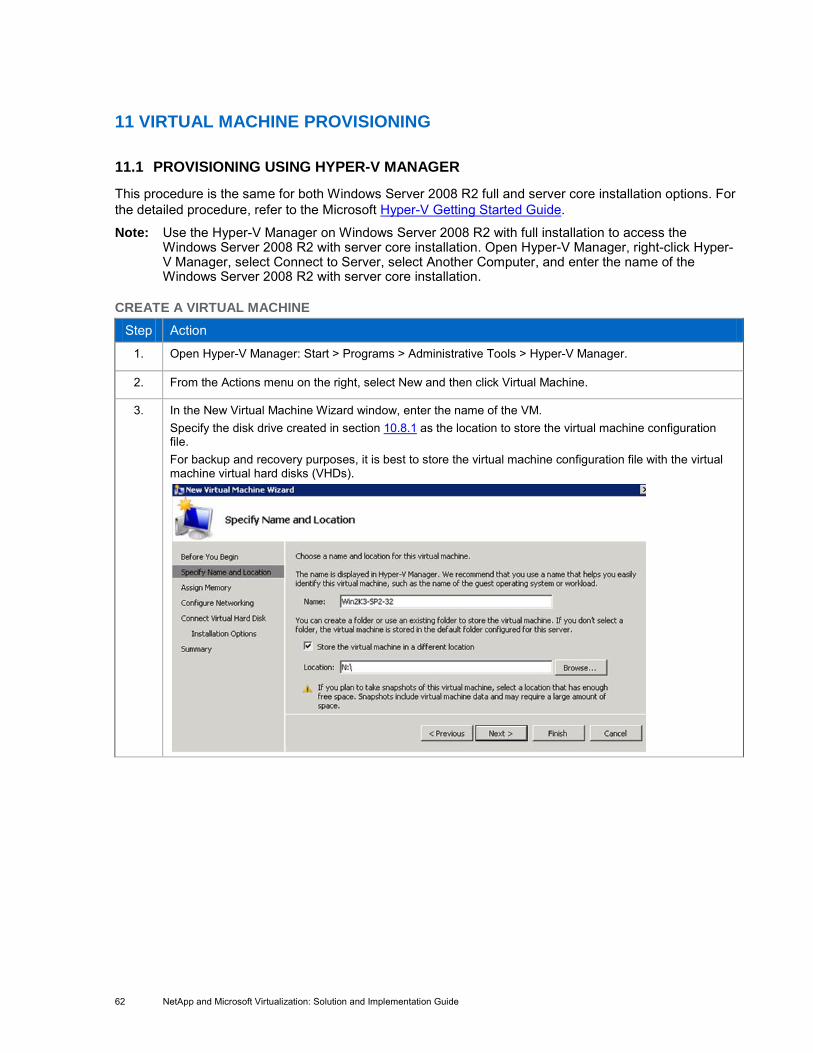
62 NetApp and Microsoft Virtualization: Solution and Implementation Guide
11 VIRTUAL MACHINE PROVISIONING
11.1 PROVISIONING USING HYPER-V MANAGER
This procedure is the same for both Windows Server 2008 R2 full and server core installation options. For the detailed procedure, refer to the Microsoft Hyper-V Getting Started Guide.
Note: Use the Hyper-V Manager on Windows Server 2008 R2 with full installation to access the Windows Server 2008 R2 with server core installation. Open Hyper-V Manager, right-click Hyper-V Manager, select Connect to Server, select Another Computer, and enter the name of the Windows Server 2008 R2 with server core installation.
CREATE A VIRTUAL MACHINE Step Action
1. Open Hyper-V Manager: Start > Programs > Administrative Tools > Hyper-V Manager.
2. From the Actions menu on the right, select New and then click Virtual Machine.
3. In the New Virtual Machine Wizard window, enter the name of the VM. Specify the disk drive created in section 10.8.1 as the location to store the virtual machine configuration file. For backup and recovery purposes, it is best to store the virtual machine configuration file with the virtual machine virtual hard disks (VHDs).
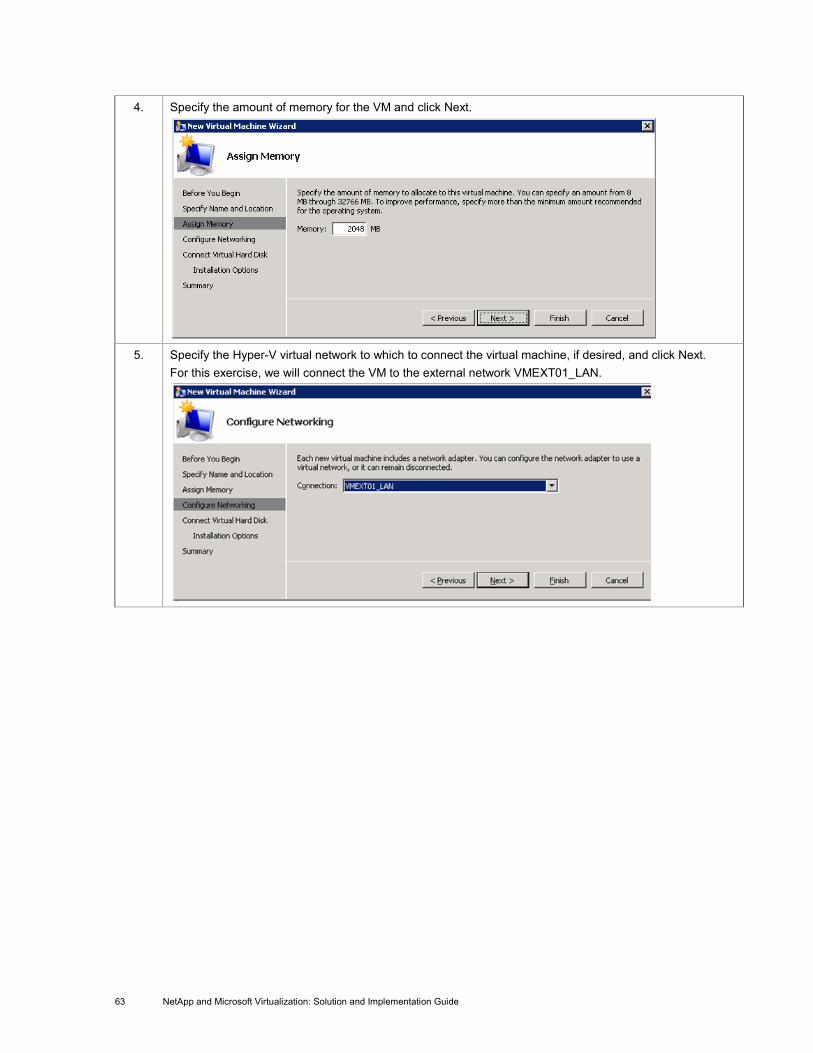
63 NetApp and Microsoft Virtualization: Solution and Implementation Guide
4. Specify the amount of memory for the VM and click Next.
5. Specify the Hyper-V virtual network to which to connect the virtual machine, if desired, and click Next. For this exercise, we will connect the VM to the external network VMEXT01_LAN.
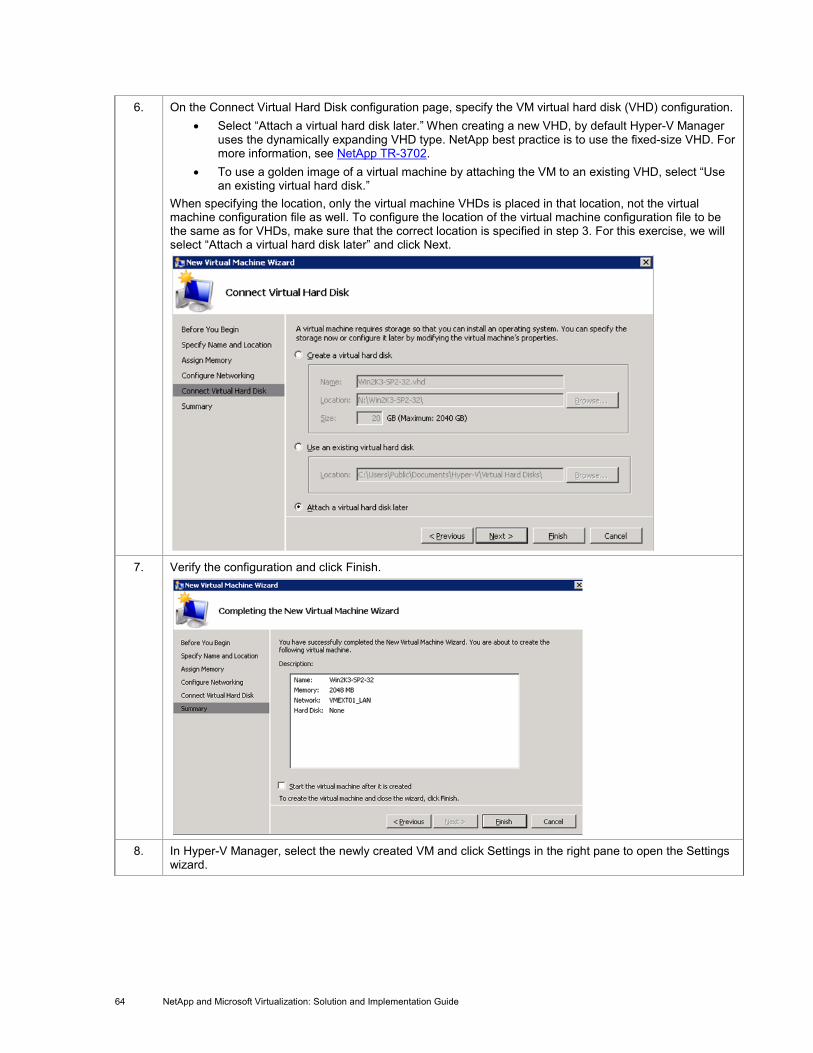
64 NetApp and Microsoft Virtualization: Solution and Implementation Guide
6. On the Connect Virtual Hard Disk configuration page, specify the VM virtual hard disk (VHD) configuration. • Select “Attach a virtual hard disk later.” When creating a new VHD, by default Hyper-V Manager
uses the dynamically expanding VHD type. NetApp best practice is to use the fixed-size VHD. For more information, see NetApp TR-3702.
• To use a golden image of a virtual machine by attaching the VM to an existing VHD, select “Use an existing virtual hard disk.”
When specifying the location, only the virtual machine VHDs is placed in that location, not the virtual machine configuration file as well. To configure the location of the virtual machine configuration file to be the same as for VHDs, make sure that the correct location is specified in step 3. For this exercise, we will select “Attach a virtual hard disk later” and click Next.
7. Verify the configuration and click Finish.
8. In Hyper-V Manager, select the newly created VM and click Settings in the right pane to open the Settings wizard.

65 NetApp and Microsoft Virtualization: Solution and Implementation Guide
9. In the Settings window, click IDE Controller 0, make sure that Hard Drive is selected, and click Add.
10. Click New to open the New Virtual Hard Disk wizard.
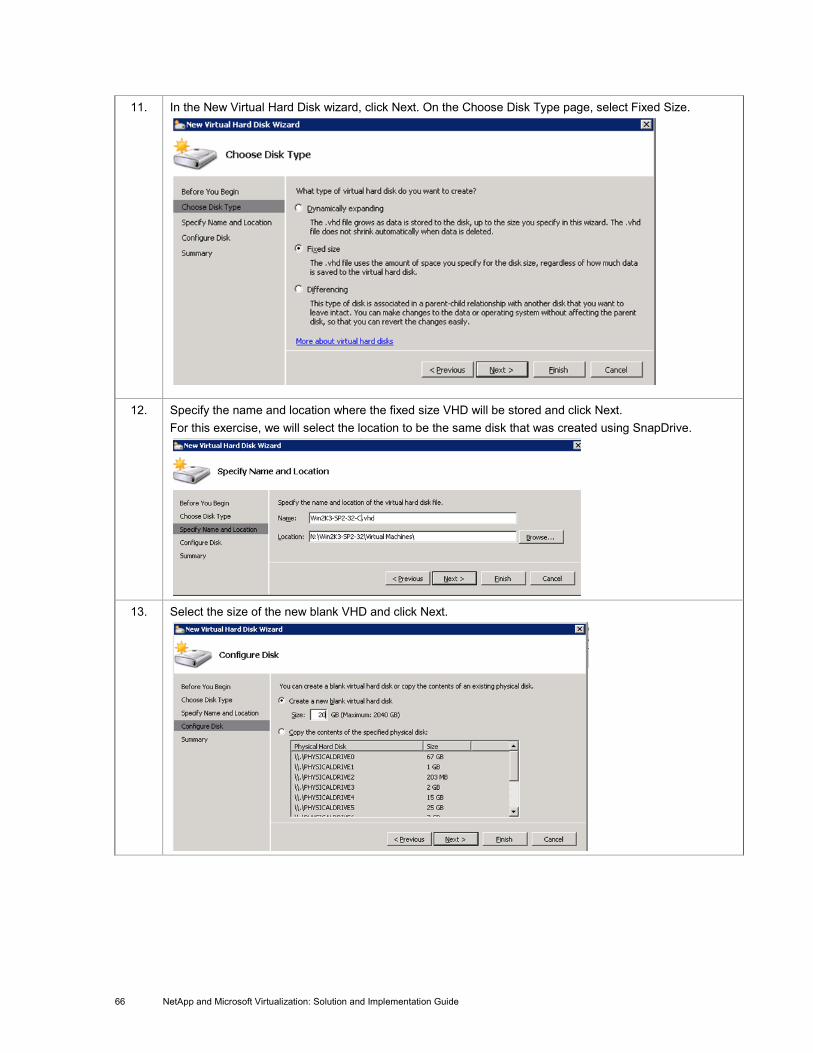
66 NetApp and Microsoft Virtualization: Solution and Implementation Guide
11. In the New Virtual Hard Disk wizard, click Next. On the Choose Disk Type page, select Fixed Size.
12. Specify the name and location where the fixed size VHD will be stored and click Next. For this exercise, we will select the location to be the same disk that was created using SnapDrive.
13. Select the size of the new blank VHD and click Next.
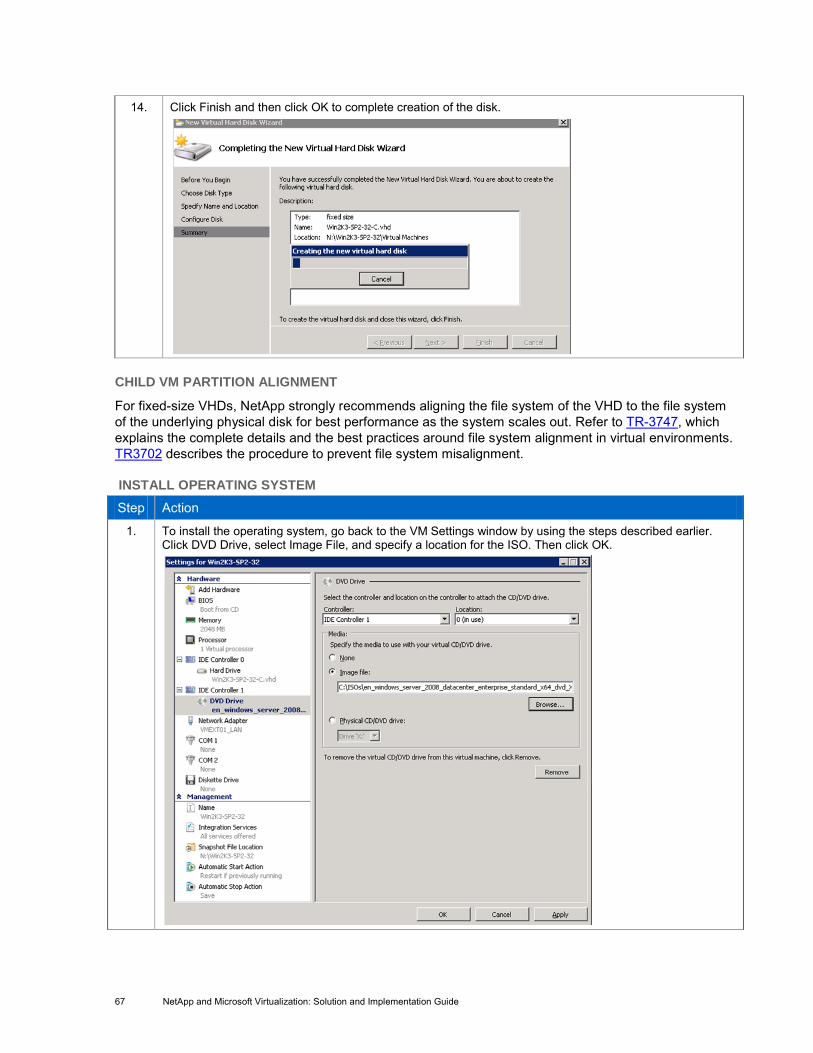
67 NetApp and Microsoft Virtualization: Solution and Implementation Guide
14. Click Finish and then click OK to complete creation of the disk.
CHILD VM PARTITION ALIGNMENT
For fixed-size VHDs, NetApp strongly recommends aligning the file system of the VHD to the file system of the underlying physical disk for best performance as the system scales out. Refer to TR-3747, which explains the complete details and the best practices around file system alignment in virtual environments. TR3702 describes the procedure to prevent file system misalignment.
INSTALL OPERATING SYSTEM Step Action
1. To install the operating system, go back to the VM Settings window by using the steps described earlier. Click DVD Drive, select Image File, and specify a location for the ISO. Then click OK.

68 NetApp and Microsoft Virtualization: Solution and Implementation Guide
2. In the Hyper-V Manager, click the newly created VM, right-click, and select Connect.
3. Click the green Start button.
4. Install the operating system as you would install the OS on a physical system.
Note: You will not be able to use your mouse throughout the installation because the Hyper-V Integrated Services component of Hyper-V is not yet installed on the VM.
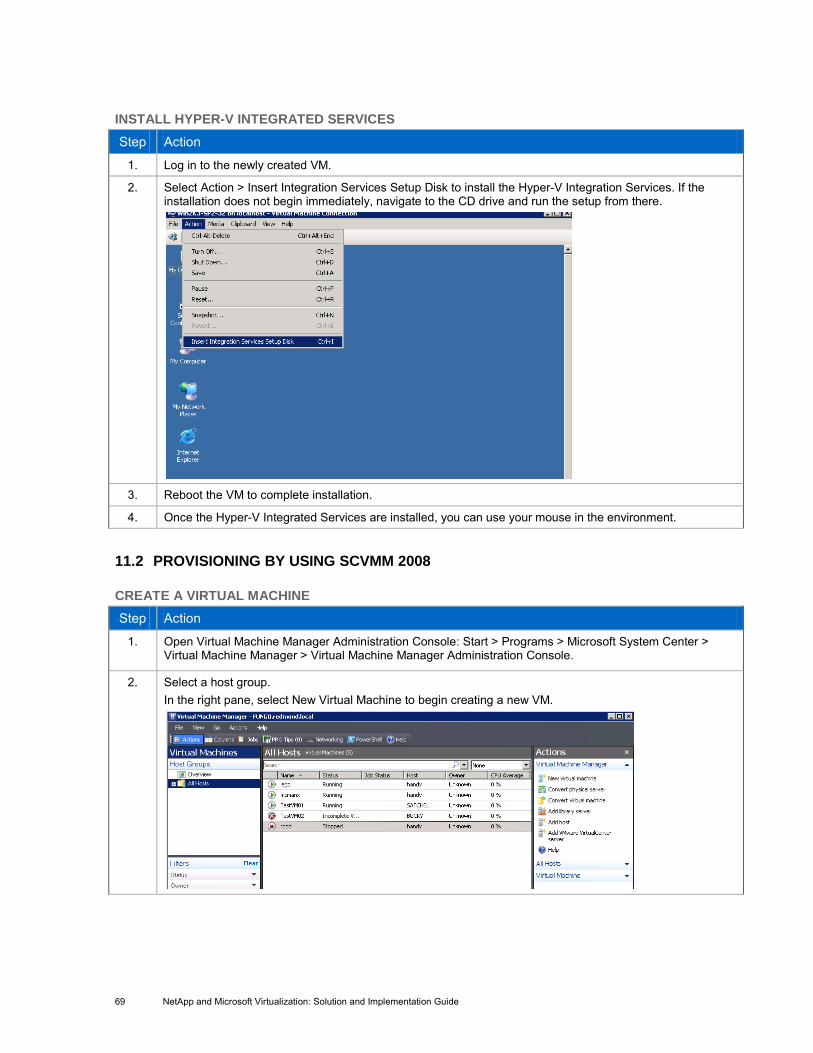
69 NetApp and Microsoft Virtualization: Solution and Implementation Guide
INSTALL HYPER-V INTEGRATED SERVICES Step Action
1. Log in to the newly created VM.
2. Select Action > Insert Integration Services Setup Disk to install the Hyper-V Integration Services. If the installation does not begin immediately, navigate to the CD drive and run the setup from there.
3. Reboot the VM to complete installation.
4. Once the Hyper-V Integrated Services are installed, you can use your mouse in the environment.
11.2 PROVISIONING BY USING SCVMM 2008
CREATE A VIRTUAL MACHINE Step Action
1. Open Virtual Machine Manager Administration Console: Start > Programs > Microsoft System Center > Virtual Machine Manager > Virtual Machine Manager Administration Console.
2. Select a host group. In the right pane, select New Virtual Machine to begin creating a new VM.

70 NetApp and Microsoft Virtualization: Solution and Implementation Guide
3. Select “Create the new virtual machine with a blank virtual hard disk.”
4. Specify the virtual machine name and the owner of the VM. Add a description of the VM and any notes and then click Next.

71 NetApp and Microsoft Virtualization: Solution and Implementation Guide
5. To configure VM hardware, select to use a new or existing hardware profile. To create this VM, we will use a new hardware profile.
• Configure the processor and memory for the VM.
6. Specify the Virtual Hard Disk configuration for the virtual machine. • To use a golden image of a virtual machine by attaching the VM to an existing VHD, select “Use an
existing virtual hard disk.”
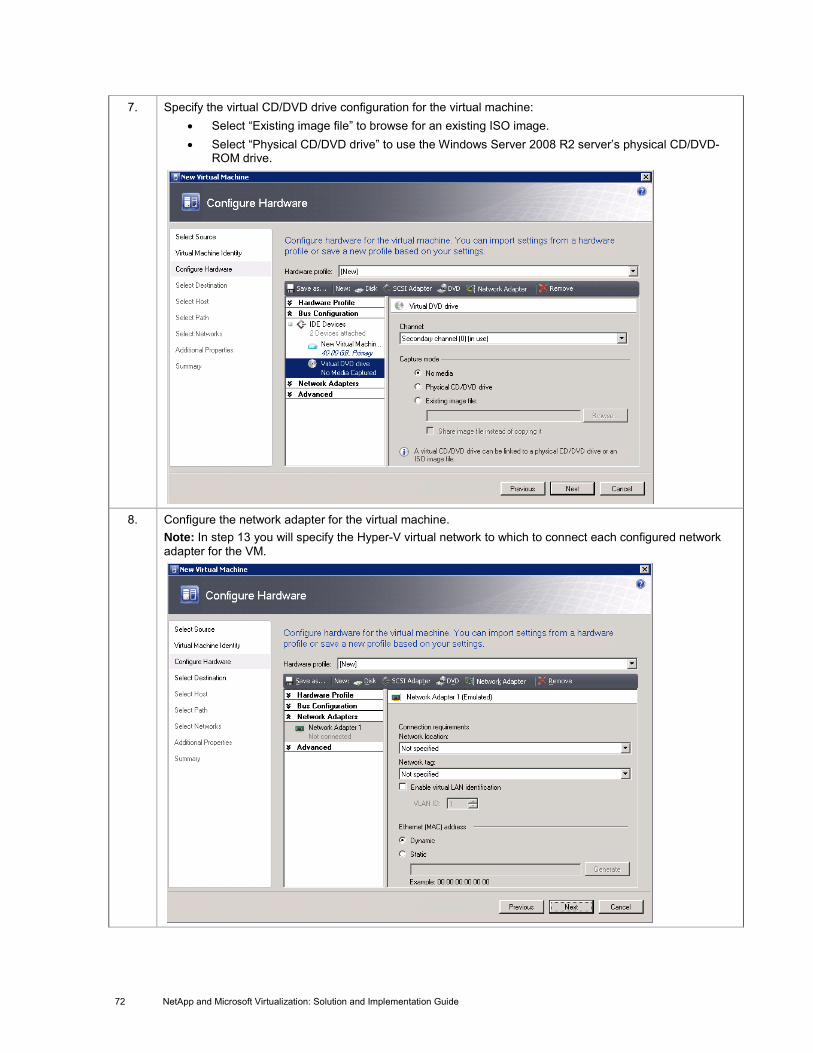
72 NetApp and Microsoft Virtualization: Solution and Implementation Guide
7. Specify the virtual CD/DVD drive configuration for the virtual machine: • Select “Existing image file” to browse for an existing ISO image. • Select “Physical CD/DVD drive” to use the Windows Server 2008 R2 server’s physical CD/DVD-
ROM drive.
8. Configure the network adapter for the virtual machine.
Note: In step 13 you will specify the Hyper-V virtual network to which to connect each configured network adapter for the VM.

73 NetApp and Microsoft Virtualization: Solution and Implementation Guide
9. Select the priority of the virtual machine based on CPU resources relative to other VMs residing on the same Windows Server 2008 R2 server.
Note: You must have a Hyper-V cluster configured in SCVMM in order to make the virtual machine highly available.
10. Select “Place the virtual machine on a host” to continue creating the virtual machine.

74 NetApp and Microsoft Virtualization: Solution and Implementation Guide
11. Select the Windows Server 2008 R2 host on which to place the newly created virtual machine. If the server is a clustered host (part of the failover cluster), you are prompted to make the VM highly available.
12. Specify the path/location for storing the virtual machine configuration file and VHDs.
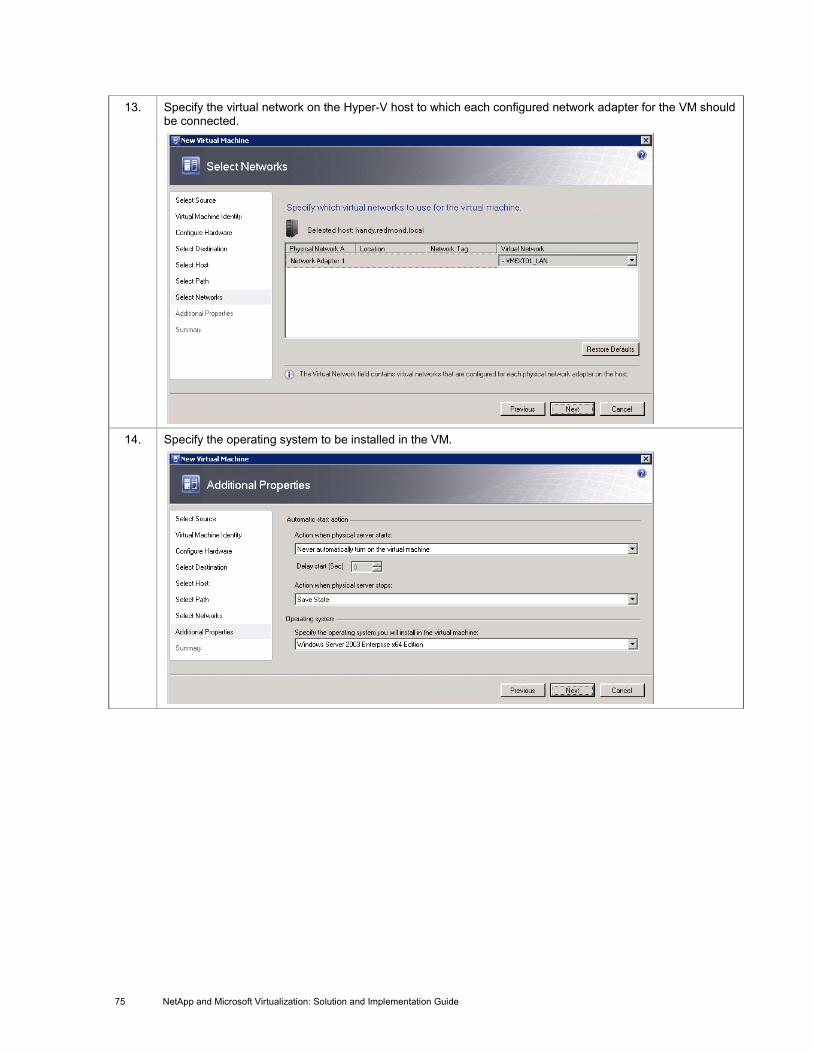
75 NetApp and Microsoft Virtualization: Solution and Implementation Guide
13. Specify the virtual network on the Hyper-V host to which each configured network adapter for the VM should be connected.
14. Specify the operating system to be installed in the VM.
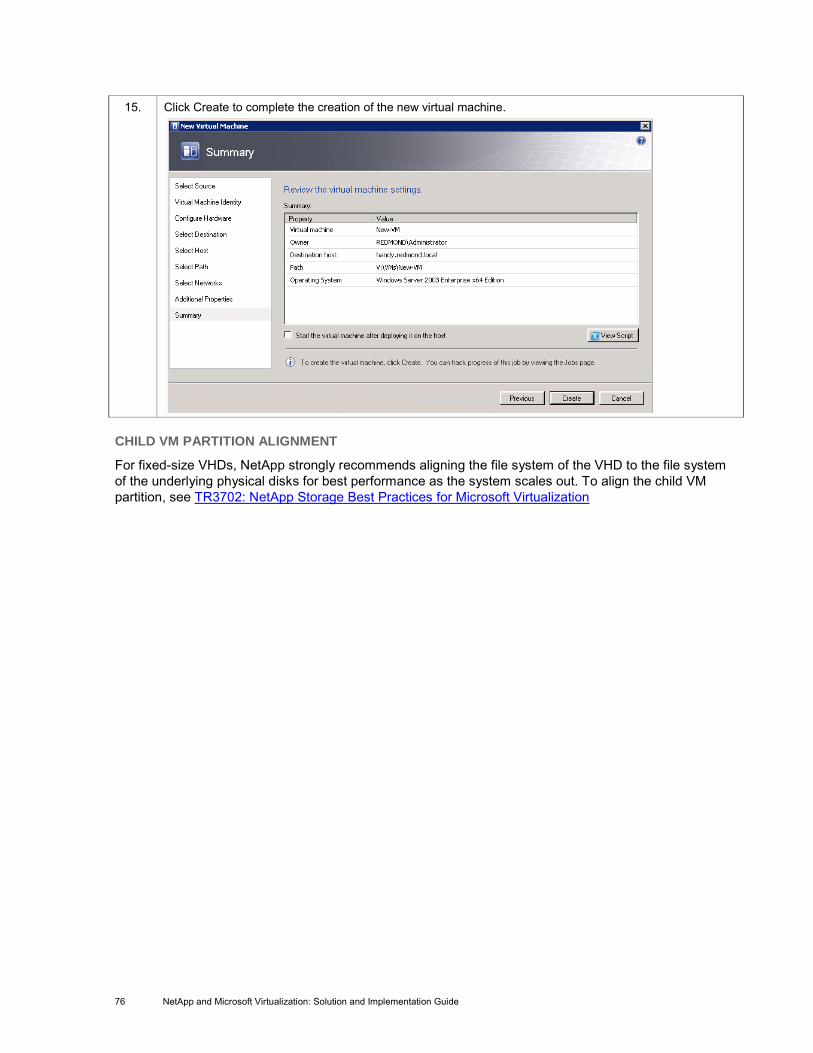
76 NetApp and Microsoft Virtualization: Solution and Implementation Guide
15. Click Create to complete the creation of the new virtual machine.
CHILD VM PARTITION ALIGNMENT
For fixed-size VHDs, NetApp strongly recommends aligning the file system of the VHD to the file system of the underlying physical disks for best performance as the system scales out. To align the child VM partition, see TR3702: NetApp Storage Best Practices for Microsoft Virtualization

77 NetApp and Microsoft Virtualization: Solution and Implementation Guide
INSTALL OPERATING SYSTEM
To connect to the VM directly from SCVMM, follow this step.
Step Action
1. To connect to the VM directly from SCVMM, select the VM, right-click, and select Connect to Virtual Machine.

78 NetApp and Microsoft Virtualization: Solution and Implementation Guide
12 ENABLE HIGHLY AVAILABLE VIRTUAL MACHINES
12.1 VMS PROVISIONED BY USING HYPER-V MANAGER
Now that we have created the VMs, the next step is to configure them for high availability by creating a VM resource group.
Step Action
1. Open the Failover Cluster Manager.
2. Right-click Services and Applications in the left pane and select Configure a Service or Application
3. Skip the introduction page and click Next.
4. Select Virtual Machine as the service or application type.

79 NetApp and Microsoft Virtualization: Solution and Implementation Guide
5. Select the virtual machine to make highly available.
6. Review the summary and click Next to continue the creation of the virtual machine resource group.
7. Click Finish to complete the creation of the virtual machine resource group.

80 NetApp and Microsoft Virtualization: Solution and Implementation Guide
8. To review the details of the virtual machine resource group, select it under Services and Applications in the left pane.
9. Select Show Dependency Report to review the dependencies of each resource in the virtual machine
resource group.
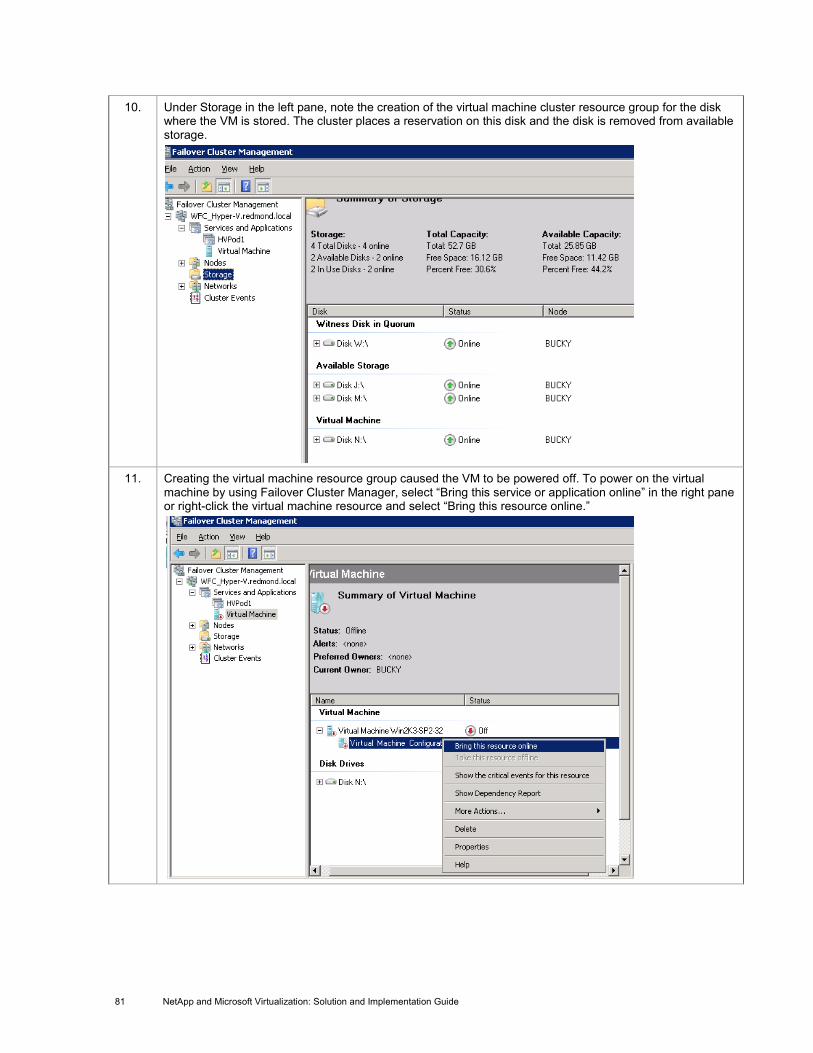
81 NetApp and Microsoft Virtualization: Solution and Implementation Guide
10. Under Storage in the left pane, note the creation of the virtual machine cluster resource group for the disk where the VM is stored. The cluster places a reservation on this disk and the disk is removed from available storage.
11. Creating the virtual machine resource group caused the VM to be powered off. To power on the virtual
machine by using Failover Cluster Manager, select “Bring this service or application online” in the right pane or right-click the virtual machine resource and select “Bring this resource online.”
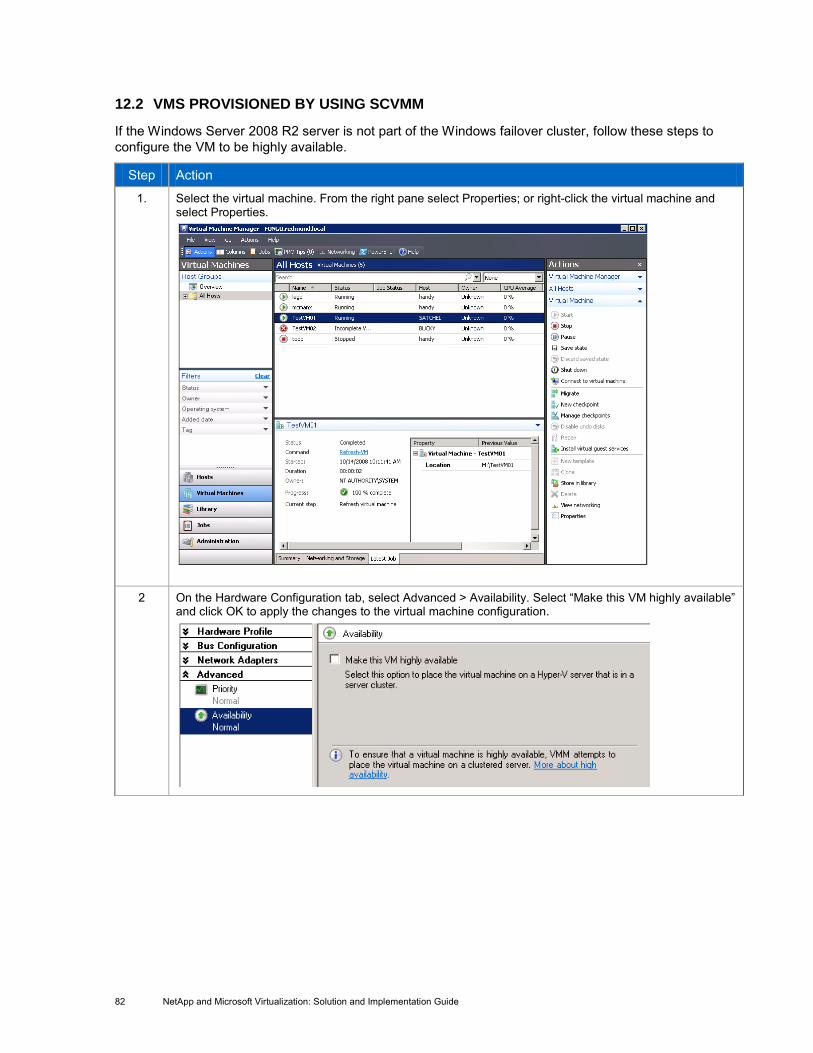
82 NetApp and Microsoft Virtualization: Solution and Implementation Guide
12.2 VMS PROVISIONED BY USING SCVMM
If the Windows Server 2008 R2 server is not part of the Windows failover cluster, follow these steps to configure the VM to be highly available.
Step Action
1. Select the virtual machine. From the right pane select Properties; or right-click the virtual machine and select Properties.
2 On the Hardware Configuration tab, select Advanced > Availability. Select “Make this VM highly available” and click OK to apply the changes to the virtual machine configuration.

83 NetApp and Microsoft Virtualization: Solution and Implementation Guide
This is what a configuration looks like for a highly available virtual machine.
13 LIVE MIGRATION SETUP AND CONFIGURATION Live migration is an enterprise-class feature introduced in Windows 2008 R2 Hyper-V. This new feature allows administrators to move running virtual machines between nodes within a Windows failover cluster without any downtime: that is, transparently to applications running on the virtual machines and/or applications and users connected to them. This allows application and service downtime to be avoided for planned server /storage maintenance.
Live migration requires failover clustering role to be installed and configured on the Hyper-V servers.
13.1 STANDARD CLUSTERED SHARED STORAGE VOLUMES
Live migration is possible with standard cluster volumes; a cluster shared volume is not a requirement to support live migration in a Windows Server 2008 R2 Hyper-V cluster. When not using CSVs, Microsoft recommends a one to one mapping of virtual machines to standard cluster volumes.
13.2 CLUSTER SHARED VOLUMES (CSV)
Cluster shared volumes, also known as CSVs, are an architectural improvement for failover clustering and Hyper-V introduced in Windows Server 2008 R2. CSVs play the role of a distributed-access file system optimized for Hyper-V. It works on the usual NTFS, and hence there are no special support or license requirements. The main purpose of CSVs is to store VHDs from multiple VMs on a single LUN. It does so by allowing multiple physical nodes in a Windows failover cluster to simultaneously access VHDs on a single LUN. This eliminates the need to unmap and remap a LUN from one node to another when migrating a VM.
In addition to simplifying storage management for Hyper-V by allowing multiple VMs to be stored on a single LUN and fail them over individually, CSVs also offer greater resiliency to failures with "dynamic I/O redirection."

84 NetApp and Microsoft Virtualization: Solution and Implementation Guide
13.3 CONFIGURATION SETUP
The sequence of steps involved in the live migration setup is as indicated in the following block diagram.
Each of the steps indicated in this figure is described in detail in the following section of the document.
CREATE A FAILOVER CLUSTER
Refer to section 10.7 for a detailed description of the procedure to set up failover clustering on Windows 2008 R2.
CREATE A CLUSTER SHARED VOLUME (CSV)
With the setup of Windows failover cluster configuration, the next step would be to create a CSV to host the virtual machines (VMs), which are intended to be highly available.
To create a CSV, follow these steps.
Step Action
1. Provision a shared LUN using NetApp SnapDrive on the given volume and present it to all the nodes of the failover cluster. This LUN will be utilized to store the virtual machine data (VHD and the configuration files); hence the LUN has to be created as per the VM storage requirements.
Follow the procedure described in section 10.6.4 to create a shared LUN for the failover cluster nodes.
2. Click the link "Enable Cluster Shared Volumes" from the Failover Cluster Manager as shown in the following screen shot to activate the CSV on the cluster.
3. Read the provided instructions, which explain the implementation of the CSV for Windows 2008 R2 Hyper-V roles, and accept the given notice as shown in the following figure.

85 NetApp and Microsoft Virtualization: Solution and Implementation Guide
4. After enabling CSV, under “Failover Cluster Manager” there should be a section named “Cluster Shared
Volumes” as shown below.
5. Click the “Add Storage” link as shown in the following figure, which lists all available storage volumes that can be used as CSVs.

86 NetApp and Microsoft Virtualization: Solution and Implementation Guide
6. Select the checkbox of the storage volume that was created in step 1 and confirm to add the volume as a CSV.
7. The details of the CSV can be verified. As seen from the figure, the CSV is mounted
“C:\ClusterStorage\Volume1\,” which is accessible to all the nodes in the cluster.
CREATE A VIRTUAL MACHINE (VM) ON THE CSV
Step Action
1. Refer to section 11.1 and follow the detailed instructions to create a VM on the provisioned CSV. Make sure that the disk file (VHD) and the configuration file (.xml and .bin files) of the VM are stored on the CSV (C:\ClusterStorage\Volume1\).
2. Make sure that the VM is configured and the VHD and the configuration file reside on the CSV. Run tests to make sure that the VM starts successfully.
As seen from the following figures, the VHD and the configuration files reside on C:\ClusterStorage\Volume1\.
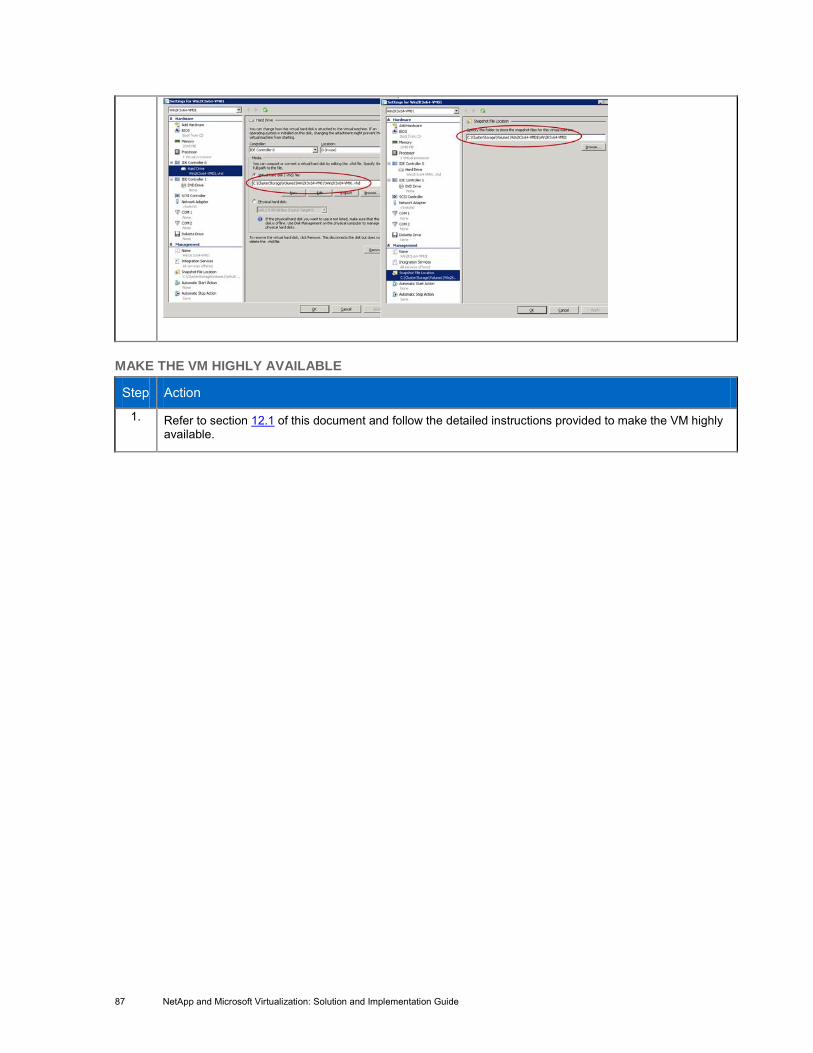
87 NetApp and Microsoft Virtualization: Solution and Implementation Guide
MAKE THE VM HIGHLY AVAILABLE
Step Action
1. Refer to section 12.1 of this document and follow the detailed instructions provided to make the VM highly available.
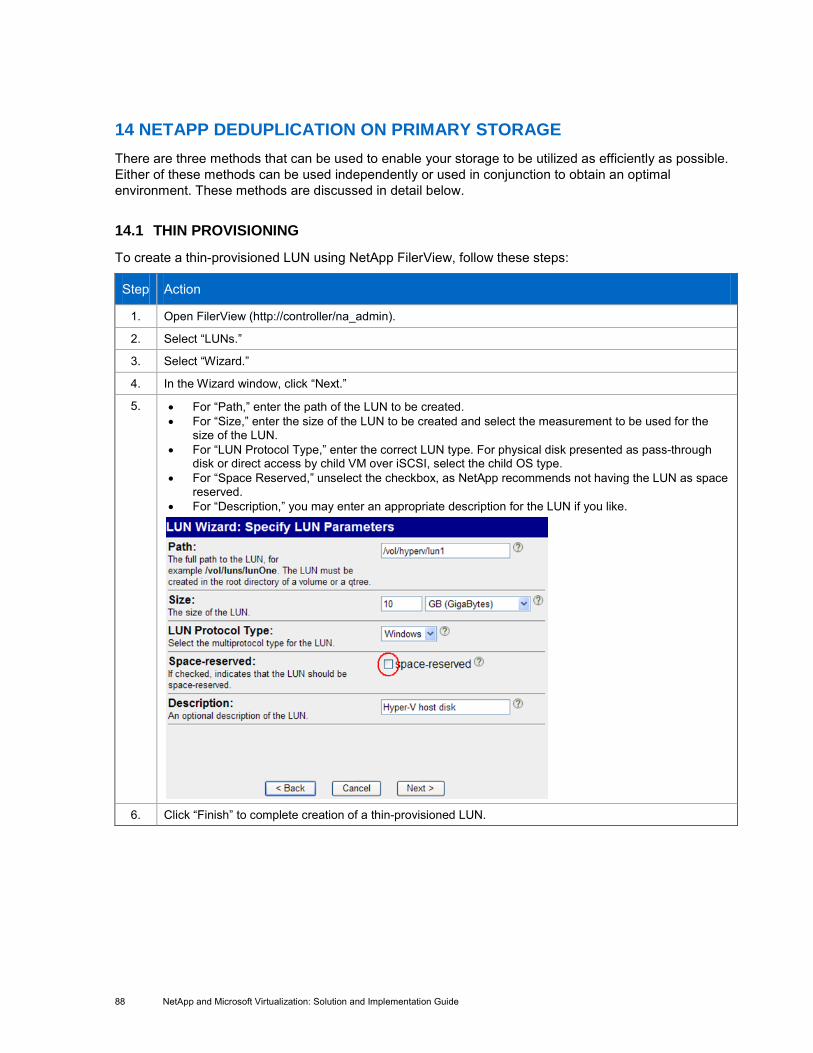
88 NetApp and Microsoft Virtualization: Solution and Implementation Guide
14 NETAPP DEDUPLICATION ON PRIMARY STORAGE There are three methods that can be used to enable your storage to be utilized as efficiently as possible. Either of these methods can be used independently or used in conjunction to obtain an optimal environment. These methods are discussed in detail below.
14.1 THIN PROVISIONING
To create a thin-provisioned LUN using NetApp FilerView, follow these steps:
Step Action
1. Open FilerView (http://controller/na_admin).
2. Select “LUNs.”
3. Select “Wizard.”
4. In the Wizard window, click “Next.”
5. • For “Path,” enter the path of the LUN to be created. • For “Size,” enter the size of the LUN to be created and select the measurement to be used for the
size of the LUN. • For “LUN Protocol Type,” enter the correct LUN type. For physical disk presented as pass-through
disk or direct access by child VM over iSCSI, select the child OS type. • For “Space Reserved,” unselect the checkbox, as NetApp recommends not having the LUN as space
reserved. • For “Description,” you may enter an appropriate description for the LUN if you like.
6. Click “Finish” to complete creation of a thin-provisioned LUN.

89 NetApp and Microsoft Virtualization: Solution and Implementation Guide
14.2 DEDUPLICATION
When you have created multiple VMs on the NetApp volume, follow these steps to deduplicate data on the volume.
To create a thin-provisioned LUN using NetApp FilerView, follow these steps:
Step Action
1. Connect to the NetApp controller’s system consol by using SSH, telnet, or serial console.
2. Enter the following command to enable deduplication for the gold volume: sis on <volume path>
3. Enter the following command to start processing existing data: sis start –s <volume path>
4. Enter the following command to monitor the status of the deduplication operation: sis status
5. When the deduplication has finished, enter the following command to see the savings: df –s
6. To schedule deduplication to run at regular intervals, use the following command: sis config -s <schedule> <volume_path>
Where <schedule> can be in the following format: schedule is [day_list][@hour_list] or [hour_list][@day_list] or - or auto The day_list specifies which days of the week SIS operations should run. It is a comma-separated list of the first three letters of the day: sun, mon, tue, wed, thu, fri, sat. The names are not case sensitive. Day ranges such as mon-fri can also be given. The default day_list is sun-sat. The hour_list specifies which hours of the day SIS operations should run on each scheduled day. The hour_list is a comma-separated list of the integers from 0 through 23. Hour ranges such as 8-17 are allowed. Step values can be used in conjunction with ranges. For example, 0-23/2 means "every two hours." The default hour_list is 0; that is, midnight on the morning of each scheduled day.
14.3 FLEXCLONE
FlexClone volumes are writable point-in-time copies generated from the Snapshot copy of a FlexVol volume. FlexClone Volume Creation
CREATE A FLEXCLONE VOLUME FROM THE CONSOLE
FlexClone volumes can be created either using the shell console or FilerView.
To create a FlexClone volume of a FlexVol volume, follow these steps:
Step Action
1. Log into the NetApp console using either SSH, Telnet, or console connection.
2. To create a FlexClone volume, type the following into the prompt: vol clone create FlexCloneName –b ParentFlexVolName
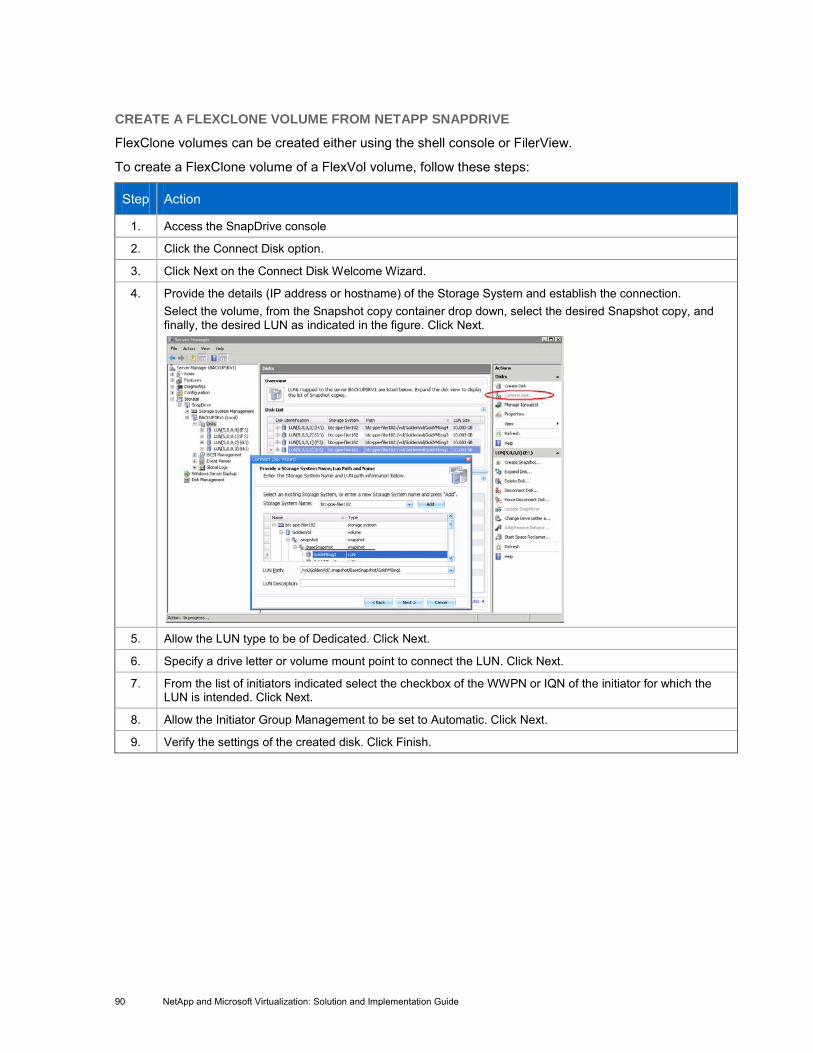
90 NetApp and Microsoft Virtualization: Solution and Implementation Guide
CREATE A FLEXCLONE VOLUME FROM NETAPP SNAPDRIVE
FlexClone volumes can be created either using the shell console or FilerView.
To create a FlexClone volume of a FlexVol volume, follow these steps:
Step Action
1. Access the SnapDrive console
2. Click the Connect Disk option.
3. Click Next on the Connect Disk Welcome Wizard.
4. Provide the details (IP address or hostname) of the Storage System and establish the connection. Select the volume, from the Snapshot copy container drop down, select the desired Snapshot copy, and finally, the desired LUN as indicated in the figure. Click Next.
5. Allow the LUN type to be of Dedicated. Click Next.
6. Specify a drive letter or volume mount point to connect the LUN. Click Next.
7. From the list of initiators indicated select the checkbox of the WWPN or IQN of the initiator for which the LUN is intended. Click Next.
8. Allow the Initiator Group Management to be set to Automatic. Click Next.
9. Verify the settings of the created disk. Click Finish.

91 NetApp and Microsoft Virtualization: Solution and Implementation Guide
15 VIRTUAL MACHINE MIGRATION The following two methods allow you to move Virtual Machines from Hyper-V node to Hyper-V node.
15.1 QUICK MIGRATION
Use quick migration to quickly move the VMs between Windows Server 2008 R2 Hyper-V servers, supported on both full and server core installations.
The Hyper-V Manager provides information about the host server.
Step Action
1. Open the Failover Cluster Management console to view the virtual machines running on the individual Windows Server 2008 R2 nodes.
2. Right-click the virtual machine name to open the Actions menu. You have the option to move the virtual machine to another node, and you can select the destination node.

92 NetApp and Microsoft Virtualization: Solution and Implementation Guide
3. When the command has been run, the virtual machine enters a pending state before it is moved.
4. After a few seconds, the virtual machine appears on the destination node, and the status returns to Online.
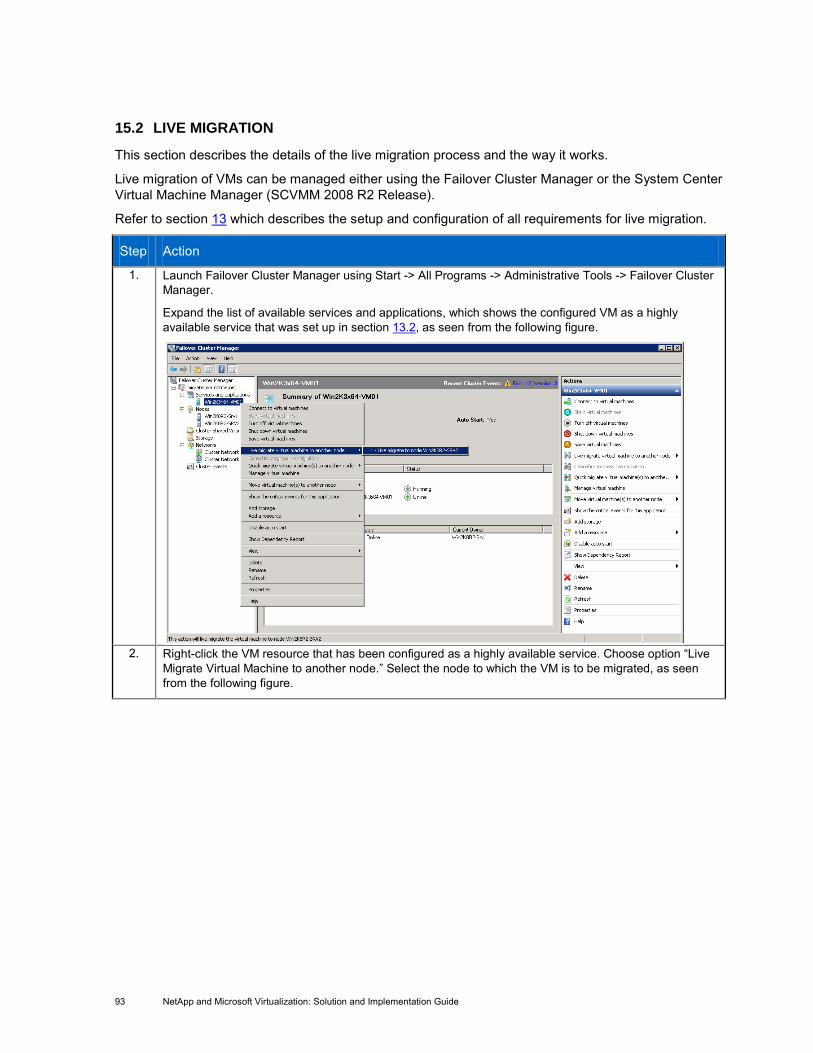
93 NetApp and Microsoft Virtualization: Solution and Implementation Guide
15.2 LIVE MIGRATION
This section describes the details of the live migration process and the way it works.
Live migration of VMs can be managed either using the Failover Cluster Manager or the System Center Virtual Machine Manager (SCVMM 2008 R2 Release).
Refer to section 13 which describes the setup and configuration of all requirements for live migration.
Step Action
1. Launch Failover Cluster Manager using Start -> All Programs -> Administrative Tools -> Failover Cluster Manager.
Expand the list of available services and applications, which shows the configured VM as a highly available service that was set up in section 13.2, as seen from the following figure.
2. Right-click the VM resource that has been configured as a highly available service. Choose option “Live
Migrate Virtual Machine to another node.” Select the node to which the VM is to be migrated, as seen from the following figure.

94 NetApp and Microsoft Virtualization: Solution and Implementation Guide
3. The process of live migration starts the migration to the destination node. The status of the migration can
be observed from the Failover Cluster Manager, as shown in the following figure.

95 NetApp and Microsoft Virtualization: Solution and Implementation Guide
4. After the successful migration of the VM resource, it can be observed that the ownership of the VM resource is changed to the target node, as seen from the following figure.
5. To show that the live migration did not involve any downtime of the VM, a “ping” to the VM was initiated while the VM migration was started. The following figure shows the test results.
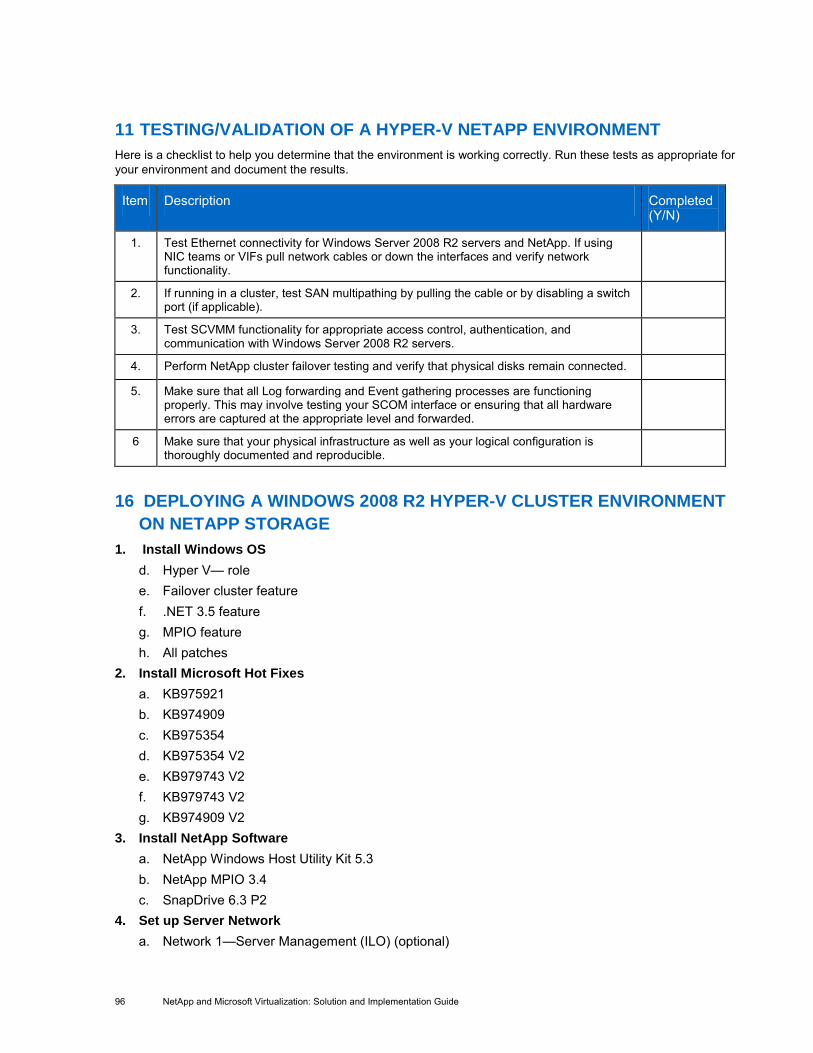
96 NetApp and Microsoft Virtualization: Solution and Implementation Guide
11 TESTING/VALIDATION OF A HYPER-V NETAPP ENVIRONMENT Here is a checklist to help you determine that the environment is working correctly. Run these tests as appropriate for your environment and document the results.
Item Description Completed (Y/N)
1. Test Ethernet connectivity for Windows Server 2008 R2 servers and NetApp. If using NIC teams or VIFs pull network cables or down the interfaces and verify network functionality.
2. If running in a cluster, test SAN multipathing by pulling the cable or by disabling a switch port (if applicable).
3. Test SCVMM functionality for appropriate access control, authentication, and communication with Windows Server 2008 R2 servers.
4. Perform NetApp cluster failover testing and verify that physical disks remain connected.
5. Make sure that all Log forwarding and Event gathering processes are functioning properly. This may involve testing your SCOM interface or ensuring that all hardware errors are captured at the appropriate level and forwarded.
6 Make sure that your physical infrastructure as well as your logical configuration is thoroughly documented and reproducible.
16 DEPLOYING A WINDOWS 2008 R2 HYPER-V CLUSTER ENVIRONMENT ON NETAPP STORAGE
1. Install Windows OS d. Hyper V— role e. Failover cluster feature f. .NET 3.5 feature g. MPIO feature h. All patches
2. Install Microsoft Hot Fixes a. KB975921 b. KB974909 c. KB975354 d. KB975354 V2 e. KB979743 V2 f. KB979743 V2 g. KB974909 V2
3. Install NetApp Software a. NetApp Windows Host Utility Kit 5.3 b. NetApp MPIO 3.4 c. SnapDrive 6.3 P2
4. Set up Server Network a. Network 1—Server Management (ILO) (optional)

97 NetApp and Microsoft Virtualization: Solution and Implementation Guide
b. Network 2—Client Access (VM BRIDGE) c. Network 3—Live migration network (optional) d. Network 4—Heartbeat network e. Network 5—iSCSI network (as needed) f. HBA-FCP connections as needed (as needed)
5. Set up SnapDrive for Windows a. Set up transport protocol defaults b. Set up individual storage systems c. Set up the disks in the storage system
6. Set up Cluster a. Create Windows cluster b. Enable clustered shared volumes c. Use SnapDrive to set up LUN to be used for quorum drive d. Use Cluster Manager to setup failover cluster settings for quorum system e. Create clustered shared volumes (CSV) f. Use SnapDrive for Windows to create clustered shared volume
17 REFERENCES Virtualization and Consolidation with Hyper-V http://www.microsoft.com/windowsserver2008/en/us/virtualization-consolidation.aspx Microsoft System Center Virtual Machine Manager 2008 http://www.microsoft.com/systemcenter/virtualmachinemanager/en/us/default.aspx Microsoft System Center Operations Manager 2007 http://www.microsoft.com/systemcenter/operationsmanager/en/us/default.aspx NetApp Thin Provisioning: Better for Business http://media.netapp.com/documents/wp-thin-provisioning.pdf NetApp Virtualization Guarantee http://www.netapp.com/guarantee NetApp Deduplication http://www.netapp.com/us/products/platform-os/dedupe.html NetApp RAID-DP: Dual-Parity RAID 6 Protection without Compromise http://media.netapp.com/documents/netapp-raid-dp.pdf NetApp Snapshot Technology http://media.netapp.com/documents/snapshot-brochure.pdf NetApp MetroCluster Technology http://media.netapp.com/documents/metrocluster.pdf NetApp SnapMirror Technology http://media.netapp.com/documents/snapmirror.pdf
98 NetApp and Microsoft Virtualization: Solution and Implementation Guide
NetApp FlexClone Volumes: A Thorough Introduction http://www.netapp.com/us/library/technical-reports/tr-3347.html NetApp Data Motion for vFiler http://www.netapp.com/us/library/technical-reports/tr-3814.html High-Availability System Configuration http://www.netapp.com/us/products/platform-os/active-active.html
Reference Architectures
Customer Blueprint: Improving Efficiency and Availability Using Microsoft Hyper-V and NetApp Storage http://www.netapp.com/us/library/premium/Seattle_Retail_Customer_Blueprint.html Exchange, SQL Server, and SharePoint Mixed Workload on Microsoft Hyper-V and NetApp MetroCluster http://media.netapp.com/documents/tr-3804.pdf Cisco Validated Design: 5,000-User Ex2010 Environment on Hyper-V with NetApp Storage http://www.cisco.com/en/US/docs/solutions/Enterprise/Data_Center/App_Networking/hypervexchange.pdf Best-Practice Guides and White Papers NetApp Storage Best Practices for Microsoft Virtualization http://www.netapp.com/us/library/technical-reports/tr-3702.html Avanade: Delivers Rapid Turnkey VM Provisioning http://media.netapp.com/documents/avanade-virtualization.pdf
18 ACKNOWLEDGEMENTS The authors would like to thank the following people for their contributions:
Vineeth Karinta - Member of Technical Staff, Microsoft Business Unit
Atul Bhalodia - Senior Engineer, Microsoft Business Unit
Chris A Collins - Enterprise Infrastructure Architect
Chance Bingen - Escalation Engineer
19 REVISION HISTORY
Version Revision Comments Author
1.0 Initial document 2.0 Added sections “Live Migration Setup and Configuration” and “Live Migration” 3.0 Merged and updated TR 3701 and TR 3733 Santhosh Rao

99 NetApp and Microsoft Virtualization: Solution and Implementation Guide
NetApp provides no representations or warranties regarding the accuracy, reliability or serviceability of any information or recommendations provided in this publication, or with respect to any results that may be obtained by the use of the information or observance of any recommendations provided herein. The information in this document is distributed AS IS, and the use of this information or the implementation of any recommendations or techniques herein is a customer’s responsibility and depends on the customer’s ability to evaluate and integrate them into the customer’s operational environment. This document and the information contained herein may be used solely in connection with the NetApp products discussed in this document.
© Copyright 2011 NetApp, Inc. All rights reserved. No portions of this document may be reproduced without prior written consent of NetApp, Inc. Specifications are subject to change without notice. NetApp, the NetApp logo, Go further, faster, ApplianceWatch PRO, Data ONTAP, FlexClone, NetApp Data Motion, RAID-DP, SnapDrive, SnapManager, SnapMirror, Snapshot, and SnapRestore are trademarks or registered trademarks of NetApp, Inc. in the United States and/or other countries. Windows, Microsoft, Vista, SharePoint, and SQL Server are registered trademarks and Hyper-V is a trademark of Microsoft Corporation. Linux is a registered trademark of Linus Torvalds. All other brands or products are trademarks or registered trademarks of their respective holders and should be treated as such.