Embed Size (px)
Citation preview
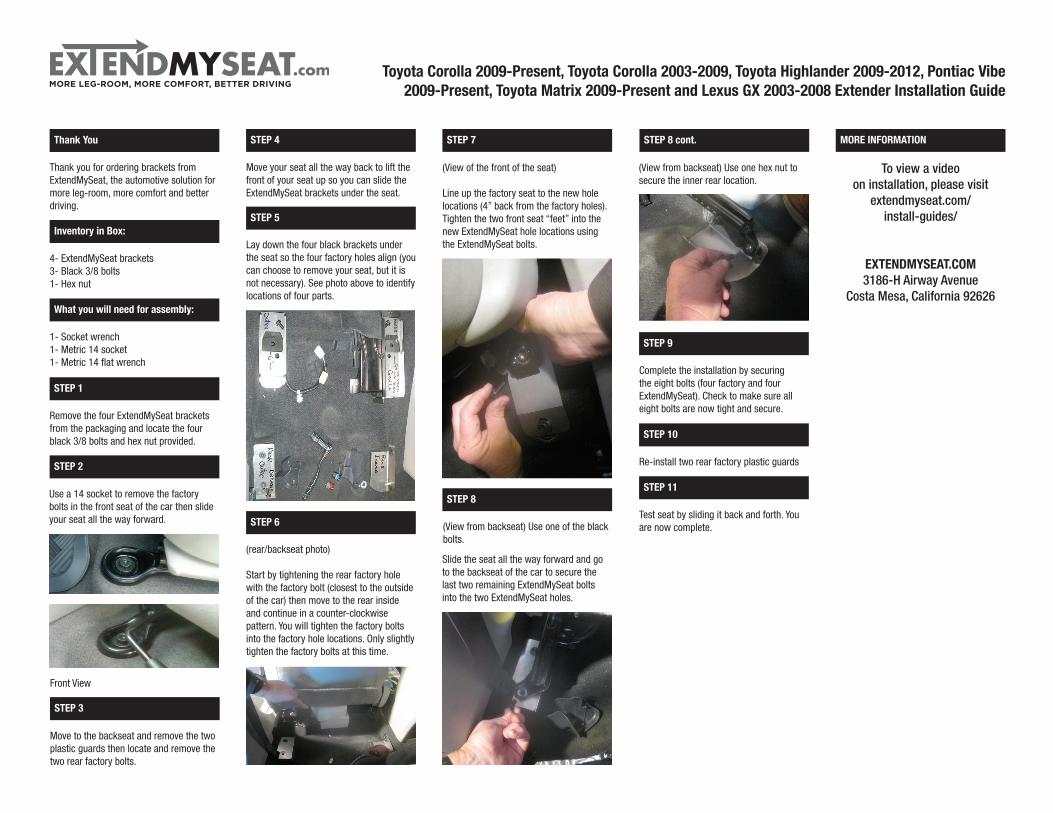
Thank you for ordering brackets from ExtendMySeat, the automotive solution for more leg-room, more comfort and better driving.
Thank You
Inventory in Box:
4- ExtendMySeat brackets3- Black 3/8 bolts1- Hex nut
1- Socket wrench1- Metric 14 socket1- Metric 14 flat wrench
What you will need for assembly:
Remove the four ExtendMySeat brackets from the packaging and locate the four black 3/8 bolts and hex nut provided.
STEP 1
STEP 2
Use a 14 socket to remove the factory bolts in the front seat of the car then slide your seat all the way forward.
Slide the seat all the way forward and go to the backseat of the car to secure the last two remaining ExtendMySeat bolts into the two ExtendMySeat holes.
STEP 7
(View of the front of the seat)
Line up the factory seat to the new hole locations (4” back from the factory holes). Tighten the two front seat “feet” into the new ExtendMySeat hole locations using the ExtendMySeat bolts.
STEP 8
STEP 9
Complete the installation by securing the eight bolts (four factory and four ExtendMySeat). Check to make sure all eight bolts are now tight and secure.
STEP 10
Re-install two rear factory plastic guards
STEP 11
Test seat by sliding it back and forth. You are now complete.
Toyota Corolla 2009-Present, Toyota Corolla 2003-2009, Toyota Highlander 2009-2012, Pontiac Vibe 2009-Present, Toyota Matrix 2009-Present and Lexus GX 2003-2008 Extender Installation Guide
To view a video on installation, please visit
extendmyseat.com/ install-guides/
EXTENDMYSEAT.COM3186-H Airway Avenue
Costa Mesa, California 92626
MORE INFORMATION
(View from backseat) Use one hex nut to secure the inner rear location.
STEP 4
Move your seat all the way back to lift the front of your seat up so you can slide the ExtendMySeat brackets under the seat.
STEP 5
Lay down the four black brackets under the seat so the four factory holes align (you can choose to remove your seat, but it is not necessary). See photo above to identify locations of four parts.
STEP 6
(rear/backseat photo)
Start by tightening the rear factory hole with the factory bolt (closest to the outside of the car) then move to the rear inside and continue in a counter-clockwise pattern. You will tighten the factory bolts into the factory hole locations. Only slightly tighten the factory bolts at this time.
STEP 8 cont.
STEP 3
Move to the backseat and remove the two plastic guards then locate and remove the two rear factory bolts.
(View from backseat) Use one of the black bolts.
Front View
![STANDOX TOYOTA 2010 [Kompatibilitätsmodus]info.pages.color.tc/Yellowpages/SX/TOYOTA/TOYOTA Colour Info.pdf · TOYOTA MODELS / MODELLE VIN / TYPENSCHILD 01 Corolla Corolla Fielder](https://img.pdfslide.us/doc/110x75/5b5543817f8b9a575f8de257/standox-toyota-2010-kompatibilitaetsmodusinfopagescolortcyellowpagessxtoyotatoyota.jpg)