Embed Size (px)
Citation preview
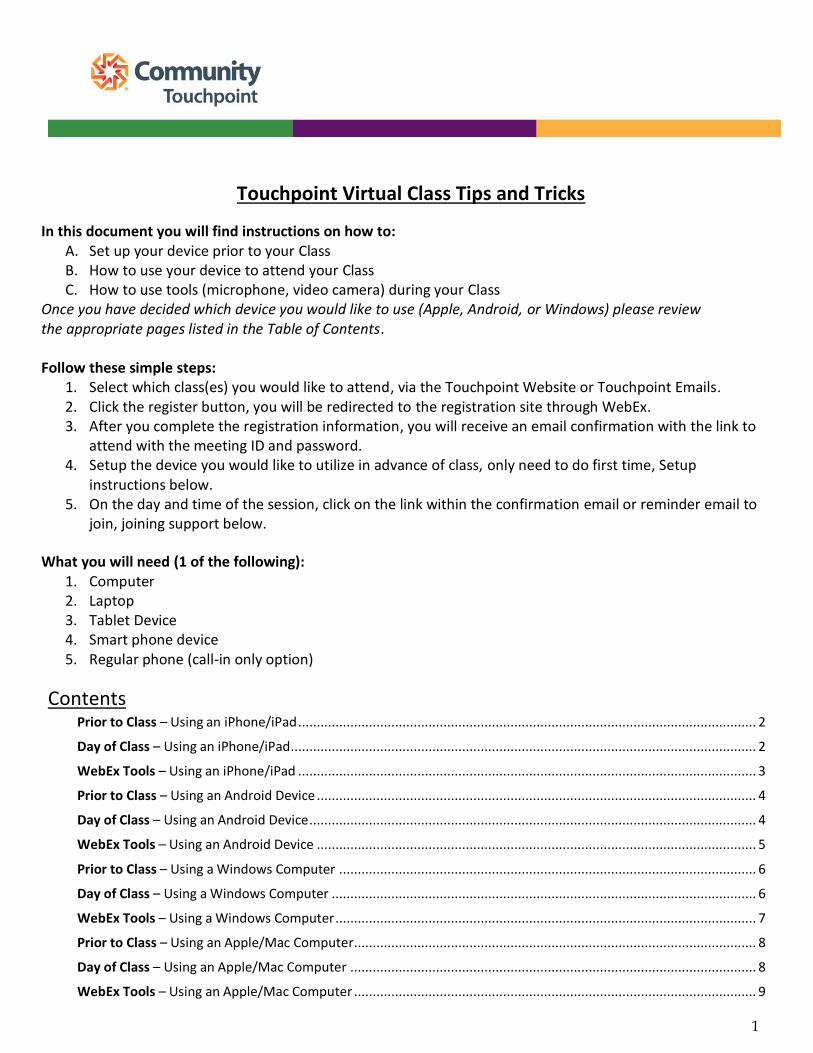
1
Touchpoint Virtual Class Tips and Tricks
In this document you will find instructions on how to: A. Set up your device prior to your Class B. How to use your device to attend your Class C. How to use tools (microphone, video camera) during your Class
Once you have decided which device you would like to use (Apple, Android, or Windows) please review the appropriate pages listed in the Table of Contents. Follow these simple steps:
1. Select which class(es) you would like to attend, via the Touchpoint Website or Touchpoint Emails. 2. Click the register button, you will be redirected to the registration site through WebEx. 3. After you complete the registration information, you will receive an email confirmation with the link to
attend with the meeting ID and password. 4. Setup the device you would like to utilize in advance of class, only need to do first time, Setup
instructions below. 5. On the day and time of the session, click on the link within the confirmation email or reminder email to
join, joining support below.
What you will need (1 of the following): 1. Computer 2. Laptop 3. Tablet Device 4. Smart phone device 5. Regular phone (call-in only option)
Contents Prior to Class – Using an iPhone/iPad ........................................................................................................................... 2
Day of Class – Using an iPhone/iPad............................................................................................................................. 2
WebEx Tools – Using an iPhone/iPad ........................................................................................................................... 3
Prior to Class – Using an Android Device ...................................................................................................................... 4
Day of Class – Using an Android Device ........................................................................................................................ 4
WebEx Tools – Using an Android Device ...................................................................................................................... 5
Prior to Class – Using a Windows Computer ................................................................................................................ 6
Day of Class – Using a Windows Computer .................................................................................................................. 6
WebEx Tools – Using a Windows Computer ................................................................................................................. 7
Prior to Class – Using an Apple/Mac Computer ............................................................................................................ 8
Day of Class – Using an Apple/Mac Computer ............................................................................................................. 8
WebEx Tools – Using an Apple/Mac Computer ............................................................................................................ 9
2
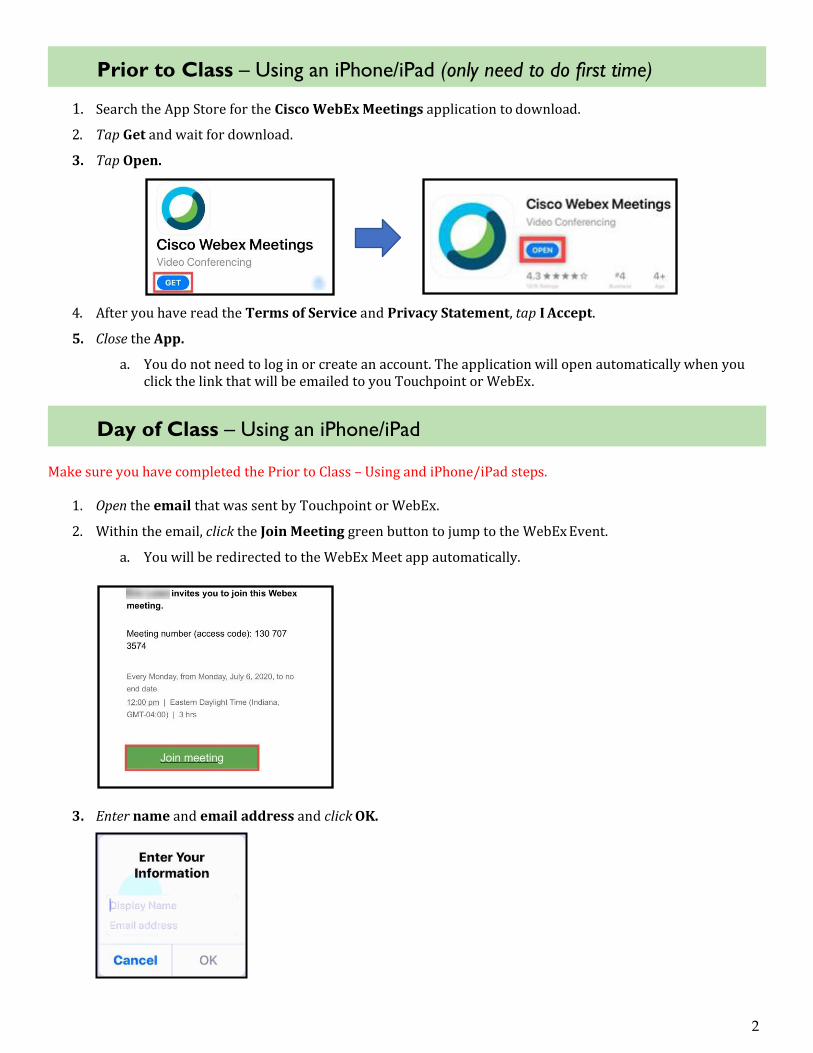
1. Search the App Store for the Cisco WebEx Meetings application to download.
2. Tap Get and wait for download.
3. Tap Open.
4. After you have read the Terms of Service and Privacy Statement, tap I Accept.
5. Close the App.
a. You do not need to log in or create an account. The application will open automatically when you click the link that will be emailed to you Touchpoint or WebEx.
Make sure you have completed the Prior to Class – Using and iPhone/iPad steps.
1. Open the email that was sent by Touchpoint or WebEx.
2. Within the email, click the Join Meeting green button to jump to the WebEx Event.
a. You will be redirected to the WebEx Meet app automatically.
3. Enter name and email address and click OK.
Prior to Class – Using an iPhone/iPad (only need to do first time)
Day of Class – Using an iPhone/iPad
3
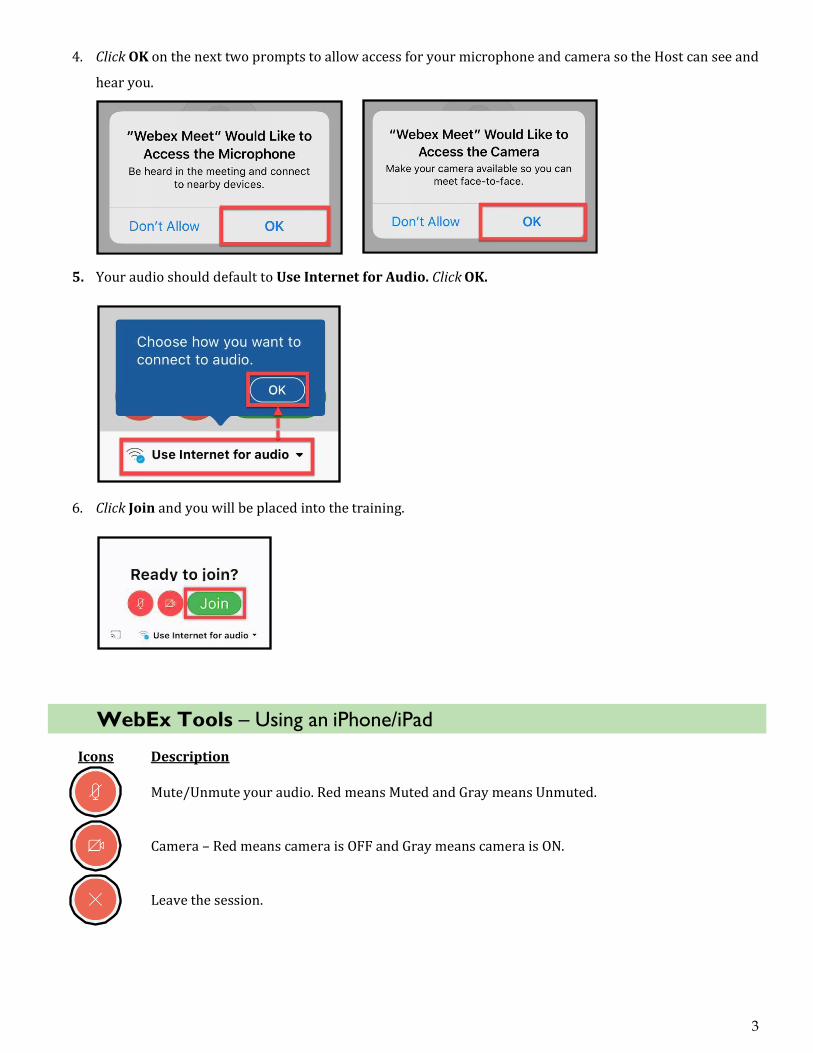
4. Click OK on the next two prompts to allow access for your microphone and camera so the Host can see and
hear you.
5. Your audio should default to Use Internet for Audio. Click OK.
6. Click Join and you will be placed into the training.
WebEx Tools – Using an iPhone/iPad
Icons Description
Mute/Unmute your audio. Red means Muted and Gray means Unmuted.
Camera – Red means camera is OFF and Gray means camera is ON.
Leave the session.

4
1. Go to Play Store and search for Cisco WebEx Meetings.
2. Tap Install and wait for download.
3. Tap Open.
4. Read Terms of Service and Privacy Statement. Tap Accept.
5. Tap Ok to use location for video.
6. Tap Allow for next 5 questions.
7. Close the App.
a. You do not need to log in or create an account. The application will open automatically when you click the link that will be emailed to you by Touchpoint or WebEx.
Make sure you have completed the Prior to Class – Using an Android Device
1. Open the email that was sent by Touchpoint or WebEx
2. Within the email, tap the Join Meeting green button to jump to the WebEx Event.
a. You will be redirected to the WebEx Meet app automatically.
3. A menu appears at the bottom of the screen, tap WebEx Meet.
Prior to Class – Using an Android Device (only need to do first time)
Day of Class – Using an Android Device

5
4. The Application opens automatically and displays your audio option. Make sure it defaults to Use Internet
for Audio and click Next.
5. Tap OK on the connect to Cisco video device prompt.
6. If your microphone and camera icons are red, you are muted, and your camera is off.
a. Tap the icons to unmute your audio and turn on your camera.
7. Tap Join.
8. You will then need to type in your name and an email address then click ok
WebEx Tools – Using an Android Device
Icons Description
Mute/Unmute your audio. Red means Muted and Gray means Unmuted.
Camera – Red means camera is OFF and Gray means camera is ON.
Leave the session.

6
Prior to Class – Using a Windows Computer (only need to do first time) There are no special steps needed to prepare your computer for class.
We recommend: Your computer has a microphone and a webcam
Your laptop battery is fully charged Ensure your internet browser is up to date and any updates are installed prior to class
o However, Google Chrome works best Download WebEx to your computer: www.chnw.webex.com
Day of Class – Using a Windows Computer
1. Open the email that was sent by Touchpoint or WebEx. 2. Within the email, tap the Join Meeting green button to jump to the WebEx Events.
a. You will be redirected to the WebEx Meet app automatically.
3. Type your First and Last Name and an email address. 4. When the Join Meeting button turns green, click the drop-down arrow on the button and choose Always
join from the web app.
5. Click Join Meeting. 6. The next window allows you to set up your audio and camera options.
a. At the bottom of the screen, click the drop down arrow next to Use computer for audio.
b. In the Call me at section, type a phone number
i. WebEx will call this number so you can hear the meeting audio and speak during
the meeting.
7
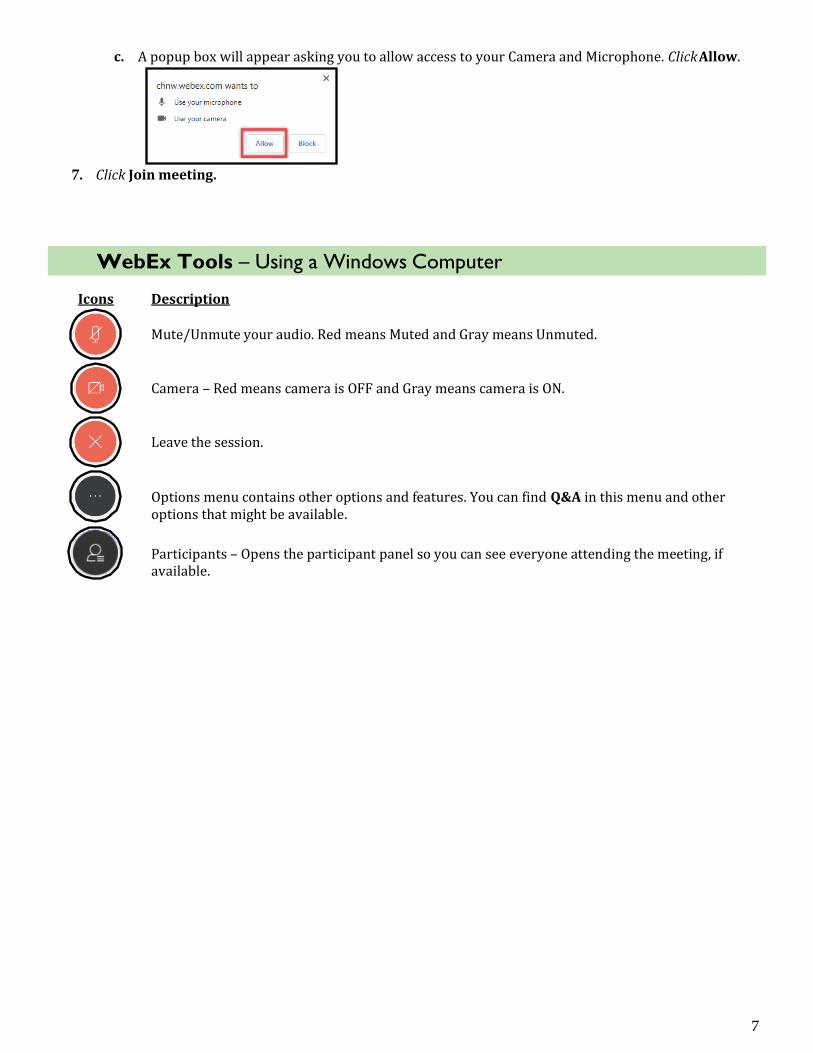
c. A popup box will appear asking you to allow access to your Camera and Microphone. Click Allow.
7. Click Join meeting.
WebEx Tools – Using a Windows Computer
Icons Description
Mute/Unmute your audio. Red means Muted and Gray means Unmuted.
Camera – Red means camera is OFF and Gray means camera is ON.
Leave the session.
Options menu contains other options and features. You can find Q&A in this menu and other options that might be available.
Participants – Opens the participant panel so you can see everyone attending the meeting, if available.
8
There are no special steps needed to prepare your computer for class. We
recommend:
Your computer has a microphone and a webcam
Your laptop battery is fully charged
You have Safari or Google Chrome installed on your apple computer
Download WebEx from www.chnw.webex.com
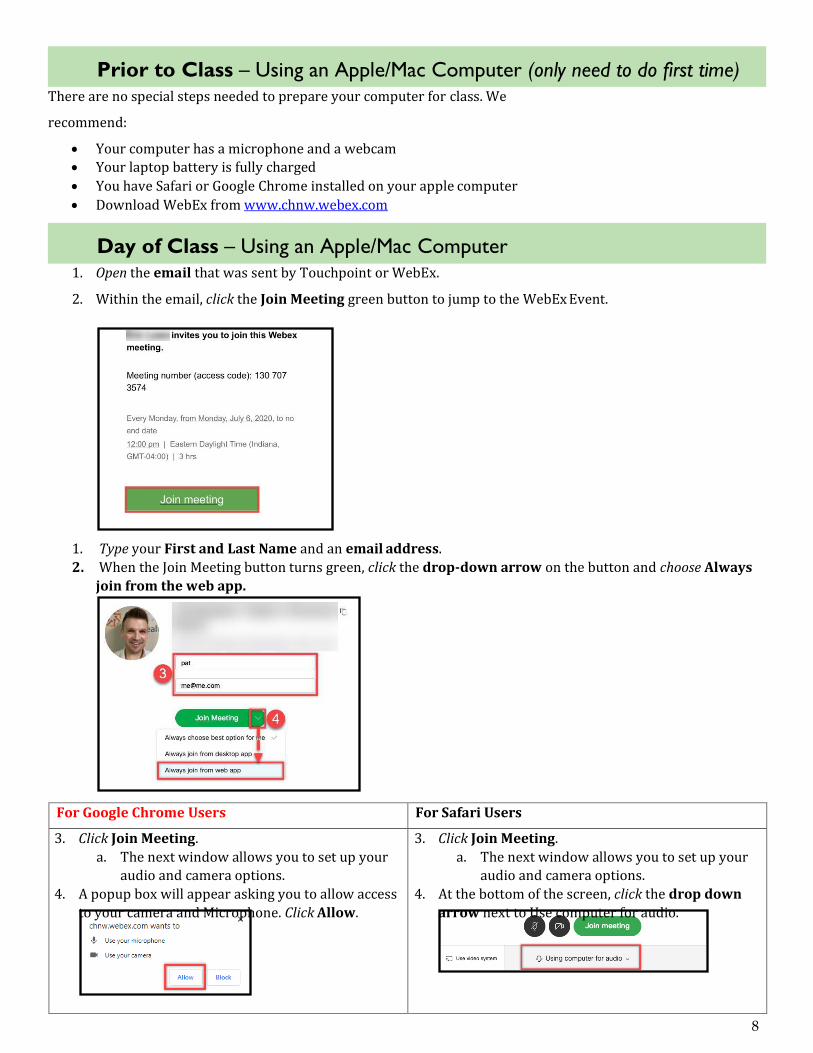
1. Open the email that was sent by Touchpoint or WebEx.
2. Within the email, click the Join Meeting green button to jump to the WebEx Event.
1. Type your First and Last Name and an email address.
2. When the Join Meeting button turns green, click the drop-down arrow on the button and choose Always
join from the web app.
For Google Chrome Users For Safari Users
3. Click Join Meeting.
a. The next window allows you to set up your
audio and camera options.
4. A popup box will appear asking you to allow access
to your camera and Microphone. Click Allow.
3. Click Join Meeting.
a. The next window allows you to set up your
audio and camera options.
4. At the bottom of the screen, click the drop down
arrow next to Use computer for audio.
Prior to Class – Using an Apple/Mac Computer (only need to do first time)
Day of Class – Using an Apple/Mac Computer

9
5. At the bottom of the screen, click the drop down
arrow next to Use computer for audio.
6. In the Call me at section, type a phone number.
7. Press Enter on your keyboard.
a. WebEx will call this number so you can hear the
meeting audio and speak during the meeting.
8. Click Join meeting.
5. In the Call me at section, type a phone number.
6. Press Enter on your keyboard.
a. WebEx will call this number so you can
hear the meeting audio and speak during
the meeting.
7. Click Join Meeting.
8. You will see 1-2 individual pop ups asking for
access to your Microphone and Camera. Click
Allow for both.
WebEx Tools – Using an Apple/Mac Computer
Icons Description
Mute/Unmute your audio. Red means Muted and Gray means Unmuted.
Camera – Red means camera is OFF and Gray means camera is ON.
Leave the session.
Options menu contains other options and features. You can find Q&A in this menu, and other tools if available.
Participants – Opens the participant panel so you can see everyone attending the meeting, if available.