Embed Size (px)
Citation preview
TouchNet
Saint Louis University
Web Departmental Deposits User Guide
Version 5.0
1
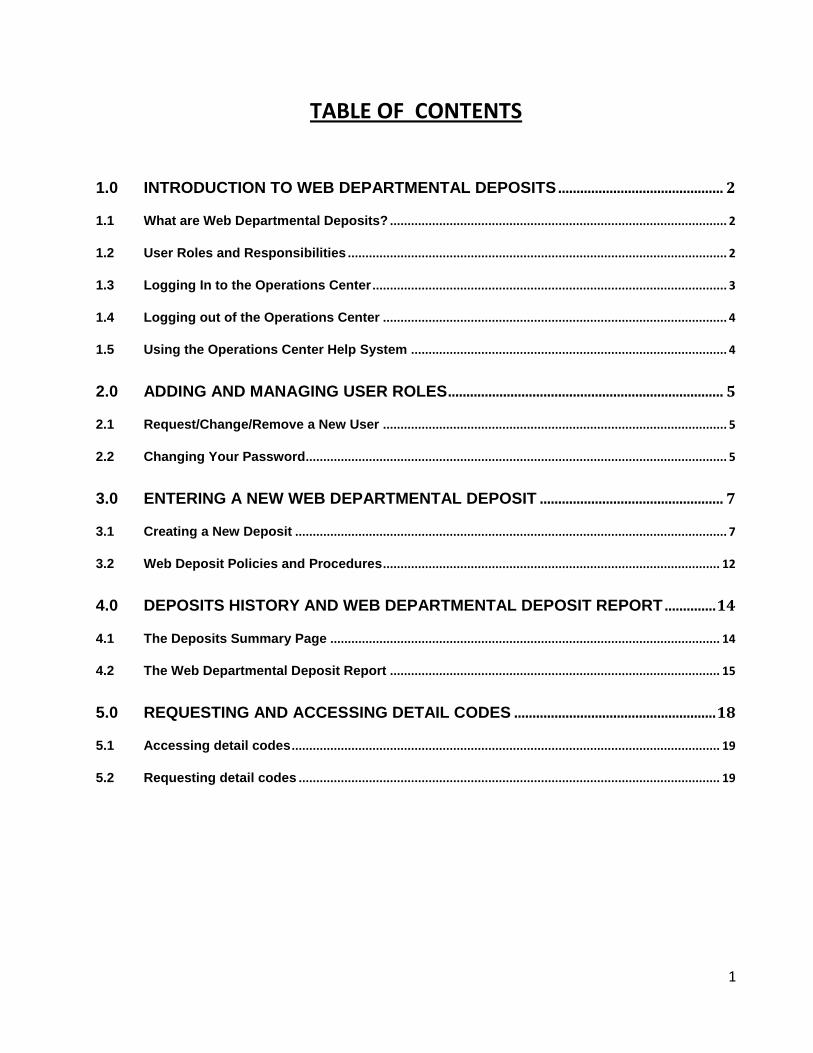
TABLE OF CONTENTS
1.0 INTRODUCTION TO WEB DEPARTMENTAL DEPOSITS ............................................. 2
1.1 What are Web Departmental Deposits? ................................................................................................ 2
1.2 User Roles and Responsibilities ............................................................................................................ 2
1.3 Logging In to the Operations Center ..................................................................................................... 3
1.4 Logging out of the Operations Center .................................................................................................. 4
1.5 Using the Operations Center Help System .......................................................................................... 4
2.0 ADDING AND MANAGING USER ROLES ........................................................................... 5
2.1 Request/Change/Remove a New User .................................................................................................. 5
2.2 Changing Your Password........................................................................................................................ 5
3.0 ENTERING A NEW WEB DEPARTMENTAL DEPOSIT .................................................. 7
3.1 Creating a New Deposit ........................................................................................................................... 7
3.2 Web Deposit Policies and Procedures ................................................................................................ 12
4.0 DEPOSITS HISTORY AND WEB DEPARTMENTAL DEPOSIT REPORT .............. 14
4.1 The Deposits Summary Page ............................................................................................................... 14
4.2 The Web Departmental Deposit Report .............................................................................................. 15
5.0 REQUESTING AND ACCESSING DETAIL CODES ....................................................... 18
5.1 Accessing detail codes .......................................................................................................................... 19
5.2 Requesting detail codes ........................................................................................................................ 19
2
1.0 Introduction to Web Departmental Deposits
With web departmental deposits, you can now enter departmental deposits online
through the TouchNet Cashiering Operation Center. This streamlines operations in your department and the Cashier’s Office, providing a more accurate and efficient way to process departmental deposits.
1.1 What are Web Departmental Deposits?
Web departmental deposits are batch deposits that can be submitted remotely to
the Cashier’s Office using the TouchNet Cashiering Operations Center. Web departmental deposits:
Include cash, paper check, and cash-like transactions (such as money orders or cashier’s checks) or pre-authorized credit. Pre-authorized credit is defined as credit already processed in the department but that must still be credited to the General Ledger.
and…
Do not require individual receipts for each payment item.
1.2 User Roles and Responsibilities
You have been assigned one or both of these roles in the TouchNet Cashiering
Operations Center:
Web departmental deposit user- All users will be assigned the web departmental deposit user role, which will enable users to process deposits online through TouchNet. This user role is limited to viewing and reporting on their own transactions.
Web departmental reporting user- The web departmental reporting user role is assigned to users who require access to view all deposit history and reporting for a specific office.
Note: Both roles may be assigned to one user depending on the needs of your
department.

3
1.3 Logging In to the Operations Center
TouchNet Web Departmental Deposits may be accessed from the mySLU home page, using Microsoft Internet Explorer.
1. Open Microsoft Internet Explorer.
2. In the Address field, enter the following address:
http://gateway.slu.edu/cp/home/loginf
3. Enter your username (excluding the slu.edu extension) at SLU Net ID. At Password, enter your mySLU password.
If you have forgotten your password, please call the ITS Help Desk at 977-4000.
4. At the mySLU home page, click on the Groups icon. The My Groups screen will appear.
5. Click on the “Web Dept. Deposit Users” group. The Group Homepage will appear.
6. Select “Links” under Group Tools and the Web Deposits link will appear. Click on the link “Web Deposits”.
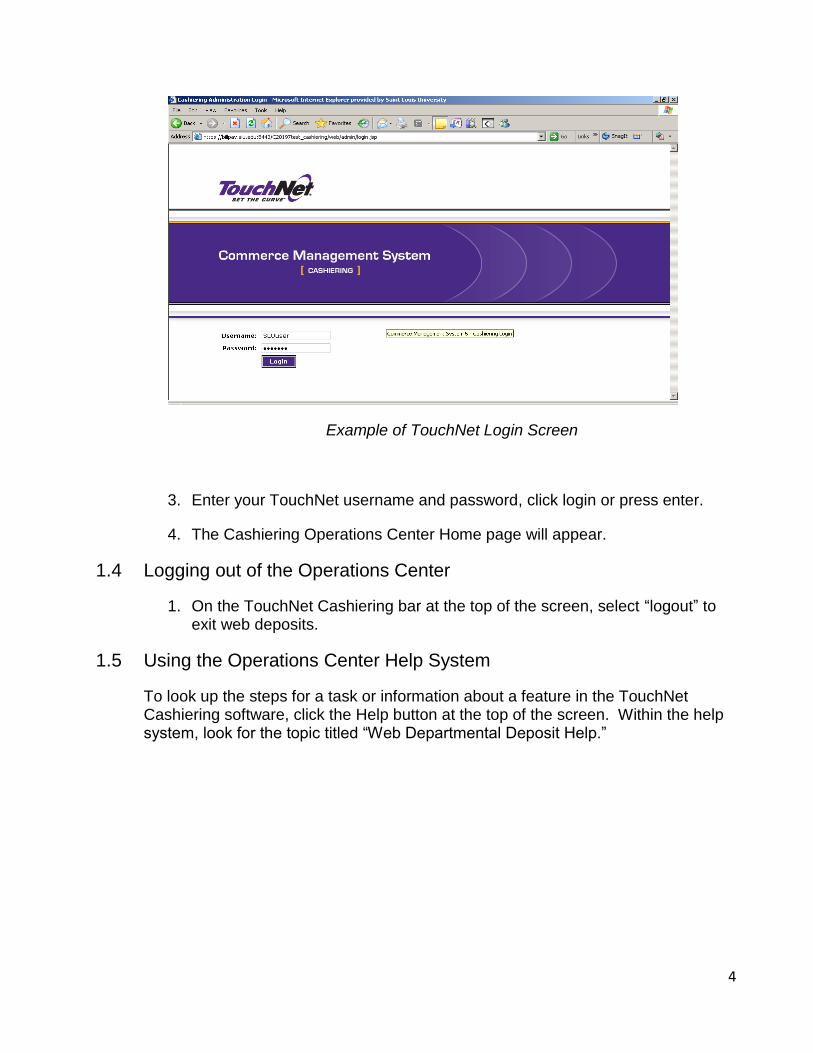
7. The following TouchNet log in screen should appear.
4
Example of TouchNet Login Screen
3. Enter your TouchNet username and password, click login or press enter.
4. The Cashiering Operations Center Home page will appear.
1.4 Logging out of the Operations Center
1. On the TouchNet Cashiering bar at the top of the screen, select “logout” to exit web deposits.
1.5 Using the Operations Center Help System
To look up the steps for a task or information about a feature in the TouchNet Cashiering software, click the Help button at the top of the screen. Within the help system, look for the topic titled “Web Departmental Deposit Help.”
5
2.0 Adding and Managing User Roles
Before users can begin entering web departmental deposits, access must be requested by your departmental administrator. After the request has been submitted and approved, the user will be assigned a specific role for processing web departmental deposits.
This chapter shows web departmental deposit users how to request new users, change or remove user access and change passwords.
2.1 Request/Change/Remove a New User
1. To request access for an employee or to disable an employee who no longer needs access due to a job change, please contact JoAnn Grant in the Cashier’s Office.
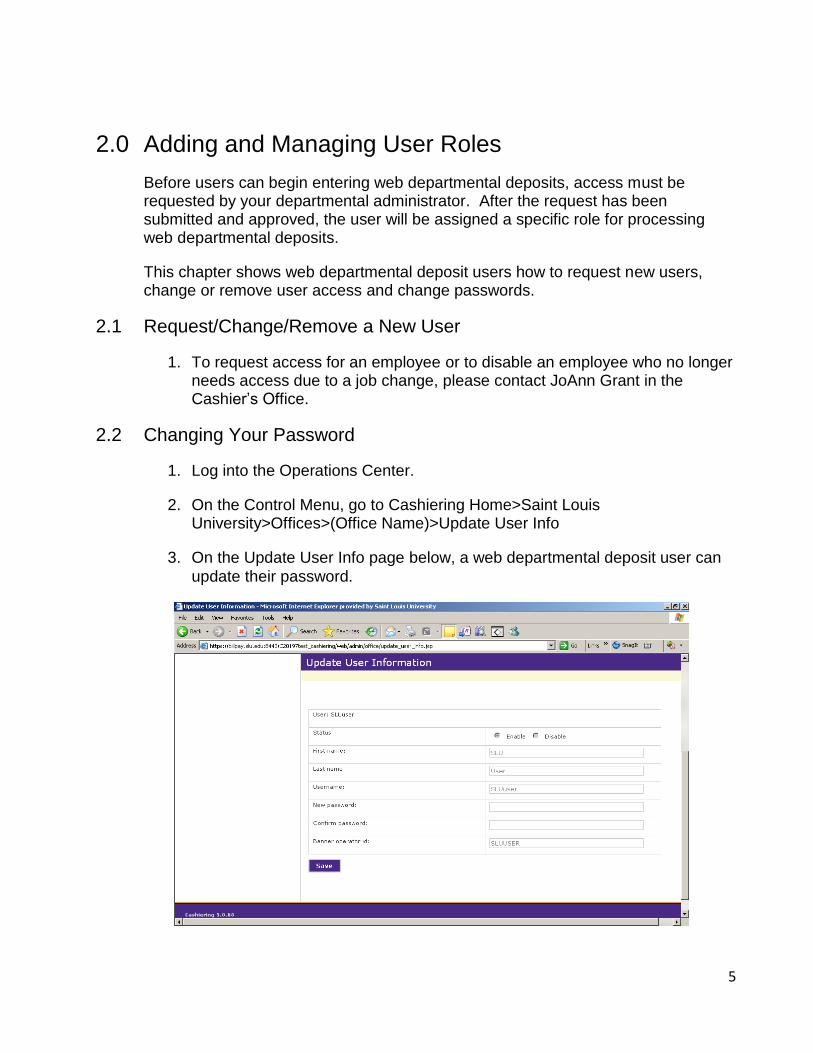
2.2 Changing Your Password
1. Log into the Operations Center.
2. On the Control Menu, go to Cashiering Home>Saint Louis University>Offices>(Office Name)>Update User Info
3. On the Update User Info page below, a web departmental deposit user can
update their password.
6
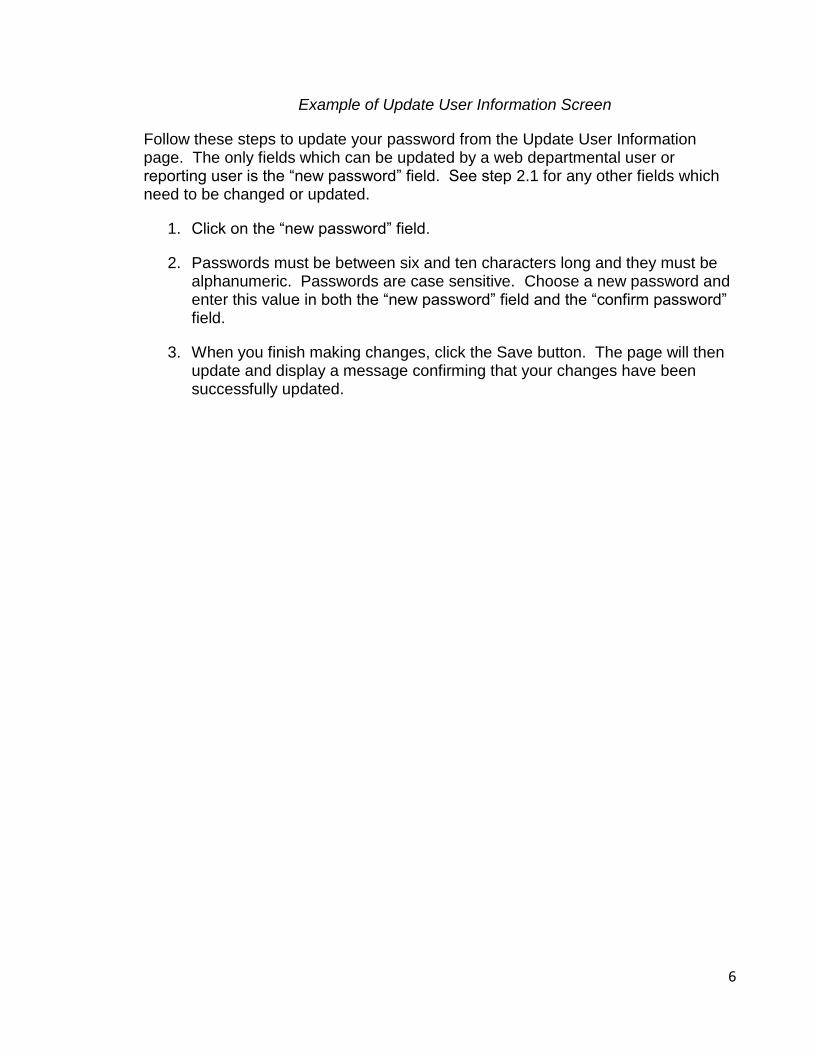
Example of Update User Information Screen
Follow these steps to update your password from the Update User Information page. The only fields which can be updated by a web departmental user or reporting user is the “new password” field. See step 2.1 for any other fields which need to be changed or updated.
1. Click on the “new password” field.
2. Passwords must be between six and ten characters long and they must be alphanumeric. Passwords are case sensitive. Choose a new password and enter this value in both the “new password” field and the “confirm password” field.
3. When you finish making changes, click the Save button. The page will then update and display a message confirming that your changes have been successfully updated.
7
3.0 Entering a New Web Departmental Deposit
To enter a web departmental deposit, a web departmental deposit user enters the deposit information and submits batches to the Cashier’s Office for approval.
The procedure for adding a new deposit is described in this chapter. Note: Credit card deposits will not be processed on the same web deposit as cash and checks. Please submit separate web deposits for credit card deposits.
Funds from a grant should be forwarded to and deposited by Sponsored Programs.
3.1 Creating a New Deposit
How to get to the New Deposit page: Log into the Operations Center as a web departmental deposit user.
On the Control Menu, click on >Cashiering Home>Saint Louis University>Offices>(Office Name)>Web Departmental Deposits>New Deposit To enter a web departmental deposit from the “New Deposit” page, follow these steps.
1. Enter the number of credits and debits to be calculated in the deposit. These
numbers do not have to match, but you must enter a value in both fields.
The Enter number of credits field – Enter the number of Banner fund/accounts over which the credits are to be dispersed.
The Enter number of debits field – This value is determined by how you group specific tender types including cash, paper check, or pre-authorized credit. The “other” tender type may also be used if a Banner fund/account is being debited. Enter the number of tender types or Banner fund/accounts over which the debits are to be dispersed.
Note: Debit and credit entries can also be added on the following screen if the estimated number is incorrect.
8
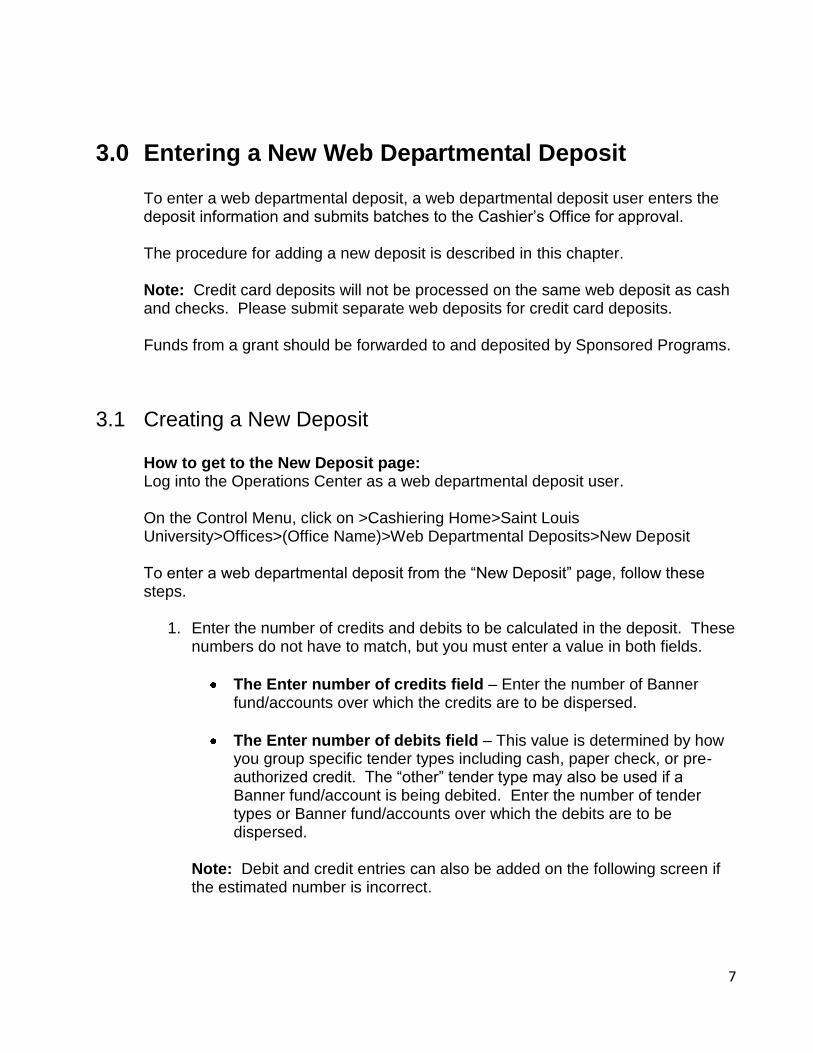
2. Select continue. The Create Web Departmental Deposit page is displayed.
Example of Create Web Departmental Deposit Screen
3. In the Enter Credit Information section, complete the following fields.
Detail Code – This field determines the General Ledger (GL) accounts to be credited. Detail codes are four alpha-numeric characters that are used to represent the Banner FOAPAL which will be credited. After the detail code is entered and the deposit is validated, the Banner FOAPAL will populate and can only be corrected by changing the detail code. See section 5.0 for more information on detail codes.
Amount – Enter the total amount of funds to be credited to each individual Detail Code.
Description – Enter a detailed description of the deposit. Please use a description that will easily reference the deposit for future research and identification.
Note: The description field contains thirty character spaces which will feed to Banner. If additional space is needed, the description area will allow for additional text, although the additional text may only be viewed in TouchNet.
Each line in the “Enter Credit Information” field should now show the Detail Code to be credited, the amount to be credited, and a description.
4. In the Enter Debit Information section, complete the following fields:
9
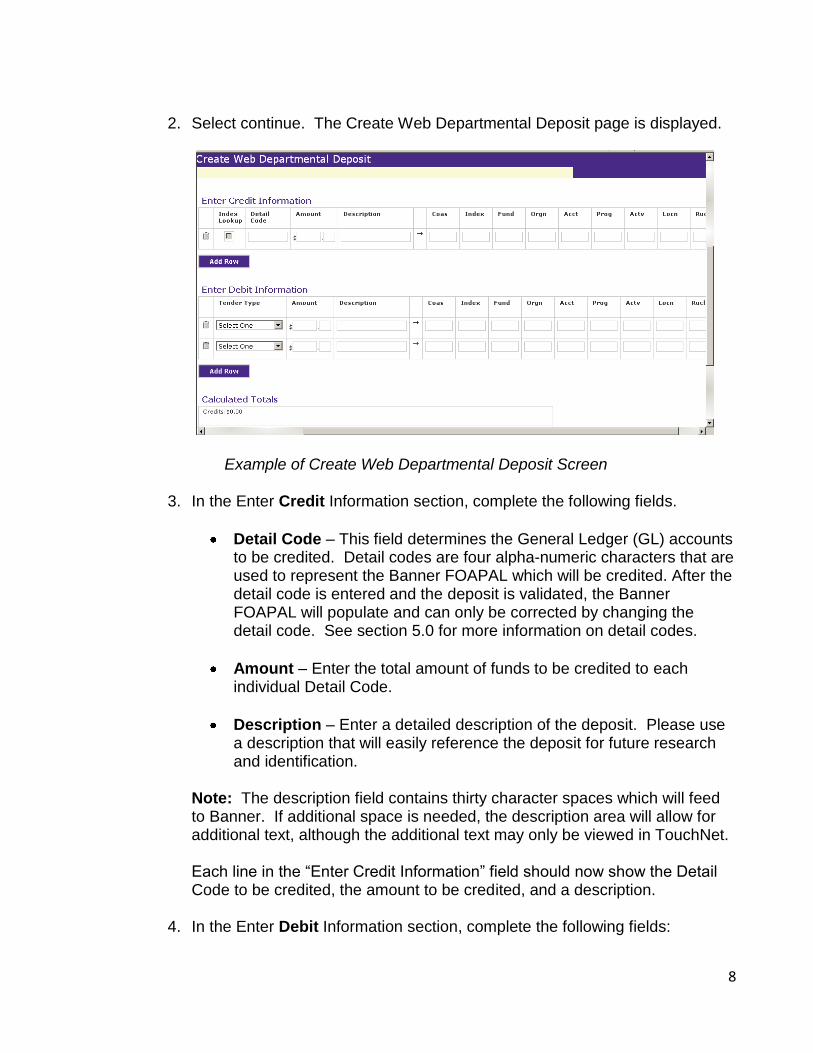
Tender Type-select a tender type from the dropdown list (cash, paper check, pre-authorized credit, or other) Note: The “other” option allows you to debit a Detail Code rather than a tender type.
Amount-In each available row, enter the total amount of each tender type. The tender types can be entered individually (as a series of checks) or as a group (the series of checks totaled together).
Description-Enter date of deposit and initials in the description area, if the tender type is cash or check. If the tender type is preauthorized AMEX, Discover or MC/Visa, please enter your merchant name, date credit card batch was processed and your initials.
Each line in the “Enter Debit Information” field should now show the selected tender type, the amount to be debited, and a description.
5. Click the Validate button to confirm that your totals balance and that the
Detail Codes you have entered are valid. If all the values are correct, the page will update and display a validation message.
Now the account information associated with each Detail Code you entered will be displayed in the FOAPAL fields to the right of that code. If you are satisfied with your Detail Codes and FOAPAL string values and the validation message is displayed, please proceed to step 7.
An error message may display when:
You enter a Detail Code or a value in the FOAPAL string that cannot be validated by your Banner system.
Or…
The totals for your credits and debits do not balance.
Note: These are the two most common error messages. If any other error message is displayed, follow the instructions provided or contact the Cashier’s Office.
5. If you receive a message for an invalid Detail Code or value in the FOAPAL string, any field containing an error will be highlighted in red. A detail code may be corrected by deleting the row with the incorrect detail code. Click on
10
the trash can icon to delete a row. Select “add row” to enter a new detail code.
6. Review the Detail Codes and the values in the FOAPAL string and ensure
the Calculated Totals match for both debits and credits, then click the Validate button again. Please contact the Cashier’s Office for assistance if you are unsure of how to correct any of these values.
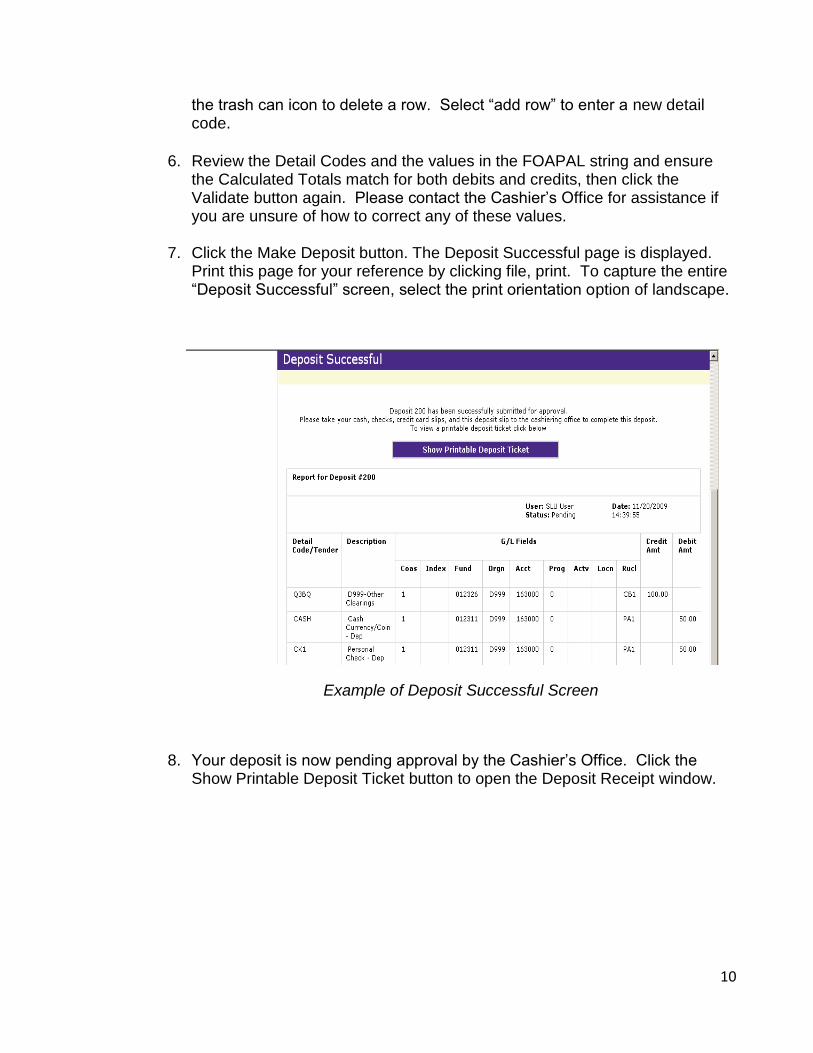
7. Click the Make Deposit button. The Deposit Successful page is displayed. Print this page for your reference by clicking file, print. To capture the entire “Deposit Successful” screen, select the print orientation option of landscape.
Example of Deposit Successful Screen
8. Your deposit is now pending approval by the Cashier’s Office. Click the Show Printable Deposit Ticket button to open the Deposit Receipt window.
11
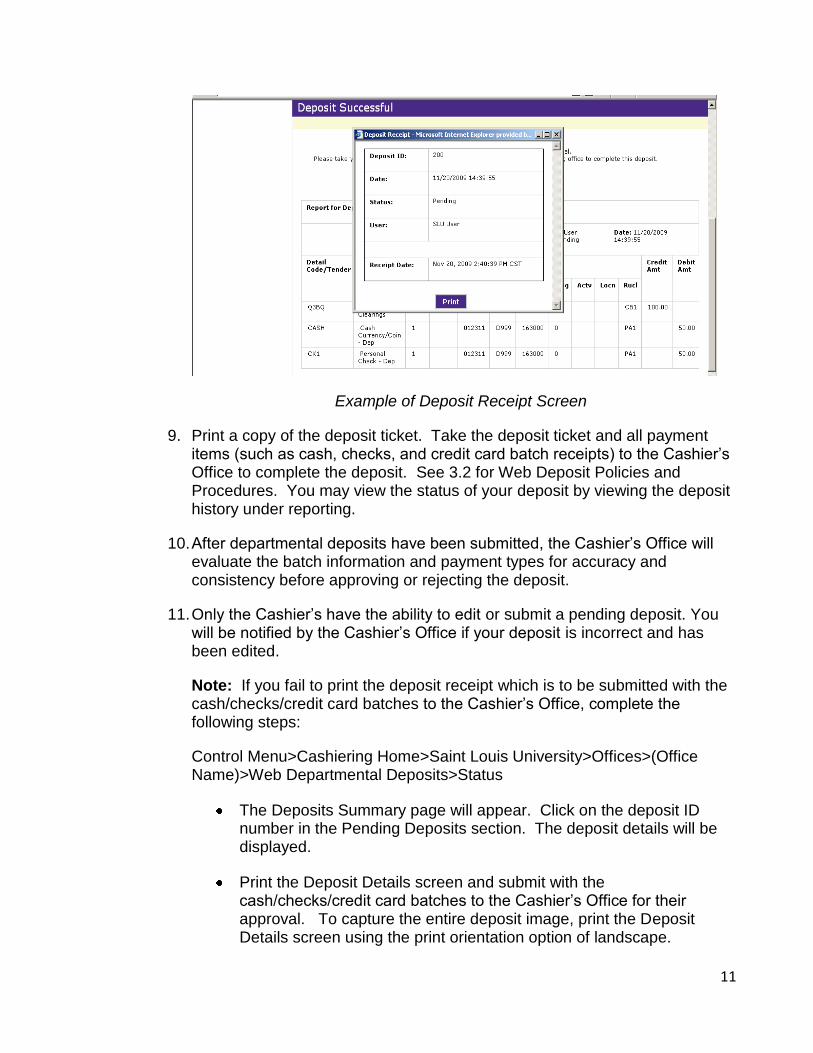
Example of Deposit Receipt Screen
9. Print a copy of the deposit ticket. Take the deposit ticket and all payment items (such as cash, checks, and credit card batch receipts) to the Cashier’s Office to complete the deposit. See 3.2 for Web Deposit Policies and Procedures. You may view the status of your deposit by viewing the deposit history under reporting.
10. After departmental deposits have been submitted, the Cashier’s Office will evaluate the batch information and payment types for accuracy and consistency before approving or rejecting the deposit.
11. Only the Cashier’s have the ability to edit or submit a pending deposit. You will be notified by the Cashier’s Office if your deposit is incorrect and has been edited.
Note: If you fail to print the deposit receipt which is to be submitted with the cash/checks/credit card batches to the Cashier’s Office, complete the following steps:
Control Menu>Cashiering Home>Saint Louis University>Offices>(Office Name)>Web Departmental Deposits>Status
The Deposits Summary page will appear. Click on the deposit ID number in the Pending Deposits section. The deposit details will be displayed.
Print the Deposit Details screen and submit with the cash/checks/credit card batches to the Cashier’s Office for their approval. To capture the entire deposit image, print the Deposit Details screen using the print orientation option of landscape.
12
3.2 Web Deposit Policies and Procedures Departments and individuals receiving funds on behalf of the University are responsible for submitting deposits on a daily basis. All payments to the University become the property of Saint Louis University and are subject to its policies and procedures.
1. All web deposits submitted to the Cashier’s Office must be accompanied by a receipt.
2. All cash should be secured at all times and kept in locked storage at all times.
3. Access to cash must be limited to authorized staff.
4. Locking bags should be utilized to transport large deposits to the Cashier’s Office.
5. Receipts which are to be recorded in a fund that has not yet been established, may be deposited with the Cashier’s Office in a holding fund and transferred to the new fund after it has been created.
6. All funds received by departments should be deposited to the Cashier’s Office within 24 hours of receipt.
7. Verification of deposits can be made by reviewing the monthly fund statement or reviewing screens in Banner Self-Service Finance. Discrepancies should be promptly reported to the Cashier’s Office.
8. When processing deposits with checks, please follow the procedures below:
Write the Deposit ID# on the front of each check being deposited. This number can be found on the Deposit Receipt which was printed out of the system to be submitted with your deposit.
If there is more than one check to be deposited, prepare a calculator tape which lists and totals all checks and submit with deposit. This total must agree with the total of your Web Deposit.
All checks received for deposit must be made payable or endorsed to Saint Louis University.
All checks should be endorsed with a “deposit only” stamp.
13
8. When processing deposits with cash, please follow the procedures below:
Bundle every 25 bills of the same denomination with a rubber band and roll coin in coin wrappers. Attach a calculator tape that totals all cash. The total cash amount must agree with your Web Deposit.
All cash must be delivered to the Cashier’s Office in person and should NEVER be forwarded via interoffice mail. Guard escorts can be requested, if necessary, from Public Safety. Locking bags should be utilized to secure large deposits.
9. When processing credit card deposits, please follow the procedures below:
Attach daily batch documents to the web deposit receipt. The daily batch documents can be obtained from the device used to process credit card transactions.
All credit card web deposits must be submitted separately from cash and check deposits.
When processing a credit card web deposit, all credit card types must be entered on separate rows, not as a total of all credit card types. Department merchant names must be notated in the description field.
14
4.0 Deposits History and Web Departmental Deposit Report
You may need to track the status of a deposit, research the details of a specific deposit, or generate a Web Departmental Deposits report based on certain criteria. This section describes how users can view the Web Departmental Deposit report and monitor the status of a deposit using the Deposits Summary page.
4.1 The Deposits Summary Page
How to get to the Deposits Summary Page:
Log into the Operations Center.
On the Control Menu, click on>Cashiering Home>Saint Louis University>Offices>(Office Name)>Web Departmental Deposits>Status
The web departmental deposit user and the reporting user are both authorized to view the Deposits Summary page. However, a web departmental deposit user may only view their own deposit history, whereas a reporting user may view all deposit history in their office.
The deposit history table displays the status of all deposits submitted to the Cashier’s Office. Deposits may have the following status types:
Pending-The deposit has been submitted to the Cashier’s Office but not yet approved.
Changed and Submitted-The deposit has been changed, approved and submitted by the Cashier’s Office. A change to a deposit will only be made by the Cashier’s Office if there is a discrepancy in the web deposit. Any discrepancies will be communicated to the user before any changes are made to a web deposit.
Submitted-The deposit has been approved by the Cashier’s Office.
If you are a web departmental deposit user, you will use the Deposit Summary page to track the status of deposits you have submitted to the Cashier’s Office.
If you are a reporting user in addition to a web departmental deposit user, you will also use the Deposit Summary page to track the status of deposits you or users in your office have submitted.
Below is an example of the Deposits Summary page which displays the Deposit History Table. This screen displays a list of pending and completed deposits (pending, submitted or changed and submitted).
15
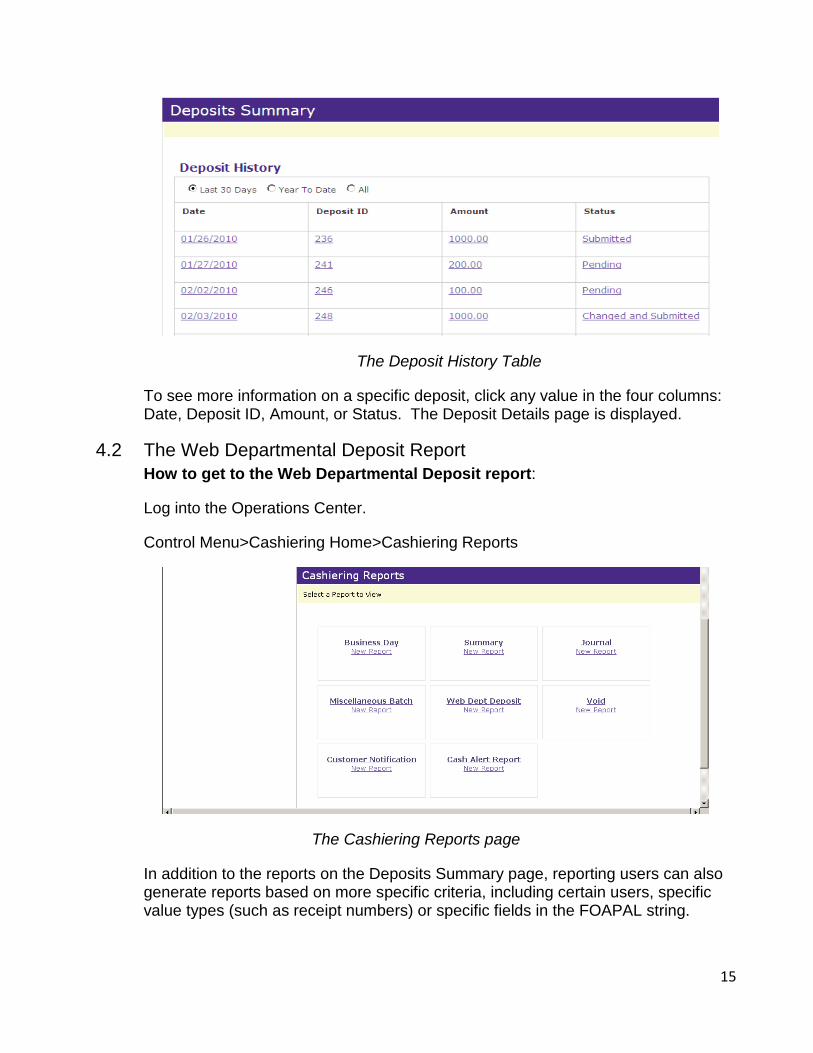
The Deposit History Table
To see more information on a specific deposit, click any value in the four columns: Date, Deposit ID, Amount, or Status. The Deposit Details page is displayed.
4.2 The Web Departmental Deposit Report
How to get to the Web Departmental Deposit report:
Log into the Operations Center.
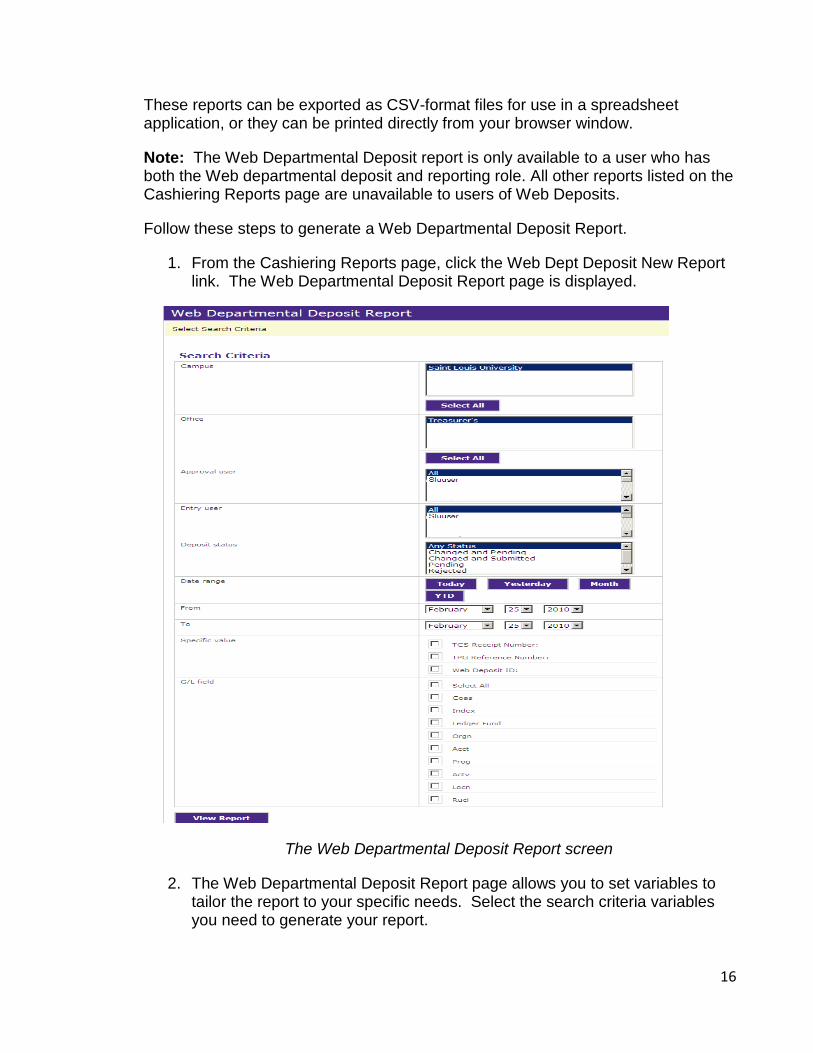
Control Menu>Cashiering Home>Cashiering Reports
The Cashiering Reports page
In addition to the reports on the Deposits Summary page, reporting users can also generate reports based on more specific criteria, including certain users, specific value types (such as receipt numbers) or specific fields in the FOAPAL string.
16
These reports can be exported as CSV-format files for use in a spreadsheet application, or they can be printed directly from your browser window.
Note: The Web Departmental Deposit report is only available to a user who has both the Web departmental deposit and reporting role. All other reports listed on the Cashiering Reports page are unavailable to users of Web Deposits.
Follow these steps to generate a Web Departmental Deposit Report.
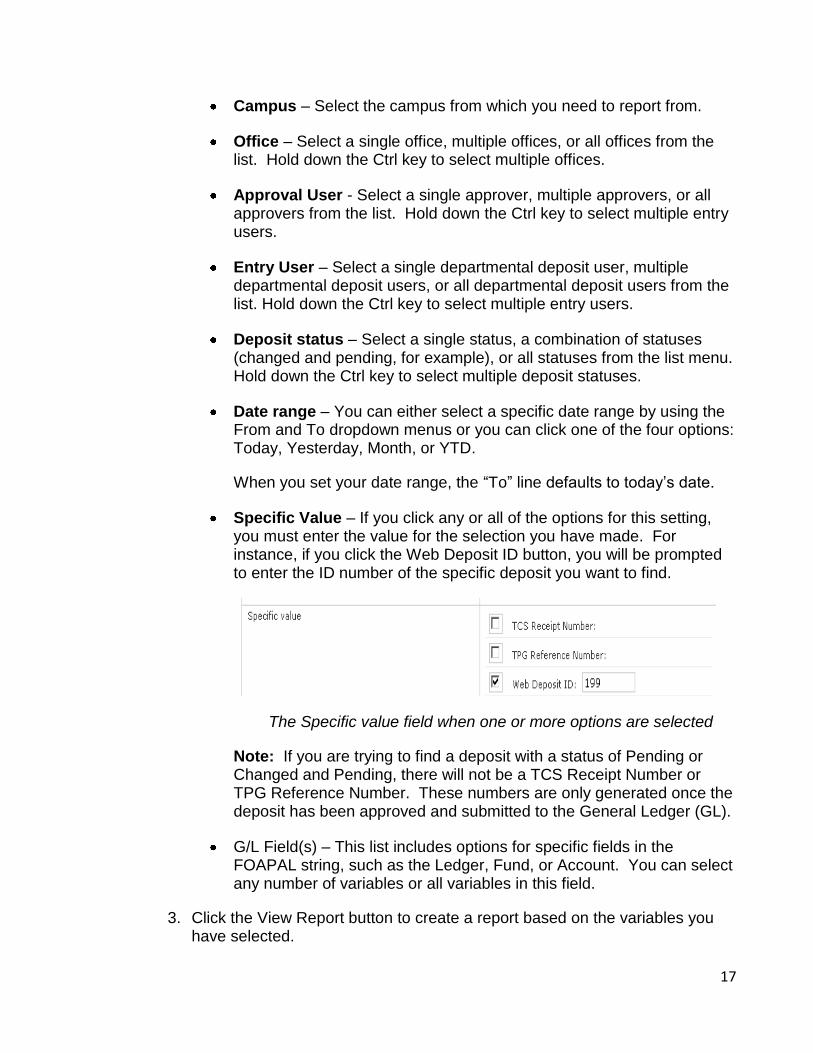
1. From the Cashiering Reports page, click the Web Dept Deposit New Report link. The Web Departmental Deposit Report page is displayed.
The Web Departmental Deposit Report screen
2. The Web Departmental Deposit Report page allows you to set variables to tailor the report to your specific needs. Select the search criteria variables you need to generate your report.
17
Campus – Select the campus from which you need to report from.
Office – Select a single office, multiple offices, or all offices from the list. Hold down the Ctrl key to select multiple offices.
Approval User - Select a single approver, multiple approvers, or all approvers from the list. Hold down the Ctrl key to select multiple entry users.
Entry User – Select a single departmental deposit user, multiple departmental deposit users, or all departmental deposit users from the list. Hold down the Ctrl key to select multiple entry users.
Deposit status – Select a single status, a combination of statuses (changed and pending, for example), or all statuses from the list menu. Hold down the Ctrl key to select multiple deposit statuses.
Date range – You can either select a specific date range by using the From and To dropdown menus or you can click one of the four options: Today, Yesterday, Month, or YTD.
When you set your date range, the “To” line defaults to today’s date.
Specific Value – If you click any or all of the options for this setting, you must enter the value for the selection you have made. For instance, if you click the Web Deposit ID button, you will be prompted to enter the ID number of the specific deposit you want to find.
The Specific value field when one or more options are selected
Note: If you are trying to find a deposit with a status of Pending or Changed and Pending, there will not be a TCS Receipt Number or TPG Reference Number. These numbers are only generated once the deposit has been approved and submitted to the General Ledger (GL).
G/L Field(s) – This list includes options for specific fields in the FOAPAL string, such as the Ledger, Fund, or Account. You can select any number of variables or all variables in this field.
3. Click the View Report button to create a report based on the variables you have selected.
18
Once the page updates and displays your report, you can click the Export to CSV button to export your data to a CSV-format file, which can be opened using a spreadsheet application.
5.0 Requesting and Accessing Detail Codes A detail code is a set of four alpha-numeric characters which are used to represent a Banner FOAPAL when processing a web deposit.

19
5.1 Accessing detail codes
Detail codes may be accessed from the Business and Finance Budget Domain. The Business and Finance Budget Domain may be accessed from the mySLU tools tab, using Microsoft Internet Explorer (do not use Netscape). (see section 1.3 for log in instructions to the mySLU portal).
Note: Access to detail code listings is based on the user’s Banner Finance Fund/Org security.
1. At the mySLU home page, click on the Tools tab, then click on the WebFOCUS Dashboard icon.
2. At the login screen, enter your SLU Net ID and Password.
3. Click Logon. The WebFOCUS Dashboard displays.
4. Select the Finance Budget Development Domain and click submit.
5. The Web Deposits Detail Code file can be found under standard reports in the Web Deposit folder.
5.2 Requesting detail codes
1. Detail codes for new funds may be requested on the Fund Request/Change Form.
2. To assign a detail code to an existing Banner fund, please contact the Cashier’s Office.