Embed Size (px)
DESCRIPTION
setting Database Management System
Citation preview

Togamas Bookstore Database Management System
1
BAB 1
PENDAHULUAN
1.1 Background
Book store represent requirement of very supporter is necessary for the continuity
of study especially among student, because in the book store we can get the book to add
their science and knowledge.
This book store consisted of a central book store as place of management of data
and two branch book stores. All data about the library still be kept in form MS Access, so
management the library requires for transformed the data to SQL database server
database.
We know that a book store of difficulty in handling management of data
and depositor of data and also delivery of data can run better and accurate hence
the book store have to have data repository, its on file data better. One of the
solutions is using SQL Server 2000 database.
1.2 Problem Formulation
Based on background upper, we embrace problem formulation are:
1. How to install SQL Server 2000?
2. How to make the database design and table in SQL Server 2000?
3. How to make and give a login, user role and permission to each database?
4. How to backup and restored database in SQL Server 2000?
5. How to make replication database and process DTS Export Import?
6. How to make an alert to SQL Server 2000?
1.3 Purpose
The purpose of this project is:
1. To know how to install SQL Server 2000.
2. To know how to make the database design and table in SQL Server 2000.
3. To know how to make and give a login, user role and permission to each
database.
4. To know how to backup and restore database in SQL Server 2000

Togamas Bookstore Database Management System
2
5. To make replication database and process DTS Export Import
6. To know how to make an alerts to SQL Server 2000.
1.4 Benefit
The benefits of this project are:
1. Give knowledge to the readers about a configuration in SQL Server 2000.
2. Give knowledge about advantages using a Database SQL Server 2000.
1.5 Problem Boundaries
The problem boundaries of this project only explain about installing SQL
Server 2000, create login, role, permission, create alert, and the last are doing
backup and restore data.
1.6 Writing Systematic
The writing systematic of this project is as like bellow.
CHAPTER I INTRODUCTION
Explain about background, problem formulation, purpose, benefit, problem
boundaries, writing systematic, and time schedule.
CHAPTER II ANALYSIS
Explain about current setup and problem detail.
CHAPTER III SCHEME
Explain about envisioned system.
CHAPTER IV IMPLEMENTATION
Explain about installing SQL Server 2000, create databases and tables, create
and assign logins, roles, and permission, creating alert, creating a permanent
backup device, creating job for backup.
CHAPTER V CLOSING
Explain about conclusion and suggestion.

Togamas Bookstore Database Management System
3
1.7 Time Schedule
Table 1.1 Table of Time Schedule
No. Steps
On July 2008
1
2
3
4
5
6
7

Togamas Bookstore Database Management System
4
CHAPTER 2
REQUIREMENT ANALYSIS
2.1 The Existing Specification System
Togamas Bookstore is a bookstore that is famous in Bandung, especially
there has special discount offering in every buying of book. Currently, Togamas
book store does not have a centralized data is either stored in MS Access namely
TogaData as a central database is in .xls format. Data is either stored in MS Excel
worksheets. Data of this Bookstore stored in different file type. It‟s a cumbersome
process to handle data spread across different applications.
The management faces many problems, such as loss and disparity in data.
Another problem that the sales executives are facing because of non availability of
a centralized database is that they have to collate data from various data sources.
The employee will arrange and perform the data of book that customer
wanted, such as book title, book category, book writer, and book publisher. So at
the time the request of customer could be handled easily. But near this time, when
the new technology grow fast, these ways above will not be helping as we know
in MS Access has many limitation for handling many jobs include the security.
2.2 Problem Details
The Togamas Bookstore has management internal issue in central done in
manual, transfer process of data to slow, giving of access right in each user which
login done in manual out of one computer to computer the other. Not only that is
not connecting it between central Bookstore and Bookstore of branch is main
constraint faced.
Besides that, Togamas Bookstore finds difficulties, such as in backing up
the numbers a lot of the data, it is of course at risk to big also like losing of data,
inconsistent data between central data to another SERVER . In other hand some
difficulties showed in data maintaining. We need all of them to ensure the right
database and secure database in many conditions, such as disaster, human error,
and other unpredictable situation.

Togamas Bookstore Database Management System
5
CHAPTER 3
DESIGN AND SCHEME
3.1 Envisioned Setup Design
To deal with the above problems, the management has decided to
implement a centralized database system and the management has decided to form
a new IT department bookstores at the headquarter and at the two branch offices.
In addition, the headquarter will be transformed of all the data from bookstores
branches to central Bookstore using SQL Server 2000.
Head Office
BranchBranch
Using MS Excel Using MS Excel
DTSDTS
The IT department Bookstores decides to perform the following tasks:
1. Creating new SQL Server 2000 database in centralized database system.
2. Create databases and tables.
3. All the database should be converted to SQL Server 2000 from MS Excel
worksheets.
4. The headquarters would have a centralized database, Bookstore, running
on SQL Server 2000. Bookstore would be transform with the entire two
branch offices database at the headquarters using DTS. The following
figure illustrates the DTS model.
5. Create and assign logins, Roles, Alert and Permission
6. Create appropriate alerts to monitor the databases and hardware resources.
7. Creating a Permanent Backup Device.
8. Create Operator using Enterprise Manager.

Togamas Bookstore Database Management System
6
9. Creating Job for Backup
10. Create Restore Database.
11. Create Trace Database.
12. Create Shrink Database
3.2 Scheme of New Design
MAU BUAT APA ??

Togamas Bookstore Database Management System
7
CHAPTER IV
IMPLEMENTATION
APA YANG MAU DIIMPLEMENTASIKAN
4.1 Installing SQL Server 2000
1. Insert the CD-ROM in the CD drive to start the SQL Server Installation
Wizard.
2. Place the pointer on SQL Server 2000 Components and click to move to
the next screen.
3. Place the pointer on Install Database Server and click to start the
installation.
4. The Welcome screen of the installation wizard appears.
5. Click the Next button to move to the Computer Name screen.
6. The Computer Name screen displays the following:
a. Local Computer
b. Remote Computer
c. Virtual Server
7. The administrator wants to install SQL Server 2000 at its headquarter
only. Therefore, select the Local Computer option and click the Next
button to continue with the setup program. The Remote Computer option I
not selected because at present, the administration does not want to install
SQL Server 2000 at its production units, situated in the different area. This
will display Installation Selection screen.
8. The Installation Selection screen display the following three option:
a. Create a new instance of SQL Server, or install Client Tools.
b. Upgrade, remove, or add components to an existing instance of
SQL Server.
c. Advanced Options.
9. The Library requires a fresh installation of SQL Server 2000. Therefore,
select the Create a new instance of SQL Server, or install Client Tools
option and click the Next button to move to the User Information screen.

Togamas Bookstore Database Management System
8
10. The User Information screen displays a message Enter your name below
along with two text boxes. Enter the department name in the first textbox,
labeled as Name. In the second textbox, labeled as department name,
enter the department name again. However, this entry is optional. Click the
Next button to move to the Software Licensing Agreement screen of the
installation wizard.
11. Click Yes to accept the License Agreement. The Installation Definition
screen is displayed.
12. The Installation Definition screen displays the following three options:
a. Client Tools
b. Server and Client Tools
c. Connectivity
13. The setup of Libraries requires booth the client and the server tools for its
centralized database management system. Therefore, select the second
option Server and Client Tools.
14. Click the Next button to move to the Instance Name screen of the
installation wizard.
15. Select Default option for a default installation.
16. Click Next to move to the Setup Type Screen.
17. The Setup Type screen displays of the following three setup options:
a. Typical
b. Minimum
c. Custom
18. The administrator requires the most commonly used components of SQL
Server 2000, therefore, select the Typical option.
19. Click the Browse button to specify different destination folders to
Program Files and Data Files.
20. Click the Next button to move to the Service Accounts screen. Select the
Use the same account for each service option. You also need to select the
Use a Domain Settings option, from the Services Setting section of the
Togamas Bookstore Database Management System
9
screen. In the Username textbox, enter the username as Library. In the
Password textbox enter the password as Administrator.
21. Click the Next button to display Authentication Mode screen. Select the
Windows Authentication Mode option. This will display the Start copying
Files screen.
22. Click the Next button to move to Choose Licensing Mode screen.
23. From the Licensing Mode section, select the Per Seat for option and
specify the number of devices for which license is purchased. Enter 10 as
device number.
Click the Continue button to start the installation process.
4.2 Create databases and Tables
Use the following T-SQL statements to create databases and tables:
Create Database
Create DATABASE Library
ON
(NAME = Library,
FILENAME = 'D:\Libraries Database\Library.mdf',
SIZE = 10,
FILEGROWTH=5),
(NAME= 'Library Log',
FILENAME = 'D:\Libraries Database\Library.ldf',
SIZE = 30,
FILEGROWTH = 15)
Create Table Member
Create Table Member
(
MemberID char (20) constraint pkcMemberID PRIMARY KEY Not Null,
FirstName varchar (20)Not Null,
LastName varchar (20)Not Null,
Gender varchar (10)Not Null,

Togamas Bookstore Database Management System
10
DateofBirthday datetime Not Null,
Address varchar (50) Not Null
)
Create Table Employee
Create table Employee
(
EmployeeId char(5) constraint pkEmployeeId PRIMARY KEY Not Null,
FirstName varchar (10)Not Null,
LastName varchar (10) Not Null,
Address varchar (30) Not Null,
)
Create Table Book
Create Table Book
(
BookID char (20) constraint pkcBukuID PRIMARY KEY Not Null,
Judul_Buku varchar (20)Not Null,
Kategori_Buku varchar(20) Not Null,
Penerbit varchar (20)Not Null,
Status varchar (10)Not Null
)
Create Table Items
Create table Items
(
ItemID char(3) constraint pkItemID PRIMARY KEY Not Null,
Item_Name varchar (30) Not Null,
Category varchar(10) Not Null,
Sum_item varchar(3) Not Null

Togamas Bookstore Database Management System
11
)
Create Table Transaction
Create Table transactions
(
TransactionID char (20) constraint pkcTransactionID PRIMARY KEY Not
Null,
MemberID char (20) constraint pkMemberID foreign key (MemberID)
references Member (MemberID),
BookID char (20)constraint pkBookID foreign key (BookID)
references Book (BookID),
Tgl_Pinjam datetime Not Null,
Tgl_Pengembalian datetime Not Null,
Tgl_Dikembalikan datetime Not Null
)
4.3 Transfer Old data from MS Excel to SQL Server 2000 using Data
Transformation Services (DTS)
1. Click start, all programs, Microsoft SQL Server, Enterprise Manager
2. In the SQL Server Enterprise Manager Console Root, Expand the SQL
Server.
3. Expand the registered SQL Server Instance displayed under the SQL Server
Group
4. Right-click the Data Transformation Services and click the New Package
option, to open DTS Designer windows.
5. From the Connection panel of the DTS Designer windows, click the
Microsoft Excel icon . And the connection dialog box appears, as shown.
6. In the new connection text box, type Microsoft Excel 97-2000.
7. In the file name text box, type D:\DATA.xls.
8. Click OK button to close the connection properties dialog box and return to
the DTS Designer windows.

Togamas Bookstore Database Management System
12
9. To identify the destination connection, click the Microsoft OLEDB Provider
for SQL Server icon from the connection pane of the DTS Designer
windows.
10. In the Server drop-down list, verify that the registered SQL Server instance
having Use Windows Authentication option is selected.
11. Select Pubs from the Database drop-down list.
12. Click OK button to close dialog box.
13. From the task pane of the DTS Designer, click the Transform Data Task
icon . The mouse pointer Change and display the word Select source
connection with an arrow attached to it.
14. Select destination connection with an arrow attached to it.
15. Double click the dark gray arrow to open the Transform Data Task
Properties dialog box.
16. Select the Destination tab
17. Click creates in the destination tab dialog box.
18. Change the default table name Sheet1$ to Anggota and Syntax.
19. Select transformations tab to define the transformation between the source
and the destination.
20. Click OK button to close the Transform Data Task Properties dialog box
21. Click the Execute icon in the toolbar of the DTS Designer windows.
22. Click OK and click done.
4.4 Create and Assign Logins, Roles, and Permission
To create and assign logins, roles, and permission, perform the following tasks:
1. Select Start – All Programs – Microsoft SQL Server – Enterprise Manager,
to open the Enterprise Manager console.
2. In the console root, expand the Microsoft SQL Server container and then
expand SQL Server Group container. Click the default instance.
3. Select the wizard icon on the Tools menu to open select wizard dialog box.
4. Expand the Database tree and double-click Create Login Wizard.

Togamas Bookstore Database Management System
13
5. Verify that the Windows Authentication option is selected from the Select
Authentication Mode for this Login screen.
6. Select Grant access to the server option from the security access section of
the Authentication with Windows screen.
7. Example, specify WALNER \ Admin in the Windows Account text box to
authenticate user by Windows operating system. In the case the domain
name of the machine is WALNER.
8. To grant privileges to users for creating new database, select the Database
Creators option from the Server role section of Grant Access to Security
Roles screen.
9. Click the Next button to continue.
10. Select the Library option from the Permit in database section of Grant
Access to Database screen, which allows accessing to the Library
database.
11. Click the Next button to continue with the wizard.
12. The Completing the Create Login Wizard screen is displayed. Click the
finish button to create the SQL Server 2000 login with the specified
information.
13. A Wizard Complete! Message box appears.
14. Click the OK button to close the message box.
15. Expand the Security Containers from the console tree and select the
Logins option. Verify that the Admin appears as the login name in the
details pane.
4.5 Creating Alert ((ALASAN)
Perform the following steps to create alerts:
1. Click Start → All Programs → Microsoft SQL Servers → Enterprise
Manager, to open the Enterprise Manager console of SQL Server 2000.
2. Expand Console Root → Microsoft SQL Servers → SQL Server
Group. Select the default instance.

Togamas Bookstore Database Management System
14
3. Expand the default instance, Select and expand the Management option,
to reach the SQL Server Agent.
4. Expand SQL Server Agent. Right-click Alerts and select New Alert
from the pop-up menu to open the New Alert Properties dialog box.
5. In the Name text box, enter Backup Database, as shown.
6. In the even alert definition section, select the 010-Information option from
the Severity drop-down list.
7. Specify the name of the database in which the error message must occur.
In this case, specify Library as the database name.
8. Click OK to close the New Alert Properties dialog box.
4.6 Creating a Permanent Backup Device
Perform the following steps to create a Permanent Backup Device:
1. Click Start → All Programs → Microsoft SQL Servers → Enterprise
Manager, to open the Enterprise Manager console of SQL Server 2000.
2. From the Console Root, expand the Microsoft SQL Server option and then
expand the SQL Server Group option.
3. Expand the SQL Server default instance option and expand the
Management option.
4. Select the Backup option and right-click the Backup option, the display the
pop-up menu.
5. From the pop-up menu, select the New Backup Device option, to open the
Backup Device Properties-New Device dialog box.
6. In the name text box of the Backup Device Properties dialog box, specify
LibraryBackupDevice as the name of the backup device. In the filename
text box, specify the backup filename as D:\Librarybackups.
7. Click the OK button to close.
JOB BACKUP SCHEDULE
RESTORE

Togamas Bookstore Database Management System
15
4.7 Create Operator using Enterprise Manager
The system Administrator of Library, wants to monitor backup operations
and their result for the database Library. The system Administrator wants to
assign this task to Walner and designate him as an SQL Server 2000 operator. To
designate Walner as an operator, the system Administrator wants to configure the
operator option in SQL server 2000. The system Administrator wants the
notifications of result of backup operations should be done through email. This is
following how to make operator with Enterprise Manager.
1. Select Start → All Programs → Microsoft SQL Servers → Enterprise
Manager, to open the Enterprise Manager console.
2. Expand Console Root → Microsoft SQL Servers → SQL Server Group
→ Default Instance → Management → SQL Server Agent container.
3. Right click the Operators container and then click the New Operator
option, to open the New Operator Properties dialog box.
4. Type Walner in the Name text box.
5. Type [email protected] in the E-mail name text box.
4.8 Creating Job for Backup
Perform the following steps to create a Job for Backup:
1. Select Start → All Programs → Microsoft SQL Servers → Enterprise
Manager, to open the Enterprise Manager console of SQL server 2000.
2. Expand Console Root → Microsoft SQL Servers → SQL Server
Group. Select the default instance and click the Run a Wizard icon on
the tool bar to open the Select Wizard dialog box.
3. Expand the Management container and select the create job wizard option.
Click the OK button to open the create job wizard dialog box
4. The welcome to the create job wizard screen appears. Then click Next
5. Verify that Transact-SQL command option is selected from the Select
job command type
6. Click the Next button to open the Enter Transact-SQL Statement screen.
Select the Library database from the Database Name drop-down list.

Togamas Bookstore Database Management System
16
7. In the Transact SQL statement text area, write the following Transact-
SQL statement:
8. Click the Next, then in the Specify job schedule screen, select on a
recurring basis option, as shown.
9. Click the Schedule button to open the Edit Recurring Job Schedule dialog
box.
10. Verify that Weekly option is selected from the Occurs section.
11. Select Mon option from the Weekly section. Deselect Sun from the
Weekly section.
12. Select Occurs once at from the Daily frequency section and set the time as
8:30:00 PM in the drop-down list.
13. Set Start date as 11/07/2008 in the Start date drop-down list of Duration
section, as shown.
14. Click the OK button to close the Edit Recurring Job Schedule dialog box
15. Click the Next button to continue with the Create a Job Wizard.
Assign operator to notify backup operation
1. In the Job Notifications screen, select Walner from the E-mail drop-
down list, as shown.
2. Click the next OK button to continue with the wizard.
3. Enter Backup of Customer Database in the Job name text box of
Completing the Create Job Wizard
4. Click the Finish button to create the job. The job was created
successfully message box appears
5. Click the OK button to close the message box.
Togamas Bookstore Database Management System
17
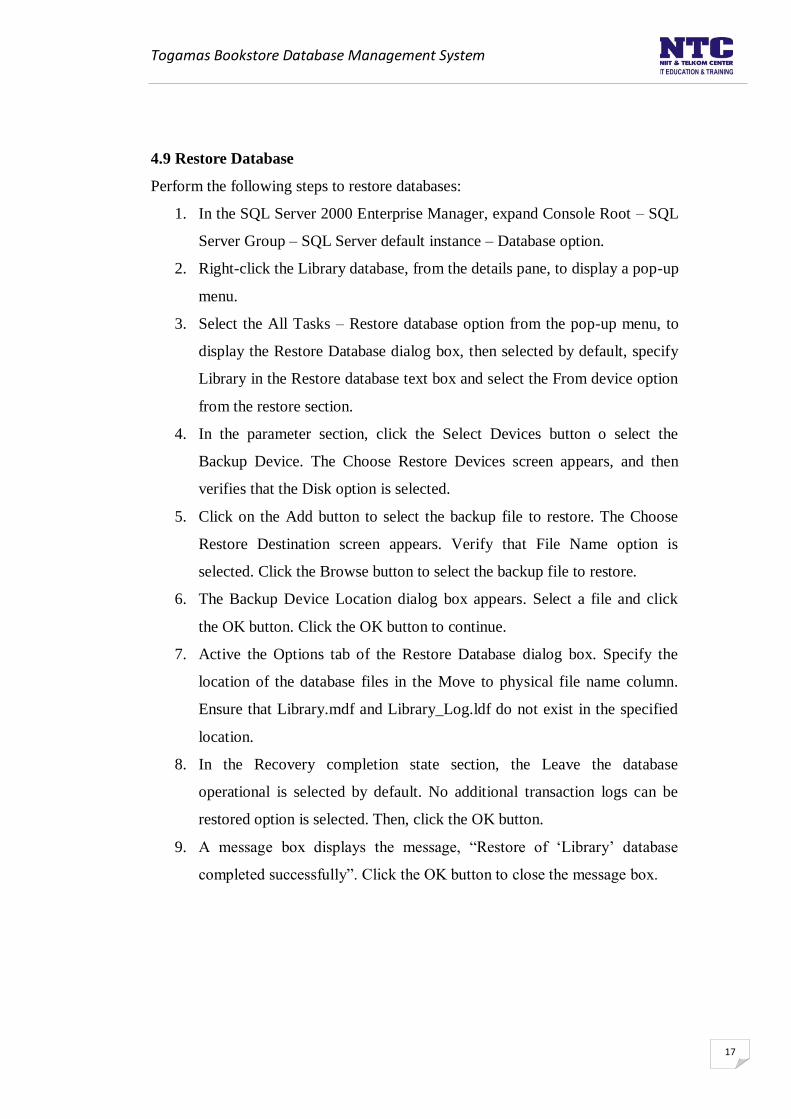
4.9 Restore Database
Perform the following steps to restore databases:
1. In the SQL Server 2000 Enterprise Manager, expand Console Root – SQL
Server Group – SQL Server default instance – Database option.
2. Right-click the Library database, from the details pane, to display a pop-up
menu.
3. Select the All Tasks – Restore database option from the pop-up menu, to
display the Restore Database dialog box, then selected by default, specify
Library in the Restore database text box and select the From device option
from the restore section.
4. In the parameter section, click the Select Devices button o select the
Backup Device. The Choose Restore Devices screen appears, and then
verifies that the Disk option is selected.
5. Click on the Add button to select the backup file to restore. The Choose
Restore Destination screen appears. Verify that File Name option is
selected. Click the Browse button to select the backup file to restore.
6. The Backup Device Location dialog box appears. Select a file and click
the OK button. Click the OK button to continue.
7. Active the Options tab of the Restore Database dialog box. Specify the
location of the database files in the Move to physical file name column.
Ensure that Library.mdf and Library_Log.ldf do not exist in the specified
location.
8. In the Recovery completion state section, the Leave the database
operational is selected by default. No additional transaction logs can be
restored option is selected. Then, click the OK button.
9. A message box displays the message, “Restore of „Library‟ database
completed successfully”. Click the OK button to close the message box.

Togamas Bookstore Database Management System
18
4.10 Create Trace (MONITOR PERFORMANSI DB TIAP HARI DI
UPDATE TIAP HARI)
Perform the following steps to trace databases:
1. Select Start - All Programs - Microsoft SQL Server - Profiler to open
the Profiler as shown.
2. Choose File – New - Trace to open Trace Properties dialog box. This
will display the Connect to SQL Server dialog box.
3. Enter a dot symbol (.) in the SQL Server drop down list to connect to the
default instance of SQL Server 2000. Select the Windows Authentication
option to connect to the SQL Server 2000 instance as shown.
4. Click the OK button to close Connect to SQL Server dialog box and
open the Trace Properties dialog box.
5. In the Trace Properties dialog box, write Performance in the Trace
Name text box as shown.
6. Select Save to file to save the trace results into a file. Click the folder
button placed alongside the Save to file checkbox, to open the Save As
dialog box.
7. To specify a name for the trace file, locate C: drive and enter
Performance.trc in the File name text box of Save As dialog box.
8. Click the Save button to close the Save As dialog box.
9. In the Trace Properties dialog box, click the Run button to start the trace.
4.11 Create Shrink Database (MEMPERKECIL DISK SPACE DI DB)
To shrink the database Library using the SQL Server 2000 Enterprise
Manager, perform the following steps:
1. Open SQL Server Enterprise Manager. The Microsoft SQL Servers
Console Tree is displayed.
2. Expand the Microsoft SQL Server option, and then expand the Microsoft
Server Group option.
3. Expand the SQL Server Instance option to display a tree structure.
Expand the Database option.

Togamas Bookstore Database Management System
19
4. Select the databases that you want to shrink and right-click on the selected
database. A popup menu is displayed.
5. Select All Task → Shrink Database from the pop-up menu to open the
Shrink Database dialog box as shown.
6. The Schedule check list the Shrink the database based on the this
schedule, write Occurs every 1 week(s) on Sunday, at 1:22:00 PM.
7. Click the Ok button to close the Shrink database dialog box.
4.12 Rebuilding Indexes
Indexes are rebuilt to repair the corrupt indexes. We use the DBCC
DBREINDEX statement to repair the corrupt indexes.
Perform the following steps to create rebuilding indexes:
Use Library
DBCC DBREINDEX ('Library.dbo.Book','', 40)
LINKED SERVER
DB ROLE (CREATE,MODIFY, DLL)
USER RIGHT
REPLIKASI?
Togamas Bookstore Database Management System
20
CHAPTER 5
CLOSING
5.1 Conclusion
1. By Using SQL Server 2000 as database, hence can improve the
performance and easily in managing of data.
2. By Using DTS, stripper data kept in file like MS Excel can in keeping and
in transformation to SQL Server 2000.
3. With making Login, Role and Permission at SQL Server can limit user in
doing actions in the database.
4. SQL Server also give task Alerts to provide notification for events such as
user-define error and describing the performance condition, and also to
execute jobs in response to specific events.
5. SQL Server give Backup operation as a precautionary to prevent data lost
that stored at other location.
5.2 Suggestion
For next project, writer suggests if using two different databases, for
example MS Access and SQL Server 2000, so better apply replication process to
synchronize the data.

Togamas Bookstore Database Management System
21
BIBLIOGRAPHY
[1] NIIT, Administring and Troubleshooting SQL Server 2000, printed at
Sona Printers Pvt. Ltd, New Delhi, 2008.
[2] NIIT, Administring Database and Information Exchage in SQL
Server 2000, printed at Sona Printers Pvt. Ltd, New Delhi, 2008.
[3] NIIT, Project and Reference Reading Guide, printed at Sona Printers
Pvt. Ltd, New Delhi, 2008.
.


![Database Management System [DBMS] Tutoriallibvolume2.xyz/.../designofdbms/designofdbmstutorial2.pdf · Database Management System [DBMS] Tutorial ... A database management system](https://img.pdfslide.us/doc/110x75/5a9482c27f8b9ab6188bda5a/database-management-system-dbms-management-system-dbms-tutorial-a-database.jpg)