Embed Size (px)
Citation preview

To EXPORT video from Final Cut Pro X: The settings and directions that follow provide you with an overview of how to export video in a variety of functionalities. The EASIEST way to export video is the method described on THIS page. However, please note that sometimes it is best to use the COMPRESSOR settings (explained below), especially if you want to save your video in a YouTube/iPod (low-res) format because you can save the video at even smaller image size, which translates to smaller file sizes. But if you want to keep it simple (even though it might take you longer to export the video), you can use this method: After completing your video, in FINAL CUT PRO X…. First, make sure that you are in the TIMELINE window. If you’re not, the menu boxes that you’ll need to “share” your video will be grayed out. Go to FILE and then to SHARE. Then to MASTER FILE.
Once you click on SETTINGS, you will then see a menu that allows you to select many different formats for your video. Select the that is best for you. Small format, for the smallest video size: FORMAT: Web Hosting. VIDEO CODEC: H.264 Faster Encode RESOLUTION: 842X480 (Rest of stuff doesn’t matter). NOTE that you can get even smaller file size by using the method described for “LOW-RES” video exporting. High-Res: FORMAT: Video and Audio VIDEO CODEC: Apple Pro-Res 422 RESOLUTION: Whatever your video is shot at will show under “Resolution.” (Rest of the stuff doesn’t matter.)

To EXPORT video from Final Cut Pro X to be Placed on YouTube (LOW-RES): After completing your video, in FINAL CUT PRO X…. First, make sure that you are in the TIMELINE window. If you’re not, the menu boxes that you’ll need to “share” your video will be grayed out. Go to FILE and then to SHARE. If you want to output AND upload directly to YouTube, click on “YouTube.” Then click on SETTINGS. Make sure that you use the LOWEST Resolution (SD 480p [632x360]), which will allow for you to upload the video faster. Then click on SIGN IN. Click on NEXT (bottom right). When the next menu pops up, click on PUBLISH. Type in the YouTube account and password.
To check your video, go to the class YouTube site and sign in. You can then click next to “Upload,” to pull down the drop-down menu to see Video Manager. You should see your video starting to process (about 30 seconds or so after you finish the process in FCPX.
Clic
Clic

If you would prefer making a low-res version of your video and NOT upload it to YouTube (at least initially) – so that you could copy it to your iPod or iPhone – then…. Go to FILE and then to SHARE. Then, go to ADD DESTINATION.
Once you see the menu (on the right) appear, double-click on COMPRESSOR SETTINGS. You will get this menu. Select the APPLE folder. Then scroll to the PODCASTING folder. Open it up. Select H.264 for Video Podcasting.

This will add a NEW DESTINATION TO the list in the SHARE.
Then go back to FILE > SHARE > H.265 for Video Podcasting, Click on NEXT, give your file a new name, and then save it to your desktop or to a folder on your desktop. After the video has been made, upload it to the class YouTube account so that we all can view it.

To EXPORT video from Final Cut Pro X to be made into a DVD (HIGH-RES): To get a high-resolution, high-definition version of your video…. Go to FILE and then to SHARE. Then, go to ADD DESTINATION.
Once you see the menu (on the right) appear, double-click on COMPRESSOR SETTINGS. You will get this menu. Select the APPLE folder. Then scroll to the ProRES folder. Open it up. Click on the FIRST setting – Apple ProRes 422.
Do not use the other Apple ProRes 422 settings (HQ, Proxy). Use the FIRST ONE.

This will add a NEW DESTINATION TO the list in the SHARE.
Then go back to FILE > SHARE > Apple Pro-Res.
Click on NEXT, give your file a new name, and then save it to your desktop or to a folder on your desktop.
Then click “Next” on bottom right.
This will create a .MOV file of a HUGE size. For example, I created a 2:45 video, and it was almost 6 GIGABYTES. However, it took very little time to process — only 13 minutes.

Give your file a name – PREFERABLY WITH YOUR NAME IN THE FILE NAME – and save it to the desktop. After the video has been made, insert the finished video into iDVD to make a DVD.
To EXPORT video from Final Cut Pro X to make a STILL FRAME: To export just one frame of video (as if you were going to use one frame for a video DVD menu)…. Go to FILE and then to SHARE. Then, go to ADD DESTINATION.
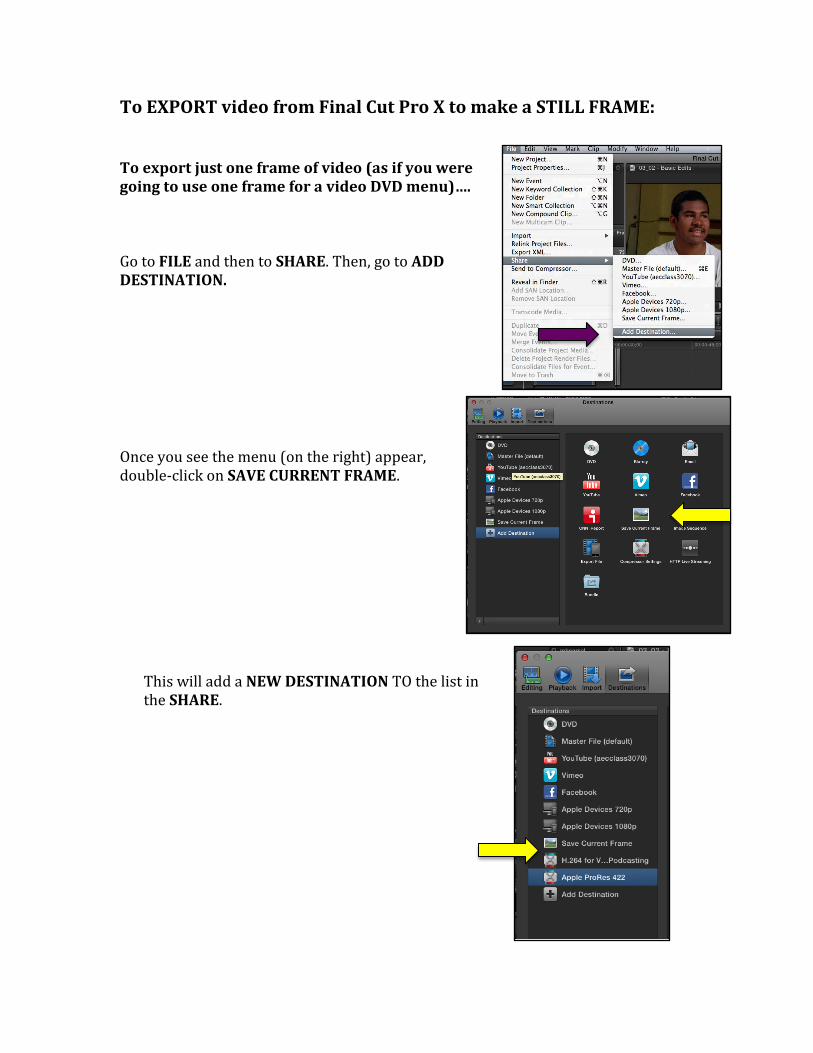
Once you see the menu (on the right) appear, double-click on SAVE CURRENT FRAME.
This will add a NEW DESTINATION TO the list in the SHARE.

Place your cursor on the image in the TIMELINE that you want to create a frame from. Then go back to FILE > SHARE > SAVE CURRENT FRAME. Choose SETTINGS to create the image as a JPG. Then click “Next” on bottom right.
Give your file a name, and save it to the desktop. You can use this image for a DROP ZONE in iDVD.


![New shoes video [autosaved] final cut](https://img.pdfslide.us/doc/110x75/55b7e7b3bb61eb516b8b4591/new-shoes-video-autosaved-final-cut.jpg)