Embed Size (px)
Citation preview

2E
2E
ii
To ensure long, trouble-free operation, please read this manual carefully.
Precautions
LocationUsing the unit in the following locations can result in a mal-function.
• In direct sunlight• Locations of extreme temperature or humidity• Excessively dusty or dirty locations• Locations of excessive vibration
Power supply Please connect the designated AC/AC power supply to an AC outlet of the correct voltage. Do not connect it to an AC outlet of voltage other than that for which your unit is intended.The AC/AC power supply will produce a certain amount of heat during operation, but this is not a malfunction. When power is connected, place it in a well ventilated location, and avoid placing it on a plastic object or where heat buildup might occur.
Interference with other electrical devicesThis product contains a microcomputer. Radios and televi-sions placed nearby may experience reception interference. Operate this unit at a suitable distance from radios and tele-visions.
HandlingTo avoid breakage, do not apply excessive force to the switches or controls.
CareIf the exterior becomes dirty, wipe it with a clean, dry cloth. Do not use liquid cleaners such as benzene or thinner, or cleaning compounds or flammable polishes.
Keep this manualAfter reading this manual, please keep it for later reference.
Keeping foreign matter out of your equipment• Never set any container with liquid in it near this equip-
ment. If liquid gets into the equipment, it could cause a breakdown, fire, or electrical shock.
• Be careful not to let metal objects get into the equip-ment. If something does slip into the equipment, unplug the AC/AC power supply from the wall outlet. Then con-tact your nearest Korg dealer or the store where the equipment was purchased.
Data handlingUnforeseen malfunctions can result in the loss of mem-ory contents. Please be sure to save important data on an external data filer (storage device). Korg can accept no responsibility for any loss or damage which you may incur as a result of data loss.
THE FCC REGULATION WARNING (for U.S.A.)This equipment has been tested and found to comply with the limits for a Class B digital device, pursuant to Part 15 of the FCC Rules. These limits are designed to provide reason-able protection against harmful interference in a residential installation. This equipment generates, uses, and can radiate radio frequency energy and, if not installed and used in accordance with the instructions, may cause harmful interfer-ence to radio communications. However, there is no guaran-tee that interference will not occur in a particular installation. If this equipment does cause harmful interference to radio or television reception, which can be determined by turning the equipment off and on, the user is encouraged to try to correct the interference by one or more of the following measures:• Reorient or relocate the receiving antenna.• Increase the separation between the equipment and
receiver.• Connect the equipment into an outlet on a circuit different
from that to which the receiver is connected.• Consult the dealer or an experienced radio/TV technician
for help.Unauthorized changes or modification to this system can void the user’s authority to operate this equipment.
CE mark for European Harmonized StandardsCE mark which is attached to our company’s products of AC mains operated apparatus until December 31, 1996 means it conforms to EMC Directive (89/336/EEC) and CE mark Directive (93/68/EEC).And, CE mark which is attached after January 1, 1997 means it conforms to EMC Directive (89/336/EEC), CE mark Directive (93/68/EEC) and Low Voltage Directive (73/23/EEC).Also, CE mark which is attached to our company’s products of Battery operated apparatus means it conforms to EMC Directive (89/336/EEC) and CE mark Directive (93/68/EEC).
Table of Contents
Introduction.................................................................... 71. Before you begin .................................................................... 7
Check the included items............................................................................. 7
2. How to use this manual .......................................................... 7Printing conventions in this manual .............................................................. 7
3. Main features......................................................................... 84. Panel layouts........................................................................ 10
Front panel .............................................................................................. 10Rear panel ............................................................................................... 11Operating panel....................................................................................... 12
Preparations for playing ............................................... 131. Before you turn on the power ............................................... 13
Connections ............................................................................................. 13When using headphones .......................................................................... 13Using the music stand ............................................................................... 14Turning the power on................................................................................ 14Adjusting the volume ................................................................................ 14
Basic operation............................................................. 151. LCD screen ........................................................................... 15
Items in the LCD screen ............................................................................. 15LCD screen contrast .................................................................................. 15Using the LCD screen ................................................................................ 15The main page ......................................................................................... 16
2. Operating panel................................................................... 163. Help function........................................................................ 17
Demo playback ............................................................ 191. Listening to the demo............................................................ 19
To listen to the demo songs........................................................................ 19
2. Practicing along with a demo song........................................ 21Practicing right hand and left hand separately ............................................ 21Changing the tempo of the demo playback................................................. 21
Playing the SP-500 ....................................................... 231. Playing a sound ................................................................... 23
Turing the power on ................................................................................. 23Adjusting the volume ................................................................................ 23
2. Selecting sounds................................................................... 24Changing sounds ..................................................................................... 24Selecting percussion instrument sounds....................................................... 25Selecting sounds from the [USER] program group ....................................... 25
3
4
3. Combining sounds ................................................................ 26Layer function (play two sounds together) ................................................... 26Selecting different sounds for the lower and upper ranges of the keyboard (the Split function)..................................................................................... 27Playing the SP-500 as a piano (PLAY PIANO mode) ................................... 28
4. Applying effects to a sound................................................... 29Adding Reverb to the sound ...................................................................... 29Adding Chorus or other modulation effects to the sound .............................. 30
5. Playing along with the metronome ........................................ 31Starting the metronome............................................................................. 31Adjusting the tempo.................................................................................. 32
6. Using pedals ........................................................................ 337. Changing the touch response of the keyboard ....................... 348. Using the [USER] program group........................................... 34
Collecting favorite sounds into a [USER] program group.............................. 34Changing the program name .................................................................... 35
Automatic accompaniment ............................................ 371. Performing with automatic accompaniment ........................... 37
Using automatic accompaniment ............................................................... 37Adjusting the tempo.................................................................................. 39Adjusting the overall volume...................................................................... 40Adjusting the volume of individual parts ..................................................... 40Muting a part........................................................................................... 40
2. Various automatic accompaniment functions.......................... 41Selecting how you will start and stop automatic accompaniment .................. 41Changing how you specify the chords ........................................................ 42Performing with an ensemble..................................................................... 42To change the variation ............................................................................ 43Adding an intro ....................................................................................... 43Adding an ending .................................................................................... 44Adding a fill............................................................................................. 44Selecting the most appropriate program for a Rhythm Style ......................... 44Reducing the number of parts in the accompaniment................................... 45
3. Using the [USER] rhythm style group...................................... 45Collecting your favorite styles in the [USER] rhythm style group .................... 45
4. Creating a custom rhythm style ............................................. 46Customizing a rhythm style........................................................................ 46Custom style parameter list ........................................................................ 47
Recording..................................................................... 491. Recording your performance................................................. 49
Basic recording (Realtime Recording) ......................................................... 49Recording with automatic accompaniment.................................................. 51Loading performance data that you recorded ............................................. 51
2. Various recording methods ................................................... 53Using Quantize while you record............................................................... 53Multitrack recording ................................................................................. 53Recording from the middle of the song ....................................................... 54Auto punch-in/out.................................................................................... 54

Recording the automatic accompaniment without performing (Step Recording)....................................................................................... 55Let’s use step recording to input chords ...................................................... 56
3. Editing functions ................................................................... 57Editing previously-saved data .................................................................... 57
Functions...................................................................... 631. Adjusting the pitch................................................................ 63
Fine adjustments to the pitch...................................................................... 63Changing the key (Transposing)................................................................. 63Changing the octave................................................................................. 64
2. Selecting a temperament....................................................... 64Selecting a temperament ........................................................................... 65Creating your own temperament................................................................ 65
3. Using the pedals................................................................... 66Damper pedal settings for Layer and Split .................................................. 66Specifying the function of the assignable switch .......................................... 66
4. All setup............................................................................... 67To store these settings into internal memory ................................................ 67
5. Convenient functions............................................................. 68Adjusting the left/right balance ................................................................. 68Adjusting the display time of a popup screen.............................................. 68
Connecting other equipment.......................................... 691. Connecting MIDI equipment69
What is MIDI? .......................................................................................... 69MIDI connections ...................................................................................... 69MIDI channel settings ................................................................................ 69Using the SP-500 as a multi-timbral tone generator..................................... 70Local on/off setting................................................................................... 70Synchronizing to an external sequencer ..................................................... 71MIDI Transpose ........................................................................................ 71MIDI Filter ................................................................................................ 71
Appendices .................................................................. 73Troubleshooting......................................................................... 73Specifications ............................................................................ 74Program list .............................................................................. 75Rhythm style list ........................................................................ 78Drum kits list ............................................................................. 81Demo songs list ......................................................................... 83List of detected chords ............................................................... 84MIDI Implementation Chart ........................................................ 86
Index ........................................................................... 87
5

6

ctio
n
IntroductionIntr
odu
Thank you for purchasing the Korg SP-500 digital piano.In order to enjoy this instrument to its fullest potential, please read this owner’s manual care-fully and use the instrument as directed.
1. Before you beginPlease read the sections entitled “Precautions” on p.ii of this manual.
Check the included itemsPlease make sure that the following items were included with the SP-500.• “Owner’s manual” (the book you are reading)• AC/AC power supply• Pedal• Music stand
2. How to use this manual
Printing conventions in this manual☞ p.■■ : This indicates a page to which you can refer.
, : These symbols respectively indicate points of caution and advice.
Panel: […] switch, dial, […] slider: The names enclosed by [square brackets] are printed on the front panel. Operate the corresponding item.
LCD screen: “…” cell, “…” button: The names enclosed by double quotation marks appear in the LCD screen, and you can operate the corresponding cell, button, check box, or radio button that is displayed.
A check box is considered to be “on” when it is displayed as an outlined box; a check box that is filled in is considered to be “off.”
If you select “English” as the language for the Help function, the display will be entirely in English. If you select “Japanese,” some of the display will not be in Japa-nese.
*LCD screen display: The parameter values etc. shown in the screens printed in this manual are only examples for explanatory purposes, and may not necessarily match the screens that appear on your instrument.
7

8
3. Main features
Grand piano-like touchThe SP-500 features an RH2 (Real Weighted Hammer Action 2) keyboard, which pro-vides a differing key weight in each of four keyboard ranges, just as on a grand piano.
Diverse soundsUse the keyboard to play 412 different sounds (including 16 drum kits) produced by Korg’s proprietary stereo sampling system. You can use the Layer function to play two sounds simultaneously, or the Split function to divide the keyboard and play two different sounds in separate ranges.
Versatile rhythm stylesThe automatic accompaniment styles include various rhythm styles from all around the world. You can enjoy adding the musical flavors of different countries to your play-ing.
EffectsTwo digital effect processors (37 effect types) are built-in, letting you add reverberation to create the impression of playing in a concert hall, or apply chorus to create fuller sounds.
Pedal effectsThe Damper pedal jack allows connection of a damper pedal, indispensable for piano performance, and a Assignable Switch jack allows you to connect a soft pedal or other switch. If a separately sold DS-1H damper pedal is connected, you can take advantage of the half-pedal function that adjusts the amount of effect by the depth to which you press the pedal.
MetronomeThe included metronome is available at the touch of a switch. The volume is also adjustable.
RecorderThe built-in recorder is as easy to use as a tape recorder. Since you can record five tracks in addition to the keyboard, you can even input small chamber ensembles or band scores.Of course you can record the automatic accompaniment by itself if desired.Internal memory can store up to 100 songs, which are preserved even when the power is turned off.
Step recordingThe step recording function lets you record an automatic accompaniment by inputting chords and panel operations one by one.This function makes it easy to record an accompaniment from sheet music with chord symbols even if you are not a skilled pianist.

Intr
oduc
tion
Touch controlPlaying touch is a vital aspect of a piano’s response, and you can choose from six differ-ent touch settings. This allows the SP-500 to be played by anyone from children (who tend to have a lighter touch) to experienced pianists.You can also select a setting in which playing dynamics will have no effect on the sound – ideal for playing organ sounds etc..
TemperamentsYou can use ten different temperaments, including classical temperaments and tunings used in ethnic music. Four user scales can also be created.
Pitch adjustment (Transpose)The Transpose function makes it easy to change the key (pitch) of your performance to match another instrument or vocal range.
MIDIMIDI connectors allow you to connect a computer or another MIDI device.This allows you to record your playing to a computer with music software.
Touch-View LCD screenThe 64 · 240 pixel LCD graphic display makes operation intuitive and easy.Selections shown in the LCD screen can be operated simply by touching them.
9

10
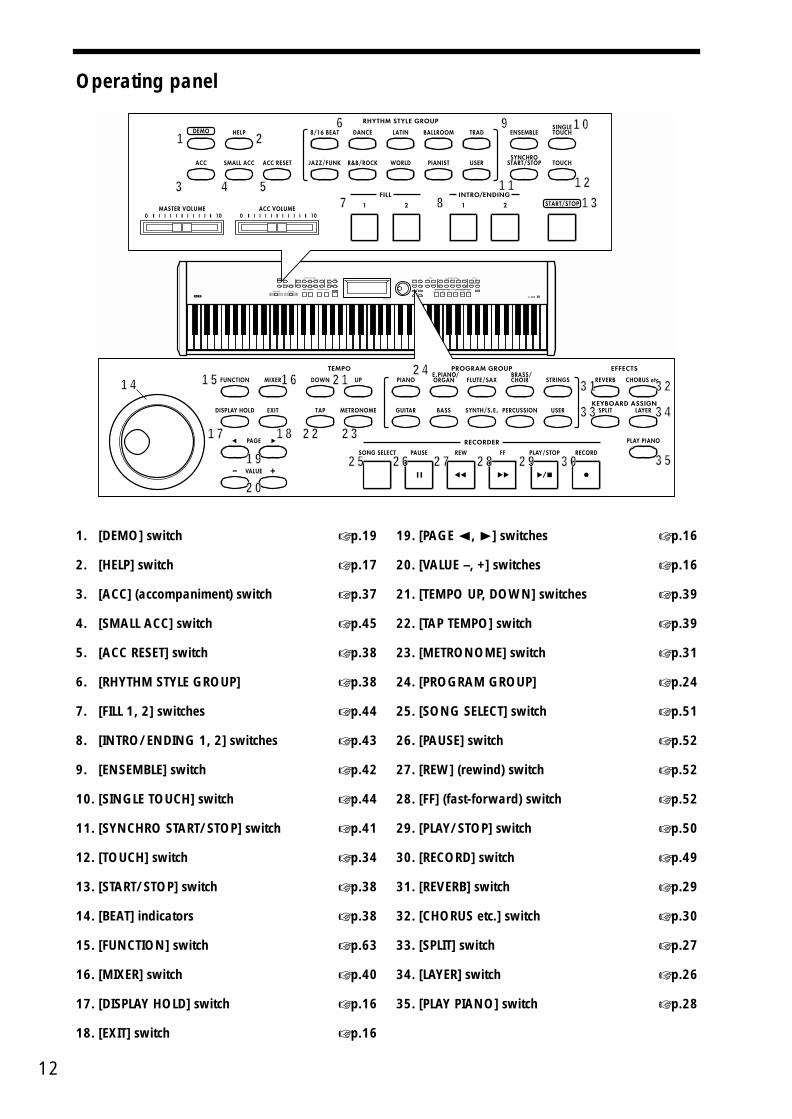
4. Panel layouts
Front panel
1. Operating panelFor the names of each switch, refer to p.12 “Operating panel.”
2. [ACC VOLUME] (accompaniment volume) sliderWhen using automatic accompaniment or when playing the demo songs, this slider adjusts the volume of the sounds that are not being played from the keyboard. If this slider is set to 0, there will be no sound other than from the keyboard.
3. [MASTER VOLUME] sliderThis adjusts the overall volume that is pro-duced from the headphone jacks and output jacks. (☞ p.14)
4. Headphone jacksStereo headphones can be connected to these jacks. Two pairs of headphones can be con-nected simultaneously. If using commercially-available headphones, use stereo headphones with a mini-plug (1/8 inch) connector. (☞ p.13)
5. Screen with touch switch (☞ p.15)
6. Dial (☞ p.16)
12
3
4
5
6
C1[24] C2[36] C4[60]C3[48] C5[72] C6[84] C7[96] C8[108]
[ ]:MIDI note No.
4

Intr
oduc
tion
Rear panel
1. AC 9V connectorConnect the included AC/AC power supply here. (☞ p.14)
2. [POWER] switchThis switch turns the power on or off. Each time you press it, the power will be switched on or off. (☞ p.14)
3. ASSIGNABLE SWITCH jackThe included pedal or a separately sold DS-1H damper pedal can be connected here. (☞ p.13, 33, 66)
4. DAMPER (pedal) jackThe included pedal or a separately sold DS-1H damper pedal can be connected here. (☞ p.13, 33, 66)
5. OUTPUT jacksThese jacks can be connected to the input jacks of an audio devise to output the sound, or to a tape recorder to record your performance. Use the [MASTER VOLUME] slider of the SP-500 to adjust the volume.When making connections in stereo, use the L/MONO jack and the R jack. When making con-nections in mono, use only the L/MONO jack. Use cables with 1/4 inch monaural phone plugs.
6. INPUT jackThe output jack of a CD player or other audio device can be connected to this jack, so that its sound can be heard through the SP-500’s head-phones. Use the controls of the connected audio device to adjust the volume.Use a stereo mini-plug (1/8 inch) cable.
7. [MIDI] connectorsThese connectors can be connected to other MIDI devices such as a synthesizer, sequencer, or rhythm machine, so that data can be exchanged with these devices.☞ p.69 “1. Connecting MIDI equipment”
8. ContrastThis adjusts the contrast of the screen. (☞ p.15)
9. Holes for attaching the music stand (☞ p.14)Attach the included music stand using these two holes.
5678 4 23 1
9
11
12
Operating panel
1. [DEMO] switch ☞ p.19
2. [HELP] switch ☞ p.17
3. [ACC] (accompaniment) switch ☞ p.37
4. [SMALL ACC] switch ☞ p.45
5. [ACC RESET] switch ☞ p.38
6. [RHYTHM STYLE GROUP] ☞ p.38
7. [FILL 1, 2] switches ☞ p.44
8. [INTRO/ENDING 1, 2] switches ☞ p.43
9. [ENSEMBLE] switch ☞ p.42
10. [SINGLE TOUCH] switch ☞ p.44
11. [SYNCHRO START/STOP] switch ☞ p.41
12. [TOUCH] switch ☞ p.34
13. [START/STOP] switch ☞ p.38
14. [BEAT] indicators ☞ p.38
15. [FUNCTION] switch ☞ p.63
16. [MIXER] switch ☞ p.40
17. [DISPLAY HOLD] switch ☞ p.16
18. [EXIT] switch ☞ p.16
19. [PAGE √, ®] switches ☞ p.16
20. [VALUE –, +] switches ☞ p.16
21. [TEMPO UP, DOWN] switches ☞ p.39
22. [TAP TEMPO] switch ☞ p.39
23. [METRONOME] switch ☞ p.31
24. [PROGRAM GROUP] ☞ p.24
25. [SONG SELECT] switch ☞ p.51
26. [PAUSE] switch ☞ p.52
27. [REW] (rewind) switch ☞ p.52
28. [FF] (fast-forward) switch ☞ p.52
29. [PLAY/STOP] switch ☞ p.50
30. [RECORD] switch ☞ p.49
31. [REVERB] switch ☞ p.29
32. [CHORUS etc.] switch ☞ p.30
33. [SPLIT] switch ☞ p.27
34. [LAYER] switch ☞ p.26
35. [PLAY PIANO] switch ☞ p.28
1 2
3 4 57 8 1313
101096
1111 1212
1414 1515 1616
1717
1919
2020
1818
2121
2222 2323
2424
2525
3131 3232
3333 3434
353530302929282827272626

ctio
n
Preparations for playingIntr
odu
1. Before you turn on the powerBefore you turn on the power, connect the included pedal and your powered monitor speaker/audio system (sold separately).
Connections
When using headphonesConnect the plug (stereo mini plug) of your headphones to one of the headphone jacks located at the front left of the instrument. Since there are two headphone jacks, two people can enjoy the performance at the same time.
When using headphones, protect your hearing by avoiding long periods of use at high volume.
AUX INL R
OUTPUTL R
DAMPER
~AC9V
STEREOINPUT
ASSIGNABLESWITCH
Audio system
CD, MD, etc.
Headphone
Stereo mini plug
13

14
Using the music standTo use the music stand, insert it into the two holes located on the rear panel.
Turning the power on
1 Connect the AC/AC power supplyInsert the round connector of the AC/AC power adaptor into the AC9V jack located on the rear of the SP-500.Connect the plug of the AC/AC power supply to an electrical outlet.
The [POWER] switch of the SP-500 must be off when you connect the AC/AC power supply. Also, you must connect the power supply to the rear panel AC9V jack before you connect it to the electrical outlet.
You must use only the included AC/AC power supply. Make sure that your electrical outlet is supplying the correct voltage for your SP-500.
2 Turn on the powerPress the [POWER] switch located on the rear panel. When you turn on the power, the panel indicators will light, and the startup screen will appear.
Turning the power offPress the [POWER] switch once again. When the power is turned off, the panel indica-tors will all go dark.
If you turn off the power while data is being written, the memory contents may be damaged. If the memory contents are damaged, the user rhythm styles, user programs, and All Setup data will automatically return to their factory-set condition the next time the power is turned on. If part of the recorded data has also been damaged, all of the recorded data will return to the factory-set condition.
Adjusting the volumeUse the [MASTER VOLUME] slider to adjust the volume of the head-phone jacks and rear panel [OUTPUT] jacks.Raise the [MASTER VOLUME] slider to the middle position. Moving the slider toward the right will increase the volume, and moving it toward the left will decrease the volume. At a position of “0” there will be no sound.While actually playing the instrument, adjust the volume to an appropriate level.
~ A C 9 V
Softer Louder

ctio
n
Basic operationIntr
odu
1. LCD screen
Items in the LCD screenThe LCD screen of the SP-500 features the Touch View system that uses a one touch-panel.By directly touching buttons or cells (referred to as “objects”) that are displayed in the LCD screen, you can directly select pages, set values, move a selected region, or modify a setting.
Cells (rectangular frames with rounded corners):When you press a cell, it will be highlighted. Now you can use the dial or the [VALUE] switches to change its value. If the cell has “▲” “▼” symbols, you can press these “▲” “▼” symbols to change the value of the cell.
Buttons (rectangular frames): By pressing a button, you can execute the operation of that button, or open a page. If the button has “▲” “▼” symbols, you can press the “▲” “▼” symbols to modify the value of the corresponding cell.
Check boxes: Each time you select a check box, its setting will be made.When on, the box will be displayed as solid.
Radio buttons: Radio buttons are used to select one of multiple choices. When you press a button, the corresponding choice will be selected.
LCD screen contrastAdjust the contrast of the screen by turning the [CONTRAST] knob on the rear panel.
Using the LCD screenThe objects displayed in the LCD screen can be chosen with a light touch of the finger tip.If they are pressed with excessive force, they may fail to respond, or the screen may malfunction.If a displayed object is shown in gray, it is not possible to select that object.
To avoid damaging the LCD screen, you must observe the following cautions.
• Never press or rub the LCD screen with a pointed or hard object such as a mechan-ical pencil.
• Never scrape the edge of the LCD screen with a pen or fingernail, etc.
15
16
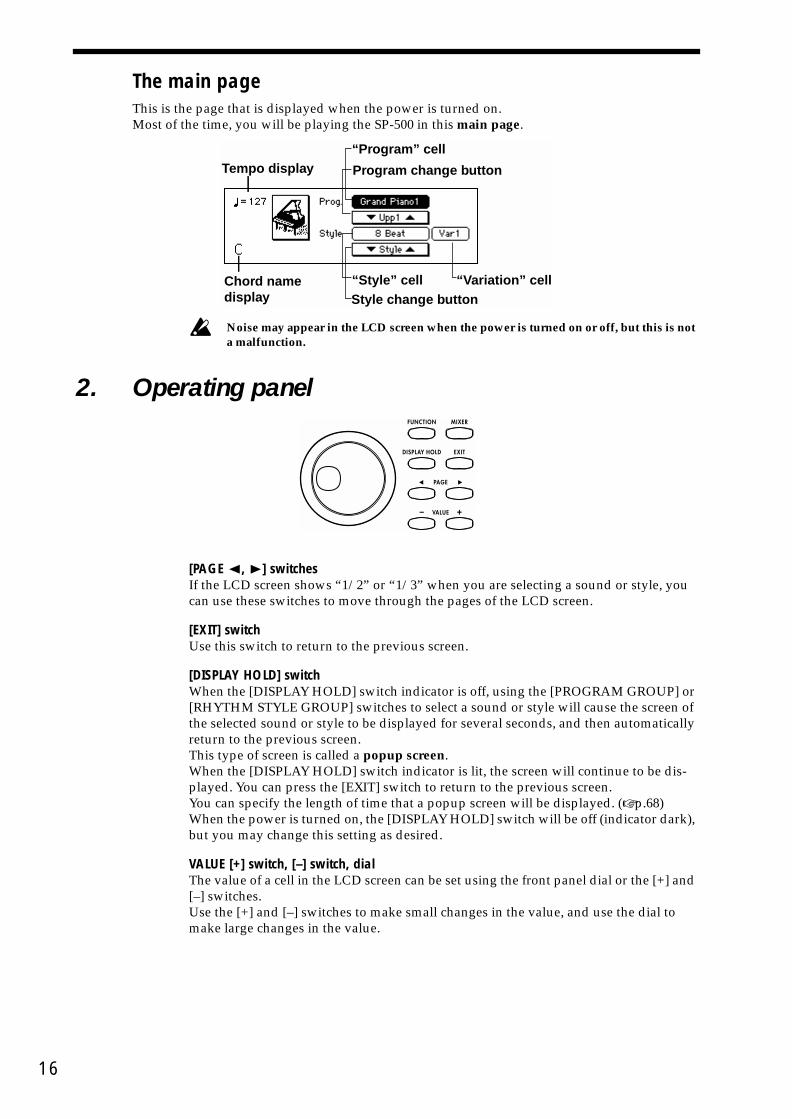
The main pageThis is the page that is displayed when the power is turned on.Most of the time, you will be playing the SP-500 in this main page.
Noise may appear in the LCD screen when the power is turned on or off, but this is not a malfunction.
2. Operating panel
[PAGE √, ®] switchesIf the LCD screen shows “1/2” or “1/3” when you are selecting a sound or style, you can use these switches to move through the pages of the LCD screen.
[EXIT] switchUse this switch to return to the previous screen.
[DISPLAY HOLD] switchWhen the [DISPLAY HOLD] switch indicator is off, using the [PROGRAM GROUP] or [RHYTHM STYLE GROUP] switches to select a sound or style will cause the screen of the selected sound or style to be displayed for several seconds, and then automatically return to the previous screen.This type of screen is called a popup screen.When the [DISPLAY HOLD] switch indicator is lit, the screen will continue to be dis-played. You can press the [EXIT] switch to return to the previous screen.You can specify the length of time that a popup screen will be displayed. (☞ p.68)When the power is turned on, the [DISPLAY HOLD] switch will be off (indicator dark), but you may change this setting as desired.
VALUE [+] switch, [–] switch, dialThe value of a cell in the LCD screen can be set using the front panel dial or the [+] and [–] switches.Use the [+] and [–] switches to make small changes in the value, and use the dial to make large changes in the value.
Tempo display
Chord name display
“Style” cell
“Program” cell
Program change button
Style change button“Variation” cell

Intr
oduc
tion
3. Help functionBy using the Help function, you can view a simple explanation of the SP-500’s functions in the LCD screen.
1 Press the [HELP] switchThe [HELP] switch indicator will light, and the LCD screen will show a list of the Help items.
2 Select the language for displayThe contents of Help can be displayed in either English or Japanese. To display in English, press the “English” radio button. To display in Japanese, press the “Japanese” radio button.
To change the LCD screen for items other than HelpYou can use the same procedure to select either English display or Japanese display for items other than the Help screens, such as program names and some button names.
Never turn off the power while this is being switched.
3 Select the itemPress a button in the LCD screen for the desired explanation.
Symbols in the screens[ ] indicates switches on the panel.“ ” indicates buttons in the screen.“>>” is the first page of Help.“<<” is the last page of Help.“ ” means that further pages are available.“[ ]:ON” means that you should press the switch to turn on the indicator.“[ ]:OFF” means that you should press the switch to turn off the indicator.
Introduction Help screen operations and easy functions
Demo Listening to the demo
Program Changing sounds
Style Changing the rhythm style
Accompaniment Using automatic accompaniment
Recording Recording
Function List the various [FUNCTION] pages
17

18
4 Move through the pagesPress the [PAGE ®] switch to advance to the next page.Press the [PAGE √] switch to return to the previous page.
To view another itemPress the [EXIT] switch. You will return to the list of Help items.
5 To exit HelpPress the [HELP] switch to turn off the indicator, and you will return to the previous screen.

Demo playback
Dem
o pl
ayba
ck
1. Listening to the demoThe SP-500 contains twenty-fourth piano demo songs, nine style demo songs, and nine sound demo songs. Listen to these demo performances to get an introduction to the rich sounds of the SP-500 and their expressive potential.
To listen to the demo songs
1 Press the [DEMO] switchThe [DEMO] switch indicator will light, and the “Demo” page will appear.
2 Select a “Demo Group”Use the “Demo Group” radio buttons to select the desired group of demo songs.
3 Select a songPress the “Song name” cell, and use the dial or the [VALUE] switches to select the song that you wish to hear.Refer to p.83 for the names of the demo songs.
The “Song name” can be selected by pressing the following switches.Pressing a rhythm style switch within the [RHYTHM STYLE GROUP] for the desired rhythm style will select “Style.” Pressing a program group switch within the [PRO-GRAM GROUP] will select “Prog.” The demo songs of the selected song will play.
To hear all songs of the selected groupIf the “Play Mode” radio button “All” is pressed, all songs in the “Demo Group” will be played consecutively, starting with the selected song. If the radio button “One” is pressed, only the selected song will be played.
Composer name
Song name“Demo Group” radio buttons
19

20
4 Start demo playbackPress the RECORDER [PLAY/STOP] switch.
If the [ACC VOLUME] slider is set to 0, you will not be able to hear the demo perfor-mance. Use the [ACC VOLUME] slider and [MASTER VOLUME] slider to adjust the volume.
Stopping the demo performanceTo stop the performance, press the [PLAY/STOP] screen. When you have finished lis-tening to the demo songs, press the [EXIT] switch. The [DEMO] switch indicator will go dark, and you will return to the main page.
Pausing the demo performanceDuring the performance, you can press the [PAUSE] switch to pause.When you press the [PAUSE] switch once again, the performance will resume.
Changing the keyboard sound during the demo performanceYou can also play along with the demo performance on the keyboard. At this time, the keyboard will play the sound that had been selected before you pressed the [DEMO] switch. If you want to change this sound, press the [DEMO] switch once again to return to the main page, and then select a different sound. ☞ p.24 “2. Selecting sounds”
Dem
o pl
ayba
ck
2. Practicing along with a demo songIf the “Demo Group” radio button “Piano” is selected, you can use the following functions to practice playing along with the song.
Practicing right hand and left hand separatelyFor the piano demo songs, you can select either the right or left hand part to be played by the demo; you can also turn down the volume of the remaining part so that you can play along.
1 Select the song that you wish to practiceAs described in steps 1–3 of “Listening to a demo song,” select the “Piano” radio but-ton in the “Demo Group,” and use the “Song name” cell to select the song.
These functions are not available if a “Demo Group” radio button other than “Piano” is selected.
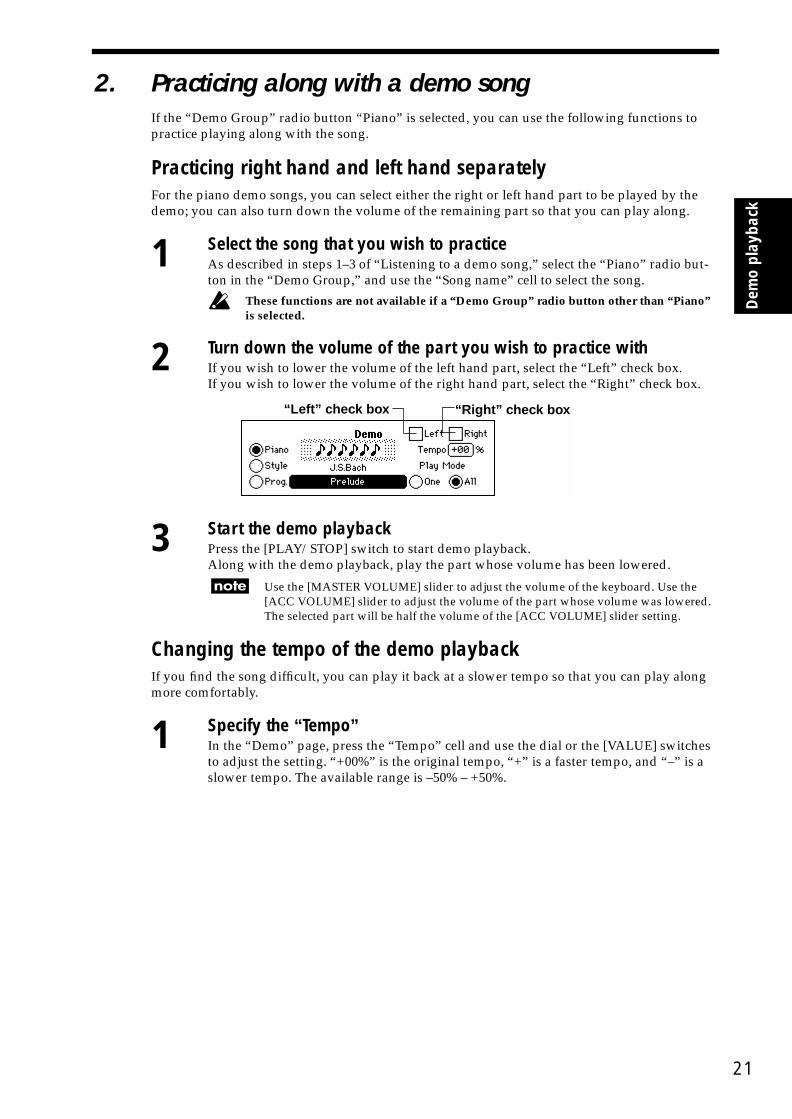
2 Turn down the volume of the part you wish to practice withIf you wish to lower the volume of the left hand part, select the “Left” check box. If you wish to lower the volume of the right hand part, select the “Right” check box.
3 Start the demo playbackPress the [PLAY/STOP] switch to start demo playback.Along with the demo playback, play the part whose volume has been lowered.
Use the [MASTER VOLUME] slider to adjust the volume of the keyboard. Use the [ACC VOLUME] slider to adjust the volume of the part whose volume was lowered. The selected part will be half the volume of the [ACC VOLUME] slider setting.
Changing the tempo of the demo playbackIf you find the song difficult, you can play it back at a slower tempo so that you can play along more comfortably.
1 Specify the “Tempo”In the “Demo” page, press the “Tempo” cell and use the dial or the [VALUE] switches to adjust the setting. “+00%” is the original tempo, “+” is a faster tempo, and “–” is a slower tempo. The available range is –50% – +50%.
“Left” check box “Right” check box
21

22

Playing the SP-500
Play
ing
the
SP-5
00
1. Playing a soundFirst let’s turn on the power and play the keyboard to produce sound.
Turing the power onAs described in the connection procedure on p.14, connect the AC/AC power supply, head-phones, and pedal. Then turn on the power of the SP-500.
1 Turn on the powerLeave the [VOLUME] slider set at about 0.Press the [POWER] switch located on the rear panel. When you turn on the power, the panel indicators will light, and the startup screen will appear.
Turning the power offPress the [POWER] switch once again. When the power is turned off, the panel indica-tors will all go dark.
2 Play the keyboardWhile playing the keyboard, gradually adjust the [VOLUME] slider to adjust the vol-ume.
If you are listening to the SP-500 through your monitor speakers, cassette-radio unit, or audio system, adjust the output volume of this equipment as well.
Adjusting the volumeRaise the [MASTER VOLUME] slider to the middle position. Moving the slider toward the right will increase the volume, and moving it toward the left will decrease the volume. At a position of “0” there will be no sound.While actually playing the instrument, adjust the volume to an appropriate level.
Softer Louder
23
24
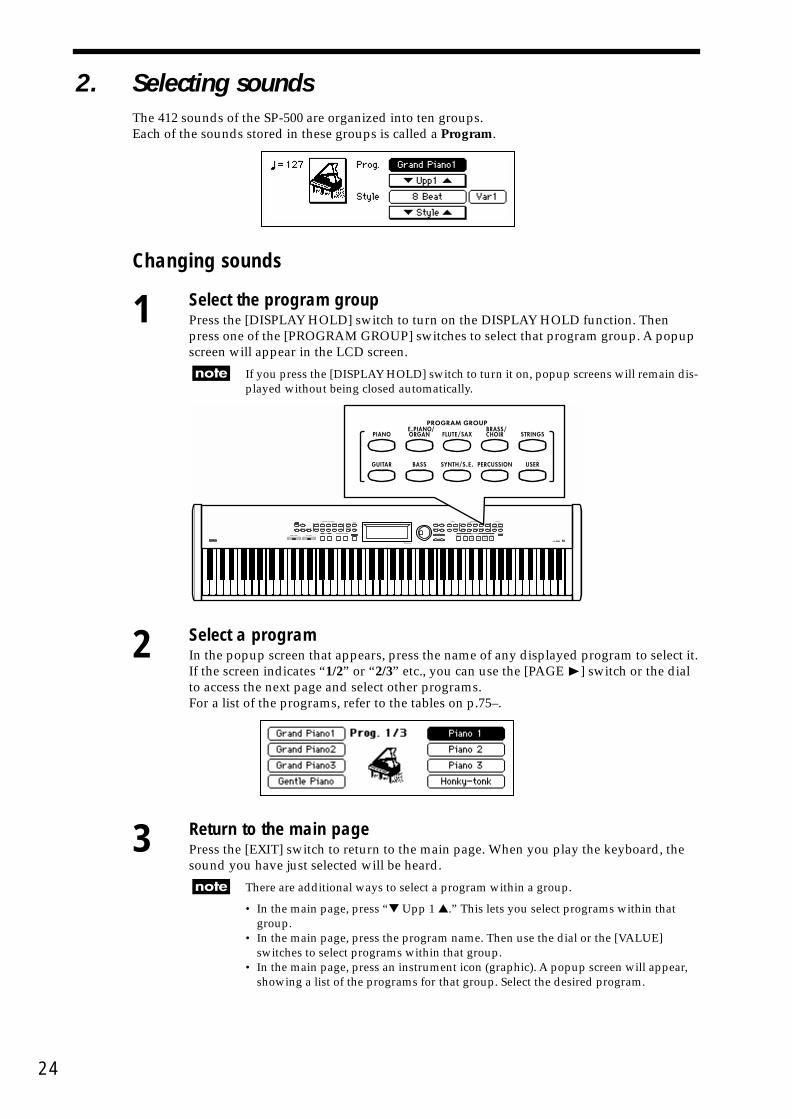
2. Selecting soundsThe 412 sounds of the SP-500 are organized into ten groups.Each of the sounds stored in these groups is called a Program.
Changing sounds
1 Select the program groupPress the [DISPLAY HOLD] switch to turn on the DISPLAY HOLD function. Then press one of the [PROGRAM GROUP] switches to select that program group. A popup screen will appear in the LCD screen.
If you press the [DISPLAY HOLD] switch to turn it on, popup screens will remain dis-played without being closed automatically.
2 Select a programIn the popup screen that appears, press the name of any displayed program to select it.If the screen indicates “1/2” or “2/3” etc., you can use the [PAGE ®] switch or the dial to access the next page and select other programs.For a list of the programs, refer to the tables on p.75–.
3 Return to the main pagePress the [EXIT] switch to return to the main page. When you play the keyboard, the sound you have just selected will be heard.
There are additional ways to select a program within a group.
• In the main page, press “▼ Upp 1 ▲.” This lets you select programs within that group.
• In the main page, press the program name. Then use the dial or the [VALUE] switches to select programs within that group.
• In the main page, press an instrument icon (graphic). A popup screen will appear, showing a list of the programs for that group. Select the desired program.

Play
ing
the
SP-5
00
Selecting percussion instrument soundsYou can play percussion instrument sounds from the keyboard.
1 Press the PROGRAM GROUP [PERCUSSION] switch
2 Select a programIf you select one of the programs ending with the word “kit” - (“GM kit 1”–“SFX kit”) on page “5/6,” a different instrument will be assigned to each note of the keyboard. Refer to the Drum Kit List.
Selecting sounds from the [USER] program groupYou can rearrange the [USER] program group so that the programs can be played more conve-niently, or create your own program group containing your favorite programs. (☞ p.34)
1 Press the PROGRAM GROUP [USER] switchA list of the programs loaded into the SP-500 will appear.
2 Select a programNow you can play the sounds from the keyboard.
25

26
3. Combining sounds
Layer function (play two sounds together)This allows you to combine two programs to be played together when you play a single note. This is called the Layer function.
1 Press the [LAYER] switchThe [LAYER] switch indicator will light, and the “Layer” page will appear.
2 Select each soundTo select the “Upp1” program, press cell A. To select the “Upp2” program, press cell B. Then select the desired sound. ☞ p.24 “2. Selecting sounds”
If the Layer function is turned on, the total polyphony will be 32 notes. If a program such as “Grand piano 1” is selected, the polyphony will be 21 notes. ☞ p.73 “Trouble-shooting”
3 Adjust the volume balance of the two soundsUse the dial or the [VALUE] switches to adjust the value of the “Vol” (volume) cell.The volume can be adjusted from 0 (minimum) – 127 (maximum).
4 Specify the octave of each soundThe pitch played by the keyboard can be adjusted for each program in one-octave steps.Use the “Octave” cell “▲” or “▼” to set the value.The octave can be adjusted over a range of –2, –1, 0, +1, +2.
B
A
Upp2
Upp1
Play
ing
the
SP-5
00
5 Return to the main pageIf the [DISPLAY HOLD] switch is on, press the [EXIT] switch to return to the main page.The names of the “Upp2” and “Upp1” programs will be displayed in the main page.
In this screen you can also you can use the “▼ Upp2 ▲” and “▼ Upp1 ▲” buttons to select different programs.
To cancel the Layer functionPress the [LAYER] switch to make the [LAYER] switch indicator turn off.
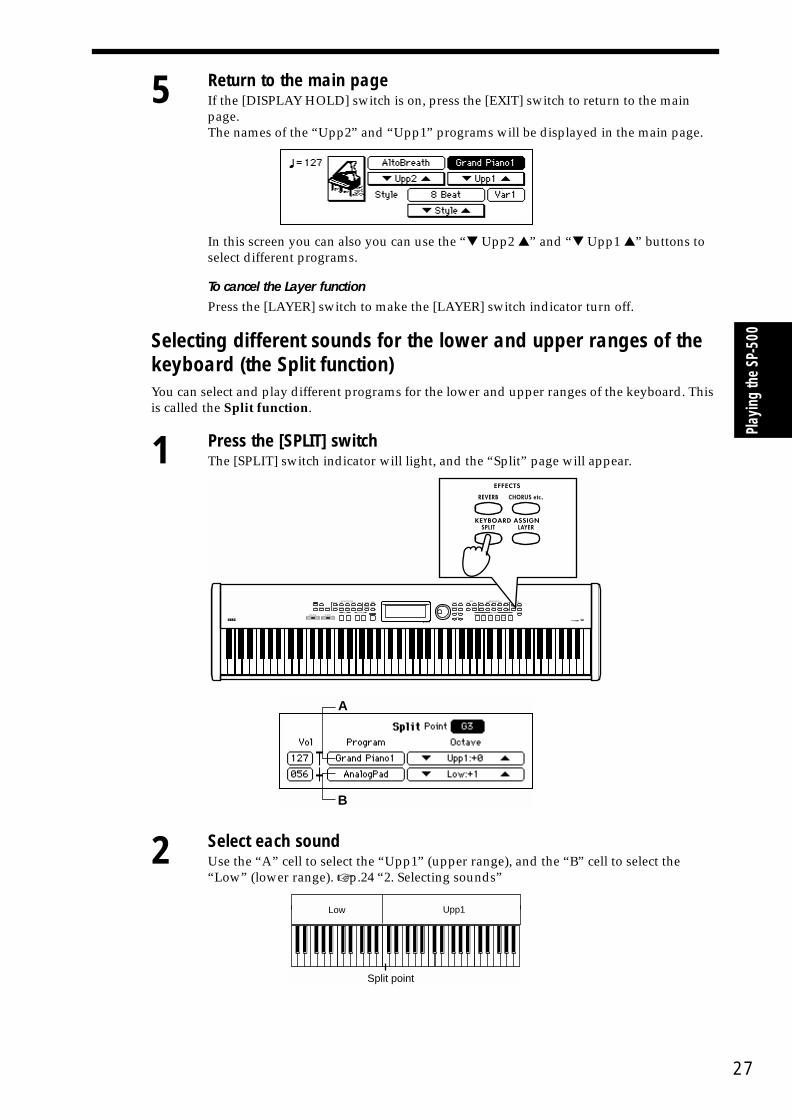
Selecting different sounds for the lower and upper ranges of the keyboard (the Split function)You can select and play different programs for the lower and upper ranges of the keyboard. This is called the Split function.
1 Press the [SPLIT] switchThe [SPLIT] switch indicator will light, and the “Split” page will appear.
2 Select each soundUse the “A” cell to select the “Upp1” (upper range), and the “B” cell to select the “Low” (lower range). ☞ p.24 “2. Selecting sounds”
B
A
Upp1Low
Split point
27

28
3 Adjust the volume balance of the two soundsUse the dial or the [VALUE] switches to adjust the value of the “Vol” (volume) cell.The volume can be adjusted from 0 (minimum) – 127 (maximum).
4 Specify the octave of each soundThe pitch played by the keyboard can be adjusted for each sound in one-octave steps.Use the “Octave” cell “▲” or “▼” to set the value.The octave can be adjusted over a range of –2, –1, 0, +1, +2.
To change the split pointTo change the note (the split point) that divides the two ranges of the keyboard, press the “Point” cell, and use the dial or the [VALUE] switches to change the setting. Alter-natively, you can hold down the [SPLIT] switch, and then press the desired note. The note you pressed will be part of the upper range.
5 Return to the main pageIf the [DISPLAY HOLD] switch is on, press the [EXIT] switch to return to the main page.The main page will display the names of the “Low” and “Upp1” programs.
In this screen you can also use the “▼ Low ▲” and “▼ Upp1 ▲” buttons to select dif-ferent programs.
To cancel the Split functionPress the [SPLIT] switch to make the [SPLIT] switch indicator turn off.
Playing the SP-500 as a piano (PLAY PIANO mode)When you press the [PLAY PIANO] switch, the instrument will be set to the following settings. This allows you to use the SP-500 simply as a piano.
• The entire keyboard will sound.SPLIT and LAYER will be off, and “KeyL” muting will be defeated. (☞ p.26, p.27, p.40)
• The Upp1 program will be set to “Grand Piano 1.”• The Upp1 octave setting will be set to “0.” (☞ p.63)
All other settings will remain unchanged.
Split point Lowest note in the upper rangeLower range Upper range

Play
ing
the
SP-5
00
4. Applying effects to a soundDepending on the program that you select, it may be difficult to hear the reverb or chorus (effects). If you have selected a drum kit, the effect will not apply even if you press the [CHORUS etc.] switch.
Adding Reverb to the soundApplying this effect to a selected sound will create the illusion that you are playing in various acoustical spaces such as a concert hall. This is called Reverb.
1 Press the [REVERB] switchThe [REVERB] switch indicator will light, and reverb will be applied to the sound.
2 Select the type of reverb effectPress the “Type” cell, and use the dial or the [VALUE] switches to change the reverb type.
List of reverb types
3 Adjust the reverb depthPress the “Balance” cell, and use the dial or the [VALUE] switches to adjust the setting.The selectable range is Dry (no effect), 01–99, Fx (maximum).
4 Return to the main pageIf the [DISPLAY HOLD] switch is on, press the [EXIT] switch to return to the main page.
1 Pedal Simulat Simulates the natural resonance of a piano.Pressing the pedal will strengthen the effect.
2 Hall Reverb that simulates the acoustics of a small concert hall
3 Ensemble Hall Reverb that simulates the acoustics of a large hall
4 Concert Hall Reverb with emphasized early reflections
5 Room Reverb that simulates the acoustics of a room
6 Large Room Reverb that simulates the acoustics of a large room
7 Live Stage Reverb that simulates a live performance
8 Wet Plate Deep plate reverb
9 Dry Plate Light plate reverb
10 Spring Reverb Simulation of a spring reverb unit
11 Early Ref 1 Reverb that simulates only the early reflections of the reverberation
12 Early Ref 2 Reverb in which the early reflections decay slowly
13 Early Ref 3 Reverb in which the early reflections progressively increase
29

30
To cancel ReverbPress the [REVERB] switch to make the [REVERB] indicator lamp turn off.
Adding Chorus or other modulation effects to the soundYou can apply modulation to the selected sound to create a sensation of rich spaciousness, or apply distortion to give the sound an Rock’n Roll character. These are called Effects.
1 Press the [CHORUS etc.] switchThe [CHORUS etc.] switch indicator will light, and an effect such as chorus will be applied to the sound.
2 Select the type of effectPress the “Type” cell, and use the dial or the [VALUE] switches to change the selection.
List of effect types
1 Stereo Delay Stereo delay
2 Cross Delay Delay that alternates between left and right channels
3 Dual Delay Independent mono delays for left and right channels
4 Multitap Dly1 A single sound will be repeated twice
5 Multitap Dly2 Same as above, but with different spacing of the two sounds
6 Multitap Dly3 Same as above
7 Chorus 1 Stereo chorus with left and right channels in opposite phase
8 Chorus 2 Stereo chorus with left and right channels in the same phase
9 Quad Chorus Chorus where the left and right channels are 90 degrees out of phase
10 XOver Chorus Crossover effect
11 Harmonic Cho. A chorus that is effective on low instruments such as bass
12 Symphonic Ens A chorus that is effective on strings
13 Flanger 1 Modulation with left and right channels in the same phase
14 Flanger 2 Modulation with left and right channels in opposite phase
15 XOver Flanger Modulation in opposite phase, but with channels applying feedback to each other
16 Exciter Adds sparkle to the sound to give it better definition
17 Enhancer Gives the sound a sense of spaciousness
18 Distortion Hard, solid-state distortion
19 Overdrive Warm tube amp distortion
20 Phaser 1 Left and right channels modulated in opposite phase
21 Phaser 2 Left and right channels modulated in the same phase
22 Rotary Speakr Simulation of a rotary speaker
23 Auto Pan An effect that automatically pans the sound in stereo
24 Tremolo Tremolo effect

Play
ing
the
SP-5
00
3 Adjust the effect depthPress the “Balance” cell, and use the dial or the [VALUE] switches to adjust the setting.The selectable range is Dry (no effect), 01–99, Fx (maximum).
4 Return to the main pageIf the [DISPLAY HOLD] switch is on, press the [EXIT] switch to return to the main page.
To cancel the effectPress the [CHORUS etc.] switch to make the [CHORUS etc.] indicator lamp turn off.
5. Playing along with the metronomeIf you wish to play/Practice with an accurate tempo, it is convenient to use the metronome. The metronome also sets the time signature and tempo when you record your playing.
Starting the metronome
1 Press the [METRONOME] switchThe [METRONOME] switch indicator will light, and the metronome will start.
To set the time signaturePress one of the “Meter” radio buttons to select a time signature.The available time signatures are 1/4, 2/4, 3/4, 4/4, 5/4, and 6/8.If you select “1/4,” no accent (strong note) will sound.
If the “Tempo Guide” check box is off, the BEAT indicator will not light.
To adjust the volumePress the “Volume” cell, and use the dial or the [VALUE] switches to adjust the volume.The volume range is 0 (minimum) – 127 (maximum).
The metronome will default to tempo “127,” time signature (“Meter”) “4/4,” and vol-ume “100” - (default conditions upon power up).
31

32
2 Return to the main pageIf the [DISPLAY HOLD] switch is on, press the [EXIT] switch to return to the main page.
Stopping the metronomeTo stop the metronome, press the [METRONOME] switch once again.The [METRONOME] switch indicator will turn off, and the metronome will stop.
Adjusting the tempoPress the “Tempo” cell in the “Metronome” page and use the dial or [VALUE] switches to adjust the tempo, or use the [TEMPO UP] or [TEMPO DOWN] switches to adjust the tempo that is dis-played in the upper left of the main page. Alternatively, you can set the tempo by pressing the [TAP TEMPO] switch twice or more in time with the tempo of the song.The tempo range is � =40–240. (☞ p.39)
On the SP-500, tempo is displayed as the number of quarter notes per minute. If you select “6/8” as the time signature, you must input half the value of the “actual” (8th note) tempo.Example: For � =96, set this to “48”.

Play
ing
the
SP-5
00
6. Using pedalsTwo pedals can be connected to the SP-500.The included pedal switch, a DS-1H or a PS-1 (both sold separately) can be connected to the Damper pedal jack and/or Assignable Switch jack located on the rear panel.
Assignable switchConnect the included pedal or a separately sold pedal to the Assignable Switch jack. A variety of functions can be assigned to the Assignable Switch.With the factory settings, this is set to “Soft.” (☞ p.66)
Damper pedalConnect the included pedal to the Damper Pedal jack.While you hold down the pedal, the sound will be sustained, producing a rich reso-nance.If you use a separately sold DS-1H, you will be able to vary the amount of the damper effect by the depth to which you press the pedal (“half-pedal effect”).
To reverse the polarity of the pedalThe SP-500 is designed to work with a variety of pedals. When you want to use a pedal, you must connect it to the SP-500 before turning on the power. In this way, the SP-500 will automatically set each pedal jack to the correct polarity.
Damper pedal settings for Layer and SplitYou can specify whether the damper pedal effect will apply to one or both sounds when you use the Layer or Split functions. (☞ p.66)
DAMPER
L/MONO
OUTPUTR
ASSIGNABLESWITCH
STEREOINPUT
33

34
7. Changing the touch response of the keyboard
You can change the way the piano will respond to how hard you strike the keyboard. This function is called Touch Control.
1 Press the [TOUCH] switch
2 Select the desired touchPress a radio button to select the desired playing touch.Light 1, 2: Even soft playing can produce loud notes. (Light touch)Normal: This is the standard piano touch.Heavy 1, 2: You must play strongly to produce loud notes. (Heavy touch)Fix: Playing strength will have no effect; suitable for organ playing.
This function does not change the physical weight of the keyboard itself.
3 Return to the main pageIf the [DISPLAY HOLD] switch is on, press the [EXIT] switch to return to the main page.
This setting can be stored in internal memory by selecting the “Func 7/10” page “Setup” and executing “Write,” so that the setting will be in effect when the power is turned on. (☞ p.67)
8. Using the [USER] pro-gram group
You can use the [USER] program group when you wish to rearrange programs in an order convenient for performance, or when you wish to create a pro-gram group that contains only the programs you use frequently.
For details on the factory-set data, refer to the table on p.78.
Collecting favorite sounds into a [USER] program groupHere’s how to select your favorite programs from the various program groups of the SP-500, and arrange them in the desired order in the [USER] program group.
Drum kits such as “GM kit 1” in the [PERCUS-SION] program group can be copied to page “9/9.”
1 Press the PROGRAM GROUP [USER] switchThe contents of the currently-loaded [USER] program group will be displayed.
2 Select the copy destination pro-gramPress the program name of the copy des-tination.The program you select here will be replaced by the program you select in step 5.
When you execute the Write operation in step 7, the program you select here will be erased.
3 Press the “Custom” buttonThe “Custom Prog” page will appear.
Play
ing
the
SP-5
00
4 Press the “Copy” buttonThe “Custom Copy” page will appear.
5 Select the program that you wish to copyPress the “Source Prog” cell, and select the program you wish to copy to the pro-gram that was selected in step 2. Use the same procedure as usual when selecting a program. (☞ p.24) After making your selection, press the [EXIT] switch to return to the previous screen.
6 Press the “Copy” buttonThe program will be copied, and you will return to the “Custom Prog” page.
To change the program nameIf you wish to change the name of the program, press the “Rename” button before you write, and change the name. ☞ “Changing the program name”
7 Write the programIf this is the program you want, press the “Write” button to write it.
Never turn off the power while data is being written.
If you decide not to writePress the “Cancel” button without writ-ing, the copied contents will be dis-carded, and the data will revert to the original program. You will return to the main page.
8 Change other programs as wellRepeat steps 1–7 to collect the desired programs in the [USER] program group.
Restoring the factory-set conditionPress the “Preset” button. When the con-firmation message appears, press “OK.”
When you restore the factory-set data, the entire [USER] program contents will be lost.
Changing the program nameYou can modify the name of a program that you “Write” to the [USER] program group. Press the “Rename” button and modify the filename.
1 Access the “Rename” buttonPress the “Rename” button, and the “Rename” page will appear.
2 Select a characterUse the dial or the [VALUE] switches to select the first characters.
3 Finalize the first characterPress the “Set” button to finalize the first character.
4 Select the next characterSelect characters as in steps 2 and 3 to assign the desired file name.A file name of up to 16 characters can be assigned.
To make a correctionUse the “o,” “k” button to move the cursor to the character that you wish to correct.If you wish to delete the character, press the “Delete” button; the character at the cursor location will be deleted. If you wish to insert a character, press the “Insert” button; the selected character will be inserted at the cursor location.
5 Finalize the program nameAfter you have input the entire program name, press the “Return” button.To save the program name, you must per-form the “Write” operation. ☞ Refer to step 7 of “Collecting favorite sounds into a [USER] program group.”
35

36

Automatic accompaniment
Aut
omat
ic
acco
mpa
nim
ent
1. Performing with automatic accompanimentWhen using the Automatic Accompaniment function, you can simply specify a chord from the keyboard, and an accompaniment appropriate for that chord will be added automatically.A variety of accompaniment styles are provided, including [PIANIST] (which mainly uses piano sounds suitable for a piano performance), and styles such as pops, rock, jazz, and dance music. These accompaniments are called “rhythm styles” (a total of 217 styles are provided), and are organized into ten rhythm style groups.A Rhythm Style consists of six musical tracks: Drum (a conventional drum set as used in popular music), Perc (all percussion instruments other than drums), Bass (the low-range instrument), and Acc1–3 (accompaniment instruments).
Using automatic accompaniment
1 Press the [ACC] switchThe [ACC] switch indicator will light, and the “Accompaniment” page will appear.
2 Select how to specify chordsHere you can select how you will be specifying chords. For details on how to specify chords, refer to “Changing how you specify the chords” (☞ p.42).
3 Return to the main pagePress the [EXIT] switch to return to the main page.
37

38
4 Selecting a rhythm style
Select a rhythm style groupPress one of the [RHYTHM STYLE GROUP] switches to select a rhythm style group.By pressing the [PIANIST] switch, you can select an accompaniment style for only piano sounds.
Select a rhythm styleThe rhythm styles in the selected group will appear in the LCD screen.If the screen indicates “1/2” or “2/3” etc., you can use the dial or the [PAGE ®] switch to access the next page and select other rhythm styles. For a list of the rhythm styles, refer to the tables on p.78–.
There are other ways to select rhythm styles.
• In the main page, press the “▼ Style ▲” buttons to select rhythm styles within the currently selected group.
• Press the style name shown in the display. Then use the dial or the [VALUE] switches to select rhythm styles within the currently selected group.
5 Select a sound for the part that you yourself will playSelect a program in the same way as usual. (☞ p.24)
6 Use the keyboard to specify the chordTo specify a chord, play notes in the keyboard area below the “Split Point” that was displayed in the “Accompaniment” page. The name of the chord you specify will appear in the LCD screen. At this time, the keyboard note that you use to specify the chord will not sound. If you want this note to sound, refer to p.42.
If you press the [ACC RESET] switch, you will return to a condition in which no chord has been specified. If you do not specify a chord, only “Drum” and “Perc” will play.
7 Press the [START/STOP] switchThe automatic accompaniment for the chord shown in the LCD screen will start. Go ahead and play along with the automatic accompaniment.
Chord name display

Aut
omat
ic
acco
mpa
nim
ent
During the performance, the [BEAT] indicators will light in time with the beat.While playing, you can change chords, add a fill, change variations for the rhythm style, or automatically add harmony to the part that you yourself play. (☞ p.42)
To stop automatic accompanimentPress the [START/STOP] switch once again. The [START/STOP] switch indicator will turn off, and the accompaniment will stop.
You can also start/stop automatic accompaniment in other ways than described above.Synchro Start/Stop (☞ p.41), Intro/Ending (☞ p.43)
Adjusting the tempo
1 Press the [TEMPO DOWN, UP] switchesThe tempo display in the main page will change, and so will the playback tempo.
Using the [TAP TEMPO] featureYou can change the tempo by pressing the [TAP TEMPO] switch two times or more in rhythm to the beat. The tempo will be set to the rhythm at which you press the [TAP TEMPO] switch.
Tempo display
39

40
Adjusting the overall volumeThe [ACC VOLUME] slider will adjust the volume balance between the automatic accompani-ment and the keyboard performance.To adjust the overall volume including your keyboard performance, use the [MASTER VOL-UME] slider.
Adjusting the volume of individual partsTo adjust the volume of each automatic accompaniment part and of the keyboard, make settings in the screen that appears when you press the [MIXER] switch.
1 Press the [MIXER] switchThe [MIXER] switch indicator will light, and the “Mixer” page will appear.
2 Select the part whose volume you wish to adjustPress the “Vol” cell for the part whose volume you wish to adjust.
3 Adjust the volumeUse the dial or the [VALUE] switches to adjust the volume.
Muting a partEach part of the rhythm style can be muted (silenced)
1 Select the ^ (check box) of the part you wish to muteWhen you press the check box (the check box fills in) that part will not sound.
To cancel mutingWhen you press the check box once again (the check box returns to an outline) muting will be cancelled.
Upp1:
Upp2:Low:
Volume of the Upper1 if [LAYER] switch or [SPLIT] switch are on, or volume of the keyboard if [LAYER] switch and [SPLIT] switch are offVolume of layered sound if [LAYER] switch is onVolume of the sound to the left of the split point when [SPLIT] switch is on
Drum, Perc, Bass, Acc1–3: Volume of the automatic accompaniment parts

Aut
omat
ic
acco
mpa
nim
ent
2. Various automatic accompaniment functions
Selecting how you will start and stop automatic accompanimentThere are several ways to start/stop automatic accompaniment.Use the method that is appropriate for your perfor-mance.
a. Basic start and stop
1 Specify a chordSpecify a chord by playing notes in the keyboard area selected for this purpose. The name of the selected chord will appear in the main page.
2 Press the [START/STOP] switchAutomatic accompaniment will start.
The [BEAT] indicators will light in time with the meter.
3 Press the [START/STOP] switch once againAutomatic accompaniment will stop.
b. Synchro start, Synchro stopYou can use Synchro Start to start automatic accompaniment at the moment you press a key, and Synchro Stop to stop automatic accompani-ment at the moment you take your hand off of the keyboard.
1 Press the [SYNCHRO START/STOP] switchThe [SYNCHRO START/STOP] switch indicator will light.
2 Specify a chord, and playback will start (Synchro start)☞ p.42 “Changing how you specify the chords”
3 While a chord is specified, press the [SYNCHRO START/STOP] switch.
4 When you take your hand off of the chord-specifying keys, auto-matic accompaniment will stop (Synchro Stop)You can use this to break the accompani-ment when you wish to add a right-hand solo.When you play notes in the chord-speci-fying area, the accompaniment will begin from the first measure of the accompani-ment pattern.To cancel this, press the [SYNCHRO START/STOP] switch to make the indica-tor go dark.
c. Pedal Start, Pedal StopYou can start/stop the automatic accompaniment by pressing the assignable switch.
1 Access the “Func 3/10” pageAfter pressing the [FUNCTION] switch, use the [PAGE ®] switch to access the “Func 3/10” page.
2 Set the “Assignable Switch” set-ting to “Start/Stop”The pedal connected to the Assignable Switch jack will now function in the same way as the [START/STOP] switch. (☞ p.66)
3 Press the [EXIT] or [FUNCTION] switchYou will return to the main page.
4 Specify a chordSpecify a chord by playing notes in the keyboard area selected for this purpose. The name of the selected chord will appear in the main page.
5 Press the pedalAutomatic accompaniment will start when you press the pedal connected to the Assignable Switch jack. It will stop when you press the pedal once again.
41

42
Changing how you specify the chordsThere are several different ways to use the key-board to specify chords, as appropriate for your preferences and abilities.
1 Press the [ACC] switchThe [ACC] switch indicator will light, and the “Accompaniment” page will appear.
2 Select how you will specify the chordPress one of the radio buttons in the screen to select the method you will use to input chords.“Onefinger”: This method makes it easy to input chords even if you do not know how the chord is fingered. In the keyboard range to the left of the Split Point, simply press the root of the chord to specify the corresponding major chord. Pressing the root together with the white key to the left of it will specify a seventh chord. Pressing the root together with the black key to the left of it will specify a minor chord. Pressing both will specify a minor sev-enth chord.“Fingered1”: This method is easy to under-stand if you know how the chord is fingered. You can press a note in the keyboard range to the left of the Split Point to input chords using the conventional fingering. However if only the root is pressed, a major chord will be input. To input an inverted chord, turn on “Bass Inv..”“Fingered2”: This is the same as “Fingered 1,” but a chord will not be input unless you press three or more notes.“FullKeyboard”: This is the same as “Fin-gered 2,” but chords can be specified from the entire keyboard, regardless of the split point.
Changing the split pointExcept when the “FullKeyboard” chord input method is selected, the keyboard area consisting of the displayed “Split Point” and the keys to the left of it will be used to input chords. “C4” is the middle C key of the keyboard.In the “Accompaniment” page, select the “Split Point” cell, and use the dial or the [VALUE] switches to change the setting. Alternatively, you can hold down the [SPLIT] switch and press a note on the keyboard to set the split point.
Muting the notes you use to specify chordsIf you press the [ACC] screen, the notes you use to specify a chord will automati-cally be muted. You may wish to do this so that these notes do not interfere with the accompaniment. If you want to mute the other notes, press the [MIXER] switch, and then press the “KeyL” check box to turn it on (muted).
To defeat muting of the keys used to specify chords
• Press the [MIXER] switch, and press the “KeyL” check box to turn it off.
• Press the [PLAY PIANO] switch.
If the [SPLIT] switch is lit, the left side of the keyboard cannot be muted.
When the “Bass Inv.” check box is turned onIf this check box is turned on, the lowest note of the keys you press to specify a chord will be taken as the bass note, and will be detected separately from the developed form of the chord.This allows you to specify chords in which the bass note is independent, such as Am7/G or F/C.
Performing with an ensembleThis function automatically adds harmony to the notes that you play in the keyboard area to the right of the split point (Upp 1).
This function is not available if chord detection is set to “FullKeyboard.”
1 Press the [ENSEMBLE] switchWhen you press the [ENSEMBLE] switch, the switch indicator will light.The “Ensemble” page will appear.
Duet: The melody will become two voices.Close: Two notes will normally be added close below the melody to create three voices (sometimes three notes will be added to create four voices).

Aut
omat
ic
acco
mpa
nim
ent
Open1: Two notes will normally be added below the melody to create three voices (sometimes three notes will be added to create four voices).Open2: Two notes will normally be added above the melody to create three voices (some-times three notes will be added to create four voices).Octave: Two notes will be added an octave above and below the melody.Power Ens.: Notes will be added a fourth below and an octave below the melody to cre-ate three voices.Fourths: Notes will be added a fourth above and a minor seventh above the melody to cre-ate three voices.Block: Three notes will be added below the melody plus an octave below it, creating five voices.Brass Ens.: Three notes will be added below the melody, creating four voices.Reed Ens.: A three-note chord with a different inversion than added by “Block” will be added below the melody, plus an octave below the melody, creating five voices.
2 Select the type of ensemblePress one of the radio buttons to select the desired type of ensemble.Different harmony will be added accord-ing to the type of ensemble you select.
To turn off the Ensemble functionPress the [ENSEMBLE] button once again.
To change the variationEach rhythm style allows you to choose four differ-ent variations.
1 While automatic accompaniment is playing, select the “Variation” CellPress the “Variation” Cell, and use the dial or the [VALUE] switches to specify the variation. The accompaniment will switch to the selected variation at the next beat or measure.
If you specify “After Fill” in the “Accompani-ment” page (☞ p.44), playback will automati-cally switch to the specified variation after a fill is played. This lets you add variety to the way in which your song develops.
The content of the variations, intros, and end-ings will differ according to the rhythm style.
Adding an introYou can add an intro to the beginning of the auto-matic accompaniment. After the intro has been played, the variation will begin playing.Each rhythm style has two intros and two endings.• When you press the [INTRO/ENDING 1] switch,
an intro or ending with a chord progression will be played.
• When you press the [INTRO/ENDING 2] switch, a simple intro or ending without a chord progres-sion will be played.
1 Press the [INTRO/ENDING 1] switch or the [INTRO/ENDING 2] switch
2 Press the [START/STOP] switchThe automatic accompaniment intro will play.When the intro ends, the accompaniment will switch to the variation you selected in the main page.The indicator of the [INTRO/ENDING 1, 2] switch you selected will be lit while the intro is playing, and dark when the varia-tion begins playing.
To repeat the introIf you press the same [INTRO/ENDING] switch while the intro is playing, that intro will continue playing repeatedly. The repeated playback will be cancelled if you press the other [INTRO/ENDING] switch or the [FILL 1, 2] switch, or if you re-select the “Variation” Cell.
To cancel the introBefore starting automatic accompani-ment, you can press a [FILL 1, 2] switch to cancel the intro.After starting automatic accompaniment, you can press the [START/STOP] switch to stop playback and cancel the intro selection.
Once the intro has started, it cannot be can-celled by pressing a [FILL 1, 2] switch.
It is also possible to select either fill to be used an intro.
“Variation” cell
43

44
Adding an ending
1 While automatic accompaniment is playing, press the [INTRO/ENDING 1] switch or the [INTRO/ENDING 2] switchThe ending will be played, and then the accompaniment will stop automatically.The switch indicator of the selected ending will continue blinking until the playback switches to that ending. After the ending has begun, the indicator will be lit until playback ends. After the ending, automatic accompaniment will stop automatically.
To cancel the ending before it is finishedIf you change the setting of the “Varia-tion” Cell or press the [FILL 1, 2] switch after the accompaniment has switched to the ending, the accompaniment will move to the selected variation or fill from the next beat or the next measure, and automatic accompaniment will continue
Adding a fill
1 While automatic accompaniment is playing, press the [FILL 1] switch or [FILL 2] switchA fill-in will be inserted. When the fill ends, the accompaniment will switch to the variation you specified in the “AfterFill1” or “AfterFill2” cell, just as for the intro.
The timing at which the accompaniment changes from the variation to the fill is adjusted automatically to create a natural transition. However, depending on the timing at which you press the switch, only the latter part may be played, so it is important to pay attention to the timing.
To change the variation after a fillYou can specify the variation to which auto-matic accompaniment will change when fill 1 has finished.
“After Fill1” cell: Specify the variation that the accompaniment will use after fill 1 has ended, when you press the [FILL 1] switch during rhythm style playback.
“Off”: When fill 1 ends, you will return to the variation that had been selected immediately
before the fill began.Var 1&2: If Fill 1 ends when Variation 1 or Variation 2 are selected, Variation 1 and Varia-tion 2 will be selected alternately.Var 1&3: If Fill 1 ends when Variation 1 or Variation 3 are selected, Variation 1 and Varia-tion 3 will be selected alternately.Var 1&4: If Fill 1 ends when Variation 1 or Variation 4 are selected, Variation 1 and Varia-tion 4 will be selected alternately.Var 2&3: If Fill 1 ends when Variation 2 or Variation 3 are selected, Variation 2 and Varia-tion 3 will be selected alternately.Var 2&4: If Fill 1 ends when Variation 2 or Variation 4 are selected, Variation 2 and Varia-tion 4 will be selected alternately.Var 3&4: If Fill 1 ends when Variation 3 or Variation 4 are selected, Variation 3 and Varia-tion 4 will be selected alternately.“Var+”: When fill 1 ends, accompaniment will switch to the variation to the right of the varia-tion that had been selected when the fill began.“Var-”: When fill 1 ends, accompaniment will switch to the variation to the left of the varia-tion that had been selected when the fill began.
“After Fill2” cell: Specify the variation that the accompaniment will use after fill 2 has ended, when you press the [FILL 2] switch during rhythm style playback. The selection is the same as for “After Fill 1.”
Selecting the most appropriate program for a Rhythm Style
1 Press the [SINGLE TOUCH] switchWhen you turn on the [SINGLE TOUCH] switch and select a rhythm style, a sound and automatic accompaniment settings suitable for that style will be selected.
Settings that will be made• Keyboard sound, and pan, volume,
octave and sound selections for the Upp1, Upp2, and Low parts
• On/off status of [SPLIT] and [LAYER], and the status of the “KeyL” check box
• “FullKeyboard” select status• [ENSEMBLE] on/off status and
selected type
Aut
omat
ic
acco
mpa
nim
ent
Reducing the number of parts in the accompaniment
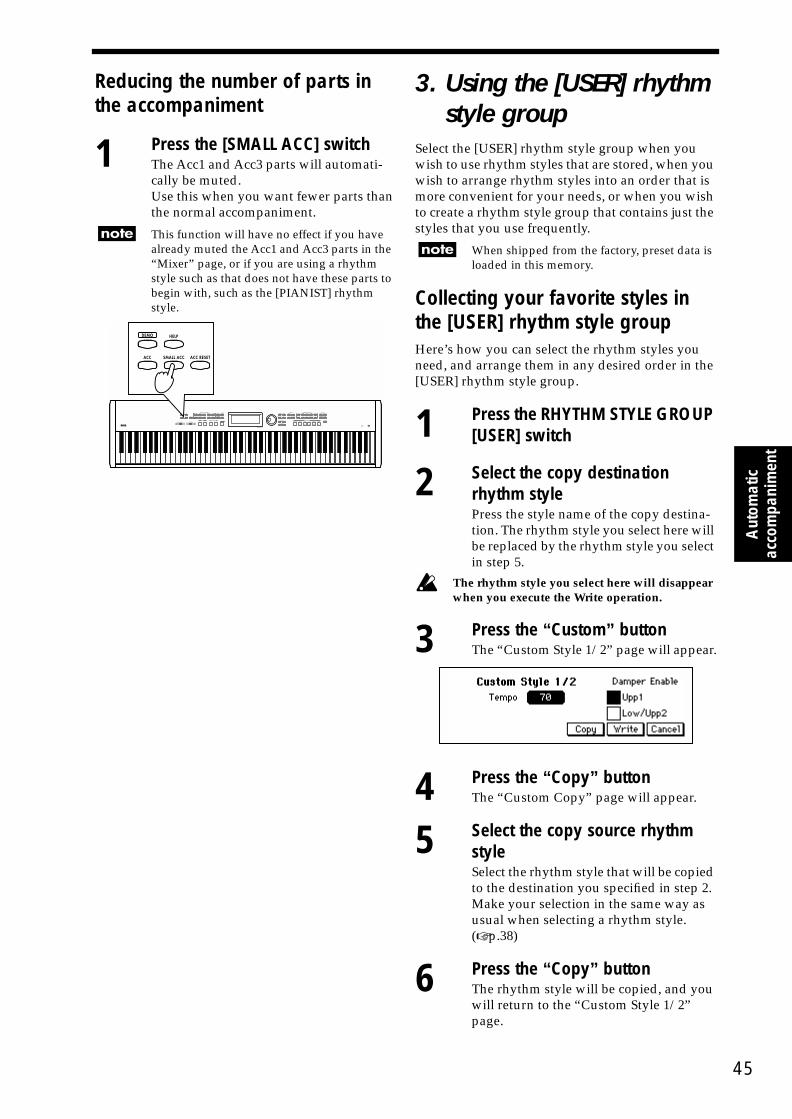
1 Press the [SMALL ACC] switchThe Acc1 and Acc3 parts will automati-cally be muted.Use this when you want fewer parts than the normal accompaniment.
This function will have no effect if you have already muted the Acc1 and Acc3 parts in the “Mixer” page, or if you are using a rhythm style such as that does not have these parts to begin with, such as the [PIANIST] rhythm style.
3. Using the [USER] rhythm style group
Select the [USER] rhythm style group when you wish to use rhythm styles that are stored, when you wish to arrange rhythm styles into an order that is more convenient for your needs, or when you wish to create a rhythm style group that contains just the styles that you use frequently.
When shipped from the factory, preset data is loaded in this memory.
Collecting your favorite styles in the [USER] rhythm style groupHere’s how you can select the rhythm styles you need, and arrange them in any desired order in the [USER] rhythm style group.
1 Press the RHYTHM STYLE GROUP [USER] switch
2 Select the copy destination rhythm stylePress the style name of the copy destina-tion. The rhythm style you select here will be replaced by the rhythm style you select in step 5.
The rhythm style you select here will disappear when you execute the Write operation.
3 Press the “Custom” buttonThe “Custom Style 1/2” page will appear.
4 Press the “Copy” buttonThe “Custom Copy” page will appear.
5 Select the copy source rhythm styleSelect the rhythm style that will be copied to the destination you specified in step 2. Make your selection in the same way as usual when selecting a rhythm style. (☞ p.38)
6 Press the “Copy” buttonThe rhythm style will be copied, and you will return to the “Custom Style 1/2” page.
45

46
To modify the name of the rhythm styleIf you wish to modify the name of the rhythm style, press the “Rename” button before you write it, and then modify the rhythm style name. (☞ p.48)
7 Press the “Write” button to write the rhythm styleIf you are satisfied with the changed rhythm style, press the “Write” button to write it into the [USER] rhythm style group.If you do not write this data, the copy operation will have no effect, and the set-tings prior to the copy will be restored when you select another rhythm style. Once you press the “Write” button to write the data, the original rhythm style will be overwritten and lost.
Never turn off the power while data is being written.
8 Change other rhythm styles as wellRepeat steps 1–7 to collect the rhythm styles you like in the [USER] rhythm style group.
The state of the rhythm styles you collect here will be preserved even when the power is turned off.
To return to the factory-set stylesPress the factory “Preset” button.When the confirmation screen appears, press the “OK” button.If you press the “Cancel” button, the data will not be loaded.
Never turn off the power while data is being loaded.
4. Creating a custom rhythm style
Customizing a rhythm styleHere it is possible to assign new sounds, adjust the volume and effect setting of each sound, change the transposition and otherwise custoimize a style and save it under a new name.
1 Press the RHYTHM STYLE GROUP [USER] switch
2 Select a style that you don’t mind erasingPress the RHYTHM STYLE GROUP [USER] switch, and in the [USER] rhythm style group, select a rhythm style that you don’t mind erasing.
When you press the “Custom” button, the “Custom Style 1/2” page will appear.
3 In the “Custom Style 1/2” page, press the “Copy” buttonWhen you press the “Copy” button in the “Custom Style 1/2” page, the “Custom Copy” page will appear. In the “Source Style” cell, select the rhythm style that will be the copy source.
4 In the “Custom Copy” page, press the “Copy” buttonWhen you press the “Copy” button in the “Custom Copy” page, the source rhythm style will be loaded into a temporary memory area.The “Custom Style 1/2” page will appear.
At this stage, the previous rhythm style still remains. Your new data will be written only when you press the “Write” button. If you select another rhythm style or turn off the power without pressing the “Write” button, the previous rhythm style will reappear.

Aut
omat
ic
acco
mpa
nim
ent
5 Edit the rhythm styleYou can modify the settings in “Custom Style” pages 1/2 and 2/2.For details on the settings that can be modified, refer to “Custom style parame-ter list”.
6 Name your custom styleIn the “Custom Style 2/2” page, press the “Rename” button to access the “Reneme” page. Assign a name to the rhythm style that you edited. (☞ p.48)
7 Save your custom style to inter-nal memoryIn the “Custom Style 1/2” page, press the “Write” button.
To revert to the original styleIf you press the “Cancel” button instead of pressing the “Write” button, you will return to the main page, and the rhythm style you created will revert to the data you selected in step 2.
Never turn off the power while the “Write” operation is in progress.
Custom style parameter list
“Custom Style 1/2” page
“Tempo” cell: Specify the tempo of the rhythm style. This is adjustable in a range of 40–240.“Damper Enable” check box: For each key-board part, you can specify whether or not the damper pedal will apply to the sounds played from the keyboard.
Upp1: Sound of the Upper1 if [LAYER] switch or [SPLIT] switch are on, or sound of the key-board if [LAYER] switch and [SPLIT] switch are offLow/Upp2: The left-hand sound for [SPLIT], or the sound layered on “Upp1” for [LAYER].
“Custom Style 2/2” pageYou can make the settings listed below for each accompaniment part: Drum, Perc, Bass, Acc1, Acc2, Acc3, Upp1, Upp2, and Low.
“Part” cell: To change the part, use the cells “▲”, “▼” or the dial, [VALUE] switches.
For the Upp1, Upp2, and Low parts, it is not possible to set the “Prog.” cell, “Reverb” cell, and “Chorus” cell.
“Wrap Around” cell: This can be specified for the Bass, Acc1, Acc2, and Acc3 parts. This allows the pitch to be shifted upward (or downward) by one octave if the accompani-ment of that part becomes unnaturally low (or high). The range of settings is “Org, 1–12.” With a setting of “Org,” the style will use its original setting.For example based on a C chord, a Wrap-Around setting of “1” would cause the accompaniment to be shifted downward one octave when a C# chord was specified. With a setting of “2,” the accompaniment would be shifted downward one octave when a “D” chord was specified.
With setting “1”C chord fi Bass pattern 1C# chord fi 1 by a semitone and lower by an octave 2D chord fi 1 by a semitone and lower by an octave 3
47

48
With setting “2”C chord fi 1C# chord fi Raise 1 by a semitone 4D chord fi 3
“Status” cell: This setting can be made for the Drum, Perc, Bass, Acc1, Acc2, and Acc3 parts. You can whether the automatic accom-paniment of each part will be played by the SP-500 itself, or by an external MIDI tone device.
Off: There will be no output, either to the internal tone generator or to MIDI OUT.Int: The part will sound only the internal tone generator. It will not be output to MIDI OUT.Ext: The part data will be transmitted from MIDI OUT.The internal tone generator will not be played.Both: The part will be output both to the inter-nal tone generator and to MIDI OUT.
“Octave” cell: This setting can be made for the Bass, Acc1, Acc2, and Acc3 parts. You can adjust the pitch of each part in steps of an octave. This can be adjusted in a range of ±2 octaves.By setting this in conjunction with “Wrap-Around,” you can prevent the accompani-ment from sounding unnatural.“Prog” cell: Specify the sound program for each part.“Pan” cell: Specify the panning for each part.
Off: Muting the part sound.L15–L01: Increasing the value will move the sound further left.Cnt: Place the sound at the center.R15–R01: Increasing the value will move the sound further right.Prg: The pan setting of the sound program itself will be used.
“Vol” cell: Specify the volume level of each part. The range is 0–127.“Reverb” cell: Specify the reverb effect send level (depth) for each part, which will be used when the [REVERB] switch is pressed.
“Chorus” cell: Specify the effect send level (depth) for each part, which will be used when the [CHORUS etc.] switch is pressed.“Rename” button: When you “write” a cus-tom voice style, you can modify the style name. Press the “Rename” button to modify the style name. For details on modifying a style name, refer to the procedure for “Changing the program name” on p.35.
� � � � �1
� �� �� �� ��2
� � �� � �3
� � � � � � � � �4

Recording
Reco
rdin
g
1. Recording your performanceJust as you would record your performance on a tape recorder, you can capture your playing on the SP-500 song recorder. You can also record multiple tracks and edit any mistakes you may make.
Basic recording (Realtime Recording)Here’s how to record a song you play from the keyboard without using automatic accompani-ment.
1 Press the RECORDER [RECORD] switchWhen the basic screen is displayed, press the RECORDER [RECORD] switch. The “Rec 1/3” page will appear, and the [RECORD] switch will blink.A “New Song” containing no performance data will be selected automatically.If you want to record without using automatic accompaniment, turn the [ACC] switch off. (☞ p.37)
2 Check the tracks that you want to record, and select a programMake sure that the “KBD,” “Control,” and “Chord” track buttons are set to “Rec.” ☞ p.52 “About tracks”Press the “Program” cell, and select the program for the track you will play. (☞ p.24)
If you want to use the Split or Layer functionPress the [SPLIT] switch or [LAYER] switch to select Split or Layer, and then select the desired program. (☞ p.26)
49

50
3 Specify the time signaturePress the [METRONOME] switch to specify the time signature. (☞ p.31)
If you do not need the metronome during recording, press the [METRONOME] switch once again to turn it off.
If recording with the [ACC] switch on, you will not be able to specify the time signa-ture here.
To change the time signature during a songAfter recording the entire song with the same time signature, you can use the “Rec 3/3” page “Event Edit” function to change the time signature. All tracks will be in the same state as the track in which you last changed the time signature.
If you record with the [ACC] switch on, you can leave the “Rec 1/3” page “Tempo” setting at “Man” so that the time signature will match the rhythm style. However if you use “Event Edit” to modify the time signature and then re-record, the time signa-ture with which you re-recorded will be used.
To record the tempo as wellIn the “Rec 1/3” page, press the “Tempo” button to change “Man” to “Rec,” and tempo changes you make during recording will be recorded. When playing back the recorded data, setting the “Tempo” button to “Auto” will cause the recorded tempo to play back. Setting it to “Man” will allow you to change the tempo manually.
When you stop recording, the “Tempo” button will automatically change to “Auto.”
It is not possible to record only the tempo by itself.
4 Start recordingPress the RECORDER [PLAY/STOP] switch.After a two-measure count-off, recording will begin.Play the keyboard to record your performance.
To change the number of measures in the pre-countIn the “Rec 2/3” page “Count-In” cell, set the number of measures in the pre-count to “0,” “1,” or “2.”If you are using the metronome, pressing the [START/STOP] switch will start the met-ronome from the first beat (strong beat).
If you wish to set the “Count-In” cell to “0” and start recording from the first beat, it is convenient to set the “Assignable Switch” cell of the “Func 3/10” page to “Start/Stop,” and use the assignable switch to start recording.

Reco
rdin
g
To stop recordingWhen you are finished performing, press the RECORDER [PLAY/STOP] switch.You will return to the “Rec 1/3” page, and the track you had set to “Rec” will be set to “Play.”At this time the performance data will be automatically stored in internal memory. A message will be displayed while this is occurring.
Never turn off the power while data is being stored.
5 Play back the song you recordedWhen you press the RECORDER [PLAY/STOP] switch, the recorded song will play back.
Recording with automatic accompanimentPress the [ACC] switch to turn it on, and then follow the “Basic recording” procedure. (☞ p.49)The rhythm styles or chords that you specify during your performance can also be recorded.
When checking the tracks to be recorded in step 2, press the “Style” cell and select a rhythm style.
It is not possible to turn off the [SINGLE TOUCH] switch.
Loading performance data that you recordedPerformance data that you recorded on the SP-500 can be played back or edited. You can also add to it by recording additional material.
1 Press the RECORDER [SONG SELECT] switchThe “Rec 1/3” page will appear.Press the “SONG number: Song name” cell, and use the dial or [VALUE] switches to select the song that you want to play back.
2 Press the RECORDER [PLAY/STOP] switchMake sure that the “KBD,” “Control,” and “Chord” track buttons are all set to “Play.” When you press the RECORDER [PLAY/STOP] switch, the recorded song will be played back.
51

52
To pause the playbackPress the RECORDER [PAUSE] switch. When you press the [PAUSE] switch once again, playback will resume.
To fast-forwardPress the RECORDER [FF] switch while the recorder is stopped or paused.
To rewindPress the RECORDER [REW] switch while the recorder is stopped or paused.
To stop the playbackWhen playback ends, press the RECORDER [PLAY/STOP] switch.
About tracksThe recorder of the SP-500 consists of three tracks that independently record specific functions (“KBD,” “Control,” and “Chord”) and five tracks for multi-track recording.Each of these tracks can be independently set to “Rec” (record), “Play” (playback), or “Mute” (muted).If any track is set to “Rec,” the [RECORD] switch will blink.
Tracks “1”–“5” cannot be set to “Mute.”
“Rec 1/3” page“KBD”: The track that records the performance you play on the keyboard“Control”: The track that records controllers and panel operations such as auto-matic accompaniment fills and functions“Chord”: The track that records the chord progression of the rhythm style
When the “KBD,” “Control,” or “Chord” track are set to “Mute,” that track will not play back.
“Rec 2/3” pageTrack “1”–“5”: Tracks for multi-track recording (☞ p.53)

Reco
rdin
g
2. Various recording methods
Using Quantize while you recordThe Quantize function corrects the timing of your performance while you record.In the “Rec 2/3” page, press the “Quantize” cell, and use the dial or the [VALUE] switches to specify the resolution (timing precision).
“High”: Data will be recorded at the maxi-mum resolution (a quarter note is divided into 96 parts), and the timing will not be quan-tized.“� ”–“� ”: The timing will be corrected to the specified note value. When “� ” is selected, the timing will be corrected to the nearest 32th note triplet. When “� ” is selected, the timing will be corrected to the nearest quarter note unit.
If you use a rough quantization such as � or � when recording damper pedal or other control data, the result may sound unnatural when played back. To avoid this, record with a quantize setting of “High,” and then use the “Rec 3/3” page “Quantize” function to correct the timing of only the note data. (☞ p.57)
Multitrack recordingYou can layer up to five tracks of recording onto the data that was recorded in “KBD,” “Control,” and “Chord.”Here’s how to load the performance data you recorded in “Basic recording” and use it as the basis of a multi-track recording.
1 Load the performance data that you savedLoad performance data that you saved in “Basic recording” or in step recording. (☞ p.51)
2 Access the “Rec 2/3” pagePress the [PAGE ®] to access the “Rec 2/3” page.
3 Select the track that you wish to recordPress the “Track” button for the track that you wish to record, to should say “Rec.”
Only one track at a time can be set to “Rec.”The Rec setting in the “Rec 1/3” page is auto-matically cancelled by the “Rec” setting you make here.
4 Select a sound programPress the “Program” cell, and select a pro-gram for the track on which you will be performing. (☞ p.24)
The Layer or Split functions cannot be used for tracks 1–5.
5 Start recordingPress the RECORDER [PLAY/STOP] switch, and the switch indicator will light.After a two-measure count-off, recording will begin.
To stop recordingPress the RECORDER [PLAY/STOP] switch. After a message informs you that the data is being stored into memory, the [RECORD] switch indicator will go dark. The “Track” button that was recorded will change to “Play.”
6 Record additional tracksSelect another track as described in step 3, and record using the same procedure.
To record additional material on the same track
Press the “Recording mode” cell, and select “OVDB.”The following record types can be selected.OVWR (overwrite): The newly-recorded data will overwrite (and erase) the previ-ously-recorded data.
“Quantize” cell
�� � � � � � � �
� � � � � � �With a setting of �
53

54
OVDB (overdub): The newly recorded data will be added to the previously-recorded data.AUTP (auto punch-in/out): Auto punch-in/out recording will be performed.
In the “Rec 1/3” page, “OVWR” will be used regardless of this setting.For “OVWR” and “OVDB,” the “start mea-sure” cell and the “end measure” cell settings are ignored.
To change the name of the songAccess the “Rec 3/3” page, press the “Song Name” button, and edit the song name. (☞ p.59)
Recording from the middle of the song
1 Select the performance data that you savedLoad performance data that you saved in “Basic recording” or step recording. (☞ p.51)
2 Play back the recorded songSet each track to “Play,” and press the [PLAY/STOP] switch.
3 When you come to the measure that you wish to record, pause the playbackWhen playback reaches the measure at which you wish to begin recording, press the [PAUSE] switch to pause.
4 Select the track that you wish to recordChange the setting to “Rec” for the track that you wish to additionally record.• When recording with the [ACC] switch
on, the KBD, CTRL, and CHORD tracks.
• When recording with the [ACC] switch off, the KBD and CTRL tracks.
• When recording tracks 1 – 5, the corre-sponding track.
5 Defeat pausePress the [PAUSE] switch to defeat pause.After a two-measure pre-count, recording will begin.
Auto punch-in/outIf you made a mistake or did not obtain the desired result in one location of a recorded song, you can re-record just that location without having to re-record from the beginning of the song. Auto Punch In is the action of automatically switching from playback into record mode at the previously speci-fied measure. Conversely, Auto Punch Out is the action of automatically switching from record mode into playback at the specified measure.
This function can be used on tracks 1–5.
1 Select the performance data that you savedLoad performance data that you saved in “Basic recording” or step recording. (☞ p.51)
2 Pause at a point earlier than the measures you wish to re-recordSet each track to “Play,” and press the [PLAY/STOP] switch. Two or three mea-sures before the measure at which you will begin re-recording, press the [PAUSE] switch.
3 Select the track that you wish to re-recordFor the track that you wish to re-record, press the “Track” button to select “Rec”.
The following settings cannot be made unless you select “Rec.”
4 In the “Rec 2/3” page, set the “Recording mode” cell to “AUTP.”Press the “Recording mode” cell, and use the dial or the [VALUE] switches to select “AUTP.”
5 Set the “start measure” cellPress the “start measure” cell, and use the dial or the [VALUE] switches to specify the measure at which you will begin re-recording.
“Recording mode” “Start” “End”

Reco
rdin
g
6 Set the “end measure” cellPress the “end measure” cell, and use the dial or the [VALUE] switches to specify the last measure that you will re-record.
7 Start recordingWhen you press the RECORDER [PAUSE] switch, the song will play back from the measure you specified in step 2.
Recording will begin automatically when you reach the measure specified in step 5, so start playing a few measures earlier than the recording start measure.
8 Stop recordingWhen the recording end measure has passed, recording will stop automatically, and playback will resume. Press the RECORDER [PLAY/STOP] switch to stop playback.
Recording the automatic accompa-niment without performing (Step Recording)By using the Step Recording function you can input controllers such as automatic accompaniment chords and fills at the specified measures, without having to actually play the keyboard yourself. This means that you can record an automatic accompa-niment from the chords or chord symbols of printed music, even if you are not able to play the piano.
1 Press the RECORDER [RECORD] switchThe “Rec 1/3” page will appear.“NewSong” will be selected automati-cally.Turn on the [ACC] switch.
2 Access the “Rec 3/3” pageUse the [PAGE ®] switches to access the “Rec 3/3” page.
3 Press the “Step Rec” buttonThe “Step Rec” page will appear.
To input a rhythm style chord, set the “Track” cell to “Chord.”To input a rhythm style controller, set the “Track” cell to “Ctrl.”The “Start Measure” cell specifies the beginning measure, and the “End Mea-sure” cell specifies the ending measure.
In the case of a track you are recording for the first time, you will be able to input as far as the measure you specify in the “End Measure” cell. If the track has previously been recorded, this cell will automatically be set to the last measure.
4 Press the “Start” buttonThe step recording page will appear.
To end step recordingPress the [EXIT] switch. The “Rec 3/3” page will appear.
Step recording procedure
“Chord”: Inputting chords
1“Measure” cell: The event will be written into the measure specified here.
2“Location” cell: Specify the location within the measure into which the event will be written.The displayed numbers indicate “beat:clock.”Beats are quarter-note units.Clocks are 1/96th of a quarter note.“1:00” indicates the beginning of the mea-sure.For example, the second quarter note beat would be displayed as “2:00,” the third beat as “3:00,” and beat 1.5 as “1:48.”For step recording, this is set to 48 (8th note) units.
3Chord root:4Chord bass note:5Chord type: If you specify “No Chord” here,
only Drum and Perc will play.6Chord tension:7“▲, ▼” button: Select the location
61
2
90
87
3
45
55
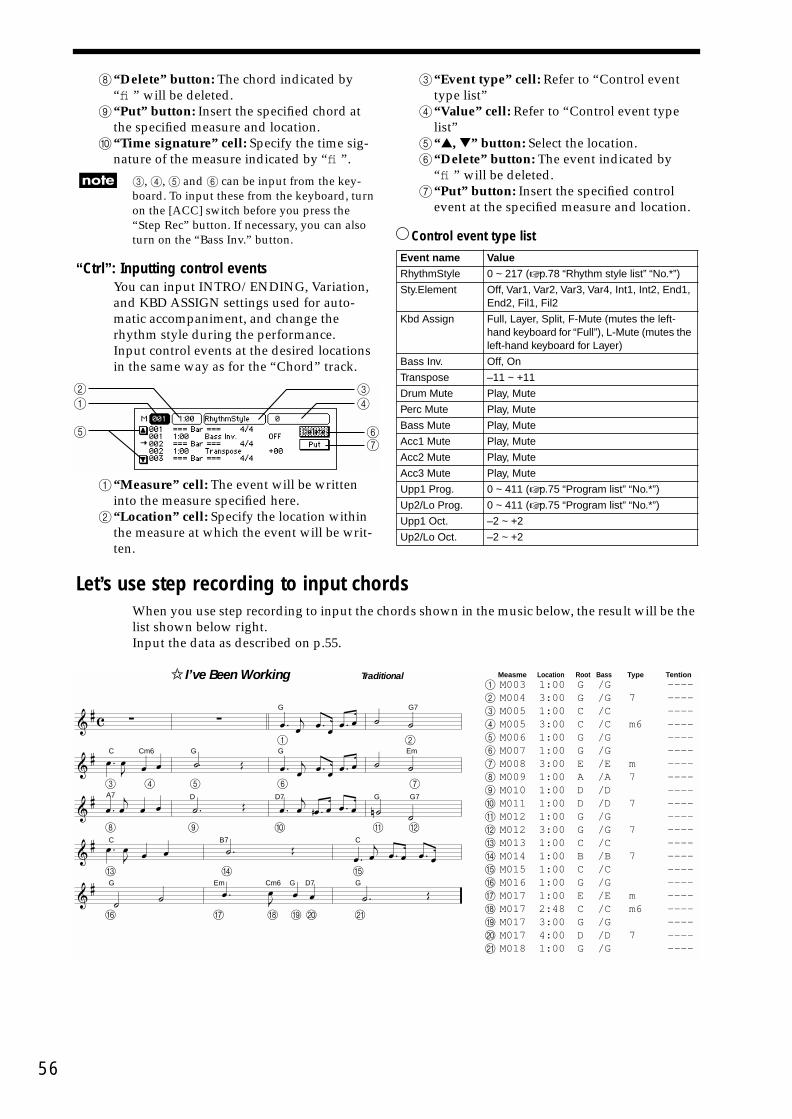
56
8“Delete” button: The chord indicated by “fi ” will be deleted.
9“Put” button: Insert the specified chord at the specified measure and location.
0“Time signature” cell: Specify the time sig-nature of the measure indicated by “fi ”.
3, 4, 5 and 6 can be input from the key-board. To input these from the keyboard, turn on the [ACC] switch before you press the “Step Rec” button. If necessary, you can also turn on the “Bass Inv.” button.
“Ctrl”: Inputting control eventsYou can input INTRO/ENDING, Variation, and KBD ASSIGN settings used for auto-matic accompaniment, and change the rhythm style during the performance.Input control events at the desired locations in the same way as for the “Chord” track.
1“Measure” cell: The event will be written into the measure specified here.
2“Location” cell: Specify the location within the measure at which the event will be writ-ten.
3“Event type” cell: Refer to “Control event type list”
4“Value” cell: Refer to “Control event type list”
5“▲, ▼” button: Select the location.6“Delete” button: The event indicated by
“fi ” will be deleted.7“Put” button: Insert the specified control
event at the specified measure and location.
Control event type list
Let’s use step recording to input chordsWhen you use step recording to input the chords shown in the music below, the result will be the list shown below right.Input the data as described on p.55.
6
12
7
34
5
Event name Value
RhythmStyle 0 ~ 217 (☞ p.78 “Rhythm style list” “No.*”)
Sty.Element Off, Var1, Var2, Var3, Var4, Int1, Int2, End1, End2, Fil1, Fil2
Kbd Assign Full, Layer, Split, F-Mute (mutes the left-hand keyboard for “Full”), L-Mute (mutes the left-hand keyboard for Layer)
Bass Inv. Off, On
Transpose –11 ~ +11
Drum Mute Play, Mute
Perc Mute Play, Mute
Bass Mute Play, Mute
Acc1 Mute Play, Mute
Acc2 Mute Play, Mute
Acc3 Mute Play, Mute
Upp1 Prog. 0 ~ 411 (☞ p.75 “Program list” “No.*”)
Up2/Lo Prog. 0 ~ 411 (☞ p.75 “Program list” “No.*”)
Upp1 Oct. –2 ~ +2
Up2/Lo Oct. –2 ~ +2
� �
����
�����
� �
�� �
� �
�
�
� �
� � �
�
�
�
�
��
�
� � �� �� �
� �
�
�� �� �� ��
�� ���
��
G G7
GG EmCm6C
B7C C
Em Cm6 G D7G G
D7 G G7DA7
M003 1:00 G /G ----M004 3:00 G /G 7 ----M005 1:00 C /C ----M005 3:00 C /C m6 ----M006 1:00 G /G ----M007 1:00 G /G ----M008 3:00 E /E m ----M009 1:00 A /A 7 ----M010 1:00 D /D ----M011 1:00 D /D 7 ----M012 1:00 G /G ----M012 3:00 G /G 7 ----M013 1:00 C /C ----M014 1:00 B /B 7 ----M015 1:00 C /C ----M016 1:00 G /G ----M017 1:00 E /E m ----M017 2:48 C /C m6 ----M017 3:00 G /G ----M017 4:00 D /D 7 ----M018 1:00 G /G ----
1 2
3 4 5 6 7
8 9 0 A B
C D E
F G H I J K
1
2
3
4
5
6
7
8
9
0
A
B
C
D
E
F
G
H
I
J
K
Measme Location Root Bass Type Tention✩ I’ve Been Working Traditional

Reco
rdin
g
3. Editing functions
Editing previously-saved dataData that you recorded in realtime or by step recording can be recalled again, so that you can edit the data or add an additional performance.
1 Select the performance data that you savedLoad performance data that you saved in “Basic recording” or step recording. (☞ p.51)
2 Edit the dataYou can edit data in the “Rec 1/3,” “Rec 2/3” and “Rec 3/3” pages.
“Rec 1/3” page
“KBD” button: The track for data you played on the keyboard and recorded in the “Rec 1/3” page“Control” button: The track that records controllers and panel operations such as switching automatic accompaniment fills and variations on/off. (☞ p.56 “Control event type list”)“Chord” button: The track in which the rhythm style chord progression is recorded“Tempo” button: Each time you press the “Tempo” button in the “Rec 1/3” page, the setting will alternate between “Man,” “Auto,” and “Rec.” If the “Func 4/10” page “Sync.” parameter is set to “Ext.” (☞ p.71), the tempo display will be “� =EXT.” In this case it will not be possible to change the tempo on the SP-500, so the setting here will be ignored.
Man: You can adjust the tempo manually.Auto: The tempo will change according to the data in the tempo track.Rec: Tempo data will be recorded in the tempo track.
“Rec 2/3” page
Track 1–5 button: These contain keyboard performance data that was recorded in the “Rec 2/3” page.
“Rec 3/3” page
A variety of functions are provided for you to edit recorded data. For details on each item, refer to “Details of the “Rec 3/3” page items”.
Details of the “Rec 3/3” page itemsThe “Rec 3/3” page provides the following func-tions for editing recorded data.To access these pages, press the button for the item that you wish to edit.The procedures explained below will assume that you have already pressed the appropriate button to access the page.When you return to the “Rec 3/3” page after edit-ing, the edited performance data will be stored automatically.
“Quantize” pageHere you can correct the timing of the recorded performance data.This function is more flexible than the “Quantize” cell of the “Rec 2/3” page. Since you can select the range of measures and the type of data to be quantized, other measures and other types of data will not be affected.
“Quantize” Radio buttons: Select the type of data that will be quantized.
All: All event dataNote: Data played from the keyboard (referred to as “note-on/off events”)CTRL: Damper, soft, and sostenuto pedal data (referred to as “control changes”)AFTT: Aftertouch data (this cannot be recorded on the SP-500)Bend: Pitch bend data (this cannot be recorded on the SP-500)Prog.: Data to switch programs (referred to as “program changes.” Bank changes are also included.)
“Track” cell: Specify the track to which quantization will be applied.
Kbd, Ctrl, Chord, Track 1–5, Tempo“Res.” cell: Specify the note length (resolution).
High: 1/96th of a quarter note� : 32nd note triplet� : 32nd note� : 16th note triplet� : 16th note� : 8th note triplet
57

58
� : 8th note� : quarter note“Start” cell: Specify the starting measure.“End” cell: Specify the ending measure.“QNTZ” button: Execute the Quantize oper-ation.“Cancel” button: Return to the previous screen without executing Quantize.
“Event Edit” pageHere you can directly rewrite or add to the data.Select the track and measure that you wish to edit, and press the “Start” button.
“Track” cell: Select the track that you wish to edit. The event editing procedure will differ depending on the track you select.“Start Measure” cell: Select the measure at which you wish to start editing.“Start” button: Begin event editing.“Cancel” button: Return to the previous screen.
Event editing procedure when the Kbd track or Track 1–Track 5 is selectedWhen you press the “Start” button, the “Event Filter” page will appear.
Turn on the check boxes for the events that you wish to edit. When you press the “OK” button, the “Event Edit” page will appear.The data in the center of the screen is what you will be editing.
1“Measure” cell: The event will be written into the measure specified here.
2“Location” cell: Specify the location within the measure into which the event will be written.The displayed numbers indicate “beat:clock.”Beats are quarter-note units.Clocks are 1/96th of a quarter note.“1:00” indicates the beginning of the mea-sure.
For example, the second quarter note beat would be displayed as “2:00,” the third beat as “3:00,” and beat 1.5 as “1:48.”
3Event type: Some event types contain two items of data, while other types have only one.
4Event data 1:5Event data 2:6“▲, ▼” button: Select the location7“Set” button: Finalize the specified event.
In the edit screens, the “Set” button will be grayed out if the settings have not been modified. The “Set” button will be displayed when you modify the settings, so that you can press the “Set” button to finalize your changes. After you press the “Set” button, it will once again be grayed out.
8“Insert” button: Insert the event into the “M” location (center of the page).
9“Delete” button: Delete the event of the “M” location.
Event type list
712
98
6
3 45
Event type Value 1 Value 2
C-1...G9(note data)
V:002–V:126 (velocity)
0:00–5:00 (length, beat:clock)
*1
BEND(pitch bend)
–8192 – +8191 (upper/lower value)
AFTT (aftertouch) 000–127 (value)
PROG(program change)
000–127(program bank)
000–127(program number)
*2
CTRL(control change)
C000–C127 (number)
000–127 (value)
PAFT(poly aftertouch)
C-1–G9(note number)
000–127 (value) *3
*1 Displayed as “TIE” if the note continues to the following measure.
*2 “004” is the drum bank. For the correspondence between program numbers and drum programs, refer to the Pro-gram List (☞ p.75) in the Appendix.For Value 1, the range 000...127 indicates the MIDI bank change LSB. The MSB will be 0.With a setting of …, the program bank will not be transmit-ted. The previously specified bank will be maintained.
*3 MIDI polyphonic key pressure will be transmitted.
Dot
Triplet
Example)
�(0:12)
�(0:24)
�(0:48)
�(1:00)
(2:00)
�(4:00)
� (0:18)
� (0:36)
� (0:72)
� (1:48)
(3:00)
� (6:00)
�(0:08)
�(0:16)
�(0:32)
�(0:64)
(1:32)
�(2:64)
3 3 3 3 3 3
4:64
� � �� � �1:00 2:00 4:003:00 1:00
2:483:00
�34:00
4:32
� �2:00
��3:48
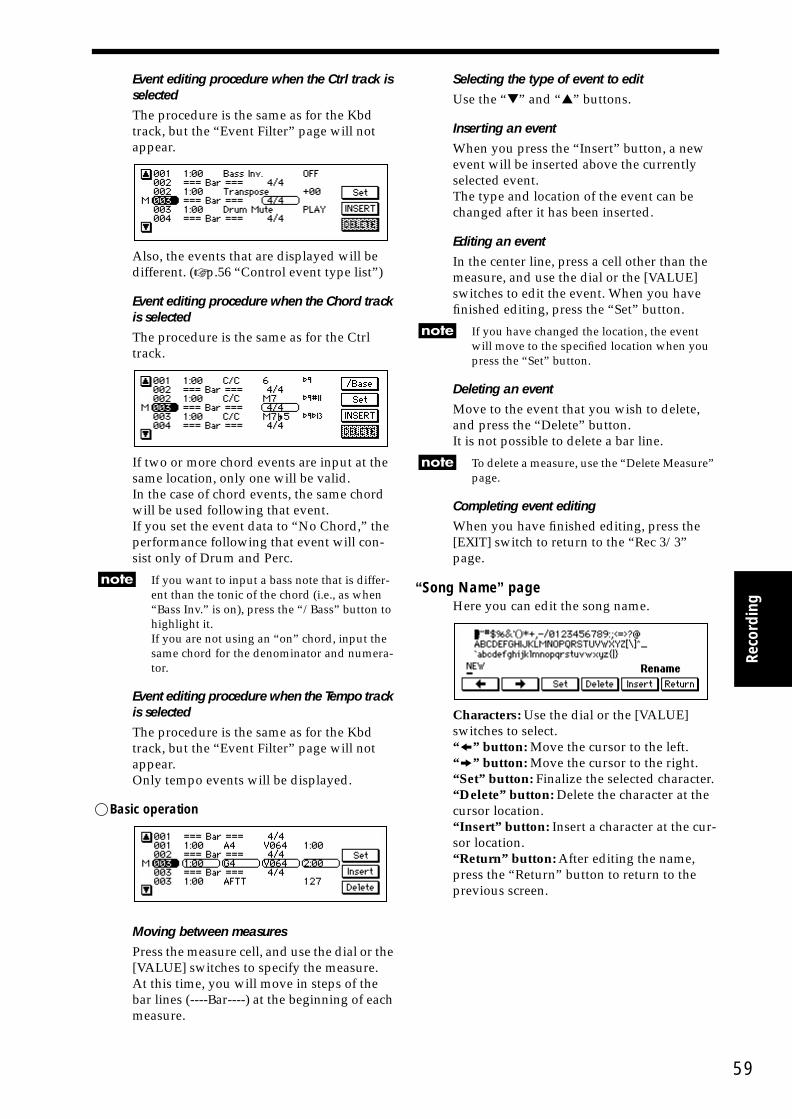
Reco
rdin
g
Event editing procedure when the Ctrl track is selectedThe procedure is the same as for the Kbd track, but the “Event Filter” page will not appear.
Also, the events that are displayed will be different. (☞ p.56 “Control event type list”)
Event editing procedure when the Chord track is selectedThe procedure is the same as for the Ctrl track.
If two or more chord events are input at the same location, only one will be valid.In the case of chord events, the same chord will be used following that event.If you set the event data to “No Chord,” the performance following that event will con-sist only of Drum and Perc.
If you want to input a bass note that is differ-ent than the tonic of the chord (i.e., as when “Bass Inv.” is on), press the “/Bass” button to highlight it.If you are not using an “on” chord, input the same chord for the denominator and numera-tor.
Event editing procedure when the Tempo track is selectedThe procedure is the same as for the Kbd track, but the “Event Filter” page will not appear.Only tempo events will be displayed.
Basic operation
Moving between measuresPress the measure cell, and use the dial or the [VALUE] switches to specify the measure.At this time, you will move in steps of the bar lines (----Bar----) at the beginning of each measure.
Selecting the type of event to editUse the “▼” and “▲” buttons.
Inserting an eventWhen you press the “Insert” button, a new event will be inserted above the currently selected event.The type and location of the event can be changed after it has been inserted.
Editing an eventIn the center line, press a cell other than the measure, and use the dial or the [VALUE] switches to edit the event. When you have finished editing, press the “Set” button.
If you have changed the location, the event will move to the specified location when you press the “Set” button.
Deleting an eventMove to the event that you wish to delete, and press the “Delete” button.It is not possible to delete a bar line.
To delete a measure, use the “Delete Measure” page.
Completing event editingWhen you have finished editing, press the [EXIT] switch to return to the “Rec 3/3” page.
“Song Name” pageHere you can edit the song name.
Characters: Use the dial or the [VALUE] switches to select.“o” button: Move the cursor to the left.“k” button: Move the cursor to the right.“Set” button: Finalize the selected character.“Delete” button: Delete the character at the cursor location.“Insert” button: Insert a character at the cur-sor location.“Return” button: After editing the name, press the “Return” button to return to the previous screen.
59

60
“Bounce Track” pageHere you can select two tracks from the Kbd track and Track 1–Track 5, and combine them into a single track.
“Source” cell: Specify the first track.“Destination” cell: Specify the second track.“Bounce” button: When you press the “Bounce” button, the two tracks will be com-bined into the “Destination” track. The data of the “Source” track will be erased.“Cancel” button: Return to the previous screen without executing.
If pitch bend, damper pedal, or other control events are used in both tracks, combining the two tracks may produce unintended results if the location of this data overlaps.
The resulting track will use the program, MIDI channel, and other track settings of the merge destination track.
“Insert Measure” pageHere you can insert one or more measures.
“Track” cell: Specify the track(s) that will be affected. To insert into all tracks, specify “All.”“Start” cell: Specify the beginning measure.“Length” cell: Specify the number of mea-sures that will be inserted.“Meter” cell: Specify the time signature.“Insert” button: When you press the “Insert” button, the measures will be inserted.“Cancel” button: Return to the previous screen without executing.
To insert a measure of a different time signa-ture
The modified time signature will be valid if you set the “Rec 1/3” page “Tempo” parameter to “Auto.” When you insert a measure of a different time signature, the corresponding measures of all tracks will use this time signature, meaning that this measure will become shorter or longer.
Regardless of whether or not you select a different time signature, the measures fol-lowing the inserted measures will be moved backward. If you insert measures into only one track, the measures that are moved backward will be the same time signature as the corresponding measures of the other tracks, as shown in the above diagram.Measures whose number has changed as a result of the insertion may be shortened or lengthened.
If you want the time signature to match the other tracks, select “**/**” for “Meter”; the inserted measures will have the same time sig-nature as the other tracks.
“Delete Measure” pageHere you can delete one or more measures.
“Track” cell: Specify the track(s) that will be affected. To delete measures from all tracks, specify “All.”“Start” cell: Specify the first measure that will be deleted.“End” cell: Specify the last measure that will be deleted.“Delete” button: When you press the “Delete” button, the measures will be deleted.“Cancel” button: Return to the previous screen without executing.
If you delete measures from only one track, the measures that are moved forward will be the same time signature as the corresponding measures of the other tracks, as shown in the above diagram. Measures whose number has changed as a result of the deletion may be shortened or lengthened.
“Initial Edit”Here you can edit the initial settings and effect settings located at the beginning of the song. These settings can be made for each track.
Track 1
Before insertion
1 (4/4) 2 (7/8)Track 1
• Insert 2 measures of time signature = 7/8
4 (4/4) 5 (3/4)
5 (3/4) 6 (3/4)4 (4/4)Track 2
Afterinsertion
1 (4/4) 2 (7/8)
3 (7/8)
3 (7/8)
5 (3/4)4 (4/4)1 (4/4) 2 (2/4) 3 (2/4)
Track 2 5 (3/4)4 (4/4)1 (4/4) 2 (2/4) 3 (2/4)
Inserted
7 (3/4)
(Time signature is changed, with data remaining the same)
(Time signature is changed, with data remaining the same)
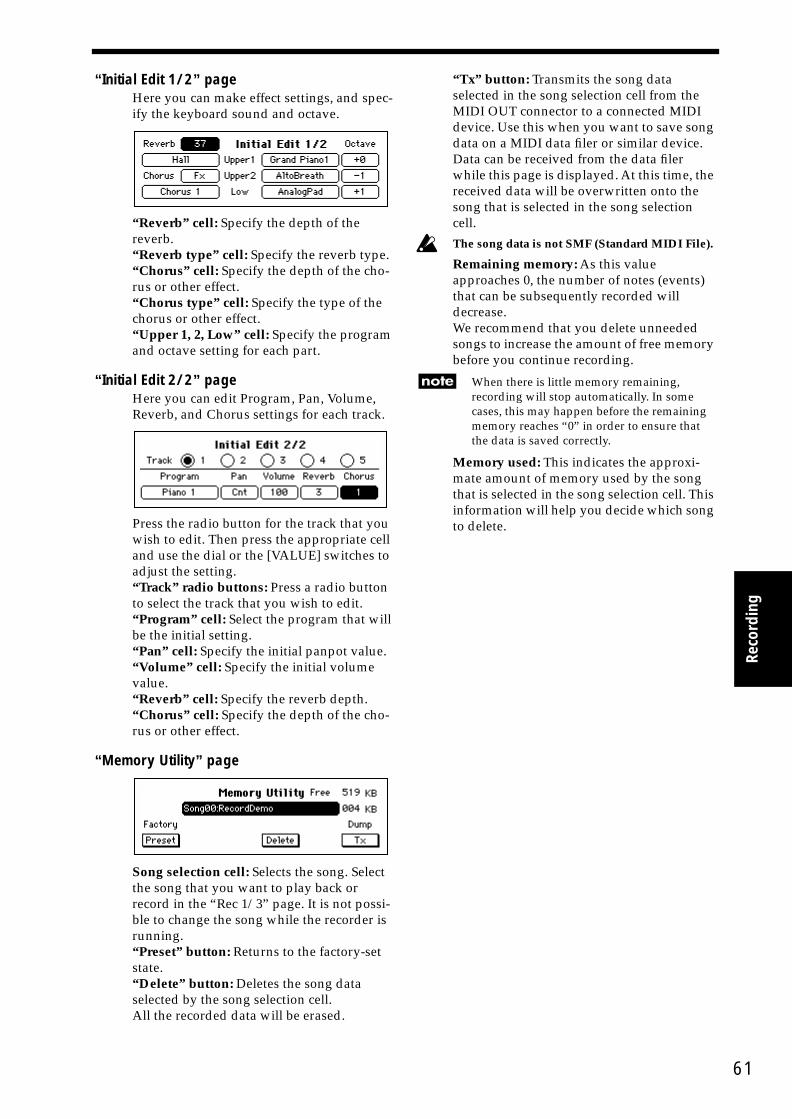
Reco
rdin
g
“Initial Edit 1/2” pageHere you can make effect settings, and spec-ify the keyboard sound and octave.
“Reverb” cell: Specify the depth of the reverb.“Reverb type” cell: Specify the reverb type.“Chorus” cell: Specify the depth of the cho-rus or other effect.“Chorus type” cell: Specify the type of the chorus or other effect.“Upper 1, 2, Low” cell: Specify the program and octave setting for each part.
“Initial Edit 2/2” pageHere you can edit Program, Pan, Volume, Reverb, and Chorus settings for each track.
Press the radio button for the track that you wish to edit. Then press the appropriate cell and use the dial or the [VALUE] switches to adjust the setting.“Track” radio buttons: Press a radio button to select the track that you wish to edit.“Program” cell: Select the program that will be the initial setting.“Pan” cell: Specify the initial panpot value.“Volume” cell: Specify the initial volume value.“Reverb” cell: Specify the reverb depth.“Chorus” cell: Specify the depth of the cho-rus or other effect.
“Memory Utility” page
Song selection cell: Selects the song. Select the song that you want to play back or record in the “Rec 1/3” page. It is not possi-ble to change the song while the recorder is running.“Preset” button: Returns to the factory-set state.“Delete” button: Deletes the song data selected by the song selection cell.All the recorded data will be erased.
“Tx” button: Transmits the song data selected in the song selection cell from the MIDI OUT connector to a connected MIDI device. Use this when you want to save song data on a MIDI data filer or similar device. Data can be received from the data filer while this page is displayed. At this time, the received data will be overwritten onto the song that is selected in the song selection cell.
The song data is not SMF (Standard MIDI File).
Remaining memory: As this value approaches 0, the number of notes (events) that can be subsequently recorded will decrease.We recommend that you delete unneeded songs to increase the amount of free memory before you continue recording.
When there is little memory remaining, recording will stop automatically. In some cases, this may happen before the remaining memory reaches “0” in order to ensure that the data is saved correctly.
Memory used: This indicates the approxi-mate amount of memory used by the song that is selected in the song selection cell. This information will help you decide which song to delete.
61

62

Functions
Func
tions
1. Adjusting the pitch
Fine adjustments to the pitchHere’s how you can make fine adjustments to the pitch.When you are playing together with other instru-ments, you can use this function to tune the SP-500 to the other instruments.The pitch can be adjusted in half-step (0.5) Hz intervals over a range of 427.5 – 453.0 Hz (Hertz). The factory setting is A4=440 Hz.
1 Press the [FUNCTION] switchThe [FUNCTION] switch indicator will light, and the “Func 1/10” page will appear.
2 Adjust the “Tune” cellUse the dial or the [VALUE] switches to adjust the value of the “Tune” cell.
To write settings into internal memoryIn the “Func 7/10” page, execute “Write” button.If you turn off the power without writing, the previous settings will reappear.
To return to the previous displayIf you press the [EXIT] switch or the [FUNCTION] switch, the [FUNCTION] switch indicator will go dark, and you will return to the previous LCD screen.
Changing the key (Transposing)When you wish to play a song that is written in a difficult key (e.g., f#, c# etc.), or when you need to tune to another instrument or accompany a vocalist it is convenient to use this function. This function also allows you to use familiar fingerings to play songs.
1 Press the [FUNCTION] switch
2 Change the “Transpose” settingPress the “Transpose” cell “▲” or “▼” to change the setting.The available range is –11 – +11.
When the power is turned off, this will be set to “0.”
To return to the previous displayIf you press the [EXIT] switch or the [FUNCTION] switch, the [FUNCTION] switch indicator will go dark, and you will return to the previous LCD screen.
Example 1: To play a song a semitone higherSet the “Transpose” setting to “+1.”With this setting, pressing the C key will sound like a C#. If the pitch has been raised a semitone as in this example, playing the notes shown at the lower left will produce the pitches shown at the lower right.
Example 2: Using G fingering to play a song in B �Set the “Transpose” setting to “+3.”Bb is a minor third above G (three semi-tones higher). Thus, we will make set-tings so that when the C key is pressed, the D# note (three semitones above C) is played.
� � �
63

64
Changing the octave
1 Press the [FUNCTION] switch
2 Change the desired “Octave” settingPress the “▲” or “▼” of the “Octave” cell to change the setting.The range is –2, –1, 0, +1, +2 octaves.Upp1: The first sound when [LAYER] or [SPLIT] are on, or the keyboard when [LAYER] or [SPLIT] are offUpp2: The sound layered on Upp1 when [LAYER] is onLow: The sound to the left of the split point when [SPLIT] is on
When the power is turned off, Upp1 will be set to “0,” Upp2 to “–1,” and Low to “+1.”
To return to the previous displayIf you press the [EXIT] switch or the [FUNCTION] switch, the [FUNCTION] switch indicator will go dark, and you will return to the previous LCD screen.
2. Selecting a temperamentNumerous classical pieces were composed using older temperaments that are slightly different than the equal temperament (tuning) commonly used today.In order to re-create the authentic resonances of such pieces, you can select and use classical tem-peraments such as Kirnberger or Werckmeister. You can also select ethnic scales used in Arabian or Indonesian music.
In addition, you can make assignable pedal settings for the “Quarter Tone” scale that is used in middle-eastern music. (☞ p.66)
Temperament name
Remark
Equal Temp Equal temperamentThe conventional temperament most widely used for keyboard instruments today. Since semitone steps are arranged at equal inter-vals, the same scale can be played in any key.
Equal Temp2 Equal temperament (random)This adds a slight degree of randomness to the equal tempered pitches. It is suitable for simulating acoustic instruments whose pitch tends to be naturally unstable.
Pure Major TemperamentIn this temperament, the principal major chords in the key specified by the “Key” cell will be completely harmonious.
Pure Minor Just intonation, major scaleThe principal major chords of the scale speci-fied in the “Key” cell will be acoustically perfect in this temperament.
Arabic Arabic (1/4)This is a quarter tone scale used in Arabic music. For Rast-C/Bayati-D, use C. For Rast-D/Bayati-E, use D. For Rast-F/Bayati-G use F. For Rast-G/Bayati-A use G. For Rast-Bb/Bayati-C, use A#.
Pythagorean PythagoreanThis temperament is based on ancient Greek musical theories, and is effective for playing melodies.
Werkmeister WerkmeisterThis is a temperament that was used in the Baroque period, and is similar to equal tem-perament.
Kirnberger KirnbergerThis18th century temperament is used mainly for harpsichords.
Slendro SlendroThis is an Indonesian Gamelan scale that divides the octave into five notes. When the key is C, use the C, D, F, G, and A notes.
Pelog PelogThis is an Indonesian Gamelan scale that divides the octave into seven notes. When the key is C, use the C, D, E, F, G, A, and B notes.
User 1–4 User scale

Func
tions
Selecting a temperament
1 Press the [FUNCTION] switch
2 Access the “Func 9/10” page
3 Select a temperamentUse the dial or the [VALUE] switches to change the “Main Scale” cell or the “Sub Scale” cell.Refer to the temperaments list on the pre-vious page.
When the power is turned on, “Main Scale” will be selected. You can use the assignable switch to switch to the “Sub Scale.” (☞ p.66)
4 Specify the “Key”Specify the key of the selected scale.However, this is not available for “Equal Temp” or “Equal Temp2.”
To return to the previous displayIf you press the [EXIT] switch or the [FUNCTION] switch, the [FUNCTION] switch indicator will go dark, and you will return to the previous LCD screen.
About stretched tuningFor some programs, a more natural resonance is obtained by adjusting the lower range flat-ter, and the higher range sharper, than the equal tempered pitches.
Creating your own temperamentYou can use the User Scale function to create and store four of your own scales.
1 Press the [FUNCTION] switch
2 Access the “Func 8/10” page
3 Select the “User Scale” cell that you wish to modifyFrom “User Scale 1–4,” use the dial or the [VALUE] switches to select the user scale that you wish to modify.
4 Specify the pitch of each key in one-cent stepsYou can adjust the pitch over a range of –50 – +50 cents.
To write settings into internal memoryIn the “Func 7/10” page, execute “Write” button.If you turn off the power without writing, the previous settings will reappear.
To return to the previous displayIf you press the [EXIT] switch or the [FUNCTION] switch, the [FUNCTION] switch indicator will go dark, and you will return to the previous LCD screen.
65

66
3. Using the pedals
Damper pedal settings for Layer and SplitYou can specify whether the damper pedal effect will apply to one or both sounds when you use the Layer or Split functions.
1 Press the [FUNCTION] switch
2 Access the “Func 3/10” pagePress the [PAGE ®] switch twice to access the “Func 3/10” page.
3 Make the desired settingsIf you select off the “Upp1” check box, the damper will not apply to Upper 1.If you select off the “Low/Upp2” check box, the damper will not apply to Upper 2 or Lower.
If you change rhythm styles, this will change to the setting that is stored in the newly-selected rhythm style. (☞ p.46)
4 Return to the main pagePress the [EXIT] switch to return to the main page.
Specifying the function of the assignable switchA variety of functions can be assigned to a pedal connected to the Assignable Switch jack.With the factory settings, this is set to “Soft.”
1 Press the [FUNCTION] switch
2 Access the “Func 3/10” pagePress the [PAGE ®] switch twice to access the “Func 3/10” page.
3 Change the “Assignable Switch” settingUse the dial or the [VALUE] switches to select the function that you want to con-trol from the pedal connected to the Assignable Switch jack.
Soft The soft pedal of a pianoStart/Stop [STRAT/STOP] or [PLAY/STOP]Sync Start Same function as the [SYNCHRO START/
STOP] switchesAcc Reset Same function as the [ACC RESET]
switchesIntro/Ending1 Same function as the [INTRO/ENDING 1]
switchesIntro/Ending2 Same function as the [INTRO/ENDING 2]
switchesFill1 Same function as the [FILL 1] switchesFill2 Same function as the [FILL 2] switchesVariation 1 Select “1” for the “Variation” CellVariation 2 Select “2” for the “Variation” CellVariation 3 Select “3” for the “Variation” CellVariation 4 Select “4” for the “Variation” CellBass Inversion Turn the “Bass Inv.” cell on/offScale Change Switch between “Main Scale” and “Sub
Scale” (☞ p.65)Variation Up Select next variationVariation Down Select previous variationReverb On/Off [REVERB] switch, on/offEffect On/Off [CHORUS etc.] switch, on/offDrum Mute Mute Drum part of automatic accompani-
ment (☞ p.40)Perc. Mute Mute Perc. part of automatic accompani-
ment (☞ p.40)Bass Mute Mute Bass part of automatic accompani-
ment (☞ p.40)Acc1 Mute Mute Acc1 part of automatic accompani-
ment (☞ p.40)Acc2 Mute Mute Acc2 part of automatic accompani-
ment (☞ p.40)Acc3 Mute Mute Acc3 part of automatic accompani-
ment (☞ p.40)Tap Tempo Same function as the [TAP TEMPO]
switchesEnsemble Same function as the [ENSEMBLE]
switchesQuarter Tone Used in middle-eastern music. The pitch
will be adjusted by +50 cents for notes played while the pedal is on (or adjusted by –50 cents if the pedal is pressed twice). Press the pedal once again to cancel.

Func
tions
4. All setupSettings such as the [FUNCTION] settings are stored in internal memory.If you execute this operation, the settings will be preserved in internal memory even when the power is turned off, so that the same settings will still be in effect when the power is next turned on.The following items are remembered.
❍ Setting contents
[FUNCTION] switch settings“Func 1/10” page
Tune“Func 3/10” page
Assignable Switch“Func 4/10” page
MIDI Transpose“Func 5/10” page
Prog., ProgBank, Control, AfterTouch, Exclusive
“Func 6/10” pageKeyboard, Upper 1, Low/Upp2Dr, Perc, Bass, Acc1, Acc2, Acc3Chord Rx1, Chord Rx2
“Func 8/10” pageUser Scale 1–4 settings
“Func 10/10” pagePopup Time
[TOUCH] switch setting
The following settings of the [ACC] switchOne finger, Fingered 1, Fingered 2, Split Point, After Fill1, After Fill2
To store these settings into internal memoryHere’s how to store All Setup data into internal memory.
1 Press the [FUNCTION] switch
2 Access the “Func 7/10” page
If the current settings differ from the stored settings, this page will show a message of “Setup parameter modified.” In this case, press the “Write” button to store the settings into internal memory.If you turn off the power without storing, the previous settings will reappear when the power is next turned on.
Never turn off the power while data is being stored.
Restoring the factory-set conditionBy pressing the factory “Preset” button you can return the contents of All Setup to the factory-set condition.
If you turn off the power while data is being written, the memory contents may be damaged. If the memory contents are damaged, the user rhythm styles, user programs, and All Setup data will automatically return to their factory-set condition the next time the power is turned on. If part of the recorded data has also been dam-aged, all of the recorded data will return to the factory-set condition.
67

68
5. Convenient functions
Adjusting the left/right balanceHere’s how to adjust the left/right balance of the sound.
1 Press the [FUNCTION] switch
2 Access the “Func 2/10” screen
3 Adjust the “Pan”If you are not using layer or split, or if you wish to change the panning of Upp1 when using Layer, press “▲” or “▼” for the “Upp1” cell to change the value.To change the panning of Upp2 when using Layer, press “▲” or “▼” for the “Upp2” cell to change the value.To change the panning of the lower sound (Low) when using Split, press “▲” or “▼” for the “Low” cell to change the value.The available range is Off*, L15 (left only)–Cnt (center)–R15 (right only), and Prg (the value specified by the program).* Only the sound processed by the reverb
or effect will be heard.
For some programs, “Pan” will have no effect.
To return to the previous displayIf you press the [EXIT] switch or the [FUNCTION] switch, the [FUNCTION] switch indicator will go dark, and you will return to the previous LCD screen.
Adjusting the display time of a popup screen
1 Press the [FUNCTION] switch
2 Access the “Func 10/10” screen
3 Adjust the display timeUse “Prog/Style” to adjust the time that the popup screen that appears when you switch the program or rhythm style will remain visible. Use “Other Page” to adjust the time that popup screens for other settings will be displayed.The available range is 0.1–10 seconds.
To write settings into internal memoryIn the “Func 7/10” page, execute “Write.”If you turn off the power without writing, the previous settings will reappear.
To return to the previous displayIf you press the [EXIT] switch or the [FUNCTION] switch, the [FUNCTION] switch indicator will go dark, and you will return to the previous LCD screen.

Connecting other equipment
Func
tions
1. Connecting MIDI equipment
What is MIDI?MIDI (Musical Instrument Digital Interface) is a standard for connecting a variety of MIDI instru-ments together allowing to talk to each other. By playing the SP-500, you can connect other MIDI-equipped instruments. When doing so, your sound selections and damper pedal operations etc. will control the other instru-ment as well.Conversely, other MIDI keyboards or sequencers (automatic playback devices) can control the SP-500 to play its sounds. By combining two or more MIDI devices, you can expand the SP-500’s sound selection. You can also use MIDI to transfer data from the SP-500’s built-in recorder for external stor-age.This section will explain how you can take advan-tage of the SP-500’s MIDI functionality. If you would like to learn more about MIDI, please refer to one of the many introductory books that are commercially available.
MIDI connectionsMIDI cables are used to transfer MIDI data.Connect this cable to the MIDI connectors of the SP-500 and the MIDI connectors of an external MIDI device. There are two MIDI port types.
MIDI IN connectorMIDI messages are received at this connector.This lets you use an external MIDI device (e.g., MIDI keyboard or sequencer) to play and control the sounds of the SP-500. Use a MIDI cable to con-nect the SP-500’s MIDI IN connector to the MIDI OUT connector of the external MIDI device.
MIDI OUT connectorMIDI messages are transmitted from this connec-tor.The MIDI messages that are transmitted when you play the SP-500 can control an external MIDI device. Use a MIDI cable to connect the MIDI OUT connector of the SP-500 to the MIDI IN connector of the external MIDI device.
MIDI channel settingsAfter you have finished making connections to your MIDI devices, set the MIDI channels of the SP-500 and the connected MIDI device to the same number. There are sixteen MIDI channels; 1–16.
1 Press the [FUNCTION] switch
2 Access the “Func 6/10” page
3 Set the value of each cellPress each cell, and use the dial or the [VALUE] switches to set the MIDI chan-nel.
“Chord Rx1,” “Chord Rx2”
Receive channel functionsThis is used when using an external MIDI device to control the chords for the auto-matic accompaniment.Chords can be specified by receiving MIDI note events from an external device on the specified channel. With this type of input, chords can be detected over the full range of the keyboard, regardless of the split point setting.
Since the normal keyboard input and the Chord Rx channels can function simulta-neously, unexpected results may occur if you use keyboard input together with MIDI input.
MIDI OUTMIDI cable
MIDI keyboard
MIDI tone generator module
MIDI IN
69

70
“Keyboard”
Receive channel functionsUse this when you wish to use an exter-nal device to control the SP-500 via MIDI with the same operation as the SP-500’s own keyboard. If [LAYER] or [SPLIT] is on, note events will be sounded in the same way as when the SP-500’s own key-board is used. However, program changes will not be received.
When [DEMO] is selected, it is not possible to play the keyboard sound from an external device. The default sounds for MIDI channels 1–16 will be the sounds of the demo song.
Transmit channel functionsWhen the [DEMO] switch is lit, your per-formance on the keyboard will be trans-mitted on this channel.
When you use Recorder Tracks, please select “Keyboard” Channel 1.
❍ The following channel settings are valid when the [DEMO] switch is dark.
“Upper 1”
Receive channel functionsWhen MIDI note events of this channel are received, the Upper 1 sound will be heard.
Transmit channel functionsPerformance data from the keyboard will be transmitted on this channel.If the [SPLIT] switch is on, notes will be output only for the Upper 1 range.
If this is set to the same channel as “Keyboard,” program changes will not be received.
“Low/Upp2”
Receive channel functionsWhen MIDI note events of this channel are received, the Upper2 sound will be played if the [LAYER] switch is on, or the “Lower” sound will be played if the [SPLIT] switch is on.
Transmit channel functionsWhen the [SPLIT] switch is on, only the notes of the Lower range will be output on this channel.
If this is set to the same channel as “Keyboard” or “Upp1,” program changes will not be received.
“Drum,” “Perc,” “Bass,” “Acc1,” “Acc2,” “Acc3”
Receive channel functionsWhen MIDI note events of this channel are received, the corresponding auto-matic accompaniment part will be played.
Transmit channel functionsThe performance data of each automatic accompaniment part will be output on this channel.
Recorder Track 1–Track 5 are fixed at MIDI channels 2–6.
To write settings into internal memoryIn the “Func 7/10” page, execute “Write.”If you turn off the power without writing, the previous settings will reappear.
To return to the previous displayIf you press the [EXIT] switch or the [FUNCTION] switch, the [FUNCTION] switch indicator will go dark, and you will return to the previous LCD screen.
Using the SP-500 as a multi-tim-bral tone generatorThe SP-500 can function as a multi-timbral tone generator that can be played from an external MIDI device.When the [DEMO] switch is on, the SP-500 will function as a 16-timbre GM tone generator.
It is not possible to set the MIDI channel. While the demo plays, the sounds will change accord-ing to the demo data.
Local on/off settingIf you wish to use the SP-500’s keyboard to trigger an external MIDI tone generator without hearing the internal tone generator, or if the SP-500 is con-nected to a sequencer with an Echo Back setting (that re-transmits the incoming data) and need to prevent notes from being heard in duplicate, you can set the SP-500 to Local Off. Normally you will leave this set to Local On so that when playing the SP-500’s keyboard will hear its own internal tone generator.
1 Press the [FUNCTION] switch
2 Access the “Func 4/10” page
3 Press a “Local” radio buttonPress either the “On” or the “Off” radio button.

Func
tions
To return to the previous displayIf you press the [EXIT] switch or the [FUNCTION] switch, the [FUNCTION] switch indicator will go dark, and you will return to the previous LCD screen.
When the power is turned on, this setting will automatically be Local On.
Synchronizing to an external sequencerAn external sequencer or drum machine connected via MIDI can be synchronized to the SP-500’s recorder for synchronized playback.
1 Press the [FUNCTION] switch
2 Access the “Func 4/10” page
3 Select a “Sync.” radio buttonPress either the “Int.” or the “Ext.” radio button.“Int.”: The internal clock will be used.Select “Int.” when you are using the SP-500 by itself, or when using it as the mas-ter (controlling device) to synchronize external MIDI devices to the MIDI clock transmitted by the SP-500.“Ext.”: The SP-500’s recorder will operate in synchronization with the MIDI clock messages it receives. Select “Ext.” when you are using the SP-500 as a slave device (the device being controlled) that is syn-chronized to the MIDI clock transmitted from an external device.
To return to the previous displayIf you press the [EXIT] switch or the [FUNCTION] switch, the [FUNCTION] switch indicator will go dark, and you will return to the previous LCD screen.
MIDI TransposeYou can specify whether the “Transpose” setting of the “Func 1/10” page will be applied to the data that is transmitted or received via MIDI.
1 Press the [FUNCTION] switch
2 Access the “Func 4/10” page
3 Select one of the “MIDI Trans-pose” radio buttonsPress either the “Tx” or “Rx” radio but-ton.“Tx”: Transpose will apply to the trans-mitted note data that you input from the keyboard. It will not affect the received note data.“Rx”: Transpose will apply to the received note data.It will not affect the transmitted note data.
MIDI FilterYou can specify whether or not each type of MIDI message (e.g., program change, control change) will be transmitted and received.
1 Press the [FUNCTION] switch
2 Access the “Func 5/10” page
3 For the types of MIDI message that you do not wish to transmit or receive, select the correspond-ing check box to turn it off
“Prog.”: Program changePrograms of a connected MIDI device can be changed by transmitting program changes from the SP-500.
71

72
When a program change number is received from an external device, sound will be selected on the SP-500 as shown in the tables on p.75–.To allow these messages to be transmitted and received, turn on the “Prog.” check box. To prevent these messages from being transmitted or received, turn off the “Prog.” check box.
“Prog Bank”: Program bank changeIf you want MIDI program bank mes-sages to be transmitted and received, turn on the “Prog Bank” check box. If you do not want these messages to be transmit-ted or received, turn off the “Prog Bank” check box.
“Control”: Control changeThese messages transmit data such as the SP-500’s damper pedal operation to an external MIDI device to control it, or receive damper pedal and other messages from an external MIDI device to control the SP-500. If you wish to transmit/receive these messages, turn the “Con-trol” check box on. If you do not want to transmit/receive these messages, turn the “Control” check box off.
Control changes from an external device will always affect both sounds even in Layer or Split mode, regardless of the pedal settings of the SP-500 itself. (☞ p.66 “Damper pedal settings for Layer and Split”)
“After Touch”If you want MIDI aftertouch messages to be transmitted and received, turn on the “After Touch” check box. If you do not want these messages to be transmitted or received, turn off the “After Touch” check box.
“Exclusive”If you want MIDI exclusive messages to be transmitted and received, turn on the “Exclusive” check box. If you do not want these messages to be transmitted or received, turn off the “Exclusive” check box.
To write settings into internal memoryIn “Func 7/10” page, press the “Write” button. If you turn off the power without writing, the setting will revert to the pre-vious setting.
To return to the previous displayIf you press the [EXIT] switch or the [FUNCTION] switch, the [FUNCTION] switch indicator will go dark, and you will return to the previous LCD screen.

Appendices
App
endi
ces
TroubleshootingPower does not turn on• Is the AC/AC power supply connected to an
appropriate AC outlet? (☞ p.14)• Is the AC/AC power supply connected to the
AC9V connector of the SP-500? (☞ p.14)• Is the power switch turned on? (☞ p.14)• If the power still does not turn on, disconnect the
AC/AC power supply from the AC outlet, and contact your local Korg distributor.
No sound• Are the [MASTER VOLUME] slider and [ACC
VOLUME] slider turned up? (☞ p.14)• Is the currently selected part set to a volume of
“0”? (☞ p.40)• Has the currently selected part been muted?
(☞ p.40)• Make sure that Local On is selected. (☞ p.70)• In the “Mixer” page, is the “KeyL” check box
turned on? (☞ p.40)
Sound is interrupted• The sounds of the SP-500 are created by sampling
(recording) the sounds of actual instruments. Some sounds play a single piece of sampled data when you press a key, while other sounds play two pieces of sampled data. When one of these two-sample sounds are selected, the maximum polyphony is 32 notes. For other sounds (i.e., one-sample sounds), the maximum polyphony is 64 notes. If the maximum polyphony is exceeded, some of the notes will be lost. If you use layer or split to play two sounds simultaneously, the max-imum polyphony will depend on whether one-sample or two-sample sounds are used. For example if you combine a one-sample sound and a two-sample sound, the maximum polyphony will be 21 notes. When using layer or split, or when recording multiple parts on the recorder, be aware of the sounds you combine, so that you can take full advantage of the SP-500’s potential.
Piano pitch or tone seems wrong in specific ranges of pitch• The piano sounds of the SP-500 simulate a real
piano as closely as possible. For this reason, it may appear that certain overtones are empha-sized in certain ranges, this is not a malfunction.
The high range does not sound, or the pitch is lowered• Since some sounds have an upper limit to the
pitch they can produce, playing them in the high range may produce no sound, or may re-assign the notes to a lower octave.
Pedals do not produce the correct result• Has the pedal connected to the Damper Pedal
jack been unplugged? (☞ p.33)• Is the Assignable Pedal set appropriately?
(☞ p.66)
Effect does not apply when a DS-1H (sold sepa-rately) is used• You must connect the DS-1H (sold separately)
before you turn on the power. After turning on the power, press the pedal deeply before you begin using it.
Cannot record• Is the part set to “Rec”? (☞ p.49)
External device does not respond to transmitted MIDI data• Make sure that the MIDI cable is connected cor-
rectly. (☞ p.69)• Make sure that the SP-500 is transmitting MIDI
data on the same channel that is being received by the external device. (☞ p.69)
• Is the MIDI channel (part) correct? (☞ p.69)
73
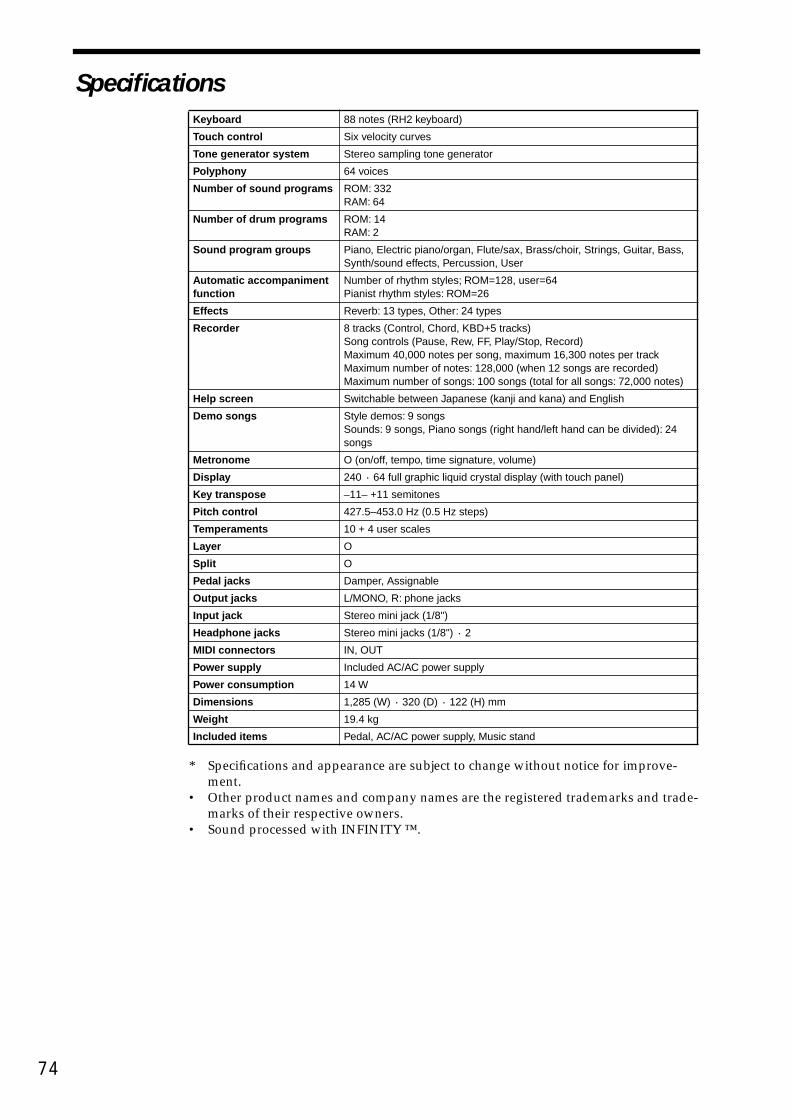
74
Specifications
* Specifications and appearance are subject to change without notice for improve-ment.
• Other product names and company names are the registered trademarks and trade-marks of their respective owners.
• Sound processed with INFINITY ™.
Keyboard 88 notes (RH2 keyboard)
Touch control Six velocity curves
Tone generator system Stereo sampling tone generator
Polyphony 64 voices
Number of sound programs ROM: 332RAM: 64
Number of drum programs ROM: 14RAM: 2
Sound program groups Piano, Electric piano/organ, Flute/sax, Brass/choir, Strings, Guitar, Bass, Synth/sound effects, Percussion, User
Automatic accompaniment function
Number of rhythm styles; ROM=128, user=64Pianist rhythm styles: ROM=26
Effects Reverb: 13 types, Other: 24 types
Recorder 8 tracks (Control, Chord, KBD+5 tracks)Song controls (Pause, Rew, FF, Play/Stop, Record)Maximum 40,000 notes per song, maximum 16,300 notes per trackMaximum number of notes: 128,000 (when 12 songs are recorded)Maximum number of songs: 100 songs (total for all songs: 72,000 notes)
Help screen Switchable between Japanese (kanji and kana) and English
Demo songs Style demos: 9 songsSounds: 9 songs, Piano songs (right hand/left hand can be divided): 24 songs
Metronome O (on/off, tempo, time signature, volume)
Display 240 · 64 full graphic liquid crystal display (with touch panel)
Key transpose –11– +11 semitones
Pitch control 427.5–453.0 Hz (0.5 Hz steps)
Temperaments 10 + 4 user scales
Layer O
Split O
Pedal jacks Damper, Assignable
Output jacks L/MONO, R: phone jacks
Input jack Stereo mini jack (1/8")
Headphone jacks Stereo mini jacks (1/8") · 2
MIDI connectors IN, OUT
Power supply Included AC/AC power supply
Power consumption 14 W
Dimensions 1,285 (W) · 320 (D) · 122 (H) mm
Weight 19.4 kg
Included items Pedal, AC/AC power supply, Music stand

App
endi
ces
Program list
* “No.” is the program number used in the “Mixer 1/3” page etc.
• Programs with a “MIDI Bank#” of “0” are GM programs.
• s: Programs with up to 64-note polyphonyw: Programs with up to 32-note polyphony
Program NamePiano
プログラム名ピアノ
No.*MIDI#
Bank Prog Grand Piano1 グランドピアノ 1 400 5 0 wGrand Piano2 グランドピアノ 2 401 5 1 sGrand Piano3 グランドピアノ 3 402 5 2 sGentle Piano ジェントル・ピアノ 403 5 3 wPiano 1 ピアノ 1 0 0 0 sPiano 2 ピアノ 2 1 0 1 sPiano 3 ピアノ 3 2 0 2 wHonky-tonk ホンキー・トンク 3 0 3 wHarpsichord ハープシコード 6 0 6 s90's Piano 90's ピアノ 128 1 0 wRock Piano ロック・ピアノ 129 1 1 wNew Piano ニュー・ピアノ 130 1 2 wM1 Piano M1 ピアノ 131 1 3 sHarpsiFunk ハープシ・ファンク 134 1 6 wPiano&Strgs ピアノ &ストリングス 256 2 0 wPianoPad ピアノ・パッド 257 2 1 wMidi Piano ミディ・ピアノ 258 2 2 wPianoVibes ピアノ・バイブス 263 2 7 wLyle Stack ライルスタック 291 2 35 w
Program NameE.Piano/ORGAN
プログラム名エレクトリックピアノ/オルガン
No.*MIDI#
Bank Prog E.Piano 1 エレクトリックピアノ 1 4 0 4 sE.Piano 2 エレクトリックピアノ 2 5 0 5 sClavi クラビ 7 0 7 sWhirly ウーリー 132 1 4 wDW-8000 EP DW-8000 エレピ 133 1 5 wClavmation クラブメーション 135 1 7 wMark II bis マーク・ビス 260 2 4 wHard Tines ハード・タインズ 261 2 5 wFunkyRoads ファンキー・ローズ 262 2 6 wFantasia ファンタジア 88 0 88 wBellPad ベル・パッド 226 1 98 wMelody Organ メロディー・オルガン 404 5 4 sMelodyMonica メロディー・ハーモニカ 405 5 5 sChurchOrgan チャーチ・オルガン 19 0 19 wReed Organ リード・オルガン 20 0 20 sOrgan 1 オルガン 1 16 0 16 sOrgan 2 オルガン 2 17 0 17 sOrgan 3 オルガン 3 18 0 18 sMusette ミュゼット 21 0 21 sBandoneon バンドネオン 23 0 23 sHarmonica ハーモニカ 22 0 22 sEuro Pipe ユーロ・パイプ 147 1 19 wSmallPipe スモール・パイプ 148 1 20 wGospel Org. ゴスペル・オルガン 144 1 16 wClickOrgan クリック・オルガン 145 1 17 wRotary Org. ロータリー・オルガン 146 1 18 sFr.Musette フレンチ・ミュゼット 149 1 21 wCassotto キャソット 151 1 23 sAkordeon アコーデオン 150 1 22 wTone Wheel トーン・ホイール 264 2 8 w70' Organ 70' オルガン 265 2 9 wTheatre Org. シアター・オルガン 266 2 10 wVelo Organ タッチ・オルガン 267 2 11 w
Program NameFlute/Sax
プログラム名フルート /サックス
No.*MIDI#
Bank Prog Melody Flute メロディー・フルート 406 5 6 sMelody FltAtk メロディフルート Atk 407 5 7 wMelody Tenor メロディー・テナー 408 5 8 sSoprano Sax ソプラノ・サックス 64 0 64 wAlto Sax アルト・サックス 65 0 65 sTenor Sax テナー・サックス 66 0 66 sBaritone Sax バリトン・サックス 67 0 67 sPiccolo ピッコロ 72 0 72 sFlute フルート 73 0 73 sClarinet クラリネット 71 0 71 sOboe 1 オーボエ 1 68 0 68 sEnglish Horn イングリッシュ・ホルン 69 0 69 sBasson バスーン 70 0 70 sRecorder リコーダー 74 0 74 sOcarina 1 オカリナ 1 79 0 79 sPan Flute パン・フルート 75 0 75 sBottle Blow ボトル・ブロー 76 0 76 wShaku 1 シャクハチ 1 77 0 77 sBagpipe バグパイプ 109 0 109 wShanai シャナイ 111 0 111 sWhistle 1 ホイッスル 1 78 0 78 sSyn.Calliope シンセ・カリオペ 82 0 82 wChiffer Lead チファー・リード 83 0 83 wAltoBreath アルト・ブレス 192 1 64 wFolk Sax フォーク・サックス 193 1 65 wSoftTenor ソフト・テナー 194 1 66 wPerkySaxes パーキー・サックス 195 1 67 wSynth Fife シンセ・フルート 200 1 72 wBreathFlute ブレス・フルート 201 1 73 wClarn.Ens. クラリネット Ens. 199 1 71 wOboe 2 オーボエ 2 196 1 68 sWoodwinds ウッドウィンズ 197 1 69 wSmall^Orch スモール・オーケストラ 198 1 70 wTraverso トラヴェルソ 202 1 74 wOcarina 2 オカリナ 2 207 1 79 sKawala カワラ 203 1 75 wBottleBlow ボトル・ブロウ 204 1 76 wShaku 2 シャクハチ 2 205 1 77 sJaw Harp ジョー・ハープ 237 1 109 sHichiriki ヒチリキ 239 1 111 wWhistle 2 ホイッスル 2 206 1 78 wPurePanLd. ピュア・パンリード 210 1 82 wVelo Flute ヴェロ・フルート 288 2 32 wFlute/Muted フルート / ミュート 289 2 33 wFolk Clar. フォーク・クラリネット 292 2 36 sSectWinds セクト・ウィンズ 293 2 37 wPoppin'Pad ポッピン・パッド 310 2 54 w
Program NameBrass/Choir
プログラム名ブラス/クァイア
No.*MIDI#
Bank Prog MelodyTrumpet メロディトランペット 409 5 9 sMelody MuteTp メロディーミュート Tp 410 5 10 sTrumpet トランペット 56 0 56 sMuteTrumpet ミュート・トランペット 59 0 59 sTrombone トロンボーン 57 0 57 sTuba チューバ 58 0 58 sFrenchHorns フレンチ・ホルン 60 0 60 wBrass ブラス 61 0 61 wSyn.Brass1 シンセ・ブラス 1 62 0 62 wSyn.Brass2 シンセ・ブラス 2 63 0 63 wFlugelHorn フリューゲル・ホルン 184 1 56 sMute Ens. ミュート・アンサンブル 187 1 59 wDynabone ダイナボーン 185 1 57 wOB. Tuba OBチューバ 186 1 58 wHorn Ens. ホルン・アンサンブル 188 1 60 wBrass Band ブラス・バンド 189 1 61 w
75

76
Syn.Brass3 シンセ・ブラス 3 190 1 62 wSfz<Brass Sfz・ブラス 191 1 63 wDblBrass ダブル・ブラス 268 2 12 wTrump Ens. トランペットEns. 290 2 34 wBrass Fall ブラス・フォール 319 2 63 wChoir Aahs クァイア アー 52 0 52 sSolo Vox ソロ・ボックス 85 0 85 wSpace Voice スペース・ボイス 91 0 91 wHalo Pad ハロー・パッド 94 0 94 wBrightness ブライトネス 100 0 100 wEcho Drops エコー・ドロップ 102 0 102 sVoice Oohs ボイス ウー 53 0 53 sSynVox シンセ・ボックス 54 0 54 wBreath Noise ブレス・ノイズ 121 0 121 wDoolally ドゥーラリー 180 1 52 wVox Lead ボックス・リード 213 1 85 wHeaven ヘブン 219 1 91 wPolar Pad ポーラー・パッド 222 1 94 wElastikPad イラスティックパッド 228 1 100 wBig Panner ビッグ・パンナー 230 1 102 wAirVoxDbl エアボックスダブル 181 1 53 wGlassglide グラスグライド 182 1 54 wLaughing ラフィング 249 1 121 sDanceReMix ダンス・リミックス 271 2 15 wLiteVoices ライト・ボイス 304 2 48 wDigitalAir デジタル・エアー 305 2 49 wAir Vox エアー・ボックス 306 2 50 sAmbi.Voice アンビエント・ボイス 307 2 51 wAirways エアーウェイズ 308 2 52 w
Program NameStrings
プログラム名ストリングスブラス /クァイア
No.*MIDI#
Bank Prog Melody Violin メロディーバイオリン 411 5 11 sStrings ストリングス 48 0 48 sSlow Strings スロー・ストリングス 49 0 49 sTremolo Str. トレモロ・ストリングス 44 0 44 sPizzicatoStr. ピチカートストリング 45 0 45 sViolin バイオリン 40 0 40 wViola ビオラ 41 0 41 sCello チェロ 42 0 42 sContrabass コントラバス 43 0 43 sMarcato マルカート 176 1 48 sExpr Str. Exp. ストリングス 177 1 49 sOctave Str. オクターブストリング 172 1 44 wOctavePizz. オクターブピチカート 173 1 45 wThe Strings ザ・ストリングス 168 1 40 wChambViola チェンバー・ヴィオラ 169 1 41 wCello Ens. チェロ・アンサンブル 170 1 42 wChamDBass チェンバー・Wベース 171 1 43 wi3 Strings i3 ストリングス 296 2 40 wN-Strings N- ストリングス 297 2 41 wLight Pizz ライト・ピチカート 302 2 46 wDblStrings ダブルストリングス 303 2 47 wStab Pad スタブ・パッド 309 2 53 wSynStrings 1 シンセ・ストリングス 1 50 0 50 wSynStrings 2 シンセ・ストリングス 2 51 0 51 wAnalogPad アナログ・パッド 178 1 50 wAnaStrings アナログストリングス 179 1 51 wFiddle フィドル 110 0 110 sMandoTrem. マンドリン・トレモロ 238 1 110 wHarp ハープ 46 0 46 sMy dream マイ・ドリーム 174 1 46 wOrchestraHit オーケストラ・ヒット 55 0 55 sImpact Hit インパクト・ヒット 183 1 55 w
Program NameBrass/Choir
プログラム名ブラス/クァイア
No.*MIDI#
Bank Prog Program Name
Guitarプログラム名ギター
No.* MIDI#Bank Prog
Nylon Gtr. ナイロン・ギター 24 0 24 sSteelGtr. スチール・ギター 25 0 25 sJazz Gtr. ジャズ・ギター 26 0 26 sClean Gtr. クリーン・ギター 27 0 27 sOverdrive オーバードライブ 29 0 29 sDist.Gtr. ディスト・ギター 30 0 30 sMuted Gtr. ミュート・ギター 28 0 28 sCharang チャラン 84 0 84 wGT.Harm. ギター・ハーモニクス 31 0 31 sL&R Ac.Gtr. L&R アコースティックG 152 1 24 w12 Strings 12 ゲン・ギター 153 1 25 wPedalSteel ペダル・スチール 154 1 26 sL&R El.Gtr. ステレオ・エレキギター 155 1 27 wDistoMutes ディスト・ミュート 157 1 29 wSolo Dist. ソロ・ディストーション 158 1 30 wClean Funk クリーン・ファンク 156 1 28 wDist.Lead ディスト・リード 212 1 84 wPowerChord パワー・コード 159 1 31 wR&R Guitar R&Rギター 272 2 16 wResonatedGtr レゾネート・ギター 273 2 17 sElectricAc. エレ・アコ・ギター 274 2 18 wMr.Clean ミスター・クリーン 275 2 19 sHackbrett ハックブレット 276 2 20 wGtr.Strings ギター・ストリングス 277 2 21 wStereoDist. ステレオ・ディスト 278 2 22 wSitar シタール 104 0 104 wBanjo バンジョー 105 0 105 sSantur サントゥール 15 0 15 sShamisen シャミセン 106 0 106 sKoto コト 107 0 107 sGt.FretNoise ギターフレットノイズ 120 0 120 sTambra タンブーラ 232 1 104 wBouzouki ブズーキー 233 1 105 wCeltic Plug ケルティック・プラグ 143 1 15 wOud ウード 234 1 106 wKanoon カヌーン 235 1 107 wUkulele ウクレレ 236 1 108 s
Program NameBass
プログラム名べース
No.*MIDI#
Bank Prog Acoustic Bs. アコースティックベース 32 0 32 sFingered Bs. フィンガー・ベース 33 0 33 sPicked Bs.1 ピック・ベース 1 34 0 34 sFretless Bs. フレットレス・ベース 35 0 35 sSlap Bass 1 スラップ・ベース1 36 0 36 sSlap Bass 2 スラップ・ベース2 37 0 37 sSynthBass 1 シンセ・ベース 1 38 0 38 sSynthBass 2 シンセ・ベース 2 39 0 39 sUpright アップライト 160 1 32 wBass/Harm. ベース・ハーモニクス 161 1 33 sPicked Bs.2 ピック・ベース 2 162 1 34 sFat Fretty ファット・フレッティー 163 1 35 wSuperRound スーパー・ラウンド 164 1 36 wDynaSlap ダイナミックスラップ 165 1 37 wDance Bass ダンス・ベース 166 1 38 wSquareBass スクエア・ベース 167 1 39 wUltra Rez ウルトラ・レゾ 270 2 14 wGtr/Bass ギター/ ベース 279 2 23 wFingerDark フィンガー・ダーク 280 2 24 wDyno Bass ダイノ・ベース 281 2 25 wBass/Mute ベース / ミュート 282 2 26 wStick Bass スティック・ベース 283 2 27 wDeep House ディープ・ハウス 284 2 28 wDr.Octave ドクター・オクターブ 285 2 29 wRap Bass ラップ・ベース 286 2 30 wZap bass ザップ・ベース 287 2 31 w
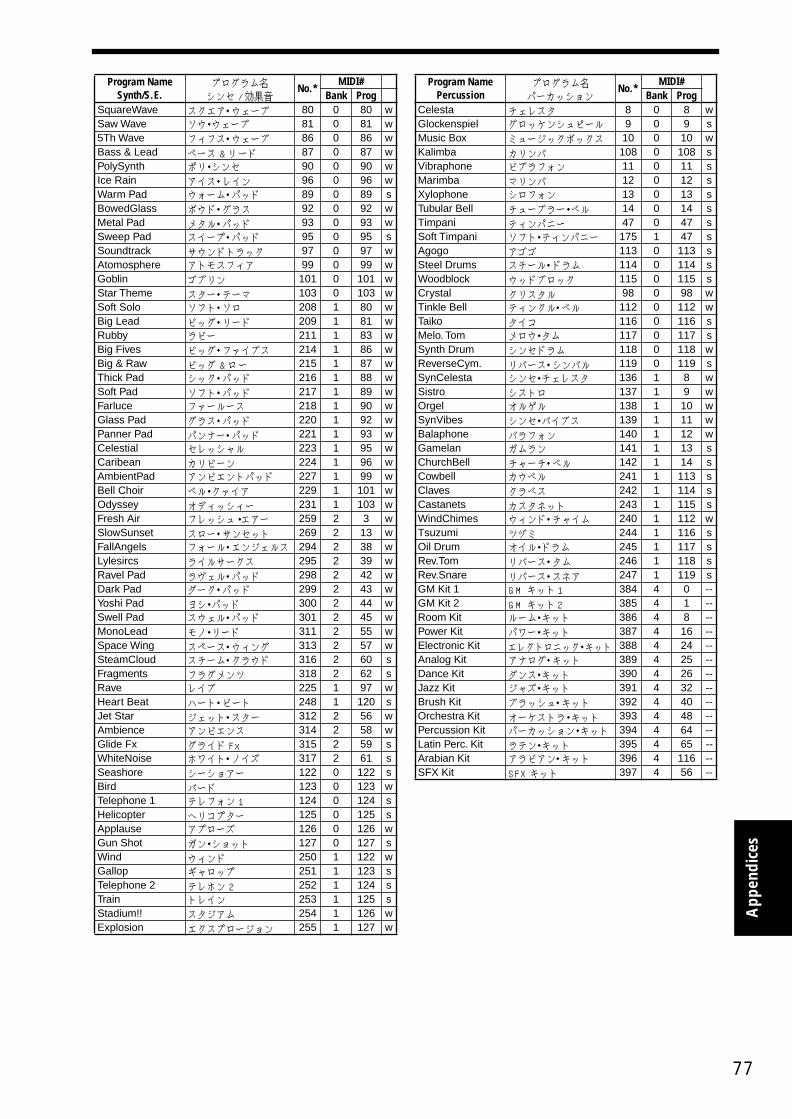
App
endi
ces
Program NameSynth/S.E.
プログラム名シンセ /効果音
No.*MIDI#
Bank Prog SquareWave スクエア・ウェーブ 80 0 80 wSaw Wave ソウ・ウェーブ 81 0 81 w5Th Wave フィフス・ウェーブ 86 0 86 wBass & Lead ベース &リード 87 0 87 wPolySynth ポリ・シンセ 90 0 90 wIce Rain アイス・レイン 96 0 96 wWarm Pad ウォーム・パッド 89 0 89 sBowedGlass ボウド・グラス 92 0 92 wMetal Pad メタル・パッド 93 0 93 wSweep Pad スイープ・パッド 95 0 95 sSoundtrack サウンドトラック 97 0 97 wAtomosphere アトモスフィア 99 0 99 wGoblin ゴブリン 101 0 101 wStar Theme スター・テーマ 103 0 103 wSoft Solo ソフト・ソロ 208 1 80 wBig Lead ビッグ・リード 209 1 81 wRubby ラビー 211 1 83 wBig Fives ビッグ・ファイブス 214 1 86 wBig & Raw ビッグ &ロー 215 1 87 wThick Pad シック・パッド 216 1 88 wSoft Pad ソフト・パッド 217 1 89 wFarluce ファールース 218 1 90 wGlass Pad グラス・パッド 220 1 92 wPanner Pad パンナー・パッド 221 1 93 wCelestial セレッシャル 223 1 95 wCaribean カリビーン 224 1 96 wAmbientPad アンビエントパッド 227 1 99 wBell Choir ベル・クァイア 229 1 101 wOdyssey オディッシィー 231 1 103 wFresh Air フレッシュ・エアー 259 2 3 wSlowSunset スロー・サンセット 269 2 13 wFallAngels フォール・エンジェルス 294 2 38 wLylesircs ライルサークス 295 2 39 wRavel Pad ラヴェル・パッド 298 2 42 wDark Pad ダーク・パッド 299 2 43 wYoshi Pad ヨシ・パッド 300 2 44 wSwell Pad スウェル・パッド 301 2 45 wMonoLead モノ・リード 311 2 55 wSpace Wing スペース・ウィング 313 2 57 wSteamCloud スチーム・クラウド 316 2 60 sFragments フラグメンツ 318 2 62 sRave レイブ 225 1 97 wHeart Beat ハート・ビート 248 1 120 sJet Star ジェット・スター 312 2 56 wAmbience アンビエンス 314 2 58 wGlide Fx グライド Fx 315 2 59 sWhiteNoise ホワイト・ノイズ 317 2 61 sSeashore シーショアー 122 0 122 sBird バード 123 0 123 wTelephone 1 テレフォン 1 124 0 124 sHelicopter ヘリコプター 125 0 125 sApplause アプローズ 126 0 126 wGun Shot ガン・ショット 127 0 127 sWind ウィンド 250 1 122 wGallop ギャロップ 251 1 123 sTelephone 2 テレホン 2 252 1 124 sTrain トレイン 253 1 125 sStadium!! スタジアム 254 1 126 wExplosion エクスプロージョン 255 1 127 w
Program NamePercussion
プログラム名パーカッション
No.*MIDI#
Bank Prog Celesta チェレスタ 8 0 8 wGlockenspiel グロッケンシュピール 9 0 9 sMusic Box ミュージックボックス 10 0 10 wKalimba カリンバ 108 0 108 sVibraphone ビブラフォン 11 0 11 sMarimba マリンバ 12 0 12 sXylophone シロフォン 13 0 13 sTubular Bell チューブラー・ベル 14 0 14 sTimpani ティンパニー 47 0 47 sSoft Timpani ソフト・ティンパニー 175 1 47 sAgogo アゴゴ 113 0 113 sSteel Drums スチール・ドラム 114 0 114 sWoodblock ウッドブロック 115 0 115 sCrystal クリスタル 98 0 98 wTinkle Bell ティンクル・ベル 112 0 112 wTaiko タイコ 116 0 116 sMelo. Tom メロウ・タム 117 0 117 sSynth Drum シンセドラム 118 0 118 wReverseCym. リバース・シンバル 119 0 119 sSynCelesta シンセ・チェレスタ 136 1 8 wSistro シストロ 137 1 9 wOrgel オルゲル 138 1 10 wSynVibes シンセ・バイブス 139 1 11 wBalaphone バラフォン 140 1 12 wGamelan ガムラン 141 1 13 sChurchBell チャーチ・ベル 142 1 14 sCowbell カウベル 241 1 113 sClaves クラベス 242 1 114 sCastanets カスタネット 243 1 115 sWindChimes ウィンド・チャイム 240 1 112 wTsuzumi ツヅミ 244 1 116 sOil Drum オイル・ドラム 245 1 117 sRev.Tom リバース・タム 246 1 118 sRev.Snare リバース・スネア 247 1 119 sGM Kit 1 GM キット1 384 4 0 --GM Kit 2 GM キット2 385 4 1 --Room Kit ルーム・キット 386 4 8 --Power Kit パワー・キット 387 4 16 --Electronic Kit エレクトロニック・キット 388 4 24 --Analog Kit アナログ・キット 389 4 25 --Dance Kit ダンス・キット 390 4 26 --Jazz Kit ジャズ・キット 391 4 32 --Brush Kit ブラッシュ・キット 392 4 40 --Orchestra Kit オーケストラ・キット 393 4 48 --Percussion Kit パーカッション・キット 394 4 64 --Latin Perc. Kit ラテン・キット 395 4 65 --Arabian Kit アラビアン・キット 396 4 116 --SFX Kit SFX キット 397 4 56 --
77
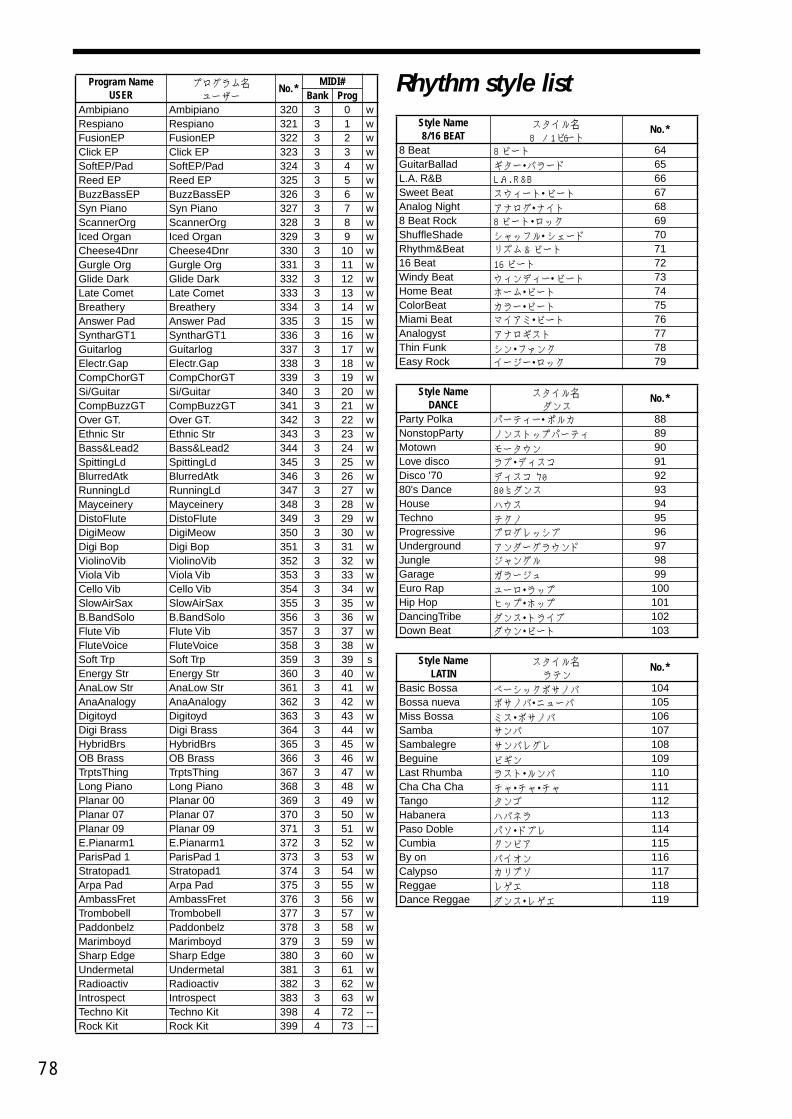
78
Rhythm style list
Program NameUSER
プログラム名ユーザー
No.*MIDI#
Bank Prog Ambipiano Ambipiano 320 3 0 wRespiano Respiano 321 3 1 wFusionEP FusionEP 322 3 2 wClick EP Click EP 323 3 3 wSoftEP/Pad SoftEP/Pad 324 3 4 wReed EP Reed EP 325 3 5 wBuzzBassEP BuzzBassEP 326 3 6 wSyn Piano Syn Piano 327 3 7 wScannerOrg ScannerOrg 328 3 8 wIced Organ Iced Organ 329 3 9 wCheese4Dnr Cheese4Dnr 330 3 10 wGurgle Org Gurgle Org 331 3 11 wGlide Dark Glide Dark 332 3 12 wLate Comet Late Comet 333 3 13 wBreathery Breathery 334 3 14 wAnswer Pad Answer Pad 335 3 15 wSyntharGT1 SyntharGT1 336 3 16 wGuitarlog Guitarlog 337 3 17 wElectr.Gap Electr.Gap 338 3 18 wCompChorGT CompChorGT 339 3 19 wSi/Guitar Si/Guitar 340 3 20 wCompBuzzGT CompBuzzGT 341 3 21 wOver GT. Over GT. 342 3 22 wEthnic Str Ethnic Str 343 3 23 wBass&Lead2 Bass&Lead2 344 3 24 wSpittingLd SpittingLd 345 3 25 wBlurredAtk BlurredAtk 346 3 26 wRunningLd RunningLd 347 3 27 wMayceinery Mayceinery 348 3 28 wDistoFlute DistoFlute 349 3 29 wDigiMeow DigiMeow 350 3 30 wDigi Bop Digi Bop 351 3 31 wViolinoVib ViolinoVib 352 3 32 wViola Vib Viola Vib 353 3 33 wCello Vib Cello Vib 354 3 34 wSlowAirSax SlowAirSax 355 3 35 wB.BandSolo B.BandSolo 356 3 36 wFlute Vib Flute Vib 357 3 37 wFluteVoice FluteVoice 358 3 38 wSoft Trp Soft Trp 359 3 39 sEnergy Str Energy Str 360 3 40 wAnaLow Str AnaLow Str 361 3 41 wAnaAnalogy AnaAnalogy 362 3 42 wDigitoyd Digitoyd 363 3 43 wDigi Brass Digi Brass 364 3 44 wHybridBrs HybridBrs 365 3 45 wOB Brass OB Brass 366 3 46 wTrptsThing TrptsThing 367 3 47 wLong Piano Long Piano 368 3 48 wPlanar 00 Planar 00 369 3 49 wPlanar 07 Planar 07 370 3 50 wPlanar 09 Planar 09 371 3 51 wE.Pianarm1 E.Pianarm1 372 3 52 wParisPad 1 ParisPad 1 373 3 53 wStratopad1 Stratopad1 374 3 54 wArpa Pad Arpa Pad 375 3 55 wAmbassFret AmbassFret 376 3 56 wTrombobell Trombobell 377 3 57 wPaddonbelz Paddonbelz 378 3 58 wMarimboyd Marimboyd 379 3 59 wSharp Edge Sharp Edge 380 3 60 wUndermetal Undermetal 381 3 61 wRadioactiv Radioactiv 382 3 62 wIntrospect Introspect 383 3 63 wTechno Kit Techno Kit 398 4 72 --Rock Kit Rock Kit 399 4 73 --
Style Name8/16 BEAT
スタイル名8/16ビート
No.*
8 Beat 8 ビート 64GuitarBallad ギター・バラード 65L.A. R&B L.A. R&B 66Sweet Beat スウィート・ビート 67Analog Night アナログ・ナイト 688 Beat Rock 8 ビート・ロック 69ShuffleShade シャッフル・シェード 70Rhythm&Beat リズム& ビート 7116 Beat 16 ビート 72Windy Beat ウィンディー・ビート 73Home Beat ホーム・ビート 74ColorBeat カラー・ビート 75Miami Beat マイアミ・ビート 76Analogyst アナロギスト 77Thin Funk シン・ファンク 78Easy Rock イージー・ロック 79
Style NameDANCE
スタイル名ダンス
No.*
Party Polka パーティー・ポルカ 88NonstopParty ノンストップパーティ 89Motown モータウン 90Love disco ラブ・ディスコ 91Disco '70 ディスコ '70 9280's Dance 80's ダンス 93House ハウス 94Techno テクノ 95Progressive プログレッシブ 96Underground アンダーグラウンド 97Jungle ジャングル 98Garage ガラージュ 99Euro Rap ユーロ・ラップ 100Hip Hop ヒップ・ホップ 101DancingTribe ダンス・トライブ 102Down Beat ダウン・ビート 103
Style NameLATIN
スタイル名ラテン
No.*
Basic Bossa ベーシックボサノバ 104Bossa nueva ボサノバ・ニューバ 105Miss Bossa ミス・ボサノバ 106Samba サンバ 107Sambalegre サンバレグレ 108Beguine ビギン 109Last Rhumba ラスト・ルンバ 110Cha Cha Cha チャ・チャ・チャ 111Tango タンゴ 112Habanera ハバネラ 113Paso Doble パソ・ドブレ 114Cumbia クンビア 115By on バイオン 116Calypso カリプソ 117Reggae レゲエ 118Dance Reggae ダンス・レゲエ 119
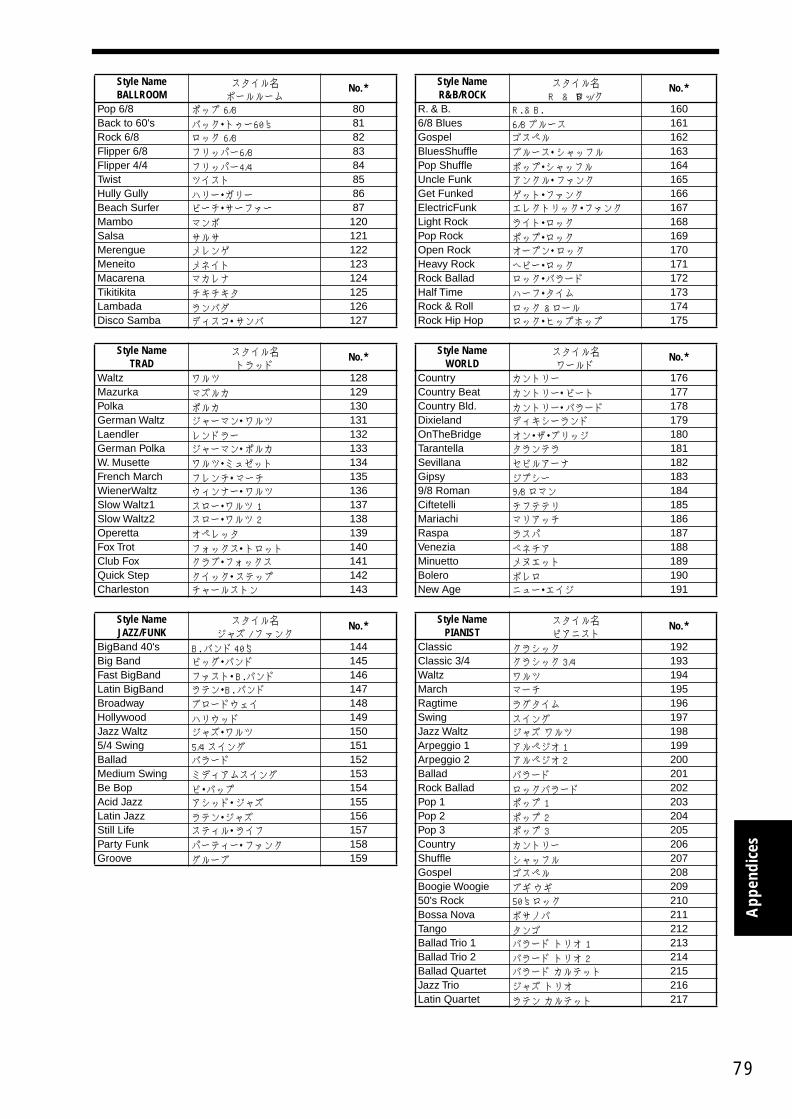
App
endi
ces
Style NameBALLROOM
スタイル名ボールルーム
No.*
Pop 6/8 ポップ 6/8 80Back to 60's バック・トゥー60's 81Rock 6/8 ロック 6/8 82Flipper 6/8 フリッパー6/8 83Flipper 4/4 フリッパー4/4 84Twist ツイスト 85Hully Gully ハリー・ガリー 86Beach Surfer ビーチ・サーファー 87Mambo マンボ 120Salsa サルサ 121Merengue メレンゲ 122Meneito メネイト 123Macarena マカレナ 124Tikitikita チキチキタ 125Lambada ランバダ 126Disco Samba ディスコ・サンバ 127
Style NameTRAD
スタイル名トラッド
No.*
Waltz ワルツ 128Mazurka マズルカ 129Polka ポルカ 130German Waltz ジャーマン・ワルツ 131Laendler レンドラー 132German Polka ジャーマン・ポルカ 133W. Musette ワルツ・ミュゼット 134French March フレンチ・マーチ 135WienerWaltz ウィンナー・ワルツ 136Slow Waltz1 スロー・ワルツ 1 137Slow Waltz2 スロー・ワルツ 2 138Operetta オペレッタ 139Fox Trot フォックス・トロット 140Club Fox クラブ・フォックス 141Quick Step クイック・ステップ 142Charleston チャールストン 143
Style NameJAZZ/FUNK
スタイル名ジャズ /ファンク
No.*
BigBand 40's B. バンド40'S 144Big Band ビッグ・バンド 145Fast BigBand ファスト・B.バンド 146Latin BigBand ラテン・B. バンド 147Broadway ブロードウェイ 148Hollywood ハリウッド 149Jazz Waltz ジャズ・ワルツ 1505/4 Swing 5/4 スイング 151Ballad バラード 152Medium Swing ミディアムスイング 153Be Bop ビ・バップ 154Acid Jazz アシッド・ジャズ 155Latin Jazz ラテン・ジャズ 156Still Life スティル・ライフ 157Party Funk パーティー・ファンク 158Groove グルーブ 159
Style NameR&B/ROCK
スタイル名R&B/ロック
No.*
R. & B. R. & B. 1606/8 Blues 6/8 ブルース 161Gospel ゴスペル 162BluesShuffle ブルース・シャッフル 163Pop Shuffle ポップ・シャッフル 164Uncle Funk アンクル・ファンク 165Get Funked ゲット・ファンク 166ElectricFunk エレクトリック・ファンク 167Light Rock ライト・ロック 168Pop Rock ポップ・ロック 169Open Rock オープン・ロック 170Heavy Rock ヘビー・ロック 171Rock Ballad ロック・バラード 172Half Time ハーフ・タイム 173Rock & Roll ロック &ロール 174Rock Hip Hop ロック・ヒップホップ 175
Style NameWORLD
スタイル名ワールド
No.*
Country カントリー 176Country Beat カントリー・ビート 177Country Bld. カントリー・バラード 178Dixieland ディキシーランド 179OnTheBridge オン・ザ・ブリッジ 180Tarantella タランテラ 181Sevillana セビルアーナ 182Gipsy ジプシー 1839/8 Roman 9/8 ロマン 184Ciftetelli チフテテリ 185Mariachi マリアッチ 186Raspa ラスパ 187Venezia ベネチア 188Minuetto メヌエット 189Bolero ボレロ 190New Age ニュー・エイジ 191
Style NamePIANIST
スタイル名ピアニスト
No.*
Classic クラシック 192Classic 3/4 クラシック 3/4 193Waltz ワルツ 194March マーチ 195Ragtime ラグタイム 196Swing スイング 197Jazz Waltz ジャズ ワルツ 198Arpeggio 1 アルペジオ 1 199Arpeggio 2 アルペジオ 2 200Ballad バラード 201Rock Ballad ロックバラード 202Pop 1 ポップ 1 203Pop 2 ポップ 2 204Pop 3 ポップ 3 205Country カントリー 206Shuffle シャッフル 207Gospel ゴスペル 208Boogie Woogie ブギウギ 20950's Rock 50's ロック 210Bossa Nova ボサノバ 211Tango タンゴ 212Ballad Trio 1 バラード トリオ 1 213Ballad Trio 2 バラード トリオ 2 214Ballad Quartet バラード カルテット 215Jazz Trio ジャズ トリオ 216Latin Quartet ラテン カルテット 217
79

80
* These are the numbers and MIDI numbers that are loaded into
[USER] with the factory settings.
Style NameUSER
スタイル名ユーザー
No.*
Pop Ballad Pop Ballad 0Pop Ballad 2 Pop Ballad 2 14/4 Ballad 4/4 Ballad 24/4 Ballad 2 4/4 Ballad 2 38 Beat 5 8 Beat 5 4Unplugged Unplugged 516 Beat 5 16 Beat 5 6Analog Soul Analog Soul 7Red Rose Red Rose 8Sunflower Sunflower 9Lite Bossa Lite Bossa 10Black Shape Black Shape 11Light Rock 2 Light Rock 2 12Light Crunch Light Crunch 13Mdn Country Mdn Country 14Greyhound Greyhound 156/8 Swing 6/8 Swing 16Warm Ballad Warm Ballad 17Mood Swing Mood Swing 18Jimmy's mood Jimmy's mood 19SwingShuffle SwingShuffle 20All Star All Star 21The Duke The Duke 22The Count The Count 2360's Rock 60's Rock 24Jhonny... Jhonny... 2560's Dance 60's Dance 26VibraBeach VibraBeach 27Energy Energy 28Trance Trance 29Toonchi Toonchi 30Rave Party Rave Party 31Mondo Beat Mondo Beat 32Love Ballad Love Ballad 33On the road On the road 34Many Stories Many Stories 35True Love True Love 36Heart Beat Heart Beat 37Rock & Soul Rock & Soul 38Phaser Funk Phaser Funk 39Romance Romance 40SynphoBeat SynphoBeat 41Soft Beat Soft Beat 42Shuffle Beat Shuffle Beat 43Blue Tales Blue Tales 4412/8 beat 12/8 beat 45Europe Europe 46Electro Pop Electro Pop 47DiscoTrance DiscoTrance 48Still Dance Still Dance 49...Go on! ...Go on! 50GuitarDance GuitarDance 51Cool Cumbia Cool Cumbia 52Caribbean Caribbean 53HawaianDream HawaianDream 54Sirtaki Sirtaki 55Fast Walzer A Fast Walzer A 56Folk Mazurka Folk Mazurka 57Hit Polka Hit Polka 58Paris Valzer Paris Valzer 59Thin Fox Thin Fox 60Big Fox Big Fox 61Organ Swing Organ Swing 62Soft Bossa Soft Bossa 63

App
endi
ces
Drum kits list
Key GM Kit 1 GM Kit 2 Room Kit Power Kit Electronic Kit Analog Kit Dance Kit Jazz Kit# Note Inst Excl Inst Excl Inst Excl Inst Excl Inst Excl Inst Excl Inst Excl Inst Excl
21 A0 Syn Kick 1 --- Syn Kick 1 --- Syn Kick 2 --- Dance Kick --- Dance Kick --- Explosion --- Snare 1 --- Syn Kick 1 ---22 A#0 SynSnare 2 --- SynSnare 2 --- AmbiSnare1 --- SynSnare 2 --- SynSnare 2 --- AmbiSnare1 --- Snare 1 --- SynSnare 1 ---23 B0 Syn Kick 3 --- Syn Kick 3 --- Syn Kick 3 --- Syn Kick 3 --- Syn Kick 3 --- Real Kick --- Syn Kick 3 --- Syn Kick 3 ---24 C1 SynSnare 1 --- SynSnare 1 --- SynSnare 1 --- SynSnare 1 --- SynSnare 1 --- GatedSnare --- SynSnare 1 --- SynSnare 1 ---25 C#1 FullRoomSD --- FullRoomSD --- LightSnare --- PicloSnare --- Rock Snare --- PicloSnare --- Snare 1 --- LightSnare ---26 D1 GatedSnare --- -- --- TightSnare --- Snare 1 --- OilDrum --- Rock Snare --- AmbiSnare2 --- AmbiSnare2 ---27 D#1 Dry Kick 2 --- Dry Kick 2 --- Fat Kick --- Rock Kick --- Syn Kick 1 --- Fat Kick --- Ambi.Kick --- Ambi.Kick ---28 E1 Rock Kick --- Ambi.Kick --- Gated Kick --- -- --- Gated Kick --- Dance Kick --- Rock Snare --- PillowKick ---29 F1 Snare 2 --- AmbiSnare2 --- FullRoomSD --- FullRoomSD --- PowerSnare --- AmbiSnare2 --- WhiteNoise --- FullRoomSD ---30 F#1 Open HH 1 1 Close HH 1 Open HH 1 1 Open HH 1 1 ClosSynHH1 1 Close HH 1 Zap 2 1 Open HH 1 131 G1 Gated Kick --- PillowKick --- Real Kick --- Fat Kick --- Fat Kick --- Ambi.Kick --- Dry Kick 1 --- Dry Kick 1 ---32 G#1 Side Stick --- -- --- Metronome2 --- Metronome2 --- Zap 1 --- Zap 1 --- Zap 1 --- Metronome2 ---33 A1 RollSnare2 7 RollSnare2 7 AmbiSnare2 --- AmbiSnare2 --- GatedSnare --- FullRoomSD --- Gun Shot 1 --- DrySnare 1 ---34 A#1 RollSnare1 7 RollSnare1 7 PowerSnare --- FullRoomSD --- PowerSnare --- Snare 1 --- SolidHit --- FullRoomSD ---35 B1 Fat Kick --- ProcesKick --- Rock Kick --- Ambi.Kick --- Ambi.Kick --- Syn Kick 1 --- Syn Kick 1 --- Ambi.Kick ---36 C2 Ambi.Kick --- Fat Kick --- Ambi.Kick --- Gated Kick --- Syn Kick 4 --- Syn Kick 3 --- Dance Kick --- Dry Kick 2 ---37 C#2 Side Stick --- Side Stick --- Side Stick --- Side Stick --- Syn Rim --- Syn Rim --- Metronome2 --- Side Stick ---38 D2 DrySnare 1 --- DrySnare 1 --- GatedSnare --- PowerSnare --- SynSnare 2 --- SynSnare 1 --- FullRoomSD --- LightSnare ---39 D#2 Syn Claps --- Syn Claps --- Syn Claps --- Hand Claps --- Syn Claps --- Syn Claps --- Syn Claps --- Hand Claps ---40 E2 FullRoomSD --- Rock Snare --- LightSnare --- GatedSnare --- AmbiSnare1 --- SynSnare 2 --- AmbiSnare1 --- Snare 2 ---41 F2 Tom 2 Lo --- Tom 2 Lo --- Tom 1 Lo --- ProcessTom --- Syn Tom 1 --- SynTom2 Hi --- ProcessTom --- Tom 1 Lo ---42 F#2 Close HH 1 Close HH 1 Close HH 1 Close HH 1 Close HH 1 ClosSynHH1 1 Close HH 1 Close HH 143 G2 Tom 2 Lo --- Tom 2 Lo --- Tom 1 Lo --- ProcessTom --- Syn Tom 1 --- SynTom2 Hi --- ProcessTom --- Tom 1 Lo ---44 G#2 Pedal HH 1 1 Pedal HH 1 1 Pedal HH 1 1 Pedal HH 1 1 Pedal HH 1 1 ClosSynHH1 1 ClosSynHH1 1 Pedal HH 1 145 A2 Tom 2 Lo --- Tom 2 Lo --- Tom 1 Lo --- ProcessTom --- Syn Tom 1 --- SynTom2 Hi --- ProcessTom --- Tom 1 Lo ---46 A#2 Open HH 1 1 Open HH 1 1 Open HH 1 1 Open HH 1 1 Open HH 1 1 OpenSynHH1 1 OpenSynHH1 1 Open HH 1 147 B2 Tom 2 Lo --- Tom 2 Hi --- Tom 1 Lo --- ProcessTom --- Syn Tom 1 --- SynTom2 Hi --- ProcessTom --- Tom 1 Lo ---48 C3 Tom 2 Hi --- Tom 2 Hi --- Tom 1 Lo --- ProcessTom --- Syn Tom 1 --- SynTom2 Hi --- ProcessTom --- Tom 1 Hi ---49 C#3 Crash Cym --- Crash Cym --- Crash Cym --- Crash Cym --- Crash Cym --- OpenSynHH1 --- Crash Cym --- Crash Cym ---50 D3 Tom 2 Hi --- Tom 2 Hi --- Tom 1 Lo --- ProcessTom --- Syn Tom 1 --- SynTom2 Hi --- ProcessTom --- Tom 1 Hi ---51 D#3 Ride Cym 2 --- Ride Cym 2 --- Ride Cym 2 --- Ride Cym 2 --- Ride Cym 2 --- Ride Cym 2 --- Ride Cym 2 --- Ride Cym 2 ---52 E3 China Cym --- China Cym --- China Cym --- China Cym --- Rev.Cymbal --- China Cym --- Rev.Cymbal --- China Cym ---53 F3 Ride Cup --- Ride Cup --- Ride Cup --- Ride Cup --- Ride Cup --- Ride Cup --- Ride Cup --- Ride Cup ---54 F#3 Tambourine --- Tambourine --- Tambourine --- Tambourine --- Tambourine --- Tambourine --- Tambourine --- Tambourine ---55 G3 Splash Cym --- Splash Cym --- Splash Cym --- Splash Cym --- Splash Cym --- Splash Cym --- Splash Cym --- Splash Cym ---56 G#3 Cowbell 1 --- Cowbell 1 --- Cowbell 1 --- Cowbell 1 --- Cowbell 1 --- SynCowbell --- SynCowbell --- Cowbell 1 ---57 A3 Crash Cym --- Crash Cym --- Crash Cym --- Crash Cym --- Crash Cym --- Crash Cym --- Crash Cym --- Crash Cym ---58 A#3 Viblaslap --- Viblaslap --- Viblaslap --- Viblaslap --- Viblaslap --- Viblaslap --- Viblaslap --- Viblaslap ---59 B3 Ride Cym 2 --- Ride Edge --- Ride Cym 2 --- Ride Cym 2 --- Ride Cym 2 --- Ride Cym 2 --- Ride Cym 2 --- Ride Cym 2 ---60 C4 Hi Bongo --- Hi Bongo --- Hi Bongo --- Hi Bongo --- Hi Bongo --- Hi Bongo --- Hi Bongo --- Hi Bongo ---61 C#4 Lo Bongo --- Lo Bongo --- Lo Bongo --- Lo Bongo --- Lo Bongo --- Lo Bongo --- Lo Bongo --- Lo Bongo ---62 D4 Slap Conga --- Slap Conga --- Slap Conga --- Slap Conga --- Slap Conga --- SynTom2 Hi --- Palm Conga --- Slap Conga ---63 D#4 Open Conga --- Open Conga --- Open Conga --- Open Conga --- Open Conga --- SynTom2 Hi --- Open Conga --- Open Conga ---64 E4 Open Conga --- Open Conga --- Open Conga --- Open Conga --- Open Conga --- SynTom2 Lo --- Open Conga --- Open Conga ---65 F4 Timbal1HiO --- Timbal1HiO --- Timbal1HiO --- Timbal1HiO --- Timbal1HiO --- Timbal1HiO --- Timbal1HiO --- Timbal1HiO ---66 F#4 Timbal1LoO --- Timbal1LoO --- Timbal1LoO --- Timbal1LoO --- Timbal1LoO --- Timbal1LoO --- Timbal1LoO --- Timbal1LoO ---67 G4 Agogo 1 --- Agogo 1 --- Agogo 1 --- Agogo 1 --- Agogo 1 --- Agogo 1 --- Agogo 1 --- Agogo 1 ---68 G#4 Agogo 1 --- Agogo 1 --- Agogo 1 --- Agogo 1 --- Agogo 1 --- Agogo 1 --- Agogo 1 --- Agogo 1 ---69 A4 Cabasa --- Cabasa --- Cabasa --- Cabasa --- Cabasa --- Cabasa --- Cabasa --- Cabasa ---70 A#4 SynMaracas --- SynMaracas --- SynMaracas --- SynMaracas --- SynMaracas --- SynMaracas --- SynMaracas --- SynMaracas ---71 B4 Whistle S 2 Whistle S 2 Whistle S 2 Whistle S 2 Whistle S 2 Whistle S 2 Whistle S 2 Whistle S 272 C5 Whistle L 2 Whistle L 2 Whistle L 2 Whistle L 2 Whistle L 2 Whistle L 2 Whistle L 2 Whistle L 273 C#5 Guiro S 4 Guiro S 4 Guiro S 4 Guiro S 4 Guiro S 4 Guiro S 4 Guiro S 4 Guiro S 474 D5 Guiro L 4 Guiro L 4 Guiro L 4 Guiro L 4 Guiro L 4 Guiro L 4 Guiro L 4 Guiro L 475 D#5 Claves --- Claves --- Claves --- Claves --- Claves --- Syn Claves --- Syn Claves --- Claves ---76 E5 WoodBlockM --- WoodBlockM --- WoodBlockM --- WoodBlockM --- WoodBlockM --- WoodBlockM --- WoodBlockM --- WoodBlockM ---77 F5 WoodBlockM --- WoodBlockM --- WoodBlockM --- WoodBlockM --- WoodBlockM --- WoodBlockM --- WoodBlockM --- WoodBlockM ---78 F#5 Mute Cuica 3 Mute Cuica 3 Mute Cuica 3 Mute Cuica 3 Mute Cuica 3 Mute Cuica 3 Mute Cuica 3 Mute Cuica 379 G5 Open Cuica 3 Open Cuica 3 Open Cuica 3 Open Cuica 3 Open Cuica 3 Open Cuica 3 Open Cuica 3 Open Cuica 380 G#5 MuteTriang 5 MuteTriang 5 MuteTriang 5 MuteTriang 5 MuteTriang 5 MuteTriang 5 MuteTriang 5 MuteTriang 581 A5 OpenTriang 5 OpenTriang 5 OpenTriang 5 OpenTriang 5 OpenTriang 5 OpenTriang 5 OpenTriang 5 OpenTriang 582 A#5 Cabasa --- Cabasa --- Cabasa --- Cabasa --- Cabasa --- Cabasa --- Cabasa --- Cabasa ---83 B5 JingleBell --- JingleBell --- JingleBell --- JingleBell --- JingleBell --- JingleBell --- JingleBell --- JingleBell ---84 C6 MarcTree 1 --- MarcTree 1 --- MarcTree 1 --- MarcTree 1 --- MarcTree 1 --- MarcTree 1 --- MarcTree 1 --- MarcTree 1 ---85 C#6 Castanet1V --- Castanet1V --- Castanet1V --- Castanet1V --- Castanet1V --- Castanet1V --- Castanet1V --- Castanet1V ---86 D6 Baya 1 6 Baya 1 6 Baya 1 6 Baya 1 6 Baya 1 6 Baya 1 6 Baya 1 6 Baya 1 687 D#6 Tom 2 Hi V 6 Tom 2 Hi V 6 Tom 2 Hi V 6 Tom 2 Hi V 6 Tom 2 Hi V 6 Tom 2 Hi V 6 Tom 2 Hi V 6 Tom 2 Hi V 6
81

82
Key Brush Kit Orchestra Kit Percussion Kit Latin Perc. Kit Arabian Kit SFX Kit Techno Kit Rock Kit# Note Inst Excl Inst Excl Inst Excl Inst Excl Inst Excl Inst Excl Inst Excl Inst Excl
21 A0 Tom 1 Lo --- OFF OFF OFF Metronome2 --- OFF Dry Kick 2 --- Syn Kick 1 ---22 A#0 Tom 1 Lo --- OFF OFF MuteTriang 7 Tubular 3 --- OFF Rock Snare --- SynSnare 2 ---23 B0 Tom 1 Lo --- OFF OFF OpenTriang 7 Cowbell 1 --- OFF Gated Kick --- SynTom2 Lo ---24 C1 Tom 1 Lo --- RollSnare2 7 Flexatone --- Flexatone --- Cowbell 1 --- OFF FullRoomSD --- SynSnare 1 ---25 C#1 Tom 1 Hi --- RollSnare1 7 FingCymbal --- FingCymbal --- RollSnare1 --- OFF PicloSnare --- LightSnare ---26 D1 DrySnare 1 --- FingrSnap1 --- Tsuzumi --- SynCowbell --- FingrSnap1 --- OFF Rock Snare --- AmbiSnare2 ---27 D#1 Orch B.Drm --- Close HH 1 Lo Bongo --- Castanet 1 6 Zap 2 --- OFF Syn Kick 1 --- Dry Kick 2 ---28 E1 Punch Kick --- -- 1 Hi Bongo --- Castanet1V --- Tite HH 1 --- OFF Dance Kick --- PillowKick ---29 F1 FingrSnap1 --- Open HH 1 1 Lo Bongo --- FingrSnap1 --- Gt Scratch --- OFF Snare 1 --- PicloSnare ---30 F#1 Open HH 1 1 Ride Edge --- Tambourine --- Snap --- Gt Scratch --- OFF Close HH 1 ClosSynHH1 131 G1 Dry Kick 1 --- Stick Hit --- Agogo 1 --- MetalHitHi --- Stick Hit --- Scratch b 1 Ambi.Kick --- Ambi.Kick ---32 G#1 Side Stick --- Snap --- Wind --- MetalHitLo --- Palm Conga --- Scratch c 1 Zap 1 --- Metronome2 ---33 A1 Brush Tap --- Metronome1 --- Agogo 1 --- Tsuzumi --- Metronome2 --- GtCutNois1 --- FullRoomSD --- DrySnare 1 ---34 A#1 Brush Tap --- Tubular 3 --- Slap Bongo --- Tsuzumi --- Metronome1 --- GtCutNois2 --- SynSnare 2 --- LightSnare ---35 B1 PillowKick --- Real Kick --- WoodBlockL --- Tsuzumi --- Ambi.Kick --- Chic 2 --- Syn Kick 1 --- Metal Kick ---36 C2 Dry Kick 2 --- Orch B.Drm --- Claves --- Orch B.Drm 1 Real Kick --- Chic 1 --- Syn Kick 1 --- Gated Kick ---37 C#2 Side Stick --- Side Stick --- WoodBlockM --- Orch B.Drm 1 Side Stick --- Bass Slide --- Zap 1 --- Metronome2 ---38 D2 BrushNoise --- DrySnare 1 --- BongBellOp --- Agogo 1 --- Snare 1 --- Gt Scratch --- SynSnare 1 --- Rock Snare ---39 D#2 Brush Slap --- Castanet1V --- WoodBlockH --- Agogo 1 --- Hand Claps --- Zap 1 --- Syn Claps --- Hand Claps ---40 E2 BrushSwish --- DrySnare 1 --- Castanet 1 --- Open Conga --- Snare 1 --- WhiteNoise --- LightSnare --- FullRoomSD ---41 F2 Brush Tom --- Timpani --- Baya 2 --- Mute Conga --- Tom 1 Lo --- Scratch Hi 2 OilDrum --- Tom 1 Lo ---42 F#2 Close HH 1 Timpani --- Shaker 1 --- Palm Conga --- Tite HH 1 1 Scratch Lo 2 Ride Edge 1 Tite HH 1 143 G2 Brush Tom --- Timpani --- Baya 1 --- Slap Conga --- Tom 1 Lo --- Stick Hit --- OilDrum --- Tom 1 Lo ---44 G#2 Pedal HH 1 1 Timpani --- Maracas 1 --- SynMaracas --- Tite HH 1 1 Footstep 2 --- Ride Edge 1 Pedal HH 1 145 A2 Brush Tom --- Timpani --- Baya 2 --- Open Conga --- Tom 1 Lo --- Metronome2 --- OilDrum --- Tom 1 Lo ---46 A#2 Open HH 1 1 Timpani --- Cabasa --- MuteTriang 2 Open HH 1 1 Metronome1 --- Crash LP 1 Open HH 1 147 B2 Brush Tom --- Timpani --- Tabla 3 1 OpenTriang 2 Tom 1 Hi --- Gtr Slide --- OilDrum --- Tom 1 Lo ---48 C3 Brush Tom --- Timpani --- Tabla 2 1 Mute Conga --- Tom 1 Hi --- GtCutNois1 --- OilDrum --- Tom 1 Hi ---49 C#3 Crash Cym --- Timpani --- Viblaslap --- Palm Conga --- Crash Cym 2 GtCutNois1 --- Crash Cym --- Crash Cym ---50 D3 Brush Tom --- Timpani --- Tabla 1 1 Slap Conga --- Tom 1 Hi --- StringSlap --- OilDrum --- Tom 1 Hi ---51 D#3 Ride Cym 2 --- Timpani --- MuteTriang 3 Tambourine --- Ride Cym 2 3 StringSlap --- Ride Cym 2 --- Ride Cym 2 ---52 E3 China Cym --- Timpani --- Orch B.Drm --- Open Conga --- Darabuka O --- Laughing V --- China Cym --- China Cym ---53 F3 Ride Edge --- Timpani --- OpenTriang 3 Lo Bongo --- Darabuka M --- Scream --- Ride Cup --- Ride Cup ---54 F#3 Tambourine --- Tambourine --- Guiro S 2 Lo Bongo --- Tambourine --- Punch --- Tambourine --- Tambourin ---55 G3 Splash Cym --- Splash Cym --- JingleBell --- Hi Bongo --- Darabuka R --- Hart Beat --- Splash Cym --- Splash Cym ---56 G#3 Cowbell 1 --- Cowbell 1 --- Guiro L 2 Timbal1LoO --- Cowbell 1 --- Footstep 1 --- SynCowbell --- Cowbell 1 ---57 A3 Crash Cym --- Crash Cym --- MarcTree 1 --- Slap Bongo --- Darabuka R --- Footstep 1 --- Crash Cym --- Crash Cym ---58 A#3 Viblaslap --- Viblaslap --- MarcTree 2 --- Timbal1LoO --- Cabasa --- Applause 1 --- Zap 2 --- Viblaslap ---59 B3 Ride Cym 1 --- Orch Cym --- Maracas 1 --- Tambourine --- Douf Dom --- Door Creak --- Ride Cym 2 --- Ride Cym 2 ---60 C4 Hi Bongo --- Hi Bongo --- Hand Claps --- Timbal1Pil --- Douf Tak 2 --- Door Slam --- Hi Bongo --- Hi Bongo ---61 C#4 Lo Bongo --- Lo Bongo --- Syn Claps --- Timbal1HiO --- Lo Bongo --- Scratch a --- Lo Bongo --- Lo Bongo ---62 D4 Slap Conga --- Slap Conga --- Scratch Lo --- Timbal1Pil --- Douf Tak 1 --- MarcTree 2 --- Douf Rim --- Slap Conga ---63 D#4 Open Conga --- Open Conga --- Scratch Hi --- Timbal1HiO --- Hi Bongo --- Car Engine --- Douf Dom --- Open Conga ---64 E4 Open Conga --- Open Conga --- ScratchDbl --- Timbal1HiR --- Douf Rim --- Car Stop --- Douf Dom --- Open Conga ---65 F4 Timbal1HiO --- Timbal1HiO --- Whistle S 4 Timbal1HiR --- Tabla Dom --- Car Pass --- SolidHit --- Timbal1HiO ---66 F#4 Timbal1LoO --- Timbal1LoO --- Whistle L 4 Rek Dom 2 --- Tabla Roll 4 Car Crash --- SolidHit --- Timbal1LoO ---67 G4 Agogo 1 --- Agogo 1 --- Slap Conga --- Rek Dom 2 --- Tabla Tak 4 Siren --- MouthHarp1 --- Agogo 1 ---68 G#4 Agogo 1 --- Agogo 1 --- Mute Conga --- Rek Dom 2 --- Tabla Flam --- Train --- MouthHarp1 --- Agogo 1 ---69 A4 Cabasa --- Cabasa --- Open Conga --- Rek Slap --- Tabla Rim --- Jetstar --- Cabasa --- Cabasa ---70 A#4 SynMaracas --- SynMaracas --- Open Conga --- BongBellOp --- Slap Bongo --- Helicopter --- SynMaracas --- SynMaracas ---71 B4 Whistle S 2 Whistle S 2 Mute Cuica --- WoodBlockL --- Tabla 2 --- Laser Gun --- Explosion 2 Whistle S 272 C5 Whistle L 2 Whistle L 2 Open Cuica --- WoodBlockM --- Rek Dom 2 --- Gun Shot 2 --- Jetstar 2 Whistle L 273 C#5 Guiro S 4 Guiro S 4 Timbal1Pil --- BongBellMt --- Rek Tak --- MachineGun --- Rev.Cymbal 4 Guiro S 474 D5 Guiro L 4 Guiro L 4 Timbal1HiR --- Maracas 1 --- Rek Dom 1 --- Laser Gun --- Crash Cym 4 Guiro L 475 D#5 Claves --- Claves --- Timbal1HiO --- Manbo Bell --- Rek Rim --- Explosion --- Syn Claves --- Claves ---76 E5 WoodBlockM --- WoodBlockM --- Timbal1LoO --- Cabasa --- Rek Rim --- Dog --- WoodBlockM --- WoodBlockM ---77 F5 WoodBlockM --- WoodBlockM --- Syn Claves --- Shaker 3 --- Rek Slap --- Gallop --- WoodBlockM --- WoodBlockM ---78 F#5 Mute Cuica 3 Mute Cuica 3 SynCowbell --- Cowbell 1 --- Tambourine --- Bird 1 3 Mute Cuica 3 Mute Cuica 379 G5 Open Cuica 3 Open Cuica 3 FingrSnap1 --- Shaker 1 --- Rek Dom 2 --- Rain --- Open Cuica 3 Open Cuica 380 G#5 MuteTriang 5 MuteTriang 5 Taiko Hi --- Shaker 1 --- Tambourine 2 Thunder --- MuteTriang 5 MuteTriang 581 A5 OpenTriang 5 OpenTriang 5 Taiko Lo --- Shaker 2 --- Rek Tak 2 Wind --- OpenTriang 5 OpenTriang 582 A#5 Cabasa --- Cabasa --- Zap 2 --- Tambourim3 --- Rek Rim --- Seashore --- Cabasa --- Cabasa ---83 B5 JingleBell --- JingleBell --- RollSnare1 5 Tambourim1 --- Rek Slap --- Stream --- JingleBell --- JingleBell ---84 C6 MarcTree 1 --- MarcTree 1 --- RollSnare2 5 Tambourim2 --- Sagat Open 5 Bubble --- MarcTree 1 --- MarcTree 1 ---85 C#6 Castanet1V --- Castanet1V --- Orch Cym 6 Tambourim2 --- Sagat HfOp 5 Kitty --- Castanet1V --- Castanet1V ---86 D6 Baya 1 6 Baya 1 6 Orch Cym 6 Tambourim1 --- SagatClose 5 Bird 2 --- Baya 1 6 Baya 1 687 D#6 Tom 2 Hi V 6 Tom 2 Hi V 6 Udu --- Udu --- JingleBell --- Growl 2 --- Tom 2 Hi V 6 Tom 2 Hi V 688 E6 OFF Applause 1 1 Orch Hit --- DjembeOpen --- DjembeOpen 6 Stadium --- OFF OFF89 F6 OFF OFF Orch Hit --- Maracas 1 --- DjembeOpen 6 Telephone1 --- OFF OFF90 F#6 OFF OFF Orch Hit --- Maracas 1 --- Darabuka O 6 Telephone2 --- OFF OFF91 G6 OFF OFF Orch Hit --- Mute Cuica --- Sagat Open 7 OFF OFF OFF92 G#6 OFF OFF Orch Hit --- Guiro L 3 Sagat HfOp 7 OFF OFF OFF93 A6 OFF OFF Orch Hit --- Guiro S 3 SagatClose 7 OFF OFF OFF94 A#6 OFF OFF Orch Hit --- Guiro S 3 JingleBell --- OFF OFF OFF95 B6 OFF OFF Orch Hit --- Open Cuica --- Real Kick --- OFF OFF OFF96 C7 OFF OFF Orch Hit --- Claves --- Cast Roll --- OFF OFF OFF97 C#7 OFF OFF Orch Hit --- Whistle S 4 OFF OFF OFF OFF98 D7 OFF OFF Orch Hit --- Whistle L 4 OFF OFF OFF OFF99 D#7 OFF OFF Orch Hit --- Sagat Open 5 OFF OFF OFF OFF100 E7 OFF OFF Orch Hit --- Sagat HfOp 5 OFF OFF OFF OFF101 F7 OFF OFF Orch Hit --- SagatClose 5 OFF OFF OFF OFF102 F#7 OFF OFF Orch Hit --- JingleBell --- OFF OFF OFF OFF103 G7 OFF OFF Orch Hit --- MarcTree 1 --- OFF OFF OFF OFF104 G#7 OFF OFF Orch Hit --- MarcTree 2 --- OFF OFF OFF OFF105 A7 OFF OFF Orch Hit --- Tri Roll 2 OFF OFF OFF OFF106 A#7 OFF OFF Orch Hit --- Cast Roll 6 OFF OFF OFF OFF107 G8 OFF OFF Orch Hit --- Metronome1 --- OFF OFF OFF OFF

App
endi
ces
Demo songs list
Piano demo songs
Style demo songs
Program demo
曲 名 Piano Demo Songs1 J.S. バッハ / プレリュード(平均律第1 番より) J.S.Bach/The equal temperament No.1~Prelude
2 W.A. モーツァルト / ソナタK.545 第 1 楽章 W.A.Mozart/Sonata K.5453 W.A. モーツァルト / ソナタK.331 第 3 楽章「トルコ行進曲」 W.A.Mozart/Sonata K.331
4 L.v. ベートーヴェン / エリーゼのために L.v.Beethoven/For Elise
5 F. ブルグミュラー/ アラベスク Op.100-2 F.Burgmuller/Arabesque Op.100-26 F. ブルグミュラー/ スティリアの女Op.100-14 F.Burgmuller/La styrienne Op.100-14
7 F. ブルグミュラー/ 貴婦人の乗馬Op.100-25 F.Burgmuller/La chevaleresque Op.100-258 F. メンデルスゾーン / 春の歌Op.62-6 F.Mendelssohn/Springs Song Op.62-6
9 F. ショパン / ワルツ 第 6番 変ニ長調「小犬」Op.64-1 F.Chopin/Waltz No.6 Db-major Op.64-1
10 F. ショパン / ワルツ 第 7番 ホ短調Op.64-2 F.Chopin/Waltz No.7 E-minor Op.64-211 F. ショパン / ノクターン第 2 番 Op.9-2 F.Chopin/Nocturne Op.9-2
12 F. ショパン / マズルカ第 5 番 Op.7-1 F.Chopin/Mazurka No.5 Op.7-113 R. シューマン / トロイメライOp.15-7 R.Schumann/A Dream Op.15-7
14 G. ランゲ / 荒野のばら G.Lange/Heidenroslein
15 A. エルメンライヒ / 紡ぎ歌 A.Ellmenreich/Spinning Song16 T. オースティン /人形の夢と目覚め T.Oesten/Dolly's Dreaming and Awaking
17 C. ドビュッシー/ ゴリィウォーグのケークウォーク C.Debussy/Golliwog's Cake walk18 C. ドビュッシー/ 亜麻色の髪の乙女 C.Debussy/La fille aux cheveux de lin
19 C. ドビュッシー/ アラベスク第 1番 C.Debussy/Arabesque No.1
20 C. ドビュッシー/ 月の光 C.Debussy/Claiar de lune21 F. ショパン / 黒鍵のエチュード Op.10-5 F.Chopin/Etude Op.10-5
22 F. ショパン / 別れの曲 Op.10-3 F.Chopin/Etude Op.10-323 E. サティ/ジムノペディ第 1番 E.Satie/Gymnopedie No.1
24 E. エルガー/ 愛の挨拶 E.Elgar/Salut d'Amour
グループ名 スタイル名 Style Group Style Name1 8/16 ビート アナロギスト 8/16 BEAT Analogyst
2 ダンス ジャングル DANCE Jungle3 ラテン ミス・ボサノバ LATIN Miss Bossa
4 ボールルーム サルサ BALLROOM Salsa
5 トラッド ジャーマン・ワルツ TRAD German Waltz6 ジャズ / ファンク ビッグ・バンド JAZZ/FUNK Big Band
7 R&B/ ロック R. & B. R&B/ROCK R. & B.8 ワールド カントリー WORLD Country
9 ピアニスト ロックバラード PIANIST Rock Ballad
グループ名 プログラムデモ(音色デモ) Prog. Group Prog. Name1 ピアノ F.ショパン / 幻想即興曲 Op.66 PIANO F.Chopin/Fantasy-Impromptu Op.66
2 エレクトリックピアノ /オルガン KORGオリジナル /The Harp of Wind E.PIANO/ORGAN KORG Original/The Harp of Wind3 フルート / サックス P. チャイコフスキー/ くるみ割人形~行進曲 Op.71a FLUTE/SAX P.Tschaikowsky/Nutcracker ~ March Op.71a
4 ブラス / クァイア M. ムソルグスキー/展覧会の絵~プロムナード BRASS/CHOIR M. Moussorgsky/Pictures at an Exhibition ~ Promenade
5 ストリングス J.S. バッハ /G線上のアリア STRINGS J.S.Bach/Air on the G string6 ギター J.S. バッハ / ブーレ GUITAR J.S.Bach/Bourree
7 ベース KORGオリジナル /Movement BASS KORG Original/Movement8 シンセ / 効果音 KORGオリジナル /Synth Pict. SYNTH/S.E. KORG Original/Synth Pict.
9 パーカッション KORGオリジナル / A Target、R. コルサコフ/熊蜂の飛行 PERCUSSION KORG Original/A Target, R.Korsakov/The Flight of The Bumble Bee
83

84
List of detected chords
Each of the chords pictured rught are shown in root position with a root note of C. In order for the SP-500 to correctly recognize major 6th and minor 6th chords, they must be played in root position as pictured. This is because these chords consist of the same notes as the minor 7th and minor 7th flatted 5th of the relative minor key. (For example, the notes C, E, G, and A could be either C6 or Am7.)
: Root
Major "C"
Major 6th "C6"
Major 7th "CM7"
Sus 4 "Csus4"
Sus 2 "Csus2"
Dominant 7th "C7"
3-note 2-note
2-note
2-note
3-note
2-note
4-note
4-note 3-note
2-note
3-note
4-note 3-note
2-note
1-note
9
�11�9�911
�9 �11
9 11
�11
9
�11
9
�11
9
9
�99
�99
�11�913
�99
�913
�99 13
: Notes which can be used as tension
: Constituent notes of the chord

85
App
endi
ces
Minor "Cm"
Minor 6th "Cm6"
Minor 7th "Cm7"
Minor-Major 7th "CmM7"
Diminished "Cdim"
Diminished Major 7th "CdimM7"
Minor 7th �5 "Cm7�5"
3-note
3-note
3-note 2-note
4-note
4-note
4-note
3-note
4-note
4-note
Dominant 7th Sus 4 "C7sus4"
4-note 3-note
9
�99
�9
9 11
9 11
9 11
9
�9
9 11 13
9 13 9
99 11
11
3-note
Augmented "Caug"
4-note
Augmented Major 7th "CaugM7"
4-note
Major 7th �5 "CM7�5
4-note
Dominant 7th �5 "C7�5"
4-note
Major 7th Sus 4 "CM7sus4"
4-note
Augmented 7th "Caug7"
9
�9
�99
�11�9
�99
�11�9
9
�99
�99
�913

[Digital Piano]S
BC
M
NN
V
A
P
CC
PC
S
SC
SR
AM
R
.1
ta
ta
ed.
Co
MIDI Implementation Chart
Recorder dataAll Sound Off, Reset All Controllers
P-500 MIDI Implementation Chart
Function Transmitted Recognized Remarks
asic hannel:
Default
Changed
MemorizedMessagesAltered
ode
ote umber: True Voice
elocity:Note On
Note Off
ftertouch:Polyphonic (Key)
Monophonic (Channel)
itch Bend
ontrol hange
rogram hange: Variable Range
ystem Exclusive
ystemommon:
Song PositionSong SelectTune
ystemeal Time:
Clock
Command
Local On/OffAll Notes OffActive SenseReset
uxessages:
emarks
646667
Mode 1: OMNI ON, POLY Mode 2: OMNI ON, MONO : YesMode 3: OMNI OFF, POLY Mode 4: OMNI OFF, MONO : No
2001.11
7
2–126 transmitted as recorder da
Acts as channel aftertouch
0–127 transmitted as recorder da
0–127 received by some sounds
111091
120, 1210–101
0, 321, 2
93
Memorized
Transmitted/received when control changes are enabled.Transmitted/received when program changes are enabled.Transmitted/received when exclusive are enabled.When Clock Source is Internal, transmitted and not received. When Clock Source is Exterual, received and not transmittHalf Damper output value (0, 38, 74, 127) *Only when separately sold DS-1H is usedRecorded by the recorder regardless of the *C and *P settings. Data recorded in the recorder is likewise transmitted.
Bank select (MSB, LSB)Modulation (pitch, cutoff)VolumeExpressionPanpotReverbChorusDamper pedalSostenuto pedalSoft pedal
nsult your local Korg distributor for more information on MIDI IMPLEMENTATION.

87
Index
A
Accompaniment..................................................... 37Assignable switch .................................................. 33Automatic accompaniment .................................. 37
C
ChordsSpecifying the chord .................................. 37, 41
Chorus ..................................................................... 30Control event type ................................................. 56Copy................................................................... 35, 45Custom .................................................................... 45
D
Damper pedal......................................................... 33Drum Kit ................................................................. 25
E
Effect ........................................................................ 30Ending ............................................................... 39, 44Ensemble ................................................................. 42Event Edit................................................................ 58Event type ............................................................... 58
F
Fill ...................................................................... 39, 44Front panel.............................................................. 10
H
Harmony................................................................. 39
I
Intro ................................................................... 39, 43
L
Layer function ........................................................ 26Location................................................................... 55
M
Metronome ............................................................. 31MIDI......................................................................... 69Multitrack recording ............................................. 53Mute......................................................................... 40
O
Operating panel ..................................................... 12
P
Parameter................................................................ 47Part........................................................................... 40Pedal ........................................................................ 33PIANIST.................................................................. 37[PLAY PIANO] switch.......................................... 28Popup screen.............................................. 16, 24, 68Program .................................................................. 24
Program group................................................. 24Program name.................................................. 35[USER] program group............................. 25, 34
Q
Quantize............................................................ 53, 57
R
Rear panel ............................................................... 11Recording mode..................................................... 53Rename.................................................................... 35Resolution......................................................... 53, 57Reverb effect........................................................... 29Rhythm style .................................................... 37, 38
Custom rhythm style....................................... 46Rhythm style group......................................... 38Rhythm style name.......................................... 46[USER] rhythm style group............................ 45
S
[SINGLE TOUCH] switch .................................... 44Split function .......................................................... 27Split point ......................................................... 28, 40Synchro Start/Stop................................................ 39
T
Tempo ............................................................... 32, 39Touch Control function ........................................ 34
V
Variation ........................................................... 39, 43