Embed Size (px)
Citation preview

http://www.maxtekinc.com 5980 Lakeshore Drive, Cypress, CA 90630-3371
Tel: (714) 828-4200 • Fax: (714) 828-4443
Email: [email protected] • [email protected]
OPERATION AND SERVICE MANUAL
MODEL TM-350/400 MAXTEK THICKNESS MONITOR
MAXTEK, INC.


http://www.maxtekinc.com 5980 Lakeshore Drive, Cypress, CA 90630-3371
Tel: (714) 828-4200 • Fax: (714) 828-4443
Email: [email protected] • [email protected]
OPERATION AND SERVICE MANUAL
MODEL TM-350/400 MAXTEK THICKNESS MONITOR
P/N 178800
S/N _____________
MAXTEK, INC

ii
©1998-2005 MAXTEK, INC. All rights reserved. First Edition, February 1998 Second Edition, July 1998 Third Edition, October 1998 Fourth Edition, January 1999 Fifth Edition, May 2000 Sixth Edition, October 2000 Seventh Edition, June 2002 Eighth Edition, February 2003 Ninth Edition, December 2003 Tenth Edition, October 2004
Revised January 2005 Revised July 2005 Eleventh Edition, August 2005

iii
WARRANTY Maxtek, Inc. warrants the product to be free of functional defects in material and workmanship and that it will perform in accordance with its published specification for a period of (twenty-four) 24 months. The foregoing warranty is subject to the condition that the product be properly operated in accordance with instructions provided by Maxtek, Inc. or has not been subjected to improper installation or abuse, misuse, negligence, accident, corrosion, or damage during shipment. Purchaser's sole and exclusive remedy under the above warranty is limited to, at Maxtek's option, repair or replacement of defective equipment or return to purchaser of the original purchase price. Transportation charges must be prepaid and upon examination by Maxtek the equipment must be found not to comply with the above warranty. In the event that Maxtek elects to refund the purchase price, the equipment shall be the property of Maxtek. This warranty is in lieu of all other warranties, expressed or implied and constitutes fulfillment of all of Maxtek's liabilities to the purchaser. Maxtek does not warrant that the product can be used for any particular purpose other than that covered by the applicable specifications. Maxtek assumes no liability in any event, for consequential damages, for anticipated or lost profits, incidental damage of loss of time or other losses incurred by the purchaser or third party in connection with products covered by this warranty or otherwise.
DISCLOSURE The disclosure of this information is to assist owners of Maxtek equipment to properly operate and maintain their equipment, and does not constitute the release of rights thereof. Reproduction of this information and equipment described herein is prohibited without prior written consent from Maxtek, Inc., 5980 Lakeshore Drive, Cypress, California, 90630.
SAFETY WARNING All standard safety procedures associated with the safe handling of
electrical equipment must be observed. Always disconnect power when working inside the monitor. Only properly trained personnel should
attempt to service the instrument.

iv
Safety Precaution and Preparation for Use Input Power Requirements The TM Series Thickness Monitor can be set to operate one of the following line voltages: 100, 120, 200, or 240 VAC at line frequency of 50 or 60 Hz. Maximum power consumption is 25 watts. See Section 3.2.6 for instruction to select line voltage. Power Entry Module The AC (alternating current) power entry module, located in the rear panel of the TM, provides connection to the power source and a protective ground. It also holds the fuses and the voltage selection wheel. Power Cord WARNING: To avoid electrical shock, always connect the power cord to an AC outlet which has a proper protective ground.
The TM Series Thickness Monitor comes with a detachable, three-wire power cord for connection to a power source with protective ground. The TM chassis is connected to the power ground to protect against electrical shock. Always connect to an AC outlet which has a properly connected protective ground. If necessary, or when in doubt, consult a certified electrician. Grounding A grounding lug is located on the rear panel, near the power entry module. Use heavy ground wire, wire braid, or copper strap of #12 AWG or larger to connect this grounding lug directly to a facility protective earth ground to provide additional protection against electrical shock. Line Fuses There are two 5 x 20 mm fuses mounted inside the power entry module. They are accessible via the snap-in cover. Replace with the correct fuse rating: IEC T Type (Slow), 4/10 A, 250 VAC. Refer to Section 3.2.6 for instruction to replace the fuse. Power Switch WARNING: Do NOT use the power switch as a disconnecting device; disconnect the power cord from the power entry module to fully remove hazardous voltage from inside the TM monitor.
The power switch is located on the front of the TM monitor. The switch is a toggle type, marked with I and O. The I (on) position applies the power to the unit. The O (off) position cuts off the power to the unit. However, turning the power switch off does not fully remove the AC power from inside the unit. Always disconnect the power cord from the power entry module to fully remove AC power from inside the unit.

v
Table of Contents Safety Precaution and Preparation for Use……………………..……………iv 1 GENERAL DESCRIPTION .............................................................................................. 1-1
1.1 FEATURES.................................................................................................................... 1-1 1.1.1 INDEPENDENT FILM DENSITY AND TOOLING FACTOR PARAMETERS .... 1-1 1.1.2 ACOUSTIC IMPEDANCE CORRECTION........................................................... 1-1 1.1.3 PARAMETER DISPLAY........................................................................................ 1-1 1.1.4 HIGH RESOLUTION AUTORANGED DISPLAY ................................................ 1-1 1.1.5 LONG-TERM PARAMETER STORAGE............................................................... 1-2 1.1.6 MULTIPLE COMPUTER INTERFACES.............................................................. 1-2 1.1.7 COMPACT CASE.................................................................................................. 1-2 1.1.8 DAC OUTPUT ...................................................................................................... 1-2 1.1.9 MULTIPLE CRYSTAL FREQUENCIES ............................................................... 1-2 1.1.10 BUILT IN TEST..................................................................................................... 1-2 1.1.11 DYNAMIC MEASUREMENT UPDATE RATE ..................................................... 1-2 1.1.12 AUTOMATIC CRYSTAL SWITCHING (TM-400 ONLY)...................................... 1-2
1.2 SPECIFICATIONS......................................................................................................... 1-3 1.2.1 MEASUREMENT .................................................................................................. 1-3 1.2.2 DISPLAY ............................................................................................................... 1-3 1.2.3 COMPUTER INTERFACES ................................................................................. 1-3 1.2.4 PROGRAM PARAMETERS .................................................................................. 1-3 1.2.5 INPUT CAPABILITY ............................................................................................ 1-3 1.2.6 OUTPUT CAPABILITY......................................................................................... 1-3 1.2.7 OTHER.................................................................................................................. 1-4
1.3 ACCESSORIES.............................................................................................................. 1-7 2 UNPACKING & INSPECTION........................................................................................ 2-1
2.1 BENCH CHECK-OUT................................................................................................... 2-1 2.2 INSTALLING OPTIONS............................................................................................... 2-2
2.2.1 IEEE-488 OPTION BOARD ................................................................................. 2-2 2.2.2 RS-485 OPTION.................................................................................................... 2-2
2.3 DIGITAL TO ANALOG CONVERTER (DAC) CHECKOUT...................................... 2-2 3 MONITOR INSTALLATION ........................................................................................... 3-1
3.1 MONITOR INSTALLATION PRECAUTIONS............................................................ 3-1 3.1.1 PROPER GROUNDING ....................................................................................... 3-1 3.1.2 HEAT DISSIPATION ............................................................................................ 3-1
3.2 REAR PANEL CONNECTIONS ................................................................................... 3-1 3.2.1 OSCILLATOR CONNECTOR(S) .......................................................................... 3-1 3.2.2 IEEE-488 OPTION BOARD (optional)................................................................. 3-1 3.2.3 DIGITAL TO ANALOG CONVERTER (DAC) CONNECTION............................ 3-2 3.2.4 REMOTE TTL INPUTS......................................................................................... 3-2 3.2.5 RELAY OUTPUTS ................................................................................................ 3-2 3.2.6 LINE VOLTAGE SELECTION AND FUSE REPLACEMENT.............................. 3-2
3.3 INTERNAL DIP SWITCHES ........................................................................................ 3-3 3.3.1 CRYSTAL TYPE SELECTION .............................................................................. 3-4 3.3.2 COMPUTER INTERFACE ADDRESS.................................................................. 3-4 3.3.3 DAC....................................................................................................................... 3-5 3.3.4 DISABLE NEGATIVE THICKNESS/RATE READINGS....................................... 3-5 3.3.5 ALLOW CRYSTAL SWITCHING TO A FAILED SENSOR (TM-400 only)........... 3-5 3.3.6 PULSE SWITCH AT THICKNESS ENDPOINT (TM-350 Only) .......................... 3-6 3.3.7 S16 SWITCH SETTINGS....................................................................................... 3-6 3.3.8 DAC RANGE SETTINGS ...................................................................................... 3-6
3.4 MONITOR COVER REMOVAL................................................................................... 3-7 4 SENSOR, FEEDTHROUGH AND OSCILLATOR ........................................................ 4-1
vi
4.1 SENSOR HEAD DESCRIPTION................................................................................... 4-1 4.2 SENSOR HEAD INSTALLATION................................................................................ 4-1 4.3 INSTRUMENTATION FEEDTHROUGH INSTALLATION....................................... 4-2 4.4 SENSOR OSCILLATOR INSTALLATION.................................................................. 4-2
5 SENSOR CRYSTAL REPLACEMENT........................................................................... 5-1 6 OPERATION....................................................................................................................... 6-1
6.1 FRONT PANEL DISPLAYS.......................................................................................... 6-1 6.2 FRONT PANEL CONTROLS ........................................................................................ 6-1 6.3 DISPLAY AND MODIFICATION OF PARAMETERS ............................................... 6-2 6.4 THICKNESS SET POINT SHUTTER CONTROL ........................................................ 6-2 6.5 CRYSTAL TEST DISPLAY .......................................................................................... 6-3 6.6 CRYSTAL FAIL INDICATION..................................................................................... 6-3 6.7 POWER FAIL INDICATION......................................................................................... 6-3 6.8 DAC OPERATION......................................................................................................... 6-4
7 THEORY OF OPERATION.............................................................................................. 7-1 7.1 BASIC MEASUREMENT.............................................................................................. 7-1 7.2 FILM THICKNESS CALCULATION ........................................................................... 7-1 7.3 CRYSTAL HEALTH CALCULATION......................................................................... 7-3 7.4 RATE CALCULATION................................................................................................. 7-3
8 ESTABLISHING THE DEPOSITION PARAMETERS................................................. 8-1 8.1 TOOLING FACTOR ...................................................................................................... 8-1 8.2 SENSOR NUMBER (TM-400 ONLY) .............................................................................. 8-1 8.3 DENSITY ....................................................................................................................... 8-1 8.4 ACOUSTIC IMPEDANCE............................................................................................. 8-1 8.5 EMPIRICAL CALIBRATION ....................................................................................... 8-2
8.5.1 MATERIAL DENSITY CALIBRATION.................................................................. 8-2 8.5.2 TOOLING FACTOR CALIBRATION.................................................................... 8-3 8.5.3 ACOUSTIC IMPEDANCE .................................................................................... 8-3
9 COMPUTER INTERFACE ............................................................................................... 9-1 9.1 GENERAL...................................................................................................................... 9-1 9.2 RS-232 SERIAL INTERFACE....................................................................................... 9-1 9.3 RS-485 SERIAL INTERFACE....................................................................................... 9-1 9.4 IEEE-488 PARALLEL INTERFACE............................................................................. 9-2 9.5 PROTOCOL ................................................................................................................... 9-2 9.6 DATA TYPES ................................................................................................................ 9-2 9.7 MESSAGE RECEIVED STATUS.................................................................................. 9-3 9.8 INSTRUCTION SUMMARY......................................................................................... 9-4 9.9 INSTRUCTION DESCRIPTIONS ................................................................................. 9-4
10 REPAIR AND MAINTENANCE .............................................................................. 10-1 10.1 HANDLING PRECAUTIONS................................................................................. 10-1 10.2 MAINTENANCE PHILOSOPHY ........................................................................... 10-1 10.3 SELF TEST FAILURE DETECTION ..................................................................... 10-1
10.3.1 EPROM FAILURE (E FAIL)............................................................................... 10-2 10.3.2 RAM FAILURE (I FAIL) ..................................................................................... 10-2 10.3.3 FILM DATA FAILURE (C-FAIL)........................................................................ 10-2 10.3.4 POWER FAILURE (P-FAIL)............................................................................... 10-3 10.3.5 OSCILLATOR FAILURE (O-FAIL) .................................................................... 10-3 10.3.6 SENSOR CARD FAILURE (S FAIL) ................................................................... 10-3
10.4 TROUBLESHOOTING AIDS TO ISOLATE INSTALLATION FAULTS ............ 10-3 10.5 RETURNING THE TM-350/400 TO THE FACTORY ........................................... 10-4
vii
Table of Figures FIGURE 1-1 TM-400 OUTLINE ................................................................................................ 1-5 FIGURE 1-2 TM-400R OUTLINE.............................................................................................. 1-6 FIGURE 2-1 TM-350 FRONT PANEL........................................................................................ 2-4 FIGURE 2-2 TM-400 FRONT PANEL WITH DESCRIPTIONS ............................................... 2-5 FIGURE 2-3 TM-400 REAR PANEL WITH DESCRIPTIONS.................................................. 2-6 FIGURE 2-4 OUTPUT CONNECTOR....................................................................................... 2-7 FIGURE 2-5 INPUT CONNECTOR............................................................................................ 2-7 FIGURE 2-6 IEEE-488 CONNECTOR........................................................................................ 2-8 FIGURE 2-7 D9S DTE REAR-PANEL RS-232 MALE CONNECTOR..................................... 2-9 FIGURE 2-8 DAC SOCKET CONNECTOR............................................................................... 2-9 FIGURE 2-9 TM-400 TOP VIEW (COVER REMOVED) .........................................................2-10 FIGURE 3-1 POWER ENTRY MODULE................................................................................... 3-2 FIGURE 3-2 TYPICAL SYSTEM INSTALLATION.................................................................. 3-8

viii
List of Tables TABLE 2-1 OUTPUT CONNECTOR PIN ASSIGNMENTS..................................................... 2-7 TABLE 2-2 INPUT CONNECTOR PIN ASSIGNMENTS.......................................................... 2-7 TABLE 2-3 IEEE-488 PIN ASSIGNMENTS.............................................................................. 2-8 TABLE 2-4 D9 REAR PANEL RS-232/RS-485 CONNECTOR PIN ASSIGNMENTS............. 2-9 TABLE 2-5 DAC SYSTEM INTERFACE CONNECTOR PIN ASSIGNMENTS. .................... 2-9 TABLE 8-1 CALIBRATION ADJUSTMENT............................................................................ 8-3 TABLE 8-2 DENSITY AND ACOUSTIC IMPEDANCE VALUES FOR SELECTED
MATERIALS ...................................................................................................................... 8-4 TABLE 10-1 TROUBLESHOOTING AIDS............................................................................. 10-4
TM-350/400 THICKNESS MONITOR
GENERAL DESCRIPTION 1-1
1 GENERAL DESCRIPTION The Thickness Monitor allows improved manual control of the vacuum film deposition process by providing a direct display of film thickness and deposition rate during deposition.
Semiautomatic control of film thickness can be accomplished by utilization of the shutter control relay in the Monitor. The shutter control relay allows for direct operator control of the systems shutter and will also automatically close the shutter when the deposition thickness equals a preprogrammed value.
The Monitor requires 4 (6 in a TM-400 using crystal switching) operator-supplied parameters in order to provide direct readout and shutter control. Entry, modification and display of these parameters are easy and straightforward. Parameter storage is not dependent on continuous AC power. An internal, self-charging, Lithium battery provides parameter storage for a minimum of five years without external power.
1.1 FEATURES
1.1.1 INDEPENDENT FILM DENSITY AND TOOLING FACTOR PARAMETERS The tooling factor parameter allows the Monitor to compensate for deposition geometry effects such as different source to sensor and source to substrate distances, which result in proportional but not equal film thicknesses at the sensor and the substrates. By utilizing the tooling factor, the Monitor can calculate and display film thickness and rate at the substrate rather than at the sensor.
1.1.2 ACOUSTIC IMPEDANCE CORRECTION The Monitor corrects the thickness reading for acoustic impedance mismatch between the crystal and film material by taking into account the operator supplied Acoustic Impedance Parameter for the film. If not corrected for, errors result as the film thickness builds up on the sensor crystal. The sensitivity of quartz crystals to material buildup changes with the amount of material on the crystal if the deposited material's acoustic impedance is significantly different than that of quartz. With some materials this effect can lead to differences between indicated and actual thickness of up to 20% as material builds up on the sensor crystal.
1.1.3 PARAMETER DISPLAY The Film Density, Tooling Factor, and Acoustic Impedance parameters are instantly viewable on demand for quick reference at any time.
1.1.4 HIGH RESOLUTION AUTORANGED DISPLAY All parameter displays and Rate and Thickness displays are fully auto ranged. Rate measurements are displayed to resolution of 0.1 Å/sec, and thickness to a resolution of 1 Å.

TM-350/400 THICKNESS MONITOR
GENERAL DESCRIPTION 1-2
1.1.5 LONG-TERM PARAMETER STORAGE Parameters entered into the Monitor are maintained in memory for a period of at least five years without power. Short-term power loss will not require parameters to be re-entered.
1.1.6 MULTIPLE COMPUTER INTERFACES Supports RS-232 (standard), RS-485, or IEEE-485.
1.1.7 COMPACT CASE Available in either a bench top model or with a standard (19”) rack mounting kit
1.1.8 DAC OUTPUT Dual Digital-to-Analog converter outputs provide data for recording Rate and Thickness data, simultaneously.
1.1.9 MULTIPLE CRYSTAL FREQUENCIES The Monitor is designed to accept 2.5, 3, 5, 6, 9, & 10 MHz sensor crystals and nominal AC line voltages of 100 through 120 or 220 through 240VAC at 50 to 60Hz.
1.1.10 BUILT IN TEST The Monitor incorporates built in test functions to guarantee its operational integrity and to aid in fault isolation in the event of an internal failure.
1.1.11 DYNAMIC MEASUREMENT UPDATE RATE The Monitor utilizes a dynamic updating scheme where the update rate is automatically varied from 0.5 to 10 measurement updates/sec depending on the deposition rate. The update rate will increase for high deposition rates where fast response is important. Conversely, the update rate will decrease for slow deposition rates to maximize the measurement resolution.
1.1.12 AUTOMATIC CRYSTAL SWITCHING (TM-400 ONLY) Allows the use of a dual sensor head so that upon crystal failure the unit can switch to a backup sensor to complete the film.

TM-350/400 THICKNESS MONITOR
GENERAL DESCRIPTION 1-3
1.2 SPECIFICATIONS
1.2.1 MEASUREMENT Frequency Resolution 0.03 Hz @6.0 MHz (TM-400)
0.5 Hz @6.0 MHz (TM-350) Mass Resolution 0.375 ng/cm2 (TM-400)
6.0 ng/cm^2 (TM-350) Thickness Accuracy 0.5% + 1 count Measurement Update Rate Dynamically adjusted, 0.5 to 10 Hz Display Update Rate 10 Hz Sensor Crystal Frequency 2.5, 3, 5, 6, 9, 10 MHz
1.2.2 DISPLAY Thickness Display Autoranging: 0.000 to ± 999.9 KÅ Rate Display Autoranging: 000.0 to ± 999.9 Å/sec Frequency 0,000,000.0 to 9,999,999.9 MHz
1.2.3 COMPUTER INTERFACES RS-232 serial port standard RS-485 serial port optional IEEE-488 bus interface optional
1.2.4 PROGRAM PARAMETERS Film Number 100 Programmable films Thickness Endpoint 0.000 to 999.9 KÅ Density 0.1 to 99.99 gm/cm3 Acoustic Impedance 0.50 to 59.99 × 10⁻⁵ gm/cm2/sec Tooling Factor #1 10.0 to 999.9% Tooling Factor #2 (TM-400 only) 10.0 to 999.9% Primary Sensor (TM-400 only) 1 to 2
1.2.5 INPUT CAPABILITY Discrete Inputs TTL level inputs activated by a short across
the input pins (min 200ms pulse): Start, Stop, Film Number, Increase, Decrease
1.2.6 OUTPUT CAPABILITY Source Shutter Relay One Single Pole Single Throw Relay, 120
VA, 2A Max Sensor Shutter Relay (TM-400 only)
One Single Pole Single Throw Relay, 120 VA, 2A Max
Digital to Analog Converter Rate and Thickness; 0 to 5 VDC, 11 bit resolution, 2 or 3 Decade range
TM-350/400 THICKNESS MONITOR
GENERAL DESCRIPTION 1-4
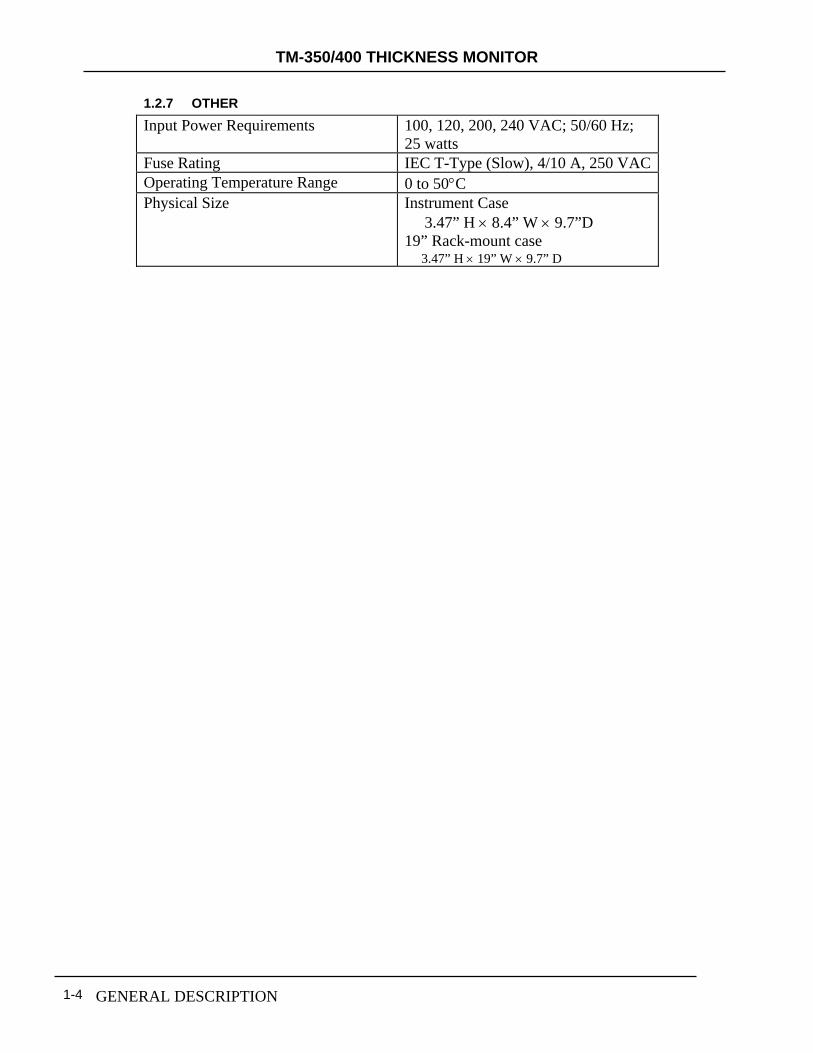
1.2.7 OTHER Input Power Requirements 100, 120, 200, 240 VAC; 50/60 Hz;
25 watts Fuse Rating IEC T-Type (Slow), 4/10 A, 250 VAC Operating Temperature Range 0 to 50°C Physical Size Instrument Case
3.47” H × 8.4” W × 9.7”D 19” Rack-mount case 3.47” H × 19” W × 9.7” D

TM-350/400 THICKNESS MONITOR
GENERAL DESCRIPTION 1-5
Figure 1-1 TM-400 Outline

TM-350/400 THICKNESS MONITOR
GENERAL DESCRIPTION 1-6
Figure 1-2 TM-400R Outline

TM-350/400 THICKNESS MONITOR
GENERAL DESCRIPTION 1-7
1.3 ACCESSORIES Part Number Description 179217 IEEE-488 Communication Board 179219 RS-232 to RS-485 conversion 123200-5 SH-102 Sensor Head, cables, and
carousel of 10 each 6MHz Gold SC-101 sensor crystals
124201-4 SO-100 Oscillator with 6" and 10' BNC Cables.
130200-2 IF-111 Instrument Feedthrough, 1" O-Ring with 1 electrical connector and dual 3/16" water tubes.
130204-2 IF-276 Instrumentation Feedthrough, 2 3/4" Conflat® Flange seal with 1 electrical connector and dual 3/16" water tubes.
150902 SF-120 Combination Sensor Head, Feedthrough, Cables, Crystals and Oscillator.
123204-1 Internal Coax Cable 30". 123204-2 Internal Coax Cable 60". 124202-1 BNC Cable Assembly 10'. 124202-2 BNC Cable Assembly 20' 124204 BNC Cable Assembly 6". 103220 SC-101 Carousel of 10 each 6MHz
gold sensor crystals. 103221 SC-102 Carousel of 10 each 6MHz
silver sensor crystals. Refer to Maxtek’s Price List for more accessories and other products.


TM-350/400 THICKNESS MONITOR
UNPACKING & INSPECTION 2-1
2 UNPACKING & INSPECTION Carefully inspect your Monitor and its shipping container for evidence of possible shipping damage or loss. If such evidence is present, a report should be filed with the carrier as soon as possible. Keep the shipping container as evidence if shipping damage is present or for possible future return of the unit. Check the material received against the packing list to be certain that all material is accounted for. The following items should have been included with your Monitor:
1 TM-350/400 instrument 1 Operator's Manual 1 Power cord 1 Output cable (8 pin mini-din, 10’) 1 Input cable, (6 pin mini-din, 10’) optional 1 DAC interface/control unit, optional
2.1 BENCH CHECK-OUT If there is no evidence of damage, the Monitor can now be bench checked. Make sure that the input power voltage requirement is correct for your installation. If not, see Section 3.2.6, LINE POWER VOLTAGE RANGE SELECTION, to set your Monitor for the correct line voltage.
When power is first applied to the Monitor, all LED displays will light for about two seconds. This is followed by an "E FAIL" message indicating that the EPROM is being tested followed by an "I FAIL" message indicating that the RAM is being tested. The monitor will halt with the failure displayed if a fault is detected and will remain inoperative until the fault is corrected. Further details of error messages can be found in Section 10.3, SELF TEST FAILURE DETECTION.
Assuming both tests pass, the "P FAIL" message will begin flashing indicating that power was interrupted for more than 250 ms. Pressing the Stop key will clear the "P FAIL" message. If a working sensor is not connected to the monitor, a flashing "O FAIL" will be displayed indicating that the sensor is failed. If an oscillator, feedthrough, and sensor head are available, you may wish to bench check the total system at this time. Obviously good vacuum practice should be observed when handling those items that will later be installed in the vacuum system. Be careful not to touch the surface of the sensor crystal installed in the Crystal Holder. Connect the various components as follows. Use the 10' coaxial cable to connect the Monitor to the "Output" end of the Oscillator. Use the 6" coaxial cable to connect the "Input" end of the Oscillator to the atmosphere side of the Feedthrough. Use the 30" miniature coaxial cable to connect the vacuum side of the Feedthrough to the Sensor Head.
After all the components have been connected, press the STOP button to clear the "O FAIL" message.
Depressing the START button will set the thickness display to zero. Breathe lightly on the sensor crystal surface. The displayed thickness should increase due

TM-350/400 THICKNESS MONITOR
UNPACKING & INSPECTION 2-2
to condensed water vapor on the crystal. The "O FAIL" message may be reactivated if excessive water on the crystal causes it to fail. Pressing the Stop key after sufficient water has evaporated from the surface of the crystal should clear the failure. The displayed thickness should then decrease as additional water vapor evaporates from the surface. If operation seems abnormal, check to see that the stored parameter values are reasonable. The following parameter values are suggested.
Set Point Thickness 10.00 KÅ Material Density 2.650 gm/cubic cm Acoustic Impedance 8.830 Tooling Factor 100.0%
If everything responds as described above the total system is OK. If not, refer to Section 10, REPAIR AND MAINTENANCE.
2.2 INSTALLING OPTIONS Options are most easily installed while the TM-350/400 is on the bench. Figure 2-9 shows the location of the various options.
2.2.1 IEEE-488 OPTION BOARD 1. Remove the chassis top cover. 2. Locate IEEE-488 option slot and remove the slot cover. 3. Carefully slide the connector of the IEEE-488 board into the slot. 4. Plug the 20-pin ribbon connector into the J7 connector on the Main board, and then secure the board in place using the screws that came with the board. 5. Replace the chassis top cover and apply power to the monitor.
2.2.2 RS-485 OPTION 1. Remove the chassis top cover. 2. Locate the IC socket labeled U1. It is on the left side along the back of the TM-350/400’s main board. Remove the device from this socket. This will disable the standard RS-232 interface. 3. Carefully insert the supplied IC labeled ”U2 RS485” into socket U2, being careful no to bend any of the pins. It is on the left side along the back of the TM-350/400’s main board. 4. Carefully insert the supplied IC labeled ”U4 RS485” into socket U4, being careful no to bend any of the pins. It is on the left side along the back of the TM-350/400’s main board. 5. Insert the supplied yellow jumper across J22, which is on the left side along the front of the main board. See Figure 2-9. 6. Replace the chassis top cover.
2.3 DIGITAL TO ANALOG CONVERTER (DAC) CHECKOUT The built-in DAC function on the Main board contains two converters, allowing simultaneous recording of Rate and Thickness. The full-scale output of each converter is 5 volts, is single ended and is referenced to ground.

TM-350/400 THICKNESS MONITOR
UNPACKING & INSPECTION 2-3
In addition to the individual channel output pins there are two control pins that are common to both channels and are intended to simplify the process of setting up analog recorders. Connecting the Zero control line to ground will drive both channel outputs to zero, allowing the recorder zero reference to be easily set. Releasing the Zero line and connecting the Full Scale line to ground will drive both channel outputs to full scale for establishing the recorder full scale calibration.
Each channel can be set independently to convert either the two or the three least significant digits of the displayed Rate and Thickness to a proportional analog signal, corresponding to the DAC setup option chosen. With the three-digit setting, a thickness of 0.500 KÅ would result in an analog output of 2.50 volts, or a scale factor of 5 mV/Å. If more resolution is desired, either channel can be configured, using the switches shown in Figure 2-9, to convert only the last two digits of the parameter, thus the analog output would achieve full scale at 99Å. The output scale factor in this configuration is 50 mV/Å.
The above scale factors are based on the assumption that the thickness display is in the 0 - 9.999 KÅ range. Because the thickness and rate displays are autoranging, the analog output of these variables will also autorange. In the above example, if the thickness were in the range of 10 KÅ to 99.9 KÅ, the analog scale factor would be 50 mV per 10 Å, also ten times larger.

TM-350/400 THICKNESS MONITOR
UNPACKING & INSPECTION 2-4
Figure 2-1 TM-350 Front Panel

TM-350/400 THICKNESS MONITOR
UNPACKING & INSPECTION 2-5
Figure 2-2 TM-400 Front Panel with Descriptions

TM-350/400 THICKNESS MONITOR
UNPACKING & INSPECTION 2-6
Figure 2-3 TM-400 Rear Panel with descriptions.

TM-350/400 THICKNESS MONITOR
UNPACKING & INSPECTION 2-7
Figure 2-4 Output Connector
Pin Number Signal 1 Sensor Shutter, Normally Closed 2 Source Shutter, Normally Closed 3 Sensor Shutter, Normally Open 4 Source Shutter, Normally Open 5 Not Connected 6 Sensor Shutter, Common 7 Source Shutter, Common 8 GND
Table 2-1 Output Connector Pin Assignments
Figure 2-5 Input Connector.
Pin Number Signal 1 Start 2 Stop 3 Film Number 4 Increase 5 Decrease 6 GND
Table 2-2 Input Connector Pin Assignments

TM-350/400 THICKNESS MONITOR
UNPACKING & INSPECTION 2-8
Figure 2-6 IEEE-488 Connector
Pin Number Signal 1 DATA I/O 1 2 DATA I/O 2 3 DATA I/O 3 4 DATA I/O 4 5 End Or Identify 6 Data Valid 7 Not Ready For Data 8 Data Not Accepted 9 Service Request 10 Interface Clear 11 Attention 12 Shield or Wire GND 13 DATA I/O 5 14 DATA I/O 6 15 DATA I/O 7 16 DATA I/O 8 17 Remote Enable 18 GND 19 GND 20 GND 21 GND 22 GND 23 GND 24 Logic GND
Table 2-3 IEEE-488 Pin Assignments

TM-350/400 THICKNESS MONITOR
UNPACKING & INSPECTION 2-9
Figure 2-7 D9S DTE Rear-panel RS-232 male connector
Pin Signal Number RS-232 RS-485
1 Not used Rx- Input 2 Tx Output Rx+ Input 3 Rx Input Tx+ Output 4 Not used Tx- Output 5 GND GND 6 Not used CTS- Input 7 CTS Input CTS+ Input 8 RTS Output RTS+ Output 9 Not used RTS- Output
Table 2-4 D9 Rear Panel RS-232/RS-485 Connector Pin Assignments.
Figure 2-8 DAC socket connector.
Pin Number Signal 1 Thickness 2 Thickness Return 3 Rate 4 Rate Return 5 Zero Scale Input 6 Full Scale Input 7 Scale Input Return
Table 2-5 DAC System Interface Connector Pin Assignments.

TM-350/400 THICKNESS MONITOR
UNPACKING & INSPECTION 2-10
Figure 2-9 TM-400 Top View (Cover Removed)

TM-350/400 THICKNESS MONITOR
MONITOR INSTALLATION 3-1
3 MONITOR INSTALLATION
3.1 MONITOR INSTALLATION PRECAUTIONS
3.1.1 PROPER GROUNDING The Monitor was designed to operate in electrically noisy environments. In many cases no special grounding precautions will be required. Where noise susceptibility is suspected, use a short length of wire, wire braid or copper strap is recommended, to connect the Monitor to the equipment on which, or in which, the unit is mounted. Use the grounding lug provided on the back of the Monitor for this purpose. If trouble still persists, make sure that the equipment on which the Monitor is mounted, or the equipment rack in which the unit is mounted is adequately grounded to the vacuum frame. Use short copper straps or braid. It is a good idea to use several grounding straps attached to widely separated points on the vacuum system and equipment frame in order to minimize the inductance of the ground path.
3.1.2 HEAT DISSIPATION Your Monitor dissipates very little heat. Even so the heat that is generated must be allowed to dissipate or the Monitor will overheat. Most of the heat generated in the Monitor is routed to the rear panel that is cooled by convection and radiation. Make sure that there is adequate clearance around the unit to allow airflow. If the unit is mounted in an enclosure, make sure that the airflow is enough to maintain a maximum temperature environment of 50 degrees centigrade for the Monitor. Overheating of the Monitor will ultimately cause functional failures and may cause permanent failures.
3.2 REAR PANEL CONNECTIONS
3.2.1 OSCILLATOR CONNECTOR(S) A BNC connector is provided on the rear panel of the TM-350, and 2 BNC connectors on the TM-400, for connection to the sensor oscillator. The Monitor's oscillator input buffer is designed to operate with coaxial cable of 50 Ω impedance. Cable lengths up to 100 feet may be installed using RG-58 cable or an equivalent. Cable lengths longer than the 10-ft. length supplied are available upon request. Refer to Section 4 for SENSOR, FEEDTHROUGH AND OSCILLATOR installation instructions.
3.2.2 IEEE-488 OPTION BOARD (optional) The optional IEEE-488 interface provides the TM-350/400 with the ability to communicate with computers and other devices over a standard IEEE-488 interface bus. Figure 2-6 shows the connector and IEEE-488 Connector shows the signal assignments.

TM-350/400 THICKNESS MONITOR
MONITOR INSTALLATION 3-2
3.2.3 DIGITAL TO ANALOG CONVERTER (DAC) CONNECTION The Digital-to-Analog Converters are interfaced via a 7-pin, circular mini DIN connector. The mating connector is a CINCH MDX-7PI or equivalent. Figure 2-8 shows the DAC connector and Table 2-5 shows the signal assignments.
3.2.4 REMOTE TTL INPUTS A short across the input pins activates TTL level inputs. The pins must be shorted for a minimum of 200ms or else the monitor will consider it unintentional and ignore it. Provides for remote activation of the Start, Stop, Film Number, Increase and Decrease function keys. Figure 2-5 shows the connector and Table 2-2 shows the signal assignments.
3.2.5 RELAY OUTPUTS The Source Shutter output is an isolated, SPST, normally open relay, rated at 120 VA, and 2A max. The Sensor Shutter (TM-400 only) output is an isolated, SPST, normally open relay, rated at 120 VA and 2A max Figure 2-4 shows the connector and Table 2-1 shows the signal assignments.
3.2.6 LINE VOLTAGE SELECTION AND FUSE REPLACEMENT The TM-350/400 is compatible with AC line voltages of 100 through 120 or 220 through 240VAC at 50 to 60Hz. The two line fuses are IEC T Type (Slow), 4/10 A, 250 VAC. To select the line voltage or to replace the fuses, refer to Figure 3-1 and follow the steps below.
Figure 3-1 Power Entry Module WARNING: To avoid electrical shock or personal injury, disconnect the power cord before opening the cover on the power entry module.
1. Disconnect the power cord from the power entry module. 2. Using a medium flat-tip screwdriver or similar tool, open the cover on the

TM-350/400 THICKNESS MONITOR
MONITOR INSTALLATION 3-3
power module exposing the two fuses and the voltage selection wheel. 3. Insert the tool into the voltage selection slot and remove the wheel from
the module. 4. Select the desired voltage. Replace the wheel back into the module. 5. If fuse replacement is needed, pull out the fuse holders. Check and
replace fuse(s) with the correct type. Replace the fuse holders back into the module.
6. Close the module cover, making sure the selected voltage shows through the window.
3.3 INTERNAL DIP SWITCHES On the back of the display board (as shown in Figure 2-9) are 2 DIP switch packs:
• S1’s switches control Crystal Frequency selection and Computer Interface Address settings.
• S16’s switches control the DAC scale, enable/disable negative thickness readings in the Rate and Thickness displays, allow/disallow crystal switching to a failed sensor input, and allows the source shutter to pulse close (on) for 1 second once thickness endpoint is reached.
WARNING: Under no circumstances should the Monitor cover be removed without first removing the line voltage cord, as dangerous voltages are present inside the case.
To make any changes to these settings, first remove the cover as described in Section 3.4. Once your changes have been made to, replace the cover and restore power to the Monitor. Changes will take effect only after the unit has been restarted.

TM-350/400 THICKNESS MONITOR
MONITOR INSTALLATION 3-4
3.3.1 CRYSTAL TYPE SELECTION The Monitor is compatible with 2.5, 3, 5, 6, 9, and 10 MHz sensor crystals. The DIPswitch pack, S1, is used to set the Monitor for the particular sensor crystal frequency to be used. As shipped the Monitor is set up for a 6 MHz sensor crystal. To reconfigure the monitor for any other frequency, the switches 1, 2, and 3, respectively, on the front panel need to be set as follows:
Frequency S/SEL 1 S/SEL 2 S/SEL 3 2.5 OFF OFF OFF 3 ON OFF OFF 5 OFF ON OFF 6 ON ON OFF 9 OFF OFF ON 10 ON OFF ON
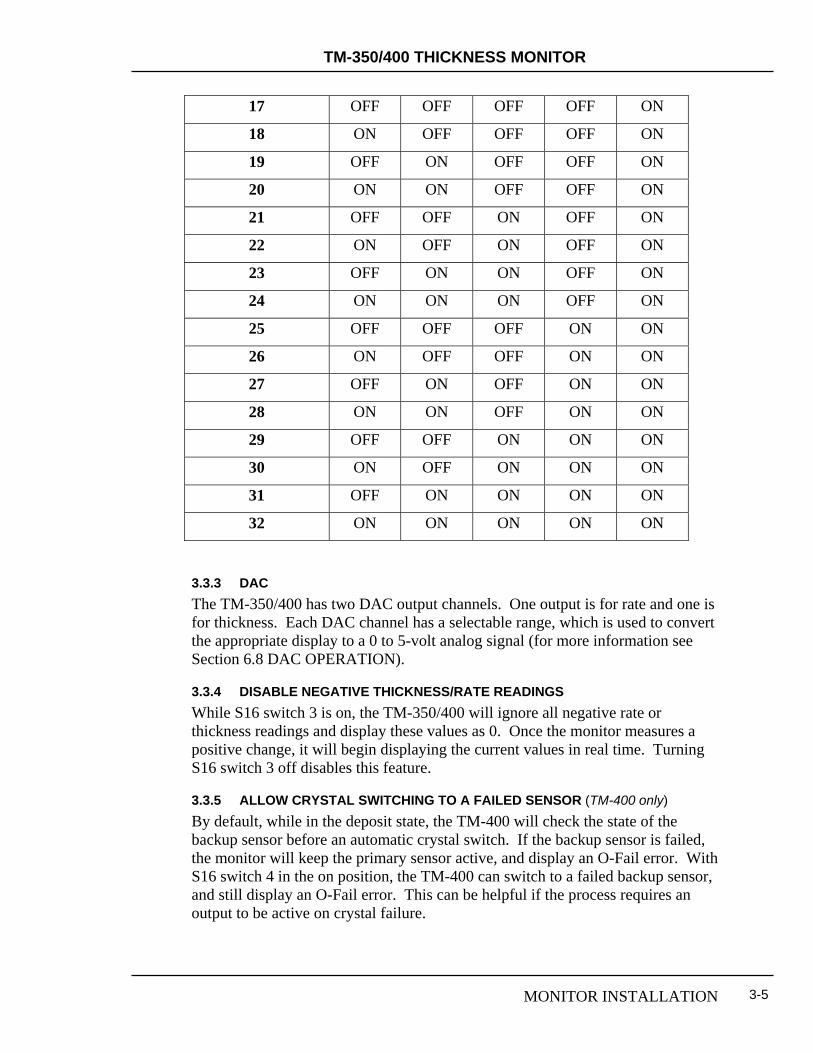
3.3.2 COMPUTER INTERFACE ADDRESS The TM-350/400 allows for computer interfaces between 1 and 32 for RS-485 and IEEE-488 communications. As shipped the Monitor is set up for an interface address of 1. To reconfigure the monitor for any other interface address, switches 4, 5, 6, 7, and 8, respectively, of S1 need to be set as follows:
Interface Address S/SEL 4 S/SEL 5 S/SEL 6 S/SEL 7 S/SEL 8
1 OFF OFF OFF OFF OFF
2 ON OFF OFF OFF OFF
3 OFF ON OFF OFF OFF
4 ON ON OFF OFF OFF
5 OFF OFF ON OFF OFF
6 ON OFF ON OFF OFF
7 OFF ON ON OFF OFF
8 ON ON ON OFF OFF
9 OFF OFF OFF ON OFF
10 ON OFF OFF ON OFF
11 OFF ON OFF ON OFF
12 ON ON OFF ON OFF
13 OFF OFF ON ON OFF
14 ON OFF ON ON OFF
15 OFF ON ON ON OFF
16 ON ON ON ON OFF
TM-350/400 THICKNESS MONITOR
MONITOR INSTALLATION 3-5
17 OFF OFF OFF OFF ON
18 ON OFF OFF OFF ON
19 OFF ON OFF OFF ON
20 ON ON OFF OFF ON
21 OFF OFF ON OFF ON
22 ON OFF ON OFF ON
23 OFF ON ON OFF ON
24 ON ON ON OFF ON
25 OFF OFF OFF ON ON
26 ON OFF OFF ON ON
27 OFF ON OFF ON ON
28 ON ON OFF ON ON
29 OFF OFF ON ON ON
30 ON OFF ON ON ON
31 OFF ON ON ON ON
32 ON ON ON ON ON
3.3.3 DAC The TM-350/400 has two DAC output channels. One output is for rate and one is for thickness. Each DAC channel has a selectable range, which is used to convert the appropriate display to a 0 to 5-volt analog signal (for more information see Section 6.8 DAC OPERATION).
3.3.4 DISABLE NEGATIVE THICKNESS/RATE READINGS While S16 switch 3 is on, the TM-350/400 will ignore all negative rate or thickness readings and display these values as 0. Once the monitor measures a positive change, it will begin displaying the current values in real time. Turning S16 switch 3 off disables this feature.
3.3.5 ALLOW CRYSTAL SWITCHING TO A FAILED SENSOR (TM-400 only) By default, while in the deposit state, the TM-400 will check the state of the backup sensor before an automatic crystal switch. If the backup sensor is failed, the monitor will keep the primary sensor active, and display an O-Fail error. With S16 switch 4 in the on position, the TM-400 can switch to a failed backup sensor, and still display an O-Fail error. This can be helpful if the process requires an output to be active on crystal failure.

TM-350/400 THICKNESS MONITOR
MONITOR INSTALLATION 3-6
3.3.6 PULSE SWITCH AT THICKNESS ENDPOINT (TM-350 Only) While S16 Switch 7 is set on, the source shutter pulses closed (on) for 1 second once the thickness endpoint is reached. As opposed to the standard operation where the source shutter relay turns on after pressing Start and remains on until the endpoint thickness is reached.
3.3.7 S16 SWITCH SETTINGS
Switch #
State Description
1 ON/OFF DAC Rate Range Select Bit 0 (Refer to DAC Table below).
2 ON/OFF DAC Thickness Range Select Bit 0 (Refer to DAC Table below).
ON Ignores all negative rate or thickness readings and displays these values as 0.
3
OFF Disables above feature. ON The TM-400 can switch to a failed back-up sensor, and
still display an O-fail error. 4
OFF Disables above feature 5 ON/OFF DAC Rate range Select Bit 1 (Refer to DAC Table
below). 6 ON/OFF DAC Thickness range Select Bit 1 (Refer to DAC
Table below). 7 ON The TM-350 allows the source shutter to pulse close for
1 second once the thickness endpoint is reached. OFF Disables above feature and uses standard operation 8 Not used
3.3.8 DAC RANGE SETTINGS
DAC Range Thickness Rate Range
Bit 1 (Switch#6)
Bit 0 (Switch#2)
Bit 1 (Switch#5)
Bit 0 (Switch#1)
OFF OFF OFF OFF 99
OFF ON OFF ON 999
ON OFF ON OFF 5000
ON ON ON ON 9999
For more detail information on the DAC refer to Section 6.8.
TM-350/400 THICKNESS MONITOR
MONITOR INSTALLATION 3-7
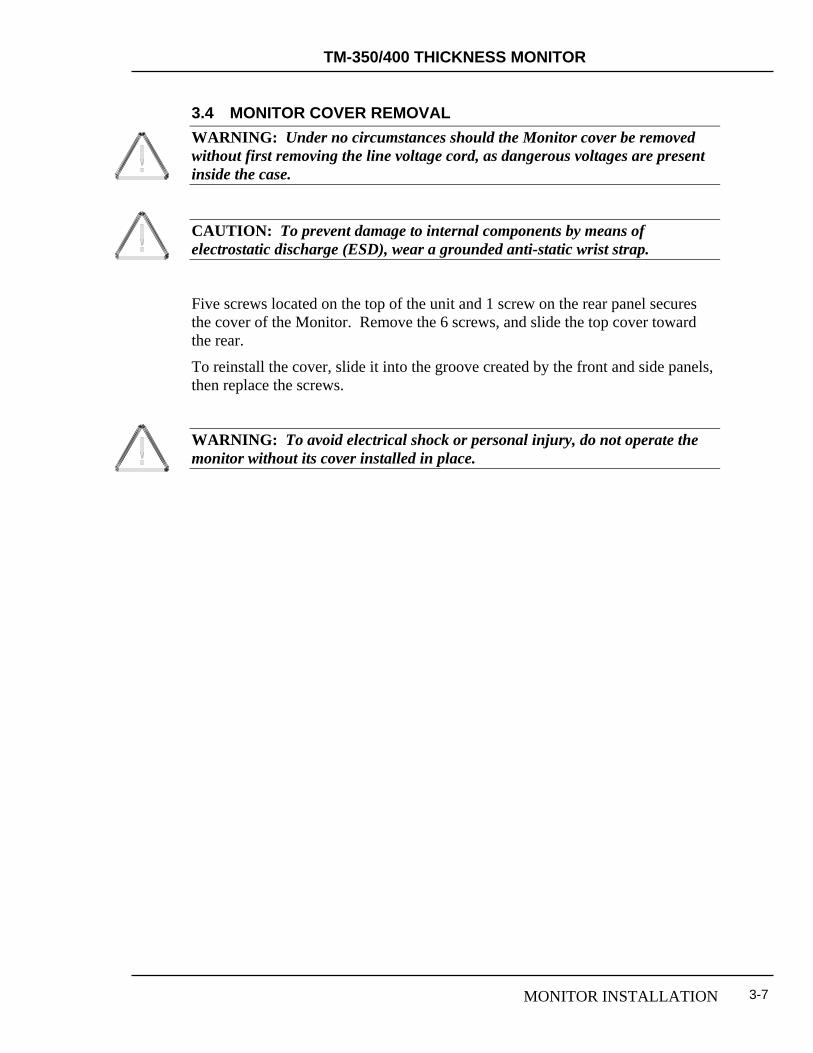
3.4 MONITOR COVER REMOVAL WARNING: Under no circumstances should the Monitor cover be removed without first removing the line voltage cord, as dangerous voltages are present inside the case.
CAUTION: To prevent damage to internal components by means of electrostatic discharge (ESD), wear a grounded anti-static wrist strap.
Five screws located on the top of the unit and 1 screw on the rear panel secures the cover of the Monitor. Remove the 6 screws, and slide the top cover toward the rear.
To reinstall the cover, slide it into the groove created by the front and side panels, then replace the screws.
WARNING: To avoid electrical shock or personal injury, do not operate the monitor without its cover installed in place.

TM-350/400 THICKNESS MONITOR
MONITOR INSTALLATION 3-8
Figure 3-2 Typical System Installation

TM-350/400 THICKNESS MONITOR
SENSOR, FEEDTHROUGH AND OSCILLATOR 4-1
4 SENSOR, FEEDTHROUGH AND OSCILLATOR
4.1 SENSOR HEAD DESCRIPTION The Sensor head is designed for simple installation and easy crystal replacement. It consists of two parts; a water-cooled 304 stainless steel housing which is permanently positioned in the vacuum system, and a quickly removable gold plated 304 stainless steel crystal holder which snaps into the housing. The crystal holder accommodates an industry standard .550” diameter crystal.
This design provides several convenient features in performance and use. The crystal holder is thermally shielded by the water-cooled housing insuring excellent crystal performance in temperature environments up to 300°C.
The exposed crystal electrode is fully grounded to effectively eliminate problems due to free electrons and RF interference.
The crystal holder is easily removed and installed even in awkward location in the vacuum system. Once removed from the housing the crystal is still retained in the crystal holder by a snap on retainer. The crystal can be easily replaced without tools at a more convenient place, such as a clean bench.
The housing is provided with four tapped (4-40) holes for convenient mounting, 1/8” diameter × 30” long inlet and outlet water-cooling tubes, and a coaxial connector. The electrical connection to an instrumentation feedthrough is made with a 30” coaxial cable. Both ends of the cable terminate with standard Microdot® S-50 type connectors. Cable lengths up to 60” are available upon request with a factory-modified oscillator.
4.2 SENSOR HEAD INSTALLATION The sensor head can be installed in any appropriate location in the vacuum chamber, preferably more than 10 inches from the evaporation source. It can be supported by its integral mounting bracket furnished with two #4-40 tapped holes. The internal (vacuum) cable, supplied with the sensor kit, connects the sensor head to the dual water/electrical feedthrough, to which the oscillator is attached. The cable length from the sensor head to feedthrough connection should not exceed 60 inches. Cable lengths in excess of 30 inches require a factory-modified oscillator. Shield the sensor cable in the most expedient way possible to protect it from radiation heat released from the evaporation source or the substrate heater.
The water-cooling tube connects to the feedthrough by brazing or vacuum couplings. If necessary, both cable and water lines may be wrapped in aluminum foil to extend their useful life. The mounting tabs may be used to install a radiation shield to specifically protect the Microdot® connector and cable at its attachment point to the head.
Water-cooling of the sensor head should always be provided except during short depositions at low temperatures. In all cases, head-operating temperatures should not exceed 100°C. Sufficient cooling for thermal environment to 300°C can be provided by approximately 0.2 gallons per minute water flow.

TM-350/400 THICKNESS MONITOR
SENSOR, FEEDTHROUGH AND OSCILLATOR 4-2
Use a shutter to shield the sensor head during initial soak periods to protect the crystal from any sputtering that may occur. If a small droplet of molten material hits the crystal, the crystal may be damaged and oscillation will cease.
4.3 INSTRUMENTATION FEEDTHROUGH INSTALLATION A 1-inch diameter, O-Ring sealed feedthrough or a 2-3/4 inch Conflat® flange seal are available with 3/10-inch source and return water cooling lines and internal and external coaxial cable connectors. Base plate thickness up to one inch can be accommodated.
RF interference and free electrons are effectively shielded from the signal connector through the use of fully closed coaxial cable connections. A standard coaxial cable with a Microdot® S-50 connector mates the internal feedthrough connector to the sensor head. The feedthrough has a standard BNC connector for the coaxial connection the sensor oscillator.
The feedthrough is installed in the vacuum chamber housing with the smaller Microdot® S-50 connector exposed to the vacuum chamber. The sensor head is connected to the Microdot® connector by a coaxial cable. This coaxial cable should not exceed 60 inches. Connect the 6-inch coaxial cable to the feedthrough's external BNC connector and the sensor oscillator's TRANSDUCER BNC connector. Brazing or vacuum couplings may accomplish water line connections to the feedthrough.
4.4 SENSOR OSCILLATOR INSTALLATION The sensor oscillator was designed to be used with industry standard 6 MHz sensor crystals. The oscillator’s characteristics enable it to obtain maximum life from the sensor crystal.
The oscillator is supplied with a 6” coaxial cable and a 10’ cable. The 6” cable interconnects the oscillator and the feedthrough. The 10’ cable interconnects the oscillator and the TM-350/400. This single coaxial cable provides both power for the oscillator and the signal output for the Monitor. Be careful to route the cable away from any high voltage or RF lines and away from hot or moving surfaces.
Cables of any length are available upon request for replacing the 10’ cable.
TM-350/400 THICKNESS MONITOR
SENSOR CRYSTAL REPLACEMENT 5-1
5 SENSOR CRYSTAL REPLACEMENT The Sensor Head is especially designed for easy sensor crystal replacement and reliable operation. The crystal lies in a drawer that slides into the sensor housing. Pull the drawer straight out of the sensor housing by gripping the drawer's edges between thumb and forefinger. With the drawer removed pull straight up on the retainer spring clip and shake out the spent crystal. Drop a new crystal into the drawer with the full electrode side down and the pattern electrode side up. Make sure the crystal is properly seated in the bottom of the drawer. Install the retainer clip by gently pressing it onto the drawer. The retainer clip should snap into the drawer. All three retaining legs must be fully engaged onto the drawer housing. Replace the drawer into the sensor housing. The drawer should slide in easily and snap into place.
Removal and replacement of sensor crystals should be performed in a clean environment. An isolated clean workbench is recommended for crystal replacement. To prevent crystal contamination use clean lab gloves or plastic tweezers when handling the crystal and keep the new crystals in a closed plastic case. When handling the drawer always hold it by the edges to avoid touching the crystal surface.


TM-350/400 THICKNESS MONITOR
OPERATION 6-1
6 OPERATION
6.1 FRONT PANEL DISPLAYS The TM-350 display consists of a 4 digit Thickness display, a 4 digit Rate display, a Source Shutter LED, a Frequency LED, a Test LED, and a Sensor status LED. The TM-400 also has a Sensor Shutter LED and a second Sensor Status LED.
When the Source Shutter LED is on, the Source Shutter relay is activated.
The tricolor Sensor Status LED is Green when the sensor is good and is the active sensor, yellow when the sensor is good and is the inactive sensor (on the TM-400 only), and red when the sensor is failed.
When the Sensor Shutter LED is on, the Sensor Shutter relay is activated.
The rate and thickness displays can display rate and thickness, active sensor frequency or sensor 1&2 test values. The FREQ and TEST LED’s indicate what values are being displayed and the Display key increments to the next display value. If the FREQ and the TEST LED’s are both off, the Rate and Thickness displays show Rate and Thickness, respectively. If the FREQ LED is on, the rate display shows the frequency of the active sensor in MHz and the thickness display shows the remaining digits of frequency in hertz. If the Test LED is on, the first digit of the Rate display shows the current frequency setting (2=2.5, 3=3.0, 5-5.0, 6=6.0, 9=9.0 or 1=10.0 MHz). The next digit is a dash [-] where a blinking dash indicates the active sensor. For the TEST display, the last two digits of the rate shows the crystal health for Sensor 1. The TM-400, will show the same information for Sensor 2 in the Thickness display.
6.2 FRONT PANEL CONTROLS The front panel controls are made up of fourteen keys, which are arranged in three groups. The first group of six keys, on the left side of the front panel, are the operating keys. In this group you will find the Start, Stop, Shutter, Display, Film Number and Sensor Swap (TM-400 only) keys. The second group of two keys in the center of the front panel are the Modify up and Modify down keys which are used to change parameter values and the active film number. The third group of six keys on the right side of the front panel are the parameter keys. These keys are used for the display and modification of parameters which is described in the DISPLAY AND MODIFICATION OF PARAMETERS section below.
The following describes the function of the operating keys:
START KEY Sets the thickness display to zero, opens the source shutter and sets the active crystal equal to the primary crystal for the current film.
STOP KEY Closes the source shutter. Also used to clear failures such as P FAIL, O FAIL, etc.

TM-350/400 THICKNESS MONITOR
OPERATION 6-2
SHUTTER KEY Toggles the source shutter relay output.
DISPLAY KEY Switches the rate and thickness displays between Rate and Thickness, Frequency and TEST display modes
FILM NUMBER KEY Used to display and modify the current film number. When pressed, current film number is displayed in the rate display and is changed by pressing the Modify up and Modify down keys. Each film can be individually programmed by setting the film number and programming as described in paragraph 6.3. Note: Any failures must be cleared in order to advance to the next film.
SENSOR SWAP KEY (TM-400 only) Toggles the active sensor between sensor 1 and sensor 2. The Sensor shutter will also toggle so that it is closed when sensor #2 is the active sensor and open when sensor #1 is the active sensor. Use this key with caution because you can switch to a failed sensor during a deposit thereby aborting the run and causing and "O FAIL" message.
6.3 DISPLAY AND MODIFICATION OF PARAMETERS Display of the parameter values stored in the monitor is accomplished by pressing the corresponding parameter's key. The value of the parameter is displayed in the Thickness display and the current film number is displayed in the Rate display. The parameter is displayed as long as the parameter key or a Modify key is pressed and is held for about 3 seconds once the keys are released. When displayed, the value of the parameter can be modified by pressing the Modify up and Modify down keys. The parameter key needs not be simultaneously pressed with the Modify up or Modify Down keys. If a Modify up or down keys is kept depressed, the rate at which the parameter changes gradually increases. Thus the longer the key is kept depressed the faster the parameter changes. When the key is released and then depressed again the rate returns to its initial slow value. With a little practice this allows parameters to be set to the necessary accuracy while keeping the time to go from one extreme value to another within reasonable limits.
The Modify up and Modify down keys are only active when a parameter is being displayed. The parameters may be changed before, during, and after a deposition. Only during a failure condition will the parameters be viewable but unchangeable.
6.4 THICKNESS SET POINT SHUTTER CONTROL The TM-350 and the TM-400 provide a single shutter set point. The Thickness Endpoint parameter establishes the film thickness at which the shutter will close. As described above, depressing the START key zeros the Thickness Display and opens the source shutter. The shutter is then automatically closed when the thickness equals or exceeds the Thickness Endpoint parameter. If auto control of
TM-350/400 THICKNESS MONITOR
OPERATION 6-3
the shutter is not desired the Thickness End Point parameter can be programmed at a value much greater than can reasonably be achieved.
6.5 CRYSTAL TEST DISPLAY To view the crystal test display, press the Display key until the TEST LED is illuminated. With the Test display, the first digit of the Rate display shows the current frequency setting (2=2.5, 3=3.0, 5-5.0, 6=6.0, 9=9.0 or 1=10.0 MHz). See Section 3.3.1, CRYSTAL TYPE SELECTION to change the crystal type. The next digit is a dash [-] where a blinking dash indicates the active sensor. The last two digits of the rate show the crystal health for Sensor 1. Crystal health is indicated as a percentage of crystal life remaining. A new crystal will have a health of 98 to 99%. The health decreases as material is deposited on the crystal sensing surface.
The TM-400, will show the same information for Sensor 2 in the Thickness display.
Pressing the Display key again, until both the FREQ and the TEST LED’s are off, will change the display back to rate and thickness. Displaying the Test function does not affect the normal operation of the Monitor. In particular, both Thickness and Rate continue to be calculated and the normal operation of the Thickness Endpoint is not affected.
6.6 CRYSTAL FAIL INDICATION As material builds up on the sensor crystal, a point will be reached at which the crystal will no longer be able to support oscillation. At this point the crystal has failed. The TM-400 will automatically switch to the backup sensor/crystal upon a crystal failure and continue on from the last valid thickness. However, with the TM-350 or if the backup sensor is failed, the monitor will indicate the crystal failure by alternately flashing an "O FAIL" message with the normal display. The normal display can still be changed using the Display key so that the last valid thickness before the failure can be recorded. The source shutter closes and the Source Shutter Indicator LED is turned off.
Correcting the cause of the failure then pressing the Stop key clears a crystal failure.
A crystal that has failed should be replaced. For obvious reasons crystals should normally be replaced well before they are likely to fail. See Section 5 for the procedure on replacing spent crystals.
6.7 POWER FAIL INDICATION The Monitor is designed to tolerate short duration power failures of less than 250 milliseconds. During a deposition, if the power is disrupted for less than 250 milliseconds then there is no disruption to the deposition. However, if the power is disrupted for more than 250 milliseconds, the deposit is terminated. And, because the Monitor is designed for possible unattended operation it does not reopen the source shutter if the power returns a process disruption of this duration could seriously affect the deposition. Instead the Monitor retains the value of the

TM-350/400 THICKNESS MONITOR
OPERATION 6-4
film thickness at the time of power failure and flashes the "P FAIL" message to indicate to the operator that power was down during their absence. The operator then has the option of continuing the deposition if desired by restarting the Monitor.
6.8 DAC OPERATION The monitor has one rate and one thickness DAC output, which are suitable for recording with a strip chart recorder or other recording device. Each DAC has a selectable range which is used to convert the appropriate display to a 0 to 5-volt analog signal. The four available DAC ranges are selected by setting the S16 dipswitch array on the TM's front panel PWB. The default setting is 99 for both DAC's. To select a different range, unplug the TM, remove the top cover and change the settings. The new settings will take affect once the TM is turned on. The S16 dipswitch array also controls other features of the TM as listed below.
Switch# Description
1 DAC Rate Range Select Bit 0
2 DAC Thickness Range Select Bit 0
3 Disable negatives - Disables negative rate and thickness values
4 Switch to backup crystal even if backup is failed
5 DAC Rate Range Select Bit 1
6 DAC Thickness Range Select Bit 1
7 Allows source shutter to pulse close (on) for 1 sec. once thickness endpoint is reached.
Both of the rate and the thickness DAC range selections work the same. The following table shows the settings to select one of the four the available ranges.
DAC Range Thickness Rate Range
Bit 1 (Switch#6)
Bit 0 (Switch#2)
Bit 1 (Switch#5)
Bit 0 (Switch#1)
OFF OFF OFF OFF 99
OFF ON OFF ON 999
ON OFF ON OFF 5000
ON ON ON ON 9999
With the range set to 999, a thickness of 0.999 KÅ would correspond to an output of 999/999x5 volts or 5 volts. A thickness of 0.900 would correspond to an output of 900/999x5 volts or 4.5 volts. With the range set to 5000, a thickness of 1.000 KÅ would correspond to an output of 1000/5000x5 volts or 1.0 volts.

TM-350/400 THICKNESS MONITOR
OPERATION 6-5
To select between two or three digit conversion, a set of DIP switches (S16 switches 1 and 2) are provided on the back of the front panel. With J2 (Rate) or J3 (Thickness) installed (default), the DAC is set for three digit conversion. If the jumper is removed, the DAC is set for two-digit conversion.

TM-350/400 THICKNESS MONITOR
THEORY OF OPERATION 7-1
7 THEORY OF OPERATION
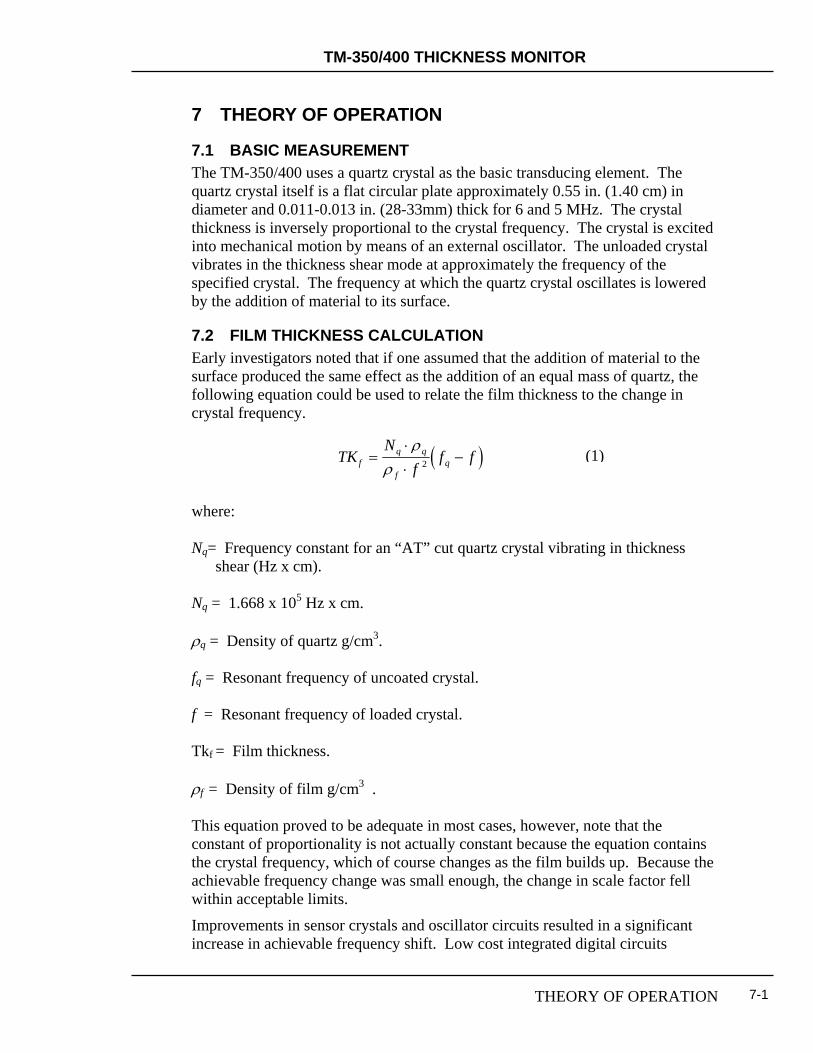
7.1 BASIC MEASUREMENT The TM-350/400 uses a quartz crystal as the basic transducing element. The quartz crystal itself is a flat circular plate approximately 0.55 in. (1.40 cm) in diameter and 0.011-0.013 in. (28-33mm) thick for 6 and 5 MHz. The crystal thickness is inversely proportional to the crystal frequency. The crystal is excited into mechanical motion by means of an external oscillator. The unloaded crystal vibrates in the thickness shear mode at approximately the frequency of the specified crystal. The frequency at which the quartz crystal oscillates is lowered by the addition of material to its surface.
7.2 FILM THICKNESS CALCULATION Early investigators noted that if one assumed that the addition of material to the surface produced the same effect as the addition of an equal mass of quartz, the following equation could be used to relate the film thickness to the change in crystal frequency.
where: Nq= Frequency constant for an “AT” cut quartz crystal vibrating in thickness
shear (Hz x cm). Nq = 1.668 x 10⁵ Hz x cm. ρq = Density of quartz g/cm3. fq = Resonant frequency of uncoated crystal. f = Resonant frequency of loaded crystal. Tkf = Film thickness. ρf = Density of film g/cm3 . This equation proved to be adequate in most cases, however, note that the constant of proportionality is not actually constant because the equation contains the crystal frequency, which of course changes as the film builds up. Because the achievable frequency change was small enough, the change in scale factor fell within acceptable limits.
Improvements in sensor crystals and oscillator circuits resulted in a significant increase in achievable frequency shift. Low cost integrated digital circuits
( )TKN
ff ff
q q
fq=
⋅⋅
−ρ
ρ 2 (1)

TM-350/400 THICKNESS MONITOR
THEORY OF OPERATION 7-2
became available allowing a significant increase in basic instrument accuracy. As a result of the above two factors, the frequency squared term in the scale factor became a significant limitation on the measurement accuracy.
If the period of oscillation is measured rather than the frequency, 1/period can be substituted for frequency resulting in the following equation.
where: τ= Period of loaded crystal (sec.) τq= Period of uncoated crystal (sec.) Note: Units of are cm/sec.
Note that the constant of proportionality in this equation is constant. This approach was demonstrated to be a significant improvement over frequency measurement and was widely adopted.
The original assumption that the addition of a foreign material to the surface of the crystal produced the same effect as that of the addition of an equal mass of quartz was of course, questionable and indeed work with crystals heavily loaded with certain materials showed significant and predictable deviation between the actual measured film thickness and that predicted by equation 2. Analysis of the loaded crystal as a one-dimensional composite resonator of quartz and the deposited film led to the equation below:
where: Rz is referred to as the Acoustic Impedance Ratio and is obtained by dividing the
acoustic impedance of quartz by the acoustic impedance of the deposited film. This equation introduces another term into the relationship, which is the ratio of the acoustic impedance of quartz to the acoustic impedance of the deposited film. The acoustic impedance is that associated with the transmission of a shear wave in the material. Note that if the acoustic impedance ratio is equal to one, quartz on quartz, equation 3 reduces to equation 2.
( )TKN
fq q
fq=
⋅−
ρρ
τ τ
TK NR
Rfq
fq
zz
q=⎛
⎝⎜⎜
⎞
⎠⎟⎟ ⋅ ⋅
⎛⎝⎜
⎞⎠⎟ ⋅
−⎛⎝⎜
⎞⎠⎟
⎡
⎣⎢
⎤
⎦⎥
ρρ
τπ
πτ ττ
arctan tan
(2)
(3)

TM-350/400 THICKNESS MONITOR
THEORY OF OPERATION 7-3
Although the above equation still involves a number of simplifying assumptions, its ability to accurately predict the film thickness of most commonly deposited materials has been demonstrated.
The use of microprocessors allows an equation as complex as equation 3 to be solved economically and the above equation is implemented in the TM-350/400.
The basic measurement is period, which can be thought of as a measurement of equivalent quartz mass.
The actual film mass on the crystal is then found by applying the acoustic impedance correction factor.
At the beginning of the deposit, or when the thickness indication is zeroed, the initial equivalent quartz mass and the initial corrected film mass are stored. For each subsequent measurement the new corrected total film mass is calculated, and the film mass deposited since the start of deposit is determined by subtracting the initial corrected film mass from the total corrected film mass.
The film thickness on the crystal is calculated by dividing by the film mass by the film density.
The film thickness on the substrates is then calculated by multiplying the film thickness on the crystal by a tooling factor.
If the acoustic impedance parameter is changed following a deposition both the total and the initial film masses are recalculated. This allows the effect of the changed parameter value to be immediately displayed and provides a relatively straightforward method of empirically determining the acoustic impedance if it is not available. See section: 8.5.3.
7.3 CRYSTAL HEALTH CALCULATION Crystal Health decreases from a value of 100% for an uncoated crystal blank to 0 at a total deposited aerial mass of 25 mg/cm2. This value corresponds to a crystal frequency shift of approximately 1.5 MHz, or an aluminum thickness of 925 KÅ.
Very few materials can be deposited to this thickness without producing a crystal failure, so that a crystal health of zero will not normally be achieved and indeed for some materials the crystal health may never get below 90%.
In order to establish the point at which the crystal should be changed, several trial runs should be made to determine the point at which the crystal fails and subsequent crystals should then be replaced well in advance of this point.
Because the crystal health is determined from the calculated film mass, the Acoustic Impedance parameter will affect the displayed crystal health.
7.4 RATE CALCULATION The deposition rate is calculated by dividing the change in thickness between measurements by the time between measurements. The rate is then filtered by a three pole digital filter to filter out quantizing and sampling noise introduced by the discrete time, digital nature of the measurement process. The above filter has

TM-350/400 THICKNESS MONITOR
THEORY OF OPERATION 7-4
an effective time constant of about 2 seconds. Following a step the displayed rate will settle to 95% of the final value in 5 sec.

TM-350/400 THICKNESS MONITOR
ESTABLISHING THE DEPOSITION PARAMETERS 8-1
8 ESTABLISHING THE DEPOSITION PARAMETERS The following is a guide to establishing the deposition parameters. Valid reasons may occur to deviate from the recommendations and these reasons of course would take precedence.
8.1 TOOLING FACTOR The Tooling Factor parameter compensates for geometric factors in the deposition system, which result in a difference between the deposition rate on the substrates and the rate on the sensing crystal. The TM-350 has only one tooling parameter for its one sensor input. The TM-400 has two tooling parameters, one for each sensor. Since they are in different locations, they most likely will require different values.
The tooling is entered in percent units and 100% corresponds to equal rates at the substrate and at the sensing crystal. For initial approximation the tooling factor can be calculated using the following equation:
%100)/(% 2 ×= dsubdcryTooling
where:
dcry = Distance from the source to the crystal
dsub = Distance from the source to the substrate.
Empirical calibration of the tooling factor is described in Section 8.5.2.
8.2 SENSOR NUMBER (TM-400 only) The Sensor Number parameter defines the primary sensor for the film meaning the sensor that the film will start with. This parameter is included because it is desirable to use one sensor/crystal for one material and the other sensor/crystal for the second material in a multi layer application.
8.3 DENSITY The Density parameter provides the Monitor with the density of the material being deposited so that it can calculate and display the physical film thickness. If the film density is known, it should be used. A list of the more commonly used film densities is presented in Table 7.1. As a first approximation, bulk material density can be used in programming this parameter. Empirical calibration of this parameter is described in Section 8.5.1.
8.4 ACOUSTIC IMPEDANCE The shear wave acoustic impedance of the deposited film is required by the monitor in order to accurately establish the sensor scale factor when the sensor crystal is heavily loaded. If the acoustic impedance of the film material is known, it can be entered directly in units of 100,000 gm/sq. cm sec. In most cases the acoustic impedance of the bulk material can be used and can be obtained from the Handbook of Physics or other source of acoustic data. The shear wave acoustic

TM-350/400 THICKNESS MONITOR
ESTABLISHING THE DEPOSITION PARAMETERS 8-2
impedance can be calculated from the shear modulus or the shear wave velocity and the density by using the following equation:
PGPCimpedanceacoustic ==
where:
P = Density (gm/cm3).
C = Transverse (shear) wave velocity (cm/sec).
G = Shear modulus (dynes/cm2).
A list of the acoustic impedance and density of the more commonly deposited materials is presented in Table 8-2, and a technique for empirically determining this parameter is presented in Section 8.5.3.
In many cases, and particularly if the sensor crystal is not heavily loaded, sufficient accuracy can be achieved by using the acoustic impedance of quartz: 8.83 X 100,000 gm/sq. cm sec.
8.5 EMPIRICAL CALIBRATION If the density and acoustic impedance of the film material is known, the values should be entered into the monitor and a trial deposition should be made. If the displayed thickness does not agree with an independently measured thickness, the monitor should be calibrated as described below.
To calibrate the monitor, material density, tooling factor and acoustic impedance must be established in that order. Approximate values should be used initially. Table 8-2 provides density of some materials, which should provide guidance as to the approximate density. If the acoustic impedance is unknown, use the value for quartz 8.83.
8.5.1 MATERIAL DENSITY CALIBRATION Use a fresh sensor crystal.
Place test substrates as close as possible to the sensor crystal.
Make a trial deposition of sufficient thickness to permit adequate precision of measurement by an independent measuring device.
Determine the average thickness on test substrates.
If the monitor's displayed thickness is lower than the measured thickness, push the MATERIAL DENSITY key and then push the Modify down key. If the displayed thickness is higher than the actual thickness, push the Modify up key.
The thickness will be displayed three seconds after the Modify key is released. Check to see if the thickness displayed now equals the measured thickness. If it does not, repeat the procedure in 5 above until the displayed thickness agrees with the measured thickness.
The programmed material density will now be correct for that particular material. Record this value for future use.
TM-350/400 THICKNESS MONITOR
ESTABLISHING THE DEPOSITION PARAMETERS 8-3
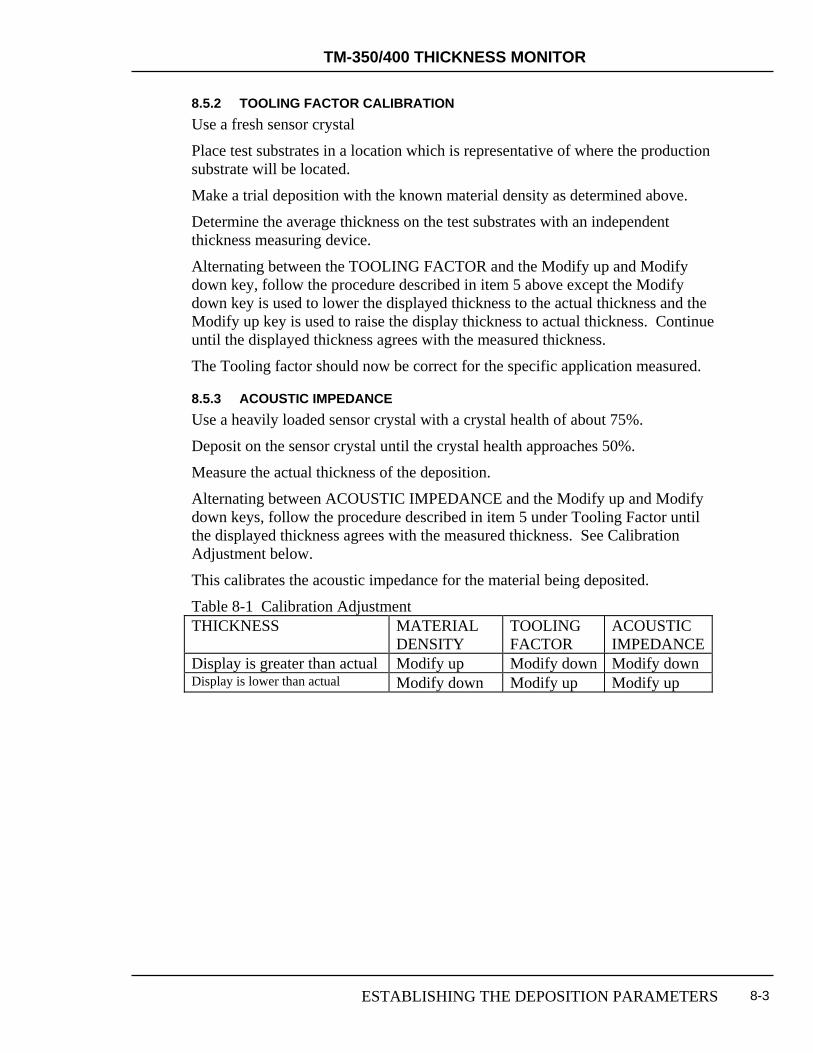
8.5.2 TOOLING FACTOR CALIBRATION Use a fresh sensor crystal
Place test substrates in a location which is representative of where the production substrate will be located.
Make a trial deposition with the known material density as determined above.
Determine the average thickness on the test substrates with an independent thickness measuring device.
Alternating between the TOOLING FACTOR and the Modify up and Modify down key, follow the procedure described in item 5 above except the Modify down key is used to lower the displayed thickness to the actual thickness and the Modify up key is used to raise the display thickness to actual thickness. Continue until the displayed thickness agrees with the measured thickness.
The Tooling factor should now be correct for the specific application measured.
8.5.3 ACOUSTIC IMPEDANCE Use a heavily loaded sensor crystal with a crystal health of about 75%.
Deposit on the sensor crystal until the crystal health approaches 50%.
Measure the actual thickness of the deposition.
Alternating between ACOUSTIC IMPEDANCE and the Modify up and Modify down keys, follow the procedure described in item 5 under Tooling Factor until the displayed thickness agrees with the measured thickness. See Calibration Adjustment below.
This calibrates the acoustic impedance for the material being deposited.
Table 8-1 Calibration Adjustment THICKNESS MATERIAL
DENSITY TOOLING FACTOR
ACOUSTIC IMPEDANCE
Display is greater than actual Modify up Modify down Modify down Display is lower than actual Modify down Modify up Modify up

TM-350/400 THICKNESS MONITOR
ESTABLISHING THE DEPOSITION PARAMETERS 8-4
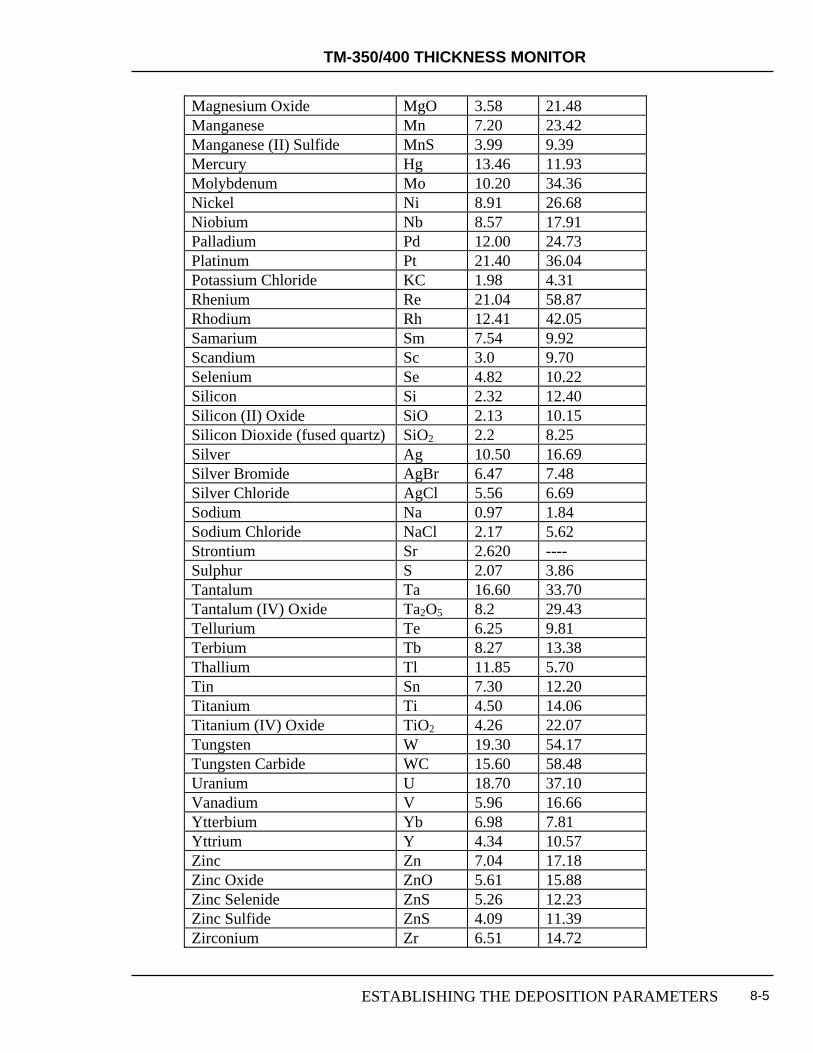
Table 8-2 Density and Acoustic Impedance Values for Selected Materials Material Symbol Density
gm/cm^2 Impedance
10^5gm/(cm^2sec) Aluminum Al 2.70 8.17 Aluminum Oxide Al2O3 3.97 26.28 Antimony Sb 6.62 11.49 Arsenic As 5.73 9.14 Barium Ba 3.5 4.20 Beryllium Be 1.85 16.26 Bismuth Bi 9.8 11.18 Boron B 2.54 22.70 Cadmium Cd 8.64 12.95 Cadmium Sulfide CdS 4.83 8.66 Cadmium Telluride CdTe 5.85 9.01 Calcium Ca 1.55 3.37 Calcium Fluoride CaF2 3.18 11.39 Carbon (Diamond) C 3.52 40.14 Carbon (Graphite) C 2.25 2.71 Chromium Cr 7.20 28.95 Cobalt Co 8.71 25.74 Copper Cu 8.93 20.21 Copper (I) Sulfide (alpha) Cu2S 5.6 12.80 Copper (I) Sulfide (beta) Cu2S 5.8 13.18 Copper (II) Sulfide CuS 4.6 10.77 Dysprosium Dy 8.54 14.72 Erbium Er 9.05 11.93 Europium Eu 5.244 ---- Gadolinium Gd 7.89 13.18 Gallium Ga 5.93 14.89 Gallium Arsenide GaAs 5.31 5.55 Germanium Ge 5.35 17.11 Gold Au 19.30 23.18 Hafnium Hf 13.09 24.53 Holnium Ho 8.8 15.2 Indium In 7.30 10.50 Indium Antimonide InSb 5.76 11.48 Iridium Ir 22.40 68.45 Iron Fe 7.86 25.30 Lanthanum La 6.17 9.59 Lead Pb 11.30 7.81 Lead Sulfide PbS 7.50 15.60 Lithium Li 0.53 1.50 Lithium Fluoride LiF 2.64 11.41 Magnesium Mg 1.74 5.48 Magnesium Fluoride MgF2 3.0 13.86
TM-350/400 THICKNESS MONITOR
ESTABLISHING THE DEPOSITION PARAMETERS 8-5
Magnesium Oxide MgO 3.58 21.48 Manganese Mn 7.20 23.42 Manganese (II) Sulfide MnS 3.99 9.39 Mercury Hg 13.46 11.93 Molybdenum Mo 10.20 34.36 Nickel Ni 8.91 26.68 Niobium Nb 8.57 17.91 Palladium Pd 12.00 24.73 Platinum Pt 21.40 36.04 Potassium Chloride KC 1.98 4.31 Rhenium Re 21.04 58.87 Rhodium Rh 12.41 42.05 Samarium Sm 7.54 9.92 Scandium Sc 3.0 9.70 Selenium Se 4.82 10.22 Silicon Si 2.32 12.40 Silicon (II) Oxide SiO 2.13 10.15 Silicon Dioxide (fused quartz) SiO2 2.2 8.25 Silver Ag 10.50 16.69 Silver Bromide AgBr 6.47 7.48 Silver Chloride AgCl 5.56 6.69 Sodium Na 0.97 1.84 Sodium Chloride NaCl 2.17 5.62 Strontium Sr 2.620 ---- Sulphur S 2.07 3.86 Tantalum Ta 16.60 33.70 Tantalum (IV) Oxide Ta2O5 8.2 29.43 Tellurium Te 6.25 9.81 Terbium Tb 8.27 13.38 Thallium Tl 11.85 5.70 Tin Sn 7.30 12.20 Titanium Ti 4.50 14.06 Titanium (IV) Oxide TiO2 4.26 22.07 Tungsten W 19.30 54.17 Tungsten Carbide WC 15.60 58.48 Uranium U 18.70 37.10 Vanadium V 5.96 16.66 Ytterbium Yb 6.98 7.81 Yttrium Y 4.34 10.57 Zinc Zn 7.04 17.18 Zinc Oxide ZnO 5.61 15.88 Zinc Selenide ZnS 5.26 12.23 Zinc Sulfide ZnS 4.09 11.39 Zirconium Zr 6.51 14.72

TM-350/400 THICKNESS MONITOR
ESTABLISHING THE DEPOSITION PARAMETERS 8-6

TM-350/400 THICKNESS MONITOR
COMPUTER INTERFACE 9-1
9 COMPUTER INTERFACE
9.1 GENERAL The various computer interfaces of the Maxtek TM-350/400 Deposition Monitors permit complete remote control using a personal computer. There are three types of computer interfaces offered. The TM-350/400 comes standard with an RS-232 serial interface. Both RS-485 and IEEE-488 interfaces are available as options.
9.2 RS-232 SERIAL INTERFACE The standard RS-232 serial interface of the TM-350/400 allows one monitor to be connected to any other device with an RS-232 serial interface. The RS-232 interface port is the D9P connector on the rear panel of the monitor. The pin layout is shown in Figure 2-7 and Table 2-4 lists pin signal assignments, including a definition of whether the signal is an input or an output of the TM-350/400.
The TM-350/400 acts as DTE, and accordingly the 9-pin connector has ‘plug’ pins. It can be used with a DCE or a DTE host cable connection providing the sense of the RxD/TxD data lines and the control lines is observed. Pin 2 ‘TxD’ transmits data from the TM-350/400 to the host; pin 3 ‘RxD’ receives data from the host. Pin 7 ‘CTS’ is a control output signal, and pin 8 ‘RTS’ is a control input signal.
In this implementation, pin 7 ‘CTS’ means what is says, namely, this is an output control line, and when the TM-350/400 asserts this control line ‘true’ the host can transmit to the TM-350/400. On the other hand, pin 8 ‘RTS’ is not quite what it may seem because this is a signal input to the TM-350/400, and it is intended that the host should assert this line ‘true’ only when the TM-350/400 is allowed to transmit data to the host. The TM-350/400 does not generate an RTS ‘request-to-send’ as such for the host PC, so the host should assert pin 8 true whenever the TM-350/400 is allowed to transmit to the host, without being asked to do so.
The TM-350/400’s RS-232 port is automatically set up to operate with the following specifications:
9600 Baud, 8 Bit data, No Parity, 1 Stop bit
9.3 RS-485 SERIAL INTERFACE The optional RS-485 serial interface of the TM-350/400 allows connection of up to 32 separate devices equipped with RS-485. The RS-485 serial interface is also ideal in electrically noisy environments and in applications where long cables are required. The RS-485 port of the TM-350/400 is the same D9P connector on the rear panel used for RS-232. The pin layout is shown in Figure 2-7 and Table 2-4 lists pin signal assignments, including a definition of whether the signal is an input or an output of the TM-350/400.
The TM-350/400’s RS-485 port is automatically set up to operate with the following specifications:
9600 Baud, 8 Bit data, No Parity, 1 Stop bit
TM-350/400 THICKNESS MONITOR
COMPUTER INTERFACE 9-2
9.4 IEEE-488 PARALLEL INTERFACE The optional IEEE-488 interface provides the TM-350/400 with the ability to communicate with computers and other devices over a standard IEEE-488 interface bus. The IEEE-488 interface, also known as GPIB or HPIB, provides an eight bit parallel asynchronous interface between up to 15 individual devices on the same bus. This means that one computer equipped with an IEEE-488 interface card can communicate with up to 14 TM monitors or other devices.
The pin layout of the IEEE-488 port is shown in Figure 2-6 and Table 2-3 lists pin signal assignments, including a definition of whether the signal is an input or an output of the TM.
The RS-232 serial port can still be used with IEEE-488 installed. However, since both interfaces use the same input and output message buffers, they should not be used at the same time. This will result in communication errors.
9.5 PROTOCOL All communications between the computer and the TM-350/400 are in the form of message character strings with the format:
* Two byte header - (FFh, FEh i.e. Chr$(255), Chr$(254)) The header indicates the beginning of a message.
*One byte device address - (0 to 32) The device address byte defines the bus address of the instrument that sent or should receive the message. The device address will range from 0 to 32. See Section 3.3.2 for instructions on setting the TM's device address. A message sent to a device address of zero will be received by all TMs except in the case of the IEEE-488 interface. With this interface, only the addressed device will receive the message.
*One byte instruction code - (0 to 6) Defines the code number of the message.
*One byte message length - (0 to 249) Indicates the number of data bytes contained in the message.
* One byte checksum - (0 to 255) The checksum byte is used for transmission error detection. If the TM receives a message with an incorrect checksum, it will disregard the message. The checksum is the compliment of the one-byte sum of all bytes from, and including, the instruction code to the end of the message. If the one-byte sum of all these bytes is added to the checksum, the result should equal 255.
If the sum of all bytes occupies more than one byte, a single byte checksum can be generated using the expression: checksum=! (Sum MOD 256), i.e. the checksum is the complement of the remainder byte, which results from dividing the sum of all bytes by 256.
9.6 DATA TYPES There are three data types stored in the TM-350/400: One byte, two byte, and three byte parameters. All data types are stored as integers in binary format with the most significant byte first. The one-byte data types are ASCII characters,
TM-350/400 THICKNESS MONITOR
COMPUTER INTERFACE 9-3
numeric values (0-255), or 8 bit registers. Some of the multiple byte data types are decimal values stored as integers. To convert these values to their decimal equivalent, use the following equation:
Decimal Value = (Integer Value)/(10*DP)
Where:
DP = the value’s decimal point position.
The decimal point positions for all the parameters are constant and are given in tables along with the parameters’ range.
9.7 MESSAGE RECEIVED STATUS Following the receipt of each message, the monitor will send a one-byte ‘received status’ message, indicating how the message was received, with the following format:
Header
Address
Inst=253
Length=2
Instruction Code
Receive code
Checksum
A value of 253 for the instruction byte indicates that this is a received status message. The Instruction Code byte indicates the instruction code of the message that was received. The following table shows a list of possible receive codes:
Receive Code Description 0 Message received O.K. 1 Invalid checksum. 2 Invalid instruction code. 3 Invalid message length. 4 Parameter(s) out of range. 5 Invalid message.

TM-350/400 THICKNESS MONITOR
COMPUTER INTERFACE 9-4
9.8 INSTRUCTION SUMMARY The following table is a list of valid instruction codes.
Instruction Code Description 0 Remote activation 1 Send monitor configuration 2 Send a film's parameters 3 Receive a film's parameters 4 Send monitor status 5 Initiate automatic data logging of string values 6 Internal command 7 Internal command 8 Internal command 9 Internal command 10 Set active film number
9.9 INSTRUCTION DESCRIPTIONS The following is a description of the valid instructions along with an example of how they are used. All the examples assume the device address is 1.
1. Remote activation of monitor (Code #0) This instruction initiates a key press of the TM-350/400’s keyboard. The valid key codes are shown in the following table:
Remote Activation Code Description 1 Start key 2 Stop key 4 Shutter key 8 Display key 16 Film key 32 Sensor Swap key 64 Simulate mode on 128 Simulate mode off
Format: Header, Instruction=1, Length=1, Key Code, Checksum
Example: Example of a remote start message:
Chr$(255)+Chr$(254)+Chr$(1)+Chr$(0)+Chr$(1)+Chr$(1)+Chr$(253)

TM-350/400 THICKNESS MONITOR
COMPUTER INTERFACE 9-5
2. Send monitor hardware configuration (Code #1)
Instructs the monitor to send monitor configuration data to the host computer. The following is a description of the configuration data:
Name Length (bytes) Message Software Version 35 Maxtek TM-350 Software Version X.XXCommunication Port 1 (1=RS232, 2=RS-485, 3=IEEE488) Total 36 bytes
Example: To instruct the monitor to send the hardware configuration data the computer would send:
Chr$(255)+Chr$(254)+Chr$(1)+Chr$(1)+Chr$(0)+Chr$(254)
3. Send film parameters (Code #2)
Instructs the monitor to send the parameters for film # n to the host computer. A description of the film parameter list is in the table below:
Parameter name Len Bytes
Byte Offset
Decimal Pt. Position
Range Units
Film Number 1 0 * 1-99 None Endpoint Thickness 3 1 * 0 - 999,999 Ang Primary Sensor # 1 4 * 1 - 2 None Material Density 2 5 2 80-9999 0.01
gm/cm3 Acoustic Impedance 2 7 2 50-5999 0.01
gm/cm2/sec
Tooling Factor #1 2 9 1 100-4999 0.1% Tooling Factor #2 2 11 1 100-4999 0.1%
Total 13 bytes * - Indicates decimal point position is not applicable.
Format: Header, Address, Instruction=2, Length=1, Film#(1-100), Checksum.
Example: To instruct the monitor to send the parameter list for material #15 the computer would send:
Chr$(255)+Chr$(254)+Chr$(1)+Chr$(2)+Chr$(1)+Chr$(15)+Chr$(237)
4. Receive film parameters (Code #3)
Instructs the monitor to enter all the incoming film parameters for film # n into memory. The parameters must be in the same order and format as the above film parameter list.
Format: Header, Address, Instruction=3, Length=13, 1 byte, Film# (1-100), 12 bytes film parameter data, Checksum.

TM-350/400 THICKNESS MONITOR
COMPUTER INTERFACE 9-6
5. Send monitor status (Code #4)
Instructs the monitor to send the status data. The description of the status data is as follows:
Parameter Name Length (bytes) Range Active Film # 1 (1-100) Active Sensor # 1 (1-2) Sensor #1 Health 1 (0-99 or 255=Failed) Sensor #2 Health 1 (0-99 or 255=Failed) Source & Sensor Shutter 1 (Bit6 = Source, Bit7 =
Sensor. 0=Closed,1=Open)
Display # 1 (0=Rate&Thk, 1=Freq, 2=Test)
I/O Address 1 (0-31) Crystal Type 1 (0=2.5MHz, 1=3.0MHz,
2=5.0MHz, 3=6.0MHz, 4=9.0MHz, 5=10.0MHz)
Simulate Mode 1 (Bit 4, 0=Off, 1=On) Failure Register 1 Bit0 = Ram Fail
Bit1 = EPROM Fail Bit2 = Film Data Fail Bit3 = Sensor Input Fail Bit4 = Not Used Bit5 = Power Fail Bit6 = Sensor Card Fail
Total 10 bytes
Example: To instruct the monitor to send the status data the computer would send:
Chr$(255)+Chr$(254)+Chr$(1)+Chr$(4)+Chr$(0)+Chr$(251)
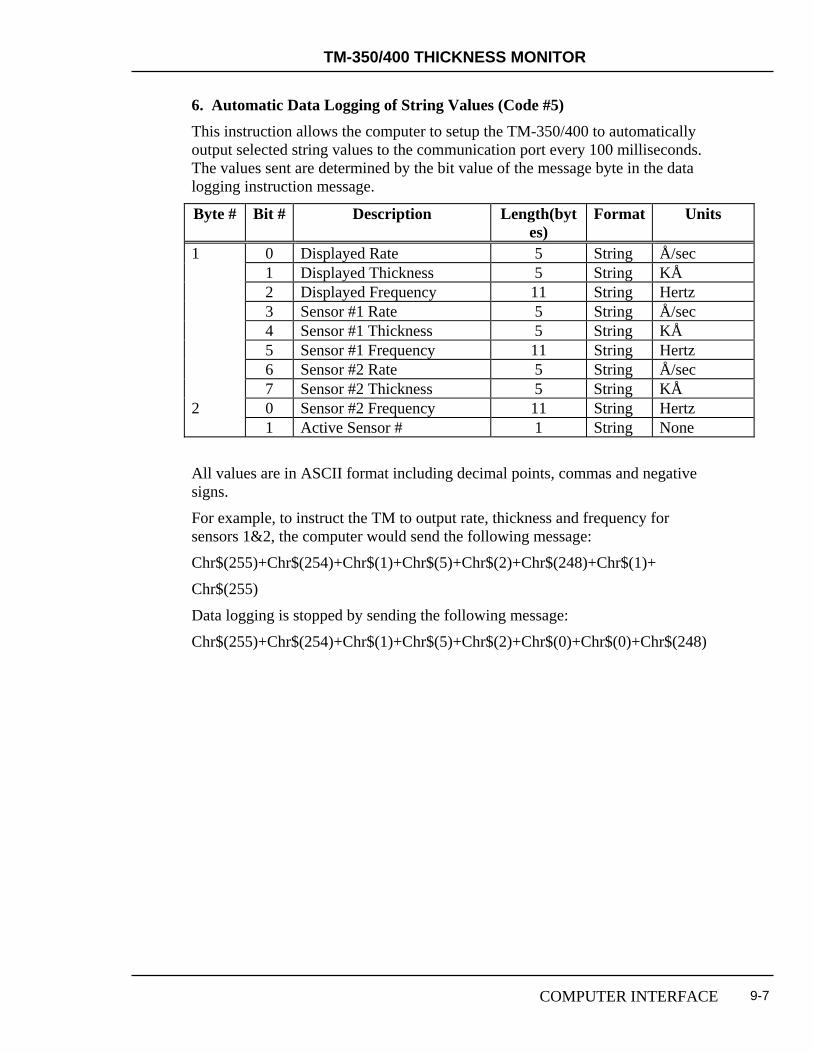
TM-350/400 THICKNESS MONITOR
COMPUTER INTERFACE 9-7
6. Automatic Data Logging of String Values (Code #5)
This instruction allows the computer to setup the TM-350/400 to automatically output selected string values to the communication port every 100 milliseconds. The values sent are determined by the bit value of the message byte in the data logging instruction message.
Byte # Bit # Description Length(bytes)
Format Units
1 0 Displayed Rate 5 String Å/sec 1 Displayed Thickness 5 String KÅ 2 Displayed Frequency 11 String Hertz 3 Sensor #1 Rate 5 String Å/sec 4 Sensor #1 Thickness 5 String KÅ 5 Sensor #1 Frequency 11 String Hertz 6 Sensor #2 Rate 5 String Å/sec 7 Sensor #2 Thickness 5 String KÅ 2 0 Sensor #2 Frequency 11 String Hertz 1 Active Sensor # 1 String None
All values are in ASCII format including decimal points, commas and negative signs.
For example, to instruct the TM to output rate, thickness and frequency for sensors 1&2, the computer would send the following message:
Chr$(255)+Chr$(254)+Chr$(1)+Chr$(5)+Chr$(2)+Chr$(248)+Chr$(1)+
Chr$(255)
Data logging is stopped by sending the following message:
Chr$(255)+Chr$(254)+Chr$(1)+Chr$(5)+Chr$(2)+Chr$(0)+Chr$(0)+Chr$(248)

TM-350/400 THICKNESS MONITOR
COMPUTER INTERFACE 9-8
7. Automatic Data Logging of Binary Values (Code #6)
This instruction allows the computer to setup the TM-350/400 to automatically output selected binary values to the communication port every 100 milliseconds. The only benefit in this command over command #5 is that the binary values are at the maximum resolution of the instrument where the string values are not.
The values sent are determined by the bit value of the message byte in the data logging instruction message.
Byte # Bit # Description Length(bytes)
Format Units
1 0 Active Sensor Rate 3 Binary Å/sec 1 Active Sensor Thickness 3 Binary Å 2 Active Sensor Period 4 Binary *** 3 Sensor #1 Rate 3 Binary Å/sec 4 Sensor #1 Thickness 3 Binary Å 5 Sensor #1 Period 4 Binary *** 6 Sensor #2 Rate 3 Binary Å/sec 7 Sensor #2 Thickness 3 Binary Å 2 0 Sensor #2 Period 4 Binary *** 1 Active Sensor # 1 String None 2 Sensor #1 Mass per unit
area 4 Binary 0.137
ng/cm^2 3 Sensor #2 Mass per unit
area 4 Binary 0.137
ng/cm^2
All values are sent in Binary format with the most significant byte first. To convert this to decimal, use the following formula:
Decimal Value = Sum of Byte[n]*256^(Y-1) where n goes from 1 to Y and Y is the total number of bytes that make up the value.
For example, say you receive the four following bytes representing the mass per unit area: 0,10,250,76
This equals (0*256^3 + 10*256^2 + 250*256 + 76)*0.137 ng/cm^2 = 98,562.7 ng/cm^2
The rate and thickness values are in the normal units of Ang and Ang/sec. Sensor period however, is in special units. Use the following formula to convert period to frequency.
Frequency (Hz) = (3.221E15)/Period
Where the period value is converted from the four byte binary data as shown in the example above.
To instruct the TM to output sensor #1 and sensor #2 period, the computer would send the following message:
Chr$(255)+Chr$(254)+Chr$(1)+Chr$(6)+Chr$(2)+Chr$(128)+Chr$(1)+

TM-350/400 THICKNESS MONITOR
COMPUTER INTERFACE 9-9
Chr$(118)
The TM will return two, four byte values containing sensors #1&2 period.
Data logging is stopped by sending the following message:
Chr$(255)+Chr$(254)+Chr$(1)+Chr$(6)+Chr$(2)+Chr$(0)+Chr$(0)+Chr$(247)
8. Internal command (Code #7)
9. Internal command (Code #8)
10. Internal command (Code #9)
11. Set active film # (Code #10) This instruction allows the computer to set the active film number. The message must be in the following format:
Format: Header, Address, Instruction=10, Length=1, 1 byte Film# (1-100), Checksum.


TM-350/400 THICKNESS MONITOR
REPAIR AND MAINTENANCE 10-1
10 REPAIR AND MAINTENANCE
10.1 HANDLING PRECAUTIONS Integrated Circuits (I.C.’s) can be damaged by static discharge into their inputs. This static discharge is the same phenomenon that produces the unpleasant shock when one grabs a doorknob after walking across a carpet. The likelihood of static buildup is proportional to the dryness of the air and can be particularly troublesome in cold, dry climates, or hot desert climates.
In order to minimize the chance of discharging body charge into the I.C. inputs, always handle circuit boards by the edge, avoiding contact with the connector area. When moving a board from one surface or work area to another surface or work area, always personally touch the new surface or location before laying down or inserting the board so that you, the board, and the surface, or equipment, are all at the same potential. It is wise in dry climates to minimize the amount of movement when handling or replacing I.C.’s in circuit boards. When handing a circuit board or I.C. to another person, always touch the person first.
Wood or paper surfaces are the most forgiving surfaces to work on. Plastic should be avoided. Metal is O.K. as long as the metal is always touched with the hand prior to laying down the I.C.’s or circuit boards.
P.C. boards or I.C.’s should never be placed in plastic bags unless they are of the conductive plastic type intended for this use. These bags are typically black or pink and are normally labeled as conductive or anti-static. If no conductive plastic bags are available, boards or I.C.’s can be wrapped in paper, and then placed in plastic bags or shipping bags.
If the above precautions are observed, the chance of damage will be minimal and no problems should be encountered.
10.2 MAINTENANCE PHILOSOPHY The TM-350/400 was designed around a maintenance philosophy of board replacement. Field repair at the component level is not recommended and indeed can void the warranty. The following sections are intended primarily as an aid in understanding the operation of the TM-350/400 and to help in isolating problems to the board level.
All electronic components, with the exception of the power supply transformer, are mounted on plug-in assemblies for ease of removal and replacement. The circuitry is partitioned among plug-in modules on a functional basis to make fault isolation to the plug-in assembly level as straightforward as possible.
Most problems can be diagnosed to the board level without external test equipment and verified by simple board replacement.
10.3 SELF TEST FAILURE DETECTION The Monitor's self test features detect several system failures. The specific failures are described below. Upon detection of a failure the appropriate message

TM-350/400 THICKNESS MONITOR
REPAIR AND MAINTENANCE 10-2
is displayed. There are basically two types of system failures: failures that may not be reset by the operator and those that may. You cannot reset the E FAIL or I FAIL messages. They may be cleared only by the replacement of the defective components. These failures are displayed continuously and ALL OTHER SYSTEM OPERATIONS ARE DISABLED. For these internal failures, it is recommended that the unit be returned to the factory for repair. On failures that may be reset, the front panel display alternates the particular failure message and the Rate and Thickness values prior to the failure. The display continues to alternate the failure until the fault has been reset.
The following is a summary of detected failures, the displayed messages and the necessary actions to reset them.
Detected Failure Failure Message Reset by: EPROM Failure E FAIL Replacement of defective ROM RAM Failure I FAIL Replacement of defective RAM Film Data Failure C FAIL Press STOP button Power Failure P FAIL Press STOP button Oscillator Failure O FAIL Press STOP button Sensor Card Failure
S FAIL Replacement of sensor measurement card
Any long-term failures can cause serious thickness errors if they occur during a run. To save any materials, which may be in process, the shutter is automatically closed. The process can be continued only after the fault has been corrected and the message has been reset as described above. If there is more than one failure, the other failure will then be displayed. When no failures exist, only current display values will be displayed. A description of the conditions of the individual failures follows.
10.3.1 EPROM FAILURE (E FAIL) In the case of a failure in the TM-350/400's program memory or EPROM, the E FAIL message is displayed. If an EPROM failure occurs, the monitor should be returned for repair.
10.3.2 RAM FAILURE (I FAIL) In the case of a failure in the Monitor's data memory or RAM, the I FAIL message will be displayed. The shutter is automatically closed since reliable operation of the Monitor is impossible until it is serviced. To confirm the RAM failure, cycle the AC power to the unit. The monitor will recheck its memory and if failed, will again display the I FAIL message. If the I FAIL message is not displayed on power up the second time, the problem may be intermittent, and it is recommended that your monitor be returned for repair.
10.3.3 FILM DATA FAILURE (C-FAIL) The C-FAIL message indicates that an error has been detected in the film data storage area of the RAM and could not be corrected. When such an error is detected, the parameters of all the films are automatically tested and set to default

TM-350/400 THICKNESS MONITOR
REPAIR AND MAINTENANCE 10-3
if out of range. The monitor should not be started until the user has checked all of the parameters for the desired film.
In the event of a C-Fail, the shutter is automatically closed since reliable operation of the Monitor is impossible until the bad data is corrected.
10.3.4 POWER FAILURE (P-FAIL) Since power interruptions may seriously effect your run, indication of any significant AC line disruptions is provided by the P-FAIL message. The shutter is automatically closed if a run was in process. It may be continued, once all other equipment is functioning normally again, by depressing the STOP key.
Note that it is normal for the power failure message to flash when the unit is first turned on. Press the STOP key to clear this message.
10.3.5 OSCILLATOR FAILURE (O-FAIL) An Oscillator Fail message indicates an improper or missing signal from the oscillator. The problem is most likely with the sensor crystal; however, failures in the oscillator, coaxial cables, Feedthrough, or sensor head can also generate this failure message. Pressing the STOP key once the cause has been corrected clears oscillator failures.
10.3.6 SENSOR CARD FAILURE (S FAIL) The S FAIL message indicates that the sensor measurement card has failed or is not installed. If this failure occurs then either the sensor card should be replaced or the monitor should be returned for repair. Press the STOP key to clear an S-FAIL message.
10.4 TROUBLESHOOTING AIDS TO ISOLATE INSTALLATION FAULTS
The following table describes possible problems that could occur when interfacing the Monitor with a vacuum system. With each symptom is a list of probable causes.
If you should decide to remove the Monitor cover read Sections 3.4 and 10.1 carefully before doing so.
WARNING: To avoid electrical shock or personal injury, disconnect the power cord before opening the cover on the power entry module.
WARNING: Do NOT use the power switch as a disconnecting device; disconnect the power cord from the power entry module to fully remove hazardous voltage from inside the TM monitor.
WARNING: All standard safety procedures associated with the safe handling of electrical equipment must be observed. Only properly trained personnel should attempt to service the instrument.

TM-350/400 THICKNESS MONITOR
REPAIR AND MAINTENANCE 10-4
Table 10-1 Troubleshooting Aids Symptom Possible Cause Unit blows line fuse. a) Line voltage selector is not set for
the line voltage being used. See Section 3.2.6. b) Incorrect fuse size.
Front Panel display never illuminates. a) Blown fuse. b) Faulty clock generator TM-400 only (High Speed Counter board)
“O FAIL” message can't be cleared. a) Active sensor number not equal to sensor connected to the "good" sensor. TM-400 only b) Defective cable or cables. See Section 4. c) Defective or overloaded sensor crystal. See Section 5. d) Oscillator unit connected in the wrong direction. e) Bad Oscillator unit. f) Thickness Monitor not properly grounded to the vacuum system. g) Wrong crystal selection, J5. See Section 3.3.1
Front panel control keys non- functional.
a) Defective keys b) Bad Front Panel Logic board
Reoccurring C-Fail message on power up.
a) “Power up” or “Power down” sequencing circuit malfunctioning. b) “RAM Power” switching circuit not functioning. c) Aged or defective battery.
Unable to remotely control the unit via Input connector.
a) Improperly wired cable/connector. b) Inputs not properly grounded.
Faulty DAC outputs. a) Improper DAC wiring. b) External recording device puts excessive load on the DAC.
For further assistance, call (714) 828-4200.
10.5 RETURNING THE TM-350/400 TO THE FACTORY If there is a need to return your monitor to the factory, please call Maxtek to obtain a Returned Merchandise Authorization Number (RMA#). This number is required prior to returning your monitor to the factory. You are required to show this RMA number on your shipping document. It will help us track and ensure proper actions will be made to your monitor

TM-350/400 THICKNESS MONITOR
REPAIR AND MAINTENANCE 10-5


![Monsoon precaution [aden pku]](https://img.pdfslide.us/doc/110x75/5883c5ca1a28ab5c378b77b5/monsoon-precaution-aden-pku.jpg)