Embed Size (px)
Citation preview

TK Suite Instructions
for Administrators and Users

Table of Contents1. TK Suite Set.................................................................................................................5
1.1. How Does TK Suite Function?.........................................................................................................51.2. Rights.................................................................................................................................................5
2. TK Suite Client............................................................................................................62.1. Show TK Suite Client........................................................................................................................62.2. TK Suite Client Settings....................................................................................................................6
2.2.1. TK Suite Server IP Address......................................................................................................62.2.2. User Name and Password.........................................................................................................7
2.3. Starting TK Suite Applications.........................................................................................................72.4. TK Suite Modes................................................................................................................................7
2.4.1. Passive Mode............................................................................................................................72.4.2. Active Mode.............................................................................................................................8
3. TK Suite Menu.............................................................................................................83.1. Showing the TK Suite Menu.............................................................................................................93.2. Changing to an Application...............................................................................................................93.3. Logging On as Another User.............................................................................................................93.4. Further Views....................................................................................................................................9
4. TK Suite Settings.........................................................................................................94.1. Starting TK Suite Settings...............................................................................................................104.2. Interface Settings.............................................................................................................................10
4.2.1. Active Interfaces.....................................................................................................................104.2.2. Passive Interfaces...................................................................................................................10
4.3. Setting up Users...............................................................................................................................104.3.1. Telephones Assigned .............................................................................................................104.3.2. Rights......................................................................................................................................10
5. TK Suite Set Configurator........................................................................................115.1. Starting TK Suite Set.......................................................................................................................115.2. Configuration Options.....................................................................................................................11
5.2.1. Configuration Assistant..........................................................................................................115.2.2. Configuration Menu................................................................................................................125.2.3. Using the Glossary..................................................................................................................125.2.4. Resizing the Display Area......................................................................................................12
5.3. Menu Bar.........................................................................................................................................125.3.1. Receiving................................................................................................................................125.3.2. Sending...................................................................................................................................125.3.3. Loading...................................................................................................................................125.3.4. Saving as.................................................................................................................................135.3.5. Saving.....................................................................................................................................135.3.6. Printing...................................................................................................................................13
6. TK Suite Bill...............................................................................................................136.1. Starting TK Suite Bill......................................................................................................................14
3

6.2. Menu Bar.........................................................................................................................................146.2.1. Read Out New Data................................................................................................................146.2.2. Read Out All Data..................................................................................................................146.2.3. Printing...................................................................................................................................146.2.4. Showing Phonebook/Showing Numbers................................................................................146.2.5. Exporting................................................................................................................................14
6.3. Archives...........................................................................................................................................146.4. Filters...............................................................................................................................................15
6.4.1. 'Time Period' Filter.................................................................................................................156.4.2. Filtering 'Numbers’.................................................................................................................156.4.3. Filtering 'Lines'.......................................................................................................................166.4.4. Filtering 'LCR Carriers'...........................................................................................................166.4.5. Filtering 'Parties'.....................................................................................................................16
6.5. The Connection List .......................................................................................................................166.6. Comparing Statistics........................................................................................................................176.7. Statistic Progression........................................................................................................................17
7. TK Suite Contact.......................................................................................................177.1. Starting TK Suite Contact...............................................................................................................187.2. Contact Overview............................................................................................................................18
7.2.1. Filterbar..................................................................................................................................187.2.2. Editing Contacts.....................................................................................................................187.2.3. Adding Contacts.....................................................................................................................187.2.4. Clearing Contacts....................................................................................................................187.2.5. Leafing....................................................................................................................................19
7.3. 'Edit Contact' Mode.........................................................................................................................197.3.1. Contact Data...........................................................................................................................197.3.2. Contact Rights........................................................................................................................197.3.3. Communication Heading........................................................................................................197.3.4. Addresses Heading.................................................................................................................207.3.5. Notes Heading........................................................................................................................20
7.4. Resorting Numbers..........................................................................................................................217.5. Dialling Numbers............................................................................................................................217.6. Writing e-Mails...............................................................................................................................21
8. More Information......................................................................................................218.1. Network...........................................................................................................................................218.2. Server Protection.............................................................................................................................21
4
TK Suite Set
1. TK Suite Set
TK Suite Set is a valuable addition to your PBX. Besides a convenient configurationinterface for setting up and managing your PBX, TK Suite provides a contact database,resubmission, call time distribution and many more possibilities as detailed in the fol-lowing.
TK Suite is a network and multi-user software package consisting of a server and cli-ent application. Separation of the components allows the software to be used in a net-work.
1.1. How Does TK Suite Function?The application TK Suite Server forms the basis of TK Suite, and is referredto in the
following simply as TK Suite Server. TK Suite Server is installed on a computer from where a connection is made to the
PBX via a USB or serial interface. TK Suite Server provides its services to all com-puters in a network.
A thin application is installed on these computers only. They then communicate withTK Suite Server via a network. This application is called TK Suite Client andallowsdial-up links, notes and a variety of other functions.
Server and Client can also be installed on a single computer.TK Suite Server contains a database and provides various web interfaces which can
be used by other computers in a network with a web browser. The core applications in TK Suite are also included in these interfaces.
• TK Suite Set (configuring the PBX)
• TK Suite Bill (call time monitoring)
• TK Suite Contact (contact management)
Although these applications can be reached directly via a standard web browser, it iseasier to start an application using the appropriate button in TK Suite Client.
1.2. RightsThe basis of all multi-user applications is a rights system. This prevents users in a
network being able to edit other people's private contacts, or even see the last numbersthey dialled.
Each user is issued a user name and password for this reason. The respective userenters this combination once in the client application at his workplace. Only the Admin-istrator has permanent access to all the data on the server and can enter or delete usersand rights.
5

TK Suite Set
Normally a company appoints an officer to the position of administrator. If a userfor-gets his or her password, the administrator simply has to issue a new password or findthe old one. The administrator function exists as standard in TK Suite and cannot bede-leted. Under User Administration the administrator can assign telephones and issue spe-cific rights to the users.
If multi-user capability is to be used, the first step after installing TK Suite Server isto set up users and important rights (see Page 10). The administrator's user name is 'ad-min' and does not require a password as standard.
As soon as the basic settings have been made, the administrator needs to secure hisaccount with a password. Normally, a user is set up for each telephone allowing him orher access to this telephone alone.
2. TK Suite Client
TK Suite Client allows you to use the convenient CTI functions of your PBX. De-pending on the firmware version installed on the PBX, you can control all the essentialexchange functions via TK Suite Client.
Please consult the instructions for TK Suite Client supplied separately for detailedinformation on this programme. The following merely supplies a brief summary of themost important settings.
2.1. Show TK Suite ClientIf TK Suite Client is placed in the Autostart Programme Group during installation, it
will start automatically after you log on to Windows. Left-click on the TK Suite icon inthe taskbar to show TK Suite Client.
2.2. TK Suite Client Settings
2.2.1. TK Suite Server IP Address
Click File and thenSettings to enter the computer name or server IP address so thatthe client knows how to reach the server. The server address can be obtained from theadministrator or by entering the command line ‘ipconfig’ in the MS-DOS commandprompt window on the server (for Windows systems).
6
Figure 1The TK Suite icon in the taskbar
TK Suite Client
If the server is running on the same computer as the Client, then enter 'localhost'or'127.0.0.1'.
2.2.2. User Name and Password
The user name and password are entered in the same dialogue.The user name and password are sent to the server, which checks the log-on details
every time TK Suite Client is started. As soon as a connection has been set up to theserver and the log-on details have been verified, a green section appears underneath theclient on the right. If the section stays red, either no server is available, or the user namecould not be verified by the server.
2.3. Starting TK Suite ApplicationsClick the appropriate button (circle icons) or right-click on the TK Suite iconin the
taskbar, and select an application from the menu to start TK Suite applications whichrun in the browser.
2.4. TK Suite Modes
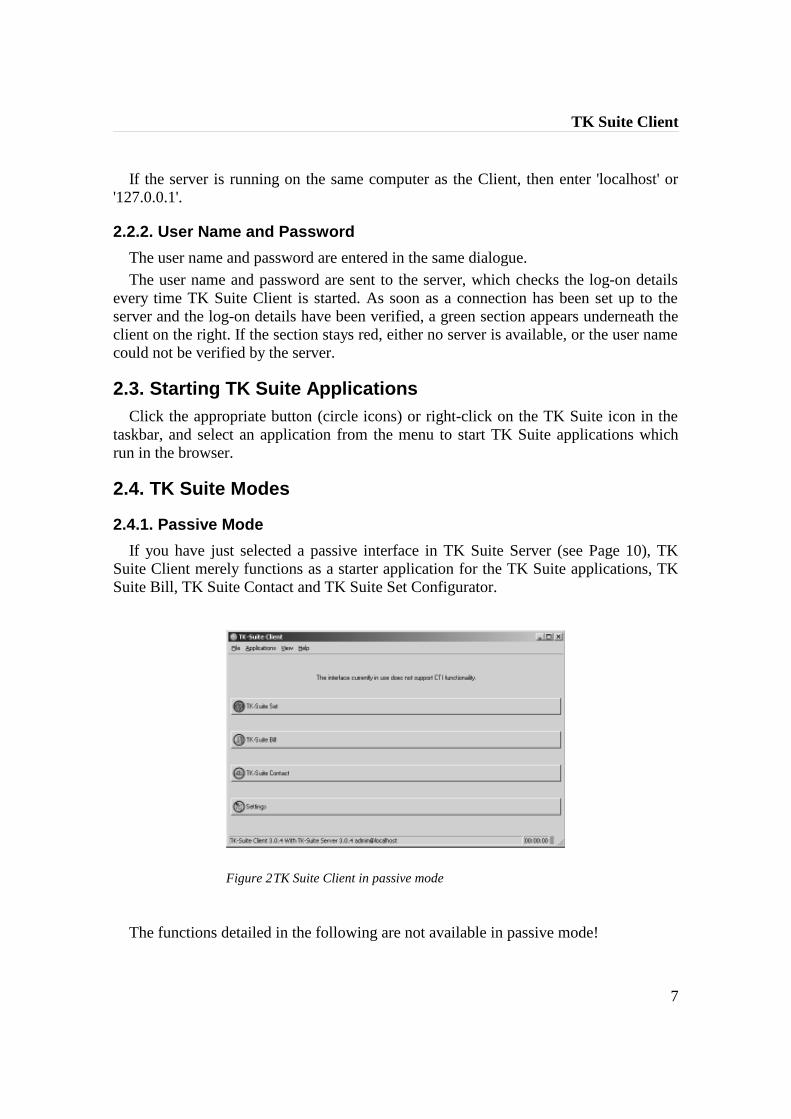
2.4.1. Passive Mode
If you have just selected a passive interface in TK Suite Server (see Page 10), TKSuite Client merely functions as a starter application for the TK Suite applications, TKSuite Bill, TK Suite Contact and TK Suite Set Configurator.
The functions detailed in the following are not available in passive mode!
7
Figure 2TK Suite Client in passive mode

TK Suite Client
2.4.2. Active Mode
If, in contrast, you have selected an active interface in TK Suite Server, all CTI func-tions are available in addition to the applications.
CTI allows you to use computer-aided telephony. You can call numbers with TKSuite Client and stay informed of incoming calls.
Along with the note and resubmissions functions, this provides you with a profession-al CTI workplace. Several computers can even communicate with TK Suite Server viaTK Suite Client in a network.
3. TK Suite Menu
The TK Suite menu allows you to toggle between the various TK Suite applicationsand log-in using another password.
8
Figure 3TK Suite Client in active mode

TK Suite Menu
3.1. Showing the TK Suite MenuYou can go to the TK Suite menu using the context menu in TK Suite Client in the
Windows taskbar (right-click the icon to do so).If you are working in TK Suite Bill, TK Suite Contact or TK Suite Set, you canalso
go to the TK Suite menu by clicking the applications icon in the top-right of the win-dow.
3.2. Changing to an ApplicationThe TK Suite menu shows you all TK Suite Applications you are authorised to use.
Click on an icon to go to the respective application.
TK Suite Set TK Suite Bill TK Suite Contact TK Suite Set Settings
3.3. Logging On as Another UserClick on the key ring icon to log on using another password.
New Log-on
3.4. Further Views
At the end of the page you will also be shown the TK Suite Server version, the nameand version of the operating system used, and the address of the computer. This inform-ation can be especially useful in networks.
4. TK Suite Settings
Among other things, you can set the interface to the PBX and administer users underTK Suite Settings.
9

TK Suite Settings
4.1. Starting TK Suite SettingsThe menu for the TK Suite settings is started directly from the client via the Settings
icon. You can also use the TK Suite menu as an alternative.
4.2. Interface SettingsYou have to set the appropriate interface for TK Suite Server to communicate with
the PBX.Normally, this is carried out automatically during installation. However,if the inter-
face has been changed in the meantime, you can reset the interface in this menu.
4.2.1. Active Interfaces
If you select one of the active interfaces, this is opened when TK Suite Serveris star-ted and closed again first when you quit TK Suite Server.
Since CTI messages need to be received by TK Suite Server, so that for instance, apop-up window with information on the caller appears on your computer when a callcomes in, you need to select an active interface to use the CTI functions.
4.2.2. Passive Interfaces
If you select a passive interface, this is only opened for data transfer purposessuch astransferring configuration data. You cannot use CTI functions in this case.
4.3. Setting up UsersBesides 'admin', which always exists as a user, you can set up other userswho are
then able to use the services provided by TK-Suite Server.Whereas TK Suite Bill and TK Suite Contact as applications can almost be usedin
their complete entirety, TK Suite Set as a configuration application is limited to user-rel-evant settings.
4.3.1. Telephones Assigned
Here you can set which telephones the user has access to. Telephones available to theuser for selection in TK Suite Client and the telephones provided for choice on the TKSuite Set configuration pages are concerned here.
4.3.2. Rights
You can issue the following rights:
Rights Meaning
Phonebook The user can edit the PBX phonebook with TK Suite Set.
10
TK Suite Settings
Rights Meaning
Telephone Settings The user can edit telephone settings with TK Suite Set(for instance, external allocation).
Telephone Redirects The user can set up telephone lines with TK Suite Set viathe PBX.
Timing Control The user can edit a timing control functionally assignedto his telephone with TK Suite Set. Only the time profilecan be edited.
Bill Call Data The user can analyse the call data for the telephones as-signed to him or her, but not delete or move them to anarchive.
Setting up Users The user can set up other users.
5. TK Suite Set Configurator
TK Suite Set Configurator allows you to programme your PBX. You can also print,save and load configurations.
5.1. Starting TK Suite SetTK Suite Set is started directly from the client via the TK Suite Set icon.You can
also use the TK Suite menu as an alternative.
5.2. Configuration OptionsConfiguration options depend on the PBX used. Please use the TK Suite Set Config-
urator Online Help Glossary for explanations on the configuration options available.A menu with a variety of PBX settings is shown after the read out. Optionally, you
can select a chosen item from this menu, or be guided through the most important set-tings by a wizard.
5.2.1. Configuration Assistant
Use the Configuration Assistant to be guided though the most important basic set-tings. Start the assistant by clicking on the question mark.
11

TK Suite Set Configurator
5.2.2. Configuration Menu
Click on an entry in the configuration menu to use all the configuration options avail-able.
5.2.3. Using the Glossary
You can go to the Online Help Glossary by clicking the question mark, or the termshighlighted in the Help texts on the configuration pages. You can also jump to pages inthe configurator directly from the Glossary. These links are highlighted in the text.
5.2.4. Resizing the Display Area
With smaller screens, it can be of benefit to create more room for displaying configur-ation tables by hiding the configuration menu. Click on the Minus sign above the con-figuration menu to do this. Click the Plus sign to show the menu again.
5.3. Menu Bar
5.3.1. Receiving
Click Read Out Configuration and Process to load the full configurationfrom the PBX to the computer.
Clicking Edit Last PBX Configuration Read Out only allows you edit the last ver-sion saved. This is updated after each complete read out and changes are sent tothePBX every time.
5.3.2. Sending
Click Send to send all changes made to the PBX. If you have loaded theconfiguration from a file, all data will be sent. If you have read out the configurationfrom the PBX previously, only the changes will be sent.
5.3.3. Loading
Click Load to see a selection of the PBX settings last saved on the server.Simply click the item required to make a selection.
You can also load an appropriate configuration file from the hard disk, or an externaldata carrier (for instance, a diskette). ClickSearch and select a file with the ending .tfkfrom the standard file dialogue to do this. The name selected will be adopted by theentry field and you can load it by clicking Import.
12
TK Suite Set Configurator
5.3.4. Saving as
Click Save as to save the last configuration in a file. This can either takeplace at a default location in TK Suite Server (files on the server), or exported (your loc-al file system). Exporting also allows you to save a configuration on a disk,CD or otherportable data medium.
Click the Save Copy checkbox to avoid modifying the configuration source when sav-ing. For instance, if you have read out a configuration from the PBX and saved it inafile (on the server), the configuration is treated like one which was loaded from a filefrom this point onwards. This results in all data being sent following a small change be-ing made to the configuration. Click Save Copy to prevent this.
5.3.5. Saving
Save as a menu item is only available if you have read out a configurationfrom a file. Click the button to write the changes back to the same file.
5.3.6. Printing
Click Print to print the full configuration or selected configuration pages.Click Select All Pages to select all configuration pages. Alternatively, click the
Checkbox next to the pages required. The pages selected can then be printed by clickingClick Here To Open Print Window. Another browser window will open where the Printoption can be selected from the menu.
6. TK Suite Bill
With TK Suite Bill, TK Suite provides you with an advanced tool monitoring calldurations and costs.
Depending on the rights issued, connections can be shown filtered according to vari-ous criteria. A user only sees the calls made from a telephone which he has the appropri-ate rights for. Filters which have already been set up can be activated or disabled at thepress of a button so that you do not have to re-enter all filters for each session.
Besides the connection list, which automatically resolves all telephones numbers lis-ted via TK Suite Contact, TK Suite Bill also provides various statistics views. You cangenerate and view bar charts for statistics relevant to particular usersper month and dayof the week here.
13

TK Suite Bill
6.1. Starting TK Suite BillTK Suite Bill is started directly from the client via the TK Suite Bill icon. You can
also use the TK Suite menu as an alternative.
6.2. Menu Bar
6.2.1. Read Out New Data
A connection is made to the PBX and all new call data records added sincethe last read out are transferred to the database. The most recent data records are high-lighted with a blue hash.
6.2.2. Read Out All Data
A connection is made to the PBX and all data records stored in the PBXare transferred to the database. Double entries are recognised automatically and not ad-ded to the database.
6.2.3. Printing
Use this function to print currently filtered data records. A PDF file is cre-ated for this purpose, which can be printed out in your browser using Acrobat Reader.
6.2.4. Showing Phonebook/Showing Numbers
Click this button if you want to specify whether numbers present in the TKSuite Contact database are to be displayed according to name.
6.2.5. Exporting
Click this button to save filtered data records as a text file so that theycanbe reprocessed with a spreadsheet programme.
6.3. ArchivesThe administrator (admin) has the right to create new archives, change current
archives and move data records to other archives. Select the appropriate archive to seethe actual number of data records in the archive.
Creating various archives (personnel-related archives, months etc.) allows you to re-duce the size of the actual data records. For instance, you could move all the connec-tions for a previous year to an archive for this year.
Show archive
Hide archives
Move filtered data from the current archive to this one
14

TK Suite Bill
Create new archive
Delete archive
Edit archive (change name)
6.4. FiltersYou can filter connections in the active archive according to various criteria.
Create filter
Delete filter
Edit filterFilters can be activated or disabled at any time. To ensure a good overview, disabled
filters are normally hidden. You can use the following buttons to activate or disable fil-ters:
Show all filters of this type
Hide all disabled filters of this type
6.4.1. 'Time Period' Filter
The last six months are provided for selection and can be added to the filter list with asimple click of the mouse. Deviating time periods (quarter, week, specific days etc.) canalso be created. Click the icon for the new filter to open a calendar sheet where the startand stop point can be selected and confirmed. A time period filter can also beset upvery easily by clicking a date in the connectivity list. The period of time only appears onthe user interface.
You also have the option of setting a tick to activate or disable a time filter, or linkseveral filters or edit them. The time period is first deleted (and cannot berestored) afterclicking the crossed out icon.
Examples:
• Compare October 2002 to October 2001
• Compare two time periods with regard to call duration
• Compare the call charges incurred on specific weekdays
6.4.2. Filtering 'Numbers’
Click the icon to open a display where the number to be selected can be entered. If thephonebook display is activated, the system compares the number with the database andthe contact selected appears in the filter list. A number filter can be very easily set up byclicking a number in the connection list. Linking several number filters is alsopossiblehere.
15
TK Suite Bill
Examples:
• Linked to the time period filter: how frequently was a number called during a specifictime period.
• Linked to the line filter: which line was used most frequently to talk to business part-ner XY?
6.4.3. Filtering 'Lines'
The line filter allows you to name selected telephone lines according to the methoddescribed above. A line filter can very easily be set up by clicking a line in the con-nectivity list.
6.4.4. Filtering 'LCR Carriers'
Use this filter to show connections made via a particular carrier. A carrier filter can beset up very easily by clicking a carrier in the connection list.
With this menu item you can compare how often carriers are used. Click Create List to search all data records according to appropriate carrier prefix
codes, compare them with the database, and create a new list with named details of theprovider, if available.
6.4.5. Filtering 'Parties'
Use this filter to show connections made by a particular party. A party filter can be setup very easily by clicking a party in the connection list.
6.5. The Connection List The following items are displayed in the connection list taking the filter criteria selec-
ted into consideration.
• Date and time
• A choice of the numbers called or phonebook display
• Carriers used to set up the call
• Line (which line/MSN was used to make the call)
• Parties
• Call duration
• Call type (incoming or outgoing)
16
TK Suite Bill
You can highlight specific column entries with a click in the connection list and usethem as a filter. For instance, click on a number to add it automatically tothe numberfilter. The same method can be used for dates and times etc. as well. The grey filter iconhighlights these filter options.
A blue hash sign refers to all new data records added since the last read out.
6.6. Comparing StatisticsThis menu item compares all parties according to time in a bar chart. Individual
parties can also be selected in order to make a direct comparison.Example:
Compare employee A with employee B with regard to the call duration.
6.7. Statistic ProgressionTime progression per party is shown for the time period selected using a chart. Click
the month to open a second chart with a detailed view of the days for a specific timeperiod.
7. TK Suite Contact
TK Suite Contact provides you with a complete contact database for all users in thenetwork.
17

TK Suite Contact
Instead of contacts doubling or tripling up on various computers, TK Suite Contactsaves contacts just once on a central server. Something like an address change onlyhasto be carried out once instead for each computer. This means that users alwaysfind themost up-to-date addresses and telephone numbers in TK Suite Contact. Instead of pre-scribing a predefined selection of addresses, any number of telephone numbers, e-mailaddresses, post addresses and even notes can be saved in one contact in TK Suite Con-tact.
Even the privacy of a user is taken into consideration in TK Suite Contact, becauseeach contact has specific rights assigned to it on the server. Meaning thata private con-tact remains private and no other user can view or edit it. The various rights’ levelsrange from private (hidden from view for other users), and read only to read and write.
7.1. Starting TK Suite ContactTK Suite Contact is started directly from the client via the TK Suite Contact icon.
You can also use the TK Suite menu as an alternative.The application consists of two different views: theContact Overview and theCon-
tact Editing Mode.
7.2. Contact OverviewIn the Contact Overview, all database contacts which are not private contacts belong-
ing to another user are displayed alphabetically.1.
7.2.1. Filterbar
The filterbar allows you to jump to a particular letter of the alphabet quickly. TheSearch field allows you to search for a particular name or firm easily. Clicking a numbershown in the overview induces TK Suite Client to invoke it immediately. Clicking an e-mail address opens the edit window in your mail programme if you have one installedand set up.
7.2.2. Editing Contacts
Click the name of a contact to edit it in Edit Contact mode.
7.2.3. Adding Contacts
Click Add Contact underneath the contact list to create a new contact.
Add Contacts
7.2.4. Clearing Contacts
Click delete in the Contact Overview to delete contacts following confirmation.
1 The TK Suite administrator sees all contacts.
18

TK Suite Contact
Clear Contacts
7.2.5. Leafing
If more contacts are available than fit on the page, use the Leafing button underneaththe contact list.
7.3. 'Edit Contact' ModeOnly one contact is shown for editing if you use this mode. Go to this mode by click-
ing a name in the Contact Overview or clicking Add Contact.Besides always visible contact data (name, first name and firm), furtherheadings can
be added by clicking the Heading button.
7.3.1. Contact Data
Personal information on a contact is always shown beneath the menu bar in Edit Con-tact mode. Click on Edit on the right in the window to edit the contact data.
Edit Contacts
Clear Contacts
7.3.2. Contact Rights
Rights can be specified for each contact. You can only edit rights for a contact if youare the owner (creator) of the contact or the administrator.
Rights Meaning
private Only the owner sees the contact
read only Other users can read the contact, but not edit it.
read+write Other users can edit the contact, but not delete it.
7.3.3. Communication Heading
You have the option of adding various telephone and fax numbers and e-mail andweb addresses for a contact here. Select the type of connection (for instance, 'mobile') inconnection with the criterion 'private' or 'business', and then enter the appropriate calldata under Number/E-mail.
Delete Entries
Edit Entries
Create Entries
19

TK Suite Contact
Sequential Dialling
Sequential dialling provides a quick and easy method of reaching a party if you do notknow where they are at any time. With sequential dialling, you can call the number atwork first and then the private and the mobile number afterwards. Besides the sequenceof numbers to be called, you can also set how often a number is to be called before go-ing on to the next number. This is very useful if you want to put down before an answer-ing machine switches in, so that you can try the next number.
Contact Overview
You can view numbers or mail addresser in the Contact Overview to call them fromthere directly.
Link to the PBX Phonebook
You can link a number to an entry in the phonebook as an option. ClickPhonebookand select a any position available to do this. You can also adapt the names usedin thePBX phonebook, for instance, to achieve homogenous vanity number dialling.
7.3.4. Addresses Heading
Several addresses can be entered for each contact. To do this click,Add Address orEdit for an existing address.
You can then fill out the address fields and specify the address type.
Delete Addresses
Edit Addresses
Add Addresses
7.3.5. Notes Heading
You can save notes for each contact if required. The current data is preset but can alsobe modified.
When a call comes in, TK Suite Client shows the name of the contact person and nextto it a button which you can use to call up notes before taking the call. This letsyou pre-pare yourself for the call in advance. A note edited in this way is a special notereferredto as a ‘TK Suite Client Notepad’. The note is only available for viewing in the TKSuite Contact interface.
Delete Notes
Edit Notes
Add Notes
20

TK Suite Contact
7.4. Resorting NumbersIf you want to move the number for a contact to another, clickCut Entry to cut thenumber and then Paste Number From Clipboard to add it to another contact.
Cut Entries
Paste Entries
7.5. Dialling NumbersIf you click on the required number in the contact person list, a connection to the
party is set up immediately. TK Suite Client needs to be running on the same computerfor this to work.
7.6. Writing e-MailsClick on an e-mail address to open the e-mail window and write a message.The standard mail programme set in your browser is started here.
8. More Information
8.1. NetworkSince TK Suite is a client-server application, a functioning network infrastructure is
required for its successful use in a network. For single-user installation without a net-work, a TCP/IP protocol is merely required, which is activated as standard in all currentoperating systems.
You should also note that any firewall installed on the TK-Suite Server computer mayrelease ports 5080 and 5081.
8.2. Server ProtectionIn TK Suite Set, all data is stored on the server. To secure all data (PBX configuration, contacts, call times) you simply have to
backup thevar directory below thetkserver directory on the server. Thetkserverdirectory itself is located in the directory set when the server was installed (normallyc:\programmes\AGFEO\TK Suite Basic-2\ on Windows platforms).
In var\dbf you will find the databases for TK Suite Contact and TK Suite Bill (con-
tact.bd and bill.db).In var\files you will find the files containing the PBX configurations(ending.tkf)
and an mirror of the configuration for the PBX connected (local.ltkf and local.ed).In the var directory you will find a list of TK Suite users (users.xml) and the TK
Suite Server configurations file (tksock.ini).
21

More Information
In the rare case of a hardware failure, it is useful to have a current backup of thesefiles to be able to restore the functioning system as rapidly as possible.
22