Embed Size (px)
Citation preview

Tivoli® Access Manager for Enterprise Single Sign-On
Installation and Setup Guide
Version 6.0
SC32-1989-00
���


Tivoli® Access Manager for Enterprise Single Sign-On
Installation and Setup Guide
Version 6.0
SC32-1989-00
���

Note:
Before using this information and the product it supports, read the information in “Notices,” on page 19.
First Edition (September 2006)
This edition applies to version 6, release 0, modification 0 of IBM Tivoli Access Manager for Enterprise Single
Sign-On (product number 5724-N70) and to all subsequent releases and modifications until otherwise indicated in
new editions.
© Copyright International Business Machines Corporation 2006. All rights reserved.
US Government Users Restricted Rights – Use, duplication or disclosure restricted by GSA ADP Schedule Contract
with IBM Corp.

TAM E-SSO Installation and Setup Guide
Table of Contents Welcome to IBM Tivoli Access Manager for Enterprise Single Sign-On ........ 2
About this Guide ........................................................................................ 2 Installation Overview................................................................................... 3 System Requirements .................................................................................. 4
TAM E-SSO System Requirements ................................................................ 4 SSO Administrative Console System Requirements ......................................... 5
Installation Steps......................................................................................... 6 Uninstalling TAM E-SSO.............................................................................. 18

TAM E-SSO Installation and Setup Guide
Welcome to IBM Tivoli Access Manager for Enterprise Single Sign-On IBM Tivoli Access Manager for Enterprise Single Sign-On (TAM E-SSO) lets you use a single password to logon to any password-protected application on your desktop, your network, and the Internet. It works "out-of-the-box" (without programming or additional network infrastructure) with virtually all applications, including Windows, Web, proprietary, and host/mainframe applications. TAM E-SSO is intelligent agent software. It remembers your credentials – your username/ID, password, and other information – for each application or website and automatically responds to its logon requests.
About this Guide This document provides step-by-step instructions for installing and configuring the TAM E-SSO Administrative Console and Agent. Upon completion of this guide, you should have the TAM E-SSO Administrative Console and Agent up and running.
2

TAM E-SSO Installation and Setup Guide
Installation Overview The following is a brief overview of the steps that must be taken in order to successfully install TAM E-SSO. Each step is explained in detail in the Installation Steps section.
• Review System Requirements
• Install TAM E-SSO Console
• Install TAM E-SSO Agent

TAM E-SSO Installation and Setup Guide
System Requirements
TAM E-SSO System Requirements
Minimum Configuration
Microsoft Windows 2000 (SP1+), XP (SP1 or SP2), 2003
120 MHz Pentium-compatible processor (233Mhz Pentium-compatible processor recommended)
32 Mb RAM (64Mb RAM recommended)
4-7 Mb hard drive space for the agent (depending on installation options)
Hard drive space for user data
Other Installer Components (installed if needed)
MSI (installer) file 2.0: 20 Mb hard drive space (if used or stored on the local drive)
Microsoft Windows Installer 2.0: 20 Mb hard drive space (if not present and if used)
Microsoft MDAC Package 2.8: hard drive space (if not present)
Optional Components from other sources Browser support: Microsoft Internet Explorer v5.5SP2 or later, Microsoft Firefox 1.0 or later Java support: Java Runtime Environment (JRE), version 1.3 or later. Note: JRE must be installed on the workstation prior to installing the TAM E-SSO Agent. Host emulator support: one or more of the following host emulators: Attachmate EXTRA!, Attachmate Extra! X-Treme, BOSaNOVA, Ericom PowerTerm Pro/Pro Enterprise, Ericom PowerTerm WebConnect, Ericom PowerTerm Lite/Plus/InterConnect, G&R Glink, Hummingbird HostExplorer, IBM Client Access, IBM Client Access Express, IBM Host On-Demand, IBM Personal Communications (PCom), IRMA for the Mainframe 4, NetManage Chameleon Hostlink 97, NetManage Rumba, Net Soft's NS/Elite, Novell LAN Workplace Pro 5.2, ScanPak Aviva, SDI Limited TN3270 Plus, Seagull Blue Zone, WRQ Reflection, Zephyr PASSPORT PC TO HOST, Zephyr PASSPORT WEB TO HOST Windows Event Logging support: a Microsoft Windows Server configured for Event Logging Microsoft Active Directory Server support (AD 2000 server version 5.0 / AD 2003 server version 5.2): hard drive space for Directory Server Client (if not present and if Microsoft Active Directory Server support is needed) Remote Store support: Directory Servers, including Microsoft Active Directory Server (including Application Mode), IBM Tivoli Directory Server, Novell eDirectory, Oracle Directory Server, Sun Java System Directory Server 5.1, or any LDAP Directory Server; any File System.
4

TAM E-SSO Installation and Setup Guide
SSO Administrative Console System Requirements
Minimum Configuration
Microsoft Windows 2000 (SP1+), XP (SP1 or SP2), 2003 (Note: Windows 2000 SP1+, XP, or 2003 required for Directory access)
120 MHz Pentium-compatible processor (233Mhz Pentium-compatible processor recommended)
48 Mb RAM (128Mb RAM recommended)
~10 Mb hard drive space for SSO Administrative Console (depending on installation options)
Other Installer Components (installed if needed)
MSI (installer) file 2.0: 20 Mb hard drive space
Microsoft Windows Installer 2.0: 20 Mb hard drive space (if not present)
Microsoft .NET Framework 2.0: 20Mb hard drive space (if not present)
Note: Run the TAM E-SSO Administrative Console.exe from the TAM E-SSO CD to install .NET 2.0. Please note that the installation of .NET 2.0 could take up to five minutes.
SSO File Sync Service System Requirements
Minimum Configuration
Microsoft Windows 2000 (SP1+), XP (SP1 or SP2), 2003
<1Mb hard drive space for SSO File Sync Service (depending on installation options)
NTFS File System with a shared folder and sufficient hard drive space for user data
Note: SAMBA is not officially supported by File Sync.
Other Installer Components (installed if needed)
MSI (installer) file 2.0: 20 Mb hard drive space (if used or stored on the local drive)
Microsoft Windows Installer 2.0: 20 Mb hard drive space (if not present and if used)
Microsoft MDAC package 2.8: hard drive space (if not present)

TAM E-SSO Installation and Setup Guide
Installation Steps Follow these steps to install and configure TAM E-SSO.
Step 1: Review System Requirements Make sure you have carefully reviewed the system requirements on the previous page.
Step 2: Install TAM E-SSO Administrative Console Follow these steps to install and configure the TAM E-SSO Console.
1. Double-click the TAM E-SSO Admin Console.MSI file to begin the installation. Wait while the installer loads.
Note: .NET 2.0 must be installed to install the TAM E-SSO Administrative Console. Use the TAM E-SSO Admin Console.EXE file to install .NET 2.0. Please note that the installation of .NET 2.0 could take up to five minutes.
2. The Welcome Panel appears. Click [Next>].
6

TAM E-SSO Installation and Setup Guide
3. The License Agreement panel appears. Read the license agreement carefully. Select I accept the terms in the license agreement and click [Next>] to continue.
4. Select a setup type. The Complete type installs all program features. The Custom option allows you to choose which program features to install and where they will be installed. If you will be performing a custom installation, go to Step 5. If not, go to Step 6.
TAM E-SSO Installation and Setup Guide
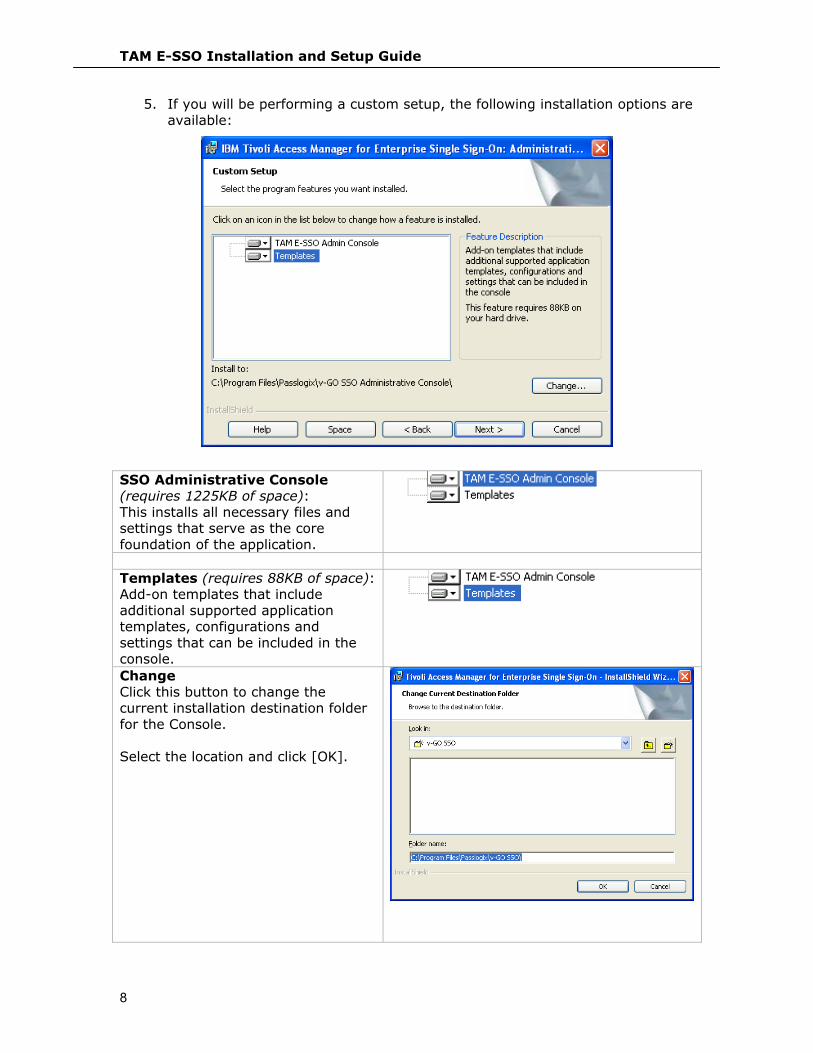
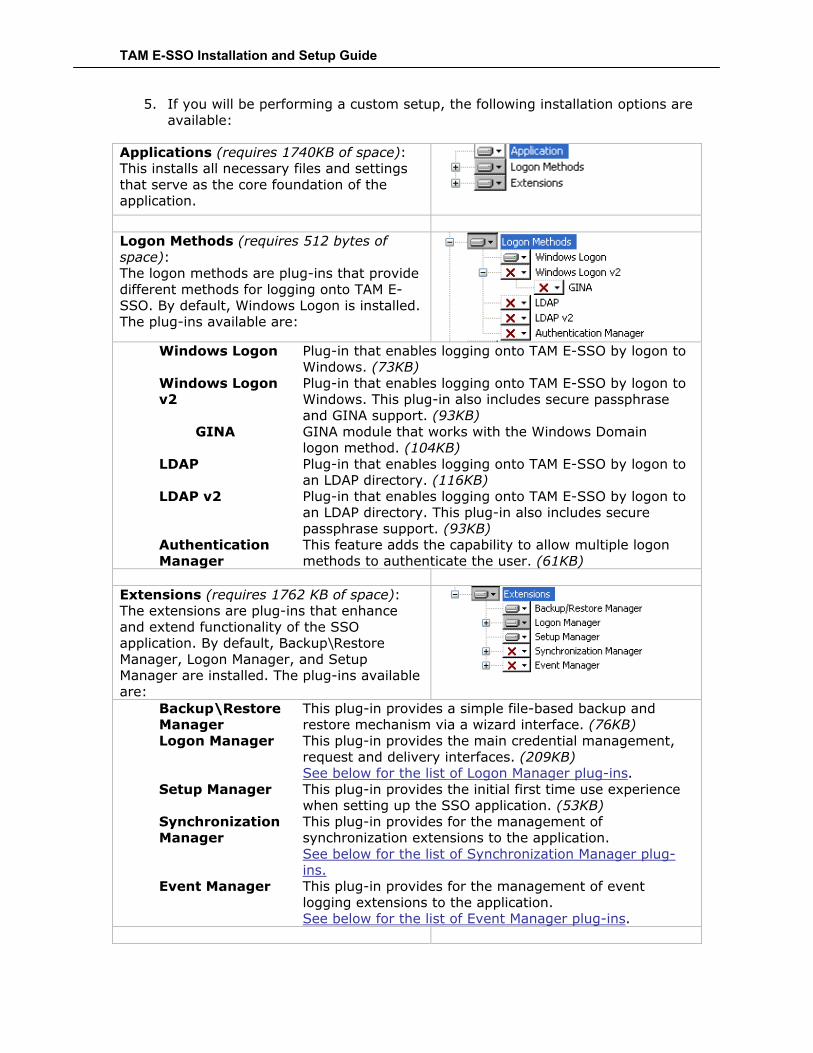
5. If you will be performing a custom setup, the following installation options are available:
SSO Administrative Console (requires 1225KB of space): This installs all necessary files and settings that serve as the core foundation of the application.
Templates (requires 88KB of space): Add-on templates that include additional supported application templates, configurations and settings that can be included in the console.
Change Click this button to change the current installation destination folder for the Console. Select the location and click [OK].
8

TAM E-SSO Installation and Setup Guide
Help Clicking the Help button displays the Custom Setup tips. Each icon indicates the state of the available feature.
Icon Means the feature:
Will be completely installed to the local hard drive.
Will have some subfeatures installed to the local hard drive.
Will not be installed.
Will be installed on first use.
Will be installed to run from the network.
Space Click this button to display the local servers Disk Space Requirements for the installation of the selected features. Click [OK].
6. The InstallShield Wizard is ready to begin the installation. Click [Install].

TAM E-SSO Installation and Setup Guide
7. Wait for the installation to complete. Upon completion, the Completed screen
will appear. Click [Finish].
10

TAM E-SSO Installation and Setup Guide
Step 3: Install TAM E-SSO Agent Follow these steps to install and configure the TAM E-SSO Agent.
1. Double-click the TAM E-SSO.MSI file to begin the installation. Wait while the
installer loads.
2. The Welcome Panel appears. Click [Next>].
3. The License Agreement panel appears. Read the license agreement carefully. Select I accept the terms in the license agreement and click [Next>] to continue.
4. Select a setup type. The Standalone type installs commonly used program
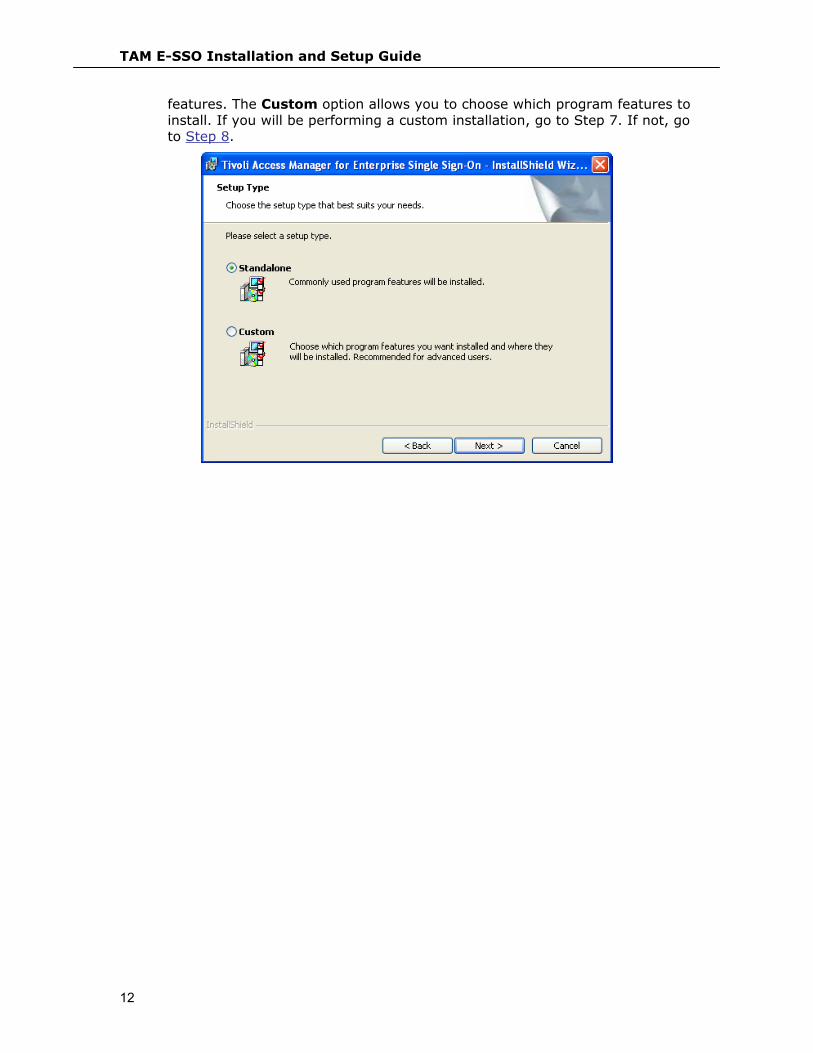
TAM E-SSO Installation and Setup Guide
features. The Custom option allows you to choose which program features to install. If you will be performing a custom installation, go to Step 7. If not, go to Step 8.
12
TAM E-SSO Installation and Setup Guide
5. If you will be performing a custom setup, the following installation options are available:
Applications (requires 1740KB of space): This installs all necessary files and settings that serve as the core foundation of the application.
Logon Methods (requires 512 bytes of space): The logon methods are plug-ins that provide different methods for logging onto TAM E-SSO. By default, Windows Logon is installed. The plug-ins available are:
Windows Logon Plug-in that enables logging onto TAM E-SSO by logon to
Windows. (73KB) Windows Logon v2
Plug-in that enables logging onto TAM E-SSO by logon to Windows. This plug-in also includes secure passphrase and GINA support. (93KB)
GINA GINA module that works with the Windows Domain logon method. (104KB)
LDAP Plug-in that enables logging onto TAM E-SSO by logon to an LDAP directory. (116KB)
LDAP v2 Plug-in that enables logging onto TAM E-SSO by logon to an LDAP directory. This plug-in also includes secure passphrase support. (93KB)
Authentication Manager
This feature adds the capability to allow multiple logon methods to authenticate the user. (61KB)
Extensions (requires 1762 KB of space): The extensions are plug-ins that enhance and extend functionality of the SSO application. By default, Backup\Restore Manager, Logon Manager, and Setup Manager are installed. The plug-ins available are:
Backup\Restore Manager
This plug-in provides a simple file-based backup and restore mechanism via a wizard interface. (76KB)
Logon Manager This plug-in provides the main credential management, request and delivery interfaces. (209KB) See below for the list of Logon Manager plug-ins.
Setup Manager This plug-in provides the initial first time use experience when setting up the SSO application. (53KB)
Synchronization Manager
This plug-in provides for the management of synchronization extensions to the application. See below for the list of Synchronization Manager plug-ins.
Event Manager This plug-in provides for the management of event logging extensions to the application. See below for the list of Event Manager plug-ins.

TAM E-SSO Installation and Setup Guide
Logon Manager (requires 1762 KB of space): The helper plug-ins available are:
Internet Explorer Helper
Extension helpers that adds SSO support for Internet Explorer. (105KB)
Mozilla Browser Helper
Extension helpers that adds SSO support for Mozilla-based browser. (872KB)
Mainframe Emulator Helper
Extension helpers that adds SSO support for HLLAPI-based emulators. (109KB) The Mainframe helper extensions are:
Console Window Support
Support for Console windows (command prompt) within TAM E-SSO’s mainframe plug-in. (56KB)
Legacy Emulator Support
Support for 16-bit legacy HLLAPI-based emulators. (295KB)
Java Helper
Extension helpers that adds SSO support for Java applications natively. (144KB)
SAP Helper Extension helpers that adds SSO support for SAP applications. (209KB) Note: SAP must be configured to work with TAM E-SSO. Please see the “Technical Notes” in the TAM E-SSO 6.00 Release Notes.
Synchronizer Manager: The synchronizer plug-ins available are:
Active Directory Synchronizer
Synchronization plug-in that supports storage and retrieval of credentials and settings from an Active Directory server. (88KB)
LDAP Synchronizer
Plug-in that supports storage and retrieval of credentials and settings from an LDAP-compliant directory, such as SUN Java System Directory Server or eDirectory. (116KB)
ADAM Synchronizer
Synchronization plug-in that supports storage and retrieval of credentials and settings from an ADAM server. (85KB)
File System Synchronizer
Synchronization plug-in that supports storage and retrieval of credentials and settings from a file share. (69KB)
Database Synchronizer
Synchronization plug-in that supports storage and retrieval of credentials and settings from a database. (64KB)
Roaming Profile Synchronizer
Synchronization plug-in that supports roaming profiles. (73KB).
14

TAM E-SSO Installation and Setup Guide
Event Manager: The plug-ins available are:
XML File Event Management plug-in that supports logging of
events to a local XML file. (36KB) Windows Event Extension
Event Management plug-in that supports logging of events to the Windows Event Manager. (57KB)
Change Click this button to change the current installation destination folder for the Agent. Select the location and click [OK].
Help Clicking the Help button displays the Custom Setup tips. Each icon indicates the state of the available feature.
Icon Means the feature:
Will be completely installed to the local hard drive.
Will have some subfeatures installed to the local hard drive.
Will not be installed.
Will be installed on first use.
Will be installed to run from the network.
Space Click this button to display the local servers Disk Space Requirements for the installation of the selected features. Click [OK].

TAM E-SSO Installation and Setup Guide
6. The InstallShield Wizard is ready to begin the installation. Click [Install].
7. Wait for the installation to complete. Upon completion, the Completed screen will appear. Click [Finish].
8. The installation of TAM E-SSO does not require a reboot, unless the Windows Authentication v2 SSO GINA has been installed. If the SSO GINA was installed, upon clicking [Finish], you will be prompted to reboot your machine.
16
TAM E-SSO Installation and Setup Guide
9. Once the workstation or server has been restarted, you will be presented with TAM E-SSO’s Welcome Screen/First Time Use (FTU) Wizard. Follow the instruction on the screen and complete the FTU wizard. After the FTU is complete an Icon will appear in the tool tray.
Please refer to the TAM E-SSO User Guide and online help for information on completing the FTU Wizard and using the TAM E-SSO Agent. Please refer to the TAM E-SSO Administrative Console Help (SSOAdmin.chm -located in the ‘Documentation’ directory on the TAM E-SSO CD) for information on using the Administrative Console to configure TAM E-SSO.

TAM E-SSO Installation and Setup Guide
Uninstalling TAM E-SSO Follow these steps to uninstall TAM E-SSO.
1. Click Start, point to Settings, and then click Control Panel.
2. Open Add/Remove Programs.
3. To remove the TAM E-SSO Agent, select IBM Tivoli Access Manager for Enterprise Single Sign-On and click Remove. The following dialog appears:
4. Click Yes.
5. Follow the prompts to uninstall TAM E-SSO.
6. To uninstall the TAM E-SSO Administrative Console, select IBM Tivoli Access Manager for Enterprise Single Sign-On Administrative Console v6.0 and click Remove.
7. Repeat steps 4 and 5.
18

Appendix. Notices
This information was developed for products and services offered in the U.S.A.
IBM may not offer the products, services, or features discussed in this document in
other countries. Consult your local IBM® representative for information on the
products and services currently available in your area. Any reference to an IBM
product, program, or service is not intended to state or imply that only that IBM
product, program, or service may be used. Any functionally equivalent product,
program, or service that does not infringe any IBM intellectual property right may
be used instead. However, it is the user’s responsibility to evaluate and verify the
operation of any non-IBM product, program, or service.
IBM may have patents or pending patent applications covering subject matter
described in this document. The furnishing of this document does not give you
any license to these patents. You can send license inquiries, in writing, to:
IBM Director of Licensing
IBM Corporation
North Castle Drive
Armonk, NY 10504-1785
U.S.A.
For license inquiries regarding double-byte (DBCS) information, contact the IBM
Intellectual Property Department in your country or send inquiries, in writing, to:
IBM World Trade Asia Corporation
Licensing
2-31 Roppongi 3-chome, Minato-ku
Tokyo 106-0032, Japan
The following paragraph does not apply to the United Kingdom or any other
country where such provisions are inconsistent with local law:
INTERNATIONAL BUSINESS MACHINES CORPORATION PROVIDES THIS
PUBLICATION “AS IS” WITHOUT WARRANTY OF ANY KIND, EITHER
EXPRESS OR IMPLIED, INCLUDING, BUT NOT LIMITED TO, THE IMPLIED
WARRANTIES OF NON-INFRINGEMENT, MERCHANTABILITY OR FITNESS
FOR A PARTICULAR PURPOSE. Some states do not allow disclaimer of express or
implied warranties in certain transactions, therefore, this statement may not apply
to you.
This information could include technical inaccuracies or typographical errors.
Changes are periodically made to the information herein; these changes will be
incorporated in new editions of the publication. IBM may make improvements
and/or changes in the product(s) and/or the program(s) described in this
publication at any time without notice.
Any references in this information to non-IBM Web sites are provided for
convenience only and do not in any manner serve as an endorsement of those Web
sites. The materials at those Web sites are not part of the materials for this IBM
product and use of those Web sites is at your own risk.
IBM may use or distribute any of the information you supply in any way it
believes appropriate without incurring any obligation to you.
© Copyright IBM Corp. 2006 19

Licensees of this program who wish to have information about it for the purpose
of enabling: (i) the exchange of information between independently created
programs and other programs (including this one) and (ii) the mutual use of the
information which has been exchanged should contact:
IBM Corporation
2ZA4/101
11400 Burnet Road
Austin, TX 78758
U.S.A.
Such information may be available, subject to appropriate terms and conditions,
including in some cases, payment of a fee.
The licensed program described in this information and all licensed material
available for it are provided by IBM under terms of the IBM Customer Agreement,
IBM International Program License Agreement, or any equivalent agreement
between us.
Any performance data contained herein was determined in a controlled
environment. Therefore, the results obtained in other operating environments may
vary significantly. Some measurements may have been made on development-level
systems and there is no guarantee that these measurements will be the same on
generally available systems. Furthermore, some measurements may have been
estimated through extrapolation. Actual results may vary. Users of this document
should verify the applicable data for their specific environment.
Information concerning non-IBM products was obtained from the suppliers of
those products, their published announcements or other publicly available sources.
IBM has not tested those products and cannot confirm the accuracy of
performance, compatibility or any other claims related to non-IBM products.
Questions on the capabilities of non-IBM products should be addressed to the
suppliers of those products.
Trademarks
The following terms are trademarks or registered trademarks of International
Business Machines Corporation in the United States, other countries, or both:
AIX
DB2
developerWorks
eServer
IBM
iSeries
Lotus
Passport Advantage
pSeries
RACF
Rational
Redbooks
Tivoli
WebSphere
zSeries
Microsoft®, Windows®, Windows NT®, and the Windows logo are trademarks of
Microsoft Corporation in the United States, other countries, or both.
20 IBM Tivoli Access Manager for Enterprise Single Sign-On: Installation and Setup Guide
Intel®, Intel Inside® (logos), MMX and Pentium® are trademarks of Intel
Corporation in the United States, other countries, or both.
UNIX® is a registered trademark of The Open Group in the United States and
other countries.
Linux® is a trademark of Linus Torvalds in the U.S., other countries, or both.
Java™ and all Java-based trademarks are trademarks of Sun
Microsystems, Inc. in the United States, other countries, or
both.
Other company, product, and service names may be trademarks or service marks
of others.
Appendix. Notices 21

22 IBM Tivoli Access Manager for Enterprise Single Sign-On: Installation and Setup Guide


����
Printed in USA