Embed Size (px)
Citation preview
1REVISED DECEMBER 2018
TIPSHEET 7Published by Bullseye Glass Co.
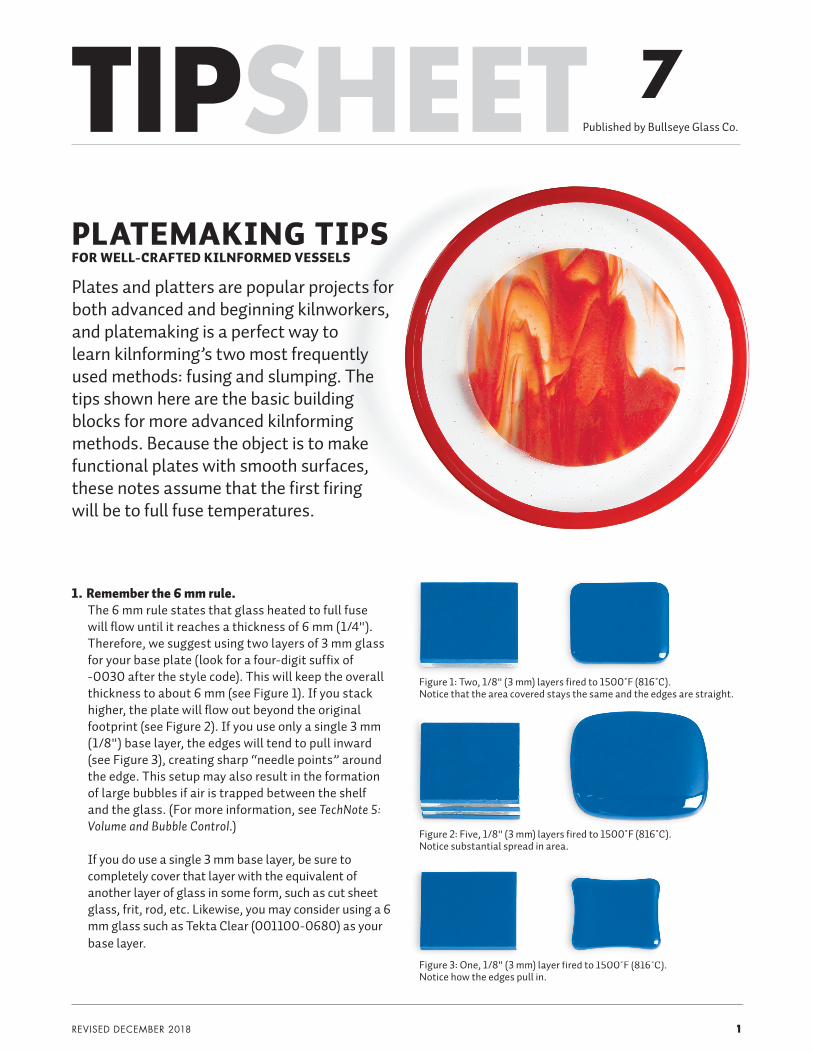
PLATEMAKING TIPSFOR WELL-CRAFTED KILNFORMED VESSELS
Plates and platters are popular projects for both advanced and beginning kilnworkers, and platemaking is a perfect way to learn kilnforming’s two most frequently used methods: fusing and slumping. The tips shown here are the basic building blocks for more advanced kilnforming methods. Because the object is to make functional plates with smooth surfaces, these notes assume that the first firing will be to full fuse temperatures.
Figure 3: One, 1/8" (3 mm) layer fired to 1500˚F (816˚C). Notice how the edges pull in.
Figure 2: Five, 1/8" (3 mm) layers fired to 1500˚F (816˚C). Notice substantial spread in area.
Figure 1: Two, 1/8" (3 mm) layers fired to 1500˚F (816˚C). Notice that the area covered stays the same and the edges are straight.
1. Remember the 6 mm rule. The 6 mm rule states that glass heated to full fuse will flow until it reaches a thickness of 6 mm (1/4"). Therefore, we suggest using two layers of 3 mm glass for your base plate (look for a four-digit suffix of -0030 after the style code). This will keep the overall thickness to about 6 mm (see Figure 1). If you stack higher, the plate will flow out beyond the original footprint (see Figure 2). If you use only a single 3 mm (1/8") base layer, the edges will tend to pull inward (see Figure 3), creating sharp “needle points” around the edge. This setup may also result in the formation of large bubbles if air is trapped between the shelf and the glass. (For more information, see TechNote 5: Volume and Bubble Control.) If you do use a single 3 mm base layer, be sure to completely cover that layer with the equivalent of another layer of glass in some form, such as cut sheet glass, frit, rod, etc. Likewise, you may consider using a 6 mm glass such as Tekta Clear (001100-0680) as your base layer.
1
2 TIPSHEET 7
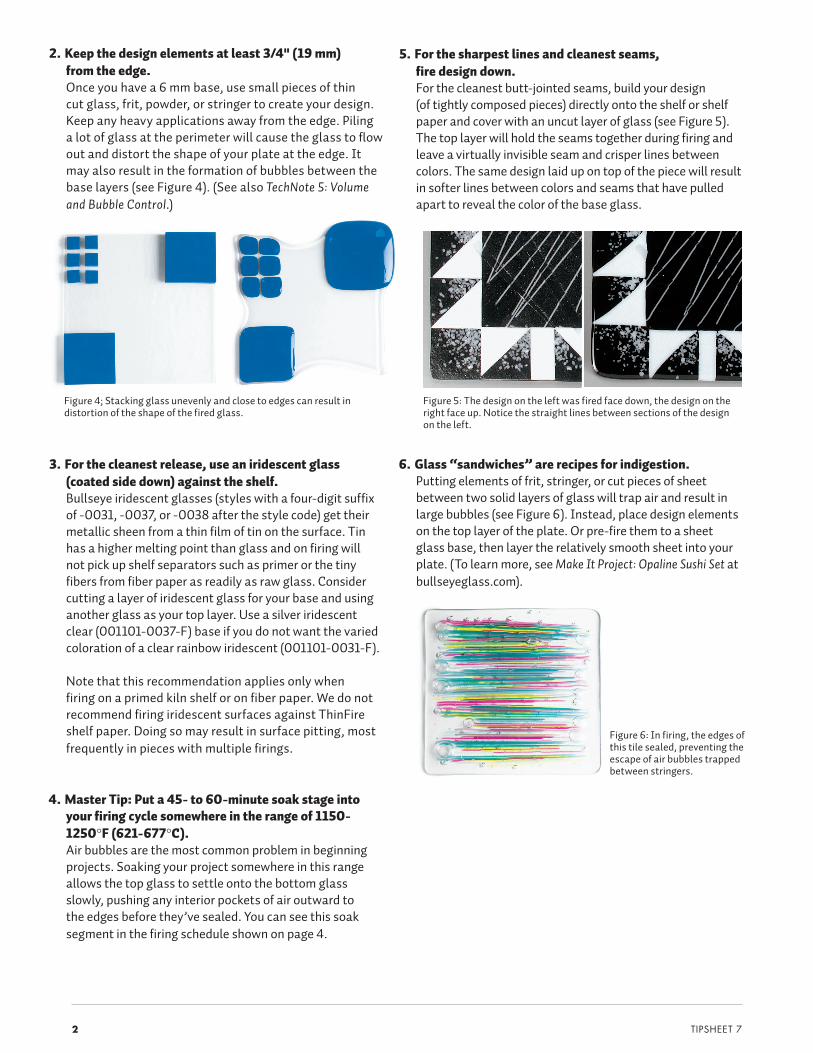
Figure 5: The design on the left was fired face down, the design on the right face up. Notice the straight lines between sections of the design on the left.
Figure 4; Stacking glass unevenly and close to edges can result in distortion of the shape of the fired glass.
Figure 6: In firing, the edges of this tile sealed, preventing the escape of air bubbles trapped between stringers.
5. For the sharpest lines and cleanest seams, fire design down. For the cleanest butt-jointed seams, build your design (of tightly composed pieces) directly onto the shelf or shelf paper and cover with an uncut layer of glass (see Figure 5). The top layer will hold the seams together during firing and leave a virtually invisible seam and crisper lines between colors. The same design laid up on top of the piece will result in softer lines between colors and seams that have pulled apart to reveal the color of the base glass.
2. Keep the design elements at least 3/4" (19 mm) from the edge. Once you have a 6 mm base, use small pieces of thin cut glass, frit, powder, or stringer to create your design. Keep any heavy applications away from the edge. Piling a lot of glass at the perimeter will cause the glass to flow out and distort the shape of your plate at the edge. It may also result in the formation of bubbles between the base layers (see Figure 4). (See also TechNote 5: Volume and Bubble Control.)
3. For the cleanest release, use an iridescent glass (coated side down) against the shelf. Bullseye iridescent glasses (styles with a four-digit suffix of -0031, -0037, or -0038 after the style code) get their metallic sheen from a thin film of tin on the surface. Tin has a higher melting point than glass and on firing will not pick up shelf separators such as primer or the tiny fibers from fiber paper as readily as raw glass. Consider cutting a layer of iridescent glass for your base and using another glass as your top layer. Use a silver iridescent clear (001101-0037-F) base if you do not want the varied coloration of a clear rainbow iridescent (001101-0031-F). Note that this recommendation applies only when firing on a primed kiln shelf or on fiber paper. We do not recommend firing iridescent surfaces against ThinFire shelf paper. Doing so may result in surface pitting, most frequently in pieces with multiple firings.
4. Master Tip: Put a 45- to 60-minute soak stage into your firing cycle somewhere in the range of 1150-1250°F (621-677°C). Air bubbles are the most common problem in beginning projects. Soaking your project somewhere in this range allows the top glass to settle onto the bottom glass slowly, pushing any interior pockets of air outward to the edges before they’ve sealed. You can see this soak segment in the firing schedule shown on page 4.
6. Glass “sandwiches” are recipes for indigestion. Putting elements of frit, stringer, or cut pieces of sheet between two solid layers of glass will trap air and result in large bubbles (see Figure 6). Instead, place design elements on the top layer of the plate. Or pre-fire them to a sheet glass base, then layer the relatively smooth sheet into your plate. (To learn more, see Make It Project: Opaline Sushi Set at bullseyeglass.com).
3PLATEMAKING TIPS
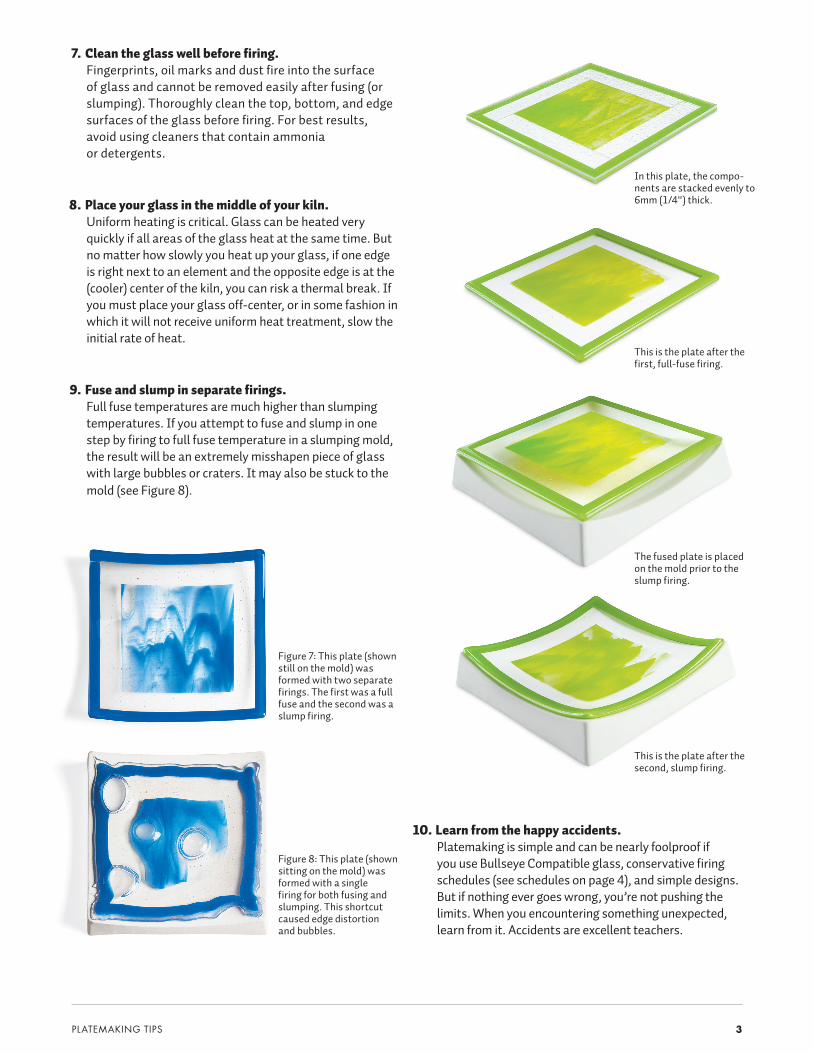
7. Clean the glass well before firing. Fingerprints, oil marks and dust fire into the surface of glass and cannot be removed easily after fusing (or slumping). Thoroughly clean the top, bottom, and edge surfaces of the glass before firing. For best results, avoid using cleaners that contain ammonia or detergents.
8. Place your glass in the middle of your kiln. Uniform heating is critical. Glass can be heated very quickly if all areas of the glass heat at the same time. But no matter how slowly you heat up your glass, if one edge is right next to an element and the opposite edge is at the (cooler) center of the kiln, you can risk a thermal break. If you must place your glass off-center, or in some fashion in which it will not receive uniform heat treatment, slow the initial rate of heat.
9. Fuse and slump in separate firings. Full fuse temperatures are much higher than slumping temperatures. If you attempt to fuse and slump in one step by firing to full fuse temperature in a slumping mold, the result will be an extremely misshapen piece of glass with large bubbles or craters. It may also be stuck to the mold (see Figure 8).
10. Learn from the happy accidents. Platemaking is simple and can be nearly foolproof if you use Bullseye Compatible glass, conservative firing schedules (see schedules on page 4), and simple designs. But if nothing ever goes wrong, you’re not pushing the limits. When you encountering something unexpected, learn from it. Accidents are excellent teachers.
Figure 7: This plate (shown still on the mold) was formed with two separate firings. The first was a full fuse and the second was a slump firing.
Figure 8: This plate (shown sitting on the mold) was formed with a single firing for both fusing and slumping. This shortcut caused edge distortion and bubbles.
In this plate, the compo-nents are stacked evenly to 6mm (1/4") thick.
This is the plate after the first, full-fuse firing.
This is the plate after the second, slump firing.
The fused plate is placed on the mold prior to the slump firing.
TIPSHEET 7: PLATEMAKING TIPS
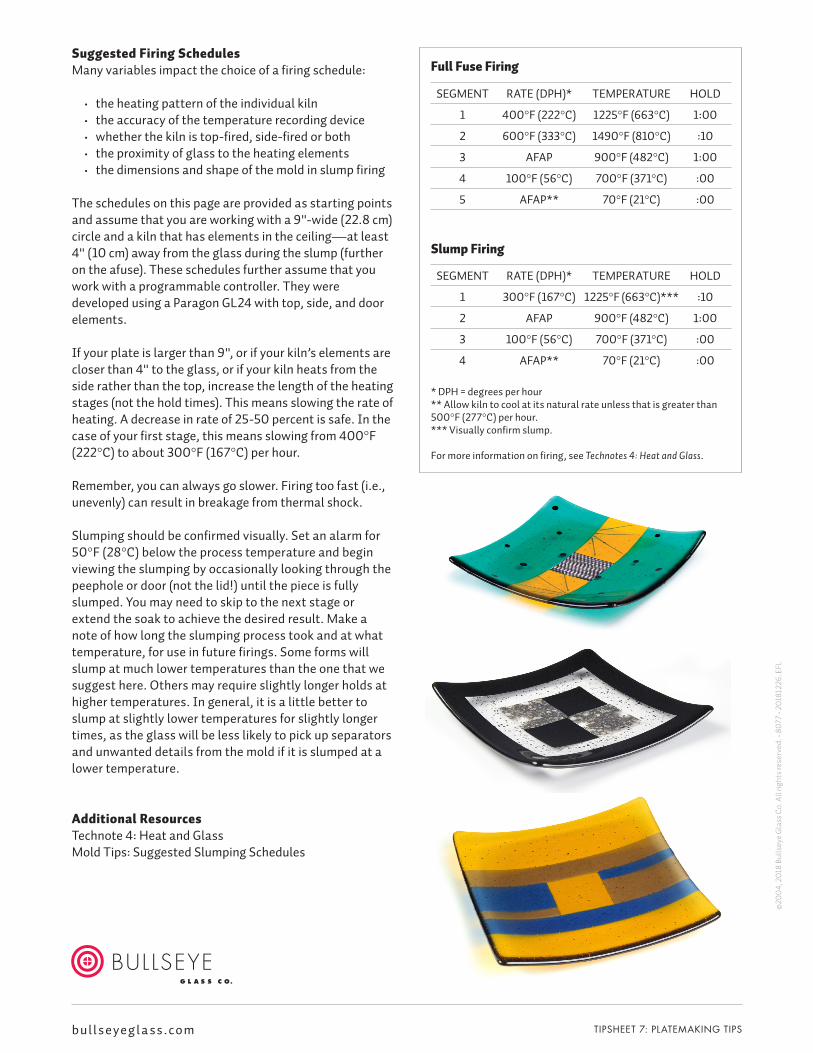
Suggested Firing SchedulesMany variables impact the choice of a firing schedule:
• the heating pattern of the individual kiln• the accuracy of the temperature recording device • whether the kiln is top-fired, side-fired or both • the proximity of glass to the heating elements• the dimensions and shape of the mold in slump firing
The schedules on this page are provided as starting points and assume that you are working with a 9"-wide (22.8 cm) circle and a kiln that has elements in the ceiling—at least 4" (10 cm) away from the glass during the slump (further on the afuse). These schedules further assume that you work with a programmable controller. They were developed using a Paragon GL24 with top, side, and door elements.
If your plate is larger than 9", or if your kiln’s elements are closer than 4" to the glass, or if your kiln heats from the side rather than the top, increase the length of the heating stages (not the hold times). This means slowing the rate of heating. A decrease in rate of 25-50 percent is safe. In the case of your first stage, this means slowing from 400°F (222°C) to about 300°F (167°C) per hour.
Remember, you can always go slower. Firing too fast (i.e., unevenly) can result in breakage from thermal shock.
Slumping should be confirmed visually. Set an alarm for 50°F (28°C) below the process temperature and begin viewing the slumping by occasionally looking through the peephole or door (not the lid!) until the piece is fully slumped. You may need to skip to the next stage or extend the soak to achieve the desired result. Make a note of how long the slumping process took and at what temperature, for use in future firings. Some forms will slump at much lower temperatures than the one that we suggest here. Others may require slightly longer holds at higher temperatures. In general, it is a little better to slump at slightly lower temperatures for slightly longer times, as the glass will be less likely to pick up separators and unwanted details from the mold if it is slumped at a lower temperature.
Additional ResourcesTechnote 4: Heat and GlassMold Tips: Suggested Slumping Schedules
Full Fuse Firing
SEGMENT RATE (DPH)* TEMPERATURE HOLD
1 400°F (222°C) 1225°F (663°C) 1:00
2 600°F (333°C) 1490°F (810°C) :10
3 AFAP 900°F (482°C) 1:00
4 100°F (56°C) 700°F (371°C) :00
5 AFAP** 70°F (21°C) :00
Slump Firing
SEGMENT RATE (DPH)* TEMPERATURE HOLD
1 300°F (167°C) 1225°F (663°C)*** :10
2 AFAP 900°F (482°C) 1:00
3 100°F (56°C) 700°F (371°C) :00
4 AFAP** 70°F (21°C) :00
* DPH = degrees per hour** Allow kiln to cool at its natural rate unless that is greater than 500°F (277°C) per hour.*** Visually confirm slump.
For more information on firing, see Technotes 4: Heat and Glass.
b ul l s e ye g l a s s . c o m
©20
04,
201
8 Bu
llsey
e G
lass
Co.
All
right
s res
erve
d. •
8077
• 20
1812
26_E
FL