Embed Size (px)
Citation preview
Tips to Use Microsoft Word 2007
“If the ax is dull and its edge unsharpened, more strength is needed
but skill will bring success.” – King Solomon, the wise
About this document?
It's for you if you are struggling to use MS Word in writing reports, thesis,
articles, stories or books
o Available at http://www.sudheer.droppages.com/WordTips.html
This is not an argument but to help students who are using it
Some of the myths that are around Word:
Cannot do automatic numbering (It’s a pretty simple task)
Never allows a single line in a paragraph to next page (In fact, that’s how a
document should be, refer Chapter 12)
Cannot handle large files (Then that’s the problem with your age-old processor.
Word works well even on Atom processor for large files)
Cannot insert Chapters from other files (Day to day task, refer Chapter 13)
No textbook is written using MS Word as it is poor in typography (Google it)
It crashes often (May be it was when our grandparents were using it, but not in
21st centaury)
Poor in hyphenation (MS Word has got latest updated dictionary and it gets
updated)
It’s for dummies. That’s an attack on personality but not on what Word cannot do
MS Word follows What You See What You Get. There are different views, refer
Chapter 4. In Print Layout, tries to show you almost What You See What You Get
Few years down the line, you have compatibility issues. We don’t write a Word in
2020 format today to get compatibility issues in 2015

ii
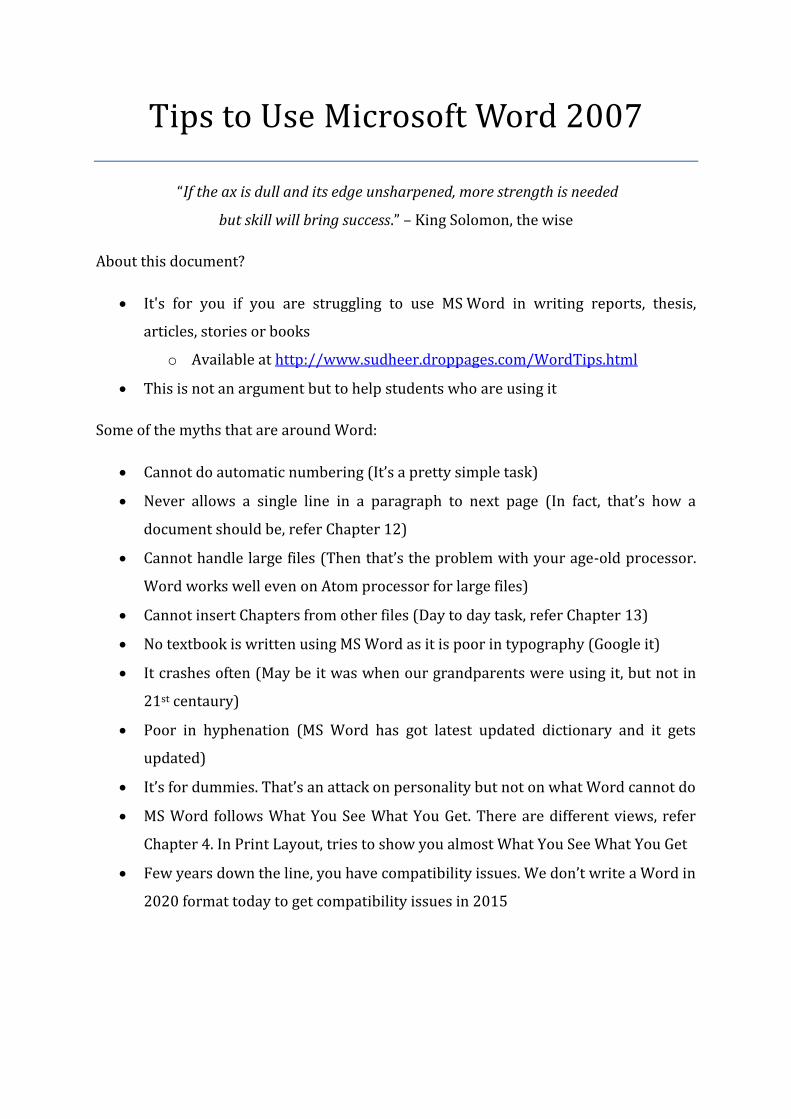
List of Contents
List of Contents ............................................................................................................................................... ii
List of Figures ................................................................................................................................................... v
List of Tables ................................................................................................................................................... vi
1. Page setup .................................................................................................................................................... 1
2. Styles .............................................................................................................................................................. 3
2.1.1. Normal .......................................................................................................................................... 3
2.1.2. Heading 1 ..................................................................................................................................... 4
2.1.3. Heading 2 ..................................................................................................................................... 4
2.1.4. Heading 3 ..................................................................................................................................... 4
2.1.5. Caption .......................................................................................................................................... 4
2.1.6. Figure and Table ....................................................................................................................... 5
2.2. Heading Numbering ......................................................................................................................... 6
2.3. Style for following paragraph: Normal ..................................................................................... 6
3. Making The Setting Default ................................................................................................................... 8
3.1. Creating New Normal File ............................................................................................................. 9
4. Document Viewer .................................................................................................................................... 10
4.1. Document Map ................................................................................................................................. 10
4.2. Outline View ...................................................................................................................................... 10
5. Figure and Table Numberings ............................................................................................................ 11
5.1. Format ................................................................................................................................................. 11
5.2. Figure Numbering ........................................................................................................................... 11
5.3. Bookmark for Cross-referring ................................................................................................... 13
6. Equations .................................................................................................................................................... 14
6.1. Format ................................................................................................................................................. 14
iii
6.2. Do you want precision? ................................................................................................................ 14
6.3. Equation number ............................................................................................................................ 15
6.4. Inserting Equations and Shortcuts ........................................................................................... 15
6.5. Example .............................................................................................................................................. 15
6.6. LaTex Guys ......................................................................................................................................... 16
7. Table of Contents ..................................................................................................................................... 17
8. List of Figures or Tables ....................................................................................................................... 18
8.1. Updating the Tables ....................................................................................................................... 19
9. References or Citations ......................................................................................................................... 20
9.1. Reference Manager ......................................................................................................................... 20
9.2. Insert Citation ................................................................................................................................... 20
9.3. Change Citation Style ..................................................................................................................... 20
9.4. Insert Bibliography ........................................................................................................................ 21
10. Page Breaks and Page Numbering ................................................................................................. 22
10.1. Page Breaks .................................................................................................................................... 22
10.1.1. View Page Breaks ................................................................................................................. 22
10.1.2. Delete a Page Break ............................................................................................................. 22
10.2. Page Numbering ........................................................................................................................... 22
11. Save as PDF ............................................................................................................................................. 24
11.1. Save AS PDF .................................................................................................................................... 24
11.2. Bookmarks in PDF........................................................................................................................ 25
12. Pagination: Widow and Orphan ...................................................................................................... 26
12.1. Widow ............................................................................................................................................... 26
12.2. Orphan .............................................................................................................................................. 26
12.3. Control Pagination ....................................................................................................................... 27
13. Move, Delete and Insert Chapters .................................................................................................. 28
13.1. Move or Delete a Heading (Reorganize your document).............................................. 28
iv
13.2. Insert a Chapter or Heading ..................................................................................................... 28
14. Review ....................................................................................................................................................... 30
15. Some Hidden Secrets ........................................................................................................................... 31
15.1. Non-Breaking Space .................................................................................................................... 31
15.2. Non-Breaking Hyphenation ..................................................................................................... 31
15.3. Character Codes ............................................................................................................................ 31
15.4. Keyboard Shortcuts ..................................................................................................................... 31
15.5. Easy Approach in Word ............................................................................................................. 31
15.6. Automatic Correction ................................................................................................................. 32
15.7. Want Something More? .............................................................................................................. 32
Contact ............................................................................................................................................................. 33

v
List of Figures
FIG. 1.1 FIRST STEP IS TO SETUP PAGE LAYOUT .................................................................................................................. 1
FIG. 1.2 SET PAPER SIZE TO A4 ...................................................................................................................................... 2
FIG. 1.3 SET THE MARGINS. FOR REPORT – BOTH SIDES PRINT – USE MIRROR MARGINS ........................................................... 2
FIG.2.4 MODIFY NORMAL STYLE .................................................................................................................................... 3
FIG.2.2 STYLE MODIFY HEADING 1 ................................................................................................................................. 4
FIG. 2.3 SELECT MULTILEVEL LIST WITH HEADING.............................................................................................................. 7
FIG. 3.1 SAVE SETTINGS FOR DEFAULT ............................................................................................................................. 8
FIG. 5.1 WHAT AM I DOING STILL IN IIT? ....................................................................................................................... 11
FIG. 12.1 WIDOW (YELLOW HIGHLIGHT) AND ORPHAN (RED MARKED) ............................................................................... 26
FIG. 13.1 OUTLINE VIEW TO INSERT ANOTHER DOCUMENT ................................................................................................ 29

vi
List of Tables
TABLE 5.1 KEYBOARD SHORTCUT KEYS FOR FIELD TOGGLE ................................................................................................. 11
TABLE 6.1 KEYBOARD SHORTCUT KEYS FOR EQUATIONS .................................................................................................... 15
1
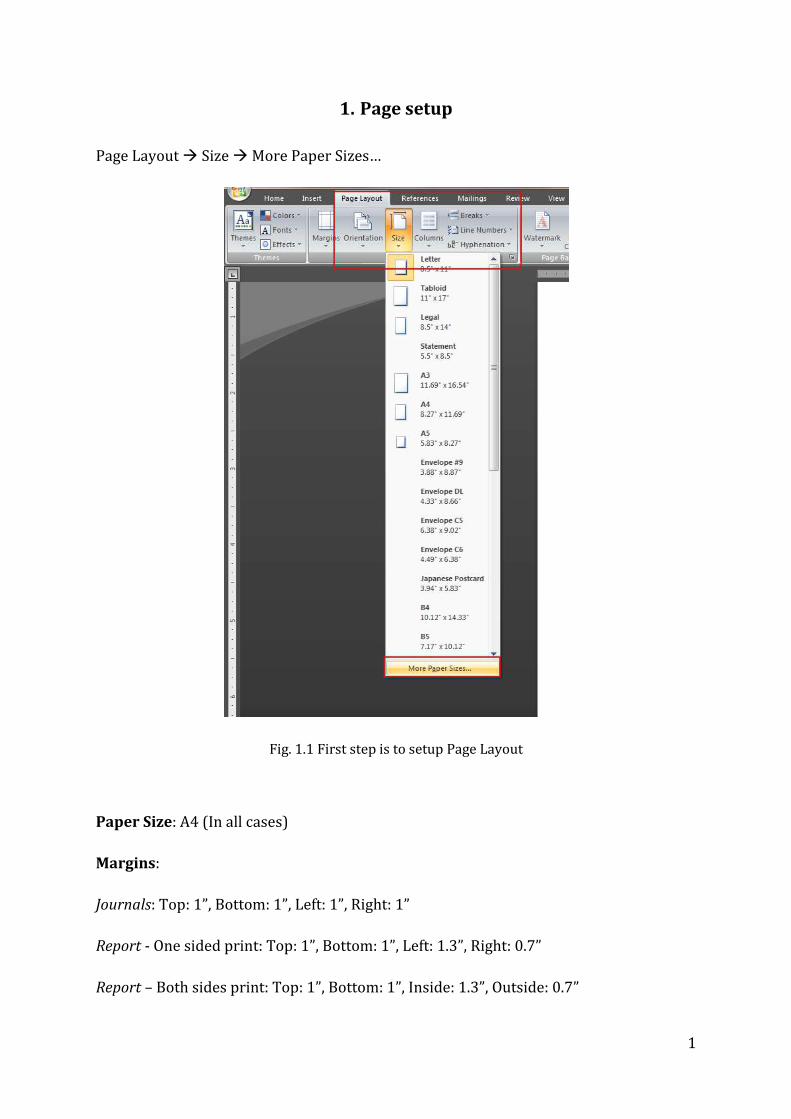
1. Page setup
Page Layout Size More Paper Sizes…
Fig. 1.1 First step is to setup Page Layout
Paper Size: A4 (In all cases)
Margins:
Journals: Top: 1”, Bottom: 1”, Left: 1”, Right: 1”
Report - One sided print: Top: 1”, Bottom: 1”, Left: 1.3”, Right: 0.7”
Report – Both sides print: Top: 1”, Bottom: 1”, Inside: 1.3”, Outside: 0.7”

2
Fig. 1.2 Set Paper size to A4
Fig. 1.3 Set the Margins. For Report – both sides print – use Mirror margins
3
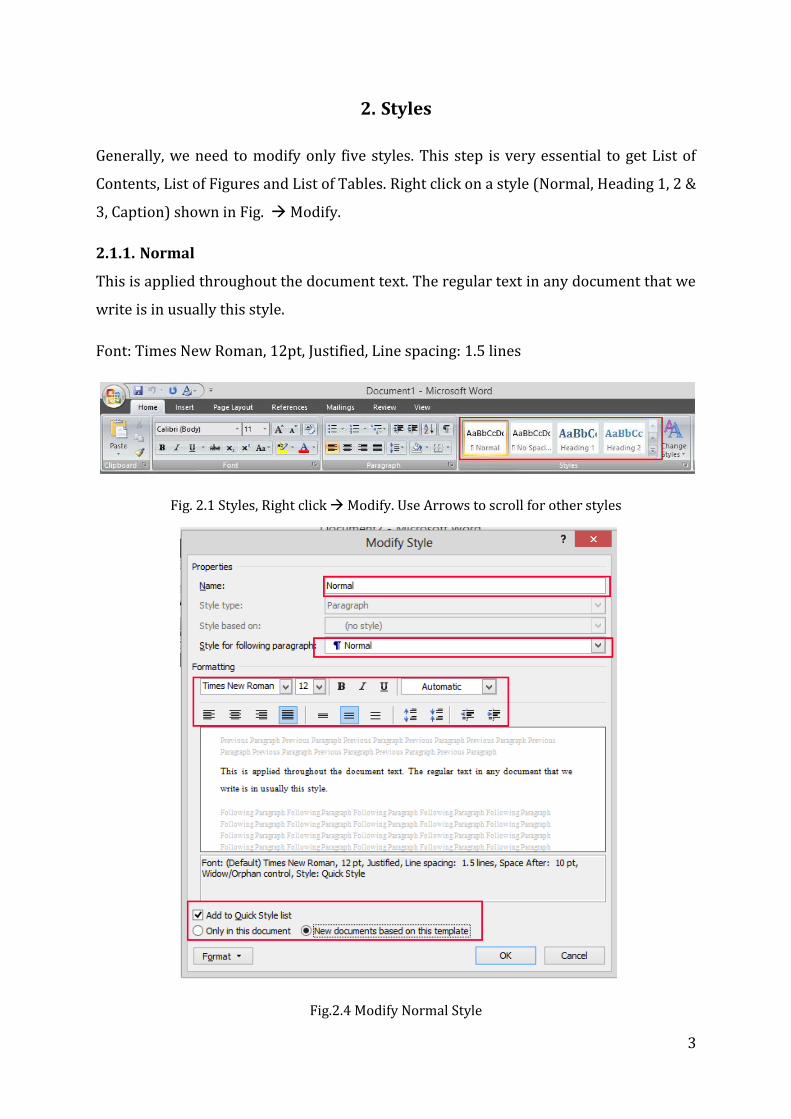
2. Styles
Generally, we need to modify only five styles. This step is very essential to get List of
Contents, List of Figures and List of Tables. Right click on a style (Normal, Heading 1, 2 &
3, Caption) shown in Fig. Modify.
2.1.1. Normal
This is applied throughout the document text. The regular text in any document that we
write is in usually this style.
Font: Times New Roman, 12pt, Justified, Line spacing: 1.5 lines
Fig. 2.1 Styles, Right click Modify. Use Arrows to scroll for other styles
Fig.2.4 Modify Normal Style
4
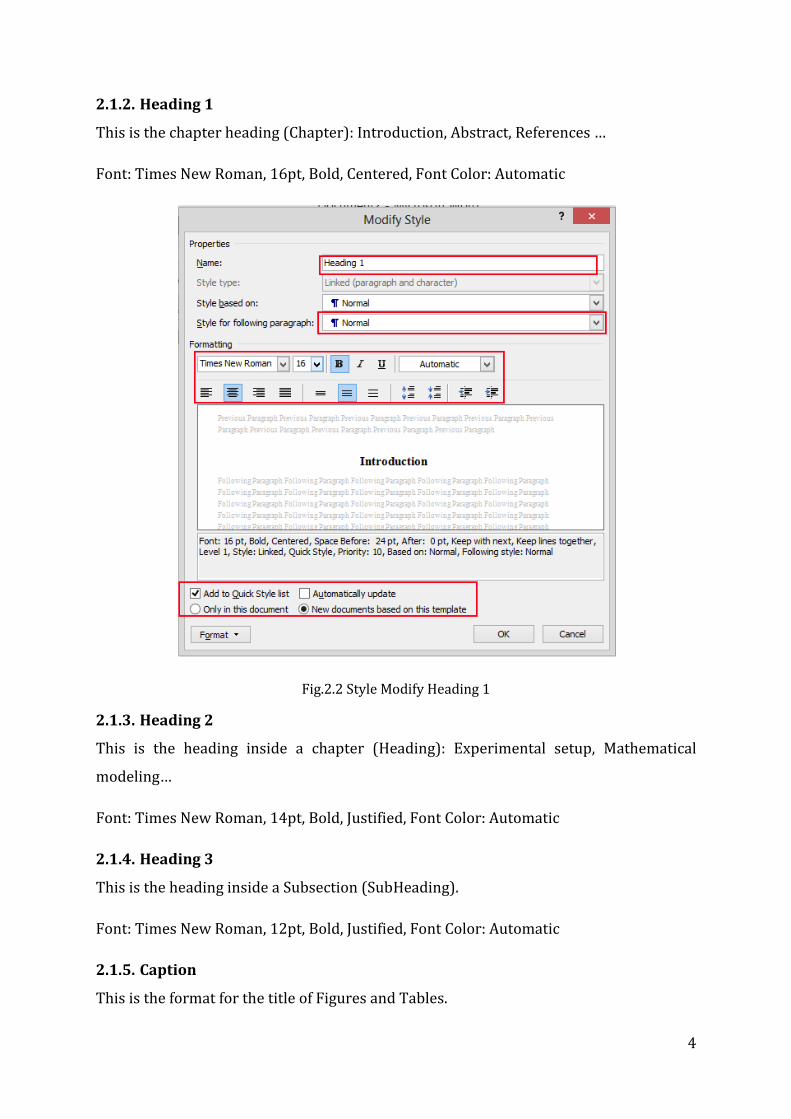
2.1.2. Heading 1
This is the chapter heading (Chapter): Introduction, Abstract, References …
Font: Times New Roman, 16pt, Bold, Centered, Font Color: Automatic
Fig.2.2 Style Modify Heading 1
2.1.3. Heading 2
This is the heading inside a chapter (Heading): Experimental setup, Mathematical
modeling…
Font: Times New Roman, 14pt, Bold, Justified, Font Color: Automatic
2.1.4. Heading 3
This is the heading inside a Subsection (SubHeading).
Font: Times New Roman, 12pt, Bold, Justified, Font Color: Automatic
2.1.5. Caption
This is the format for the title of Figures and Tables.
5
Font: Times New Roman, 12pt, Bold, Centered, Font Color: Automatic
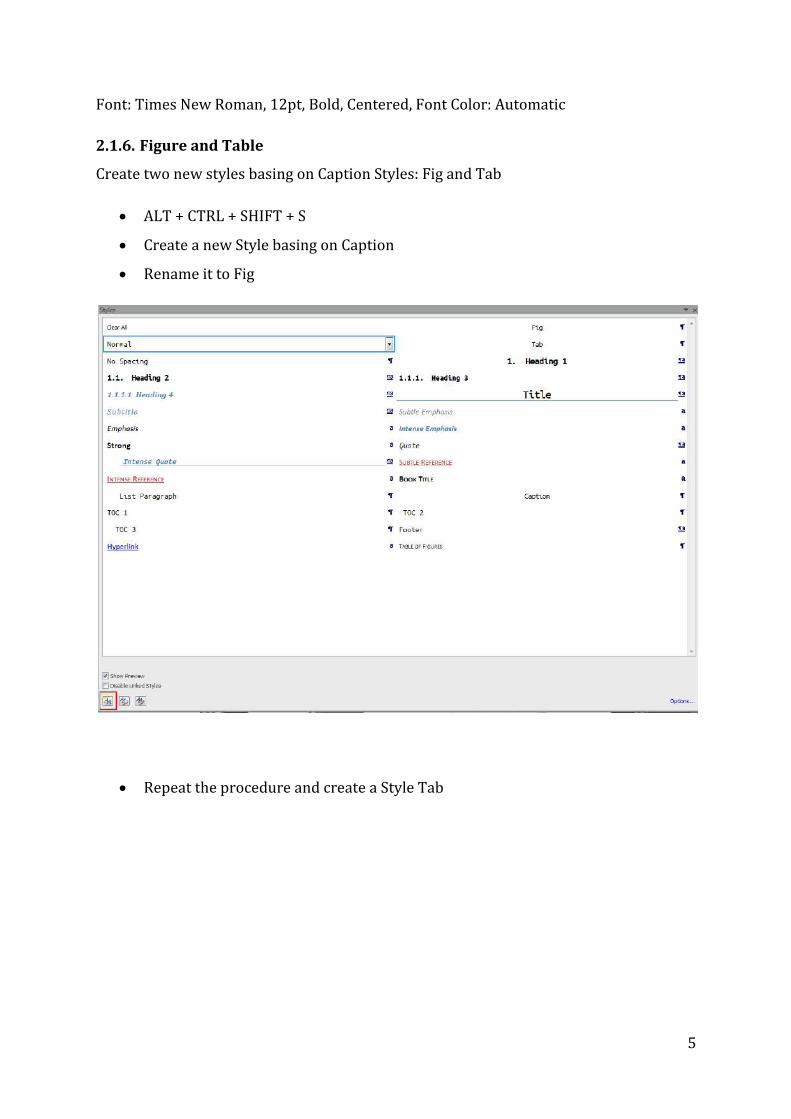
2.1.6. Figure and Table
Create two new styles basing on Caption Styles: Fig and Tab
ALT + CTRL + SHIFT + S
Create a new Style basing on Caption
Rename it to Fig
Repeat the procedure and create a Style Tab

6
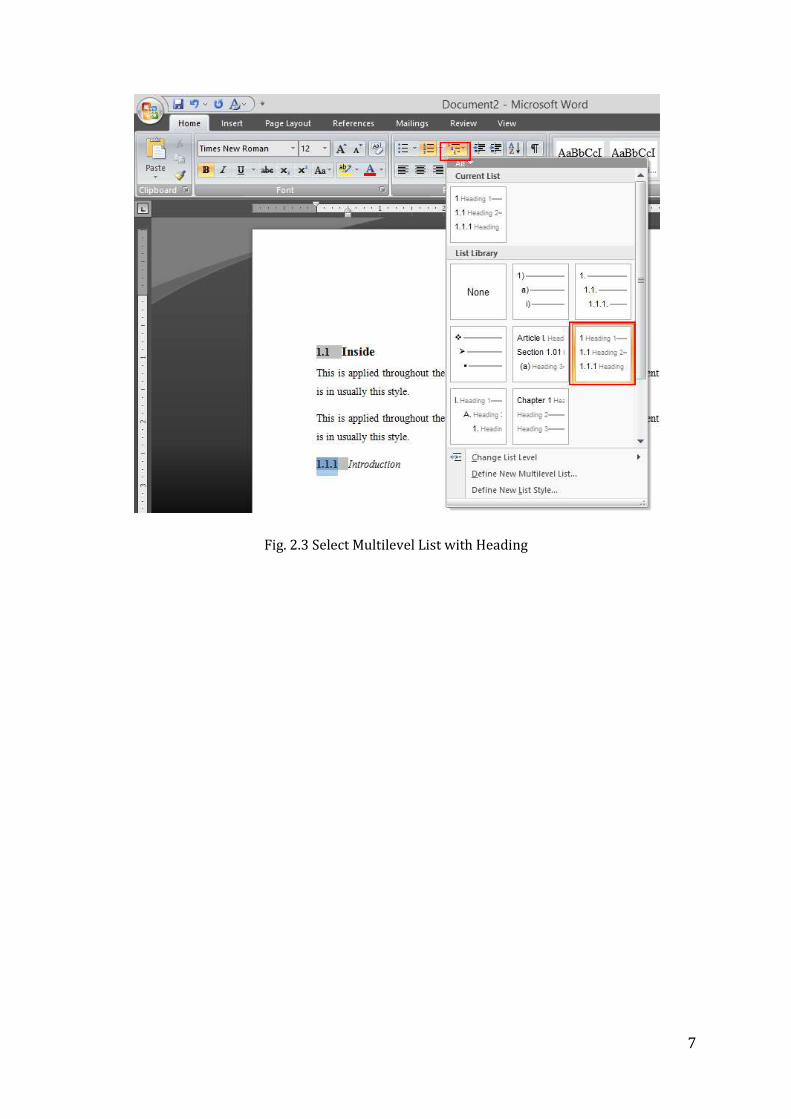
2.2. Heading Numbering
Write a heading (say INTRODUCTION) and in Styles select Heading 1. This changes the
format of INTRODUCTION to match with Heading 1. Now select Multilevel List of
numbering for headings.
2.3. Style for following paragraph: Normal
Always, make Sure that the ‘Style for following paragraph: Normal’ for all the Style
modifications.
7
Fig. 2.3 Select Multilevel List with Heading
8
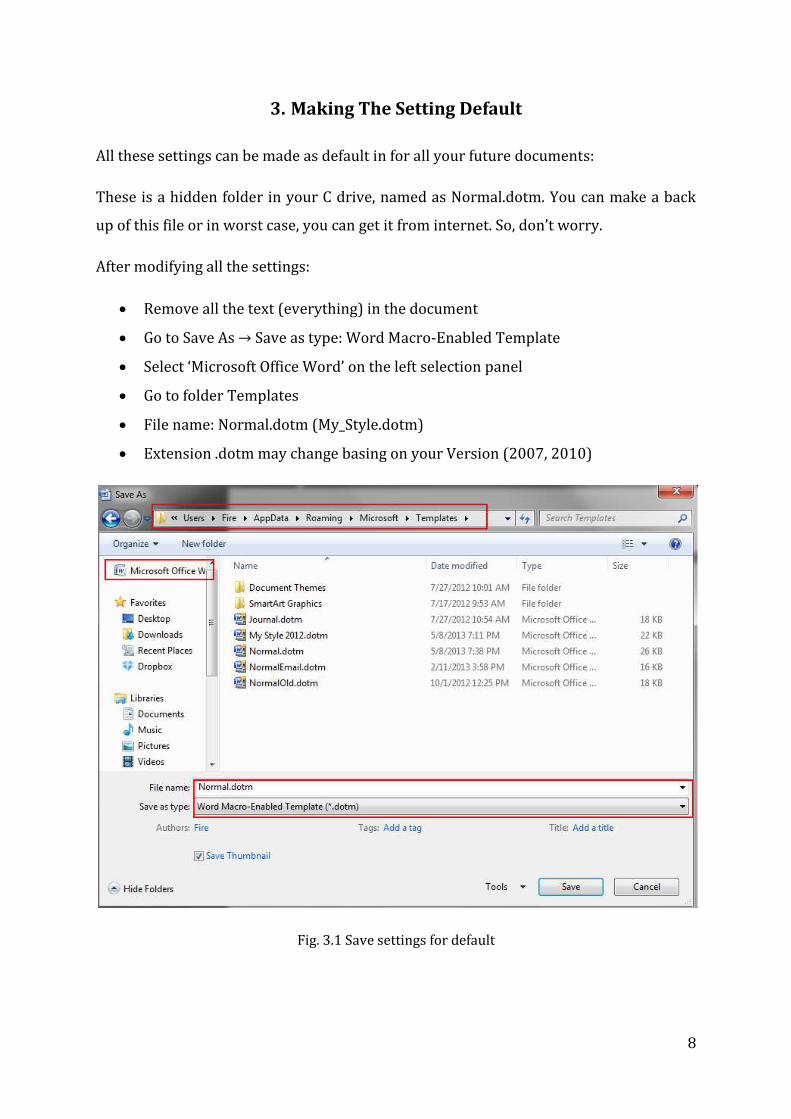
3. Making The Setting Default
All these settings can be made as default in for all your future documents:
These is a hidden folder in your C drive, named as Normal.dotm. You can make a back
up of this file or in worst case, you can get it from internet. So, don’t worry.
After modifying all the settings:
Remove all the text (everything) in the document
Go to Save As → Save as type: Word Macro-Enabled Template
Select ‘Microsoft Office Word’ on the left selection panel
Go to folder Templates
File name: Normal.dotm (My_Style.dotm)
Extension .dotm may change basing on your Version (2007, 2010)
Fig. 3.1 Save settings for default
9
3.1. Creating New Normal File
Close all open Word files
Go to C:\Users\<username>\AppData\Roaming\Microsoft\Templates
o Change <username> to your PC user name
Rename Normal.dotm to Default.dotm
Rename My_Style.dotm to Normal.dotm
Now open a new document, there you have all your settings
10
4. Document Viewer
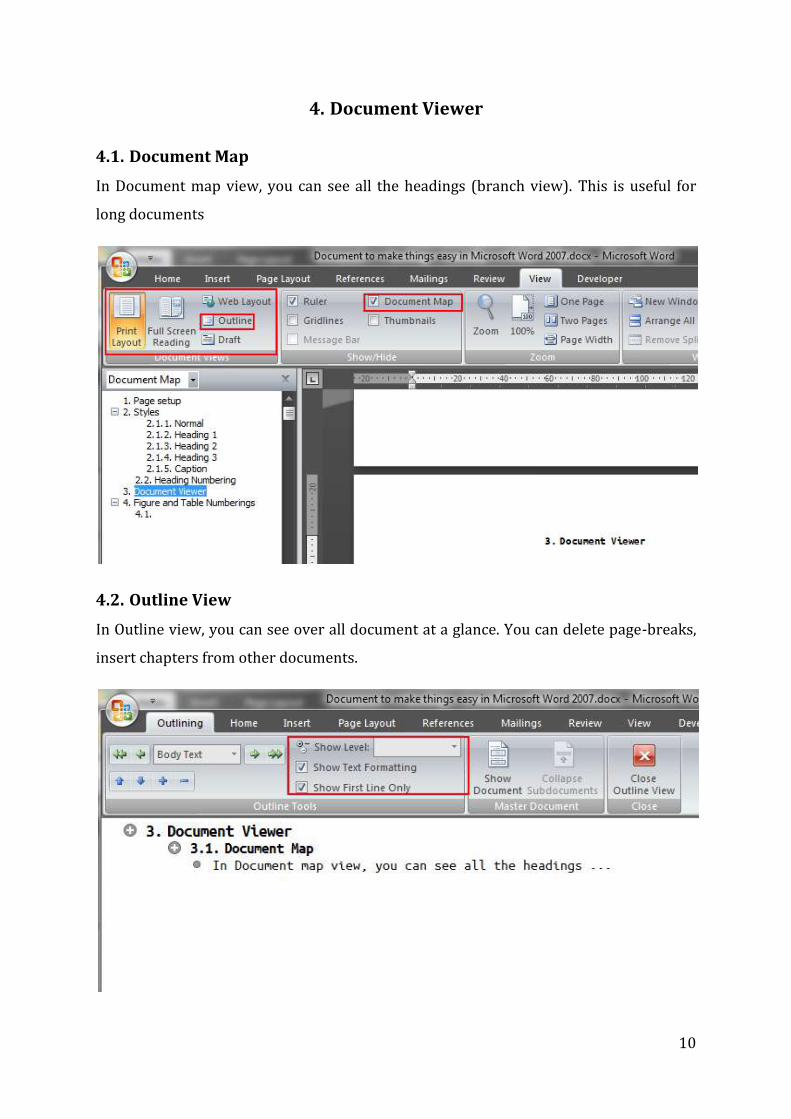
4.1. Document Map
In Document map view, you can see all the headings (branch view). This is useful for
long documents
4.2. Outline View
In Outline view, you can see over all document at a glance. You can delete page-breaks,
insert chapters from other documents.
11
5. Figure and Table Numberings
5.1. Format
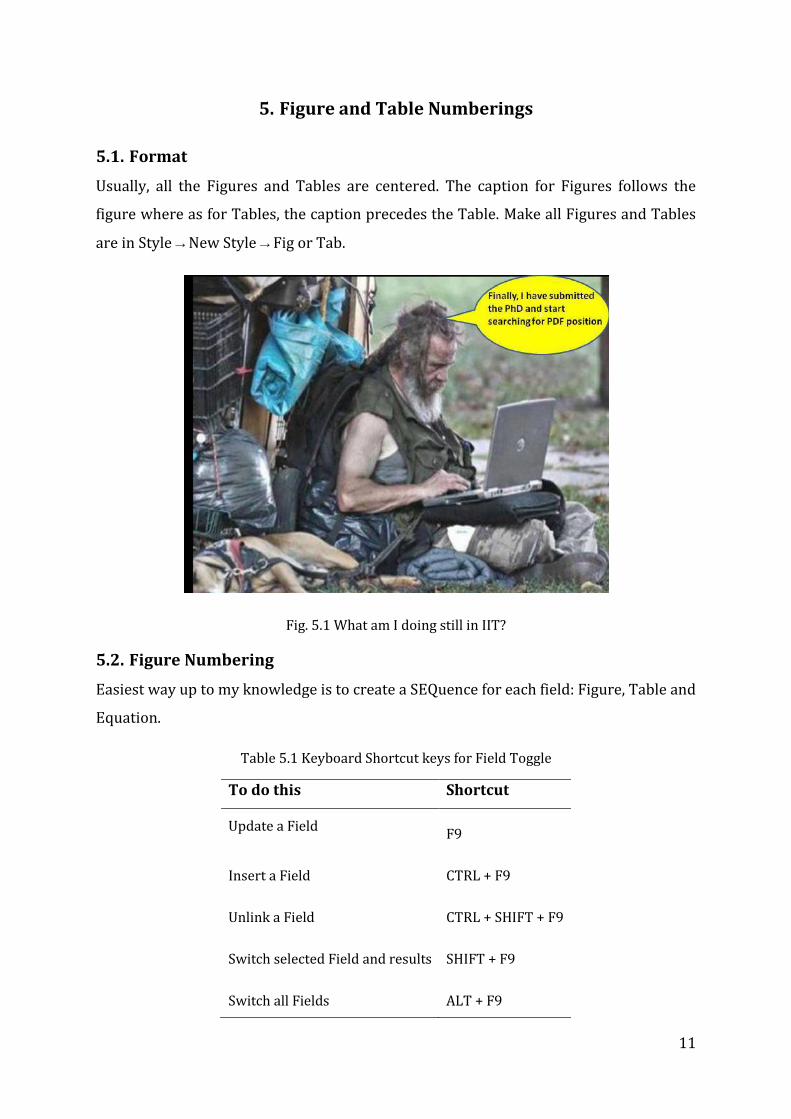
Usually, all the Figures and Tables are centered. The caption for Figures follows the
figure where as for Tables, the caption precedes the Table. Make all Figures and Tables
are in Style → New Style → Fig or Tab.
Fig. 5.1 What am I doing still in IIT?
5.2. Figure Numbering
Easiest way up to my knowledge is to create a SEQuence for each field: Figure, Table and
Equation.
Table 5.1 Keyboard Shortcut keys for Field Toggle
To do this Shortcut
Update a Field F9
Insert a Field CTRL + F9
Unlink a Field CTRL + SHIFT + F9
Switch selected Field and results SHIFT + F9
Switch all Fields ALT + F9
12
Insert a Field {SEQ Fig_FigTab \n}
SEQ is sequence
Fig_FigTab is the Name of the Field, it can be Eq or Tab
o To restart Figure numbering for a new Chapter, change the SEQ name for
each Chapter (Thesis)
\n is to say that the numbering follows the previous number
\r n is to say that the numbering starts from number n
This is how you go:
CTRL + F9
Type in ‘SEQ Fig_ChName \n’
F9
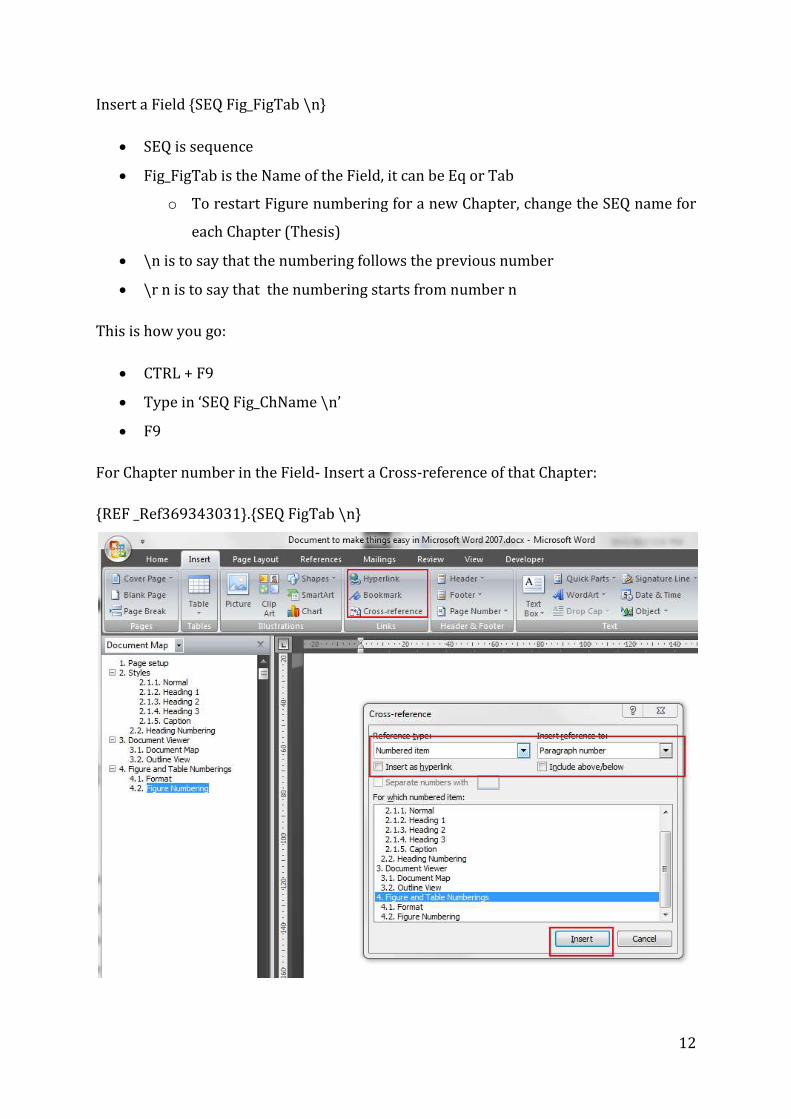
For Chapter number in the Field- Insert a Cross-reference of that Chapter:
{REF _Ref369343031}.{SEQ FigTab \n}
13
5.3. Bookmark for Cross-referring
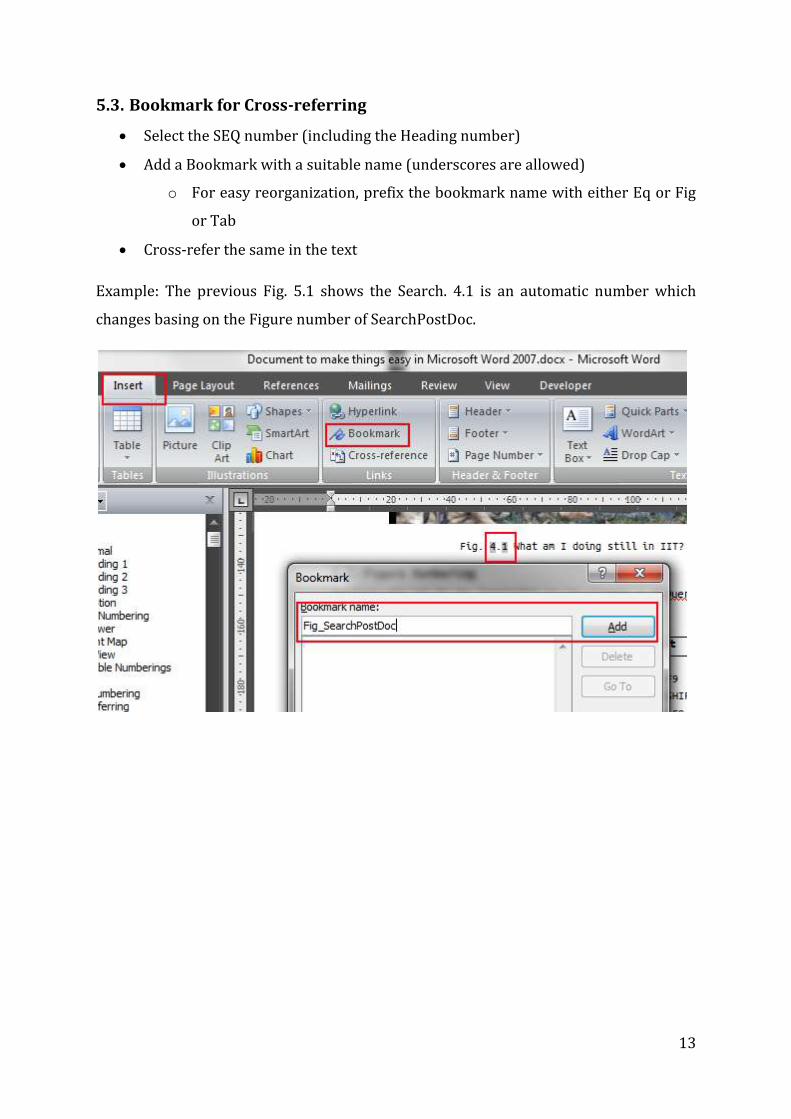
Select the SEQ number (including the Heading number)
Add a Bookmark with a suitable name (underscores are allowed)
o For easy reorganization, prefix the bookmark name with either Eq or Fig
or Tab
Cross-refer the same in the text
Example: The previous Fig. 5.1 shows the Search. 4.1 is an automatic number which
changes basing on the Figure number of SearchPostDoc.
14
6. Equations
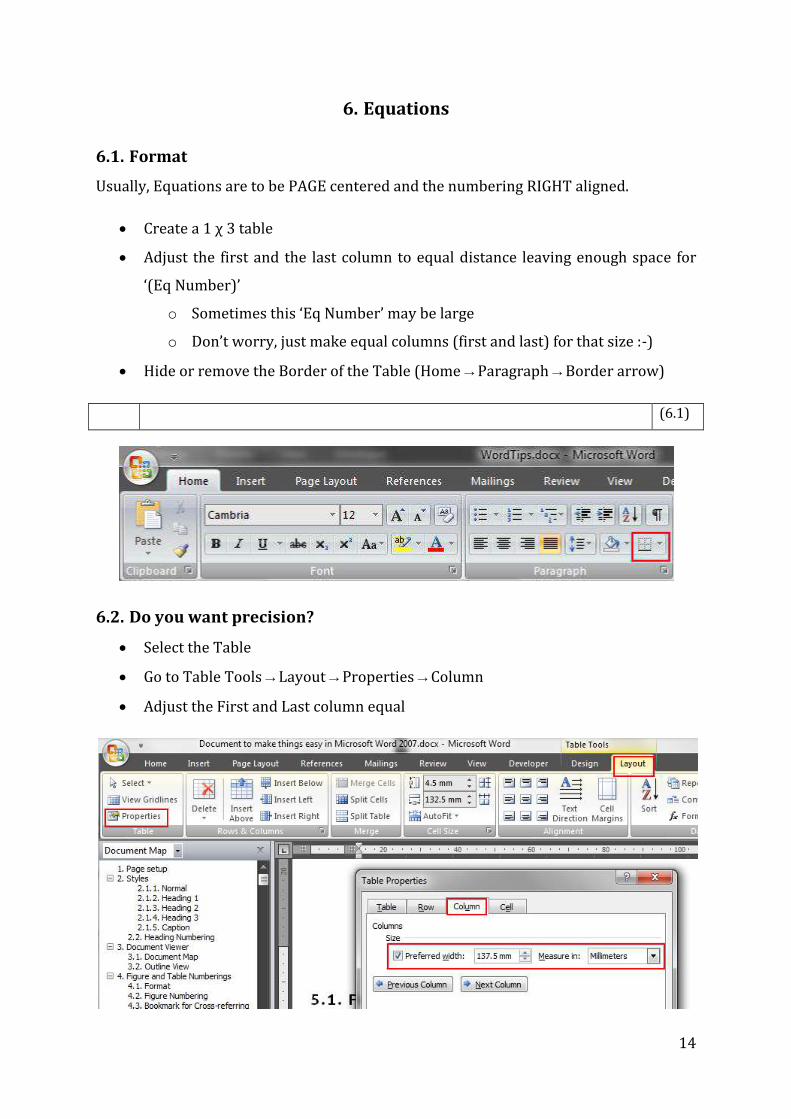
6.1. Format
Usually, Equations are to be PAGE centered and the numbering RIGHT aligned.
Create a 1 χ 3 table
Adjust the first and the last column to equal distance leaving enough space for
‘(Eq Number)’
o Sometimes this ‘Eq Number’ may be large
o Don’t worry, just make equal columns (first and last) for that size :-)
Hide or remove the Border of the Table (Home → Paragraph → Border arrow)
(6.1)
6.2. Do you want precision?
Select the Table
Go to Table Tools → Layout → Properties → Column
Adjust the First and Last column equal

15
6.3. Equation number
Follow the procedure explained in Section 5.2 and 5.3. Don’t forget to add Brackets
before and after the Equation number.
6.4. Inserting Equations and Shortcuts
Add space after each shortcut to get the result
Table 6.1 Keyboard Shortcut keys for Equations
To do this Shortcut
Insert Equation ALT + =
x^n space
X^(1+n) space
\alpha space
\int ^2_10 space
First type () space
Then (x+7)/(1/2-7y^3) space
Want to know Google it. One such example
http://www.physicsforums.com/showthread.php?t=474856
6.5. Example
Sample example for inserting Equation:
ALT + =
x^n
space;
If you are inserting a text in the Equation, then make sure that you the text is no
italic

16
6.6. LaTex Guys
Do you know LaTex Equation – Be smart... Use them directly, Mostly you are there.
Confused, use the graphical interface.
17
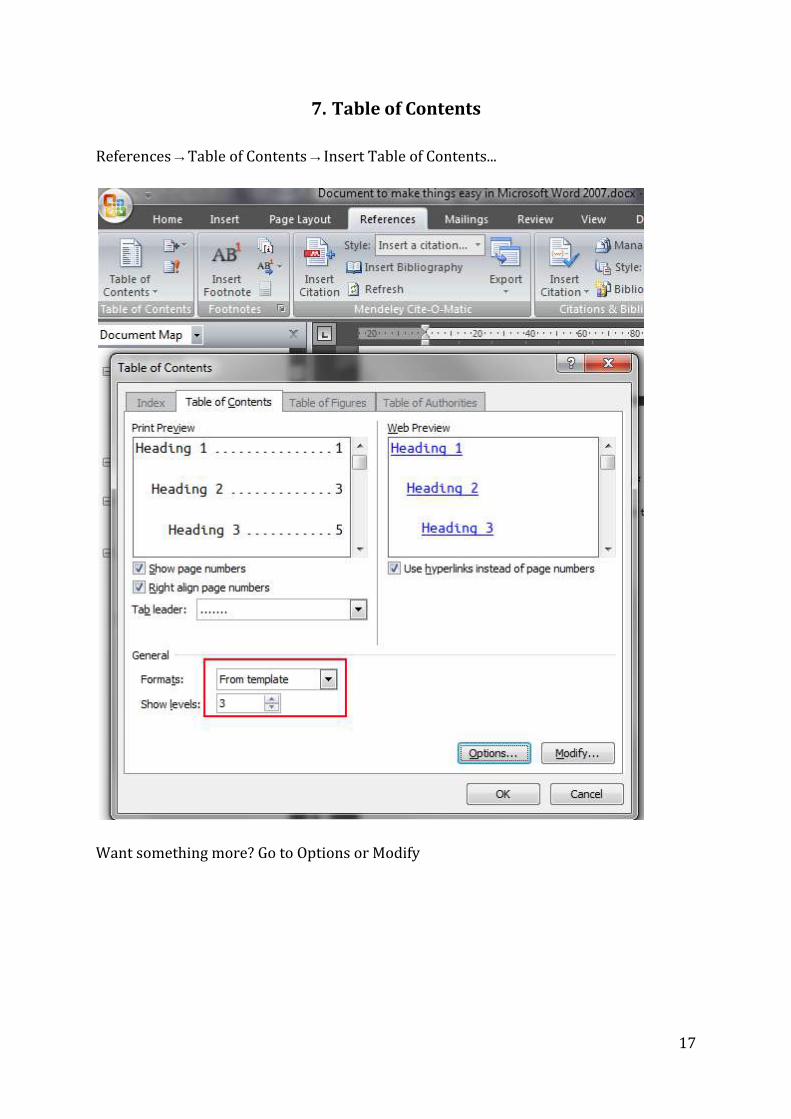
7. Table of Contents
References → Table of Contents → Insert Table of Contents...
Want something more? Go to Options or Modify
18
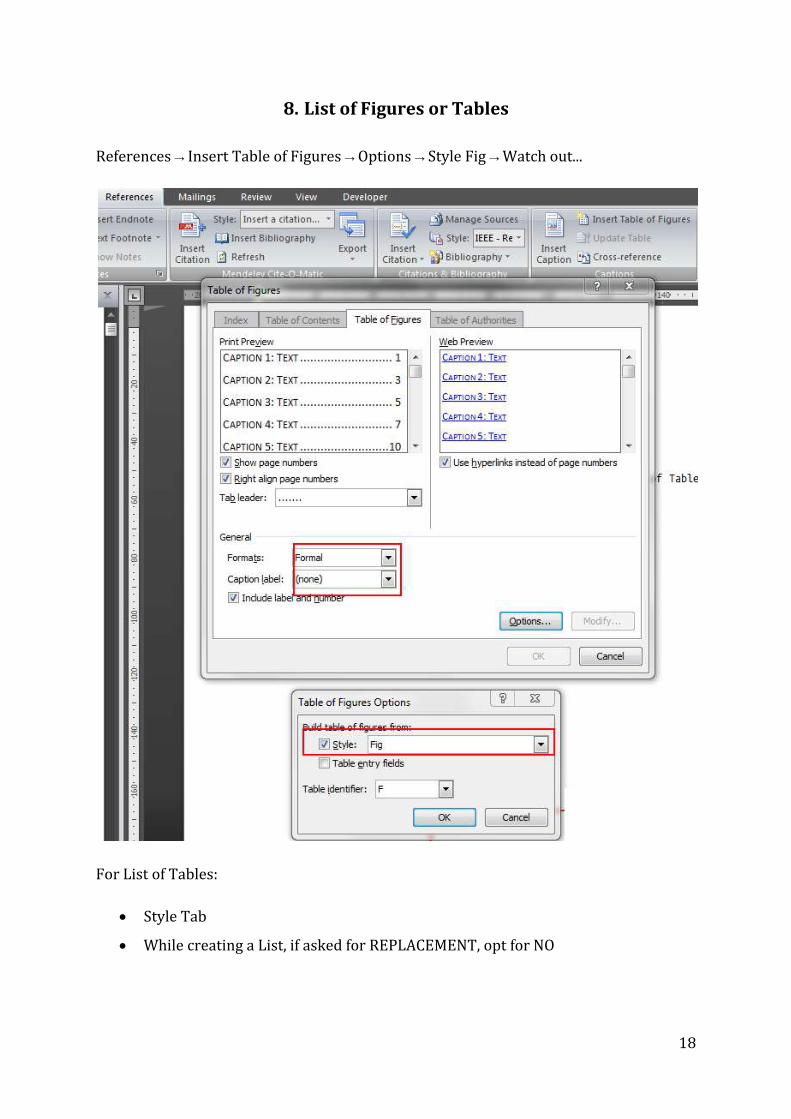
8. List of Figures or Tables
References → Insert Table of Figures → Options → Style Fig → Watch out...
For List of Tables:
Style Tab
While creating a List, if asked for REPLACEMENT, opt for NO
19
8.1. Updating the Tables
Select all (CTRL + A) then press F9 key
Update only Page Numbers only or the Entire Table
Right click on the List of Contents → Update Fields
To remove the number for the Heading ‘List of Contents’ Delete it
20
9. References or Citations
9.1. Reference Manager
Download Mendeley
http://www.mendeley.com/download-mendeley-desktop/
There are several out there. This one can take the LaTex Bibliography .bib.
Get your references properly (Refer http://www.mendeley.com/features/add-and-
organize/)
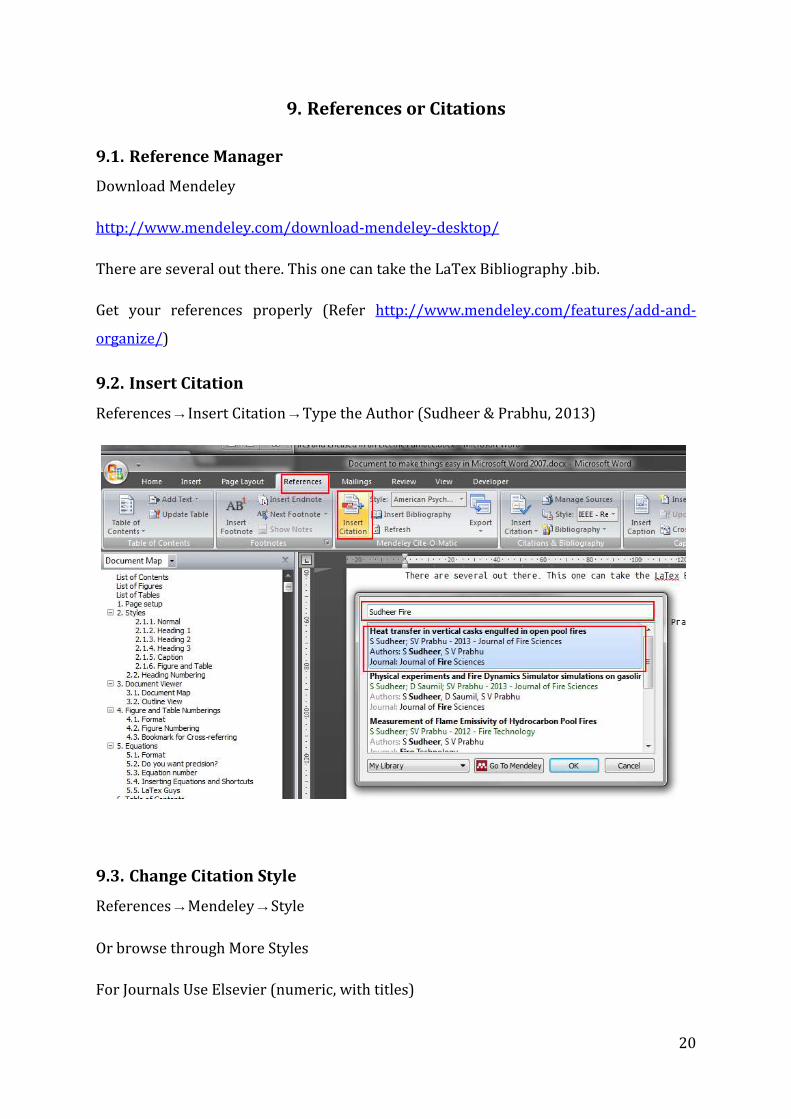
9.2. Insert Citation
References → Insert Citation → Type the Author (Sudheer & Prabhu, 2013)
9.3. Change Citation Style
References → Mendeley → Style
Or browse through More Styles
For Journals Use Elsevier (numeric, with titles)

21
9.4. Insert Bibliography
References → Insert Bibliography
Sudheer, S., & Prabhu, S. V. (2013). Heat transfer in vertical casks engulfed in open pool fires. Journal of Fire Sciences.

22
10. Page Breaks and Page Numbering
10.1. Page Breaks
A Page Break makes a Section Break. To change the page numbering from a page. Insert
Page Break. Single Page Break makes two Sections.
Page Layout → Breaks → New page
For Two-Sided Printout, before each chapter
Page Layout → Breaks → Odd page
This would make the all the new Chapters begin on Right side
10.1.1. View Page Breaks
View → Outline
10.1.2. Delete a Page Break
In Outline View Delete the Section Break
10.2. Page Numbering
Click on the Footer → Add a Page Number at the bottom
23
Link with Previous – Number follows the previous Section
Different First Page – First page of Section
Removing the numbering on a page but counting it
Different Even & Odd Pages – This can be used to change position
This can also be used to change the Headings
24
11. Save as PDF
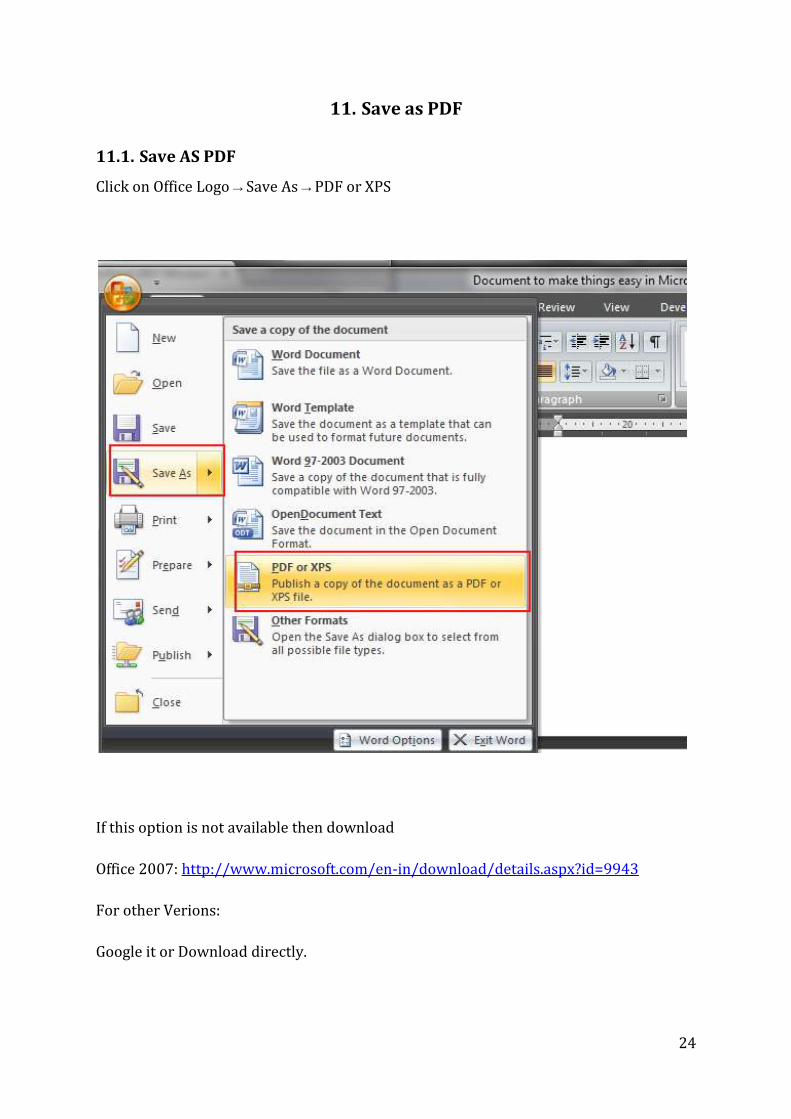
11.1. Save AS PDF
Click on Office Logo → Save As → PDF or XPS
If this option is not available then download
Office 2007: http://www.microsoft.com/en-in/download/details.aspx?id=9943
For other Verions:
Google it or Download directly.
25
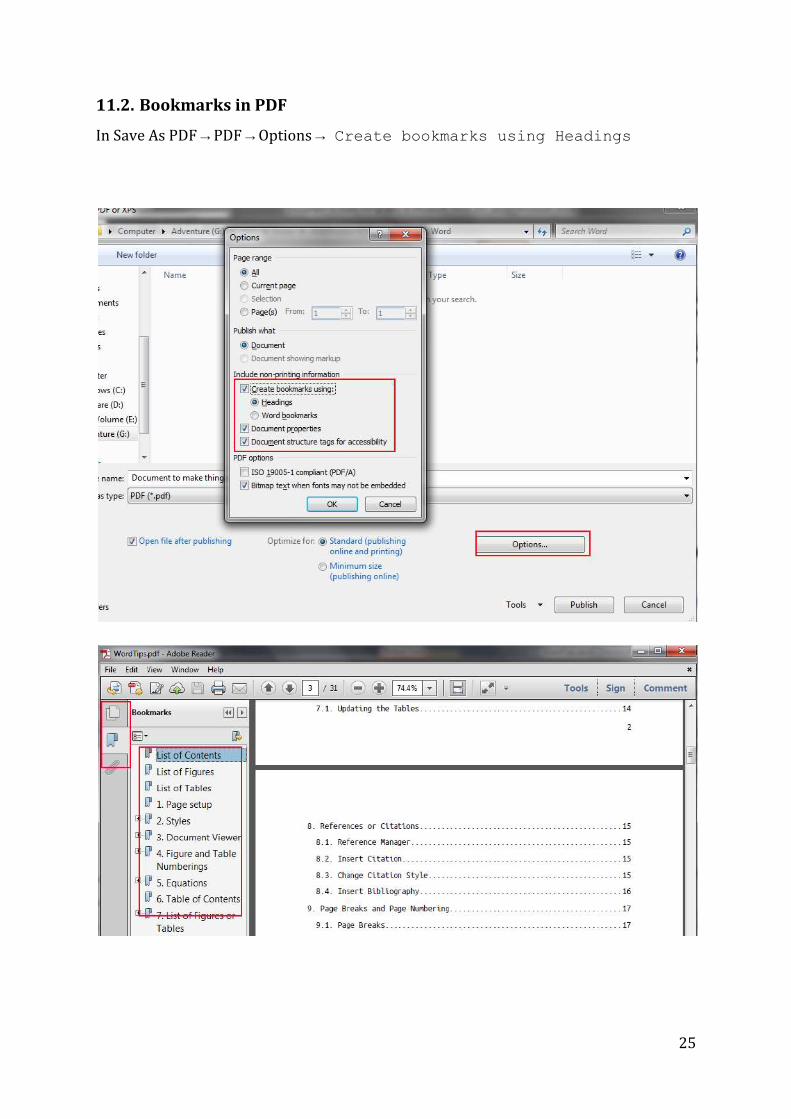
11.2. Bookmarks in PDF
In Save As PDF → PDF → Options → Create bookmarks using Headings
26
12. Pagination: Widow and Orphan
Usually, a Thesis or a Report is not supposed to have any Widow or Orphan in the whole
content. By default, MS Word does a good job. Don’t get annoyed when MS Word doesn’t
allow you to leave a single of a paragraph on a page but either pushes two lines to next
page or leaves it intact in the previous page. That’s how a report should be. But, if you
insist then know that this can be controlled.
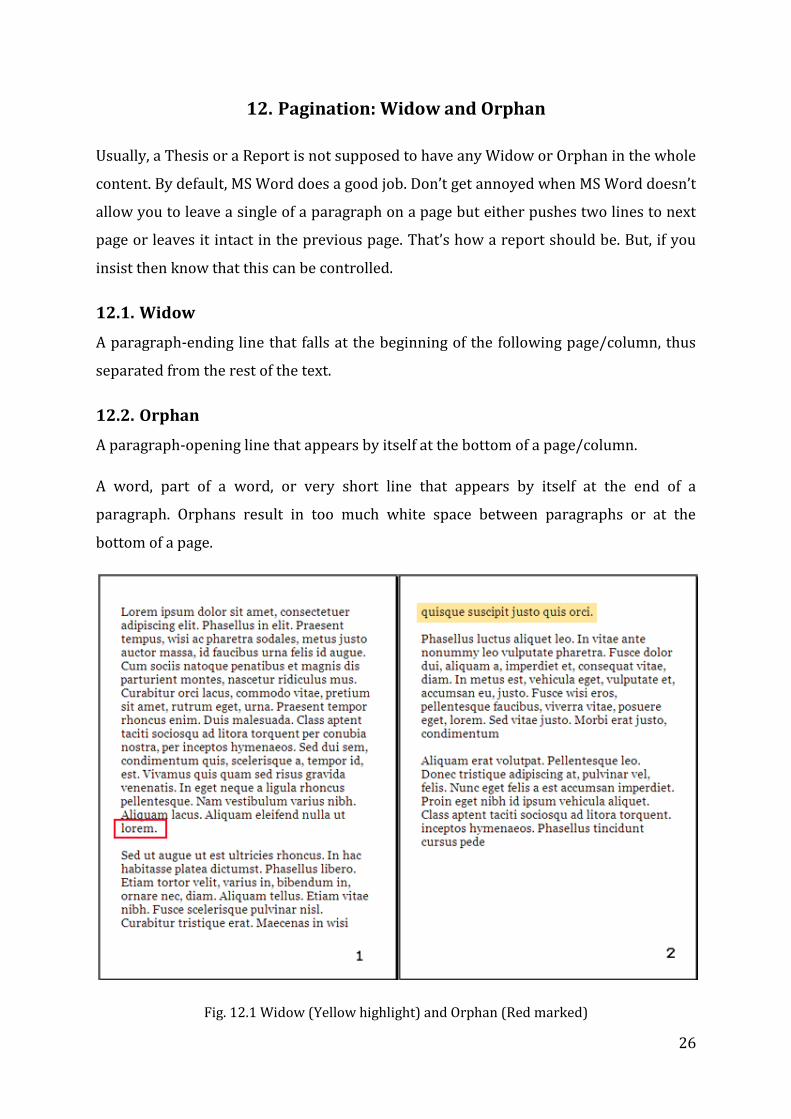
12.1. Widow
A paragraph-ending line that falls at the beginning of the following page/column, thus
separated from the rest of the text.
12.2. Orphan
A paragraph-opening line that appears by itself at the bottom of a page/column.
A word, part of a word, or very short line that appears by itself at the end of a
paragraph. Orphans result in too much white space between paragraphs or at the
bottom of a page.
Fig. 12.1 Widow (Yellow highlight) and Orphan (Red marked)
27
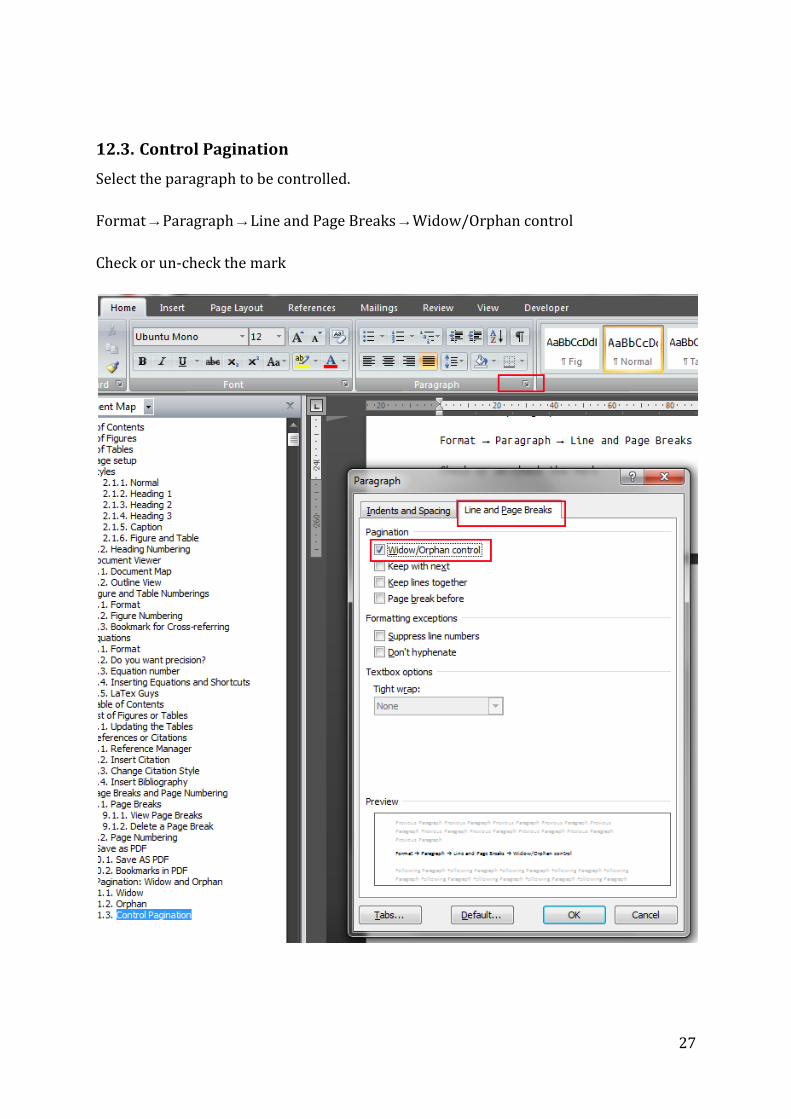
12.3. Control Pagination
Select the paragraph to be controlled.
Format → Paragraph → Line and Page Breaks → Widow/Orphan control
Check or un-check the mark

28
13. Move, Delete and Insert Chapters
13.1. Move or Delete a Heading (Reorganize your document)
Go to View → Outline View → Show level → Choose the appropriate level
click on plus symbol
Use up or down arrows to move (All the numbers would be taken care)
Delete to delete a Heading (Section)
CTRL + A then F9 would refresh all the automatic values
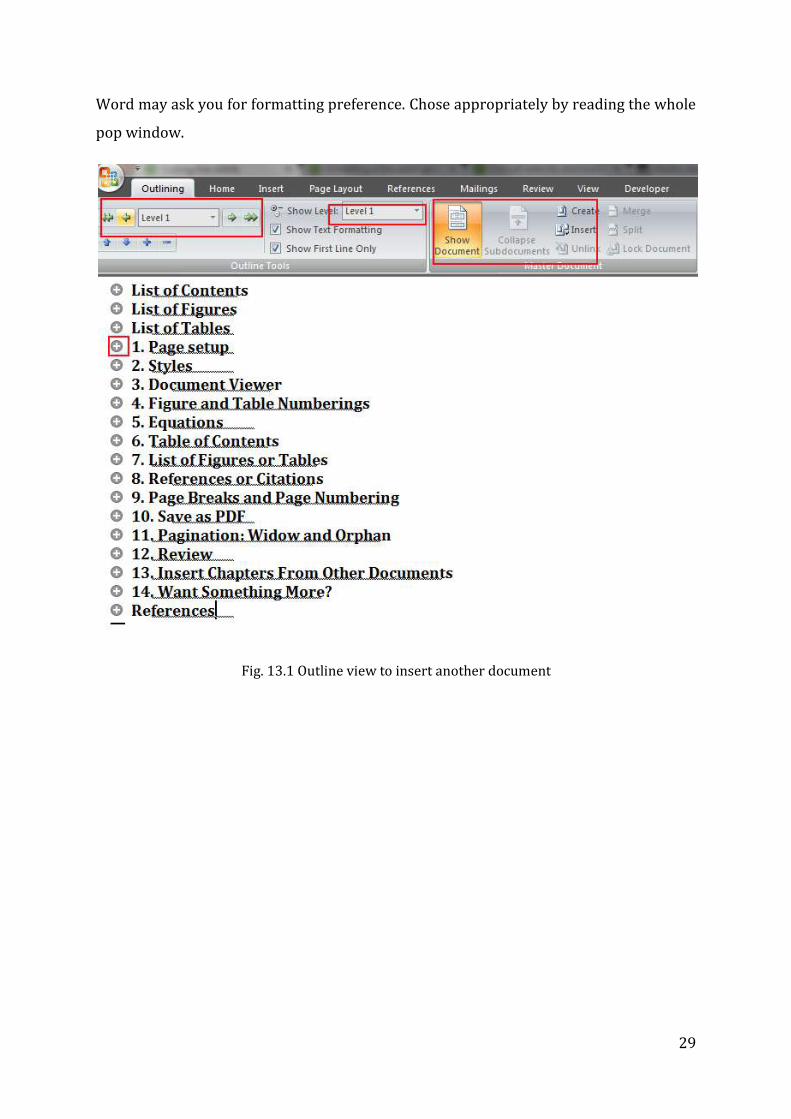
13.2. Insert a Chapter or Heading
To insert a chapter that was written separately into a Master document:
In View → Outline View → Show document
This would open for you new options: Insert would take you to insert a document.
29
Word may ask you for formatting preference. Chose appropriately by reading the whole
pop window.
Fig. 13.1 Outline view to insert another document

30
14. Review
Have you ever asked someone to correct your report? You might have received reply
with a corrected version from two or three persons. Now the problem is to see all the
corrections to judge by yourself and incorporate the correct ones!
Here you go...
Track all those corrections, judge and incorporate in the final version. Don’t get panic,
Word won’t mess up with your original files.
31
15. Some Hidden Secrets
15.1. Non-Breaking Space
Keyboard Short: CTRL + SHIFT + SPACE
Engineers: It’s a good idea to have units next to the number but not on next line. Ex. 1
cm. Use a non-breaking space between 1 and cm. That would make 1<space>cm always,
either in the previous line or in the next line.
Sometimes, we see a author name and the number are separated, as we see like Planck
[7]. Add a non-breaking space after Plank.
15.2. Non-Breaking Hyphenation
Keyboard Shorcut: CTRL + SHIFT + -
15.3. Character Codes
Don’t use superscript ‘o’ for a degree symbol. Instead, insert a degree symbol from
Insert → Symbol → Degree Symbol.
Don’t use ‘x’ for or ‘X’ for multiplication symbol, Instead, insert a multiplication symbol
from Insert → Symbol → Multiplication Symbol
15.4. Keyboard Shortcuts
In order to ALT Codes, press and hold the ALT and then type the number in numeric
keypad (right side numbers of keyboard) then release the ALT. ALT shortcuts work not
just in MS Word but almost everywhere (now, you know how to add symbols on GTalk
or on FB)
Degree: ALT + 0176
Multiplication: ALT + 0215
15.5. Easy Approach in Word
Type \times then space and \degree space.
32
15.6. Automatic Correction
Sometimes, you don’t want word to auto-correct the word that you write: like
capitalization in the beginning of sentence or you want to type \degree but word
corrects it to ° Symbol.
Wherever there is an auto-correction, use CTRL + Z to Undo the auto-correction. That
means \degree would become ° immediately after you type space. Now hit CTRL + Z
then you get \degree back without auto-correction.
15.7. Want Something More?
Google it. Use Google lavishly www.google.com
33
Contact
S Sudheer
† Born twice to die only once †
Email: [email protected]
fb: https://www.facebook.com/haissudheer (Sudheer IIT)
Web: http://www.sudheer.droppages.com


![IIT-JEE 2013 PAPER-II WITH SOLUTION [CODE - 3 ] · IIT-JEE 2013 PAPER-II WITH SOLUTION [CODE - 3 ] ... nzO; eku m dh Åt kZ l nSo fLFkj jgrh gSA Sol. B Åt kZ l j{k.k l s GMm GMm](https://img.pdfslide.us/doc/110x75/5ae599a67f8b9aee078bc02a/iit-jee-2013-paper-ii-with-solution-code-3-2013-paper-ii-with-solution-code.jpg)