Embed Size (px)
Citation preview

Tips for Translucents
Sign makers guide to creating new profitswith 3M translucent products and technologies
Table of Contents Page
Expanding your capabilities . . . . . . . . . . . . . . . . . . . . . . . . . . . . . . . . . . . . . . . . . . . . . . 3
Basic Techniques
1. White background with color image, or white image on color background . . . . . 4
2. Color background with color image . . . . . . . . . . . . . . . . . . . . . . . . . . . . . . . . . . . 6
3. Acid-etched or sandblasted effects on glass . . . . . . . . . . . . . . . . . . . . . . . . . . . . . 8
Advanced Techniques
4. Multiple color effect with one color film . . . . . . . . . . . . . . . . . . . . . . . . . . . . . . .10
5. White background with multiple color image . . . . . . . . . . . . . . . . . . . . . . . . . . . .12
6. Color background with multiple color image . . . . . . . . . . . . . . . . . . . . . . . . . . . .14
Special Effects
7. White background by day; black background by night . . . . . . . . . . . . . . . . . . . .16
7a. White background by day; neon effect by night . . . . . . . . . . . . . . . . . . . . . . . . . .17
8. Color background by day; black background by night . . . . . . . . . . . . . . . . . . . . .18
9. Message hidden until illuminated . . . . . . . . . . . . . . . . . . . . . . . . . . . . . . . . . . . . .20
10. Dark by day, white or color by night . . . . . . . . . . . . . . . . . . . . . . . . . . . . . . . . . .22
11. Color by day, white by night . . . . . . . . . . . . . . . . . . . . . . . . . . . . . . . . . . . . . . . .24
12. Reflective signs . . . . . . . . . . . . . . . . . . . . . . . . . . . . . . . . . . . . . . . . . . . . . . . . . . .26
13. White halo background with color image . . . . . . . . . . . . . . . . . . . . . . . . . . . . . . .27
14. Color by day; Different color by night . . . . . . . . . . . . . . . . . . . . . . . . . . . . . . . . .28
15. Color image by day; Different color image by night . . . . . . . . . . . . . . . . . . . . . .29
16. One graphic by day; Different graphic by night . . . . . . . . . . . . . . . . . . . . . . . . . .30
Tips for productivity . . . . . . . . . . . . . . . . . . . . . . . . . . . . . . . . . . . . . . . . . . . . . . . . . . . .31
© 3M 2000No part of this manual may be reproduced or transmitted in any form or by anymeans, electronic or mechanical, including photocopying and recording, for anypurpose without the express written permission of 3M Company.
2
3
Expanding your capabilities and business with just a little more IMAGEination
This book is about adding new customers and adding newbusiness from existing customers. It’s about expanding yourcapabilities without adding equipment or cost. On the bottomline, it’s about increasing your profits through just a littlemore IMAGEination.
IMAGEination is the combination of 3M CommercialGraphics Division technology and your sign making imagination and skills.
3M™ Scotchcal™ Translucent Films and 3M™ Panaflex™
Awning and Sign Facing are probably familiar examples toyou of the many 3M technologies. You may already be taking advantage of the following features:
• Vast color selection to meet customer requirements.
• Consistent, bright colors.
• Uniform appearance.
• Durability for continued customer satisfaction.
• Fast, easy cutting and weeding for productivity.
• Worldwide availability.
And when you use 3M Commercial Graphics technology,
you get the 3M™ MCS™ Warranty.
MCS Warranty
Finished 3M™ MCS™ Graphics and Scotchprint® Graphicsmanufactured with all 3M matched components — graphicfilms, inks, toners and flexible sign facings are backed by theMCS warranty — your assurance that all components havebeen designed, developed,tested and manufactured for compatibility, performance,and your peace of mind.
Based on that, it should be nosurprise that 3M can offer aunique warranty on combinations of 3M productswhen properly appliedaccording to 3M installationinstructions.
From the moment your graphics are applied, they are warranted against color fading, loss of adhesion, andshrinkage for the time specified in the 3M Product Bulletins.Other important provisions are stated in the Worldwide 3M™
MCS™ Warranty Packet.
In the unlikely event, that you do have a problem whileunder the standard warranty, 3M will replace any faulty 3M film or material, according to the Warranty of ProductsBulletin.
Techniques...
in this book are intended to stimulate your imagination into developing new and more dramatic ways of using 3Mtechnology. The information can help you create and offerthe kind of innovative signs, awnings and fascias that attractprospects and help customers look their best. IMAGEinationis a foundation for going beyond being an ordinary sign shop.
On the following pages you’ll find basic, advanced and special effect techniques. Each technique is divided into first and second surface applications.
First surface applications...
are generally used when a customer wants a matte finish.The image and background color (if used) are applied to the front side of a flexible or rigid substrate. The substrateis usually diffuse white. Images are cut to be right reading.
Second surface applications...
are generally used for a glossy finish or for additional protection of the graphics. The image and background color (if used) are applied to the back side of a clear, rigidsubstrate. Images are cut to be reverse reading.
In the graphics throughoutthis guide, a solid line indi-cates a full sheet. A dottedline means a partial sheet.
Full support
Whatever your sign, awning or fascia requirement, large orsmall, local, national or international, the 3M CommercialGraphics Division has the systems, technology and expertiseto meet your requirements.
Support is always available from your 3M CommercialGraphics Division sales representative, or through theTechnical Service Hotline: 1-800-328-3908.
In Canada, call 1-800-265-1840.
partial sheetfull sheet
NOTE: When using polycarbonate as a substrate,remember that polycarbonate absorbs moisture and willoutgas, so it must be dried according to manufacturerinstructions before film application. Film over undriedpolycarbonate will trap moisture from outgasing andform bubbles. Increasing the layers of film increases thepotential for bubbles.

White background with color image, or white image on color background
White background: day
White background
Color background
White background: night
FIR
ST RUN
V I D E O
FIR
ST RUNV I D E O
Color background: day Color background: night
The bread and butter technique of the sign shop is a single color image on a white background, or a white imagereversed out of a single color background.
Both are a simple letter cutting and film application tech-nique that can be done either by hand or on an electronicfilm cutter.
1. Cut, weed and prespace translucent film image (C).
2. Prep substrate (B).
3. Apply translucent film graphics (C) to front of substrate (B).
4. Apply diffuser film (A) to back of substrate (B) if using clear substrate.
5. Apply GPS film (D) over translucent film (C) if you need maximum graphic protection.
BASICTECHNIQUE 1
Diffuser film (A).
Translucentfilm (C).
Substrate (B).
GPS film (D).
FIR
ST RUN
V I D E O
Diffuser film (A).
Translucentfilm (C).
Substrate (B).
GPS film (D).
First Surface Assembly
4

Materials and tools for basic technique 1
Materials:
(A) Diffuser film (3M™ Diffuser Film 3635-30 or 3635-70 – see Product Bulletin 3635).
(B) Substrate (3M™ Panaflex™ Awning and Sign Facing 945 GPS, 3M™ Panaflex™ Enhanced Image Sign Facing 645EI, or rigid plastic* – see Product Bulletins 945 or 645).
(C) Translucent film (3M™ Scotchcal™ Transcluent Film Series 230, 3630 or 3631 – see Product Bulletins 230, 3630 or 3631).
(D) Optional GPS film (3M™ Scotchcal™
Transparent Film 3642 – see Product Bulletin 3642).
Tools and supplies:
1. 3M™ Applicator PA-1.
2. Detergent and water solution.
3. Razor knife/cutter.
4. Ruler.
5. Cleaners (DuPont Prep-Sol™, isopropyl alco-hol). Refer to solvent container label and the manufacturer’s Material Safety Data Sheet for health, safety and handling information.
6. Lint-free wipes.
7. 3M™ Masking Tape 232.
8. 3M™ Prespace Tape SCPS-2.
9. 3M™ Premask Tape SCPM-3.
Instruction bulletins:
Using 3M application tapes; premasking and prespacing of films and sheetings, Bulletin 4.3
Application, substrate selection, preparation and substrate-specific application techniques, Bulletin 5.1
Application of translucent pressure sensitive and changeable films to flat rigid plastic signs, Bulletin 5.7
Application of translucent film to Panaflex awning and sign facing 945 GPS, Bulletin 5.9
Applying GPS film to 3M™ Scotchcal™ Transparent Film 3640 GPS and 3642 GPS, Bulletin 5.10
Graphic application and attachment; 3M™ Panaflex™
Enhanced Image Sign Facing 645EI, Bulletin 5.21
White background
1. Reverse cut, weed and prespace film image (C).
2. Prep clear substrate (B).
3. Apply translucent film graphics (C) to back of clear substrate (B).
4. Apply diffuser film (A) to back of film (C).
Diffuser film (A).
Translucentfilm (C).
Clear substrate (B).
Color background
FIR
STRUN
VIDEO
Diffuser film (A).
Translucentfilm (C).
Clearsubstrate (B).
Second Surface Assembly
5
* See polycarbonate note on page 3.

Color backgroundwith color image
Day Night A color background with color image is more complex thanbasic technique 1, but you can still easily add it to your signshop capabilities.
Since the role of color is increased in technique 2, importantconsiderations for your customers include contrast, eyeappeal, legibility and lay-out.
1. Cut and weed translucent film background color (D).
2. Cut, weed and prespace translucent film image (C).
3. Assemble film image (D) to background color (C) using common premask.
4. Prep substrate (B) and apply assembly (D/C) to front of substrate.
5. Apply diffuser film (A) to back of substrate (B) if clear substrate is used.
6. Apply GPS film (E) over translucent film (D/C) if you need maximum graphic protection.
BASICTECHNIQUE 2
Diffuser film (A).
Translucentfilm (D).
Translucentfilm (C).
Substrate (B).
GPS film (E).
First Surface Assembly
6
TIP: Always assemble dark colors over light colors when possible.

1. Reverse cut and weed translucent film background color (D).
2. Reverse cut, weed and prespace translucent film image (C).
3. Assemble film image (C) to background color (D) using common premask.
4. Prep clear substrate (B) and apply assembly (C/D) to back of substrate.
5. Apply diffuser film (A) to back of assembly (C/D).
Diffuser film (A).
Translucentfilm (C).
Clearsubstrate (B).
Translucentfilm (D).
Second Surface Assembly
7
Materials and tools for basic technique 2
Materials:
(A) Diffuser film (3M™ Diffuser Film 3635-30 or 3635-70 – see Product Bulletin 3635).
(B) Substrate (3M™ Panaflex™ Awning and Sign Facing 945 GPS, 3M™ Panaflex™ Enhanced Image Sign Facing 645EI, or rigid plastic* – see Product Bulletins 945 or 645).
(C/D) Translucent film (3M™ Scotchcal™ Translucent Film Series 230, 3630 or 3631 – see Product Bulletins 230, 3630 or 3631).
(E) Optional GPS film (3M™ Scotchcal™
Transparent Film 3640 – see Product Bulletin 3640).
Tools and supplies:
1. 3M™ Applicator PA-1.
2. Detergent and water solution.
3. Razor knife/cutter.
4. Ruler.
5. Cleaners (DuPont Prep-Sol™, isopropyl alco-hol). Refer to solvent container label and the manufacturer’s Material Safety Data Sheet for health, safety and handling information.
6. Lint-free wipes.
7. 3M™ Masking Tape 232.
8. 3M™ Prespace Tape SCPS-2.
9. 3M™ Premask Tape SCPM-3.
Instruction bulletins:
Using 3M application tapes; premasking and prespacing of films and sheetings, Bulletin 4.3
Application, substrate selection, preparation and substrate-specific application techniques, Bulletin 5.1
Application of translucent pressure sensitive and changeable films to flat rigid plastic signs, Bulletin 5.7
Application of translucent film to Panaflex awning and sign facing 945 GPS, Bulletin 5.9
Applying GPS film to 3M™ Scotchcal™ Transparent Film 3640 GPS and 3642 GPS, Bulletin 5.10
Graphic application and attachment; 3M™ Panaflex™
Enhanced Image Sign Facing 645EI, Bulletin 5.21
* See polycarbonate note on page 3.
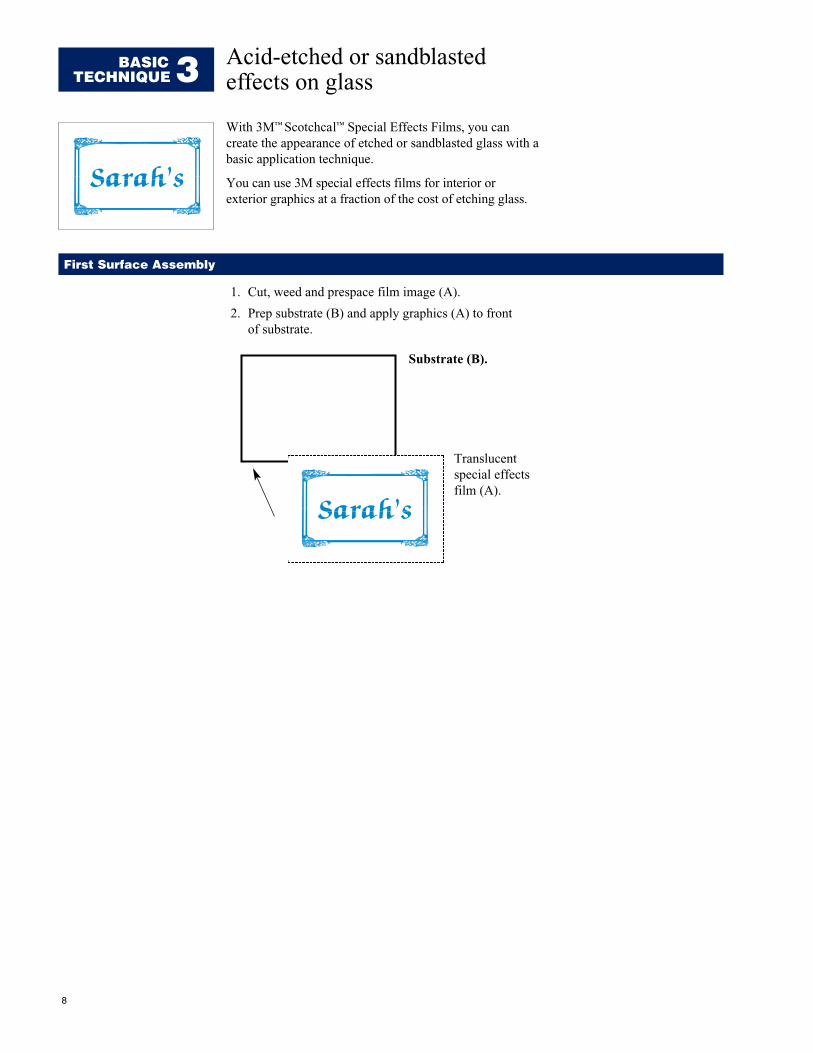
Acid-etched or sandblastedeffects on glass
With 3M™ Scotchcal™ Special Effects Films, you can create the appearance of etched or sandblasted glass with abasic application technique.
You can use 3M special effects films for interior or exterior graphics at a fraction of the cost of etching glass.
1. Cut, weed and prespace film image (A).
2. Prep substrate (B) and apply graphics (A) to front of substrate.
BASICTECHNIQUE 3
Translucentspecial effectsfilm (A).
Substrate (B).
First Surface Assembly
8

Materials and tools for basic technique 3
Materials:
(A) Special effects film (3M™ Scotchcal™ Special Effects Film Series 7725 SE or Series 210 – see Product Bulletin 7725 SE).
(B) Substrate: glass or rigid plastic.*
Tools and supplies:
1. 3M™ Applicator PA-1.
2. Detergent and water solution.
3. Razor knife/cutter.
4. Ruler.
5. Cleaners (DuPont Prep-Sol™, isopropyl alco-hol). Refer to solvent container label and the manufacturer’s Material Safety Data Sheet for health, safety and handling information.
6. Lint-free wipes.
7. 3M™ Masking Tape 232.
8. 3M™ Prespace Tape SCPS-2.
9. 3M™ Premask Tape SCPM-53X.
Instruction bulletins:
Using 3M application tapes; premasking and prespacing of films and sheetings, Bulletin 4.3
Application of translucent pressure sensitive and changeable films to flat glass, Bulletin 5.8
1. Reverse cut, weed and prespace film image (A).
2. Prep substrate (B) and apply graphics (A) to back of clear substrate.
Second Surface Assembly
Translucentspecial effectsfilm (A).
Clearsubstrate (B).
9
* See polycarbonate note on page 3.
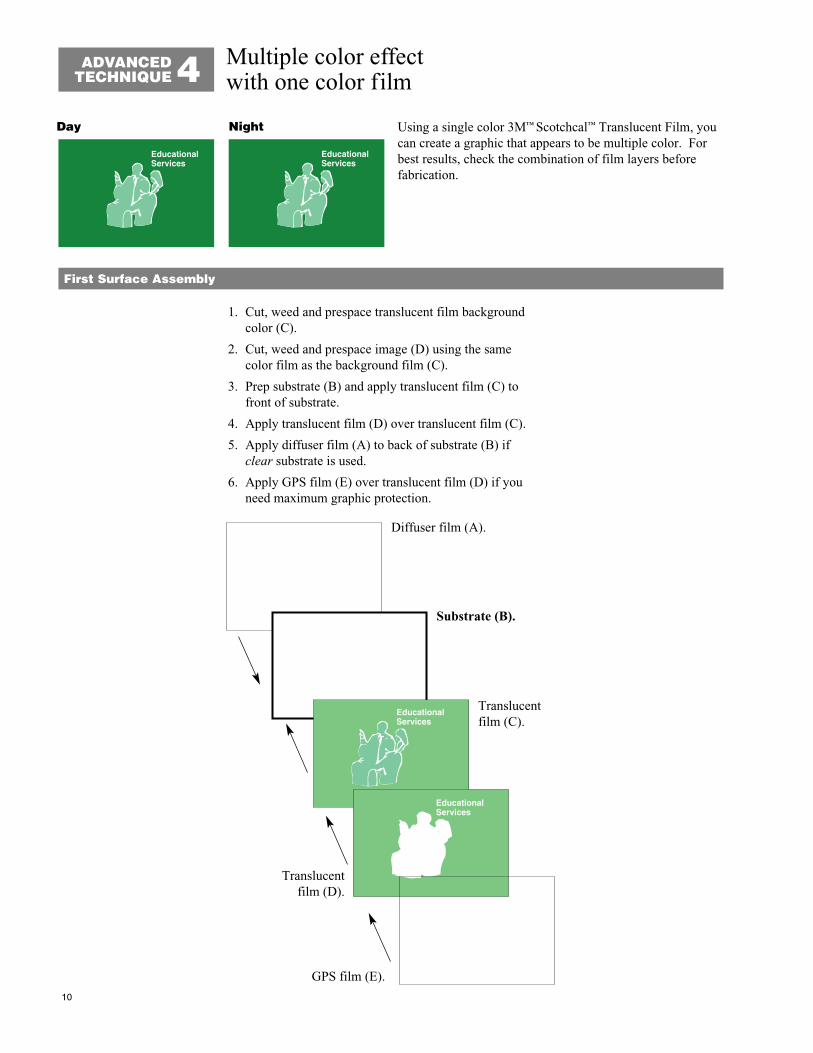
Multiple color effectwith one color film
EducationalServices
EducationalServices
Day Night Using a single color 3M™ Scotchcal™ Translucent Film, youcan create a graphic that appears to be multiple color. Forbest results, check the combination of film layers before fabrication.
1. Cut, weed and prespace translucent film background color (C).
2. Cut, weed and prespace image (D) using the same color film as the background film (C).
3. Prep substrate (B) and apply translucent film (C) to front of substrate.
4. Apply translucent film (D) over translucent film (C).
5. Apply diffuser film (A) to back of substrate (B) if clear substrate is used.
6. Apply GPS film (E) over translucent film (D) if you need maximum graphic protection.
ADVANCED TECHNIQUE 4
First Surface Assembly
10
EducationalServices
EducationalServices
Diffuser film (A).
Translucentfilm (C).
Translucentfilm (D).
Substrate (B).
GPS film (E).
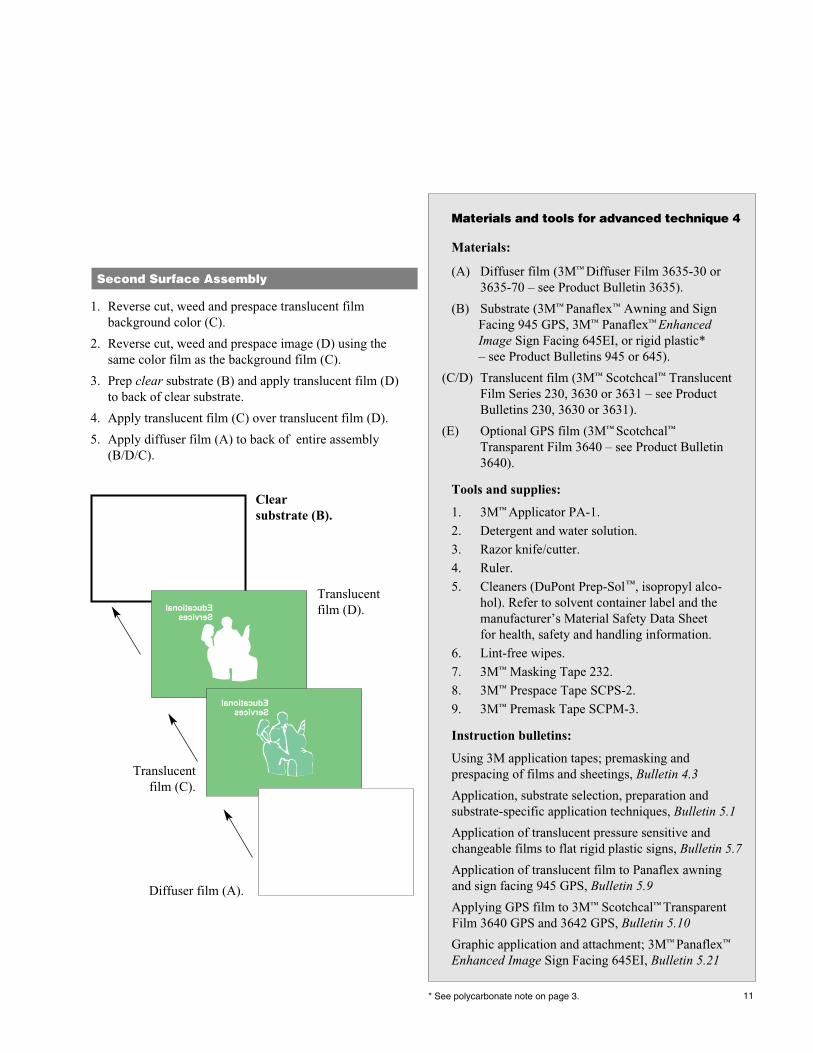
1. Reverse cut, weed and prespace translucent film background color (C).
2. Reverse cut, weed and prespace image (D) using the same color film as the background film (C).
3. Prep clear substrate (B) and apply translucent film (D) to back of clear substrate.
4. Apply translucent film (C) over translucent film (D).
5. Apply diffuser film (A) to back of entire assembly (B/D/C).
Diffuser film (A).
Translucentfilm (D).Educational
Services
EducationalServices
Clearsubstrate (B).
Translucentfilm (C).
Second Surface Assembly
11
Materials and tools for advanced technique 4
Materials:
(A) Diffuser film (3M™ Diffuser Film 3635-30 or 3635-70 – see Product Bulletin 3635).
(B) Substrate (3M™ Panaflex™ Awning and Sign Facing 945 GPS, 3M™ Panaflex™ Enhanced Image Sign Facing 645EI, or rigid plastic* – see Product Bulletins 945 or 645).
(C/D) Translucent film (3M™ Scotchcal™ Translucent Film Series 230, 3630 or 3631 – see Product Bulletins 230, 3630 or 3631).
(E) Optional GPS film (3M™ Scotchcal™
Transparent Film 3640 – see Product Bulletin 3640).
Tools and supplies:
1. 3M™ Applicator PA-1.
2. Detergent and water solution.
3. Razor knife/cutter.
4. Ruler.
5. Cleaners (DuPont Prep-Sol™, isopropyl alco-hol). Refer to solvent container label and the manufacturer’s Material Safety Data Sheet for health, safety and handling information.
6. Lint-free wipes.
7. 3M™ Masking Tape 232.
8. 3M™ Prespace Tape SCPS-2.
9. 3M™ Premask Tape SCPM-3.
Instruction bulletins:
Using 3M application tapes; premasking and prespacing of films and sheetings, Bulletin 4.3
Application, substrate selection, preparation and substrate-specific application techniques, Bulletin 5.1
Application of translucent pressure sensitive and changeable films to flat rigid plastic signs, Bulletin 5.7
Application of translucent film to Panaflex awning and sign facing 945 GPS, Bulletin 5.9
Applying GPS film to 3M™ Scotchcal™ Transparent Film 3640 GPS and 3642 GPS, Bulletin 5.10
Graphic application and attachment; 3M™ Panaflex™
Enhanced Image Sign Facing 645EI, Bulletin 5.21
* See polycarbonate note on page 3.
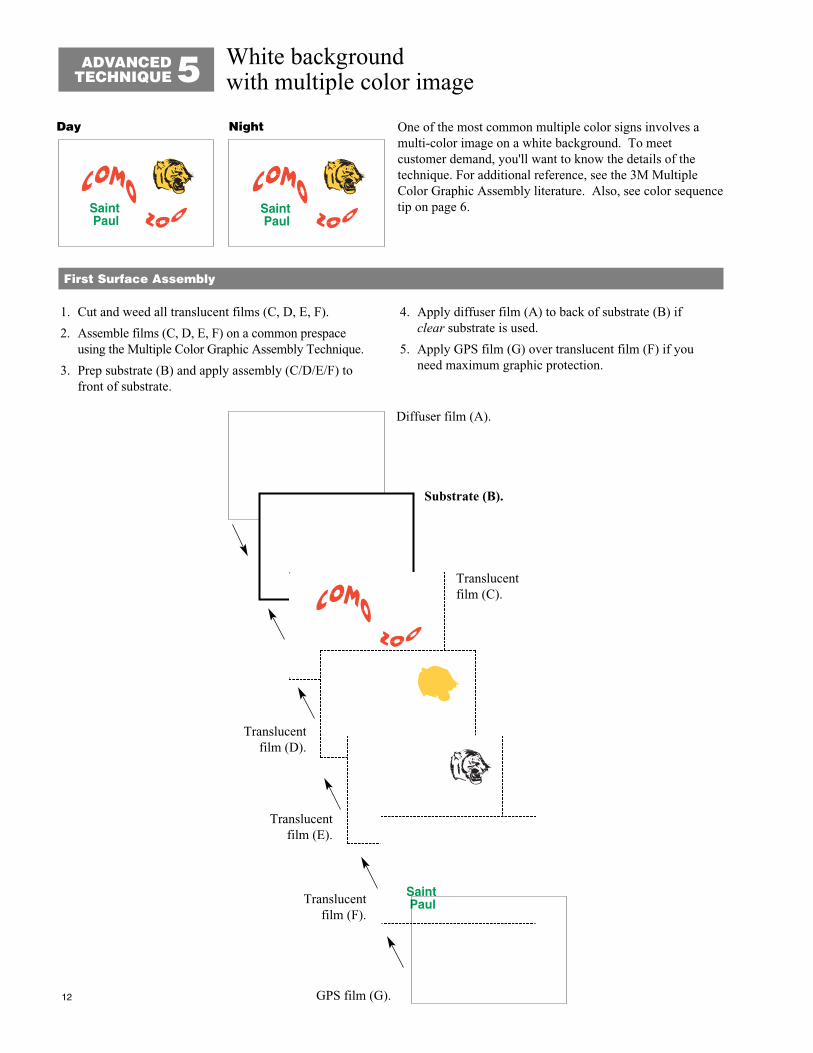
White backgroundwith multiple color image
Saint Paul
Saint Paul
Saint Paul
Day Night One of the most common multiple color signs involves amulti-color image on a white background. To meetcustomer demand, you'll want to know the details of thetechnique. For additional reference, see the 3M MultipleColor Graphic Assembly literature. Also, see color sequencetip on page 6.
1. Cut and weed all translucent films (C, D, E, F).
2. Assemble films (C, D, E, F) on a common prespace using the Multiple Color Graphic Assembly Technique.
3. Prep substrate (B) and apply assembly (C/D/E/F) to front of substrate.
4. Apply diffuser film (A) to back of substrate (B) if clear substrate is used.
5. Apply GPS film (G) over translucent film (F) if you need maximum graphic protection.
ADVANCED TECHNIQUE 5
Diffuser film (A).
Translucentfilm (C).
Translucentfilm (D).
Translucentfilm (E).
Translucentfilm (F).
Substrate (B).
GPS film (G).
First Surface Assembly
12
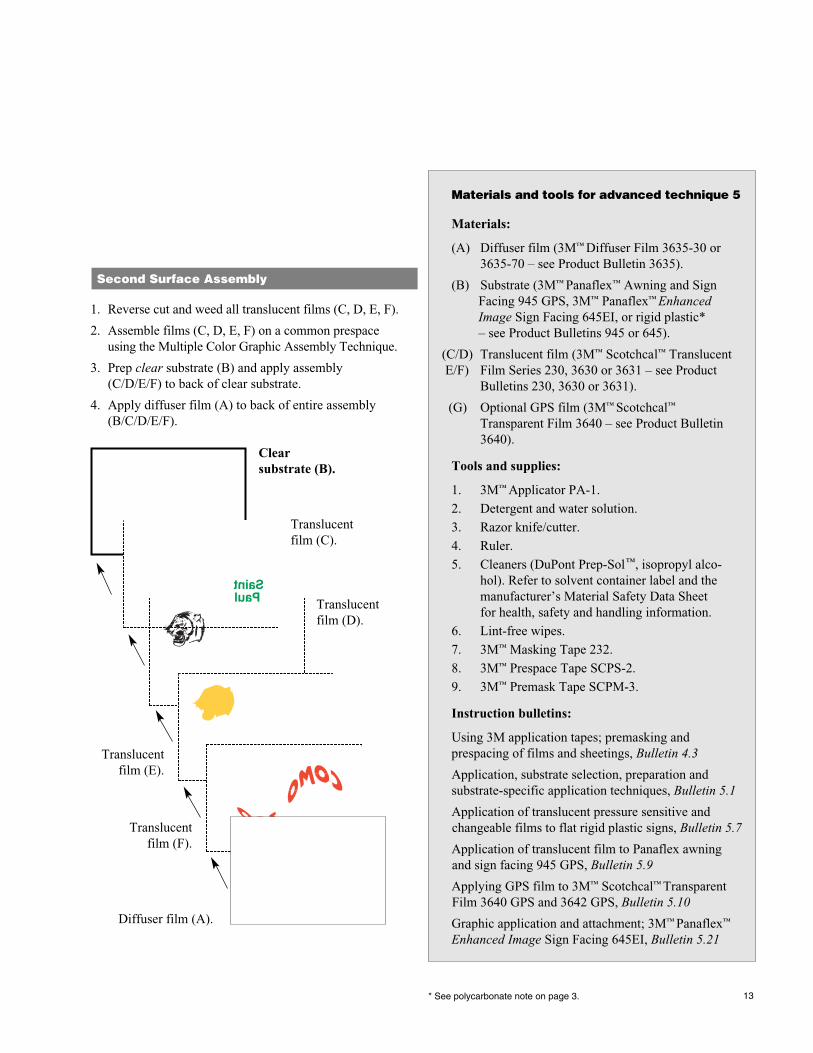
Second Surface Assembly
Saint Paul
1. Reverse cut and weed all translucent films (C, D, E, F).
2. Assemble films (C, D, E, F) on a common prespace using the Multiple Color Graphic Assembly Technique.
3. Prep clear substrate (B) and apply assembly (C/D/E/F) to back of clear substrate.
4. Apply diffuser film (A) to back of entire assembly (B/C/D/E/F).
Diffuser film (A).
Translucentfilm (D).
Translucentfilm (E).
Translucentfilm (F).
Translucentfilm (C).
Clearsubstrate (B).
13
Materials and tools for advanced technique 5
Materials:
(A) Diffuser film (3M™ Diffuser Film 3635-30 or 3635-70 – see Product Bulletin 3635).
(B) Substrate (3M™ Panaflex™ Awning and Sign Facing 945 GPS, 3M™ Panaflex™ Enhanced Image Sign Facing 645EI, or rigid plastic* – see Product Bulletins 945 or 645).
(C/D) Translucent film (3M™ Scotchcal™ Translucent E/F) Film Series 230, 3630 or 3631 – see Product
Bulletins 230, 3630 or 3631).
(G) Optional GPS film (3M™ Scotchcal™
Transparent Film 3640 – see Product Bulletin 3640).
Tools and supplies:
1. 3M™ Applicator PA-1.
2. Detergent and water solution.
3. Razor knife/cutter.
4. Ruler.
5. Cleaners (DuPont Prep-Sol™, isopropyl alco-hol). Refer to solvent container label and the manufacturer’s Material Safety Data Sheet for health, safety and handling information.
6. Lint-free wipes.
7. 3M™ Masking Tape 232.
8. 3M™ Prespace Tape SCPS-2.
9. 3M™ Premask Tape SCPM-3.
Instruction bulletins:
Using 3M application tapes; premasking and prespacing of films and sheetings, Bulletin 4.3
Application, substrate selection, preparation and substrate-specific application techniques, Bulletin 5.1
Application of translucent pressure sensitive and changeable films to flat rigid plastic signs, Bulletin 5.7
Application of translucent film to Panaflex awning and sign facing 945 GPS, Bulletin 5.9
Applying GPS film to 3M™ Scotchcal™ Transparent Film 3640 GPS and 3642 GPS, Bulletin 5.10
Graphic application and attachment; 3M™ Panaflex™
Enhanced Image Sign Facing 645EI, Bulletin 5.21
* See polycarbonate note on page 3.

Color backgroundwith multiple color image
Day Night This advanced technique is similar to advanced technique 5on page 12, except that with advanced technique 6 your cus-tomer will have a color background instead of a white back-ground. Choice of specific film colors will be important foraesthetics and image contrast. See tip on page 6.
For additional reference, see the 3M Multiple Color GraphicAssembly literature
1. Cut and weed all translucent films (C, D, E).
2. Assemble films (C,D,E) on a common prespace usingthe Multiple Color Graphic Assembly Technique.
3. Prep substrate (B) and apply assembly (C/D/E) to front of substrate.
4. Apply diffuser film (A) to back of substrate (B) if clear substrate is used.
5. Apply GPS film (F) over translucent film (E) if you need maximum graphic protection.
ADVANCED TECHNIQUE 6
Diffuser film (A).
Translucentfilm (C).
Translucentfilm (D).
Translucentfilm (E).
GPS film (F).
Substrate (B).
First Surface Assembly
14

Second Surface Assembly
1. Reverse cut and weed all translucent films (C, D, E).
2. Assemble films (C, D, E) on a common prespace using the Multiple Color Graphic Assembly Technique.
3. Prep clear substrate (B) and apply assembly (B/C/D) to back of clear substrate.
4. Apply diffuser film (A) to back of entire assembly (B/C/D/E).
Diffuser film (A).
Translucentfilm (D).
Translucentfilm (E).
Translucentfilm (C).
Clear substrate (B).
15
Materials and tools for advanced technique 6
Materials:
(A) Diffuser film (3M™ Diffuser Film 3635-30 or 3635-70 – see Product Bulletin 3635).
(B) Substrate (3M™ Panaflex™ Awning and Sign Facing 945 GPS, 3M™ Panaflex™ Enhanced Image Sign Facing 645EI, or rigid plastic* – see Product Bulletins 945 or 645).
(CD) Translucent film (3M™ Scotchcal™ Translucent E) Film Series 230, 3630 or 3631 – see Product
Bulletins 230, 3630 or 3631).
(F) Optional GPS film (3M™ Scotchcal™
Transparent Film 3640 – see Product Bulletin 3640).
Tools and supplies:
1. 3M™ Applicator PA-1.
2. Detergent and water solution.
3. Razor knife/cutter.
4. Ruler.
5. Cleaners (DuPont Prep-Sol™, isopropyl alco-hol). Refer to solvent container label and the manufacturer’s Material Safety Data Sheet for health, safety and handling information.
6. Lint-free wipes.
7. 3M™ Masking Tape 232.
8. 3M™ Prespace Tape SCPS-2.
9. 3M™ Premask Tape SCPM-3.
Instruction bulletins:
Using 3M application tapes; premasking and prespacing of films and sheetings, Bulletin 4.3
Application, substrate selection, preparation and substrate-specific application techniques, Bulletin 5.1
Application of translucent pressure sensitive and changeable films to flat rigid plastic signs, Bulletin 5.7
Application of translucent film to Panaflex awning and sign facing 945 GPS, Bulletin 5.9
Applying GPS film to 3M™ Scotchcal™ Transparent Film 3640 GPS and 3642 GPS, Bulletin 5.10
Graphic application and attachment; 3M™ Panaflex™
Enhanced Image Sign Facing 645EI, Bulletin 5.21
* See polycarbonate note on page 3.

White background by day;black background by night
Day Night With this special effect technique, your customer will have a background that appears white by day and black by night.At night, the color image will appear to float, similar to theappearance created by push-through letters in a routed metalface. The color image will be the same color by day or night.
1. Prep substrate (B) and apply color translucent film (C) to front of substrate.
2. Cut, weed and prespace image in 3M white blockout film (D).
3. Apply blockout film (D) over translucent film (C).
4. Apply diffuser film (A) to back of substrate (B) if clear substrate is used.
5. Apply GPS film (E) over blockout film (D) if you need maximum graphic protection.
SPECIAL EFFECT 7
Diffuser film (A).
Translucentfilm (C).
White blockout film (D).
Substrate (B/B1).
GPS film (E).
First Surface Assembly
16
Materials and tools for special effect 7A
Materials:
(A) Diffuser film (3M™ Diffuser Film 3635-30 or 3635-70 – see Product Bulletin 3635).
(B) 1⁄8″ rigid clear plastic* second surface or first surface.
(B1) Substrate (3M™ Panaflex™ Enhanced Image Sign Facing 645EI — see (B) previous page).
(C) Translucent film (3M™ Scotchcal™ Translucent Film Series 230, 3630 or 3631 – see Product Bulletins 230, 3630 or 3631).
(D) Blockout film (3M™ Blockout Film 3635-22B(black) — see Product Bulletin 3635).
Tools and supplies:
1. 3M™ Applicator PA-1.
2. Detergent and water solution.
3. Razor knife/cutter.
4. Ruler.
5. Cleaners (DuPont Prep-Sol™, isopropyl alcohol). Refer to solvent container label and the manufacturer’s Material Safety Data Sheet for health, safety and handling information.
6. Lint-free wipes.
7. 3M™ Masking Tape 232.
8. 3M™ Prespace Tape SCPS-2.
9. 3M™ Premask Tape SCPM-3.
Instruction bulletins:
Using 3M application tapes; premasking and prespacing of films and sheetings, Bulletin 4.3
Application, substrate selection, preparation and substrate-specific application techniques, Bulletin 5.1
Application of translucent pressure sensitive and changeable films to flat rigid plastic signs, Bulletin 5.7
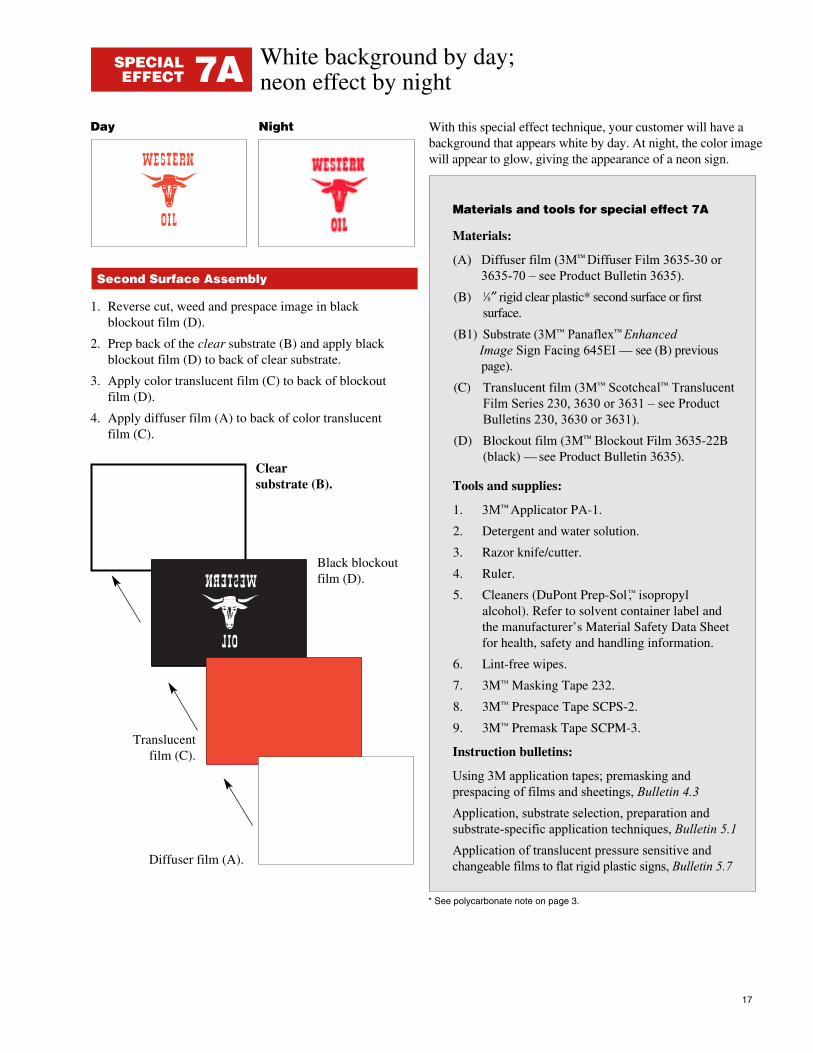
1. Reverse cut, weed and prespace image in black blockout film (D).
2. Prep back of the clear substrate (B) and apply blackblockout film (D) to back of clear substrate.
3. Apply color translucent film (C) to back of blockout film (D).
4. Apply diffuser film (A) to back of color translucent film (C).
Diffuser film (A).
Black blockoutfilm (D).
Clearsubstrate (B).
Translucentfilm (C).
Second Surface Assembly
17
White background by day;neon effect by night
Day Night With this special effect technique, your customer will have abackground that appears white by day. At night, the color imagewill appear to glow, giving the appearance of a neon sign.
SPECIAL EFFECT 7A
* See polycarbonate note on page 3.

Color background by day;black background by night
Day Night With this special effect technique, your customer will have abackground that appears in color by day and black by night.At night, the color image will appear to float, similar to theappearance created by push-through letters in a routed metalface. The color image will be the same color by day or night.
1. Prep substrate (B) and apply color translucent film (C) to front of substrate.
2. Cut, weed and prespace image in white blockout film (D).
3. Apply blockout film (D) over translucent film (C).
4. Cut, weed and prespace image in translucent film (E).
5. Apply translucent film (E) over blockout film (D).
6. Apply diffuser film (A) to back of substrate (B) if clear substrate is used.
7. Apply GPS film (F) over translucent film (E) if you need maximum graphic protection.
SPECIAL EFFECT 8
First Surface Assembly
18 GPS film (F).
Translucentfilm (C).
White blockoutfilm (D).
Translucentfilm (E).
Substrate (B).
Diffuser film (A).
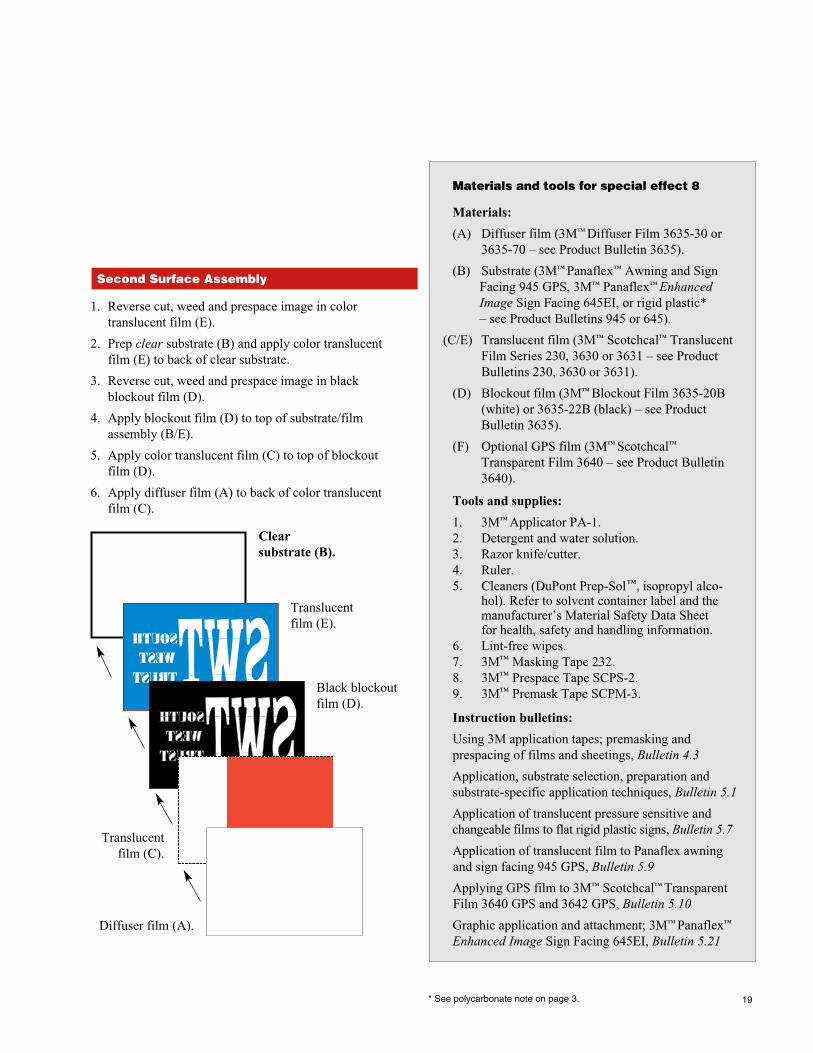
1. Reverse cut, weed and prespace image in color translucent film (E).
2. Prep clear substrate (B) and apply color translucent film (E) to back of clear substrate.
3. Reverse cut, weed and prespace image in blackblockout film (D).
4. Apply blockout film (D) to top of substrate/film assembly (B/E).
5. Apply color translucent film (C) to top of blockout film (D).
6. Apply diffuser film (A) to back of color translucent film (C).
Second Surface Assembly
19
Diffuser film (A).
Black blockoutfilm (D).
Translucentfilm (C).
Translucentfilm (E).
Clearsubstrate (B).
Materials and tools for special effect 8
Materials:
(A) Diffuser film (3M™ Diffuser Film 3635-30 or 3635-70 – see Product Bulletin 3635).
(B) Substrate (3M™ Panaflex™ Awning and Sign Facing 945 GPS, 3M™ Panaflex™ Enhanced Image Sign Facing 645EI, or rigid plastic* – see Product Bulletins 945 or 645).
(C/E) Translucent film (3M™ Scotchcal™ Translucent Film Series 230, 3630 or 3631 – see Product Bulletins 230, 3630 or 3631).
(D) Blockout film (3M™ Blockout Film 3635-20B(white) or 3635-22B (black) – see Product Bulletin 3635).
(F) Optional GPS film (3M™ Scotchcal™
Transparent Film 3640 – see Product Bulletin 3640).
Tools and supplies:
1. 3M™ Applicator PA-1.2. Detergent and water solution.3. Razor knife/cutter.4. Ruler.5. Cleaners (DuPont Prep-Sol™, isopropyl alco-
hol). Refer to solvent container label and the manufacturer’s Material Safety Data Sheet for health, safety and handling information.
6. Lint-free wipes.7. 3M™ Masking Tape 232.8. 3M™ Prespace Tape SCPS-2. 9. 3M™ Premask Tape SCPM-3.
Instruction bulletins:
Using 3M application tapes; premasking and prespacing of films and sheetings, Bulletin 4.3
Application, substrate selection, preparation and substrate-specific application techniques, Bulletin 5.1
Application of translucent pressure sensitive and changeable films to flat rigid plastic signs, Bulletin 5.7
Application of translucent film to Panaflex awning and sign facing 945 GPS, Bulletin 5.9
Applying GPS film to 3M™ Scotchcal™ Transparent Film 3640 GPS and 3642 GPS, Bulletin 5.10
Graphic application and attachment; 3M™ Panaflex™
Enhanced Image Sign Facing 645EI, Bulletin 5.21
* See polycarbonate note on page 3.
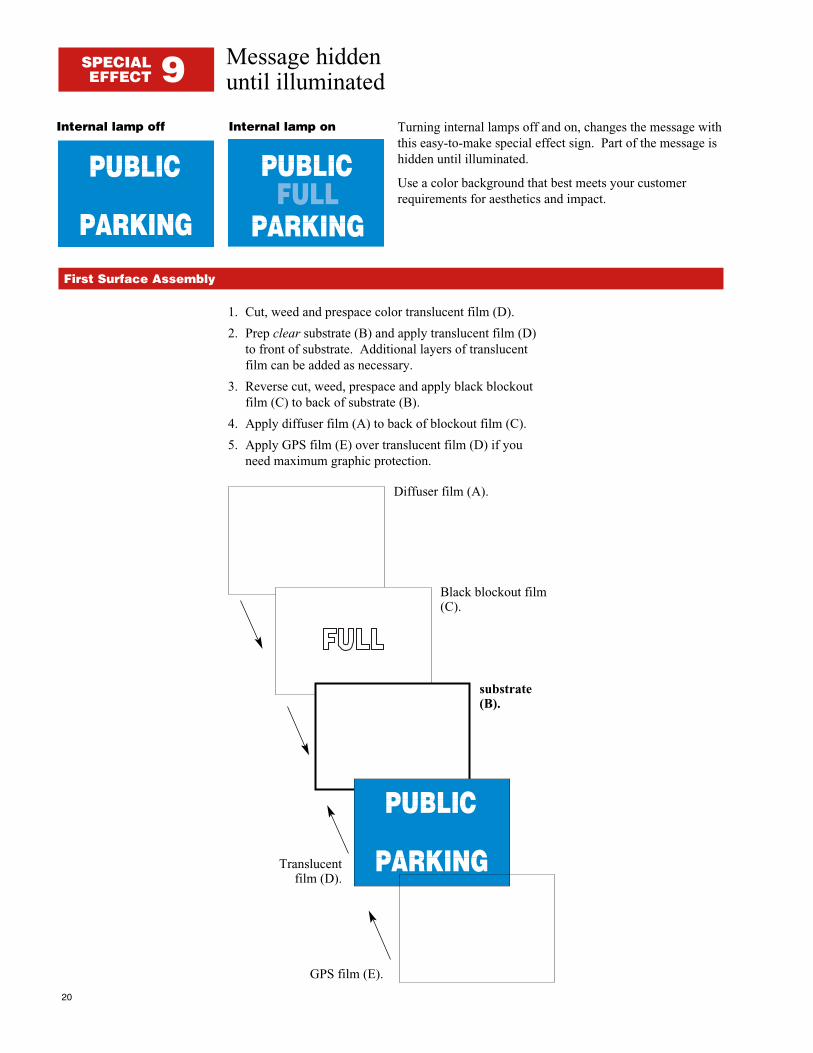
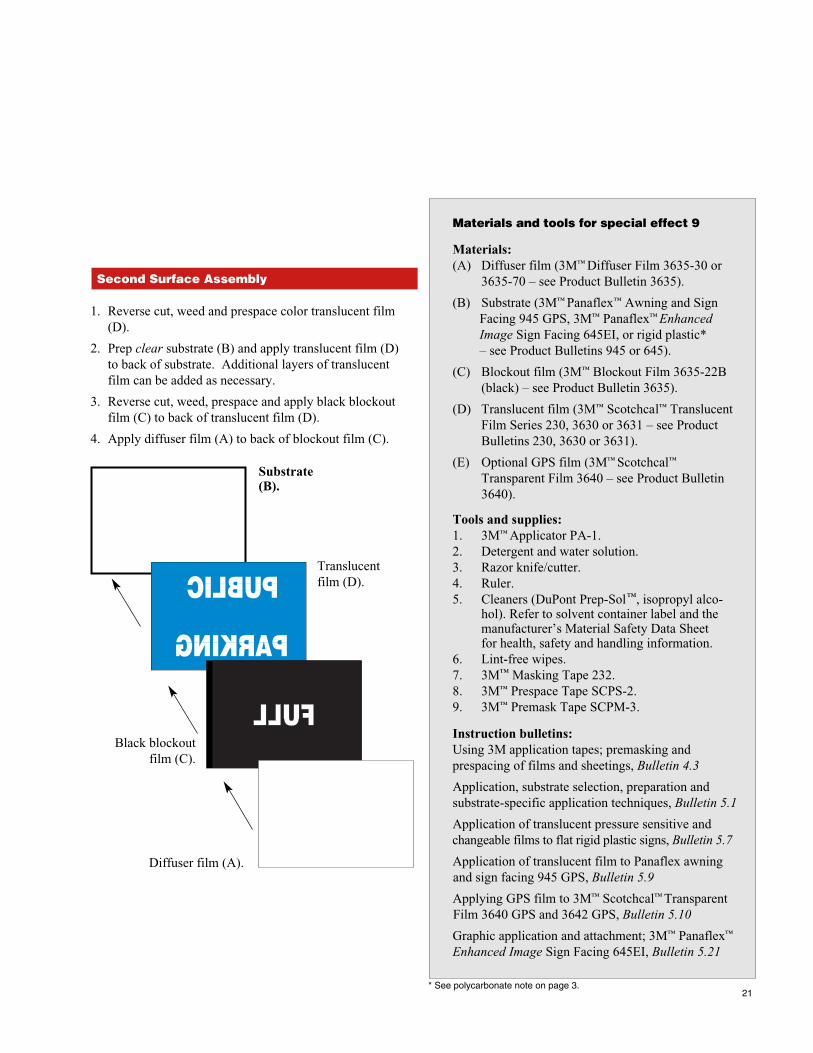
Message hiddenuntil illuminated
Internal lamp off Internal lamp on Turning internal lamps off and on, changes the message withthis easy-to-make special effect sign. Part of the message ishidden until illuminated.
Use a color background that best meets your customerrequirements for aesthetics and impact.
1. Cut, weed and prespace color translucent film (D).
2. Prep clear substrate (B) and apply translucent film (D) to front of substrate. Additional layers of translucent film can be added as necessary.
3. Reverse cut, weed, prespace and apply black blockout film (C) to back of substrate (B).
4. Apply diffuser film (A) to back of blockout film (C).
5. Apply GPS film (E) over translucent film (D) if you need maximum graphic protection.
SPECIALEFFECT 9
Diffuser film (A).
substrate(B).
Translucent film (D).
Black blockout film(C).
GPS film (E).
First Surface Assembly
20
1. Reverse cut, weed and prespace color translucent film (D).
2. Prep clear substrate (B) and apply translucent film (D) to back of substrate. Additional layers of translucent film can be added as necessary.
3. Reverse cut, weed, prespace and apply black blockout film (C) to back of translucent film (D).
4. Apply diffuser film (A) to back of blockout film (C).
Diffuser film (A).
Substrate(B).
Translucentfilm (D).
Black blockoutfilm (C).
Second Surface Assembly
21
Materials and tools for special effect 9
Materials:(A) Diffuser film (3M™ Diffuser Film 3635-30 or
3635-70 – see Product Bulletin 3635).
(B) Substrate (3M™ Panaflex™ Awning and Sign Facing 945 GPS, 3M™ Panaflex™ Enhanced Image Sign Facing 645EI, or rigid plastic* – see Product Bulletins 945 or 645).
(C) Blockout film (3M™ Blockout Film 3635-22B (black) – see Product Bulletin 3635).
(D) Translucent film (3M™ Scotchcal™ Translucent Film Series 230, 3630 or 3631 – see Product Bulletins 230, 3630 or 3631).
(E) Optional GPS film (3M™ Scotchcal™
Transparent Film 3640 – see Product Bulletin 3640).
Tools and supplies:1. 3M™ Applicator PA-1.2. Detergent and water solution.3. Razor knife/cutter.4. Ruler.5. Cleaners (DuPont Prep-Sol™, isopropyl alco-
hol). Refer to solvent container label and the manufacturer’s Material Safety Data Sheet for health, safety and handling information.
6. Lint-free wipes.7. 3M™ Masking Tape 232.8. 3M™ Prespace Tape SCPS-2. 9. 3M™ Premask Tape SCPM-3.
Instruction bulletins:Using 3M application tapes; premasking and prespacing of films and sheetings, Bulletin 4.3
Application, substrate selection, preparation and substrate-specific application techniques, Bulletin 5.1
Application of translucent pressure sensitive and changeable films to flat rigid plastic signs, Bulletin 5.7
Application of translucent film to Panaflex awning and sign facing 945 GPS, Bulletin 5.9
Applying GPS film to 3M™ Scotchcal™ Transparent Film 3640 GPS and 3642 GPS, Bulletin 5.10
Graphic application and attachment; 3M™ Panaflex™
Enhanced Image Sign Facing 645EI, Bulletin 5.21
* See polycarbonate note on page 3.

Dark by day, white or color by night
Day Night A
With this technique, you can fabricate channel letters or asign with the appearance of dark letters during the day andwhite or color letters at night.
Using 3M™ Day/Night Film 3635-91 and 3M™ Panaflex™
Awning and Sign Facing 945 GPS, you can create a cost-effective flexible sign or channel letter.
1. Prep substrate (B) and apply day/night film (C) to front of substrate.
2. Cut, weed and prespace image from white blockout film (D).
3. Apply blockout film (D) over day/night film (C).
4. Apply GPS film (E) over blockout film (D) if you need maximum graphic protection.
5. Apply diffuser film A1 to the back of substrate (B) ifwhite is required.
6. Apply color translucent film (A2) to the back of the substrate (B) if a color other than white is required.
SPECIALEFFECT 10
Smoked greyfilm (C).
White blockout film (D).
Substrate (B).
GPS film (E).
First Surface Assembly — Panaflex Substrate
22
Night B
Diffuser film (A1) for white letters or translucent film (A2) for color letters.
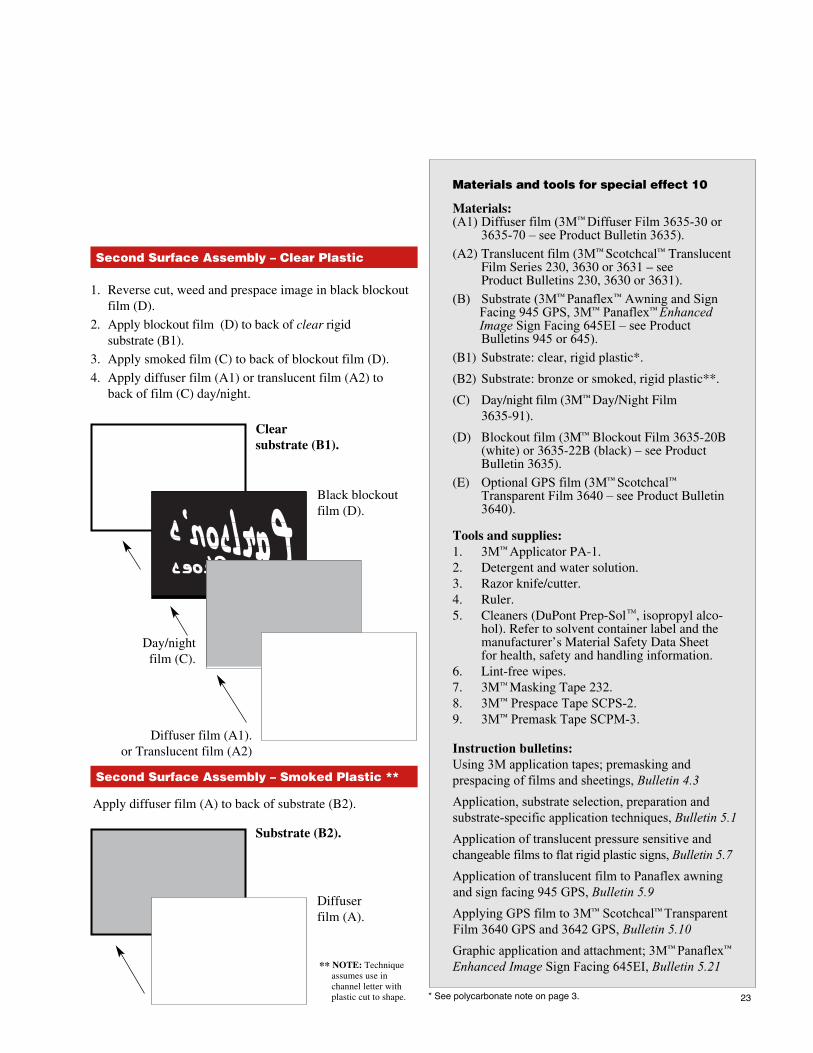
1. Reverse cut, weed and prespace image in black blockout film (D).
2. Apply blockout film (D) to back of clear rigid substrate (B1).
3. Apply smoked film (C) to back of blockout film (D).
4. Apply diffuser film (A1) or translucent film (A2) to back of film (C) day/night.
Diffuser film (A1).or Translucent film (A2)
Black blockoutfilm (D).
Clearsubstrate (B1).
Diffuser film (A).
Substrate (B2).
Day/nightfilm (C).
Second Surface Assembly – Clear Plastic
Apply diffuser film (A) to back of substrate (B2).
Second Surface Assembly – Smoked Plastic **
23
** NOTE: Technique assumes use in channel letter with plastic cut to shape.
Materials and tools for special effect 10
Materials:(A1) Diffuser film (3M™ Diffuser Film 3635-30 or
3635-70 – see Product Bulletin 3635).
(A2) Translucent film (3M™ Scotchcal™ Translucent Film Series 230, 3630 or 3631 – see Product Bulletins 230, 3630 or 3631).
(B) Substrate (3M™ Panaflex™ Awning and Sign Facing 945 GPS, 3M™ Panaflex™ Enhanced Image Sign Facing 645EI – see Product Bulletins 945 or 645).
(B1) Substrate: clear, rigid plastic*.
(B2) Substrate: bronze or smoked, rigid plastic**.
(C) Day/night film (3M™ Day/Night Film 3635-91).
(D) Blockout film (3M™ Blockout Film 3635-20B(white) or 3635-22B (black) – see Product Bulletin 3635).
(E) Optional GPS film (3M™ Scotchcal™
Transparent Film 3640 – see Product Bulletin 3640).
Tools and supplies:1. 3M™ Applicator PA-1.2. Detergent and water solution.3. Razor knife/cutter.4. Ruler.5. Cleaners (DuPont Prep-Sol™, isopropyl alco-
hol). Refer to solvent container label and the manufacturer’s Material Safety Data Sheet for health, safety and handling information.
6. Lint-free wipes.7. 3M™ Masking Tape 232.8. 3M™ Prespace Tape SCPS-2. 9. 3M™ Premask Tape SCPM-3.
Instruction bulletins:Using 3M application tapes; premasking and prespacing of films and sheetings, Bulletin 4.3
Application, substrate selection, preparation and substrate-specific application techniques, Bulletin 5.1
Application of translucent pressure sensitive and changeable films to flat rigid plastic signs, Bulletin 5.7
Application of translucent film to Panaflex awning and sign facing 945 GPS, Bulletin 5.9
Applying GPS film to 3M™ Scotchcal™ Transparent Film 3640 GPS and 3642 GPS, Bulletin 5.10
Graphic application and attachment; 3M™ Panaflex™
Enhanced Image Sign Facing 645EI, Bulletin 5.21
* See polycarbonate note on page 3.

Color by day, white by night
Day Night With this technique you can fabricate low cost channel letters or rigid sign faces that appear to have solid color letters by day and white letters by night when internally illuminated.
Spacing of colored film strips must be precise as shownbelow in schematic at left.
1. Laminate color translucent film (D) to white blockout film (C).
2. Cut, weed and prespace striped image from the laminated films (D/C). See figure A at left.
3. Prep substrate (B) and apply assembly (D/C) to front.
4. Apply diffuser film (A) to back of substrate (B) if clear substrate is used.
5. Apply GPS film (E) over translucent film (D) if you need maximum graphic protection.
SPECIALEFFECT 11
Diffuser film (A).
White blockout film(C).
Translucent film (D).
Substrate (B).
GPS film (E).
First Surface Assembly
24
1/8" (3.175mm) white borderon all sides
3/16"(4.76mm)color overblock-out film
1/16"(1.5875mm)translucentwhite
Fig. ASpacing illustrated above isrepresentative only, and notactual precise scale.
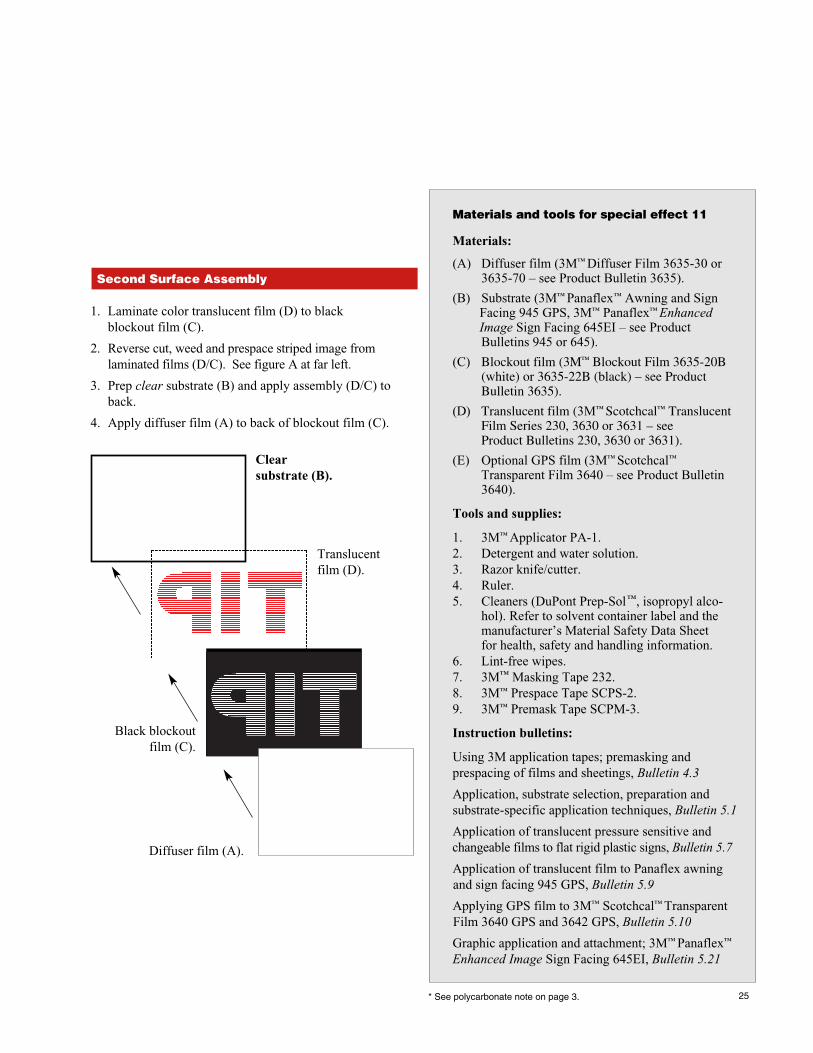
1. Laminate color translucent film (D) to black blockout film (C).
2. Reverse cut, weed and prespace striped image from laminated films (D/C). See figure A at far left.
3. Prep clear substrate (B) and apply assembly (D/C) to back.
4. Apply diffuser film (A) to back of blockout film (C).
Diffuser film (A).
Translucentfilm (D).
Clearsubstrate (B).
Black blockoutfilm (C).
Second Surface Assembly
25
Materials and tools for special effect 11
Materials:
(A) Diffuser film (3M™ Diffuser Film 3635-30 or 3635-70 – see Product Bulletin 3635).
(B) Substrate (3M™ Panaflex™ Awning and Sign Facing 945 GPS, 3M™ Panaflex™ Enhanced Image Sign Facing 645EI – see Product Bulletins 945 or 645).
(C) Blockout film (3M™ Blockout Film 3635-20B(white) or 3635-22B (black) – see Product Bulletin 3635).
(D) Translucent film (3M™ Scotchcal™ Translucent Film Series 230, 3630 or 3631 – see Product Bulletins 230, 3630 or 3631).
(E) Optional GPS film (3M™ Scotchcal™
Transparent Film 3640 – see Product Bulletin 3640).
Tools and supplies:
1. 3M™ Applicator PA-1.2. Detergent and water solution.3. Razor knife/cutter.4. Ruler.5. Cleaners (DuPont Prep-Sol™, isopropyl alco-
hol). Refer to solvent container label and the manufacturer’s Material Safety Data Sheet for health, safety and handling information.
6. Lint-free wipes.7. 3M™ Masking Tape 232.8. 3M™ Prespace Tape SCPS-2. 9. 3M™ Premask Tape SCPM-3.
Instruction bulletins:
Using 3M application tapes; premasking and prespacing of films and sheetings, Bulletin 4.3
Application, substrate selection, preparation and substrate-specific application techniques, Bulletin 5.1
Application of translucent pressure sensitive and changeable films to flat rigid plastic signs, Bulletin 5.7
Application of translucent film to Panaflex awning and sign facing 945 GPS, Bulletin 5.9
Applying GPS film to 3M™ Scotchcal™ Transparent Film 3640 GPS and 3642 GPS, Bulletin 5.10
Graphic application and attachment; 3M™ Panaflex™
Enhanced Image Sign Facing 645EI, Bulletin 5.21
* See polycarbonate note on page 3.
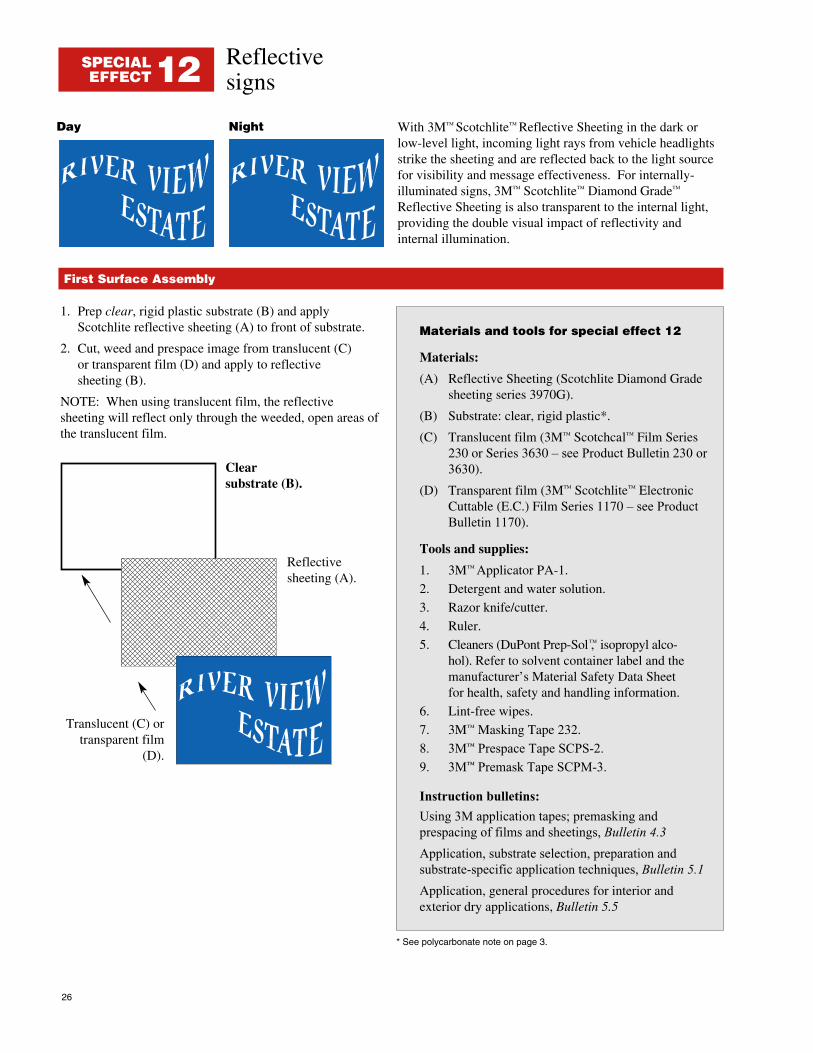
Reflective signs
Day Night With 3M™ Scotchlite™ Reflective Sheeting in the dark orlow-level light, incoming light rays from vehicle headlightsstrike the sheeting and are reflected back to the light sourcefor visibility and message effectiveness. For internally-illuminated signs, 3M™ Scotchlite™ Diamond Grade™
Reflective Sheeting is also transparent to the internal light,providing the double visual impact of reflectivity and internal illumination.
1. Prep clear, rigid plastic substrate (B) and apply Scotchlite reflective sheeting (A) to front of substrate.
2. Cut, weed and prespace image from translucent (C) or transparent film (D) and apply to reflectivesheeting (B).
NOTE: When using translucent film, the reflective sheeting will reflect only through the weeded, open areas ofthe translucent film.
SPECIALEFFECT12
Reflectivesheeting (A).
Clearsubstrate (B).
Translucent (C) ortransparent film
(D).
First Surface Assembly
26
Materials and tools for special effect 12
Materials:
(A) Reflective Sheeting (Scotchlite Diamond Grade sheeting series 3970G).
(B) Substrate: clear, rigid plastic*.
(C) Translucent film (3M™ Scotchcal™ Film Series 230 or Series 3630 – see Product Bulletin 230 or3630).
(D) Transparent film (3M™ Scotchlite™ Electronic Cuttable (E.C.) Film Series 1170 – see Product Bulletin 1170).
Tools and supplies:
1. 3M™ Applicator PA-1.
2. Detergent and water solution.
3. Razor knife/cutter.
4. Ruler.
5. Cleaners (DuPont Prep-Sol™, isopropyl alco-hol). Refer to solvent container label and the manufacturer’s Material Safety Data Sheet for health, safety and handling information.
6. Lint-free wipes.
7. 3M™ Masking Tape 232.
8. 3M™ Prespace Tape SCPS-2.
9. 3M™ Premask Tape SCPM-3.
Instruction bulletins:
Using 3M application tapes; premasking and prespacing of films and sheetings, Bulletin 4.3
Application, substrate selection, preparation and substrate-specific application techniques, Bulletin 5.1
Application, general procedures for interior and exterior dry applications, Bulletin 5.5
* See polycarbonate note on page 3.

1. Cut, weed and prespace translucent film image (D).
2. Prep the clear substrate (C).
3. Apply translucent film graphics (D) to front of the clear substrate (C).
4. Reverse cut, weed and prespace in black blockout film (B) the same image as was used with the translucent film (C).
5. Apply the blockout film graphic (B) to the back of theclear substrate (C). Make sure that it is properly alignedwith the translucent graphics (D) that was applied to thefront of the substrate.
6. Apply diffuser film (A) to the back of the blockout film (B).
7. Apply GPS film (E) over the translucent film (D) if youneed maximum graphic protection.
White halo background with color image
White background: day Halo background: night With this special effect technique there will be a halo of lightaround the color image.
SPECIALEFFECT13
Black blockout film (B).
Diffuser film (A).
Translucent film (D).
First Surface Assembly
Materials and tools for special effect 13
Materials:
(A) Diffuser film (3M™ Diffuser Film 3635-30 or3635-70 – see Product Bulletin 3635).
(B) Blockout film (3M™ Blockout Film 3635-22B(black) – see Product Bulletin 3635).
(C) Substrate clear, rigid plastic*.
(D) Translucent film (3M™ Scotchcal™ Translucent Film Series 230, 3630 or 3631 – see ProductBulletins 230, 3630 or 3631).
(E) Optional GPS film (3M™ Scotchcal™
Transparent Film 3640 – see Product Bulletin 3640).
Tools and supplies:
1. 3M™ Applicator PA-1.2. Detergent and water solution.3. Razor knife/cutter.4. Ruler.5. Cleaners (DuPont Prep-Sol™, isopropyl
alcohol). Refer to solvent container label andthe manufacturer’s Material Safety Data Sheetfor health, safety and handling information.
6. Lint-free wipes.7. 3M™ Masking Tape 232.8. 3M™ Prespace Tape SCPS-2. 9. 3M™ Premask Tape SCPM-3.
Instruction bulletins:
Using 3M application tapes; premasking and prespacing of films and sheetings, Bulletin 4.3
Application, substrate selection, preparation and substrate-specific application techniques, Bulletin 5.1
Application of translucent pressure sensitive and changeable films to flat rigid plastic signs, Bulletin 5.7
Applying GPS film to 3M™ Scotchcal™ Transparent Film 3640 GPS and 3642 GPS, Bulletin 5.10
Clear substrate (C).
GPS film (E). 27
* See polycarbonate note on page 3.

Color by day;Different color by night
Day Night With this special effect technique you can fabricate signsthat appear to have one color by day and a different color bynight when internally illuminated.
1. By screen print or Scotchprint® Graphic System, colorthe 3M™ Scotchcal™ Perforated Window Graphic Film8671(ES) (D).
2. Prep front of the substrate (C) and apply the printed perforated window marking film (D) to the front of the substrate.
3. Cut, weed and prespace image in white blockout film (E).
4. Apply blockout film (E) over perforated window marking film (D).
5. a. Prep back of the substrate (C) and apply diffuser film(B) to back of substrate (C) if clear substrate is used.
b. Prep back of the substrate (C) and apply color translu-cent film (A) to the back of substrate (C) if 3M™
Panaflex™ Enhanced Image Sign Facing 645EI orwhite plastic is used.
6. Apply color translucent film (A) to diffuser film (B) ifclear substrate (C) is used.
7. Apply GPS film (not shown) over the blockout film (E) ifyou need maximum graphic protection.
SPECIALEFFECT14
First Surface Assembly
28
Diffuser film (B).
Translucent film (A).
Perforated film (D).
Substrate(C).
White blockout film (E).
Materials and tools for special effect 14
Materials:
(A) Translucent film (3M™ Scotchcal™ Translucent Film Series 230, 3630 or 3631 – see ProductBulletins 230, 3630 or 3631).
(B) Diffuser film (3M™ Diffuser Film 3635-30 or3635-70 – see Product Bulletin 3635).
(C) Substrate ( Panaflex enhanced image sign facing 645EI – see Product Bulletins 645).
(D) Perforated window graphic film 8671 –see Product Bulletin 8671.
(E) Blockout film (3M™ Blockout Film 3635-20B(white) – see Product Bulletin 3635).
(F) Optional GPS film (3M™ Scotchcal™
Transparent Film 3640 and 3642 – see ProductBulletin 3640 and 3642) for maximum graphicprotection (not shown).
Tools and supplies:
1. 3M™ Applicator PA-1.
2. Detergent and water solution.
3. Razor knife/cutter.
4. Ruler.
5. Cleaners (DuPont Prep-Sol™, isopropyl alcohol). Refer to solvent container label andthe manufacturer’s Material Safety Data Sheetfor health, safety and handling information.
6. Lint-free wipes.
7. 3M™ Masking Tape 232.
8. 3M™ Prespace Tape SCPS-2.
9. 3M™ Premask Tape SCPM-3.
Instruction bulletins:
Using 3M application tapes; premasking and prespacing of films and sheetings, Bulletin 4.3
Application, substrate selection, preparation and substrate-specific application techniques, Bulletin 5.1
Application of translucent pressure sensitive and changeable films to flat rigid plastic signs, Bulletin 5.7
Applying GPS film to 3M™ Scotchcal™ Transparent Film 3640 GPS and 3642 GPS, Bulletin 5.10
Graphic application and attachment; 3M™ Panaflex™
Enhanced Image Sign Facing 645EI, Bulletin 5.21
* See polycarbonate note on page 3.
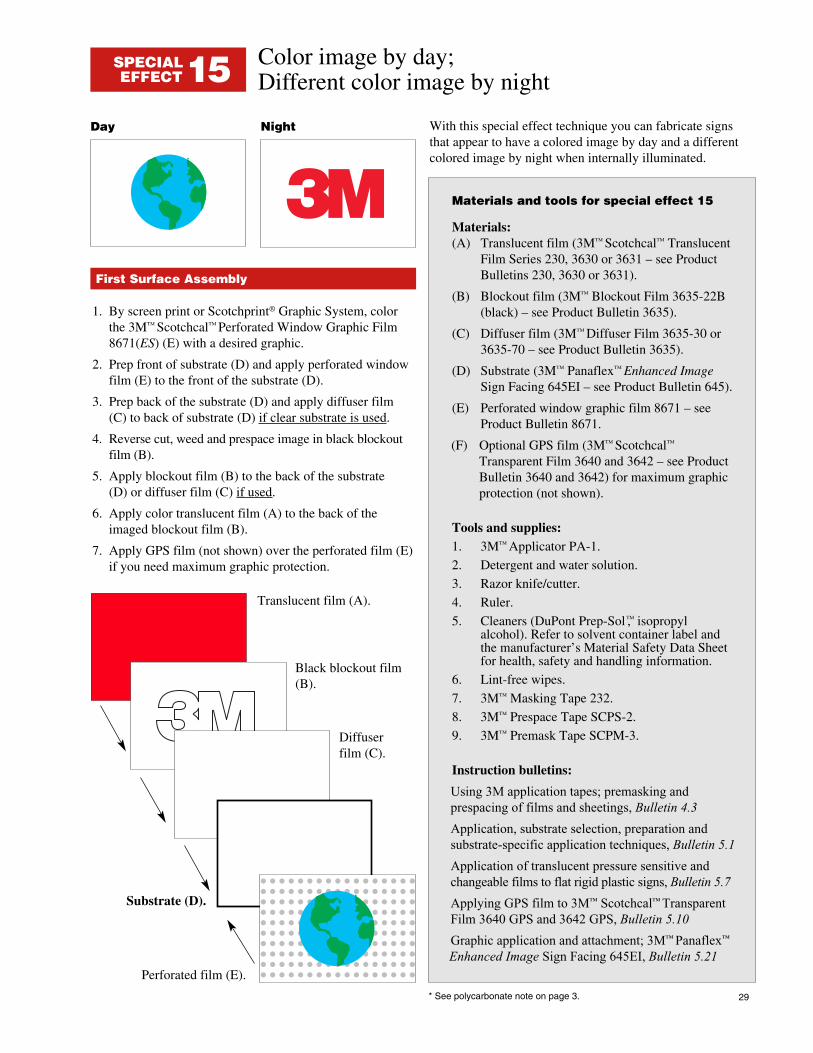
Color image by day;Different color image by night
Day Night With this special effect technique you can fabricate signsthat appear to have a colored image by day and a differentcolored image by night when internally illuminated.
1. By screen print or Scotchprint® Graphic System, colorthe 3M™ Scotchcal™ Perforated Window Graphic Film8671(ES) (E) with a desired graphic.
2. Prep front of substrate (D) and apply perforated windowfilm (E) to the front of the substrate (D).
3. Prep back of the substrate (D) and apply diffuser film (C) to back of substrate (D) if clear substrate is used.
4. Reverse cut, weed and prespace image in black blockoutfilm (B).
5. Apply blockout film (B) to the back of the substrate (D) or diffuser film (C) if used.
6. Apply color translucent film (A) to the back of theimaged blockout film (B).
7. Apply GPS film (not shown) over the perforated film (E)if you need maximum graphic protection.
SPECIALEFFECT15
Black blockout film (B).
Translucent film (A).
Substrate (D).
First Surface Assembly
Materials and tools for special effect 15
Materials:(A) Translucent film (3M™ Scotchcal™ Translucent
Film Series 230, 3630 or 3631 – see ProductBulletins 230, 3630 or 3631).
(B) Blockout film (3M™ Blockout Film 3635-22B(black) – see Product Bulletin 3635).
(C) Diffuser film (3M™ Diffuser Film 3635-30 or 3635-70 – see Product Bulletin 3635).
(D) Substrate (3M™ Panaflex™ Enhanced ImageSign Facing 645EI – see Product Bulletin 645).
(E) Perforated window graphic film 8671 – seeProduct Bulletin 8671.
(F) Optional GPS film (3M™ Scotchcal™
Transparent Film 3640 and 3642 – see ProductBulletin 3640 and 3642) for maximum graphicprotection (not shown).
Tools and supplies:1. 3M™ Applicator PA-1.
2. Detergent and water solution.
3. Razor knife/cutter.
4. Ruler.
5. Cleaners (DuPont Prep-Sol™, isopropyl alcohol). Refer to solvent container label andthe manufacturer’s Material Safety Data Sheetfor health, safety and handling information.
6. Lint-free wipes.
7. 3M™ Masking Tape 232.
8. 3M™ Prespace Tape SCPS-2.
9. 3M™ Premask Tape SCPM-3.
Instruction bulletins:
Using 3M application tapes; premasking and prespacing of films and sheetings, Bulletin 4.3
Application, substrate selection, preparation and substrate-specific application techniques, Bulletin 5.1
Application of translucent pressure sensitive and changeable films to flat rigid plastic signs, Bulletin 5.7
Applying GPS film to 3M™ Scotchcal™ Transparent Film 3640 GPS and 3642 GPS, Bulletin 5.10
Graphic application and attachment; 3M™ Panaflex™
Enhanced Image Sign Facing 645EI, Bulletin 5.21
* See polycarbonate note on page 3.
Diffuser film (C).
Perforated film (E).
29
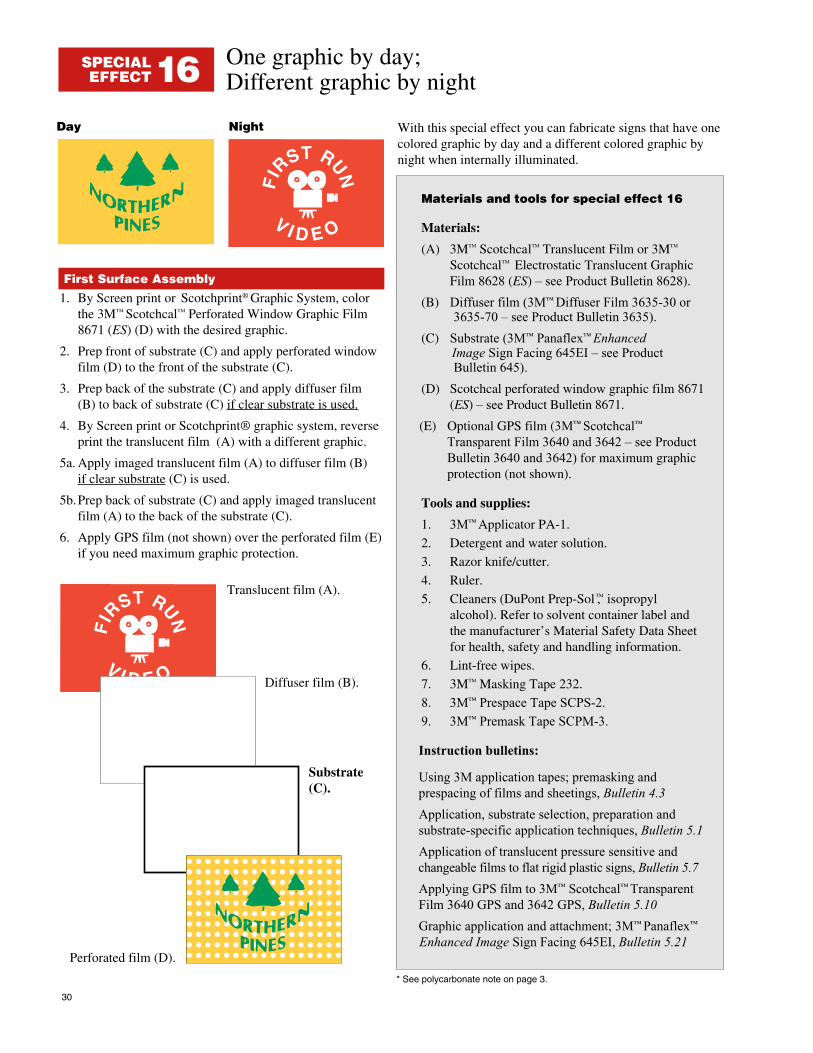
One graphic by day;Different graphic by night
FIR
ST RUN
V I D E O
FIR
ST RUN
V I D E O
Day Night With this special effect you can fabricate signs that have onecolored graphic by day and a different colored graphic bynight when internally illuminated.
1. By Screen print or Scotchprint® Graphic System, colorthe 3M™ Scotchcal™ Perforated Window Graphic Film8671 (ES) (D) with the desired graphic.
2. Prep front of substrate (C) and apply perforated windowfilm (D) to the front of the substrate (C).
3. Prep back of the substrate (C) and apply diffuser film (B) to back of substrate (C) if clear substrate is used.
4. By Screen print or Scotchprint® graphic system, reverseprint the translucent film (A) with a different graphic.
5a. Apply imaged translucent film (A) to diffuser film (B) if clear substrate (C) is used.
5b.Prep back of substrate (C) and apply imaged translucentfilm (A) to the back of the substrate (C).
6. Apply GPS film (not shown) over the perforated film (E)if you need maximum graphic protection.
SPECIALEFFECT16
First Surface Assembly
30
Diffuser film (B).
Translucent film (A).
Perforated film (D).
Substrate(C).
Materials and tools for special effect 16
Materials:
(A) 3M™ Scotchcal™ Translucent Film or 3M™
Scotchcal™ Electrostatic Translucent GraphicFilm 8628 (ES) – see Product Bulletin 8628).
(B) Diffuser film (3M™ Diffuser Film 3635-30 or 3635-70 – see Product Bulletin 3635).
(C) Substrate (3M™ Panaflex™ Enhanced Image Sign Facing 645EI – see Product Bulletin 645).
(D) Scotchcal perforated window graphic film 8671(ES) – see Product Bulletin 8671.
(E) Optional GPS film (3M™ Scotchcal™
Transparent Film 3640 and 3642 – see ProductBulletin 3640 and 3642) for maximum graphic protection (not shown).
Tools and supplies:
1. 3M™ Applicator PA-1.
2. Detergent and water solution.
3. Razor knife/cutter.
4. Ruler.
5. Cleaners (DuPont Prep-Sol™, isopropyl alcohol). Refer to solvent container label andthe manufacturer’s Material Safety Data Sheetfor health, safety and handling information.
6. Lint-free wipes.
7. 3M™ Masking Tape 232.
8. 3M™ Prespace Tape SCPS-2.
9. 3M™ Premask Tape SCPM-3.
Instruction bulletins:
Using 3M application tapes; premasking and prespacing of films and sheetings, Bulletin 4.3
Application, substrate selection, preparation and substrate-specific application techniques, Bulletin 5.1
Application of translucent pressure sensitive and changeable films to flat rigid plastic signs, Bulletin 5.7
Applying GPS film to 3M™ Scotchcal™ Transparent Film 3640 GPS and 3642 GPS, Bulletin 5.10
Graphic application and attachment; 3M™ Panaflex™
Enhanced Image Sign Facing 645EI, Bulletin 5.21
* See polycarbonate note on page 3.
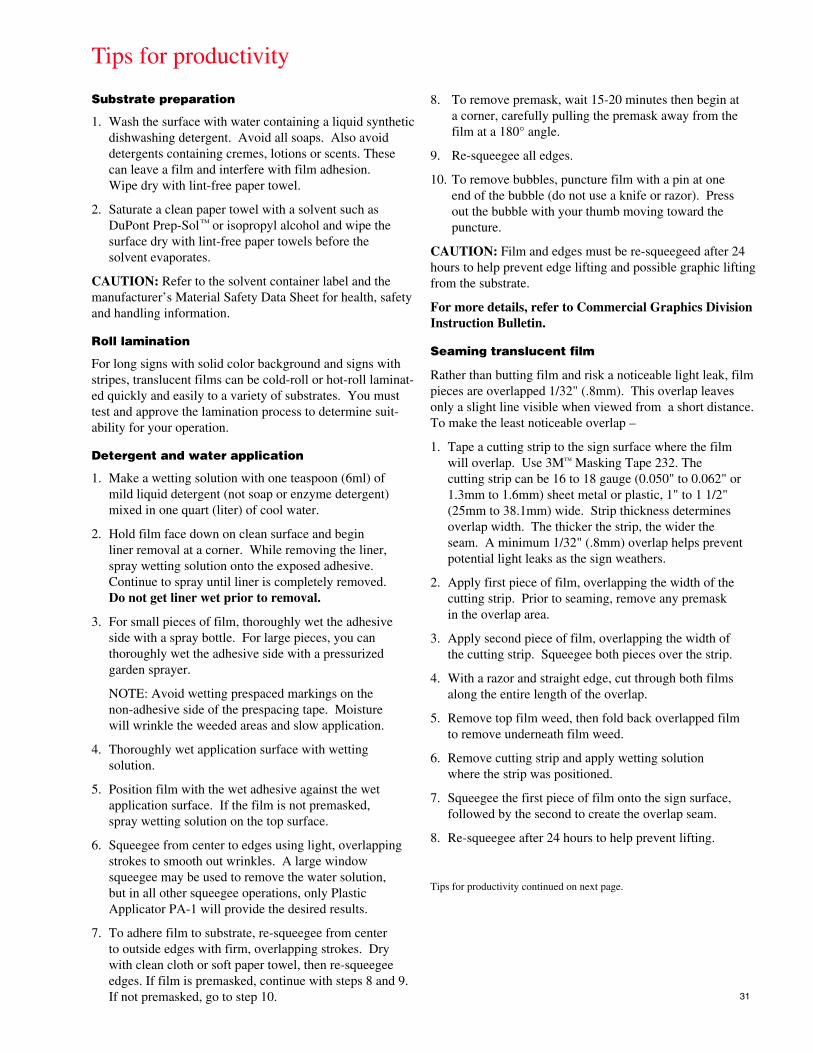
Substrate preparation
1. Wash the surface with water containing a liquid synthetic dishwashing detergent. Avoid all soaps. Also avoid detergents containing cremes, lotions or scents. These can leave a film and interfere with film adhesion. Wipe dry with lint-free paper towel.
2. Saturate a clean paper towel with a solvent such as DuPont Prep-Sol™ or isopropyl alcohol and wipe thesurface dry with lint-free paper towels before the solvent evaporates.
CAUTION: Refer to the solvent container label and themanufacturer’s Material Safety Data Sheet for health, safetyand handling information.
Roll lamination
For long signs with solid color background and signs withstripes, translucent films can be cold-roll or hot-roll laminat-ed quickly and easily to a variety of substrates. You musttest and approve the lamination process to determine suit-ability for your operation.
Detergent and water application
1. Make a wetting solution with one teaspoon (6ml) of mild liquid detergent (not soap or enzyme detergent) mixed in one quart (liter) of cool water.
2. Hold film face down on clean surface and begin liner removal at a corner. While removing the liner, spray wetting solution onto the exposed adhesive. Continue to spray until liner is completely removed. Do not get liner wet prior to removal.
3. For small pieces of film, thoroughly wet the adhesive side with a spray bottle. For large pieces, you can thoroughly wet the adhesive side with a pressurized garden sprayer.
NOTE: Avoid wetting prespaced markings on the non-adhesive side of the prespacing tape. Moisture will wrinkle the weeded areas and slow application.
4. Thoroughly wet application surface with wetting solution.
5. Position film with the wet adhesive against the wet application surface. If the film is not premasked, spray wetting solution on the top surface.
6. Squeegee from center to edges using light, overlapping strokes to smooth out wrinkles. A large window squeegee may be used to remove the water solution, but in all other squeegee operations, only Plastic Applicator PA-1 will provide the desired results.
7. To adhere film to substrate, re-squeegee from center to outside edges with firm, overlapping strokes. Dry with clean cloth or soft paper towel, then re-squeegee edges. If film is premasked, continue with steps 8 and 9.If not premasked, go to step 10.
8. To remove premask, wait 15-20 minutes then begin at a corner, carefully pulling the premask away from the film at a 180° angle.
9. Re-squeegee all edges.
10. To remove bubbles, puncture film with a pin at one end of the bubble (do not use a knife or razor). Press out the bubble with your thumb moving toward the puncture.
CAUTION: Film and edges must be re-squeegeed after 24hours to help prevent edge lifting and possible graphic liftingfrom the substrate.
For more details, refer to Commercial Graphics DivisionInstruction Bulletin.
Seaming translucent film
Rather than butting film and risk a noticeable light leak, filmpieces are overlapped 1/32" (.8mm). This overlap leavesonly a slight line visible when viewed from a short distance.To make the least noticeable overlap –
1. Tape a cutting strip to the sign surface where the film will overlap. Use 3M™ Masking Tape 232. The cutting strip can be 16 to 18 gauge (0.050" to 0.062" or 1.3mm to 1.6mm) sheet metal or plastic, 1" to 1 1/2" (25mm to 38.1mm) wide. Strip thickness determines overlap width. The thicker the strip, the wider the seam. A minimum 1/32" (.8mm) overlap helps prevent potential light leaks as the sign weathers.
2. Apply first piece of film, overlapping the width of the cutting strip. Prior to seaming, remove any premask in the overlap area.
3. Apply second piece of film, overlapping the width of the cutting strip. Squeegee both pieces over the strip.
4. With a razor and straight edge, cut through both films along the entire length of the overlap.
5. Remove top film weed, then fold back overlapped film to remove underneath film weed.
6. Remove cutting strip and apply wetting solution where the strip was positioned.
7. Squeegee the first piece of film onto the sign surface, followed by the second to create the overlap seam.
8. Re-squeegee after 24 hours to help prevent lifting.
Tips for productivity continued on next page.
Tips for productivity
31
For more information, contact your 3M CommercialGraphics Division representative, or call 800-374-6772.For technical questions or assistance call 800-328-3908In Canada, call 800-265-1840.
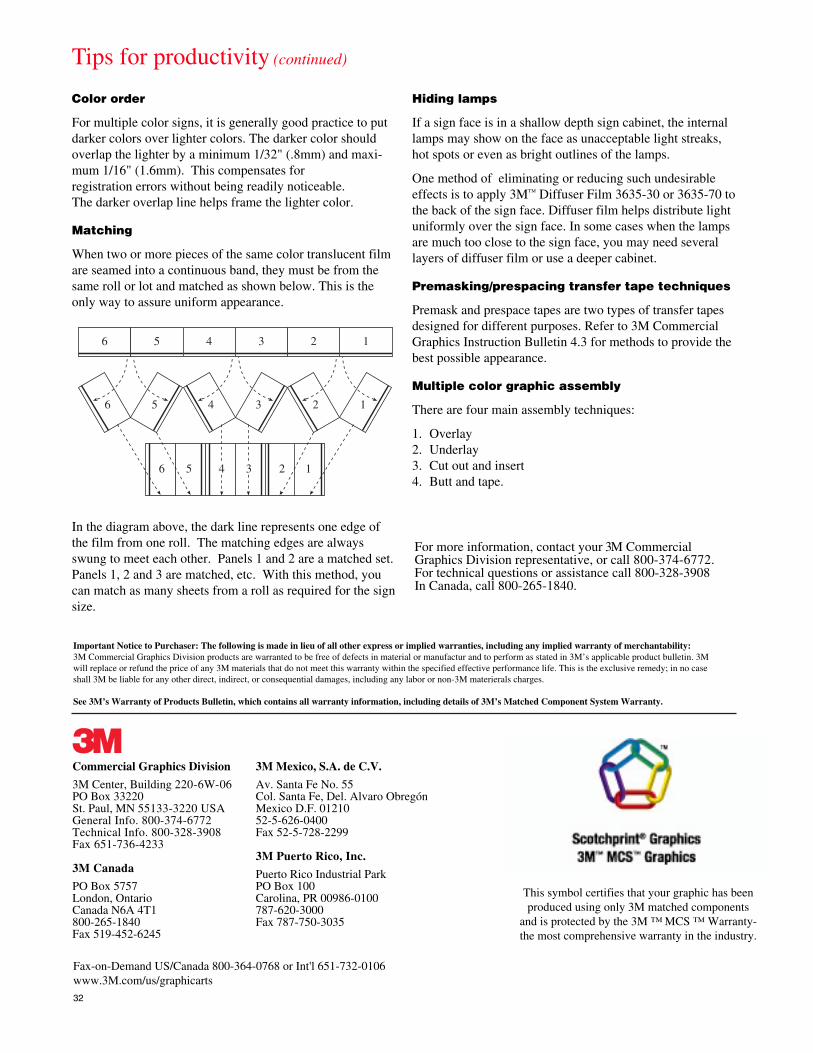
Color order
For multiple color signs, it is generally good practice to putdarker colors over lighter colors. The darker color shouldoverlap the lighter by a minimum 1/32" (.8mm) and maxi-mum 1/16" (1.6mm). This compensates for registration errors without being readily noticeable. The darker overlap line helps frame the lighter color.
Matching
When two or more pieces of the same color translucent filmare seamed into a continuous band, they must be from thesame roll or lot and matched as shown below. This is theonly way to assure uniform appearance.
Hiding lamps
If a sign face is in a shallow depth sign cabinet, the internallamps may show on the face as unacceptable light streaks,hot spots or even as bright outlines of the lamps.
One method of eliminating or reducing such undesirableeffects is to apply 3M™ Diffuser Film 3635-30 or 3635-70 tothe back of the sign face. Diffuser film helps distribute lightuniformly over the sign face. In some cases when the lampsare much too close to the sign face, you may need severallayers of diffuser film or use a deeper cabinet.
Premasking/prespacing transfer tape techniques
Premask and prespace tapes are two types of transfer tapesdesigned for different purposes. Refer to 3M CommercialGraphics Instruction Bulletin 4.3 for methods to provide thebest possible appearance.
Multiple color graphic assembly
There are four main assembly techniques:
1. Overlay2. Underlay3. Cut out and insert4. Butt and tape.
Tips for productivity (continued)
In the diagram above, the dark line represents one edge ofthe film from one roll. The matching edges are alwaysswung to meet each other. Panels 1 and 2 are a matched set.Panels 1, 2 and 3 are matched, etc. With this method, youcan match as many sheets from a roll as required for the signsize.
Commercial Graphics Division
3M Center, Building 220-6W-06PO Box 33220St. Paul, MN 55133-3220 USAGeneral Info. 800-374-6772Technical Info. 800-328-3908Fax 651-736-4233
3M Canada
PO Box 5757London, OntarioCanada N6A 4T1800-265-1840Fax 519-452-6245
3M Mexico, S.A. de C.V.
Av. Santa Fe No. 55Col. Santa Fe, Del. Alvaro ObregónMexico D.F. 0121052-5-626-0400Fax 52-5-728-2299
3M Puerto Rico, Inc.
Puerto Rico Industrial ParkPO Box 100Carolina, PR 00986-0100787-620-3000Fax 787-750-3035
6 5 4 3 2 1
6 5 4 3 2 1
6 5 4 3 2 1
Important Notice to Purchaser: The following is made in lieu of all other express or implied warranties, including any implied warranty of merchantability:3M Commercial Graphics Division products are warranted to be free of defects in material or manufactur and to perform as stated in 3M’s applicable product bulletin. 3Mwill replace or refund the price of any 3M materials that do not meet this warranty within the specified effective performance life. This is the exclusive remedy; in no caseshall 3M be liable for any other direct, indirect, or consequential damages, including any labor or non-3M materierals charges.
See 3M’s Warranty of Products Bulletin, which contains all warranty information, including details of 3M’s Matched Component System Warranty.
Fax-on-Demand US/Canada 800-364-0768 or Int'l 651-732-0106www.3M.com/us/graphicarts
32
This symbol certifies that your graphic has beenproduced using only 3M matched components
and is protected by the 3M ™ MCS ™ Warranty- the most comprehensive warranty in the industry.