Embed Size (px)
Citation preview

Appendix 6
More Tips & Tricks
Introduction In this appendix you will be introduced to more Tips and Tricks that can be used in 3ds Max Design
Tip #19 - Emulating Velvet Type Materials To emulate velvet type materials in 3ds Max Design, apply the falloff procedural map to the diffuse color toggle.
© 2009 Elsevier Inc. All rights reserved.

The two color swatches determine the surface color under direct and indirect light; the adjacent buttons are for bitmaps, shaders etc.
This procedural map is also powerful to emulate surfaces under the influence of rim lights. This procedural map is available from the material/map browser dialog.
Tip #20 - Importing CAD Models at the right scale Often, one can easily make the mistake of importing AutoCAD files at the wrong scale in 3ds Max Design. To prevent this from happening, you should pay attention to the resulting model size units display.
© 2009 Elsevier Inc. All rights reserved. 2

For instance, if the CAD file was originally modelled in millimetres and your 3ds Max Design system unit setup is in meters, it may result in the CAD model being overly big or vice versa. Therefore you should rescale the incoming CAD file by checking the rescale function and choosing the correct incoming file units in order to have the correct resulting model size values.
© 2009 Elsevier Inc. All rights reserved. 3
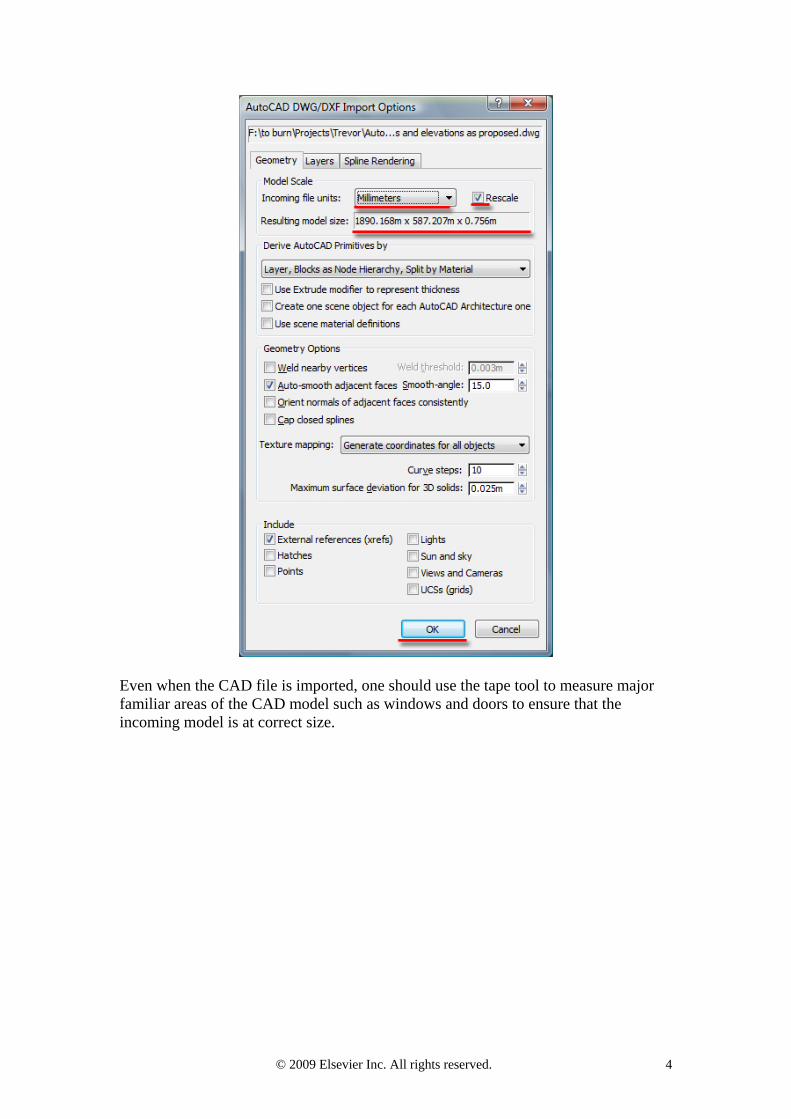
Even when the CAD file is imported, one should use the tape tool to measure major familiar areas of the CAD model such as windows and doors to ensure that the incoming model is at correct size.
© 2009 Elsevier Inc. All rights reserved. 4

Tip #21 - Determining the correct round corners fillet radius. At times, just using the tape helper to determine the adequate fillet radius for a particular object may not be as straightforward as it may seem. An alternative method is to create in the viewport, a ChamferBox extended primitive as a reference, and adjust the built in fillet radius that is displayed in the viewport. This will then give you the correct round corners fillet radius for a variety of objects in the scene.
Tip # 22 - Overcoming sudden increases in rendering times Depending on your computer system, you may suddenly experience unjustified increases of rendering times. One way of overcoming this situation is to close 3ds Max Design and restart it. Then merge the relevant scene in a new .max file. The environment and exposure settings may require matching with the original scene.
Tip # 23 - Saving scene shaders & bitmaps to a library After finishing a project, you may want to save material, shader and bitmap settings to potentially re-use in a different scene or project. To do this, select the relevant object in the scene, open the Material Editor, select any particular slot and click on the get material button.
© 2009 Elsevier Inc. All rights reserved. 5

On the material/map browser dialog box, choose the “selected” or “scene” option and click on save as... button.
© 2009 Elsevier Inc. All rights reserved. 6

This process will save the Material/Map settings however, it may not save the bitmap paths. You may have to use the bitmap/photometric path editor utility to copy bitmaps/files from the current 3ds Max Design scene onto the desired location. In the Bitmap/Photometric Path Editor dialog box, select all relevant files from the list and click on the copy files...button.
© 2009 Elsevier Inc. All rights reserved. 7
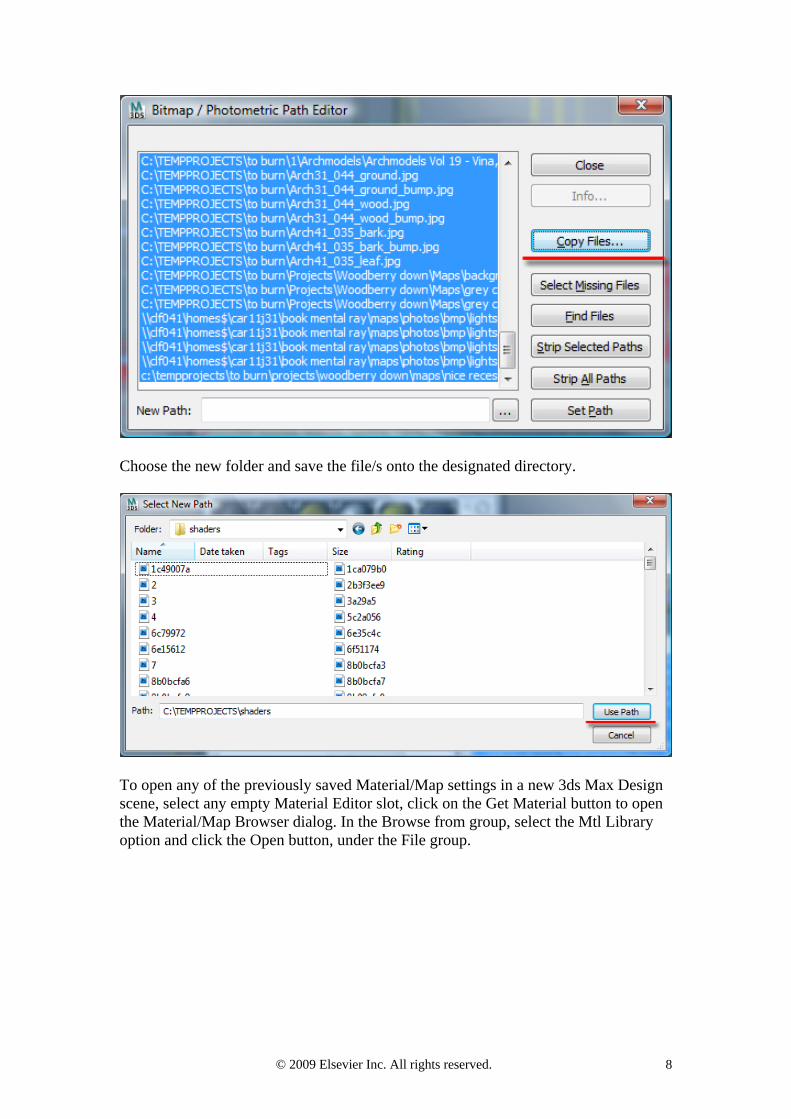
Choose the new folder and save the file/s onto the designated directory.
To open any of the previously saved Material/Map settings in a new 3ds Max Design scene, select any empty Material Editor slot, click on the Get Material button to open the Material/Map Browser dialog. In the Browse from group, select the Mtl Library option and click the Open button, under the File group.
© 2009 Elsevier Inc. All rights reserved. 8

Locate your file(s) and open it. Once loaded in the Material/Map Browser dialog, double click to open it in the Material Editor. You can then assign it to the relevant object in scene.
© 2009 Elsevier Inc. All rights reserved. 9

Tip # 24 - Baking Textures for Shockwave/other external applications or Animations in 3ds Max Design First of all, the shockwave 3d scene Export (*.W3D) is only available on the 32-bit version of Max 2010. By default, the baked textures are saved as Targa (*.tga) files. Although this file format preserves the quality of renders, shockwave 3d translates it with artifacts as semi transparent bitmaps. You will often have to open these *.tga files in Photoshop and re-save it as a *.jpg. In 3ds Max Design, you can choose to either save baked textures of the objects individually or as multiple objects attached via edit poly or edit mesh. The more attached objects you have the bigger the baked textures are required to be when rendered in pixels, as one can often end up with very small low res baked textures. For example, one entire building attached together may require the baked textures to be no smaller than 6000x6000 pixels. However, if you were to texture bake a single door from the same building, the baked texture would not need to be bigger than 1024x1024 pixels. When texture baking, 3ds Max Design automatically applies the “automatic flatten UVs” modifier and renders it to the specified location. Due to the fact shockwave and other external applications don’t recognize the “automatic flatten UVs” modifier, the Shockwave 3d/other external applications will display the bitmap coordinates with artifacts. However, the “unwrap UVW” modifier is recognized by most applications but it has to be applied separately on its own with a standard 3ds
© 2009 Elsevier Inc. All rights reserved. 10

Max material as opposed to a mental ray material. The following steps will show you how to quickly and accurately bake textures.
1. Open the Max file under the name of “building main start.max”; select one or multiple individual objects in the scene (...not groups...) followed by pressing the 0 key on your keyboard to open the render to texture dialog box. Keep the object(s) selected at all times.
2. Its parameters seem daunting however, there are only few relevant settings to focus on. The first one is the Path, under the Output group; click on the adjacent button to set the rendering destination folder.
© 2009 Elsevier Inc. All rights reserved. 11

3. If you require changing any of the rendering parameters such as Final Gather, Sampling Quality etc, click on the Setup button.
4. In the Objects to Bake rollout, the name field displays the object(s) to be texture baked. Keep the default settings and go to the Output rollout. The Add button allows you to add elements to where the baked textures will be saved to. Typically, you will only use the DiffuseMap element as all the remaining elements in the Add Texture Elements list are often baked onto one *.tga texture that will be used on the diffuse map channel of the destination standard (or other) material.
© 2009 Elsevier Inc. All rights reserved. 12

5. Once the element has been added, go to the Baked Material rollout and choose the Create New Baked option. This option will instruct 3ds Max Design to create and apply the baked texture onto the material. In the Selected Element Common Settings group, choose the Diffuse Color as the target map slot. This function instructs 3ds Max Design to apply the baked texture onto the diffuse color map channel.
6. Check the Lighting and Shadows functions, under the Selected Element Unique Settings group, this function enables lighting and shadows to be baked onto the surface.
© 2009 Elsevier Inc. All rights reserved. 13
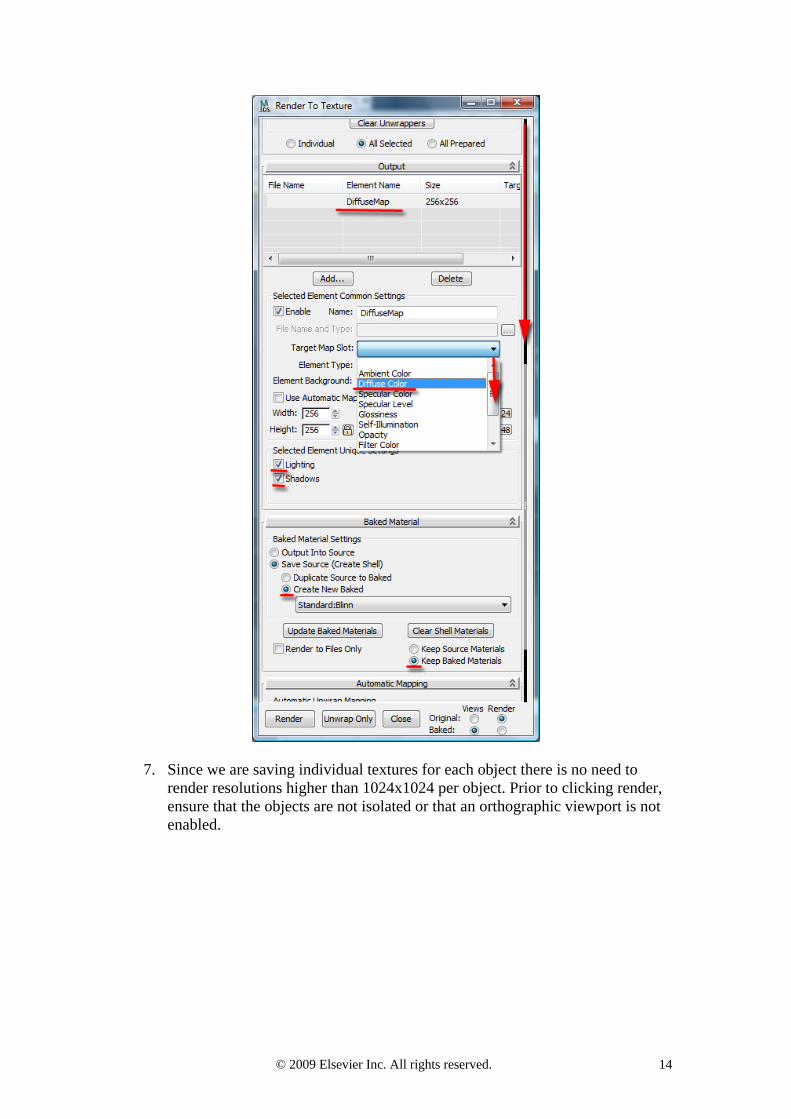
7. Since we are saving individual textures for each object there is no need to render resolutions higher than 1024x1024 per object. Prior to clicking render, ensure that the objects are not isolated or that an orthographic viewport is not enabled.
© 2009 Elsevier Inc. All rights reserved. 14

8. While the objects are still selected in the scene, save the selection as a named selection set, Building to Bake, by typing and pressing enter on the named selection sets field of the main tool bar. Save the current .max file as :”...._ original”, due to the next step that will follow, and click Render.
© 2009 Elsevier Inc. All rights reserved. 15

Note: Each texture will be automatically named according to their respective object name, therefore ensure that each object has a unique name.
9. Once the rendering process starts, the “automatic flatten UVs” modifier will
be applied individually to all selected objects followed by rendering the baked texture of each selected object. If the render is coming out completely dark, it is probably due to the fact that an object is obstructing the whole scene or your .max file had become corrupt. If this is the case, simply open a fresh 3ds Max Design scene and merge in the relevant .max file.
10. Once the full process is finished, save the .max file as”..._ unwrapped”. You will later understand the reasons behind this. As previously mentioned, shockwave and other external applications, don’t recognize the automatic flatten USs, therefore we are simply going to save its coordinates settings to later use it with the Unwrap UVW modifier, which is recognized by most external applications. If you were to use the baked textures mainly for animation in 3ds Max Design, your job would now be complete, as 3ds Max Design has saved a Shell material containing both original and the newly baked material. To see the new Shell material while the objects are still
© 2009 Elsevier Inc. All rights reserved. 16

selected, simply open them in the material editor by double clicking on them from the Material/Map Browser.
11. Moreover, the shell material allows one to switch between the two modes (IE Original & Baked).With the baked material one can switch off the lights and the FG settings and still maintain the shadows and other baked rendering elements.
© 2009 Elsevier Inc. All rights reserved. 17

If you were to export the object/s to an external application, you would have to use the “unwrap UVW” modifier, the standard Max material and a *.jpg image to avoid artifacts.
12. To begin, isolate the selected objects.
Next, you will start saving the “Automatic Flatten UVs” modifier’s coordinates to use with “unwrap UVW” modifier.
© 2009 Elsevier Inc. All rights reserved. 18

13. Select one of the many objects that had been textured baked. In the modifier settings of the Automatic Flatten UVs modifier, click on the Edit button to open its coordinate parameters. The edit UVWs dialog box will open. Click on the File menu and on the dropdown list, choose the save UVs... selection to save it.
14. Select the location and save the *.uvw file. Ensure that the file name corresponds to the object’s name to keep things organized (i.e. ramp02.uvw ). Freeze the selected object and select the next.
© 2009 Elsevier Inc. All rights reserved. 19

15. Repeat the action with all remaining objects. Once finished, open the original file saved prior to baking the textures. In Photoshop, open the unwrapped *.tga files and saved them as *.jpg. If necessary create an action script in Photoshop to automatically convert the files.
16. Open the Material Editor and select an empty material slot. Click on the Material/Map Browser button, and choose the Standard material from the list.
17. In the Standard material parameters, lock the Ambient, Diffuse and Specular buttons. Click on the diffuse map button to load up the first bitmap. Select and load the 1st bitmap. Name the Material according to the bitmap name and assign it to the relevant object in the scene.
© 2009 Elsevier Inc. All rights reserved. 20

© 2009 Elsevier Inc. All rights reserved. 21

© 2009 Elsevier Inc. All rights reserved. 22

© 2009 Elsevier Inc. All rights reserved. 23
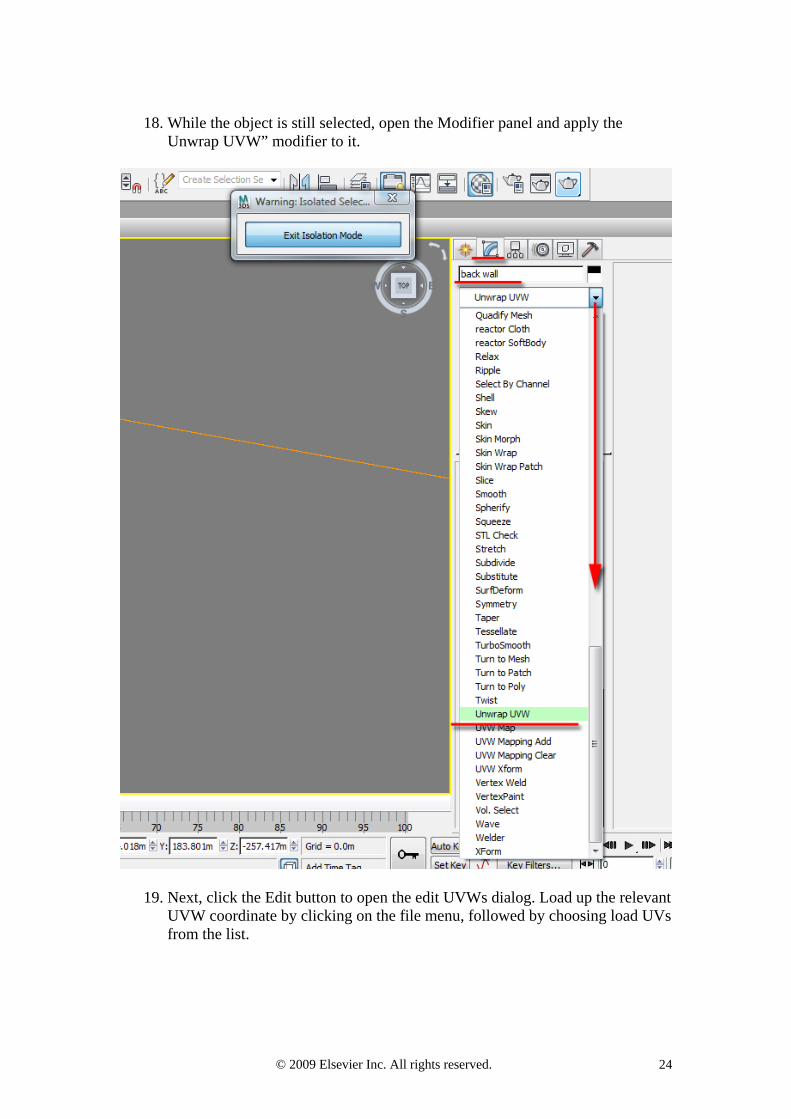
18. While the object is still selected, open the Modifier panel and apply the
Unwrap UVW” modifier to it.
19. Next, click the Edit button to open the edit UVWs dialog. Load up the relevant UVW coordinate by clicking on the file menu, followed by choosing load UVs from the list.
© 2009 Elsevier Inc. All rights reserved. 24

20. Locate and load the UVW coordinate previously saved.
© 2009 Elsevier Inc. All rights reserved. 25

21. To view how the bitmap fits on the new UVW coordinates, select the pick texture option from the bitmap list, followed by locating and selecting the relevant bitmap .
22. The bitmap should fit perfectly with the loaded UVW coordinate. Repeat these actions with all remaining objects.
© 2009 Elsevier Inc. All rights reserved. 26

23. Save out just the baked textured objects, in a separate 3ds Max Design scene(i.e save as selected). This is mainly to avoid exporting unselected objects. Open the previously saved .max file. Ensure that, the Environment map slot and the Exposure Control settings are empty. In addition, ensure that the Ambient slot is white.
© 2009 Elsevier Inc. All rights reserved. 27

24. Test render the scene.
© 2009 Elsevier Inc. All rights reserved. 28

25. While all objects are selected, click on Application Menu. In the dropdown
list, choose Export > Export Selected.
26. In the dialog which appears, choose the Shockwave 3d Scene Export (*.W3D) file format from the list; name it and click Save.
© 2009 Elsevier Inc. All rights reserved. 29

27. The Shockwave 3d Scene Export Options dialog will appear. Ensure that the
View after export function is enabled; the geometry and the texture values are set to 100, in the Compression Settings group.
© 2009 Elsevier Inc. All rights reserved. 30

28. Click export. If the file is not displaying as anticipated, try exporting them one
at time by isolating each object. In Adobe Director, bring in each file individually.
Alternatively, if you prefer to view the entire building in Max through the default Shockwave viewer, go back to the step prior to baking the textures or open again the original Max file named “building main start.max” ; select the respective objects in the scene; right click and choose to convert selected to editable mesh, on the pop up list menu. Isolate the selected objects; open the modify parameters and click on the Attach list button. Select all objects from the list and accept the default attach options dialog settings by clicking ok. Exit the Isolation mode, name the attached object as “building new_” and save out the selected object as a separate Max file (i.e save as selected), under the same name (i.e. building new_).
© 2009 Elsevier Inc. All rights reserved. 31

Next, texture bake the selected object with the correct settings as previously done however; this time around set the map size to about 6000x6000 pixels...and click render. Follow the procedures previously described by first saving out the UVWs coordinates from Automatic Flatten UVs and converting the *.tga unwrapped bitmap to *.jpg in Photoshop. Open the .max file recently saved and create a new Standard material in the Material Editor, and assign the unwrapped *.jpg bitmap to the diffuse slot as previously done. Apply the Unwrap UVW modifier to the attached object and load up the UVW coordinates previously saved. Export the object as a Shockwave 3d Scene Export (*.W3D) file format, as previously done. The shockwave viewer seems to display the objects more accurately now. The problem was that, the shockwave viewer in 3ds Max Design could not accurately display too many separate bitmaps and/or objects in the way Adobe Director does. To view the final Max file with the attached objects prior to exporting it to an external application, please open the Max file under the name” building main finish.max”
© 2009 Elsevier Inc. All rights reserved. 32