Embed Size (px)
Citation preview

Timex® Ironman®
SLEEK™ 250-LAP
FULL USER GUIDE

1
Timex® Ironman® SLEEK™ 250-LAP
User Manual
INTRODUCING YOUR SLEEK™ 250-LAP The SLEEK™ 250-LAP is easy to use. With TapScreen™ technology, take laps/splits manually without breaking stride. Audible alerts let you know when to speed up or slow down to keep on pace. Use the easy-to-read display to acquire workout data quickly.
FEATURES • TapScreen™ technology (tap watch face to start a workout or take a lap/split • no
interruption of workout • quickly activate or deactivate from several modes) • Target pacer (set a goal for minutes per lap • alert sounds upon taking a lap/split • adjust
your pace accordingly to reach your goal time) • Eat and drink timers (reminders to stay hydrated and watch your nutrition • alert sounds
in Chrono mode • separate timers for eating and hydration) • Chronometer (tap watch face to start or take a lap/split • time up to 99:59:59 • time up to
99 laps) • Interval Timer (two independent interval workouts • set up to 8 intervals per workout •
time up to 23:59:59 per interval • tap watch face to start or stop • custom interval labels indicate intensity level • manages 99 repetitions for you)
• Time and date (2 time zones • 12- or 24-hour time format • four date formats) • Review (store and review up to 5 Chrono or Interval Timer workouts • oldest workout
replaced with newest when memory is full • lock and unlock workouts) • Timer (tap watch face to start timing • up to 23:59:59 countdown • repeat timer or stop at
end) • Alarm (set up to 3 alarms • alarm frequency can be once, daily, weekly, on weekends, or
on specific days) • INDIGLO night-light with Night-Mode® (illuminate watch face for 4 seconds • Night-
Mode® illuminates screen with any button press)

2
BASIC OPERATION
INDIGLO® Press to turn on night-light, or hold to activate Night-Mode®. START/SPLIT/+ Start a workout or timer, take a lap/split, or increase values in settings screens. MODE Cycle through the watch modes, or move to the next field in settings screens. STOP/RESET/SET Stop a running workout or timer, reset a stopped timer, enter a settings screen, or exit a settings screen. TAPSCREEN™ When enabled, start a workout or timer, take a lap/split in Chrono mode, or stop an Interval timer or Timer. DISPLAY/TAP ON-OFF/- Scroll through data during a workout, lock or unlock workouts in Review mode, decrease values in settings screens, or enable the TapScreen™ before a workout. Hold to disable or enable the TapScreen™ during a workout.
DISPLAY ICONS (Margaret to check if we can paste icons)
w The chronometer is running.
H The timer is running.
d An alarm is active and will sound at the specified time.
The TapScreen™ is enabled.
l The workout you are viewing is locked and cannot be overwritten.
N The watch will beep at the top of every hour.
k Night-Mode™ is active.
INDIGLO®
START/SPLIT/+
DISPLAY/TAP ON-OFF/-
STOP/ RESET/SET
MODE
TAPSCREEN™

3
GETTING STARTED
SETTING THE TIME AND DATE Set the time and date, and the format in which they display. You can set two time zones. The primary time zone displays on the time of day screen. Press START/SPLIT/+ to view the alternate time zone, or hold START/SPLIT/+ to change primary time zones.
1. Hold SET until SET TIME displays. 2. Press START/SPLIT/+ and DISPLAY/TAP ON-OFF/- to choose the time zone to set. 3. Press MODE. The hours digits flash. 4. Press START/SPLIT/+ and DISPLAY/TAP ON-OFF/- to set hours, and then press
MODE to select minutes. 5. Continue pressing START/SPLIT/+, DISPLAY/TAP ON-OFF/-, and MODE to set
minutes, seconds, month, day, year, time format (12-hour or 24-hour), and date format (MMM-DD, DD.MMM, MM-DD-YY, or DD.MM.YY).
6. Press SET to exit.
SETTING YOUR TARGET PACE Target pace is a minutes per mile or kilometer goal you set for yourself. In Chrono mode, every lap/split you take is compared to this target, and an audible alert with onscreen message indicates whether to speed up, slow down, or maintain your current pace. There are several components of target pace:
SETTING FUNCTION
Target pace (TARGET PACE)
The number of minutes in which you want to complete each mile or kilometer.
Maximum target range (TARGET RANGE +)
The time by which your pace may exceed your target and still be ON TARGET.
Minimum target range (TARGET RANGE -)
The time by which your pace may fall short of your target and still be ON TARGET.
Target distance (TARGET DIST)
The distance you want to cover during a workout (optional).
1. Press MODE until SETUP displays. 2. Press START/SPLIT/+ until TARGET TIME displays. 3. Press SET. 4. Press START/SPLIT/+ and DISPLAY/TAP ON-OFF/- to select ON.
4
5. Continue pressing MODE, START/SPLIT/+, and DISPLAY/TAP ON-OFF/- to set target pace, target range, and target distance.
6. Press SET to exit. Your total time (target pace multiplied by target distance) displays.
CHRONO MODE Chrono mode times workouts and records data useful for measuring your progress toward your training goals.
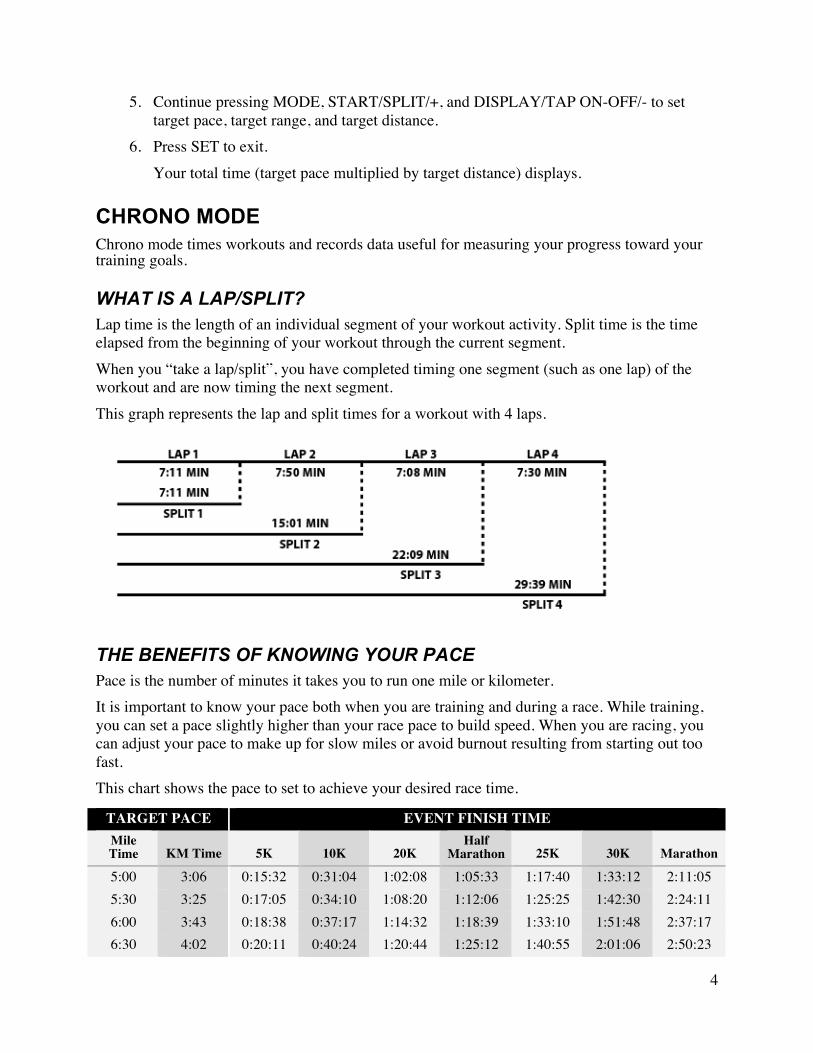
WHAT IS A LAP/SPLIT? Lap time is the length of an individual segment of your workout activity. Split time is the time elapsed from the beginning of your workout through the current segment. When you “take a lap/split”, you have completed timing one segment (such as one lap) of the workout and are now timing the next segment. This graph represents the lap and split times for a workout with 4 laps.
THE BENEFITS OF KNOWING YOUR PACE Pace is the number of minutes it takes you to run one mile or kilometer. It is important to know your pace both when you are training and during a race. While training, you can set a pace slightly higher than your race pace to build speed. When you are racing, you can adjust your pace to make up for slow miles or avoid burnout resulting from starting out too fast. This chart shows the pace to set to achieve your desired race time.
TARGET PACE EVENT FINISH TIME Mile Time KM Time 5K 10K 20K
Half Marathon 25K 30K Marathon
5:00 3:06 0:15:32 0:31:04 1:02:08 1:05:33 1:17:40 1:33:12 2:11:05 5:30 3:25 0:17:05 0:34:10 1:08:20 1:12:06 1:25:25 1:42:30 2:24:11 6:00 3:43 0:18:38 0:37:17 1:14:32 1:18:39 1:33:10 1:51:48 2:37:17 6:30 4:02 0:20:11 0:40:24 1:20:44 1:25:12 1:40:55 2:01:06 2:50:23

5
7:00 4:20 0:21:44 0:43:30 1:26:56 1:31:45 1:48:40 2:10:24 3:03:29 7:30 4:39 0:23:17 0:46:36 1:33:08 1:38:18 1:56:25 2:19:42 3:16:35 8:00 4:58 0:24:50 0:49:42 1:39:20 1:44:51 2:04:10 2:29:00 3:29:41 8:30 5:16 0:26:23 0:52:48 1:45:32 1:51:24 2:11:55 2:38:18 3:42:47 9:00 5:35 0:27:56 0:55:54 1:51:44 1:57:57 2:19:40 2:47:36 3:55:53 9:30 5:54 0:29:29 0:59:00 1:57:56 2:04:30 2:27:25 2:56:54 4:08:59
10:00 6:12 0:31:02 1:02:06 2:04:08 2:11:03 2:35:10 3:06:12 4:22:05 10:30 6:31 0:32:35 1:05:12 2:10:20 2:17:36 2:42:55 3:15:30 4:35:11 11:00 6:50 0:34:08 1:08:18 2:16:32 2:24:09 2:50:40 3:24:48 4:48:17 11:30 7:08 0:35:41 1:11:24 2:22:44 2:30:42 2:58:25 3:34:06 5:01:23 12:00 7:27 0:37:14 1:14:30 2:28:56 2:37:15 3:06:10 3:43:24 5:14:29 12:30 7:46 0:38:47 1:17:36 2:35:08 2:43:48 3:13:55 3:52:42 5:27:35 13:00 8:04 0:40:20 1:20:42 2:41:20 2:50:21 3:21:40 4:02:00 5:40:41 13:30 8:23 0:41:53 1:23:48 2:47:32 2:56:54 3:29:25 4:11:18 5:53:47 14:00 8:41 0:43:26 1:26:54 2:53:44 3:03:27 3:37:10 4:20:36 6:06:53
HOW DOES THE TARGET PACER WORK? When you take a lap/split, the watch compares your current pace with the target pace you have set, and lets you know whether your pace is too fast, too slow, or on target. In Chrono mode, the watch will take a lap/split based on your AUTO-SPLIT settings (or use the TapScreen™, if enabled). Your pace for the current lap/split displays, compared with your target pace. T shows the difference between your current and target pace.
The watch emits an audible alert indicating how your pace compares with your target. If you are faster than the target, the watch emits two sets of four quick beeps. If you are slower than the target, the watch emits two slow beeps. If you are within the target range, the watch beeps once.
LAP 1 T 1.01
FAST
LAP 1 T 1.25
SLOW
LAP 1 T 0 ON PACE

6
Adjust your pace according to these tones and messages so you can achieve your goal times without burning out too early.
WORKOUT DATA TRACKED IN CHRONO MODE This data is captured and saved for each workout.
TOTAL TIME – elapsed time of all laps in the workout LAPS STORED – total number of laps in the workout BEST LAP – The time of the fastest lap LAP <#> – time, split time, NOTE: If you set the target pacer, the target pace and whether the lap was fast, slow, or on target is also saved.
If you set the target pacer, these data will also be tracked: TARGET PACE – the minutes per mile/km goal you set TARGET DIST – the distance goal you set for the workout TARGET TOTAL – your goal for the total time to complete the workout (target distance
times target pace) TOTAL <FAST/SLOW/ON PACE> – indicates whether you were faster or slower than
your target total, and by how much NOTE: To track and store all workout data, make sure the target pace is set. See SETTING SYSTEM PREFERENCES. .
STARTING, STOPPING, AND SAVING A WORKOUT 1. Press MODE until CHRONO displays. 2. Tap the watch face or press START.
The chronometer begins timing. Press DISPLAY to scroll through data for the workout currently running.
3. Tap the watch face or press SPLIT to take a lap/split.

7
If you have set a target pace, the watch displays a comparison between your current pace and the target, and beeps to let you know to speed up, slow down, or maintain your pace.
4. Press STOP to stop the workout. 5. Press RESET when workout is stopped to select SAVE or ERASE. 6. Hold RESET to reset the chronometer and save or erase the workout data.
If you selected SAVE in step 5, all workout data is saved. If you already have 5 workouts in memory, the oldest unlocked workout is deleted and the current workout is saved. See VIEWING CHRONO WORKOUTS for instructions on viewing this data. If you selected ERASE in step 5, the workout is erased but not saved.
NOTE: To preserve battery life, make sure to turn off the chronometer when you are finished with your workout.
INTERVAL TIMER MODE Interval workouts are powerful tools that let you target specific qualities (like speed, endurance, threshold, and more) and train for that quality intensely. The structure of interval workouts can be difficult to keep track of as you devote your energy into the actual training. Interval Timer mode helps you make more effective use of interval workouts by keeping track of interval intensity and repetitions for you.
BENEFITS OF INTERVAL TRAINING Intense periods of activity interspersed with recovery periods of lesser activity help you train more intensely and for longer periods. Combining aerobic and anaerobic activity in this way helps you:
• Target workouts for improving speed, cardiovascular and muscular endurance, threshold, or other qualities
• Speed up your body’s processing of lactic acid • Reduce the risk of injury
SETTING UP INTERVAL WORKOUTS You can customize 2 separate interval workouts. In this way, you can easily target different qualities without setting up a new workout every time. For example, you could set up one interval workout to train for endurance, and the other to train for speed. Each workout can contain up to 8 intervals and can time up to 24 hours. You can choose a name for each interval, and this name helps you stay on track as your workout progresses; a quick look at the interval name on the screen reminds you of the intensity at which you should be running, so you can focus on running instead of the order of your workout. Each interval workout can be set to repeat up to 99 times. This expands the complexity of the workouts you can design, and the watch keeps track of the number of repetitions you have completed so you don’t have to count them yourself.
1. Press MODE until INT TIMER displays. 2. Press SET.

8
3. Press START/SPLIT/+ and DISPLAY/TAP ON-OFF/- to select the workout to set up, and then press MODE.
4. Press STAR/SPLIT/+ and DISPLAY/TAP ON-OFF/- to set number of times to repeat the intervals, and then press MODE to begin setting up intervals.
5. Press START/SPLIT/+ and DISPLAY/TAP ON-OFF/- to choose a name for the interval, and then press MODE.
6. Press START/SPLIT/+, DISPLAY/TAP ON-OFF/-, and MODE to set the time for the interval.
7. If you want to set up an additional interval, press MODE until the interval number at the top of the display flashes, press START/SPLIT/+ to select the next interval, and then press MODE to begin setting the time. NOTE: You can also press DISPLAY/TAP ON-OFF/- and MODE to select an interval you already configured if you need to make changes.
8. Repeat steps 5 through 7 until all intervals are set. You can set up to 8 intervals for each workout.
9. Press STOP/RESET/SET. You should set up interval workouts to train for a specific quality. To train for endurance, for example, you might set up a classic 1-mile repeat workout: 3 to 6 repetitions of one fast interval (about half-marathon pace) followed by a 1-minute recovery period. Or, to train for speed, you might run sets of 4 x 400m, using all 8 intervals in the workout: 3 repetitions consisting of four fast intervals (at slightly more than your race pace), each followed by a 2-minute recovery period. By working with the 8 intervals and up to 99 repetitions, you can design an interval workout to suit virtually any training program.
WORKOUT DATA TRACKED IN INTERVAL TIMER MODE This data is captured and saved for each workout.
TOTAL TIME – elapsed time of all repetitions in the workout REPS DONE – total number of repetitions performed <INTERVAL NAME> – Name of the intensity of the interval
STARTING, STOPPING, AND SAVING AN INTERVAL WORKOUT 1. Press MODE until INT TIMER displays. 2. Press START.
The first interval begins timing. The repetition number and interval name display at the top of the screen.
3. When one interval ends, an alert sounds prompting you to begin the next interval. The name and timer for the new interval display.

9
4. Press STOP to stop the workout. 5. Press RESET when workout is stopped to select SAVE or ERASE. 6. Hold RESET to reset the chronometer and save or erase the workout data.
If you selected SAVE in step 5, all workout data is saved. If you already have 5 workouts in memory, the oldest unlocked workout is deleted and the current workout is saved. If you selected ERASE in step 5, the workout is erased but not saved.
REVIEW MODE You can review workouts you have saved to see how your workouts improve over time. The SLEEK™ 250 stores up to 5 workouts. If you save a workout when there are already 5 workouts in memory, the oldest unlocked workout is replaced with your most recent one. Your workouts display from most recent to oldest, and the time and date of each workout displays in the list. An icon also displays so you know if the workout was a Chrono mode workout or an Interval Timer workout: w indicates Chrono mode, H indicates Interval Timer.
VIEWING CHRONO WORKOUTS You can view all the data tracked in Chrono mode (see WORKOUT DATA TRACKED IN CHRONO MODE for a list), and data specific to each lap.
1. Press MODE until REVIEW displays. 2. Press START/SPLIT/+ to select a Chrono workout to view, and then press
STOP/RESET/SET to view the data for that workout. 3. Press START/SPLIT/+ and DISPLAY/TAP ON-OFF/- to scroll through the workout
data. 4. Press STOP/RESET/SET to go back to the list of saved workouts. 5. Press MODE to exit.
VIEWING INTERVAL WORKOUTS You can view all the data tracked in Interval Timer mode.
1. Press MODE until REVIEW displays.
10
2. Press START/SPLIT/+ to select an Interval Timer workout to view, and then press STOP/RESET/SET to view the data for that workout.
3. Press START/SPLIT/+ and DISPLAY/TAP ON-OFF/- to scroll through the workout data.
4. Press STOP/RESET/SET to stop viewing workouts. 5. Press MODE to exit.
LOCKING AND UNLOCKING WORKOUTS Lock a workout to prevent it from being overwritten by a new workout.
1. Press MODE until REVIEW displays. 2. Press START/SPLIT/+ to select an unlocked workout. 3. Hold DISPLAY for about two seconds to lock the workout. The l icon appears and the
workout cannot be overwritten by a new workout. Repeat this process on a locked workout to unlock it. NOTE: If all 5 saved workouts are locked, you will not be able to save any more workouts. You can still start Chrono and Interval Timer workouts, but new workout data is erased when you reset the chronometer or interval timer.
TIMER MODE Use Timer mode to countdown a fixed event time. You can set the countdown to continuously repeat (REPEAT), or stop at the end of the countdown (STOP).
SETTING THE TIMER 1. Press MODE until TIMER displays. 2. Press SET. 3. Press START/SPLIT/+ and DISPLAY/TAP ON-OFF/- to set hours, and then press
MODE to select minutes. 4. Continue pressing START/SPLIT/+, DISPLAY/TAP ON-OFF/-, and MODE to set
minutes, seconds, and the timer end behavior. 5. Press SET to exit.
STARTING, STOPPING, AND RESETTING THE TIMER 1. Press MODE until TIMER displays.
2. Press START or TAP to start the timer. The H icon is lit when the timer is running. The watch beeps when the timer has run out.
3. To stop the timer before it has run out, tap the watch face or press STOP. 4. When the timer is stopped, hold RESET to reset it. NOTE: No workout data is saved when you reset the timer. Use Chrono or Interval Timer mode to record data for review. See CHRONO MODE and INTERVAL TIMER MODE for instructions on timing Chrono or Interval Timer workouts.

11
ALARM MODE You can set up to 3 alarms to remind you of upcoming events. You can set these alarms to sound once, daily, weekly, on weekends, or only on specific days.
SETTING THE ALARMS 1. Press MODE until ALARM displays. 2. Press DISPLAY/TAP ON-OFF/- to choose the alarm to set. 3. Press SET. 4. Press START/SPLIT/+ and DISPLAY/TAP ON-OFF/- and to set hours, and then press
MODE. 5. Continue pressing START/SPLIT/+, DISPLAY/TAP ON-OFF/-, and MODE to set
minutes, AM/PM, and frequency. 6. Press SET to exit.
TURNING THE ALARM ON AND OFF 1. Press MODE until ALARM displays. 2. Press DISPLAY/TAP ON-OFF/- to choose the alarm to set. 3. Press START/SPLIT/+ to turn the alarm on or off.
When the d icon displays, the alarm is armed and will sound at the specified time and frequency.
SETUP MODE Setup mode is where all global settings for the watch are configured.
SETTING SYSTEM PREFERENCES
You can choose from several settings to determine how you interact with the SLEEK™ 250 and how the watch collects and displays data.
Tap force – Determines how hard you must tap the watch face to start a timer or take a lap/split. Select from LIGHT, MEDIUM, or HARD. If you experience accidental laps/splits if the watch is bumped, increase the tap force. You can also turn the TapScreen™ OFF.
Units – Choose to display measurements in IMPRL units (miles, feet, inches, pounds) or METRIC units (kilometers, centimeters, kilograms).
Hourly chime – When hourly chime is ON, the N icon displays, and the watch will beep at the top of every hour.
Button beep – Choose BEEP ON to enable a beep when you press a button on the watch or tap the watch face. Choose BEEP OFF to disable this feature. 1. Press MODE until SETUP displays. 2. Press START/SPLIT/+ to select SYSTEM.

12
3. Press SET. 4. Press MODE to select the system preference to set, and press START/SPLIT/+ or
DISPLAY/TAP ON-OFF/- to choose the setting value. 5. Press SET to exit.
SETTING YOUR TARGET PACE Set your target pace so you can compare your current pace with your goal when you take a lap/split in Chrono mode.
SETTING THE HYDRATION TIMER Staying hydrated is key to a successful workout; if you get dehydrated, your performance will suffer, the length of your workout will decrease, and you are more susceptible to injury. The drink timer reminds you when it is time to hydrate. When a Chrono workout is running, a message (accompanied by audible alert) reminding you to drink displays after the specified time.
1. Press MODE until SETUP displays. 2. Press START/SPLIT/+ to select DRINK TIMER. 3. Press SET. 4. Press START/SPLIT/+ or DISPLAY/TAP ON-OFF/- to select ON, and then press
MODE. 5. Continue pressing START/SPLIT/+, DISPLAY/TAP ON-OFF/-, and MODE to set the
drink timer. 6. Press SET to exit.
SETTING THE NUTRITION TIMER Good nutrition gives you the energy you need for extended workouts. The eat timer reminds you of when it is time to eat. When a Chrono workout is running, a message (accompanied by an audible alert) reminding you to eat displays after the specified time.
1. Press MODE until SETUP displays. 2. Press START/SPLIT/+ to select EAT TIMER. 3. Press SET. 4. Press START/SPLIT/+ or DISPLAY/TAP ON-OFF/- to select ON, and then press
MODE. 5. Continue pressing START/SPLIT/+, DISPLAY/TAP ON-OFF/-, and MODE to set the
EAT timer. 6. Press SET to exit.
INDIGLO® NIGHT-LIGHT FEATURE WITH NIGHT-MODE® INDIGLO® technology illuminates the entire watch face in low-light conditions.

13
1. Press INDIGLO® to activate the night-light for several seconds. 2. While night-light is on, press any button to keep the light on for an additional few
seconds. 3. Hold INDIGLO® for several seconds to activate Night-Mode®. While Night-Mode® is
active, tapping the watch face or pressing any button turns on the night-light for several seconds.
While Night-Mode® remains active for 8 hours. The k icon displays when Night-Mode®
is active. To turn Night-Mode® off before 8 hours has elapsed, hold INDIGLO® again for several seconds.
BATTERY REPLACEMENT If the watch display becomes difficult to read, the battery should be changed. Timex strongly recommends that a retailer or jeweler replace the battery. The battery type is stamped on the back of the watch. DO NOT DISPOSE OF BATTERY IN FIRE. DO NOT RECHARGE. KEEP LOOSE BATTERIES AWAY FROM CHILDREN.
WATER RESISTANCE The SLEEK™ 250 is water resistant to 100 meters. Water-Resistance Depth p.s.i.a.* Water Pressure Below Surface 100m/328ft 160 *pound per square inch absolute WARNING: TO MAINTAIN WATER RESISTANCE, DO NOT PRESS ANY BUTTONS UNDER WATER.
Watch is water-resistant only if lens, push buttons, and case remain intact. Watch is not a dive watch and should not be used for diving. Rinse watch with fresh water after exposure to salt water.

Thank you for purchasing your Timex® waTch.
ExtEndEd Warrantyavailable in U.S. only. Extend your warranty for an additional 4 years from date of purchase for $5. You can pay with AMEX, Discover, Visa or MasterCard by calling 1 800-448-4639 during normal business hours. Payment must be made within 30 days of purchase. Name, address, telephone number, purchase date, and 5-digit model number required. You can also mail a check for $5 to: Timex Extended Warranty, P.O. Box 1676, Dept. EF, Little Rock, AR 72203. Please read instructions carefully to understand how to operate your Timex® watch. Visit www.timex.com/manuals to download a full and detailed user manual.
Timex® ironman® sleek™ 250-lap Quick sTarTFEWER DISTRACTIONS FOR BETTER WORKOUTSPreserve momentum and avoid breaking your stride. Use the TapScreen technology to take a lap/split without having to slow down or take your eyes off the road. You can set the SLEEK™ 250-Lap Watch with your target pace and audible distinct alerts will let you know when to speed up or slow down to stay on pace.
geTTing sTarTedSet up the SLEEK™ 250 watch with your goals and personal settings. BUTTON FUNCTIONSUse the buttons on the watch to set preferences and time workouts. IndIGLO® night-light or button Press to turn on night-light, or hold to activate Night-Mode® feature. Start/SPLIt/+ Start a workout or timer, take a lap/split, or increase values in settings screens. MOdE Cycle through the watch modes, or move to the next field in settings screens. StOP/rESEt/SEt Stop a running workout or timer, reset a stopped time, or enter and exit settings screens. taPSCrEEn™ tECHnOLOGy When enabled, start a workout or timer, take a lap/split in Chrono mode, or stop an interval timer or timer. dISPLay/taP On-OFF/- Scroll through data during a workout, decrease values in settings screens, or enable the TapScreen™ feature before a workout. SETTING THE TIME AND DATESet the time, date, and the format in which time and date display.
1. Hold SET until SET TIME displays.2. Press START/SPLIT/+ and DISPLAY/TAP ON-OFF/- to choose the time zone to set. 3. Press MODE. 4. Continue pressing START/SPLIT/+, DISPLAY/TAP ON-OFF/-, and MODE to set time, date, time format,
and date format. 5. Press SET to exit.
SETTING YOUR TARGET PACESet your goal for workouts in minutes per mile/km.
SEttInG FUnCtIOn
Target pace (TARGET PACE) The number of minutes in which you want to complete each mile or kilometer.
Maximum target range (TARGET RANGE +)
The time by which your pace may exceed your target and still be considered ON TARGET.
Minimum target range (TARGET RANGE -) The time by which your pace may fall short of your target and still be considered
ON TARGET.
Target distance(TARGET DIST) The distance you want to cover during a workout (optional).
1. Press MODE until SETUP displays. 2. Pres START/SPLIT/+ until TARGET TIME displays. 3. Press SET. 4. Press START/SPLIT/+ and DISPLAY/TAP ON-OFF/- to select ON.5. Continue pressing MODE, START/SPLIT/+, and DISPLAY/TAP ON-OFF/- to set target pace, target range,
and target distance. 6. Press SET to exit. Your total time (target pace multiplied by target distance) displays.
chrono on The goUse Chrono mode to track your lap, split and delta times to train more efficiently. To start the chrono just tap the watch face. To take a lap/split, tap again and your data will be displayed for five seconds meanwhile the chronograph continues running. Press stop to stop the workout and press again to find the options to save or erase.If your target pacer is on, when you take a split the watch compares your current pace with your target pace and distinct alerts will advise to adjust or keep the running pace. Slow beeps indicate you’re behind pace, a single beep lets you know you’re on pace, and fast beeps indicate you’re ahead. An onscreen message tells you just how far ahead or behind you are.
TARGET8’ LAP/
START
ACTUAL
LAP 1/MILE 1 10’00
-2’00 (slow)
LAP 3/MILE 3 7’00
+1’00
(fast)
LAP 2/MILE 2 8’00
(on time)
FINISH
(on pace) (fast)(slow)
MILE
inTerval TrainingUse the Interval Timer mode to help you keep track of complex interval workouts. DESIGNING YOUR INTERVAL WORKOUT TO SUIT YOUR NEEDSYou can set up 2 separate interval workouts, each with up to 8 intervals. Each interval can time up to 24 hours, and you can choose a name for each interval to help you know what activity you should be performing.You can set up your interval workouts to repeat when a set of intervals is complete, expanding the complexity of workouts the watch can manage for you. The watch keeps track of repetitions for you, and with customizable names for the intervals you always know how intense your run should be at a given time.
1. Press MODE until INT TIMER displays. 2. Press SET. 3. Press START/SPLIT/+ and DISPLAY/TAP ON-OFF/- to select the workout to set up, and then press MODE. 4. Press START/SPLIT/+ and DISPLAY/TAP ON-OFF/- to set number of times to repeat the intervals, and then
press MODE to begin setting up intervals. 5. Press START/SPLIT/+ and DISPLAY/TAP ON-OFF/- to choose a name for the interval, and then press MODE. 6. Press START/SPLIT/+, DISPLAY/TAP ON-OFF/-, and MODE to set the time for the interval. 7. If you want to set up an additional interval, press MODE until the interval number at the top of the
display flashes, press START/SPLIT/+ to select the next interval, and then press MODE to begin setting the time.
nOtE: You can also select an interval you already configured if you need to make changes. 8. Repeat steps 5 through 7 until all intervals are set. You can set up to 8 intervals for each workout. 9. Press STOP/RESET/SET. Follow these steps to time an interval workout. 1. Press MODE until INT TIMER displays. 2. Press START. 3. When one interval ends, an alert sounds prompting
you to begin the next interval. The name and time for the new interval display.
4. Press STOP to stop the workout. 5. Press RESET when workout is stopped to select SAVE
or ERASE. 6. Hold RESET to reset the chronometer and save or erase the workout data. If you selected SAVE in step 5, all workout data is saved. If you selected ERASE in step 5, the workout is erased but not saved.
merci d’avoir acheTé voTre monTre Timex®.
GarantIE ÉtEndUEProposée aux États-Unis seulement. La garantie peut être prolongée pour une période additionnelle de 4 ans à compter de la date d’achat pour la somme de 5 $. Vous pouvez effectuer ce paiement avec AMEX, Discover, Visa ou MasterCard en composant le 1-800-448-4639 durant les heures normales d’ouverture. Le paiement doit être effectué dans les 30 jours qui suivent l’achat. Indiquer les nom, adresse, numéro de téléphone, date d’achat et numéro de modèle à 5 chiffres. Il est également possible d’envoyer un chèque de 5 $ US par courrier à : Timex Extended Warranty, P.O. Box 1676, Dept. EF, Little Rock, AR 72203.Lire les instructions attentivement pour bien comprendre le fonctionnement de cette montre Timex®. Consultez le site www.timex.com/manuals pour télécharger un manuel d’utilisateur complet et détaillé.
guide de démarrage rapide Timex® ironman® sleek™ 250-lapMOINS DE DISTRACTIONS POUR DE MEILLEURES SÉANCES D’EXERCICEPréservez votre élan et votre foulée. Utilisez la technologie TapScreen pour prendre un tour/temps intermédiaire sans avoir à ralentir ni avoir besoin de quitter les yeux de la route. Il est possible de régler la montre SLEEK™ 250-Lap avec l’allure cible et donner des alarmes sonores distinctes pour indiquer quand accélérer ou ralentir pour rester à l’allure souhaitée.
mise en marcheConfigurez la montre SLEEK™ 250 avec vos paramètres et objectifs personnels. FONCTIONS DES BOUTONSUtilisez les boutons de la montre pour configurer les préférences et chronométrer les séances d’exercice. Veilleuse IndIGLO® ou Bouton Appuyez pour allumer la veilleuse ou maintenez pour activer la fonction Night-Mode®. Start/SPLIt/+Démarrez une séance d’exercice ou la minuterie, prenez un tour/temps intermédiaire ou augmentez les valeurs dans les écrans de paramètres. MOdE Faites défiler les modes de la montre ou passez au champ suivant dans les écrans de paramètres. StOP/rESEt/SEt Arrêtez une séance d’exercice ou une minuterie en cours, réinitialisez un temps arrêté ou entrez dans et quittez les écrans de paramètres. tECHnOLOGIE taPSCrEEn™ Quand activé, démarrez une séance d’exercice ou une minuterie, prenez un tour/temps intermédiaire en mode Chrono ou arrêtez une minuterie par intervalles ou une minuterie. dISPLay/taP On-OFF/- Faites défiler les données pendant une séance d’exercice, diminuez des valeurs dans les écrans de paramètres, ou activez/désactivez la fonction TapScreen™ avant une séance d’exercice. RÉGLAGE DE L’HEURE ET DE LA DATERéglez l’heure, la date et le format auxquels l’heure et la date s’affichent.
1. Maintenez SET jusqu’à affichage de SET TIME.2. Appuyez sur START/SPLIT/+ et DISPLAY/TAP ON-OFF/- pour choisir le fuseau horaire à régler. 3. Appuyez sur MODE. 4. Continuez à appuyer sur START/SPLIT/+, DISPLAY/TAP ON-OFF/- et MODE pour régler l’heure, la date,
le format d’heure et le format de date. 5. Appuyez sur SET pour quitter.
RÉGLAGE DE VOTRE ALLURE CIBLERéglez votre objectif pour les séances d’exercice en minutes par mile/km.
ParaMÈtrE FOnCtIOn
Allure cible (ALLURE CIBLE) Le nombre de minutes dans lequel vous souhaitez terminer chaque mile ou kilomètre.
Plage cible maximum (TARGET RANGE +)
Le temps auquel votre allure peut excéder votre cible et toujours être considérée SUR CIBLE.
Plage cible minimum (TARGET RANGE -) Le temps auquel votre allure peut être inférieure à votre cible et toujours être
considérée SUR CIBLE.
Distance cible (TARGET DIST/DIST CIBLE) La distance que vous souhaitez couvrir pendant une séance d'exercice (en option).
1. Appuyez sur MODE jusqu’à affichage de SETUP [Configuration]. 2. Appuyez sur START/SPLIT/+ jusqu’à affichage de TARGET TIME [TEMPS CIBLE]. 3. Appuyez sur SET (RÉGLER). 4. Appuyez sur START/SPLIT/+ et DISPLAY/TAP ON-OFF/- pour sélectionner ON.5. Continuez à appuyer sur MODE, START/SPLIT/+ et DISPLAY/TAP ON-OFF/- pour régler l’allure cible, la plage
cible et la distance cible. 6. Appuyez sur SET pour quitter. Votre temps total (allure cible multipliée par distance cible) s’affiche.
chrono insTanTanéUtilisez le mode Chrono pour suivre vos temps au tour, intermédiaire et delta pour vous entraîner plus efficacement. Pour démarrer le chrono, tapez sur le cadran de la montre. Pour marquer un temps au tour/intermédiaire, tapez à nouveau et vos données s’afficheront durant 5 secondes, pendant ce temps le chronographe reste en marche. Appuyer sur stop pour arrêter la séance et appuyez à nouveau pour trouver les options de sauvegarde ou d’effacement.Si votre moniteur d’allure est activé, lorsque vous prenez un temps intermédiaire, la montre compare votre allure actuelle avec votre allure cible, et des alertes distinctes vous conseilleront d’ajuster ou de maintenir l’allure de course. Les bips lents indiquent que vous êtes en-deçà de votre allure cible, un simple bip vous laisse savoir que vous allez à la bonne allure et un bip rapide lorsque vous êtes au-delà de votre allure cible. Un message à l’écran vous indique de combien vous êtes en-deçà ou au-delà de votre allure.
CIBLE 8’ TOUR/MILE
RÉEL
TOUR 1/MILE 110’00
-2’00 (lent)
(bonne allure)(lent)
TOUR 2/MILE 28’00
(à temps)
TOUR 3/MILE 37’00
+1’00 (rapide)
TERMINER
(rapide)
DÉMARRER
exercice par inTervallesUtilisez le mode Minuterie par intervalles pour vous permettre de suivre vos séances d’exercice à intervalles complexes. CONCEPTION DE VOTRE SÉANCE D’EXERCICE À INTERVALLES POUR CONVENIR À VOS BESOINSVous pouvez configurer jusqu’à 2 séances d’exercice à intervalles séparées, chacune avec un maximum de 8 intervalles. Chaque intervalle peut mesurer jusqu’à 24 heures et vous pouvez choisir un nom pour chaque intervalle pour vous permettre de savoir quelle activité vous devriez effectuer.Vous pouvez configurer vos séances d’exercice à intervalles à répéter lorsqu’une série d’intervalles est terminée, élargissant la complexité des séances d’exercice que la montre peut gérer pour vous. La montre effectue un suivi des répétitions pour vous et, avec des noms personnalisables pour les intervalles, vous connaissez toujours l’intensité de votre course à tout moment.
1. Appuyez sur MODE jusqu’à affichage de INT TIMER (minuterie par intervalles). 2. Appuyez sur SET (RÉGLER). 3. Appuyez sur START/SPLIT/+ et DISPLAY/TAP ON-OFF/- pour sélectionner la séance d’exercice à configurer,
puis appuyez sur MODE. 4. Appuyez sur START/SPLIT/+ et DISPLAY/TAP ON-OFF/- pour sélectionner le nombre de fois à répéter les
intervalles, puis appuyez sur MODE pour conserver à configurer les intervalles. 5. Appuyez sur START/SPLIT/+ et DISPLAY/TAP ON-OFF/- pour choisir un nom pour l’intervalle, puis appuyez
sur MODE. 6. Appuyez sur START/SPLIT/+, DISPLAY/TAP ON-OFF/- et MODE pour régler le temps pour l’intervalle. 7. Si vous souhaitez configurer un intervalle additionnel, appuyez sur MODE jusqu’à ce que le nombre
d’intervalles clignote en haut de l’affichage, appuyez sur START/SPLIT/+ pour sélectionner l’intervalle suivant puis appuyez sur MODE pour commencer à régler le temps.
rEMarQUE : Vous pouvez également sélectionner un intervalle que vous avez déjà configuré si vous devez effectuer des modifications.
8. Répétez les étapes 5 et 7 jusqu’à ce que tous les intervalles soient réglés. Vous pouvez configurer jusqu’à 8 intervalles pour chaque séance d’exercice.
9. Appuyez sur STOP/RESET/SET. Suivez ces étapes pour chronométrer une séance d’exercice à intervalles. 1. Appuyez sur MODE jusqu’à affichage de INT TIMER
(minuterie par intervalles). 2. Appuyer sur START. 3. Lorsqu’un intervalle se termine, un alerte retentit
vous invitant à commencer l’intervalle suivant. Le nom et le temps pour le nouvel intervalle s’affichent.
4. Appuyez sur STOP pour arrêter la séance d’exercice. 5. Appuyez sur RESET lorsque la séance d’exercice est arrêtée pour sélectionner SAVE [SAUVEGARDER] ou
ERASE [EFFACER].
gracias por la compra de su reloj Timex®.
Garantía ExtEndIdaDisponible solamente en EUA. Extienda su garantía por 4 años más a partir de la fecha de compra por $5. Puede pagar con AMEX, Discover, Visa o MasterCard llamando al 1 800-448-4639 en horas normales de oficina. El pago deberá efectuarse dentro de los 30 días siguientes a la fecha de compra. Indique el nombre, dirección, número de teléfono, fecha de compra y número de modelo (5 dígitos). También puede enviar un cheque de $5 por correo a: Timex Extended Warranty, P.O. Box 1676, Dept. EF, Little Rock, AR 72203.Por favor lea atentamente las instrucciones para saber cómo funciona su reloj Timex®. Visite www.timex.com/manuals para descargar el manual del usuario completo y detallado.
guía rápida del reloj Timex® ironman® sleek™ 250-lapPOCAS DISTRACCIONES PARA MEJORES EJERCICIOSConserve el impulso y evite interrumpir el ritmo. Use la tecnología TapScreen para tomar una vuelta o fracción sin tener que frenar o perder de vista la carretera. Puede programar el reloj SLEEK™ de 250 vueltas con su ritmo previsto y alertas sonoras diferenciadas le avisarán cuándo acelerar o frenar para mantener el paso.
para iniciarAjuste el reloj SLEEK™ 250 a su configuración y metas personales. FUNCIONES DE LOS BOTONESUse los botones del reloj para establecer preferencias y ejercicios de tiempo. Luz nocturna o botón IndIGLO®
Pulse para activar la luz nocturna o mantenga para activar la función Night-Mode®. Start/SPLIt/+ (inicio/sección/+) Inicie un ejercicio o un temporizador, tome una vuelta/sección o aumente los valores en las pantallas de configuración. MOdE (modo) Recorra los modos del reloj, o cambie al siguiente campo en las pantallas de configuraciones. StOP/rESEt/SEt (parar/reiniciar/fijar) Detenga un ejercicio o un temporizador en curso, reinicie un temporizador detenido o ingrese y salga de las pantallas de configuración. tECnOLOGía taPSCrEEn™
Cuando está activada, inicia un ejercicio o un temporizador, toma una vuelta/sección o detiene un temporizador o temporizador de intervalo. dISPLay/taP On-OFF/- (pantalla/encender apagar tap/-) Recorre los datos durante un ejercicio, disminuye los valores en las pantallas de ajustes o activa la herramienta TapScreen™ antes de un ejercicio. CONFIGURACIÓN DE HORA Y FECHAAjuste la hora, fecha y el formato en que aparecen.
1. Pulse y mantenga SET hasta que aparezca SET TIME.2. Pulse START/SPLIT/+ y DISPLAY/TAP ON-OFF/- para elegir el huso horario que se ajusta. 3. Pulse MODE. 4. Siga pulsando START/SPLIT/+, DISPLAY/TAP ON-OFF/- y MODE para ajustar la hora, fecha, formato de hora
y formato de fecha. 5. Pulse SET para salir.
CONFIGURACIÓN DE SU PASO METAEstablezca su meta para ejercicios en minutos por milla/km.
COnFIGUraCIÓn FUnCIÓn
Paso deseado (TARGET PACE) El número de minutos en los que desea completar cada milla o kilómetro.
Intervalo máximo de la meta (TARGET RANGE +)
El tiempo en que su paso puede superar el deseado y aún considerarse ON TARGET (en la meta).
Intervalo mínimo de la meta (TARGET RANGE -) El tiempo en que su paso puede estar por debajo del deseado y aún considerarse ON
TARGET (en la meta).
Distancia deseada(TARGET DIST) La distancia que desea cubrir durante un ejercicio (opcional).
1. Pulse MODE hasta que aparezca SETUP. 2. Pulse START/SPLIT/+ hasta que aparezca TARGET TIME (tiempo deseado). 3. Pulse SET. 4. Pulse START/SPLIT/+ y DISPLAY/TAP ON-OFF/- para elegir ON (encendido).5. Siga pulsando MODE, START/SPLIT/+ y DISPLAY/TAP ON-OFF/- para ajustar el paso deseado, el intervalo
de la meta y la distancia deseada. 6. Pulse SET para salir. Aparece su tiempo total (paso deseado multiplicado por la distancia deseada).
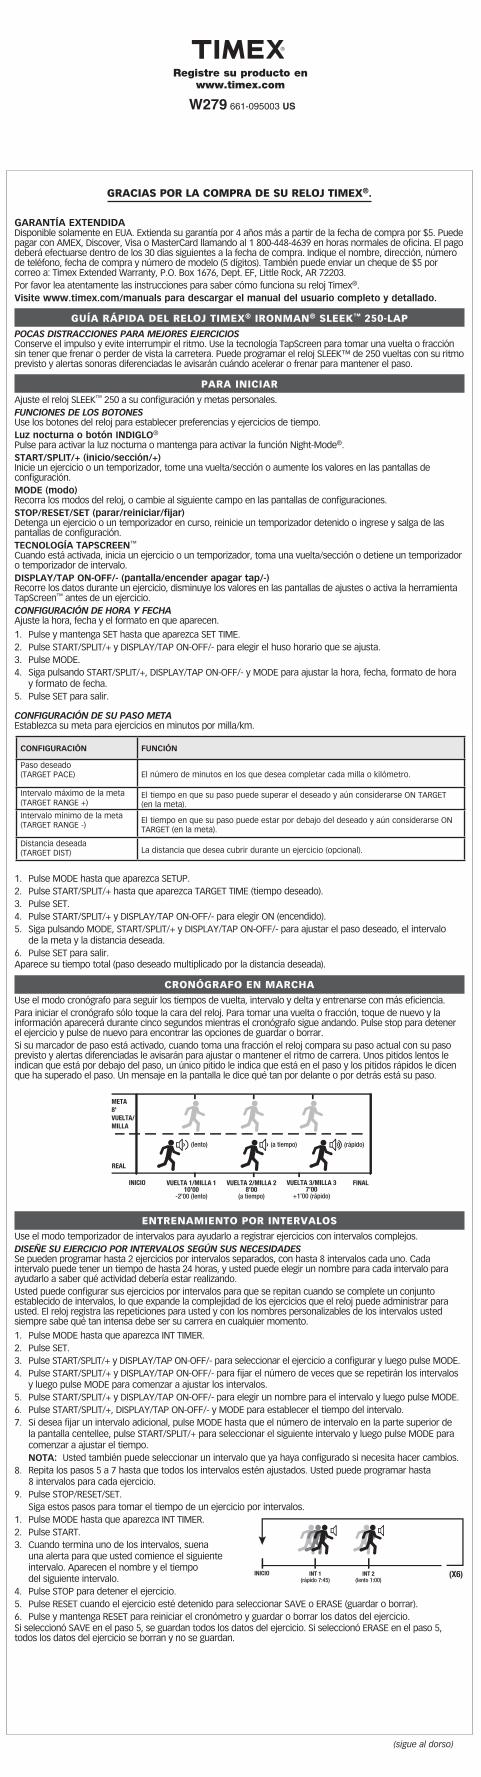
cronÓgrafo en marchaUse el modo cronógrafo para seguir los tiempos de vuelta, intervalo y delta y entrenarse con más eficiencia. Para iniciar el cronógrafo sólo toque la cara del reloj. Para tomar una vuelta o fracción, toque de nuevo y la información aparecerá durante cinco segundos mientras el cronógrafo sigue andando. Pulse stop para detener el ejercicio y pulse de nuevo para encontrar las opciones de guardar o borrar.Si su marcador de paso está activado, cuando toma una fracción el reloj compara su paso actual con su paso previsto y alertas diferenciadas le avisarán para ajustar o mantener el ritmo de carrera. Unos pitidos lentos le indican que está por debajo del paso, un único pitido le indica que está en el paso y los pitidos rápidos le dicen que ha superado el paso. Un mensaje en la pantalla le dice qué tan por delante o por detrás está su paso.
META 8' VUELTA/MILLA
REAL
VUELTA 1/MILLA 110’00
-2’00 (lento)
(a tiempo)(lento)
VUELTA 2/MILLA 28’00
(a tiempo)
VUELTA 3/MILLA 37’00
+1’00 (rápido)
FINAL
(rápido)
INICIO
enTrenamienTo por inTervalosUse el modo temporizador de intervalos para ayudarlo a registrar ejercicios con intervalos complejos. DISEÑE SU EJERCICIO POR INTERVALOS SEGÚN SUS NECESIDADESSe pueden programar hasta 2 ejercicios por intervalos separados, con hasta 8 intervalos cada uno. Cada intervalo puede tener un tiempo de hasta 24 horas, y usted puede elegir un nombre para cada intervalo para ayudarlo a saber qué actividad debería estar realizando.Usted puede configurar sus ejercicios por intervalos para que se repitan cuando se complete un conjunto establecido de intervalos, lo que expande la complejidad de los ejercicios que el reloj puede administrar para usted. El reloj registra las repeticiones para usted y con los nombres personalizables de los intervalos usted siempre sabe qué tan intensa debe ser su carrera en cualquier momento.
1. Pulse MODE hasta que aparezca INT TIMER. 2. Pulse SET. 3. Pulse START/SPLIT/+ y DISPLAY/TAP ON-OFF/- para seleccionar el ejercicio a configurar y luego pulse MODE. 4. Pulse START/SPLIT/+ y DISPLAY/TAP ON-OFF/- para fijar el número de veces que se repetirán los intervalos
y luego pulse MODE para comenzar a ajustar los intervalos. 5. Pulse START/SPLIT/+ y DISPLAY/TAP ON-OFF/- para elegir un nombre para el intervalo y luego pulse MODE. 6. Pulse START/SPLIT/+, DISPLAY/TAP ON-OFF/- y MODE para establecer el tiempo del intervalo. 7. Si desea fijar un intervalo adicional, pulse MODE hasta que el número de intervalo en la parte superior de
la pantalla centellee, pulse START/SPLIT/+ para seleccionar el siguiente intervalo y luego pulse MODE para comenzar a ajustar el tiempo.
nOta: Usted también puede seleccionar un intervalo que ya haya configurado si necesita hacer cambios. 8. Repita los pasos 5 a 7 hasta que todos los intervalos estén ajustados. Usted puede programar hasta
8 intervalos para cada ejercicio. 9. Pulse STOP/RESET/SET. Siga estos pasos para tomar el tiempo de un ejercicio por intervalos. 1. Pulse MODE hasta que aparezca INT TIMER. 2. Pulse START. 3. Cuando termina uno de los intervalos, suena
una alerta para que usted comience el siguiente intervalo. Aparecen el nombre y el tiempo del siguiente intervalo.
4. Pulse STOP para detener el ejercicio. 5. Pulse RESET cuando el ejercicio esté detenido para seleccionar SAVE o ERASE (guardar o borrar). 6. Pulse y mantenga RESET para reiniciar el cronómetro y guardar o borrar los datos del ejercicio. Si seleccionó SAVE en el paso 5, se guardan todos los datos del ejercicio. Si seleccionó ERASE en el paso 5, todos los datos del ejercicio se borran y no se guardan.
(continued on reverse) (suite au dos) (sigue al dorso)
Register your product at www.timex.com
W279 661-095003 US
enregistrez votre produit à www.timex.com
W279 661-095003 US
Registre su producto en www.timex.com
W279 661-095003 US
Printed in the Phillipines
START INT 1 INT 2 (X6)(fast 7:45) (slow 1:00)
DÉMARRER (X6)INT 1(rapide 7:45)
INT 2(lent 1:00)
INICIO (X6)INT 1(rápido 7:45)
INT 2(lento 1:00)

review modeYou can view all saved data for Chrono mode or Interval Timer mode workouts from Review mode. Compare these workouts to one another to know if you are on track for your training program and to chart your improvement over time. When you stop and reset a workout, it is saved in the watch memory. Your 5 most recent workouts are stored; if you save a sixth workout, the oldest workout is deleted to make room for it. If you took laps/splits during a Chrono mode workout, you can view data for each lap individually, so you can compare your performance from lap to lap. Chrono mode workout data is compared to your target pace, so you can see how you compared to your goals overall.
indiglo® nighT-lighT/nighT-mode® feaTure
1. Press INDIGLO® Button to activate night-light for several seconds. 2. Hold INDIGLO® Button for 4 seconds to activate NIGHT-MODE® feature. Beep will sound. 3. In NIGHT-MODE® feature, press any button to activate night-light. 4. Hold INDIGLO® Button for 4 seconds to turn off NIGHT-MODE® feature. Beep will sound. NIGHT-MODE®
feature automatically turns off after 8 hours.
BaTTerytimex strongly recommends that a retailer or jeweler replace battery. Battery type is on watch back. If present, push/short internal reset switch after replacing battery. Battery life estimates are based on certain assumptions regarding usage; battery life may vary depending on actual usage.dO nOt dISPOSE OF BattEry In FIrE. dO nOt rECHarGE. KEEP LOOSE BattErIES aWay FrOM CHILdrEn.
waTer resisTanceIf your watch is water-resistant, meter marking or (O) is indicated.
WarnInG: tO MaIntaIn WatEr-rESIStanCE, dO nOt PrESS any BUttOnS UndEr WatEr. • Watchiswater-resistantonlyaslongaslens,pushbuttons,andcaseremainintact.• Watchisnotadivewatchandshouldnotbeusedfordiving.• Rinsewatchwithfreshwaterafterexposuretosaltwaterorchlorine.Consult your doctor before beginning an exercise program to confirm a workout plan that is right for you.
modo review (revisiÓn)Usted puede ver todos los datos guardados en el modo cronógrafo o temporizador por intervalos en el modo revisión. Compare estos ejercicios entre sí para saber si está siguiendo su programa de entrenamiento y para graficar sus mejoras en el tiempo. Cuando usted para y reinicia un ejercicio, se guarda en la memoria del reloj. Se almacenan los 5 ejercicios más recientes; si guarda un sexto ejercicio, el más antiguo se borra para hacer lugar. Si tomó vueltas/fracciones durante el ejercicio en el modo cronógrafo, usted puede ver los datos de cada vuelta por separado, así puede comparar su desempeño entre vuelta y vuelta. Los datos de ejercicios en el modo cronógrafo se comparan con su paso deseado, de manera que usted puede compararse con sus metas en general.
luZ nocTurna indiglo®/herramienTa nighT-mode®
1. Pulse el botón INDIGLO® para activar la luz nocturna durante varios segundos. 2. Pulse y mantenga el botón INDIGLO® durante 4 segundos para activar la herramienta NIGHT-MODE®.
Sonará un pitido. 3. Con la herramienta NIGHT-MODE®, pulsar cualquier botón activa la luz nocturna. 4. Pulse y mantenga el botón INDIGLO® durante 4 segundos para desactivar la herramienta NIGHT-MODE®.
Sonará un pitido. La herramienta NIGHT-MODE® se desactiva automáticamente después de 8 horas.
pilatimex recomienda enfáticamente que sea un distribuidor o un joyero quien cambie la pila. El tipo de pila se indica en la parte trasera de la caja. Si lo hubiera, pulse/puentee el interruptor de reinicio luego de cambiar la pila. La vida útil estimada de la pila se basa en ciertas suposiciones relacionadas con el uso. La duración de la pila puede variar según el uso real.nO arrOJE La PILa aL FUEGO. nO La rECarGUE. MantEnGa LaS PILaS SUELtaS FUEra dEL aLCanCE dE LOS nIÑOS.
resisTencia al aguaSi su reloj es resistente al agua, tiene una marca de metros o (O) indicada.
Profundidad de resistencia al agua p.s.i.a. * Presión del agua debajo de la superficie
30m/98pie 60 50m/164pie 86 100m/328pie 160*libras por pulgada cuadrada absoluta
adVErtEnCIa: Para nO PErdEr La rESIStEnCIa aL aGUa, nO PULSE nInGÚn BOtÓn MIEntraS EStÉ SUMErGIdO. • Elrelojesresistentealaguasolamentesielcristal,losbotonesylacajaestánintactos.• Elrelojnoesunrelojdebuceoynodebeusarseparabucear.• Enjuaguesurelojconaguacorrientedespuésdehaberestadoexpuestoaaguasaladaocloro.Consulte a su médico para confirmar antes de iniciar un programa de ejercicios para confirmar que un plan de ejercicios es el indicado para usted.
tIMEx IntErnatIOnaL Warranty(U.S. – LIMITED WARRANTY – PLEASE SEE FRONT OF INSTRUCTION BOOKLET
FOR TERMS OF EXTENDED WARRANTY OFFER)Your TIMEX® watch is warranted against manufacturing defects by Timex Group USA, Inc. for a period of ONE YEAR from the original purchase date. Timex and its worldwide affiliates will honor this International Warranty.
Please note that Timex may, at its option, repair your watch by installing new or thoroughly reconditioned and inspected components or replace it with an identical or similar model. IMPOrtant — PLEaSE nOtE tHat tHIS Warranty dOES nOt COVEr dEFECtS Or daMaGES tO yOUr WatCH:
1) after the warranty period expires;2) if the watch was not originally purchased from an authorized Timex retailer;3) from repair services not performed by Timex;4) from accidents, tampering or abuse; and5) lens or crystal, strap or band, watch case, attachments or battery. Timex may charge you for replacing any of these parts.
THIS WARRANTY AND THE REMEDIES CONTAINED HEREIN ARE EXCLUSIVE AND IN LIEU OF ALL OTHER WARRANTIES, EXPRESS OR IMPLIED, INCLUDING ANY IMPLIED WARRANTY OF MERCHANTABILITY OR FITNESS FOR PARTICULAR PURPOSE. TIMEX IS NOT LIABLE FOR ANY SPECIAL, INCIDENTAL OR CONSEQUENTIAL DAMAGES. Some countries and states do not allow limitations on implied warranties and do not allow exclusions or limitations on damages, so these limitations may not apply to you. This warranty gives you specific legal rights and you may also have other rights which vary from country to country and state to state.
To obtain warranty service, please return your watch to Timex, one of its affiliates or the Timex retailer where the watch was purchased, together with a completed original Watch Repair Coupon or, in the U.S. and Canada only, the completed original Watch Repair Coupon or a written statement identifying your name, address, telephone number and date and place of purchase. Please include the following with your watch to cover postage and handling (this is not a repair charge): a US$ 8.00 check or money order in the U.S.; a CAN$7.00 cheque or money order in Canada; and a UK£2.50 cheque or money order in the U.K. In other countries, Timex will charge you for postage and handling. NEVER INCLUDE A SPECIAL WATCHBAND OR ANY OTHER ARTICLE OF PERSONAL VALUE IN YOUR SHIPMENT.
For the U.S., please call 1-800-328-2677 for additional warranty information. For Canada, call 1-800-263-0981. For Brazil, call +55 (11) 5572 9733. For Mexico, call 01-800-01-060-00. For Central America, the Caribbean, Bermuda and the Bahamas, call (501) 370-5775 (U.S.). For Asia, call 852-2815-0091. For the U.K., call 44 020 8687 9620. For Portugal, call 351 212 946 017. For France, call 33 3 81 63 42 00. For Germany/Austria, call +43 662 88921 30. For the Middle East and Africa, call 971-4-310850. For other areas, please contact your local Timex retailer or Timex distributor for warranty information. In Canada, the U.S. and in certain other locations, participating Timex retailers can provide you with a postage-paid, pre-addressed Watch Repair Mailer for your convenience in obtaining factory service.
©2012 Timex Group USA, Inc. TIMEX, SLEEK, TAPSCREEN, INDIGLO and NIGHT-MODE are trademarks of Timex Group B.V. and it’s subsidiar-ies. IRONMAN is a registered trademark of World Triathlon Corporation. Used here by permission.
Water-Resistance Depth p.s.i.a. * Water Pressure Below Surface
30m/98ft 60 50m/164ft 86 100m/328ft 160*pounds per square inch absolute
6. Maintenez RESET pour réinitialiser le chronomètre et sauvegarder ou effacer les données de séance d’exercice.
Si vous avez sélectionné SAVE à l’étape 5, toutes les données de séance d’exercice sont sauvegardées. Si vous avez sélectionné ERASE à l’étape 5, la séance d’exercice est effacée sans être sauvegardée.
mode récapiTulaTifVous pouvez visualiser toutes les données sauvegardées pour les séances d’exercice en mode Chrono ou mode Minuterie par intervalles à partir du mode Récapitulatif. Comparez ces séances d’exercice à une autre pour savoir si vous êtes sur la bonne voie avec votre programme d’entraînement et pour tabler leur amélioration avec le temps. Lorsque vous arrêtez et réinitialisez une séance d’exercice, elle est sauvegardée dans la mémoire de la montre. Vos 5 séances d’exercice les plus récentes sont mises en mémoire ; si vous sauvegardez une sixième séance d’exercice, la plus ancienne est effacée pour faire de la place. Si vous prenez des temps au tours/intermédiaires pendant une séance d’exercice de mode Chrono, vous pouvez afficher des données pour chaque tour individuellement, de manière à pouvoir comparer votre performance d’un tour à l’autre. Les données de séance d’exercice en mode Chrono sont comparées à votre allure cible, de manière à pouvoir comparer à vos objectifs dans l’ensemble.
veilleuse indiglo® avec foncTion nighT-mode®
1. Enfoncez le bouton de la veilleuse INDIGLO® pour activer l’éclairage pendant plusieurs secondes. 2. Tenez le bouton INDIGLO® enfoncé pendant 4 secondes pour activer la fonction NIGHT-MODE®. Un bip
sonore se déclenche. 3. En utilisant la fonction NIGHT-MODE® appuyez sur n’importe quel bouton pour activer l’éclairage. 4. Tenez le bouton INDIGLO® enfoncé pendant 4 secondes pour activer la fonction NIGHT-MODE®. Un bip
sonore se déclenche. La fonction NIGHT-MODE® s’éteint automatiquement au bout de 8 heures.
piletimex recommande fortement de faire changer la pile par un détaillant ou un bijoutier. Le type de pile est indiqué au dos de la montre. S’il est présent, appuyez sur le bouton « internal reset » (remise à zéro interne) après avoir remplacé la pile. L’estimation de la durée de vie de la pile est basée sur certaines hypothèses d’utilisation ; la durée réelle peut varier selon l’utilisation de la montre.nE PaS JEtEr La PILE aU FEU. nE PaS rECHarGEr La PILE. GardEr LES PILES HOrS dE La POrtÉE dES EnFantS.
éTanchéiTéSi la montre est étanche, la profondeur maximale ou le symbole (O) est indiqué.
attEntIOn : POUr PrÉSErVEr L’ÉtanCHÉItÉ, nE PaS EnFOnCEr LES BOUtOnS SOUS L’EaU. • Lamontreestétancheaussilongtempsqueleverre,lesboutonsetleboîtiersontintacts.• Lamontren’estpasconçuepourlaplongée.Nel’utilisezpasdanscesconditions.• Rincezàl’eaudouceaprèstoutcontactavecl’eaudemeroulechlore.Consultez votre médecin avant de commencer un programme d’exercice et pour confirmer la zone de fréquence cardiaque vous convenant.
GarantIE IntErnatIOnaLE tIMEx(GARANTIE LIMITÉE – É.-U. – PRIÈRE DE SE REPORTER À LA COUVERTURE DU LIVRET D’INSTRUCTION
POUR LES MODALITÉS DE L’OFFRE DE GARANTIE PROLONGÉE)Votre montre TIMEX® est garantie contre les défauts de fabrication par Timex Group USA, Inc. pour une période d’UN AN, à compter de la date d’achat. Timex ainsi que ses filiales du monde entier honoreront cette garantie internationale.
Timex se réserve le droit de réparer votre montre en y installant des composants neufs ou révisés, ou bien de la remplacer par un modèle identique ou similaire. IMPOrtant — CEttE GarantIE nE COUVrE PaS LES dÉFaUtS OU L’EndOMMaGEMEnt dE VOtrE MOntrE :
1) après l’expiration de la période de garantie ;2) si la montre n’a pas été achetée initialement chez un revendeur Timex agréé ;3) résultant de travaux de réparation non effectués par Timex ;4) s’il s’agit d’un accident, falsification ou abus ;5) s’il s’agit du verre ou cristal, du bracelet ou brassard, du boîtier, des accessoires ou de la pile. Le remplacement de ces pièces peut
vous être facturé par Timex.CETTE GARANTIE AINSI QUE LES RECOURS PRÉVUS DANS LES PRÉSENTES SONT EXCLUSIFS ET REMPLACENT TOUTE AUTRE GARANTIE EXPRESSE OU IMPLICITE, Y COMPRIS TOUTE GARANTIE IMPLICITE DE QUALITÉ MARCHANDE ET D’ADAPTATION À UN USAGE PARTICULIER. TIMEX N’EST RESPONSABLE D’AUCUN DOMMAGE PARTICULIER, ACCESSOIRE OU INDIRECT. Certains états ou provinces n’autorisent pas les limitations de garanties implicites et n’autorisent pas les exclusions ou limitations pour des dommages, auquel cas lesdites limitations pourraient ne pas vous concerner. Les modalités de la présente garantie vous donnent des droits légaux précis et vous pouvez également vous prévaloir d’autres droits qui varient d’un état ou d’une province à l’autre.
Pour obtenir le service garanti, retourner la montre à Timex, à une de ses filiales ou au détaillant Timex où il a été acheté. Inclure un cou-pon de réparation original dûment rempli ou, aux É.-U. et au Canada, le coupon original ou une déclaration écrite comprenant votre nom, adresse, numéro de téléphone ainsi que la date et le lieu d’achat. Veuillez inclure la somme suivante avec votre montre pour couvrir les frais de poste et de manutention (ce ne sont pas des frais de réparation) : un chèque ou mandat de 8,00 $ É.U. aux États-Unis, de 7,00 $ CAN au Canada et de 2,50 £ au Royaume-Uni. Dans les autres pays, Timex vous facturera les frais de poste et de manutention. N’INCLUEZ JAMAIS DANS VOTRE ENVOI UN BRACELET SPÉCIAL OU AUTRE ARTICLE AYANT UNE VALEUR SENTIMENTALE.
Aux É.-U. veuillez composer le 1-800-328-2677 pour plus de renseignements sur la garantie. Au Canada, composer le 1-800-263-0981. Au Brésil, composer le +55 (11) 5572 9733. Au Mexique, composer le 01-800-01-060-00. En Amérique centrale, les Caraïbes, les Bermudes et les Bahamas, composer le (501) 370-5775 (É.-U.). En Asie, composer le 852-2815-0091. Au R.U., composer le 44 020 8687 9620. Au Portugal, composer le 351 212 946 017. En France, composer le 33 3 81 63 42 00. En Allemagne/Autriche, composer le +43 662 88921 30. Au Moyen-Orient et en Afrique, composer le 971-4-310850. Dans les autres régions, veuillez contacter votre détaillant ou distributer Timex pour des renseignements sur la garantie. Au Canada, aux É.-U. et en certains autres endroits, les détaillants Timex participants peuvent vous faire parvenir un emballage pré-adressé et pré-affranchi pour vous faciliter l’envoi de la montre à l’atelier de réparation.
©2012 Timex Group USA, Inc. TIMEX, SLEEK, TAPSCREEN, INDIGLO et NIGHT-MODE sont des marques déposées de Timex Group B.V. et de ses filiales. IRONMAN est une marque déposée de World Triathlon Corporation. Utilisées avec une permission.
GarantIa IntErnaCIOnaL tIMEx(GARANTIA LIMITADA USA - LEA POR FAVOR EL FOLLETO DE INSTRUCCIONES PARA LOS DETALLES
DE LA OFERTA DE EXTENSIóN DE LA GARANTíA).Timex Group USA, Inc. garantiza su reloj TIMEX® contra defectos de fabricación por un período de UN A—O a partir de la fecha de compra original. Timex y sus sucursales en todo el mundo respaldan esta Garantía Internacional.
Cabe aclarar que Timex tiene la libertad de optar por reparar el reloj con componentes nuevos o reacondicionados e inspeccionados, y también podría optar por reemplazarlo por un modelo idéntico o similar. IMPOrtantE — OBSErVE POr FaVOr QUE ESta Garantía nO CUBrE dEFECtOS O da—OS a SU rELOJ:
1) después de vencido el plazo de la garantía;2) si el reloj inicialmente no se compró a un distribuidor autorizado de Timex;3) si las reparaciones efectuadas no las hizo Timex;4) si son consecuencia de accidentes, manipulación no autorizada o abuso; y5) por cristal, correa o pulsera, caja, accesorios o pila. Timex podría cobrar por el cambio de cualquiera de estas partes.
ESTA GARANTíA SE OFRECE EN FORMA EXCLUSIVA Y EN LUGAR DE CUALQUIER OTRA GARANTíA, SEA EXPRESA O IMPLíCITA, INCLUSIVE TODA GARANTíA IMPLíCITA PARA FINES COMERCIALES O DE ADECUACIóN A FINES PARTICULARES. TIMEX NO ASUME NINGUNA RESPONSABILIDAD POR PERJUICIOS DIRECTOS, INDIRECTOS NI ESPECIALES. En ciertos países y estados no se permiten limitaciones de las garantías implícitas ni exclusiones o limitaciones de perjuicios, por lo cual las limitaciones mencionadas anteriormente podrían no aplicarse en su caso particular. Esta garantía le otorga derechos establecidos por ley, pero usted también podría tener otros derechos que difieren de un país a otro, o de un estado a otro.
Para solicitar los servicios incluidos en la garantía, devolver el reloj a Timex, a una de sus sucursales o al comercio minorista adonde se compró el reloj, adjuntando el Cupón de Reparación que originalmente viene con el mismo. En EUA y Canadá se puede adjuntar el original del Cupón de Reparación del Reloj o una nota en la que figure su nombre, domicilio, número de teléfono y fecha y lugar de compra. Para cubrir el costo de envío, adjunte el siguiente importe (este importe no es para el pago de la reparación): En EUA, un cheque o giro por valor de US $ 8,00 (dólares estadounidenses); en Canadá, un cheque certificado o giro por valor de CAN $7,00 (dólares canadienses); en el Reino Unido, un cheque certificado o giro por valor de UK £ 2,50 (libras). En otros países, Timex se encargará de cobrarle el importe por gastos de envío. NUNCA INCLUYA CON EL RELOJ UNA MALLA O BANDA ESPECIAL NI NINGÚN OTRO ARTíCULO DE VALOR PERSONAL.
En EUA, por favor llame al 1-800-328-2677 para obtener información adicional sobre la garantía. En Canadá, llamar al número 1-800-263-0981. En Brasil, al +55 (11) 5572 9733. En México, al 01-800-01-060-00. En América Central, Países del Caribe, Bermuda y Bahamas, al (501) 370-5775 (EUA). En Asia, al 852-2815-0091. En el Reino Unido, al 44 020 8687 9620. En Portugal, al 351 212 946 017. En Francia, al 33 3 81 63 42 00. Para Alemania/Austria: +43 662 88921 30. En Medio Oriente y África, al 971-4-310850. En otras áreas, consulte al vend-edor local de Timex o al distribuidor de Timex sobre la garantía. En Canadá, EUA y en otros lugares, algunos distribuidores de Timex podrían proporcionarle un sobre con la dirección y el franqueo previamente pagado para que envíe el reloj a reparación.
©2012 TIMEX, SLEEK, TAPSCREEN, INDIGLO y NIGHT-MODE son marcas registradas de Timex Group B.V. y sus afiliados. IRONMAN es una marca registrada de World Triathlon Corporation. Usadas aquí con permiso.
Profondeur d’étanchéité Pression de l’eau sous la surface en p.s.i.a.*
30 m/98 pi 60 50 m/164 pi 86 100 m/328 pi 160*livres par pouce carré (abs.)
Thank you for purchasing your Timex® waTch.
ExtEndEd Warrantyavailable in U.S. only. Extend your warranty for an additional 4 years from date of purchase for $5. You can pay with AMEX, Discover, Visa or MasterCard by calling 1 800-448-4639 during normal business hours. Payment must be made within 30 days of purchase. Name, address, telephone number, purchase date, and 5-digit model number required. You can also mail a check for $5 to: Timex Extended Warranty, P.O. Box 1676, Dept. EF, Little Rock, AR 72203. Please read instructions carefully to understand how to operate your Timex® watch. Visit www.timex.com/manuals to download a full and detailed user manual.
Timex® ironman® sleek™ 250-lap Quick sTarTFEWER DISTRACTIONS FOR BETTER WORKOUTSPreserve momentum and avoid breaking your stride. Use the TapScreen technology to take a lap/split without having to slow down or take your eyes off the road. You can set the SLEEK™ 250-Lap Watch with your target pace and audible distinct alerts will let you know when to speed up or slow down to stay on pace.
geTTing sTarTedSet up the SLEEK™ 250 watch with your goals and personal settings. BUTTON FUNCTIONSUse the buttons on the watch to set preferences and time workouts. IndIGLO® night-light or button Press to turn on night-light, or hold to activate Night-Mode® feature. Start/SPLIt/+ Start a workout or timer, take a lap/split, or increase values in settings screens. MOdE Cycle through the watch modes, or move to the next field in settings screens. StOP/rESEt/SEt Stop a running workout or timer, reset a stopped time, or enter and exit settings screens. taPSCrEEn™ tECHnOLOGy When enabled, start a workout or timer, take a lap/split in Chrono mode, or stop an interval timer or timer. dISPLay/taP On-OFF/- Scroll through data during a workout, decrease values in settings screens, or enable the TapScreen™ feature before a workout. SETTING THE TIME AND DATESet the time, date, and the format in which time and date display.
1. Hold SET until SET TIME displays.2. Press START/SPLIT/+ and DISPLAY/TAP ON-OFF/- to choose the time zone to set. 3. Press MODE. 4. Continue pressing START/SPLIT/+, DISPLAY/TAP ON-OFF/-, and MODE to set time, date, time format,
and date format. 5. Press SET to exit.
SETTING YOUR TARGET PACESet your goal for workouts in minutes per mile/km.
SEttInG FUnCtIOn
Target pace (TARGET PACE) The number of minutes in which you want to complete each mile or kilometer.
Maximum target range (TARGET RANGE +)
The time by which your pace may exceed your target and still be considered ON TARGET.
Minimum target range (TARGET RANGE -) The time by which your pace may fall short of your target and still be considered
ON TARGET.
Target distance(TARGET DIST) The distance you want to cover during a workout (optional).
1. Press MODE until SETUP displays. 2. Pres START/SPLIT/+ until TARGET TIME displays. 3. Press SET. 4. Press START/SPLIT/+ and DISPLAY/TAP ON-OFF/- to select ON.5. Continue pressing MODE, START/SPLIT/+, and DISPLAY/TAP ON-OFF/- to set target pace, target range,
and target distance. 6. Press SET to exit. Your total time (target pace multiplied by target distance) displays.
chrono on The goUse Chrono mode to track your lap, split and delta times to train more efficiently. To start the chrono just tap the watch face. To take a lap/split, tap again and your data will be displayed for five seconds meanwhile the chronograph continues running. Press stop to stop the workout and press again to find the options to save or erase.If your target pacer is on, when you take a split the watch compares your current pace with your target pace and distinct alerts will advise to adjust or keep the running pace. Slow beeps indicate you’re behind pace, a single beep lets you know you’re on pace, and fast beeps indicate you’re ahead. An onscreen message tells you just how far ahead or behind you are.
TARGET8’ LAP/
START
ACTUAL
LAP 1/MILE 1 10’00
-2’00 (slow)
LAP 3/MILE 3 7’00
+1’00
(fast)
LAP 2/MILE 2 8’00
(on time)
FINISH
(on pace) (fast)(slow)
MILE
inTerval TrainingUse the Interval Timer mode to help you keep track of complex interval workouts. DESIGNING YOUR INTERVAL WORKOUT TO SUIT YOUR NEEDSYou can set up 2 separate interval workouts, each with up to 8 intervals. Each interval can time up to 24 hours, and you can choose a name for each interval to help you know what activity you should be performing.You can set up your interval workouts to repeat when a set of intervals is complete, expanding the complexity of workouts the watch can manage for you. The watch keeps track of repetitions for you, and with customizable names for the intervals you always know how intense your run should be at a given time.
1. Press MODE until INT TIMER displays. 2. Press SET. 3. Press START/SPLIT/+ and DISPLAY/TAP ON-OFF/- to select the workout to set up, and then press MODE. 4. Press START/SPLIT/+ and DISPLAY/TAP ON-OFF/- to set number of times to repeat the intervals, and then
press MODE to begin setting up intervals. 5. Press START/SPLIT/+ and DISPLAY/TAP ON-OFF/- to choose a name for the interval, and then press MODE. 6. Press START/SPLIT/+, DISPLAY/TAP ON-OFF/-, and MODE to set the time for the interval. 7. If you want to set up an additional interval, press MODE until the interval number at the top of the
display flashes, press START/SPLIT/+ to select the next interval, and then press MODE to begin setting the time.
nOtE: You can also select an interval you already configured if you need to make changes. 8. Repeat steps 5 through 7 until all intervals are set. You can set up to 8 intervals for each workout. 9. Press STOP/RESET/SET. Follow these steps to time an interval workout. 1. Press MODE until INT TIMER displays. 2. Press START. 3. When one interval ends, an alert sounds prompting
you to begin the next interval. The name and time for the new interval display.
4. Press STOP to stop the workout. 5. Press RESET when workout is stopped to select SAVE
or ERASE. 6. Hold RESET to reset the chronometer and save or erase the workout data. If you selected SAVE in step 5, all workout data is saved. If you selected ERASE in step 5, the workout is erased but not saved.
merci d’avoir acheTé voTre monTre Timex®.
GarantIE ÉtEndUEProposée aux États-Unis seulement. La garantie peut être prolongée pour une période additionnelle de 4 ans à compter de la date d’achat pour la somme de 5 $. Vous pouvez effectuer ce paiement avec AMEX, Discover, Visa ou MasterCard en composant le 1-800-448-4639 durant les heures normales d’ouverture. Le paiement doit être effectué dans les 30 jours qui suivent l’achat. Indiquer les nom, adresse, numéro de téléphone, date d’achat et numéro de modèle à 5 chiffres. Il est également possible d’envoyer un chèque de 5 $ US par courrier à : Timex Extended Warranty, P.O. Box 1676, Dept. EF, Little Rock, AR 72203.Lire les instructions attentivement pour bien comprendre le fonctionnement de cette montre Timex®. Consultez le site www.timex.com/manuals pour télécharger un manuel d’utilisateur complet et détaillé.
guide de démarrage rapide Timex® ironman® sleek™ 250-lapMOINS DE DISTRACTIONS POUR DE MEILLEURES SÉANCES D’EXERCICEPréservez votre élan et votre foulée. Utilisez la technologie TapScreen pour prendre un tour/temps intermédiaire sans avoir à ralentir ni avoir besoin de quitter les yeux de la route. Il est possible de régler la montre SLEEK™ 250-Lap avec l’allure cible et donner des alarmes sonores distinctes pour indiquer quand accélérer ou ralentir pour rester à l’allure souhaitée.
mise en marcheConfigurez la montre SLEEK™ 250 avec vos paramètres et objectifs personnels. FONCTIONS DES BOUTONSUtilisez les boutons de la montre pour configurer les préférences et chronométrer les séances d’exercice. Veilleuse IndIGLO® ou Bouton Appuyez pour allumer la veilleuse ou maintenez pour activer la fonction Night-Mode®. Start/SPLIt/+Démarrez une séance d’exercice ou la minuterie, prenez un tour/temps intermédiaire ou augmentez les valeurs dans les écrans de paramètres. MOdE Faites défiler les modes de la montre ou passez au champ suivant dans les écrans de paramètres. StOP/rESEt/SEt Arrêtez une séance d’exercice ou une minuterie en cours, réinitialisez un temps arrêté ou entrez dans et quittez les écrans de paramètres. tECHnOLOGIE taPSCrEEn™ Quand activé, démarrez une séance d’exercice ou une minuterie, prenez un tour/temps intermédiaire en mode Chrono ou arrêtez une minuterie par intervalles ou une minuterie. dISPLay/taP On-OFF/- Faites défiler les données pendant une séance d’exercice, diminuez des valeurs dans les écrans de paramètres, ou activez/désactivez la fonction TapScreen™ avant une séance d’exercice. RÉGLAGE DE L’HEURE ET DE LA DATERéglez l’heure, la date et le format auxquels l’heure et la date s’affichent.
1. Maintenez SET jusqu’à affichage de SET TIME.2. Appuyez sur START/SPLIT/+ et DISPLAY/TAP ON-OFF/- pour choisir le fuseau horaire à régler. 3. Appuyez sur MODE. 4. Continuez à appuyer sur START/SPLIT/+, DISPLAY/TAP ON-OFF/- et MODE pour régler l’heure, la date,
le format d’heure et le format de date. 5. Appuyez sur SET pour quitter.
RÉGLAGE DE VOTRE ALLURE CIBLERéglez votre objectif pour les séances d’exercice en minutes par mile/km.
ParaMÈtrE FOnCtIOn
Allure cible (ALLURE CIBLE) Le nombre de minutes dans lequel vous souhaitez terminer chaque mile ou kilomètre.
Plage cible maximum (TARGET RANGE +)
Le temps auquel votre allure peut excéder votre cible et toujours être considérée SUR CIBLE.
Plage cible minimum (TARGET RANGE -) Le temps auquel votre allure peut être inférieure à votre cible et toujours être
considérée SUR CIBLE.
Distance cible (TARGET DIST/DIST CIBLE) La distance que vous souhaitez couvrir pendant une séance d'exercice (en option).
1. Appuyez sur MODE jusqu’à affichage de SETUP [Configuration]. 2. Appuyez sur START/SPLIT/+ jusqu’à affichage de TARGET TIME [TEMPS CIBLE]. 3. Appuyez sur SET (RÉGLER). 4. Appuyez sur START/SPLIT/+ et DISPLAY/TAP ON-OFF/- pour sélectionner ON.5. Continuez à appuyer sur MODE, START/SPLIT/+ et DISPLAY/TAP ON-OFF/- pour régler l’allure cible, la plage
cible et la distance cible. 6. Appuyez sur SET pour quitter. Votre temps total (allure cible multipliée par distance cible) s’affiche.
chrono insTanTanéUtilisez le mode Chrono pour suivre vos temps au tour, intermédiaire et delta pour vous entraîner plus efficacement. Pour démarrer le chrono, tapez sur le cadran de la montre. Pour marquer un temps au tour/intermédiaire, tapez à nouveau et vos données s’afficheront durant 5 secondes, pendant ce temps le chronographe reste en marche. Appuyer sur stop pour arrêter la séance et appuyez à nouveau pour trouver les options de sauvegarde ou d’effacement.Si votre moniteur d’allure est activé, lorsque vous prenez un temps intermédiaire, la montre compare votre allure actuelle avec votre allure cible, et des alertes distinctes vous conseilleront d’ajuster ou de maintenir l’allure de course. Les bips lents indiquent que vous êtes en-deçà de votre allure cible, un simple bip vous laisse savoir que vous allez à la bonne allure et un bip rapide lorsque vous êtes au-delà de votre allure cible. Un message à l’écran vous indique de combien vous êtes en-deçà ou au-delà de votre allure.
CIBLE 8’ TOUR/MILE
RÉEL
TOUR 1/MILE 110’00
-2’00 (lent)
(bonne allure)(lent)
TOUR 2/MILE 28’00
(à temps)
TOUR 3/MILE 37’00
+1’00 (rapide)
TERMINER
(rapide)
DÉMARRER
exercice par inTervallesUtilisez le mode Minuterie par intervalles pour vous permettre de suivre vos séances d’exercice à intervalles complexes. CONCEPTION DE VOTRE SÉANCE D’EXERCICE À INTERVALLES POUR CONVENIR À VOS BESOINSVous pouvez configurer jusqu’à 2 séances d’exercice à intervalles séparées, chacune avec un maximum de 8 intervalles. Chaque intervalle peut mesurer jusqu’à 24 heures et vous pouvez choisir un nom pour chaque intervalle pour vous permettre de savoir quelle activité vous devriez effectuer.Vous pouvez configurer vos séances d’exercice à intervalles à répéter lorsqu’une série d’intervalles est terminée, élargissant la complexité des séances d’exercice que la montre peut gérer pour vous. La montre effectue un suivi des répétitions pour vous et, avec des noms personnalisables pour les intervalles, vous connaissez toujours l’intensité de votre course à tout moment.
1. Appuyez sur MODE jusqu’à affichage de INT TIMER (minuterie par intervalles). 2. Appuyez sur SET (RÉGLER). 3. Appuyez sur START/SPLIT/+ et DISPLAY/TAP ON-OFF/- pour sélectionner la séance d’exercice à configurer,
puis appuyez sur MODE. 4. Appuyez sur START/SPLIT/+ et DISPLAY/TAP ON-OFF/- pour sélectionner le nombre de fois à répéter les
intervalles, puis appuyez sur MODE pour conserver à configurer les intervalles. 5. Appuyez sur START/SPLIT/+ et DISPLAY/TAP ON-OFF/- pour choisir un nom pour l’intervalle, puis appuyez
sur MODE. 6. Appuyez sur START/SPLIT/+, DISPLAY/TAP ON-OFF/- et MODE pour régler le temps pour l’intervalle. 7. Si vous souhaitez configurer un intervalle additionnel, appuyez sur MODE jusqu’à ce que le nombre
d’intervalles clignote en haut de l’affichage, appuyez sur START/SPLIT/+ pour sélectionner l’intervalle suivant puis appuyez sur MODE pour commencer à régler le temps.
rEMarQUE : Vous pouvez également sélectionner un intervalle que vous avez déjà configuré si vous devez effectuer des modifications.
8. Répétez les étapes 5 et 7 jusqu’à ce que tous les intervalles soient réglés. Vous pouvez configurer jusqu’à 8 intervalles pour chaque séance d’exercice.
9. Appuyez sur STOP/RESET/SET. Suivez ces étapes pour chronométrer une séance d’exercice à intervalles. 1. Appuyez sur MODE jusqu’à affichage de INT TIMER
(minuterie par intervalles). 2. Appuyer sur START. 3. Lorsqu’un intervalle se termine, un alerte retentit
vous invitant à commencer l’intervalle suivant. Le nom et le temps pour le nouvel intervalle s’affichent.
4. Appuyez sur STOP pour arrêter la séance d’exercice. 5. Appuyez sur RESET lorsque la séance d’exercice est arrêtée pour sélectionner SAVE [SAUVEGARDER] ou
ERASE [EFFACER].
gracias por la compra de su reloj Timex®.
Garantía ExtEndIdaDisponible solamente en EUA. Extienda su garantía por 4 años más a partir de la fecha de compra por $5. Puede pagar con AMEX, Discover, Visa o MasterCard llamando al 1 800-448-4639 en horas normales de oficina. El pago deberá efectuarse dentro de los 30 días siguientes a la fecha de compra. Indique el nombre, dirección, número de teléfono, fecha de compra y número de modelo (5 dígitos). También puede enviar un cheque de $5 por correo a: Timex Extended Warranty, P.O. Box 1676, Dept. EF, Little Rock, AR 72203.Por favor lea atentamente las instrucciones para saber cómo funciona su reloj Timex®. Visite www.timex.com/manuals para descargar el manual del usuario completo y detallado.
guía rápida del reloj Timex® ironman® sleek™ 250-lapPOCAS DISTRACCIONES PARA MEJORES EJERCICIOSConserve el impulso y evite interrumpir el ritmo. Use la tecnología TapScreen para tomar una vuelta o fracción sin tener que frenar o perder de vista la carretera. Puede programar el reloj SLEEK™ de 250 vueltas con su ritmo previsto y alertas sonoras diferenciadas le avisarán cuándo acelerar o frenar para mantener el paso.
para iniciarAjuste el reloj SLEEK™ 250 a su configuración y metas personales. FUNCIONES DE LOS BOTONESUse los botones del reloj para establecer preferencias y ejercicios de tiempo. Luz nocturna o botón IndIGLO®
Pulse para activar la luz nocturna o mantenga para activar la función Night-Mode®. Start/SPLIt/+ (inicio/sección/+) Inicie un ejercicio o un temporizador, tome una vuelta/sección o aumente los valores en las pantallas de configuración. MOdE (modo) Recorra los modos del reloj, o cambie al siguiente campo en las pantallas de configuraciones. StOP/rESEt/SEt (parar/reiniciar/fijar) Detenga un ejercicio o un temporizador en curso, reinicie un temporizador detenido o ingrese y salga de las pantallas de configuración. tECnOLOGía taPSCrEEn™
Cuando está activada, inicia un ejercicio o un temporizador, toma una vuelta/sección o detiene un temporizador o temporizador de intervalo. dISPLay/taP On-OFF/- (pantalla/encender apagar tap/-) Recorre los datos durante un ejercicio, disminuye los valores en las pantallas de ajustes o activa la herramienta TapScreen™ antes de un ejercicio. CONFIGURACIÓN DE HORA Y FECHAAjuste la hora, fecha y el formato en que aparecen.
1. Pulse y mantenga SET hasta que aparezca SET TIME.2. Pulse START/SPLIT/+ y DISPLAY/TAP ON-OFF/- para elegir el huso horario que se ajusta. 3. Pulse MODE. 4. Siga pulsando START/SPLIT/+, DISPLAY/TAP ON-OFF/- y MODE para ajustar la hora, fecha, formato de hora
y formato de fecha. 5. Pulse SET para salir.
CONFIGURACIÓN DE SU PASO METAEstablezca su meta para ejercicios en minutos por milla/km.
COnFIGUraCIÓn FUnCIÓn
Paso deseado (TARGET PACE) El número de minutos en los que desea completar cada milla o kilómetro.
Intervalo máximo de la meta (TARGET RANGE +)
El tiempo en que su paso puede superar el deseado y aún considerarse ON TARGET (en la meta).
Intervalo mínimo de la meta (TARGET RANGE -) El tiempo en que su paso puede estar por debajo del deseado y aún considerarse ON
TARGET (en la meta).
Distancia deseada(TARGET DIST) La distancia que desea cubrir durante un ejercicio (opcional).
1. Pulse MODE hasta que aparezca SETUP. 2. Pulse START/SPLIT/+ hasta que aparezca TARGET TIME (tiempo deseado). 3. Pulse SET. 4. Pulse START/SPLIT/+ y DISPLAY/TAP ON-OFF/- para elegir ON (encendido).5. Siga pulsando MODE, START/SPLIT/+ y DISPLAY/TAP ON-OFF/- para ajustar el paso deseado, el intervalo
de la meta y la distancia deseada. 6. Pulse SET para salir. Aparece su tiempo total (paso deseado multiplicado por la distancia deseada).
cronÓgrafo en marchaUse el modo cronógrafo para seguir los tiempos de vuelta, intervalo y delta y entrenarse con más eficiencia. Para iniciar el cronógrafo sólo toque la cara del reloj. Para tomar una vuelta o fracción, toque de nuevo y la información aparecerá durante cinco segundos mientras el cronógrafo sigue andando. Pulse stop para detener el ejercicio y pulse de nuevo para encontrar las opciones de guardar o borrar.Si su marcador de paso está activado, cuando toma una fracción el reloj compara su paso actual con su paso previsto y alertas diferenciadas le avisarán para ajustar o mantener el ritmo de carrera. Unos pitidos lentos le indican que está por debajo del paso, un único pitido le indica que está en el paso y los pitidos rápidos le dicen que ha superado el paso. Un mensaje en la pantalla le dice qué tan por delante o por detrás está su paso.
META 8' VUELTA/MILLA
REAL
VUELTA 1/MILLA 110’00
-2’00 (lento)
(a tiempo)(lento)
VUELTA 2/MILLA 28’00
(a tiempo)
VUELTA 3/MILLA 37’00
+1’00 (rápido)
FINAL
(rápido)
INICIO
enTrenamienTo por inTervalosUse el modo temporizador de intervalos para ayudarlo a registrar ejercicios con intervalos complejos. DISEÑE SU EJERCICIO POR INTERVALOS SEGÚN SUS NECESIDADESSe pueden programar hasta 2 ejercicios por intervalos separados, con hasta 8 intervalos cada uno. Cada intervalo puede tener un tiempo de hasta 24 horas, y usted puede elegir un nombre para cada intervalo para ayudarlo a saber qué actividad debería estar realizando.Usted puede configurar sus ejercicios por intervalos para que se repitan cuando se complete un conjunto establecido de intervalos, lo que expande la complejidad de los ejercicios que el reloj puede administrar para usted. El reloj registra las repeticiones para usted y con los nombres personalizables de los intervalos usted siempre sabe qué tan intensa debe ser su carrera en cualquier momento.
1. Pulse MODE hasta que aparezca INT TIMER. 2. Pulse SET. 3. Pulse START/SPLIT/+ y DISPLAY/TAP ON-OFF/- para seleccionar el ejercicio a configurar y luego pulse MODE. 4. Pulse START/SPLIT/+ y DISPLAY/TAP ON-OFF/- para fijar el número de veces que se repetirán los intervalos
y luego pulse MODE para comenzar a ajustar los intervalos. 5. Pulse START/SPLIT/+ y DISPLAY/TAP ON-OFF/- para elegir un nombre para el intervalo y luego pulse MODE. 6. Pulse START/SPLIT/+, DISPLAY/TAP ON-OFF/- y MODE para establecer el tiempo del intervalo. 7. Si desea fijar un intervalo adicional, pulse MODE hasta que el número de intervalo en la parte superior de
la pantalla centellee, pulse START/SPLIT/+ para seleccionar el siguiente intervalo y luego pulse MODE para comenzar a ajustar el tiempo.
nOta: Usted también puede seleccionar un intervalo que ya haya configurado si necesita hacer cambios. 8. Repita los pasos 5 a 7 hasta que todos los intervalos estén ajustados. Usted puede programar hasta
8 intervalos para cada ejercicio. 9. Pulse STOP/RESET/SET. Siga estos pasos para tomar el tiempo de un ejercicio por intervalos. 1. Pulse MODE hasta que aparezca INT TIMER. 2. Pulse START. 3. Cuando termina uno de los intervalos, suena
una alerta para que usted comience el siguiente intervalo. Aparecen el nombre y el tiempo del siguiente intervalo.
4. Pulse STOP para detener el ejercicio. 5. Pulse RESET cuando el ejercicio esté detenido para seleccionar SAVE o ERASE (guardar o borrar). 6. Pulse y mantenga RESET para reiniciar el cronómetro y guardar o borrar los datos del ejercicio. Si seleccionó SAVE en el paso 5, se guardan todos los datos del ejercicio. Si seleccionó ERASE en el paso 5, todos los datos del ejercicio se borran y no se guardan.
(continued on reverse) (suite au dos) (sigue al dorso)
Register your product at www.timex.com
W279 661-095003 US
enregistrez votre produit à www.timex.com
W279 661-095003 US
Registre su producto en www.timex.com
W279 661-095003 US
Printed in the Phillipines
START INT 1 INT 2 (X6)(fast 7:45) (slow 1:00)
DÉMARRER (X6)INT 1(rapide 7:45)
INT 2(lent 1:00)
INICIO (X6)INT 1(rápido 7:45)
INT 2(lento 1:00)

review modeYou can view all saved data for Chrono mode or Interval Timer mode workouts from Review mode. Compare these workouts to one another to know if you are on track for your training program and to chart your improvement over time. When you stop and reset a workout, it is saved in the watch memory. Your 5 most recent workouts are stored; if you save a sixth workout, the oldest workout is deleted to make room for it. If you took laps/splits during a Chrono mode workout, you can view data for each lap individually, so you can compare your performance from lap to lap. Chrono mode workout data is compared to your target pace, so you can see how you compared to your goals overall.
indiglo® nighT-lighT/nighT-mode® feaTure
1. Press INDIGLO® Button to activate night-light for several seconds. 2. Hold INDIGLO® Button for 4 seconds to activate NIGHT-MODE® feature. Beep will sound. 3. In NIGHT-MODE® feature, press any button to activate night-light. 4. Hold INDIGLO® Button for 4 seconds to turn off NIGHT-MODE® feature. Beep will sound. NIGHT-MODE®
feature automatically turns off after 8 hours.
BaTTerytimex strongly recommends that a retailer or jeweler replace battery. Battery type is on watch back. If present, push/short internal reset switch after replacing battery. Battery life estimates are based on certain assumptions regarding usage; battery life may vary depending on actual usage.dO nOt dISPOSE OF BattEry In FIrE. dO nOt rECHarGE. KEEP LOOSE BattErIES aWay FrOM CHILdrEn.
waTer resisTanceIf your watch is water-resistant, meter marking or (O) is indicated.
WarnInG: tO MaIntaIn WatEr-rESIStanCE, dO nOt PrESS any BUttOnS UndEr WatEr. • Watchiswater-resistantonlyaslongaslens,pushbuttons,andcaseremainintact.• Watchisnotadivewatchandshouldnotbeusedfordiving.• Rinsewatchwithfreshwaterafterexposuretosaltwaterorchlorine.Consult your doctor before beginning an exercise program to confirm a workout plan that is right for you.
modo review (revisiÓn)Usted puede ver todos los datos guardados en el modo cronógrafo o temporizador por intervalos en el modo revisión. Compare estos ejercicios entre sí para saber si está siguiendo su programa de entrenamiento y para graficar sus mejoras en el tiempo. Cuando usted para y reinicia un ejercicio, se guarda en la memoria del reloj. Se almacenan los 5 ejercicios más recientes; si guarda un sexto ejercicio, el más antiguo se borra para hacer lugar. Si tomó vueltas/fracciones durante el ejercicio en el modo cronógrafo, usted puede ver los datos de cada vuelta por separado, así puede comparar su desempeño entre vuelta y vuelta. Los datos de ejercicios en el modo cronógrafo se comparan con su paso deseado, de manera que usted puede compararse con sus metas en general.
luZ nocTurna indiglo®/herramienTa nighT-mode®
1. Pulse el botón INDIGLO® para activar la luz nocturna durante varios segundos. 2. Pulse y mantenga el botón INDIGLO® durante 4 segundos para activar la herramienta NIGHT-MODE®.
Sonará un pitido. 3. Con la herramienta NIGHT-MODE®, pulsar cualquier botón activa la luz nocturna. 4. Pulse y mantenga el botón INDIGLO® durante 4 segundos para desactivar la herramienta NIGHT-MODE®.
Sonará un pitido. La herramienta NIGHT-MODE® se desactiva automáticamente después de 8 horas.
pilatimex recomienda enfáticamente que sea un distribuidor o un joyero quien cambie la pila. El tipo de pila se indica en la parte trasera de la caja. Si lo hubiera, pulse/puentee el interruptor de reinicio luego de cambiar la pila. La vida útil estimada de la pila se basa en ciertas suposiciones relacionadas con el uso. La duración de la pila puede variar según el uso real.nO arrOJE La PILa aL FUEGO. nO La rECarGUE. MantEnGa LaS PILaS SUELtaS FUEra dEL aLCanCE dE LOS nIÑOS.
resisTencia al aguaSi su reloj es resistente al agua, tiene una marca de metros o (O) indicada.
Profundidad de resistencia al agua p.s.i.a. * Presión del agua debajo de la superficie
30m/98pie 60 50m/164pie 86 100m/328pie 160*libras por pulgada cuadrada absoluta
adVErtEnCIa: Para nO PErdEr La rESIStEnCIa aL aGUa, nO PULSE nInGÚn BOtÓn MIEntraS EStÉ SUMErGIdO. • Elrelojesresistentealaguasolamentesielcristal,losbotonesylacajaestánintactos.• Elrelojnoesunrelojdebuceoynodebeusarseparabucear.• Enjuaguesurelojconaguacorrientedespuésdehaberestadoexpuestoaaguasaladaocloro.Consulte a su médico para confirmar antes de iniciar un programa de ejercicios para confirmar que un plan de ejercicios es el indicado para usted.
tIMEx IntErnatIOnaL Warranty(U.S. – LIMITED WARRANTY – PLEASE SEE FRONT OF INSTRUCTION BOOKLET
FOR TERMS OF EXTENDED WARRANTY OFFER)Your TIMEX® watch is warranted against manufacturing defects by Timex Group USA, Inc. for a period of ONE YEAR from the original purchase date. Timex and its worldwide affiliates will honor this International Warranty.
Please note that Timex may, at its option, repair your watch by installing new or thoroughly reconditioned and inspected components or replace it with an identical or similar model. IMPOrtant — PLEaSE nOtE tHat tHIS Warranty dOES nOt COVEr dEFECtS Or daMaGES tO yOUr WatCH:
1) after the warranty period expires;2) if the watch was not originally purchased from an authorized Timex retailer;3) from repair services not performed by Timex;4) from accidents, tampering or abuse; and5) lens or crystal, strap or band, watch case, attachments or battery. Timex may charge you for replacing any of these parts.
THIS WARRANTY AND THE REMEDIES CONTAINED HEREIN ARE EXCLUSIVE AND IN LIEU OF ALL OTHER WARRANTIES, EXPRESS OR IMPLIED, INCLUDING ANY IMPLIED WARRANTY OF MERCHANTABILITY OR FITNESS FOR PARTICULAR PURPOSE. TIMEX IS NOT LIABLE FOR ANY SPECIAL, INCIDENTAL OR CONSEQUENTIAL DAMAGES. Some countries and states do not allow limitations on implied warranties and do not allow exclusions or limitations on damages, so these limitations may not apply to you. This warranty gives you specific legal rights and you may also have other rights which vary from country to country and state to state.
To obtain warranty service, please return your watch to Timex, one of its affiliates or the Timex retailer where the watch was purchased, together with a completed original Watch Repair Coupon or, in the U.S. and Canada only, the completed original Watch Repair Coupon or a written statement identifying your name, address, telephone number and date and place of purchase. Please include the following with your watch to cover postage and handling (this is not a repair charge): a US$ 8.00 check or money order in the U.S.; a CAN$7.00 cheque or money order in Canada; and a UK£2.50 cheque or money order in the U.K. In other countries, Timex will charge you for postage and handling. NEVER INCLUDE A SPECIAL WATCHBAND OR ANY OTHER ARTICLE OF PERSONAL VALUE IN YOUR SHIPMENT.
For the U.S., please call 1-800-328-2677 for additional warranty information. For Canada, call 1-800-263-0981. For Brazil, call +55 (11) 5572 9733. For Mexico, call 01-800-01-060-00. For Central America, the Caribbean, Bermuda and the Bahamas, call (501) 370-5775 (U.S.). For Asia, call 852-2815-0091. For the U.K., call 44 020 8687 9620. For Portugal, call 351 212 946 017. For France, call 33 3 81 63 42 00. For Germany/Austria, call +43 662 88921 30. For the Middle East and Africa, call 971-4-310850. For other areas, please contact your local Timex retailer or Timex distributor for warranty information. In Canada, the U.S. and in certain other locations, participating Timex retailers can provide you with a postage-paid, pre-addressed Watch Repair Mailer for your convenience in obtaining factory service.
©2012 Timex Group USA, Inc. TIMEX, SLEEK, TAPSCREEN, INDIGLO and NIGHT-MODE are trademarks of Timex Group B.V. and it’s subsidiar-ies. IRONMAN is a registered trademark of World Triathlon Corporation. Used here by permission.
Water-Resistance Depth p.s.i.a. * Water Pressure Below Surface
30m/98ft 60 50m/164ft 86 100m/328ft 160*pounds per square inch absolute
6. Maintenez RESET pour réinitialiser le chronomètre et sauvegarder ou effacer les données de séance d’exercice.
Si vous avez sélectionné SAVE à l’étape 5, toutes les données de séance d’exercice sont sauvegardées. Si vous avez sélectionné ERASE à l’étape 5, la séance d’exercice est effacée sans être sauvegardée.
mode récapiTulaTifVous pouvez visualiser toutes les données sauvegardées pour les séances d’exercice en mode Chrono ou mode Minuterie par intervalles à partir du mode Récapitulatif. Comparez ces séances d’exercice à une autre pour savoir si vous êtes sur la bonne voie avec votre programme d’entraînement et pour tabler leur amélioration avec le temps. Lorsque vous arrêtez et réinitialisez une séance d’exercice, elle est sauvegardée dans la mémoire de la montre. Vos 5 séances d’exercice les plus récentes sont mises en mémoire ; si vous sauvegardez une sixième séance d’exercice, la plus ancienne est effacée pour faire de la place. Si vous prenez des temps au tours/intermédiaires pendant une séance d’exercice de mode Chrono, vous pouvez afficher des données pour chaque tour individuellement, de manière à pouvoir comparer votre performance d’un tour à l’autre. Les données de séance d’exercice en mode Chrono sont comparées à votre allure cible, de manière à pouvoir comparer à vos objectifs dans l’ensemble.
veilleuse indiglo® avec foncTion nighT-mode®
1. Enfoncez le bouton de la veilleuse INDIGLO® pour activer l’éclairage pendant plusieurs secondes. 2. Tenez le bouton INDIGLO® enfoncé pendant 4 secondes pour activer la fonction NIGHT-MODE®. Un bip
sonore se déclenche. 3. En utilisant la fonction NIGHT-MODE® appuyez sur n’importe quel bouton pour activer l’éclairage. 4. Tenez le bouton INDIGLO® enfoncé pendant 4 secondes pour activer la fonction NIGHT-MODE®. Un bip
sonore se déclenche. La fonction NIGHT-MODE® s’éteint automatiquement au bout de 8 heures.
piletimex recommande fortement de faire changer la pile par un détaillant ou un bijoutier. Le type de pile est indiqué au dos de la montre. S’il est présent, appuyez sur le bouton « internal reset » (remise à zéro interne) après avoir remplacé la pile. L’estimation de la durée de vie de la pile est basée sur certaines hypothèses d’utilisation ; la durée réelle peut varier selon l’utilisation de la montre.nE PaS JEtEr La PILE aU FEU. nE PaS rECHarGEr La PILE. GardEr LES PILES HOrS dE La POrtÉE dES EnFantS.
éTanchéiTéSi la montre est étanche, la profondeur maximale ou le symbole (O) est indiqué.
attEntIOn : POUr PrÉSErVEr L’ÉtanCHÉItÉ, nE PaS EnFOnCEr LES BOUtOnS SOUS L’EaU. • Lamontreestétancheaussilongtempsqueleverre,lesboutonsetleboîtiersontintacts.• Lamontren’estpasconçuepourlaplongée.Nel’utilisezpasdanscesconditions.• Rincezàl’eaudouceaprèstoutcontactavecl’eaudemeroulechlore.Consultez votre médecin avant de commencer un programme d’exercice et pour confirmer la zone de fréquence cardiaque vous convenant.
GarantIE IntErnatIOnaLE tIMEx(GARANTIE LIMITÉE – É.-U. – PRIÈRE DE SE REPORTER À LA COUVERTURE DU LIVRET D’INSTRUCTION
POUR LES MODALITÉS DE L’OFFRE DE GARANTIE PROLONGÉE)Votre montre TIMEX® est garantie contre les défauts de fabrication par Timex Group USA, Inc. pour une période d’UN AN, à compter de la date d’achat. Timex ainsi que ses filiales du monde entier honoreront cette garantie internationale.
Timex se réserve le droit de réparer votre montre en y installant des composants neufs ou révisés, ou bien de la remplacer par un modèle identique ou similaire. IMPOrtant — CEttE GarantIE nE COUVrE PaS LES dÉFaUtS OU L’EndOMMaGEMEnt dE VOtrE MOntrE :
1) après l’expiration de la période de garantie ;2) si la montre n’a pas été achetée initialement chez un revendeur Timex agréé ;3) résultant de travaux de réparation non effectués par Timex ;4) s’il s’agit d’un accident, falsification ou abus ;5) s’il s’agit du verre ou cristal, du bracelet ou brassard, du boîtier, des accessoires ou de la pile. Le remplacement de ces pièces peut
vous être facturé par Timex.CETTE GARANTIE AINSI QUE LES RECOURS PRÉVUS DANS LES PRÉSENTES SONT EXCLUSIFS ET REMPLACENT TOUTE AUTRE GARANTIE EXPRESSE OU IMPLICITE, Y COMPRIS TOUTE GARANTIE IMPLICITE DE QUALITÉ MARCHANDE ET D’ADAPTATION À UN USAGE PARTICULIER. TIMEX N’EST RESPONSABLE D’AUCUN DOMMAGE PARTICULIER, ACCESSOIRE OU INDIRECT. Certains états ou provinces n’autorisent pas les limitations de garanties implicites et n’autorisent pas les exclusions ou limitations pour des dommages, auquel cas lesdites limitations pourraient ne pas vous concerner. Les modalités de la présente garantie vous donnent des droits légaux précis et vous pouvez également vous prévaloir d’autres droits qui varient d’un état ou d’une province à l’autre.
Pour obtenir le service garanti, retourner la montre à Timex, à une de ses filiales ou au détaillant Timex où il a été acheté. Inclure un cou-pon de réparation original dûment rempli ou, aux É.-U. et au Canada, le coupon original ou une déclaration écrite comprenant votre nom, adresse, numéro de téléphone ainsi que la date et le lieu d’achat. Veuillez inclure la somme suivante avec votre montre pour couvrir les frais de poste et de manutention (ce ne sont pas des frais de réparation) : un chèque ou mandat de 8,00 $ É.U. aux États-Unis, de 7,00 $ CAN au Canada et de 2,50 £ au Royaume-Uni. Dans les autres pays, Timex vous facturera les frais de poste et de manutention. N’INCLUEZ JAMAIS DANS VOTRE ENVOI UN BRACELET SPÉCIAL OU AUTRE ARTICLE AYANT UNE VALEUR SENTIMENTALE.
Aux É.-U. veuillez composer le 1-800-328-2677 pour plus de renseignements sur la garantie. Au Canada, composer le 1-800-263-0981. Au Brésil, composer le +55 (11) 5572 9733. Au Mexique, composer le 01-800-01-060-00. En Amérique centrale, les Caraïbes, les Bermudes et les Bahamas, composer le (501) 370-5775 (É.-U.). En Asie, composer le 852-2815-0091. Au R.U., composer le 44 020 8687 9620. Au Portugal, composer le 351 212 946 017. En France, composer le 33 3 81 63 42 00. En Allemagne/Autriche, composer le +43 662 88921 30. Au Moyen-Orient et en Afrique, composer le 971-4-310850. Dans les autres régions, veuillez contacter votre détaillant ou distributer Timex pour des renseignements sur la garantie. Au Canada, aux É.-U. et en certains autres endroits, les détaillants Timex participants peuvent vous faire parvenir un emballage pré-adressé et pré-affranchi pour vous faciliter l’envoi de la montre à l’atelier de réparation.
©2012 Timex Group USA, Inc. TIMEX, SLEEK, TAPSCREEN, INDIGLO et NIGHT-MODE sont des marques déposées de Timex Group B.V. et de ses filiales. IRONMAN est une marque déposée de World Triathlon Corporation. Utilisées avec une permission.
GarantIa IntErnaCIOnaL tIMEx(GARANTIA LIMITADA USA - LEA POR FAVOR EL FOLLETO DE INSTRUCCIONES PARA LOS DETALLES
DE LA OFERTA DE EXTENSIóN DE LA GARANTíA).Timex Group USA, Inc. garantiza su reloj TIMEX® contra defectos de fabricación por un período de UN A—O a partir de la fecha de compra original. Timex y sus sucursales en todo el mundo respaldan esta Garantía Internacional.
Cabe aclarar que Timex tiene la libertad de optar por reparar el reloj con componentes nuevos o reacondicionados e inspeccionados, y también podría optar por reemplazarlo por un modelo idéntico o similar. IMPOrtantE — OBSErVE POr FaVOr QUE ESta Garantía nO CUBrE dEFECtOS O da—OS a SU rELOJ:
1) después de vencido el plazo de la garantía;2) si el reloj inicialmente no se compró a un distribuidor autorizado de Timex;3) si las reparaciones efectuadas no las hizo Timex;4) si son consecuencia de accidentes, manipulación no autorizada o abuso; y5) por cristal, correa o pulsera, caja, accesorios o pila. Timex podría cobrar por el cambio de cualquiera de estas partes.
ESTA GARANTíA SE OFRECE EN FORMA EXCLUSIVA Y EN LUGAR DE CUALQUIER OTRA GARANTíA, SEA EXPRESA O IMPLíCITA, INCLUSIVE TODA GARANTíA IMPLíCITA PARA FINES COMERCIALES O DE ADECUACIóN A FINES PARTICULARES. TIMEX NO ASUME NINGUNA RESPONSABILIDAD POR PERJUICIOS DIRECTOS, INDIRECTOS NI ESPECIALES. En ciertos países y estados no se permiten limitaciones de las garantías implícitas ni exclusiones o limitaciones de perjuicios, por lo cual las limitaciones mencionadas anteriormente podrían no aplicarse en su caso particular. Esta garantía le otorga derechos establecidos por ley, pero usted también podría tener otros derechos que difieren de un país a otro, o de un estado a otro.
Para solicitar los servicios incluidos en la garantía, devolver el reloj a Timex, a una de sus sucursales o al comercio minorista adonde se compró el reloj, adjuntando el Cupón de Reparación que originalmente viene con el mismo. En EUA y Canadá se puede adjuntar el original del Cupón de Reparación del Reloj o una nota en la que figure su nombre, domicilio, número de teléfono y fecha y lugar de compra. Para cubrir el costo de envío, adjunte el siguiente importe (este importe no es para el pago de la reparación): En EUA, un cheque o giro por valor de US $ 8,00 (dólares estadounidenses); en Canadá, un cheque certificado o giro por valor de CAN $7,00 (dólares canadienses); en el Reino Unido, un cheque certificado o giro por valor de UK £ 2,50 (libras). En otros países, Timex se encargará de cobrarle el importe por gastos de envío. NUNCA INCLUYA CON EL RELOJ UNA MALLA O BANDA ESPECIAL NI NINGÚN OTRO ARTíCULO DE VALOR PERSONAL.
En EUA, por favor llame al 1-800-328-2677 para obtener información adicional sobre la garantía. En Canadá, llamar al número 1-800-263-0981. En Brasil, al +55 (11) 5572 9733. En México, al 01-800-01-060-00. En América Central, Países del Caribe, Bermuda y Bahamas, al (501) 370-5775 (EUA). En Asia, al 852-2815-0091. En el Reino Unido, al 44 020 8687 9620. En Portugal, al 351 212 946 017. En Francia, al 33 3 81 63 42 00. Para Alemania/Austria: +43 662 88921 30. En Medio Oriente y África, al 971-4-310850. En otras áreas, consulte al vend-edor local de Timex o al distribuidor de Timex sobre la garantía. En Canadá, EUA y en otros lugares, algunos distribuidores de Timex podrían proporcionarle un sobre con la dirección y el franqueo previamente pagado para que envíe el reloj a reparación.
©2012 TIMEX, SLEEK, TAPSCREEN, INDIGLO y NIGHT-MODE son marcas registradas de Timex Group B.V. y sus afiliados. IRONMAN es una marca registrada de World Triathlon Corporation. Usadas aquí con permiso.
Profondeur d’étanchéité Pression de l’eau sous la surface en p.s.i.a.*
30 m/98 pi 60 50 m/164 pi 86 100 m/328 pi 160*livres par pouce carré (abs.)