Embed Size (px)
Citation preview

Copyright ©2016 xRM Consultancy Limited
Timeline for Microsoft Dynamics CRM
A beautiful and intuitive way to view activity or
record history for CRM entities
Version 2.3

Copyright ©2016 xRM Consultancy Limited
xRM
Co
nsu
ltan
cy T
ime
line
: Wh
y a
tim
elin
e?
2
Contents Why a timeline? ............................................................................................................................................ 3
What does the timeline do? ......................................................................................................................... 3
Default entities displayed on the timeline ............................................................................................ 3
Download ...................................................................................................................................................... 3
Browser Support ....................................................................................................................................... 4
Installation .................................................................................................................................................... 4
Upgrading – important information ......................................................................................................... 4
Import the Timeline solution .................................................................................................................... 4
Assign your users a Timeline security role to view the Timeline .............................................................. 5
Configure your forms to display the Timeline .......................................................................................... 6
Other optional Parameters ................................................................................................................... 8
Show Email and Phone Call records only .......................................................................................... 8
Display on a Dashboard .................................................................................................................... 9
Position the Timeline navigation bar at the top ............................................................................. 10
Show the Timeline navigation bar without the detail panes .......................................................... 11
Configure Timeline Entities ..................................................................................................................... 11
Understanding how it all ties together ............................................................................................... 11
Setting up a new Entity ....................................................................................................................... 12
Create a new Timeline Entity Record .............................................................................................. 13
Create the Timeline Entity Link records .......................................................................................... 15
Set up a Dashboard Timeline – note currently only supported on CRM 2013 ............................... 18
Support ....................................................................................................................................................... 21

Copyright ©2016 xRM Consultancy Limited
xRM
Co
nsu
ltan
cy T
ime
line
: Wh
y a
tim
elin
e?
3
Why a timeline?
We think grids are a dull way to view and interpret activity or time-based data.
Interactions with your clients are time based so we thought lets display this information in a way that
users intuitively understand and provides context to the future and historical activities for the relevant
entity.
What does the timeline do? The Timeline presents the future and historical activities for entities such as Account, Contact or
Opportunity (free/evaluation version) or any other entity and Dashboards (paid version) in a visually
pleasing way. It is very intuitive to use and even supports mobile devices (really this means tablets only
as on phone displays everything is a bit cramped!). The evaluation version randomly adds “Evaluation
version” entries on the timeline.
Default entities displayed on the timeline
Appointment
Campaign Response
Case
Fax
Letter
Opportunity
Order
Phone Call
Service Activity
Task
The above entities are configured by default. You can edit the configuration of these or add new ones to
suit your needs (paid version only).
We welcome your feedback – [email protected].
Download Timeline from xRM Consultancy is currently available from http://www.xrmconsultancy.com/timeline-
for-microsoft-crm/.
If you would like us to extend the capability of the timeline please get in touch –

Copyright ©2016 xRM Consultancy Limited
xRM
Co
nsu
ltan
cy T
ime
line
: In
stal
lati
on
4
Browser Support All browsers supported by Microsoft Dynamics CRM 2013+ Online are supported by the Timeline (If you
run into problems with IE8 or IE9 and get an error message saying IE7 is not supported, it may be
because you are running the browser in IE7 compatibility mode. Here are directions on how to change
the compatibility mode).
Installation
Upgrading – important information If you are upgrading from a Version 1.x Timeline solution you will need to follow the instructions below
for importing – you need to accept the End User License Agreement and Assign your users a Timeline
Security role before the Timeline will display for your existing configurations.
Import the Timeline solution 1. Download the managed solution from http://www.xrmconsultancy.com/timeline-for-microsoft-
crm/.
2. As a user with the System Administration role navigate to Settings > Customization > Solutions
and choose Import from the gird menu.
3. Locate your downloaded solution zip file and follow the instructions in the import wizard.
4. Publish All Customizations.
5. Open the Timeline Solution from the Solutions grid and click the button to Accept Terms and
Conditions – you must do this step to use the Timeline solution (new for Version 2)

Copyright ©2016 xRM Consultancy Limited
xRM
Co
nsu
ltan
cy T
ime
line
: In
stal
lati
on
5
6. After a short while the page will refresh and provide a link to the Timeline Configuration record
– during this process the default Timeline Entity and Timeline Entity Link records are set up
7. If you want to only use the free/evaluation version with limited entity support you do not need
to open the configuration record. If you have a license key to allow you to add custom entities
open the Timeline Configuration record from the link shown above and enter your License Key
in the Licensing Section
Assign your users a Timeline security role to view the Timeline Two security roles are included in the Timeline solution:
1. Timeline Reader – view the Timeline
2. Timeline Writer – view the Timeline and edit Timeline Entities, Timeline Entity Links and
TimeLine Configuration records
A user must have one of these roles to view the Timeline, other the following message will be displayed
on the Timeline:

Copyright ©2016 xRM Consultancy Limited
xRM
Co
nsu
ltan
cy T
ime
line
: In
stal
lati
on
6
Configure your forms to display the Timeline To display the Timeline you will need to modify your existing forms (or create a new one). We haven’t
included any preconfigured forms as you (not us!) know where is best to place the Timeline for your
users. Don’t worry it is easy to do if you don’t know how – we show you how to set it up for the Account
entity below, but the process is the same for any other entity.
1. As a User with Customization privileges navigate to an open an Account Record
2. From the … (more commands) menu item choose Form Editor or the Customize tab (classic
forms) choose Form to open the form editor.
3. From the ribbon select Insert > One Column tab
4. Position the Tab where you want it on the form – under the Summary tab works well.
With the Tab selected in the form area select from the ribbon Insert > Web Resource
Search for the Timeline.html web resource and configure the settings on the General and
Formatting tabs as below. We recommend that Timeline occupies at least 20 rows in CRM 2013
forms (24 in CRM 2011) for optimal viewing. This can be too big for smaller laptop screens so
test with your users to find the best size for your organization. The Timeline will scale
appropriately.
Copyright ©2016 xRM Consultancy Limited
xRM
Co
nsu
ltan
cy T
ime
line
: In
stal
lati
on
7
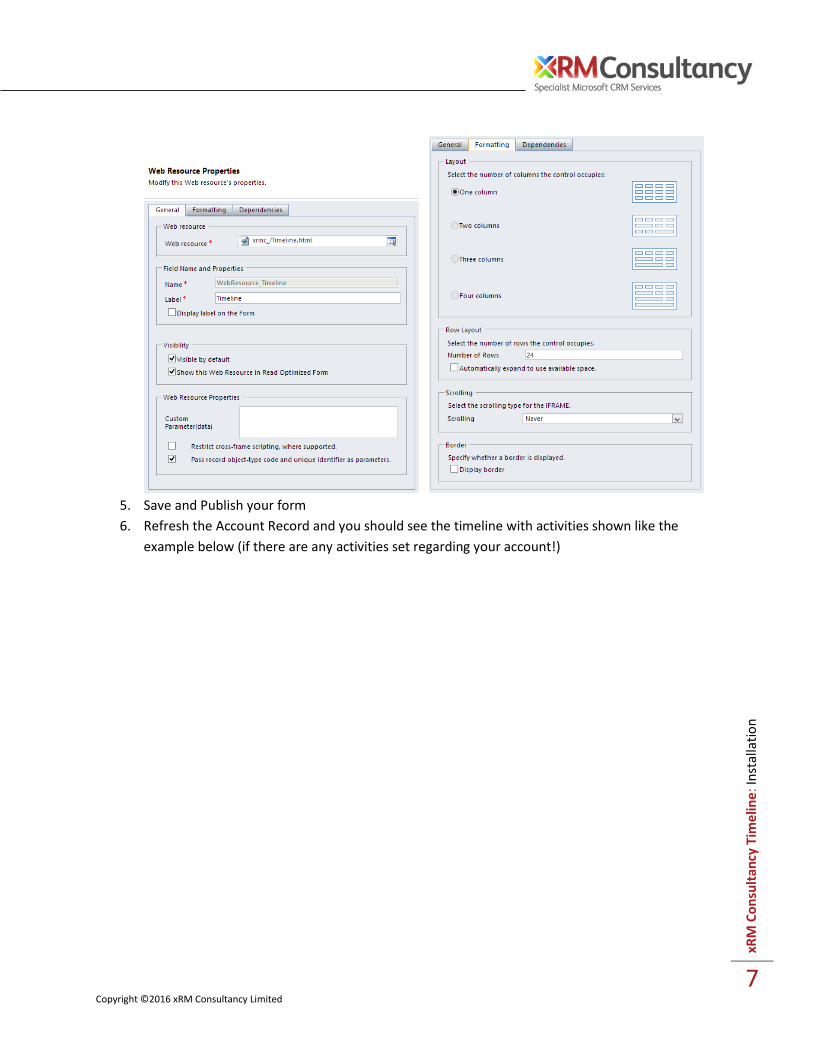
5. Save and Publish your form
6. Refresh the Account Record and you should see the timeline with activities shown like the
example below (if there are any activities set regarding your account!)

Copyright ©2016 xRM Consultancy Limited
xRM
Co
nsu
ltan
cy T
ime
line
: In
stal
lati
on
8
Other optional Parameters
By specifying Custom Parameters you can modify the behaviour of the Timeline on the form:
Show only specified entities when the Timeline loads (user can still manually check other
available entities)
Display the Timeline on a Dashboard
Position the Timeline navigation bar at the top
Show the Timeline navigation bar without the detail panes
Use the following examples to help you configure the Timeline display for your needs. Combine multiple
parameters by separating with a | (pipe) character.
Show Email and Phone Call records only
IncludeEntities=email;phonecall
Separate the entity logical name by a ;
When the Timeline loads only email and phone call records will be shown on the Timeline. A user can
enable other available entities by clicking on the Settings icon in the top right corner of the Timeline
(see below):

Copyright ©2016 xRM Consultancy Limited
xRM
Co
nsu
ltan
cy T
ime
line
: In
stal
lati
on
9
Display on a Dashboard
dashboard=myOpenOpportunities
myOpenOpportunities is matched with any Entity Link records where the Entity Logical Name has been
specified as ‘myOpenOpportunities’. See how to configure a Dashboard Timeline on page 18.

Copyright ©2016 xRM Consultancy Limited
xRM
Co
nsu
ltan
cy T
ime
line
: In
stal
lati
on
10
Position the Timeline navigation bar at the top
If you would like to position the timeline navigation bar above the record detail you can add the
parameter “timelineposition=top” as part of the setup configuration.

Copyright ©2016 xRM Consultancy Limited
xRM
Co
nsu
ltan
cy T
ime
line
: In
stal
lati
on
11
Show the Timeline navigation bar without the detail panes
If you would like to show only the timeline navigation you can add the parameter
“timelineposition=full” as part of the setup configuration. Clicking on any item in the timeline will then
open that record.
Tip – scrolling the Timeline using the scroll-wheel
To move along the Timeline navigation bar using your scroll-wheel hold down the SHIFT key while
scrolling
Configure Timeline Entities With the paid version of Timeline you can display the Timeline on entities other than Account, Contact
and Opportunity and also display the Timeline on a Dashboard. Any entity with a date field can be used
to display records in the Timeline.
It is straight-forward to set up but it does need some technical expertise – you should be comfortable
with HTML and extracting the FetchXML from an Advanced Find query. This guide walks you step by step
through what you need to do.
Understanding how it all ties together
It is worth understanding how the configuration ties together before getting into the configuration
details. There are 3 components to making the Timeline display on your forms:
Copyright ©2016 xRM Consultancy Limited
xRM
Co
nsu
ltan
cy T
ime
line
: In
stal
lati
on
12
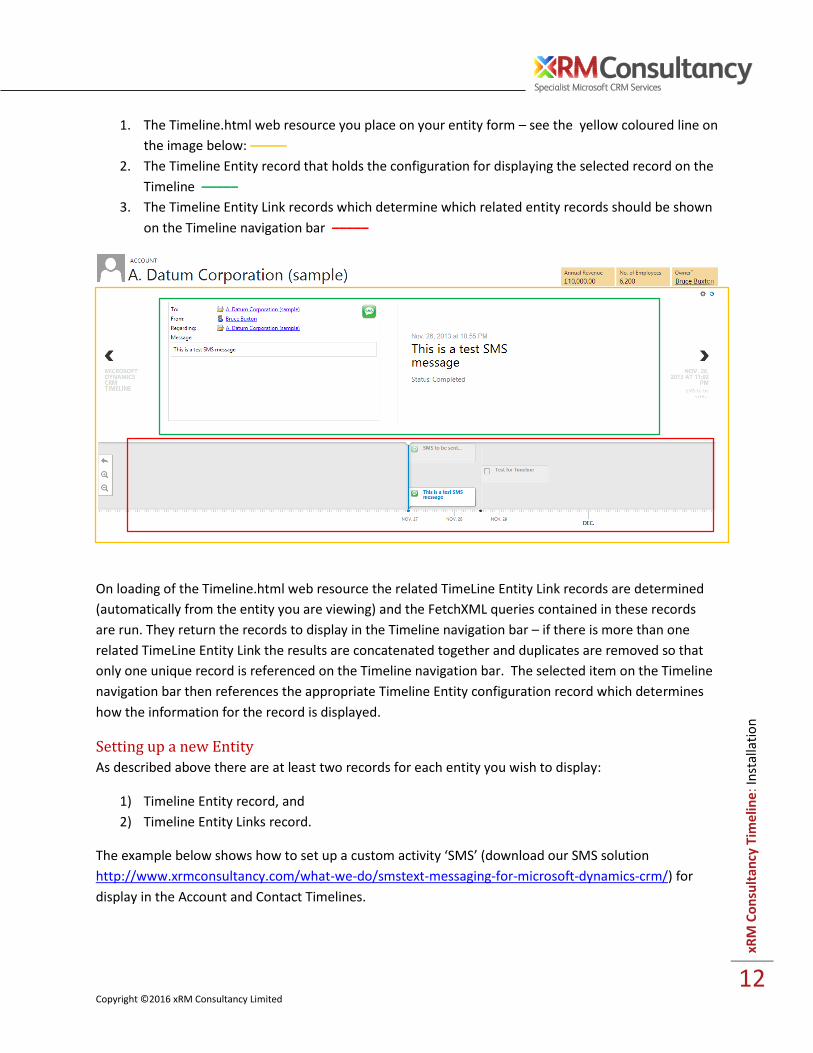
1. The Timeline.html web resource you place on your entity form – see the yellow coloured line on
the image below: –––––
2. The Timeline Entity record that holds the configuration for displaying the selected record on the
Timeline –––––
3. The Timeline Entity Link records which determine which related entity records should be shown
on the Timeline navigation bar –––––
On loading of the Timeline.html web resource the related TimeLine Entity Link records are determined
(automatically from the entity you are viewing) and the FetchXML queries contained in these records
are run. They return the records to display in the Timeline navigation bar – if there is more than one
related TimeLine Entity Link the results are concatenated together and duplicates are removed so that
only one unique record is referenced on the Timeline navigation bar. The selected item on the Timeline
navigation bar then references the appropriate Timeline Entity configuration record which determines
how the information for the record is displayed.
Setting up a new Entity
As described above there are at least two records for each entity you wish to display:
1) Timeline Entity record, and
2) Timeline Entity Links record.
The example below shows how to set up a custom activity ‘SMS’ (download our SMS solution
http://www.xrmconsultancy.com/what-we-do/smstext-messaging-for-microsoft-dynamics-crm/) for
display in the Account and Contact Timelines.

Copyright ©2016 xRM Consultancy Limited
xRM
Co
nsu
ltan
cy T
ime
line
: In
stal
lati
on
13
Create a new Timeline Entity Record
Navigate to the Timeline Entity records in Settings > Timeline > Timeline Entities
Create a new record and complete the fields:
Field Value Notes
Name SMS The name of the Timeline Entity Record.
Entity Logical Name xrmc_sms You can find this in Settings > Customization > Customize the System > Components > Entities > [your entity] > Name field from the General tab.
Headline Field subject The text to be displayed in the Timeline navigation bar and headline for the selected record. Add multiple fields by separating with a comma e.g. subject,createdon
Start Date Field actualend The field name to be used that will determine the position on the timeline. For Activity entities (including custom activity entities) this should be ‘actualend’.
End Date Field The field name to be used for showing the duration of the record on the timeline navigation bar – shown as a blue line along the bottom of the navigation bar. The line becomes darker when the record is selected.
Max Records The maximum number of CRM records to show in the Timeline. Default is 50.
Limit to Last X days The number of days prior to today you wish to show records on the Timeline.
Small Icon /WebResources/xrmc_SMSIcon16x16 URL to the icon (16px square) you want to display on the Timeline navigation for the current type of entity record.
Hide Status Yes Hides the status from displaying under the headline on the timeline detail pane.
HTML to determine the display of the Selected Timeline Record:
HTML <div class="summaryinfo"> <div class="openentity">

Copyright ©2016 xRM Consultancy Limited
xRM
Co
nsu
ltan
cy T
ime
line
: In
stal
lati
on
14
<a id="recordURL" href='#' title="Open full record"></a> </div> <p id="to" class="xRMC-Attribute xRMC-PartyList"> <span>To:</span> </p> <p id="from" class="xRMC-Attribute xRMC-PartyList"> <span>From:</span> </p> <p id="regardingobjectid" class="xRMC-Attribute xRMC-Reference"> <span>Regarding:</span> </p> </div> <p> <span>Message:</span> </p> <div class="innerwrapper"> <p id="description" class="XRMC-Attribute"> </p> </div>
HTML Notes: You can insert your own HTML and inline styles in the HTML field. To display data from a CRM field the HTML element that is to contain the data must have an id attribute with the field’s logic name as the value. For example for the To field: <p id="to" class="xRMC-Attribute xRMC-PartyList"> <span>To:</span> </p> The CSS class attribute needs to contain the class “xRMC-Attribute” at a minimum. Additional CSS attributes should be applied for certain types of fields: PartyList: xRMC-PartyList Regarding/Lookup: xRMC-Reference Date: xRMC-Date Activity Date: xRMC-ActivityDate (For standard MS CRM Activity types so that it knows to look for actual end / scheduled end etc.) Optionset, Currency, Number: xRMC-FormattedValue - Can be attached to optionsets / currencies / numbers to display in the correct format. Opportunity date: xRMC-OpportunityDate - Used on opportunities to pull in estimated / actual dates depending on status Opportunity value: xRMC-OpportunityValue - Used on opportunities to pull in estimated / actual revenue depending on status URLs: xRMC-Url - used to make a URL clickable Hide if null of blank: xRMC-AutoHide - Can be attached to a div in conjunction with a "for" attribute to hide a complete section. For example: <div class="xRMC-AutoHide" for="currentsituation"> <p><span>Current Situation:</span></p> <div class="innerwrapper" id="currentsituation"> <p id="currentsituation" class="xRMC-Attribute"></p> </div> </div>

Copyright ©2016 xRM Consultancy Limited
xRM
Co
nsu
ltan
cy T
ime
line
: In
stal
lati
on
15
This div will automatically hide if the attribute "currentsituation" is null or blank.
Query for obtaining the selected record details:
Query <fetch version="1.0" output-format="xml-platform" mapping="logical" distinct="false"> <entity name="xrmc_sms"> <attribute name="to" /> <attribute name="regardingobjectid" /> <attribute name="activityid" /> <attribute name="description" /> <attribute name="from" /> <filter type="and"> <condition attribute="activityid" operator="eq" value="{0}" /> </filter> </entity> </fetch>
Query Notes: You need to include all the attributes you wish to display on the Timeline selected record in your query i.e. all those referenced in the HTML above. You need to include a reference to the id of the record (activityid in the example above). Do not include more than you need as this could affect performance (i.e. do not use the all-attributes parameter) The "{0}" is replaced at run-time with the relevant record ID.
Create the Timeline Entity Link records
From within the Timeline Entity record form scroll to the Timeline Entity Link sub-grid and create a new
records to find SMS records that meet the following 3 queries:
1. Display SMS’s on the Account record Timeline where the Account is set Regarding
2. Display SMS’s on the Account record where Contact belonging to the Account is a To recipient
or set as the Regarding record (ie. A member of a PartyList)
3. Display SMS’s on the Contact record Timeline where the Contact is the To recipient or set as the
Regarding record (ie. A member of a PartyList)
1. Display SMS’s on the Account record where the Account is set Regarding
Field Value Notes
Name SMS by Regarding Account The name of the Timeline Entity Link Record – describe the query you are making.
Timeline Entity SMS The Timeline Entity record this query relates to.

Copyright ©2016 xRM Consultancy Limited
xRM
Co
nsu
ltan
cy T
ime
line
: In
stal
lati
on
16
Logical Entity Name account You can find this in Settings > Customization > Customize the System > Components > Entities > [your entity] > Name field from the General tab This field is used when the Timeline is placed on the corresponding entity form – in this case the Account form.
Query <fetch version="1.0" output-format="xml-platform" mapping="logical" distinct="false"> <entity name="xrmc_sms"> <attribute name="subject" /> <attribute name="statuscode" /> <attribute name="regardingobjectid" /> <attribute name="activityid" /> <attribute name="scheduledstart" /> <attribute name="actualstart" /> <attribute name="actualend" /> <attribute name="activitytypecode" /> <attribute name="statecode" /> <order attribute="actualend" descending="true" /> <order attribute="actualstart" descending="true" /> <filter type="and"> <condition attribute="regardingobjectid" operator="eq" value="{0}" /> </filter> </entity> </fetch>
Query Notes: To ensure optimum performance it is better to only include attributes that you need. The "{0}" is replaced at run-time with the relevant record ID.
2. Display SMS’s on the Account record where Contact belonging to the Account is a To recipient or set
as the Regarding record (ie. A member of a PartyList)
Field Value Notes
Name SMS by Account’s Contacts The name of the Timeline Entity Link Record – describe the query you are making.
Timeline Entity SMS The Timeline Entity record this query relates to.
Logical Entity Name account You can find this in Settings > Customization > Customize the System > Components > Entities > [your entity] > Name field from the General tab This field is used when the Timeline is placed on the corresponding entity form – in this case the Account form.

Copyright ©2016 xRM Consultancy Limited
xRM
Co
nsu
ltan
cy T
ime
line
: In
stal
lati
on
17
Query <fetch version="1.0" output-format="xml-platform" mapping="logical" distinct="false"> <entity name="xrmc_sms"> <attribute name="subject" /> <attribute name="statuscode" /> <attribute name="regardingobjectid" /> <attribute name="activityid" /> <attribute name="scheduledstart" /> <attribute name="actualstart" /> <attribute name="actualend" /> <attribute name="activitytypecode" /> <attribute name="statecode" /> <order attribute="actualend" descending="true" /> <order attribute="actualstart" descending="true" /> <link-entity name="activityparty" from="activityid" to="activityid" alias="ag"> <link-entity name="contact" from="contactid" to="partyid" alias="ah"> <filter type="and"> <condition attribute="parentcustomerid" operator="eq" value="{0}" /> </filter> </link-entity> </link-entity> </entity> </fetch>
Query Notes: To ensure optimum performance it is better to only include attributes that you need. The "{0}" is replaced at run-time with the relevant record ID.
3. Display SMS’s on the Contact record Timeline where the Contact is the To recipient or set as the
Regarding record (ie. A member of a PartyList)
Field Value Notes
Name SMS by Contact (To recipient or set Regarding)
The name of the Timeline Entity Link Record – describe the query you are making.
Timeline Entity SMS The Timeline Entity record this query relates to.
Logical Entity Name contact You can find this in Settings > Customization > Customize the System > Components > Entities > [your entity] > Name field from the General tab This field is used when the Timeline is placed on the corresponding entity form – in this case the Account form.
Query <fetch version="1.0" output-format="xml-platform" mapping="logical" distinct="false"> <entity name="xrmc_sms"> <attribute name="subject" /> <attribute name="statuscode" />

Copyright ©2016 xRM Consultancy Limited
xRM
Co
nsu
ltan
cy T
ime
line
: In
stal
lati
on
18
<attribute name="regardingobjectid" /> <attribute name="activityid" /> <attribute name="scheduledstart" /> <attribute name="actualstart" /> <attribute name="actualend" /> <attribute name="activitytypecode" /> <attribute name="statecode" /> <order attribute="actualend" descending="true" /> <order attribute="actualstart" descending="true" /> <link-entity name="activityparty" from="activityid" to="activityid" alias="al"> <link-entity name="contact" from="contactid" to="partyid" alias="am"> <filter type="and"> <condition attribute="contactid" operator="eq" value="{0}" /> </filter> </link-entity> </link-entity> </entity> </fetch>
Query Notes: Do not include more attributes than you need as this will affect performance. The "{0}" is replaced at run-time with the relevant record ID.
Once you have added the Timeline HTML webresource(s) to your Account and Contact forms test your
configuration.
Set up a Dashboard Timeline – note currently only supported on CRM 2013
To create a Dashboard Timeline you need to create on or more Entity Link records which have the same
unique Logical Entity Name value. In the example below we are going to create a Dashboard which
shows a user their open Opportunities.
1. Navigate to the Opportunity Timeline Entity record (from the Timeline configuration page or
from and Advanced Find)
2. Create a new Timeline Entity Link
Name: Dashboard: My Open Opportunities
Logical Entity Name: myOpenOpportunities
3. Open an Advanced Find and select the Opportunities entity and select the Saved View ‘My Open
Opportunities’
4. Click on Edit Columns and add the Status Reason Column

Copyright ©2016 xRM Consultancy Limited
xRM
Co
nsu
ltan
cy T
ime
line
: In
stal
lati
on
19
5. Click the Download Fetch XML, open the file in Notepad and copy the XML to the clipboard
6. Go back to your ‘My Open Opportunities’ Timeline Entity Link record and paste the XML into the
Query field
7. Save and close the record
8. Navigate to the Dashboards and create a new Dashboard

Copyright ©2016 xRM Consultancy Limited
xRM
Co
nsu
ltan
cy T
ime
line
: In
stal
lati
on
20
9. Add a Web Resource to the Dashboard pane with the following parameters
10. Adjust the size to suit your needs. We recommend make it full width and increase the height by
selecting the Increase Height option 2 times.
11. Save and close your Dashboard
12. You My Opportunities Timeline should be displayed

Copyright ©2016 xRM Consultancy Limited
xRM
Co
nsu
ltan
cy T
ime
line
: Su
pp
ort
21
Support Please contact [email protected] with any questions.