Embed Size (px)
Citation preview


Time Manager ProA Perfect Complement to Childcare Manager
by Personalized Software, Inc.
Welcome to Time Manager Pro.
Time Manager Pro is a flexible, yet simple tool for managingtime and attendance for childcare centers. It embraces thelatest software and hardware technologies to deliver aprogram that is truely unique in the industry.
Time Manager Pro offers many advanced features availableonly from Personalized Software, the leader in timemanagement solutions for the childcare industry for over twodecades. Among the many new advances included in TimeManager Pro are multi-child clock in, announcements,messaging, email and text message notifications, and childand employee popups.

All rights reserved. No parts of this work may be reproduced in any form or by any means - graphic, electronic, ormechanical, including photocopying, recording, taping, or information storage and retrieval systems - without thewritten permission of the publisher.
Products that are referred to in this document may be either trademarks and/or registered trademarks of therespective owners. The publisher and the author make no claim to these trademarks.
While every precaution has been taken in the preparation of this document, the publisher and the author assume noresponsibility for errors or omissions, or for damages resulting from the use of information contained in this documentor from the use of programs and source code that may accompany it. In no event shall the publisher and the author beliable for any loss of profit or any other commercial damage caused or alleged to have been caused directly orindirectly by this document.
Printed: June 2007 in Phoenix, OR
Time Manager Pro User's Guide
© 2007 Personalized Software, Inc.
PublisherSpecial thanks to:
All the users who beta tested Time Manager Pro and offeredvaluable feedback during the development process. And to all theexisting users of earlier versions of Time Manager who havecontributed valuable feedback during the life-cycle of this product.
A very special thanks to Michael Lange whose unique experienceand programming skills made this program a reality.
Technical Editors
Cover Designer
Personalized Software, Inc.
Patrick Lange
Brandon Trask
Steven Lange

Time Manager Pro Users GuideI
childcaremanager.com
Table of Contents
Chapter 1 Time Manager Installation 2
................................................................................................................................... 21.1 What You Need to Run Time Manager Pro
................................................................................................................................... 31.2 How to Install Time Manager Software
................................................................................................................................... 61.3 How to Install the Timeclock
................................................................................................................................... 81.4 How to Install the Timeclock (with door lock relay)
Chapter 2 The Timeclock 12
................................................................................................................................... 122.1 What is It?
................................................................................................................................... 132.2 Timeclock Configurations
Chapter 3 Using the Timeclock 15
................................................................................................................................... 153.1 How to Clock Children In and Out
................................................................................................................................... 173.2 How to Clock Employees In and Out
................................................................................................................................... 193.3 How Employees Can View Their Workhours
................................................................................................................................... 203.4 How Parents Can View Their Account Balances
................................................................................................................................... 213.5 How Parents Can Request Meals
Chapter 4 The Control Panel 23
................................................................................................................................... 234.1 Overview
................................................................................................................................... 254.2 Center Options
.......................................................................................................................................................... 25To Select Your Active Center
.......................................................................................................................................................... 26To Setup Center Hours
.......................................................................................................................................................... 26To Setup Your Email Server
................................................................................................................................... 294.3 Clock In and Out Options
.......................................................................................................................................................... 29Parent Options
.......................................................................................................................................................... 30Child Options
.......................................................................................................................................................... 31Employee Options
................................................................................................................................... 334.4 Messages
.......................................................................................................................................................... 33To Setup a Parent or Employee Message
.......................................................................................................................................................... 34To Set Your Message Display Options
................................................................................................................................... 364.5 Announcements
.......................................................................................................................................................... 36To Setup Parent Announcements
.......................................................................................................................................................... 37To Setup Employee Announcements
.......................................................................................................................................................... 37To Setup Classroom Announcements
.......................................................................................................................................................... 38To Setup Program Announcements
.......................................................................................................................................................... 39To Setup Activity Announcements
.......................................................................................................................................................... 40To Set Your Announcement Display Options
................................................................................................................................... 424.6 The Virtual Timeclock
................................................................................................................................... 444.7 Managing Timeclocks
.......................................................................................................................................................... 44Connected Timeclocks

IIContents
II
© 2007 Personalized Software, Inc.
.......................................................................................................................................................... 45Relay Options
.......................................................................................................................................................... 45Welcome Message
................................................................................................................................... 474.8 Clock In and Out Notifications
.......................................................................................................................................................... 47Email Notificatons
.......................................................................................................................................................... 48Text Message Notifications
................................................................................................................................... 504.9 Door Access
.......................................................................................................................................................... 50Door Access PINS
.......................................................................................................................................................... 53Door Security
Chapter 5 The Tray Menu 56
................................................................................................................................... 565.1 Using the Menu
................................................................................................................................... 585.2 Clocked Children In/Batch Children Out
................................................................................................................................... 605.3 Clocked Employees In/Batch Employees Out
Chapter 6 Child Attendance Monitor (CAM) 63
................................................................................................................................... 636.1 What is It?
................................................................................................................................... 646.2 How to Use the CAM Right Click Menu
................................................................................................................................... 656.3 How to Use the CAM Control Panel
Chapter 7 Employee Time Monitor (ETM) 67
................................................................................................................................... 677.1 What is It?
................................................................................................................................... 687.2 How to Use the ETM Right Click Menu
................................................................................................................................... 697.3 How to Use the ETM Control Panel
Chapter 8 Reports 71
................................................................................................................................... 718.1 How to Run Reports
................................................................................................................................... 728.2 Report Descriptions
.......................................................................................................................................................... 72Attendance Detail
.......................................................................................................................................................... 72Attendance Summary
.......................................................................................................................................................... 72Currently Clocked In (Child)
.......................................................................................................................................................... 72Currently Clocked In (Employee)
.......................................................................................................................................................... 73Suspect Times
.......................................................................................................................................................... 73TimeSheet Detail Employee)
.......................................................................................................................................................... 73TimeSheet Summary (Employee)
Chapter 9 New Features in Time Manager Pro 75
Index 77

Chapter ITime Manager Installation

What You Need to Run Time Manager Pro 2
© 2007 Personalized Software, Inc.
Time Manager Installation
1.1What You Need to Run Time Manager Pro
Section
Copy of Childcare Manager software installed
Computer with any Pentium or compatible processor
Minimum of 64 (MB) of RAM
Minimum of 3MB of available hard disk space. Actual requirements will vary depending on your systemconfiguration and other applications and features you choose.
VGA video resolution VGA adapter and monitor
CD-ROM or DVD drive
Computer keyboard
Microsoft mouse or compatible pointing device; a touch screen will work.
RS232 connector on your computer or a certified 'USB - Serial Port' adapter.

How to Install Time Manager Software3
childcaremanager.com
1.2How to Install Time Manager Software
Section
1. Insert the Time Manager Pro CD into your CD ROM drive. The welcome screen will appear.
2. Click Next. The license agreement screen will appear.
3. Check the ' I accept the terms in the license agreement'.
4. Click Next. The Registration screen will appear
5. Enter your User Name and the name of your Organization.
6. Enter the 25 digit Serial Number that is included on the inside cover of your Time Manager's Users Guide.

How to Install Time Manager Software 4
© 2007 Personalized Software, Inc.
7. Click Next. The Destination Folder will appear. Click Change to locate and enter a new destination folder.
8. Click Next to use the default destination folder. The Setup Type screen will appear.
9. Check the appropriate boxes to select the features you want to install. You can install 1) Time Manager alone,2) Time Manager with ETM or Cam but not both, 3) ETM alone, or 4) CAM alone. You can install 1) TimeManager alone on other computers on a network, 2) Time Manager with ETM or CAM on other computers on anetwork, 3) ETM alone on other computers on a network, or 4) CAM alone with other computers on a network.
10.Click Next. The 'Ready to Install the Program' screen will appear.

How to Install Time Manager Software5
childcaremanager.com
11.Click Install to begin installation. The Installing Time Manager Pro screen will appear. A status bar willdisplay your installation progress.
12. Click Next. The InstallShield Wizard Completed screen will appear.
13.Click Finish. Installation is complete.

How to Install the Timeclock 6
© 2007 Personalized Software, Inc.
1.3How to Install the Timeclock
Section
Before you install the timeclock, check to see that you have received everything for installation. You should havereceived the following items with your shipment.
1 timeclock
1 RS232 serial cable
1 USB to Serial Port Adapter cable (Optional)
1 AC/DC power transformer
1 plastic bag that includes the following items: 1) 1 paper template for use in mounting the data terminal on awall. 2) 2 wall board anchors and mounting screws for mounting wall bracket. 3) 1 connector marked ' DATATERM". 4) 2 connectors connected together marked 'COMPUTER'.
1 Time Manager installation CD
1 Time Manager Users Guide
Note: if you are receiving more than 1 timeclock you should have a corresponding number of the above items.
If you are missing any of the above items, contact Personalized Software's Customer Service department at

How to Install the Timeclock 7
childcaremanager.com
(800) 553-2312. If you do not have an available serial port on your computer, you will need to install an additionalserial port or use a USB to Serial Port Adapter cable.
To Install the Timeclock1. Decide where you want to place the timeclock.
2. Place the timeclock where it will be used. The timeclock should be no more than eight feet from a 110 VACpower outlet, and 50 feet from your computer serial port. The timeclock can be mounted on a wall using thebuilt-in wall mounts on the back of the timeclock. The timeclock can also be set on a flat surface, e.g., desk,counter top, table. When using the timeclock on a flat surface, you can set the timeclock flat or use the wallmount bracket in the back to raise the back of the timeclock.
3. Connect the timeclock to an RS232 serial port on your computer using the RS232 cable and connectors thatcame with your package. Warning: Only use cables and connectors that you receive with your package. If aRS232 port is not available you will need to obtain a USB to Serial Port Adapter cable and connect the datatimeclock to your computer using it.
4. Connect the AC/DC transformer. The timeclock uses the AC/DC transformer to provide power for thetimeclock display. To connect the AC/DC transformer, plug one end into the timeclock and one end into a 110VAC power outlet.

How to Install the Timeclock (with door lock relay) 8
© 2007 Personalized Software, Inc.
1.4How to Install the Timeclock (with door lock relay)
Section
The timeclock with optional door lock relay is installed the same way as the standard timeclock with theexception that you must also set up the relay.
Relay Specifications The timeclock includes two relays that are accessed via a terminal block on the back of the timeclock. Theserelays are normally used to trigger an automatic door opener but may also be used to trigger a light, a bell, or alarger relay. Both relays use dry reed contacts. The maximum contact rating is 10VA (20VDC@500ma). Themaximum switched voltage is 100VDC. The relays do not provide any external voltage for driving relays or otherdevices.
The terminal block is configured with two relays. There are four connectors, two for each relay. The top twoconnectors are the contacts for the first relay and the bottom two are for the second relay.

How to Install the Timeclock (with door lock relay)9
childcaremanager.com
Relays
Warning: Do not exceed any of the recommended specifications for the relay contacts. To do so will void yourwarranty and could possibly lead to costly repairs.
Wiring ExamplesFollowing are two examples of wiring the timeclock to external devices. These examples are provided as a guideto the installer. The installer should always be a professional locksmith or electrician. Exact specifications fordoor locks and other devices will vary.
Solid State Example. Here is an example of how the timeclock can be connected to a door lock system that ispowered by 120 or 240 VAC using a solid state relay and a 12 VDC power supply.
Solid State Example
Standard Mechanical Example. Here is an example of how the timeclock can be connected to one or more doorlocks that are powered by 120 VAC using a standard mechanical relay powered by a 24 VAC transformer.

How to Install the Timeclock (with door lock relay) 10
© 2007 Personalized Software, Inc.
Standard Mechanical Example
Note for Installer: When using a standard mechanical relay, it is a good idea to shunt the relay coil using areverse diode (part number 1N4003 or 1N4000). This helps prevent voltage spikes to the dry reed relays in thetimeclock.

Chapter IIThe Timeclock

What is It? 12
© 2007 Personalized Software, Inc.
The Timeclock
2.1What is It?
Section
The timeclock is a remote data terminal designed to transmit and receive information interactively with ChildcareManager. The timeclock collects time and attendance data and transmits it back to Childcare Manager where it isstored in the appropriate records. It also displays a variety of announcements and messages to timeclock usersand carries out certain tasks such as sending email and text message notifications.
The timeclock contains a built-in keyboard and display and is a rugged, highly reliable unit capable ofwithstanding the rigorous demands of today's busy childcare centers. The timeclock meets the following generalspecifications.
DISPLAY: Two line by 24 character electro-reflective LCD.
USER INTERFACE: Custom designed keyboard, rated life - 10 million cyclesper switch.
COMMUNICATION INTERFACE: RS232 serial port, rated for connections up to 5 ft.
CASE: Highly durable, light weight aluminum.
CABLE: One cable with power and communications lines exitsfrom the timeclock case. The cable is 4 feet long with aconnection hub at the end. One serial cable forconnecting the timeclock to the computer. One AC/DCpower adaptor to provide power to the timeclock display.
DIMENSIONS: Height 9.25 inches; width 8.5 inches; depth 2 inches.
WEIGHT: 1.4 pounds.
OPERATING ENVIRONMENT: Temperature 0 to 60 degrees C (32-140F); humidity 0 to100%
Timeclock Configurations13
childcaremanager.com
2.2Timeclock Configurations
Section
Timeclocks are available with and without door lock relays and in indoor and outdoor configurations.
Indoor Timeclock Outdoor Timeclock

Chapter IIIUsing the Timeclock

How to Clock Children In and Out15
childcaremanager.com
Using the Timeclock
3.1How to Clock Children In and Out
Section
Virtual Terminal Screen
You can check in or out 1 to 4 children at a time with the timeclock or virtual timeclock. Sponsors, co-sponsorsand family contacts use a PIN (personal identification number)that is assigned in Childcare Manager to checkthe children in and out. The PIN is a unique identification number that is composed of 2 to 8 numeric characters.

How to Clock Children In and Out 16
© 2007 Personalized Software, Inc.
The PIN is entered in the Sponsor and Co-sponsors tab and in the Family Contacts record.
To Clock a Child In or Out
1. Press the child button .
2. You will be prompted to enter your PIN (see below).
3. Using the numeric keys on the keyboard, enter your PIN.
4. If the family has only one child, click OK to sign in or out the child.
5. If the family has more than one child, Click Ok to sign in or out all of the children listed at the same time.Your display will list the names of the children in the family. To clock individual children in or out, enter thenumbers of the children you want to clock in or out. For example, in the display below if you only want toclock in Cindy and Wendy, enter the number 1 and 3 and click OK.
6. After clicking OK, The display will show each child checked in or out, whether they were checked in orout, and the time of check in or out.

How to Clock Employees In and Out17
childcaremanager.com
3.2How to Clock Employees In and Out
Section
Employee Clock In /Out Process
To Clock an Employee In or Out
1. Press the staff button . You will be prompted to enter the employee's PIN (see below).

How to Clock Employees In and Out 18
© 2007 Personalized Software, Inc.
2. Enter the employee's PIN (Personal Identification Number). The employee's PIN is a unique identificationnumber that is composed of 2 to 9 alphanumeric characters. Use of numeric characters only isrecommended. The PIN is entered in the job tab of the employee's data card in Childcare Manager.
3. Click OK. The name of the employee and the time the employee was clocked in or out will be displayed.

How Employees Can View Their Workhours19
childcaremanager.com
3.3How Employees Can View Their Workhours
Section
1. Press the Total button .You will be prompted to enter the employee PIN (Personal IdentificationNumber).
2. Enter the employee PIN . The employee PIN is a unique identification number that is composed of 2 to 9alphanumeric characters. The PIN is entered in the job tab of the employee's data card in Childcare Manager.
3. Click OK. The number of work hours for the employee for the day and for the week will be displayed.

How Parents Can View Their Account Balances 20
© 2007 Personalized Software, Inc.
3.4How Parents Can View Their Account Balances
Section
1. Press the Balance button .You will be prompted to enter the Sponsor's PIN (Personal IdentificationNumber).
2. Enter the sponsor's PIN . The sponsor PIN is a unique identification number that is composed of 2 to 9alphanumeric characters. The PIN is entered in the personal tab of the sponsor's data card in ChildcareManager.
3. Click OK. The sponsor's outstanding balance will be displayed. Note: Credit balances are displayed as dollar,minus sign and the amount, e.g., $-113.

How Parents Can Request Meals21
childcaremanager.com
3.5How Parents Can Request Meals
Section
1. Press the Meal button .You will be prompted to enter the sponsor's PIN (Personal IdentificationNumber).
2. Enter the sponsor's PIN . The sponsor PIN is a unique identification number that is composed of 2 to 9alphanumeric characters. The PIN is entered in the personal tab of the sponsor's data card in ChildcareManager.
3. Click OK. The sponsor's children will appear. Select the ones you want to authorize meals for.
4. Click OK. Time Manager will post an entry in the child's notekeeper with the note type Meal Request. If youdon't have a note type called Meal Request Time manager will create one the first time you enter a mealrequest on the timeclock or virtual timeclock.
5. This information can be displayed and printed from Childcare Manager by running the Family Notes reportand filtering on Meal Request.

Chapter IVThe Control Panel

Overview23
childcaremanager.com
The Control Panel
4.1Overview
Section
Time Manager centralizes all of its options and operations in a control panel. The Control Panel (shown below) isaccessible by right clicking the Time Manager Pro icon in the system tray and clicking Control Panel.
Time Manager Pro Control Panel
To Use the Control Panel Click Center Options to tell Time Manager

Overview 24
© 2007 Personalized Software, Inc.
which center you want Time Manager to transfer its time and attendance data to,
the days and hours your center is open, and
how to configure your email server for Time Manager to send email notifications.
Click Clock In/Out Options to
send balance due messages to parents,
display 'shots due' messages for children with overdue immunizations, and
set child and employee clock in/out rounding options.
Click Messages to
send messages to individual parents and employees ,and
to display message display options.
Click Announcements to send announcements to
all parents or employees,
classrooms,
programs, and
activities.
Click Manager Virtual Timeclock to display an onscreen version of the timeclock.
Click Manage Timeclocks to
display information about connected timeclocks,
setup your relay time options if you are using a timeclock with relays, and
configure the welcome message for your display.
Click Clock In and Out Notifications to send an email or text message to a parent whenever their child isclocked in or out, or both.
Click Door Access to
create PINs that can be used for special access to your building, such as for a cleaning service,
define user restrictions, expirations and notifications for these PINs,
view a history of usage through a built-in log, and
define failed door attempt limits and setup email or text message notification when limits are exceeded.

Center Options25
childcaremanager.com
4.2Center Options
Section
To Select Your Active Center
1. Right click the Time Manager icon in your system tray .
2. From the pop up menu, click Control Panel.
3. From the Control Panel, click Center Options.
4. Click Change Center.
5. Go to Active Time Manager Center. Use the drop-down list and enter the center you want your timeclockconnected to. The drop-down list displays all of the centers stored in Childcare Manager's default databasefolder.
6. If the center you want your timeclock connected to is not in this folder, it may be stored in an alternatelocation. If you know the location, click Change Centers Folder..., locate the alternate location, then click OKto include your center in the drop-down list. You can then enter it in Active Time Manager Center.
7. If you don't know where your active center is located, open your center in Childcare Manager, go to the Helpmenu, and click About Childcare Manager. The location of your active center will be displayed at the bottomof the window in the Location field. Use this information to locate and enter your center in Active TimeManager Center.

Center Options 26
© 2007 Personalized Software, Inc.
To Setup Center Hours
With Time Manager you can indicate what days your center is open and the times during those days you areopen. This information is used by the program for messages and announcements, and when utilizing the optionaldoor lock relays.
How to Set Your Center Hours
1. Right click the Time Manager icon in your system tray .
2. From the pop up menu, click Control Panel.
3. From the Control Panel, click Center Options.
4. Click the Center Hours tab.
5. Use the Center Hours window to indicate what days your center is open and closed, and your hours ofoperation. Time Manager uses these settings as defaults for messages, announcements, and door access.
If You are Open Past Midnight If your center is open past midnight, check the 'This center is open past midnight' option. When this option ischecked, the first transaction every day is always the opposite of the preceding transaction. Thus, if the lasttransaction of the day is a clock in, then the first transaction the next day is a clock out . If the option is notselected, the first transaction every day is always a clock in transaction.
To Setup Your Email Server
1. Right click the Time Manager icon in your system tray .
2. From the pop up menu, click Control Panel.
3. From the Control Panel, click Center Options.
4. Click Email Server.

Center Options27
childcaremanager.com
5. Enter your Outgoing mail server (SMTP). See a list of common SMTPs below.
6. Enter default email address for email notifications.
Email Address Outgoing (SMTP) RequireAuthent?
Support #
*@aim.com smtp.aim.com Yes 1-888-265-8003
*@ameritech.net smtp.att.yahoo.com Yes 1-877-722-3755
*@aol.com smtp.aol.com Yes 1-888-265-8003
*@att.net (SBC) smtp.att.yahoo.com Yes 1-877-722-3755
*@att.net(WorldNet)
Imailhost.worldnet.att.net Yes 1-866-596-8455
*@bellatlantic.net smtpout.bellatlantic.net ? ?
*@bellsouth.net mail.bellsouth.net No 1-888-321-2375
*@charter.net smtp.charter.net No 1-888-438-2427
*@comcast.net smtp.Comcast.net No ?
*@cox.net smtp.east.cox.net ? ?
*@flash.net smtp.att.yahoo.com Yes 1-877-722-3755
*@gmail.com Smtp.gmail.com Yes ?

Center Options 28
© 2007 Personalized Software, Inc.
*@hotmail.com NOT SUPPORTED N/A N/A
*@lycos.com Smtp.mail.lycos.com No ?
*@msn.com smtp.email.msn.com Yes ?
*@netscape.com Smtp.isp.netscape.com Yes ?
*@netzero.com authsmtp.netzero.com Yes 1-877-912-5866
*@nvbell.net smtp.att.yahoo.com Yes 1-877-722-3755
*@pacbell.net smtp.att.yahoo.com Yes 1-877-722-3755
*@prodigy.net smtp.att.yahoo.com Yes 1-877-722-3755
*@rogers.com smtp.broadband.rogers.com
Yes 1-888-764-3771
*@sbcglobal.net smtp.att.yahoo.com Yes 1-877-722-3755
*@se.rr.com smtp-server.se.rr.com No 1-866-207-2337
*@snet.net smtp.att.yahoo.com Yes 1-877-722-3755
*@swbell.net smtp.att.yahoo.com Yes 1-877-722-3755
*@verizon.net outgoing.verizon.net ? ?
*@wans.net smtp.att.yahoo.com Yes 1-877-722-3755
*@yahoo.com smtp.sbcglobal.yahoo.com ? ?
*@yahoo.com Smtp.mail.yahoo.com No? N/A
Outgoing SMTP List as of April 30, 2007

Clock In and Out Options29
childcaremanager.com
4.3Clock In and Out Options
Section
Parent Options
Displaying a Parent's Balance Due
1. Right click the Time Manager icon in your system tray .
2. From the pop up menu, click Control Panel.
3. Click Clock In/Out Options.
4. Click the Parent tab.
5. Enter the Minimum balance that you want displayed.
6. Display for. Enter how long, in seconds, you want the message to display.
7. (Optional) Play sound. Select the number of beeps you want played when the message is displayed.
8. (Optional) Enter your custom message in the Message box. For example, you might use 'See the Director' or'Balance Due'.
9. By default, the message is left adjusted on the display. Check the Center box if you want the messagecentered on the display.
Clock In and Out Options 30
© 2007 Personalized Software, Inc.
Masking Parent/Contact PINs
1. Right click the Time Manager icon in your system tray .
2. From the pop up menu, click Control Panel.
3. Click Clock In/Out Options.
4. Click the Parent tab.
5. Check the Mask PINs on Entry box.
6. Click OK.
Child Options
Displaying a Child's Overdue Shot Status
1. Right click the Time Manager icon in your system tray .
2. From the pop up menu, click Control Panel.
3. From the Control Panel, click Clock In/Our Options.
4. Click the Child tab.
5. Go to Overdue Shot Message. Check the IN box if you want to the parent to be notified when clocking in, andthe OUT box if you want the parent to be notified when clocking out. You can check either one or both.
6. Use the Display message for field to enter the time in seconds that you want the message displayed for.
7. Use Play sound if you want the program to beep when the message is displayed. You can select the programto beep from 1 to 4 times each time the message is displayed.

Clock In and Out Options31
childcaremanager.com
Rounding Child Clock In/Out Times
1. Right click the Time Manager icon in your system tray .
2. From the pop up menu, click Control Panel.
3. From the Control Panel, click Clock In/Our Options.
4. Click the Child tab.
5. Go to Rounding Options.
6. Change rounding Method for Clocking In and Clocking Out. The choices are: None, Forward to next interval,Backward to prior interval, and Nearest interval.
7. Adjust the Interval for Clocking In and Clocking Out. The choices are: 3 min, 4 min, 5 min, 6 min, 10 min, 12min, 15 min, 20 min, 30 min and 60 min.
8. Click OK.
Employee Options
Rounding Employee Clock In/Out Times
1. Right click the Time Manager icon in your system tray .
2. From the pop up menu, click Control Panel.
3. From the Control Panel, click Clock In/Our Options.
4. Click the Employee tab.
5. Go to Rounding Options.

Clock In and Out Options 32
© 2007 Personalized Software, Inc.
6. Change rounding Method for Clocking In and Clocking Out. The choices are: None, Forward to next interval,Backward to prior interval, and Nearest interval.
7. Adjust the Interval for Clocking In and Clocking Out. The choices are: 3 min, 4 min, 5 min, 6 min, 10 min, 12min, 15 min, 20 min, 30 min and 60 min.
8. Click OK.
Masking Employee PINs
1. Right click the Time Manager icon in your system tray .
2. From the pop up menu, click Control Panel.
3. Click Clock In/Out Options.
4. Click the Employee tab.
5. Check the Mask PINs on Entry box.
6. Click OK.

Messages33
childcaremanager.com
4.4Messages
Section
Messages are brief messages that you can send to:
a specific parent
a specific employee
To Setup a Parent or Employee Message
1. Right click the Time Manager icon in your system tray .
2. From the pop up menu, click Control Panel.
3. Click Messages.
4. Click the Parent Messages or Employee Messages tab. A list of active messages are shown. To create anew message, click Add. The Lookup Child or Lookup Employee screen will appear.
Messages 34
© 2007 Personalized Software, Inc.
5. From the Lookup Child or Employee screen, select employee or the child whose parent you want to send amessage to.
6. In the Parent Message or Employee Message screen, enter your message. Next, enter your delivery options.Enter the start and ending dates and start and ending times you want the message displayed. If you only wantthe message displayed until it is delivered, check the Automatically remove the message after delivery box.
7. Click OK to record your message and exit the Parent Message or Employee Message screen.
To Set Your Message Display Options
1. Right click the Time Manager icon in your system tray .
2. From the pop up menu, click Control Panel.
3. From the Control Panel, click Messages.
4. Click Display Options.

Messages35
childcaremanager.com
5. To change the duration your message will be displayed for, enter the time in seconds in the Display for field.
6. To have the program play a sound when your message is displayed, enter the number of beeps you want todisplay in the Play sound field using the drop-down list. You can have the program beep once, twice, threetimes or four times.
7. Click Close to exit and record your options.

Announcements 36
© 2007 Personalized Software, Inc.
4.5 Announcements
Section
Announcements are brief messages that you can send to:
All of your parents
All of your employees
All parents of children assigned to a specific classroom
All parents of children assigned to a specific program
All parents of children assigned to a specific activity
To Setup Parent Announcements
1. Right click the Time Manager icon in your system tray .
2. From the menu, click Control Panel.
3. Click Announcements.
4. Select the Parent tab. Active announcements and the day they are to be displayed are shown.
5. Click Add. The announcement editor will appear.

Announcements37
childcaremanager.com
6. Type the announcement you would like to appear on your timeclock. A standard timeclock uses Line 1 andLine 2 only.
7. Select the day you would like the announcement to display.
8. Click OK when finished. The announcements tab will reappear.
9. Click Close to exit.
To Setup Employee Announcements
1. Right click the Time Manager icon in your system tray .
2. From the menu, click Control Panel.
3. Click Announcements.
4. Select the Employee tab. Active announcements and the day they are to be displayed are shown.
5. Select the Employee from the drop down list that you want to display your announcement for.
6. Click Add. The announcement editor will appear.
7. Type the announcement you would like to appear on your timeclock. A standard timeclock uses Line 1 andLine 2 only.
8. Select the day you would like the announcement to display.
9. Click OK when finished. The announcements tab will reappear.
10.Click Close to exit.
To Setup Classroom Announcements
1. Right click the Time Manager icon in your system tray .

Announcements 38
© 2007 Personalized Software, Inc.
2. From the menu, click Control Panel.
3. Click Announcements.
4. Select the Classroom tab. Any active announcements and the day they are to be displayed are shown.
5. Select the Classroom from the drop down list that you want to display your announcement for.
6. Click Add. The announcement editor will appear.
7. Type the announcement you would like to appear on your timeclock. A standard timeclock uses Line 1 andLine 2 only.
8. Select the day you would like the announcement to display.
9. Click OK when finished. The announcements tab will reappear.
10.Click Close to exit.
To Setup Program Announcements
1. Right click the Time Manager icon in your system tray .
2. From the menu, click Control Panel.
3. Click Announcements.
4. Select the Program tab. Any active announcements and the day they are to be displayed are shown.
5. Select the Program from the drop down list that you want to display your announcement for.
6. Click Add. The announcement editor will appear.

Announcements39
childcaremanager.com
7. Type the announcement you would like to appear on your timeclock. A standard timeclock uses Line 1 andLine 2 only.
8. Select the day you would like the announcement to display.
9. Click OK when finished. The announcements tab will reappear.
10.Click Close to exit.
To Setup Activity Announcements
1. Right click the Time Manager icon in your system tray .
2. From the menu, click Control Panel.
3. Click Announcements.
4. Select the Activity tab. Any active announcements and the day they are to be displayed are shown.
5. Select the Activity from the drop down list that you want to display your announcement for.
6. Click Add. The announcement editor will appear.

Announcements 40
© 2007 Personalized Software, Inc.
7. Type the announcement you would like to appear on your timeclock. A standard timeclock uses Line 1 andLine 2 only.
8. Select the day you would like the announcement to display.
9. Click OK when finished. The announcements tab will reappear.
10.Click Close to exit.
To Set Your Announcement Display Options
1. Right click the Time Manager icon in your system tray .
2. From the pop up menu, click Control Panel.
3. From the Control Panel, click Announcements.
4. Click Display Options.

Announcements41
childcaremanager.com
5. To change the duration your message will be displayed for, enter the time in seconds in the Display for field.
6. To have the program play a sound when your message is displayed, enter the number of beeps you want todisplay in the Play sound field using the drop-down list. You can have the program beep once, twice, threetimes or four times.
7. Click Close to exit and record your options.

The Virtual Timeclock 42
© 2007 Personalized Software, Inc.
4.6The Virtual Timeclock
Section
Time Manager Pro includes a virtual timeclock. The virtual timeclock is a software version of Time Manager'soptional timeclock. It includes a keypad and display, and can perform all of the functions that the regulartimeclock can, except exercise the optional door lock trigger. You can choose how you want your virtualtimeclock to look and you can set the default resolution to ensure that the virtual timeclock fills your wholedesktop screen. You can also tell the computer to display the virtual timeclock at startup.
To Select a Different Skin for the Virtual Timeclock
1. Right click the Time Manager icon in your system tray ..
2. From the menu, click Control Panel.

The Virtual Timeclock43
childcaremanager.com
3. Click Manage Virtual Timeclock.
4. In the Settings tab, Select Skin matching your screen resolution.
5. Click OK.
To Display the Virtual Timeclock When You Start Your Computer
1. Right click the Time Manager icon in your system tray ..
2. From the menu, click Control Panel.
3. Click Manage Virtual Timeclock.
4. In the Settings tab, check Show Virtual Timeclock at startup.
Note: When set up properly, the virtual timeclock will completely cover your desktop. You can also use use AltTab to switch back and forth between your virtual timeclock and other active screens.
5. Click OK
Tip: To remove the Virtual Timeclock from your desktop click the F10 function key.

Managing Timeclocks 44
© 2007 Personalized Software, Inc.
4.7Managing Timeclocks
Section
Connected Timeclocks
Time Manager keeps track of the timeclocks connected to your program. If they include the optional door lockrelays, you can also test them here.
Keeping Track of Connected Timeclocks
1. Right click the Time Manager icon in your system tray .
2. From the popup menu, click Control Panel.
3. Click Manage Timeclocks .
4. Click the Connected Timeclocks tab. A list of timeclocks connected to your program will be displayed. If youthink your clock is connected but not listed, click the Refresh button.
Testing Your Door Lock Relays
1. To test your relays, highlight a timeclock and click Test Relay 1 or Test Relay 2.

Managing Timeclocks45
childcaremanager.com
Relay Options
To set how long Time Manager's relays stay open when clocking in or out, or using a door access pin from anyterminal:
1. Right click the Time Manager icon in your system tray .
2. From the pop up menu, click Control Panel.
3. Click Manage Timeclocks.
4. Select the Relay Options tab.
5. Enter the amount of time, from the drop-down list, that you want the relay to stay open for. Your choices are :100 milliseconds, 250 milliseconds, 500 milliseconds, 750 milliseconds, 1.0 seconds, 1.5 seconds, 2.0seconds, and 2.5 seconds.
Welcome Message
Time Manager displays a welcome message on your timeclock and virtual timeclock. You can customize asdescribed below.
To Customize Your Welcome Message
1. Right click the Time Manager icon in your system tray .
2. From the popup menu, click Control Panel.
3. Click Manage Timeclocks.
4. Click the Welcome Message tab.

Managing Timeclocks 46
© 2007 Personalized Software, Inc.
5. In the Show Date and Time on field, use the drop-down list to enter the line that you want the date and timeto display. If your display is a 2 line display, select line 1 or line 2. The default format is Day (Tue), Month(Feb) Day (6), Time (2:56PM). If you check the Use short day and time format, the program will use thefollowing format, Day (Saturday) Time (10:17AM).
6. Enter the text for your welcome message. For example, If you use line 2 to display the date and time, you canuse line 1 for a welcome message such as Welcome or the name of your center.
7. If you want your message centered check the appropriate checkbox under Center. If you don't check acheckbox, your message will be left adjusted.
8. Click OK.

Clock In and Out Notifications47
childcaremanager.com
4.8Clock In and Out Notifications
Section
Email Notificatons
With Time Manager, you can have the program automatically send an email to a parent or an individualdesignated by the parent each time the child is clocked in or out.
To Setup an Email Notification
1. Right click the Time Manager icon in your system tray .
2. Click Control Panel.
3. Click Clock In/Out Notifications. The Parent Notifications tab will appear.
4. Click Add. The Lookup Child screen will appear
5. Select the child whose parent or contact you want to send an email notification to.
6. Click Close. The Email Notification screen will appear.
7. In the Email or Text Message Address field, enter the email address where you want the notification sent to.
8. Check the appropriate box in Notify On when you want the email sent.

Clock In and Out Notifications 48
© 2007 Personalized Software, Inc.
Note: Time Manager sends a standard email message that identifies the name of the child clocked in, whoclocked the child in, and when. An actual message sent is displayed in the email below.
Text Message Notifications
With Time Manager, you can have the program automatically send a text message to a parent or an individualdesignated by the parent each time the child is clocked in or out.
To Setup a Text Message Notification
1. Right click the Time Manager icon in your system tray .
2. Click Control Panel.
3. Click Clock In/Out Notifications. The Parent Notifications tab will appear.
4. Click Add. The Lookup Child screen will appear.
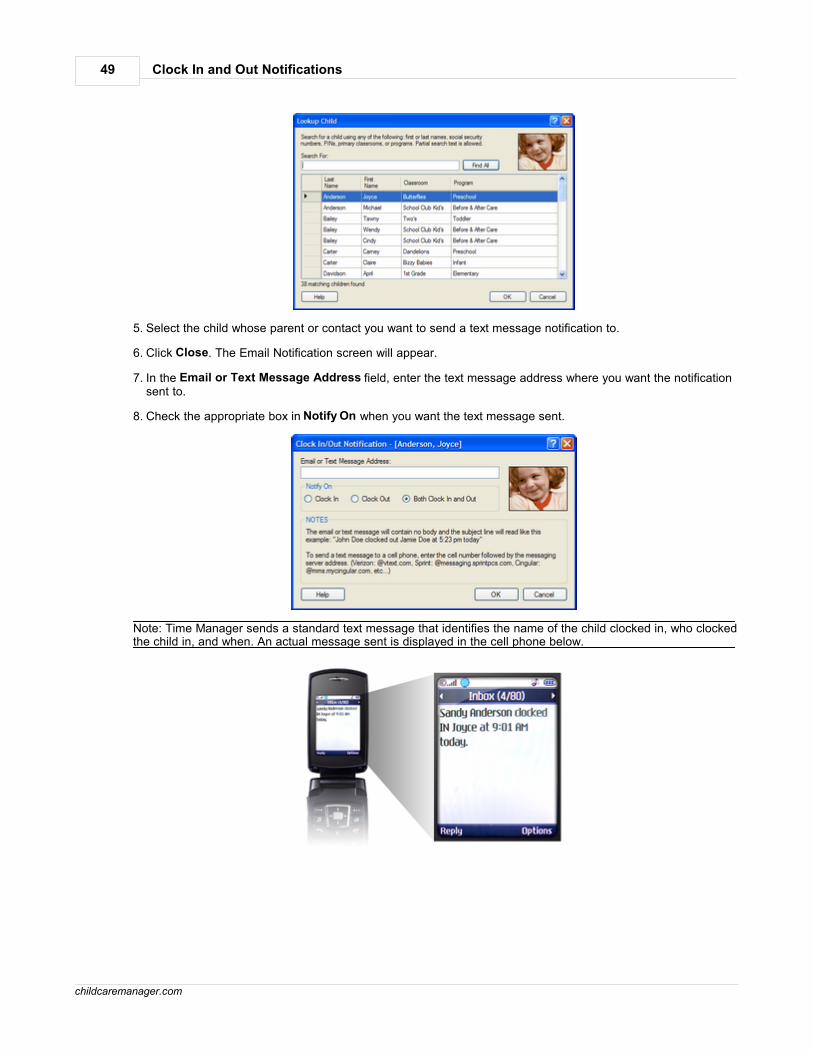
Clock In and Out Notifications49
childcaremanager.com
5. Select the child whose parent or contact you want to send a text message notification to.
6. Click Close. The Email Notification screen will appear.
7. In the Email or Text Message Address field, enter the text message address where you want the notificationsent to.
8. Check the appropriate box in Notify On when you want the text message sent.
Note: Time Manager sends a standard text message that identifies the name of the child clocked in, who clockedthe child in, and when. An actual message sent is displayed in the cell phone below.

Door Access 50
© 2007 Personalized Software, Inc.
4.9Door Access
Section
Door Access PINS
With Time Manager you can create PINs for special door access requirements, such as cleaning services or onetime after hour maintenance access. These PINs can be given to single users or to multiple users. You can set itup so that you or other designated individuals are notified by email or text message each time the PIN is used.You can define the days and between what hours the PIN can be used. You can even define how long the PINis good for.
To Add a Door Access PIN
1. Right click the Time Manager icon in your system tray .
2. From the pop up menu, click Control Panel.
3. Click Door Access.
4. Click the Door Access PINs tab. This tab provides a list of any active door access PINs.
5. Click on Add. See To Assign a PIN below.
To View Door Access Usage History
1. Right click the Time Manager icon in your system tray .

Door Access51
childcaremanager.com
2. From the pop up menu, click Control Panel.
3. Click Door Access.
4. Click the Door Access PINs tab.
5. Click View Usage History. The Door Access Usage History screen will appear.
Tip: If you have a lot of door access pin usage, you can use the Purge button to occasionally remove old historydata.
To Mask Door Lock Access PINs on Entry
1. Right click the Time Manager icon in your system tray .
2. From the pop up menu, click Control Panel.
3. Click Door Access.
4. Click the Door Access PINs tab.
5. Check the Mask PINs on Entry checkbox.
6. Click OK.

Door Access 52
© 2007 Personalized Software, Inc.
To Assign a PIN
1. Enter a PIN number.
2. Enter the name of the person or company the PIN is assigned to. You might also enter the purpose of the PIN.
3. (Optional) Enter any notes that might be helpful.
4. Click OK or select another tab.
Usage Notification
1. In Email To, enter the email address or text message address you want the notification to be sent to.
2. Enter a Subject; something that identifys what the email is for.
3. If desired, enter a message in the Body field.
Door Access PIN (Usage Notification tab)
4. Click OK or select another tab.
Restrictions
1. In the Usage Allowed On field, check the days the PIN is authorized for use.
2. In the Usage Allowed Between field, enter the hours the PIN is authorized for use. Place a check in the box

Door Access53
childcaremanager.com
to the left of the authorized times.
Door Access PIN (Restrictions tab)
4. Click OK or select another tab.
Expiration
1. In Expire Rules, enter the dates that the PIN is good for.
2. Check Expire PIN based on rules below if you want the PIN to implement the expire rules.
3. Check Automatically remove the PIN after expiration to remove PIN after expiration.
4. Click OK or select another tab.
Door Security
You can setup Time Manager so that it will send an email or text message notification each time the programrecords a specific number of failed door attempts.
To Send an Email or Text Message on a Pre-determined Number of Failed Door

Door Access 54
© 2007 Personalized Software, Inc.
Attempts
1. Right click the Time Manager icon in your system tray .
2. From the pop up menu, click Control Panel.
3. Click Door Access.
4. Click on the Door Security tab.
5. Enter the number of allowed failed door attempts.
6. Enter the email/mobile address and a subject that the notification will be sent to.
7. Click Close.

Chapter VThe Tray Menu

Using the Menu 56
© 2007 Personalized Software, Inc.
The Tray Menu
5.1Using the Menu
Section
Whenever Time Manager is running, the Time Manager icon is displayed in your computer's system tray
. The system tray is located in the lower right corner of your Desktop on the
Status bar. If you right click on the Time Manager icon , you will display the menu shown below.
Show Virtual Timeclock
Click Show Virtual Terminal to display Time Manager's virtual timeclock on your screen. Time Manager'svirtual timeclock performs all the same functions as the timeclock except for the door lock trigger functions.
Messages
Click Messages to send a message to: 1) a single family or 2) a single employee. This is a shortcut to theMessages section in the Control Panel.
Announcements
Click Announcements to send an announcement to: 1) all families, 2) all employees, 3) all families in aclassroom, 4) all families in a program, or 5) all families in an activity. This is a shortcut to the

Using the Menu57
childcaremanager.com
Announcements section in the Control Panel.
Children Clocked In...
Click Children Clocked In... to display a list of children clocked in. You can also print the list of childrenclocked in and batch clock out one or more of them.
Employees Clocked In ...
Click Employees Clocked In... to display a list of employees clocked in. You can also print the list ofemployees clocked in and batch clock out one or more of them.
Control Panel
Click Control Panel to display Time Manager's Control Panel.
About Time Manager Pro
Click About Time Manager Pro to see what version of the program you are using.

Clocked Children In/Batch Children Out 58
© 2007 Personalized Software, Inc.
5.2Clocked Children In/Batch Children Out
Section
To View Children Clocked In
1. Right click the Time Manager icon in your system tray .
2. From the pop up menu, click Children Clocked In. The Children Clocked In screen will appear. Thisscreen lists all of the children who are currently clocked in. The number of children clocked in is displayedin the lower left corner of the screen.
3. Click Print to print a list of children currently clocked in.
To Batch Children Out
1. Right click the Time Manager icon in your system tray .
2. From the pop up menu, click Children Clocked In. The Children Clocked In screen will appear.
3. Click Select All and click Clock Out to clock out all of the employees at the current time. The SelectClock Out Time screen will appear.
4. If you want to selectively clock out employees on the list, hold the Ctrl key down and highlight theemployees you want to clock out. Click Clock Out. The Select Clock Out Time screen will appear.

Clocked Children In/Batch Children Out59
childcaremanager.com
5. Click Now if you want to clock out selected employees with the current date and time.
6. Click Closing time if you want to clock out selected employees at your scheduled closing time. TimeManager clocks the employees out using the closing time in Center Options in your Control Panel.
7. Click Choose if you want to choose a different closing date and time.

Clocked Employees In/Batch Employees Out 60
© 2007 Personalized Software, Inc.
5.3Clocked Employees In/Batch Employees Out
Section
To View Employee's Clocked In
1. Right click the Time Manager icon in your system tray .
2. From the pop up menu, click Employees Clocked In. The Employees Clocked In screen will appear.This screen lists all of the employees who are currently clocked in. The number of employees clocked inis displayed in the lower left corner of the screen.
3. Click Print to print a list of employees currently clocked in.
To Batch Employees Out
1. Right click the Time Manager icon in your system tray .
2. From the pop up menu, click Employees Clocked In. The Employees Clocked In screen will appear.
3. Click Select All and click Clock Out to clock out all of the employees at the current time.
4. If you want to selectively clock out employees on the list, hold the Ctrl key down and highlight theemployees you want to clock out. Click Clock Out. The Select Clock Out Time screen will appear.

Clocked Employees In/Batch Employees Out61
childcaremanager.com
5. Click Now if you want to clock out selected employees with the current date and time.
6. Click Closing time if you want to clock out selected employees at your scheduled closing time. TimeManager clocks the employees out using the closing time in Center Options in your Control Panel.
7. Click Choose if you want to choose a different closing date and time.

Chapter VIChild Attendance Monitor (CAM)

What is It?63
childcaremanager.com
Child Attendance Monitor (CAM)
6.1What is It?
Section
The Time Manager Pro installation program includes an option to install a program called the Child AttendanceMonitor. This program, when installed, displays a pop up message in the lower right corner of your screen eachtime a child clocks in or out (see below). The message indicates if the child is clocked in or out and includes thechild's name, a picture of the child (if available), and the child's classroom assignment. A second pop upmessage accompanies the first and displays the name of the individual clocking the child in and theirrelationship to the child's family.
CAM Popup Message
Time Manager Pro must be installed and operating for the Child Attendance Monitor to work. However, the ChildAttendance Monitor does not have to be installed on the same computer as Time Manager when the computerTime Manager is installed on is networked to other computers. The Child Attendance Monitor can be installed onany computer on the network.
When the Child Attendance Monitor is installed, a shortcut icon is installed on the desktop (see below). This iconis used to launch the Child Attendance Monitor from your desktop.
CAM Desktop Shortcut Icon
When you run the Child Attendance Monitor, a small icon , is installed in your system tray in the lower rightcorner of your screen.

How to Use the CAM Right Click Menu 64
© 2007 Personalized Software, Inc.
6.2How to Use the CAM Right Click Menu
Section
If you right click on the tray icon, a menu will appear (see below).
Click Redisplay Last Popup to display the last popup. You can also double click the tray icon to display thelast popup.
Click Control Panel to display the control panel.
Click About Employee Time Monitor to display what version of the program is installed.

How to Use the CAM Control Panel65
childcaremanager.com
6.3How to Use the CAM Control Panel
Section
Check the Display child attendance popups box if you want to display child attendance popups along withthe employee time popups. When the Employee Time Monitor is installed employee time popups aredisplayed automatically.
Check Keep popups on the screen until I close them if you want your popups to remain on the screen until
you close them. Close your popups by clicking the in the upper right corner of the screen.
Click Close popups after displaying for : if you want your popups to stay on thescreen for a specific period of time.
CAM Control Panel

Chapter VIIEmployee Time Monitor (ETM)

What is It?67
childcaremanager.com
Employee Time Monitor (ETM)
7.1What is It?
Section
The Time Manager Pro installation program includes an option to install a program called the Employee TimeMonitor (ETM). This program, when installed, displays a pop up message in the lower right corner of your screeneach time an employee clocks in or out (see below). The message indicates if the employee is clocked in or outand includes the employee's name, a picture of the employee (if available), and the employee's department.
assignment.
ETM Pop Up Message
Time Manager Pro must be installed and operating for the Employee Monitor to work. However, the EmployeeTime Monitor does not have to be installed on the same computer as Time Manager when the computer thatTime Manager is installed on is networked to other computers. The Employee Time Monitor can be installed onany computer on the network.
When the Employee Time Monitor is installed, a shortcut icon is installed on the desktop (see below). This iconis used to launch the Employee Time Monitor from your desktop.
ETM Desktop Shortcut Icon
When you run the Employee Time Monitor, a small icon , is installed in your system tray in the lower rightcorner of your screen.

How to Use the ETM Right Click Menu 68
© 2007 Personalized Software, Inc.
7.2How to Use the ETM Right Click Menu
Section
If you right click on the ETM tray icon, a menu will appear (see below).
Click Redisplay Last Popup to display the last popup. You can also double click the tray icon to display thelast popup.
Click Control Panel to display the control panel.
About Employee Time Monitor. Click to display the Employee Time Monitor's About Box. The About Boxidentifies what version of the program is installed.

How to Use the ETM Control Panel69
childcaremanager.com
7.3How to Use the ETM Control Panel
Section
1. Check the Display child attendance popups box if you want to display child attendance popups along withthe employee time popups. When the Employee Time Monitor is installed employee time popups aredisplayed automatically.
2. Check Keep popups on the screen until I close them if you want your popups to remain on the screen until
you close them. Close your popups by clicking the in the upper right corner of the screen.
3. Click Close popups after displaying for : if you want your popups to stay on thescreen for the specific period of time in seconds selected.

Chapter VIIIReports
How to Run Reports71
childcaremanager.com
Reports
8.1How to Run Reports
Section
Time Manager uses Childcare Manager's report engine to run and print seven time and attendance reports.These reports are described in the next section.
To run Childcare Manager's time and attendance reports1. Click Report Center
2. Click Child Attendance or Employee Scheduling and Time.
3. Select the report you want to run. Click the report to run it or double click to modify the report before running.

Report Descriptions 72
© 2007 Personalized Software, Inc.
8.2Report Descriptions
Section
Attendance Detail
Description: The Attendance Detail report provides a list of children, the times they wereclocked in and out, and who clocked them in an out when the validation option in TimeManager is used. It also includes total hours and minutes and total days for each child for thedate range selected. available to show who clocked the child in or out.
Filters: Child, Classroom, Date Range, DOB, Enrollment, Ethnicity, Page Separations,Program, Show Hundredths, Status, Withdrawal.
Sorting Options: Last Name, First Name, Date of Clock-in, Time of Clock-in.
Attendance Summary
Description: The Child Attendance Summary displays daily child schedules in bar graphformat. Up to two schedules are shown for each child.
Filters: Child, Classroom, DOB, Enrollment, Ethnicity, Program, Status, Withdrawal, ShowHundredths, Date Range.
Sorting Options: Last Name, First Name, Date of Clock-in, Date of Birth, Enrollment Date,Withdrawal Date.
Currently Clocked In (Child)
Description: The Currently Clocked In report provides a list of children currently clocked in.An option is available to display a list of children currently clocked out.
Filters: In/Out.
Sorting Options: Last Name, First Name, Date/Time.
Currently Clocked In (Employee)
Description: The Currently Clocked In report provides a list of employees currently

Report Descriptions73
childcaremanager.com
clocked-in. An option is available to display a list of employees currently clocked-out.
Filters: In/Out.
Sorting Options: Last Name, First Name, Date/Time.
Suspect Times
Description: The Suspect Times report provides a list of children that have been clocked in orout twice in a row. This normally occurs when a child is clocked in but not clocked out.
Filters: Child, Classroom, Date, DOB, Enrollment, Ethnicity, Program, Status, Withdrawal.
Sorting Options: Last Name, First Name, Date of Clock in, Time of Clock in, Date of Birth,Withdrawal Date, Enrollment Date.
TimeSheet Detail Employee)
Description: The Timesheet Detail report provides a list of employees and their daily clock inand out times. There is also a place for a supervisor verification signature and an option todefine your overtime criteria.
Filters: Classroom, Date Range, Department, Employee, Ethnicity, Hire Date, Overtime,Position, Release Date, Page Separations, Show Hundredths, Status.
Sorting Options: Last Name, First Name, Date of Clock in, Time of Clock in.
TimeSheet Summary (Employee)
Description: The Timesheet Summary provides a list of employees and shows the amount ofhours and minutes the employee was clocked in each day. It also provides total hours andminutes for the period selected.
Filters: Classroom, Department, Employee, Ethnicity, Hire Date, Position, Release Date,Show Hundredths, Status, Date Range.
Sorting Options: Last Name, First Name, Date of Clock in.

Chapter IXNew Features in Time Manager Pro

75
childcaremanager.com
New Features in Time Manager Pro
Parent/employee announcements. You can now send a custom announcement to all parents or employees.
Classroom, program,& activity announcements. You can now send a custom announcement to all parentsof children in a classroom, program or activity.
Parent/employee messages. You can now send a custom message to a parent or employee.
Parent notifications. Parents can now be notified by text message or email when a child is clocked in or out,and who clocked them in or out.
Family check in and out flexibility. Parents can now clock in and out 1 to 4 children at a time. Parents andcontacts now use their PINs to clock a child in or out. Child PINs are no longer required.
Unlimited number of door access PINs. An unlimited number of door access PINs can now be assigned.This is changed from a maximum of 4.
Meal Request Authorization. Parents can now authorize daily meals from the timeclock.
New virtual terminal. The virtual terminal now includes an improved look and full screen coverage. Parentscan no longer see behind the terminal.
Improved interface with Childcare Manager. Time Manager is no longer required to be shut down whenChildcare Manager runs a backup. This eliminates problems that occurred when a backup is run with TimeManager running.
Shots Due message. Parents can now be notified when a child is due an immunization.
Balance due notification. Parents can now be notified when they have a balance due. You have a choice ofdisplaying the customer balance or a user defined message such as ‘balance due’ or ‘see the director”.
Timeclock connections. Up to 9 timeclocks can now be connected to the system simultaneously.
Dynamic plug and play. Timeclocks are now configured automatically on initial installation and on accidentaldisconnects.
Child Attendance Monitor (CAM). The CAM is a message that pops up in the lower right corner of yourscreen each time a child is clocked in or out. The message indicates if the child is being checked in or out. Itdisplays a picture of the child, the child’s name, classroom and program. It also displays who clocked the childin or out, their relationship to the child, and a picture of the individual. The CAM can be installed on astandalone computer or on any computer on a network.
Employee Time Monitor (ETM). The ETM is a message that pops up in the lower right corner of your screeneach time an employee clocks in or out. The message indicates if the employee is clocking in or out. Itdisplays a picture of the employee, the employee’s name, and classroom assignment. The CAM can beinstalled on a standalone computer or on any computer on a network.
Children clocked in. You can now right click the Time Manager Pro trey icon and display a list of childrenclocked in. This list can be sorted and printed directly from the screen.
Employees clocked in. You can now right click the Time Manager Pro trey icon and display a list of employeesclocked in. This list can be sorted and printed directly from the screen.
Child/Employee batch clock out. You can now right click the Time Manager Pro trey icon and batch clockout all children or employees still clocked in.

76
© 2007 Personalized Software, Inc.
New Control Panel. Time Manager now has a new, improved Control Panel.
Built-in door lock relay tester. You can now test your door lock relays through a built-in test function in TimeManager’s Control panel.
Door lock access failure notification. You can now receive a text message or email when a user definedfailure threshold is reached. For example, you can be notified if the door access is tried and failed threeconsecutive times.
Faster performance. Check in and out is faster.

Time Manager Pro Users Guide77
childcaremanager.com
Index- A -Active center 25
Activity announcements 39
Announcement display options 40
Announcements,
Activity 39
Classroom 37
Employee 37
Parents 36
Program 38
Assign a door access PIN 52
Attendance Detail 72
Attendance Summary 72
- B -Batch children out 58
Batch employees out 60
- C -CAM 63
CAM,
control panel 65
Right click menu 64
Center hours 26
Center options,
Selecting your active center 25
Setting up center hours 26
Setup email server 26
Child attendance monitor 63
Child attendance monitor,
control panel 65
Right click menu 64
Child options,
Over due shot status 30
Rounding child times 31
Children,
Clocking in and out 15
Classroom announcements 37
Clcok in and out options
Rounding child times 31
Rounding employee times 31
Clock in and out options
Masking employee PINs 32
Clock in and out options,
Displaying parents balance due 29
Masking contact PINs 30
Masking parent PINs 30
Over due shot status 30
Clocked children in 58
Clocked employees in 60
Clocking a child in or out 15
Clocking an employee in or out 17
Connected timeclocks 44
Control panel,
Using 23
Currently Clocked In (Child) 72
Currently Clocked In (Employee) 72
- D -Display options,
Announcements 40
Messages 34
Displaying the virtual timeclock 42
Displaying,
Overdue shot status 30
Parents balance due 29
Door access expiration 53
Door access PIN 52
Door access PINs 50
Door access restricitions 52
Door access,
Usage notification 52
Door lock relays,
Door lock access 50
- E -Email notifications,
Setting up 47
Email server 26
Employee announcements 37
Employee options
Masking PINs 32
Employee options,
Rounding employeet times 31
Employee time monitor 67

Index 78
© 2007 Personalized Software, Inc.
Employee time monitor,
Control panel 69
Right click menu 68
Employees,
Clocking in and out 17
Viewing workhours 19
ETM 67
ETM,
Control panel 69
Right click menu 68
Expiration 53
- F -Failed door attempts notifications 53
- H -Hardware requirements 2
How to run reports 71
- I -Installation,
Time Manager 3
Timeclock 6
Timeclock (w/door lock trigger) 8
- M -Masking contact PINs 30
Masking employee PINs 32
Masking parent PINs 30
Meals,
Requesting 21
Message display options 34
Messages,
employee 33
parent 33
- N -New features 75
Notifications,
Failed door attempts 53
- O -Overdue shot status 30
- P -Parent announcments 36
Parent options,
Displaying parents balance due 29
Masking contact PINs 30
Masking parent PINs 30
Parents balance due 29
Parents,
Viewing account balances 20
PIN,
Door access 52
PINs,
Masking 30
Program announcements 38
- R -Reports,
Attendance Detail 72
Attendance Summary 72
Currently Clocked In (Child) 72
Currently Clocked In (Employee) 72
How to run 71
Suspect Times 73
TimeSheet Detail 73
TimeSheet Summary 73
Requesting meals 21
Requirements,
Hardware 2
Software 2
Restrictions 52
Rounding,
Child clock in and out times 31
Employee clock in and out times 31
- S -Selecting a different skin 42
Selecting your active center 25
Setting door access PINs 50
Setting the welcome message 45

Time Manager Pro Users Guide79
childcaremanager.com
Setting up email notifications 47
Setting up text message notifications 48
Setting,
Timeclock relay options 45
Setup a parent message 33
Setup an employee message 33
Setup center hours 26
Setup your email server 26
Software requirements 2
Suspect Times 73
- T -Text messagel notifications,
Setting up 48
Time Manager installation 3
Time Manager setup,
Connected timeclocks 44
Setting the welcome message 45
Timeclock installation 6
Timeclock installation (w/door lock trigger) 8
Timeclock relay options 45
Timeclock,
Configurations 13
What is It? 12
TimeSheet Detail 73
TimeSheet Summary 73
Tray menu
Announcements 56
Batch children out 56
Batch employees out 56
Children clocked in 56
Control panel 56
Employees clocked in 56
Messages 56
Show virtual timeclock 56
- U -Usage notification 52
Using the Control Panel 23
- V -Viewing a parent's balance 20
Viewing an employee's workhours 19
Virtual timeclock,
Displaying 42
Selecting a different skin 42
- W -Welcome message 45
Back Cover