Embed Size (px)
Citation preview

TIBCO iProcess™ Workspace (Browser)
Installation GuideSoftware Release 11.3May 2011

Important Information
SOME TIBCO SOFTWARE EMBEDS OR BUNDLES OTHER TIBCO SOFTWARE. USE OF SUCH EMBEDDED OR BUNDLED TIBCO SOFTWARE IS SOLELY TO ENABLE THE FUNCTIONALITY (OR PROVIDE LIMITED ADD-ON FUNCTIONALITY) OF THE LICENSED TIBCO SOFTWARE. THE EMBEDDED OR BUNDLED SOFTWARE IS NOT LICENSED TO BE USED OR ACCESSED BY ANY OTHER TIBCO SOFTWARE OR FOR ANY OTHER PURPOSE.USE OF TIBCO SOFTWARE AND THIS DOCUMENT IS SUBJECT TO THE TERMS AND CONDITIONS OF A LICENSE AGREEMENT FOUND IN EITHER A SEPARATELY EXECUTED SOFTWARE LICENSE AGREEMENT, OR, IF THERE IS NO SUCH SEPARATE AGREEMENT, THE CLICKWRAP END USER LICENSE AGREEMENT WHICH IS DISPLAYED DURING DOWNLOAD OR INSTALLATION OF THE SOFTWARE (AND WHICH IS DUPLICATED IN LICENSE.PDF) OR IF THERE IS NO SUCH SOFTWARE LICENSE AGREEMENT OR CLICKWRAP END USER LICENSE AGREEMENT, THE LICENSE(S) LOCATED IN THE “LICENSE” FILE(S) OF THE SOFTWARE. USE OF THIS DOCUMENT IS SUBJECT TO THOSE TERMS AND CONDITIONS, AND YOUR USE HEREOF SHALL CONSTITUTE ACCEPTANCE OF AND AN AGREEMENT TO BE BOUND BY THE SAME.This document contains confidential information that is subject to U.S. and international copyright laws and treaties. No part of this document may be reproduced in any form without the written authorization of TIBCO Software Inc.TIBCO, The Power of Now, TIBCO iProcess,TIBCO FormBuilder, and TIBCO General Interface are either registered trademarks or trademarks of TIBCO Software Inc. in the United States and/or other countries. EJB, Java EE, J2EE, JMS and all Java-based trademarks and logos are trademarks or registered trademarks of Sun Microsystems, Inc. in the U.S. and other countries.All other product and company names and marks mentioned in this document are the property of their respective owners and are mentioned for identification purposes only.THIS SOFTWARE MAY BE AVAILABLE ON MULTIPLE OPERATING SYSTEMS. HOWEVER, NOT ALL OPERATING SYSTEM PLATFORMS FOR A SPECIFIC SOFTWARE VERSION ARE RELEASED AT THE SAME TIME. PLEASE SEE THE README FILE FOR THE AVAILABILITY OF THIS SOFTWARE VERSION ON A SPECIFIC OPERATING SYSTEM PLATFORM.THIS DOCUMENT IS PROVIDED “AS IS” WITHOUT WARRANTY OF ANY KIND, EITHER EXPRESS OR IMPLIED, INCLUDING, BUT NOT LIMITED TO, THE IMPLIED WARRANTIES OF MERCHANTABILITY, FITNESS FOR A PARTICULAR PURPOSE, OR NON-INFRINGEMENT.THIS DOCUMENT COULD INCLUDE TECHNICAL INACCURACIES OR TYPOGRAPHICAL ERRORS. CHANGES ARE PERIODICALLY ADDED TO THE INFORMATION HEREIN; THESE CHANGES WILL BE INCORPORATED IN NEW EDITIONS OF THIS DOCUMENT. TIBCO SOFTWARE INC. MAY MAKE IMPROVEMENTS AND/OR CHANGES IN THE PRODUCT(S) AND/OR THE PROGRAM(S) DESCRIBED IN THIS DOCUMENT AT ANY TIME.THE CONTENTS OF THIS DOCUMENT MAY BE MODIFIED AND/OR QUALIFIED, DIRECTLY OR INDIRECTLY, BY OTHER DOCUMENTATION WHICH ACCOMPANIES THIS SOFTWARE, INCLUDING BUT NOT LIMITED TO ANY RELEASE NOTES AND "READ ME" FILES.Copyright © 2006-2011 TIBCO Software Inc. ALL RIGHTS RESERVED.TIBCO Software Inc. Confidential Information

| iii
Contents
Preface . . . . . . . . . . . . . . . . . . . . . . . . . . . . . . . . . . . . . . . . . . . . . . . . . . . . . . . . . . . . . . . . . . . . . . . . v
Related Documentation . . . . . . . . . . . . . . . . . . . . . . . . . . . . . . . . . . . . . . . . . . . . . . . . . . . . . . . . . . . . . . . . . . . . . viTIBCO iProcess Workspace (Browser) Documentation . . . . . . . . . . . . . . . . . . . . . . . . . . . . . . . . . . . . . . . . . viOther TIBCO Documentation . . . . . . . . . . . . . . . . . . . . . . . . . . . . . . . . . . . . . . . . . . . . . . . . . . . . . . . . . . . . . vii
How to Contact TIBCO Customer Support . . . . . . . . . . . . . . . . . . . . . . . . . . . . . . . . . . . . . . . . . . . . . . . . . . . . . viii
Chapter 1 Introduction . . . . . . . . . . . . . . . . . . . . . . . . . . . . . . . . . . . . . . . . . . . . . . . . . . . . . . . . . . 1
Installation Overview . . . . . . . . . . . . . . . . . . . . . . . . . . . . . . . . . . . . . . . . . . . . . . . . . . . . . . . . . . . . . . . . . . . . . . . 2Hosting the iProcess Client and Action Processor . . . . . . . . . . . . . . . . . . . . . . . . . . . . . . . . . . . . . . . . . . . . . 3Upgrading from Previous Versions . . . . . . . . . . . . . . . . . . . . . . . . . . . . . . . . . . . . . . . . . . . . . . . . . . . . . . . . . 4
System Requirements . . . . . . . . . . . . . . . . . . . . . . . . . . . . . . . . . . . . . . . . . . . . . . . . . . . . . . . . . . . . . . . . . . . . . . 7Microsoft Visual C++ 2008 Redistributable Package . . . . . . . . . . . . . . . . . . . . . . . . . . . . . . . . . . . . . . . . . . 10
Installation Modes . . . . . . . . . . . . . . . . . . . . . . . . . . . . . . . . . . . . . . . . . . . . . . . . . . . . . . . . . . . . . . . . . . . . . . . . 12
Chapter 2 Installation Prerequisites. . . . . . . . . . . . . . . . . . . . . . . . . . . . . . . . . . . . . . . . . . . . . . . 13
Installation Prerequisites . . . . . . . . . . . . . . . . . . . . . . . . . . . . . . . . . . . . . . . . . . . . . . . . . . . . . . . . . . . . . . . . . . . 14Prerequisites if Using IIS to Host a .NET Action Processor . . . . . . . . . . . . . . . . . . . . . . . . . . . . . . . . . . . . . 14Prerequisites If Using IIS to Host the iProcess Client. . . . . . . . . . . . . . . . . . . . . . . . . . . . . . . . . . . . . . . . . . 20Prerequisite if Using Tomcat to Host a Java Action Processor . . . . . . . . . . . . . . . . . . . . . . . . . . . . . . . . . . . 22Prerequisite if Using Tomcat to Host the iProcess Client . . . . . . . . . . . . . . . . . . . . . . . . . . . . . . . . . . . . . . . 23
Chapter 3 Using the GUI Installer . . . . . . . . . . . . . . . . . . . . . . . . . . . . . . . . . . . . . . . . . . . . . . . . . 25
Installation/Upgrade Procedure . . . . . . . . . . . . . . . . . . . . . . . . . . . . . . . . . . . . . . . . . . . . . . . . . . . . . . . . . . . . . . 26iProcess Client Dialogs. . . . . . . . . . . . . . . . . . . . . . . . . . . . . . . . . . . . . . . . . . . . . . . . . . . . . . . . . . . . . . . . . 30Components Dialogs . . . . . . . . . . . . . . . . . . . . . . . . . . . . . . . . . . . . . . . . . . . . . . . . . . . . . . . . . . . . . . . . . . 36iProcess Action Processor Dialogs. . . . . . . . . . . . . . . . . . . . . . . . . . . . . . . . . . . . . . . . . . . . . . . . . . . . . . . . 42
Chapter 4 Using the Console Installer . . . . . . . . . . . . . . . . . . . . . . . . . . . . . . . . . . . . . . . . . . . . . 47
Installing Using Console Mode . . . . . . . . . . . . . . . . . . . . . . . . . . . . . . . . . . . . . . . . . . . . . . . . . . . . . . . . . . . . . . 48
Chapter 5 Using the Silent Installer . . . . . . . . . . . . . . . . . . . . . . . . . . . . . . . . . . . . . . . . . . . . . . . 49
Installing Using Silent Mode. . . . . . . . . . . . . . . . . . . . . . . . . . . . . . . . . . . . . . . . . . . . . . . . . . . . . . . . . . . . . . . . . 50Generating a Response File . . . . . . . . . . . . . . . . . . . . . . . . . . . . . . . . . . . . . . . . . . . . . . . . . . . . . . . . . . . . . 50Performing a Silent Installation . . . . . . . . . . . . . . . . . . . . . . . . . . . . . . . . . . . . . . . . . . . . . . . . . . . . . . . . . . . 51
TIBCO iProcess Workspace (Browser) Installation Guide

iv | Contents
Chapter 6 Post-Installation Configuration . . . . . . . . . . . . . . . . . . . . . . . . . . . . . . . . . . . . . . . . . . 53
Post-Installation Configuration . . . . . . . . . . . . . . . . . . . . . . . . . . . . . . . . . . . . . . . . . . . . . . . . . . . . . . . . . . . . . . . 54Configuration if Using IIS to Host a .NET Action Processor . . . . . . . . . . . . . . . . . . . . . . . . . . . . . . . . . . . . . 54Configuration if Using Tomcat to Host a Java Action Processor . . . . . . . . . . . . . . . . . . . . . . . . . . . . . . . . . . 61. . . . . . . . . . . . . . . . . . . . . . . . . . . . . . . . . . . . . . . . . . . . . . . . . . . . . . . . . . . . . . . . . . . . . . . . . . . . . . . . . . . . 66
Chapter 7 Accessing the Client. . . . . . . . . . . . . . . . . . . . . . . . . . . . . . . . . . . . . . . . . . . . . . . . . . . 67
Accessing the iProcess Client. . . . . . . . . . . . . . . . . . . . . . . . . . . . . . . . . . . . . . . . . . . . . . . . . . . . . . . . . . . . . . . . 68
Chapter 8 Removing the iProcess Workspace (Browser) . . . . . . . . . . . . . . . . . . . . . . . . . . . . . 69
Removing the TIBCO iProcess Workspace (Browser) . . . . . . . . . . . . . . . . . . . . . . . . . . . . . . . . . . . . . . . . . . . . . 70
TIBCO iProcess Workspace (Browser) Installation Guide

| v
Preface
This preface provides information about documentation related to the TIBCO iProcess Workspace (Browser), as well as how to contact TIBCO Customer Support.
Topics
• Related Documentation, page vi
• How to Contact TIBCO Customer Support, page viii
TIBCO iProcess Workspace (Browser) Installation Guide

vi | Related Documentation
Related Documentation
This section lists documentation resources you may find useful.
TIBCO iProcess Workspace (Browser) Documentation
The following documents form the TIBCO iProcess Workspace (Browser) documentation set:
• TIBCO iProcess™ Workspace (Browser) Installation Guide - Read this manual for information about installing and configuring the TIBCO iProcess Workspace (Browser).
• TIBCO iProcess™ Workspace (Browser) Release Notes - Read the release notes for a list of new and changed features. This document also contains lists of known issues and closed issues for each release.
• TIBCO iProcess™ Workspace (Browser) User’s Guide - Read this manual for instructions on using the TIBCO iProcess Workspace (Browser) client application.
• TIBCO iProcess™ Workspace (Browser) Configuration and Customization - This manual provides information about configuring and customizing the iProcess Workspace (Browser) and Action Processor.
• TIBCO iProcess™ Workspace (Browser) Components Concepts - This guide provides an overview of the TIBCO iProcess Workspace (Browser) Components, and how they work with other TIBCO products, as well as information about using the Properties and Events Editor to configure components you’ve added to your application. It also provides a tutorial that steps you through creating a simple application using the iProcess Workspace (Browser) Components.
• TIBCO iProcess™ Workspace (Browser) Components Reference - This guide provides details about each of the components available in the TIBCO iProcess Workspace (Browser).
• TIBCO iProcess™ Workspace (Browser) Action Processor Reference - This document provides an overview of the Action Processor, as well as information about all of the requests that can be sent to the Action Processor from TIBCO General Interface components.
• Integrating TIBCO Forms 2.1.x with GI Applications - Describes a programmatic approach to instantiating and launching TIBCO Forms applications from a standalone General Interface application. This is included in the TIBCO iProcess Workspace (Browser) document set as the TIBCO Forms Add-in is installed via the TIBCO iProcess Workspace (Browser) installer.
TIBCO iProcess Workspace (Browser) Installation Guide

Preface | vii
Other TIBCO Documentation
You may find it useful to read the documentation for the following TIBCO products:
• TIBCO iProcess™ Server Objects (Java or .NET) Programmer’s Guide - The TIBCO iProcess Server Objects (either Java or .NET) are installed as part of the TIBCO iProcess Workspace (Browser). This guide provides information about configuring the iProcess Server Objects.
• TIBCO iProcess™ Objects Server Administrator’s Guide - The TIBCO iProcess Workspace (Browser) communicates with the iProcess Engine through an iProcess Objects Server. This guide can be used to help configure your iProcess Objects Server.
• TIBCO PageBus™ Developer’s Guide - This guide provides an introduction to the PageBus, an Ajax publish/subscribe message delivery hub used by the TIBCO iProcess Workspace (Browser) components.
• TIBCO iProcess™ Workspace (Windows) Manager's Guide - Read this guide for information about using the TIBCO iProcess Administrator, which includes the User Manager. The User Manager is used to add users to the system, who can then log into the TIBCO iProcess Workspace (Browser) application.
• TIBCO Business Studio™ Forms User’s Guide - Read this guide for information about creating and deploying TIBCO Forms.
All of these guides are available in the TIBCO Documentation Library.
TIBCO iProcess Workspace (Browser) Installation Guide

viii | How to Contact TIBCO Customer Support
How to Contact TIBCO Customer Support
For comments or problems with this manual or the software it addresses, please contact TIBCO Support as follows.
• For an overview of TIBCO Support, and information about getting started with TIBCO Product Support, visit this site:
http://www.tibco.com/services/support
• If you already have a valid maintenance or support contract, visit this site:
http://support.tibco.com
Entry to this site requires a username and password. If you do not have a username, you can request one.
TIBCO iProcess Workspace (Browser) Installation Guide

| 1
Chapter 1 Introduction
This chapter contains important information which you should read before you install or upgrade the TIBCO iProcess Workspace (Browser).
Topics
• Installation Overview, page 2
• System Requirements, page 7
• Installation Modes, page 12
TIBCO iProcess Workspace (Browser) Installation Guide

2 | Chapter 1 Introduction
Installation Overview
This installation guide provides instructions on how to install, upgrade, or remove the following elements of the iProcess Workspace (Browser):
• iProcess Client - This client application provides a graphical user interface that allows you to perform functions such as starting cases of procedures, viewing lists of work items, processing (keeping, releasing, etc.) work items, etc. After installing iProcess Client on any of the supported operating systems, it can then be accessed and run from a Windows system using a browser (for a list of the supported browsers, see System Requirements on page 7).
• iProcess Action Processor - This is the engine that interprets action requests from the iProcess Client. It receives requests from the browser (in which the iProcess Client is running), then interacts with the TIBCO iProcess Objects Server to either return the requested data to the client, or perform the requested operation (open a form, release a work item, close a case, etc.).
The following two types of Action Processor are available:
— Java
— .NET
This installation program allows you to install either the Java or the .NET Action Processor. If you have a need to install both, you must run the installation program twice.
• Components - These are building blocks, accessed via the TIBCO General Interface Builder, that can be used to construct iProcess applications. For more information, see the TIBCO iProcess Workspace (Browser) Components Concepts guide. (Note that the components can only be installed on Windows systems.)
• Samples - Includes sample code for setting up things like ASP forms, single authentication, etc. The sample code available is described in the TIBCO iProcess Workspace (Browser) Configuration and Customization guide.
• Documentation - This includes both .PDF and HTML versions of all of the iProcess Workspace (Browser) documentation. It is installed in the InstallationHome\iprocessclientbrowser\doc\ directory, where InstallationHome is the installation home directory, which defaults to C:\tibco on Windows systems and /opt/tibco on UNIX systems.
TIBCO iProcess Workspace (Browser) Installation Guide

Installation Overview | 3
Hosting the iProcess Client and Action Processor
There are no dependencies between where the iProcess Client is hosted and where the Action Processor is hosted.
For instance, you may host the iProcess Client in IIS (Microsoft Internet Information Services) and a Java Action Processor in Tomcat. Or you may host both the iProcess Client and a .NET Action Processor in IIS. There are many combinations you may choose depending on your situation.
Even though the installer allows you to install the iProcess Client and an Action Processor at the same time, you should view them as separate actions, as they are not dependent on one another (except that, to run, the iProcess Client must be able to point to a running Action Processor).
This installation guide provides examples of installing and hosting the following:
• iProcess Client in Tomcat
• iProcess Client in IIS
• Java Action Processor in Tomcat
• .NET Action Processor in IIS (note that this is the only dependency for the Action Processors — if you install the .NET Action Processor, it must be hosted on IIS)
If you are using a different Web server, you can use the installer to install the iProcess Client and Action Processor files to the proper locations, then deploy according to your Web server.
Packing/Unpacking WAR Files
The installation program packs and unpacks WAR files as follows:
• iProcess Client WAR File - The installation program unpacks the iProcess Client’s WAR file during the installation process. If you are using an Application Server that requires WAR files, you will need to manually repack them into a WAR file after the installation is completed.
• Action Processor WAR File - The installation program gives you the option to have the installation program unpack the Action Processor WAR file, or to leave it packed. This is specified during the installation process.
If you choose not to unpack the Action Processor WAR file, no configuration
The assumption is that most installations will host the iProcess Client in a Web server. However, the iProcess Client does not have to be hosted in a Web server. You can run the installation program to install the iProcess Client anywhere on your system, then run the iProcess Client locally from there if desired.
TIBCO iProcess Workspace (Browser) Installation Guide

4 | Chapter 1 Introduction
of the Action Processor will take place.
Upgrading from Previous Versions
If you already have a previous version of the iProcess Client or Action Processor installed, you can upgrade to a newer version by simply following the installation instructions starting on page 26.
The following subsections describe issues concerning upgrading the iProcess Workspace (Browser).
Configuration Files
The following describes how configuration files are affected during an upgrade of the iProcess Workspace (Browser).
Action Processor Configuration File — apConfig.xml
Upgrading the iProcess Workspace (Browser) Action Processor software causes the Action Processor configuration file (APInstallDir\apConfig.xml, where APInstallDir is the directory in which the Action Processor is installed) to be overwritten. Therefore, if you have made changes to this file, you may want to make a copy prior to performing the installation / upgrade procedure.
After the installation is complete, you can make any desired modifications to the new configuration file.
iProcess Client Configuration Files — config.xml & userAccessProfiles.xml
When you are upgrading the iProcess Workspace (Browser) client application, the installer renames your existing iProcess Client configuration file from config.xml file to config_old.xml. This is so that any customizations you have made in your original configuration file are retained.
The installer also renames your existing user access profile configuration file from userAccessProfiles.xml to userAccessProfiles_old.xml. This is so that any customizations you have made in your user access profiles are retained.
The client’s configuration and user access profile files are located in the following directory:
ClientInstallDir\JSXAPPS\ipc\
where ClientInstallDir is the directory in which the iProcess Client is installed.
After the upgrade, it is your responsibility to perform the following tasks, depending on the version you are upgrading from:
TIBCO iProcess Workspace (Browser) Installation Guide

Installation Overview | 5
If Upgrading from Versions 10.6, 10.7, or 11.x
• Transfer any custom configurations from your old configuration file (which is now named config_old.xml) to the new config.xml file.
• Transfer any custom user access profile settings from your old user access profile file (which is now named userAccessProfiles_old.xml) to the new userAccessProfiles.xml file.
If Upgrading from a Pre-10.6 Version
• Transfer any custom configurations from your old configuration file (which is now named config_old.xml) to the new config.xml file.
• Transfer any user access profiles from the old config.xml file (which is now named config_old.xml) to the new userAccessProfile.xml file.
(The user access profile definitions were removed from the config.xml file in version 10.6.0 and placed in the new userAccessProfiles.xml file. The way in which user access profiles are defined also changed in the 10.6.0 release. For more information, see the TIBCO iProcess Workspace (Browser) Configuration and Customization guide.)
For information about all of the client configuration settings, see the TIBCO iProcess Workspace (Browser) Configuration and Customization guide.
Also see the Migration section in the TIBCO iProcess Workspace (Browser) Release Notes.
Multiple Shortcuts
If you are upgrading from a pre-version 10.6 iProcess Workspace (Browser) to version 10.6 or newer on a Windows system, you may end up with shortcuts to both the older and newer version. After installing the newer version, delete the old shortcut.
Previously Localized Client Application
If you are upgrading from version 10.6.0, and have manually localized your client application using the procedure provided in the Localization chapter of the TIBCO iProcess Workspace (Browser) Configuration and Customization guide, you need to perform the following steps prior to installing the new version of TIBCO iProcess Workspace (Browser).
If you fail to perform these steps before upgrading, your existing custom locale resource file in the ClientInstallDir\JSXAPPS\ipc\locale directory will be overwritten by the installation program.
1. Create a file named ipcLocale.properties.
TIBCO iProcess Workspace (Browser) Installation Guide
6 | Chapter 1 Introduction
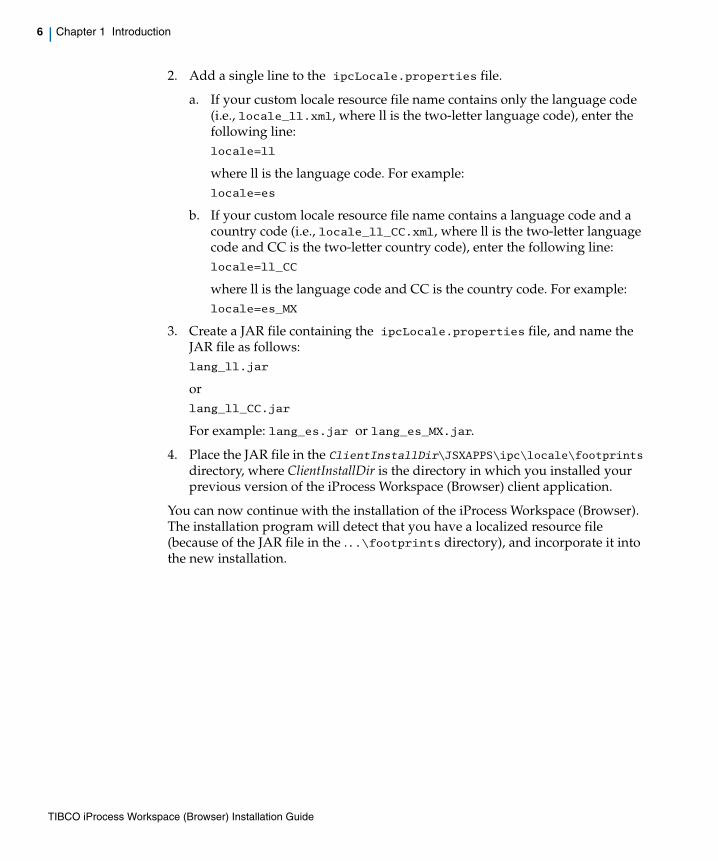
2. Add a single line to the ipcLocale.properties file.
a. If your custom locale resource file name contains only the language code (i.e., locale_ll.xml, where ll is the two-letter language code), enter the following line:locale=ll
where ll is the language code. For example: locale=es
b. If your custom locale resource file name contains a language code and a country code (i.e., locale_ll_CC.xml, where ll is the two-letter language code and CC is the two-letter country code), enter the following line:locale=ll_CC
where ll is the language code and CC is the country code. For example: locale=es_MX
3. Create a JAR file containing the ipcLocale.properties file, and name the JAR file as follows:lang_ll.jar
orlang_ll_CC.jar
For example: lang_es.jar or lang_es_MX.jar.
4. Place the JAR file in the ClientInstallDir\JSXAPPS\ipc\locale\footprints directory, where ClientInstallDir is the directory in which you installed your previous version of the iProcess Workspace (Browser) client application.
You can now continue with the installation of the iProcess Workspace (Browser). The installation program will detect that you have a localized resource file (because of the JAR file in the ...\footprints directory), and incorporate it into the new installation.
TIBCO iProcess Workspace (Browser) Installation Guide
System Requirements | 7
System Requirements
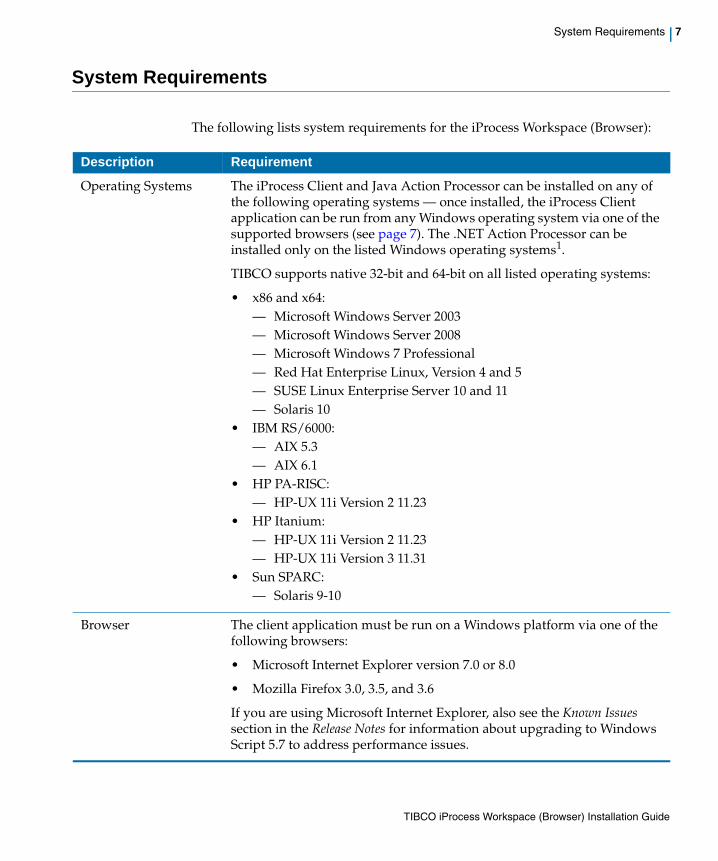
The following lists system requirements for the iProcess Workspace (Browser):
Description Requirement
Operating Systems The iProcess Client and Java Action Processor can be installed on any of the following operating systems — once installed, the iProcess Client application can be run from any Windows operating system via one of the supported browsers (see page 7). The .NET Action Processor can be installed only on the listed Windows operating systems1.
TIBCO supports native 32-bit and 64-bit on all listed operating systems:
• x86 and x64:— Microsoft Windows Server 2003 — Microsoft Windows Server 2008— Microsoft Windows 7 Professional— Red Hat Enterprise Linux, Version 4 and 5— SUSE Linux Enterprise Server 10 and 11— Solaris 10
• IBM RS/6000:— AIX 5.3— AIX 6.1
• HP PA-RISC:— HP-UX 11i Version 2 11.23
• HP Itanium:— HP-UX 11i Version 2 11.23— HP-UX 11i Version 3 11.31
• Sun SPARC: — Solaris 9-10
Browser The client application must be run on a Windows platform via one of the following browsers:
• Microsoft Internet Explorer version 7.0 or 8.0
• Mozilla Firefox 3.0, 3.5, and 3.6
If you are using Microsoft Internet Explorer, also see the Known Issues section in the Release Notes for information about upgrading to Windows Script 5.7 to address performance issues.
TIBCO iProcess Workspace (Browser) Installation Guide

8 | Chapter 1 Introduction
Java Runtime Environment (JRE)
Version 1.5.0 or 1.6.0 of the JRE is required for the Java Action Processor.
TIBCO iProcess Objects Server
Version 10.5.1 or newer of the TIBCO iProcess Objects Server is required to run the iProcess Workspace (Browser).
Note - If your application is using TIBCO Forms, your iProcess Objects Server must have MR 32564 implemented. The iProcess Objects Server version 10.6.1 and newer contains this MR, plus there is a hotfix available for the 10.6.0 version. If the iProcess Object Server does not contain MR 32564, and TIBCO Forms are used, intermittent errors may occur, as well as a server crash.
TIBCO iProcess Server Objects
The iProcess Client uses the TIBCO iProcess Server Objects to request functions/data from the iProcess Engine.
• If you are using the Java Action Processor, it requires the use of TIBCO iProcess Server Objects (Java).
• If you are using the .NET Action Processor, it requires the use of TIBCO iProcess Server Objects (.NET).
Note, however, that you do not need to explicitly install the iProcess Server Objects. The appropriate version of the iProcess Server Objects are installed automatically as part of the iProcess Workspace (Browser) installation.
Description Requirement
TIBCO iProcess Workspace (Browser) Installation Guide

System Requirements | 9
Web / Application Server
The Java Action Processor must be hosted on an application server that supports the Java Servlet 2.4 specification. It has been tested on Tomcat 5.x, Tomcat 6.0, WebLogic 9.x, and WebSphere 6.1.
The Java Action Processor is a standard Java servlet. Follow the instructions provided with your application server for deploying Java servlets. Note, however, that the Java Action Processor uses iProcess Server Objects, which contain native code libraries. This means that your application server needs to be configured to allow the Java Action Processor servlet to find those native code libraries. The mechanism(s) for this can vary from server to server.
The .NET Action Processor must be hosted on Microsoft Internet Information Services (IIS).
The iProcess Client can be hosted on any Web server that supports the HTTP 1.1 specification (also see the note on page 3).
The versions of Microsoft IIS that are supported are:
— IIS 6.0 (Windows Server 2003)
— IIS 7.0 (Windows Server 2008)
— IIS 7.5 (Windows Server 2008 R2 and Windows 7)
TIBCO General Interface
If you are installing the iProcess Workspace (Browser) components, you must have TIBCO General Interface installed.
This release of iProcess Workspace (Browser) supports version 3.9 of TIBCO General Interface.
The iProcess Workspace (Browser) installation program will ask you where to install the components — they should be installed in the directory in which TIBCO General Interface was installed.
After the components are installed, they can be accessed via General Interface Builder.
Also see the Migration section in the TIBCO iProcess Workspace (Browser) Release Notes for migration issues concerning TIBCO General Interface.
Description Requirement
TIBCO iProcess Workspace (Browser) Installation Guide

10 | Chapter 1 Introduction
Microsoft Visual C++ 2008 Redistributable Package
If you are installing the Action Processor on a Windows system, you must also ensure that that machine has the Microsoft Visual C++ 2008 Redistributable Package installed. (This package is needed by the underlying iProcess Server Objects that make calls to the Action Processor.)
The Microsoft Visual C++ 2008 Redistributable Package is not installed by default (although it is included when Microsoft Visual Studio 2008 is installed). You can determine if you have it installed on your machine by looking for "Microsoft Visual C++ 2008 Redistributable" in Add/Remove Programs.
If you do not have the redistributable package installed, download and install it using the following links:
x86:
http://www.microsoft.com/downloads/details.aspx?FamilyID=9b2da534-3e03-4391-8a4d-074b9f2bc1bf&displaylang=en
TIBCO PageBus The TIBCO PageBus is automatically installed with the iProcess Workspace (Browser) software if you choose to install the components.
This release of the iProcess Workspace (Browser) uses version 2.0 of the PageBus.
For more information about the PageBus, see the TIBCO iProcess Workspace (Browser) Components Concepts guide.
WebDAV Web-based Distributed Authoring and Versioning (WebDAV) is a protocol used for publishing and managing content to web servers.
If your application is using TIBCO Forms, a WebDAV server is required to host those forms. The webDAVRoot configuration parameter in your application’s config.xml file must point to the location of the forms on the WebDAV server. For information about this parameter, see the TIBCO iProcess Workspace (Browser) Configuration and Customization guide.
For information about creating and deploying TIBCO Forms, see the TIBCO Business Studio™ Forms User’s Guide.)
1. The 64-bit .NET Action Processor cannot be installed on the 64-bit version Windows Server 2003, as it does not support ASP.NET, which is required by the 64-bit .NET Action Processor. (For more infor-mation, see http://www.microsoft.com/technet/prodtechnol/WindowsServer2003/Li-brary/IIS/9bf79e1f-a5a5-4558-8f21-148e5585eb23.mspx?mfr=true.)
Description Requirement
TIBCO iProcess Workspace (Browser) Installation Guide

System Requirements | 11
x64:
http://www.microsoft.com/downloads/details.aspx?familyid=bd2a6171-e2d6-4230-b809-9a8d7548c1b6&displaylang=en
TIBCO iProcess Workspace (Browser) Installation Guide

12 | Chapter 1 Introduction
Installation Modes
The TIBCO iProcess Workspace (Browser) can be installed using the following installation modes:
• GUI Mode - The GUI (graphical user interface) mode causes the installer to present dialogs that allow you to make choices about product selection, product location, and so on.
For information about installing in GUI mode, see Using the GUI Installer on page 25.
• Console Mode - Console mode allows you to run the installer from the command prompt or terminal window. This is useful if your machine does not have a Windows environment.
For information about installing in Console mode, see Using the Console Installer on page 47.
• Silent Mode - Silent mode installs the software without prompting you for information — all the information the installer needs is passed to the installer in the form of a response file that was saved during an earlier installation.
For information about installing in Silent mode, see Using the Silent Installer on page 49.
For all installation modes, however, you must ensure the prerequisites described in Installation Prerequisites on page 13 have been met.
TIBCO iProcess Workspace (Browser) Installation Guide

| 13
Chapter 2 Installation Prerequisites
This chapter describes prerequisites to installing the TIBCO iProcess Workspace (Browser) software.
Topics
• Installation Prerequisites, page 14
TIBCO iProcess Workspace (Browser) Installation Guide

14 | Chapter 2 Installation Prerequisites
Installation Prerequisites
This chapter describes prerequisites to installing the iProcess Client and/or Action Processor.
Use the section that is appropriate for the software you are installing and the web server in which you will be hosting that software. If you are installing both an iProcess Client and an Action Processor, you will need to satisfy the requirements specified in two of the following sections.
• Prerequisites if using IIS to host a .NET Action Processor — see page 14
• Prerequisites if using IIS to host the iProcess Client — page 20
• Prerequisites if using Tomcat to host a Java Action Processor — page 22
• Prerequisites if using Tomcat to host the iProcess Client — page 23
Prerequisites if Using IIS to Host a .NET Action Processor
The following are prerequisites if you are using Internet Information Services (IIS) to host a .NET Action Processor:
• Ensure that IIS is installed.
• Ensure that ASP .NET is enabled (Windows Server 2003 only).
• Ensure IIS is configured for ASP .NET (Windows 2003 only).
• Ensure there is an Application Pool for .NET Framework 2.0 applications (Windows Server 2003 only)
These are explained in the following subsections.
Ensure that IIS is Installed
To determine if IIS is installed, and to install it, perform these steps, according to the operating system you are using:
Windows Server 2003
1. In the Control Panel, access Add or Remove Programs. The Add or Remove Programs dialog is displayed.
2. In the left-hand pane, select Add/Remove Windows Components. The Windows Components Wizard dialog is displayed.
3. In the list of components, select Application Server, then click the Details button. The Application Server dialog is displayed.
TIBCO iProcess Workspace (Browser) Installation Guide

Installation Prerequisites | 15
4. Ensure that the Internet Information Services (IIS) check box is checked.
— If the Internet Information Services (IIS) check box is checked, IIS is already installed on this system. You can click Cancel and exit the Control Panel. No further action is required.
— If the Internet Information Services (IIS) check box is not checked, click in the box, then click OK. The Windows Components Wizard dialog is re-displayed.
5. Click the Next button. The wizard will install the files necessary for IIS (it may require you to insert the Windows operating system CD) and inform you when it is finished.
6. Click Finish, then exit the Control Panel.
Windows Sever 2008
1. In the Server Manager, access Roles.
— If “Web Server (IIS)” is listed under the installed roles, IIS is already installed. Note that even if IIS is already installed, you should select it and scroll down and verify that ASP.NET is shown as installed in the list of Role Services. If it is not, click the Add Role Services link and add it. No further action is required.
— If “Web Server (IIS)” is not listed under the installed roles, IIS is not installed — proceed to step 2.
2. Click Add Roles.
3. If the Before You Begin dialog is displayed, read the information, then click Next.
4. On the Server Select Roles dialog, click in the Web Server (IIS) check box.
If your system does not already have the Windows Process Activation Service (WAS) feature installed, a dialog is displayed informing you of that. That feature, which is required by IIS, can be added from this dialog by clicking the Add Required Features button.
TIBCO iProcess Workspace (Browser) Installation Guide

16 | Chapter 2 Installation Prerequisites
5. Click Next.
The Introduction to Web Server (IIS) dialog is displayed.
6. Click Next.
The Select Role Services dialog is displayed.
7. Under “Application Development”, check the ASP.NET check box.
A dialog may be displayed informing you that role services and features are required for ASP.NET. If so, you can add them from this dialog by clicking on the Add Required Role Services button.
8. Click Next.
The Confirm Installation Selections dialog is displayed.
9. Click Install.
When the installation is complete, the Installation Results dialog is displayed.
10. Click Close to close the Add Roles Wizard.
11. Close the Server Manager.
Windows 7
1. In the Control Panel, access Programs.
2. Under the Programs and Features heading, click on Turn Windows features on or off.
3. In the Windows Features dialog, click in the Internet Information Services check box.
This causes the check box to become filled with a blue color.
4. Expand the check boxes below Internet Information Services, as follows:
- Internet Information Services- World Wide Web Services
- Application Development Features
Then check the ASP.NET check box.
5. Click OK on the Windows Features dialog.
6. Close the Programs and Features dialog.
Ensure ASP. NET is Enabled
(This is required only if you are using Windows Server 2003.)
TIBCO iProcess Workspace (Browser) Installation Guide

Installation Prerequisites | 17
To determine if ASP .NET is enabled, and to enable it, perform the following steps:
1. In the Control Panel, access Add or Remove Programs. The Add or Remove Programs dialog is displayed.
2. In the left-hand pane, select Add/Remove Windows Components. The Windows Components Wizard dialog is displayed.
3. In the list of components, select Application Server, then click the Details button. The Application Server dialog is displayed.
4. Ensure that the ASP.NET check box is checked.
— If the ASP.NET check box is checked, ASP .NET is already enabled on this system. You can click Cancel and exit the Control Panel. No further action is required.
— If the ASP.NET check box is not checked, click in the box, then click OK. The Windows Components Wizard dialog is re-displayed.
5. Click the Next button. The wizard will install the files necessary for ASP. NET and inform you when it is finished.
6. Click Finish, then exit the Control Panel.
Ensure IIS is Configured for ASP .NET
(This is required only on IIS 6.0 (Windows Server 2003).)
To ensure that IIS 6.0 is configured for ASP .NET, perform the following steps:
1. Open Internet Information Services (IIS) Manager.
TIBCO iProcess Workspace (Browser) Installation Guide

18 | Chapter 2 Installation Prerequisites
2. In the Internet Information Services window, right click on the directory / virtual directory in which you are installing the Action Processor and select Properties from the drop-down menu. If you have not yet created a directory or virtual directory for the Action Processor, do so now. The default Action Processor installation directory is C:\Inetpub\wwwroot\TIBCOActProc. For information about creating virtual directories, see:
http://www.microsoft.com/technet/prodtechnol/WindowsServer2003/Library/IIS/5adfcce1-030d-45b8-997c-bdbfa08ea459.mspx?mfr=true
3. On the Virtual Directory tab, if there is a Create button to the right of the Application Name field, click this button. This creates an IIS application from which the Action Processor will run. The Create button changes to a Remove button.
If there is already a Remove button to the right of the Application name field, the IIS application has already been created.
4. On the ASP.NET tab, select the "2.0.x" entry (for .NET Framework 2.0) in the ASP.NET version field drop-down list.
5. On the Virtual Directory tab, click the Configuration button in the Application Settings section.
6. On the Mappings tab, ensure that the .asmx, .aspx, and .asax extensions have been installed and reference the .NET Framework aspnet_isapi.dll library.
— If the extensions are listed and configured properly, no further action is required — you can close the IIS Manager.
— If the extensions are not listed, you need to register .NET with IIS using ASP .NET registration utility, aspnet_regiis.exe, which is located in the .NET Framework installation directory. For example:
C:\WINDOWS\Microsoft.NET\Framework\v2.0.50727\aspnet_regiis.exe -i
Note - This example shows v2.0, although you may be using a newer version of .NET Framework.
Consult your Windows documentation for more information about the ASP .NET registration utility.
7. Click OK to save the changes and exit the Application Configuration dialog.
Note - All other settings on the Properties dialog can be left at their default values.
8. Click OK to save the changes and exit the Properties dialog.
TIBCO iProcess Workspace (Browser) Installation Guide

Installation Prerequisites | 19
Ensure there is an Application Pool for .NET Framework 2.0 Applications
(This is required only on IIS 6.0 (Windows Server 2003).)
Microsoft .NET Framework imposes a limitation that each Application Pool can only run one version of Microsoft .NET Framework. Therefore, if you have applications that require Microsoft .NET Framework 1.1 and others that require version 2.0 (or newer), you must create two separate application pools.
Note that .NET Framework 3.0 and 3.5 are the same as .NET Framework 2.0 from the perspective of web applications. So there is no requirement to separate applications using versions 2.0, 3.0 or 3.5 of .NET Framework into separate application pools.
As TIBCO iProcess Workspace (Browser) requires .NET Framework 2.0 or newer, you must ensure that there is an Application Pool for .NET 2.0 Framework applications. To do this:
1. Open Internet Information Services (IIS) Manager.
2. In the Internet Information Services window, right click on the directory / virtual directory in which you are installing the Action Processor and select Properties from the drop-down menu.
3. On the Virtual Directory tab, ensure that the Application pool field contains the name of an Application Pool that only contains .NET 2.0 Framework (or newer) applications. (Best practice is to actually have each application in its own Application Pool.)
4. If the Application pool field drop-down list does not contain an Application Pool for .NET 2.0 Framework or newer applications, create a new one, then perform steps 1-3 above again.
To create a new Application Pool:
a. In the left-pane in IIS Manager, right click on Application Pools, then select New | Application Pool.
b. Provide a descriptive name for the Application Pool.
c. Use the radio buttons to either accept the defaults, or use an existing Application Pool as a template.
d. After the Application Pool is created, you can right-click on it under Application Pools in IIS Manager and change the configuration.
For more information creating and configuring Application Pools, see:
http://technet.microsoft.com/en-us/library/cc786585(WS.10).aspx
TIBCO iProcess Workspace (Browser) Installation Guide

20 | Chapter 2 Installation Prerequisites
Prerequisites If Using IIS to Host the iProcess Client
The following are prerequisites if you are using IIS to host the iProcess Client:
• Ensure that IIS is installed
These are described in the following sections.
Ensure that IIS is Installed
To determine if IIS is installed, and to install it, perform these steps, according to the operating system you are using:
Windows Server 2003
1. In the Control Panel, access Add or Remove Programs. The Add or Remove Programs dialog is displayed.
2. In the left-hand pane, select Add/Remove Windows Components. The Windows Components Wizard dialog is displayed.
3. In the list of components, select Application Server, then click the Details button. The Application Server dialog is displayed.
4. Ensure that the Internet Information Services (IIS) check box is checked.
— If the Internet Information Services (IIS) check box is checked, IIS is already installed on this system. You can click Cancel and exit the Control Panel. No further action is required.
— If the Internet Information Services (IIS) check box is not checked, click in the box, then click OK. The Windows Components Wizard dialog is re-displayed.
5. Click the Next button. The wizard will install the files necessary for IIS (it may require you to insert the Windows operating system CD) and inform you when it is finished.
6. Click Finish, then exit the Control Panel.
TIBCO iProcess Workspace (Browser) Installation Guide

Installation Prerequisites | 21
Windows Sever 2008
1. In the Server Manager, access Roles.
— If IIS is already installed, “Web Server (IIS)” will be listed under the installed roles. No further action is required.
— If IIS is not installed, proceed to step 2.
2. Click Add Roles.
3. If the Before You Begin dialog is displayed, read the information, then click Next.
4. On the Server Select Roles dialog, click in the Web Server (IIS) check box.
If your system does not already have the Windows Process Activation Service (WAS) feature installed, a dialog is displayed informing you of that. That feature, which is required by IIS, can be added from this dialog by clicking the Add Required Features button.
5. Click Next.
The Introduction to Web Server (IIS) is displayed.
6. Click Next.
The Select Role Services dialog is displayed.
7. Under “Application Development”, check the ASP.NET check box.
A dialog may be displayed informing you that role services and features are required for ASP.NET. If so, you can add them from this dialog by clicking on the Add Required Role Services button.
8. Click Next.
The Confirm Installation Selections dialog is displayed.
9. Click Install.
When the installation is complete, the Installation Results dialog is displayed.
10. Click Close to close the Add Roles Wizard.
11. Close the Server Manager.
Windows 7
1. In the Control Panel, access Programs.
2. Under the Programs and Features heading, click on Turn Windows features on or off.
TIBCO iProcess Workspace (Browser) Installation Guide

22 | Chapter 2 Installation Prerequisites
3. In the Windows Features dialog, click in the Internet Information Services check box.
This causes the check box to become filled with a blue color.
4. Expand the check boxes below Internet Information Services, as follows:
- Internet Information Services- World Wide Web Services
- Application Development Features
Then check the ASP.NET check box.
5. Click OK on the Windows Features dialog.
6. Close the Programs and Features dialog.
Prerequisite if Using Tomcat to Host a Java Action Processor
The following are prerequisites if you are using Tomcat to host a Java Action Processor:
• Ensure that the Java Runtime Environment (JRE) is installed
• Ensure that Tomcat is installed
These are described in the following sections.
Ensure that the JRE is Installed
Enter the following from the command line to determine if the Java Runtime Environment (JRE) is installed, and to determine its version:
java -version
If you need to install JRE, it can be downloaded from the following website:
www.java.sun.com/getjava
Ensure that Tomcat is Installed
If Tomcat needs to be installed, follow these steps:
1. Log into the system with an account that has administrator privileges.
2. Download the appropriate binary file from the following web site:
http://tomcat.apache.org/index.html
An embedded version of Tomcat is installed with the iProcess Engine; this version can be used to host the Action Processor. However, you may want to install a separate version of Tomcat that would host the Java Action Processor.
TIBCO iProcess Workspace (Browser) Installation Guide

Installation Prerequisites | 23
3. Install the software on your machine following the steps in the Tomcat installer.
Note that testing of the TIBCO iProcess Workspace (Browser) was performed using Tomcat 5.x and 6.0.
Prerequisite if Using Tomcat to Host the iProcess Client
The following are prerequisites if you are using Tomcat to host the iProcess Client portion of the iProcess Workspace (Browser):
• Ensure that the Java Runtime Environment (JRE) is installed
• Ensure that Tomcat is installed
These are described in the following sections.
Ensure that the JRE is Installed
Enter the following from the command line to determine if the Java Runtime Environment (JRE) is installed, and to determine its version:
java -version
If you need to install JRE, it can be downloaded from the following website:
www.java.sun.com/getjava
TIBCO iProcess Workspace (Browser) Installation Guide

24 | Chapter 2 Installation Prerequisites
Ensure that Tomcat is Installed
If Tomcat needs to be installed, follow these steps:
1. Log into the system with an account that has administrator privileges.
2. Download the appropriate binary file from the following web site:
http://tomcat.apache.org/index.html
3. Install the software on your machine following the steps in the Tomcat installer.
Note that testing of the TIBCO iProcess Workspace (Browser) was performed using Tomcat 5.x and 6.0.
An embedded version of Tomcat is installed with the iProcess Engine; this version can be used to host the iProcess Client. However, you may want to install a separate version of Tomcat that would host the iProcess Client.
TIBCO iProcess Workspace (Browser) Installation Guide

| 25
Chapter 3 Using the GUI Installer
This chapter describes how to install or upgrade the TIBCO iProcess Workspace (Browser) software using the graphical user interface (GUI).
Topics
• Installation/Upgrade Procedure, page 26
TIBCO iProcess Workspace (Browser) Installation Guide

26 | Chapter 3 Using the GUI Installer
Installation/Upgrade Procedure
The following steps describe installing/upgrading an iProcess Client, Action Processor, and components using the graphical user interface (GUI).
1. If installing on a Windows system, log in as a user with administrative privileges. If installing on a UNIX system, log in as any user — you do not need to be the root user.
2. Stop your Web server.
3. Run the TIBCO iProcess Workspace (Browser) setup program from the appropriate subdirectory on the distribution DVD. The setup program is named as follows:
TIB_iprocessworkspacebrowser-simple_version_platform.ext
where:
— version is the version number of the release you are installing.
— platform is the operating system on which you are installing.
— ext is the file extension, which is .exe for Windows files and .bin for UNIX files.
4. Review the information in the Welcome dialog, then click Next. The TIBCO Software Inc. End User License Agreement is displayed.
5. Read the license agreement, and respond by clicking in the I accept... radio button to accept the agreement, or in the I do not accept... radio button to cancel the installation, then click Next. (You must scroll down through the license agreement to make the radio buttons active.)
6. Read the Important Notice dialog, then click Next to proceed.
If you are upgrading from an earlier version of the TIBCO iProcess Workspace (Browser), read Upgrading from Previous Versions on page 4 before proceeding.
Also, if your previously installed application had been localized, be sure to read Previously Localized Client Application on page 5.
TIBCO iProcess Workspace (Browser) Installation Guide
Installation/Upgrade Procedure | 27
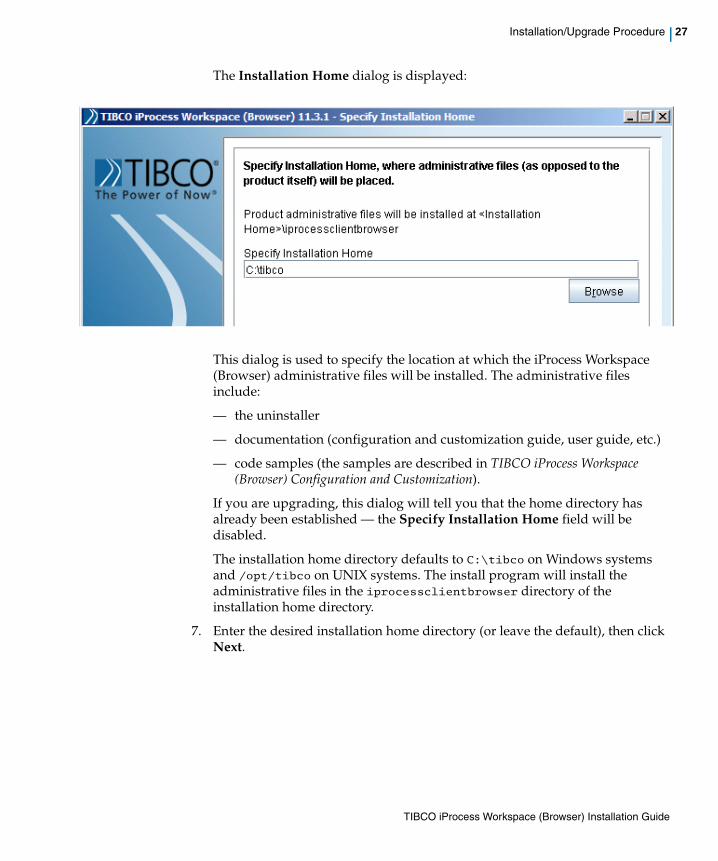
The Installation Home dialog is displayed:
This dialog is used to specify the location at which the iProcess Workspace (Browser) administrative files will be installed. The administrative files include:
— the uninstaller
— documentation (configuration and customization guide, user guide, etc.)
— code samples (the samples are described in TIBCO iProcess Workspace (Browser) Configuration and Customization).
If you are upgrading, this dialog will tell you that the home directory has already been established — the Specify Installation Home field will be disabled.
The installation home directory defaults to C:\tibco on Windows systems and /opt/tibco on UNIX systems. The install program will install the administrative files in the iprocessclientbrowser directory of the installation home directory.
7. Enter the desired installation home directory (or leave the default), then click Next.
TIBCO iProcess Workspace (Browser) Installation Guide

28 | Chapter 3 Using the GUI Installer
The Component Selection dialog is displayed:
The items that can be installed are:
— iProcess Client - The client application that allows users to process/administer cases/work items. For more information, see Installation Overview on page 2.
— Components - These are building blocks, accessed via TIBCO General Interface Builder, that are used to construct iProcess applications. For more information, see the TIBCO iProcess Workspace (Browser) Components Concepts guide.
— iProcess Action Processor - The engine that interprets actions from the client application and sends them to the server. For more information, see Installation Overview on page 2.
— Samples - Includes sample code for setting up things like ASP forms, single authentication, etc. The sample code available is described in the TIBCO iProcess Workspace (Browser) Configuration and Customization guide.
— Documentation - This includes both PDF and HTML versions of all of the iProcess Workspace (Browser) documentation. It is installed in the InstallationHome\iprocessclientbrowser\doc\ directory, where InstallationHome is the installation home directory, which defaults to C:\tibco on Windows systems and /opt/tibco on UNIX systems.
Note that the Component Selection dialog does not indicate if you already have any of the listed items installed. Therefore, if you install an iProcess Client, Components, or Action Processor in the same location as one already installed, the existing one will be overwritten.
TIBCO iProcess Workspace (Browser) Installation Guide

Installation/Upgrade Procedure | 29
8. Choose the item(s) you would like to install/upgrade by checking the appropriate box(es), then click Next.
Depending on which boxes you have checked, a series of dialogs is displayed, on which you must enter configuration information for each of the items you are installing.
Use the following subsections for information about how to complete each of the dialogs:
— if you are installing an iProcess Client application, see iProcess Client Dialogs on page 30
— if you are installing an iProcess Action Processor, see iProcess Action Processor Dialogs on page 42
— if you are installing the iProcess Workspace components, see Components Dialogs on page 36
Note - The Samples and Documentation selections do not result in dialogs.
TIBCO iProcess Workspace (Browser) Installation Guide

30 | Chapter 3 Using the GUI Installer
iProcess Client Dialogs
Selecting the iProcess Client checkbox on the Component Selection dialog causes as series of four iProcess Client dialogs to be displayed. These dialogs are described in the following subsections.
iProcess Client Dialog (1 of 4)
The first iProcess Client dialog is used to specify the Web server that will host the client application, as well as the home directory of the client application.
The following describes the radio buttons and field on this dialog:
• Web Server: Specify which Web server will be used to host the iProcess Client: IIS, Tomcat, or other.
• iProcess Client Home: Specify the directory in which the iProcess Client software will be installed. You can use the Browse button to locate the directory.
If IIS is selected for the Web server, the home directory defaults to C:\Inetpub\wwwroot\TIBCOiPClnt. If you have created a virtual directory into which the iProcess Workspace (Browser) will be installed, modify this path accordingly.
If Tomcat is selected for the Web server, the home directory defaults to TOMCAT_HOME\webapps\TIBCOiPClnt (in Windows) or TOMCAT_HOME/webapps/TIBCOiPClnt (in UNIX). You must replace
TIBCO iProcess Workspace (Browser) Installation Guide

Installation/Upgrade Procedure | 31
TOMCAT_HOME with the directory in which Tomcat is installed (e.g., D:\Tomcat). The remainder of the default path can also be changed, if desired. (Note that if the TOMCAT_HOME variable is defined on the system, the installer will automatically insert the variable’s value instead of displaying “TOMCAT_HOME”.)
If “Other” is selected for the Web server, the home directory field is blank. Enter the path to the directory into which the iProcess Client should be installed.
• Create iProcess Client Desktop icon - (Only applicable when installing on Windows.) Checking this box causes an icon to be created on the desktop that can be used to start the iProcess Client.
iProcess Client Dialog (2 of 4)
The second iProcess Client dialog is used to specify the type of Action Processor to which the iProcess Client will connect, as well as the URL to the Action Processor.
Information entered in this dialog is written to the config.xml file for the iProcess Client. This information can be modified at a later time by manually editing the config.xml file. For more information, see the TIBCO iProcess Workspace (Browser) Configuration and Customization guide.
The following describes the radio buttons and field on this dialog:
• iProcess Client will Connect to a: Select the Java or .NET Action Processor. This is the Action Processor to which the iProcess Client you are currently installing will connect.
• Action Processor URL: This is the URL to either the Java Action Processor or the .NET Action Processor. This must be in the form:
TIBCO iProcess Workspace (Browser) Installation Guide

32 | Chapter 3 Using the GUI Installer
http://Host:Port/APDir/ActionProcessor.ext
where:
— Host is the name of the machine hosting the Action Processor.
— Port is the port number used by the Web server to communicate with web applications.
— APDir is the directory (or virtual directory alias) on Host in which the Action Processor is installed.
— ext is the file name extension (this is “servlet” if it’s a Java servlet, i.e., the Java Action Processor; or “aspx” if it’s a .NET ASP web application, i.e., the .NET Action Processor).
Note that if you are hosting both the iProcess Client and the Action Processor on the same machine, and they are both being hosted by Tomcat, you can specify Host as “localhost”.
iProcess Client Dialog (3 of 4)
The third iProcess Client dialog specifies information about the TIBCO iProcess Objects Server that the user can log into after starting the iProcess Client.
Information entered in this dialog is written to the config.xml file for the iProcess Client. This information can be modified at a later time by manually editing the config.xml file. For more information, see the TIBCO iProcess Workspace (Browser) Configuration and Customization guide.
TIBCO iProcess Workspace (Browser) Installation Guide

Installation/Upgrade Procedure | 33
The following describes the fields on this dialog:
• Display Node Name: The name that you would like displayed in the iProcess Client Server field drop-down list on the Login screen. This is the name the user would select when choosing a server to log into.
• Computer Name: The name of the machine on which the TIBCO iProcess Objects Server is installed.
• IP Address or Host Name: The IP address of the machine on which the TIBCO iProcess Objects Server is installed. You can enter the name of the host machine in this field, as long as that name resolves to the IP address of the machine where the iProcess Objects Server is running. Note, however, that this name must be able to be resolved by the machine on which the Action Processor is running.
• TCP Port: The TCP port number used by the TIBCO iProcess Objects Server. (The TCP port used by the server is specified using the iProcess Objects Server Configuration Utility in Windows systems (SWDIR\bin\SWEntObjSvCfg.exe), or by editing the iProcess Objects Server configuration file in UNIX systems ($SWDIR/seo/data/swentobjsv.cfg). For more information, see the TIBCO iProcess Objects Server Administrator’s Guide.)
Note that the iProcess Objects Server must be configured to use a static TCP port, so that that port number can be specified here — it cannot be configured to use a dynamic port.
If you are using an iProcess Objects Director, see the TIBCO iProcess Objects Director Administrator’s Guide for information about configuring the TCP port on the Director.
• iProcess Node Name: The name of the TIBCO iProcess Engine / iProcess Objects Server to which the user can log in. This is the “nodename” that is assigned to the iProcess Engine when it is installed.
• Director: Specifies whether or not the previous entries actually describe a TIBCO iProcess Objects Director, which is used to connect the client to a server). Select “true” if the specifications are for a Director, or “false” if a TIBCO iProcess Objects Director is not being used.
• Persist User Preferences On Server - This specifies whether user data1 is persisted locally or on the server, as well as obtained locally or from the server upon login. Server-side persistence allows users to move to different machines and/or browser types, and pick up user preferences specified from another machine and/or browser type.
TIBCO iProcess Workspace (Browser) Installation Guide
34 | Chapter 3 Using the GUI Installer
If set to “false”:
— All user data is stored on the client.
— User data is not cached and is persisted client-side immediately.
If set to “true”:
— All user data is stored on the server.
— User data is cached and is not saved to the server until the user logs out or closes the browser window.
— Options values (i.e., all settings on the Options dialog in the application) are stored on both the client and the server. This is required because the language setting is stored in the Options data and this is needed to set up the locale before login.
Note - The first time server-side data is accessed for a given user, the user is given the option of initializing the server-side data with any data that has previously been persisted client side (if any client-side data exists). The user’s response to this question is persisted on the server and will not be asked again.
1. User data consists of the following: Adding, removing, or changing views (note that changes to views are persisted immediately, whereas all other user data are persisted upon logout or application closure); list filters; list sorts; column changes (either using the Column Selector, or done manually); auto-repeat toggle on the work item list; case history show seconds/microseconds setting.
TIBCO iProcess Workspace (Browser) Installation Guide

Installation/Upgrade Procedure | 35
iProcess Client Dialog (4 of 4)
The fourth iProcess Client dialog is used to tell the installer if your client application is using TIBCO Forms. TIBCO Forms are forms that are created and deployed using TIBCO Business Studio™. For more information, see the TIBCO Business Studio Forms User’s Guide.
The following describes the radio buttons and field on this dialog:
• Will the iProcess Client use TIBCO Forms? - Select the Yes radio button if your client application will be using TIBCO forms, or No if it will be using some other type of forms.
• Enter WebDAV root - Enter the base URL of the location at which the TIBCO forms are stored. The installation program writes this URL to the webDAVRoot configuration parameter in the client application’s config.xml file. This allows the client application to find the TIBCO Forms on the server.
If you don’t know if the client application will use TIBCO Forms, respond No; the webDAVRoot configuration parameter can be manually updated at a later time. For more information, see the TIBCO iProcess Workspace (Browser) Configuration and Customization guide.
TIBCO iProcess Workspace (Browser) Installation Guide
36 | Chapter 3 Using the GUI Installer
Components Dialogs
Selecting the Components check box on the Component Selection dialog causes as series of four Web Client Components dialogs to be displayed. These dialogs are described in the following subsections.
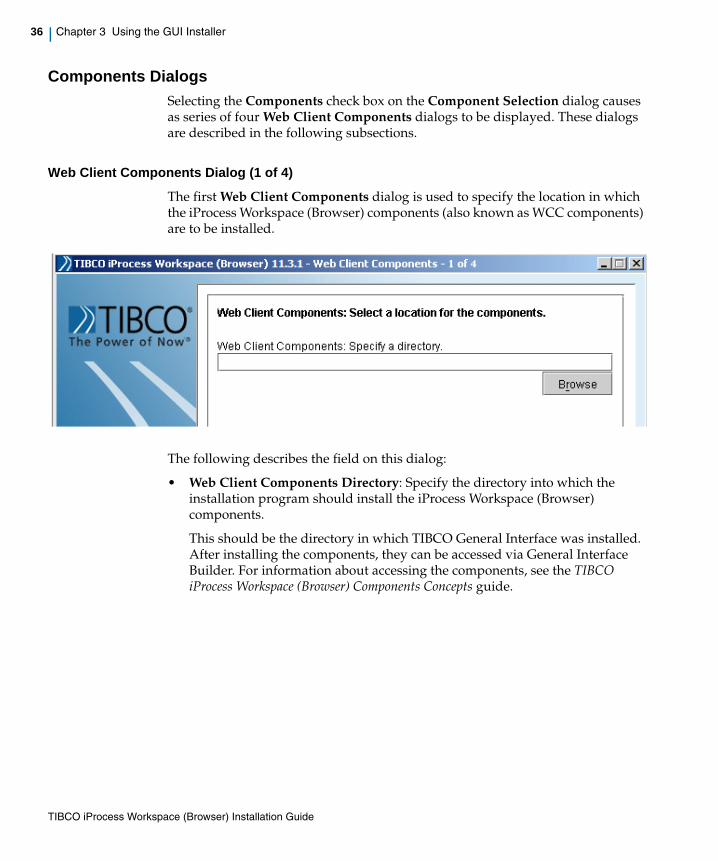
Web Client Components Dialog (1 of 4)
The first Web Client Components dialog is used to specify the location in which the iProcess Workspace (Browser) components (also known as WCC components) are to be installed.
The following describes the field on this dialog:
• Web Client Components Directory: Specify the directory into which the installation program should install the iProcess Workspace (Browser) components.
This should be the directory in which TIBCO General Interface was installed. After installing the components, they can be accessed via General Interface Builder. For information about accessing the components, see the TIBCO iProcess Workspace (Browser) Components Concepts guide.
TIBCO iProcess Workspace (Browser) Installation Guide

Installation/Upgrade Procedure | 37
Web Client Components Dialog (2 of 4)
The second Web Client Components dialog is used to specify the type of Action Processor to which custom applications created with WCC components will connect. It also allows you to specify the URL to the Action Processor.
Information entered in this dialog is written to the config.xml file created for a custom application created with WCC components. For more information, see the Custom Applications chapter in the TIBCO iProcess Workspace (Browser) Components Concepts guide.
The following describes the radio buttons and field on this dialog:
• The Web Client Components will connect to a: Select the Java or .NET Action Processor. This is the Action Processor to which the custom application created with the iProcess Workspace (Browser) components will connect.
• Action Processor URL: This is the URL to either the Java Action Processor or the .NET Action Processor. This must be in the form:
http://Host:Port/APDir/ActionProcessor.ext
where:
— Host is the name of the machine hosting the Action Processor. Note that if you are hosting both the custom application and the Action Processor on
TIBCO iProcess Workspace (Browser) Installation Guide
38 | Chapter 3 Using the GUI Installer
the same machine, and they are both being hosted by Tomcat, you can specify Host as “localhost”.
— Port is the port number used by the Web server to communicate with web applications.
— APDir is the directory (or virtual directory alias) on Host in which the Action Processor is installed.
— ext is the file name extension (this is “servlet” if it’s a Java servlet, i.e., the Java Action Processor; or “aspx” if it’s a .NET ASP web application, i.e., the .NET Action Processor).
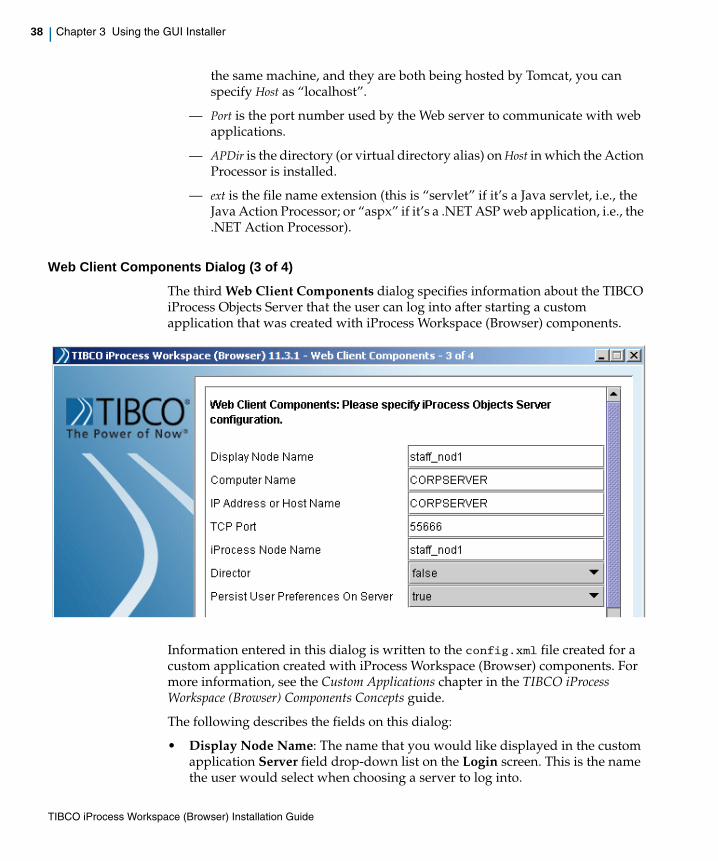
Web Client Components Dialog (3 of 4)
The third Web Client Components dialog specifies information about the TIBCO iProcess Objects Server that the user can log into after starting a custom application that was created with iProcess Workspace (Browser) components.
Information entered in this dialog is written to the config.xml file created for a custom application created with iProcess Workspace (Browser) components. For more information, see the Custom Applications chapter in the TIBCO iProcess Workspace (Browser) Components Concepts guide.
The following describes the fields on this dialog:
• Display Node Name: The name that you would like displayed in the custom application Server field drop-down list on the Login screen. This is the name the user would select when choosing a server to log into.
TIBCO iProcess Workspace (Browser) Installation Guide

Installation/Upgrade Procedure | 39
• Computer Name: The name of the machine on which the TIBCO iProcess Objects Server is installed.
• IP Address or Host Name: The IP address of the machine on which the TIBCO iProcess Objects Server is installed. You can enter the name of the host machine in this field, as long as that name resolves to the IP address of the machine where the iProcess Objects Server is running. Note, however, that this name must be able to be resolved by the machine on which the Action Processor is running.
• TCP Port: The TCP port number used by the TIBCO iProcess Objects Server. (The TCP port used by the server is specified using the iProcess Objects Server Configuration Utility in Windows systems (SWDIR\bin\SWEntObjSvCfg.exe), or by editing the iProcess Objects Server configuration file in UNIX systems ($SWDIR/seo/data/swentobjsv.cfg). For more information, see the TIBCO iProcess Objects Server Administrator’s Guide.)
Note that the iProcess Objects Server must be configured to use a static TCP port, so that that port number can be specified here — it cannot be configured to use a dynamic port.
If you are using an iProcess Objects Director, see the TIBCO iProcess Objects Director Administrator’s Guide for information about configuring the TCP port on the Director.
• iProcess Node Name: The name of the TIBCO iProcess Engine / iProcess Objects Server to which the user can log in. This is the “nodename” that is assigned to the iProcess Engine when it is installed.
• Director: Specifies whether or not the previous entries actually describe a TIBCO iProcess Objects Director, which is used to connect the client to a server). Select “true” if the specifications are for a Director, or “false” if a TIBCO iProcess Objects Director is not being used.
• Persist User Preferences On Server - Set to "true" to specify that user preferences be persisted on, and read from, the server. If set to “false”, user preferences are stored locally, as well as read from the local machine upon login. Server-side persistence allows users to move to different machines and/or browser types, and pick up user preferences specified from another machine and/or browser type.
TIBCO iProcess Workspace (Browser) Installation Guide
40 | Chapter 3 Using the GUI Installer
The following types of user preferences are persisted:
— Adding, removing, or changing views - Note that changes to views are persisted immediately, whereas all other user preferences are persisted upon logout or application closure.
— All settings on the Options dialog
— List filters
— List sorts
— Column changes - either using the Column Selector, or done manually
— Auto-repeat toggle on the work item list
— Case history show seconds/microseconds setting
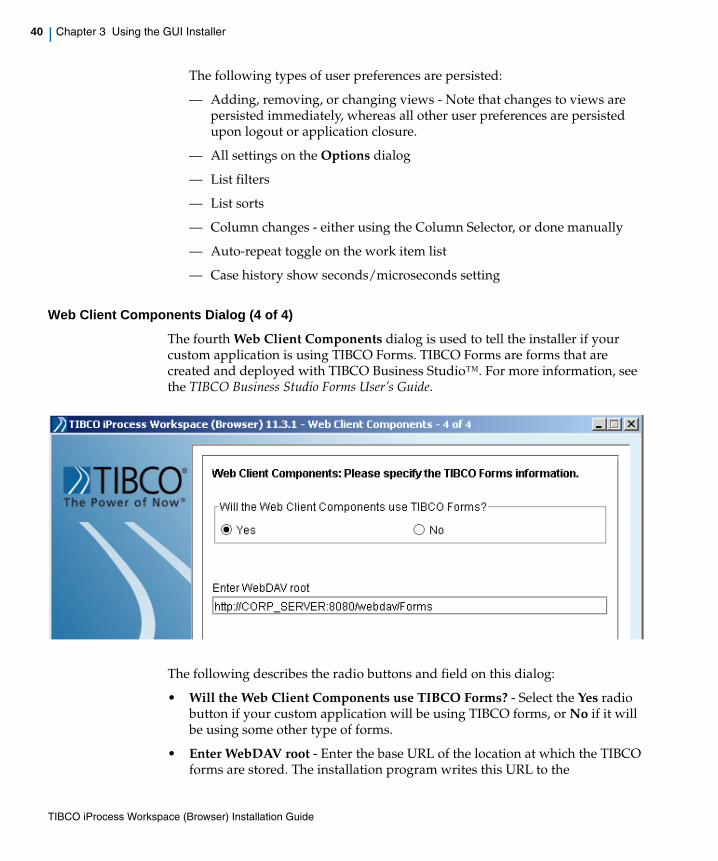
Web Client Components Dialog (4 of 4)
The fourth Web Client Components dialog is used to tell the installer if your custom application is using TIBCO Forms. TIBCO Forms are forms that are created and deployed with TIBCO Business Studio™. For more information, see the TIBCO Business Studio Forms User’s Guide.
The following describes the radio buttons and field on this dialog:
• Will the Web Client Components use TIBCO Forms? - Select the Yes radio button if your custom application will be using TIBCO forms, or No if it will be using some other type of forms.
• Enter WebDAV root - Enter the base URL of the location at which the TIBCO forms are stored. The installation program writes this URL to the
TIBCO iProcess Workspace (Browser) Installation Guide

Installation/Upgrade Procedure | 41
webDAVRoot configuration parameter in the custom application’s config.xml file. This allows the custom application to find the TIBCO Forms on the server.
If you don’t know if the custom application will use TIBCO Forms, respond No; the webDAVRoot configuration parameter can be manually updated at a later time. For more information, see the TIBCO iProcess Workspace (Browser) Configuration and Customization guide.
TIBCO iProcess Workspace (Browser) Installation Guide

42 | Chapter 3 Using the GUI Installer
iProcess Action Processor Dialogs
Selecting the iProcess Action Processor checkbox on the Component Selection dialog causes the following Action Processor-related dialogs to be displayed:
• Action Processor Installation dialog
• iProcess Server Objects (Java) dialog (Note that this dialog is displayed only if you have selected to install the Java Action Processor)
These dialogs are described in the following subsections.
Action Processor Installation Dialog
This dialog is used to specify which Action Processor to install, the Web server that will host it, as well as the location to install the Action Processor.
The following describes the radio buttons and field on this dialog:
• Action Processor to Install: Specify which Action Processor you want to install — .NET or Java — by clicking the appropriate radio button.
• Web Server: Specify which Web server will be used to host the Action Processor: IIS, Tomcat, or other. Note that if the .NET Action Processor was selected, this is automatically set to IIS, which is the only Web server you can use to host the .NET Action Processor.
TIBCO iProcess Workspace (Browser) Installation Guide

Installation/Upgrade Procedure | 43
• Action Processor Home Directory: Specify the directory in which the Action Processor software will be installed. You can use the Browse button to locate the directory.
If IIS is selected for the Web server, the home directory defaults to C:\Inetpub\wwwroot\TIBCOActProc.
If Tomcat is selected for the Web server, the home directory defaults to TOMCAT_HOME\webapps\TIBCOActProc (in Windows) or TOMCAT_HOME/webapps/TIBCOActProc (in UNIX). You must replace TOMCAT_HOME with the directory in which Tomcat is installed (e.g., D:\Tomcat). The remainder of the default path can also be changed, if desired. (Note that if the TOMCAT_HOME variable is defined on the system, the installer will automatically insert the variable’s value instead of displaying TOMCAT_HOME.)
If “Other” is selected for the Web server, the home directory field is blank. Enter the path to the directory into which the Action Processor should be installed.
• Un-war Action Processor War file?: These radio buttons are displayed only if you select the Java Action Processor.
These radio buttons allow you to specify whether or not the Action Processor WAR file should be left packed or not. For more information, see Packing/Unpacking WAR Files on page 3. Select the appropriate radio button. Note that if you choose not to unpack the Action Processor WAR file, no configuration of the Action Processor will take place.
iProcess Server Objects (Java) Dialog
This dialog is used to specify where to install the iProcess Server Objects (Java). It also allows you to specify which interface to install, Standalone or RMI.
The iProcess Server Objects are required to run the iProcess Workspace (Browser). There are two types of the iProcess Server Objects: Java and .NET. The type you need depends on the type of Action Processor you are installing, as follows:
— if you are installing the Java Action Processor, you need the iProcess Server Objects (Java)
— if you are installing the .NET Action Processor, you need the iProcess Server Objects (.NET)
The appropriate type of iProcess Server Objects is automatically installed for you with the iProcess Workspace (Browser) software.
TIBCO iProcess Workspace (Browser) Installation Guide

44 | Chapter 3 Using the GUI Installer
This dialog is displayed only if you are installing the iProcess Server Objects (Java) (which are automatically installed if you are installing a Java Action Processor). It is not displayed if you are installing the iProcess Server Objects (.NET) (which are automatically installed if you are installing a .NET Action Processor), as there are no configuration requirements for the iProcess Server Objects (.NET).
• Directory for the iProcess Server Objects: Specify the directory into which the iProcess Server Objects (Java) are to be installed.
If your Java Action Processor will be hosted on Tomcat, the iProcess Server Objects (Java) must be installed in the Tomcat_Home\shared\lib directory (Tomcat 5.x) or Tomcat_Home\lib directory (Tomcat 6.0) (Tomcat_Home/shared/lib and Tomcat_Home/lib, respectively, on UNIX).
If your Java Action Processor will be hosted by any other Web server, see the Web server’s documentation for information about where to install shared libraries so that they will be accessible by the Action Processor Java servlet.
The installation program checks to see if there were iProcess Server Objects (Java) already installed in the specified directory. If it finds an existing installation, it will ask if it can overwrite the files in that installation.
If you had a previous version of the TIBCO iProcess Server Objects (Java) installed in a different directory, you should uninstall them before installing the new version. The iProcess Workspace (Browser) may not work properly if the TIBCO iProcess Server Objects (Java) library file (e.g., ssoJNI.dll in Windows; libssoJNI.sl or libssoJNI.so in UNIX) is located anywhere else on your system.
TIBCO iProcess Workspace (Browser) Installation Guide

Installation/Upgrade Procedure | 45
• Interface Type: Specify which iProcess Server Objects (Java) interface type should be installed. The choice here will depend on how the iProcess Server Objects (Java) are implemented, as follows:
— Standalone (JBase) - This is the local solution — it exposes TIBCO iProcess Server Objects functionality as simple Java objects. This interface does not make use of remote objects. It is typically used when incorporating a broker application that is automatically processing work items arriving in a particular work queue.
— RMI (Remote Method Invocation) - This is the remote solution — it uses Java’s Remote Method Invocation (RMI) technology. This allows the client to be located on a machine remote from the TIBCO iProcess Server Objects.
If RMI is selected, the following fields and radio buttons are displayed:
These allow you to specify configuration information when using RMI. The information you specify in the RMI Server Factory section is automatically written to the Action Processor’s configuration file, apConfig.xml, as described below.
— Unique Server Factory ID: This is a unique name that identifies the server factory. If you are running the iProcess Server Objects (Java) through RMI, a server factory must be set up to access the remote objects across the network. The name that is given to the server factory when it is set up, is entered in this field.
The name entered in this field is written to the <UniqueId /> and <Name /> elements in the apConfig.xml file. (Note that this will not occur if you chose not to unpack the Action Processor WAR file — see Packing/Unpacking WAR Files on page 3.)
— Java Naming Provider URL - Specifies the location of the registry when the registry is being used as the initial context. This value should contain a URL
TIBCO iProcess Workspace (Browser) Installation Guide

46 | Chapter 3 Using the GUI Installer
string (e.g. "rmi://host:port"). This value is written to a <JNDIEnv /> element <Name> / <Value> element pair in the apConfig.xml file.
— Protocol: This specifies the protocol used to marshall objects across the RMI boundary. This protocol is specified when the server factory is started — the same protocol must be specified here. The options are:
- JRMP - Java Remote Method Protocol
- IIOP - CORBA standard Internet Inter-Orb Protocol
The protocol specified with these radio buttons is written to the <IsJRMP /> element in the apConfig.xml file.
For more information about the RMI interface, see the TIBCO iProcess Server Objects (Java) Programmer’s Guide.
TIBCO iProcess Workspace (Browser) Installation Guide

| 47
Chapter 4 Using the Console Installer
This chapter describes how to install the TIBCO iProcess Workspace (Browser) using console mode.
Topics
• Installing Using Console Mode, page 48
TIBCO iProcess Workspace (Browser) Installation Guide

48 | Chapter 4 Using the Console Installer
Installing Using Console Mode
Console mode allows you to install the TIBCO iProcess Workspace (Browser) from a non-Windows environment. This mode presents a series of prompts that request the same information that you would enter on the dialogs presented in the GUI installation mode.
The basic command to run a console installation is:
<Installer> -console
where <Installer> is the name of the installer .exe file (on Windows) or .bin file (on UNIX).
To perform a console mode installation, follow these steps:
1. Log in as the iProcess Engine administrator (IPEADMIN).
— in UNIX, this defaults to pro (also referred to as the “Background” user in UNIX).
— in Windows, this is specified when the iProcess Engine is installed (it defaults to the user installing the iProcess Engine).
For more information, see the TIBCO iProcess Engine Installation Guide.
2. Enter the TIBCO iProcess Workspace (Browser) setup program name at a command prompt or in a terminal window, followed by the -console switch.
For example:setup.exe -console
3. Respond to each of the prompts as required.
Generally, the prompts in console mode expect you to enter a number to indicate your selection, then press Enter to submit that entry. Then you must enter a 0 (zero) and press Enter to finish that prompt and proceed to the next prompt.
If a value is shown in square brackets at the end of the prompt (for example, [0]), it signifies a default. Pressing Enter submits that value.
For additional information about possible responses to the prompts, refer to the chapter about the GUI installation on page 25.
If you are upgrading from an earlier version of the TIBCO iProcess Workspace (Browser), read Upgrading from Previous Versions on page 4 before proceeding.
Also, if your previously installed application had been localized, be sure to read Previously Localized Client Application on page 5.
TIBCO iProcess Workspace (Browser) Installation Guide

| 49
Chapter 5 Using the Silent Installer
This chapter describes how to install the TIBCO iProcess Workspace (Browser) using silent mode.
Topics
• Generating a Response File, page 50
• Performing a Silent Installation, page 51
TIBCO iProcess Workspace (Browser) Installation Guide

50 | Chapter 5 Using the Silent Installer
Installing Using Silent Mode
A silent-mode installation installs the TIBCO iProcess Workspace (Browser) without prompting you for information. The installer uses a response file to determine values for all required settings (e.g., the type of web server used, client and Action Processor installation directories, etc.).
Generating a Response File
Response files are generated by including the -options-record switch (note that there no space between -options and -record) when performing a GUI or console installation from the command line or terminal. It must be in one of the following forms:
<Installer> -options-record <responseFileName>
or
<Installer> -console -options-record <responseFileName>
where <Installer> is the name of the installer .exe file (on Windows) or .bin file (on UNIX, and <responseFileName> is the path/name of the response file you want to generate.
All configuration parameters, i.e., your responses to prompts, during the GUI or console installation are recorded in the response file, which can then be used in a silent installation.
If you are upgrading from an earlier version of the TIBCO iProcess Workspace (Browser), read Upgrading from Previous Versions on page 4 before proceeding.
Also, if your previously installed application had been localized, be sure to read Previously Localized Client Application on page 5.
When performing a GUI or console installation, spaces can be entered in paths without any problem, for example you can enter the following for the Action Processor installation directory:C:\Tomcat 6.0\webapps\TIBCOActProc
Note, however, if you specify paths with spaces when creating a response file, then use that response file, the portion of the path after the space is not recognized. For example, if the path specified above is included in the response file, the Action Processor installation directory will be “C:\Tomcat”. You can work around this issue by locating all of the instances of paths with spaces in the response file and manually editing them to include quotes around the entire path. For example:"C:\Tomcat 6.0\webapps\TIBCOActProc"
TIBCO iProcess Workspace (Browser) Installation Guide
Installing Using Silent Mode | 51
Performing a Silent Installation
The basic command to run a silent installation is:
<Installer> -silent -options <responseFileName>
where <Installer> is the name of the installer .exe file (on Windows) or .bin file (on UNIX), and <responseFileName> is the path/name of the response file that was generated during an earlier GUI or console installation (see Generating a Response File on page 50).
To perform a silent-mode installation, follow these steps:
1. Log in as the iProcess Engine administrator (IPEADMIN).
— in UNIX, this defaults to pro (also referred to as the “Background” user in UNIX).
— in Windows, this is specified when the iProcess Engine is installed (it defaults to the user installing the iProcess Engine).
For more information, see the TIBCO iProcess Engine Installation Guide.
2. Generate a response file — see Generating a Response File on page 50. For example:
setup.exe -options-record C:\temp\ipc.rsp
3. Using the response file generated in step 2, perform an installation using the -silent switch. For example:
setup.exe -silent -options C:\temp\ipc.rsp
The installation will be performed silently, with no dialogs/prompts displayed.
If you specify a non-existent response file (or an incorrect path to a response file that exists), the installer does not install the software, nor does it return an error or any indication that it couldn’t find the response file. This is a known issue in InstallShield.
TIBCO iProcess Workspace (Browser) Installation Guide

52 | Chapter 5 Using the Silent Installer
TIBCO iProcess Workspace (Browser) Installation Guide
| 53
Chapter 6 Post-Installation Configuration
This chapter describes post-installation requirements.
Topics
• Post-Installation Configuration, page 54
TIBCO iProcess Workspace (Browser) Installation Guide

54 | Chapter 6 Post-Installation Configuration
Post-Installation Configuration
This section describes configuration functions you need to perform after installing an Action Processor. There are no post-installation requirements after installing an iProcess Client (except for the note shown below), nor the components.
The configuration information is divided into the following sections.
• Configuration if using IIS to host a .NET Action Processor — see page 54
• Configuration if using Tomcat to host a Java Action Processor — page 61
Use the appropriate section depending on which software has been installed and which web server will be used to host them.
If you are installing on a Web server other than IIS or Tomcat, there may be configuration functions required by that Web server. Refer to that server’s documentation.
Configuration if Using IIS to Host a .NET Action Processor
The following are configuration functions you must perform if you are using IIS to host a .NET Action Processor. They are listed according to the version of IIS.
IIS 6.0
The following need to be performed if you are using IIS 6.0 (Windows Server 2003). Also note that they are required only upon initial installation — if this is an upgrade, they should already be configured.
• Give the ASP .NET user modify permission to the Action Processor installation directory — see page 55.
• Give the IIS_WPG group modify permission to the Action Processor installation directory — see page 57.
Note that the iProcess Workspace (Browser) installation program unpacks the iProcess Client’s WAR file during the installation process. If you are using an Application Server that requires WAR files, you will need to manually repack them into a WAR file after the installation is completed. For more information, see Packing/Unpacking WAR Files on page 3.
TIBCO iProcess Workspace (Browser) Installation Guide

Post-Installation Configuration | 55
IIS 7.0
The following need to be performed if you are using IIS 7.0 (Windows Server 2008). Also note that they are required only upon initial installation — if this is an upgrade, they should already be configured.
• Give the IIS_IUSRS group modify permission to the Action Processor installation directory — see page 58.
• Convert the Action Processor’s virtual directory to an application — see page 60.
• Give the NETWORK SERVICE user full control permission to the Action Processor installation directory — see page 59.
IIS 7.5
The following needs to be performed if you are using IIS 7.5 (Windows Server 2008 R2 and Windows 7). Also note that this is required only upon initial installation — if this is an upgrade, it should already be configured.
• Convert the Action Processor’s virtual directory to an application — see page 60.
All Versions
The following needs to be performed for all versions of IIS.
• Start the web site to start the Action Processor — see page 61.
Give the ASP .NET User Modify Permission to the Action Processor Installation Directory
This is required only:
• if you are using IIS 6.0 (Windows Server 2003), and
• this is the initial installation (if this is an upgrade, the permissions from the previous installation should still be correct).
The ASP .NET user (machine account) must be given modify permissions to the Action Processor installation directory. To do this:
1. Right click on the directory that was created by the installer for the Action Processor files (TIBCOActProc in this example) and select Properties.
TIBCO iProcess Workspace (Browser) Installation Guide

56 | Chapter 6 Post-Installation Configuration
2. On the Security tab, check to see if the ASP.NET machine account has modify permissions. If necessary, add the “ASPNET” machine account and give it modify permissions:
TIBCO iProcess Workspace (Browser) Installation Guide

Post-Installation Configuration | 57
Give the IIS_WPG Group Modify Permission to the Action Processor Installation Directory
This is required only:
• if you are using IIS 6.0 (Windows Server 2003), and
• this is the initial installation (if this is an upgrade, the permissions from the previous installation should still be correct).
The IIS_WPG group must be given modify permissions to the Action Processor installation directory. To do this:
1. Right click on the directory that was created by the installer for the Action Processor files (TIBCOActProc in this example) and select Properties.
2. On the Security tab, check to see if the IIS_WPG group account has modify permissions. If necessary, add the “IIS_WPG” group account and give it modify permissions:
TIBCO iProcess Workspace (Browser) Installation Guide

58 | Chapter 6 Post-Installation Configuration
Give the IIS_IUSRS Group Modify Permission to the Action Processor Installation Directory
This is required only:
• if you are using IIS 7.0 (Windows Server 2008), and
• this is the initial installation (if this is an upgrade, the permissions from the previous installation should still be correct).
The IIS_IUSRS group must be given modify permissions to the Action Processor installation directory. To do this:
1. Right click on the directory that was created by the installer for the Action Processor files (TIBCOActProc in this example) and select Properties.
2. On the Security tab, check to see if the IIS_IUSRS group account has modify permissions. If necessary, add the "IIS_IUSRS" group account and give it modify permissions:
TIBCO iProcess Workspace (Browser) Installation Guide

Post-Installation Configuration | 59
Give the NETWORK SERVICE User Full Control Permission to the Action Processor Installation Directory
This is required only:
• if you are using IIS 7.0 (Windows Server 2008), and
• this is the initial installation (if this is an upgrade, the permissions from the previous installation should still be correct).
The NETWORK SERVICE user must be given full control permissions to the Action Processor installation directory so that it can write to the Action Processor log file. To do this:
1. Right click on the directory that was created by the installer for the Action Processor files (TIBCOActProc in this example) and select Properties.
2. On the Security tab, check to see if the NETWORK SERVICE account has full control permissions. If necessary, add the “NETWORK SERVICE” user account and give it full control permissions:
TIBCO iProcess Workspace (Browser) Installation Guide

60 | Chapter 6 Post-Installation Configuration
Convert the Action Processor’s Virtual Directory to an Application
This is required only:
• if you are using IIS 7.0 or 7.5 (Windows Server 2008 and Windows 7, respectively), and
• this is the initial installation — this is not needed for an upgrade.
You must convert the virtual directory being used by the Action Processor to an application. To do this:
1. From IIS Manager, right click on the virtual directory being used for the Action Processor and select Convert to Application from the drop-down menu:
2. From the Add Application dialog, leave all default values and click OK.
The icon for the virtual directory changes to indicate it is now an application. For example:
Application Pool Settings in IIS 7.0
When using IIS 7.0 (Windows Server 2008), either the default application pool (DefaultAppPool) or the classic application pool (Classic .NET AppPool) can be used.
TIBCO iProcess Workspace (Browser) Installation Guide

Post-Installation Configuration | 61
Note, however, if you are installing on a 64-bit version of Windows Server 2008, you must set the application pool’s Enable 32-bit Applications option correctly, as follows:
— If you are installing a 32-bit .NET Action Processor on the 64-bit version of Server 2008, you must set Enable 32-bit Applications to "True".
— If you are installing a 64-bit .NET Action Processor on the 64-bit version of Server 2008, you must set Enable 32-bit Applications to "False".
To check/set the Enable 32-bit Applications option:
1. From IIS Manager, click on Application Pools.
2. In the list of application pools, select the application pool that is configured for your web application.
To determine the application pool being used:
a. From IIS Manager, select the virtual directory being used for the Action Processor (TIBCOActProc, for example).
b. Click the Basic Settings link.
The application pool being used is shown in the Application pool field.
3. Click the Advanced Settings link.
4. Set the Enable 32-Bit Applications option to "True" or "False" according to the information above.
Start the Web Site to Start the Action Processor
Starting the web site on which your Action Processor is hosted starts the Action Processor.
To start the web site, in IIS Manager, right click on the web site hosting your Action Processor, then select Start.
If for some reason, the web site had not been previously stopped, stop it now, then restart it.
Configuration if Using Tomcat to Host a Java Action Processor
The following are configuration functions you must perform if you are using Tomcat to host a Java Action Processor:
• Update the Java library path
• Start Tomcat to start the Action Processor
These are described in the following sections.
TIBCO iProcess Workspace (Browser) Installation Guide

62 | Chapter 6 Post-Installation Configuration
Update the Java Library Path
Update the Java library path so that it points to the TIBCO iProcess Server Objects (Java) JAR file.
The following subsections describe how to do this, depending on whether you are installing on Windows or UNIX.
Windows Systems
To update the Java library path in Windows:
1. Start the Tomcat monitoring/configuration program by executing the following:
TomcatDir\bin\tomcat5w.exe [Tomcat 5.x]
or
TomcatDir\bin\tomcat6w.exe [Tomcat 6.0]
You need to perform the steps in this section only if you are using a version of Tomcat other than the one that is embedded in, and installed with, the iProcess Engine. If you are using the embedded Tomcat, the Java library path is updated when you run smserv.bat (Windows) or smstart (UNIX) to start the embedded Tomcat. If you are using a version of Tomcat other than the embedded one, you must explicitly update the Java library path as described in this section.
TIBCO iProcess Workspace (Browser) Installation Guide

Post-Installation Configuration | 63
The following dialog is displayed:
2. Click the Java tab.
3. In the Java Options section, ensure the following line is included in the entries. If it is not already included, add it after the existing entries.
-Djava.library.path=TomcatDir\shared\lib [Tomcat 5.x]
or
-Djava.library.path=TomcatDir\lib [Tomcat 6.0]
where TomcatDir is the directory in which Tomcat is installed.
TIBCO iProcess Workspace (Browser) Installation Guide

64 | Chapter 6 Post-Installation Configuration
The Java Options section should now appear similar to the following:
4. Click OK to save the changes and close the Tomcat monitoring program.
UNIX Systems
To check the Java library path on UNIX systems:
1. Open the following file with an editor:
TomcatDir/bin/catalina.sh
2. Locate “RUNJAVA” in the catalina.sh file and ensure the following line is included:
-Djava.library.path=TomcatDir/shared/lib \ [Tomcat 5.x]
or-Djava.library.path=TomcatDir/lib \ [Tomcat 6.0]
where TomcatDir in the directory in which Tomcat is installed.
For example:
"$_RUNJAVA" $JAVA_OPTS $CATALINA_OPTS \ -Djava.library.path=/tomcat/lib \-Djava.endorsed.dirs="$JAVA_ENDORSED_DIRS" -classpath "$CLASSPATH" \-Dcatalina.base="$CATALINA_BASE" \-Dcatalina.home="$CATALINA_HOME" \-Djava.io.tmpdir="$CATALINA_TMPDIR" \
3. Save and close the catalina.sh file.
Note that if you are installing on 64-bit Solaris or HP-UX, in 64-bit mode, the entries to the catalina.sh file need to be preceded with "-d64" as follows:
-d64 -Djava.library.path=TomcatDir/shared/lib \ [Tomcat 5.x]
or
-d64 -Djava.library.path=TomcatDir/lib \ [Tomcat 6.0]
TIBCO iProcess Workspace (Browser) Installation Guide

Post-Installation Configuration | 65
Start Tomcat to Start the Action Processor
Starting Tomcat causes the Action Processor to start.
The following sections describe how to start Tomcat, depending whether you have installed on Windows or UNIX.
Windows Systems
To start Tomcat on Windows systems:
1. Start the Tomcat monitoring/configuration program by executing the following:
TomcatDir\bin\tomcat5w.exe [Tomcat 5.x]
or
TomcatDir\bin\tomcat6w.exe [Tomcat 6.0]
The following dialog is displayed:
TIBCO iProcess Workspace (Browser) Installation Guide

66 | Chapter 6 Post-Installation Configuration
2. Click on the Start button.
This starts Tomcat and the Action Processor.
3. Click OK to close the Tomcat monitoring program.
UNIX Systems
To start Tomcat on UNIX systems:
1. Run the Tomcat startup script:
TomcatDir/bin/startup.sh
This starts the Java Action Processor.
Tomcat can also be stopped by executing the Tomcat monitoring program as described above, then clicking the Stop button. This also stops the Action Processor.
TIBCO iProcess Workspace (Browser) Installation Guide
| 67
Chapter 7 Accessing the Client
This chapter describes how to access the client application after installing the TIBCO iProcess Workspace (Browser).
Topics
• Accessing the iProcess Client, page 68
TIBCO iProcess Workspace (Browser) Installation Guide

68 | Chapter 7 Accessing the Client
Accessing the iProcess Client
After all installation and configuration tasks are completed, and the Web Application Server hosting the iProcess Client and Action Processor has been started, the iProcess Client can be accessed using Microsoft Internet Explorer pointing to the following location:
http://Host:Port/ClientDir/iProcessClient.html
where:
— Host is the machine name on which the iProcess Client is being hosted.
— Port is the port number used by the Web server to communicate with web applications.
— ClientDir is the directory (or virtual directory alias) in which you installed the iProcess Client files (which defaults to TIBCOiPClnt).
For example:http://Roxie:8090/TIBCOiPClnt/iProcessClient.html
Or alternatively, if you checked the Create iProcess Client Desktop icon check box on the iProcess Client - 1 of 4 dialog, you can use the shortcut icon that the installer places on the desktop to start the iProcess Client (only applicable when installing on Windows):
TIBCO iProcess Workspace (Browser) Installation Guide
| 69
Chapter 8 Removing the iProcess Workspace (Browser)
This section describes how to remove the individual components of the iProcess Workspace (Browser) using the uninstall program. You can remove one or all of the components, depending on your requirements.
Topics
• Removing the TIBCO iProcess Workspace (Browser), page 70
TIBCO iProcess Workspace (Browser) Installation Guide

70 | Chapter 8 Removing the iProcess Workspace (Browser)
Removing the TIBCO iProcess Workspace (Browser)
The uninstall program removes all of the iProcess Client, Action Processor, or component files that were copied to your system by the installation program.
The directories that were created by the installation program (by default, TIBCOiPClnt and TIBCOActProc) can optionally be deleted during the removal process. Therefore, if you delete them, and there are files in those directories you would like to save, they must be copied prior to removing the TIBCO iProcess Workspace (Browser).
Uninstall Procedure (Windows)
To remove a component of TIBCO iProcess Workspace (Browser) or the complete product from your computer, complete the following steps:
1. Log in as an Administrator.
2. From the Control Panel, select Add or Remove Programs.
3. From the Add or Remove Programs dialog, select “TIBCO iProcess Workspace (Browser) <version#>”, then click the Change/Remove button.
The Welcome window is displayed.
4. Click Next.
The Component Selection dialog is displayed:
5. Ensure the check boxes are checked for the components you want to uninstall, then click Next.
TIBCO iProcess Workspace (Browser) Installation Guide

Removing the TIBCO iProcess Workspace (Browser) | 71
You may be prompted to confirm whether or not the iProcess Client and/or Action Processor home directories should be deleted. Respond as necessary.
The Uninstall Preview window is displayed.
6. Review the information about the uninstall, then click Next.
When the uninstall is complete, the Uninstallation Summary dialog is displayed.
7. Click Finish to complete the uninstall.
8. Exit Add or Remove Programs.
Uninstall Procedure (UNIX)
To remove part of the TIBCO iProcess Workspace (Browser) or the complete product from your computer, complete the following steps:
1. Log in as the user who initially installed the TIBCO iProcess Workspace (Browser) (this user needs to uninstall the software because the installation registry files (vpd.properties and vpd.properties.tibco.<systemName>) are maintained in that user's Home directory).
2. Run the following uninstall program:
InstallHomeDir/iprocessclientbrowser/_uninst/Tibuninstall.bin
where InstallHomeDir is the directory in which the installer placed administrative files, such as the uninstaller, documentation, and sample code. This defaults to /opt/tibco, but can be specified as a different directory when the TIBCO iProcess Client is installed. (see page 27).
The Welcome window is displayed.
3. Click Next.
The Component Selection dialog is displayed.
4. Ensure the check boxes are checked for the components you want to uninstall, then click Next.
You may be prompted to confirm whether or not the iProcess Client and/or Action Processor home directories should be deleted. Respond as necessary.
The Uninstall Preview window is displayed.
5. Review the information about the uninstall, then click Next.
When the uninstall is complete, the Uninstallation Summary dialog is displayed.
6. Click Finish to complete the uninstall.
TIBCO iProcess Workspace (Browser) Installation Guide

72 | Chapter 8 Removing the iProcess Workspace (Browser)
TIBCO iProcess Workspace (Browser) Installation Guide