Embed Size (px)
Citation preview

Page 1 of 19
TIBCO Enterprise Message Service (EMS) on the AWS Cloud
Quick Start Reference Deployment
January 2018
Richard Flather, TIBCO Messaging Group – TIBCO Software Inc.
Scott Kellish and Shivansh Singh – Amazon Web Services
Contents
Overview ................................................................................................................................. 2
TIBCO EMS on AWS .......................................................................................................... 2
Costs and Licenses .............................................................................................................. 3
Architecture ............................................................................................................................ 3
Prerequisites .......................................................................................................................... 6
Specialized Knowledge ....................................................................................................... 6
Technical Requirements ..................................................................................................... 6
Deployment Options .............................................................................................................. 6
Deployment Steps .................................................................................................................. 7
Step 1. Prepare Your AWS Account .................................................................................... 7
Step 2. Upload the TIBCO EMS Software to Your S3 Bucket ............................................ 7
Step 3. Launch the Quick Start ..........................................................................................8
Step 4. Test the Deployment ............................................................................................ 13
Best Practices for Using TIBCO EMS on AWS .................................................................... 17
Troubleshooting ................................................................................................................... 17
Additional Resources ........................................................................................................... 17
GitHub Repository ............................................................................................................... 18
Document Revisions ............................................................................................................ 18

Amazon Web Services – TIBCO EMS on the AWS Cloud January 2018
Page 2 of 19
This Quick Start deployment guide was created by the Messaging Group at TIBCO Software
in partnership with Amazon Web Services (AWS).
Quick Starts are automated reference deployments that use AWS CloudFormation
templates to deploy key technologies on AWS, following AWS best practices.
Overview
This Quick Start reference deployment guide provides step-by-step instructions for
deploying TIBCO Enterprise Message Service (EMS) on the AWS Cloud, using Amazon
Elastic File System (Amazon EFS) for shared storage.
This deployment guide is for infrastructure architects and TIBCO administrators who want
to quickly deploy a TIBCO EMS system in a fault-tolerant configuration across AWS
Availability Zones.
TIBCO EMS on AWS You can use a message service to help integrate the applications within an enterprise. For
example, you may have several applications: one for customer relations, one for product
inventory, and another for raw material tracking. Each application is crucial to the
operation of the enterprise, but even more crucial is the communication between the
applications to ensure the smooth flow of business processes. Message-oriented
middleware (MoM) creates a common communication protocol between these applications
and enables you to easily integrate new and existing applications into your enterprise
computing environment.
Java Message Service (JMS) is a Java framework specification that provides a uniform
messaging interface for enterprise applications. The JMS framework is an interface
specification (not an implementation) that provides a basis for MoM development. TIBCO
EMS implements JMS and connects other messaging services, such as TIBCO Rendezvous
and TIBCO FTL, directly. EMS also integrates with other application types and services by
using TIBCO BusinessWorks.
AWS extends the capabilities of TIBCO EMS by supporting MoM across AWS and enabling
applications running on different Amazon Elastic Compute Cloud (Amazon EC2) instances
to communicate easily. With Amazon EFS, AWS also removes the need to have dedicated
hardware or expensive disk arrays (SAN or NAS) for shared storage, while providing a
complete fault-tolerant environment for all messages.

Amazon Web Services – TIBCO EMS on the AWS Cloud January 2018
Page 3 of 19
Costs and Licenses You are responsible for the cost of the AWS services used while running this Quick Start
reference deployment. There is no additional cost for using the Quick Start.
The AWS CloudFormation templates for this Quick Start include configuration parameters
that you can customize. Some of these settings, such as instance type, will affect the cost of
deployment. For cost estimates, see the pricing pages for the AWS services you will be
using. Prices are subject to change.
You are responsible for obtaining a TIBCO EMS license and the TIBCO EMS software, as
described in step 2 of the deployment steps. To request a license, contact TIBCO at
https://www.tibco.com/contact-us.
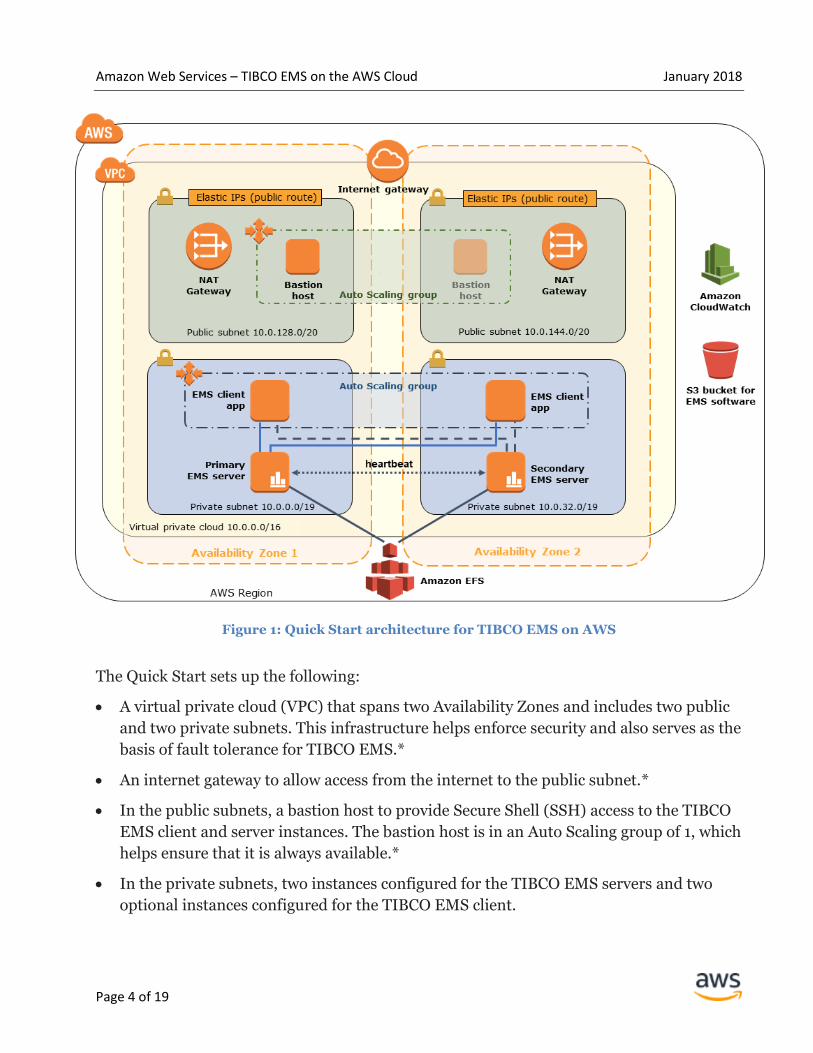
Architecture Deploying this Quick Start for a new virtual private cloud (VPC) with default parameters
builds the following TIBCO EMS environment in the AWS Cloud.
Amazon Web Services – TIBCO EMS on the AWS Cloud January 2018
Page 4 of 19
Figure 1: Quick Start architecture for TIBCO EMS on AWS
The Quick Start sets up the following:
A virtual private cloud (VPC) that spans two Availability Zones and includes two public
and two private subnets. This infrastructure helps enforce security and also serves as the
basis of fault tolerance for TIBCO EMS.*
An internet gateway to allow access from the internet to the public subnet.*
In the public subnets, a bastion host to provide Secure Shell (SSH) access to the TIBCO
EMS client and server instances. The bastion host is in an Auto Scaling group of 1, which
helps ensure that it is always available.*
In the private subnets, two instances configured for the TIBCO EMS servers and two
optional instances configured for the TIBCO EMS client.
Amazon Web Services – TIBCO EMS on the AWS Cloud January 2018
Page 5 of 19
– The Quick Start uses the Amazon EC2 automatic recovery feature to help ensure that
the TIBCO EMS server instances are highly available. This feature automatically
recovers instances when a system impairment is detected, by moving the instances to
new hardware and reattaching the original Amazon Elastic Block Store (Amazon
EBS) and Amazon EFS volumes. After recovery, network adapters retain the same IP
addresses.
– On the TIBCO EMS server instances, TIBCO EMS is configured as a Linux service.
This is to ensure that TIBCO EMS will be started on the initial launch of the EC2
instance or after the EC2 instance is recovered.
– The optional TIBCO EMS client instances are configured with the TIBCO EMS client
software only. After deployment, you can install additional client software on these
instances.
– The TIBCO client instances are in an Auto Scaling group. Auto Scaling isn’t used for
the TIBCO server instances.
Amazon EFS for shared storage on the two EC2 instances that host the TIBCO EMS
servers. Amazon EFS is mounted using the Linux fstab (file systems table) file, so the
shared file system will be available to TIBCO EMS after the initial launch of the EC2
instances or after any TIBCO EMS server instance is recovered. This ensures that the
TIBCO EMS persisted messages are always available to the active TIBCO EMS instance,
no matter which EC2 instance is running. If a TIBCO EMS server instance should fail,
the failover and recovery of the persisted messages would occur in a matter of seconds
due to the TIBCO EMS fault-tolerant configuration.
The appropriate security group for each EC2 instance based on the function of the
instance. For instance, the EC2 instances hosting the TIBCO EMS servers can access the
Amazon EFS shared storage, but the TIBCO EMS client instances cannot. You can use
Secure Shell (SSH) to access all instances from the bastion host.
* You can choose either a new VPC or an existing VPC for your deployment. If you
use an existing VPC with a security group that provides the appropriate access, the
Quick Start template will skip the components marked by asterisks.

Amazon Web Services – TIBCO EMS on the AWS Cloud January 2018
Page 6 of 19
Prerequisites
Specialized Knowledge
Before you deploy this Quick Start, we recommend that you become familiar with the
following AWS services. (If you are new to AWS, see the Getting Started Resource Center.)
Amazon CloudWatch
Amazon EBS
Amazon EFS
Amazon EC2
Amazon S3
Amazon VPC
Auto Scaling
AWS Trusted Advisor
Identity and Access Management
Technical Requirements
This Quick Start supports TIBCO EMS version 8.4 or greater and Amazon Linux (kernel
4.9.51) or greater. Other Linux kernels are supported, but note that there is a Network File
System (NFS) client defect in Linux distributions with kernels 4.9.0- 4.9.49. The NFS defect
was corrected in Linux kernels 4.9.50 and above.
You need to obtain a TIBCO EMS license and the TIBCO EMS software, as discussed in step
2 of the deployment section. To request a license, contact TIBCO at
https://www.tibco.com/contact-us.
Deployment Options This Quick Start provides two deployment options:
Deploy TIBCO EMS into a new VPC (end-to-end deployment). Use this option to
build a new AWS environment consisting of the VPC, subnets, NAT gateways, security
groups, bastion hosts, and other infrastructure components. The Quick Start then
deploys TIBCO EMS into the new VPC.
Deploy TIBCO EMS into an existing VPC. Use this option to provision TIBCO EMS
in your existing AWS infrastructure.
The Quick Start provides separate templates for these options. It also lets you configure
CIDR blocks, instance types, and TIBCO EMS settings, as discussed later in this guide.
Amazon Web Services – TIBCO EMS on the AWS Cloud January 2018
Page 7 of 19
Deployment Steps
Step 1. Prepare Your AWS Account
1. If you don’t already have an AWS account, create one at https://aws.amazon.com by
following the on-screen instructions.
2. Use the region selector in the navigation bar to choose the AWS Region where you want
to deploy TIBCO EMS on AWS.
Important This Quick Start includes Amazon EFS, which isn’t supported in all
AWS Regions. See AWS Regions and Endpoints for a list of supported regions.
3. Create a key pair in your preferred region.
4. If necessary, request a service limit increase for the Amazon EC2 t2.medium instance
type. Do this only if you already have an existing deployment that uses this instance
type, and if you think you might exceed the default limit with this reference deployment.
Step 2. Upload the TIBCO EMS Software to Your S3 Bucket
1. Sign in to the AWS Management Console, and open the Amazon S3 console at https://console.aws.amazon.com/s3/.
2. Create a new S3 bucket in the region where you will be launching the Quick Start.
3. Make sure that the appropriate permissions are set for your S3 bucket.
4. Upload the TIBCO EMS installation software to your S3 bucket.
– If you are currently a TIBCO customer, download the software from
https://edelivery.tibco.com.
– If you would like to request a license, contact TIBCO at
https://www.tibco.com/contact-us. Evaluation versions are available at
https://tap.tibco.com.
You will be prompted for the installer package name and the S3 bucket name when you
deploy the Quick Start.
Amazon Web Services – TIBCO EMS on the AWS Cloud January 2018
Page 8 of 19
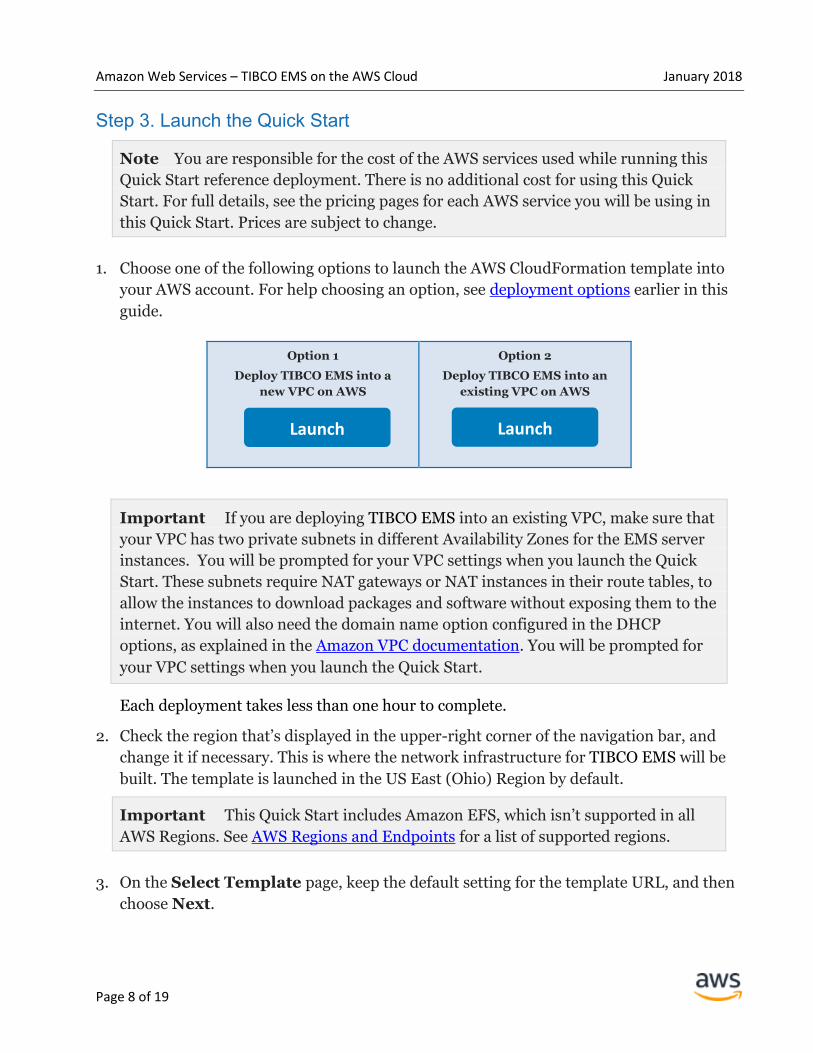
Step 3. Launch the Quick Start
Note You are responsible for the cost of the AWS services used while running this
Quick Start reference deployment. There is no additional cost for using this Quick
Start. For full details, see the pricing pages for each AWS service you will be using in
this Quick Start. Prices are subject to change.
1. Choose one of the following options to launch the AWS CloudFormation template into
your AWS account. For help choosing an option, see deployment options earlier in this
guide.
Option 1
Deploy TIBCO EMS into a
new VPC on AWS
Option 2
Deploy TIBCO EMS into an
existing VPC on AWS
Important If you are deploying TIBCO EMS into an existing VPC, make sure that
your VPC has two private subnets in different Availability Zones for the EMS server
instances. You will be prompted for your VPC settings when you launch the Quick
Start. These subnets require NAT gateways or NAT instances in their route tables, to
allow the instances to download packages and software without exposing them to the
internet. You will also need the domain name option configured in the DHCP
options, as explained in the Amazon VPC documentation. You will be prompted for
your VPC settings when you launch the Quick Start.
Each deployment takes less than one hour to complete.
2. Check the region that’s displayed in the upper-right corner of the navigation bar, and
change it if necessary. This is where the network infrastructure for TIBCO EMS will be
built. The template is launched in the US East (Ohio) Region by default.
Important This Quick Start includes Amazon EFS, which isn’t supported in all
AWS Regions. See AWS Regions and Endpoints for a list of supported regions.
3. On the Select Template page, keep the default setting for the template URL, and then
choose Next.
Launch Launch
Amazon Web Services – TIBCO EMS on the AWS Cloud January 2018
Page 9 of 19
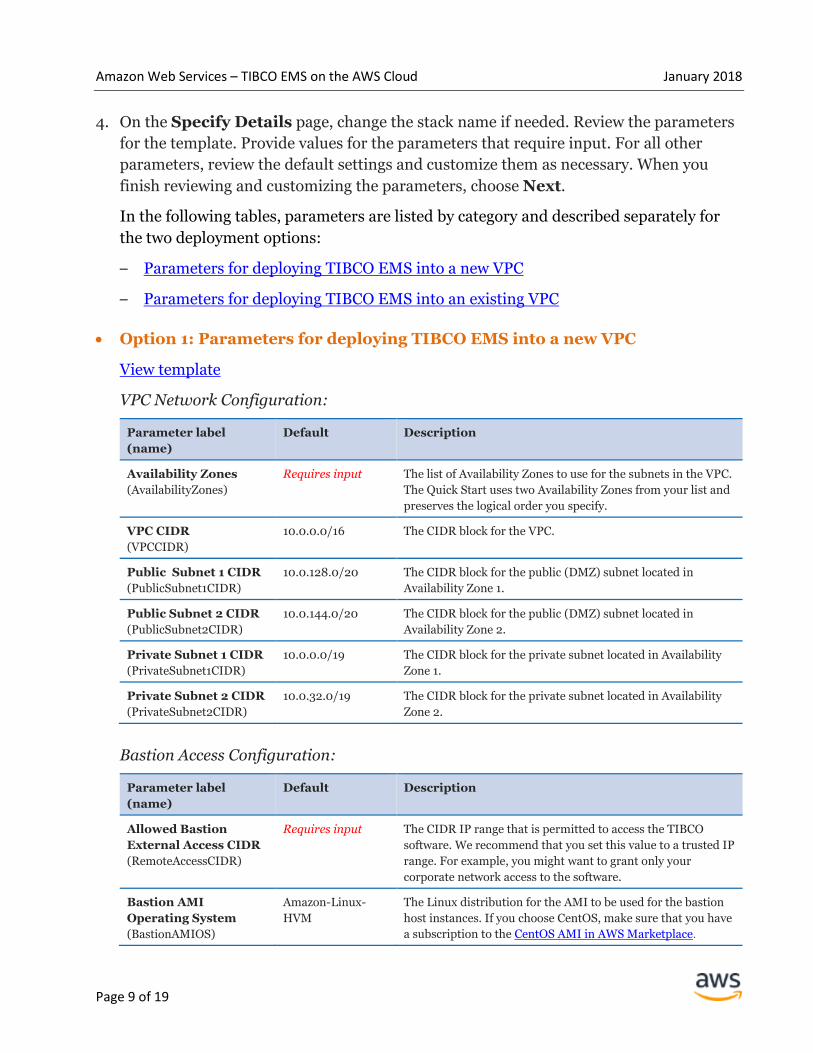
4. On the Specify Details page, change the stack name if needed. Review the parameters
for the template. Provide values for the parameters that require input. For all other
parameters, review the default settings and customize them as necessary. When you
finish reviewing and customizing the parameters, choose Next.
In the following tables, parameters are listed by category and described separately for
the two deployment options:
– Parameters for deploying TIBCO EMS into a new VPC
– Parameters for deploying TIBCO EMS into an existing VPC
Option 1: Parameters for deploying TIBCO EMS into a new VPC
View template
VPC Network Configuration:
Parameter label
(name)
Default Description
Availability Zones
(AvailabilityZones)
Requires input The list of Availability Zones to use for the subnets in the VPC.
The Quick Start uses two Availability Zones from your list and
preserves the logical order you specify.
VPC CIDR
(VPCCIDR)
10.0.0.0/16 The CIDR block for the VPC.
Public Subnet 1 CIDR
(PublicSubnet1CIDR)
10.0.128.0/20 The CIDR block for the public (DMZ) subnet located in
Availability Zone 1.
Public Subnet 2 CIDR
(PublicSubnet2CIDR)
10.0.144.0/20 The CIDR block for the public (DMZ) subnet located in
Availability Zone 2.
Private Subnet 1 CIDR
(PrivateSubnet1CIDR)
10.0.0.0/19 The CIDR block for the private subnet located in Availability
Zone 1.
Private Subnet 2 CIDR
(PrivateSubnet2CIDR)
10.0.32.0/19 The CIDR block for the private subnet located in Availability
Zone 2.
Bastion Access Configuration:
Parameter label
(name)
Default Description
Allowed Bastion
External Access CIDR
(RemoteAccessCIDR)
Requires input The CIDR IP range that is permitted to access the TIBCO
software. We recommend that you set this value to a trusted IP
range. For example, you might want to grant only your
corporate network access to the software.
Bastion AMI
Operating System
(BastionAMIOS)
Amazon-Linux-
HVM
The Linux distribution for the AMI to be used for the bastion
host instances. If you choose CentOS, make sure that you have
a subscription to the CentOS AMI in AWS Marketplace.
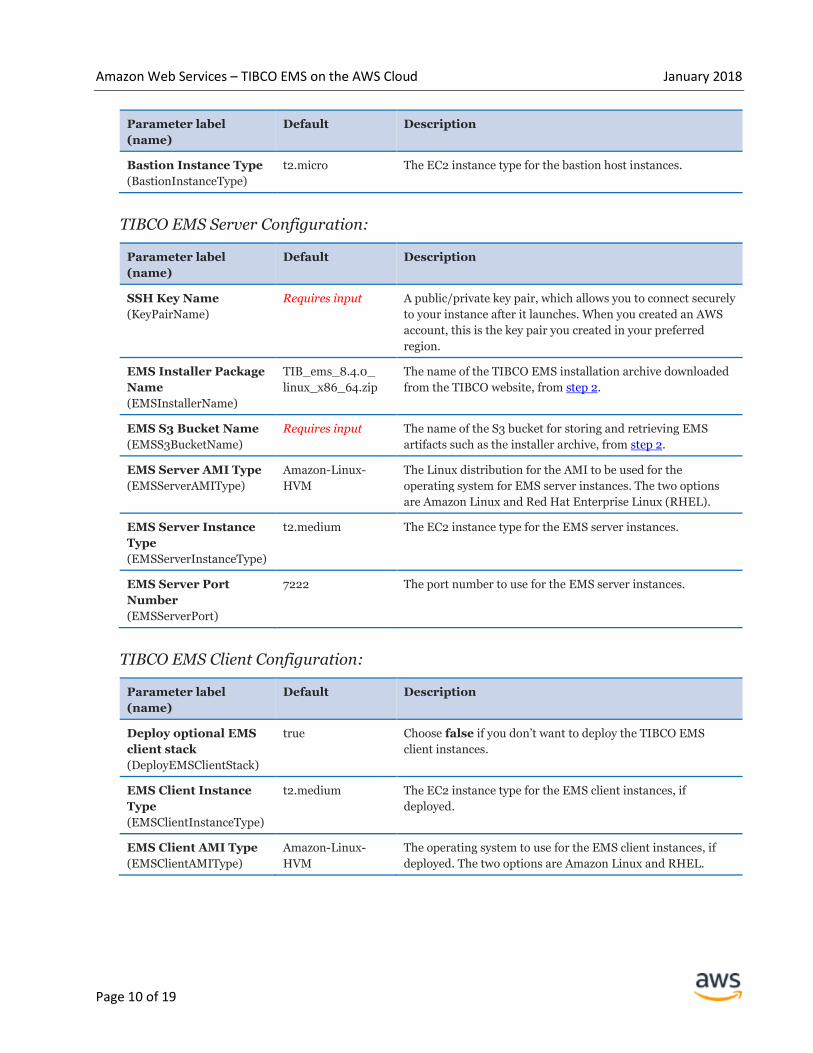
Amazon Web Services – TIBCO EMS on the AWS Cloud January 2018
Page 10 of 19
Parameter label
(name)
Default Description
Bastion Instance Type
(BastionInstanceType)
t2.micro The EC2 instance type for the bastion host instances.
TIBCO EMS Server Configuration:
Parameter label
(name)
Default Description
SSH Key Name
(KeyPairName)
Requires input A public/private key pair, which allows you to connect securely
to your instance after it launches. When you created an AWS
account, this is the key pair you created in your preferred
region.
EMS Installer Package
Name
(EMSInstallerName)
TIB_ems_8.4.0_
linux_x86_64.zip
The name of the TIBCO EMS installation archive downloaded
from the TIBCO website, from step 2.
EMS S3 Bucket Name
(EMSS3BucketName)
Requires input The name of the S3 bucket for storing and retrieving EMS
artifacts such as the installer archive, from step 2.
EMS Server AMI Type
(EMSServerAMIType)
Amazon-Linux-
HVM
The Linux distribution for the AMI to be used for the
operating system for EMS server instances. The two options
are Amazon Linux and Red Hat Enterprise Linux (RHEL).
EMS Server Instance
Type
(EMSServerInstanceType)
t2.medium The EC2 instance type for the EMS server instances.
EMS Server Port
Number
(EMSServerPort)
7222 The port number to use for the EMS server instances.
TIBCO EMS Client Configuration:
Parameter label
(name)
Default Description
Deploy optional EMS
client stack
(DeployEMSClientStack)
true Choose false if you don’t want to deploy the TIBCO EMS
client instances.
EMS Client Instance
Type
(EMSClientInstanceType)
t2.medium The EC2 instance type for the EMS client instances, if
deployed.
EMS Client AMI Type
(EMSClientAMIType)
Amazon-Linux-
HVM
The operating system to use for the EMS client instances, if
deployed. The two options are Amazon Linux and RHEL.

Amazon Web Services – TIBCO EMS on the AWS Cloud January 2018
Page 11 of 19
AWS Quick Start Configuration:
Parameter label
(name)
Default Description
Quick Start S3 Bucket
Name
(QSS3BucketName)
quickstart-
reference
The S3 bucket you have created for your copy of Quick Start
assets, if you decide to customize or extend the Quick Start for
your own use. The bucket name can include numbers,
lowercase letters, uppercase letters, and hyphens, but should
not start or end with a hyphen.
Quick Start S3 Key
Prefix
(QSS3KeyPrefix)
tibco/ems/latest/ The S3 key name prefix used to simulate a folder for your copy
of Quick Start assets, if you decide to customize or extend the
Quick Start for your own use. This prefix can include numbers,
lowercase letters, uppercase letters, hyphens, and forward
slashes.
Option 2: Parameters for deploying TIBCO EMS into an existing VPC
View template
Network Configuration:
Parameter label
(name)
Default Description
VPC ID
(VPCID)
Requires input The ID of your existing VPC (e.g., vpc-0343606e).
VPC CIDR
(VPCCIDR)
10.0.0.0/16 The CIDR block for your existing VPC.
Public subnet 1 ID in
Availability Zone 1
(PublicSubnet1ID)
Requires input The ID of the public subnet in Availability Zone 1 in your
existing VPC (e.g., subnet-a0246dcd).
Public subnet 2 ID in
Availability Zone 2
(PublicSubnet2ID)
Requires input The ID of the public subnet in Availability Zone 2 in your
existing VPC (e.g., subnet-b58c3d67).
Private subnet 1 ID in
Availability Zone 1
(PrivateSubnet1ID)
Requires input The ID of the private subnet in Availability Zone 1 in your
existing VPC (e.g., subnet-a0246dcd).
Private subnet 2 ID in
Availability Zone 2
(PrivateSubnet2ID)
Requires input The ID of the private subnet in Availability Zone 2 in your
existing VPC (e.g., subnet-b58c3d67).
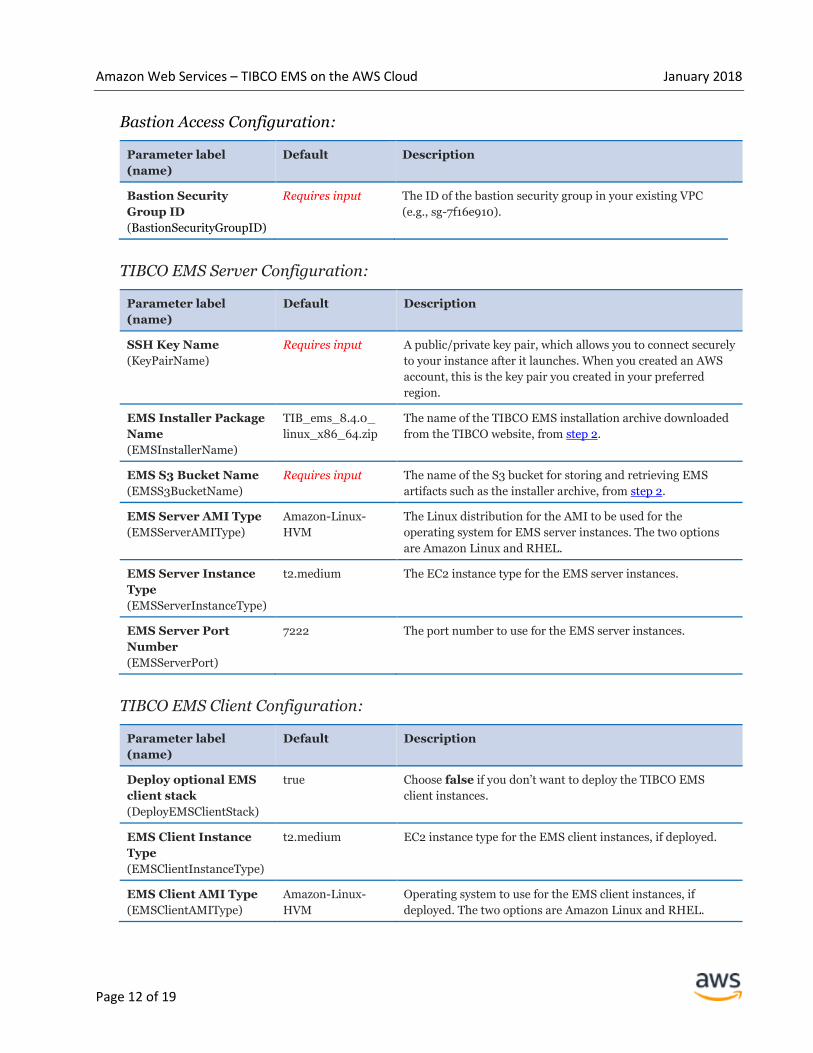
Amazon Web Services – TIBCO EMS on the AWS Cloud January 2018
Page 12 of 19
Bastion Access Configuration:
Parameter label
(name)
Default Description
Bastion Security
Group ID
(BastionSecurityGroupID)
Requires input The ID of the bastion security group in your existing VPC
(e.g., sg-7f16e910).
TIBCO EMS Server Configuration:
Parameter label
(name)
Default Description
SSH Key Name
(KeyPairName)
Requires input A public/private key pair, which allows you to connect securely
to your instance after it launches. When you created an AWS
account, this is the key pair you created in your preferred
region.
EMS Installer Package
Name
(EMSInstallerName)
TIB_ems_8.4.0_
linux_x86_64.zip
The name of the TIBCO EMS installation archive downloaded
from the TIBCO website, from step 2.
EMS S3 Bucket Name
(EMSS3BucketName)
Requires input The name of the S3 bucket for storing and retrieving EMS
artifacts such as the installer archive, from step 2.
EMS Server AMI Type
(EMSServerAMIType)
Amazon-Linux-
HVM
The Linux distribution for the AMI to be used for the
operating system for EMS server instances. The two options
are Amazon Linux and RHEL.
EMS Server Instance
Type
(EMSServerInstanceType)
t2.medium The EC2 instance type for the EMS server instances.
EMS Server Port
Number
(EMSServerPort)
7222 The port number to use for the EMS server instances.
TIBCO EMS Client Configuration:
Parameter label
(name)
Default Description
Deploy optional EMS
client stack
(DeployEMSClientStack)
true Choose false if you don’t want to deploy the TIBCO EMS
client instances.
EMS Client Instance
Type
(EMSClientInstanceType)
t2.medium EC2 instance type for the EMS client instances, if deployed.
EMS Client AMI Type
(EMSClientAMIType)
Amazon-Linux-
HVM
Operating system to use for the EMS client instances, if
deployed. The two options are Amazon Linux and RHEL.

Amazon Web Services – TIBCO EMS on the AWS Cloud January 2018
Page 13 of 19
AWS Quick Start Configuration:
Parameter label
(name)
Default Description
Quick Start S3 Bucket
Name
(QSS3BucketName)
quickstart-
reference
The S3 bucket you have created for your copy of Quick Start
assets, if you decide to customize or extend the Quick Start for
your own use. The bucket name can include numbers,
lowercase letters, uppercase letters, and hyphens, but should
not start or end with a hyphen.
Quick Start S3 Key
Prefix
(QSS3KeyPrefix)
tibco/ems/latest/ The S3 key name prefix used to simulate a folder for your copy
of Quick Start assets, if you decide to customize or extend the
Quick Start for your own use. This prefix can include numbers,
lowercase letters, uppercase letters, hyphens, and forward
slashes.
5. On the Options page, you can specify tags (key-value pairs) for resources in your stack
and set advanced options. When you’re done, choose Next.
6. On the Review page, review and confirm the template settings. Under Capabilities,
select the check box to acknowledge that the template will create IAM resources.
7. Choose Create to deploy the stack.
8. Monitor the status of the stack. When the status is CREATE_COMPLETE, the TIBCO
EMS environment is ready.
9. Use the URLs displayed in the Outputs tab for the stack to view the resources that were
created. For example, in the next step, you will use the EMSServer1CP and
EMSServer2CP keys to connect to the TIBCO EMS servers.
The Quick Start creates three or five EC2 instances: one instance for the bastion host, two
instances for the TIBCO EMS servers, and two optional instances for the TIBCO EMS client,
if the DeployEMSClientStack parameter is set to true. All EC2 instances are named
according to their use.
Step 4. Test the Deployment
When the AWS CloudFormation template successfully creates the stack, the EC2 instances
will be running in your AWS account, and the TIBCO EMS software will be installed from
the S3 bucket you specified during launch. Additionally, the TIBCO EMS servers will be
running in a fault-tolerant configuration on the server instances.
To verify that EMS is running and accessible, follow these steps:

Amazon Web Services – TIBCO EMS on the AWS Cloud January 2018
Page 14 of 19
1. In the AWS CloudFormation console, choose the Outputs tab, and record the values for
EMSServer1CP and EMSServer2CP, as highlighted in yellow in Figure 2.
Figure 2: IP address and port for EMS server instances
These values have also been set as Linux shell environment variables in the client
instances, as shown in Figure 3.
Figure 3: EMS server IP address and port Linux shell variables
2. Open the Amazon EC2 console at https://console.aws.amazon.com/ec2/, and record the
private IP address for the EMS client instance to be used for testing.
3. In the EC2 console, choose the bastion host, and then choose the Connect tab. Follow
the instructions to connect to the bastion host.

Amazon Web Services – TIBCO EMS on the AWS Cloud January 2018
Page 15 of 19
Note Do not copy your private key to the bastion host. Use the -A option
as a part of your SSH connection. This ensures that you can log in to an EMS client
instance without copying the private key (.pem) files to the bastion host. Here’s an
example of logging in using an SSH client:
ssh -i "your.pem" –A [email protected]
4. Log in to the EMS client instance using SSH and the private IP address for an EMS
client instance.
ssh –A [email protected]
5. Switch to the EMS bin directory at /opt/tibco/ems/version/bin.
6. Use the IP addresses from Figure 2 and the tibemsadmin64 command to log in to
EMS, as shown in Figure 4. Use admin as the login name, and C/R for the password.
This step will verify that TIBCO EMS is running and accessible from a client instance.
Figure 4: Logging in to TIBCO EMS
7. Use the show server command to ensure that you are connected to the active EMS
instance, as shown in Figure 5.

Amazon Web Services – TIBCO EMS on the AWS Cloud January 2018
Page 16 of 19
Figure 5: Verifying connectivity to the active server
8. Create a new queue called sync using $sys.failsafe as the EMS data store, as shown
in Figure 6. Creating the queue verifies that TIBCO EMS can create a new queue on
Amazon EFS shared storage, and is ready for use.
Figure 6: Queue creation in TIBCO EMS
9. This concludes the test. Log out from EMS, the EMS client instance, and the bastion
host.
Amazon Web Services – TIBCO EMS on the AWS Cloud January 2018
Page 17 of 19
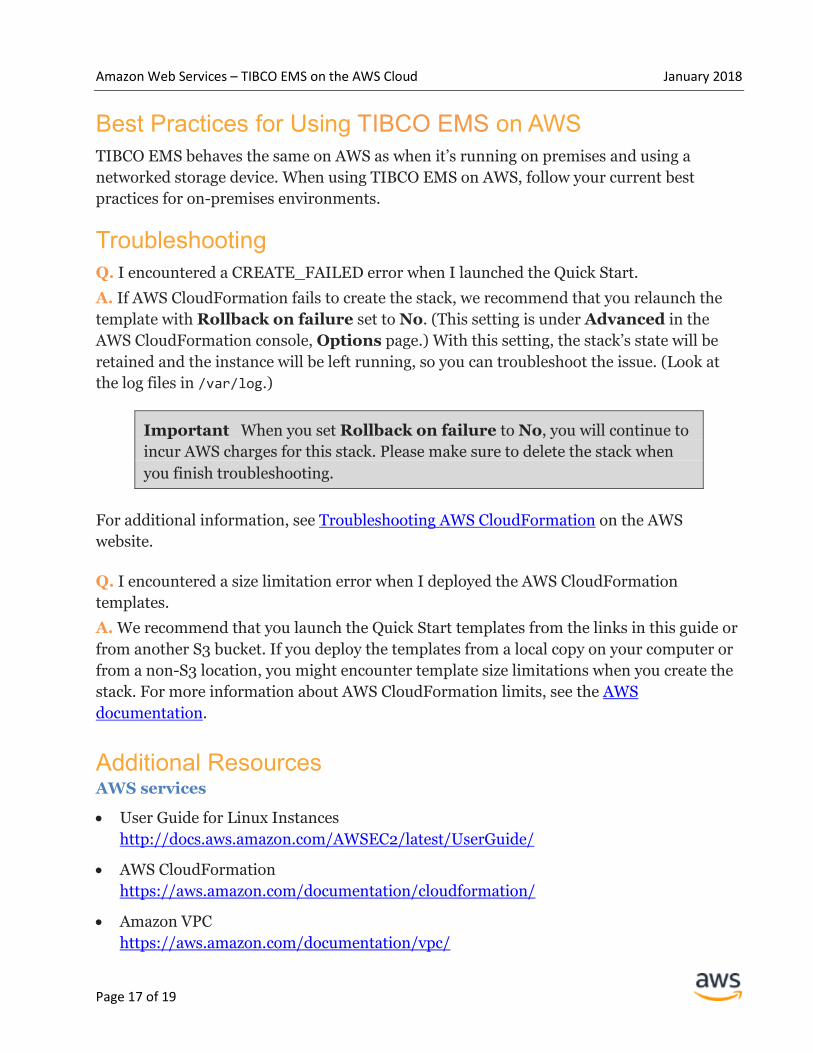
Best Practices for Using TIBCO EMS on AWS
TIBCO EMS behaves the same on AWS as when it’s running on premises and using a
networked storage device. When using TIBCO EMS on AWS, follow your current best
practices for on-premises environments.
Troubleshooting
Q. I encountered a CREATE_FAILED error when I launched the Quick Start.
A. If AWS CloudFormation fails to create the stack, we recommend that you relaunch the
template with Rollback on failure set to No. (This setting is under Advanced in the
AWS CloudFormation console, Options page.) With this setting, the stack’s state will be
retained and the instance will be left running, so you can troubleshoot the issue. (Look at
the log files in /var/log.)
Important When you set Rollback on failure to No, you will continue to
incur AWS charges for this stack. Please make sure to delete the stack when
you finish troubleshooting.
For additional information, see Troubleshooting AWS CloudFormation on the AWS
website.
Q. I encountered a size limitation error when I deployed the AWS CloudFormation
templates.
A. We recommend that you launch the Quick Start templates from the links in this guide or
from another S3 bucket. If you deploy the templates from a local copy on your computer or
from a non-S3 location, you might encounter template size limitations when you create the
stack. For more information about AWS CloudFormation limits, see the AWS
documentation.
Additional Resources AWS services
User Guide for Linux Instances
http://docs.aws.amazon.com/AWSEC2/latest/UserGuide/
AWS CloudFormation
https://aws.amazon.com/documentation/cloudformation/
Amazon VPC
https://aws.amazon.com/documentation/vpc/

Amazon Web Services – TIBCO EMS on the AWS Cloud January 2018
Page 18 of 19
Amazon EFS
http://docs.aws.amazon.com/efs/latest/ug/
TIBCO Enterprise Message Service
TIBCO Software
http://www.tibco.com/
TIBCO Enterprise Message Service
https://docs.tibco.com/products/tibco-enterprise-message-service-8-4-0
Quick Start reference deployments
AWS Quick Start home page
https://aws.amazon.com/quickstart/
GitHub Repository
You can visit our GitHub repository to download the templates and scripts for this Quick
Start, to post your comments, and to share your customizations with others.
Document Revisions
Date Change In sections
January 2018 Initial publication —

Amazon Web Services – TIBCO EMS on the AWS Cloud January 2018
Page 19 of 19
© 2018, Amazon Web Services, Inc. or its affiliates, and TIBCO Software, Inc. All rights
reserved.
TIBCO, Enterprise Message Service, Rendezvous, TIBCO FTL, and TIBCO BusinessWorks are either
registered trademarks or trademarks of TIBCO Software Inc. and/or its subsidiaries in the United States
and/or other countries.
Notices
This document is provided for informational purposes only. It represents AWS’s current product offerings
and practices as of the date of issue of this document, which are subject to change without notice. Customers
are responsible for making their own independent assessment of the information in this document and any
use of AWS’s products or services, each of which is provided “as is” without warranty of any kind, whether
express or implied. This document does not create any warranties, representations, contractual
commitments, conditions or assurances from AWS, its affiliates, suppliers or licensors. The responsibilities
and liabilities of AWS to its customers are controlled by AWS agreements, and this document is not part of,
nor does it modify, any agreement between AWS and its customers.
The software included with this paper is licensed under the Apache License, Version 2.0 (the "License"). You
may not use this file except in compliance with the License. A copy of the License is located at
http://aws.amazon.com/apache2.0/ or in the "license" file accompanying this file. This code is distributed on
an "AS IS" BASIS, WITHOUT WARRANTIES OR CONDITIONS OF ANY KIND, either express or implied.
See the License for the specific language governing permissions and limitations under the License.