Embed Size (px)
Citation preview

THREE OF A THEME GUIDANCE
Quick overview - A ‘theme’ is not the same as a ‘kind’. A ‘kind’ would be for example a banana. So 3 identical
bananas are 3 of a kind. A theme is a topic such as flowers. So 3 images of different flowers like a daisy, a dahlia and
a rose would be a ‘theme’ because they are not all the same.
Here’s an example of neon signs:
This is the easiest interpretation to help explain the Competition. You can always ask if unsure.
How to get your PDI Entry made in Photoshop inc Elements (Picasa on the last page) assuming you have chosen and
edited your three images (suggest the files are each set to the PDI 1400px for Landscape or 1050px for Portrait):
In the main screen of Photoshop at the top of screen click File > New >
Give the document a ‘Title’ as per PDI entry e.g. NEON SIGNS by Keith Tester and change the Resolution to 240
Pixels/Inch then click ‘OK’ and the screen should look like this:

With this screen still open, now open your first image File > Open > choose from your file and click to open. Once
that image is open then click on the original document (NEON SIGNS in this instance) and on the keyboard type ‘V’.
This opens the ‘Move’ tool which looks like this:
Click & Hold on the name part of the image file and drag to your open white page.
You will then need to click in the middle of the picture and drag again across to the page and it should then be on the
white background like this:
Click on the ‘X’ to close this image only.
Now repeat the process until all 3 images are on the page like this:

You will now see all 3 images on the top of the white paper and they are a bit messy!
On the bottom right of the screen you should see some little icons of your photos and the white page in a list. These
are the ‘Layers’. So if you imagine a jazz band of a drummer, guitarist and bass player, each of those is the layer of
musical sound that makes up the band. This time it is in pictures. So depending on your preferred layout we need to
set about changing and arranging the picture layers into something that looks right.
In this instance we will use Layer 1 – the long Pizzeria sign, we need to click on Layer to the resize the image:
If you click on the ‘eye’ on Layers 3 and 2 you will close the Layers for now and we can
work on Layer 1. Hold down the Ctrl key and press T on the keyboard. This allows you to change the size of the
image so you can place it where you want to on the white page. And then click on the
Your image is now in place so click on the eye for Layer 2 and click where it says Layer 2 which will highlight the box
and repeat until all 3 images in your ‘jazz band’ are in place.

So here’s all 3 images in place. This layout is just an example.
So now you need to ensure all this ‘sticks’. At the top of the screen on the tab ‘Layer’ allow the drop down menu
and click on ‘Flatten Image’
Then to the left go to ‘Image’ drop down and click on ‘Image Size’ and resize your image to 1400px (Landscape).
Click OK and then Save As ensuring you use the .jpeg for saving. To submit PDI remember to name as per this
example: Bob Bloggs—Neon Signs

Ta dah!
PICASA
Step1. From the opening page, select the folder and click on the first image wanted, Click on Create > Picture Collage

Step 2. Click on ‘Clips’ and then click on the red ‘X’ to clear the tray.
'
Step 3. Click on ‘Get more..’

Step 4. Click on the next image and then click on ‘Back to Collage’. Repeat from Step 3 for the next image.
You should now have 1 on the page and 2 in the ‘Clips’ tray.
Step 5. Click the green + which will add the next image which has the blue outline. Click on the final image in the ‘Clips’ tray and click the green + again.

Step 6. All images are now on the page but not organised. All images need to be spread out so click on each picture and drag into position.
Step 7. When you are happy click on the ‘Create Collage’ button
Your image should look something like this:
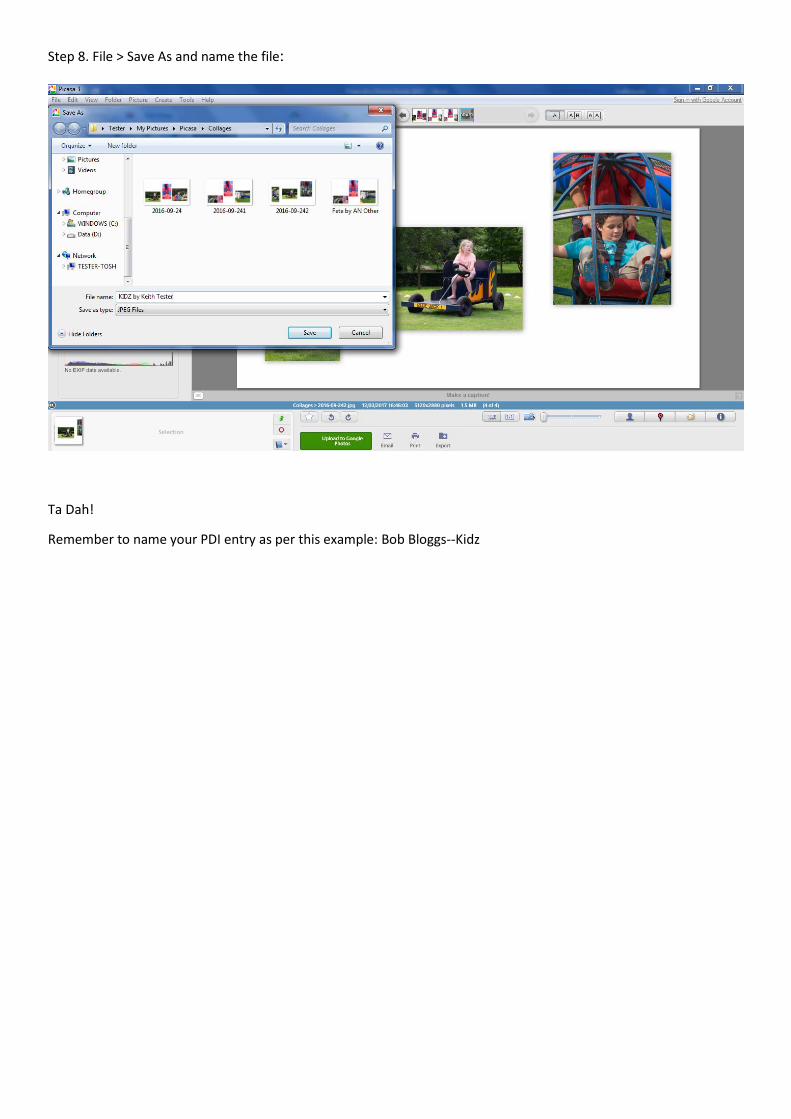
Step 8. File > Save As and name the file:
Ta Dah!
Remember to name your PDI entry as per this example: Bob Bloggs--Kidz