Embed Size (px)
Citation preview
Thoracic Outlet Lab exam and techniques
Since many of the muscles, arteries, and nerves that act on the wrist also act on the elbow, the shoulder and the hand, the osteopath must examine both above and below the dysfunctional region.
• Assess the blood pressure in the neutral position.• Assess the radial and ulnar pulses in the neutral position.• Examine the upper extremities for symmetry, atrophy, scars,
TART.
Neurovascular Assessment

Neuro-Vascular Assessment (continued)
DTR’s:Biceps - C5Brachioradialis - C6Triceps - C7
Motor (muscle strength testing) C5 - T1C5 = bicepsC6 = wrist extensionC7 = tricepsC8 = finger flexionT1 = finger abduction/adduction
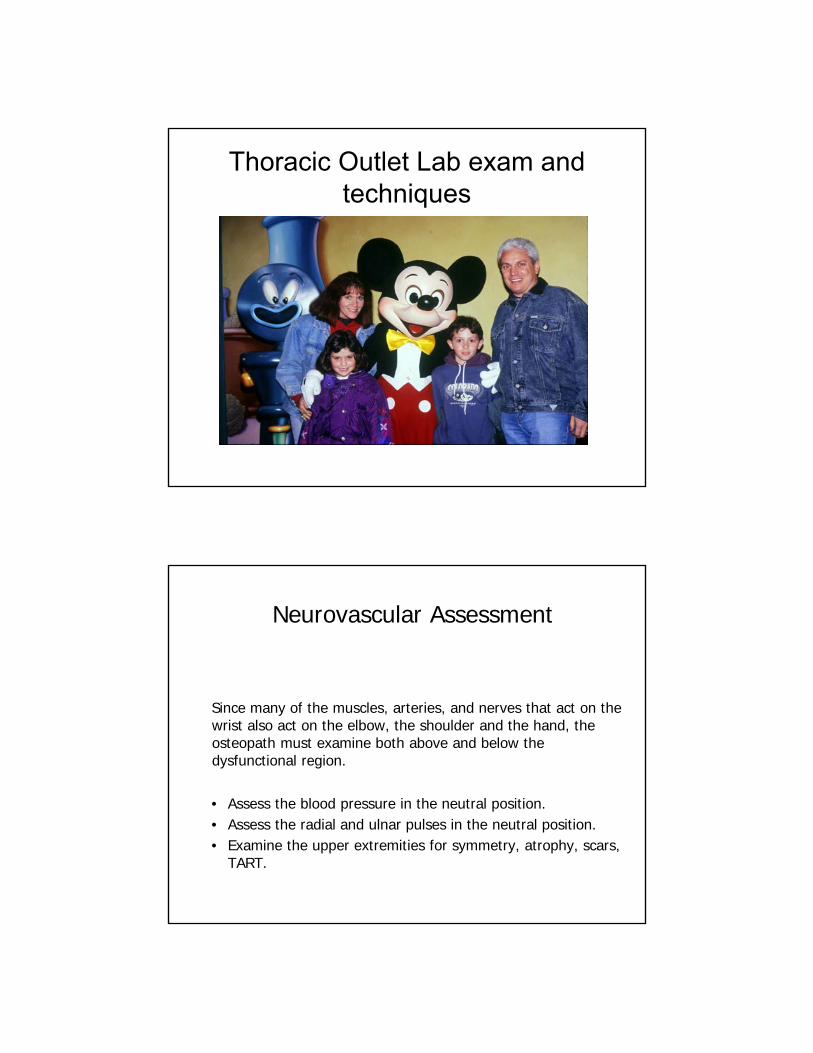
Sensory Exam:C5 = lateral armC6 = volar index fingerC7 = volar middle fingerC8 = volar 5th fingerT1 = volar medial forearm
4
Upper Extremity Myotomes
Motor Exam
5
Volar Upper Extremity Dermatomes
Dorsal Upper Extremity Dermatomes
Sensory Exam
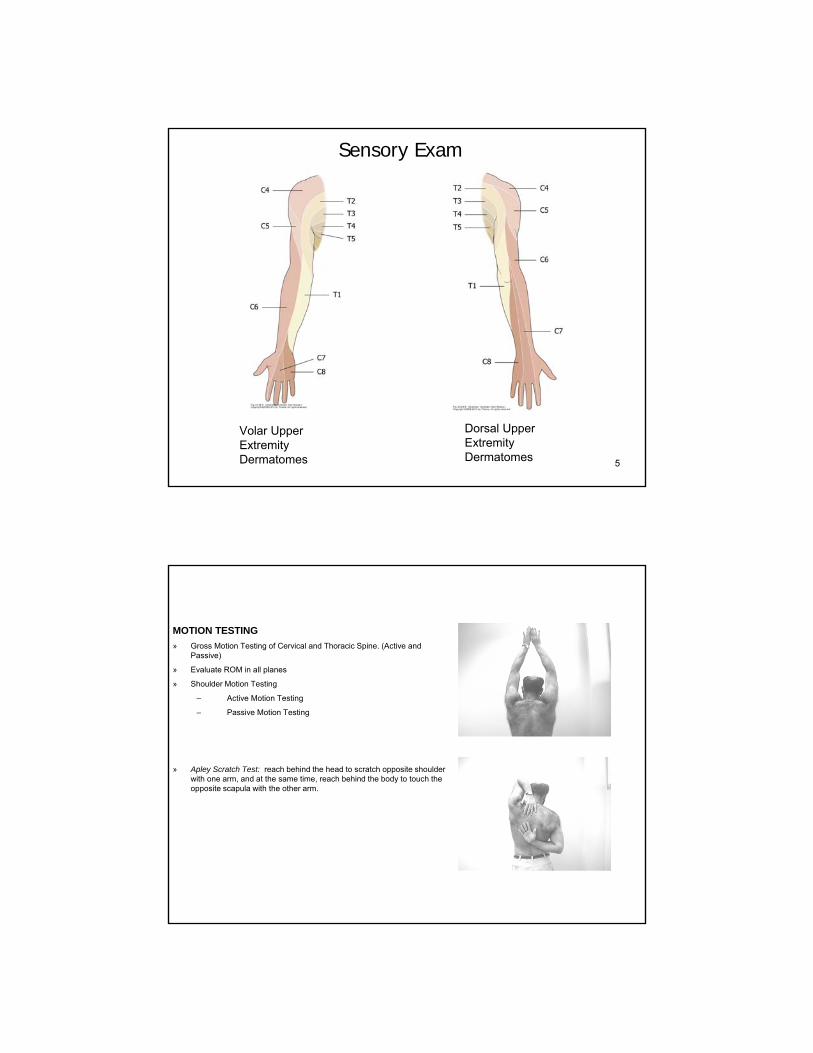
MOTION TESTING
» Gross Motion Testing of Cervical and Thoracic Spine. (Active and Passive)
» Evaluate ROM in all planes
» Shoulder Motion Testing
– Active Motion Testing
– Passive Motion Testing
» Apley Scratch Test: reach behind the head to scratch opposite shoulder with one arm, and at the same time, reach behind the body to touch the opposite scapula with the other arm.
• Adduction: reach across the chest and touch the opposite shoulder
• Normal Ranges of Active Motion
PLANE AXIS RANGE OF MOTIONSagittal Plane Transverse Flexion 180
Extension 45Coronal plane A-P Abduction 180
Adduction 45Horizontal Plane(shoulder at 90flexion)
Vertical Adduction Across Chest 140Adduction Across Back 30
---------Longitudinal Internal Rotation 85
External Rotation 85
Note: Flexion at 180 is the same ending position as Abduction to 180 but obviously requires a different route to getthere
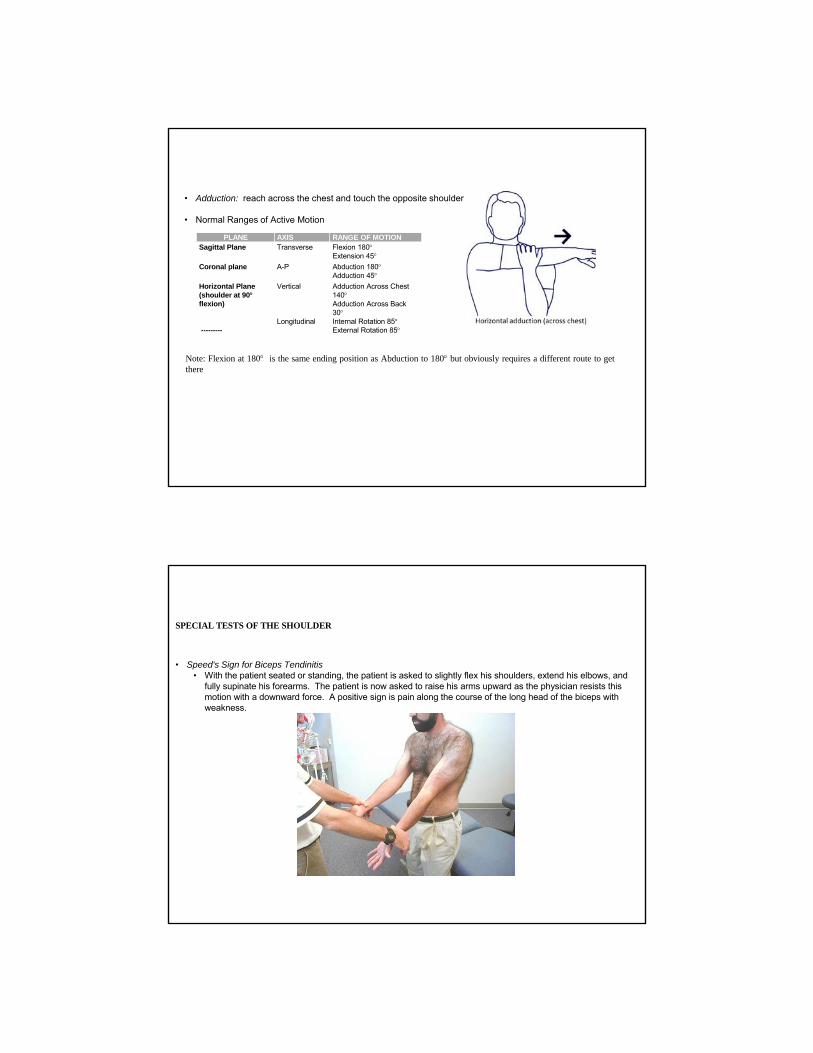
SPECIAL TESTS OF THE SHOULDER
• Speed's Sign for Biceps Tendinitis• With the patient seated or standing, the patient is asked to slightly flex his shoulders, extend his elbows, and
fully supinate his forearms. The patient is now asked to raise his arms upward as the physician resists this motion with a downward force. A positive sign is pain along the course of the long head of the biceps with weakness.
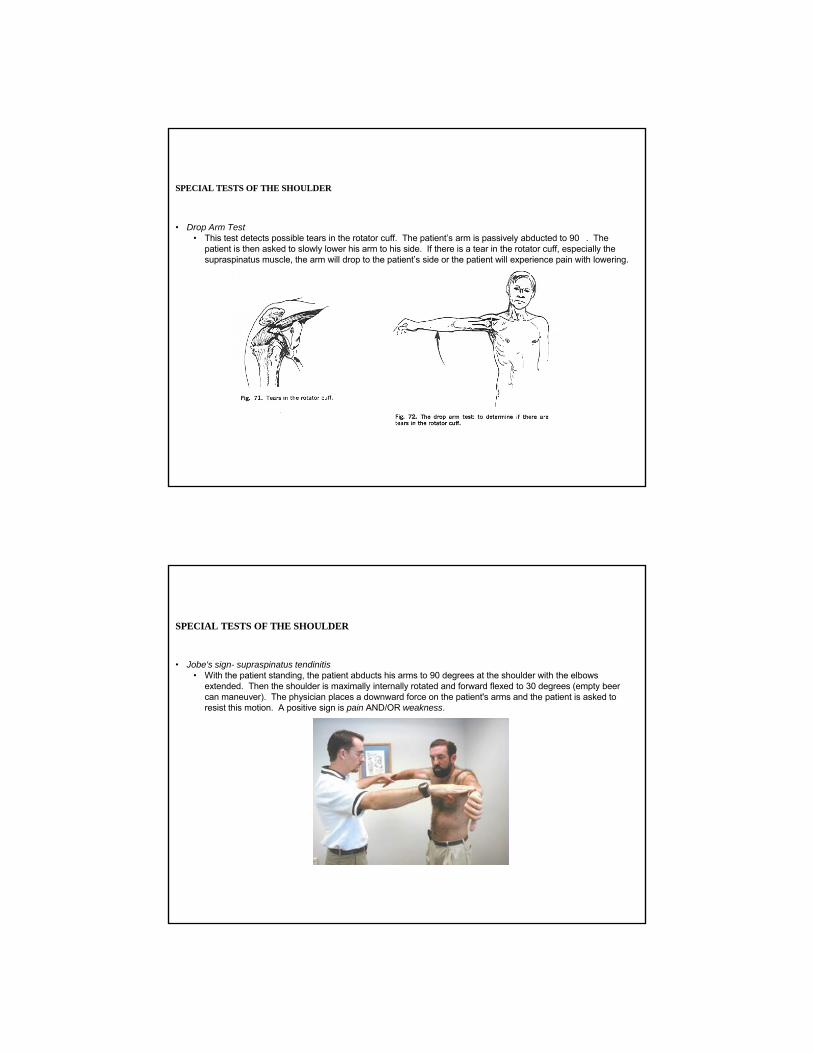
SPECIAL TESTS OF THE SHOULDER
• Drop Arm Test• This test detects possible tears in the rotator cuff. The patient’s arm is passively abducted to 90�. The
patient is then asked to slowly lower his arm to his side. If there is a tear in the rotator cuff, especially the supraspinatus muscle, the arm will drop to the patient’s side or the patient will experience pain with lowering.
SPECIAL TESTS OF THE SHOULDER
• Jobe's sign- supraspinatus tendinitis• With the patient standing, the patient abducts his arms to 90 degrees at the shoulder with the elbows
extended. Then the shoulder is maximally internally rotated and forward flexed to 30 degrees (empty beer can maneuver). The physician places a downward force on the patient's arms and the patient is asked to resist this motion. A positive sign is pain AND/OR weakness.

SPECIAL TESTS OF THE SHOULDER
• Impingement Sign• Impingement does not tell you the cause, but rather is a symptom. Impingement is most often caused by a
subacromial bursitis or supraspinatus tendinitis or tear. There are three ways to test for impingement. First, test for impingement of the head of the humerus into the acromion secondary to soft tissue swelling of the supraspinatus muscle or Subdeltoid bursa. The arm is abducted to 180�. Impingement exists if the shoulder will not abduct beyond 90� with or without pain. Hawkin’s test is performed by flexing and internally rotating the shoulder, while placing downward pressure on the patient’s wrist which will cause pain in a patient with shoulder impingement. Neer’s test is performed by flexing the arm while placed in internal rotation.
Hawkin’s Test
Neer’s Test
Diagnostic Tests for TOS
3) Hyperabduction Test (Wright’s test)• Tests for vascular compromise of the subclavian artery
as a result of compression by the pectoralis minormuscle.
• Baseline: palpate radial pulse with patient in neutral position.
• The arm is externally rotated and hyperabducted. • Monitor radial pulse. • The test is positive if the pulse disappears or
diminishes or if the patient’s symptoms are elicited or increased.
*CORE TECHNIQUE
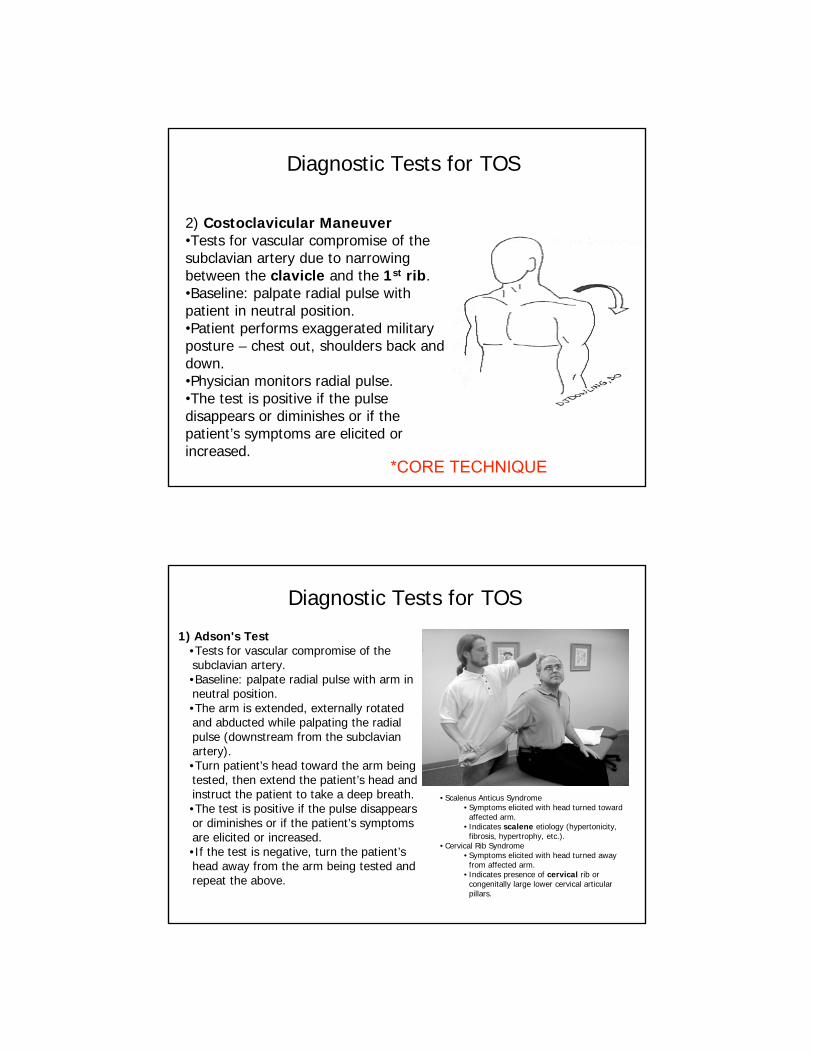
2) Costoclavicular Maneuver•Tests for vascular compromise of the subclavian artery due to narrowing between the clavicle and the 1st rib.•Baseline: palpate radial pulse with patient in neutral position.•Patient performs exaggerated military posture – chest out, shoulders back and down.•Physician monitors radial pulse.•The test is positive if the pulse disappears or diminishes or if the patient’s symptoms are elicited or increased.
Diagnostic Tests for TOS
*CORE TECHNIQUE
1) Adson's Test•Tests for vascular compromise of the subclavian artery.•Baseline: palpate radial pulse with arm in neutral position.•The arm is extended, externally rotated and abducted while palpating the radial pulse (downstream from the subclavian artery). •Turn patient’s head toward the arm being tested, then extend the patient’s head and instruct the patient to take a deep breath. •The test is positive if the pulse disappears or diminishes or if the patient’s symptoms are elicited or increased. •If the test is negative, turn the patient’s head away from the arm being tested and repeat the above.
Diagnostic Tests for TOS
• Scalenus Anticus Syndrome• Symptoms elicited with head turned toward
affected arm.• Indicates scalene etiology (hypertonicity,
fibrosis, hypertrophy, etc.).• Cervical Rib Syndrome
• Symptoms elicited with head turned away from affected arm.
• Indicates presence of cervical rib or congenitally large lower cervical articular pillars.

Cervical Radiculopathy
Axial Compression Test•Tests for nerve root impingement (proximal to formation of brachial plexus) •Patient seated.•Physician applies an axial compressive force to the top of patient’s head.•Pain down the arm indicates nerve root compression (may be due to herniated nucleus pulposis/neuroforaminal stenosis).
Cervical Radiculopathy: not TOS but similar symptoms
Cervical Radiculopathy
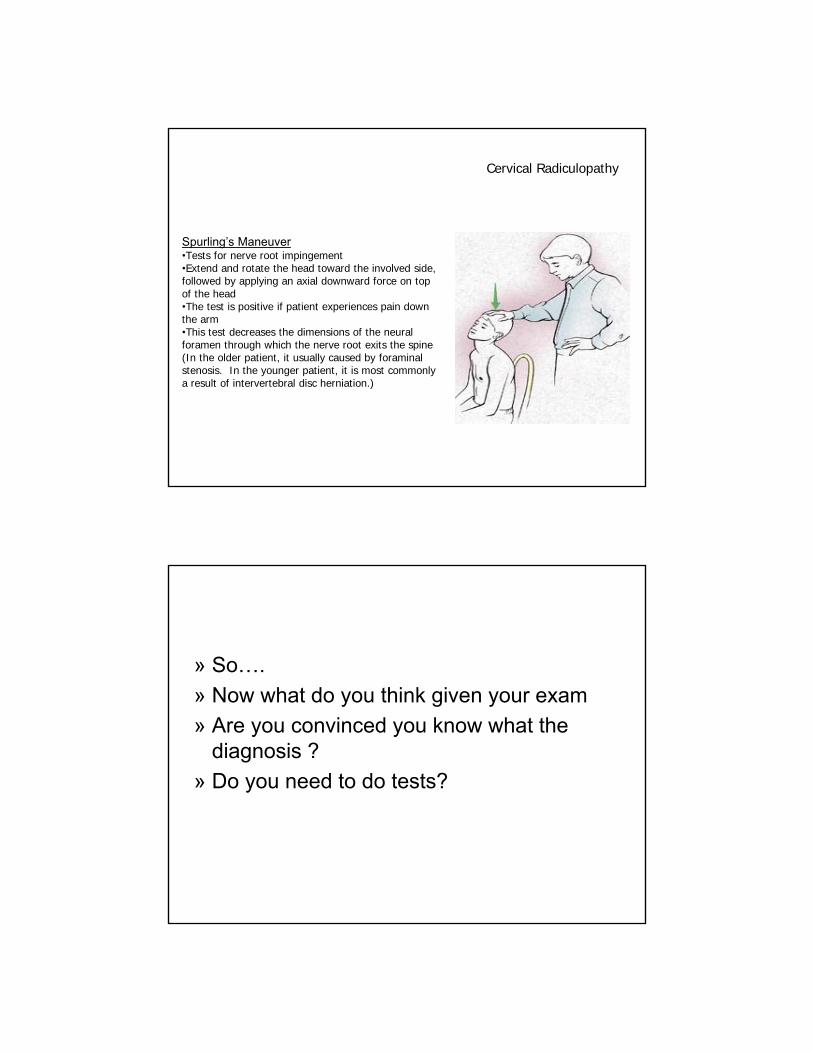
Spurling’s Maneuver•Tests for nerve root impingement•Extend and rotate the head toward the involved side, followed by applying an axial downward force on top of the head•The test is positive if patient experiences pain down the arm•This test decreases the dimensions of the neural foramen through which the nerve root exits the spine (In the older patient, it usually caused by foraminalstenosis. In the younger patient, it is most commonly a result of intervertebral disc herniation.)
» So….
» Now what do you think given your exam
» Are you convinced you know what the diagnosis ?
» Do you need to do tests?
In treating TOS, all of the following could be considered and treated:•Cervical spine dysfunction•Thoracic spine dysfunction•Rib dysfunction•Clavicle dysfunction•Upper extremity dysfunction, incl.: shoulder, elbow, wrist, hand•4 diaphragms: Thoracic Diaphragm (Sibson’s Fascia), Thoraco-Abdominal Diaphragm, Pelvic Diaphragm, Tentorium Cerebelli - all four affect each other
•Carpal Tunnel Syndrome•Ulnar Neuropathy
Osteopathic Considerations
SCAPULOTHORACIC RELEASE TECHNIQUE - Myofascial Release Technique
• The patient lies on his side with the affected side up.
• The patient's hips and knees are flexed (for stability) and a pillow is placed under his head for comfort.
• The physician stands along side the table facing the patient.
• Drape the patient’s arm over your caudad forearm.
• Introduce the fingertips of both hands under the medial border of the scapula.
• Control the scapula with both hands and gently assess its full range of motion (medial/lateral glide, superior/inferior glide, clockwise/counterclockwise rotation). Keep in mind the muscular restrictions that would cause a loss of motion.
• Restrictions in motion can be relieved by:
• Holding against a barrier with traction. (Direct Myofascial Release)
• Holding in a position of ease. (Indirect Myofascial Release) Follow the unwind.
• Range of motion / stretching or vibrating against the barrier. (Articulatory Technique)
• Reassess the S-T motion and treat remaining restrictions

SCAPULOTHORACIC RELEASE TECHNIQUE (Myofascial Release Technique)
This is a very useful technique which can be used in numerous medical problems involving the neck, shoulder, thoracics & ribs because itaffects muscle tension in muscles and fascia attached to scapula.
Educate the patient in exercises that will keep the S-T articulation mobile• Shoulder shrugs - shrug shoulders up (try to touch ears) hold for a count of 5.• Shoulder rolls - roll shoulders forward, upward, backward and downward in a circular fashion.• Scapular squeezes - squeezes shoulders back as far as possible and hold for a count of 5.• Arm swings – pull arms into extension by squeezing shoulders back then allow arms to fall
forward. Repeat in a rhythmic fashion.
Muscles attached to scapula1. supraspinatus2. infraspinatus3. subscapularis4. levator scapulae5. teres major6. teres minor 7. serratus anterior8. rhomboideus major9. rhomboideus minor10. trapezius11. deltoid12. coracobrachialis13. pectoralis minor14. biceps brachii15. triceps brachii (long head)16. omohyoid
COUNTERSTRAIN FOR SHOULDER (Cont.)
• Subscapularis
• Location: On the anterior surface of the scapula in the posterior axillary fold.
• Position: Patient supine. Extension 30 degrees and internal rotation of the shoulder.
• Treat using Counterstrain principles.
• Pectoralis Minor / Anterior Acromioclaviculartus• Location: 3cm inferior and medial to coracoid (or anterior
aspect of AC joint)• Position: Patient supine. Adduct the patient’s arm
obliquely across the body and add caudal traction.• Treat using Counterstrain principles

Counterstrain for Anterior 1st and 2nd Rib Tenderpoints
(Inhaled Rib Dysfunction)
The tender point for the 1st rib is lateral to the sternum, just below the sternoclavicular joint (circle). The tender point for the 2nd ribis in the midclavicular line at the level of the second rib interspace (star).
Rib 1 & 2 Strain Counterstrain
Counterstrain for anterior 1st Rib Tenderpoint
•Patient seated.•Physician standing behind patient.•Patient drapes his arm on the side opposite the dysfunction over the physician’s flexed knee.•The tenderpoint is monitored with the physician’s finger.•The patient’s head is slightly flexed, rotated and side-bent toward the tenderpoint.•Slightly more flexion and sidebending is required for the second rib than for the first.•Hold until a release is felt (approximately 90 seconds).•Slowly return patient to neutral.
Counterstrain for Anterior 2nd Rib Tenderpoint

Thoracic Outlet: Direct Myofacial Release*CORE TECHNIQUE #1* (Necklace Technique – Turning the Wheel)1. Physician seated at the head, and patient is supine. Hands are placed on the shoulders with
fingers on the anterior chest wall, below the clavicle, and thumbs posterior, behind the 1st and 2nd ribs. (Hands may be flipped).
2. Apply a caudal pressure to the patient’s elevated shoulder to its fascial barrier, while applying a cephalad pressure to the opposite shoulder to its barrier. The hands move together like turning a wheel.
3. Ask the patient to take a deep breath (respiratory assist), move further into the barrier, and follow the fascial release (myofascial or ligamentous).
4. Reassess.
Thoracic Inlet: Indirect Myofacial Release1. Physician seated at the side and patient supine. Caudad hand contacts the sternum and the
palm of the cephalad hand cups spinous processes of T1-4.
2. Sense the breath, heart rate, and tissue texture between your hands.
3. Assess all planes of sternal motion, and the fascial layers in the mediastinum, including the anterior/posterior, superior/inferior, medial/lateral, and clockwise/counterclockwise rotation. Select one plane of motion, and augment the tissue motion preference with both hands away from the restrictive barrier. Hold the tissue, and wait.
4. Allow the tissue tension to release, and follow the increased fascial motion.
5. Treat the next fascial plane. Do not stack.
6. Reassess for improvement.
26
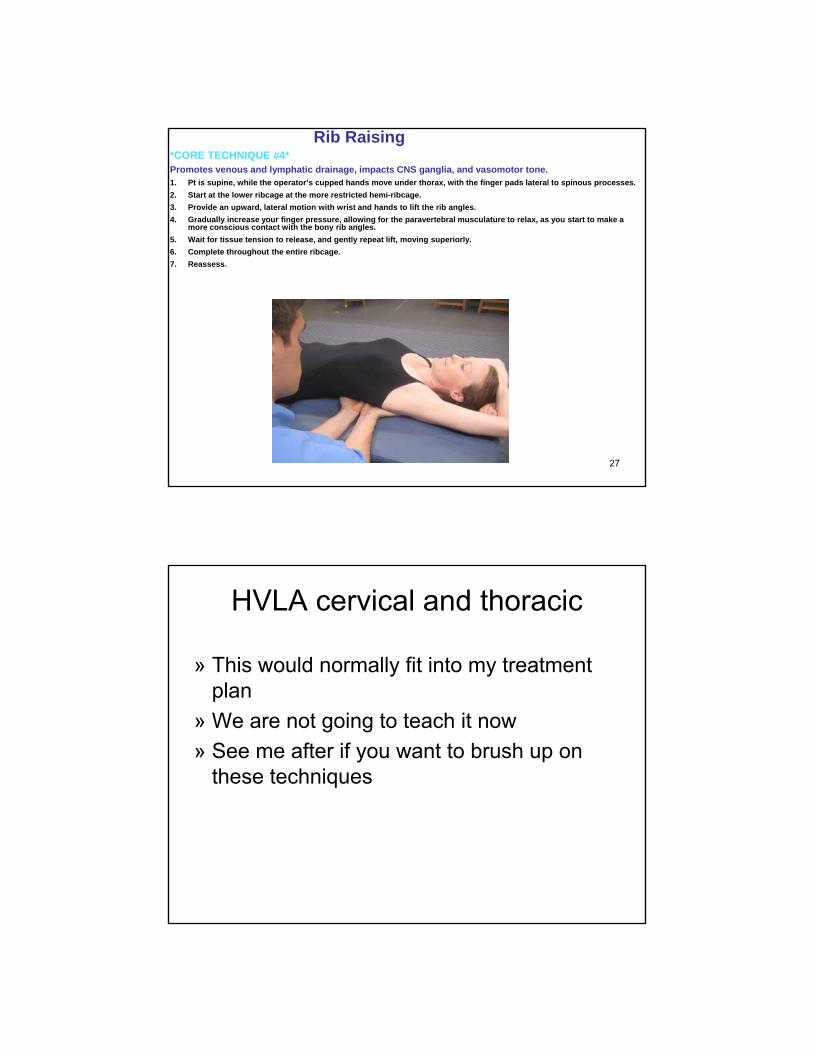
Rib Raising*CORE TECHNIQUE #4*Promotes venous and lymphatic drainage, impacts CNS ganglia, and vasomotor tone.1. Pt is supine, while the operator’s cupped hands move under thorax, with the finger pads lateral to spinous processes.
2. Start at the lower ribcage at the more restricted hemi-ribcage.
3. Provide an upward, lateral motion with wrist and hands to lift the rib angles.
4. Gradually increase your finger pressure, allowing for the paravertebral musculature to relax, as you start to make a more conscious contact with the bony rib angles.
5. Wait for tissue tension to release, and gently repeat lift, moving superiorly.
6. Complete throughout the entire ribcage.
7. Reassess.
27
HVLA cervical and thoracic
» This would normally fit into my treatment plan
» We are not going to teach it now
» See me after if you want to brush up on these techniques
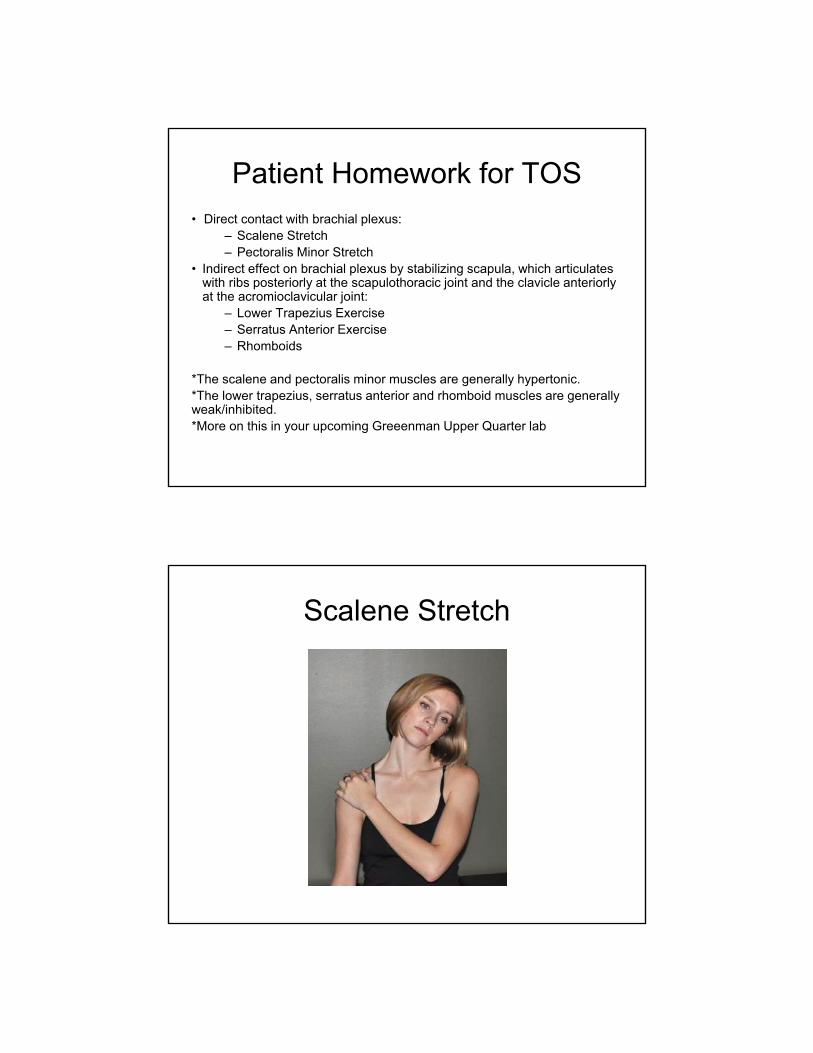
Patient Homework for TOS• Direct contact with brachial plexus:
– Scalene Stretch– Pectoralis Minor Stretch
• Indirect effect on brachial plexus by stabilizing scapula, which articulates with ribs posteriorly at the scapulothoracic joint and the clavicle anteriorly at the acromioclavicular joint:
– Lower Trapezius Exercise– Serratus Anterior Exercise– Rhomboids
*The scalene and pectoralis minor muscles are generally hypertonic.*The lower trapezius, serratus anterior and rhomboid muscles are generally weak/inhibited.*More on this in your upcoming Greeenman Upper Quarter lab
Scalene Stretch

Pectoralis Minor Stretch
Pec Minor & lower fibers of Pec Major
Middle fibers of Pec Major
Upper fibers of Pec Major
Lower Trapezius

Lower Trapezius Exercise
Rhomboids

Rhomboids Exercise
REFERENCES
1. DiGiovanna, Eileen L., D.O., Stanley Schiowitz, D.O. An Osteopathic Approach to Diagnosis and Treatment, 2nd Edition, 1997.
2. Graham, Kenneth E., D.O. Outline of Muscle Energy Techniques, 1985.3. Hoppenfeld, Stanley Physical Examination of the Spine and Extremities pp 25, 31, 93-99.4. Mitchell Jr., Fred L. The Muscle Energy Manual, 1998.5. Moore, Keith L. Clinically Oriented Anatomy, 7th Edition. Figure 6.20.6. Netter, 3rd ed plate 407. Reider, The Orthopaedic Physical Examination pp 145, 3388. Savarese, Robert. OMT Review, pp 61-62, 140, 159.9. Thieme. Atlas of Anatomy, 2nd Edition. Figures 24.28A and 24.28B.10.Ward, Robert C. pp 444-447 & 690-704. Foundations for Osteopathic Medicine, 2nd Ed.
Thanks so much to the AOMA for inviting me and for your attention