Embed Size (px)
Citation preview
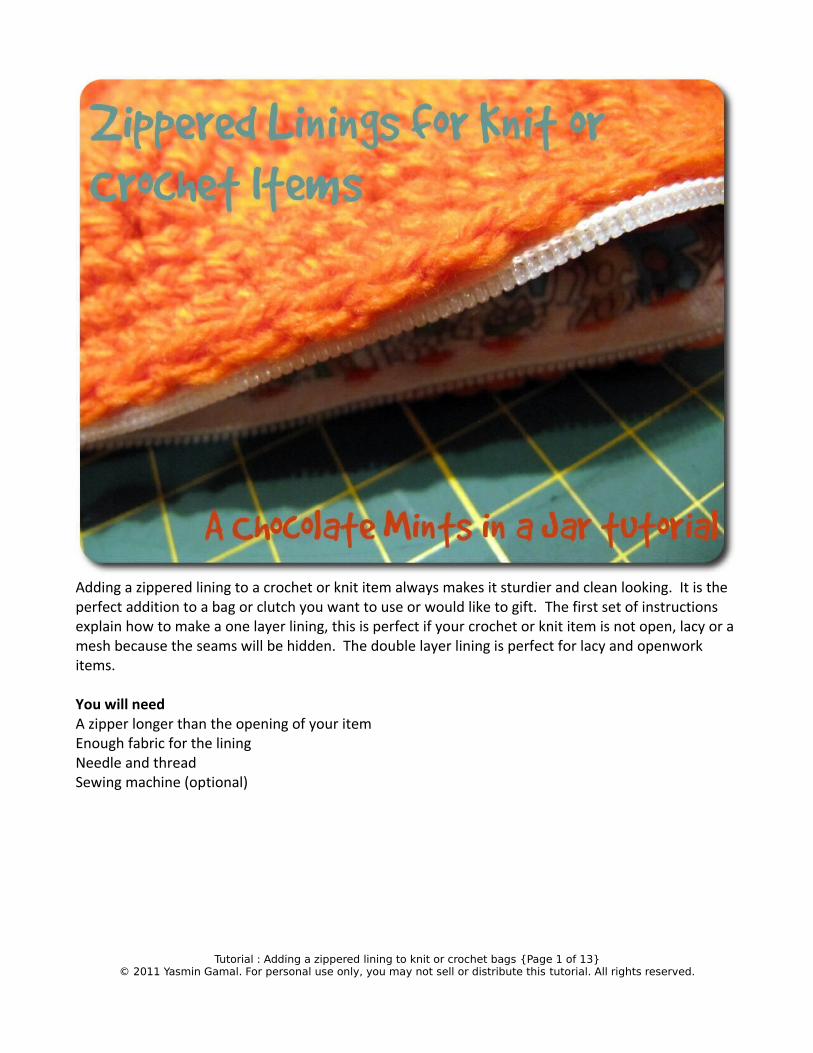
Adding a zippered lining to a crochet or knit item always makes it sturdier and clean looking. It is the perfect addition to a bag or clutch you want to use or would like to gift. The first set of instructions explain how to make a one layer lining, this is perfect if your crochet or knit item is not open, lacy or a mesh because the seams will be hidden. The double layer lining is perfect for lacy and openwork items.
You will needA zipper longer than the opening of your itemEnough fabric for the liningNeedle and threadSewing machine (optional)
Tutorial : Adding a zippered lining to knit or crochet bags {Page 1 of 13}© 2011 Yasmin Gamal. For personal use only, you may not sell or distribute this tutorial. All rights reserved.
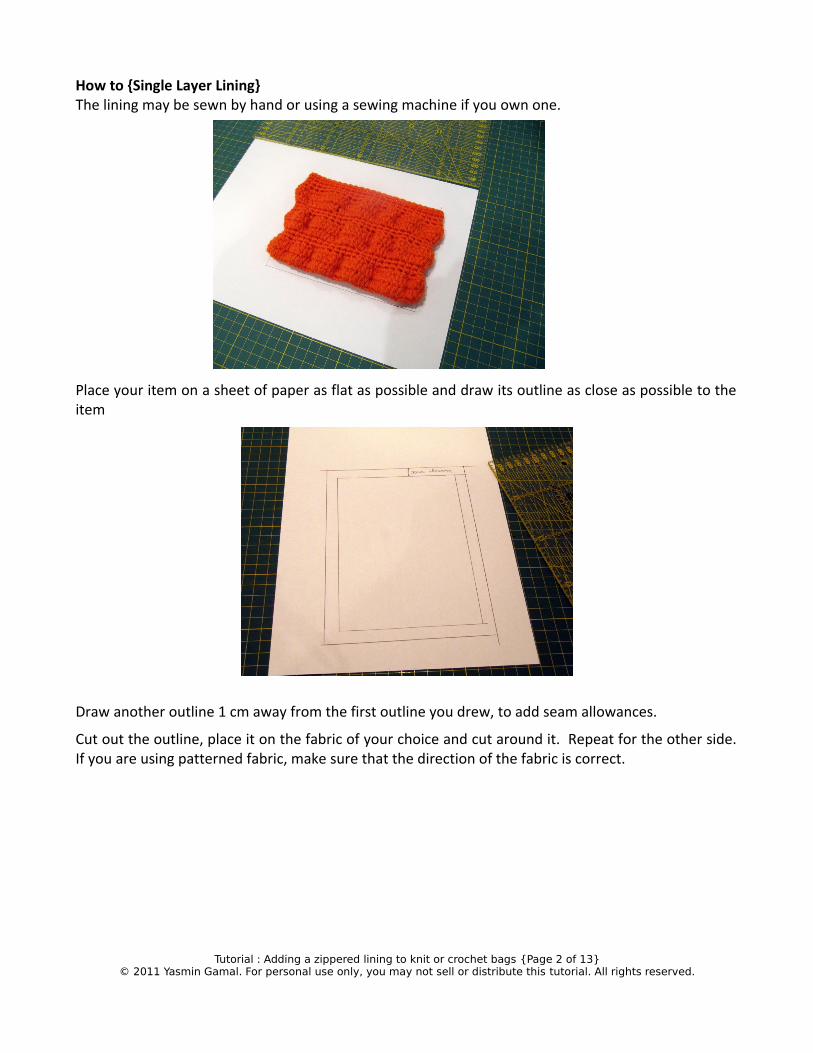
How to {Single Layer Lining}The lining may be sewn by hand or using a sewing machine if you own one.
Place your item on a sheet of paper as flat as possible and draw its outline as close as possible to the item
Draw another outline 1 cm away from the first outline you drew, to add seam allowances.
Cut out the outline, place it on the fabric of your choice and cut around it. Repeat for the other side. If you are using patterned fabric, make sure that the direction of the fabric is correct.
Tutorial : Adding a zippered lining to knit or crochet bags {Page 2 of 13}© 2011 Yasmin Gamal. For personal use only, you may not sell or distribute this tutorial. All rights reserved.
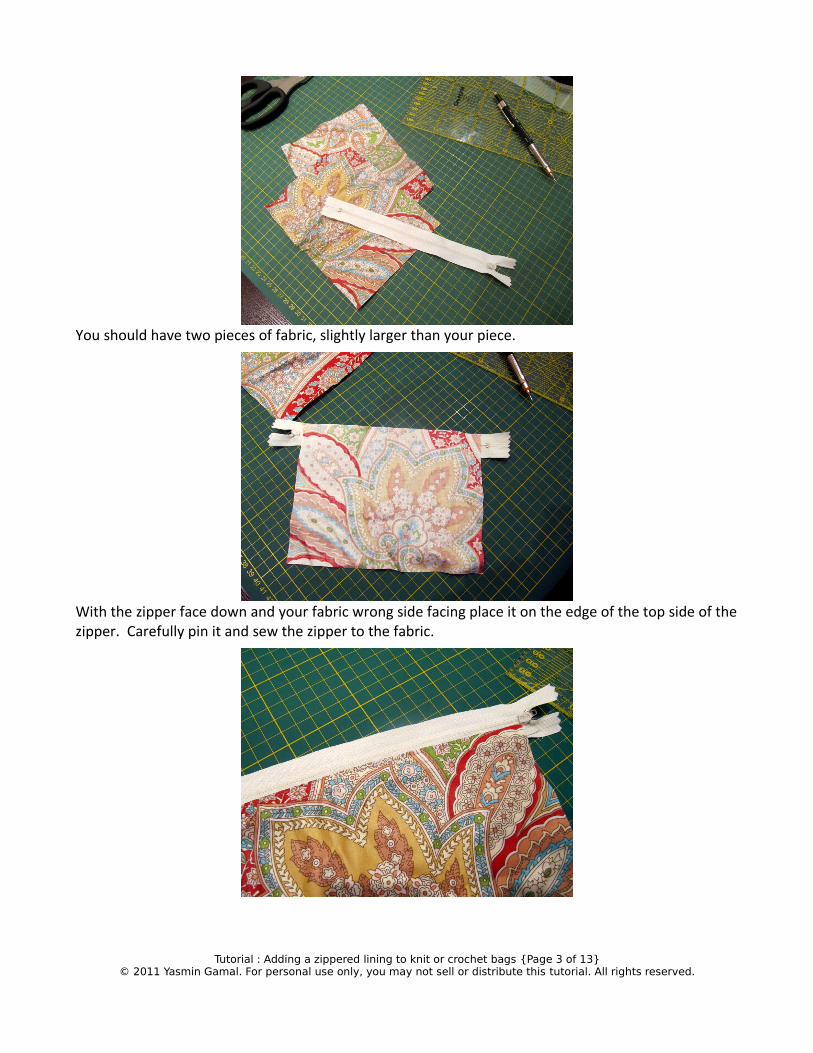
You should have two pieces of fabric, slightly larger than your piece.
With the zipper face down and your fabric wrong side facing place it on the edge of the top side of the zipper. Carefully pin it and sew the zipper to the fabric.
Tutorial : Adding a zippered lining to knit or crochet bags {Page 3 of 13}© 2011 Yasmin Gamal. For personal use only, you may not sell or distribute this tutorial. All rights reserved.
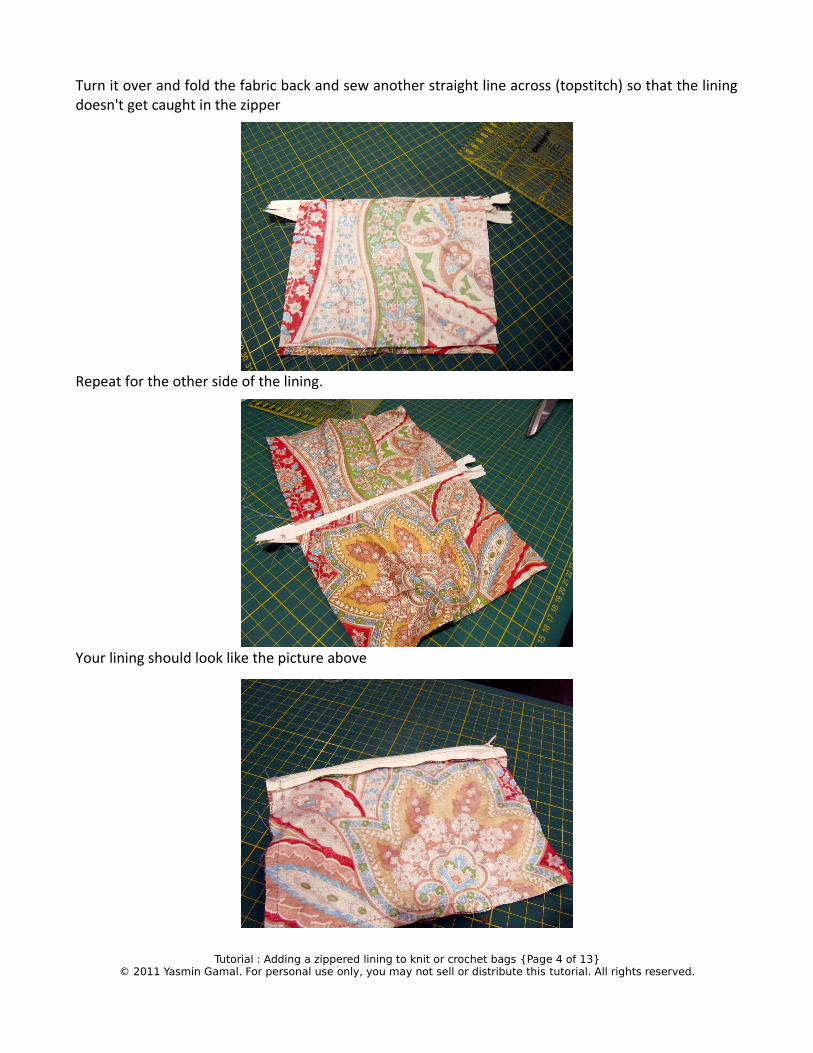
Turn it over and fold the fabric back and sew another straight line across (topstitch) so that the lining doesn't get caught in the zipper
Repeat for the other side of the lining.
Your lining should look like the picture above
Tutorial : Adding a zippered lining to knit or crochet bags {Page 4 of 13}© 2011 Yasmin Gamal. For personal use only, you may not sell or distribute this tutorial. All rights reserved.
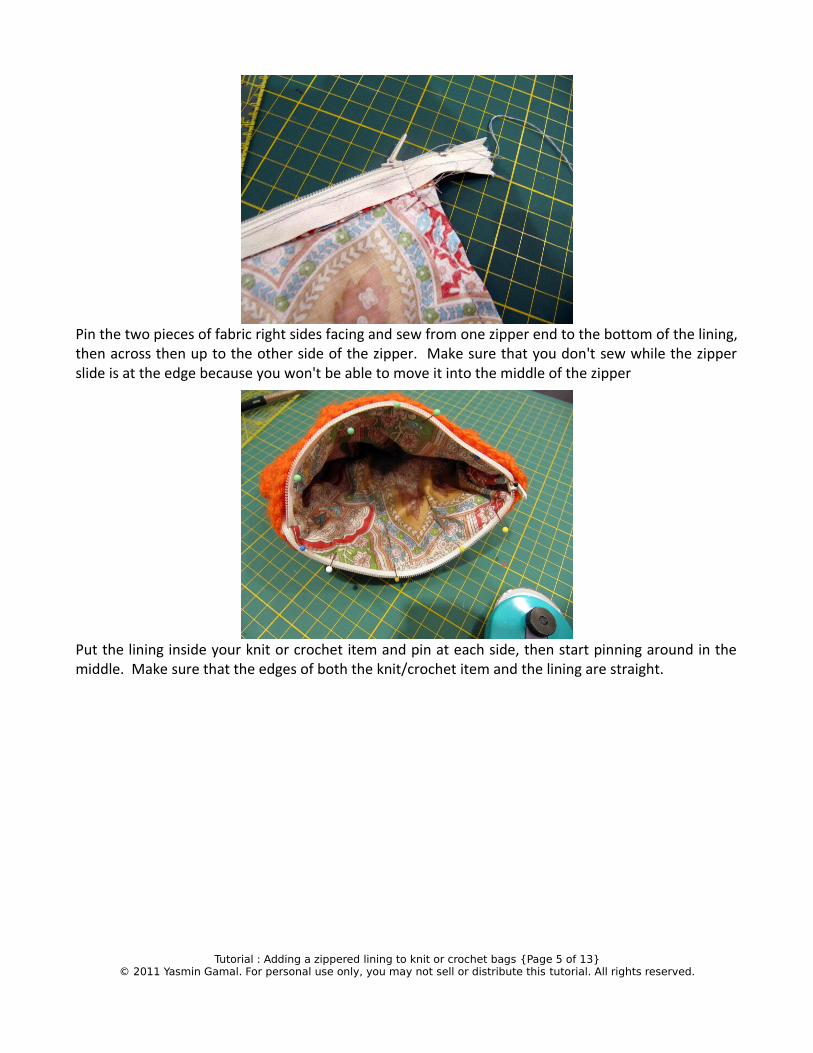
Pin the two pieces of fabric right sides facing and sew from one zipper end to the bottom of the lining, then across then up to the other side of the zipper. Make sure that you don't sew while the zipper slide is at the edge because you won't be able to move it into the middle of the zipper
Put the lining inside your knit or crochet item and pin at each side, then start pinning around in the middle. Make sure that the edges of both the knit/crochet item and the lining are straight.
Tutorial : Adding a zippered lining to knit or crochet bags {Page 5 of 13}© 2011 Yasmin Gamal. For personal use only, you may not sell or distribute this tutorial. All rights reserved.
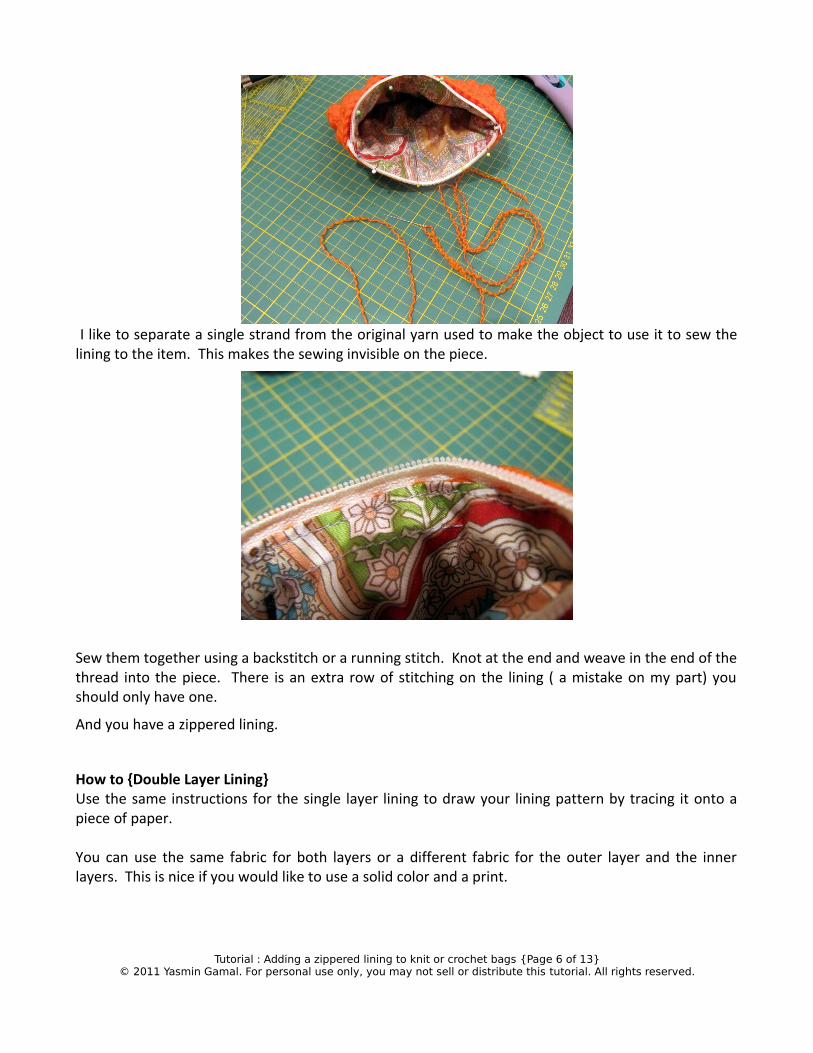
I like to separate a single strand from the original yarn used to make the object to use it to sew the lining to the item. This makes the sewing invisible on the piece.
Sew them together using a backstitch or a running stitch. Knot at the end and weave in the end of the thread into the piece. There is an extra row of stitching on the lining ( a mistake on my part) you should only have one.
And you have a zippered lining.
How to {Double Layer Lining}Use the same instructions for the single layer lining to draw your lining pattern by tracing it onto a piece of paper.
You can use the same fabric for both layers or a different fabric for the outer layer and the inner layers. This is nice if you would like to use a solid color and a print.
Tutorial : Adding a zippered lining to knit or crochet bags {Page 6 of 13}© 2011 Yasmin Gamal. For personal use only, you may not sell or distribute this tutorial. All rights reserved.
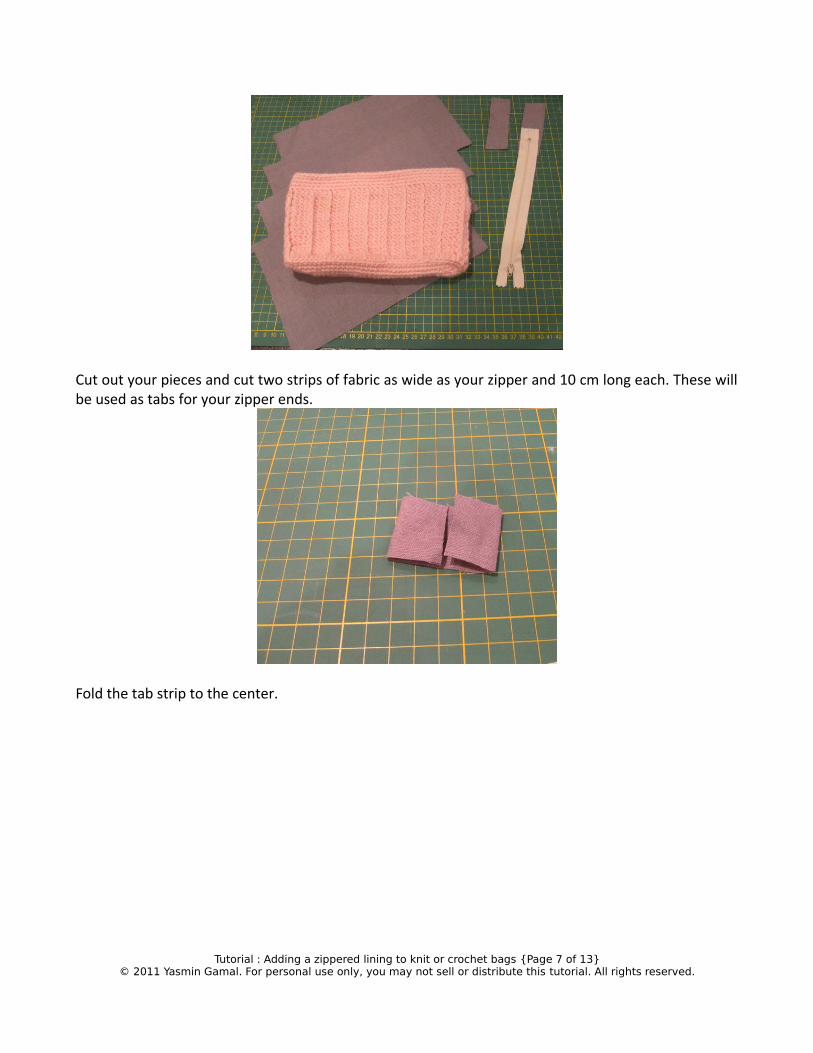
Cut out your pieces and cut two strips of fabric as wide as your zipper and 10 cm long each. These will be used as tabs for your zipper ends.
Fold the tab strip to the center.
Tutorial : Adding a zippered lining to knit or crochet bags {Page 7 of 13}© 2011 Yasmin Gamal. For personal use only, you may not sell or distribute this tutorial. All rights reserved.
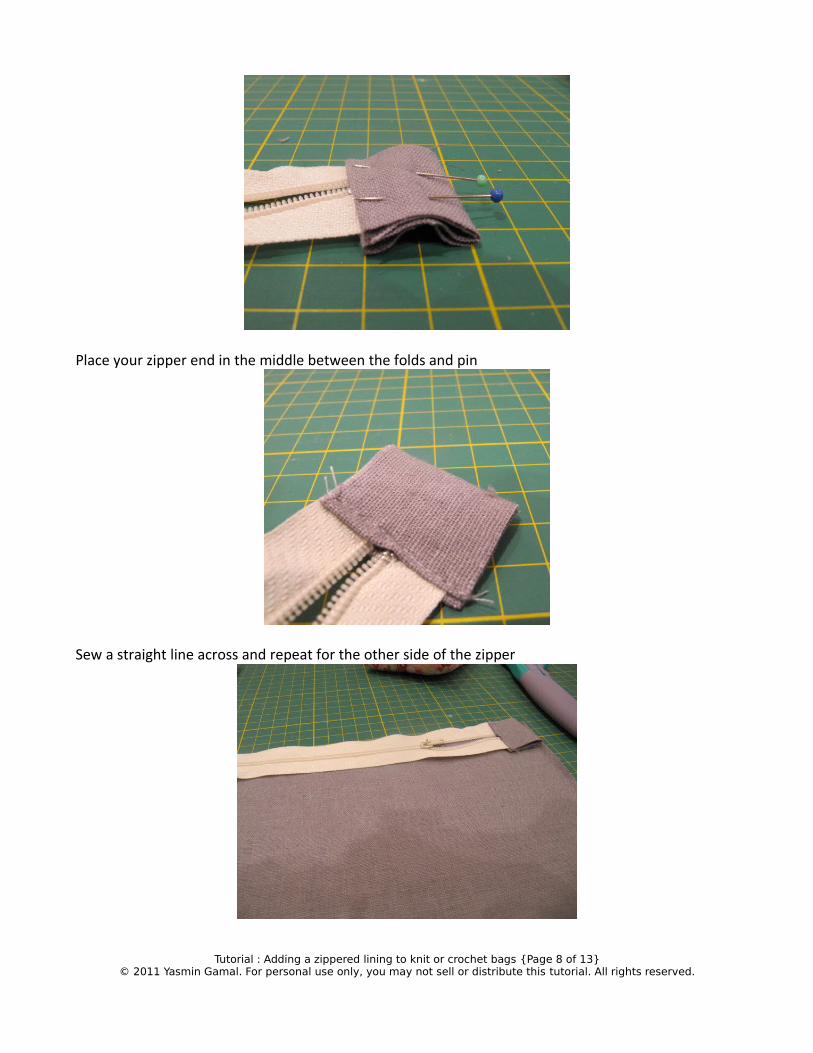
Place your zipper end in the middle between the folds and pin
Sew a straight line across and repeat for the other side of the zipper
Tutorial : Adding a zippered lining to knit or crochet bags {Page 8 of 13}© 2011 Yasmin Gamal. For personal use only, you may not sell or distribute this tutorial. All rights reserved.
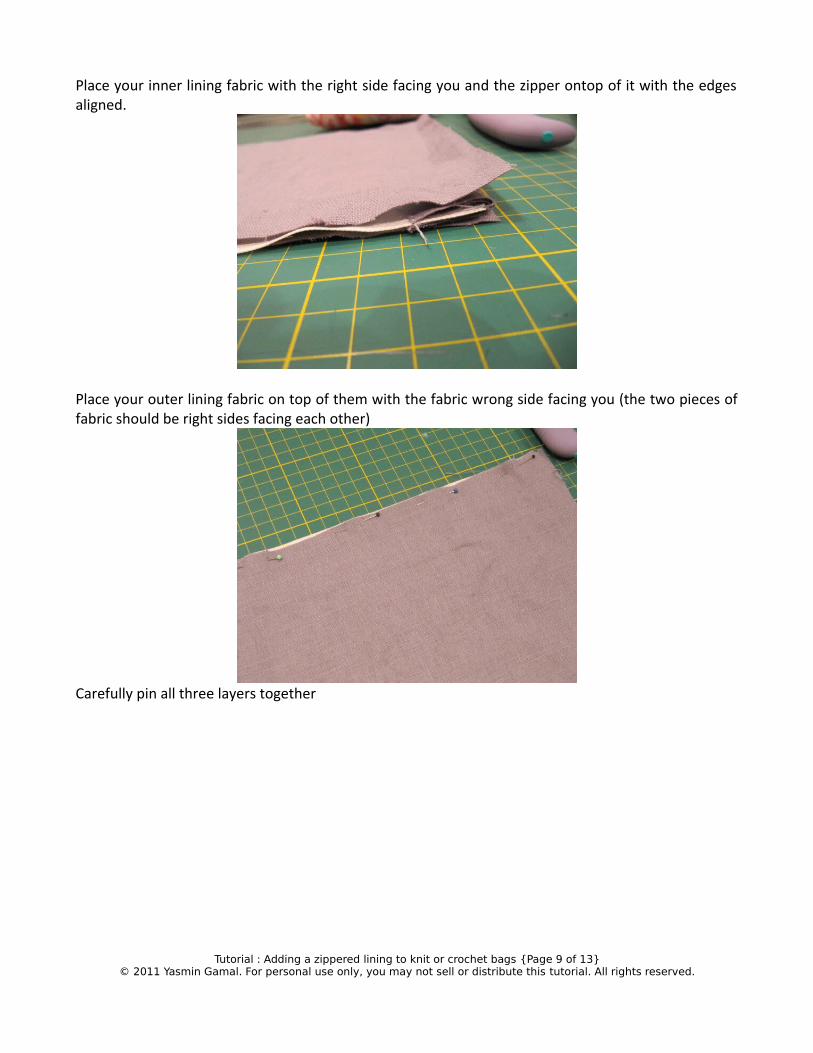
Place your inner lining fabric with the right side facing you and the zipper ontop of it with the edges aligned.
Place your outer lining fabric on top of them with the fabric wrong side facing you (the two pieces of fabric should be right sides facing each other)
Carefully pin all three layers together
Tutorial : Adding a zippered lining to knit or crochet bags {Page 9 of 13}© 2011 Yasmin Gamal. For personal use only, you may not sell or distribute this tutorial. All rights reserved.
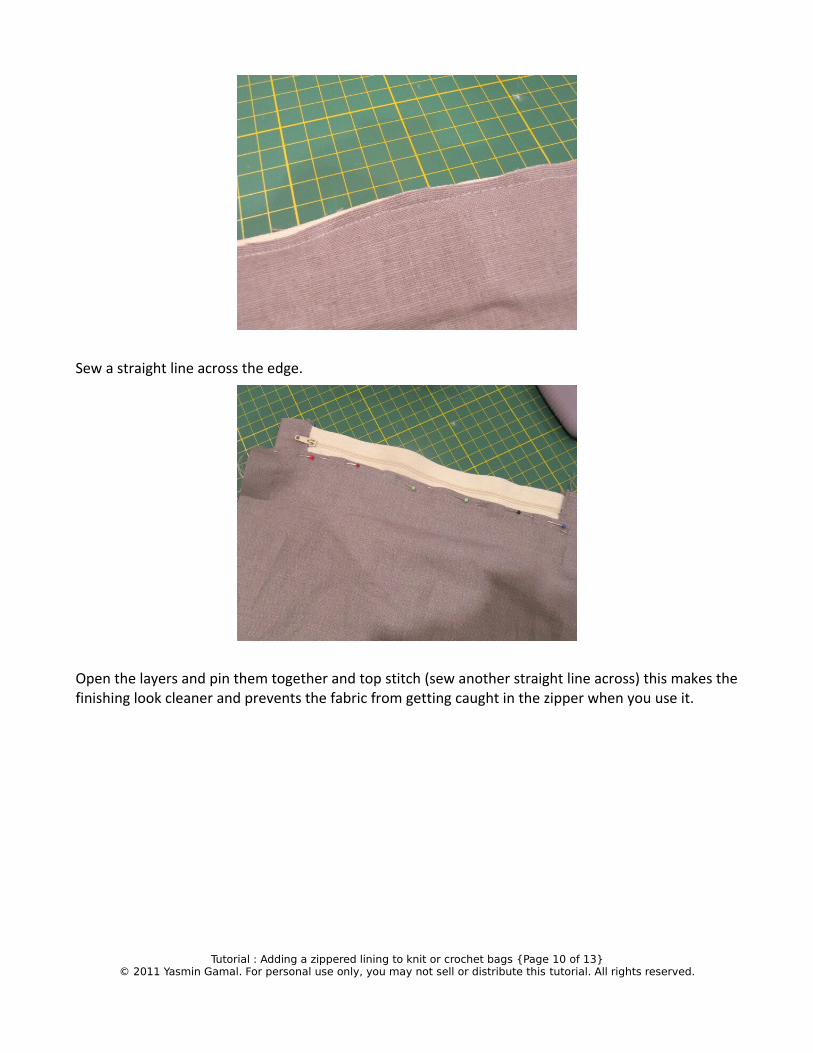
Sew a straight line across the edge.
Open the layers and pin them together and top stitch (sew another straight line across) this makes the finishing look cleaner and prevents the fabric from getting caught in the zipper when you use it.
Tutorial : Adding a zippered lining to knit or crochet bags {Page 10 of 13}© 2011 Yasmin Gamal. For personal use only, you may not sell or distribute this tutorial. All rights reserved.
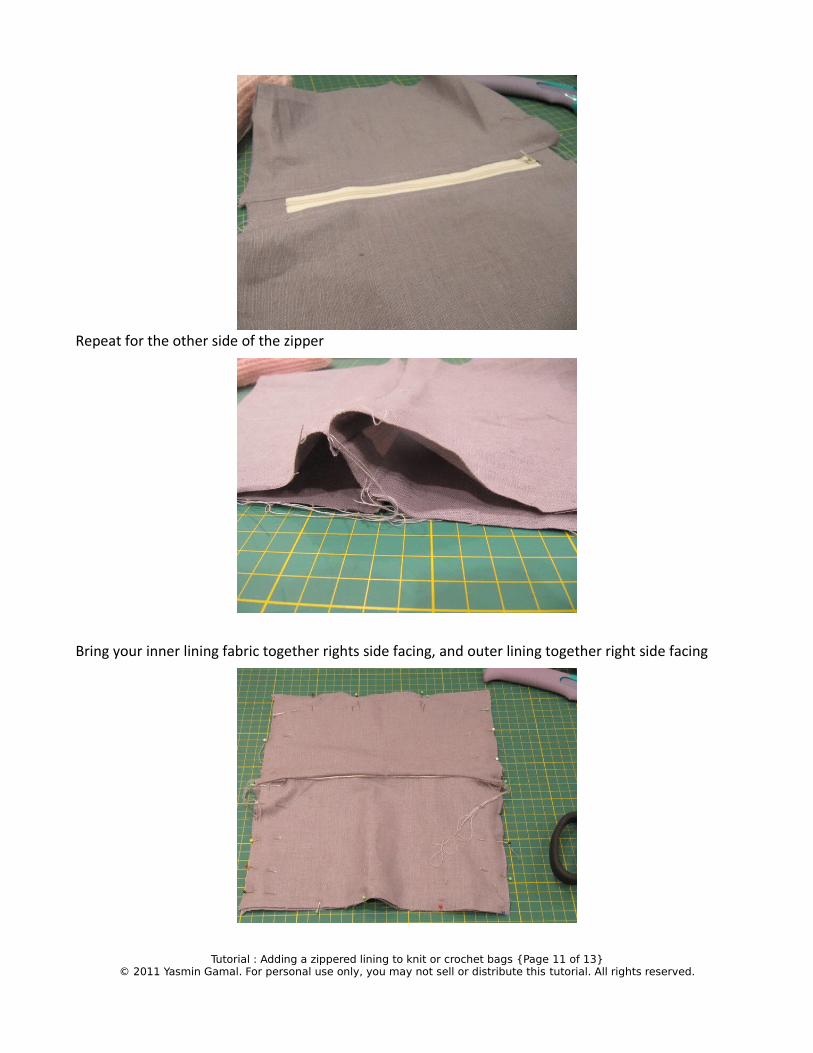
Repeat for the other side of the zipper
Bring your inner lining fabric together rights side facing, and outer lining together right side facing
Tutorial : Adding a zippered lining to knit or crochet bags {Page 11 of 13}© 2011 Yasmin Gamal. For personal use only, you may not sell or distribute this tutorial. All rights reserved.
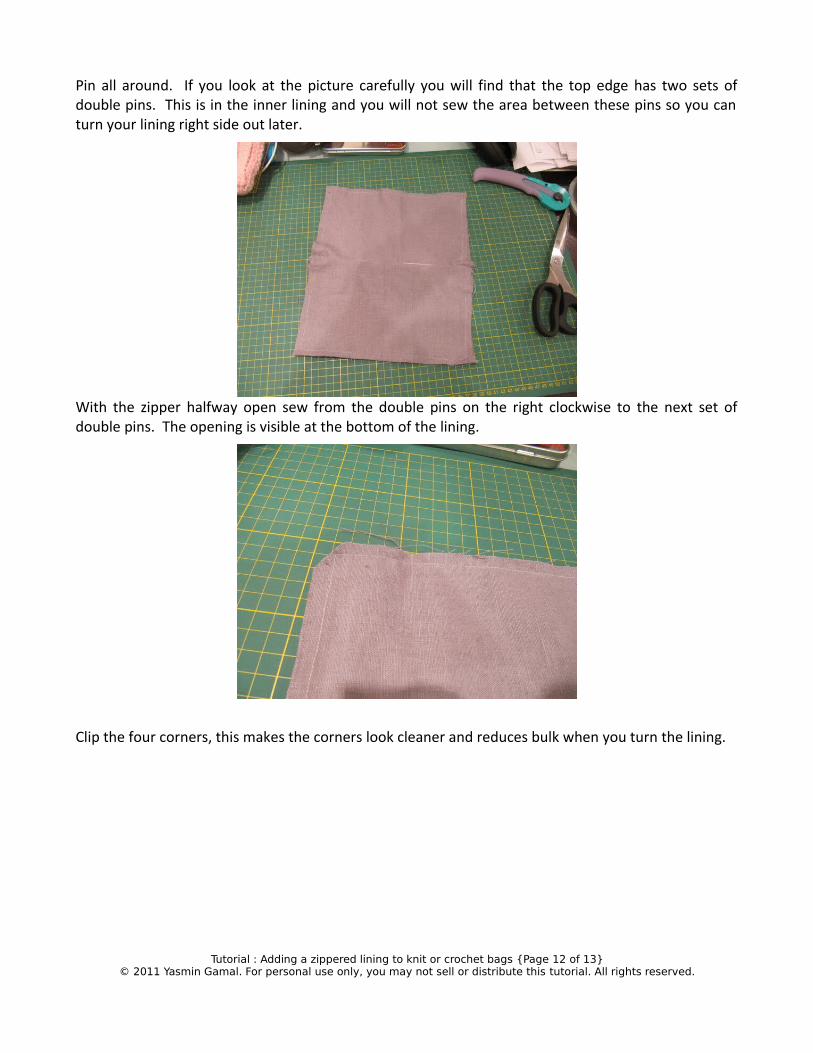
Pin all around. If you look at the picture carefully you will find that the top edge has two sets of double pins. This is in the inner lining and you will not sew the area between these pins so you can turn your lining right side out later.
With the zipper halfway open sew from the double pins on the right clockwise to the next set of double pins. The opening is visible at the bottom of the lining.
Clip the four corners, this makes the corners look cleaner and reduces bulk when you turn the lining.
Tutorial : Adding a zippered lining to knit or crochet bags {Page 12 of 13}© 2011 Yasmin Gamal. For personal use only, you may not sell or distribute this tutorial. All rights reserved.
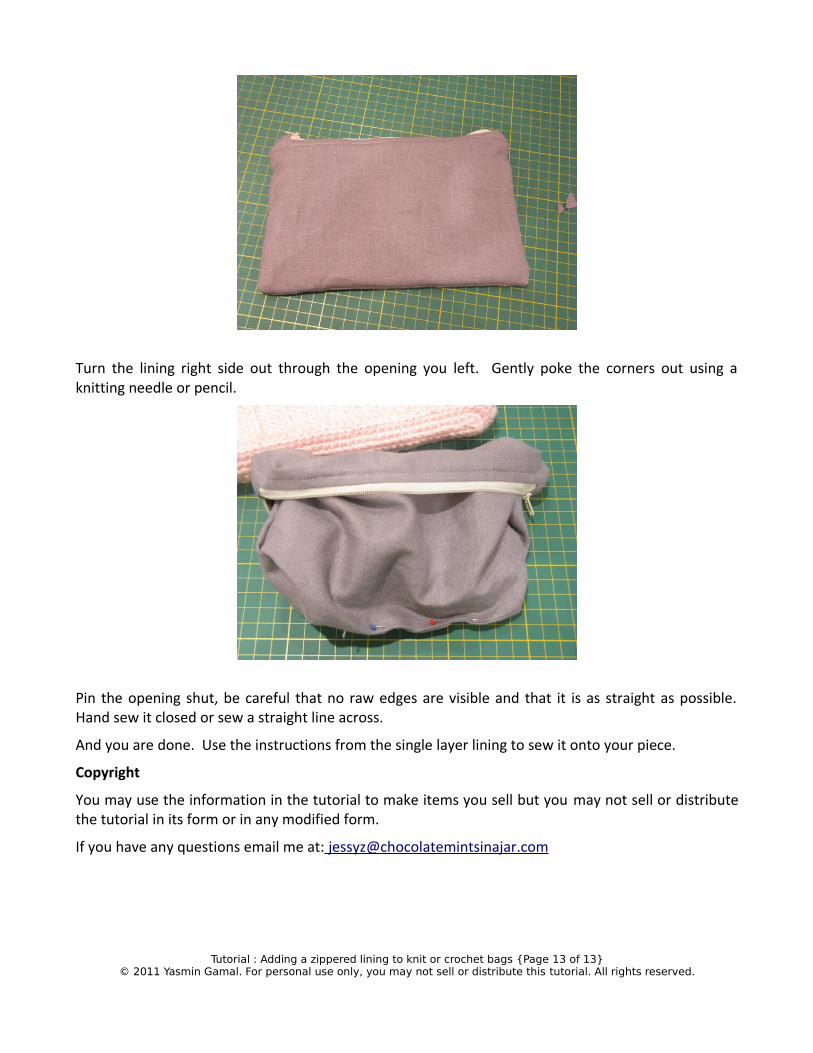
Turn the lining right side out through the opening you left. Gently poke the corners out using a knitting needle or pencil.
Pin the opening shut, be careful that no raw edges are visible and that it is as straight as possible. Hand sew it closed or sew a straight line across.
And you are done. Use the instructions from the single layer lining to sew it onto your piece.
Copyright
You may use the information in the tutorial to make items you sell but you may not sell or distribute the tutorial in its form or in any modified form.
If you have any questions email me at: [email protected]
Tutorial : Adding a zippered lining to knit or crochet bags {Page 13 of 13}© 2011 Yasmin Gamal. For personal use only, you may not sell or distribute this tutorial. All rights reserved.