Embed Size (px)
Citation preview
1
User Manual
65” Interactive LED/LCD
Model: HILF65101
65˝
(64.56˝)

2
Contents
1. Important safety Instruction …………….………………………………………………………………. 3
1.1 Safety precautions
1.2 Maintenance
2. Introduction ………………….……………………………………….………………………………………… 8
3. Product Description ……………….…………………………….…………………………………………… 9
3.1 Front View
3.2 Rear View
3.3 Connection
4. Remote Control ……………………………………………………………………………….………………… 11
5. OSD menu Description ………………………….…………………………………………………………… 12
6. Product Specifications ……………………………….……………………………………………………… 21
7. Product Dimensions ……………………………………………….……………………………………………… 23
8. Troubleshooting .……….….………………………………………………………………….………………… 24
8.1 Product Self-Diagnosis
8.2 Before Requesting Service

3
1. Important Safety instructions
[SAFETY WARNING]
• To reduce the risk of fire or electric shock, do not expose this product to rain or moisture.
• To prevent injury, this product must be securely attached to the floor/wall in accordance with
the installation instructions.
• To reduce the risk of electric shock, do not remove the back cover
• Refer servicing to qualified service personnel if needed.
▶Icons used in this manual
[WARNING] means,
If you ignore the warning message, you may be seriously injured or there is a possibility of
accident or death.
[CAUTION] means,
If you ignore the caution message, you may be slightly injured or the product may be
damaged.
[NOTE] means,
The note helps you understand and use the product safely. Please read the note carefully
before using the product.
▶ When moving the product, please grab the handles behind and the bottom of the product as
shown below picture.
- The product must keep horizontal and upright position when moving.
- Do not hold the corner of the product when you grab the bottom of the product.

4
1.1 SAFETY PRECAUTION
Note) The color and design may different by each model and the product specification are subject to
change without notice for performance enhancement.
1.1.1 Power
[Warning]
• Do not use damaged power cord, plug nor loose socket. It may cause electric shock or fire.
• Do not connect multiple devices into a single s socket. It may cause fire due to overheating.
• Do not touch with wet hands when remove or plug the power cord to avoid electric shock.
• Insert the power plug into socket firmly. It may cause fire when the connections are unstable.
• Connect the power cord to a grounded wall socket. There is risk of electric shock or injury.
• Do not bend nor pull the power cord and place heavy objects over the power cord. It may occur
cord damage and this may result in fire.
• Please clean only with dry cloth when the plug pin or socket are dusty. It may cause fire.
[Caution]
• Do not unplug the power plug while the product is operating. It may damage the product due to
electric shock.
• Only a power cord specified by product manufacturer are recommended.
Do not use the power cord from other devices. It may cause electric shock or fire.
• Hold the plug itself when unplugging the power plug from the wall socket. If not, there is risk of
electric shock or fire.
• Before moving or installing this product, be sure to turn off the power and disconnect the power
cord. To turn this product off completely, you must pull the power plug out of the wall socket.
Consequently, the power plug must be easily and readily accessible at all times.
1.1.2 Installation
[Warning]
• Do not install near any heat sources such as radiators, or other devices that produce heat. It may
cause electric shock or fire.
• When mounting a product on the wall, make sure not to install the product by hanging the power
and signal cables on the back of it.
• Consult with your local dealer or specialized engineer to mount the product on the wall, and use
the screws and wall mounts that meet the VESA standard. Any damages or injuries by misuse or
using an improper accessory are not covered by the warranty.
• Leave a 10 cm (4 inches) (minimum) space from the wall for proper ventilation. If not, it may cause
fire.
• Keep the packing anti-moisture material or vinyl packing out of the reach of children. Anti-moisture
material is harmful if swallowed. If swallowed by mistake, force the patient to vomit and visit the
nearest hospital. Additionally, vinyl packing can cause suffocation. Keep it out of the reach of
children.
5
• Please note than the product must be supported on proper stands or installed according to the
manufacturer’s recommendations. The product that are inappropriately situated on unstable
shelves, inclined planes, or vibrating places, etc., may fall over, resulting in injury.
• To reduce the risk of fire or electrical shock, do not expose this product to rain, moisture or other
liquids or dust. It may cause electric shock or fire.
• Keep the product away from direct sunlight.
• Keep the product of the reach of children and install on the stable and flat place. NEVER allow
children to climb on or play on the product or the furniture and stands on which the product is
placed.
[Caution]
• Do not allow an impact shock or any objects to fall into the product, and do not drop anything onto
the screen.
• Make sure the product is turned off, unplugged, and all cables have been removed. It may take
more than 4 people to than carry.
Do not press or put stress on the front panel of the product.
• If the product is installed in a place where the operating conditions considerably, a serious quality
problem may occur due to the surrounding environment. In this case, install the product only after
consulting our dealer about the matter. (Places exposed to microscopic dust, chemicals, too high or
low temperature, high humidity, airports or stations where the product is continuously used.)
1.1.3 Cleaning
[Warning]
• Clean the product with a soft dry cloth.
• Avoid cleaning the product by spraying water onto it. If water enters the product, it may result in fire, electric
shock or a problem with the product.
• Avoid scratching the screen with your fingernails, marker pen or a sharp object.
• In case of the products that attached additional sensors reflector in the bottom of the screen, do not attempt to
clean with water. Use a soft brush to remove the dust or dirt.
» If it was wet in water, touch function can cause malfunction and failure.
• In case of the products that attached additional purple sensor filter on the right and left screen both
[Caution]
• Do not push, rub, or hit the surface with your fingernail or a sharp object, as this may result in
scratches on the screen and image distortions.
• Do not use any chemicals, such as waxes, benzene, alcohol, thinners, insecticides, air fresheners, or
lubricants, as these may damage the screen’s finish and cause discoloration.
• Do not spray liquid onto the surface. If water enters the product, it may result in fire, electric shock,
or malfunction.

6
1.1.4 General Usage
[Warning]
• To reduce the risk of electric shock, do not open the cover or back. No user serviceable parts inside.
Refer to qualified service personnel.
• Before moving or lifting the product, disconnect the power cord and all cables.
• The route cords and cables connected to the product so that they cannot be tripped over, pulled or
grabbed.
• Do not stick metal objects or any other conductive material into the power cord. Do not touch the
end of the power cord while it is plugged in. It may result in fire, electric shock.
• Unplug this product during lightning storms or when unused for long periods of time.
• Do not block any ventilation openings. Install in accordance with the manufacturer’s instructions.
• To reduce the risk of fire or electrical shock, do not expose this product to rain, moisture or other
liquids. Do not touch the product with wet hands. Do not install this product near flammable objects
such as gasoline or candles, or expose to direct air conditioning.
• NEVER allow children to climb on or play on the product or the furniture on which it is placed. It
may cause severe injury to children.
• Use only with a cart, stand, tripod, bracket, or table specified by the manufacturer, or sold with the
product. When a cart is used, be careful when moving the cart/product combination to avoid injury
from tip-over.
• Install where it cannot be pushed, pulled over or knocked down.
• It is recommended to move the product in the box or packing material that originally came in.
• When holding the product, the screen should face away from you to avoid damage.
[Caution]
• If a fixed image displays on the screen for a long period of time, it will be imprinted and become a
permanent disfigurement on the screen. This is image burn or burn-in and not covered by the
warranty.
• Avoid displaying a fixed image on the screen for a long period of time (2 or more hours for LCD) to
prevent image burn. Recommend to power off or set the screen saver mode when not in use.
• When watching the screen, take 5 to 15 minute breaks every hour. Viewing screen for a long period
of time may cause fatigue or eye strain.
• Take care not to touch the ventilation openings. When watching the screen for a long period, the
ventilation openings may become hot. This does not affect the performance of the product or cause
defects in the product.
• Do not install this product on a wall if it could be exposed to oil or oil mist. This may damage the
product and cause it to fall.
• To install batteries in remote control, open the battery cover, replace batteries matching (+) and (-)
ends to the label inside the compartment, and close the battery cover. Failure to match the correct
polarities of the battery may cause the battery to burst or leak, resulting in fire, personal injury, or
ambient pollution.
• To prevent to swallow the small accessories for children, keep the accessories out of the reach of
children.

7
※ The product must keep horizontal and upright position when moving. Hold the top and bottom of
the frame firmly. Handles are only for the supporting purpose.
※ When attaching the stand to the set, place the screen facing down on a cushioned table or flat
surface to protect the screen from scratches by more than 2 people,
※ Make sure that the screws are fastened tightly. (If they are not fastened securely enough, it may
tilt forward after being installed.)
1.2 MAINTENANCE
1.2.1 Cleaning
• When cleaning, unplug the power cord and wipe gently
with a soft dry cloth to prevent scratching.
• Do not spray water or other liquids directly on the screen
as electric shock may occur.
• Do not clean with chemicals such as alcohol,
thinners, or benzene.
1.2.2 Installation
• Leave a 10 cm (4 inches) (minimum) space from the wall for proper ventilation.
If not, it may cause fire or malfunction due to the high temperature product inside.
[When attaching the stand] [When mounting on a wall]
1.2.3 Panel
• Avoid displaying a fixed image on the screen for a long period of time (2 or more hours for LCD) to
prevent image burn. Recommend to power off or set the power saving mode or screen saver when
not in use.
• Due to technological constraints of the Panel manufacturer, the images generated by this product
may appear either brighter or darker than normal by appr. 1ppm (parts per million) pixel.
The number of sub-pixels of a panel by size: The number of Sub-Pixels = Max. Horizontal Resolution
x Max. Vertical Resolution x 3.
For example, if the maximum resolution is 1920 x 1080, the number of sub-pixels is 1920 x 1080 x 3
= 6,220,800.
8
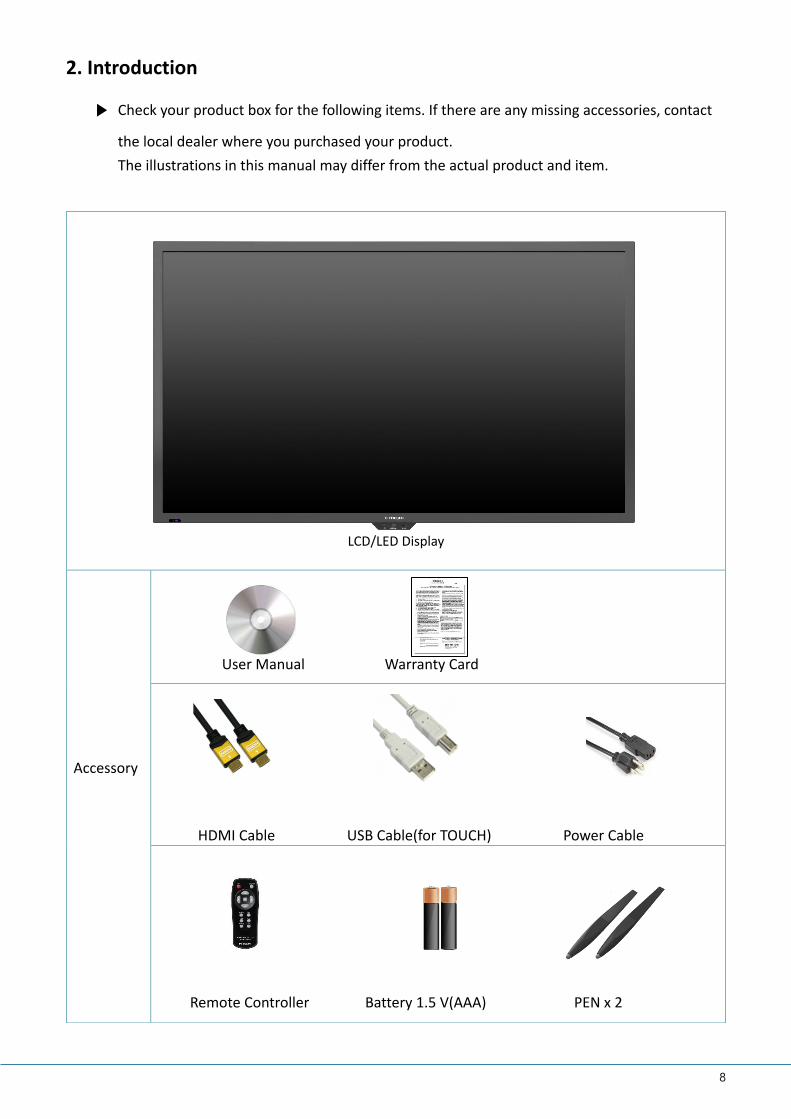
2. Introduction
▶ Check your product box for the following items. If there are any missing accessories, contact
the local dealer where you purchased your product.
The illustrations in this manual may differ from the actual product and item.
LCD/LED Display
Accessory
User Manual Warranty Card
HDMI Cable USB Cable(for TOUCH) Power Cable
Remote Controller Battery 1.5 V(AAA) PEN x 2

9
3. Product Description
3.1 FRONT VIEW
①USB ②TOUCH ③HDMI
3.2 REAR VIEW
①
①
②
③
ⓐ ⓑ ⓒ ⓓ ⓔ ⓕ ⓖ ⓗⓘ ⓙⓚ
④

10
ⓐ USB for Touch(Option)
ⓑ USB for Touch
ⓒ RS232C
ⓓ HDMI 1 Input
ⓔ HDMI 2 Input
ⓕ DISPLAY PORT Input
ⓖ VGA Input
ⓗ PC AUDIO Input
ⓘ AUDIO LINE Out
ⓙ SPEAKER Out R. ( 10W , 8 Ohm )
ⓚ SPEAKER Out L. ( 10W , 8 Ohm )
When you need to install OPS PC.
There is a slot on ② for OPS PC. When you need to install OPS, remove screws and existing
cover first and screw up again after mounting OPS PC in the slot.
③
②
④
• Power: ON / OFF
• Menu: Display the main screen menu
• Source: Display Port, HDMI1, HDMI2, HDMI3,
HDMI Front, HDMI OPS, PC, USB
• Vol +: Volume Up (Right)
• Vol -: Volume Down (Left)
• ▲: Move Up
• ▼: Move Down
ⓐ
ⓑ
ⓒ
ⓐ LAN
ⓑ Power Switch : ON / OFF
ⓑ AC IN: 100V~ 240V, 50/60Hz

11
4. Remote Control
4.1 How to insert battery.
Key Name Description
Power ON/OFF.
SOURCE Activates OSD menu of input source selecting.
Navigates input source.
▲ Navigates upper menu in main OSD menu.
Navigates input source.
▼ Navigates down menu in main OSD menu.
Navigates input source
▶ Navigates next menu in main OSD menu.
◀ Navigates before menu in main OSD menu.
OK Select the highlighted menu option.
MENU Activates main OSD menu.
EXIT Escapes main OSD menu.
FREEZE Allows you to capture and freeze an image from a
moving image that you are watching.
VOL+ Volume UP
VOL- Volume Down
MUTE Toggles sound status of speaker.
Insert the battery into proper polarities
Battery model: Battery 1.5V (AAA)
12
5. OSD Menu Description
5.1 Menu Overview
In this menu system, there are several ways to customize the menu settings provided. If you
press the MENU button, only the first and second level of the menu system will appear on the
monitor screen. The third level can be displayed by pressing SELECT.
1) To show and hide the menu:
Press the MENU button on the Remote Control to display the menu.
Press of the MENU button will take you back to monitor viewing.
2) To go to advance to the next menu:
Press OK on the Remote Control.
3) To go back to the previous menu:
Press MENU on the Remote Control.
4) Typical Menu Operation
• Press MENU button: The main menu will appear.
• Use to select the desired menu option (icon).
• While the desired menu option is selected, press OK to move to the second level.
• Press OK to move to the third level: Some menu options require additional steps.
• Press MENU to return to the previous menu.

13
Setup Menus
◆ Press the [MENU] Button. The OSD Main MENU will be shown.
◆ Entering the SETUP MENU
Press the ▲/▼ buttons to highlight SETUP and press
the OK Button.
◆ Change the OSD Language
Press the ▷ buttons to select Language, and press the
OK button to view and select available languages. Use
the ▲/▼ buttons to highlight the language you would
like to use and press the OK button to select it.
◆ Setup Child Lock (deactivate display buttons)
Press ◁ or the Menu Button to move or go back to
the previous menu options.
Press the ▲/ ▼ buttons to highlight Child Lock, and
press the OK Button.
Press the ▷ buttons to select ON or OFF. Press the
OK button to choose either option. ON will lock the
display’s buttons so that you can only control through
the remote.
◆ Setup Reset
Press ◁ or the Menu Button to move or go back to
the previous menu options.
Press the ▲/ ▼buttons to highlight Reset. Press the OK
Button.
Press the ▷buttons to select On Off, and press the OK
button to confirm. Selecting Reset On will return all OSD
menu settings to their factory defaults. Selecting Reset
Off will cancel and exit the menu.

14
◆ Internal PC Setting
Internal PC will be automatically set up according to
user PC type (OPS or Desktop, Laptop)

15
Input Menus
◆ Press the [MENU] Button.
The OSD Main MENU will show.
◆ Entering the Input MENU
Press ▲/▼ Button to highlight Input, Press the OK
button to OK and view the available settings.
◆ Input source select
Press the ▷ buttons to highlight either VGA/OPS/
HDMI2/HDMI1/DP. Once the desired input is
highlighted, press the OK button to select it.
Only sources that are connected to the display can be
selected.
◆ Selecting the screen ratio
Press ◁ or the Menu Button to move or go back to
the previous menu options.
Press the ▲/▼ buttons to highlight ARC (Auto Ratio
Control), and press the OK button to view the available
settings.
Press the ▷ buttons to select either AUTO/16:9/ 4:3.
After highlighting the desired screen ration, press the OK
button to select it.
After finishing the adjustment, Press the [Exit] Button to exit the OSD MENU.

16
Picture Menus
◆ Press the [MENU] Button. The OSD Main MENU will be shown.
◆ OK the PICTURE MENU
Press the ▲/▼ buttons to move through options in the
PICTURE Menu. When you have moved to the option
you would like to adjust, press the OK button and you
will OK its settings.
◆ Adjustment CSM(Color Status Mode)
Press the ▲/▼ buttons to move to CSM. Press the
OK Button to select it.
Press the ▷ buttons to move to either Cool,
Normal, Warm, or User. Cool, Normal and Warm
are preset color options. If you want to adjust the
color settings individually, select USER and press
the OK Button.
◆ Custom adjustment CSM
Press the ▷ buttons to highlight the Red, Green or
Blue level. Next, press the OK button to select one of
them.
Once selected, press the ▷ buttons to adjust
the Red, Green, or Blue level.
Color
Sharpness
Color
Sharpness
Color
Sharpness

17
◆ Picture Select mode
Press ◁ or the Menu button to move or go back
to the previous menu options.
Press the ▲/▼ buttons to highlight PSM (Picture
Status Mode), and press the OK button to see the
available options.
Press the ▷ buttons to select highlight either
Dynamic/Standard/Mild/Game/User, and press OK to
select one. User is the default setting.
◆ Backlight Adjustment
Press ◁ or the Menu Button to move or go back
to the previous menu options.
Press the ▲/▼ buttons to highlight Backlight, and
press the OK button to change the setting.
Press the ▷ buttons to change the setting.
Note that the backlight value is related to power
consumption. If you set your backlight at a higher
level, you may be using more energy.
◆ Contrast and Brightness Adjustment
Press ◁ or the Menu Button to move or go back
to the previous menu options.
Press the ▲/▼ buttons to highlight Contrast or
Brightness, and press the OK button to change
either of their settings.
Press the ◁/▷ buttons to adjust both the Contrast
and Brightness levels.
◆ Color Adjustment
Press ◁ or the Menu Button to move or go back
to the previous menu options.
Press the ▲/▼ buttons to highlight Color and press
the OK button to change either of their settings.
Press the ◁/▷ buttons to change the setting.
Color
Sharpness
Color
Sharpness

18
◆ Sharpness Adjustment
Press ◁ or the Menu Button to move or go back
to the previous menu options.
Press the ▲/▼ buttons to highlight Sharpness and
press the OK button to change either of their settings.
Press the ◁/▷ buttons to change the setting.
Color mode and sharpness modes are available
when you connect HDMI.
Sound Menus
◆ Press [MENU] Button. The OSD Main MENU will be shown.
◆ Entering the Sound MENU
Press the ▲/▼ buttons to move up to the SOUND
Menu. Press the OK button to OK the menu.
◆ Select Sound Status Mode
Press the ▷ buttons to move up to the SSM (Sound
Status Mode) Menu, and press the OK button to view
the settings. Press ▷Button to select either
Flat/Music/Movie/Speech/User, and press the OK
button to select one.
◆ Sound Balance
Press ◁ or the Menu Button to move or go back to
the previous menu options.
Press ▲/▼ Button to highlight the Balance Menu, and
press the OK button to adjust the settings.
Press the ▷ buttons to adjust the Left/Right Balance
value.

19
◆ Equalizer Adjustment
Press ◁ or the Menu Button to move or go back
to the previous menu options.
Press ▲/▼ Button to highlight the Equalizer Menu,
press the OK button to view the settings.
Press the ▷ buttons to highlight one of the
0.1/0.5/1.0/5.0/10kHz values. Press the OK button to
select the value and change its setting.
Press the ◁/▷ buttons to adjust the frequency
setting.
AVL mode is not supported.
After finishing your adjustments, press the [Exit] button to exit the OSD MENU.
Time Menus
Setup your system’s clock and automatic ON/OFF times.
◆ Press the [MENU] Button.
The OSD Main MENU will be shown.
◆ Entering the TIME MENU
Press the ▲/▼ buttons to move up to the TIME Me
nu. Press the OK button to view the options in the
menu.
◆ Setup System Clock
Press the ▷ buttons to highlight the Clock Menu. Press
the OK button to view and adjust the time setting. Your
display will not automatically detect the time. You must
set the time manually.
Press the ▷ buttons to highlight Manual, and press the
OK button to select it.
Press the ▲/▼ buttons to adjust the time, and press the
OK button to confirm it.

20
◆ Setup System OFF Time
Press ◁ or the Menu Button to move or go back to
the previous menu options.
Press the ▲/▼ buttons to highlight Off Time, and press
the OK button to select it.
Press the ▷ buttons to highlight Off, and press the ▷
buttons to turn this feature on or off.
Press the ▲/▼ buttons to highlight the time, and press
▷ buttons to adjust the minutes and hours. Set the
time you would like the display to automatically power
off. Exit to save these settings.
◆ Setup System ON Time
Press ◁ or the Menu Button to move or go back to
the previous menu options.
Press the ▲/▼ buttons to highlight On Time, and press
the OK button to adjust the settings.
Press the ▷ buttons to highlight the time, and press
▷ buttons to adjust the minutes and hours. Set the
time you would like the display to automatically power
off.
Use the ▲/▼ buttons to highlight VOL and use the ▷
buttons to set the volume level you would like the
display to automatically turn on at. The other options
allow you to choose how often you want the display to
automatically turn on (once/daily). Finally, you can
choose to have this feature ON or OFF. Exit to save
your settings.
◆ Setup Auto Sleep
If Auto Sleep mode is ON, the screen will go to sleep
when no input signal is received and 5 minutes have
passed.
Press ◁ or the Menu Button to move or go back to
the previous menu options.
Press the ▲/▼ buttons to highlight Auto Sleep, and
press the OK button to change the settings.
Press the ▷ buttons to select OFF or ON, and press
the OK button to select it.

21
6. Product Specification
Note: Product design and features without prior notice may be changed.
LED PANEL
Diagonal size 64.56"/ 163.9(cm)
Display Resolution (Max.) 1,920 x 1,080 (FHD)
Brightness (average) 350 cd/㎡
Viewing Angle H: 176° / V: 176°
Contrast ratio 5000:1 (Typ.)
Supported Colors 16.7M colors (8bit)
Response Time 6.5 ms (GTG)
Display Frame Rate 60Hz (Actual)
Installation Landscape Orientation
TOUCH
Detect area 1428.5(H) x 803.5(V) mm / 56.24"(H) x 31.63"(V)
Detection method Infrared blocking Detection Method
Touch tool Hand or other solid object(except sharpness)
Accuracy ±2mm
Response time < 12ms
Available Touch Point
10 Points (Windows)
4 points (Mac with driver software)
1 point (Mac without driver software)
Operating Systems Windows 7, 8, 10 / MAC 10.10-10.12
PC connector USB

22
SIGNAL CONNECTIVITY
Connector Display Port x1, HDMI x2(Rear(1.3ver.) x 1, Inside OPS(1.3ver.) x 1), VGA x1
Audio Out Speaker Out (R/L) , Line out, VGA Audio in
Communication Port RS-232C (D-sub 9-pin) or LAN(RJ45)
Front Panel HDMI(1.3ver.) x1, USB-B(for Touch)x1, USB-Ax1
OPS Slot 1
MECHANICAL
Dimensions Landscape 1506 x 902 x 92 mm
Weight 44.3 kg
VESA mount 400 x 200 (mm), M8 Screw
Front Glass Tempered Glass 4.0t (Anti-glare Type)
ELECTRICAL
Power Requirement 100 - 240V AC, 50/60 Hz
Power Consumption Max. 185W
Power Consumption
(Standby) < 0.5W
Speaker Output 10W + 10W Stereo (8-ohms)
ENVIRONMENTAL
Operating Temperature 0 ~ 40 ºC (32 ~104 ℉)
Storage Temperature - 20 ~ 60 ºC (-4 ~ 140 ℉)
Operating Humidity 20% to 80% RH (no condensation)
OSD FUNCTIONS
OSD Language Function English / Français / Deutsch / Spanish / Portuguese /Italiano / Danish / Swedish / Norwegian / Suomi /
Russian / Polish /Turkish / Hungarian / Chesky / Korean
OSD Key Lock Function Support
* Design and Specifications are subject to change without notice.

23
7. Product Dimensions
24
8. Troubleshooting
8-1 Product Self-Diagnosis
• You can check if the product is working properly using the Self-Diagnosis function.
• If a blank screen is displayed but the Power LED on even if the product and the PC are properly
connected, perform the self-diagnosis function according to the procedures below.
1) Turn the product and the PC off.
2) Remove the any connected cables from the product.
3) Turn the product on.
4) If the product is working properly, the <No Signal>message appears.
In this case, if a blank screen is displayed again, make sure that there is no problem with
the PC and the connection.
8-2. Before Requesting Service
• Please check the following before requesting After-Sales service and if the problem continues,
please contact the local dealer where you purchased your product.
1) PROBLEMS RELATED TO SCREEN
A. Screen is blank and power indicator is off.
» Ensure that the power cord is firmly connected and the monitor is on.
B. “No Signal” Message.
» Check the maximum resolution and the frequency of the video adapter.
» Compare these values with the data in the Standard Signal Mode Table.
C. Picture rolls vertically.
» Check if the signal cable is securely connected. Connect it again securely.
D. Image is not clear. Picture is blurred.
» Run frequency tuning.
» Turn on again after removing all accessories. (Video extension cable, etc.)
» Set resolution and frequency to the recommended ranges.
E. The image is too light or too dark.
» Adjust the <Brightness>and<Contrast>and<Backlight>.
2) PROBLEMS RELATED TO AUDIO
A. No sound.
» Ensure that the audio cable is firmly connected to both the audio-in port on your
monitor and the audio-out port on your sound card.
B. The sound level is too low.
» Check the volume level. If the volume is still too low after turning the control to its
maximum, check the volume control on the computer sound card or software program.
25
3) PROBLEMS RELATED TO REMOTE CONTROL
A. The remote control buttons do not respond.
» Check the battery polarities (+/-).
» Check if the batteries have been exhausted.
» Check if the power is on.
» Check if the power cord is securely connected.
» Check if a special fluorescent or neon lamp is on in the vicinity.

26
Rev 002