Embed Size (px)
Citation preview

THINGMAGIC EL6e USER GUIDE
TM_EL6e-UG Rev 03222019

www.JADAKtech.com
COPYRIGHT INFORMATION
© Copyright 2019 Novanta Corporation. All rights reserved.
Version 03222019
This product or document is protected by copyright and distributed under licenses restricting its use, copying, distribution, and decompilation. No part of this product or document may be reproduced in any form by any means without prior written authorization of Novanta Corporation and its licensors, if any.
CryptoRF is a registered trademark of Atmel Corporation.
MIFARE and NXP is a registered trademark of Royal Philips Electronics.
Tag-it is a trademark of Texas Instruments, Incorporated.
Microsoft® and Windows® are registered trademarks of Microsoft Corporation.
TECHNICAL SUPPORT AND CONTACT INFORMATION
Telephone: 315.701.0678
www.JADAKtech.com
Email: [email protected]

TABLE OF CONTENTS
Copyright Information ................................................................................................................ iTechnical Support and Contact Information .............................................................................. iRevision History ....................................................................................................................... ii
Introduction ................................................................................................................................................1
Release Notes ..........................................................................................................................1Hardware Overview ...................................................................................................................................2
Hardware Options ....................................................................................................................2Antennas ............................................................................................................................2Protocols ............................................................................................................................2
Authorized Antennas ................................................................................................................3Supported Regions ..................................................................................................................3
NA Range ..........................................................................................................................4EU Range ..........................................................................................................................4
Interfaces .................................................................................................................................6USB Module .......................................................................................................................6RS232 Interface .................................................................................................................8Cable Connections ............................................................................................................8
General Purpose Input, Output (GPIO) ....................................................................................9SKU Ordering .........................................................................................................................10Power Requirements ..............................................................................................................10
When Transmitting (Duty Cycle and RF Power Level) ....................................................10When Idle (Settings) ........................................................................................................10USB Characteristics .........................................................................................................10
Host Requirements ................................................................................................................10User Indicators ....................................................................................................................... 11
LEDs ................................................................................................................................ 11Audio Indicators ...............................................................................................................12
Software Overview ..................................................................................................................................13
Host Software .........................................................................................................................13ThingMagic Configuration Tool (TCT) ..............................................................................13Java Code Samples .........................................................................................................13Serial Emulator (Optional) ...............................................................................................13
Firmware Update ....................................................................................................................13Update Firmware Using TCT ...........................................................................................14
Communication Protocol ........................................................................................................................15
Workflow Overview .................................................................................................................15HDR ................................................................................................................................15
www.JADAKtech.com

Monitor ...........................................................................................................................16Tag Commissioning .......................................................................................................16 Tag Update .....................................................................................................................16
Save and Restore Configuration ............................................................................................17Save Configuration ..........................................................................................................18Restore Configuration ......................................................................................................18Load Default Configuration ..............................................................................................18
Data Reporting Formats and Metadata ..................................................................................18EPC Only .........................................................................................................................18Plain Metadata .................................................................................................................18JSON Metadata ...............................................................................................................19
Autonomous Operation ..........................................................................................................19Set Date and Time Support ....................................................................................................20Heartbeat Support ..................................................................................................................20Reboot Support ......................................................................................................................20Set Read Power Support .......................................................................................................21
RAIN Command Interface .......................................................................................................................22
Autonomous Workflow ..........................................................................................................22Autonomous Workflow Breakdown .................................................................................23Autonomous Workflow: Single Read ..............................................................................23Autonomous Workflow: Bulk Read .................................................................................23Autonomous Workflow: Tag Commission ......................................................................24Autonomous Workflow: Tag Update ...............................................................................24Start Reading Automatically ............................................................................................25
RAIN Command Reference ...................................................................................................26Command Summary .......................................................................................................26Command Reference Format ..........................................................................................26Command Format ...........................................................................................................26Response Format ...........................................................................................................26
Core Commands ....................................................................................................................27Advanced Commands ............................................................................................................28Bootloader Commands .........................................................................................................29
ThingMagic Configuration Tool ..............................................................................................................31
Introduction ............................................................................................................................31Install the USB Driver .............................................................................................................31Install TCT ..............................................................................................................................31Home ......................................................................................................................................32Connect ..................................................................................................................................33
HID Mode ........................................................................................................................33CDC Mode ......................................................................................................................33
www.JADAKtech.com
Configure ................................................................................................................................33Results ...................................................................................................................................34Utilities ....................................................................................................................................34Help ........................................................................................................................................34
Compliance and IP Notices .....................................................................................................................35Federal Communication Commission (FCC) Interference Statement .............................35
Industry Canada .....................................................................................................................35Industrie Canada (French Canadian) .....................................................................................36
Appendix A - RAIN Error Messages .......................................................................................................37Appendix B - Getting Started - Development Kit ..................................................................................39
USB Development Kit Hardware ............................................................................................39Set Up the USB Development Kit ..........................................................................................40
Connect the Antenna .......................................................................................................40Download the Software Development Kit ........................................................................40Install the USB Driver ......................................................................................................40
Connect the USB EL6e Reader .............................................................................................42Appendix C - Environmental Considerations .......................................................................................43
ElectroStatic Discharge (ESD) Considerations ................................................................43Operating Temperature: ...................................................................................................43Installation Considerations ...............................................................................................43
www.JADAKtech.com

www.JADAKtech.com
LIST OF TABLES
ThingMagic Nano (Used in EL6e) Authorized Antennas .............................................................................3NA and EU Regions ....................................................................................................................................3Open Region ...............................................................................................................................................4RAIN Commands to Configure Region ........................................................................................................5USB EL6e Connector Pinout .......................................................................................................................6USB Interface RAIN Commands to Enable/Disable HID Mode ...................................................................7USB Interface RAIN Commands to Start and Stop Read ............................................................................7RS232 EL6e Connector Pinout ...................................................................................................................8Universal EL6e Connector Pinout ...............................................................................................................9GPIO RAIN Commands .............................................................................................................................10SKUs .........................................................................................................................................................10Audio Indicator RAIN Commands ..............................................................................................................12Autonomous Workflow Specifications .......................................................................................................17Workflow RAIN Commands .......................................................................................................................17RAIN Commands to Save and Restore Configurations .............................................................................18Keyboard Wedge Data Format RAIN Commands .....................................................................................19Metadata RAIN Commands .......................................................................................................................19Autonomous Read RAIN Commands ........................................................................................................19Date and Time RAIN Commands ..............................................................................................................20Heartbeat RAIN Commands ......................................................................................................................20Reboot RAIN Command ............................................................................................................................20Set Read Power RAIN Command .............................................................................................................21Autonomous Workflows in EL6e and RAIN terms .....................................................................................22Single Read Workflow ...............................................................................................................................23Bulk Read Workflow ..................................................................................................................................23Tag Commission Workflow ........................................................................................................................24Tag Update Workflow - Write a Fixed Value .............................................................................................24Tag Update Workflow - Write a Timestamp ...............................................................................................25Enable Autonomous Operation .................................................................................................................25Disable Autonomous Operation .................................................................................................................26RAIN Core Command Examples ...............................................................................................................27RAIN Advanced Command Examples .......................................................................................................28RAIN Bootloader Command Examples .....................................................................................................29Bootloader Faults and Application Faults ..................................................................................................37

www.JADAKtech.com
REVISION HISTORY
Date Version Description
3/22/2019 TM_EL6-UG Rev 03222019
• Initial Release.

ThingMagic EL6e User Guide 1
Introduction
The EL6e RFID smart module (PC board) is a ThingMagic UHF-embeddable module. It is built around the ThingMagic Nano module and is a standard product offering as well as a platform for creating an application-specific product for OEM customers.
A processor alongside the Nano module provides a simplified interface with the ability to mimic other readers, such as keyboard emulating barcode readers. It has a flexible platform and is capable of performing a large set of tasks. Its modular design allows for extension without redesigning the entire system.
This document is for hardware designers and software developers. The ThingMagic Configuration Tool (TCT) application and code samples to control the EL6e module from an external host are written using the Java programming language.
Release Notes
This document applies to EL6e module with firmware version 1.D.1 or later. It explains how to set up EL6e modules, how to configure them through RAIN interface and ThingMagic Configuration Tool (TCT), and how to configure them for keyboard operation. See the corresponding EL6e Firmware Release Notes for operational differences from what is in this User Guide specific to a firmware version. Any new features or known issues that are not reflected in this User Guide will be found in the Release Notes for the version of firmware you are using. Release notes can be downloaded from the same web site where you obtained this document.
www.JADAKtech.com

ThingMagic EL6e User Guide 2
Hardware Overview
The EL6e UHF RFID Module is a UHF Gen2V2 RFID reader that is controlled by a USB 2.0 or RS232 inteface (SPI and I2C configurations are available on request). The USB version is powered by USB and/or an external 5V power source and the RS232 version is powered by a DC power source between 4.5 and 26 volts.The EL6e does not include an antenna as a standard feature, but offers one antenna connector (U.FL) for an antenna that can be mounted on the board or separately from the board. JADAK offers two antenna options that can be mounted directly on the board.
The USB 2.0 input connection from a USB host source powers the EL6e with 5 volts and up to 3.5 watts peak power (700 mA). An additional set of pins on the connector allows additional power to be provided should the primary USB connection be unable to supply all the required current for high duty cycle and high RF level operation. The RS232 module consumes slightly less power above 10 VDC (4.3 W max) than it does below 10 VDC (4.7 W max).
The EL6e interface connects to a microprocessor that handles inbound and outbound data communication. The processor connects to an internal module, with its own processor, that handles communication with RFID tags.
The UHF RFID module used in the EL6e is a JADAK ThingMagic Nano reader with FCC certification QV5MERCURY6N. The Nano performs all the Gen2V2 RFID read operations. To communicate with RFID tags, the Nano reader transmits approximately 900 MHz signals through either an antenna mounted on the EL6e board, or to a separate antenna. In either case, the antenna is attached to the EL6e board via a U.FL RF connector.
The board mounted antennas offered as an option by JADAK are ceramic patch antennas type with an integrated PC board as part of the antenna structure. The output is circularly polarized. The read distance using the board-mounted antennas is 2 meters using standard folded-dipole tags in free space.
The Nano receives the tag back scatter signals and decodes tag data present in them. The Nano buffers and forwards the tag data back to the microprocessor.
The microprocessor accepts the decoded tag data, reformats it into RAIN protocol (or alternatively emulates a USB keyboard), that is forwarded to the application host. The EL6e primary mode of data transfer is “streamed tag data” where any tag in the antenna field is read and the data is sent immediately to the host. The EL6e also conforms to the RFID RAIN protocol for additional RFID operations.
Hardware Options
Antennas
The EL6e can be enhanced with an optional integrated antenna or will support an external antenna via a UFL on-board connector. A North American range and an EU range antenna are available which are designed to be physically attached to the EL6e board via stand-off hardware. See Set Up the USB Development Kit on page 40 for more information.
Protocols
The EL6e module supports only Gen2V2 (and earlier Gen2) UHF RFID protocol tags.
www.JADAKtech.com
ThingMagic EL6e User Guide 3
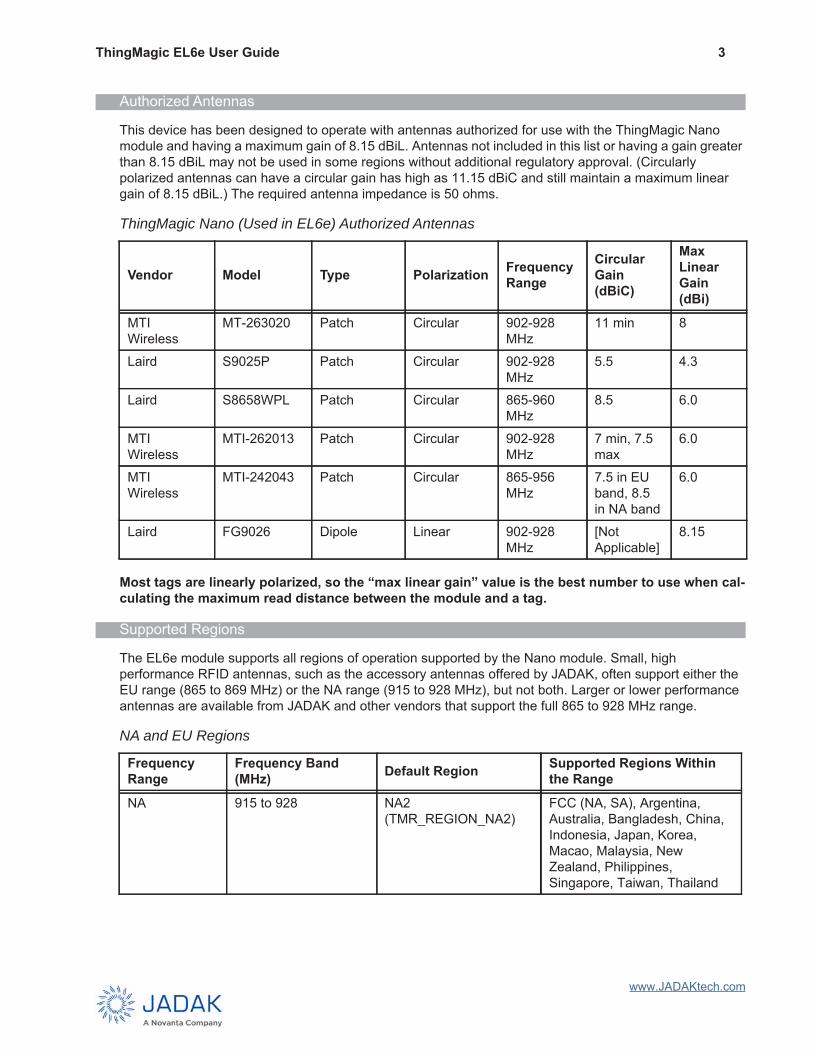
Authorized Antennas
This device has been designed to operate with antennas authorized for use with the ThingMagic Nano module and having a maximum gain of 8.15 dBiL. Antennas not included in this list or having a gain greater than 8.15 dBiL may not be used in some regions without additional regulatory approval. (Circularly polarized antennas can have a circular gain has high as 11.15 dBiC and still maintain a maximum linear gain of 8.15 dBiL.) The required antenna impedance is 50 ohms.
Most tags are linearly polarized, so the “max linear gain” value is the best number to use when cal-culating the maximum read distance between the module and a tag.
Supported Regions
The EL6e module supports all regions of operation supported by the Nano module. Small, high performance RFID antennas, such as the accessory antennas offered by JADAK, often support either the EU range (865 to 869 MHz) or the NA range (915 to 928 MHz), but not both. Larger or lower performance antennas are available from JADAK and other vendors that support the full 865 to 928 MHz range.
ThingMagic Nano (Used in EL6e) Authorized Antennas
Vendor Model Type Polarization Frequency Range
Circular Gain (dBiC)
Max Linear Gain (dBi)
MTI Wireless
MT-263020 Patch Circular 902-928 MHz
11 min 8
Laird S9025P Patch Circular 902-928 MHz
5.5 4.3
Laird S8658WPL Patch Circular 865-960 MHz
8.5 6.0
MTI Wireless
MTI-262013 Patch Circular 902-928 MHz
7 min, 7.5 max
6.0
MTI Wireless
MTI-242043 Patch Circular 865-956 MHz
7.5 in EU band, 8.5 in NA band
6.0
Laird FG9026 Dipole Linear 902-928 MHz
[NotApplicable]
8.15
NA and EU Regions
Frequency Range
Frequency Band (MHz) Default Region Supported Regions Within
the Range
NA 915 to 928 NA2 (TMR_REGION_NA2)
FCC (NA, SA), Argentina, Australia, Bangladesh, China, Indonesia, Japan, Korea, Macao, Malaysia, New Zealand, Philippines, Singapore, Taiwan, Thailand
www.JADAKtech.com

ThingMagic EL6e User Guide 4
There is also an additional “Open” region that scans a superset of all the other ranges for testing:
The following is the list of regions supported by each range and their abbreviation in the RAIN protocol setting:
NA Range
• FCC (NA2, NA3) • Argentina, Brazil (AR)• Australia (AU)• Bangladesh (BD)• China (PRC)• Indonesia (ID)• Japan (JP, JP2, JP3)• Korea (KR2)• Macao (MO)• Malaysia (MY)• New Zealand (NZ) • Philippines (PH)• Singapore (SG)• Taiwan (TW)• Thailand (TH)EU Range
• ETSI (EU3)• Hong Kong (HK)• India (IN)• Russia (RU)• Vietnam (VN)
EU 865 to 869 EU3 (TMR_REGION_EU3)
ETSI (EU), Hong Kong, India, Russia, Vietnam
Open Region
Frequency Range
Frequency Band (MHz) Default Region Supported Regions Within
the Range
OPEN 865- 869 and 915-928
OPEN (TMR_REGION_OPEN)
All regions are supported. NA and EU ranges plus Open region.
NA and EU Regions
Frequency Range
Frequency Band (MHz) Default Region Supported Regions Within
the Range
www.JADAKtech.com

ThingMagic EL6e User Guide 5
The host must configure a region of operation before tags can be read.
Countries not listed either have adopted the FCC or EU standards as-is or they have adopted these standards with an abbreviated frequency range. If the latter, JADAK provides a way to redefine the channels within a regional setting without changing any other characteristics of that region.
Different regions can be configured within the NA/EU region range on an EL6e module using the ThingMagic Configuration Tool (TCT) or by sending “"FreqReg" RAIN command through the RAIN Command Interface (RCI).
TCT Command to Configure Region
RAIN Commands to Configure Region
RAIN Command Purpose
{“Cmd”:”SetCfg”, “FreqReg”:”OPEN”} Configures Open region
{“Cmd”:”SetCfg”, “FreqReg”:”NA2”} (or){“Cmd”:”SetCfg”, “FreqReg”:”NA3”} (or){“Cmd”:”SetCfg”, “FreqReg”:”AR”} (or){“Cmd”:”SetCfg”, “FreqReg”:”AU”} (or){“Cmd”:”SetCfg”, “FreqReg”:”BD”} (or){“Cmd”:”SetCfg”, “FreqReg”:”JP”} (or){“Cmd”:”SetCfg”, “FreqReg”:”JP2”} (or){“Cmd”:”SetCfg”, “FreqReg”:”JP3”} (or){“Cmd”:”SetCfg”, “FreqReg”:”ID”} (or){“Cmd”:”SetCfg”, “FreqReg”:”PRC”} (or){“Cmd”:”SetCfg”, “FreqReg”:”KR2”} (or){“Cmd”:”SetCfg”, “FreqReg”:”MO”} (or){“Cmd”:”SetCfg”, “FreqReg”:”MY”} (or){“Cmd”:”SetCfg”, “FreqReg”:”NZ”} (or){“Cmd”:”SetCfg”, “FreqReg”:”PH”} (or){“Cmd”:”SetCfg”, “FreqReg”:”TW”} (or){“Cmd”:”SetCfg”, “FreqReg”:”SG”} (or){“Cmd”:”SetCfg”, “FreqReg”:”TH”}
Configures a region in NA region range:FCC (NA, SA), Argentina, Australia, Bangladesh, China, Indonesia, Japan, Korea, Macao, Malaysia, New Zealand, Philippines, Singapore, Taiwan, Thailand
www.JADAKtech.com
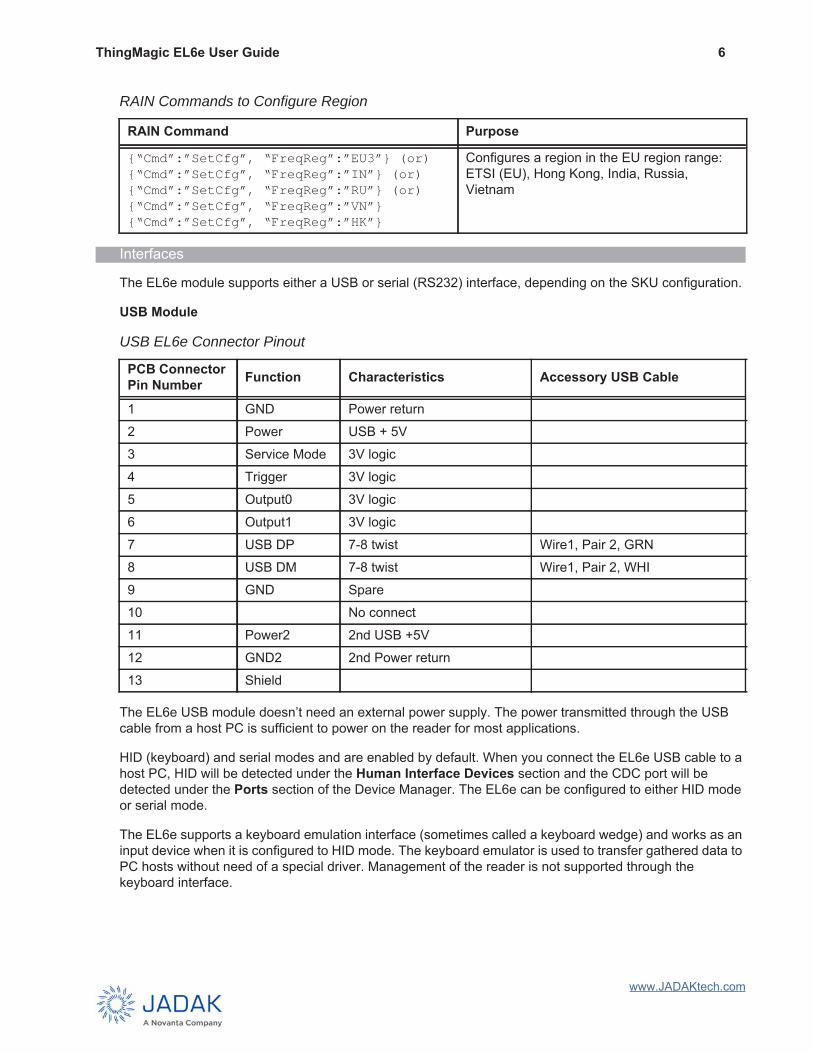
ThingMagic EL6e User Guide 6
Interfaces
The EL6e module supports either a USB or serial (RS232) interface, depending on the SKU configuration.
USB Module
The EL6e USB module doesn’t need an external power supply. The power transmitted through the USB cable from a host PC is sufficient to power on the reader for most applications.
HID (keyboard) and serial modes and are enabled by default. When you connect the EL6e USB cable to a host PC, HID will be detected under the Human Interface Devices section and the CDC port will be detected under the Ports section of the Device Manager. The EL6e can be configured to either HID mode or serial mode.
The EL6e supports a keyboard emulation interface (sometimes called a keyboard wedge) and works as an input device when it is configured to HID mode. The keyboard emulator is used to transfer gathered data to PC hosts without need of a special driver. Management of the reader is not supported through the keyboard interface.
{“Cmd”:”SetCfg”, “FreqReg”:”EU3”} (or){“Cmd”:”SetCfg”, “FreqReg”:”IN”} (or){“Cmd”:”SetCfg”, “FreqReg”:”RU”} (or){“Cmd”:”SetCfg”, “FreqReg”:”VN”}{“Cmd”:”SetCfg”, “FreqReg”:”HK”}
Configures a region in the EU region range:ETSI (EU), Hong Kong, India, Russia, Vietnam
USB EL6e Connector Pinout
PCB Connector Pin Number Function Characteristics Accessory USB Cable
1 GND Power return2 Power USB + 5V3 Service Mode 3V logic4 Trigger 3V logic5 Output0 3V logic6 Output1 3V logic7 USB DP 7-8 twist Wire1, Pair 2, GRN8 USB DM 7-8 twist Wire1, Pair 2, WHI9 GND Spare10 No connect11 Power2 2nd USB +5V12 GND2 2nd Power return13 Shield
RAIN Commands to Configure Region
RAIN Command Purpose
www.JADAKtech.com
ThingMagic EL6e User Guide 7
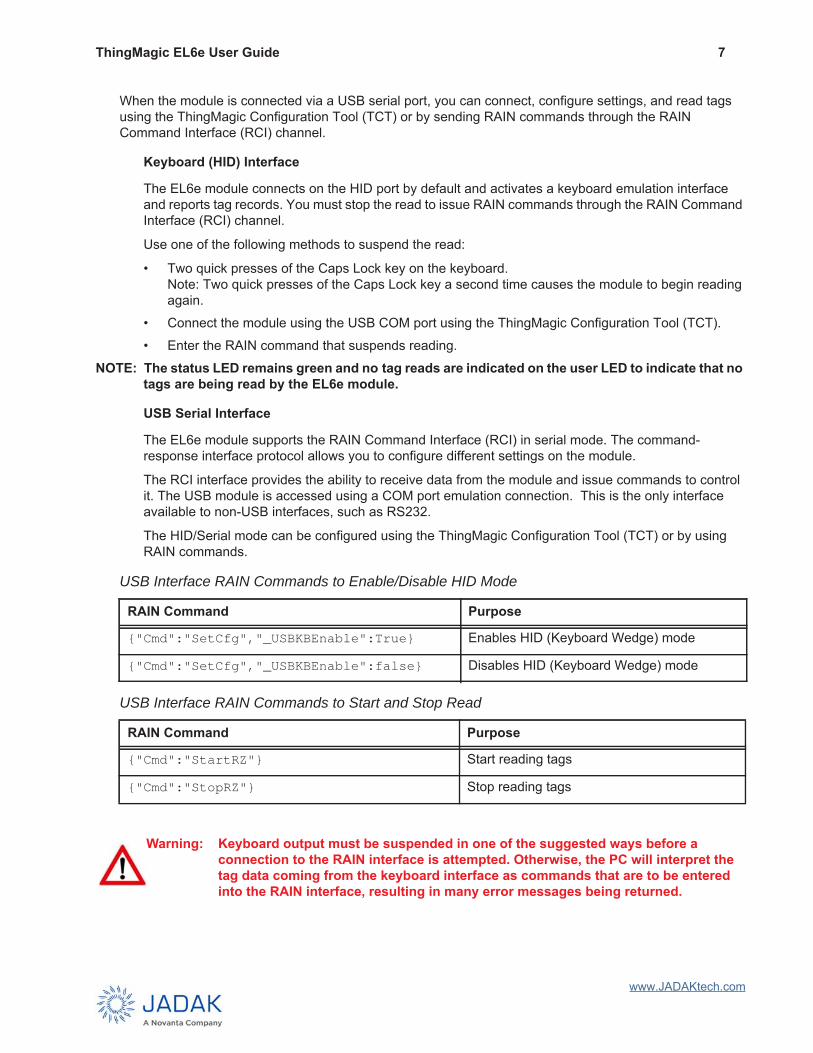
When the module is connected via a USB serial port, you can connect, configure settings, and read tags using the ThingMagic Configuration Tool (TCT) or by sending RAIN commands through the RAIN Command Interface (RCI) channel.
Keyboard (HID) Interface
The EL6e module connects on the HID port by default and activates a keyboard emulation interface and reports tag records. You must stop the read to issue RAIN commands through the RAIN Command Interface (RCI) channel.
Use one of the following methods to suspend the read:
• Two quick presses of the Caps Lock key on the keyboard. Note: Two quick presses of the Caps Lock key a second time causes the module to begin reading again.
• Connect the module using the USB COM port using the ThingMagic Configuration Tool (TCT).• Enter the RAIN command that suspends reading.
NOTE: The status LED remains green and no tag reads are indicated on the user LED to indicate that no tags are being read by the EL6e module.
USB Serial Interface
The EL6e module supports the RAIN Command Interface (RCI) in serial mode. The command-response interface protocol allows you to configure different settings on the module.
The RCI interface provides the ability to receive data from the module and issue commands to control it. The USB module is accessed using a COM port emulation connection. This is the only interface available to non-USB interfaces, such as RS232.
The HID/Serial mode can be configured using the ThingMagic Configuration Tool (TCT) or by using RAIN commands.
USB Interface RAIN Commands to Enable/Disable HID Mode
RAIN Command Purpose
{"Cmd":"SetCfg","_USBKBEnable":True} Enables HID (Keyboard Wedge) mode
{"Cmd":"SetCfg","_USBKBEnable":false} Disables HID (Keyboard Wedge) mode
USB Interface RAIN Commands to Start and Stop Read
RAIN Command Purpose
{"Cmd":"StartRZ"} Start reading tags
{"Cmd":"StopRZ"} Stop reading tags
Warning: Keyboard output must be suspended in one of the suggested ways before a connection to the RAIN interface is attempted. Otherwise, the PC will interpret the tag data coming from the keyboard interface as commands that are to be entered into the RAIN interface, resulting in many error messages being returned.
www.JADAKtech.com

ThingMagic EL6e User Guide 8
RS232 Interface
The RS232 EL6e module supports a single serial interface (RS232) over which the module can be configured and maintained. This interface is also used by the host to obtain tag data and operational warnings.
The EL6e module requires an external power supply to communicate with the module via the RS232 port. You can connect to the module on the RS232 port using a COM port and you can change the module configuration/settings and read tags using the ThingMagic Configuration Tool (TCT) or by using RAIN commands.
Cable Connections
Three different styles of cables are available to connect the EL6e board to a host, depending on the active interface:
1. USB cable terminated in a standard USB Type A male plug
2. RS232 cable terminated in a 9-pin D-shell connector (standard pin-out for older PCs).
3. Universal interface cable terminated in a 15-pin connector as is standard for video VGA connections (DE-15, also called HD-15), with a proprietary pin-out arrangement for USB, RS232, or other interfaces.
RS232 EL6e Connector Pinout
PCB Connector Pin Number Function Characteristics Accessory 9-Pin RS232 Cable
1 GND Power return2 Power 4.5 - 26 VDC3 Service Mode 3V logic in4 Trigger 3V logic in5 Output0 3V logic6 Output1 3V logic7 RS232 TX Bipolar, in Pin 38 RS232 RX Bipolar, out Pin 29 RS232 RTS Bipolar, in Pin 710 RS232 CTS Bipolar, out Pin 811 RS232 DTR Bipolar, in Pin 412 RS232 DSR Bipolar, out Pin 613 Shield
www.JADAKtech.com
ThingMagic EL6e User Guide 9
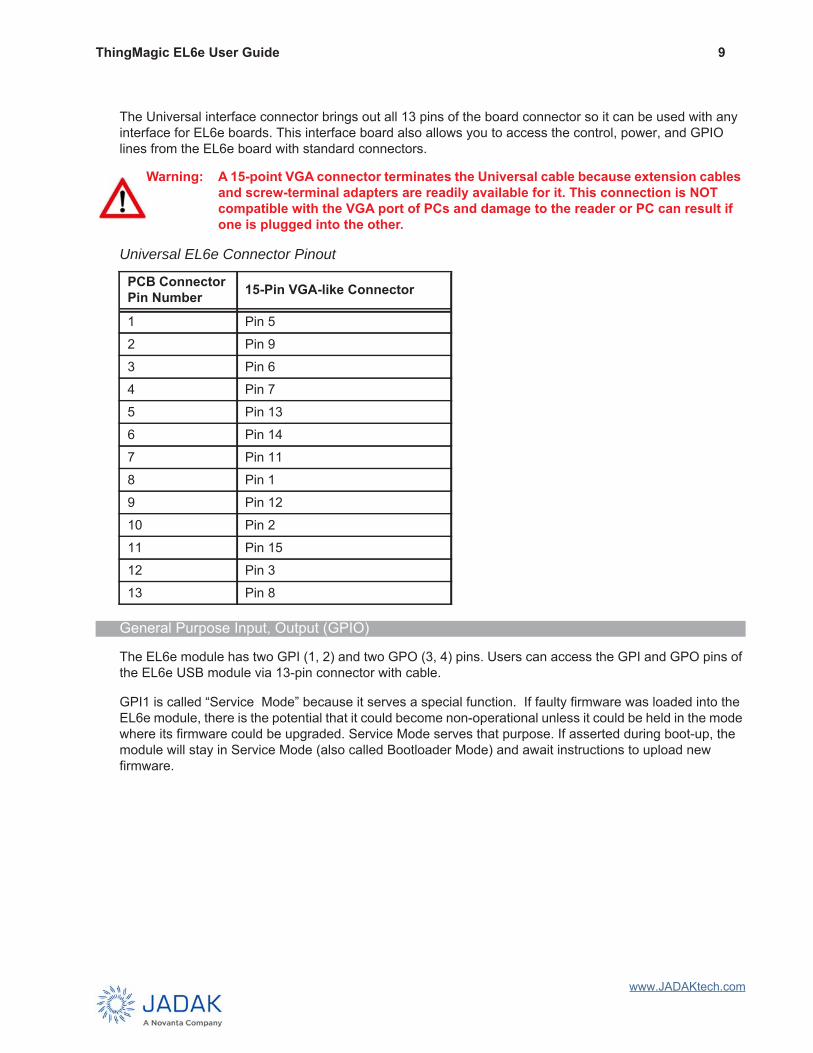
The Universal interface connector brings out all 13 pins of the board connector so it can be used with any interface for EL6e boards. This interface board also allows you to access the control, power, and GPIO lines from the EL6e board with standard connectors.
General Purpose Input, Output (GPIO)
The EL6e module has two GPI (1, 2) and two GPO (3, 4) pins. Users can access the GPI and GPO pins of the EL6e USB module via 13-pin connector with cable.
GPI1 is called “Service Mode” because it serves a special function. If faulty firmware was loaded into the EL6e module, there is the potential that it could become non-operational unless it could be held in the mode where its firmware could be upgraded. Service Mode serves that purpose. If asserted during boot-up, the module will stay in Service Mode (also called Bootloader Mode) and await instructions to upload new firmware.
Warning: A 15-point VGA connector terminates the Universal cable because extension cables and screw-terminal adapters are readily available for it. This connection is NOT compatible with the VGA port of PCs and damage to the reader or PC can result if one is plugged into the other.
Universal EL6e Connector Pinout
PCB Connector Pin Number 15-Pin VGA-like Connector
1 Pin 52 Pin 93 Pin 64 Pin 75 Pin 136 Pin 147 Pin 118 Pin 19 Pin 1210 Pin 211 Pin 1512 Pin 313 Pin 8
www.JADAKtech.com

ThingMagic EL6e User Guide 10
Using the following RAIN commands you can view the current GPIO configuration and change the GPO pin state to High or Low.
NOTE: There is no option in the ThingMagic Configuration Tool (TCT) to check the current module GPIO states and to change the GPO state.
SKU Ordering
Power Requirements
When Transmitting (Duty Cycle and RF Power Level)
USB Power consumption: 3.5 Watts peak, less than 2.5 Watts average with duty cycle 50%.
4.5 to 10 Volt power in power consumption: 4.7 Watts
10 to 26 Volt power in power consumption: 4.3 Watts.
When Idle (Settings)
USB power idle consumption: 0.7 Watts.
USB Characteristics
USB Start up current: 275 mA after 120 second power down.
Tag reading input power: Less than 2.5 Watts average with duty cycle 50%.
Host Requirements
Microsoft® Windows® 64-bit Operating System
The ThingMagic Configuration Tool (TCT) only supports a Windows 64-bit operating system.
NOTE: In Windows 7 and lower operating systems, the EL6e COM port driver (EL6e.inf) needs to be installed manually. Windows 10 automatically installs and detects using a generic driver.
JRE 1.8 or later
Java 1.8 or later needs to be installed on the host PC to work with the ThingMagic Configuration Tool (TCT) and to run Java samples.
GPIO RAIN Commands
RAIN Command Purpose
{"Cmd":"GetGPIOs","ReportNow":[1,2,3,4]} Get GPIO states
{"Cmd":"SetGPIOs","GPIOs":[[3,true],[4,false]]} Change GPO state
SKUs
SKU Packaging Interface Frequency Range
PLT-RFID-EL6E-UHF-0-USB Board only USB UniversalPLT-RFID-EL6E-UHF-0-232 Board only RS232 Universal
www.JADAKtech.com
ThingMagic EL6e User Guide 11
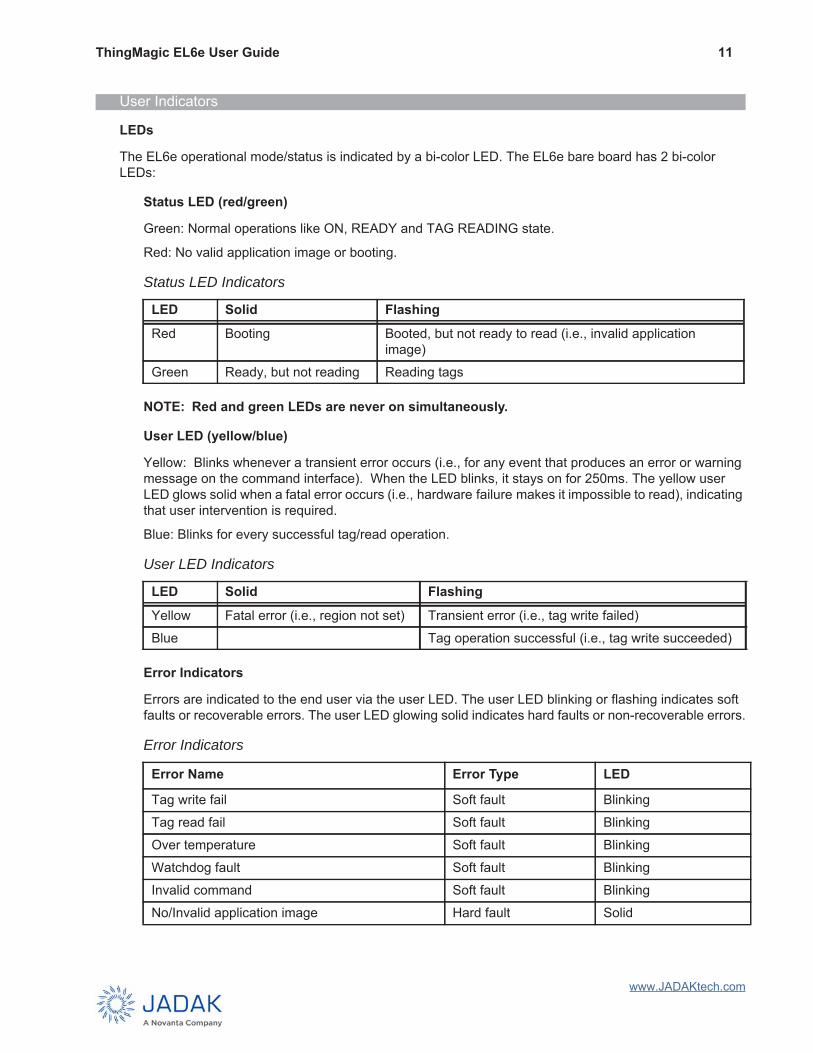
User Indicators
LEDs
The EL6e operational mode/status is indicated by a bi-color LED. The EL6e bare board has 2 bi-color LEDs:
Status LED (red/green)
Green: Normal operations like ON, READY and TAG READING state.
Red: No valid application image or booting.
NOTE: Red and green LEDs are never on simultaneously.
User LED (yellow/blue)
Yellow: Blinks whenever a transient error occurs (i.e., for any event that produces an error or warning message on the command interface). When the LED blinks, it stays on for 250ms. The yellow user LED glows solid when a fatal error occurs (i.e., hardware failure makes it impossible to read), indicating that user intervention is required.
Blue: Blinks for every successful tag/read operation.
Error Indicators
Errors are indicated to the end user via the user LED. The user LED blinking or flashing indicates soft faults or recoverable errors. The user LED glowing solid indicates hard faults or non-recoverable errors.
Status LED Indicators
LED Solid Flashing
Red Booting Booted, but not ready to read (i.e., invalid application image)
Green Ready, but not reading Reading tags
User LED Indicators
LED Solid Flashing
Yellow Fatal error (i.e., region not set) Transient error (i.e., tag write failed)Blue Tag operation successful (i.e., tag write succeeded)
Error Indicators
Error Name Error Type LED
Tag write fail Soft fault BlinkingTag read fail Soft fault BlinkingOver temperature Soft fault BlinkingWatchdog fault Soft fault BlinkingInvalid command Soft fault BlinkingNo/Invalid application image Hard fault Solid
www.JADAKtech.com

ThingMagic EL6e User Guide 12
Audio Indicators
The beeper indicates successful tag reads as well as successful and unsuccessful tag operations. Beepers are configurable to the four following levels:
• Mute• Low (Default)• Medium• HighBy default, the beeper is configured to low volume. Configure the beeper to other levels using the ThingMagic Configuration Tool (TCT) or by sending RAIN commands through the RAIN Command Interface (RCI) channel.
Insufficient DC power Hard fault SolidNano module interface fail Hard fault SolidHigh return loss Hard fault SolidOver current Hard fault SolidProcessor exceptions Hard fault Solid
Audio Indicator RAIN Commands
RAIN Command Purpose
{"Cmd":"SetCfg","_AudioVolume":"MUTE”} Mute the beeper
{"Cmd":"SetCfg","_AudioVolume":"LOW"} Set beeper to low
{"Cmd":"SetCfg","_AudioVolume":"MED"} Set beeper to medium
{"Cmd":"SetCfg","_AudioVolume":"HIGH"} Set beeper to high
Error Indicators
www.JADAKtech.com

ThingMagic EL6e User Guide 13
Software Overview
Host Software
No software installation is needed for basic or default operation. But the following software is required if you wish to configure the EL6e.
ThingMagic Configuration Tool (TCT)
The ThingMagic Configuration Tool is a desktop application developed using Java language and built in javafx technology. TCT is used to connect, configure, and read tags. TCT is only supported on the Windows 64-bit operating system.
Refer to ThingMagic Configuration Tool, for more information.
Java Code Samples
You may also perform a few operations on the EL6e module using Java. The following Java code samples can be executed using an IDE (NetBeans, Eclipse) through a terminal. You must install JRE 1, 8 or later to work with the following code samples.
SingleTagRead.java
This demonstrates read functionality against an HDR workflow. It reports one closest tag per second.
BulkTagRead.java
This demonstrates read functionality against a MONITOR workflow. It reports tag records for every second.
FirmwareUpdate.java
This allows you to update firmware on the EL6e module. This code sample takes approximately 30 seconds to update the firmware on the module. You must provide the firmware path.
TagCommissioning.java
This performs a write operation on the closest tag in the field.
TagUpdate.java
This performs a write operation on all available tags in the field.
Serial Emulator (Optional)
You can also control the EL6e module by sending RAIN commands manually either through a third party serial emulator such as Putty or Dock light, or through a customized application. Refer to RAIN Command Interface, beginning on page 22, for more information.
Firmware Update
You can update the firmware on all variants of the EL6e module using the ThingMagic Configuration Tool (TCT) or Java sample code.
www.JADAKtech.com

ThingMagic EL6e User Guide 14
Update Firmware Using TCT
1. Download and install TCT using the following steps.
• Use a web browser to navigate to https://www.jadaktech.com/documentation/.• Download the SDK (EL6e_sdk-ZOLA-01.0D.00.xx.zip), available under the EL6e folder.• Once downloaded, extract the zip archive to the desired location.• Find the ThingMagic Configuration Tool executable and double click on it to install to the host PC.• Follow the steps for your OS.
2. Open the ThingMagic Configuration Tool (TCT) and navigate to the Connect page.
3. Select the proper COM port under Available Devices and click on Connect.
4. Navigate to the Utilities tab.
5. Click on Browse and go to the SDK extracted file location. Select the EL6e_app-01.0D.00.xx.bin file.
6. Click on Update. The firmware update takes approximately 25-30 seconds and redirects you to the Connect page when complete.
NOTE: Once the firmware update process is initiated, the existing firmware is erased. To revert to the old firmware, repeat the firmware update process with an old firmware image file.
www.JADAKtech.com

ThingMagic EL6e User Guide 15
Communication Protocol
Workflow Overview
The RAIN interface specification introduces the concept of Modes, where a single setting can modify a range of reader protocol settings. JADAK has extended this concept to define Autonomous Workflows where a wider range of settings, and reader behavior, can be changed with a single command.
By default, the EL6e board is connected to the PC using a USB cable and is detected by the PC as a keyboard device. For basic or default operation, no driver or software installation is needed. You can set the reader into different modes using Java code samples or using the ThingMagic Configuration Tool.
There are 4 following autonomous workflows you can configure on the EL6e module:
• HDR (single tag read) • Monitor (bulk tag read, default mode)• Tag Commissioning• Tag UpdateHDR
This mode is similar to a barcode scanner and is used for applications such as inventory or equipment logging and attendee registration at events.
HDR mode is also known as single tag read. With HDR mode, The EL6e module may read many tags but reports the closest tag every second. The reader reports the tag again if the tag is moved out of range for a specified length of time and then presented to the reader again. The module reads the next tag if the first tag is moved away from the reader and a different tag has the highest field strength.
By default, HDR mode reports EPC of tag reads irrespective of the configured data format. But you can configure the reader to report other tag read metadata information along with tag EPC.
Tag data to be read:
• EPC and time (default)• Metadata Output data format:
• Scan engine format (default); keyboard is QUERTY data presented in ASCII • Verbose format• RAIN format User indicators:
• Application shows status LED in blinking green for tag reads.• Application beeps for every tag report.
www.JADAKtech.com
ThingMagic EL6e User Guide 16
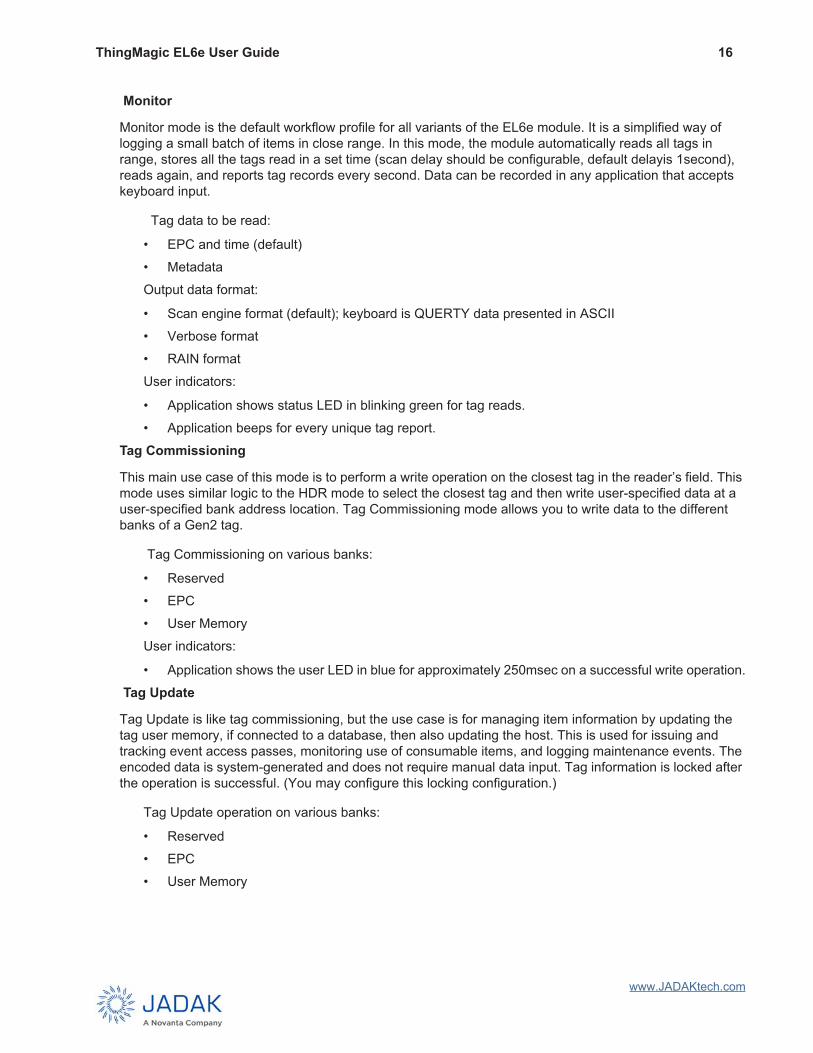
Monitor
Monitor mode is the default workflow profile for all variants of the EL6e module. It is a simplified way of logging a small batch of items in close range. In this mode, the module automatically reads all tags in range, stores all the tags read in a set time (scan delay should be configurable, default delayis 1second), reads again, and reports tag records every second. Data can be recorded in any application that accepts keyboard input.
Tag data to be read:
• EPC and time (default)• Metadata Output data format:
• Scan engine format (default); keyboard is QUERTY data presented in ASCII • Verbose format• RAIN format User indicators:
• Application shows status LED in blinking green for tag reads.• Application beeps for every unique tag report.
Tag Commissioning
This main use case of this mode is to perform a write operation on the closest tag in the reader’s field. This mode uses similar logic to the HDR mode to select the closest tag and then write user-specified data at a user-specified bank address location. Tag Commissioning mode allows you to write data to the different banks of a Gen2 tag.
Tag Commissioning on various banks:
• Reserved• EPC• User MemoryUser indicators:
• Application shows the user LED in blue for approximately 250msec on a successful write operation. Tag Update
Tag Update is like tag commissioning, but the use case is for managing item information by updating the tag user memory, if connected to a database, then also updating the host. This is used for issuing and tracking event access passes, monitoring use of consumable items, and logging maintenance events. The encoded data is system-generated and does not require manual data input. Tag information is locked after the operation is successful. (You may configure this locking configuration.)
Tag Update operation on various banks:
• Reserved• EPC• User Memory
www.JADAKtech.com

ThingMagic EL6e User Guide 17
User indicators:
• Application shows the user LED in blue for approximately 250msec on a successful write operation and shows the status LED in blinking green.
• Application beeps for every write operation.
Save and Restore Configuration
You may need to use the same reader configuration multiple times. You can save the current existing reader configuration to flash memory, then restore the saved configuration on the EL6e module. This can be done using ThingMagic Configuration Tool (TCT) and by issuing RAIN Command Interface commands.
Autonomous Workflow Specifications
Item Bulk Read Single Read Tag Commission Tag Update
Output Report Rate 1 report/second 1 tag/second N/A: Reports result
N/A: Reports result
Detection Filter All reads Closest reads Closest reads Closest reads RSSI Threshold Off -40 dBm -40 dBm -40 dBm Tag Priority N/A Least recently
read Least recently read
Least recently read
Report Time 1/second Tag first seen (Action results) (Action results) TX Read Power 20 dBm 20 dBm 20 dBm 20 dBm TX Write Power 23 dBm 23 dBm 23 dBm 23 dBm Gen2 Session S1 S0 S0 S0 Gen2 Target A A A A Gen2 Q Dynamic Dynamic Dynamic Dynamic Gen2 Init Q 4 2 2 2 Gen2 Encoding M4 M2 M2 M2 Duty Cycle On Time 250 1000 1000 1000 Duty Cycle Off Time 0 0 0 0
Workflow RAIN Commands
RAIN Command Purpose
{"Cmd":"SetCfg","Mode":"HDR"} To set HDR workflow
{"Cmd":"SetCfg","Mode":"MONITOR"} To set MONITOR workflow
{"Cmd":"SetCfg","Mode":"TagCommission"} To set Tag Commission workflow
{"Cmd":"SetCfg","Mode":"TagUpdate"} To set Tag Update workflow
www.JADAKtech.com

ThingMagic EL6e User Guide 18
Save Configuration
You can store the current reader configuration in permanent memory (flash). Send a SaveFields RAIN command through the Rain Command Interface (RCI), or click the Save button on the TCT Configuration page.
Restore Configuration
You can discard current active settings and apply the settings retrieved from the reader’s permanent memory. Send a ReadFields RAIN command through the Rain Command Interface (RCI), or click the Revert button on the TCT Configuration page.
Load Default Configuration
You can discard current active settings and replace them with factory provided settings. Send a DefaultFields RAIN command through the Rain Command Interface (RCI), or click the Load Defaults button on the TCT Configuration page.
Data Reporting Formats and Metadata
When the EL6e module is connected on the HID port, you can configure various data formats for the output string. By default, the keyboard interface is configured to EPC format, and returns only the EPC of tags read.
Data formats you can configure when the reader is connected via a HID port are:
• EPC only• Plain metadata• JSON metadataEPC Only
The EL6e module returns only the tag read EPCs when data is transmitted on a HID port. You cannot apply this data format for USB CDC and RS232 interfaces.
Plain Metadata
By default, the reader reports tag EPCs along with a timestamp on a HID port when you configure the Metadata format. But the reader has no concept of time zone. You should set the time to your local time zone before starting a read. You cannot apply this data format for USB CDC and RS232 interfaces.
RAIN Commands to Save and Restore Configurations
RAIN Command Purpose
{"Cmd":"SaveFields"} Save current reader configuration in nonvolatile memory
{"Cmd":"ReadFields"} Load configuration on reader from nonvolatile memory
{"Cmd":"DefaultFields"} Load factory provided configuration on reader
www.JADAKtech.com
ThingMagic EL6e User Guide 19
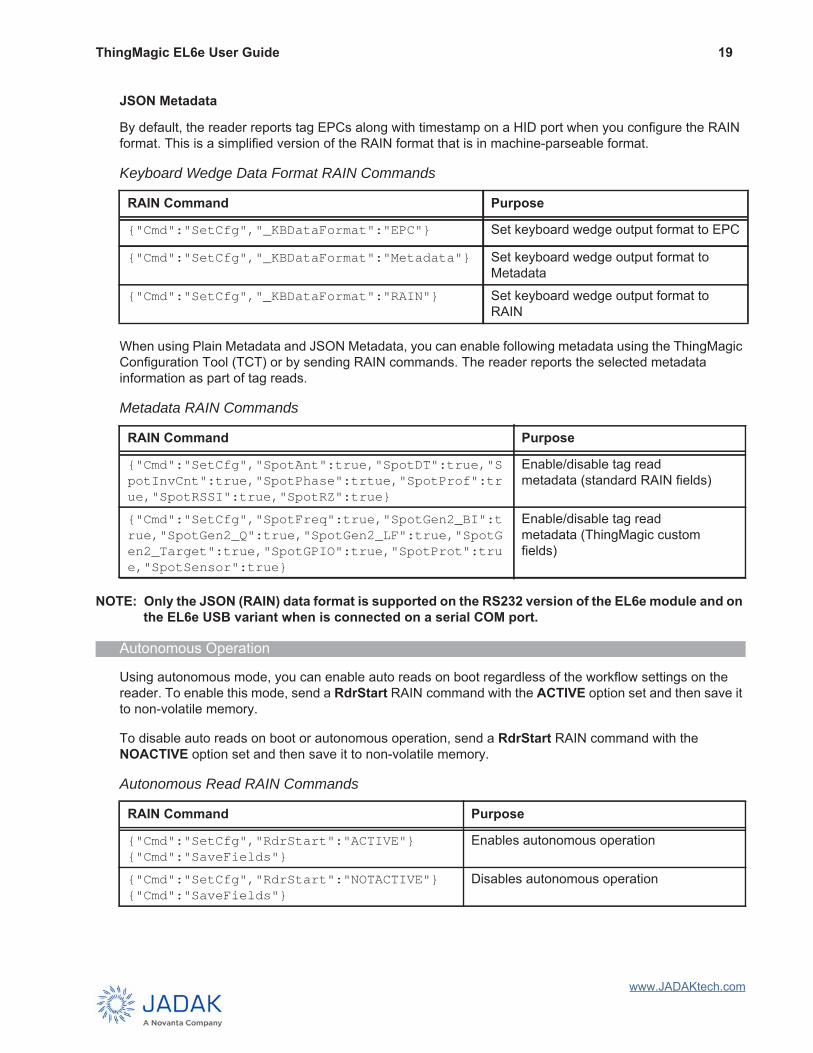
JSON Metadata
By default, the reader reports tag EPCs along with timestamp on a HID port when you configure the RAIN format. This is a simplified version of the RAIN format that is in machine-parseable format.
When using Plain Metadata and JSON Metadata, you can enable following metadata using the ThingMagic Configuration Tool (TCT) or by sending RAIN commands. The reader reports the selected metadata information as part of tag reads.
NOTE: Only the JSON (RAIN) data format is supported on the RS232 version of the EL6e module and on the EL6e USB variant when is connected on a serial COM port.
Autonomous Operation
Using autonomous mode, you can enable auto reads on boot regardless of the workflow settings on the reader. To enable this mode, send a RdrStart RAIN command with the ACTIVE option set and then save it to non-volatile memory.
To disable auto reads on boot or autonomous operation, send a RdrStart RAIN command with the NOACTIVE option set and then save it to non-volatile memory.
Keyboard Wedge Data Format RAIN Commands
RAIN Command Purpose
{"Cmd":"SetCfg","_KBDataFormat":"EPC"} Set keyboard wedge output format to EPC
{"Cmd":"SetCfg","_KBDataFormat":"Metadata"} Set keyboard wedge output format to Metadata
{"Cmd":"SetCfg","_KBDataFormat":"RAIN"} Set keyboard wedge output format to RAIN
Metadata RAIN Commands
RAIN Command Purpose
{"Cmd":"SetCfg","SpotAnt":true,"SpotDT":true,"SpotInvCnt":true,"SpotPhase":trtue,"SpotProf":true,"SpotRSSI":true,"SpotRZ":true}
Enable/disable tag read metadata (standard RAIN fields)
{"Cmd":"SetCfg","SpotFreq":true,"SpotGen2_BI":true,"SpotGen2_Q":true,"SpotGen2_LF":true,"SpotGen2_Target":true,"SpotGPIO":true,"SpotProt":true,"SpotSensor":true}
Enable/disable tag read metadata (ThingMagic custom fields)
Autonomous Read RAIN Commands
RAIN Command Purpose
{"Cmd":"SetCfg","RdrStart":"ACTIVE"} {"Cmd":"SaveFields"}
Enables autonomous operation
{"Cmd":"SetCfg","RdrStart":"NOTACTIVE"} {"Cmd":"SaveFields"}
Disables autonomous operation
www.JADAKtech.com

ThingMagic EL6e User Guide 20
You can also can enable or disable autonomous mode using the ThingMagic Configuration Tool (TCT), in the Configure page under the General settings section.
Set Date and Time Support
The EL6e module has a real-time clock for reporting time stamps along with tag records, but it does not have a battery backup. By default, the reader reports the date 01 Jan 2010 and time after power on. You can change the reader date and time by sending a RAIN command or using the ThingMagic Configuration Tool (TCT). The reader then keeps track of the date and time until powered down.
By default, the EL6e reports the date and time along with tag reads in Plain Metadata and JSON Metadata formats. When just Plain Metadata is configured on the reader, the EL6e reports a time stamp. When just JSON Metadata is configured on the reader, the EL6e reports the calendar date and time.
Heartbeat Support
The EL6e module supports a heartbeat feature, which indicates the presence of the reader. When heartbeat is enabled on the reader, the reader name with the serial number is reported in configured time intervals. A RAIN command must be sent to the reader to enable or disable the heartbeat option.
NOTE: The ThingMagic Configuration Tool (TCT) does not have an option to enable or disable heartbeat.
Reboot Support
You can reboot the EL6e module by sending the following RAIN command to the reader through the Rain Command Interface (RCI). After the reader reboots, it applies the configuration stored in non-volatile memory on the reader.
NOTE: The ThingMagic Configuration Tool (TCT) does not have an option to reboot the reader.
Date and Time RAIN Commands
RAIN Command Purpose
{"Cmd":"SetCfg", "DateTime":"2018-12-18T19:30:00.000Z"}
Change the reader date and time
{"Cmd":"GetCfg","Fields":["DateTime"]} Get the reader’s current date and time
Heartbeat RAIN Commands
RAIN Command Purpose
{"Cmd":"SetCfg","HBPeriod":1} Enable heartbeat for every 1 second
{"Cmd":"SetCfg","HBPeriod":0} Disable heartbeats
{"Cmd":"SetCfg","HBPeriod":10} Enable heartbeat for every 10 seconds
Reboot RAIN Command
RAIN Command Purpose
{"Cmd":"Reboot"} Reboot the reader
www.JADAKtech.com

ThingMagic EL6e User Guide 21
Set Read Power Support
A default read power is allocated for each workflow. You can change the read power using a RAIN command or via ThingMagic Configuration Tool (TCT).
Set Read Power RAIN Command
RAIN Command Purpose
{"Cmd":"SetRZ","ID":1,"ReadPwr":20.0} Set read power
www.JADAKtech.com

ThingMagic EL6e User Guide 22
RAIN Command Interface
The RAIN Command Interface provides a human-readable format for controlling the reader and obtaining its output. It provides a structure for commands as well as a structure for organizing and grouping reader configuration settings. Status and error message formats and content are also defined. The RAIN Command Interface Specification allows customization at all levels beyond basic functionality (see RAIN Command Reference on page 26).
RAIN command capabilities:
• Enable using Caps Lock to toggle reading on and off (USB EL6e only)• Set the Hop table definition within a region • Show available regions • Turn on and off keyboard interface output (USB EL6e only)• Turn on and off RAIN Interface tag output (retains command/response capability) • Turn off reporting of Heartbeat messages • Set autonomous Reading • Set Save, Default, and Restore settings • Set entering SGTIN and GID information • Set Tag Updates• Set Memory Bank and location • Set length of the Date/Time Format• Set the Counter length and maximum allowed value • Select the interpreted output format for data fields • Set time for when a tag is re-reported for single tag reads
Autonomous Workflow
Each workflow has a name by which it can be selected. The EL6e terminology differs from the RAIN RCI terminology.
{"Cmd":"SetCfg", "Mode":" MONITOR"}
{"Cmd":"SetCfg", "Mode":" HDR"}
Autonomous Workflows in EL6e and RAIN terms
RAIN Term EL6e Term
“Mode” Workflow“Mode”:”AUTO” Default settings, i.e., no workflow-specific tuning“Mode”:”MONITOR” Workflow: Bulk Read“Mode”:”HDR” Workflow: Single Read
www.JADAKtech.com

ThingMagic EL6e User Guide 23
Each workflow may have additional, optional parameters. If a parameter’s value is not specified, it takes on the workflow’s default value. If the workflow does not define a default value, then it retains its currently set value.
Autonomous Workflow Breakdown
The EL6e utilizes the RAIN Communication Interface (RCI). The basic JSON format and command structure of RAIN is general enough to accommodate more commands, but there may be some cases where custom extensions to the protocol are required to accommodate additional user and product scenarios.
The actual "work" of a workflow is divided between various computing resources and levels of abstraction:
• Host: The host computer. We will deliver code samples for each workflow. In some cases, these code samples will be trivial, if most of the functionality is present in the EL6e firmware. In other cases, significant logic may be housed in the host program. Initially, the code samples will be implemented in Java, to maximize reuse opportunities in the TCT.
• RAIN: The host communicates to the EL6e module via RCI protocol.• EL6e: The EL6e main processor (SAM4).Autonomous Workflow: Single Read
Single Read is appropriate for focusing on reading one tag at a time.
Autonomous Workflow: Bulk Read
Bulk Read is appropriate for reading a large number of tags.
Single Read Workflow
Abstraction Level Commands
Host N/A – Not required unless data needs postprocessing RAIN {"Cmd":"SetCfg", "Mode":"HDR"}
{"Cmd":"StartRZ"} {"Report":"TagEvent", …}
EL6e Filter incoming tag reads from Mercury API, choosing only one to report per read cycle
Mercury API TMR_startReading() or TMR_Read(), depending on use case
Bulk Read Workflow
Abstraction Level Commands
Host N/A – Not required unless data needs postprocessing RAIN {"Cmd":"SetCfg", "Mode":"MONITOR"}
{"Cmd":"StartRZ"} {"Report":"TagEvent", …}
EL6e N/A – Just translate between RAIN and Mercury API Mercury API TMR_startReading() or TMR_Read(), depending on use case
www.JADAKtech.com

ThingMagic EL6e User Guide 24
Autonomous Workflow: Tag Commission
Tag Commission is used to initialize tag memory.
Autonomous Workflow: Tag Update
Tag Update is used for incremental writes to tag memory. Some scenarios include:
• Write a fixed value to tag, e.g., Mark a tag as having been present at a certain location by writing a Reader ID.
• Write the current time to a tag, e.g., Timestamp a tag's presence at a certain point
Tag Commission Workflow
Abstraction Level Commands
Host Convert from Data Standard format (e.g., SGTIN, UDI) to a plain, binary EPCRAIN {"Cmd":"SetCfg", "Mode":"TagCommission"}
{"Cmd":"SetProf", "Write":[[1,1,7,0,["VAL",":3000:1111:2222:3333:4444:5555:6666"],true]]} {"Cmd":"SetProf", "Write":[ [1,1,7,0,["VAL",":3000:1111:2222:3333:4444:5555:6666"],true], [3,0,2,0,["VAL",":1234:5678"],true] ]} {"Cmd":"ThisTag", "Prof":[1]}
EL6e N/A – Just translate between RAIN and Mercury API Mercury API Iterate over write tuples: run
TMR_executeTagOp() with TMR_TagOp_GEN2_WriteData for each one
Tag Update Workflow - Write a Fixed Value
Abstraction Level Commands
Host N/A – Just set things up RAIN {"Cmd":"SetCfg", "Mode":"TagUpdate"}
{"Cmd":"SetProf", "Write":[[3,0,2,0,["VAL",":1234:5678"],true]]} {"Cmd":"StartRZ"}
EL6e N/A – Just translate between RAIN and Mercury API Mercury API Embedded Tag Write
Create a read plan with an embedded tag write TagOp TMR_RP_init_simple() TMR_RP_set_tagop() with TMR_TagOp_GEN2_WriteData TMR_paramSet(TMR_PARAM_READ_PLAN) TMR_startReading() or TMR_Read(), depending on use case
www.JADAKtech.com

ThingMagic EL6e User Guide 25
Start Reading Automatically
The procedure for making the reader run autonomously is the same, regardless of workflow. Set the RdrStart setting and save it to non-volatile configuration.
Tag Update Workflow - Write a Timestamp
Abstraction Level Commands
Host N/A – Just set things up RAIN {"Cmd":"SetCfg", "DateTime":"2018-09-25T21:04:05.123Z"}
{"Cmd":"SetCfg", "Mode":"TagUpdate"} {"Cmd":"SetProf", "Write":[[3,0,2,0,["DT"],true]]} {"Cmd":"StartRZ"}
EL6e TMR_RP_init_simple() while (RZ still activated) { now = tmr_gettime() / 1000 TMR_RP_set_tagop() with TMR_TagOp_GEN2_WriteData(Bank=USER, Addr=0, Data=[(now>>16)&0xFFFF, now&0xFFFF]) TMR_paramSet(TMR_PARAM_READ_PLAN) TMR_startReading() <wait until time to get a new timestamp value> TMR_stopReading(); }
Mercury API Embedded Tag Write Create a read plan with an embedded tag write TagOp Periodically update the embedded tag write value See EL6e pseudocode, above
Enable Autonomous Operation
Abstraction Level Commands
Host N/ARAIN {"Cmd":"SetCfg", "RdrStart":"ACTIVE"}
{"Cmd":"SaveFields"}
Setting RdrStart=ACTIVE makes the reader automatically restore config (ReadFields) and start reading (StartRZ(ALL)) at boot.
SaveFields commits the current configuration to non-volatile memory. EL6e On boot, handle the RdrStart=ACTIVE case Mercury API N/A
www.JADAKtech.com

ThingMagic EL6e User Guide 26
RAIN Command Reference
Command Summary
The RCI can be carried over any serial channel. In a typical EL6e this is a USB-Serial port (USB CDC ACM). Even though there is only one physical USB connection, multiple logical devices can be presented via USB Composite Device functionality. Both USB HID Keyboard and USB Serial interfaces will be available simultaneously, but you can ignore the USB Serial.
The default configuration is optimized for an easy-to-use experience with no drivers required. The defaults are appropriate to the USB HID keyboard wedge interface.
Command Reference Format
EL6e RAIN commands follows the RAIN Communication Interface (RCI) specification, with proprietary extensions.
Message Format
RAIN RCI messages are JSON objects. They always begin with an open curly brace { and end with a matching close curly brace }. Arbitrary whitespace is allowed between message elements for readability purposes (within JSON syntax constraints).
Protocol messages are indented.
{<message>}
Command Format
Commands are JSON objects which contain a "Cmd" field. RAIN recommends that "Cmd" be the first field, but the implementation should be lenient about its placement.
Commands (messages sent host-to-reader) are boldfaced.
{"Cmd":"Reboot"} Response Format
Reponses are JSON objects that contain a "Response" and "ErrID" field. RAIN recommends that these fields come first, but parser implementations should be lenient about their placement.
Reports (messages sent reader-to-host) are italicized.
{"Report":"Reboot", "ErrID":0}
Disable Autonomous Operation
Abstraction Level Commands
Host N/ARAIN {"Cmd":"SetCfg", "RdrStart":"NOTACTIVE"}
{"Cmd":"SaveFields"}
EL6e N/AMercury API N/A
www.JADAKtech.com

ThingMagic EL6e User Guide 27
Core Commands
RAIN Core Command Examples
RAIN Command Examples Description
{"Cmd":"SetCfg","Mode":"AUTO"} (default) {"Cmd":"SetCfg","Mode":"HDR"} {"Cmd":"SetCfg","Mode":"MONITOR"} {"Cmd":"SetCfg","Mode":"TagCommission"} {"Cmd":"SetCfg","Mode":"TagUpdate1"}
Set tag reading profile. A "Mode" is a bundle of parameter settings that is recommended for a particular use case.
{"Cmd":"SetCfg","_KBDataFormat":"EPC "} (default) {"Cmd":"SetCfg","KBDataFormat":"Metadata"} {"Cmd":"SetCfg","_KBDataFormat":"RAIN"}
Set keyboard wedge output format .
{"Cmd":"SetCfg","_USBKBEnable":true} (default) {"Cmd":"SetCfg","_USBKBEnable":false}
Turn USB HID Keyboard interface on or off.
{"Cmd":"GetCfg", "Fields":["ALL"]} Retrieve user configuration list.{"Cmd":"SetCfg", "FreqReg":"NA2"} {"Cmd":"SetCfg", "FreqReg":"EU3"} {"Cmd":"SetCfg", "FreqReg":"OPEN"}
Set region.
{"Cmd":"SetRZ","ReadPwr":20.0} (default) Set read power. {"Cmd":"SetRZ","DutyCycle":[0,250,750]} Set duty cycle.
[start_delay_ms, on_ms, off_ms]
{"Cmd":"StartRZ"} Start reading. {"Cmd":"StopRZ"} Stop reading. {"Cmd":"ActivateUpdateMode"} Go to firmware update mode. {"Cmd":"SaveFields"} Save configuration from RAM to
NVM. {"Cmd":"ReadFields"} Load configuration from NVM to
RAM. {"Cmd":"DefaultFields"}
Clear in-RAM configuration, i.e., load configuration from hard-coded defaults to RAM.
{"Cmd":"GetInfo","Fields":["ALL"]} Get reader information. {"Cmd":"Reboot"} Reboot the reader. {"Cmd":"GetGPIOs"} Get GPIO states. {"Cmd":"SetGPIOs"} Set GPIO states. {"Report":"HB"} Reader heartbeat.
www.JADAKtech.com
ThingMagic EL6e User Guide 28
Advanced Commands
RAIN Advanced Command Examples
RAIN Command Examples Description
{"Cmd":"SetCfg","_AudioVolume":"MUTE"} {"Cmd":"SetCfg","_AudioVolume":"LOW"} (default) {"Cmd":"SetCfg","_AudioVolume":"MED"} {"Cmd":"SetCfg","_AudioVolume":"HIGH"}
Set beeper volume.
{ "Cmd":"SetCfg", "SpotAnt":false, "SpotDT":false, "SpotInvCnt":false, "SpotPhase":false, "SpotProf":false, "SpotRSSI":false, "SpotRZ":false } (default)
Enable/Disable tag read metadata (standard RAIN fields).
{ "Cmd":"SetCfg", "SpotFreq":false, "SpotGen2_BI":false, "SpotGen2_Q":false, "SpotGen2_LF":false, "SpotGen2_Target":false, "SpotGPIO":false, "SpotProt":false, "SpotSensor":false } (default)
Enable/Disable tag read metadata (ThingMagic custom fields).
{ "Cmd":"SetProf", "Read":[[3,0,4,0]] } Note: The "read tuple" arguments are [MemBank, StartWord, NumWords, RetryLimit]
Enable embedded data read on tag reads.
{"Cmd":"SetProf", "Write":[[1,1,7,0, ["VAL", ":3000:1111:2222:3333:4444:5555:6666"], true]]} Note: The "write tuple" arguments are [MemBank, StartWord, NumWords, RetryLimit, WriteMethod, Check]
Embedded data write. See Command Reference for supported Write types.
{"Cmd":"ThisTag", "Prof":1} Immediate data operation.
www.JADAKtech.com

ThingMagic EL6e User Guide 29
Bootloader Commands
If the application firmware becomes corrupted, the module runs a permanently installed application called the bootloader. The bootloader is used to update the application firmware image in Flash memory.
The application cannot update its own image because it executes out of Flash. Modifying that image in-place risks corrupting the program as it runs, so a separate bootloader must be executed in order to guarantee that no access is made to the app image while it is being rewritten.
{"Cmd":"SetCfg", "DateTime":"2018-09-25T21:04:05.123Z"}
Set current time.
{"Cmd":"GetCfg", "Fields":["DateTime"]} {"Report":"GetCfg", "ErrID":0, "DateTime":"2018-09-25T21:04:05.123Z"}
Get current time.
RAIN Bootloader Command Examples
RAIN Command Examples Description
{"Cmd":"GetInfo","Fields":["ALL”]} {"Report":"GetInfo","ErrID":0,"_BootloaderVersion":"YYMMDDRR","BootloaderLockBits":"0x0000003F","BootModeTrigger":"0x2X","PartNumber":"540-XXXX-XX" ,"SerialNumber" :"WWYYcccccENNNN","ProductRevision":"0A","Interface":"ALL","Sensor":"ALL","RegionRange":"NA"} {"Cmd":"GetInfo","Fields":"_BootloaderVersion", "_BootloaderLockBits"]} {"Report":"GetInfo","ErrID":0,"_BootloaderVersion":"0x00000000","_BootloaderLockBits":"0x0000003F"}
Retrieve Bootloader info that includes version and locked area in Flash.
{"Cmd":"_SetFlashLock", "Section":"BootLoader", "State":"Lock"} {"Cmd":"_SetFlashLock", "Section":"HWInfo", "State":"Lock”} {"Cmd":"_SetFlashLock", "Section":"App","State":"Lock"} {"Report":"_GetFlashLock","ErrID":0,"Section":"App","State":"Unlock"}
Set lock on or off to section in Flash. State is “Lock” or “Unlock.”
RAIN Advanced Command Examples
RAIN Command Examples (Continued) Description
www.JADAKtech.com
ThingMagic EL6e User Guide 30
{"Cmd":"_GetFlashLock", "Section":"Bootloader"} {"Report":"_GetFlashLock","ErrID":0,"Section":"Bootloader","State":"Lock"} {"Cmd":"_GetFlashLock", "Section":"HWInfo"} {"Report":"_GetFlashLock","ErrID":0,"Section":"HWInfo","State":"Lock"} {"Cmd":"_GetFlashLock", "Section":"App"} {"Report":"_GetFlashLock","ErrID":0,"Section":"App","State":"Unlock"}
Retrieve current lock state for section in Flash. State is “Lock” or “Unlock.”
{"Cmd":"StartUpdate", "Section":"HWInfo", "Password":"0x07584172"} {"Cmd":"StartUpdate", "Section":"App", "Password":"0x02254410"}
Initiate firmware update for section with password required if protected. Password is an unsigned long value in HEX.
{"Cmd":"SendData","Data":"MDEwMjAzMDQwNTA2MDcwODA5MEE="}
Send data to be updated in firmware. Data is binary data encoded with base64.
{"Cmd":"EndUpdate"} Terminate firmware update.
RAIN Bootloader Command Examples
RAIN Command Examples (Continued) Description
www.JADAKtech.com

ThingMagic EL6e User Guide 31
ThingMagic Configuration Tool
Introduction
The ThingMagic Configuration Tool is a desktop application developed using Java language and built in javafx technology. TCT is used to connect, configure, and read tags.
• TCT is only supported on the Windows 64-bit operating system.• TCT requires JRE version 1.8 or later.
Install the USB Driver
For Windows 10 operating systems, no additional driver is required. USB is automatically detected after plugging in the USB cable. If the automatic detection fails, follow these steps to recognize the Elara module:
1. Plug the EL6e USB cable into the PC.
2. Windows should report it has Found New Hardware and open the Hardware Installation Wizard.
3. Select Install from a list or specific location (Advanced). Click Next.
4. Select Don’t search… Click Next, then Next again.
5. Click Have Disk and navigate to where the SDK zip is extracted. Select EL6e.inf under the drivers folder. Click Open, then OK.
6. A COM port should now be assigned to the EL6e. If you aren’t sure what COM port is assigned you can find it using the Windows Device Manager.
In order to use the USB interface with a Windows 7 operating system, you must first install the EL6e.inf file, available in the SDK download package.
1. Right click Computer on the Start Menu and select Manage.
2. Select Device Manager.
3. Select EL6e reader and click on Update Drivers.
4. Click on Browse my computer for driver software.
5. Click on Let me pick from a list of available drivers on my computer.
6. Click on Have Disk.
7. Provide the .inf file path.
8. Proceed with the driver installation.
Install TCT
Download and install TCT using the following steps.
www.JADAKtech.com

ThingMagic EL6e User Guide 32
1. Use a web browser to navigate to https://www.jadaktech.com/documentation/.
2. Download the SDK available under the EL6e folder.
3. Once downloaded, extract the zip archive to the desired location.
4. Find the ThingMagic Configuration Tool executable and double click on it to install to the host PC.
5. Follow the steps for your OS.
Home
The Home page displays version details and main functionalities of TCT.
This screen introduces the set of available features of TCT. Across the top of the window are the following tabs:
Connect: Used to discover and connect to available readers
Configure: Presents all the configuration settings that can be saved.
Results: Provides a quick way to view streaming tag reads
Utilities: Loads firmware on the EL6e module
Help: Displays information for using TCT.
In addition to the main tabs providing access to different functionality, additional information is provided on all screens in the following sections:
• The right section of each screen contains a short summary of contextual help along with links to more detailed help.
• The bottom left shows the reader connection status.
www.JADAKtech.com

ThingMagic EL6e User Guide 33
• Warning, Status and Error messages are displayed from the corresponding bottom right message icons.
Connect
The Connect tab provides connection options to find and connect to a reader. Refer to the product’s Hardware Guide for details on how to establish a connection to the reader and how to identify the correct port to identify it.
When EL6e module is connected to a host, it is shown as:
EL6e (COMxx): USB serial Device (where xx is the COM port number)
EL6e HID: USB Input Device
Clicking on the refresh icon next to Available Devices displays all the devices connected to the host. You must click the refresh icon whenever a new device is connected to the host or an existing device is disconnected.
HID Mode
When you select EL6e HID, you are sent to the Results tab. If tags are present in field, the EL6e module starts reading tags that are then displayed on the screen.
CDC Mode
When you select EL6e (COMxx), you can choose the baud rate for serial communication and turn on or off the Transport Logging feature.
Baud Rate
If the reader is using a RS232 connection and you know the baud rate of the reader being connected, you can select it prior to connecting. Otherwise, TCT sets the baud rate to 115200. (For native USB connections the baud rate setting does not apply. )
Transport Logging
Transport Logging lets you see the RAIN communication messages between TCT and the EL6e module for debugging purposes.
Once the reader has been connected, you can configure your device.
Configure
The Configure tab provides all the available reading settings and allows you to enable metadata and configure the beeper volume.
General: This tab allows you to change the Region, Date/Time, RF Power, and Workflow settings.
Advanced: This tab allows you to change Gen2 Session, Target, Encoding, BLF, Q, Tari, and InitQ settings.
User Interface: This tab allows you to enable/disable Metadata and change Beeper Volume settings.
Once entered, you can Set, Save, or Revert your changes. You can also Load Defaults on the reader.
Set: Applies the modified settings temporarily in the reader’s volatile memory (RAM) during the current session.
www.JADAKtech.com

ThingMagic EL6e User Guide 34
Save: Applies and stores the modified settings in the reader’s permanent memory.
Revert: Discards the current active settings and applies the settings retrieved from reader’s permanent memory.
Load Defaults: Discards the current active settings and replaces them with the factory-provided settings. You must click Save to store the default settings in the reader’s permanent memory.
NOTE: In order to change the configuration on a HID port, you need to connect the reader on a COM port.
Results
The Results tab displays tag reads like a text editor. Double click the Caps Lock key on the keyboard to start reading tags. Double clicking Caps Lock again stops the tag reads.
Utilities
The Utilities tab is used to upgrade the EL6e firmware. Select the .bin file from the host PC.
Help
The Help tab contains a short summary of contextual help.
www.JADAKtech.com

ThingMagic EL6e User Guide 35
Compliance and IP Notices
EMC FCC 47 CFR, Part 15
Industrie Canada RSS-210
Federal Communication Commission (FCC) Interference Statement
This equipment has been tested and found to comply with the limits for a Class B digital device, pursuant to Part 15 of the FCC Rules. These limits are designed to provide reasonable protection against harmful interference in a residential installation. This equipment generates uses and can radiate radio frequency energy and, if not installed and used in accordance with the instructions, may cause harmful interference to radio communications. However, there is no guarantee that interference will not occur in a particular installation. If this equipment does cause harmful interference to radio or television reception, which can be determined by turning the equipment off and on, the user is encouraged to try to correct the interference by one of the following measures:
• Reorient or relocate the receiving antenna.• Increase the separation between the equipment and receiver.• Connect the equipment into an outlet on a circuit different from that to which the receiver is connected.• Consult the dealer or an experienced radio/TV technician for help.This device complies with Part 15 of the FCC Rules. Operation is subject to the following two conditions: (1) This device may not cause harmful interference, and (2) this device must accept any interference received, including interference that may cause undesired operation.
FCC Caution: Any changes or modifications not expressly approved by the party responsible for compliance could void the user's authority to operate this equipment.
Industry Canada
Under Industry Canada (IC) regulations, this radio transmitter may only operate using an antenna of a type and maximum (or lesser) gain approved for the transmitter by Industry Canada. To reduce potential radio interference to other users, the antenna type and its gain should be so chosen that the Equivalent Isotropically Radiated Power (EIRP) is not more than that necessary for successful communication.
This radio transmitter (identify the device by certification number, or model number if Category II) has been approved by Industry Canada to operate with the antenna types listed below with the maximum permissible gain and required antenna impedance for each antenna type indicated. Antenna types not included in this list, having a gain greater than the maximum gain indicated for that type, are strictly prohibited for use with this device.
Operation is subject to the following two conditions: (1) this device may not cause interference, and (2) this device must accept any interference, including interference that may cause undesired operation of the device.
To reduce potential radio interference to other users, the antenna type and its gain should be so chosen that the Equivalent Isotropically Radiated Power (EIRP) is not more than that permitted for successful communication.
www.JADAKtech.com

ThingMagic EL6e User Guide 36
This device has been designed to operate with the antennas sold with the EL6e and antennas listed in the Authorized Antennas table. Antennas not included in these lists are strictly prohibited for use with this device.
To comply with IC RF exposure limits for general population/uncontrolled exposure, the antenna(s) used for this transmitter must be installed to provide a separation distance of at least 25 cm from all persons and must not be colocated or operating in conjunction with any other antenna or transmitter.
Industrie Canada (French Canadian)
Conformément à la réglementation d'Industrie Canada, le présent émetteur radio peut fonctionner avec une antenne d'un type et d'un gain maximal (ou inférieur) approuvé pour l'émetteur par Industrie Canada. Dans le but de réduire les risques de brouillage radioélectrique à l'intention des autres utilisateurs, il faut choisir le type d'antenne et son gain de sorte que la puissance isotrope rayonnée équivalente (p.i.r.e.) ne dépasse pas l'intensité nécessaire à l'établissement d'une communication satisfaisante.
Le présent émetteur radio (identifier le dispositif par son numéro de certification ou son numéro de modèle s'il fait partie du matériel de catégorie I) a été approuvé par Industrie Canada pour fonctionner avec les types d'antenne énumérés ci-dessous et ayant un gain admissible maximal et l'impédance requise pour chaque type d'antenne. Les types d'antenne non inclus dans cette liste, ou dont le gain est supérieur au gain maximal indiqué, sont strictement interdits pour l'exploitation de l'émetteur
Le fonctionnement de lʼ appareil est soumis aux deux conditions suivantes:
1. Cet appareil ne doit pas perturber les communications radio, et
2. cet appareil doit supporter toute perturbation, y compris les perturbations qui pourraient provoquer son dysfonctionnement.
Pour réduire le risque d'interférence aux autres utilisateurs, le type d'antenne et son gain doivent être choisis de façon que la puissance isotrope rayonnée équivalente (PIRE) ne dépasse pas celle nécessaire pour une communication réussie.
Au but de conformer aux limites d'exposition RF pour la population générale (exposition non-contrôlée), les antennes utilisés doivent être installés à une distance d'au moins 25 cm de toute personne et ne doivent pas être installé en proximité ou utilisé en conjonction avec un autre antenne ou transmetteur.
www.JADAKtech.com
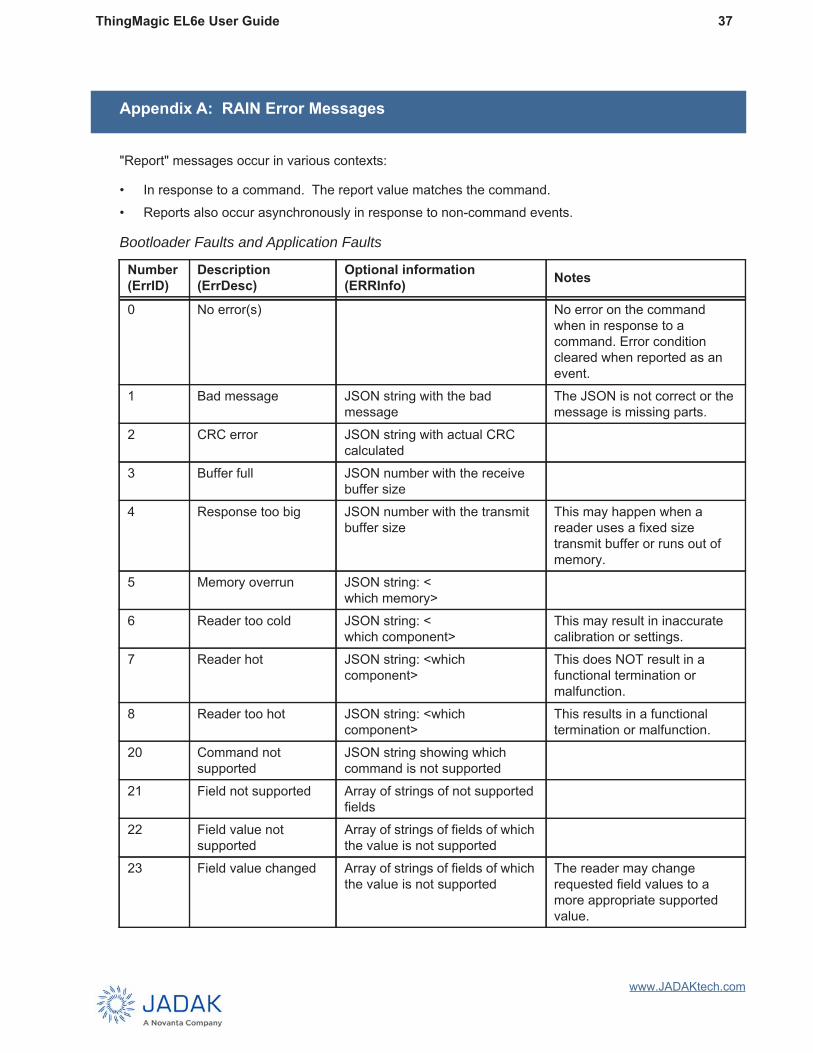
ThingMagic EL6e User Guide 37
Appendix A: RAIN Error Messages
"Report" messages occur in various contexts:
• In response to a command. The report value matches the command.• Reports also occur asynchronously in response to non-command events.
Bootloader Faults and Application Faults
Number(ErrID)
Description(ErrDesc)
Optional information(ERRInfo) Notes
0 No error(s) No error on the command when in response to a command. Error condition cleared when reported as an event.
1 Bad message JSON string with the bad message
The JSON is not correct or the message is missing parts.
2 CRC error JSON string with actual CRC calculated
3 Buffer full JSON number with the receive buffer size
4 Response too big JSON number with the transmit buffer size
This may happen when a reader uses a fixed size transmit buffer or runs out of memory.
5 Memory overrun JSON string: <which memory>
6 Reader too cold JSON string: <which component>
This may result in inaccurate calibration or settings.
7 Reader hot JSON string: <whichcomponent>
This does NOT result in a functional termination ormalfunction.
8 Reader too hot JSON string: <whichcomponent>
This results in a functional termination or malfunction.
20 Command notsupported
JSON string showing which command is not supported
21 Field not supported Array of strings of not supported fields
22 Field value notsupported
Array of strings of fields of which the value is not supported
23 Field value changed Array of strings of fields of which the value is not supported
The reader may change requested field values to a more appropriate supported value.
www.JADAKtech.com

ThingMagic EL6e User Guide 38
30 GPIO toggle value the same
Array of numbers identifying the GPIO IDs with the problem
A toggle could not beperformed.
31 GPIO not settable Array of numbers identifying the GPIO IDs with the problem
The GPIO is not an output, D2A, or register.
25 Trigger not an inputswitch
Array of number identifying the offending GPIO
30 SpotProfiles full31 SpotProfile error Array with:
JSON number: SpotProfile number,JSON string: <more info>
A spot profile resulted in an air protocol configuration error.
32 Illegal SpotProfile Number array listing the illegalSpotProfiles
33 Thig Tag timeout String stating one of the following:"No tags inventoried.""No SpotProfile triggered."
No tags were spotted during the ThisTag duration.
34 Spot error String describing the error The spot event could not be completed.
40 ReadZones full41 ReadZone start error Array of which the first element is
a string describingthe start error, followed by numbers indicating the ReadZones with a start error
42 ReadZone definitionerror
An array listing the offending fields
≥1000 <Proprietary errors> <Vendor specific> Refer to Nano User Guide for vendor-specific error codes.
Bootloader Faults and Application Faults (Continued)
Number(ErrID)
Description(ErrDesc)
Optional information(ERRInfo) Notes
www.JADAKtech.com

ThingMagic EL6e User Guide 39
Appendix B: Getting Started - Development Kit
There are two development kits available:
• USB EL6e development kit, which includes the module with accessory cables and antennas.• EL6e/Elara Universal Development kit, which includes a motherboard, assembly hardware, AC power
adapter, accessory cables and antennas, but no EL6e module.The instructions that follow are for the USB development kit. A separate set of instructions are available for the EL6e/Elara Universal Development Kit.
USB Development Kit Hardware
Components included in the development kit:
• EL6e USB module (configured to OPEN region by default)• Two antennas (one for NA region range and one for EU region range) • One USB cable with 13-pin connector on one end• One USB “Y” cable• Sample tag pack• Antenna mounting hardware• Board feet assembly to prevent board from shorting out on conductive surfaces when in use on desktop• The Quick Start Guide that details which documents and software to download to get up and running
quickly, along with details on how to register for and contact support.NOTE: Some of these parts cannot be ordered separately.
www.JADAKtech.com

ThingMagic EL6e User Guide 40
Set Up the USB Development Kit
Connect the Antenna
The EL6e Development Kit contains two antennas. One supports reading tags in the NA region range (915 to 928 MHz) and another antenna read tags in the EU region range (865 to 869 MHz). Connect the preferred antenna using a U.FL on-board connector.
Download the Software Development Kit
Download and extract the EL6e Software Development Kit to get all the required software to work with EL6e module.
1. Use a web browser to navigate to https://www.jadaktech.com/documentation/.
2. Download the SDK (EL6e_sdk-ZOLA-01.0D.00.xx.zip), available under the EL6e folder.
3. Once downloaded, extract the zip archive to the desired location.
The EL6e Software Development Kit contains the following files.
• Drivers• Java code samples• EL6e firmware file• ThingMagic Configuration Tool ExecutableInstall the USB Driver
For Windows 10 operating systems, no additional driver is required. USB is automatically detected after plugging in the USB cable. If the automatic detection fails, follow these steps to recognize the EL6e module:
USB Board PCBA-10009
RS232 Board PCBA-10010
NA Antenna (924.5 MHz Center)
EU Antenna (867 MHz Center)
www.JADAKtech.com

ThingMagic EL6e User Guide 41
1. Plug the EL6e module USB cable into the PC.
2. Windows should report it has Found New Hardware and open the Hardware Installation Wizard.
3. Select Install from a list or specific location (Advanced). Click Next.
4. Select Don’t search… Click Next, then Next again.
5. Click Have Disk and navigate to where the SDK zip is extracted. Select EL6e.inf under the drivers folder. Click Open, then OK.
6. A COM port should now be assigned to the EL6e. If you aren’t sure what COM port is assigned you can find it using the Windows Device Manager.
In order to use the USB interface with a Windows 7 operating system, you must first install the EL6e.inf file, available in the SDK download package.
1. Right click Computer on the Start Menu and select Manage.
2. Select Device Manager.
3. Select Elara reader and click on Update Drivers.
4. Click on Browse my computer for driver software.
5. Click on Let me pick from a list of available drivers on my computer.
6. Click on Have Disk.
7. Provide the .inf file path.
8. Proceed with the driver installation.
www.JADAKtech.com
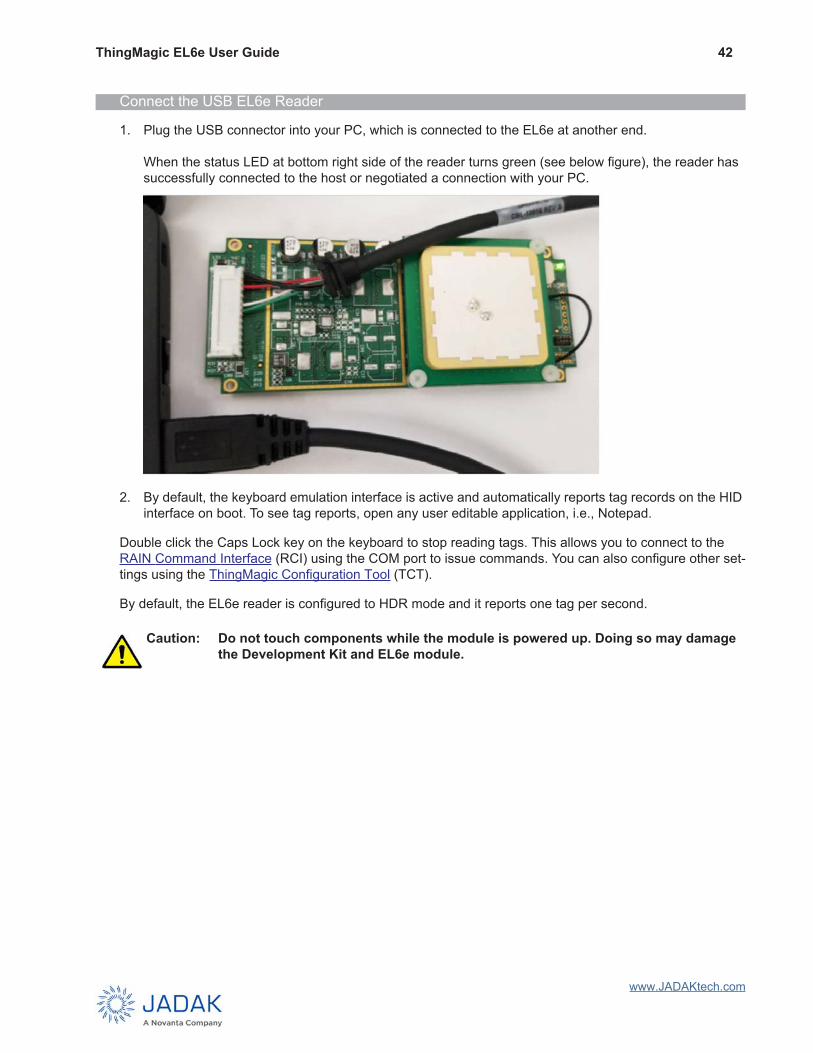
ThingMagic EL6e User Guide 42
Connect the USB EL6e Reader
1. Plug the USB connector into your PC, which is connected to the EL6e at another end.
When the status LED at bottom right side of the reader turns green (see below figure), the reader has successfully connected to the host or negotiated a connection with your PC.
2. By default, the keyboard emulation interface is active and automatically reports tag records on the HID interface on boot. To see tag reports, open any user editable application, i.e., Notepad.
Double click the Caps Lock key on the keyboard to stop reading tags. This allows you to connect to the RAIN Command Interface (RCI) using the COM port to issue commands. You can also configure other set-tings using the ThingMagic Configuration Tool (TCT).
By default, the EL6e reader is configured to HDR mode and it reports one tag per second.
Caution: Do not touch components while the module is powered up. Doing so may damage the Development Kit and EL6e module.
www.JADAKtech.com

ThingMagic EL6e User Guide 43
Appendix C: Environmental Considerations
ElectroStatic Discharge (ESD) Considerations
Air discharge to +/- 15 kV.
Operating Temperature:
0°C to +50°C
Installation Considerations
The board mounting hole inside diameter is 2.5mm. The antenna mounting hole inside diameter is 2.5mm. CAD files for the board are available on request.
www.JADAKtech.com

™
TM_M6e-UG Rev 03222019


![User Guide...User. {{]}]} {}]}](https://img.pdfslide.us/doc/110x75/60918ca14327954d24291644/-user-guide-user-.jpg)