Embed Size (px)
Citation preview
800 East 96th Street,Indianapolis, Indiana 46240 USA
THE UNAUTHORIZED GUIDE TO
IPHONE®
, IPAD®
, AND IPOD®
REPAIR A DIY Guide to Extending the Life of Your iDevices!
Timothy L. Warner
ii The Unauthorized Guide to iPhone®, iPad®, and iPod® Repair
The Unauthorized Guide to iPhone®, iPad®, and iPod® Repair
Copyright © 2013 by Pearson Education, Inc.All rights reserved. No part of this book shall be reproduced, stored in a retrieval system, or transmitted by any means, electronic, mechanical, photocopying, recording, or otherwise, without written permission from the publisher. No patent liability is assumed with respect to the use of the information contained herein. Although every precaution has been taken in the preparation of this book, the publisher and author assume no responsibility for errors or omissions. Nor is any liability assumed for damages resulting from the use of the information contained herein.
ISBN-10: 0-7897-5073-2ISBN-13: 978-0-7897-5073-0
Library of Congress Cataloging-in-Publication Data is on fi le
Printed in the United States of AmericaFirst Printing: May 2013
TrademarksAll terms mentioned in this book that are known to be trademarks or service marks have been appropriately capitalized. Que Publishing cannot attest to the accuracy of this information. Use of a term in this book should not be regarded as affecting the validity of any trademark or service mark.
Warning and DisclaimerEvery effort has been made to make this book as complete and as accurate as possible, but no warranty or fi tness is implied. The information provided is on an “as is” basis. The authors and the publisher shall have neither liability nor responsibility to any person or entity with respect to any loss or damages arising from the information contained in this book.
While Que, iFixit, and I have made every effort to ensure that the directions provided in this book are complete and accurate, any attempt on the reader’s part to perform an iDevice do-it-yourself upgrade or repair is solely at the reader’s risk. Even when our instructions are carefully followed, the slightest misstep in disassembly or reassembly could result in further damage or destruction of the iDevice. Also, any attempt to repair or upgrade your iDevice immediately voids any warranty you have through Apple. You’ve been warned!
Bulk SalesQue Publishing offers excellent discounts on this book when ordered in quantity for bulk purchases or special sales. For more information, please contact
U.S. Corporate and Government [email protected]
For sales outside of the U.S., please contact
International [email protected]
Editor-in-Chief
Greg Wiegand
Executive Editor
Rick Kughen
Development Editor
Rick Kughen
Technical Editor
Walter Galan, ifi xit.com
Managing Editor
Kristy Hart
Senior Project Editor
Lori Lyons
Copy Editor
Charlotte Kughen, The Wordsmithery LLC
Indexer
Tim Wright
Proofreader
Kathy Ruiz
Publishing Coordinators
Cindy TeetersKristen Watterson
Book Designer
Anne Jones
Compositor
Nonie Ratcliff
Manufacturing Buyer
Dan Uhrig
Contents at a Glance iii
Contents at a Glance Introduction 1
CHAPTER 1 Why Do it Yourself? 5
CHAPTER 2 The Tools of the Trade 25
CHAPTER 3 Protecting Your iDevice User Data and Settings 43
CHAPTER 4 iDevice Repair Best Practices 59
CHAPTER 5 iPhone 3GS Disassembly and Reassembly 71
CHAPTER 6 iPhone 4S Disassembly and Reassembly 87
CHAPTER 7 iPhone 5 Disassembly and Reassembly 109
CHAPTER 8 iPad 2nd Generation Disassembly and Reassembly 129
CHAPTER 9 iPad 3rd and 4th Generation Disassembly and Reassembly 145
CHAPTER 10 iPad mini Disassembly and Reassembly 159
CHAPTER 11 iPod touch 4th Generation Disassembly and Reassembly 177
CHAPTER 12 iPod nano 5th and 7th Generation Disassembly and Reassembly 193
CHAPTER 13 Sourcing iDevice Replacement Parts 211
CHAPTER 14 Addressing Water Damage 217
CHAPTER 15 Replacing the Front Display and/or Rear Case 225
CHAPTER 16 Replacing the Battery 233
CHAPTER 17 Replacing the Logic Board and/or Dock Connector 243
CHAPTER 18 Recovering Data from Your Broken iDevice 255
CHAPTER 19 Before You Sell, Donate, or Recycle Your iDevice 267
Index 277
iv The Unauthorized Guide to iPhone®, iPad®, and iPod® Repair
Table of Contents Introduction 1
Chapter 1 Why Do It Yourself? 5
The Benefits of DIY iDevice Repair 5
Saving Money 6
Fighting Back Against the “Tyranny” of Apple 6
Preparing to Become an Apple Tech 7
Earning Extra Money 9
iDevices—A Roster 10
iPod 10
iPod touch 13
iPhone 13
iPad 15
Limiting Our Scope 17
Apple Warranties and You 18
Apple Hardware Warranty 18
AppleCare+ 19
Finding Old, “Broken” iDevices 21
Pawn or Secondhand Shops 21
eBay or Craigslist 22
Amazon.com 23
Yard Sales or Flea Markets 24
Friends, Family, and Colleagues 24
Bulletin Boards 24
Chapter 2 The Tools of the Trade 25
What Does It Take to Become an iDevice Technician? 25
Character Traits 26
Technical Ability 27
Obtaining iDevice Technician Tools 28
Sources for iDevice Tech Tools 28
ESD Safety Equipment 29
Screwdrivers 31
Spudger 31
Table of Contents v
Plastic Opening Tool(s) 32
Heat Gun/Hair Dryer 32
Magnetizer/Demagnetizer 34
Pick-up Tools 34
Work Lamp with Magnifying Glass 34
Magnetic Project Mat 35
Industry Certification 36
Increased Professional Credibility 36
Gaining a Leg Up in the Job Market 36
Meeting Apple’s Certification Requirements 37
Attaining Deeper Access to Apple Tech Resources 37
Increased Confidence 38
Certification Options 38
Apple Certified Macintosh Technician (ACMT) 38
iCracked iTech 39
OnForce Consultant 40
Apple Consultants Network (ACN) 40
Chapter 3 Protecting Your iDevice User Data and Settings 43
What Exactly Do You Need to Back Up? 43
Backing Up an iDevice by Using iTunes 11 44
Where Are the Backup Files Stored? 46
Backing Up an iDevice by Using iCloud 48
Backing Up an iDevice Manually 50
Restoring an iDevice by Using iTunes 11 50
Restoring an iDevice by Using iCloud 51
Jailbreaking and Unlocking iDevices 52
What Is Jailbreaking? 52
What Is Unlocking? 56
Chapter 4 iDevice Repair Best Practices 59
Checking iDevice Warranty Coverage 59
Verifying iDevice Version Info 62
What Are Order Numbers? 64
Deciphering iOS Speak 65
vi The Unauthorized Guide to iPhone®, iPad®, and iPod® Repair
How Do Warranty Repair Orders Work? 66
Creating an ESD-Safe Workspace 67
Wear Appropriate Clothing and Protect Your Workspace 67
Handle IC Components Appropriately 68
Condition the Air in Your Workspace 68
Documenting and Securing Your iDevice Components 69
Chapter 5 iPhone 3GS Disassembly and Reassembly 71
iPhone 3GS External Anatomy 73
Disassembly Procedure 75
Reassembly Notes 85
A Few Words About iOS 6 85
Chapter 6 iPhone 4S Disassembly and Reassembly 87
External Anatomy 88
Required Tools 90
Disassembly Procedure 90
Reassembly Notes 107
Chapter 7 iPhone 5 Disassembly and Reassembly 109
External Anatomy 110
Required Tools 113
Disassembly Procedure 113
Reassembly Notes 126
On Material Costs and Profit Margins 127
Chapter 8 iPad 2nd Generation Disassembly and Reassembly 129
External Anatomy 130
Required Tools 133
Disassembly Procedure 133
Reassembly Notes 143
What Exactly Is a Retina Display? 143
Chapter 9 iPad 3rd and 4th Generation Disassembly and Reassembly 145
External Anatomy 146
Required Tools 148
Disassembly Procedure 148
Reassembly Notes 157
Why Do Front and Rear Cameras Have Different Resolutions? 157
Table of Contents vii
Chapter 10 iPad mini Disassembly and Reassembly 159
External Anatomy 160
Required Tools 162
Disassembly Procedure 162
Reassembly Notes 174
What Are Benchmarks? 174
Chapter 11 iPod touch 4th Generation Disassembly and Reassembly 177
External Anatomy 178
Required Tools 180
Disassembly Procedure 180
Reassembly Notes 191
Is the iPod touch a “Watered Down” iPhone? 192
Chapter 12 iPod nano 5th and 7th Generation Disassembly and Reassembly 193
External Anatomy 194
Required Tools 198
Disassembly Procedure 198
iPod nano 5th Generation Reassembly Notes 208
iPod nano 7th Generation Quick-Disassembly 208
About the Mysterious Pixo OS 210
Chapter 13 Sourcing iDevice Replacement Parts 211
What Is OEM, and Why Do I Care? 211
Where Can I Find OEM iDevice Parts? 213
No Guarantees 213
Study Buyer Reviews 214
Trust Your Gut 214
But Where Do I Start My Search? 214
Grim Realities 215
Chapter 14 Addressing Water Damage 217
The Problem of Water Damage 217
Warranty Ramifications of Water Damage 218
Liquid Contact Indicators (LCIs) and You 218
viii The Unauthorized Guide to iPhone®, iPad®, and iPod® Repair
How to Address a Waterlogged iDevice: Non-Invasive Approach 219
The Rice Method 220
Dedicated Drying Tools 220
How to Address a Waterlogged iDevice: Invasive Approach 221
How to Limit the Possibility of Water Damage 222
Purchase a Specialty Case 222
Limit Exposure to Steam 223
Use a Low-Tech Plastic Baggie 223
Chapter 15 Replacing the Front Display and/or Rear Case 225
Anatomy of the iDevice Front Display 226
Repair Options and DIY Strategies 227
Visit the Apple Store 228
Hire a Third Party to Replace the Display 228
Do It Yourself 229
How to Minimize Damage to the Display/Rear Case 232
Chapter 16 Replacing the Battery 233
What You Need to Know about Lithium-Ion Batteries 234
What Is the “Memory Effect”? 235
Understanding iDevice Battery Specifications 236
Best Practices for iDevice Battery Use 237
Exploding Batteries 238
Maximizing Battery Life 239
Performing Battery Replacements 240
Chapter 17 Replacing the Logic Board and/or Dock Connector 243
About the Logic Board 243
iDevice Connectors 245
Repair Advice 249
Tips and Tricks for Logic Board Replacements 251
iPhone 5 251
iPad 3rd and 4th Generation 252
iPad mini 252
iPod touch 5th Generation 252
Table of Contents ix
Chapter 18 Recovering Data from Your Broken iDevice 255
Protecting Your Data by Using Apple Services 255
iCloud 256
iTunes Match 256
Retrieving User Data from a “Dead” iDevice 256
Retrieving User Data from a Live iDevice 257
Music 257
Photos 259
The Rest of Your Stuff 260
Passcode Security 262
Encrypted Backups, Anyone? 266
Chapter 19 Before You Sell, Donate, or Recycle Your iDevice 267
Is Deleted Stuff Actually Deleted? 268
Encryption, Your iDevice, and You 268
Preparing Your iDevice for Transfer—Local Method 270
Preparing Your iDevice for Transfer–Remote Method 272
Corporate Solutions 273
Disposal and Associated Environmental Concerns 274
Index 277
x The Unauthorized Guide to iPhone®, iPad®, and iPod® Repair
About the AuthorTimothy L. Warner is an IT professional and technical trainer based in Nashville, TN. As Director of Technology for a progressive high school, he created and managed a self-servicing warranty repair shop for all Apple hardware used at the institution. Warner has been an Apple enthusiast and power user since the original Macintosh was released in 1984. He has worked in nearly every facet of IT, from systems administration and software architecture to technical writing and training. Warner can be reached at [email protected].
Acknowledgments xi
DedicationTo the most important women in my life: Susan Warner, Zoey Warner, Sherry Warner, and Trish Warner.
AcknowledgmentsPublishing a book requires collaboration between many different people. Thanks to my wonderful editor, Rick Kughen, for conceiving the idea for this work. Thanks to the entire Pearson team, especially Lori Lyons, who worked valiantly to get this book out before Apple released another set of products (not an easy feat, I assure you).
Special thanks to Walter Galan and Kyle Wiens from iFixit for their enthusiastic partnership in this endeavor. Thanks to Charlotte Kughen of Wordsmithery LLC for her great suggestions and for making my words flow so nicely.
Thanks to Tom Chick of Intelligent Designs (idez.com) for the technical guidance on the iDevice take-aparts—you have been a great mentor to me over the years.
Thanks to all my family and friends for your continued love and support. Special shout-out to my parents, Larry and Sherry Warner, in whose basement I produced most of this manuscript during an extended family vacation.
xii The Unauthorized Guide to iPhone®, iPad®, and iPod® Repair
We Want to Hear from You!As the reader of this book, you are our most important critic and commentator. We value your opinion and want to know what we’re doing right, what we could do better, what areas you’d like to see us publish in, and any other words of wisdom you’re willing to pass our way.
We welcome your comments. You can email or write to let us know what you did or didn’t like about this book—as well as what we can do to make our books better.
Please note that we cannot help you with technical problems related to the topic of this book.
When you write, please be sure to include this book’s title and author as well as your name and email address. We will carefully review your comments and share them with the author and editors who worked on the book.
Email: [email protected]
Mail: Que Publishing ATTN: Reader Feedback800 East 96th StreetIndianapolis, IN 46240 USA
Reader ServicesVisit our website and register this book at quepublishing.com/register for convenient access to any updates, downloads, or errata that might be available for this book.
IntroductionHave you ever broken an electronic device? In particular, has your iPod, iPhone, or iPad ever taken a tumble, resulting in a cracked screen? Is your iDevice’s battery life not what it once was?
How do you ordinarily handle these situations when they occur? Please take comfort in the fact that you are not obligated to pay Apple’s sometimes exorbitant fees for out-of-warranty iDevice replacements. Instead, you can learn to perform your own repairs!
If you study this book and invest in the proper time, tools, and materials to attain enough practical experience then you can save yourself a lot of money (and even make quite a bit of extra money to boot) performing iDevice repairs for your family, friends, and even the general public.
Do you want to know more? Read on, friend!
What’s in This BookTo present all the various ways you can take full control of your iDevices, this book contains 19 chapters. Each chapter walks you through a different aspect of Do-It-Yourself (DIY) iDevice repair, from character traits of the ideal iDevice tech to where to get the best deals on iDevice hardware:
■ Chapter 1, “Why Do It Yourself?” presents all the reasons why you might want to consider taking screwdriver in hand and performing DIY work on your iDevices.
■ Chapter 2, “The Tools of the Trade,” is all about understanding what is required of you, from character traits to specific hardware tools, to become an effective iDevice technician.
■ Chapter 3, “Protecting Your iDevice User Data and Settings,” is where you learn how to ensure that you don’t lose any of your precious documents or settings when you perform work on iDevice hardware.
■ Chapter 4, “iDevice Repair Best Practices,” connects you to the larger computer technician community and makes you fully aware of the tips and tricks professionals use to guarantee a safe work environment.
■ Chapter 5, “iPhone 3GS Disassembly and Reassembly,” is a great place to begin your iDevice disassembly practice because 3GS hardware is inexpensive and the phones are relatively easy to take apart.
2 Introduction
■ Chapter 6, “iPhone 4S Disassembly and Reassembly,” shows you how easy and (dare I say it) enjoyable it is to work on iPhones; they represent the best Apple iDevices to repair, bar none.
■ Chapter 7, “iPhone 5 Disassembly and Reassembly,” continues the iPhone DIY love; you’ll be pleased to note that with respect to the iPhone, Apple actually made this model of the device easier for us repair techs to disassemble and perform parts replacements.
■ Chapter 8, “iPad 2nd Generation Disassembly and Reassembly,” presents a full walkthrough on the iPad 2. You’ll be unpleasantly surprised to learn how difficult it is to gain entry to these beasts.
■ Chapter 9, “iPad 3rd and 4th Generation Disassembly and Reassembly,” doesn’t have a lot more good news in the screen removal department (iPads are notorious for DIYers in this regard). However, after you have the display off, performing repairs and parts replacements on iPads is largely a breeze.
■ Chapter 10, “iPad mini Disassembly and Reassembly,” presents how to disassemble and reassemble Apple’s smallest iPad model. The good news is that the iPad interior is intelligently designed. The bad news is that the display is difficult to remove and parts are permanently soldered to the logic board.
■ Chapter 11, “iPod touch 4th Generation Disassembly and Reassembly,” provides proof that Apple doesn’t want anybody (including its Apple Store employees) opening any iPod touch device.
■ Chapter 12, “iPod nano 5th and 7th Generation Disassembly and Reassembly,” takes on the nearly insurmountable task of disassembling an iPod nano without doing more damage in the process. Again, Apple considers all iPods to be disposable devices; I do my best to teach you how to prove Apple wrong.
■ Chapter 13, “Sourcing iDevice Replacement Parts,” submits strategies for separating the wheat from the chaff, as it were, in terms of finding iDevice replacement parts that actually work. You would be surprised (or not) at the quality variance that exists in the marketplace.
■ Chapter 14, “Addressing Water Damage,” gives practical tips and tricks for resurrecting an iDevice that has taken a bath against your will. The information in this chapter can save you quite a bit of money at the Apple Store!
■ Chapter 15, “Replacing the Front Display and/or Rear Case,” shows you how to perform what is by far the most common iDevice repair—replacing the display assembly and/or the rear case.
■ Chapter 16, “Replacing the Battery,” demonstrates that batteries do indeed have a limited lifetime and it is relatively straightforward, depending upon the model, to replace the battery in your iDevice.
How to Use This Book 3
■ Chapter 17, “Replacing the Logic Board and/or Dock Connector,” teaches you about the logic board, which constitutes the “brains” of any iDevice, and gives you techniques for performing this most fundamental of parts swap-outs.
■ Chapter 18, “Recovering Data from Your Broken iDevice,” presents clear instructions for retrieving otherwise lost data from crashed, crushed, or otherwise hopelessly damaged iDevices.
■ Chapter 19, “Before You Sell, Donate, or Recycle Your iDevice,” outlines lots of ways to protect your privacy when you decide to pass your iDevice along to another person.
That’s a lot of stuff! Then again, there’s a lot you can do with your iDevices. It is my goal as your instructor to make you fully aware of what’s possible with your new, secondhand, or seemingly “broken” iPods, iPhones, and iPads.
Who Can Use This BookYou don’t have to be a technical expert to use this book; many of the procedures discussed here require nothing more than basic computer skills. It helps if you know your way around electronics or computer hardware, and you’ll find out soon enough that this book contains some procedures that require those skills to greater or lesser degrees. But in general, just about anybody can perform most of the hardware and software exercises presented.
As you must know, iDevices are made by Apple. However, you can use iTunes and many other iDevice management tools either on OS X (Mac) or Windows. This book is written for both platforms. In most cases, the procedure is the same; I point out where operating system-specific differences exist.
How to Use This BookI think you will find this book easy to use and helpful. To that end, I have included some items that help organize and call attention to specific pieces of information.
As you’ve probably already noticed, this book contains Notes, Tips, and Cautions—all of which are explained here:
NOTENotes point out ancillary bits of information that are helpful, but not crucial.
4 Introduction
TIPTips point out a useful bit of information to help you solve a problem.
CAUTIONCautions alert you to potential disasters and pitfalls. Don’t ignore these!
I’ve offered many solutions to your iDevice repair problems, but some of these solutions involve software, websites, and services owned by third parties outside my direct control. I’ve included web addresses (URLs) for those sites when appropriate. To keep long and cryptic URLs under control, I used the is.gd URL shortening service for your convenience. I’ve tried to ensure that the web addresses in this book are accurate, but given how quickly the Web changes, you might find an address or two that no longer works. I am sorry about that, but with a little Google searching, you can probably find the resource at its new location.
Warning and DisclaimerWhile Que, iFixit, and I have made every effort to ensure that the directions provided in this book are complete and accurate, any attempt on the reader’s part to perform an iDevice do-it-yourself upgrade or repair is solely at the reader’s risk. Even when our instructions are carefully followed, the slightest misstep in disassembly or reassembly could result in further damage or destruction of the iDevice. Also, any attempt to repair or upgrade your iDevice immediately voids any warranty you have through Apple. You’ve been warned!
There’s More Online…When you need a break from reading, feel free to go online and check out my personal website at www.timwarnertech.com. Here you’ll find more information about this book as well as other work I do. And if you have any questions or comments, feel free to email me directly at [email protected]. I do my utmost to answer every email message I receive from my readers and students.
Do It Your WayWith all these preliminaries out of the way, it’s now time to get started. Put on your reading glasses, fire up your iDevice, and get ready to take complete control of your Apple hardware!

4iDevice Repair Best PracticesThis chapter takes care of some literal and figurative housecleaning that any self-respecting iDevice technician should undertake before performing any DIY work on iDevices.
I’m talking about answers to questions such as the following:
■ How can I determine whether an iDevice is in or out of warranty?
■ What do those strange acronyms like IMEI and ICCID mean?
■ What’s the difference between an iDevice Model Number and an Order Number?
■ What do the strange hieroglyphics on the back of my iDevice represent?
■ How can I maximize the safety effectiveness of my repair workshop?
Those are some juicy questions, don’t you agree? What are you waiting for? Let’s get to work!
Checking iDevice Warranty CoverageWhenever you are presented with an iDevice and are asked to perform an out-of-warranty repair, the first thing you should do is definitively verify the actual warranty status of the device. Fortunately, you can easily find an answer to this question in ways that we will discuss now.
If you can’t start the iDevice, then you can obtain the serial number, from the original product packaging or in iTunes. (You can find instructions for locating the serial number in iTunes in the sidebar later in this section.)
NOTECheck the Back of the Device
Some older iDevice models have their serial numbers printed on the back case.
60 CHAPTER 4: iDevice Repair Best Practices
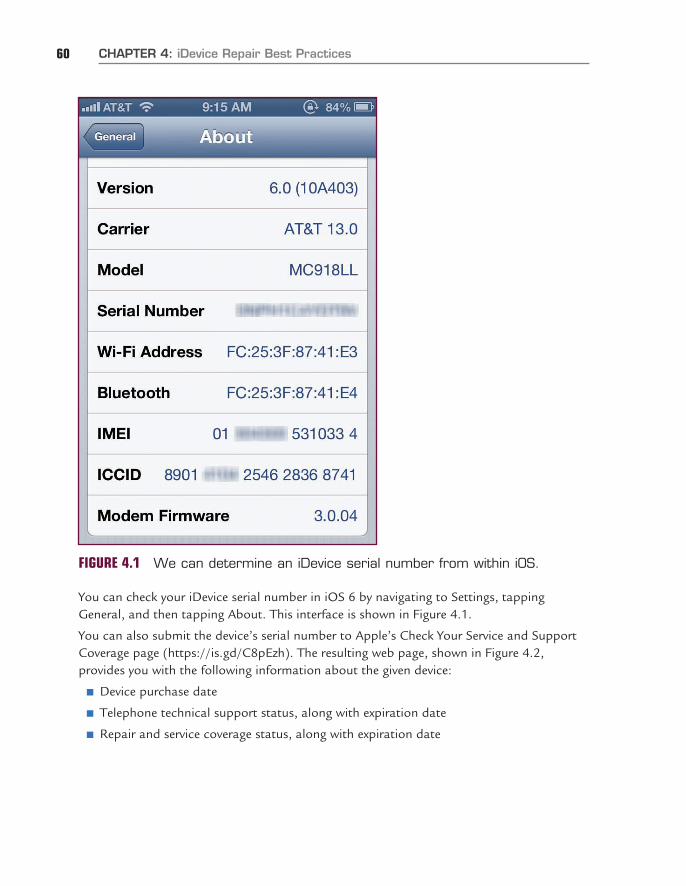
FIGURE 4.1 We can determine an iDevice serial number from within iOS.
You can check your iDevice serial number in iOS 6 by navigating to Settings, tapping General, and then tapping About. This interface is shown in Figure 4.1.
You can also submit the device’s serial number to Apple’s Check Your Service and Support Coverage page (https://is.gd/C8pEzh). The resulting web page, shown in Figure 4.2, provides you with the following information about the given device:
■ Device purchase date
■ Telephone technical support status, along with expiration date
■ Repair and service coverage status, along with expiration date
Checking iDevice Warranty Coverage 61
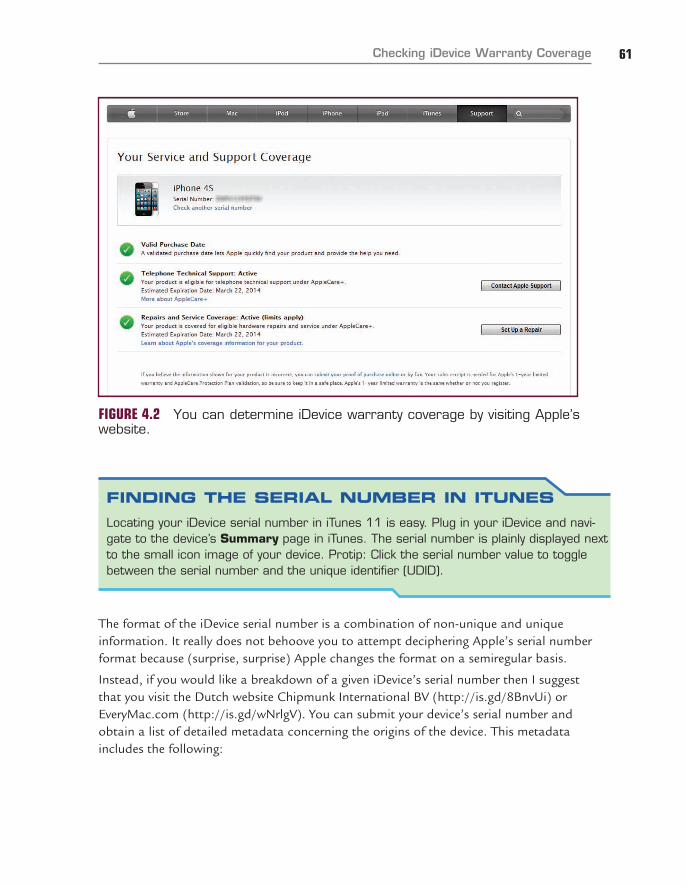
FIGURE 4.2 You can determine iDevice warranty coverage by visiting Apple’s website.
FINDING THE SERIAL NUMBER IN ITUNESLocating your iDevice serial number in iTunes 11 is easy. Plug in your iDevice and navi-gate to the device’s Summary page in iTunes. The serial number is plainly displayed next to the small icon image of your device. Protip: Click the serial number value to toggle between the serial number and the unique identifier (UDID).
The format of the iDevice serial number is a combination of non-unique and unique information. It really does not behoove you to attempt deciphering Apple’s serial number format because (surprise, surprise) Apple changes the format on a semiregular basis.
Instead, if you would like a breakdown of a given iDevice’s serial number then I suggest that you visit the Dutch website Chipmunk International BV (http://is.gd/8BnvUi) or EveryMac.com (http://is.gd/wNrlgV). You can submit your device’s serial number and obtain a list of detailed metadata concerning the origins of the device. This metadata includes the following:
62 CHAPTER 4: iDevice Repair Best Practices
■ Year the model was introduced
■ Production year
■ Production week
■ iDevice model name
■ Order Number
■ CPU speed
■ Screen size
■ Screen resolution
■ Case color
■ Capacity
■ Factory of origin
To quote Miguel de Cervantes from his wonderful novel Don Quixote, “Forewarned, forearmed; to be prepared is half the victory.” With that in mind, let’s continue on the journey to iDevice metadata enlightenment.
Verifying iDevice Version InfoAs you know, Apple has historically not been precise, much less consistent, in its product naming. For instance, consider the iPad. These are the official product names for the three generations of iPad:
■ iPad
■ iPad 2
■ New iPad
Give me a break! What makes matters worse is that all three generations have simply iPad etched on the back panel.
The same goes for iPhones; remember our previous discussion of iPhone 3G, 3GS, and iPhone 4S? What relationship do those product names have with 3G or 4G carrier network connectivity? You have to consult a reference table to answer that question.
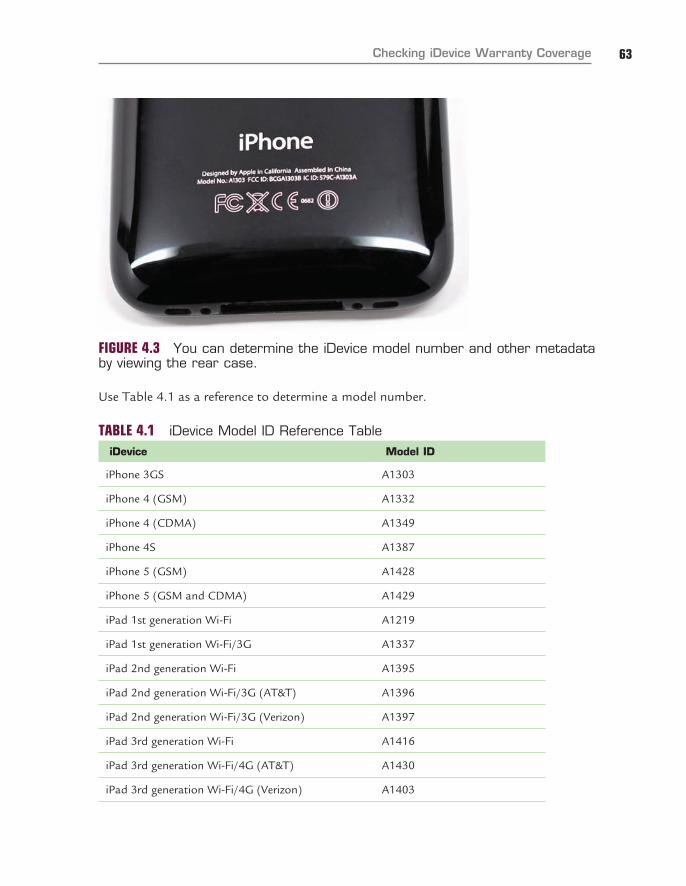
The most reliable method for identifying a particular iDevice model is to ascertain its model number. This alphanumeric string is printed on the rear case of the device (see Figure 4.3).
Checking iDevice Warranty Coverage 63
FIGURE 4.3 You can determine the iDevice model number and other metadata by viewing the rear case.
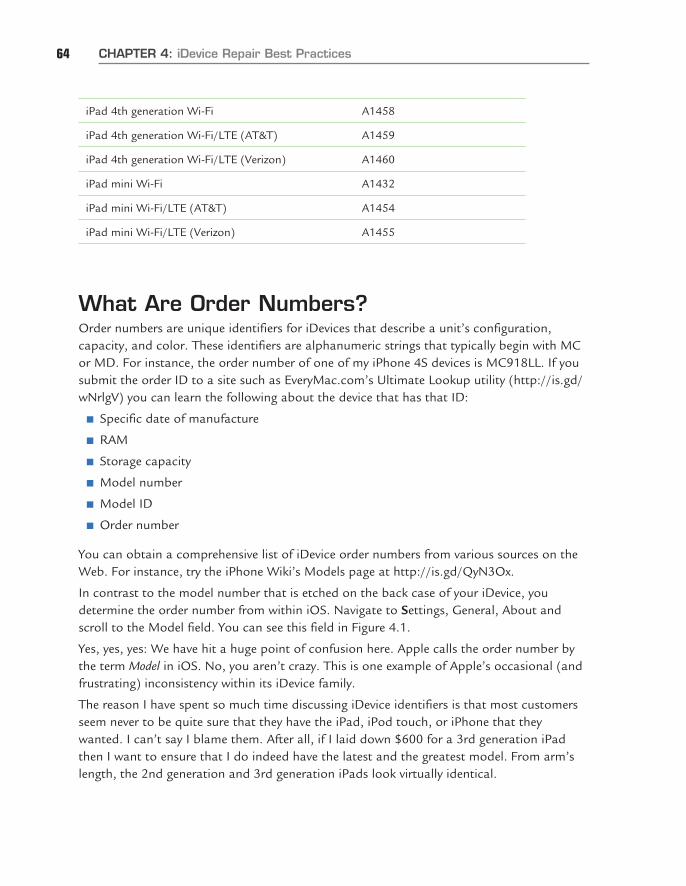
Use Table 4.1 as a reference to determine a model number.
TABLE 4.1 iDevice Model ID Reference TableiDevice Model ID
iPhone 3GS A1303
iPhone 4 (GSM) A1332
iPhone 4 (CDMA) A1349
iPhone 4S A1387
iPhone 5 (GSM) A1428
iPhone 5 (GSM and CDMA) A1429
iPad 1st generation Wi-Fi A1219
iPad 1st generation Wi-Fi/3G A1337
iPad 2nd generation Wi-Fi A1395
iPad 2nd generation Wi-Fi/3G (AT&T) A1396
iPad 2nd generation Wi-Fi/3G (Verizon) A1397
iPad 3rd generation Wi-Fi A1416
iPad 3rd generation Wi-Fi/4G (AT&T) A1430
iPad 3rd generation Wi-Fi/4G (Verizon) A1403
64 CHAPTER 4: iDevice Repair Best Practices
iPad 4th generation Wi-Fi A1458
iPad 4th generation Wi-Fi/LTE (AT&T) A1459
iPad 4th generation Wi-Fi/LTE (Verizon) A1460
iPad mini Wi-Fi A1432
iPad mini Wi-Fi/LTE (AT&T) A1454
iPad mini Wi-Fi/LTE (Verizon) A1455
What Are Order Numbers?Order numbers are unique identifiers for iDevices that describe a unit’s configuration, capacity, and color. These identifiers are alphanumeric strings that typically begin with MC or MD. For instance, the order number of one of my iPhone 4S devices is MC918LL. If you submit the order ID to a site such as EveryMac.com’s Ultimate Lookup utility (http://is.gd/wNrlgV) you can learn the following about the device that has that ID:
■ Specific date of manufacture
■ RAM
■ Storage capacity
■ Model number
■ Model ID
■ Order number
You can obtain a comprehensive list of iDevice order numbers from various sources on the Web. For instance, try the iPhone Wiki’s Models page at http://is.gd/QyN3Ox.
In contrast to the model number that is etched on the back case of your iDevice, you determine the order number from within iOS. Navigate to Settings, General, About and scroll to the Model field. You can see this field in Figure 4.1.
Yes, yes, yes: We have hit a huge point of confusion here. Apple calls the order number by the term Model in iOS. No, you aren’t crazy. This is one example of Apple’s occasional (and frustrating) inconsistency within its iDevice family.
The reason I have spent so much time discussing iDevice identifiers is that most customers seem never to be quite sure that they have the iPad, iPod touch, or iPhone that they wanted. I can’t say I blame them. After all, if I laid down $600 for a 3rd generation iPad then I want to ensure that I do indeed have the latest and the greatest model. From arm’s length, the 2nd generation and 3rd generation iPads look virtually identical.
Deciphering iOS Speak 65
Deciphering iOS SpeakIf you have spent some additional time nosing around the About screen in your iDevice’s iOS or the home page in iTunes then you doubtless noticed some additional acronyms that may tickle your fancy.
■ The International Mobile Equipment Identity (IMEI) is a globally unique identifier for GSM iPhones or iPads.
■ The Integrated Circuit Card Identifier (ICCID) is a globally unique identifier for SIM cards.
■ The Electromagnetic Compatibility (EMC) number is defined in electrical engineering (Reference: http://is.gd/e8JE43) as the “ability of electronic equipment to be a ‘good electromagnetic neighbor’: It neither causes, nor is susceptible to, electromagnetic interference (within the limits of applicable standards).”
■ The Integrated Circuit Card ID (ICCID) is a yet another globally unique identifier associated with a GSM iDevice’s SIM card. What’s interesting is that you can run an ICCID through a mathematical formula in order to yield the subscriber’s IMSI (International Mobile Subscriber Identity) number.
■ The Unique Device ID (UDID) is a globally unique identifier associated with your iDe-vice that is used by iOS app developers to provision apps prior to their approval and availability at the Apple App Store.
As I mentioned in the earlier sidebar “Finding the Serial Number in iTunes,” you can toggle through your iDevice’s unique identifiers from within iTunes.
Okay, friends: Time for another experiment. Take your nearest iPhone, iPod touch, or iPad and turn it over. At this point you should feel proud of yourself inasmuch as you understand most of the information that is etched there.
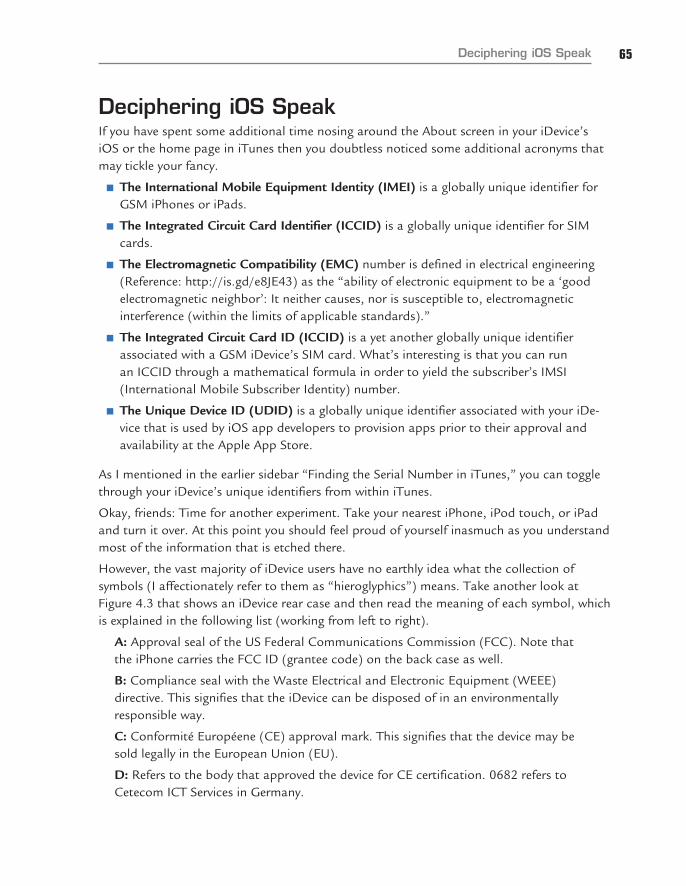
However, the vast majority of iDevice users have no earthly idea what the collection of symbols (I affectionately refer to them as “hieroglyphics”) means. Take another look at Figure 4.3 that shows an iDevice rear case and then read the meaning of each symbol, which is explained in the following list (working from left to right).
A: Approval seal of the US Federal Communications Commission (FCC). Note that the iPhone carries the FCC ID (grantee code) on the back case as well.
B: Compliance seal with the Waste Electrical and Electronic Equipment (WEEE) directive. This signifies that the iDevice can be disposed of in an environmentally responsible way.
C: Conformité Européene (CE) approval mark. This signifies that the device may be sold legally in the European Union (EU).
D: Refers to the body that approved the device for CE certification. 0682 refers to Cetecom ICT Services in Germany.
66 CHAPTER 4: iDevice Repair Best Practices
E: Alerts you of the iDevice’s status as a Class II wireless device, which means that the iDevice may attempt to operate on wireless frequency bands that some countries disallow.
Whew—that was a heavy slog through acronymville, wasn’t it? It’s time to lighten things up by covering how warranty repair orders work for iDevices. Next we’ll describe some aspects of an electrostatic discharge (ESD)-friendly workspace. After that I share some best prac-tices, won through hard-earned experience, for organizing that workspace.
How Do Warranty Repair Orders Work?I have to hand it to Apple in how they architected their Apple Retail Stores—it is a pretty slick operation.
Assume that your iPhone is malfunctioning somehow and you make an appointment to visit an Apple Genius at your local Genius bar by visiting the website at https://www.apple.com/retail/geniusbar/. What happens after you hand the Genius your iDevice?
1. The Genius uses Safari to access Apple’s online iOS Diagnostics web app at https://iosdiags.apple.com. Apple Stores may alternatively use a hidden app on iOS devices called iOS Diagnostics or Behavior Scan.
2. The Genius opens a session ticket and sends a link to your iDevice.
3. After you agree to the process, the iOS Diagnostics web app runs a series of scans on your iDevice and generates a report.
The results of an iOS Diagnostics scan are pretty robust; they are generally broken into the following categories:
■ Battery Health
■ Usage Statistics
■ Call Statistics
■ Thermal Statistics
■ Detailed Analysis
The “Detailed Analysis” also scrubs your iDevice for diagnostic log entries that may reveal the past installation of jailbreak apps. Remember that if the Apple Store technician discovers evidence of jailbreaking, your AppleCare warranty will be voided.
If, by contrast, the problem with your iDevice is definitely hardware-based, the Genius might (at the most) remove the bottom screws and remove the rear panel. You won’t find that any Apple Store staffer field-strips your iDevice.
Creating an ESD-Safe Workspace 67
If your warranty claim is approved, you receive a replacement device—period. I sometimes wonder to myself if any Apple Store has an employee who knows how to completely disassemble an iDevice.
Apple Store personnel use a number of proprietary, internal iOS apps. It’s far beyond our scope to consider these, but if you want to practice your Google-fu to learn more about them on your own, here is a not-at-all comprehensive list of internal app names:
■ Apple Employee Directory
■ AppleConnect
■ Behavior Scan
■ Chatterbox
■ Concierge
■ Espresso
■ Merlin
■ MobileGenius
■ RFA
■ speX
■ Switchboard
Creating an ESD-Safe WorkspaceChapter 2, “The Tools of the Trade,” covers the dangers of ESD. It also explains how you can protect yourself and your iDevice equipment against ESD by using an antistatic wrist strap and an ESD work mat.
At this time I’d like to share with you some additional tips and tricks to minimize the possibility of ESD causing damage to iDevice components.
Wear Appropriate Clothing and Protect Your WorkspacePlease don’t even think of wearing polyester clothing (such as a jogging suit) while you work on iDevices. Polyester is an absolute haven for ESD buildup.
Moreover, never introduce vinyl, Styrofoam, or plastic (except for your ESD-safe plastic work tools) into your workspace environment. Surely you’ve felt a static zap from vinyl, or had Styrofoam packing peanuts stick to your hands? These materials sound a potential death knell to IC components.
68 CHAPTER 4: iDevice Repair Best Practices
Believe it or not, you should strongly consider investing in ESD-safe, antistatic gloves. The reason for this suggestion is that the oils from your fingers can transfer all too easily to the tiny IC components and conductive contacts inside your iDevice. When this happens, you can unintentionally create extra resistance and potential short circuits. This is obviously not a desirable outcome, and it’s difficult to troubleshoot these problems to boot.
ESD-safe gloves also carry the advantage of not leaving fingerprints on your pretty iDevice cases.
Handle IC Components AppropriatelyNever place iDevice parts on a metal surface. Instead, place the parts on your antistatic work mat. For that matter, be sure that you have a supply of static-shielding storage bags on hand for easy parts transport. When you order an iDevice replacement part, the component should ship in a static-shielding bag. Don’t throw them out! You’ll be glad to have a stockpile of them on hand in your workspace for future use.
Handle all IC components only at their edges and never by their contact points. As I just mentioned, you need to ward against the transfer of your body oils to the contacts. You also don’t want to create an inadvertent circuit bridge between the delicate contacts, which might very well short-circuit and fry them. It should go without saying, but here I go, saying it: Never touch another person who is working on IC components, and vice versa.
Condition the Air in Your WorkspaceIndustry best practice guidelines suggest that you keep the humidity of your workspace between 70 and 90 percent. You can achieve this level of humidity by measuring the humidity and then using a humidifier or dehumidifier in the room. Why leverage higher humidity? Because ESD charge levels are reduced (but not eliminated) in a higher-humidity environment.
You should also consider installing an ionized air generator in the room to add another layer of defense against the dreaded ESD.
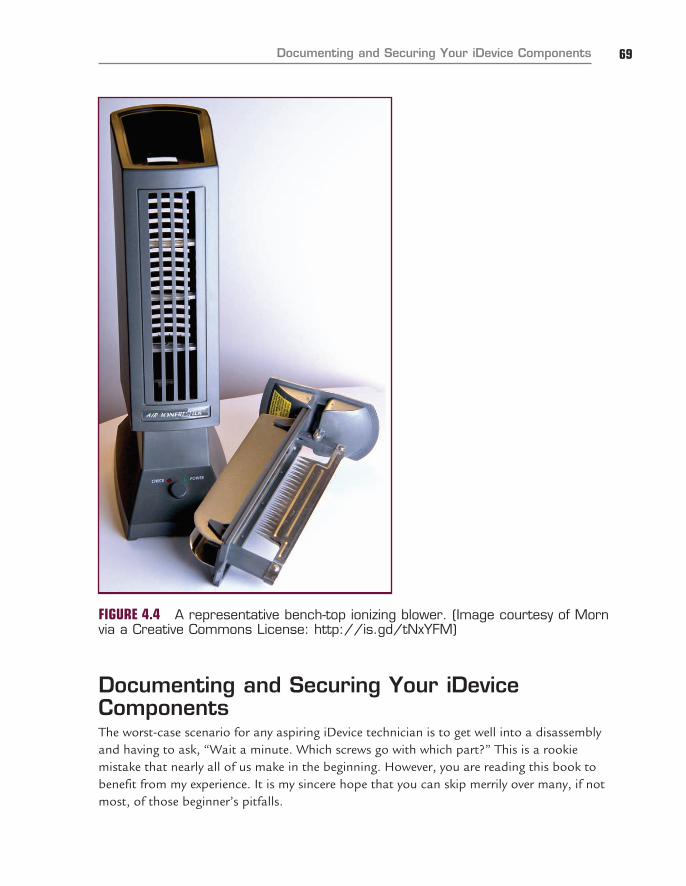
Figure 4.4 shows a bench-top blower. Bench-top ionizers, such as the minIOS2 ionizing air blower (http://www.esdproducts.biz/Ionization/BenchtopIonizers/minION2/minion2.html) cost about $400. However, you must weigh this investment against the peace of mind of insuring against damaging iDevice components and risking dissatisfied customers who face unnecessary delays in parts shipments due to ESD damage.
Documenting and Securing Your iDevice Components 69
FIGURE 4.4 A representative bench-top ionizing blower. (Image courtesy of Morn via a Creative Commons License: http://is.gd/tNxYFM)
Documenting and Securing Your iDevice ComponentsThe worst-case scenario for any aspiring iDevice technician is to get well into a disassembly and having to ask, “Wait a minute. Which screws go with which part?” This is a rookie mistake that nearly all of us make in the beginning. However, you are reading this book to benefit from my experience. It is my sincere hope that you can skip merrily over many, if not most, of those beginner’s pitfalls.
70 CHAPTER 4: iDevice Repair Best Practices
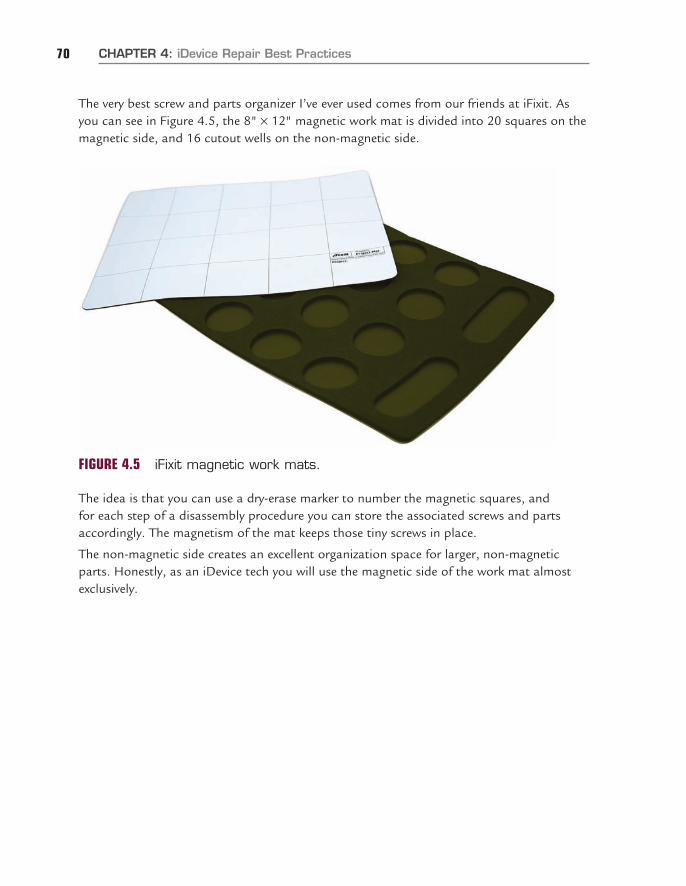
The very best screw and parts organizer I’ve ever used comes from our friends at iFixit. As you can see in Figure 4.5, the 8" × 12" magnetic work mat is divided into 20 squares on the magnetic side, and 16 cutout wells on the non-magnetic side.
FIGURE 4.5 iFixit magnetic work mats.
The idea is that you can use a dry-erase marker to number the magnetic squares, and for each step of a disassembly procedure you can store the associated screws and parts accordingly. The magnetism of the mat keeps those tiny screws in place.
The non-magnetic side creates an excellent organization space for larger, non-magnetic parts. Honestly, as an iDevice tech you will use the magnetic side of the work mat almost exclusively.

This page intentionally left blank
INDEX
AAASPs (Apple Authorized Service Providers),
8, 212ACMT (Apple Certifi ed Macintosh Technician),
37-39ACN (Apple Consultants Network), 8-9, 40-41ActiveSync, 273adapters for Lightning and Dock connectors,
245-249adhesive strips, 230AES (Advanced Encryption Standard), 268aluminosilicate glass, 92Amazon.com, 28
fi nding used iDevices, 23replacement parts, 214
antistatic wrist wraps/work mats, 30Apple
business model, 6-7profi t margins on iPhone 5, 127technician training, 7-9warranties, 18-21
Apple Authorized Service Providers (AASPs), 8, 212
AppleCare+, 19-21display replacements, 228water damage coverage, 218
Apple Certifi ed Macintosh Technician (ACMT), 37-39
Apple Certifi ed Professionals Registry, 37Apple Consultants Network (ACN), 8-9, 40-41Apple Hardware Warranty, 18-19
water damage coverage, 218
AppleOEMParts replacement parts, 214Apple Store, 7-8
display assembly repair, 228apps for benchmarking, 174-175Ars Technica, 249authorized wireless carriers, 57
Bback plate. See rear casebackups, 255-256
encrypted backups, 266iCloud, 48-50, 256iTunes 11, 44-48iTunes Match, 256manual backups, 50restoring, 260-262what to back up, 43-44
batteryLithium-ion batteries, 234-239
best practices, 237-238exploding, 238-239maximizing life, 239memory effect, 235-236specifi cations, 236-237
recycling, 235removing
diffi culty ratings, 240-242iPad mini, 170iPhone 3GS, 83iPhone 4S, 92iPhone 5, 116

278 battery
iPod nano, 205iPod touch, 188
warranty coverage, 233Battery Doctor, 239benchmarks, 174-175best practices
battery replacement, 241-242display repairs, 229-231Lithium-ion batteries, 237-238repairing iDevices, 59-70
checking warranty coverage, 59-64ESD (electrostatic discharge) safety, 67-69organizing components, 69-70terminology on back case, 65-66warranty repair orders, 66-67
bezel in iPod nano, removing, 201“brick,” 21bulletin boards, fi nding used iDevices, 24buyer reviews for replacement parts, 214
CCamera Roll, 259cameras
front-facing versus rear-facing, 157-158iPhones versus iPod touch, 192removing
iPhone 3GS, 80iPhone 4S, 97iPod nano, 204iPod touch, 188
capacitive touch screens, 12, 226capacity of Lithium-ion batteries, 236-237cases for iDevices, 222cellular antenna connector, removing
in iPhone 4S, 95in iPhone 5, 118
certifi cation programsexamples of, 38-41reasons for completing, 36-38
character traits for iDevice technicians, 26-27
charge cycles for batteries, 235-236Chipmunk International BV, 61click wheel in iPod nano, removing, 202clothing, avoiding static electricity, 67-68cloud-based storage, 256computer literacy for iDevice
technicians, 27confi dence, 27, 38connectors
in iPad 2, 139Lightning and Dock connectors compared,
245-249Cook, Tim, 159Corning Gorilla Glass, 212, 226corporate devices, secure erasure, 273-274courage, 27CPU speeds for iPhones, 71cracked glass in iPads, 132Craigslist, fi nding used iDevices, 22-23Cydia, 56
Ddata backups. See backupsdata deletion. See deleting datadata protection, 269data recovery. See recovering datadead iDevices
questions to ask about, 255recovering data, 256-257
deleting dataimportance of, 267secure erasure
of corporate devices, 273-274length of time for, 269local method, 270-271remote method, 272-273
demagnetizer, 34dexterity, 26
front-facing camera, comparison with rear-facing camera 279
DFU (Device Firmware Update) mode, 264digitizer, 226
removingiPad 2, 135iPad mini, 168iPad 3rd/4th generation, 151
disassemblyiPad 2, 133-142iPad 3rd/4th generation, 148-157iPad mini, 162-173iPhone 3GS, 75-84iPhone 4S, 90-106iPhone 5, 113-126iPod nano 5th generation, 198-208iPod nano 7th generation, 208-210iPod touch, 180-191
display assemblycracked glass in iPads, 132elements of, 226-227frequency of breakage, 225-226minimizing damage, 232removing
iPad 2, 133iPad 3rd/4th generation, 149iPad mini, 162iPhone 3GS, 76iPhone 4S, 104iPhone 5, 114
repair optionsApple Store, 228third-party vendors, 228tips for, 229-231
Retina display, 143-144iPod touch versus iPhones, 192
disposable iPod touches, 13, 117disposal of iDevices, 274-275Dock connectors
Lightning connectors, compared, 245-249relationship with logic board, 249removing
iPad 2, 136iPad 3rd/4th generation, 152
iPhone 3GS, 83iPhone 4S, 95
drying tools (repairing water damage), 220dust blowers, 231
Eearning extra money, 9eBay
fi nding used iDevices, 22-23replacement parts, 214
EMC (Electromagnetic Compatibility), 65EMI (electromagnetic interference)
shields, 82encryption, 268-270
of backups, 266environmental concerns with iDevice
disposal, 274-275erasing data. See deleting dataESD (electrostatic discharge) safety,
29-30, 67-69eTechParts replacement parts, 214EveryMac.com, 61Exchange Server, 273exploding Lithium-ion batteries, 238-239external hardware. See hardware
FFaceTime, 157-158fi le systems, 268Find My iPhone, 272fi nding used iDevices, 21-24fi ngerprints, removing, 231fi rmware, restoring, 264fl ea markets, fi nding used iDevices, 24Foxconn Technology Group, 212front display assembly. See display
assemblyfront-facing camera, comparison with
rear-facing camera, 157-158
280 front panel assembly
front panel assemblycracked glass in iPads, 132removing
iPad 2, 133iPad 3rd/4th generation, 149iPad mini, 162iPhone 5, 114iPod touch, 180
Gglass. See display assemblyglass cleaner, 107glass panel in iPod nano, removing, 201.
See also display assemblyGlobal Service Exchange (GSX), 37, 212Gorilla Glass, 212, 226grounding clip in iPhone 4S,
removing, 100Group ID (GID) key, 268GSX (Global Service Exchange), 37, 212
Hhair dryers, 32-33hardware
encryption, 268-270iPad 2, 130-132iPad 3rd/4th generation, 146-148iPad mini, 160-162iPhone 3GS, 73-74iPhone 4S, 88iPhone 5, 110-112iPod nano 5th generation, 194-198iPod nano 7th generation, 196-198iPod touch, 178warranties, 18-19
headphone jack, removingiPad 3rd/4th generation, 154iPod touch, 184
heat guns, 32-33HFSX (Hierarchical File System,
Extended), 268hidden fi les, viewing, 47hold switch button in iPod nano,
removing, 198hold switch plate in iPod nano,
removing, 200humidity of workplace, 68-69
IICCID (Integrated Circuit Card
Identifi er), 65iCloud
backing up with, 48-50, 256restoring with, 51-52
iCracked iTech certifi cation, 39iDevices
Apple warranties, 18-21benefi ts of repairing, 5-9connector comparison, 245-249coverage in book, 17-18display comparison, 227disposal and recycling, 235, 274-275encryption, 268-270fi nding used, 21-24jailbreaking, 52-56logic board and Dock connector
relationship, 249model numbers, obtaining, 62-64music, restoring, 257-259order numbers, obtaining, 64passcode security, 262-265photos, restoring, 259-260refurbished hardware, 19replacement costs for, 19
iPhones 281
serial numbers, obtaining, 59-62terminology, 17-18, 65-66transferring
local method, 270-271remote method, 272-273
types of, 10-17unlocking, 56-58
iDVM Multimeter, 250iFixit replacement parts, 29, 214, 229IMEI (International Mobile Equipment
Identity), 65in-plane switching (IPS) technology, 192Integrated Circuit Card Identifi er
(ICCID), 65International Mobile Equipment Identity
(IMEI), 65invasive remedies to water damage,
221-222ionized air in workplace, 68-69iOS, 27iOS 6 on iPhone 3GS, 85iOS Direct Service Program, 8iPad and iPhone Tips and Tricks (Rich), 27iPads, 15-17
battery replacement, diffi culty of, 240comparison of models, 129-130display repairs, diffi culty of, 230iPad 2
disassembly, 133-142external hardware, 130-132iPad 4th generation comparison, 146reassembly, 143
iPad 3rd generationdisassembly, 148-157external hardware, 146-148iPad 4th generation comparison, 145logic board, replacing, 252reassembly, 157
iPad 4th generationdisassembly, 148-157external hardware, 146-148
iPad 2 comparison, 146iPad 3rd generation comparison, 145logic board, replacing, 252reassembly, 157
iPad minidisassembly, 162-173external hardware, 160-162logic board, replacing, 252reassembly, 174specifi cations, 159-160
Retina display, 143-144iPhone Backup Extractor, 261iPhone Software File (IPSW) archive, 264iPhones, 13-15
battery replacement, diffi culty of, 240CPU speed comparison, 71display assembly repairs, ease of, 229-230iPhone 3GS
disassembly, 75-84external hardware, 73-74iOS 6 on, 85reassembly, 85
iPhone 4iPhone 4S comparison, 87iPhone 5 comparison, 109
iPhone 4Sdisassembly, 90-106external hardware, 88iPhone 4 comparison, 87reassembly, 107
iPhone 5disassembly, 113-126external hardware, 110-112iPhone 4 comparison, 109logic board, replacing, 251material costs, 127profi t margins for Apple, 127reassembly, 126Samsung Galaxy S III comparison, 110
iPod touch comparison, 192
282 iPods
iPods, 10-12battery replacement, diffi culty of, 241iPod nano, 11-12
advantages of, 193battery replacement damage, 242
iPod nano 5th generationdisassembly, 198-208external hardware, 194-198iPod nano 7th generation comparison, 194reassembly, 208
iPod nano 7th generationdisassembly, 208-210external hardware, 196-198iPod nano 5th generation comparison, 194Pixo OS, 210
iPod Shuffl e, 11iPod touch, 13
disassembly, 180-191as disposable, 13, 177external hardware, 178iPhones comparison, 192logic board, replacing, 252-253reassembly, 191
IPS (in-plane switching) technology, 192IPSW (iPhone Software File) archive, 264iSight, 157isopropyl alcohol, 222iTech certifi cation, 39iTunes 11
iDevice serial number, obtaining, 61restoring with, 50-51synchronization with, 44-48
iTunes Match, 256
J–Kjailbreaking iDevices, 52-56job availability for certifi ed technicians,
36-37Jobs, Steve, 159, 192
Kapton tape, 190
Llatex gloves, 107LCD (Liquid Crystal Display), 227
fi ngerprints, removing, 231iPad 2, removing, 135iPad 3rd/4th generation, removing, 149iPad mini, removing, 164, 167
LCIs (liquid contact indicators), 82, 218-219
licensing restrictions on music, 257-258Lightning connector
Dock connector comparison, 245-249iPad 3rd/4th generation, removing, 155iPad mini, 172iPhone 5, removing, 126iPad 3rd/4th generation, removing, 152
liquid contact indicators (LCIs), 82, 218-219
Liquid Crystal Display. See LCDliquids. See water damageLithium-ion batteries, 234-239
best practices, 237-238exploding, 238-239maximizing life, 239memory effect, 235-236specifi cations, 236-237
logic boardcomponents of, 243-245Dock connector, relationship with, 249iPad 2, removing, 138iPad 3rd/4th generation, removing,
154, 252iPad mini, removing, 172, 252iPhone 3GS, removing, 80iPhone 4S, removing, 99iPhone 5, removing, 120, 251iPod nano, removing, 205iPod touch, removing, 190, 252-253purpose of, 82sourcing replacement parts, 250
Recording Industry Association of American (RIAA) 283
MMac Authority, 8magnetic work mats, 35, 70magnetizer/demagnetizer blocks, 34mAh (milliampere-hour), 236manual backups, 50material costs for iPhone 5, 127maximizing battery life, 239memory effect (Lithium-ion batteries),
235-236metadata in serial numbers, 61-62metal-to-metal contacts, removing skin
oils from, 107microcontroller in iPad mini,
removing, 170microphone in iPod nano, removing, 204Microsoft ActiveSync, 273Microsoft Exchange Server, 273midplane in iPod touch, removing, 182midplate in iPad mini, removing, 165milliampere-hour (mAh), 236minimizing display assembly damage, 232Mobile Technical Competency (MTC),
40-41model numbers, obtaining, 62-64money, earning extra, 9MTC (Mobile Technical Competency),
40-41multimeter, 250music, restoring, 257-259
N–ONew iPad. See iPad 3rd generationnon-invasive water damage remedies,
219-221
OEM (Original Equipment Manufacturer)explained, 211-213fi nding parts, 213-214warnings about parts, 215
OnForce consultants, 40order numbers, obtaining, 64organization, 26, 35, 69-70Original Equipment Manufacturer.
See OEM
Ppasscode security, 262-265, 269patience, 26pawn shops, fi nding used iDevices, 21-22pentalobe screws, 28, 90photos, restoring, 259-260pick-up tools, 34pixels, 143Pixo OS, 210plastic baggies, 223plastic opening tools, 32professional credibility, 36Profi le Manager, 274profi t margins for Apple, 127protecting display assembly, 232
Q–Rrear case, composition of, 227rear cover. See rear caserear-facing camera, comparison with
front-facing camera, 157-158reassembly
iPad 2, 143iPad 3rd/4th generation, 157iPad mini, 174iPhone 3GS, 85iPhone 4S, 107iPhone 5, 126iPod nano 5th generation, 208iPod touch, 191
Recording Industry Association of American (RIAA), 257
284 recovering data from dead iDevice
recovering data from dead iDevices, 256-257
recycling iDevices, 235, 274-275refurbished iDevices, 19remote wipes, 272-274repairing iDevices
abilities needed for, 25-27benefi ts of, 5-9best practices, 59-70certifi cation programs, 36-41tools
ESD safety equipment, 29-30heat guns/hair dryers, 32-33magnetic project mats, 35, 70magnetizer/demagnetizer blocks, 34obtaining, 28-29pick-up tools, 34plastic opening tools, 32screwdrivers, 31soldering, 35-36spudgers, 31work lamps with magnifying glass, 34-35
replacement costs for iDevices, 19replacement parts, sourcing, 229
logic boards, 250OEM (Original Equipment Manufacturer)
explained, 211-213fi nding OEM parts, 213-214
warnings about, 215replacing
batterydiffi culty ratings, 240-242warranty coverage, 233
display assemblyApple Store, 228third-party vendors, 228tips for, 229-231
requirements for iDevice technicians, 25-27
restoringbackups, 260-262
with iCloud, 51-52with iTunes 11, 50-51
fi rmware, 264music, 257-259photos, 259-260
Retina display, 143-144iPod touch versus iPhones, 192
reviews for replacement parts, 214RIAA (Recording Industry Association of
American), 257ribbon cable
connectors in iPhone 3GS, removing, 78in iPod nano, caution, 200, 203
rice method (repairing water damage), 220rubber gloves, 107
SSamsung Galaxy S III, comparison with
iPhone 5, 110savings from iDevice repair, 6screwdrivers, 31screws, organizing, 35secondhand shops, fi nding used iDevices,
21-22secure erasure
of corporate devices, 273-274length of time for, 269local method, 270-271remote method, 272-273
securityencryption, 268-270passcodes, 262-265
serial numbers, obtaining, 59-62SHSH (Signature Hash) blob, 56, 265sideloading, 44silica gel packets (repairing water
damage), 220
User ID (UID) key 285
SIM card tray, removingin iPhone 4S, 95in iPhone 5, 122
skin oils, removing from metal-to-metal contacts, 107
social networking, fi nding used iDevices, 24
SoC (system-on-a-chip), 82, 243soldering, 35-36solid-state disk storage, 12sourcing replacement parts, 229
logic boards, 250OEM (Original Equipment Manufacturer)
explained, 211-213fi nding OEM parts, 213-214
warnings about, 215speaker assembly/cables, removing
iPod touch, 186iPad 2, 136iPad 3rd/4th generation, 152iPhone 4S, 104
specifi cations for Lithium-ion batteries, 236-237
spudgers, 31static electricity, 29-30, 67-69steam, limiting exposure to, 223switching wireless carriers, 56-58synchronization with iTunes 11, 44-48system-on-a-chip (SoC), 82, 243
Ttechnical ability for iDevice technicians, 27technician training for Apple, 7-9tenacity, 26terminology
on iDevice back case, 65-66for iDevices, 17-18
testing display repairs, 230tethered jailbreaks, 56
theming, 54third-party sources
display assembly repair, 228tools, 29
Thirsty Bag (repairing water damage), 220Tiny Umbrella, 56tools
ESD safety equipment, 29-30heat guns/hair dryers, 32-33iPad 2 disassembly, 133iPad 3rd/4th generation disassembly, 148iPad mini disassembly, 162iPhone 3GS disassembly, 75iPhone 4S disassemly, 90iPhone 5 disassembly, 113iPod nano disassembly, 198iPod touch disassembly, 180magnetic project mats, 35, 70magnetizer/demagnetizer blocks, 34obtaining, 28-29pick-up tools, 34plastic opening tools, 32screwdrivers, 31soldering, 35-36spudgers, 31work lamps with magnifying glass, 34-35
training for Apple technicians, 7-9transferring iDevices
local method, 270-271remote method, 272-273
U–VUDID (Unique Device ID), 65underclocking, 72unlocking iDevices, 56-58untethered jailbreaks, 56USB version comparison, 247used iDevices, fi nding, 21-24User ID (UID) key, 268
286 vibrator in iPhone 4S, removing
vibrator in iPhone 4S, removing, 104viewing
hidden fi les, 47iTunes backup fi les, 46-48
voiding warranty, 6-7
W–Zwarranties, 18-21
battery coverage, 233checking coverage, 59-64, 214jailbreaking as invalidation of, 53voiding, 6-7warranty repair orders, 66-67water damage coverage, 218
warranty repair orders, 66-67water damage
determining, 82invasive remedies, 221-222LCIs (liquid contact indicators), 218-219limiting, 222-223non-invasive remedies, 219-221problems caused by, 217-218warranty coverage, 218
watt hour (Whr), 236Wi-Fi antenna, removing
iPad 2, 141iPad 3rd/4th generation, 152iPhone 4S, 100iPhone 5, 124
wireless carriers, switching, 56-58wireless synchronization, 45work lamps with magnifying glass, 34-35
yard sales, fi nding used iDevices, 24