Embed Size (px)
Citation preview
123
Srikar AdhikariMichael Blaivas Editors
The Ultimate Guide to Point-of-Care Ultrasound-Guided Procedures
The Ultimate Guide to Point-of-Care Ultrasound-Guided Procedures
Srikar Adhikari • Michael BlaivasEditors
The Ultimate Guide to Point-of-Care Ultrasound-Guided Procedures
ISBN 978-3-030-28265-3 ISBN 978-3-030-28267-7 (eBook)https://doi.org/10.1007/978-3-030-28267-7
© Springer Nature Switzerland AG 2020This work is subject to copyright. All rights are reserved by the Publisher, whether the whole or part of the material is concerned, specifically the rights of translation, reprinting, reuse of illustrations, recitation, broadcasting, reproduction on microfilms or in any other physical way, and transmission or information storage and retrieval, electronic adaptation, computer software, or by similar or dissimilar methodology now known or hereafter developed.The use of general descriptive names, registered names, trademarks, service marks, etc. in this publication does not imply, even in the absence of a specific statement, that such names are exempt from the relevant protective laws and regulations and therefore free for general use.The publisher, the authors, and the editors are safe to assume that the advice and information in this book are believed to be true and accurate at the date of publication. Neither the publisher nor the authors or the editors give a warranty, expressed or implied, with respect to the material contained herein or for any errors or omissions that may have been made. The publisher remains neutral with regard to jurisdictional claims in published maps and institutional affiliations.
This Springer imprint is published by the registered company Springer Nature Switzerland AGThe registered company address is: Gewerbestrasse 11, 6330 Cham, Switzerland
EditorsSrikar AdhikariDepartment of Emergency Medicine University of ArizonaTucson, AZUSA
Michael BlaivasDepartment of Medicine University of South CarolinaColumbia, SCUSA
v
One of the things I recall most distressingly from medical school and intern-ship is struggling with procedures. Those were days when central and arterial lines were daily occurrences, every cardiac arrest got a pericardiocentesis, and thoracentesis and paracentesis were done frequently and all blindly. My many failures are still vivid in my mind, including the feeling of procedural incompetence compared to my fellow residents. Many clinicians have had the frustration of wanting to learn a new procedure or simply become more suc-cessful at ones they have tried before. Unlike those experts who act as proce-dure wizards and scoff at our attempts to cannulate a vein or artery, drain, or inject something or even float a temporary transvenous pacemaker, many of us would benefit from a method to significantly improve and become as good as these experts tell us they are. This is not a feeling for open discussion in the halls of academia but one which spills out in the trenches of clinical practice. How can we get a leg up and become accurate, precise, and expert-like in our procedure outcomes? It is no accident that this magical method is real, and it turns out to be ultrasound guidance.
Erasmus of Rotterdam said: “In the land of the blind, the one-eyed man is king.” Ultrasound is that one eye which not only levels our playing field with the experts using blind techniques but elevates us far beyond their sightless capabilities. Is it somehow cheating to visualize a needle approaching a nerve, the location of which I had forgotten immediately after the gross anat-omy test? Maybe it is, but not to our patients. They benefit from precision and ultrasound-created expertise at the bedside, not far away in a procedure room or another facility. The ability to perform procedures not previously possible or to perform old procedures with a new level of accuracy benefits patient and clinician alike. I have seen many tired senior colleagues get a second wind upon discovering ultrasound guidance for procedures.
This text is for those who are interested in improving their procedural skills or expanding their procedure toolkit and may not be diagnostic ultra-sound gurus. Many clinicians just want to use ultrasound for procedure guid-ance and are reluctant to attend days-long courses or read massive textbooks which focus on diagnostic ultrasound use and contain occasional hidden pro-cedural gems. If you are interested in applying ultrasound to procedure guid-ance, this book is for you and your patients. We both hope it improves your
Preface
vi
practice, your patients’ experiences, and their access to expert procedure delivery like it has for us. We sincerely hope this text will help increase patient safety and contribute to universal adoption of ultrasound guidance for procedures.
Tucson, AZ, USA Srikar AdhikariColumbia, SC, USA Michael Blaivas
Preface
vii
To my wife for her love, patience, and tolerance, my daughters for constantly reminding me of the priorities in life, and my sisters and parents for their unconditional love and support.
Srikar Adhikari
To my family, I owe them everything. My incredible wife and daughters.
Michael Blaivas
Acknowledgments
ix
1 Introduction . . . . . . . . . . . . . . . . . . . . . . . . . . . . . . . . . . . . . . . . . . . 1Srikar Adhikari and Michael Blaivas
2 Principles of Ultrasound Guidance . . . . . . . . . . . . . . . . . . . . . . . . 5Elaine Situ-LaCasse and Josie Acuña
3 Disinfection and Sterile Techniques . . . . . . . . . . . . . . . . . . . . . . . 29Sean Maley and Alison Thurber
4 Ultrasound-Guided Airway Procedures . . . . . . . . . . . . . . . . . . . . 39Abdullah Sulieman Terkawi, Ahmed Labib, Ashley Shilling, Andrew R. Bodenham, and Dimitrios Karakitsos
5 Ultrasound-Guided Cardiac Procedures . . . . . . . . . . . . . . . . . . . 63Timothy Faust and J. Matthew Fields
6 Ultrasound-Guided Central Venous Access . . . . . . . . . . . . . . . . . 81Azeem Tajani, Arthur Au, and J. Matthew Fields
7 Ultrasound-Guided Ear, Nose, and Throat Procedures . . . . . . . 99Richard Amini and Parisa Javedani
8 Ultrasound-Guided Musculoskeletal Procedures. . . . . . . . . . . . . 115Bret Nelson, Joshua Guttman, and David Spinner
9 Ultrasound-Guided Nerve Blocks . . . . . . . . . . . . . . . . . . . . . . . . . 139Arun Nagdev, Emily Lovallo, and Brian Johnson
10 Ultrasound-Guided Gastrointestinal and Genitourinary Procedures . . . . . . . . . . . . . . . . . . . . . . . . . . . . . . . . . . . . . . . . . . . . 179Mathew Nelson, Nat Kittisarapong, Tanya Bajaj, Robert Ellspermann, Adam Ash, and Veena Modayil
11 Ultrasound-Guided Percutaneous Drainage Procedures . . . . . . 205Elaine Situ-LaCasse, Parisa Javedani, Paola Devis, and Hina Arif-Tiwari
12 Ultrasound-Guided Peripheral Venous Access . . . . . . . . . . . . . . . 225Lori Stolz
Contents

x
13 Ultrasound-Guided Spinal Procedures . . . . . . . . . . . . . . . . . . . . . 237Maged A. Guirguis, Samita S. Das, William K. White, and Matthew E. Patterson
14 Ultrasound-Guided Thoracic Procedures . . . . . . . . . . . . . . . . . . . 251Kay Odashima, Samuel Blake Kluger, Pete Keenan, and Eitan Dickman
15 Ultrasound-Guided Vascular Procedures . . . . . . . . . . . . . . . . . . . 271Brian Burke and Srikar Adhikari
Index . . . . . . . . . . . . . . . . . . . . . . . . . . . . . . . . . . . . . . . . . . . . . . . . . . . . . 293
Contents
xi
Josie Acuña, MD Department of Emergency Medicine, Banner University Medical Center-Tucson, Tucson, AZ, USA
Srikar Adhikari, MD, MS Department of Emergency Medicine, University of Arizona, Tucson, AZ, USA
Richard Amini, MD University of Arizona, Department of Emergency Medicine, Tucson, AZ, USA
Hina Arif-Tiwari, MD Department of Medical Imaging, University of Arizona, Tucson, AZ, USA
Adam Ash, DO Department of Emergency Medicine, North Shore University Hospital, Manhasset, NY, USA
Arthur Au, MD Department of Emergency Medicine, Thomas Jefferson University Hospital, Philadelphia, PA, USA
Tanya Bajaj, DO Department of Emergency Medicine, North Shore University Hospital, Manhasset, NY, USA
Michael Blaivas, MD, MBA Department of Medicine, University of South Carolina, Columbia, SC, USA
Andrew R. Bodenham, MBBS, FRCA Department of Anesthesia, Leeds General Infirmary, Leeds, UK
Brian Burke, MD Department of Radiology, North Shore University Hospital, Manhasset, NY, USA
Samita S. Das, MD, MBA Department of Anesthesiology & Critical Care Medicine, Ochsner Health System, New Orleans, LA, USA
Paola Devis, MD Medical Imaging and Gastroenterology, University of Arizona College of Medicine, Staff Interventional Radiologist, Southern Arizona Veterans Affairs Health care System, Tucson, AZ, USA
Eitan Dickman, MD, MMM, FACEP, FAIUM Department of Emergency Medicine, Maimonides Medical Center, Brooklyn, NY, USA
Robert Ellspermann, MD Department of Emergency Medicine, North Shore University Hospital, Manhasset, NY, USA
Contributors
xii
Timothy Faust, MD Department of Emergency Medicine, Thomas Jefferson University Hospital, Philadelphia, PA, USA
J. Matthew Fields, MD Department of Emergency Medicine, Thomas Jefferson University Hospital, Philadelphia, PA, USA
Maged A. Guirguis, MD Department of Interventional Pain Management, Ochsner Health System, New Orleans, LA, USA
Joshua Guttman, MD Department of Emergency Medicine, Emory University Hospital, Atlanta, GA, USA
Parisa Javedani, MD Colorado Permanente Medical Group, Denver, CO, USA
Brian Johnson, MD University of Washington – Valley Medical Center, Emergency Department, Renton, WA, USA
Dimitrios Karakitsos, MD Department of Internal Medicine, University of South Carolina, School of Medicine, Columbia, SC, USA
Pete Keenan, MD Lakewood Regional Medical Center, Lakewood, CA, USA
Los Alamitos Medical Center, Los Alamitos, CA, USA
Nat Kittisarapong, DO Department of Emergency Medicine, North Shore University Hospital, Manhasset, NY, USA
Samuel Blake Kluger, MD Ultrasound Faculty, Emergency Care Specialists, Grand Rapids, MI, USA
Ahmed Labib, FRCA Medical Intensive Care Unit, Hamad General Hospital, Doha, Qatar
Emily Lovallo, MD Department of Emergency Medicine, University of Pittsburgh School of Medicine, Pittsburgh, PA, USA
UPMC Mercy and Magee Hospitals, Pittsburgh, PA, USA
Sean Maley, MD Northwest Medical Center, Tucson, AZ, USA
Veena Modayil, MD Department of Emergency Medicine, North Shore University Hospital, Manhasset, NY, USA
Arun Nagdev, MD Highland General Hospital, Alameda Health System, Oakland, CA, USA
Bret Nelson, MD Department of Emergency Medicine, Mount Sinai Hospital, New York, NY, USA
Mathew Nelson, DO Department of Emergency Medicine, North Shore University Hospital, Manhasset, NY, USA
Kay Odashima, MD Department of Emergency Medicine, Maimonides Medical Center, Brooklyn, NY, USA
Matthew E. Patterson, MD Department of Anesthesiology & Critical Care Medicine, Ochsner Health System, New Orleans, LA, USA
Contributors
xiii
Ashley Shilling, MD Department of Anesthesiology, University of Virginia, Charlottesville, VA, USA
Elaine Situ-LaCasse, MD Department of Emergency Medicine, Banner University Medical Center-Tucson, Tucson, AZ, USA
David Spinner, DO Department of Rehabiliation Medicine, Mount Sinai Hospital, New York, NY, USA
Lori Stolz, MD University of Cincinnati, Department of Emergency Medicine, Cincinnati, OH, USA
Azeem Tajani, MD Department of Emergency Medicine, Thomas Jefferson University Hospital, Philadelphia, PA, USA
Abdullah Sulieman Terkawi, MD Department of Anesthesiology, Perioperative, and Pain Medicine, Stanford University, Stanford, CA, USA
Department of Anesthesiology, King Fahad Medical City, Riyadh, Saudi Arabia
Syrian Expatriate Medical Association - US (SEMA US), Santa Clara, CA, USA
Alison Thurber, MD Emergency Medicine, SUNY Upstate University Hospital, Syracuse, NY, USA
William K. White, MD Department of Anesthesiology & Critical Care Medicine, Ochsner Health System, New Orleans, LA, USA
Contributors
1© Springer Nature Switzerland AG 2020 S. Adhikari, M. Blaivas (eds.), The Ultimate Guide to Point-of-Care Ultrasound-Guided Procedures, https://doi.org/10.1007/978-3-030-28267-7_1
Introduction
Srikar Adhikari and Michael Blaivas
The widespread availability of portable ultra-sound has increased bedside use of this technol-ogy in a variety of healthcare settings [1]. Ultrasound technology is relatively cheap and delivers no ionizing radiation to the patient or the provider. Concomitantly, the house of medi-cine is witnessing the largest expansion to point-of- care ultrasound in history as it moves beyond fields such as emergency medicine, critical care, and anesthesiology. With internal medicine, family medicine, and others quickly taking up point- of- care ultrasound and expanding its utili-zation, ultrasound may soon be at the bedside of most patients being treated in the developed and developing worlds. The use of point-of-care ultrasound for procedural guidance is rapidly increasing in clinical practice as providers real-ize that ultrasound allows guidance of almost any needle or device as long as an image can be obtained from the skin surface to the target organ or tissue [2]. Recent data suggests that nonradiologists are performing more ultra-sound-guided procedures than radiologists and are responsible for a majority of growth in pro-cedure volume [3].
Performing invasive procedures safely is an important aspect of both medical education and clinical practice. Ultrasound guidance helps visu-alize the target precisely for directing a needle’s path and avoiding adjacent structures. Ultrasound procedural guidance may involve use of a free-hand technique or utilize some sort of guidance device such as a needle guide. Needle guides can take on varied shapes and sizes depending on the ultrasound transducer they will be attaching to and the type of procedure for which they will be used. Further, needle and other guides have matured sig-nificantly in the last two decades, becoming more streamlined, functional, and versatile [4].
The use of ultrasound as an adjunct to perform invasive procedures has been shown to enhance procedural success, decrease complications, improve satisfaction, and decrease time required to perform procedures. There is a robust body of evidence demonstrating that ultrasound guidance can significantly increase the safety and quality of patient care, while reducing complications and costs among patients undergoing invasive proce-dures [5]. The clinical efficacy of ultrasound guidance for performing procedures can be trans-lated into significant cost savings in multiple fashions, including reduction of procedure- related complications and associated costs, decreased procedure times, reduced hospital length of stay, improved throughput, and more consistent success across a broader range of qual-ified healthcare providers [6].
S. Adhikari (*) Department of Emergency Medicine, University of Arizona, Tucson, AZ, USAe-mail: [email protected]
M. Blaivas Department of Medicine, University of South Carolina, Columbia, SC, USA
1

2
Ultrasound guidance has been shown to improve success for a simple procedure, such as peripheral intravenous catheter placement, to the most complex and technically challenging proce-dure, such as transvenous pacemaker placement. The use of real-time ultrasound guidance not only improves success rate but also reduces the number of attempts and the amount of anesthetic needed for certain procedures. Although less well studied, the introduction of ultrasound guidance can have a tremendous impact on provider satis-faction, feeling of competence, or mastery and even breathe new life into some clinician prac-tices by allowing them to competently perform procedures which were once out of reach such as nerve blocks in emergency medicine, precise ten-don injections in primary care, and many other examples. The use of ultrasound guidance for central venous access has become the standard of care after being recommended by multiple medi-cal societies and supported by ample number of studies in the literature [7]. Although currently the highest quality evidence may be present for ultrasound-guided vascular access, the evidence for the use of ultrasound guidance for other pro-cedures is rapidly increasing as well. Considerable evidence is building which demonstrates the ben-efits of real-time ultrasound guidance for proce-dures such as paracentesis, thoracentesis, arthrocentesis, and other procedures.
This technique can be broadly categorized into two groups: ultrasound assistance and real- time ultrasound guidance. Ultrasound-assisted procedures refer to evaluating patient anatomy and localization of procedure site (including tar-get and surrounding structures) with ultrasound and do not involve real-time visualization of the needle and the target. This static method is less favored because of the potential for complica-tions. Real-time ultrasound-guided procedures refer to the continuous visualization of the needle to direct needle placement while performing the procedure. This is the preferred technique since the location of the needle tip and target structure are continuously visualized.
Successful performance of ultrasound-guided procedures is dependent on training, experience, competence, and skills of the operator.
Ultrasound-guided technique has been shown to increase operator confidence and is frequently replacing the anatomical landmark approach as the new standard for various invasive procedures. However, healthcare providers who perform ultrasound-guided procedures should be quali-fied to perform invasive procedures within their scope of practice. It is crucial to understand the principles of needle guidance to achieve success while using ultrasound for procedural guidance. They should receive training in the basic physical principles, ultrasound equipment, imaging modes, scanning planes, relevant sonographic anatomy needle guidance techniques, and limita-tions of ultrasound as they pertain to invasive procedures.
Despite growing evidence referenced above, the use of ultrasound-guided procedures is grow-ing more slowly in nonacademic clinical settings [8]. Most of the research published to date has naturally occurred in academic settings, and more attention needs to be paid in community practice settings which represent the majority of patients seen worldwide. To have a larger and meaningful impact on patient care, it is impera-tive to integrate ultrasound guidance into clinical practice outside of academic centers. Providers in these settings may not even be aware of the potential available with ultrasound technology, its ever-lowering cost, and its ease of use as well as its capability. Technological advances such as beam steering software can potentially increase the ease of use and therefore adoption. In addi-tion, artificial intelligence is rapidly making an impact on medical imaging, and multiple studies of deep learning applications in point-of-care ultrasound will soon be emerging as well and as commercially available artificial intelligence aps for real ultrasound machines.
In summary, adopting ultrasound guidance for procedural performance can increase safety, improve speed, simply comply with the new stan-dard of care, improve patient satisfaction, and also radically improve the feeling of mastery and accomplishment by clinicians who gain access to procedures they were once unable to perform. Anecdotally, we have seen this in a variety of prac-tice settings, and this repeatable finding is not lim-
S. Adhikari and M. Blaivas
3
ited to any provider age or experience group. It is likely that ultrasound guidance will one day be the standard of care for virtually every procedure in which ultrasound can visualize the intended target, but long before that, both providers and patients are increasingly benefiting from its increased utili-zation. We hope this book will move you forward in your discovery and mastery of ultrasound guid-ance in procedural performance.
References
1. American College of Emergency Physicians. Ultrasound guidelines: emergency, point-of-care and clinical ultrasound guidelines in medicine. Ann Emerg Med. 2017;69(5):e27–54.
2. Rippey J. Ultrasound guidance should be the stan-dard of care for most invasive procedures performed
by clinicians. Australas J Ultrasound Med. 2012; 15(4):116–20.
3. McGahan J, Pozniak M, Cronan J, et al. Handheld ultrasound: threat or opportunity? Appl Radiol. 2015; 44(3):20–5.
4. Ueshima H, Kitamura A. The use of a needle guide kit improves the stability of ultrasound-guided tech-niques. J Anesth. 2015;29(5):803–4.
5. Patel PA, Ernst FR, Gunnarsson CL. Evaluation of hospital complications and costs associated with using ultrasound guidance during abdominal paracentesis procedures. J Med Econ. 2012;15:1–7.
6. Nicolaou S, Talsky A, Khashoggi K, Venu V. Ultrasound guided interventional radiology in critical care. Crit Care Med. 2007;35:S186–97.
7. Adhikari S, Theodoro D, Raio C, Nelson M, Lyon M, Leech S, Akhtar S, Stolz U. Central venous cath-eterization: are we using ultrasound guidance? J Ultrasound Med. 2015;34(11):2065–70.
8. Amini R, Wyman MT, Hernandez NC, Guisto JA, Adhikari S. Use of emergency ultrasound in Arizona Community Emergency Departments. J Ultrasound Med. 2017;36(5):913–21.
1 Introduction
5© Springer Nature Switzerland AG 2020 S. Adhikari, M. Blaivas (eds.), The Ultimate Guide to Point-of-Care Ultrasound-Guided Procedures, https://doi.org/10.1007/978-3-030-28267-7_2
Principles of Ultrasound Guidance
Elaine Situ-LaCasse and Josie Acuña
Introduction
Procedures guided by ultrasound have been proven to be far safer than the conventional landmark- based technique [1]. Central venous catheter placements are expected to be placed using ultrasound, and it is now considered the standard of care [2].
For those who are not trained in the use of bedside ultrasound, ultrasound-guided proce-dures may appear daunting. However, the princi-ples and techniques are straightforward, and with some education and practice, any healthcare pro-vider can safely perform procedures under the guidance of ultrasound, taking the guesswork out of the needle tip location. It is important to under-stand that the basic procedure remains the same and is not affected by the addition of ultrasound guidance per se. Thus, providers should not view adding ultrasound guidance as having to relearn how to perform a procedure. This chapter covers the basic principles of ultrasound and its use for procedural guidance, and once these principles are understood, they can be applied to the most commonly performed procedures.
Basic Physics
Although one does not need to know ultrasound physics to operate the machine, understanding the basics will allow the user to improve image quality and better utilize the technology. Physics topics will be briefly reviewed in this chapter, and they can be directly applied to clinical ultrasound use.
Sound is energy transmitted through a medium, be it air, liquid, or solid. Ultrasound is beyond the audible range of humans, which means any sound frequency greater than 20,000 Hz. Ultrasound has been harnessed into imaging technology, and diagnostic ultrasound typically ranges between 2.5 MHz and 15 MHz. There are newer ultrasound transducers that emit higher frequencies for improved imaging of superficial structures [3]. Clinical indications for use of the various transducers will be discussed later in the chapter.
Ultrasound systems transmit electrical current through the cord of the ultrasound transducer, causing special piezoelectric crystals in the probe to vibrate. This energy from the vibrations is transmitted into the patient’s body in the form of sound. As the sound travels through the body, it collides with various structures, and the sound waves bounce or reflect back toward the trans-ducer. The transducer is constantly monitoring for returning sound waves while recording them. This information travels back to the machine,
E. Situ-LaCasse (*) · J. Acuña Department of Emergency Medicine, Banner University Medical Center-Tucson, Tucson, AZ, USAe-mail: [email protected]
2

6
and the processed data becomes the ultrasound image on the monitor.
To understand diagnostic ultrasound, one must understand the interaction between the sound waves and the structures of the human body. Impedance is the resistance to the propaga-tion of sound, and ultrasound uses sound waves to detect impedance mismatch to differentiate structures [4]. Different tissues have varying lev-els of impedance. For example, bone has higher impedance, which means it reflects most of the
ultrasound signal back to the ultrasound trans-ducer, yielding a brighter image. On the contrary, fluid has little to no impedance, so the ultrasound signal travels through the fluid with no reflection of the signal, yielding black image on the screen. Liver is a structure that has levels of impedance between bone and fluid, appearing as various shades of gray on the monitor (Fig. 2.1).
Attenuation is defined as the decrease in inten-sity, power, and amplitude of a sound wave as it passes through a medium. This can also be described as acoustic loss [5]. There are three components of attenuation: absorption, scatter-ing, and reflection [6]. Air has the most attenua-tion, and that is why gel is used to remove air from the path of the sound beams when perform-ing an ultrasound study. Bone attenuates less than air, absorbing some but reflecting more sound. Water attenuates the sound energy the least, transmitting almost all the sound beams and reflecting very little.
Learning about attenuation segues into learn-ing echogenicity. Echogenicity is the brightness of an object on the ultrasound image. If a struc-ture is hyperechoic, it is white or bright. If a tis-sue is hypoechoic or less bright, it is seen as shades of gray. An object that is anechoic, such as a fluid-filled structure, will appear black on the image (Fig. 2.2). The term isoechoic describes two adjacent structures or tissues that are the same echogenicity.
Fig. 2.1 This image shows tissues of various imped-ances. Note that the fluid is dark, having little to no imped-ance. The bone has high impedance, which is seen as bright on this image. The rest of the tissues have levels of impedance between the bone and fluid, appearing as vari-ous shades of gray
Fig. 2.2 Echogenicity refers to brightness of structures. Fluid is considered anechoic, tissues such as liver can be con-sidered hypoechoic, and bone on ultrasound is hyperechoic
E. Situ-LaCasse and J. Acuña
7
Knobology
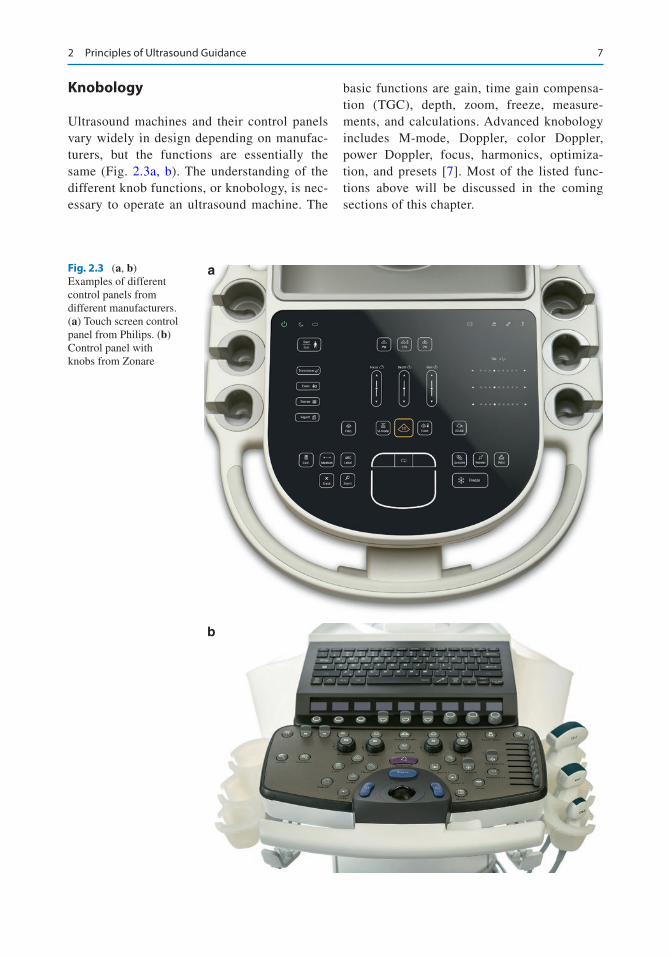
Ultrasound machines and their control panels vary widely in design depending on manufac-turers, but the functions are essentially the same (Fig. 2.3a, b). The understanding of the different knob functions, or knobology, is nec-essary to operate an ultrasound machine. The
basic functions are gain, time gain compensa-tion (TGC), depth, zoom, freeze, measure-ments, and calculations. Advanced knobology includes M-mode, Doppler, color Doppler, power Doppler, focus, harmonics, optimiza-tion, and presets [7]. Most of the listed func-tions above will be discussed in the coming sections of this chapter.
a
b
Fig. 2.3 (a, b) Examples of different control panels from different manufacturers. (a) Touch screen control panel from Philips. (b) Control panel with knobs from Zonare
2 Principles of Ultrasound Guidance
8
Probes/Frequency
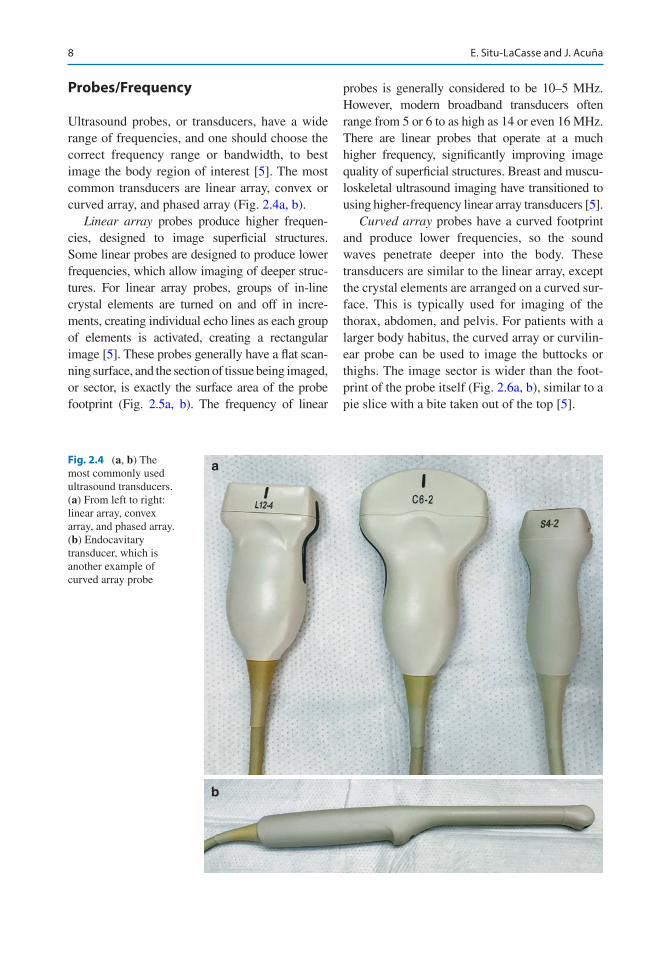
Ultrasound probes, or transducers, have a wide range of frequencies, and one should choose the correct frequency range or bandwidth, to best image the body region of interest [5]. The most common transducers are linear array, convex or curved array, and phased array (Fig. 2.4a, b).
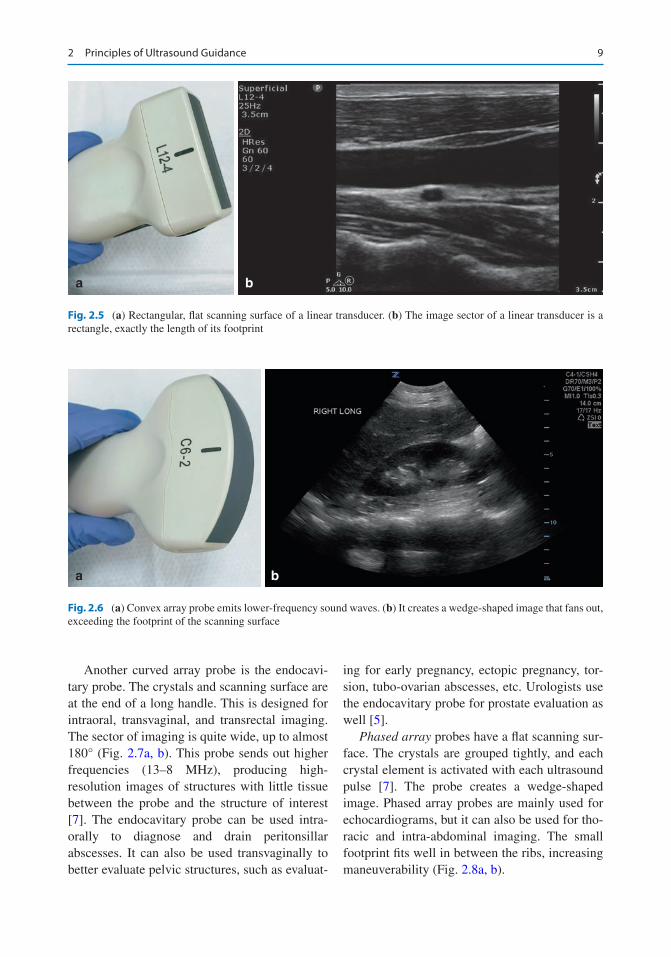
Linear array probes produce higher frequen-cies, designed to image superficial structures. Some linear probes are designed to produce lower frequencies, which allow imaging of deeper struc-tures. For linear array probes, groups of in-line crystal elements are turned on and off in incre-ments, creating individual echo lines as each group of elements is activated, creating a rectangular image [5]. These probes generally have a flat scan-ning surface, and the section of tissue being imaged, or sector, is exactly the surface area of the probe footprint (Fig. 2.5a, b). The frequency of linear
probes is generally considered to be 10–5 MHz. However, modern broadband transducers often range from 5 or 6 to as high as 14 or even 16 MHz. There are linear probes that operate at a much higher frequency, significantly improving image quality of superficial structures. Breast and muscu-loskeletal ultrasound imaging have transitioned to using higher-frequency linear array transducers [5].
Curved array probes have a curved footprint and produce lower frequencies, so the sound waves penetrate deeper into the body. These transducers are similar to the linear array, except the crystal elements are arranged on a curved sur-face. This is typically used for imaging of the thorax, abdomen, and pelvis. For patients with a larger body habitus, the curved array or curvilin-ear probe can be used to image the buttocks or thighs. The image sector is wider than the foot-print of the probe itself (Fig. 2.6a, b), similar to a pie slice with a bite taken out of the top [5].
a
b
Fig. 2.4 (a, b) The most commonly used ultrasound transducers. (a) From left to right: linear array, convex array, and phased array. (b) Endocavitary transducer, which is another example of curved array probe
E. Situ-LaCasse and J. Acuña
9
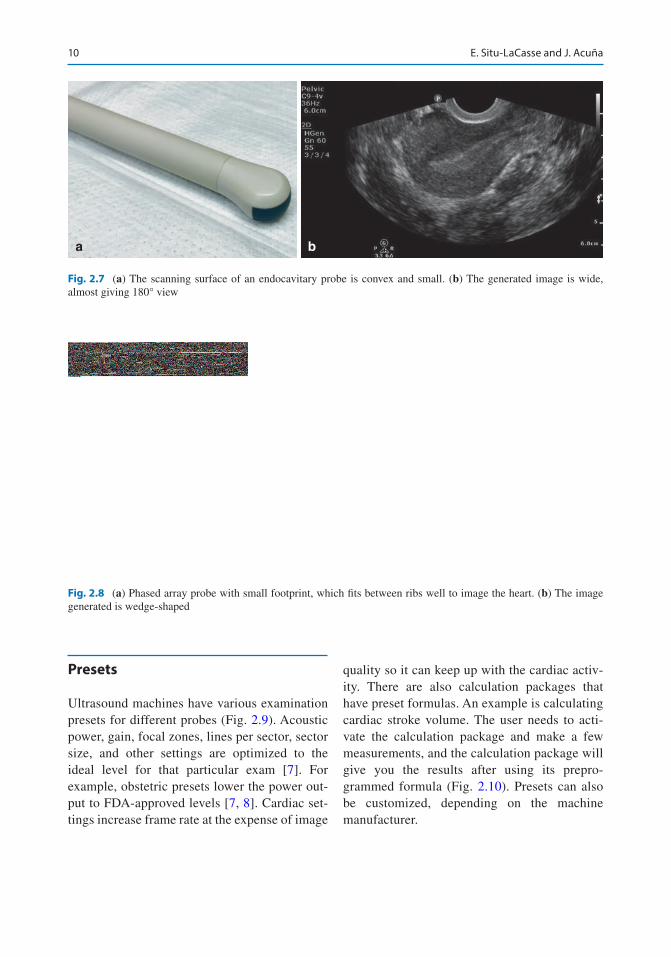
Another curved array probe is the endocavi-tary probe. The crystals and scanning surface are at the end of a long handle. This is designed for intraoral, transvaginal, and transrectal imaging. The sector of imaging is quite wide, up to almost 180° (Fig. 2.7a, b). This probe sends out higher frequencies (13–8 MHz), producing high- resolution images of structures with little tissue between the probe and the structure of interest [7]. The endocavitary probe can be used intra-orally to diagnose and drain peritonsillar abscesses. It can also be used transvaginally to better evaluate pelvic structures, such as evaluat-
ing for early pregnancy, ectopic pregnancy, tor-sion, tubo-ovarian abscesses, etc. Urologists use the endocavitary probe for prostate evaluation as well [5].
Phased array probes have a flat scanning sur-face. The crystals are grouped tightly, and each crystal element is activated with each ultrasound pulse [7]. The probe creates a wedge-shaped image. Phased array probes are mainly used for echocardiograms, but it can also be used for tho-racic and intra-abdominal imaging. The small footprint fits well in between the ribs, increasing maneuverability (Fig. 2.8a, b).
a b
Fig. 2.5 (a) Rectangular, flat scanning surface of a linear transducer. (b) The image sector of a linear transducer is a rectangle, exactly the length of its footprint
a b
Fig. 2.6 (a) Convex array probe emits lower-frequency sound waves. (b) It creates a wedge-shaped image that fans out, exceeding the footprint of the scanning surface
2 Principles of Ultrasound Guidance
10
Presets
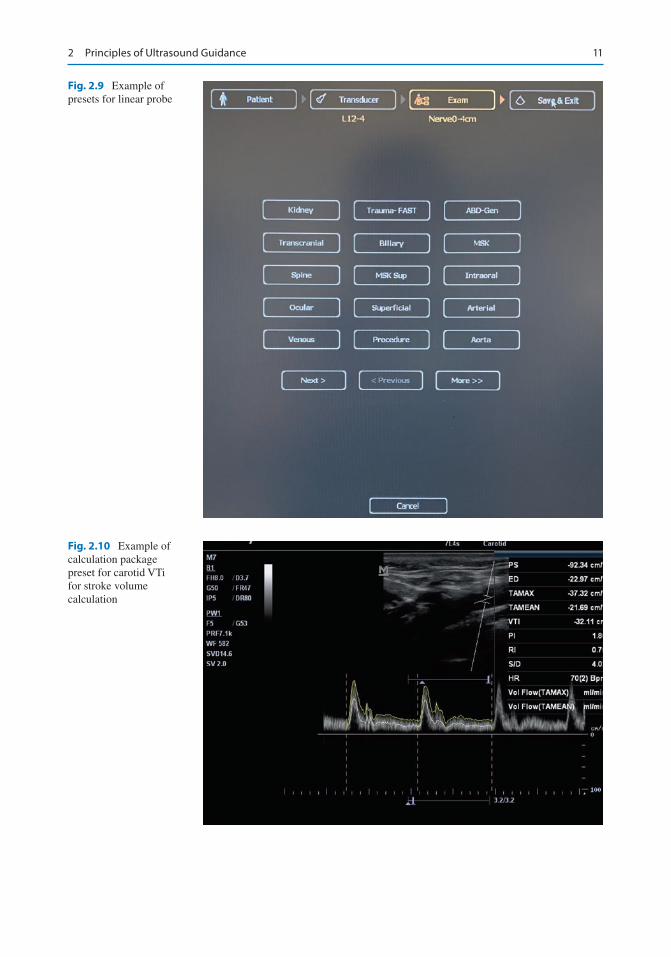
Ultrasound machines have various examination presets for different probes (Fig. 2.9). Acoustic power, gain, focal zones, lines per sector, sector size, and other settings are optimized to the ideal level for that particular exam [7]. For example, obstetric presets lower the power out-put to FDA- approved levels [7, 8]. Cardiac set-tings increase frame rate at the expense of image
quality so it can keep up with the cardiac activ-ity. There are also calculation packages that have preset formulas. An example is calculating cardiac stroke volume. The user needs to acti-vate the calculation package and make a few measurements, and the calculation package will give you the results after using its prepro-grammed formula (Fig. 2.10). Presets can also be customized, depending on the machine manufacturer.
a b
Fig. 2.7 (a) The scanning surface of an endocavitary probe is convex and small. (b) The generated image is wide, almost giving 180° view
a b
Fig. 2.8 (a) Phased array probe with small footprint, which fits between ribs well to image the heart. (b) The image generated is wedge-shaped
E. Situ-LaCasse and J. Acuña
11
Fig. 2.9 Example of presets for linear probe
Fig. 2.10 Example of calculation package preset for carotid VTi for stroke volume calculation
2 Principles of Ultrasound Guidance
12
Depth and Gain
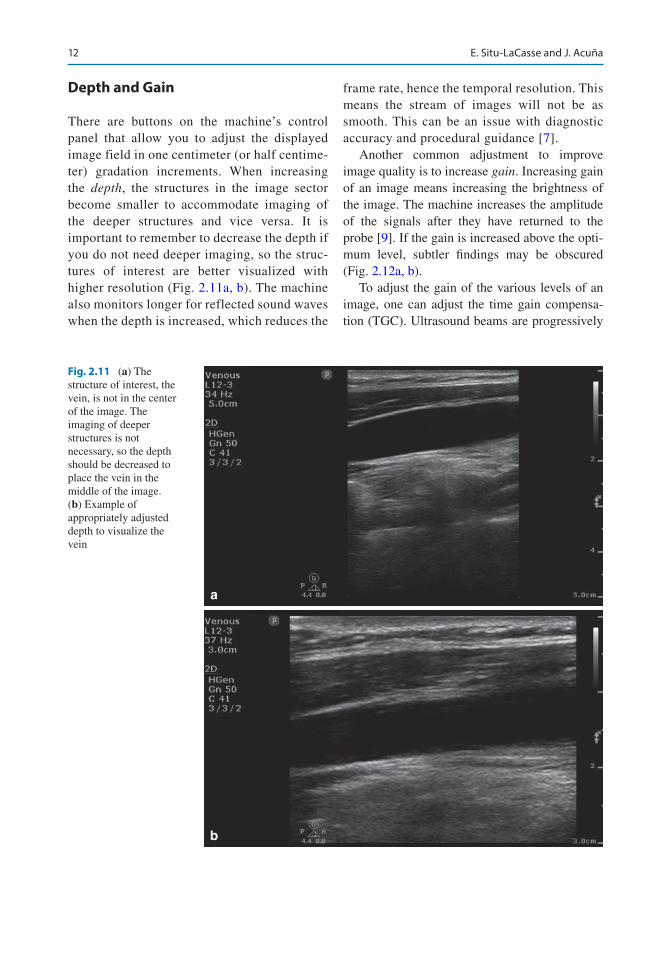
There are buttons on the machine’s control panel that allow you to adjust the displayed image field in one centimeter (or half centime-ter) gradation increments. When increasing the depth, the structures in the image sector become smaller to accommodate imaging of the deeper structures and vice versa. It is important to remember to decrease the depth if you do not need deeper imaging, so the struc-tures of interest are better visualized with higher resolution (Fig. 2.11a, b). The machine also monitors longer for reflected sound waves when the depth is increased, which reduces the
frame rate, hence the temporal resolution. This means the stream of images will not be as smooth. This can be an issue with diagnostic accuracy and procedural guidance [7].
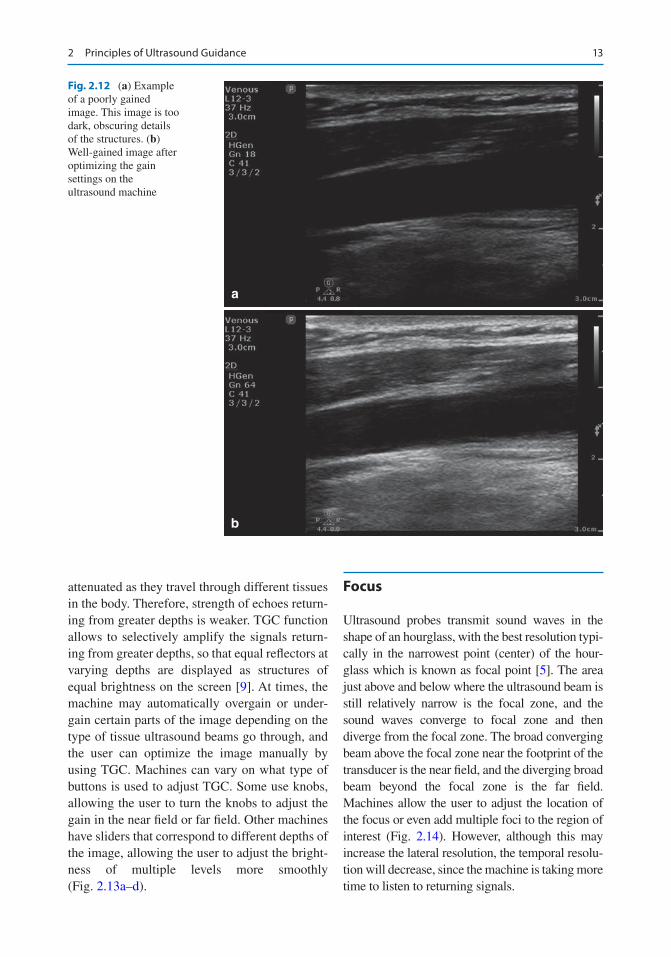
Another common adjustment to improve image quality is to increase gain. Increasing gain of an image means increasing the brightness of the image. The machine increases the amplitude of the signals after they have returned to the probe [9]. If the gain is increased above the opti-mum level, subtler findings may be obscured (Fig. 2.12a, b).
To adjust the gain of the various levels of an image, one can adjust the time gain compensa-tion (TGC). Ultrasound beams are progressively
a
b
Fig. 2.11 (a) The structure of interest, the vein, is not in the center of the image. The imaging of deeper structures is not necessary, so the depth should be decreased to place the vein in the middle of the image. (b) Example of appropriately adjusted depth to visualize the vein
E. Situ-LaCasse and J. Acuña
13
attenuated as they travel through different tissues in the body. Therefore, strength of echoes return-ing from greater depths is weaker. TGC function allows to selectively amplify the signals return-ing from greater depths, so that equal reflectors at varying depths are displayed as structures of equal brightness on the screen [9]. At times, the machine may automatically overgain or under-gain certain parts of the image depending on the type of tissue ultrasound beams go through, and the user can optimize the image manually by using TGC. Machines can vary on what type of buttons is used to adjust TGC. Some use knobs, allowing the user to turn the knobs to adjust the gain in the near field or far field. Other machines have sliders that correspond to different depths of the image, allowing the user to adjust the bright-ness of multiple levels more smoothly (Fig. 2.13a–d).
Focus
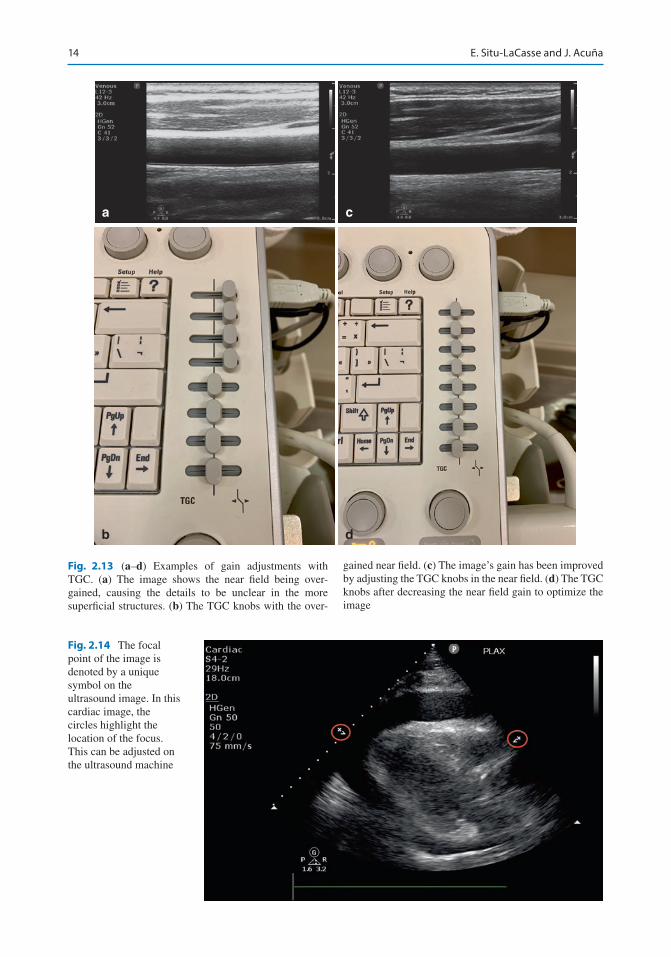
Ultrasound probes transmit sound waves in the shape of an hourglass, with the best resolution typi-cally in the narrowest point (center) of the hour-glass which is known as focal point [5]. The area just above and below where the ultrasound beam is still relatively narrow is the focal zone, and the sound waves converge to focal zone and then diverge from the focal zone. The broad converging beam above the focal zone near the footprint of the transducer is the near field, and the diverging broad beam beyond the focal zone is the far field. Machines allow the user to adjust the location of the focus or even add multiple foci to the region of interest (Fig. 2.14). However, although this may increase the lateral resolution, the temporal resolu-tion will decrease, since the machine is taking more time to listen to returning signals.
a
b
Fig. 2.12 (a) Example of a poorly gained image. This image is too dark, obscuring details of the structures. (b) Well-gained image after optimizing the gain settings on the ultrasound machine
2 Principles of Ultrasound Guidance
14
Fig. 2.14 The focal point of the image is denoted by a unique symbol on the ultrasound image. In this cardiac image, the circles highlight the location of the focus. This can be adjusted on the ultrasound machine
a c
b d
Fig. 2.13 (a–d) Examples of gain adjustments with TGC. (a) The image shows the near field being over-gained, causing the details to be unclear in the more superficial structures. (b) The TGC knobs with the over-
gained near field. (c) The image’s gain has been improved by adjusting the TGC knobs in the near field. (d) The TGC knobs after decreasing the near field gain to optimize the image
E. Situ-LaCasse and J. Acuña
15
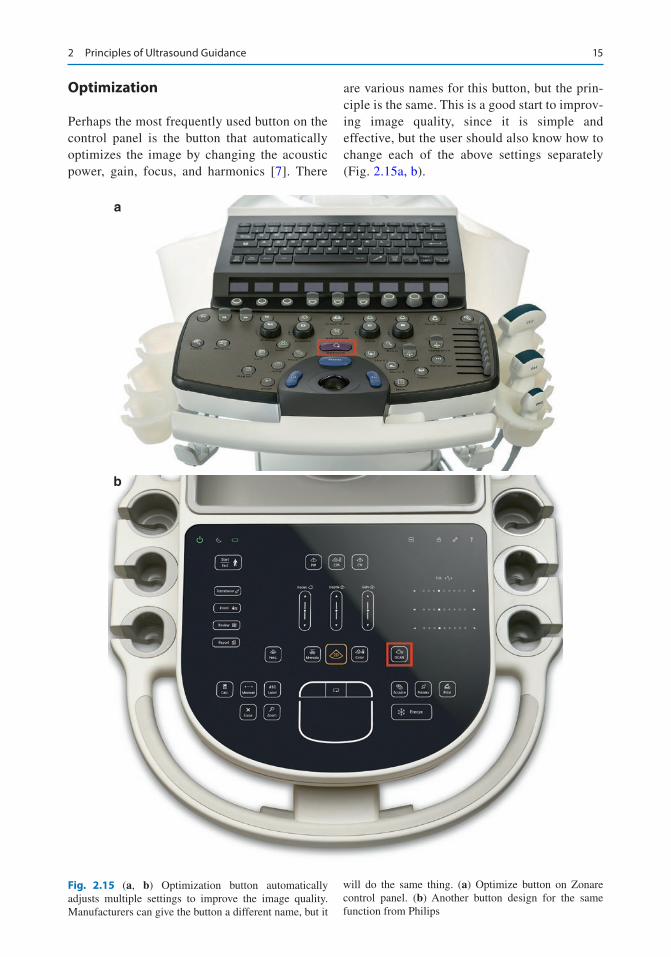
Optimization
Perhaps the most frequently used button on the control panel is the button that automatically optimizes the image by changing the acoustic power, gain, focus, and harmonics [7]. There
are various names for this button, but the prin-ciple is the same. This is a good start to improv-ing image quality, since it is simple and effective, but the user should also know how to change each of the above settings separately (Fig. 2.15a, b).
a
b
Fig. 2.15 (a, b) Optimization button automatically adjusts multiple settings to improve the image quality. Manufacturers can give the button a different name, but it
will do the same thing. (a) Optimize button on Zonare control panel. (b) Another button design for the same function from Philips
2 Principles of Ultrasound Guidance
16
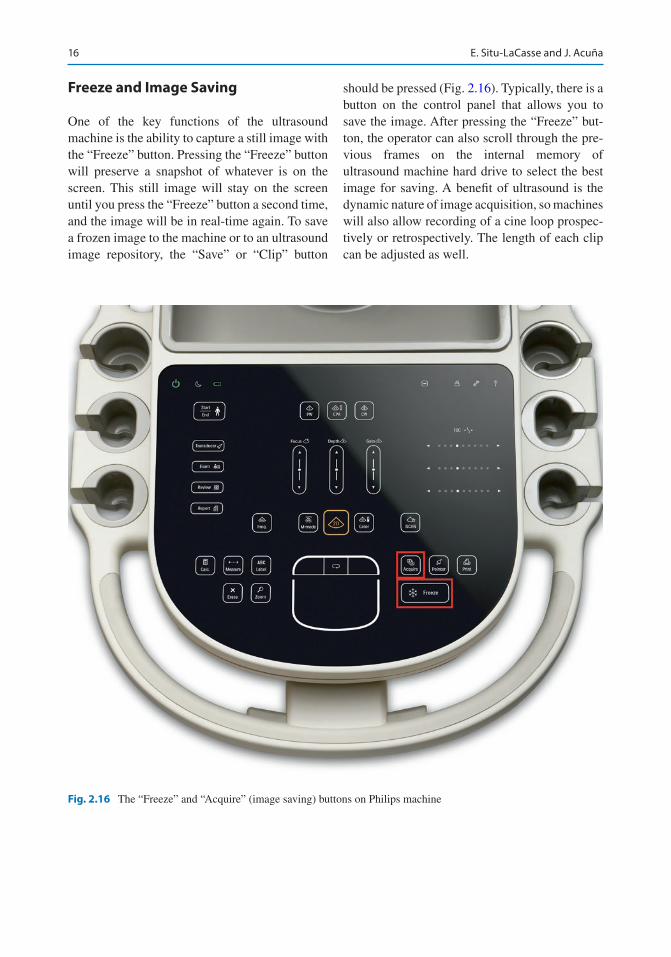
Freeze and Image Saving
One of the key functions of the ultrasound machine is the ability to capture a still image with the “Freeze” button. Pressing the “Freeze” button will preserve a snapshot of whatever is on the screen. This still image will stay on the screen until you press the “Freeze” button a second time, and the image will be in real-time again. To save a frozen image to the machine or to an ultrasound image repository, the “Save” or “Clip” button
should be pressed (Fig. 2.16). Typically, there is a button on the control panel that allows you to save the image. After pressing the “Freeze” but-ton, the operator can also scroll through the pre-vious frames on the internal memory of ultrasound machine hard drive to select the best image for saving. A benefit of ultrasound is the dynamic nature of image acquisition, so machines will also allow recording of a cine loop prospec-tively or retrospectively. The length of each clip can be adjusted as well.
Fig. 2.16 The “Freeze” and “Acquire” (image saving) buttons on Philips machine
E. Situ-LaCasse and J. Acuña
17
a b
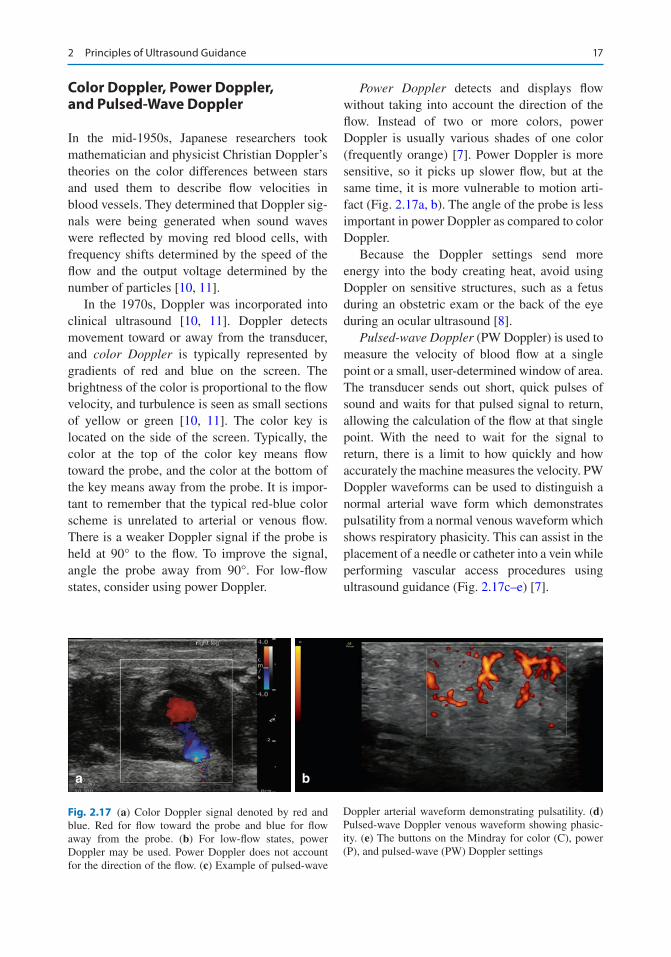
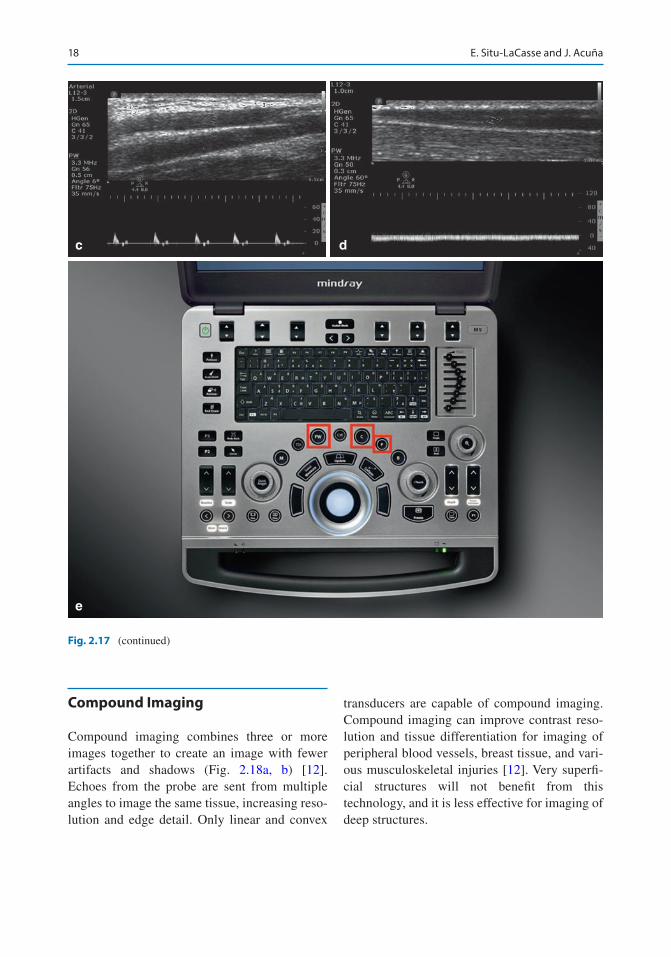
Fig. 2.17 (a) Color Doppler signal denoted by red and blue. Red for flow toward the probe and blue for flow away from the probe. (b) For low-flow states, power Doppler may be used. Power Doppler does not account for the direction of the flow. (c) Example of pulsed-wave
Doppler arterial waveform demonstrating pulsatility. (d) Pulsed-wave Doppler venous waveform showing phasic-ity. (e) The buttons on the Mindray for color (C), power (P), and pulsed-wave (PW) Doppler settings
Color Doppler, Power Doppler, and Pulsed-Wave Doppler
In the mid-1950s, Japanese researchers took mathematician and physicist Christian Doppler’s theories on the color differences between stars and used them to describe flow velocities in blood vessels. They determined that Doppler sig-nals were being generated when sound waves were reflected by moving red blood cells, with frequency shifts determined by the speed of the flow and the output voltage determined by the number of particles [10, 11].
In the 1970s, Doppler was incorporated into clinical ultrasound [10, 11]. Doppler detects movement toward or away from the transducer, and color Doppler is typically represented by gradients of red and blue on the screen. The brightness of the color is proportional to the flow velocity, and turbulence is seen as small sections of yellow or green [10, 11]. The color key is located on the side of the screen. Typically, the color at the top of the color key means flow toward the probe, and the color at the bottom of the key means away from the probe. It is impor-tant to remember that the typical red-blue color scheme is unrelated to arterial or venous flow. There is a weaker Doppler signal if the probe is held at 90° to the flow. To improve the signal, angle the probe away from 90°. For low-flow states, consider using power Doppler.
Power Doppler detects and displays flow without taking into account the direction of the flow. Instead of two or more colors, power Doppler is usually various shades of one color (frequently orange) [7]. Power Doppler is more sensitive, so it picks up slower flow, but at the same time, it is more vulnerable to motion arti-fact (Fig. 2.17a, b). The angle of the probe is less important in power Doppler as compared to color Doppler.
Because the Doppler settings send more energy into the body creating heat, avoid using Doppler on sensitive structures, such as a fetus during an obstetric exam or the back of the eye during an ocular ultrasound [8].
Pulsed-wave Doppler (PW Doppler) is used to measure the velocity of blood flow at a single point or a small, user-determined window of area. The transducer sends out short, quick pulses of sound and waits for that pulsed signal to return, allowing the calculation of the flow at that single point. With the need to wait for the signal to return, there is a limit to how quickly and how accurately the machine measures the velocity. PW Doppler waveforms can be used to distinguish a normal arterial wave form which demonstrates pulsatility from a normal venous waveform which shows respiratory phasicity. This can assist in the placement of a needle or catheter into a vein while performing vascular access procedures using ultrasound guidance (Fig. 2.17c–e) [7].
2 Principles of Ultrasound Guidance
18
c
e
d
Fig. 2.17 (continued)
Compound Imaging
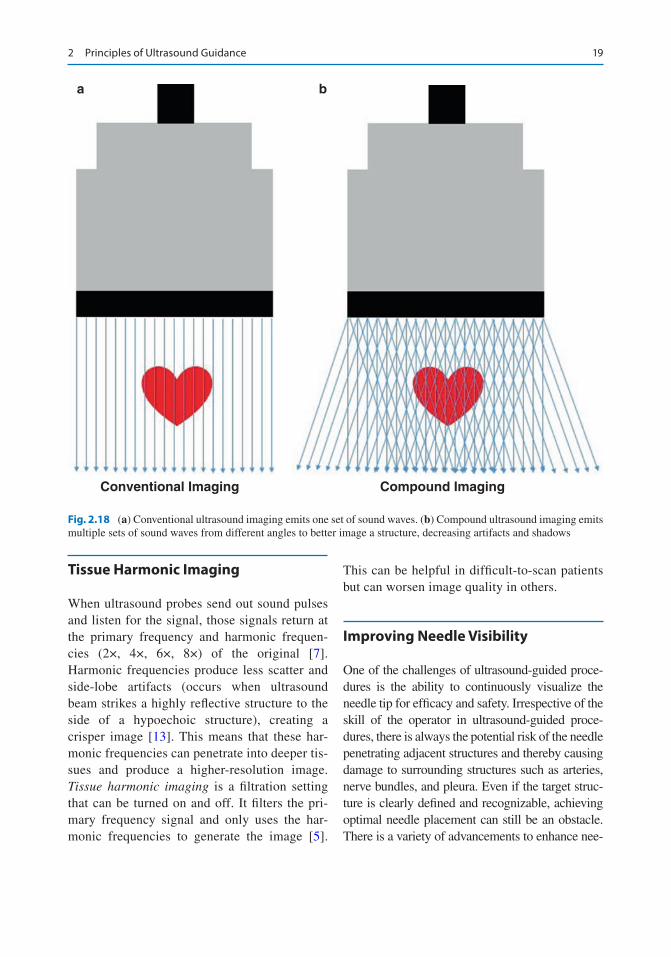
Compound imaging combines three or more images together to create an image with fewer artifacts and shadows (Fig. 2.18a, b) [12]. Echoes from the probe are sent from multiple angles to image the same tissue, increasing reso-lution and edge detail. Only linear and convex
transducers are capable of compound imaging. Compound imaging can improve contrast reso-lution and tissue differentiation for imaging of peripheral blood vessels, breast tissue, and vari-ous musculoskeletal injuries [12]. Very superfi-cial structures will not benefit from this technology, and it is less effective for imaging of deep structures.
E. Situ-LaCasse and J. Acuña
19
Tissue Harmonic Imaging
When ultrasound probes send out sound pulses and listen for the signal, those signals return at the primary frequency and harmonic frequen-cies (2×, 4×, 6×, 8×) of the original [7]. Harmonic frequencies produce less scatter and side-lobe artifacts (occurs when ultrasound beam strikes a highly reflective structure to the side of a hypoechoic structure), creating a crisper image [13]. This means that these har-monic frequencies can penetrate into deeper tis-sues and produce a higher- resolution image. Tissue harmonic imaging is a filtration setting that can be turned on and off. It filters the pri-mary frequency signal and only uses the har-monic frequencies to generate the image [5].
This can be helpful in difficult-to-scan patients but can worsen image quality in others.
Improving Needle Visibility
One of the challenges of ultrasound-guided proce-dures is the ability to continuously visualize the needle tip for efficacy and safety. Irrespective of the skill of the operator in ultrasound-guided proce-dures, there is always the potential risk of the needle penetrating adjacent structures and thereby causing damage to surrounding structures such as arteries, nerve bundles, and pleura. Even if the target struc-ture is clearly defined and recognizable, achieving optimal needle placement can still be an obstacle. There is a variety of advancements to enhance nee-
a b
Conventional Imaging Compound Imaging
Fig. 2.18 (a) Conventional ultrasound imaging emits one set of sound waves. (b) Compound ultrasound imaging emits multiple sets of sound waves from different angles to better image a structure, decreasing artifacts and shadows
2 Principles of Ultrasound Guidance


![Ultrasound Guided Vascular Access[2]](https://img.pdfslide.us/doc/110x75/5420582a7bef0a06088b4679/ultrasound-guided-vascular-access2.jpg)