Embed Size (px)
Citation preview
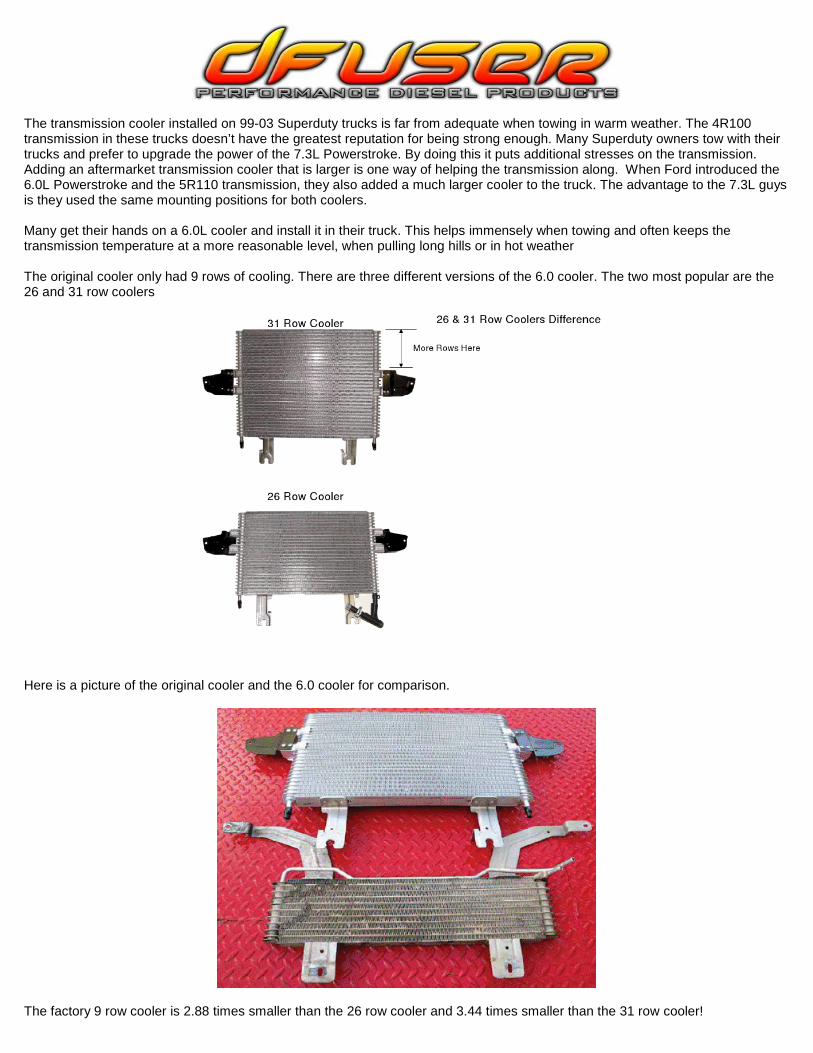
The transmission cooler installed on 99-03 Superduty trucks is far from adequate when towing in warm weather. The 4R100 transmission in these trucks doesn’t have the greatest reputation for being strong enough. Many Superduty owners tow with their trucks and prefer to upgrade the power of the 7.3L Powerstroke. By doing this it puts additional stresses on the transmission. Adding an aftermarket transmission cooler that is larger is one way of helping the transmission along. When Ford introduced the 6.0L Powerstroke and the 5R110 transmission, they also added a much larger cooler to the truck. The advantage to the 7.3L guys is they used the same mounting positions for both coolers. Many get their hands on a 6.0L cooler and install it in their truck. This helps immensely when towing and often keeps the transmission temperature at a more reasonable level, when pulling long hills or in hot weather The original cooler only had 9 rows of cooling. There are three different versions of the 6.0 cooler. The two most popular are the 26 and 31 row coolers
Here is a picture of the original cooler and the 6.0 cooler for comparison.
The factory 9 row cooler is 2.88 times smaller than the 26 row cooler and 3.44 times smaller than the 31 row cooler!
Installation Instructions Installation of the 6.0 cooler into a 7.3L truck is pretty straight forward. It does take a little bit of time to do, since access is not the greatest, but can be done in about 2-4 hours if you take your time. List of supplies you will need:
• 6.0 L Cooler • ½” Transmission Cooler Line (6’) • 3/8”- ½” Barbed Splice Fitting (2 Each) • Stainless Steel Hose Clamps (8) • Zip Ties
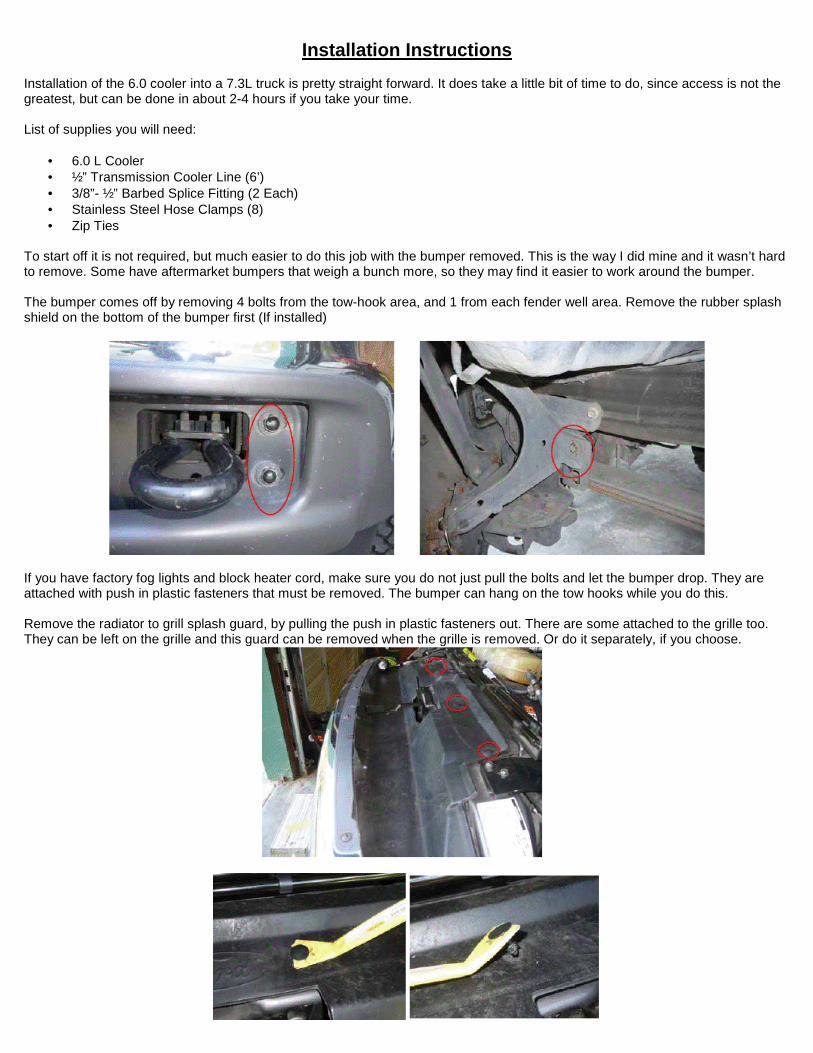
To start off it is not required, but much easier to do this job with the bumper removed. This is the way I did mine and it wasn’t hard to remove. Some have aftermarket bumpers that weigh a bunch more, so they may find it easier to work around the bumper. The bumper comes off by removing 4 bolts from the tow-hook area, and 1 from each fender well area. Remove the rubber splash shield on the bottom of the bumper first (If installed)
If you have factory fog lights and block heater cord, make sure you do not just pull the bolts and let the bumper drop. They are attached with push in plastic fasteners that must be removed. The bumper can hang on the tow hooks while you do this. Remove the radiator to grill splash guard, by pulling the push in plastic fasteners out. There are some attached to the grille too. They can be left on the grille and this guard can be removed when the grille is removed. Or do it separately, if you choose.
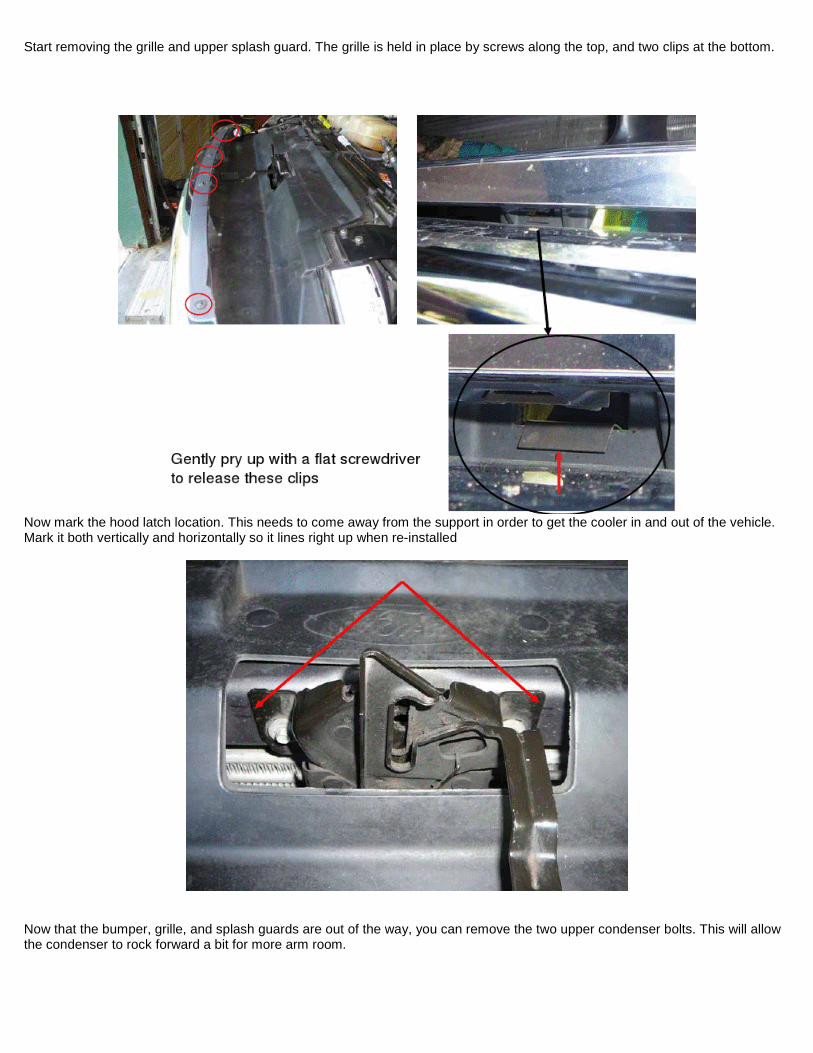
Start removing the grille and upper splash guard. The grille is held in place by screws along the top, and two clips at the bottom.
Now mark the hood latch location. This needs to come away from the support in order to get the cooler in and out of the vehicle. Mark it both vertically and horizontally so it lines right up when re-installed
Now that the bumper, grille, and splash guards are out of the way, you can remove the two upper condenser bolts. This will allow the condenser to rock forward a bit for more arm room.
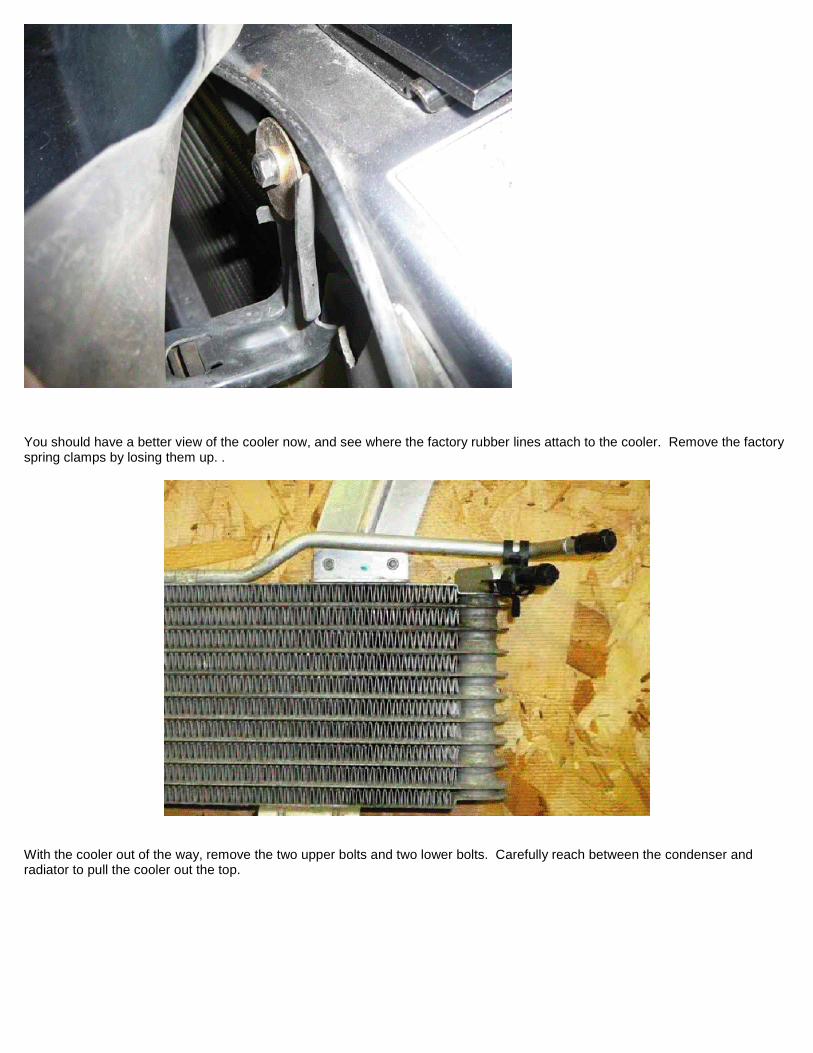
You should have a better view of the cooler now, and see where the factory rubber lines attach to the cooler. Remove the factory spring clamps by losing them up. .
With the cooler out of the way, remove the two upper bolts and two lower bolts. Carefully reach between the condenser and radiator to pull the cooler out the top.
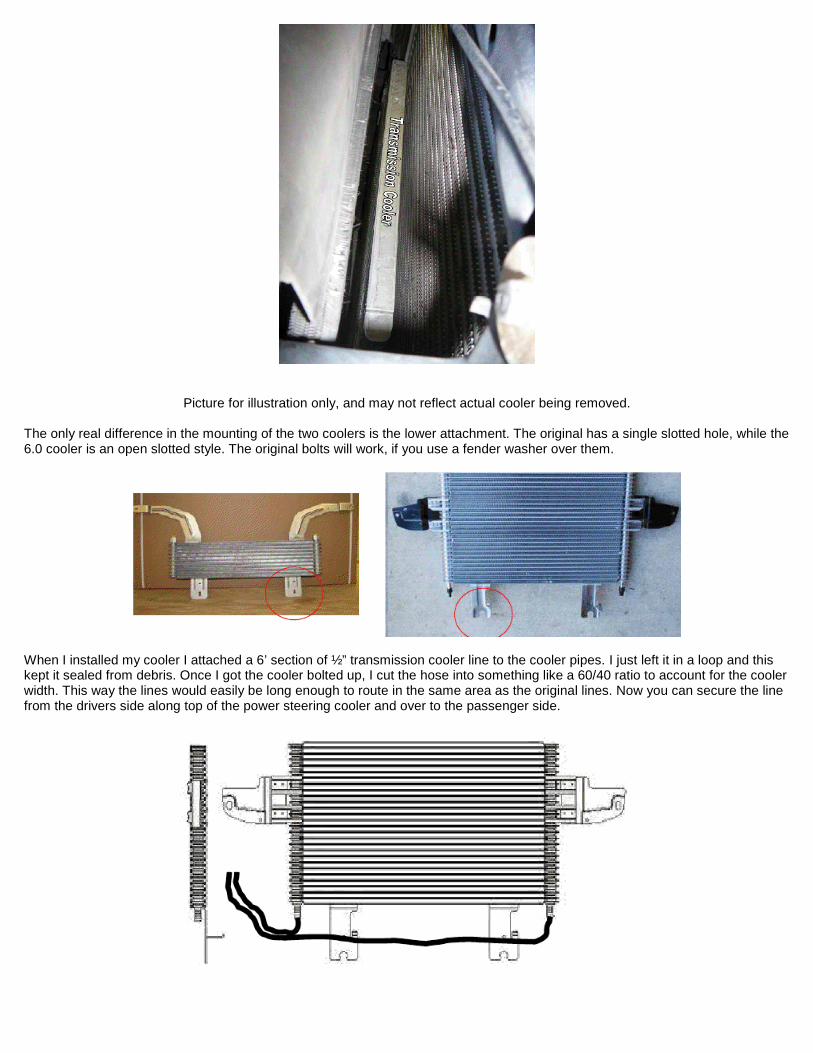
Picture for illustration only, and may not reflect actual cooler being removed.
The only real difference in the mounting of the two coolers is the lower attachment. The original has a single slotted hole, while the 6.0 cooler is an open slotted style. The original bolts will work, if you use a fender washer over them.
When I installed my cooler I attached a 6’ section of ½” transmission cooler line to the cooler pipes. I just left it in a loop and this kept it sealed from debris. Once I got the cooler bolted up, I cut the hose into something like a 60/40 ratio to account for the cooler width. This way the lines would easily be long enough to route in the same area as the original lines. Now you can secure the line from the drivers side along top of the power steering cooler and over to the passenger side.
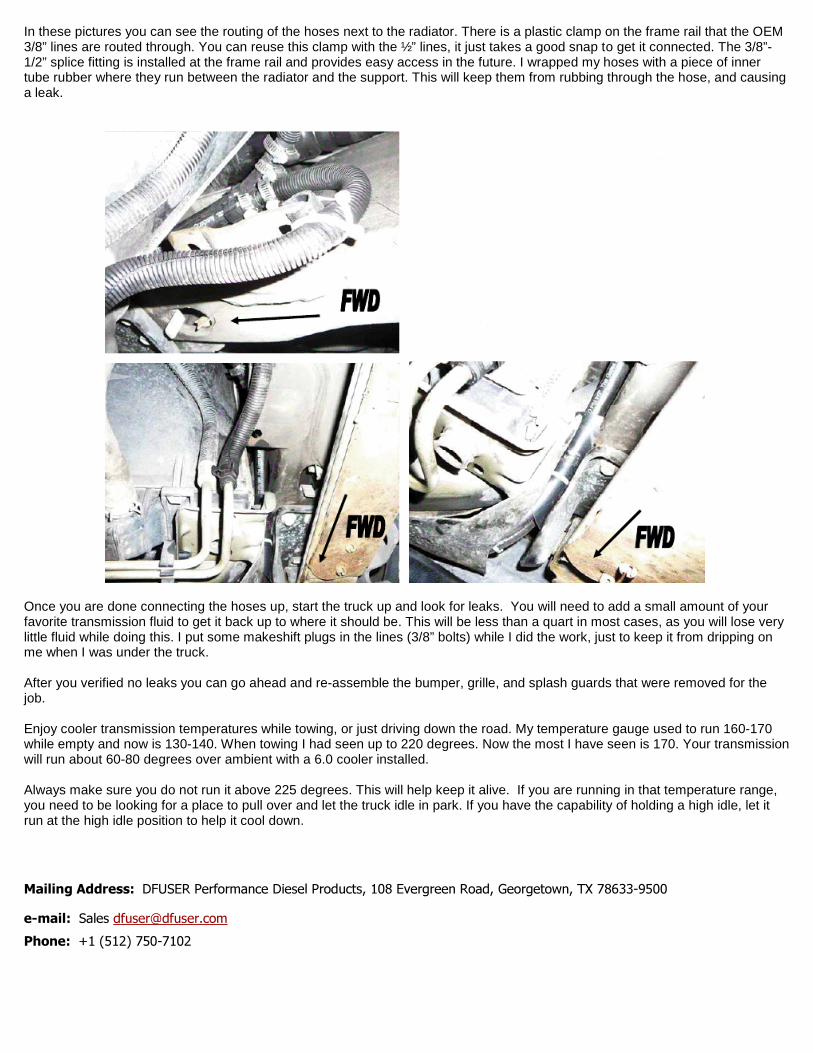
In these pictures you can see the routing of the hoses next to the radiator. There is a plastic clamp on the frame rail that the OEM 3/8” lines are routed through. You can reuse this clamp with the ½” lines, it just takes a good snap to get it connected. The 3/8”-1/2” splice fitting is installed at the frame rail and provides easy access in the future. I wrapped my hoses with a piece of inner tube rubber where they run between the radiator and the support. This will keep them from rubbing through the hose, and causing a leak.
Once you are done connecting the hoses up, start the truck up and look for leaks. You will need to add a small amount of your favorite transmission fluid to get it back up to where it should be. This will be less than a quart in most cases, as you will lose very little fluid while doing this. I put some makeshift plugs in the lines (3/8” bolts) while I did the work, just to keep it from dripping on me when I was under the truck. After you verified no leaks you can go ahead and re-assemble the bumper, grille, and splash guards that were removed for the job. Enjoy cooler transmission temperatures while towing, or just driving down the road. My temperature gauge used to run 160-170 while empty and now is 130-140. When towing I had seen up to 220 degrees. Now the most I have seen is 170. Your transmission will run about 60-80 degrees over ambient with a 6.0 cooler installed. Always make sure you do not run it above 225 degrees. This will help keep it alive. If you are running in that temperature range, you need to be looking for a place to pull over and let the truck idle in park. If you have the capability of holding a high idle, let it run at the high idle position to help it cool down.
Mailing Address: DFUSER Performance Diesel Products, 108 Evergreen Road, Georgetown, TX 78633-9500
e-mail: Sales [email protected]
Phone: +1 (512) 750-7102