Embed Size (px)
Citation preview
THE TRADITIONNAL WOOD EVAPORATORS
Les Équipements d’Érablière CDL inc.
Owner’s Manual
2
Les équipement s d’érablière CDL
inc
Thank you for choosing a CDL-Dallaire wood evaporator. Our 40 years of experience working with sugarmakers ensures you that you acquired a performant and quality piece of equipment. Before using this product, make sure you understand all the following instructions. If there is any problem upon reception of this product, please immediately contact CDL or your local representative.
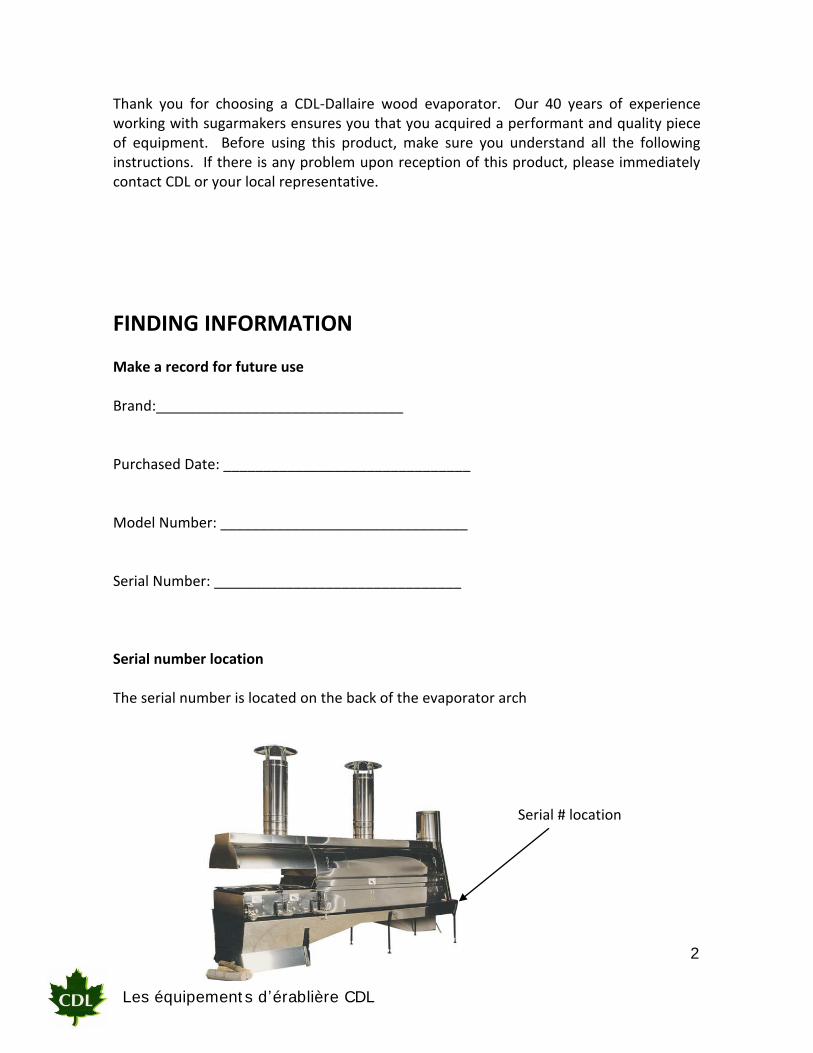
FINDING INFORMATION Make a record for future use Brand:_______________________________ Purchased Date: _______________________________ Model Number: _______________________________ Serial Number: _______________________________ Serial number location The serial number is located on the back of the evaporator arch Serial # location
3
Les équipement s d’érablière CDL
inc
TABLE OF CONTENT Finding information 2 Table of content 3 Safety 3 Evaporator installation 4 Operating the evaporator 9 Maintenance 11 Troubleshooting 13 Dimensions 14 Performance 15 Warranty 16
SAFETY A wood evaporator can be a dangerous piece of equipment. Always wear heat resistant gloves and clothing when you fire an evaporator. Often, visitors can be in the sugarhouse. Make sure they stay at a safe distance from the evaporator, especially children. A wood evaporator works with solid material (wood) and produces intense heat in front of the arch and around the smoke stack. For the location of your evaporator, make sure you have a concrete or ceramic floor strong enough to support the weight of the evaporator and its content as well as at least 24” between any wall and the smoke stack. If you need to put it closer to the wall, a heat barrier (ceramic blanket for example) should be installed. Also, make sure that your steam and smoke stacks have a free way to the roof of the building (avoid rafters). Also, your ceiling should be high enough for you to raise the hoods safely with a cable and pulley system. IMPORTANT: Make sure to contact your insurance company in order to verify their safety standards. If your building is not insulated, you will have a better combustion and a better steam evacuation. If it is insulated, you will need to have an air intake inside your building (air trap, open window etc)
4
Les équipement s d’érablière CDL
inc
INSTALLATION
1) Remove the wheels from the evaporator (if you have some). 2) Level your arch with the adjustable legs. Use a carpenter’s level onto the smooth rail
(pans are off the arch at this point) and adjust the leg adjustable bolts located at the very bottom of the legs as needed.
3) Once the evaporator is leveled (length and width), make sure the locking nuts are
secured and tight. 4) Brick your arch (see drawing #C)
4.1 Place insulation board against inside arch panels using refractor cement to help hold board in place. The insulation board can be cut with a utility knife or saw. Always use a dust mask when insulating your arch. For additional insulation, it’s possible to create an air chamber by putting a sheet of corrugated steel on top of the bottom of the evaporator before installing the insulation board.
4.2 Start placing firebricks on the bottom, then on the walls Work up and towards the rear end of the arch. Refractory cement is applied in THIN layers only to stick the firebricks to the insulation board and to each other.
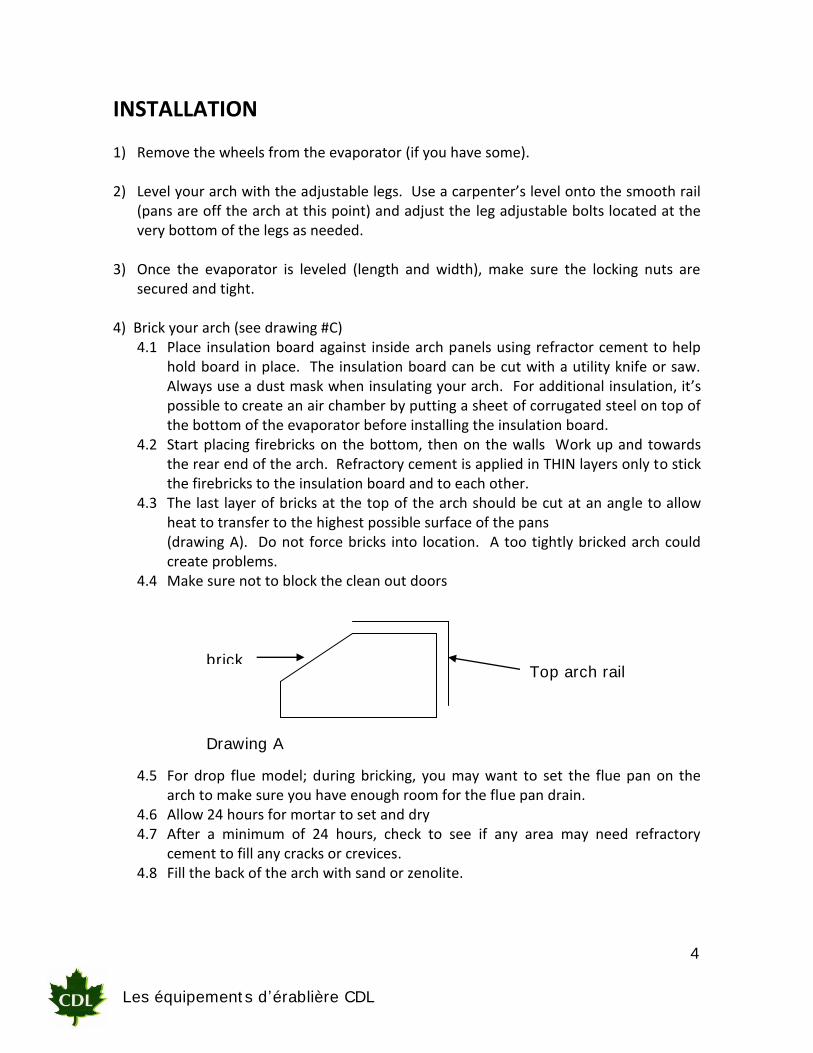
4.3 The last layer of bricks at the top of the arch should be cut at an angle to allow heat to transfer to the highest possible surface of the pans (drawing A). Do not force bricks into location. A too tightly bricked arch could create problems.
4.4 Make sure not to block the clean out doors
4.5 For drop flue model; during bricking, you may want to set the flue pan on the
arch to make sure you have enough room for the flue pan drain. 4.6 Allow 24 hours for mortar to set and dry 4.7 After a minimum of 24 hours, check to see if any area may need refractory
cement to fill any cracks or crevices. 4.8 Fill the back of the arch with sand or zenolite.
Top arch rail brick
Drawing A
5
Les équipement s d’érablière CDL
inc
5) Place the pans on the arch. Start with the flue pan (the bigger one). Adjust it to
the back collar. Then install the syrup pan(s) on the front of the arch. Install the base stack behind the flue pan and be sure that flue pan is levelled
6) Install the roof jack, base stack, stack pipe, collar and stack cover (please make
sure that the stack cover is installed, the cover has to be against dominant wind). Ideally, have a rope coming down from the stack cover to a place where it is easy to operate. Don’t overtighten the cables. The chimney will expand with the heat.
7) If you have a drop flue pan, you need to raise the front of the pan (3/16”) to help
drainage.
8) Install the float boxes and transfer fittings. All valves and fittings will need Teflon tape applied prior to installation.
9) Install the sap level gage (if acquired) on the side of the flue pan. Remove glass
tube before installing. Don’t overtighten the glass tube holding nut.
10) Install the draw off valve on your syrup pan.
11) Use only dry wood free of paint, glue or other chemicals. Never use tubing, rope, plastic bags, old tires (rubber), coal or any other combustible.
Note: the quality of the wood you will use is an important factor in the performance of your evaporator. Poor quality wood will cause a more frequent opening of the doors and can reduce the quality of the final product (darker syrup). For example: oak provides 29 million BTU per cord vs 16 million BTU for spruce. (see table 1)
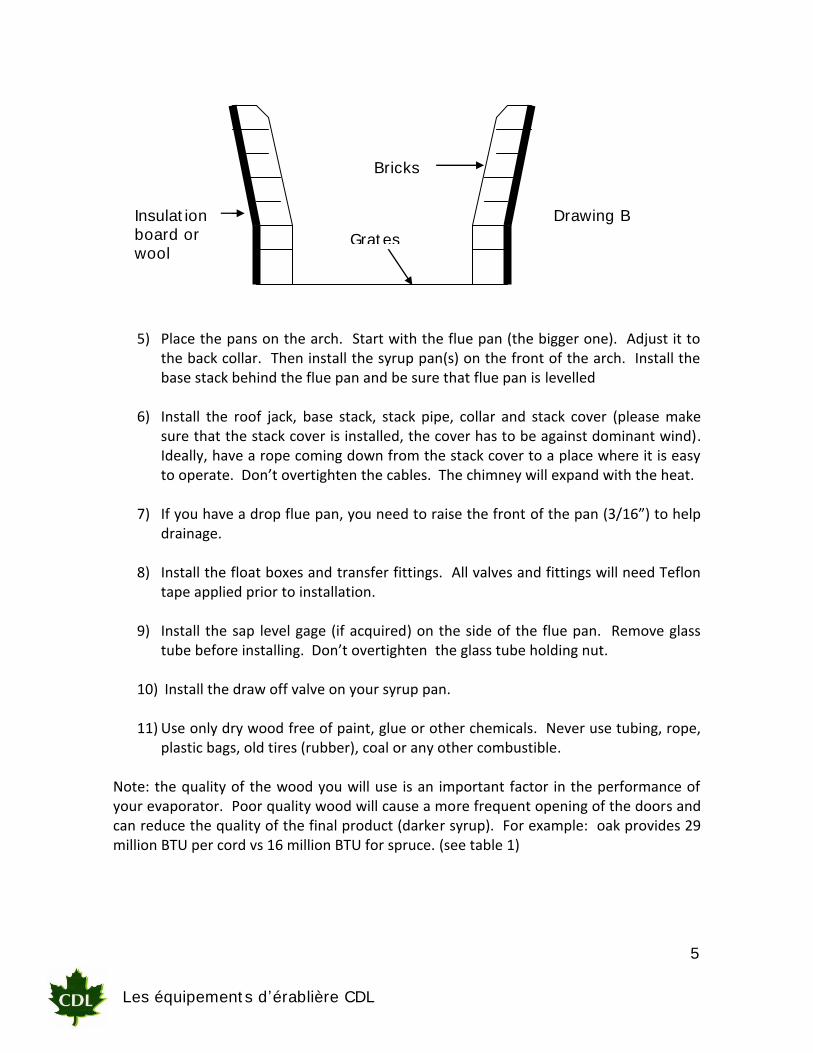
Insulat ion
board or
wool
Bricks
Grat es
Drawing B
6
Les équipement s d’érablière CDL
inc
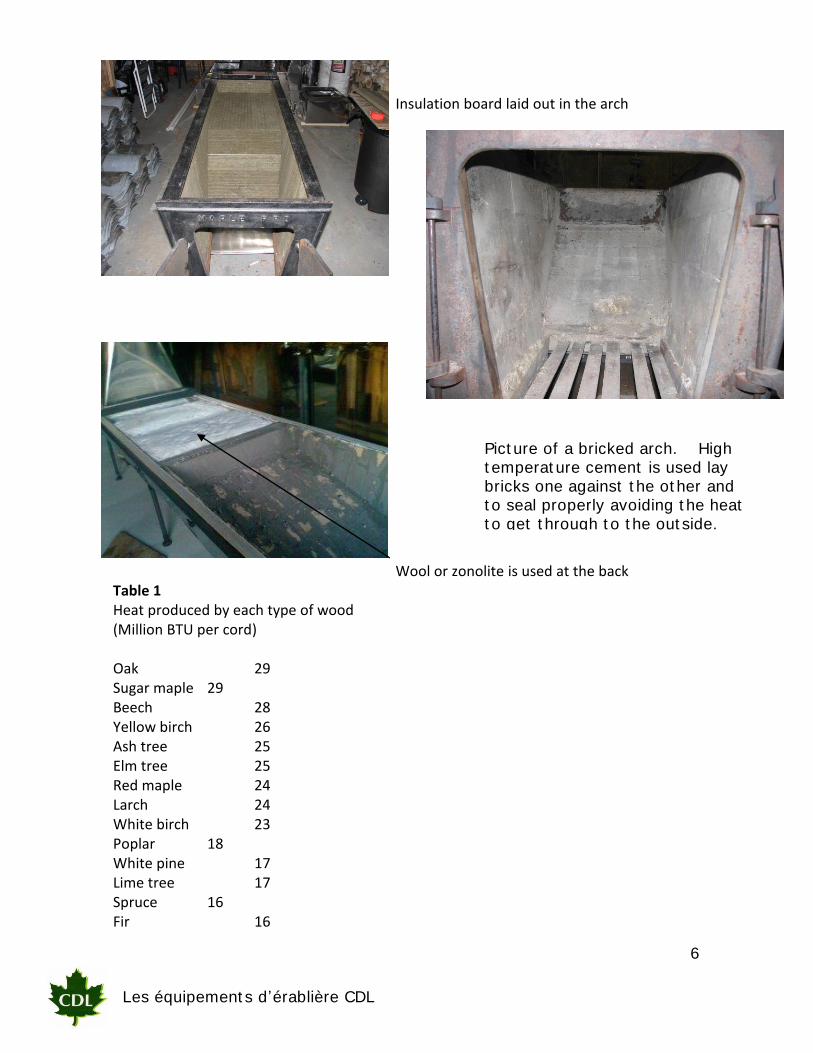
Insulation board laid out in the arch Wool or zonolite is used at the back Table 1 Heat produced by each type of wood (Million BTU per cord) Oak 29 Sugar maple 29 Beech 28 Yellow birch 26 Ash tree 25 Elm tree 25 Red maple 24 Larch 24 White birch 23 Poplar 18 White pine 17 Lime tree 17 Spruce 16 Fir 16
Pict ure of a bricked arch. High
t emperat ure cement is used lay
bricks one against t he ot her and
t o seal properly avoiding t he heat
t o get t hrough t o t he out side.
7
Les équipement s d’érablière CDL
inc
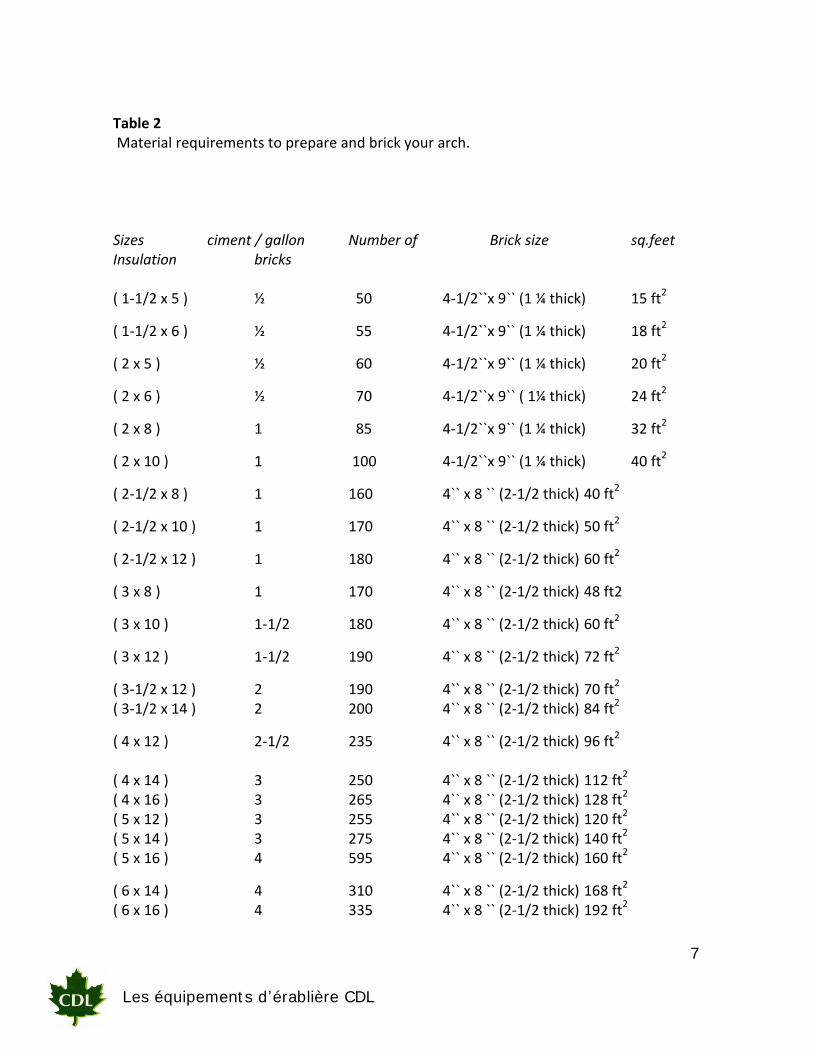
Table 2 Material requirements to prepare and brick your arch.
Sizes ciment / gallon Number of Brick size sq.feet Insulation bricks ( 1-1/2 x 5 ) ½ 50 4-1/2``x 9`` (1 ¼ thick) 15 ft2
( 1-1/2 x 6 ) ½ 55 4-1/2``x 9`` (1 ¼ thick) 18 ft2
( 2 x 5 ) ½ 60 4-1/2``x 9`` (1 ¼ thick) 20 ft2
( 2 x 6 ) ½ 70 4-1/2``x 9`` ( 1¼ thick) 24 ft2
( 2 x 8 ) 1 85 4-1/2``x 9`` (1 ¼ thick) 32 ft2
( 2 x 10 ) 1 100 4-1/2``x 9`` (1 ¼ thick) 40 ft2
( 2-1/2 x 8 ) 1 160 4`` x 8 `` (2-1/2 thick) 40 ft2
( 2-1/2 x 10 ) 1 170 4`` x 8 `` (2-1/2 thick) 50 ft2
( 2-1/2 x 12 ) 1 180 4`` x 8 `` (2-1/2 thick) 60 ft2
( 3 x 8 ) 1 170 4`` x 8 `` (2-1/2 thick) 48 ft2
( 3 x 10 ) 1-1/2 180 4`` x 8 `` (2-1/2 thick) 60 ft2
( 3 x 12 ) 1-1/2 190 4`` x 8 `` (2-1/2 thick) 72 ft2
( 3-1/2 x 12 ) 2 190 4`` x 8 `` (2-1/2 thick) 70 ft2
( 3-1/2 x 14 ) 2 200 4`` x 8 `` (2-1/2 thick) 84 ft2
( 4 x 12 ) 2-1/2 235 4`` x 8 `` (2-1/2 thick) 96 ft2
( 4 x 14 ) 3 250 4`` x 8 `` (2-1/2 thick) 112 ft2
( 4 x 16 ) 3 265 4`` x 8 `` (2-1/2 thick) 128 ft2
( 5 x 12 ) 3 255 4`` x 8 `` (2-1/2 thick) 120 ft2
( 5 x 14 ) 3 275 4`` x 8 `` (2-1/2 thick) 140 ft2
( 5 x 16 ) 4 595 4`` x 8 `` (2-1/2 thick) 160 ft2
( 6 x 14 ) 4 310 4`` x 8 `` (2-1/2 thick) 168 ft2
( 6 x 16 ) 4 335 4`` x 8 `` (2-1/2 thick) 192 ft2
8
Les équipement s d’érablière CDL
inc
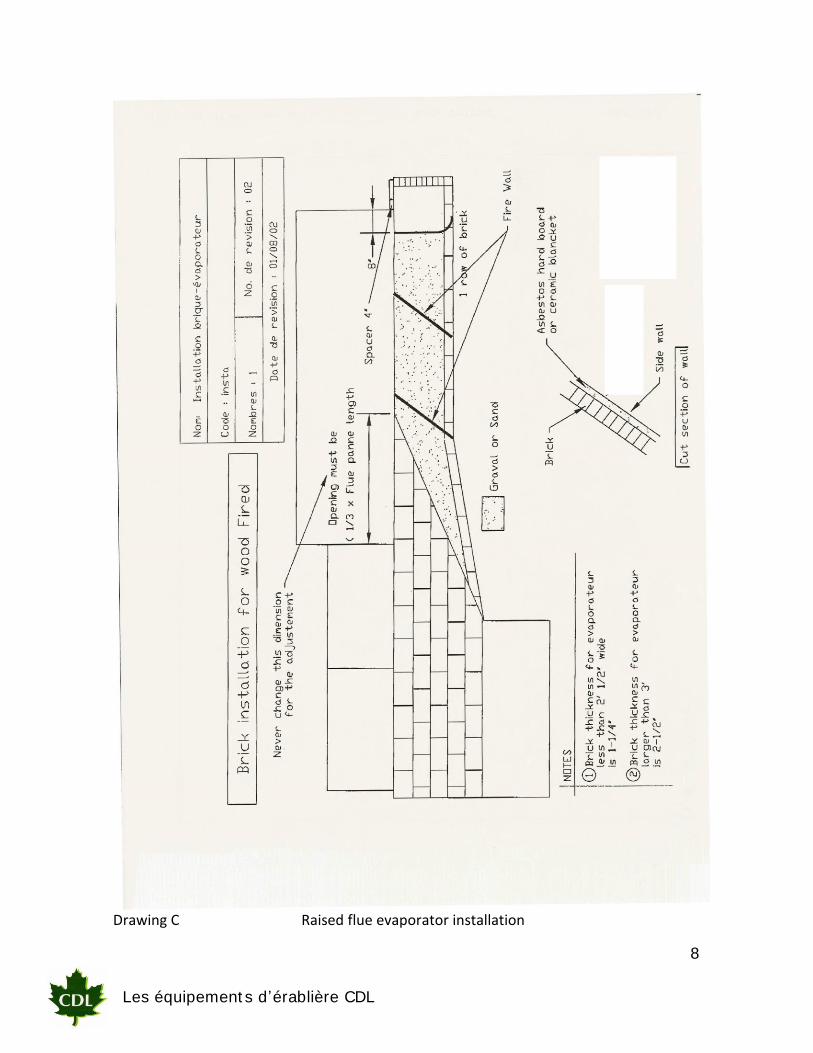
Drawing C Raised flue evaporator installation
9
Les équipement s d’érablière CDL
inc
OPERATING THE EVAPORATOR Before starting the evaporator 1. Make sure that the outlet of the tank feeding the evaporator is at least 12” higher
than the sap level in the flue pan. Connect it to the rear float box. 2. Install a thermometer at the outlet of the last syrup pan. Calibrate it in boiling
water and adjust the temperature at 0 degrees. 3. Open the base stack cover. 4. Open valve on front float box to fill syrup pans between 1 ½” to 2” above the
bottom of pans. (ADJUST FLOAT TO MAINTAIN LEVEL). 5. Make sure valve to feed flue pan and syrup stay open. 6. Now you are ready to make a fire in the fire box using wood split 2” to 3” in
diameter, 20” long on a smaller unit, larger on a bigger evaporator. Load the combustion chamber with wood. Place the wood 6” from the door and 4” from the syrup pans. Lite the fire.
7. The use of defoamer is necessary for a good operation of the evaporator. Syrup
always generates foam. The float boxes stability will be greatly altered if there is too much foam. It will also prevent the syrup from boiling over.
8. Pay attention at the front and rear levels. Adjust the sap levels with the float
boxes if the levels are not where they should be. 9. At this point the thermometer that is being used has to be placed in boiling water
for 5 minutes. (WRITE THIS TEMPERATURE DOWN) and then place the thermometer at the point where syrup is to be drawn from the evaporator.
10. Finish syrup is always drawn off at 7 degrees above the boil point of water.
(EXAMPLE: IF BOILING WATER IS AT 212 DEGREES, THEN YOU WOULD OPEN VALVE AT 219 DEGREES). Close valve when temperature starts to drop.
11. Repeat step # 9 when next batch reaches 219 degrees. 12. When you become more experienced on the evaporation of your evaporator, you
can bring the level of sap down to 3/4” above the flues in the flue pan. (ALWAYS MAINTAIN THE LEVEL BETWEEN 1 ½” TO 2” IN THE SYRUP PAN).
10
Les équipement s d’érablière CDL
inc
Should you have any problems, our service personnel will be pleased to assist you. Our toll free number is: 800-762-5587 Draft adjustment
Draft adjustment of a wood fired evaporator is made by adjusting the distance between the base stack and the bottom of the back pan on the arch. Smoke in the sugarhouse is a good indication that there is not enough draft. That distance as to be verified and cleaned regularly. To get more draft, adjust the opening from 2” to 4” under base stack frame.
Often remove ashes under the grates. If there is not enough air space under the grates, they will be damaged. Always have stack at least 3’ above peak of the roof and at least one and a half times the length of the evaporator. If there is not enough draft, add more stack.
IMPORTANT SAFETY NOTE: THE HEAT COMING OUT OF THE FRONT OF A WOOD EVAPORATOR IS INTENCE WHEN THE DOOR IS OPEN. ALWAYS WEAR HEAT PROTECTIVE CLOTHES COVERING ALL YOUR BODY, INCLUDING GLOVES AND GOGGLES. SEVERE BURNING COULD OCCUR IF THE EVAPORATOR IS OPERATED WITHOUT ADEQUATE PROTECTION.
11
Les équipement s d’érablière CDL
inc
MAINTENANCE
Pan cleaning 1) Fill pans with permeate or clean water. Fill it to the top of the flues with clean water.
2) Add a CDL recommended cleaner, heat up and leave sitting all night.
3) Drain and rinse thoroughly with water.
4) Fill the pan to the top again with clean soft water and bring it to a boil for 15 minutes,
to insure that there is no more cleaner residues left.
5) Use only a CDL recommended cleaner.
6) Never use abrasive products or steel brush, steel wool or any product containing chlorine or muriatic acid.
7) If there is burned syrup on the side of a pan, use commercial cold oven cleaner. It will
dissolve the syrup without using abrasive products. To bring back the shine, use a foaming industrial glass cleaning product.
IMPORTANT: if there is any cleaning product left in the pan, it will seriously damage the pan. It could even make holes in it.
When to clean you pans Pan cleaning depends on evaporator size and the amount of scale deposit produced by your evaporator. Front pans have to be checked every hour to prevent overheating. If too much scale deposit in your pan, you could burn it. So make sure that you check your flue pan at the end of every day, especially in the corners at the end of each flue. Too much scale deposits can cause a pan to overheat.
12
Les équipement s d’érablière CDL
inc
In between season storage 1) Put all your pans on wood blocks to let air circulate in the arch and under the pans.
Too much humidity can cause damage. 2) It is necessary to brush all the flues inside and outside with the appropriate brush.
Always make sure the flues of the pan are clean;
3) Never leave any kind of cleaning product in the pans, it will damage them and it’s not covered by the warranty;
4) O-rings should be greased with food use grease (to prevent shrinking and drying)
13
Les équipement s d’érablière CDL
inc
TROUBLESHOOTING GUIDE Float doesn’t hold a constant level of sap
The rubber piece of the float arm needs to be replaced or readjusted. Float box arm needs to be realigned. Make sure there isn’t sap inside the float (hole in the float). The sap tank is too high and puts too much pressure on the float arm; you
need to install a secondary pressure control float box or to relocate the sap tank.
Use more defoamer. Syrup is being made in the second pan
It’s normal when you start. If problem continues, reduce your draft (see draft adjustment).
Intense heat in front (the doors become red)
Not enough draft (see draft adjustment). The burning wood is too close to the doors (need to be at least 6” from the
doors). Intense heat in the base stack (or the evaporator boils slowly)
Too much draft, reduce the distance under the base stack. Too much gap between insulation under the flues and the pan (insulation
needs to be even with the rails). The heat needs to be forced in the flues.
*** For any other problem, please refer to your local representative.
14
Les équipement s d’érablière CDL
inc
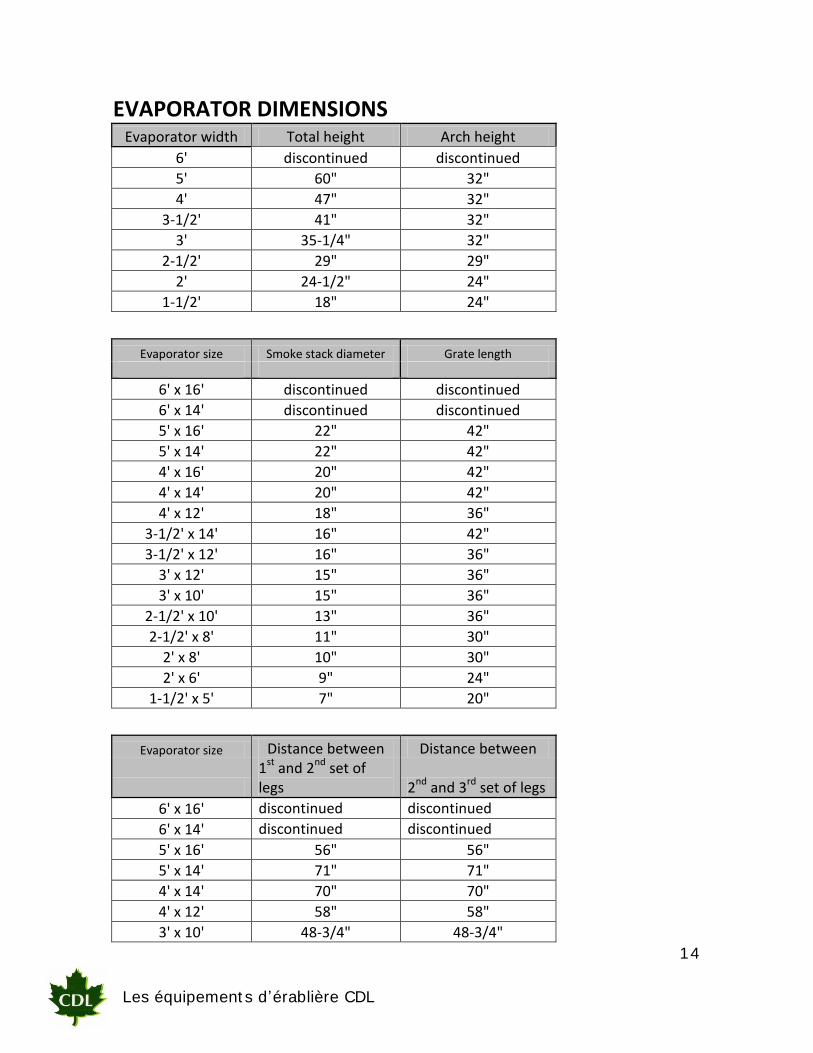
EVAPORATOR DIMENSIONS Evaporator width Total height Arch height
6' discontinued discontinued
5' 60" 32"
4' 47" 32"
3-1/2' 41" 32"
3' 35-1/4" 32"
2-1/2' 29" 29"
2' 24-1/2" 24"
1-1/2' 18" 24"
Evaporator size Smoke stack diameter Grate length
6' x 16' discontinued discontinued
6' x 14' discontinued discontinued
5' x 16' 22" 42"
5' x 14' 22" 42"
4' x 16' 20" 42"
4' x 14' 20" 42"
4' x 12' 18" 36"
3-1/2' x 14' 16" 42"
3-1/2' x 12' 16" 36"
3' x 12' 15" 36"
3' x 10' 15" 36"
2-1/2' x 10' 13" 36"
2-1/2' x 8' 11" 30"
2' x 8' 10" 30"
2' x 6' 9" 24"
1-1/2' x 5' 7" 20"
Evaporator size Distance between Distance between
1st and 2nd set of legs 2nd and 3rd set of legs
6' x 16' discontinued discontinued
6' x 14' discontinued discontinued
5' x 16' 56" 56"
5' x 14' 71" 71"
4' x 14' 70" 70"
4' x 12' 58" 58"
3' x 10' 48-3/4" 48-3/4"
15
Les équipement s d’érablière CDL
inc
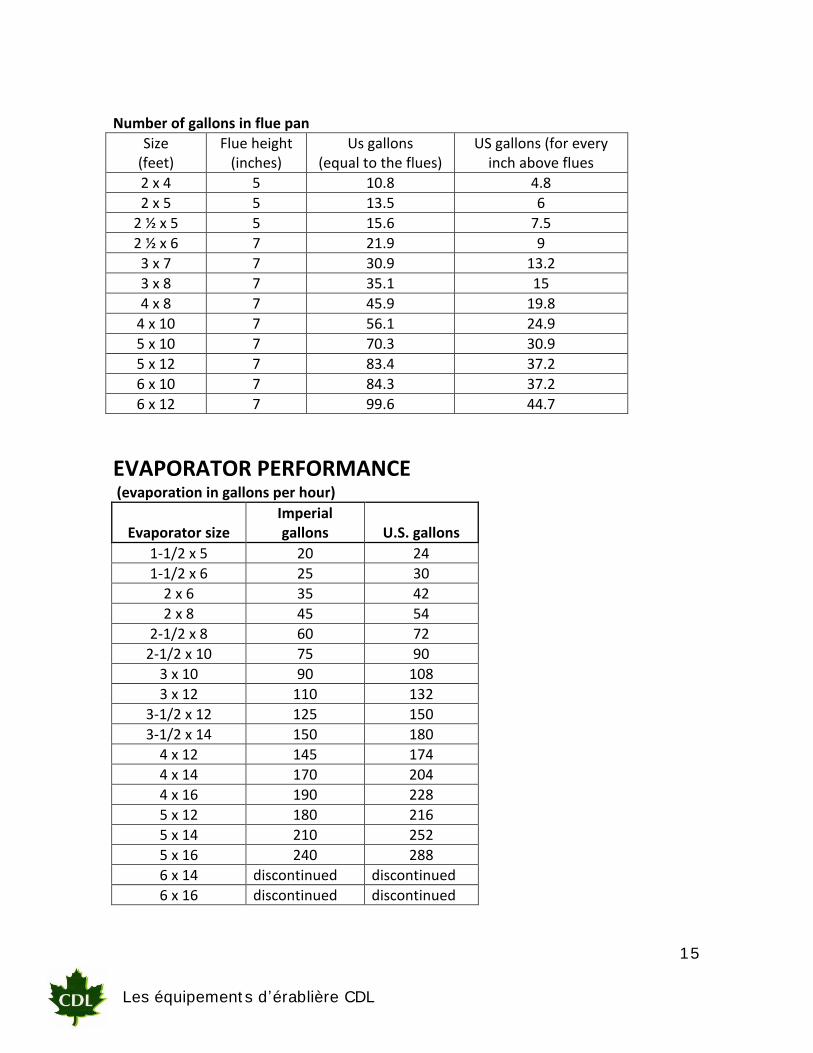
Number of gallons in flue pan
Size (feet)
Flue height (inches)
Us gallons (equal to the flues)
US gallons (for every inch above flues
2 x 4 5 10.8 4.8
2 x 5 5 13.5 6
2 ½ x 5 5 15.6 7.5
2 ½ x 6 7 21.9 9
3 x 7 7 30.9 13.2
3 x 8 7 35.1 15
4 x 8 7 45.9 19.8
4 x 10 7 56.1 24.9
5 x 10 7 70.3 30.9
5 x 12 7 83.4 37.2
6 x 10 7 84.3 37.2
6 x 12 7 99.6 44.7
EVAPORATOR PERFORMANCE (evaporation in gallons per hour)
Evaporator size Imperial gallons U.S. gallons
1-1/2 x 5 20 24
1-1/2 x 6 25 30
2 x 6 35 42
2 x 8 45 54
2-1/2 x 8 60 72
2-1/2 x 10 75 90
3 x 10 90 108
3 x 12 110 132
3-1/2 x 12 125 150
3-1/2 x 14 150 180
4 x 12 145 174
4 x 14 170 204
4 x 16 190 228
5 x 12 180 216
5 x 14 210 252
5 x 16 240 288
6 x 14 discontinued discontinued
6 x 16 discontinued discontinued
16
Les équipement s d’érablière CDL
inc
***IMPORTANT: This performance chart is for reference only. Actual performance will depend on many exterior factors as type of wood used, quantity of wood used, wood filling frequency, humidity in the wood, draft etc.
EVAPORATOR WARRANTY
Your evaporator is covered by a two year limited warranty. For two years from your original date of purchase, Les Équipements d’Érablière CDL (CDL), will replace or replace any parts of this evaporator that prove to be defective in materials or workmanship when such evaporator is installed, used and maintained in accordance with the provided instructions. Exclusions This warranty does not cover the following:
1. Products with original serial number that have been removed altered or cannot be readily determined.
2. Product that has been transferred from its original owner to another party or removed outside the USA or Canada.
3. Production loss due to any kind of failure of the evaporator. 4. Revenu losses due to syrup quality. 5. Service calls which do not involve malfunction or defect in materials or
workmanship, or used other than in accordance with the provided instructions.
6. Service calls to correct the installation of your evaporator or to instruct you how to use your evaporator.
7. Expenses for making the evaporator accessible for servicing, such as the removal of wall, shelves etc.
8. Service calls to repair insulation or the bricking job. 9. Crack cast iron parts if a blower was used in the evaporator. 10. Any service beyond the first two years. 11. Damages caused by: services performed by unauthorized service
companies; use of parts other than genuine CDL parts or parts obtained from persons other than authorized service companies; or external causes such as abuse, misuse, inadequate power supply, accidents, fires, or acts of God.
12. It doesn’t cover the consumable products or accessories. 13. If the product was damaged by abusive use, negligence, accident caused
by the customer, modification made by the customer, variation in the electric power.
14. Damage cause by the use of products that are not meant for use with our equipment or a bad use of a product as acids, cleaning products.

17
Les équipement s d’érablière CDL
inc
15. Use of painted wood or any wood containing chemicals, glue or any other added agent.
16. Use of any other burning agent than wood. Disclaimer of implied warranties; limitation of remedies Customer’s sole and exclusive remedy under this limited warranty shall be repair or replacement as provided herein. Claims based on implied warranties, including warranties of merchantability or fitness for a particular purpose, are limited to two years or the shortest period allowed by law, but not less than two years. CDL shall not be liable for consequential or incidental damages such as property damages and incidental expenses or loss or revenues caused by any event covered by this warranty. Some states and provinces do not allow the exclusion or limitation of incidental or consequential damages, or limitations on the duration of implied warranties, so these limitations or exclusions may not apply to you. This written warranty gives you specific legal rights. You may also have other rights that vary from states to states. If you need service Keep your receipt, delivery slip or some other appropriate payment record to establish the warranty period should service be required. If service is performed, it is in your best interest to obtain and keep all receipts. Service under this warranty must be obtained by contacting CDL at the addresses or phone numbers below. Obligations for service and parts under this warranty will be performed by CDL in Canada. Products features or specifications as described or illustrated are subject to change without notice. Les Équipements d’Érablière CDL CDL USA 257 Route 279 3 Lemnah Drive St-Lazare, Québec, Canada St. Albans, VT, 05478 G0R 3J0 (802) 527-0000 (418) 883-5158