Embed Size (px)
Citation preview

The Solar System: 1
Science Club sponsored by ANS Oak Ridge/Knoxville Local Section & WIN
Did you ever wonder how far it was to the Moon? Or how big the Sun was? Our solar system is a pretty big place! Space explorers have found ways to look at planets really far way and tell us back on Earth what they look like. In the activities in this handout, we’ll look at how big our planets are, how big our solar system is, and how scientists can explore these planets from Earth. We’ll also look at how our star, the Sun, can heat things up here on planet Earth, even from millions of miles away. Here are some activities we will do as we investigate the solar system:
1. Make models of the planets 2. The toilet paper solar system 3. Walking to the planets 4. Cooking with the sun 5. Radar – “Seeing” inside a closed box 6. Telephone on a string 7. Have super hearing with a super sound cone
Your experiment kit should contain: • A small plastic grid, a long toothpick, and some tracing paper • A thermometer strip (mercury free!) • Aluminum foil and wax paper • A black sheet of paper and a white sheet of paper • 10 popsicle sticks • 10 sheets of 8x14 paper • Planet cards • a roll of toilet paper • 2 plastic cups and some string
You will also need: • a baking pan big enough to hold 3 graham cracker halves, glass or metal is
OK, preferably with a lid • ingredients for solar cooking (we’ve given you several recipes to try), • a shallow sauce pan or bowl about the size of your parent’s hand, • Your parents will need to choose a small object to use for the radar
experiment • tape (use what’s left over from you Electromagnetism kit),
these are not in your kit.

The Solar System: 2
Science Club sponsored by ANS Oak Ridge/Knoxville Local Section & WIN
Make Models of the Planets Look at this scale of the planets and Sun, with the Sun being a bowling bowl.
Wow! What a difference! Let’s make our own model. What you need:
1. 10 sheets of 8x14 paper 2. Information cards (planet cards)
What to do: Let’s draw "scale" pictures of the planets. Jupiter is about 11 times bigger than Earth. To draw to scale means that Jupiter's picture should be about 11 times bigger than Earth's.
Your pictures of the planets will be circles. There are two ways of measuring a circle. From one side to the other is the diameter. From the center to the side is the radius. The radius is one half the diameter.
Radius = ½ Diameter

The Solar System: 3
Science Club sponsored by ANS Oak Ridge/Knoxville Local Section & WIN
1. Start with the Earth. Make the radius ¾ inches. This is greater than 0, but less than 1 inch. Your ruler has markings between 0 and 1 for the fractions, or parts, of an inch. It may even have markings for eighths.
1 0
One way to draw good circles is to make a point on your paper, then using your ruler measure and make marks for the radius.
Another way to draw a circle this big is to use a piece of string with loops tied in it so that the loops are as far apart as the radius. Use one pencil in one loop at the center of the circle and use the other pencil in the other loop to draw the outside of the circle. Another person can hold one pencil down for the center, while you go around the outside of the circle, dragging the other pencil.

The Solar System: 4
Science Club sponsored by ANS Oak Ridge/Knoxville Local Section & WIN
2. Now make Jupiter. You will need to tape several pieces of paper together. Make Jupiter’s circle with an 8-3/8 inch radius.
3. Now make the rest of the planets. Be sure to put the planet's name on its drawing. Remember, for Jupiter and Saturn you will need to glue or tape 4 pieces of paper together. You may want to color your model planets like you see on your planet cards.
Name Diameter, inches Radius, inches
Mercury 1/2 1/4 Venus 1 1/2 3/4
Earth 1 1/2 3/4 Mars 3/4 3/8
Jupiter 16 3/4 8 3/8 Saturn 14 1/4 7 1/2
Uranus 6 3 Neptune 5 3/4 2 7/8
Pluto 1/4 1/8
You can cut out the circles so they are easier to compare. You can color them. For the very tiny planets, you may need to ask for help.
4. Now cut out your information cards for the planets. Glue the planet cards to your cut-out scaled “planets”. Now that you have your planets cut-out and to scale; let’s see how far away from each other they are. The next two activities will demonstrate the “scaled” distance for our solar system.

The Solar System: 5
Science Club sponsored by ANS Oak Ridge/Knoxville Local Section & WIN
The Toilet Paper Solar System
You will need a lot of space outside to do this activity!
What you need: 1. A roll of toilet tissue 2. Your 9 planets you made 3. Permission from your parents to do this (it could make a mess)
NOTE: DON”T FORGET TO CLEAN UP WHEN YOU ARE DONE! What to do: Using a scale of 1 standard sheet of toilet tissue as 10,000,000 miles-that’s 10 MILLION Miles, we can use pieces from the roll of tissue as a ruler for a scale model of the solar system.
Celestial Object # of Tissues from previous object
Sun 0.0
Mercury 3.6 Venus 3.1
Earth 2.6
Mars 4.8
Jupiter 34.3 Saturn 40.3
Uranus 90
Neptune 101.0 Pluto (avg. orbit) 86.4
Pick a starting point to call the Sun, then tear off 3.6 sheets of toilet paper and place your Mercury Card down. Next tear off 3.1 sheets place them in-line with Mercury and place your Venus card down. Keep doing this for all the planets.
Sun 3.6 sheets Mercury 3.1 sheets Venus 2.6 sheets Earth

The Solar System: 6
Science Club sponsored by ANS Oak Ridge/Knoxville Local Section & WIN
Walking to the Planets You will need your 10 popsicle sticks for this activity and your model planets.
This activity will need to be done where you have a lot of room, such as a park or very large backyard. Pick a spot to call your “Sun” and put one popsicle stick in the ground. From that spot, begin your walk to the planets. Once you have reached your first planet (Mercury) place your Mercury model down on the ground and poke one of your popsicle sticks into the ground next to it so you can see it. Then head off in a straight line to your next planet Venus, which according to the table below is 9 steps. Place your Venus card down and poke a different popsicle stick into the ground. Continue with the rest of the planets using the table below.
Celestial Object # of Steps from previous object
Sun 0.0 Mercury 10
Venus 9
Earth 7 Mars 14
There is an asteroid belt halfway between Mars & Jupiter!
Jupiter 95 Saturn 112
Uranus 249
Neptune 281 Pluto (avg. orbit) 241
You walked a total of 1018 paces before reaching “Pluto”!

The Solar System: 7
Science Club sponsored by ANS Oak Ridge/Knoxville Local Section & WIN
Things You May Be Curious About:
What about the Moon?
The Moon is almost the same size as Pluto, which is the smallest planet. (In fact, the Moon is actually a bit bigger than Pluto.) Unlike Pluto, however, the Moon is very close to the Earth. If we put the Moon in this model, we would have to add it to the same planet card as the Earth. (The actual distance would be only about 4 centimeters (38 millimeters) away from the scale model Earth. The Moon is about 30 Earth diameters from the Earth.)
What about asteroids or comets?
Real asteroids or comets (the solid part that is) can be as big as mountains or even bigger, but would be too small to see on our model.
Are the real planets all in a straight line?
No. The real planets move around the Sun at different speeds, and are very rarely lined up in a straight line.
Is the Sun a planet?
No, the Sun is a star. It is much closer than other stars, and looks very bright from the Earth. You should never look at the Sun because it is so bright.
How close are the other stars?
The nearest star to the Sun is Alpha Centauri, and on the model (if standing in the San Francisco Bay Area) it would be all the way across the United States in New York.

The Solar System: 8
Science Club sponsored by ANS Oak Ridge/Knoxville Local Section & WIN
CCCooooookkkiiinnnggg wwwiiittthhh ttthhheee SSSuuunnn Our star the Sun is really far away, but it still manages to make some pretty hot days here on Earth. Think about how hot the Sun must be to cook something here on Earth! Let’s see just how hot things can get with this experiment, and maybe make a yummy treat. What you need:
1. A thermometer strip 2. Aluminum foil 3. A baking pan big enough to hold 3 graham cracker halves, glass or metal is
OK, preferably with a lid 4. Something to melt – a crayon, a piece of chocolate candy, a small birthday
candle or try one of the recipes given at the end of this experiment 5. A black sheet of paper 6. A white sheet of paper
NOTE: Save your black and white paper for another experiment later! What to do:
1. Wait for a warm, sunny day. Use your thermometer to check the temperature outside. If the temperature outside is less than 85°F, wait for another day. You will see one side of the thermometer marked with numbers and the letter F. You can read your thermometer by looking at how far the little red line goes. Where it stops, that is the temperature. “F” stands for Fahrenheit, the way we tell what the temperature is here in the USA. On a really hot day, it can be 90ºF outside! On a really cold day the temperature will be about 38ºF.
2. Place your sample (crayon, chocolate candy, or small birthday candle) into the pan with one thermometer.
3. Cover the baking pan with the lid or the aluminum foil 4. Place the covered pan in the direct sunlight, but where animals or your
family can’t get to any candy! 5. Place each sheet of paper out in the sun next to your covered pan. 6. Wait 10 minutes and check your sample. Record what is happening in the
chart. 7. Feel the surface of each piece of paper. Does one sheet of paper feel
different than the other? Record what you feel and see in your results table.
8. Keep checking your covered pan every 10 minutes and recording your answers for 60 minutes. What do you think would happen if you left your sample in the sun all day?

The Solar System: 9
Science Club sponsored by ANS Oak Ridge/Knoxville Local Section & WIN
SSSOOOLLLAAARRR CCCOOOOOOKKKIIINNNGGG RRREEESSSUUULLLTTTSSS CCCHHHAAARRRTTT
Temperature outside when I did the experiment:
Time Temperature inside pan
What’s happening to the sample?
Which sheet of paper is hotter?
10 min. after start
20 min. after start
30 min. after start
40 min. after start
50 min. after start
60 min. after start
What is happening: Solar energy is what we call the energy given off by the sun. The temperature of the Sun, depending on where you are on the Sun, ranges from several thousands of degrees to millions of degrees! This energy is produced by nuclear fusion reactions on the sun. Fusion is what happens when the middles from two atoms (nuclei) smash together so hard they combine to become one bigger nucleus. Fusion makes a lot of energy, and it makes its way millions of miles to Earth in the form of sunlight. When sunlight hits a surface on Earth, the energy is absorbed by that surface and gets changed into heat. We can use this heat to cook food. A light surface absorbs less heat than a dark surface, so a dark surface will produce more heat than a light surface. What surface should be better to cook on, a dark one or a light one, and why? You can repeat the experiment by lining your pan with aluminum foil or the dark paper and see if your results change. Do you think you could cook other things with

The Solar System: 10
Science Club sponsored by ANS Oak Ridge/Knoxville Local Section & WIN
the sun? If you do want to cook more things with the sun you can build a more efficient solar cooker from any of several plans on the internet. Did you notice that your sheets of paper looked different in the sun? Light colored objects look light because they reflect light (make it bounce off) instead of absorb it. Your eye catches this reflected light and sees a light colored object. Light colored objects will give off less heat than dark objects because they reflect the sunlight instead of absorbing it. Darker objects appear to be dark because they absorb most of the light that hits them. Solar S’Mores Recipe What you need: Your baking pan from solar cooking 8 mini-marshmallows 2 small chocolate bars or a handful of chocolate chips 2 full-size graham crackers (You can also try this with just the chocolate and any cookie, like Nilla wafers) What to do:
1. Break each graham cracker into 2 pieces 2. Place 2 graham cracker halves on the bottom of the pan 3. Place 1 chocolate bar on each graham cracker half 4. Place 4 marshmallows on one of the chocolate bars 5. Place one graham cracker half on top of the marshmallows 6. Place the last graham cracker half in the pan 7. Place 4 marshmallows on the other graham cracker 8. Place the covered pan in the direct sunlight, but where animals or your
family can’t get to your s’mores! 9. Wait 10 minutes and check your cooking. Are there any differences between
the stacked s’more and the open-faced marshmallows and chocolate? 10. Keep checking your covered pan every 5 minutes and observing what is
happening until your s’mores are ready to eat.

The Solar System: 11
Science Club sponsored by ANS Oak Ridge/Knoxville Local Section & WIN
Solar Noodle Cookies Recipe You can also use flavored chocolate chips for this recipe. We’ve also tried dry cereal (plain Cheerios ☺) instead of chow mein noodles, and it tastes pretty good! What you need: Your baking pan from the solar cooking 6 oz chocolate chips 6 oz butterscotch chips 1 large can of chow mein noodles wax paper What to do:
1. Wait 10 minutes and place the chocolate and butterscotch chips into the pan 2. Put the thermometer in with the chips 3. Place the covered pan in the direct sunlight, but where animals or your
family can’t get to your melting chips! 4. Wait 10 minutes and check your cooking. 5. Keep checking your covered pan every 5 minutes and when the chips are
almost melted, stir them until melting is complete. 6. Add the noodles and mix well. 7. Drop by spoonfuls onto a sheet of waxed paper. 8. Eat when cool! Makes about 30 cookies.
Thanks to the Reach Out! Michigan website: www.reachoutmichigan.org/funexperiments/agesubject/lessons/smores.html

The Solar System: 12
Science Club sponsored by ANS Oak Ridge/Knoxville Local Section & WIN
Radar - "Seeing" Inside a Closed Box!*
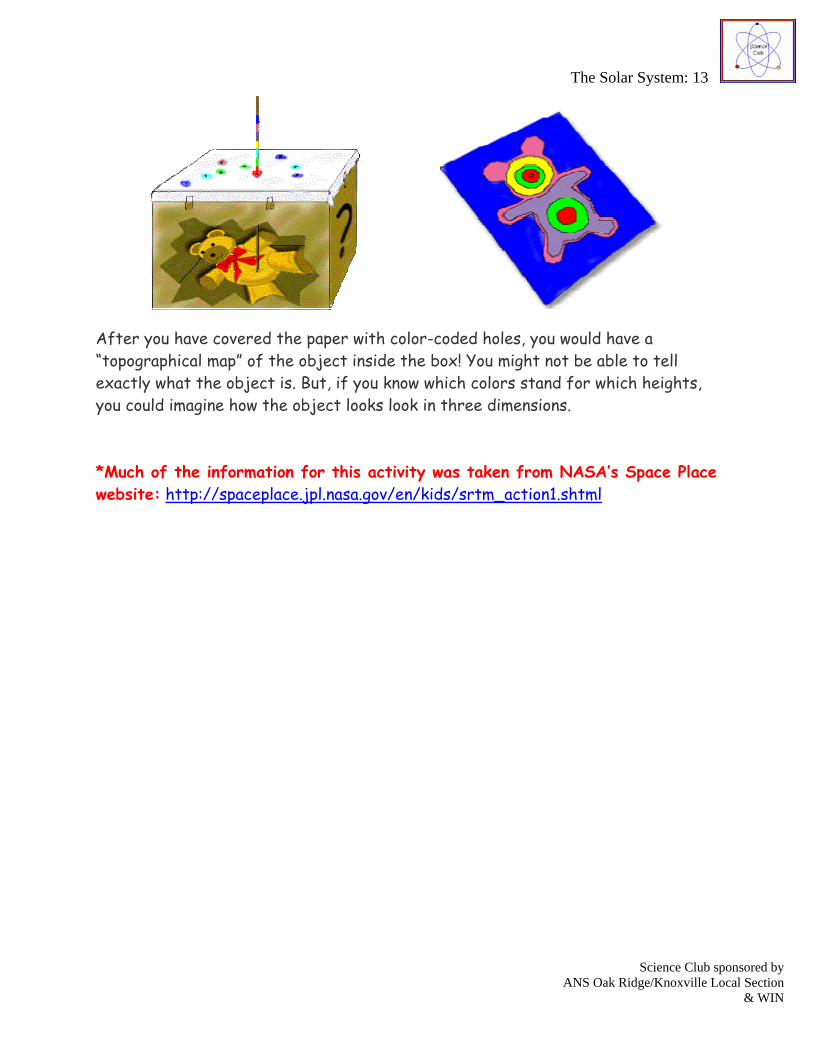
Scientists frequently need to measure things they cannot see. You may have done this before at a science museum (or zoo, or aquarium) where sometimes there will be a collection of objects hidden in a container that you have to identify by touching them. Now imagine that you cannot touch the object – how would you measure it? In this activity we will determine the shape of an object that you cannot see or touch. This illustrates the concept of radar, which is used to make weather forecasts, map the surface of the earth, catch drivers going over the speed limit, and measure the speed of a fastball. Suppose someone shows you a box and says it contains a mysterious object. The box is covered by a piece of paper so you can't see inside. You are allowed to poke small holes in the paper with some sort of probe, but you can't peek inside. How would you discover what's in the box?
One way is to poke a probe into the box until it touches something. You could measure how far the probe went into the box and mark that hole with that measurement. An easy way to mark the holes is with color. For example, 5 inches deep is blue, 6 inches is purple.
The Solar System: 13
Science Club sponsored by ANS Oak Ridge/Knoxville Local Section & WIN
After you have covered the paper with color-coded holes, you would have a “topographical map” of the object inside the box! You might not be able to tell exactly what the object is. But, if you know which colors stand for which heights, you could imagine how the object looks look in three dimensions. *Much of the information for this activity was taken from NASA’s Space Place website: http://spaceplace.jpl.nasa.gov/en/kids/srtm_action1.shtml

The Solar System: 14
Science Club sponsored by ANS Oak Ridge/Knoxville Local Section & WIN
What you need:
1. 6” toothpick 2. Colored pencils 3. Tracing paper 4. Plastic mesh 5. Tape 6. A hidden object – suggestions include a bottle cap, a roll of tape, a pad of post-
it notes, a wooden block, etc. See Step 3, below. 7. A “box” – suggestions include a shoe box, or a sauce pan, a bowl. See Step 4,
below.
What to do:
Step 1: Preparing the probe:
Mark the skewer every centimeter along its length. Color the skewer by rubbing with colored pencils. Use a different color between each centimeter mark. Note: with simple objects (e.g., objects for which the surface is at a uniform height) this step can be skipped.
Step 2: Preparing the box cover:
Tape the piece of plastic mesh to the center of a blank sheet of tracing paper. You can use the electrical tape left over from the Electromagnetism kit. This will be the cover to your box.
Step 3: Find an appropriate object:
This activity works best with objects that have a relatively simple shape with well-defined changes in height. For example: a roll of tape, a pad of post-it notes, a wooden block, a spice container, etc. For an extra challenge you could choose two objects.
Don’t let the junior scientist see the object!
Step 4: Find an appropriate box:
The box needs to be deeper than the object you have chosen, but cannot be deeper than the 6” toothpick being used as the probe. A shoe box can work, although be sure to pick one with stiff sides. A sauce pan works well, as does a bowl.

The Solar System: 15
Science Club sponsored by ANS Oak Ridge/Knoxville Local Section & WIN
Step 5: Place the object in the box:
If the object moves around easily in the box it may be necessary to attach it to the bottom of the box with a small loop of tape.
Step 6: Attach the cover to the box:
Tape the cover, grid-side down, to the box, hiding the object.
Be sure to attach the cover firmly so it doesn’t detach, or push down too much, as you poke through it in the next step.
Step 7: Measure the object:
As in the introduction above, push the probe through the box cover and see how far it goes before touching something (the object or the bottom of the box). The penetration depth at each grid point is given by the color band on the probe that shows just above the cover. Use colored pencils to mark the penetration depth on the box cover.
Notes:
• If you have a simple object and have skipped the step of color-coding the skewer, then the penetration depth has only two values: “object found” and “no object found”. With one color you can mark the grid points where the object was found to see the shape of the object.
• Even on our little grid there are approximately 1,000 holes – your junior scientist (and likely you) will run out of patience before examining each of them! To avoid this problem it is a good idea to first examine a set of widely spaced holes to find the object. Once the object has been located the finely spaced holes can be used to accurately define the shape.

The Solar System: 16
Science Club sponsored by ANS Oak Ridge/Knoxville Local Section & WIN
Radar: What is happening?
Like the paper that hides our object, clouds often hide large areas of the Earth's surface. But, just as we can map the object through the paper, we can use radar to make detailed maps of Earth right through clouds or darkness.
Radar is a kind of light energy, but we can't see it. It also acts like sound, because it bounces off surfaces making "echoes," which are "heard" by the radar antenna.
We know how fast the radar signal travels in air, so if we time how long it takes for the signal to return, we can figure out how far it traveled and use this information to get a picture of the surface.
When radar bounces off the ground, only some of the signal gets back to where it started. Much of the signal scatters in other directions. How much of the signal scatters depends on how smooth or rough the surface is--whether it is covered with smooth water or rough trees, for example--or whether the surface is flat or slanted--like deserts or mountains, or farmlands or cities. This makes it more difficult to interpret than our skewer. But it also means we can get a lot more information than just surface height.
The Solar System: 17
Science Club sponsored by ANS Oak Ridge/Knoxville Local Section & WIN
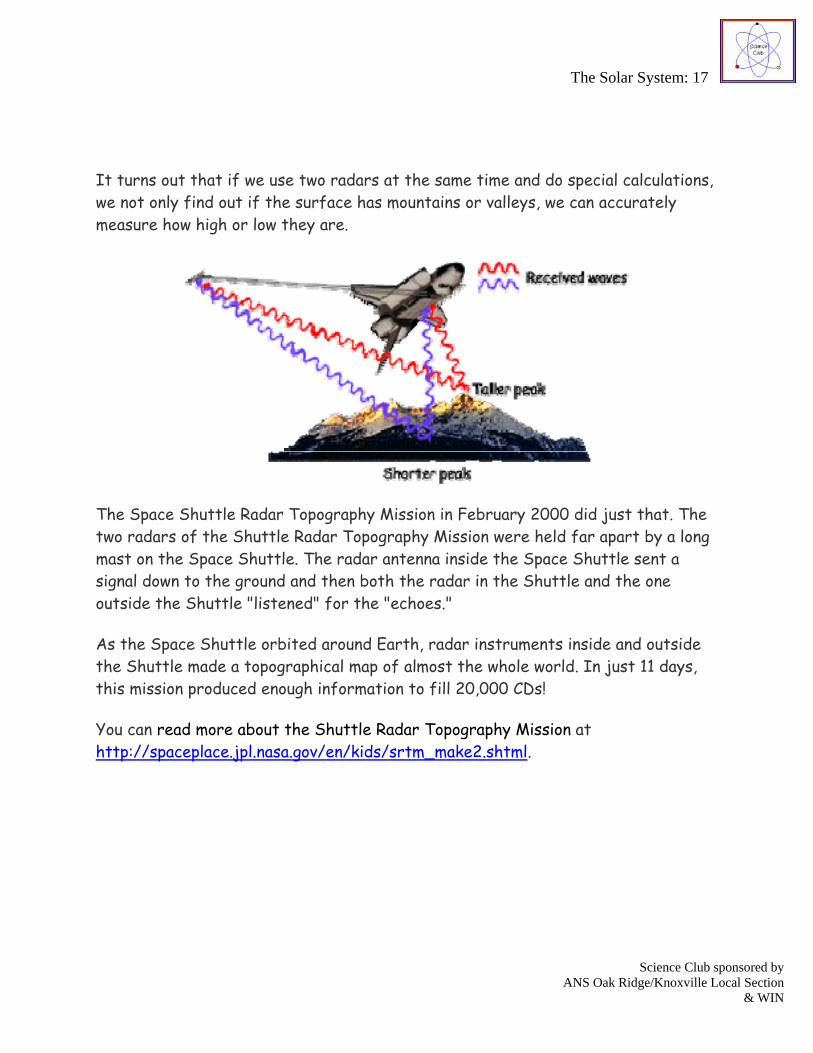
It turns out that if we use two radars at the same time and do special calculations, we not only find out if the surface has mountains or valleys, we can accurately measure how high or low they are.
The Space Shuttle Radar Topography Mission in February 2000 did just that. The two radars of the Shuttle Radar Topography Mission were held far apart by a long mast on the Space Shuttle. The radar antenna inside the Space Shuttle sent a signal down to the ground and then both the radar in the Shuttle and the one outside the Shuttle "listened" for the "echoes."
As the Space Shuttle orbited around Earth, radar instruments inside and outside the Shuttle made a topographical map of almost the whole world. In just 11 days, this mission produced enough information to fill 20,000 CDs!
You can read more about the Shuttle Radar Topography Mission at http://spaceplace.jpl.nasa.gov/en/kids/srtm_make2.shtml.

The Solar System: 18
Science Club sponsored by ANS Oak Ridge/Knoxville Local Section & WIN
Telephone on a String This simple version of the telephone has been around for a while. Here on Earth we still use cables to transit sound waves so we can communicate over long distances. What you need:
1. 2 strong plastic cups 2. a long piece of string (at least 6 ft. or 2 m long) 3. sharp scissors 4. a partner 5. 2 paperclips (optional)
What to do:
1. Poke a small hole in the bottom of each cup 2. Put one end of the string through the hole from the outside of the cup to
the inside. Put several knots in the string so that it won’t fall out of the cup. If the knots aren’t enough to keep the string in the cup, then tie a paperclip in with the knots.
3. Take the other end of the string and tie it onto the other cup in the same way.
4. Take one cup for yourself and give the other to your partner. Stretch the string out as tightly as you can, without pulling a string out of a cup.
5. Have your partner put his/her cup up to his/her ear while you speak into your cup. Take turns!
NOTE: The string will need to be tight for this to work- if it is too droopy, the sound waves will not make it from one end of the string to the other. What is happening: Sound waves travel through solids better than they travel through air. This is why you can hear through your string telephone. When you speak into the cup, the cup vibrates which causes the string to vibrate. The vibrating string then causes the second cup to vibrate which reproduces the sound for your partner’s ears. Modern telephones use wire to transmit the sound waves. Cellular telephones and radios use antennas to amplify sound waves in air so that the sound waves can travel a long way and still be captured by another telephone or radio.
The Solar System: 19
Science Club sponsored by ANS Oak Ridge/Knoxville Local Section & WIN
Have Super Hearing with a Super Sound Cone! What you need:
• A big piece of paper, or the black and white paper taped together • tape
What to do:
This is so easy!
Just roll the paper into a cone shape, leaving a small hole (about 1/2 to 1 inch across) at the pointed end. Leave the big end as wide as you can. Then tape the edge into position.
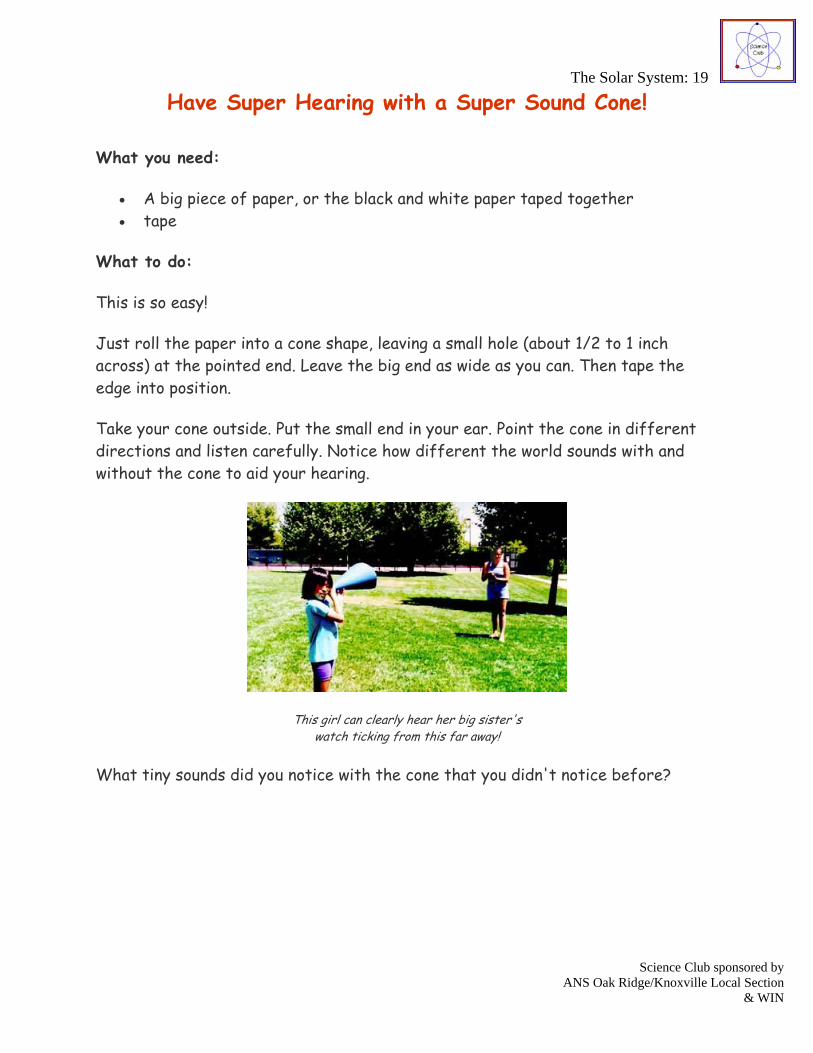
Take your cone outside. Put the small end in your ear. Point the cone in different directions and listen carefully. Notice how different the world sounds with and without the cone to aid your hearing.
This girl can clearly hear her big sister's watch ticking from this far away!
What tiny sounds did you notice with the cone that you didn't notice before?

The Solar System: 20
Science Club sponsored by ANS Oak Ridge/Knoxville Local Section & WIN
Now, can you guess what these two objects have in common?
What's a Got to Do with a ?
Like waves in the ocean, sound makes waves in the air. Air jostles back and forth as the sound energy waves pass.
If you put something like paper in the path of the sound wave, it will also vibrate quite a lot. If you give this paper surface the right shape, the sound waves will be funneled to a point. So your super sound cone is a sound funnel!
The same sort of idea makes NASA's giant dish antennas work. These antennas listen for signals from the planetary spacecraft now exploring space far from Earth.
The antenna dish in this picture is 34 meters (about 110 feet) across. This antenna is in Australia. See how tiny the sheep look as they graze peacefully beneath its attentive ear.
little sheep, happily munching grass
We can't just build a spacecraft, tell it to phone home once in a while, then launch it to Mars or Jupiter! We must have a way to hear its tiny voice and talk to it when it is very far away. Of course, no spacecraft actually communicates by sound. Messages wouldn't get very far, since sound waves can't travel in the vacuum of space! But the spacecraft do send out radio waves, which can travel practically forever. The trouble is, the radio waves spread out and get weaker and weaker the farther they travel.
So NASA's radio wave "ears" must be very big indeed!
Some of the Deep Space Network antennas are twice as big as the one watching over the sheep above!
These dish antennas don't look much like your sound cone, do they? But the path the radio signals take once they hit the dish is like a folded up cone. Once the

The Solar System: 21
Science Club sponsored by ANS Oak Ridge/Knoxville Local Section & WIN
signal hits the focus (like the small end of your cone), electronic instruments take over to turn up the volume even more.
Then we can begin to decode the message and figure out what the spacecraft has to show and tell us!

The Solar System: 22
Science Club sponsored by ANS Oak Ridge/Knoxville Local Section & WIN
Credit where credit is due: The activities in this handout were either taken directly from or adapted from the following resources:
Models of the planets, the toilet paper solar system, and walking to the planets were taken from:
A Solar System Scale Model Meta Page: http://www.vendian.org/mncharity/dir3/solarsystem/. This page has links to all sorts of Solar System activities
Cooking with the Sun was adapted from the Reach Out! Michigan website: www.reachoutmichigan.org/funexperiments/agesubject/lessons/smores.html You can read more about the Shuttle Radar Topography Mission at http://spaceplace.jpl.nasa.gov/en/kids/srtm_make2.shtml. The Radar experiment was taken from NASA’s Space Place website: http://spaceplace.jpl.nasa.gov/en/kids/srtm_action1.shtml The Super Sound Cone was also taken from NASA’s Space Place website:
http://spaceplace.jpl.nasa.gov/en/kids/tmodact.shtml
Special thanks to the University of Tennessee Physics Department for their generous support!