Embed Size (px)
Citation preview

Vol. 20 N1 2015
The Smoking Hole A Publication of the Antelope Valley Group IPMS
Volume 20, Number 1
www.avg-ipms.org
2015 Club Officers President Vice President Treasurer Secretary
Mike Otis Richard Manaseri Curtis Stidham Matt Graham
[email protected] [email protected] [email protected] [email protected]
Vol. 20 N1 2015
Club News and Business
NEXT MEETING January 17, 2015, 1 PM AT ROSAMOND LIBRARY
Beginning of a New Year Another year has come and gone for the Antelope Valley Group. 2014 was a good year for the club, with another successful Desert Classic, three in-house contests and outstanding participation from the membership. We gained a few new members, but unfortunately also had a couple departures. Here’s hoping for an exciting 2015 for the AVG! 2015 Club Officer Elections The club held elections for club officers for the upcoming year. The 2015 officers are as follows: President: Mike Otis Vice President: Richard Manaseri Secretary: Matt Graham Treasurer: Curtis Stidham Club Dues A reminder- 2015 club dues are due in January. Dues are $36 for the year. Contest Car Pool Gas Reimbursement Proposal A proposal was made to provide reimbursement for gasoline costs to club members who provide their vehicle for car pool service for travel to contests. Would need to transport 3 or more members to be eligible. We will discuss further.

Vol. 20 N1 2015
2015 Meeting Schedule .
Primary Activities Refreshments Demo Review
17 Jan Member Dues Collected
21 Feb Salt Chipping Method (Matt)
21 Mar “Things Under
Wings” (Henry)
18 Apr
16 May 20 June 18 July 15 Aug
19 Sept
17 Oct Judge’s Clinic 7 Nov 2016 Desert Classic
21 Nov 2016 Club Officer
Nominations
19 Dec Christmas Potluck
Gift Exchange 2016 Officer Elections

Vol. 20 N1 2015
The Tool Crib
In what seems to be a monthly event, Rich R. brought in some cool new tools and supplies to show.
Glaze Coat sealant. This is a thick, two-part clear epoxy resin, intended for protecting furniture. Rich used it as a coating for the base of his TIE Interceptor, but I have also found it useful for making flat windows in aircraft models. It does not seem to yellow over time. Available from places like Michael’s and Home Depot.
Novus Plastic Polish and Cleaner. The cleaner (#1) is great for removing residue and has anti-static properties. The polish (#2) is excellent for removing fine scratches from clear plastic, for example,

Vol. 20 N1 2015
after using sanding sticks on a canopy. There is also a coarser polish (#3). Available from Micro Mark and plastic supply stores.
OttLite lighted magnifier and lighted magnifying tweezers. Great for us, um, “mature” modelers whose eyesight is not what it one was. Available at Costco for about $20.
Club Demos
Let me know if you’d like to do a demo for the club and I’ll highlight it in the newsletter. We already have a couple lined up.

Vol. 20 N1 2015
Member Show and Tell
Name:
Mike Otis
Time To Build:
1 month
Kit & Scale:
Monogram Pro-Modeler Focke Wulf Ta-154 Moskito 1/48th scale
Aftermarket Items:
Photoetch seatbelts Paints Used:
Tamiya German Gray Model Master RLM 75 Grauviolet, RLM 76 Lt. Blue
Comments:
Built mostly OOB. Fit is Decent. Antennas and some decals were no fun.

Vol. 19 N12 2014
Name:
Tom Hamel
Time To Build:
1 month
Kit & Scale:
Academy US M551 Sheridan (Gulf War Version)
1/35th scale
Aftermarket Items:
None
Paints Used:
Tamiya and Model Master. Some pastels.
Some minor fit problems – generally a decent model of an obscure subject.
Vol. 20 N1 2015
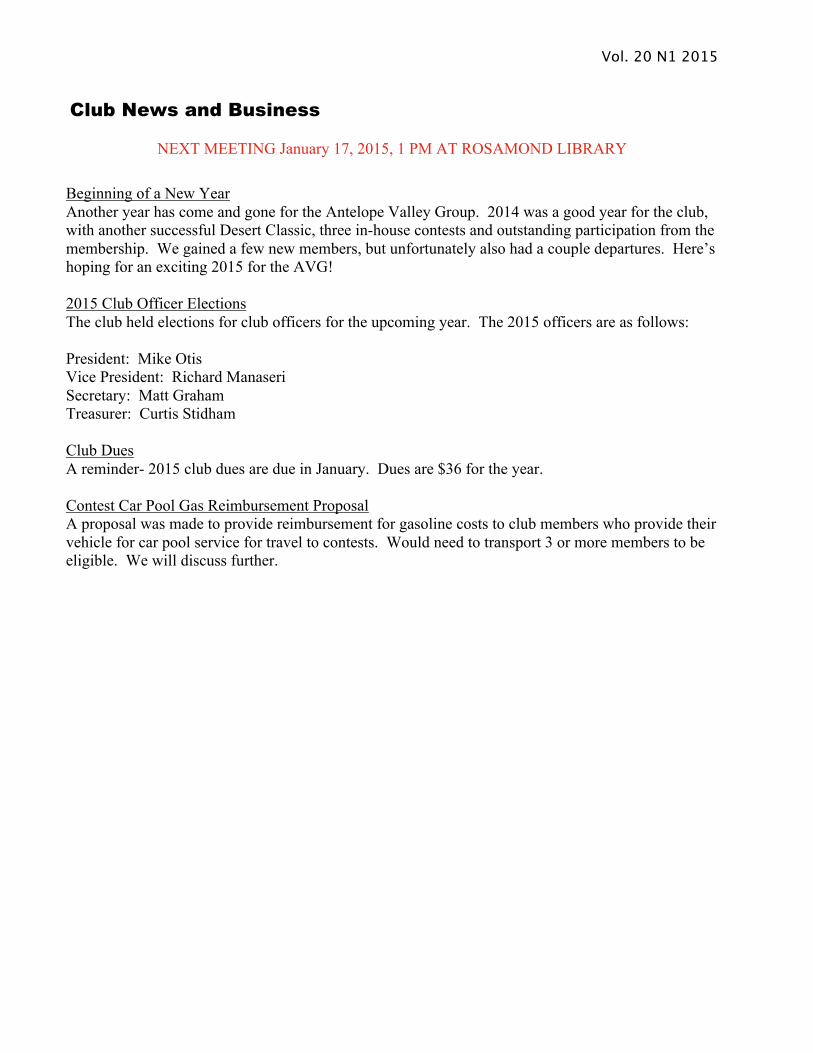
Name:
Rick Reinert
Time To Build:
Kit & Scale:
Eduard Bf-110E and Bf-110G
1/48th scale
Aftermarket Items:
Paints Used:

Vol. 19 N12 2014
Name:
Rich Ribaudo
Time To Build:
40 – 50 hours
Kit & Scale:
AMT Meyers Manx
1/25th scale
Aftermarket Items:
None
Paints Used:
Tamiya, Model Master and Alclad Chrome
See Rich’s detailed build-up article (following)

Vol. 20 N1 2015
Name:
Rich Ribaudo
Time To Build:
Approx. 20 hours
Kit & Scale:
Fine Molds TIE Interceptor
1/72nd scale
Aftermarket Items:
None
Paints Used:
Tamiya and Model Master.
See Rich’s detailed build-up article (following)

Vol. 20 N1 2015
Page 11
Meyers Manx Build Report By Rich Ribaudo Model: AMT 1/24 Meyers Manx Dune Buggy. Kit # AMT651/12
Build Time: Construction = 30 hours. Paint & decals = 5 hours. Display stand = 4 hours.
Finish: Overall Tamiya Metallic Green TS-17. Seats Model Master Insignia White FS 17875 and Testors Jade green # 1530. Chasis Testors Flat Black. Miscellaneous small details picked out with various Testors and Model Master paints. Chrome and aluminum parts stripped and finished with Alclad.
Build Notes: I remember building one of these kits back in 1968 or 69. What I didn’t remember was how much work was involved. To be completely fair the kit offered (and still does) a great many options for the modeler. One of three distinct versions of a Meyers Manx can be had from this kit as all the accessories are included. The fit of the parts wasn’t terrible but on par with most 1960s kits. Don’t expect modern fit behavior from this kit; you’ll have a little flash to remove and some “convincing” to do in order to get a good fit here & there. The most troubling part of the build was the complicated exhaust system. I wound up bending and even shortening some of the pipes to get what could technically be called a “fit”. If I built this again I would take Bill Pressley’s advice and make the pipes from solder.
The kit includes all the specific part and tire options to make a dune buggy, street version and Baja buggy. Some parts have no location pins or holes but this really isn’t a big deal. I opted to strip the chrome from all parts but the wheels and refinished them with Alclad Chrome over a base of Tamiya Gloss Black. As I chose the Manx street version most of the optional parts were used, such as headlights, marker lights, license plates and such. The only items on the car not included in the kit are the spark plug wires and the flagpoles made from styrene rod. Computer printed AVG emblems made for some very stylish flags.
A real standout feature of this kit is the decal sheet. It offers dozens of beautifully printed images, flames, emblems and logos. I used only the license plates and three small Manx badges from the sheet. The others will be put to good use on a future Willys Gasser project for sure.
A cardboard display stand is included in this “Retro Deluxe” edition just like the first release of the kit in the 1960s. Since the cardboard was oversized

Vol. 20 N1 2015
Page 12
everything was rolled to fit in the box. No amount of bending or flattening would make the cardboard behave so all the parts were either attached to Styrofoam with double sided tape or stiffened with wooden stir sticks glued to them. When the wrestling was over I thought it was worth the effort. I make no apologies for the computer generated “AVG IPMS” adornments placed about the building and sign!
Summary: This was a fun build. There are a few areas that make you earn success, but nothing the modeler with average skill cannot overcome. It also helps to have built a car or two recently and I have to admit I was rusty! I built nothing but cars as a kid but switched to aircraft as a teen. Lately I have taken to building older kits that I made as a kid. I’m glad so many are available again. It is very satisfying to get results with modern finishing materials and skills a bit more matured (I hope) from years of practice and experimentation.

Vol. 20 N1 2015
Page 13
TIE Interceptor Build Report By Rich Ribaudo Model: Fine Molds 1/72 Star Wars Imperial TIE Interceptor
Build Time: Construction = 4 hours. Paint & decals = 7 hours. Display stand = 2 hours.
Finish: Overall Tamiya Haze Gray TS-32. Black “wing” panels Model Master Aircraft Interior Black FS 37031. Miscellaneous small details picked out with various Testors and Model Master paints. Overall clear coat of Humbrol semi-matt. Panel lines and details were pin-washed with Winsor Newton Paynes Gray #32 Artist oil.
Build Notes: This kit, like all other Fine Molds kits was a pleasure to build. The fit was about as perfect as you could hope for and I don’t recall using any filler at all. Seams cleaned up nicely with very little sanding and polishing. Detail abounds in this little kit; despite the difficulty to see into the cockpit there is a well detailed pilot figure with decals even provided for his (her?) uniform patches. 8 red and black decals adorn the interior walls of the cockpit to give it some animation. The time to build this little gem passed quickly, proving time flies when you’re having fun. In a bout as much time as it takes for me to finish just a cockpit and engine of a 1/48 airplane I had a completed TIE Interceptor.
The only odd bit worth mentioning is that Fine Molds includes masks for the abundant windows on this craft. The problem is that they were not die-cut as you would expect. It was easier and faster to just use Tamiya tape cut to fit than use the supplied masks. In fairness, my example may simply not have been cut at the factory.
A display stand of truss-like construction was included in the kit but (for my taste) it has a large presence that I thought detracted from the model itself. I chose to use something simpler and less obvious.
The base was constructed from a 4” dia. wooden craft platform, a 1/8” diameter acrylic rod and a swivel joint taken from the Airfix Aircraft Display Stand Set. The base was primed, sanded smooth, painted gloss black and over coated with a pour of Famowood Glaze Coat.
Summary: This truly is a great out-of-the-box build with no drama. If you want to take a break from complicated projects and get something done quickly I highly recommend this kit.

Vol. 20 N1 2015
Page 14
Calendar
3/1/2015 Valley Con 2015 Ronald Reagan Presidential Library and Museum 40 Presidential Drive, Simi Valley, CA
3/15/2015 Kit Collectors Exposition and Show
UFCW Local 324 Union Hall 8530 Stanton Ave., Buena Park, CA
4/10-11/2015
SCAHMS 2015 California Show
TBA
4/11/2015 Silicon Valley Classic 2015
Naperdak Hall 770 Montague Expressway, San Jose, CA
4/18/2015 20th Annual Best of the West
Riviera Hotel and Casino 2901 Las Vegas Blvd South, Las Vegas, NV
6/6/2015 San Diego Model Expo and Swap Meet
San Diego Air and Space Museum Annex, Gillespie Field 335 Kenney St., San Diego, CA
6/13/2015 Hobby Expo 2015 Well Fargo Center for the Arts 50 Mark West Springs Rd., Santa Rosa, CA
7/12/2015 Kit Collectors Exposition and Show
UFCW Local 324 Union Hall 8530 Stanton Ave., Buena Park, CA
9/12/2015 “High Rollers 16th Annual Invitational
Desert Heights Elementary School 13948 Mt. Bismark, Reno, NV
9/27/2015 TriCity Classic Eleven Milpitas Community Center 457 E Calaveras Blvd., Milpitas, CA
11/8/2015 Kit Collectors Exposition and Show
UFCW Local 324 Union Hall 8530 Stanton Ave., Buena Park, CA


![4.5. Contests [extras]](https://img.pdfslide.us/doc/110x75/55c4b0a3bb61eb182c8b45da/45-contests-extras.jpg)