Embed Size (px)
Citation preview
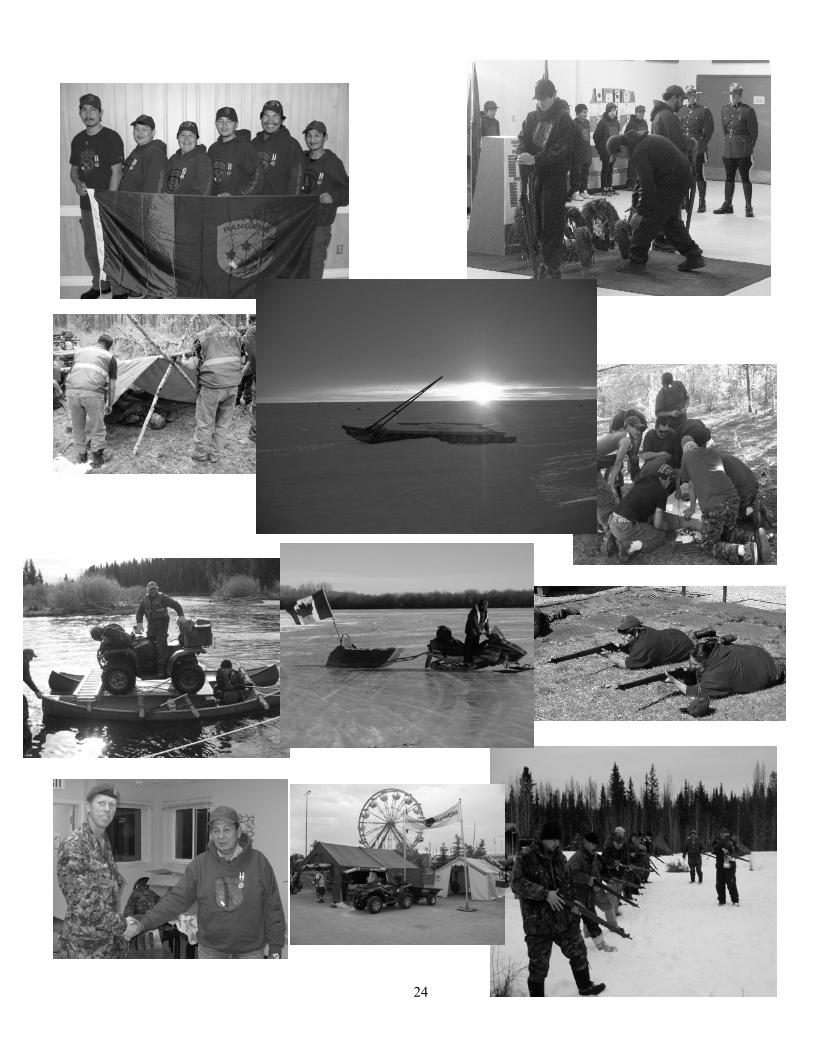
FOURTH CANADIAN RANGER PATROL GROUP
Kitshop hhtp://www.gcks.ca hhtp://www.army.gc.ca/4crpg
RangerRanger The
Instruction * Training * Information
Summer 2010 The Newsletter of the 4th Canadian Ranger Patrol Group
What is NORFORCE?
History
• The first and most commonly known foundation unit is 2/1st North Australia Observer Unit (2/1 NAOU) or Nacke-roos which was formed on 11 May 1942, by the then MAJ W.E.H "Bill" Stanner.
NORFORCE was specifically raised in 1981, to meet the require-
ments for surveillance and reconnaissance in the North and North
West of Australia. In 1985, two other RFSUs were raised: the Pil-
bara Regiment in Western Australia, and the 51st Battalion Far
North Queensland Regiment in Cape York.
Mission
To conduct land based reconnaissance and surveillance within an assigned Area of Responsibility IOT provide situational
awareness to the supported JIATF (Joint Interagency Task Force).
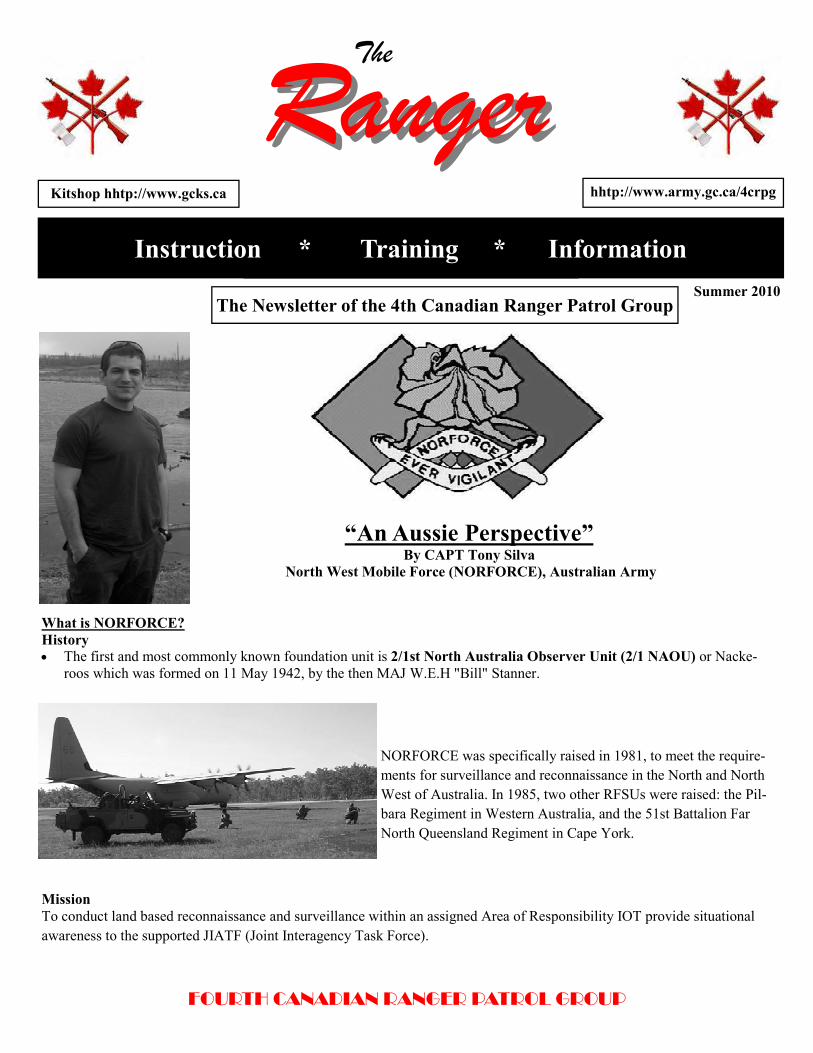
“An Aussie Perspective” By CAPT Tony Silva
North West Mobile Force (NORFORCE), Australian Army
2
The “Business”
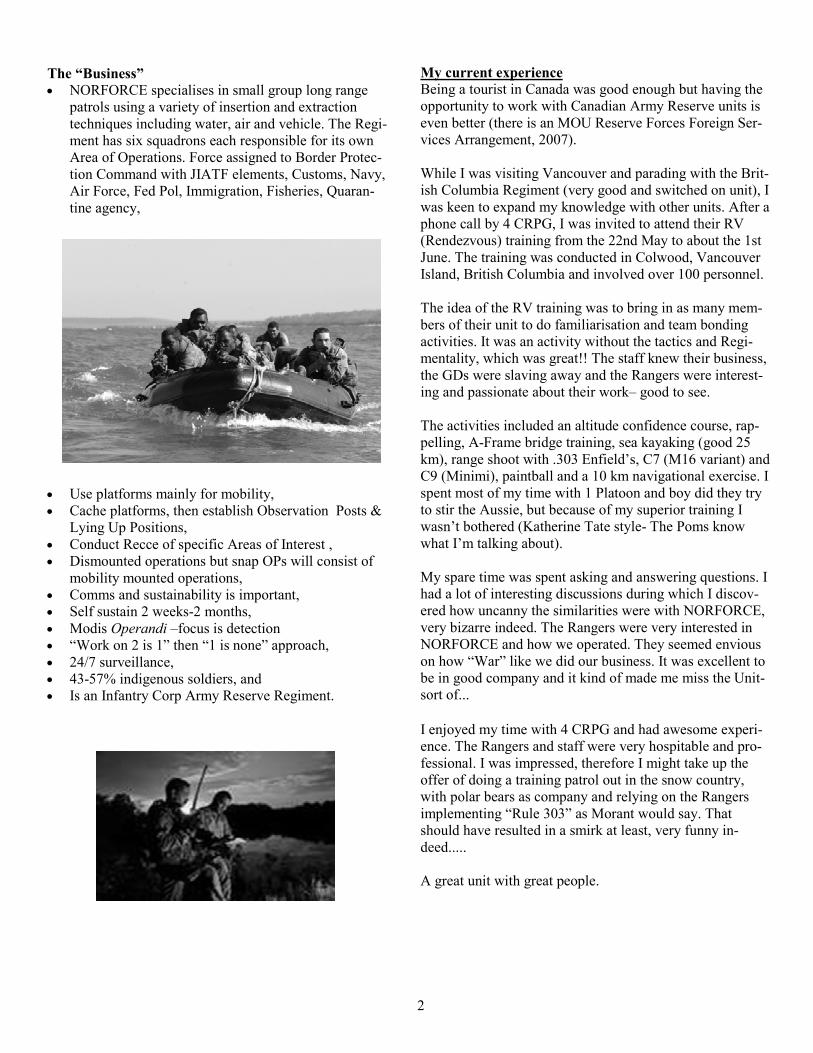
• NORFORCE specialises in small group long range patrols using a variety of insertion and extraction techniques including water, air and vehicle. The Regi-ment has six squadrons each responsible for its own Area of Operations. Force assigned to Border Protec-tion Command with JIATF elements, Customs, Navy, Air Force, Fed Pol, Immigration, Fisheries, Quaran-tine agency,
• Use platforms mainly for mobility, • Cache platforms, then establish Observation Posts & Lying Up Positions,
• Conduct Recce of specific Areas of Interest , • Dismounted operations but snap OPs will consist of mobility mounted operations,
• Comms and sustainability is important, • Self sustain 2 weeks-2 months, • Modis Operandi –focus is detection • “Work on 2 is 1” then “1 is none” approach, • 24/7 surveillance, • 43-57% indigenous soldiers, and • Is an Infantry Corp Army Reserve Regiment.
My current experience
Being a tourist in Canada was good enough but having the opportunity to work with Canadian Army Reserve units is even better (there is an MOU Reserve Forces Foreign Ser-vices Arrangement, 2007). While I was visiting Vancouver and parading with the Brit-ish Columbia Regiment (very good and switched on unit), I was keen to expand my knowledge with other units. After a phone call by 4 CRPG, I was invited to attend their RV (Rendezvous) training from the 22nd May to about the 1st June. The training was conducted in Colwood, Vancouver Island, British Columbia and involved over 100 personnel. The idea of the RV training was to bring in as many mem-bers of their unit to do familiarisation and team bonding activities. It was an activity without the tactics and Regi-mentality, which was great!! The staff knew their business, the GDs were slaving away and the Rangers were interest-ing and passionate about their work– good to see. The activities included an altitude confidence course, rap-pelling, A-Frame bridge training, sea kayaking (good 25 km), range shoot with .303 Enfield’s, C7 (M16 variant) and C9 (Minimi), paintball and a 10 km navigational exercise. I spent most of my time with 1 Platoon and boy did they try to stir the Aussie, but because of my superior training I wasn’t bothered (Katherine Tate style- The Poms know what I’m talking about). My spare time was spent asking and answering questions. I had a lot of interesting discussions during which I discov-ered how uncanny the similarities were with NORFORCE, very bizarre indeed. The Rangers were very interested in NORFORCE and how we operated. They seemed envious on how “War” like we did our business. It was excellent to be in good company and it kind of made me miss the Unit- sort of...
I enjoyed my time with 4 CRPG and had awesome experi-ence. The Rangers and staff were very hospitable and pro-fessional. I was impressed, therefore I might take up the offer of doing a training patrol out in the snow country, with polar bears as company and relying on the Rangers implementing “Rule 303” as Morant would say. That should have resulted in a smirk at least, very funny in-deed..... A great unit with great people.
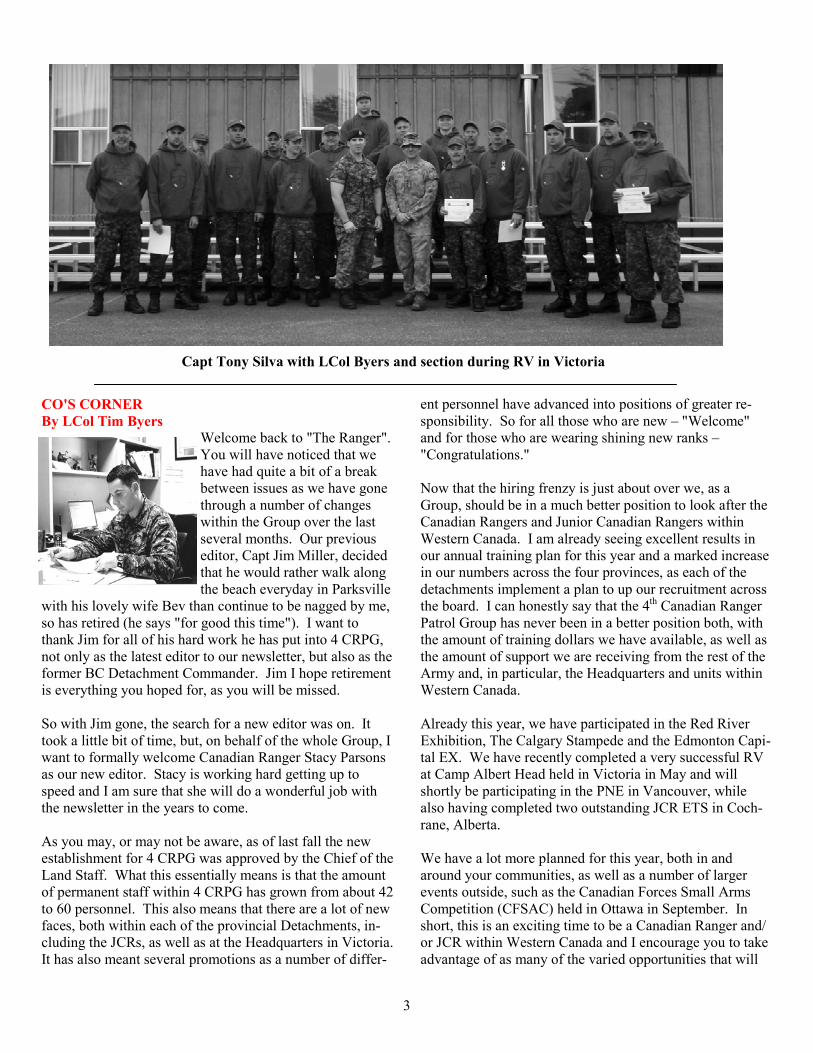
Capt Tony Silva with LCol Byers and section during RV in Victoria
CO'S CORNER
By LCol Tim Byers
Welcome back to "The Ranger". You will have noticed that we have had quite a bit of a break between issues as we have gone through a number of changes within the Group over the last several months. Our previous editor, Capt Jim Miller, decided that he would rather walk along the beach everyday in Parksville
with his lovely wife Bev than continue to be nagged by me, so has retired (he says "for good this time"). I want to thank Jim for all of his hard work he has put into 4 CRPG, not only as the latest editor to our newsletter, but also as the former BC Detachment Commander. Jim I hope retirement is everything you hoped for, as you will be missed. So with Jim gone, the search for a new editor was on. It took a little bit of time, but, on behalf of the whole Group, I want to formally welcome Canadian Ranger Stacy Parsons as our new editor. Stacy is working hard getting up to speed and I am sure that she will do a wonderful job with the newsletter in the years to come. As you may, or may not be aware, as of last fall the new establishment for 4 CRPG was approved by the Chief of the Land Staff. What this essentially means is that the amount of permanent staff within 4 CRPG has grown from about 42 to 60 personnel. This also means that there are a lot of new faces, both within each of the provincial Detachments, in-cluding the JCRs, as well as at the Headquarters in Victoria. It has also meant several promotions as a number of differ-
ent personnel have advanced into positions of greater re-sponsibility. So for all those who are new – "Welcome" and for those who are wearing shining new ranks – "Congratulations." Now that the hiring frenzy is just about over we, as a Group, should be in a much better position to look after the Canadian Rangers and Junior Canadian Rangers within Western Canada. I am already seeing excellent results in our annual training plan for this year and a marked increase in our numbers across the four provinces, as each of the detachments implement a plan to up our recruitment across the board. I can honestly say that the 4th Canadian Ranger Patrol Group has never been in a better position both, with the amount of training dollars we have available, as well as the amount of support we are receiving from the rest of the Army and, in particular, the Headquarters and units within Western Canada. Already this year, we have participated in the Red River Exhibition, The Calgary Stampede and the Edmonton Capi-tal EX. We have recently completed a very successful RV at Camp Albert Head held in Victoria in May and will shortly be participating in the PNE in Vancouver, while also having completed two outstanding JCR ETS in Coch-rane, Alberta. We have a lot more planned for this year, both in and around your communities, as well as a number of larger events outside, such as the Canadian Forces Small Arms Competition (CFSAC) held in Ottawa in September. In short, this is an exciting time to be a Canadian Ranger and/or JCR within Western Canada and I encourage you to take advantage of as many of the varied opportunities that will
3
be made available to you to increase your skills and chal-lenge yourselves in the future. I and the GSM, CWO Dave Ames, look forward to seeing you, whether it is here in Victoria on the DP1/DP2 in the fall or out on one of the many training events in and around your community.
"Have your musket clean as a whistle, hatchet scoured, sixty rounds powder and ball, and be ready to march at a minute's notice." - Standing Orders, Rogers' Rangers - Major Robert Rogers 1759
4
JCR ETS (Enhanced Training Session)
By JCR Det Comd , Capt Sandra Heidel
July is always a busy month for the JCR Detachment. As part of our training plan, we run two ETS (Enhanced Train-ing Session). Each ETS or ‘summer camp’ runs approxi-mately 10 days and takes JCR from their community to a centralized location. This year, the JCRs travelled to the beginning of the Rocky Mountains, in Cochrane, Alberta. 120 JCRs from across 4 CRPG landed in Calgary and were whisked away to a re-mote location where the adventure began! Rock climbing, canoeing, mountain biking and hiking were on the schedule for the week! The JCRs were broken down into two platoons, 12 sections and completed each activity in a round robin fashion. Halfway through, the week; each platoon was rewarded with a half day of paintball! As the JCRs settled into the camp routine, friends were made, adventures were had and everyone had a great time! By the time the camp was finished; friends were made, tears were shed and the paintball welts got juicier!
BC DET COMD'S SITREP
By Capt Meades, DCO
When I took over BC Det back at the end of March, it was clear that I had some considerable work to do to get the Det back on the right track. While certainly no fault of the staff, nevertheless the work had to be done and I began by host-ing a meeting with all but the very newest of the current staff (who came aboard afterwards) and explained the way ahead for the Det. Shortly afterwards, I held a similar meet-ing with the Det's Ptl Comds at the Ptl Comds' Working Group and expressed somewhat the same imperatives and direction to them. I am happy to say that all, both staff and Ptl Comds, have taken my words very much to heart and we are seeing very positive results. Our recruiting is working well (the Det figures speak for themselves). As the CO's stated number one priority for this training year, we are already successful! At one point, I swore in 22 Canadian Rangers in 22 Days. The training being delivered is top notch. The exercise de-briefs I am receiving from the CRIs and the DSM, as well as my own experiences on the ground on training exercises indicates that this Det is doing precisely what it is supposed to be doing...and doing it well! We have gained some considerable momentum and I am conscious of the fact that our CRIs are working flat out to meet the aim and then some. The Stores are working very well with a full team and the Orderly Room is providing excellent admin support. We have had a somewhat fractured personnel picture be-tween med issues, hiring freezes, staff changes, etc., but we have adapted and overcome, ensuring that the aim was met,
Ready to launch. Vanderhoof Rangers stand by to test
their floating masterpiece during the June mobility
exercise
JR Rangers & Rangers
Grand Cache Patrol
5
regardless. Albeit that MCpl McIntyre will be at HQ for some time to support the Group as a whole in the finance office, we are now finally up to full strength as a Det staff and the benefits of that are clear. The enthusiasm, ingenuity, and determination of the BC Det staff have been impressive and have made for an excel-lent start to this training and fiscal year. It is great to see that, within the team, individuals are making such positive changes. Overall, I am very pleased with the way things are going at BC Det, always conscious, however, that my personal aim is to ensure that the Det is in the best possible shape to hand over to its rightful leader, Capt Parker, upon his return from the Sudan. I believe that aim will be well met and that Capt Parker will be happy with the shape of the organization he takes over in November!
Having said all of the above, now is not the time to rest on our laurels. The down-side to success is that it can lead to complacency among the successful. Our job now is to maintain that positive momentum, but also to seek new ideas and improvements, fresh approaches, and keep the energy levels up so we can continue to be just as success-ful. For instance, I would like to see attendance at training events increase among the Rangers in some patrols. I find it very hard to believe that I am almost half way though my time here with BC Det. I have to say it has been a pleasure to be here and I intend to thoroughly enjoy the next three-and-a-half months, as I hope all staff and Rang-ers do too.
There is much still to do before I can put my hand on my heart and say that the Det is where I would want it to be when Capt Parker takes over in November. But the task ahead looks entirely doable and I am optimistic that he will be pleased with the standard when he arrives.
Vanderhoof Rangers on Patrol
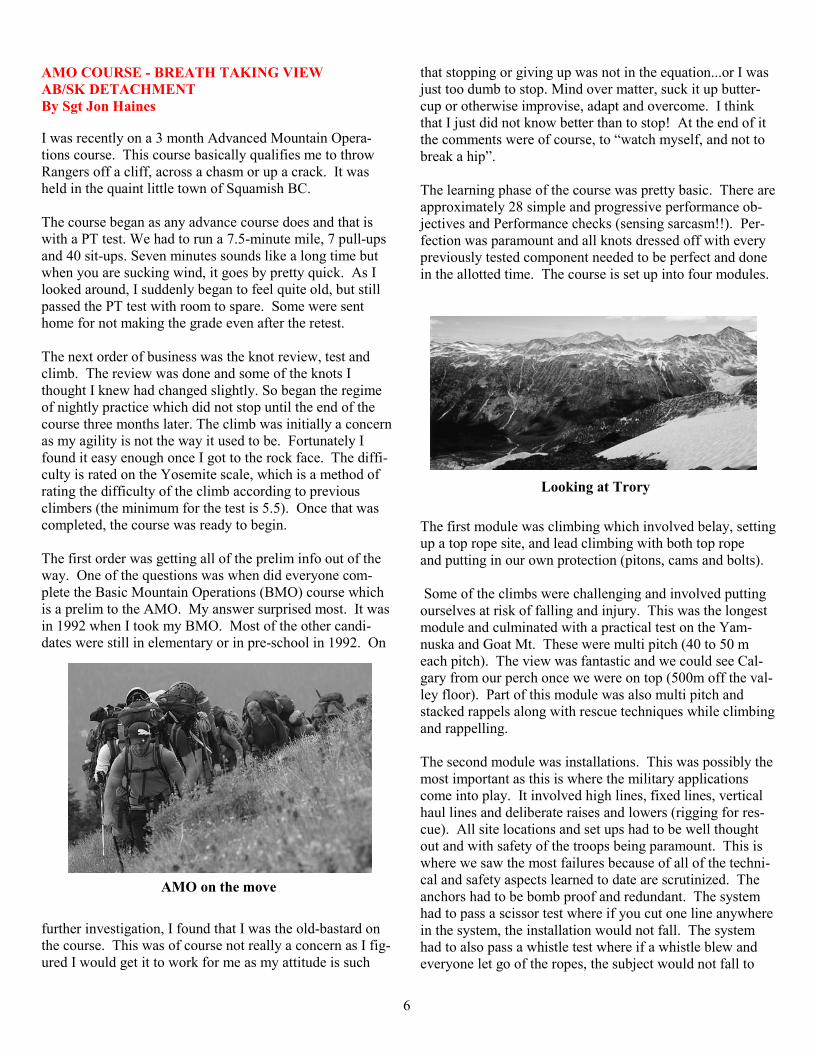
RGR RECEIVES COMMENDATION
AB/SK DETACHMENT
The Commander-In-Chief Unit Commen-dation is awarded to the 1 R22eR Battle Group (BG) (including N Coy, 3 RCR) for having opened the airport in the besieged city of Sarajevo in July 1992. While surrounded and being shot at by bel-ligerents on all sides, the BG steadfastly executed its mission,
securing the Sarajevo airport for humanitarian relief flights and escorting these relief convoys into the city. As a result of their presence, the anti-aircraft weapons, howitzers and tanks stationed around the airport were soon forced to draw back. The superb effort of the BG led directly to the provi-sion of critical aid for the war ravaged citizens of Sarajevo and helped in large measure establish the UN in the eyes of the community as a vital force for world peace and security. Rgr Jim Melsom was deployed in Sarajevo with N Com-pany at the time. He was awarded this insignia from Her Excellency, the Governor General of Canada. Major Byers presented Rgr Melsom with the insignia on Ex River Run III.
Rgr Jim Melsom receiving his
Commendation Insignia
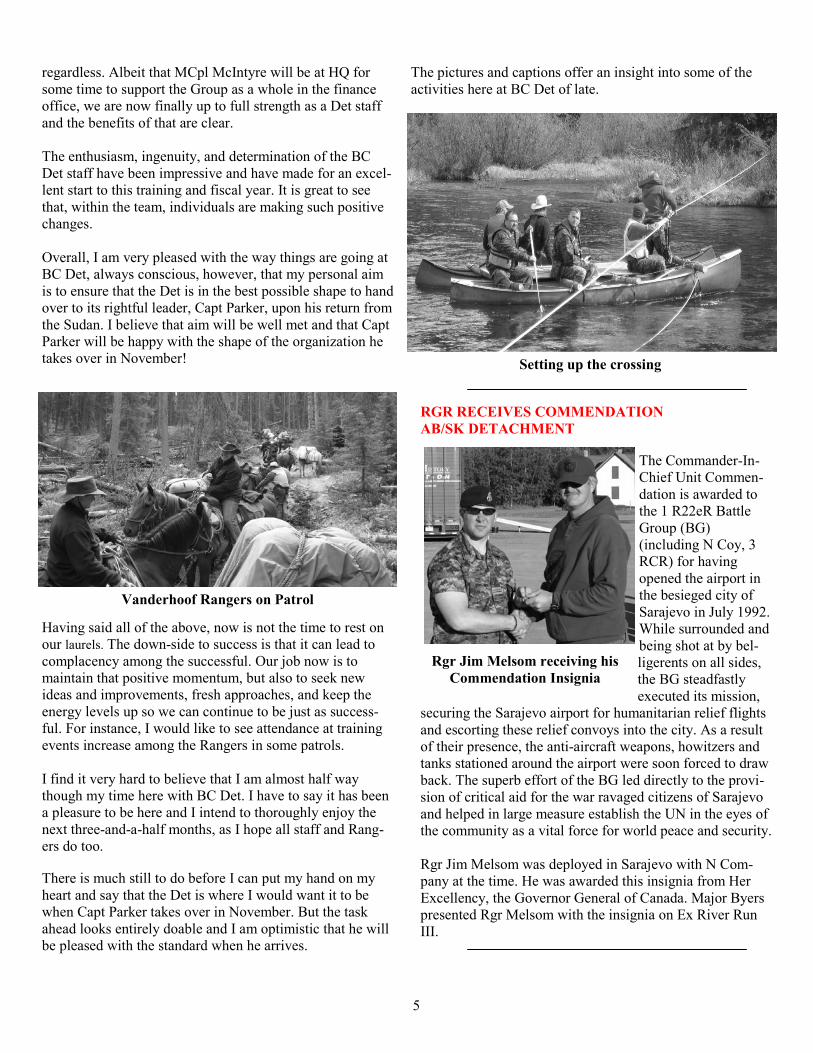
Setting up the crossing
The pictures and captions offer an insight into some of the activities here at BC Det of late.
AMO COURSE - BREATH TAKING VIEW
AB/SK DETACHMENT
By Sgt Jon Haines
I was recently on a 3 month Advanced Mountain Opera-tions course. This course basically qualifies me to throw Rangers off a cliff, across a chasm or up a crack. It was held in the quaint little town of Squamish BC. The course began as any advance course does and that is with a PT test. We had to run a 7.5-minute mile, 7 pull-ups and 40 sit-ups. Seven minutes sounds like a long time but when you are sucking wind, it goes by pretty quick. As I looked around, I suddenly began to feel quite old, but still passed the PT test with room to spare. Some were sent home for not making the grade even after the retest. The next order of business was the knot review, test and climb. The review was done and some of the knots I thought I knew had changed slightly. So began the regime of nightly practice which did not stop until the end of the course three months later. The climb was initially a concern as my agility is not the way it used to be. Fortunately I found it easy enough once I got to the rock face. The diffi-culty is rated on the Yosemite scale, which is a method of rating the difficulty of the climb according to previous climbers (the minimum for the test is 5.5). Once that was completed, the course was ready to begin. The first order was getting all of the prelim info out of the way. One of the questions was when did everyone com-plete the Basic Mountain Operations (BMO) course which is a prelim to the AMO. My answer surprised most. It was in 1992 when I took my BMO. Most of the other candi-dates were still in elementary or in pre-school in 1992. On
further investigation, I found that I was the old-bastard on the course. This was of course not really a concern as I fig-ured I would get it to work for me as my attitude is such
that stopping or giving up was not in the equation...or I was just too dumb to stop. Mind over matter, suck it up butter-cup or otherwise improvise, adapt and overcome. I think that I just did not know better than to stop! At the end of it the comments were of course, to “watch myself, and not to break a hip”. The learning phase of the course was pretty basic. There are approximately 28 simple and progressive performance ob-jectives and Performance checks (sensing sarcasm!!). Per-fection was paramount and all knots dressed off with every previously tested component needed to be perfect and done in the allotted time. The course is set up into four modules.
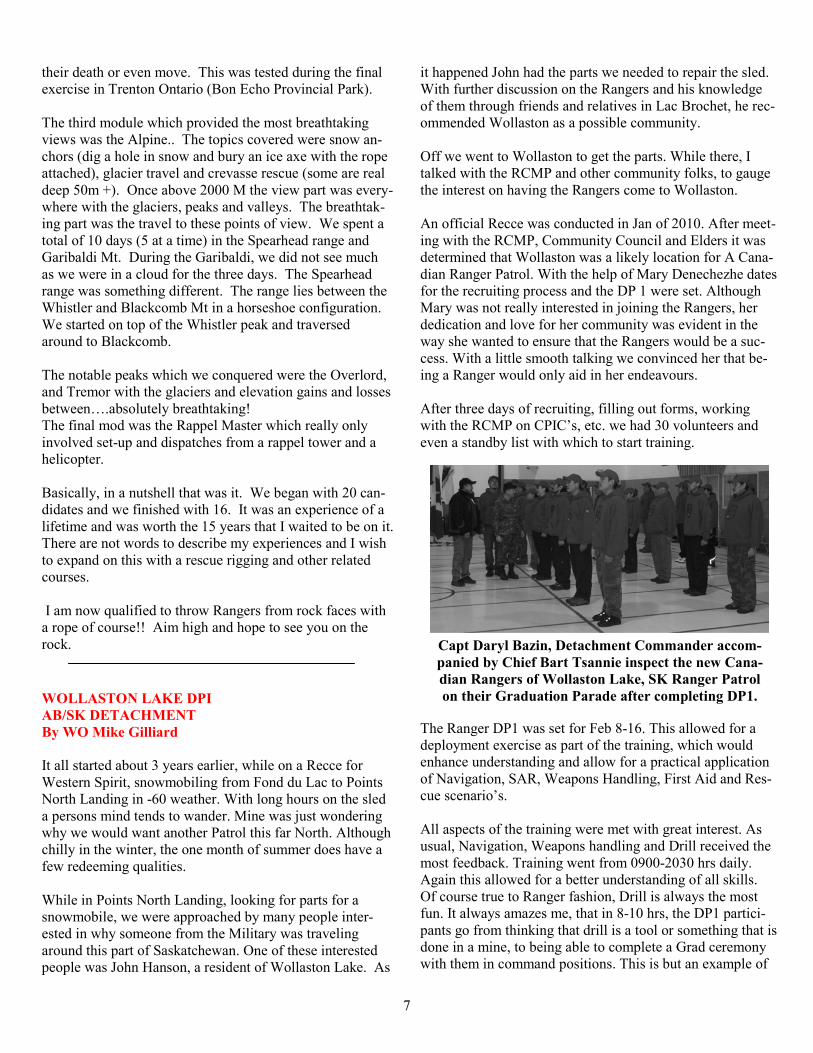
The first module was climbing which involved belay, setting up a top rope site, and lead climbing with both top rope and putting in our own protection (pitons, cams and bolts). Some of the climbs were challenging and involved putting ourselves at risk of falling and injury. This was the longest module and culminated with a practical test on the Yam-nuska and Goat Mt. These were multi pitch (40 to 50 m each pitch). The view was fantastic and we could see Cal-gary from our perch once we were on top (500m off the val-ley floor). Part of this module was also multi pitch and stacked rappels along with rescue techniques while climbing and rappelling. The second module was installations. This was possibly the most important as this is where the military applications come into play. It involved high lines, fixed lines, vertical haul lines and deliberate raises and lowers (rigging for res-cue). All site locations and set ups had to be well thought out and with safety of the troops being paramount. This is where we saw the most failures because of all of the techni-cal and safety aspects learned to date are scrutinized. The anchors had to be bomb proof and redundant. The system had to pass a scissor test where if you cut one line anywhere in the system, the installation would not fall. The system had to also pass a whistle test where if a whistle blew and everyone let go of the ropes, the subject would not fall to
AMO on the move
Looking at Trory
6
WOLLASTON LAKE DPI
AB/SK DETACHMENT
By WO Mike Gilliard
It all started about 3 years earlier, while on a Recce for Western Spirit, snowmobiling from Fond du Lac to Points North Landing in -60 weather. With long hours on the sled a persons mind tends to wander. Mine was just wondering why we would want another Patrol this far North. Although chilly in the winter, the one month of summer does have a few redeeming qualities. While in Points North Landing, looking for parts for a snowmobile, we were approached by many people inter-ested in why someone from the Military was traveling around this part of Saskatchewan. One of these interested people was John Hanson, a resident of Wollaston Lake. As
it happened John had the parts we needed to repair the sled. With further discussion on the Rangers and his knowledge of them through friends and relatives in Lac Brochet, he rec-ommended Wollaston as a possible community. Off we went to Wollaston to get the parts. While there, I talked with the RCMP and other community folks, to gauge the interest on having the Rangers come to Wollaston. An official Recce was conducted in Jan of 2010. After meet-ing with the RCMP, Community Council and Elders it was determined that Wollaston was a likely location for A Cana-dian Ranger Patrol. With the help of Mary Denechezhe dates for the recruiting process and the DP 1 were set. Although Mary was not really interested in joining the Rangers, her dedication and love for her community was evident in the way she wanted to ensure that the Rangers would be a suc-cess. With a little smooth talking we convinced her that be-ing a Ranger would only aid in her endeavours. After three days of recruiting, filling out forms, working with the RCMP on CPIC’s, etc. we had 30 volunteers and even a standby list with which to start training.
The Ranger DP1 was set for Feb 8-16. This allowed for a deployment exercise as part of the training, which would enhance understanding and allow for a practical application of Navigation, SAR, Weapons Handling, First Aid and Res-cue scenario’s. All aspects of the training were met with great interest. As usual, Navigation, Weapons handling and Drill received the most feedback. Training went from 0900-2030 hrs daily. Again this allowed for a better understanding of all skills. Of course true to Ranger fashion, Drill is always the most fun. It always amazes me, that in 8-10 hrs, the DP1 partici-pants go from thinking that drill is a tool or something that is done in a mine, to being able to complete a Grad ceremony with them in command positions. This is but an example of
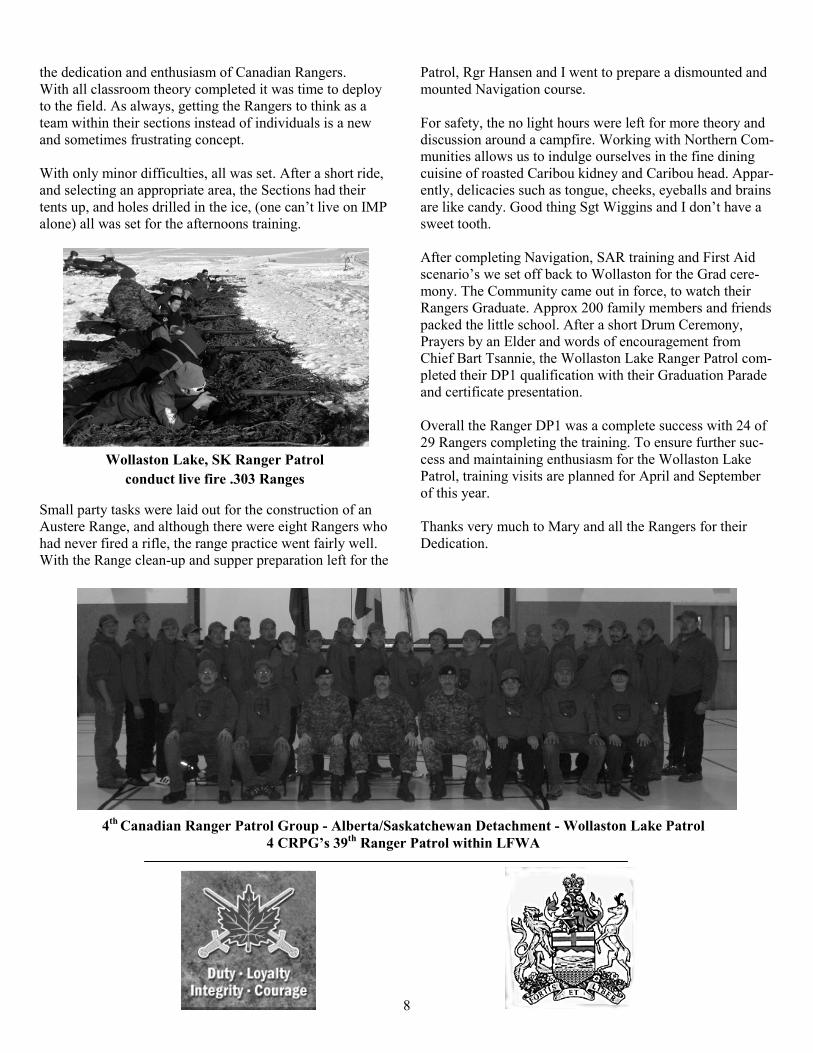
Capt Daryl Bazin, Detachment Commander accom-
panied by Chief Bart Tsannie inspect the new Cana-
dian Rangers of Wollaston Lake, SK Ranger Patrol
on their Graduation Parade after completing DP1.
their death or even move. This was tested during the final exercise in Trenton Ontario (Bon Echo Provincial Park). The third module which provided the most breathtaking views was the Alpine.. The topics covered were snow an-chors (dig a hole in snow and bury an ice axe with the rope attached), glacier travel and crevasse rescue (some are real deep 50m +). Once above 2000 M the view part was every-where with the glaciers, peaks and valleys. The breathtak-ing part was the travel to these points of view. We spent a total of 10 days (5 at a time) in the Spearhead range and Garibaldi Mt. During the Garibaldi, we did not see much as we were in a cloud for the three days. The Spearhead range was something different. The range lies between the Whistler and Blackcomb Mt in a horseshoe configuration. We started on top of the Whistler peak and traversed around to Blackcomb. The notable peaks which we conquered were the Overlord, and Tremor with the glaciers and elevation gains and losses between….absolutely breathtaking! The final mod was the Rappel Master which really only involved set-up and dispatches from a rappel tower and a helicopter. Basically, in a nutshell that was it. We began with 20 can-didates and we finished with 16. It was an experience of a lifetime and was worth the 15 years that I waited to be on it. There are not words to describe my experiences and I wish to expand on this with a rescue rigging and other related courses. I am now qualified to throw Rangers from rock faces with a rope of course!! Aim high and hope to see you on the rock.
7
the dedication and enthusiasm of Canadian Rangers. With all classroom theory completed it was time to deploy to the field. As always, getting the Rangers to think as a team within their sections instead of individuals is a new and sometimes frustrating concept. With only minor difficulties, all was set. After a short ride, and selecting an appropriate area, the Sections had their tents up, and holes drilled in the ice, (one can’t live on IMP alone) all was set for the afternoons training.
Small party tasks were laid out for the construction of an Austere Range, and although there were eight Rangers who had never fired a rifle, the range practice went fairly well. With the Range clean-up and supper preparation left for the
Patrol, Rgr Hansen and I went to prepare a dismounted and mounted Navigation course. For safety, the no light hours were left for more theory and discussion around a campfire. Working with Northern Com-munities allows us to indulge ourselves in the fine dining cuisine of roasted Caribou kidney and Caribou head. Appar-ently, delicacies such as tongue, cheeks, eyeballs and brains are like candy. Good thing Sgt Wiggins and I don’t have a sweet tooth. After completing Navigation, SAR training and First Aid scenario’s we set off back to Wollaston for the Grad cere-mony. The Community came out in force, to watch their Rangers Graduate. Approx 200 family members and friends packed the little school. After a short Drum Ceremony, Prayers by an Elder and words of encouragement from Chief Bart Tsannie, the Wollaston Lake Ranger Patrol com-pleted their DP1 qualification with their Graduation Parade and certificate presentation. Overall the Ranger DP1 was a complete success with 24 of 29 Rangers completing the training. To ensure further suc-cess and maintaining enthusiasm for the Wollaston Lake Patrol, training visits are planned for April and September of this year. Thanks very much to Mary and all the Rangers for their Dedication.
Wollaston Lake, SK Ranger Patrol
conduct live fire .303 Ranges
4th Canadian Ranger Patrol Group - Alberta/Saskatchewan Detachment - Wollaston Lake Patrol
4 CRPG’s 39th Ranger Patrol within LFWA
8
9
EXERCISE RIVER RUN III
AB/SK DETACHMENT
By Spr Benoit When polled, the common consensus from the members of 1 CER who participated in Exercise RIVER RUN III, a joint exercise with members of 4 CRPG, LDSH (RC) and 1 CER was this: the Rangers surprised us. Going into Ex RIVER RUN III most of the engineers expected to be boat-ing down the river with civilians who were totally out of their element. They could not have been more wrong. The Rangers are expert woodsmen and very capable guides. The diversity and depth of their knowledge is impressive to say the least. The Strathcona’s and Engineers were taught a myriad of useful skills such as starting a camp fire without using modern tools like fire starter logs or lighters. They were shown such methods like flint and steel. Even meth-ods like using pieces of wood and a bow to start a fire with friction were explored. The Rangers also taught everyone what type of flora and fauna were edible in a pinch and which would poison a person. A very detailed list of what should and shouldn’t go into an emergency pack for long trips was also explained. Exercise RIVER RUN III was also a great opportunity to practice engineer skills like watermanship and over water navigation. The Rangers were instructed on how to prop-erly assemble and disassemble assault boats. Rangers then guided the rest of the group safely through the waterways of the Peace River. All told the exercise was very educational for all of the par-ties involved. The tireless work of the echelon was also greatly appreciated. Every day when the Troops and
Rangers beached their boats on the banks of the river their tents and campsite was always established and supper was always on the way. In the end Exercise RIVER RUN III was exactly what it was supposed to be: an opportunity for Rangers and Sol-diers to both learn from and be able to work with each other. Every member of the exercise has returned with a changed opinion of the Rangers. They are a very valuable resource that should be utilized more often, as Units look expand both experience and knowledge.
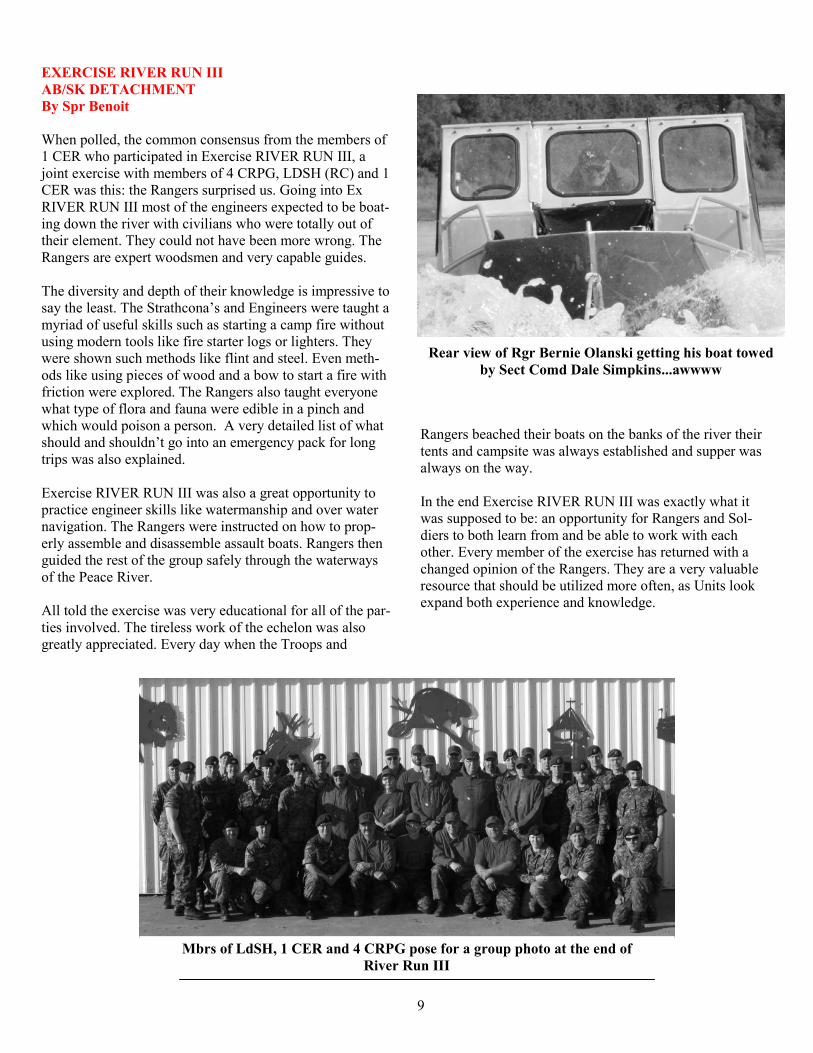
Rear view of Rgr Bernie Olanski getting his boat towed
by Sect Comd Dale Simpkins...awwww
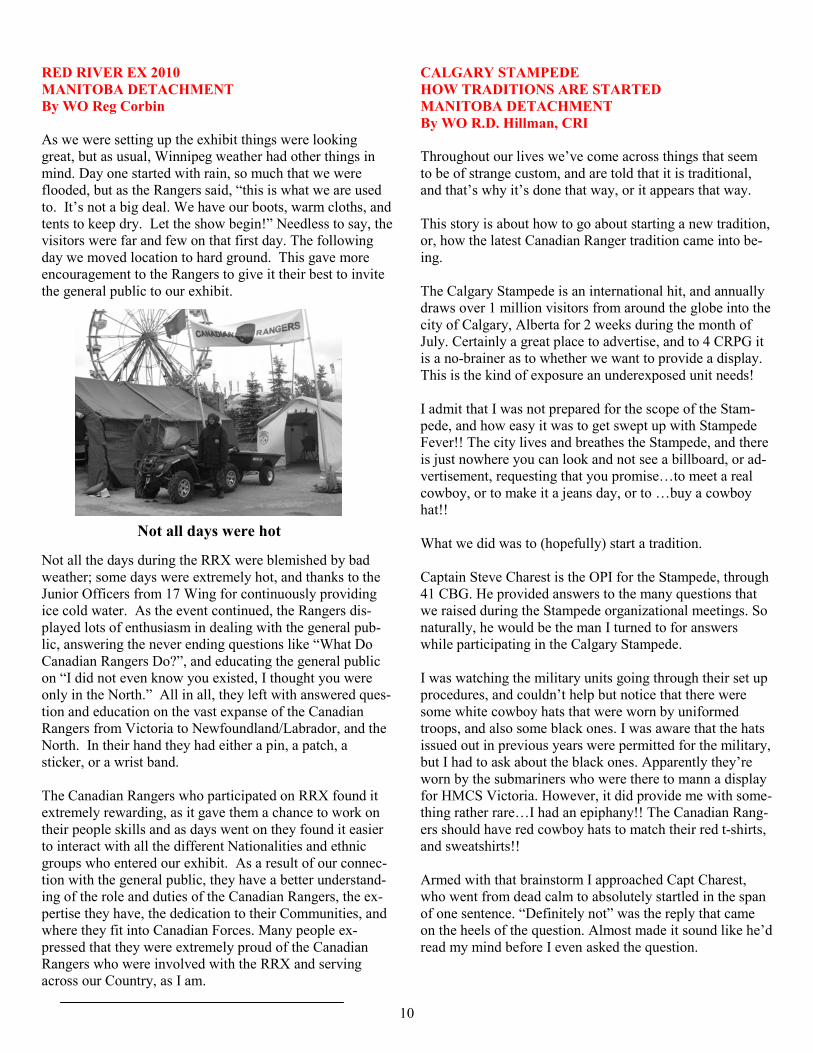
Mbrs of LdSH, 1 CER and 4 CRPG pose for a group photo at the end of
River Run III
RED RIVER EX 2010
MANITOBA DETACHMENT
By WO Reg Corbin
As we were setting up the exhibit things were looking great, but as usual, Winnipeg weather had other things in mind. Day one started with rain, so much that we were flooded, but as the Rangers said, “this is what we are used to. It’s not a big deal. We have our boots, warm cloths, and tents to keep dry. Let the show begin!” Needless to say, the visitors were far and few on that first day. The following day we moved location to hard ground. This gave more encouragement to the Rangers to give it their best to invite the general public to our exhibit.
Not all the days during the RRX were blemished by bad weather; some days were extremely hot, and thanks to the Junior Officers from 17 Wing for continuously providing ice cold water. As the event continued, the Rangers dis-played lots of enthusiasm in dealing with the general pub-lic, answering the never ending questions like “What Do Canadian Rangers Do?”, and educating the general public on “I did not even know you existed, I thought you were only in the North.” All in all, they left with answered ques-tion and education on the vast expanse of the Canadian Rangers from Victoria to Newfoundland/Labrador, and the North. In their hand they had either a pin, a patch, a sticker, or a wrist band. The Canadian Rangers who participated on RRX found it extremely rewarding, as it gave them a chance to work on their people skills and as days went on they found it easier to interact with all the different Nationalities and ethnic groups who entered our exhibit. As a result of our connec-tion with the general public, they have a better understand-ing of the role and duties of the Canadian Rangers, the ex-pertise they have, the dedication to their Communities, and where they fit into Canadian Forces. Many people ex-pressed that they were extremely proud of the Canadian Rangers who were involved with the RRX and serving across our Country, as I am.
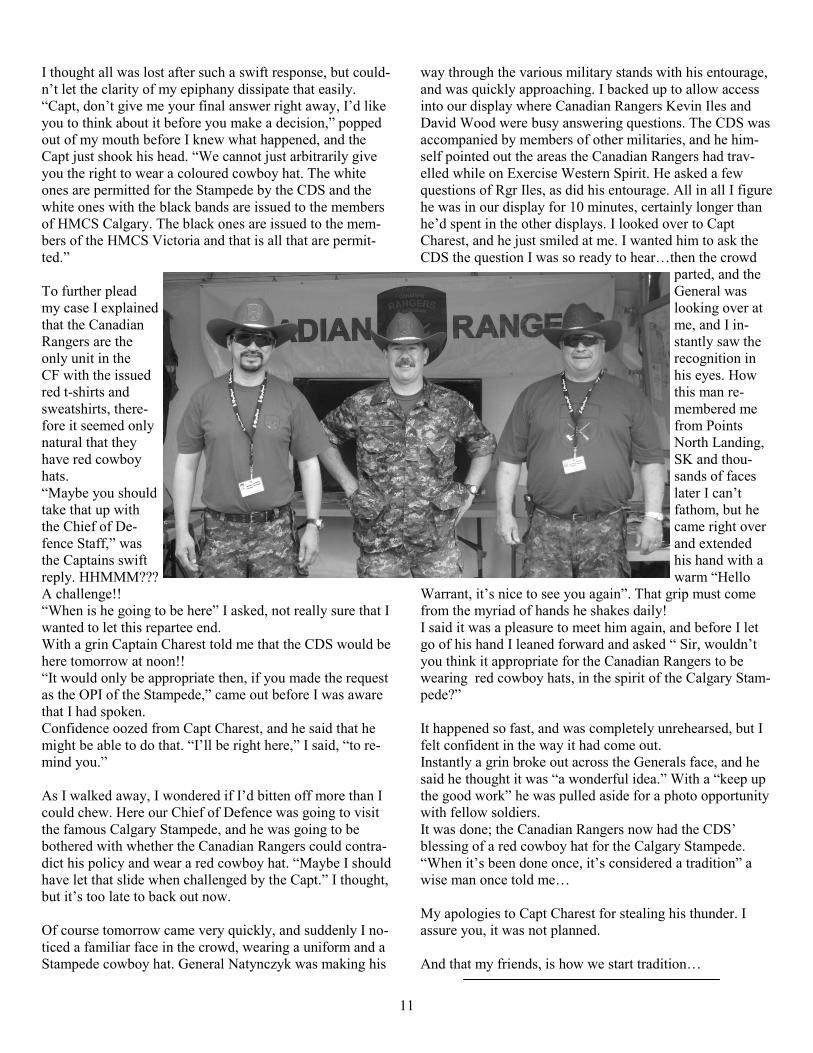
Not all days were hot
CALGARY STAMPEDE
HOW TRADITIONS ARE STARTED
MANITOBA DETACHMENT
By WO R.D. Hillman, CRI
Throughout our lives we’ve come across things that seem to be of strange custom, and are told that it is traditional, and that’s why it’s done that way, or it appears that way. This story is about how to go about starting a new tradition, or, how the latest Canadian Ranger tradition came into be-ing. The Calgary Stampede is an international hit, and annually draws over 1 million visitors from around the globe into the city of Calgary, Alberta for 2 weeks during the month of July. Certainly a great place to advertise, and to 4 CRPG it is a no-brainer as to whether we want to provide a display. This is the kind of exposure an underexposed unit needs! I admit that I was not prepared for the scope of the Stam-pede, and how easy it was to get swept up with Stampede Fever!! The city lives and breathes the Stampede, and there is just nowhere you can look and not see a billboard, or ad-vertisement, requesting that you promise…to meet a real cowboy, or to make it a jeans day, or to …buy a cowboy hat!! What we did was to (hopefully) start a tradition. Captain Steve Charest is the OPI for the Stampede, through 41 CBG. He provided answers to the many questions that we raised during the Stampede organizational meetings. So naturally, he would be the man I turned to for answers while participating in the Calgary Stampede. I was watching the military units going through their set up procedures, and couldn’t help but notice that there were some white cowboy hats that were worn by uniformed troops, and also some black ones. I was aware that the hats issued out in previous years were permitted for the military, but I had to ask about the black ones. Apparently they’re worn by the submariners who were there to mann a display for HMCS Victoria. However, it did provide me with some-thing rather rare…I had an epiphany!! The Canadian Rang-ers should have red cowboy hats to match their red t-shirts, and sweatshirts!! Armed with that brainstorm I approached Capt Charest, who went from dead calm to absolutely startled in the span of one sentence. “Definitely not” was the reply that came on the heels of the question. Almost made it sound like he’d read my mind before I even asked the question.
10
I thought all was lost after such a swift response, but could-n’t let the clarity of my epiphany dissipate that easily. “Capt, don’t give me your final answer right away, I’d like you to think about it before you make a decision,” popped out of my mouth before I knew what happened, and the Capt just shook his head. “We cannot just arbitrarily give you the right to wear a coloured cowboy hat. The white ones are permitted for the Stampede by the CDS and the white ones with the black bands are issued to the members of HMCS Calgary. The black ones are issued to the mem-bers of the HMCS Victoria and that is all that are permit-ted.” To further plead my case I explained that the Canadian Rangers are the only unit in the CF with the issued red t-shirts and sweatshirts, there-fore it seemed only natural that they have red cowboy hats. “Maybe you should take that up with the Chief of De-fence Staff,” was the Captains swift reply. HHMMM??? A challenge!! “When is he going to be here” I asked, not really sure that I wanted to let this repartee end. With a grin Captain Charest told me that the CDS would be here tomorrow at noon!! “It would only be appropriate then, if you made the request as the OPI of the Stampede,” came out before I was aware that I had spoken. Confidence oozed from Capt Charest, and he said that he might be able to do that. “I’ll be right here,” I said, “to re-mind you.” As I walked away, I wondered if I’d bitten off more than I could chew. Here our Chief of Defence was going to visit the famous Calgary Stampede, and he was going to be bothered with whether the Canadian Rangers could contra-dict his policy and wear a red cowboy hat. “Maybe I should have let that slide when challenged by the Capt.” I thought, but it’s too late to back out now. Of course tomorrow came very quickly, and suddenly I no-ticed a familiar face in the crowd, wearing a uniform and a Stampede cowboy hat. General Natynczyk was making his
way through the various military stands with his entourage, and was quickly approaching. I backed up to allow access into our display where Canadian Rangers Kevin Iles and David Wood were busy answering questions. The CDS was accompanied by members of other militaries, and he him-self pointed out the areas the Canadian Rangers had trav-elled while on Exercise Western Spirit. He asked a few questions of Rgr Iles, as did his entourage. All in all I figure he was in our display for 10 minutes, certainly longer than he’d spent in the other displays. I looked over to Capt Charest, and he just smiled at me. I wanted him to ask the CDS the question I was so ready to hear…then the crowd
parted, and the General was looking over at me, and I in-stantly saw the recognition in his eyes. How this man re-membered me from Points North Landing, SK and thou-sands of faces later I can’t fathom, but he came right over and extended his hand with a warm “Hello
Warrant, it’s nice to see you again”. That grip must come from the myriad of hands he shakes daily! I said it was a pleasure to meet him again, and before I let go of his hand I leaned forward and asked “ Sir, wouldn’t you think it appropriate for the Canadian Rangers to be wearing red cowboy hats, in the spirit of the Calgary Stam-pede?” It happened so fast, and was completely unrehearsed, but I felt confident in the way it had come out. Instantly a grin broke out across the Generals face, and he said he thought it was “a wonderful idea.” With a “keep up the good work” he was pulled aside for a photo opportunity with fellow soldiers. It was done; the Canadian Rangers now had the CDS’ blessing of a red cowboy hat for the Calgary Stampede. “When it’s been done once, it’s considered a tradition” a wise man once told me… My apologies to Capt Charest for stealing his thunder. I assure you, it was not planned. And that my friends, is how we start tradition…
11
HOW TO BUILD A KOMATIK
MANITOBA DETACHMENT
By WO Wade Jones
Churchill Ranger Teaches
38 Brigade, Winnipeg Infantry Tactical Group
Komatik (kom-a-tik) a word form the Eastern Canadian Inuktitut Language. A rawhide lashed sledge with wooden crossbars and runners used by the Inuit people. Simply said, but not all the truth these days. The Komatik has been around in one form or another for as long as the Inuit people have inhabited the arctic from the western shores Greenland to Canada’s’ Eastern Arctic. Originally it would have been made of a variety of materials; from whale bone, frozen fish, wood or any other available items. It was then, as it is now the primary means of hauling loads behind either dog teams, snow mobiles or tractors. The Komatik will range in size fro 6’to over 40’in length. Today they are usually 48” wide and 16’ long to accommodate the width of snowmobiles. They can haul a load of seal meat a full size van or 10,000 lbs of propane. With the Winnipeg Infantry Tactical Group (WITG) des-ignated as the Arctic Response Battalion and one exercise under their belt in the Eastern Arctic, (Ex Northern Bison 08, Churchill). It was time to start using the proven equip-ment of the north. “Komatiks would be needed for the next deployment in Feb 10 and we need to be shown how to build them” Said Capt Ray Taylor the Company Comd for Ex Northern Bison 10 deployment. There are no better people to show how to build a Komatik then the Canadian Rangers and the Churchill Patrol. They (Churchill Patrol) were tasked to provide a Ranger well versed in the build-ing and use of the Komatik. Ranger Dixon Hunter volun-teered his skills along with myself WO Wade Jones. Both of us would instruct a section from the WITG during the period 8-9 Dec 09 at Minto Armoires in Winnipeg.
The WITG asked to have two Komatiks built during this
time so a materials list was prepared by PC Camille Hamil-ton about two months in advance to allow the gathering of materials. Here is what you need to build one 16’ Komatik with a rope or solid hitch:
2ea 2”x 10”x 16” - Fir 14ea 2”x 4”x 8” - Fir 3ea ½” G1S plywood - Fir 5lbs 1 ½” deck screws 24ea 4” deck screws 6ea Tubes of construction adhesive(PL200) 1 Roll 5mm sideline 80’ of ½” Rope 36’ of ¾” x 3 ½” (12 ft lengths) UHMWPE (Ultra High Molecular Weight Polyethylene) Runners 2lbs 4” spiral galvanized nails If you want a solid hitch then you will need: 16'x 1" x 1/8" wall round tube 1/4" x 2 1/2" x 4" x 6 plate steel 1/4" x 4" x 2" x 2 plate steel 1/2 x 4" nylon nuts and bolts x 10 Hear are the tools that you will need: 16’ Measuring tape Chalk Line Pencil Skill saw Drill 2ea 8” clamps ¼” punch Router and ¼” mortising bit Extension cord #8 Robertson bits Drill Bits 1"spade bit, ½”" spade bit, ½ “, ¼”, Counter
sink Jigsaw with spare blades Caulking Gun Power Planner or belt sander Welder for solid hitch
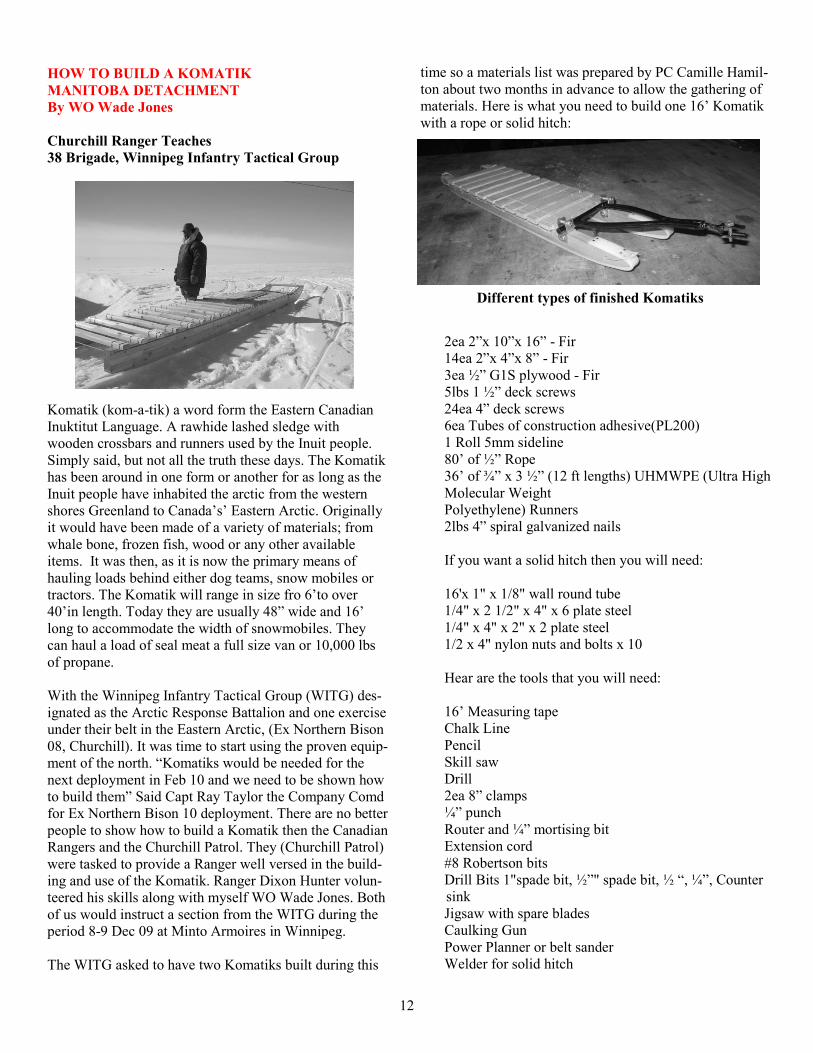
Different types of finished Komatiks
12
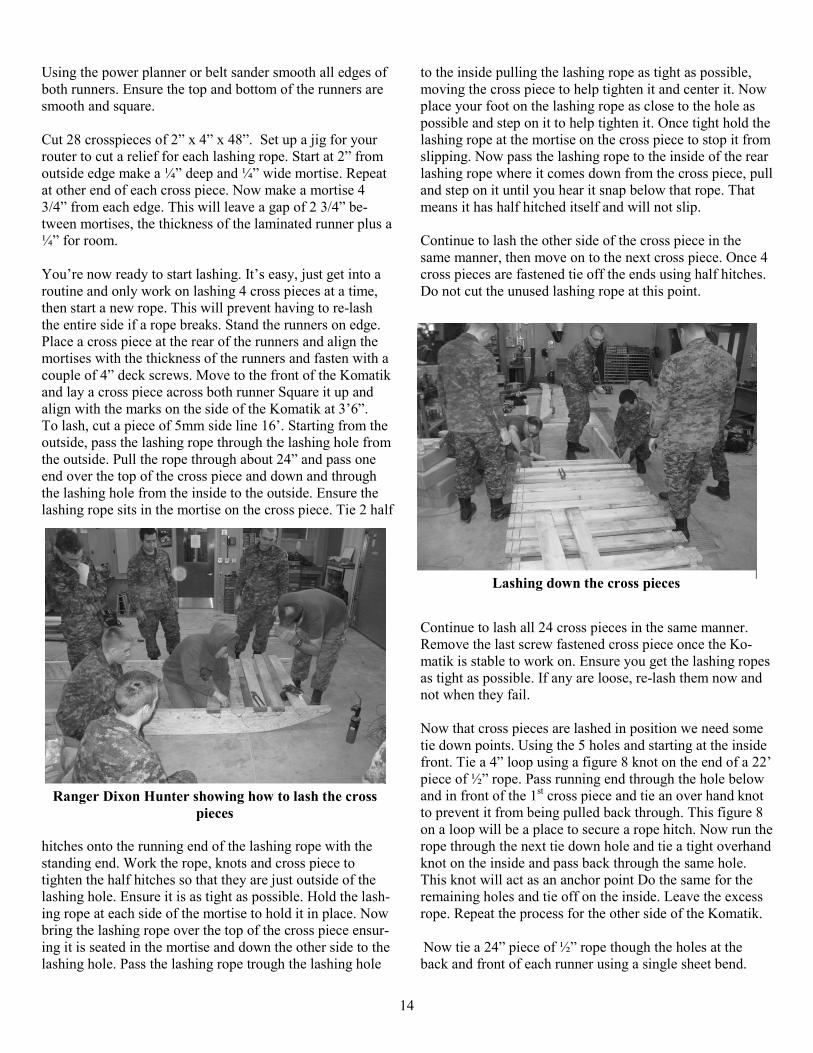
Now to ensure efficiency a few things were completed in advance to help the understanding. First a 1/10 scale model was constructed; a picture is worth a thousand words, and some preliminary construction was done on one half of a Komatik. To put in Ranger Hunters words “lets get at her”. I will try to lay out the steps in a logical sequence; those of you with some carpentry skills can do things your way if you under-stand the plan:
Take one 16’ runner and inspect it for any flaws, always choose the best side down and out. Lay the runner on its side and mark a 3’ line from the front/bottom on one side. Now, lay your Plastic runner on edge so it just touches the edge of the runner at the 3’ mark. Drive a 4” nail behind the plastic runner. Now pull the plastic runner away from the 3’ mark to the rear and place another nail in any place to stop the plastic runner from reaching the edge. Now at the front of the 16’ runner grasp the plastic runner and bend it to the top of the 2” x 10” x 16’, hold and mark the curve. Cut along the curved line and save the cut away piece.
Using 4” deck screws and the cut away piece flip it over and laminate it to the front top side of the runner as to in-crease its height. Mark a 4 ¾”’ radius from a point 4 3/4” from the front edge and cut it out to make a smooth curved front edge back to the laminated joint.
At the rear of the runner make a mark 2’ from the rear on the bottom and a mark 2” from the top at the very rear. Join these two marks with the curve plastic runner as above and cut out.
Trace the runner onto a sheet of ½ fir plywood insuring good side out. It should be done in two pieces for one side and three for the inside to prevent all joints in one location.
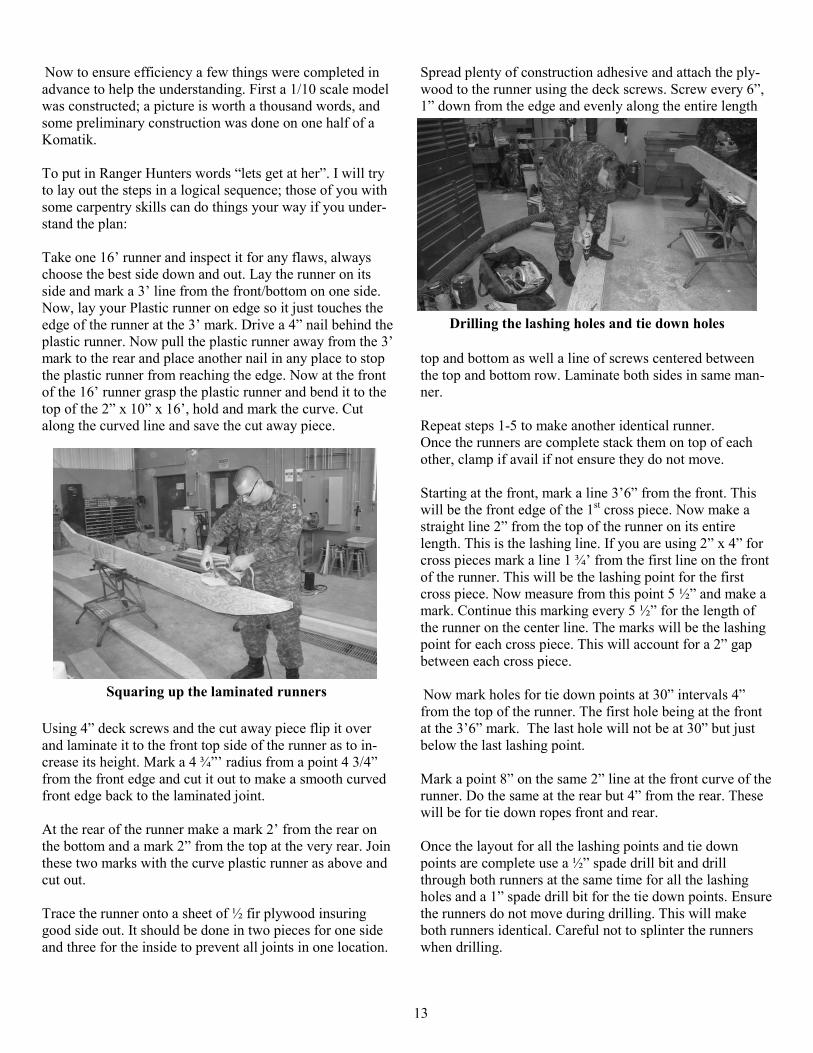
Spread plenty of construction adhesive and attach the ply-wood to the runner using the deck screws. Screw every 6”, 1” down from the edge and evenly along the entire length
top and bottom as well a line of screws centered between the top and bottom row. Laminate both sides in same man-ner. Repeat steps 1-5 to make another identical runner. Once the runners are complete stack them on top of each other, clamp if avail if not ensure they do not move.
Starting at the front, mark a line 3’6” from the front. This will be the front edge of the 1st cross piece. Now make a straight line 2” from the top of the runner on its entire length. This is the lashing line. If you are using 2” x 4” for cross pieces mark a line 1 ¾’ from the first line on the front of the runner. This will be the lashing point for the first cross piece. Now measure from this point 5 ½” and make a mark. Continue this marking every 5 ½” for the length of the runner on the center line. The marks will be the lashing point for each cross piece. This will account for a 2” gap between each cross piece.
Now mark holes for tie down points at 30” intervals 4” from the top of the runner. The first hole being at the front at the 3’6” mark. The last hole will not be at 30” but just below the last lashing point.
Mark a point 8” on the same 2” line at the front curve of the runner. Do the same at the rear but 4” from the rear. These will be for tie down ropes front and rear.
Once the layout for all the lashing points and tie down points are complete use a ½” spade drill bit and drill through both runners at the same time for all the lashing holes and a 1” spade drill bit for the tie down points. Ensure the runners do not move during drilling. This will make both runners identical. Careful not to splinter the runners when drilling.
Drilling the lashing holes and tie down holes
Squaring up the laminated runners
13
Using the power planner or belt sander smooth all edges of both runners. Ensure the top and bottom of the runners are smooth and square.
Cut 28 crosspieces of 2” x 4” x 48”. Set up a jig for your router to cut a relief for each lashing rope. Start at 2” from outside edge make a ¼” deep and ¼” wide mortise. Repeat at other end of each cross piece. Now make a mortise 4 3/4” from each edge. This will leave a gap of 2 3/4” be-tween mortises, the thickness of the laminated runner plus a ¼” for room.
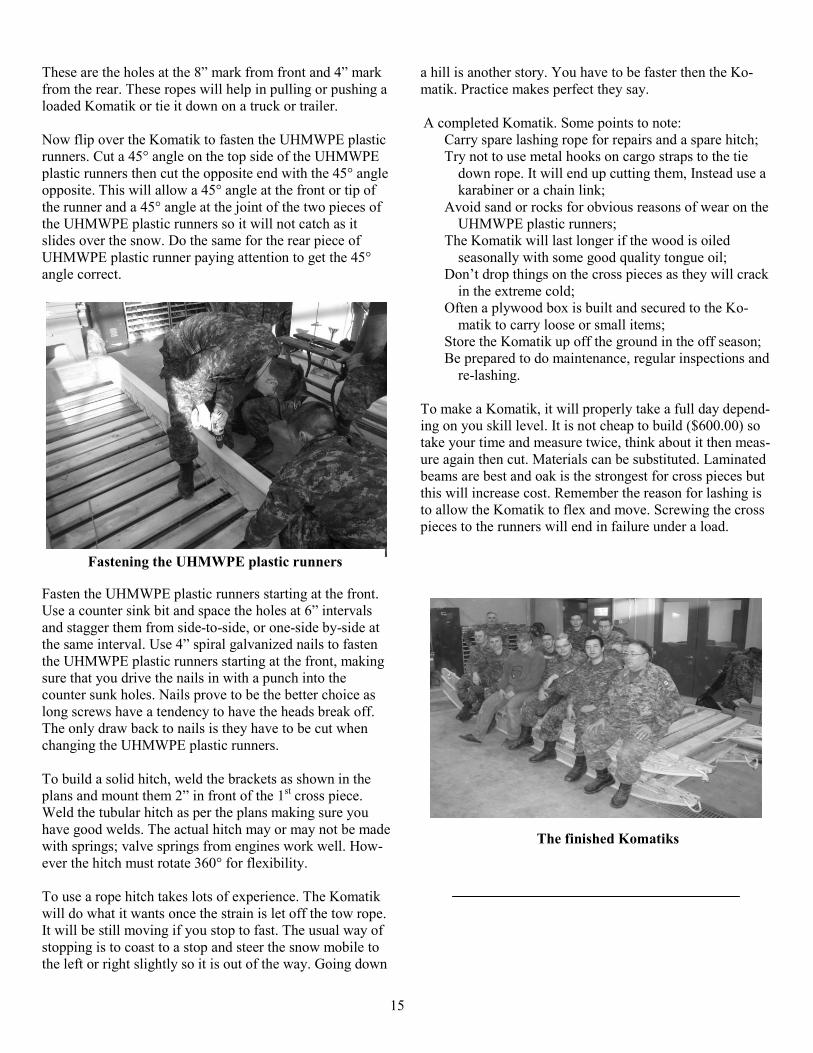
You’re now ready to start lashing. It’s easy, just get into a routine and only work on lashing 4 cross pieces at a time, then start a new rope. This will prevent having to re-lash the entire side if a rope breaks. Stand the runners on edge. Place a cross piece at the rear of the runners and align the mortises with the thickness of the runners and fasten with a couple of 4” deck screws. Move to the front of the Komatik and lay a cross piece across both runner Square it up and align with the marks on the side of the Komatik at 3’6”. To lash, cut a piece of 5mm side line 16’. Starting from the outside, pass the lashing rope through the lashing hole from the outside. Pull the rope through about 24” and pass one end over the top of the cross piece and down and through the lashing hole from the inside to the outside. Ensure the lashing rope sits in the mortise on the cross piece. Tie 2 half
hitches onto the running end of the lashing rope with the standing end. Work the rope, knots and cross piece to tighten the half hitches so that they are just outside of the lashing hole. Ensure it is as tight as possible. Hold the lash-ing rope at each side of the mortise to hold it in place. Now bring the lashing rope over the top of the cross piece ensur-ing it is seated in the mortise and down the other side to the lashing hole. Pass the lashing rope trough the lashing hole
to the inside pulling the lashing rope as tight as possible, moving the cross piece to help tighten it and center it. Now place your foot on the lashing rope as close to the hole as possible and step on it to help tighten it. Once tight hold the lashing rope at the mortise on the cross piece to stop it from slipping. Now pass the lashing rope to the inside of the rear lashing rope where it comes down from the cross piece, pull and step on it until you hear it snap below that rope. That means it has half hitched itself and will not slip.
Continue to lash the other side of the cross piece in the same manner, then move on to the next cross piece. Once 4 cross pieces are fastened tie off the ends using half hitches. Do not cut the unused lashing rope at this point.
Continue to lash all 24 cross pieces in the same manner. Remove the last screw fastened cross piece once the Ko-matik is stable to work on. Ensure you get the lashing ropes as tight as possible. If any are loose, re-lash them now and not when they fail.
Now that cross pieces are lashed in position we need some tie down points. Using the 5 holes and starting at the inside front. Tie a 4” loop using a figure 8 knot on the end of a 22’ piece of ½” rope. Pass running end through the hole below and in front of the 1st cross piece and tie an over hand knot to prevent it from being pulled back through. This figure 8 on a loop will be a place to secure a rope hitch. Now run the rope through the next tie down hole and tie a tight overhand knot on the inside and pass back through the same hole. This knot will act as an anchor point Do the same for the remaining holes and tie off on the inside. Leave the excess rope. Repeat the process for the other side of the Komatik.
Now tie a 24” piece of ½” rope though the holes at the back and front of each runner using a single sheet bend.
Ranger Dixon Hunter showing how to lash the cross
pieces
Lashing down the cross pieces
14
These are the holes at the 8” mark from front and 4” mark from the rear. These ropes will help in pulling or pushing a loaded Komatik or tie it down on a truck or trailer.
Now flip over the Komatik to fasten the UHMWPE plastic runners. Cut a 45° angle on the top side of the UHMWPE plastic runners then cut the opposite end with the 45° angle opposite. This will allow a 45° angle at the front or tip of the runner and a 45° angle at the joint of the two pieces of the UHMWPE plastic runners so it will not catch as it slides over the snow. Do the same for the rear piece of UHMWPE plastic runner paying attention to get the 45° angle correct.
Fasten the UHMWPE plastic runners starting at the front. Use a counter sink bit and space the holes at 6” intervals and stagger them from side-to-side, or one-side by-side at the same interval. Use 4” spiral galvanized nails to fasten the UHMWPE plastic runners starting at the front, making sure that you drive the nails in with a punch into the counter sunk holes. Nails prove to be the better choice as long screws have a tendency to have the heads break off. The only draw back to nails is they have to be cut when changing the UHMWPE plastic runners.
To build a solid hitch, weld the brackets as shown in the plans and mount them 2” in front of the 1st cross piece. Weld the tubular hitch as per the plans making sure you have good welds. The actual hitch may or may not be made with springs; valve springs from engines work well. How-ever the hitch must rotate 360° for flexibility. To use a rope hitch takes lots of experience. The Komatik will do what it wants once the strain is let off the tow rope. It will be still moving if you stop to fast. The usual way of stopping is to coast to a stop and steer the snow mobile to the left or right slightly so it is out of the way. Going down
a hill is another story. You have to be faster then the Ko-matik. Practice makes perfect they say.
A completed Komatik. Some points to note: Carry spare lashing rope for repairs and a spare hitch; Try not to use metal hooks on cargo straps to the tie
down rope. It will end up cutting them, Instead use a karabiner or a chain link; Avoid sand or rocks for obvious reasons of wear on the
UHMWPE plastic runners; The Komatik will last longer if the wood is oiled
seasonally with some good quality tongue oil; Don’t drop things on the cross pieces as they will crack
in the extreme cold; Often a plywood box is built and secured to the Ko-
matik to carry loose or small items; Store the Komatik up off the ground in the off season; Be prepared to do maintenance, regular inspections and
re-lashing. To make a Komatik, it will properly take a full day depend-ing on you skill level. It is not cheap to build ($600.00) so take your time and measure twice, think about it then meas-ure again then cut. Materials can be substituted. Laminated beams are best and oak is the strongest for cross pieces but this will increase cost. Remember the reason for lashing is to allow the Komatik to flex and move. Screwing the cross pieces to the runners will end in failure under a load.
Fastening the UHMWPE plastic runners
The finished Komatiks
15
MARKSMENSHIP
MANITOBA DETACHMENT
By WO Wade Jones
Shooting (marksmanship) is one of those basic Ranger skills that some of us take for granted. Shooting is also one of those skills that will take practise and a basic knowledge of the theory of shooting. Unlike the adage of riding a bicy-cle, you will forget the basics if you don’t make it part of your “Patrol Annual Training Plan”. The revived participa-tion of the Rangers at the annual Canadian Forces Small Arms competition and the great show our team made for 2008 just drives the point home. We have to be good shots. Now in this short article I don’t intent to replace time on the range shooting but review some of the theory and tools that may assist you to becoming a tack driving shot. The .303 Lee Enfield is at no disadvantage when in competition with another service rifles. It is on the contraire. Rangers have competed very well in the past winning individual shoots and team competitions. This was only accomplished by ap-plying the basics and practice. 1. Marksmanship Principals: a. Position and hold. The position and hold must sup-port the rifle, but not be so firm as to cause fatigue;
b. Natural alignment. The body and rifle must be aligned to the target naturally;
c. Aiming. The correct sight picture and use of sights must be consistently the same; and
d. Shot release and follow through. The manipulation of the trigger must be a squeeze and not a jerking motion. Each shot, when released, should be a sur-prise and not anticipated.
2. Rule of Aim: a. Close the disengaged eye; b. Look through the centre of the rear sight aperture at the target and select a point of aim;
c. Keeping the sight upright, align the tip of the front sight on the point of aim; and
d. Ensure the point of aim is in the centre of the rear aperture.
Now, once the basics have been mastered and understood, it is time to allow someone to critique and assist you in your marksmanship. This is called coaching. 3. Aim of Coaching: To inspire confidence and determination and to improve the Ranger’s shooting technique and knowledge to such a degree that he/she has the confidence and determina-tion to use his/her rifle effectively to qualify as a Marks-man in the annual classification shoot.
4. Qualities of a Good Coach: Each Patrol has at least a couple of Rangers who are good shots. Generally speaking these are the ones who can coach others in developing their shooting. They should show: a. All the basic lessons and the principles of marksman-ship;
b. The capabilities of the rifle and ammunition; c. The examination, testing and zeroing of the weapon to be fired;
d. The theory of a group; e. The causes of poor shooting and how to rectify it; and f. The factors that affect the application of fire.
5. Forms of Shooting: a. Grouping; b. Elementary application; and c. Advanced application of fire.
6. What a Coach Must Know to Coach a Successful Group-ing Practice: a. Marksmanship principals; b. Theory of a group; c. How to get the best from the firer; and d. Causes of bad shooting:
(1) Aiming- This can be caused by not seeing the correct aim picture every time, staying in the aim too long, or aiming incorrectly when adjusting forwind. Another major cause of incorrect aiming occurs if the firer varies the position of his head on the butt for each aim, giving a different sight alignment for each shot,
(2) Trigger Operation- The firer may be snatching the trigger,
(3) Body Movement-. The firer's body may move during firing,
(4) Poor Breath Control, (5) Anxiety-
The firer may be gun shy,
Ranger Kevin Burke in the kneeling
position
Ranger Sheldon Olivier shows
how to support your rifle
16
over anxious to do well, or not determined enough, e. Causes outside the firer's control are:
(1) Meteorology- Poor light or severe weather ad-versely affect shooting skills,
(2) Weapon- The weapon may be incorrectly zeroed or poorly maintained, or the butt may be the wrong length,
(3) Individual Ranger- The Ranger may have poor eyesight, bad health or some other ailment which affects shooting ability, and
(4) Improper Coaching or Range Organization. 7. Rules for Zeroing a. To raise MPI …….. put on a shorter front sight; b. To lower MPI ……… put on a taller front sight; c. To move MPI left …….. move the front sight left; d. To move MPI right ……. move the front sight right;
Notes: MPI = mean point of impact of all the rounds fired ESA = expected scoring area
CZP = correct zeroing point + 19 mm at 22.86 m, (¾ inch at 25 yards) this will be 9 cm at 91.44 m,(3 ½ inches at 100 yards) above the POA at both ranges. This will place the MPI at the POA at 182.8 m(200 yards) PV = permissible variance POA = point of aim
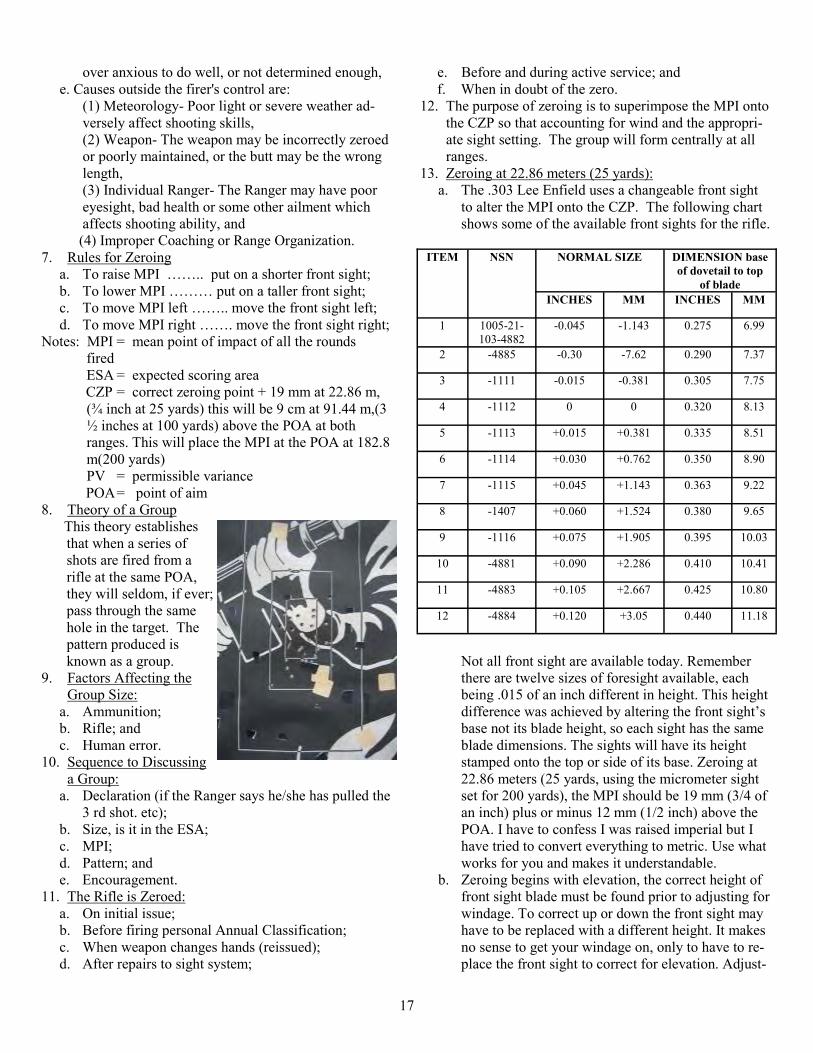
8. Theory of a Group This theory establishes that when a series of shots are fired from a rifle at the same POA, they will seldom, if ever; pass through the same hole in the target. The pattern produced is known as a group.
9. Factors Affecting the Group Size: a. Ammunition; b. Rifle; and c. Human error.
10. Sequence to Discussing a Group: a. Declaration (if the Ranger says he/she has pulled the 3 rd shot. etc);
b. Size, is it in the ESA; c. MPI; d. Pattern; and e. Encouragement.
11. The Rifle is Zeroed: a. On initial issue; b. Before firing personal Annual Classification; c. When weapon changes hands (reissued); d. After repairs to sight system;
e. Before and during active service; and f. When in doubt of the zero.
12. The purpose of zeroing is to superimpose the MPI onto the CZP so that accounting for wind and the appropri-ate sight setting. The group will form centrally at all ranges.
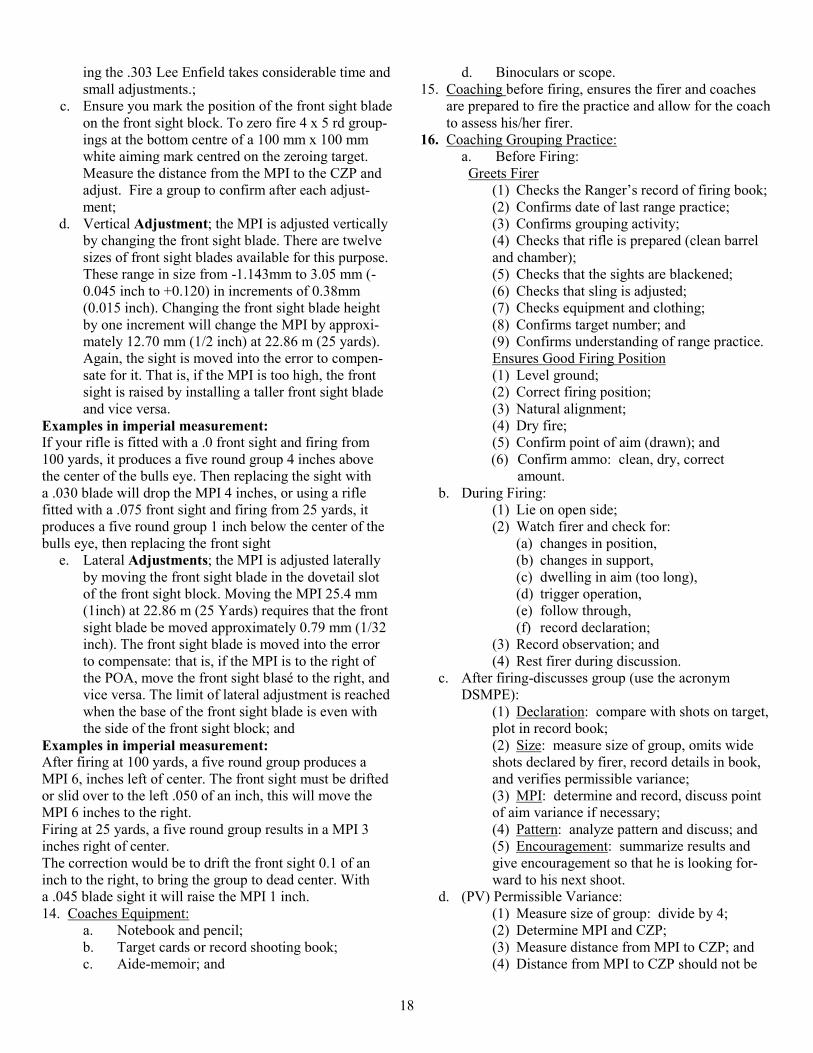
13. Zeroing at 22.86 meters (25 yards): a. The .303 Lee Enfield uses a changeable front sight to alter the MPI onto the CZP. The following chart shows some of the available front sights for the rifle.
Not all front sight are available today. Remember there are twelve sizes of foresight available, each being .015 of an inch different in height. This height difference was achieved by altering the front sight’s base not its blade height, so each sight has the same blade dimensions. The sights will have its height stamped onto the top or side of its base. Zeroing at 22.86 meters (25 yards, using the micrometer sight set for 200 yards), the MPI should be 19 mm (3/4 of an inch) plus or minus 12 mm (1/2 inch) above the POA. I have to confess I was raised imperial but I have tried to convert everything to metric. Use what works for you and makes it understandable.
b. Zeroing begins with elevation, the correct height of front sight blade must be found prior to adjusting for windage. To correct up or down the front sight may have to be replaced with a different height. It makes no sense to get your windage on, only to have to re-place the front sight to correct for elevation. Adjust-
17
ITEM NSN NORMAL SIZE DIMENSION base
of dovetail to top
of blade
INCHES MM INCHES MM
1 1005-21-103-4882
-0.045 -1.143 0.275 6.99
2 -4885 -0.30 -7.62 0.290 7.37
3 -1111 -0.015 -0.381 0.305 7.75
4 -1112 0 0 0.320 8.13
5 -1113 +0.015 +0.381 0.335 8.51
6 -1114 +0.030 +0.762 0.350 8.90
7 -1115 +0.045 +1.143 0.363 9.22
8 -1407 +0.060 +1.524 0.380 9.65
9 -1116 +0.075 +1.905 0.395 10.03
10 -4881 +0.090 +2.286 0.410 10.41
11 -4883 +0.105 +2.667 0.425 10.80
12 -4884 +0.120 +3.05 0.440 11.18
ing the .303 Lee Enfield takes considerable time and small adjustments.;
c. Ensure you mark the position of the front sight blade on the front sight block. To zero fire 4 x 5 rd group-ings at the bottom centre of a 100 mm x 100 mm white aiming mark centred on the zeroing target. Measure the distance from the MPI to the CZP and adjust. Fire a group to confirm after each adjust-ment;
d. Vertical Adjustment; the MPI is adjusted vertically by changing the front sight blade. There are twelve sizes of front sight blades available for this purpose. These range in size from -1.143mm to 3.05 mm (-0.045 inch to +0.120) in increments of 0.38mm (0.015 inch). Changing the front sight blade height by one increment will change the MPI by approxi-mately 12.70 mm (1/2 inch) at 22.86 m (25 yards). Again, the sight is moved into the error to compen-sate for it. That is, if the MPI is too high, the front sight is raised by installing a taller front sight blade and vice versa.
Examples in imperial measurement: If your rifle is fitted with a .0 front sight and firing from 100 yards, it produces a five round group 4 inches above the center of the bulls eye. Then replacing the sight with a .030 blade will drop the MPI 4 inches, or using a rifle fitted with a .075 front sight and firing from 25 yards, it produces a five round group 1 inch below the center of the bulls eye, then replacing the front sight e. Lateral Adjustments; the MPI is adjusted laterally by moving the front sight blade in the dovetail slot of the front sight block. Moving the MPI 25.4 mm (1inch) at 22.86 m (25 Yards) requires that the front sight blade be moved approximately 0.79 mm (1/32 inch). The front sight blade is moved into the error to compensate: that is, if the MPI is to the right of the POA, move the front sight blasé to the right, and vice versa. The limit of lateral adjustment is reached when the base of the front sight blade is even with the side of the front sight block; and
Examples in imperial measurement:
After firing at 100 yards, a five round group produces a MPI 6, inches left of center. The front sight must be drifted or slid over to the left .050 of an inch, this will move the MPI 6 inches to the right. Firing at 25 yards, a five round group results in a MPI 3 inches right of center. The correction would be to drift the front sight 0.1 of an inch to the right, to bring the group to dead center. With a .045 blade sight it will raise the MPI 1 inch. 14. Coaches Equipment: a. Notebook and pencil; b. Target cards or record shooting book; c. Aide-memoir; and
d. Binoculars or scope. 15. Coaching before firing, ensures the firer and coaches are prepared to fire the practice and allow for the coach to assess his/her firer.
16. Coaching Grouping Practice: a. Before Firing:
Greets Firer (1) Checks the Ranger’s record of firing book; (2) Confirms date of last range practice;
(3) Confirms grouping activity; (4) Checks that rifle is prepared (clean barrel and chamber); (5) Checks that the sights are blackened; (6) Checks that sling is adjusted; (7) Checks equipment and clothing; (8) Confirms target number; and (9) Confirms understanding of range practice.
Ensures Good Firing Position (1) Level ground; (2) Correct firing position; (3) Natural alignment; (4) Dry fire; (5) Confirm point of aim (drawn); and (6) Confirm ammo: clean, dry, correct amount.
b. During Firing: (1) Lie on open side; (2) Watch firer and check for: (a) changes in position, (b) changes in support, (c) dwelling in aim (too long), (d) trigger operation, (e) follow through, (f) record declaration;
(3) Record observation; and (4) Rest firer during discussion.
c. After firing-discusses group (use the acronym DSMPE):
(1) Declaration: compare with shots on target, plot in record book; (2) Size: measure size of group, omits wide shots declared by firer, record details in book, and verifies permissible variance; (3) MPI: determine and record, discuss point of aim variance if necessary; (4) Pattern: analyze pattern and discuss; and (5) Encouragement: summarize results and give encouragement so that he is looking for-ward to his next shoot.
d. (PV) Permissible Variance: (1) Measure size of group: divide by 4; (2) Determine MPI and CZP; (3) Measure distance from MPI to CZP; and (4) Distance from MPI to CZP should not be
18
greater than size of group divided by 4 for cor-rect PV.
17. Coaches Elementary Application of Fire a. Before Firing
(1) Determine grouping capacity; (2) Convert to ESA; (3) Draw in book (ESA); (4) Confirm Ranger understands practice; (5) Confirm target number; (6) Discuss wind; (7) Confirm point of aim; (8) Draw in book (POA); and (9) Check sights.
b. During firing: (1) Lie on Ranger’s open side; (2) Watch Ranger for each shot; (3) Correct faults as they occur; (4) Use bino’s to check strike indication; (5) Record value and shot in book; (6) Watch formation of group relative to ESA; and (7) Correctly advise Ranger in changes to point of aim.
c. After firing: (1) Total score and info Ranger of progress; and (2) Relate results to grouping capacity.
18. Factors affecting the application of fire: a. Wind; b. Light; c. Attachments to weapon (shooting sling); d. Zeroing; e. Position support; f. Oily or wet ammo or chamber; and g. Body position.
19. Analysis of a Pattern a. Wide Group:
(1) Lack of determination; (2) Variation in aiming and holding; and (3) Sling not adjusted correctly.
b. Split Group: (1) Changing firing position during the group; (2) Failing to centralize aperture for each shot; (3) Failure to focus foresight for each shot; and (4) Inconsistent use of sling.
c. Vertical Pattern: (1) Poor aiming; (2) Incorrect breathing; (3) Not focusing the foresight onto the point of aim; (4) Not following through; and (5) Changing eye relief.
d. Diagonal Group: (1) Head not upright;
(2) Flinching; (3) Trigger snatching; (4) Not following through; and (5) Inconsistent hold of trigger hand.
e. Group Forming Up & Left of POA: (1) Right shoulder not in firm contact with butt; (2) Butt slipping out of shoulder; (3) Not following through; (4) Trigger snatching; and (5) Incorrect use of sight.
f. Tight Group: (1) The sights can now be adjusted to the CZP after the correct number of groups fired (i.e. 4x5 rd groups)
20. Advanced Application of Fire a. Before firing:
(1) Determine grouping capacity; (2) Convert to ESA; (3) Discuss with firer; (4) Confirm practice; (5) Confirm target number; (6) Discuss wind; (7) Discuss point of aim (drawn); and (8) Discuss order for shoot (go left, right etc.)
b. During Firing: (1) Position behind firer in line with weapon; (2) Spot the shot on strike or swirl; (3) Call corrections outside of ESA; and Watch timings.
c. After firing: (1) Summarize shoot; and (2) Record in book.
There is nothing that demonstrates a Rangers marksmanship abil-ity better then the crossed rifles and crown on their sleeve. Prac-tice and shoot the annual classification. You will surprise your-self.
19
Ranger - Jason Sahulka was very modest but credit has
to be given were it is due. He shot a 241 out of 260 HPS
for the annual classification in -28°C. His explanation:
PRACTICE

GPS WAAS
MANITOBA DETACHMENT
By WO Wade Jones
How to better our GPS accuracy! Well I can only make the assumption that all of 4CRPG, as we have accepted it in Manitoba, that GPS is a very important tool in accurate navigation, particularly on the open barrens or large lakes with little or no geographical features for reference. Used along side the map and compass it gives you the ability to accurately plot and record much of your navigational needs. What if I were to say the GPS could be even more accurate! You've heard the term WAAS, seen it on the packaging of your Garmin GPS and in ads for Garmin products in maga-zines, and maybe even know it stands for Wide Area Aug-mentation System (WAAS). Okay, so what the heck is it? Basically, it's a system of satellites and ground stations that provide GPS signal corrections, giving you even better po-sition accuracy. How much better? Try an average of up to five times better. A WAAS-capable receiver (our Garmin 72, 76 and 60 series GPS are) can give you a position accu-racy of better than 3 meters 95 % of the time¹. Three me-ters, you can’t plot a grid that accurately even with a sharp pencil. The best I have seen it is 1.2 meters as you can see in Figure 14. I got 2 meters outside the office when I wrote this article and uploaded the screen (s) shot pictures from the GPS. Best of all we don't have to purchase additional receiving equipment or pay service fees to utilize WAAS. It’s FREE. The origins of WAAS The Federal Aviation Administration (FAA) [US] and the Department of Transportation (DOT) [US] have and are continuing to develop the WAAS program for use in precision flight approaches. Currently, GPS alone does not meet all the FAA’s naviga-tion requirements for accuracy, integ-rity, and availability in either the US or Canada 4. So as with all technology and the additions of WAAS capability to civilian GPS, ac-curacy will greatly improve with time 4. What does WAAS do? WAAS corrects for GPS signal errors caused by iono-spheric disturbances, timing, and satellite orbit errors (drift), and it provides vital integrity information regarding the health of each GPS satellite ¹. Don’t confuse WAAS with Selective Availability (SA), which was the US Depart-ment of Defences’ intentional error placed in the satellite signal to reduce accuracy. It does not correct this. It was
announced May 1, 2000, by the US that SA was removed and in 2006 it was announced the US no longer will pro-duce satellites with the SA ability ². I leave it to you to draw your own conclusion if the US Military removed SA as it is widely debated. WAAS is completely different. WAAS corrects naturally, (for a lack of a better term), attributed errors. How it Works WAAS uses a network of ground-based reference stations, located in North America and Hawaii, to measure small variations in the GPS satellites' signals in the Western Hemisphere. Measurements from the reference stations are routed to master stations, located on either coast, which generate and send the correction messages to one of two geostationary WAAS satellites (GEO-SV) with a fixed po-sition over the equator. Those satellites broadcast the cor-rection messages back to Earth, where [our] WAAS-enabled GPS receiver uses the corrections while computing its position to greatly improve accuracy 3. Who benefits from WAAS? Currently, the WAAS specification 4 requires it to provide a position accuracy of 7.6 meters or better (for both lateral and vertical measurements), at least 95% of the time. Ac-tual performance measurements of system at specific loca-tions have shown it typically provides better than 1.0 me-ters laterally and 1.5 meters vertically throughout most of the US and large parts of Canada. WAAS satellite cover-age is only available in North America 4.
There are no ground reference stations in South America, so even though GPS us-ers there can receive WAAS, the signal has not been corrected and thus would not improve the accuracy of their unit. For some users in Canada and the U.S., the position of the satellites over the equator makes it difficult to receive the signals when trees or mountains obstruct the view of the horizon 3. So one can only assume the further north you get the more difficult it will be to receive the signal.
Even though there are ground stations in Iqaluit, Winnipeg, Goose Bay and Gander. I have found that WAAS reception strength is excellent in just about all of Manitoba as long as you keep in mind WAAS signal reception is ideal for open land and marine applications. WAAS provides extended coverage both inland and offshore compared to the land-based DGPS (Differential GPS) system. Another benefit of WAAS is that it does not require additional receiving equipment, while DGPS does.
20
Figure 1
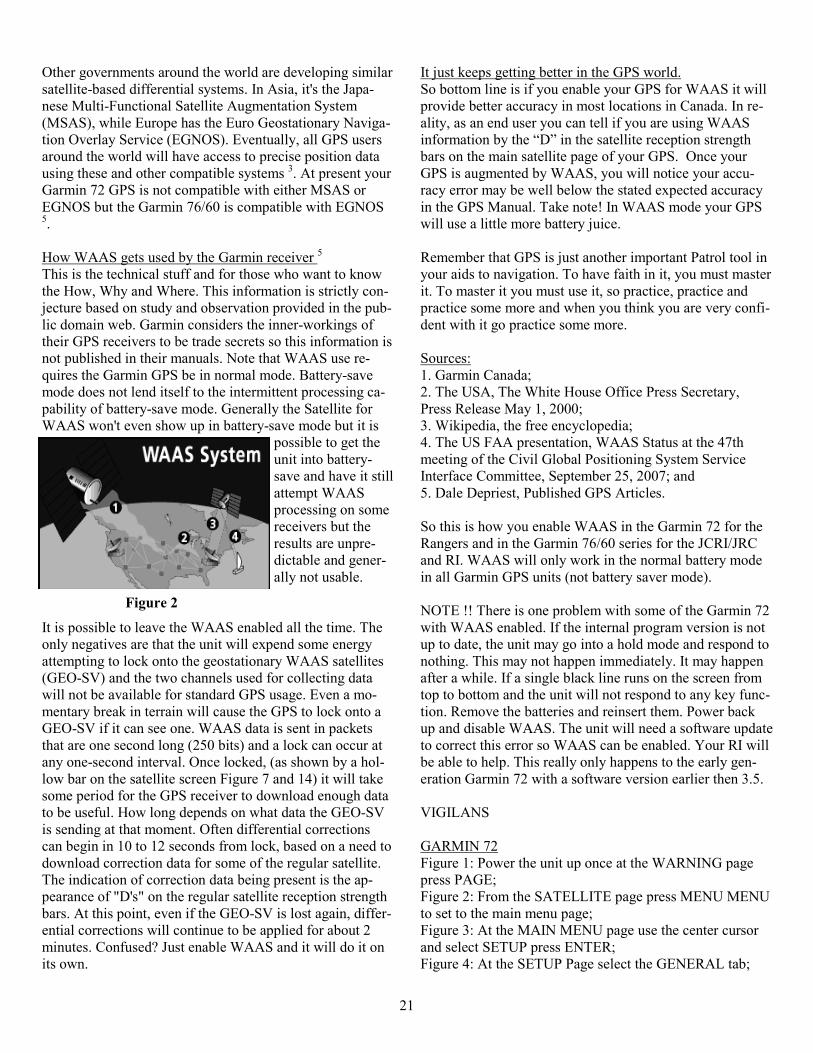
Other governments around the world are developing similar satellite-based differential systems. In Asia, it's the Japa-nese Multi-Functional Satellite Augmentation System (MSAS), while Europe has the Euro Geostationary Naviga-tion Overlay Service (EGNOS). Eventually, all GPS users around the world will have access to precise position data using these and other compatible systems 3. At present your Garmin 72 GPS is not compatible with either MSAS or EGNOS but the Garmin 76/60 is compatible with EGNOS 5. How WAAS gets used by the Garmin receiver 5
This is the technical stuff and for those who want to know the How, Why and Where. This information is strictly con-jecture based on study and observation provided in the pub-lic domain web. Garmin considers the inner-workings of their GPS receivers to be trade secrets so this information is not published in their manuals. Note that WAAS use re-quires the Garmin GPS be in normal mode. Battery-save mode does not lend itself to the intermittent processing ca-pability of battery-save mode. Generally the Satellite for WAAS won't even show up in battery-save mode but it is
possible to get the unit into battery-save and have it still attempt WAAS processing on some receivers but the results are unpre-dictable and gener-ally not usable.
It is possible to leave the WAAS enabled all the time. The only negatives are that the unit will expend some energy attempting to lock onto the geostationary WAAS satellites (GEO-SV) and the two channels used for collecting data will not be available for standard GPS usage. Even a mo-mentary break in terrain will cause the GPS to lock onto a GEO-SV if it can see one. WAAS data is sent in packets that are one second long (250 bits) and a lock can occur at any one-second interval. Once locked, (as shown by a hol-low bar on the satellite screen Figure 7 and 14) it will take some period for the GPS receiver to download enough data to be useful. How long depends on what data the GEO-SV is sending at that moment. Often differential corrections can begin in 10 to 12 seconds from lock, based on a need to download correction data for some of the regular satellite. The indication of correction data being present is the ap-pearance of "D's" on the regular satellite reception strength bars. At this point, even if the GEO-SV is lost again, differ-ential corrections will continue to be applied for about 2 minutes. Confused? Just enable WAAS and it will do it on its own.
It just keeps getting better in the GPS world. So bottom line is if you enable your GPS for WAAS it will provide better accuracy in most locations in Canada. In re-ality, as an end user you can tell if you are using WAAS information by the “D” in the satellite reception strength bars on the main satellite page of your GPS. Once your GPS is augmented by WAAS, you will notice your accu-racy error may be well below the stated expected accuracy in the GPS Manual. Take note! In WAAS mode your GPS will use a little more battery juice. Remember that GPS is just another important Patrol tool in your aids to navigation. To have faith in it, you must master it. To master it you must use it, so practice, practice and practice some more and when you think you are very confi-dent with it go practice some more. Sources: 1. Garmin Canada; 2. The USA, The White House Office Press Secretary, Press Release May 1, 2000; 3. Wikipedia, the free encyclopedia; 4. The US FAA presentation, WAAS Status at the 47th meeting of the Civil Global Positioning System Service Interface Committee, September 25, 2007; and 5. Dale Depriest, Published GPS Articles. So this is how you enable WAAS in the Garmin 72 for the Rangers and in the Garmin 76/60 series for the JCRI/JRC and RI. WAAS will only work in the normal battery mode in all Garmin GPS units (not battery saver mode). NOTE !! There is one problem with some of the Garmin 72 with WAAS enabled. If the internal program version is not up to date, the unit may go into a hold mode and respond to nothing. This may not happen immediately. It may happen after a while. If a single black line runs on the screen from top to bottom and the unit will not respond to any key func-tion. Remove the batteries and reinsert them. Power back up and disable WAAS. The unit will need a software update to correct this error so WAAS can be enabled. Your RI will be able to help. This really only happens to the early gen-eration Garmin 72 with a software version earlier then 3.5. VIGILANS GARMIN 72 Figure 1: Power the unit up once at the WARNING page press PAGE; Figure 2: From the SATELLITE page press MENU MENU to set to the main menu page; Figure 3: At the MAIN MENU page use the center cursor and select SETUP press ENTER; Figure 4: At the SETUP Page select the GENERAL tab;
21
Figure 2
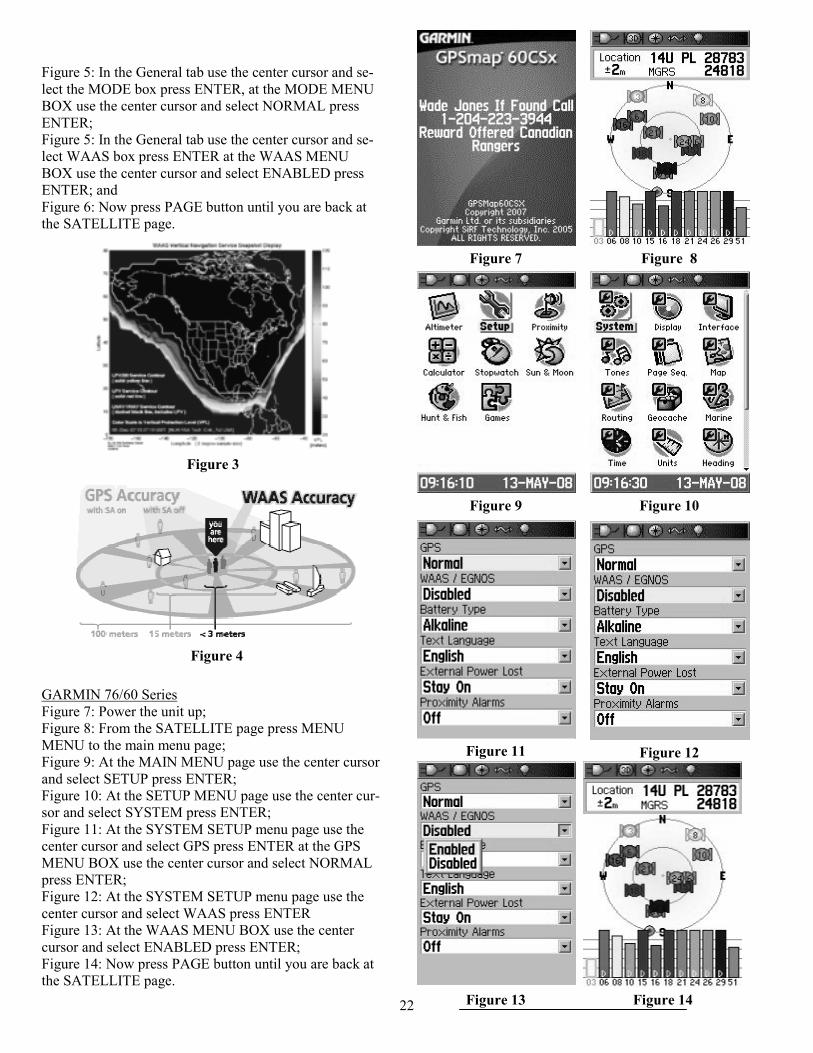
Figure 5: In the General tab use the center cursor and se-lect the MODE box press ENTER, at the MODE MENU BOX use the center cursor and select NORMAL press ENTER; Figure 5: In the General tab use the center cursor and se-lect WAAS box press ENTER at the WAAS MENU BOX use the center cursor and select ENABLED press ENTER; and Figure 6: Now press PAGE button until you are back at the SATELLITE page.
GARMIN 76/60 Series Figure 7: Power the unit up; Figure 8: From the SATELLITE page press MENU MENU to the main menu page; Figure 9: At the MAIN MENU page use the center cursor and select SETUP press ENTER; Figure 10: At the SETUP MENU page use the center cur-sor and select SYSTEM press ENTER; Figure 11: At the SYSTEM SETUP menu page use the center cursor and select GPS press ENTER at the GPS MENU BOX use the center cursor and select NORMAL press ENTER; Figure 12: At the SYSTEM SETUP menu page use the center cursor and select WAAS press ENTER Figure 13: At the WAAS MENU BOX use the center cursor and select ENABLED press ENTER; Figure 14: Now press PAGE button until you are back at the SATELLITE page.
Figure 3
Figure 4
Figure 7 Figure 8
Figure 9 Figure 10
Figure 11 Figure 12
Figure 13 Figure 14 22

23
BUSH TIP
NAVIGATION WITHOUT MAP OR COMPASS
By WO McNicol
General
Navigation alone can be challenging with the correct tools but not having the necessary tools can make matters worse when lost or misplaced in the bush. Below are some proven methods that can assist you should you venture out without the proper tools. A. Shadow Stick Method -Roughly speaking, in the northern hemisphere the sun rises in the east and sets in the west. Based on this fact it is possible to deter-mine direction using the shadow cast by the sun.
1. Place a one meter (3 foot) stick upright on a flat piece of ground.
2. Mark the ground where the shadow of the tip of the stick hits.
3. Wait 15 minutes and mark the new shadow tip.
4. Draw a straight line connecting the two points. This line denotes the east - west axis of the compass.
5. Draw a straight line through the first line at a right angle (90 degrees) to form the north - south axis.
B. Watch Method - A traditional analog watch with two hands can tell direction, provided it is set to true local time, disregarding daylight saving time and standard time zones (i.e. when the sun is at its highest point in the sky it is 12:00 noon).
In the northern hemisphere you will:
1. Be sure watch is set to true local time.
2. Point the hour hand at the sun.
3. Draw a line that bisects the angle between the hour hand and the 12 mark. This line will be the north - south axis.
4. Draw a line through the first line at a right angle to form the east west axis.
C. An Improvised Compass - A piece of ferrous metal wire (such as a sewing needle) that is stroked repeat-
edly in one direction with a piece of silk (or better still a magnet) will become magnetized. If it is then sus-pended by a string (or let float on a piece of paper or bark on still water) it will point to magnetic north.
D. Plant Indicators- If all else fails, plants can give you and indication of north - and south. They tend to grow towards the sun, so flowers and most abundant growth will be to the south (in the northern hemisphere). Moss on tree trunks will be greener and more profuse on the south side. When looking at the trunk of a tree that has been felled, the pattern of the growth rings will be more widely spaced on the south side of the tree.
24


![LDSA AUGUST NEWSLETTER · 2 days ago · LDSA AUGUST NEWSLETTER Dear Member Welcome to the Liverpool Disabled Supporters Association August newsletter. [Test] LDSA August Newsletter](https://img.pdfslide.us/doc/110x75/5f7c84340ec672518d1142a2/ldsa-august-newsletter-2-days-ago-ldsa-august-newsletter-dear-member-welcome-to.jpg)