Embed Size (px)
Citation preview

7
THE POWER OF LAYERMASKING
Some men have commitment problems—or so thecliché goes. Well, I’ve met quite a few Photoshop
users with deep-rooted commitment problems, and yes,I count myself among them. We fear the commitmentof making an irrevocable image-editing decision thatwe’ll regret in the morning. In fact, if it wasn’t for oneessential feature in Photoshop—layer masks—I wouldbe a nail-biting, sleep-deprived wreck.
Layer masks allow the commitment-wary and -wearythe opportunity to try various approaches to theirimages without losing the flexibility to change theirminds. In this chapter, you’ll be introduced to the per-fect partnership—layers and layer masks—and howthey work hand in hand (or should I say pixel inpixel?). This chapter addresses
• How to work with painted, gradated, and selec-tive layer masks
• When to use pixel or vector layer masks
• Why layer masks are powerful, flexible, andcreative
• How to combine multiple image exposures
If I had to decide between giving up coffee or layermasks, I wouldn’t think twice. I hear that tea has caf-feine, too. So brew a cup of your favorite beverage andlet’s explore one of the most exciting and essential fea-tures of Photoshop.

WORKING WITH LAYER MASKSLayer masks are the soul of Photoshop—the key tocombining images in a completely nondestructivemanner. They enable you to move, hide, blend,conceal, and experiment with image combinationsto your heart’s content—all without ever losing asingle pixel.
Each layer can support a pixel and a vector layermask. Pixel-based masks are used for blending pho-tographs together, to gradually have images or toneand color changes fade in and out, and whereverpainted or soft edge quality is desired. Vector-basedmasks are employed when Bézier accuracy andcrispness is required. Both types are very useful, butthe pixel-based mask is the true workhorse of thecompositing artist.
Background and type layers do not support layermasks. Adjustment Layers automatically come witha layer mask. To add a layer mask to an image layer,either click on the Mask button in the Layerspalette to add a white layer mask, or (Option-click)[Alt-click] to add a black layer mask. You can alsochoose Layer > Add Layer Mask > Reveal All toadd a white layer mask, or Layer > Add Layer Mask> Hide All to add a black layer mask.
Just like Channel masks, pixel layer masks can beblack or white with all shades of gray in between.Wherever the mask is darker, less image effect willshow through; wherever it is lighter, more imageeffect shows through. In a nutshell, black concealsand white reveals—meaning that if you want partof an image to show through, then the correspon-ding mask must be light. If you don’t want an imagearea to be visible, the mask must be black.
T i p
Use the masking mnemonic, “White Reveals andBlack Conceals” when working with layer masks.
Painted Layer MasksWhen layers were introduced with Photoshop 3.0,I was having a problem adopting the new layered,dimensional approach to combining images. Tounderstand how layers and layer masks worked, onenight I opened two images that I liked (figure 7.1),literally plopped one on top of the other by drag-ging the Pegasus image over to the tree image,added a layer mask to the top one, and then startedpainting. If you, too, have struggled to grasp theconcept of combining images using layer masks, fol-lowing the same steps I did may help:
ch7_wintertrees.jpg
ch7_pegasus.jpg
208 Photoshop Masking & Compositing
figure 7.1The two source images.
1. Open both images and decide which one willserve as the image background. I chose thewinter tree branches image as the background,and the Pegasus image as the foregroundsubject.
2. Use the Move tool to drag the Pegasus over tothe winter tree branches image and name thelayer Pegasus.

3. Click on the Layer Mask button. Notice thatnothing has changed in your image and thatPhotoshop has added a white layer mask tothe Pegasus layer (figure 7.2).
4. Paint with a soft, black brush over those areasof the Pegasus layer that you do not want tosee (figure 7.3). If by accident you paint overan area that you do want to see, press x toswitch the foreground and background colors,and paint over the area you want to see withwhite. Keep in mind, white reveals and blackconceals—meaning that if you paint withblack on the layer mask, you will be hiding“Pegasus” pixels.
figure 7.3Painting with a large, soft black brush quickly conceals areasof the Pegasus image you do not want to see.
209Chapter 7 The Power of Layer Masking
figure 7.2Adding a white layer mask does not alter the image in any way.
5. In a few minutes, you should have the imageroughly combined. To fine-tune the imageedges, zoom in on an area (figure 7.4) andpaint with a smaller, harder brush. Press x topaint with black or conceal, or white to revealthe Pegasus layer. (Option-click) [Alt-click]on the layer mask to view it (figure 7.5).
figure 7.4Zoom in and paint with a smaller, harder brush to fine-tunehow the image elements come together.
figure 7.5Viewing the layer mask shows that white reveals and blackconceals.
6. When you’ve finished, select File > Save Asand save the file in the PSD or TIFF format(these are the two recommended formats thatwill maintain the layers). When you return tothis image, you can readjust it any way youwant by painting on the layer mask again.
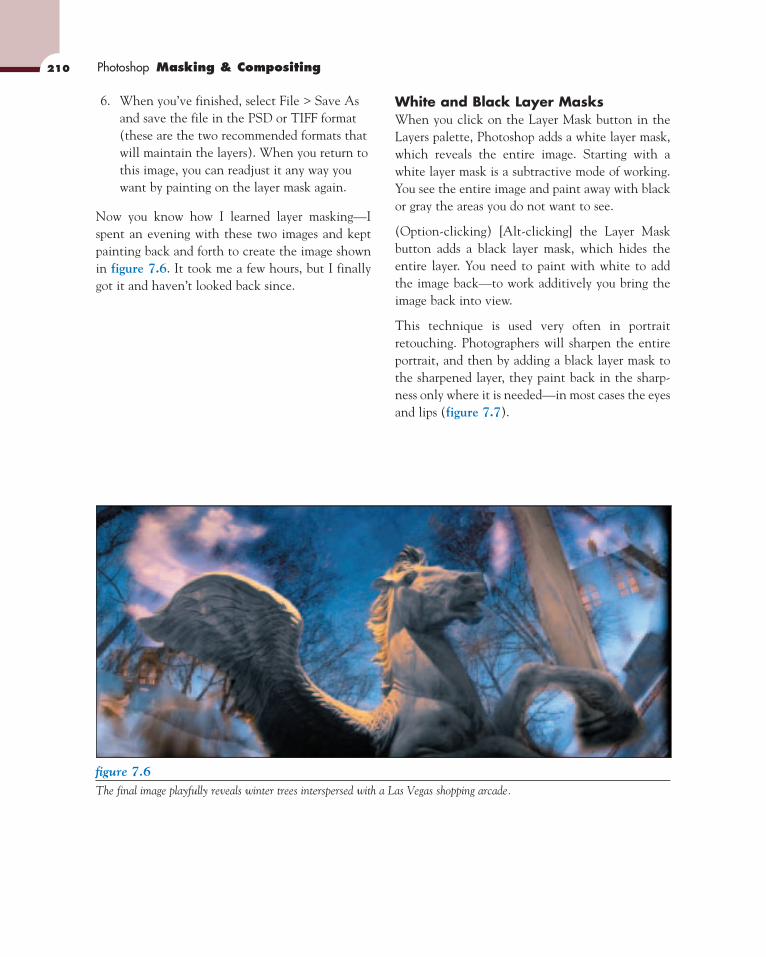
Now you know how I learned layer masking—Ispent an evening with these two images and keptpainting back and forth to create the image shownin figure 7.6. It took me a few hours, but I finallygot it and haven’t looked back since.
White and Black Layer MasksWhen you click on the Layer Mask button in theLayers palette, Photoshop adds a white layer mask,which reveals the entire image. Starting with awhite layer mask is a subtractive mode of working.You see the entire image and paint away with blackor gray the areas you do not want to see.
(Option-clicking) [Alt-clicking] the Layer Maskbutton adds a black layer mask, which hides theentire layer. You need to paint with white to addthe image back—to work additively you bring theimage back into view.
This technique is used very often in portraitretouching. Photographers will sharpen the entireportrait, and then by adding a black layer mask tothe sharpened layer, they paint back in the sharp-ness only where it is needed—in most cases the eyesand lips (figure 7.7).
210 Photoshop Masking & Compositing
figure 7.6The final image playfully reveals winter trees interspersed with a Las Vegas shopping arcade.

Gradated Layer MasksThe largest paintbrush in Photoshop is theGradient tool. You can use it on layer masks to con-trol tonal and color effects and to seamlessly blendimages together.
Darkening Image EdgesAdjustment Layers in combination with blendingmodes and layer masks offer a straightforwardmethod for lightening and darkening (traditionallycalled dodging and burning) areas in an image where
211Chapter 7 The Power of Layer Masking
Without sharpening Sharpened eyes
© M
ark Beckelman
figure 7.7The layer mask controls where the sharpening effect is applied to the original image.
you want to draw attention. Light areas attract theviewer’s focus, whereas dark areas are of less visualinterest.
Traditionally, photographers often burned or dark-ened the edges of their prints to focus the viewer’sattention on the center. If you employ this tech-nique, you should do it as subtly as possible so thatit’s not noticeable. After finishing a composite, Ioften add a slight edge burn to darken the outeredges and keep the viewer’s eyes focused on the cen-ter, as figure 7.8 illustrates.
ch7_pear.jpg

figure 7.8Framing the pear with a hint of darkness maintains the focuson the center of the image.
You can quickly create this darkening effect usingan Adjustment Layer and the Gradient tool:
1. Activate the topmost layer of your compositeor image.
2. Add a Levels or Curves Adjustment Layer—it doesn’t matter which one you choose. Assoon as the interface pops up, click OK with-out changing anything.
3. Change the blending mode to Multiply andreduce the opacity to 50%. The entire imagewill become darker (figure 7.9).
212 Photoshop Masking & Compositing
figure 7.9Changing the layer blending mode to Multiply darkens theentire image.
4. Select Image > Adjustments > Invert or (Cmd + I) [Ctrl + I] to invert the layer mask,which will turn it black.
5. Activate the Gradient tool and select the second gradient from the Gradient picker—Foreground to Transparent (figure 7.10).Verify that white is the foreground color; if it isn’t, press x to switch the foreground andbackground colors.

figure 7.12After one gradient pull from each corner, the image is morefocused.
213Chapter 7 The Power of Layer Masking
figure 7.11Working in full-screen mode and starting well outside theimage lets you subtly darken the image edges.
figure 7.13Continue adding gradients to create an image to your liking.
8. If you are not at all happy with the effect,throw away the entire Adjustment Layer andstart over.
Once you’ve darkened image edges like this a fewtimes you’ll be able to do it very quickly, giving yourimages a professional and subtle polish.
figure 7.10You need the Foreground to Transparent gradient for thistechnique to work.
6. Press f to place the image into full-screenmode and zoom out to see the entire image. I prefer to start the gradient well outside theimage (figure 7.11). Pull the first gradientfrom the upper left toward the center of theimage, and then repeat on all four corners(figure 7.12). Continue as necessary to createan image to your liking, as I did in figure 7.13.
7. Turn the Image Adjustment Layer viewcolumn on and off to view the image with andwithout the darkening effect. If you like whatyou see, save the file. If you are not satisfied—maybe it’s too light or too dark—adjust thelayer opacity to create the desired effect.
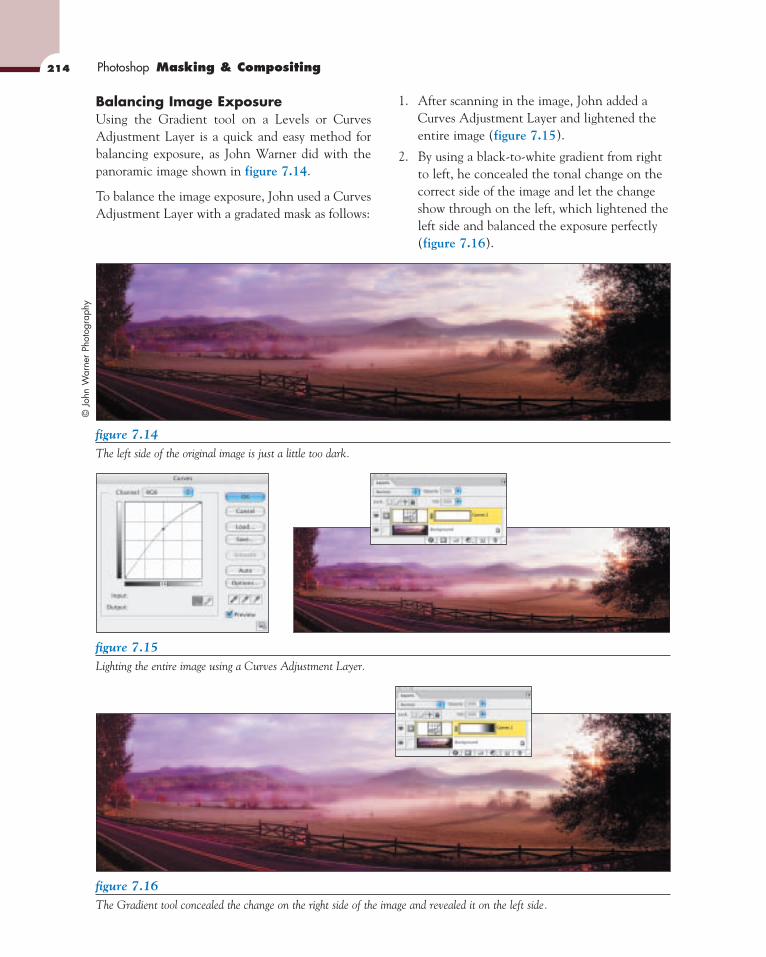
Balancing Image ExposureUsing the Gradient tool on a Levels or CurvesAdjustment Layer is a quick and easy method forbalancing exposure, as John Warner did with thepanoramic image shown in figure 7.14.
To balance the image exposure, John used a CurvesAdjustment Layer with a gradated mask as follows:
1. After scanning in the image, John added aCurves Adjustment Layer and lightened theentire image (figure 7.15).
2. By using a black-to-white gradient from rightto left, he concealed the tonal change on thecorrect side of the image and let the changeshow through on the left, which lightened theleft side and balanced the exposure perfectly(figure 7.16).
214 Photoshop Masking & Compositing©
Joh
n W
arne
r Ph
otog
raph
y
figure 7.14The left side of the original image is just a little too dark.
figure 7.15Lighting the entire image using a Curves Adjustment Layer.
figure 7.16The Gradient tool concealed the change on the right side of the image and revealed it on the left side.

Seamlessly Blending ImagesBuilding image backgrounds by combining two ormore images is a fantastic method for building up astock of creative backdrops. The Gradient tool canhelp you achieve good results very quickly.
ch7_sunset.jpg
ch7_reflection.jpg
1. Open the two images you want to blend anddetermine which one will serve as the back-ground and which one will be in the fore-ground. Drag the top image over to thebottom image with the Move tool. Whendragging images—especially Backgroundlayers—it helps to do it with confidence or as I like to say, with schwung. Otherwise,Photoshop will pop up the polite yet irritatingmessage: “Could not complete your requestbecause the layer is locked.” So drag quicklyand with confidence. Pressing and holding theShift key will place the top image exactly onthe center point of the bottom image.
2. Add a layer mask to the top image and reducethe layer opacity to 50%. This helps you findthe best position for the image, since you can see through to the lower image (see figure 7.17).
3. Click on the layer mask to make sure it isactive, activate the Gradient tool, and choosethe third gradient from the gradient library—black to white. Start the gradient where youwant the bottom image to show through com-pletely and draw up. Release the mouse whenyou reach the point in the top image that youwant to see completely (figure 7.18).
4. Increase the layer opacity to 100% to see theresults (figure 7.19).
215Chapter 7 The Power of Layer Masking
figure 7.17After dragging one image onto another, reduce the layeropacity so that you can view the relationship between the two.
figure 7.18Using a black-to-white gradient to reveal the buildings in thelower part of the image.
figure 7.19Set layer opacity to 100% to see the image combination.

Adjusting PositionThe layer and the layer mask can be movedtogether or independently of one another. To movethe layer and mask together, make sure they arelinked; to move either one independently, unlinkthem by clicking on the small chain between thelayer and the Layer Mask icon.
To change the position of the sky:
• Move the sky with the layer mask (figure7.20) by grabbing the top layer in the imageand moving it using the Move tool.
figure 7.20Moving the layer and the layer mask together.
• Move just the sky by unlinking the sky pixelsfrom the layer mask. Click on the small chainbetween the layer and Mask icon (figure7.21) and then make sure the layer is activebefore moving it.
• Move just the mask by unlinking the skypixels from the layer mask. Click on the smallchain between the layer and Mask icon, andthen move the layer mask (figure 7.22).
216 Photoshop Masking & Compositing
figure 7.21Unlinking the layer and layer mask by clicking the link iconlets you move just the layer or the mask.
figure 7.22Moving the layer mask is very useful for fine-tuning the tran-sition position.
There are many times when you want the mask tostay linked with the layer, but very often it is quiteuseful to move the layer mask—for example, whenthe steepness of the blend is perfect, but you wantto change its position slightly.

ExperimentationThe best thing about the Gradient tool and layermasks is that you can redo the blend over and overagain to get the image exactly right. Take a momentto experiment with the Gradient tool—create verysteep transitions by only drawing for a short dis-tance; create a very long transition by drawing the
217Chapter 7 The Power of Layer Masking
figure 7.23Experiment with the Gradient tool to create a variety of image effects.
Long gradient
Steep gradient
Right to Left gradient
Diagonal gradient
gradient across the entire image. Try it going fromright to left, or diagonally. I’ve provided a few vari-ations in figure 7.23. Every time you draw a newgradient, the previous blend is overwritten, lettingyou experiment to your heart’s content.

Refining Blended ImagesMany times an image combination requires morethan a straight-line gradient to blend in a newbackground or sky, as shown in figures 7.24 and7.25, in which I replaced the sky with a more dra-matic one.
ch7_stormsky.jpg
ch7_pony.jpg
Combine the Gradient and Brush tools to refinelayer masks to improve images as described here.
1. Open both images and drag the sky image ontop of the pony image.
2. Add a layer mask to the sky image and draw a gradient from below the horizon to the topof the new sky to create the results shown in figure 7.26.
Now the problem is that the new sky is cover-ing the pony, which of course needs to be infront of the sky.
218 Photoshop Masking & Compositing
BEFORE
AFTER
figure 7.24
figure 7.25
figure 7.26The initial gradient on the layer mask adds the sky but coversthe pony.
3. Click on the sky layer mask, and using a blackbrush with 50% hardness, carefully paintinside the pony to block the sky from beingvisible, as shown in figure 7.27.
4. (Option-click) [Alt-click] the layer mask tosee exactly what is going on—the gradient isletting the new sky blend in, and the blackareas are blocking the sky from affecting thepony (figure 7.28).
5. If by chance you paint into the sky and see atelltale halo (figure 7.29), (Option-click)[Alt-click] the gradient directly adjacent tothe mistake. This samples the gray with thedensity of the gradient, and as you paint thesky will blend in without showing any densitydifferences.
BEFORE

figure 7.27Painting on the layer mask protects the pony from beingaffected by the sky layer.
6. If necessary, (Option-click) [Alt-click] to sample darker or lighter density areas from thegradient as you work up or down the pony’shead. You can see the detail work I did in figure 7.30.
219Chapter 7 The Power of Layer Masking
figure 7.28Viewing the layer mask is often a good way to catch errors.
figure 7.29The lighter halo around the pony’s head is a telltale sign ofpoor masking.
figure 7.30Sampling the density of the gradient lets you paint on thelayer mask to remove halos.
Selective ChangesWhen you make a selection and then add anAdjustment Layer, Photoshop automatically trans-fers the active selection to the layer mask and theadjustments only take place within the active areas.Starting with a selection is demonstrated here to cor-rect the backlit photograph of the golf course sign:
ch7_golfsign.jpg
1. Select the sign with the Polygon Lasso tooland feather the selection by 1 pixel to softenthe edges ever so slightly (figure 7.31).
2. Add a Curves Adjustment Layer and raise themidtones (figure 7.32). As you can see,Photoshop has transferred the Lasso selectioninto the layer mask. The selected area—thesign—is white, so the Curves correction onlytakes place through the white areas of themask, lightening the dark sign.

figure 7.31Select the area you need to change.
MERGING PHOTOGRAPHICEXPOSURESPhotographers are always looking for better toolsand techniques to express their vision and not letthe limitations of their tools negatively impact thequality of the final image. Some of the limitationsthey face include:
• The dynamic range of the scene is wider thanwhat the digital camera or film can capture.
• The lens isn’t wide enough to frame the fullgrandeur of the scene.
• The natural light doesn’t illuminate the sceneproperly.
• The scene contains mixed color temperaturesthat conflict with one another.
Today photographers still face these challenges, buttheir tools have improved—they use professionaldigital cameras and can preview their images onlaptops while on location or on set. The hugeadvantage of working with a professional digitalcamera is that a photographer can combine a seriesof exposures or acquire the file with multiple set-tings in Photoshop to achieve the following:
• Extend the dynamic range
• Expand the view of the scene
• Capture light over time
• Color balance a scene without having to gelor filter the lights or lens
Note that you can achieve similar results whenworking with film capture. However, the advantageof working with a high-quality digital RAW file—which is the native, unprocessed data as it was cap-tured by the camera sensor—and the precision withwhich you can register the multiple files does givedigital capture the definitive upper hand.
Adobe Camera RAWMany prosumer and professional digital camerasproduce RAW files, which offer a number of advan-tages, including hi-bit depth, lack of compressionartifacts, and flexibility in image processing. Check
220 Photoshop Masking & Compositing
figure 7.32Adding an Adjustment Layer with an active selection letsyou work on the active area without affecting the rest of theimage.
3. To soften the transition between the lightersign and the background, choose Filter > Blur> Gaussian Blur and use a low setting of 1.
All active selections will automatically be trans-ferred into the layer mask when you add anAdjustment Layer, allowing you to fine-tuneimages with great precision and care. You’ll findlots more information on applying tonal and colorcorrections in one of my other books, PhotoshopRestoration and Retouching.

your camera’s documentation to determine if it willshoot RAW files.
I use the Adobe Camera RAW feature in PhotoshopCS to process RAW files from my Nikon and Fujicameras. In the example in the following section,we’ll process the same RAW file twice to create awell-exposed image.
Luminance MaskingVery often a scene will have too much contrast. Nomatter how you adjust the camera exposure ortweak the file in software, either the highlights aretoo bright or the shadows are blocked. To create afile with detail in both the highlights and shadows,start by acquiring the same RAW file twice—oncefor the highlights and once for the shadows—sothat you can capture the best of both images andcreate an image that has good shadow informationand bright highlights with detail.
ch7_helmet.nef
1. Working with RAW files in Photoshop CSopens the Adobe Camera RAW interface. Use the sliders to process the image so that it captures good highlight information. Theshadows will look washed out, but that is fine.Make sure to keep the file in 16-bit (figure7.33) and save it to your hard drive using the name your subject_light.psd.
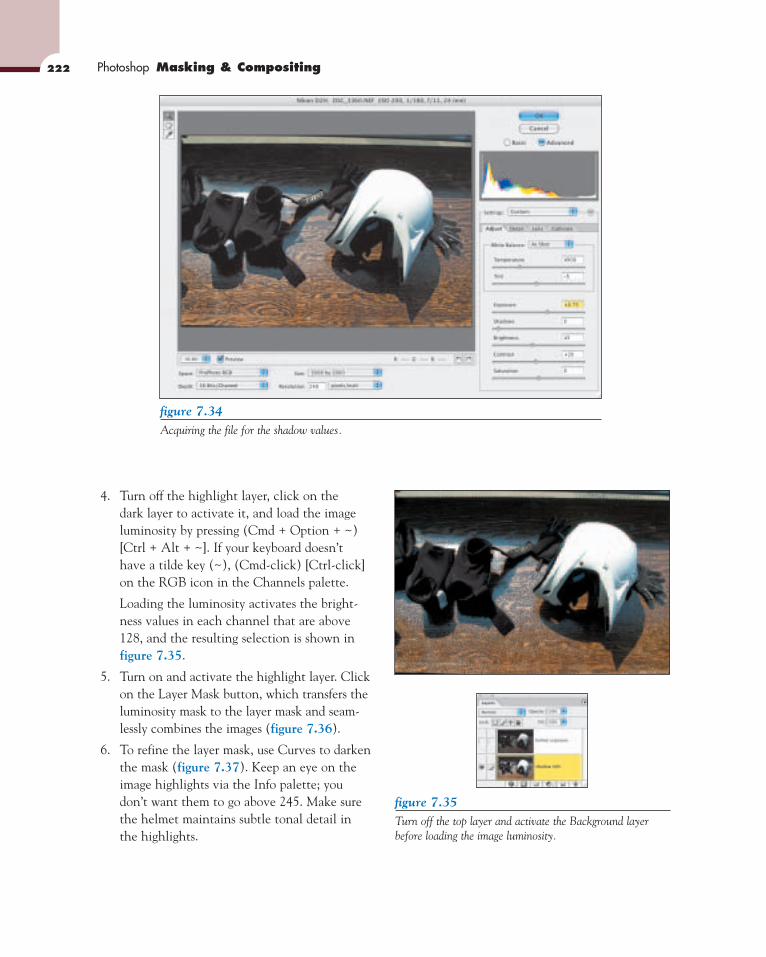
2. Open the original image in Adobe CameraRAW again, but this time process it so that itcaptures good shadow information (figure7.34). Now the highlights will be completelyblown out and without detail—that is OK.Save the file to your hard drive using thename your subject_dark.psd.
3. Drag the light file on top of the dark file. Pressthe Shift key while dragging so that the filelands in perfect registration. Rename thelayers to make it easier to keep track of whichis which.
221Chapter 7 The Power of Layer Masking
figure 7.33Acquiring the file for the highlight values.
4. Turn off the highlight layer, click on the dark layer to activate it, and load the imageluminosity by pressing (Cmd + Option + ~)[Ctrl + Alt + ~]. If your keyboard doesn’thave a tilde key (~), (Cmd-click) [Ctrl-click]on the RGB icon in the Channels palette.
Loading the luminosity activates the bright-ness values in each channel that are above128, and the resulting selection is shown infigure 7.35.
5. Turn on and activate the highlight layer. Clickon the Layer Mask button, which transfers theluminosity mask to the layer mask and seam-lessly combines the images (figure 7.36).
6. To refine the layer mask, use Curves to darkenthe mask (figure 7.37). Keep an eye on theimage highlights via the Info palette; youdon’t want them to go above 245. Make surethe helmet maintains subtle tonal detail inthe highlights.
figure 7.35Turn off the top layer and activate the Background layerbefore loading the image luminosity.
222 Photoshop Masking & Compositing
figure 7.34Acquiring the file for the shadow values.

figure 7.36Turn on the top layer and activate it. Clicking on the LayerMask button transfers the active selection to the layer mask.
7. Adjust the layer opacity for the desired effect.I often experiment at the same time with thelayer blending modes to see if the effect ispleasing. To create the final image, I reducedthe top layer opacity to 80%.
T i p
After acquiring a RAW file, duplicate it and closethe original without saving changes. This lets youreopen the same RAW file without having to savethe first one to your hard drive.
Once the images are combined and you’ve saved thenew combination version, you can delete the savedfiles. All in all, this is a good technique to quicklyhelp you bring image contrast within a printablerange—special thanks to Stephen Johnson and JeffSchewe for showing me this technique.
Emphasizing the EssentialSimilar to the luminance-masking technique I justdiscussed, you can also extend an image’s dynamicrange to increase image drama by deciding whichareas you want to reveal or conceal in creating thefinal image.
ch7_cloudtower.nef
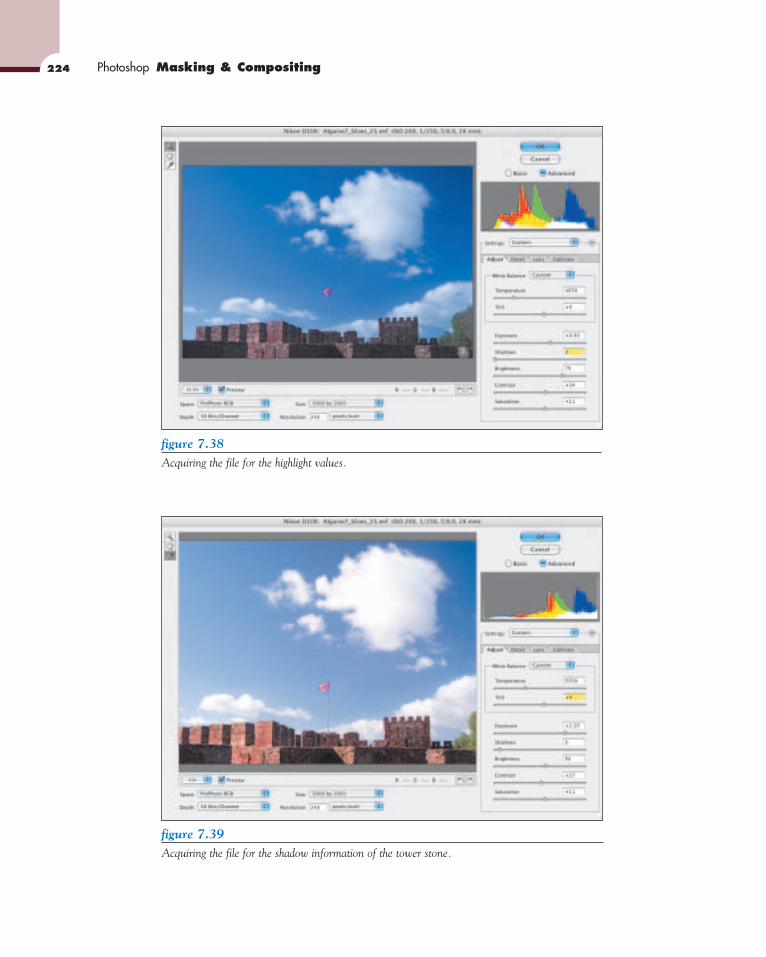
1. Follow Steps 1 and 2 of the previous task toacquire the same image file twice—once forthe highlights, in this example the clouds (figure 7.38), and once for the shadow infor-mation of the castle ramparts (figure 7.39).Remember to save the first file after youacquire it to your hard drive so that you canopen the original RAW file again with differ-ent Camera RAW settings.
2. Drag the images into one file, add a layermask, and use the Gradient tool to initiallycombine the images (figure 7.40).
3. Use a large soft, black brush to paint over thetowers to complete the photograph, as shownin figure 7.41.
This technique is useful for accentuating specificimage areas with the ability to paint informationback and forth via the layer mask.
223Chapter 7 The Power of Layer Masking
figure 7.37Adjusting the layer mask using Curves lets you fine-tune theimage combination.
224 Photoshop Masking & Compositing
figure 7.38Acquiring the file for the highlight values.
figure 7.39Acquiring the file for the shadow information of the tower stone.

figure 7.40Use the Gradient tool on the layer mask to create the initialimage combination.
Increasing Dynamic RangeJohn Warner is the consummate professional photographer—skilled, talented, creative, consci-entious, and always ready to try new tools and tech-niques to produce better images. Having worked forover 20 years with film technology, John is now anavowed digital photographer who takes great pleas-ure in planning, composing, and compositingimages. One of John’s specialties is interior andexterior architectural photography—a field thatbrings many constraints and challenges with it. Forexample, it’s pretty hard to move a building to facethe light, or to close the window to control theexposure, when the client wants to simultaneouslysee the beautiful view and the interior of the room.
John photographs with high-end, digital cameras.After framing the image, he locks down the cameraon the tripod and takes separate exposures for shad-ows, midtones, and highlights to create images thathold information from the darkest shadows to thebrightest highlights.
C a u t i o n
When photographing multiple exposures, it isvery important to set the camera to either manualexposure or Aperture Priority, both of which letthe photographer set the f-stop (the aperture) andadjust exposure by changing the shutter speed.The slightest variation in f-stop will change thedepth of field and the size of the subject in theimage ever so slightly, making it more difficult toseamlessly combine the images.
Combining Exposures Using Layers and MasksAfter photographing two exposures for the bedroomscene—one for the room (figure 7.42) and one forthe exterior setting sun (figure 7.43)—Johnacquired and saved each file with the respectivenames outside and inside, and then blended them inPhotoshop as follows:
225Chapter 7 The Power of Layer Masking
figure 7.41Painting over the towers in the layer mask with a soft blackbrush allows the shadow information to show through.
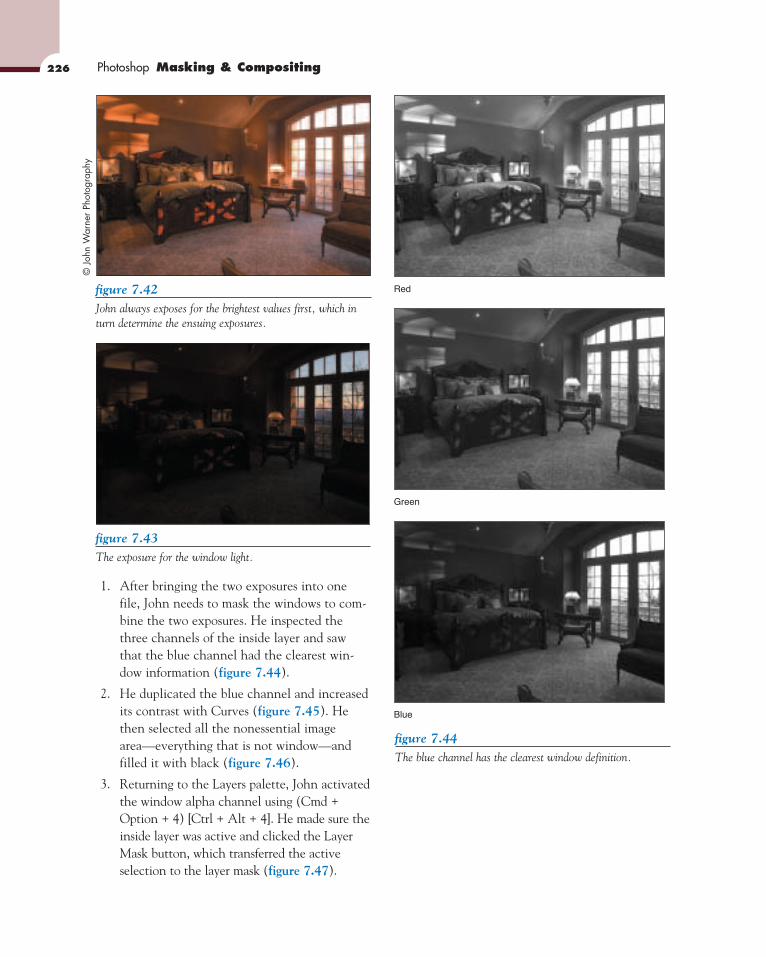
figure 7.42John always exposes for the brightest values first, which inturn determine the ensuing exposures.
figure 7.44The blue channel has the clearest window definition.
226 Photoshop Masking & Compositing©
Joh
n W
arne
r Ph
otog
raph
y
figure 7.43The exposure for the window light.
1. After bringing the two exposures into onefile, John needs to mask the windows to com-bine the two exposures. He inspected thethree channels of the inside layer and sawthat the blue channel had the clearest win-dow information (figure 7.44).
2. He duplicated the blue channel and increasedits contrast with Curves (figure 7.45). Hethen selected all the nonessential imagearea—everything that is not window—andfilled it with black (figure 7.46).
3. Returning to the Layers palette, John activatedthe window alpha channel using (Cmd +Option + 4) [Ctrl + Alt + 4]. He made sure theinside layer was active and clicked the LayerMask button, which transferred the activeselection to the layer mask (figure 7.47).
Red
Green
Blue

figure 7.45Increasing the contrast using Curves makes the alpha maskdenser and better defined.
figure 7.47After transferring the alpha mask to the layer mask.
4. John inverted the layer mask to reveal theroom interior (figure 7.48).
5. Upon careful inspection, John refined thelayer mask using a slight Gaussian Blur and abit of painting to repair any unsightly seams tocreate the final image shown in figure 7.49.
227Chapter 7 The Power of Layer Masking
figure 7.46Areas that don’t contain window information are filled with black.
figure 7.48Inverting the layer mask reveals the window exposure.

All in all, this technique works best with static sub-jects such as buildings and still lives. In the exampleshown in figure 7.50, the final image required threeseparate exposures: the room interior, the outsidescene, and the fireplace. John then combined thethree exposures and added a few additional flames tothe fire to make the room even more inviting.
Combining Color TemperaturePhotographing an interior scene with natural day-light coming in through the windows has alwaysbeen a challenge for architectural photographers.This is because in most cases the room is lit withtungsten light, which has a color temperature of3,400 degrees Kelvin and is inherently orange. The daylight coming through the windows isapproximately 5,500 degrees Kelvin and is muchbluer than the tungsten light.
To compensate for this, the photographer couldeither cover the windows with expensive gels (filters) to bring the color temperature down, or usedaylight-balanced light to illuminate the interior,which in turn would conflict in color temperaturewith the room’s lighting fixtures.
Working with a Canon digital camera, MarkBeckelman developed an elegant solution thatrequires him to photograph the scene only once asa RAW file, acquire the file three times in AdobeCamera RAW with different color temperature set-tings, and then combine the separate files asdescribed here:
ch7_kitcheninterior.jpg
ch7_kitchenexterior.jpg
ch7_kitchenstove.jpg
228 Photoshop Masking & Compositing
figure 7.49The final image.
© J
ohn
War
ner
Phot
ogra
phy

229Chapter 7 The Power of Layer Masking
figure 7.50After photographing the scene three times, John Warner combined the exposures to create this final image.
© John W
arner Photography

1. Mark shoots only in the RAW file format,which yields both higher image quality andgreater creative interpretation upon acquiringthe file. In this instance he acquired the sameimage three times (figure 7.51)—once withtungsten for the interior scene, once with day-light color balance for the exterior light seenthrough the windows, and once as a darkerversion that maintained the detail in thebright wall above the stove.
2. Using the primary interior exposure as theBackground layer, he Shift-dragged the win-dow layer on top and named the layer window.
3. Mark outlined the windows with the Pen tool,turned the path into a selection, and clickedthe Layer Mask button of the window layer,which added a layer mask. The mask revealsonly the windows (figure 7.52) and nowcombines the daylight-balanced exterior withthe interior.
230 Photoshop Masking & Compositing
figure 7.51Acquiring the same exposure three times using differentCamera RAW settings is the foundation of the composite.
figure 7.52Combining the interior with the exterior exposures.
4. Mark noticed some daylight spill (figure7.53) that was contaminating the scene. Heremoved it by painting on the window layermask with a low-opacity, soft white brush toreveal the color-corrected layer.
5. After Shift-dragging the stove highlight file onto the composite, he (Option-clicked) [Alt-clicked] on the Layer Mask button to adda black layer mask that concealed the entirelayer. He then subtly painted back the high-lights with a low-opacity, soft-edged whitebrush (figure 7.54).
Interior exposure
Exterior exposure
Highlight exposure
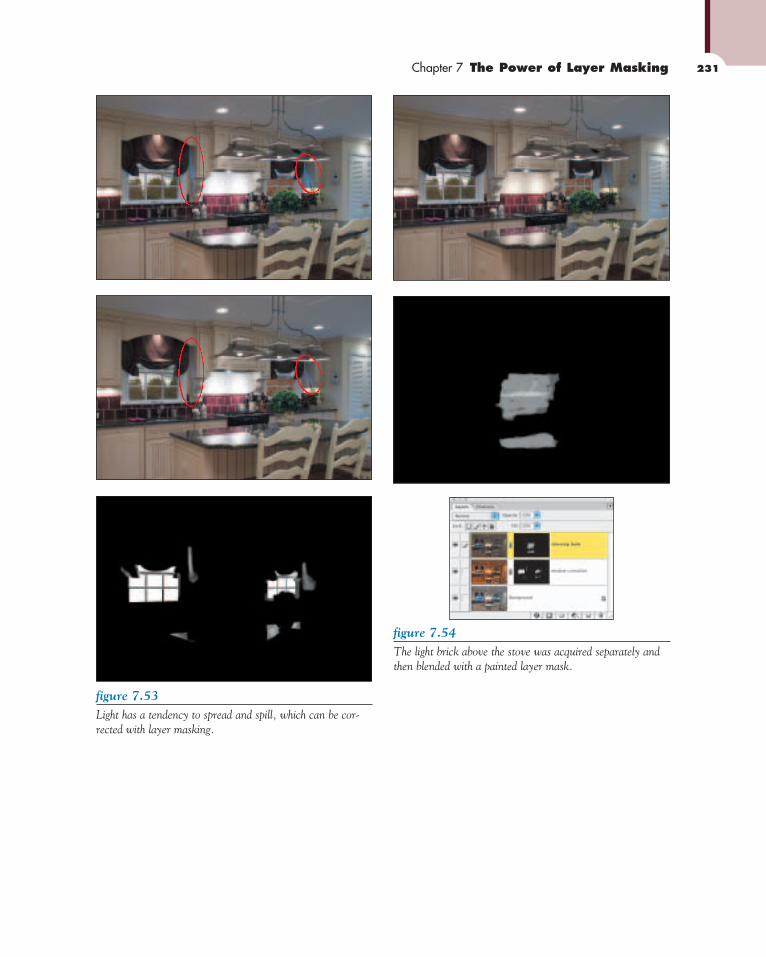
figure 7.53Light has a tendency to spread and spill, which can be cor-rected with layer masking.
figure 7.54The light brick above the stove was acquired separately andthen blended with a painted layer mask.
231Chapter 7 The Power of Layer Masking

figure 7.55Paying attention to the smallest reflections and color detailsis part of being a professional photographer.
figure 7.56After adding a Photo Filter layer, Mark sampled the offend-ing blue color.
232 Photoshop Masking & Compositing
figure 7.57Invert the A and B values to create the opposite color.
Removing Color ContaminationBeing the accomplished professional that he is,Mark noticed a few hints of blue, caused by the day-light that hit the reflective surfaces of the lightingfixtures and on the kitchen counters (figure 7.55).He used the following sophisticated technique toneutralize the color spill:
1. After zooming in on the blue, Mark added aPhoto Filter Adjustment Layer, clicked on thesquare Color picker, and sampled the offend-ing blue color (figure 7.56). For additionalinformation on working with the Photo FilterAdjustment Layer feature, see Chapter 12,“Photorealistic Compositing.”
2. To neutralize the blue, he needed the exactopposite color, which is only possible to cal-culate with the LAB values. LAB is a colormode that defines the image as Luminanceand two color channels. It is used to calculatecolor relationships. If the A or B values arepositive, making them negative, or vice versa,will flip the color values exactly to the oppo-site (figure 7.57). To neutralize the colorcompletely, Mark increased the density of thecolor correction to 100%.
3. He then inverted the layer mask and paintedover the offending blue with a small, soft-edged white brush to remove the color alongthe kitchen curtain and the chrome lights(figure 7.58).

233Chapter 7 The Power of Layer Masking
figure 7.58Painting away the blue reflections polishes the image.
© M
ark Beckelman

Creative Color InterpretationsAccentuating color temperature differences canadd a beautiful creative twist to your images. Figure7.59 shows the same camera RAW file acquiredtwice—once with daylight settings and once withinterpretive color settings. As John Warnerexplains, “The first version is color balanced as ifthe light source were near tungsten, so the BlueRidge Mountains become very blue. For the second
version, I re-adjusted the Adobe Camera RAW set-tings to yield a smoky sepia and dialed down theexposure to keep the sky from burning out.”
After acquiring and saving both files, John Shift-dragged the warmer file onto the blue file, andadded a layer mask to the top file (the warmer file).He then used a large, soft brush to paint in the sepiatones. After changing the blending mode of the skyto Color, the image comes together (figure 7.60).
234 Photoshop Masking & Compositing
figure 7.59Acquiring the same camera RAW file twice using different color balance settings.

figure 7.60Combining the two color-interpreted files using a layer maskcreates a hauntingly beautiful image.
N o t e
You can use the Mergenator script to automati-cally combine files that were acquired with different color temperature or exposure settings.Developed by Thomas Ruark and Julieanne Kostfrom Adobe Systems, Mergenator makes layereddocuments on which you apply layer masking tocreate the final image. To use the Mergenator,first install the script into the Presets/Scriptsfolder, make three folders (for example, Color 1,Color 2, and Done), and then select File > Script> Mergenator (figure 7.61) to create a new com-posite image without your having to open anddrag the images manually.
ch7_Mergenator.sit
235Chapter 7 The Power of Layer Masking©
Joh
n W
arne
r Ph
otog
raph
y
figure 7.61To automatically combine the images, point the MergenatorScript at the two images containing the color-interpreted filesand the composite folder.
Extending the Time of DayFor me, watching a sunset is as good as watching athrilling Hollywood movie. But often when I pho-tograph the scene, I’m disappointed by the results.In most cases, this is because either the sky looksgood but the landscape is too dark, or the landscapelooks good but the sky is washed out.
In the following example, John Warner set up hiscamera on a rooftop high above Asheville, NorthCarolina, and made two separate exposures—onefor the cityscape, which required a longer shutterspeed to capture the shadow detail, and one for thesunset. For a first-person commentary from Johnabout the differences between getting multipleexposures using film versus digital, see the sidebar.
Obtaining Multiple Exposures Using Filmand Digital: An Imagemaker Reflects
“When I worked with sheet film and a 4 × 5 Sinarview camera, doing double exposures on the samepiece of film was tedious at best. It required exposingfor the mountains and the sky at sunset, which left thecity buildings looking like dark cardboard cutouts.After the sun went down, I had to keep the cameraabsolutely still for another hour until the sky was blackand the city lights were gleaming. Then with a 40magenta filter over the lens, I would re-photographthe scene for 8 minutes to ‘burn’ the city lights into thedark building shapes. Because the sky was black, noadditional exposure would wash out the sunset, sky,and mountains. Of course, with this technique I hadonly one chance per sunset to get it right.
“Digital is far more forgiving. The approach is essen-tially the same as with film—it requires getting a goodsunset shot that correctly exposes the sky and themountains but leaves the foreground buildings asdark objects. About 45 minutes after sunset, I capturesome additional shots exposing for the city lights (figure 7.62). Using Adobe Camera RAW, I can cor-rect the color balance of the artificial lights awayfrom their greenish cast, which eliminates the need
for the 40 magenta filter. Shift-dragging the nightexposure over to the sunset using the Lighten blend-ing mode completes the composite. Another keyadvantage of digital is having multiple sunset framesto choose from, unlike the film example where youget one per session.”
—John Warner
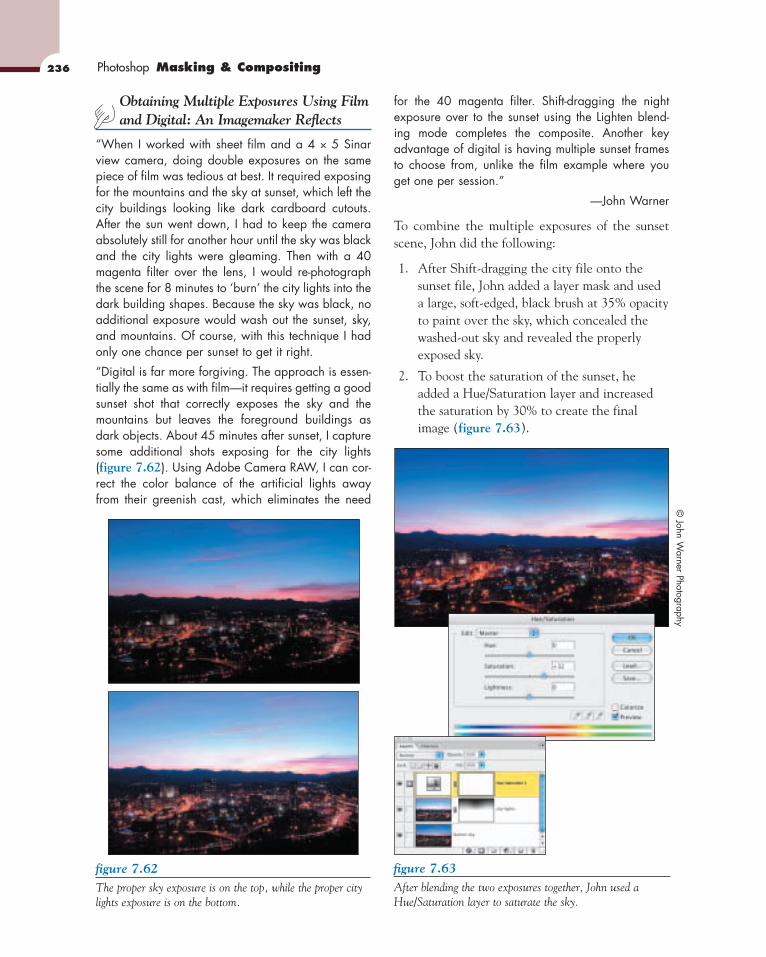
To combine the multiple exposures of the sunsetscene, John did the following:
1. After Shift-dragging the city file onto thesunset file, John added a layer mask and useda large, soft-edged, black brush at 35% opacityto paint over the sky, which concealed thewashed-out sky and revealed the properlyexposed sky.
2. To boost the saturation of the sunset, headded a Hue/Saturation layer and increasedthe saturation by 30% to create the finalimage (figure 7.63).
236 Photoshop Masking & Compositing
figure 7.62The proper sky exposure is on the top, while the proper citylights exposure is on the bottom.
figure 7.63After blending the two exposures together, John used aHue/Saturation layer to saturate the sky.
© John W
arner Photography

Modeling Architecture Using LightOne of the best aspects of working on a book likethis is the opportunity to learn from many differentimagemakers. Take a look at the home in figure7.64. Now take a look at the seven separate photo-graphs John took to capture the best light for the
237Chapter 7 The Power of Layer Masking©
Joh
n W
arne
r Ph
otog
raph
y
figure 7.64The final composite was created from seven separate exposures.
various aspects of the home, from the façade he litwith portable flash units; to the rooms where heused a warmer, more inviting light; to the exposuresfor the driveway, the sky, and the mountains in thebackground (figure 7.65).
figure 7.65The seven component images were shot over a three-hour time period.

figure 7.66Using the initial exposure as a guide, the sky is added.
figure 7.68The roof was photographed earlier in the day.
238 Photoshop Masking & Compositing
figure 7.67The Lighten blending mode adds natural-looking windowlights.
John arrived a few hours before sunset to find thebest angle to photograph the house and to plan thelighting. As he told me, “I always begin with theexposures of the exterior first, as they are the over-all brightest elements in the image.”
1. After downloading the files, John identifiedthe best exposures for each element of thebuilding. Starting with the initial exposure,he added the sky file and painted away thedriveway with the layer mask and a soft-edgedbrush (figure 7.66).
2. He then added the lighter layers for thefaçade and room lights, all of which he set tothe Lighten blending mode and adjusted theopacity to lighten the areas without overex-posing them (figure 7.67).
3. John added the roof exposure and a layermask and then painted away everythingexcept the roof (figure 7.68).
4. He used two layers to enhance the driveway.Finishing touches included removing the dis-tracting stripe of lights along the walkway and color correcting the stones on the rightside of the frame to create the image shownin figure 7.69.

239Chapter 7 The Power of Layer Masking
figure 7.69The final composite.
figure 7.70Photographed over a period of a few months, the two imageseach carry important information.
Extending the SeasonsPhotographing a large subject over time requirespatience—but the results are certainly worth it asthe photograph of the Biltmore Estate in Asheville,North Carolina, reveals. Taken over a period of afew months, the final composite combines a nightshot with a late spring photograph in which thetrees frame the estate (figure 7.70) to create thefinal composite shown in figure 7.71.

T i p
To photograph the same subject over the courseof days, weeks, or months, it is necessary to tri-angulate the tripod. After you set up the first shot,measure and write down the height from the tri-pod head to the ground. Then measure and notetwo vertical distances to fixed objects and the tri-pod head. If you use a zoom lens, also note theexact zoom setting you used. In the example ofthe Biltmore Estate, John was standing betweentwo columns which he used as anchor points totriangulate the exact position of the tripod headso that he could return months later and set up inthe same spot.
CLOSING THOUGHTSRemember, if you want to conceal an area, paint thelayer mask with black; if you want to reveal more ofa certain area, the layer mask must be white. That’sall there is to it—so grab a few files, stack them ontop of one another, add some layer masks, and thenstart painting to hide, reveal, and conceal the imageareas. I promise that if you do this a few times, you’llbecome a happy Photoshopper who can finally say,“I get it!” More importantly, you’ll enjoy workingwith Photoshop more.
240 Photoshop Masking & Compositing
figure 7.71The final composite is a stunning example of combined images.
© J
ohn
War
ner
Phot
ogra
phy