Embed Size (px)
Citation preview
The Newbie Advanced Strategy Guide to Playing like
An Experienced Player -by Arjun S. a.k.a. Çárñágè (Epsilon)
I’d like to thank the present and former members of the Epsilon server and all my friends where I
began this game 3 years ago as a newbie for their invaluable advice and experience for which I
have gained playing with and against them. Special thanks to Doom and the former members of
my first guild and all my friends in [·V·]Villain that helped start it all. Special thanks to
Salsashark a.k.a. Glenn for the Base Development Simulator Excel Spreadsheet.
A few points to highlight:
1) It is assumed that the player reading this has read the basic guides by other authors and
the developers on starting the game and has an idea about how the mechanics of the game
works.
2) Assumes the player is upgraded or intends to upgrade to take full advantage of the
account development potential. There are other development guides for players who do
not intend to upgrade but this is more of a strategy and tactics guide than a basic how to
guide.
a. Here is my first piece of tactical advice fundamental to becoming an advanced
level player. Without an upgrade you are not able to achieve a competitive level.
b. That being said, not all upgrades necessarily need to be done throughout the year
but can also be done for few months at a time to take advantage of upgrade
features such as advanced structure development and new bases. If you achieve
the goals highlighted in this guide you will not have to upgrade further as the time
taken for construction or research of technology can go well beyond a reasonable
amount of time that the construction started (not qued) will continue to develop
even after your upgrade expires. So if you need to build an advanced structure
that takes 6 months to complete then you can group a few of these together
upgrade for a month and start them. Even if the upgrade runs out at the end of the
month, the construction will still continue. Cancel it though and you cannot restart
it if you are not upgraded.
3) There is no hard and fast rule about the end game structures built and you can follow
what you believe is best. In this case however it would be better to employ some kind of
base development simulator to test your ideas of base models.
4) The structures suggested to build in this guide are based on efficient cost per unit of
construction or production capacities. This however does not make it necessarily cheaper
as area is the costliest structure and if you need to build a non-efficient anti-matter plant
versus another level of multi-level platform, it would work out cheaper to build the anti-
matter plant. However if 3 or more structures are needed and the MLP has to be built
anyway then the cost of the extra anti-matter plant per unit in the end becomes a wasted
resource until balanced by the need for more energy and adding energy structures.
Contents
Introduction:- ........................................................................................................................ 3
Choosing the Best Astro for Current and Long term Success: ............................................. 4
Advancing on the 30/26/20/15, 26/10 Rule:- .......................................................................... 7
Asteroid vs. Rocky and Base Development: ............................................................................ 9
P-Rings and P-Shields: ......................................................................................................... 11
Technologies: ................................................................................................................... 13
Base is occupied what do I do? ............................................................................................ 14
Fleet over Base is going to be attacked!!! ............................................................................. 16
Attacking Strategies and Tactics: .......................................................................................... 17
Tools: ............................................................................................................................... 17
Standard and Advanced Attacking Strategies: ................................................................... 18
Blob Warfare: ............................................................................................................... 22
Analyze Your Guild Fleet To Know What and How Much Can Be Combated: ......................... 24
Commanders: .................................................................................................................. 25
Debris Split by Losses and Split by Debris Application: ...................................................... 26

Introduction:- To begin there are 3 types of players in this game.
1. The smart player who actively asks questions and discusses strategies heeding the
advisement of more experienced players,
2. The player who despite the advice believes he knows everything and can attempt to do
something that no one else has attempted before and have different positive consequences
before the fail becomes clearly apparent. Listening to advisement but comprehending by
experience.
3. The third kind of player who doesn’t follow or hear any advice because they believe that
they are smarter than everyone else since they are 40 years+ or that they were told they
have a high IQ. Since most player fall between the 15 years to 40 years range the person
feels by right of age, military experience or whatever else that they can out think an
experienced 18 year old. The player also maybe stubborn and usually ends up kicked out
of the guild for rude behavior, bad hits and overall non co-op play style that maybe
detrimental to the guild.
This game is and will always be a game of experience. The longer you have actively played it the
better you become. Experience points within the game tell very little about the true game
experience of a person. There is no true substitution for actual play experience and though I try
to bridge the gap between a relative newbie and an experienced player, this is hardly a
substitution.
Over the years I have found that two playing styles predominate that is,
1) The Simmer style and
2) The Proactive Attack Style.
The former style of play is less respected and is a little slow if not boring and it has over the
years been labeled as a farm style of play (because active players occupy their bases for the extra
income especially if activity is an issue) whereas the latter is more pro-active and is designated
as the farmer style of play. In my experience both styles can be used, the hybrid of which is
extremely effective late game. The farm is extremely defensive and his play depends on quietly
using his self-generated economy to build his empire. He doesn’t usually attack other and feels
that since he leave them alone and doesn’t rock the boat he will be left alone as well. This is
however not true as the pro-active player is competitively trying to grow his account in the
shortest fastest way possible and rather than wait for economy he actively hunts and seeks out
targets. His own economy is of little concern as most of his income is based of fleet debris
gained from attacks. As such he tries to max out his production, fleet and if smart research as
well.
Understand that Astro Empires is a strategy game based on some very well thought out formulas
tweaked over the years. These formulas have led to the development of strategies and counter
strategies which have been tried and tested and like the laws of physics in nature are absolute
until the formulas are tweaked again. Though the basics have been extensively discussed in
length in other guides I will cover some of them with you again as we go along explaining them
further.
Choosing the Best Astro for Current and Long term Success:
This game is based on three very important basic variables Economy, Fleet and Technology.
Why do I refer to them as basic is because to ignore any one would be detrimental to your game.
With this in mind I personally prefer the Asteroid/Rocky combination and though others would
argue for Rocky exclusively, the fact is if you plan on long term end game playing the
Asteroid/Rocky combination is the better of the two as compared to Rocky alone.
Now what do I mean by end game. This is a basic term you’ll come across in various
discussions to denote a point at which construction or researching time to complete exceeds
anywhere from months to years. Cost is less of a limitation than time. This of course takes into
account the fact that you have already efficiently maxed all structures and tech concerned with
further development almost being equal to banking credits unless your still around to see the
construction or research finish. To other experienced players it also refers to a return on
investment i.e. a maximum credit return generated by structures in an astro versus cost spent to
developed the astros within a realistic time frame (variable). The latter though considered is not
always factored in by all experienced players as many like me believe that since the majority of
your economy will be generated from enemy fleet as a simming economy is not adequate enough
to run construction, research and production at the same time. The added economy generated
does help but is not an active player’s main source of income. Your only goal is to build the
best account possible to support your imperialistic designs of server domination. The faster
you develop the faster you are able to realize your goal. To this effect someone else will pay for
your growth. Another way to think about it is if you spend 2 years developing your fleet, do you
want to spend another two years again rebuilding once you lose it? So developing capacities
never stops until time taken for next level is too long to wait or real life forces you to end your
game.
Bases in astros are based around three important variables which are Area, Energy and
Population. The asteroid for all intents and purposes is the smallest area wise and is also limited
in fertility. To the inexperienced player starting out rushing to compete, a lack of this fact can be
detrimental and hence is always advisable at start, by choosing an astro that takes the least
amount of work to develop. Rocky type astros are such that they require the least amount of
investment and so would give you the maximum developmental advantage initially. They offer
the high solar energy comparable to other astro types while offering the second highest fertility
at 5-6 of any astro in game. Most important is that they are metal-3 which is the important base
unit in determining construction and production capacities. Higher this values faster the base
development. In the game, speed of development is extremely important as putting it simply
bigger fleet and capacities is always better.
Now of the two types of available rocky astros, the planet should be your first choice followed
by moons in the beginning. In fact first 1 or 2 astros should preferably be planets and the next 11
astros should be moons. Also the acceptable positions for an ideal astro base location are the
very 1st
& 2nd
position (i.e. vertical rows) in a system. A 4th
or 5th
position Rocky can be
considered as well where energy will be derived from gas-3. You cannot always get to choose
what you would like to have ideally and in the mad rush may end up having to settle for the
next best options which are 1st and 2
nd position metallic or crater astros, or a 4
th or 5
th position
rocky astro instead. A final option to consider would be a first or second position asteroid though
as stated development initially will be slow, you can take advantage of the crystal mines to
generate more credits.
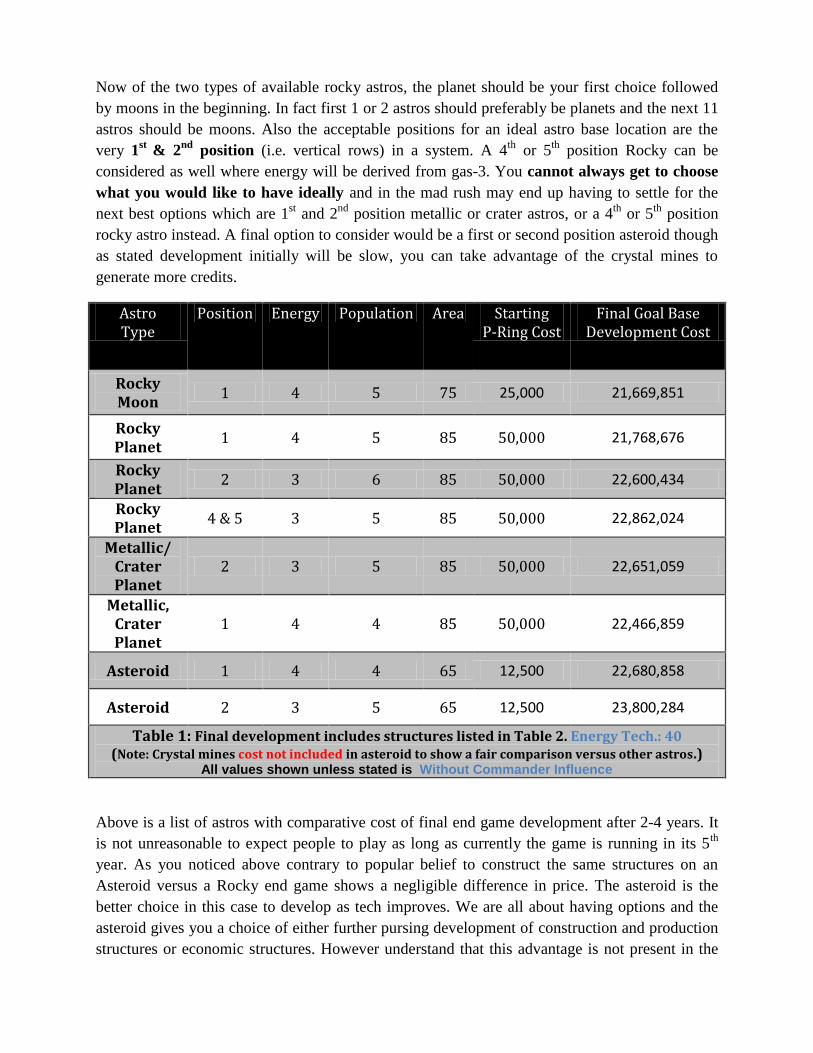
Astro Type
Position Energy Population Area Starting P-Ring Cost
Final Goal Base Development Cost
Rocky Moon
1 4 5 75 25,000 21,669,851
Rocky Planet
1 4 5 85 50,000 21,768,676
Rocky Planet
2 3 6 85 50,000 22,600,434
Rocky Planet
4 & 5 3 5 85 50,000 22,862,024
Metallic/ Crater Planet
2 3 5 85 50,000 22,651,059
Metallic, Crater Planet
1 4 4 85 50,000 22,466,859
Asteroid 1 4 4 65 12,500 22,680,858
Asteroid 2 3 5 65 12,500 23,800,284
Table 1: Final development includes structures listed in Table 2. Energy Tech.: 40 (Note: Crystal mines cost not included in asteroid to show a fair comparison versus other astros.)
All values shown unless stated is Without Commander Influence
Above is a list of astros with comparative cost of final end game development after 2-4 years. It
is not unreasonable to expect people to play as long as currently the game is running in its 5th
year. As you noticed above contrary to popular belief to construct the same structures on an
Asteroid versus a Rocky end game shows a negligible difference in price. The asteroid is the
better choice in this case to develop as tech improves. We are all about having options and the
asteroid gives you a choice of either further pursing development of construction and production
structures or economic structures. However understand that this advantage is not present in the
beginning with technology at zero and hence a well-rounded astro (Rocky planet) presenting
with the most amounts of resources would be the best option at start.
So for the best gain initially start with 1 rocky planet to give you that initial fast development
boost without worrying about area and resources. These can later be converted into a high jump
gate logistics base. Again the limitation would be cost of defense but if you have 1 to maximum
two planets this will pose no problem to develop. Some people prefer fortresses on asteroids due
to the low cost of defense but if you plan on having a strong economy this can really hinder
crystal mine development and so I would prefer a moon as a first choice to build on. The next 11
astros can be developed on rocky moons. The planet area will be useful as the first astro
usually needs to develop everything from construction, research to economy. The next 11 being
moons will be less costly to develop compared to the planet. Structures such as biosphere
modification and defense (P. Rings and P. Shields) will be less expensive as well. This is
especially helpful when initially gaining credits will be a tedious process involving simming,
attacking and gaining occupations for credits. One of the crucial steps in game is speed of
development and sadly the asteroid though long term is good can become expensive and difficult
to develop in the beginning. If however you are already part of a guild with a large group of
friends trying to create a stronghold galaxy then perhaps you can attempt developing asteroids
while at the same time developing crystal mines at the earliest which can help give a much
needed boost to economy; the downside being presenting an attractive target for opponents
looking for early profit. Remember others will be competing along with their friends so slow
development can also burden your friends/guild as well. The last 9 bases should be developed
on asteroids. Once the initial 12 astros are built you will now be in a comfortable position to
start developing long term. Also since the initial 12 astros are rocky you will be able to develop
your 12 linked research bases on them as they will not be hindered as much by lack of area. The
10 asteroids should be able to present you with further options. End game Linking 16 bases is a
viable option and as such 4 asteroids can be used to setup research bases with a few crystal mines
cost allowing. All the above astro development costs have been shown with 33 research labs
each. So the difference between the asteroid and rocky is not enough to warrant not having
asteroids in your build as end game you will be having a fleet that easily surpasses a 100 million
and would be generating about 100 million or over in profit. That makes a difference of 1-2
million negligible. If you have a choice between a position 1 or 2 astro always choose position
1 as cost associated with energy (Antimatter, Fusion plant) which is the second most costliest
base structure end game after area (Multi-level platforms and Terraforms) will make it cheaper
especially if you don’t intend to take energy as high as level 40.
Make sure you read the other guides on how to survive the initial scramble or find your-self an
experienced set of friends and join them. Bigger the guild, better are the chances of survival.
Below is what I have listed as final development of 21 bases essential structures.
Advancing on the 30/26/20/15, 26/10 Rule:-
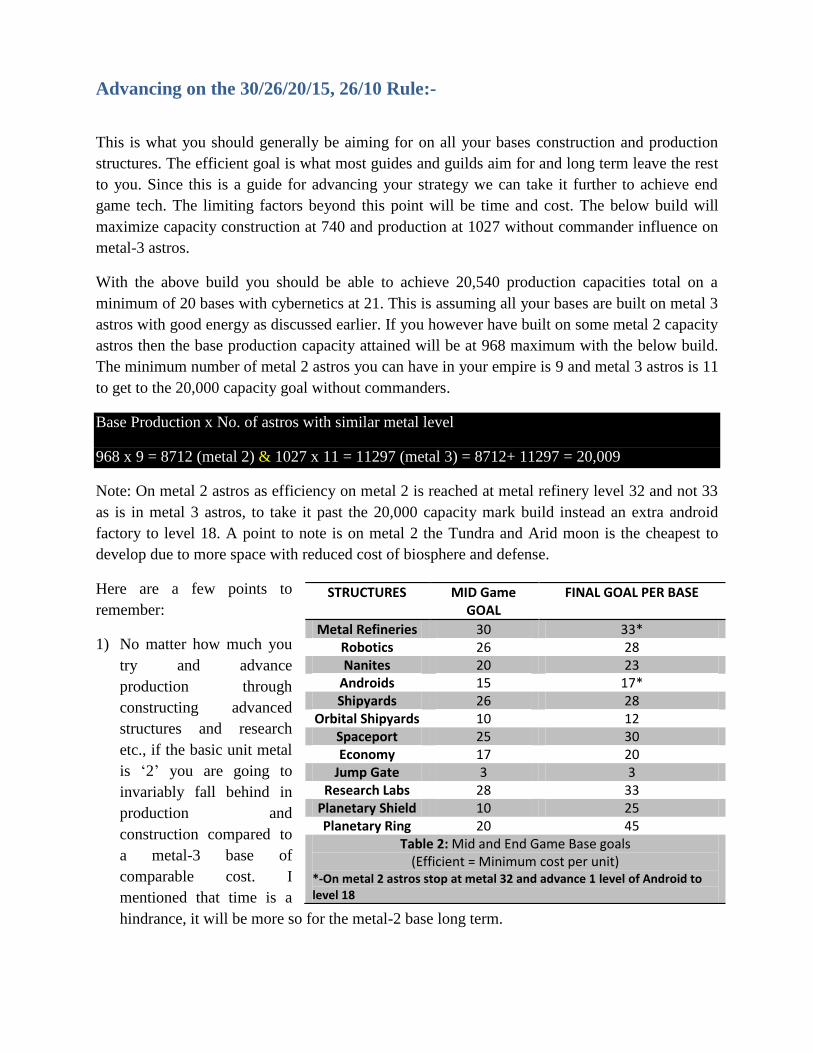
This is what you should generally be aiming for on all your bases construction and production
structures. The efficient goal is what most guides and guilds aim for and long term leave the rest
to you. Since this is a guide for advancing your strategy we can take it further to achieve end
game tech. The limiting factors beyond this point will be time and cost. The below build will
maximize capacity construction at 740 and production at 1027 without commander influence on
metal-3 astros.
With the above build you should be able to achieve 20,540 production capacities total on a
minimum of 20 bases with cybernetics at 21. This is assuming all your bases are built on metal 3
astros with good energy as discussed earlier. If you however have built on some metal 2 capacity
astros then the base production capacity attained will be at 968 maximum with the below build.
The minimum number of metal 2 astros you can have in your empire is 9 and metal 3 astros is 11
to get to the 20,000 capacity goal without commanders.
Base Production x No. of astros with similar metal level
968 x 9 = 8712 (metal 2) & 1027 x 11 = 11297 (metal 3) = 8712+ 11297 = 20,009
Note: On metal 2 astros as efficiency on metal 2 is reached at metal refinery level 32 and not 33
as is in metal 3 astros, to take it past the 20,000 capacity mark build instead an extra android
factory to level 18. A point to note is on metal 2 the Tundra and Arid moon is the cheapest to
develop due to more space with reduced cost of biosphere and defense.
Here are a few points to
remember:
1) No matter how much you
try and advance
production through
constructing advanced
structures and research
etc., if the basic unit metal
is ‘2’ you are going to
invariably fall behind in
production and
construction compared to
a metal-3 base of
comparable cost. I
mentioned that time is a
hindrance, it will be more so for the metal-2 base long term.
STRUCTURES MID Game GOAL
FINAL GOAL PER BASE
Metal Refineries 30 33* Robotics 26 28 Nanites 20 23
Androids 15 17* Shipyards 26 28
Orbital Shipyards 10 12 Spaceport 25 30 Economy 17 20
Jump Gate 3 3 Research Labs 28 33
Planetary Shield 10 25 Planetary Ring 20 45
Table 2: Mid and End Game Base goals (Efficient = Minimum cost per unit)
*-On metal 2 astros stop at metal 32 and advance 1 level of Android to level 18
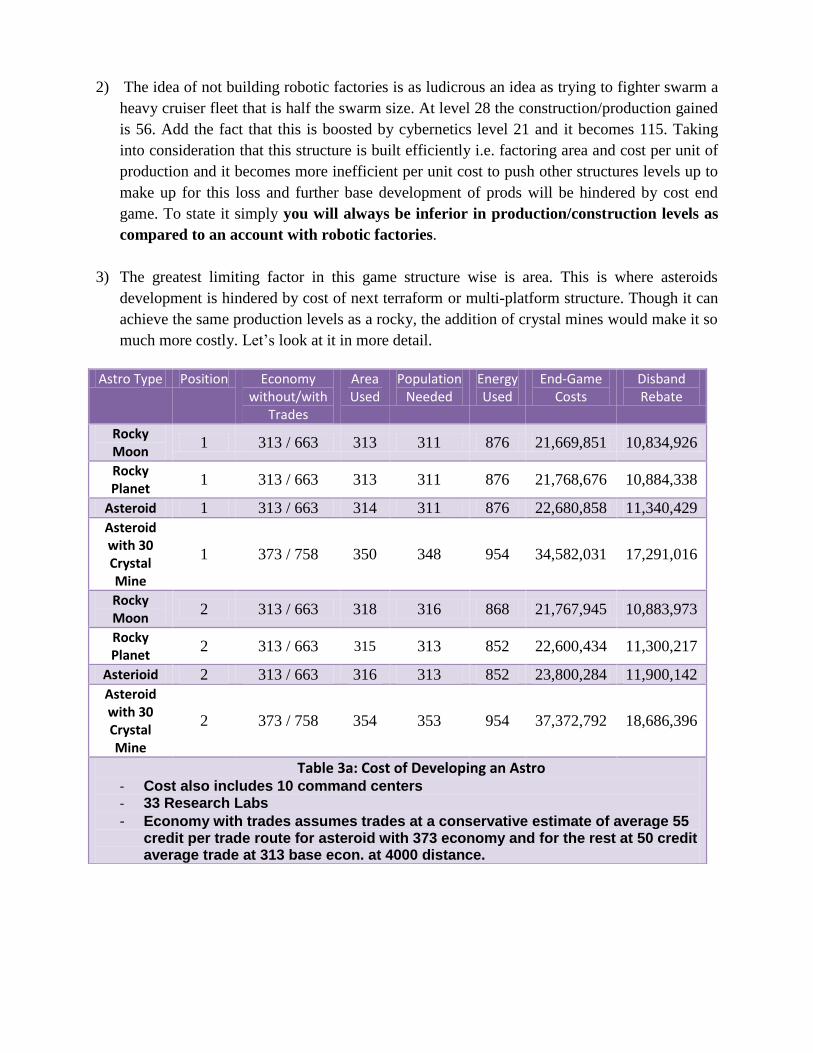
2) The idea of not building robotic factories is as ludicrous an idea as trying to fighter swarm a
heavy cruiser fleet that is half the swarm size. At level 28 the construction/production gained
is 56. Add the fact that this is boosted by cybernetics level 21 and it becomes 115. Taking
into consideration that this structure is built efficiently i.e. factoring area and cost per unit of
production and it becomes more inefficient per unit cost to push other structures levels up to
make up for this loss and further base development of prods will be hindered by cost end
game. To state it simply you will always be inferior in production/construction levels as
compared to an account with robotic factories.
3) The greatest limiting factor in this game structure wise is area. This is where asteroids
development is hindered by cost of next terraform or multi-platform structure. Though it can
achieve the same production levels as a rocky, the addition of crystal mines would make it so
much more costly. Let’s look at it in more detail.
Astro Type Position Economy without/with
Trades
Area Used
Population Needed
Energy Used
End-Game Costs
Disband Rebate
Rocky Moon
1 313 / 663 313 311 876 21,669,851 10,834,926
Rocky Planet
1 313 / 663 313 311 876 21,768,676 10,884,338
Asteroid 1 313 / 663 314 311 876 22,680,858 11,340,429
Asteroid with 30 Crystal Mine
1 373 / 758 350 348 954 34,582,031 17,291,016
Rocky Moon
2 313 / 663 318 316 868 21,767,945 10,883,973
Rocky Planet
2 313 / 663 315 313 852 22,600,434 11,300,217
Asterioid 2 313 / 663 316 313 852 23,800,284 11,900,142
Asteroid with 30 Crystal Mine
2 373 / 758 354 353 954 37,372,792 18,686,396
Table 3a: Cost of Developing an Astro - Cost also includes 10 command centers - 33 Research Labs
- Economy with trades assumes trades at a conservative estimate of average 55 credit per trade route for asteroid with 373 economy and for the rest at 50 credit average trade at 313 base econ. at 4000 distance.
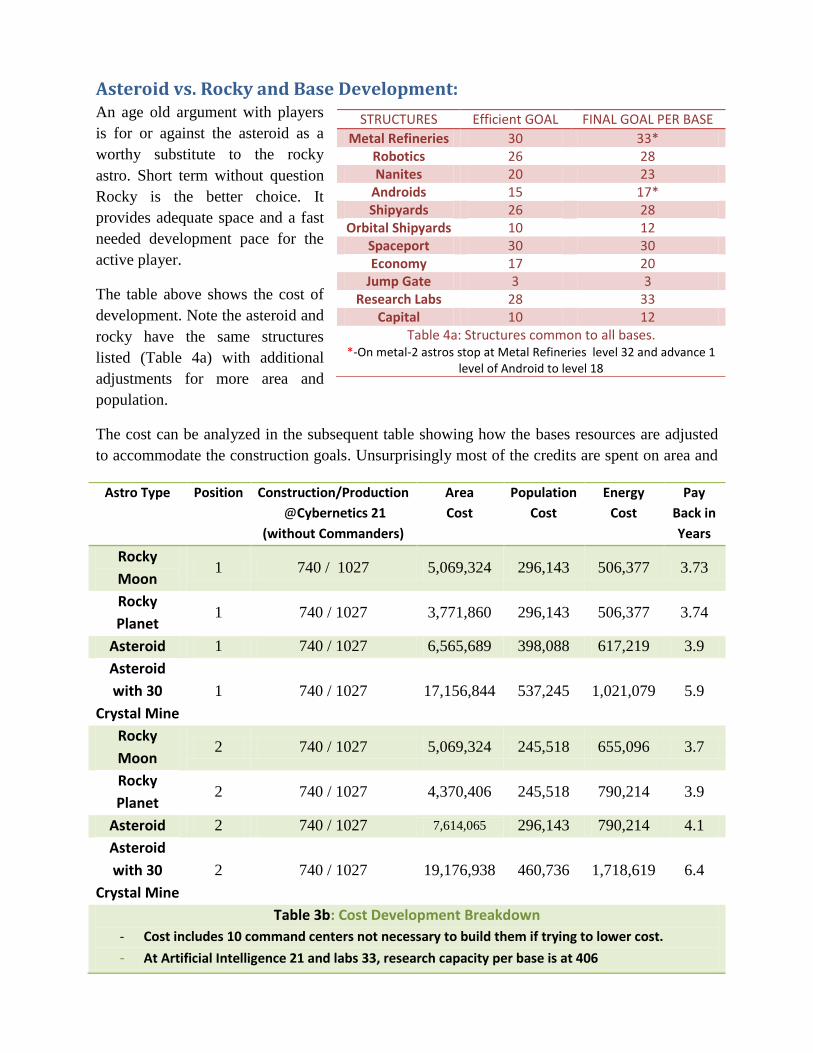
Asteroid vs. Rocky and Base Development: An age old argument with players
is for or against the asteroid as a
worthy substitute to the rocky
astro. Short term without question
Rocky is the better choice. It
provides adequate space and a fast
needed development pace for the
active player.
The table above shows the cost of
development. Note the asteroid and
rocky have the same structures
listed (Table 4a) with additional
adjustments for more area and
population.
The cost can be analyzed in the subsequent table showing how the bases resources are adjusted
to accommodate the construction goals. Unsurprisingly most of the credits are spent on area and
STRUCTURES Efficient GOAL FINAL GOAL PER BASE
Metal Refineries 30 33* Robotics 26 28 Nanites 20 23
Androids 15 17* Shipyards 26 28
Orbital Shipyards 10 12 Spaceport 30 30 Economy 17 20
Jump Gate 3 3 Research Labs 28 33
Capital 10 12 Table 4a: Structures common to all bases.
*-On metal-2 astros stop at Metal Refineries level 32 and advance 1 level of Android to level 18
Astro Type Position Construction/Production
@Cybernetics 21
(without Commanders)
Area
Cost
Population
Cost
Energy
Cost
Pay
Back in
Years
Rocky
Moon 1 740 / 1027 5,069,324 296,143 506,377 3.73
Rocky
Planet 1 740 / 1027 3,771,860 296,143 506,377 3.74
Asteroid 1 740 / 1027 6,565,689 398,088 617,219 3.9
Asteroid
with 30
Crystal Mine
1 740 / 1027 17,156,844 537,245 1,021,079 5.9
Rocky
Moon 2 740 / 1027 5,069,324 245,518 655,096 3.7
Rocky
Planet 2 740 / 1027 4,370,406 245,518 790,214 3.9
Asteroid 2 740 / 1027 7,614,065 296,143 790,214 4.1
Asteroid
with 30
Crystal Mine
2 740 / 1027 19,176,938 460,736 1,718,619 6.4
Table 3b: Cost Development Breakdown
- Cost includes 10 command centers not necessary to build them if trying to lower cost.
- At Artificial Intelligence 21 and labs 33, research capacity per base is at 406
the discounts offered by biosphere modification and defensive p-rings and p-shields in smaller
asteroids do little to help especially as cost of area almost doubles and triples past level ‘13’
multi-level platform. For the most part costs are relatively similar when comparing an asteroid to
a rocky moon. The difference is seen when building extra crystal mines with the intention of
boosting economy further.
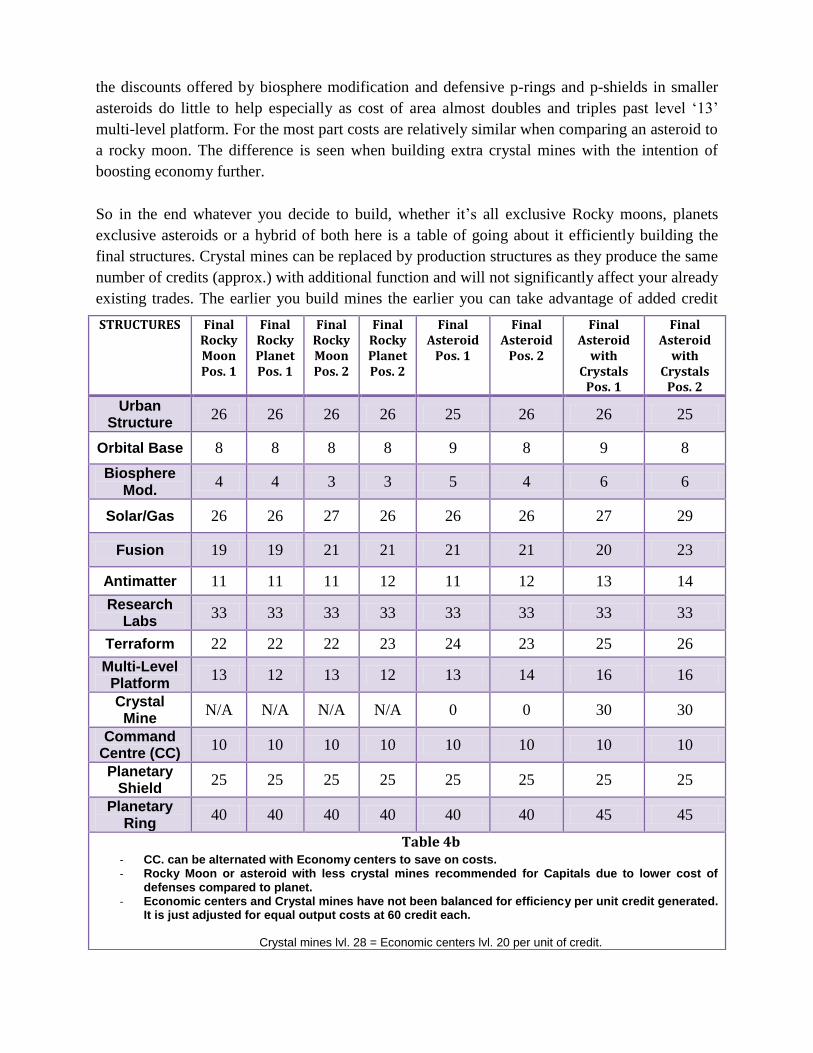
So in the end whatever you decide to build, whether it’s all exclusive Rocky moons, planets
exclusive asteroids or a hybrid of both here is a table of going about it efficiently building the
final structures. Crystal mines can be replaced by production structures as they produce the same
number of credits (approx.) with additional function and will not significantly affect your already
existing trades. The earlier you build mines the earlier you can take advantage of added credit
STRUCTURES Final Rocky Moon Pos. 1
Final Rocky Planet Pos. 1
Final Rocky Moon Pos. 2
Final Rocky Planet Pos. 2
Final Asteroid
Pos. 1
Final Asteroid
Pos. 2
Final Asteroid
with Crystals
Pos. 1
Final Asteroid
with Crystals
Pos. 2
Urban Structure
26 26 26 26 25 26 26 25
Orbital Base 8 8 8 8 9 8 9 8
Biosphere Mod.
4 4 3 3 5 4 6 6
Solar/Gas 26 26 27 26 26 26 27 29
Fusion 19 19 21 21 21 21 20 23
Antimatter 11 11 11 12 11 12 13 14
Research Labs
33 33 33 33 33 33 33 33
Terraform 22 22 22 23 24 23 25 26
Multi-Level Platform
13 12 13 12 13 14 16 16
Crystal Mine
N/A N/A N/A N/A 0 0 30 30
Command Centre (CC)
10 10 10 10 10 10 10 10
Planetary Shield
25 25 25 25 25 25 25 25
Planetary Ring
40 40 40 40 40 40 45 45
Table 4b - CC. can be alternated with Economy centers to save on costs. - Rocky Moon or asteroid with less crystal mines recommended for Capitals due to lower cost of
defenses compared to planet. - Economic centers and Crystal mines have not been balanced for efficiency per unit credit generated.
It is just adjusted for equal output costs at 60 credit each.
Crystal mines lvl. 28 = Economic centers lvl. 20 per unit of credit.
boost to economy. Late game trying to keep mines is costly.
You may wonder at why there are so many planetary shields and rings? If you are in a dominant
guild on the server then the home territory is where your members are the safest and any guild
would be foolish to attempt invading it. Minimal defense such as 5 p. shields to 20 p. rings can
be employed. I’ve seen 10 shields to 10 rings at times on 450+ economy base located in a guild
stronghold.
However if like most of us you are outside the guild stronghold or located in enemy territory
chances are you’re going to get hit and the faster you free yourself the quicker you can develop.
On average base economies can range from 275 to 312 on a rocky and 310 to 375 on an asteroid.
For crystal bases their economies can easily reach 400+ end game. So a good defense is never a
bad thing especially when you do not know which guild you’re going to end up being in 1-2
years from now..
Spontaneous adaptability is the key to a warrior’s survival. -- Suro Mike Inay
No matter how comfortable you are in a guild and how close your friends are, there can be only 1
top guild. The choice is ally with the top and be a part of its family or derb your way to the top.
Beginning game guilds only 1 or 2 survive to the end game. Many merge and re-merge which I
call evolving to what it becomes eventually. Those who cannot handle change or are resistant to
it invariably die out. Those who are flexible survive to see its end.
Remember profit is profit and if your base gives half a days’ worth of total economy in pillage
you can expect people to hit it.
P-Rings and P-Shields: People often times underestimate the value of p-shields building it at level 1 (5 units) and
concentrating more on p-rings at level 4 (20 units). P-shield though not an attack unit allows for
the damage given by an attacker to be distributed, absorbing a part of it and in effect protecting
P-rings. If the fighter swarm did not exist in this game the role of a p-shield would be minor. A
well teched fighter swarm can hit a base for very good ratios meaning minimal loss at 10,000 to
100,000 credits and thus many players ignore the p-ring and p-shield past 20 units as they feel
building more of the unit is tactically pointless as the defense offered is not much and in the case
of the p-ring is an energy hog.
The presence of p-shields however necessitates a higher number of fighters in a swarm to be
present in order to take the base in 1 wave. For every wave it takes to break the defense, the
lower the profit margin due to loss of attack fleet. So we try to make our base unattractive by
setting the bar for a minimum number of fighters in a swarm to attack in one wave higher. In late
game scenarios it can be easily assumed that non-swarm fleet will carry a set ratio of fighters to
main fleet and the sizes can reach around 4 to 5 million fighters.
Against most ships rings do a lot of damage which includes cruisers as well especially when
coupled with p-shields. However against a well teched fighter swarm (most profitable unit in the
game per credit spent) they are almost useless. So the best solution for this is building the
minimal amount of defense which ensures that the base pillage based on base economy gives a
loss to the attacker. However you cannot ever build enough defenses to protect the bonus pillage
which is based on credits available. So the best thing to do is to bank them away in construction
and research as much as possible.
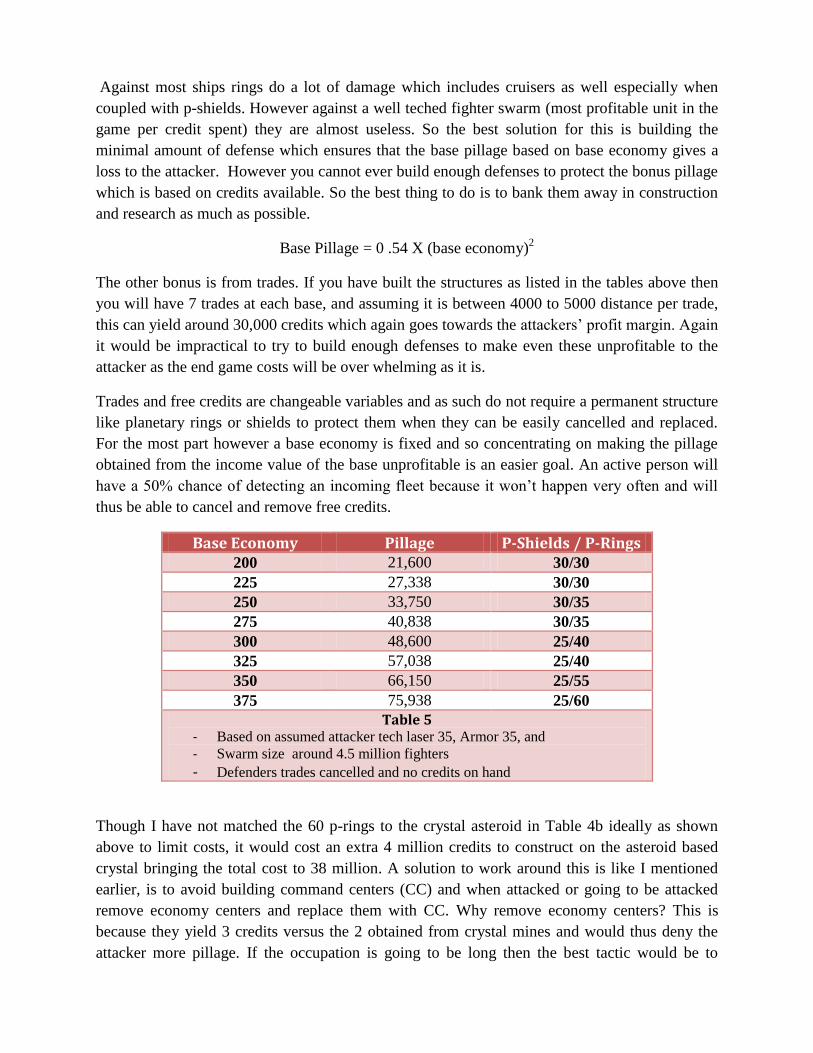
Base Pillage = 0 .54 X (base economy)2
The other bonus is from trades. If you have built the structures as listed in the tables above then
you will have 7 trades at each base, and assuming it is between 4000 to 5000 distance per trade,
this can yield around 30,000 credits which again goes towards the attackers’ profit margin. Again
it would be impractical to try to build enough defenses to make even these unprofitable to the
attacker as the end game costs will be over whelming as it is.
Trades and free credits are changeable variables and as such do not require a permanent structure
like planetary rings or shields to protect them when they can be easily cancelled and replaced.
For the most part however a base economy is fixed and so concentrating on making the pillage
obtained from the income value of the base unprofitable is an easier goal. An active person will
have a 50% chance of detecting an incoming fleet because it won’t happen very often and will
thus be able to cancel and remove free credits.
Base Economy Pillage P-Shields / P-Rings 200 21,600 30/30
225 27,338 30/30
250 33,750 30/35
275 40,838 30/35
300 48,600 25/40
325 57,038 25/40
350 66,150 25/55
375 75,938 25/60
Table 5 - Based on assumed attacker tech laser 35, Armor 35, and
- Swarm size around 4.5 million fighters
- Defenders trades cancelled and no credits on hand
Though I have not matched the 60 p-rings to the crystal asteroid in Table 4b ideally as shown
above to limit costs, it would cost an extra 4 million credits to construct on the asteroid based
crystal bringing the total cost to 38 million. A solution to work around this is like I mentioned
earlier, is to avoid building command centers (CC) and when attacked or going to be attacked
remove economy centers and replace them with CC. Why remove economy centers? This is
because they yield 3 credits versus the 2 obtained from crystal mines and would thus deny the
attacker more pillage. If the occupation is going to be long then the best tactic would be to
remove all economy centers and replace with CC instead of just 10. The saved credits to space
and area resources would also help in being able to build 50 to 60 p-ring units. Beyond this point
improved tech in armor, photon and shielding should improve p-rings and p-shields defense
capability a little more.
Always keep only 1 dreadnought over your base. Anything more is just profit. Any other fleet
type or ship type is profit. Keep anything lower than a dreadnought and chances are you might
find a small corvette or swarm fleet pirating trades. Remember it is not necessary to break p-
rings or p-shields to pirate trades.
Note: Hold out on building more than 10/20 or 10/30 p-shield/p-rings till you reach end
game. Structures on base take priority. Defending base becomes secondary after establishing the
standard 10/20 since economy in mid-game surpasses 300 only when you build crystal mines to
enhance economy. Rocky planets do not pass 300 econ without economy structures to assist and
even then only after most of end game construction is almost achieved.
Technologies: I’ll probably go into this in detail in another guide in addition to this one time allowing. I
however did want to make a mention of a few important points for new players to note.
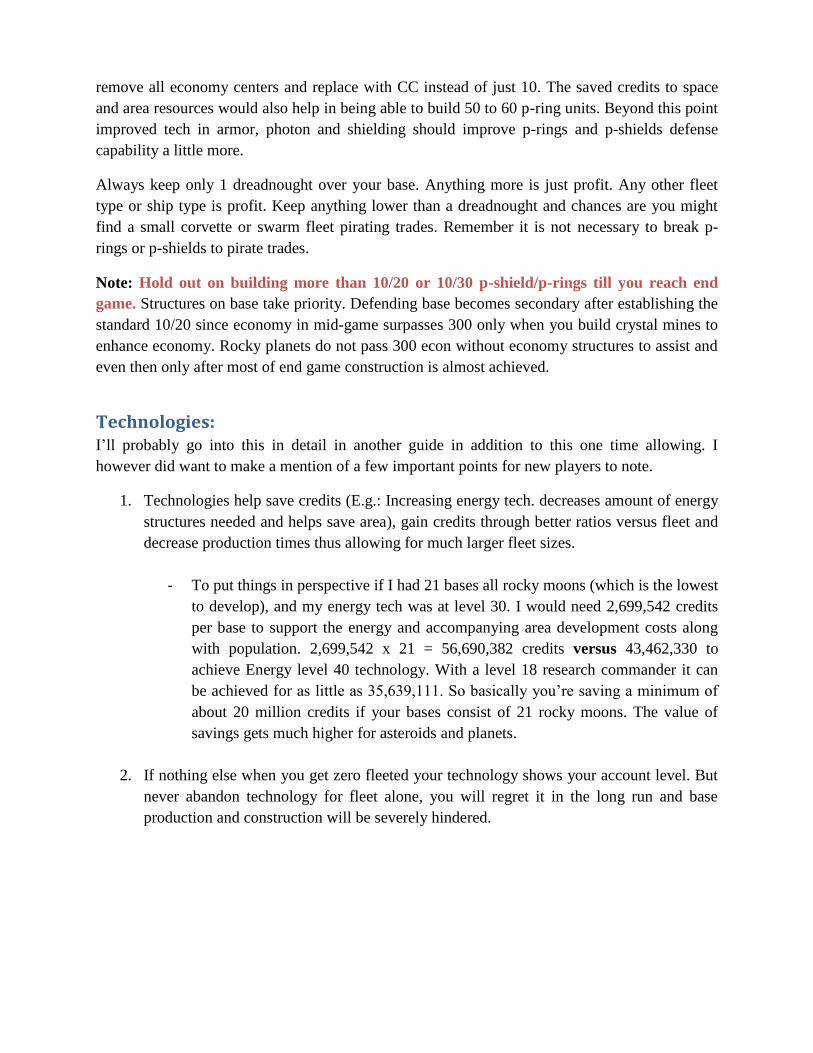
1. Technologies help save credits (E.g.: Increasing energy tech. decreases amount of energy
structures needed and helps save area), gain credits through better ratios versus fleet and
decrease production times thus allowing for much larger fleet sizes.
- To put things in perspective if I had 21 bases all rocky moons (which is the lowest
to develop), and my energy tech was at level 30. I would need 2,699,542 credits
per base to support the energy and accompanying area development costs along
with population. 2,699,542 x 21 = 56,690,382 credits versus 43,462,330 to
achieve Energy level 40 technology. With a level 18 research commander it can
be achieved for as little as 35,639,111. So basically you’re saving a minimum of
about 20 million credits if your bases consist of 21 rocky moons. The value of
savings gets much higher for asteroids and planets.
2. If nothing else when you get zero fleeted your technology shows your account level. But
never abandon technology for fleet alone, you will regret it in the long run and base
production and construction will be severely hindered.
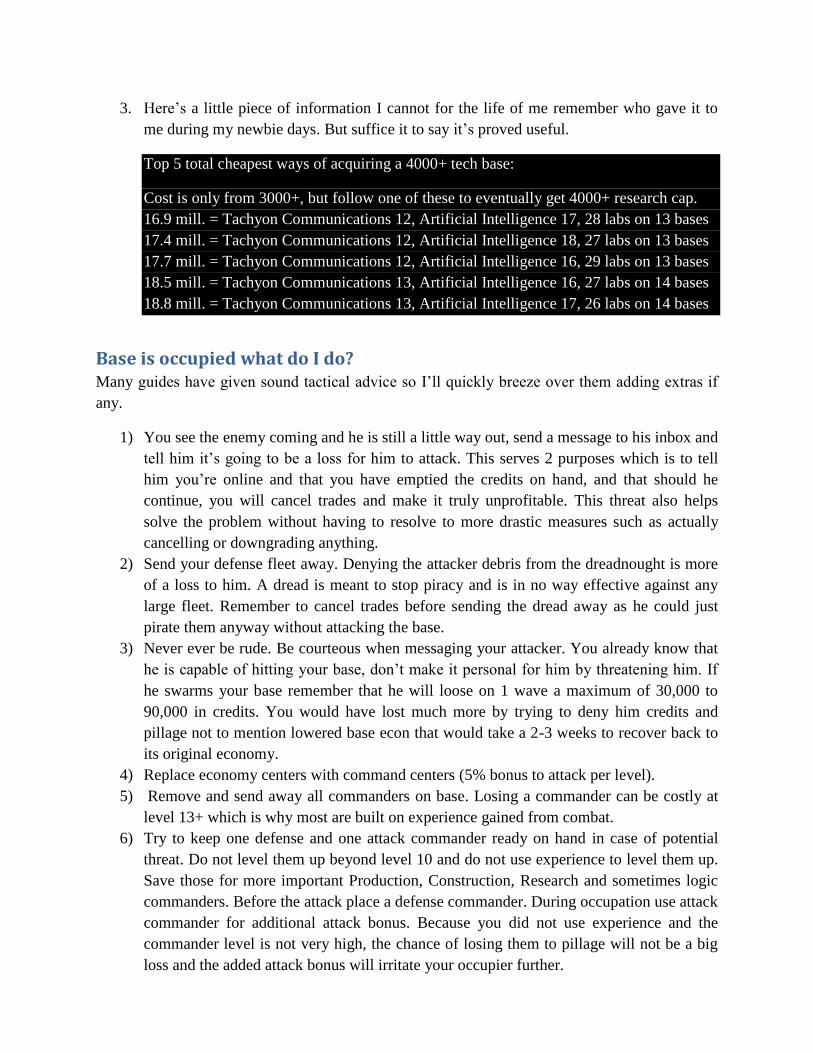
3. Here’s a little piece of information I cannot for the life of me remember who gave it to
me during my newbie days. But suffice it to say it’s proved useful.
Top 5 total cheapest ways of acquiring a 4000+ tech base:
Cost is only from 3000+, but follow one of these to eventually get 4000+ research cap.
16.9 mill. = Tachyon Communications 12, Artificial Intelligence 17, 28 labs on 13 bases
17.4 mill. = Tachyon Communications 12, Artificial Intelligence 18, 27 labs on 13 bases
17.7 mill. = Tachyon Communications 12, Artificial Intelligence 16, 29 labs on 13 bases
18.5 mill. = Tachyon Communications 13, Artificial Intelligence 16, 27 labs on 14 bases
18.8 mill. = Tachyon Communications 13, Artificial Intelligence 17, 26 labs on 14 bases
Base is occupied what do I do? Many guides have given sound tactical advice so I’ll quickly breeze over them adding extras if
any.
1) You see the enemy coming and he is still a little way out, send a message to his inbox and
tell him it’s going to be a loss for him to attack. This serves 2 purposes which is to tell
him you’re online and that you have emptied the credits on hand, and that should he
continue, you will cancel trades and make it truly unprofitable. This threat also helps
solve the problem without having to resolve to more drastic measures such as actually
cancelling or downgrading anything.
2) Send your defense fleet away. Denying the attacker debris from the dreadnought is more
of a loss to him. A dread is meant to stop piracy and is in no way effective against any
large fleet. Remember to cancel trades before sending the dread away as he could just
pirate them anyway without attacking the base.
3) Never ever be rude. Be courteous when messaging your attacker. You already know that
he is capable of hitting your base, don’t make it personal for him by threatening him. If
he swarms your base remember that he will loose on 1 wave a maximum of 30,000 to
90,000 in credits. You would have lost much more by trying to deny him credits and
pillage not to mention lowered base econ that would take a 2-3 weeks to recover back to
its original economy.
4) Replace economy centers with command centers (5% bonus to attack per level).
5) Remove and send away all commanders on base. Losing a commander can be costly at
level 13+ which is why most are built on experience gained from combat.
6) Try to keep one defense and one attack commander ready on hand in case of potential
threat. Do not level them up beyond level 10 and do not use experience to level them up.
Save those for more important Production, Construction, Research and sometimes logic
commanders. Before the attack place a defense commander. During occupation use attack
commander for additional attack bonus. Because you did not use experience and the
commander level is not very high, the chance of losing them to pillage will not be a big
loss and the added attack bonus will irritate your occupier further.
7) Use the right fleet to counter. For more information refer to a combat guide. But always
remember to try and use non shielded units as you can kill for better ratios. Smaller the
ship used to kill a bigger target more is the profit. Command centers at level 10 can boost
the power of your fighter and other fleet power by 50% which enables stellar units to
effectively give more damage to shielded units. Higher the command center levels and
attack commander (never higher than level10) more is the damage produced.
8) If not in the attacker’s guild dominated stronghold try and sneak recyclers in just before
spawning units to attack. For the most part he might be offline, and the debris you
produced by hitting his occupation fleet can be collected quickly at the tic (30 min. past
the hour every hour of server time regardless of time of attack). If you hit him at 9:28,
you can collect at 9:30 and be of before he realizes. The next pickup time will be at 10:30
and so on. Never try and keep recyclers in the same galaxy as the attacker might take the
trouble of scouting around for where you parked your fleet.
9) Every good guild has a database which includes a collection of bases scouted. They can
refer to this list anytime they want which means assume they know all your base
locations. If you park your recyclers or attack fleet over an astro in a neighboring galaxy,
they will check there first and hit you. Keep it a little farther away and sneak them in
when you need to attack.
10) Keep them guessing as to when you will attack their occupation fleet. Don’t set a
predictable time of attack
11) Don’t put language spoken in your guild page as a country flag seen on the lower right
hand corner as it is a sign of a player who most likely is on that countries time zone and
his activity time can be more accurately guessed. This is also a way for you to assess his
location and online time.
12) The best occupation force is around 3000 - 5000 fighters and a small HC unit of 500 or
200 battleships or 1 Leviathan (It is wise to consider the level of the person you are
occupying and take note of the structures built on base and accordingly add occupation
fleet). The defender (you), though will be making profitable hits will never be able to hit
past the fighters to get at the capital unit with smaller non-shielded units, while larger
units would take time to produce which would still be harder to produce in sufficient
numbers to remove the entire fleet. In such cases you have two options. The first is to
sneak in a big enough fleet from your main fleet to remove the occupation force. Second
option is if your production ques are empty then use all you bases to produce the required
fleet and gather them at one location to make a big enough fleet unit to attack at once.
Use the time method hinted below to spawn fleet at the same time regardless of differing
production times.
Hint: Production on all bases can be done by inputting normal numbers, by time e.g.
100h or 30m or 2000s. Another way to que large amounts of fleet is 10 raised to number
of zeroes written like this 10E3 = 10,000 units to produce.
Standard tactics to avoid being hit are making your base appear unprofitable (All war is
deception. - Sun Tzu). If your activity level is good and detect someone approaching, you are at
least in a position to get rid of your credits and drop trades. All that’s left is base economy. You

can downgrade crystal mines or economy centers to replace them with command centers. If you
have developed your bases well and have around 640 construction capacity, you can have them
back in very little time.
Downgrading economic centers just before the attack ensure lower pillage based on base
economy and increasing the margin of loss to the attacker for breaking rings. Also if he plans to
occupy your base for a long time the lowered base economy will deny him daily income of 30%
of base economy and lower daily pillage (remember to always empty credits on hand to make the
pillage as low as possible). Once you have freed the occupation you can quickly replace the
command centers with economic centers. If you followed the tables above and have already
included the command centers then downgrading economy centers can help by replacing it with
even higher levels of command centers giving an even harder time to the occupier.
Scanners are your best friends in an upgraded account. Hit them to scan when you log on and
just before you log off.
Fleet over Base is going to be attacked!!! i) Move fleet away especially if only stellar units or if directly landing on base and not
neighboring base.
ii) The Nasty Surprise: if you see recyclers incoming very close to target main fleet few
seconds apart, wait for target to land and keep three screen windows open. In one go to
your fleet screen and choose all stellar units to be ready to move in one click (especially
recyclers) with safe far away destination coordinates already inputted. In the other screen
select your shielded warp units like HC and higher to be ready to move to players
neighboring landing zone. Now in third screen watch incoming fleet land and then keep
your base astro open and wait with finger constantly pressing F5 after the person lands on
his landing zone.
Keep pressing F5 till you see him take off to land on your base with his attack fleet. Five
seconds before he lands move to your other screens and press move on both screens.
Make sure that hangar spaces selected before match with fighters etc., and there is no
fault with being able to move. Before he realizes what’s happening, your weak units are
gone while your strong units are heading towards his recyclers at less than a second since
you launched from a jump gate. Kill his recyclers and support units if it’s profitable and
you have nearly no losses. Leave system for a long and far non jump gate flight to safety.
He has lost recyclers and will be angry. He cannot pick them up but will not leave and
guard it till one of his guild friends come to pick it. Your guild members and you, can
harass his friends or he with attack units and he won’t be able to sleep for fear of fleet
being derbed. If you have strong friends they can schedule to come and derb him or chase
him away after which you can risk recalling to pick up debris. This only works and is
worth it if loss to your fleet is less than 50,000 credits. Why? Because you would like to
make it unprofitable even after debris collection. If you move recyclers out early, the
attacker will know you are active and online. The recyclers being there is bait.
Another strategy which is easier is to move you’re stellar units at the last minute to take
advantage of the command centers on base to kill attackers drop fleet with shielded units.
This however requires that most or at least half your light units be carried by carriers or
are stellar units to freely allow use of shielded units such as battleships, heavy cruisers
etc.
Counter: If you’re the attacker to counter this leave recyclers in the air until after the
fleet is derbed. To test activity recall 5 seconds before landing and see if player moves.
NPC Fleet: Just a quick mention if you did not already know
- Two NPC’s, United Colonies(UC) and Drekons(Dre.)
o UC never attacks and has a medium level technology. Basically takes over an abandoned
free account with economy above 50.
o Can be occupied with a dreadnought and at the most spawns 12 Heavy cruisers at one
time. Using Leviathans allows for lower repair costs. Added economy is an advantage as
long as breaking the rings and shields is profitably possible.
o Drekons are more aggressive and have extremely high tech. Spawns numerous amounts
of fleet and aggressively initiates attack over base.
o As far as Drekons are concerned take advantage of their aggressiveness and just keep
required fleet over base for maybe drops etc. This will cause the Drekons to attack first
and will not cause your fleet unnecessary loss due to base defense (passive). They will
send fleet in the few millions, so advisable to keep a small fleet and wait for the next
wave to come in. Gives much higher pillages than UC and higher armor levels give more
debris.
Attacking Strategies and Tactics: Invincibility lies in the defense; the possibility of victory in the Attack. -- Sun Tzu
Tools: 1) Battle Calculator: Personal preference KaHaR’s calculator. I do not know him but his
calculator has been passed around the AE community and across servers. His calculator
falls under the following points for being the most successful
a. Easy to use
b. Copy and Paste enemy fleet type and tech which means very fast to use
c. Save multiple profiles which could be enemies or your own made up
d. Accurate
e. Comes with extra useful tools like travel calc. and debris splitter
Anyone one who says they do not need to use a calculator are just lying to themselves
or acting foolish because tech. levels change, CC levels change, fleet composition
changes. Here are a few simple questions to test yourselves if you think your one of
them
a) Which of the following three fleet types of equal cost can most profitably take out
10 million fighters of power and armor 5.5 / 5.5 assuming comparable tech for the
following choices
i. 120,000 heavy cruisers
ii. 30,000 Battleships
iii. 1200 Titans
iv. 300 Leviathans
b) Same question as above but now the fighters are located over the owners base and
are accompanied by 15 command centers.
c) Can 350,000 cruisers at 5.0 shielding power successfully attack the 10 million
fighters without command center?
o Run the above scenarios through a battle calculator for the answer.
Experienced players will be able to answer these without any problems if
they are actively playing the game.
2) Alarm preferably one around your wrist or in your phone
3) Access to the guild database (DB) of scouted player bases
Standard and Advanced Attacking Strategies:
1) Never attack anything out of anger unless its profitable. This game is all about maximum
profit, the more credits you get the more you grow.
2) Once target has been located access guild DB for the following reason
i. To see who the dominant guild in the area is
ii. Where is your nearest point of entry to target in the galaxy?
iii. If the point of entry has an enemy base located there or within the galaxy, is the
player upgraded or allied to target guild as they can warn friends?
iv. Is there perhaps a safe neighboring galaxy with an astro on the border closest to
the gate that you can land in unseen and slowly move towards jump gate?
3) Locate the dominant guild blob or other potential enemy guild blob location to know how
far they are from your potential target.
4) If the enemy average fleet size is larger than your fleet send scouts to nearby high level
jump gates to watch for potential threatening traffic. Can also be a good area to locate
more targets.
5) Never send scouts directly to enemy base location or same system. High probability of
being spotted and your target may run. Always send scouts to a neighboring system
within the same region.
Attack Tactics and Maneuvers:
i) Getting as close to a target as possible undetected
a) The best way to go about this is to find an empty friendly single base galaxy with
a high level jump gate (JG) that you can land and use. This of course is rare and
late game especially in an enemy stronghold galaxy is hard to find.
b) The more likely option is to find one or two non-upgraded free account enemy
bases located in the same galaxy. It’s hard for anyone to manually scan 21 free
base areas however they might bookmark the friendly JG entry point so make sure
to land on the neighboring astro to the friendly JG. There is a 50% chance of
being discovered depending on how often the person checks enemy JG’s.
c) The next best option is to land in a neighboring region that’s completely free of
bases or second best option a region with one enemy free account base. This is
because since the area has no bases the enemy is going to not check it unless
asked to. And since the account is free chances are he will not check every system
to see if it has someone incoming since most people think that no one will try and
do that. Once you land move to the friendly jump gate.
d) If system is heavily guarded then land in a neighboring galaxy friendly high level
jump gate and then move to target galaxy friendly jump gate. The idea is to
minimize flight time and consequently detection time giving less time for target to
get spooked and run.
e) Never attack an enemy scout unless it just appeared. Scouts are just for eyes in a
galaxy if the guild can’t afford a base in that area. Since it was there before you
decided to land in the area chances are the person will not check it twice daily
every single day. However if the person is known to be extremely active or using
a script to detect incoming then your options are limited but still do not attack
the scout if you’re not sure you have been detected. The minute you attack the
scout there will be a nice red message in the enemy inbox alerting the player
immediately who will send another scout to investigate. The sure sign of detection
is when more than one player from the same guild or non-allied guilds sends
scouts to view your landing party.
ii) Now that you have landed in the galaxy where and when do you land ideally next to the
enemy? The answer is in any neighboring astro in the same position i.e. 1,2,3,4 or 5
depending on the position of the enemy base. This is because the travel time from a same
position astro as the enemy is on average less than a minute than compared to a
neighboring position astro. This lowered time helps facilitate making faster drops and
moving your fleet to and from target base for the perfect sequence of waves. You land 3
-5 minutes before the recycler pickup time (constant) that I explained earlier i.e. 30
minutes after the hour with pickup cycles being every 60 minutes from last pickup.
iii) Never land your recyclers next to your enemy. Keep them 5 minutes behind if you’re not
sure how long you’re going to take to finish drops and end the attack. However if you
have to do multiple drops or depend on others to assist you in taking out a target or more
than one fleet located on base then it’s best to move recyclers after attack is complete.
This is because if the target is active and you land with recyclers he will have jump gate
support and can move to your landing zone instantaneously. So he will wait for you to
land and then while you move in your attack fleet over his base will suddenly send off his
non-combat fleet and rush your now defenseless recyclers seconds before your landing.
What was once an ideal target will now be a nasty surprise because when you land you
will look to attack only to find the base empty and a red message in your inbox showing
that your recyclers and non-combat fleet were derbed. So keep your recycler in the air or
at the main landing zone till the target is eliminated.
iv) Know what you can hit and what your limitations are. A battleship can hit a frigate fleet
for very good profit. The question however is when? Ideally a frigates target is a
battleship and below spec. fleet. This is where shielding in important to understand.
Unlike armor which is resistance, shielding stops an attackers power from reaching and
allows for only 1% bleed through. So when a frigate fleet has less that 30 attack power
and the battleship shielding is at 22, most of the attack is absorbed and now becomes
weak. The battleship will then essentially massacre the frigate fleet. A frigate fleet also
depends on fighters to spread the attack damage it receives, kind of like its own version
of shielding. So when there is not enough fighters to support its attack the battleship will
turn the tables and massacre the frigate ship. This is why as a battleship spec its essential
to drop all fighter on a larger than ideal frigate fleet size as its not needed as meat to bring
down the frigate fleet to an ideal level of 1 wave or 2 wave attack. A battleship starts at a
shielding of level 8 which gives it shield power of 14. So a mediocre teched frigate fleet
at power 25 is more than enough when dealing with them. However late game tech level
averages for players is much higher. This same principle can also be applied to cruiser
and fighters and cruisers and dreadnoughts.
v) Send a scout quickly to target to get tech information. This is achieved by initiating the
attack until you come to the start attack screen which shows defenders and attackers fleet
information. Copy and paste this information somewhere in a notepad or your notes
section provided in game. Move your scout away immediately. The last thing you want to
do is alert your target. This information then can be used to run simulations on the battle
calculator to help maximize profits and prevent you from making a useless costly hit.
You can then decide whether to drop and then finish would yield better results or would a
naked hit (without shielding units (meat) i.e. fighter, corvettes etc that help protect loss to
main fleet which can be frigs, heavy cruisers and above) by heavily shielded or capital
units give better ratios and prevent taking too much losses. The idea behind this is smaller
units can be replaced more quickly than larger units. Of course this does not help if the
amount of smaller units lost costs as much as the larger units, as production does not
necessarily depend on unit type but rather on total cost. So to produce 7 million worth of
fleet takes the same time whether its corvettes or leviathans. The idea however is that
larger units can survive on their own and still make excellent hits than compared to
smaller units which have a high attrition rate and whose attack depends on killing the
enemy with overwhelming numbers (swarm). Think of a fighter swarm as a group of
wasps and a leviathan as an elephant to give you an idea. A large enough group of wasps
can take on an elephant. The other reason is on average you produce a lot more of your
main fleet type and a lot less of your meat units to shield the main fleet units, so to
replace the smaller meat unit’s size will on average take less time.
vi) It’s not necessary to break planetary defense shield and rings to make hitting fleet over
base profitable unless it’s unavoidable. This is especially true over a fortress base. Use
the calculator to determine how much fleet to use ideally. Breaking p-rings is never
profitable enough to warrant attempting it unless unavoidable or you know person is
having a large amount of credits on hand. E.g. Enemy base has corvette 100,000, heavy
bombers 200,000, recycler 300,000 with p-shield 30, p-ring 60 and 25 command centers.
Using a battle calculator you can make an ideal fighter drop to remove only fleet or just
swarm the entire base. The difference is a 2 million profit. Both hits look good but only 1
makes you that much richer and that much ahead in the game. That the difference
between a noob and a professional. No matter how good the latter is, he double checks
just to be sure. The former is too lazy to be bothered and doesn’t care as long as he makes
a hit and looks good on the board i.e. until the good players in the guild scold him for
such an awful move. The attacker cannot attack your recyclers or fleet with planetary
defense. The defense is passive and works only when the base is attacked. There is
nothing to be afraid of with 1 dreadnought over a base. You do not have to kill it if it
means getting hit by the large p-rings. If he attacks you then the loss is insignificant at
3,000 credits and you can pirate his trades. He will not risk it though he may cancel his
trades and move his dreadnought away to prevent further losses anyway if he’s smart.
vii) Though profit is profit if you’re going to hit a target at a 1:1 ratio or close to it then it’s
not worth it. All you’re doing is denying a future potential target to yourself if he moves
off base and you’ve lost that much time replacing the fleet used to kill the target. Unless
in war and a tactically viable move don’t bother.
viii) Taking over bases is a good and quick method of gaining credits. The best occupation
force is anywhere between 3,000 to 5,000 fighters and a 500 heavy cruisers or 200
battleships. This ensures that the defenders small stellar units though will hit for profit
cannot penetrate enough to do any significant damage to your main units. Fighters are
easily replaceable. Just make sure to periodically collect debris to make it worthwhile.
It’s not really profitable until the debris is collected.
ix) Activity is the key to success. The most important commodity in this game is
information. A guild leader who cannot form informants or have access to information is
doomed to failure no matter how good his organizational skills are.
Blob Warfare:
Few things to remember
i. The attacking guild will always be larger because defenders have the 5 second
advantage and can use this before the attacker has a chance to attack.
ii. If the attacking guild is 25% larger then it will be a complete and certain loss to
the defender fleet unless they have the backing of capital stacks that can even the
ratios. For large guild (100+ players), every 11th
player if hes a capital stacker is a
good ratio. If smaller than 50 player then every 6th player should be a capital
stacker.
iii. Capital stacks need to be fed ready credits before a crash to help them with repair
costs.
iv. Capital stacks are the cleanup crew and as such never make the first crash but
follow a little later.
v. It’s up to every other spec in the guild to focus on hitting anti-capital fleets which
include heavy cruisers and battleships while trying to destroy enemy stacks so
they don’t suicide to get a 1:1 ratio against weaker sides stacks.
vi. Capital stacks are not as important is larger attack blobs as compared to smaller
defensive blobs.
vii. Once the defensive blob first wave has taken care of the majority of anti-capital
stacks, the left over unshielded unit stacks such as frigate and cruiser stacks etc
are to be left to the Capital stacks to cleanup.
viii. To identify the inactive in a defenders blob, look for recyclers in fleet. That is a
good indication of inactivity.
ix. Spies are always present on both sides. Be sure to pass sensitive information via
personal messages.
x. Always instruct members and allies to change log in passwords to prevent account
hijacks and suicides before joining the blob.
xi. If an ally is not on the blob chances are they will not be unless things are going
well
xii. If the odds are completely stacked up against the defender then scatter to
respective fortress bases. Do not try to run away as a blob or you will be caught
by the bigger blob. Also by landing on fortress bases the higher number of
command centers will even the odds and reduce profit ratio for attacker who will
also have to scatter. Gives time to go into vacation mode as well
xiii. Scattering will make the inactive food for the active enemy. That’s why decide on
the strategy early. If you cannot hold out then give early orders to scatter and let
the few with high recyclers derb the inactive eat and split instead of feeding the
already huge enemy.
xiv. Large blobs are hard to control for both sides and is actually worse for the
attacker. The longer the staring contest the greater the chance of inactivity.
Greater inactivity means greater chances of winning for the defenders.
xv. Just before the time of the crash attacker should launch keep a fighter behind,
derb the fighter and recall to change fleet ID’s.
xvi. Make one fake attempt at a launch and recall. This is to ensure any names
changed will now remain that way as they cannot be changed for seven days to try
and cause confusion.
xvii. Add targets to contact list with real names. This helps identify the player even
after name changes.
xviii. Change your name just before landing. Use special character letters in name so
that using conventional browser find techniques and typing the name will yield
negative search result. Eg: “Carnage” is easy to find but “Çárñágè” is difficult
unless copy and pasted and that takes time. Try it. (Note: Chrome updated to
recognize characters in browser search.)
To solve this open a few browser windows press ctrl+F. The browser find or
search will open, copy and paste before attack initiation from contacts section that
you added valid target to. Do it in number of windows and once target has been
hit by you press alt+F4 to close and move to next window target.
xix. Try and keep jumping i.e. leave the blob and recall once next target is identified,
again make the hit jump out and recall back in. Once a hit is made it will be seen
on ticker. People will be looking for you especially if hit is large and for excellent
ratios. So if you leave they are lost searching for you until you jump back in again
to hit the next victim. You can keep another browser open on the move page, the
minute you’re ready after attack, press F5 which will refresh move page and
number of units click your bookmarked destination which should be far away and
move, find target recall and repeat.
xx. You have done all you can and anything more than this is left to lady luck to
smile upon you.
xxi. Hit good right spec targets to maximize enemy loss this is very important as a
defender 1:1 ratios will not win you the war you need to make 1:2 ratios.
However if you don’t have a choice and need to save capitals then go for it and hit
at 1:1 and leave the rest for the capitals to clean.
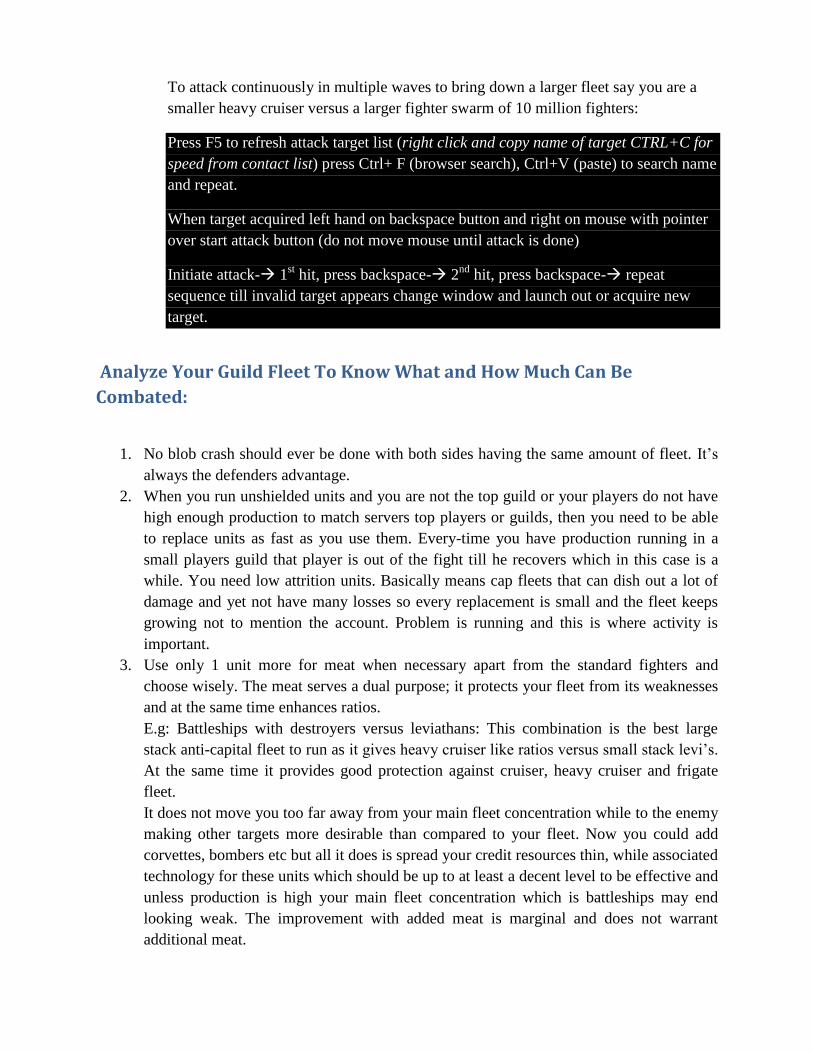
To attack continuously in multiple waves to bring down a larger fleet say you are a
smaller heavy cruiser versus a larger fighter swarm of 10 million fighters:
Press F5 to refresh attack target list (right click and copy name of target CTRL+C for
speed from contact list) press Ctrl+ F (browser search), Ctrl+V (paste) to search name
and repeat.
When target acquired left hand on backspace button and right on mouse with pointer
over start attack button (do not move mouse until attack is done)
Initiate attack- 1st hit, press backspace- 2
nd hit, press backspace- repeat
sequence till invalid target appears change window and launch out or acquire new
target.
Analyze Your Guild Fleet To Know What and How Much Can Be
Combated:
1. No blob crash should ever be done with both sides having the same amount of fleet. It’s
always the defenders advantage.
2. When you run unshielded units and you are not the top guild or your players do not have
high enough production to match servers top players or guilds, then you need to be able
to replace units as fast as you use them. Every-time you have production running in a
small players guild that player is out of the fight till he recovers which in this case is a
while. You need low attrition units. Basically means cap fleets that can dish out a lot of
damage and yet not have many losses so every replacement is small and the fleet keeps
growing not to mention the account. Problem is running and this is where activity is
important.
3. Use only 1 unit more for meat when necessary apart from the standard fighters and
choose wisely. The meat serves a dual purpose; it protects your fleet from its weaknesses
and at the same time enhances ratios.
E.g: Battleships with destroyers versus leviathans: This combination is the best large
stack anti-capital fleet to run as it gives heavy cruiser like ratios versus small stack levi’s.
At the same time it provides good protection against cruiser, heavy cruiser and frigate
fleet.
It does not move you too far away from your main fleet concentration while to the enemy
making other targets more desirable than compared to your fleet. Now you could add
corvettes, bombers etc but all it does is spread your credit resources thin, while associated
technology for these units which should be up to at least a decent level to be effective and
unless production is high your main fleet concentration which is battleships may end
looking weak. The improvement with added meat is marginal and does not warrant
additional meat.
If nothing else understands that you need to concentrate on 1 specialization and be the
best at it.
Hint: Most shielded units do extremely well with destroyer as their meat. Some large
capital ship specs run cruisers as meat because of the additional hangar space they
provide but destroyers still give better ratios.
4. Meat fleet is not the same as a second specialization. Though we would like the second
specializations to help with the first (E.g.: Fighter swarm spec. building a secondary
cruiser fleet) in many cases it does not help much and at times decreasing the ratio if not
used appropriately (E.g.: Frigate and Battleships). Second specializations should not be
attempted unless you are well above the server average for fleet and further building
seems pointless when targets are not as big.
5. Fleet bonus additions. These include adding a leviathan to any specialization. The 5%
extra bonus makes for a large incentive if they can catch up to the main fleet in time.
Keep 12 to 15 of these. Expect to lose them when needed. One is usually sufficient in the
first wave unless you’re lucky enough to have the target offline and have time to add a
second to improve ratios in the second wave. Keep too many in attack and they can mess
up ratios. Run battle calculator scenarios to make the best use of them.
Commanders: One of the most valuable fixed units in game and only units on base that can actually be killed in
an attack. Here are a few points worth mentioning.
1) The three must have commanders are: 1 research commander for main linked
research base, 3 construction commanders at 10+ level and 20 production
commanders out of 21 bases. The one base will have research commander on it. If
you are the only person in your guild in the galaxy then 1 logistics commander can be
added.
2) Pay as much as possible to initially level up your commander and after level 11 you
can start using your experience points. Experience points are important so spend
them cautiously.
3) Do not build unnecessary commanders especially in the beginning. Mid to late game
you can afford to train your commander i.e. attack and defense through credits to
level them up. Save experience points.
4) Maximize your production commanders to 16, Logistics to 17, Research 18+ (there is
no real limit for research) and construction commanders to 15. Priority is given to
research commander always.
5) Construction and Research commanders are the only two commanders that not
only give a discount but decreases time of construction and research which makes
research invaluable as construction use is finite at base 21 to 23. This can be
understood by the following formula:
Time of Research= Cost / Research capacity
Time of Construction= Cost / Individual base construction capacity
6) Except research save experience as there will come a time when you will lose a
commander and having backup experience to make a new one will prove invaluable.
Debris Split by Losses and Split by Debris Application:
The following was advice explained to us by our guild leader [RED] Salsashark and has been quoted
below unaltered. All credit goes to him for the following and has been reproduced by permission.
SalsaShark Quote - Msg - Report 8 Jun 2011, 18:49:22 (Derb=Debris)
There are times at which a derb split by losses are applicable and times when a split by derbs
created is applicable. Derb split by loss should be used when:
1. Two or more players are required for a hit or hits.
2. All targets are required to be killed, all hits are necessary.
3. Optimal or situational optimal ratios are obtained
4. Levi or other shield massacre ratios are not present.
All four of these points were met, and a split by losses is most appropriate.
A drop/finish is the simplest type of hit that would use it. The main intent of of a split by loss is
to set the profit ratios of all players to the same number. The overall profit ratio is a number
calculated in every derb split by loss. It is equal to total derbs created over total losses.
The quality or a hit or group of hits is measured by the profit ratio. The core point of the split by
loss is that everyone did as best as they possibly could and all hits were required. Since all
involved rely and depend on everyone else involved, their successes and failures are shared
among the group.
Take the following situation as an example:
A gate crash is to take place. There are ten targets. One of the targets is a frigate fleet, and is
active. The attackers time a launch to the gate, call targets, and plan everything out as best as
possible. Upon landing the active fleet suicides into an HC fleet crippling him. The other nine
targets are taken according to plan. The average derb to loss for the planned hits was 2:1. The
suicide was 1.1:1. Now, anybody could have gotten screwed by the suicide. The team shared the
risk. It could have happened to anyone. In fact, it had to happen to someone. When a group takes
on any target they share the risk. Fortunately, the split by loss averages out the ratios to 1.9:1,
and the suicide victim shares in the overall success of the op. His sacrifice was necessary, and he
is as big of a factor towards success as anyone else. The other players involved agree to take less
than they made to reimburse him for his sacrifice.
The situation at hand is a little different, but the underlying principle is the same. One player is
required to sacrifice his own personal ratio for the overall success of the op. The player who got
the better ratio agrees to reimburse him for his efforts that lead to their mutual success. Their
roles are equally important, and their profit ratios are equated.
Consider this: Person ‘A’ drops the target. Person ‘B’ refuses to finish because he won’t get a
great ratio. ‘A’ moves to collect. Target comes online, suicides ‘A’. The operation was a failure.
Person ‘B’ was required to make his hits. They were close to situationally optimal. The two
shared the risk, shared the responsibility, and hence share the profit ratio.
x---x---x