Embed Size (px)
Citation preview
The interactive activities on this tour address
HCPS III standards
in Fine Arts.
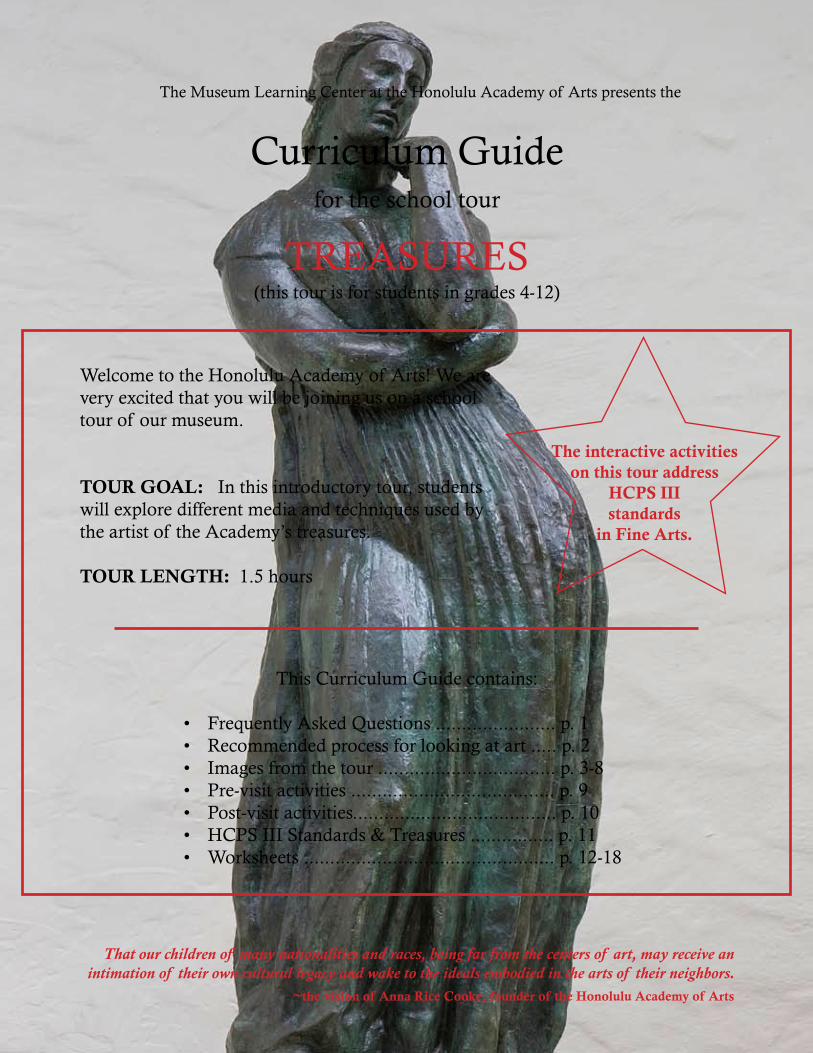
The Museum Learning Center at the Honolulu Academy of Arts presents the
Curriculum Guidefor the school tour
TREASURES(this tour is for students in grades 4-12)
Welcome to the Honolulu Academy of Arts! We are very excited that you will be joining us on a school tour of our museum.
TOUR GOAL: In this introductory tour, students will explore different media and techniques used by the artist of the Academy’s treasures. TOUR LENGTH: 1.5 hours
This Curriculum Guide contains:
Frequently Asked Questions ....................... p. 1•Recommended process for looking at art ..... p. 2•Images from the tour .................................. p. 3-8•Pre-visit activities ....................................... p. 9•Post-visit activities....................................... p. 10•HCPS III Standards & Treasures ................ p. 11•Worksheets ................................................ p. 12-18•
That our children of many nationalities and races, being far from the centers of art, may receive an intimation of their own cultural legacy and wake to the ideals embodied in the arts of their neighbors.
~the vision of Anna Rice Cooke, founder of the Honolulu Academy of Arts
FREQUENTLY ASKED QUESTIONS
How can the Curriculum Guide help me?This guide was developed to enhance your trip to the Academy by providing you with images you can share with your students and worksheets and activities for them to do before and after the tour. It also identifies connections between the tour and the HCPS III Standards so that you can relate what your students learn at the Academy to what they are learning in the classroom.
How can I prepare my students for their tour?You should show your students the video A Trip to the Art Museum, which you can download at www.honoluluacademy.org/teacher. This video gives your students an overview of the museum and what they can expect to see. You should also go through the materials in this Curriculum Guide with your stu-dents, especially the images and the activity sheets. The lesson plans are for after your tour.
What are the images in this guide?There are six images in the packet, including an image of the Academy and of the Academy’s founder, Mrs. Anna Rice Cooke. These two images include general background information on the Academy so you can explain to your students where they are going on their field trip. The other four images are art-works that they will see on their tour.
Why is it important to share images from the tour with my students?When students have seen a reproduction of a work and have a basic understanding of that work before they see it in person, they have a much stronger connection to the object than if they have never heard of it before. They can relate to it better and appreciate it more. Additionally, the children enjoy comparing the object in real life to what it looked like as a reproduction, especially concerning differences in size, color, and three-dimensionality.
How can I get the most out of these images?Each of the images is complemented by basic background information that can guide your discussion with your students about the work. Additionally, leading your students through the process of Observing, Describing, Interpreting, and Evaluating, as illustrated by the questions on the following page, can help your students gain a solid understanding of and appreciation for each work.
How can I present these images to my students?You can print out the images and distribute them to your students, or you can project them directly from your computer onto a screen so everyone can view them at once. If you have this PDF open on your com-puter and you are connected to the Internet, you can click on the image to get a full-size version from our website.
What are the activities in this guide?This guide has both pre- and post-visit activities for you to do with your students, including several work-sheets. We recommend that you complete the pre-visit activities before you come to the Academy so that your students are best prepared for their tour. After you return from your tour, the post-visit activities can help your students remember and elaborate on what they learned at the Academy.
1
1 2
RECOMMENDED PROCESS FOR LOOKING AT ARTOBSERVE, DESCRIBE, INTERPRET, EVALUATE
As you look at works of art with your students, ask them questions to make them think about the art and pique their curiosity regarding the works. The process of observing a work first and then describing, interpreting, and evaluating it, in that order, has been identified as a positive and produc-tive way for your students to get the most out of their interaction with the art. More information on this process can be found in the ARTS FIRST An Essential Arts Toolkit, which is a supplement to the Hawai'i Department of Education’s Arts Instructional Guide.
OBSERVEFirst have your students silently look at the artwork.
DESCRIBE Then ask them questions that require them to describe what it is they have observed.
Is this a painting, sculpture, drawing, ceramic, print, textile, photograph, jewelry, etc?What colors and shapes do you see? What materials did the artist use to make this work of art? What is the title of this work and who is the artist?What is the subject of this work of art?Compare this work to another work - what are the similarities and differences?
INTERPRETNow ask them questions that have them interpret what it is they have observed and described.
What is happening in this artwork?What does this work remind you of ?What mood or feeling does the artist convey? Through the use of what elements does s/he convey this mood or feeling?What does this work explain about the time and culture in which it was created?Why did the artist make this work?
EVALUATEOnce they have a deeper understanding of the work and what it could stand for, ask them to evaluate it.
Do you like this work? What would you do differently if you were the artist of this work?Should other people experience this work of art? Why or why not?
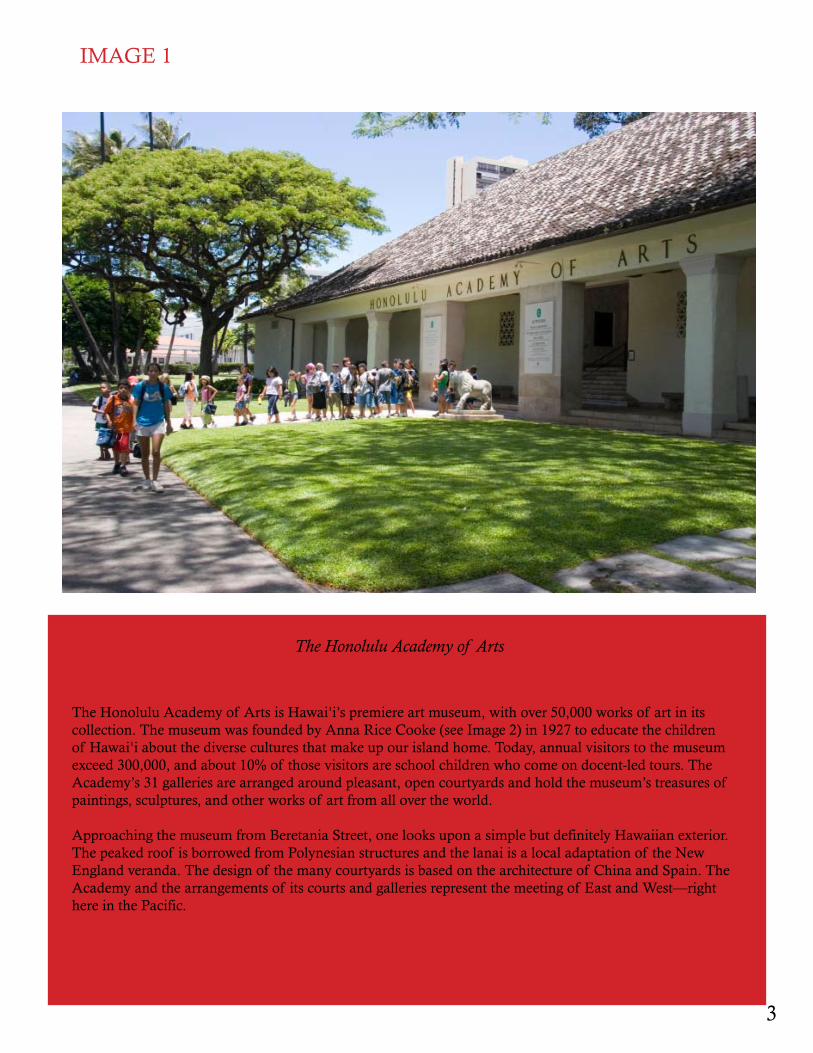
IMAGE 1
The Honolulu Academy of Arts
The Honolulu Academy of Arts is Hawai'i’s premiere art museum, with over 50,000 works of art in its collection. The museum was founded by Anna Rice Cooke (see Image 2) in 1927 to educate the children of Hawai'i about the diverse cultures that make up our island home. Today, annual visitors to the museum exceed 300,000, and about 10% of those visitors are school children who come on docent-led tours. The Academy’s 31 galleries are arranged around pleasant, open courtyards and hold the museum’s treasures of paintings, sculptures, and other works of art from all over the world.
Approaching the museum from Beretania Street, one looks upon a simple but definitely Hawaiian exterior. The peaked roof is borrowed from Polynesian structures and the lanai is a local adaptation of the New England veranda. The design of the many courtyards is based on the architecture of China and Spain. The Academy and the arrangements of its courts and galleries represent the meeting of East and West—right here in the Pacific.
3
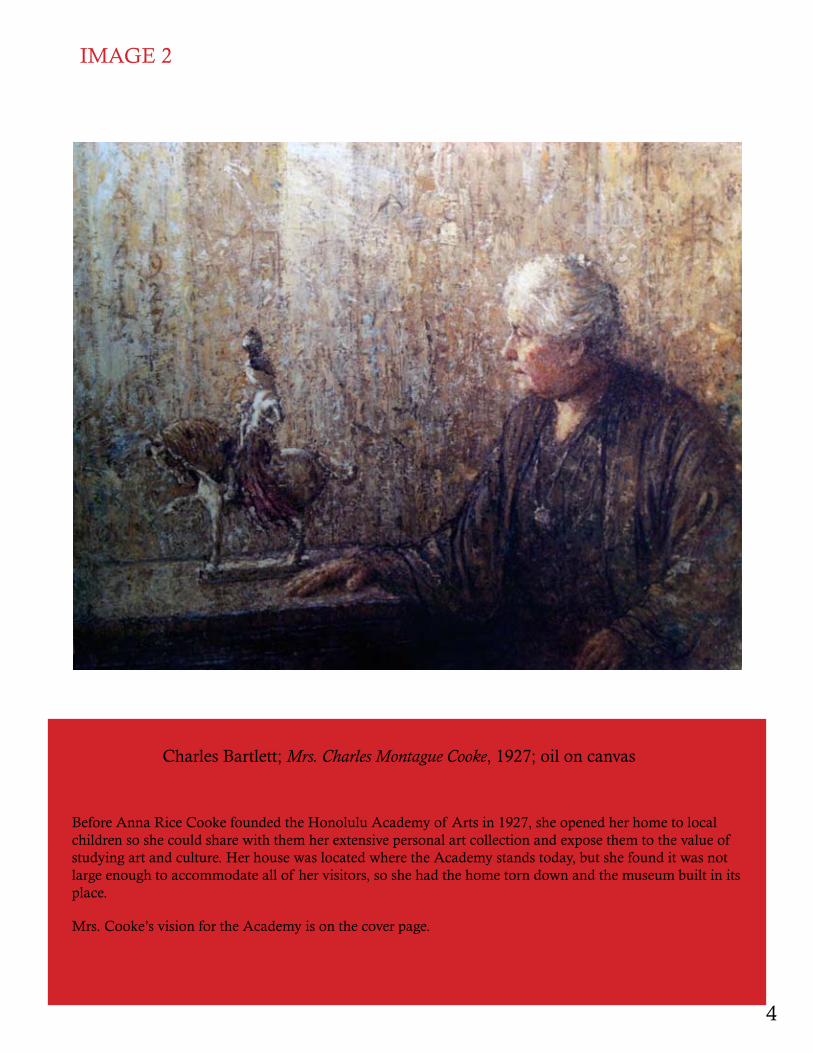
IMAGE 2
Charles Bartlett; Mrs. Charles Montague Cooke, 1927; oil on canvas
Before Anna Rice Cooke founded the Honolulu Academy of Arts in 1927, she opened her home to local children so she could share with them her extensive personal art collection and expose them to the value of studying art and culture. Her house was located where the Academy stands today, but she found it was not large enough to accommodate all of her visitors, so she had the home torn down and the museum built in its place.
Mrs. Cooke’s vision for the Academy is on the cover page.
43
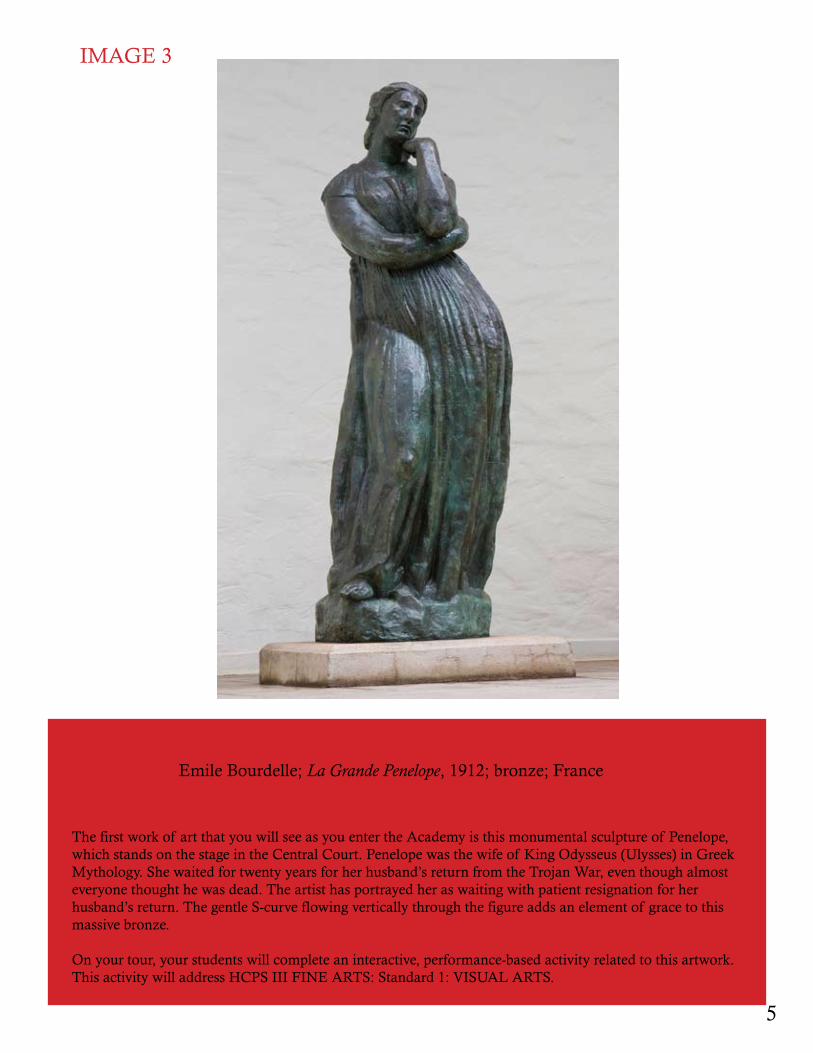
IMAGE 3
Emile Bourdelle; La Grande Penelope, 1912; bronze; France
The first work of art that you will see as you enter the Academy is this monumental sculpture of Penelope, which stands on the stage in the Central Court. Penelope was the wife of King Odysseus (Ulysses) in Greek Mythology. She waited for twenty years for her husband’s return from the Trojan War, even though almost everyone thought he was dead. The artist has portrayed her as waiting with patient resignation for her husband’s return. The gentle S-curve flowing vertically through the figure adds an element of grace to this massive bronze.
On your tour, your students will complete an interactive, performance-based activity related to this artwork. This activity will address HCPS III FINE ARTS: Standard 1: VISUAL ARTS.
5
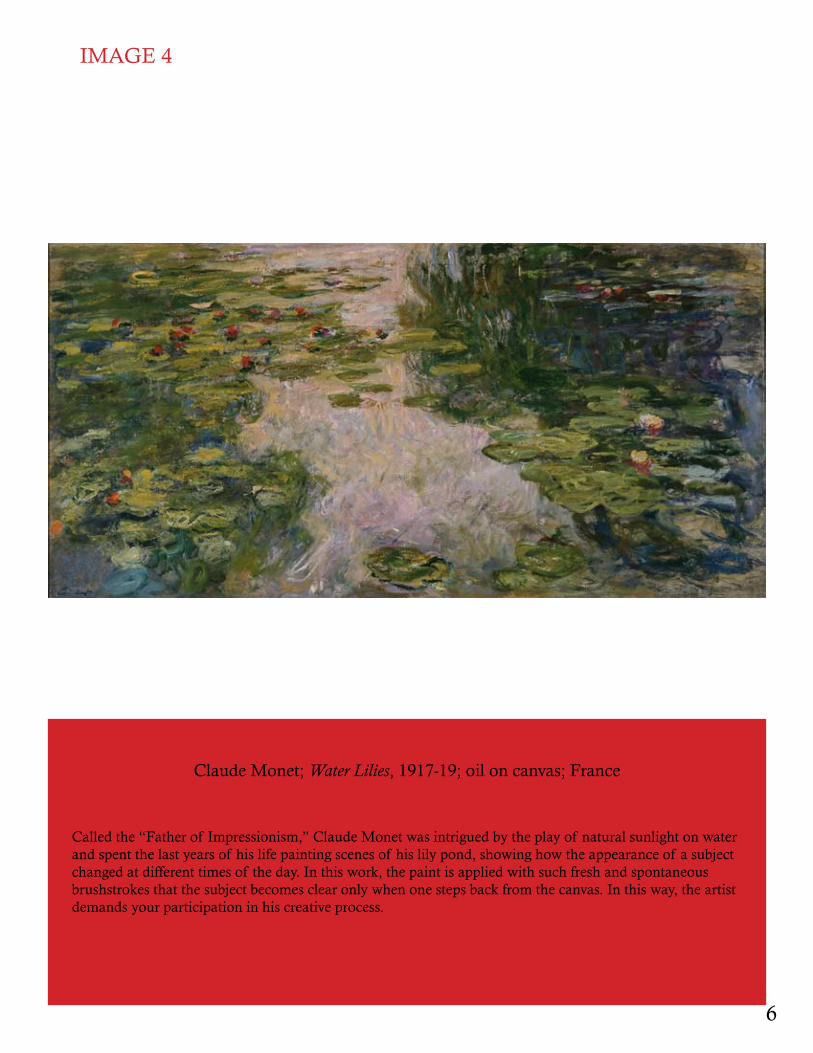
IMAGE 4
Claude Monet; Water Lilies, 1917-19; oil on canvas; France
Called the “Father of Impressionism,” Claude Monet was intrigued by the play of natural sunlight on water and spent the last years of his life painting scenes of his lily pond, showing how the appearance of a subject changed at different times of the day. In this work, the paint is applied with such fresh and spontaneous brushstrokes that the subject becomes clear only when one steps back from the canvas. In this way, the artist demands your participation in his creative process.
65
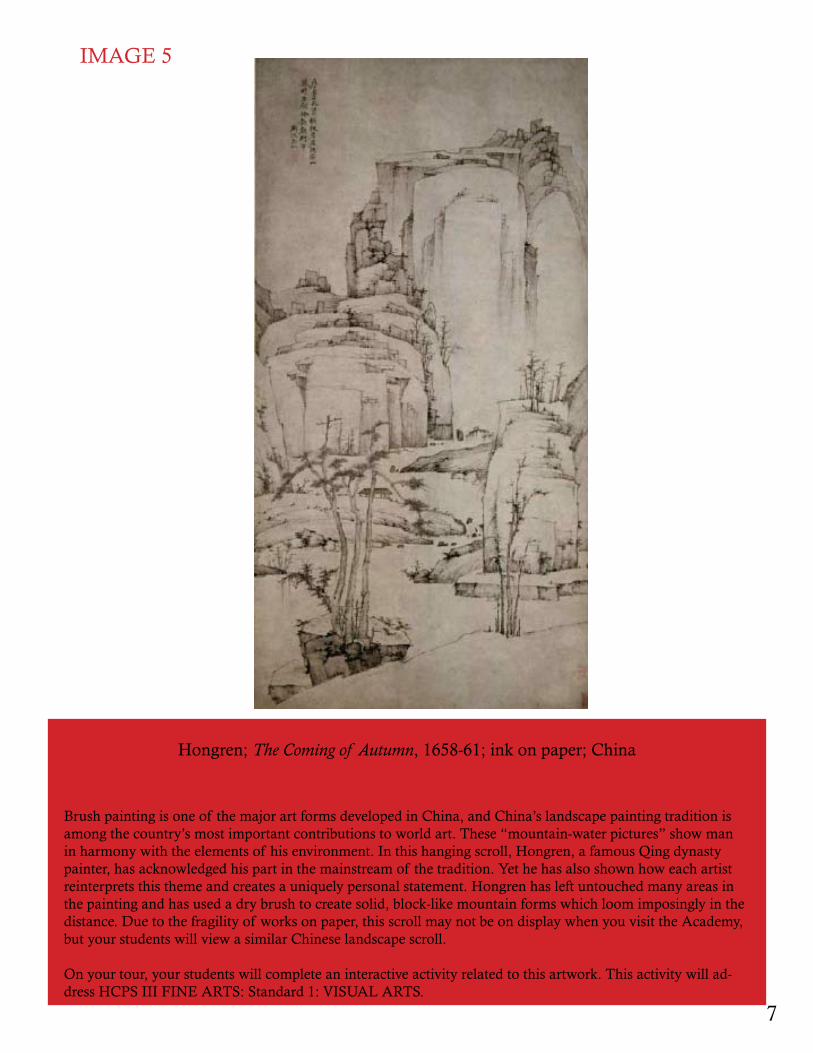
IMAGE 5
Hongren; The Coming of Autumn, 1658-61; ink on paper; China
Brush painting is one of the major art forms developed in China, and China’s landscape painting tradition is among the country’s most important contributions to world art. These “mountain-water pictures” show man in harmony with the elements of his environment. In this hanging scroll, Hongren, a famous Qing dynasty painter, has acknowledged his part in the mainstream of the tradition. Yet he has also shown how each artist reinterprets this theme and creates a uniquely personal statement. Hongren has left untouched many areas in the painting and has used a dry brush to create solid, block-like mountain forms which loom imposingly in the distance. Due to the fragility of works on paper, this scroll may not be on display when you visit the Academy, but your students will view a similar Chinese landscape scroll.
On your tour, your students will complete an interactive activity related to this artwork. This activity will ad-dress HCPS III FINE ARTS: Standard 1: VISUAL ARTS.
7

IMAGE(S) 6
James A. Michener Collection of Japanese Woodblock Prints
The collection of Japanese ukiyo-e (images of the ‘floating world’) woodblock prints is the crown jewel of the Japanese art collection at the Honolulu Academy of Arts. Since the Academy’s founding in 1927, the Japa-nese print holdings have grown to over 9,000 works though purchases and gifts, including major donations from James A. Michener, Oliver Statler, and Philip H. Roach, Jr. Japanese prints are revered for their in-novative and bold use of color. Experimentation with dyes and colorants resulted in inventive palettes in the Edo period (1600-1867), transforming the pictorial abilities of these artists. However, many pigments change in reaction to light, temperature and humidity, making these prints extremely vulnerable to color shift and instability. As a result, the prints frequently rotate, so these images may not be on display when you visit the Academy, but your students will view similar woodblock prints and learn about the printmaking process.
Katsushika Hokusai; Thirty-six Views of Mt. Fuji: The Great Wave off Kanagawa, c. 1830-34;
color woodblock print; Japan
Suzuki Harunobu; The Flowers of Beauty from the Floating World: Lady Roko, c. 1768-69; color woodblock
print; Japan
Torii Kiyonaga; The Onnagata Actor Segawa Kikunojo III in the Play 'Shakkyo ' (The Stone Bridge), 1789; color woodblock print; Japan
Katsushika Hokusai; Thirty-six Views of Mt. Fuji: Fuji in Clear Weather, c. 1830-32; color woodblock
print; Japan
87
PRE-VISIT ACTIVITIES
VIDEO: Show your students the introductory video • A Trip to the Art Museum, which you can down-load at www.honoluluacademy.org/teacher.
MAKE A PRINT: Your students will view woodblock prints on their tour. To familiarize them with •the printmaking process, have each of your students create a print of an image important to them. Your students can make this print by drawing their design on a piece of tracing paper (remembering to do it in reverse) and then transferring that design to a foam sheet (such as the flat part of a plate lunch lid) by putting the paper over the foam and going over the lines with their pencil. This will make an impression in the foam, which they can deepen with their pencil if needed. Then have them cover the foam with paint using a brayer or paintbrush, and finally have them place a fresh piece of paper over the foam and press down on it to transfer the image to their paper.
WO• RKSHEETS: The instructions are below.
WORKSHEET 1: WHAT IS A MUSEUM? ........ p. 12Your students will design their own museum to share with the world things important to them.
INTRODUCTION: After watching the introductory video, ask your students questions, such as the following:
Do any of you have a collection? What do you collect and why?Are you proud of your collections? Would you want to share them with others?What is a museum? What do museums have in their collections? Has anyone ever been to the Academy before? What did you see when you were there? If you’ve never been, what do you expect to see when you are there?What type of art do you expect to see (paintings, sculptures, etc)? Why are museums important?
PROJECT: Have your students make a map of their own museum on Worksheet 1. Have them name their museum, title the galleries, and draw objects important to them that they would display in each of galleries.
WORKSHEETS 2: WORLD OF ART ........ p. 13Your students will identify these important art vocabulary words by exploring the Academy’s online collection.
WORKSHEETS 3: I SEE ........ p. 14Your students will observe the elements of art in a work.
INTRODUCTION: You may wish to do this activity before introducing your students to Image 4 so they have the chance to explore this artwork without knowing its title or background. If you have time, you can have your students complete the exercise with the image on Worksheet 3c, which they may see on the tour, or with any other work of art.
PROJECT: Have your students work with partners to complete Worksheets 3a and 3b. You can project the im-age to a screen by clicking on it when this PDF is open on your computer and you are connected to the Inter-net. After they have completed the worksheet, share with them the information from page 6. If they work on Worksheet 3c, share with them this information—Robert Rauschenberg; Trophy V (For Jasper Johns), 1962; oil, collage, and found objects on canvas; United States. Rauschenberg perceives man’s environment as a series of randomly assembled impressions and objects, a world full of dissonances, disconnections, and ambiguities. He thus structures his work out of disparate elements and does not present us with a logically integrated image.
9
9 10
POST-VISIT ACTIVITIES
WOR• KSHEETS: The instructions are below.
DRAW OR DESCRIBE: Ask your students to recall the work to which they most closely •related on the tour. Have them sketch the work or describe it in detail and ask them why they chose to focus on this particular work.
C• OMPARE: Ask your students to compare the images from this guide to the real works and have them explain how seeing them in person differs from seeing the reproductions. You can also have your students compare different works to each other, focusing on their subjects and materials.
POE• TRY: Have your students draw an image from the tour and write a poem about the work.
STORY• TELLING: Make up a story using an artist or subject from the Academy as the main character. Describe an average day in this person’s life, and be accurate with your descriptions of his/her clothing, food, and daily pursuits. You can have your students do this individually, in groups, or as a class. Have your students make oral presentations of their stories.
WORKSHEET 4: I CREATE, YOU SEE — YOU CREATE, I SEE ....... p. 17 Your students will observe the elements of art in works created by their peers.
INTRODUCTION: Ask your students to recall a work of art to which they were particularly drawn on the tour.
PROJECT: Have your students create their own works of art based on their preferred works from the Academy. Give them a variety of art media with which to create such works. Once they have finished their own art, have them use this worksheet, which, except for the directions, is the same as Work-sheet 3a, to make observations about the artwork of their peers. Ask each student to make one obser-vation about the work, and after everyone has described what they see, have the artists explain to the group their motivations in making these work. In particular, have them explain the pieces they based their works on, and have them describe how, if at all, they used the elements of art to create meaning in their art.
WORKSHEET 5: REFLECTIONS & PAPER ........ p. 18Your students will write a research paper based on an artist from the tour.
INTRODUCTION: Ask your students to recall an artist to whom they were particularly drawn on the tour and about whom they would like to write a research paper. If they cannot remember an art-ist’s name or if you would like your students to have an image of the artwork to use for this assign-ment, contact [email protected], and we will try to assist you.
PROJECT: Your students will write both a personal reflection and a research paper about this artist. They can return to the Academy with their family passes if they want to see the art in person again. The instructions for the research paper are basic to allow you the flexibility to direct your students towards a particular topic, determine a paper length, and have them use particular research resources.
HCPS III STANDARDS & TREASURES
The interactive activities on the tour and the worksheets from this guide all address
FINE ARTS: Standard 1: VISUAL ARTS: Understand and apply art materials, techniques, and processes in the cre-
ation of works of art and understand how the visual arts communicate a variety of ideas, feelings, and experiences
IN ADDITION...
WORKSHEET 2: WORLD OF ART addresses Benchmarks related to computer usage and online research
WORKSHEET 5: REFLECTIONS & PAPER and the POETRY post-visit activity address
LANGUAGE ARTS: Standard 1: Reading: CONVENTIONS AND SKILLS: Use knowledge of the conventions of language and texts to construct meaning for a range of literary and informational texts for a variety of purposes Standard 4: Writing: CONVENTIONS AND SKILLS: Use the writing process and conven-tions of language and research to construct meaning and communicate effectively for a variety of purposes and audi-ences using a range of forms Standard 5: Writing: RHETORIC: Use rhetorical devices to craft writing appropriate to audi-ence and purpose
The STORYTELLING post-visit activity addresses
LANGUAGE ARTS: Standard 6: Oral Communication: CONVENTIONS AND SKILLS: Apply knowledge of verbal and nonverbal language to communicate effectively in various situations: interpersonal, group, and public for a variety of purposes Standard 7: Oral Communication: RHETORIC: Adapt messages appropriately to address audience, purpose, and situation
Remember: To expand the Academy’s growing collection of curriculum guides and lesson plans related to our exhi-bitions, we invite educators to share with us successful lesson plans and student work inspired by our collection. We will post these lessons online so that educators across the state can learn from each other and share best practices. Contact 532-8728 or [email protected] to learn more about submitting your work.
11
WORKSHEET 1: WHAT IS A MUSEUM?
In the space below, make a floorplan of your own museum. Name the museum, title the galleries, and draw objects that are important to you that you would like to have displayed in each of the galleries.
The Name of My Museum is: _________________________________
1211

WORKSHEET 2: WORLD OF ART
For this worksheet, you will go to the Honolulu Academy of Art’s website, www.honoluluacademy.org, and click on the “Collections” tab to find images from around the world that represent the following art vocabulary words. When you find a work of art that represents a word below, write down the artist, title, date, materials used to make this work, and country next to the appropriate vocabulary word (see sculp-ture example below). If the artist or date is unknown, you can omit that part. If you can, find more than one work for each vocabulary word. You can also sketch the artworks if you would like.
SculptureEmile Bourdelle; La Grande Penelope, 1912; bronze; France
Painting
Landscape
Portrait
Still Life
Woodblock print
Abstract
Representational
Nonrepresentational
**Keep your eyes peeled while at the Academy because you may see some of these works on your tour.13
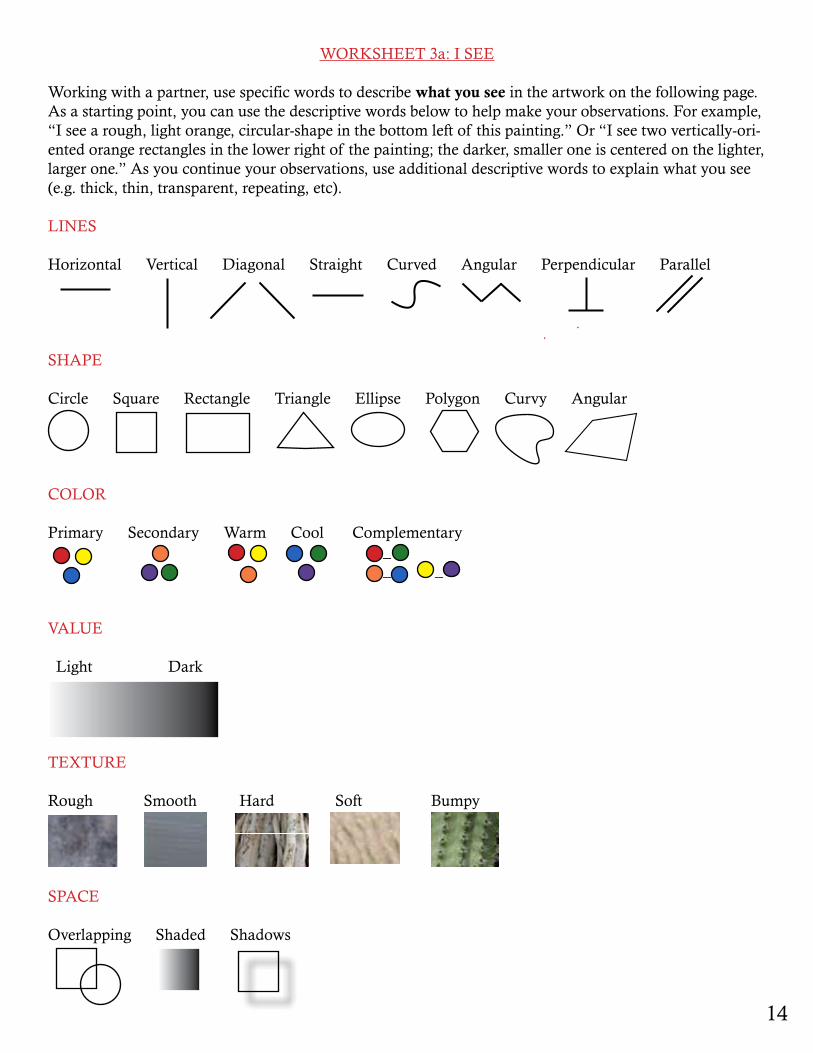
WORKSHEET 3a: I SEE
Working with a partner, use specific words to describe what you see in the artwork on the following page. As a starting point, you can use the descriptive words below to help make your observations. For example, “I see a rough, light orange, circular-shape in the bottom left of this painting.” Or “I see two vertically-ori-ented orange rectangles in the lower right of the painting; the darker, smaller one is centered on the lighter, larger one.” As you continue your observations, use additional descriptive words to explain what you see (e.g. thick, thin, transparent, repeating, etc).
LINES
Horizontal Vertical Diagonal Straight Curved Angular Perpendicular Parallel
SHAPE
Circle Square Rectangle Triangle Ellipse Polygon Curvy Angular
COLOR
Primary Secondary Warm Cool Complementary _ _ _
VALUE
Light Dark
TExTURE
Rough Smooth Hard Soft Bumpy
SPACE
Overlapping Shaded Shadows
1413
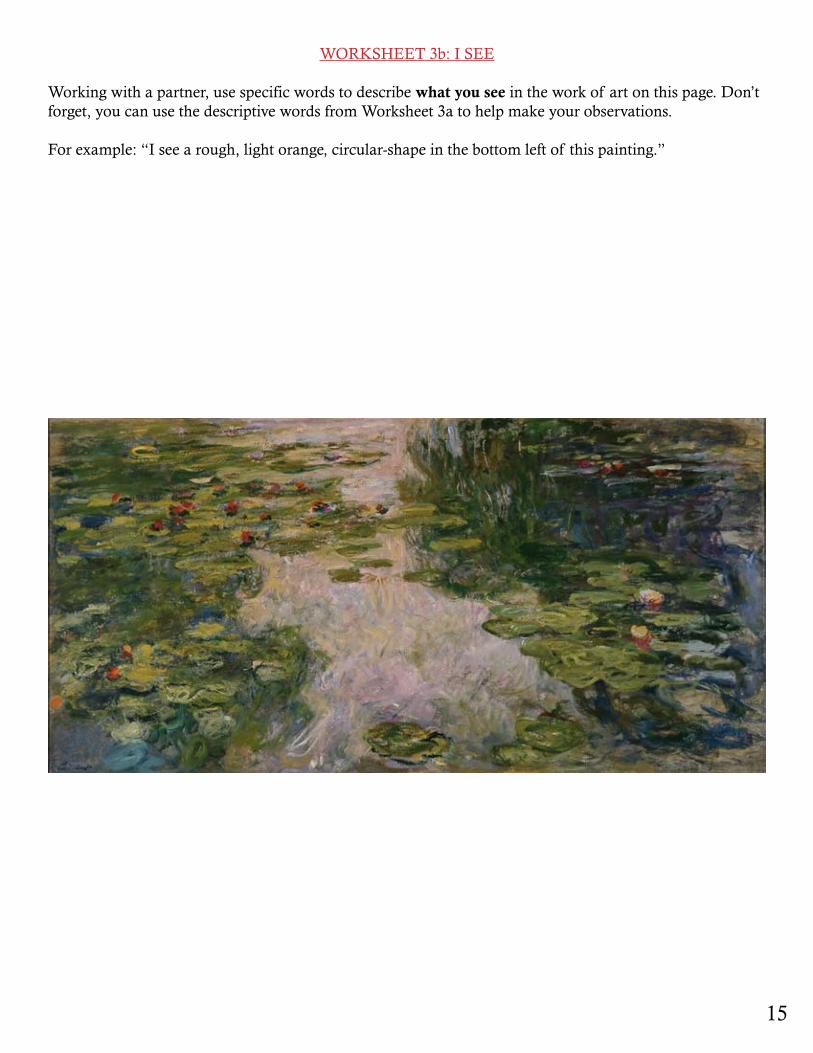
WORKSHEET 3b: I SEE
Working with a partner, use specific words to describe what you see in the work of art on this page. Don’t forget, you can use the descriptive words from Worksheet 3a to help make your observations.
For example: “I see a rough, light orange, circular-shape in the bottom left of this painting.”
15
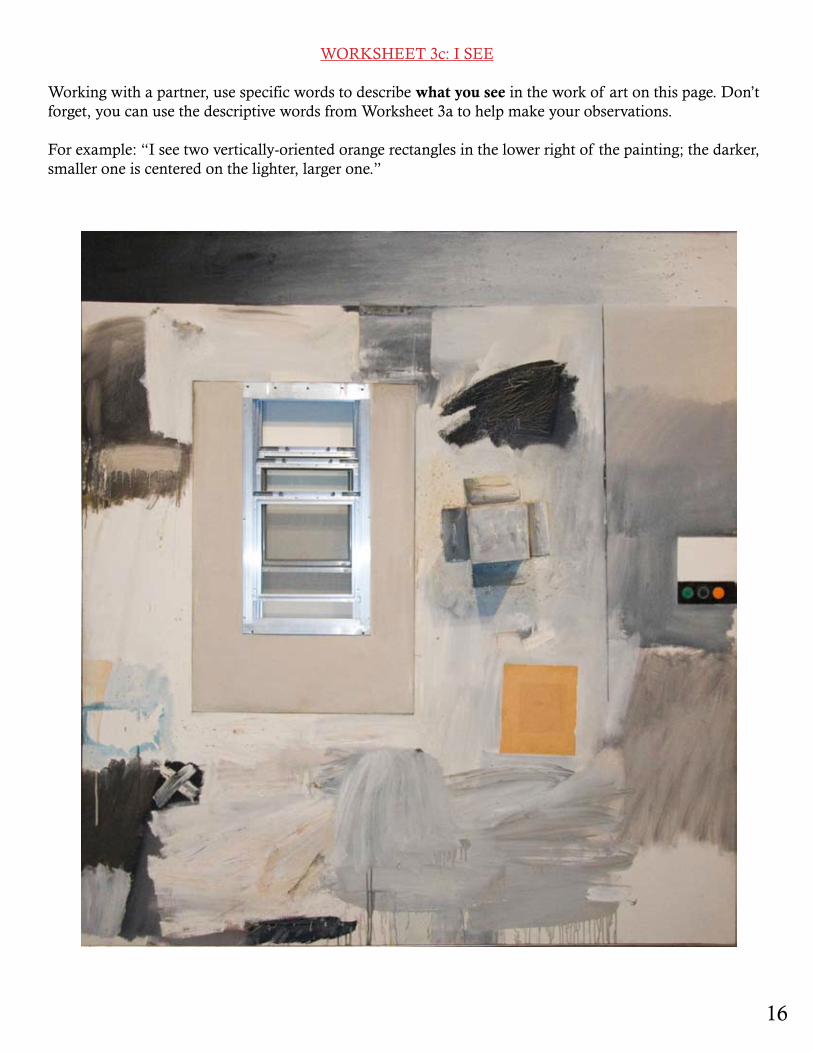
WORKSHEET 3c: I SEE
Working with a partner, use specific words to describe what you see in the work of art on this page. Don’t forget, you can use the descriptive words from Worksheet 3a to help make your observations.
For example: “I see two vertically-oriented orange rectangles in the lower right of the painting; the darker, smaller one is centered on the lighter, larger one.”
1615
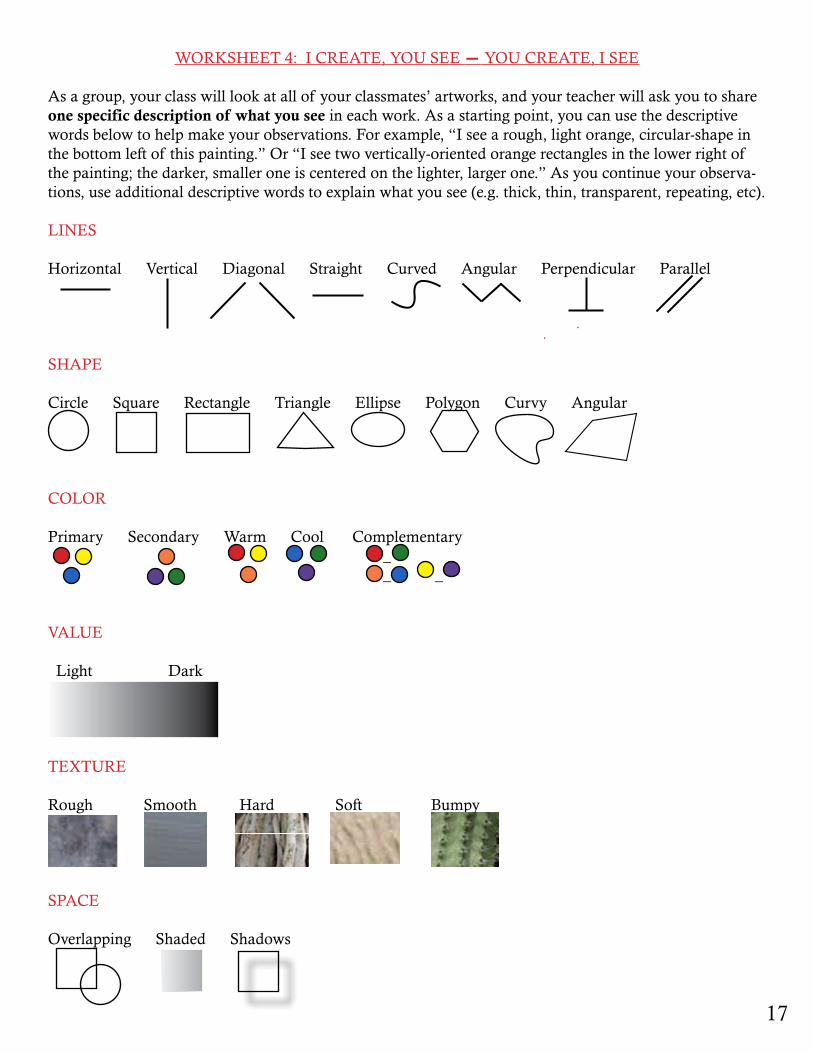
WORKSHEET 4: I CREATE, YOU SEE — YOU CREATE, I SEE
As a group, your class will look at all of your classmates’ artworks, and your teacher will ask you to share one specific description of what you see in each work. As a starting point, you can use the descriptive words below to help make your observations. For example, “I see a rough, light orange, circular-shape in the bottom left of this painting.” Or “I see two vertically-oriented orange rectangles in the lower right of the painting; the darker, smaller one is centered on the lighter, larger one.” As you continue your observa-tions, use additional descriptive words to explain what you see (e.g. thick, thin, transparent, repeating, etc).
LINES
Horizontal Vertical Diagonal Straight Curved Angular Perpendicular Parallel
SHAPE
Circle Square Rectangle Triangle Ellipse Polygon Curvy Angular
COLOR
Primary Secondary Warm Cool Complementary _ _ _
VALUE
Light Dark
TExTURE
Rough Smooth Hard Soft Bumpy
SPACE
Overlapping Shaded Shadows
17
1817
WORKSHEET 5: REFLECTIONS & PAPER
REFLECTIONS:Recall an artist to whom you were particularly drawn on your Academy tour. In the space below, write down words and sketch images that come to mind when you think of this artist and his or her work. Think of things like how you felt looking at the artist’s work, what elements of art the artist used, and the meaning/symbolism you took away from the artwork.
After you have written your initial reactions to the artist in the space above, write a reflection paragraph in the space below about why you were drawn to this artist and what it was that captured your attention.
PAPER:After you have written your reflection paragraph, write a research paper on this artist. Explore his or her biography and determine the influences in the artist’s life that led him or her to become an artist. Ex-plain this artist’s contributions to the art world and how, if at all, s/he has influenced others.
Your teacher will give you further instructions about this research paper.
![[PPT]ALOHA FROM HAWAII - WordPress.com · Web view* HONOLULU - HARBOUR HONOLULU - AIRPORT HONOLULU IOLANI PALACE - HONOLULU ROYAL GUARD KAMEHAMEHA THE GREAT LAIE MORMON TEMPLE HONOLULU](https://img.pdfslide.us/doc/110x75/5af655b67f8b9a5b1e8effdc/pptaloha-from-hawaii-view-honolulu-harbour-honolulu-airport-honolulu-iolani.jpg)