Embed Size (px)
Citation preview

Mindjet Corporation
Toll Free: 877-Mindjet
1160 Battery Street East · San Francisco CA 94111 USA
Phone: 415-229-4200 Fax: 415-229-4201
www.mindjet.com
© 2016 Mindjet. All Rights Reserved
Large-Scale Deployment Guide

MindManager Large-Scale Deployment Guide
© 2016 Mindjet All Rights Reserved Version 16.1, February 10, 2016 i
CONTENTS
Contents ........................................................................................................................................... i
List of Tables ................................................................................................................................. iv
About This Guide ........................................................................................................................... v
MindManager Support Help ................................................................................................ v
System Requirements for MindManager Installation ................................................................. 1
Understanding Deployment Strategies ........................................................................................ 3
Running the Standard Setup Manually or Automatically .................................................... 3
Running the Admin Setup Manually or Automatically ......................................................... 3
Other Deployment Options ................................................................................................. 4
Deploying with Active Directory ............................................................................. 4
Deploying with Windows Server ............................................................................ 4
Deploying with Citrix XenApp ................................................................................. 4
Using System Management Software and a Custom Setup ................................. 4
Deploying on a Shared Network Drive ................................................................... 4
What Gets Installed ........................................................................................................................ 5
MindManager Components ................................................................................................. 5
Library .................................................................................................................... 6
Dictionaries ............................................................................................................ 6
User Configuration Files ........................................................................................ 6
Shortcuts and Start Menu Items ......................................................................................... 7
Shared System Software .................................................................................................... 7
Third-Party Software ........................................................................................................... 8
ThirdPartyReadMe .............................................................................................................. 9
Registry Keys .................................................................................................................... 10
What Remains After Uninstallation ............................................................................................ 12
Remaining Files, Folders, and Software Components ..................................................... 12
Remaining Registry Keys .................................................................................................. 13

MindManager Large-Scale Deployment Guide
© 2016 Mindjet All Rights Reserved Version 16.1, February 10, 2016 ii
Using the Admin Setup................................................................................................................ 14
Required Software ............................................................................................................ 15
Required Permissions and Privileges ............................................................................... 16
Differences between the Standard and Admin Setups ..................................................... 16
Installing MindManager: An Overview .............................................................................. 16
Per-machine Setup .............................................................................................. 16
Per-user Setup ..................................................................................................... 17
Deploying with the Installation Wizard ...................................................................................... 18
Starting the Installation ..................................................................................................... 18
Customizing the Installation .............................................................................................. 19
Disabling Default Features ................................................................................... 19
Changing the Default Installation Folder .............................................................. 20
Deploying User Data and the Library to a Server ................................................ 20
Completing the Installation ................................................................................................ 22
Deploying from the Command Line ........................................................................................... 24
Configuring Installation Parameters from the Command Line .......................................... 24
Configuring Features from the Command Line ................................................................. 25
Customizing the Installation with Setup.exe ........................................................ 25
Customizing the Installation with MSI .................................................................. 25
Configuring Functions from the Command Line ............................................................... 28
Configuring Functions from the Registry .......................................................................... 29
Deploying User Data and the Library ................................................................................ 30
Deploying User Data and the Library from the Command Line ........................... 31
Deploying User Data from the Registry ............................................................... 32
Sample Setup Commands ................................................................................................ 33
Simple Installation ................................................................................................ 33
Silent Installation .................................................................................................. 33
Sample Customized Installation Using ADDLOCAL and REMOVE .................... 33
Uninstallation ........................................................................................................ 34
Deploying with Active Directory ................................................................................................. 35
Deploying with Windows Server ................................................................................................ 37
Deploying with Citrix XenApp ..................................................................................................... 39
Basic Installation for the Citrix Desktop ............................................................................ 39

MindManager Large-Scale Deployment Guide
© 2016 Mindjet All Rights Reserved Version 16.1, February 10, 2016 iii
Advanced Installation of a “Seamless” Window ................................................................ 39
Administering MindManager ....................................................................................................... 48
Disabling Zapier ................................................................................................................ 48
Managing Add-Ins ............................................................................................................. 48
Registering or Unregistering Add-Ins from the Command Line ........................... 48
Managing Add-Ins from the Registry ................................................................... 48
The Registry Add-In List ................................................................................................... 49
Removing or Restoring Add-Ins from the Registry ........................................................... 49
Enabling or Disabling Add-Ins from the Registry .............................................................. 49
Managing Microsoft Office Add-Ins ...................................................................... 50
Managing from the Registry .............................................................................................. 50
HKEY_LOCAL_MACHINE Settings ..................................................................... 50
HKEY_CURRENT_USER Settings...................................................................... 51
Managing with Event Macros ............................................................................................ 52
Managing User Licenses .................................................................................................. 54
Policies Support ................................................................................................................ 54
MindManager Linker for SharePoint ................................................................................. 54
Proxy Server Support ........................................................................................... 55
Enabling or Disabling “Treat UNC Paths as SharePoint Servers” ....................... 56
Index .............................................................................................................................................. 58

MindManager Large-Scale Deployment Guide
© 2016 Mindjet All Rights Reserved Version 16.1, February 10, 2016 iv
LIST OF TABLES
Table 1: Installation Requirements .............................................................................................. 1
Table 2: Configuration Files .......................................................................................................... 6
Table 3: Location of Shared System Components ..................................................................... 7
Table 4: Third-Party Software Overview ...................................................................................... 8
Table 5: Registry Key Overview ................................................................................................. 10
Table 6: Remaining Files, Folders, and Software components............................................... 12
Table 7: Remaining Registry Keys ............................................................................................. 13
Table 8: Configuring Installation Parameters from the Command Line ................................. 24
Table 9: Configuring Features with MSI from the Command Line .......................................... 26
Table 10: Configuring Functions from the Command Line ..................................................... 28
Table 11: Configuring Functions from the Registry ................................................................. 29
Table 12: User Data Deployment Options ................................................................................. 31
Table 13: Library Deployment Options ...................................................................................... 31
Table 14: User Data Registry Key Values .................................................................................. 32
Table 15: Properties Editable in Properties Table .................................................................... 35
Table 16: HKEY_LOCAL_MACHINE Registration Values ........................................................ 50
Table 17: HKEY_LOCAL_MACHINE Settings ............................................................................ 51
Table 18: HKEY_CURRENT_USER Settings ............................................................................. 51
Table 19: Event Macros ............................................................................................................... 52
Table 20: Command Line Settings ............................................................................................. 57
Table 21: HKEY_CURRENT_USER Settings ............................................................................. 57
Table 22: HKEY_LOCAL_MACHINE Registration Values ........................................................ 57

MindManager Large-Scale Deployment Guide
© 2016 Mindjet All Rights Reserved Version 16.1, February 10, 2016 v
ABOUT THIS GUIDE
Many customers have requested support for customized deployment of MindManager to large numbers of client machines. This document provides complete information about large-scale deployments.
Topics include:
Running the standard setup manually or automatically (page 3) Running the admin setup manually or automatically (page 3) MindManager components (page 5) Deploying using the installation wizard (page 18) Deploying from the command line(page 24) Deploying with Windows Active Directory(limited support) (page 35) Deploying with Windows Server running Terminal Services (page 37 ) Deploying with Citrix Presentation Server (page 39)
Note: Installing MindManager on a Shared network drive is not supported.
Note: To use MindManager with Microsoft SharePoint, you must purchase and install MindManager Enterprise.
Throughout this document, Add-ins specific to Windows 7 32-bit include “32” at the end of the Add-in name; those specific to Windows 7 64-bit have “64” at the end of the Add-in name.
MindManager Support Help
For technical support with this product, go to http://www.mindjet.com/support. Here you will find links to the Knowledge Base articles, User Forums, and other online resources. You can also submit a support request for additional assistance.

MindManager Large-Scale Deployment Guide
© 2016 Mindjet All Rights Reserved Version 16.1, February 10, 2016 1
SYSTEM REQUIREMENTS FOR
MINDMANAGER INSTALLATION
Table 1: Installation Requirements
REQUIREMENTS SUPPORTED OPERATING SYSTEMS ADDITIONAL REQUIREMENTS TO USE
CERTAIN FEATURES
IBM® or compatible Pentium® processor (1 GHz or greater)
2GB RAM or greater
830 MB disk space
SVGA (1024 x 768/16-bit color or greater)
Microsoft .NET 4.5.1 or higher
Microsoft® Windows® 10 32-bit and 64-bit
Microsoft® Windows® 8 and 8.1 32-bit and 64-bit
Microsoft® Windows® 7 Service Pack 1 32-bit and 64-bit
Large Scale Deployments
Citrix XenApp Version 6.5
Microsoft Windows Server 2008 R2 64-bit and later
Microsoft Windows Server® 2003 32-bit
Microsoft Office Professional 2010, 2013 or 2016 or 2013 (32-bit and 64-bit)
Microsoft Project® 2010, 2013 or 2016 (32-bit and 64-bit)
Microsoft SharePoint 2010 and 2013 (Foundation, Server, Dedicated Office 365)*
Mozilla® Firefox® 9.0 or greater
Google Chrome™ 16.0 or greater
Adobe® Acrobat® 9.2 or greater
Adobe Flash® Player 10 or greater
Broadband Internet Connection
* To use MindManager with Microsoft SharePoint, you must purchase and install MindManager Enterprise.
If deploying MindManager in a terminal server environment, the following are prerequisites:
Windows Server 2008 running Terminal Services
or
Citrix XenApp 6 64-bit

MindManager Large-Scale Deployment Guide
© 2016 Mindjet All Rights Reserved Version 16.1, February 10, 2016 2
Using this method, each client machine must also meet the software and hardware requirements. When running MindManager on a terminal server, the client must be able to connect and handle RDP. The server requirements depend on the number of clients.

MindManager Large-Scale Deployment Guide
© 2016 Mindjet All Rights Reserved Version 16.1, February 10, 2016 3
UNDERSTANDING DEPLOYMENT
STRATEGIES
This section provides an overview of different deployment strategies, including their basic technologies, advantages, limitations, and their level of support.
Running the Standard Setup Manually or Automatically
You can deploy MindManager on a machine-by-machine basis using the standard setup (MindManager.exe) by installing from the physical CD, or from a centrally accessible server. The
standard setup is robust, interactive, and user-friendly, but does not support customized deployment.
Using the standard setup has these advantages:
MindManager installs and operates properly on supported systems It requires no additional software or server resources Users with local administration privileges can manage the update process individually
And these disadvantages:
Manual installation is time-consuming The installed software uses up disk space on each user's system Centralized administration becomes more difficult
Running the Admin Setup Manually or Automatically
The MindManager Admin setup provides more control over installation and administration. You can run the admin setup from a server manually, or via a log-on script. If you use Windows Active Directory, Group Policy, and IntelliMirror, you can install on groups of user systems.
Using the admin setup has these advantages:
MindManager installs and operates properly on supported systems It requires no additional software or server resources You can customize installations on a per-group or per-user basis You can run the installation silently The installer is not cached on the client machine, reducing the required disk space
And these disadvantages:
Access to the original installer is required for repair and other setup operations

MindManager Large-Scale Deployment Guide
© 2016 Mindjet All Rights Reserved Version 16.1, February 10, 2016 4
Other Deployment Options
Deploying with Active Directory
This method is not yet fully supported. Due to the application architecture, MindManager only supports Computer-based Software installations via Active Directory. User-based deployment is not supported. Using a third party tool such as Orca allows you to edit properties for deployment. For more information, see Deploying with Active Directory, page 35.
Deploying with Windows Server
Deploying MindManager from a terminal server to a thin client is another supported option. With this architecture, it is possible (for example), to “run” a Windows application on a Windows client machine, where one server services many clients. You need to deploy MindManager using Windows Server Terminal Services to use full color mode in MindManager. For more information, see Deploying with Windows Server, page 37.
Deploying with Citrix XenApp
The Citrix XenApp is a sophisticated terminal server environment built on top of the Windows Terminal Services provided by Windows Server. This is currently the only tested and supported Citrix platform for MindManager (although other combinations may work). For more information, see Deploying with Citrix Presentation Server, page 39.
Using System Management Software and a Custom Setup
System management software, such as Microsoft System Management Server, enables you to centrally install and administer client machines. While you can deploy MindManager using such software, there is no specialized support for this in MindManager. This document supplies much of the information you will need if you choose to deploy in this way.
Using system management software has these advantages:
You can deploy the software to many machines with one command You can create different setups for different groups of users Updating the software is simple
And these disadvantages:
You must have system management software in place It takes time to create the custom setup The installed software uses up disk space on each user's system
Deploying on a Shared Network Drive
MindManager does not support installing on a shared network drive and having users run it directly from there.

MindManager Large-Scale Deployment Guide
© 2016 Mindjet All Rights Reserved Version 16.1, February 10, 2016 5
WHAT GETS INSTALLED
The Admin setup installs:
Required program files Configurable components Shortcuts and Start Menu items Third-party add-ins or components Shared system software Registry keys
The default location for required program files is:
C:\Program Files\Mindjet\MindManager 16
This folder contains MindManager.exe, application DLLs, and third party components. No user files are
stored in this folder.
MindManager uses merge modules to install required system software, such as ATL80.dll. If
MindManager uses a later version of a component than one already installed on the machine, MindManager installs the required version during deployment. For more information, see Shared System Software, below.
The first time a user runs the application, user data is placed in the default location C:\Users\[username]\AppData\Local\Mindjet\MindManager\16, where username is the
current user name. You must enable viewing hidden files to see this directory.
The first time a user starts the application, the application also searches to determine if a Microsoft Office custom dictionary exists for that user.
The first location searched is C:\Users\[username]\AppData\Roaming\Microsoft\UProof\CUSTOM.DIC (for
Unicode). If the dictionary is not found there, MindManager checks for the ANSI version (which is used in
earlier Office versions) at C:\Users\[username]\AppData\Roaming\Microsoft\Proof\CUSTOM.DIC.
If the user-specific Microsoft Office custom dictionary is found, a reference to that dictionary is added to the list of spelling dictionaries.
MindManager stores maps at this default location:
C:\Users\[username]\Documents\My Maps
MindManager Components
The application installs a variety of configurable components, including:
Library Dictionary

MindManager Large-Scale Deployment Guide
© 2016 Mindjet All Rights Reserved Version 16.1, February 10, 2016 6
User configuration files are also installed to help govern their behavior.
Library
The Library component consists of several sub-components:
Background Images: a library of map background wallpapers Icons: a library of symbols to indicate, at a glance, the status of an item Images: a library of pictures to help make maps more memorable Map Marker Lists: the library of user-created collections of map markers Map Parts: a library of insertable topic structures Shapes: a library of different topic shapes Styles: a library of MindManager map themes to customize the map’s overall appearance Templates: a library of map templates to provide a jump start on map creation Web: a library of web templates to format web pages
These are optional but highly recommended components.
The library is not uninstalled if you uninstall the application; this content is preserved for users upgrading to newer versions.
The default location for the Library is: C:\Users\[username]\AppData\Local\Mindjet\MindManager\16\Library\[language] where language is ENU (English), FRE (French), GER (German), or RUS (Russian).
You may wish to install the library to a different location. See the documentation for deploying with the Installation Wizard (page 18) or from the command line (page 24) for instructions.
Dictionaries
The Dictionaries component contains both spell check and autocorrect dictionaries, including dictionaries for over 10 languages. When using the installer, you can choose which dictionaries to install. You can also control dictionary installation from the command line.
Spell check dictionaries are removed during the uninstall process, but the autocorrect dictionaries are preserved for users upgrading to newer versions of the application.
The default location for spell check Dictionaries is:
C:\Program Files\Mindjet\MindManager 16\sys\spell
The default location for autocorrect Dictionaries is:
C:\Users\[username]\AppData\Local\Mindjet\MindManager\16\Spell
User Configuration Files
MindManager creates and stores user configuration files for different purposes.
Table 2: Configuration Files
FILE NAME LOCATION AND FUNCTION
ImagePropertyDatabase.dat
C:\Users\[username]\AppData\Local\Mindjet\MindManager\1
6
The application runtime, not the installer, creates this file dynamically. It

MindManager Large-Scale Deployment Guide
© 2016 Mindjet All Rights Reserved Version 16.1, February 10, 2016 7
FILE NAME LOCATION AND FUNCTION
collects information about keywords assigned by the user to images.
UserData.ini C:\Users\[username]\AppData\Local\Mindjet\MindManager\1
6
This file detects the first time a user launches the application and initiates procedures such as registry cleanup.
Library.ini C:\Users\[username]\AppData\Local\Mindjet\MindManager\1
6\Library\[language]
This file detects the library installation time. Because the application installs the library the first time it is launched, this file prevents multiple library installations.
Shortcuts and Start Menu Items
The installer puts a shortcut to the program on the Windows Desktop, the Windows Send To menu and in the main Start menu. It creates a Mindjet MindManager 16 folder in the Start >Programs folder
with a shortcut to MindManager in it.
The MindManager shortcut is an “advertised shortcut” to the program that automatically checks to determine if the program needs to be repaired before it is run. If a repair is needed, it is performed then. If you do not want to use this self-repairing feature, you can create a shortcut directly to the MindManager.exe file instead. Deleting this copy of the installer disables the self-repair service as well.
Shared System Software
Some shared software must be installed on your system before using the admin setup. During installation, MindManager uses merge modules to install other missing software, such as PIPanel.msm. Missing components are installed from the modules. Depending on the host machine’s configuration, the merge module installs the components required for that machine.
These shared components are not uninstalled automatically. Their default locations are indicated below.
Table 3: Location of Shared System Components
COMPONENT FOLDERS AND FILES
Ink related files %CommonProgramFiles%\Microsoft Shared\Ink
InkObj.dll
tpcps.dll
PIPanel.exe*
PIPanel.dll*
GdiPlus.dll
%WINDIR%\system32
InkEd.dll
PipRes.dll*

MindManager Large-Scale Deployment Guide
© 2016 Mindjet All Rights Reserved Version 16.1, February 10, 2016 8
COMPONENT FOLDERS AND FILES
wisptis.exe
* These components are installed only on Tablet PCs.
C++ runtime libraries %WINDIR%\system32
msvcp60.dll
msvcp80.dll
For a complete list of these merge modules’ components, see Microsoft’s documentation
Environment variable names (e.g. “%CommonProgramFiles%”) are expanded to their actual values (e.g.
“C:\Programs Files\Common Files”) by the installer.
Third-Party Software
MindManager uses specific third-party software. Unless otherwise stated, the installer checks to learn if the component is present on the system. If not, or if the application uses a newer version, the application installs or updates the software. The setup process places third-party software at C:\Program
Files\Mindjet\MindManager 16\, and removes during the application uninstall process.
Table 4: Third-Party Software Overview
THIRD-PARTY SOFTWARE DESCRIPTION AND VENDOR
atl70.dll Active Template Library, template-based C++ classes, creates COM objects
Microsoft
BCGCBPRO2310u.dll
BCGPStyle2010Black2310.dll
BCGPStyle2010Blue2310.dll
BCGPStyle2010White2310.dll
BCG Control Bar Professional DLL BCGSoft Ltd. Portions
Blowfish algorithm 128-bit encryption for password protection Schneier Publishing
extensibility.dll Allows addition of add-ins Microsoft
HTS32MM.dll (for 32-bit)
hts64mm.dll (for 64-bit)
An HTML control that supports inserting pictures, hyperlinks, tables, and other objects into RTF text
Sub Systems, Inc.
Independentsoft.Webdav.dll WebDAV protocol client API for .NET Framework Independentsoft
libtidyU.dll
libtidy64U.dll (for 64-bit)
HTML Tidy fixes a variety of HTML issues WWW Consortium

MindManager Large-Scale Deployment Guide
© 2016 Mindjet All Rights Reserved Version 16.1, February 10, 2016 9
THIRD-PARTY SOFTWARE DESCRIPTION AND VENDOR
matrix.dll Map co-editing engine AG Software
Microsoft .NET Framework Microsoft Web Services Enhancements 4.0 for Microsoft Windows Communication Foundation
Microsoft
Mfc80.dll Microsoft Foundation Classes, wrap Windows APIs in C++ libraries, forming application framework
Other components are associated with this .dll. See Microsoft’s documentation for complete information.
Microsoft
msvcp70.dll Microsoft C++ Runtime Library Microsoft
redemption.dll
redemption64.dll (for 64-bit)
Supports Microsoft Outlook Integration
Sax Basic Engine Components that enable VB-like scripting
ww10_000.chm
ww10_32w.dll (for 32-bit)
ww10_64.dll (for 64-bit)
Support WinWrapBasic from Polar Engineering
Spr32du80.dll (for 32-bit)
Spr64du80.dll (for 64-bit)
FarPoint Spreadsheet Control FarPoint Technologies, Inc.
Ssce5532.dll (for 32-bit)
Ssce5564.dll (for 64-bit)
Spell checker engine Wintertree Software, Inc.
Ter32mm.dll (for 32-bit)
Ter64mm.dll (for 64-bit)
RTF edit control Sub Systems, Inc.
Vic32.dll (for 32-bit)
Vic64.dll (for 64-bit)
Image processor Catenary Systems, Inc.
vsflex8n.ocx VSFlexGrid8 (Unicode) helps display, edit, and format tabular data in spreadsheets. Helps integrate with Microsoft Excel.
ComponentOne
zlib.dll
zlib64.dll
Lossless data compression library Jean-Loup Gailly and Mark Adler
ThirdPartyReadMe
See the link below for additional legal information regarding Mindjet’s use of third-party software:
http://www.mindjet.com/legal/thirdpartyreadme.

MindManager Large-Scale Deployment Guide
© 2016 Mindjet All Rights Reserved Version 16.1, February 10, 2016 10
The ReadMe can also be found in the installation directory:
C:\Program Files\Mindjet\MindManager 16\THIRDPARTYREADME.txt
Registry Keys
The installer places any per-machine Mindjet registry settings in or below the key:
HKEY_LOCAL_MACHINE\SOFTWARE\Mindjet\MindManager\16
These are the settings used by the application and its add-ins on a per-machine basis. No per-user values are stored in this key.
Following Windows guidelines, the application registers its associated file types, COM objects, etc., in sub-keys of HKEY_CLASSES_ROOT.
Table 5: Registry Key Overview
KEY TYPE LOCATION/KEY
HKEY_LOCAL_MACHINE HKEY_LOCAL_MACHINE\SOFTWARE\Mindjet\MindManager\16
HKEY_CLASSES_ROOT
HKEY_CLASSES_ROOT\...(all keys below this level)
.mmap .mmas .mmat .mmbas .mmmp .mmms .mmp Mindjet.MindManager.Custom.Document Mindjet.MindManager.Document.x Mindjet.MindManager.Document.Template.x Mindjet.MindManager.Macro.x Mindjet.MindManager.MapMarker.x Mindjet.MindManager.MapMarkerSet.x Mindjet.MindManager.MapPart.x Mindjet.MindManager.Style.x Mindjet.Mm5GenericSmartMapPart.AddIn Mindjet.Mm5GenericSmartMapPart.AddIn.x Mindjet.Mm5Sort.AddIn Mindjet.Mm5Sort.AddIn.x Mindjet.Mm5WebExportAddIn Mindjet.Mm5WebExportAddIn.x Mindjet.Mm10ExcelLinker.AddIn.x Mindjet.Mm10ExcelLinker.AddIn Mindjet.Mm10MsProject.AddIn Mindjet.Mm10MsProject.AddIn.x Mindjet.Mm10Outlook.AddIn Mindjet.Mm10Outlook.AddIn.x Mindjet.Mm10OutlookLinker.AddIn Mindjet.Mm10Outlooklinker.AddIn.x Mindjet.Mm10PPExport.AddIn

MindManager Large-Scale Deployment Guide
© 2016 Mindjet All Rights Reserved Version 16.1, February 10, 2016 11
KEY TYPE LOCATION/KEY
Mindjet.Mm10PPExport.AddIn.x Mindjet.Mm10Project.AddIn Mindjet.Mm10Project.AddIn.x Mindjet.Mm10Word.AddIn Mindjet.Mm10Word.AddIn.x MindManager.Application MindManager.Application.x MindManager.Color MindManager.Color.x MindManager.TextFont MindManager.TextFont.x Mm5WebExport.Page Mm5WebExport.Page.x Mm5WebExport.Pages Mm5WebExport.Pages.x Mm5WebExport.VariantSets Mm5WebExport.VariantSets.x Mm5WebExport.WebExport Mm5WebExport.WebExport.x Mm5WebExport.WebExports Mm5WebExport.WebExports.x MM8InternetExplorer.BHO MM8InternetExplorer.BHO.x
Uninstall Key HKEY_LOCAL_MACHINE\SOFTWARE\Microsoft\Windows\Curre
ntVersion\Uninstall
HKEY_CURRENT_USER HKEY_CURRENT_USER\Software\Mindjet\MindManager\16
Uninstall information for the program is stored in a sub-key of:
HKEY_LOCAL_MACHINE\SOFTWARE\Microsoft\Windows\CurrentVersion\Uninstall
The name of the sub-key is the Globally Unique Identifier (GUID) for the program (which changes with each release). You can find it by using RegEdit to search for “MindManager” in the Uninstall key. The uninstallation key does not remain after uninstalling.
When a user runs the application, any per-user registry settings are stored in or below the key:
HKEY_CURRENT_USER\Software\Mindjet\MindManager\16
Some Current User keys remain after uninstalling. These keys help preserve user data for upgrading to the next version of MindManager.

MindManager Large-Scale Deployment Guide
© 2016 Mindjet All Rights Reserved Version 16.1, February 10, 2016 12
WHAT REMAINS AFTER
UNINSTALLATION
When you uninstall, almost all traces of the application are removed, including all components located at C:\Program Files\Mindjet\MindManager 16. Most registry keys are removed as well. Map files
(.mmap files) are not deleted.
On Microsoft Windows 7 or any other system where the system administrator has disallowed the use of RegEdit to export the registry key (i.e. DisableRegistryTools is set), the registry key is backed up to a MindManager registry subkey under:
HKCU\Software\Mindjet\MindManager\MMX16RegistryBackup_<date>_<time>.
Otherwise the keys are stored under
C:\My Documents\MMX16RegistryBackup_<date>_<time>
Some the remnants of the application are left behind. These are needed to preserve user data when upgrading to a newer version. See Remaining Files, Folders, and Software Components (page 13) and Remaining Registry keys (page 13) for more information.
Remaining Files, Folders, and Software Components
When you uninstall, the installer leaves behind some components it installed with the program. The tables below reflect the most common remaining components and registry keys. The actual list may vary depending upon the installation and deployment. In general, components left behind fit one of these scenarios:
User data (the library, images, and templates) remains to support upgrading to the next version or Shared components, such as C++ libraries, and their registry keys get left behind because they
may be required for other purposes
or
A backup of your registry
Table 6: Remaining Files, Folders, and Software components
COMPONENT LOCATION AND EXPLANATION
C++ runtime libraries See Shared System Software (page7) for locations.
These files may be in use by other applications.
Ink related files See Shared System Software (page7) for locations.
These files may be in use by other applications.

MindManager Large-Scale Deployment Guide
© 2016 Mindjet All Rights Reserved Version 16.1, February 10, 2016 13
COMPONENT LOCATION AND EXPLANATION
MMX16RegistryBackup_<date>_<time>
C:\MyDocuments\
Opening this file gives you the option to add its contents to your current registry.
msvcp60.dll %WINDIR%\system32
This software may be in use by other applications.
msvcrt.dll %WINDIR%\system32
This software may be in use by other applications.
XML-related files See Shared System Software (page7) for locations.
These files may be in use by other applications.
User Data C:\Users\[username]\AppData\Local\Mindjet\MindMana
ger\16
Contains dictionaries, images, templates dictionaries etc. that the user may have customized. Does not uninstall so the user does not lose this data when upgrading.
Remaining Registry Keys
Table 7: Remaining Registry Keys
REGISTRY KEY LOCATION AND EXPLANATION
HKEY_CLASSES_ROOT HKEY_CLASSES_ROOT\
.mmap .mmp
These keys register .mmap file extensions.
HKEY_CURRENT_USER HKEY_CURRENT_USER\Software\Mindjet\MindManager\16\
Keys at or below this preserve user data for upgrading.

MindManager Large-Scale Deployment Guide
© 2016 Mindjet All Rights Reserved Version 16.1, February 10, 2016 14
USING THE ADMIN SETUP
The Admin setup gives systems administrators more control over an installation. It is distributed in a .zip archive that contains the following files:
Mindjet MindManager 16 Admin.msi
The MindManager Microsoft installer.
dotNetFx451_web_setup.exe
Microsoft’s .NET Framework redistributable setup.
instmsi30.exe
Microsoft Windows Installer engine setup. (Normally this is already on the target system.)
msxml6_x86.msi(for 32-bit) or msxml6_x64.msi (for 64-bit)
The MSXML 6.0 installer.
vcredist_2013_x86.exe (for 32-bit or 64-bit running 32-bit) or
vcredist_2013_x64.exe (for 64-bit)
Microsoft Visual C++ run-time environment for version 2013 (including 2010 and 2013 for 64-bit machines).
sharepointclientcomponents_15-4711-1001_x86_en-us.msi (for 32-bit or 64-bit
running 32-bit) or
sharepointclientcomponents_15-4711-1001_x64_en-us.msi (for 64-bit)
The SharePoint Server 2013 Client Components are used to enable connections with SharePoint Server 2013.
MindManager_Large_Scale_Deployment_Guide.pdf
This Deployment Guide.

MindManager Large-Scale Deployment Guide
© 2016 Mindjet All Rights Reserved Version 16.1, February 10, 2016 15
Using the admin setup gives you nearly complete control over your deployment, including:
Deploying (or not deploying) specific components Disabling functions, such as internet access Storing components on network drives, such as user data or the library
You also have the option of configuring many items from the registry.
Required Software
All required software is in included in the Admin setup package. It contains some software that must be installed on your system before using the setup. You should verify that this software is already installed on your system; if not, install it from the admin package.
vcredist_2013_x86.exe or vcredist_2013_x64.exe installs the VC++ Redistributable
components for Visual Studio 2013. Check for existence of registry key. For vcredist_2013_x86.exe, the registry key is:
HKEY_LOCAL_MACHINE\SOFTWARE\Microsoft\Windows\CurrentVersion\Uninstall\
{13A4EE12-23EA-3371-91EE-EFB36DDFFF3E}
For vcredist_2013_x64.exe, the registry key is:
HKEY_LOCAL_MACHINE\SOFTWARE\Microsoft\Windows\CurrentVersion\Uninstall\
{A749D8E6-B613-3BE3-8F5F-045C84EBA29B}
Or simply re-install.
vcredist_2013_x86.exe installs the VC++ Redistributable components for Visual Studio.
msxml6_x86.msi or msxml6_x64.msi installs the MSXML 6.0 SP1 Parser
Check the installed programs in the Control Panel to check existing installation.
dotNetFx451_web_setup.exe installs the Microsoft Net Framework
Check the installed programs in the Control Panel to check existing installation. This install can take quite a long time.
sharepointclientcomponents_15-4711-1001_x86_en-us.msi (for 32-bit or 64-bit
running 32-bit) or
sharepointclientcomponents_15-4711-1001_x64_en-us.msi (for 64-bit)
Check for existence of registry key HKEY_LOCAL_MACHINE\SYSTEM\Setup\Components\SharePointClient\15.0 or simply install.

MindManager Large-Scale Deployment Guide
© 2016 Mindjet All Rights Reserved Version 16.1, February 10, 2016 16
Note: You should check for and install any missing components in the order listed above.
Required Permissions and Privileges
Administrator privileges are required to install any Windows software, including MindManager.
No special privileges or disk permissions are required to run the application. A user can run the program as a restricted user, a “normal” user, a power user, or an administrator. The program does assume that the user has read/write/create privileges in the HKEY_CURRENT_USER registry key as well as in the user profile section of the hard disk and below.
Differences between the Standard and Admin Setups
The Admin setup is based on the standard setup—with a number of important differences:
Caching: The admin setup does not cache the setup on the computer where it is being installed. Instead, the setup should be run from a network location that remains accessible from the workstation at all times. This ensures proper operation of the Modify, Repair, and Remove entries in the “Add/Remove programs” Control Panel applet, and avoids duplication of the installation source on every system where the application is installed.
Patching: Admin setups are only delivered as full setups, not patch setups. The reason for this is that system administrators might modify the admin setup to suit the needs of their individual company. If the installation database is transformed in this way, a future patch would not be able to properly update the installation. We avoid this problem by not delivering patch updates at all for our admin setups. To upgrade, you need to uninstall the previous version and install the upgrade.
Packaging: We exclude the Microsoft Windows Installer engine and .NET Framework installer. Both components must be installed prior to running MindManager.msi if they are missing from a user’s machine.
User Data: The admin setup includes the option to specify the location of user data.
Library Files: There is also an option to have the application extract the library files as usual, or to have the administrator set this up “manually,” ahead of time. For more information, see Deploying User Data and the Library to a Server, page 20.
Installing MindManager: An Overview
This section gives an overview of the admin setup and application components. With this information, you can understand the installation process and determine what you may wish to customize for your deployment.
Per-machine Setup
The setup installs the program on a client machine and only sets per-machine registry settings in the HKEY_LOCAL_MACHINE and HKEY_CLASSES_ROOT registry keys. It does not directly create or set any
registry keys or values in the HKEY_CURRENT_USER registry key.
The installer installs all program files to this default folder:

MindManager Large-Scale Deployment Guide
© 2016 Mindjet All Rights Reserved Version 16.1, February 10, 2016 17
C:\Program Files\Mindjet\MindManager 16
Administrator privileges are required to install any Windows software, including MindManager.
Per-user Setup
Each time the application launches, it checks the UserData.ini file, located in C:\Users\[username]\AppData\Local\Mindjet\MindManager\16 to determine if a per-user
setup needs to be performed.
If this file is missing, or if the version of the application installed is newer than the version the user last ran, then MindManager prepares for a “new” per-user installation by deleting the following registry key:
HKEY_CURRENT_USER\Software\Mindjet\MindManager\16\User Interface
The application also determines if the per-user application data files (outline print templates and spell check auto-correct dictionaries) are present. If not, it copies them from the “All Users” folder:
C:\Users\[username]\AppData\Local\Mindjet\MindManager\16
Finally, the application determines if the per-user Library files need to be installed using the same UserData.ini algorithm described above and checks the LSDLibraryExtract. If the registry is not set to
0, then a separate background task/program is run to unzip the library files from a MindManager sub-folder:
C:\Program Files\Mindjet\MindManager16\sys\[language]
The Vista system folder structure uses environmental variables instead of real paths. Note the different path structure below:
%USERPROFILE%\Local Setting\Application Data\Mindjet\MindManager\16
%ALLUSERPROFILE%\Application Data\Mindjet\MindManager\16
%ProgramFiles%\Mindjet\MindManager16\sys\[language]

MindManager Large-Scale Deployment Guide
© 2016 Mindjet All Rights Reserved Version 16.1, February 10, 2016 18
DEPLOYING WITH THE
INSTALLATION WIZARD
Using the admin setup to install the application is straightforward and simple. Unlike the basic setup, you have customization options, though not as many as from the command line.
Starting the Installation
To install the application:
1. Launch the installer.
2. At the welcome screen, click Next.
3. Select “I agree to the terms of the license agreement” and click Next.
4. Enter the Customer Information (User Name and Organization).
5. Click Next.
The Setup Type dialog appears.

MindManager Large-Scale Deployment Guide
© 2016 Mindjet All Rights Reserved Version 16.1, February 10, 2016 19
At this point, you can customize your deployment or complete the installation (page 22).
Customizing the Installation
A custom installation allows you to:
Disable default features Change the default installation folder Deploy user data and the library on a separate server
If you need to customize the installation beyond these parameters, see Deploying from the Command Line (page 24).
Disabling Default Features
To disable the default installation features:
6. Complete steps 1-5 in Starting the Installation (page 18).
7. Select Custom and click Next.
The Custom Setup dialog appears.
8. In the tree, select a feature whose default installation you want to change.
9. Click the down arrow button .
10. Select the desired feature setting.

MindManager Large-Scale Deployment Guide
© 2016 Mindjet All Rights Reserved Version 16.1, February 10, 2016 20
For each selected feature, a description and storage requirement appears.
11. Repeat this process until you have made all of your feature customization choices.
12. Complete the installation as outlined in Completing the Installation (page 22).
Changing the Default Installation Folder
To change the default installation folder:
13. Complete steps 1-5 in Starting the Installation (page 18).
14. Select Custom and click Next.
The Custom Setup dialog appears.
15. Click Change.
The Change Current Destination Folder dialog appears.
16. Select the destination folder.
17. Click OK.
The new destination folder appears in the Custom Setup dialog.
18. Complete the installation as outlined in Completing the Installation (page 22).
Deploying User Data and the Library to a Server

MindManager Large-Scale Deployment Guide
© 2016 Mindjet All Rights Reserved Version 16.1, February 10, 2016 21
MindManager installs a “Library” folder containing:
Background Images Icons Images Map Parts Shapes Styles Templates Web Export Templates
The entire library consists of several megabytes. By default, these files are stored on a per-user basis in this folder: C:\Users\[username]\AppData\Local\Mindjet\MindManager\16\Library\[language]
where language is ENU (English), FRE (French), GER (German), or RUS (Russian).
You can store user data and the library in a network folder for if you wish to:
Save space on users' systems Decrease the time required to run the program the first time Allow roaming user’s access to their customized libraries Assure that all users have a fixed, easily updatable set of library files
You can install these files once to a common location (perhaps in a read-only folder). Multiple users can then share the files, or a single user can access them from multiple machines. If a user needs to edit these files, install them in a directory with write privileges.
You cannot install user data and the library to separate locations from the installation wizard. To install them separately, you must install them from the command line (page 24).
To deploy user data and the library to a server:
19. Complete steps 1-5 in Starting the Installation (page 18).
20. From the Custom Setup dialog, click Advanced.
The Deploy User Data Files dialog appears.
21. Select Deploy user data on server.

MindManager Large-Scale Deployment Guide
© 2016 Mindjet All Rights Reserved Version 16.1, February 10, 2016 22
22. Click Browse.
The Browse for Folder dialog appears.
23. Select the destination folder.
24. Click OK.
The new directory appears in the Server base path field.
25. Choose from the following options:
Extract library to the server path the first time the application starts Use separate folders per user
We recommend selecting both of these options to avoid needing to configure the user data folder and the library folder separately. You may want to create the user folders before installation, giving you the chance to make the files read only.
26. Click OK to close the dialog.
27. Complete the installation as outlined in Completing the Installation (page 22).
These are all of the customization choices available from the installer interface. You have more control if you deploy from the command line (page 24).
Completing the Installation
To complete the standard installation:
28. Select Complete and click Next.
The Ready to Install dialog appears.

MindManager Large-Scale Deployment Guide
© 2016 Mindjet All Rights Reserved Version 16.1, February 10, 2016 23
29. Choose your shortcut options.
30. Click Install.
31. After the installation is complete, choose from the following options:
Launch MindManager Register MindManager
32. Click Finish.

MindManager Large-Scale Deployment Guide
© 2016 Mindjet All Rights Reserved Version 16.1, February 10, 2016 24
DEPLOYING FROM THE COMMAND
LINE
While you may wish to customize your deployment from the installer interface (page 19), you have much greater control over the installation from the command line, including:
Configuring installation parameters (page 24) Specifying what to install on a feature by feature basis (page 25) Enabling or disabling program functions Specifying where to install libraries, and user data (page 30) Using a custom SharePoint SiteConnections.xml file (page 54)*
*To use MindManager with Microsoft SharePoint, you must purchase and install MindManager Enterprise.
This section identifies what you may configure and provides examples of command line arguments for customizing your deployment. A sample installation command demonstrating most of these options is included in Sample Setup Commands (page 33).
Configuring Installation Parameters from the Command Line
You can set a number of public properties with command line options.
Table 8: Configuring Installation Parameters from the Command Line
PARAMETER DESCRIPTION OF VALUES
INSTALLDIR Specifies where the application should install the program. For example:
"C:\Program Files\Mindjet\MindManager 16\"
ISX_SERIALNUM Specifies the license key for your installation. Note: No validation is performed for this key, it is simply written to the registry. If the license key is not valid, the application runs in a restricted (trial) mode.
USERNAME Specifies the User Name for registering the application.
Optional parameter; the Windows User Name will be used if this parameter is not supplied.
COMPANYNAME Specifies the Company Name for registering the application.
Optional parameter; the Windows Company Name will be used if this parameter is not supplied.

MindManager Large-Scale Deployment Guide
© 2016 Mindjet All Rights Reserved Version 16.1, February 10, 2016 25
Configuring Features from the Command Line
The admin setup is a Basic MSI project, not an InstallScript project; there is no record mode to run an install with Setup.iss. Basic MSI projects do not create or use a response file for silent installations.
Tip: When configuring features from the command line, it is better to use /s silent installation to avoid conflicts with properties set through the installer interface. You can remove or add features from the command line by using ADDLOCAL or REMOVE on a feature by feature basis. To simplify the process, use
ADDLOCAL="ALL" and then remove features you do not want. Examples are provided below.
Customizing the Installation with Setup.exe
You can use the following options to add or remove features from the command line setup.exe:
/v=command line access to msi file
/qn=when used with /v parameter, silent (no user interface) parameter
passed to msi file
Here are examples of adding and removing features through the setup.exe file, using silent install:
Adding:
<directory>\setup.exe /v"ADDLOCAL=\"MSWordAddin\" /qn"
Removing:
<directory>\setup.exe /v"ADDLOCAL=\"ALL\" "REMOVE=\"MSWordAddin\" /qn"
You can also string together multiple features for inclusion or removal:
<directory>\setup.exe
/v"ADDLOCAL=\"All\" REMOVE=\"MSWordAddin,RSS\" /qn"
Customizing the Installation with MSI
You can use these options to add or remove features from the command line with MSI.exe:
/i=install mode
/qn=silent (no user interface) parameter (Tip: /qn+ will let you know
when it’s done)
Note: On Windows 7 and above, security features require that you run silent install (/qn) as the Administrator, not as a member of the Administrator group.
Here are examples of adding and removing features through the msiexec.exe file, using silent install:
Adding:
msiexec /i "<directory>\filename.msi" ADDLOCAL="MSWordAddin" /qn
Removing:

MindManager Large-Scale Deployment Guide
© 2016 Mindjet All Rights Reserved Version 16.1, February 10, 2016 26
msiexec /i "<directory>\filename.msi" ADDLOCAL="ALL"
REMOVE="MSWordAddin" /qn
You can also string together multiple features for inclusion or removal:
msiexec /i "<directory>\filename.msi" ADDLOCAL="ALL"
REMOVE="MSWordAddin,PDFWriter,RSS" /qn
Table 9: Configuring Features with MSI from the Command Line
FEATURE COMMENTS
Library Available add-ins
The default add-in is Library, which installs add-ins below. You can also specify a subset.
Images Shapes BackgroundImages Icons ImageGallery TemplateOrganizer Templates WebTemplates Styles MapParts Markers
Example:
msiexec /i "<directory>\filename.msi" ADDLOCAL="ALL"
REMOVE="WebTemplates" /qn
Dictionaries Available add-ins
The default add-in is Dictionaries, which installs add-ins below. You can also specify a subset.
Swedish Spanish Norwegian BrazilianPortuguese Italian Danish Finnish CanadianEnglish USEnglish UKEnglish French Dutch German
Example:
msiexec /i "<directory>\filename.msi" ADDLOCAL="ALL"
REMOVE="CanadianEnglish" /qn
MindManager Large-Scale Deployment Guide
© 2016 Mindjet All Rights Reserved Version 16.1, February 10, 2016 27
FEATURE COMMENTS
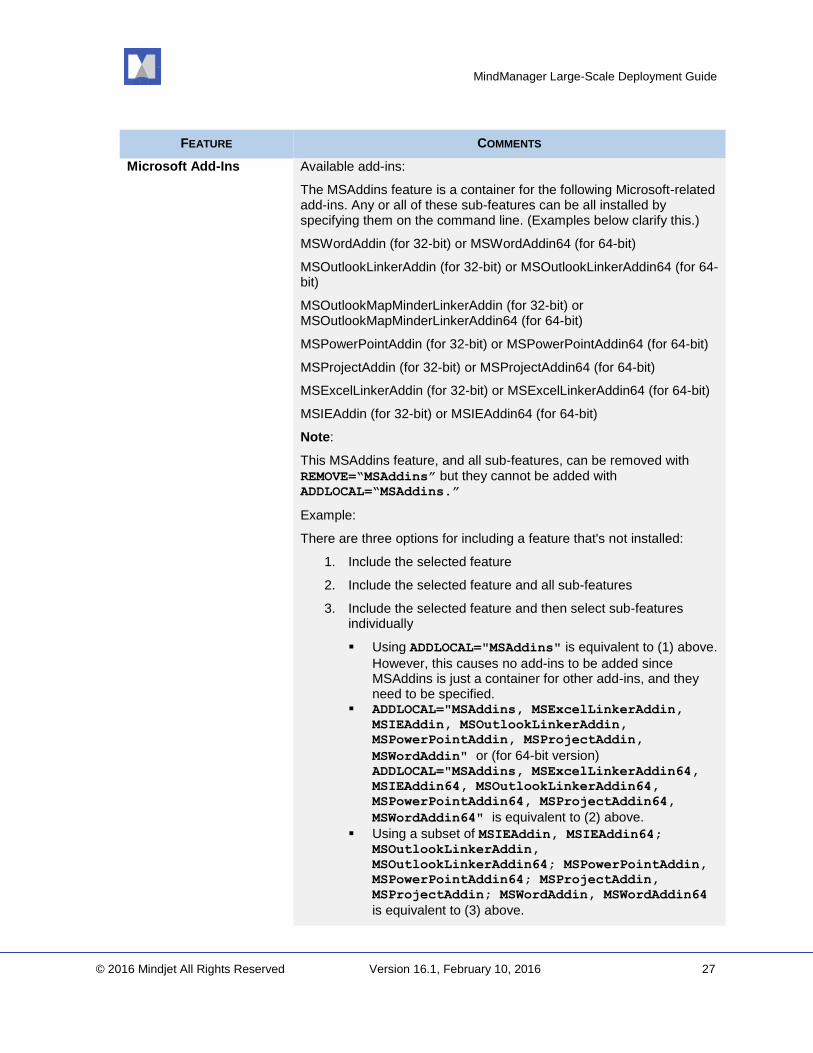
Microsoft Add-Ins Available add-ins:
The MSAddins feature is a container for the following Microsoft-related add-ins. Any or all of these sub-features can be all installed by specifying them on the command line. (Examples below clarify this.)
MSWordAddin (for 32-bit) or MSWordAddin64 (for 64-bit)
MSOutlookLinkerAddin (for 32-bit) or MSOutlookLinkerAddin64 (for 64-bit)
MSOutlookMapMinderLinkerAddin (for 32-bit) or MSOutlookMapMinderLinkerAddin64 (for 64-bit)
MSPowerPointAddin (for 32-bit) or MSPowerPointAddin64 (for 64-bit)
MSProjectAddin (for 32-bit) or MSProjectAddin64 (for 64-bit)
MSExcelLinkerAddin (for 32-bit) or MSExcelLinkerAddin64 (for 64-bit)
MSIEAddin (for 32-bit) or MSIEAddin64 (for 64-bit)
Note:
This MSAddins feature, and all sub-features, can be removed with REMOVE=“MSAddins” but they cannot be added with ADDLOCAL=“MSAddins.”
Example:
There are three options for including a feature that's not installed:
1. Include the selected feature
2. Include the selected feature and all sub-features
3. Include the selected feature and then select sub-features individually
Using ADDLOCAL="MSAddins" is equivalent to (1) above.
However, this causes no add-ins to be added since MSAddins is just a container for other add-ins, and they need to be specified.
ADDLOCAL="MSAddins, MSExcelLinkerAddin,
MSIEAddin, MSOutlookLinkerAddin,
MSPowerPointAddin, MSProjectAddin,
MSWordAddin" or (for 64-bit version) ADDLOCAL="MSAddins, MSExcelLinkerAddin64,
MSIEAddin64, MSOutlookLinkerAddin64,
MSPowerPointAddin64, MSProjectAddin64,
MSWordAddin64" is equivalent to (2) above.
Using a subset of MSIEAddin, MSIEAddin64; MSOutlookLinkerAddin,
MSOutlookLinkerAddin64; MSPowerPointAddin,
MSPowerPointAddin64; MSProjectAddin,
MSProjectAddin; MSWordAddin, MSWordAddin64
is equivalent to (3) above.

MindManager Large-Scale Deployment Guide
© 2016 Mindjet All Rights Reserved Version 16.1, February 10, 2016 28
FEATURE COMMENTS
RSS The add-in is RSS
Example:
msiexec /i "<directory>\filename.msi" ADDLOCAL="ALL"
REMOVE="RSS" /qn
Configuring Functions from the Command Line
During installation, you can disable some functions by setting the value to “0.” For example:
msiexec /i "<directory>\Mindjet Admin.msi" /qn INTERNETACCESS="0"
Table 10: Configuring Functions from the Command Line
FUNCTIONS EXAMPLES
Macro Support The function name is MACROUI.
Example (msi):
msiexec /i "<directory>\MindjetAdmin.msi" /qn
MACROUI="0"
Shortcuts The function names are:
SHORTCUTDESKTOP SHORTCUTSTARTMENU SHORTCUTQUICKLAUNCH
Example:
msiexec /i "<directory>\Mindjet Admin.msi" /qn
SHORTCUTSTARTMENU="0"
Internet Access The function name is INTERNETACCESS.
Example(msi):
msiexec /i "<directory>\Mindjet Admin.msi" /qn
INTERNETACCESS="0"
Example (setup.exe):
<directory>\setup.exe /s /v"INTERNETACCESS=0 /qn"
Online Help The function name is ONLINEHELP.
Example (msi):
msiexec /i "<directory>\Mindjet Admin.msi" /qn
ONLINEHELP="1"
Note: this will enable Online Help.
Example (setup.exe):

MindManager Large-Scale Deployment Guide
© 2016 Mindjet All Rights Reserved Version 16.1, February 10, 2016 29
FUNCTIONS EXAMPLES
<directory>\setup.exe /s /v"ONLINEHELP=1 /qn"
Note: this will enable Online Help.
UI Customization The function name is UICUSTOMIZATION.
Example (msi):
msiexec /i "<directory>\Mindjet Admin.msi" /qn
UICUSTOMIZATION="1"
Example (setup.exe):
<directory>\setup.exe /s /v"UICUSTOMIZATION=1 /qn"
Disable Attachments The function name is DISABLEATTACHMENTS
Example (msi):
msiexec.exe /i "Mindjet Admin.msi"
DISABLEATTACHMENTS=1 /qn
Configuring Functions from the Registry
The application supports configuring specific functionality in the registry before installing the application. The installer reads these keys and retains these settings. After installation is complete, you can hand-configure these settings as well. To disable a function, set the registry value to “0.” Reset the value to “1” to re-enable the function. Each key is of the type REG_DWORD except the License key.
Table 11: Configuring Functions from the Registry
FUNCTIONS EXAMPLES
Macro Support The registry key is MacroUiEnabled.
Example:
HKEY_LOCAL_MACHINE\SOFTWARE\Mindjet\MindManager\16\S
ettings "MacroUiEnabled" (0)
Internet Access The registry key is InternetConnectionEnabled.
Example:
HKEY_LOCAL_MACHINE\SOFTWARE\Mindjet\MindManager\16\S
ettings "InternetConnectionEnabled" (0)
Online Help The registry key is OnlineHelpEnabled.
Example:
HKEY_LOCAL_MACHINE\SOFTWARE\Mindjet\MindManager\16\S
ettings "OnlineHelpEnabled" (0)
UI Customization The registry key is EnableUserCustomization.
Example:

MindManager Large-Scale Deployment Guide
© 2016 Mindjet All Rights Reserved Version 16.1, February 10, 2016 30
FUNCTIONS EXAMPLES
HKEY_LOCAL_MACHINE\SOFTWARE\Mindjet\MindManager\16\S
ettings "EnableUserCustomization" (1)
Connect Access The registry key is Connect3Enabled.
Example:
HKEY_LOCAL_MACHINE\SOFTWARE\Mindjet\MindManager\16\S
ettings "Connect3Enabled" (1)
Note: Connect is turned on by default in version 10.0, and this key must be entered manually.
Disable Attachments The registry key is DisableAttachments.
Example:
HKEY_LOCAL_MACHINE\SOFTWARE\Mindjet\MindManager\16\S
ettings "DisableAttachments" (1)
Effort The registry key is ShowEffort.
Example:
HKEY_LOCAL_MACHINE\SOFTWARE\Mindjet\MindManager\16\S
ettings\ShowEffort
Note: Set dword to either 0 or 1 during an LSD (or setup.exe) installation.
License Key
Online Files
The registry key is License Key.
Example:
HKEY_LOCAL_MACHINE\SOFTWARE\Mindjet\MindManager\16\R
egistration
Note: Use .reg script to set the key via ISX_SERIALNUM deployment.
The registry key is Connect3ApiEnabled
Example:
HKEY_CURRENT_USER\Software\Mindjet\MindManager\16\Se
ttings\Connect3ApiEnabled
HKEY_LOCAL_MACHINE\SOFTWARE\Wow6432Node\Mindjet\Mind
Manager\16\Settings\Connect3ApiEnabled
Note: Adds ‘Let add-ins use online features’ checkbox to Add-Ins tab of Options dialog.
Deploying User Data and the Library
As discussed previously in Deploying User Data and the Library to a Server (page 20), you may want to deploy user data and the library to a server. If you want to deploy the user data and library on separate servers, you must do so from the command line or by editing the registry.
MindManager Large-Scale Deployment Guide
© 2016 Mindjet All Rights Reserved Version 16.1, February 10, 2016 31
Deploying User Data and the Library from the Command Line
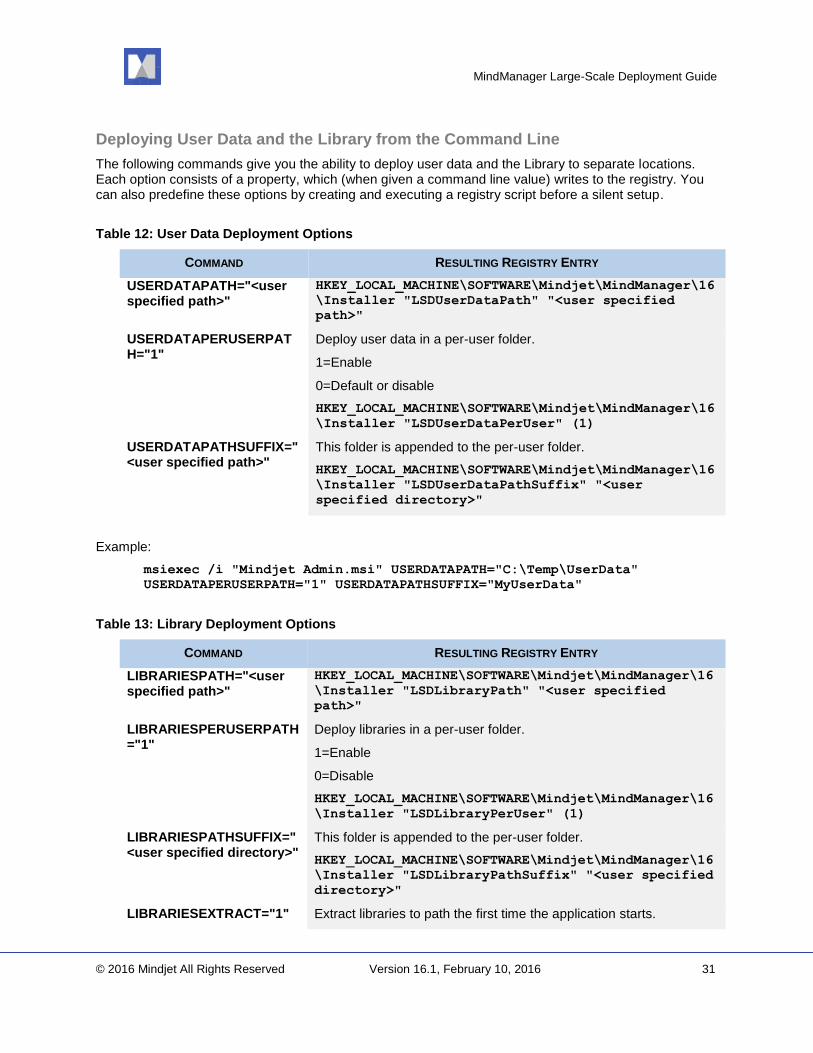
The following commands give you the ability to deploy user data and the Library to separate locations. Each option consists of a property, which (when given a command line value) writes to the registry. You can also predefine these options by creating and executing a registry script before a silent setup.
Table 12: User Data Deployment Options
COMMAND RESULTING REGISTRY ENTRY
USERDATAPATH="<user specified path>"
HKEY_LOCAL_MACHINE\SOFTWARE\Mindjet\MindManager\16
\Installer "LSDUserDataPath" "<user specified
path>"
USERDATAPERUSERPATH="1"
Deploy user data in a per-user folder.
1=Enable
0=Default or disable
HKEY_LOCAL_MACHINE\SOFTWARE\Mindjet\MindManager\16
\Installer "LSDUserDataPerUser" (1)
USERDATAPATHSUFFIX="<user specified path>"
This folder is appended to the per-user folder.
HKEY_LOCAL_MACHINE\SOFTWARE\Mindjet\MindManager\16
\Installer "LSDUserDataPathSuffix" "<user
specified directory>"
Example:
msiexec /i "Mindjet Admin.msi" USERDATAPATH="C:\Temp\UserData"
USERDATAPERUSERPATH="1" USERDATAPATHSUFFIX="MyUserData"
Table 13: Library Deployment Options
COMMAND RESULTING REGISTRY ENTRY
LIBRARIESPATH="<user specified path>"
HKEY_LOCAL_MACHINE\SOFTWARE\Mindjet\MindManager\16
\Installer "LSDLibraryPath" "<user specified
path>"
LIBRARIESPERUSERPATH="1"
Deploy libraries in a per-user folder.
1=Enable
0=Disable
HKEY_LOCAL_MACHINE\SOFTWARE\Mindjet\MindManager\16
\Installer "LSDLibraryPerUser" (1)
LIBRARIESPATHSUFFIX="<user specified directory>"
This folder is appended to the per-user folder.
HKEY_LOCAL_MACHINE\SOFTWARE\Mindjet\MindManager\16
\Installer "LSDLibraryPathSuffix" "<user specified
directory>"
LIBRARIESEXTRACT="1" Extract libraries to path the first time the application starts.

MindManager Large-Scale Deployment Guide
© 2016 Mindjet All Rights Reserved Version 16.1, February 10, 2016 32
COMMAND RESULTING REGISTRY ENTRY
1=Enable
0=Disable
HKEY_LOCAL_MACHINE\SOFTWARE\Mindjet\MindManager\16
\Installer "LSDLibraryExtract" (1)
Example:
msiexec /i "Mindjet Admin.msi" LIBRARIESPATH ="C:\Temp\Libraries"
LIBRARIESPERUSERPATH ="1" LIBRARIESPATHSUFFIX ="MyLibraries"
LIBRARIESEXTRACT="1"
Deploying User Data from the Registry
During a silent (non-interactive) installation, you can deploy data user files by setting some registry values on the user's system in the registry key before running the installer:
HKEY_LOCAL_MACHINE\SOFTWARE\Mindjet\MindManager\16\Installer
Table 14: User Data Registry Key Values
REGISTRY VALUE DATA VALUE
LSDUserDataPath Examples:
N:\User Data\All Users\Mindjet\MindManager\
or
N:\User Data (if LSDUserDataPerUser is set to 1)
LSDUserDataPerUser 0 = Do not use separate folders per user
1 = Do use separate folders per user
LSDUserDataPathSuffix See above
Example:
Mindjet\MindManager\16
Only applies if LSDUserDataPerUser is set to 1
If you want to deploy all of the user data (including the library) on a server, create a registry file named “MindManager Large-Scale Deployment Options.reg” like this:
REGEDIT4
[HKEY_LOCAL_MACHINE\SOFTWARE\Mindjet]
[HKEY_LOCAL_MACHINE\SOFTWARE\Mindjet\MindManager]
[HKEY_LOCAL_MACHINE\SOFTWARE\Mindjet\MindManager\16]
[HKEY_LOCAL_MACHINE\SOFTWARE\Mindjet\MindManager\16\Installer]

MindManager Large-Scale Deployment Guide
© 2016 Mindjet All Rights Reserved Version 16.1, February 10, 2016 33
"LSDUserDataPath"="N:\\User Data\\All Users\\Mindjet\\MindManager 16"
"LSDUserDataPerUser"=dword:00000001
"LSDUserDataPathSuffix"="User Data"
“LSDLibraryPath= N:\\All Users\\Mindjet\\MindManager 16”
"LSDLibraryPerUser"=dword:00000001
"LSDLibraryPathSuffix"="Library"
"LSDLibraryExtract"=dword:0000001
Sample Setup Commands
The following sections provide sample commands to demonstrate various installation scenarios.
Simple Installation
This command simply runs the installer in the usual interactive mode.
Msiexec.exe /i "Mindjet Admin.msi"
You can also run MindManagerAdmin.msi from Windows Explorer.
Silent Installation
This command silently runs the installer, supplying values for all required parameters.
Msiexec.exe /i "MindManagerAdmin.msi" /qn INSTALLDIR="C:\Program
Files\Mindjet\MindManager 16\" ISX_SERIALNUM="MPxM-MM1-xxxx-xxxx-xxxx"
Note that the "xxxx-xxx-xxxx-xxxx-xxxx" portion of the license key must be replaced with a valid
key. Optional parameters are USERNAME and COMPANYNAME.
Sample Customized Installation Using ADDLOCAL and REMOVE
Here is an example for a customized silent install, using ADDLOCAL and REMOVE:
Msiexec.exe /i "Mindjet Admin.msi" /qn /L*v "C:\MM16AdminSetup.log"
INSTALLDIR="D:\Program Files\Mindjet\MindManager 16\"
ISX_SERIALNUM="MPxM-MM1-xxxx-xxxx-xxxx" USERNAME="John Doe"
COMPANYNAME="Acme, Inc." ADDLOCAL="ALL" REMOVE="MMPlayerExport,
MSWordAddin" MACROUI="0" INTERNETACCESS="0" UICUSTOMIZATION="0"
ONLINEHELP="1"
Silent install options for the MMPlayerExport key that supports the Viewer feature are available and supported using Admin .MSI package.
To remove the feature:
msiexec /i PATH_TO.msi ADDLOCAL="ALL" REMOVE="MMPlayerExport" /qn\
To re-instate the feature:
msiexec /i PATH_TO.msi ADDLOCAL="MMPlayerExport" /qn

MindManager Large-Scale Deployment Guide
© 2016 Mindjet All Rights Reserved Version 16.1, February 10, 2016 34
Uninstallation
This command uninstalls the application:
Msiexec.exe /x "MindManagerAdmin.msi"

MindManager Large-Scale Deployment Guide
© 2016 Mindjet All Rights Reserved Version 16.1, February 10, 2016 35
DEPLOYING WITH ACTIVE
DIRECTORY
Deploying via Active Directory and Group policies is has limited supported at this time because:
The setup only supports computer-based software installation Some properties can only be configured from the command line
You can use configuration tools such as Orca to:
Configure properties from the property table Save the settings to a transform file (MST) Deploy it with the updated values
Here is a list of properties you can modify in the Property Table:
Table 15: Properties Editable in Properties Table
PROPERTY DESCRIPTION/DEFAULT SETTING
INTERNETACCESS=1/0 Allow internet access Default=1
ISX_SERIALNUM Specifies a license key to activate the product. Add to the properties table in the .mst file with the license key as the value.
LIBRARIESPATH=<defaultpath> User can override default path.
LIBRARIESPATHSUFFIX=<defaultpath> User can override default path.
LIBRARIESPERUSERPATH=0/1 Deploy libraries per user Default=0
LIBRARIESEXTRACT=1/0 Extracts libraries at first launch Default=1
USERDATAPATH=<defaultpath> User can override default path.
USERDATAPATHSUFFIX=<defaultpath> User can override default path.
USERDATAPERUSERPATH=0/1 User Data deployed per user Default=1
MACROUI=1/0 Enable Macros in UI Default=1
ONLINEHELP=1/0 Enable online help Default=0
REBOOTISREQUIRED=No/Yes Require reboot after installation

MindManager Large-Scale Deployment Guide
© 2016 Mindjet All Rights Reserved Version 16.1, February 10, 2016 36
PROPERTY DESCRIPTION/DEFAULT SETTING
Default=No
TOPICALERTSLINKER=1/0 Enable topic alerts linker Default=1
UICUSTOMIZATION=1/0 (default=1) Enable UI customization Default=1
SHORTCUTDESKTOP=1/0 (default=1) Create Desktop shortcut Default=1
SHORTCUTQUICKLAUNCH=1/0 Create QuickLaunch shortcut Default=1
SHORTCUTSTARTMENU=1/0 (default=1)
Create StartMenu shortcut Default=1
Recommendations include
Saving these settings to the transform file as a backup, rather than directly to the MSI Deploying on a per-machine basis only, avoiding the possibility that the machines with multiple
users get multiple copies of the application installed Creating a policy for “Always install elevated,” otherwise the installation may fail

MindManager Large-Scale Deployment Guide
© 2016 Mindjet All Rights Reserved Version 16.1, February 10, 2016 37
DEPLOYING WITH WINDOWS
SERVER
You can install with Windows Server 2003 running Terminal Services, and then deploy it to variety of client machines.
To install on a Windows Server 2003 running Windows Terminal Services (WTS):
1. Log on to the Windows Terminal Server as an administrator.
2. Launch PATH_TO.msi.
3. We recommend using the Add/Remove Programs applet in the Windows Control Panel.
4. Avoid running the installer directly from Windows Explorer unless you are familiar with using the “change user /install” and “change user /execute” commands.
5. Select Add New Programs and then select CD.
The automatic procedure does not find the setup program.
6. For the Run Installation Program dialog, click Browse.
In the Browse dialog:
7. Change Files of type to Programs.
8. Navigate to the installer location.
9. Select PATH_TO.msi.
10. Click Open and then Next to start the installer.
11. In the Customer Information dialog, leave the User Name blank or chose a “generic” name.
The user can customize this by entering an Organization name and the License Key.
12. In the Setup Type dialog, choose Complete or Custom as desired.
For details about customization, see Deploying with the Installation Wizard (page 18).
13. Complete the installation as outlined in Completing the Installation (page 22).
14. Please make sure to finish the Admin Install wizard of the Windows Terminal Server by clicking the Finish or Cancel button.
Note: DO NOT START THE APPLICATION BEFORE THIS DIALOG IS FINISHED!
You can now run on the server with the Windows Remote Desktop Connection client.

MindManager Large-Scale Deployment Guide
© 2016 Mindjet All Rights Reserved Version 16.1, February 10, 2016 38
The application runs in full color mode and does not support 256-color mode. For best results, run the terminal server clients in full color mode as well. Deploying under Windows 2000 server will function, but with less than optimal results.

MindManager Large-Scale Deployment Guide
© 2016 Mindjet All Rights Reserved Version 16.1, February 10, 2016 39
DEPLOYING WITH CITRIX XENAPP
A sophisticated terminal server environment built on top of the Windows Terminal Services provided by Windows Server, the Citrix XenApp is currently the only tested and supported Citrix platform, though other combinations may also behave properly.
Basic Installation for the Citrix Desktop
For better Citrix performance, do not install the application on a C: drive. After installation, MindManager appears as part of the Citrix Desktop—a single window containing icons for all the published applications.
Advanced Installation of a “Seamless” Window
You can also install to Citrix as a seamless individual application window, instead of installing as part of the Citrix desktop, as described above.
To install as a seamless individual application window:
1. Install on a Windows Server 2003 or Windows Server running Windows Terminal Services (WTS)
2. Log on to the server (2003 or 2008).
3. Start the Citrix Delivery Services Console.
MindManager Large-Scale Deployment Guide
© 2016 Mindjet All Rights Reserved Version 16.1, February 10, 2016 40
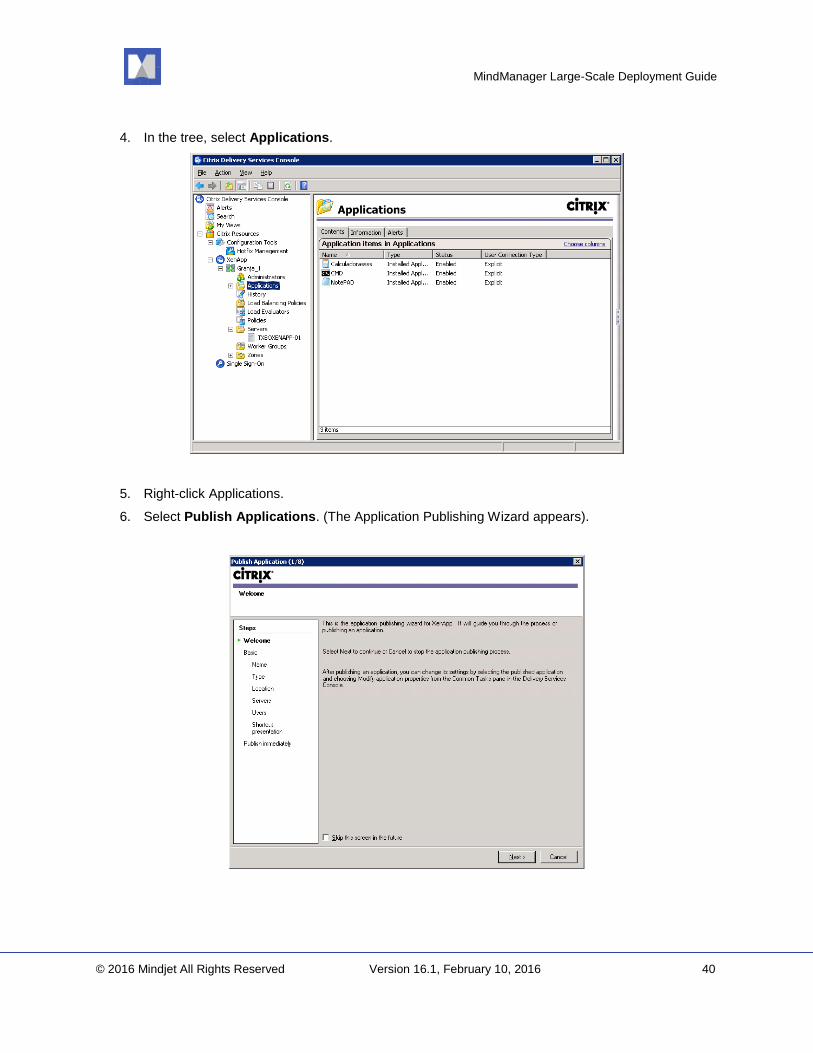
4. In the tree, select Applications.
5. Right-click Applications.
6. Select Publish Applications. (The Application Publishing Wizard appears).

MindManager Large-Scale Deployment Guide
© 2016 Mindjet All Rights Reserved Version 16.1, February 10, 2016 41
7. Click Next, in Basic, establish a name for the application.
8. Specify the type of application to publish...

MindManager Large-Scale Deployment Guide
© 2016 Mindjet All Rights Reserved Version 16.1, February 10, 2016 42
9. ...and the application’s location.
10. Specify which servers will host the application ...

MindManager Large-Scale Deployment Guide
© 2016 Mindjet All Rights Reserved Version 16.1, February 10, 2016 43
11. ...and which users will have access to the application. (We recommend doing this by group, to ease the load of adding single users.)

MindManager Large-Scale Deployment Guide
© 2016 Mindjet All Rights Reserved Version 16.1, February 10, 2016 44
12. Configure the Application’s appearance and shortcut location options.
13. One you have established the Basic Settings, you can choose between publishing immediately or inputting any desired Advanced Settings, including:

MindManager Large-Scale Deployment Guide
© 2016 Mindjet All Rights Reserved Version 16.1, February 10, 2016 45
Content Redirection
Limits

MindManager Large-Scale Deployment Guide
© 2016 Mindjet All Rights Reserved Version 16.1, February 10, 2016 46
Client options
Appearance

MindManager Large-Scale Deployment Guide
© 2016 Mindjet All Rights Reserved Version 16.1, February 10, 2016 47
Once you have completed the installation, you should see the MindManager in the Applications section:
The application icon now appears in XenApp Client applications
For more configuration options, please consult your Citrix documentation.

MindManager Large-Scale Deployment Guide
© 2016 Mindjet All Rights Reserved Version 16.1, February 10, 2016 48
ADMINISTERING MINDMANAGER
There are other administrative issues involved in deploying on a large scale. You can address many of them using the administrative tools and methods described below.
Disabling Zapier
To set this HKLM registry entry to 0 use the following command:
msiexec /i "Mindjet MindManager 2016 Admin.msi" ZAPIERENABLED="0" /qn+
The above example creates:
HKLM\SOFTWARE\Mindjet\MindManager\16\Settings\ZapierEnabled
with a value of 0 (disabled), otherwise this key is not created by the installer at all.
Note: When a 32bit installer is run on a 64bit OS, there is a Wow6432Node component added to the above registry entry. In this case, the HKEY looks like this:
HKLM\SOFTWARE\Wow6432Node\Mindjet\MindManager\16\Settings\ZapierEnabled
Managing Add-Ins
The application uses a number of add-in DLLs. The Add-Ins are automatically registered when the application is installed. On startup, the Add-Ins check for any other required resources (e.g. the supported version(s) of Microsoft Word). They enable or disable themselves as appropriate. If an add-in fails to start, it is automatically removed from the list of add-ins (but not from the disk).
Registering or Unregistering Add-Ins from the Command Line
To unregister the Word add-in:
1. Select Start>Run.
2. Enter the command:
regsvr32 /u "C:\Program Files\Mindjet\MindManager 16\Mm10Word.dll"
3. To restore an unregistered add-in, for example the Word Add-in,
4. Select Start>Run.
5. Enter the command:
regsvr32 "C:\Program Files\Mindjet\MindManager 16\Mm10Word.dll"
Managing Add-Ins from the Registry

MindManager Large-Scale Deployment Guide
© 2016 Mindjet All Rights Reserved Version 16.1, February 10, 2016 49
Users can enable and disable Add-ins via the Tools > Add-Ins command. However, if desired it is possible to disable or remove individual add-ins via the Windows Registry.
The Registry Add-In List
The list of add-ins that load at startup can be found in the Registry at:
HKEY_LOCAL_MACHINE\SOFTWARE\Mindjet\MindManager\16\AddIns
Removing or Restoring Add-Ins from the Registry
To remove an add-in (i.e. make it “invisible” to the application), delete its registry subkey.
To remove the Word add-in, delete the following key:
HKEY_LOCAL_MACHINE\SOFTWARE\Mindjet\MindManager\16\AddIns\Mindjet.Mm16W
ord.AddIn.x
This makes the add-in “invisible” to the application so it will not be loaded on program startup and will not be seen in the list of add-ins in the Tools -> Add-Ins dialog. However, the add-in DLL files still exist on the hard drive.
Another way to remove an add-in is to unregister it as described in Registering or Unregistering Add-Ins from the Command Line (page 48). We do not recommend deleting the add-ins DLLs since they will be restored automatically the next time the program is run via its shortcut.
Enabling or Disabling Add-Ins from the Registry
Users can disable or enable a given add-in directly via the Tools -> Add-Ins command. Add-ins can also be disabled via the Windows Registry as described below.
There are two keys to consider when disabling an add-in for a given user:
HKEY_LOCAL_MACHINE\SOFTWARE\Mindjet\MindManager\16\AddIns\AddInName
HKEY_CURRENT_USER\Software\Mindjet\MindManager\16\AddIns\AddInName
Where AddInName is the actual name of the add-in (e.g. Mindjet.Mm16Word.AddIn.x).
When a given user starts the application, the program checks first in the HKEY_CURRENT_USER subkey
for a “LoadBehavior” value. If it exists, it is used.
If the “LoadBehavior” value does not exist, the application copies the LoadBehavior value from the HKEY_LOCAL_MACHINE subkey to the HKEY_CURRENT_USER subkey and then uses that value.
Therefore, to disable an add-in for the current user, set the LoadBehavior value in the HKEY_CURRENT_USER subkey to 0.
To disable the add-in for all new users, set the LoadBehavior value in the HKEY_LOCAL_MACHINE
subkey to 0.
Note: This has no effect on users that have already run the application at least once. For them you must
set LoadBehavior in the HKEY_CURRENT_USER subkey.
Similarly, setting LoadBehavior to 2 enables the add-in again.

MindManager Large-Scale Deployment Guide
© 2016 Mindjet All Rights Reserved Version 16.1, February 10, 2016 50
Managing Microsoft Office Add-Ins
When the application is installed, it registers add-ins for MS Office products. The location of this add-in registration in the Windows Registry depends on the application and the add-in.
For example, the add-in for Microsoft Word is registered on a per-machine basis (so all users of the machine have it) at:
HKEY_LOCAL_MACHINE\SOFTWARE\Microsoft\Office\Word\Addins\Mindjet.Mm16Wo
rd.AddIn.x
Note that Word handles the Tools -> "COM Add-Ins" command and user interface differently than
MindManager.
In Word, if an add-in is registered in HKEY_LOCAL_MACHINE (HKLM), then it is not displayed in the COM Add-Ins dialog.
If an add-in is registered in HKEY_CURRENT_USER (HKCU), it is displayed in the dialog and can be turned off and on.
If the add-in is registered both in HKLM and HKCU, Word ignores the HKCU entry and just uses the HKLM entry.
The registry data values for the Microsoft program add-ins are the same as described for the add-ins, and can be edited in a similar fashion.
Managing from the Registry
To allow system administrators to control the environment presented to their users, the application supports registry settings, which can be set via the user interface. However, registry settings relevant to Large-Scale Deployment are not available from this user interface. See also the user data installation options on page 6, which are similarly adjusted via registry settings.
HKEY_LOCAL_MACHINE Settings
The following registry settings are used on a per-machine basis:
HKEY_LOCAL_MACHINE\SOFTWARE\Mindjet\MindManager\16\Registration
Table 16: HKEY_LOCAL_MACHINE Registration Values
VALUE NAME TYPE VALUE DATA
ShowLicense REG_DWORD 0 to not show the license key being used or allow it to be changed.
1 to show the license key
ChangeLicense REG_DWORD 0 to prevent changing the license key.
1 to allow the license key to be changed.
The following registry settings are used on a per-machine basis:
HKEY_LOCAL_MACHINE\SOFTWARE\Mindjet\MindManager\16\Settings

MindManager Large-Scale Deployment Guide
© 2016 Mindjet All Rights Reserved Version 16.1, February 10, 2016 51
Table 17: HKEY_LOCAL_MACHINE Settings
VALUE NAME TYPE VALUE DATA
LocalUserDataDirectory REG_SZ Path to copy user data files (e.g. Image Library files, etc.) at first launch. May contain environment variables.
For example:
N:\UserData\%USERNAME%\MindManager
16
If no path is specified, then this path is assumed:
%USERPROFILE%\Local Settings\
Application Data\MindManager\16
This setting can be overridden by the same setting in HKEY_CURRENT_USER (see below) or by the LSDUserDataPath setting described earlier.
PerUserInstallation REG_DWORD 0 for per-machine license key management.
1 for per-user license key management.
HKEY_CURRENT_USER Settings
The following registry settings are used on a per-user basis:
HKEY_CURRENT_USER\Software\Mindjet\MindManager\16\Settings
Table 18: HKEY_CURRENT_USER Settings
VALUE NAME TYPE VALUE DATA
AllowUpdateCheck REG_DWORD 0 to hide the Help, Check for Updates command.
1 to show this command.
2 to show this command only if the user has write privileges to HKEY_LOCAL_MACHINE (default)
DisableAnimation REG_DWORD 0 to allow animation of maps for smoother scrolling.
1 to disable animation of maps for one-jump scrolling, which is less graphics intensive and perhaps more desirable in a low-bandwidth Windows Terminal Server environment.
LocalUserDataDirectory REG_SZ Path to copy user data files (e.g. Image Library files, etc.) to when a new user first launches. May contain environment variables.
For example:

MindManager Large-Scale Deployment Guide
© 2016 Mindjet All Rights Reserved Version 16.1, February 10, 2016 52
VALUE NAME TYPE VALUE DATA
N:\UserData\%USERNAME%\MindManager
16
If no path is specified, then this path is assumed:
%USERPROFILE%\Local
Settings\Application
Data\MindManager\16
This setting can be overridden by the LSDUserDataPath setting described earlier.
Managing with Event Macros
The application can trigger certain Event Macros that can help system administrators monitor the usage of the program more carefully.
These macros are examples only. You need to customize them for your environment. Microsoft added the Outlook Object Model Guard starting with Outlook version 2002, forcing the
display of an alert message informing the user that a program is trying to access or send a message via Outlook, which the user must approve before proceeding. This behavior can be controlled by Outlook system policies.
Table 19: Event Macros
EVENT NAME WHEN FIRED
OnApplicationStarted At the end of InitInstance (only when started in “normal” mode, not /RegServer, /UnregServer, etc.)
OnExpiredTrialStarted Just before the “Trial Expired” dialog
OnFirstUse Just before installation of “per-user data”
OnBuyButtonPressed Just before the “Buy MindManager” dialog is displayed
When a macro event is fired, 0 or more macros are run. The mapping of macro event names to macro filenames is determined on startup.
On startup, the application looks in the registry atHKEY_LOCAL_MACHINE\SOFTWARE\Mindjet\MindManager\16for a key named Event Macros. If it
is found, expect to find keys such as these:
Event Macros\
OnApplicationStarted\
EventMacro_OnApplicationStarted.mmbas
EventMacro_OnApplicationStartedTwo.mmbas
Path="C:\Temp\EventMacro_OnApplicationStartedTwo.mmbas"

MindManager Large-Scale Deployment Guide
© 2016 Mindjet All Rights Reserved Version 16.1, February 10, 2016 53
OnBuyButtonPressed\
EventMacro_OnBuyButtonPressed.mmbas
OnExpiredTrialStarted\
EventMacro_OnExpiredTrialStarted.mmbas
OnFirstUse\
EventMacro_OnFirstUse.mmbas
Each event key can have 0 or more macro key names. Each macro key can have an optional “Path” value.
If the “Path” value is not there, then the key name is the path. If the path is a relative path (e.g. "EventMacro_OnApplicationStarted.mmbas"), it is
converted to an absolute path relative to the default macro folder for the user (e.g. "C:\Documents and Settings\username\Local Settings\Application
Data\Mindjet\MindManager\16\macros").
If the “Event Macros” key is not in the registry, then the application looks for event macros in the default macro folder (see above) with a name of the form:
EventMacro_<EventName>.mmbas
For example:
EventMacro_OnApplicationStarted.mmbas
Therefore, it is possible to get macro events to run a macro simply by putting macros with the proper name in the user's macro folder. However, for most typical IT uses, the “Event Macros” key will be used, since this can point to macros on a network drive, for example.
For example, this "EventMacro_OnApplicationStarted.mmbas" macro uses the Outlook object
model to send a notification email:
'#Uses "EventMacro_Utilities.mmbas"
Sub Main
SendNotificationEmail "MindManager event: Application Started"
End Sub
Where the “EventMacro_Utilities.mmbas” file contains:
' Utilities for use with MindManager event macros
Public Sub SendNotificationEmail(eventString As String)
' Sends the subject string to the appropriate IT person
' to notify them of the MindManager event that just occurred
' Get access to our email program
Dim outlookApp As Outlook.Application
Set outlookApp = New Outlook.Application
' Create a message
Dim message As Outlook.MailItem

MindManager Large-Scale Deployment Guide
© 2016 Mindjet All Rights Reserved Version 16.1, February 10, 2016 54
Set message = outlookApp.CreateItem(olMailItem)
message.To = "System Administrator"
message.Subject = eventString
message.Body = eventString
' Send the message
message.Send
End Sub
Managing User Licenses
Each user must have a license. Please contact your reseller or Mindjet sales representative for licensing terms appropriate for Large-Scale Deployment. MindManager does not include any special support for proprietary third-party license management software.
MindManager can check and administer license keys on a per-user or per-machine basis. The application first looks for a license key in:
HKEY_LOCAL_MACHINE\SOFTWARE\Mindjet\MindManager\16\Registration\
The default installation administers license keys on a per-machine basis. A license key can be entered after the program is installed, and all users of that machine have access to the program via that key.
To achieve per-user license key administration:
1. Install with no license key: use the installation wizard (which does not ask for a key), or use command-line installation without specifying a license key.
Or, set the registry key: HKEY_LOCAL_MACHINE\SOFTWARE\Mindjet\MindManager\16\Settings\PerUserInst
allation to 1 after installation. This setting instructs the application to save any license key the
user enters to the HKCU setting instead of the HKLM setting.
2. The administrator should put the user's license key in the user's HKCU registry setting (above)—or provide the user with the license key so s/he can enter it in the license key dialog that is automatically displayed upon launching in Trial mode.
Policies Support
The application does not offer official Windows Policies support.
MindManager Linker for SharePoint
Note: To use MindManager with Microsoft SharePoint, you must purchase and install MindManager Enterprise, which includes MindManager Linker for SharePoint.
MindManager Linker for SharePoint supports an optional silent argument for deploying a SharePoint SITECONNECTIONFILE as a way to pre-populate custom SharePoint connections.

MindManager Large-Scale Deployment Guide
© 2016 Mindjet All Rights Reserved Version 16.1, February 10, 2016 55
Optional silent install argument:
SITECONNECTIONFILE=full_path_to_custom_site_connection_file
This file can have any name but must be reachable from install-to machine. The file is copied to “SiteConnections.xml” in the SharePoint Linker INSTALLDIR.
Note: This argument will have no operational effect when the application runs if the SharePoint Add-In is not active.
Proxy Server Support
The application supports proxy server connections to the internet, including overriding default Microsoft Internet Explorer settings.
Primary path:
1. Select Proxy Settings from MindManagerFileOptions.
2. Choose Auto-detect/Use system proxy settings (e.g. set by system or w/in IE) or Manual proxy configuration (no proxy, https).
3. Set proxy settings for manual proxy configuration.
Alternate path:
1. System administrator sets proxy settings (Host & Port) for Large-Scale Deployment.

MindManager Large-Scale Deployment Guide
© 2016 Mindjet All Rights Reserved Version 16.1, February 10, 2016 56
2. When installed, MindManager options are configured based upon on System Administrator user's configuration.
3. System Administrator has an option to hide the ability to remember Username and Password for the HTTPS proxy settings.
Impacted areas:
* Online (Files) - New/From Maps for that Gallery, Sign in/out, and Tasks.
* Notifications; Creating/deleting files; folders, Co-editing and Sharing.
* Trial display messages emanating from Mindjet servers.
* Tasks
* Connection – sign in/sign out
* Check for updates
* All the web services Map Parts
* SharePoint Add-in
* Database linker
* To use MindManager with Microsoft SharePoint, you must purchase and install MindManager Enterprise.
The registry settings are as follows:
HKEY_LOCAL_MACHINE\SOFTWARE\Mindjet\MindManager\16\Settings\ProxyType = 0 (no proxy) - DWORD type
1 = Use default windows settings
2 = Use custom proxy settings
In case your proxy type is set to custom, you can set a custom proxy as follows:
HKEY_LOCAL_MACHINE\SOFTWARE\Mindjet\MindManager\16\Settings\ProxyHost = host name - STRING
HKEY_LOCAL_MACHINE\SOFTWARE\Mindjet\MindManager\16\Settings\ProxyPort = port name - DWORD
HKEY_LOCAL_MACHINE\SOFTWARE\Mindjet\MindManager\16\Settings\ProxyAuthenticationRequired - DWORD (can be 0 or 1)
HKEY_LOCAL_MACHINE\SOFTWARE\Mindjet\MindManager\16\Settings\ProxySaveCredentials - DWORD (can be 0 or 1) - is used to save proxy credentials across application sessions
Enabling or Disabling “Treat UNC Paths as SharePoint Servers”
When enabled, Treat UNC Paths as SharePoint Servers checks that a map is being opened
from a SharePoint server; if so, MindManager offers options for document check-out and check-in in the files > Info menu. This feature can cause a slight delay on opening documents, so it is disabled by default. Administrators can enable it via the registry or from the command line; users can enable it using MindManager’s Options.

MindManager Large-Scale Deployment Guide
© 2016 Mindjet All Rights Reserved Version 16.1, February 10, 2016 57
To enable from the command line
Table 20: Command Line Settings
COMMAND ACTION
ENABLEUNCPATH_CU="0" Disable for the Current User running the installation
ENABLEUNCPATH_CU="1" Enable for the Current User running the installation
ENABLEUNCPATH_LM="0" Disable for Local Machine
ENABLEUNCPATH_LM="1" Enable for Local Machine
To enable from via the registry
For:
HKEY_CURRENT_USER\SOFTWARE\Mindjet\MindManager\16\Settings\
Table 21: HKEY_CURRENT_USER Settings
VALUE NAME TYPE VALUE DATA
EnableUncPathDmsSupport REG_DWORD 0 to disable
1 to enable
For:
HKEY_LOCAL_MACHINE\SOFTWARE\Mindjet\MindManager\16\Settings\
Table 22: HKEY_LOCAL_MACHINE Registration Values
VALUE NAME TYPE VALUE DATA
EnableUncPathDmsSupport REG_DWORD 0 to disable
1 to enable
To enable from MindManager
In the File tab, under Options > Open & Save, click the box next to Treat UNC paths as SharePoint Servers.

MindManager Large-Scale Deployment Guide
© 2016 Mindjet All Rights Reserved Version 16.1, February 10, 2016 58
INDEX
Active Directory Deploying MindManager with, 34
Add-Ins Configuring from the command line with msi.exe,
25 Disabling, 47 Disabling from the registry, 48 Enabling from the registry, 48 Microsoft Office Add-ins, 26, 49 Registering, 47 Registry keys, 9 Removing via the Registry, 48 Restoring via the Registry, 48 Unregistering, 47
Admin Setup Comparing benefits vs. standard setup, 2, 15 Contents of admin setup zip file, 13
Citrix MetaFrame Presentation Server Deploying MindManager with, 1
Deploying MindManager from the command line, 23
Deploying MindManager with Active Directory, 3 Citrix MetaFrame Presentation Server, 3, 38
Deploying MindManagerwith Windows Server, 36
Dictionaries Overview, 5
Event Macros Administering MindManager with, 51
Installation Comparing per-machine and per-user setup, 15 Components, 4 From the command line, 23 Using the installation wizard, 17 With Active Directory, 34 With Citrix MetaFrame Presentation Server, 38 with Windows Server, 36
Library Contents, 25 Deploying to a separate server from the command
line, 29 Deploying to a separate server using the
installation wizard, 19 HKEY_LOCAL_MACHINE settings, 50 HKEY-CURRENT_USER settings, 50 Overview, 5
MindManager Third party software, 7
Orca Editing the Properties Table with, 34
Registry Keys Administering MindManager with, 49 Configuring MindManager from the registry, 28 Deploying the library and user data with, 29 Managing add-ins with, 47 Overview, 9
Shared System Software, 6 SharePoint
Linker, 53 UNC Paths, 55
Shortcuts, 6 Configuring from the command line, 27 Editing on the Properties Table with Orca, 35
Silent Installation Sample command line silent installation, 32
Start Menu Item, 6 System Requirements, 1 Third Party Software, 7 Uninstallation
Overview, 11 User Configuration Files, 5 User Data
Deploying to a separate server from the command line, 29
Deploying to a separate server using the installation wizard, 19
Deploying with registry keys, 31 Editing on the Properties Table with Orca, 34 HKEY_CURRENT_USER settings, 50 HKEY_LOCAL_MACHINE settings, 50
User Licenses Managing, 53
Zapier Disabling, 47

MindManager Large-Scale Deployment Guide
© 2016 Mindjet All Rights Reserved Version 16.1, February 10, 2016 59
The material in this document is for informational purposes only and is subject to change without notice. While reasonable efforts have been made in the preparation of this document to assure its accuracy, Mindjet makes no representation or warranty expressed, implied, or statutory, as to its completeness, accuracy, or suitability, and assumes no liability from the use of the information contained herein.
This software and related documentation are provided under a license agreement containing restrictions on use and disclosure and are protected by patent, copyright, trademark, and other intellectual property laws. Except as expressly provided in any written license agreement from Mindjet, the furnishing of this document does not give you any license to these patents, copyrights, trademarks, or other intellectual property.
Mindjet, MindManager, and the Mindjet and MindManager logos are trademarks of Mindjet, which may be registered in the U.S. and other countries. Microsoft and SharePoint are registered trademarks of Microsoft Corporation in the United States and other countries.

MindManager Large-Scale Deployment Guide
© 2016 Mindjet All Rights Reserved Version 16.1, February 10, 2016 60
Mindjet, MindManager, and the Mindjet and MindManager logos are trademarks of Mindjet, which may be registered in the U.S. and other countries. Microsoft, SharePoint, and Windows are registered trademarks of Microsoft Corporation in the United States and other countries. Citrix and XenApp are trademarks of Citrix Systems, Inc. registered in the US and other countries. IBM is a trademark of International Business Machines Corporation registered in the US and other countries. Adobe Flash and Adobe Acrobat are registered trademarks of Adobe Systems Incorporated in the United States and other countries.
© 2016 Mindjet. All rights reserved.


![The QUIC Transport Protocol:Design and Internet-Scale Deployment · · 2017-11-13Design and Internet-Scale Deployment Adam Langley, ... [40, 62], they have not seen wide deployment](https://img.pdfslide.us/doc/110x75/5ae9a9947f8b9ad73f8c23db/the-quic-transport-protocoldesign-and-internet-scale-deployment-and-internet-scale.jpg)