Embed Size (px)
Citation preview
The Mind Control:
Lego Mindstorms EV3
Jessel Serrano, Nicholas Minckler
April 20th, 2015
CEN 4935 Senior Software Engineering Project
Spring 2015
Instructor: Dr. Janusz Zalewski
Software Engineering Program
Florida Gulf Coast University
Ft. Myers, FL 33965
1. Introduction
1.1 General Project Overview
This software design project is a networking project in which a robot is remotely
accessible and manipulated over the Internet from anywhere in the world. The focus of the
project is on manipulation and control, allowing for movement of the robot. The robot that is
developed is the Lego Mindstorms EV3 [1], as shown in Figure 1.
The previous project implemented a remote control via the EV3 [2]. Using the WiFi
dongle on the EV3’s microcontroller, remote and wireless control was achieved. A website was
implemented that featured a panel to control the EV3 via a network. This website was stored on
the EV3 microcontroller itself, thereby making the microcontroller the server.
The current project will update the website by moving it to a remote server,
implementing it as a Server Site. This Server Site will be built in ASP.NET, as opposed to the
previous build of the site which was built in Java. Additionally, since the Server Site will be on a
remote server (the ROCK server) that is persisting and always operational, the website will be
available for visit continuously and will not depend on the EV3 microcontroller being
operational. The microcontroller will still need to be operational to control the EV3, however.
The importance of these concepts and respective technologies cannot be understated.
Remote accessibility, manipulation, and tracking are quintessential tools for missile guidance,
deepsea and space exploration, automobile navigation and countertheft, etc. While this is a
classroom project with student robotic systems, one cannot underestimate the striking similarity
between the Lego Mindstorms EV3 and the Mars Exploration Rover.
1
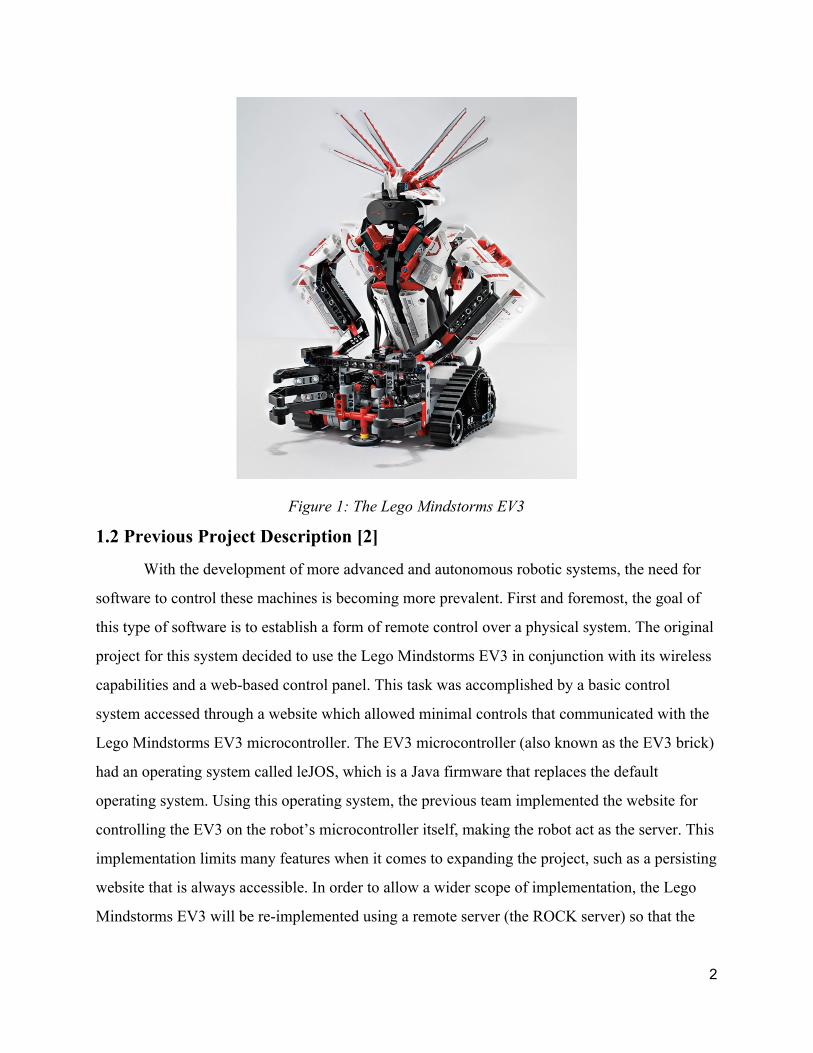
Figure 1: The Lego Mindstorms EV3
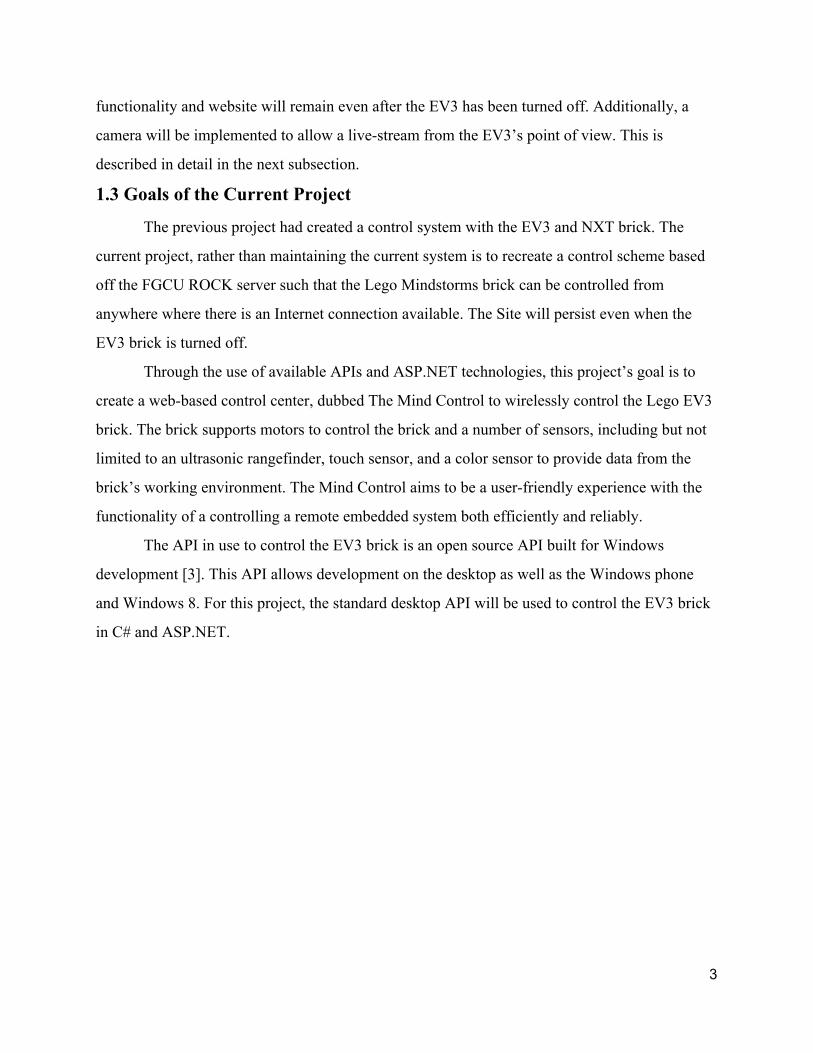
1.2 Previous Project Description [2]
With the development of more advanced and autonomous robotic systems, the need for
software to control these machines is becoming more prevalent. First and foremost, the goal of
this type of software is to establish a form of remote control over a physical system. The original
project for this system decided to use the Lego Mindstorms EV3 in conjunction with its wireless
capabilities and a webbased control panel. This task was accomplished by a basic control
system accessed through a website which allowed minimal controls that communicated with the
Lego Mindstorms EV3 microcontroller. The EV3 microcontroller (also known as the EV3 brick)
had an operating system called leJOS, which is a Java firmware that replaces the default
operating system. Using this operating system, the previous team implemented the website for
controlling the EV3 on the robot’s microcontroller itself, making the robot act as the server. This
implementation limits many features when it comes to expanding the project, such as a persisting
website that is always accessible. In order to allow a wider scope of implementation, the Lego
Mindstorms EV3 will be reimplemented using a remote server (the ROCK server) so that the
2
functionality and website will remain even after the EV3 has been turned off. Additionally, a
camera will be implemented to allow a livestream from the EV3’s point of view. This is
described in detail in the next subsection.
1.3 Goals of the Current Project
The previous project had created a control system with the EV3 and NXT brick. The
current project, rather than maintaining the current system is to recreate a control scheme based
off the FGCU ROCK server such that the Lego Mindstorms brick can be controlled from
anywhere where there is an Internet connection available. The Site will persist even when the
EV3 brick is turned off.
Through the use of available APIs and ASP.NET technologies, this project’s goal is to
create a webbased control center, dubbed The Mind Control to wirelessly control the Lego EV3
brick. The brick supports motors to control the brick and a number of sensors, including but not
limited to an ultrasonic rangefinder, touch sensor, and a color sensor to provide data from the
brick’s working environment. The Mind Control aims to be a userfriendly experience with the
functionality of a controlling a remote embedded system both efficiently and reliably.
The API in use to control the EV3 brick is an open source API built for Windows
development [3]. This API allows development on the desktop as well as the Windows phone
and Windows 8. For this project, the standard desktop API will be used to control the EV3 brick
in C# and ASP.NET.
3
2 Software Requirements Specification
2.1 General Overview
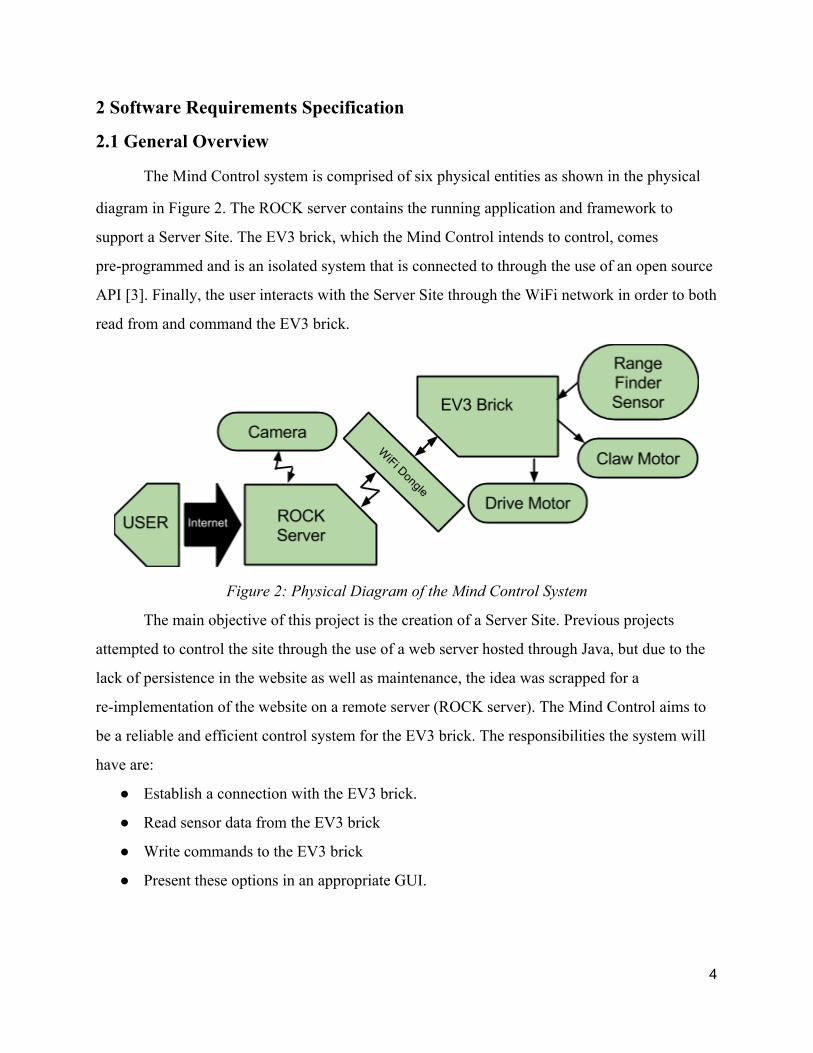
The Mind Control system is comprised of six physical entities as shown in the physical
diagram in Figure 2. The ROCK server contains the running application and framework to
support a Server Site. The EV3 brick, which the Mind Control intends to control, comes
preprogrammed and is an isolated system that is connected to through the use of an open source
API [3]. Finally, the user interacts with the Server Site through the WiFi network in order to both
read from and command the EV3 brick.
Figure 2: Physical Diagram of the Mind Control System
The main objective of this project is the creation of a Server Site. Previous projects
attempted to control the site through the use of a web server hosted through Java, but due to the
lack of persistence in the website as well as maintenance, the idea was scrapped for a
reimplementation of the website on a remote server (ROCK server). The Mind Control aims to
be a reliable and efficient control system for the EV3 brick. The responsibilities the system will
have are:
Establish a connection with the EV3 brick.
Read sensor data from the EV3 brick
Write commands to the EV3 brick
Present these options in an appropriate GUI.
4
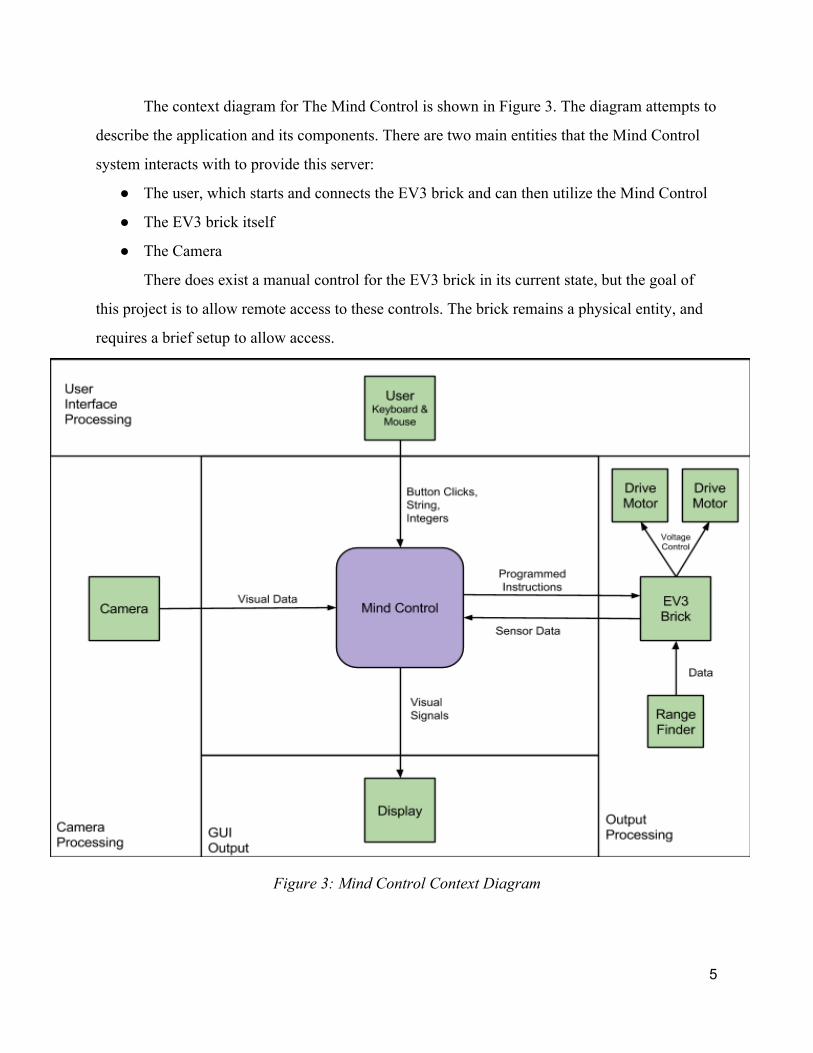
The context diagram for The Mind Control is shown in Figure 3. The diagram attempts to
describe the application and its components. There are two main entities that the Mind Control
system interacts with to provide this server:
The user, which starts and connects the EV3 brick and can then utilize the Mind Control
The EV3 brick itself
The Camera
There does exist a manual control for the EV3 brick in its current state, but the goal of
this project is to allow remote access to these controls. The brick remains a physical entity, and
requires a brief setup to allow access.
Figure 3: Mind Control Context Diagram
5
2.2 Software Requirements
This section describes the software requirements of the Mind Control system.
2.2.1 Server Requirements Specific to EV3
2.2.1.1 The Server Site shall be able to establish a connection to the EV3 brick
2.2.1.2 The Server Site shall be able to send motor commands to the EV3 brick.
2.2.1.3 The Server Site shall be able to read sensor data from the EV3 brick in the
form of numerical data.
2.2.2 Server Site Requirements
2.2.2.1 The Server Site shall accept and respond to HTTP requests for the site
lego.cs.fgcu.edu
2.2.2.2 The Server Site shall be able to format data into a readable form.
2.2.2.3 The Server Site shall accept input in the form of ASP button clicks
2.2.3 NonFunctional Requirements
2.2.3.1 Safety Requirement. The Mind Control shall set the motor speeds to
reasonable limits so as not to harm the environment or the Lego EV3.
2.2.3.2 Security Requirement. The Server Site shall restrict access to the EV3
brick controls to users who do not enter the correct login and password.
2.2.3.3 Security Requirement. The Server Site shall communicate with the EV3
brick through a dedicated serial port.
6
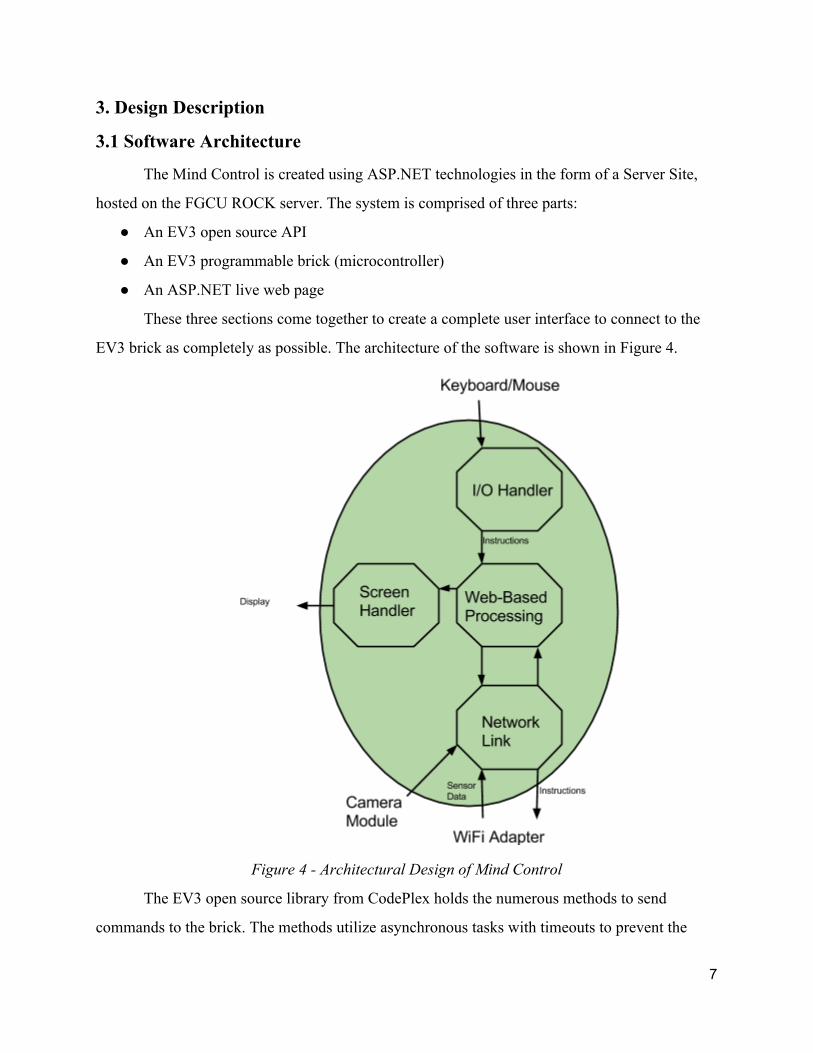
3. Design Description
3.1 Software Architecture
The Mind Control is created using ASP.NET technologies in the form of a Server Site,
hosted on the FGCU ROCK server. The system is comprised of three parts:
An EV3 open source API
An EV3 programmable brick (microcontroller)
An ASP.NET live web page
These three sections come together to create a complete user interface to connect to the
EV3 brick as completely as possible. The architecture of the software is shown in Figure 4.
Figure 4 Architectural Design of Mind Control
The EV3 open source library from CodePlex holds the numerous methods to send
commands to the brick. The methods utilize asynchronous tasks with timeouts to prevent the
7
brick from being consumed by any individual command. The EV3 brick will read sensor data
from the sensors and transform it into a usable format. The live web page will utilize both the
previous objects and provide the user with a set of simple, yet complete controls for the brick as
well as sensor data in a graphical user interface to a display.
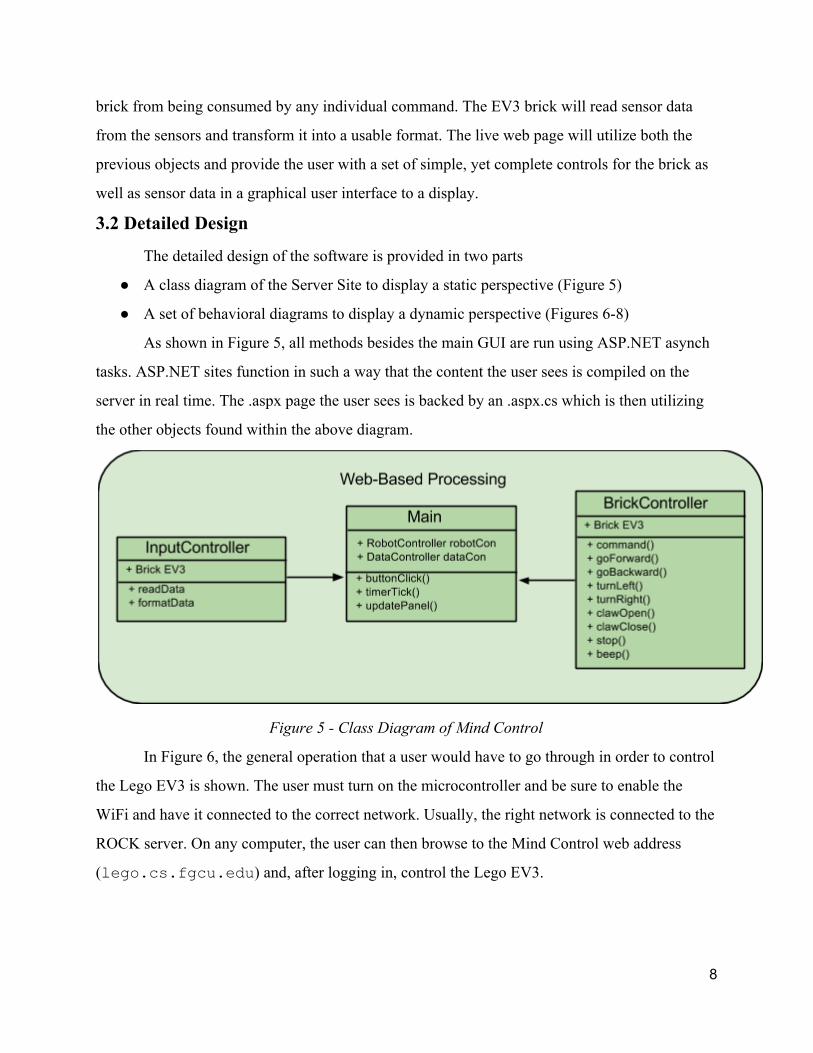
3.2 Detailed Design
The detailed design of the software is provided in two parts
A class diagram of the Server Site to display a static perspective (Figure 5)
A set of behavioral diagrams to display a dynamic perspective (Figures 68)
As shown in Figure 5, all methods besides the main GUI are run using ASP.NET asynch
tasks. ASP.NET sites function in such a way that the content the user sees is compiled on the
server in real time. The .aspx page the user sees is backed by an .aspx.cs which is then utilizing
the other objects found within the above diagram.
Figure 5 Class Diagram of Mind Control
In Figure 6, the general operation that a user would have to go through in order to control
the Lego EV3 is shown. The user must turn on the microcontroller and be sure to enable the
WiFi and have it connected to the correct network. Usually, the right network is connected to the
ROCK server. On any computer, the user can then browse to the Mind Control web address
(lego.cs.fgcu.edu) and, after logging in, control the Lego EV3.
8
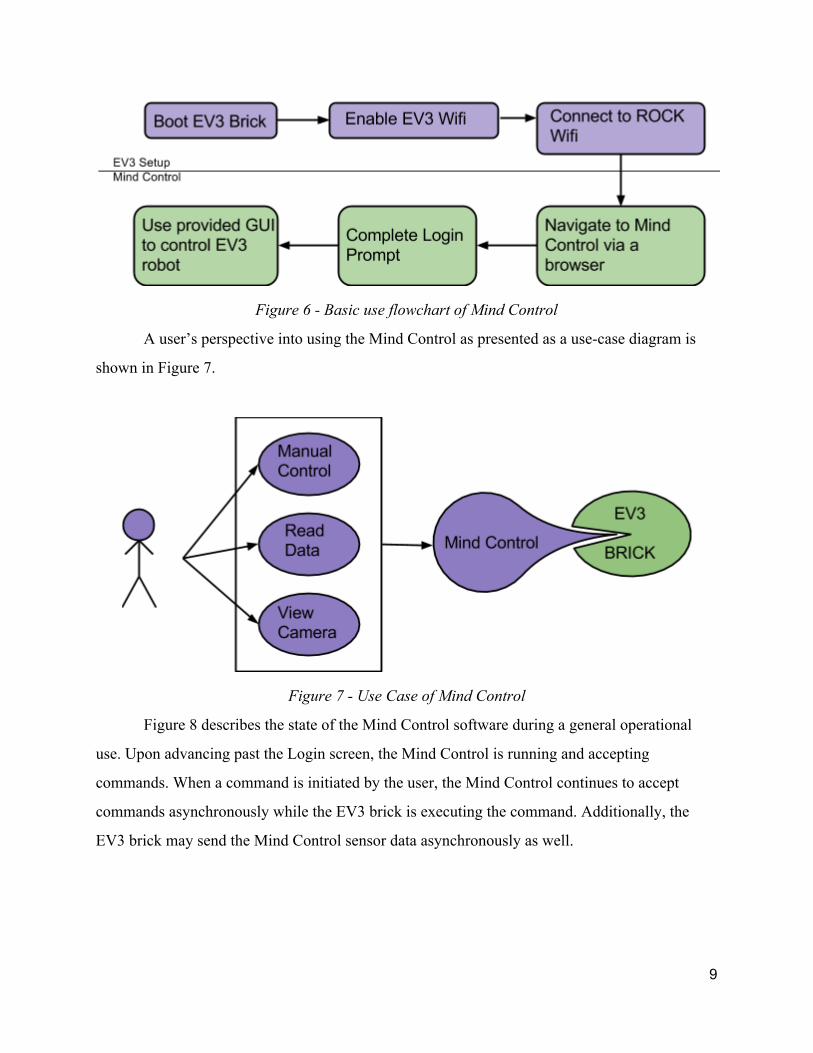
Figure 6 Basic use flowchart of Mind Control
A user’s perspective into using the Mind Control as presented as a usecase diagram is
shown in Figure 7.
Figure 7 Use Case of Mind Control
Figure 8 describes the state of the Mind Control software during a general operational
use. Upon advancing past the Login screen, the Mind Control is running and accepting
commands. When a command is initiated by the user, the Mind Control continues to accept
commands asynchronously while the EV3 brick is executing the command. Additionally, the
EV3 brick may send the Mind Control sensor data asynchronously as well.
9

Figure 8 State Diagram of Mind Control
As discussed before, there is an initial setup including the EV3 brick to enable the Mind
Control system to control the brick. These steps include booting the brick, enabling the WiFi,
then establishing a connection to server’s WiFi network. These steps are discussed more
thoroughly in section 4, Implementation and Testing.
When the brick is booted and connected to the network, the Mind Control system can be
used without any further hindrance beyond a simple login. When the user attempts to load the
Server Site, they will be prompted by a login, and upon successful login they will have access to
the EV3 brick controls. The user can then control the brick at will using the predefined control
set.
3.3 Graphical User Interface
When the user goes to lego.cs.fgcu.edu, they are presented with a login prompt as
shown in Figure 9. The site is created through the ASP.NET framework.
10
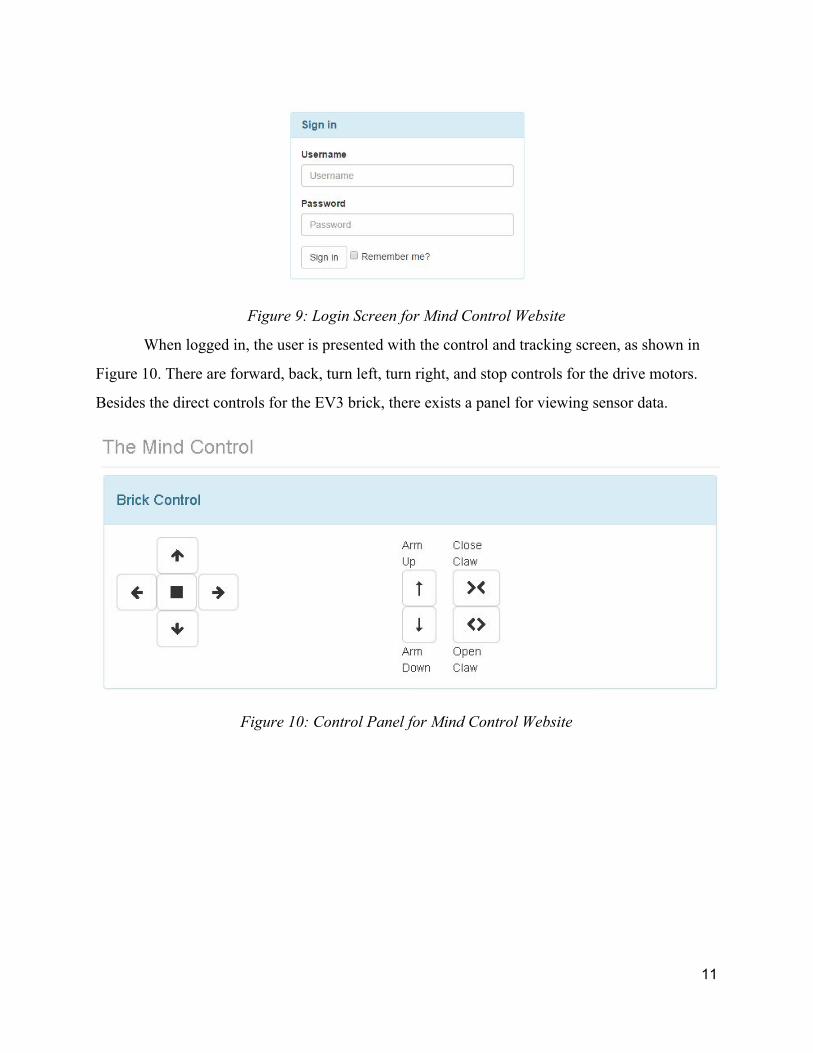
Figure 9: Login Screen for Mind Control Website
When logged in, the user is presented with the control and tracking screen, as shown in
Figure 10. There are forward, back, turn left, turn right, and stop controls for the drive motors.
Besides the direct controls for the EV3 brick, there exists a panel for viewing sensor data.
Figure 10: Control Panel for Mind Control Website
11
4. Implementation and Testing
4.1 Implementation
The Mind Control system is implemented as a serversite hosted on the FGCU ROCK
server. The system is developed using ASP.NET and C# technologies. The .NET application is
split between three parts:
A site page that functions as the Main and can accept input from the user.
An implementation of an Input Controller as codebehind input page.
A Brick Controller to send and receive commands from the brick.
These parts work in a hierarchy of control. While the codebehind, which loads the input
page, has minimal controls that initialize on page load, the majority of the instructions that are
processed come from the user’s input. When the user inputs a command using the provided page,
the Input Controller tracks the event and invokes methods to start the appropriate instruction.
The Input Page utilizes the Brick Controller which uses code to communicate with the brick in
order to isolate the control from the input.
The site page is an aspx file that utilizes HTML with ASP.NET integrated to provide
dynamic content and update data live without forcing the user to refresh the page entirely. The
way it does this is by using an ASP UpdatePanel, shown in the code below:
<asp:UpdatePanel ID="sensorPanel" runat="server" UpdateMode="Conditional">
<asp:Timer ID="Timer" OnTick="sensorTick" runat="server" Interval="10000" />
<asp:Label id="touchSensor" runat="server"></asp:Label> <asp:Button id=”forwardBtn" onClick="Forward_Click"
runat="server" /> </asp:UpdatePanel>
Anything within the UpdatePanel is refreshed without refreshing the entirety of the page.
This allows data to be displayed through the use of timers and buttons to periodically display
new information by calling functions on the codebehind page. The codebehind can then update
objects found within the UpdatePanel, such as an ASP:Label in this case. Each function called by
an ASP element has the object, which is the sending ASP element, and the event passed as
arguments which are caught by the method each element specifically calls. The method called by
the timer is shown below:
12
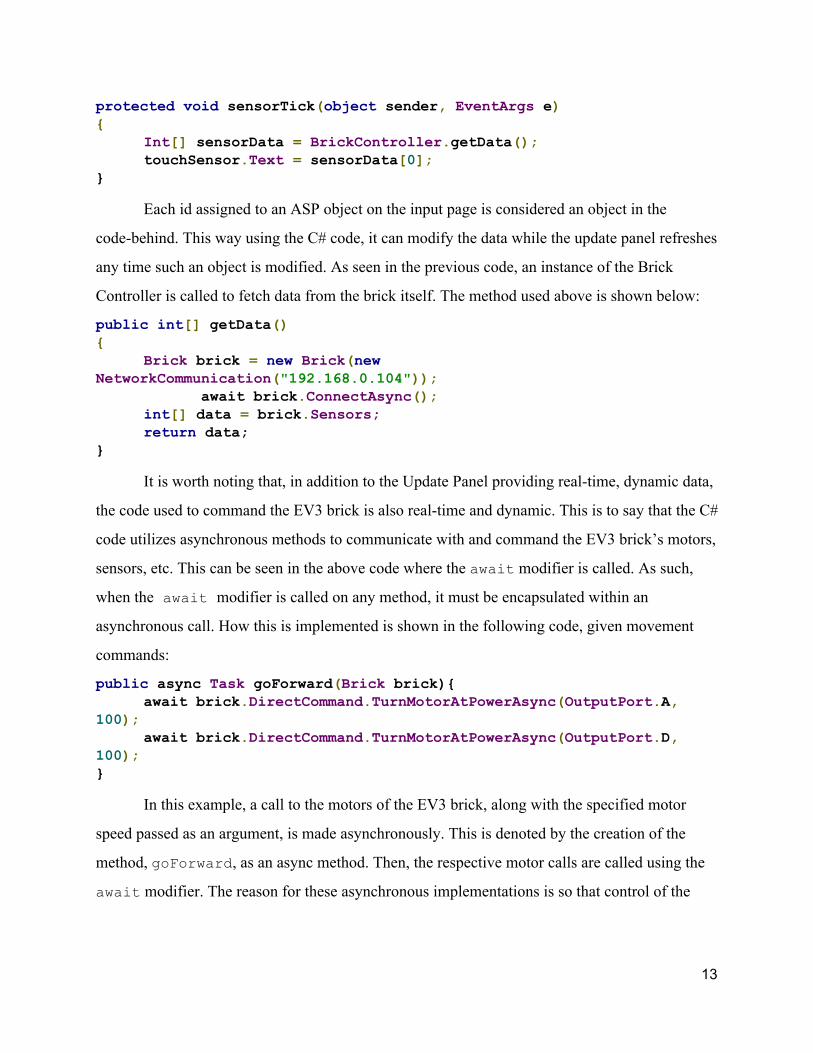
protected void sensorTick(object sender, EventArgs e)
Int[] sensorData = BrickController.getData(); touchSensor.Text = sensorData[0];
Each id assigned to an ASP object on the input page is considered an object in the
codebehind. This way using the C# code, it can modify the data while the update panel refreshes
any time such an object is modified. As seen in the previous code, an instance of the Brick
Controller is called to fetch data from the brick itself. The method used above is shown below:
public int[] getData()
Brick brick = new Brick(new NetworkCommunication("192.168.0.104")); await brick.ConnectAsync();
int[] data = brick.Sensors; return data;
It is worth noting that, in addition to the Update Panel providing realtime, dynamic data,
the code used to command the EV3 brick is also realtime and dynamic. This is to say that the C#
code utilizes asynchronous methods to communicate with and command the EV3 brick’s motors,
sensors, etc. This can be seen in the above code where the await modifier is called. As such,
when the await modifier is called on any method, it must be encapsulated within an
asynchronous call. How this is implemented is shown in the following code, given movement
commands:
public async Task goForward(Brick brick) await brick.DirectCommand.TurnMotorAtPowerAsync(OutputPort.A,
100); await brick.DirectCommand.TurnMotorAtPowerAsync(OutputPort.D,
100);
In this example, a call to the motors of the EV3 brick, along with the specified motor
speed passed as an argument, is made asynchronously. This is denoted by the creation of the
method, goForward, as an async method. Then, the respective motor calls are called using the
await modifier. The reason for these asynchronous implementations is so that control of the
13
EV3 brick does not come at the cost of a locked brick. In this way, data can still be read while a
command is issued to the EV3.
The combination of all of these elements is what has been named The Mind Control.
Each plays an integral part in allowing the client to to control the EV3 robot and view its sensor
data in a functional and meaningful way.
4.2 Testing
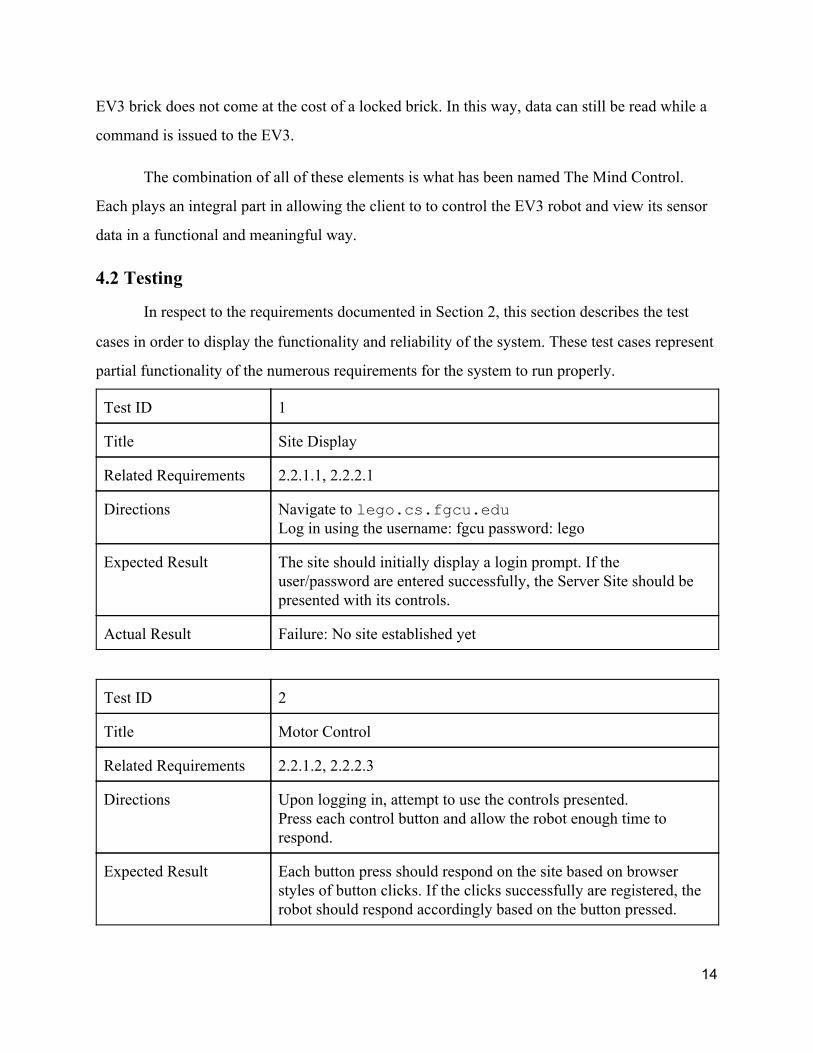
In respect to the requirements documented in Section 2, this section describes the test
cases in order to display the functionality and reliability of the system. These test cases represent
partial functionality of the numerous requirements for the system to run properly.
Test ID 1
Title Site Display
Related Requirements 2.2.1.1, 2.2.2.1
Directions Navigate to lego.cs.fgcu.edu Log in using the username: fgcu password: lego
Expected Result The site should initially display a login prompt. If the user/password are entered successfully, the Server Site should be presented with its controls.
Actual Result Failure: No site established yet
Test ID 2
Title Motor Control
Related Requirements 2.2.1.2, 2.2.2.3
Directions Upon logging in, attempt to use the controls presented. Press each control button and allow the robot enough time to respond.
Expected Result Each button press should respond on the site based on browser styles of button clicks. If the clicks successfully are registered, the robot should respond accordingly based on the button pressed.
14
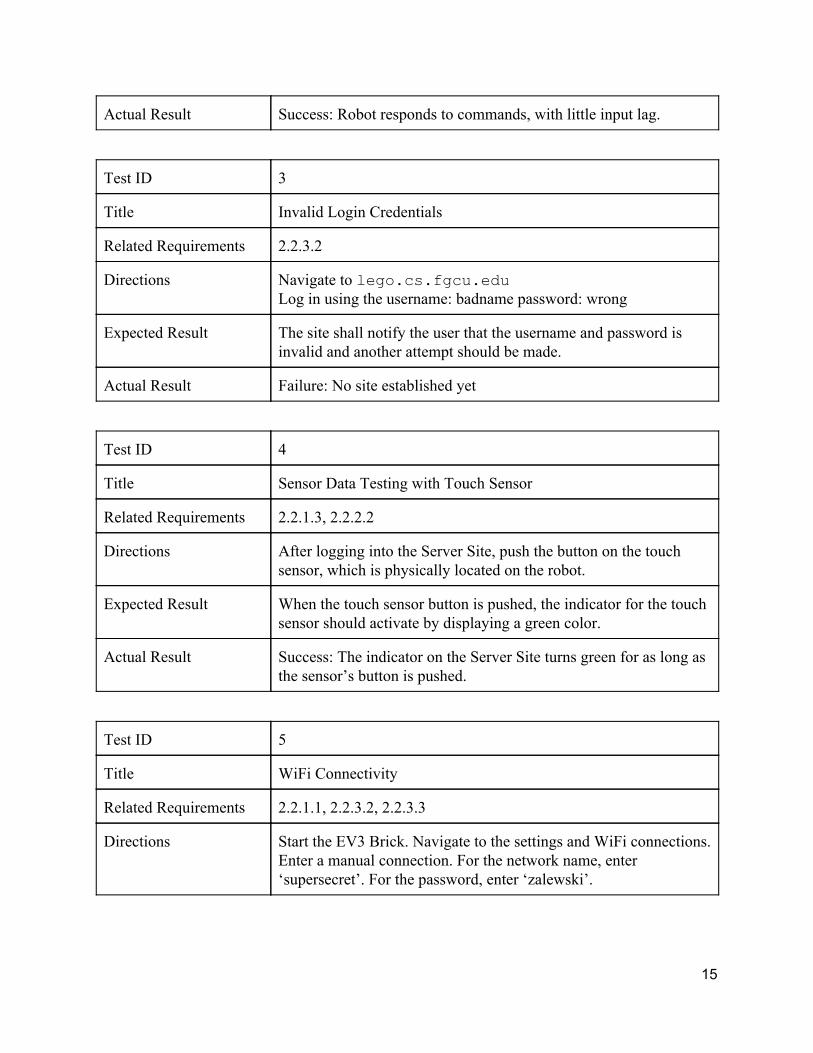
Actual Result Success: Robot responds to commands, with little input lag.
Test ID 3
Title Invalid Login Credentials
Related Requirements 2.2.3.2
Directions Navigate to lego.cs.fgcu.edu Log in using the username: badname password: wrong
Expected Result The site shall notify the user that the username and password is invalid and another attempt should be made.
Actual Result Failure: No site established yet
Test ID 4
Title Sensor Data Testing with Touch Sensor
Related Requirements 2.2.1.3, 2.2.2.2
Directions After logging into the Server Site, push the button on the touch sensor, which is physically located on the robot.
Expected Result When the touch sensor button is pushed, the indicator for the touch sensor should activate by displaying a green color.
Actual Result Success: The indicator on the Server Site turns green for as long as the sensor’s button is pushed.
Test ID 5
Title WiFi Connectivity
Related Requirements 2.2.1.1, 2.2.3.2, 2.2.3.3
Directions Start the EV3 Brick. Navigate to the settings and WiFi connections. Enter a manual connection. For the network name, enter ‘supersecret’. For the password, enter ‘zalewski’.
15

Expected Result The EV3 brick should successfully connect to the WiFi and show that it is connected by displaying the WiFi icon on the top part of the display.
Actual Result Success: the EV3 Brick connects to the WiFi ‘supersecret’
16

5. Conclusion
The goal of this project is to create a website that allows control over the Lego
Mindstorms EV3 robot. The secondary objectives involve reading sensor data and establishing a
live camera feed to display to the user. The outcome of the experiments carried out on the Mind
Control system yielded mixed results. Given the primary objective, which is to command the
Lego Mindstorms EV3 robot over a website, the results were a success. In terms of controlling
the system, the robot responded in a reasonable amount of time. For example, moving the robot
forward by clicking the forward button activated the motors properly and with very little delay.
Given, however, the secondary objectives, which were to read sensor data and establish a
live camera feed, the results were a failure. Due to the nature of the asynchronous connection to
the brick, reading from the sensors would impede further instructions. A camera module would
not integrate with the brick’s power supply, and therefore would be an entirely separate system
unrelated to the Mind Control.
The final results have proven that remote connection and control via a WiFi network is
not only feasible, but just as efficient as traditional remote control technologies. The
communication and control showed consistent, rapid response times with minimal delay, while
the only limiting factor was the range of the WiFi network. Given a stable WiFi network with
enough range to encompass the Lego Mindstorms EV3 robot, connection and control can easily
be established and continued.
It can also be concluded that it is the communication interface that greatly affects the
implementation of any remotecontrolled device. If the protocol for communication is altered,
both the response time as well as the fluidity of the software is respectively affected. To ensure
persistent and reliable control, communication protocols must be secure and streamlined. This is
the only volatile module with regards to this project: being able to talk to the robot and maintain
communication is essential.
17

6. References
[1] 31313 Mindstorms EV3, Lego Mindstorms, URL:
http://www.lego.com/enus/mindstorms/products/31313mindstormsev3
[2] J. Ickes, T. Munnerley, <Lego Mindstorms Web Control>, Florida Gulf Coast University,
21 April 2014, URL: http://itech.fgcu.edu/faculty/zalewski/CEN4935/IckesMunnerleyFinal.pdf
[3] Lego Minstorms EV3 API, CodePlex, URL: http://legoev3.codeplex.com
18
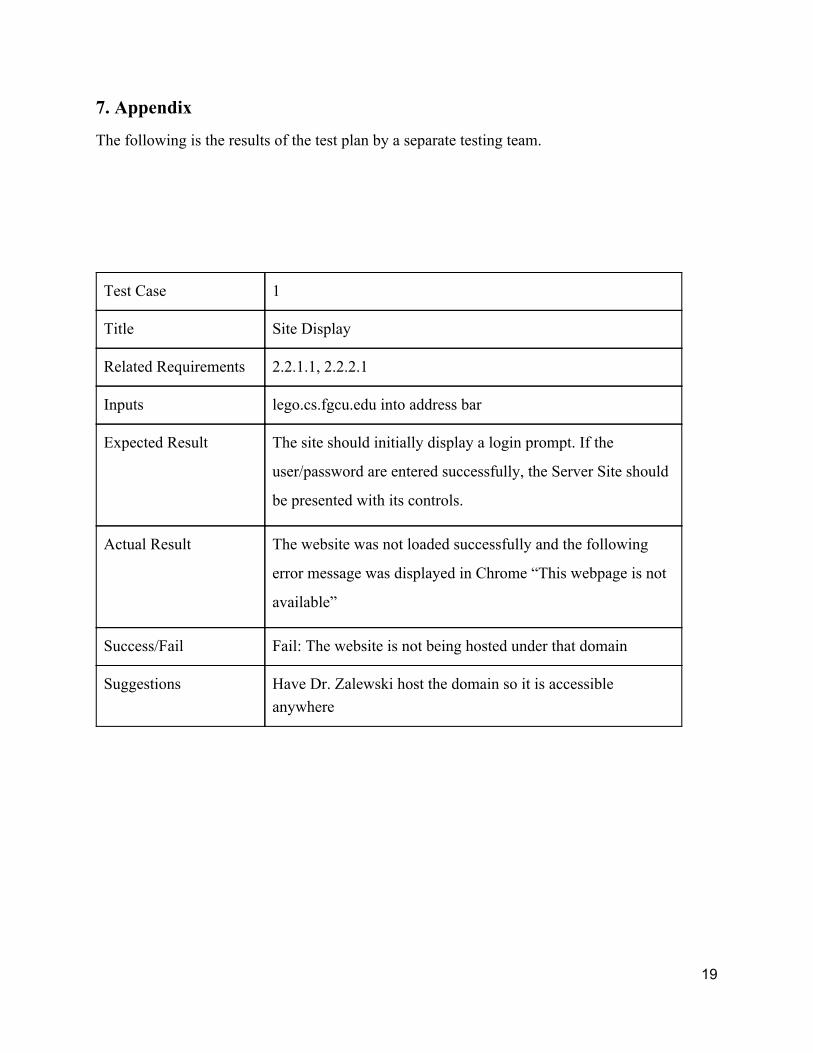
7. Appendix
The following is the results of the test plan by a separate testing team.
Test Case 1
Title Site Display
Related Requirements 2.2.1.1, 2.2.2.1
Inputs lego.cs.fgcu.edu into address bar
Expected Result The site should initially display a login prompt. If the
user/password are entered successfully, the Server Site should
be presented with its controls.
Actual Result The website was not loaded successfully and the following
error message was displayed in Chrome “This webpage is not
available”
Success/Fail Fail: The website is not being hosted under that domain
Suggestions Have Dr. Zalewski host the domain so it is accessible anywhere
19
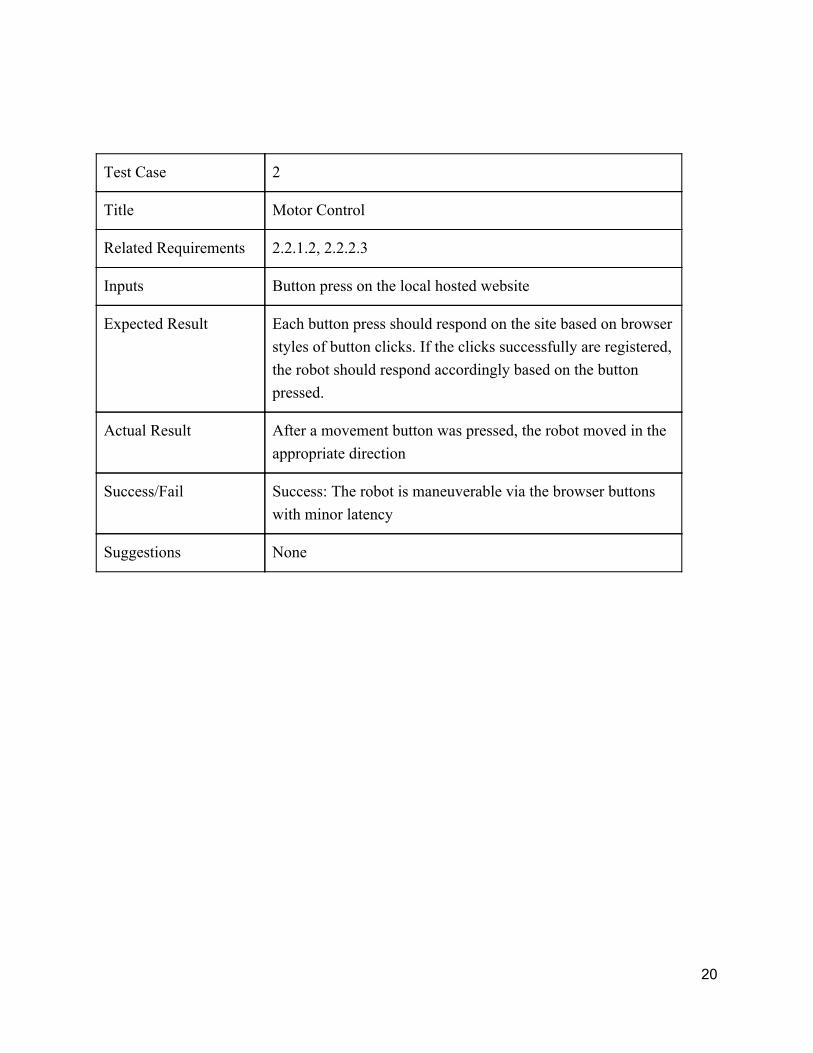
Test Case 2
Title Motor Control
Related Requirements 2.2.1.2, 2.2.2.3
Inputs Button press on the local hosted website
Expected Result Each button press should respond on the site based on browser styles of button clicks. If the clicks successfully are registered, the robot should respond accordingly based on the button pressed.
Actual Result After a movement button was pressed, the robot moved in the appropriate direction
Success/Fail Success: The robot is maneuverable via the browser buttons with minor latency
Suggestions None
20

Test Case 3
Title Invalid Login Credentials
Related Requirements 2.2.3.2
Inputs username: ‘badname’ password: ‘wrong’ typed on the local hosted website
Expected Result The site shall notify the user that the username and password is invalid and another attempt should be made.
Actual Result A message popped up and notified that the login credentials were bad
Success/Fail Success: Was not able to login with bad data
Suggestions None
21
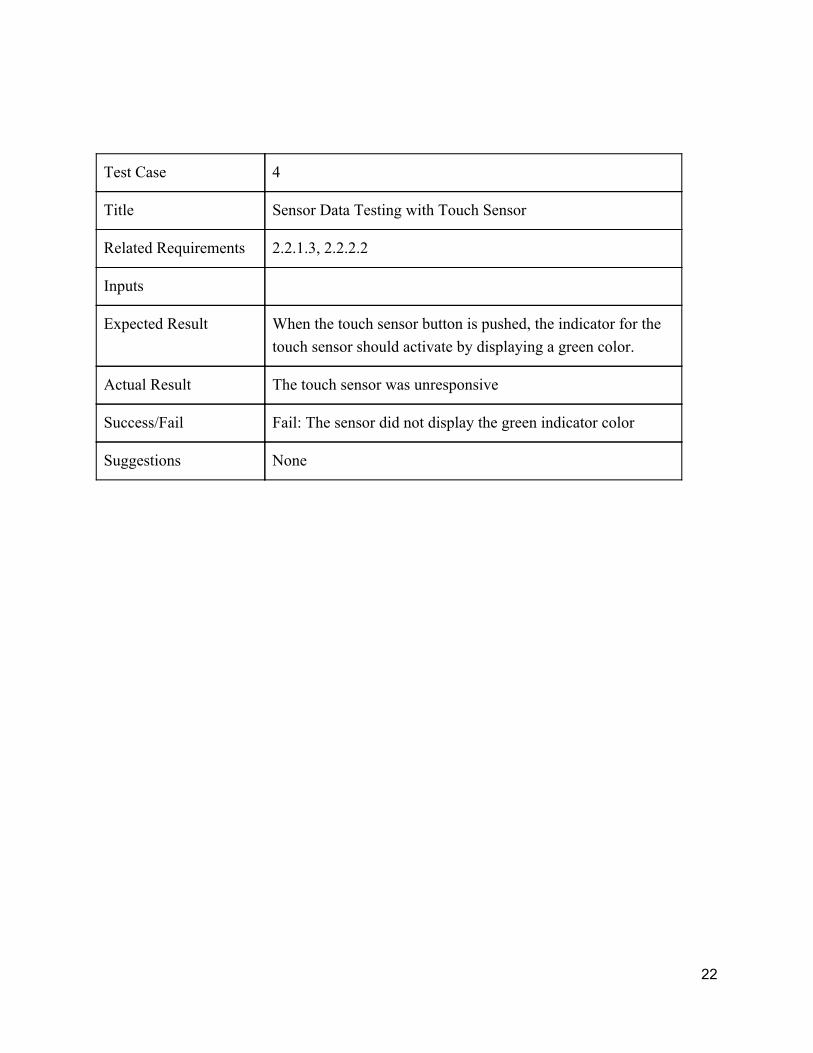
Test Case 4
Title Sensor Data Testing with Touch Sensor
Related Requirements 2.2.1.3, 2.2.2.2
Inputs
Expected Result When the touch sensor button is pushed, the indicator for the touch sensor should activate by displaying a green color.
Actual Result The touch sensor was unresponsive
Success/Fail Fail: The sensor did not display the green indicator color
Suggestions None
22
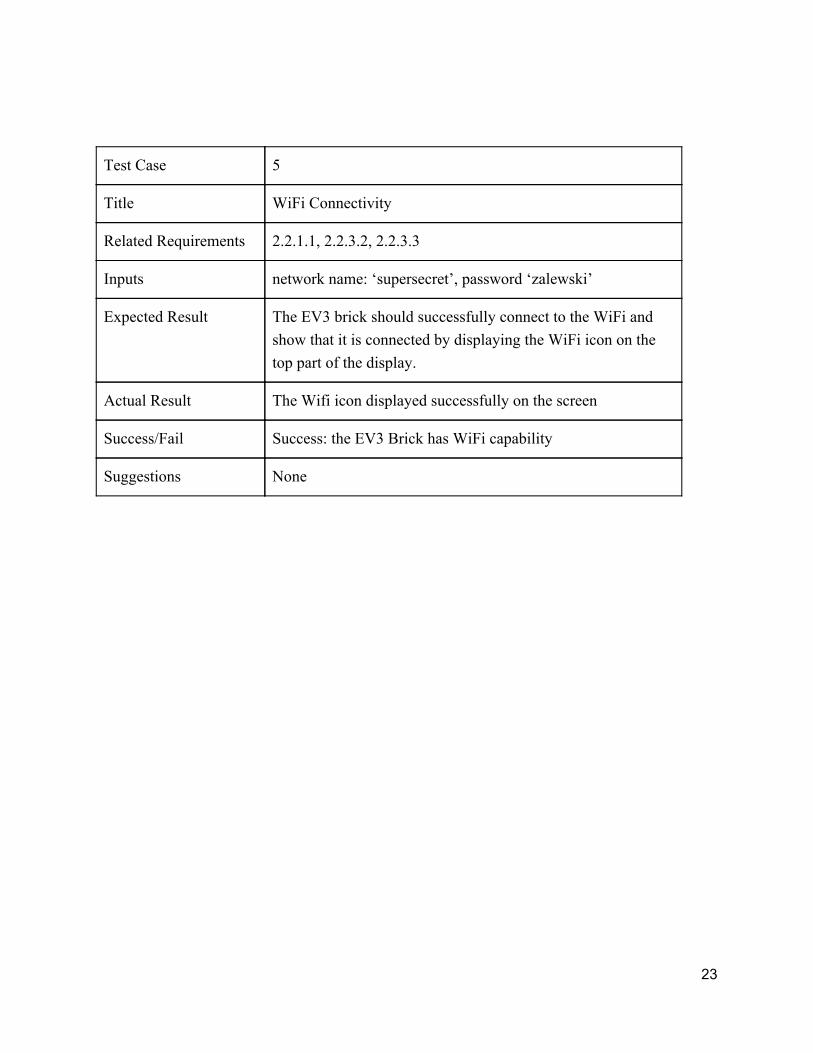
Test Case 5
Title WiFi Connectivity
Related Requirements 2.2.1.1, 2.2.3.2, 2.2.3.3
Inputs network name: ‘supersecret’, password ‘zalewski’
Expected Result The EV3 brick should successfully connect to the WiFi and show that it is connected by displaying the WiFi icon on the top part of the display.
Actual Result The Wifi icon displayed successfully on the screen
Success/Fail Success: the EV3 Brick has WiFi capability
Suggestions None
23